

Walkthrough Menu
- General Tips
- Chapter 1- Hector's House
- Chapter 2 - Cemetery
- Chapter 3 - Sarcophagus
- Chapter 4 - Underground
- Chapter 5 - Old Mirror
- Chapter 6 – Stoke the Fire
- Chapter 7 – Spheres
- Chapter 8 – Stop the Experiment
General Tips
 >
>
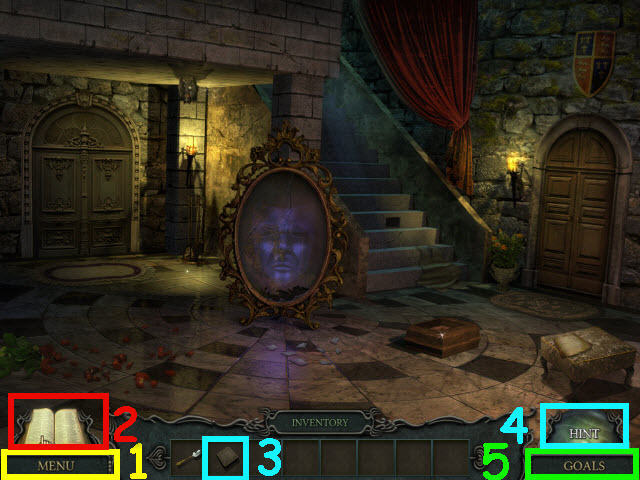
- Select Menu (1) to adjust the Music, Effects and Environment Volume. You may also adjust Full Screen and Custom Cursor.
- Throughout the guide, we will use the acronym 'HOS' for Hidden Object Scenes.
- Items written in gold in HOS require an extra step before they can be obtained.
- There is a short penalty for random clicking.
- In order to complete some of the puzzles you will need to collect the clues in your diary first.
- In order to trigger some HOS, you will need to examine specific areas first.If there is a HOS in the walkthrough that you do not have available yet, please check the walkthrough for something you may have missed.
- Most Puzzles can be skipped.Select the Help button on the bottom left of the puzzle box to get directions for the puzzles.
- Select the diary (2) to find collected clues and story updates.
- Drag an inventory item (3) into the hint sphere (4) to see where to use the item.
- Select the goals tab (5) to check your current tasks.
Chapter 1 – Hector's House
 >
>
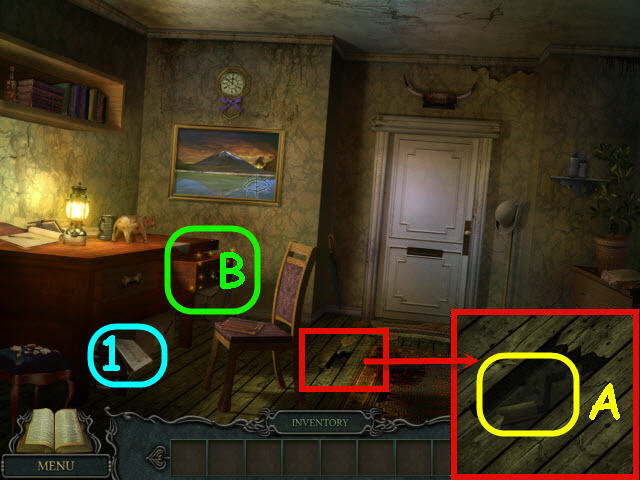
- Examine the hole in the floor; take the GRINDER HANDLE (A).
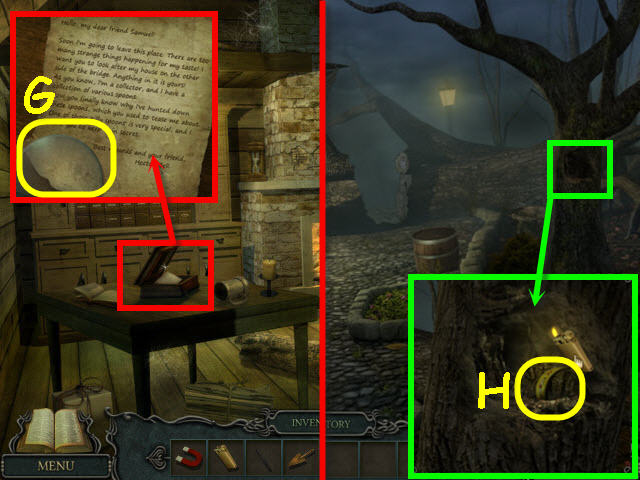
- Examine the newspaper (1) to get a diary update.
- Examine the desk drawer (B) to access a HOS.
 >
>
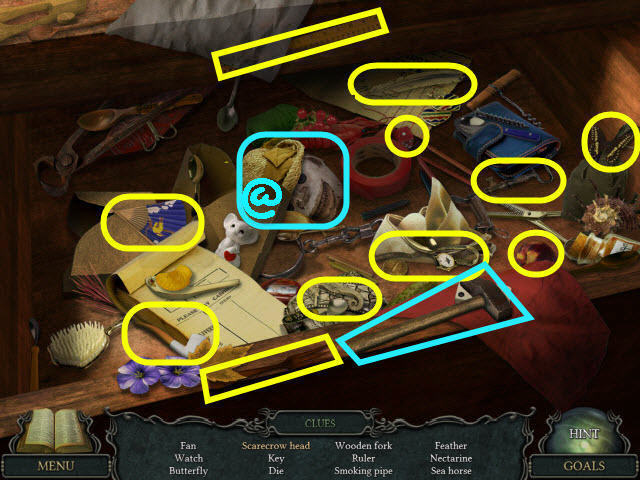
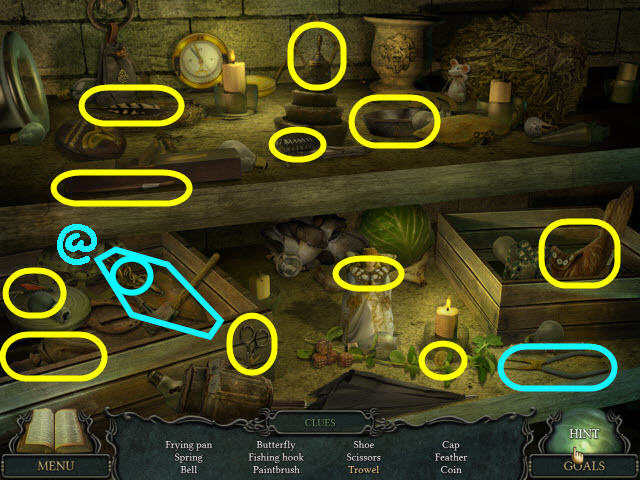
- Find the items listed.
- Use the hammer on the clay pot to get the SCARECROW HEAD (@).
- Go forward through the door.
 >
>
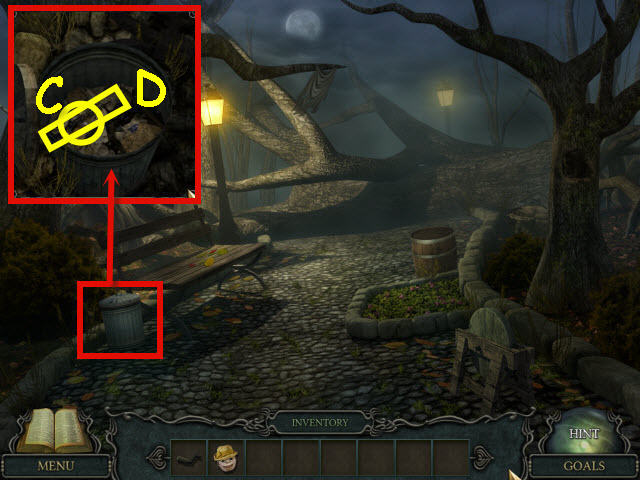
- Examine and open the garbage can; take the LAMP HANDLE (C) and FIRST CLOCK HAND (D).
- Back out.
 >
>
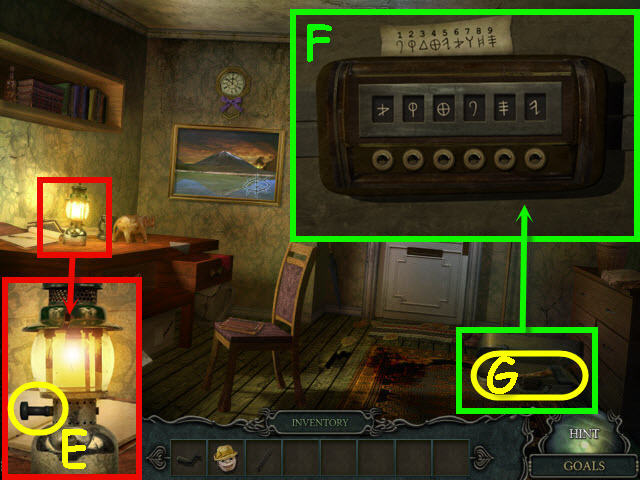
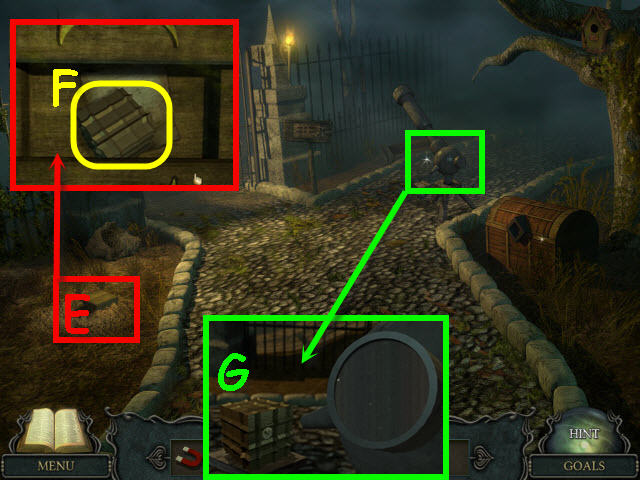
- Examine and place the LAMP HANDLE on the lamp; turn the LAMP HANDLE (E) to get a code in your diary.
- Touch the shadow on the door.
- Examine the suitcase to trigger a puzzle.
- Enter the code from the diary by pushing the buttons on the bottom row and note that the numbers are reversed.
- To solve the puzzle, enter the symbols that represent the following numbers from left to right: 624195 (F).
- Take the BLUNT AXE (G).
- Go forward through the door.
 >
>
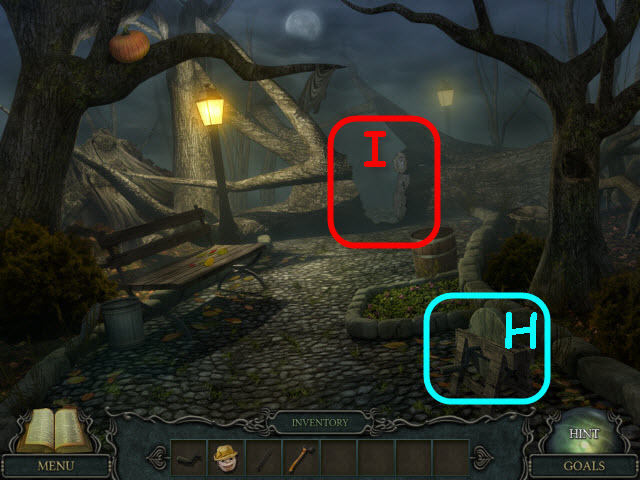
- Place the GRINDER HANDLE on the grinder (H).
- Use the BLUNT AXE on the grinder to get a SHARP AXE.
- Use the SHARP AXE on the fallen tree (I).
- Go forward.
 >
>
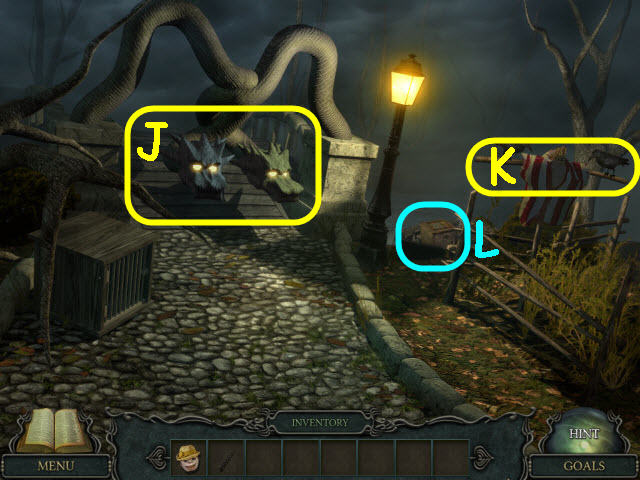
- Examine the two headed creature (J) to get your next goal.
- Place the SCARECROW HEAD on the scarecrow; take the WOODEN STICK (K).
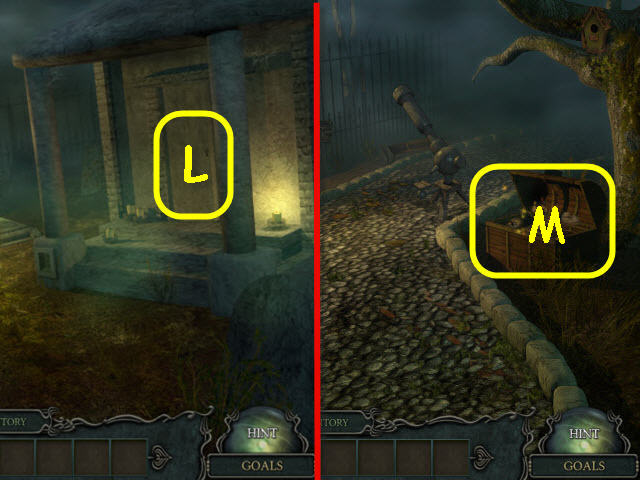
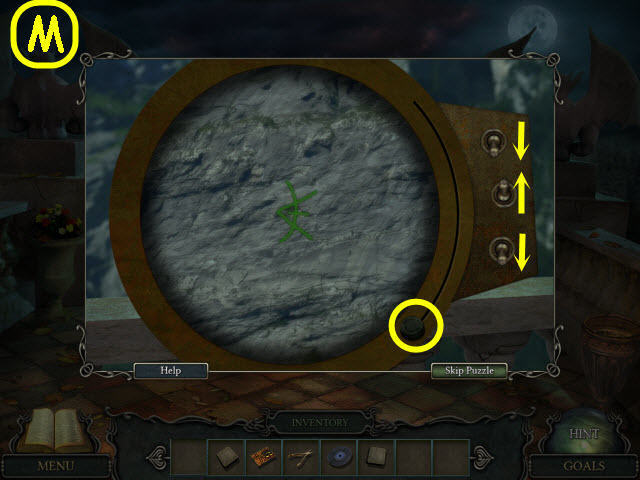
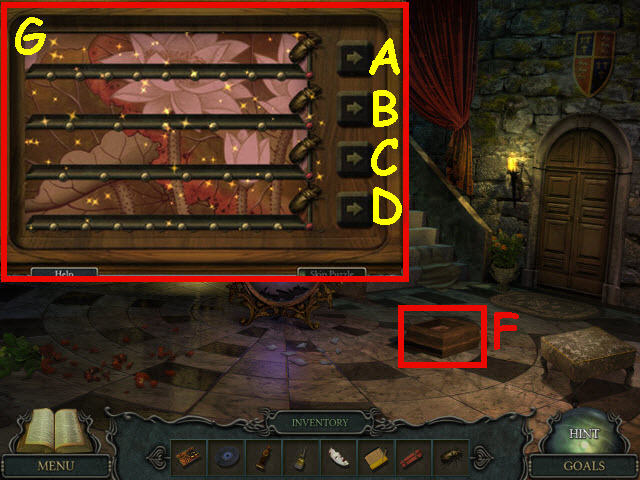
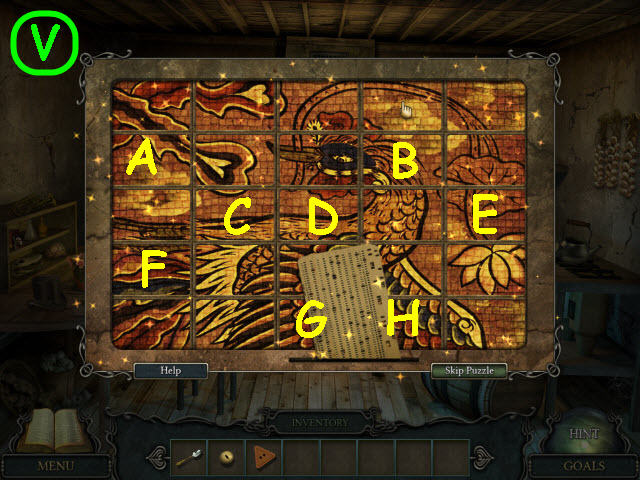
- Examine the boat (L) to trigger a puzzle.
 >
>
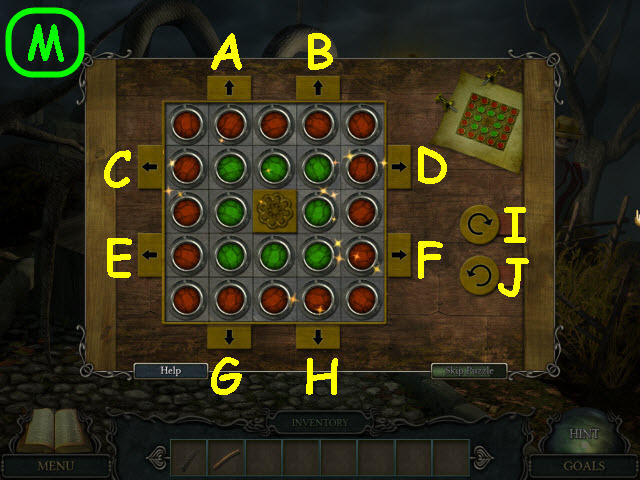
- Arrange the green squares to match the pattern in the upper right.
- Select the arrows in the following order: I, F x 2, J, A, D, I x 3, and H (M).
- Get a GOLDEN FISH and SECOND CLOCK HAND.
- Back out.
 >
>
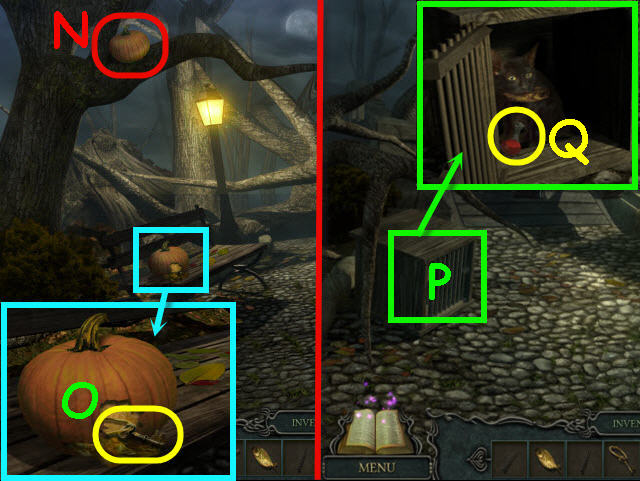
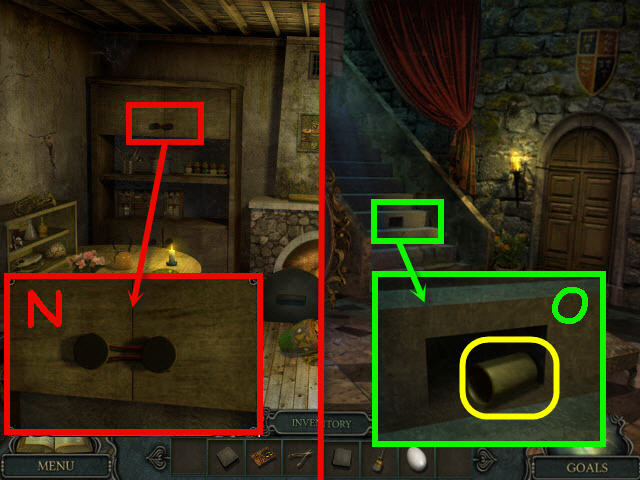
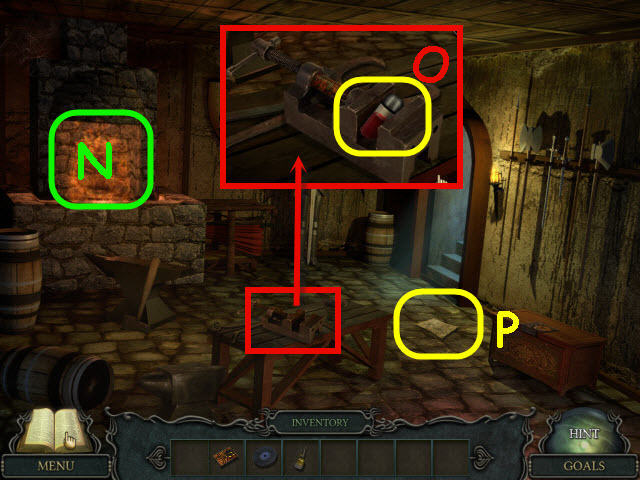
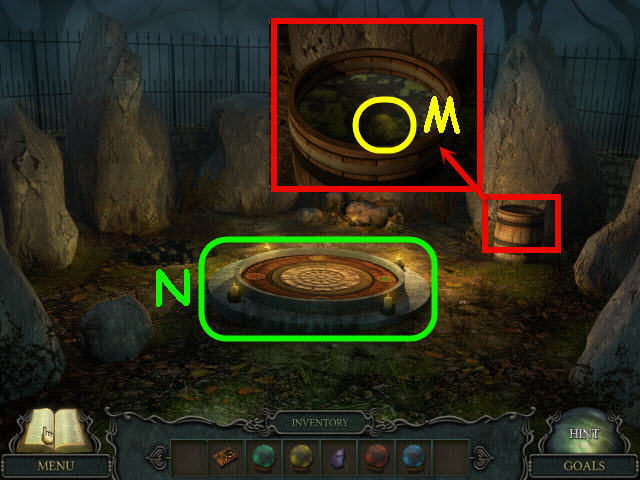
- Use the WOODEN STICK on the pumpkin (N).
- Examine the fallen pumpkin; take the CAGE KEY (O).
- Go forward.
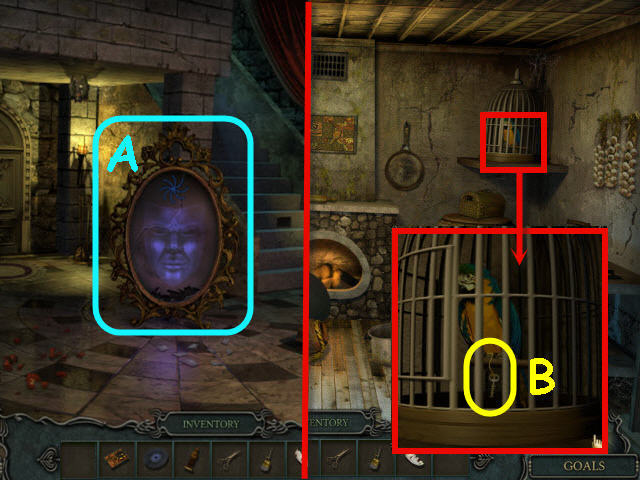
- Examine and use the CAGE KEY on the cage (P).
- Give the GOLDEN FISH to the cat; take the POTION OF LIFE (Q).
- Back out.
 >
>
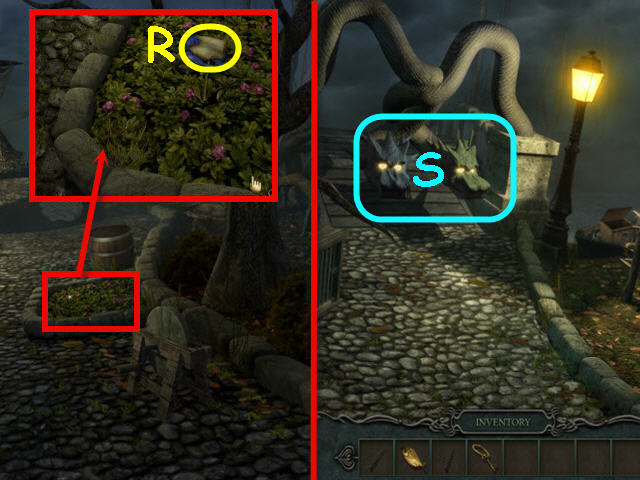
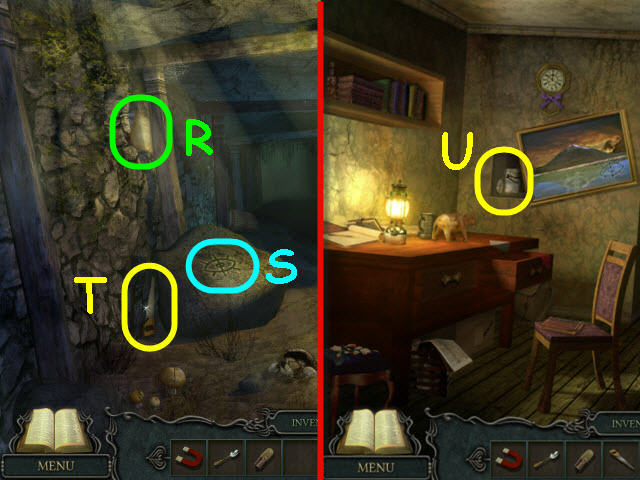
- Examine and use the POTION OF LIFE on the flower bed; take the DIARY PAGE (R).
- Go forward.
- Give the DIARY PAGE to the creature (S).
- Go forward over the bridge.
Chapter 2 – Cemetery
 >
>
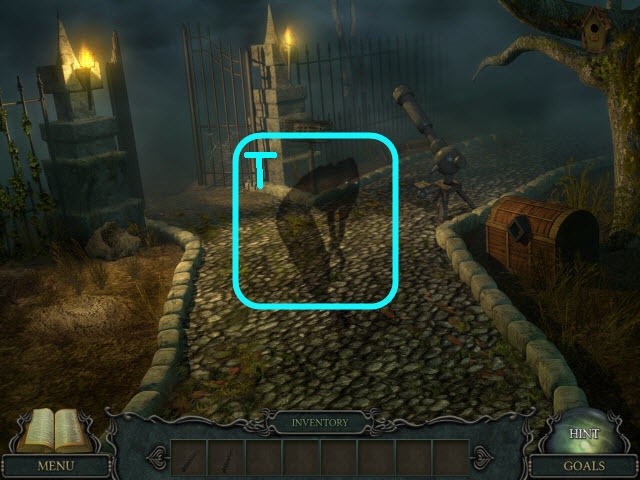
- Touch the shadow (T).
- Go forward and then right into the crypt.
 >
>
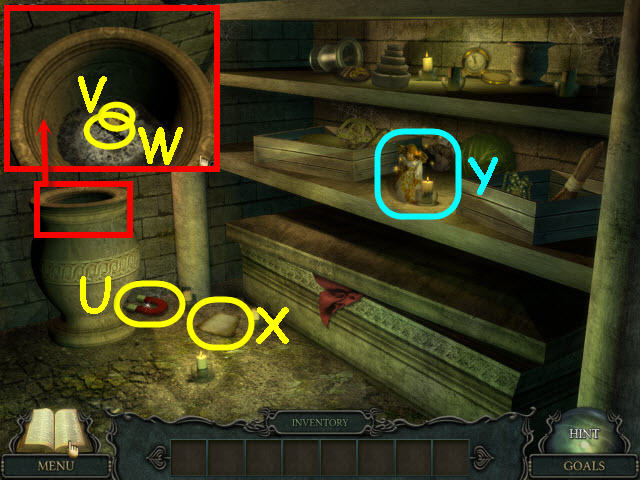
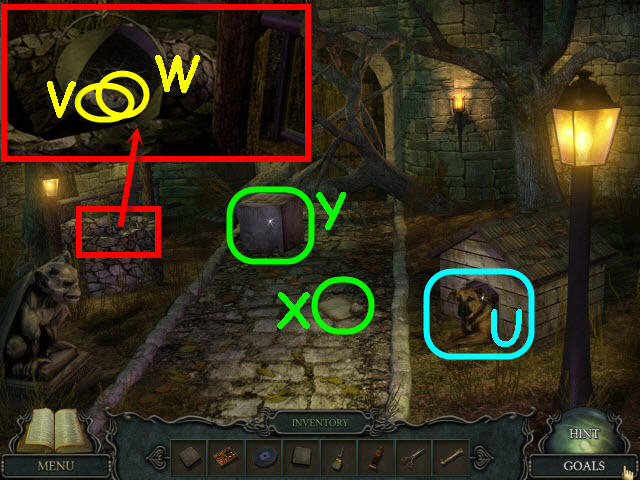
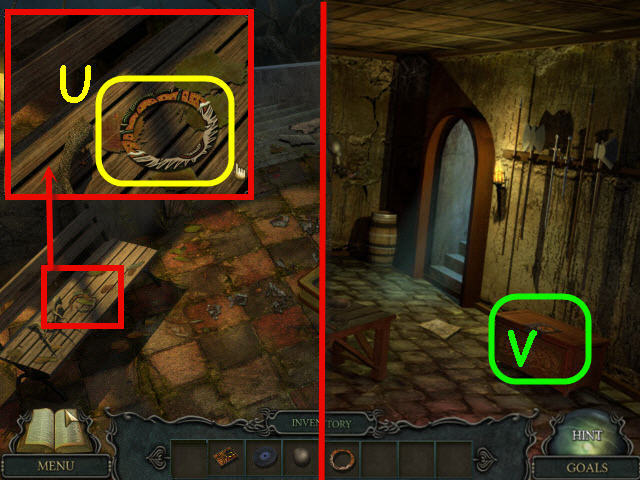
- Move the urn; take the MAGNET (U).
- Examine the top of the urn; take the LIGHTER (V) and the THIRD CLOCK HAND (W).
- Collect the note to get a diary update (X).
- Examine the angel (Y) on the bottom shelf to access a HOS.
 >
>
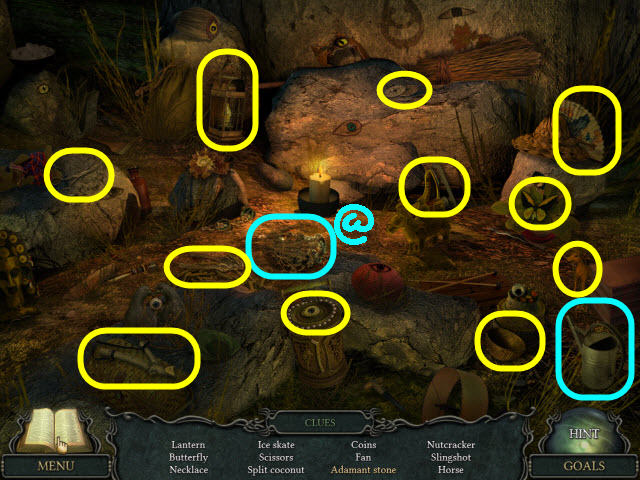
- Find the items listed.
- Use the pliers on the wire to get the TROWEL (@).
- Back out and go forward into the caretaker's office.
 >
>
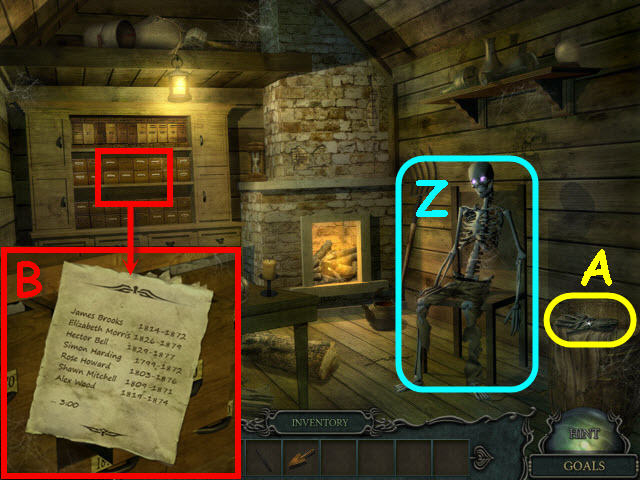
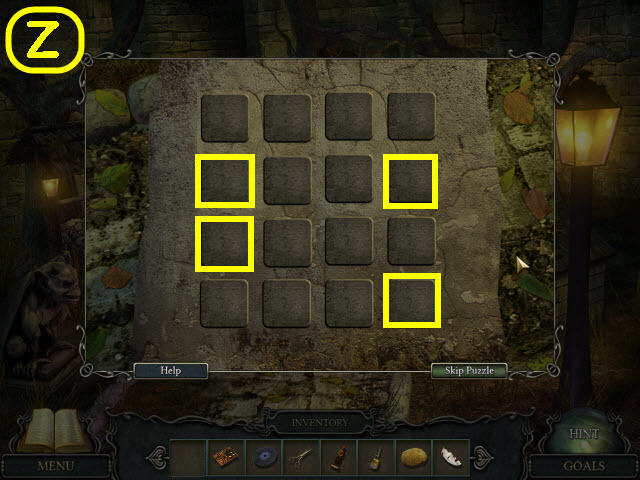
- Examine the caretaker's skeleton (Z) to get a new goal.
- Take the GLOVE (A).
- Examine and open the file drawer; select the papers twice to get a diary update (B).
- Back out.
 >
>
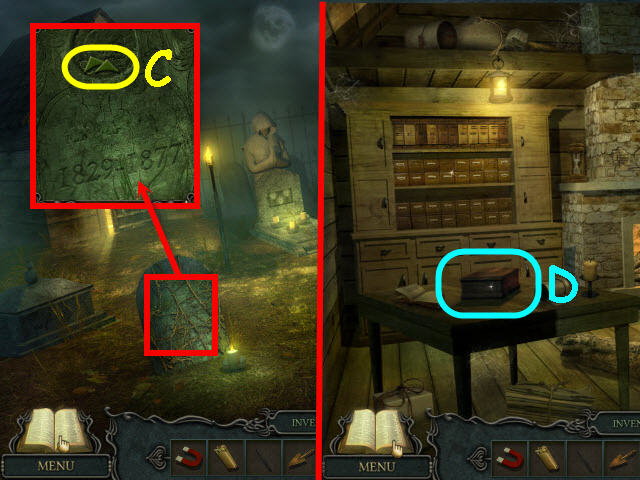
- Examine and use the GLOVE on the thorny gravestone; take the PAIR OF ARROW BUTTONS (C).
- Note the dates on the gravestone.
- Go straight into the caretaker's office.
- Examine and place the PAIR OF ARROW BUTTONS on the box (D) to trigger a puzzle.
 >
>
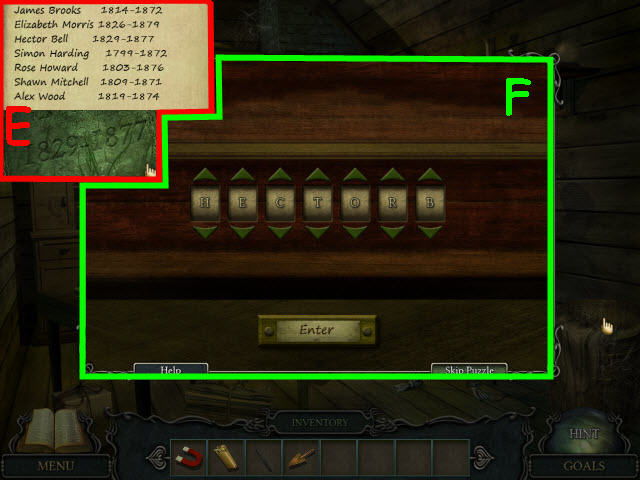
- Enter the correct name on the box to open.
- To solve the puzzle, use the dates from the thorny gravestone and the paper from the files in the caretaker's office (E) and enter: H-E-C-T-O-R-B (F).
- Press the enter button when set.
 >
>
- Examine the box; take the LENS (G) and automatically get a diary update.
- Back out four times.
- Examine and use the LIGHTER on the hole in the tree; take the LEFT HALF MOON (H).
- Back out.
- Examine the desk drawer to access a HOS.
 >
>
- Find the 12 spoons.
- Get a HALF SILVER SPOON (@).
- Go forward four times to the cemetery.
 >
>
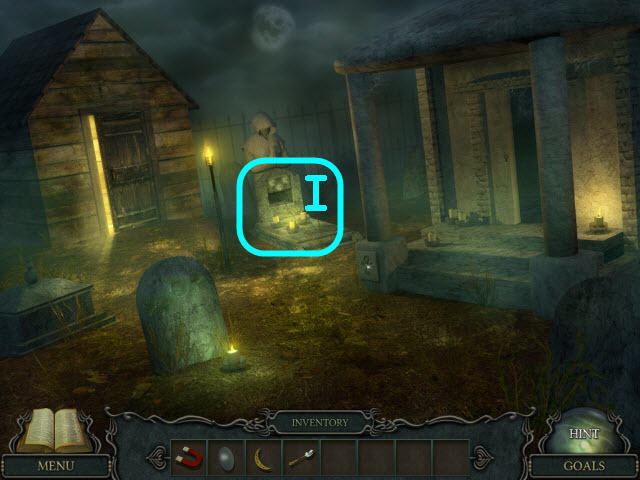
- Examine the gravestone with the 3 candles (I).
- Place the FIRST CLOCK HAND, SECOND CLOCK HAND and THIRD CLOCK HAND on the gravestone to trigger a puzzle.
 >
>
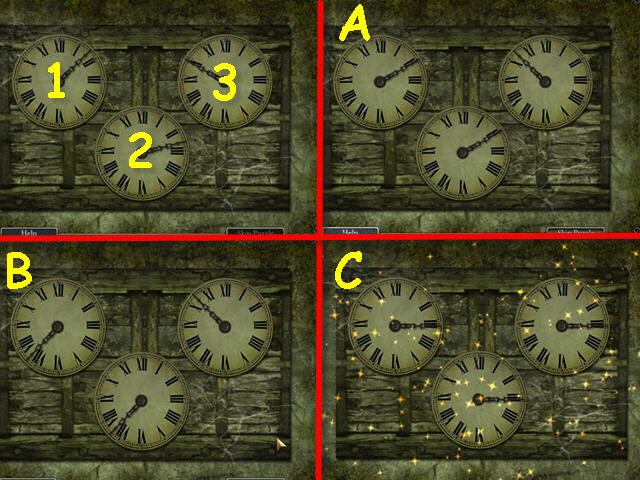
- Turn the dials so that all are on number III.
- Turn dial 3 clockwise until dial 1 and 2 are both on II (A).
- Turn dial 2 clockwise until dial 1 and 2 are both in between VII and VIII (B).
- Turn dial 1 clockwise until all are on the III (C).
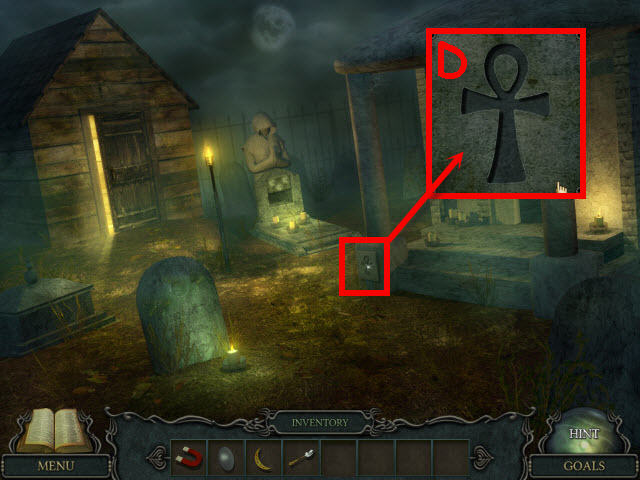
- You will earn an ANKH.
Chapter 3 – Sarcophagus
 >
>
- Examine the plinth; place the ANKH in the inset (D); get the RIGHT HALF MOON.
- Back out.
 >
>
- Use the TROWEL on the earth; examine and place the LEFT HALF MOON and RIGHT HALF MOON on the box (E).
- Take the MOON CUBE (F) and get a diary update.
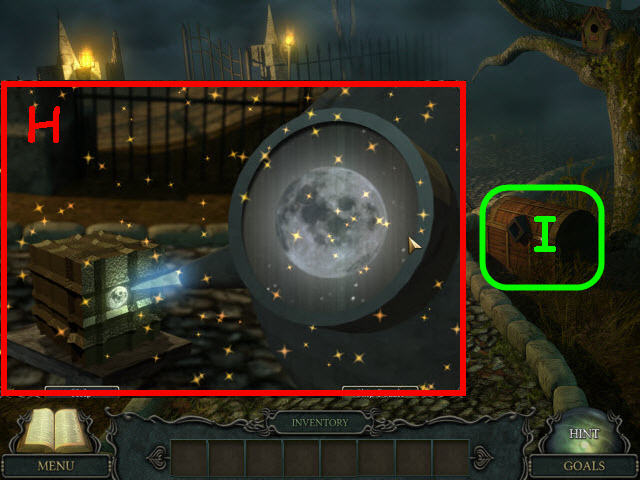
- Examine and place the LENS on the telescope and place the MOON CUBE on the platform (G) to trigger a puzzle.
 >
>
- Select, hold, and drag the cursor around the lens to find the planet.
- Solution: Scroll all the way down and then go slowly right until you see the planet on the top. Scroll up to get the full planet and select it (H).
- You will get a CHARGED CUBE.
- Examine and place the CHARGED CUBE on the chest (I).
- Examine the chest to access a HOS.
 >
>
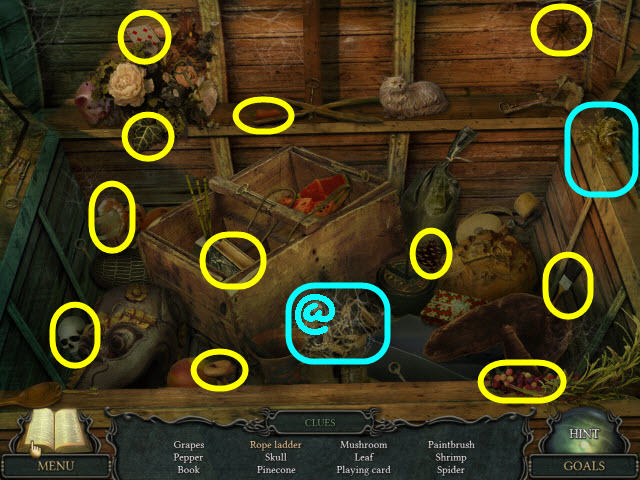
- Find the items listed.
- Use the feather duster on the cobwebs to get the ROPE LADDER (@).
- Go right.
 >
>
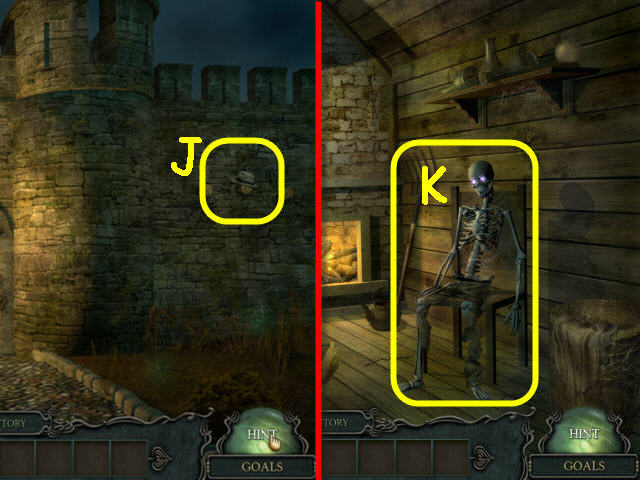
- Use the ROPE LADDER on the hat; take the HAT (J).
- Back out and go forward twice into the caretaker's office.
- Give the HAT to the caretaker (K); get a WEDDING RING and CROWBAR.
- Back out.
 >
>
- Select the crypt door (L) to get a goal.
- Back out.
- Examine the chest (M) to access a HOS.
 >
>
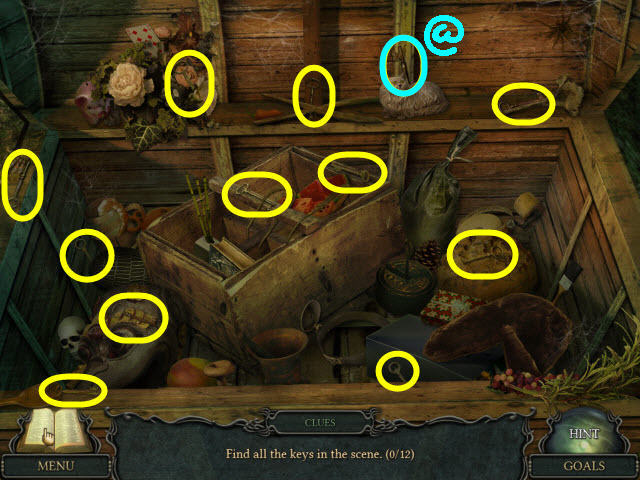
- Find the 12 keys to get a CRYPT KEY (@).
- Go forward.
- Use the CRYPT KEY on the crypt door.
- Enter the crypt.
 >
>
- Use the CROWBAR on the sarcophagus (N).
- Examine the skeleton; place the WEDDING RING on the hand (O).
- Examine the angel (P) to access a HOS.
 >
>
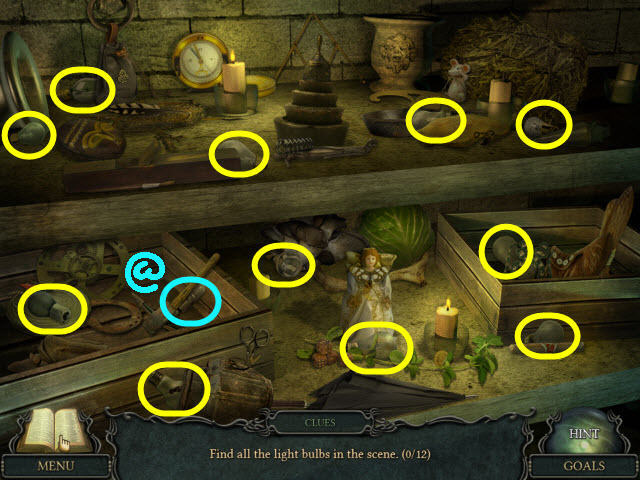
- Find the 12 light bulbs.
- You will earn a LIGHT BULB (@).
 >
>
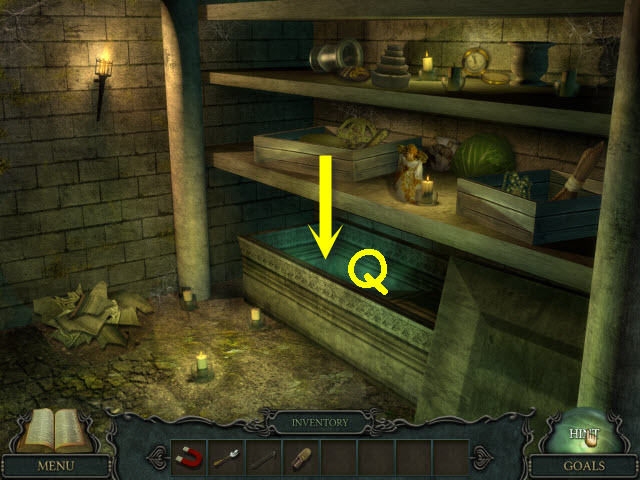
- Enter the sarcophagus (Q) to go to the underground.
Chapter 4 – Underground
 >
>
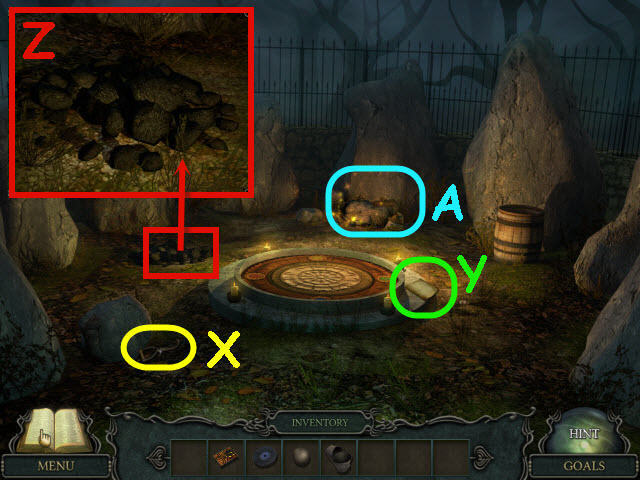
- Take the note (R) to get a diary update.
- Use the CROWBAR on the boulder; select the symbol (S) to get a diary update.
- Take the SAW (T).
- Back out all the way to the house.
- Take the EMPTY JAR (U).Note: If you did not select the symbol on the boulder (S), you will be unable to get the jar.
- Go forward three times and go right to the castle entrance.
 >
>
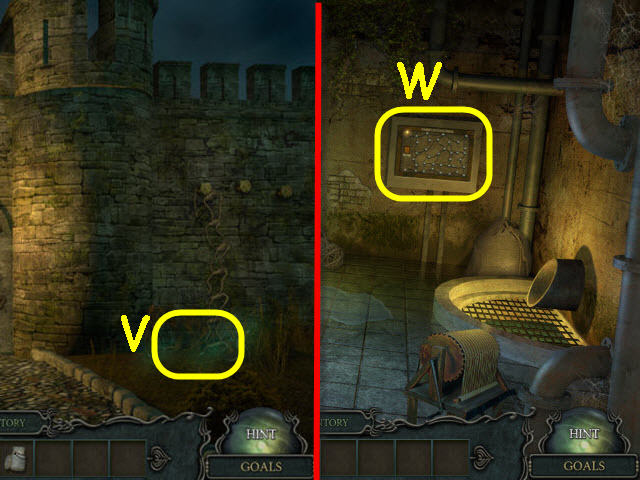
- Use the EMPTY JAR on the fireflies (V); get a JAR WITH FIREFLIES.
- Go to the underground via the sarcophagus and go forward.
- Use the JAR WITH FIREFLIES anywhere in the dark room.
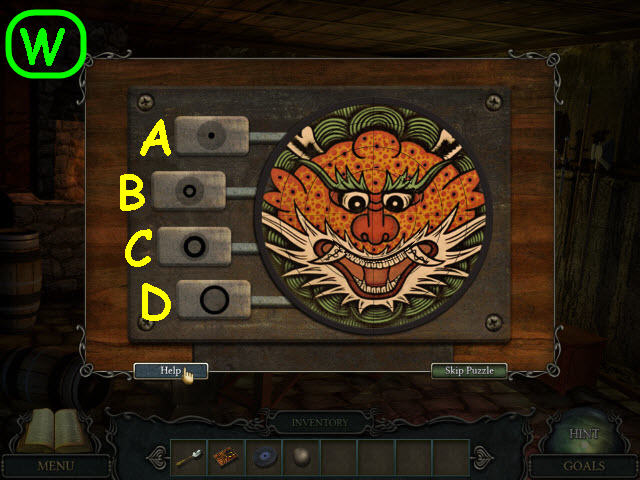
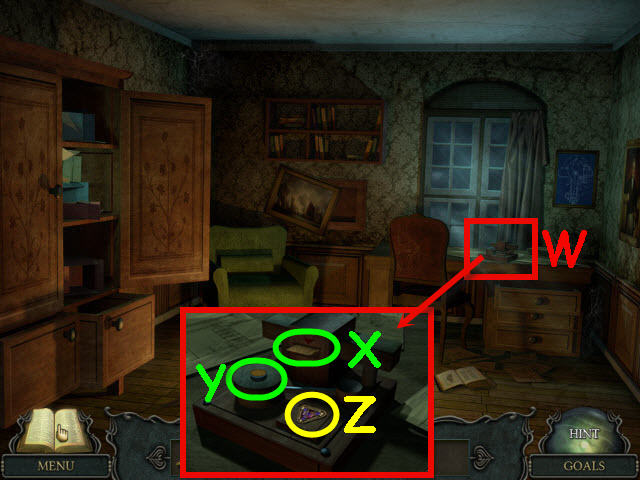
- Examine and place the LIGHT BULB on the control panel to trigger a puzzle (W).
 >
>
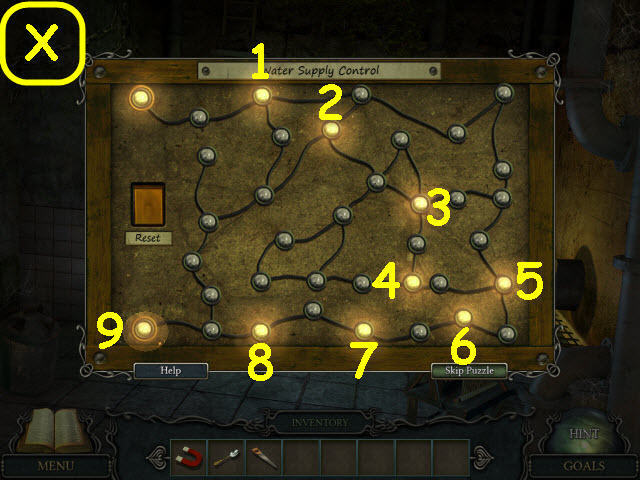
- Select the correct lamps to complete the circuit.
- See screenshot for solution (X).
 >
>
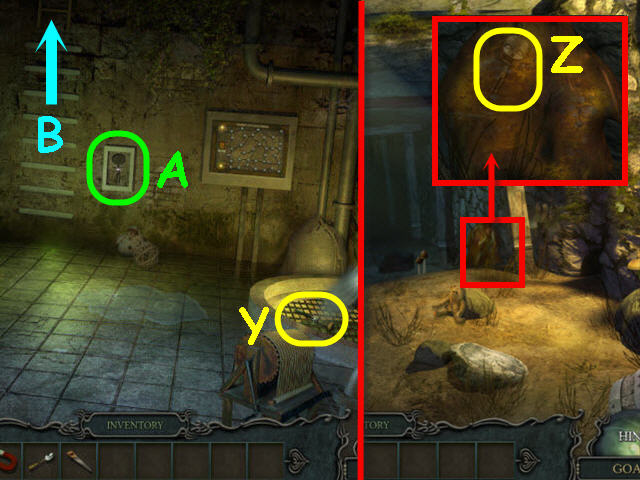
- Take the CHISEL (Y).
- Back out.
- Examine and use the CHISEL on the amber four times to get a STATUETTE (Z).
- Go forward.
- Examine and place the STATUETTE in the recess (A).
- Go up the ladder (B).
 >
>
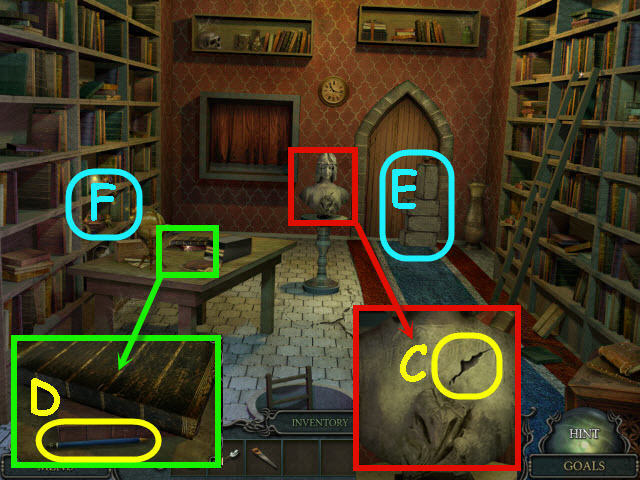
- Examine the bust; use the MAGNET on the crack (C) to get the OLD KEY.
- Examine the table; take the PENCIL (D).
- Remove the 4 bricks from the doorway (E).
- Examine the bookshelf (F) to access a HOS.
 >
>
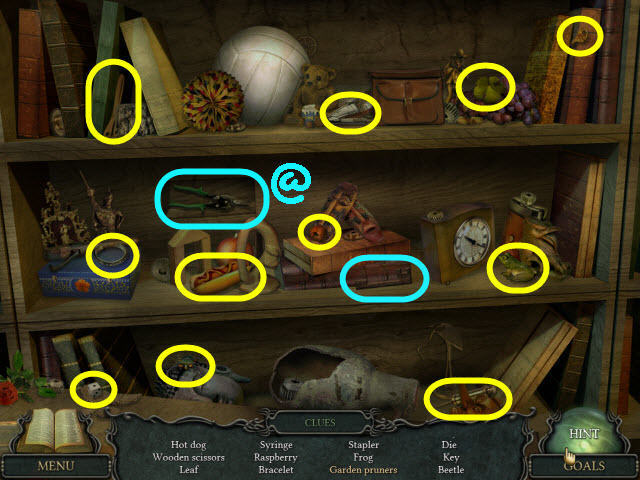
- Find the items listed.
- Use the wooden key in the recess to get the PAIR OF GARDEN PRUNERS (@).
- Back out five times and go right to the castle entrance.
 >
>
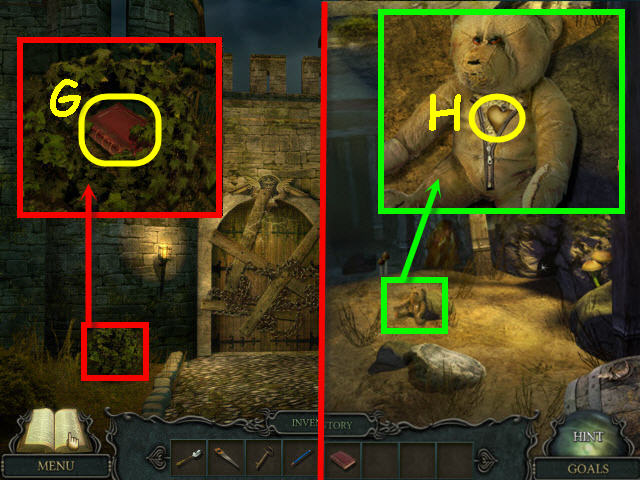
- Examine and use the PAIR OF GARDEN PRUNERS on the bush four times to get the RED BOOK (G).
- Go back to the underground.
- Examine and use the PENCIL on the teddy bear; take the HEART AMULET (H).
- Go forward and up the ladder.
 >
>
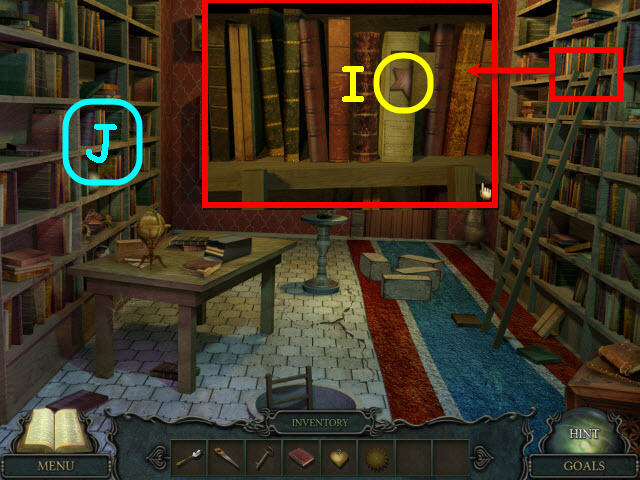
- Examine the top of the ladder on the right; place the RED BOOK in the space and take the STAR AMULET (I).
- Examine the left bookshelf (J) to access a HOS.
 >
>
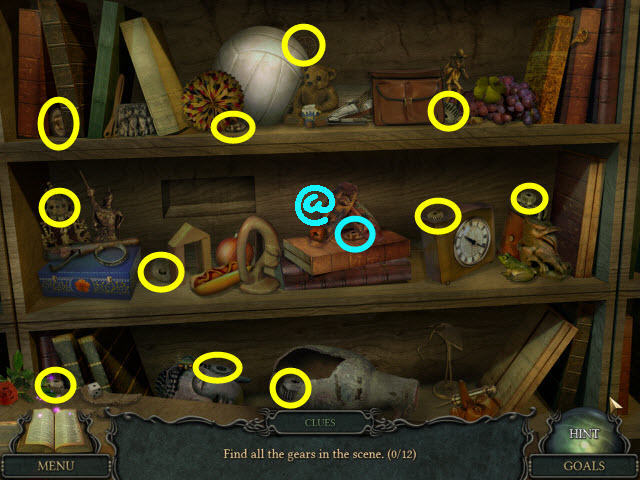
- Find the 12 gears.
- You will earn a GEAR (@).
- Open and go forward through the door (move the bricks if you did not do so earlier) and go up the stairs.
 >
>
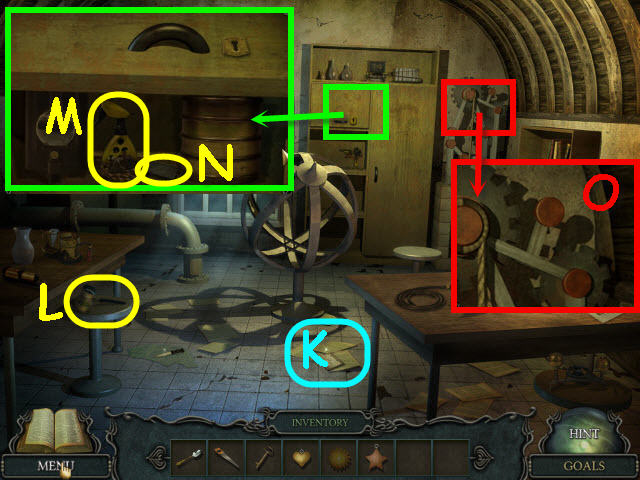
- Examine and select the note to get a diary update (K).
- Take the DIPPER (L).
- Examine and use the OLD KEY on the cabinet; zoom in and take the INSECT SPRAY (M) and STONE BUTTON (N).
- Examine and place the GEAR on the mechanism (O).
- Back out three times.
 >
>
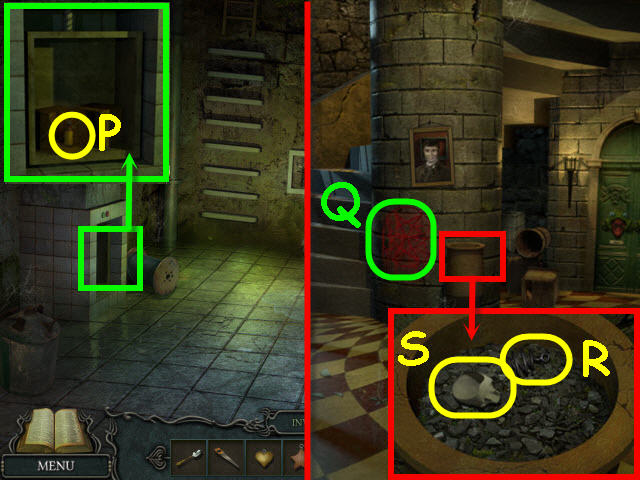
- Examine the dumbwaiter; use the SAW on the box and take the SOLVENT (P).
- Go up the ladder and then straight.
- Examine the symbol (Q) to get a diary update.
- Examine and use the INSECT SPRAY on the urn; take the SPIRAL AMULET (R) and SKULL FORM (S).
- Go up the stairs.
 >
>
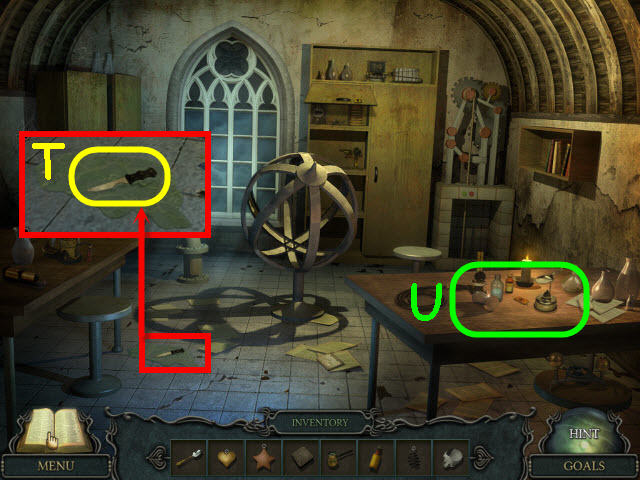
- Examine and use the SOLVENT to get the KNIFE (T).
- Examine and place the SKULL FORM and DIPPER on the table (U) to trigger a puzzle.
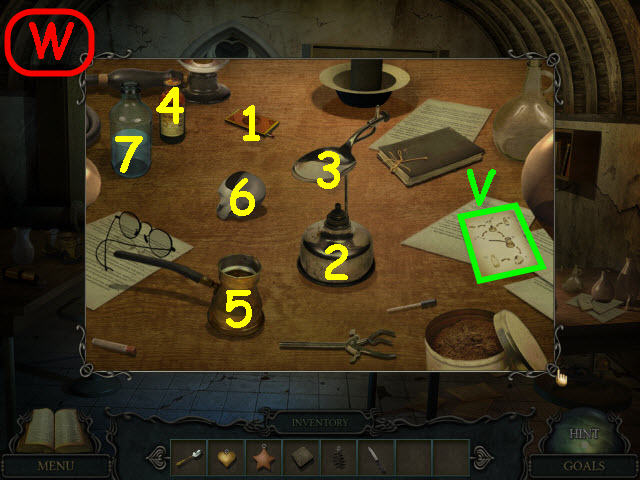 >
>
- Make the solution according to the directions (V).
- Solution: Use 1 on 2, place the HALF SILVER SPOON on 3 and wait for it to melt.
- Use 4 on 3, use 5 on 3, use 5 on 6, use 7 on 6, and select 6 to get a SILVER SKULL AMULET (W).
- Back out.
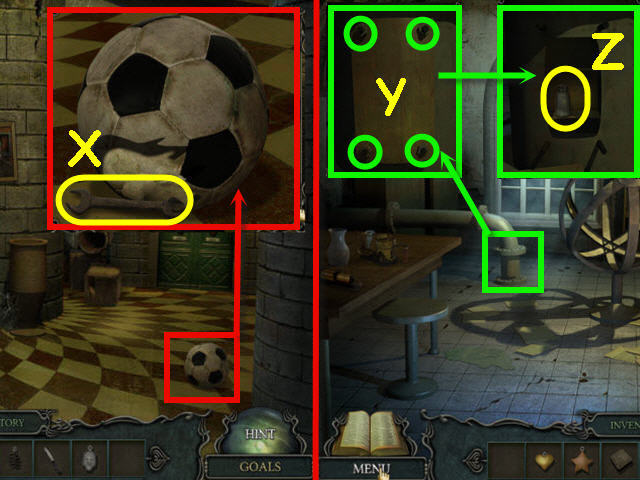 >
>
- Examine and use the KNIFE on the soccer ball; take the WRENCH (X).
- Go up the stairs.
- Examine the pipe; use the WRENCH on each of the four nuts (Y).
- Take the SALT (Z).
- Back out twice.
 >
>
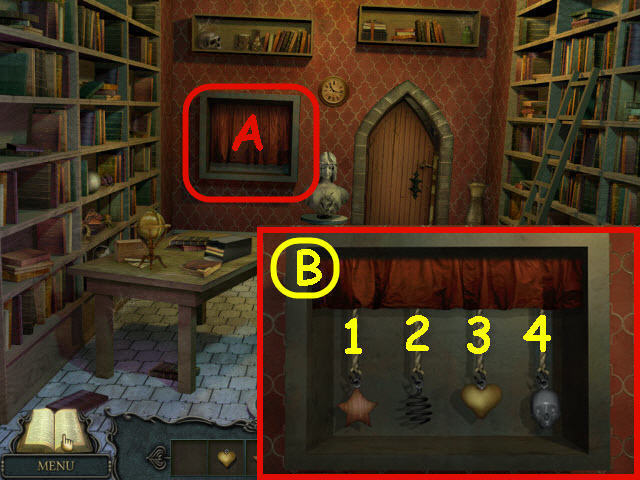
- Examine the curtained recess (A).
- Hang the SILVER SKULL AMULET, SPIRAL AMULET, STAR AMULET and HEART AMULET on the hooks to trigger a puzzle.
- Pull the amulets in the correct order.
- To solve the puzzle, pull the amulets in the following order: 3, 1, 4, and 2 (B).
- You will earn a SUGAR.
- Go forward.
Chapter 5 – Old Mirror
 >
>
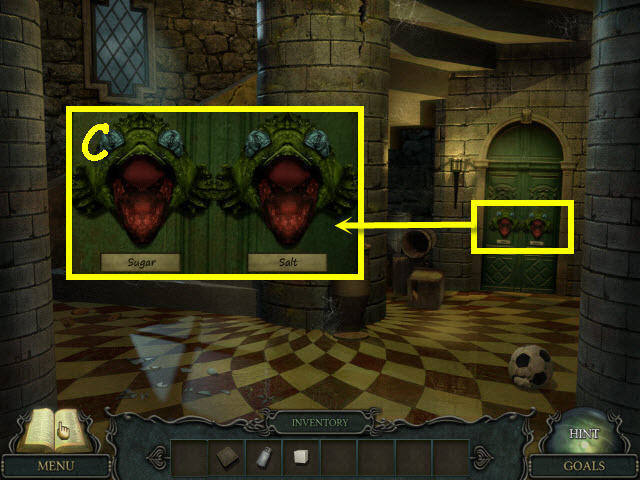
- Examine the door; place the SALT and SUGAR in the respective mouths (C).
- Go through the newly-opened door.
 >
>
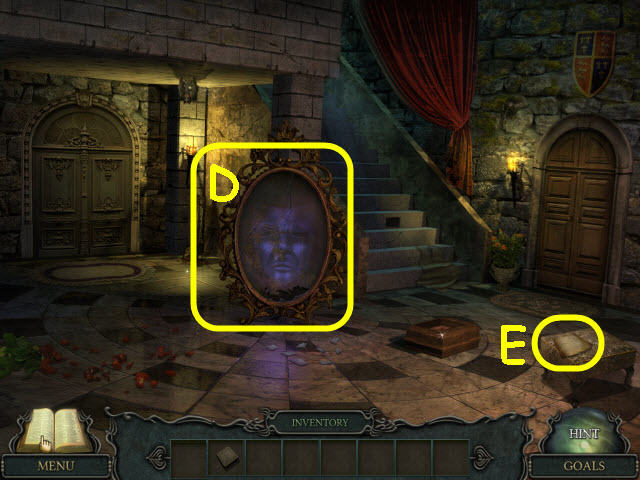
- Examine the mirror (D) to get a new goal and a diary update.
- Take the note to get a diary update (E).
- Go through the door on the right.
 >
>
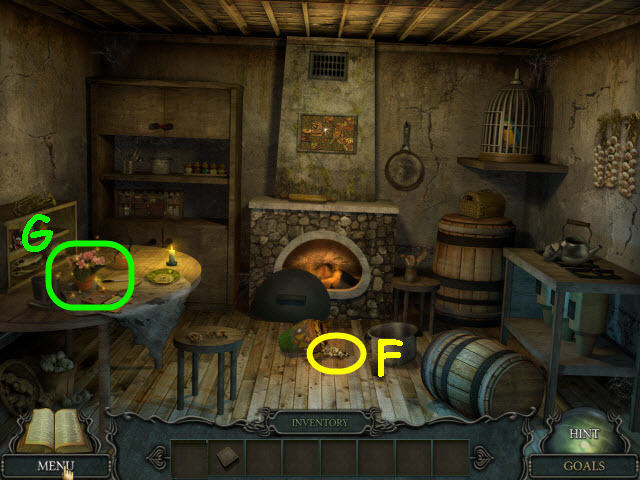
- Knock over the vase; take the SEEDS (F).
- Examine the table (G) to access a HOS.
 >
>
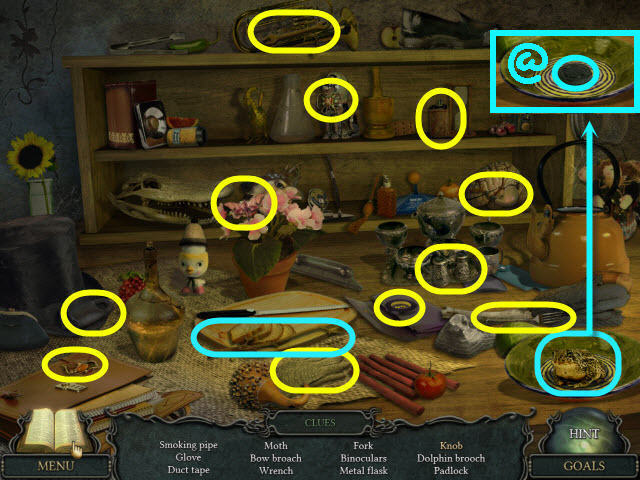
- Find the items listed.
- Use the twig on the frog to get a KNOB (@).
- Back out and go up the stairs.
 >
>
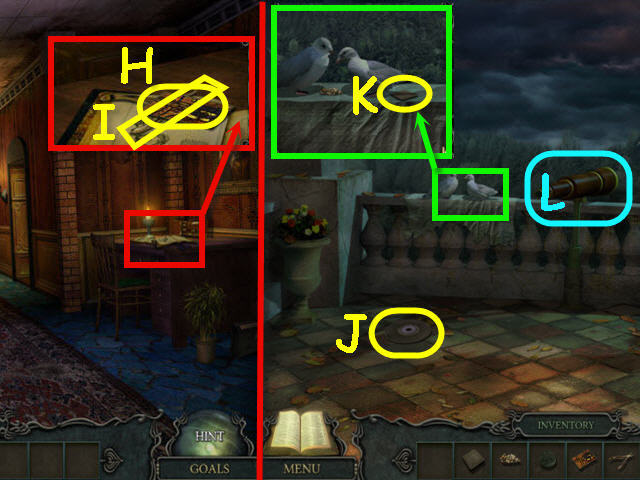
- Examine the desk; take the FIRST PIECE OF PICTURE (H) and NIPPERS (I).
- Go through the doorway on the left.
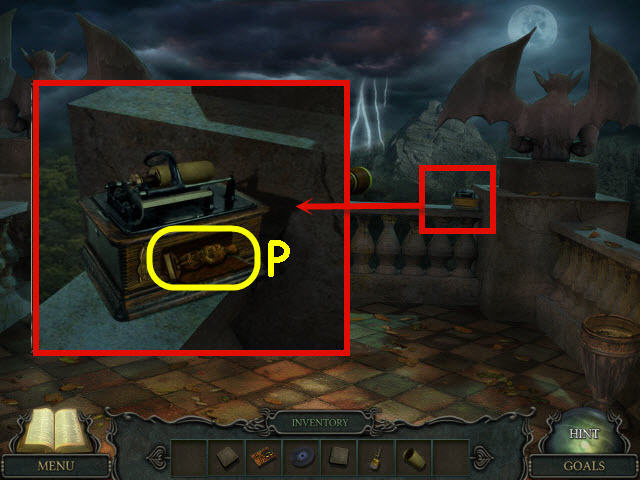
- Take the GRAMOPHONE RECORD (J).
- Examine and place the SEEDS by the doves; take the 2nd STONE BUTTON (K).
- Examine and place the KNOB on the telescope (L) to trigger a puzzle.
 >
>
- Focus the telescope using the knob and switches.
- To solve the puzzle, flip the switches in the following order, starting from the top: Down, up and down, and then move the knob all the way down (M).
- You will get a diary entry.
- Back out twice and go through the door on the right.
 >
>
- Examine the cabinet; use the NIPPERS on the wire (N) and get an EGG and OIL CAN.
- Back out.
- Examine and place the EGG in the hole in the stair riser (O); take the WAX CYLINDER.
- Go up the stairs and through the door on the left.
 >
>
- Examine and place the WAX CYLINDER on the music box; take the MISSING STATUETTE (P).
- Back out and go into the room on the right at the end of the hall.
 >
>
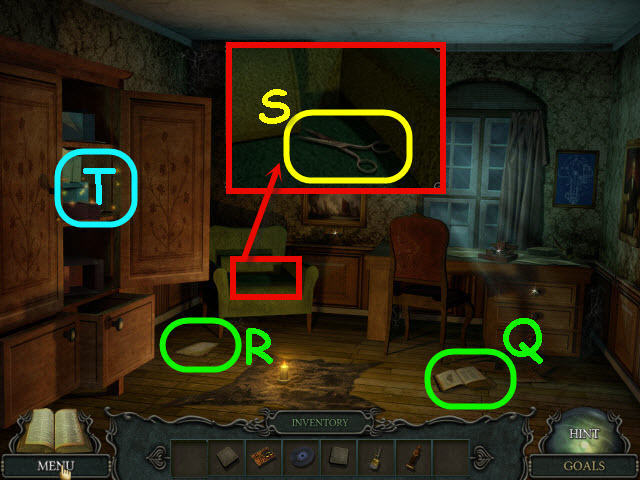
- Examine the book and select the left page to get a diary update (Q).
- Take the note to get a diary update (R).
- Examine the chair; take the SCISSORS (S).
- Examine the cabinet (T) to access a HOS.
 >
>
- Find the items listed.
- Use the utility knife on the box to get a BONE (@).
- Back out twice and go straight through the double doors.
 >
>
- Examine and give the BONE to the dog (U); get a FEATHER DUSTER.
- Examine and use the OIL CAN on the well.
- Use the FEATHER DUSTER on the bucket to get a LEFT FACE HALF (V) and SPONGE (W).
- Take the note (X) to get a diary update.
- Examine and place the 2 STONE BUTTONS on the stone block (Y) to trigger a puzzle.
 >
>
- Push the correct buttons so that all buttons are pushed down.
- See screenshot for the correct buttons to push (Z).
- Select the symbol on the stone block when complete to get a diary update.
- Back out.
 >
>
- Use the SPONGE on the mirror (A) to get a diary update.
- Go into the room on the right.
- Examine and use the SCISSORS on the cage to get a SMALL KEY (B).
- Back out; go up the stairs, and into the room on the right.
 >
>
- Examine and use the SMALL KEY on the locked drawer; take the MATCHES (C).
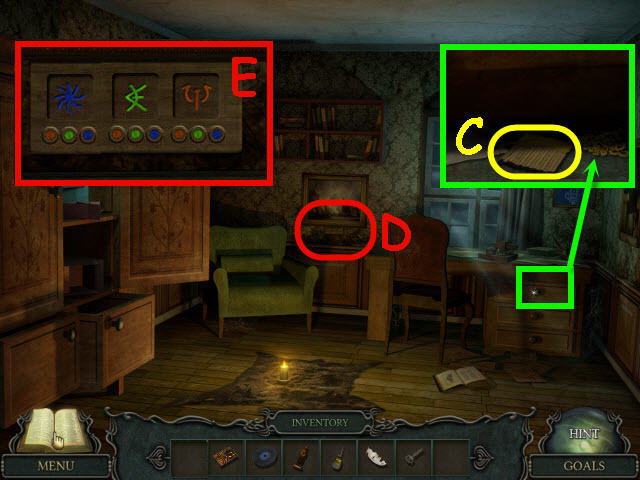
- Examine the plate under the picture (D).
- Select the colors to match the colors of the matching symbols in your diary collected from completing the mirror task, the stone block puzzle, and the telescope puzzle.
- Solution from left to right: Blue – green – red (E).
- You will earn a METAL BUG and DYNAMITE.
- Back out twice.
 >
>
- Examine and place the METAL BUG the box (F) to trigger a puzzle.
- Press the arrows to move all the bugs to the right.
- To solve the puzzle, press the buttons as follows: B x 3, C x 3, and press D x 29 (G).
- You will earn a RIGHT FACE HALF.
- Go up the stairs.
Chapter 6 – Stoke the Fire
 >
>
- Examine and place the RIGHT FACE HALF and LEFT FACE HALF in the frame (H).
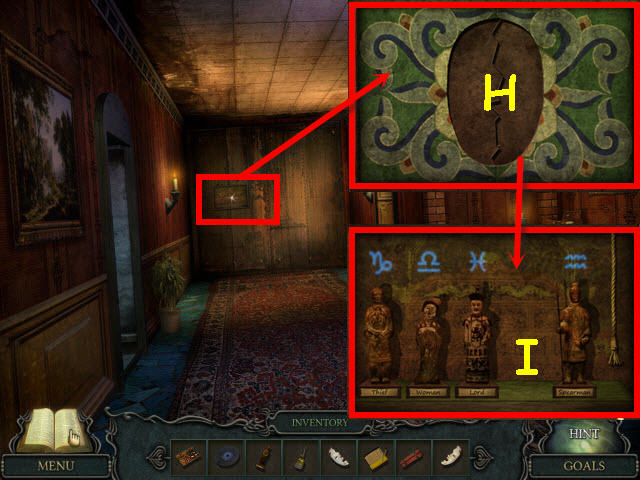
- Place the MISSING STATUETTE on the shelf (I) to trigger a puzzle.
 >
>
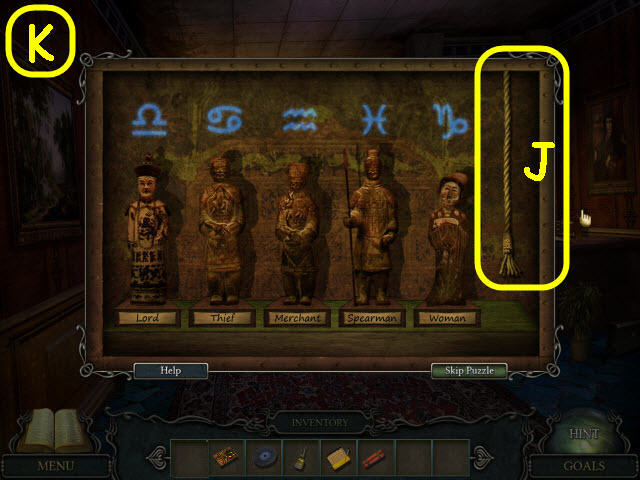
- Arrange the statues and symbols in the correct order.
- Pull the rope (J) to get a clue for the order.
- To solve the puzzle, arrange the statues and symbols in the following order starting from the left: Libra/Lord, Cancer/Thief, Aquarius/Merchant, Pisces/Spearman, and Capricorn/Woman (K).
 >
>
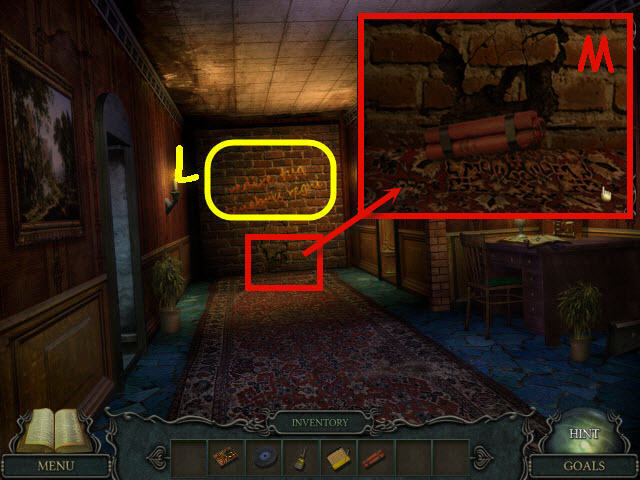
- Select the writing on the wall to get a diary update (L).
- Examine and place the DYNAMITE by the crack in the wall; use the MATCHES on the DYNAMITE (M).
- Go forward.
 >
>
- Examine the fireplace (N) to get a new goal.
- Examine and use the OIL CAN on the vise; press on the vise four times to get the BLOOD VIAL (O).
- Examine and select the note (P) to get a diary update.
- Back out twice.
 >
>
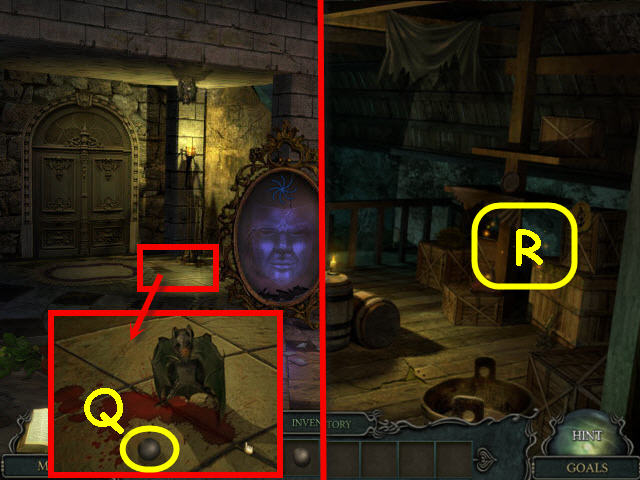
- Examine and place the BLOOD VIAL on the floor under the bat; take the METAL BALL (Q).
- Go upstairs, straight, and through the doorway on the right.
- Examine the crates (R) to access a HOS.
 >
>
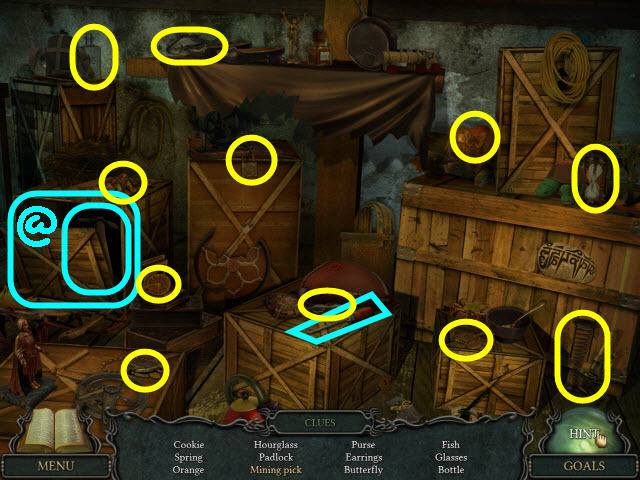
- Find the items listed.
- Use the pry bar to open the crate and get the MINING PICK (@).
- Go forward through the doorway.
 >
>
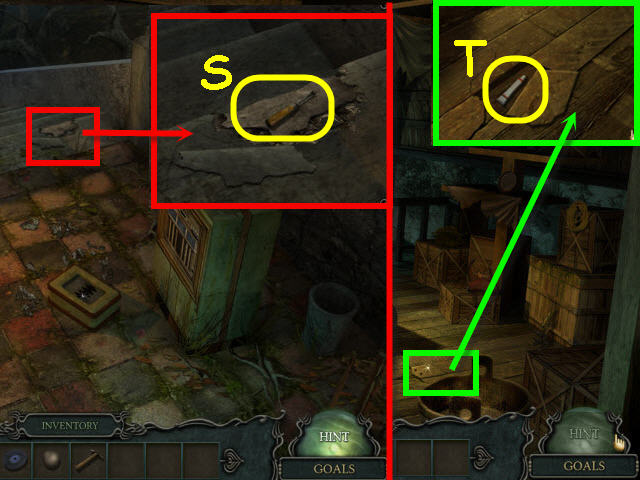
- Examine and use MINING PICK on the landing; take the NAIL PULLER (S).
- Back out.
- Examine and use the NAIL PULLER on the floorboard; take the GLUE (T).
- Go forward through the doorway.
 >
>
- Examine and use the GLUE on the ring; take the MISSING RING (U).
- Back out twice.
- Examine and place the MISSING RING on the chest (V) to trigger a puzzle.
 >
>
- Turn the rings and press the buttons to complete the face.
- To solve the puzzle, press the buttons in the following order: A x 2, B, C x 2, and D x 2. Next, rotate each of the rings so that the features are all upright (W).
- You will earn a COAL HOLDER.
- Go out the door on the right, straight, and then down the stairs.
 >
>
- Move the small boulder; take the HOOK (X).
- Take the note to get a diary update (Y).
- Examine and use the COAL HOLDER on the coal to get COAL (Z).
- Examine the broken boulder (A) to access a HOS.
 >
>
- Find the items listed.
- Use the watering can on the smoldering pile to get the ADAMANT STONE (@).
- Back out.
 >
>
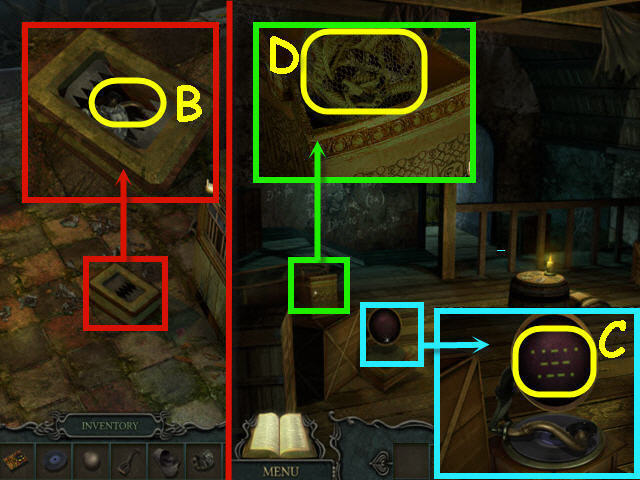
- Examine and use the ADAMANT STONE on the box; take the GRAMOPHONE ARM (B).
- Back out.
- Examine and place the GRAMOPHONE ARM and the GRAMOPHONE RECORD on the gramophone; select the code to get a diary update and NOTE WITH CODE (C).
- Examine and use the HOOK on the basket to get a SCOOP NET (D).
- Back out.
Chapter 7 – Spheres
 >
>
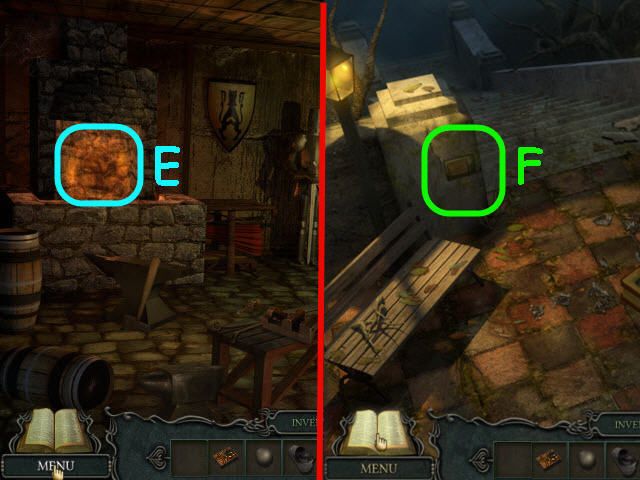
- Place the COAL in the fireplace (E); get a SPHERE OF KNOWLEDGE.
- Go through the right doorway and forward.
- Examine and place the NOTE WITH CODE on the panel (F) to trigger a puzzle.
 >
>
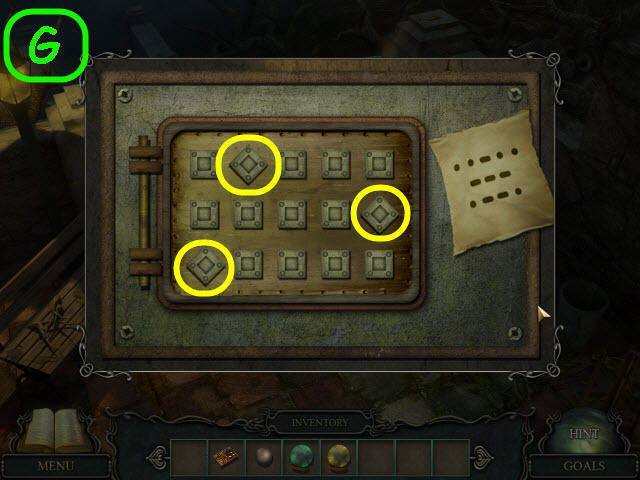
- Turn the correct squares to open the panel.
- To solve the puzzle use the clue in the diary and turn the squares marked in yellow (G).
- Place the METAL BALL on the new panel to trigger a puzzle.
 >
>
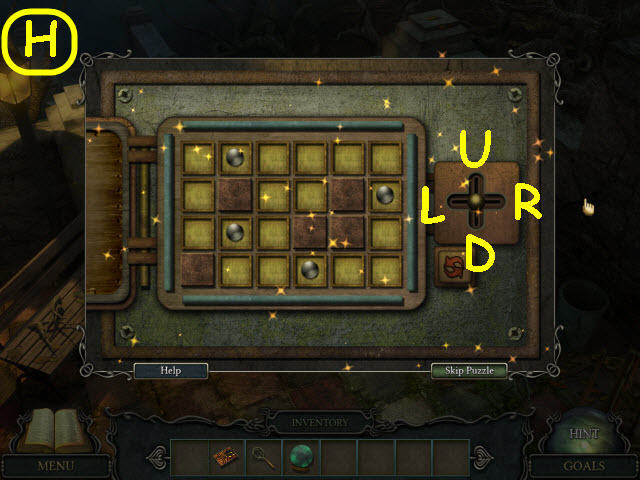
- Use the lever to move the balls over the X's.
- To solve the puzzle, move the lever on the right in the following directions: U, R x 2, D x 3, R x 2, L x 2, U, and L (H).
- Take the ENERGY CRYSTAL.
- Back out three times and go through the right door.
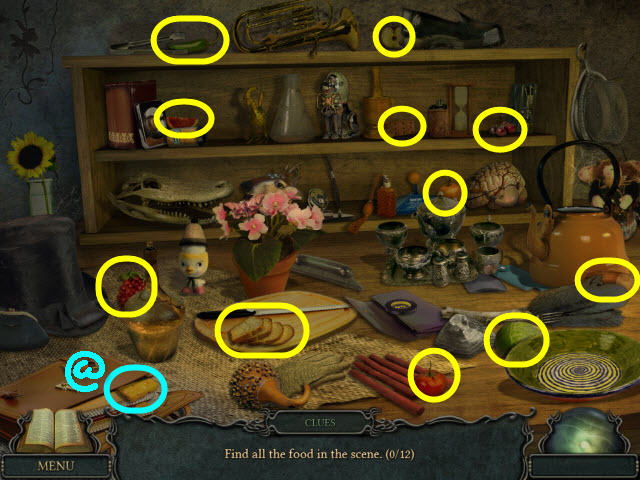
- Examine the cabinet on the left to access a HOS.
 >
>
- Find the 12 coins to earn a COIN (@).
- Back out twice and go right through the door.
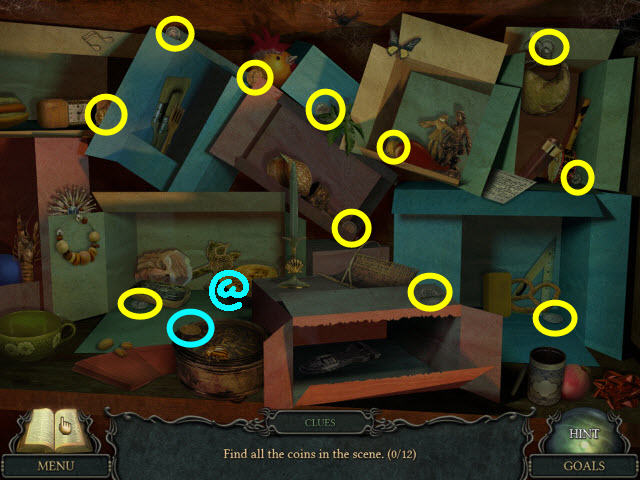
- Examine the table to access a HOS.
 >
>
- Find the 12 food items to earn CHEESE (@).
- Back out five times.
 >
>
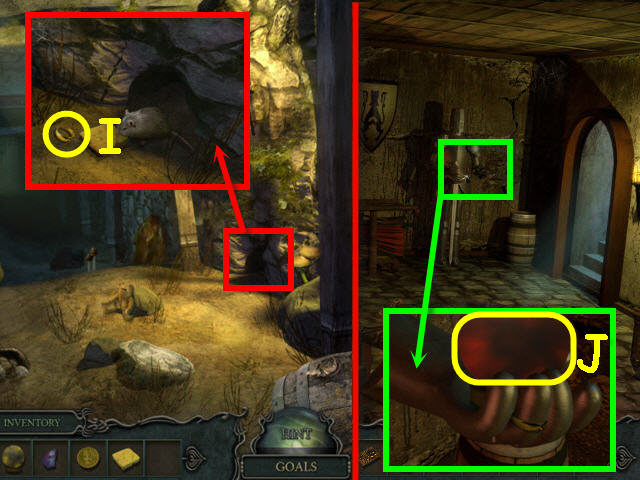
- Examine and place the CHEESE by the hole; take the RING (I).
- Go to the blacksmith's room.
- Examine the armor; place the RING on the finger and take the SPHERE OF POWER (J).
- Go right out the door and forward.
 >
>
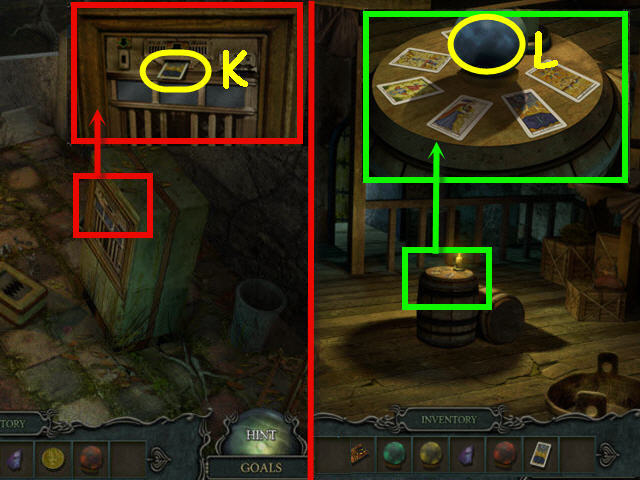
- Examine and place the COIN in the machine; take the TAROT CARD (K).
- Back out.
- Examine and place the TAROT CARD on the center barrel; take the SPHERE OF MAGIC (L).
- Go forward and down the stairs.
 >
>
- Examine and use the SCOOP NET on the barrel; get a SPHERE OF LIGHT (M).
- Examine and place the SPHERE OF KNOWLEDGE, SPHERE OF LIGHT, SPHERE OF POWER, SPHERE OF MAGIC, and ENERGY CRYSTAL in the center ring (N).
- Go down into the ring.
 >
>
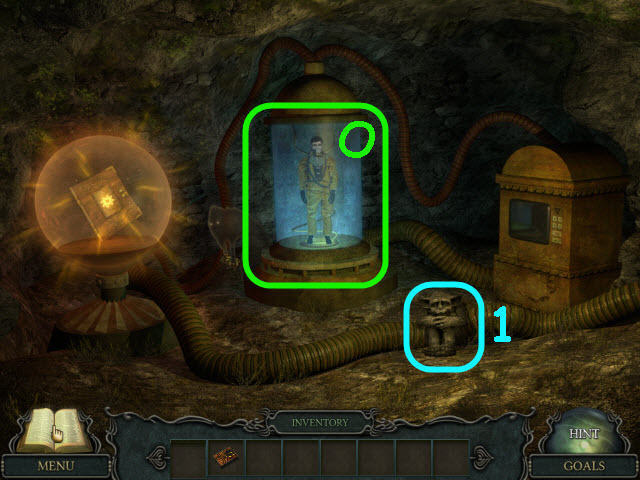
- Examine the center cylinder (O) to get a goal.
- Examine the gargoyle (1) and select the socket of the missing eye.
- Back out.
- Examine the broken boulder to access a HOS. Note: If you did not select the missing eye socket of the gargoyle (1), you will not trigger the HOS.
Chapter 8 – Stop the Experiment
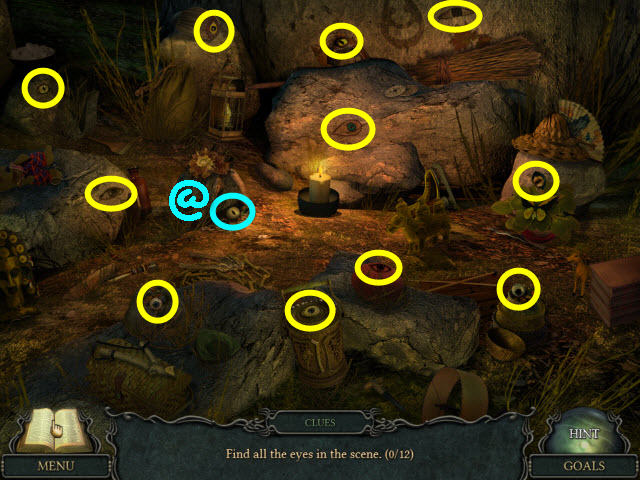 >
>
- Find the 12 eyes to get an ARTIFICIAL EYE (@).
- Go down into the ring.
 >
>
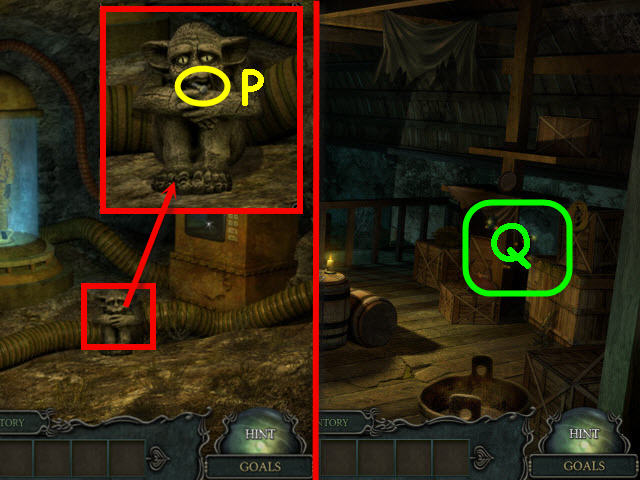
- Examine and place the ARTIFICIAL EYE on the gargoyle; take the BIG SCREW (P).
- Back out three times.
- Examine the crates to access a HOS (Q).
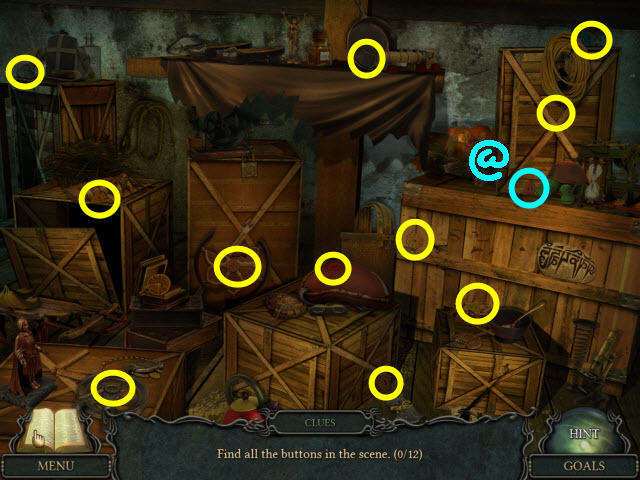 >
>
- Find the 12 buttons to get a TRIANGULAR BUTTON (@).
- Back out four times.
 >
>
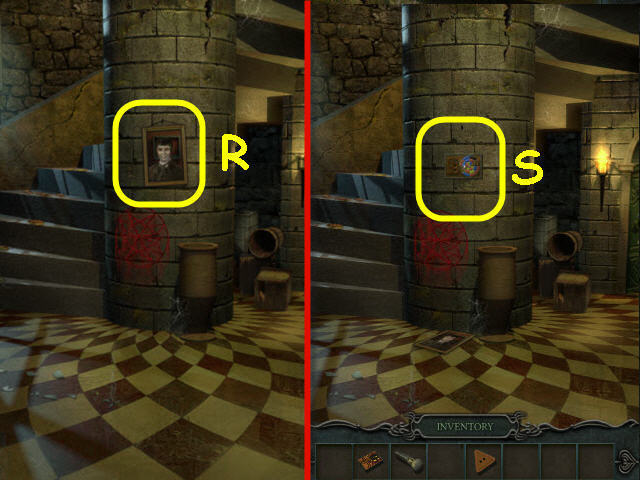
- Remove the picture (R).
- Examine and place the BIG SCREW on the panel to trigger a puzzle (S).
 >
>
- Move the colors to the matching colored frames.
- To solve the puzzle, select the following: 1, 4, D, E, F, I, H, K, J, 2, M, N, O, L, I, H, K, N, 3, O, R, Q, P, M, N, K, J, M, P, Q, N, K, L, O, R, Q, N, K, L, O, R, Q, N, K, L, O, R, Q, N, K, L, O, R, and Q.
- 6, P, S, V, 4, A, B, W, X, C, F, E, B, C, X, W, V, A, B, E, F, C, X, W, B, C, X, 6, U, R, Q, T, W, X, U, R, Q, and T (@).
- You will earn a BANISHMENT SCROLL.
- Go to Gustav in the machine.
 >
>
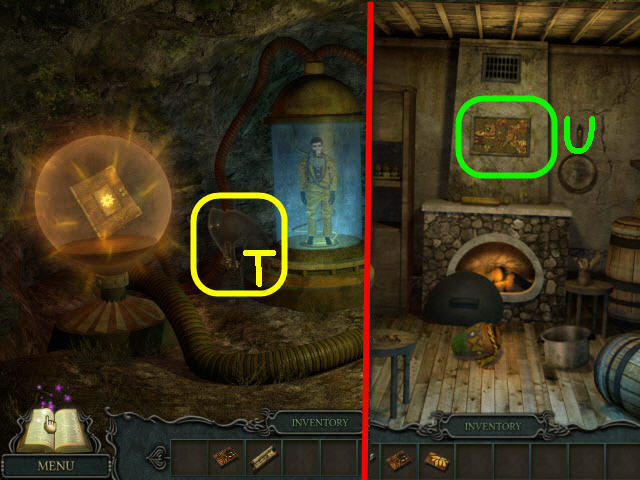
- Use the BANISHMENT SCROLL on the shadow (T); get the SECOND PIECE OF PICTURE.
- Back out six times and go into the room on the right.
- Examine and place the FIRST PIECE OF PICTURE and the SECOND PIECE OF PICTURE on the picture to trigger a puzzle (U).
 >
>
- Turn over all the picture pieces.
- To solve the puzzle, turn the following pieces: A x 2, C, D, B x 3, E x 3, H, G, and F x 3 (V).
- Take the PUNCHED CARD.
- Back out; go up the stairs, and into the room on the right.
 >
>
- Examine and place the TRIANGULAR BUTTON on the machine (W).
- Place the PUNCHED CARD in the slot (X); push the button (Y) and take the TRIANGULAR AMULET (Z).
- Go to Gustav in the underground chamber.
 >
>
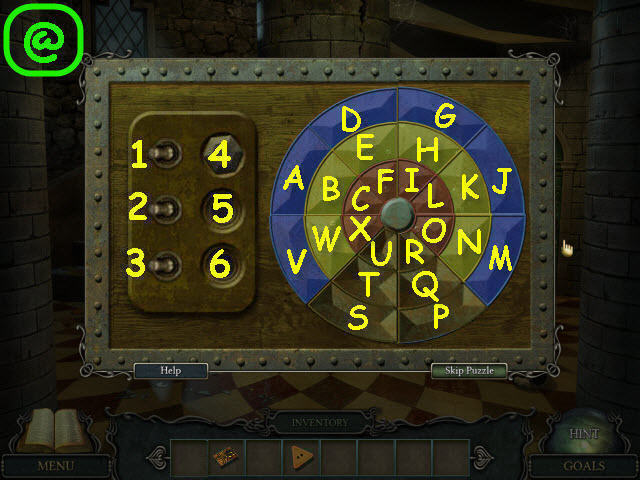
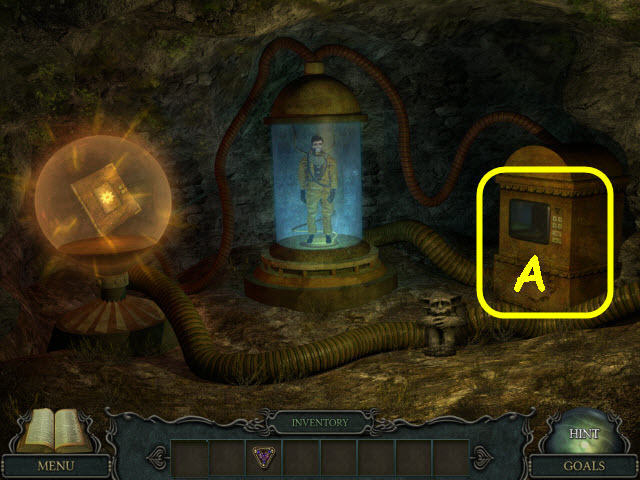
- Examine the machine (A).
- Place the TRIANGULAR AMULET on the machine to trigger a puzzle.
 >
>
- Use the arrows to move the circle through all the spaces.
- To solve the puzzle, select the following arrows: First solution – Left, Down, Right, Up, Left, Down, Right and up (1). Press the green arrow when set.
- Second Solution: Right, Down, Left, Up, Right, Down, Right, Up, and Left (2).
- Third Solution: Right, Down, Left, Up, Right, Down, Left, Up, and Left (3).
- Congratulations! You have successfully completed Mystic Diary: Missing Pages.
Created at: 2012-06-23