WALKTHROUGH MENU
- GENERAL TIPS
- CHAPTER 1: NORTH ATLANTIC
- CHAPTER 2: CENTRAL NORTH ATLANTIC
- CHAPTER 3: TROPICS
- CHAPTER 4: MID ATLANTIC RIDGE
GENERAL TIPS
- Action items are the yellow items on your list, while the normal items are the white items on your list.
- Your shipwreck sites must be fully completed before you can advance to the next chapter.
- All action areas sparkle brightly, so they are easy to detect.
- Use your PDA to see the full list of artifacts, characters, and shipwreck sites. The PDA is located on the left side of your item list.
- During expert mode you will have a time limit on each scene, and will not be able to use any hints, or quick hints.
ACTION AREAS AND ITEMS
- The action items are the yellow items on your list.
- These special items will usually go into your inventory, rather than just disappear.
- When an action item is in your inventory, you can use it on an action area either to advance the story, or gain another action item.
- Action areas appear as sparkling items. Action areas usually hide action items behind them.
- Using the appropriate action item on an action area will cause the action area to vanish from the scene.
- Sometimes you will have to go to another location to find the appropriate action item for an action area.
HINTS/QUESTION MARKS
- Collecting question marks will increase the number of hints you have left.
- Each shipwreck site has at least 1 question mark in it. However, in expert mode there are no question marks, and no hints.
- The question mark item looks like a question mark in a bubble. These items are often hard to find because they are somewhat translucent.
- In the upper right corner of your screen is a number displaying the amount of hints you have.
- Although the amount of the hints you can use is limited, the amount of quick hints you can use is unlimited.
- A quick hint will show you a silhouette of any item on your list for a brief moment.
- Click on an item from your item list to use the quick hint feature.
ARTIFACTS
- There are 12 artifacts to collect.
- These 12 artifacts have been dispersed over the 4 chapters in this game.
- For every artifact you find, a portion of the bonus content in this game will be unlocked.
- The bonus content is made up of 6 wallpapers, and 6 screensavers. Visit the bonus content section of the main menu if you would like to set a screensaver or wallpaper onto your computer.
SCREENSHOTS
- This part of the guide only applies to the undersea scenes.
- The normal items have been highlighted in yellow.
- The action items are highlighted in a light purple color.
- The action areas are highlighted in a dark purple color.
- The question marks are highlighted in red.
- The artifacts are highlighted in green.
CHAPTER 1: NORTH ATLANTIC
SS ATLANTIC
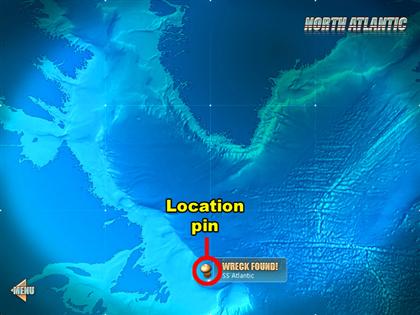
- After the intro you will arrive at the map screen. You will have to use your sonar’s ability to locate the shipwrecks hidden in the North Atlantic region.
- You must use your sonar in close proximity to an undiscovered shipwreck to locate it. The reason for this is because; your sonar has a limited range of effectiveness.
- This screenshot shows where the first shipwreck is. Click anywhere on this map’s grid to activate your sonar’s ability.
- The first shipwreck is located near the center of the bottom of the map.
- After locating this site, click on the pin by the name of the wreck.
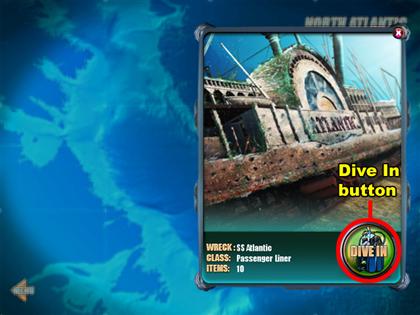
- Next, a window will pop up displaying information on this particular shipwreck site.
- Click on the green button in the lower right corner labeled “DIVE IN” to enter this underwater scene.
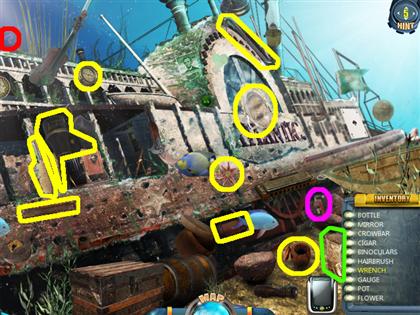
- There is 1 hint item in this scene. This item is in the upper left corner of the scene.
- The gold boot to the left of the item list is an artifact. Collecting artifacts unlocks bonus content within the game.
- The wrench is the first action item of the game; it is located on the left side of the item list. After collecting this kind of item it is often stored in your inventory.
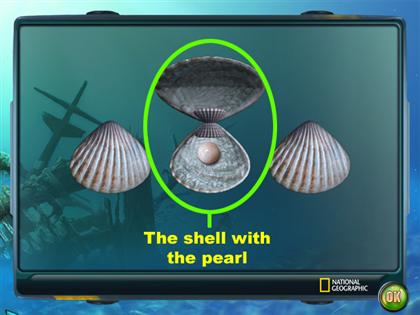
- After completing the SS Atlantic scene you will be challenged by a mini-game.
- There are 3 sea shells on the screen; 2 are empty and 1 has a pearl in it. After a brief moment the shells will begin to swap positions in a random manor. When the shells stop switching positions you will have a chance to click on the shell with the pearl in it.
- The shells will reshuffle their positions whether you make the correct choice or not. Find the correct shell 3 times to complete this mini-game.
- Note that you can press the okay button in the lower right corner of any mini-game to skip it.
HMS SAPPHIRE
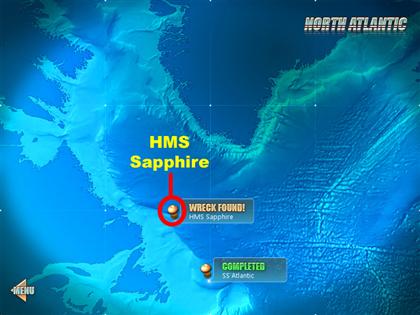
- This is a screenshot of the next shipwreck site.
- This shipwreck is located below the center of the map.
- When a site is completed it is no longer accessible.
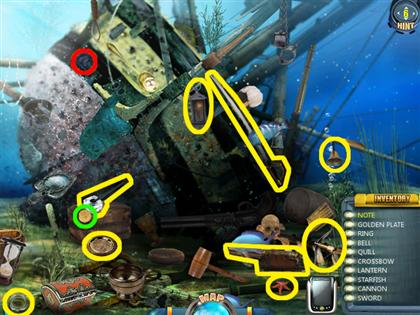
- There is a hint item to the right of the top left corner.
- There is an artifact below the center of the left half of this scene.
- The action item in this scene is the note. To acquire this item you will have to use the wrench you picked up earlier.
- Position your mouse cursor over the inventory tab to view the items in your inventory.
- The inventory tab is located above the item list on the right side of the screen.
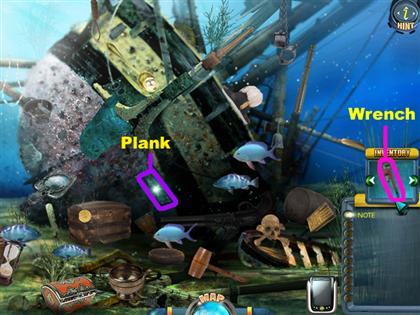
- Once you see the image of the wrench in your inventory, click it once to equip it to your mouse cursor.
- Then click on the sparkling plank which is located near the center of this scene.
- Areas in scenes which seem to sparkle are known as action areas. Using an action item on an action area will usually reveal a missing item.
- The action area; which is the sparkling plank in this scene, will disappear after you use the wrench on it.
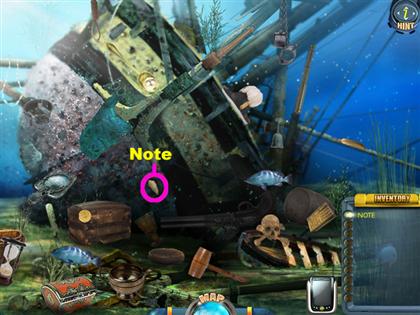
- Now that you have removed the plank, collect the note that was hidden behind it. That should complete this scene.
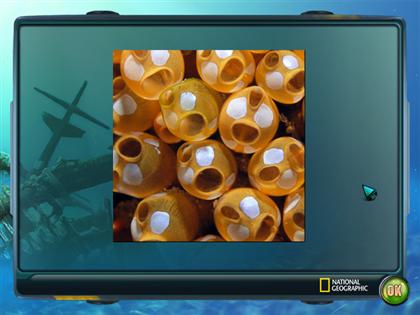
- This is how the completed puzzle should look.
- Use the pieces of this jigsaw puzzle to reconstruct the picture.
- Left-click a puzzle piece without releasing the mouse button to drag it. Release the left mouse button to drop the piece you grabbed.
- Place all 16 puzzle pieces into their correct positions within the puzzle’s square border to advance. After a puzzle piece is placed into its proper position it will light up.
- Begin with placing the corner pieces into their proper positions for an easier triumph.
SS ARCTIC
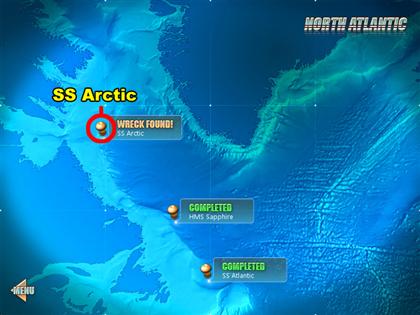
- This is a screenshot of the next shipwreck site, the SS Arctic.
- This shipwreck is located near the center of the left half of the map.
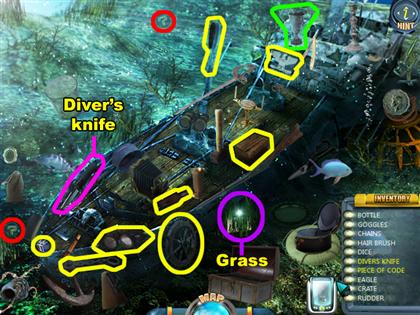
- There are 2 hint items in this scene.
- One is above the bottom left corner of the scene.
- One is to the left of the top center of the scene.
- There is an artifact to the right of the top center of this scene.
- Collect the diver’s knife from the center of the left half of this scene.
- Use the diver’s knife on the patch of grass which is sparkling below the center of this scene.
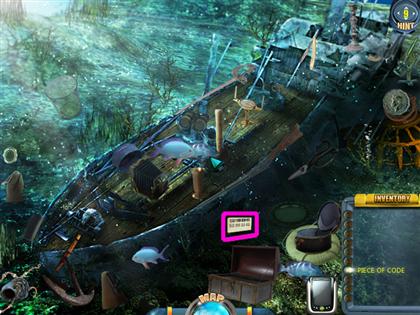
- Collect the piece of code that was hiding behind the grass.
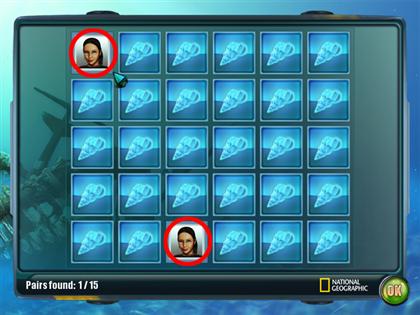
- Flip the tiles to reveal the images they have hidden underneath.
- Each kind of card has a matching pair hidden somewhere in this puzzle. Pair up all of the cards to advance.
- Left-click on a card to flip it over. When matching pairs are found the cards will remain flipped.
HMS RALEIGH 1
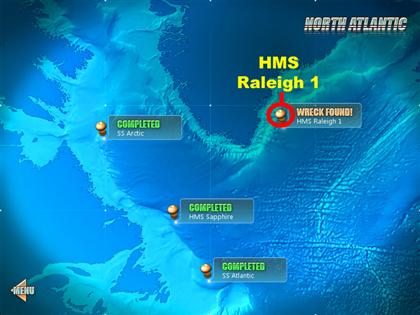
- This is a screenshot of the next shipwreck site, the HMS Raleigh 1.
- This shipwreck is located near the center of the right half of the map.
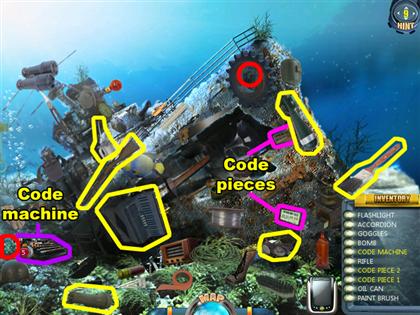
- There are 2 hint items in this scene.
- One is above the bottom left corner of this scene.
- One is above the center of this scene.
- Collect code pieces 1 and 2.
- They are both on the right side of the center of the scene.
- Use the 3 of the code pieces from your inventory on the sparkling code machine.
- The code machine is seen near the bottom left corner of this scene.
- There are 2 more code pieces to decipher, but they will have to be found elsewhere.
- Click on the “Map” button in the center of the bottom of your screen. This button will take you to the map screen.
HMS RALEIGH 2
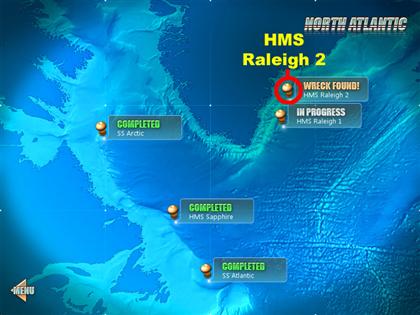
- This is the location of the next shipwreck site, the HMS Raleigh 2.
- This shipwreck is located above the previous shipwreck.
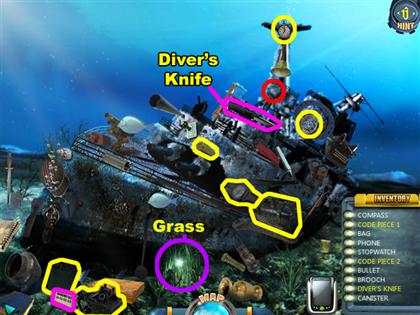
- There is a hint item above and to the right of the center of this scene.
- There are 3 action items to collect in this scene.
- The diver’s knife is located above the center of this scene.
- One of the code pieces is located near the bottom left corner of this scene.
- The other code piece is hidden behind an action area.
- The inventory viewer above your item list has 2 green arrows in it. Click on the arrows to scroll through the items in your possession.
- Use the diver’s knife on the sparkling grass below the center of this scene to reveal the code piece.
- Collect the code piece that was hidden by the grass.
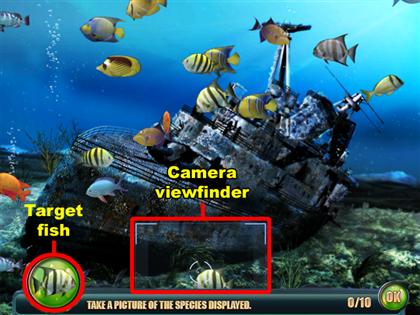
- There is a green bubble near the bottom left corner of your screen with an image of a fish on it. That image displays your target fish.
- The view of the camera will follow your mouse’s cursor.
- Photograph fish that matches the target fish 10 times to complete this mini-game. The target fish will change every time you take a picture of the correct fish.
- Afterwards go back to the HMS Raleigh 1 location.
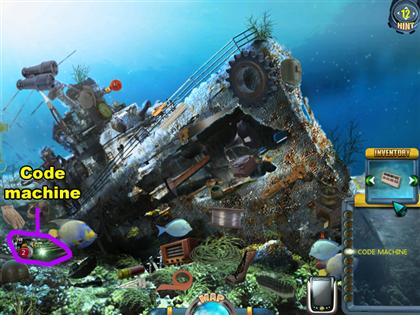
- Use the 2 remaining code pieces on the code machine to advance.
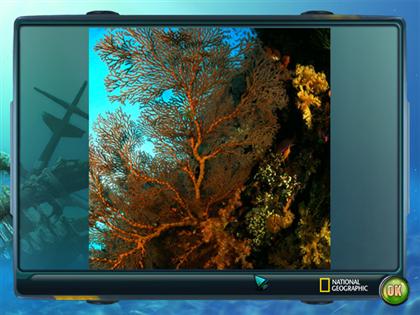
- This is how your puzzle should appear when it is complete.
- Click on the square pieces in this puzzle to rotate them by 90 degrees.
- Rotate all of the square pieces correctly to complete this picture.
CHAPTER 2: CENTRAL NORTH ATLANTIC
THE TUG BOAT
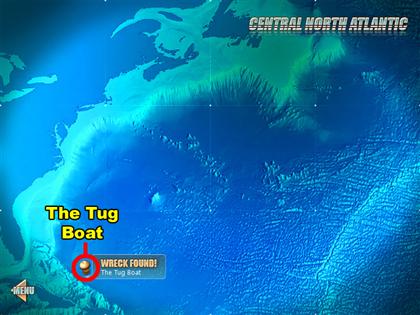
- This is the location of the next shipwreck site, The Tug Boat.
- This shipwreck is located near the bottom left corner of the map.
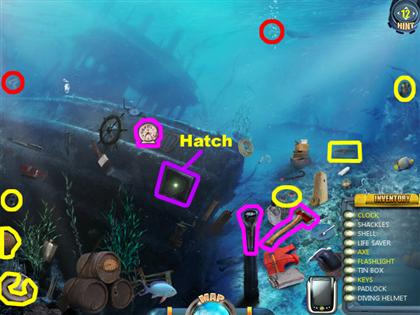
- There are 2 hint items in this scene.
- One is below the top left corner of this scene.
- One is to the right of the top center of this scene.
- There are 4 action items to collect in this scene.
- The clock is to the left of the center of this scene.
- The axe is to the left of your item list.
- The flashlight is below the center of this scene.
- The keys are hidden behind an action area.
- Use your flashlight on the sparkling hatch in the center of this scene to reveal the keys.
- Then use your axe on the hatch to remove it from the ship.
- Now that the hatch has been removed, collect the keys.
- Afterwards the fish photography mini-game will begin.
U-352
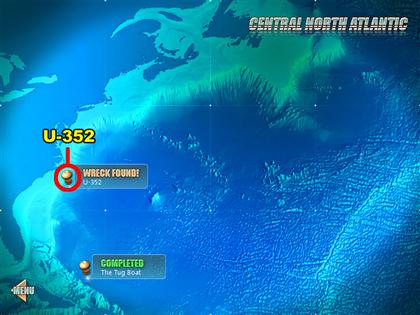
- This is the location of the next shipwreck site, the U-352.
- This shipwreck is located near the center of the left half of the map.
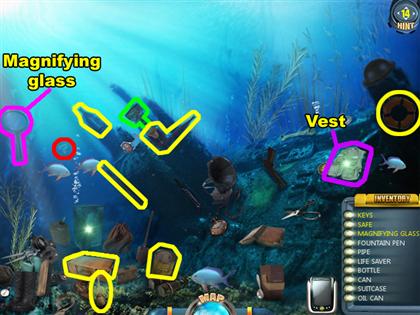
- There is 1 hint item in this scene. It is located near the center of the left half of this scene.
- There is 1 artifact to collect in this scene. It is to the left of the center of this scene.
- There are 2 action items to collect in this scene.
- The magnifying glass is below the top left corner of this scene.
- The keys are hidden behind an action area.
- Use the magnifying glass on the sparkling vest above your item list to reveal the keys.
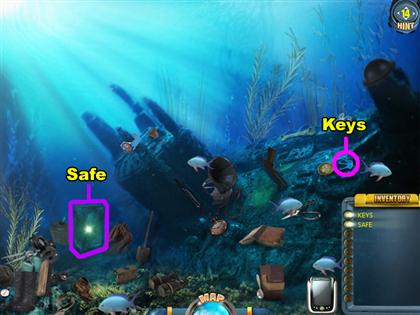
- Collect the keys that were hidden by the vest.
- Use the clock on sparkling safe which is located near the bottom left corner of this scene.
- Revisit the map screen.
CAROLINA BREEZE
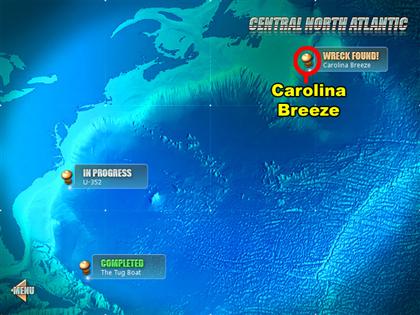
- This is the location of the next shipwreck site, the Carolina Breeze.
- This shipwreck is located above the center of the right half of the map.
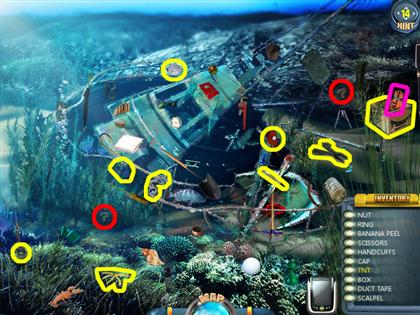
- There are 2 hint items to collect in this scene.
- One is below the center of the left half of this scene.
- One is above the center of the right half of this scene.
- There is only 1 action item to collect in this scene.
- Collect the TNT that is located below the top right corner of this scene.
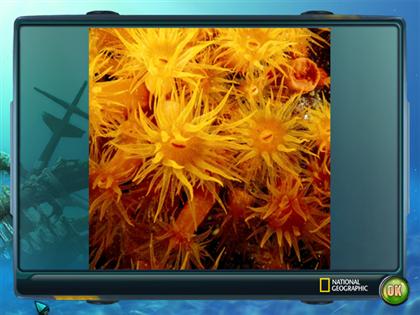
- This is the solution to the puzzle should look once completed.
- After the puzzle, go back to the U-352 location on the map and use the TNT on the safe to complete that scene.
- When that scene is complete another mini-game will show up.
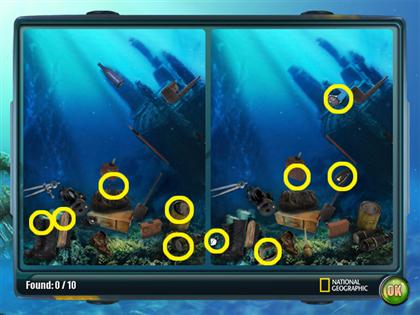
- Find 10 differences between the 2 pictures to complete this mini-game.
- Here are 5 differences in the left picture that are not in the right picture.
- Two are above the bottom left corner.
- One is below the center of the picture.
- One is in the bottom right corner.
- One is above the bottom right corner.
- Here are 5 differences in the right picture that are not in the left picture.
- One is in the bottom left corner.
- One is to the right of the bottom left corner.
- One is in the center of the picture.
- One is in the center of the right half of the picture.
- One is above the center of the right half of the picture.
ALEXANDER MACOMB
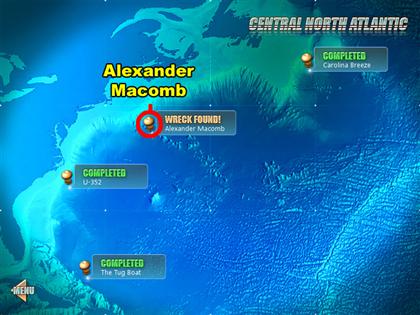
- This is the location of the next shipwreck site, the Alexander Macomb.
- This shipwreck is located near the center of the map.
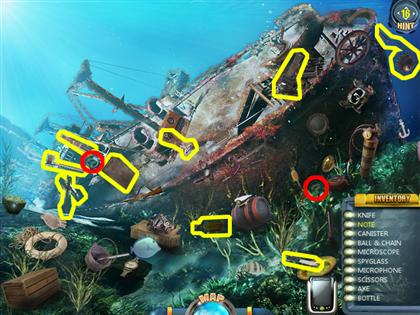
- There are 2 hint items to find in this scene.
- One is near the center of the left half of this scene.
- One is near the center of the right half of this scene.
- The action item cannot be found yet, so go back to the map screen.
JOHN MORGAN
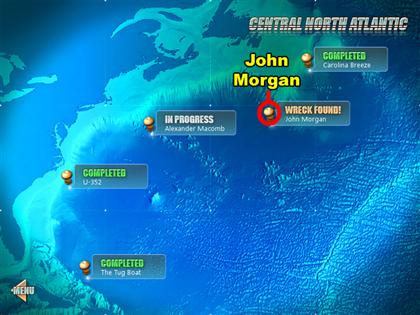
- This is the location of the next shipwreck site, the John Morgan.
- This shipwreck is located near the center of the map.
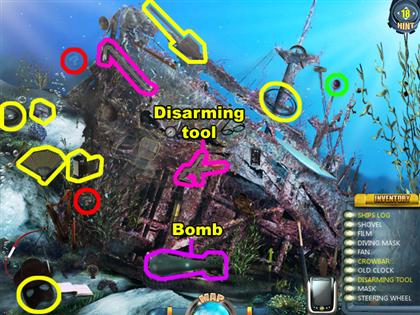
- There are 2 hint items to collect in this scene.
- One is above the center of the left half of this scene.
- One is below the center of the left half of this scene.
- There is an artifact above the center of the right half of this scene.
- There are 2 action items to collect in this scene.
- The crowbar is above the center of the left half of this scene.
- The disarming tool is in the center of this scene.
- Use the disarming tool on the sparkling bomb at the bottom center of this scene to reveal the ship’s log.
- Return to the map screen, and then go to the Alexander Macomb site again.
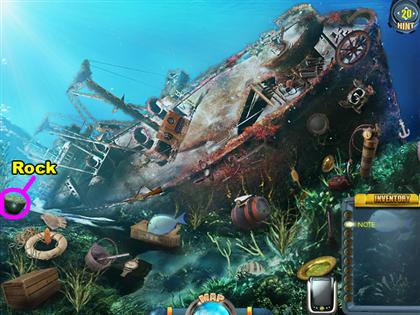
- Use your crowbar on the shining rock above the bottom left corner of this scene to uncover the note.
- Collect the note that was hidden by the rock.
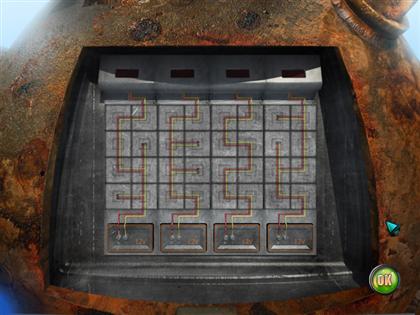
- This is how your puzzle should appear when it is completed.
- Connect all 4 light switches to the batteries below them to advance.
- Click the wire blocks to rotate them.
- Each light has 2 columns of wire blocks beneath them. Connect each pair of columns so that the wires all connect to each other.
- When a pair of columns is connected correctly, the corresponding light will switch off.
- After this puzzle go back to the John Morgan site.
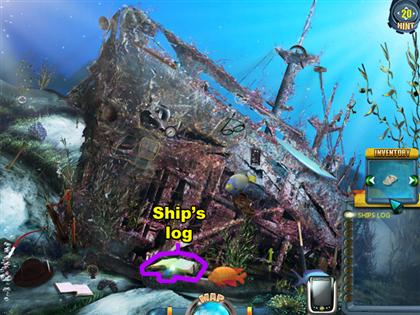
- Use the note from your inventory on the ship’s log you uncovered earlier.
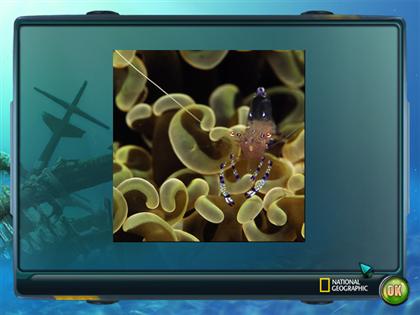
- This is how your puzzle should look once it has been completed.
SS MONTANA
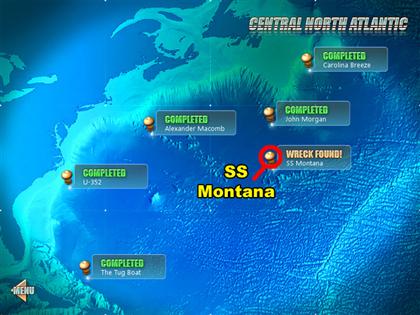
- This is the location of the new shipwreck site, the SS Montana.
- This shipwreck is located near the center of the map.
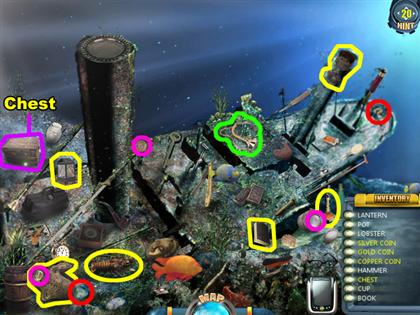
- There are 2 hint items to collect in this scene.
- One is to the right of the bottom left corner.
- One is above the item list.
- There is an artifact which is located in the center of this scene.
- There are 3 action items to collect in this scene.
- The silver coin is located below the center of the right half of this scene.
- The gold coin is located in the bottom left corner of this scene.
- The bronze coin is to the left of the center of this scene.
- Place all 3 of your coins into the sparkling treasure chest.
- The treasure chest is located below the top left corner of this scene.
- After completing the card matching mini-game you will move on the next chapter.
CHAPTER 3: TROPICS
USS WILKES-BARRE 1
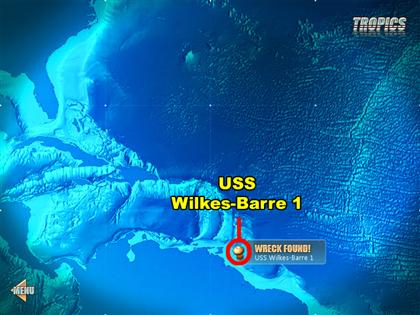
- This is the location of the next shipwreck site, the USS Wilkes-Barre 1.
- This shipwreck is located at the bottom center of the map.
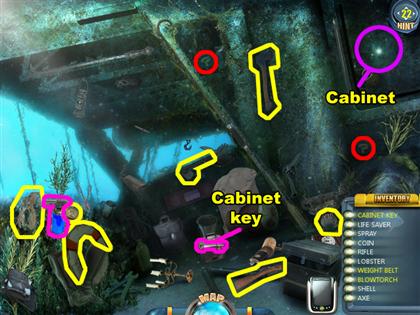
- There are 2 hint items in this scene.
- One is above the center of this scene.
- One is above your item list in this scene.
- There are 3 action items in this scene.
- The cabinet key is located below the center of this scene.
- The blowtorch is above the bottom left corner of this scene.
- The weight belt is hidden behind an action area.
- Use the cabinet key on the sparkling cabinet in the upper right corner of this scene to reveal the weight belt.
- Collect the weight belt which was hidden by the cabinet.
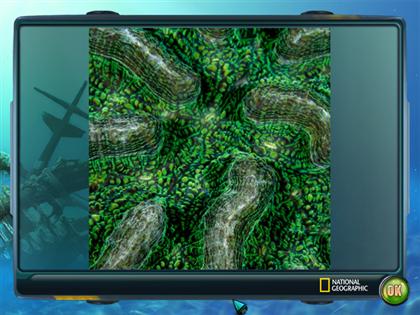
- This is how your puzzle should look once the square pieces have been rotated correctly.
USS WILKES-BARRE 2
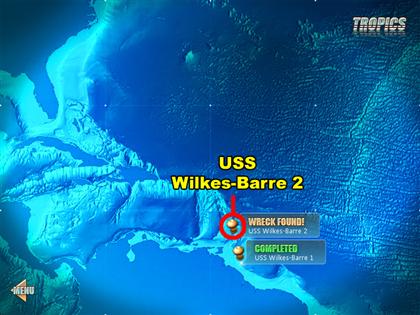
- This is the location of the next shipwreck site, the USS Wilkes-Barre 2.
- This shipwreck is located above the previous shipwreck.
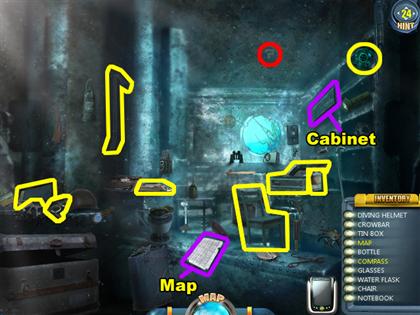
- There is 1 hint item to collect here; it is near the top center of this scene.
- Use the blowtorch on the sparkling cabinet above the center of the right half of this scene to reveal the compass.
- Collect the compass which was hidden by the cabinet.
- Use the compass on the sparkling map below the center of this scene.
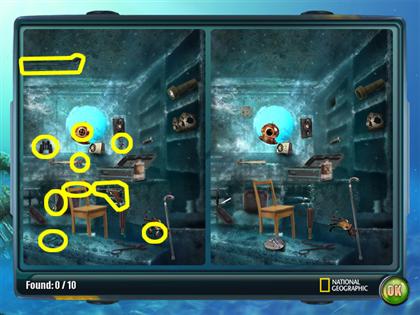
- These are the 10 differences in the left picture that are not in the right picture.
- One difference is in the upper left corner.
- Three are to the left of the center of this picture.
- One is on the brown chair.
- One is on the left side of the brown chair.
- One is on the right side of the brown chair.
- One is in the bottom left corner.
- One is near the bottom right corner.
- One is in the center of this picture.
NUESTRA SENORA DE GUADALUPE
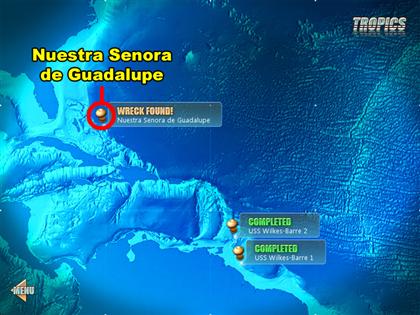
- This is the location of the next shipwreck site, the Nuestra Senora de Guadalupe.
- This shipwreck is located above the center of the left half of the map.
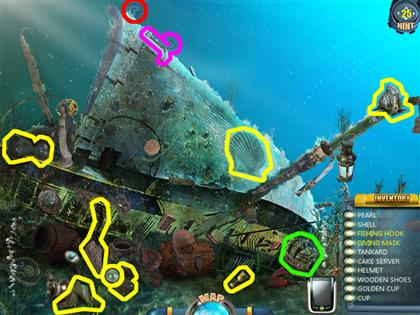
- There is 1 hint item to collect; it is to the right of the upper left corner of this scene.
- There is an artifact above your PDA in this scene.
- There are 2 action items to collect here.
- The fishing hook is near the top center of this scene.
- The diving mask is being hidden by an action area right now.
- Return to the map screen to find a new shipwreck.
HMS WIXEN
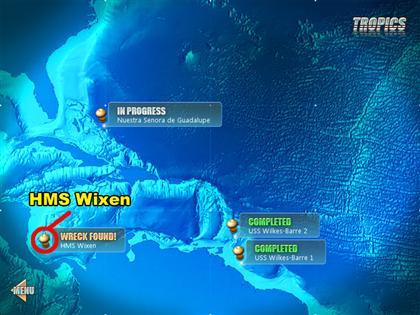
- This is the location of the next shipwreck site, the HMS Wixen.
- This shipwreck is located near the bottom left corner of the map.
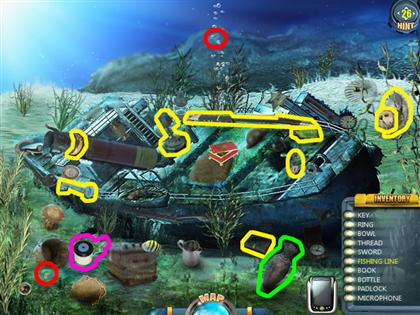
- There are two action items to collect in this scene.
- One is in the bottom left corner of this scene.
- One is at the top center of this scene.
- There is an artifact on the left side of your PDA.
- The fishing line is near the bottom left corner of this scene.
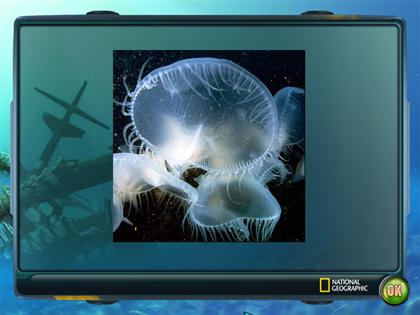
- This is how the completed puzzle will appear.
- Return to the Nuestra Senora de Guadalupe shipwreck.
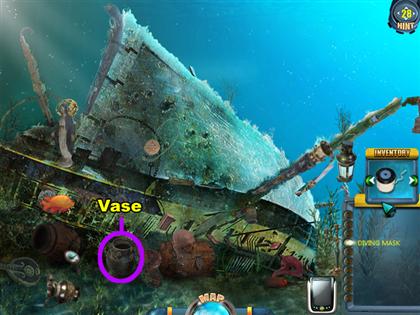
- Use both the fishing hook and the fishing line on the sparkling vase to reveal the diving mask.
- The vase is below the center of the left half of this scene.
- Collect the diving mask from where the vase was.
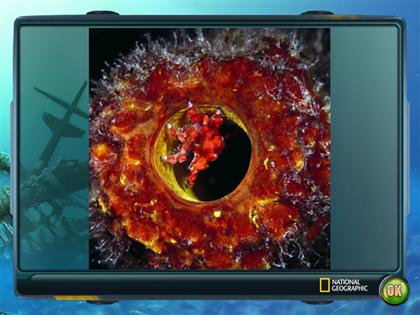
- This is how the puzzle will appear once completed.
SEA VENTURE
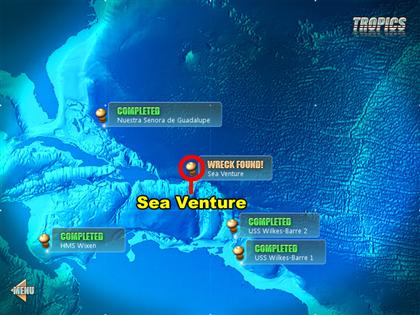
- This is the location of the next shipwreck site, the Sea Venture.
- This shipwreck is located in the center of the map.
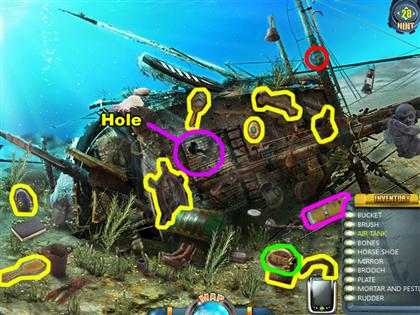
- There is a hint item above the center of the right half of this scene.
- There is an artifact on the left side of your PDA.
- The air tank is to the left of the item list.
- Use the air tank, diving mask, and weight belt on the sparkling hole in the ship.
- The hole is in the center of this scene.
- Afterwards the fish photography mini-game will start.
CHAPTER 4: MID ATLANTIC RIDGE
LUXURY YACHT 1
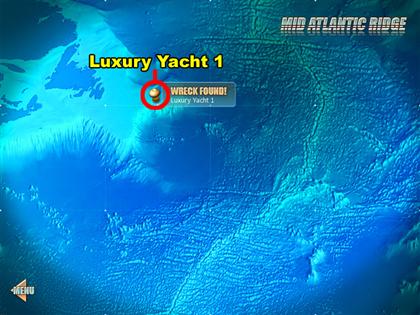
- This is the location of the next shipwreck site, the Luxury Yacht 1.
- This shipwreck is located is located above the center of the map.
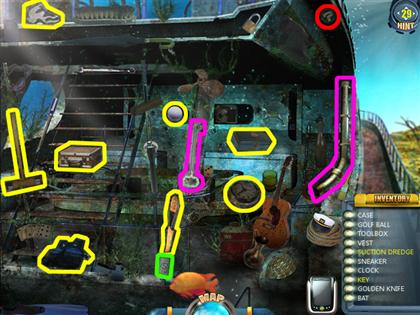
- The hint item in this scene is located left of the top right corner.
- There is an artifact near the center of the bottom of this scene.
- There are 2 action items to collect in this scene.
- The suction dredge is in the center of the right half of this scene.
- The key is in the center of this scene.
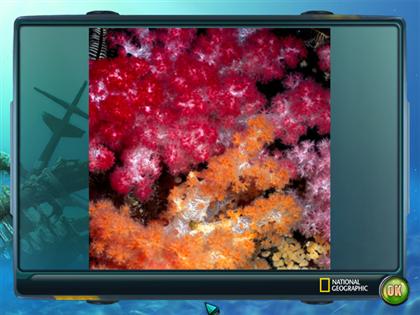
- This is how your puzzle should look once completed.
LUXURY YACHT 2
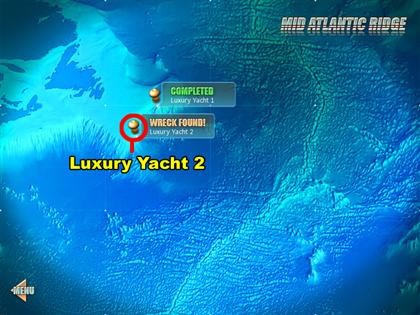
- This is the location of the next shipwreck site, the Luxury Yacht 2.
- This shipwreck is located below the previous shipwreck.
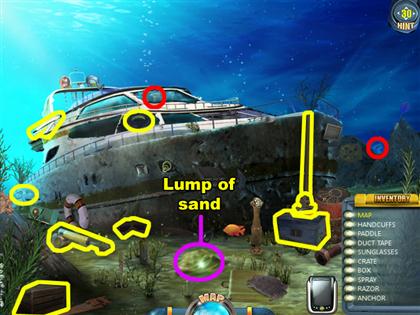
- There are 2 hint items in this scene.
- One is above and to the left of the center of this scene.
- One is above the item list.
- Use the suction dredge from your inventory on the sparkling lump of sand.
- The lump of sand is located at the bottom center of this scene.
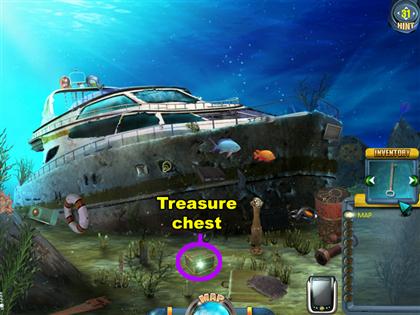
- Once the lump of sand has been blown away, you will see a treasure chest take its place.
- Use the key from your inventory on the treasure chest to reveal the map.
- Collect the map to advance.
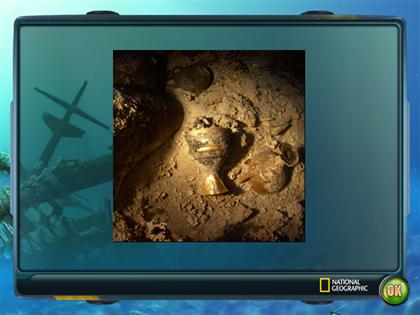
- This is how the jigsaw puzzle will turn out.
CITY OF GLASGOW 2
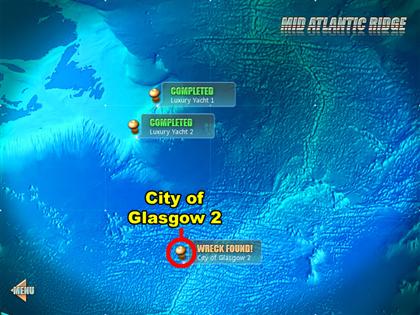
- This is the location of the new shipwreck site, the City of Glasgow 2.
- This shipwreck is located near the bottom center of the map.
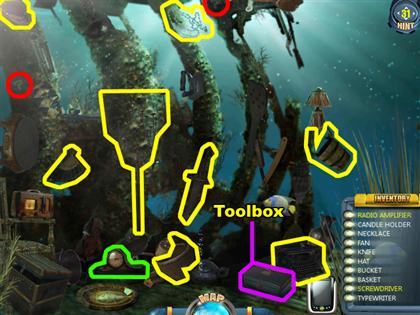
- There are 2 hint items to collect here.
- One is below the top left corner of this scene.
- One is at the top center of this scene.
- There is an artifact to the right of the bottom left corner of this scene.
- Click on the sparkling toolbox to reveal the screwdriver it has inside.
- The toolbox is to the left of your PDA.
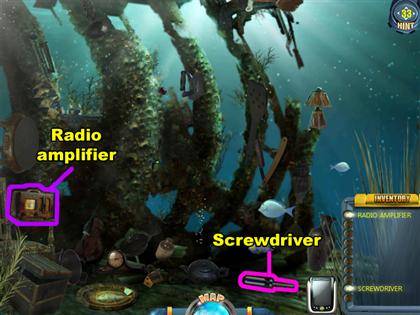
- Collect the screwdriver, and then use it on the sparkling radio amplifier.
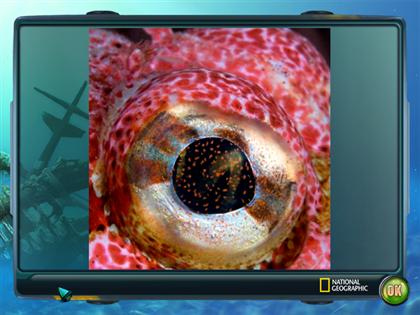
- This is how your puzzle should turn out once it is complete.
MORGAN MINI SUB
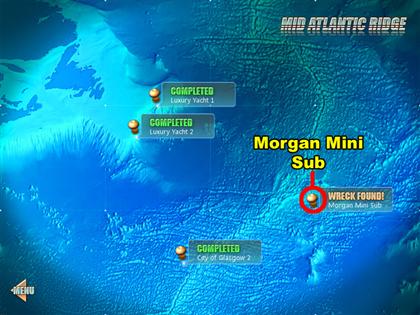
- This is the location of the new shipwreck site, the Morgan Mini Sub.
- This shipwreck is located near the center of the right half of the map.
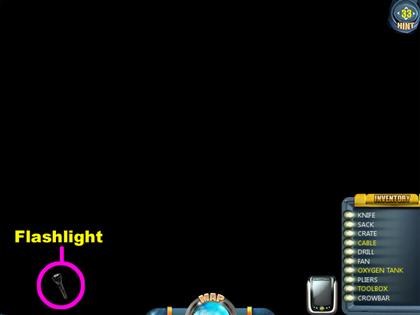
- Click on the flashlight in the bottom left corner of this scene. The flashlight will appear to be fading in and out.
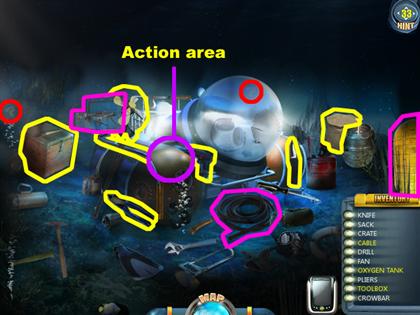
- This scene is dark, so you will have to use the flash light to look around for a while. If any of the 3 action items are used on the mini sub, the lights will turn on.
- There are 2 hint items here.
- One is below the top left corner of this scene.
- One is above the center of this scene.
- There are 3 action items to collect here.
- The cable is below the center of this scene.
- The oxygen tank is above your item list.
- The tool box is above the center of the left half of the scene.
- Use the cable, oxygen tank, and the tool box on the sparkling section of the mini sub.
- The action area on the mini sub is located near the center of this scene.
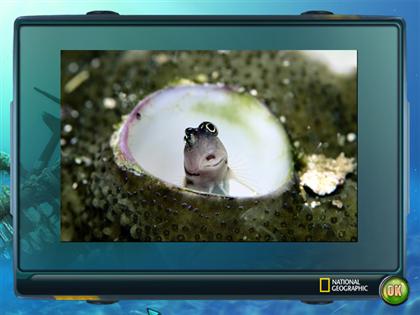
- This is how your jigsaw puzzle should look.
CITY OF GLASGOW 1
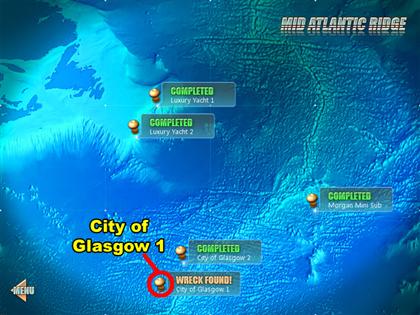
- This is the location of the new shipwreck site, the City of Glasgow 1.
- This shipwreck is located at the center of the bottom of the map.
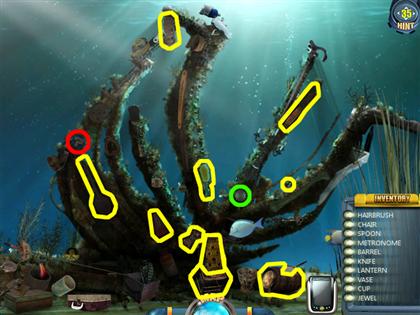
- The hint item is in the center of the left half of this scene.
- The last artifact is below the center of this scene.
- Collect all of the items from your item list to advance.
- Afterwards you will play another fish photography mini-game.
- Once the mini-game is complete enjoy the ending of the game.
Created at: 2009-12-23

