Walkthrough Menu
- General Tips
- Chapter 1: A Grim Discovery
- Chapter 2: A Cry for Help
- Chapter 3: The Only Way Out
- Chapter 4: A Gloom of Darkness
- Chapter 5: An Echo from the Past
- Chapter 6: The Plot Thickens
- Chapter 7: Closing the Curtains
General Tips
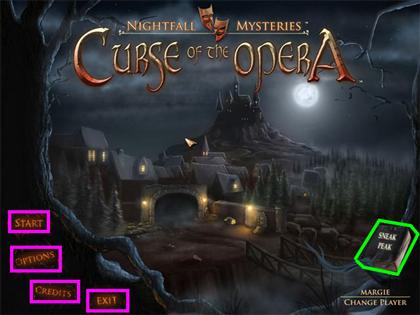
- There are 7 chapters in this game and no timer.
- Anytime you see a sparkly area, it indicates an area that needs to be investigated.
- When you get lost, review your notebook and journal which are located at the bottom corners of the screen.
- If you click randomly in the scene, your hints will be disabled for a short period of time.
- Click on the bottom area of the Puzzles and Navigations screens to exit out the scenes.
- All the puzzles in the game have some hints to help you to solve them.
- You will pick up inventory items along the way. They will be stored in the lower part of your screen.
- Select the inventory item you want to use and place it in the appropriate area.
- Use the arrows at both ends of your inventory tray to scroll through all available items.
Notebook
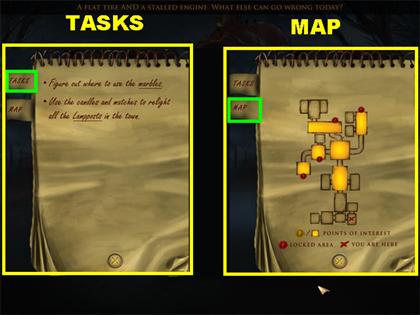
- Your notebook keeps track of the tasks you currently need to complete. It also has a map to help you navigate the town.
- Make sure you read all the letters and the dialog in color. They will give you clues as to what you need to do next.
- Reviewing your journal book at the bottom left side also can help you progress in the game.
Navigation and Cursors
- The directional arrow cursors guide you to navigate the different screens.
- The hand allows you pick up inventory items in the scene. It can also be used to interact with some interesting points in the game, such as the movable parts in a puzzle.
- If you see the magnifying glass appear it means that you will able to get a closer look at the scene you are interested in.
- The jigsaw pieces in the game mean there is a puzzle that you need to solve.
- Speech bubbles mean that you can talk to one of the characters. They usually give you valuable information or tell you about the story.
Hints
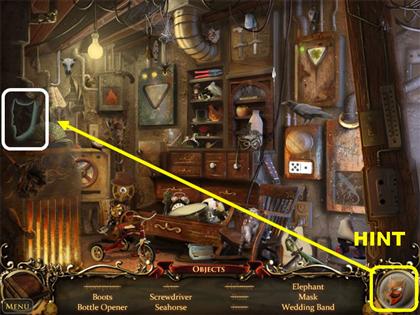
- Click on the demon in the lower right corner to use a hint.
- A silhouette of the demon will show you where a random item is on your list.
- The hints are unlimited but you have to wait for it to recharge before you can use it again.
- When you click randomly on the scene it disables the hint function for a short while.
Mini-games
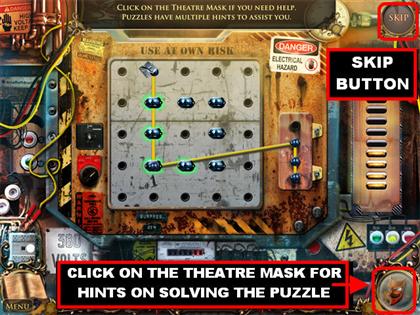
- The mini-games can be skipped once the skip button is charged.
- Click on the demon in the lower right to obtain a hint of what to do in the puzzle.
- Some puzzles have a Reset button that can be used to bring the puzzle to its original state.
- If no Reset button is available on a puzzle you can exit the game to reset the puzzle.
Chapter 1: A Grim Discovery
Get Across the River
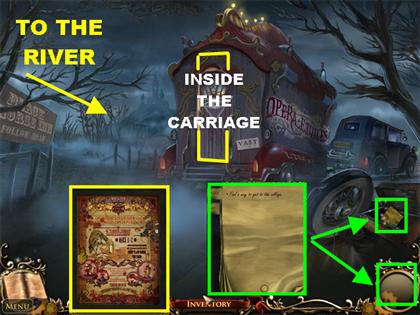
- Pick up the paper in the lower left and it will go into your inventory.
- Click on the notebook in the lower right. The notebook will remain in the lower right corner from now on. It contains the tasks and the map of the town.
- Your current task is to find a way into the village.
- Click on the carriage to enter a Hidden Object Scene.
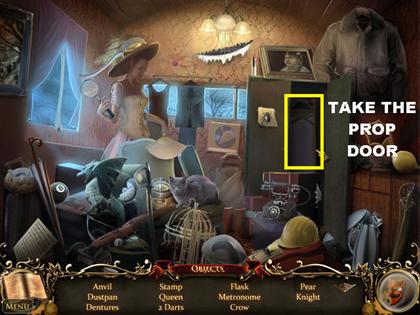
- From this point on, you can click on the theatre mask in the lower right if you need a hint.
- Click on the wardrobe after all the items have been found.
- Pick up the PROP DOOR inside the wardrobe.
- Exit the Hidden Object Scene and go towards the left of the carriage.
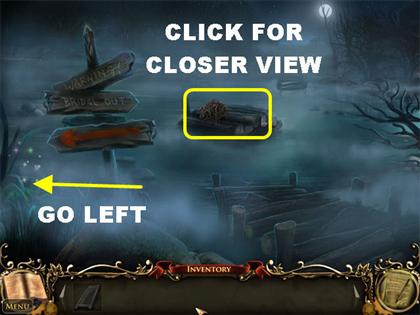
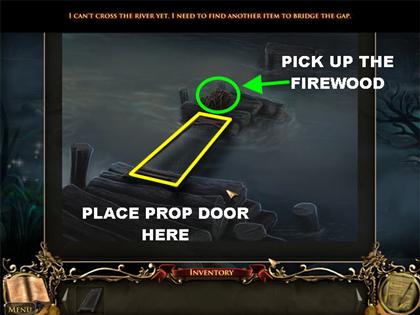
- Click on the log in the water for a closer view.
- Place the PROP DOOR on the log to bridge the gap.
- Pick up the FIREWOOD at the end of the door.
- Exit the scene and go left.
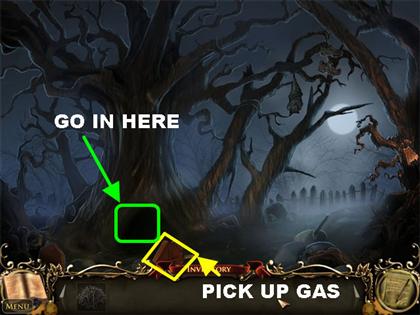
- Click on the hole in tree. You are now at a campfire.
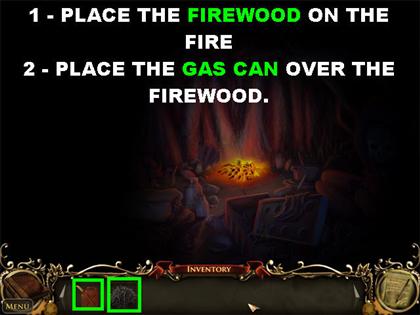
- Place the FIREWOOD on the fire.
- Place the GAS CAN over the firewood to trigger a Hidden Object Scene.
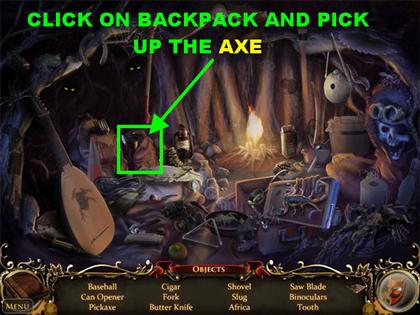
- Click on the backpack on the left after all the items have been found.
- Pick up the AXE inside the backpack. Go back outside.
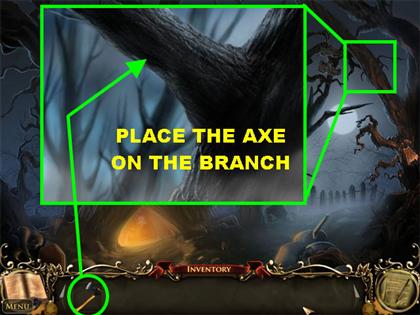
- Click on the branch in the upper left for a closer view.
- Place the AXE on the branch to cut it.
- A BRANCH will go into your inventory.
- Click at the bottom of the scene to return to the river.
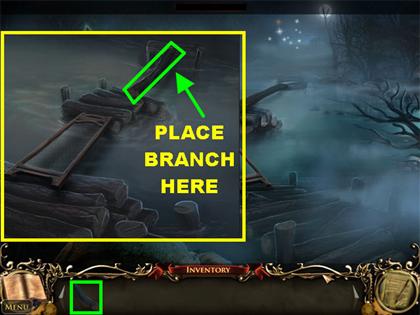
- Click on the bridge for a closer view.
- Place the BRANCH at the end of the logs. You are now able to cross the river.
- Close the pop-up window. Click in the back of the scene to cross the river.
- Click on the NOTE in the upper right. The NOTE will go into your journal.
Find the Watch
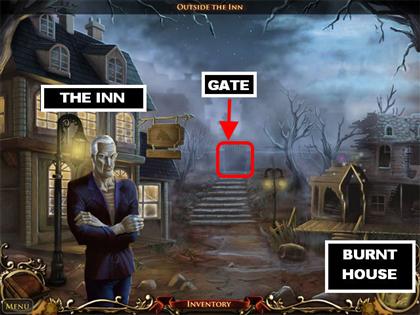
- You are in the middle of the town.
- On the left you have the Inn. On the right, you have the Burnt House.
- Go to the Burnt House on the right to enter the Hidden Object Scene.
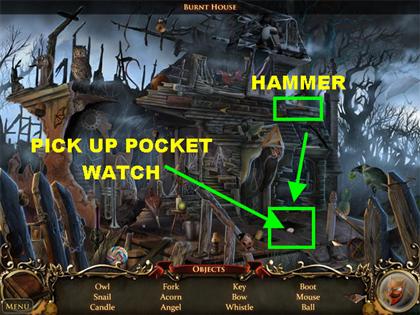
- Pick up the HAMMER in the upper left after all the items have been found.
- Place the HAMMER on the floorboard on the porch.
- Pick up the POCKET WATCH inside the floorboard.
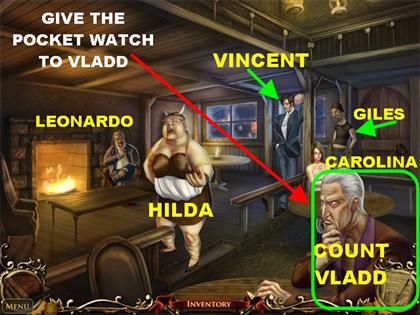
- Go into the Inn on the left.
- Talk to Hilda and Vladd at the Inn.
- Give the POCKET WATCH to Vladd.
- You will receive the INN GATE KEY from Vladd.
- Click on the door to exit.
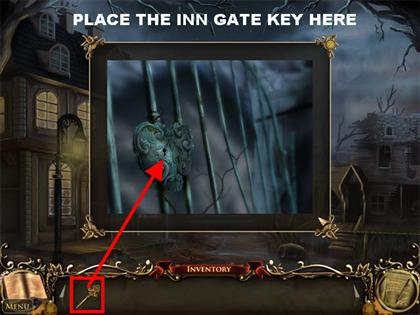
- Click in the back of the scene for a closer view of the gate.
- Place the INN GATE KEY in the lock to trigger a Hidden Object Scene.
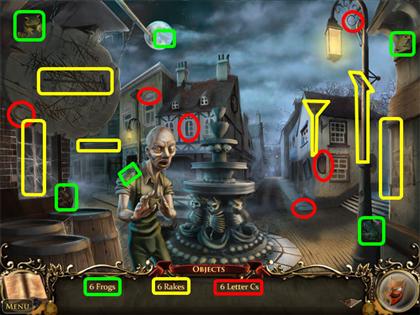
- The letter C’s are in red.
- The Rakes are in yellow.
- The frogs are in green.
- Click on the sparkly spot in the back of the scene.
Outside Opera House
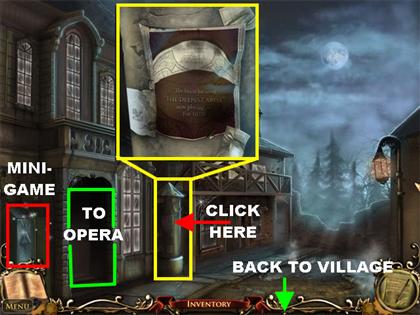
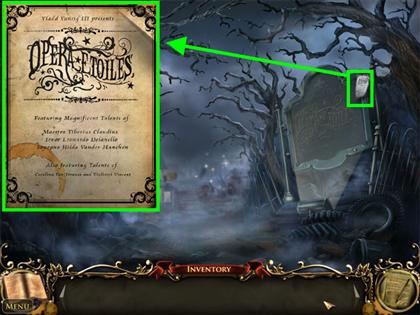
- Click on the note on the post to read it.
- Click on the sparkly fuse box on the left side of the door to trigger a mini-game.
Fuse Box Puzzle
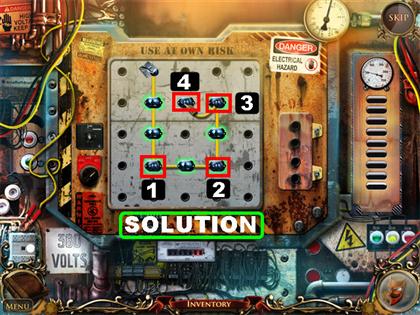
- Your goal in this game is to use the 4 available to pins to light up the 8 lights.
- Please look at the screenshot for the solution, you can also follow these steps to solve the puzzle:
- Place the 1st pin on the second hole in the fourth row.
- Place the 2nd pin on the fourth hole in the fourth row.
- Place the 3rd pin on the fourth hole in the second row.
- Place the 4th pin on the third hole in the second row.
- The lights will turn on after the puzzle has been solved.
- Go through the door once it opens.
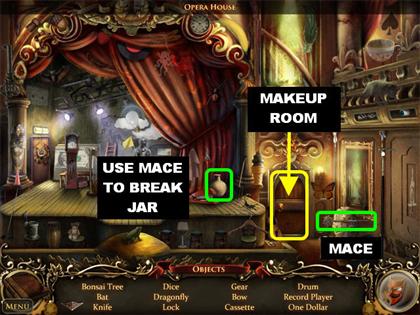
- Pick up the MACE in the lower right.
- Use the MACE to break the jug on the right side of the stage.
- Pick up the BLUE SUN KEY inside the jug.
- Click on the Makeup Room door and knock on it. Abigail will send you back to the Inn.
- Go back to the Village Square.
- Talk to Hilda and she tells you to find Tiberius for help.
- Go back to the Opera Stage to trigger a Hidden Object Scene.
Hidden Object Scene
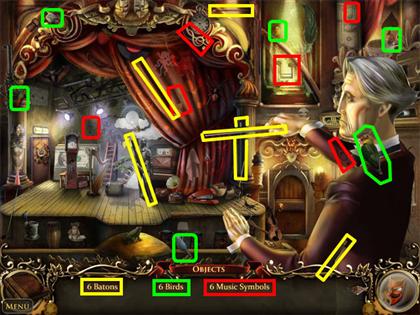
- The 6 Buttons are in yellow.
- The 6 Birds are marked in green.
- The 6 Music Symbols are marked in red.
- Tiberius tells you to find Carolina.
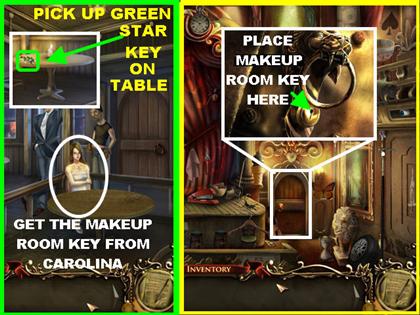
- Go back to the Inn.
- Pick up the GREEN SUN KEY on the table close to the broken window.
- Talk to Carolina. You will receive the MAKEUP ROOM KEY after you finish talking to Carolina.
- Go back to the Opera stage and click on the makeup room door to get a closer view.
- Use the MAKEUP ROOM KEY on the lock.
Opera House Makeup Room Key
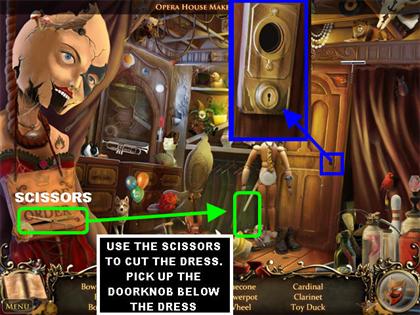
- Pick up the SCISSORS in the lower left.
- Use the SCISSORS to cut the dress in the lower right.
- You will reveal the missing DOORKNOB below the dress.
- Click on the closet door on the right side to get a closer view.
- Place the DOORKNOB on the door to discover the first victim.
Chapter 2: A Cry for Help
Phone booth
- You are taken back to the Inn. Click on Tiberius in the lower left.
- Tiberius asks you to make a call for help.
- Leave the Inn and go to the Burnt House. Once you are in the scene, click on the sparkly door.
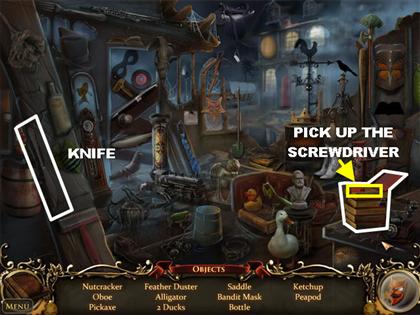
- Pick up the KNIFE on the left edge of the scene.
- Place the KNIFE on the stack of books on the right.
- Pick up the SCREWDRIVER inside the books.
- Go to the Village Square, click on the fountain area to trigger a Hidden Object Scene.
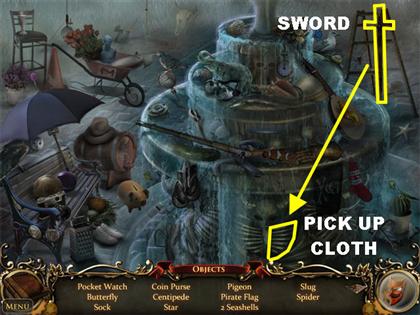
- Pick up the SWORD in the upper right.
- Use the SWORD in the skeleton’s ribs in the lower right.
- Pick up the CLOTH inside the ribs.
- Go to the Outdoor Shop Street location, which is on the left side of the Square.
- Click on the sparkly phone booth at the right side.
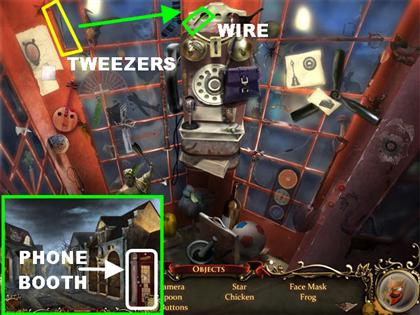
- Pick up the TWEEZERS in the upper left.
- Use the TWEEZERS to pick up the green wire in the top left side of the phone.
- You now have a GREEN ELECTRICAL PLUG in your inventory.
- The phone is dead. Go back to the Inn.
Find the Electrician
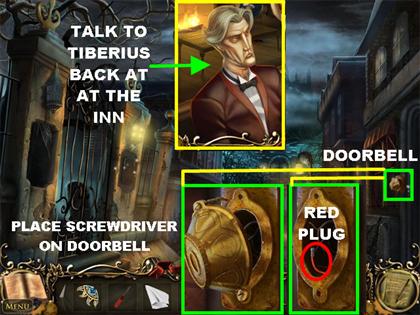
- Back at the Inn, talk to Tiberius and he tells you to find Giles so he can help you fix the phone.
- Go to Residential Street, which is on the right side of the Village Square.
- Click on the doorbell on the right side for a closer view.
- Use the SCREWDRIVER to open the doorbell.
- Pick up the RED ELECTRICAL PLUG inside the doorbell.
- Go to the Opera house.
Opera House
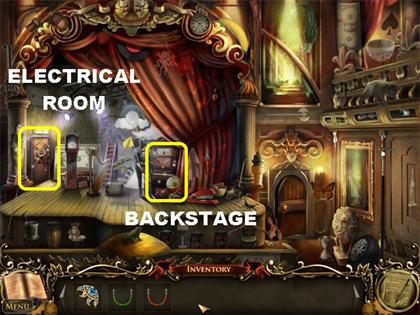
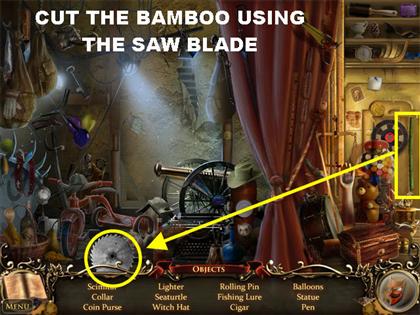
- Click on the backstage door on the right side of the stage.
- Pick up the BAMBOO STICK in the upper right and place it on the SAW BLADE in the lower right to cut it.
- The BLUE ELECTRICAL PLUG will go into your inventory.
- Click on the Electrical Room door on the left side of the stage to trigger a puzzle.
Wire Door Puzzle
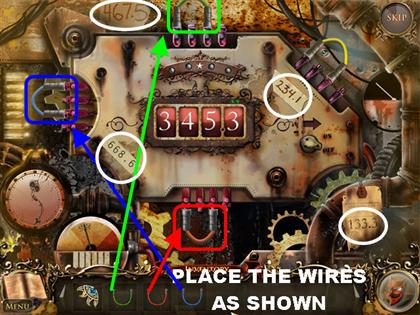
- Place the BLUE WIRE on the left.
- The RED WIRE goes at the bottom.
- The GREEN WIRE goes in the upper part of the puzzle.
- Your goal is to move the numbers in the center of the puzzle by moving the 4 wires around.
- Move the position of the wires to change the numbers to match the 4 digit numbers displayed around the puzzle.
- Match all four sets of numbers to solve the puzzle.
Solution 2341
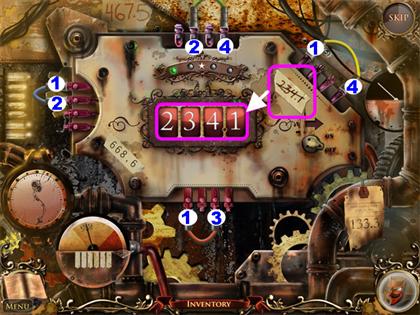
- The number 2341 is in the upper right.
- Please place the wires in the following positions to solve this puzzle:Green should be on slots 2 & 4 Yellow should be on slots 1 & 4 Red should be on slots 1 & 3 Blue should be on slots 1 & 2
Solution 4675
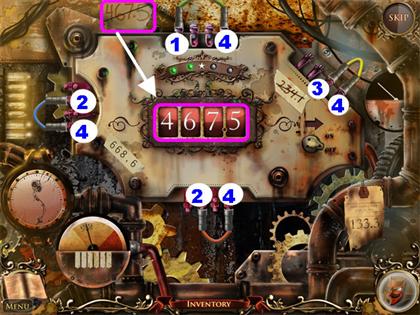
- The number 4675 is in the upper left.
- Please place the wires in the following positions to solve this puzzle:Green should be on slots1 & 4 Yellow should be on slots 3 & 4 Red should be on slots 2 & 4 Blue should be on slots 2 & 4
Solution 6686
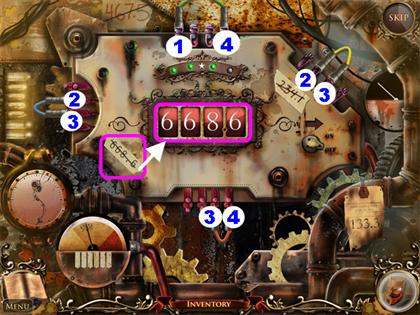
- The number 6686 is in the lower left.
- Please place the wires in the following positions to solve this puzzle:Green should be on slots 1 & 4 Yellow should be on slots 2 & 3 Red should be on slots 3 & 4 Blue should be on slots 2 & 3
Solution 1333
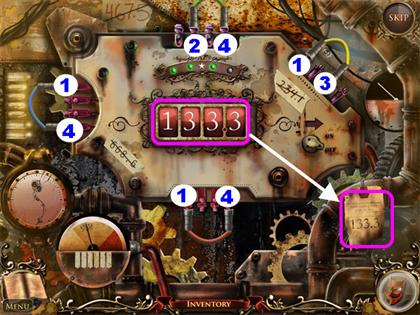
- The number 1333 is in the lower right.
- Please place the wires in the following positions to solve this puzzle:Green should be on slots 2 & 4 Yellow should be on slots 1 & 3 Red should be on slots 1 & 4 Blue should be on slots 1 & 4
- Once you solve the puzzle, the Electrical Room door will be unlocked. Go inside to trigger a Hidden Object Scene.
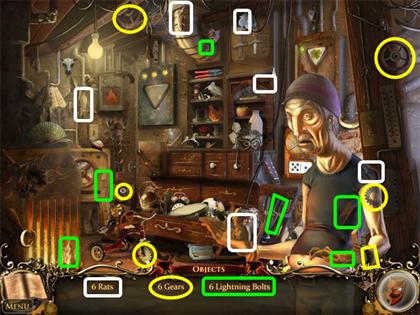
- The 6 rats are marked in white
- The 6 gears are circled in yellow.
- The 6 lightning bolts are marked in green.
- Giles needs you to help him find his pliers before he can fix the phone.
Giles’s Pliers
- Go back to the Inn.
- Vincent tells you to search somewhere on Shop Street.
- Go outside of the Inn, click on the sparkly Burnt House to trigger a Hidden Object Scene.
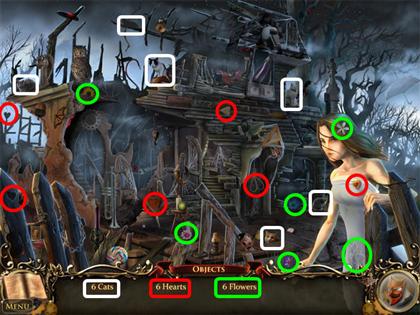
- The 6 cats are marked in white.
- The 6 hearts are marked in red.
- The 6 flowers are marked in green.
- Return to the Makeup Room in the Opera.
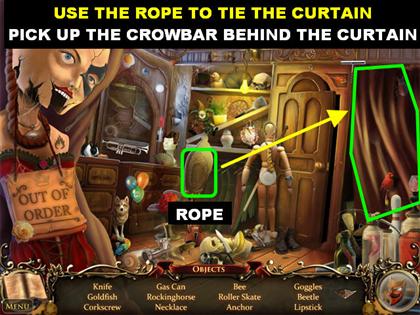
- Use the ROPE on the curtains to tie them up.
- Pick up the CROWBAR behind the curtains.
- Exit this scene and make a left at the Village Square to enter Shop Street.
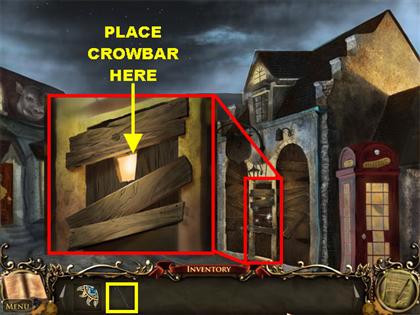
- Click on the sparkly door on the right side.
- Use the CROWBAR to pry the wooden boards off the door.
- Go inside the Coach House to trigger a Hidden Object Scene.
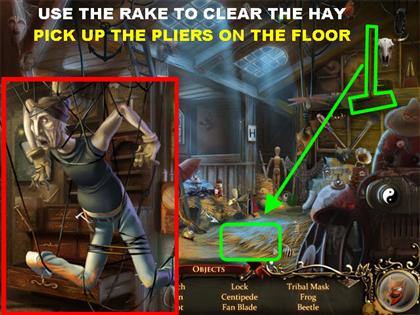
- Pick up the RAKE in the upper right side.
- Use the RAKE to clear the hay on the lower right side of the floor.
- Take the PLIERS on the floor.
- Go back to the Electrical Room in the Opera House to find the second victim.
Chapter 3: The Only Way Out
Search the Electrical Room
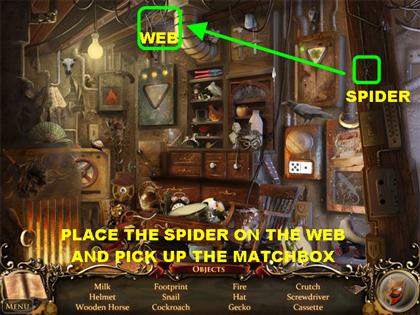
- You are taken back to the Inn. Talk to Tiberius.
- Tiberius sends you to find a way to reach the bridge and to search the Electrical Room.
- Go to the Electrical Room inside the Opera.
- Pick up the SPIDER in the upper right and place it on the web in the upper left.
- Pick up the MATCHBOX the spider drags down from the ceiling.
Find the Lantern
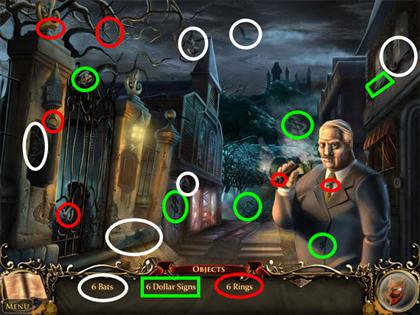
- Go to Residential Street located on the road to the right of the fountain in the Village Square. You will encounter a Hidden Object Scene.
- The 6 Bats are marked in white.
- The 6 Dollar Signs are marked in green.
- The 6 Rings are circled in red.
- Leonardo asks you to help him find a way inside the Church.
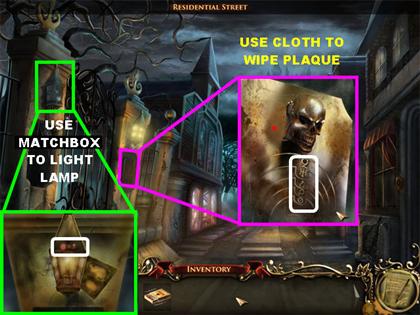
- Click on the sparkly area on the left side to get the closer view of the lamp.
- Use the MATCHBOX to light the candle. You will see a symbol which will be used for a future puzzle.
- Click on the sparkly plaque on the right side of the gate for a closer view.
- Use the CLOTH to clean the plaque, revealing a clue for the next puzzle.
- Click on the sparkly puzzle on the left side.
Graveyard Puzzle (Tower of Hanoi)
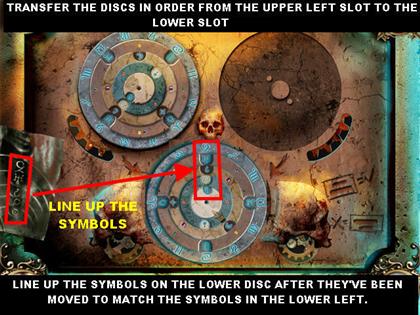
- You must first move the stack of wheels to the lower circle, using the other spots to move the pieces around.
- Follow these steps to solve the puzzle:
- 1. Move top layer from the upper left circle to the lower circle.
- 2. Move the top layer from the upper left circle to the upper right circle.
- 3. Move the piece from the lower circle to the upper right circle.
- 4. Move the top layer from the upper left circle to the lower circle.
- 5. Move the top layer from the upper right circle to the upper left circle.
- 6. Move the remaining piece from the upper right circle to the lower circle.
- 7. Move the top layer from the upper left circle to the lower circle.
- 8. Move the top layer from the upper left circle to the upper right circle.
- 9. Move the top layer from the lower circle to the upper right circle.
- 10. Move the top layer from the lower circle to the upper left circle.
- 11. Move the top layer from the upper right circle to the upper left circle.
- 12. Move the remaining piece from the lower circle to the upper right circle.
- 13. Move the top layer from the upper left circle to the lower circle.
- 14. Move the top layer from the upper left circle to the upper right circle.
- 15. Move the piece from the lower circle to the upper right circle.
- 16. Move the remaining piece from the upper left circle to the lower circle.
- 17. Move the top layer from the upper right circle to the upper left circle.
- 18. Move the top layer from the upper right circle to the lower circle.
- 19. Move the piece from the upper left circle to the lower circle.
- 20. Move the top layer from the upper right circle to the upper left circle.
- 21. Move the top layer from the lower circle to the upper right circle.
- 22. Move the top layer from the lower circle to the upper left circle.
- 23. Move the top layer from the upper right circle to the upper left circle.
- 24. Move the remaining piece from the upper right circle to the lower circle.
- 25. Move the top layer from the upper left circle to the lower circle.
- 26. Move the top layer from the upper left circle to the upper right circle.
- 27. Move the top layer from the lower circle to the upper right circle.
- 28. Move the remaining piece from the upper left circle to the lower circle.
- 29. Move the top layer from the upper right circle to the upper left circle.
- 30. Move the remaining piece from the upper right circle to the lower circle.
- 31. Move the remaining piece from the upper left circle to the lower circle to complete the stack.
- Once you have rebuilt the stack of wheels on the lower circle, you must rotate the wheels to line up the symbols in the right combination. (Please look at the screenshot).
- Refer to the symbols from the plaque beside the graveyard gate for the combination.
Graveyard
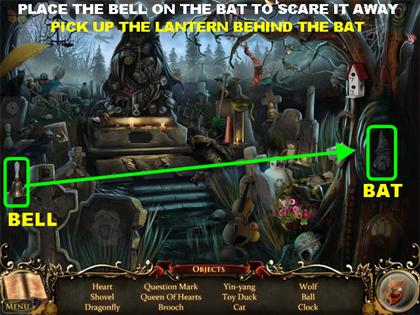
- The Graveyard gate opens, enter the Graveyard to trigger a Hidden Object Scene.
- Pick up the BELL in the lower left and place it on the bat in the lower right to scare it away.
- Pick up the LANTERN in place of the bat.
Reach the Bridge
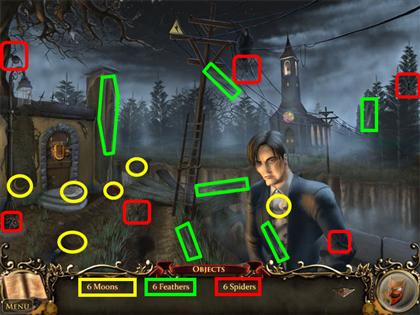
- Go to Shop Street and click on the sparkly tunnel to enter a Hidden Object Scene.
- The 6 Moons are marked in yellow.
- The 6 Feathers are marked in green.
- The 6 Spiders are marked in red.
- Vincent tells you that someone has destroyed the bridge and cut the phone lines as well. He also tells you that Demon Blood is always 15 degrees lower than a human’s.
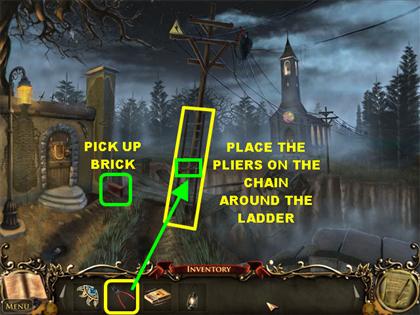
- Pick up the BRICK from the left side of the ground.
- Use the PLIERS to cut the chain on the LADDER to free it.
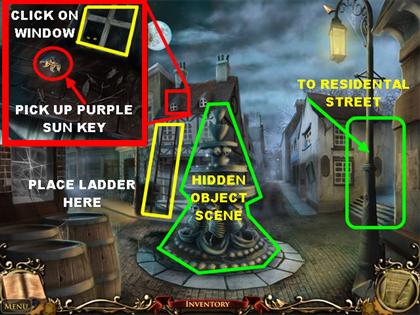
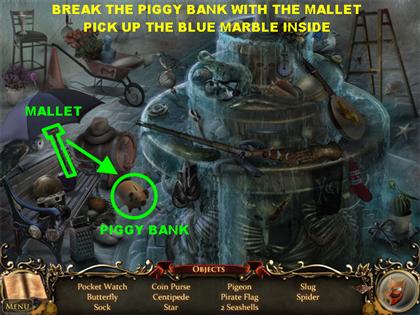
- Return to the Village Square and click on the sparkly fountain.
- Use the MALLET on the left to break open the piggy bank .
- Take the BLUE MARBLE inside the piggy bank.
- Place the LADDER on the house just to the left and behind the fountain.
- Click on the window above the house for a closer view.
- Pick up the PURPLE SUN KEY in the close-up view.
- Click on the window to enter the house.
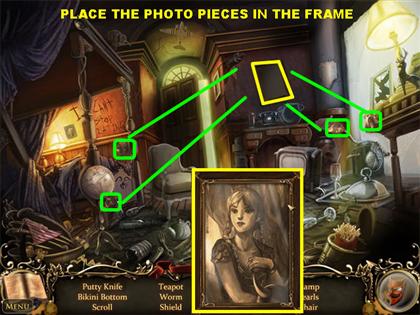
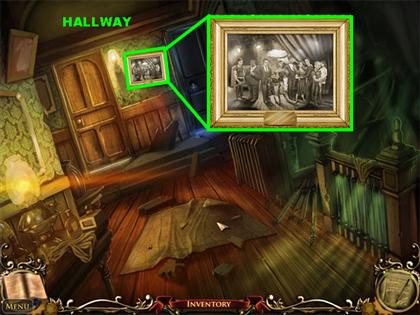
- Pick up the 4 PHOTO SCRAPS scattered around the room and place them in the frame in the upper right.
- Go through the door in the back of the scene.
- Click on the portrait for a closer view and examine the portrait.
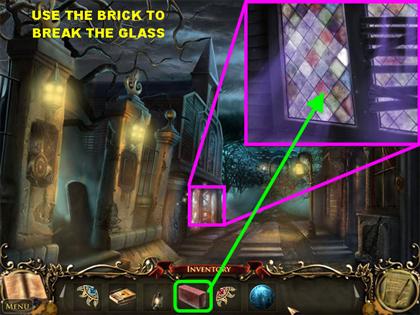
- Go to Residential Street and click on the sparkly stained glass window of the Church to get a closer look.
- Use the BRICK to break the window and enter the Church.
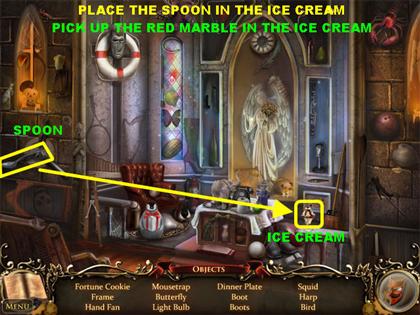
- Use the SPOON on the left on the ice cream on the right.
- Pick up the RED MARBLE on the ice cream.
- Leonardo becomes the third victim.
Chapter 4: A Gloom of Darkness
Relighting the Town
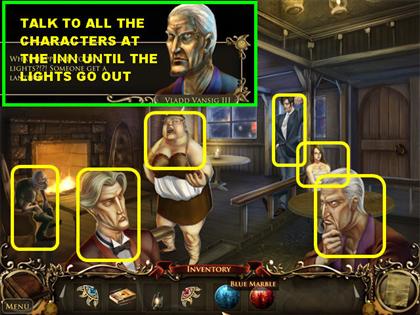
- Back at the Inn, speak to all the characters.
- After you talk to the last character the lights go out and Carolina will disappear.
- Talk to Vladd and he asks you to go to the Electrical Room to get a box of candles so you can relight the town.
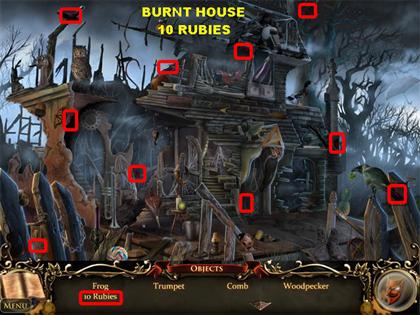
- Go to the Burnt House outside the Inn.
- Find the 10 RUBIES using only the spotlight provided. They are marked in red in the screenshot.
- The RUBY EYE will go into your inventory.
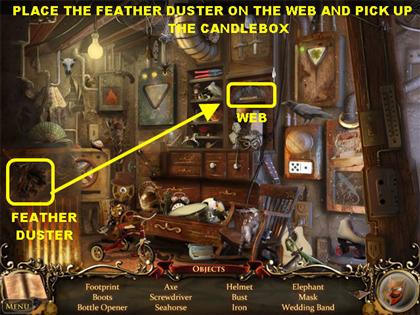
- Find your way to the Electrical Room of the Opera in the dark.
- Press the flashing red light in the upper right to turn on the lights.
- Use the FEATHER DUSTER on the lower left to clear the cobweb in the upper right.
- Pick up the CANDLEBOX behind the cobweb.
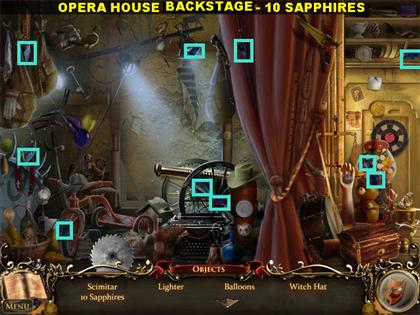
- Return to the Opera Stage and click on the sparkly part of the stage to go Backstage.
- Find all the sapphire pieces to acquire the SAPPHIRE EYE.
Lighting the Lamps
- Use the CANDLES and your MATCHBOX to light all the lampposts around town.
- Click on the lamps on the street for a closer view.
- Place the CANDLEBOX and then the MATCHBOX to light them up. Please follow the same steps for lighting the lamps in the next sections shown below.
Outside the Inn
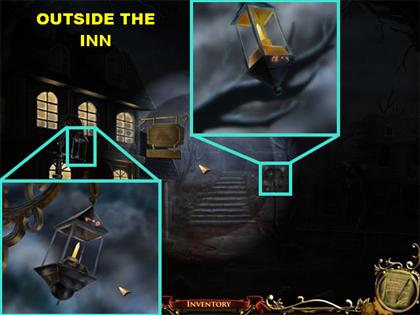
- Light the 2 lamps Outside the Inn.
Village Square
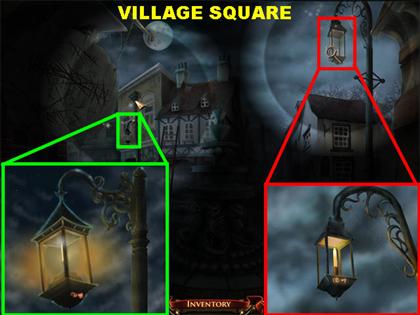
- Light the 2 lamps in the Village Square.
Residential Street
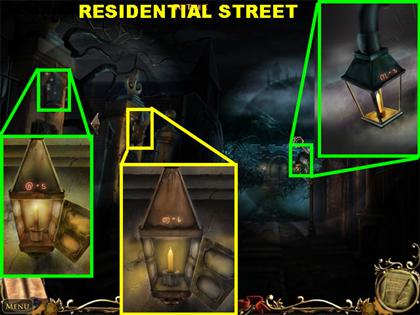
- Light the 3 lamps in Residential Street.
Outside Opera House
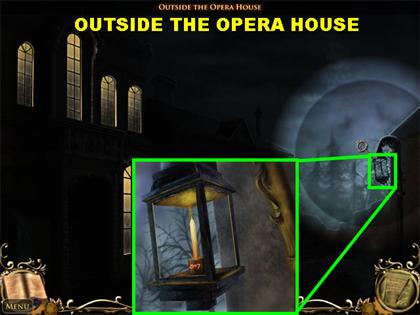
- Light the 1 lamp Outside the Opera House.
Shop Street
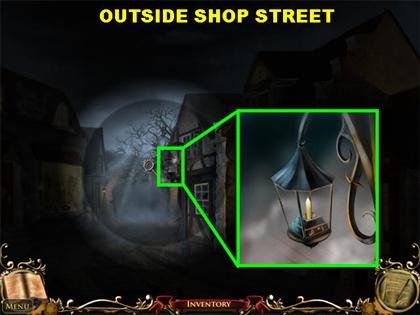
- Light the 1 lamp in Shop Street.
Bridge
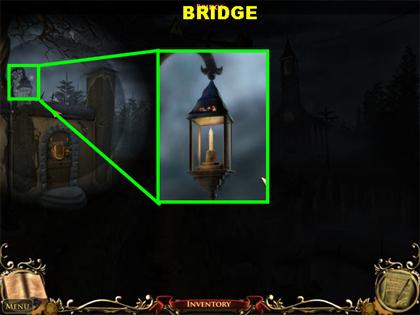
- Light the 1 lamp at the Bridge.
- Lighting all the lamps will reveal all the symbols for the Butcher Shop door puzzle.
Butcher Shop Door Puzzle
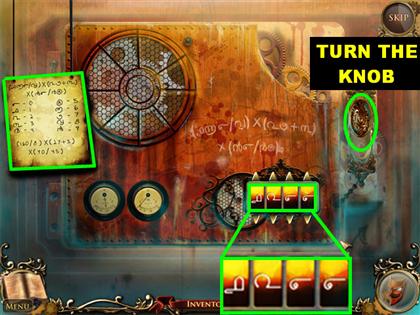
- Click on the sparkly door of the Butcher Shop located on Shop Street.
- In this puzzle the symbols all represent numbers.
- Your goal is to solve the math equation and then enter the result as a 4 digit number by using the symbols shown on the paper on the left.
- The equation is (160/8) X (27 +3) X (90/45) = (20) X (30) X (2 )=1200
- The code is 1200, click on the arrows on the puzzle to change the symbols so they reflect the code using the cheat sheet on the upper left side.
- Once you have the correct numbers entered, click on the knob in the upper right. The Butcher’s door is now unlocked, go inside.
Butcher Shop
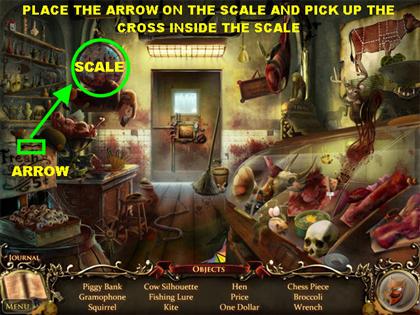
- Grab the ARROW on the left and place it on the scale in the upper left.
- Pick up the CROSS inside the scale. Go back outside.
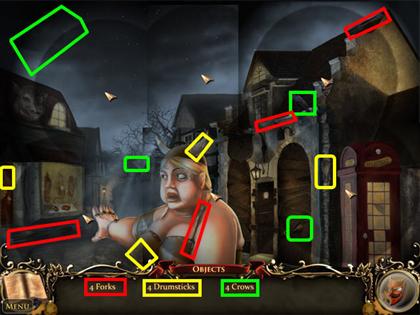
- Hilda is outside when you exit, and tells you about the clock disturbing her at 7:45, 10:30, and 2:45.
- The 4 Forks are marked in red in the screenshot.
- The 4 Drumsticks are marked in yellow in the screenshot.
- The 4 Crows are marked in green in the screenshot.
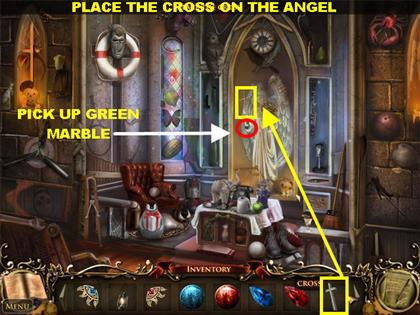
- Return to the Church on Residential Street.
- Place the CROSS on the angel.
- Pick up the GREEN MARBLE in the angel’s hand.
- Go to the bridge by way of Shop Street and click on the sparkly door on the left side.
Bridge Door Puzzle (Mastermind)
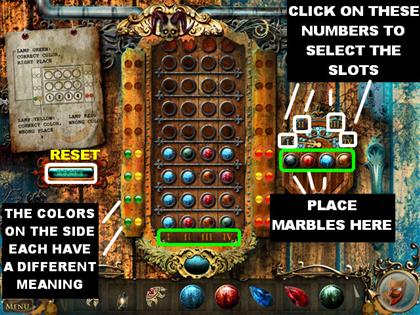
- Place the RED MARBLE, the GREEN MARBLE and the BLIE MARBLE on the board to begin the puzzle.
- On the right side of the screen you have the 4 numbered slots. Those numbers represent the slots that can be filled in. The same numbers appear at the bottom of the puzzle.
- Click on the numbers in the upper right to select the slot you want to drop a marble into.
- You can use the Reset button on the left if you want to start fresh.
- Try to figure out the combination by placing marbles into the four slots in different orders.
- Lights will light appear on the left and right side of the puzzle to show you how close you are:Green means correct color in correct position. Yellow means right color, wrong position. Red means wrong color.
- Note these lights do not indicate which marbles are in the correct position, just how many are correct.
- Keep trying, stacking on top, refining your attempt, until you get the correct combination.
- The solution to this puzzle is random so we cannot give you a tep-by-step solution for it.
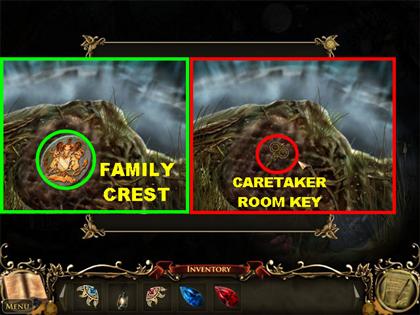
- With the puzzle complete, the door is now open.
- Go through the door and see Carolina fall from the edge.
- Click on the sparkly spot to obtain the FAMILY CREST.
- Pick up the CARETAKER ROOM KEY that appears below the FAMILY CREST.
Chapter 5: An Echo from the Past
Grandfather Clock Puzzle
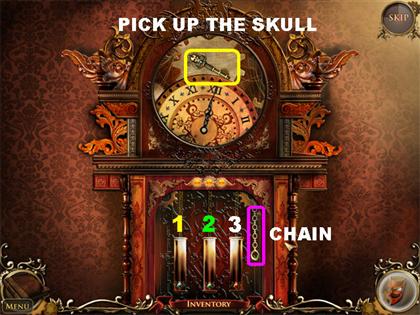
- Back at the Inn; click the sparkly spot to start the grandfather clock puzzle. If the sparkly spot does not appear, exit out of the game and come back to it.
- You must set the clock to the three different times that Hilda mentioned, 7:45, 10:30, and 2:45.
- Use the three pendulums to control how much the clock hands move when you pull the chain beside them.
- The first pendulum moves the clock forward 1 hour and 45 minutes.
- The second pendulum moves forward 15 minutes.
- The third pendulum makes the clock move forward 45 minutes.
- The clock will reset every 5 chain pulls.
- To solve the puzzle follow these steps:
- Step1 - Lower all three pendulums and pull the chain, the clock will read 2:45.
- Step 2- Raise the middle pendulum and then pull the chain twice to get the clock to 7:45.
- Step 3 - Lower the middle pendulum and pull the chain one more time to reach the final time, 10:30, and solve the puzzle.
- Pick up the SKULL KEY that appears above the clock.
Ice House
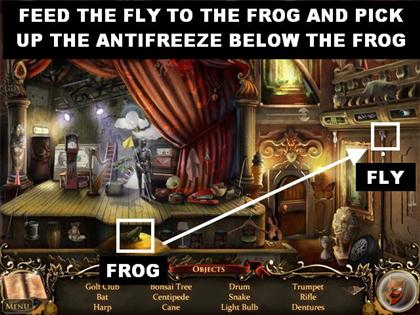
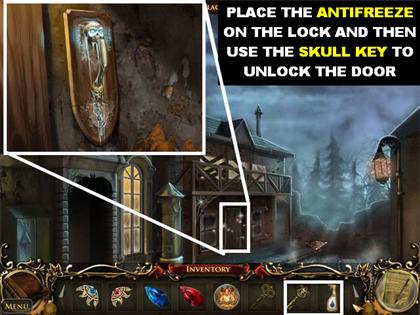
- Go Outside the Opera House.
- Click on the sparkly door for a closer look.
- You hear Hilda calling from inside but you can't use the Skull key because the lock is blocked with ice.
- Enter the Opera House.
- Feed the FLY in the upper right to the frog in the lower left.
- Pick up the ANTIFREEZE below the frog.
- Go back to the Ice House. Click on the door for a closer view.
- Use the ANTIFREEZE on the Skull lock.
- Unlock the door using the SKULL KEY.
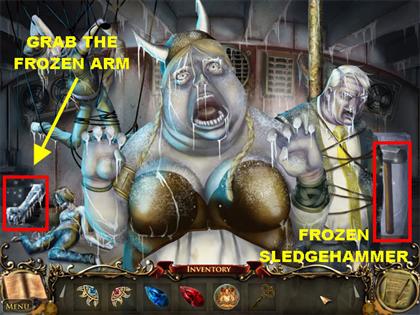
- Inside the Ice House you find all the dead bodies frozen, including Hilda.
- Click on the sparkly spot on the left side to pick up the FROZEN ARM.
Completing the Sungate
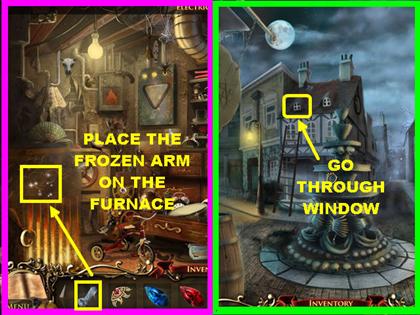
- Go to the Electrical Room inside the Opera House.
- Use the FROZEN ARM on the furnace to unfreeze it. You now have a STATUE ARM in your inventory.
- Go back to the Village Square and enter the house through the window above the ladder.
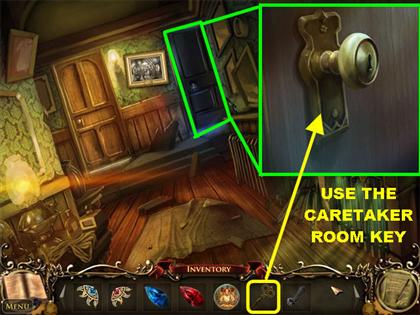
- Go to the Hallway. Click on the right door for a closer view.
- Place the CARETAKER ROOM KEY on the lock to open it.
- Enter the room to trigger a Hidden Object Scene.
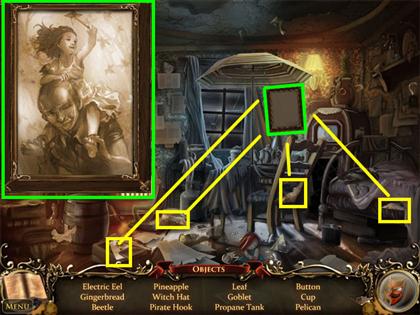
- Pick up the 4 PAPER SCRAPS as shown in the screenshot and insert them into the frame by the window.
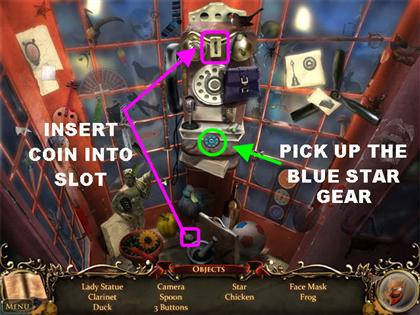
- Go to Shop Street and click on the phone booth.
- Insert the COIN in the lower center on the coin slot on the phone.
- Pick up the BLUE STAR GEAR at the bottom of the phone.
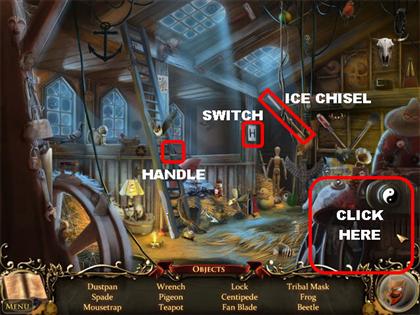
- Go inside the Coach House.
- Grab the SWITCH HANDLE on the ladder and place it in the switch mounted on the wall.
- Pick up the ICE CHISEL that descends from the ceiling.
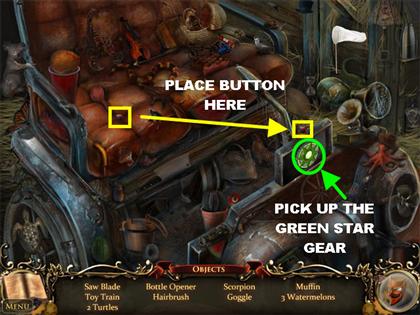
- Click on the sparkly spot on the coach to trigger a Hidden Object Scene.
- Pick up the BUTTON on the left side of the chair and place it on the panel in the lower right.
- Pick up the GREEN STAR GEAR that appears above the panel.
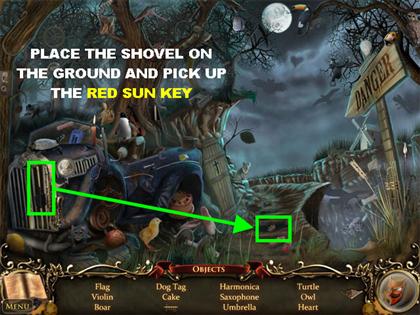
- Head out to the cliff edge near the bridge.
- Pick up the SHOVEL in the lower left and use a shovel to dig a hole in the ground.
- Pick up the RED SUN KEY in the ground.
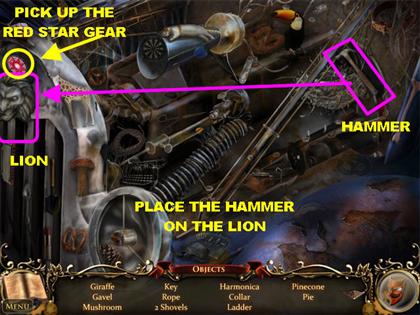
- Now click on the sparkly spot on the car for a closer look.
- Use the HAMMER in the upper right to hit the lion in the upper left.
- Pick up the RED STAR GEAR in above the lion.
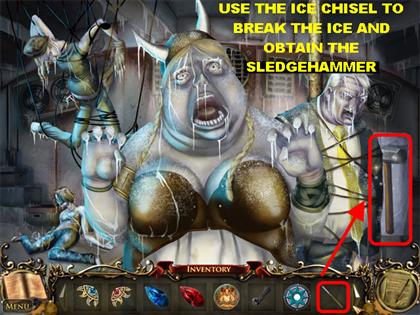
- Return to the Ice House.
- Use the ICE CHISEL on the ice in the lower right to break it.
- Pick up the SLEDGEHAMMER inside the ice.
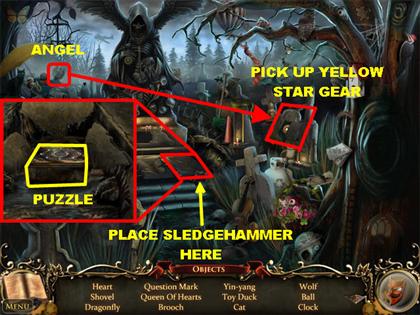
- Go to the Graveyard through Residential Street.
- Grab the ANGEL STATUE in the upper left and place it onto the gravestone on the right.
- Pick up the YELLOW STAR GEAR inside the gravestone.
- Click on the sparkly gravestone in the lower center for a closer view.
- Use the SLEDGEHAMMER to break the gravestone. Click on the sparkly spot to trigger a puzzle.
Grave Box Puzzle
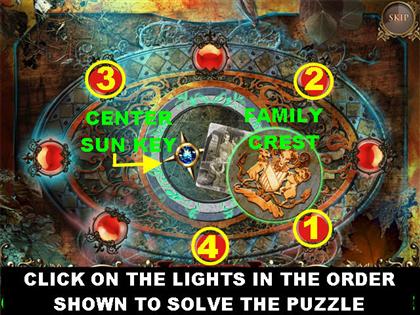
- Click on the puzzle box.
- Your goal is to click on the lights until all the red lights are lit up at once.
- The puzzle can be completed by following these four steps:
- One- Click the light just to the right of the lowest light.
- Two - Click the light just to the right of the highest light.
- Three - Click the light just to the left of the highest light.
- Four – Click on the light the bottom.
- Place the FAMILY CREST in the middle to open the box.
- Click on the CENTER SUN KEY that appears in the middle of the puzzle next to the photo.
- Return to the Residential Street and click on the sparkly gate at the end of the street.
Sungate Puzzle
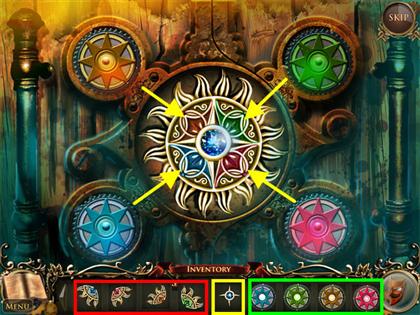
- Place all the pieces to the Sungate, the 4 STAR GEARS, the 4 SUN KEYS, and the CENTER SUN KEY.
- Click on the Sun Keys in the center of the puzzle to rotate the positions of the colors.
- Your goal is to make sure the colors of the Sun Keys in the middle, match the color of the Star Gears outside the puzzle.
- Once all the pieces are in the right spots, click in the center to end the puzzle.
Chapter 6: The Plot Thickens
Explore the Castle
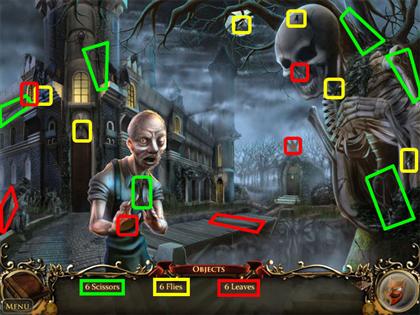
- You begin this chapter with a Hidden Object Scene.
- The 6 Scissors are marked in green.
- The 6 Flies are marked in yellow.
- The 6 Leaves are marked in red.
- Charles gives you a warning about the Count and tells you about the safe in his room.
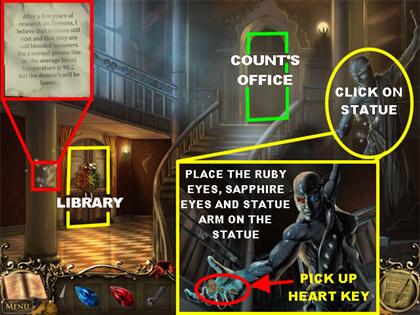
- Enter the Castle through the door on the left.
- Read the note posted on the pillar which states the average blood temperature for a human is 98.2.
- Click on the Library door on the left, you don’t have the necessary items to unlock the door at this time.
- Click on the large statue on the right for a closer look. It is missing several parts.
- Attach the STATUE ARM to the statue.
- Place the RUBY EYE AND SAPPHIRE EYE in its statue’s eye sockets.
- The statue’s hand will open. Pick up the HEART KEY in the hand.
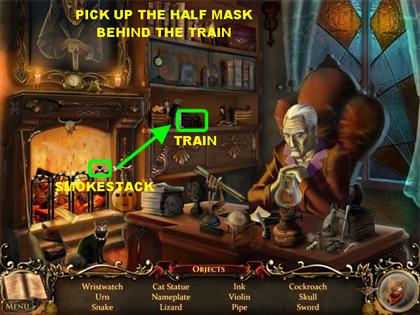
- Head upstairs to the Count's Office.
- Pick up the SMOKESTACK in front of the fireplace and place it on the train in the center.
- Take the HALF MASK that appears behind the train.
- The Count asks you to recover his notebook.
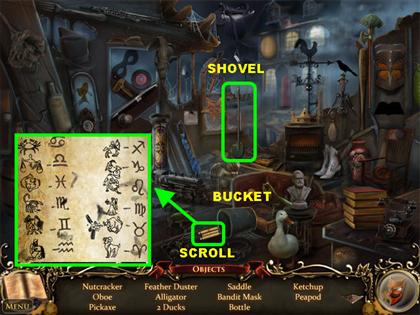
- Head back to the Burnt House.
- Use the SHOVEL in the center to pry the bucket in the lower center loose.
- Click on the SCROLL below the bucket and it goes into your journal. These are Zodiac signs that you will need for a future puzzle.
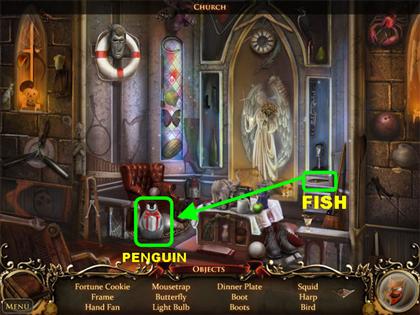
- Go to the Church.
- Grab the FISH on the right and feed it to the penguin in the lower center.
- Pick up the NOTEBOOK on the penguin.
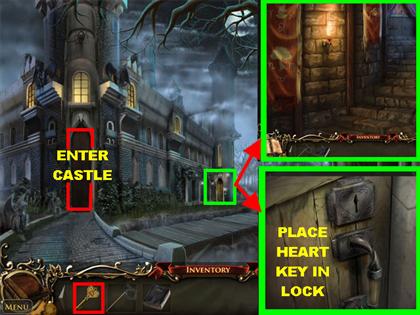
- Return to the Castle.
- Click on the sparkling door to the tower.
- Place the HEART KEY on the door to unlock it.
- Go inside the tower to get more clues for the Library door puzzle.
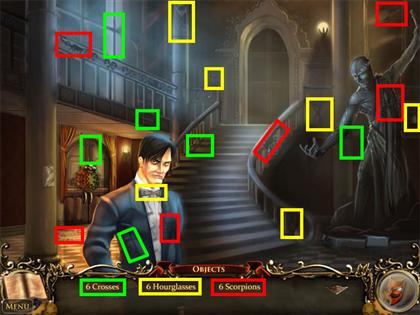
- Go back inside the Castle to trigger a Hidden Object Scene.
- The 6 Crosses are in green.
- The 6 Hourglasses are in yellow.
- The 6 Scorpions are in red.
- Talk to Vincent, who suggests the only way to call for help would be to ring the bell at the Chapel across the bridge.
Find the Missing Tokens
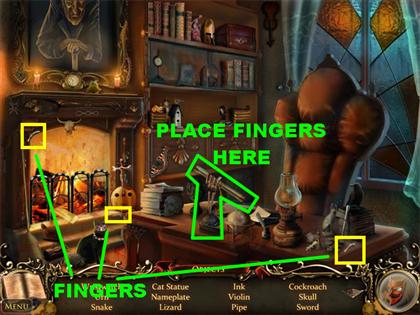
- Go upstairs to the Count's Office.
- Pick up the 3 FINGERS in the scene and place them on the skeleton hand on the desk.
- The SKELETON HAND will go into your inventory.
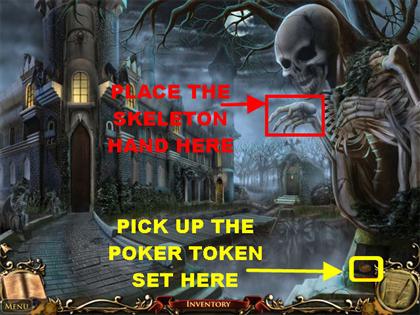
- Go outside of the Castle.
- Put the SKELETON HAND onto the large skeleton on the right side.
- Pick up the POKER TOKEN SET at the base of the skeleton.
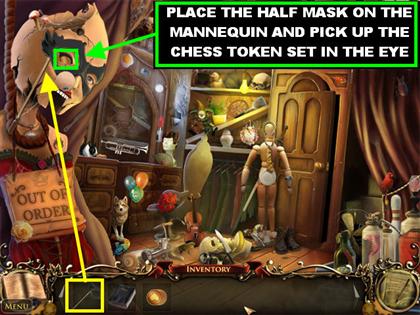
- Go to the Makeup Room in the Opera House.
- Place the HALF MASK onto the large mannequin on the left.
- Pick up the CHESS TOKEN SET in the mannequin’s eye socket.
Library Door Puzzle
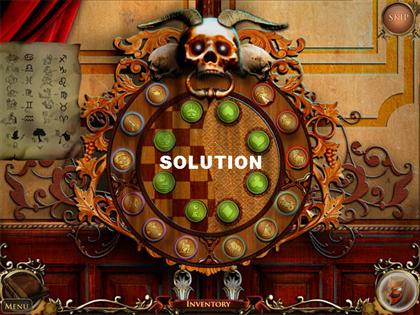
- Return to the Castle and click on the sparkly Library door to trigger a puzzle.
- Place the CHESS TOKEN SET and the POKER TOKEN SET on the board.
- Using the symbols you found at the Burnt House and the clue from the Castle Tower, match up the tokens to their proper positions on the outer ring.
- Drag one token over the other to swap their positions.
- You know the tokens are in the right spots when they light up. The tokens in the center will be green and the tokens on the outer ring will have colored edges when correct.
- The four CHESS TOKENS fit in the left inner section which has a checkerboard background.
- From top to bottom, place them in this order:King Queen Knight Pawn
- The POKER TOKENS fit in the right inner section which has a card backing background.
- The order for the two sets of inner tokens are found at the doorbell close-up (at the residential street) and the statue close-up (in the castle) respectively.
- The solution from top to bottom for the Poker Tokens is as follows:Spade Heart Club Diamond
- Starting at the top and going clockwise, please place the outside tokens in this manner:Sagittarius Leo Aries Capricorn Virgo Taurus Aquarius Libra Gemini Pisces Scorpio Cancer
- The door to the Library will open after the puzzle has been solved.
Call for help
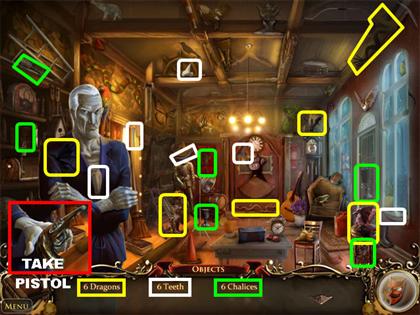
- Enter the Library to trigger a Hidden Object Scene.
- The 6 Dragons are in yellow.
- The 6 Teeth are in white.
- The 6 Chalices are in green.
- Take the COUNT’S PISTOL from his hand at the end of your search.
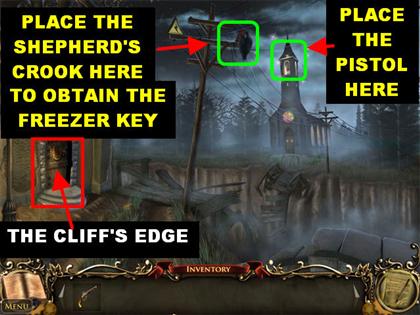
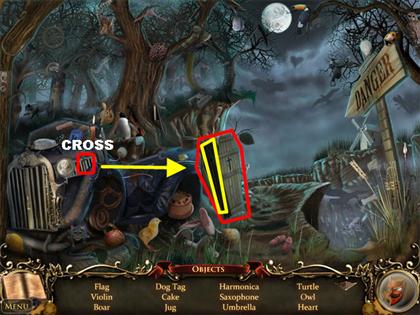
- Go to the Bridge.
- Use the COUNT’S PISTOL on the sparkly spot in the upper right to scare the raven away. A Key is revealed but cannot be reached at this time.
- Go through the door on the left.
- Place the CROSS on the side of the car onto the coffin in the lower center to open it.
- Pick up the SHEPHERD’S CROOK inside the coffin.
- Go back to the Bridge.
- Use the SHEPHERD’S CROOK to retrieve the FROZEN KEY in the upper center.
Panel Puzzle
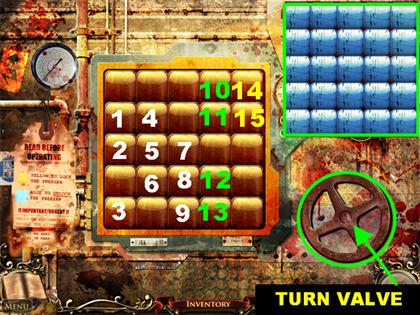
- Go back to the Butcher Shop. Click on the sparkly panel to trigger a puzzle.
- Place the FREEZER KEY in the upper right side of the puzzle.
- Your goal is to solve the puzzle by flipping the panels until all the squares are blue.
- The solution is as follows:
- First Column: Click on the 2nd, 3rd, and 5th panel.
- Second Column: Click on the 2nd, 3rd, and 4th panel.
- Third Column: Click on the 3rd, 4th, and 5th panel.
- Fourth Column: Click on the 1st, 2nd, 4th and 5th panel.
- Fifth Column: Click on the 1st & 2nd panel.
- Turn the valve in the lower right to gain access to the freezer.
Chapter 7: Closing the Curtains
Escape the Dungeon
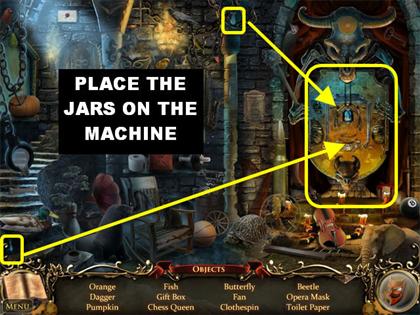
- Place the two vials onto the machine to trigger a puzzle.
Water Jar Puzzle
- Swap the liquid between the three jugs, which can hold 12L, 7L and 5L respectively. (12L,7L,5L)
- The goal is to get 6L in two of the vials, leaving the smallest vial empty.
- Follow these steps to complete the puzzle:
- 1. You begin with the 12L jar filled (12,0,0)
- 2. Click on the UPPER RIGHT Handle to fill the 7L with the 12L jar (5,7,0)
- 3. Click on the LOWER RIGHT Handle to rotate the jars.
- 4. Click on the UPPER RIGHT Handle to fill the 5L with the 7L jar (5,2,5)
- 5. Click on the LOWER RIGHT Handle to rotate the jars.
- 6. Click on the UPPER RIGHT Handle to Fill the 12L with the 5L jar (10,2,0)
- 7. Click on the LOWER RIGHT Handle 2 Times to rotate the jars.
- 8. Click on the UPPER RIGHT Handle to fill the 5L with the 7L jar (10,0,2)
- 9. Click on the LOWER RIGHT Handle 2 Times to rotate the jars.
- 10. Click on the UPPER RIGHT Handle to Fill the 7L with the 12L jar (3,7,2)
- 11. Click on the LOWER RIGHT Handle to rotate the jars.
- 12. Click on the UPPER RIGHT Handle to Fill the 5L with the 7L jar (3,4,5)
- 13. Click on the LOWER RIGHT Handle to rotate the jars.
- 14. Click on the UPPER RIGHT Handle to Fill the 12L with the 5L jar (8,4,0)
- 15. Click on the LOWER RIGHT Handle 2 Times to rotate the jars.
- 16. Click on the UPPER RIGHT Handle to Fill the 5L with the 7L jar (8,0,4)
- 17. Click on the LOWER RIGHT Handle 2 Times to rotate the jars.
- 18. Click on the UPPER RIGHT Handle to Fill the 7L with the 12L jar (1,7,4)
- 19. Click on the LOWER RIGHT Handle to rotate the jars.
- 20. Click on the UPPER RIGHT Handle to Fill the 5L with the 7L jar (1,6,5)
- 21. Click on the LOWER RIGHT Handle to rotate the jars.
- 22. Click on the UPPER RIGHT Handle to Fill the 12L with the 5L jar (6,6,0)
- 23. Click on the LOWER RIGHT Handle to rotate the jars and the button will turn red.
- 24. Press the RED BUTTON in the lower center to end the game.
- You now have access to the Sewer.
- Please watch the video for a step-by-step solution for this puzzle.
Sewer
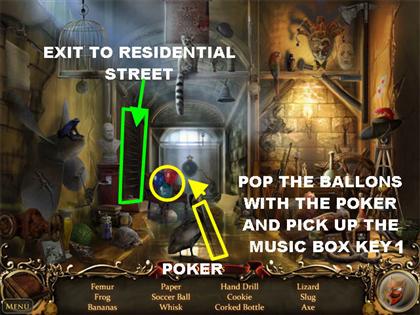
- Pick up the POKER in the lower center and use it to pop the balloons in the back of the scene.
- Pick up the MUSIC BOX KEY 1 in place of the balloons.
- To exit the Sewer and go back to Residential Street, use the ladder on the left.
Open the Count's Safe
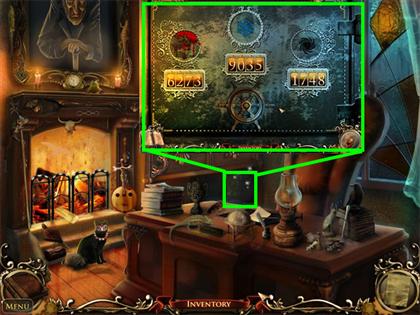
- Go to the Count's Office. He is not there.
- Check his safe behind; you cannot open it until you have the 3 codes and the 3 emblems.
- Return to the Butcher Shop.
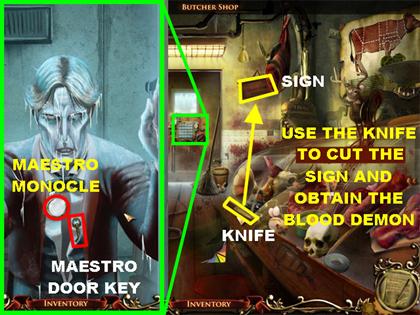
- Use the KNIFE at the bottom of the case and place it on the sign in the upper right.
- Pick up the BLOOD DEMON behind the sign.
- Click on the freezer in the back of the scene.
- Take the MAESTRO MONOCLE off of Tiberius.
- Take the MAESTRO DOOR KEY off of Tiberius.
- Go back to the Coach House.
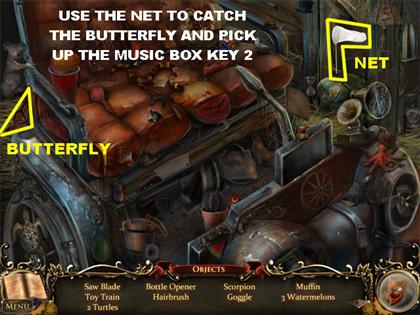
- Click on the sparkly coach on the right to trigger a Hidden Object Scene.
- Place the NET in the upper right on the butterfly on the left.
- Pick up MUSIC BOX KEY 2 in place of the butterfly.
Search the Maestro’s Room
- Go back to the Village Square and click on the window in the upper left to enter the bedroom.
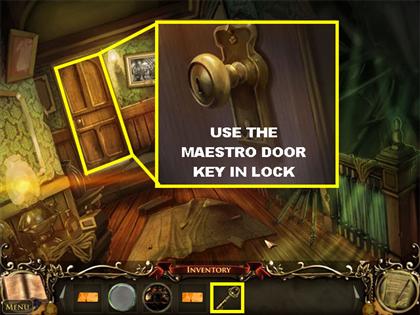
- Go to the Hallway and click on the left door for a closer view.
- Place the MAESTRO DOOR KEY on the lock.
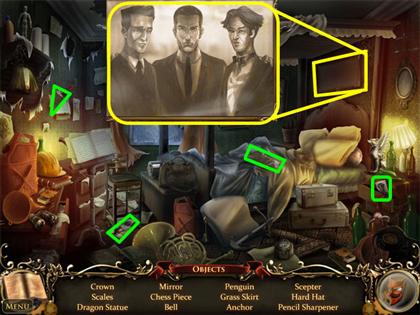
- Pick up the 4 PHOTO SCRAPS as shown in the screenshot and place them in the empty frame in the upper right.
- Go backstage at the Opera.
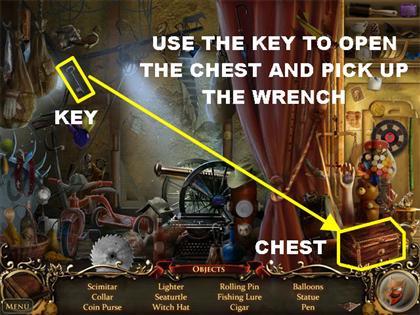
- Pick up the KEY in the upper left and place it on the chest in the lower right.
- Take the WRENCH inside the chest.
- Go to the Ice House.
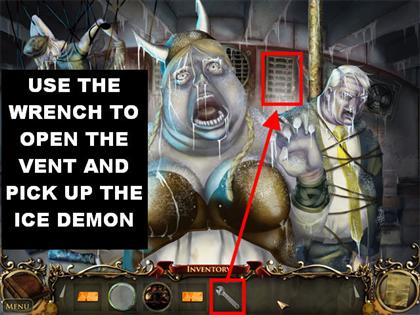
- Use the WRENCH on the sparkly vent tin the upper right.
- Pick up the ICE DEMON inside the vent.
- Return to the Dungeon via the entrance to the Sewer located on Residential Street.
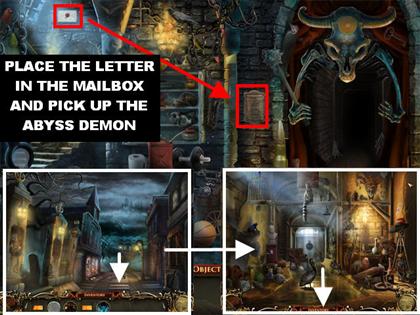
- Pick up the LETTER in the upper left and place it in the mailbox on the right.
- Pick up the ABYSS DEMON inside the mailbox.
- Return to the Castle and go to the Library.
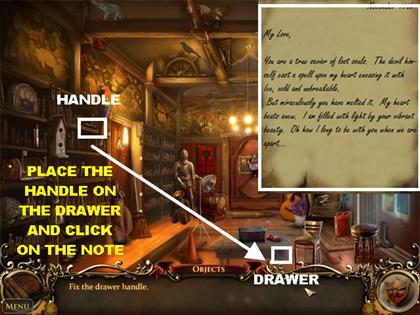
- Pick up the HANDLE in the upper left and place it on the drawer in the lower right.
- Click on the drawer to open it.
- Pick up the LETTER inside the drawer.
Count’s Safe
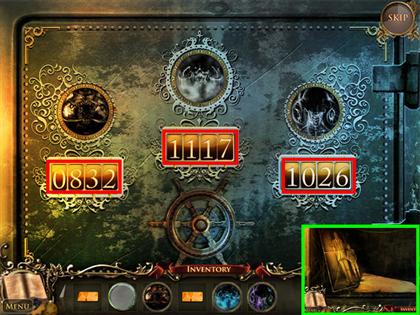
- Go back to the Count’s Office and click on the safe.
- Place the BLOOD DEMON, THE ICE DEMON and the ABYSS DEMON in the slots on the safe.
- Each demon has a corresponding combination which comes from clues collected throughout the game.
- The ABYSS DEMON code is 1026, from the Radio Station 102.6 posted next to the Opera.
- The BLOOD DEMON code is 0832, from 83.2 degrees, the temperature of demon blood. (human blood 98.2 minus 15 degrees).
- The ICE DEMON code is 1117, from November 17th, from the note in the drawer in the Library.
- Place the following codes into the safe:Left – 0832 Center – 1117 Right - 1026
- Turn the wheel at the bottom of the safe to open it.
- Inside the safe you will find an old photograph and a note in a strange language.
- Use the MAESTRO MONOCLE in the upper left corner of the note to see the numbers “804298”.
Enter the Garden
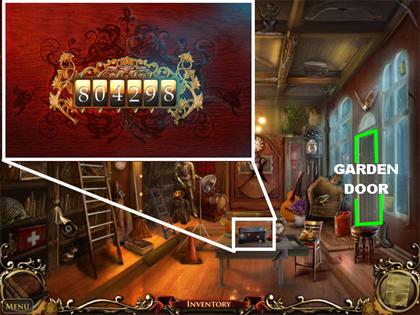
- Go to the Library.
- Click on the music box on the table.
- Enter the code “804298” into the music box to trigger a puzzle.
Music Box Puzzle
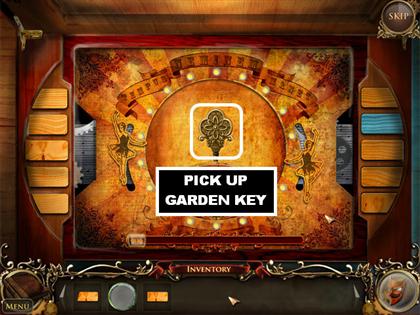
- Click on the music box.
- Place the MUSIC BOX KEY1 and the MUSIC BOX KEY 2 on the puzzle.
- Press the slider at the bottom and then follow the pattern of notes.
- Complete three sequences of notes to complete the puzzle. The sequences are random.
- Pick up the GARDEN KEY in the center of the puzzle.
- Select the door on the right for a closer view.
- Place the GARDEN KEY on the lock to enter the Garden.
Get Power for the Tower
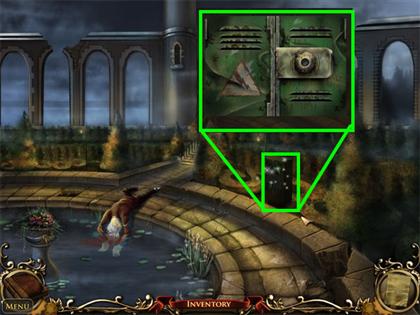
- Click the sparkly power box. It’s rusted and needs something to turn the lock.
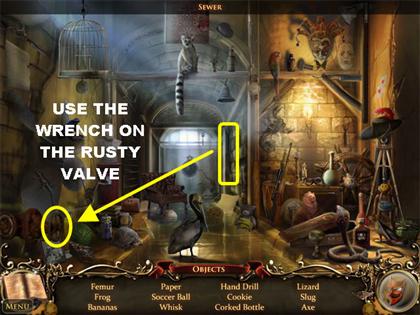
- Go back to the Sewer.
- Pick up the WRENCH in the back of the scene and place it on the RUSTY VALVE in the lower left to enter it into inventory.
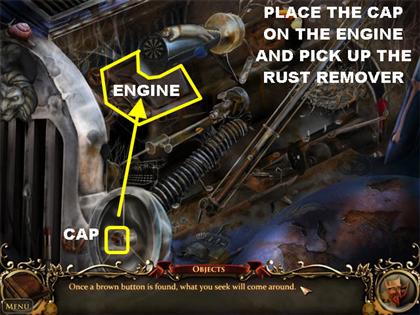
- Go to the Cliff’s Edge.
- Click on the sparkly car to trigger a Hidden Object Scene.
- Pick up the CAP in the lower left and place it on the engine in the upper left.
- Pick up the RUST REMOVER from the engine.
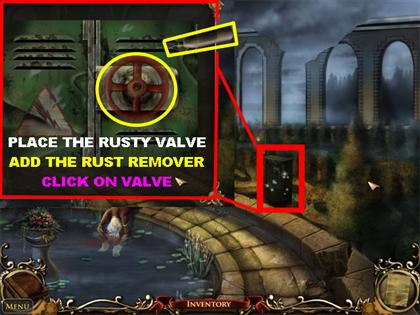
- Go back to the Garden.
- Click on the power box for a closer view.
- Place the RUSTY VALVE in the power box.
- Place the RUST REMOVER on the box.
- Click on the VALVE to trigger a puzzle.
Fuse box Puzzle
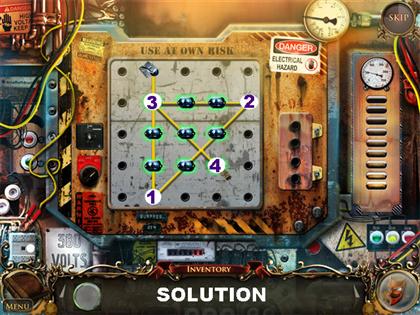
- This fuse box puzzle is similar to the first, but more difficult.
- The solution is as follows:
- Place the 1st pin on the second hole in the last row.
- Place the 2nd pin on the last hole in the second row.
- Place the 3rd pin on the second hole in the second row.
- Place the 4th pin on the fourth hole in the fourth row.
- The tower light will turn on.
- Travel back to the outside of the Castle and enter the tower.
- Click on top of the stairs to reach the final puzzle.
Final Puzzle
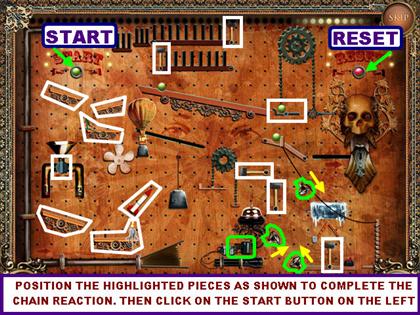
- Your goal in this puzzle is to arrange the items in a particular order so they can cause the right chain reaction.
- Please look carefully at the items marked in the screenshot along with their positions.
- The yellow arrows by the spotlights indicate which way the spotlight is facing.
- Place all the items in the right positions and click on the START button in the upper left.
- If you make a mistake, reposition the items until you get it right.
- If you want to start from scratch you can click on the RESET button in the upper right.
- Complete the puzzle to complete the game.
- Please watch the video for a step-by-step solution for this puzzle.
- Enjoy the ending story!
Created at: 2010-02-06

