Walkthrough Menu
- General Tips & Information
- The Front Gate
- The Groundskeeper's Cabin
- The Graveyard
- The Asylum Gate
- The Asylum
- Captured
- Beneath the Asylum
General Tips & Information
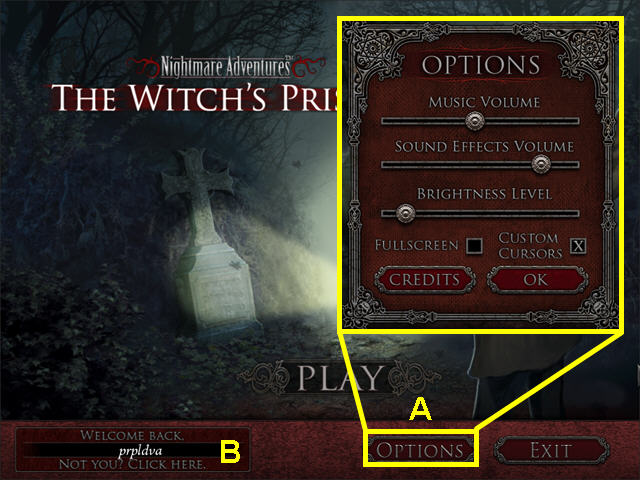
- The options menu allows for the adjustment of music and sound volume (A).
- The brightness can be adjusted.
- You may play this game in windowed or full screen mode.
- The custom cursor may be disabled.
- From the main screen you may manage player profiles (B).
- You have the choice of a brief tutorial once you start the game.
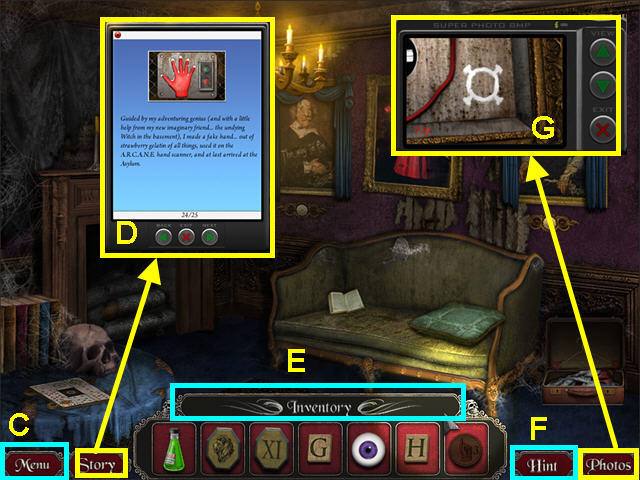
- The Menu button in the lower left corner will take you to the menu (C).
- The Story button will bring up your PDA which keeps a history of the information uncover (D).
- Click on “Inventory” to show/hide your inventory (E).
- Hints are unlimited, but you must wait for the button to refill (F).
- The Photos button in the lower right will bring up your camera (G).
- The camera will take photos of every clue you uncover.
- An eye cursor indicates that you can take a closer look.
- The hand cursor indicates that you can pick up an item.
- The footprints indicate that you can travel in the direction they point (move your cursor to the edge of the screen and click when you see the footprints).
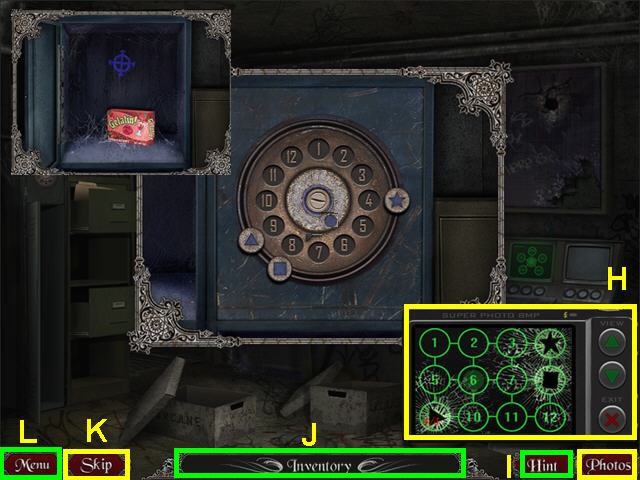
- Most mini-games will have a photo clue; make sure to check your camera if you are unsure of how to proceed (H).
- Hints are available during most mini-games (I).
- Your inventory is accessible during mini-games that may require the use of items (J).
- Once the skip button has filled up and is the same color as the menu button, you can skip the mini-game (K).
- The lower left button will take you to the menu (L).
The Front Gate
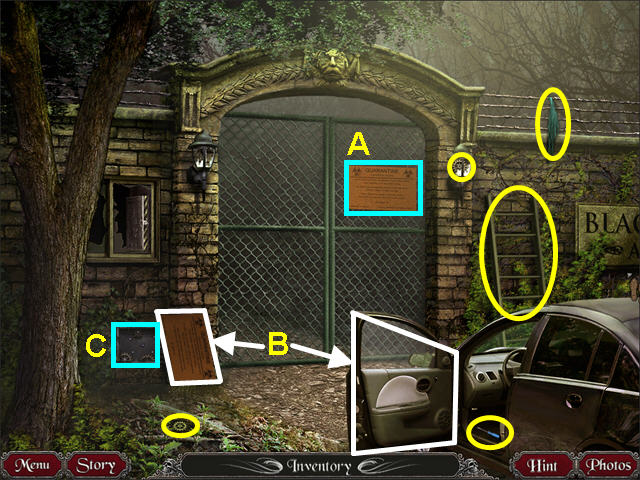
- Read the quarantine sign on the gate (A).
- Move the quarantine sign on the gear box and open the car door (B).
- Look at the gear box to learn you need to find the missing gears (C).
- Collect the SCREWDRIVER, 2 GEARS, CLOTH, and LADDER.
- Walk to the right.
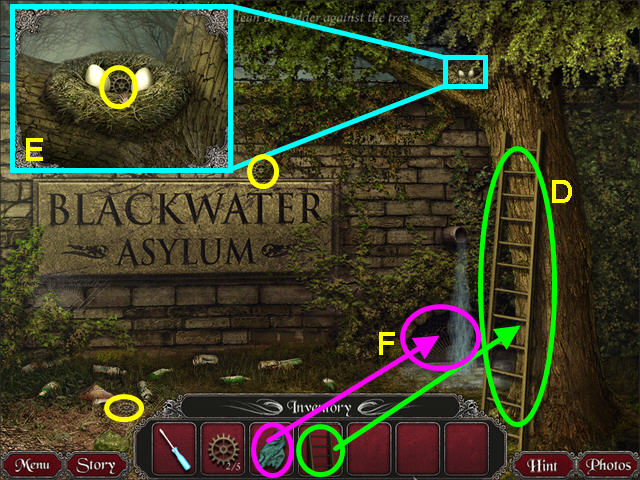
- Place the LADDER against the tree (D).
- Look in the bird's nest and click on the right egg to move it aside (E).
- Take the GEAR from the nest.
- Take the other 2 GEARS from the scene.
- Use the CLOTH on the pool of water to get the WET CLOTH (F).
- Walk to the left.
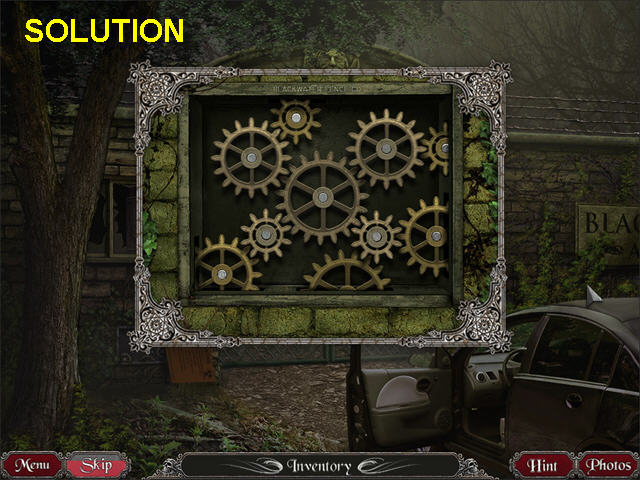
- Look at the gear box; use the GEARS on the array to trigger a mini-game.
- Click hold and drag to position the gears.
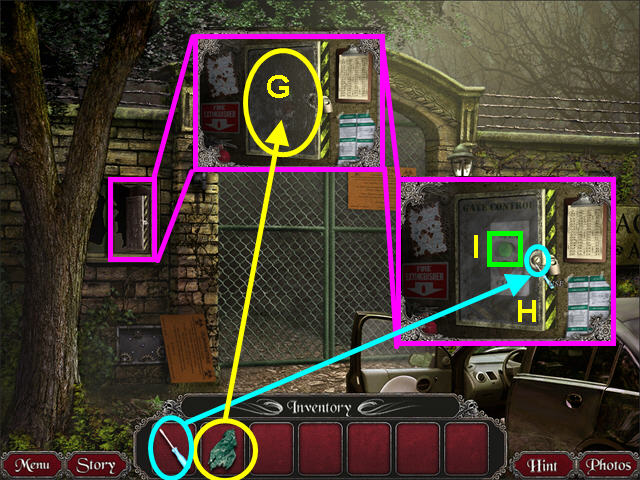
- Look at the control box and use the WET CLOTH to clean the door (G).
- Use the SCREWDRIVER on the screw for the lock latch (H).
- Push the green button to open the gate (I).
The Groundskeeper's Cabin
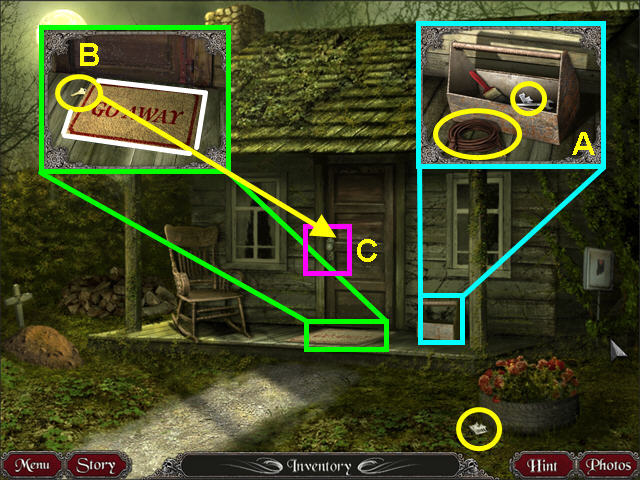
- Look at the toolbox and take the EXTENSION CORD and the LOTTERY TICKET PIECE (A).
- Take the LOTTERY TICKET PIECE by the tire planter.
- Look at the door mat and move it aside (B).
- Take the KEY from under the mat and use it on the front door (C).
- Enter the cabin.
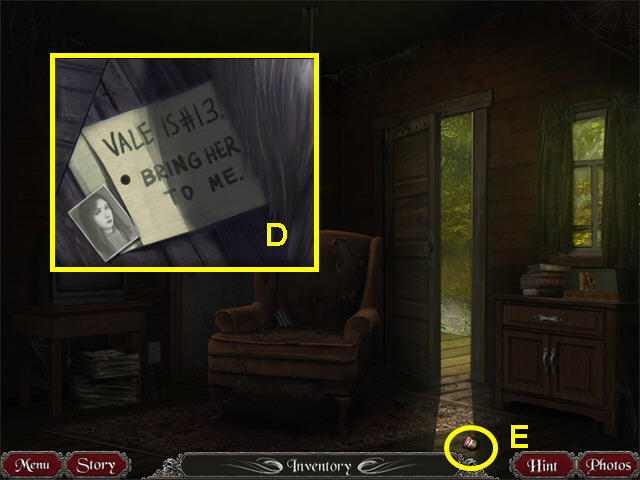
- Just inside, during the cut-scene, you find an envelope that makes you suspicious of the groundskeeper (D).
- Take the FUSE and go outside (E).
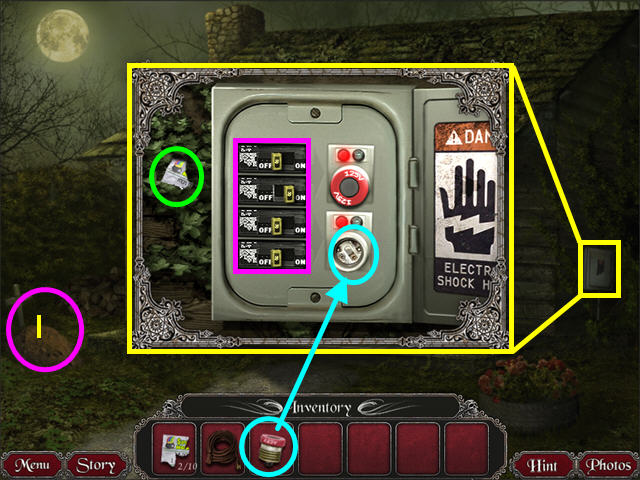
- Look at the close-up of the fusebox on the side of the house and replace the FUSE (F).
- Take the LOTTERY TICKET PIECE (G).
- Flip all the switches to ON (H).
- Note the fresh grave on the left side of the house (I).
- Enter the cabin.
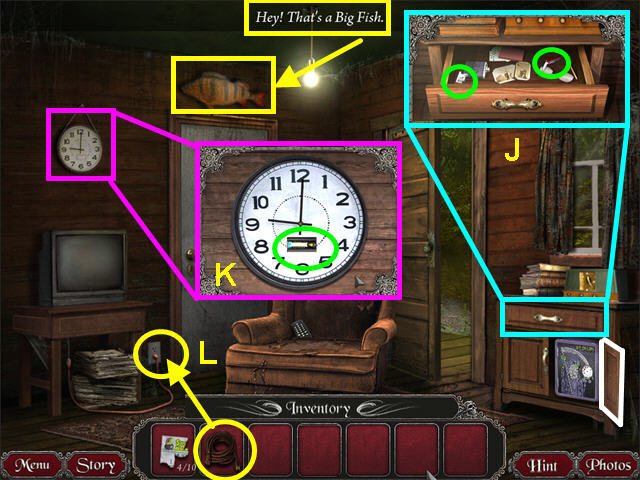
- Open the drawer and take the LOTTERY TICKET PIECE and the POCKET KNIFE (J).
- Look at the close-up of the clock; click on the panel above the 6 and take the BATTERY (K).
- Take the EXTENSION CORD from your inventory and use it on the wall outlet (L).
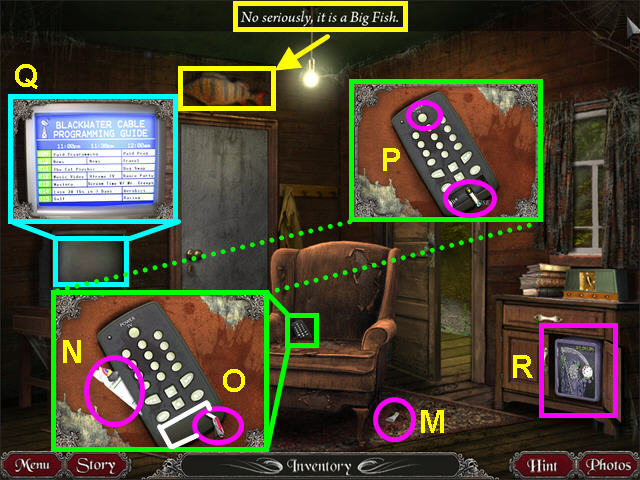
- Take the LOTTERY TICKET PIECE from the floor (M).
- Look at the close-up of the remote control; take the LOTTERY TICKET PIECE (N).
- Use the POCKETKNIFE to open the battery compartment (O).
- Place the BATTERY into the remote control and press the power button (P).
- Look at the close-up of the TV (your camera will automatically take a photo) (Q).
- Open the cupboard and look at the safe (R).
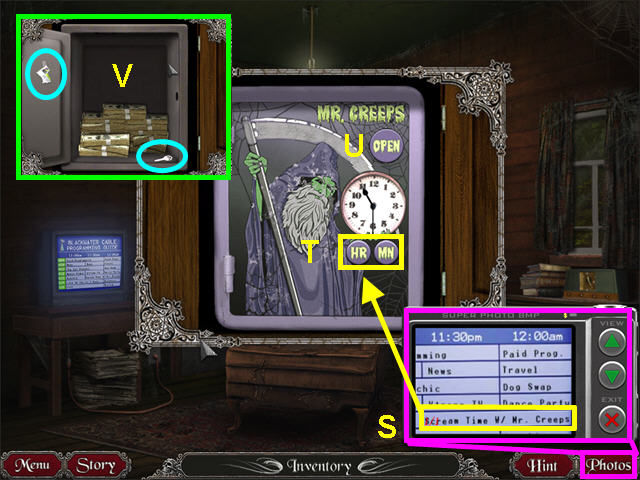
- Look at the TV schedule in your photos to see the show with Mr. Creeps starts at 11:30 (S).
- Use the HR (hour) and MN (minute) buttons to set the clock to 11:30 (T).
- Press the Open button (U).
- Take the KEY and the LOTTERY TICKET PIECE (V).
- Exit the close-up; use the KEY on the gray door and enter the room.
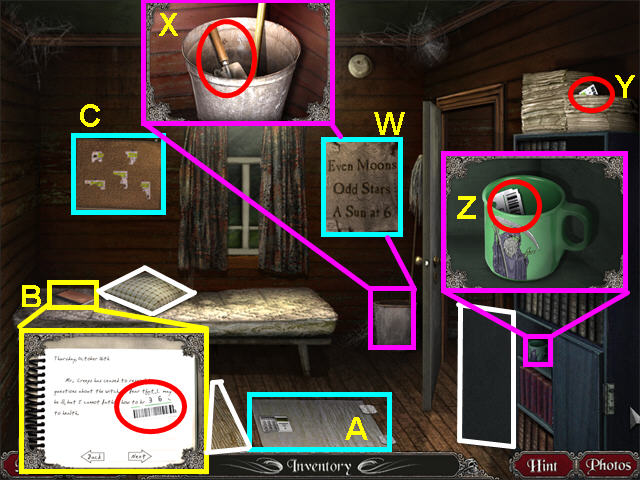
- Your camera will automatically take a photo of the wall poster (W).
- Look in the pail and take the SHOVEL (X).
- Take the LOTTERY TICKET PIECE from the top of the bookcase (Y).
- Open the cupboard, look in the cup and take the LOTTERY TICKET PIECE (Z).
- Move the rug on the floor and take note of the lock (A).
- Move the pillow on the bed and look at the journal (B).
- Turn the pages to read the journal; find the LOTTERY TICKET PIECE.
- Look at the bulletin board for a mini-game (C).
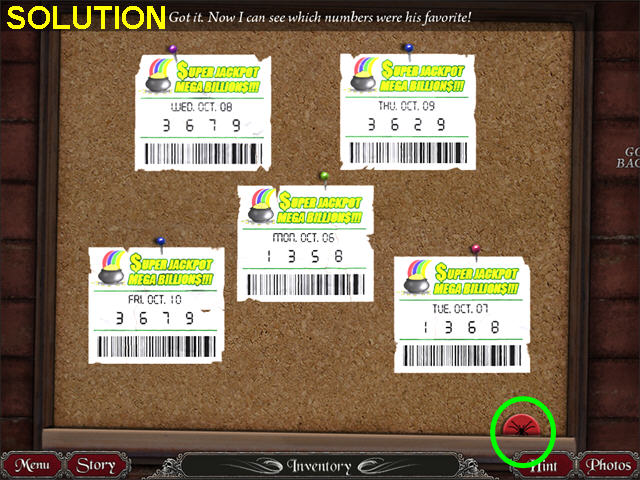
- Take the LOTTERY TICKET PIECES from your inventory and place them on the bulletin board.
- Repair the tickets in this jigsaw style game.
- Take the RED SPIDER TOKEN from the lower right corner.
- Exit the close-up and return to the front of the cabin.
- Use the SHOVEL on the fresh grave on the left.
- Click on the open grave for a mini-game.
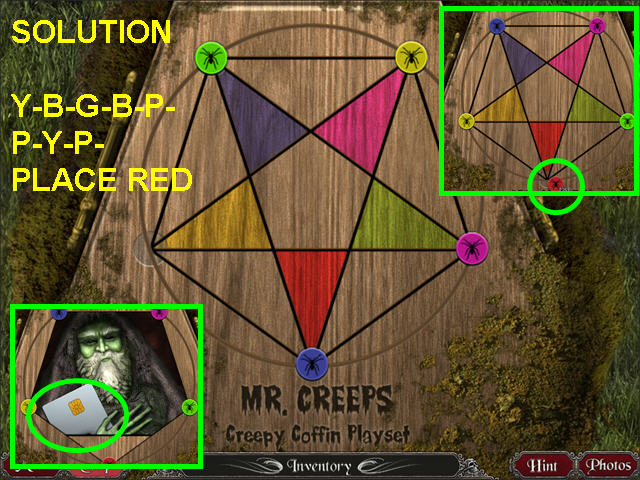
- The object of this mini-game is to get the tokens to the top of the same color star point.
- Click on the tokens in this order: yellow, blue, green, blue, pink, pink, yellow, pink.
- Now place the RED SPIDER TOKEN in the open spot (D).
- Take the KEY CARD (E).
- Exit and return to the bedroom.
- Look at the close-up of the lock.
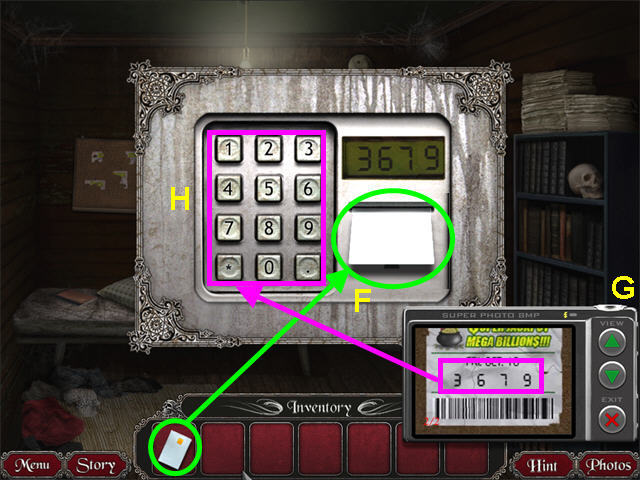
- Take the KEY CARD from your inventory and insert it into the reader (F).
- Look at the photos to see his favorite number (G).
- Enter 3679 into the keypad to open the lock (H).
- Click on the ladder to climb below.
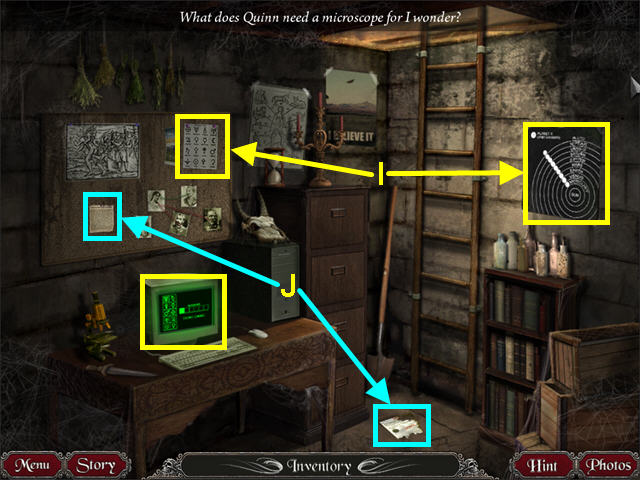
- Look at the poster on the wall and the diagram on the bulletin board (I).
- Your camera will take photos of these two items.
- Read the article on the bulletin board and the partial letter on the floor to add to your story (J).
- Look at the computer monitor for a mini-game.
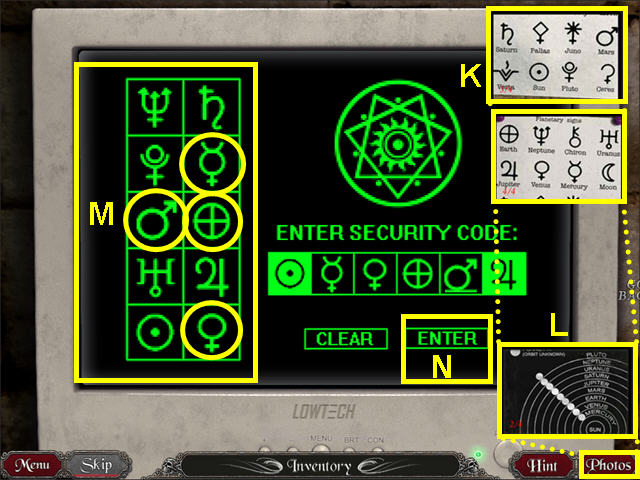
- Looking at your photos of the diagram on the bulletin board tells you the first symbol in the code is the Sun and the last is Jupiter (K).
- Looking at the photo of the solar system tells us that Mercury, Venus, Earth, and Mars are missing (L).
- Enter the symbols for Mercury, Venus, Earth, and Mars, using the buttons on the left (M).
- Click “ENTER” (N).
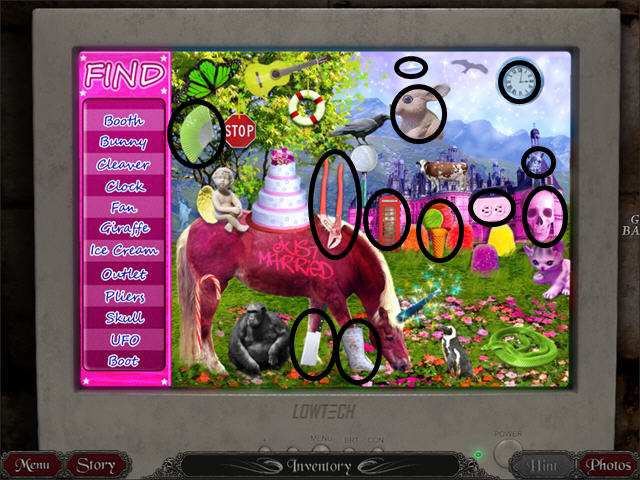
- Locate the hidden objects on the list.
- Before you can find all the objects, you will get a message that your trial has ended.
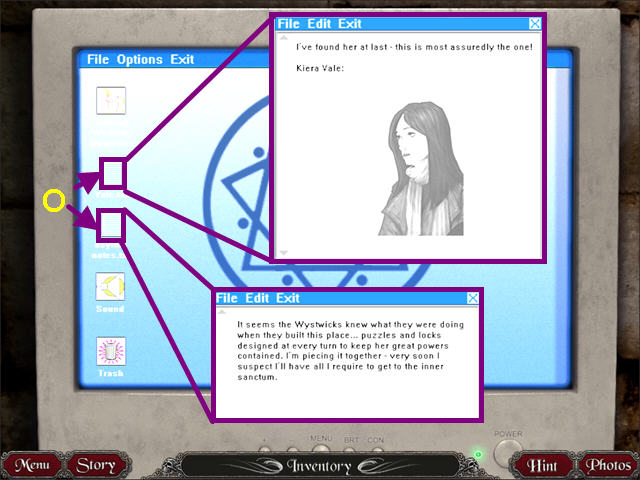
- Click to remove the message.
- Read the two documents (O).
The Graveyard
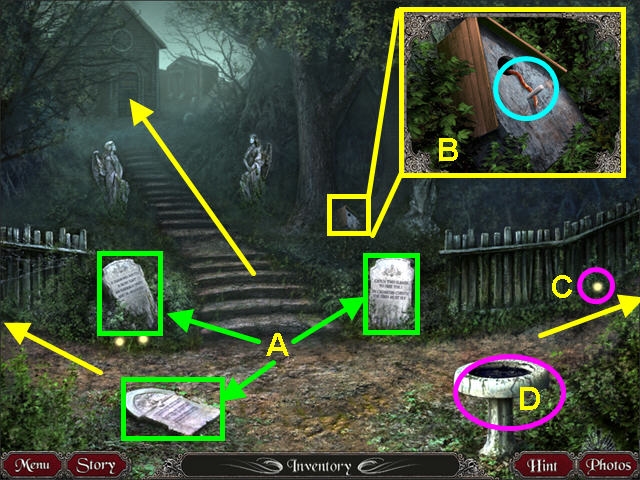
- Look at each of the three tombstones (your camera will take photos of each) (A).
- Look at the close-up of the birdhouse and take the worm (B).
- There are three paths: one leading to the chapel, one to the left, and one to the right.
- Note the fireflies (C).
- Note the birdbath (D).
- Take the left path.
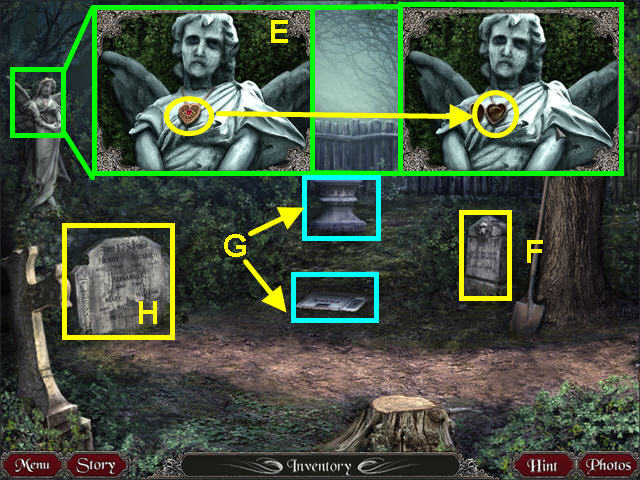
- Look at the statue on the left; then click on her locket (E).
- Take the LOCK of HAIR from the locket.
- Read the tombstone next to the shovel for a picture (F).
- Take note of the urn and the floor safe (G).
- Click on the large tombstone for a mini-game (H).
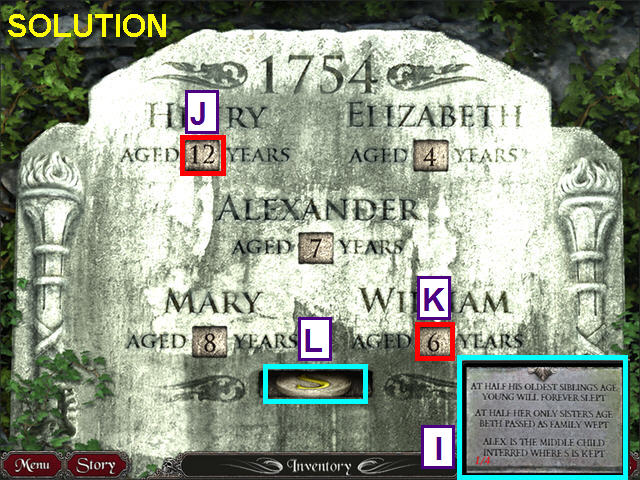
- Look at the photo of the tombstone for clues to the correct ages (I).
- Click on Henry's years four times (J); then click William’s age twice to solve (K).
- Take the “S” COIN from the slot (L).
- Exit the close-up; look at the urn for another mini-game.
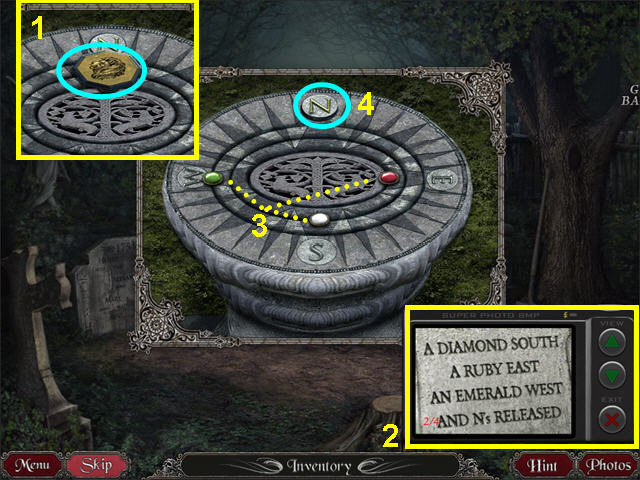
- Take the LION TILE (1).
- Look at your photo' for the mini-game's clue (2).
- Click on the gems to move them into position (3).
- Take the “N” COIN (4).
- Exit the close-up and walk right twice.
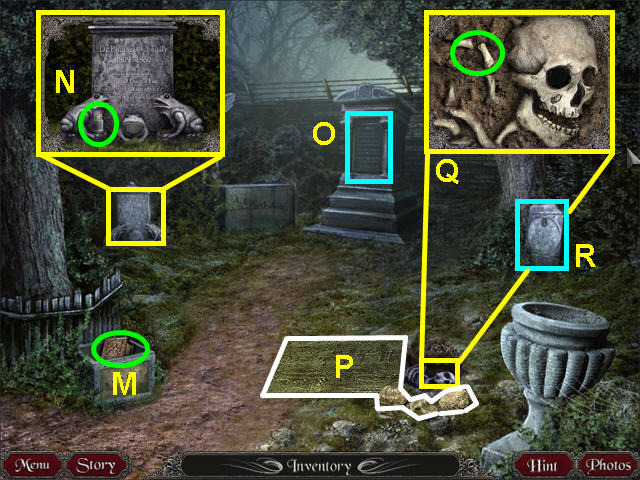
- Take the BOOK from the small crate on the left (M).
- Look at the close-up of the left tombstone; take the GLASS JAR (N).
- Read the large monument in the center (O).
- Move the three rocks and plywood to find an open grave (P).
- Look at the close-up of the grave; take the SMALL BONES (Q).
- Look at the right tombstone for a mini-game (R).
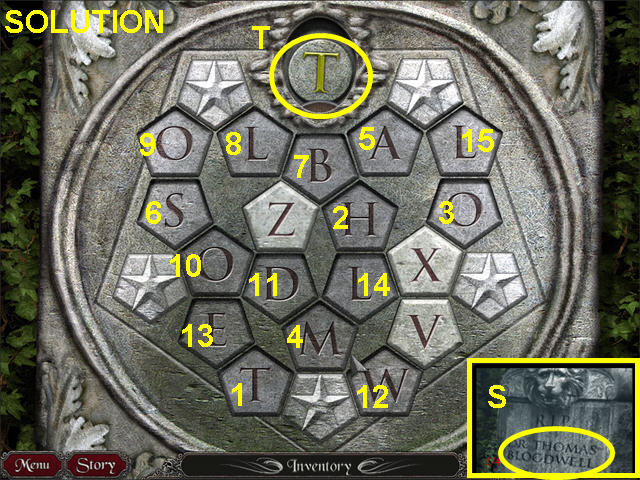
- Look at your photos to see Dr. Thomas Bloodwell's tombstone (S).
- Push on the letters to spell out “Thomas Bloodwell” without duplicating any tiles.
- Take the “T” COIN from the niche (T).
- There are several solutions to this puzzle.
- Exit the close-up; walk right and up to the chapel.
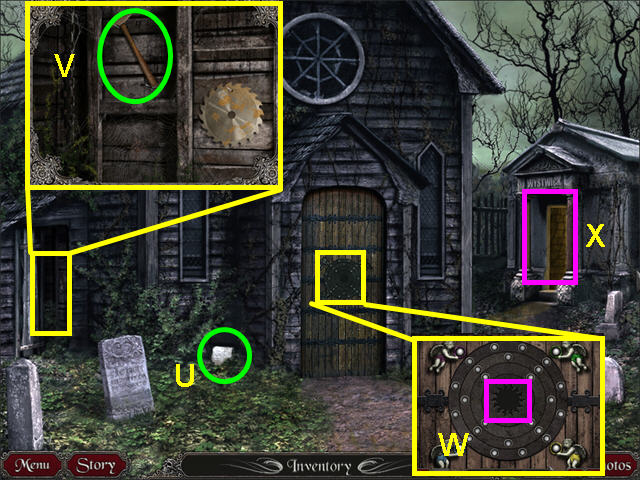
- Read the letter (U).
- Look in the side shed on the left; take the HAMMER (V).
- Make note of the mini-game on the front door: it is missing a sun shaped piece (W).
- Walk to the Wystwick mausoleum on the right (X).
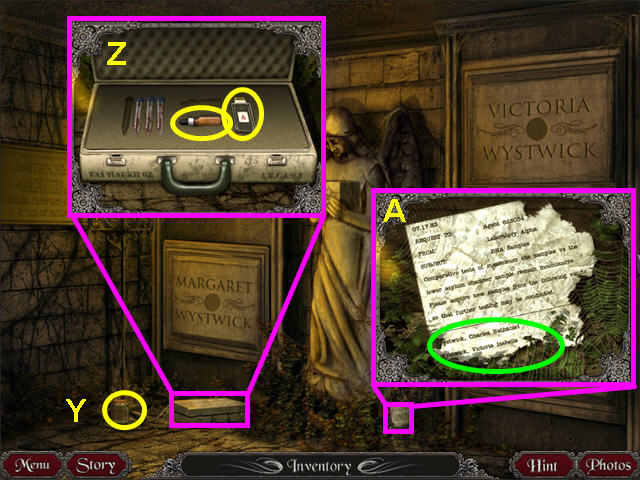
- Take the glass jar (Y).
- Look at the briefcase; take the DNA TESTER and the EYE DROPPER (Z).
- Look at the memo to learn the middle names of three of the Wystwicks (A).
- Exit the mausoleum and walk down from the chapel.
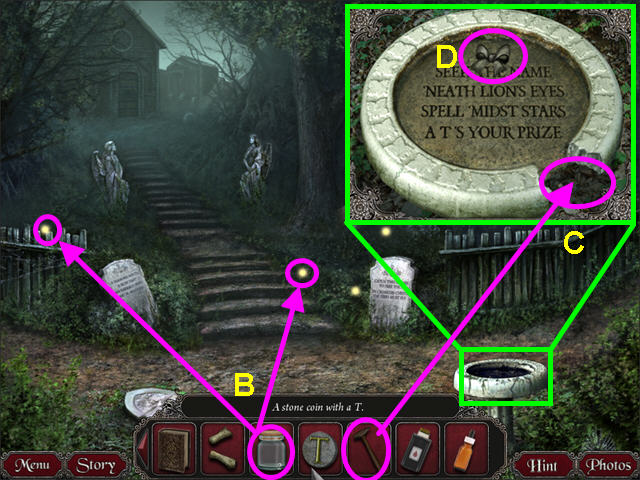
- Take a GLASS JAR from your inventory and click on a firefly; repeat this with the other GLASS JAR (B).
- Look at the close-up of the bird bath and use the HAMMER on the cracked piece (C).
- Your camera will take a photo.
- Take the ribbon (D).
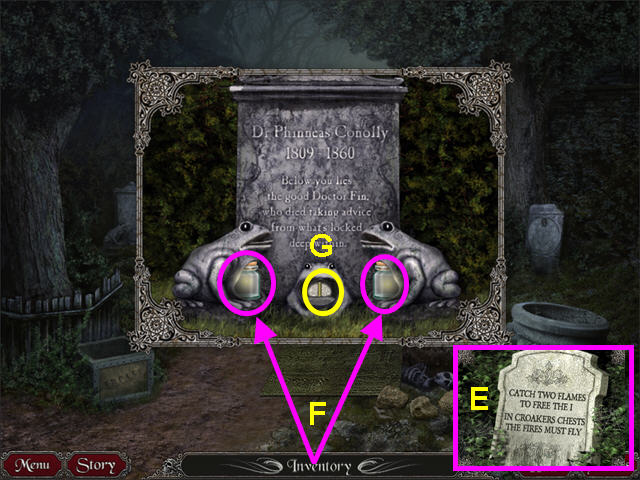
- Walk to the right and look at the left tombstone.
- Look at your photos for a clue (E).
- Place the JARS with FIREFLIES into the frogs’ mouths (F).
- Take the “I” COIN (G).
- Exit the close-up.
- Walk left and up; then enter the mausoleum.
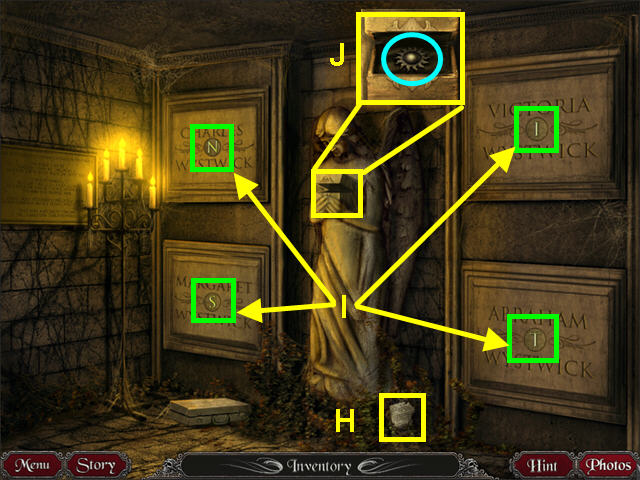
- From the memo, we know that the full names of three Wystwicks are: Charles Nathaniel, Victoria Isabella, and Abraham Theodore (H).
- Place the INITIAL COINS with the matching names; then use the “S” coin for Margaret (I).
- Look at the angel's box and take the SUN DISC (J).
- Exit the mausoleum and look at the door to the chapel.
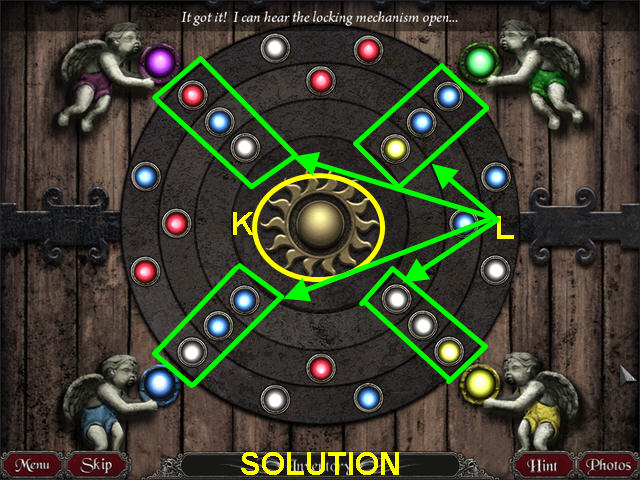
- Place the SUN DISC in the center to activate the mini-game (K).
- Rotate the rings so the three colors combined make the color of the angel (L).
- Click on a ring to rotate it into position.
- Red and blue make purple; blue and yellow make green.
- Enter the chapel.
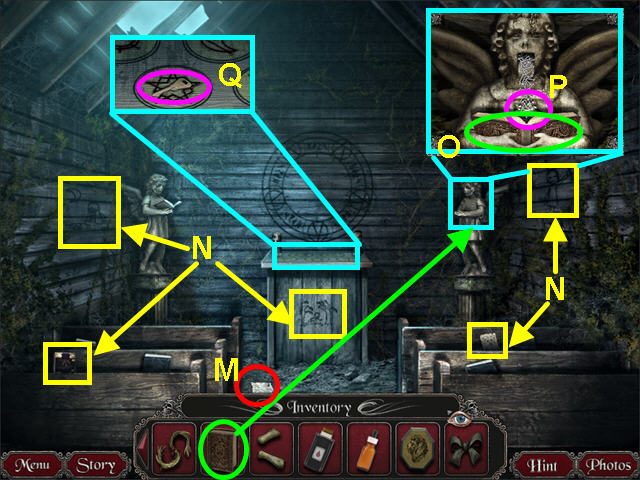
- Read the journal pages; click to read the second page (M).
- Look at the five drawings to take photos (N).
- Look at the right angel and place the BOOK into her hands (O).
- Take the PINS that fall from her mouth (P).
- Look at the altar and take the KEY (Q).
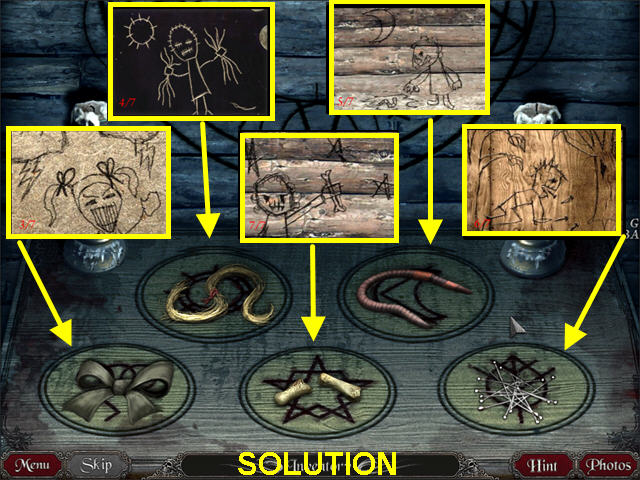
- Refer to the photos of the five drawings.
- From left to right, place the items on the symbols.
- Place the RIBBON on the lightning symbol.
- Place the LOCK of HAIR on the sun symbol.
- Place the SMALL BONES on the star.
- The WORM goes on the moon symbol.
- Place the PINS on the leaf.
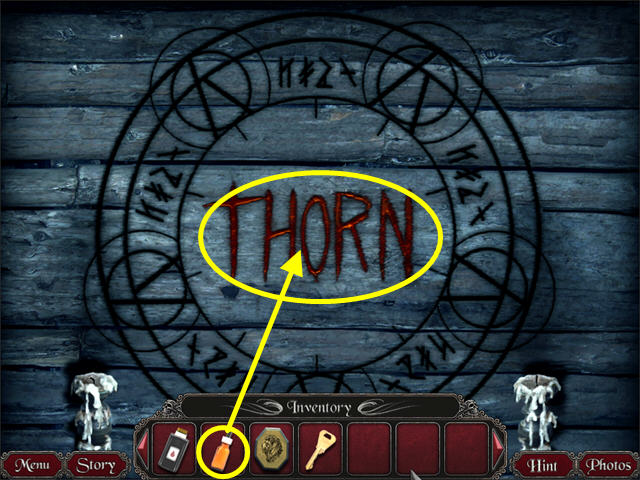
- The symbols on the wall glow and the name THORN appears oozing blood.
- Use the EYE DROPPER on THORN to get a DNA SAMPLE.
- Exit the chapel, walk down and to the left.
- Look at the floor safe.
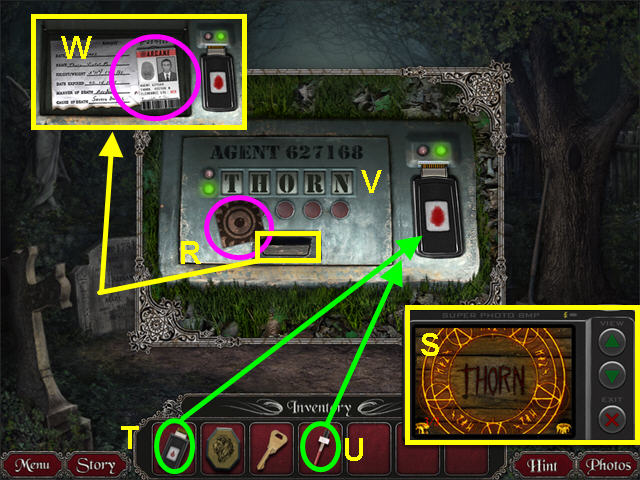
- Take the WOOD TILE (R).
- Look at the photo for a clue (S).
- Place the DNA TESTER into the slot (T).
- Use the DNA SAMPLE on the DNA tester (U).
- Use the buttons to spell THORN (V).
- Open the safe and take the ID BADGE (W).
The Asylum Gate
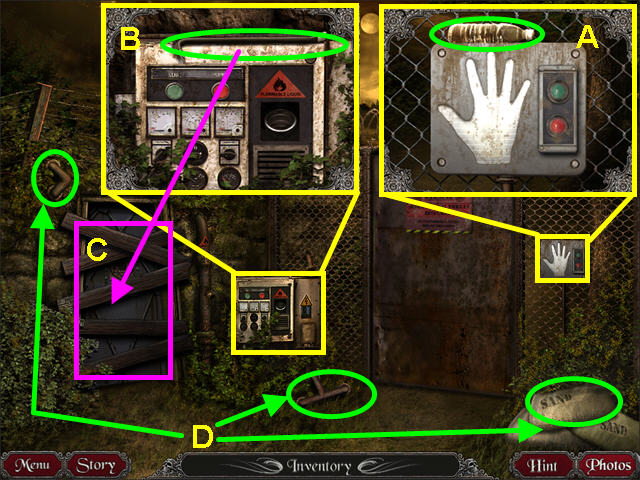
- Look at the close-up of the hand reader; take the WATER BOTTLE (A).
- Look at the close-up of the generator; take the CROWBAR (B).
- Use the CROWBAR to remove the boards covering the bunker door (C).
- Take the two pieces of PIPE and a SANDBAG (D).
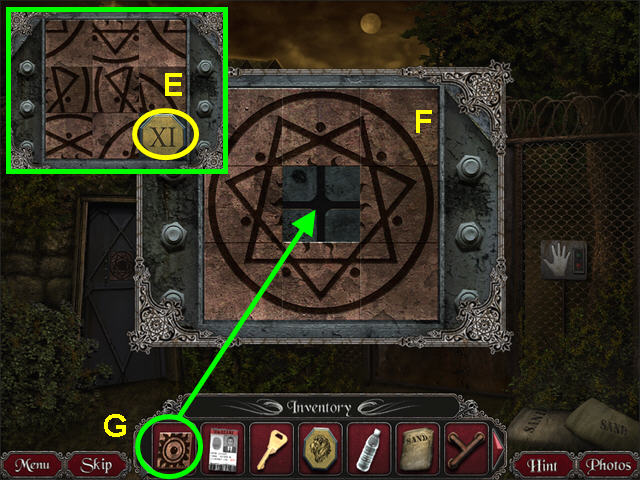
- Look at the mini-game on the bunker door.
- Take the XI TILE (E).
- Slide pieces to form a star in a circle (F).
- Place the WOOD TILE in the center (G).
- Check out our video solution!
- Enter the bunker.
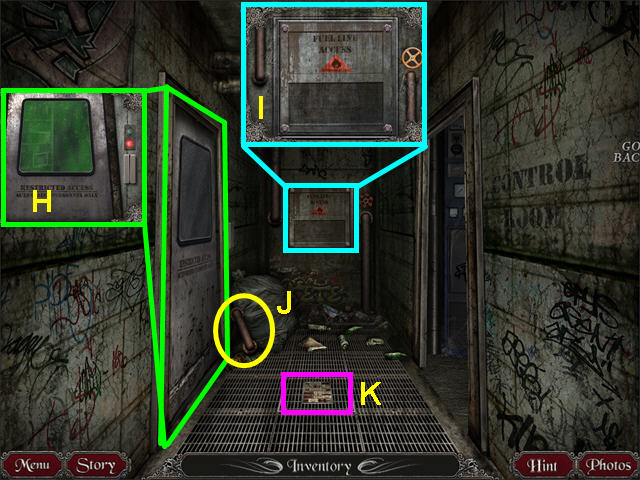
- Look at the left door and see the room is flooded with green gas (H).
- Look at the back panel to learn you need a tool to open it (I).
- Take the PIPE (J).
- Look at the floor panel for a mini-game (K).
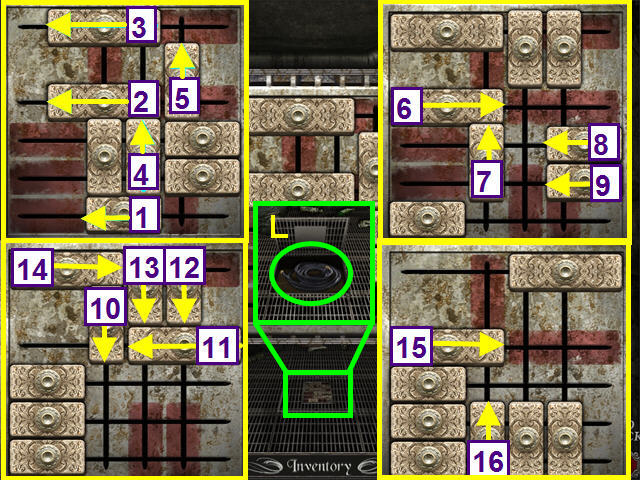
- The object of this slider puzzle is to move the bars onto the matching red areas.
- Slide the bars in the direction indicated, in numerical order.
- Once the grate opens, take the HOSE (L).
- Walk right, into the control room.
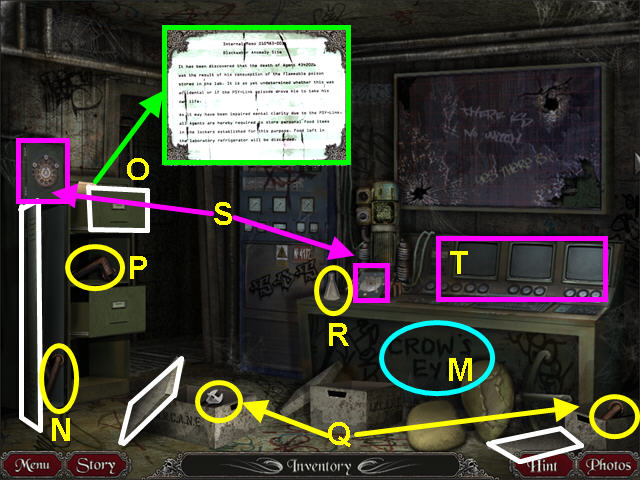
- Your camera will take a photo of the graffiti (M).
- Open the locker on the left and take the PIPE (N).
- Open the top filing cabinet drawer and read the note (O).
- Take the PIPE from the second drawer area (P).
- Remove the box lids and take the WRENCH and PIPE (Q).
- Take the FLASK (R).
- Make note of the two mini-games (S) and the computer bank (T).
- Exit left to the hall and look at the back wall panel.
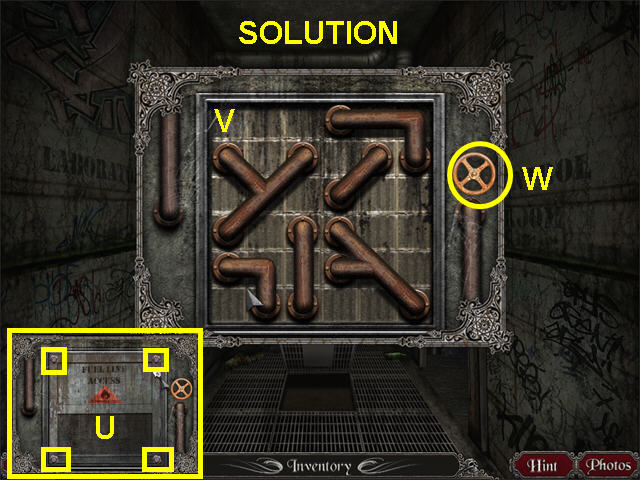
- Use the WRENCH from your inventory on each of the four bolts to remove the panel (U).
- Take the PIPE pieces from your inventory and fit them onto the holes (V).
- Turn the valve on the right to open the fuel line (W).
- Walk down to exit the bunker and look at the generator.
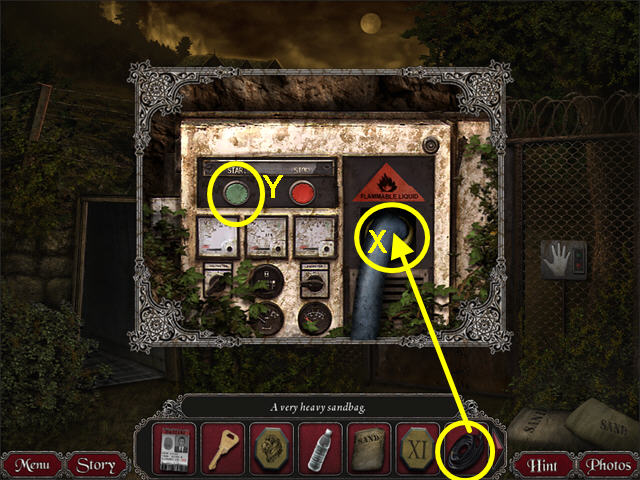
- Take the HOSE from your inventory and use it on the hole (X).
- Press the green button to start the generator (Y).
- Enter the bunker and walk right to the control room.
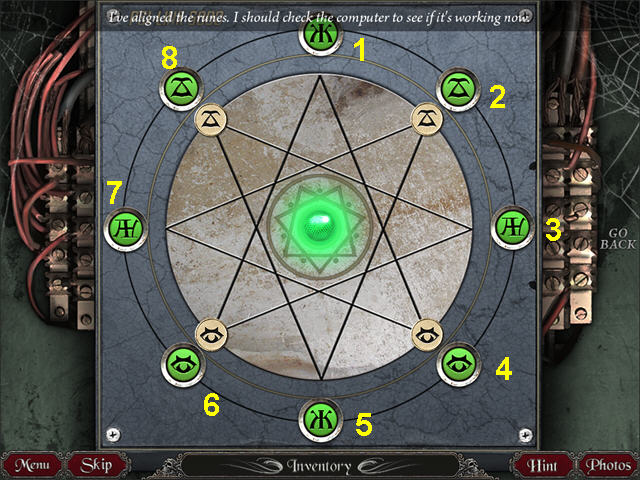
- Look at the mini-game on the end of the table.
- The object of this mini-game is to move the runes along the lines of the star using the outer buttons until they match.
- Starting at the top and going clockwise, number the buttons 1-8.
- Press these buttons: 2, 5, 8, 3, 6, 1, 4, 7, 1, 4, 5, 8, 3, 6, 6, 1, 8, 3, 3, 6, 7, 2, 2, 5, 5, 8, 3, 7, 7, 2, 1, and 4.
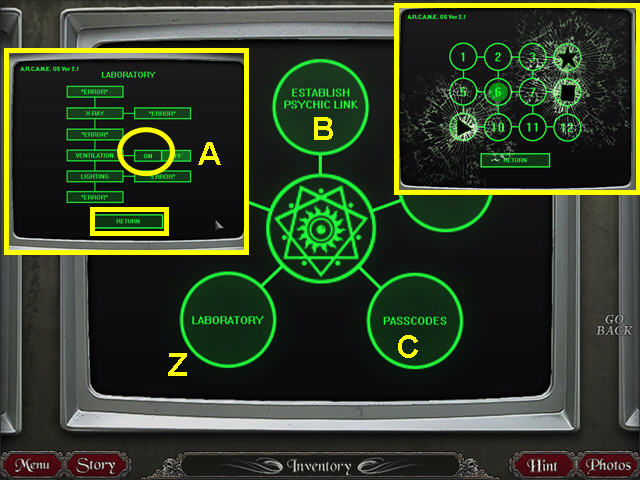
- Look at the lighted computer monitor.
- Select “LABORATORY” (Z).
- Click the ventilation “ON” (A).
- Select the “RETURN” button.
- Click on the “FILES” circle to read some memos from the past.
- Click on circle labeled “ESTABLISH PSYCHIC LINK” (B).
- You will see remote video of a coffin. Things go haywire and a strange message appears; then the screen breaks.
- Select the circle labeled “PASSCODES” (C).
- Your camera will take a picture.
- Exit; look at the mini-game at the top of the locker.
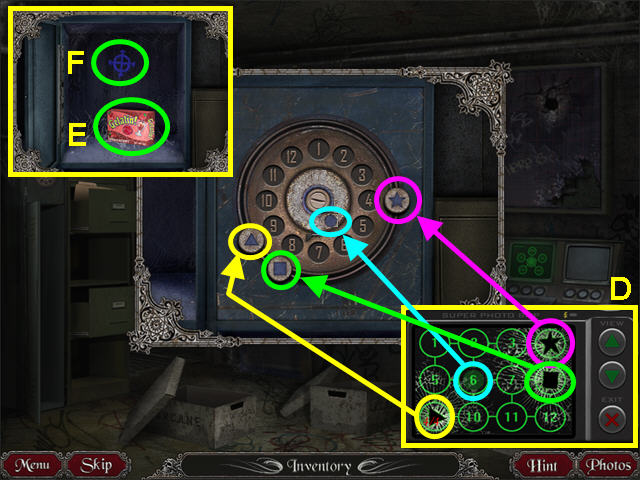
- Look at the photo for a clue on the code (D).
- Move the star, square, and triangle around the outer ring to the number indicated in the photo.
- Click on a symbol to move its position.
- Move the circle on the inner ring to the number in the photo.
- Look inside the safe; take the GELATIN (E).
- Your camera will take a photo of the blue symbol (F).
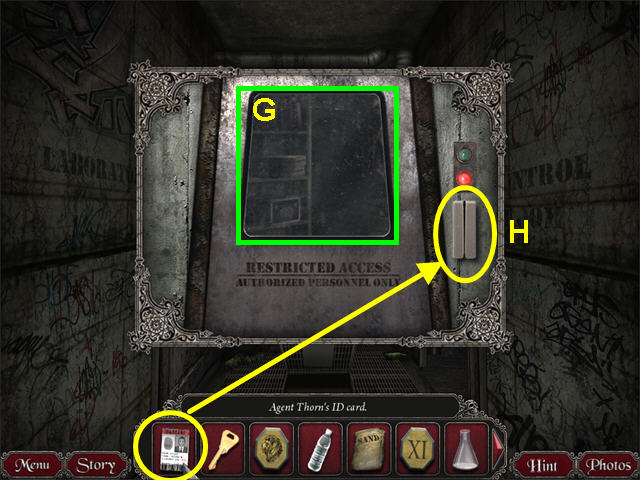
- Exit to the hall and look at the left door.
- The green poisonous gas should be gone, since the ventilation was turned on (G).
- Use Agent Thorn's ID BADGE from your inventory on the key card swipe (H).
- Enter the laboratory.
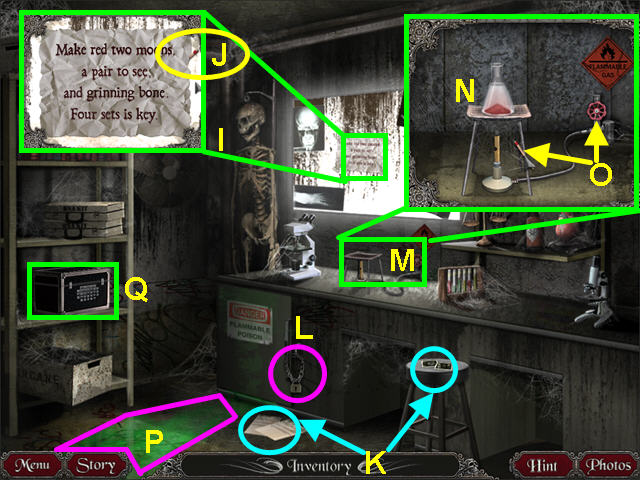
- Look at the note on the wall (your camera will automatically take a photo) (I).
- Take the MATCH stuck on the side of the note (J).
- Look at the photos on the stool and the memo on the floor (K).
- Use the KEY from your inventory to unlock the refrigerator (L).
- Look at the close-up of the Bunsen burner (M).
- From your inventory, place the FLASK on the stand (N).
- Use the WATER and the GELATIN on the flask.
- Turn on the gas then use the MATCH on the burner (O).
- Take the FLASK with GOO then turn off the gas.
- Exit the close-up.
- Use the SANDBAG on the green liquid spill (P).
- Look at the black box for a mini-game (Q).
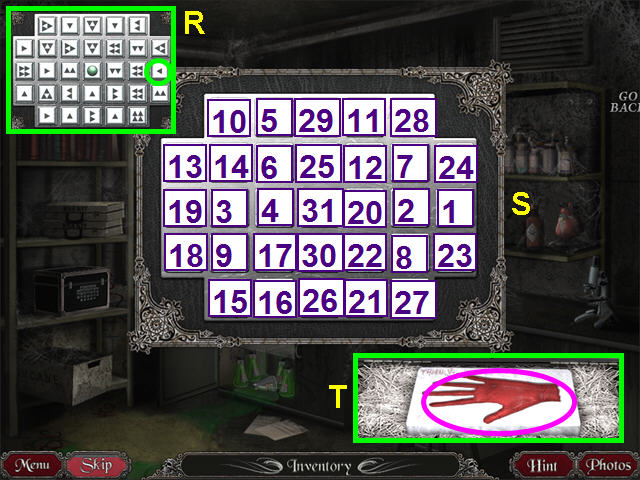
- The object of this mini-game is to press all the white buttons before pressing the green button (R).
- The button you press tells you the next button to press.
- For example, if you press a button with three arrows to the right, the next button you’ll push will be located three buttons to the right.
- Press the buttons in numerical order (S).
- Inside the box is a hand mold.
- Use the GELATIN GOO from your inventory on the mold (T).
- Take the GELATIN HAND IN PROGRESS.
- Exit the close-up and look at the refrigerator.
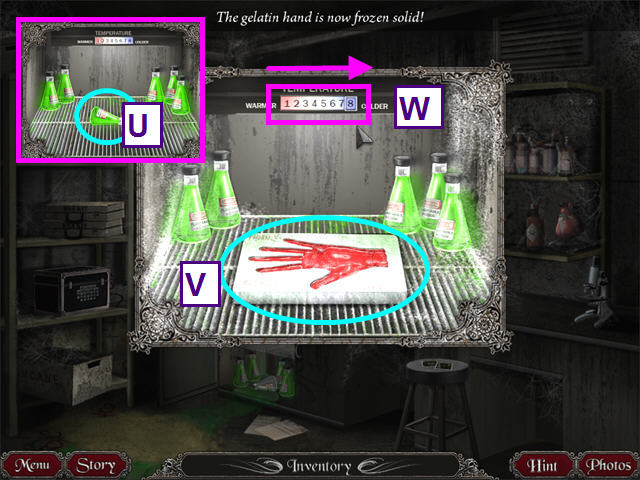
- Take the green bottle of POISON from the shelf (U).
- Place the GELATIN HAND IN PROGRESS on the shelf (V).
- Slide the freezer control all the way to the right (W).
- Take the GELATIN HAND from the mold.
- Exit the lab and return to the gate.
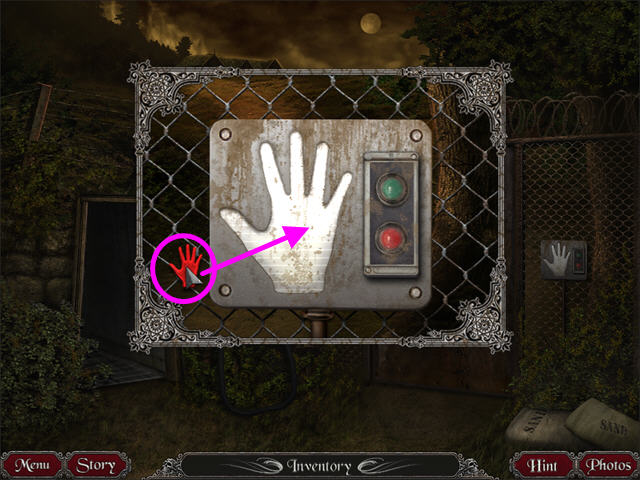
- Look at the close-up of the hand reader, right of the gate.
- Use the GELATIN HAND from your inventory on the hand.
- The gate will open.
The Asylum
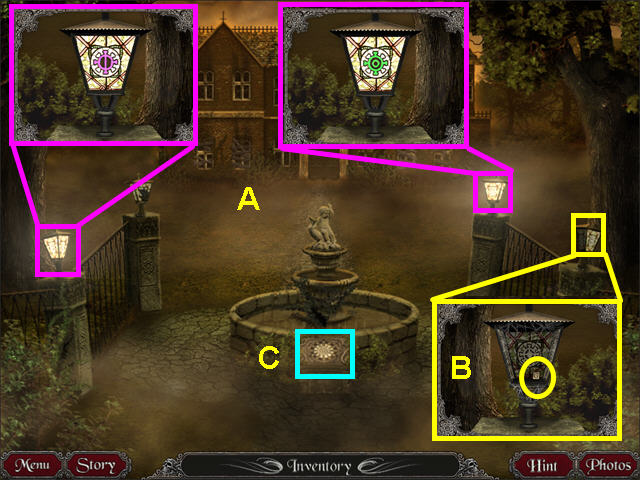
- Look at the two lighted lamps, so the camera can take photo clues (A).
- Look at the lower right lamp and take the “G” TILE (B).
- Look at the design on the fountain for a mini-game (C).
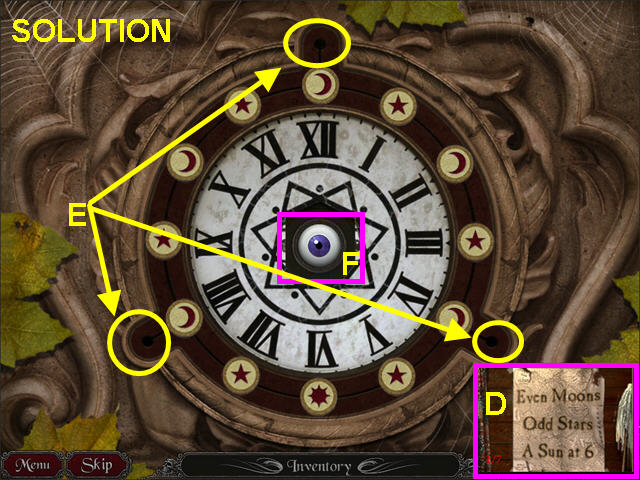
- Look at the photo for a clue (D).
- Slide the symbols around so that the sun is on the 6, the moons are on the even numbers, and the stars are on the odd numbers.
- There are three places outside of the circle to which you can move a symbol (E).
- Take the EYEBALL when the center opens (F).
- Walk up, to the front of the asylum.
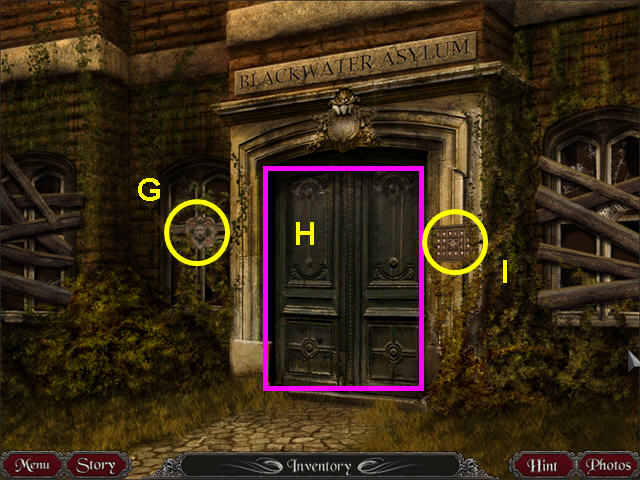
- Notice the mini-game on the left (G).
- The doors are locked (H).
- Select the right mini-game (I).
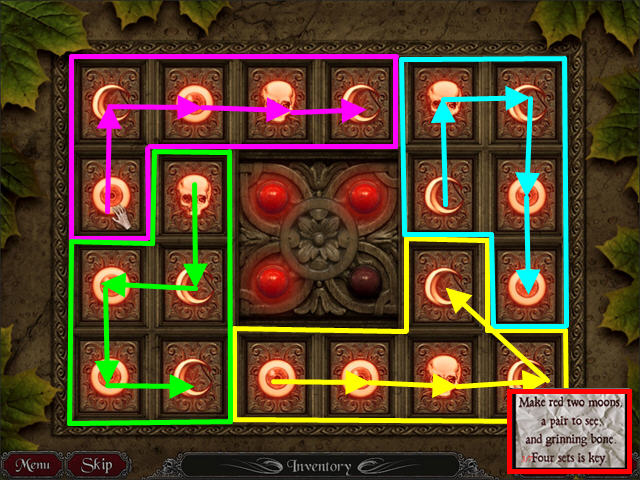
- Look at the photo clue.
- Turn on the four center lights.
- Press a tile, then adjoining lighted tiles, to make a chain that includes two eyes, two moons, and one skull.
- You need to make four sets.
- Enter the asylum through the front doors.
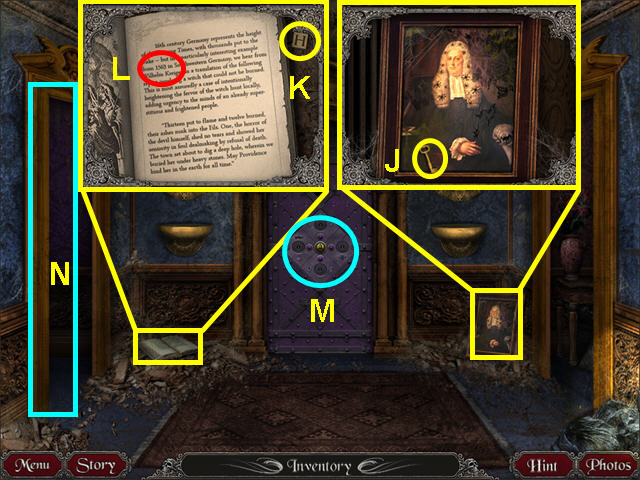
- Look at the painting on the floor and take the KEY (J).
- Your camera will take a photo.
- Look at the book on the floor; take the “H” TILE (K).
- Make note of the year in the text: 1563 (L).
- Note the mini-game on the purple door (M).
- Walk into the left room (N).
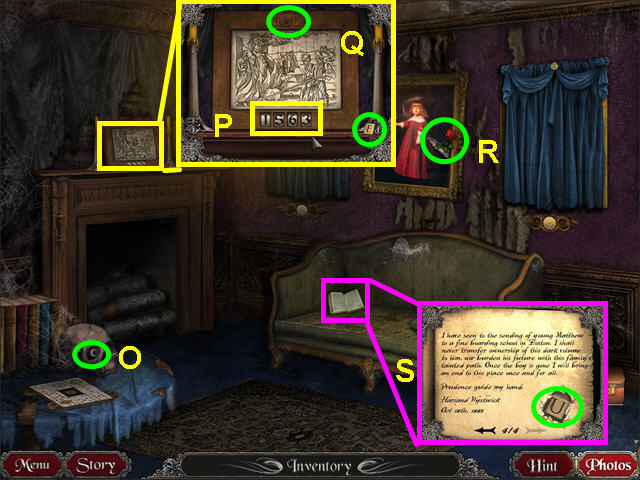
- Take the EYEBALL from the skull (O).
- Look at the engraving on the mantle and enter the date “1563” (P).
- Take the WOOD COIN and the “E” TILE (Q).
- Take the ROSE from the painting (R).
- Look at the journal on the couch and turn the pages to the end.
- Take the “U” TILE (S).
- Exit to the hall and enter the right doorway.
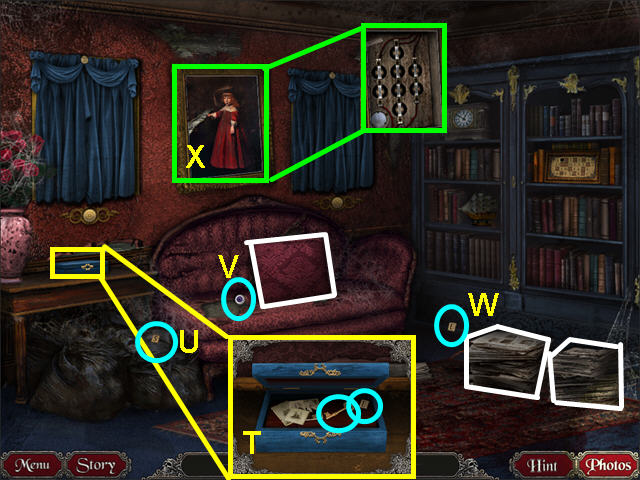
- Look at the blue box on the table; take the KEY and the “E” TILE. (T).
- Take the “S” TILE off the garbage bags (U).
- Move the pillow on the couch and take the EYEBALL (V).
- Move the two stacks of newspapers and take the “E” TILE (W).
- Take the ROSE from your inventory and use it on the painting to reveal a mini-game (X).
- Select the mini-game.
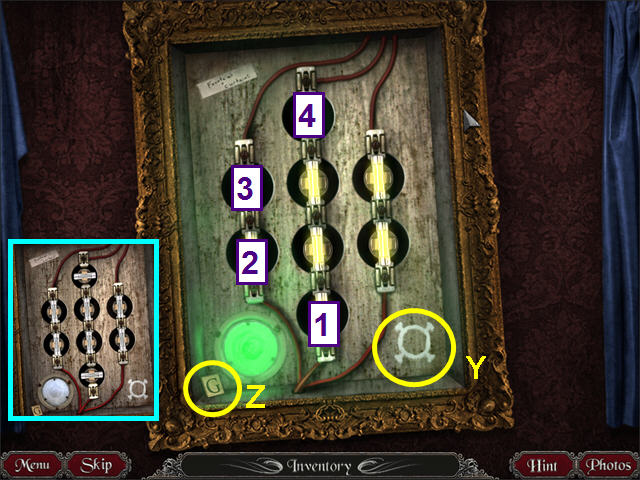
- Your camera will take a photo of the symbol (Y).
- Take the “G” TILE (Z).
- Turn all the fuses to the vertical position in this mini-game.
- Clicking on a fuse will turn that fuse, and any adjacent fuses.
- Click on the fuses in numerical order.
- Exit to the hall and back out to the front of the building.
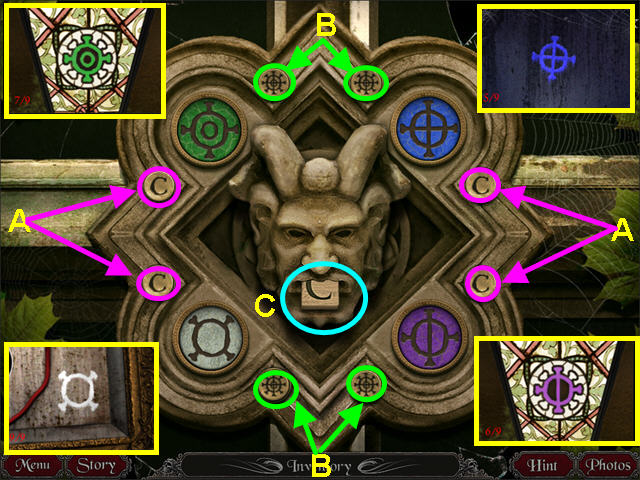
- Look at the mini-game to the left of the doors.
- Look at the photo clues of the symbols.
- The object of this mini-game is to change the symbols and colors to match the four photos.
- Note that some colors are only in one location.
- Push the “C” buttons to change colors (A) and the symbol button to change the symbol (B).
- Take the “C” TILE from the mouth of the lion (C).
- Go inside and walk to the left room.
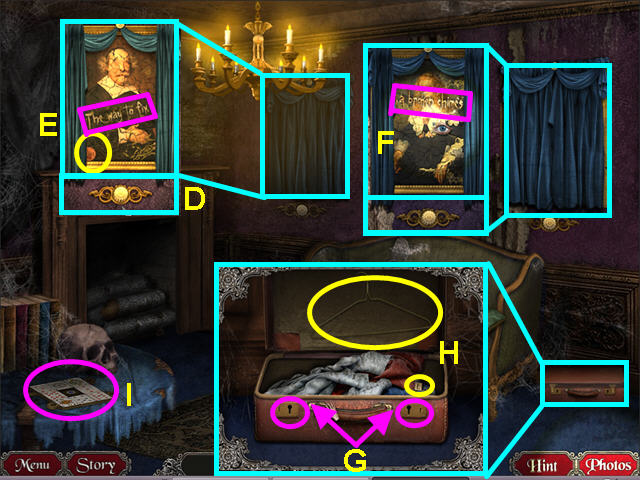
- Look at the left blue curtain and push the button beneath to reveal a painting (D).
- Take the WOOD COIN and note the phrase on the painting (E).
- Look at the right blue curtain and push the button beneath to reveal a painting (F).
- Note the phrase on the painting.
- Look at the suitcase and use the two KEYS from your inventory to unlock the lid (G).
- Take the HANGAR and the “E” TILE (H).
- Note the mini-game on the left table (I).
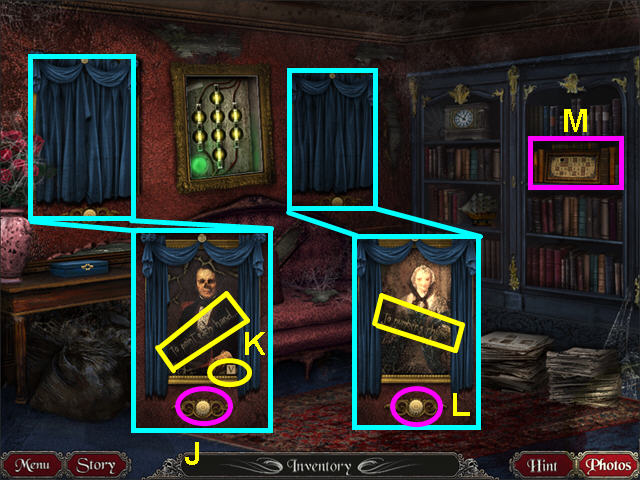
- Exit to the hall and walk right to the next room.
- Look at the left blue curtain and push the button beneath to reveal a painting (J).
- Take the “V” TILE and note the phrase on the painting (K).
- Look at the right blue curtain and push the button beneath to reveal a painting (L).
- Note the phrase on the painting.
- Look at the mini-game on the shelf (M).
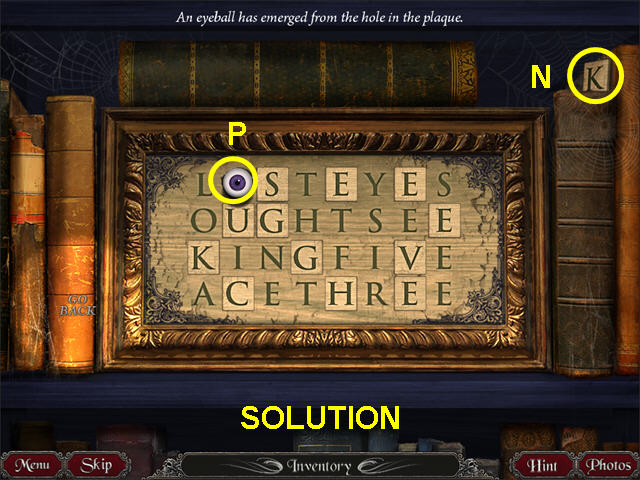
- Take the “K” TILE from the upper right (N).
- Place the TILES from your inventory to complete the phrase.
- Your camera will take a photo clue.
- Take the EYEBALL that appears (O).
- Exit to the hall and enter the left room.
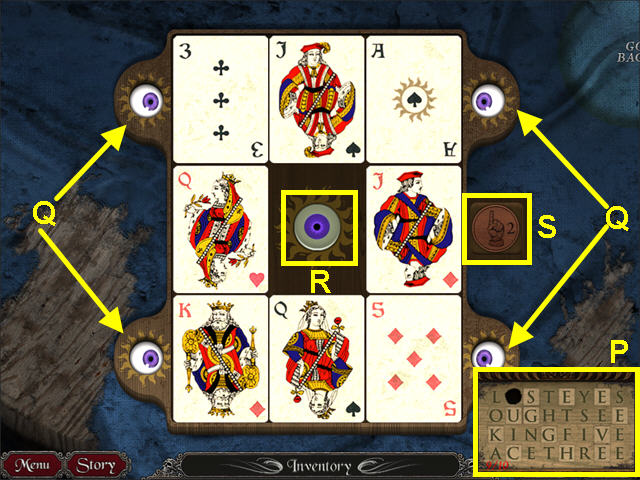
- Look at the mini-game.
- Look at the photo clue (P).
- Take the EYEBALLS from you inventory and place them in the four outer holes (Q).
- Slide the cards around so that the Ace, King, Three, and Five are next to an eye and the center is open.
- Press the center eyeball (R).
- Take the WOOD COIN from the right drawer (S).
- Exit to the hall.
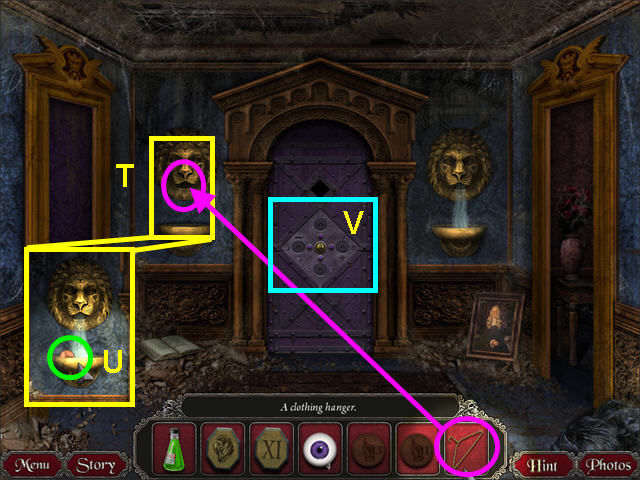
- Use the HANGAR from your inventory to unclog the left lion head (T).
- Take the WOOD COIN from the basin (U).
- Look at the mini-game on the purple door (V).
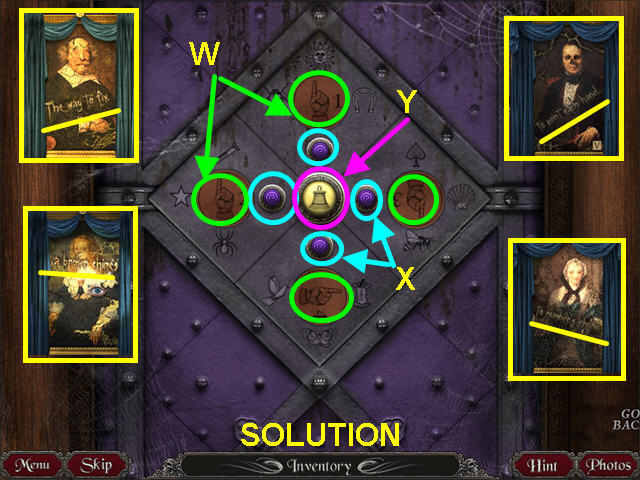
- Refer to the four paintings for the clue to this mini-game.
- “The way to fix … the broken chimes … to point each hand … to number's rhyme.”
- Place the WOOD COINS from your inventory into the circles that have an item that the coin's number rhymes with: [one-sun], [two-screw], [three-bee], and [four-core] (W).
- Use the purple buttons to rotate each coin so it points to the proper item (X).
- Press the center button to ring the bell (Y).
Captured
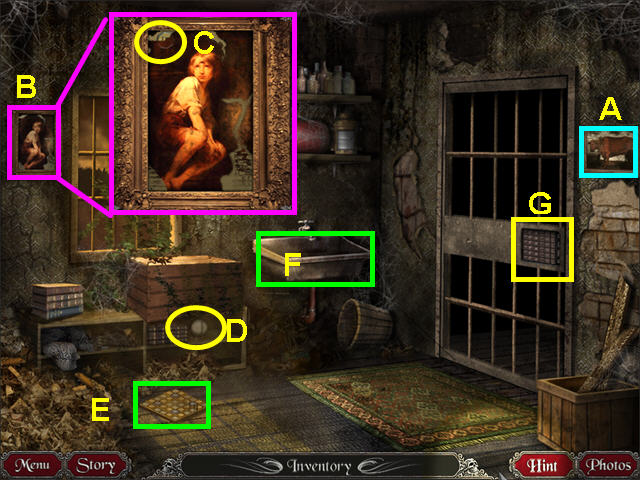
- Look at the right painting so your camera can take a photo clue (A).
- Look at the left painting so your camera can take a photo clue (B).
- Take the III TILE from the upper left corner of the painting (C).
- Take the BASEBALL (D).
- Note the mini-game on the floor (E).
- Note the sink (F).
- Look at the mini-game on the cell door (G).
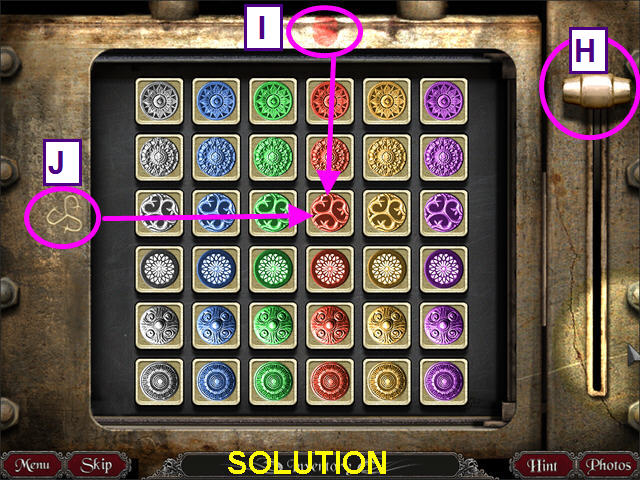
- Place the tiles in the correct positions in this mini-game.
- Click on two tiles to swap positions.
- Pull the lever on the right to check if you are correct (H).
- There are two clues to get you started: a red splotch over one column (I), and a symbol next to one row (J).
- Exit the cell.
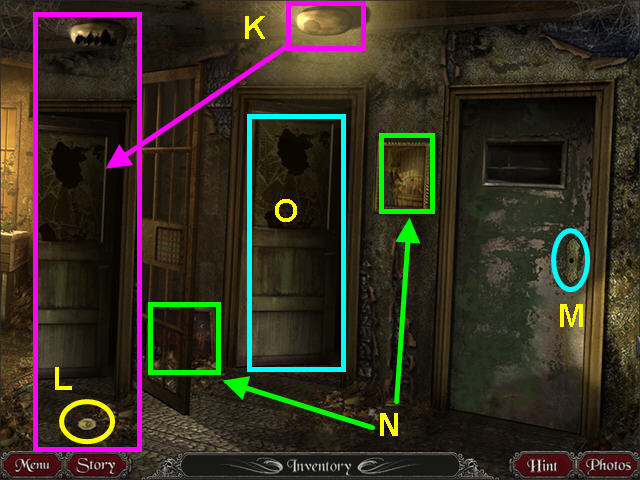
- Use the BASEBALL from your inventory on the light fixture (K).
- Take the MOON TILE that falls to the ground (L).
- Look at the right door to notice the missing door knob (M).
- Look at the two paintings so the camera can take photo clues (N).
- Enter the center door (O).
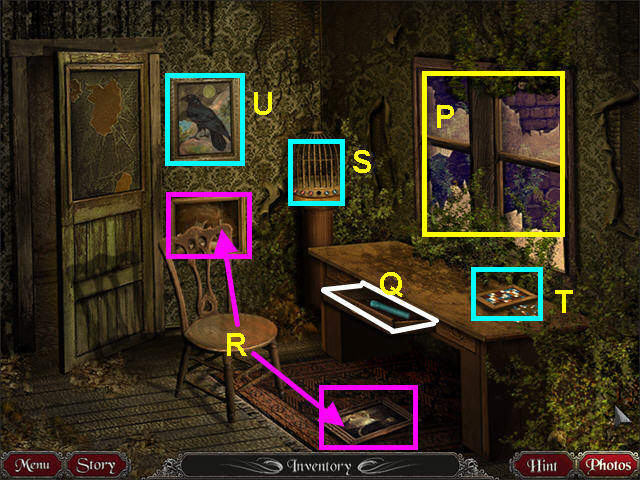
- Look out the window to see the A.R.C.A.N.E. Agents trying to reach you (P)!
- Open the drawer on the desk and take the BLUE CANDLE (Q).
- Look at the two paintings so the camera can take photo clues (R).
- Note the cage mini-game (S).
- Note the tile mini-game on the table (T).
- Look at the crow painting (U).
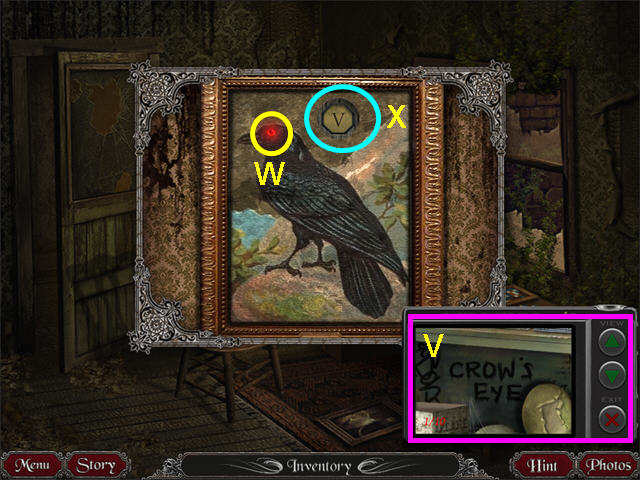
- Look at the photo for a clue (V).
- Click on the crow's eye (W).
- Take the “V” TILE (X).
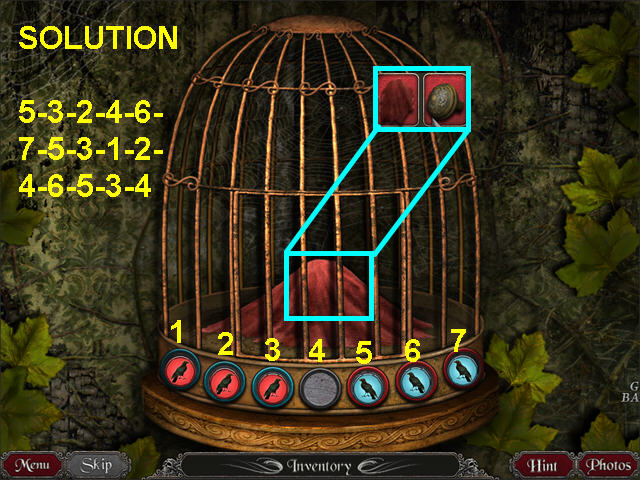
- Look at the cage mini-game.
- Swap the red crows with the blue crows.
- Pieces can only move forward one space or jump forward over an opposite color.
- Number the positions 1-7, from left to right.
- Click on the piece in these positions: 5, 3, 2, 4, 6, 7, 5, 3, 1, 2, 4, 6, 5, 3, and 4.
- After the cage door opens, take the RED CLOTH and the DOORKNOB.
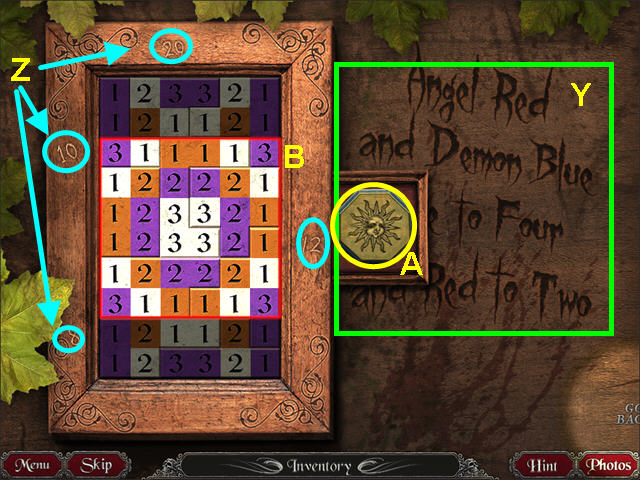
- Look at the mini-game on the desk.
- Your camera will take a photo clue of the rhyme (Y).
- Place all the pieces into the grid in this mini-game.
- There are clues to the row or column totals should be around the outside of the grid (Z).
- Take the SUN TILE from the hidden drawer (A).
- The solution to this mini-game is a clue to another mini-game (your camera will take a photo of it) (B).
- Exit to the hall and look at the close-up of the door on the right.
- Take the DOORKNOB from your inventory and use it on the door.
- Enter the right room.
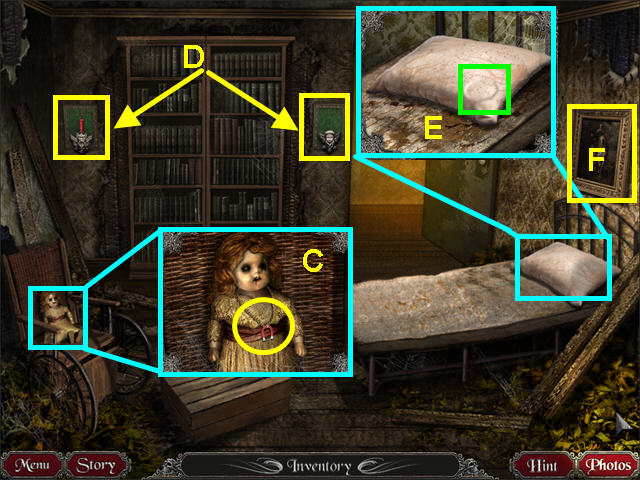
- Look at the doll on the chair and take the MAGNET (C).
- Take note off the two candle sconces (D).
- Look at the pillow and note there is something inside (E).
- Look at the painting on the right for a photo clue (F).
- Exit to the hall and walk left to the cell.
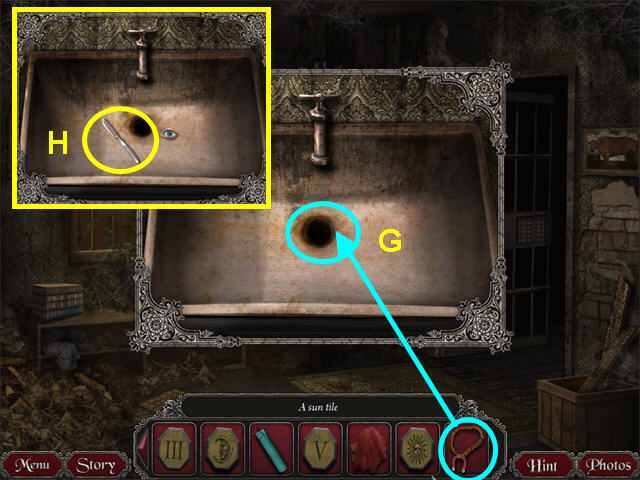
- Look at the close-up of the sink.
- Use the MAGNET from your inventory on the drain (G).
- Take the BUTTER KNIFE (H).
- Exit the close-up of the sink and look at the mini-game on the floor.
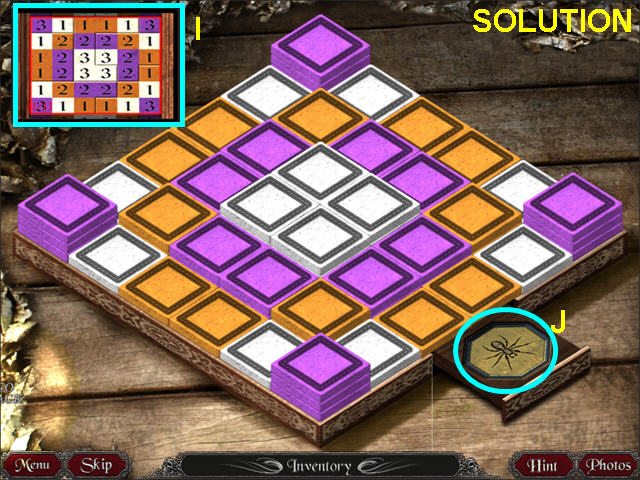
- Look at the photo clue from the other puzzle (I).
- The object is to stack the squares according to the picture.
- The numbers indicate the height of each stack.
- Click on a tile to select it; then click the location to which you want it moved.
- You cannot stack more than three high.
- Take the SPIDER TILE from the secret drawer (J).
- Exit to the hall and enter the right room.
- Look at the close-up of the pillow and use the BUTTER KNIFE on the lower right corner.
- Take the “IV” TILE.
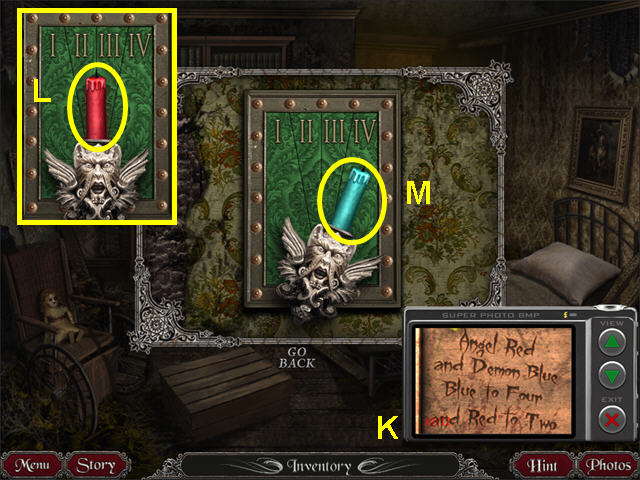
- Look at the close-up of the left candle sconce.
- Look at the photo clue (K).
- Take the RED CANDLE (L).
- Take the BLUE CANDLE from your inventory and place it in the sconce (M).
- Click on the demon sconce to move it to the IV position.
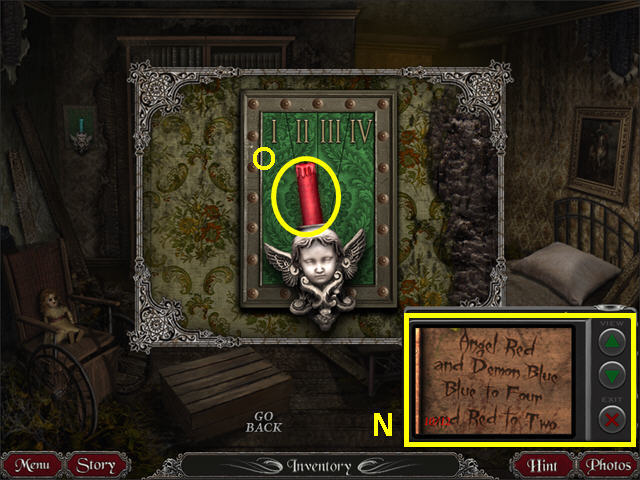
- Exit the close-up and look at the right candle sconce.
- Look at the photo clue (N).
- Take the BLUE CANDLE from your inventory and place it in the sconce (O).
- Click on the angel sconce to move it to the II position.
- Exit the close-up and look at the mini-game that was behind the bookshelves.
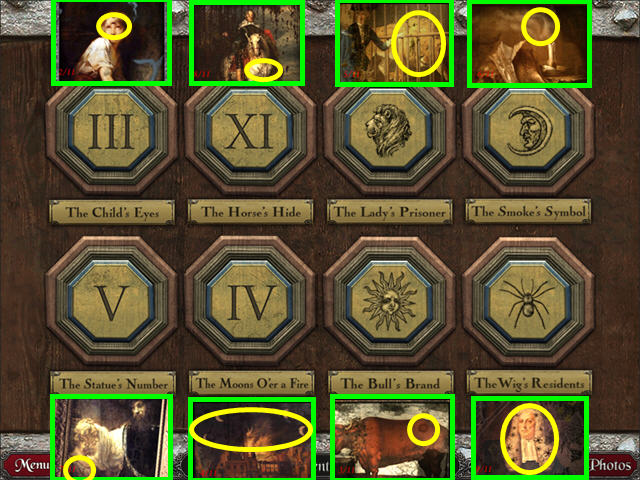
- Look at the eight photos of the paintings.
- Use the TILES from your inventory: match the numbers or symbols to the titles.
- Click to enter the passageway.
Beneath the Asylum
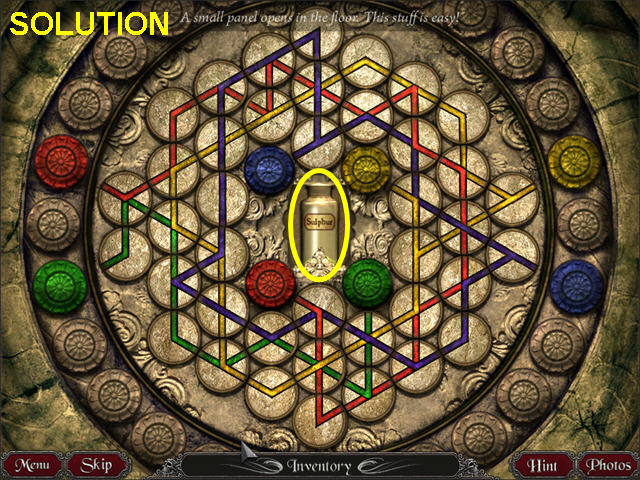
- Look at the mini-game on the center of the floor.
- The object is to connect the pairs of colored tokens with the pipes.
- Click on a circle to rotate it into position.
- Once solved, take the SULFUR from the hidden compartment.
- Exit the close-up.
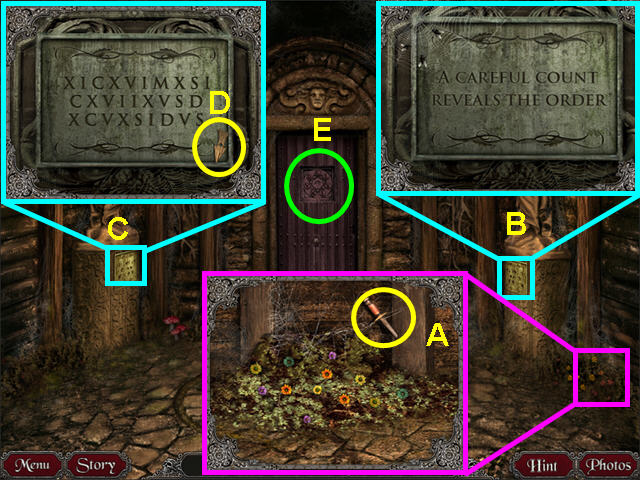
- Look at the flowers on the lower right and take the DAGGER (A).
- Read the plaque on the right statue (B).
- Read the plaque on the left statue (your camera will take a photo clue) (C).
- Take the WOODEN ARROW (D).
- Look at the mini-game on the door (E).
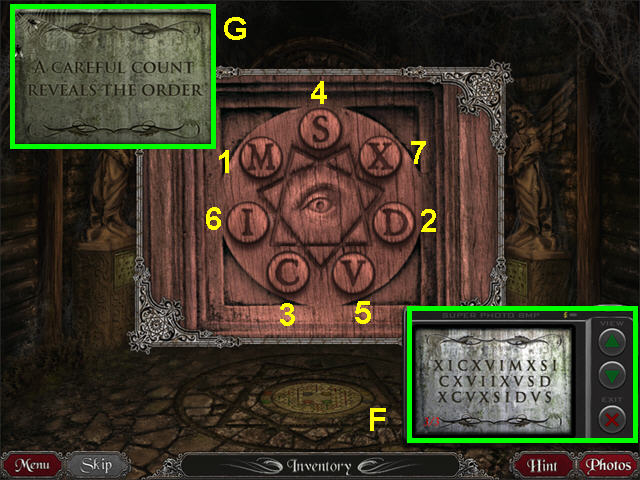
- Look at the photo clue (F).
- The clue is disguised as a Roman numeral.
- The plaque from the other statue tells you how to read the clue-count (G).
- Count how many of each letter, then press the letters from those that appear the least often to those that appear the most often.
- Press the letters M, D, C, S, V, I, and X.
- Enter the doorway and look at the mini-game on the right door.
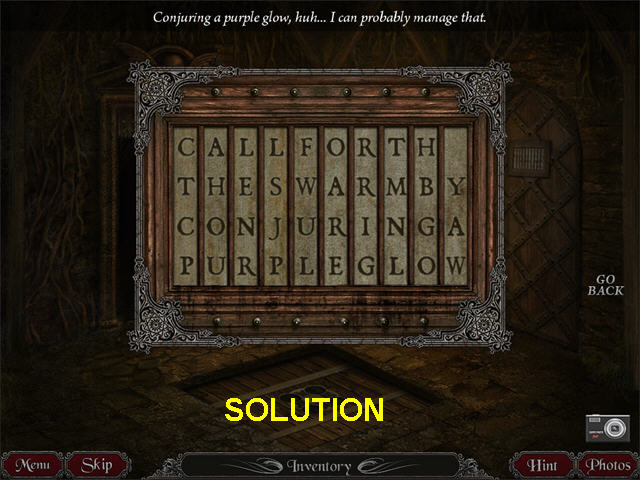
- Form a phrase in this mini-game.
- Click on each column to move the letters down.
- Once you have the phrase, the door will unlock.
- Your camera will take a photo of the solved puzzle.
- Enter the right door.
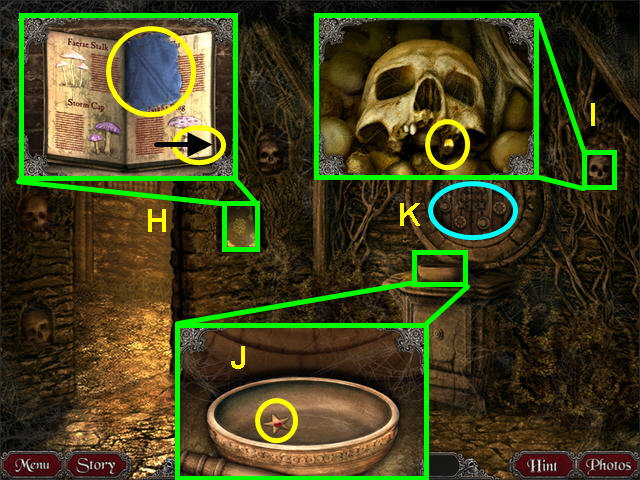
- Look at the book in the niche and take the BLUE CLOTH (H).
- Click on the arrow to turn the page and read the book.
- Look at the skull on the right and take the GOLD TOOTH (I).
- Look at the bowl and take the STAR (J).
- Make note of the mini-game over the bowl (K).
- Exit the room to the left.
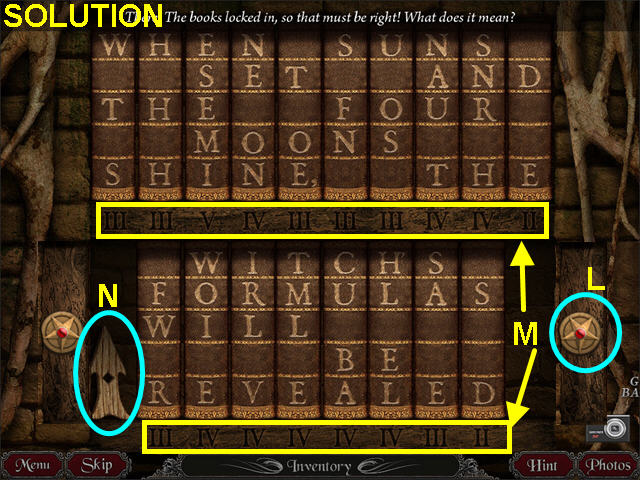
- Look at the bookcase on the left for a mini-game.
- Take the STAR from your inventory and place it in the star slot on the right (L).
- This will open an empty slot and allow you to move the books around.
- Move the books to form a phrase.
- The numbers on the bottom of the shelf indicate how many letters are on the book that belongs in that position (M).
- Click on a book to select it; then click on the empty spot to move positions.
- Your camera will take a photo of the solved puzzle.
- Take the WOODEN ARROW (N).
- Exit the close-up and enter the right room.
- Look at the mini-game over the bowl.
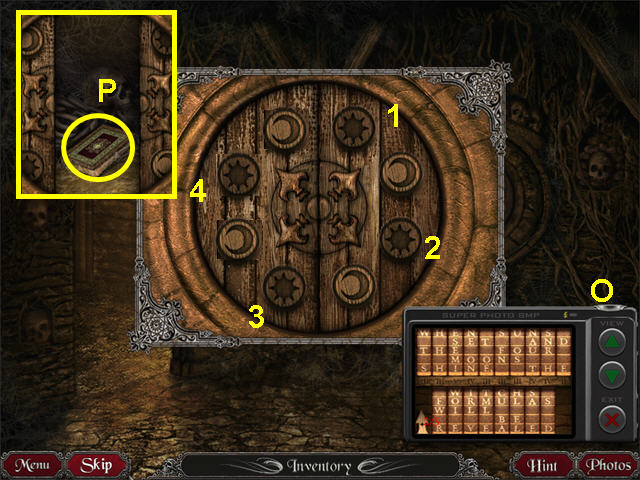
- Your camera will take a photo of the arrows in the center.
- Look at your photos for a clue (O).
- Press the suns down and the moons up in this puzzle.
- Each button you press affects the two on either side.
- Press the buttons in numerical order (1-4).
- Look at the book in the compartment; read all the pages to learn the recipes (P).
- Exit the close-up and walk left twice to return to the room with the two angel statues.
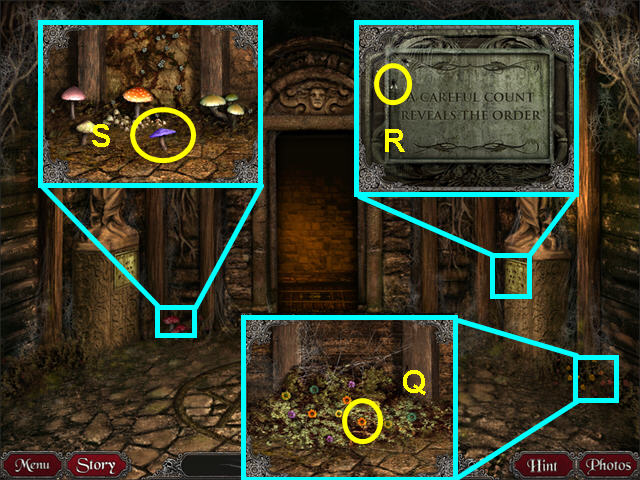
- Look at the flowers on the right and take a FLAME BLOSSOM (Q).
- Look at the right statue's plaque and take a FLY (R).
- Look at the mushrooms on the left and take a STORM CAP MUSHROOM (S).
- Walk forward to the next room.
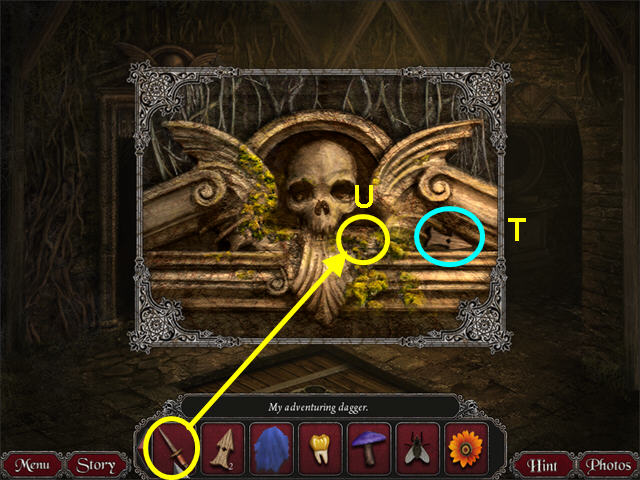
- Look at the skull over the left door.
- Take the WOODEN ARROW (T).
- Use the DAGGER from your inventory to take some MOSS (U).
- Exit the close-up and enter the right room.
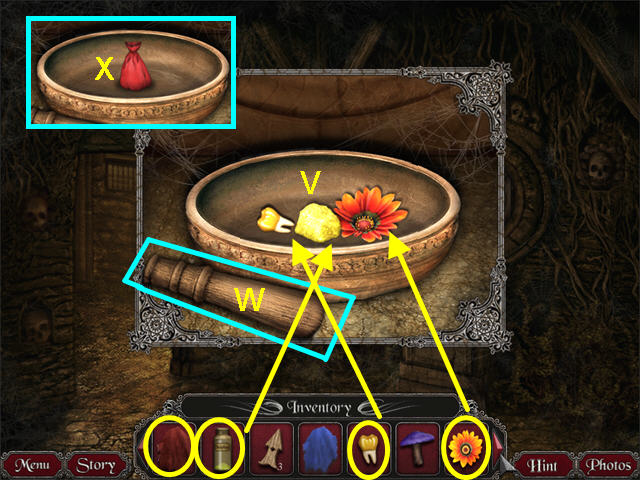
- Look at the bowl.
- Place the SULFUR, FLAME BLOSSOM, and GOLD TOOTH from your inventory into the bowl (V).
- Click on the mortar to pick it up; then click on the bowl's ingredients to grind them to a powder (W).
- Use the RED CLOTH from your inventory to make the RED POTION (X).
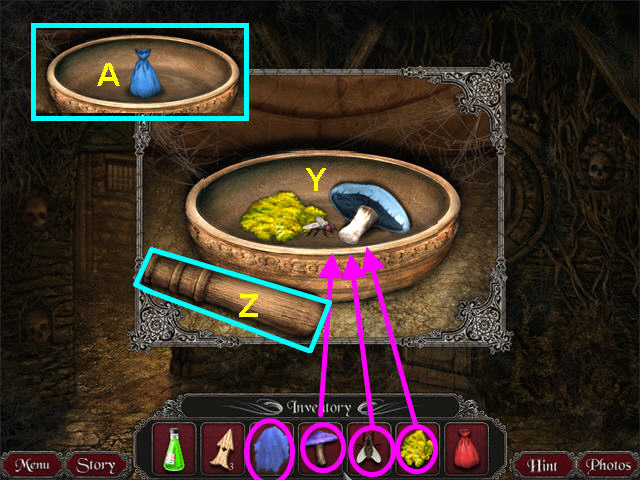
- Place the MOSS, STORM CAP MUSHROOM, and DEAD FLY from your inventory into the bowl (Y).
- Click on the mortar to pick it up; then click on the bowl's ingredients to grind them to a powder (Z).
- Use the BLUE CLOTH from your inventory to make the BLUE POTION (A).
- Exit the close-up and walk to the left room.
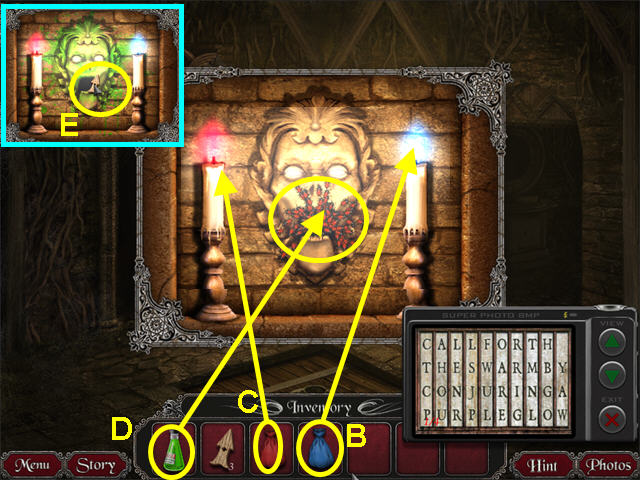
- Look at the close-up of the face sculpture on the wall.
- Look at the photo clue (B).
- Use the RED and the BLUE POTIONS on the two candles (it does not matter which candle) (C).
- When the swarm of bugs arrives, use the POISON to kill them (D).
- Reach in the mouth and take a WOODEN ARROW (E).
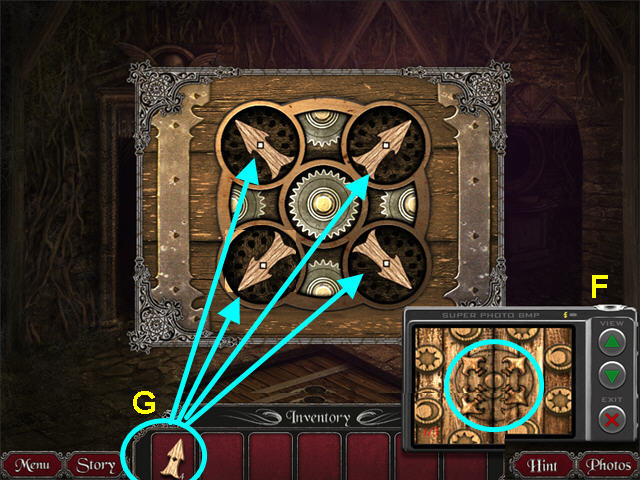
- Exit the close-up and look at the mini-game on the floor.
- Look at the photo for a clue (F).
- Place the four WOODEN ARROWS onto the spindles (G).
- Click on the arrows to match their positions in the photo.
- Exit the close-up and enter the trap door.
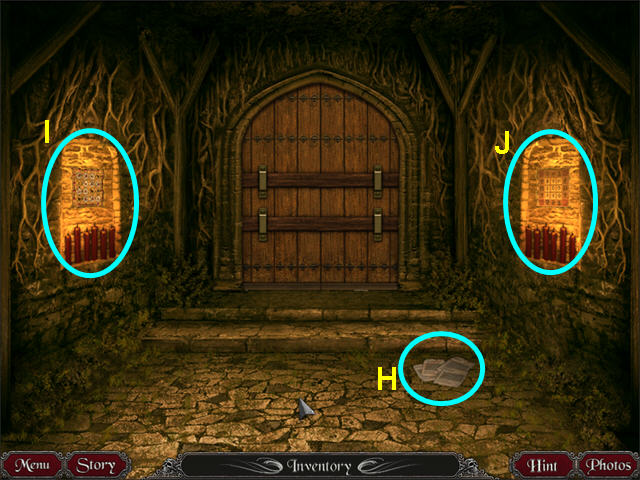
- Look at the papers on the floor so your camera can take a photo clue (H).
- Note the mini-game on the left wall (I).
- Look at the mini-game on the right wall (J).
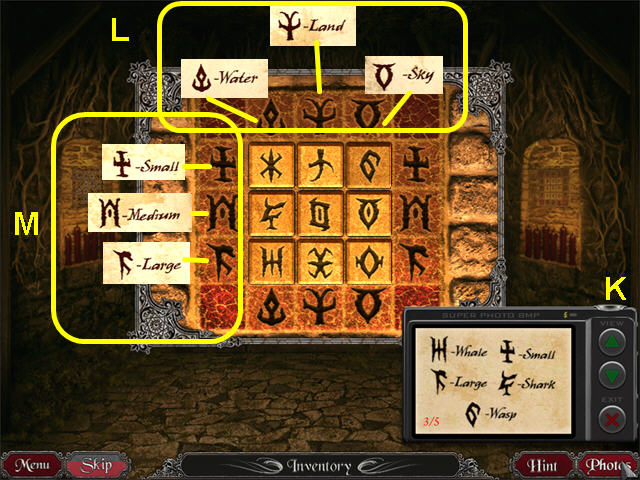
- Use the photos to decipher the symbols (K).
- The columns are Water, Air, and Sky (L).
- The rows are Small, Medium, and Large (M).
- Click on two tiles to swap their positions.
- Look at the mini-game on the left wall.
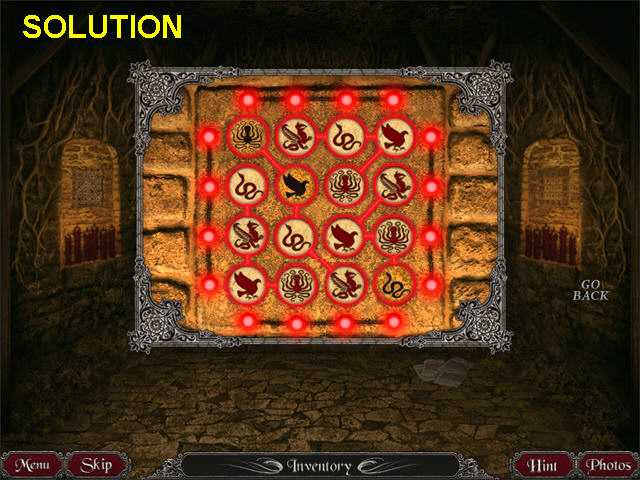
- Have one of each of the four animals in every column, row, and stringed set to complete this mini-game.
- Click on a disc to change the animal.
- Several are locked into place to get you started.
- Once the door is opened, look at the close-up of the coffin for a mini-game..
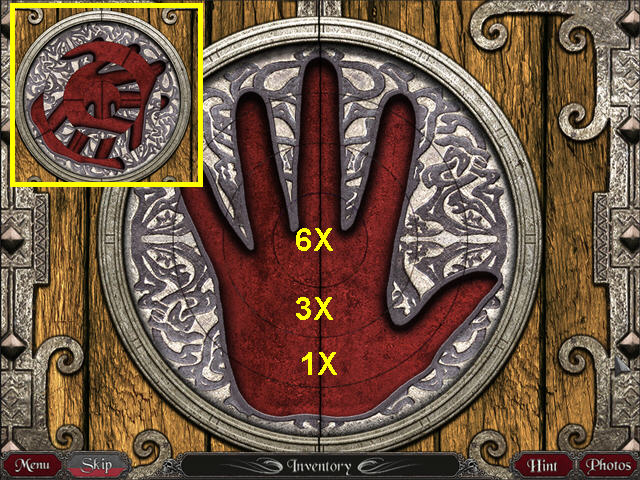
- The object of this mini-game is to reform the hand by rotating the rings.
- Click on a ring to rotate it; some rings will affect other rings.
- Click the center six times.
- Click the next ring three times and the third ring from the center once.
- The hand hid another mini-game.
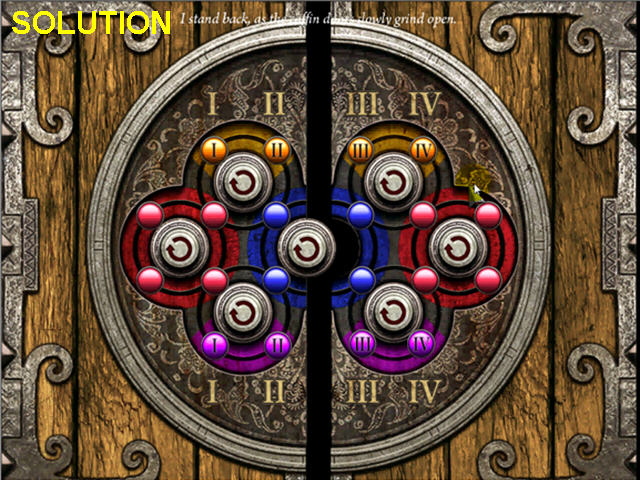
- Move the blank balls onto the matching colors, and the numbered balls adjacent to the matching numbers to complete this mini-game.
- Check out our video solution!
- Click on the rings to rotate the balls.
Created at: 2010-09-05

