

Walkthrough Menu
- General Tips
- Chapter 1: The Ship
- Chapter 2: The Beach
- Chapter 3: The Prison
- Chapter 4: The Palace
- Chapter 5: The Mines
- Chapter 6: The Town
- Chapter 7: The Swamp
- Chapter 8: The Shore
General Tips
- This is the official guide for Nightmares from the Deep: Davy Jones.
- This guide will not mention each time you have to zoom into a location; the screenshots will show each zoom scene.
- We will use the acronym HOP for Hidden-object puzzles. Interactive items will be color-coded and some will be numbered; please follow the numbers in sequence when appropriate.
- The HOP lists may be random; our lists may vary from yours.
- You may choose to play a Mah-jong game instead of an HOP.
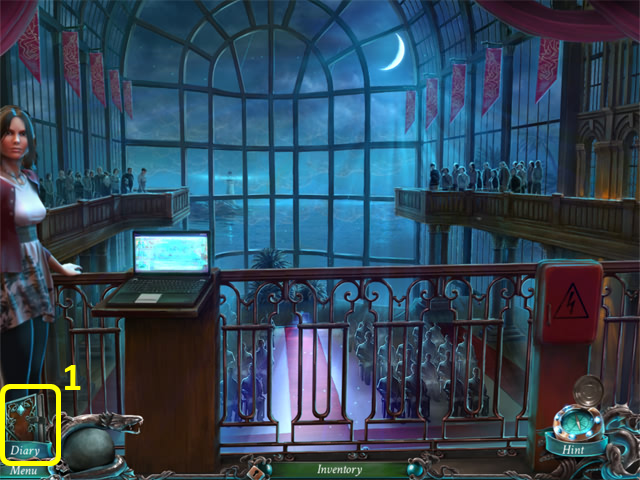
- Select the diary (1) for story updates and objectives.
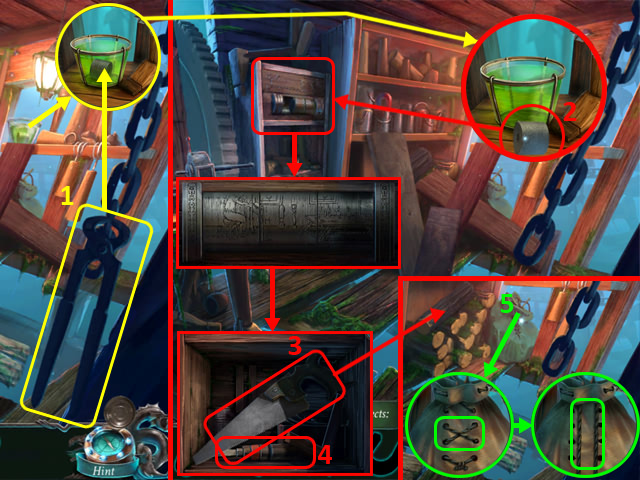
Chapter 1: The Ship
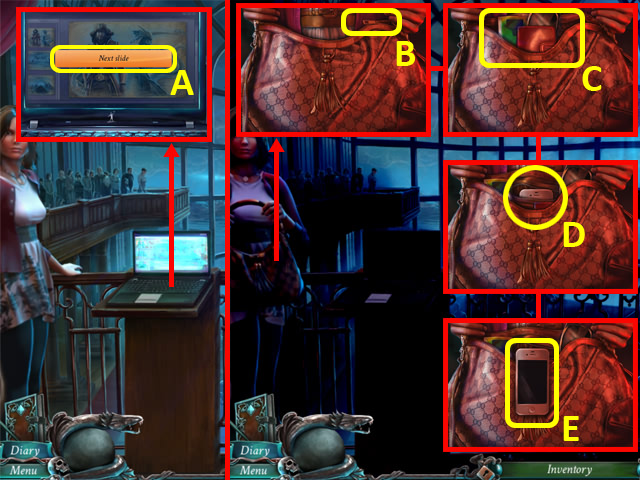
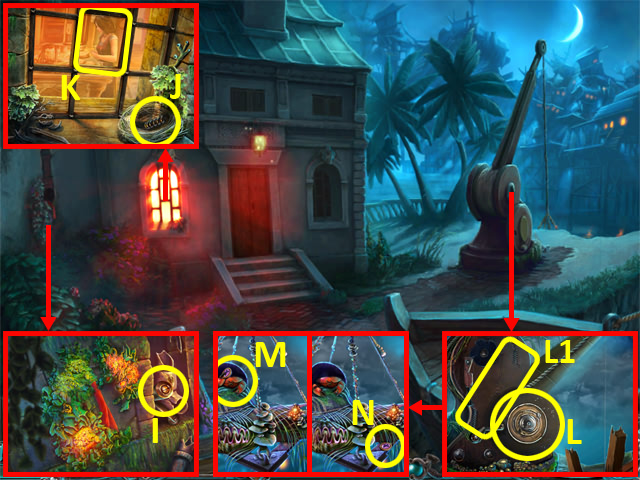
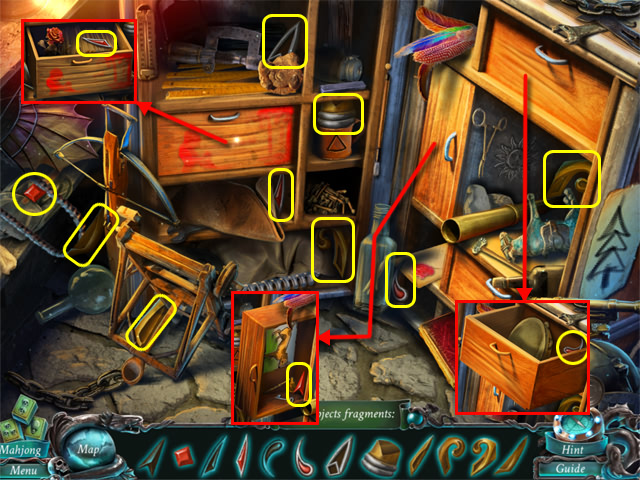
- Select the button (A).
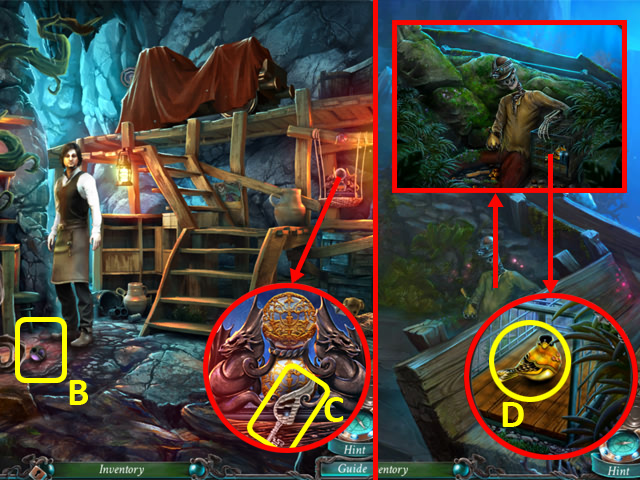
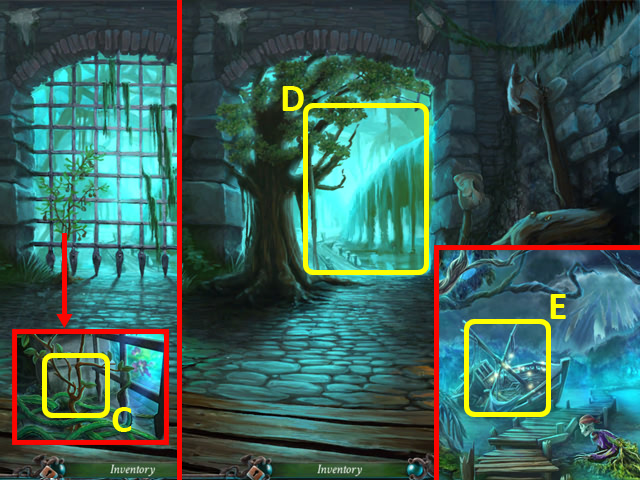
- Unzip the bag (B); move the items (C). Remove the phone (D); use it (E).
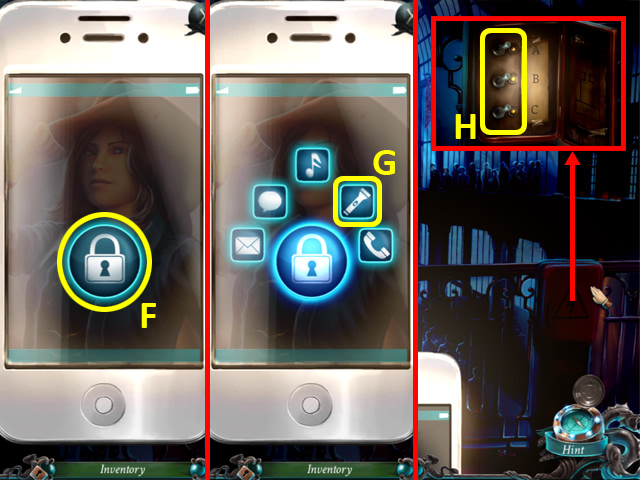
- Press the button (F); select the flashlight (G).
- Open the panel; flip all switches (H) down.
- Select Next Slide on the computer.
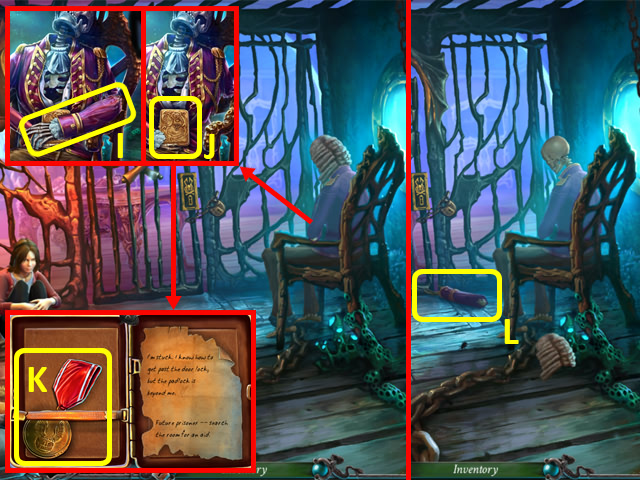
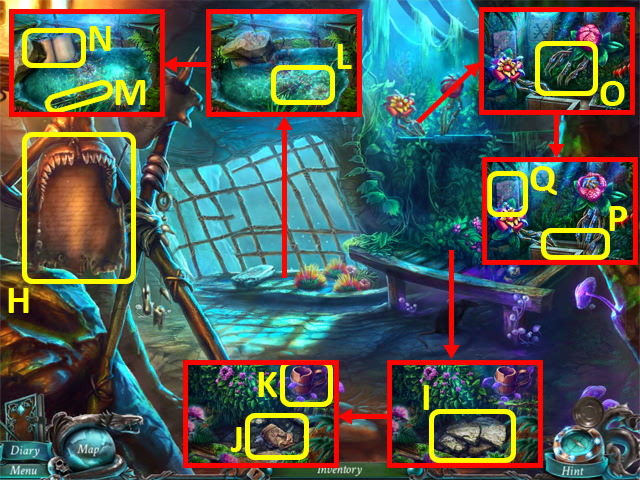
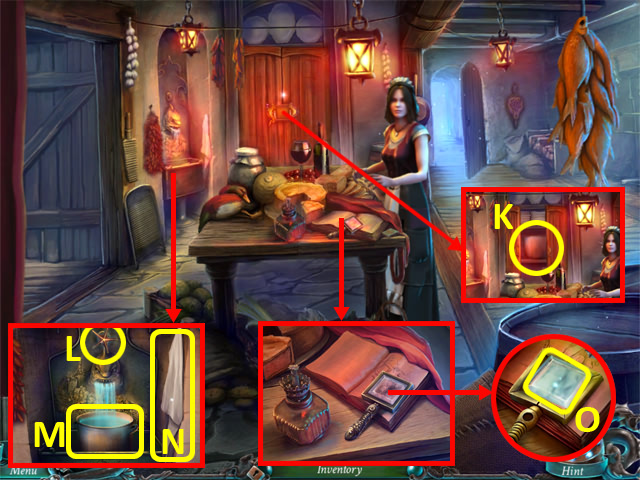
- Nudge the Admiral; move the arm (I).
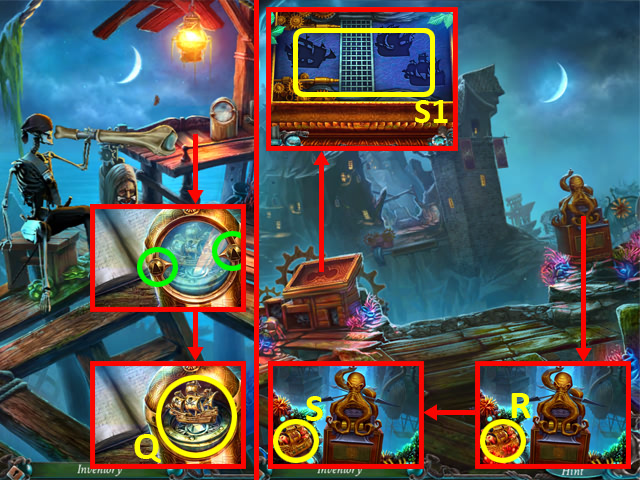
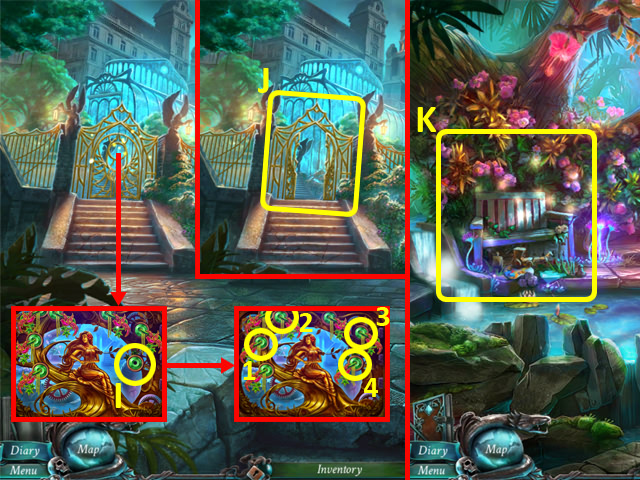
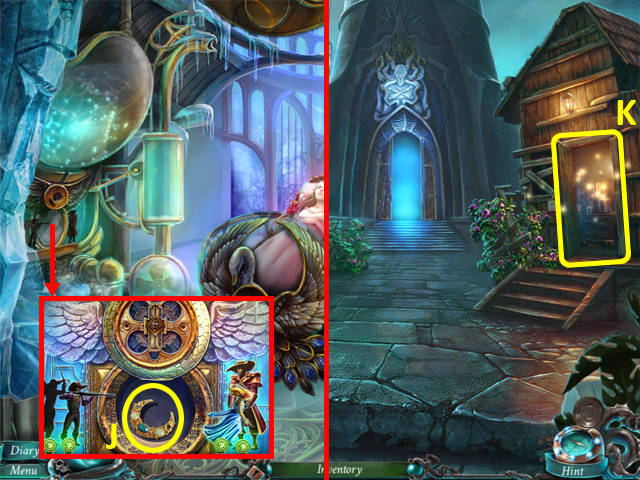
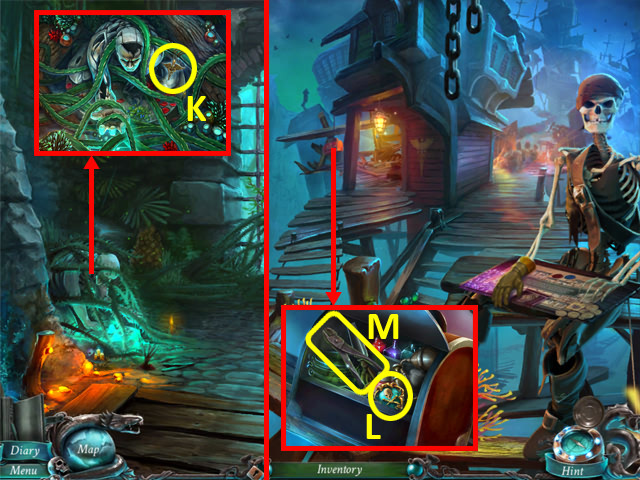
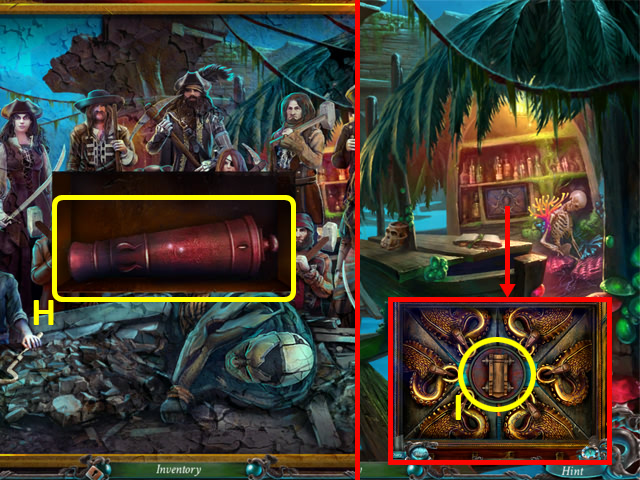
- Open the case (J); take the MEDAL (K).
- Grab the ADMIRAL'S HAND (L).
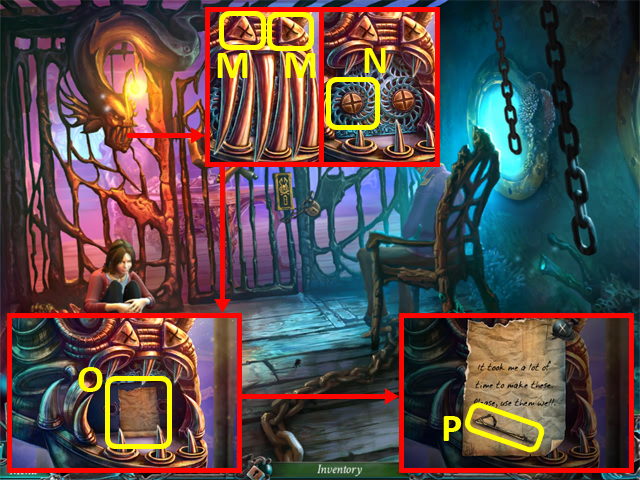
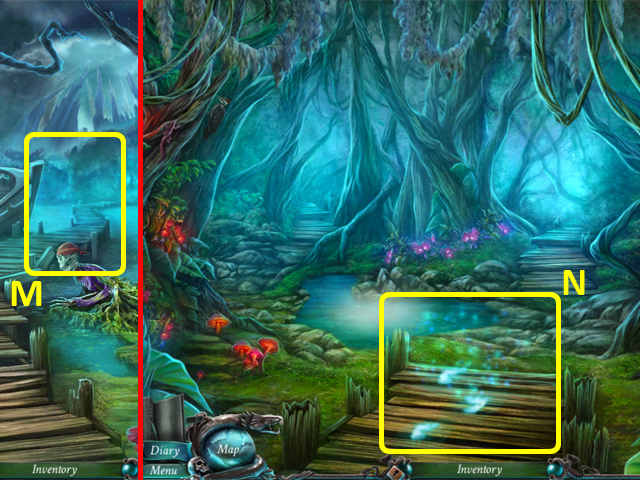
- Press the buttons (M).
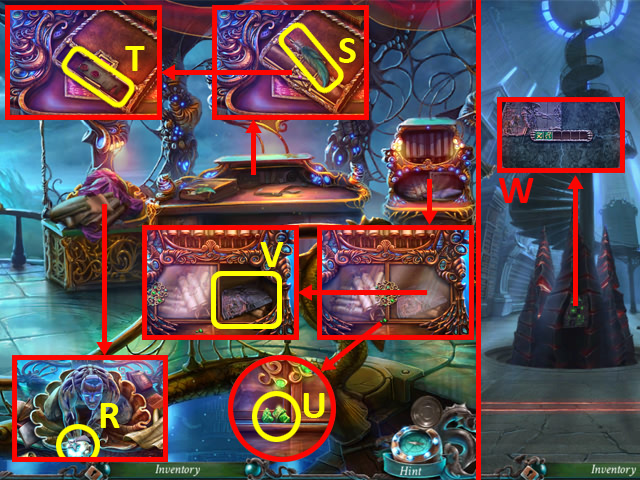
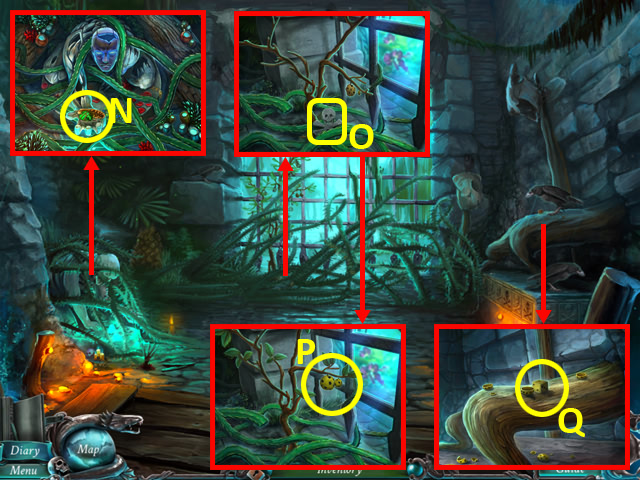
- Unscrew the grill (N) with the MEDAL.
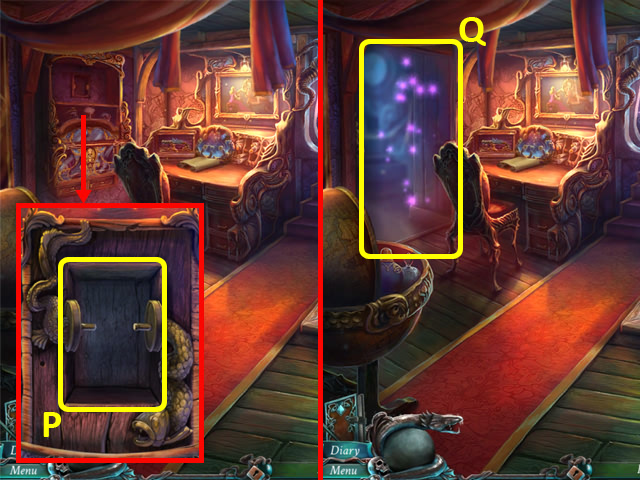
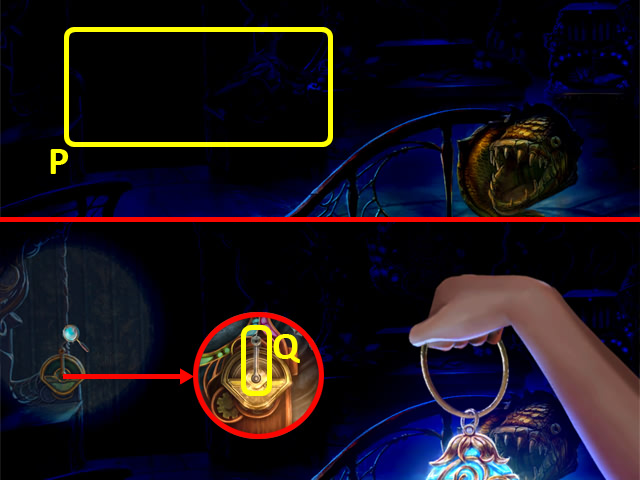
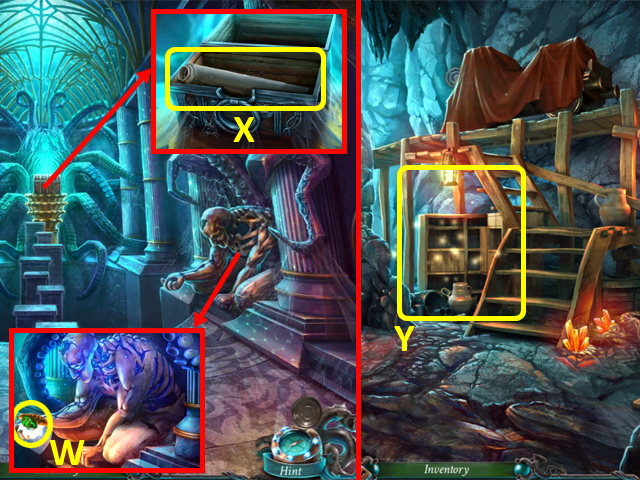
- Read the note (O); grab the LOCKPICKS (P).
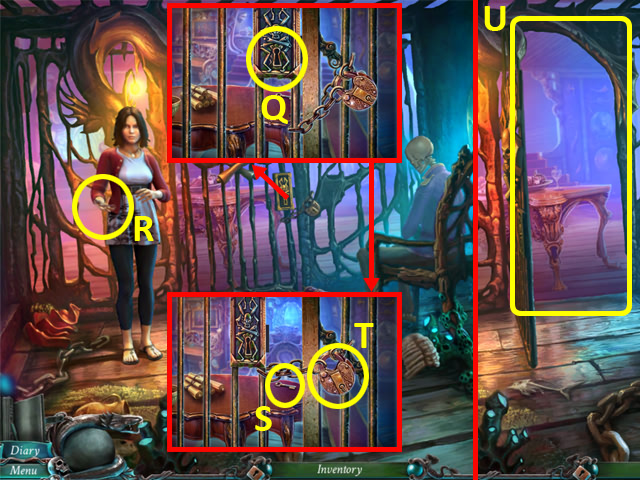
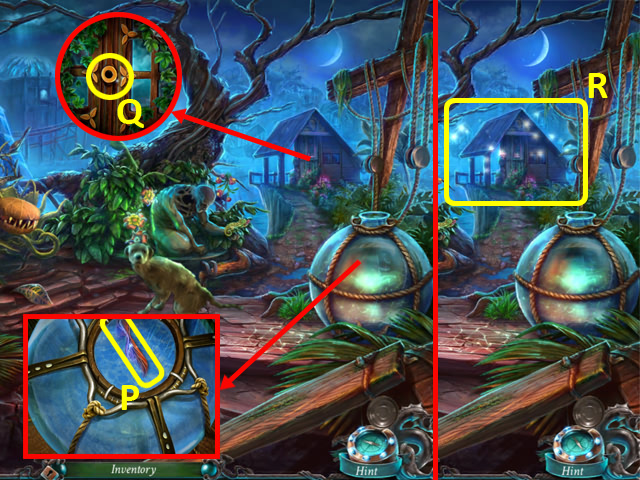
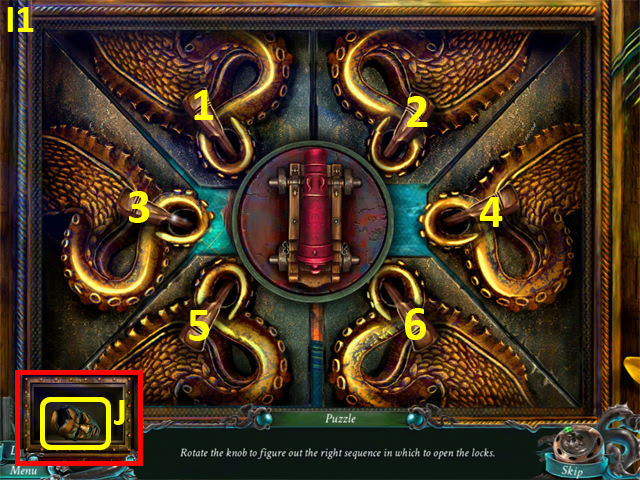
- Insert the LOCKPICKS into the lock (Q).
- Take the HAIRPIN (R); insert it into the lock (Q).
- Use the ADMIRAL'S HAND on the KEY (S).
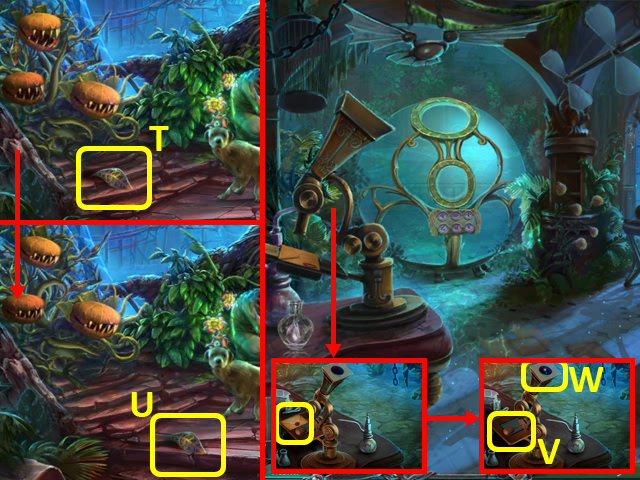
- Unlock the padlock (T) with the KEY.
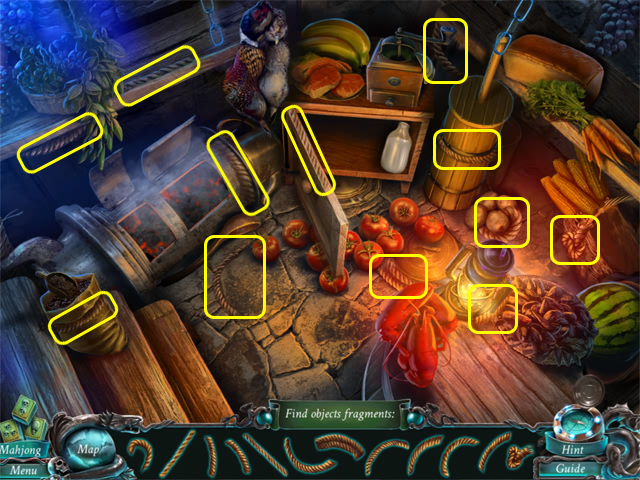
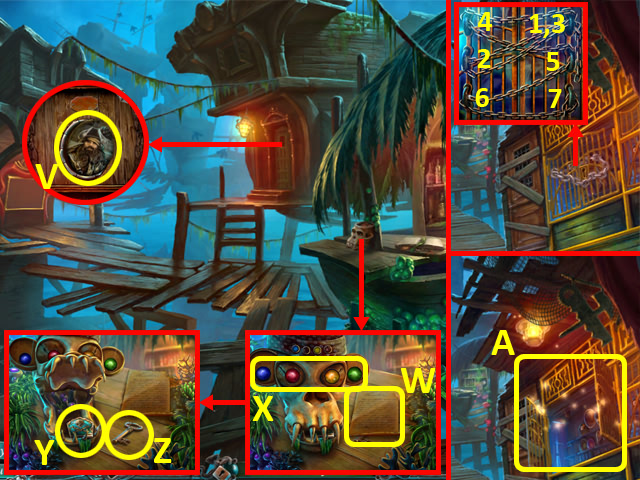
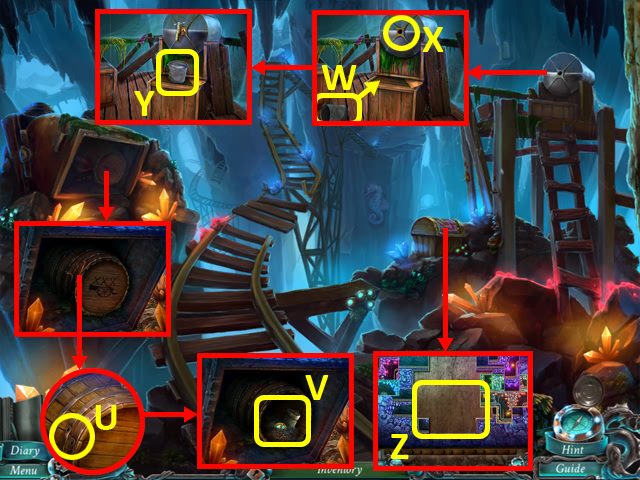
- Walk forward into the Captain's Cabin (U).
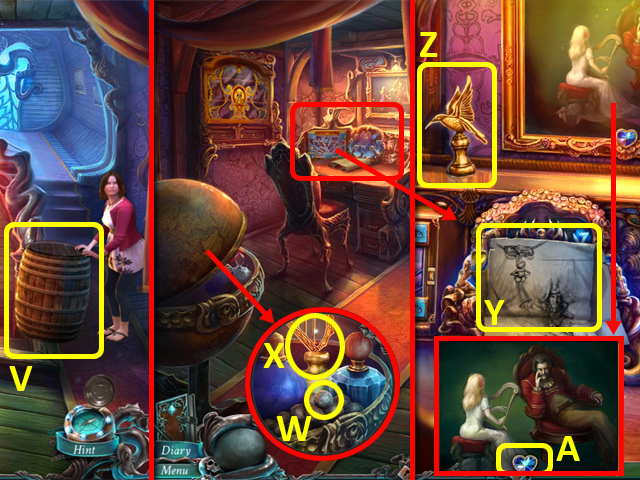
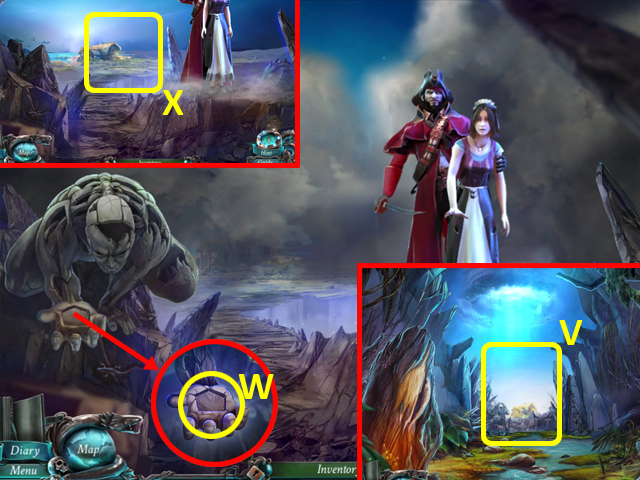
- Push the barrel (V).
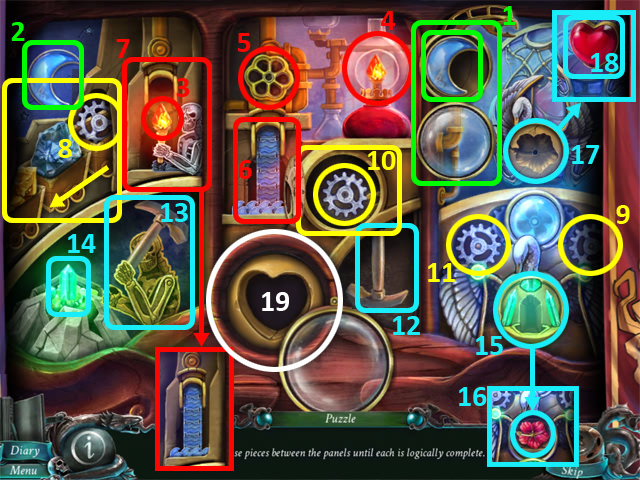
- Open the globe; grab the BULLET (W) and HARP WEIGHT (X).
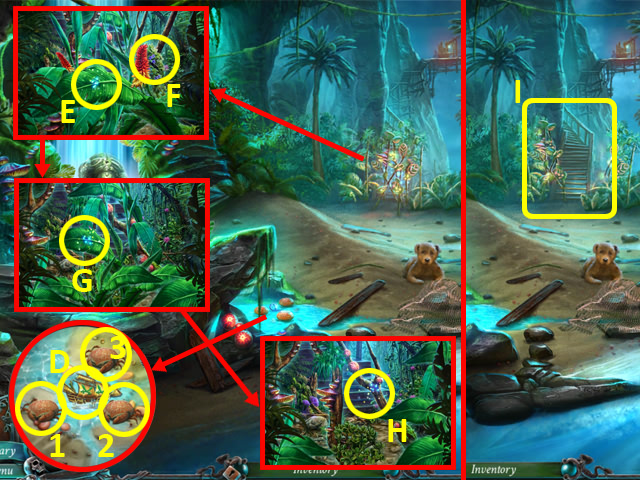
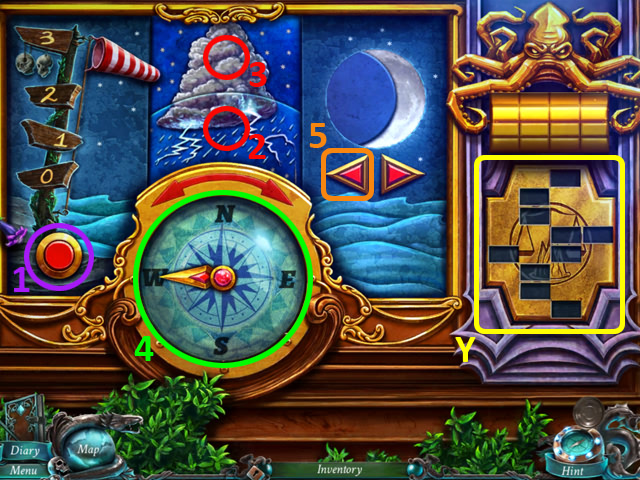
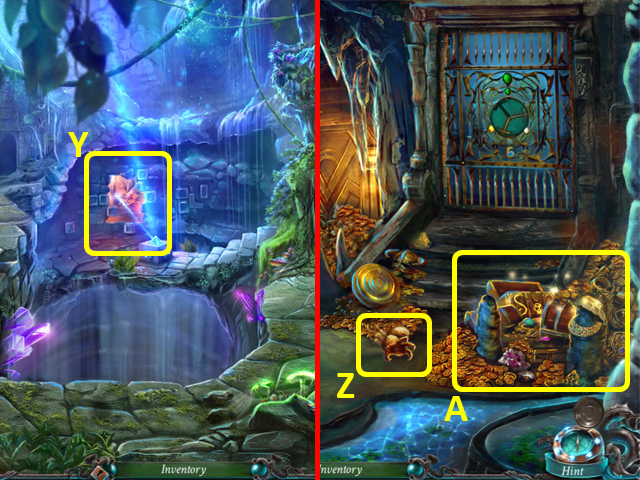
- Look at the picture (Y); take the BIRD WEIGHT (Z) and HEART 1/3 (A).
- Back out.
- Take the HEART 2/3 (B).
- Put the weight (C), HARP WEIGHT and BIRD WEIGHT on the scale (D).
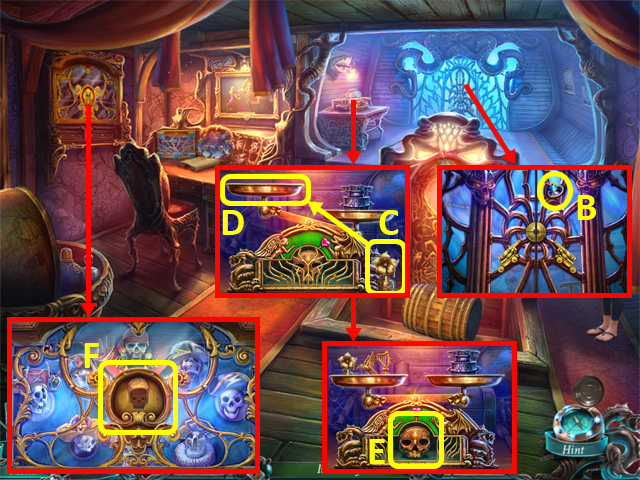
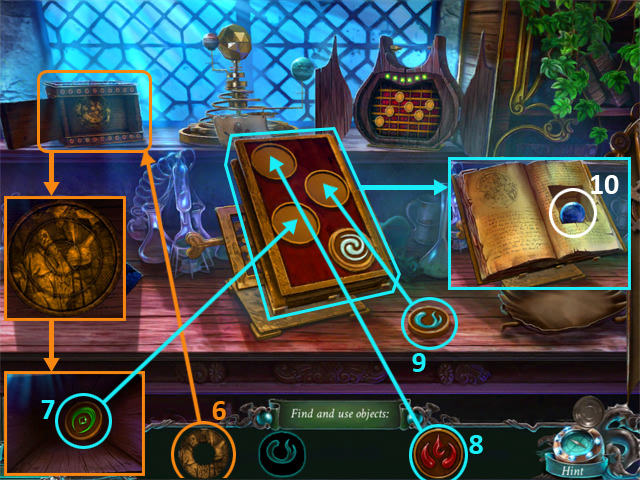
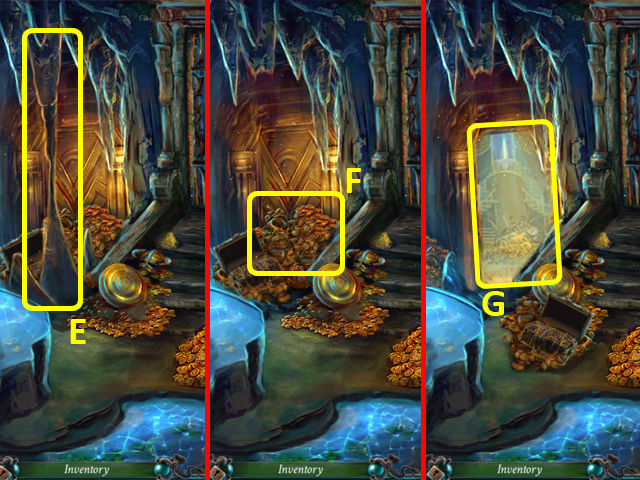
- Take the SKULL (E).
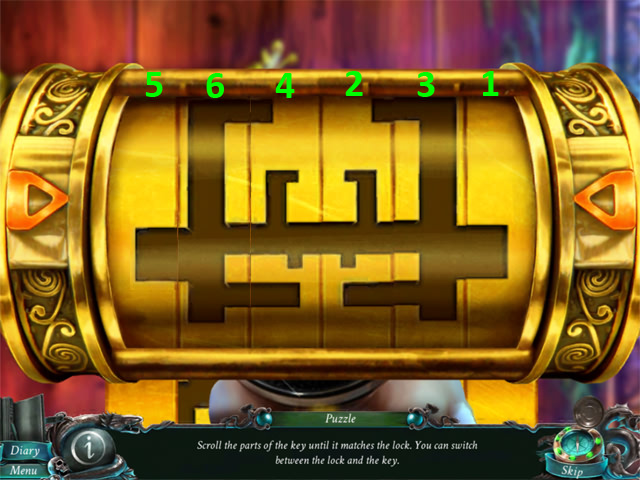
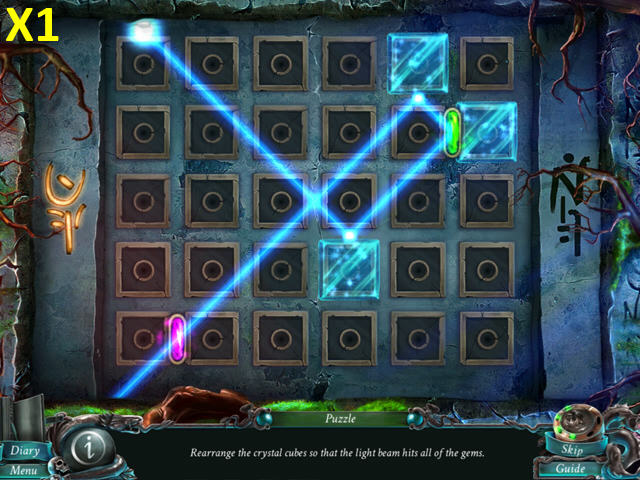
- Place the SKULL into the space (F) to trigger a puzzle.
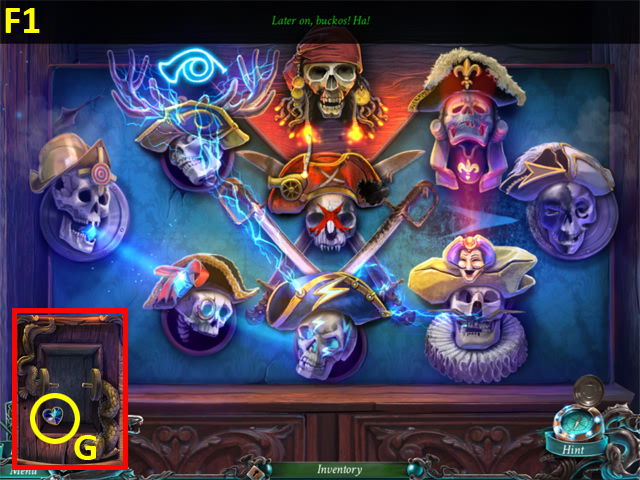
- Sort the hats.
- Solution (F1).
- Take the HEART 3/3 (G).
- Back out.
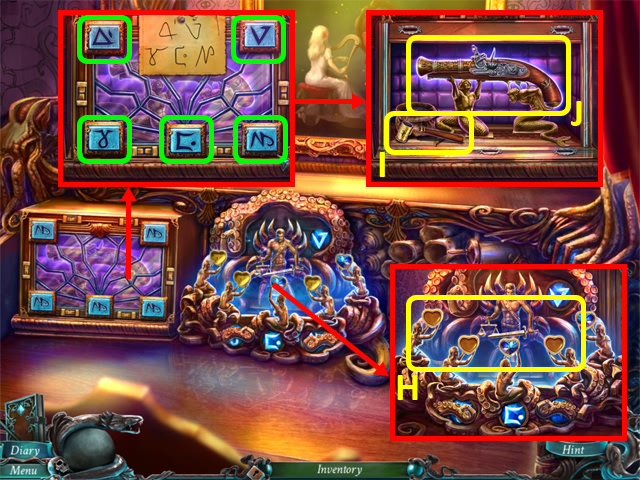
- Place the HEARTS into the holes (H).
- Set the symbols (green).
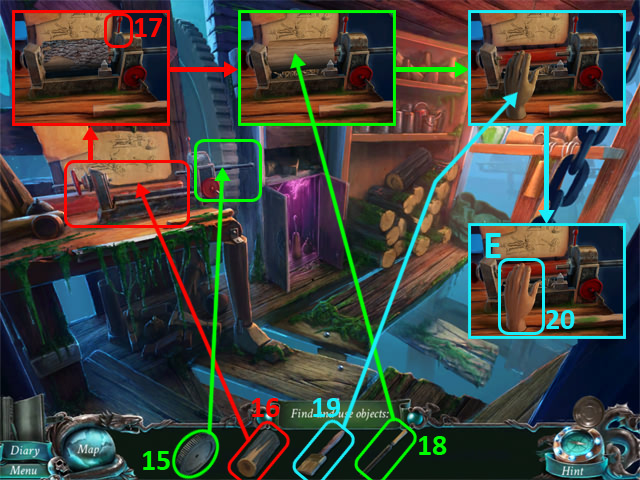
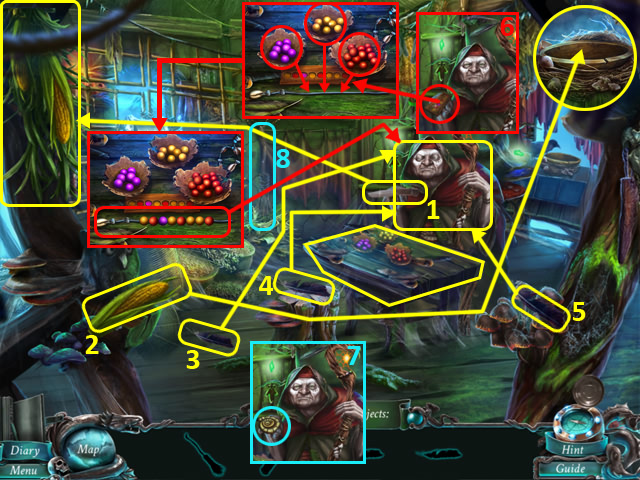
- Use the scoop (I) and BULLET on the blunderbuss; take the BLUNDERBUSS (J).
- Back out.
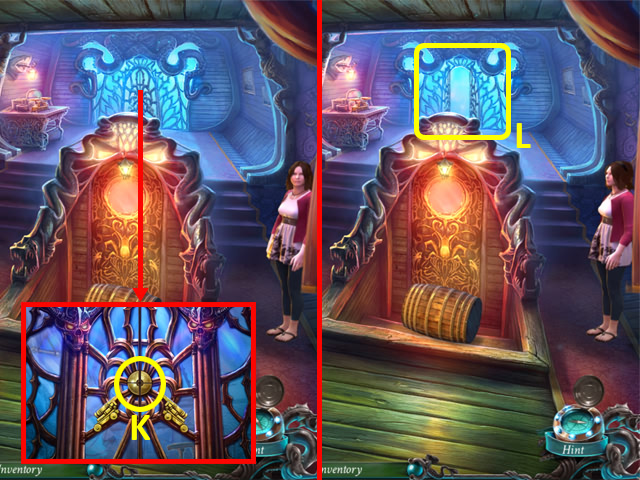
- Shoot the lock (K) with the BLUNDERBUSS.
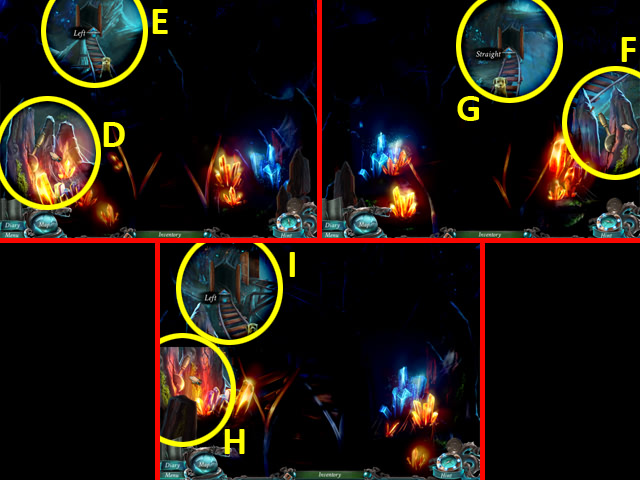
- Walk forward onto the Balcony (L).
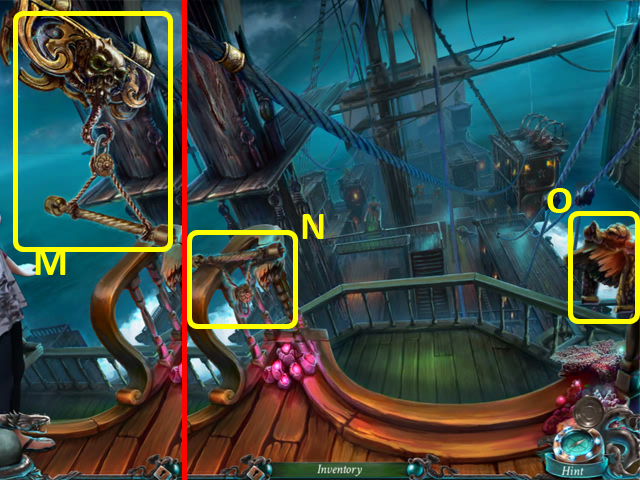
- Select the zipline (M).
- Take the ZIPLINE HANDLE (N) and LEVER (O).
- Back out.
- Place the LEVER into the opening (P).
- Go through the door (Q) to access a HOP.
- Play the HOP.
- You receive a ZIPLINE REEL (R).
- Walk forward.
- Add the ZIPLINE REEL and the ZIPLINE HANDLE to the zipline (S); use it (T).
- Use the crank three times (U).
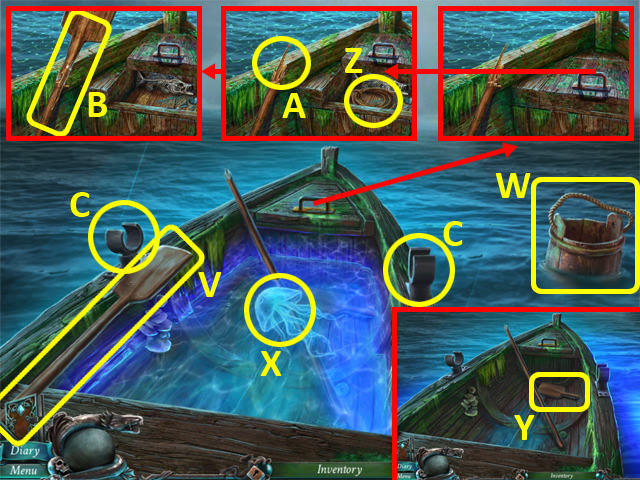
- Use the OAR (V) to get the BUCKET (W) and remove the jellyfish (X).
- Use the BUCKET on the water; grab the OAR PART (Y).
- Take the ROPE (Z).
- Use the OAR PART and ROPE on the handle (A); take the FIXED OAR (B).
- Put the OAR and FIXED OAR into the holders (C).
- Select the boat.
Chapter 2: The Beach
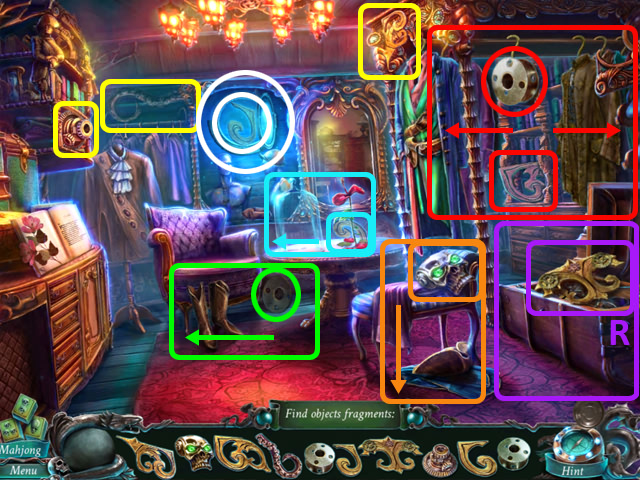
- Select the GALLEON (D) and the crabs (1-3). Take the GALLEON (D).
- Move the items (E -H).
- Walk forward to the Crow's Nest (I).
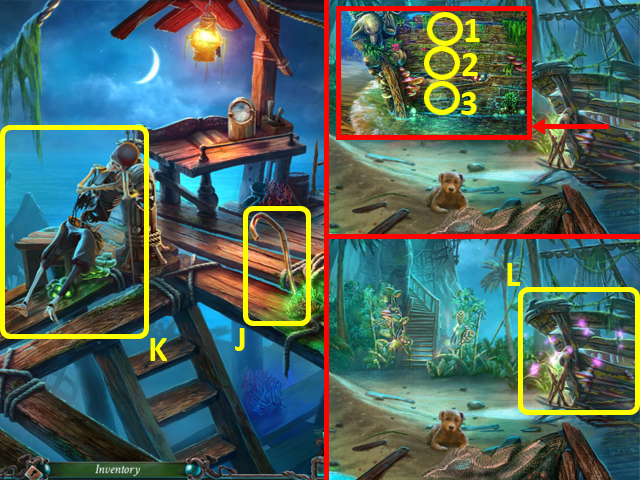
- Grab the STEEL ROD (J).
- Talk to the pirate (K).
- Back out.
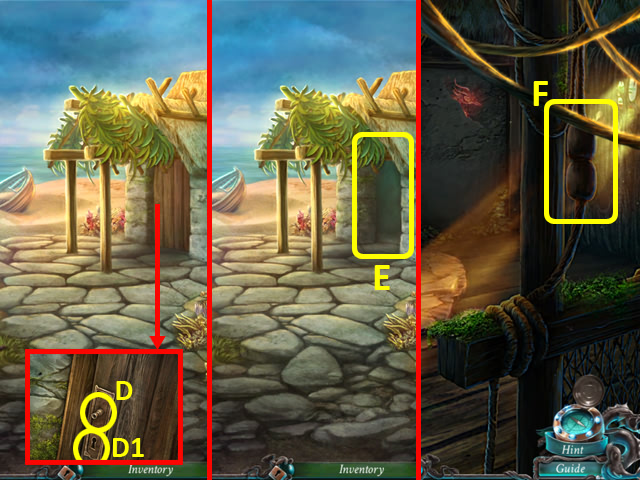
- Use the STEEL ROD on the planks (1-3).
- Examine the boat to access a HOP (L).
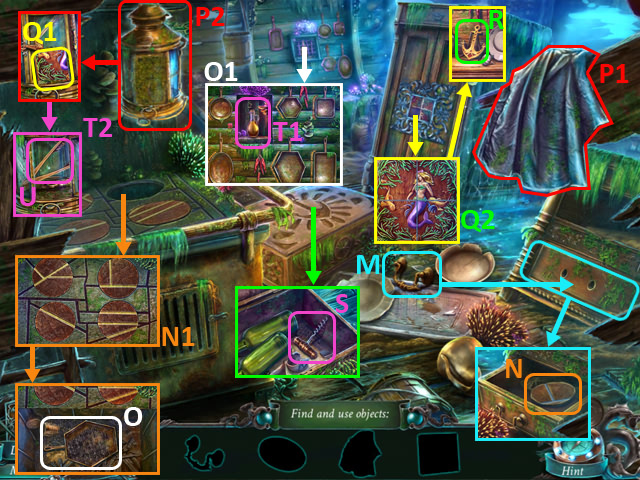
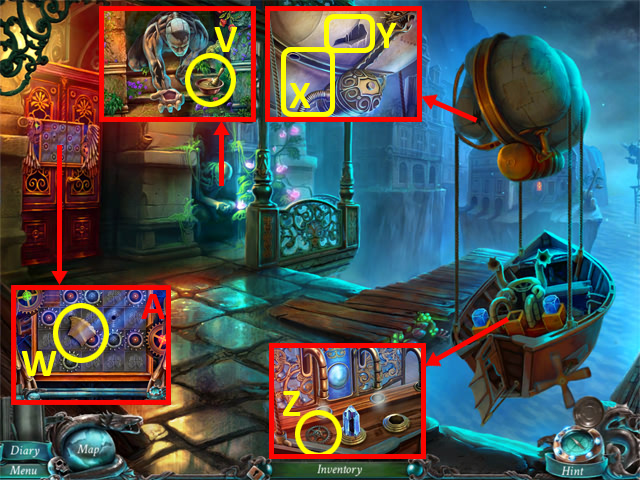
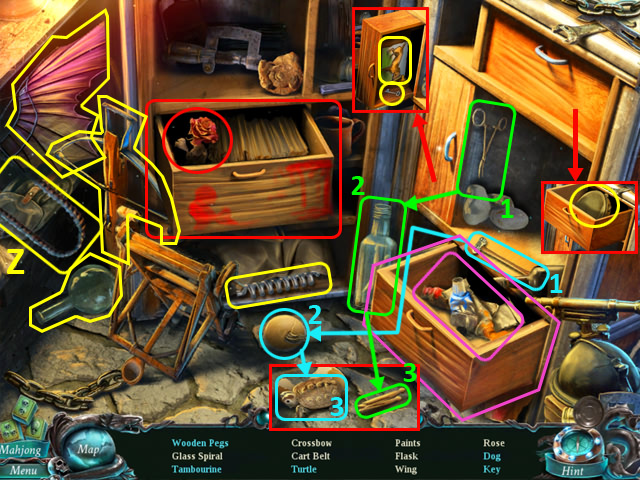
- Move the items; use the drawer handle (M) on the drawer and take the stove cover (N).
- Place the stove cover on the stove and rotate them (N1).
- Move the ash; grab the frying pan (O).
- Hang the frying pan; swap them as shown (O1).
- Use the rag (P1) on the lantern (P2); drag it to clean the lantern.
- Insert the puzzle piece (Q1) into the puzzle; complete the picture (Q2).
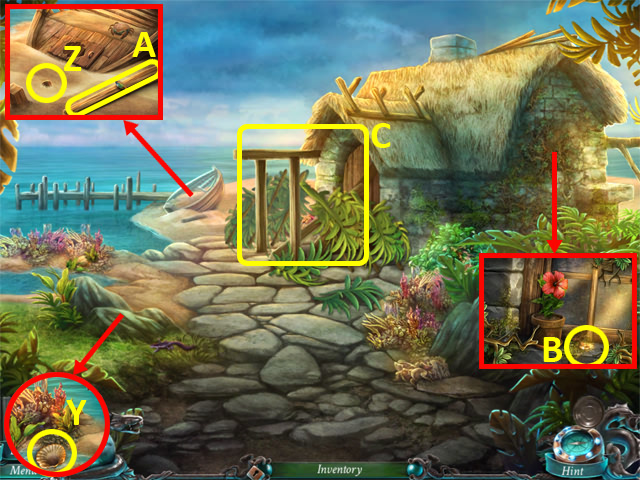
- Open the cupboard; take the anchor (R).
- Place the anchor on the box; take the corkscrew (S).
- Use the corkscrew on the oil bottle (T1); take it.
- Use the oil bottle on the lantern (T2); open it and take the WOODEN TONGS (U).
- Use the WOODEN TONGS to grab the SCISSORS (V).
- Use the SCISSORS on the net (W); grab the DOUBLOON (X).
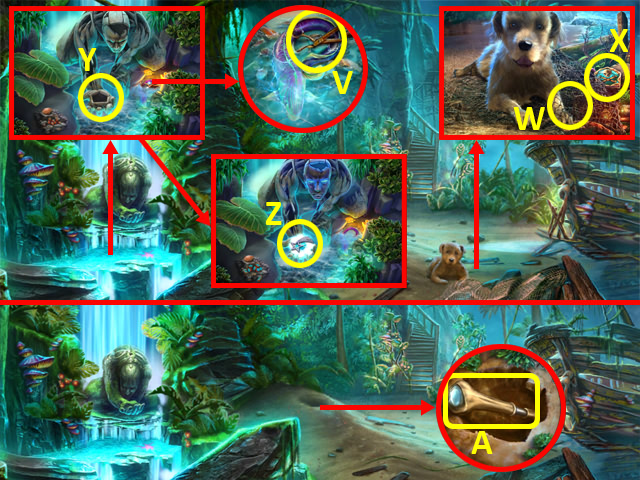
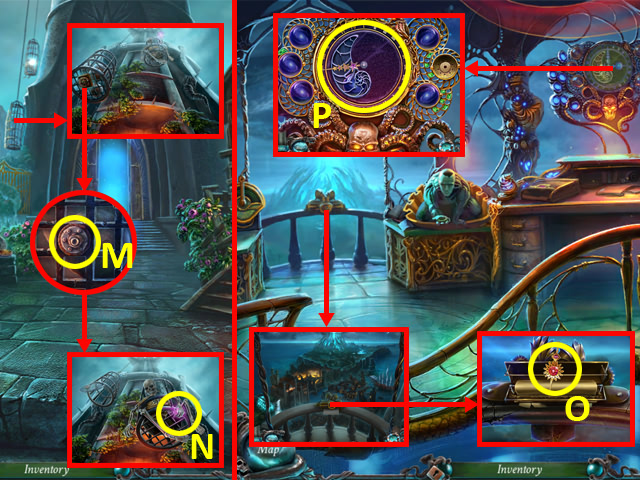
- Place the DOUBLOON into the guardian's hand (Y); take the FALLING STAR (Z).
- Take the SPYGLASS (A).
- Walk up, and give the SPYGLASS to the pirate; talk to him to trigger a puzzle.
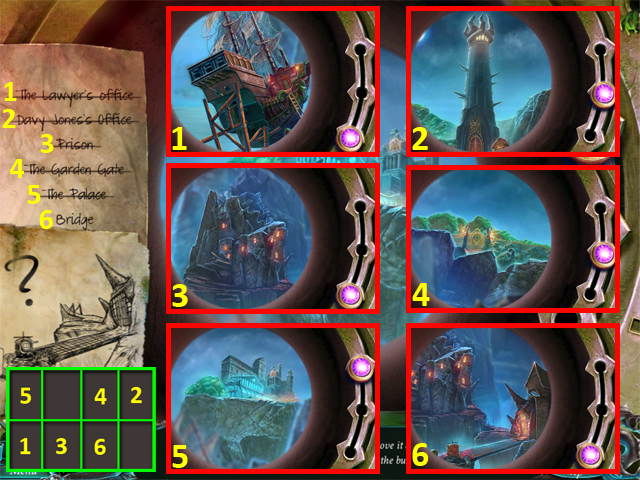
- Find the locations.
- Solution (1-6).
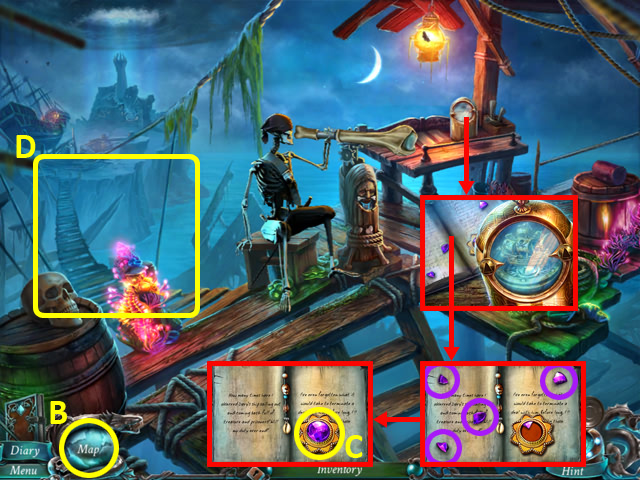
- A map is added to your toolbar (B).
- Select the fragments (purple); take the PURPLE JEWEL (C).
- Walk forward (D) to the Bridge.

- Take the RUNG 1/2 (E).
- Use the SCISSORS on the vines (F); move them and take the RUNG 2/2 (G).
- Use the RUNGS on the ladder (H).
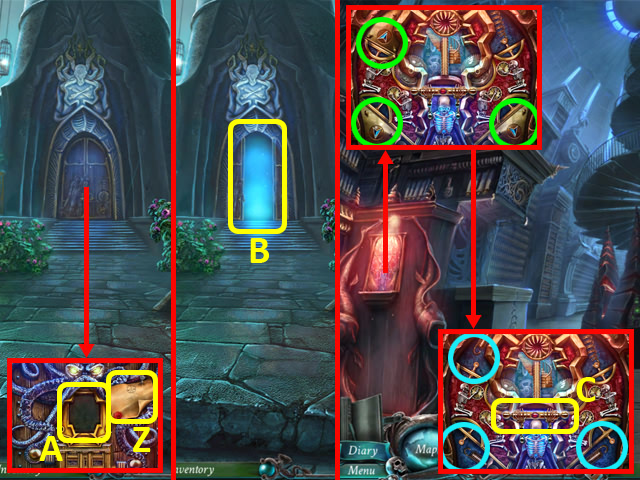
- Enter the Lawyer's Office (I).
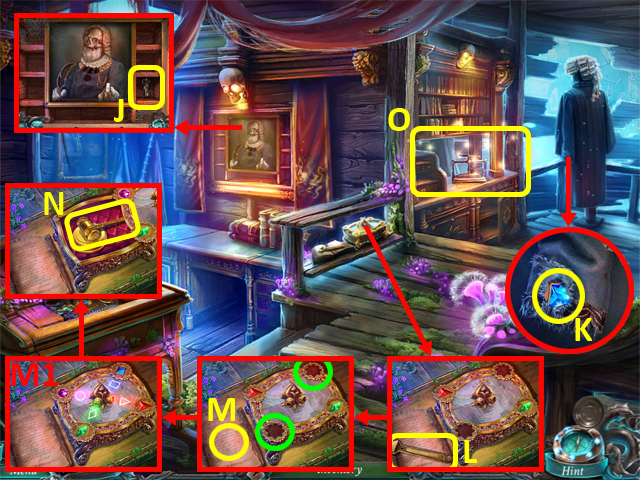
- Take the CELL KEY (J).
- Use the SCISSORS on the sleeve; take the BLUE JEWEL (K).
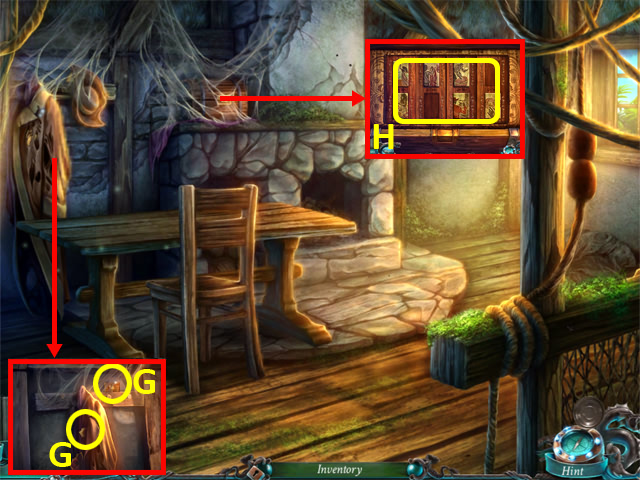
- Take the TRIANGLE SHAPED WRENCH (L); read the book (M).
- Insert the PURPLE JEWEL and BLUE JEWEL on the box (green); swap as shown (M1).
- Open the box; take the GAVEL (N).
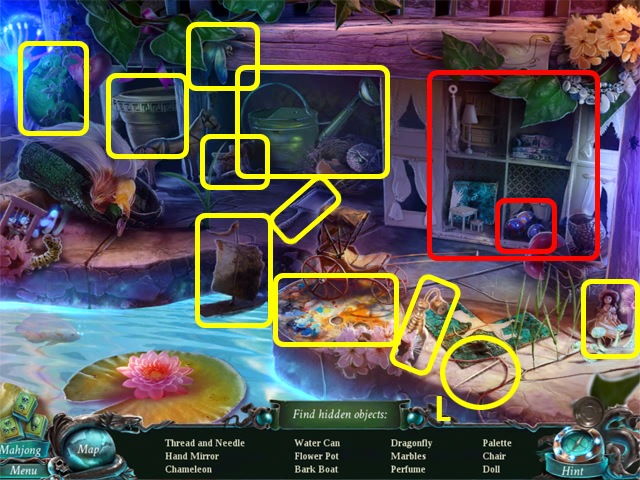
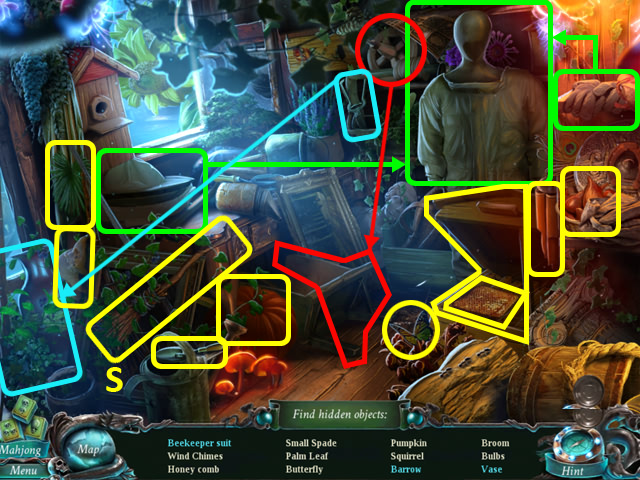
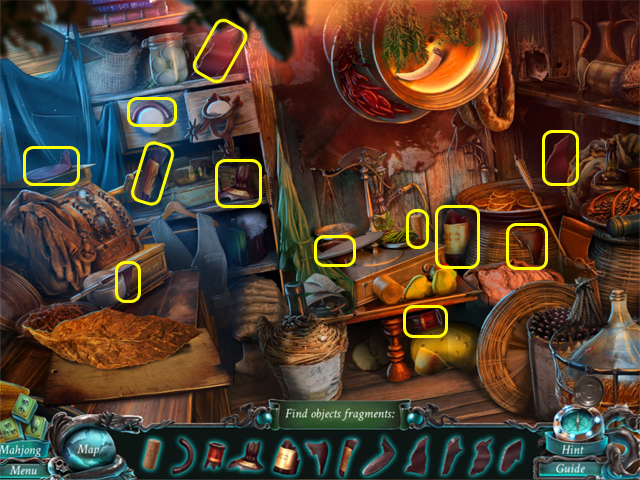
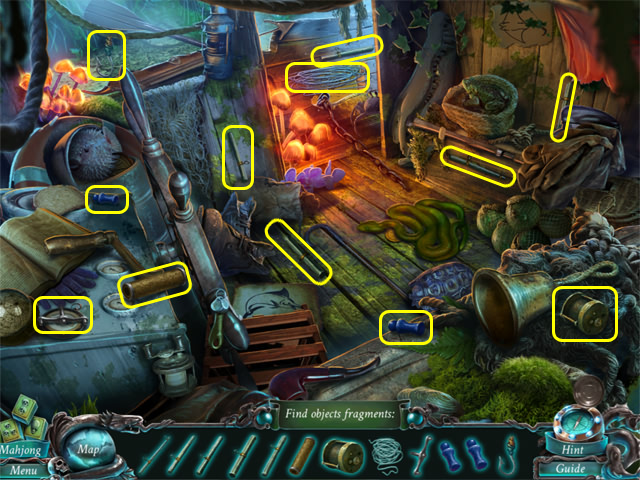
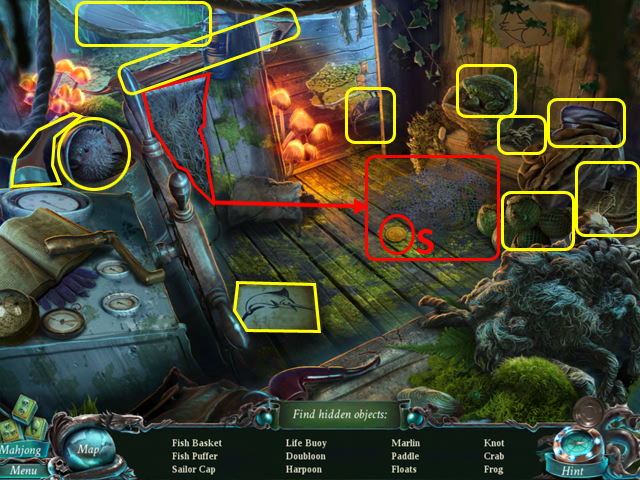
- Examine the shelves (O) for a HOP.
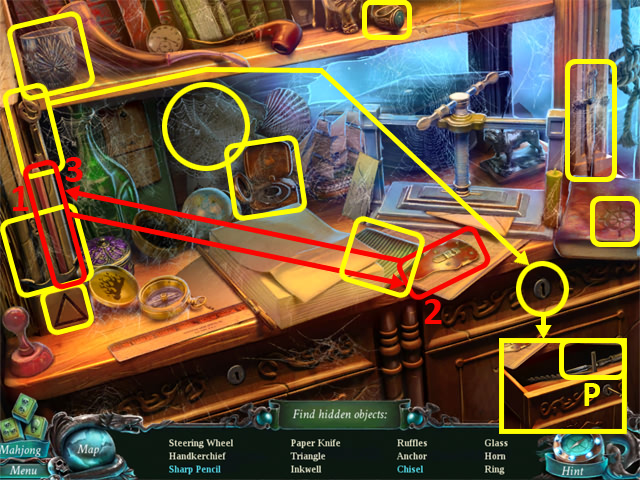
- Play the HOP.
- You receive a CHISEL (P).
- Return to the Crow's Nest.
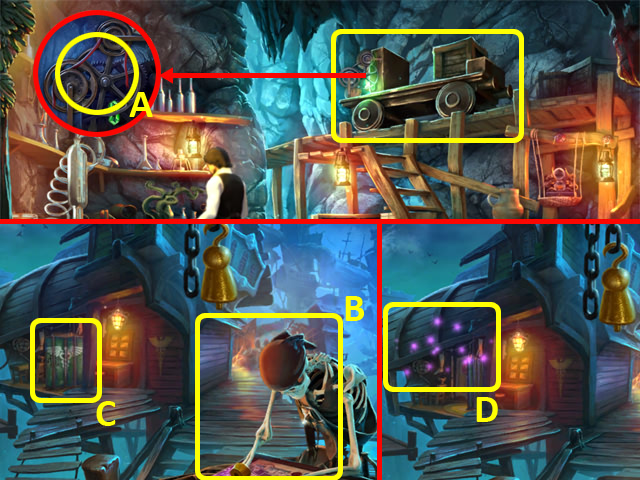
- Unscrew the bolts (green) with the SQUARE SHAPED WRENCH. Open the cover; take the BRIGANTINE (Q).
- Walk forward to the Bridge.
- Use the CHISEL on the ship (R); use the GAVEL on the chisel. Take the FRIGATE (S).
- Place the GALLEON, BRIGANTINE, and FRIGATE to trigger a puzzle (S1).
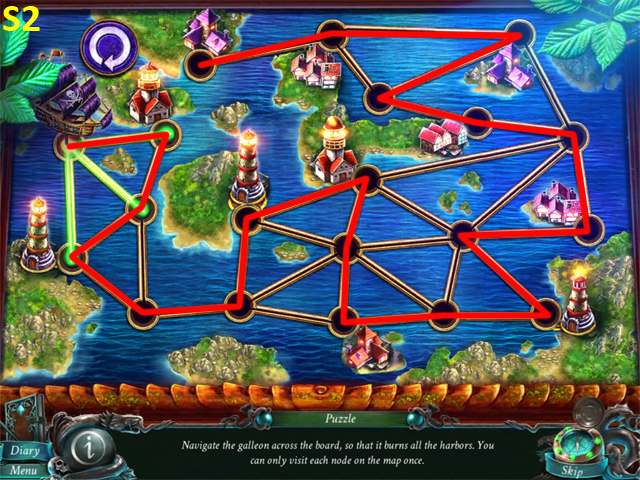
- Move the galleon along the path.
- Solution (S2).
Chapter 3: The Prison
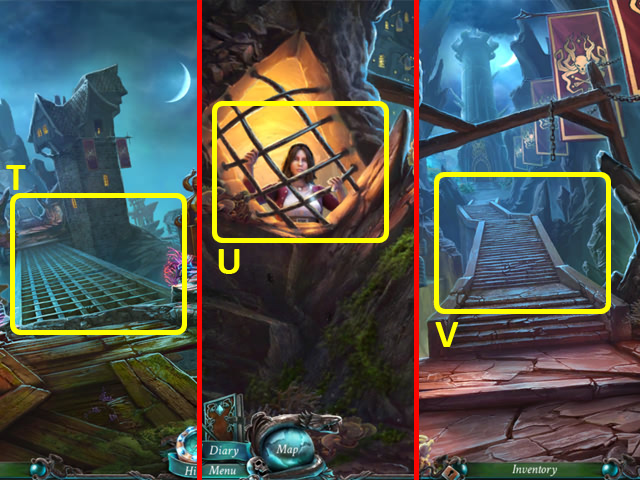
- Walk forward (T).
- Talk to Cory (U).
- Walk forward (V).

- Grab the GLOVE (W).
- Select the BOAT HOOK (X) twice.
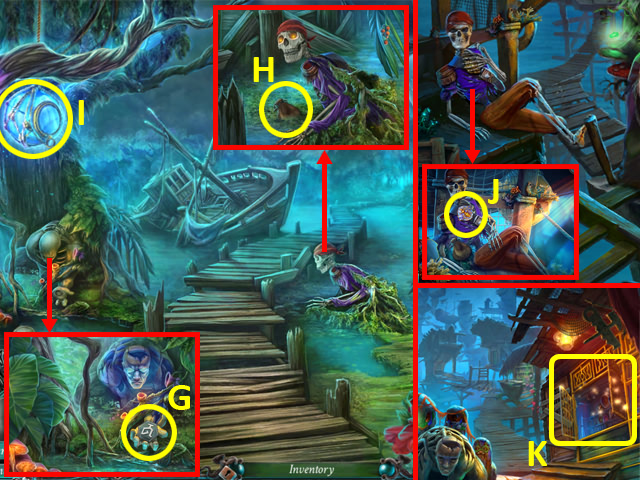
- Take the DOUBLOON (Y).
- Move the lid; take the STEAK (Z).
- Move the flowers (A); place the DOUBLOON into the guardian's hand (B) and take the FALLING STAR (C).
- Back out.
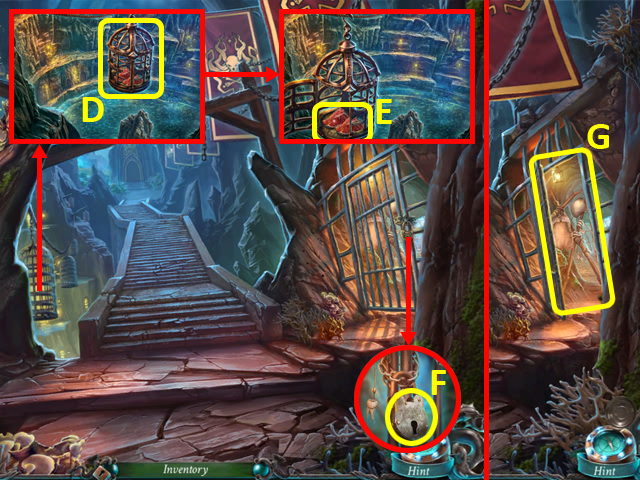
- Use the BOAT HOOK on the cage (D) and open it; take the STEAKS (E).
- Unlock the lock (F) with the CELL KEY; enter O'Malley's Cell (G).
- Read the parchment (H).
- Move the stones (I); read the note. Take the BAG OF SALT (J) and WOODEN CUP (K).
- Use the GLOVE on the water (L); take the WEATHERVANE NEEDLE (M).
- Move the rock; read the book (N).
- Use the WOODEN CUP on the water; receive a CUP OF WATER.
- Move the roots (O), then pour the CUP OF WATER into the trough (P); take the CODEX PART (Q).
- Return to the Courtyard.
- Give the STEAKS to the lizard 3x (R).
- Go through the door (S) to access a HOP.
- Play the HOP.
- You receive an EMPTY PASS (S1).
- Return to the Bridge.
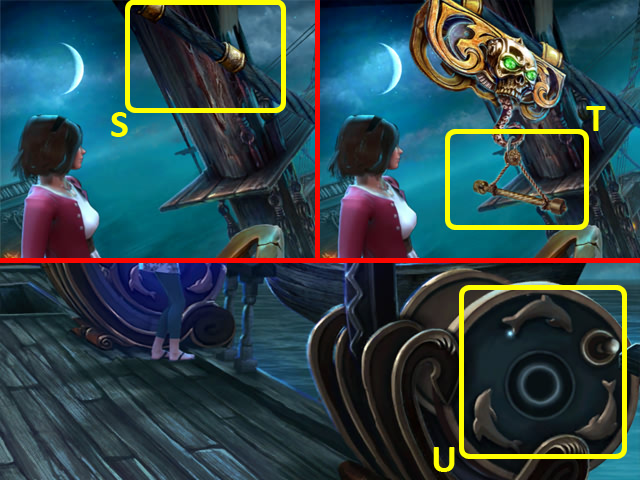
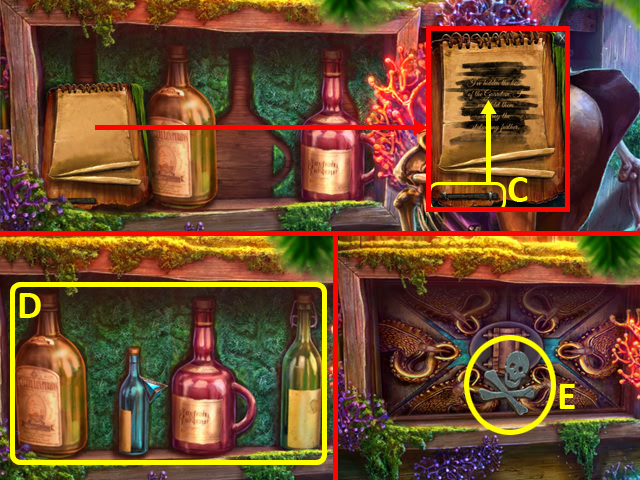
- Attach the WEATHERVANE NEEDLE to the weathervane; take the PRINTING ROLL (T).
- Enter the Lawyer's Office.
- Remove the roll (U) and passes; read the note (V).
- Insert the PRINTING ROLL (W) and EMPTY PASS (X) to trigger a puzzle.
- Solution: Press 1x3, 2x3, 3x2, rotate 4 to West and press 5.
- Take the TOWER PASS (Y).
- Return to the Courtyard.
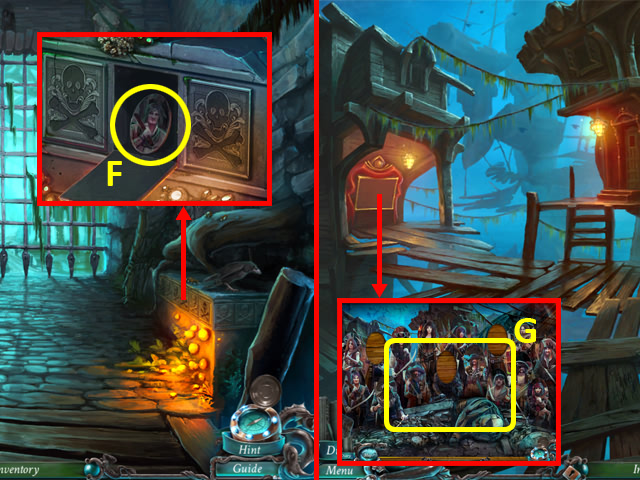
- Read the note (Z); insert the TOWER PASS into the door (A).
- Go forward (B).
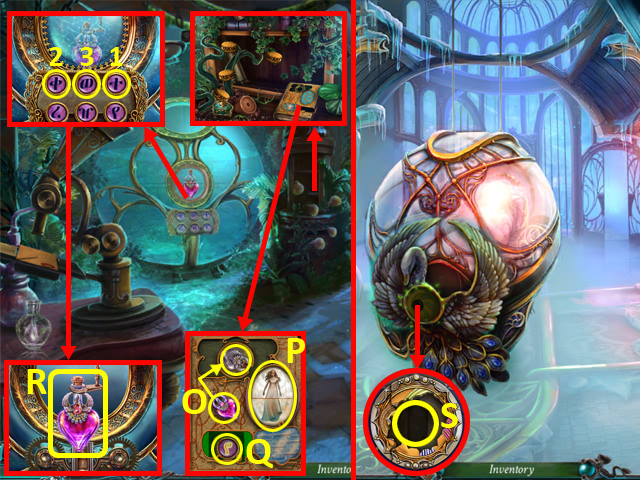
- Examine the podium, and then open the compartments (green) and attach the springs (blue); pull the lever (C).
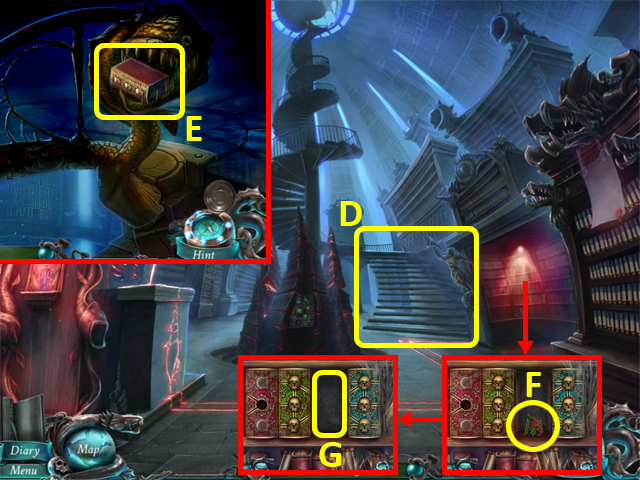
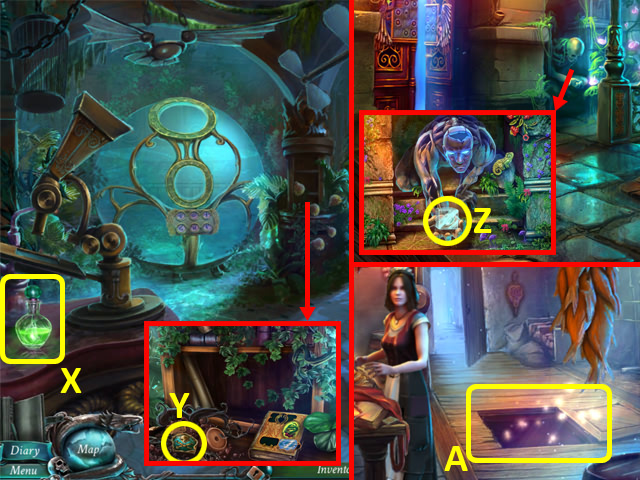
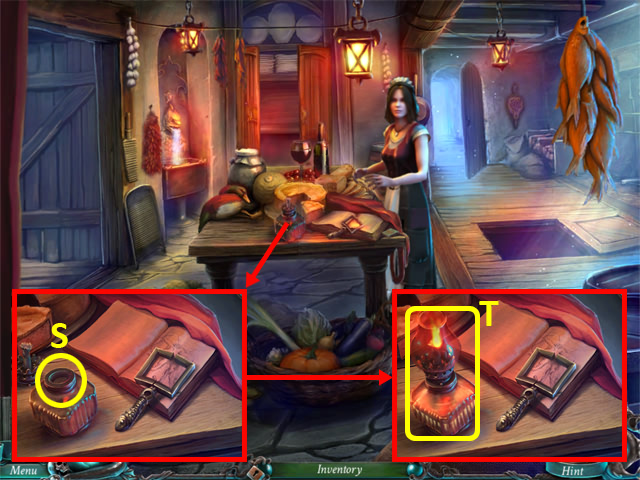
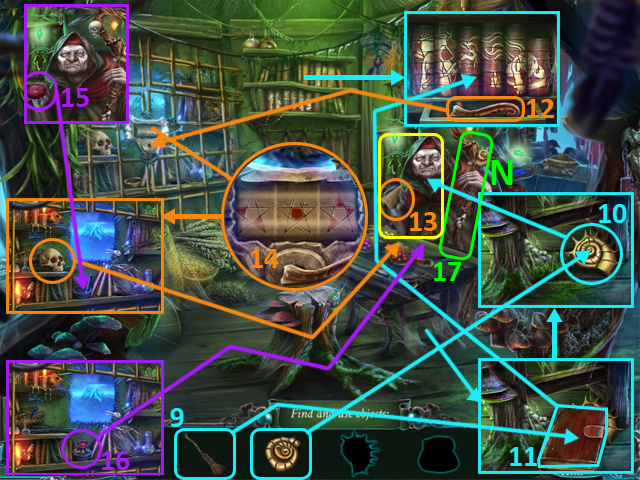
- Go to Davy Jones' Office (D); grab the TOME (E), and back out.
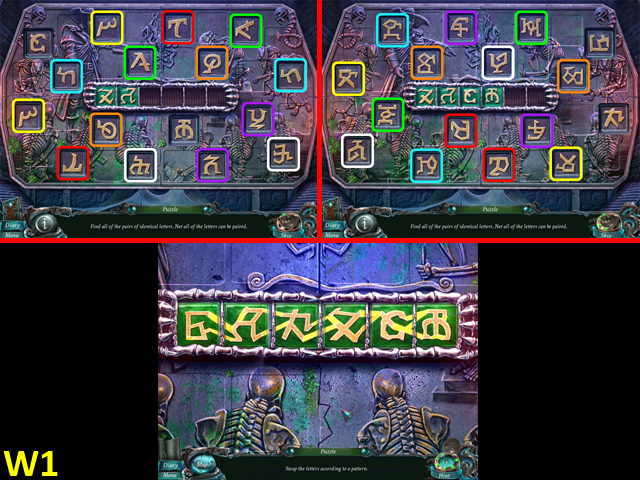
- Grab the CHIME BELLS (F); put the TOME on the shelf (G) to trigger a puzzle.
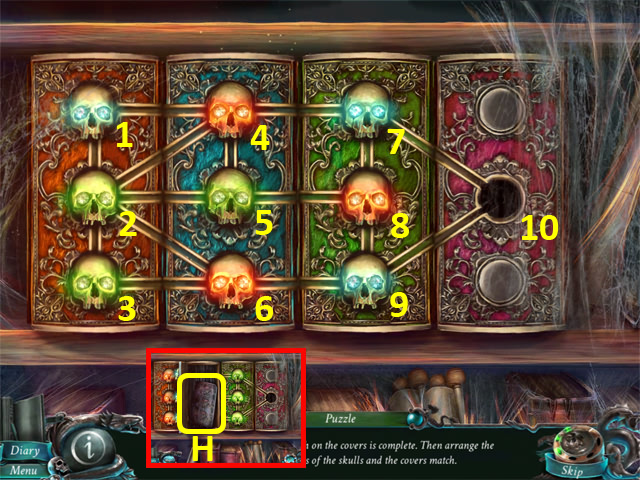
- Sort the books as shown.
- Move the skulls as follows: 9,6, 3, 2, 1, 4, 7, 8, 9, 6, 3, 2, 4, 7, 8, 9, 6, 3, 2, 4, 7, 10, 9, 6, 3, 2, 4, 7, 8, 5, 4, 7, 10, 9, 8, 7, 10, 9, 8, 5, 4, 7, 8, 5, 4, 7, 10.
- Take the CODEX PART 2/3 (H).
- Back out.
- Attach the CHIME BELLS to the gate(I); ring them (1-4).
- Enter the Garden (J).
- Examine the seat (K) to access a HOP.
- Play the HOP.
- You receive a THREAD AND NEEDLE (L).
- Back out.
- Use the THREAD AND NEEDLE on the BUTTERFLY NET (M); take it.
- Return to the Garden.
- Use the BUTTERFLY NET to catch the FIREFLIES (orange).
- Open the lamp; take the DOUBLOON (N) and place the FIREFLIES inside. Take the FIREFLY LAMP (O).
- Return to Davy Jones' Office.
- Use the FIREFLY LAMP in the darkness (P).
- Pull the lever (Q).
- Move the papers and cover, and put the DOUBLOON into the guardian's hand; take the FALLING STAR (R).
- Take the QUILL PEN (S); open the folder and take CORY'S PACT (T).
- Use the NEEDLE on the panel twice (U); slide the panel and take the CODEX PART 3/3 (V).
- Back out.
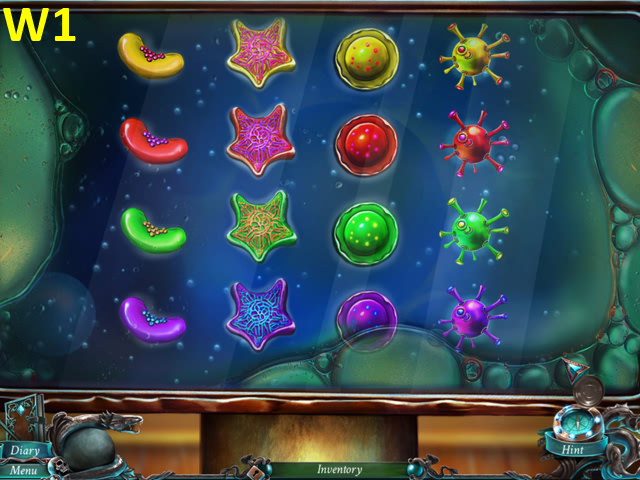
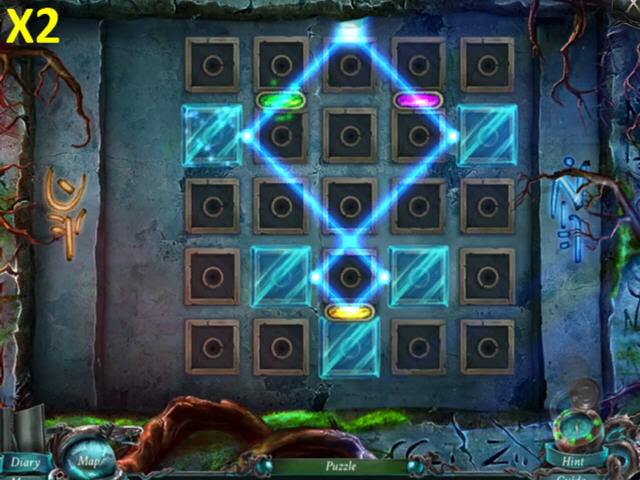
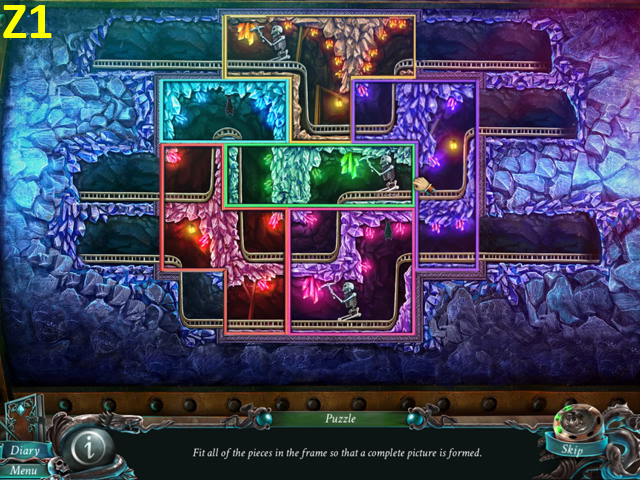
- Add the CODEX PARTS to the codex (W) to trigger a puzzle.
- Select matching pairs of symbols, then match the center pieces.
- Solution (W1).
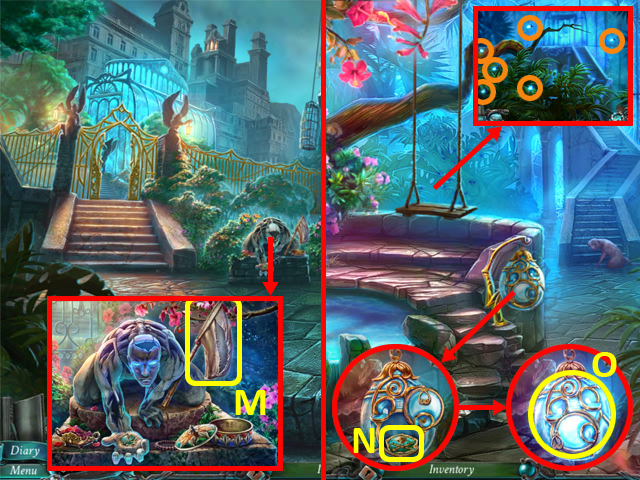
- Give CORY'S PACT to the man; take the FLOWER TOP (X).
- Return to the Garden.
- Use the BAG OF SALT on the door; place the FLOWER TOP (Y), and then select the three flowers.
- Walk up to the ICEHOUSE (Z).
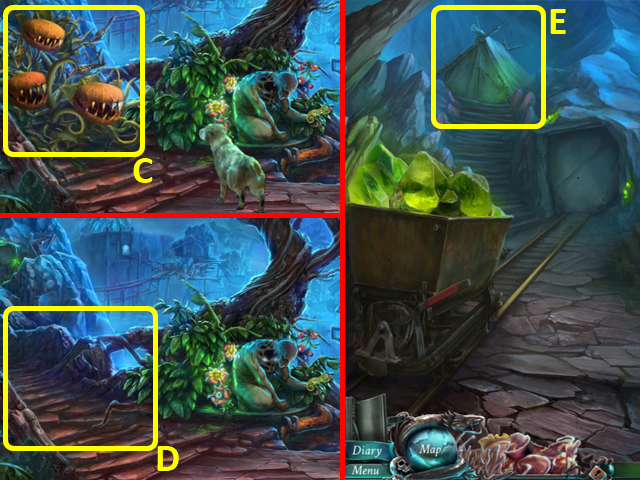
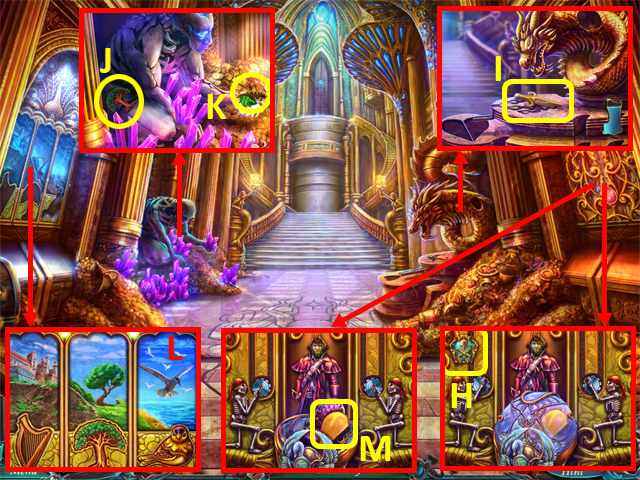
- Grab the GREEN CRYSTAL (A) and RELIEF TILE 1/2 (B).
- Place the FALLING STARS (C).
- Take the RELIEF TILE 2/2 (D).
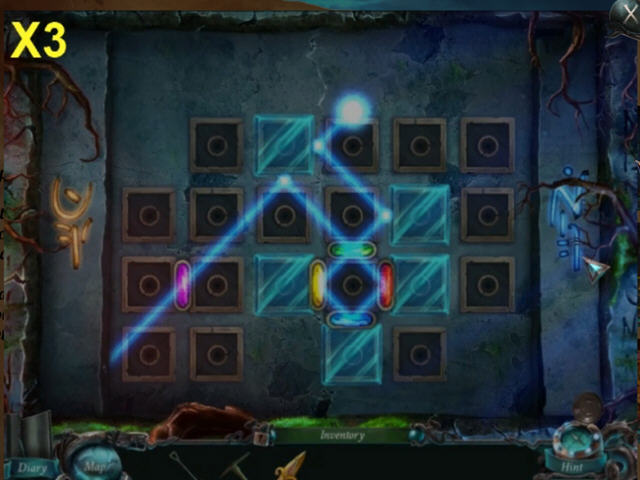
- Place the RELIEF TILES (E) to trigger a puzzle.
- Switch two tiles at a time to make a complete picture.
- Solution (E1).
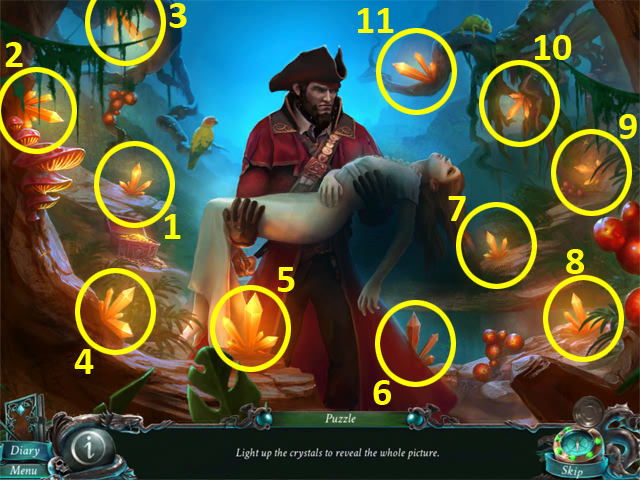
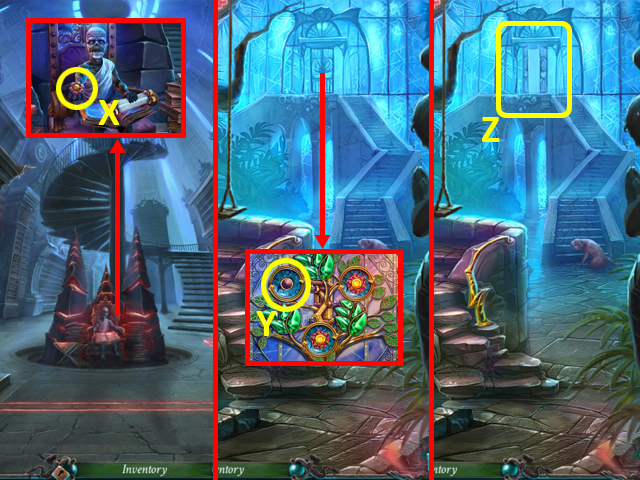
- Light up the crystals in the order shown (1-11).
Chapter 4: The Palace
- Grab the GIRL FIGURINE (F).
- Take the COG 1/2 (G); select the three flowers to unlock the door.
- Examine the bench (H) to access a HOP.
- Play the HOP.
- You receive an HOUR HAND (I).
- Return to the Icehouse.
- Place the GIRL FIGURINE between the figurines; open the cover and take the CRESCENT (J).
- Return to the Courtyard.
- Go through the door to access a HOP (K).

- Find the listed items.
- You receive a VALVE (L).
- Place the VALVE (M) and turn it; talk to the prisoner, and take the ALCHEMICAL SYMBOL (N).
- Return to Davy Jones' Office.
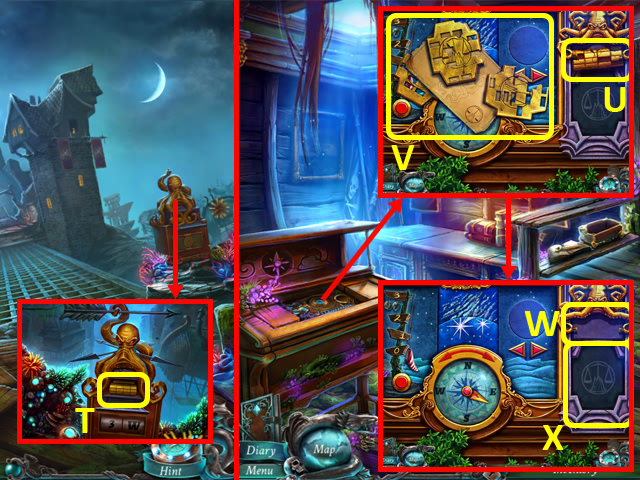
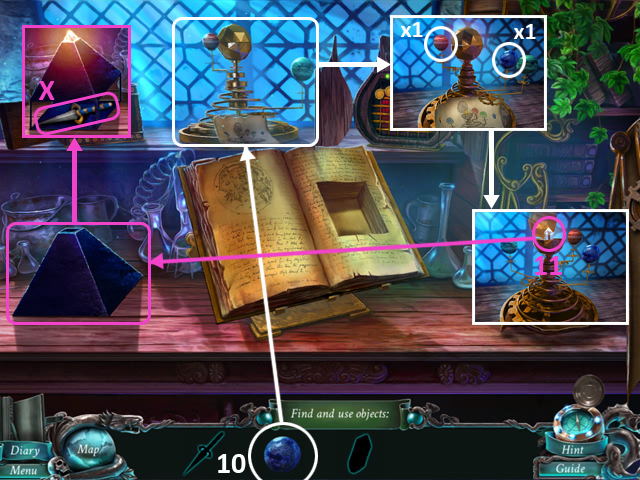
- Place the CRESCENT in the printer to receive a map; take the MINUTE HAND (O).
- Back out.
- Place the MINUTE HAND and HOUR HAND (P) to trigger a puzzle.
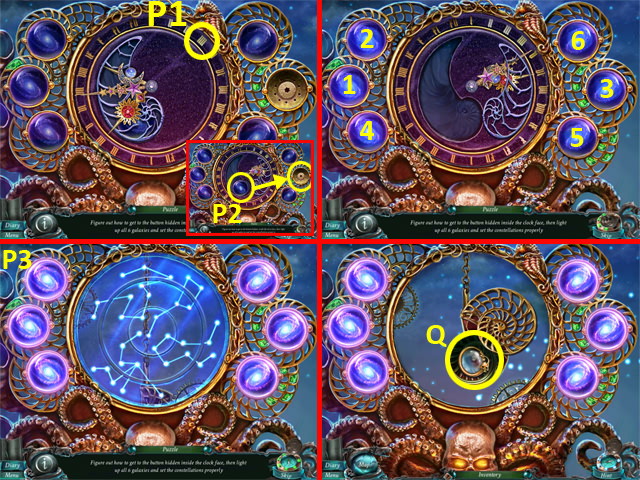
- Move the hands into position (P1); place the button (P2).
- Select the buttons in the order shown (1-6).
- Rotate the dials until they match the image shown (P3).
- Open the cover; take the MONOCLE (Q).
- Return to O'Malley's Cell.
- Place the ALCHEMICAL SYMBOL into the slot; press the symbol and take the NECKLACE (R).
- Return to the Lawyer's Office.
- Place the QUILL PEN, MONOCLE, and NECKLACE (S) to trigger a puzzle.
- Open the cover, take the moon (1); place it (2).
- Take the torch (3); place it (4).
- Turn the valve (5); take the water (6) and place it (7).
- Move the carts; take the cog (8) and place it (9).
- Open the cover; take the cog (10) and place it (11).
- Grab the hammer (12), and give it to the skeleton (13); grab the crystal (14).
- Place the crystal (15); take the flower (16).
- Place the flower (17); take the heart (18).
- Place the heart (19).

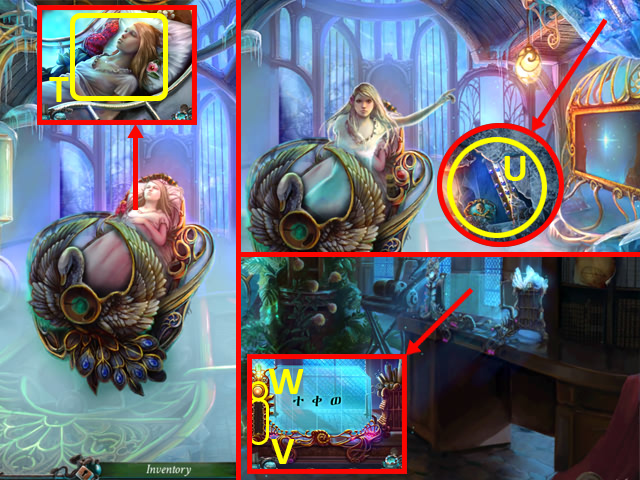
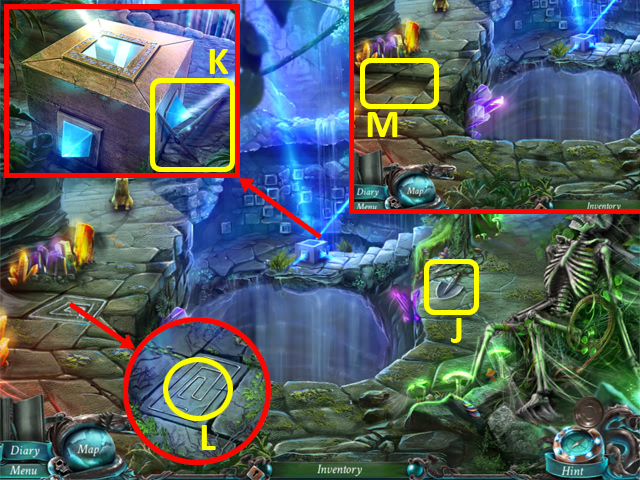
- Grab the TRIANGLE, read the note, and take the DIARY ROLL (T).
- Return to the Icehouse (without using map).
- Place the TRIANGLE in the door; select the tiles: 1x2, 2x2, 3x1.
- Walk forward to the Atrium (U).
- Grab the GLUE (V).
- Take the PATCH (W).
- Attach the pipe (X); apply the GLUE and PATCH (Y).
- Grab the COG 2/2 (Z).
- Add the COGS to the door (A) to trigger a puzzle.
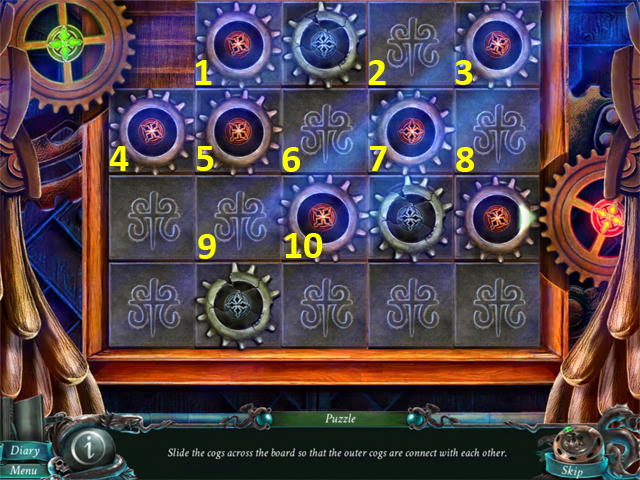
- Slide the tiles to connect the outer cogs.
- Solution: 1, 5, 6, 7, 2, 3, 8, 7, 2, 3, 8, 7, 6, 10, 9, 5, 4.
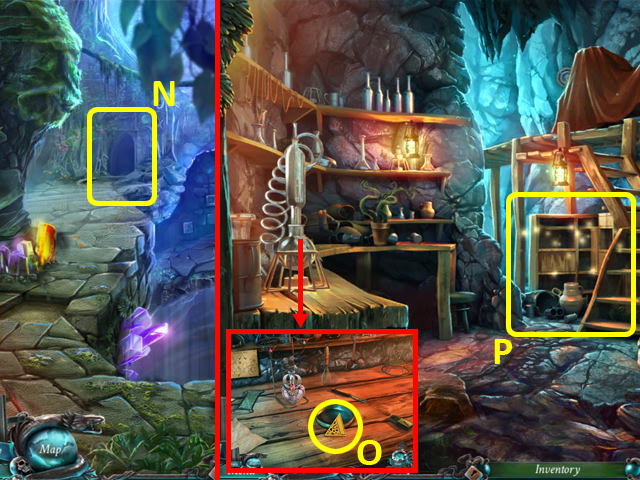
- Walk forward into the Laboratory (B).
- Read the notice (C).
- Grab the SQUARE CRYSTAL (D); place the DIARY ROLL (E), and press the button (F).
- Back out twice.
- Place the SQUARE CRYSTAL (G); flip switches down (H).
- Use the ship.
- Grab the CRANE CRANK (I).
- Clear the nest; take the SPRING (J).
- Talk to Cory (K).
- Attach the CRANE CRANK to the crank and turn it (L); remove the broken springs and attach the SPRING (L1).
- Disturb the crab (M); take the MISSING KEY (N).
- Return to the Laboratory.
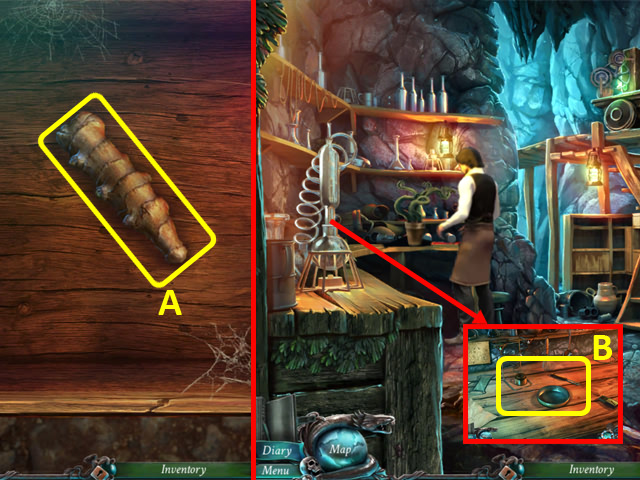
- Examine the book; place the potion (O), swap the tiles to match the picture shown (P), take the MISSING KEY (Q).
- Place the MISSING KEYS into the keypad, and then select the keys in the order shown (1-3); take the REVIVING POTION (R).
- Return to the Icehouse.
- Remove the broken green crystal; place the GREEN CRYSTAL (S).
- Use the REVIVING POTION (T).
- Grab the DOUBLOON and DIARY ROLL TWO (U).
- Return to the Laboratory.
- Place the DIARY ROLL TWO (V); press the button (W) to access a HOP.
- Play the HOP (1-6) (7-10) (X1 X2, 11).
- You receive a DAGGER (X).
- Return to the Palace Backdoor.
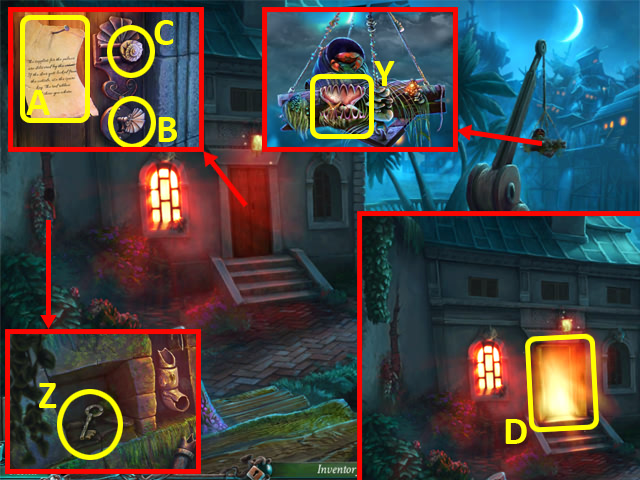
- Pry open the clam with the DAGGER; take the FAUCET (Y).
- Cut away the overgrowth with the DAGGER, pull out the stone, and take the KITCHEN KEY (Z).
- Read the note (A); put the KITCHEN KEY in the lock (B), turn it, and then slide the shell (C).
- Enter the Kitchen (D).
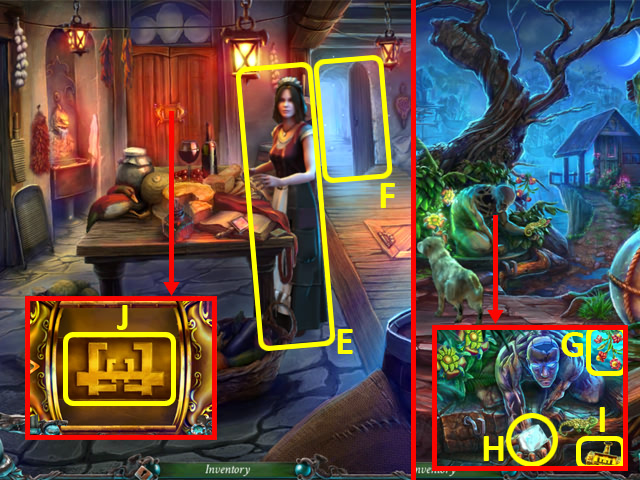
- Talk to Cory twice (E).
- Walk forward to the Road (F).
- Shake the flowers (G) to move the lizard.
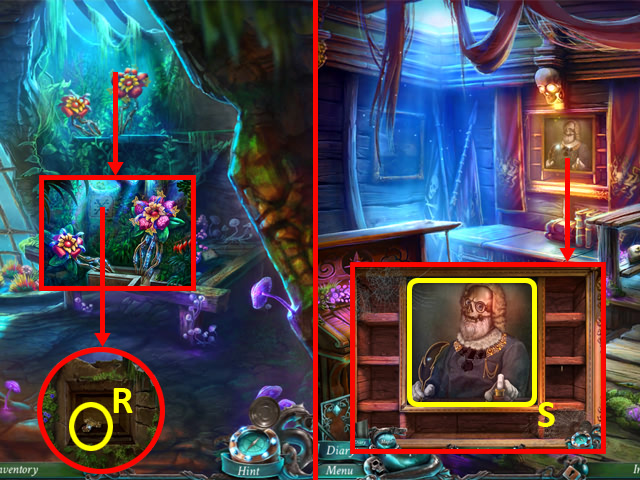
- Place the DOUBLOON into the guardian's hand; take the PUZZLE PIECE 1/3 (H) and the CABINET TILE (I).
- Return to the kitchen.
- Place the CABINET TILE (J) to trigger a puzzle.
- Scroll the dials in the order shown (1-6).
- Take the LARGE POT (K).
- Place the LARGE POT in the sink; attach the FAUCET (L) and turn it. Take the POT WITH WATER (M) and CLOTH (N).
- Unscrew the lens frame with the DAGGER, clean the lens with the CLOTH, and take the LENS (O).
- Walk forward to the Road.
- Use the POT OF WATER on the jar; take the DOOR KNOB (P).
- Attach the DOOR KNOB (Q); open the door.
- Enter the hut (R) to access a HOP.
- Play the HOP.
- You receive a BROOM (S).
- Use the BROOM on the leaf (T); take the WEED LEAF (U).
- Return to the Laboratory.
- Read the note; place the WEED LEAF (V) and LENS (W).
- Examine the microscope again to trigger a puzzle.
- Re-arrange the cells.
- Solution (W1).
- Grab the WEEDING POTION (X).
- Use the WEEDING POTION on the weeds; take the DOUBLOON (Y).
- Back out.
- Place the DOUBLOON in the guardian's hand; take the PUZZLE PIECE 2/3 (Z).
- Return to the Kitchen.
- Pull up the trapdoor to access a HOP (A).
- Play the HOP.
- You receive a BURNING SPLINTER (B).
- Walk forward to the Road.
- Use the WEEDING POTION on the weeds (C).
- Walk left to the Entrance (D).
- Open the tent to access a HOP (E).
- Play the HOP.
- You receive an OILCAN (F).
- Grab the CHAIN (G) and ROD (H).
- Return to the Road.
- Place the ROD into the screw and turn it (I); you receive a SCREW WITH EYE.
- Return to the Entrance.
- Place the SCREW WITH EYE (J).
- Place the CHAIN (K).
- Hook the chain onto the loop (L).
- Hook the chain onto the hook (M).
- Use the OILCAN on the brake (N).
- Enter the Tunnels (O).
Chapter 5: The Mines

- Grab the LAMPSHADE (P).
- Return to the Kitchen.
- Examine the trapdoor to access a HOP (Q).
- Play the HOP.
- You receive some LOOPED ROPE (R).
- Remove the lid of the lamp; use the OIL CAN (S).
- Replace the lid, light the wick with the BURNING SPLINTER, and attach the LAMPSHADE; take the OIL LAMP (T).
- Return to the Tunnels.
- Use the OIL LAMP in the darkness (U).
- Grab the PLANKS (V).
- Place the LOOPED ROPE (W) and the PLANKS (X).
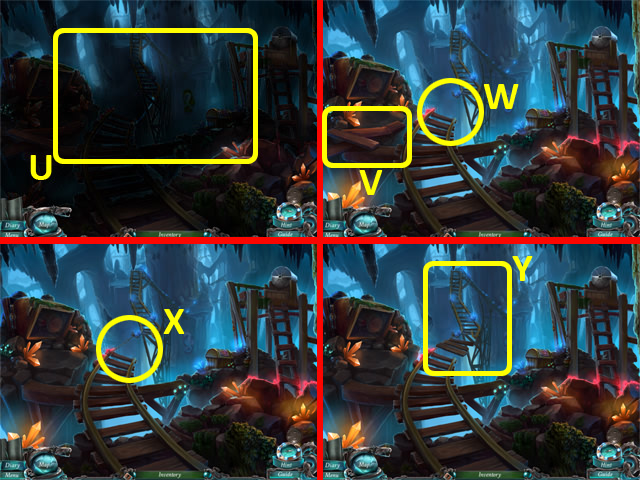
- Enter the Labyrinth (Y).
- Use the OIL LAMP in the dark.
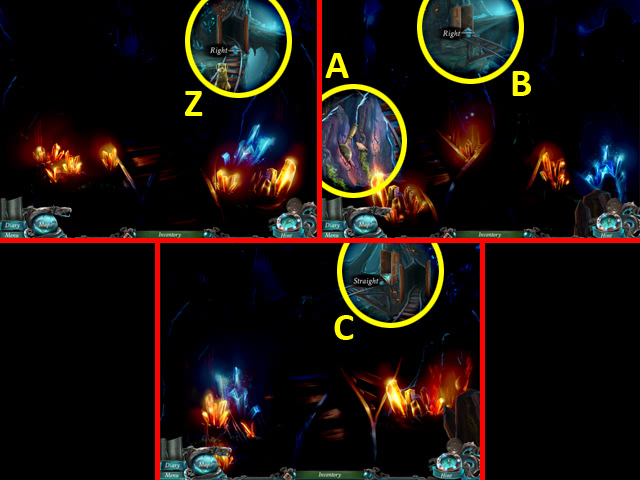
- Follow the dog right (Z).
- Uncover and pull the lever (A); walk right (B).
- Walk straight (C).
- Uncover and pull the lever (D); walk left (E).
- Uncover and pull the lever (F); walk straight (G).
- Uncover and pull the lever (H); walk left (I).
- Grab the SPADE (J) and PICKAXE (K).
- Use the PICKAXE on the slab (L).
- Examine the hole (M) to trigger a puzzle.
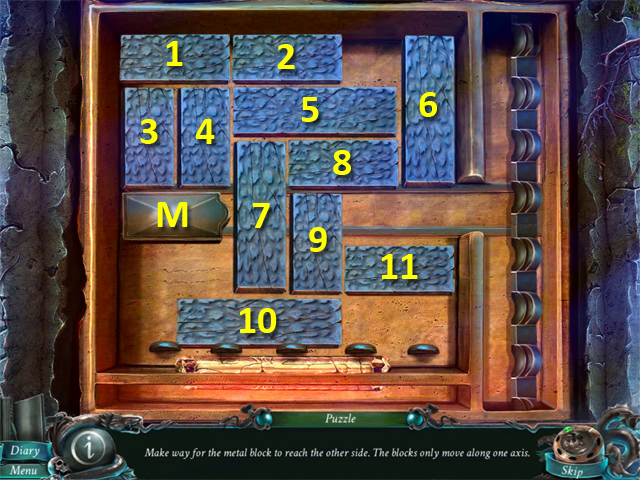
- Move the blocks to free the metal block.
- Solution: 6Dx1, 2Rx2, 1Rx2, 3Ux1, 4Ux1, 10Rx2, 7Dx1, 8Lx3, 7Ux1, 10Lx3, 9Ux1, 11Lx1, 6Dx2, 5Rx1, 7Ux1, 11Lx3, 9Dx2, 7Dx1, 9Ux1, 10Rx2, 6Ux1, 10Rx1, 7Dx1, 8Rx3, 7Ux1, 3Dx1, 4Dx1, 1Lx2, 7Ux2, MRx1, 3Dx1, 10Lx3, 9Dx1, MRx2, 4Dx1, 7Dx2, 2Lx1, 5Lx1, 6Ux2.
- Walk forward into O'Malley (N).
- Grab the EMBLEM (O).
- Examine the shelves to access a HOP (P).
- Play the HOP.
- You receive a TRIDENT'S TOOTH 1/2 (P1).
- Return to the Tunnels.
- Use the OIL LAMP in the darkness; grab the STRAINER (Q).
- Back out.
- Use the STRAINER with the chute; take the DOUBLOON (R).
- Examine the tent to access a HOP (S).
- Play the HOP.
- You receive a HARP (T).
- Return to the Chamber.
- Use the SPADE on the dirt around the statue (V1).
- Place the EMBLEM into the slot; take the PYRAMID (V).
- Place the DOUBLOON into the guardian's hand; take the PUZZLE PIECE 3/3 (U).
- Place the PYRAMID (W), back out.
- Place the PUZZLE PIECES (X) to trigger a puzzle.
- Arrange the crystals. Solution differs in Expert Mode.
- Solution (X1) and (X2).
- Expert Solution (X1) and (X3).
- Enter the Niche (Y).
- Pick up the DRAGON'S CLAW (Z).
- Examine the treasure to access a HOP (A).

- Play the HOP.
- You receive an HOURGLASS BULB (A1).
- Return to O'Malley.
- Pick up the POTION VIAL (B).
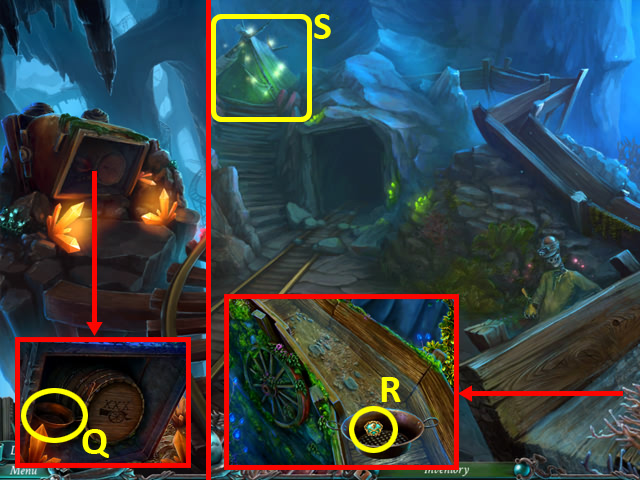
- Place the HOURGLASS BULB into the hourglass; take the CAGE KEY (C).
- Return to the Entrance.
- Open the cage with the CAGE KEY; grab the DECORATIVE BIRD (D).
- Return to the Niche.
- Use the PICKAXE on the stalagmite (E).
- Use the SPADE on the gold and jewels (F).
- Open the door and enter the Golden Cave (G).
- Take the DOUBLOON (H) and TRIDENT'S TOOTH (I).
- Grab the TREE (J), use the PICKAXE on the crystals in the statue's hand, place the DOUBLOON in the hand; take the VOODOO CRYSTAL 1/4 (K).
- Place the TREE, DECORATIVE BIRD, and HARP into the picture, and swap the background tiles as shown (L).
- Open the sarcophagus; take the GOLDEN HEART (M).
- Back out.
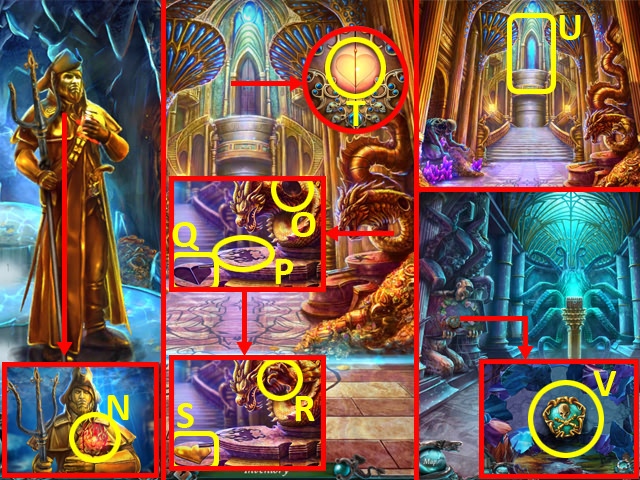
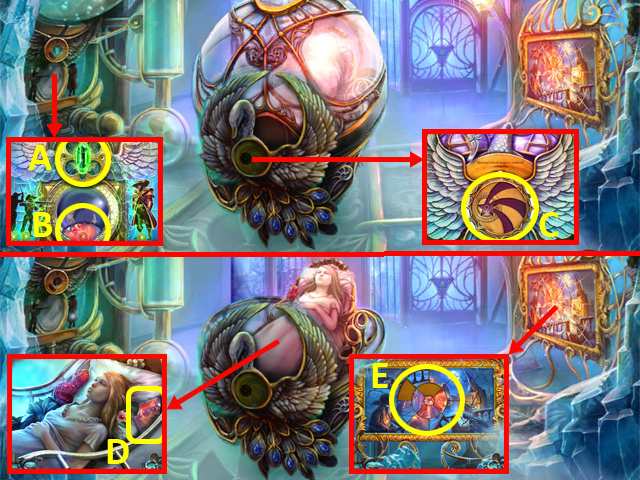
- Attach the TRIDENT'S TEETH to the trident; take DAVY JONES'S SYMBOL (N).
- Walk forward.
- Place the DRAGON'S PAW (O), DAVY JONES'S SYMBOL (P), and GOLDEN HEART (Q).
- Twist the dragon's paw (R); take the WHOLE HEART (S).
- Place the WHOLE HEART (T); enter the SECRET VAULT (U).
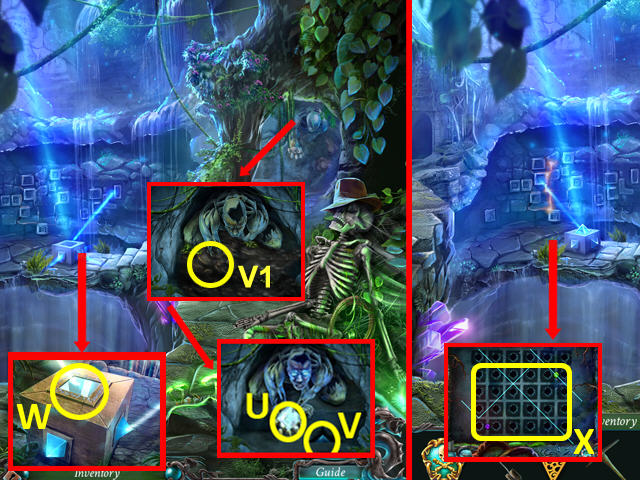
- Take the DOUBLOON (V) to trigger a puzzle.
- Re-arrange the pieces to make a complete picture.
- Solution (V1).
- Clear the cobwebs from the guardian, and place the DOUBLOON in his hand; take the Voodoo Crystals 2/4 (W).
- Open the chest and clear away the cobwebs; take the PAINTING (X).
- Return to O'Malley.
- Examine the shelves to access a HOP (Y).
- Play the HOP.
- You receive a CART BELT (Z).
Chapter 6: The Town
- Uncover the cart, and attach the CART BELT (A); select the cart to travel to the Crossroads.
- Talk to the pirate (B) twice.
- Move the curtain (C).
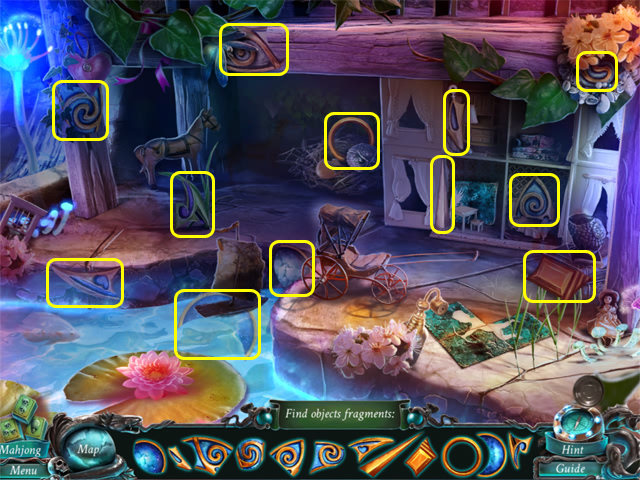
- Enter the building to access a HOP (D).
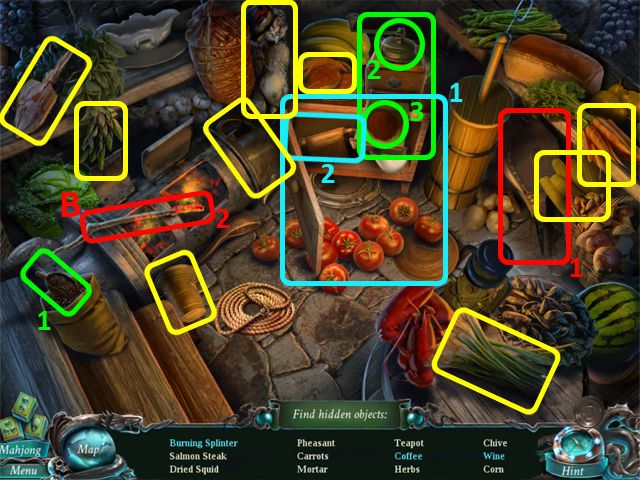
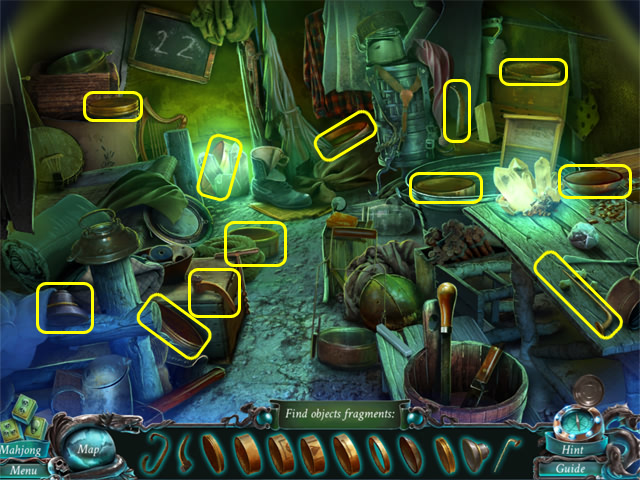
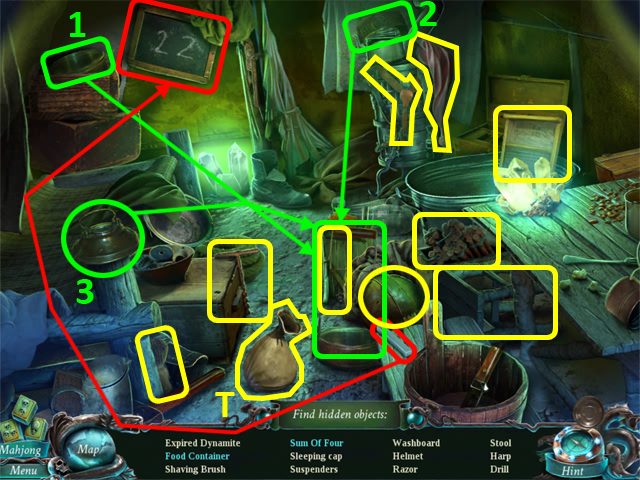
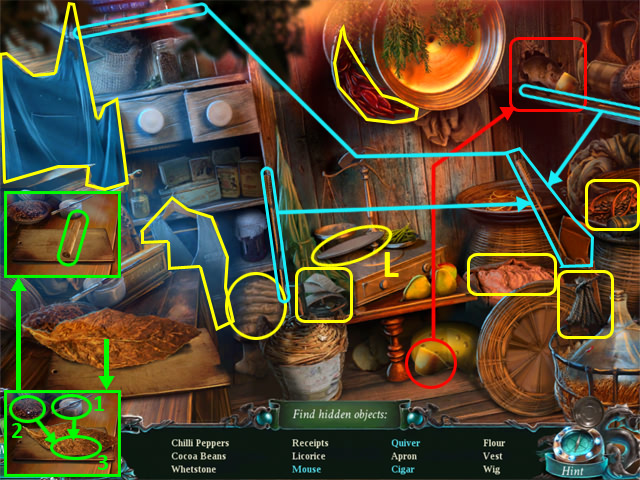
- Find and use the objects (1-20).
- You receive a PROSTHESIS (E).
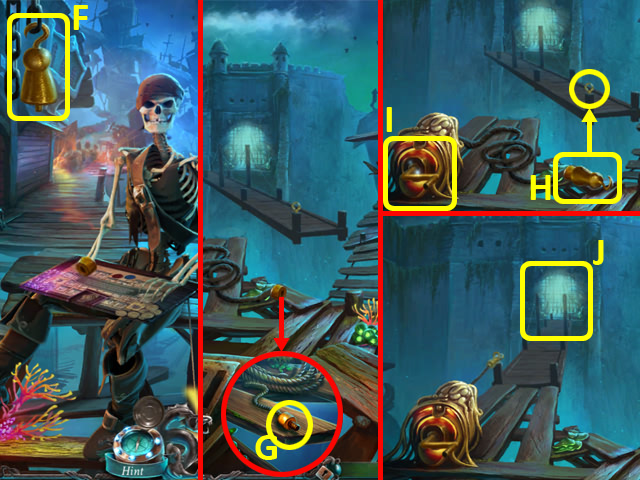
- Give the PROSTHESIS to the pirate; grab the HOOK (F).
- Attach the HOOK to the rope (G).
- Attach the hook (H) to the loop; turn the handle (I).
- Walk forward into the Forbidden Gate (J).
- Grab the CADECEUS (K).
- Back out.
- Use the CADECEUS on the toolbox; take the DOUBLOON (L) and PINCERS (M).
- Walk forward to the Forbidden Gate.
- Cut away the overgrowth with the PINCERS, and place the DOUBLOON into the guardian's hand; take the VOODOO CRYSTALS 3/4 (N).
- Cut away the overgrowth with the PINCERS, and grab the SKULL ORNAMENT (O); pour the POTION VIAL onto the tree, and take the NUTS (P).
- Place the NUTS onto the branch; grab the DICE (Q).
- Back out.
- Give the DICE to the pirate to trigger a puzzle.
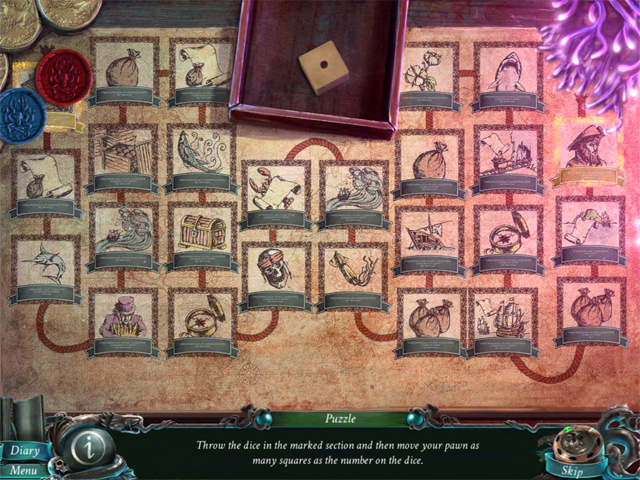
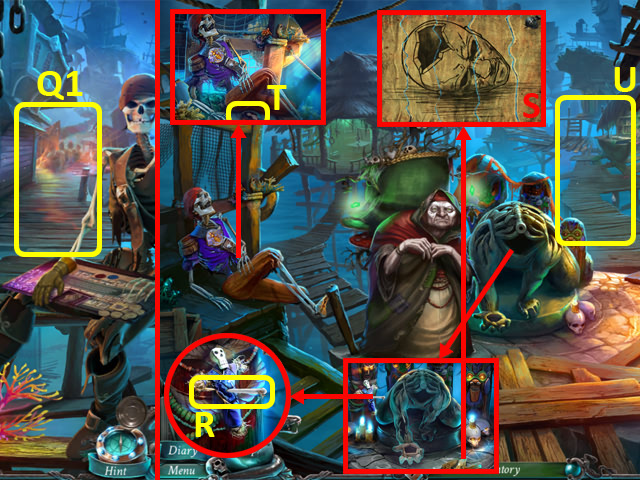
- Roll the dice, and move your pawn accordingly. Move forward to the Town (Q1).
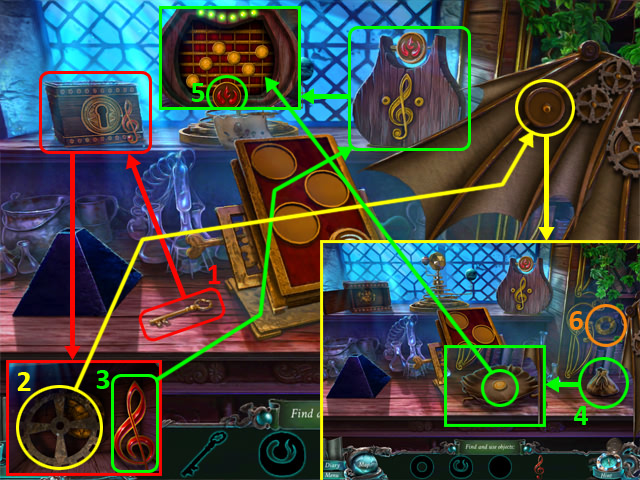
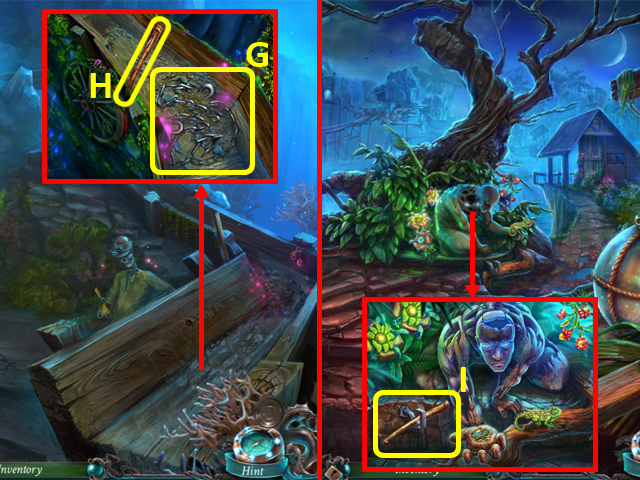
- Pull the LONG NEEDLE (R) twice to take it; re-arrange the note pieces as shown to read it (S).
- Grab the FOLK PORTRAIT 1/3 (T).
- Walk forward to the Town Square (U).
- Use the LONG NEEDLE on the FOLK PORTRAIT 2/3 (V); take it.
- Read the note (W), and set the colours on the skull as shown (X); take the DOUBLOON (Y) and SHOP KEY (Z).
- Back out.
- Unlock the padlock with the SHOP KEY; move the chains in the order shown (1-6).
- Enter the shop to access a HOP (A).
- Play the HOP.
- You receive a RUM BOTTLE (B).
- Return to Town Square.
- Drag the charcoal (C) over the page to reveal the previous note.
- Add the RUM BOTTLE to the display (D); arrange the bottles in the order shown.
- Grab the SKULL ORNAMENT 2/2 (E).
- Return to the Forbidden Gate.
- Place the SKULL ORNAMENTS in the slots, and press each of the skulls; take the FOLK PORTRAIT 3/3 (F).
- Return to the Town Square.
- Add the FOLK PORTRAITS to the portrait to trigger a puzzle (G).
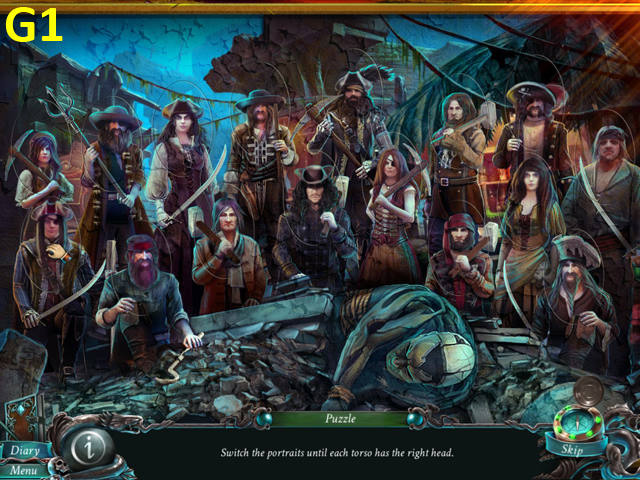
- Swap the portrait heads onto the correct bodies.
- Solution (G1).
- Grab the SAFE KNOB (H).
- Place the SAFE KNOB onto the safe to trigger a puzzle (I).
- Rotate and aim the canon in the correct sequence.
- Solution (I1).
- Grab the GUARDIAN'S HEAD (J).
- Back out.
- Attach the GUARDIAN'S HEAD, and place the DOUBLOON in his hand; take the VOODOO CRYSTALS 4/4 (K).
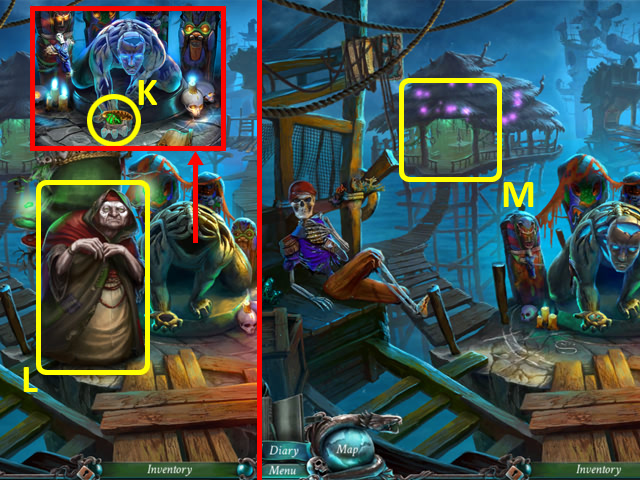
- Give the VOODOO CRYSTALS to the witch (L).
- Enter the cabin to access a HOP (M).
- Find and use the items (1-16).
- You receive a VOODOO STICK (N).
- Give the VOODOO STICK and PAINTING to the witch (O).
- Take the STARDUST (P).
- Return to O'Malley; receive the NICHE KEY.
- Return to the Niche.

- Place the NICHE KEY into the lock; turn the lock as shown (Q).
- Take the GOLDEN TAP (R) and AMBER (S).
- Examine the treasure to access a HOP (T).
- Play the HOP.
- You receive a JIGSAW PIECE (T1).
- Return to the Tunnels.
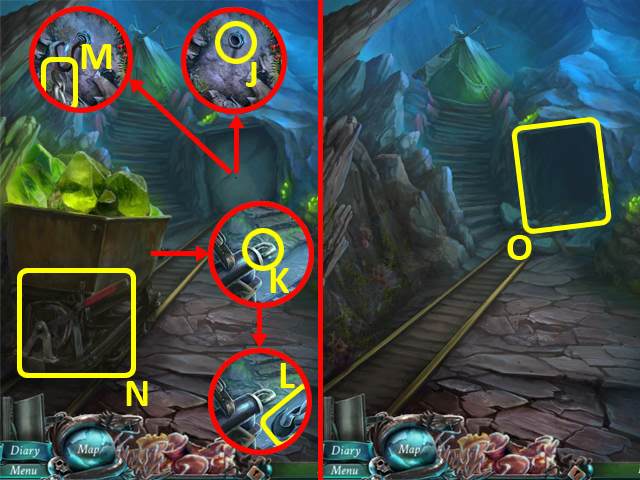
- Use the PINCERS on the barrel (U); grab the DOUBLOON and GUN POWDER (V).
- Place the bucket (W) and GOLDEN TAP (X); turn the tap, and take the BUCKET OF MERCURY (Y).
- Place the JIGSAW PIECE to trigger a puzzle (Z).
- Fit the pieces together to make a complete picture.
- Solution (Z1).
- Grab the ROOT OF LIFE (A).
- Return to O' Malley.
- Place the ROOT OF LIFE, BUCKET OF MERCURY, AMBER, GUN POWDER, and STARDUST to trigger a puzzle (B).
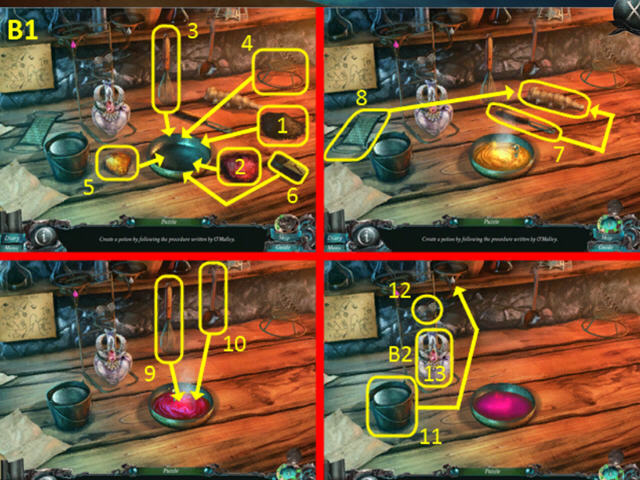
- Make the reviving potion.
- Refer to screenshot for solution (B1).
- You receive the REVIVING POTION (B2).
- Return to the Forbidden Gate.
Chapter 7: The Swamp
- Pour the REVIVING POTION on the tree (C).
- Enter the Swamp (D).
- Move the sail, and enter the ship to access a HOP (E).
- Play the HOP.
- You receive a FISHING ROD (F).
- Place the DOUBLOON in the guardian's hand; take the RUNE (G).
- Wake up the pirate; grab the SATCHEL (H).
- Use the FISHING ROD on the lantern to release the fireflies (I).
- Return to the Town.
- Give the SATCHEL to the pirate; take the TALISMAN (J).
- Look in the shop window to access a HOP (K).
- Play the HOP.
- You receive a WHETSTONE (L).
- Return to the Swamp.
- Enter the Marsh (M).
- Use the TALISMAN on the fireflies (N).
- Shine the light over the ground near the exits to spot footprints to follow; directions: R, R, L, R, L, L.

- Grab the WOODEN STICK (O).
- Use the WOODEN STICK on the machete and then use the WHETSTONE; take the MACHETE (P).
- Go back.
- Cut away the roots with the MACHETE; take the RUNE (Q).
- Enter the ship to access a HOP (R).
- Play the HOP.
- You receive a DOUBLOON (S).
- Return to the Dark Gate.
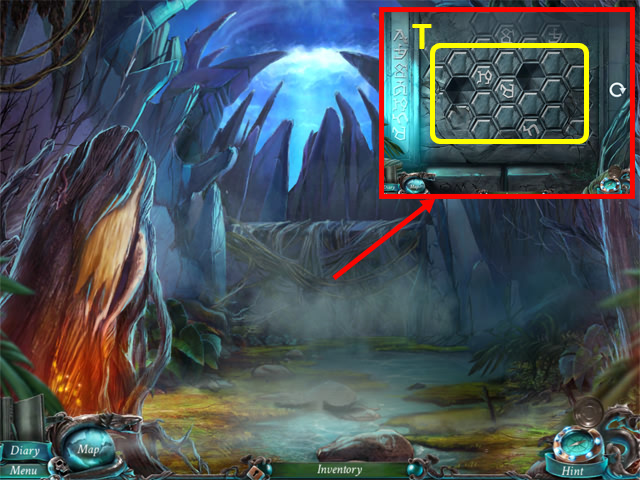
- Cut away the roots with the MACHETE, and place the RUNET (T) to trigger a puzzle.
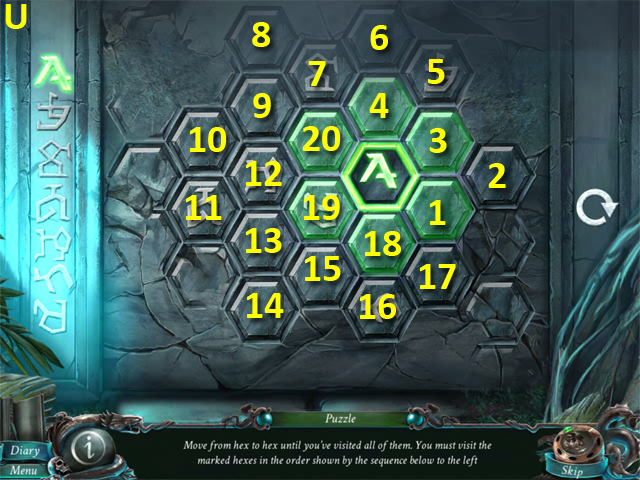
- Move across the hexes, visiting each one, and visiting the marked hexes in the order shown on the left.
- Solution (U1).
Chapter 8: The Shore
- Walk forward to The Rocks (V).
- Place the DOUBLOON in the guardian's hand (W).
- Walk forward to the Shore (X).
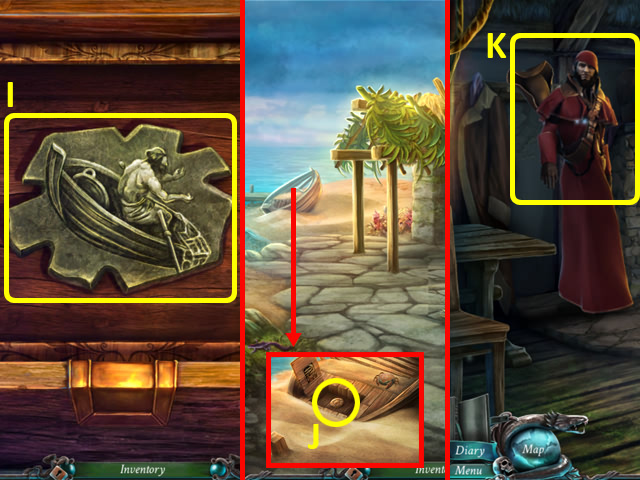
- Release the SHELL with the MACHETE; take it (Y).
- Scoop out the sand with the SHELL; grab the DOOR KNOB (Z) and BEAM (A).
- Move the branches and the flower; take the HUT KEY (B).
- Use the BEAM with the hut entrance (C).
- Place the DOOR KNOB (D) and KEY (Ds).
- Enter the Hut (E).
- Pull the chord (F).
- Dust the cobwebs; grab the WOODEN PICTURES (G).
- Move the chair and table, dust the cobwebs, open the box; place the WOODEN PICTURES to trigger a puzzle (H).
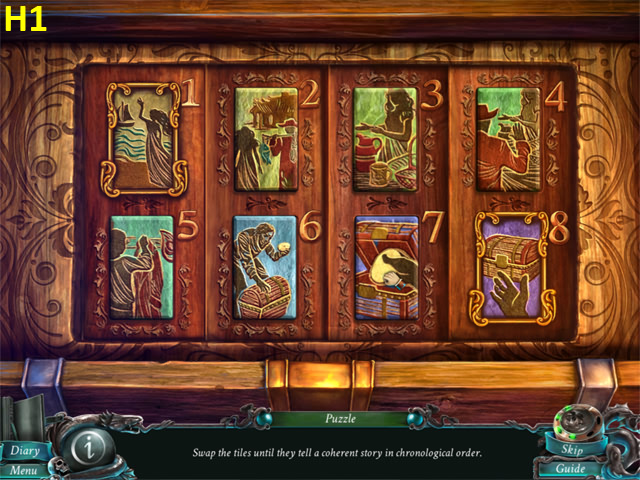
- Swap the pictures until they tell a story in chronological order.
- Solution (H1).
- Grab the FISHERMAN TOKEN (I).
- Back out.
- Place the FISHERMAN TOKEN into the boat; take the MEDALLION (J).
- Enter the Hut.
- Give the MEDALLION to Davy Jones (K).
- Congratulations, you have completed Nightmares from the Deep: Davy Jones.
Created at: 2014-04-25