
Walkthrough Menu
- General Tips
- Chapter 1: The Bridge
- Chapter 2: The Square
- Chapter 3: The Forest
- Chapter 4: The Dungeon Entrance
- Chapter 5: The City Street
- Chapter 6: The Outside Tower
General Tips
- This is the official guide for Ominous Objects: Trail of Time.
- This guide will not mention each time you have to zoom into a location; the screenshots will show each zoom scene.
- Hidden-object puzzles are referred to as HOPs. This guide will not show HOP solutions. It will identify the location of the HOP and the inventory item acquired.
- This guide will show solutions for non-random puzzles. Please read the in-game instructions for each puzzle.
- In this game, you will sometimes have to select the new scene to trigger dialog, cut-scenes, or tasks prior to interacting with the scene.
Chapter 1: The Bridge
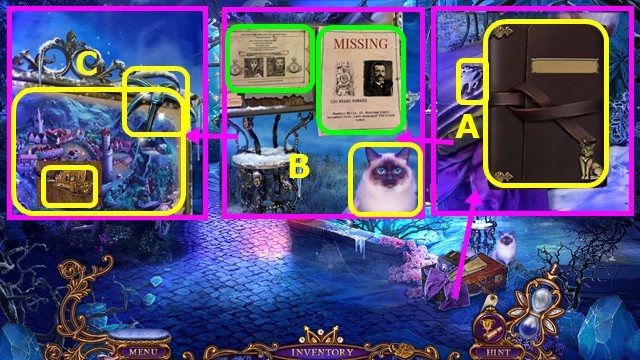
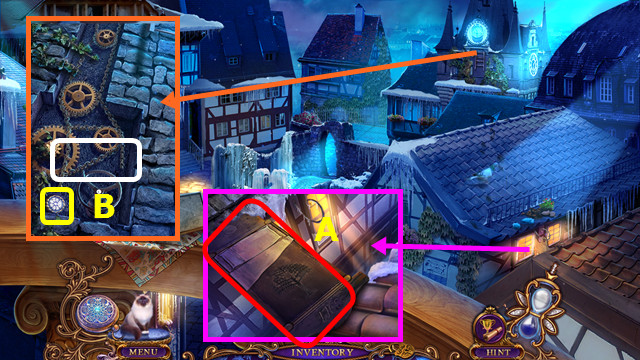
- Take and open the DIARY; take the ANIMAL EMBLEM (A).
- Read the 2 notices and take MR. JENKINS (B).
- Take the HOOK, MAP, and CARRIAGE EMBLEM (C).
- Walk forward; select the scene.
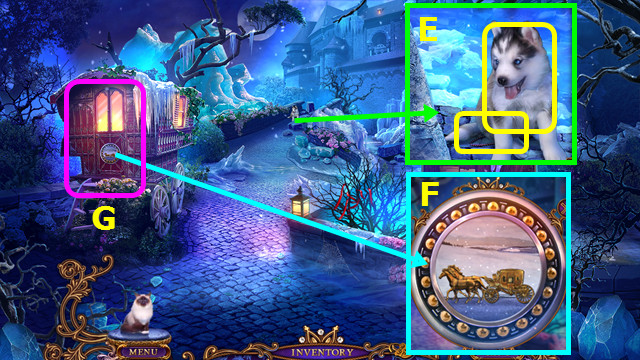
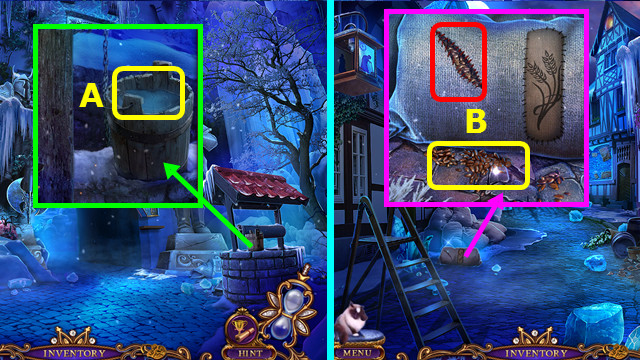
- Take the PUPPY and LOCKET (E).
- Take the BALL BEARINGS from the LOCKET (inventory).
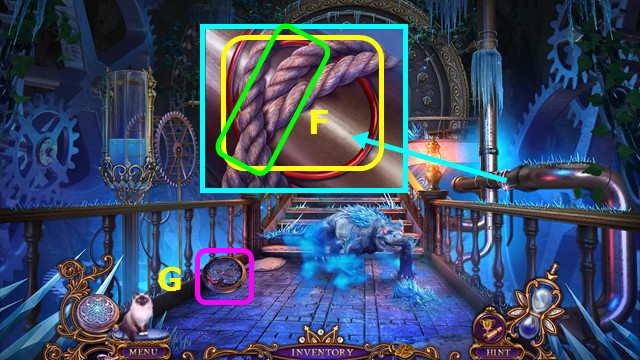
- Place the CARRIAGE EMBLEM and BALL BEARINGS (F).
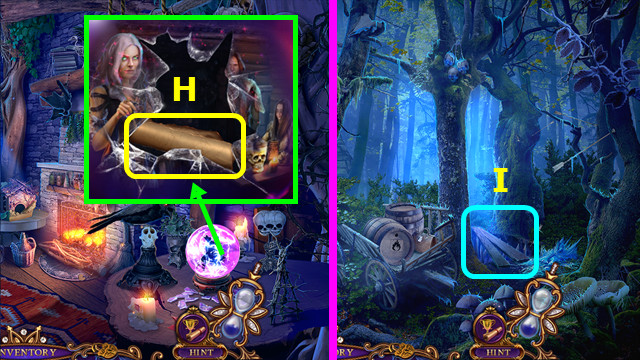
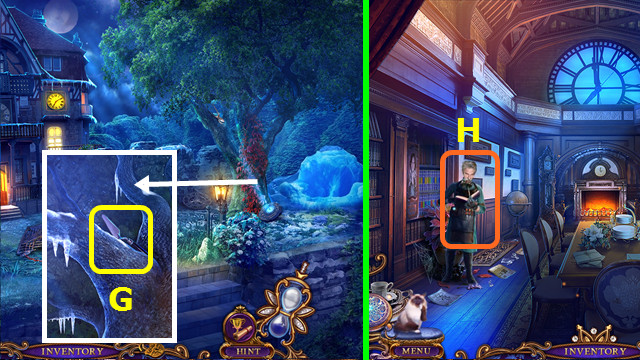
- Play the HOP; earn the ROPE (G).
- Combine the HOOK and ROPE to make the GRAPPLING HOOK (inventory).
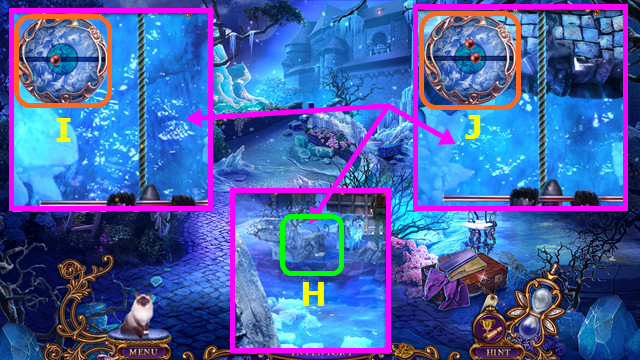
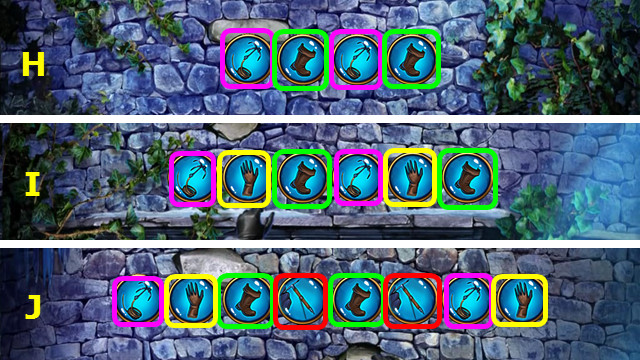
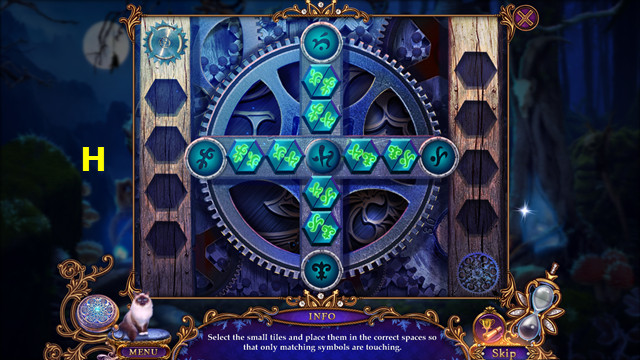
- Use the GRAPPLING HOOK (H).
- Click when the ball is in the center (I).
- Do the same for 2 balls (J).
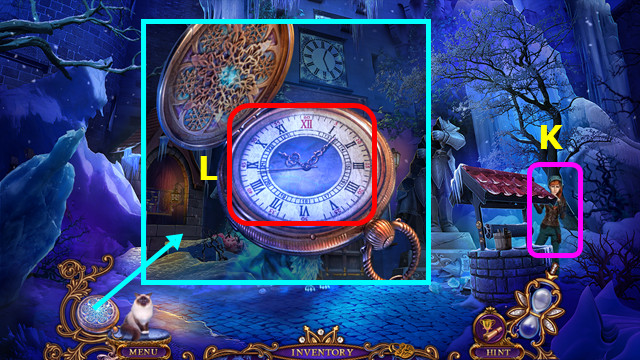
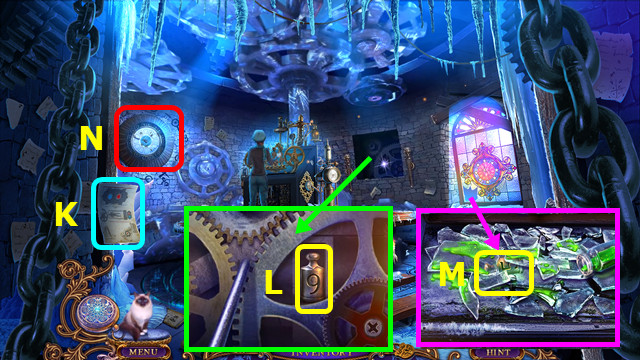
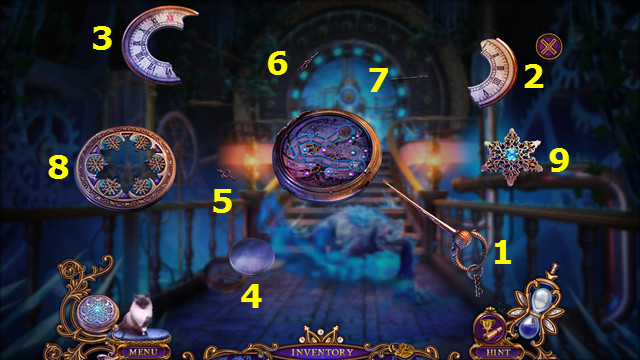
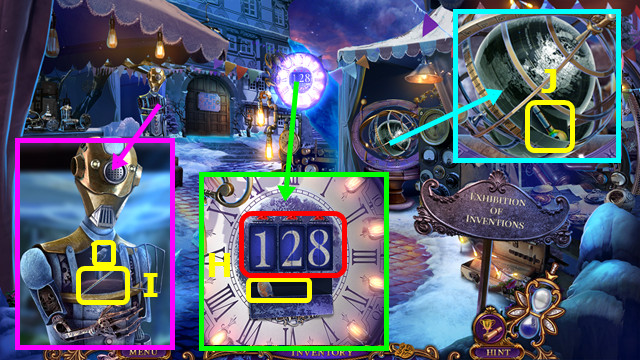
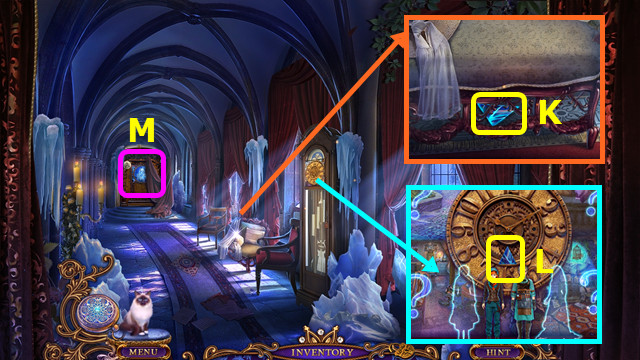
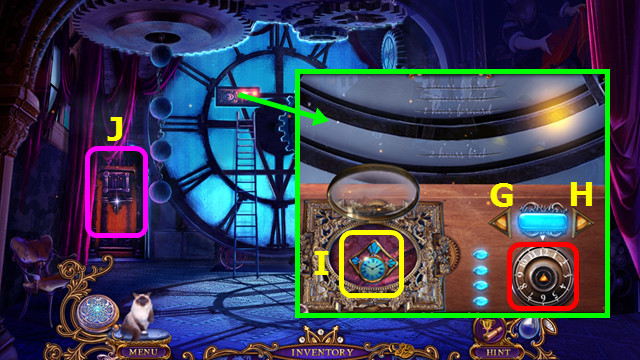
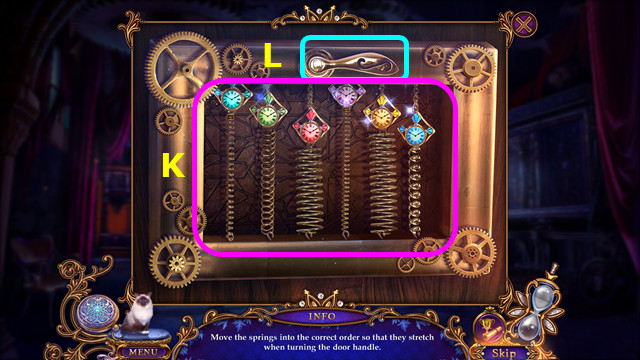
- Talk to Kate; earn the WATCH (K).
- Open the WATCH; remove the face (L).
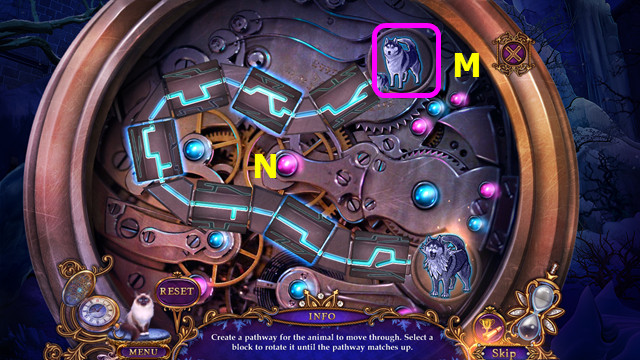
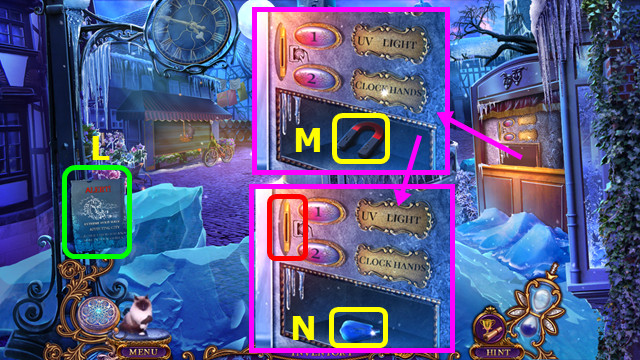
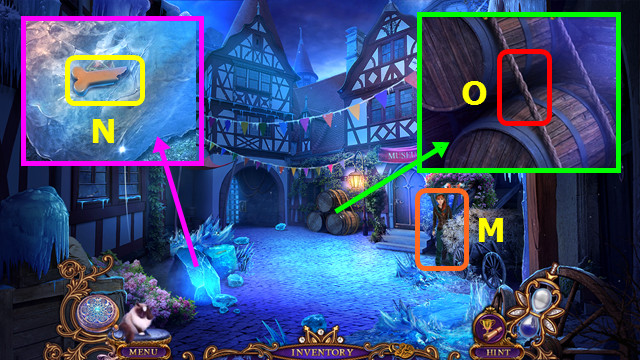
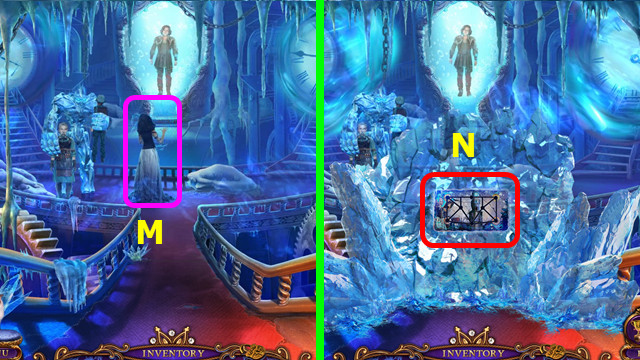
- Place the ANIMAL EMBLEM (M).
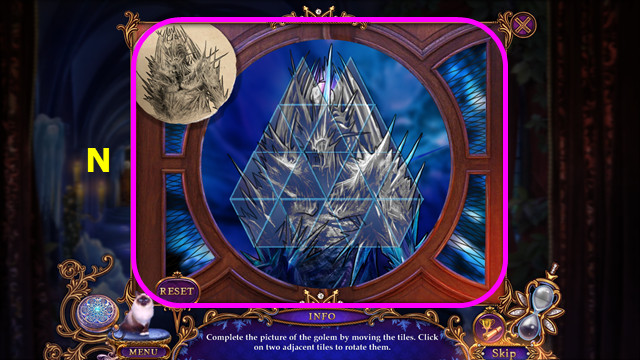
- Restore the path (N).
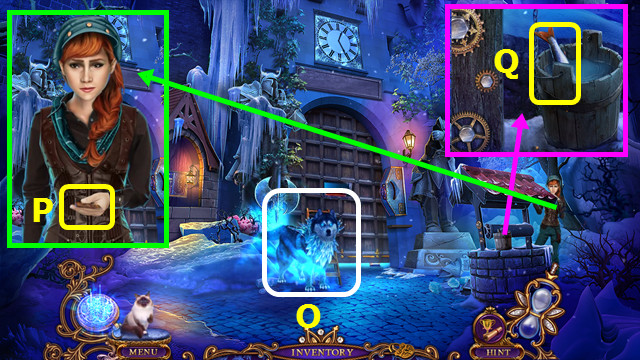
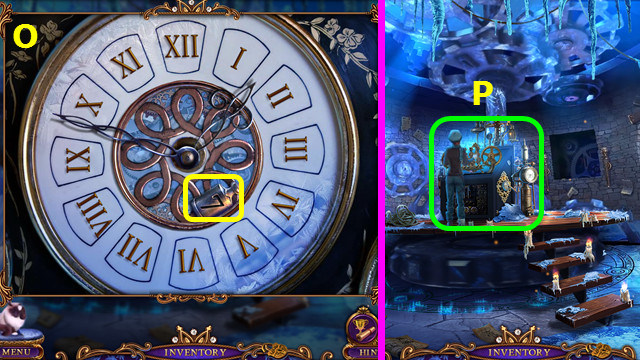
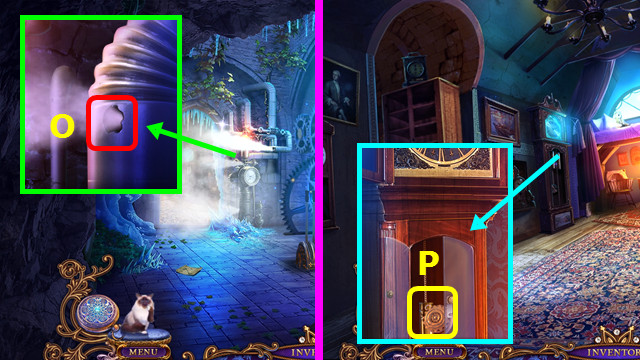
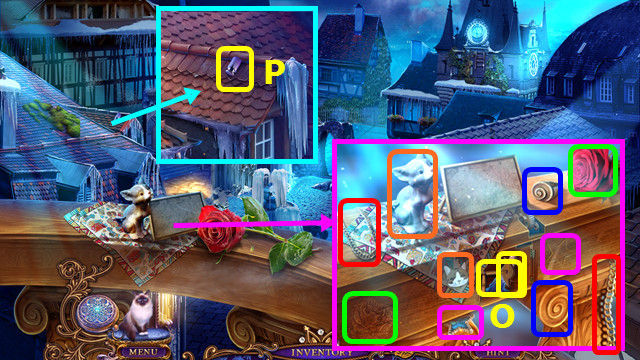
- Use the WATCH (O).
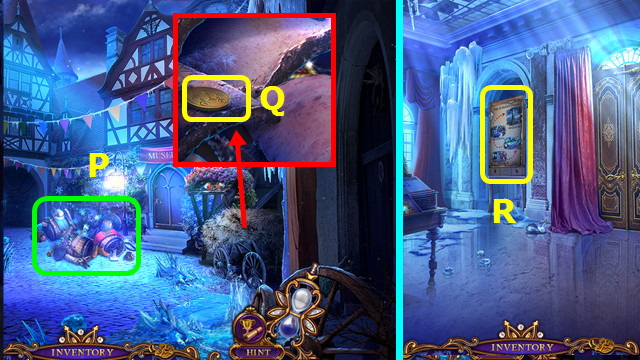
- Talk to Kate; take the SUITCASE EMBLEM (P).
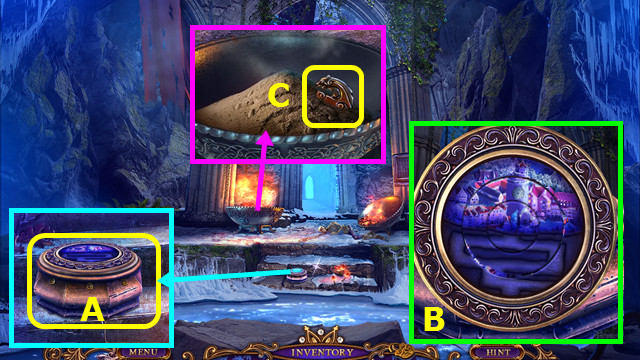
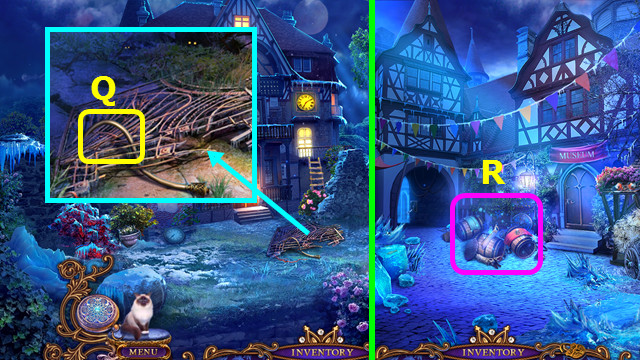
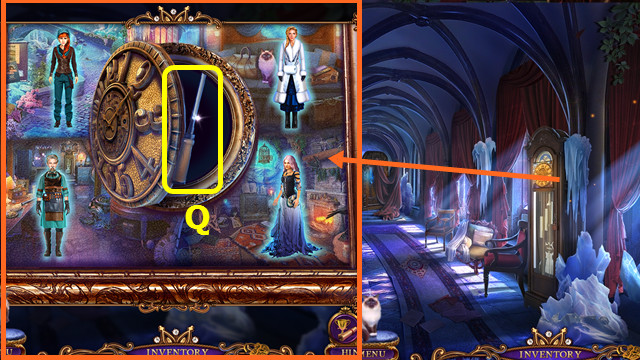
- Take the FISH (Q).
- Give the FISH to MR. JENKINS (inventory).
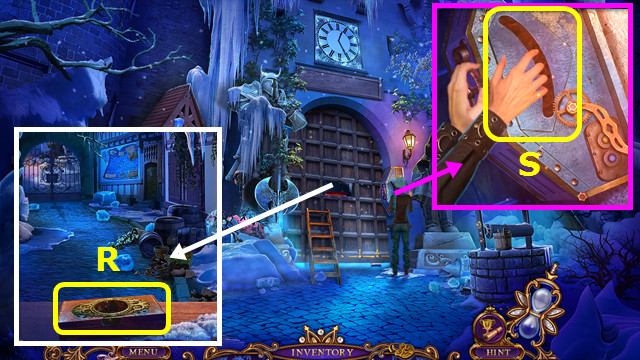
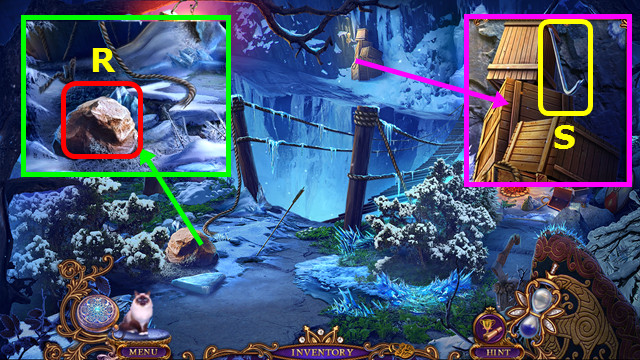
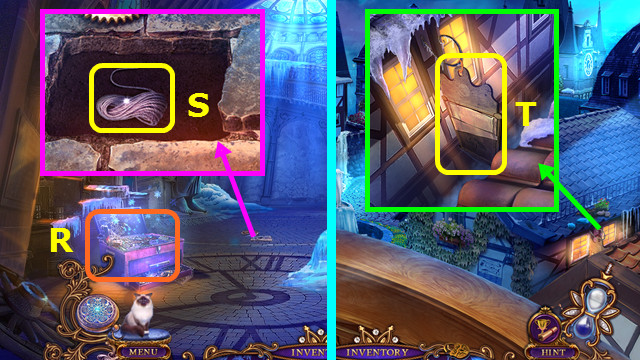
- Take the TOOLBOX (R).
- Take the BROKEN PANEL (S).

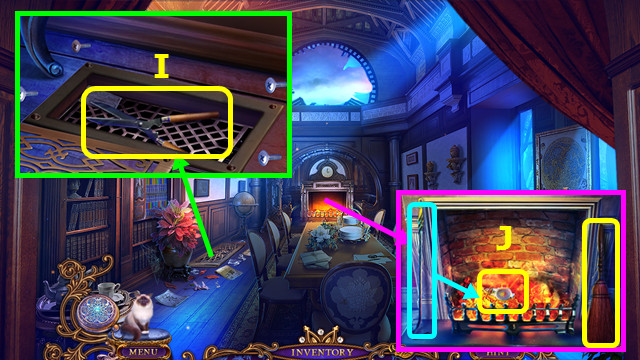
- Take the LADDER; use MR. JENKINS to take the BONE (T).
- Use the BONE; take the WATCHMAKER EMBLEM (U).
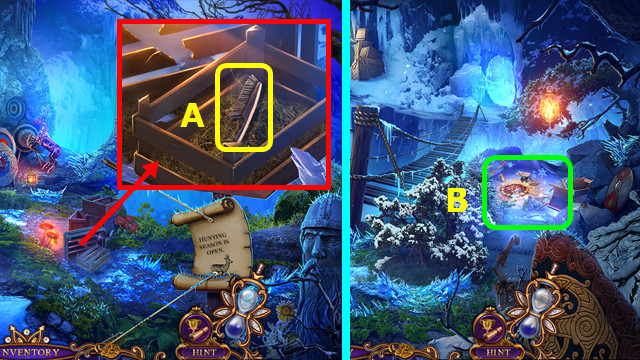
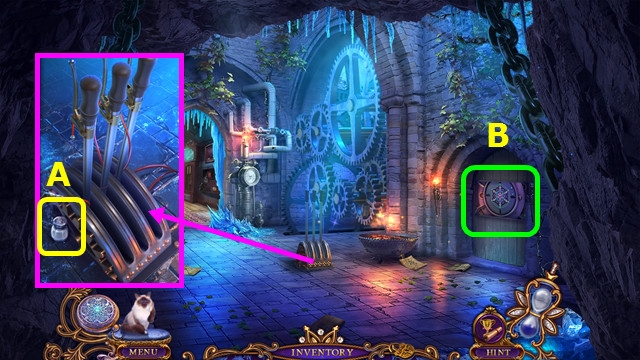
- Combine the TOOLBOX and WATCHMAKER EMBLEM; move the items and take the WRENCH (inventory).
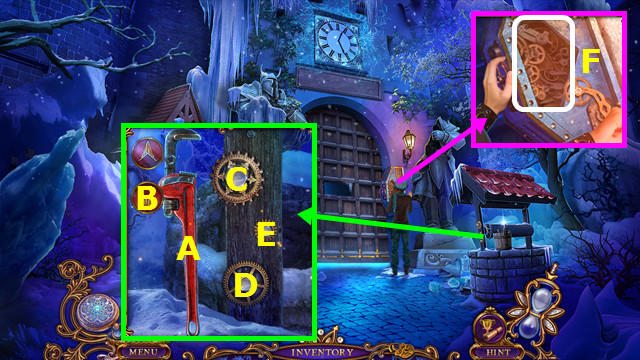
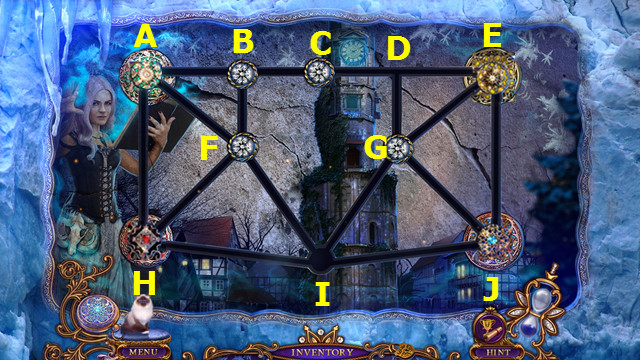
- Place the WRENCH (A).
- Select Bx2-C, Bx2-D, B-E.
- You earn the 3 GEARS.
- Combine the BROKEN PANEL and 3 GEARS to make the MECHANISM PANEL (inventory).
- Place the MECHANISM PANEL (F).

- Take the PAPERCLIP and select the trowel (G).
- Combine the LOCKET and PAPERCLIP to find the WATCH TILE (inventory).
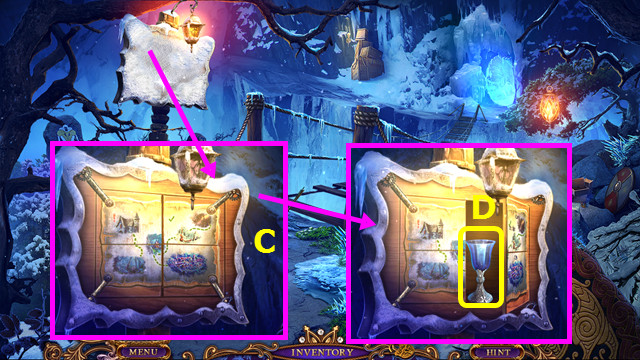
- Select the WATCH; place the WATCH TILE (H) and restore the path (I).
- Use the WATCH (J).
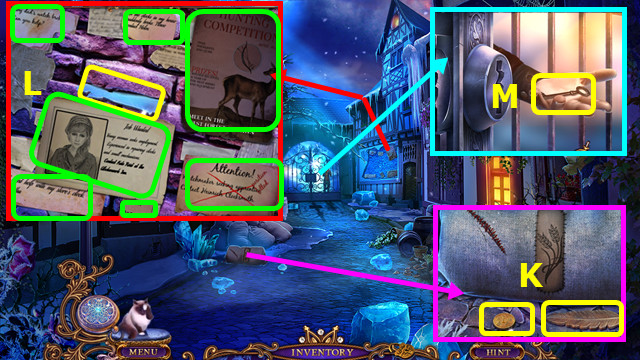
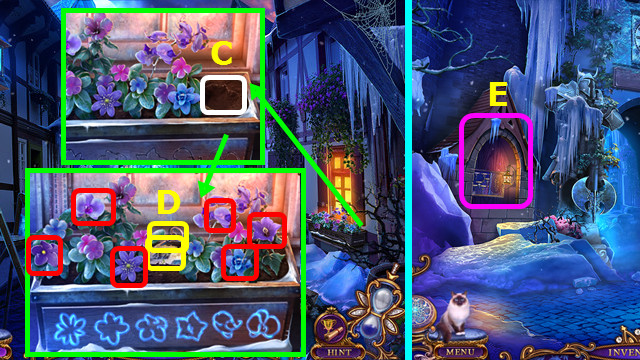
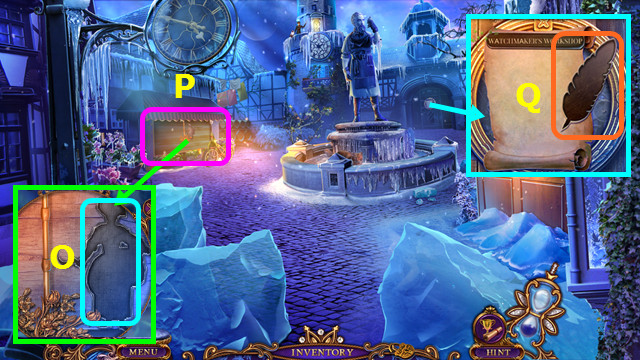
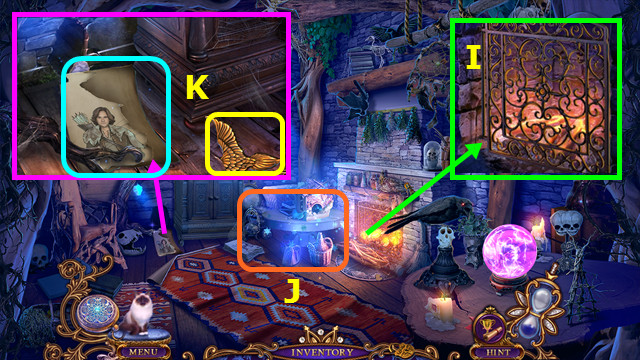
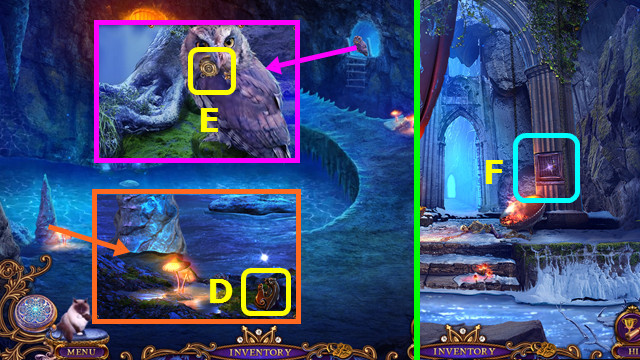
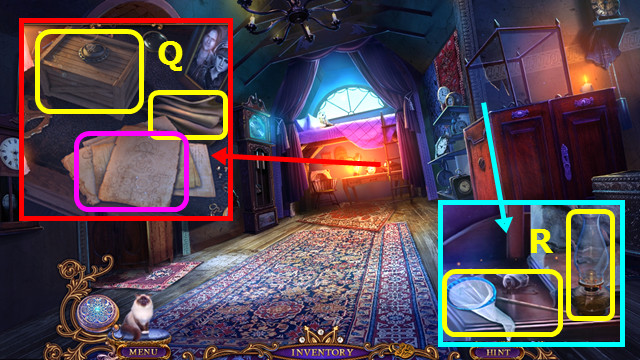
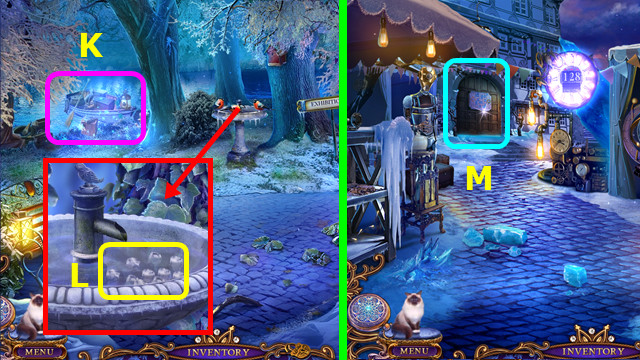
- Take the 1 FRANC and FEATHER (K).
- Read all the notices (green) and take the GLASS WOMAN (L).
- Take the 1/3 KEY (M).
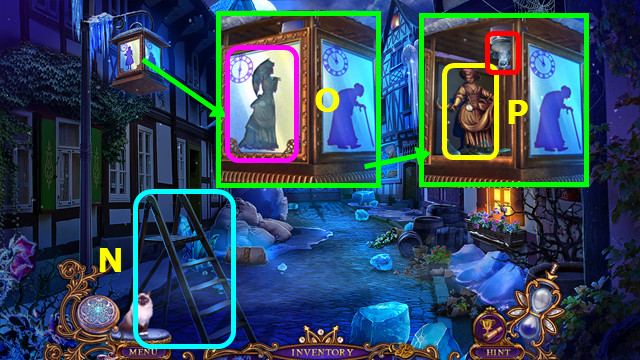
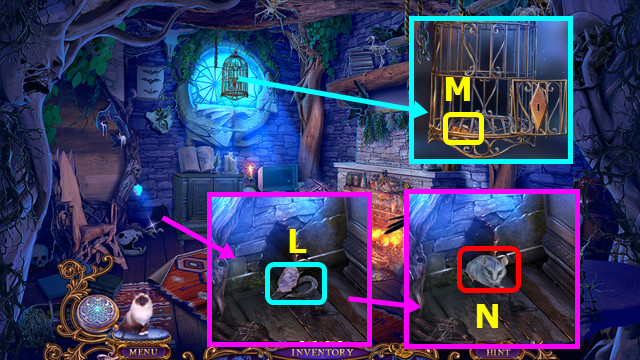
- Place the LADDER (N).
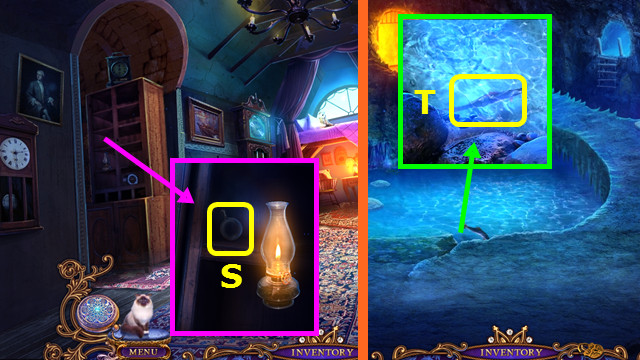
- Turn the lamp and place the GLASS WOMAN (O).
- Take the GARDENER EMBLEM and remove the broken bulb (P).
- Walk down 2x.
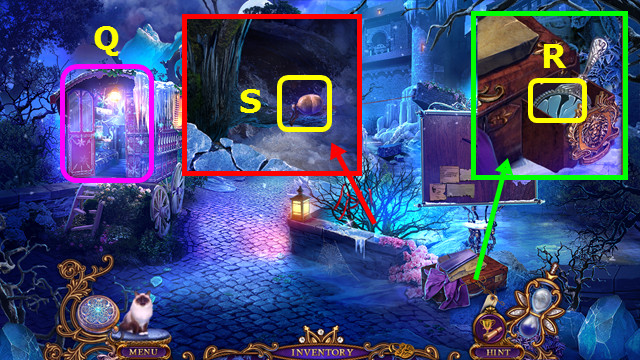
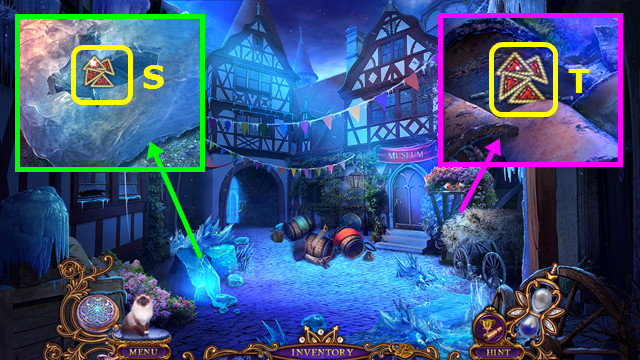
- Play the HOP; earn the 2/3 KEY (Q).
- Place the SUITCASE EMBLEM; take the SHARP GLASS (R).
- Use MR. JENKINS to take the EMPTY FLASK (S).
- Go forward.
- Use the EMPTY FLASK to take the FLASK WITH WATER (A).
- Go forward.
- Use the SHARP GLASS; take the SEEDS (B).
- Use the SEEDS and FLASK WITH WATER (C).
- Select the 6 flowers (red).
- Take the 1/3 PART OF MAP and 3/3 KEY (D).
- Walk down.
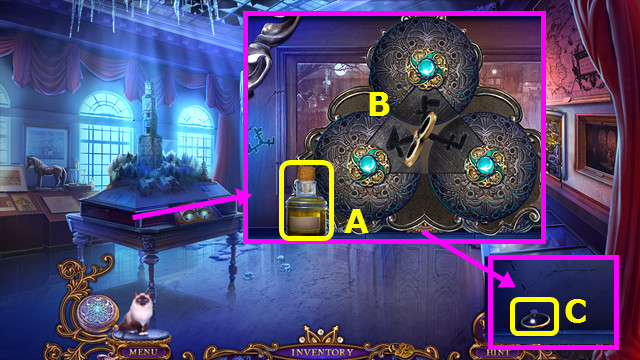
- Select (E).
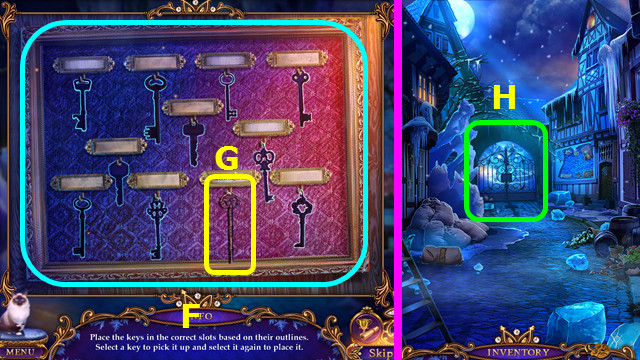
- Read the note and place the 3 KEYS on the board.
- Solution (F).
- Take the GATE KEY (G).
- Walk forward.
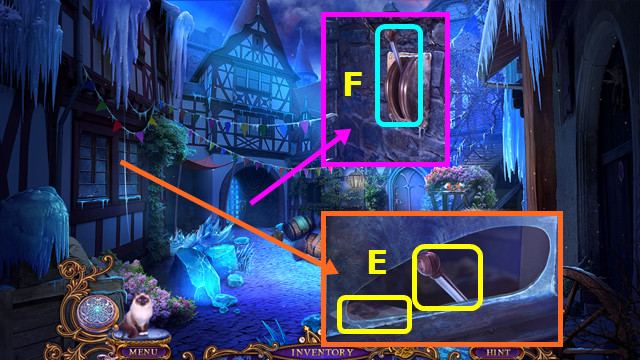
- Select (H).
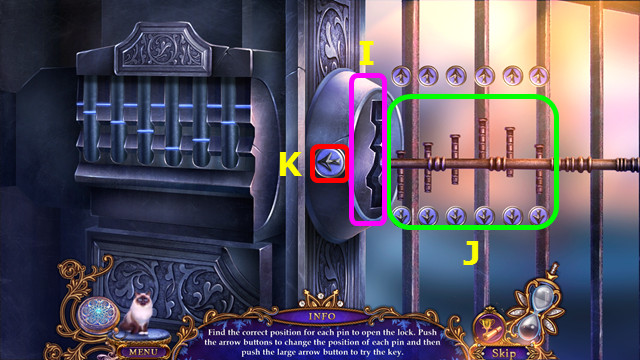
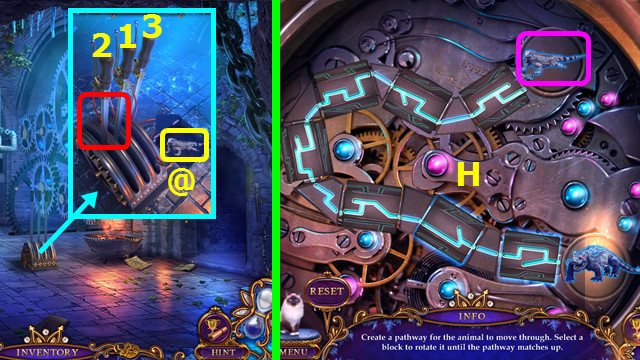
- Place the GATE KEY (I).
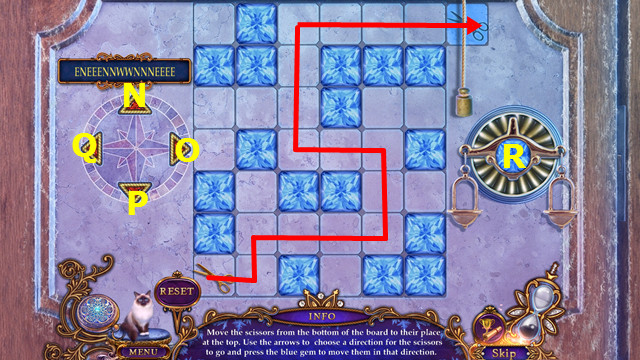
- Arrange the prongs (J).
- Select (K).
- Walk forward.
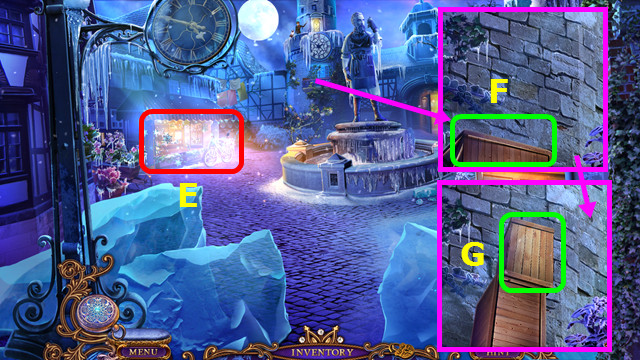
Chapter 2: The Square
- Read the notice (L).
- Take the MAGNET (M).
- Use the 1 FRANC; take the UV LIGHT (N).
- Place the GARDENER EMBLEM (O).
- Play the HOP; earn the LAMP (P).
- Place the FEATHER (Q).
- Go forward.
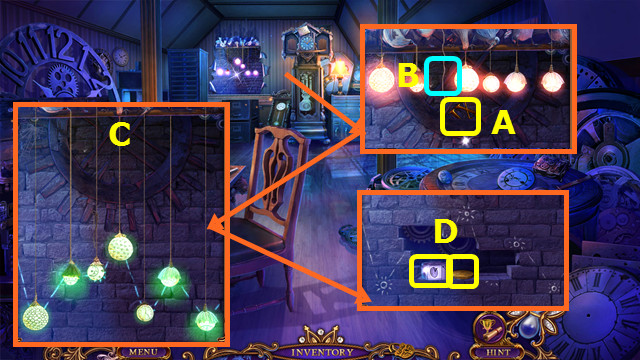
- Take the 1/2 NUMBER (A).
- Place the LAMP (B).
- Arrange the lamps (C).
- Take the LOCK CYLINDER and 2 FRANCS (D).
- Walk down.
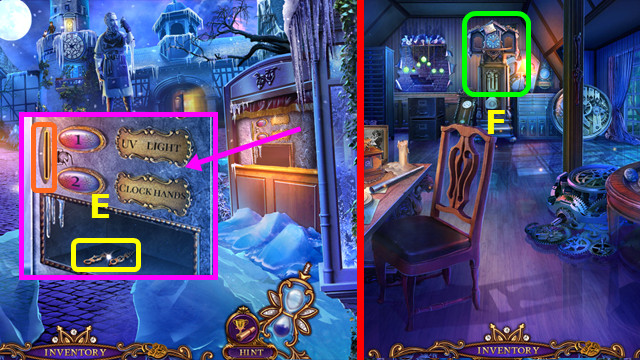
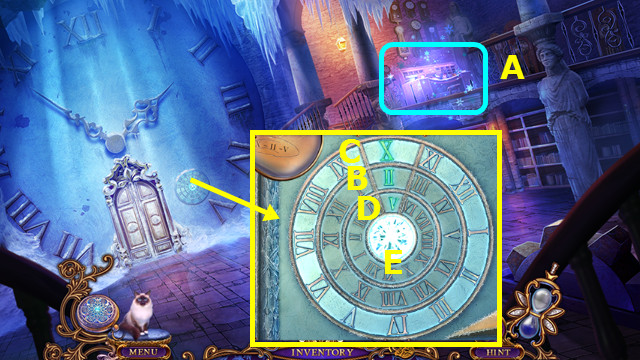
- Use the 2 FRANCS; take the CLOCK HANDS (E).
- Go forward.
- Select (F).
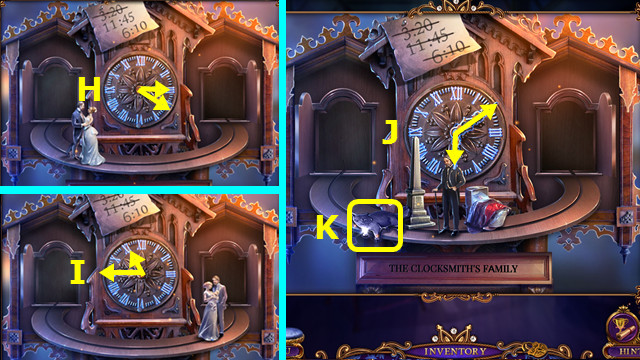
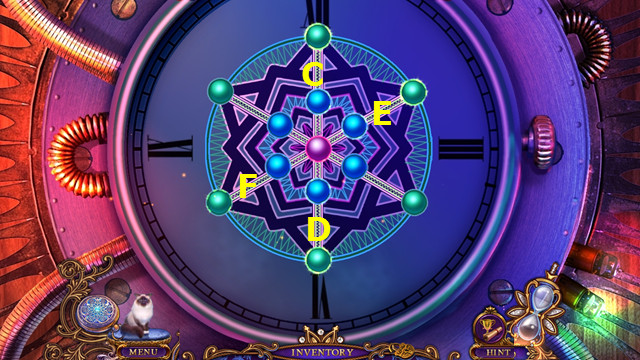
- Place the CLOCK HANDS.
- Set the clock to 3:20 (H), 11:45 (I), and 6:10 (J).
- Take the ANIMAL EMBLEM (K).
- Walk down.
- Place the ANIMAL EMBLEM; restore the path (L).
- Use the WATCH (M).
- Take the THEATER BOX (N).
- Open the THEATER BOX (inventory); select 1-6.
- Take the 2/2 NUMBERS (O).
- Walk down.

- Place the UV BULB (P).
- Press the 3 handprints (Q).
- Take the SCRAPER (R).
- Go forward 2x.
- Take the METAL ROD (A).
- Use the SCRAPER (B).
- Place the LOCK CYLINDER; set the code (C).
- Take the SMALL KEY, note, and 1/4 WEIGHTS (D).
- Walk down.
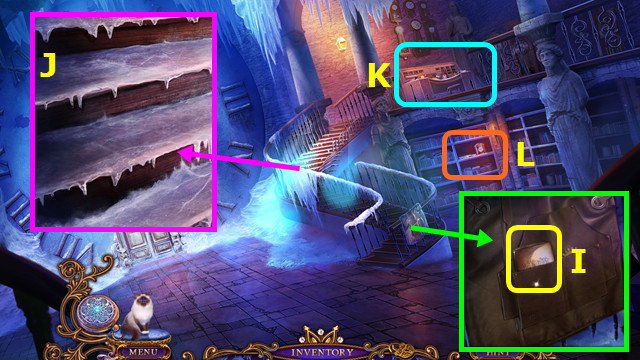
- Play the HOP; earn the BOX (E).
- Select (F).
- Place the BOX (G).
- Select the pairs (H).
- Select the pairs (I).
- Select the pairs (J).
- Read the note (K).
- Use the METAL ROD; take the 2/4 WEIGHT (L).
- Use the MAGNET to take the 3/4 WEIGHT (M).
- Select (N).
- Place the 2 NUMBERS on the clock.
- Restore the numerals; take the 4/4 WEIGHT (O).
- Select (P).
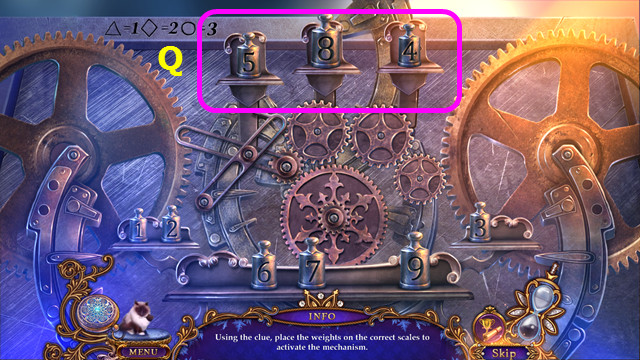
- Place the 4 WEIGHTS on the machinery.
- Solution (Q).
Chapter 3: The Forest
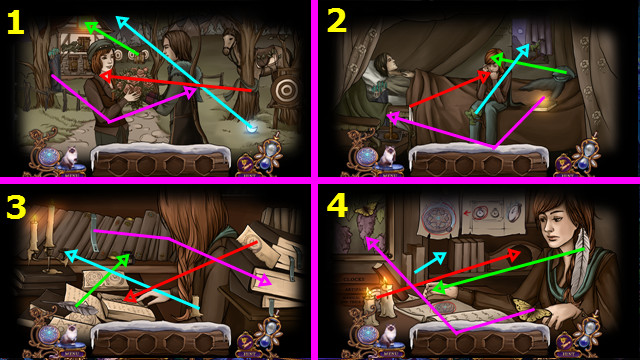
- Talk to Kate.
- Restore the items 1-4.
- Talk to Kate again.
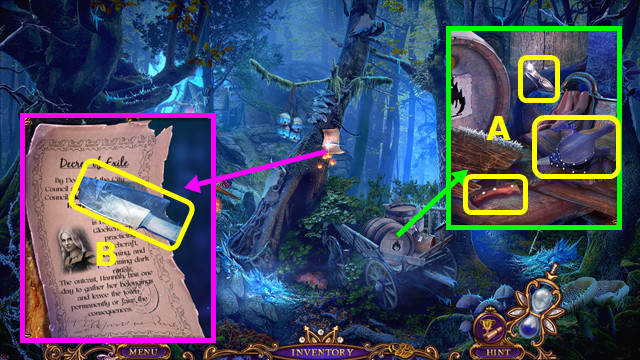
- Take the DAGGER HANDLE, BELLOWS, and TWEEZERS (A).
- Take the notice; use the DAGGER HANDLE to take the DAGGER (B).

- Take the TORCH; use the DAGGER and take the 1/2 TILE (C).
- Try to walk right.
- Walk left.
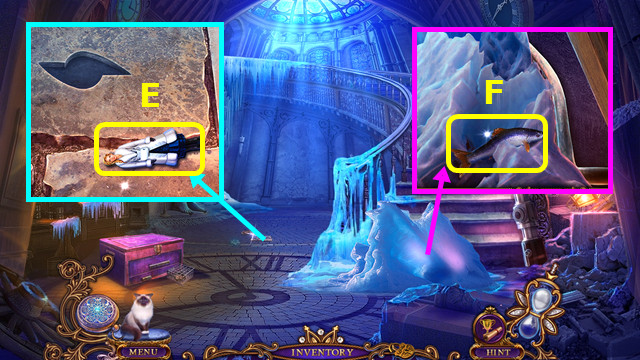
- Take the FISH; use the TWEEZERS to take the 2/2 TILE (D).
- Give the FISH to MR. JENKINS (inventory).
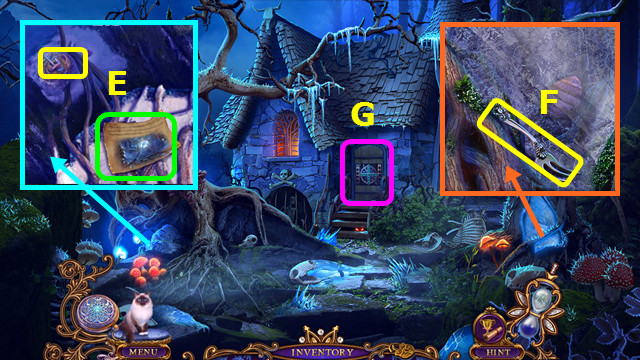
- Take the notice and use MR. JENKINS to take the CORKSCREW (E).
- Take the FORK (F).
- Select (G).
- Place the 2 TILES.
- Solution (H).
- Walk forward.
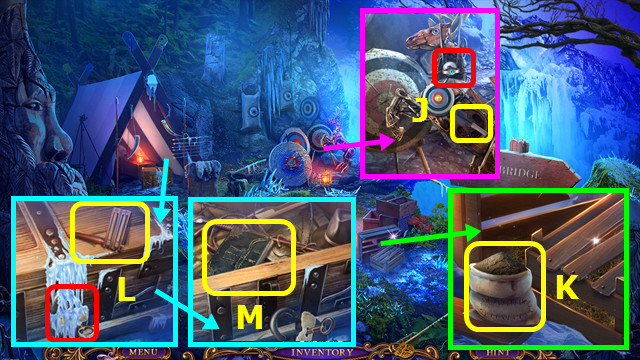
- Use the BELLOWS (I).
- Play the HOP; earn the EMPTY BOTTLE (J).
- Take the note and use the FORK to take the BIRD KEY (K).
- Try to take the flint (L).
- Place the BIRD KEY; take the CHEESE (M).
- Give the CHEESE; take the FLINT (N).
- Walk down 2x.

- Use the CORKSCREW and EMPTY BOTTLE to earn the KEROSENE (O).
- Combine the TORCH, KEROSENE, and FLINT to make the BURNING TORCH (inventory).
- Walk left.
- Use the BURNING TORCH; take the FIGURE (P).
- Go forward.
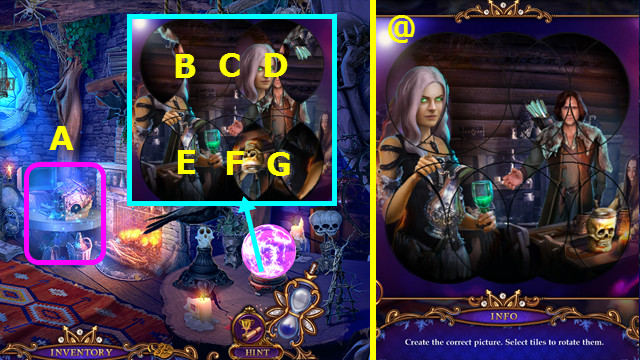
- Play the HOP; earn the BOARDS (A).
- Place the FIGURE; select D-C-B-C-D-C-B-C-E-F-G-F-G-E.
- Final solution (@).
- Take the 2/3 PART OF MAP (H).
- Walk down 2x.
- Place the BOARDS (I).
- Walk right.
- Place and turn the SMALL KEY; take the SHOVEL (J).
- Take the SAND (K).
- Take the CLAPPER and use the BURNING TORCH on the lock (L).
- Remove the lock, open the chest, and take the diary (M).
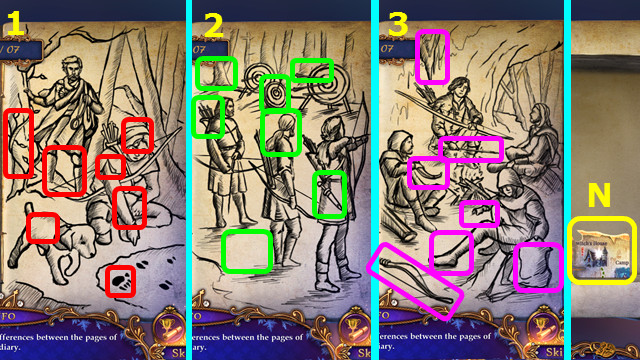
- Find the differences 1-3.
- Take the 3/3 PART OF MAP (N).
- Walk right.
- Use the SHOVEL (O).
- Play the HOP; earn the ROPE (P).
- Try to cross the bridge (Q).
- Use the ROPE (R).
- Use MR. JENKINS to take the CROWBAR (S).
- Walk down.
- Use the CROWBAR; take the BRUSH (A).
- Walk right.
- Play the HOP; earn the NET (B).
- Use the BRUSH; place the 3 PARTS OF MAP (C).
- Open the case; take the EMPTY GOBLET (D).
- Go forward.

- Use the NET to take the ALEXANDER FIGURE (E).
- Use the EMPTY GOBLET to take the GOBLET WITH WATER (F).
- Use the GOBLET WITH WATER; take the KATE FIGURE (G).
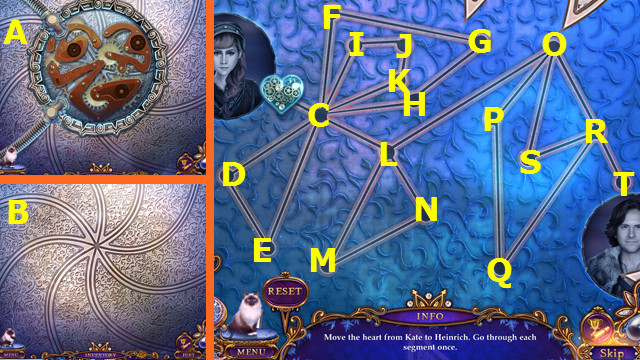
- Select (@).
- Place the KATE FIGURE and ALEXANDER FIGURE.
- Solution HI-KH-JK-LK-IL-HI-KH-JK.
Chapter 4: The Dungeon Entrance
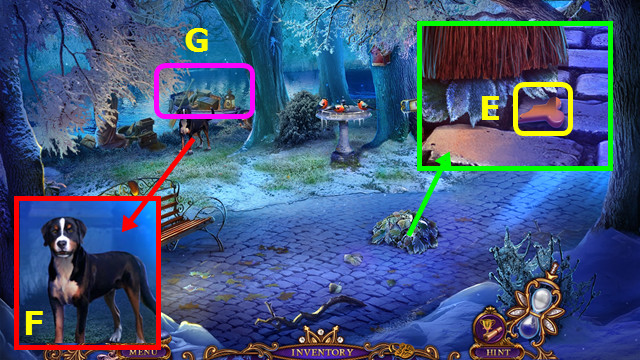
- Take the CASKET (A).
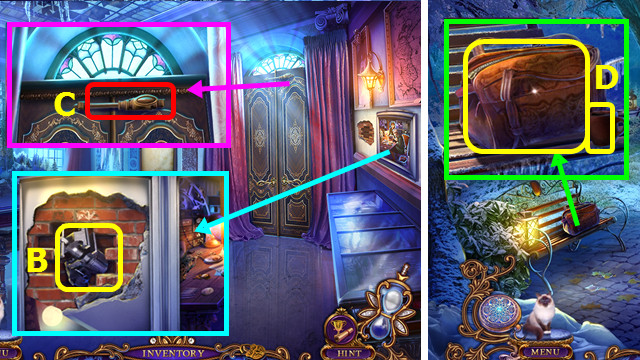
- Look at the CASKET (inventory); restore the picture (B) and take the RULER.
- Use the SAND; take the 1/2 FIGURE (C).
- Walk forward.
- Take the 2/2 FIGURE (D).
- Use the CLAPPER to take the 1/2 HEART PART (E).
- Walk down.
- Select (F).
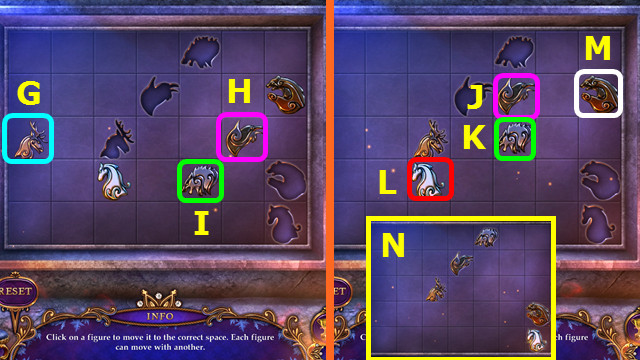
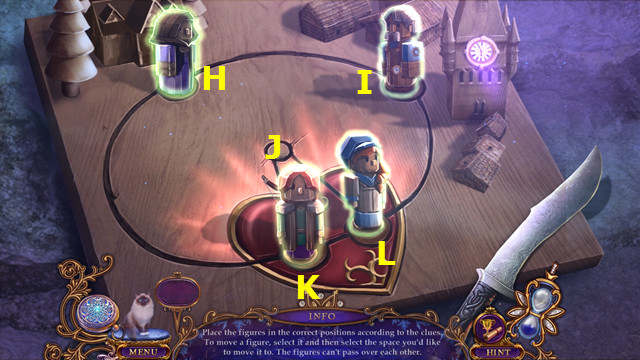
- Place the 2 FIGURES on the board.
- Select Gx2-H-I.
- Select J-Kx2-Lx4-Mx2.
- Final solution (N).
- Take the STICK and PANEL.
- Walk forward.
- Use the STICK (Q).
- Use MR. JENKINS to take the SPHERE (R).
- Place the PANEL; restore the picture (S).
- Go forward.
- Take the SALT (A).
- Try to walk forward.
- Select (B).
- Place the SPHERE.
- Select Cx2-Dx2-E-F-Ex2-Fx2.
- Walk right.
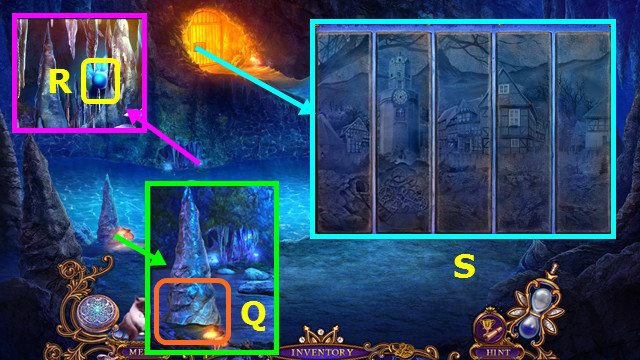
- Take the CIGARETTE CASE (I).
- Use the SALT (J).
- Play the HOP; earn the CORK (K).
- Select (L).
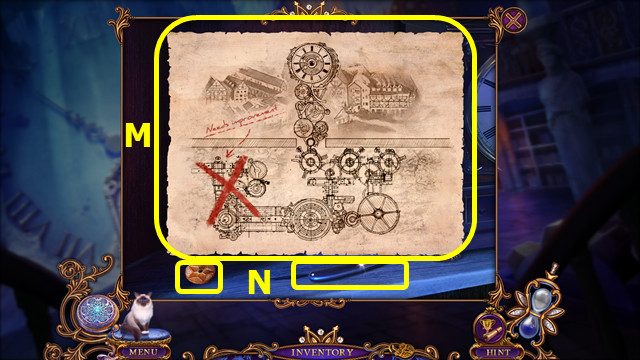
- Restore and take the diagram (M).
- Take the ADJUSTING KNOB and RAZOR (N).
- Walk down.
- Place the CORK (O).
- Walk forward.
- Use the RULER; take the 2/2 HEART PART (P).
- Take the BOX, diagram, and SHAWL (Q).
- Combine the BOX and 2 HEART PARTS, enter 1-2-4-5, and take the photo, note, and 1/3 GEARS (inventory).
- Use the SHAWL; take the NET and LAMP (R).
- Combine the LAMP and ADJUSTING KNOB to make the LIT LAMP (inventory).
- Use the LIT LAMP; take the MONOCLE (S).
- Combine the CIGARETTE CASE and MONOCLE to make the MONOCLE WITH CODE (inventory).
- Walk down 2x.
- Use the NET to take the FISH (T).
- Give the FISH to MR. JENKINS (inventory).
- Walk forward and right.
- Play the HOP; earn the 2/3 GEARS (A).
- Turn the rings to the correct numeral in the order B-C-D.
- Push (E).
- Go forward.
- Remove the rope and take the CABLE (F).
- Select (G).
- Select the parts 1-8.
- Walk down 2x.
- Place the CABLE; select 1-3.
- Take the ANIMAL EMBLEM (@).
- Open the WATCH; place the ANIMAL EMBLEM and restore the path (H).
- Walk right and forward.

- Use the WATCH (I).
- Use MR. JENKINS (J).
- Take the 3/3 GEARS (K).
- Select (L).
- Place the 3 GEARS (A).
- Open the door (B).
- Select C-D-E-C-F-G-H-C-I-J-K-C-L-M-N-L-O-P-Q-R-S-O-R-T.
- Walk forward.
Chapter 5: The City Street
- Talk to Kate (M).
- Take the 1st PART OF BONE (N).
- Use the RAZOR (O).
- Play the HOP; earn the KEY (P).
- Take the COIN (Q).
- Walk right.
- Take the map (R).
- Take the OIL and place the KEY (A).
- Set the buttons as shown (B).
- Take the DIAMOND RING (C).
- Walk down.
- Use the DIAMOND RING; take the note and LEVER (E).
- Place and pull the LEVER (F).
- Go forward.
- Use MR. JENKINS to take the TROWEL (G).
- Go forward.
- Talk to Heinrich; earn the 1/4 CONTROL BUTTONS (H).
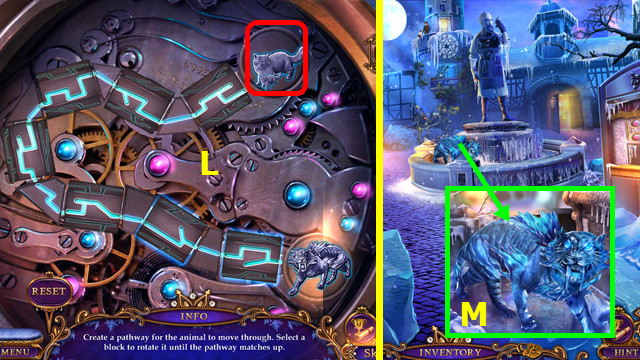
- Use the COIN 4x; remove the grate and take the GARDEN SHEARS (I).
- Take the BROOM; use the poker to take the MAGNIFYING LENS (J).
- Walk down.

- Use the GARDEN SHEARS; take the CANDLESTICK (K).
- Walk forward.
- Place the CANDLESTICK; read the diary and take the INSTRUCTION (L).
- Select (M).
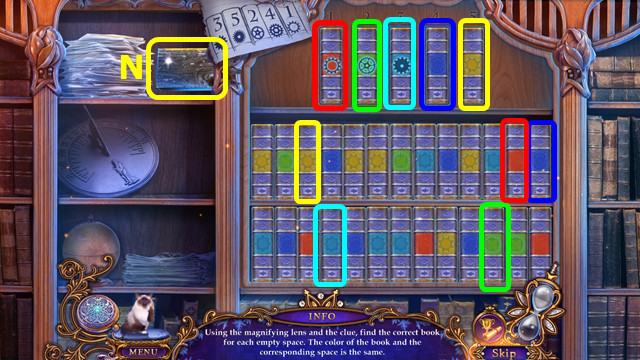
- Place the MAGNIFYING LENS.
- Move the books to the slots (color-coded).
- Take the BROKEN PLANK (N).
- Walk down.
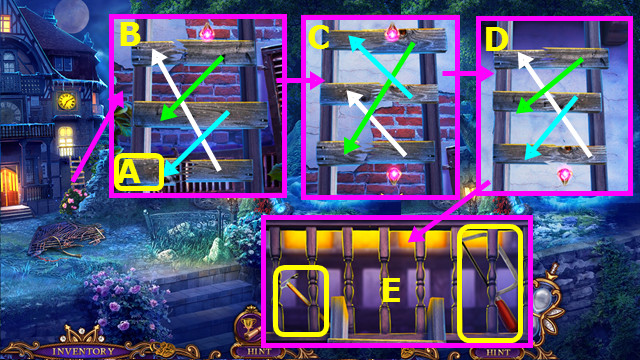
- Place the BROKEN PLANK (A).
- Swap the planks to the tier indicated; pan up (B).
- Swap the planks to the tier indicated; pan up (C).
- Swap the planks to the tier indicated; pan up (D).
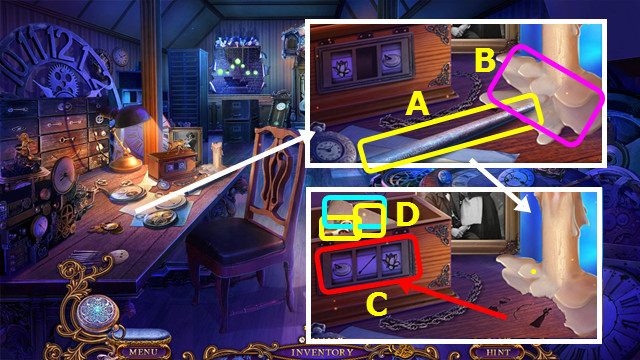
- Take the ICE PICK and HAND SAW (E).
- Use the HAND SAW to take the CURVED METAL ROD (Q).
- Walk down.
- Play the HOP; earn the HANDLE (R).
- Use the ICE PICK to take the 2/4 CONTROL BUTTONS (S).
- Use the TROWEL; take the 3/4 CONTROL BUTTONS (T).
- Walk right.

- Use the HANDLE (A).
- Select the 6 pairs (color-coded).
- Take the VICE (B).
- Combine the CURVED METAL ROD and VICE to make the LONG METAL ROD (inventory).
- Use the LONG METAL ROD (C).
- Walk forward.
- Take the BAG and EMPTY CUP (D).
- Use the BROOM; take the 2nd PART OF BONE (E).
- Combine the 2 PARTS OF BONE to make the BONE (inventory).
- Give the BONE (F).
- Play the HOP; earn the PAPER CLIP (G).
- Combine the BAG and PAPER CLIP; take the HALF OF NUMBER (inventory).
- Walk right.
- Place the HALF OF NUMBER; restore the numbers and take the RUSTY MECHANICAL ARM (H).
- Combine the RUSTY MECHANICAL ARM and OIL to make the MECHANICAL ARM (inventory).
- Place the MECHANICAL ARM and open the panel; take the SPOKE and FAUCET (I).
- Place the SPOKE; take the CLOSED ACID (J).
- Walk down.
- Play the HOP; earn the 4/4 CONTROL BUTTONS (K).
- Place the FAUCET; take the ICE (L).
- Walk right.
- Select (M).
- Place the 4 CONTROL BUTTONS; select O-N-Ox3-Nx2-Qx2-Nx3-Ox4.
- Select (R).
- Walk forward.
Chapter 6: The Outside Tower

- Take the METAL SHEARS (A).
- Use the METAL SHEARS and remove the tarp; take the LEATHER POUCH, POT, and BELLOWS (B).
- Open the LEATHER POUCH to find the 1/3 WHITE CRYSTALS and SMALL CLOCK (inventory).
- Use the BELLOWS, POT, ICE, and EMPTY CUP to make the CUP OF HOT WATER (C).
- Remove the cover and use the CUP OF HOT WATER (D).
- Walk left.
- Take the LEIA FIGURE (E).
- Take the FISH (F).
- Give the FISH to MR. JENKINS (inventory).
- Walk down.

- Use Mr. JENKINS to take the CORKSCREW (G).
- Combine the CLOSED ACID and CORKSCREW to find the ACID (inventory).
- Walk left.
- Use the ACID (H).
- Play the HOP; earn the VALVE (I).
- Place and turn the VALVE (J).
- Go up the stairs.
- Use MR. JENKINS to take the 1/2 ICE TRIANGLE (K).
- Take the 2/2 ICE TRIANGLE (L).
- Select (M).
- Place the 2 ICE TRIANGLES.
- Restore the picture (N).
- Walk forward.
- Select the pairs (color-coded); take the WITCH FIGURE and FIGURED KEY (O).
- Use MR. JENKINS to take the WEIGHT (P).
- Walk down.
- Place the LEIA FIGURE and WITCH FIGURE.
- Move the figures as shown; take the CHISEL (Q).
- Walk down.
- Play the HOP; earn the RED CLOCK (R).
- Use the FIGURED KEY; take the ROPE (S).
- Combine the ROPE and WEIGHT to make the WEIGHTED ROPE (inventory).
- Go forward 2x.
- Use the WEIGHTED ROPE to take the SIGN (T).
- Remove the CHAIN from the SIGN (inventory).
- Place the SIGN (A).
- Take the 2/3 WHITE CRYSTALS and place the CHAIN (B).

- Take the BURNING CANDLE (C).
- Place the BURNING CANDLE; take the 3/3 WHITE CRYSTALS and DIAL (D).
- Use the CHISEL to take the GREEN STONE (E).
- Combine the SMALL CLOCK and GREEN STONE to find the GREEN CLOCK (inventory).
- Place the DIAL; press Hx3-Gx2-H-Gx2.
- Take the BLUE CLOCK (I).
- Select (J).
- Place the RED CLOCK, GREEN CLOCK, and BLUE CLOCK; swap the springs as shown (K).
- Select (L).
- Walk left.
- Talk to Magdalena (M).
- Select (N).
- Place the 3 WHITE CRYSTALS.
- Solution: CD-AB-BC-HA-AB-IH-HA-GI-IH-FI-IG-AF-HA-JI-EJ-DE-GD-IG-JI-IH-EJ-DE.
- Congratulations! You have completed Ominous Objects: Trail of Time!
Created at: 2016-01-17