

Walkthrough Menu
- General Tips
- Chapter 1: Twilight at the Moor
- Chapter 2: Hand of the Forge
- Chapter 3: Forgotten Legend
- Chapter 4: Queen and the Enchantress
- Chapter 5: Within the Oak
- Chapter 6: Corridors of Memory
- Chapter 7: Return to the Ocean
- Chapter 8: Hunting the Hunter
General Tips
- This is the official guide for Otherworld: Shades of Fall.
- This guide will not mention each time you have to zoom into a location; the screenshots will show each zoom scene.
- We will use the acronym HOP for Hidden-object puzzles. Interactive items will be color-coded.
- The HOP lists may be random; our lists may vary from yours.
- The majority of the puzzles are random and will reset to a new layout if you close and restart them. Those that are not random will have step-by-step solutions.
- There are 60 Fay Dragons to collect. The locations can be found at the end of the guide.
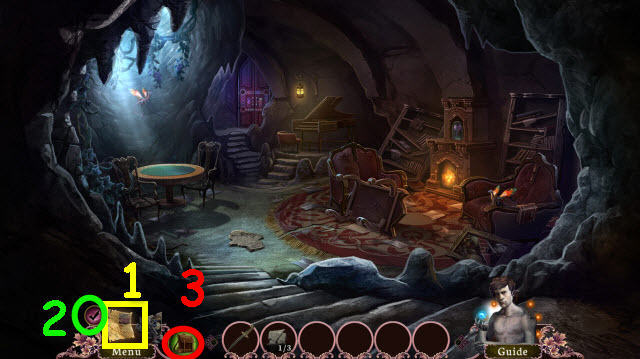
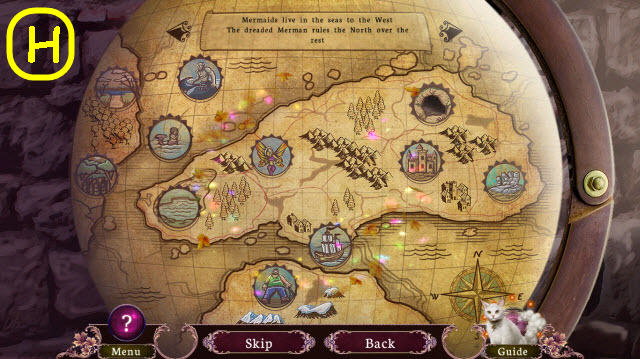
- Use the map (1) to fast travel to a location.
- Select the check mark (2) to check your current task.
- There are two Inventory bars. Select the button (3) to toggle between Clues Inventory and Items Inventory.
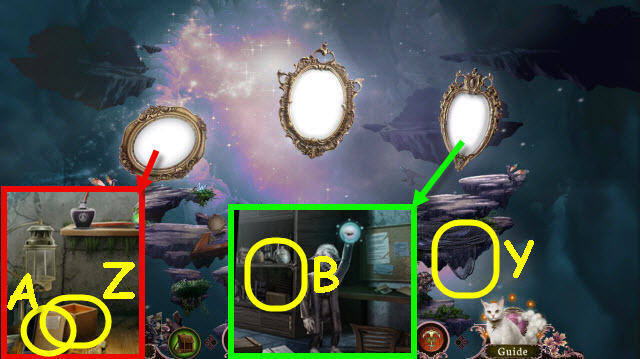
Chapter 1: Twilight at the Moore
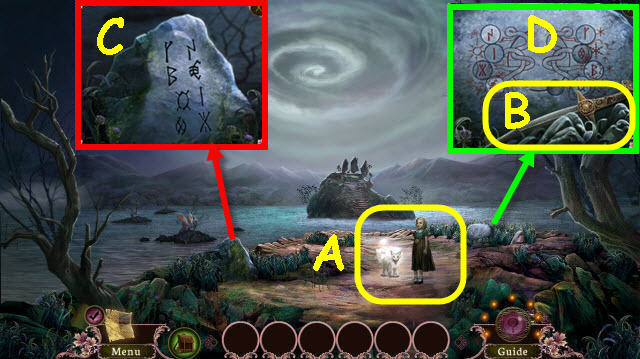
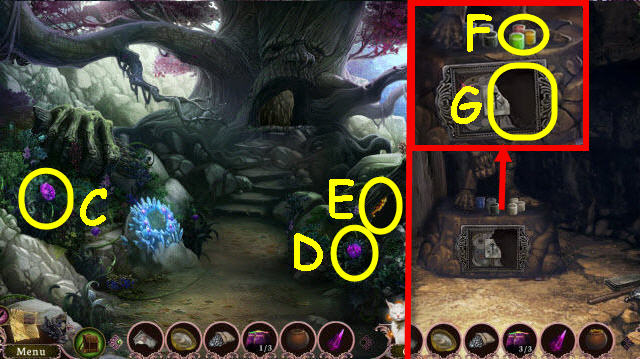
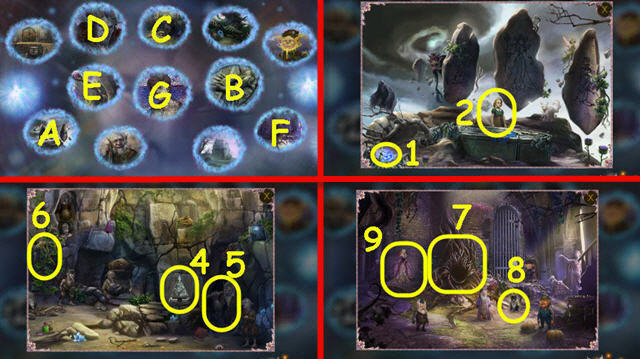
- Speak to the cat and Fiona (A).
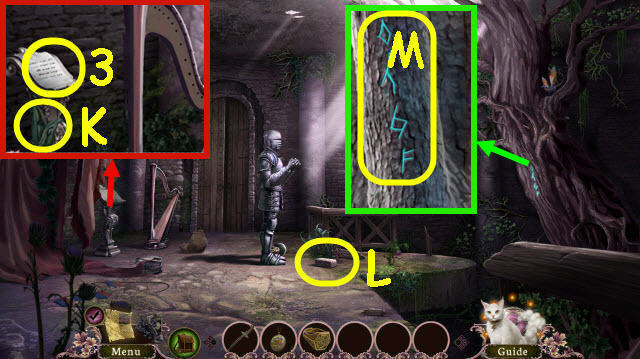
- Take the DAGGER (B).
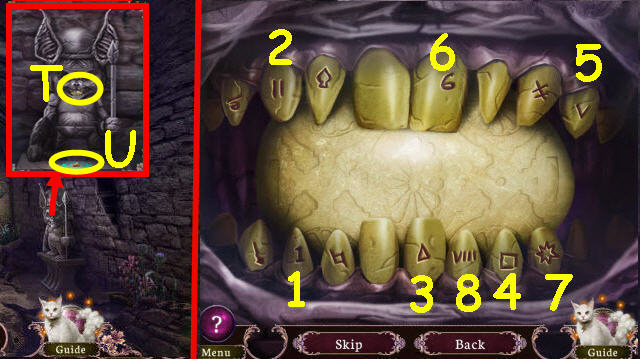
- Use the DAGGER on the rock 3x (C); select the runes to get a RUNE INSCRIPTION.
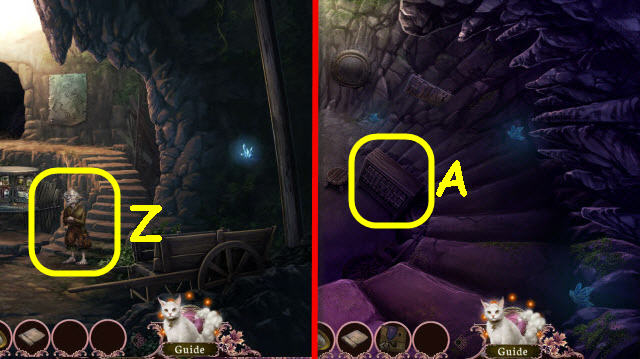
- Examine the rock to trigger a puzzle (D).
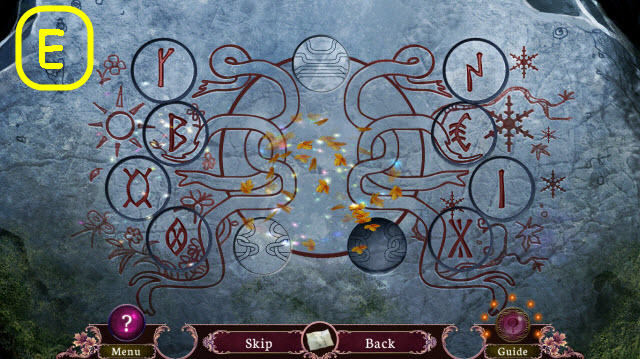
- Swap the runes to arrange them per the RUNE INSCRIPTION.
- See screenshot for solution (E).
- Go forward.
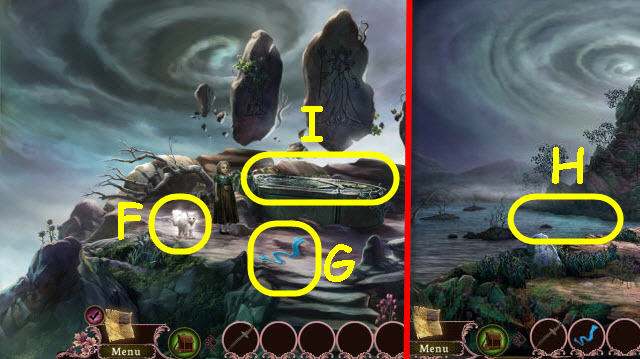
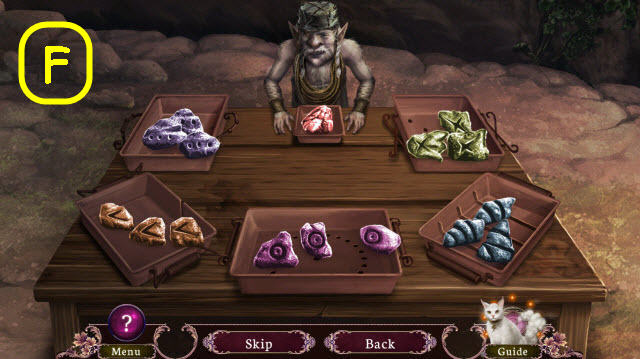
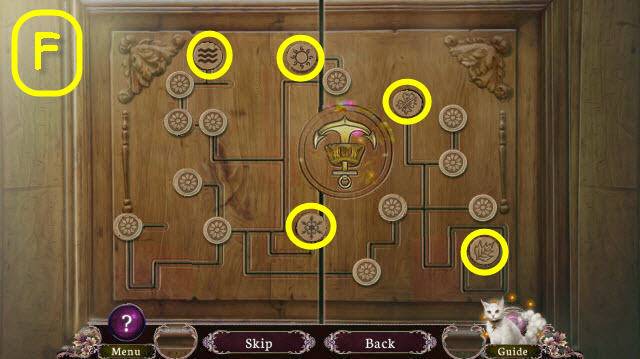
- Speak to the cat (F).
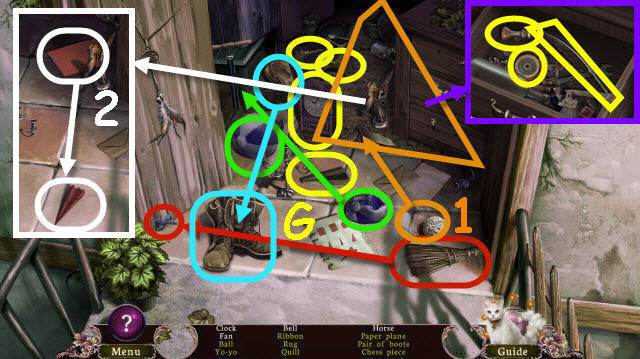
- Take the SCARF (G).
- Back out.
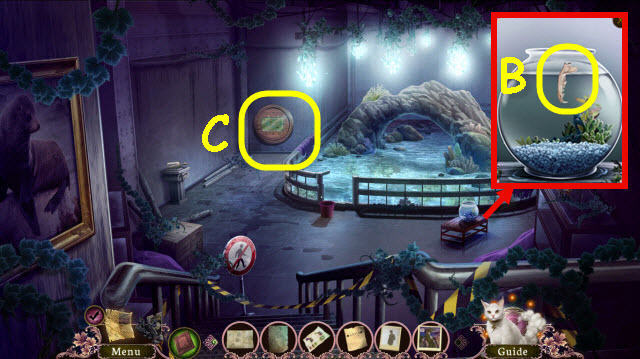
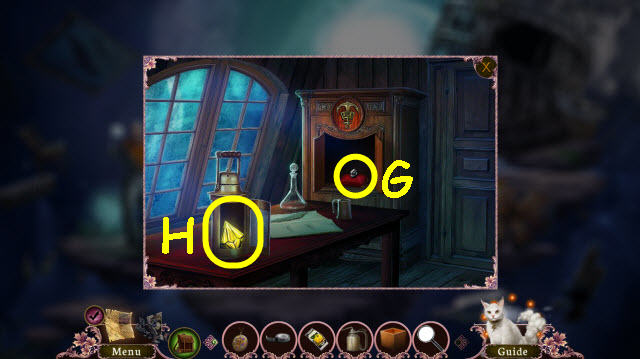
- Use the SCARF in the water; receive a WET SCARF (H).
- Go forward.
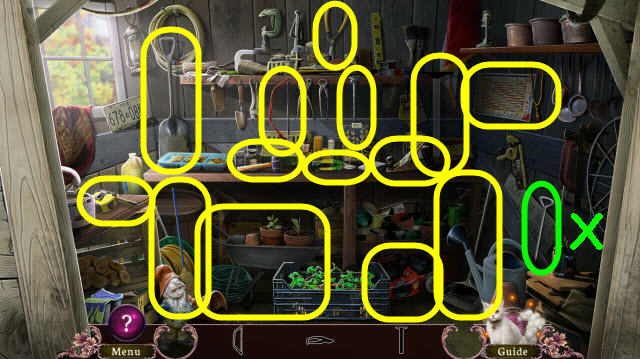
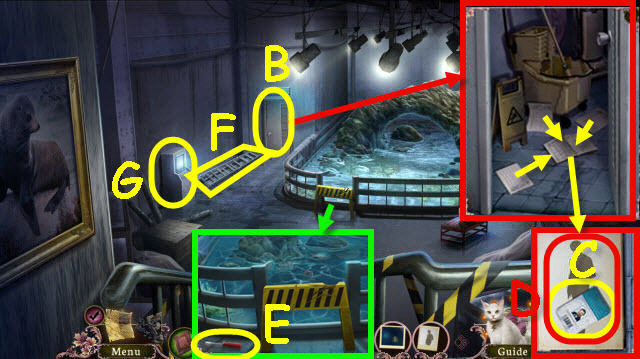
- Use the WET SCARF 3x on the sarcophagus to trigger a HOP (I).
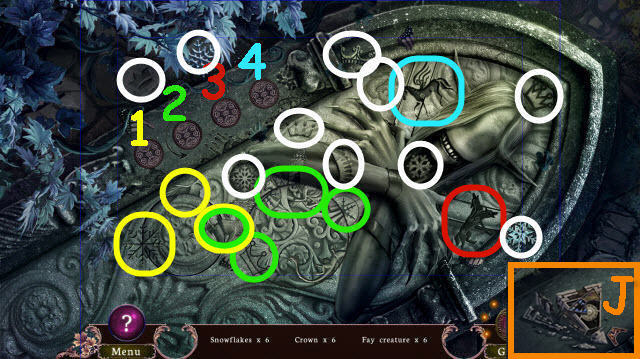
- Play the HOP.
- Turn the numbered dials to create items. The matching colored areas are item locations when turned.
- Select the pieces (J).
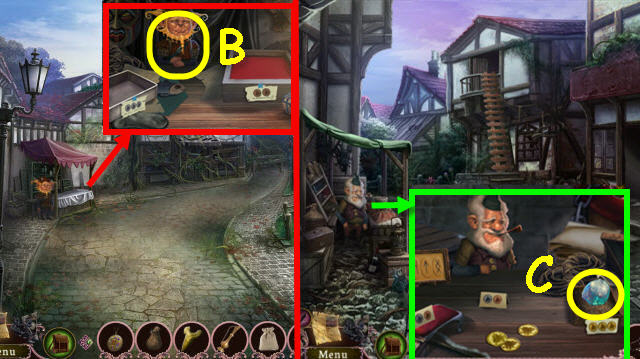
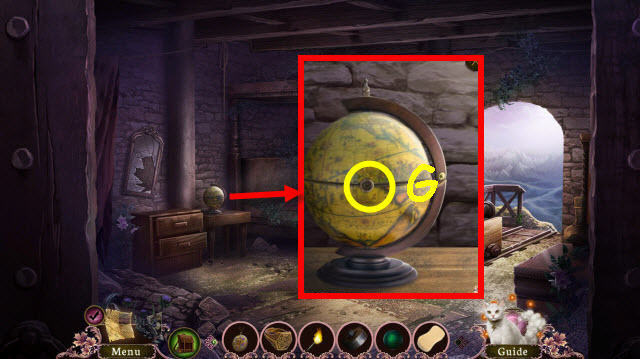
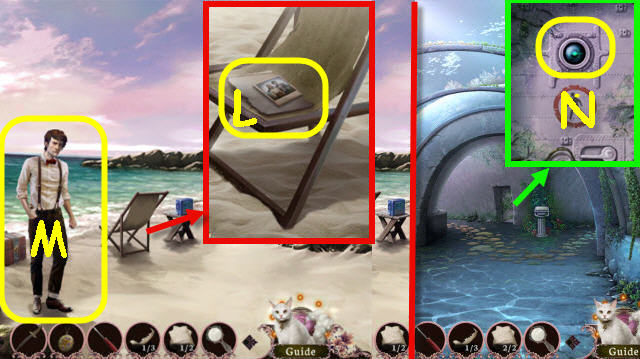
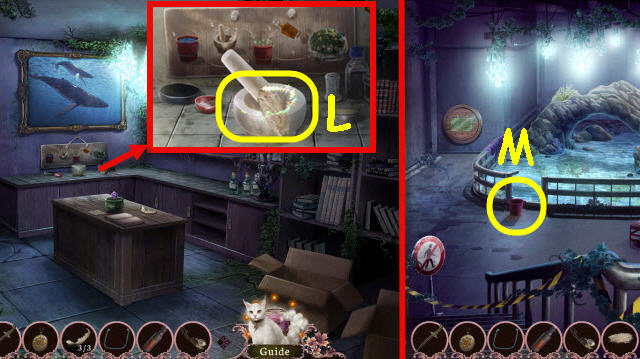
- Take the LOCKET (K).
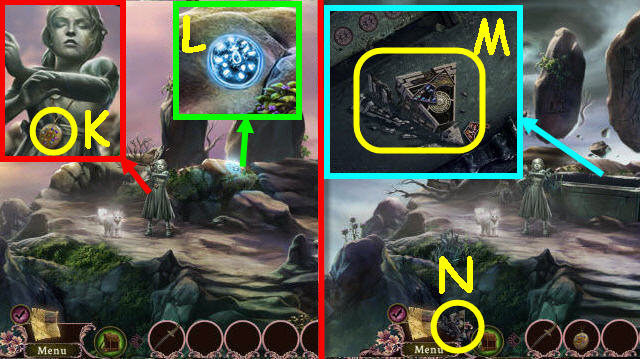
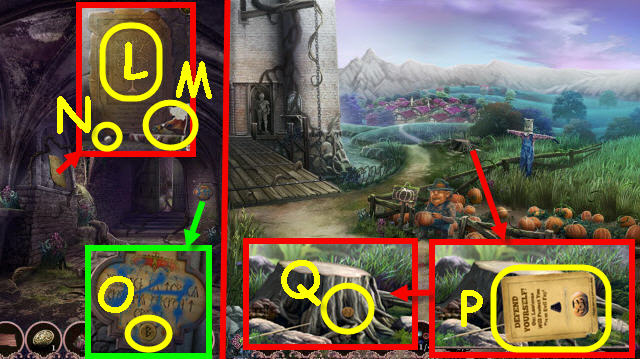
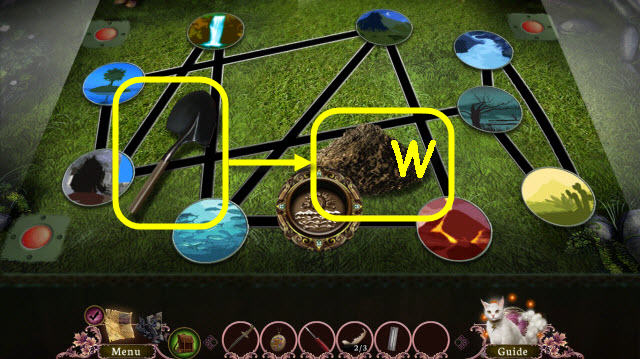
- Use the LOCKET on the symbol (L).
- Take the Perpetual Prison and select it (M); it is now added to your toolbar (N).
- Speak to the cat.
Chapter 2: Hand of the Forge
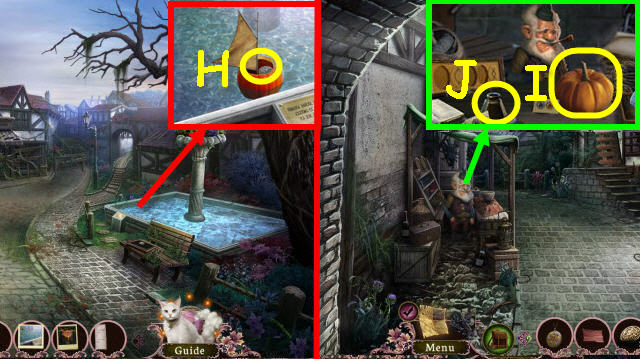
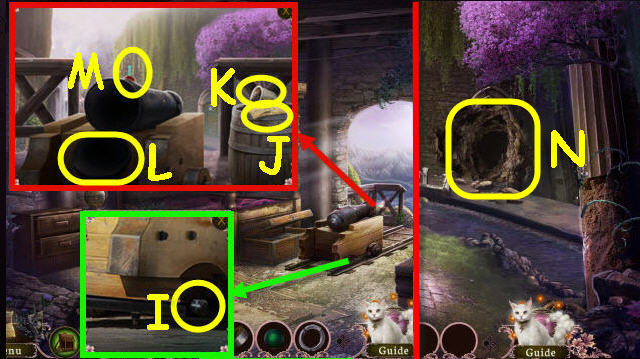
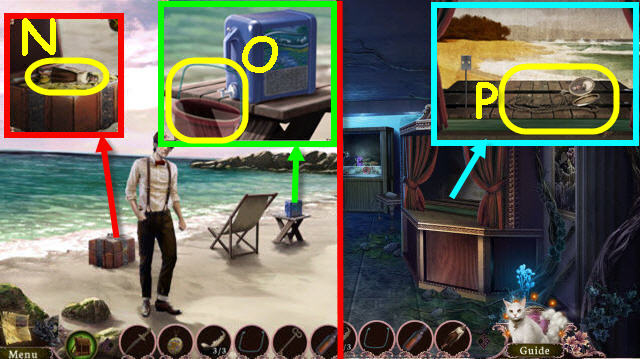
- Select anywhere and receive an EARTHQUAKE NOTE.
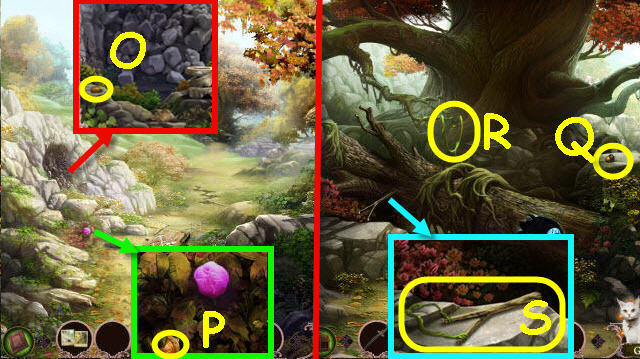
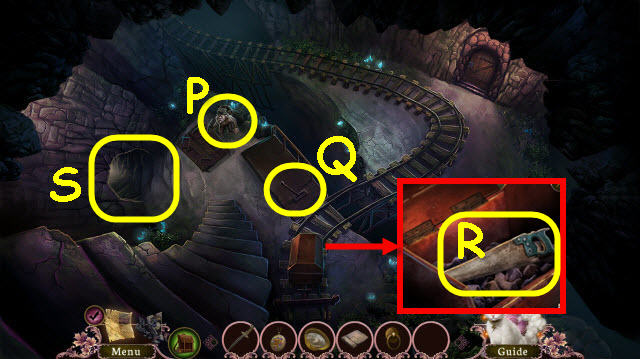
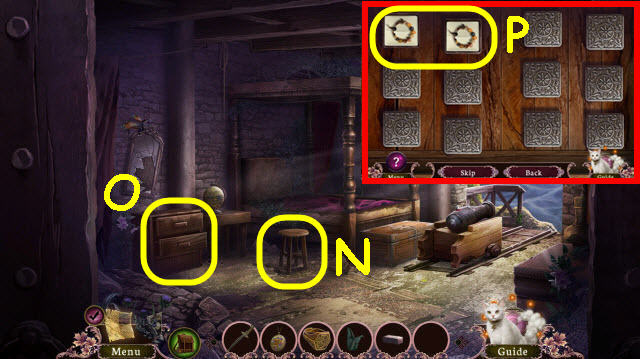
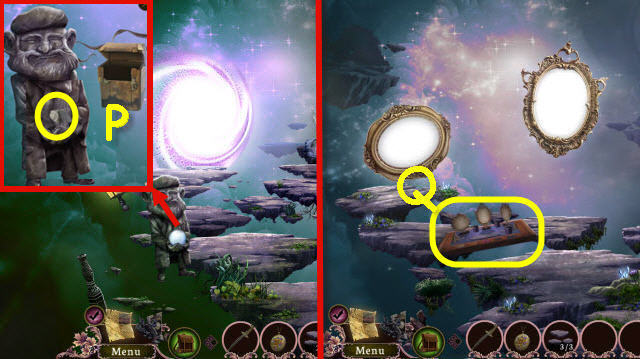
- Take the PEBBLE (O).
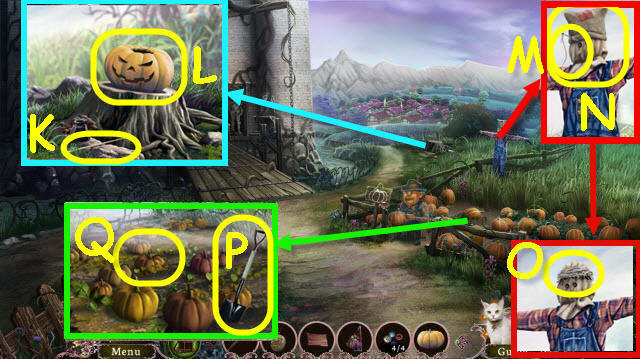
- Take the ACORNS 1/4 (P).
- Go forward.
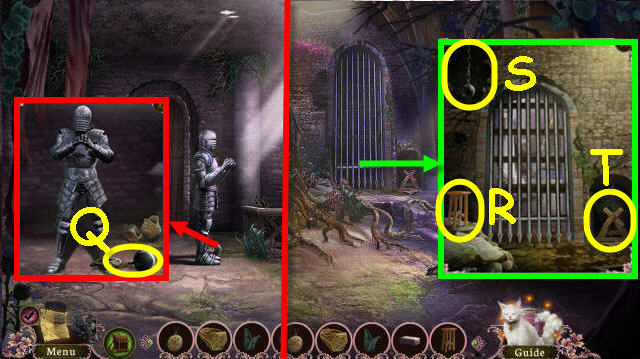
- Take the ACORNS 2/4 (Q).
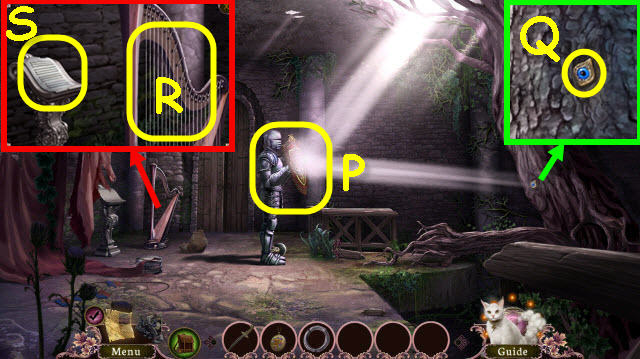
- Use the DAGGER to get the VINE (R).
- Use the DAGGER on the branch; place the VINE and PEBBLE on the branch. Receive a SLINGSHOT (S).
- Back out.

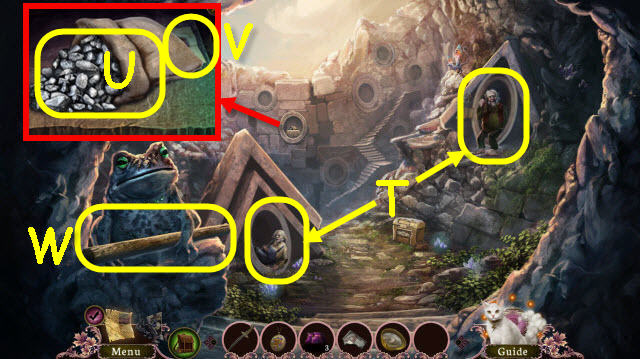
- Use the SLINGSHOT on the nest; take the ACORNS 3-4/4 (T).
- Go forward.
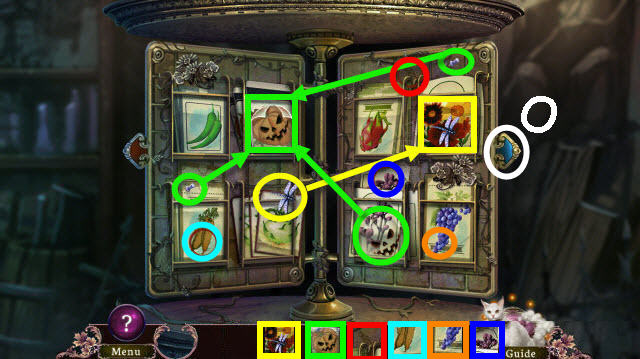
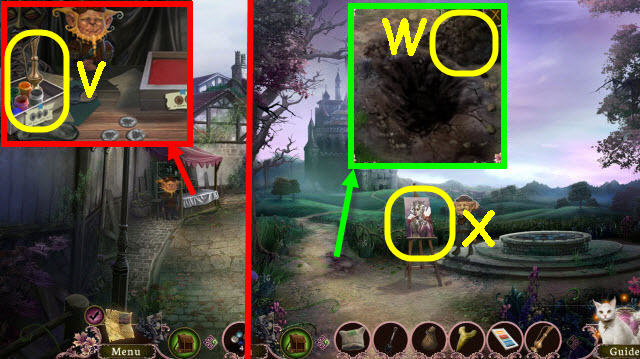
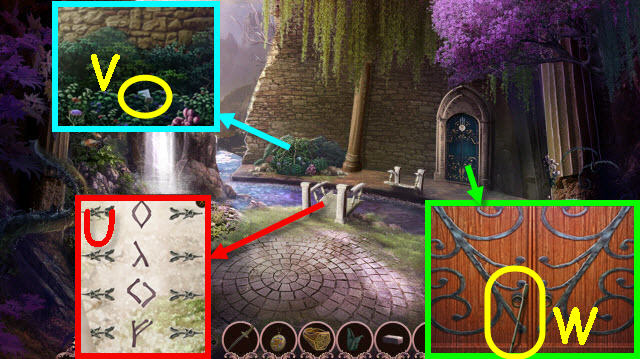
- Select the symbol twice; give the 4 ACORNS to the porcupine. Use the LOCKET on the symbol (U).
- Take the RAKE PARTS 1/2 (V).
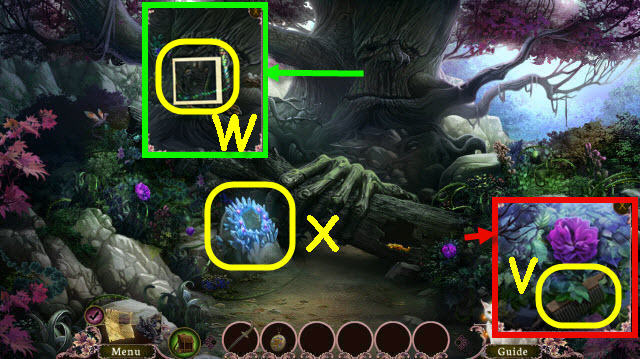
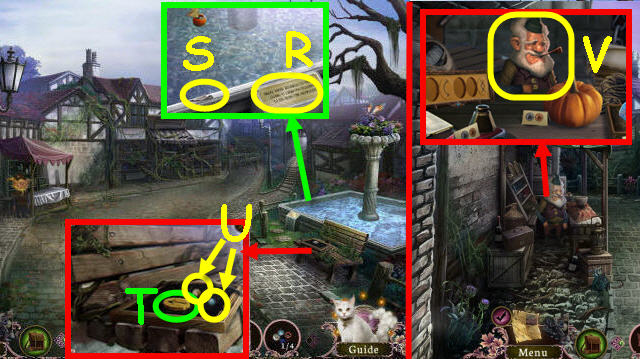
- Select the tree twice; get a TREE PICTURE (W).
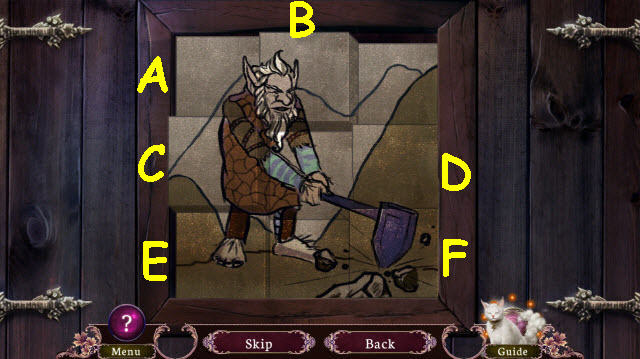
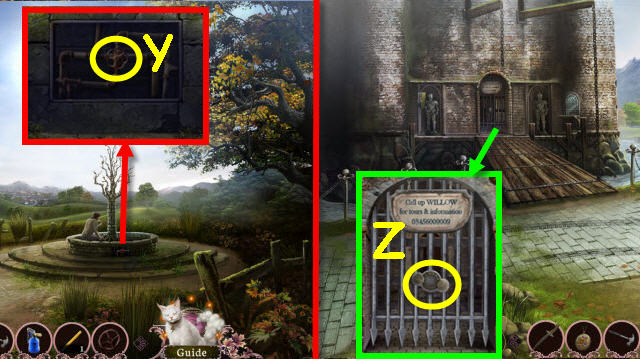
- Examine the crystals to trigger a puzzle (X).
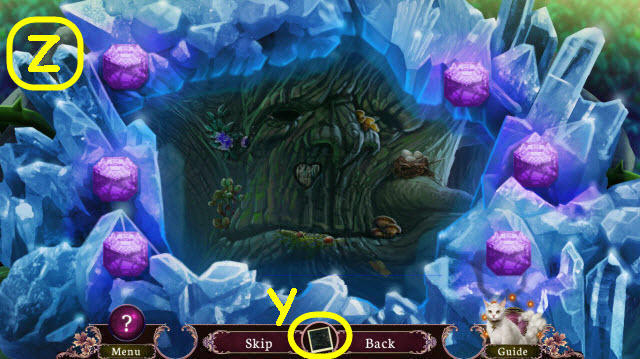
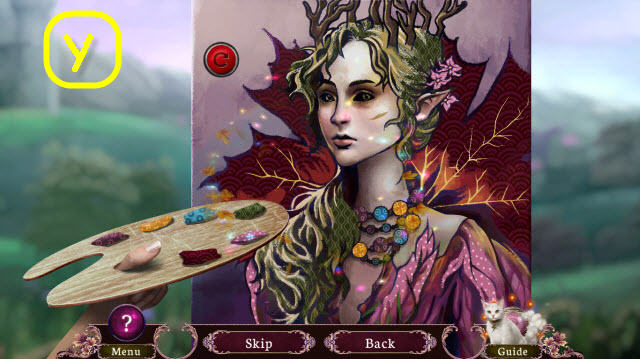
- Select the gems to duplicate the TREE PICTURE (Y).
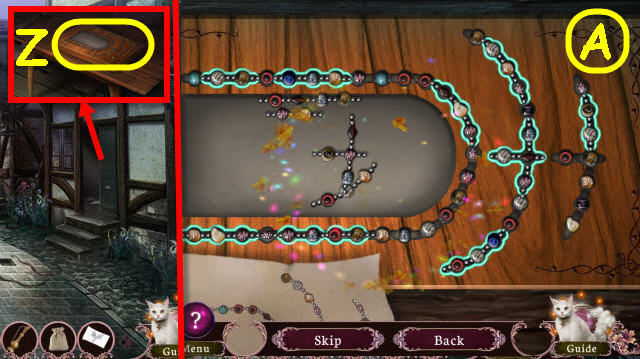
- See screenshot for solution (Z).
- Go forward.
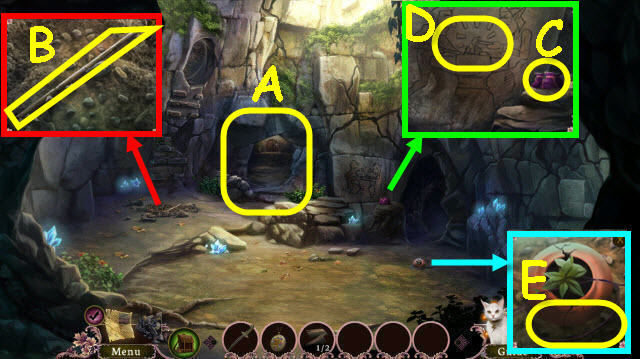
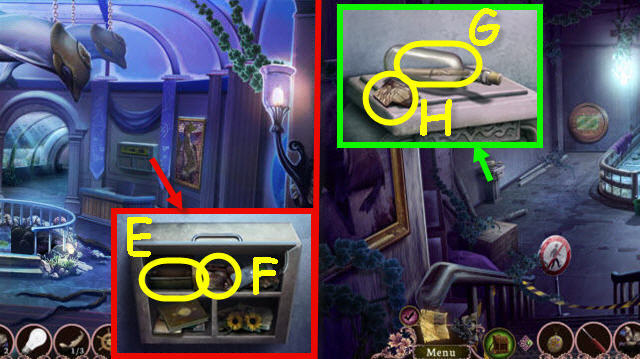
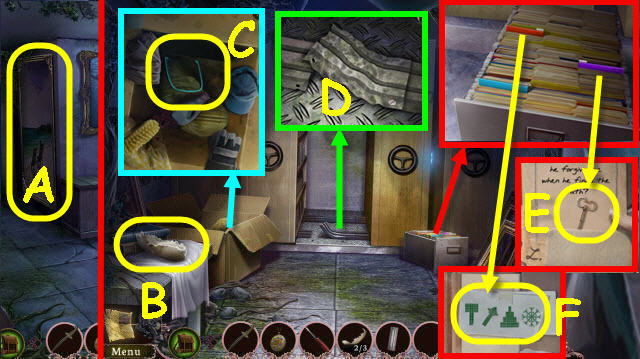
- Select the doorway twice (A).
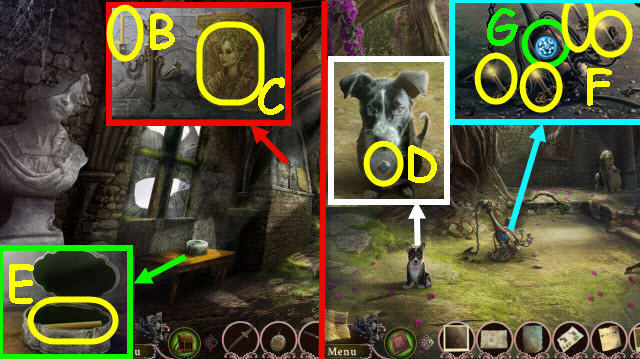
- Take the STICK (B).
- Take the 3 POUCHES (C).
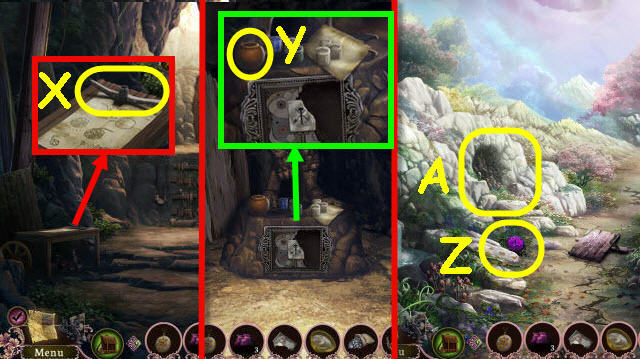
- Select the drawing to get a CAVE DRAWING (D).
- Use the DAGGER to get TWINE (E).
- Back out twice.
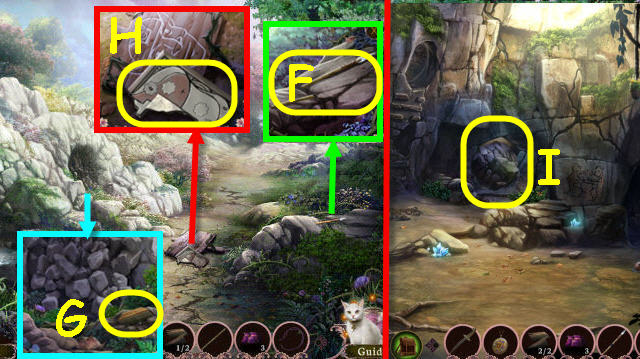
- Place the STICK and TWINE on the TWINE on the spearhead; receive a SPEAR (F).
- Take the RAKE PARTS 2/2 (G).
- Take the BROKEN PLAQUE (H).
- Go forward twice.
- Use the SPEAR on the boulder (I).
- Go forward.
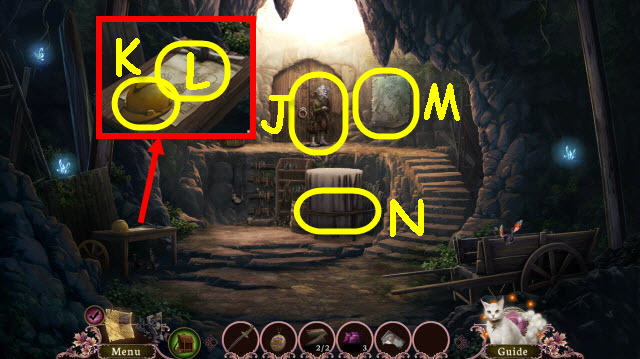
- Speak to the kobold (J); give the 2 RAKE PARTS to him and receive a RAKE.
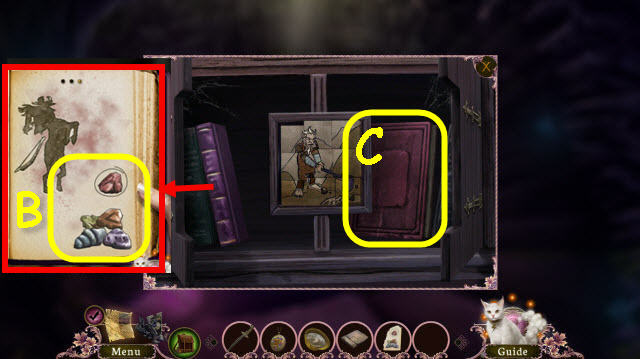
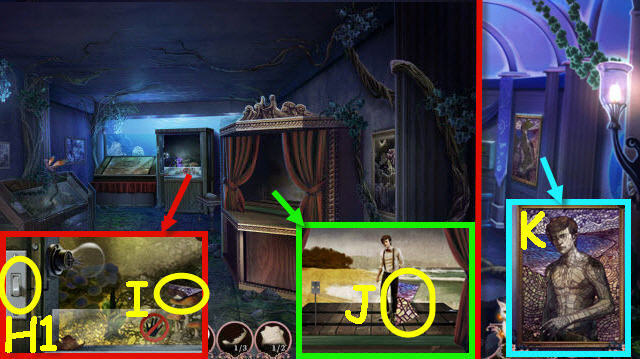
- Take the MINING HAT (K) and select the drawing twice to receive POLLEN AND RESIN (L).
- Select the drawing twice to receive a BEANSTALK (M).
- Use the DAGGER on the rope to trigger a HOP (N).
- Play the HOP.
- Select the tab for part 2 (O).
- Select the tab for part 3 (P).
- You receive a SEED.
- Back out 3x.
- Use the MINING HAT on the waterfall; receive a CAP WITH WATER (Q).
- Go forward twice.
- Use the RAKE, SEED and CAP WITH WATER on the dirt (R).
- Go through the opening (S).
- Speak to the 2 kobolds (T).
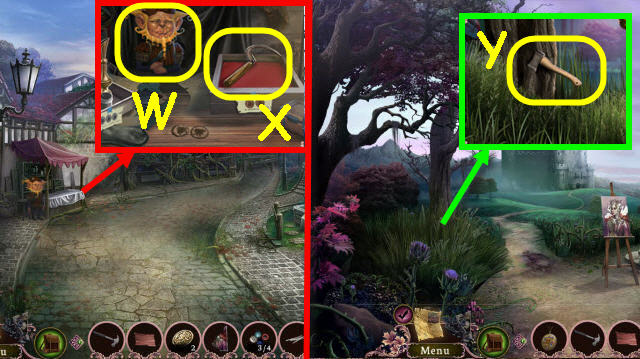
- Take the ORE (U) and select the note twice to get MIXING PAINT (V).
- Take the HANDLE (W).
- Back out and go forward.
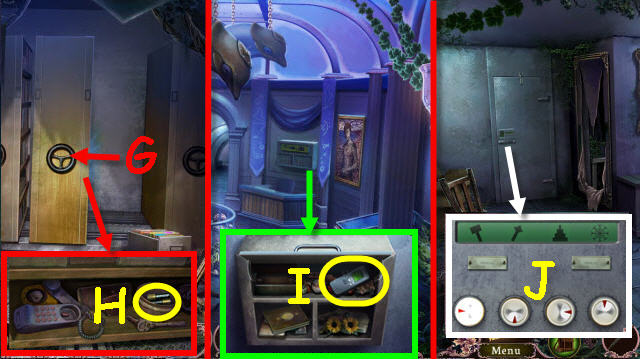
- Place the HANDLE on the head; receive a PICKAXE (X).
- Speak to the kobold.
- Go forward.
- Take the POT (Y) and note.
- Back out 4x.
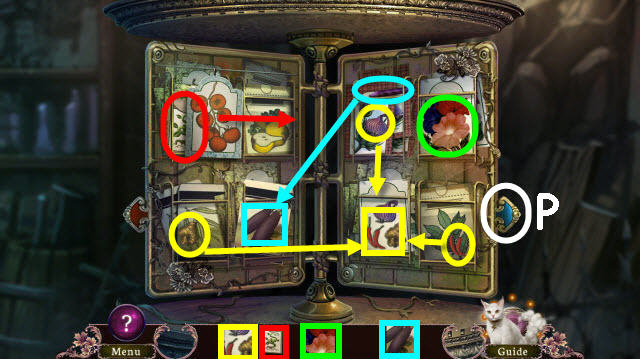
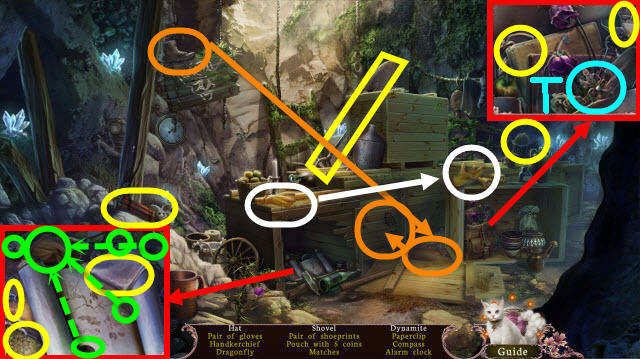
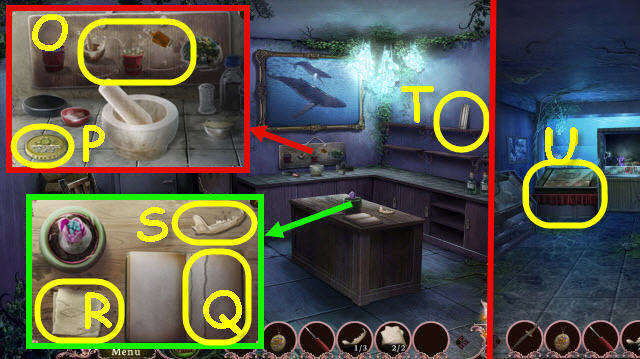
- Use 1 POUCH on the flower to get POLLEN 1 (Z).
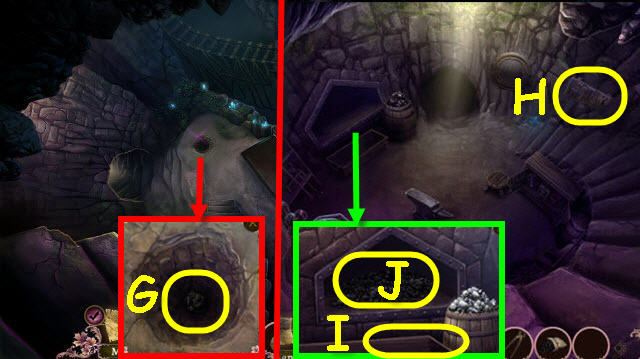
- Use the PICKAXE on the rocks to trigger a HOP (A).
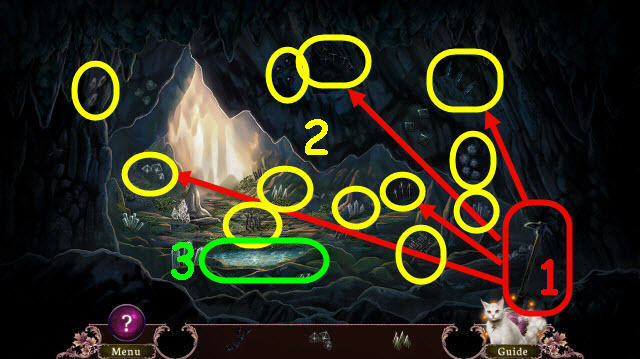
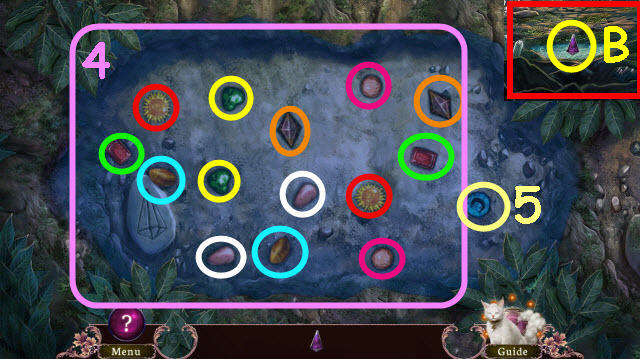
- Play the HOP.
- The remaining item (5) is random.
- You receive a LIGHT CRYSTAL (B).
- Go forward.
- Use 1 POUCH on each flower to get POLLEN 2-3 (C-D).
- Use the POT on the resin to get POT WITH RESIN (E).
- Go forward 3x.
- Place the POLLEN on the right jars (F). Use the POT WITH RESIN and BROKEN PLAQUE on the plaque (G) to trigger a puzzle.
- Complete the painting.
- See screenshot for solution (H).
- Take the HAMMER ORNAMENT.
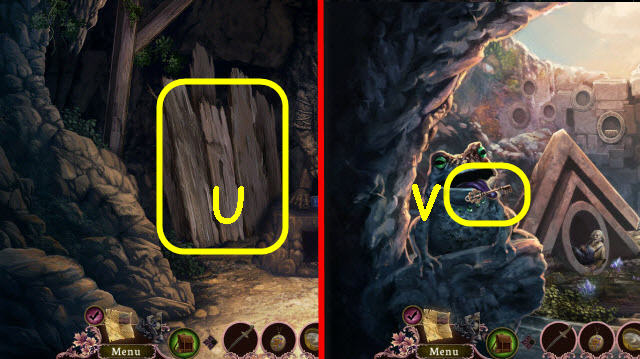
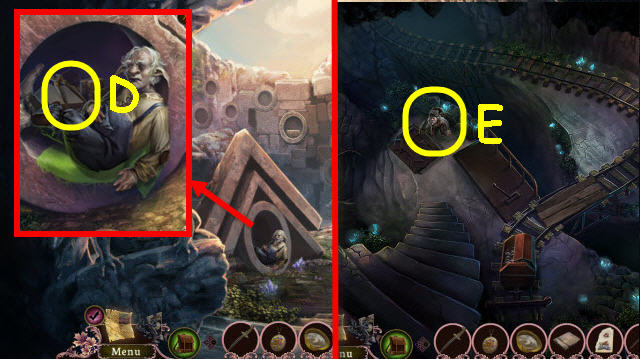
- Back out 2x; go up the beanstalk.
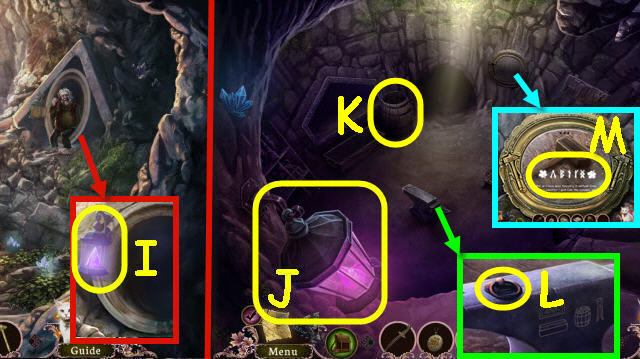
- Give the LIGHT CRYSTAL to the kobold; take the LANTERN (I).
- Back out and go through the right doorway.
- Use the LANTERN and select anywhere in the room.
- Hang the LANTERN on the hook (J).
- Use the ORE on the barrel; get a SACK (K).
- Take the DRAWER PULL (L).
- Use the HAMMER ORNAMENT on the mirror. Press the right arrow 3x; select the runes to get a SMITH'S NAME (M).
- Back out; go up the beanstalk.
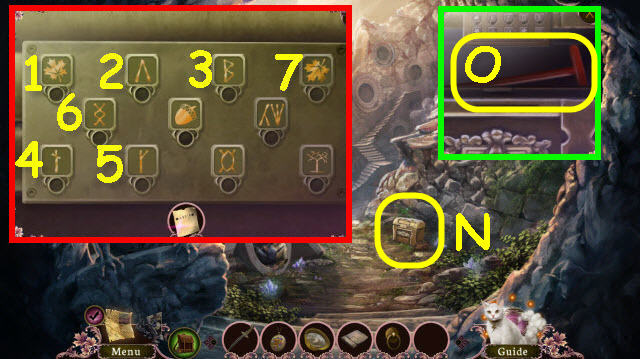
- Examine the chest to trigger a puzzle (N).
- Select the runes to match SMITH'S NAME.
- See screenshot for order (1-7).
- Take the LEVER (O).
- Back out; go straight on the right and forward.
- Select the kobold twice (P).
- Place the LEVER in the slot (Q).
- Place the DRAWER PULL on the lock; take the SAW (R).
- Examine the doorway to access a HOP (S).
- Play the HOP.
- You receive a DRAGONFLY ORNAMENT (T).
- Back out twice; go forward twice.
- Use the SAW on the boards; receive PLANKS (U).
- Back out twice; go up the beanstalk.
- Give the DRAGONFLY ORNAMENT to the toad; take the KEY (V).
- Back out; go straight on the right and forward.
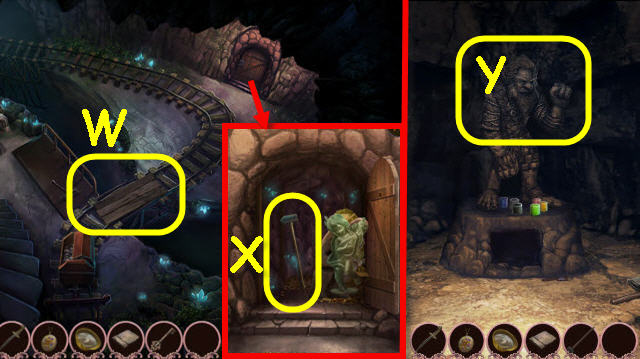
- Place the PLANKS over the ravine (W).
- Use the KEY in the lock. Move the statues; take the SMITH'S HAMMER (X).
- Back out twice; go forward twice.
- Give the SMITH'S HAMMER to the smith (Y).
- Speak to the kobold; receive a TILE (Z).
- Back out; go forward on the right.
- Place the TILE on the cabinet to trigger a puzzle (A).
- Complete the picture.
- Press all the tiles in as far as they go and then press the tiles as follows: Bx2, A, Cx3, D, E and Fx2.
- Open the book and flip the pages 2x; take the GUIDE TO MAGIC ORE (B).
- Take the BEDTIME STORIES (C).
- Back out; go up the beanstalk.
- Give the BEDTIME STORIES to the kobold; take the TONGS (D).
- Back out; go forward on the right 2x.
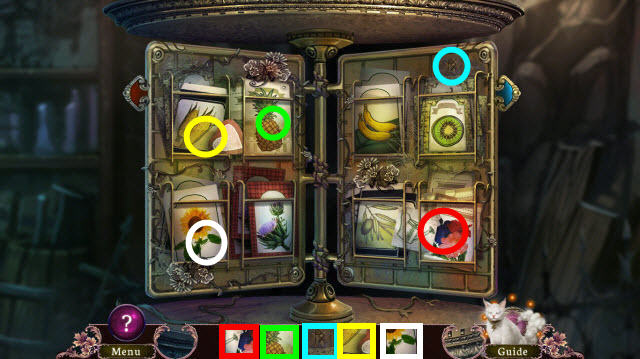
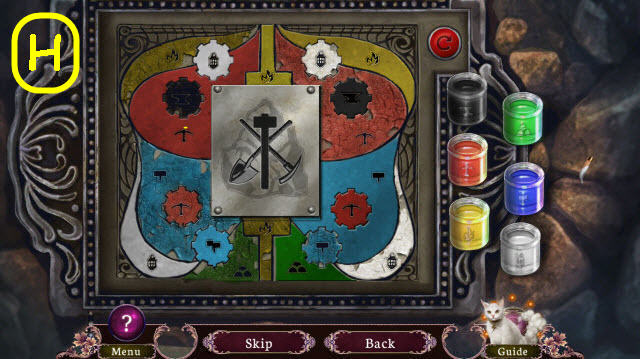
- Give the GUIDE TO MAGIC ORE to the kobold to trigger a puzzle (E).
- Sort the ore.
- See screenshot for solution (F).
- Use the SACK to get COAL (G).
- Back out.
- Hang the TONGS on the rack (H).
- Use the CAP WITH WATER on the trough (I) and the COAL in the furnace (J).
- Speak to the Smith.
Chapter 3: Forgotten Legend
- Take the BROKEN TOY SWORD (K).
- Go forward; receive ALMOST AN ACCIDENT.
- Take the FOODSTUFFS 1-2/4 (L-M).
- Take the FOODSTUFFS 3/4 (N) and open the latch (O).
- Take the FOODSTUFFS 4/4 (P) and note the sign (Q).
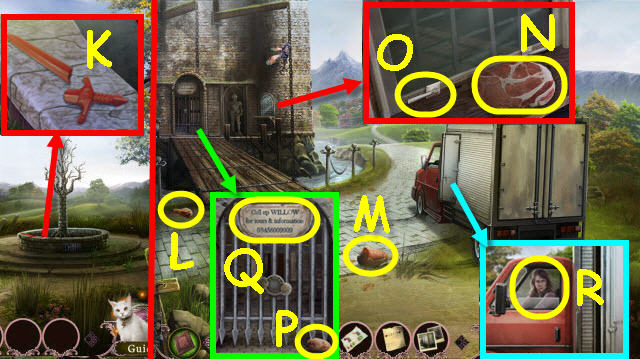
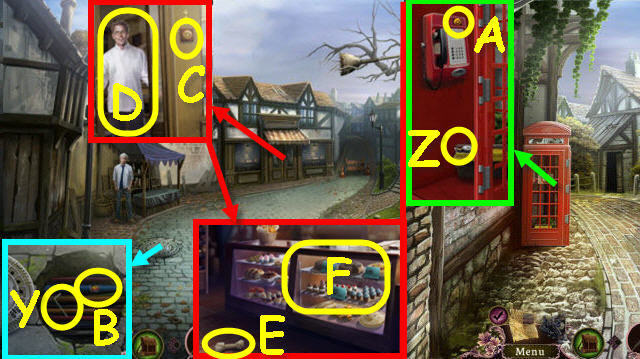
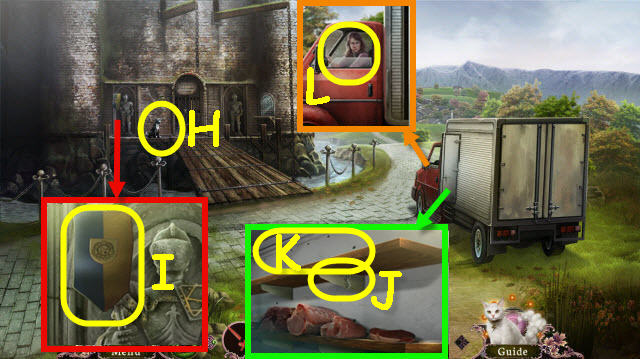
- Select the van and speak to the driver (R).
- Go up the path.
- Speak to the vender (S).
- Take the BROCHURE (T) and HAMMER (U).
- Go up the path (V).
- Use the HAMMER on the padlock to trigger a HOP (W).
- Play the HOP.
- You receive a MANHOLE OPENER (X).
- Back out.
- Use the MANHOLE OPENER on the manhole; take the ALLEN WRENCH (Y).
- Go forward.
- Use the ALLEN WRENCH and HAMMER on the hinge; take the ELECTRICAL TAPE (Z).
- Use the DAGGER to get the DOORBELL BUTTON (A).
- Back out.
- Use the ELECTRICAL TAPE on the wires (B).
- Place the DOORBELL BUTTON on the hole; ring it (C).
- Speak to the baker (D).
- Take the CHEW TOY (E).
- Select the display to trigger a HOP (F).
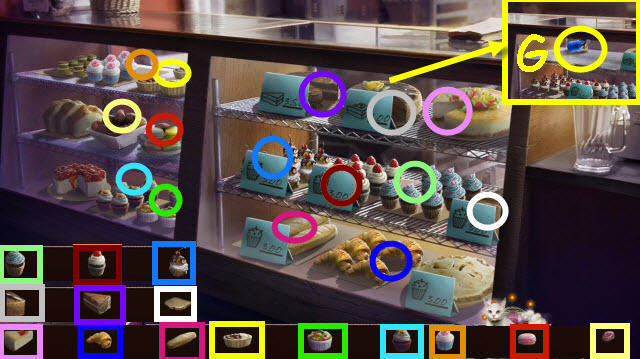
- Play the HOP.
- Move the signs as needed.
- Take the PASTRY TORCH (G).
- Back out.
- Give the CHEW TOY to the dog (H).
- Take the BANNER (I).
- Use the PASTRY TORCH on the bracket (J).
- Use the HAMMER on the shelf; place the 4 FOODSTUFFS on it (K).
- Speak to the driver; receive a TOY SHIELD (L).
- Go up the path twice.
- Use the HAMMER on the boards (M).
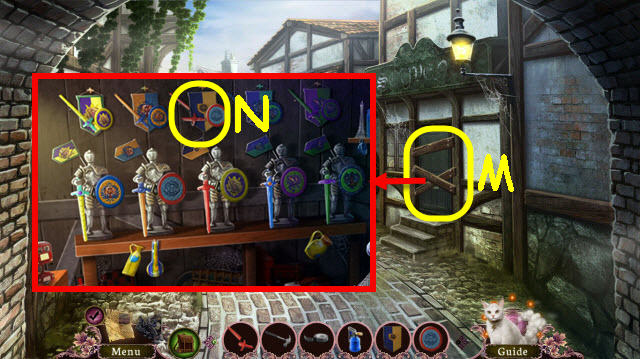
- Place the BANNER, TOY SHIELD and BROKEN TOY SWORD on the wall; use the ELECTRICAL TAPE on the broken toy sword to trigger a puzzle (N).
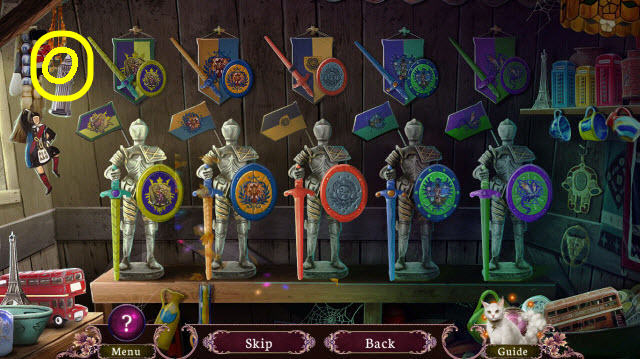
- Swap the pieces to complete the knights.
- See screenshot for solution (O).
- Receive a KNIGHT.
- Back out.
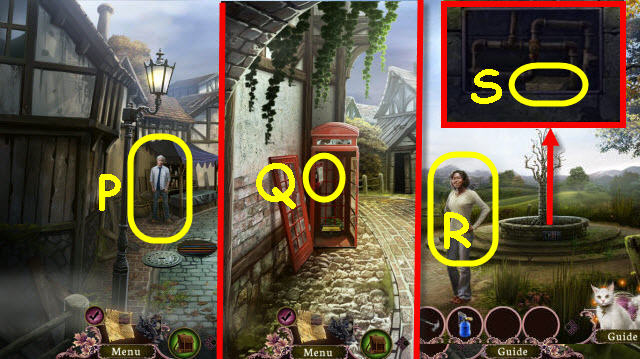
- Give the KNIGHT to the gentleman (P); receive a COIN.
- Go forward.
- Use the COIN on the phone (Q).
- Back out 3x.
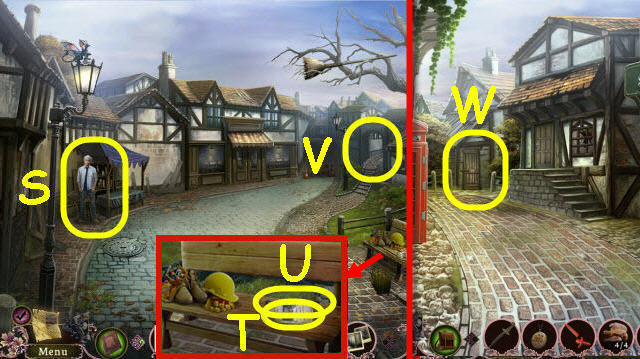
- Speak to Willow (R).
- Take the HALF A BRICK (S).
- Go up the path twice.
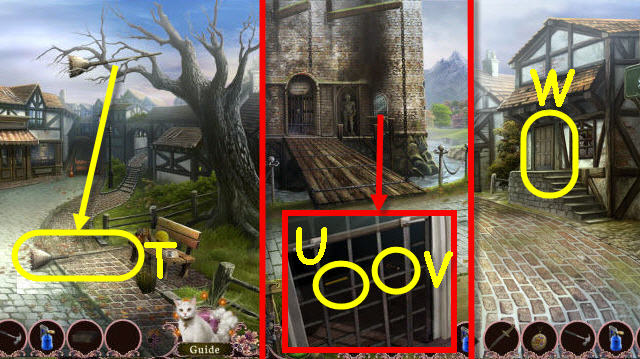
- Use the HALF A BRICK on the picker; take the FRUIT PICKER (T).
- Back out.
- Use the FRUIT PICKER to retrieve the CANDLES 1 (U) and KEY (V).
- Go up the path twice.
- Use the KEY on the lock to trigger a HOP (W).

- Play the HOP.
- You receive a VALVE (X).
- Back out 3x.
- Place the VALVE on the stem and turn it (Y); receive a DOOR ORNAMENT.
- Go forward.
- Place the DOOR ORNAMENT in the slot to trigger a puzzle (Z).
- Rotate the rings to complete the images.
- See screenshot for solution (A).
- Take the CANDLES 2 (B) and LEGEND OF THE QUEEN (C).
- Go forward.
- Take the PENDANT (D).
- Back out.
- Place the PENDANT on the lid; take the CANDLES 3 (E).
- Go forward.
- Place the 3 CANDLES in the holders; light all 4 candles with the PASTRY TORCH (F).
- Use the LOCKET on the symbol (G).
Chapter 4: Queen and Enchantress
- Speak to the wolf (H).
- Take the CLOTH SWATCH (I).
- Examine the chessboard to trigger a puzzle (J).
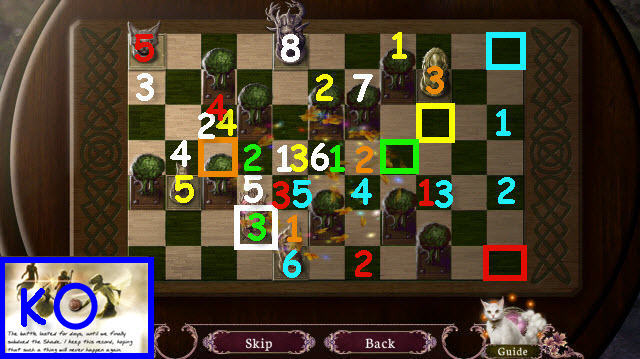
- Move the pieces to their proper base.
- Move them in numerical order in the following order: Yellow, white, green, red, orange and cyan.
- Select the story 4x; take the BRONZE COINS 1 (K).
- Back out.
- Select the poster and receive a LEGEND OF THE QUEEN (L).
- Take the HALF A DESIGN (M) and GLASS BEADS 1/4 (N).
- Take the RUNE LETTERS 1/3 (O).
- Back out.
- Take the JACK O 'LANTERNS (P) and RUNE LETTERS 2/3 (Q).
- Go up the path.
- Select the plaque; receive WISHFUL THINKING (R).
- Take the NAILS (S).
- Take the RUNE LETTERS 3/3 (T) and GLASS BEADS 2-3/4 (U).
- Go up the path.
- Speak to the vender and give him the 3 RUNE LETTERS; receive BRONZE COINS 2 (V).
- Back out.
- Speak to the jeweler and receive THE JEWELER (W).
- Place the 2 BRONZE COINS on the counter; take the SCYTHE (X).
- Back out twice.
- Use the SCYTHE 4x on the grass; take the HATCHET (Y).
- Go forward.

- Use the SCYTHE on the grass 4x. Use the NAILS, HAMMER and HATCHET on the fence; take the LADDER (Z) and CHISEL (A).
- Go up the path twice.
- Take the GLASS BEADS 4/4 (B).
- Use the CHISEL on the cobblestone and HAMMER on the CHISEL; take the BRONZE COINS 1-2 (C) and SILVER COINS 1 (D).
- Take HOBGOBLIN'S FAVORITE (D1).
- Place the LADDER against the balcony (E).
- Examine the balcony to access a HOP (F).
- Play the HOP.
- You receive a FAN (G).
- Select the note to get A FINAL LETTER.
- Back out.
- Use the FAN on the boat; take the SILVER COINS 2 (H).
- Go forward.
- Place 1 BRONZE COINS and 1 SILVER COINS on the counter; take the PUMPKIN (I).
- Place 1 BRONZE COINS and 1 SILVER COINS on the counter; take the INKWELL (J).
- Back out twice.
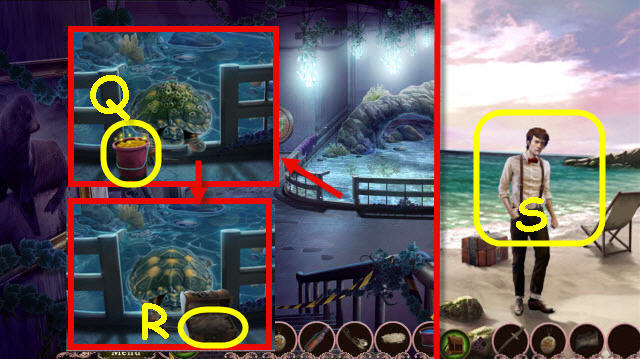
- Place the PUMPKIN and INKWELL by the stump. Use the brush (K) on the inkwell and then on the pumpkin. Use the DAGGER on the pumpkin; and select it (L).
- You receive 3 SILVER COINS.
- Place the CLOTH SWATCH on the sack; use the needle (M) on the swatch. Take the SACK (N).
- Take the ROTTEN EGG (O).
- Take the SHOVEL (P).
- Examine the pumpkins to trigger a puzzle (Q).
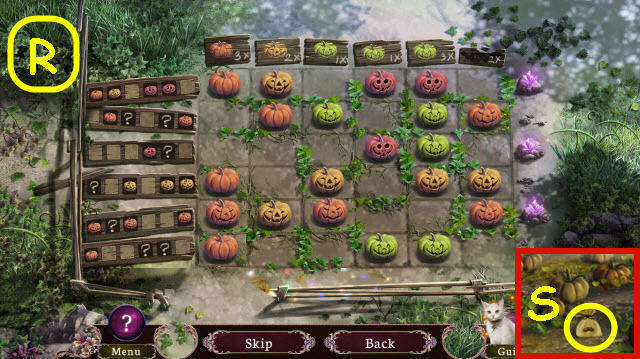
- Change the pumpkins per the clues.
- See screenshot for solution (R).
- Take the ENCHANTED SEEDS (S).
- Go forward into the Castle.
- Give the ROTTEN EGG to the hobgoblin; examine his teeth to trigger a puzzle (T).
- Select the teeth in the correct order.
- See screenshot for solution (1-8).
- Take the HOBGOBLIN TOOTH (U).
- Back out; go up the path.
- Place 3 SILVER COINS on the counter; take the COLOR PASTELS and WATER OF QUICKENING (V).
- Back out twice.
- Use the SHOVEL on the dirt and use the SACK on the pile; receive a SACK OF SOIL (W).
- Place the COLOR PASTELS and HALF A DESIGN on the painting to trigger a puzzle (X).
- Complete the painting.
- See screenshot for solution (Y).
- You receive JEWELRY DESIGN.
- Go up the path 3x.
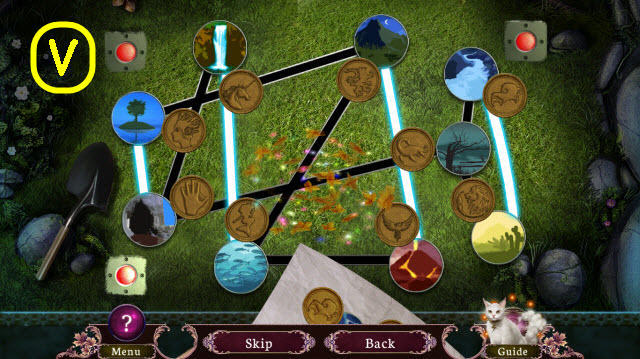
- Place the 4 GLASS BEADS and JEWELRY DESIGN on the board to trigger a puzzle (Z).
- Place the beads in the correct order.
- See screenshot for solution (A).
- Receive a NECKLACE.
- Back out.
- Give the NECKLACE to the jeweler; receive 3 GOLD COINS (B).
- Go forward.
- Place the 3 GOLD COINS on the counter; take the MERMAIDS SCALE (C).
- Back out 3x.
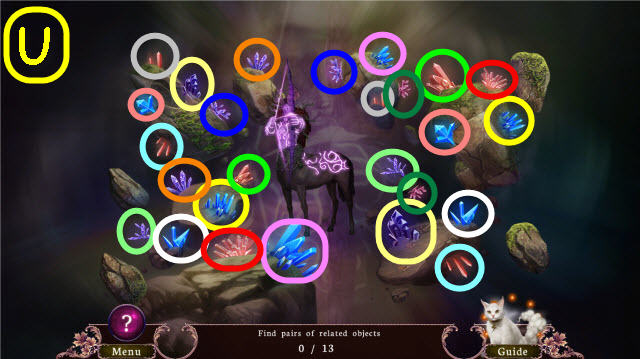
- Place the following in the slots: ENCHANTED SEEDS (D), MERMAIDS SCALE (E), HOBGOBLIN TOOTH (F).
- Select the center (G) when complete to trigger a puzzle.
- Find the matching pairs.
- See screenshot for solution (H).
- Place the SACK OF SOIL and WATER OF QUICKENING in the center.
- Use the DAGGER on the vines; receive a SCEPTER (I).
- Go forward into the Throne Room.
- Give the SCEPTER to the queen (J).
Chapter5: Within the Oak

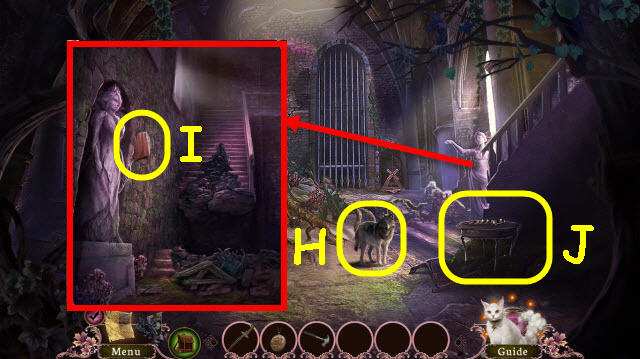
- Speak to the queen; receive a SIGNET RING (1).
- Go upstairs (2).
- Take the NOTE (3) and DIRTY CLOTH STRIPS (K).
- Take the BRICK (L).
- Select the RUNES to get RUNES (M).
- Go forward.
- Take the STOOL (N).
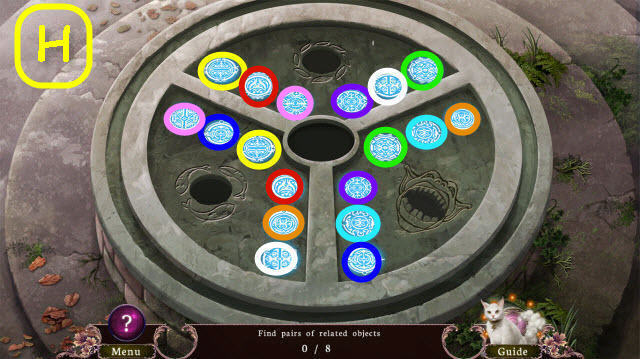
- Examine the dresser to trigger a puzzle (O).
- Find matching pairs (P).
- You receive a KEY.
- Back out.
- Use the KEY on the lock; take the BALL AND CHAIN (Q).
- Back out.
- Place the STOOL on the rock (R) and hang the BALL AND CHAIN from the hook (S).
- Turn the lever (T).
- Go forward.
- Use the left and right arrows to duplicate the RUNES code (U).
- Use the DAGGER 3x on the vines; take the CREST (V).
- Place the DIRTY CLOTH STRIPS on the end of the stick; receive an UNLIT TORCH (W).
- Back out.
- Dip the UNLIT TORCH in the pot (X) and then in the fire; receive a TORCH.
- Go upstairs and forward.
- Use the CREST on the chest to trigger a puzzle (Y).
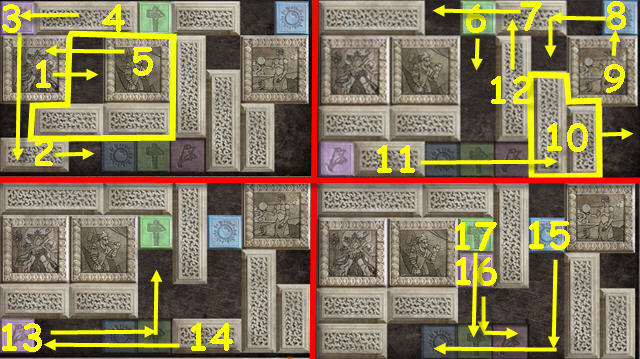
- Move the tiles to their base.
- See screenshot for solution (1-17).
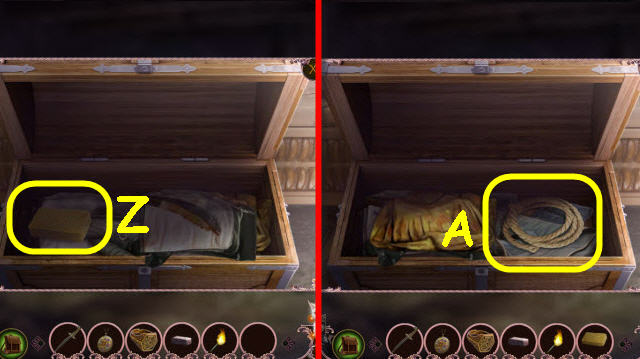
- Move the clothes; take a SPONGE (Z) and ROPE (A).
- Back out twice; go forward.
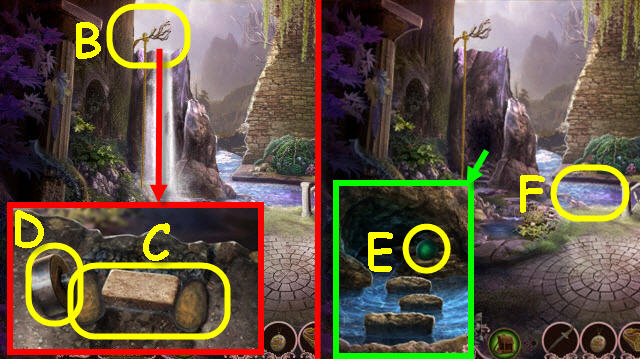
- Use the ROPE on the branch (B).
- Place the BRICK on the waterfall; move the BRICK and two smaller rocks to block the water (C).
- Take the WHEEL (D).
- Take the CANNONBALL (E).
- Use the SPONGE on the water; receive a WET SPONGE (F).
- Back out; go upstairs and forward.
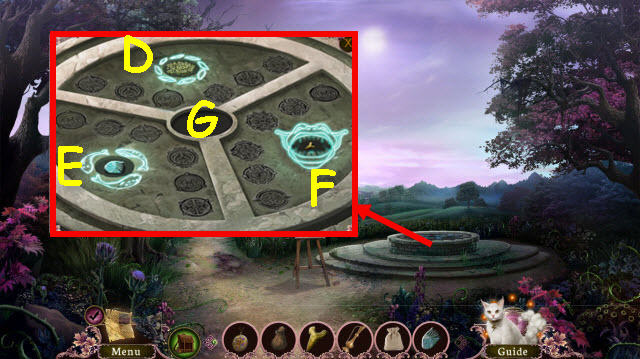
- Use the WET SPONGE on the globe 3x; use the SIGNET RING on the lock (G).
- You will trigger a puzzle.
- Drag to swap the pieces to complete the map.
- See screenshot for solution (H).
- Take the HARP STRINGS.
- Place the WHEEL on the cannon (I); push the cannon.
- Take the POSTER (J).
- Place the CANNONBALL and gunpowder (K) in the cannon.
- Close the cap (L); use the TORCH on the fuse (M).
- Back out twice; go forward.
- Use the TORCH twice in the room to trigger a HOP (N).

- Play the HOP.
- You receive a SHIELD (O).
- Back out; go upstairs.
- Place the SHIELD on the knight (P).
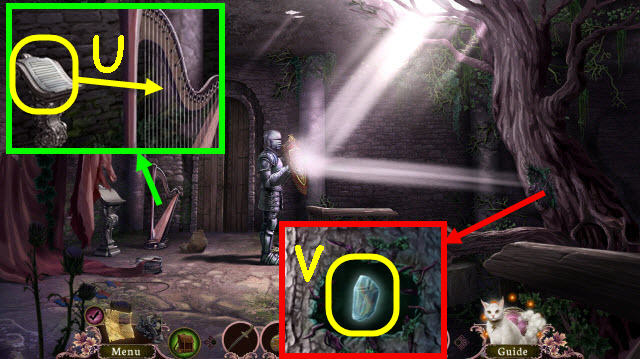
- Take the EYE-SHAPED LENS (Q).
- Place the HARP STRINGS on the harp (R).
- Use the EYE-SHAPED LENS on the music to trigger a HOP (S).
- Play the HOP.
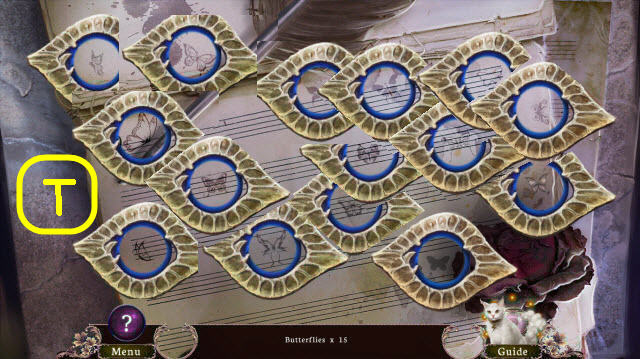
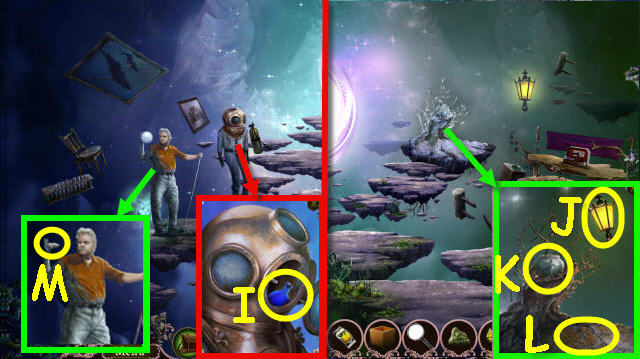
- Move the lens to find 15 butterflies (T).
- Place the music sheet on the harp (U).
- Use the DAGGER 3x on the vines; select the chrysalis and receive a BUTTERFLY (V).
- Back out.
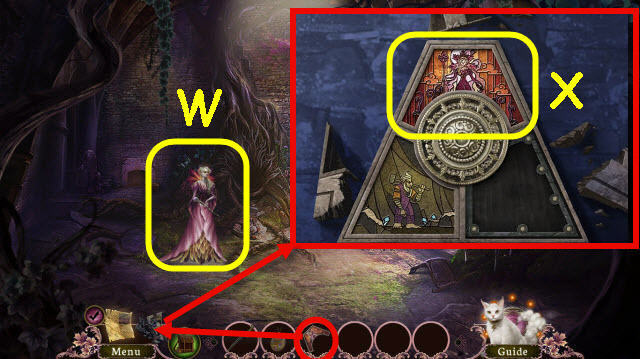
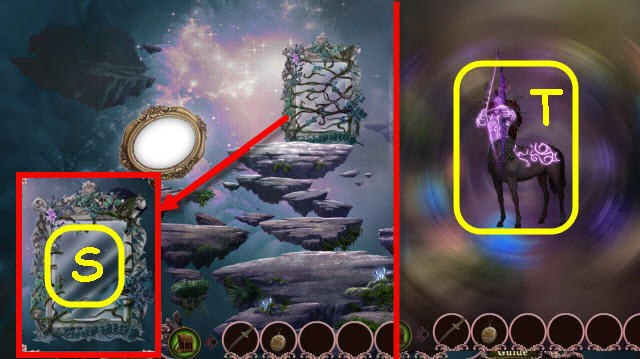
- Give the BUTTERFLY to the queen: receive a QUEEN'S PIECE (W).
- Take the QUEENS PIECE and place it on the Perpetual Prison (X).
Chapter 6: Corridors of Memory
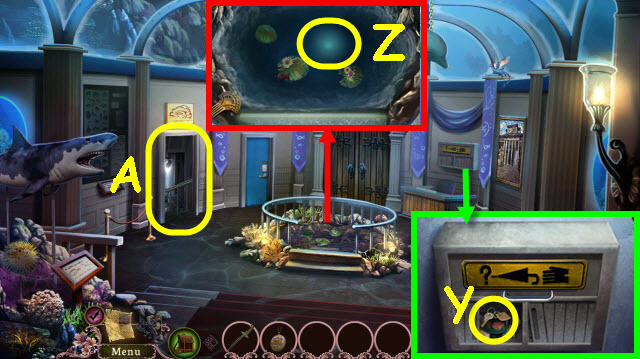
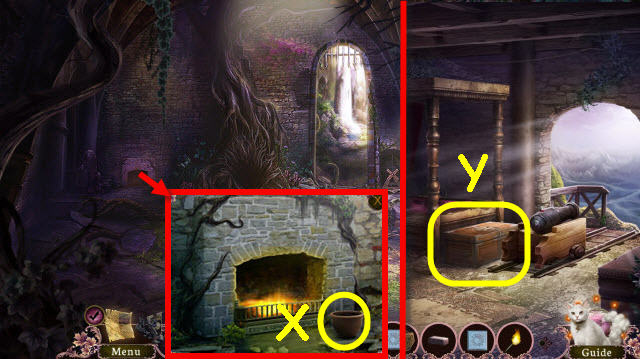
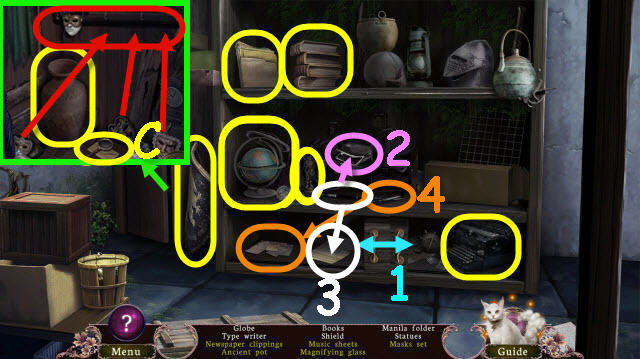
- Remove the cloth and open the cabinet door; take the KEY (Y).
- Move the water lilies and select the glow; receive an UNDER THE FOUNTAIN (Z).
- Go to the basement (A).
- Use the KEY on the door (B).
- Place the notes in the book. Turn the pages 3x and take the ID CARD (C) and SILHOUETTE (D).
- Take the SCREWDRIVER (E).
- Take the LADDER (F).
- Examine the terminal to access a HOP (G).
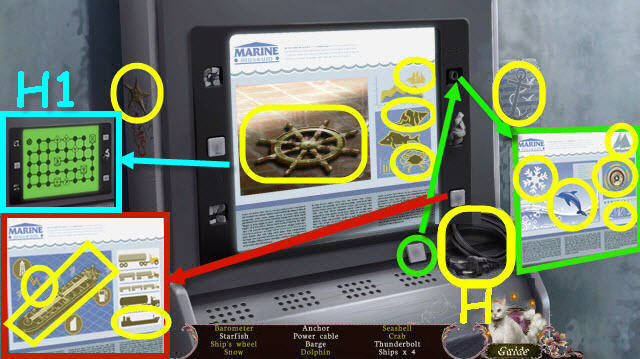
- Play the HOP.
- You receive a POWER CABLE (H).
- Select the screen after the HOP to get the WATER FLOW DIAGRAM (H1).
- Back out.
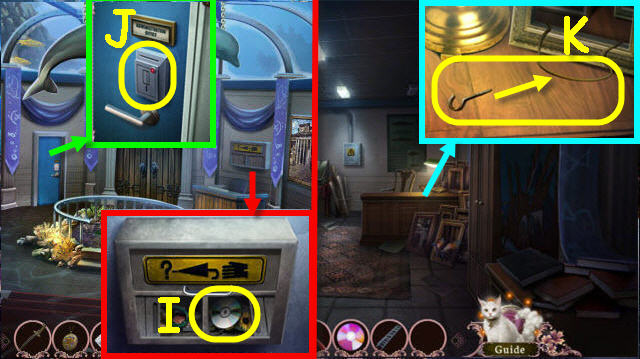
- Use the ID CARD or SCREWDRIVER on the cabinet door; take the CD (I).
- Use the ID CARD on the reader (J).
- Enter the office.
- Use the DAGGER on the wire and place the hook on the wire; receive a WIRE AND HOOK (K).
- Go to basement.
- Use the WIRE AND HOOK to get the BUTTON (L).
- Return to the office.
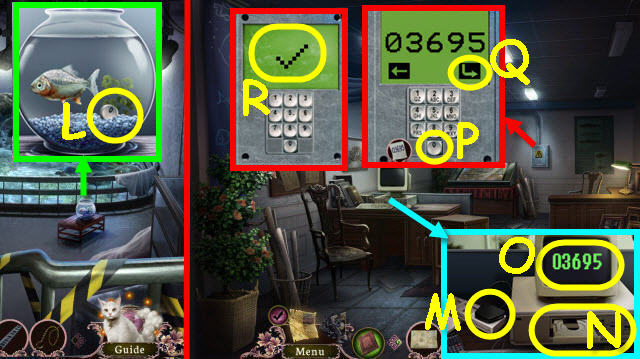
- Plug the POWER CABLE in the power strip (M).
- Place the CD in the drive (N). Select the monitor to get the COMPUTER CODE (O).
- Use the SCREWDRIVER on the panel; place the BUTTON in the slot (P).
- Punch in the COMPUTER CODE; 03695. Select the arrow (Q) and screen (R) to trigger a puzzle.
- Move the water drops to their matching containers.
- See screenshot for solution (S).
- Back out.
- Place the LADDER in the pond (T).
- Use the LOCKET on the symbol (U).
- Take the TILES 1 (V).
- Select the picture to get a PAINTING (W).
- Take the TILES 2 (X).
- Go forward.
- Use the LOCKET on the barrier (Y).
- Take the LIGHTBULB (Z).
- Use the DAGGER on the vines 4x (A).
- Back out; go through the left door.
- Take the BONES 1/3 (B).
- Examine the wooden disk to trigger a puzzle (C).
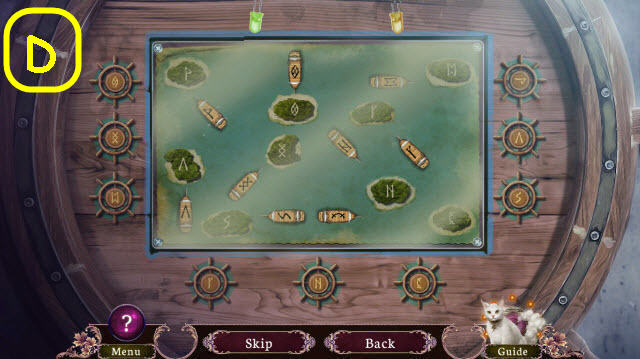
- Turn the wheels to face the ships to their matching islands.
- See screenshot for solution (D).
- You receive a SHIP'S WHEEL.
- Back out.
- Use the SHIP'S WHEEL on the cabinet; take the CORKSCREW (E) and TILES 3 (F).
- Return to basement.
- Use the CORKSCREW on the cork; take the PAGES 1/2 (G) and TILES 4 (H).
- Back out and go through the blue door.
- Flip the switch; place the LIGHTBULB in the socket and flip the switch again (H1).
- Take the TILES 5 (I).
- Move the curtain and select the figure; take the TILES 6 (J).
- Back out.
- Place the 6 TILES on the painting; enter it (K).
Chapter 7: Return to the Ocean
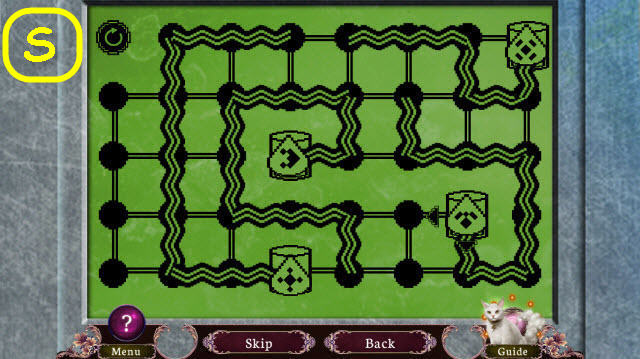
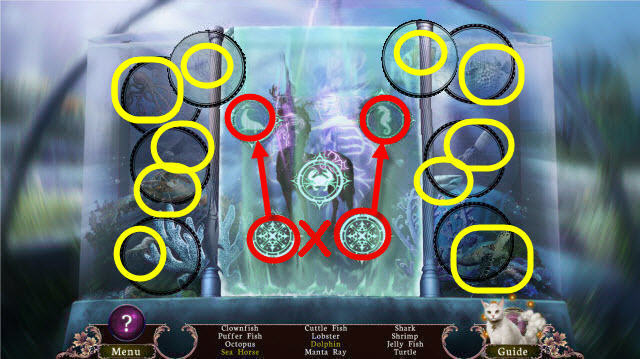
- Select anywhere to trigger a puzzle.
- Find the answers to the questions.
- Move the glowing balls to uncover all the options.
- Select the following: A, 1, 2, B, C, 4, D, C, 5, 6, F, 7, 8, E, F, 9, and G.
- You receive a MIRROR.
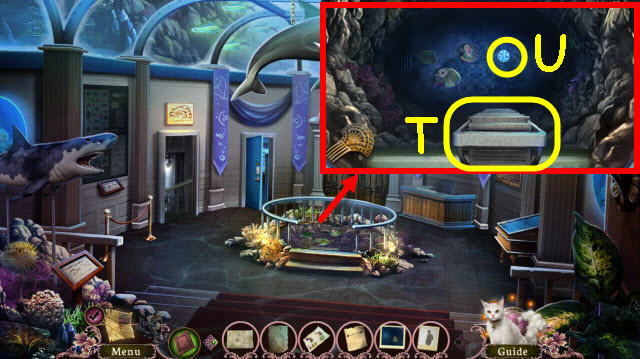
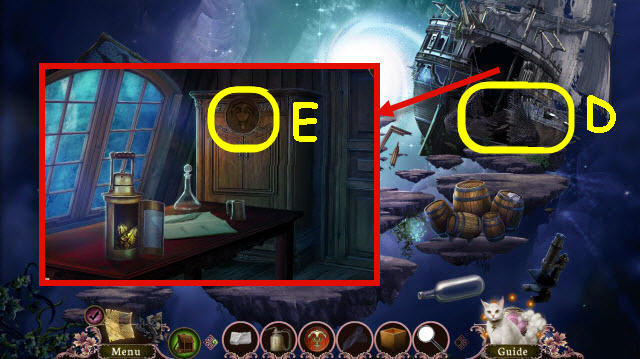
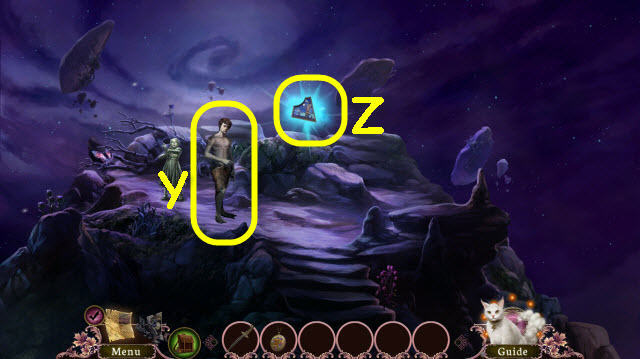
- Look at the photo and select it to receive PHOTO; take the PAGES 2/2 (L).
- Speak to the Selkie (M).
- Back out and go forward.
- Use the MIRROR on the scanner (N).
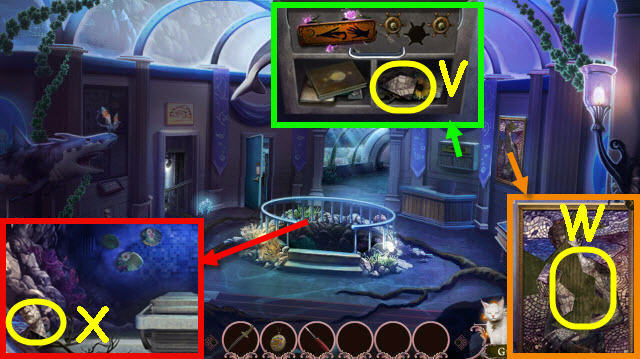
- Go forward.
- Select the diagram to receive TURTLE'S CURE (O).
- Take the SEAL (P).
- Place the 2 PAGES in the book (Q).
- Select the note twice; receive ALCHEMIST'S LOAM (R).
- Take the BONES 2/3 (S).
- Take the RAILING (T).
- Back out twice; go through the blue door.
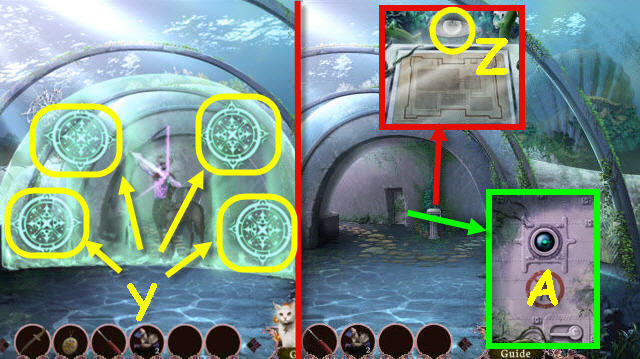
- Place the SEAL on the display lock to trigger a puzzle (U).
- Move the seals to their correct locations.
- See screenshot for solution (V).
- Use the shovel on the dirt to get ALCHEMIST'S LOAM (W).
- Back out; go forward twice.

- Place the ALCHEMIST'S LOAM in the pot (X).
- Read the book and turn the pages 4x; take the OLD MAP (Y).
- Back out.
- Place the OLD MAP on the map; receive a COMPLETE MAP (Z).
- Go forward.
- Use the COMPLETE MAP anywhere in the room.
- Use the DAGGER on the picture 2x (A); go through it.
- Take the BONES 3/3 (B).
- Move the items; take the HANDLE (C).
- Use the SCREWDRIVER on the track (D); place the RAILING down and use the SCREWDRIVER on the screws.
- Take the KEY (E).
- Take the FREEZER CODE (F).
- Move the shelves over (G).
- Use the SCREWDRIVER on the tin; take the BATTERIES (H).
- Back out 3x.
- Place the BATTERIES in the remote; receive a TEMPERATURE CONTROLS (I).
- Go forward twice.
- Enter the FREEZER CODE on the door (J); use the TEMPERATURE CONTROLS on it to trigger a HOP.
- Play the HOP.
- You receive BOTTLED NECTAR (K).
- Place 3 BONES in the mortar; grind the BONES with the pestle to receive GROUND WURM'S TOOTH (L).
- Back out twice; go through the left doorway.
- Place the HANDLE on the bucket; receive an EMPTY BUCKET (M).
- Back out; go through the painting.
- Use the KEY on the chest; take the LADY STATUETTE (N).
- Use the EMPTY BUCKET on the water; receive SPRING WATER (O).
- Back out; go through the blue door.
- Place the LADY STATUETTE on the post in the diorama; take the PENDANT (P).
- Back out; go through the left door.
- Place the SPRING WATER by the tortoise. Place the GROUND WURM'S TOOTH and BOTTLED NECTAR in it; select the bucket (Q).
- Use the DAGGER on the chest 3x and open it. Use the PENDANT on the orb; take the FUR (R).
- Back out; go through the painting.
- Give the FUR to the selkie (S).
Chapter 8: Hunting the Hunter
- Use the DAGGER on the barrel; take the PUMPKIN SEEDS (T) and RAG (U).
- Go forward.
- Use the DAGGER on the pack; take the note and OILCAN (V).
- Examine the trinkets to access a HOP (W).
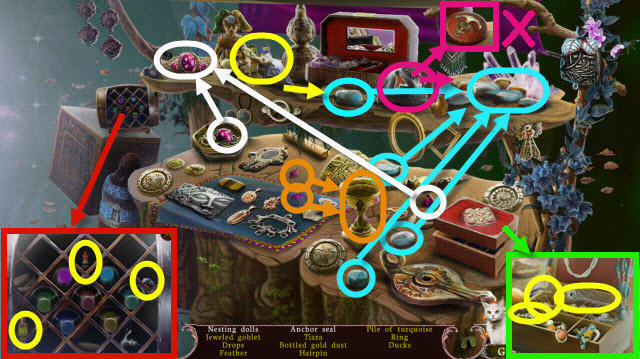
- Play the HOP.
- You receive an ANCHOR SEAL (X).
- Go forward to the portal.
- Take the NETTING (Y).
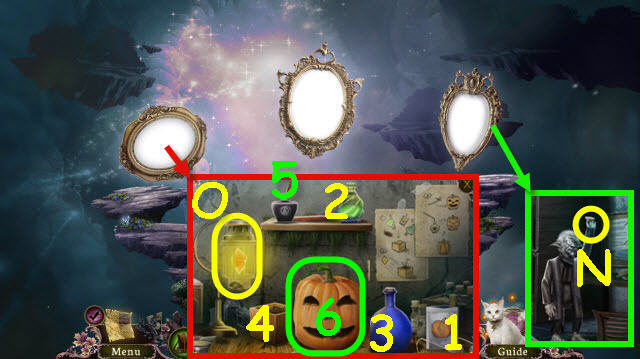
- Take the EMPTY POT (Z); select the notebook twice (A).
- Select the shelves to access a HOP (B).
- Play the HOP.
- Receive a MAGNIFYING GLASS (C).
- Back out twice.
- Place the NETTING on the ship (D).
- Use the ANCHOR SEAL on the cabinet and examine it to trigger a puzzle (E).
- Move the symbols on top of their matching spaces.
- See screenshot for solution (F).
- Take the ORE (G).
- Use the RAG on the crystals; take the SUN CRYSTAL (H).
- Use the OIL CAN on the wing nut; take the ELIXIR OF GROWTH (I).
- Go forward.
- Use the SUN CRYSTAL and MAGNIFYING GLASS on the lamp (J); take the TURTLE (K).
- Use the EMPTY POT on the dirt; receive a POT OF SOIL (L).
- Back out.
- Give the TURTLE to the caretaker; take the BOARD PIECES 1/3 (M).
- Go forward twice.
- Give the ORE to the archivist; take the BOARD PIECES 2/3 (N).
- Place the POT OF SOIL, PUMPKIN SEEDS, and ELIXIR OF GROWTH on the table. Place the SUN CRYSTAL in the lamp (O).
- Place the following: 1, 2, 3 in 4, 5 and the DAGGER on 6.
- Take the JACK O 'LANTERN (6).
- Back out.
- Give the JACK O 'LANTERN to the man; take the BOARD PIECES 3/3 (P).
- Go forward.
- Place the 3 BOARD PIECES on the board to trigger a puzzle (Q).

- Change all the pieces to rock.
- Select the symbol on the bottom to change all connecting symbols to that one.
- See screenshot for completed board (R).
- Go forward.
- Use the DAGGER on the vines twice (S).
- Enter the portal.
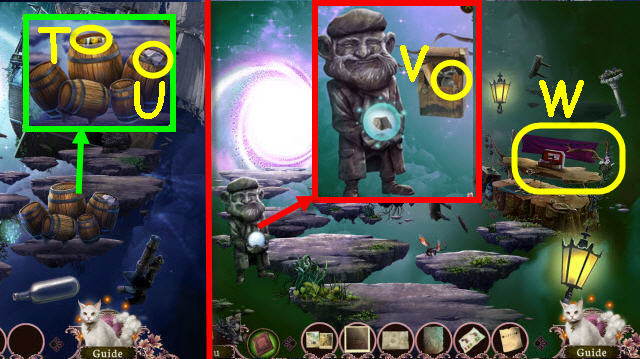
- Use the LOCKET on the huntsman to trigger a HOP (T).
- Play the HOP.
- Move the rocks out of the way to expose all crystals.
- See screenshot for solution (U).
- Use the LOCKET on the huntsman to trigger a HOP.
- Play the HOP.
- The runes will float around; you will need to release them to find them all.
- Turn each button 3x (V).
- Place the lever on the mechanism; pull down (W).
- Use the LOCKET on the huntsman to trigger a HOP.
- Play the HOP.
- Push the buttons (X) to change the images.
- Speak to selkie (Y).
- Take SELKIE'S PIECE (Z); place it on the Perpetual Prison.
- Give the LOCKET to selkie.
- Congratulations, you have completed Otherworld: Shades of Fall.
Created at: 2013-11-15