

Walkthrough Menu
General Tips
- This is the official guide for Paranormal Files: The Hook Man's Legend.
- This guide won't tell you when to zoom into a location; the screenshots show each zoom scene.
- Hidden-object puzzles are referred to as HOPs. Only the locations of the HOPs will be shown.
- Use the Map to fast travel to a location.
Chapter 1: Police Department
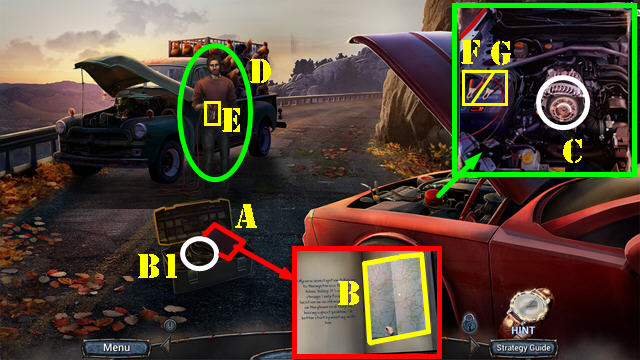
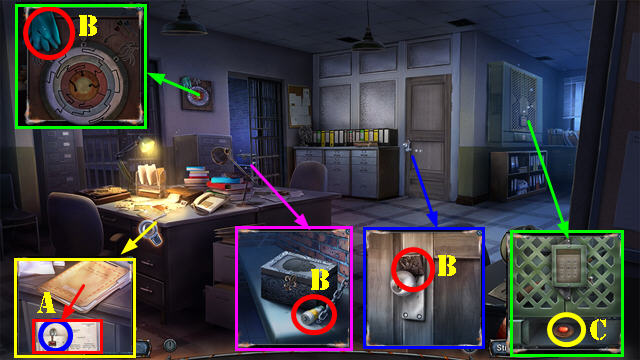
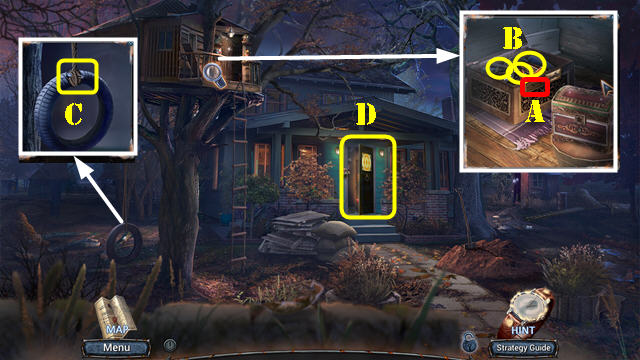
- Select scene.
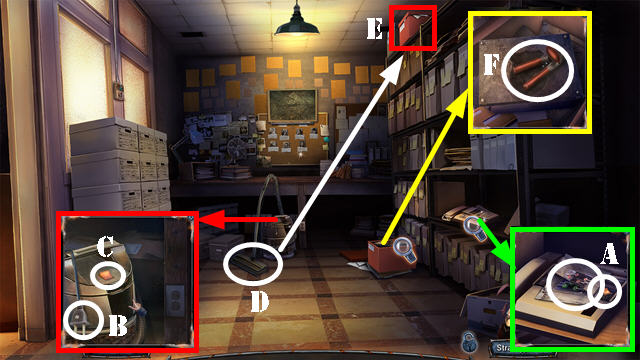
- Open book (A) and select 3x; take Map (B).
- Take BELT (B1).
- Remove worn belt; place BELT (C).
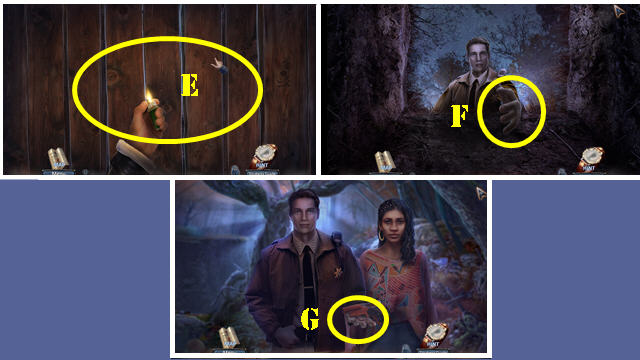
- Talk (D).
- Select (E-F-G).
- Open book; select 4x (H).
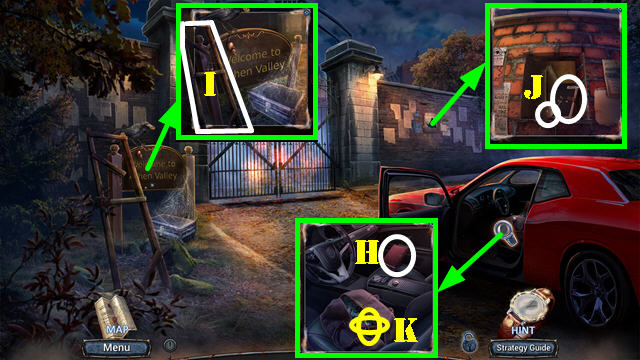
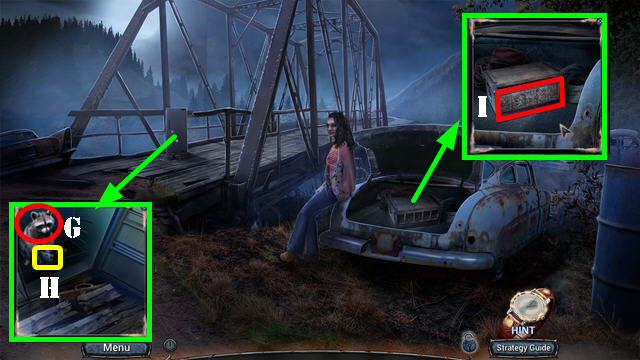
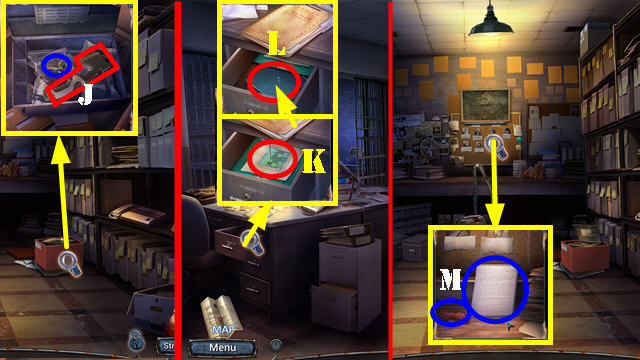
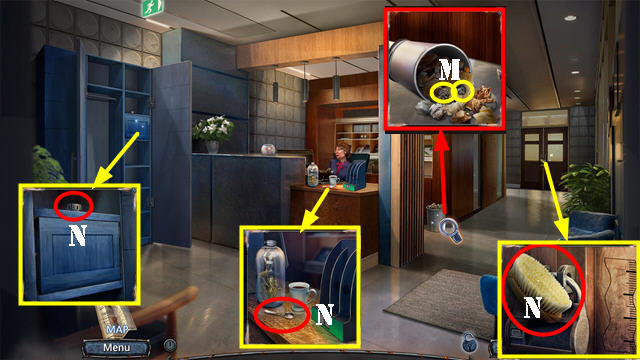
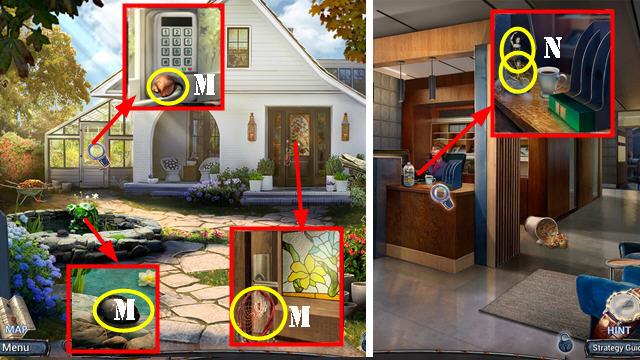
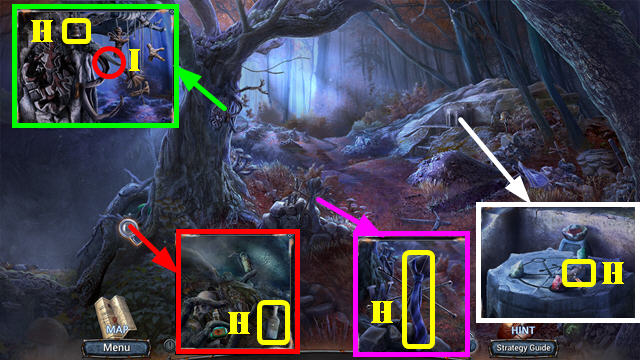
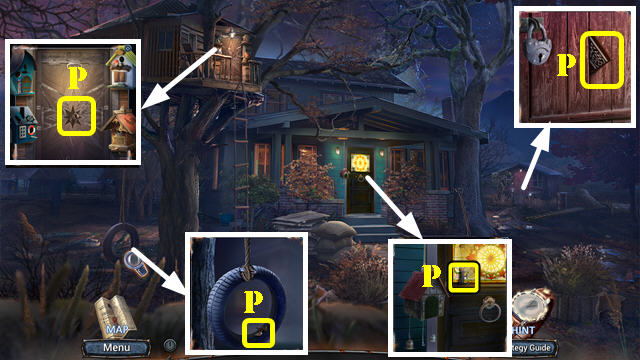
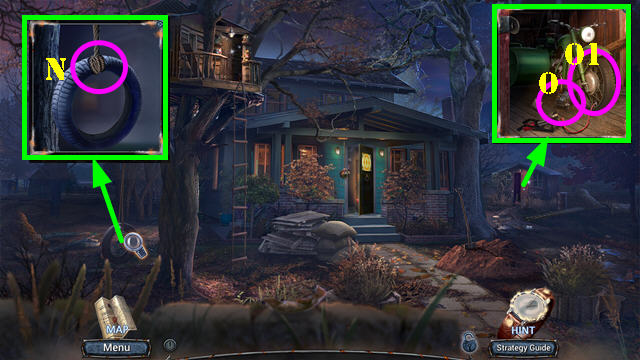
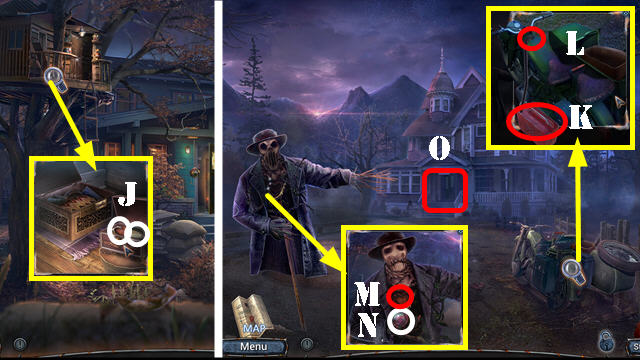
- Take BROKEN LADDER (I).
- Remove poster; take JOURNAL and SUN TOKEN (J).
- Open JOURNAL and play HOP; receive PENCIL.
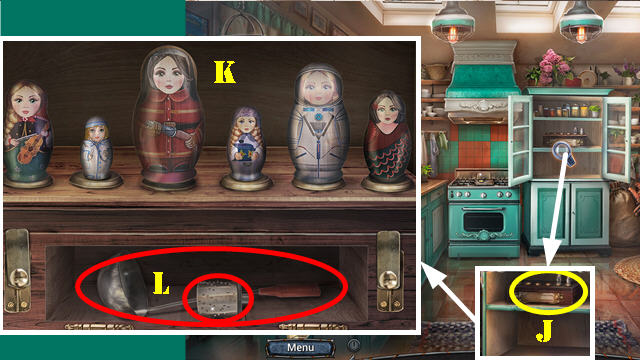
- Use PENCIL and select twice; take SCREWDRIVER and HAMMER (K).
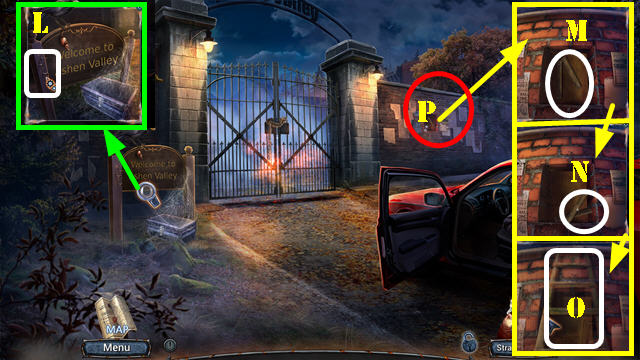
- Use HAMMER (L); receive NAILS 3/6.
- Use HAMMER (M); receive NAILS 6/6: take PLANKS (N).
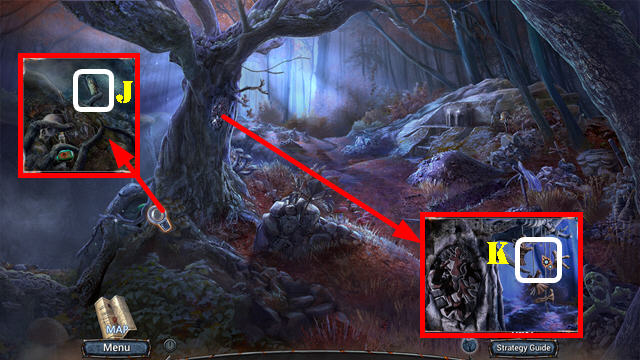
- PLANKS, NAILS, and HAMMER on BROKEN LADDER; take LADDER.
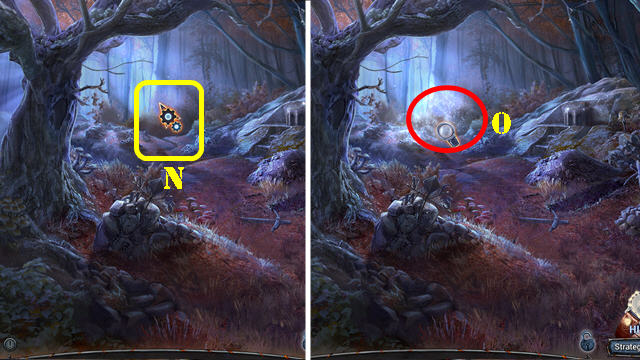
- Place LADDER (O).
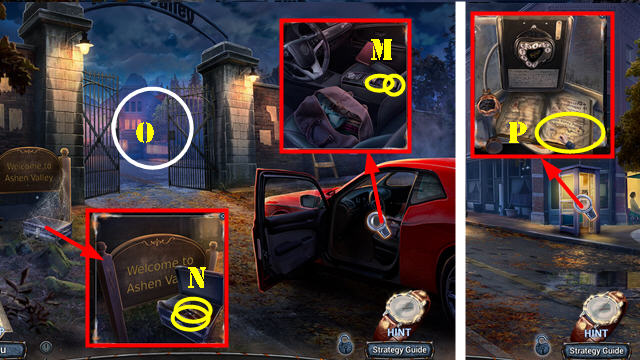
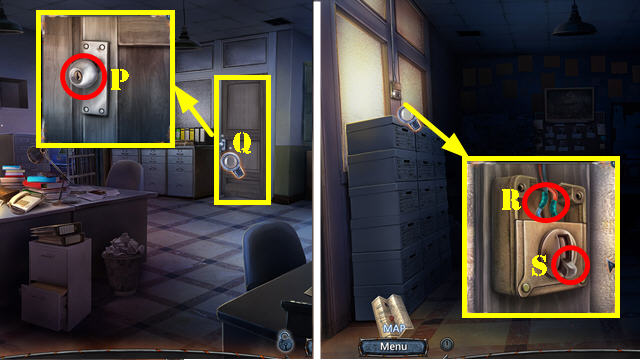
- Go (P).
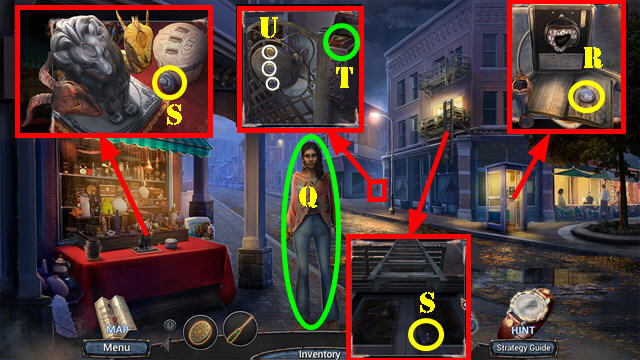
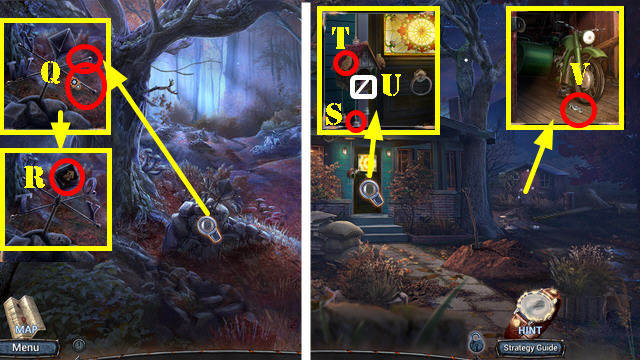
- Talk (Q).
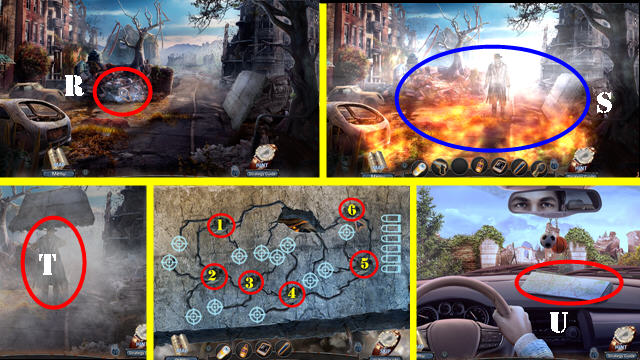
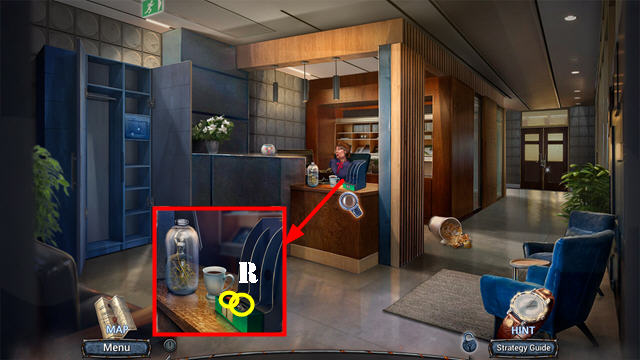
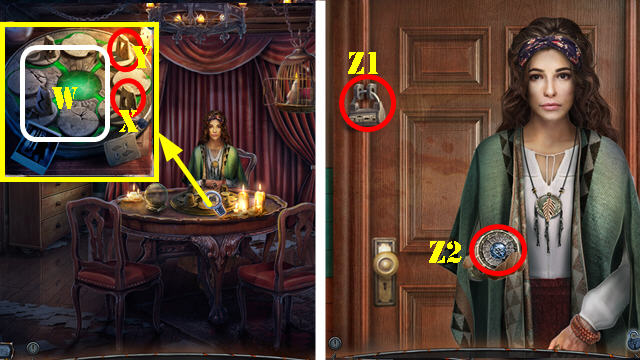
- Open phonebook; take CLOUD TOKEN (R).
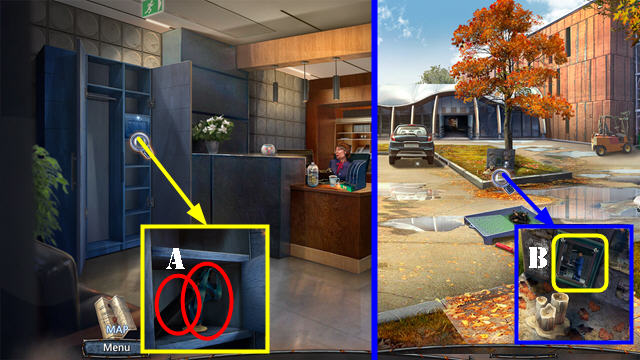
- Take MOON TOKEN and COMPARTMENT COVER (S).
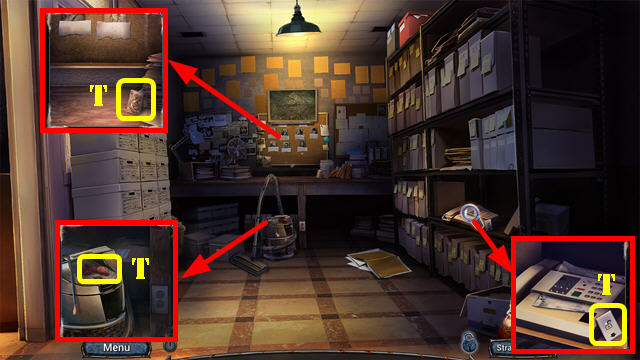
- Open mailbox; take SECRET BOX (T).
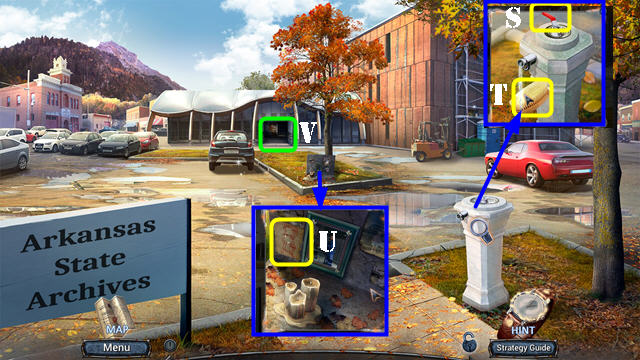
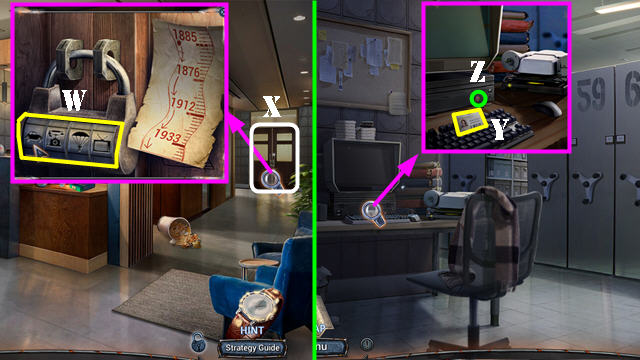
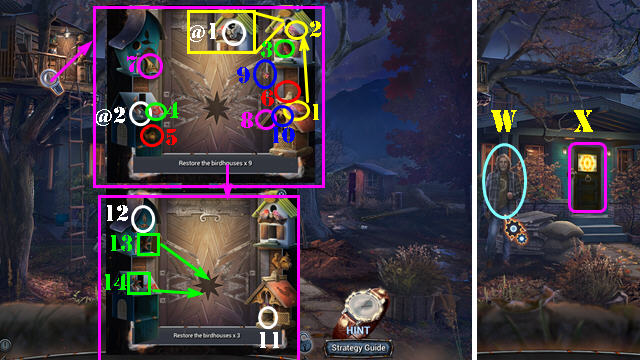
- Place CLOUD TOKEN, MOON TOKEN, and SUN TOKEN (U).

- Solution: arrange tokens as shown (V) and select (W).
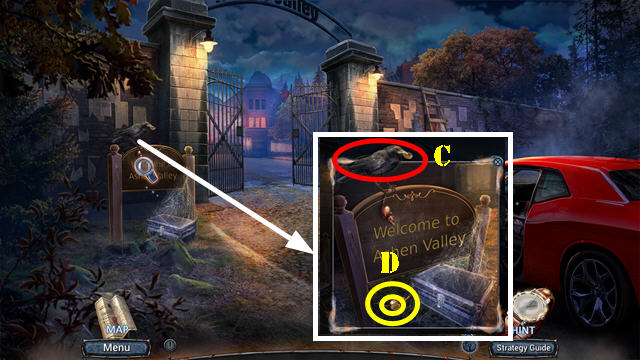
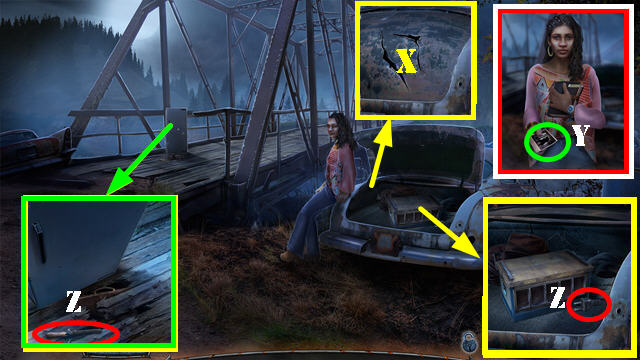
- Go (X).
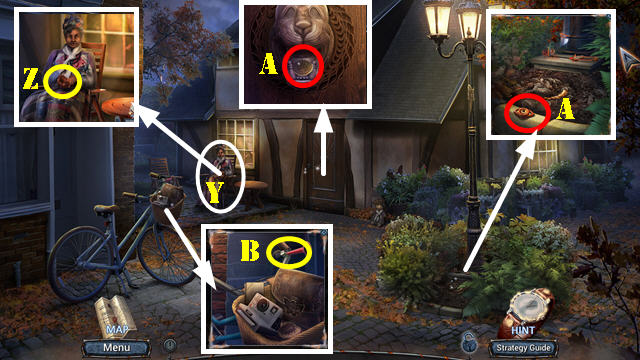
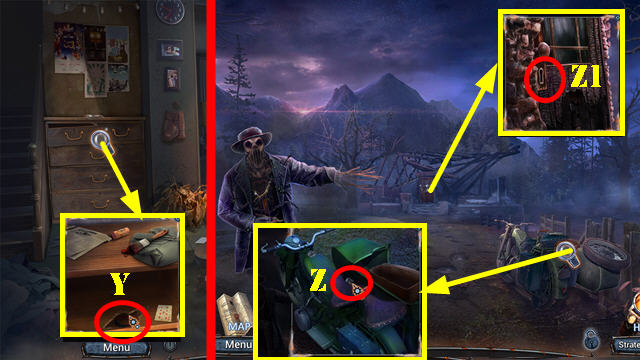
- Talk (Y); take CHEESE (Z).
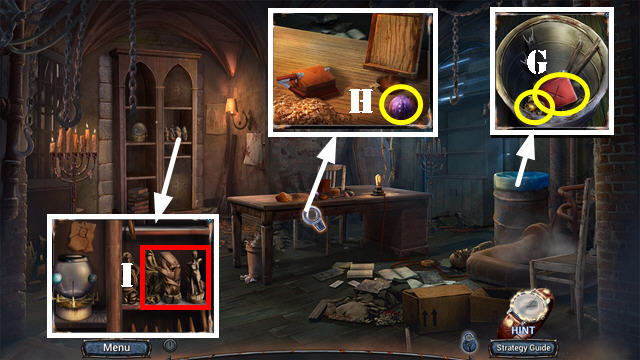
- Take COINS 1/3 and BRONZE EYE (A).
- Use SCREWDRIVER (B); take HORN.
- Walk down twice.
- Use HORN (C); take COINS 2/3 and MOUSE (D).
- Go to Courtyard.
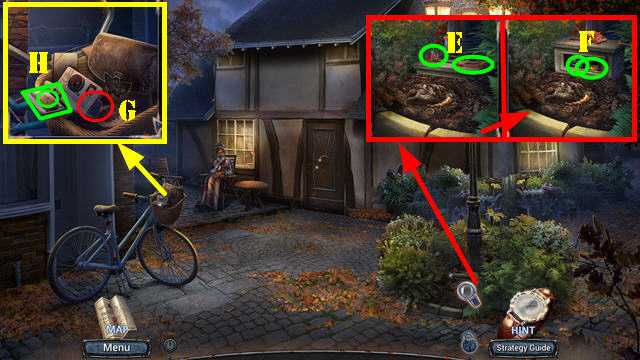
- Place CHEESE and MOUSE (E); take GOLD EYE and BATTERIES (F).
- Place BATTERIES and COMPARTMENT COVER (G). Take COINS 3/3 and PHOTO CLUE (H).
- Walk down.
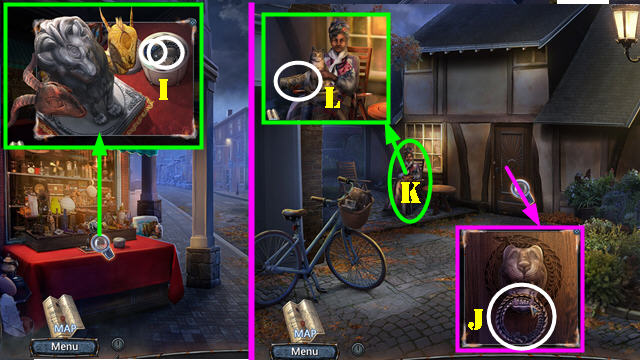
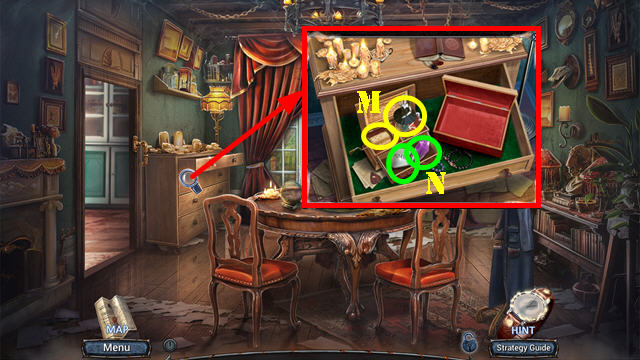
- Place COINS; take OUROBOROS and HAIRPIN (I).
- Go to Courtyard.
- Place OUROBOROS (J). Play HOP; receive MR. FLUFF.
- Give MR. FLUFF (K); take TOWN MAP (L).
- Walk down twice.
- Use HAIRPIN; take DEODORANT and LIGHTER (M).
- Use DEODORANT and LIGHTER; open the case and look at newspaper. Take RULER and DRAWING COMPASS (N).
- Go (O).
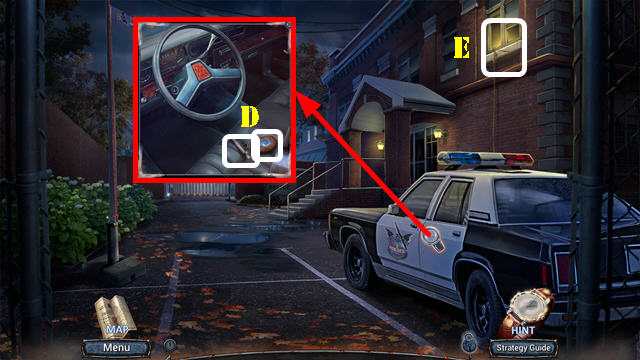
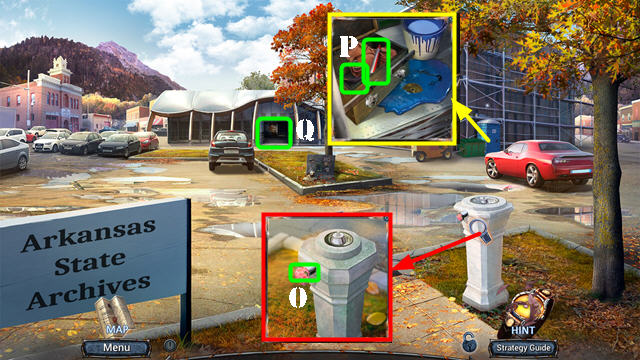
- Use RULER; take INCOMPLETE ADDRESS (P).
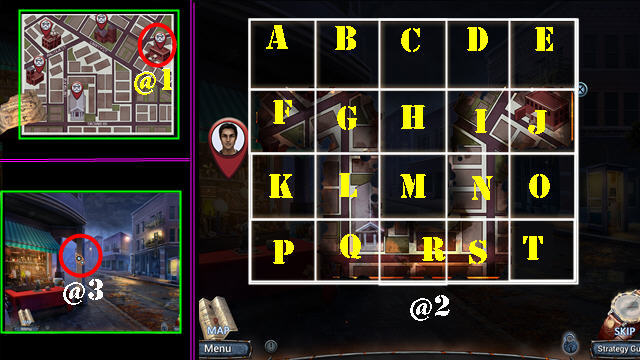
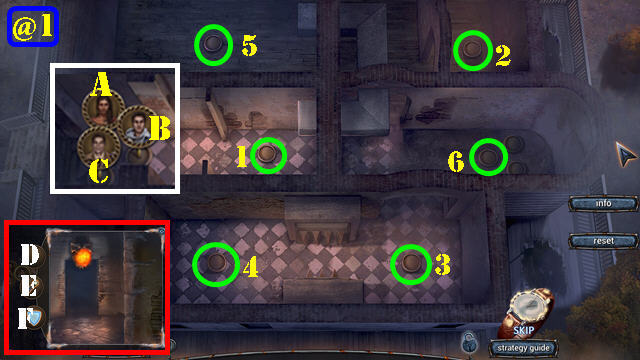
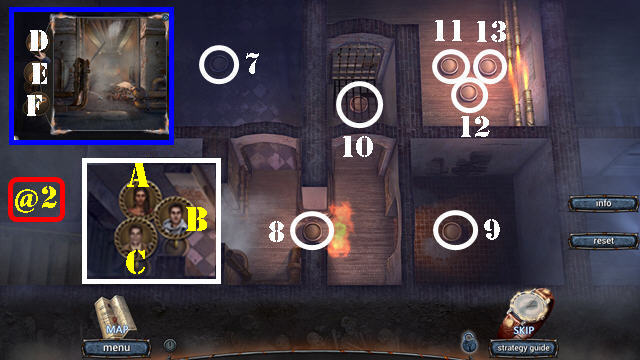
- INCOMPLETE ADDRESS on TOWN MAP; select police department on upper right (@1).
- Solution (@2): (T-up)-(L-up)-(Q-up-right)-(I-left-down-left-down)-(A-down)-(G-right).
- (O down-left)-(F right)-(R up-left-up)-(B left-down)-(H down)-(Q left)-(K right)-(P up)-(M left)-(K down-right).
- Take POLICE ADDRESS.
- Place POLICE ADDRESS and go (@3).
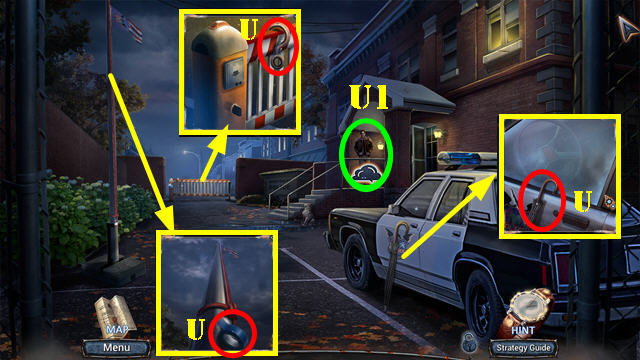
- Talk (U1).
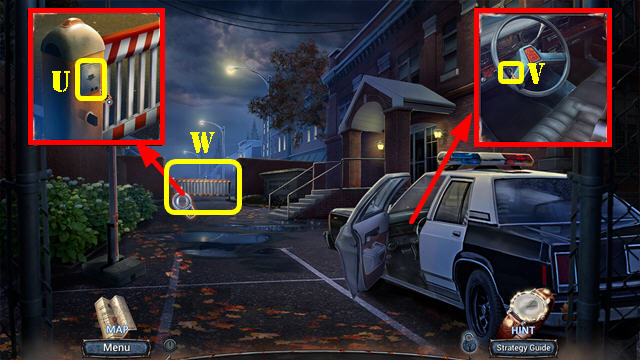
- Take TAPE, HOOK, and UMBRELLA (U).
- Walk down.
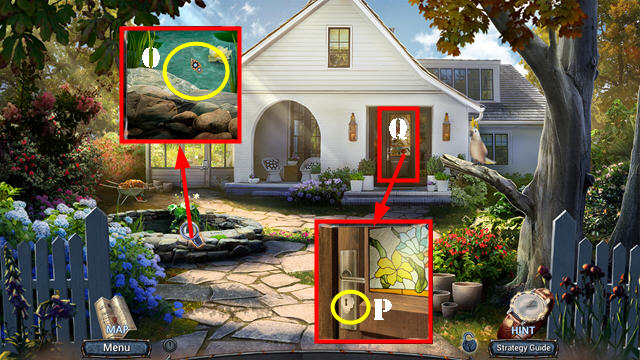
- Use UMBRELLA (V). Play HOP; receive SILVER EYE.
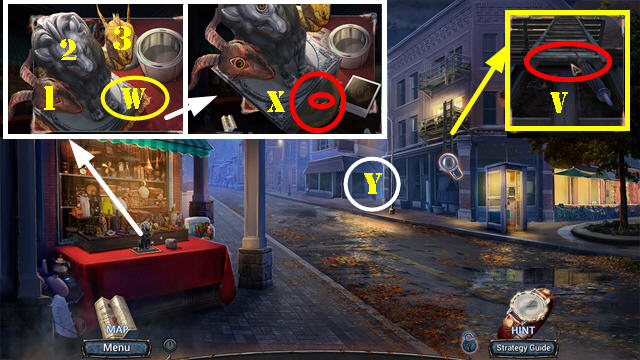
- Place BRONZE EYE (1), SILVER EYE (2), GOLD EYE (3), and PHOTO CLUE (W). Select 1-2-3-1.
- Take BOWL and HALO (X).
- Go (Y).

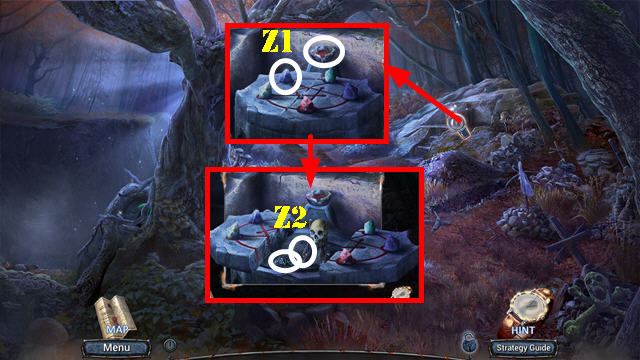
- Use BOWL; take ROPE and TILES 1/5 (Z1).
- Go to Civil Square.
- ROPE on HOOK; take GRAPPLING HOOK.
- Use GRAPPLING HOOK and go (Z2).
- Open folder; take CAR KEY (A).
- Take TILES 2/5, SEDATIVE, and GLOVES (B).
- Use DRAWING COMPASS; take WOODEN BUTTONS 1/2 (C).
- Walk down.
- Use CAR KEY; take DRAWER HANDLE and WOODEN BUTTONS 2/2 (D).
- Go (E).
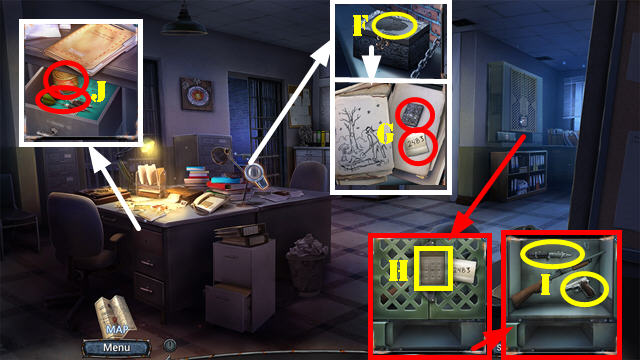
- WOODEN BUTTONS on SECRET BOX; select all three buttons; take SKULL AMULET.
- Place SKULL AMULET (F). Play HOP; take CODE and TILES 3/5 (G).
- Place CODE; enter 2483 (H); take GUN and KNIFE (I).
- Place DRAWER HANDLE; take DARTS and CANNED FOOD (J).
- Walk down.

- Use KNIFE (K); take FLAG (L).
- Go to Police Department.
- Place DARTS and FLAG (M).
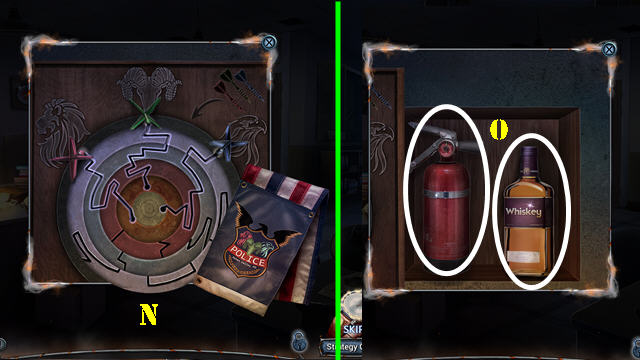
- Solution (N).
- Take FIRE EXTINGUISHER and WHISKEY (O).
- Use FIRE EXTINGUISHER (P).
- Go (Q).
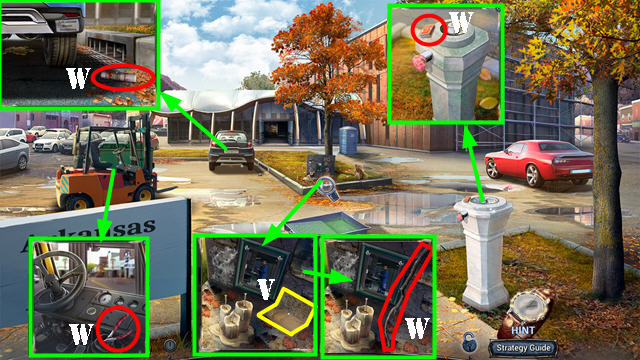
- Use GLOVES, SCREWDRIVER, and TAPE (R). Flip switch (S).
- Take TILES 4/5, KEYCARD, and RED THREAD (T).
- Walk down twice.
- Use KEYCARD (U).
- Select (V).
- Go (W).
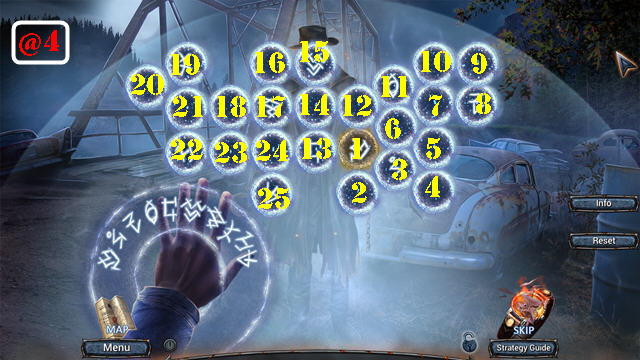
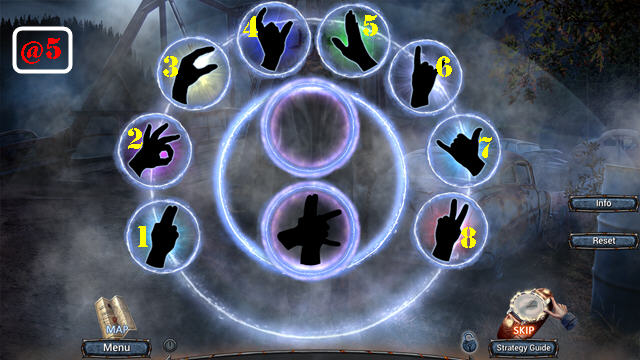
- Solution one (@4): 1-25.
- Solution two (@5): (1-6)-(3-6)-(4-7).
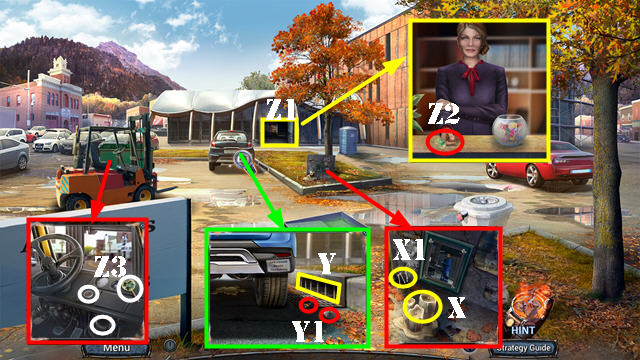
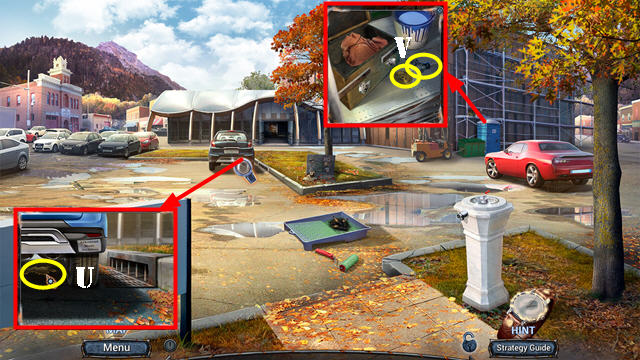
- Open trunk (X): take MYSTERIOUS PHOTO (Y).
- Take PLUG and FILE (Z).
- Go to Investigation Room.
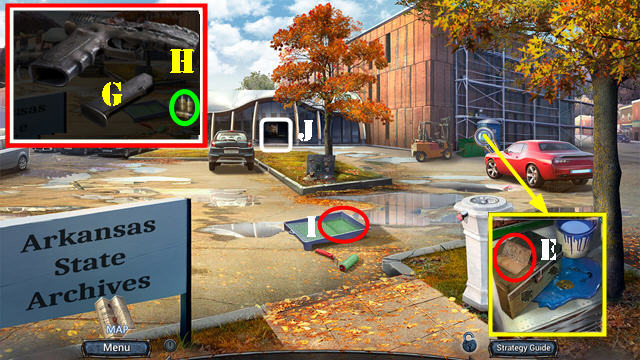
- Use FILE; take PATTERN and SWITCH (A).
- Use SCREWDRIVER and PLUG (B). Place SWITCH (C). Select plug and switch.
- Select hose (D); place on box (E).
- Take CAN OPENER (F).
- Go to Bridge.
- CAN OPENER and SEDATIVE on CANNED FOOD; take FOOD WITH SEDATIVE.
- Open fridge; give FOOD WITH SEDATIVE (G); take TILES 5/5 (H).
- Place TILES (I). Play HOP; receive BADGE.
- Go to Investigation Room.
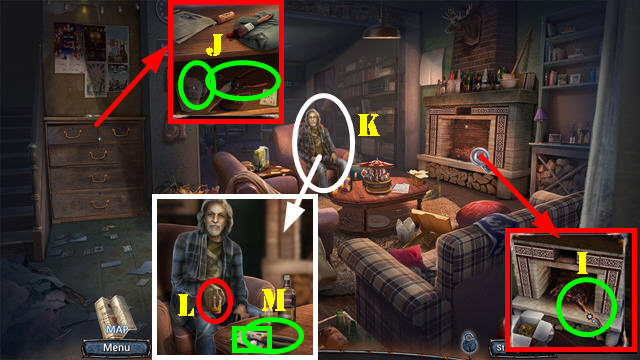
- Place BADGE; take BROOCH and HATCHET (J).
- Walk down.
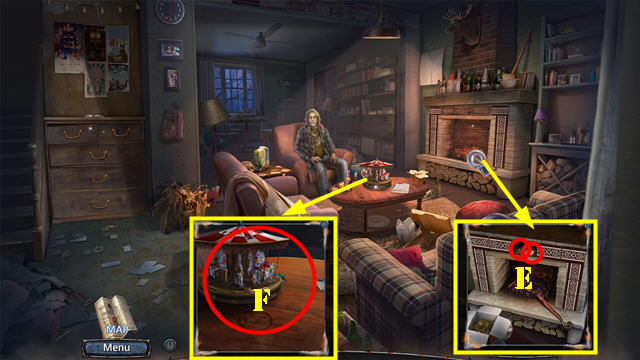
- Place PATTERN and use BROOCH (K); take SHERIFF'S NOTEBOOK (L).
- Go to Investigation Room.
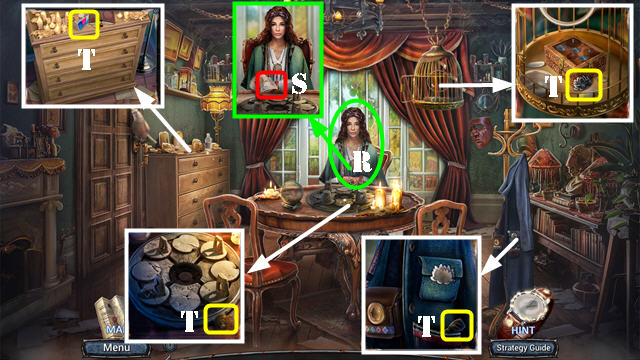
- Place RED THREAD and SHERIFF'S NOTEBOOK (M).
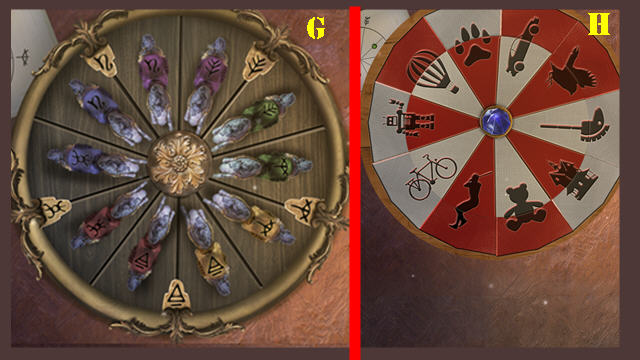
- Solution one (N).
- Solution two (O): (1-2)-(3-4)-(5-6)-(7-8)-(9-10)-(11-12)-(13-14)-(15-16).
- Take ANGEL.
- Go to Courtyard.
- Place HALO and ANGEL; take KALEIDOSCOPE and MONOGRAM (P).
- Go to Bridge.
- Use HATCHET and place MONOGRAM (Q). Play HOP.
Chapter 2: Archive
- Play HOP (R); receive GAS MASK.
- Use FIRE EXTINGUISHER and GAS MASK (S).
- Use GUN (T).
- Solution: (1-6).
- Receive BURNED GUN.
- Select Map (U).
- Select paper (V).
- Take MATCHES, WIRE CUTTER, TREE LIMB, and GLUE (W).
- Use WIRE CUTTER (X); take WICKS (X1).
- Use TREE LIMB (Y); take FORKLIFT KEY and WOLF (Y1).
- Go (Z1); take LOLLIPOP (Z2).
- Use LOLLIPOP, FORKLIFT KEY, and KALEIDOSCOPE (Z3).

- Solution: (D-Ax4-Bx5-Cx5-B-Cx2-Dx2-A-B-C-B-Ax2-D-A-B).
- (Cx2-Dx4-Ax4-D-Cx3-Bx2-C-Bx2-Ax6-Dx5-Cx4-D-C).
- (Bx3-A-B-C-D-C-Bx3-C-B-Ax2-D-A-B).
- Take PAPER (E).
- Select BURNED GUN and then magazine (G). Use WIRE CUTTER; take GUNPOWDER (H).
- Select PAPER; use GUNPOWDER, WICKS, and GLUE. Take PAPER and FIRECRACKER.
- Place FIRECRACKER and use MATCHES (I).
- Go (J).

- Use SEDATIVE (K).
- Open door (L).
- Select trash can; play HOP; take CODE WHEELS 1/3 and WOLF (M).
- Take BRUSH, CODE WHEELS 2/3, and SPOON (N).
- Walk down.
- Use SPOON (O); receive GUM and BOOK.
- Place 2 WOLF; take CRAYON and CABLE (P).
- Go (Q).
- Place BOOK; take CODE WHEELS 3/3 and VALVE (R).
- Walk down.
- Place VALVE (S) and BRUSH (T); receive WET BRUSH.
- Use WET BRUSH, PAPER, and CRAYON; take TIMELINE (U).
- Go (V).
- Place CODE WHEELS and TIMELINE; solution: car-telephone-parachute-tv (W); receive PADLOCK.
- Go (X).
- Take ID CARD (Y).
- Push button (Z).
- Walk down.
- Use ID CARD; take MEDAL and CAMERA STICK (A).
- Walk down.
- Use MEDAL; take SHELF NUMBER (B).
- Go to Archive.
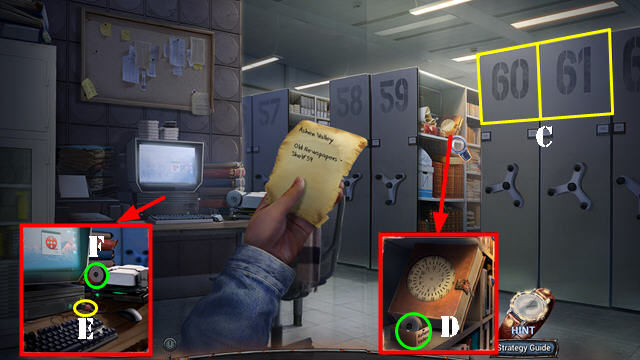
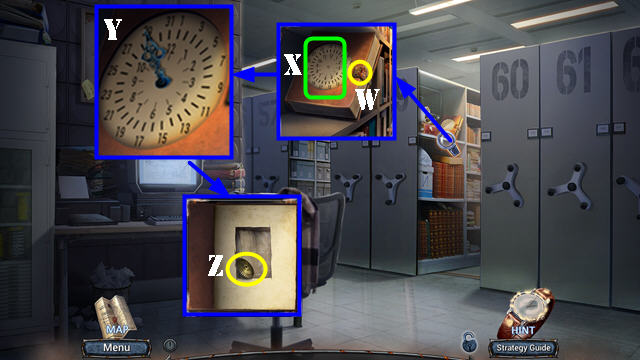
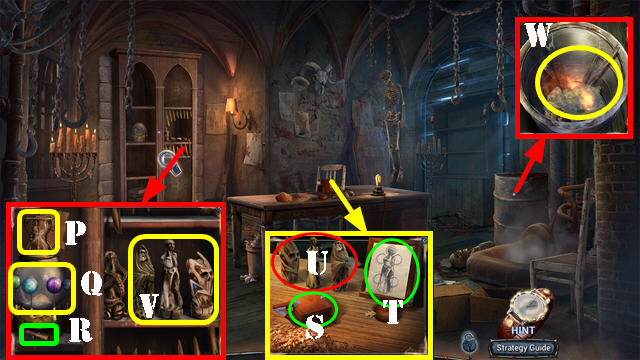
- Use SHELF NUMBER on lockers; select 61 and 60 (C); take MICROFILM (D).
- Place CABLE and use GUM (E).
- Place MICROFILM (F).
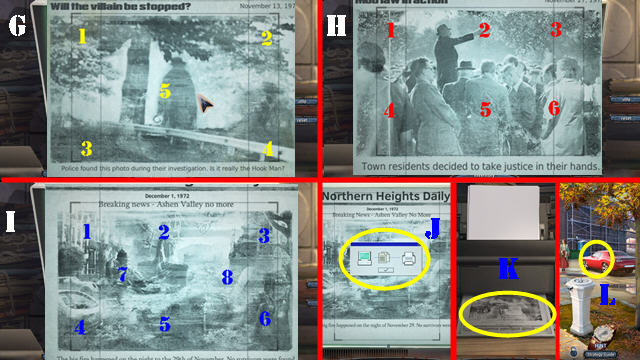
- Solution one (G): 2-2-3-3-4-5.
- Solution two (H): 1-2-2-3-5-5-6.
- Solution three (I): 1-1-3-4-5-7-7-8.
- Select (J).
- Take NEWSPAPER ARTICLE (K).
- Walk down twice.
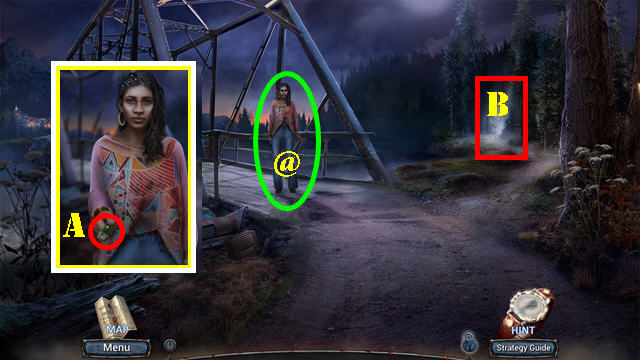
- Go (L).
- Select scene.
- Take BIRDS 1/2, ROCK, and DREAMCATCHER (M).
- Return to Reception.
- Use ROCK; take UNFINISHED FIGURINE and STRING (N).
- Return to Front Yard.
- DREAMCATCHER and STRING on CAMERA STICK; take NET.
- Use NET (O). Play HOP; receive HOUSE KEY.
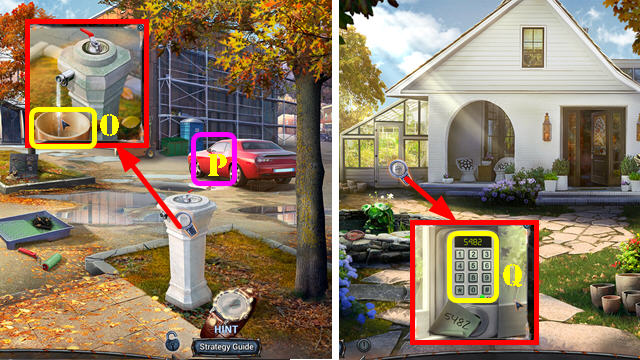
- Use HOUSE KEY (P).
- Enter (Q).
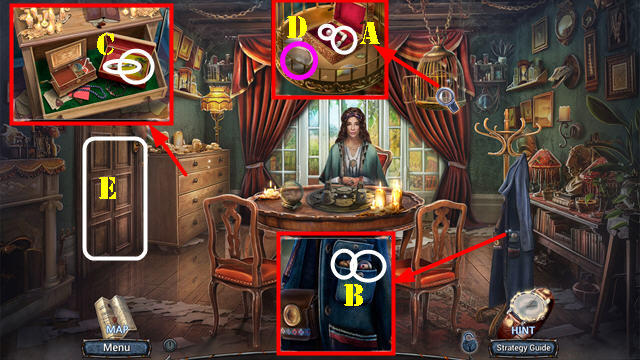
- Talk (R); take RECIPE (S).
- Take BASTER, LOTUS AMULET, GEARS 1/3, and SOLVENT (T).
- Walk down twice.
- Use BASTER (U); receive OIL.
- Use SOLVENT; take GEARS 2/3 and CLOCK HANDS (V).
- Go to Archive.
- Use OIL (W). Place CLOCK HANDS and NEWSPAPER ARTICLE (X); set clock to 29 and 11 (Y).
- Select book 3x; take GEARS 3/3 (Z).
- Go to Living Room.
- Place GEARS; take ARM and PEARL (A).
- Place LOTUS AMULET and PEARL; take NESTING DOLL and BIRDS 2/2 (B).
- Open drawer; place BIRDS; take LEG and BIRD FOOD (C).
- Place BIRD FOOD (D).
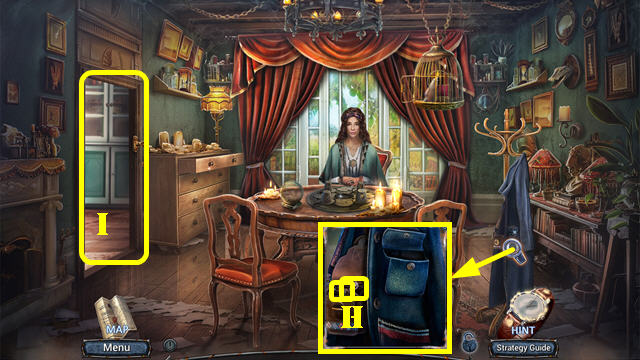
- Go (E).
- Take INSCRIPTION and HAND (F).
- Open doors; take POT (G).
- Walk down.
- Place HAND; take STRAW DOLL and NAIL FILE (H).
- Go (I).
- NAIL FILE on NESTING DOLL; select and take DOLL SET.
- Place INSCRIPTION and DOLL SET (J).
- Solution (K).
- Take MUSIC CYLINDER and LADLE (L).
- Walk down.
- ARM and LEG on UNFINISHED FIGURINE; take BALLERINA.
- Place BALLERINA and MUSIC CYLINDER (M); take GREENHOUSE CODE and QUARTZ (N).
- Walk down twice.
- Place POT (O); receive POT WITH WATER.
- Go (P).
- Place GREENHOUSE CODE; enter 5482 (Q). Play HOP; receive HERBS.
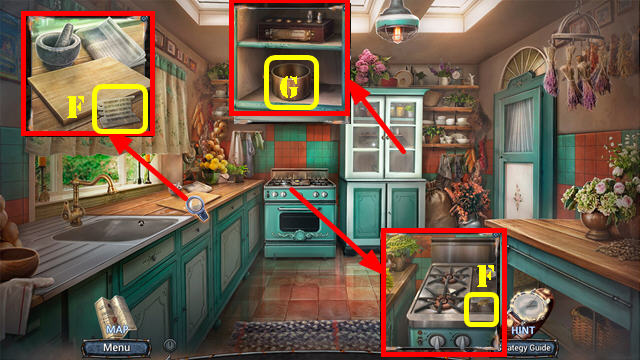
- Go to Kitchen.
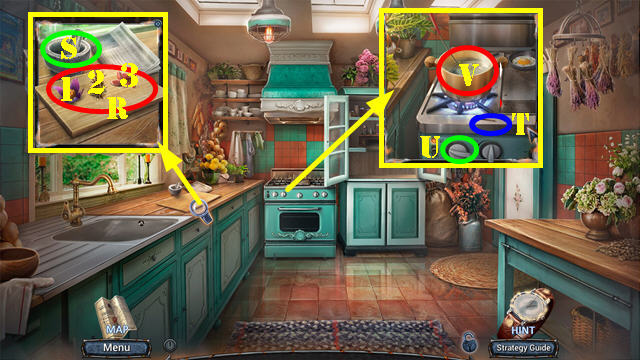
- Put down HERBS; place 2-3-1 (R) in mortar (S); take CRUSHED HERBS.
- Put MATCHES down (T) and select knob (U). Place POT WITH WATER, CRUSHED HERBS, and LADLE (V). Take HERBAL BREW.
- Walk down.
- Place MYSTERIOUS PHOTO, HERBAL BREW, and RECIPE (W). Select X-Y.
- Use PADLOCK (Z1).
- Take ANCIENT SEAL (Z2).
Chapter 3: Sheriff's House
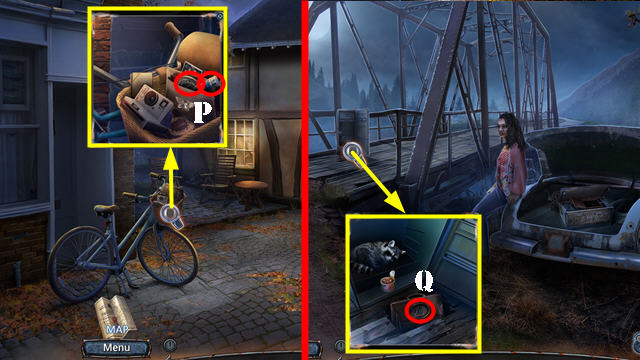
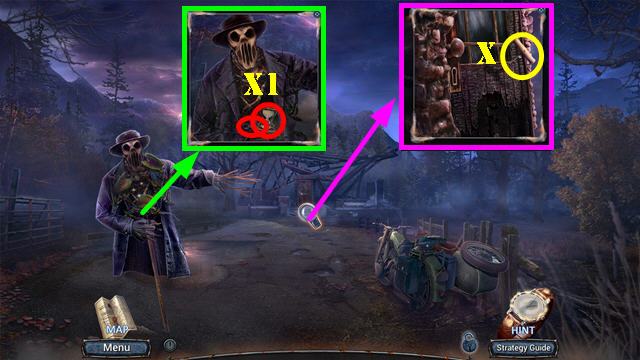
- Talk (@).
- Take LIGHTER (A).
- Try to go (B).
- Use ANCIENT SEAL on scene.
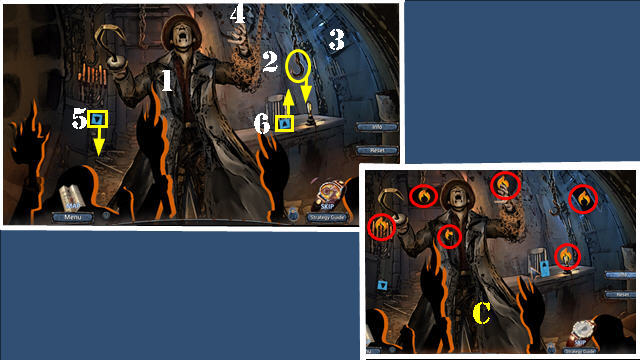
- Select 1-6, and then select all magic orbs (C).
- Select 7-12, and then select all magic orbs (D).
- Use LIGHTER on scene; select 3x (E).
- Grab hand (F).
- Take FLARE GUN (G).
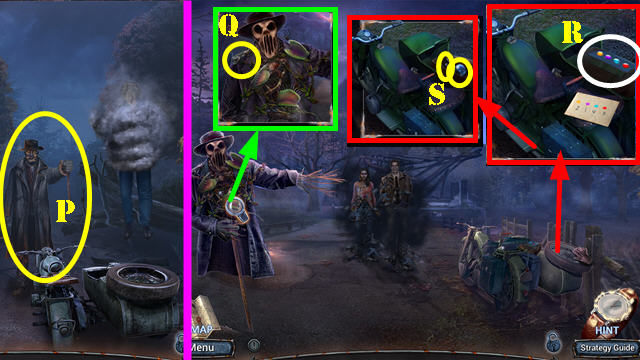
- Take KEROSENE, NECKTIE, BELL, and SHARP STONE (H).
- Use SHARP STONE (I); receive BENT BRANCH and WOODEN INLAYS 1/5.
- Select NECKTIE; place BENT BRANCH and take LONG HOOK.
- Use LONG HOOK (J); take OLD LANTERN.
- Open OLD LANTERN; take STRAW DOLL.
- Place 2 STRAW DOLLS (K).

- Solution (L).
- Take WOODEN INLAYS 2/5 and LENS (M).
- Break glass on OLD LANTERN and place LENS; use KEROSENE and LIGHTER on wick; take LANTERN.
- Place LANTERN and FLARE GUN (N). Receive EMPTY FARE GUN.
- Play HOP (O).
- Go (N).
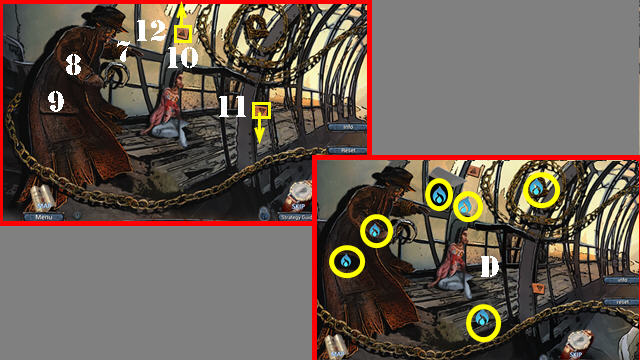
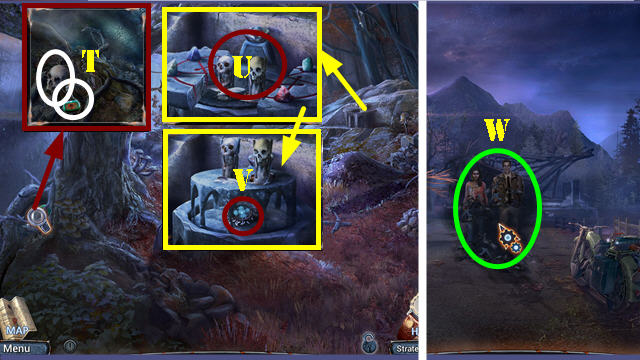
- Take WOODEN INLAYS 3/5, BRICKS 1/3, LETTER E, and LETTER S (P).
- Walk down.
- Place LETTER S and LETTER E (Q). Take OWL (R).
- Go to Sheriff's House.
- Place BELL (S) and OWL (T); take WOODEN INLAYS 4/5 and OLD KEY (U).
- Use OLD KEY; take WOODEN INLAYS 5/5 (V).
- Place WOODEN INLAYS. Move bird (1-2). Move seahorse (@1-@2). Place wheel (3-4). Place rooster on roof (5-6).
- Move fragment to house (7-8). Place hanging dice (9-10). Place leaf (11-12).
- Move star fragments to center (13 and 14).
- Give WHISKEY (W).
- Go (X).

- Take SNOW GLOBE, CHOPSTICKS, and PAINT (Y).
- Walk down twice.
- Place QUARTZ and PAINT (Z1); take MOTORCYCLE and BRICKS 2/3 (Z2).
- Go to Sheriff's House.
- Place MOTORCYCLE (A); take BRICKS 3/3, BROKEN PUMP, and FLARE (B).
- Use CHOPSTICKS (C); receive PIN.
- PIN on SNOW GLOBE; take HORSE and SPRING.
- Go (D).
- Place BRICKS; take PEDAL and DIAGRAM (E).
- Place HORSE and DIAGRAM (F).
- Solution one (G).
- Solution two (H).
- Take BASEBALL and MITT.
- Use MITT (I); receive POKER.
- Use POKER; take PRUNERS and GLASSES (J).
- Give GLASSES (K); select glass (L). Take PLIERS and FAMILY PHOTO (M).
- Walk down.
- Use PRUNERS (N); receive TIRE.
- Select BROKEN PUMP; place PEDAL and SPRING; take PUMP.
- Use PLIERS and PUMP (O); place TIRE (O1).
- FLARE on EMPTY FLARE GUN; take FLARE GUN.
- Use FLARE GUN (P).
- Take FEATHERS (Q).
- Place FAMILY PHOTO; select purple-yellow-red-blue (R).
- Take SPHERES 1/3 and TOTEM BASE (S).
- Walk down twice.
- Use PRUNERS; take SEALED VIAL and SKULL (T).
- Place SKULL, TOTEM BASE, and FEATHERS (U). Take PROTECTIVE AMULET (V).
- Go to Luther's House.
- Use PROTECTIVE AMULET (W). Play HOP.
- Take CORKSCREW (X).
- CORKSCREW on SEALED VIAL; take HERBICIDE.
- Use HERBICIDE; take HOURGLASS and CHAIN (X1).
- Go to Front Room.
- Use CHAIN (Y); receive MAGNET.
- Go to Luther's House.
- Use MAGNET (Z); receive SKELETON KEY.
- Use SKELETON KEY (Z1).
- For this solution (@1 and @2): Karen is always (A), Rick is always (B), and Andy is always (C) regardless of where they are on the board.
- Solution (@1): (B)-(F)-(A-1)-(A)-(D).
- (A)-(E)-(C-2)-(C)-(F)-(3)-(C)-(E)-(A-2).
- (A)-(D)-(B-4)-(B-D)-(6)-(A-4)-(A)-(F).
- Solution (@2): (C)-(D)-(B-7)-(B)-(E).
- (Select Rick in position 7 and move back to its original position in B).
- (B)-(D)-(B-8)-(B)-(D)-(C-9)-(C)-(F)-(7)-(B-9)-(B)-(D)-(A-10)-(A)-(D).
- (A-11)-(C-12)-(B-13)-(C)-(F)-(A)-(E)-(B)-(D).
- Remove tarp; take EMPTY GAS CAN and SIGNET (G).
- Take SPHERES 2/3 (H).
- Select and use BASEBALL; take CARVINGS (I).
- Walk down twice.
- Place SIGNET; take HEART and HOSE (J).
- Go to Luther's House.
- Place EMPTY GAS CAN (K) and HOSE (L); take GASOLINE.
- Place HEART (M); take SPHERES 3/3 (N).
- Go (O).
- Place HOURGLASS (P) and SPHERES (Q); take SKETCHES (R).
- Place CARVINGS (S) AND SKETCHES (T). Play HOP; take FIGURINES (U).
- Place FIGURINES; solution (V). Play HOP; receive LUTHER'S HOOK.
- Use GASOLINE, LIGHTER, and LUTHER'S HOOK (W).
- Congratulations, you've completed Paranormal Files: The Hook Man's Legend!
Created at: 2019-10-25