

Walkthrough Menu
- General Tips
- Chapter 1: Dr. Ryan's House
- Chapter 2: Shallows
- Chapter 3: General Store
- Chapter 4: Swamp
General Tips
- This is the official guide for Phantasmat: Déjà Vu.
- This guide won't tell you when to zoom into a location; the screenshots show each zoom scene.
- Hidden-object puzzles are referred to as HOPs. Only the locations of the HOPs will be shown.
- Use the Map to fast travel to a location.
Chapter 1: Dr. Ryan's House
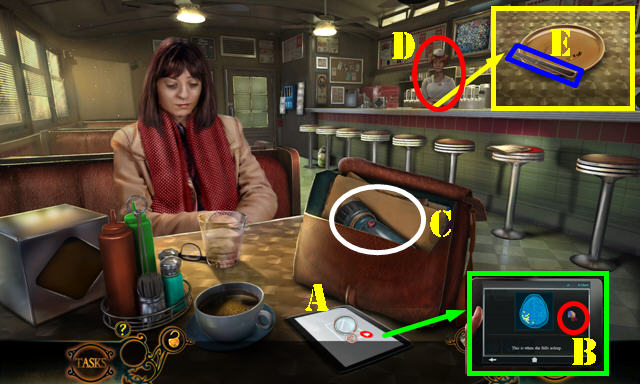
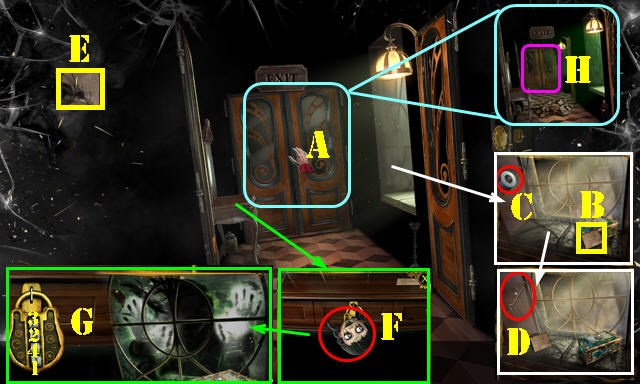
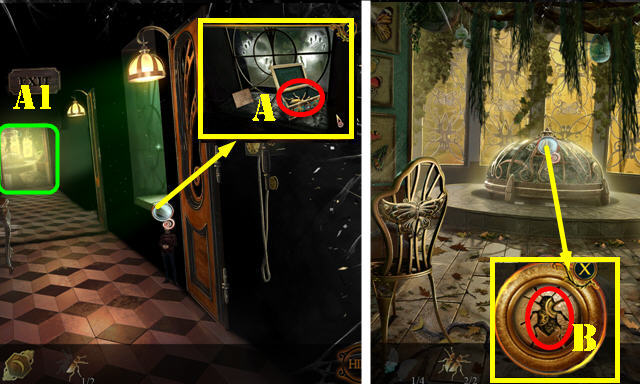
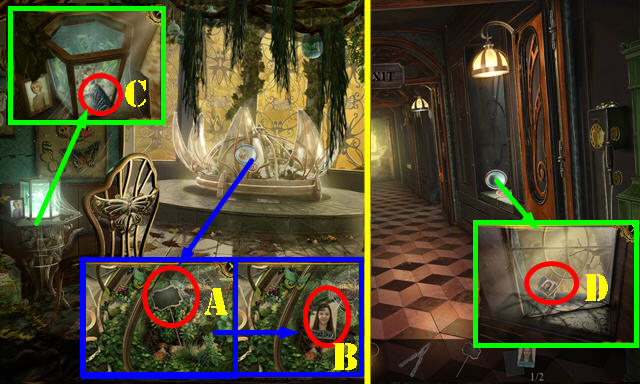
- Select tablet 3x (A); press arrow 2x (B) and select screen twice.
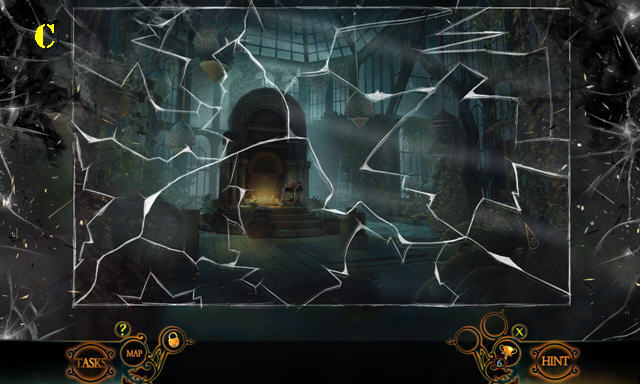
- Open case; take FLASHLIGHT and DOCUMENTS (C).
- Open DOCUMENTS; take BUSINESS CARD and receive MEDICAL RECORDS.
- Give BUSINESS CARD (D).
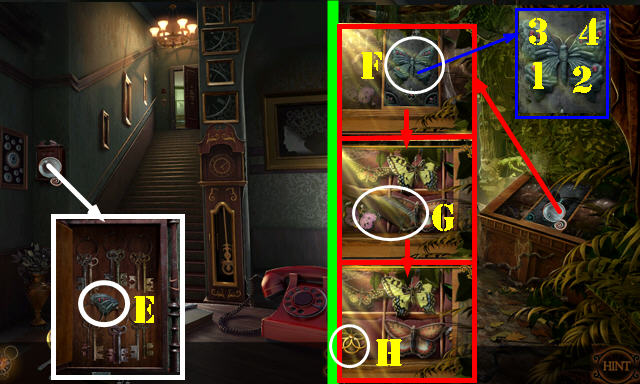
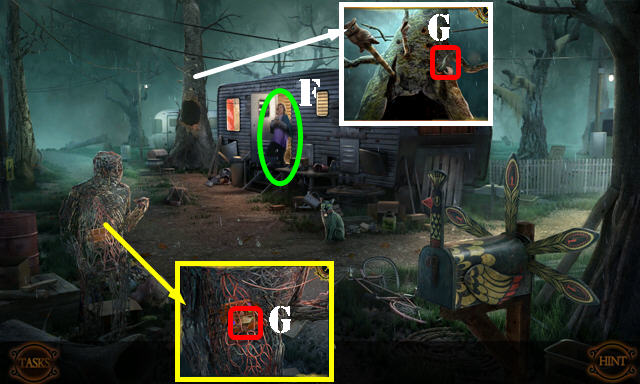
- Remove napkin; take BUTTER KNIFE (E).
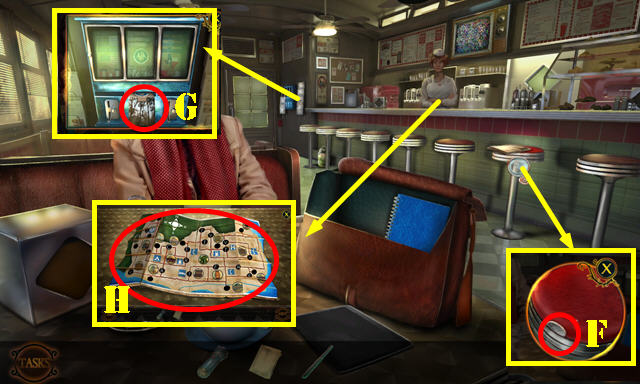
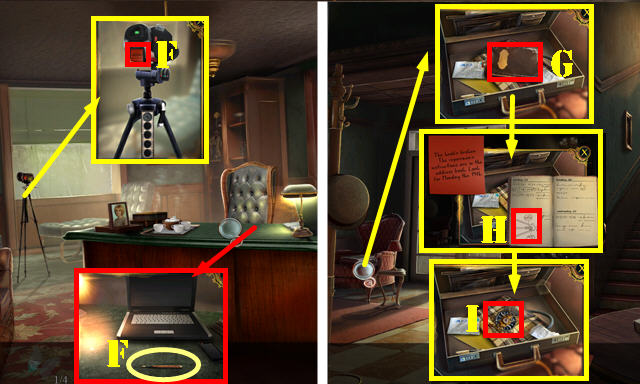
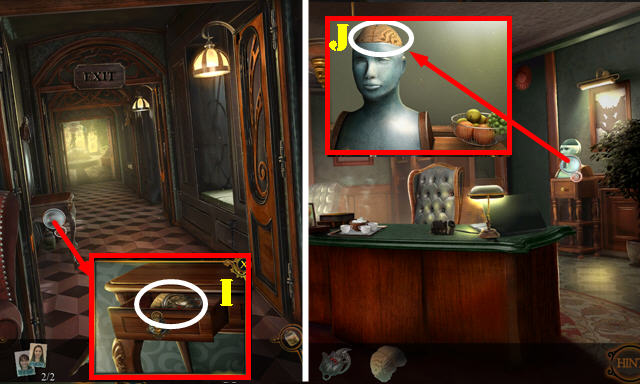
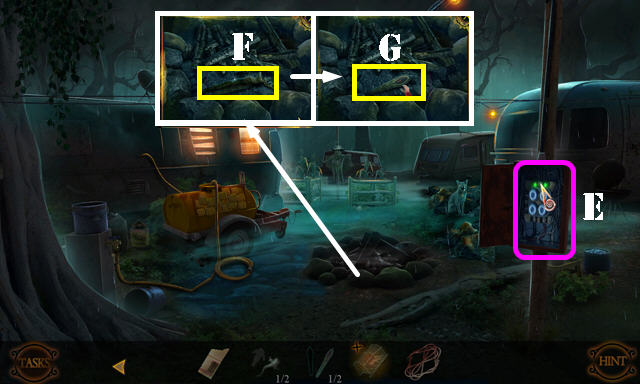
- Look at newspaper; use BUTTER KNIFE (F); receive QUARTER.
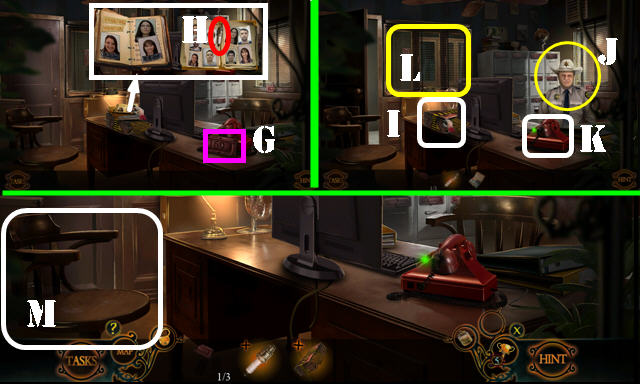
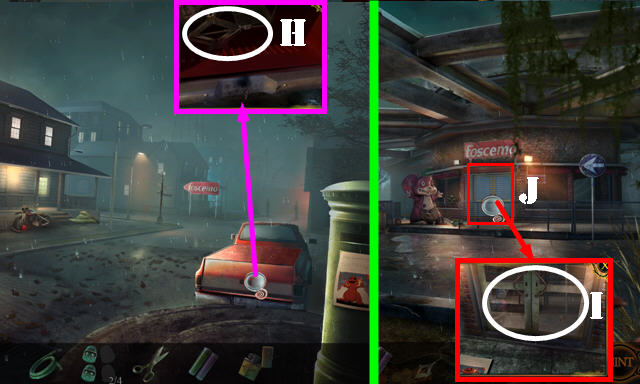
- Insert QUARTER and select; take MAP (G).
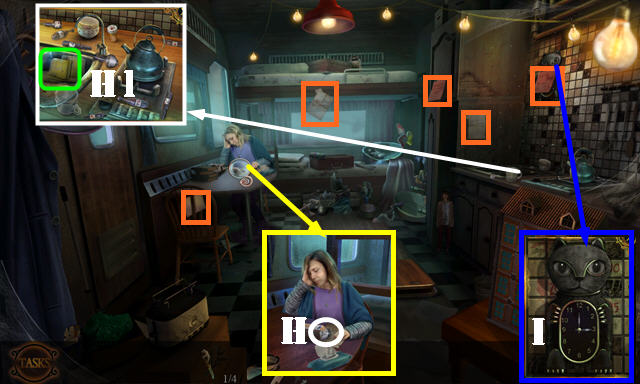
- Place MAP (H).
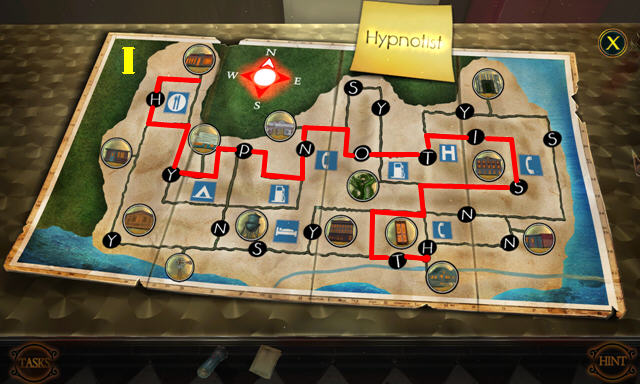
- Solution (I).
- Go through door.
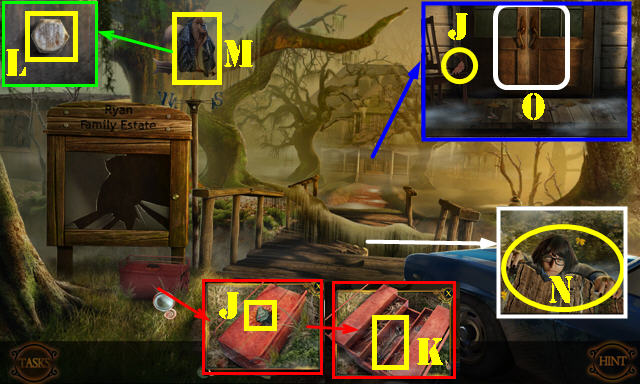
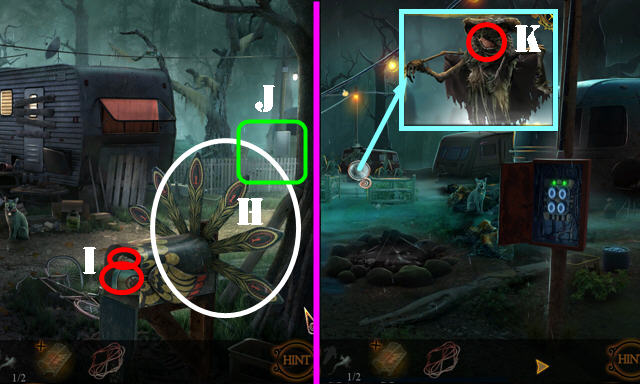
- Take TOOLBOX PLATE and BUTTERFLY PIECES 1/4 (J).
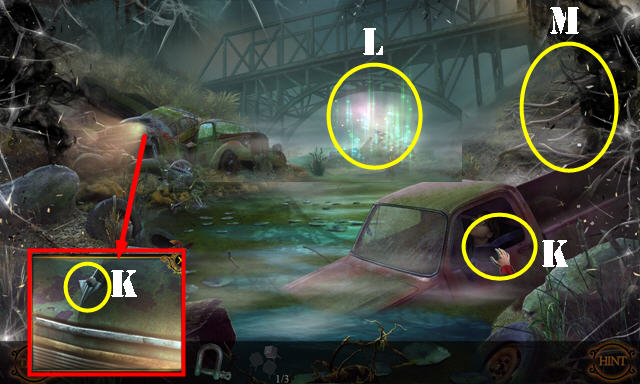
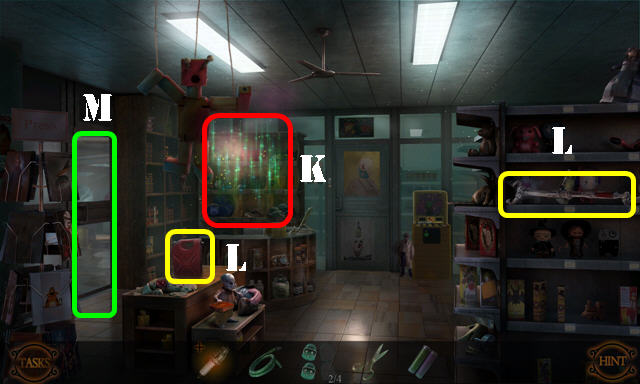
- Place TOOLBOX PLATE; take WRENCH (K).
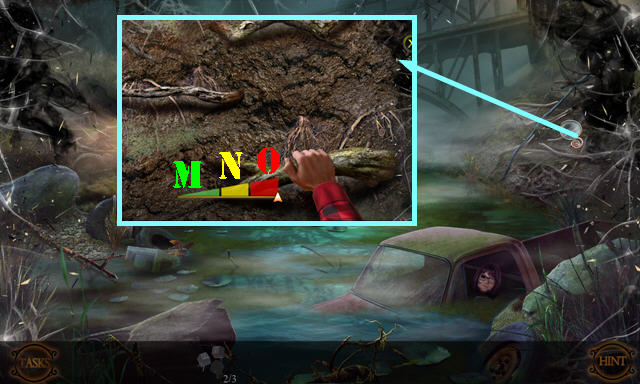
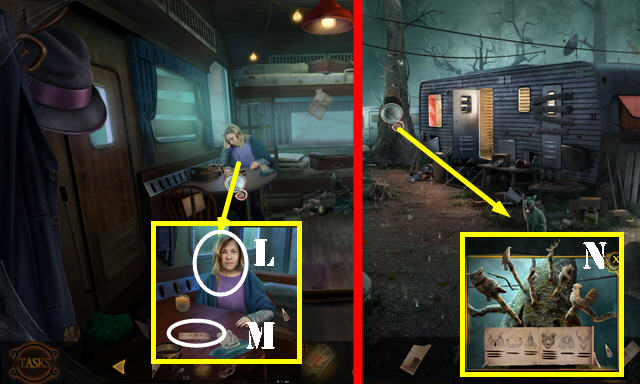
- Use WRENCH (L); take SCARF (M).
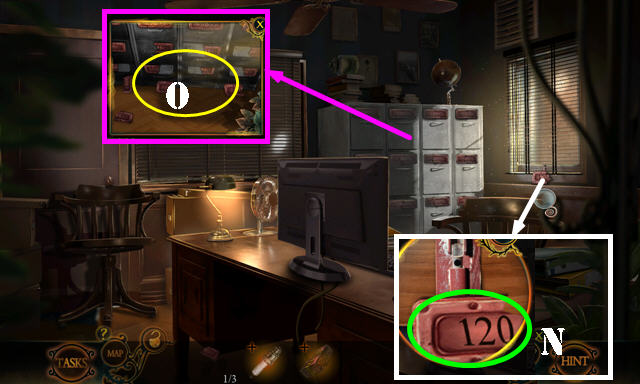
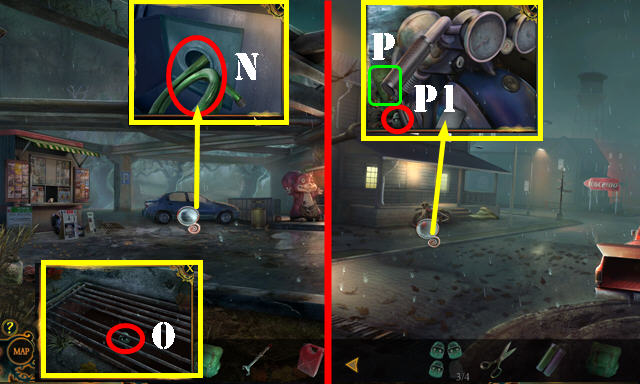
- Use SCARF (N).
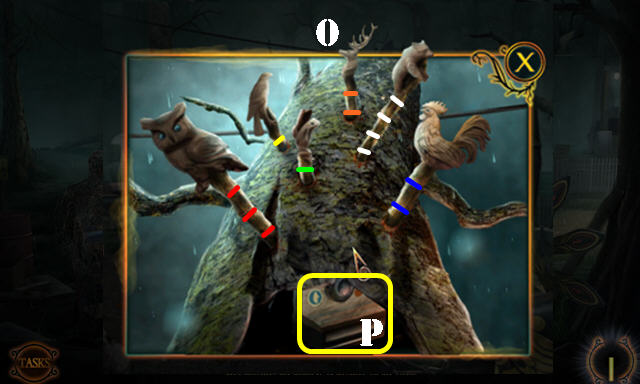
- Go to door (O).
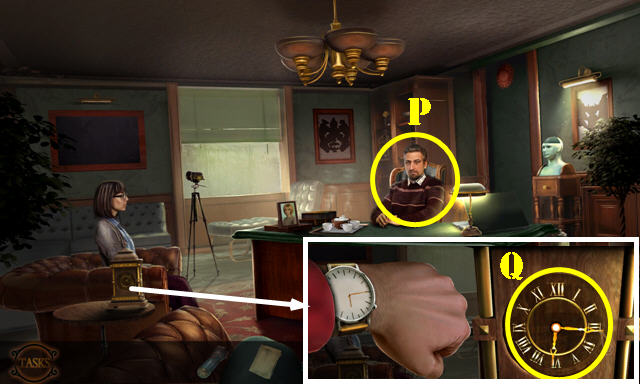
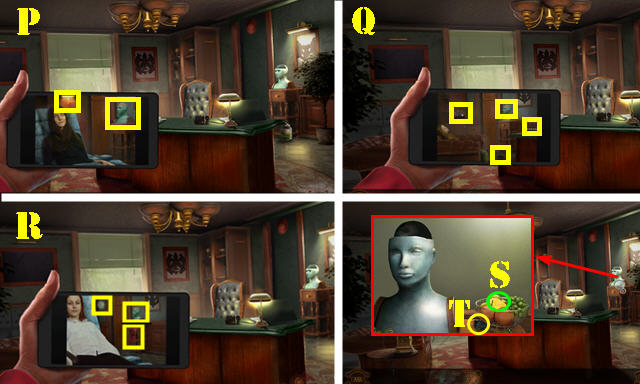
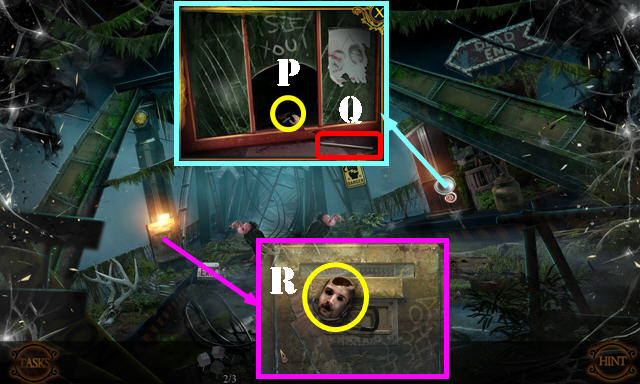
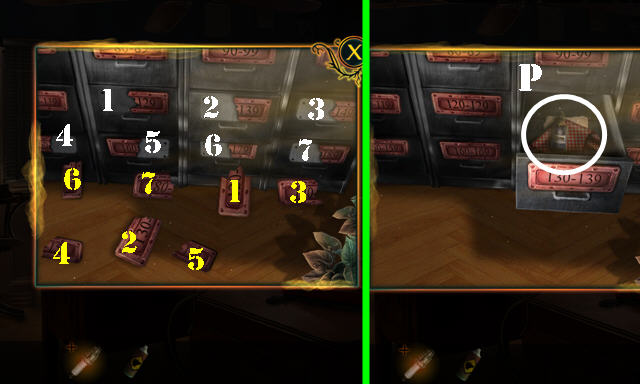
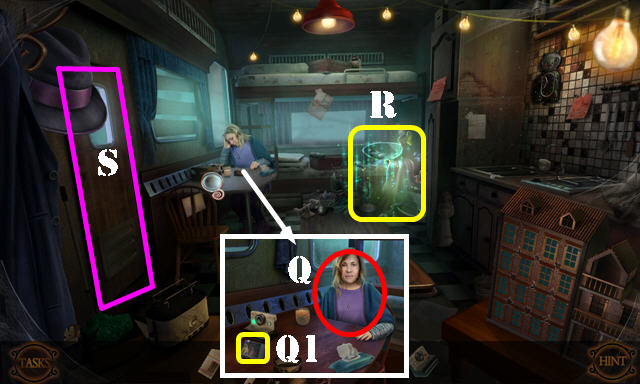
- Give MEDICAL RECORDS (P). Play HOP.
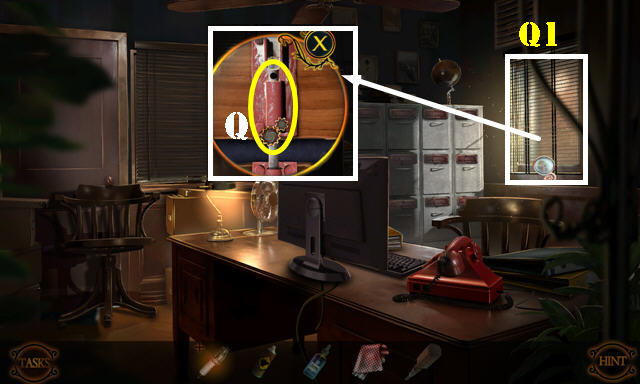
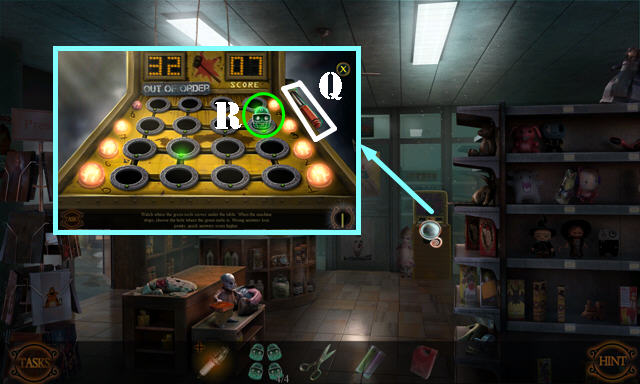
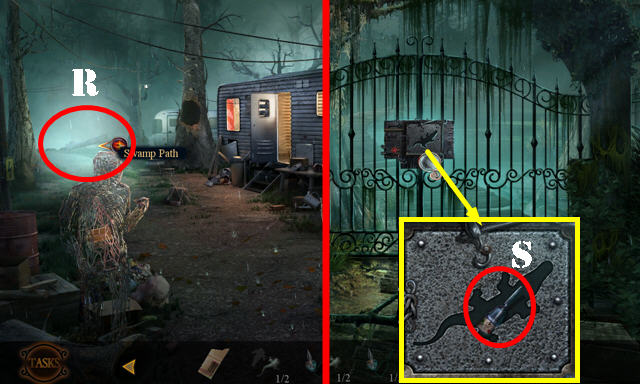
- Change time (Q).
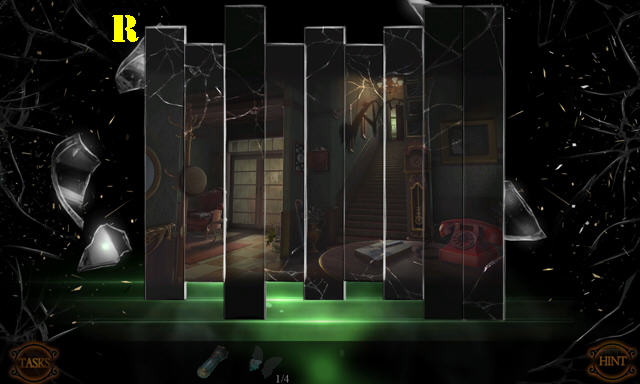
- Solution (R).

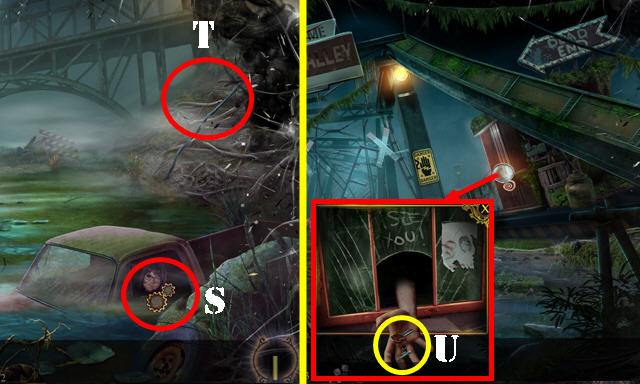
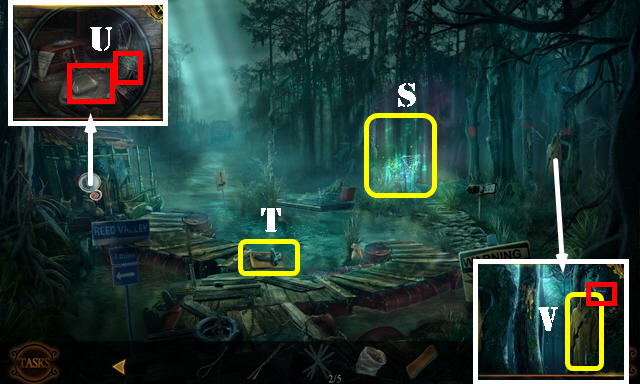
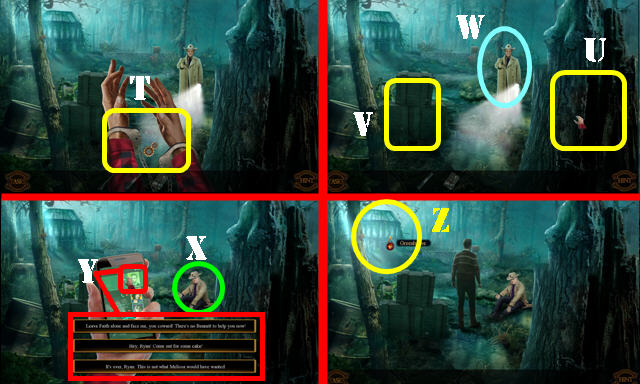
- Take UMBRELLA (S).
- Use UMBRELLA (T).
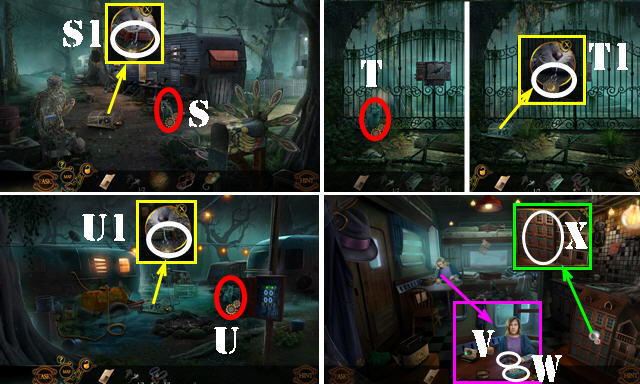
- Go (U).
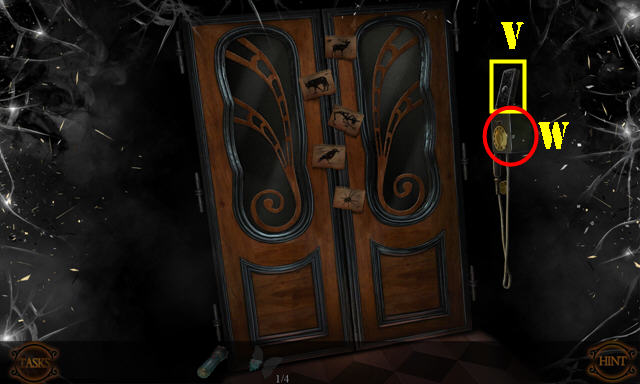
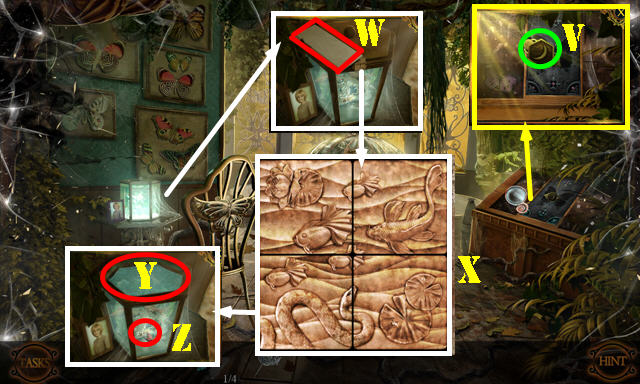
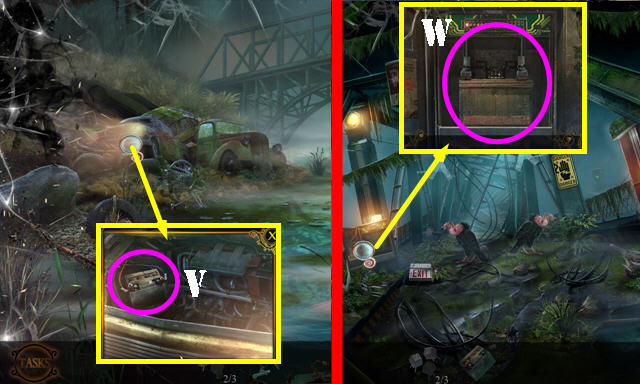
- Take DOLL BOX (V).
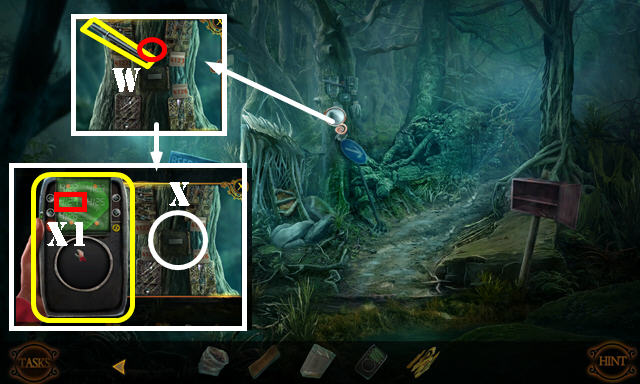
- Select phone (W).
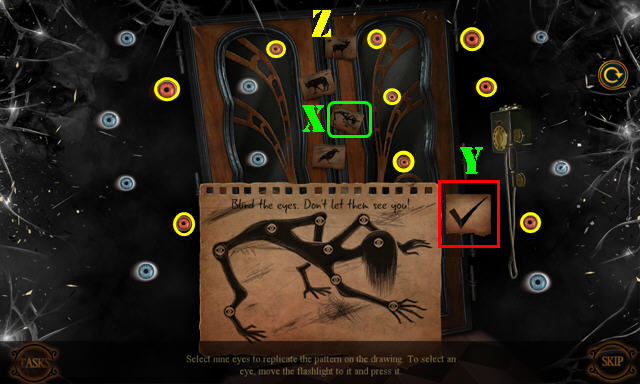
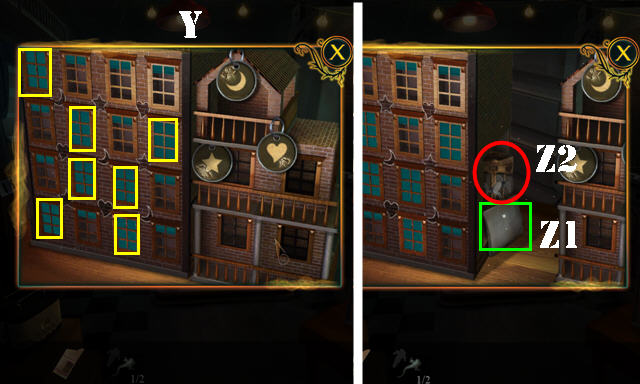
- Select beast (X) and checkmark (Y).
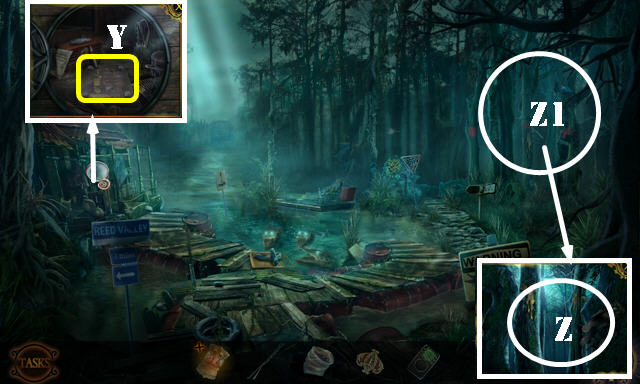
- Select marked eyes (Z) using the FLASHLIGHT.
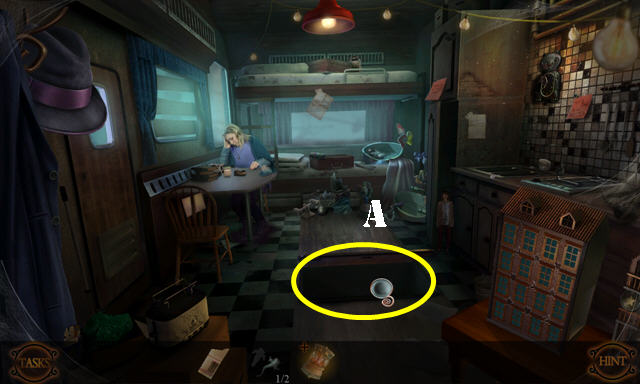
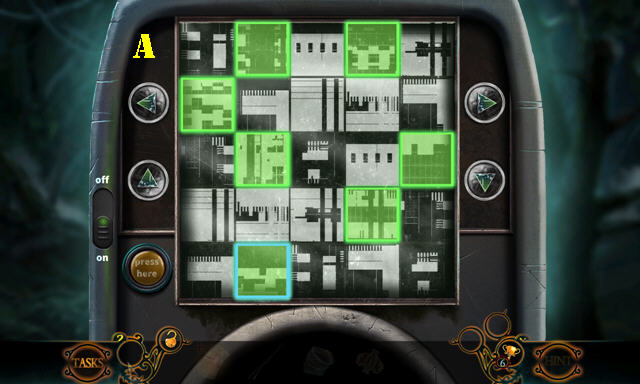
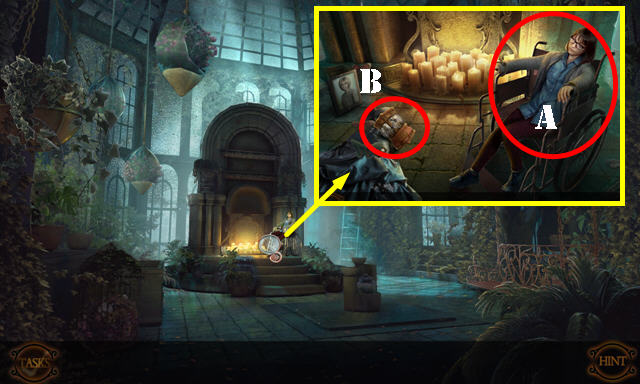
- Select door (A).
- Read note (B). Take DUCT TAPE (C) and select hook (D).
- Remove note in DOLL BOX; take BROOCH.
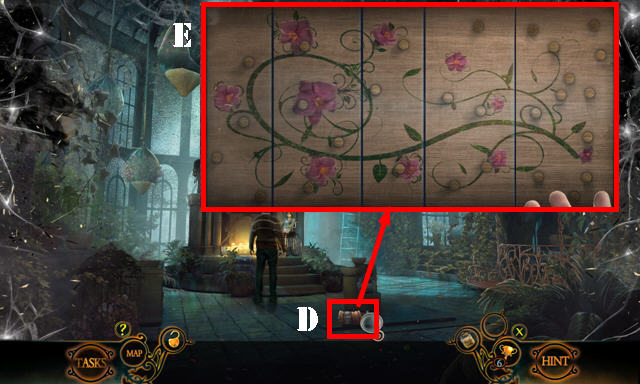
- Look at note (E).
- Look at note; take DOLL HEADS 1/3 (F). Enter 3214 (G). Play HOP; receive PICKAXE.
- Use PICKAXE and open door (H).
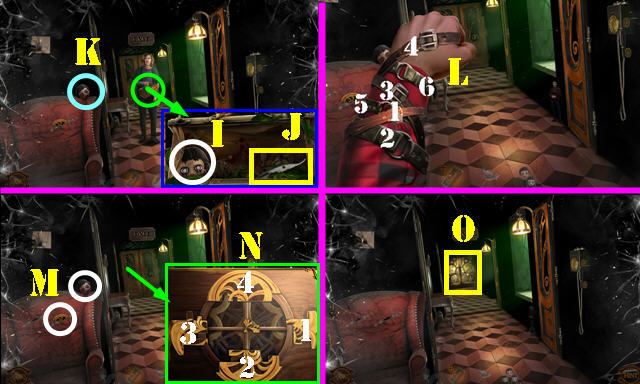
- Open bag; take DOLL HEADS 2/3 (I). Select blade (J) and use DUCT TAPE; take BLOODY RAZOR.
- Try to take doll head (K).
- Use BLOODY RAZOR; select 1-6 (L).
- Take DOLL HEADS 3/3 and LOCK PIECE (M).
- Place LOCK PIECE; select 1-4 (N).
- Go (O).
- DOLL HEADS 3/3 in DOLL BOX; take DOLL COLLECTION.
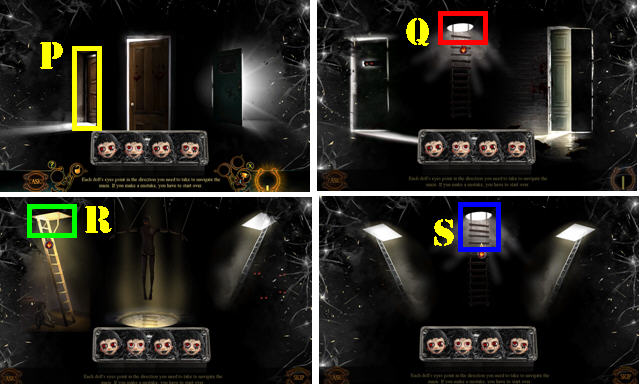
- Place DOLL COLLECTION on scene; select (P-Q-R-S).
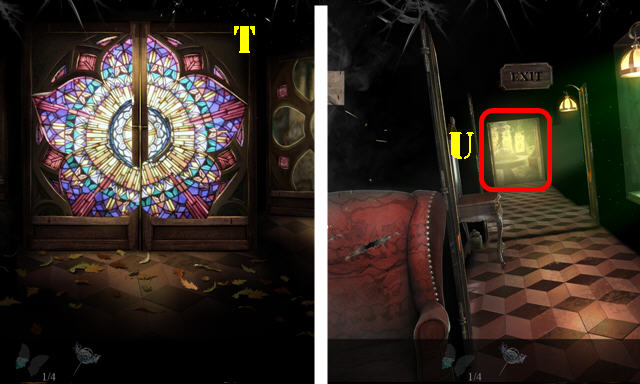
- Solution (T).
- Go (U).
- Take BOX DECORATION (V).
- Look at note (W). Use BROOCH on last tile; arrange as shown (X). Open lid (Y); take GILDED BEETLE 1/2 (Z).
- Walk down.
- Place BOX DECORATION; take GILDED BEETLE 2/2 (A).
- Go (A1).
- Place GILDED BEETLE 2/2 (B). Play HOP.

- Puzzle solution is random. Select C or D when matching symbol appears in center (E) and once the ball is on one of the green sections.
- Select correctly 3 times in a row to win.
- Take STICKY NOTE and PEN (F).
- Walk down.
- Use PEN and select. Flip book page (G) and place STICKY NOTE, flip page and take INSTRUCTIONS (H).
- Take DRAWER MECHANISM (I).
- Go to Office.
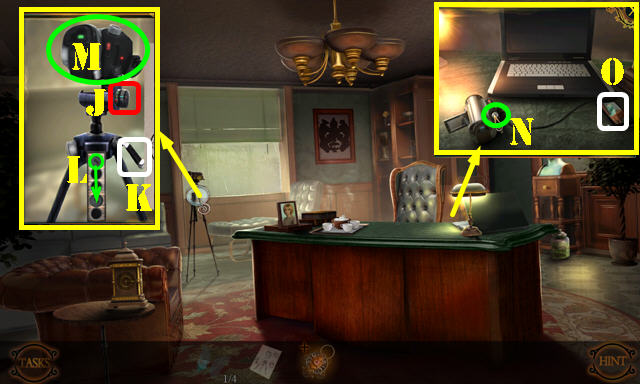
- Place INSTRUCTIONS; select Jx2-K; move L as shown. Take CAMERA (M).
- Place CAMERA and push button (N). Take PICTURE (O).
- Find differences (P-Q-R).
- Take LEMON HALF (S).
- Select basket; take BUTTERFLY PIECES 2/4 (T).
- Go to Corridor.
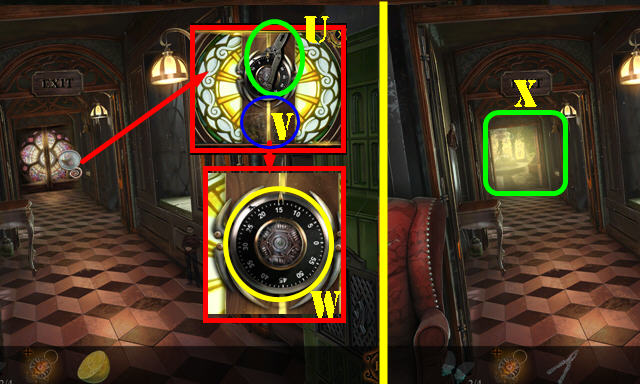
- Take PLIERS (U).
- Use LEMON HALF (V).
- Turn clockwise to 15, counterclockwise to 45, counterclockwise to 20, and clockwise to 30 (W).
- Go (X).
- Take PLANT MARKER (A). Select 3x; take PHOTOS 1/2 (B).
- Take BUTTERFLY PIECES 3/4 (C).
- Walk down.
- Use PLANT MARKER; take PHOTOS 2/2 (D).
- Walk down.
- Use PLIERS; take BUTTERFLY PIECES 4/4 (E).
- Return to Butterfly Room.
- Place BUTTERFLY PIECES 4/4 (F); select 1-4.
- Take BRUSH (G); remove butterfly; take MECHANISM PIECE (H).
- Walk down.
- MECHANISM PIECE on DRAWER MECHANISM; take DRAWER LOCK.
- Place DRAWER LOCK; take FLOWER ORNAMENT and BRAIN (I).
- Go to Office.
- Place BRAIN (J).
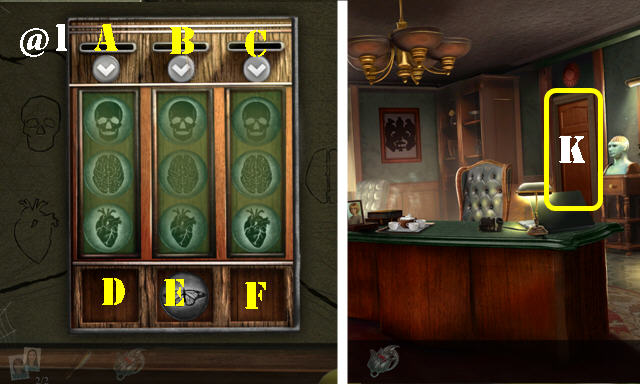
- Solution (@1):(E-C)-(F-B)-(E-C)-(F-A)-(D-A)-(D-B)-(E-C)-(F-A)-(D-C)-(F-B)-(E-B)-(E-C)-(F-C)-(F-B)-(E-B).
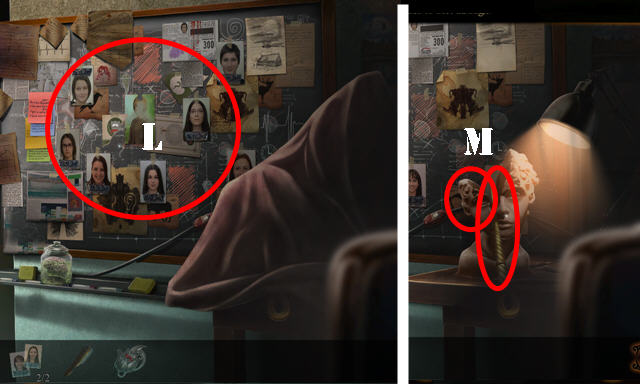
- Place PHOTOS 2/2 (L). Play HOP; receive RESEARCH NOTES.
- Remove sheet; take CLAY and CANE (M).
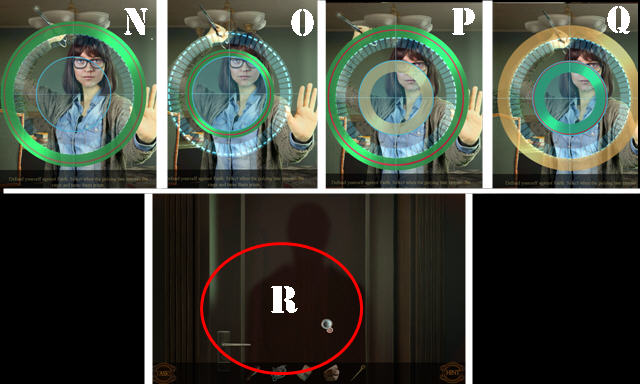
- Solution (N-O-P-Q).
- Select door (R). Open door and select scene.
- Walk down.
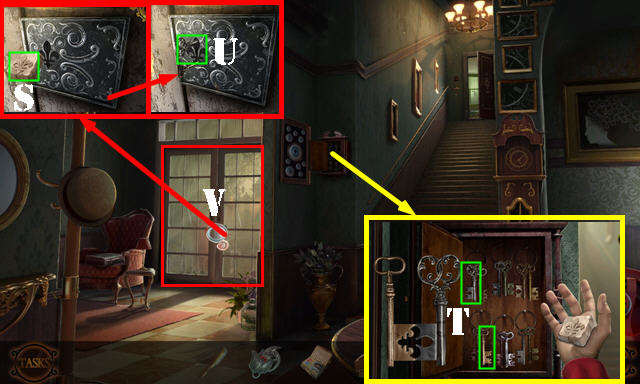
- Use CLAY; take CLAY IMPRINT (S).
- Place CLAY IMPRINT on keys; solution (T); receive BACKYARD KEYS.
- Use BACKYARD KEYS (U).
- Go (V).
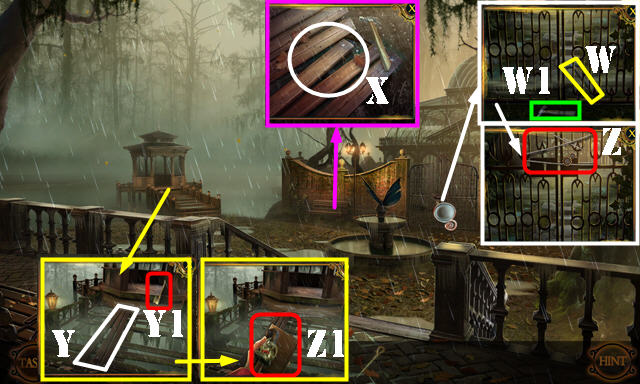
- Use CANE (W); take HAMMER (W1).
- Use HAMMER; take BOARDS (X).
- Place BOARDS (Y); take AXE (Y1).
- Use AXE (Z).
- Select FLOWER ORNAMENT, BRUSH, and RESEARCH NOTES (Z1).
Chapter 2: Shallows


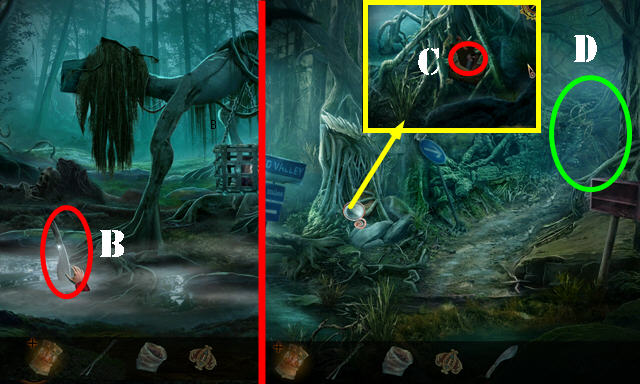
- Solution (A).
- Select iron (B); receive CLASP and CHAIN.
- Take BUNGEE HOOKS (C).
- Use CHAIN (D); take WOODEN BRUSH (D1).
- Use BUNGEE HOOKS; take DIGITS 1/3 and FLOWER ORNAMENT (E).
- Use WOODEN BRUSH and select (F). Take DRAGONFLY PIECE (G).
- Use FLOWER ORNAMENT and DRAGONFLY PIECE and select (H).
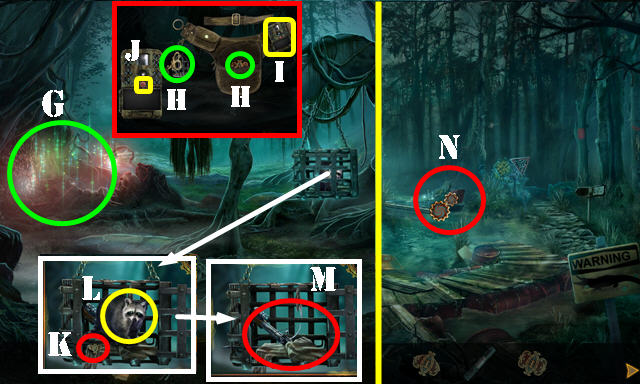
- Remove pin (I) and go (J).
- Take SEAT BELT and DIGITS 2/3 (K).
- Play HOP (L); receive SHEET.
- SHEET and CLASP on SEAT BELT; receive MAKESHIFT ROPE.
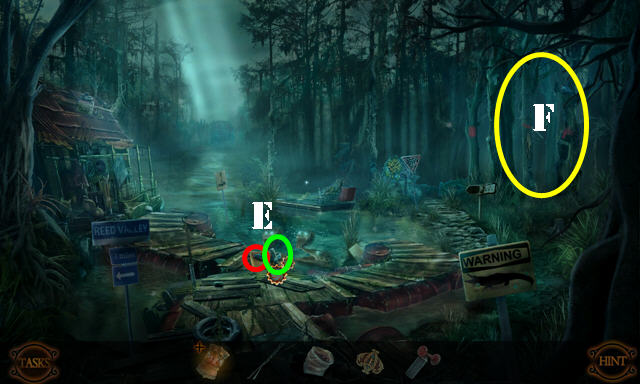
- Use MAKESHIFT ROPE (M).
- Solution: M-N-N-M-O-N-O-M.
- Try to take car keys (P) for hand to appear; take ANTENNA (Q).
- Take DECORATION PART 1/2 (R); open cover.
- Walk down.
- Use ANTENNA (S); receive DECORATION PART 2/2.
- Go (T).
- Place DECORATION PART 2/2; take CAR KEYS (U).
- Walk down.
- Use CAR KEYS; take BATTERY (V).
- Go to Bridge.
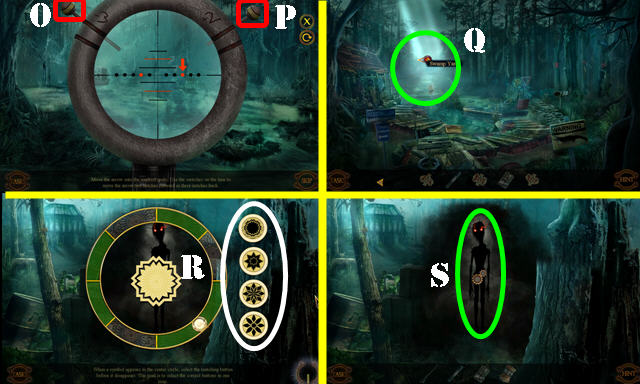
- Place BATTERY (W).

- Solution X (1-16).
- Solution Y (1-40).
- Solution Z (1-40).
- Take DIGITS 3/3.
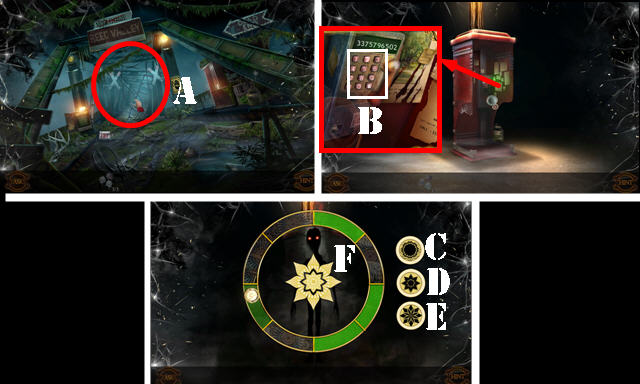
- Remove wires (A); go forward.
- Place DIGITS 3/3 (B); dial 3375796502.
- Solution is random. Select C, D, or E when matching symbol appears in center (F) and once the ball is on a green section.
- Select correctly 4 times in a row to win.
- Take NUMBER PLATES 1/3 (G).
- Look at diary, file and note; take SPARK PLUG and RYAN'S RESEARCH (H).
- Take CONFISCATED ITEMS (I).
- Give RYAN'S RESEARCH (J).
- Answer phone (K).
- Close blinds (L).
- Push chair (M).
- Take NUMBER PLATES 2/3 (N).
- Select CONFISCATED ITEMS twice; take SPRAY PAINT and NUMBER PLATES 3/3.
- Place NUMBER PLATES 3/3 (O).
- Solution (1-7).
- Take SLEEPING TONIC, HANDKERCHIEF, and SCREWDRIVER and look at notes (P).
- Use SCREWDRIVER (Q).
- Go to Alley (Q1).
- Use HANDKERCHIEF (R); select scene.
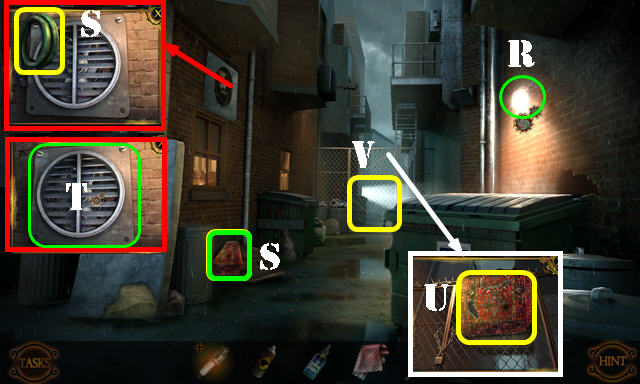
- Take CARPET and HOSE (S).
- Use SCREWDRIVER (T). Play HOP; receive STORE COUPON.
- Place CARPET (U) and STORE COUPON (V). Select fence.
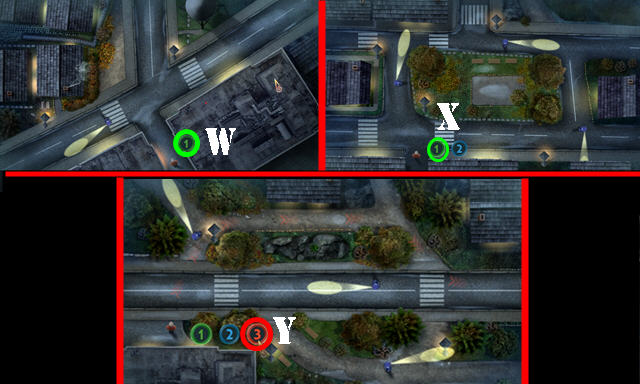
- Wait until the characters are in the spots shown, then select (W-X-Y).
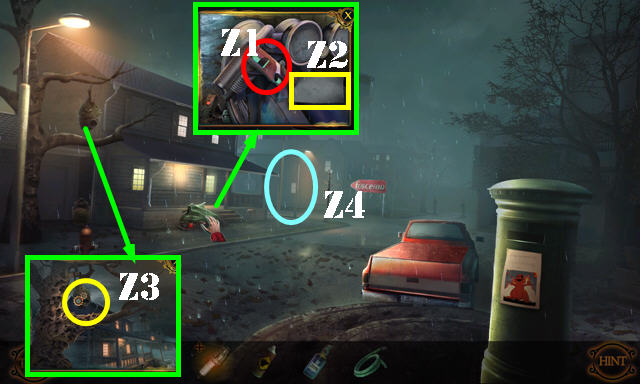
- Remove cover; take TOY GUN (Z1). Look at note (Z2).
- Use TOY GUN (Z3); receive MOLES 1/4.
- Go (Z4).
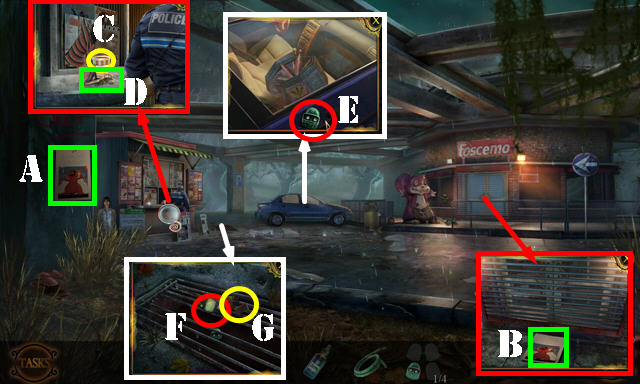
- Take SCISSORS (C). Use SLEEPING TONIC (D).
- Look at notes (A-B).
- Take MOLES 2/4 (E).
- Select walkie-talkie (F) and any of the three answers; flip walkie-talkie and select twice; receive BATTERIES.
- Take LIGHTER (G).
- Walk down.
- Use SPRAY PAINT and LIGHTER; open trunk and take CAR JACK (H).
- Go to Parking Lot.
- Use CAR JACK (I).
- Enter (J).
Chapter 3: General Store
- Select scene.
- Play HOP (K); receive FULL BACKPACK.
- Take GRABBER TOOL and EMPTY CANISTER (L).
- Go (M).
- Open gas tank; insert HOSE and use EMPTY CANISTER (N); receive FULL CANISTER.
- Use GRABBER TOOL (O); receive MOLES 3/4.
- Walk down.
- Place FULL BACKPACK (P) and select; take MOLES 4/4 (P1).
- Go to General Store.
- Place MOLES 4/4. Select lever to begin (Q).
- Solution is random. Find the green mole (R) after each turn. Take TOY CAR.
- Flip TOY CAR; take PRICE TAG.
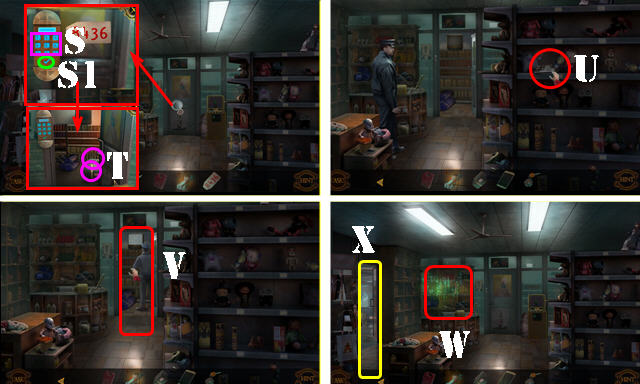
- Place PRICE TAG; enter 8436 (S) and checkmark (S1). Take DELIVERY PARCEL and FANNY PACK (T).
- SCISSORS on FANNY PACK; take DRIVER'S PHONE and BIKE KEYS.
- Select shelf and remote (U). Close door (V).
- Play HOP (W); receive NUTCRACKER.
- Go (X).
- NUTCRACKER on SPARK PLUG; take PORCELAIN PIECE.
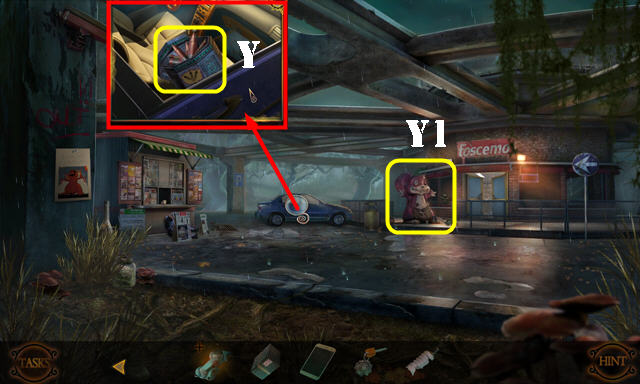
- Use PORCELAIN PIECE; take FIREWORKS (Y).
- Use FIREWORKS (Y1); play HOP.
- Walk down.
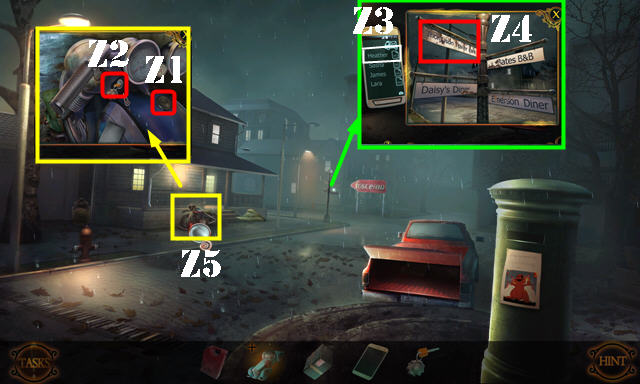
- Use FULL CANISTER (Z1) and BIKE KEYS (Z2).
- Place DRIVER'S PHONE; select heather on phone (Z3) and Thompson Trailer Park on sign (Z4).
- Select bike (Z5).
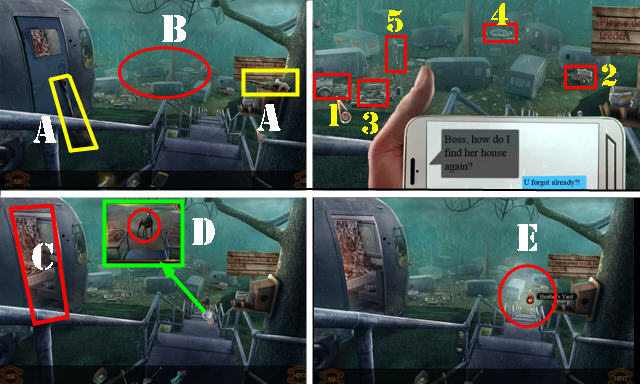
- Take DECORATIONS 1/4 and SHOVEL (A).
- Use DRIVER'S PHONE (B); select 1-5.
- Select door and use SHOVEL (C). Play HOP; receive BAIT.
- Select TOY CAR; insert BATTERIES and BAIT; receive DECOY.
- Use DECOY (D).
- Go to Heather's Yard (E).
- Give DELIVERY PARCEL (F).
- Take MATCHES and ALLIGATOR SHAPE 1/2 (G).
- Enter Heather's Home (F).
- Take VIALS 1/2 (H). Receive MEDICINE INSTRUCTIONS.
- Take SCRAP METAL (H1).
- Look at five notes (orange).
- Select clock (I).
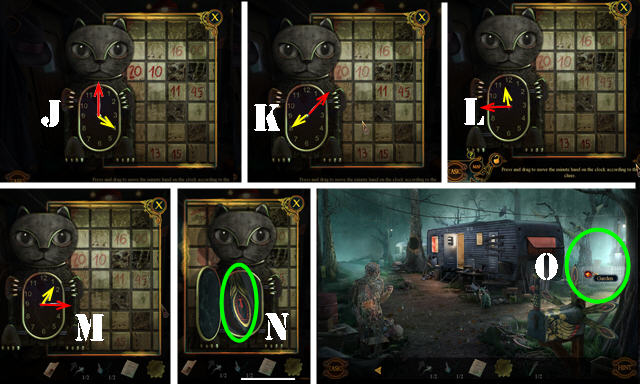
- Solution (J-K-L-M).
- Take FEATHER 1/2 (N).
- Go to Heather's Yard and go right (O).
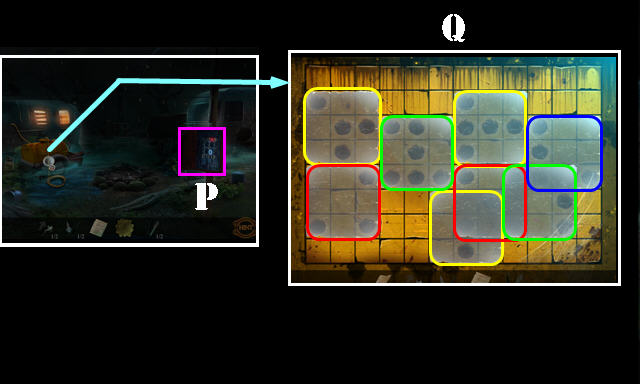
- Select electrical box (P).
- Place SCRAP METAL. Solution (Q).
- Walk down; go left (R).
- Take VIALS 2/2 (S).
- Go to Heather's Home.
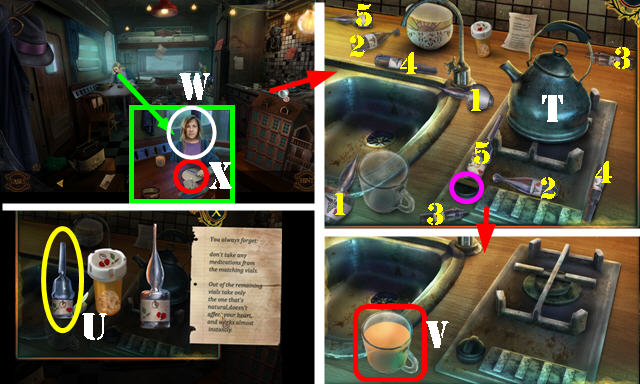
- Place MEDICINE INSTRUCTIONS and select kettle twice (T) and knob once (purple).
- Place VIALS 2/2; select matching vials (1-5). Select bottle (U); receive HOT WATER.
- Take MEDICINE (V).
- Give MEDICINE (W); take EMBROIDERY (X).
- Go to Trailer Park.
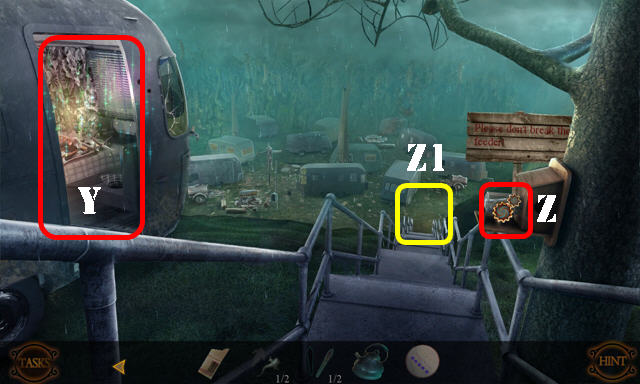
- Play HOP (Y); receive CAGE.
- Use HOT WATER; take FUSES (Z).
- Go (Z1).
- Open CAGE; take WIRE CUTTERS.
- Use WIRE CUTTERS (A); receive STRING.
- Place EMBROIDERY: change pattern to match embroidery (B).
- Take NECKLACE (C).
- Go (D).
- Use FUSES (E).
- Use SHOVEL; take DECORATIONS 2/4 (F) and FEATHER 2/2 (G).
- Walk down.
- Place FEATHER 2/2 (H); take BUG SPRAY and DECORATIONS 3/4 (I).
- Go (J).
- Use BUG SPRAY; take DECORATIONS 4/4 (K).
- Go to Heather's Home.
- Use NECKLACE (L). Select it twice (M); receive NECKLACE CLUE.
- Go to Heather's Yard.
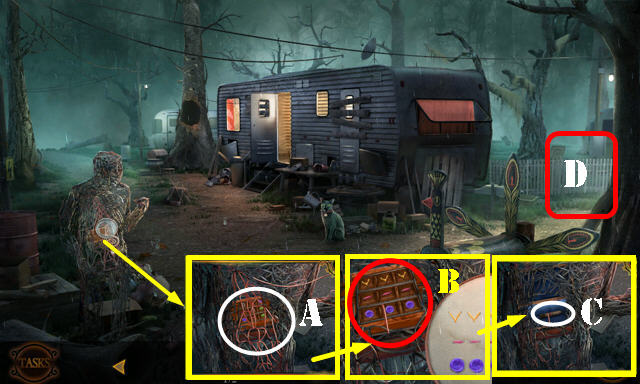
- Place DECORATIONS 4/4 and NECKLACE CLUE (N).
- Solution (O).
- Take INSTANT CAMERA (P).
- Go to Heather's Home.
- Use INSTANT CAMERA (Q) and select photos (Q1).
- Play HOP (R); receive MOUSE.
- Go (S).
- STRING and MOUSE in CAGE; receive CAT TRAP.
- Use CAT TRAP (S); take COLLARS 1/3 (S1).
- Go to Swamp Path. Use CAT TRAP (T); take COLLARS 2/3 (T1).
- Go to Garden. Use CAT TRAP (U); take COLLARS 3/3 (U1).
- Go to Heather's Home.
- Place COLLARS 3/3. Select collars (V) and tissue box (W); receive TAGS.
- Place TAGS (X).
- Solution (Y).
- Look at note (Z1); take MELISSA'S SNOW GLOBE (Z2).
- Open trapdoor (A) and look.
- Solution (B).
Chapter 4: Swamp
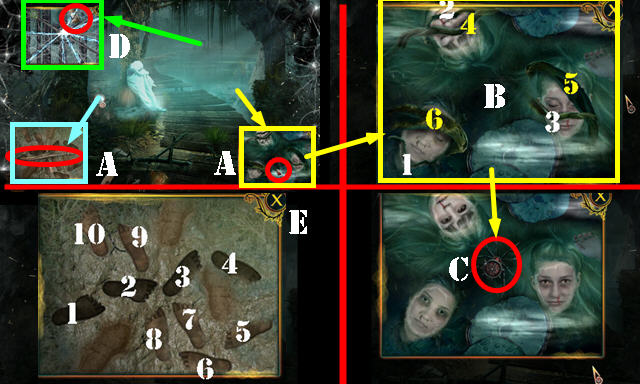
- Take WOOD and ALCOHOL (A).
- Select feet 1-10 (E); take SPIDER KEY.
- Place SPIDER KEY; take BANDAGE (D).
- Select vines 1-6 (B); take SPIDER KEY (C).
- Select WOOD; receive ZIP TIE.
- BANDAGE, ALCOHOL, and MATCHES on WOOD; receive TORCH.
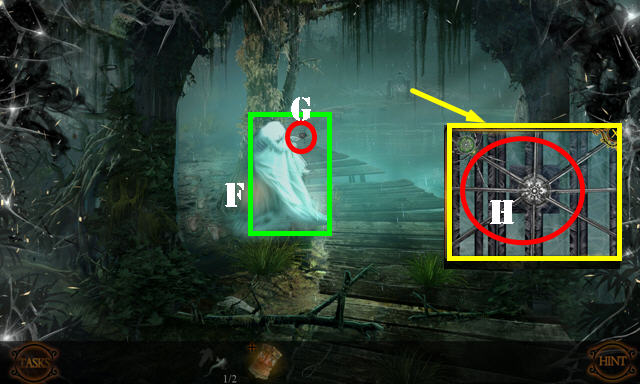
- Use TORCH (F); take SPIDER KEY (G).
- Use two SPIDER KEYS (H). Play HOP.
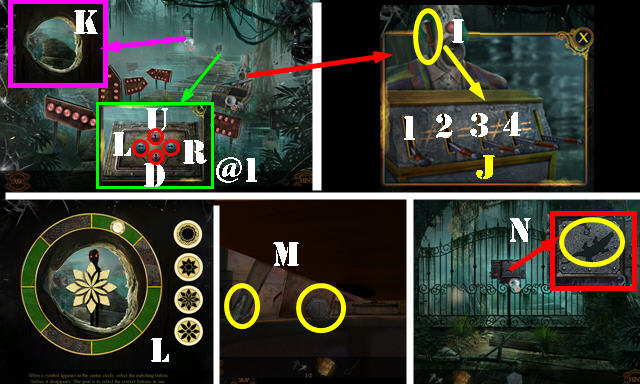
- Place lever (I); select 2-4-1-3-1-4 (J).
- Select R-U-R-L-L (@).
- Look (K).
- Solution is random (L).
- Take BUTTON and ALLIGATOR SHAPE 2/2 (M). Select scene.
- Go to Swamp Path.
- Place ALLIGATOR SHAPE 2/2 (N).
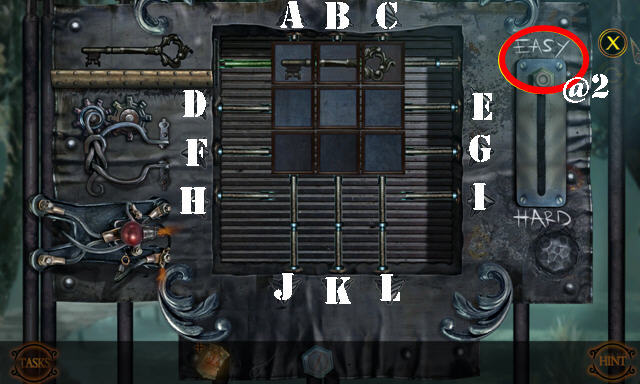
- Easy Solution (@2): (A-F-J-G-A-D-J-E)-(A-B-F-J-G-K)-(A-F-J-G-A-D-J-E)-(C-G-L-F-C-E-L-F-B-D)-(A-G-C).
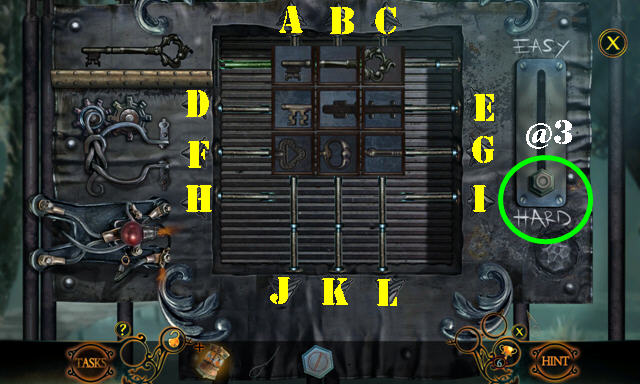
- Hard Solution (@3): (A-F-J-G-A-D-J-E)-(A-B-F-J-G-K)-(A-F-J-G-A-D-J-E)-(C-G-L-F-C-E-L-F-B-D)-(A-G-C).
- Go forward twice.
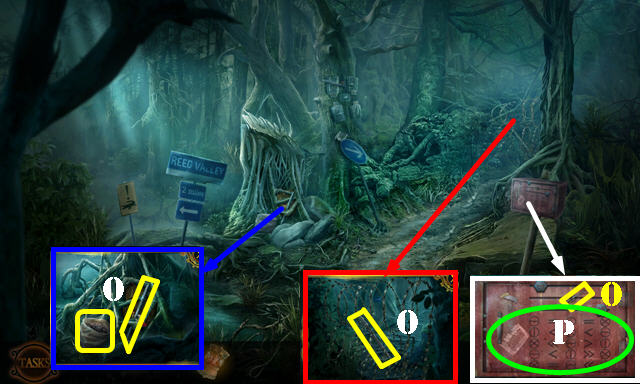
- Take TENT SPIKES 1/5-2/5, BOBBY PIN, and PACK OF RAISINS (O).
- Place BUTTON (P).
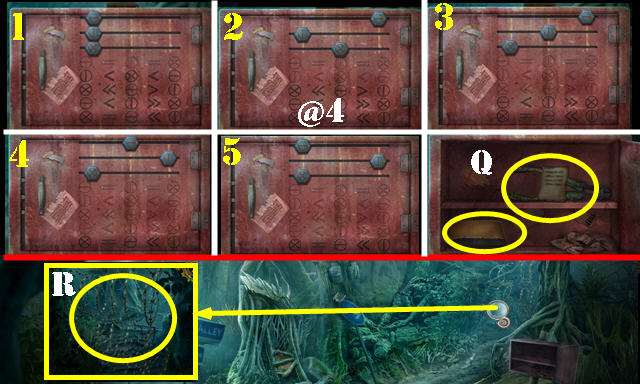
- Solution (1-5) (@4).
- Look at note; take BOLT CUTTERS and SANDPAPER (Q).
- Use BOLT CUTTERS and go (R).
- Play HOP (S); receive TENT SPIKES 3/5.
- Try to grab (T).
- Use ZIP TIE and look at note; take SOAP and CAMERA TRACKER (U).
- Take TORN RAINCOAT and TENT SPIKES 4/5 (V).
- Walk down.
- Use SOAP; take TENT SPIKES 5/5 and LEAF DECORATION (W).
- Place CAMERA TRACKER (X); select 4124 (X1); take CALIBRATED TRACKER.
- Go to Gator Mound.
- Select TORN RAINCOAT twice; receive RAINCOAT PIECES.
- SANDPAPER and RAINCOAT PIECES on TENT SPIKES 5/5; receive MARKERS.
- Place MARKERS (Y); receive TRAIL MARKERS.
- Place TRAIL MARKERS (Z). Play an HOP.
- Go (Z1).
- Solution (A).
- Take MACHETE (B).
- Walk down twice.
- Use MACHETE and select; take AIR HORN (C).
- Go (D).
- Use AIR HORN; take LASER POINTER and FLARE GUN (E).
- Go (F).
- Use FLARE GUN (G). Play HOP; receive UTILITY BELT.
- Select UTILITY BELT, take FLOWER DECORATION and CAGE KEY (H). Select video camera (I) and press button (J); receive BURIAL VIDEO.
- Use CAGE KEY; take HEART DECORATION (K). Give PACK OF RAISINS to raccoon (L); take HUNTING BOW (M).
- Walk down.
- Use HUNTING BOW (N).
- Solution (Px2-O-Px3-O-Px2).
- Go (Q) and play automatic HOP.
- Solution is random (R).
- LEAF DECORATION, FLOWER DECORATION, and HEART DECORATION on MELISSA'S SNOW GLOBE; receive SNOW GLOBE.
- Give SNOW GLOBE (S).
- Use BOBBY PIN (T).
- Select tree (U) and crates (V).
- Use LASER POINTER and select sheriff (W).
- Show BURIAL VIDEO (X); receive SHERIFF'S PHONE.
- Use SHERIFF'S PHONE; select top icon and any sentence (Y).
- Go (Z).
- Select lady (A).
- Take snow globe (B).
- Solution (C).
- Select snow globe (D). Solution (E).
- Congratulations, you've completed Phantasmat: Déjà Vu!
Created at: 2018-08-05