

Walkthrough Menu
- General Tips
- Chapter 1: Richard's Estate
- Chapter 2: City Square
- Chapter 3: Vitruvian Machine
- Chapter 4: Lighthouse Hall
- Chapter 5: Transport Square
- Chapter 6: Hills
General Tips
- This is the official guide for PuppetShow: Poetic Justice.
- This guide won't tell you when to zoom into a location; the screenshots show each zoom scene.
- Hidden-object puzzles are referred to as HOPs. Only the locations of the HOPs will be shown.
- Use the Map to fast travel to a location.
Chapter 1: Richard's Estate
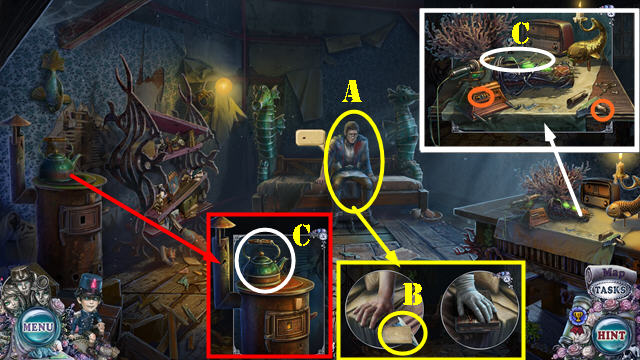
- Select DOOR CODE on scene.
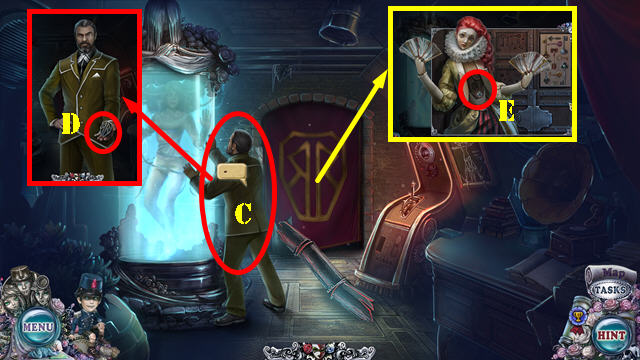
- Talk (A).
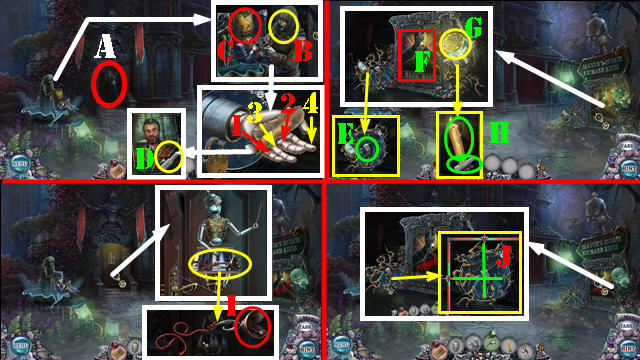
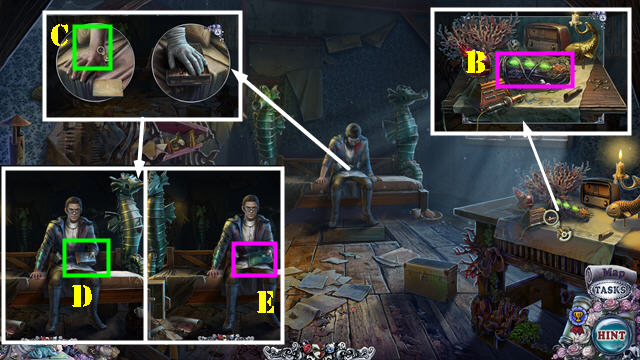
- Take STRANGE MASK (B).
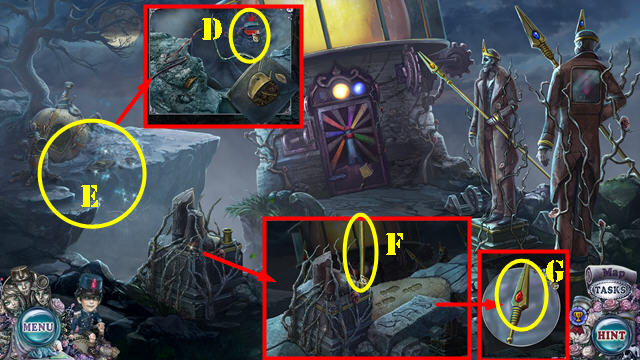
- Remove sack (C). Select 1-4; take PIANO KEY 1/3 (D).
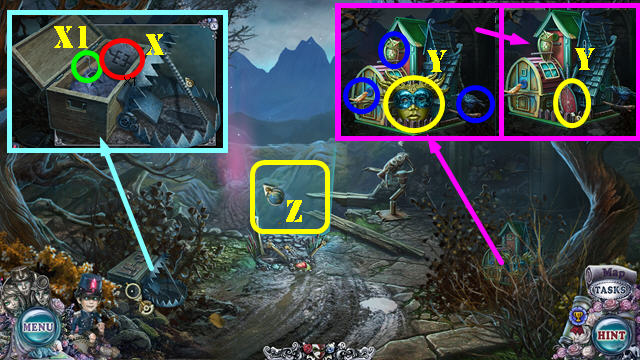
- Take BROKEN MIRROR (E).
- Look at poster (F).
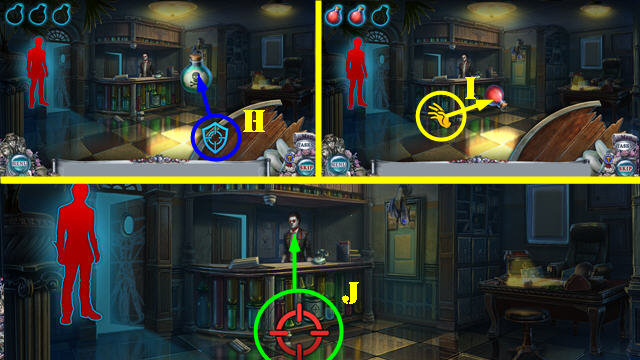
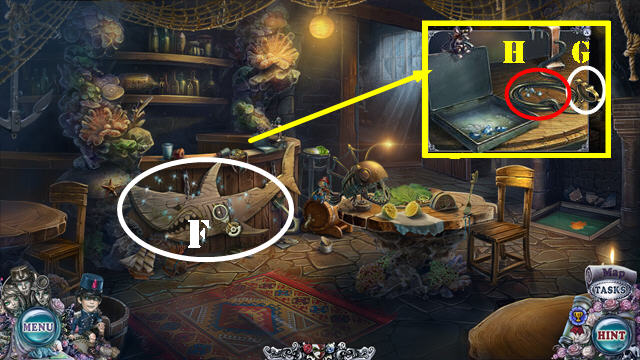
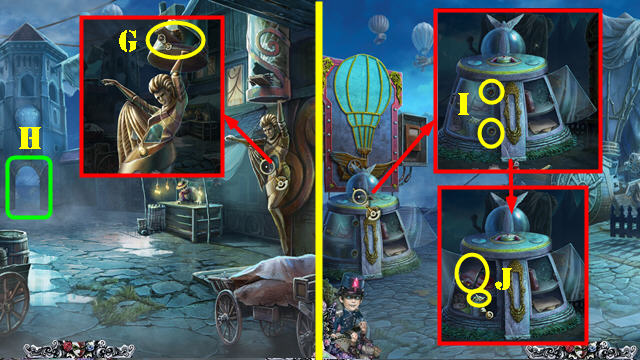
- Remove lid (G); take PIANO KEY 2/3 and LIT CANDLE (H).
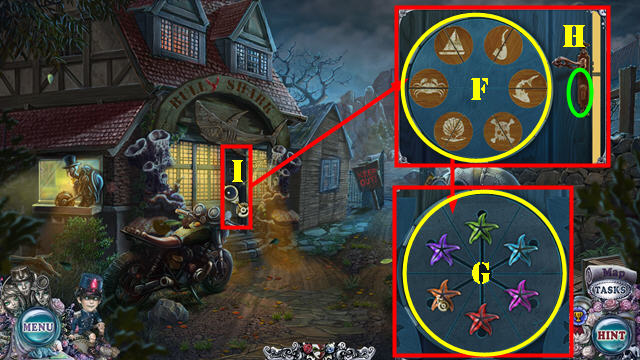
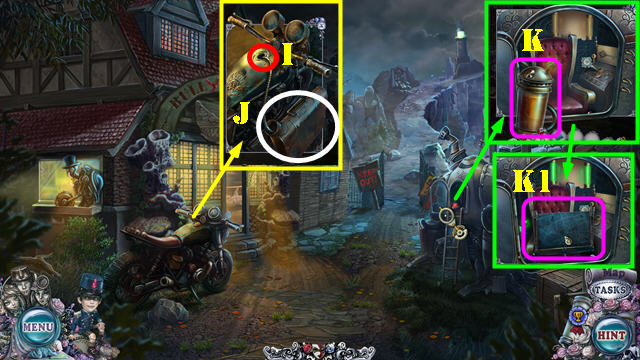
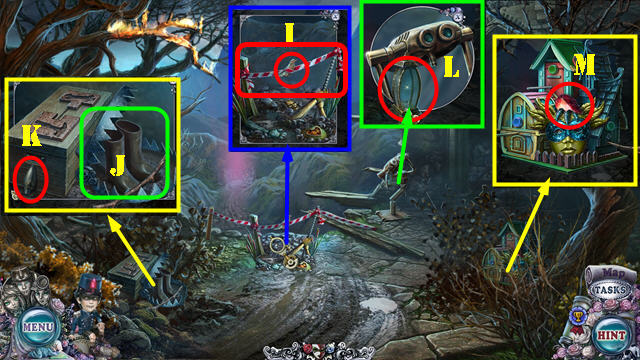
- Remove doorbell (I); take HOOK.
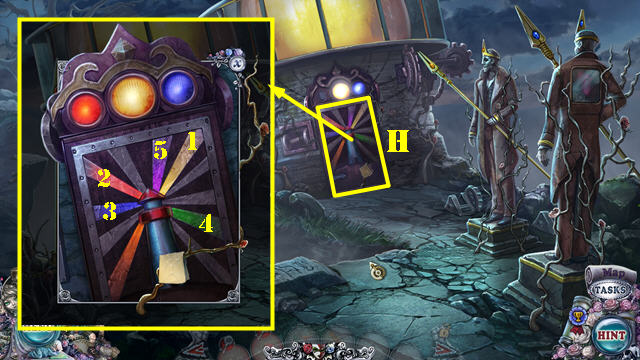
- Use HOOK; stop line twice in middle; receive PIANO KEY 3/3 (J).
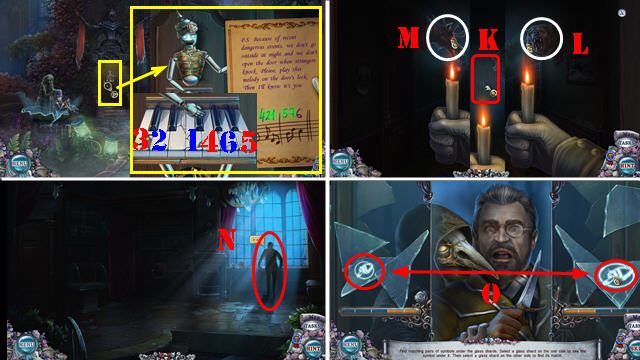
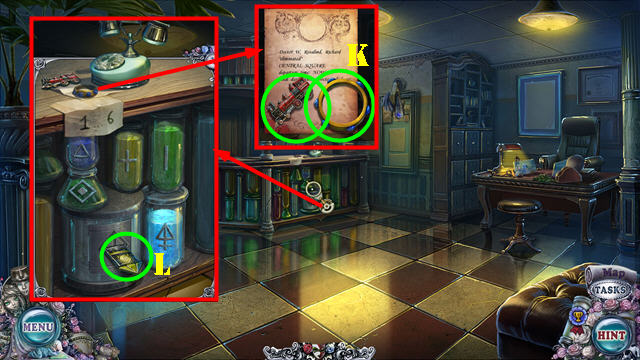
- Place PIANO KEY 3/3 and select DOOR CODE. Solution (1-6).
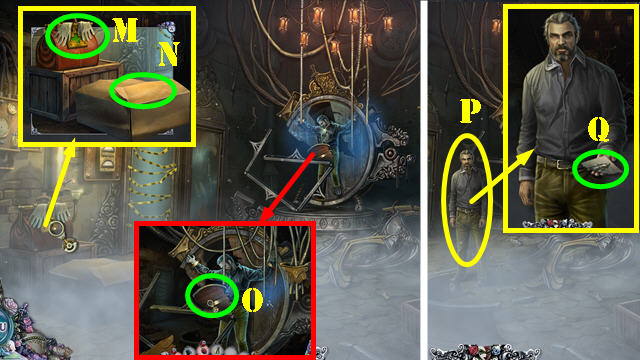
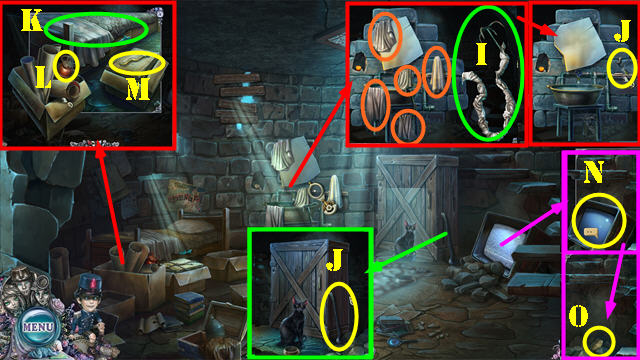
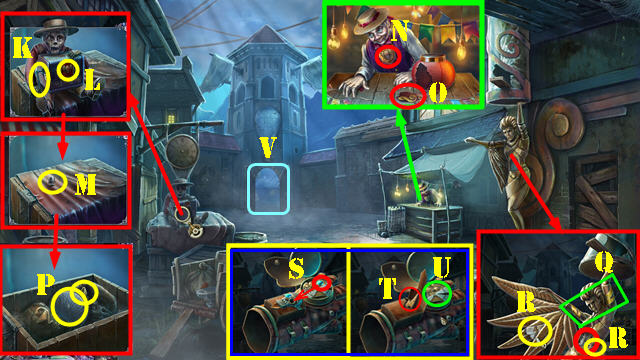
- Use LIT CANDLE on scene, door (K), and heads (L-M).
- Go (K).
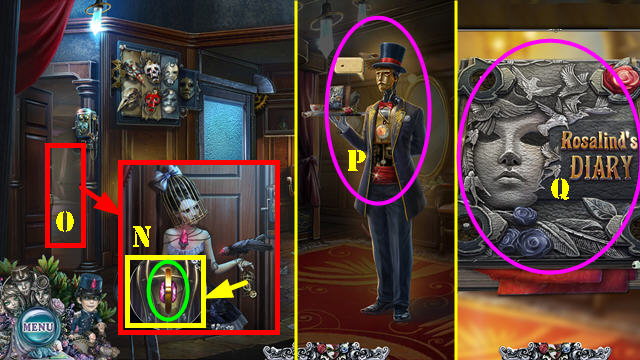
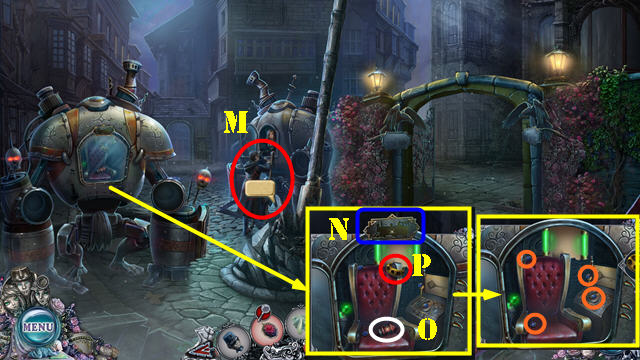
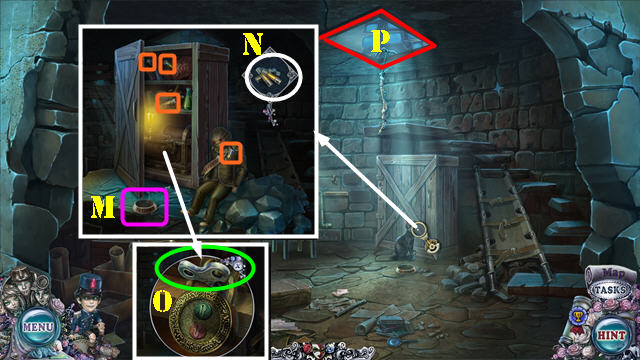
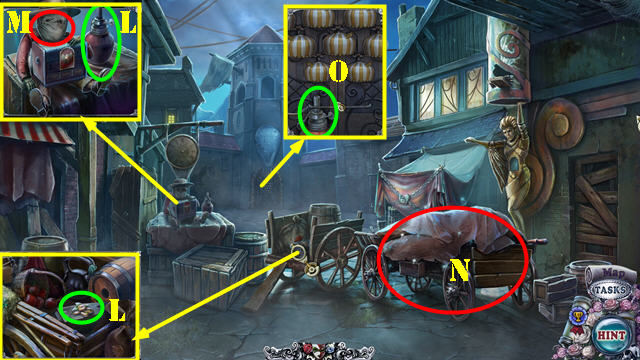
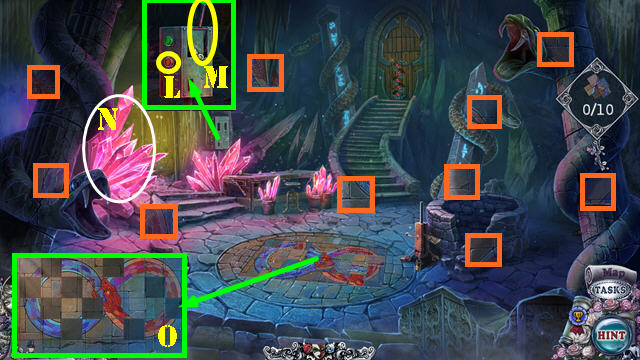
- Talk (N).
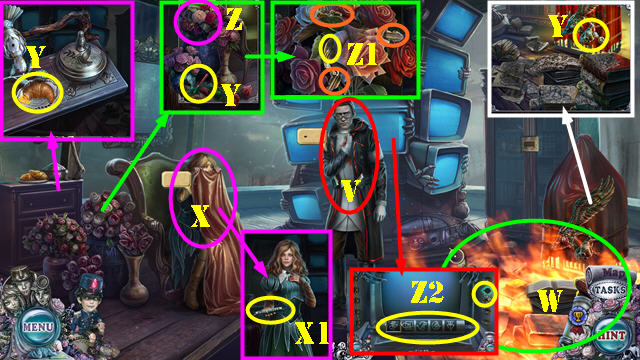
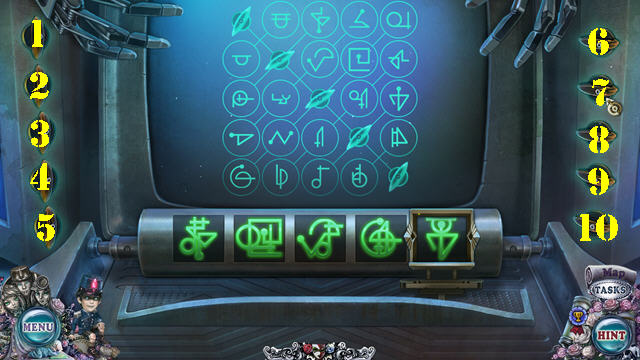
- Find matching symbols (O). Solution is random.
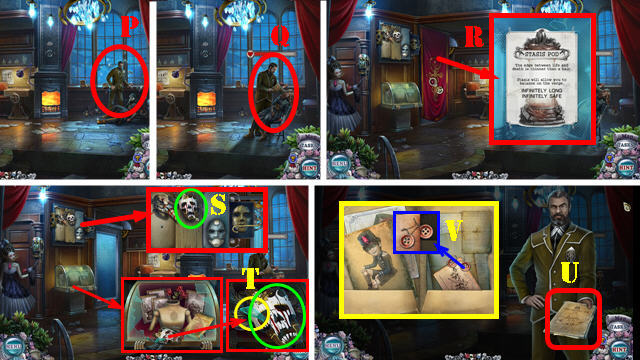
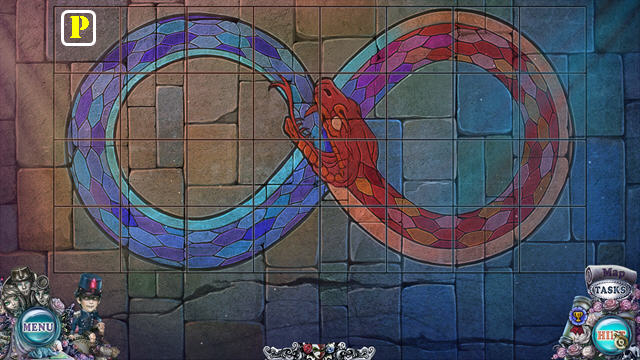
- Play HOP (P); receive MASK.
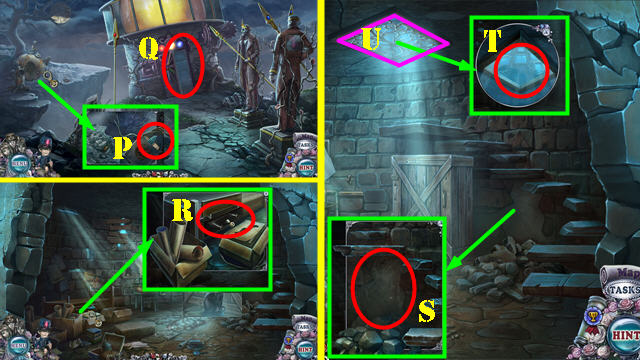
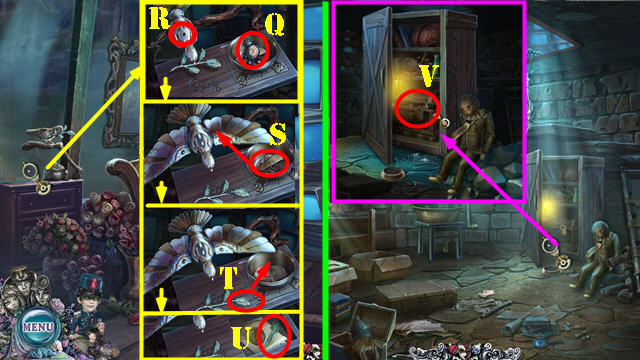
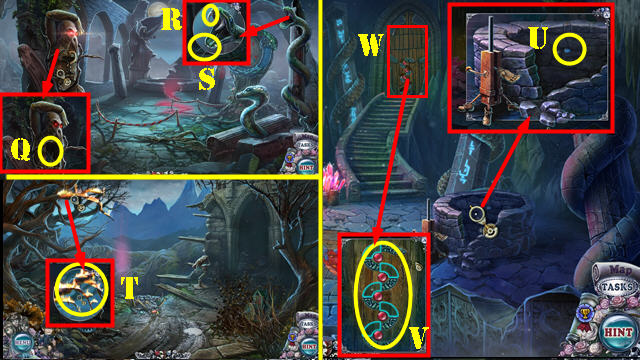
- Talk (Q).
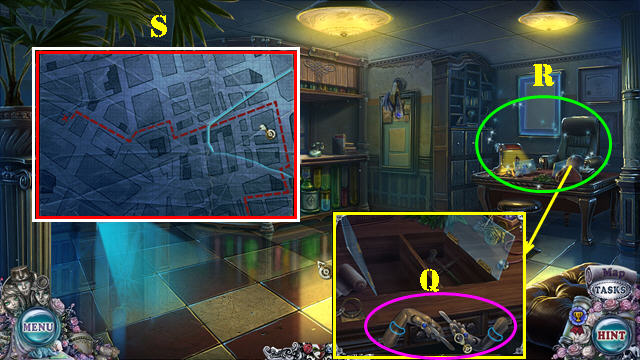
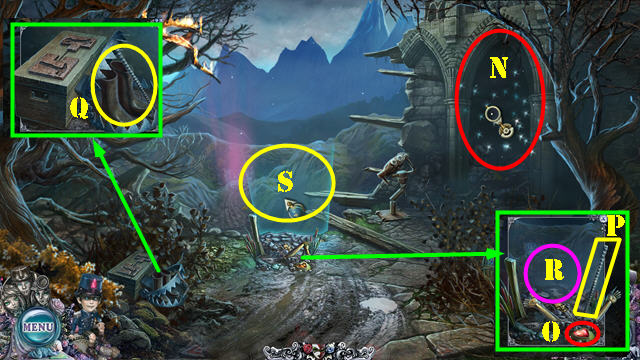
- Open curtain; remove note (R).
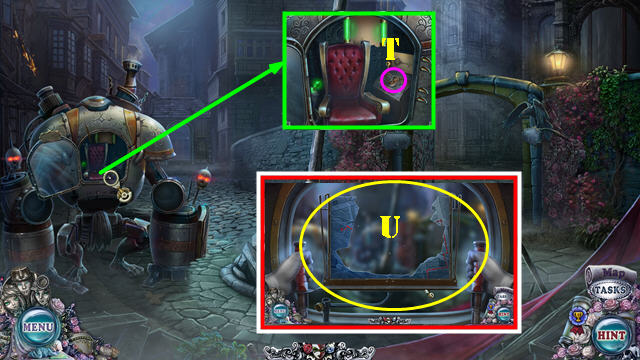
- Select mask (S).
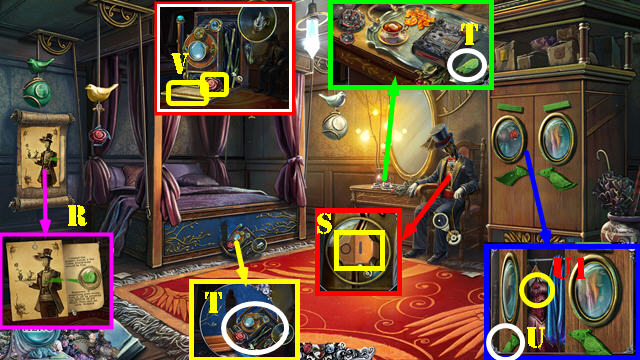
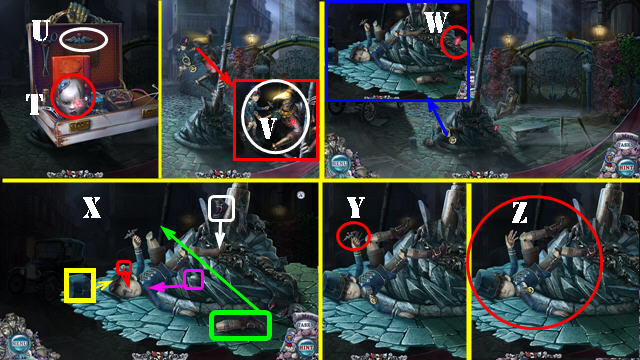
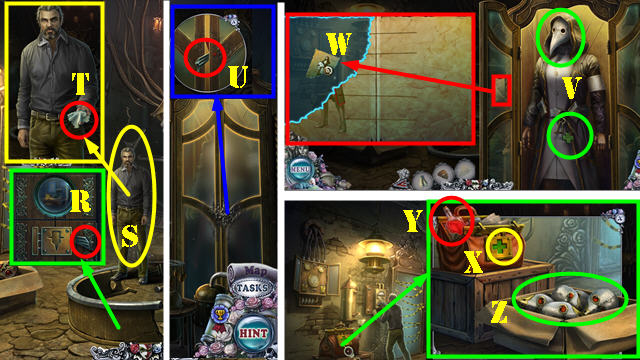
- Select 5x; take GLASS SHARD and MASK (T).
- Take folder (U); open it and select twice; take BENT WIRE (V).
- Select BENT WIRE 3x; take LOCKPICK.
- Walk down.
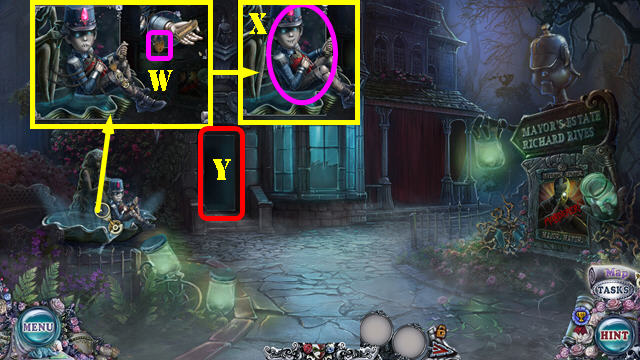
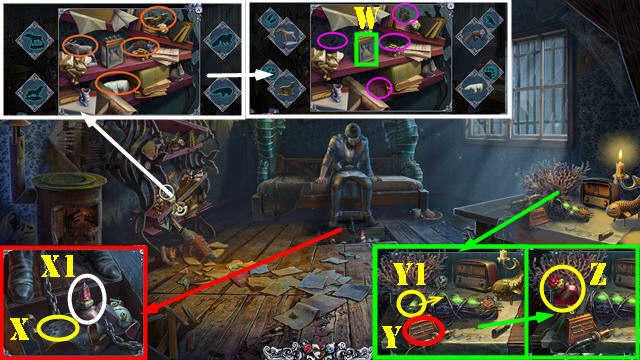
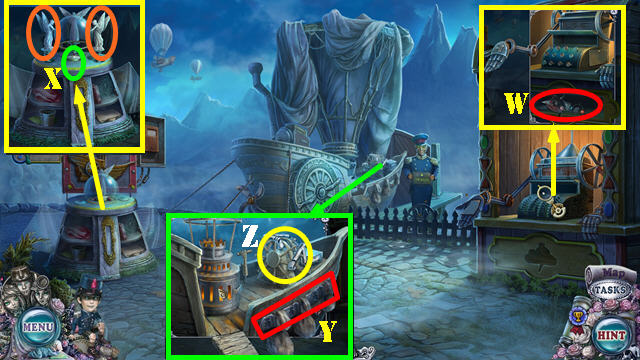
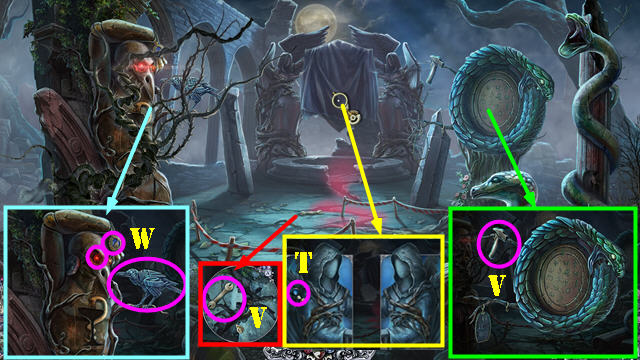
- Use LOCKPICK (W); take PUPPET ASSISTANT (X).
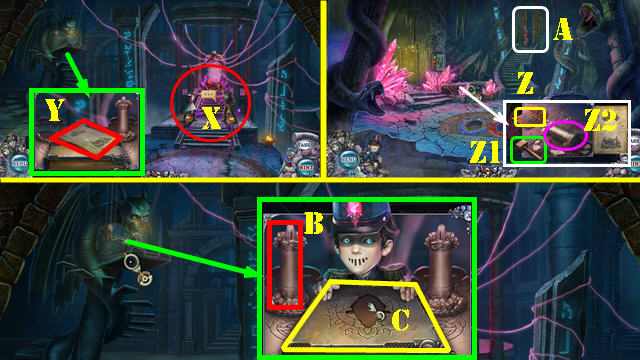
- Go (Y).
- Take MASK from PUPPET ASSISTANT.
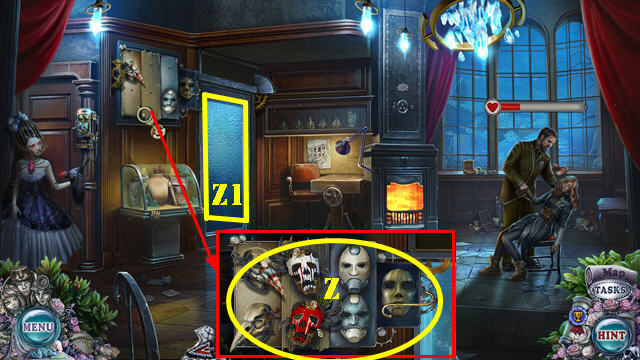
- Place 3 MASKS and STRANGE MASK (Z).
- Go (Z1).
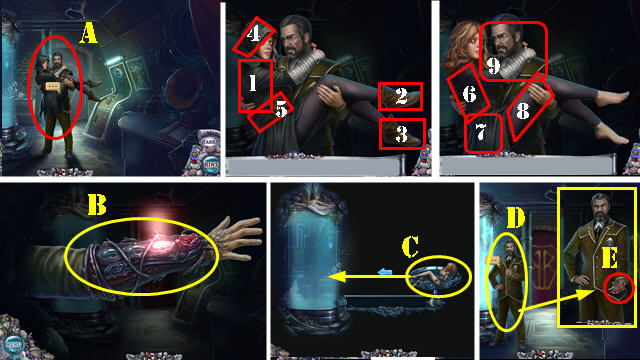
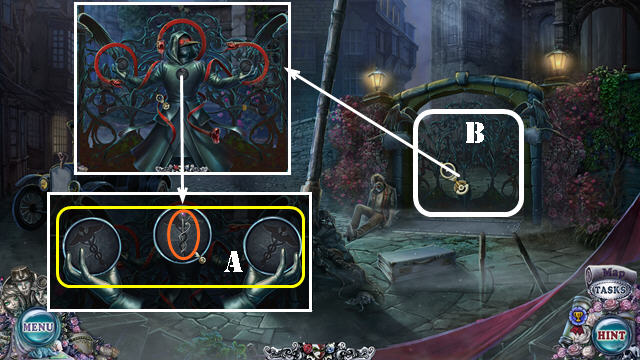
- Talk (A).
- Select 1-9.
- Select arm (B).
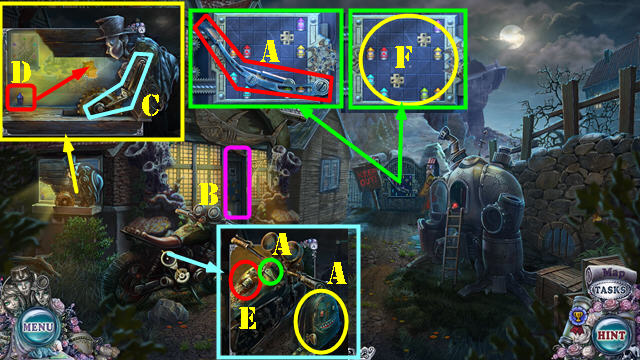
- Slide (C).
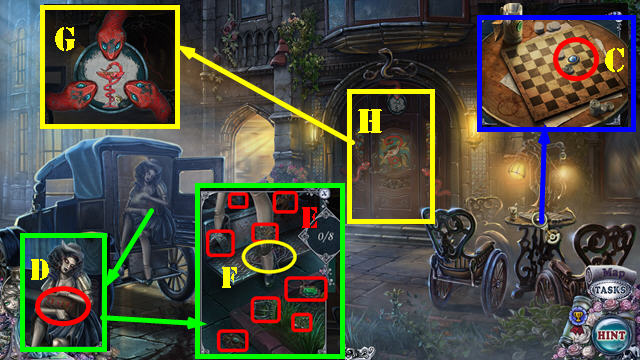
- Talk (D); take ROSALIND'S KEY (E).
- Walk down.
- Remove rag (F).
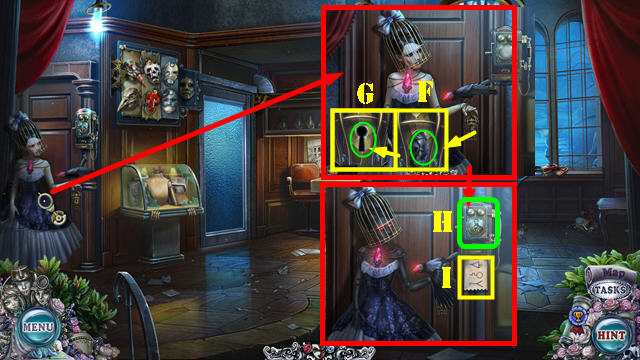
- Use ROSALIND'S KEY (G).
- Answer phone (H).
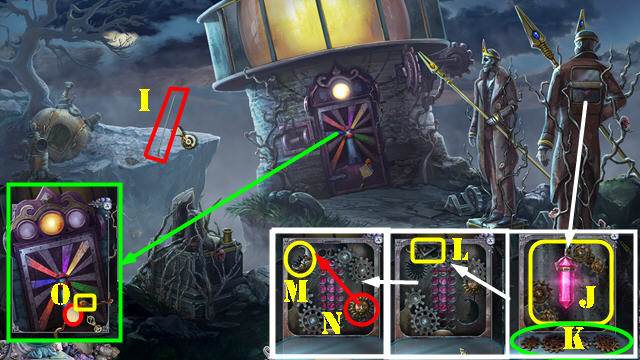
- Take PUPPET CODE (I).
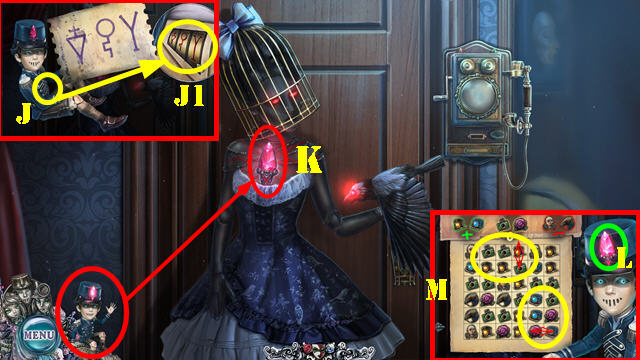
- Select chest (J) on PUPPET ASSISTANT.
- PUPPET CODE on PUPPET ASSISTANT; enter code (J1). Take Puppet Assistant.
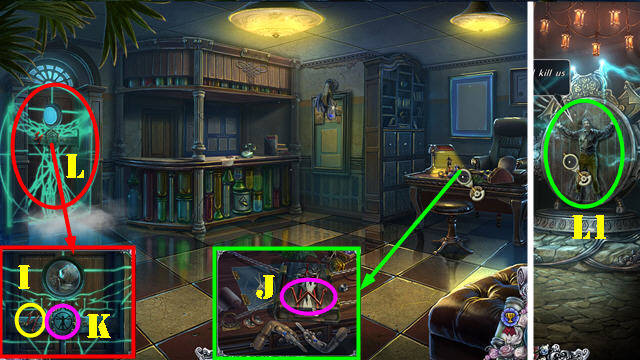
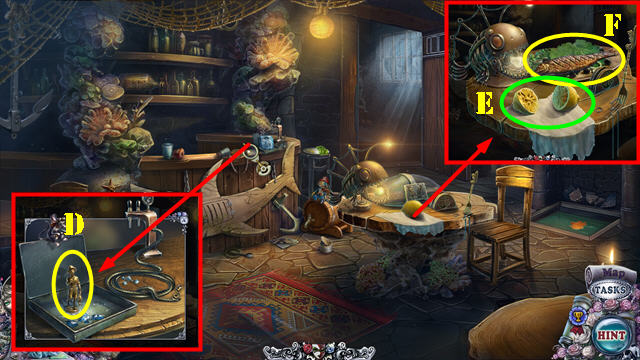
- Use Puppet Assistant (K).
- Select crystal (L).
- Play Match 3. Solution is random (M).
- Turn key (N).
- Enter (O).
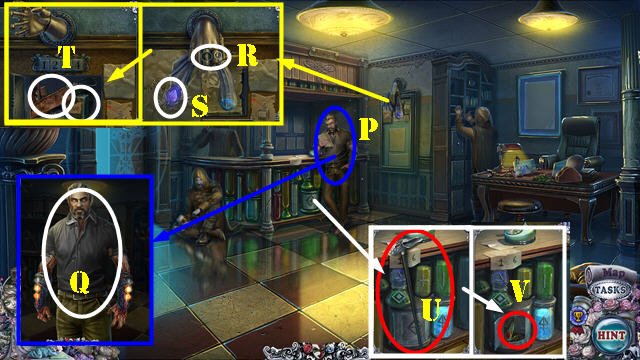
- Talk (P).
- Select diary (Q).
- Look at poster (R).
- Select 4x (S).
- Take BIRD WING and BROKEN CAMERA (T).
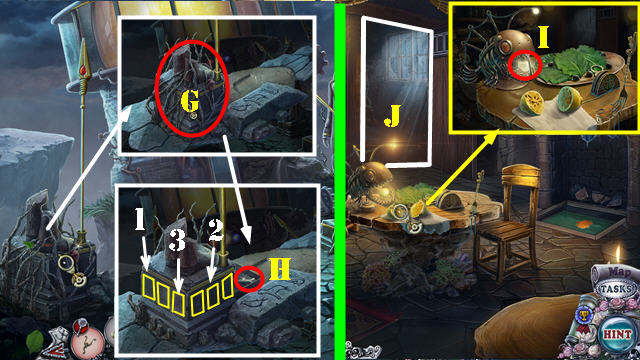
- Place BIRD WING and select (U); take ROSE BROOCH 1/3 (U1).
- Select BROKEN CAMERA; take ROSE BROOCH 2/3, look at pic (V).
- Take ROSE BROOCH 3/3 (W).
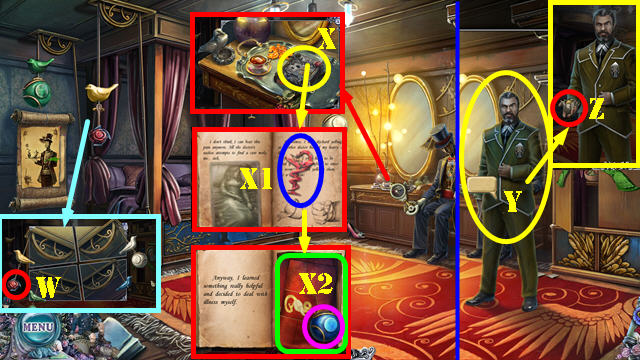
- Place ROSE BROOCH 3/3 and select (X); flip page and take ANKH (X1).
- Turn page again; take BIRD WEIGHT 1/2 and ROSALIND'S LETTERS (X2).
- Select ROSALIND'S LETTERS 8x; receive ENCRYPTED LETTER.
- Talk; give ENCRYPTED LETTER (Y). Select twice; receive BIRD WEIGHT 2/2 (Z).
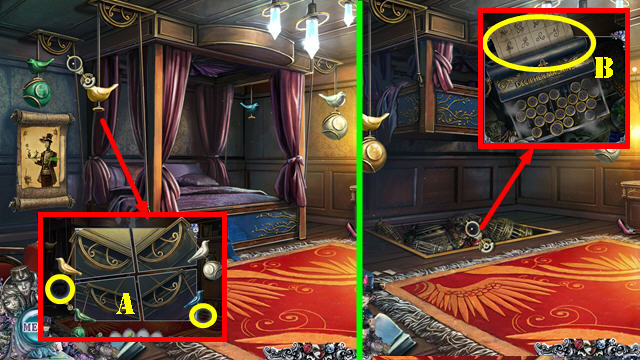
- Place BIRD WEIGHT 2/2 (A).
- Place ENCRYPTED LETTER (B). Play HOP; receive DECRYPTED LETTER.
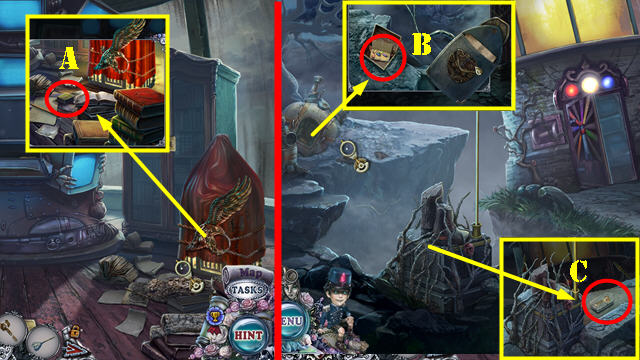
- Go to Stasis Pod.
- Talk (C); give DECRYPTED LETTER and take RICHARD'S BROOCH (D).
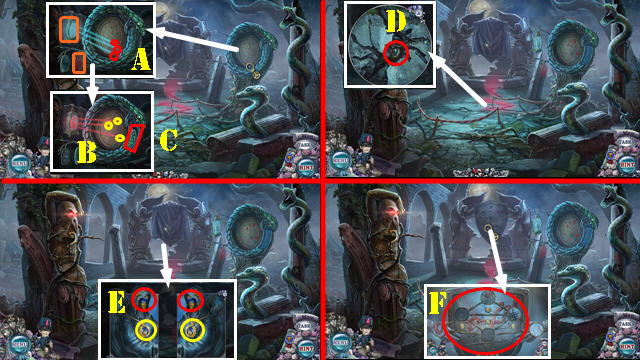
- Open; place RICHARD'S BROOCH (E).
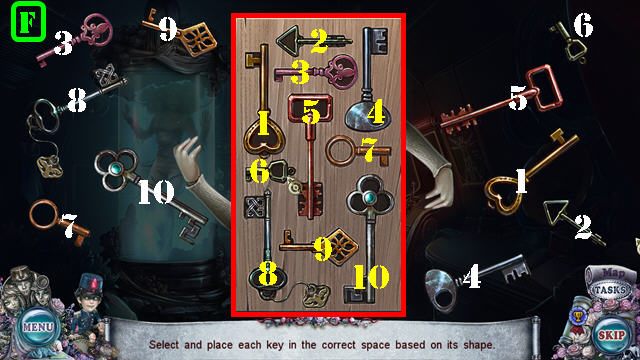
- Solution (F): (1-10).
- Go forward.
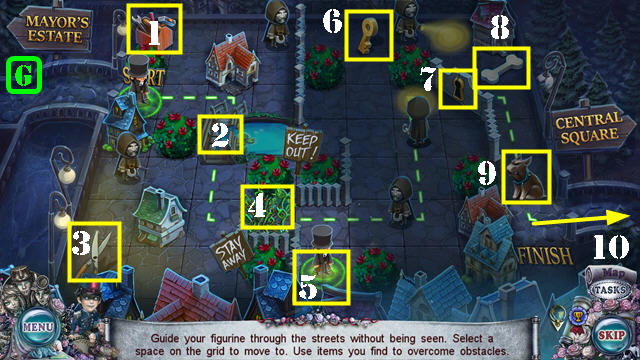
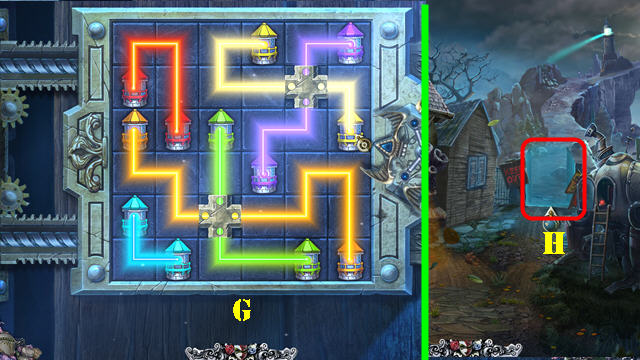
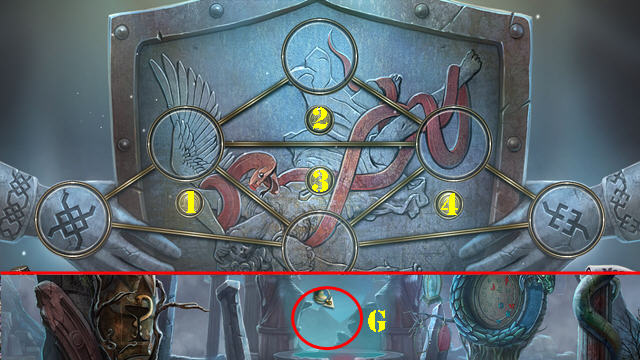
- Solution (G).
- Take toolbox (1); use on bridge (2).
- Take shears (3); use on bush (4).
- Take lantern (5).
- Take key (6); use on gate (7).
- Take bone (8); give to dog (9).
- Exit (10).
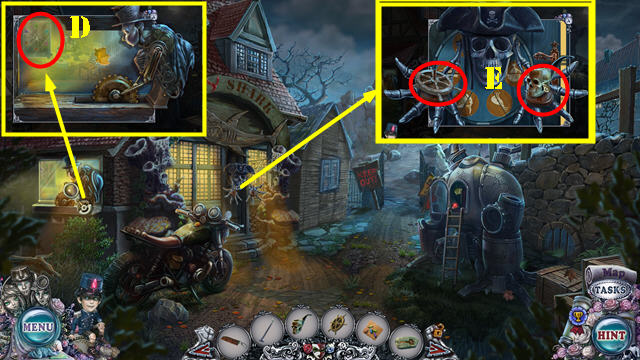
Chapter 2: City Square

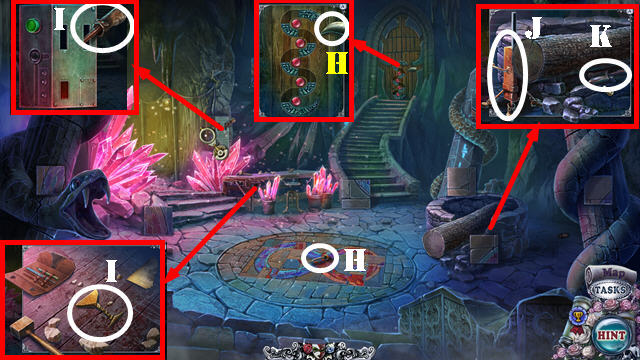
- Talk (H-I).
- Guide through paths (J-K).
- Take SNAKE EYE 1/3 (L).
- Use Puppet Assistant (M). Select crystal and play Match 3 (N).
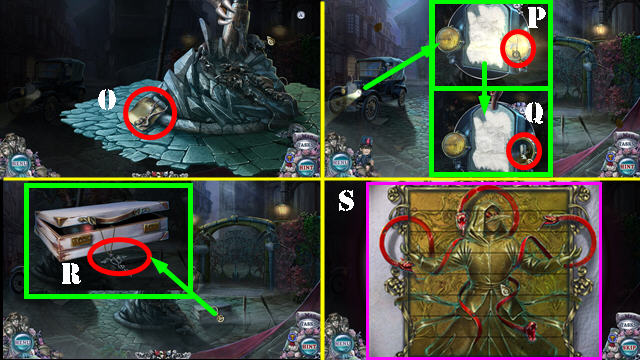
- Select scene; take TONGS (O).
- Use TONGS (P); receive CADUCEUS KEY HALF; take CAMERA BULB (Q).
- Select necklace (R); solution (S).
- Open case; hit puppet (T) and take CADUCEUS KEY 1/3 (U).
- Remove bulb from BROKEN CAMERA and place CAMERA BULB; take CAMERA.
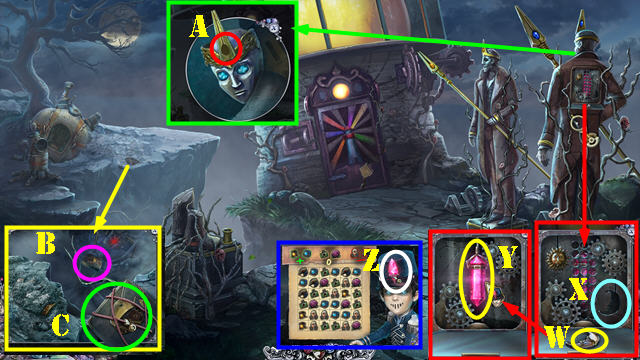
- Use CAMERA (V).
- Select crystal (W).
- Place (X).
- Take CADUCEUS KEY 2/3 (Y).
- Take BROKEN PUPPET (Z).
- Select gate; take CADUCEUS KEY HALF (orange).
- CADUCEUS KEY HALF on CADUCEUS KEY HALF; take CADUCEUS KEY 3/3.
- Place CADUCEUS KEY 3/3 (A).
- Go (B).
- Select scene.
- Take SNAKE EYE 2/3 (C).
- Look at note; use GLASS SHARD (D).
- Select pieces (E). Take FAMILY AMULET and SNAKE EYE 3/3 (F).
- Select door; place ANKH and SNAKE EYE 3/3 (G).
- Go (H).
- Take LETTER W (I).
- Place LETTER W (J). Play HOP; receive VITRUVIAN-MAN KEY.
- Use VITRUVIAN-MAN KEY (K).
- Go (L).
- Select scene (L1).
Chapter 3: Vitruvian Machine
- Take RUBBER GLOVES (M); open box (N).
- Use RUBBER GLOVES; take WOODEN SHIELD (O).
- Talk (P); take SCHEMATIC PART (Q).
- Take METAL SPLINTER (R).
- Talk (S); take HANDKERCHIEF (T).
- Use HANDKERCHIEF and METAL SPLINTER (U).
- Take UNFINISHED MASK and FIRST-AID KEY (V).
- Select note; place SCHEMATIC PART (W).
- Use FIRST-AID KEY (X); take FLUORESCENT DYE (Y).
- Place UNFINISHED MASK (Z).
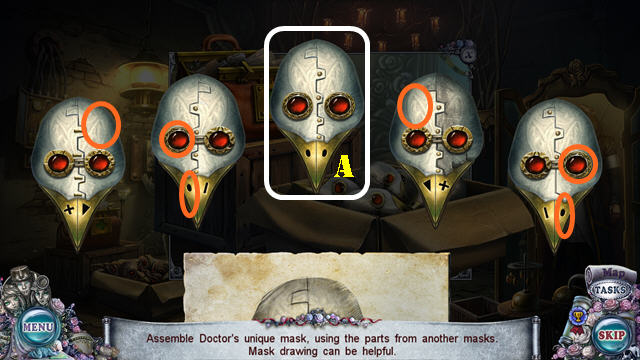
- Select marked parts (orange) to automatically add to mask (A).
- Take FINISHED MASK (A).

- Place RUBBER GLOVES and FINISHED MASK; use FLUORESCENT DYE; select it (B).
- Take DOCTOR'S TOKEN (C).
- Place DOCTOR'S TOKEN (D). Arrange as shown (E).
- Walk down.
- Talk (F).
- Use WOODEN SHIELD (G).
- Use marked items on each target (H-I-J).
- Look at note; take BRACELET 1/2 and TRAIN TOKEN (K).
- Take BEACON 1/4 (L).
- Walk down twice.
- Talk (M).
- Place TRAIN TOKEN (N); take BEACON 2/4 (O).
- Select bracelet (P) and 4 gems (orange); receive BRACELET 2/2.
- Go to Reception Hall.
- Place BRACELET 2/2 (Q); take TORN TRANSPORT MAP.
- Play HOP (R); receive TRANSPORT MAP PARTS.
- Take STARTER KEY from TORN TRANSPORT MAP.
- TRANSPORT MAP PARTS on TORN TRANSPORT MAP. Assemble map as shown (S); take TRANSPORT MAP.
- Walk down twice.
- Use STARTER KEY (T).
- Remove torn map (U); place TRANSPORT MAP.
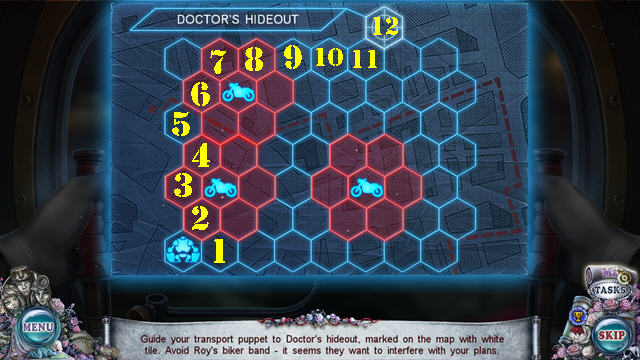
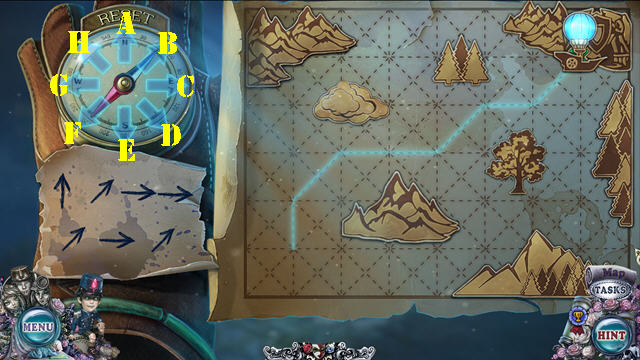
- Solution: (1-2-3-4-5)-(4-5)-(6-7-8-9)-(8-9-10-11-12).
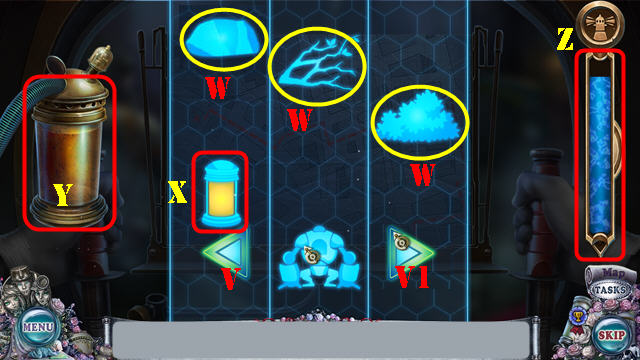
- Go left (V) and right (V1). Avoid obstacles (W). Gather fuel (X).
- Fuel level (Y). Fill meter to win (Z).
- Solution is random.
- Take PUPPET ARM, ROY'S KEYS, and ROY'S BACKPACK (A).
- Select door (B).
- ROY'S KEYS on ROY'S BACKPACK; take COIN. Sort all items; take MAGNET.
- Place PUPPET ARM (C).
- Use MAGNET and drag beacon (D); receive BEACON 3/4.
- Use HANDKERCHIEF; receive OILED HANDKERCHIEF and take BEACON 4/4 (E).
- Place BEACON 4/4 (F).
- Solution (G).
- Go (H).
- Break spear (I).
- Use COIN on each screw, open glass and select (J).
- Use OILED HANDKERCHIEF (K) and select gears.
- Take SYMBOL (L).
- Select moon (M); move sun (N).
- Look at note; take INSIGNIA RING (O).
- Go to Reception Hall.
- Talk (P); give BROKEN PUPPET (Q).
- Place INSIGNIA RING (R); take CROWN CRYSTAL (S).
- Remove papers; take RUSTY SAW and GLUE (T).
- Take RICHARD'S CANE (U).
- Place SYMBOL; take CROWN (V).
- Go to Lighthouse Yard.
- Use GLUE (W). Place moon (X).
- Use Puppet Assistant (Y). Select crystal (Z). Play match 3.
- Place CROWN CRYSTAL (A).
- Use RICHARD'S CANE (B); take ROPE (C).
- ROPE on MAGNET; take MAGNET WITH ROPE.
- Use MAGNET WITH ROPE (D).
- Play HOP (E); receive SPEAR.
- Place SPEAR (F) and CROWN (G).
- Solution: (1-2-3)-(4)-(5).
- Enter (H).
Chapter 4: Lighthouse Hall
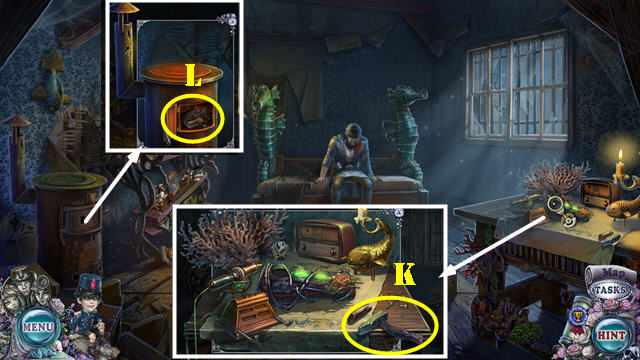
- Select cloths (orange); take HOOK WITH CLOTH (I).
- Take RAZOR and CROWBAR (J).
- Select bed twice (K).
- Look at posters and select twice; take FIRE EXTINGUISHER (L).
- Use RAZOR; look at newspaper and take METAL WORM (M).
- Select TV (N); take METAL APPLE HALF (O).
- Walk down.
- Place METAL APPLE HALF and METAL WORM; take METAL HAND (P).
- Go (Q).
- Place METAL HAND; take STRETCHER (R).
- Place STRETCHER (S); remove grate and place HOOK WITH CLOTH (T).
- Go (U).
- Talk (V).
- Use FIRE EXTINGUISHER (W).
- Select FAMILY AMULET; look at note.
- Talk (X). Give FAMILY AMULET; take MECHANICAL CYLINDER (X1).
- Take SMOKING PIPE, SHOVEL, and HONEY CROISSANT (Y).
- Use HONEY CROISSANT (Z).
- Select pieces (orange); take BROKEN KEY and TELEVISION KNOB (Z1).
- Place MECHANICAL CYLINDER and TELEVISION KNOB (Z2).
- Solution (3-6-10)-(4-5-6-7)-(3-7-10)-(1-3-9-10)-(1-5-7-8).
- Take FEATHER DUSTER.
- Use FEATHER DUSTER; take MATCHES (A).
- Select MATCHES; take DECORATIVE STEERING WHEEL.
- Walk down twice.
- Use SHOVEL 3x and open box; take CRAYONS WITH PAPER (B).
- Place BROKEN KEY; take KEY MOLD (C).
- Walk down.
- Place CRAYONS WITH PAPER (D); take DOOR CODE.
- Place DECORATIVE STEERING WHEEL and SMOKING PIPE (E).
- Swap (F).
- Place DOOR CODE. Solution (G).
- Use ROY'S KEYS (H).
- Enter (I).
- Take SCISSORS; select note (J).
- Take DOG'S PAW 1/2 and MOJITO (K).
- Select tooth (L); use CROWBAR (M).
- Use SCISSORS (N). Play HOP; receive BOXING GLOVE.
- Go to Lighthouse.
- Use BOXING GLOVE; take EAGLE WING and VALVE (O).
- Go to Connection Room.
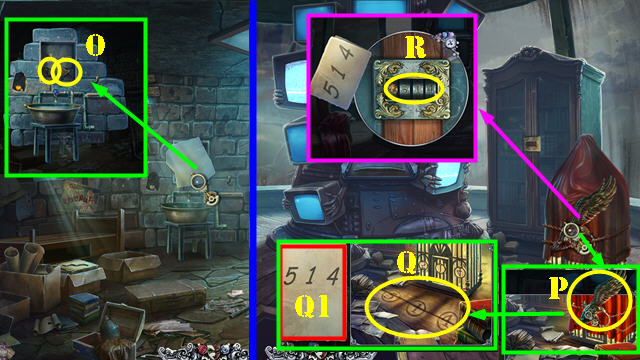
- Place EAGLE WING (P). Move all items (Q); take CABINET CODE (Q1).
- Place CABINET CODE; enter 514 (R). Play HOP: receive NIPPERS.
- Return to Tavern.
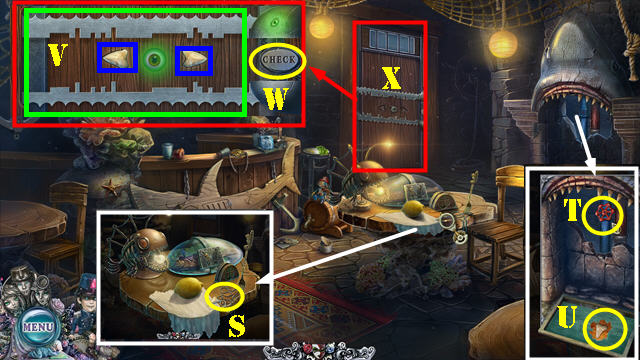
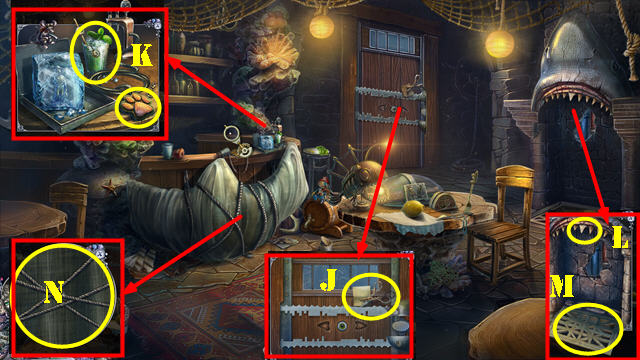
- Use NIPPERS; take SHARK TOOTH 1/2 (S).
- Place VALVE (T); take SHARK TOOTH 2/2 (U).
- Place SHARK TOOTH 2/2; use arrows (blue) to align (V) and press check (W).
- Go (X).
- Talk (A).
- Look at note; take SHARP BLADE (B).
- Remove pieces (orange).
- Take METAL FISHING ROD and TEAPOT WITH BOILING WATER (C).
- Walk down.
- Use TEAPOT WITH BOILING WATER; take FISHERMAN FIGURINE (D).
- Use SHARP BLADE and RUSTY SAW (E); receive SHARP SAW.
- Place FISHERMAN FIGURINE and METAL FISHING ROD; open lid and take FISH (F).
- Go to Lighthouse Yard.
- Use SHARP SAW (G); receive DRY BRANCH.
- Select stones (1-2-3); take OLD BONE (H).
- Go to Tavern.
- Use OLD BONE; take LIGHTBULB (I).
- Go to Captive Room (J).
- Place DRY BRANCH; take HAMMER (K).
- Use HAMMER; place KEY MOLD and MOJITO; take CHEST KEY 1/2 and SILVER DOVE (L).
- Go to Lighthouse.
- Place FISH (M).
- Open door and remove old bulb; place LIGHTBULB and select. Select 4 pieces (orange); receive FUSES (N).
- Take WINDING KEY (O).
- Go (P).
- Place SILVER DOVE; take ALARM (Q).
- Place WINDING KEY (R), feathers (S), and leaf (T).
- Open box; take CHEST KEY 2/2 (U).
- Walk down.
- Use CHEST KEY 2/2; take BRACELET SCHEMATIC and STAIN REMOVER (V).
- Go to Captive Room.
- Use STAIN REMOVER; take animals (orange) and prints (purple). Take DOG'S PAW (W).
- Place DOG'S PAW (X); take ESSENCE BULB (X1).
- ESSENCE BULB on BRACELET SCHEMATIC; take BRACELET ACTIVATOR.
- Place FUSES (Y) and move crystal (Y1).
- Place BRACELET ACTIVATOR (Z).
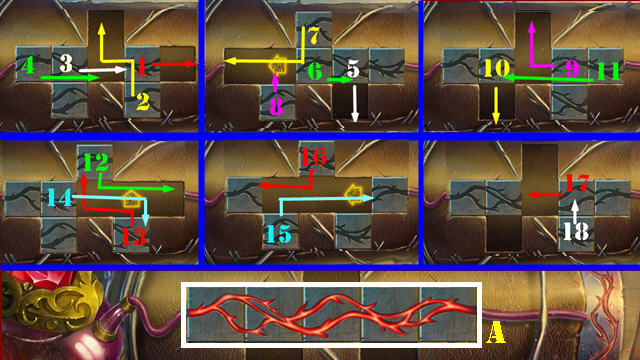
- Solution (1-18).
- Solved image (A).
- Take STASIS BRACELET (B).
- Place STASIS BRACELET (C).
- Play HOP (D); receive CORKSCREW HANDLE.
- Take NEW TRANSPORT MAP (E).
- Walk down.
- Play HOP (F); receive CANISTER.
- Place CORKSCREW HANDLE; take CORKSCREW (G).
- Take HOSE (H).
- Walk down.
- Use CORKSCREW (I); place CANISTER and HOSE; take FUEL (J).
- Pull out container and select; use FUEL (K); place NEW TRANSPORT MAP (K1).
Chapter 5: Transport Square
- Take STALE PISTACHIOS and BURNER (L).
- Remove bandage (M).
- Play HOP (N); receive WEIGHT 1/3.
- Select cart (N).
- Look at note and use BURNER (O).
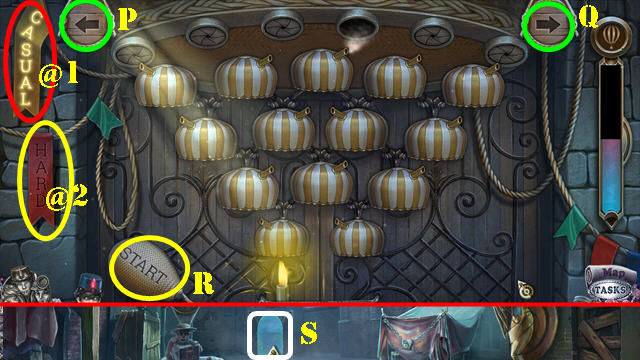
- Casual Mode (@1): Q-Rx2-Q-Rx2.
- Hard Mode (@2): Q-P-Rx2-Q-P-Rx2.
- Go (S).
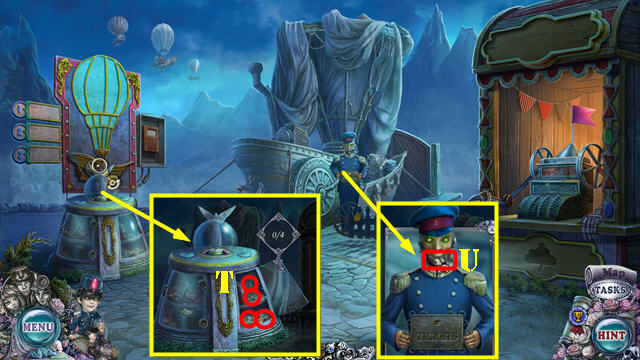
- Open door, select pieces (T); receive CASH-REGISTER BUTTONS.
- Take WINGED KEY (U).
- Walk down.
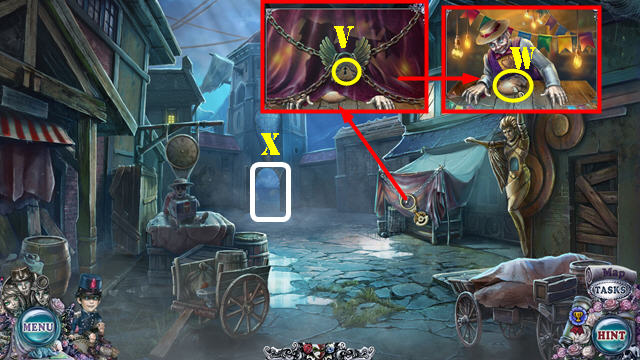
- Use WINGED KEY (V); select twice.
- Take COINS (W).
- Go (X).
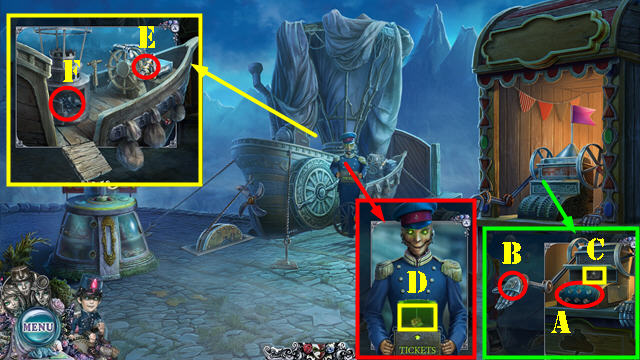
- Place CASH-REGISTER BUTTONS (A) and COINS (B); take TICKET (C).
- Place TICKET (D); take GOLDEN ARM BRACELET 1/2 (E).
- Use BURNER; take RUBBER BAND (F).
- Walk down.
- Select BROKEN MIRROR 4x.
- RUBBER BAND and STALE PISTACHIOS on SLINGSHOT; take LOADED SLINGSHOT.
- Use LOADED SLINGSHOT (G); receive BROKEN COMPASS GLOVE.
- Take HEXAGONAL WRENCH from BROKEN COMPASS GLOVE.
- Go (H).
- Use HEXAGONAL WRENCH twice (I); take METAL OWL and BARREL ORGAN HANDLE (J).
- Walk down.
- Place BARREL ORGAN HANDLE (K); take MECHANICAL HEART (L).
- Select puppet, take WEIGHT; remove cloth (M).
- Place MECHANICAL HEART (N); take TREBLE CLEF (O).
- Place TREBLE CLEF; select twice; take SHIELD PART 1/2 and GOLDEN ARM BRACELET 2/2 (P).
- Place GOLDEN ARM BRACELET 2/2 (Q); take WHITE ANGEL, WIND ROSE, and WOODEN CLOUD (R).
- WIND ROSE on BROKEN COMPASS GLOVE; select twice. Place blue crystal (S); take WOODEN LIGHTNING (T) and remove shards (U).
- Go (V).
- Place WOODEN CLOUD and WOODEN LIGHTNING; take BROKEN BAT TOY, BELL, and AZURE ANGEL (W).
- Place WHITE ANGEL and AZURE ANGEL (orange); take COMPASS FACE and WEIGHT 3/3 (X).
- Place WEIGHT 3/3 (Y); receive ALARM HANDLE.
- BELL and ALARM HANDLE on ALARM; take MAGNETIC NEEDLE.
- COMPASS FACE and MAGNETIC NEEDLE on BROKEN COMPASS GLOVE; take COMPASS GLOVE.
- Use COMPASS GLOVE (Z).
- Solution: A-B-C-C-B-C-B.
Chapter 6: Hills
- Take STARLING and remove rope (I).
- Select trap (J); take PECULIAR BULB (K).
- Take PECULIAR LANTERN (L).
- Take HEART HALF 1/2 (M).
- PECULIAR BULB on PECULIAR LANTERN; take LANTERN.
- Use LANTERN (N). Play HOP; receive HEART HALF 2/2.
- Place HEART HALF 2/2 (O); take STEEL ROD (P).
- Use STEEL ROD; take BOOTS (Q).
- Use BOOTS (R); go (S).
- Take BAT EAR (T).
- BAT EAR on BROKEN BAT TOY; arrange and take PESTICIDE (U).
- Take ORNATE WRENCH and ORNATE HAMMER (V).
- Use PESTICIDE; take RED BUTTON, ANGEL AMULET 1/2, and METAL CROW (W).
- Walk down.
- Place ORNATE WRENCH and ORNATE HAMMER; look at note and take SHIELD PART 2/2 (X).
- Select LONG HOOK 3x to receive it (X1); take BROKEN JACK.
- Place STARLING, METAL CROW, and METAL OWL (blue).
- Take ANGEL MASK 1/2 and GLASS PANEL (Y).
- Go (Z).
- Hang LANTERN and GLASS PANEL (orange).
- Hang blue glass on lantern; select three symbols (A).
- Hang red glass on lantern; select symbols (B).
- Take SNAKE PART 1/5 and ANGEL MASK 2/2 (C).
- Use LONG HOOK; receive ANGEL AMULET 2/2 (D).
- Place ANGEL MASK 2/2 and ANGEL AMULET 2/2 (E).
- Place SHIELD PART 2/2 (F).
- Solution: (3-1-4-2-3-2).
- Go (G).
- Take JACK LEVER and SNAKE FANG (H).
- Take COPPER CUP and JACK FOOT (I).
- JACK LEVER and JACK FOOT on BROKEN JACK; take JACK.
- Use JACK (J); take LEVER (K).
- Take tiles (orange); receive PUZZLE TILES.
- Place RED BUTTON (L).
- Place LEVER (M) and select.
- Play HOP (N): receive SNAKE PART 2/5.
- Place PUZZLE TILES (O).
- Solution (P).
- Take SNAKE PART WITH RESIN and MARBLE.
- Walk down.
- Place COPPER CUP; take SETS OF CHISELS and SNAKE PART 3/5 (Q).
- Place SNAKE FANG (R); take TONGS (S). Walk down.
- Place SNAKE PART WITH RESIN (T); receive SNAKE PART 4/5.
- Go to Cave Hall.
- Use TONGS (U); take SNAKE PART 5/5.
- Place SNAKE PART 5/5 (V).
- Go (W).
- Talk (X).
- Take STASIS POD SCHEMATIC (Y).
- Walk down.
- Put down MARBLE, SETS OF CHISELS, STASIS POD and SCHEMATIC; select tools (Z) and hammer (Z1); take STASIS POD REPLICA (Z2).
- Go (A).
- Place STASIS POD REPLICA (B) and lift slab.
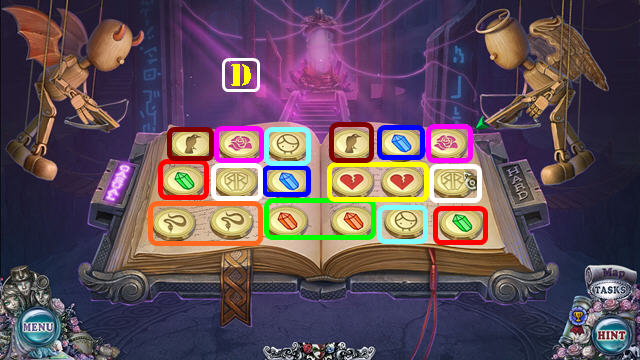
- Use Puppet Assistant and select book (C).
- Solution is random (D).
- Congratulations, you've completed PuppetShow: Poetic Justice.
Created at: 2017-11-03