Walkthrough Menu
- General Tips
- Chapter 1: The Mill
- Chapter 2: The Museum
- Chapter 3: The North Pole
- Chapter 4: Strange Island
General Tips
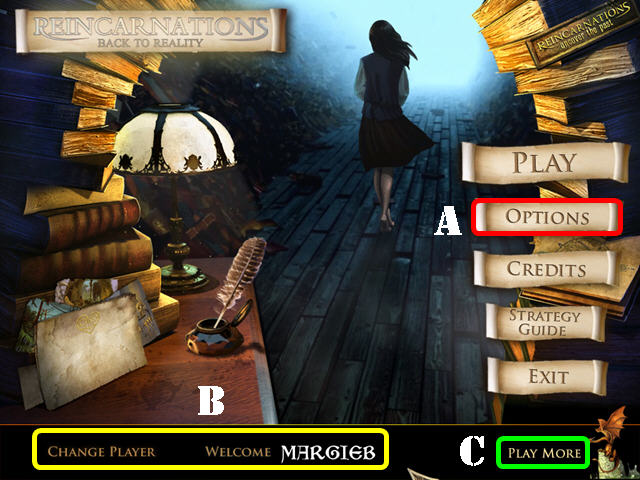
- The 'OPTIONS' (A) Button allows you to adjust the screen, music, cursor, and sound.
- The 'CHANGE PLAYER' (B) can be used to manage your profiles in the game.
- The 'PLAY MORE' (C) button gives you access to links to other titles by this developer.
- The items in the HOS (Hidden Object Scenes) are random.
- Items in HOS written in orange require another action to be performed before they can be picked up.
- Your tasks are listed in the lower left corner. On your task list use the up and down arrows to scroll through the entire list.
- Some puzzle solutions may be random.
- Inventory items will stay in inventory until they are no longer needed.
Chapter 1: The Mill
- Talk to Jane.
- Head forward.
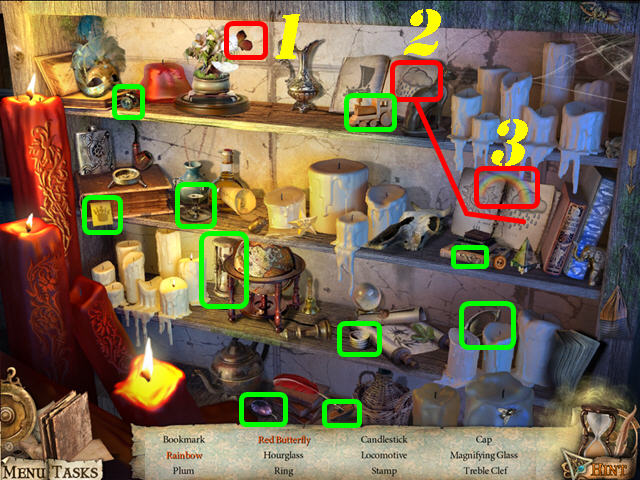
- Play the HOS.
- Remove the glass cover; take the RED BUTTERFLY (1).
- Drag the cloudy picture (2) over to the sun picture and take the RAINBOW (3).
- The MAGNIFYING GLASS will be added to inventory.
- Click down.
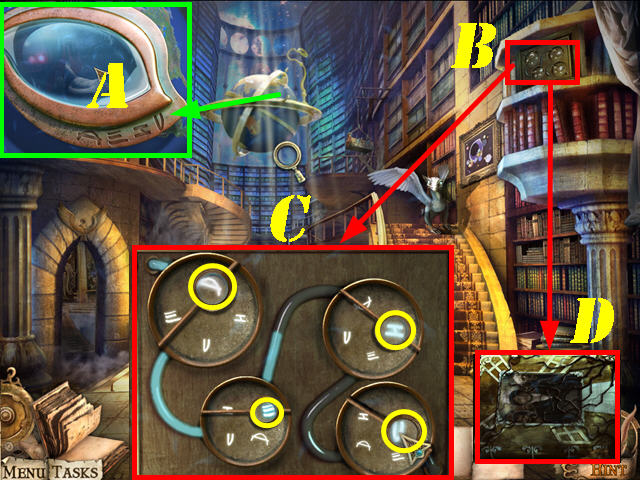
- Zoom into the globe; place the MAGNIFYING GLASS in the slot and note the symbols (A).
- Examine the safe in the upper right (B).
- Drag the monocles so the correct combination is in the center as set forth in the globe puzzle.
- Please look at the screenshot for the solution (C).
- Zoom into the safe; take the BOOK (D).
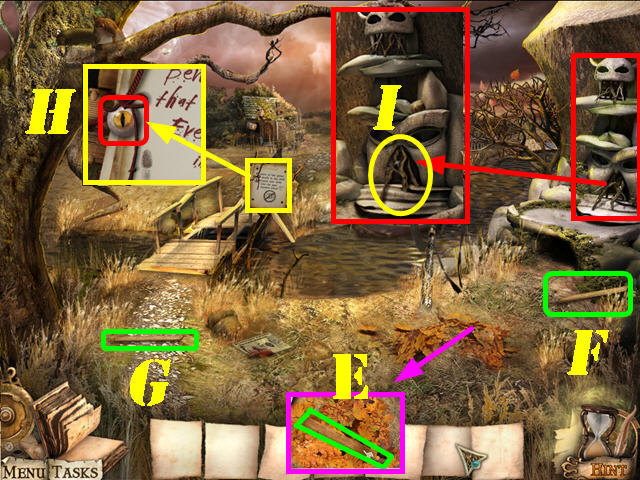
- Zoom into the leaves; push them all aside and take the BOARD 1/4 (E).
- Grab the BOARD 2/4 in the lower right (F).
- Grab the BOARD 3/4 in the lower left (G).
- Examine the note; take the EYE (H).
- Zoom into the fountain; click on the 3 branches to activate a HOS: play it (I).
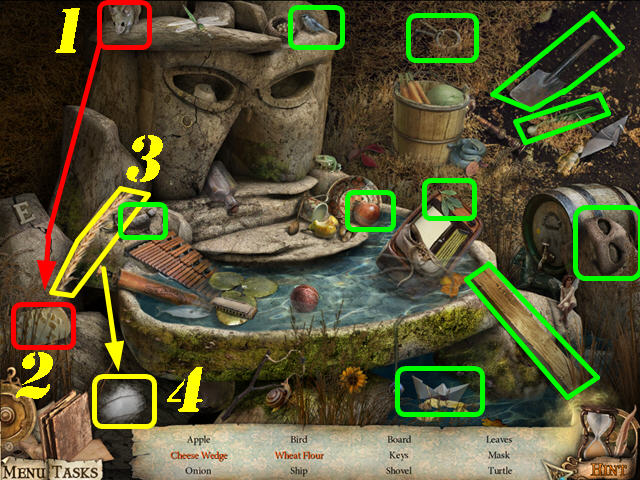
- Drag the mouse (1) to the cheese and take the CHEESE WEDGE (2).
- Click on the wheat leaf (3) and take the WHEAT FLOUR (4).
- The BOARD 4/4 will be added to inventory.
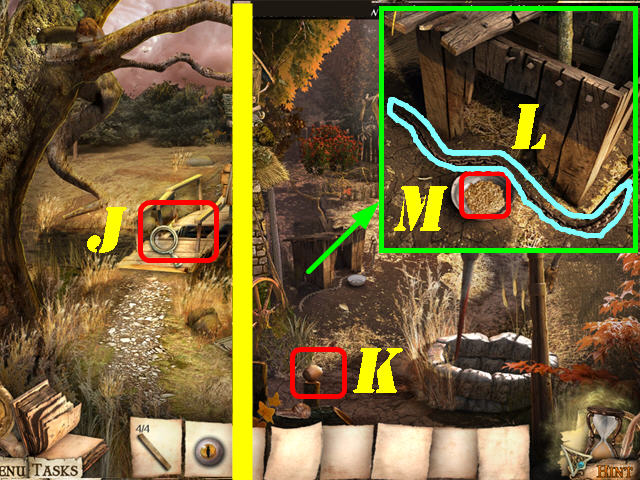
- Examine the bridge; put the 4 BOARDS on the bridge (J).
- Cross the bridge.
- Take the HAZELNUT 1/3 (K).
- Examine the dog house; take the DOG CHAIN (L) and the GRAIN 1/3 (M).
- Follow the path.
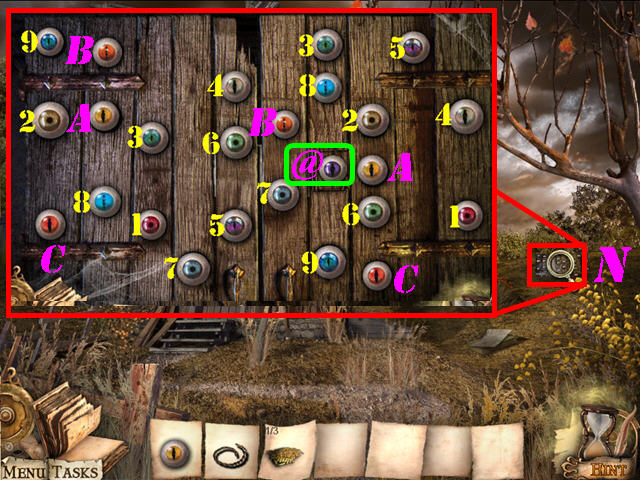
- Examine the puzzle (N).
- Put the EYE in the slot to activate the puzzle.
- Eliminate all matching pairs of eyes.
- Click on the last eye that appears to activate a HOS: play it (@).
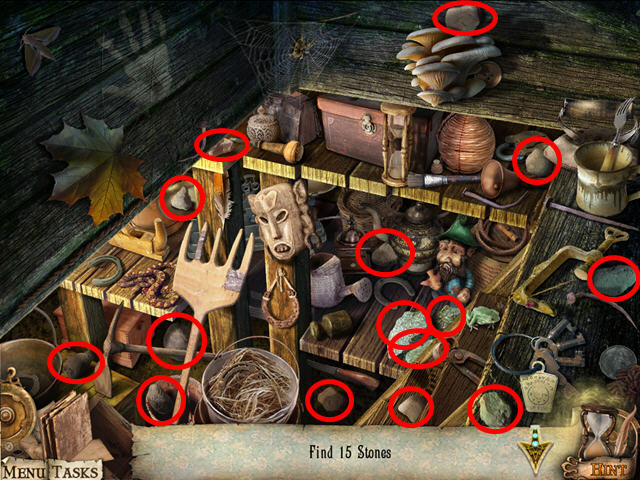
- Find the 15 stones marked in red.
- The STONES will be added to inventory.
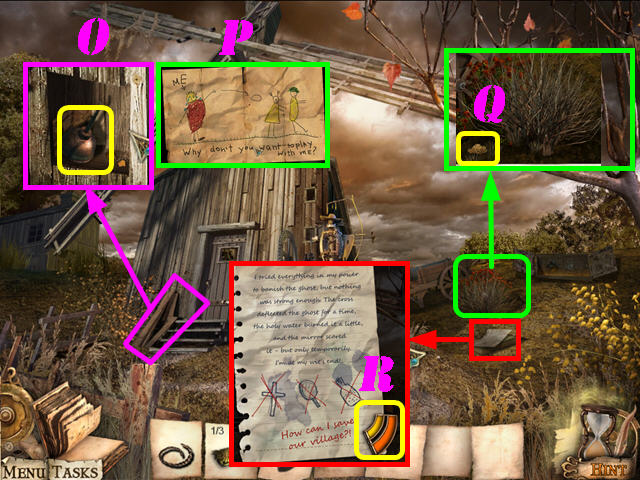
- Examine the boards on the left.
- Click on the 7 boards and take the OIL CAN (O) and look at the note (P).
- Zoom into the bush; take the GRAIN 2/3 (Q).
- Examine the note; take the LOCK PART (R).
- Click down.
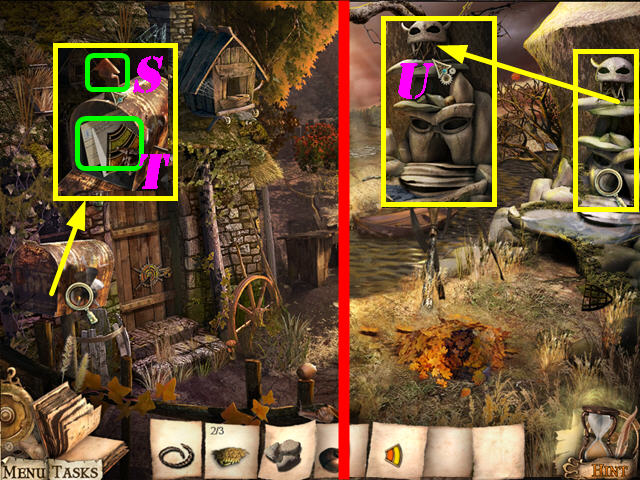
- Examine the mailbox; put the OIL CAN on it.
- Click on the arrow to open the mailbox (S); and take the LOCK PART and read the note (T).
- Click down.
- Examine the fountain; throw the STONES at the mouth of the fountain to activate a HOS: play it (U).
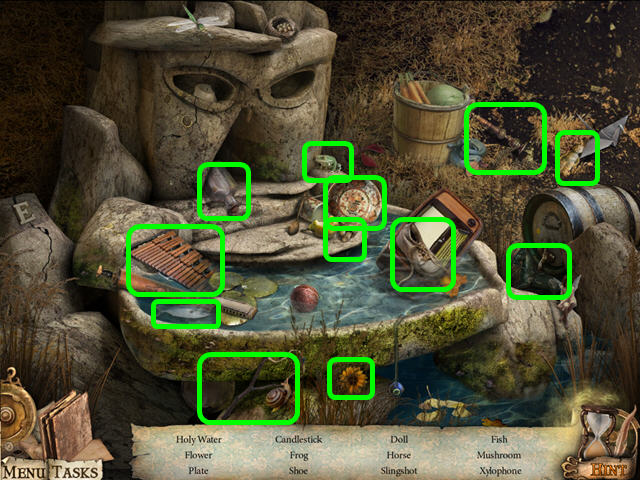
- Find all the items on the list.
- The HOLY WATER will be added to inventory.
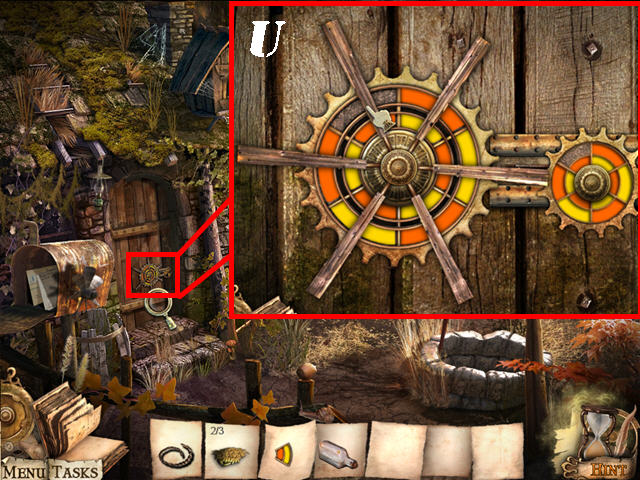
- Cross the bridge.
- Examine the door; put the LOCK PARTS on the locks to activate a puzzle.
- Turn the rings on the large circle so it matches the rings on the smaller circle.
- Click on the section next to an empty space to fill the color with that space.
- Drag the rings around to switch their positions so you can place the right colors in the right place.
- Please look at the screenshot for the solution (U).
- Put the HOLY WATER on the phantom blocking the door.
- Go through the door.
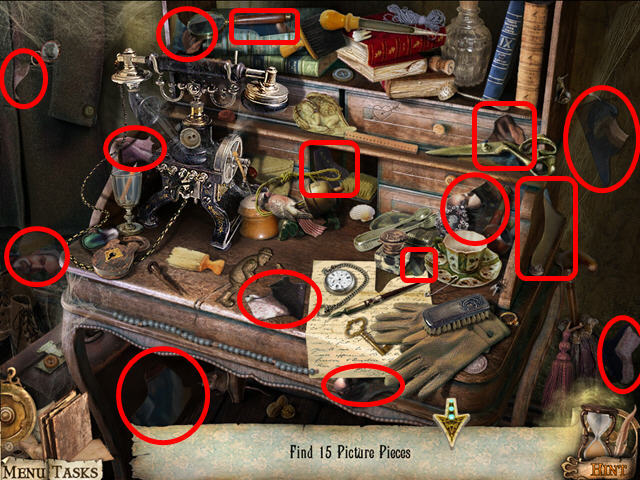
- Click on the skeleton twice to activate a HOS: play it.
- Find the 15 picture pieces marked in red.
- The PICTURE PIECES will be added to inventory.
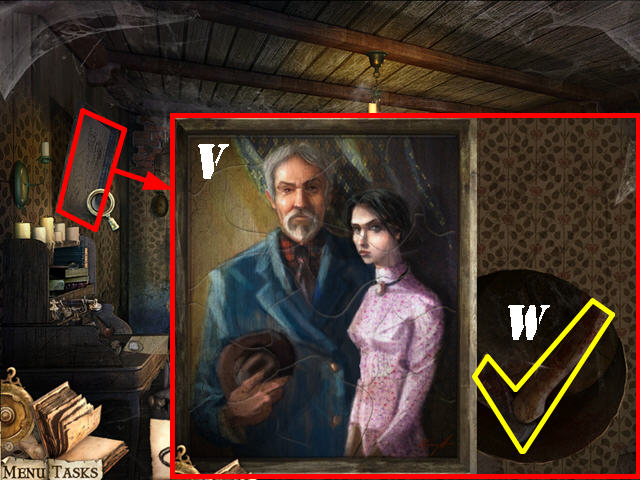
- Examine the painting; put the PICTURE PIECES on the painting.
- Left-click to pick up a piece and right-click it to rotate it.
- Once a picture is in the correct spot, left-click it to place it.
- Please look at the screenshot for the solution (V).
- Take the AXE (W).
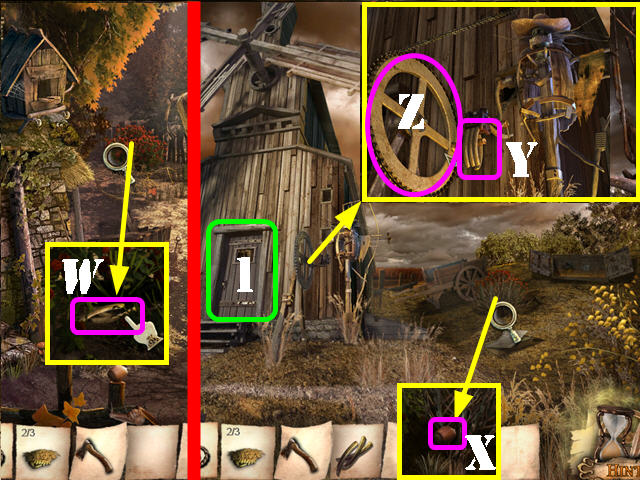
- Click down.
- Zoom into the rose bush; cut the roses with the AXE 3 times and take the FINGERS (W).
- Follow the path.
- Zoom into the bush; cut it with the AXE 3 times and take HAZELNUT 2/3 (X).
- Examine the mechanical scarecrow; put the FINGERS on its hand (Y).
- Put the DOG CHAIN on the gear (Z); this action unlocks the door.
- Enter the windmill (1).
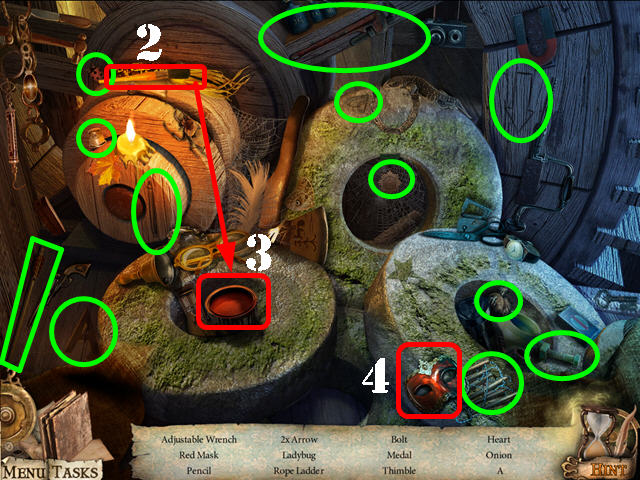
- Remove the cloth in the lower left to activate a HOS; play it.
- Drag the brush (2) to the paint can (3); take the RED MASK (4).
- The ROPE LADDER will be added to inventory.
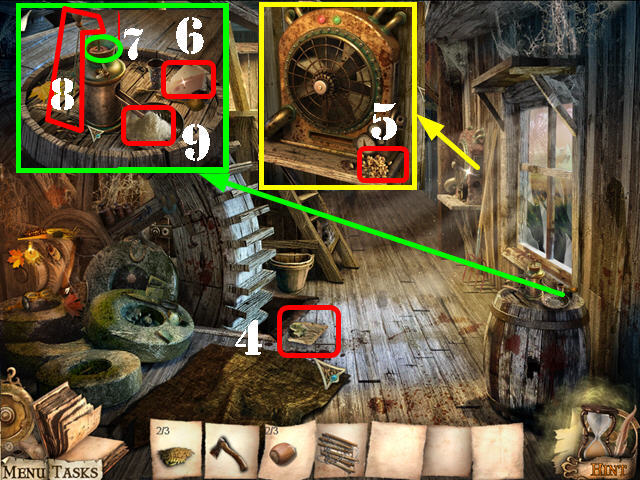
- Examine the note (4).
- Examine the fan; take the GRAIN 3/3 (5).
- Zoom into the barrel; take the CHEESE (6).
- Put the 3 GRAINS in the grinder (7).
- Click on the handle (8) and take the FLOUR (9).
- Click down twice.
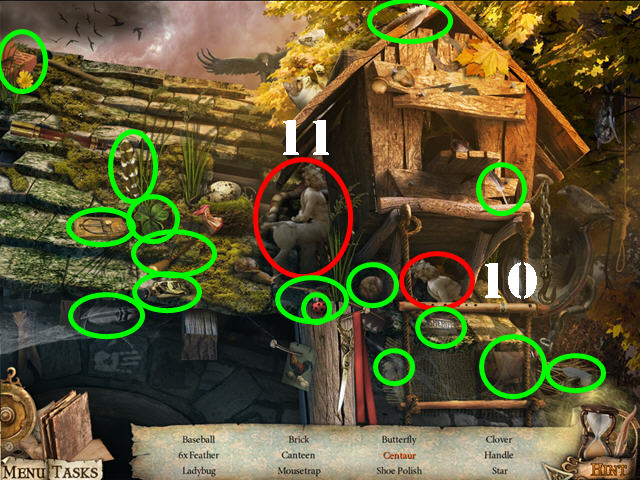
- Put the ROPE LADDER on the dovecote to activate a HOS; play it.
- Drag the half-man (10) to the horse body; take the CENTAUR (11).
- The HANDLE will be added to inventory.
- Enter the cottage.
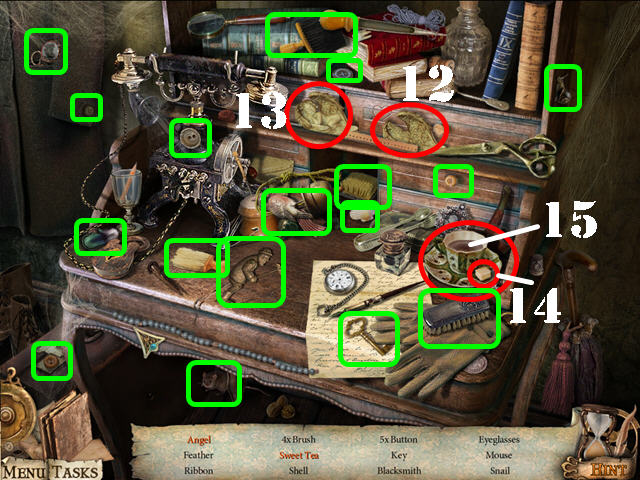
- Play the HOS.
- Drag the wings (12) to the cherub; take the ANGEL (13).
- Drop the sugar (14) into the tea; take the SWEET TEA (15).
- The BLACKSMITH will be added to inventory.
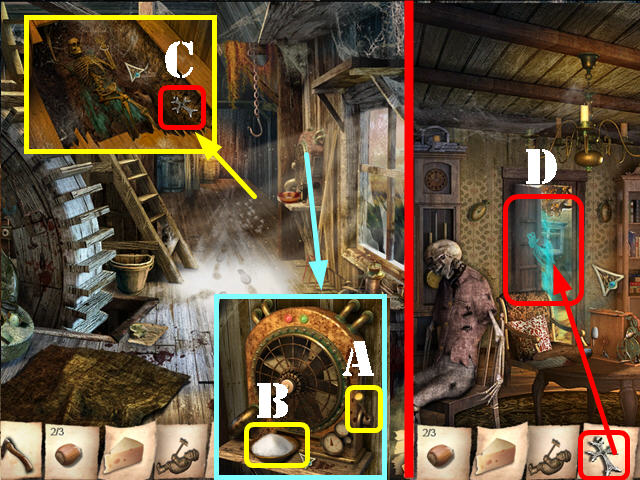
- Return to the mill.
- Examine the fan; place the HANDLE on the side (A).
- Put the FLOUR (B) down and click on the handle.
- Examine the ground; use the AXE on the floorboard and take the CROSS (C).
- Return to the cottage.
- Use the CROSS on the phantom blocking the door; go through the door (D).
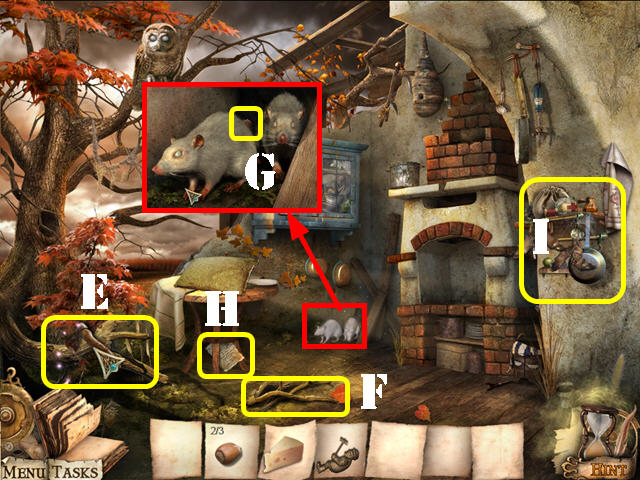
- Cut the tree roots with the AXE 3 times (E); take the WOOD (F).
- Zoom into the rats; give them the CHEESE and take HAZELNUT 3/3 (G).
- Read the note (H).
- Examine the puzzle on the right (I).
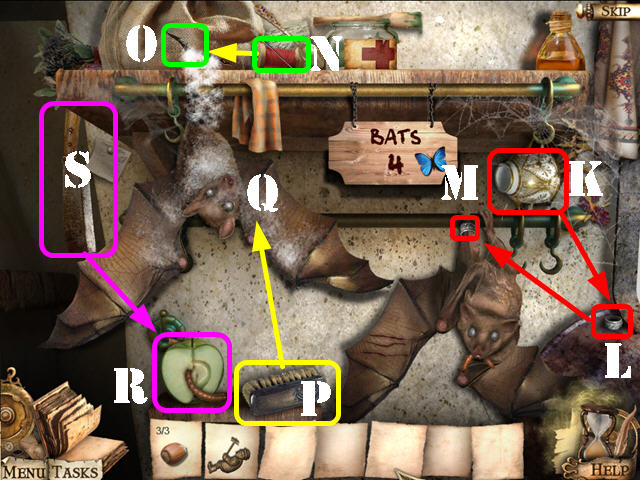
- Click on the cup (K) for a ring to fall down.
- Drag the ring (L) to the bat's ankle (M).
- Use the needle and thread (N) on the bag (O).
- Use the brush (P) on the dirty bat (Q).
- Cut the apple (R) with the cleaver (S) to reveal a worm.
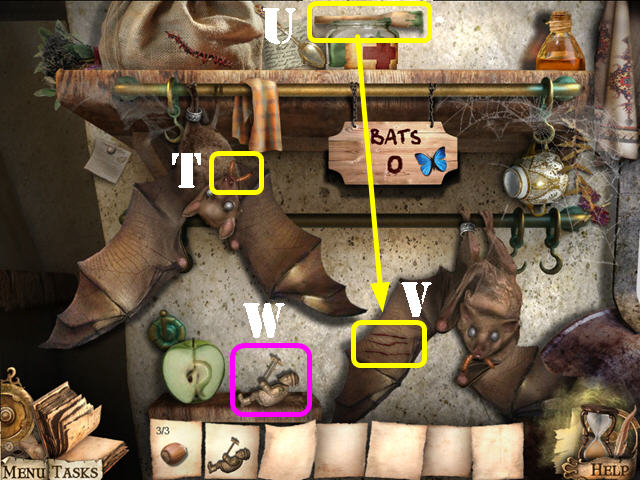
- Place the worm in the top bat's mouth (T).
- Use the medicine (U) on the bottom bat's injured wing (V).
- Take the BLACKSMITH (W) after the puzzle has been solved.
- Click down.
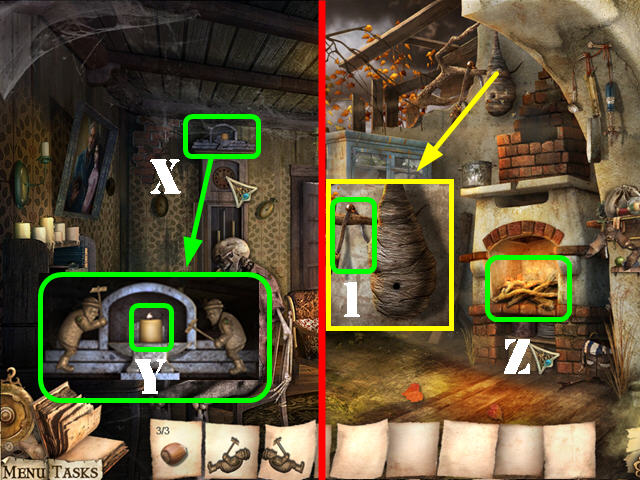
- Zoom into the clock; put the BLACKSMITHS on the each side of the clock (X).
- Take the CANDLE (Y).
- Go into the kitchen.
- Put the WOOD and then the CANDLE in the fireplace to get rid of the wasps (Z).
- Zoom into the wasp's nest and take the LEG (1).
- Click down twice.
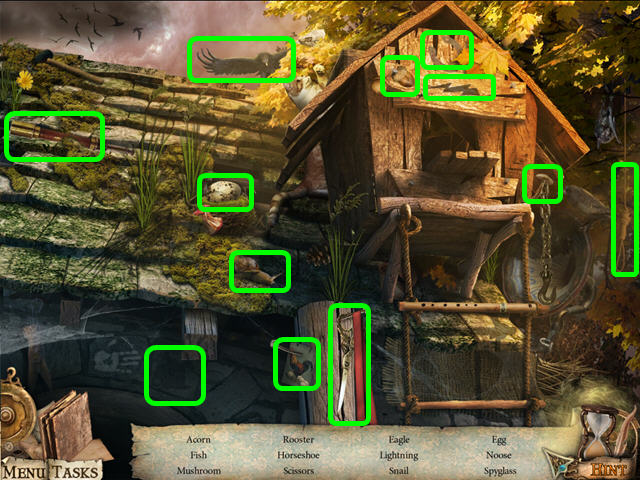
- Play the dovecote HOS.
- Find the items listed to obtain the SCISSORS.
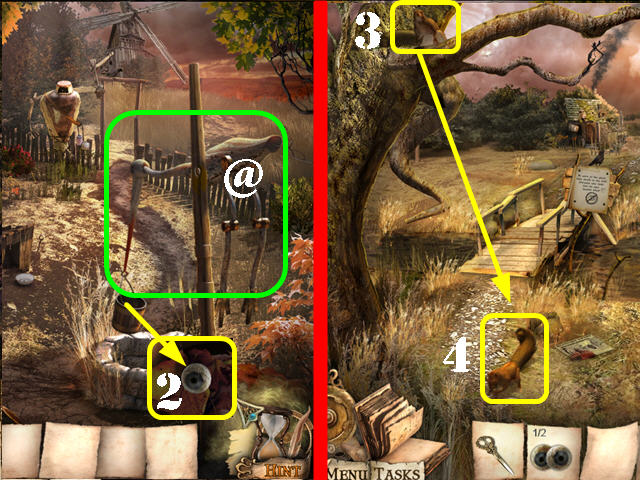
- Put the LEG on the wooden stork (@).
- Zoom into the bucket and take the EYE 1/2 (2).
- Click down.
- Give the 3 HAZELNUTS to the squirrel (3) up in the tree.
- Grab the SQUIRREL on the ground (4).
- Return to the kitchen in the cottage.
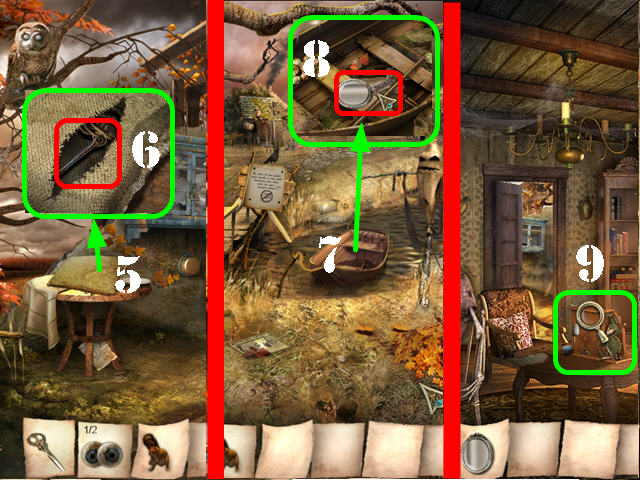
- Zoom into the sack (5); cut it open with the SCISSORS and take the ROPE AND HOOK (6).
- Click down three times.
- Put the ROPE AND HOOK on the boat to pull it closer (7).
- Zoom into the boat and take the MIRROR (8).
- Go back to the cottage.
- Zoom into the device on the table (9).
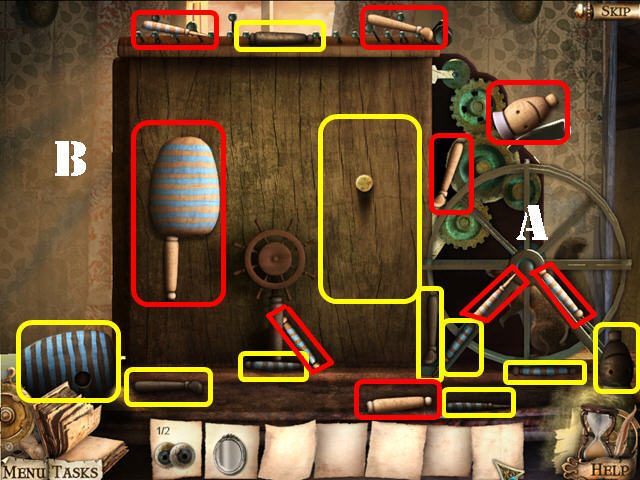
- Put the SQUIRREL in the wheel to activate a puzzle (A).
- Drag the sailor parts into place. The pieces marked in red belong on the left and the ones in yellow belong on the right (B).
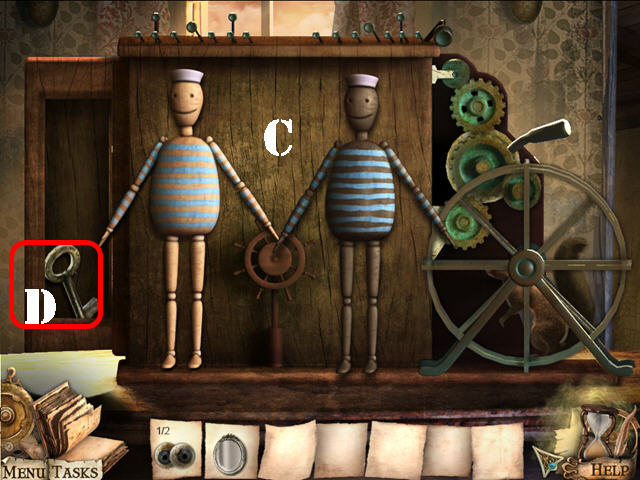
- Please look at the screenshot for the solution (C).
- Take the CABINET KEY (D).
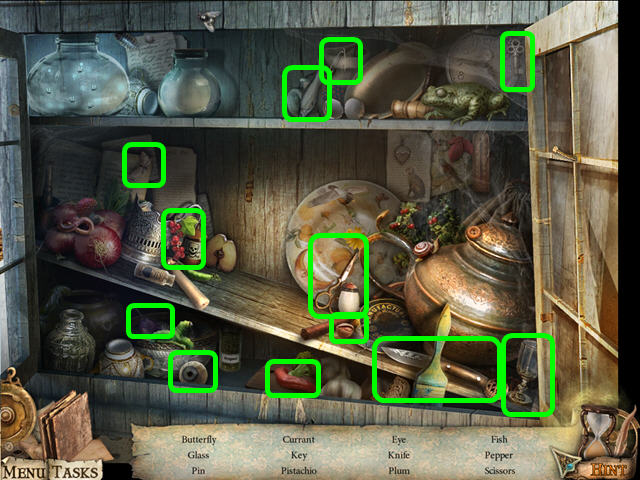
- Go to the kitchen.
- Zoom into the cabinet; open the lock with the CABINET KEY to activate a HOS.
- Find the items listed to obtain the EYE 2/2.
- Return to the outside of the mill.
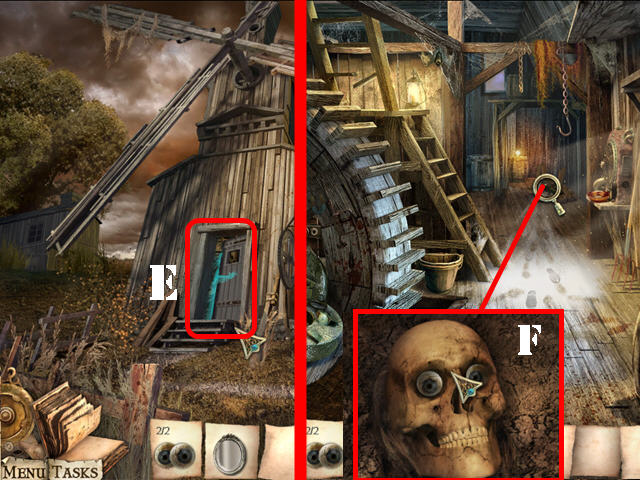
- Use the MIRROR on the phantom blocking the door (E).
- Enter the mill.
- Zoom into ground in the back; click on the skull; place the EYES in the eye sockets (F).
- Click through the conversation with the phantom.
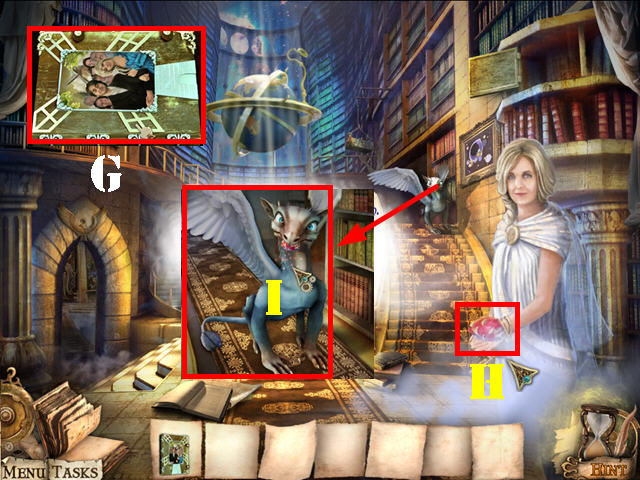
- Take the BOOK MILL (G).
- Click down; take the DRAGON FRUIT from her hand (H).
- Zoom into the creature above the steps; give the DRAGON FRUIT to it (I).
- Go past the creature.
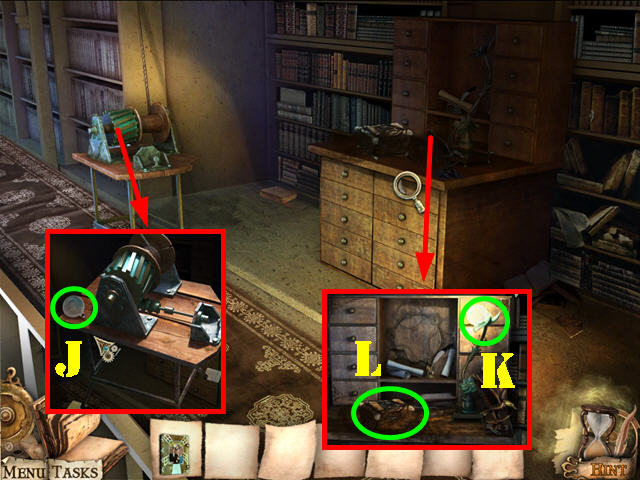
- Examine the work table; take the BULB (J).
- Examine the top of the cabinet and zoom into the lamp.
- Put the BULB in the lamp (K).
- Click on the book (L).
Chapter 2: The Museum
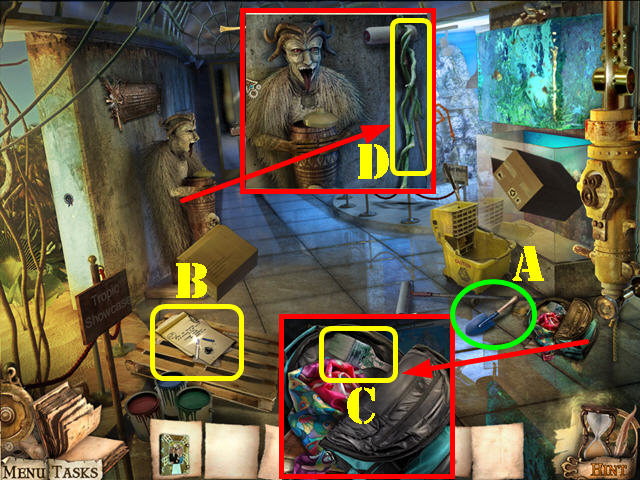
- Take the KID'S SHOVEL (A).
- Examine the notepad (B).
- Zoom into the bag; take the BRUSH (C).
- Examine the statue; take the LIANA (D).
- Head left into the tropic showcase.
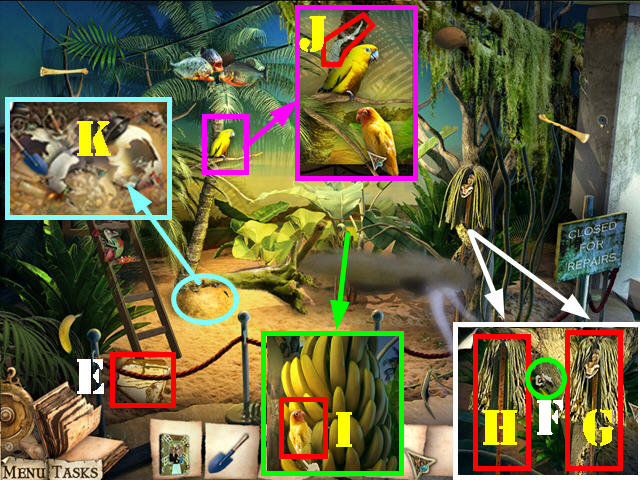
- Read the note (E).
- Zoom into the mop; take the LOCK CHEST PART (F).
- Use the LIANA on the mop (G) and take the MOP (H) on the left.
- Examine the bananas; click on them 4 times and take the PARROT (I).
- Zoom into the parrot in the tree; put the other PARROT next to it and take the LOCK CHEST PART (J).
- Examine the sand; use the KID'S SHOVEL on it to activate a HOS; play it (K).
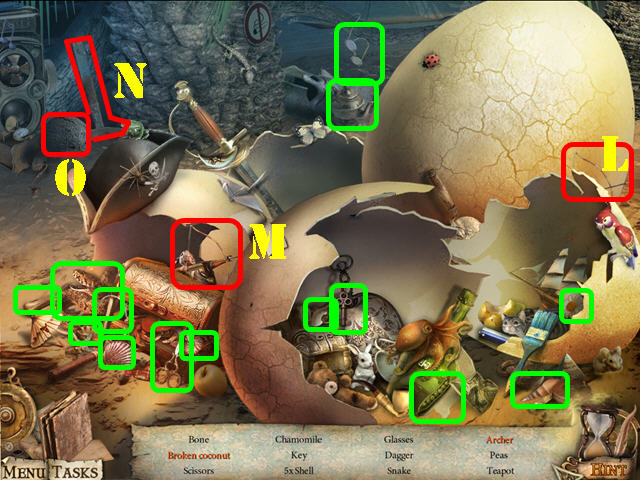
- Drag the bow (L) to the man and take the ARCHER (M).
- Use the mallet (N) on the coconut; take the BROKEN COCONUT (O).
- The DAGGER will be added to inventory.
- Click down.
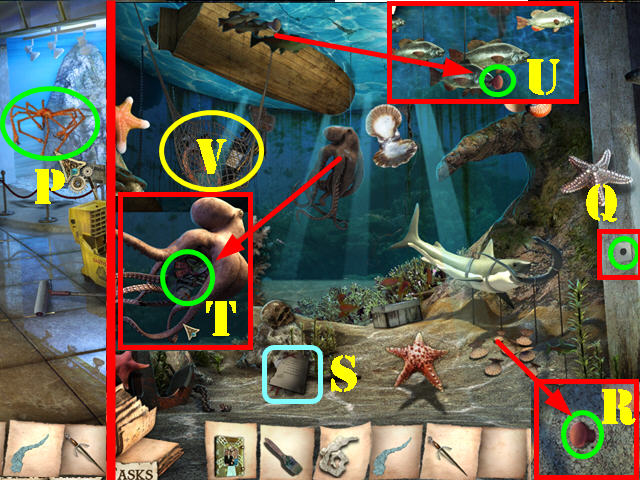
- Use the MOP on the giant crab (P); proceed to the aquarium.
- Examine the column; clean it with the BRUSH and click on the BUTTON (Q).
- Examine the shells; take LAPTOP BUTTON 1/7 (R).
- Read the note (S).
- Look at the octopus; move the 3 tentacles and take the CHAMELEON (T).
- Examine the fish in the upper left; take the LAPTOP BUTTON 2/7 (U).
- Use the DAGGER on the net to activate a HOS; play it (V).
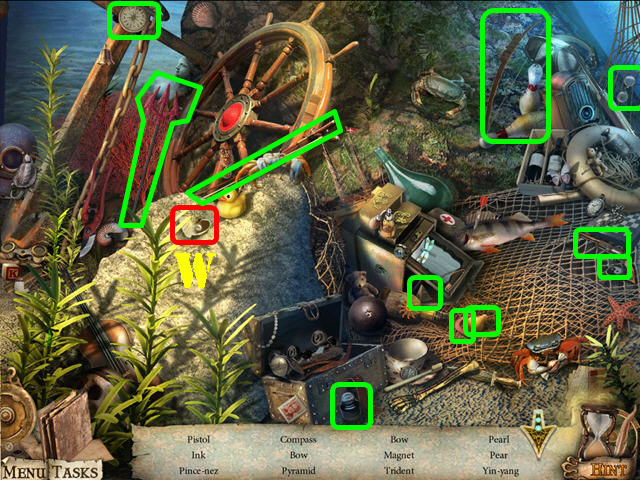
- Open the clam; take the PEARL (W).
- The AFRICAN BOW will be added to inventory.
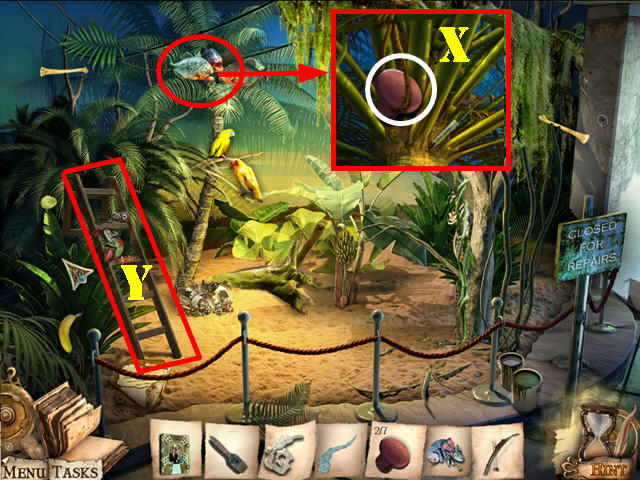
- Click down and head left.
- Use the AFRICAN BOW on the piranhas; zoom into that area and take LAPTOP BUTTON 3/7 (X).
- Examine the ladder; put the CHAMELEON on the ladder to activate a puzzle (Y).
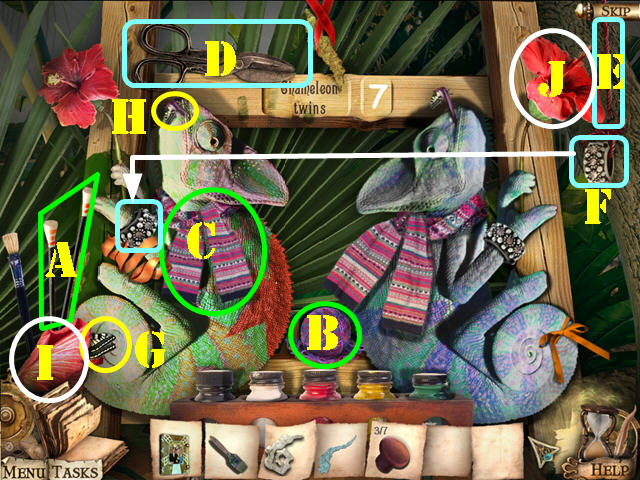
- Drag the knitting needles (A) to the ball of yarn (B); put the scarf on the chameleon (C).
- Drag the SCISSORS (D) to the string (E) to automatically move the bracelet to the chameleon (F).
- Click on the butterfly at the bottom left flower (G) and the chameleon will catch the butterfly (H).
- Drag the flower (I) to the stem (J).
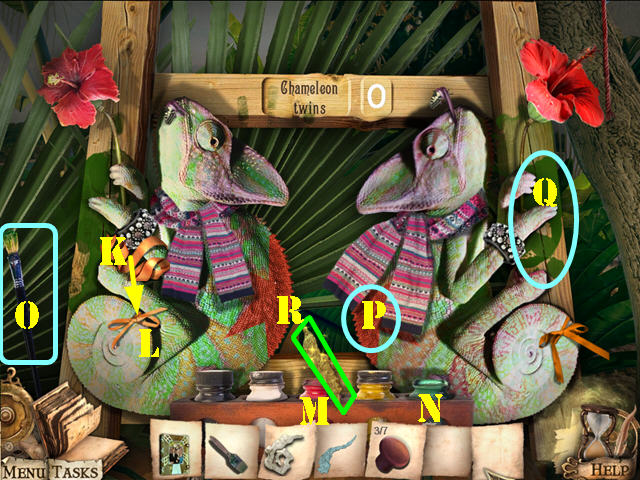
- Drag the ribbon (K) to the chameleon's tail to tie the bow around it (L).
- Open the red (M) and the green paint jars (N).
- Drag the brush (O) to the red paint (M); paint the chameleon's back (P).
- Drag the brush (O) to the green paint jar (N) and paint the wood (Q). The chameleon on the right will instantly change its color.
- Take the LOCK CHEST PART (R).
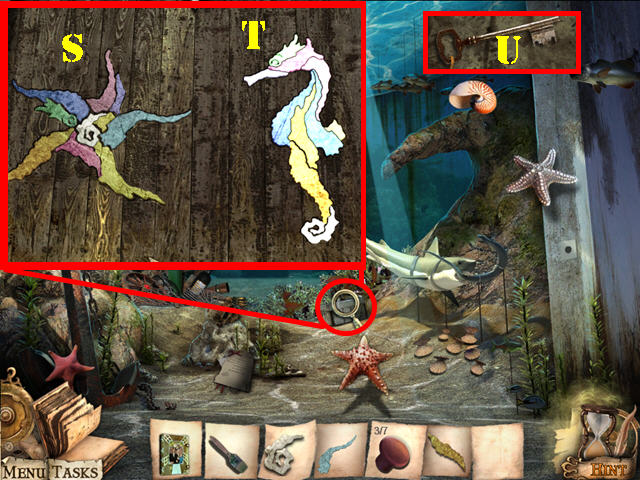
- Click down and head right into the aquarium.
- Examine the chest; put the 3 LOCK CHEST PARTS on the left to activate a puzzle (S).
- Drag the pieces to the right to form the seahorse image (T).
- Zoom into the chest and take the DOOR KEY (U).
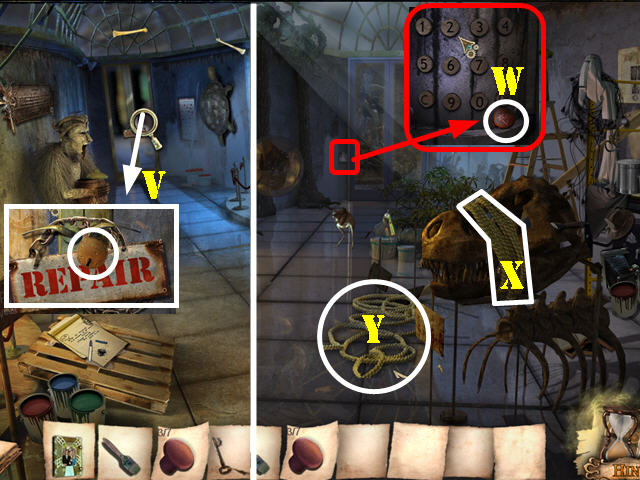
- Click down.
- Zoom into the back door; use the DOOR KEY in the lock (V).
- Click on the 2 handles and go through the door.
- Zoom into the back panel; take the BUTTON (W).
- Click on the ROPE (X) to activate a HOS.
- Take the ROPE (Y) on the ground and then play the HOS.
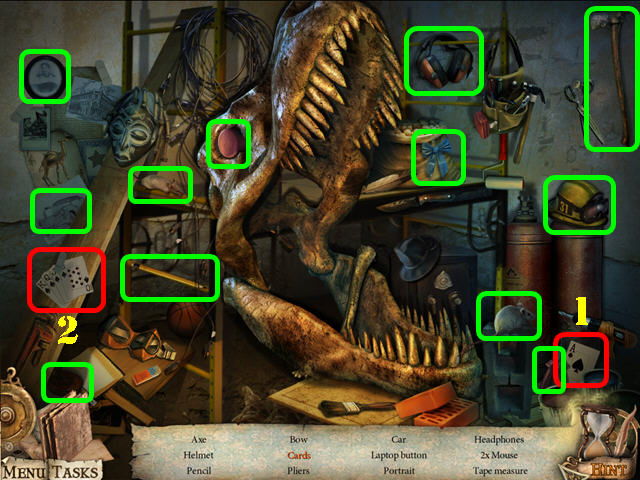
- Drag the ACE (1) to the cards; take the CARDS (2).
- The LAPTOP BUTTON 5/7 will be added to inventory.
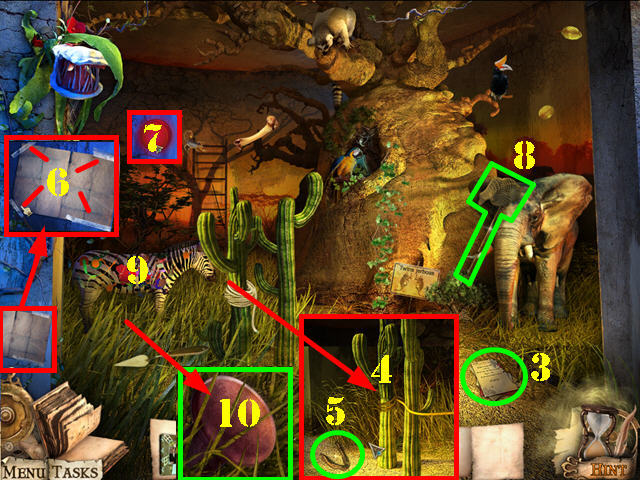
- Head left.
- Read the note (3).
- Examine the cactus; put the ROPE on the left cactus (4).
- Take BONE 1/4 (5).
- Examine the paper; remove the 4 tape pieces (6).
- Click on the button for the elephant to appear (7).
- Take the BUTTERFLY NET from the elephant (8).
- Use the BRUSH on the zebra (9); examine the grass and take LAPTOP BUTTON 6/7 (10).
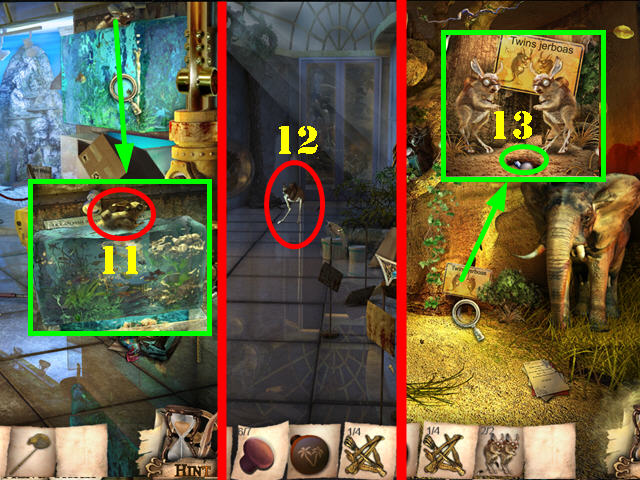
- Click down twice.
- Zoom into the tank; use the BUTTERFLY NET on the JERBOA to add it to inventory 1/2 (11).
- Go forward.
- Use the BUTTERFLY NET on JERBOA 2/2 (12).
- Head left.
- Zoom into the sign; put the 2 JERBOAS on the ground.
- Take LAPTOP BUTTON 7/7 and the BATTERY (13).
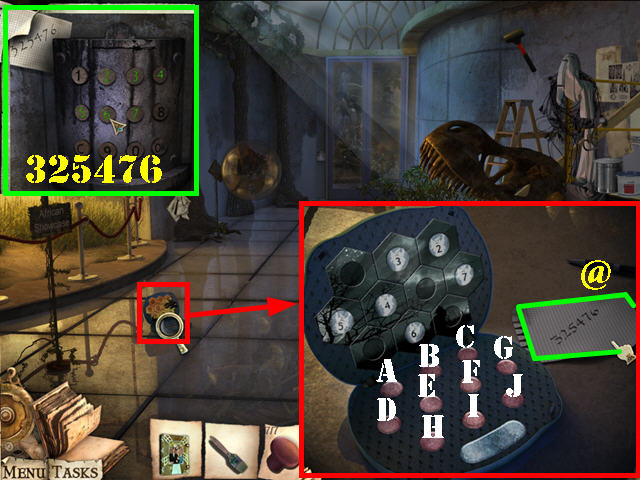
- Click down.
- Examine the laptop on the ground; put the 7 LAPTOP BUTTONS on the laptop to activate the puzzle.
- Your goal is turn the monitor black when you click on the correct buttons.
- To solve the puzzle, click on the buttons in this order: A, H, I, G, J, I, E, F, G, and J.
- Take the PAPER CODE (@).
- Examine the panel in the back; put the PAPER CODE on the panel.
- Click on the buttons in the same order as shown in the code; 325476 and then the OK button.
- Go through the door.
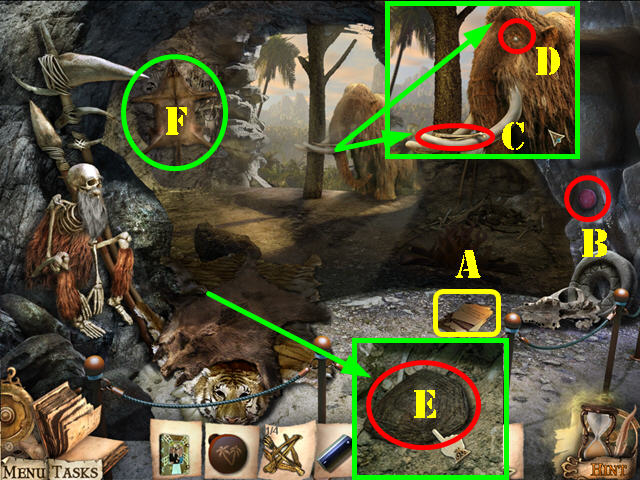
- Read the note (A).
- Examine the button; clean it with the BRUSH (B).
- Click on the button for the mammoth to appear.
- Examine the mammoth; take BONE 2/4 (C) and PEARL 1/3 (D).
- Zoom into the rugs on the ground; move the 3 rugs and take the TURTLE SHELL 1/3 (E).
- Remove the bear skin on the wall to activate a HOS; play it (F).
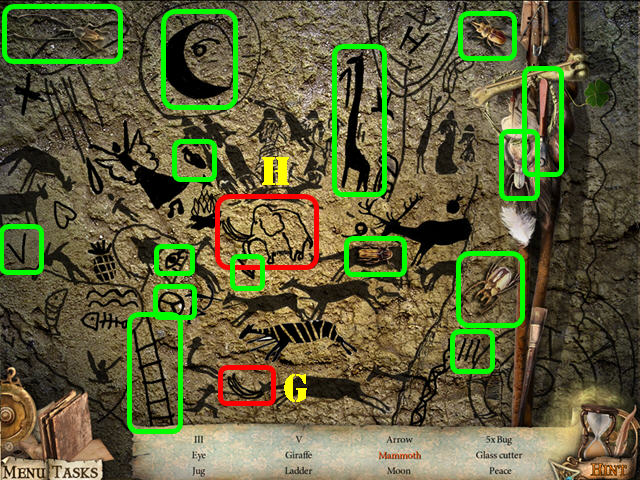
- Drag the tusks (G) to the mammoth; take the MAMMOTH (H).
- The GLASS CUTTER will be added to inventory.
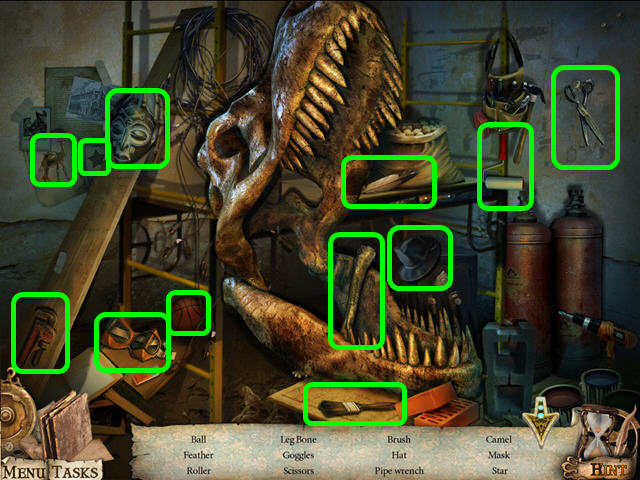
- Click down.
- Play the HOS.
- Find the listed items to obtain BONE 3/4.
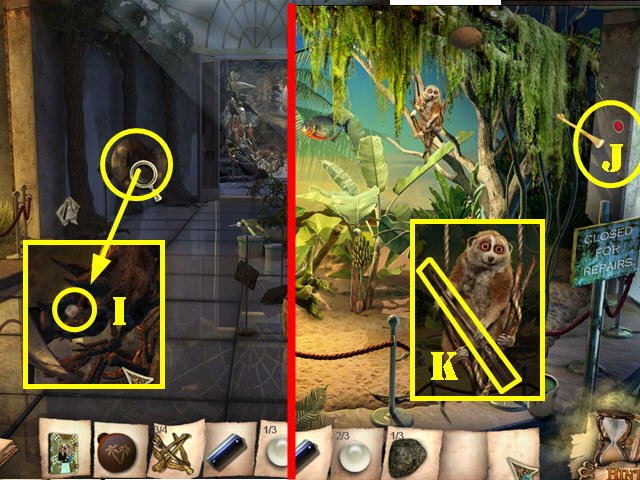
- Examine the glass sphere; cut it with the GLASS CUTTER and take PEARL 2/3 (I).
- Click down and head left.
- Examine the wires; put the BUTTON over the wires (J).
- Push the button for the lemur to appear.
- Zoom into the lemur and take the STICK (K).
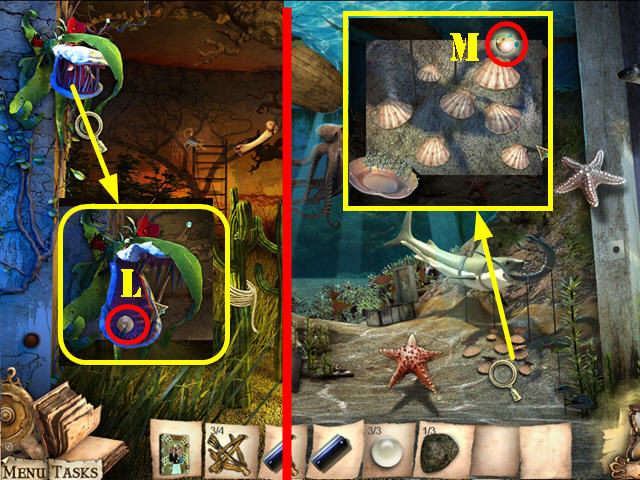
- Click down; go forward and then head left to the African showcase.
- Examine the plant in the upper left; put the STICK in its mouth and take PEARL 3/3 (L).
- Return to the aquarium.
- Zoom into the shells; put the 3 PEARLS on the tray.
- Drag the 7 PEARLS into the shells.
- Take the LUMINESCENT FISH (M).
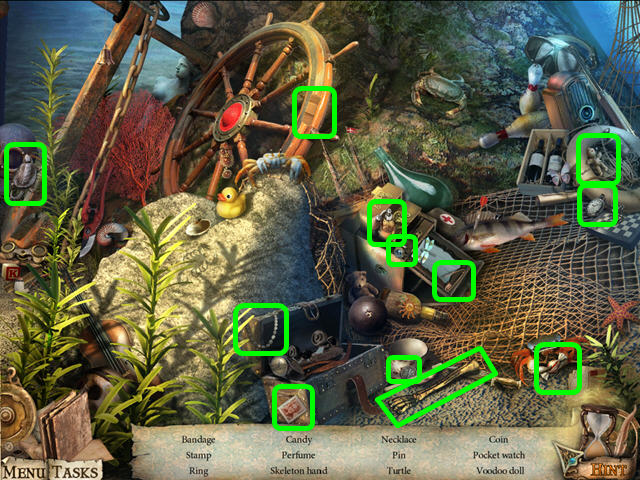
- Play the HOS.
- Find the items listed to obtain BONE 4/4.
- Return to the African showcase.
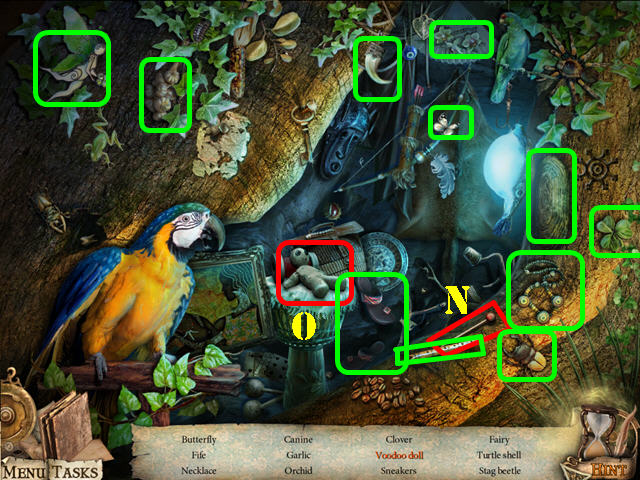
- Put the LUMINESCENT FISH in the tree hollow to activate a HOS; play it.
- Stick the pin (N) on the doll; take the VOODOO DOLL (O).
- TURTLE SHELL 2/3 will be added to inventory.
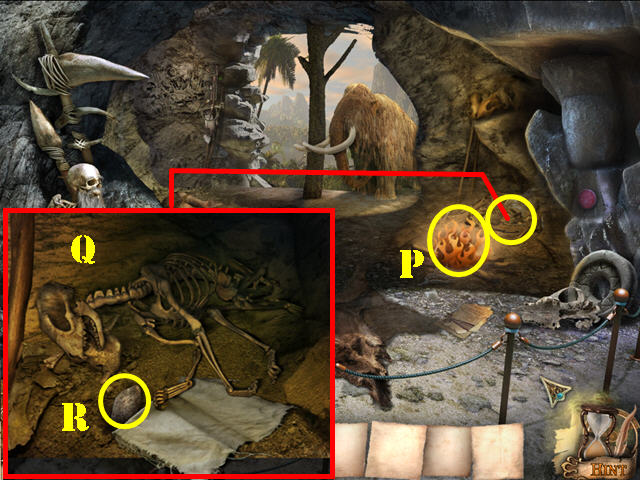
- Click down and head forward.
- Examine the fake fire; put the BATTERY in the fake fire(P).
- Examine the skeleton bones; place the 4 BONES on the ground.
- Reconstruct the skeleton as shown in the screenshot by dragging the bones to the skeleton.
- Take the TURTLE SHELL 3/3 (R).
- Click down twice.
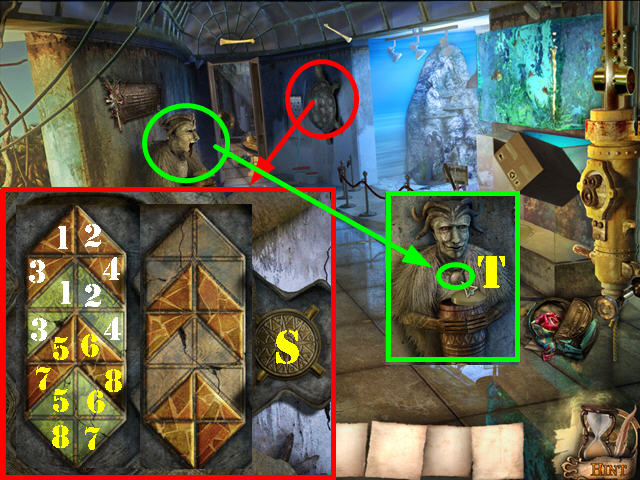
- Zoom into the tortoise shell; put the 3 TURTLE SHELLS on it to activate a puzzle.
- Move the brown triangles to an empty green spot.
- Please look at the screenshot for the solution. Move the triangles in brown to their matching empty spots in green. For example, the brown triangle number 1 should be moved to the empty spot marked 1 and so on.
- Take the KEY FOR STATUE (S).
- Zoom into the statue; insert the KEY FOR STATUE around the neck (T).
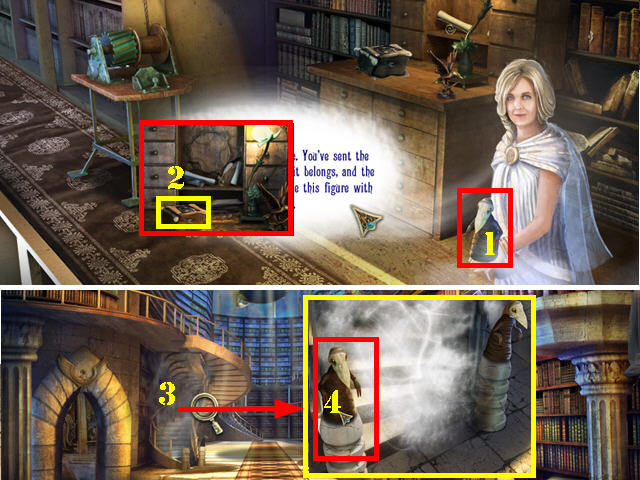
- Take the STATUE from Jane (1).
- Take the BOOK MUSEUM (2).
- Click down.
- Examine the left staircase (3).
- Put the STATUE on the left pedestal (4).
- Go up the staircase.
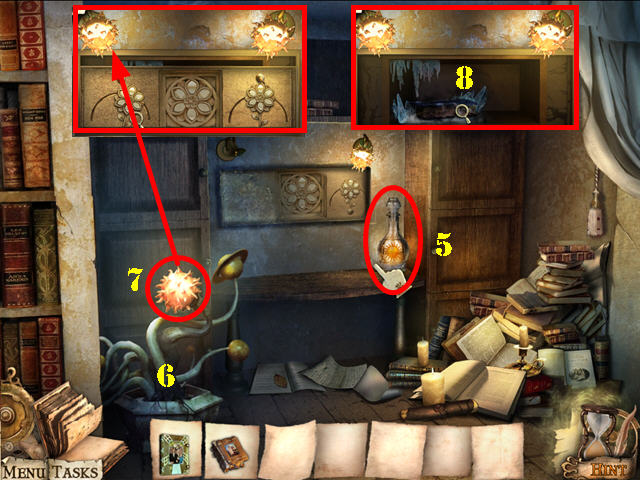
- Take the BOTTLE WITH SUN (5).
- Put the BOTTLE WITH SUN on the plant (6).
- Take the BULB SUN (7).
- Examine the door; put the BULB SUN on the left and click in the center (8).
Chapter 3: The North Pole
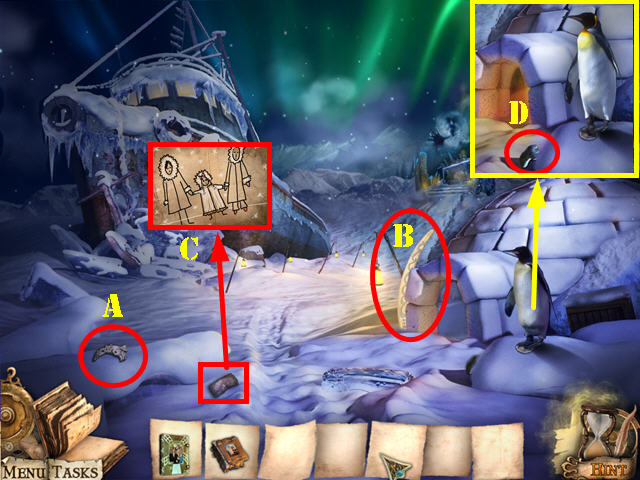
- Take the OWL (A).
- Grab the BIG TUSK 1/5 (B).
- Examine the drawing (C).
- Look at the penguin; take the STATUE'S HAND 1/3 (D).
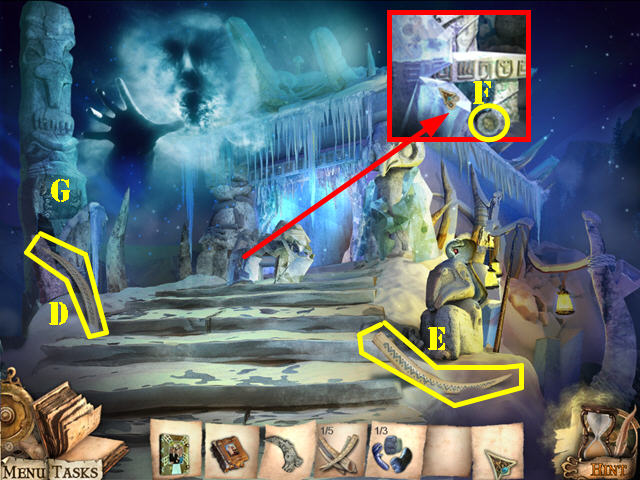
- Head towards the BUILDING.
- Grab the BIG TUSK 2/5 (D) and 3/5 (E).
- Examine the lamp; take the first IGLOO KEY (F).
- Examine the totem; put the OWL on the totem to activate a puzzle (G).
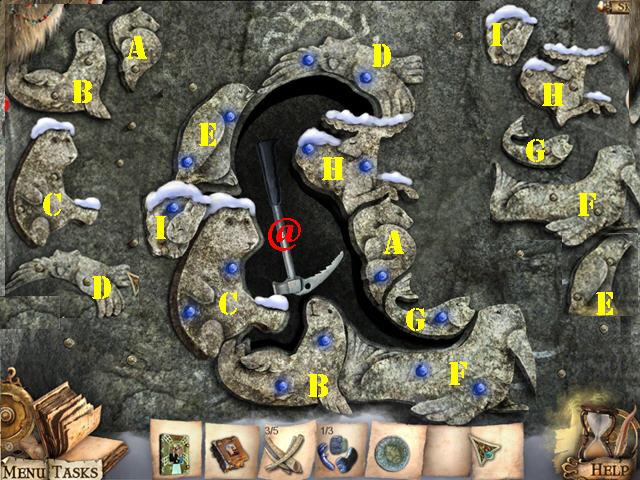
- Drag the small animal figures to the center to form the dinosaur image.
- Make sure the holes in the animals fit over the pegs in the puzzle.
- Please look at the screenshot for the solution.
- Take the ICE AXE (@).
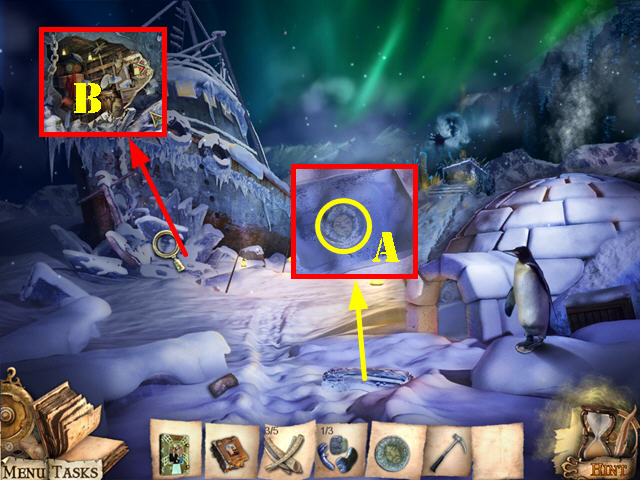
- Click down.
- Examine the block of ice on the ground; break the ice with the ICE AXE and take the second IGLOO KEY (A).
- Zoom into the frozen anchor on the left. Break the ice with the ICE AXE 7 times to trigger a HOS; play it (B).
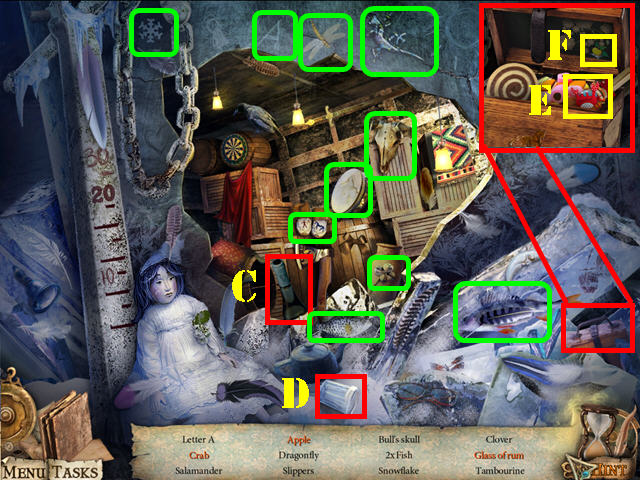
- Drag the bottle of rum (C) to the glass; take the GLASS OF RUM (D).
- Examine the box; take the CRAB (E) and the APPLE (F).
- The SALAMANDER will be added to inventory.
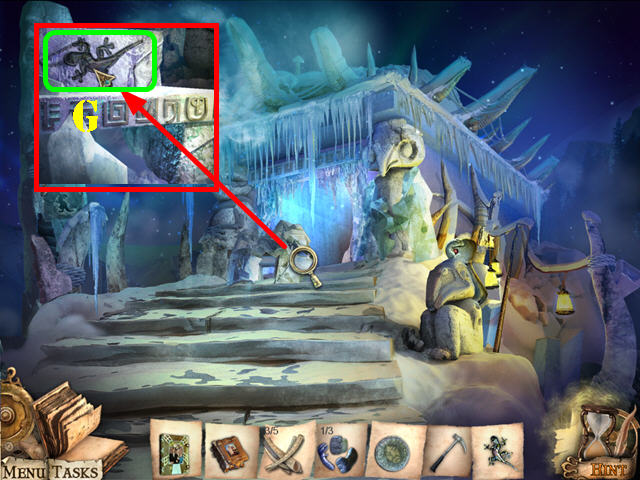
- Head back towards the building.
- Examine the lamp; break the ice with the ICE AXE 4 times.
- Put the SALAMANDER in the slot (G).
- Go into the building.
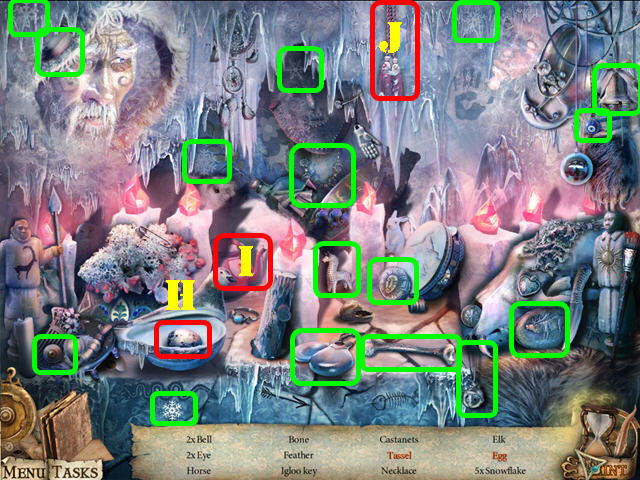
- Play the HOS.
- Click on the chicken; take the EGG (H).
- Drag the tea pot (I) to the frozen tassel; take the TASSEL (J).
- The third IGLOO KEY will be added to inventory.
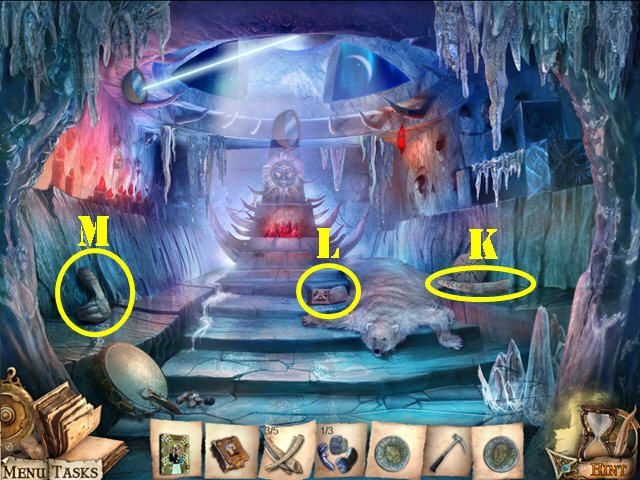
- Grab the BIG TUSK 4/5 (K).
- Zoom into the book (L).
- Grab the OWL'S WING (M).
- Click down.
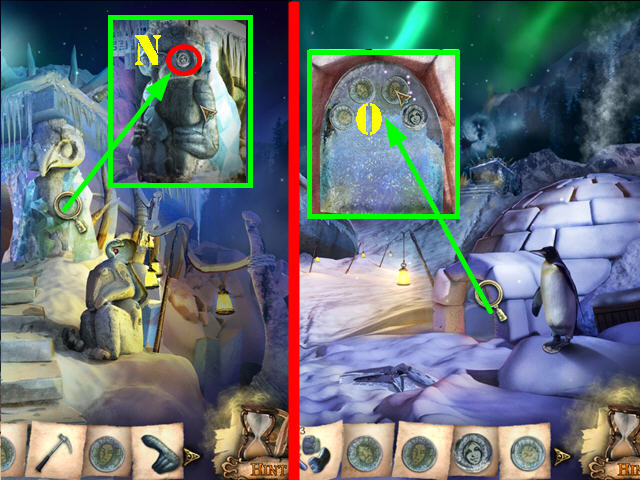
- Examine the owl; break the ice with the ICE AXE twice.
- Put the OWL'S WINGS on the owl and take the fourth IGLOO KEY (N).
- Click down.
- Zoom into the igloo; put the 4 IGLOO KEYS on the door (O).
- Enter the igloo.
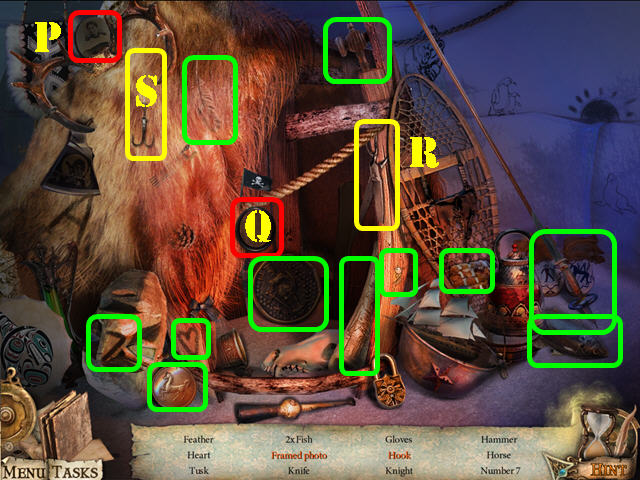
- Click on the fur on left 3 times to activate a HOS; play it.
- Drag the photo (P) to the frame; tale the FRAMED PHOTO (Q).
- Use the SCISSORS (R) to cut the string holding the hook; take the HOOK.
- The BIG TUSK 5/5 will be added to inventory.
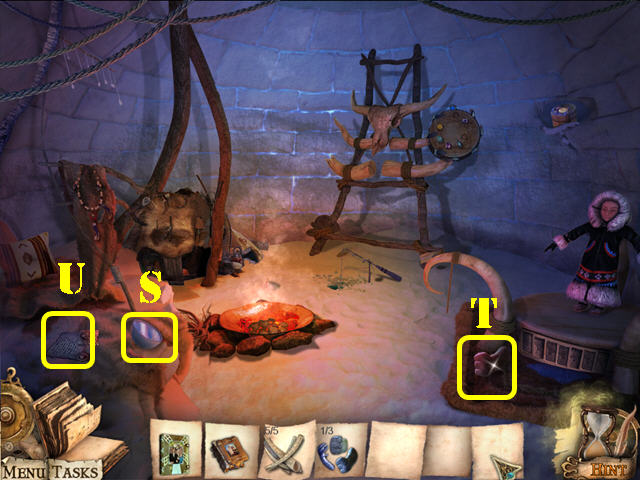
- Take the MIRROR (S).
- Grab the STATUE'S HAND 2/3 (T).
- Read the letter (U).
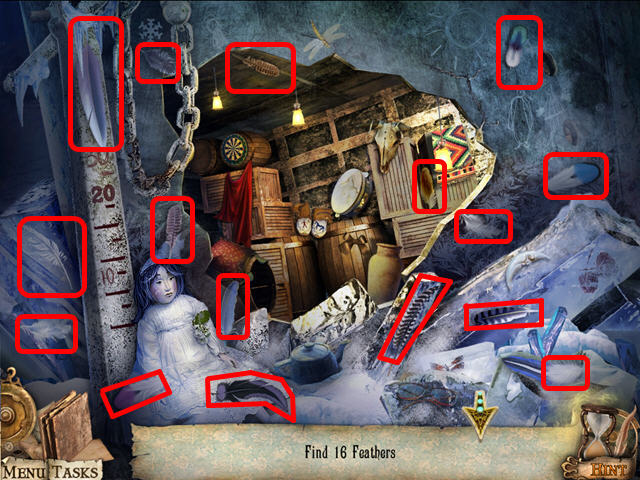
- Click down.
- Play the HOS.
- Find the 16 feathers marked in red.
- The FEATHER will be added to inventory.
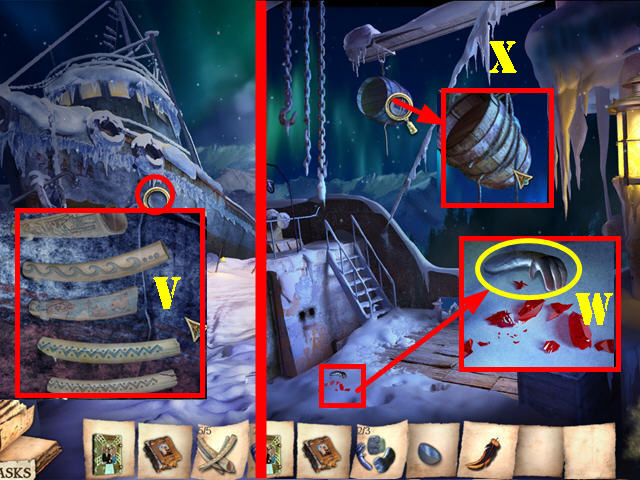
- Zoom into the side of the boat; put the 5 BIG TUSKS in the slots (V).
- Go into the ship.
- Take a closer look at the red crystals; take the STATUE'S HAND 3/3 (w).
- Examine the hanging barrel; remove the 2 ropes to activate a HOS; play it (X).
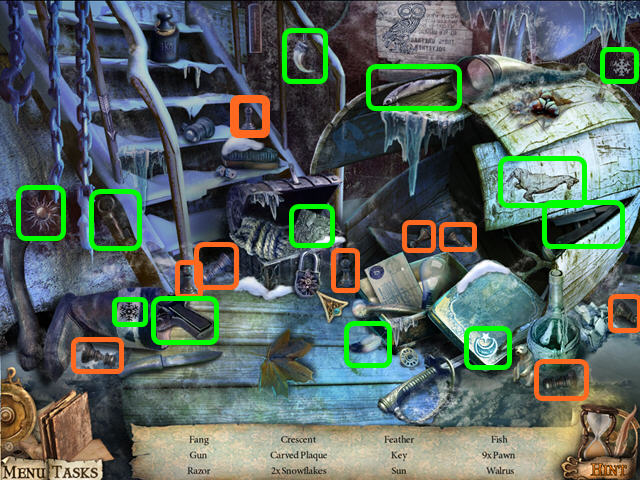
- Find all the items on the list.
- The 9 PAWNS are marked in orange.
- The CARVED PLAQUE will be added to inventory.
- Return to the inside of the igloo.
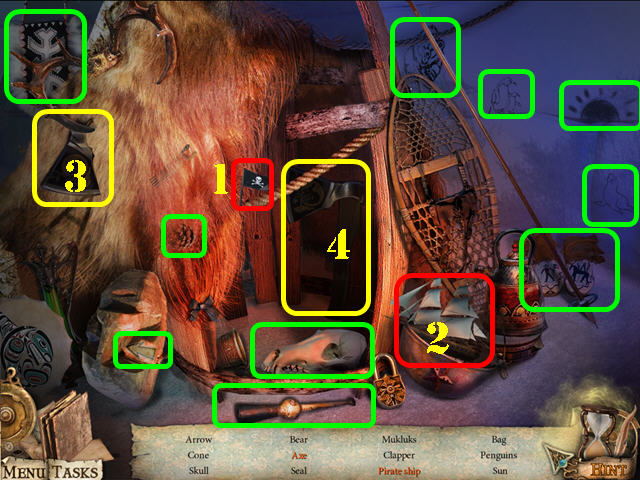
- Play the HOS.
- Drag the flag (1) to the ship; take the PIRATE SHIP (2).
- Drag the AXE BLADE (3) to the axe handle and take the AXE (4).
- The CLAPPER will be added to inventory.
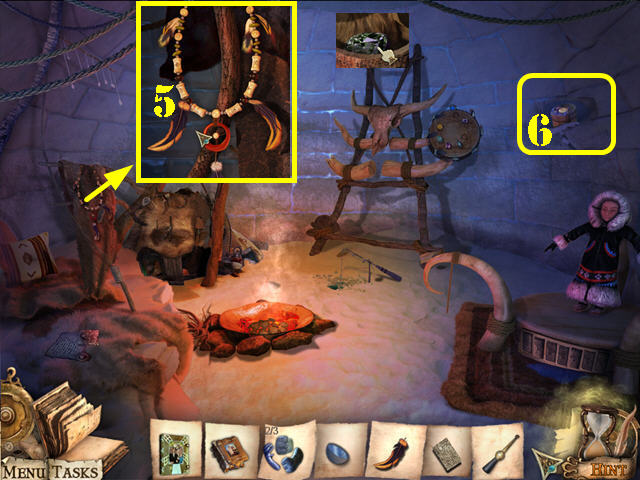
- Examine the necklace; put the FEATHER on it (5) and take the DOLL NECKLACE.
- Zoom into the puzzle in the upper right (6).
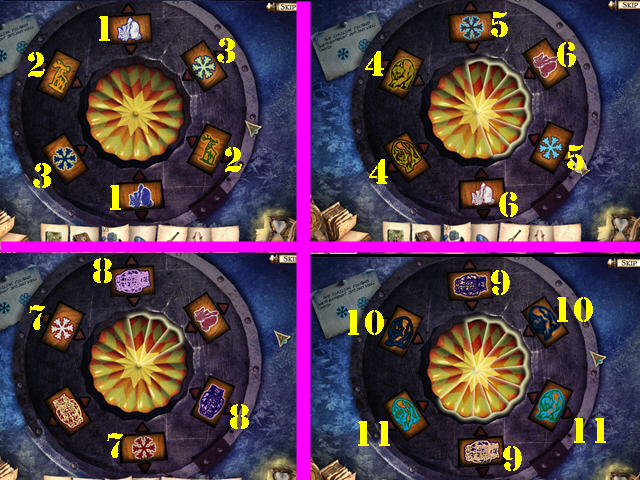
- Put the CARVED PLAQUE in the empty slot to activate a puzzle.
- Use the arrows to change the images in the slots. Find two images whose colors are the same but are inverted.
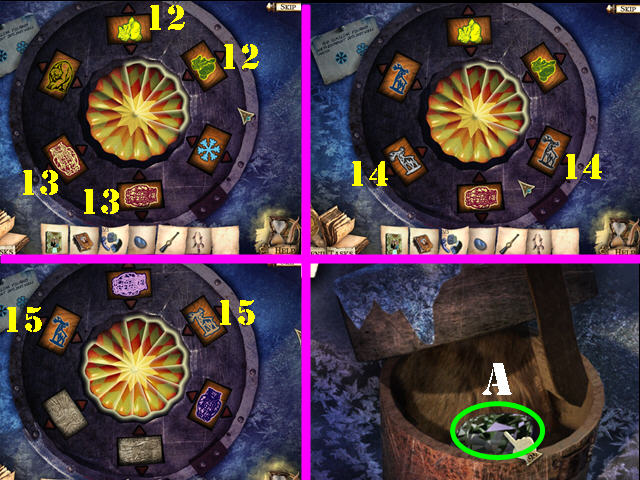
- Once you find the pairs, click on them to eliminate them and light up parts of the center.
- You will solve the puzzle once all matching pairs have been eliminated.
- Please look at the screenshots for the solutions (1 through 15). Some pairs are repeated in the screenshots, the solutions only pertain to the ones with numbers next to them.
- Zoom into the niche; take the STONE FOR TAMBOURINE (A).
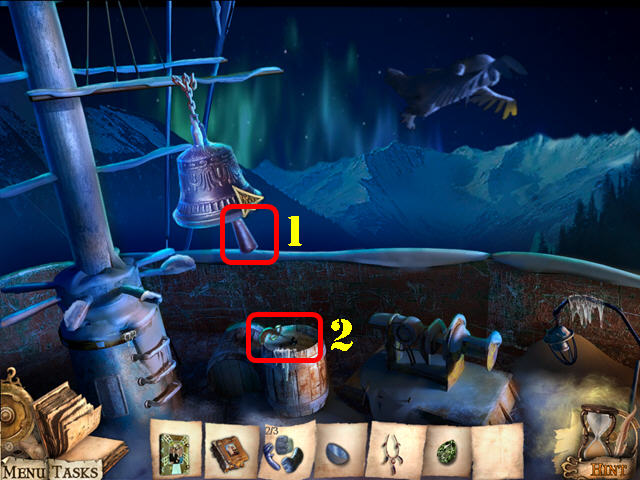
- Return to the ship's cabin.
- Head in the upper left side of the scene.
- Put the CLAPPER on the bell (1).
- Click on the bell and take the CHEST KEY (2) on the barrel.
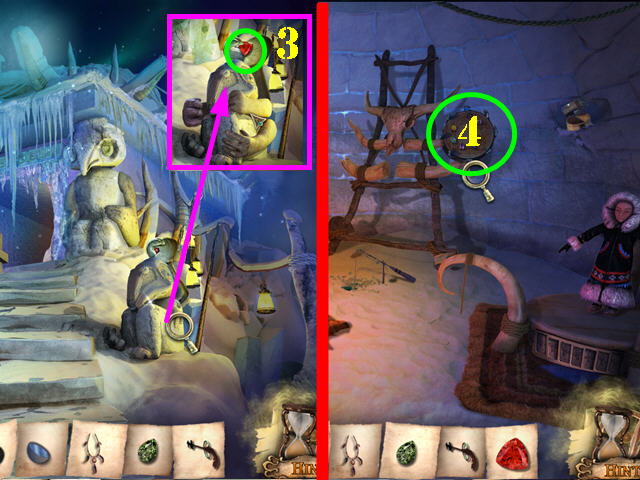
- Click down twice and head forward.
- Zoom into the statue on the right; place the 3 STATUE'S HANDS on the statue and take the STONE FOR A TAMBOURINE (3).
- Return to the igloo.
- Examine the tambourine in the back; put the 2 STONES FOR A TAMBOURINE to activate a puzzle (4).
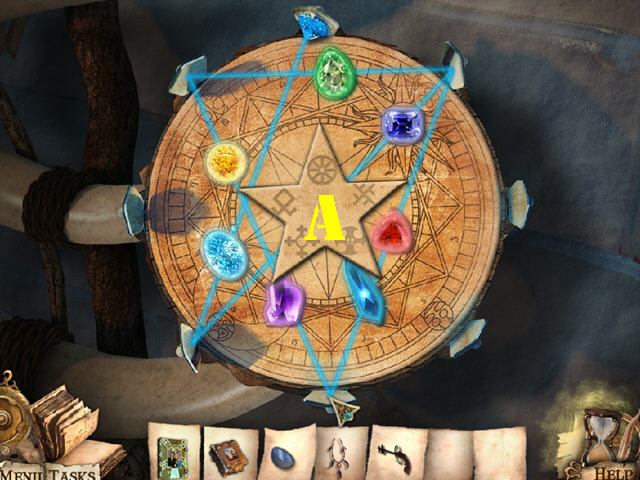
- Reposition the mirrors so the beam of light shines through all the crystals.
- Please look at the screenshot for the solution.
- Take the SEA SYMBOLS (A).
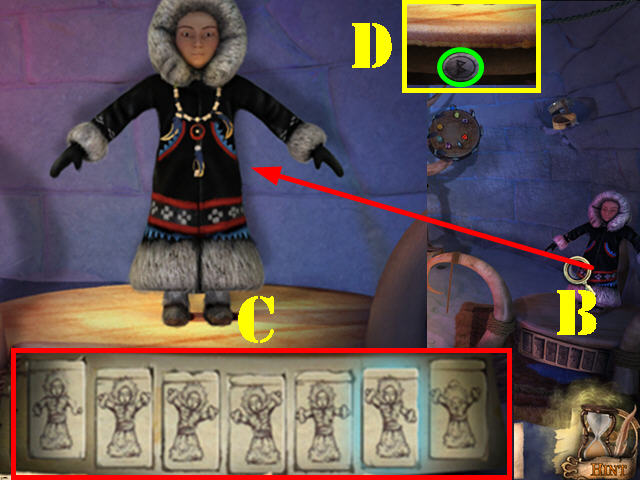
- Examine the doll; put the DOLL NECKLACE around her neck to activate a puzzle (B).
- Arrange the pictures at the bottom so they are in the same order as her dance moves.
- Hint: the first position of the pictures should be her beginning stance.
- Please look at the screenshot for the solution (C).
- Take the ALTAR SYMBOL 1/4 (D).
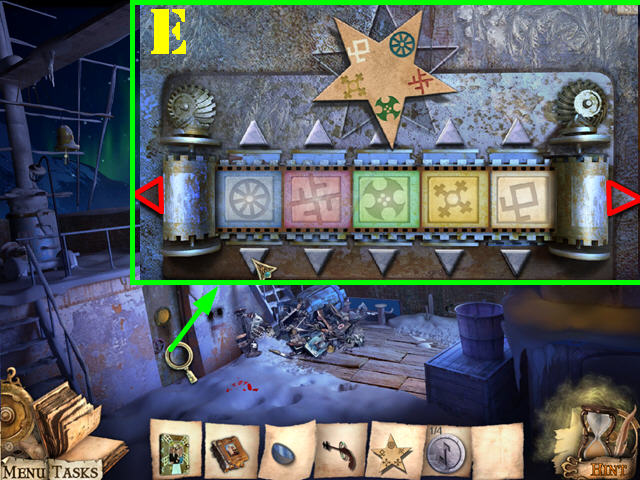
- Return to the ship.
- Zoom into the door; place the SEA SYMBOLS on the door to activate a puzzle.
- Click on the arrows above and below each symbol to change the images.
- Once you have all the symbols in the correct area, use the 2 arrows marked in red to switch the colors of each symbol until it matches the colors in the star.
- Please look at the screenshot for the solution (E). The symbols start to rotate quickly after the puzzle has been solved.
- Go through the door.
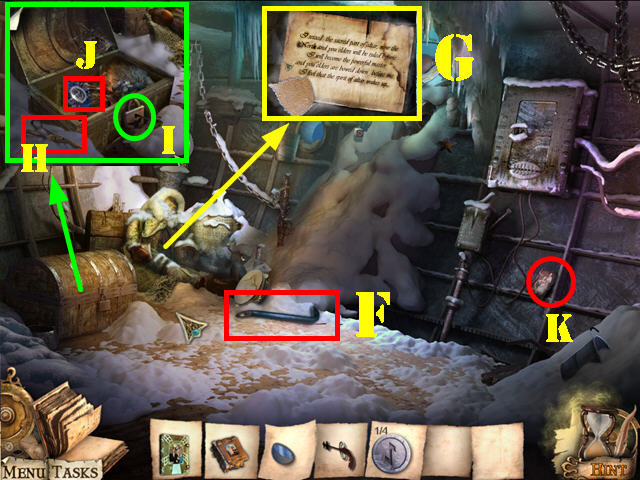
- Take the CROWBAR (F).
- Read the note (G).
- Zoom into the chest; take the SCISSORS (H).
- Use the CHEST KEY on the lock (I) to open the chest; take the ALTAR AMULET (J).
- Look at the photo (K).
- Click down.
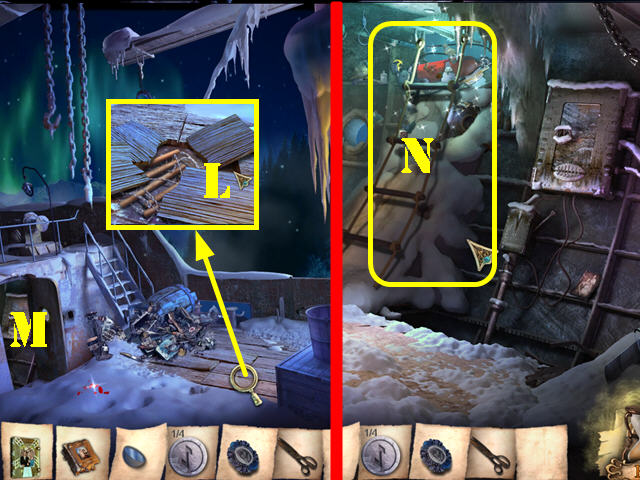
- Zoom into the floorboards.
- Use the CROWBAR on the boards and take the ROPE LADDER (L).
- Go through the door (M).
- Put the ROPE LADDER against the wall to activate a HOS; play it (N).
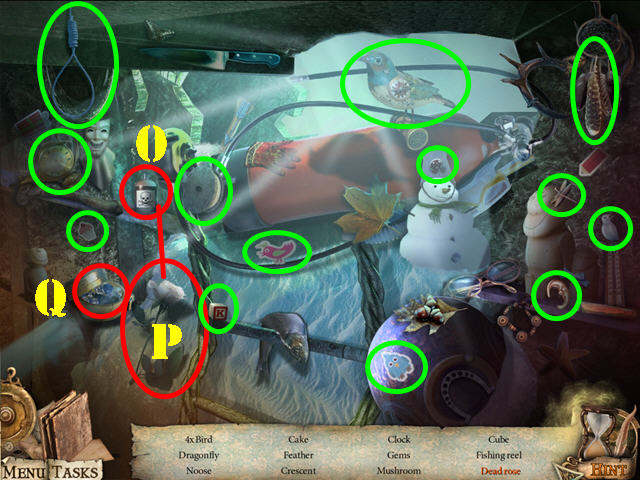
- Put the poison (O) on the flower; take the DEAD FLOWER (P).
- Open the container; take the GEMS (Q).
- The FISHING REEL will be added to inventory.
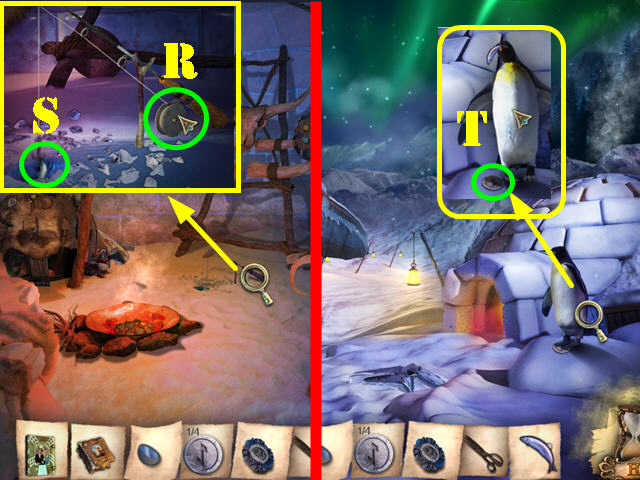
- Return to the inside of the igloo.
- Zoom into the fishing rod; put the FISHING REEL on the handle (R).
- Pull on the reel and take the FISH (S).
- Click down.
- Zoom into the penguin; give him the FISH and take the ALTAR SYMBOL 2/4 (T).
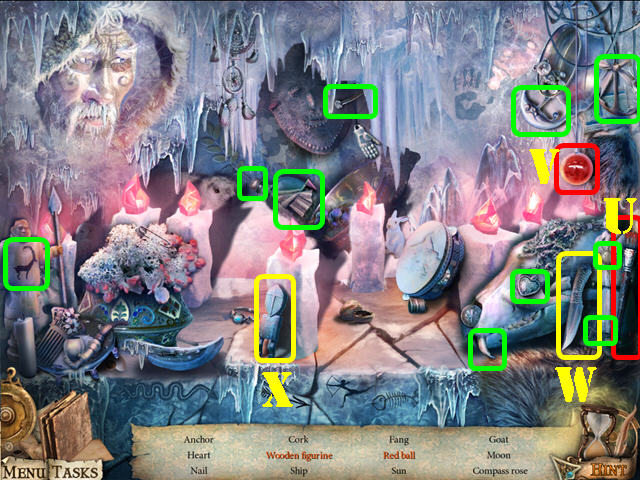
- Return to the inside of the building.
- Play the HOS.
- Put the brush (U) on the ball; take the RED BALL (V).
- Drag the knife (W) to the wooden log; take the WOODEN FIGURINE (X).
- The SHIP will be added to inventory.
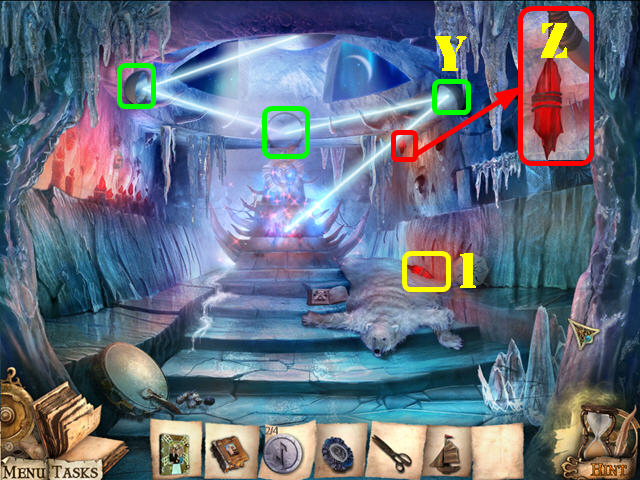
- Place the MIRROR in the upper right (Y).
- Adjust the mirrors so the light reflects onto the red crystals in the center (green).
- Zoom into the red crystal; cut the string with the SCISSORS (Z).
- Take the RED, SHINING CRYSTAL on the ground (1).
- Return to the ship.
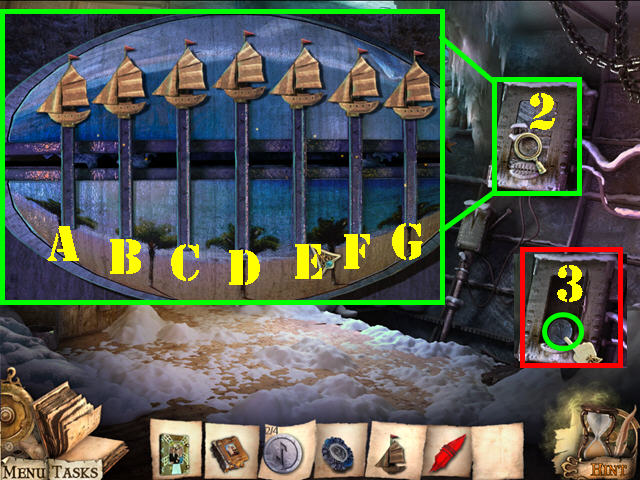
- Zoom into the device in the upper right; put the SHIP on the empty pole to activate a puzzle (2).
- Click on the ships in the correct order so they all stay up.
- To solve the puzzle click on the ships in this order: D, G, A, B, D, G, E.
- Take the ALTAR SYMBOL 3/4 (3).
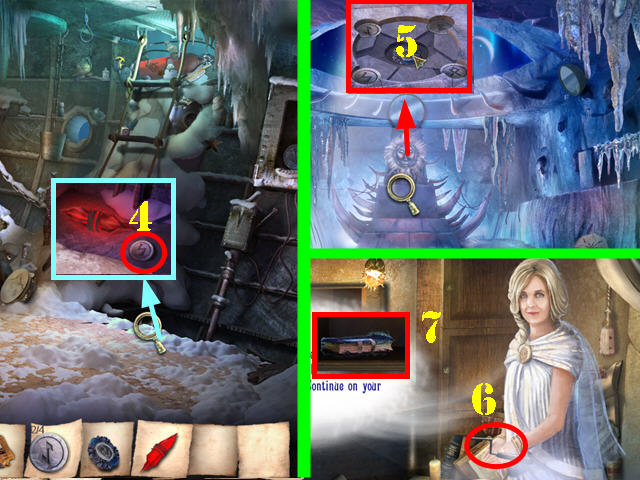
- Zoom into the darkened area; put the RED, SHINING CRYSTAL in it and take the ALTAR SYMBOL 4/4 (4).
- Return to the inside of the building.
- Zoom into the altar; put the 4 ALTAR SYMBOLS in the slots (5).
- Put the ALTAR AMULET in the center.
- Take the HANDLE from Jane's hand (6).
- Take the BOOK NORTH (7).
- Click down and go up the right steps.
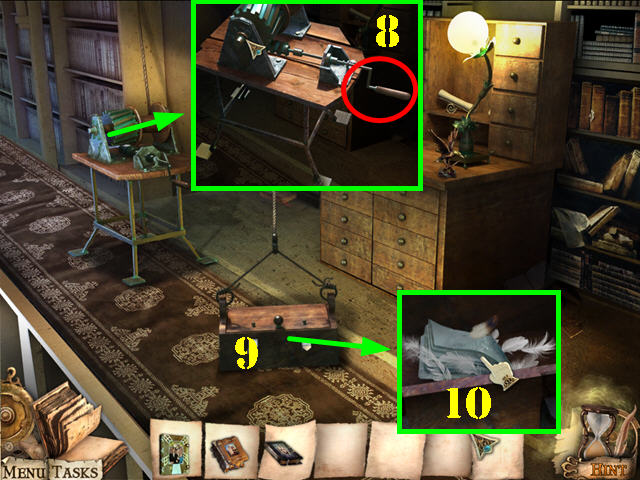
- Zoom into the device and put the HANDLE on it (8).
- Turn the handle and a box will fall down; zoom into it (9).
- Open the lid and take the STONE BOOK 1/2 (10).
- Click down and head forward.
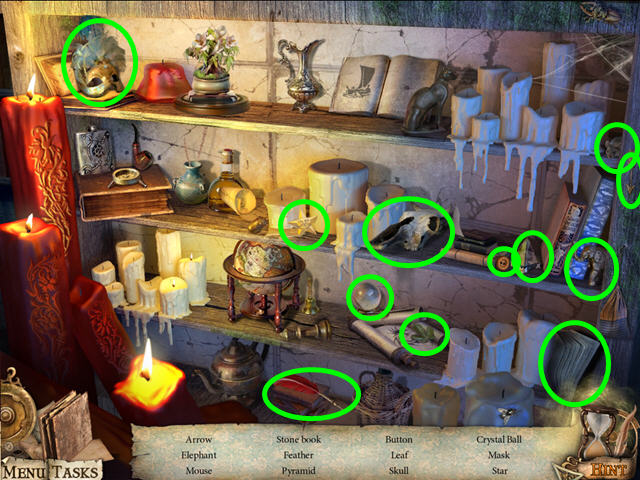
- Play the HOS.
- Find the items listed to obtain the STONE BOOK 2/2.
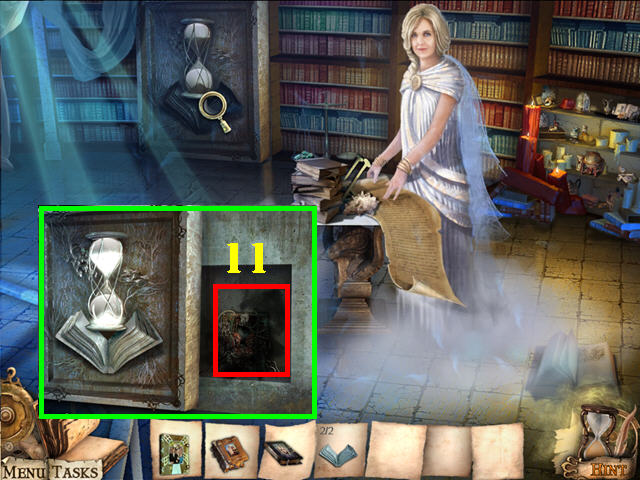
- Examine the hourglass; put the 2 STONE BOOK pieces below it.
- Click on the book behind the wall (11).
Chapter 4: Strange Island
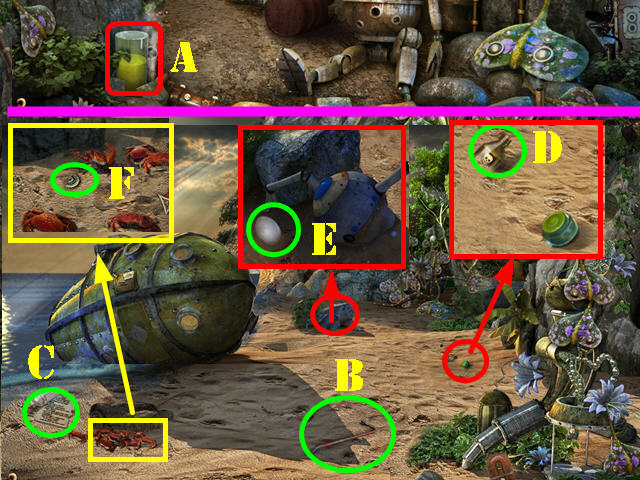
- Take the YELLOW LIQUID (A).
- Head left.
- Take the CROWBAR (B).
- Read the note (C).
- Examine the sand; take the BOTTLE WITH POISON (D).
- Zoom into the rock; take the EGG (E).
- Examine the crabs; move them all out of the way; take the STONE FLOWER 1/2 (F).
- Click down.
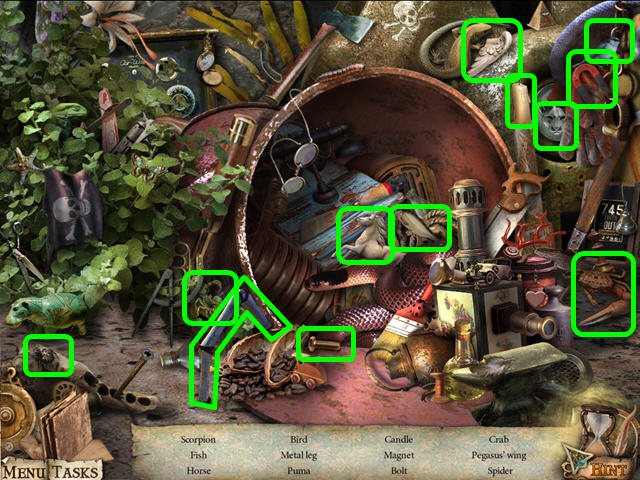
- Use the CROWBAR on the barrel to trigger a HOS; play it.
- Find all the listed items to obtain the SPIDER'S LEG.
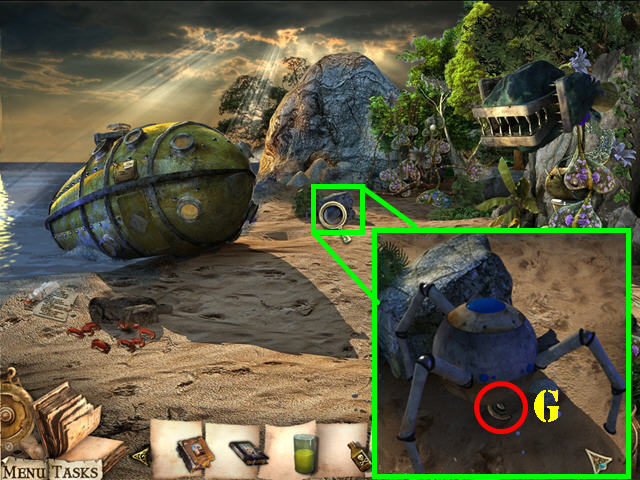
- Go back to the beach.
- Zoom into the spider; put the SPIDER'S LEG on it and take the STONE FLOWER 2/2 (G) underneath it.
- Click down.
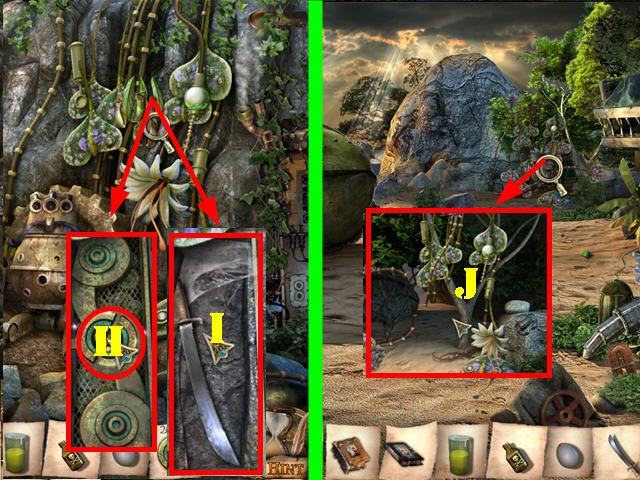
- Zoom into the plants in the upper right; move all the leaves out of the way.
- Put the 2 STONE FLOWERS in the center (H).
- Click on the stone and take the MACHETE (I).
- Return to the beach.
- Zoom into the plants; cut the plants with the MACHETE (J).
- Go through the pass.
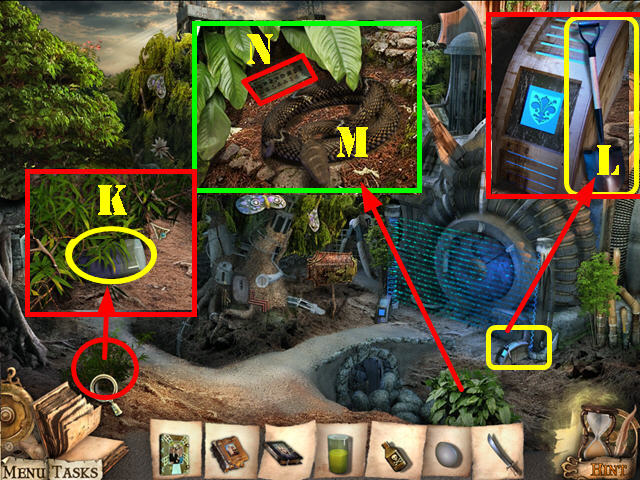
- Zoom into the bush in the lower left; cut them with the MACHETE twice and take the BLUE LIQUID (K).
- Examine the right side of the invisible fence; take the SPADE (L).
- Zoom into the snake and give it the EGG (M).
- Take the ROBOT PART (N).
- Head left.
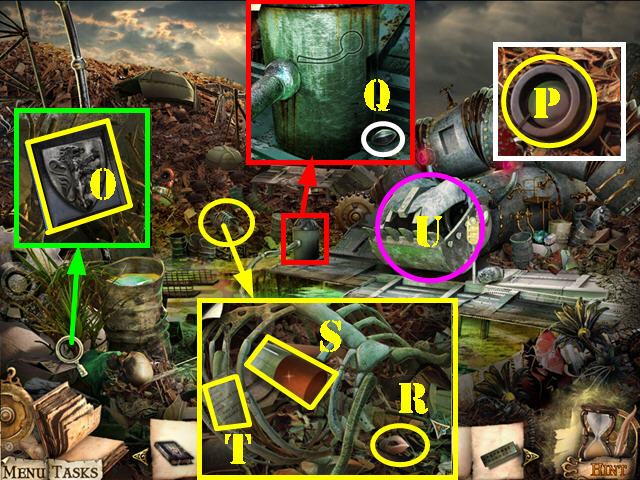
- Zoom into the bushes in the lower left; cut them with the MACHETE 3 times and take the GENERATOR KEY (O).
- Examine the debris on the right; push aside the scraps and take the ROBOT'S EYE 1/3 (P).
- Zoom into the water mechanism; take the SEED (Q).
- Examine the rib cage on the left; take the SEED (R).
- Remove the tape holding the 3 bones in place and take the RED LIQUID (S).
- Read the note (T).
- Click on the mechanical caterpillar's mouth; you need to find 2 horns (U).
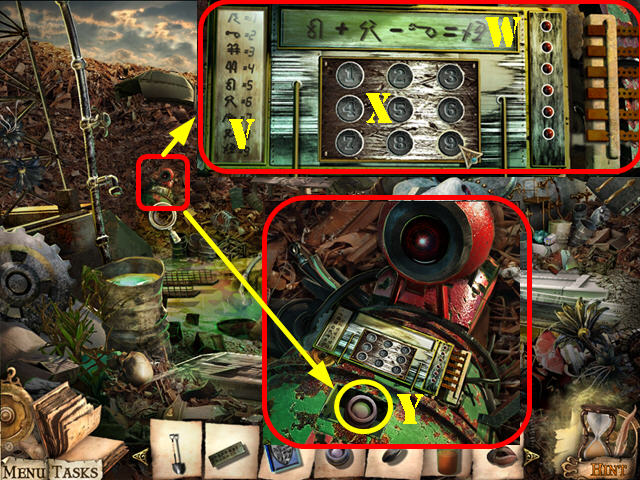
- Zoom into the robot on left twice and put the ROBOT PART on the left side of the device to activate a puzzle (V).
- Solve the equations in the upper center (W) using the codes on the left (V).
- You have to solve six equations to complete the puzzle. Just enter the solution in the center panel (X) by pressing on the correct number.
- The next equation will appear after a correct solution has been entered. If you enter an incorrect solution, the puzzle will automatically reset.
- The answers in order of appearance are: 3 – 5 – 4 – 2 – 7 – 9.
- Take the ROBOT'S EYE 2/3 (Y).
- Click down twice.
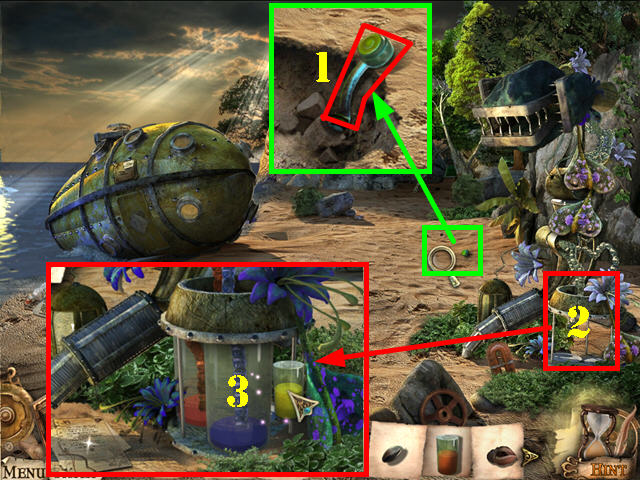
- Zoom into the sand; use the SPADE in the sand 3 times and take the CATERPILLAR'S HORN (1).
- Zoom into the device (2).
- Pour the YELLOW LIQUID, RED LIQUID, and BLUE LIQUID into the flower to activate a HOS; play it (3).
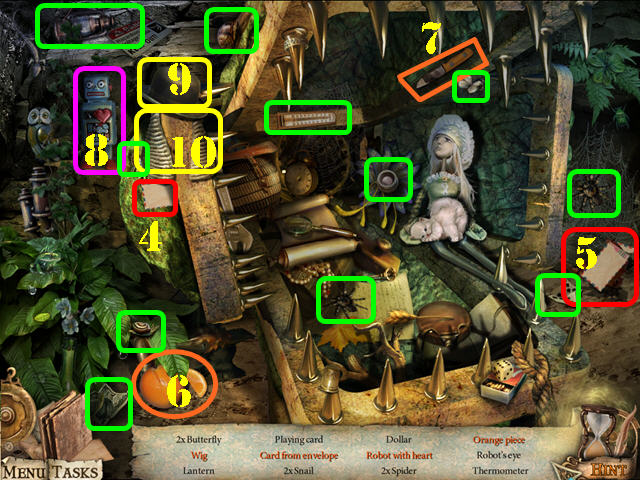
- Drag the envelope (4) to the crab; take the CARD FROM ENVELOPE (5).
- Slice the ORANGE (6) with the knife (7); take the ORANGE PIECE.
- Click on the robot; take the ROBOT WITH HEART (8).
- Remove the hat (9); take the WIG (10).
- The ROBOT'S EYE 3/3 will be added to inventory.
- Click down.
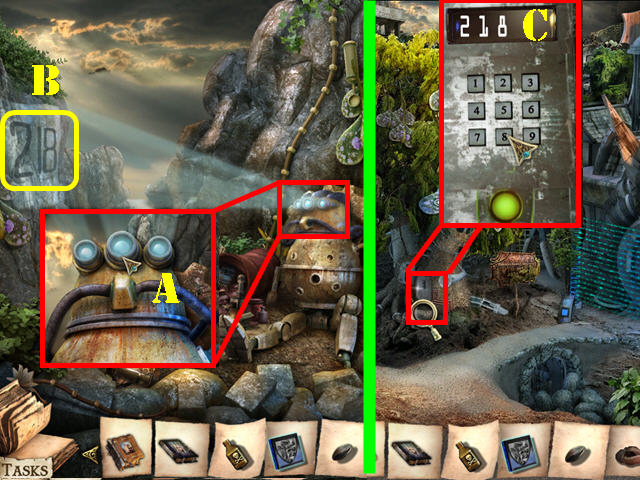
- Zoom into the robot; put the 3 ROBOT'S EYES into the eye sockets (A).
- Note the number '218' projected on the wall (B).
- Go to the beach and head right.
- Examine the panel; enter the numbers 218 on the keypad to activate a HOS; play it (C).
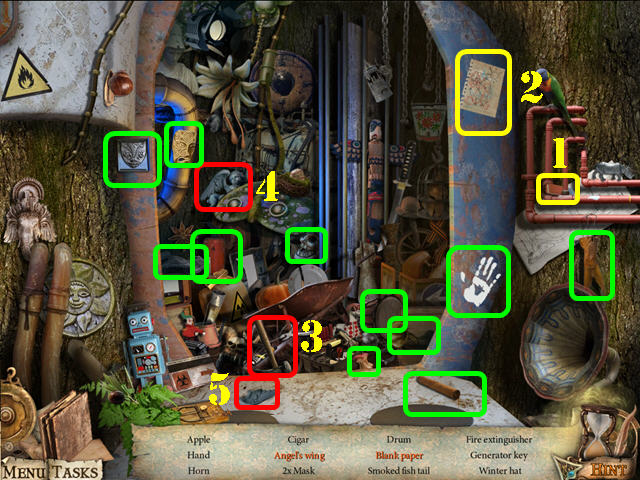
- Put the eraser (1) on the paper; take the BLANK PAPER (2).
- Drag the hammer (3) to the angel (4) and take the ANGEL'S WING (5) on the ground.
- The GENERATOR KEY will be added to inventory.
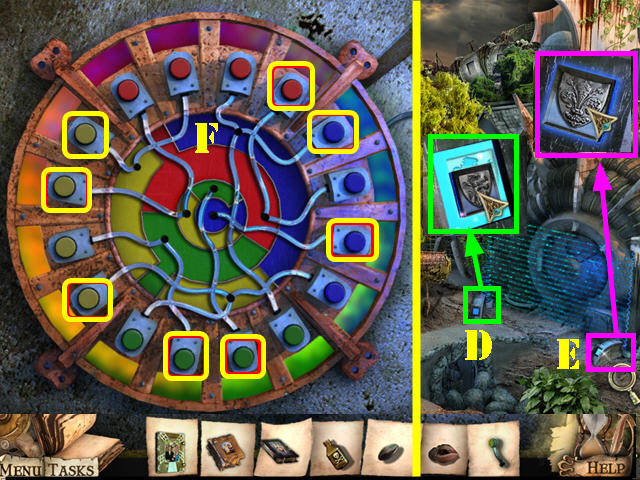
- Zoom into the lower left and lower right side of the protective field; put the 2 GENERATOR KEYS in the slots (D and E).
- Zoom into the door; click on the cover to activate a puzzle.
- Click on the buttons to fill the center with colors. Colors next to each other have to be of a different color.
- Watch the path each tube leads to.
- To solve the puzzle, click on the buttons marked in yellow on the screenshot (F). The buttons can be pushed in any order.
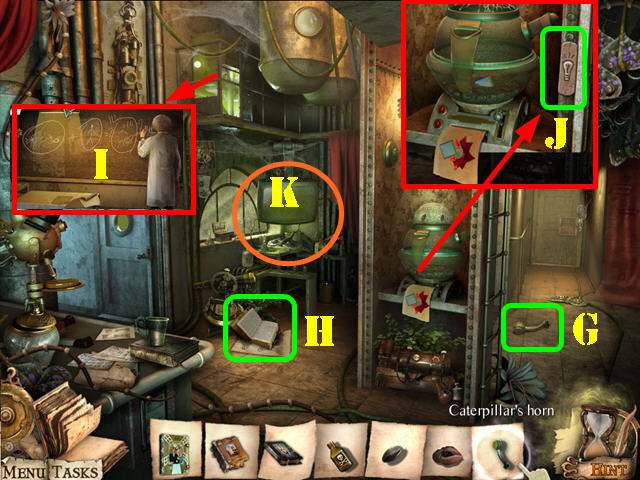
- Enter the lab.
- Take the CATERPILLAR'S HORN (G).
- Look at the book (H).
- Look through the window (I).
- Zoom into the robot; take the PLATE WITH BULB (J).
- Go into the office (K).
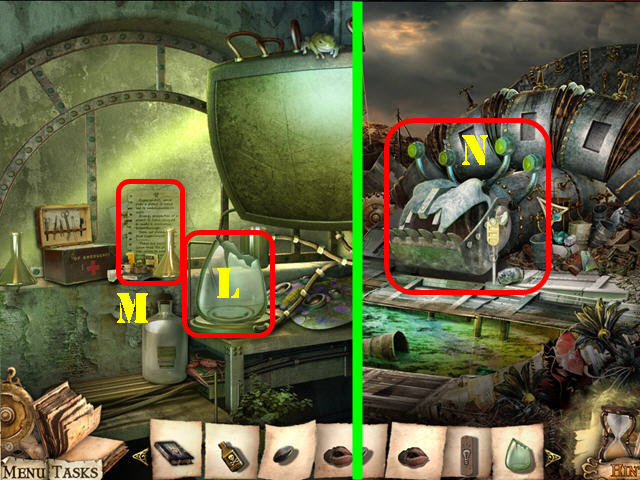
- Take the BROKEN FLASK (L).
- Read the note (M).
- Click down twice and head left.
- Put the 2 CATERPILLAR'S HORNS on the mechanical caterpillar.
- Go through the caterpillar's mouth (N).
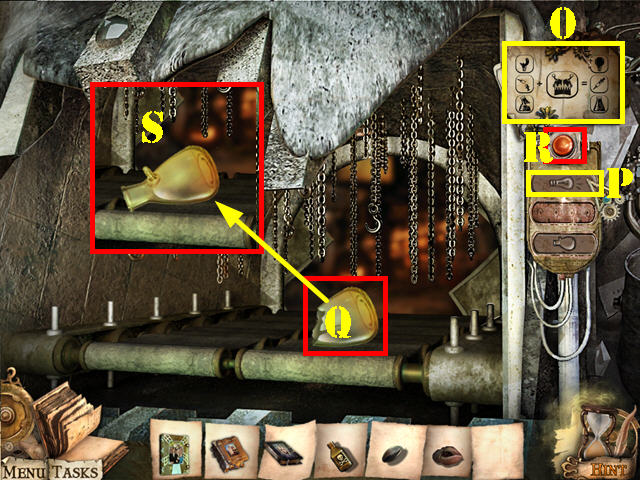
- Look at the note (O).
- Put the PLATE WITH BULB on the panel (P).
- Put the BROKEN FLASK on the conveyor belt (Q).
- Push the red button (R).
- Take the FLASK (S).
- Click down twice.
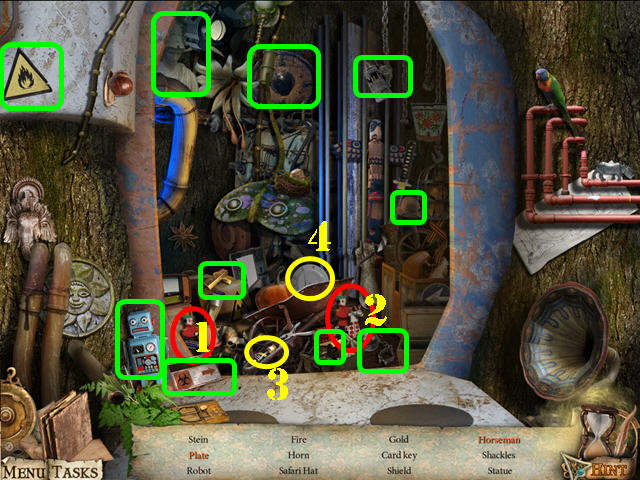
- Play the HOS.
- Drag the soldier (1) to the horse (2); take the HORSEMAN.
- Drag the glue (3) to the broken plate; take the PLATE (4).
- The CARD KEY will be added to inventory.
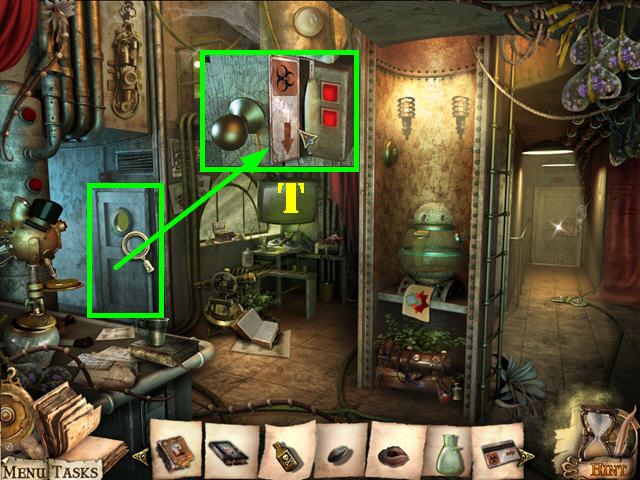
- Go through the lab door.
- Zoom into the left door; use the CARD KEY in the slot and go through the door (T).
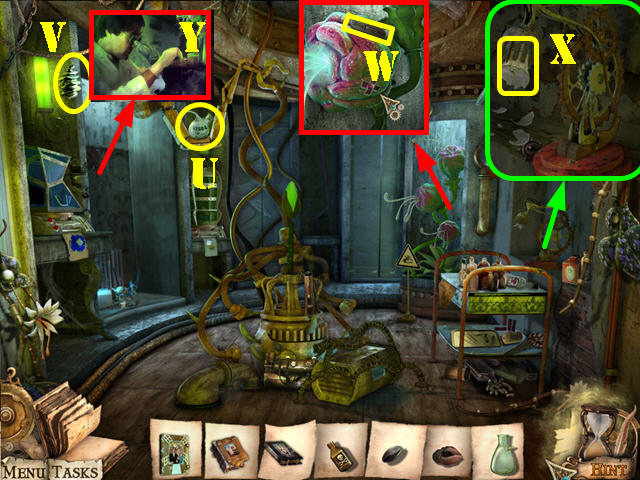
- Take the ACID (U).
- Grab the SEED (V).
- Zoom into the plant; take the PLATE WITH SYRINGE (W).
- Zoom into the lamp; take the BROKEN BULB (X).
- Look through the left window (Y).
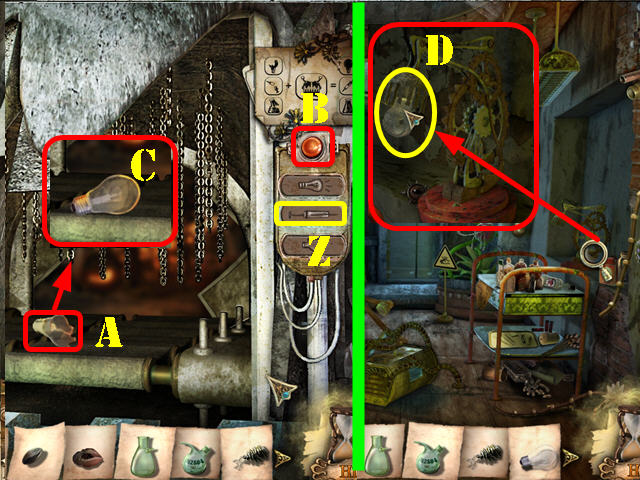
- Return to the inside of the mechanical caterpillar.
- Put the PLATE WITH SYRINGE on the panel (Z).
- Put the BROKEN BULB on the conveyor belt (A).
- Push the red button (B).
- Take the FULL LIGHT BULB (C).
- Return to the lab test chamber.
- Zoom into the lamp; put the FULL LIGHT BULB in it to activate a HOS: play it (D).
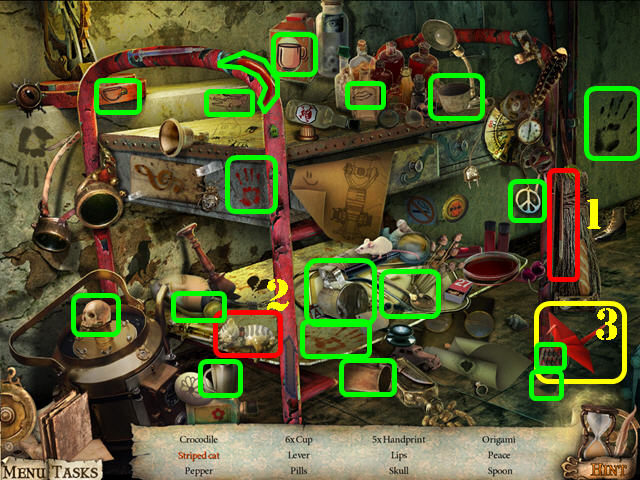
- Put the brush (1) on the cat; take the STRIPED CAT (2).
- Click on the paper; take the ORIGAMI (3).
- The HANDLE will be added to inventory.
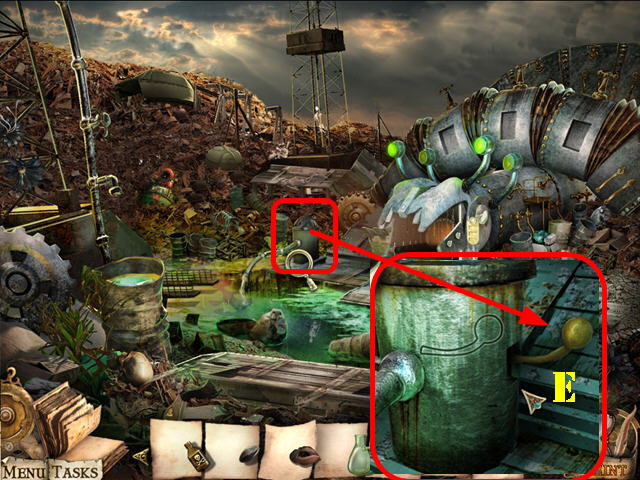
- Return to the outside of the mechanical caterpillar.
- Zoom onto the water device and put the HANDLE on it (E).
- Click on the handle to drain the water and activate a HOS; play it.
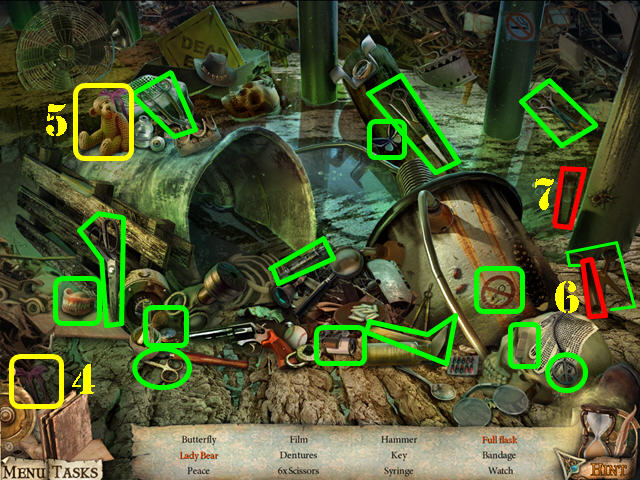
- Drag the bow (4) to the bear; take the BEAR WITH BOW (5).
- Click on the flask (6); take the FULL FLASK (7).
- The BROKEN SYRINGE will be added to inventory.
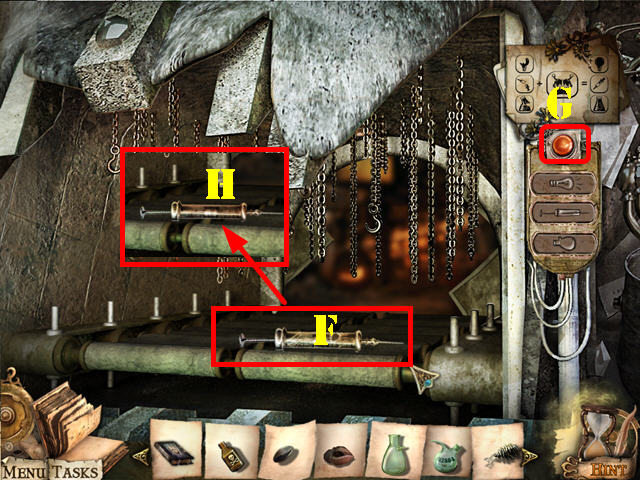
- Go inside the mechanical caterpillar.
- Put the BROKEN SYRINGE on the belt (F).
- Push the red button (G).
- Take the REPAIRED SYRINGE (H).
- Return to the lab test chamber.
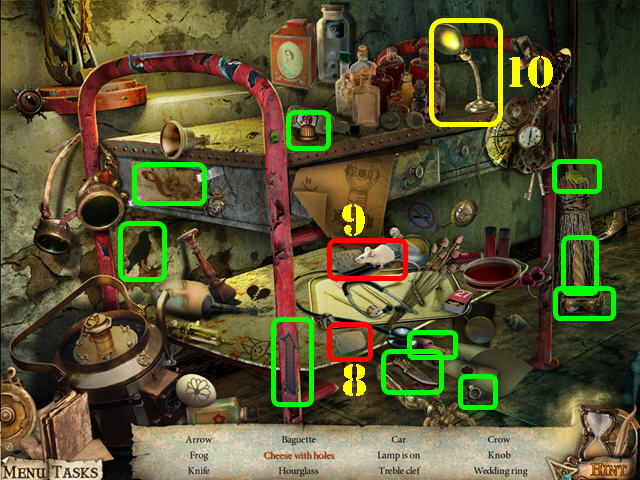
- Play the HOS.
- Drag the cheese to the mouse (8); take the CHEESE WITH HOLES (9).
- Click on the lamp's base; take the LIT LIGHT BULB(10).
- The KNOB will be added to inventory.
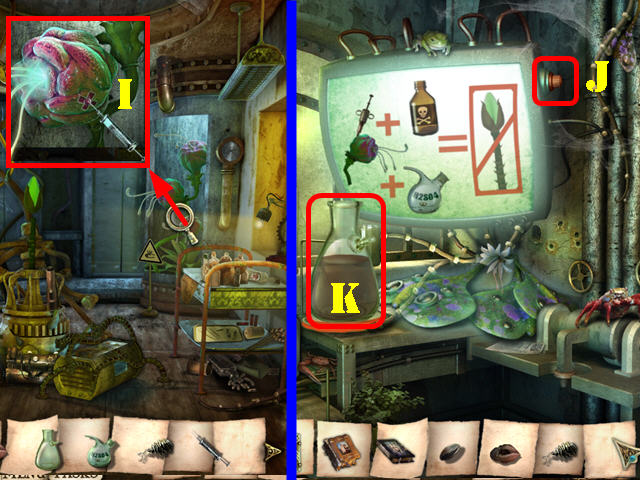
- Examine the plant; stick it with the REPAIRED SYRINGE (I).
- Take the SYRINGE WITH POISON.
- Click down and go into the office.
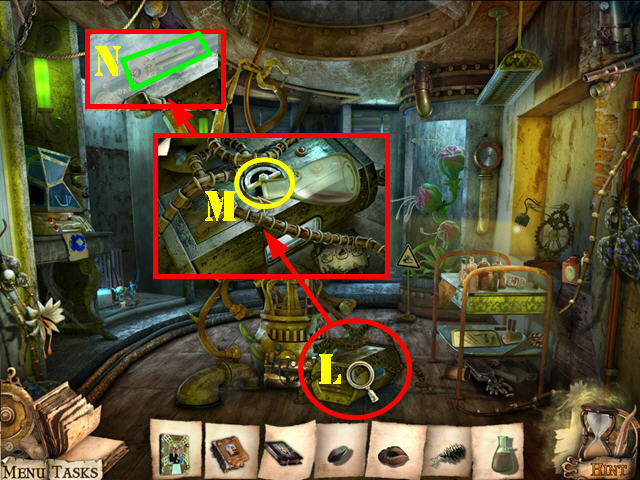
- Put the KNOB on the side of the monitor to see some instructions appear (J).
- Put the FLASK on the stand (K).
- Put the SYRINGE WITH POISON, the ACID, and the BOTTLE WITH POISON into the flask.
- Take the ACID.
- Return to the lab test chamber.
- Zoom into the box on the ground; look at the note (L).
- Pour the ACID on the cable (M).
- Click on the lock to open the box and take the KEY (N).
- Click down.
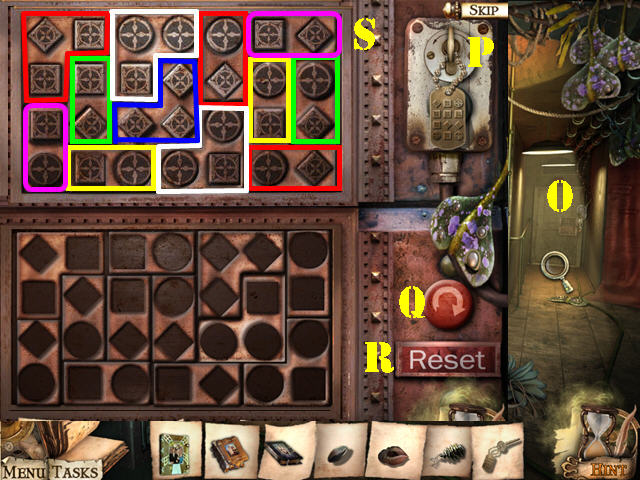
- Zoom into the right door (O); insert the KEY in the lock to activate a puzzle (P).
- Move all the shapes from the bottom of the door to the correct space above.
- Use the rotate button to switch the positions of the pieces (Q).
- Hit the RESET button to start over (R).
- Please look at the screenshot for the solution (S).
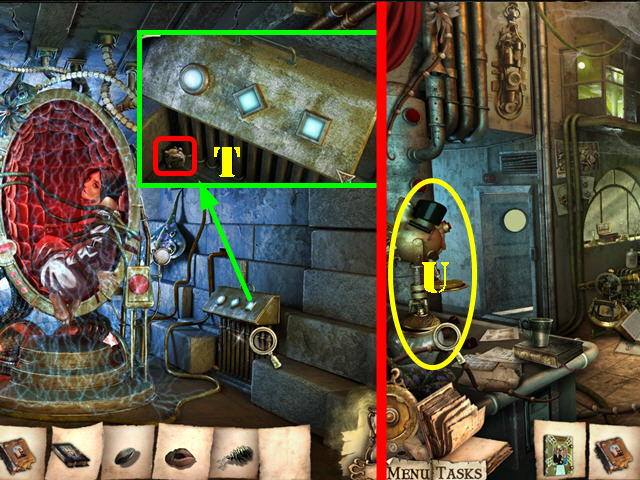
- Go through the door after the puzzle has been solved.
- Zoom into the mechanism on the right; take the last SEED (T).
- Click down.
- Zoom into the device on the left; put the 4 SEEDS into the box to activate a puzzle (U).
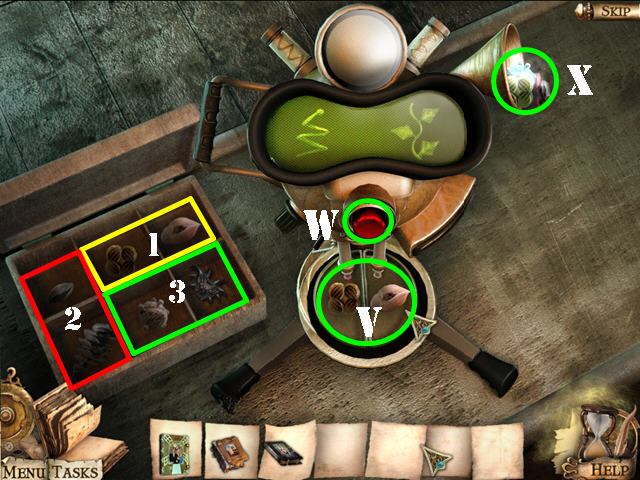
- Choose the correct combination of seeds and placed them on the dish on the device (V).
- Click on the red button (W) to enter your selection. If the combination is correct, take the SEED that comes out of the top of the device (X).
- Repeat the steps 2 more time to get all 3 SEEDS.
- Please look at the screenshot for all 3 sets of seeds (1, 2, and 3).
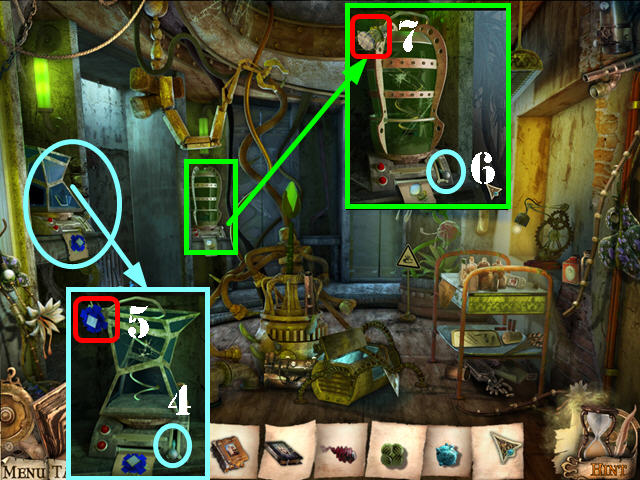
- Return to the lab.
- Zoom into the blue device; insert the blue seed and click on the handle (4).
- Take the SQUARE (5).
- Zoom into the green device; insert the green seed and click on the handle (6).
- Take the CIRCLE (7).
- Click down.
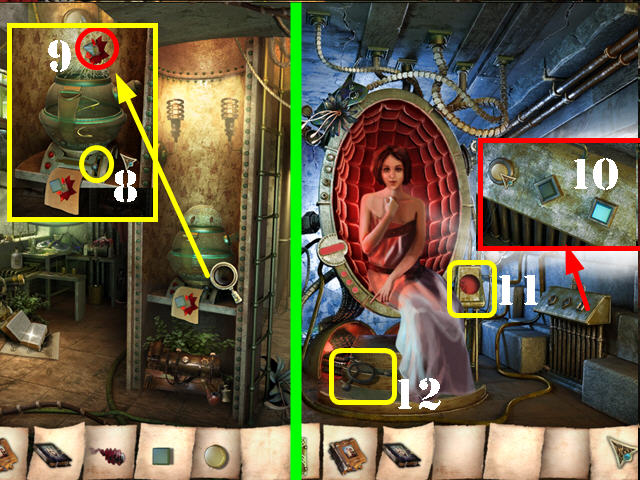
- Zoom into the red device; insert the red SEED and click on the handle (8).
- Take the DIAMOND (9).
- Go through the right door.
- Zoom into the mechanism on the right; insert the SQUARE, DIAMOND, and CIRCLE into their matching spots (10).
- Zoom into the panel and press the red button (11).
- Take the VALVE (12).
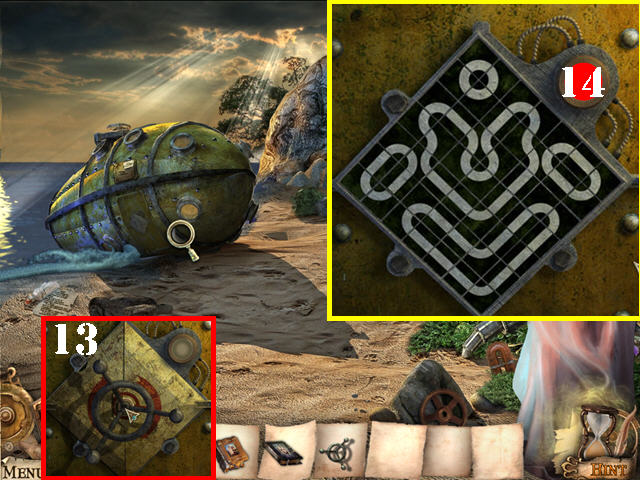
- Return to the beach.
- Zoom into the submarine; insert the VALVE on the cover.
- Click on the cover to activate the puzzle (13).
- Rotate the squares to make the correct pattern.
- Please look at the screenshot for the solution and then click on the button (14) to enter your selection.
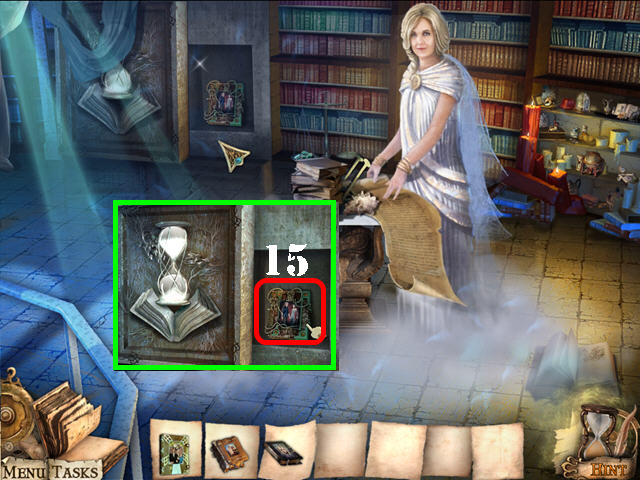
- Examine the niche; take the BOOK ISLAND (15).
- Click down and head left.
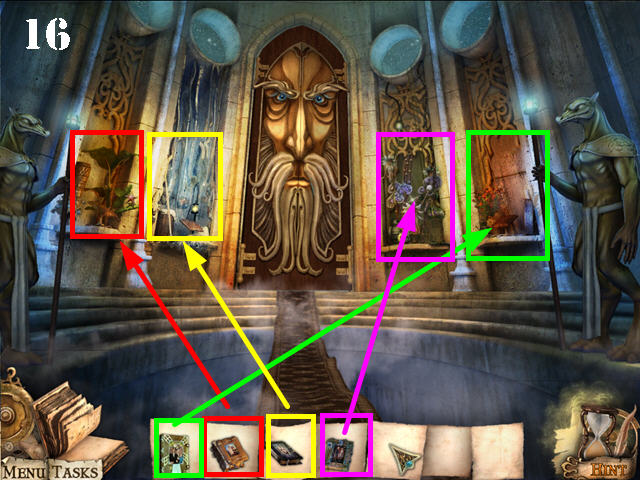
- Zoom into each of the 4 niches in the room.
- Place the 4 books in the niches shown on the screenshot (16).
- Congratulations, you've completed Reincarnations: Back to Reality!
Created at: 2011-11-05

