

Walkthrough Menu
- General Tips
- Chapter 1: The Village
- Chapter 2: The Forest
- Chapter 3: Mountain Pass
- Chapter 4: The Swamp
- Chapter 5: The Estate
- Chapter 6: Druid Grove
General Tips
- This is the official guide for Revived Legends: Road of the Kings!
- This guide will not mention each time you have to zoom into a location; the screenshots will show each zoom scene.
- Hidden-object puzzles are referred to as HOPs in this guide. Items listed in green are hidden or require additional actions to locate. Interactive items in HOPs are color-coded.
- Mini-games and HOPs are sometimes randomized; your solution may vary.
- This guide will give step-by-step solutions for all puzzles which are not random. Please read the instructions in the game for each puzzle.
Chapter 1: The Village
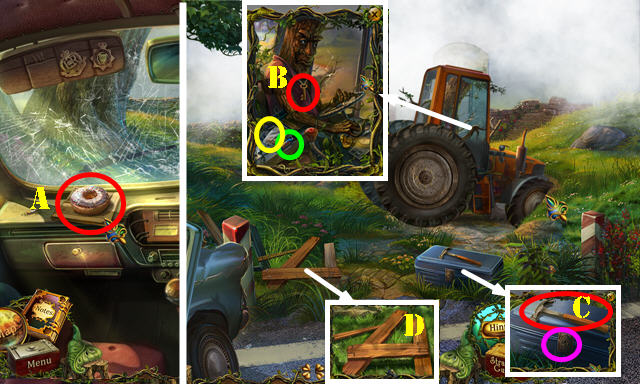
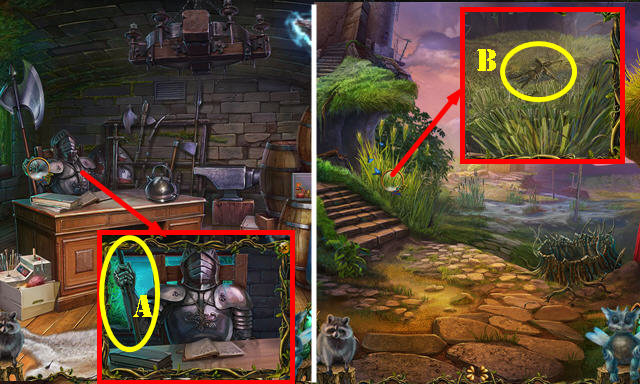
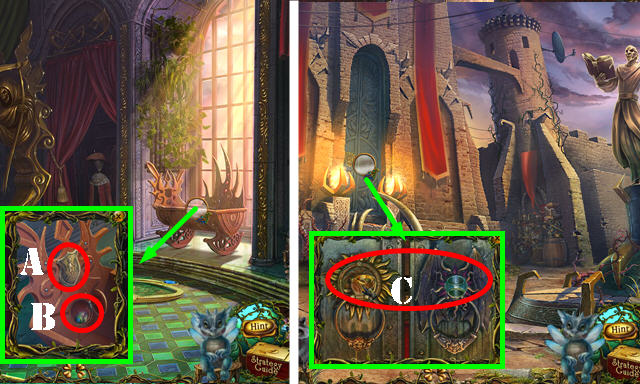
- Take the DOUGHNUT (A).
- Exit the car through the right door.
- Take the TOOLBOX KEY (B) and BAG OF SEEDS (yellow). Open the compartment; take the BATTERY (green).
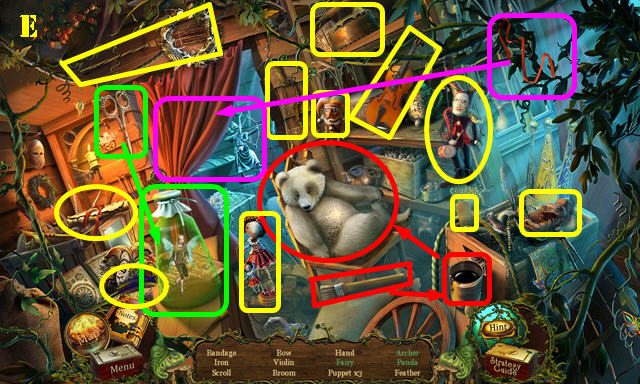
- Take the HAMMER (C). Use the TOOLBOX KEY in the lock (purple); turn the key to activate a HOP.
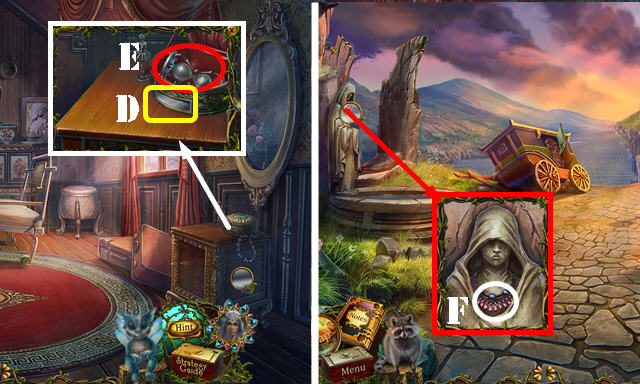
- Use the HAMMER on the nails to get the NAILS (D), then take the BOARDS.
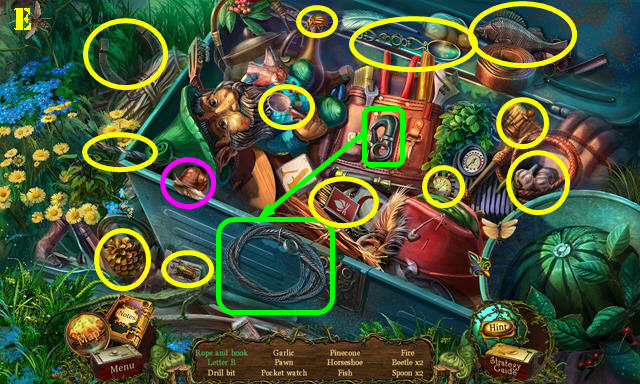
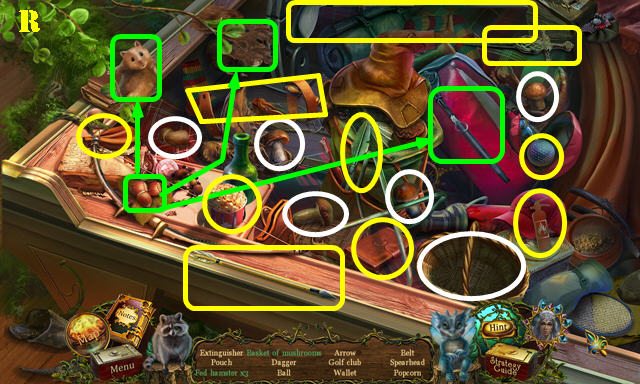
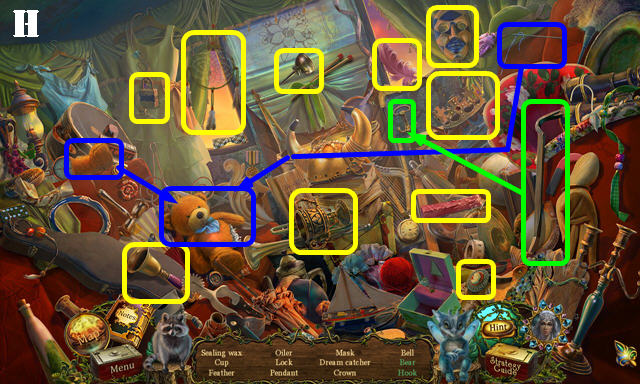
- Play the HOP.
- You receive the ROPE AND HOOK (E).
- Return to the Car.
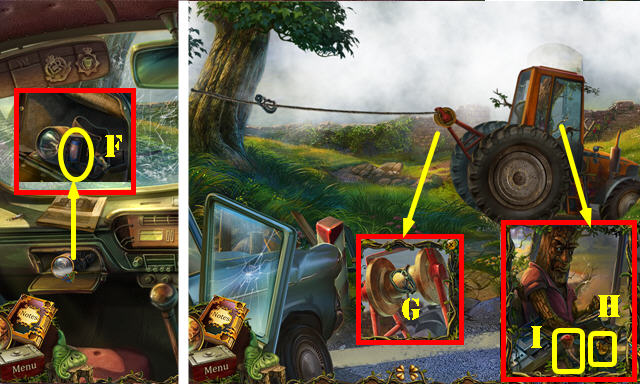
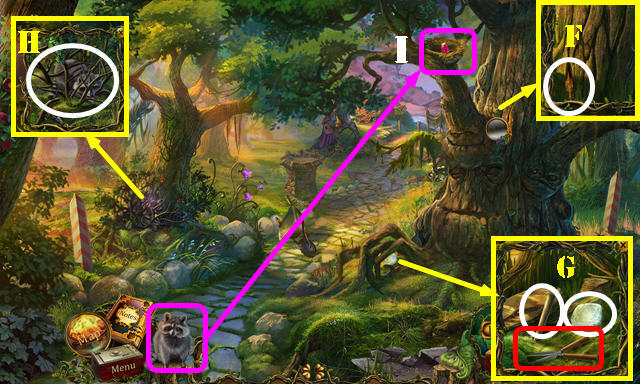
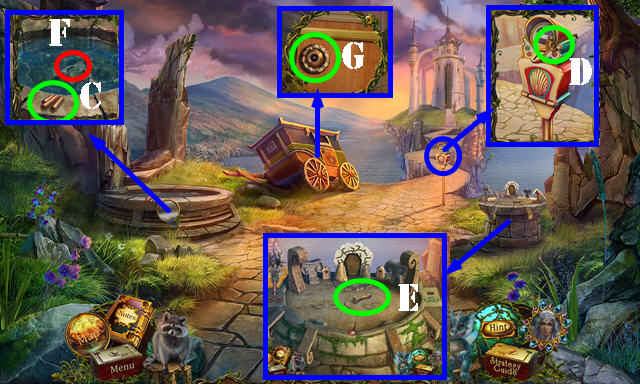
- Open the glove compartment. Place the BATTERY in the slot; close the cover and take the FLASHLIGHT (F).
- Exit the car.
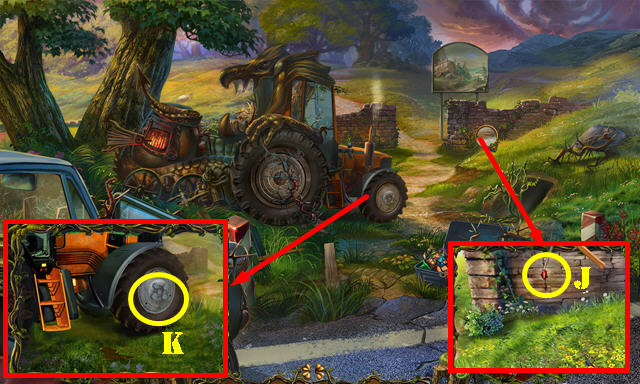
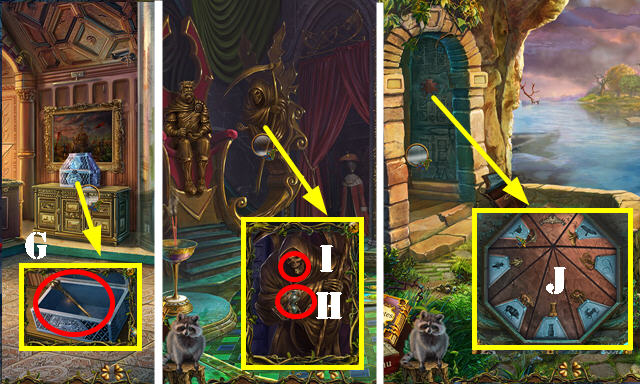
- Place the ROPE AND HOOK on the tractor (G); touch the rope on the ground.
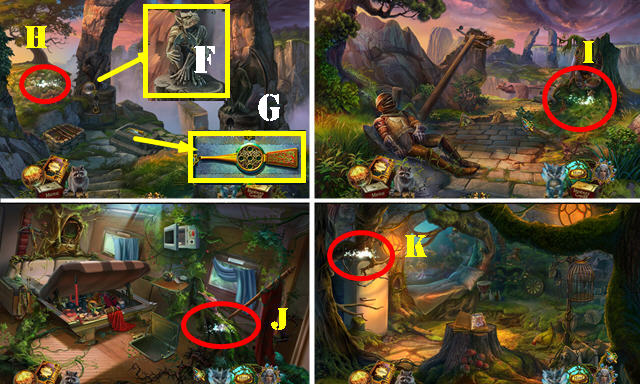
- Turn the key (H) and pull the lever (I).
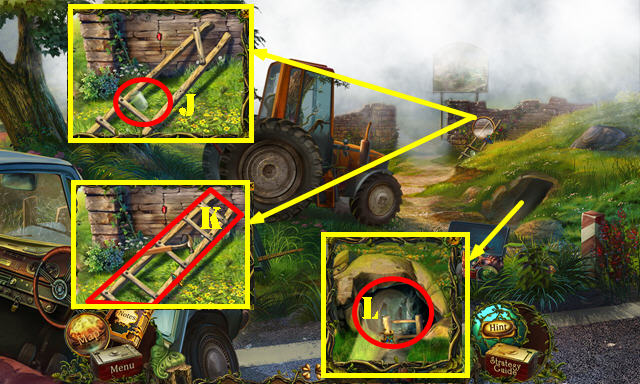
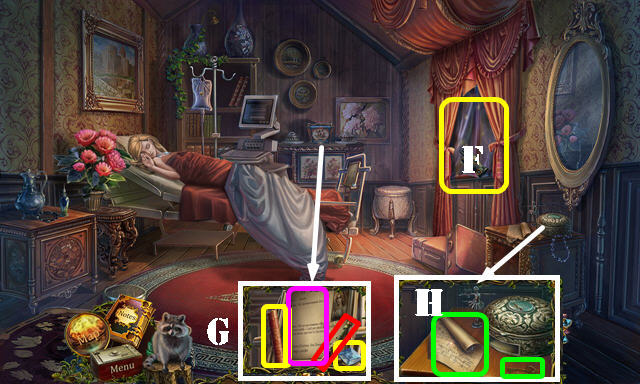
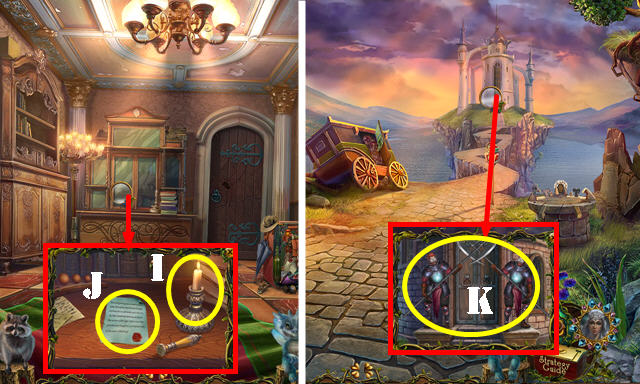
- Take the EMPTY JAR (J).
- Place the BOARDS and then the NAILS on the broken ladder (K). Use the HAMMER on the nails and take the LADDER.
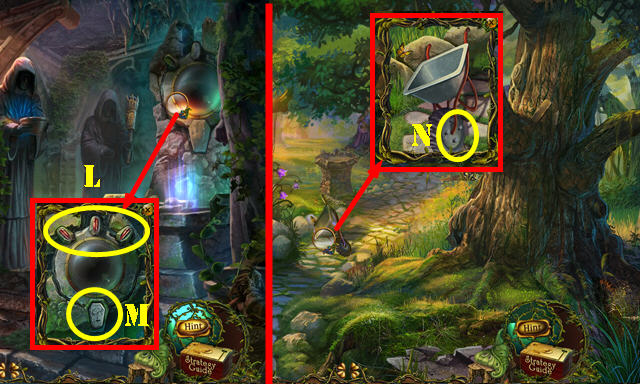
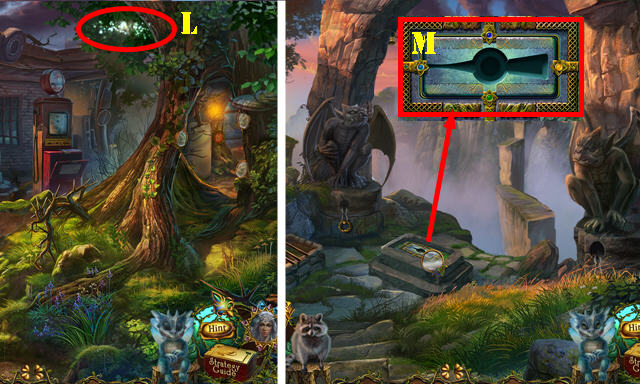
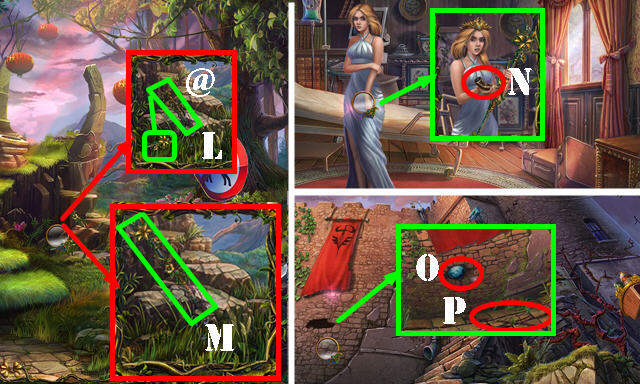
- Place the FLASHLIGHT in the hole and then put down the LADDER (L).
- Go down into the Tomb.
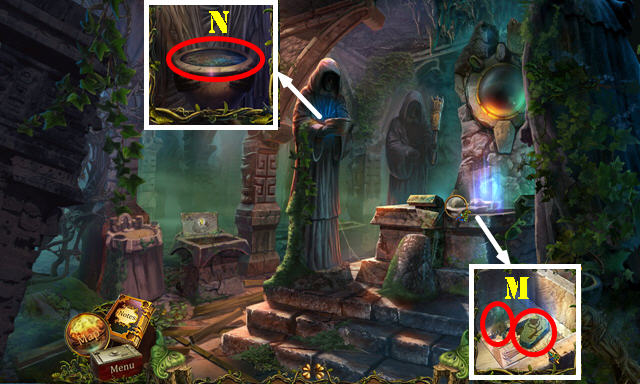
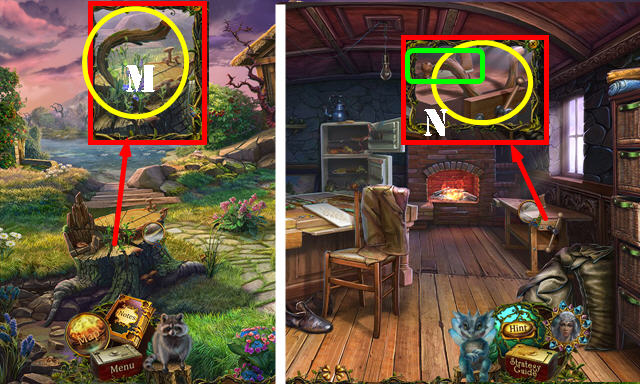
- Touch the lantern on the right for a cut scene (not pictured).
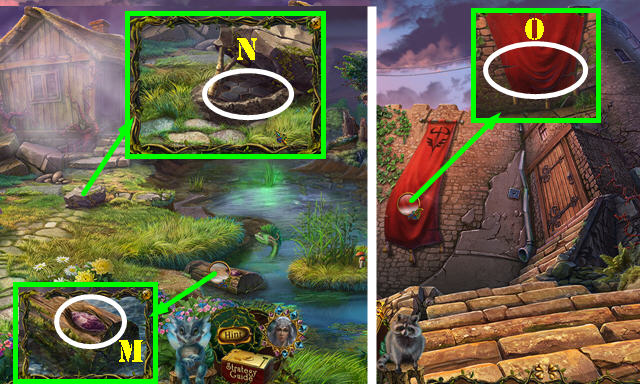
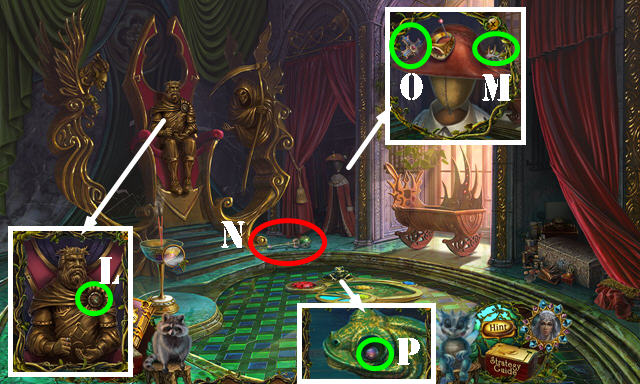
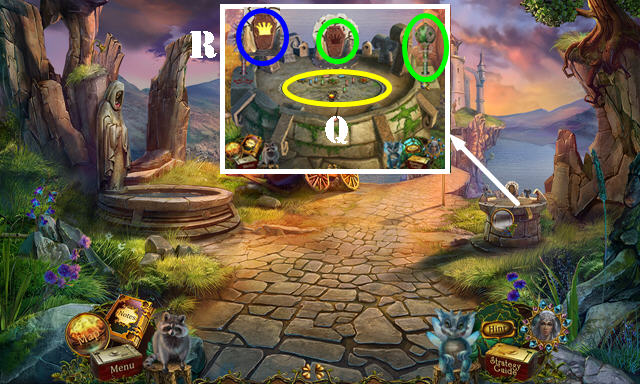
- Take the EMPTY GROWTH RUNE and the CORNELIUS FIGURINE (M).
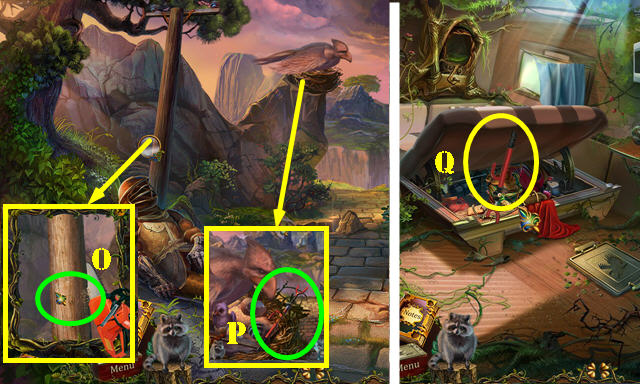
- Use the EMPTY JAR in the bowl to get the JAR OF WATER (N).
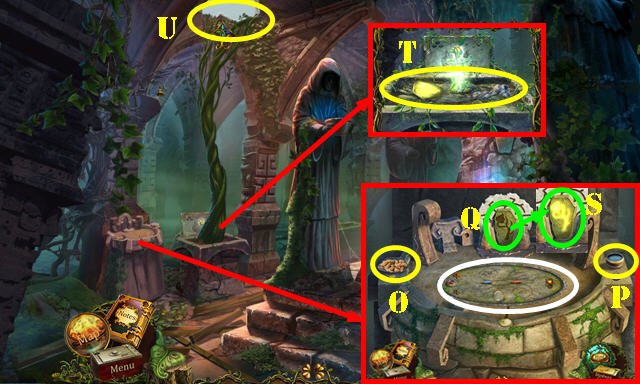

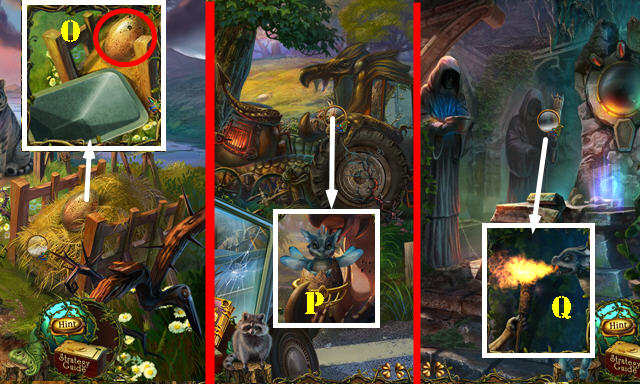
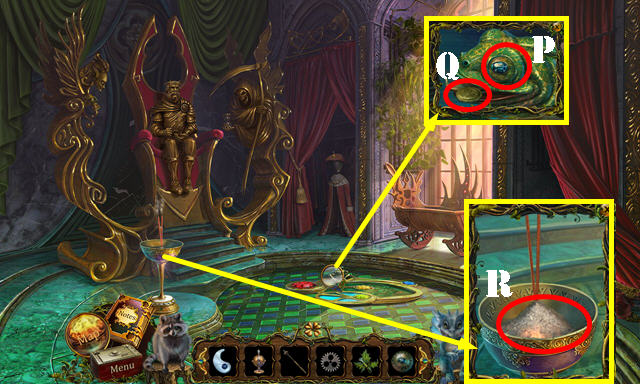
- Place the BAG OF SEEDS and JAR OF WATER in the bowls (O and P). You receive the EMPTY JAR.
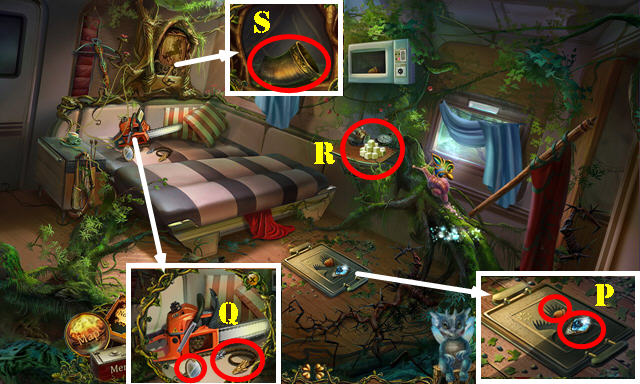
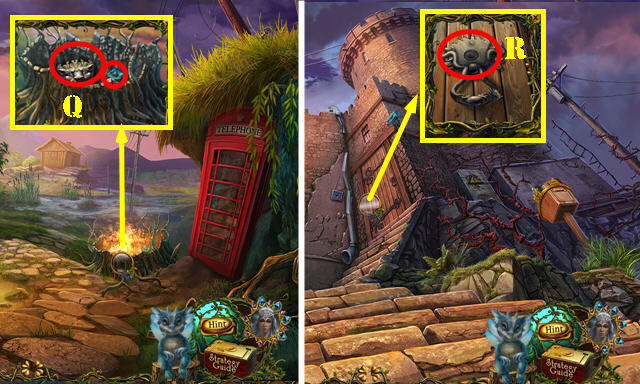
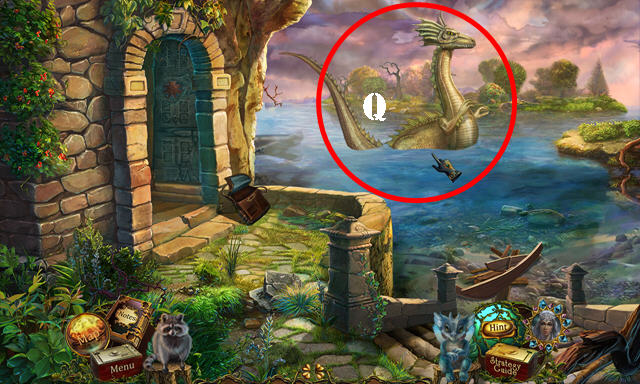
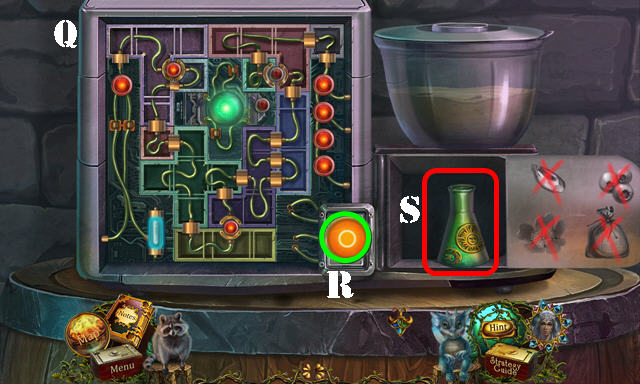
- Place the EMPTY GROWTH RUNE in the slot (Q) and zoom into the puzzle.
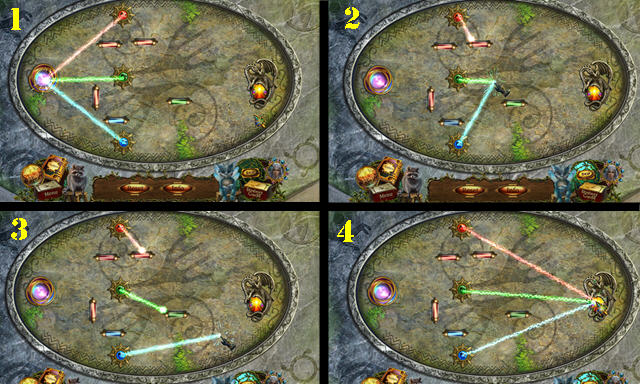
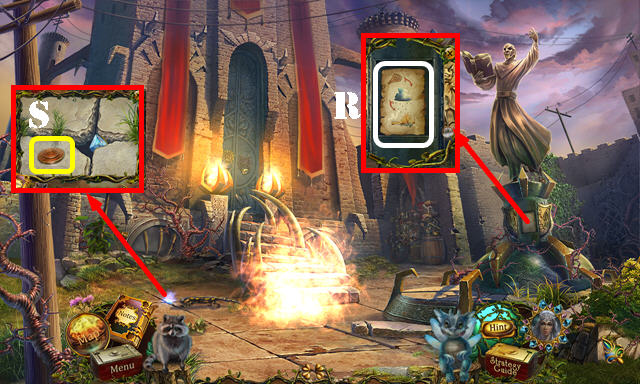
- Drag the colored lights from the glowing sphere to the dragon.
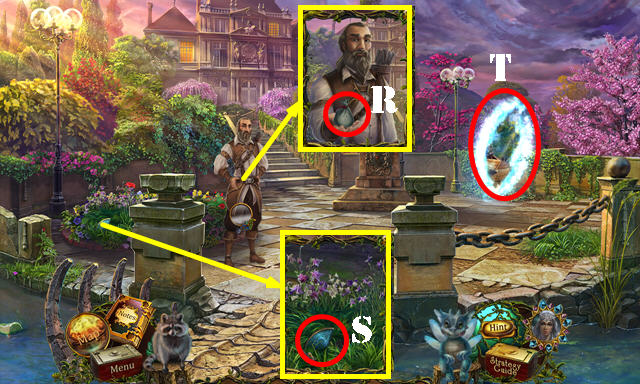
- Solution (R).
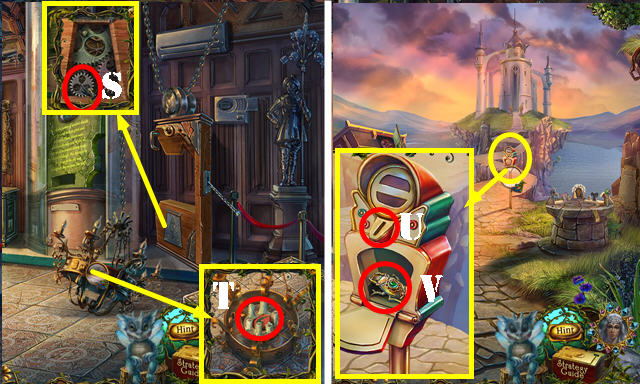
- Take the CHARGED GROWTH RUNE (S).
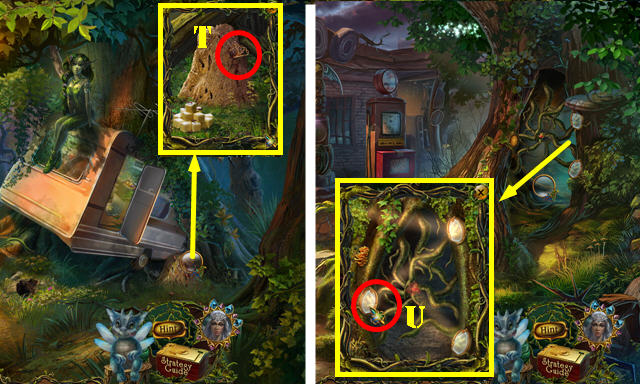
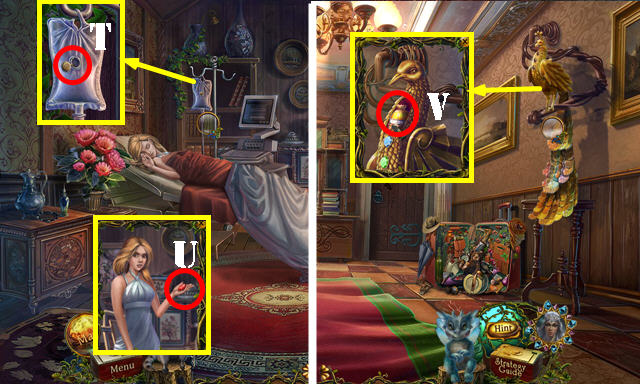
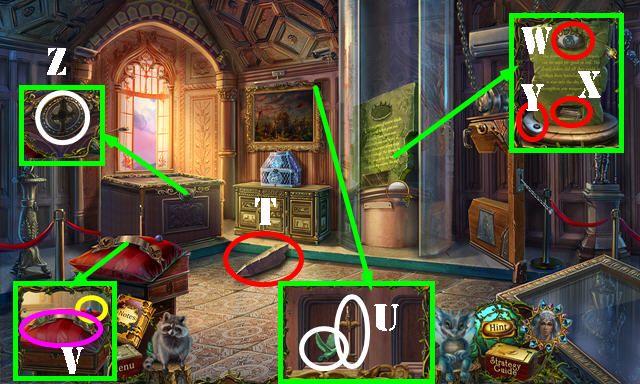
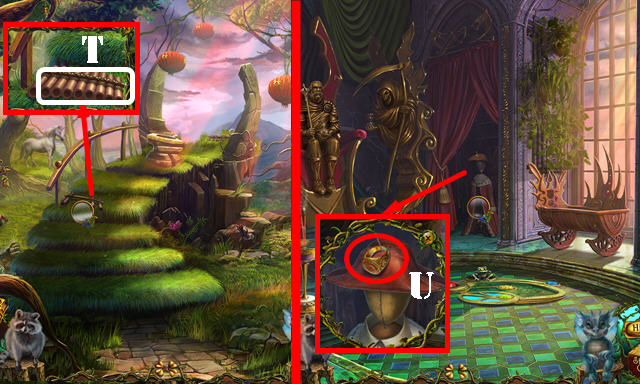
- Use the CHARGED GROWTH RUNE on the vines (T).
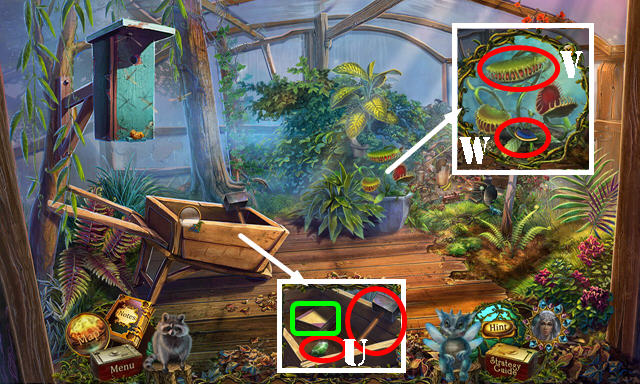
- Go through the ceiling (U).
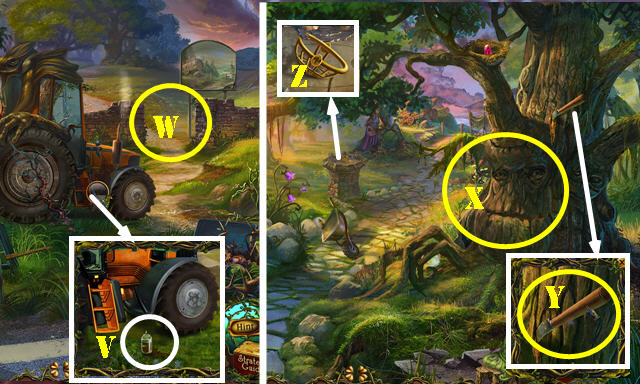
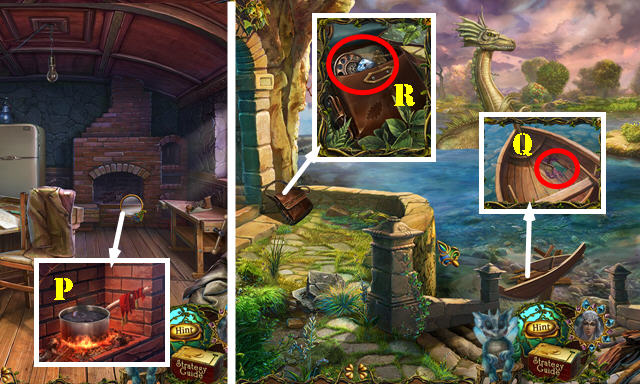
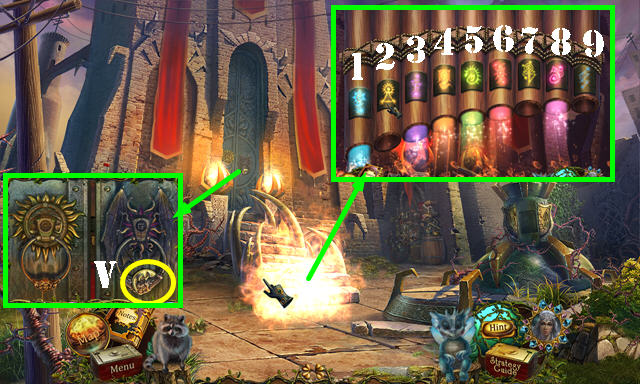
- Use the EMPTY JAR on the oil; take the JAR WITH OIL (V).
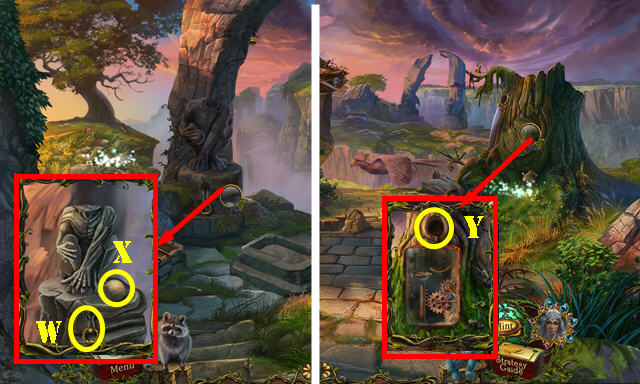
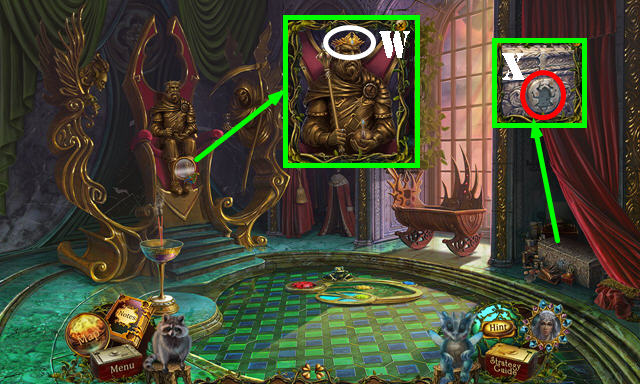
- Go forward (W) to the Gardens.
- Talk to the tree and then give it the DOUGHNUT (X).
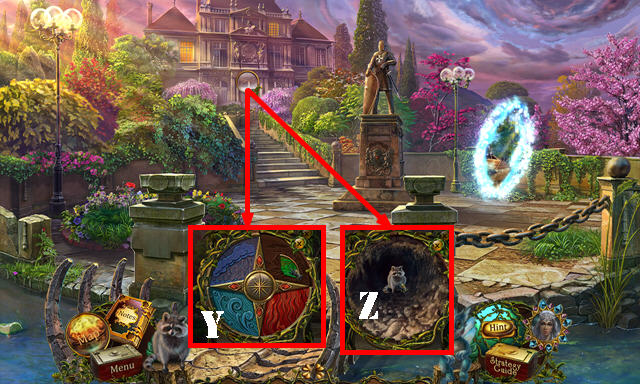
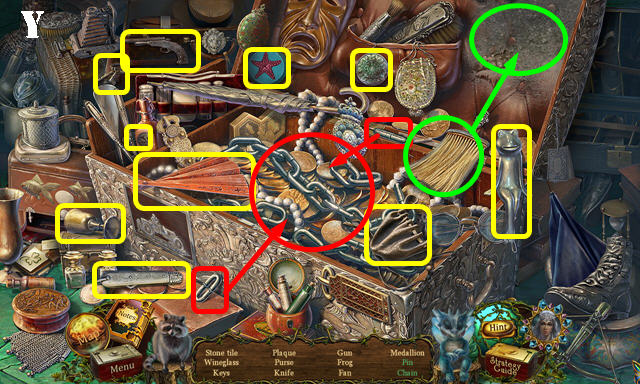
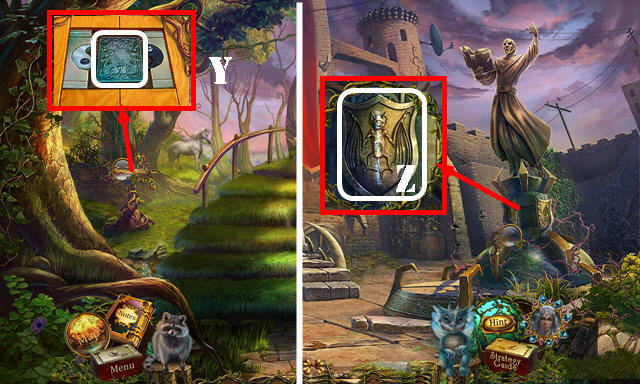
- Take the GARDEN-SHEARS HALF (Y) and EGG STAND (Z).
- Go forward.
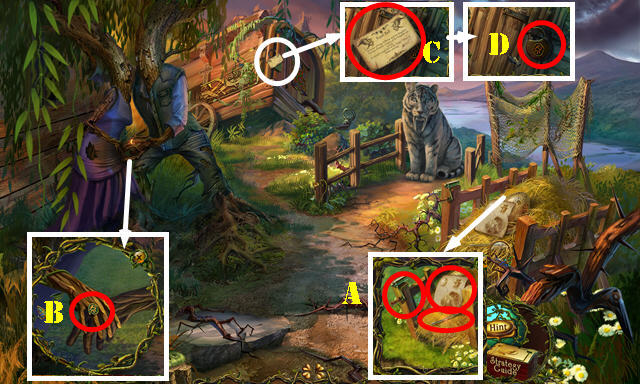
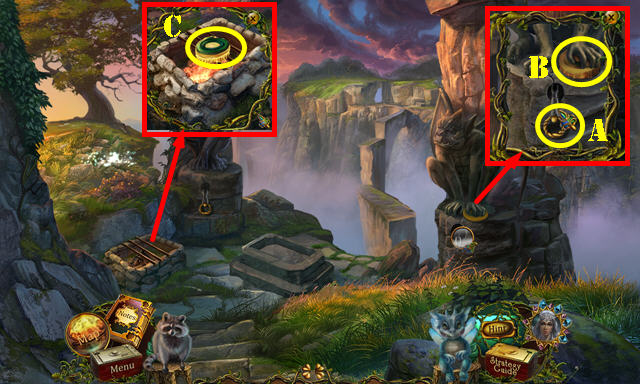
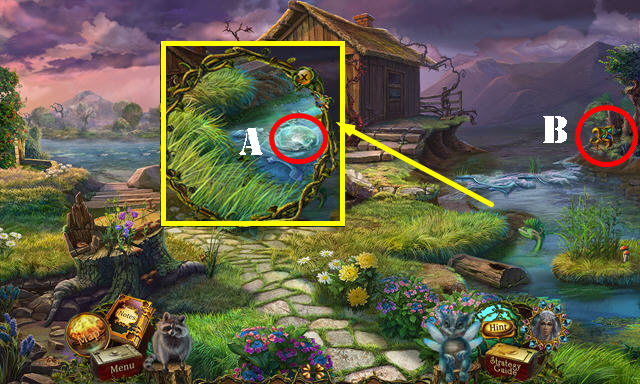
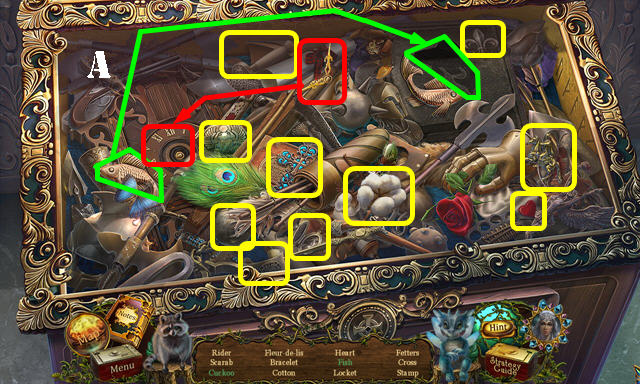
- Take the LUG WRENCH, CRANK FOR NET, and Note (A).
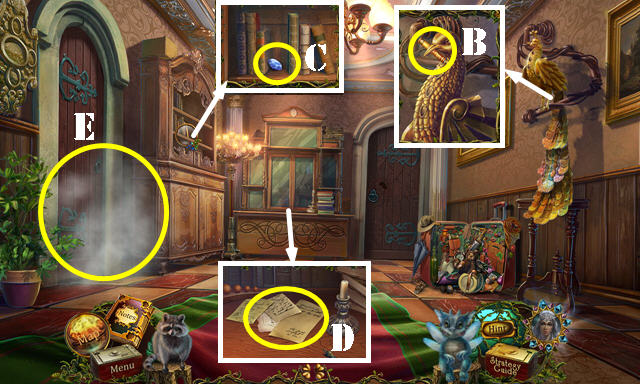
- Use the JAR WITH OIL on the ring; take the RING (B).
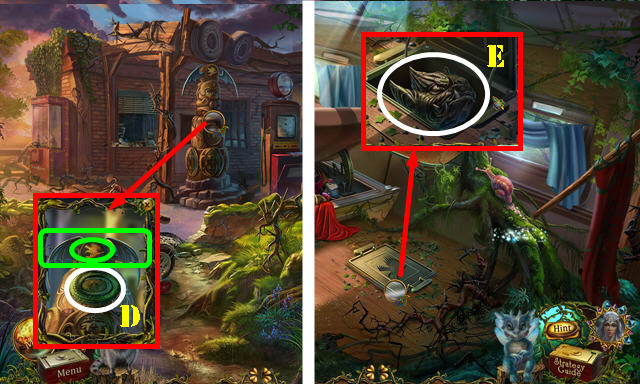
- Read the Note (C). Use the RING on the lock to activate a HOP (D).
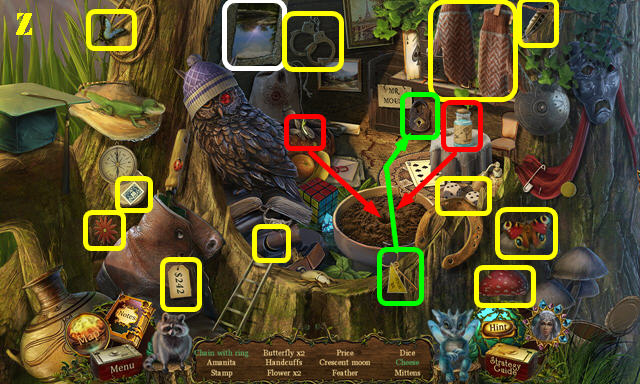
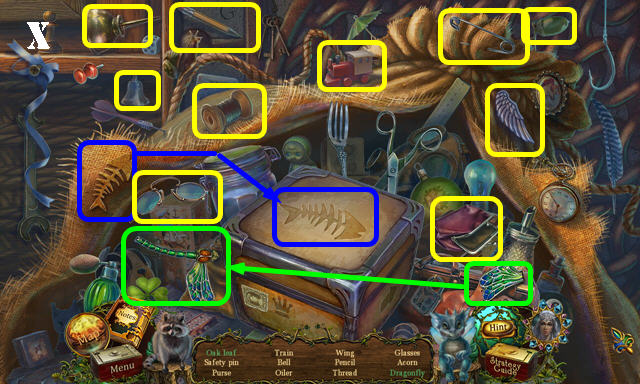
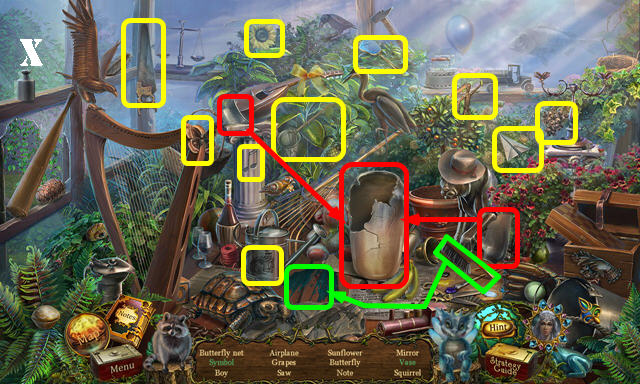
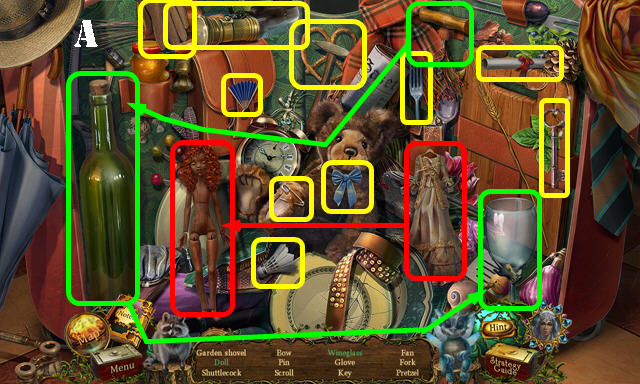
- Play the HOP.
- You receive the BANDAGE (E).
- Walk down.
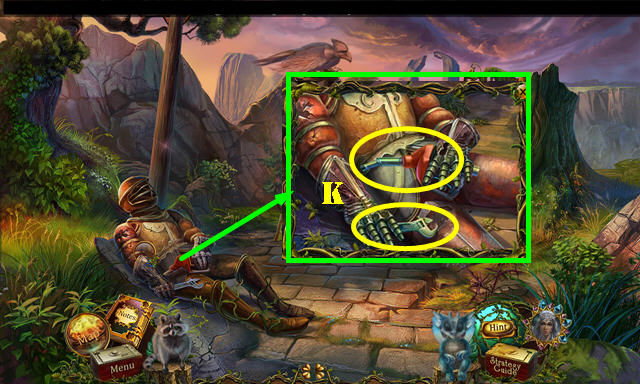
- Place the BANDAGE over the wound (F).
- Take the DRY ICE and CHISEL (G). Place the GARDEN-SHEARS HALF over the other one to get the GARDEN SHEARS (red).
- Use the GARDEN SHEARS on the vines; take the Raccoon (H).
- Use the Raccoon to get the CRYSTAL 1/2 (I).
- Walk down.
- Use the CHISEL in the crack; use the HAMMER on the chisel and take the CRYSTAL 2/2 (J).
- Remove the bolts with the LUG WRENCH; take the BOLTS (K).
- Return to the Tomb.
- Place the 2 CRYSTALS in the slot (L); take the EMPTY SHRINKING RUNE (M).
- Return to the Gardens.
- Place the 4 BOLTS on the wheel and use the LUG WRENCH on them (N). Take the WHEELBARROW.
- Go forward.
- Put down the WHEELBARROW; touch the EGG (O) and take it.
- Walk down twice.
- Remove the egg shell, put down the EGG STAND and place the EGG in it. Take the Fire Dragon and name it (P).
- Return to the Tomb.
- Use the Fire Dragon on the torch; take the BURNING TORCH (Q).
- Return to the Gardens.
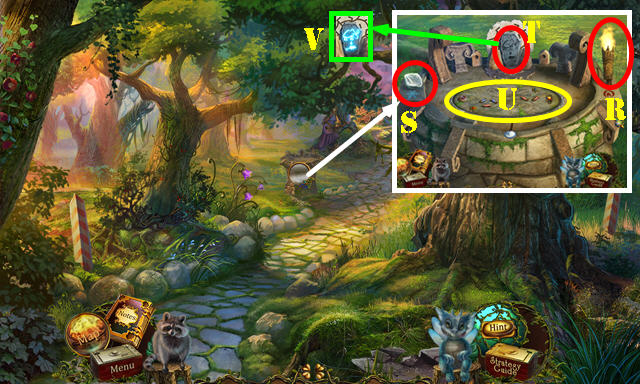
- Put down the BURNING TORCH (R) and the DRY ICE (S).
- Place the EMPTY SHRINKING RUNE in the slot (T).
- Touch the puzzle (U).
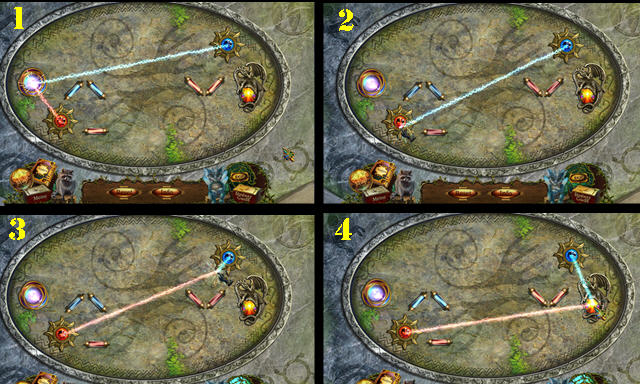
- Drag the colored lights from the glowing sphere to the dragon.
- Solution (1-4).
- Take the CHARGED SHRINKING RUNE (V).
- Go forward.
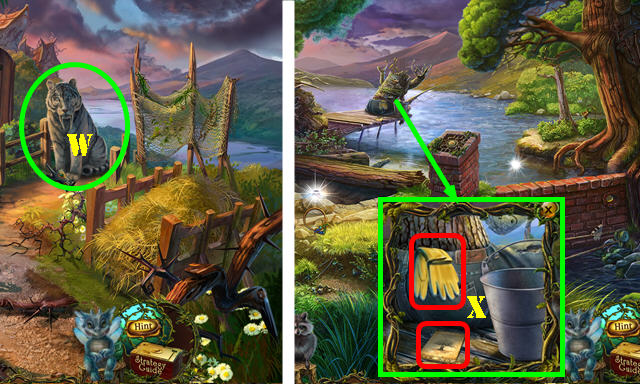
- Use the CHARGED SHRINKING RUNE on the tiger (W).
- Go forward.
- Talk to the Fairy.
- Take the GLOVES and Note (X).
- Walk down.
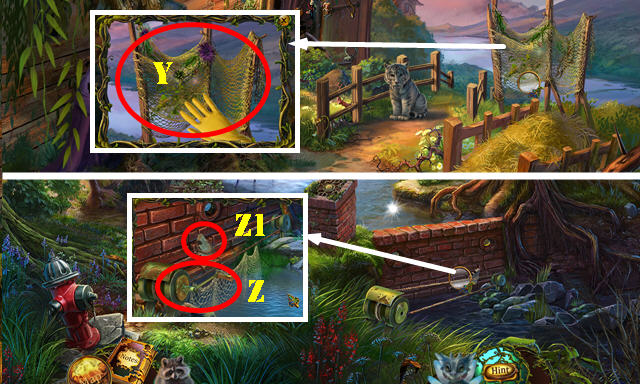
- Use the GLOVES to get the pointy things; take the NET (Y).
- Go forward.
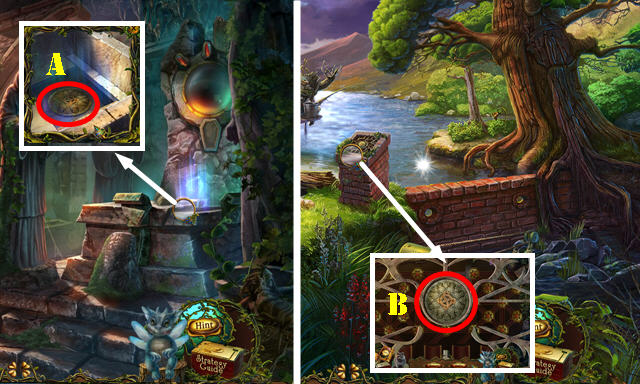
- Place the CRANK FOR NET in the niche (Z); attach the NET to the chain and take the FRESCO PART (Z1).
- Return to the Tomb.
- Place the FRESCO PART in the niche. Take the CONTROL SEAL (A).
- Return to the River.
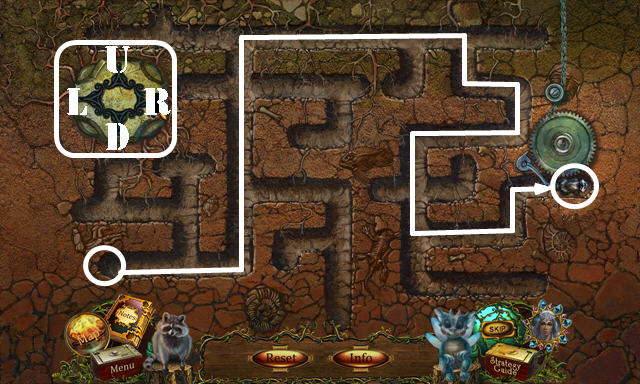
- Place the CONTROL SEAL in the slot to activate a puzzle (B).
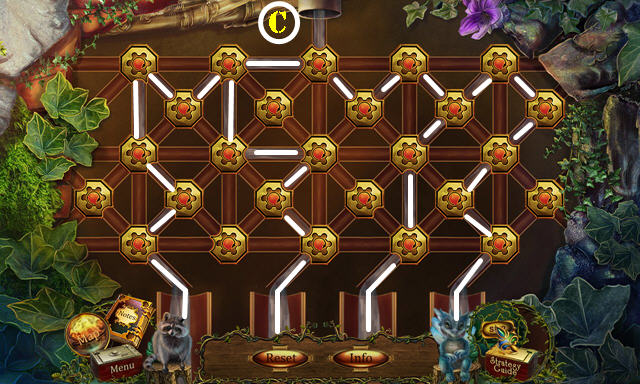
- Rotate the valves as shown (C).
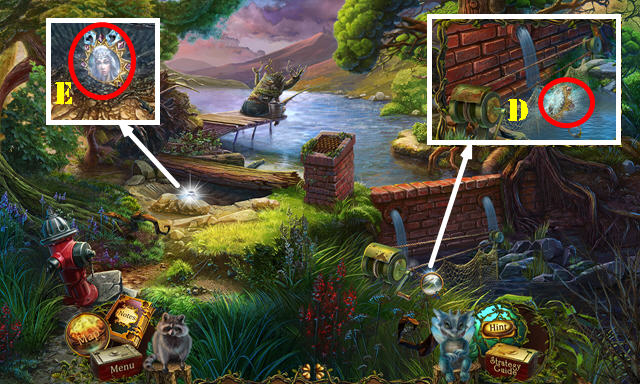
- Take the STAR-AMULET HALF (D).
- Place the STAR-AMULET HALF on the other one; take the Magic Star (E).
- You will be automatically transported to the Outer Wood.
Chapter 2: The Forest
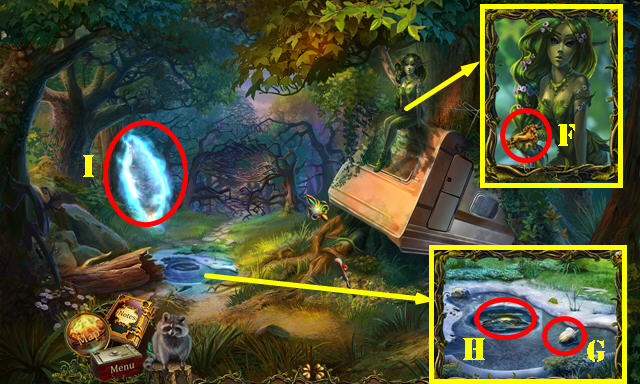
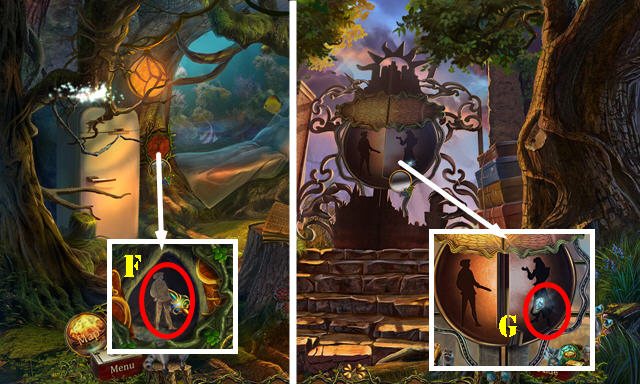
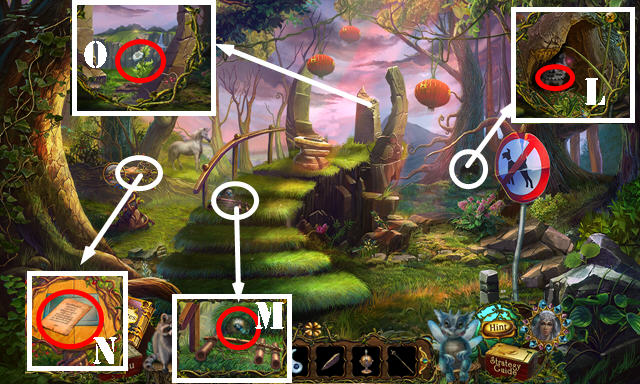
- Talk to the nymph; take the UNICORN FIGURINE (F).
- Take the ACORN (G).
- Use the FIRE DRAGON on the ice; take the HORN PIECE (H).
- Go through the portal (I).
- Take the SPADE and BUCKET (J).
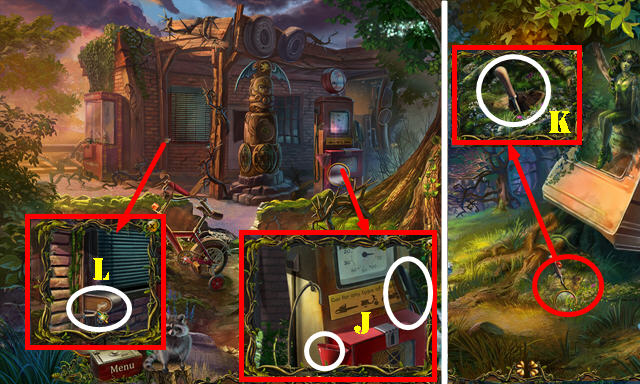
- Walk down.
- Use the SPADE on the ground; take the WINDOW HANDLE (K).
- Go through the portal.
- Place the WINDOW HANDLE in the slot (L) to activate a HOP.
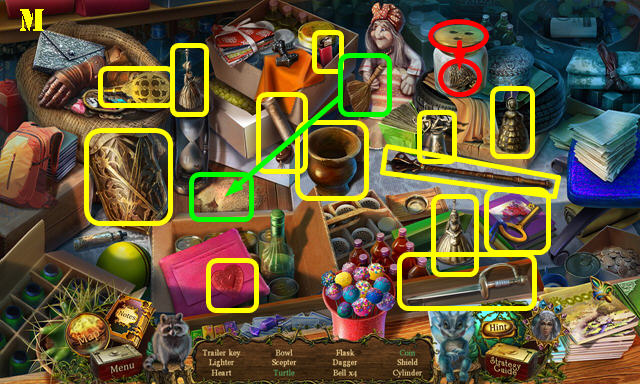
- Play the HOP.
- You receive the TRAILER KEY (M).
- Walk down.
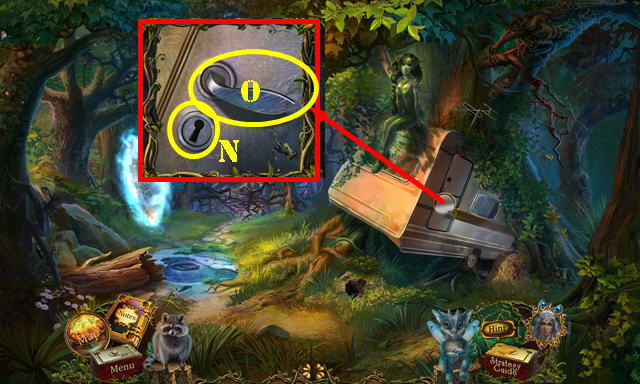
- Use the TRAILER KEY in the lock; turn the key (N) and pull the handle (O).
- Enter the Trailer.
- Take the Shard and the ACORN 2/4 (P).
- Take the CLAMPS and MIRROR (Q).
- Grab the SUGAR (R).
- Place the UNICORN FIGURINE in the slot; take the HORN PIECE (S).
- Walk down.
- Put down the SUGAR; take the DECORATION PIECE (T).
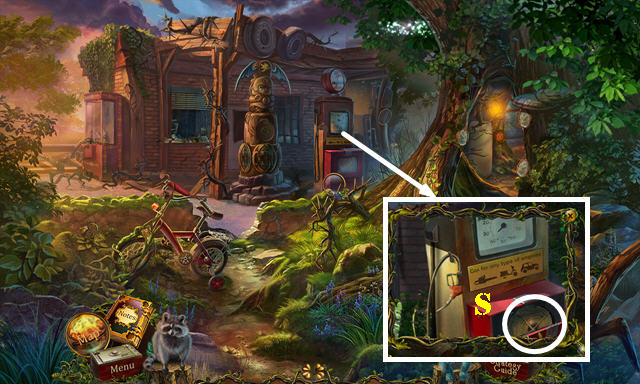
- Go to the Gas Station.
- Place the MIRROR in the frame (U); go through the hole.
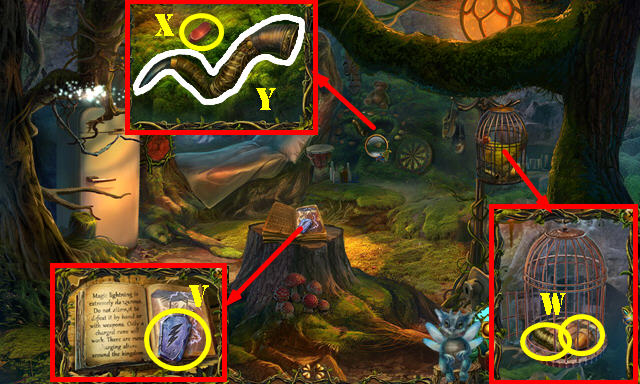
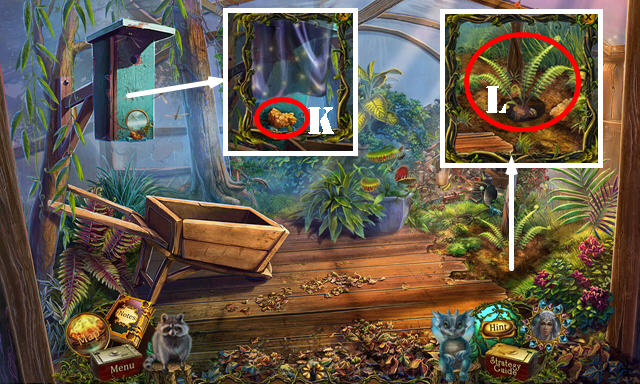
- Take the EMPTY LIGHTNING RUNE (V).
- Open the cage, take the HORN PIECE and the ACORN 3/4 (W).
- Take the MICROWAVE BUTTON (X). Place the 3 HORN PIECES, then take the NYMPH'S HORN (Y).
- Walk down twice.
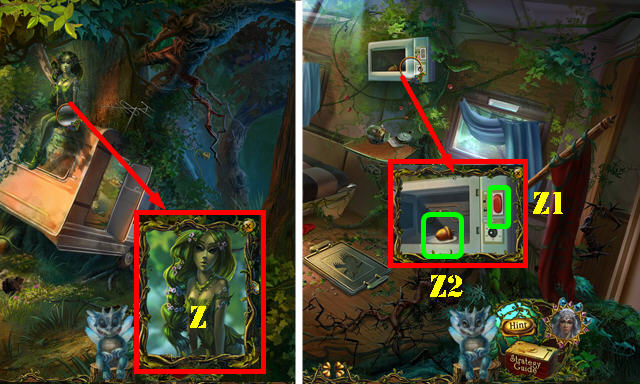
- Give the NYMPH'S HORN to the nymph (Z).
- Go into the Trailer.
- Place the MICROWAVE BUTTON (Z1); push the button and open the door. Take the ACORN 4/4 (Z2).
- Return to the Gas Station.
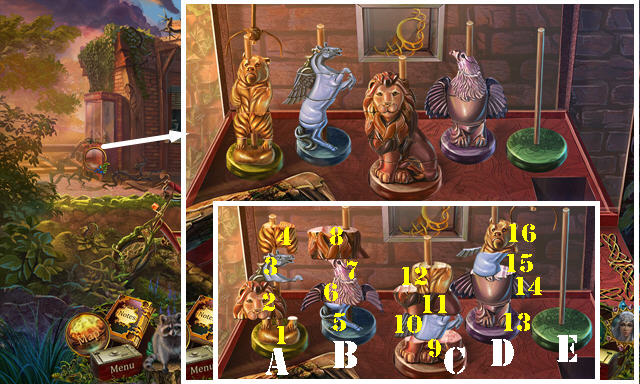
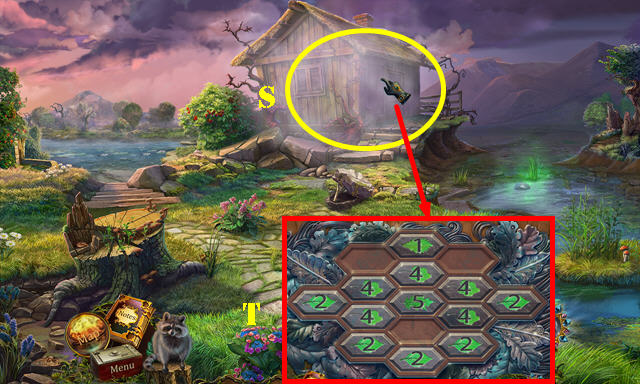
- Put down the 4 ACORNS to activate a puzzle.
- Solution: 16-E, 15-E, 14-E, 8-D, 12-B, 11-D, 14-D; 10-E, 12-C, 4-C, 3-C, 2-B, 3-A, 10-A, 15-A.
- 2-E, 7-C, 6-E, 15-B, 10-B, 3-B, 14-A, 6-A, 7-A, 4-E, 11-C, 8-C, 4-D, 2-D, 8-E, 11-E.
- 12-D, 11-C, 8-C, 12-E, 2-C, 4-E, 7-D, 6-D, 14-D, 4-A, 12-A, 14-A, 6-E, 7-E, 14-D, 7-A, 6-D, 7-D, 16-A.
- You receive the DECORATION PIECE.
- Return to the Small Hut.
- Place the 2 DECORATION PIECES in the slot; take the WILHELM FIGURINE (F).
- Walk down twice and go forward to the Gates.
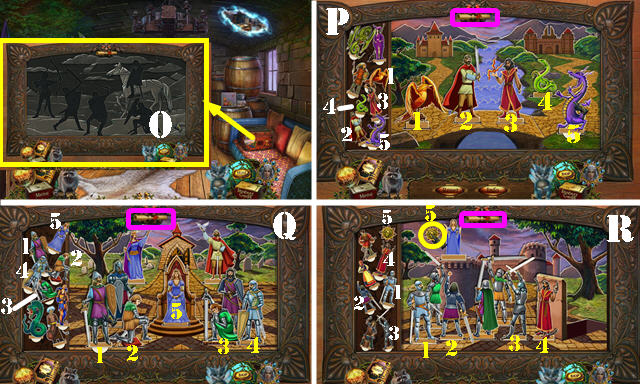
- Touch the Shard (G). Place the WILHELM FIGURINE and CORNELIUS FIGURINE in the slots to activate a puzzle.
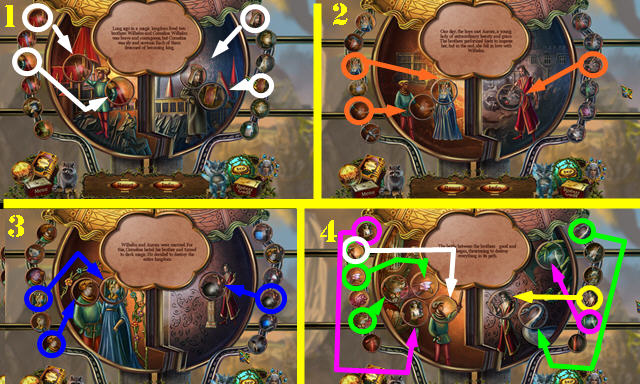
- Place the correct pictures in the slots for the 4 rounds.
- Solution (1-4).
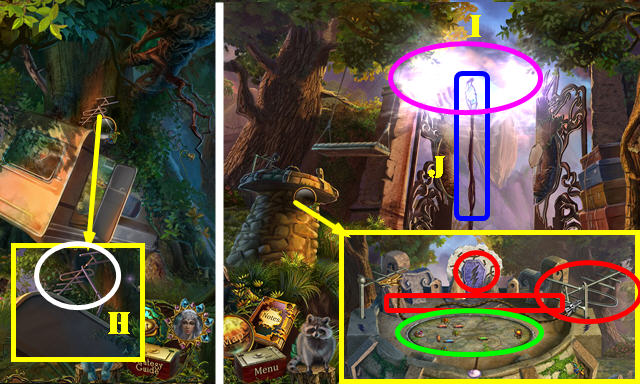
- Use the Raccoon to get the ANTENNA (H).
- Go forward.
- Place the ANTENNA, the CLAMPS and then the EMPTY LIGHTNING RUNE (red).
- Touch the puzzle to activate it (green).
- Solution (1-4).
- Take the CHARGED LIGHTNING RUNE.
- Use the CHARGED LIGHTNING RUNE on the lightning (I).
- Take the STAFF WITH LIGHTNING (J).
- Go forward.
- Use the JAR WITH OIL on the armor; take the WRENCH and NOZZLE (K).
- Return to the Gas Station.
- Use the WRENCH on the bolt; take the CHAIN (L).
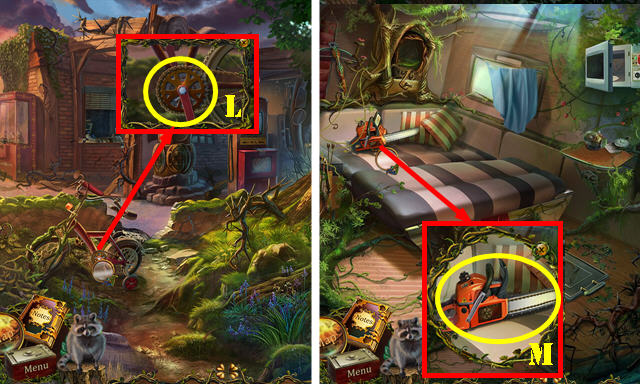
- Return to the Trailer.
- Place the CHAIN on the chainsaw; take the EMPTY CHAINSAW (M).
- Return to the Gas Station.
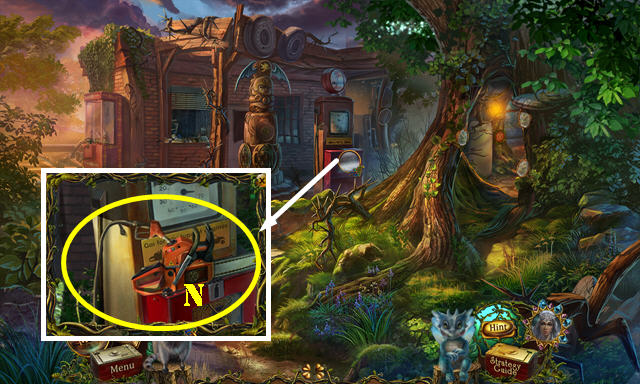
- Place the NOZZLE on the pump; put down the EMPTY CHAINSAW (N).
- Touch the nozzle; take the CHAINSAW.
- Return to the Kings' Road.
- Use the CHAINSAW on the pole (O); go up the pole.
- Take the WHEEL LOCK (P).
- Return to the Trailer.
- Place the WHEEL LOCK here (Q) to activate a HOP.
- Play the HOP.
- You receive the EXTINGUISHER (R).
- Return to the Gas Station.
- Place the EXTINGUISHER in the slot; take the ROPE (S).
- Return to the Kings' Road.
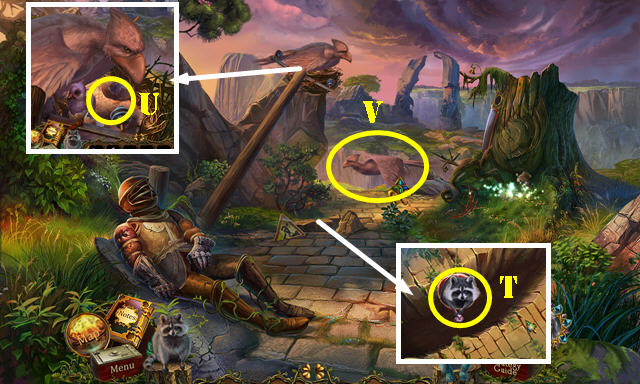
- Put down the BUCKET; use the ROPE on it and place the Raccoon in the bucket to get the ROC CHICK (T).
- Go up the pole; place the ROC CHICK in the nest (U).
- Hop on the bird (V) to reach the Mountain Pass.
Chapter 3: Mountain Pass
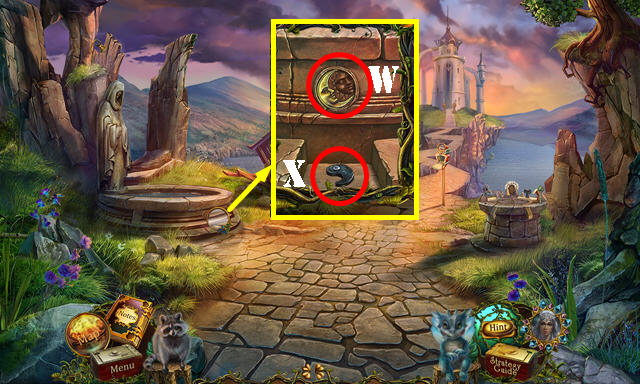
- Pull the chain twice (W); take the STONE BALL (X).
- Walk down.
- Place the STONE BALL in the hole to activate a HOP (Y).
- Play the HOP.
- You receive the CHAIN WITH RING (Z).
- Return to the Mountain Pass.
- Use the CHAIN WITH RING on the chain (A); pull it and take the SNAKE IN WAX (B).
- Use the Fire Dragon in the pit, then place the SNAKE IN WAX on the pit; take the SNAKE SYMBOL (C).
- Return to the Gas Station.
- Place the SNAKE SYMBOL in the slot (D); take the EAGLE SYMBOL and the WINGS (green).
- Return to the Trailer.
- Place the EAGLE SYMBOL in the slot; take the GARGOYLE HEAD (E).
- Return to the Mountain Pass.
- Place the GARGOYLE HEAD and the WINGS on the statue (F); take the EMPTY MAGIC CATCHER (G).
- Place the EMPTY MAGIC CATCHER on the sparkles to get the MAGIC SPARKLES 1/5 (H).
- Return to the Kings' Road. Place the MAGIC CATCHER on the sparkles to get the MAGIC SPARKLES 2/5 (I).
- Return to the Trailer. Place the MAGIC CATCHER on the sparkles to get the MAGIC SPARKLES 3/5 (J).
- Return to the Small Hut. Place the MAGIC CATCHER on the sparkles to get the MAGIC SPARKLES 4/5 (K).
- Return to the Gas Station. Place the MAGIC CATCHER on the sparkles to get the MAGIC SPARKLES 5/5 (L).
- Return to the Mountain Pass.
- Place the CHARGED MAGIC CATCHER in the slot to activate a puzzle (M).
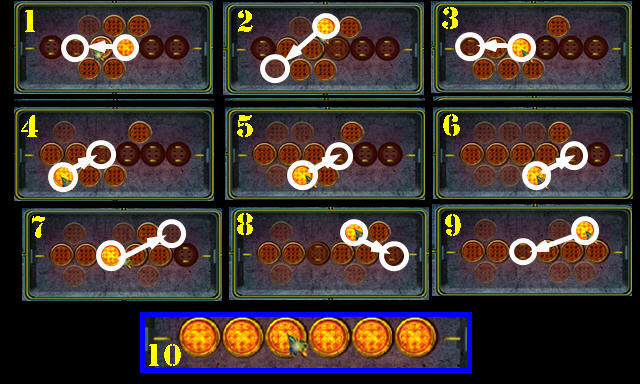
- Place the tokens in a straight line.
- Follow steps 1-9 to achieve the image in section 10.
- Go forward to the Valley.
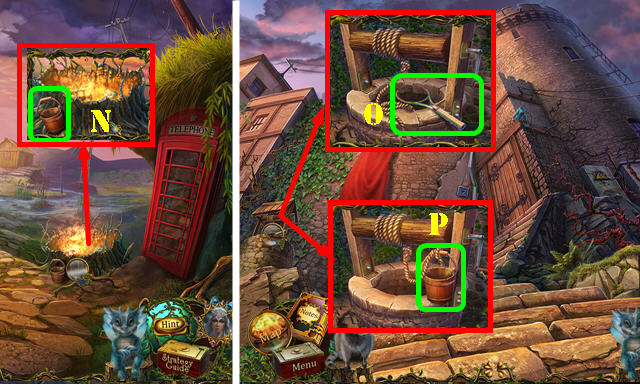
- Take the WOODEN BUCKET (N).
- Go up the steps.
- Take the RACKET WITHOUT STRINGS (O).
- Put down the WOODEN BUCKET; attach the rope to it and flip the handle (P).Take the BUCKET OF WATER.
- Walk down.
- Use the BUCKET OF WATER on the fire. Touch the Shard and take the DOOR-HANDLE PART (Q).
- Return to the Tower.
- Place the DOOR-HANDLE PART on the door (R).
- Enter the Guardhouse.
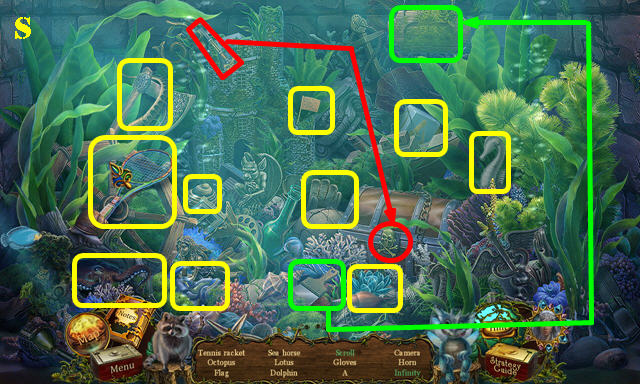
- Play the HOP.
- You receive the RACKET 1/2 (S).
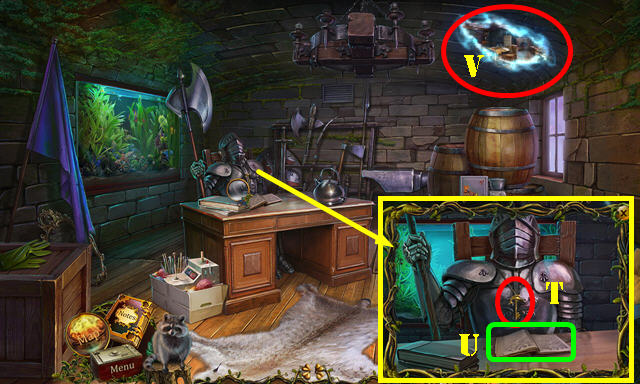
- Take the KNIGHT KEY (T).
- Read the book (U).
- Go through the portal to reach the Workshop (V).
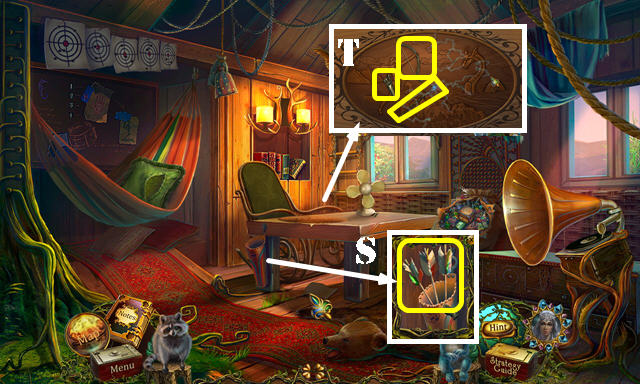
- Take the BROOM (W), SICKLE (X) and SAW (Y).
- Read the note (yellow).
- Walk down.
- Cut the pole with the SAW; take the POLE (A).
- Walk down twice.
- Take the REEDS with the SICKLE, then take the TIN SOLDIER 1/5 (B).
- Return to the Workshop.

- Put down the RACKET WITHOUT STRINGS, then place the REEDS on it; take the RACKET 2/2 (C).
- Return to the Valley.
- Put down the POLE (D) and the 2 RACKETS to activate a puzzle.
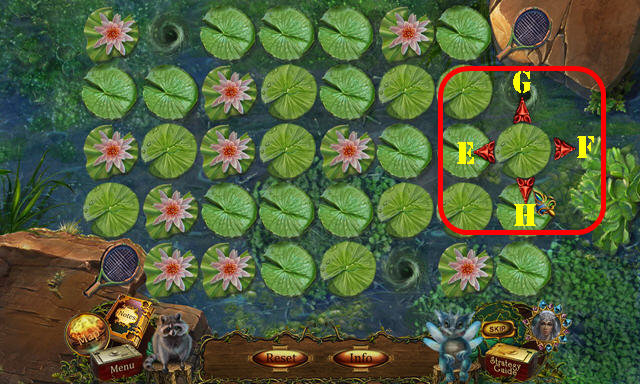
- Cross the swamp by moving both rackets to both stones.
- Solution: Ex4, Gx4, Fx5, and Hx4.
- Go forward to the Swamp.
Chapter 4: The Swamp
- Take the GREEN SPINE (I) and the 5/5 RED BERRIES (red).
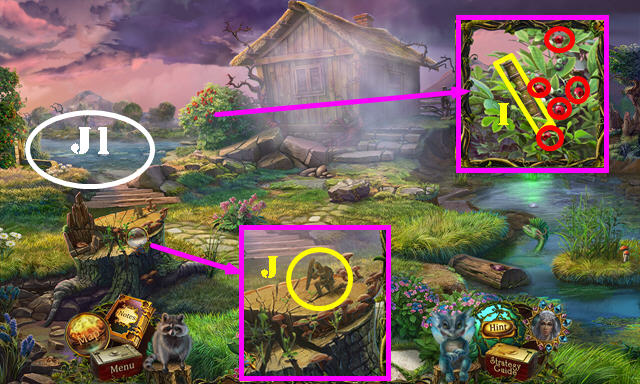
- Grab the TIN SOLDIER 5/5 (J).
- Go to Lakeshore (J1).
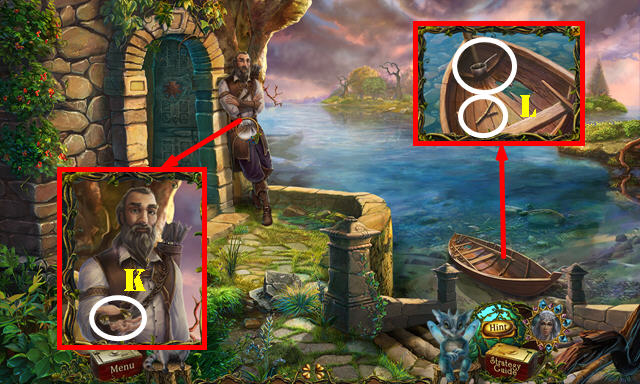
- Talk to David; take the HUNTING KNIFE (K).
- Take the PROP and the POT (L).
- Walk down.
- Get the RESIN PIECE with the HUNTING KNIFE (M).
- Use the PROP on the stone; use the Raccoon on the ground; take the HALF LOCK (N).
- Return to the Tower.
- Cut the CLOTH PIECE with the HUNTING KNIFE (O).
- Return to the Workshop.
- Use the Fire Dragon in the fireplace. Place the POT on the fire; put the RESIN PIECE in the pot; place the CLOTH PIECE on the handle and take the HOT RESIN (P).
- Return to Lakeshore.
- Place the HOT RESIN over the hole, then use the BROOM on the resin (Q).
- Open the bag. Take the Crystal Shard, PHONE DISK, TIN SOLDIER 3/5, Note, and HALF LOCK 2/2 (R).
- Walk down.
- Use the Magic Star to remove the fog (S).
- Place the 2 HALF LOCKS on the door to activate a puzzle. Place the pieces in the right spots.
- Solution (T).
- Enter the Huntsman's House.
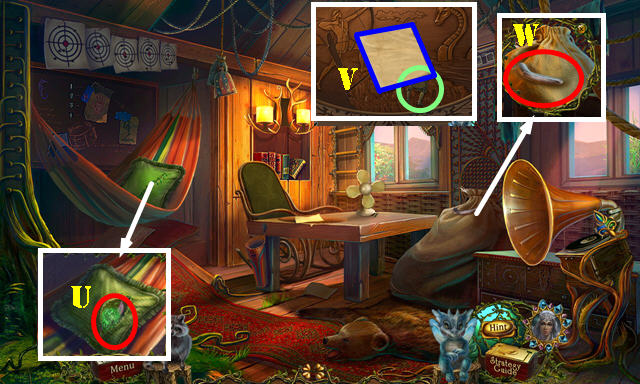
- Cut the pillow with the HUNTING KNIFE; take the THREAD and FEATHER (U).
- Take the Note and TIN SOLDIER 4/5 (V).
- Take the REFRIGERATOR HANDLE (W). Cut the sack with the HUNTING KNIFE to activate a HOP.
- Play the HOP.
- You receive the OAK LEAF (X).
- Return to the Valley.
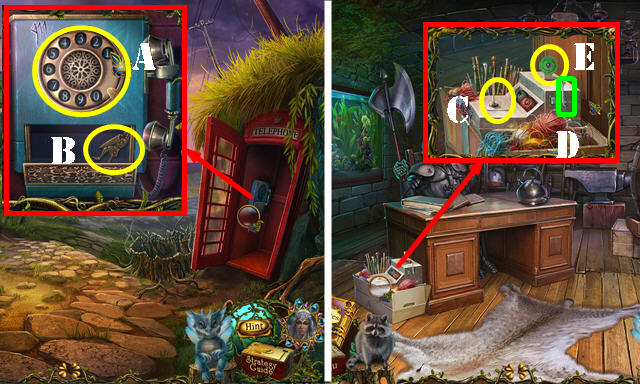
- Open the phone booth. Place the PHONE DISK on the phone (A); dial 911 and take the TIN SOLDIER 5/5 (B).
- Return to the Guardhouse.
- Place the THREAD on the device (C); touch the thread and pull the handle (D).
- Take the BALL OF YARN (E).
- Go to the Workshop.
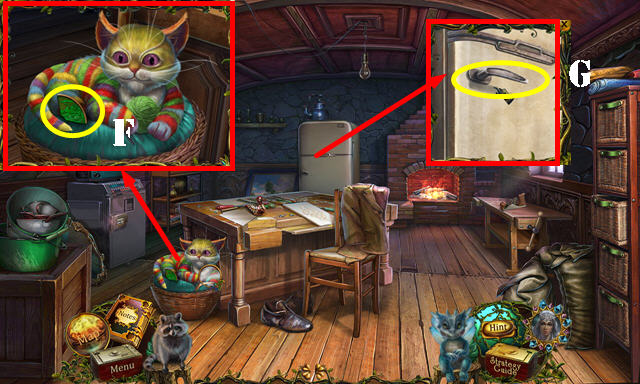
- Give the BALL OF YARN to the cat; take the EARTH ORNAMENT (F).
- Place the REFRIGERATOR HANDLE on the door (G) and pull it to activate a HOP.

- Play the HOP.
- You receive the CANDY (H).
- Return to Lakeshore.
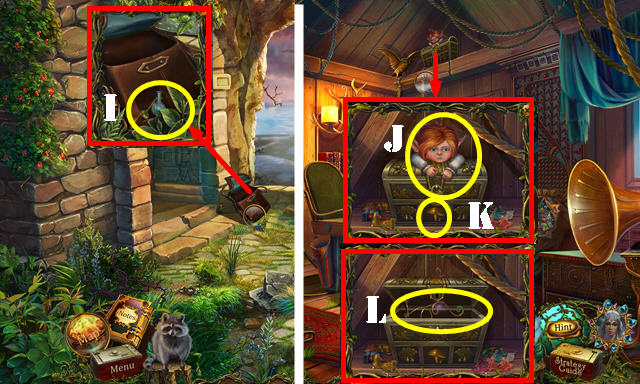
- Use the OAK LEAF on the bag; take the GARDENER ELIXIR and CHEST KEY (I).
- Return to the Huntsman's House.
- Give the CANDY to the little girl (J).
- Use the CHEST KEY in the lock (K); take the GOLDEN BOWSTRING and KNIGHT KEY (L).
- Walk down.
- Place the GARDENER ELIXIR on the stump; take the WOOD (M).
- Return to the Workshop.
- Place the WOOD on the clamp (N); use the plane (green) on the wood. Use the GOLDEN BOWSTRING on the wood; take the BOW.
- Return to the Guardhouse.
- Place the 5 TIN SOLDIERS on the chest to activate a puzzle (O).
- Place the figurines in the right spots using the information on the scrolls as a clue (purple).
- Solution (P-R).
- Take the MAGIC ARROWS.
- Return to the Huntsman's House.
- Place the MAGIC ARROWS in the quiver; take the QUIVER WITH ARROWS (S).
- Place the BOW, STAFF WITH LIGHTNING, and QUIVER WITH ARROWS in the slots to activate a puzzle (T).
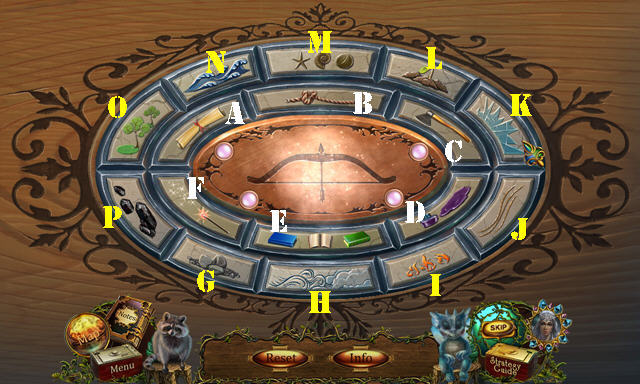
- Find the correct combination of symbols.
- Level 1: (L and I). Level 2: (H and L). Level 3: (L and N). Level 4: (M and I).
- Level 5: (O and I). Level 6: (O and G). Level 7: (J, P, and N). Level 8: (O, B, and G). Level 9: (O, N, and C).
- Level 10: (K, N, and P). Level 11: (A, B, and D). Level 12: (E, I, N, L, and H) Level 13: (O, E, F, B).
- Take the MAGIC BOW.
- Return to Lakeshore.
- Use the MAGIC BOW on the sea monster (Q).
- Go forward to the Island.
- Talk to David; take the MAGIC DUST (R).
- Take the AIR ORNAMENT (S).
- Go through the portal (T).
- Take the SMITH HAMMER and the GREEN JEWEL (U). Open the book and read it (green).
- Use the FEATHER on the flytrap (V); take the WATER ORNAMENT (W).
- Play the HOP.
- You receive the BUTTERFLY NET (X).
- Walk down.
- Zoom into the door and then the doormat; place the AIR ORNAMENT, WATER ORNAMENT, and EARTH ORNAMENT into the slots (Y).
- Place the Raccoon in the hole to activate a puzzle (Z).
- Lead the raccoon to the exit.
- Solution: Rx2, Ux3, Rx2, D, R, D, L, Dx2, R, U, and R.
- Go into the Estate Hall.
Chapter 5: The Estate
- Play the HOP.
- You receive the SHOVEL (A).
- Take the ORANGE SPINE (B) and BLUE JEWEL (C).
- Remove the papers and take the Note (D).
- Use the Magic Star on the fog (E).
- Go through the door.
- Take the STAR CURTAIN (F).
- Take the PEN, RED SPINE, and Shard (G).
- Look at the note (purple).
- Take the KNIGHT KEY and look at the Note (H).
- Walk down.
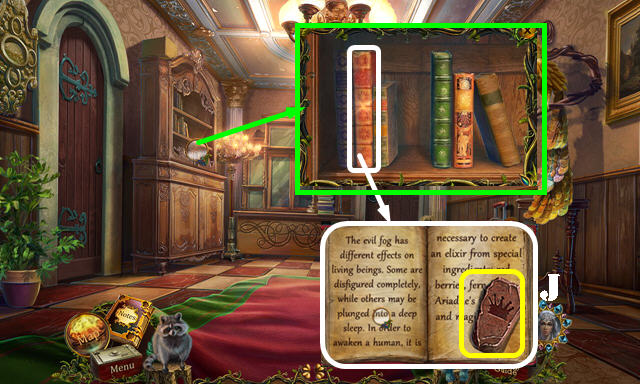
- Place the ORANGE, GREEN, and RED SPINES on the shelf. Open the book; take the EMPTY ACCESS RUNE (J).
- Return to the Greenhouse.
- Place the STAR CURTAIN over the dragonflies; take the AMBER (K).
- Use the SHOVEL on the dirt; take the FERN and the CARRIAGE HANDLE (L).
- Walk down.
- Use the SHOVEL in the dirt; plant the FERN and use the BUCKET OF WATER on it. Take the FERN FLOWER (M).
- Return to the Guardhouse.
- Place the AMBER on the anvil; use the SMITH HAMMER on it and take ARIADNE'S TEARDROP (N).
- Place the 5 RED BERRIES, ARIADNE'S TEARDROP, FERN FLOWER, and MAGIC DUST in the container (O).
- Press the button to activate a puzzle (P).
- Place the pieces in the right spots.
- Solution (Q).
- Press the button (R); touch the flask and take the WAKING POTION (S).
- Return to Ariadne's Estate.
- Open the bag; use the WAKING POTION on it (T).
- Talk to Ariadne; take the RED JEWEL (U).
- Walk down.
- Place the RED, GREEN, and BLUE JEWELS into the slots; take the JEWELED EGG (V).
- Return to the Tower.
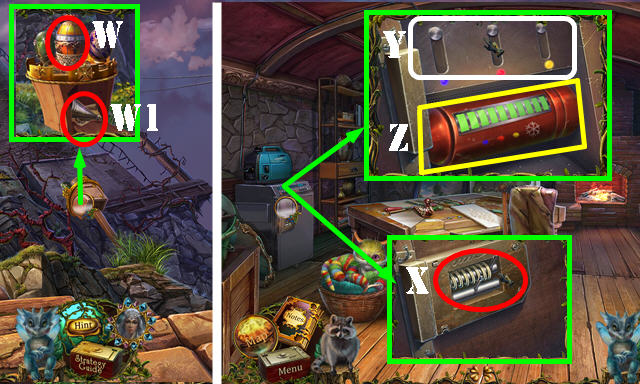
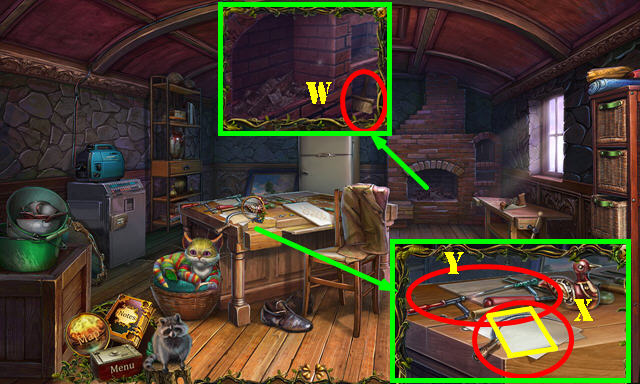
- Place the JEWELED EGG on the stand (W); take the NOZZLE, Note, PAPER, and HANDLE PART (W1).
- Return to the Workshop.
- Place the HANDLE PART on the generator and pull it twice (X). Take the Note on top of the tank (not pictured).
- Pull the buttons until you have blue, red, and yellow lights on the tank. Solution: select the third button and then the first one (Y).
- Take the NITROGEN TANK (Z).
- Return to the Swamp.
- Put down the NITROGEN TANK and place the NOZZLE on it. Spray the can in the water; take the GAS BUBBLE (A).
- Head to Temple Road (B).
- Take the PAN-FLUTE PART (C), KNIGHT KEY (D), and ROYAL SEAL (E).
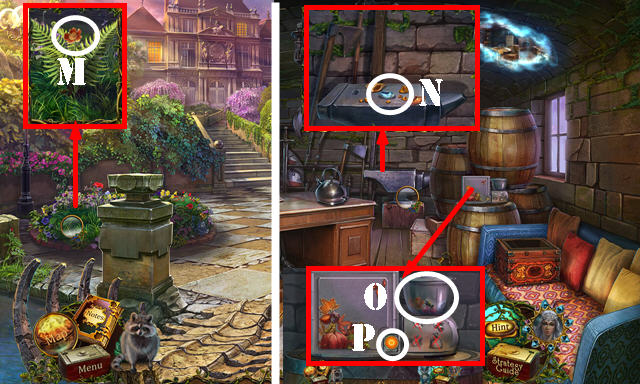
- Use the BUTTERFLY NET to get the PICTURE-FRAME PART (F).
- Place the CARRIAGE HANDLE in the slot (G). Pull the handle to activate a HOP.
- Play the HOP.
- You receive the WAX (H).
- Return to the Estate Hall.
- Put down the ROYAL SEAL and PAPER. Use the PEN on the paper.
- Use the fire Dragon on the candle (I).
- Place the WAX on the candle, then use the ROYAL SEAL on the wax. Take the ROYAL OATH (J).
- Return to Temple Road.
- Give the ROYAL OATH to the guards (K).
- Enter Wilhelm's Temple.
- Take the MEDAL (L), EYE OF WISDOM (M), MACE (N), WILHELM'S CROSS (O), and PEARL 1/2 (P).
- Walk down.

- Place the MACE and EMPTY ACCESS RUNE in the slots (green).
- Touch the puzzle to activate it (Q).
- Solution (1-3).
- Take the CHARGED ACCESS RUNE (R).
- Return to the Estate Hall.
- Place the CHARGED ACCESS RUNE in the slot (S). Go through the door.
- Take the PILLAR PART (T) and PEARL 2/2 (yellow).
- Place the PICTURE-FRAME PART on the frame; take the KNIGHT KEY and the MEDAL (U).
- Place the 2 MEDALS in the slots; take the METAL RIBBON (V).
- Place the EYE OF WISDOM (W); take the MUSIC CYLINDER (X) and the YANG (Y).
- Place WILHELM'S CROSS in the slot to activate a HOP (Z).
- Play the HOP.
- You receive the RIDER (A).
- Walk down twice.

- Place the METAL RIBBON in the slot. Take the KNIGHT KEY (B).
- Return to the Valley.
- Place the RIDER in the slot; take the ORB (C).
- Return to Ariadne's Estate.
- Place the MUSIC CYLINDER in the slot (D); take the HOURGLASS (E).
- Return to Temple Road.
- Place the 2 PEARLS on the necklace; take the NECKLACE (F).
- Go to Wilhelm's Hall.
- Place the NECKLACE in the slot; take the SCEPTER (G).
- Go to Wilhem's Temple.
- Give the HOURGLASS to the statue (H); take the KNIGHT KEY (I).
- Return to Lakeshore.
- Place the 7 KNIGHT KEYS in the lock to activate a puzzle (J).

- Swap the puzzle pieces as shown (K).
- Go to Druid Grove (L).
Chapter 6: Druid Grove
- Use the Raccoon in the hole; take the COGWHEEL (L).
- Take the TOAD EYE (M).
- Take the Note (N).
- Place the PILLAR PART on the other one; take the SCENTED PLANT (O).
- Go to Wilhelm's Temple.
- Place the TOAD EYE (P) in the socket; take the COIN (Q).
- Place the SCENTED PLANT in the burner. Use the Fire Dragon in the burner; take the MAGIC ASH (R).
- Return to Wilhelm's Hall.
- Remove the cover and place the COGWHEEL (S).
- Remove three candles and take the STONE TILE (T).
- Return to Temple Road.
- Place the COIN in the slot (U); take the SCARAB (V).
- Return to Wilhelm's Temple.
- Give the ORB and SCEPTER to the statue; take the CROWN (W).
- Place the SCARAB to activate a HOP (X).
- Play the HOP.
- You receive the STONE TILE (Y).
- Return to Druid Grove.

- Place the 2 STONE TILES to activate a puzzle. Place the tokens in the right spots.
- Solution: F, J, G, C, F, K, B, E, I, D, Hx2, G, Ax2, C, Ax2, K, C, Ax2, E, Hx2, I, and K.
- Take the DRUID AMULET.
- Use the MAGIC ASH on the staff (@); place the head on it (L).
- Place the DRUID AMULET on it and take the DRUID STAFF (M).
- Return to Ariadne's Estate.
- Give the CROWN and DRUID STAFF to Ariadne; take the GUNPOWDER HORN (N).
- Go to the Tower.
- Place the GAS BUBBLE (O) and GUNPOWDER (P); use the Fire Dragon on the gunpowder.
- Go through the hole to reach the Castle.
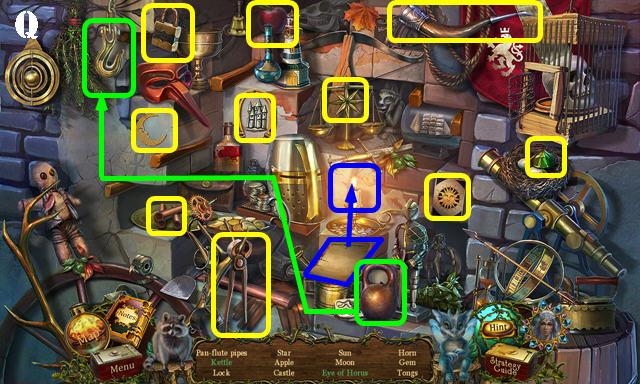
- Play the HOP.
- You receive the PAN-FLUTE PART (Q).
- Use the Magic Star to remove the fog on the right.
- Take the Note (R).
- Take the RING PART (S).
- Return to Druid Grove.
- Place the 2 PAN-FLUTE PARTS on the other one; take the PAN FLUTE (T).
- Return to Wilhelm's Temple.
- Place the RING PART on the RING; take WILHELM'S RING (U).
- Return to Cornelius' Castle.
- Use the PAN FLUTE on the fire for a puzzle.
- Repeat the pattern according to the clue.
- Round One: 2, 8, 4.
- Round Two: 1, 7, 3, 9, 6.
- Round Three: 5, 3, 1, 4, 6, 8, 2.
- Take the MOON (V).
- Return to Temple Road.
- Place the MOON in the slot (W); take the YIN (X).
- Return to Druid Grove.
- Place YIN and YANG in the slot. Take the STONE GRIMOIRE (Y).
- Return to Cornelius' Castle.
- Place the STONE GRIMOIRE in the slot. Take CORNELIUS' CREST (Z).
- Return to Wilhelm's Temple.
- Place CORNELIUS' CREST in the slot (A); take CORNELIUS' RING (B).
- Return to Cornelius' Castle.
- Use WILHELM'S RING and CORNELIUS' RING on the handle (C).
- Go into the Throne Room.
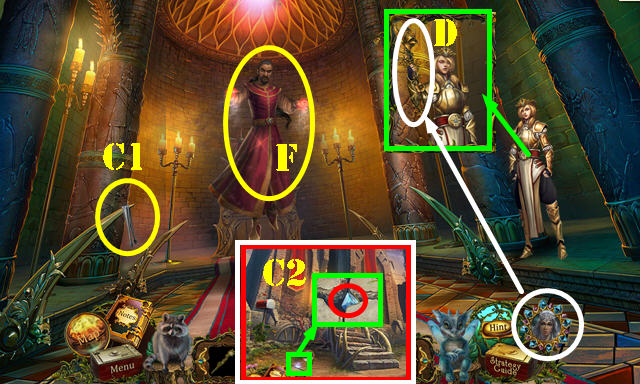

- Take the TONGS (C1).
- Walk down.
- Take the Shard with the TONGS (C2).
- Return to the Throne Room.
- Use the Magic Star on the staff to activate a puzzle (D).
- Send light beams to all gems. Place the pieces as shown and then press the center button (E).
- You receive the CHARGED STAFF. Use the CHARGED STAFF on Cornelius (F).
- Congratulations, you have completed Revived Legends: Road of the Kings Collector's Edition!
Created at: 2013-12-06