Walkthrough Menu
- General Tips
- Chapter 1 – Shipwreck
- Chapter 2 – Ships
- Chapter 3 – Lighthouse
- Chapter 4 – Lower Level Lighthouse
- Chapter 5 – Outer Lighthouse
- Chapter 6 – Light Room
General Tips
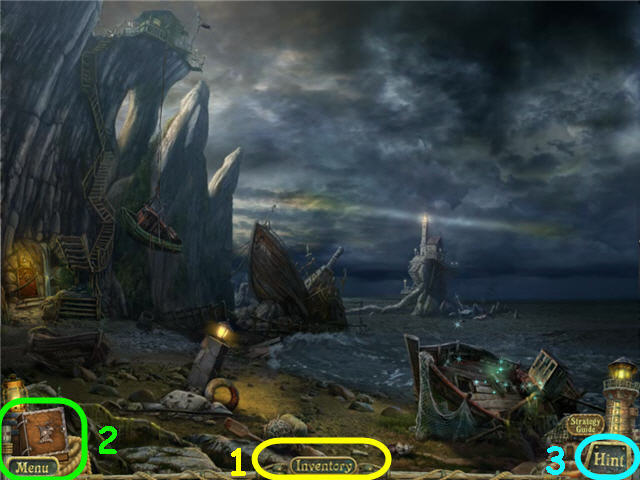
- Select Options to adjust the Music, Sound, Ambient and Voice Volume. You may also adjust Full Screen and Custom Cursor.
- Throughout the guide, we will use the acronym 'HOS' for Hidden Object Scenes.
- The items listed in blue in the find lists require an extra step to locate.
- When you pick up or earn an Inventory Item you need to press the 'X' in the upper right corner to collect the item.
- Move your cursor to the bottom of the screen to access the Inventory Bar (1).
- Puzzles may be skipped. You can reset a puzzle by exiting the puzzle and starting again.
- The Diary (2) at the bottom left of the screen contains all important game info.
- Select Goals in the Diary to access a list of current tasks.
- Press on the Hint (3) button in the lower right to get a hint in either the Hidden Object Scenes or regular gameplay.
- Press on the Help Button on the bottom center during a puzzle to get your puzzle objective.
- This game is not linear and you may do things in a different order as the guide. If you cannot do an action when stated in the guide, please check the previous entries to see if you missed something.
Chapter 1 – Shipwreck
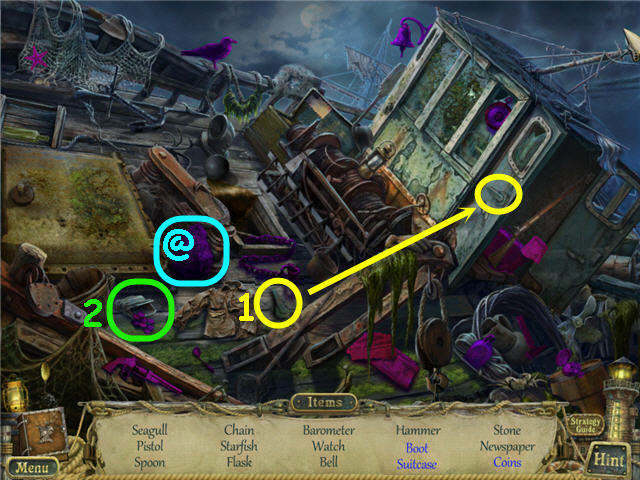
- Examine the boat to access a HOS.
- Find the items listed.
- Place the handle (1) on the door; open the door to get the boot and suitcase.
- Open the coin purse (2) to get the coins.
- You will earn a STONE (@).
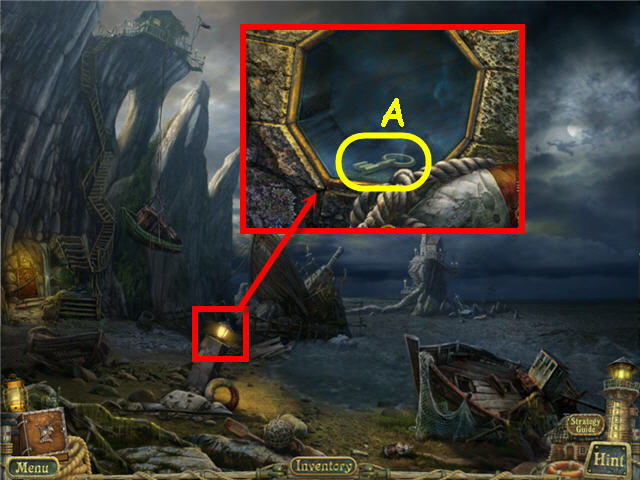
- Examine the light; use the STONE on the glass 3 times; take the KEY (A).
- Go towards the stairs.
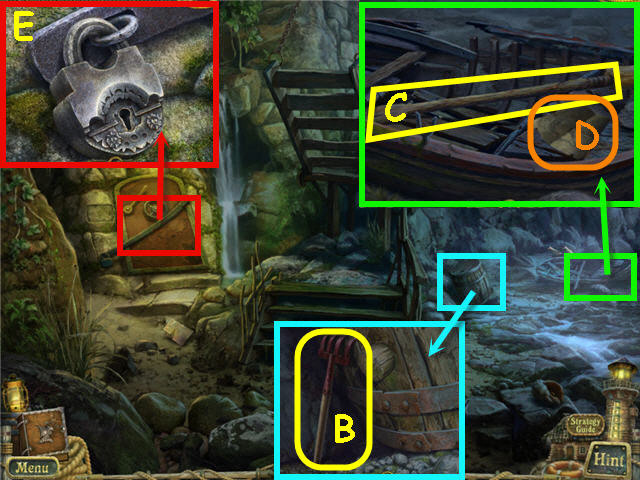
- Examine the barrel; take the RAKE (B).
- Shoo the birds; examine the boat.
- Take the OAR (C) and the map (D) for a diary update.
- Examine the door; use the KEY on the lock (E) and turn to open.
- Examine the open door to trigger a puzzle.
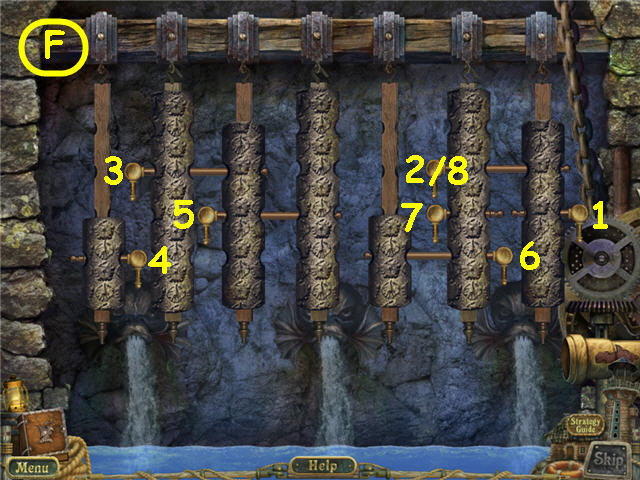
- Drop the weights in the water by removing the pins.
- Press the left mouse and hold/slide to pull the pins out.
- See screenshot (F) for one order of pin removal.
- Go up the stairs once.
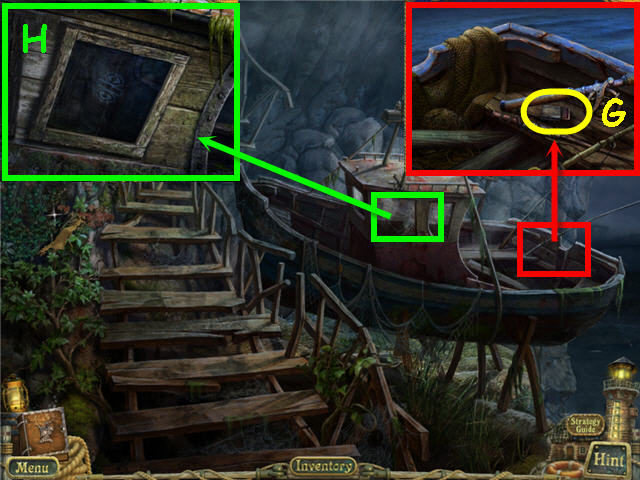
- Examine the stern; take the MATCHES (G).
- Examine and use the STONE on the cabin window (H) three times.
- Examine the window to access a HOS.
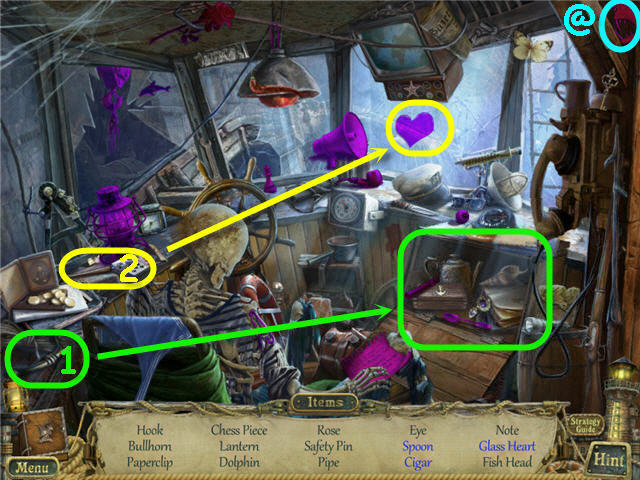
- Find the items listed.
- Use the handle (1) on the cabinet to get the spoon and cigar.
- Use the glass cutter (2) on the window to get the glass heart.
- You will earn a FISH HEAD (@).
- Go up the stairs.
- Examine the door; place the FISH HEAD on the door lock to trigger a puzzle.
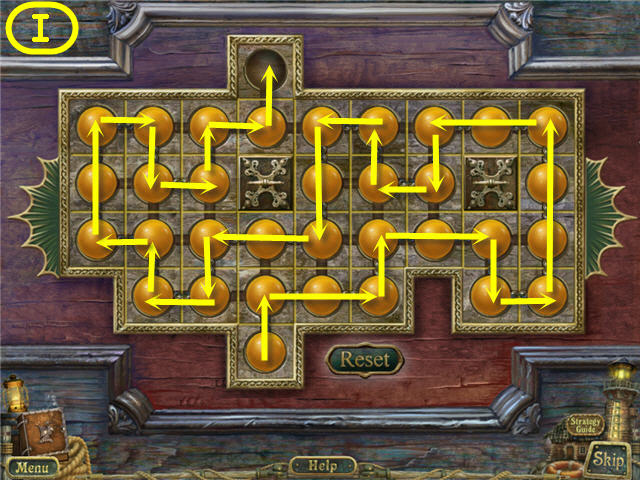
- Drag the yellow ball through all the spaces without crossing the chain and exit through the top. See screenshot (I) for solution.
- Go down the left path.
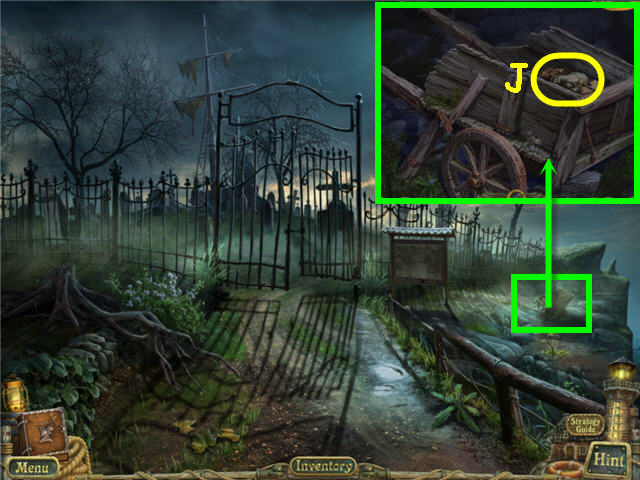
- Examine the wheel barrow.
- Use the RAKE on the leaves three times; take the BINOCULARS (J).
- Go back and enter the house.
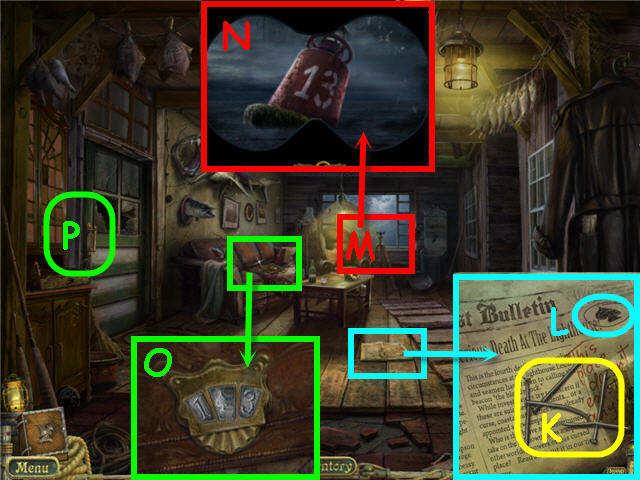
- Examine the newspaper; take the NAILS (K) and note the code (L).
- Examine and place the BINOCULARS on the tripod (M).
- Look into the BINOCULARS; note the code (N).
- Examine the couch.
- Use the code from the newspaper and buoy on the purse; enter 1 – spade – 3 (O).
- Take the note and RULER.
- Examine and use the RULER on the door latch (P).
- Examine the doorway to access a HOS.
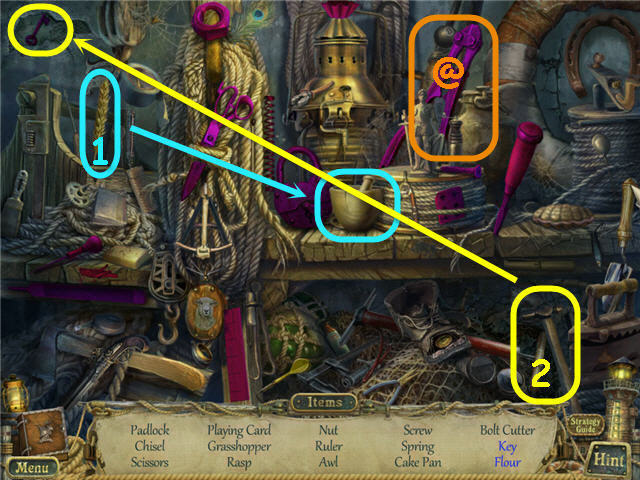
- Find the items listed.
- Place the wheat (1) in the mortar to get the flour.
- Use the hammer (2) on the patch to get a key.
- You will earn BOLT CUTTERS (@).
- Back out and go left.
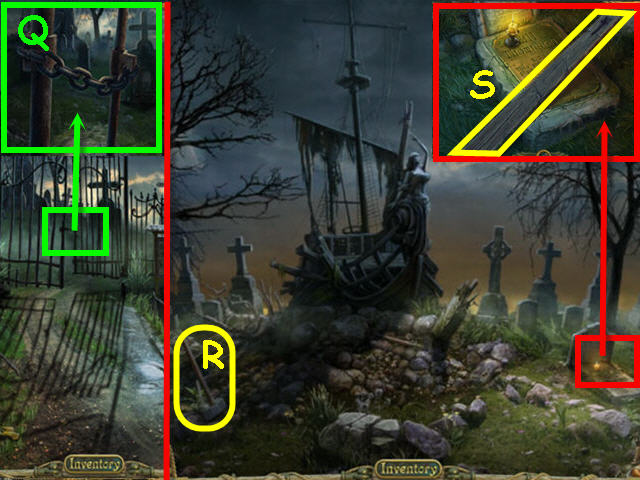
- Examine the gate; use the BOLT CUTTERS on the chain (Q).
- Go straight.
- Take the HAMMER (R).
- Examine the grave; take the BEAM (S).
- Go down twice.
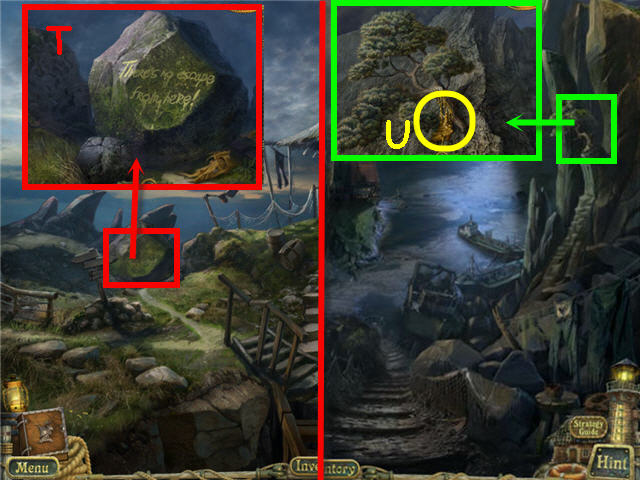
- Examine and use the BEAM on the boulder (T).
- Go straight once down the path.
- Examine the tree; take the DRY RESIN (U).
- Examine the clothesline to access a HOS.
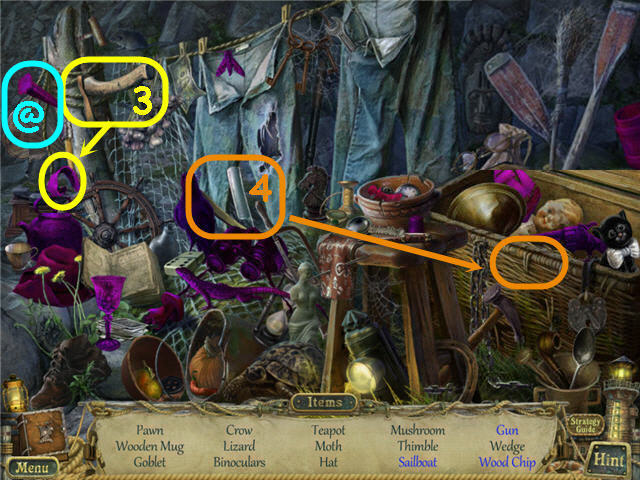
- Find the items listed.
- Use the axe (3) to get a wedge.
- Use the razor (4) on the rope to open the trunk and get the sailboat and gun.
- You will earn a WEDGE (@).
- Go down the stairs.
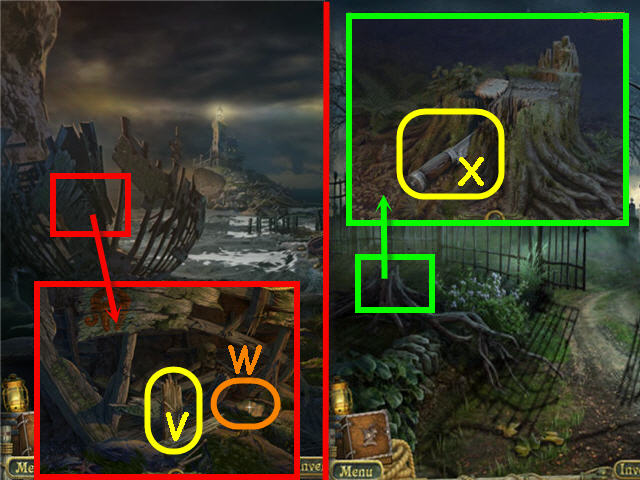
- Examine the boat hull; take the BOARDS (V) and the note (W).
- Go back twice and left.
- Examine and place the WEDGE on the top crack in the stump; use the HAMMER on the WEDGE twice and take the KNIFE (X).
- Go back.
Chapter 2 – Ships
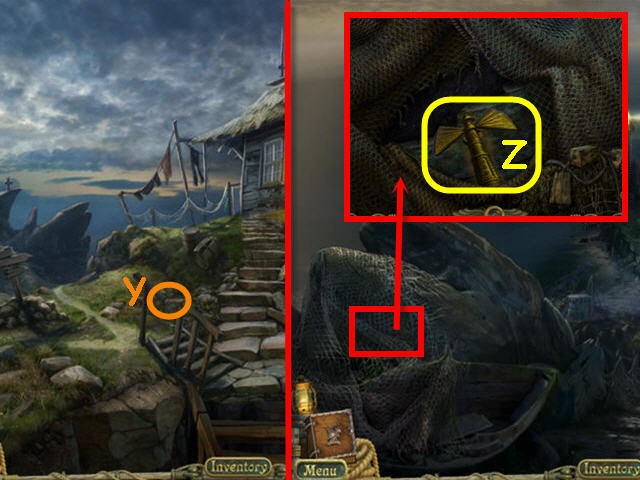
- Take the note (Y).
- Go straight.
- Shoo the bird; examine and use the KNIFE on the fishnet; take the LIGHTHOUSE (Z).
- Go back twice.
- Examine the boat to access a HOS.
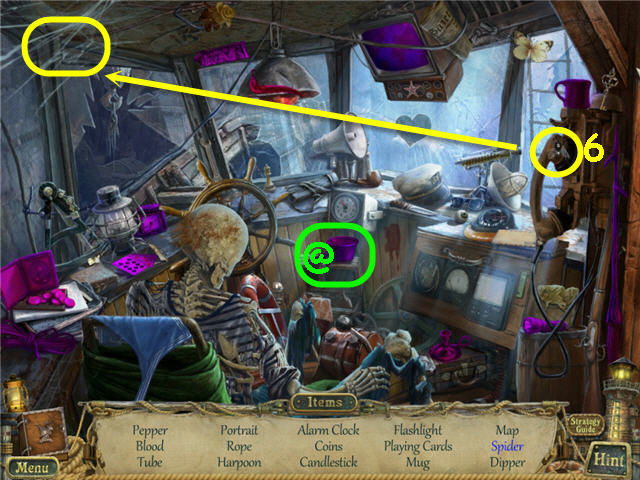
- Find the items listed.
- Place the fly (6) on the web to get the spider.
- You will earn a DIPPER (@).
- Go down twice.
- Examine the boat to access a HOS.
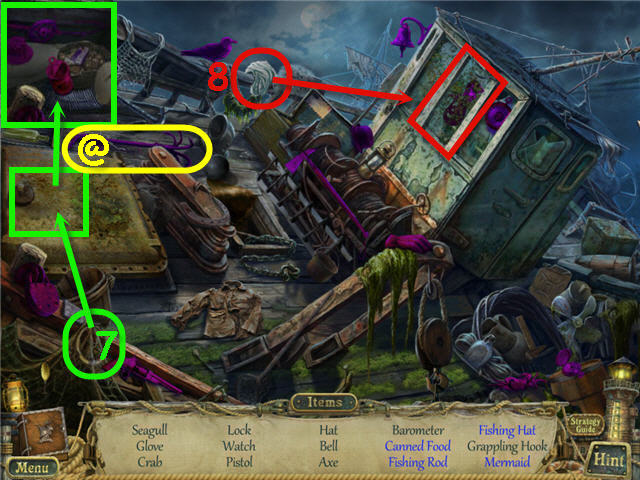
- Find the items listed.
- Use the ring (7) on the hatch to get the canned food, fishing rod and canned food.
- Use the rag (8) on the window to get the mermaid.
- You will earn a GRAPPLING HOOK (@).
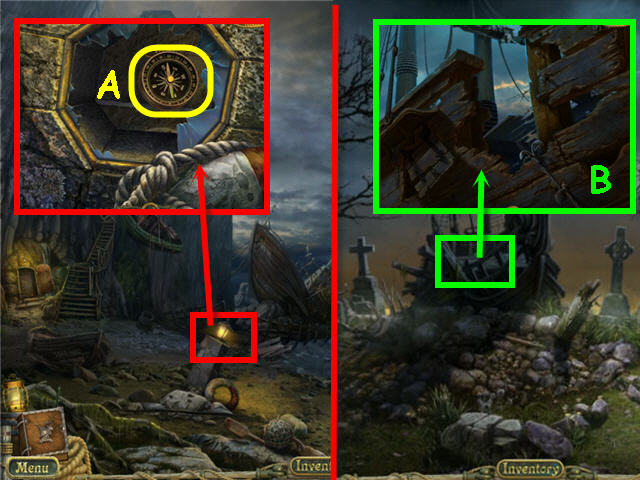
- Examine and place the LIGHTHOUSE in the lantern; take the WEST SIDE COMPASS (A).
- Go up to the house; turn left and straight.
- Examine the ship; place the GRAPPLING HOOK on the side (B) and enter the ship.
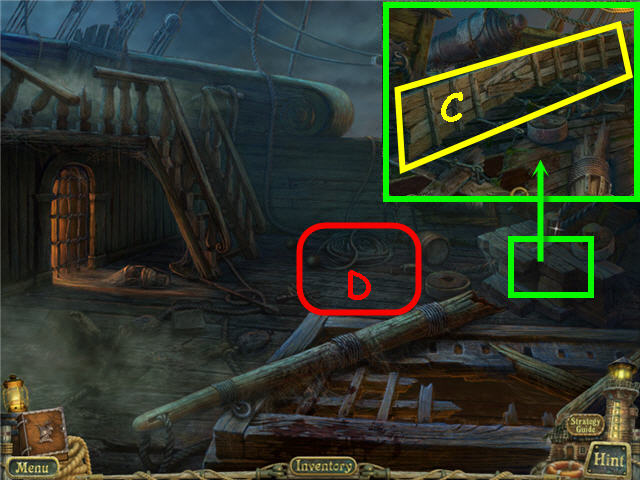
- Examine the wood; place the BOARDS, NAILS and HAMMER on the crack in the ladder; take the SHIP LADDER (C).
- Examine the rope (D) to get a hole in the deck.
- Examine the hole to access a HOS.
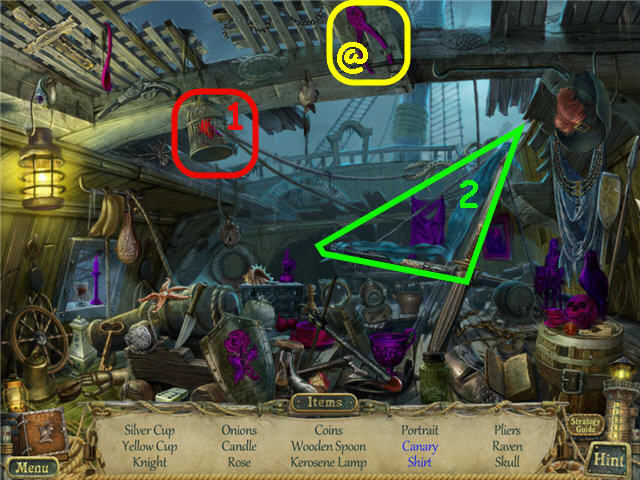
- Find the items listed.
- Move the cloth (1) to get the shirt.
- Uncover the cage (2) to get the canary.
- You will earn PLIERS (@).
- Go up the left stairs.
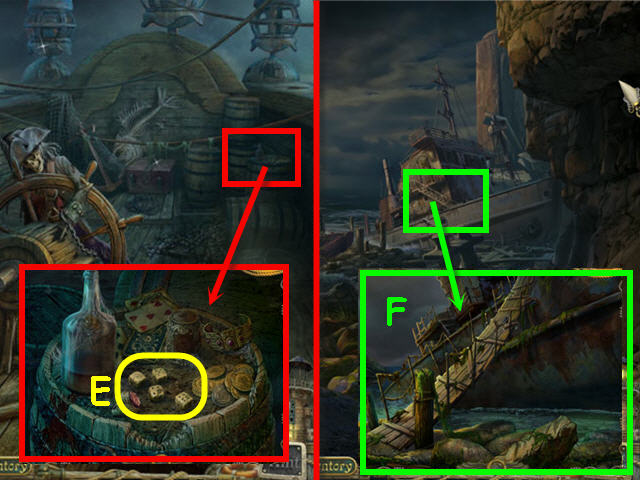
- Examine the barrels; take the DICE (E).
- Back out four times; go straight twice.
- Examine and place the SHIP LADDER against the ship (F).
- Go up the SHIP LADDER.
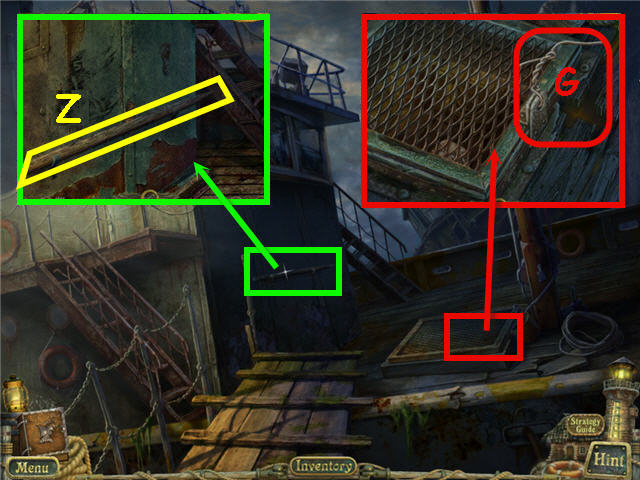
- Examine the wall under the window; take the HANDLE (Z).
- Examine the hatch; use the PLIERS on the wire (G) three times.
- Examine the hatch to access a HOS.
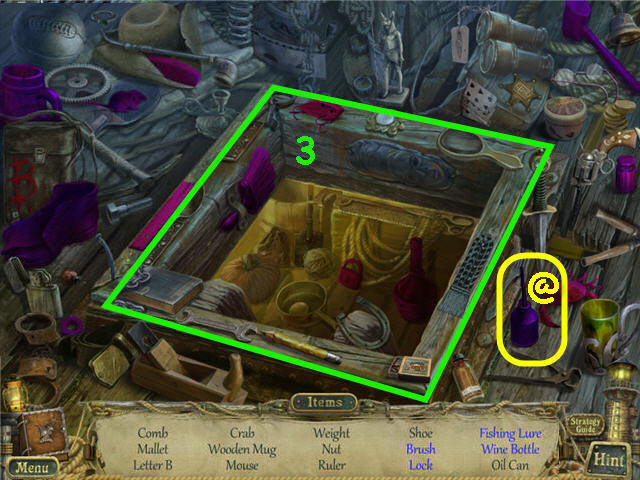
- Find the items listed.
- Open the hatch (3) to find the brush, lock, fishing lure and wine bottle.
- You will earn an OILCAN (@).
- Back out three times; enter the house.
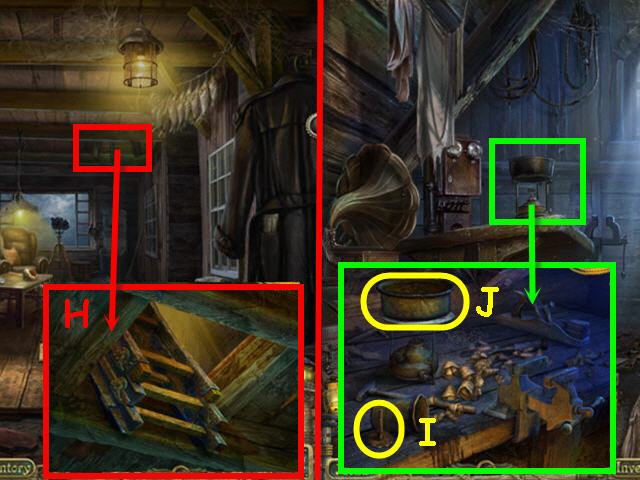
- Examine the attic hatch; use the OILCAN on the ladder (H).
- Go up the ladder.
- Examine the burner; take the LANTERN KNOB (I).
- Place the DRY RESIN in the pan; light the burner with the MATCHES; take the MELTED RESIN (J).
- Back out twice; go left and straight twice; go up the stairs.
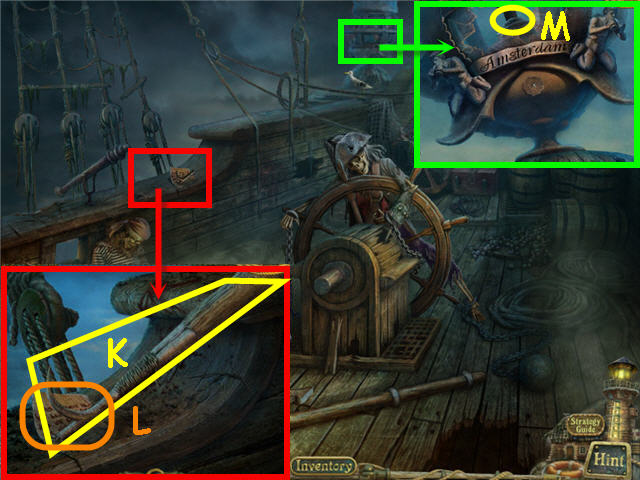
- Examine the gunwale; place the HANDLE on the harpoon tip.
- Take the BOAT HOOK (K) and note (L).
- Shoo the bird.
- Examine and place the LANTERN KNOB on the lantern; turn the knob and take the WICK (M).
- Back out.
Chapter 3 – Lighthouse
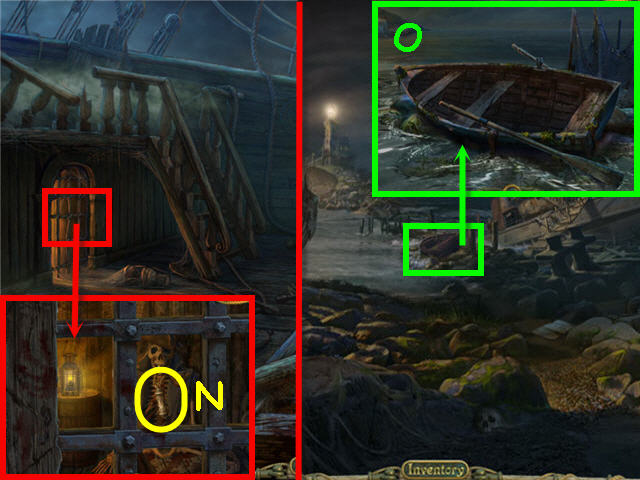
- Examine the cell; use the BOAT HOOK to get the CAPSULE (N).
- Back out three times; go straight twice.
- Examine and use the DIPPER three times on the rowboat (O).
- Place the MELTED RESIN and OAR on the rowboat and use it to go to the lighthouse.
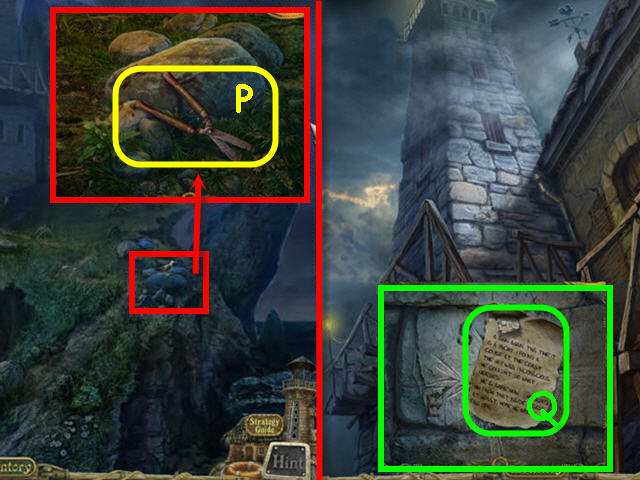
- Shoo the bird; examine the rocks and take the SHEARS (P).
- Go straight.
- Examine and take the note (Q); look at the clue under the note.
- Back out three times.
- Examine the clothesline to access a HOS.
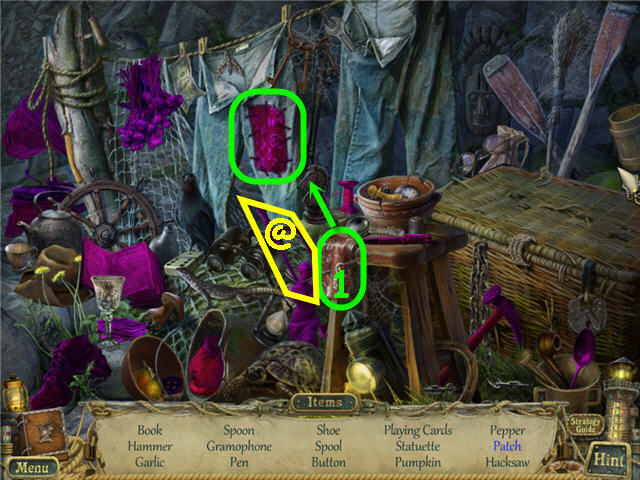
- Find the items listed.
- Use the cloth (1) on the jeans to get a patch.
- You will earn a HACKSAW (@).
- Back out and go up into the attic of the house.
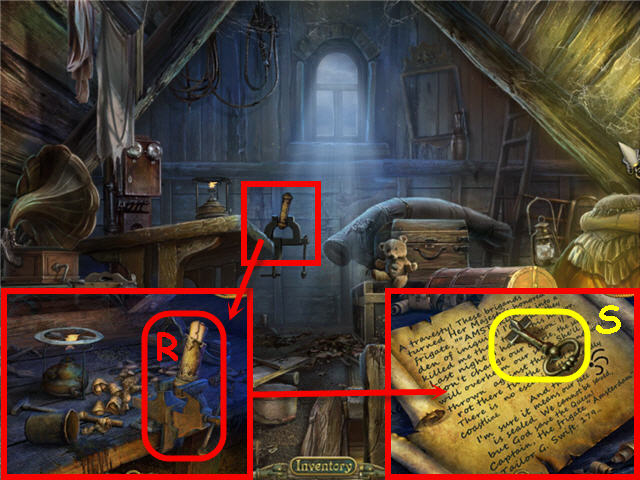
- Examine and place the CAPSULE in the vice (R).
- Use the HACKSAW on the top of the CAPSULE; remove and examine the note and take the CAPTAIN'S KEY (S).
- Back out three times.
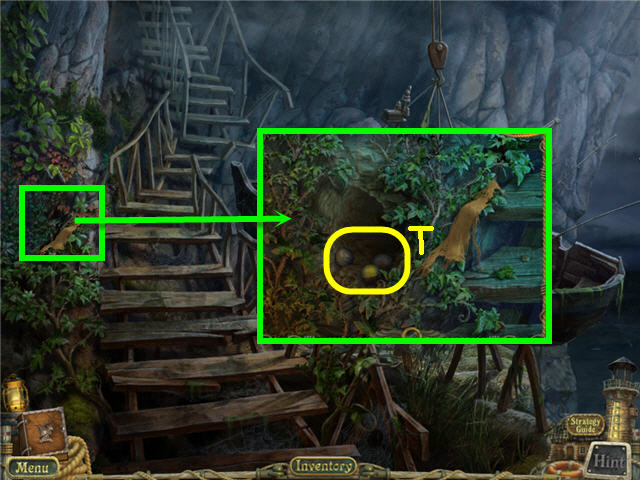
- Examine and use the SHEARS on the vines three times; take the ATTIC PUZZLE BALLS (T).
- Go back up and enter the house.
- Examine the doorway to access a HOS.
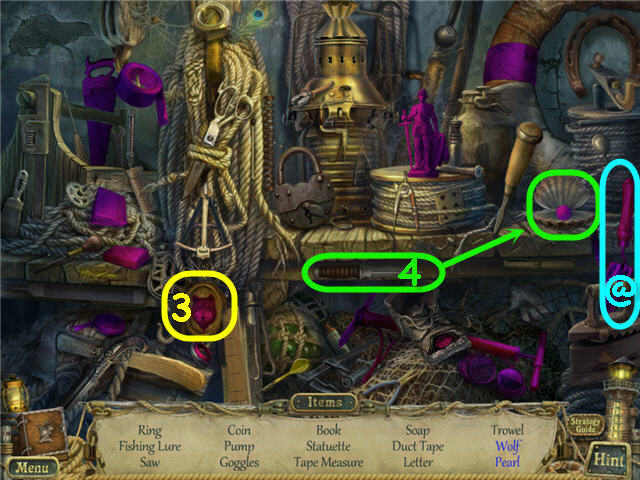
- Find the items listed.
- Open the locket (3) to get the wolf.
- Use the knife (4) to open the clam to get the pearl.
- You will earn a TROWEL (@).
- Go up the ladder to the attic.
- Examine and place the ATTIC PUZZLE BALLS on the trunk to trigger a puzzle.
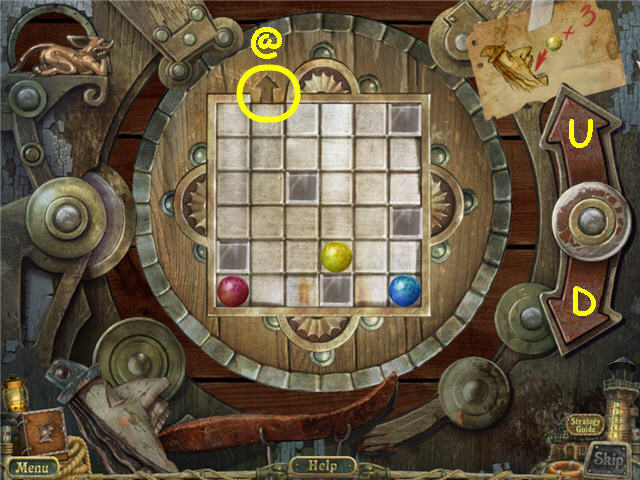
- Use the up and down arrows to move the 3 balls through the exit (@).
- Solution: Press the arrows in the following order; U-4x, D-3x, U-3x, D-3x, U.
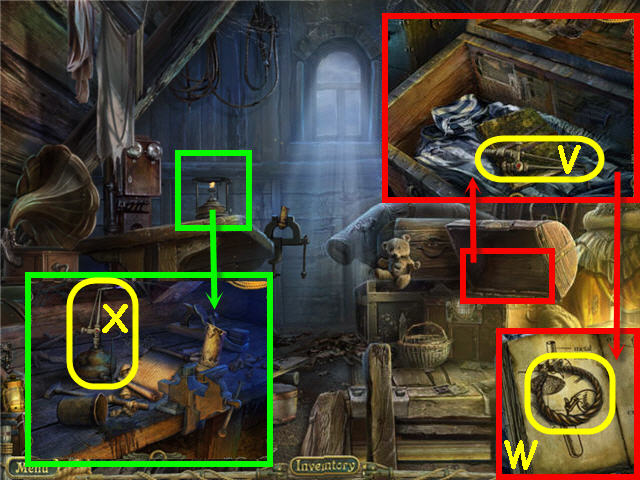
- Examine the trunk; take the GAS JET CAP (V).
- Open the book; take the note and HATCH RING (W).
- Look at the plans in the book.
- Examine and place the GAS JET CAMP on the burner; take the GAS JET (X).
- Back out twice; go left and then forward twice.
- Examine the hole in the deck to access a HOS.
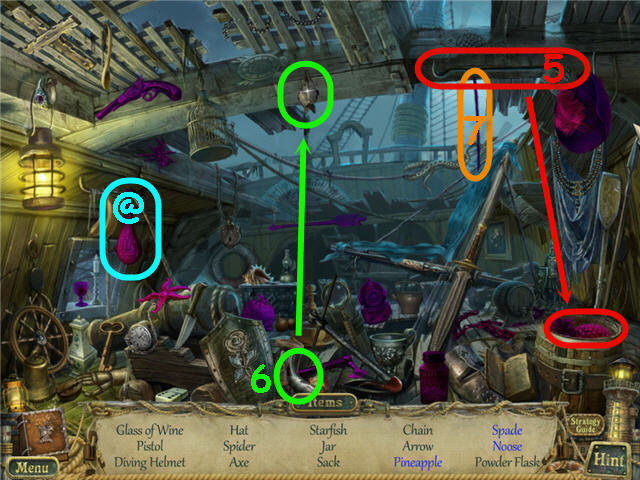
- Find the items listed.
- Use the crowbar (5) on the barrel to get the pineapple.
- Use the horn (6) on the bat to get a spade.
- Tie the rope (7) to get a noose.
- You will earn an EMPTY POWDER FLASK (@).
- Go up the stairs.
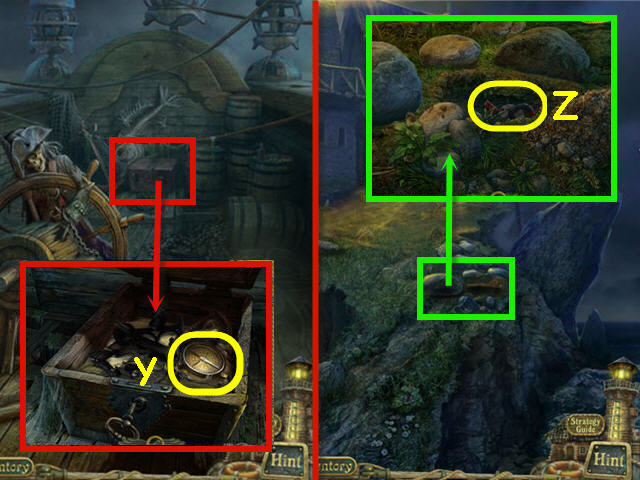
- Examine and use the CAPTAIN'S KEY on the trunk; turn the key.
- Take the EAST SIDE COMPASS (Y).
- Back out four times, go forward twice; use the rowboat to get to the lighthouse.
- Examine and move the rock; use the TROWEL on the ground; take the MAGNETS (Z).
- Back out and enter the ship.
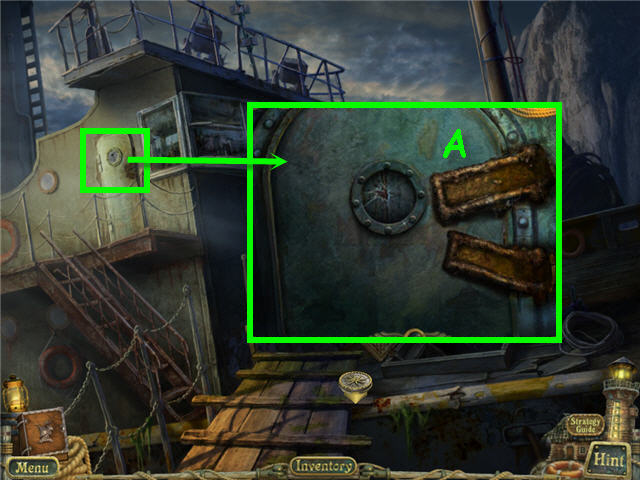
- Examine and use the GAS JET on the door (A); enter through the door.
- Go downstairs.
- Examine the corner next to the couch to access a HOS.
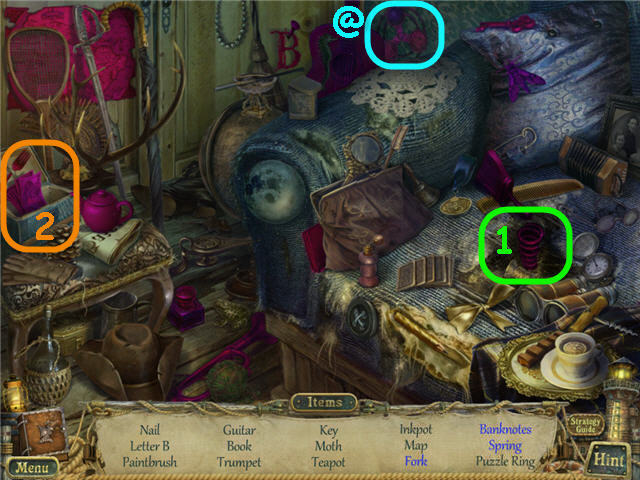
- Find the items listed.
- Tear the upholstery (1) to get a spring.
- Open the box (2) to get banknotes and fork.
- You will earn a PUZZLE PART (@).
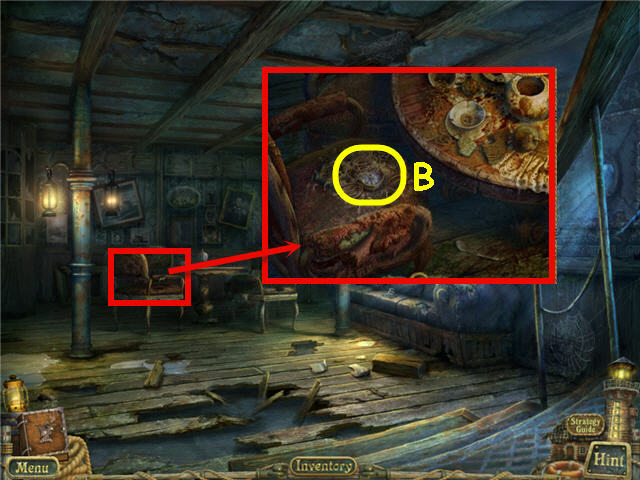
- Examine and use the KNIFE three times on the chair cushion; take the NORTH SIDE COMPASS (B).
- Go up the right stairs; back out twice; use the rowboat to go the lighthouse; go forward.
- Examine the lighthouse door and place the MAGNETS in the center, EAST SIDE COMPASS on the right slot, WEST SIDE COMPASS on the left slot and NORTH SIDE COMPASS on the top slot to trigger a puzzle.
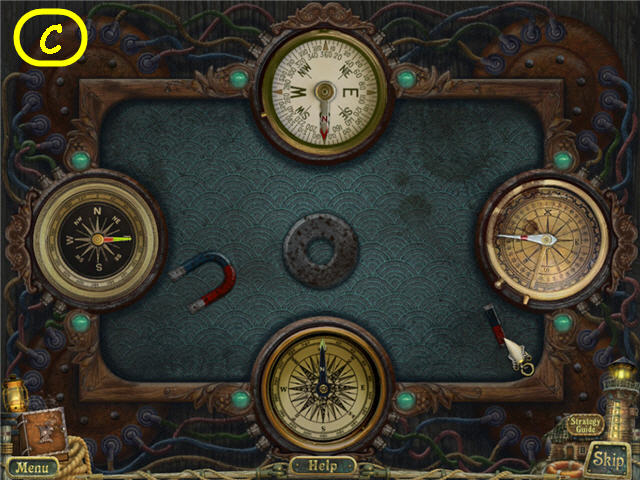
- Arrange the magnets so that all the compass arrows point to the center.
- See screenshot (C) for solution.
- Enter the lighthouse.
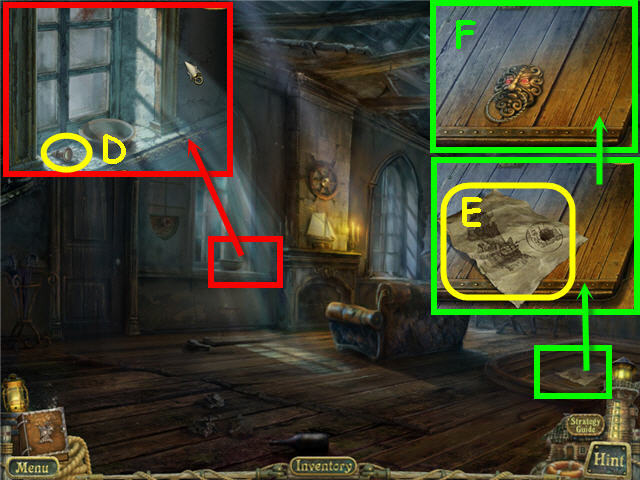
- Examine the windowsill; take the BOLT (D).
- Examine the hatch; take the note (E) and place the HATCH RING on the hatch (F) and pull.
- Examine the opened hatch to trigger a puzzle.
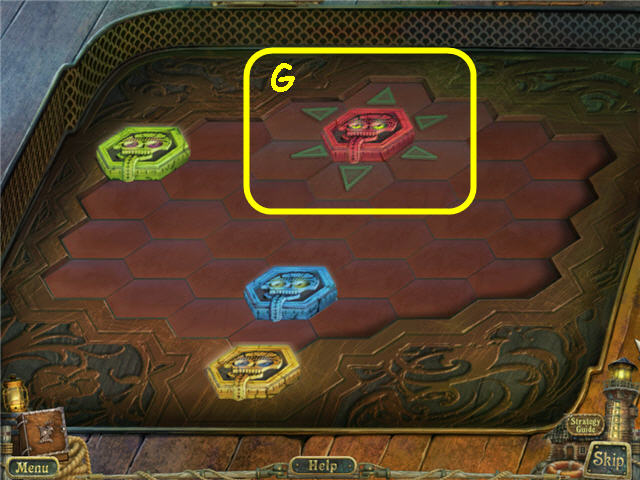
- Move the colored shapes to their matching colored space.
- Press on the color you wish to move to get arrows showing available moves (G).
- Solution: Clockwise starting at the 12 o'clock position the arrows are: up, right up, right down, down, left down and left up. Green – left down, up; blue – left down, right down, up; red – left down, up; yellow – right down; green – down; blue – left down, down; green – right up, left up, left down, down, right down, left down; blue – right down; green – up, left up, left down; yellow – down. See screenshot for solution.
- Go down the newly opened staircase.
- Examine the left area of the basement to access a HOS.
Chapter 4 – Lower Level Lighthouse
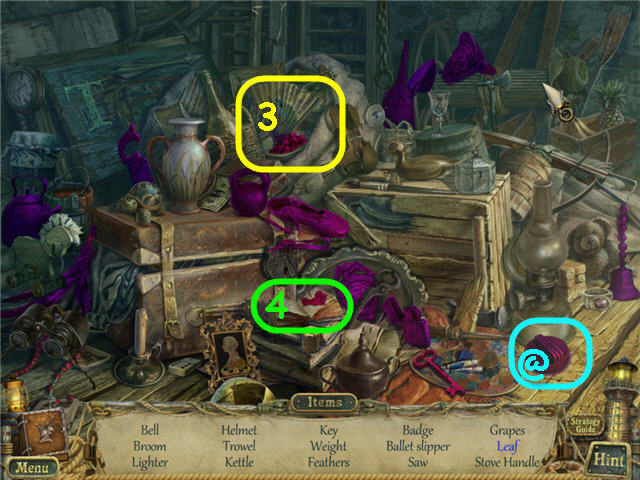
- Find the items listed.
- Open the sack (3) to get the grapes.
- Open the book (4) to get the leaf.
- You will earn a STOVE HANDLE (@).
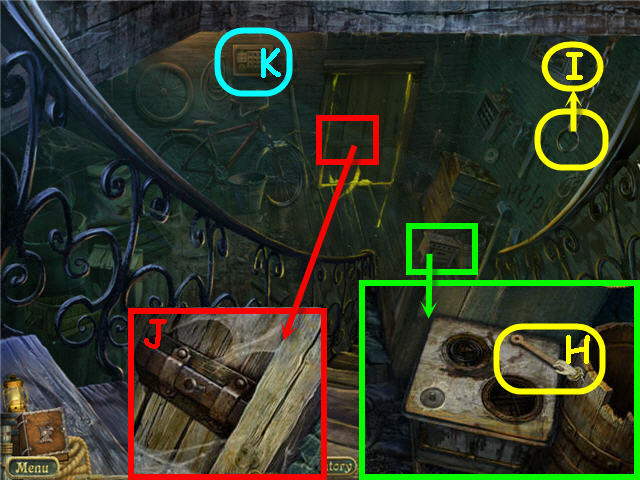
- Examine the stove; take the LEVER (H).
- Pull the chain; take the note (I).
- Examine and place the BOLT on the door lock (J); slide the lock to open.
- Examine and place the DICE on the safe lock (K) to trigger a puzzle.
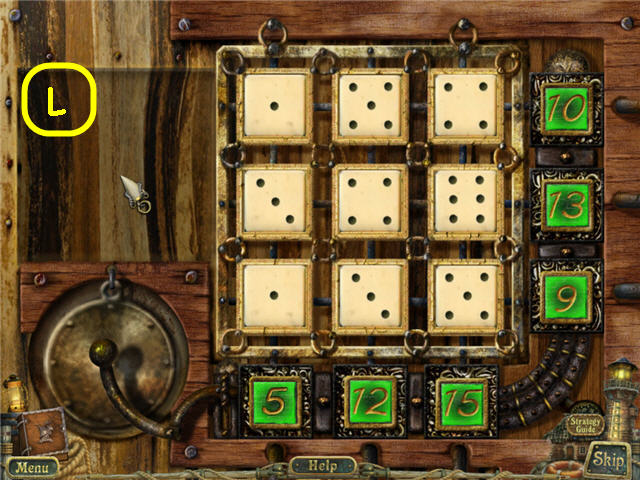
- Arrange the DICE to add up to the numbers on the bottom and right.
- See screenshot (L) for solution.
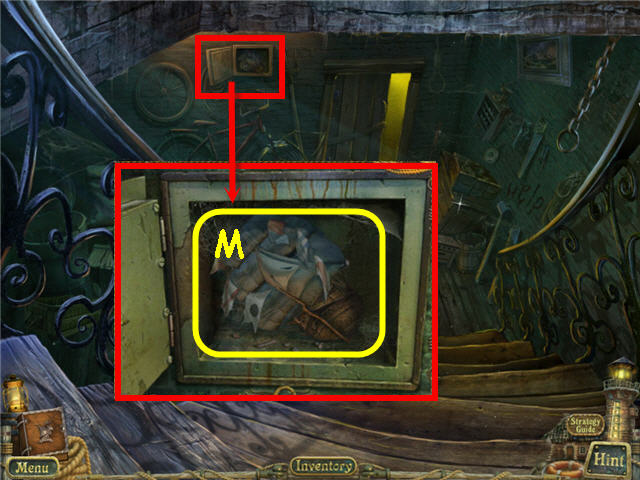
- Examine the safe; take the SHIP (M).
- Go through the door.
- Examine the pile of debris to access a HOS.
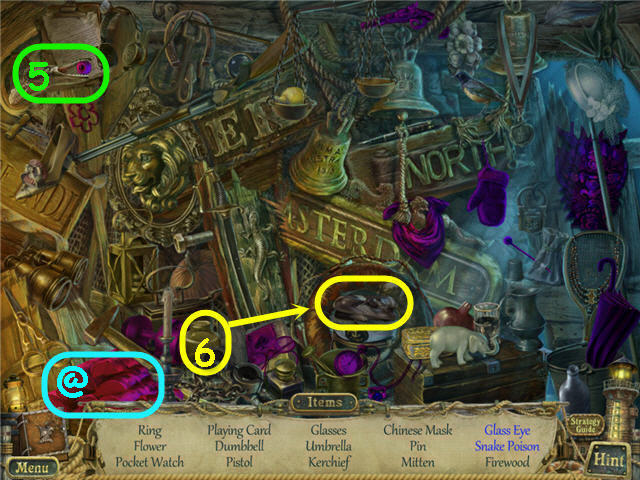
- Find the items listed.
- Open the fish's mouth (5) to get the glass eye.
- Use the jar (6) on the snake to get the snake poison.
- You will earn FIREWOOD (@).
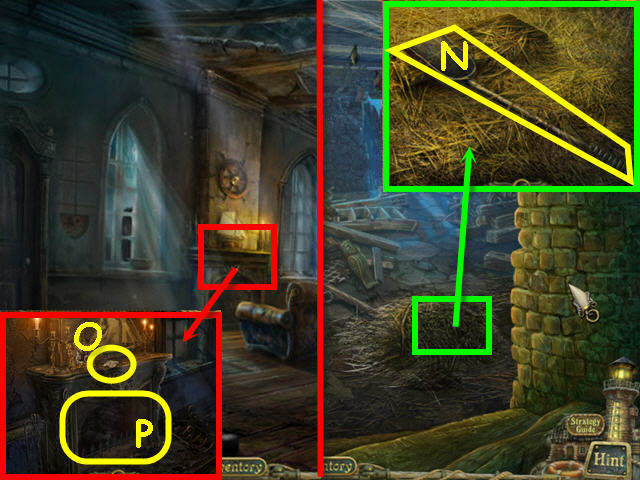
- Examine the haystack; move the hay three times and take the SCOOP (N).
- Back out two times.
- Examine the fireplace; take the note (O).
- Use the FIREWOOD, MATCHES and SCOOP in the fireplace (P) to get COAL.
- Back out three times; go into the ship.
- Examine the hatch to access a HOS.
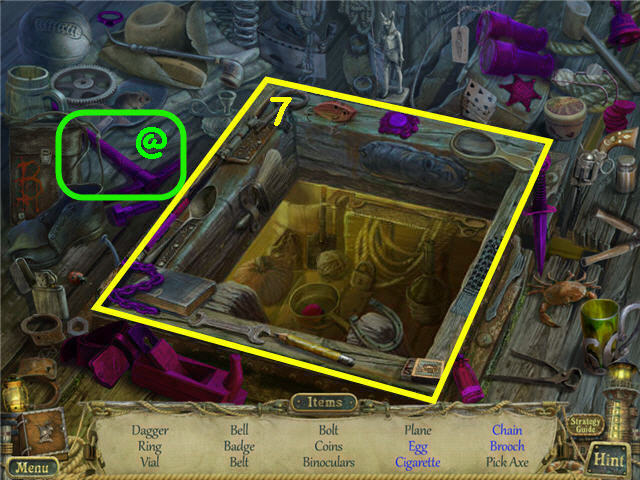
- Find the items listed.
- Open the hatch (7) to get the egg, cigarette, chain and brooch.
- You will earn a PICK AXE (@).
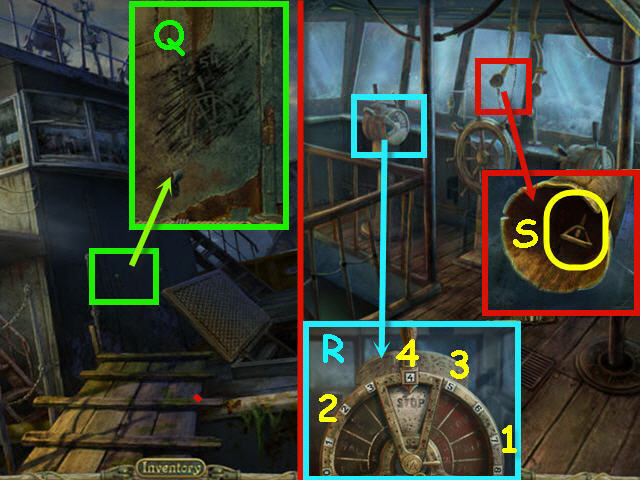
- Examine and use the COAL on the wall; note the code 7254 (Q).
- Enter the cabin.
- Examine the controls (R); enter the code from the wall by moving the lever to 7-2-5-and 4 (or follow the order shown in the screenshot 1 -4).
- Examine the tube; remove the cap and take the WINDOW LOCK (S).
- Go down to the lower level.
- Examine the corner by the couch to access a HOS.
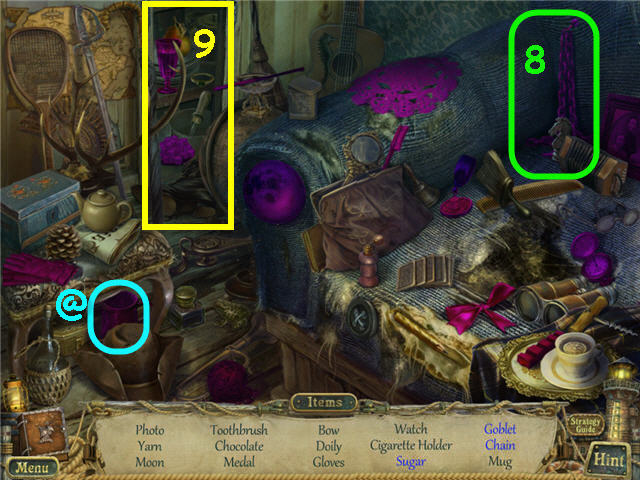
- Find the items listed.
- Move the pillow to get the chain (8).
- Open the cabinet (9) to get the sugar and goblet.
- You will earn an EMPTY MUG (@).
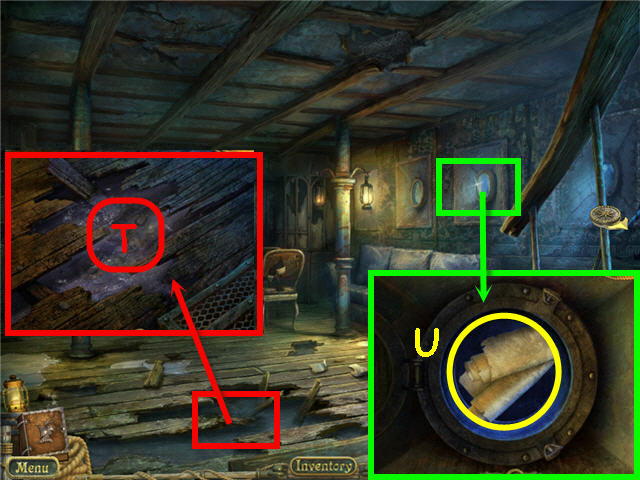
- Examine and use the EMPTY MUG on the water in the hole (T) to get a MUG OF WATER.
- Examine the porthole; place the WINDOW LOCK on the bottom latch; turn both latches and open the porthole; take the SHIP'S LOG PAGES (U).
- Go back upstairs.
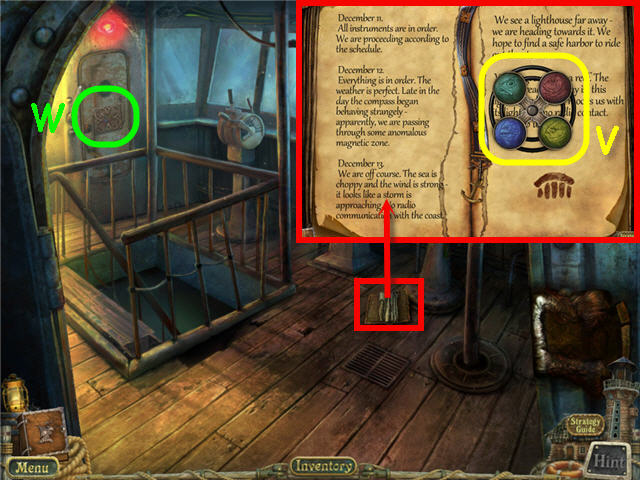
- Examine and place the SHIP'S LOG PAGES on the book; take the 2nd PUZZLE PART (V).
- Examine and place the 2 PUZZLE PARTS on the upper part of the door lock (W) to trigger a puzzle.
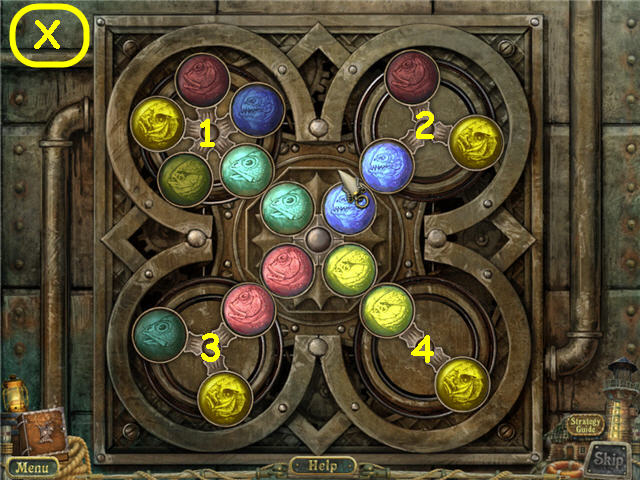
- Turn the four puzzle parts to line up the matching colors with the center. They will light up when correct.
- Press the disks in the following order: 2, 2, 4, 4, 4, 1. See screenshot (X) for solution.
- Enter the newly opened door on the left.
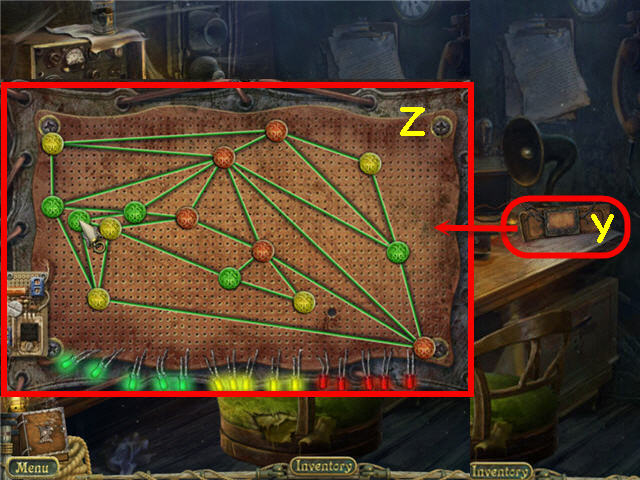
- Examine the remote control (Y) to trigger a puzzle.
- Uncross all the lines. See screenshot (Z) for one solution.
- Take the REMOTE CONTROL.
- Back out three times, use the rowboat; go into the lighthouse and down.
- Examine the left side to access a HOS.
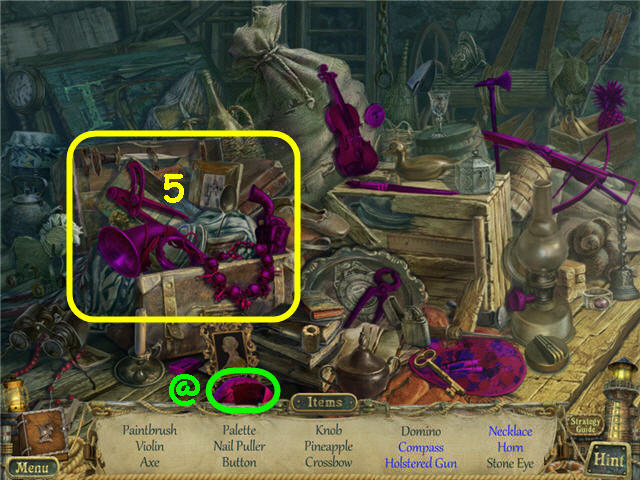
- Find the items listed.
- Open the trunk (5) to get the compass, holstered gun, necklace and horn.
- You will earn a STONE EYE (@).
- Go straight through the door.
- Examine the pile of debris to access a HOS.
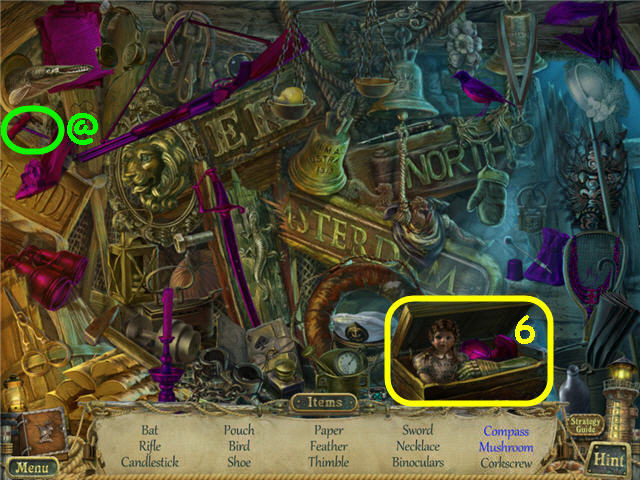
- Find the items listed.
- Open the box (6) to get the compass and mushroom.
- You will earn a CORKSCREW (@).
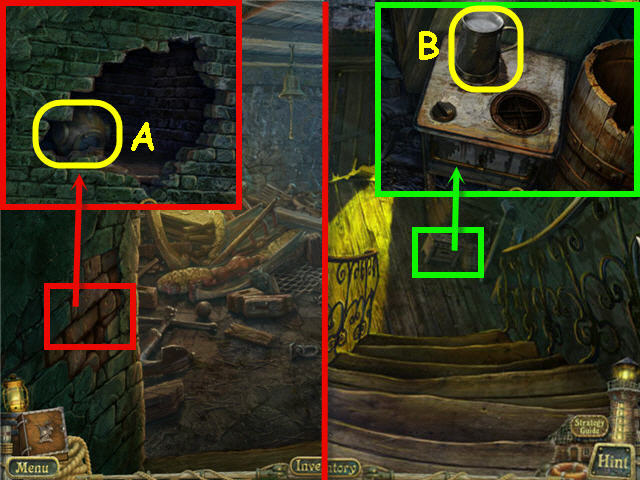
- Examine and use the PICK AXE on the bricks; take the DIVING HELMET (A).
- Back out.
- Examine and place the STOVE HANDLE on the stove; turn the handle.
- Place the MUG OF WATER on the burner; take the BOILING WATER (B).
- Back out.
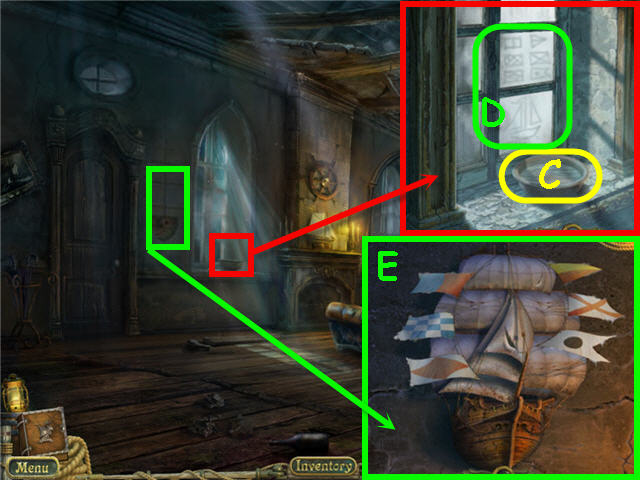
- Examine the windowsill; place the BOILING WATER in the bowl (C).
- Look at the code (D) on the window.
- Examine and place the SHIP on the ship imprint.
- Arrange the flags to match the code from the window. See screenshot (E) for solution.
- Go through the newly opened door on the left.
Chapter 5 – Outer Lighthouse
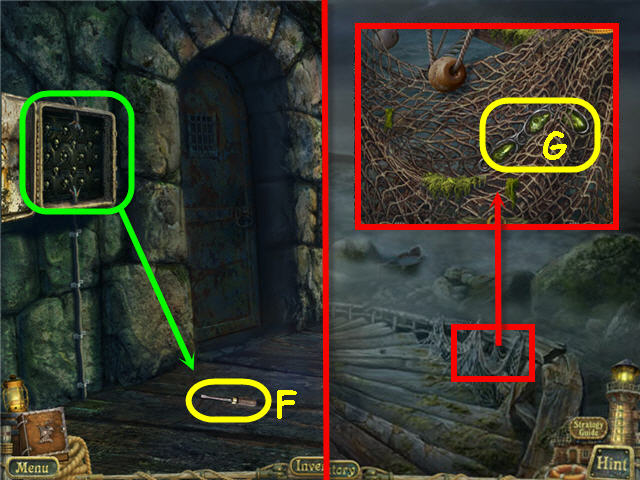
- Open the electrical panel; take the SCREWDRIVER (F).
- Go right.
- Examine the net; take the JEWEL CHAIN (G).
- Go downstairs by placing your cursor by the crosses.
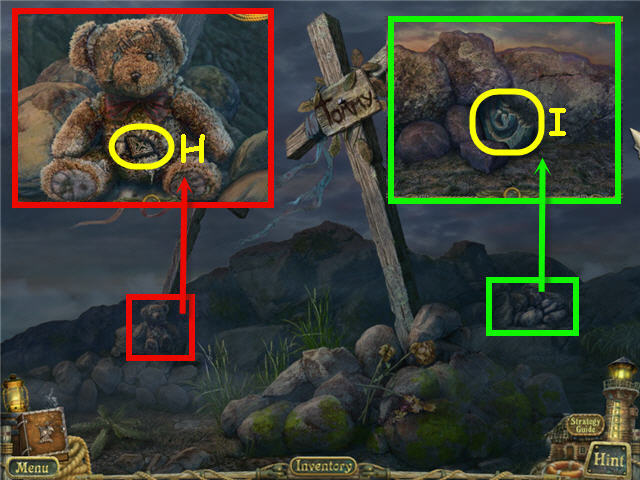
- Examine the teddy bear; use the KNIFE three times on the stomach stitches; take the PUZZLE BLOCK 1/5 (H).
- Examine the rocks; remove the loose rocks; take the SIGN KEY PART (I).
- Back out eight times to the house.
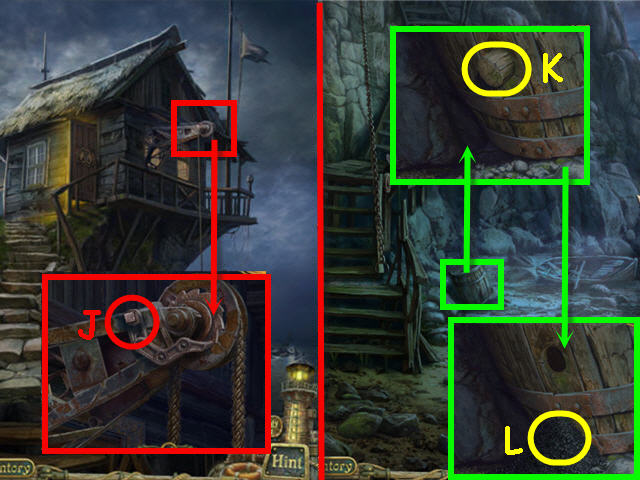
- Examine and use the LEVER on the winch (J).
- Back out twice.
- Examine the barrel; use the CORKSCREW on the cork, turn twice and get a CORK (K).
- Use the EMPTY POWDER FLASK on the gunpowder (L); get a FULL POWDER FLASK.
- Go up to the attic of the house.
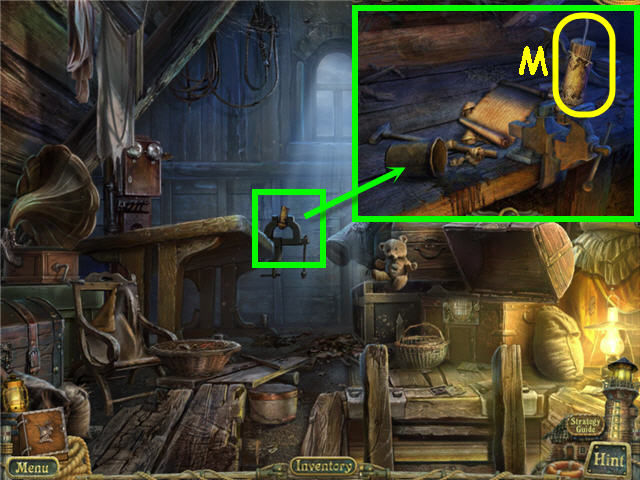
- Examine the vice; use the FULL POWDER FLASK, CORK and WICK on the capsule.
- Take the EXPLOSIVE (M).
- Back out twice; go forward twice; go to the ship, enter the cabin and go left to the control room.
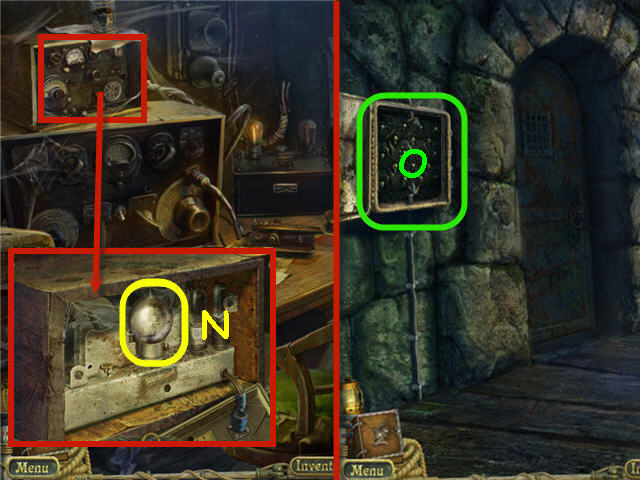
- Examine and use the SCREWDRIVER on each of the three screws on the radio; remove the panel and take the LIGHT BULB (N).
- Back out three times; use the rowboat; go into the lighthouse and out the left door.
- Examine and use the LIGHT BULB in the slot with the burned out bulb on the electric panel (O) to trigger a puzzle.
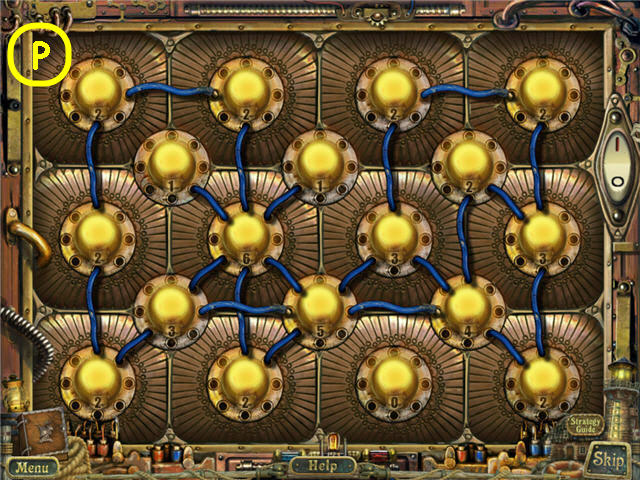
- Place an equal number of wires as shown on the connectors to complete the circuit.
- Use the toggle switch on the right to check your progress or when complete. See screenshot (P) for solution.
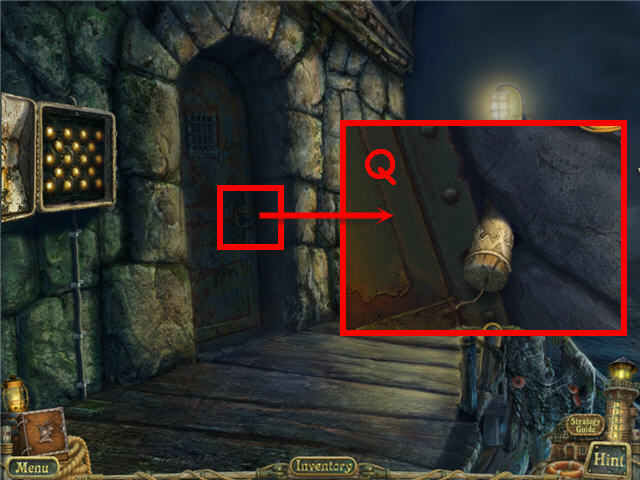
- Examine and place the EXPLOSIVE on the door (Q); light with MATCHES.
- Go through the newly opened door.
- Examine the left rear corner to access a HOS.
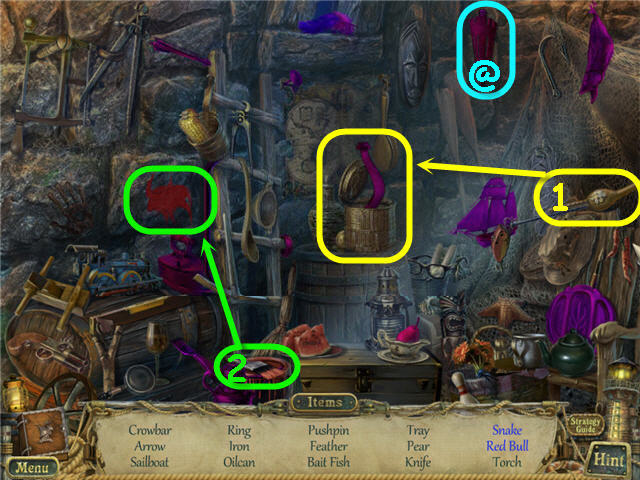
- Find the items listed.
- Use the flute (1) on the basket to get the snake.
- Use the paintbrush (2) on the bull to get a red bull.
- You will earn a TORCH (@).
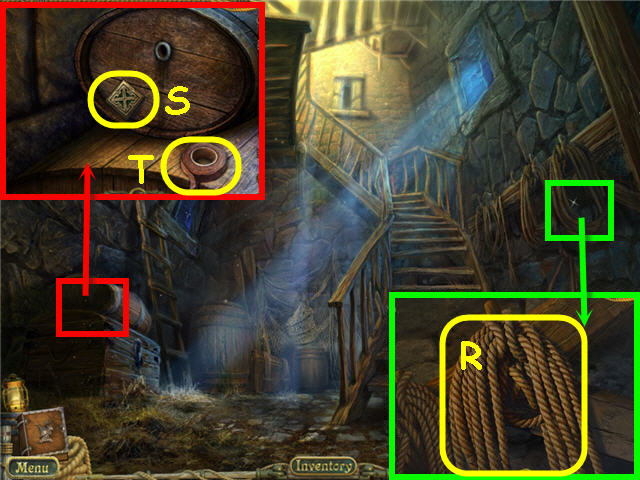
- Examine and take the ROPE (R).
- Examine the chest; take the PUZZLE BLOCK 2/5 (S) and ELECTRIC TAPE (T).
- Go up the stairs once.
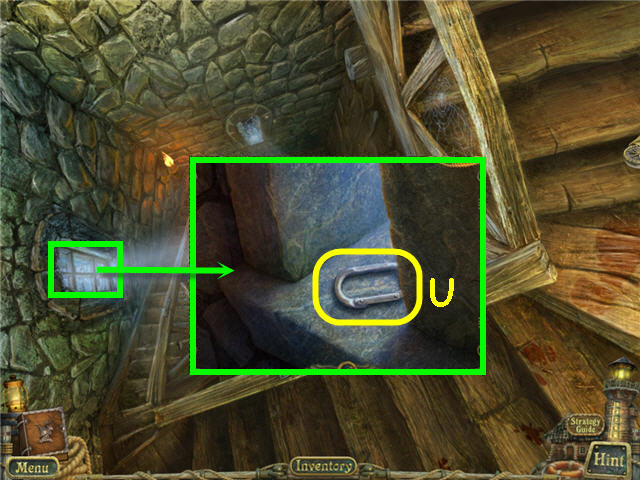
- Examine the window; take the SPRING HOOK (U).
- Go up the stairs.
Chapter 6 – Light Room
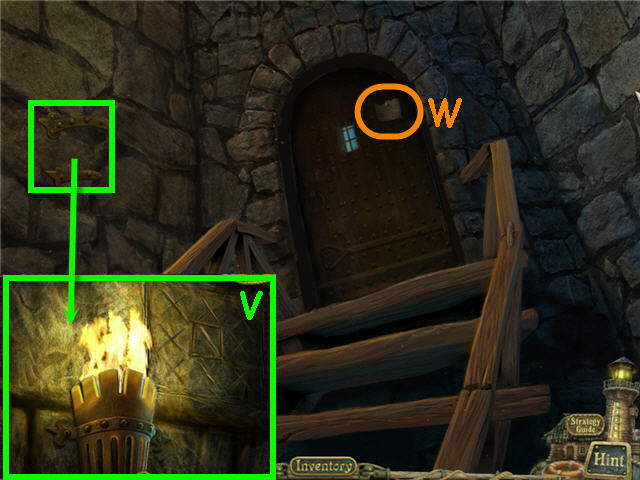
- Examine and place the TORCH on the holder; light with the MATCHES.
- Note the code (V) on the wall.
- Take the note (W) on the door.
- Go down twice.
- Examine the corner to access a HOS.
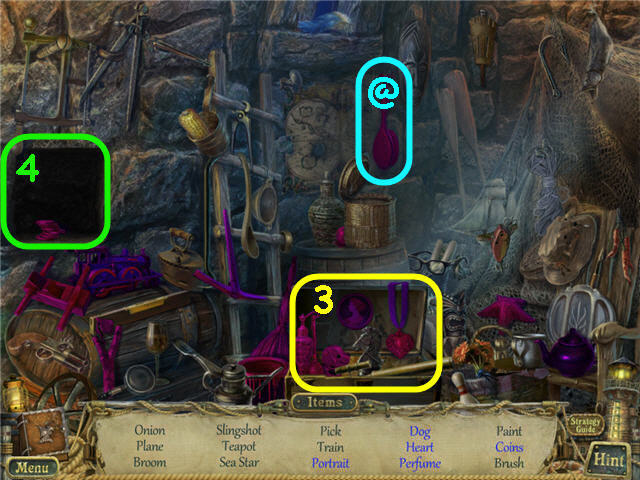
- Find the items listed.
- Open the trunk (3) to get the portrait, dog, heart and perfume.
- Move the brick (4) to get the coins.
- You will earn a BRUSH (@).
- Back out and go forward.
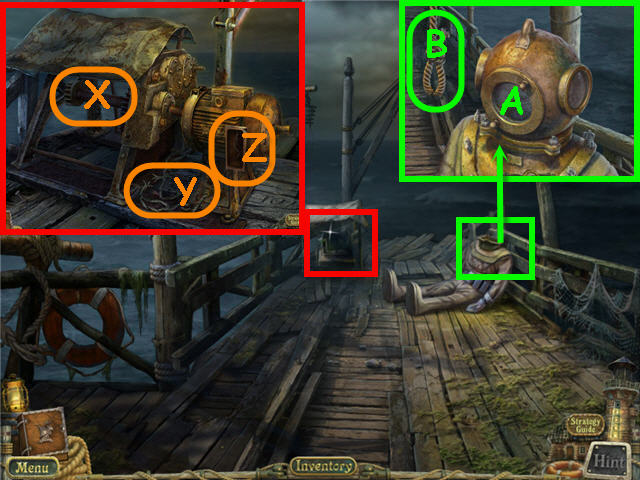
- Examine and place the ROPE on the winch (X).
- Examine and place the ELECTRIC TAPE on the split wires (Y).
- Examine and place the REMOTE CONTROL the control panel (Z) and exit out of winch close-up.
- Examine and place the DIVING HELMET on the suit (A); place the SPRING HOOK on the rope (B) and attach the SPRING HOOK to the suit.
- Examine the winch; zoom into the control panel and press the green button.
- Go straight into the suit.
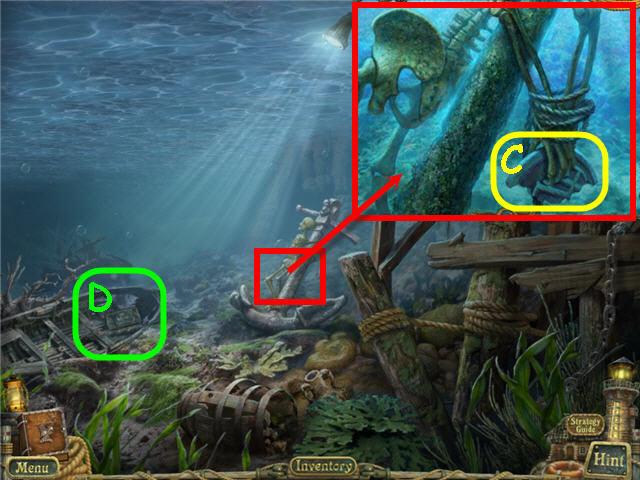
- Examine the skeleton; take the 2nd SIGN KEY PART (C).
- Examine the rowboat (D) to trigger a puzzle.
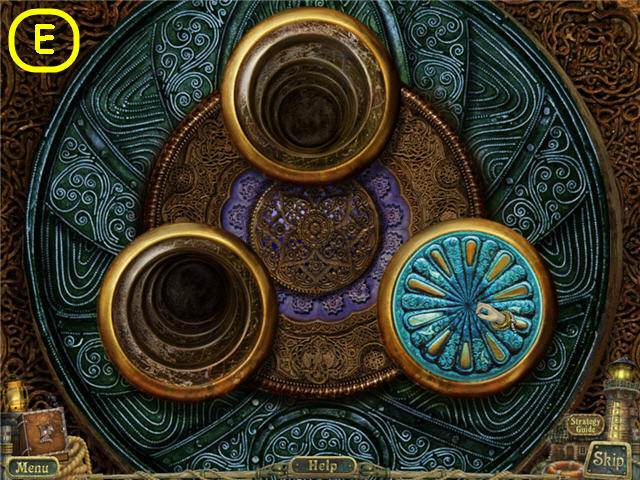
- Move the disks from the left to the right keeping the smallest on the bottom.
- Solution: Move the blue disk to the right stack, move the pink disk to the center, move the blue disk to the center, move the green to the right, move the blue to the left, move the pink to the right, move the blue to the right.
- Move the olive to the center, move the pink to the left, move the blue to the left, move the green to the center, move the blue to the right, move the pink to the center, move the blue to the center, move the dark blue to the right.
- Move the blue to the left, move the pink to the right, move the blue to the right, move the green to the left, move the blue to the center, move the pink to the left, move the blue to the left, move the olive to the right.
- Move the blue to the right, move the pink to the center, move the blue to the center, move the green to the right, move the blue to the left, move the pink to the right, move the blue to the right. See screenshot (E) for solution.
- Take the LIGHTROOM KEY.
- Back out twice; go left through the door and up the stairs twice.
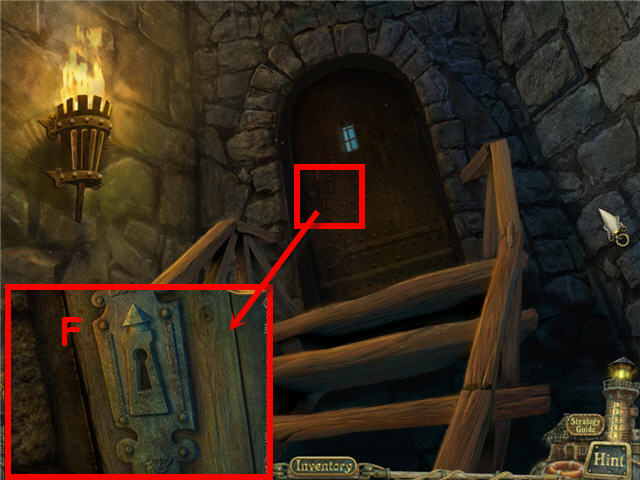
- Examine and use the LIGHTROOM KEY on the door (F); turn the key.
- Enter the light room.
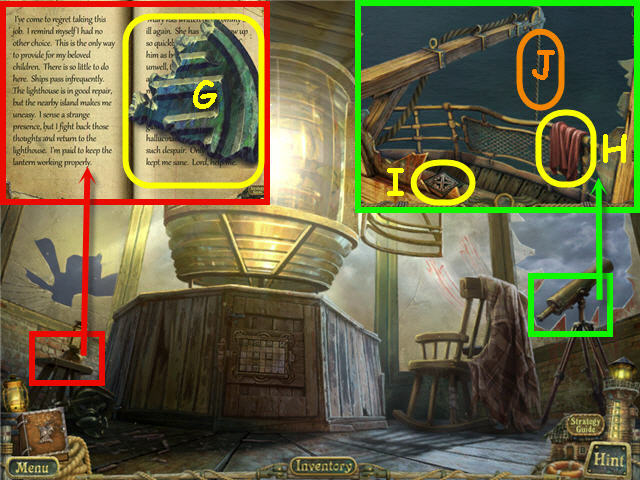
- Examine the table; take the 3rd SIGN KEY PART (G) and read the book; press the arrows to turn the pages.
- Examine the telescope; take the RAG (H) and PUZZLE BLOCK 3/5 (I).
- Pull the rope (J) three times.
- Back out twice; go down, back out 8 times; enter the cave on the right.
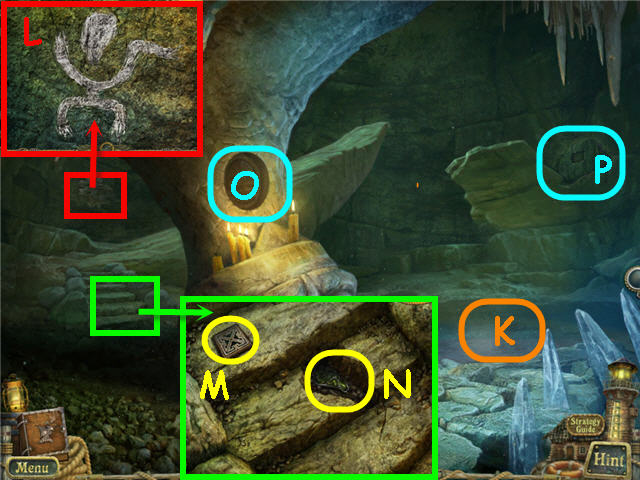
- Use the RAG in the water (K) to get a WET RAG.
- Examine and use the WET RAG on the back wall to get a code (L).
- Examine the steps; take the PUZZLE BLOCK 4/5 (M).
- Use the KNIFE on the broken step; take the JEWEL (N).
- Examine and place the 3 SIGN KEY PARTS in the hollow in the rock (O).
- Examine and place the JEWEL CHAIN on the right center and the JEWEL on the head of the mechanism (P) to trigger a puzzle.
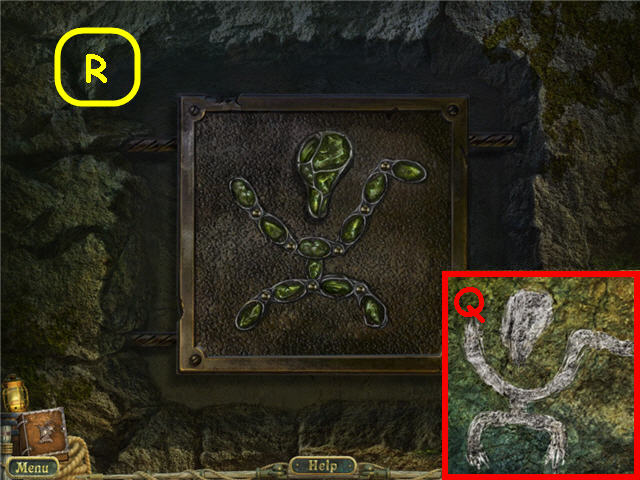
- Move the joints of the figure to match the drawing on the wall (Q).
- See screenshot for solution (R).
- Go through the newly opened doorway across the walkway.
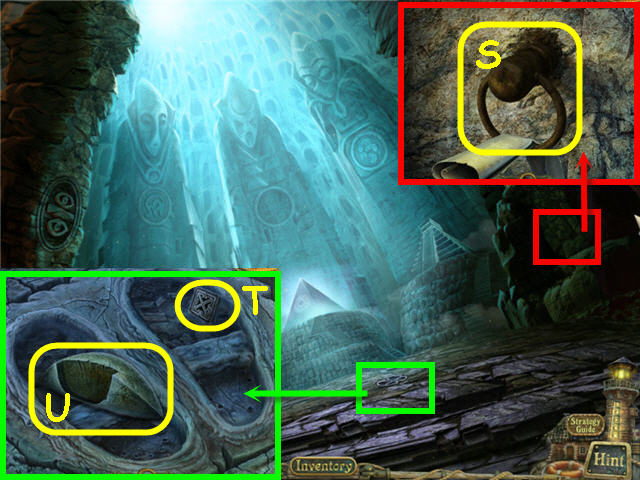
- Examine the right stone platform; read the note; use the SCOOP on the ring to get a RING (S).
- Examine the ground; take the PUZZLE BLOCK 5/5 (T) and 2nd STONE EYE (U).
- Back out.
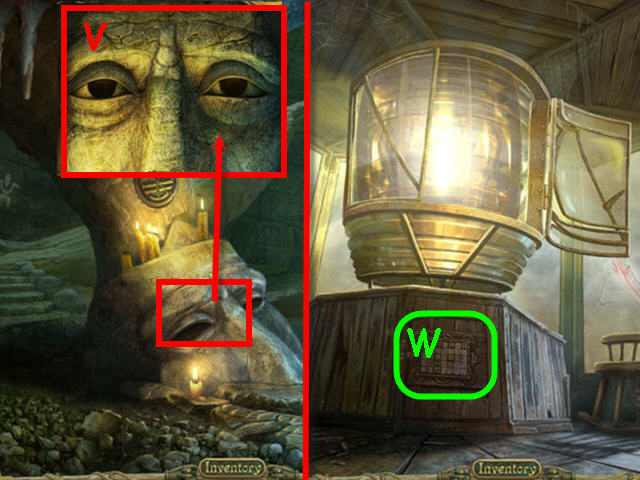
- Examine and place the 2 STONE EYES in the sockets (V).
- Back out; go up the stairs, forward twice, use the rowboat; go into the lighthouse, out the left door, left, go up the stairs twice and into the light room.
- Examine and place the 5 PUZZLE BLOCKS on the lock (W) to trigger a puzzle.
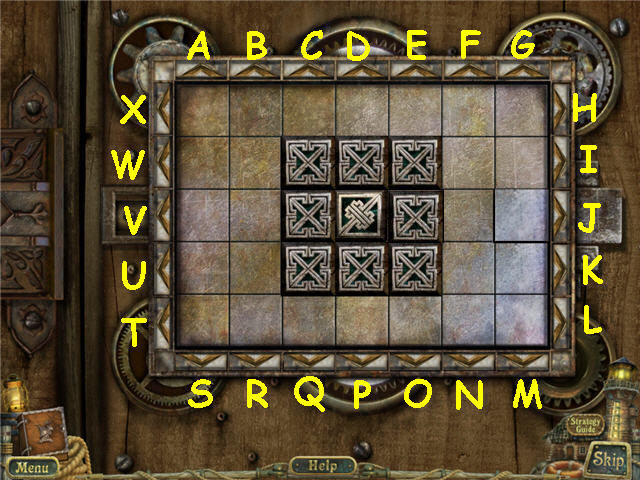
- Using the arrows on the outer edge; place the X's in the pattern found on the wall outside the light room by the torch.
- Solution: Press the following arrows; A, H, H, J, V, T, D, C, Q, P, O. See screenshot for solution.
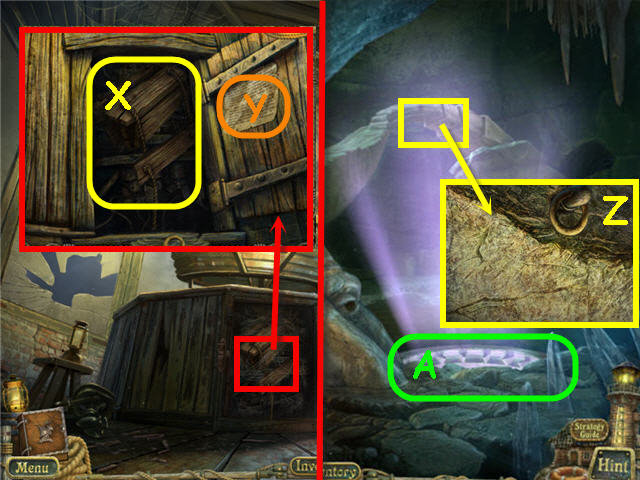
- Examine the cabinet; use the BRUSH on the cobwebs; take the ROPE LADDER (X) and the note (Y).
- Go back to the mountainside and enter the cave.
- Examine the arched walkway; place the RING in the hole (Z); hang the ROPE LADDER on the RING.
- Go down the opening (A).
- Touch the pyramid twice to trigger a puzzle.
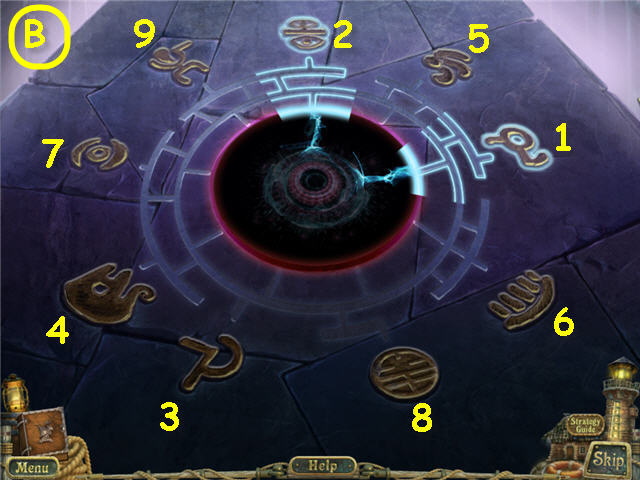
- Press the symbols in the order of the signs located in your diary.
- See screenshot (B) for solution.
- Congratulations! You have successfully completed the Sea Legends: Phantasmal Light Standard Edition.
Created at: 2012-02-11

