Walkthrough Menu
- General Tips
- Chapter 1: At Home
- Chapter 2: The Forest Road
- Chapter 3: The Dock
- Chapter 4: The Cabin Interior
- Chapter 5: Anne's Cell
- Chapter 6: The Doctor Room
General Tips
- This is the official guide for Secrets of Great Queens: Old Tower.
- Hidden-object puzzles are referred to as HOPs. This guide will not show screenshots of the HOPs, however, it will mention when an HOP is available and the inventory item you'll collect from it.
- This guide will not mention each time you have to zoom into a location; the screenshots will show each zoom scene.
Chapter 1: At Home
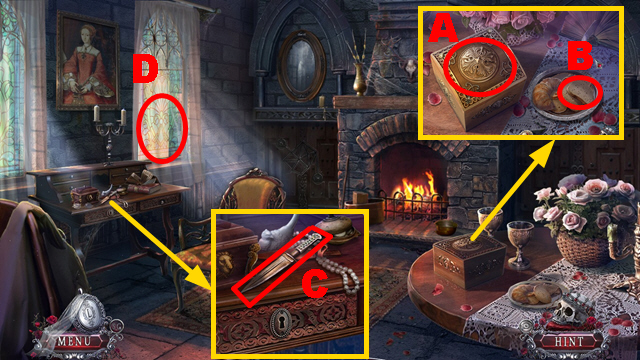
- Open the box, take the scroll, FRAME DECORATION 1/ 2, doll (A), and BREAD SLICE (B).
- Receive the QUEEN'S CASE.
- Take the KNIFE (C).
- Open the window (D).
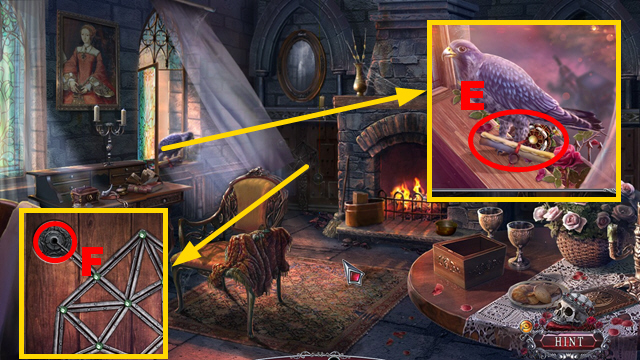
- Use the BREAD SLICE and take the scroll and TUDOR ROSE (E).
- Place the TUDOR ROSE (F).
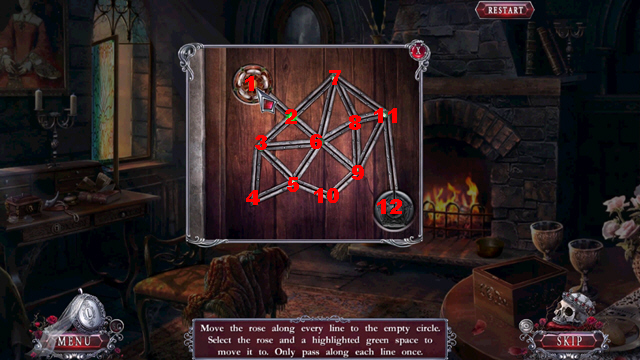
- Play the mini-game.
- Solution: 2-3-4-5-3-6-2-7-11-8-7-6-5-10-9-6-8-9-11-12.
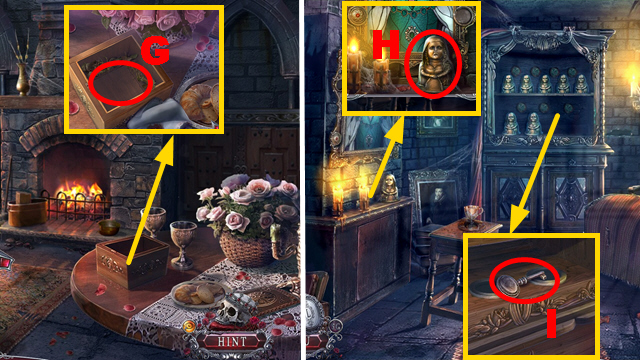
- Use the KNIFE and take the DIAMOND RING and DRY STAMP (G).
- Go forward.
- Take WOMEN FIGURINE 1/2 (H) and the DRAWER KEY (I).
- Walk down.
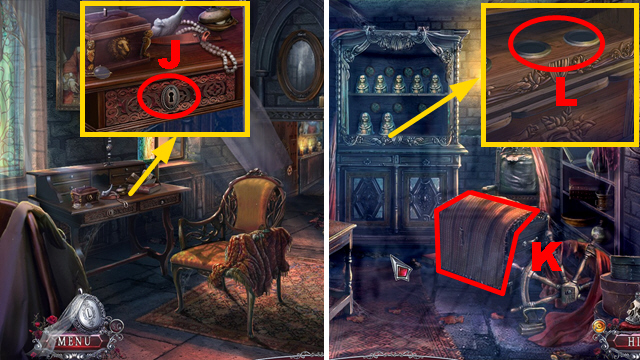
- Insert the DRAWER KEY, take WOMEN FIGURINE 2/2, remove 2 items, open the box, and use the DRY STAMP (J); receive the ROYAL STAMP.
- Go forward.
- Remove the blanket (K).
- Place 2 WOMEN FIGURINES (L).
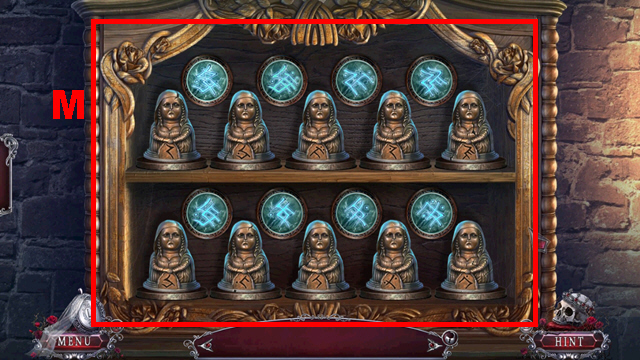
- Play the mini-game.
- Solution: (M).
- Take the CROWN SYMBOL.
- Place the CROWN SYMBOL on the QUEEN'S CASE; take the LION SHIELD.
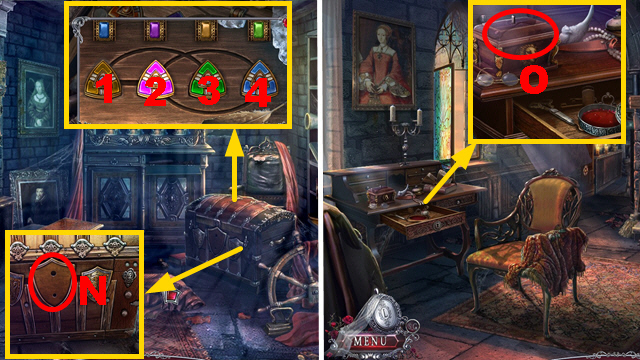
- Place the LION SHIELD (N) and play the HOP.
- Mini-game solution: (1-3)-(1-2)-(2-4)-(1-2).
- Receive the LION FIGURINE.
- Walk down.
- Place the LION FIGURINE and take FRAME DECORATION 2/2 (O).
- Go forward.
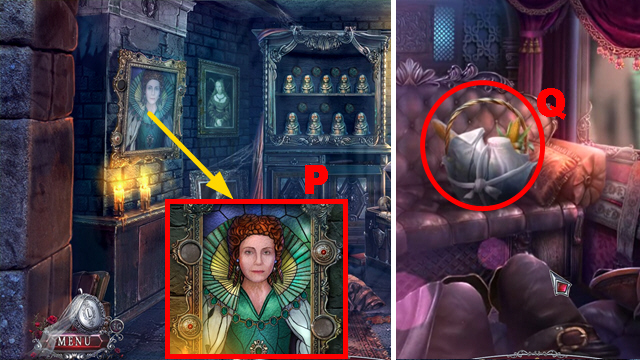
- Place 2 FRAME DECORATIONS and take the UNSTAMPED ROYAL CERTIFICATE (P).
- Apply the ROYAL STAMP on the UNSTAMPED ROYAL CERTIFICATE; take the STAMPED ROYAL CERTIFICATE.
- Take the BASKET (Q).
- Open the BASKET with the KNIFE; remove 2 items and take NAIL 1/10.
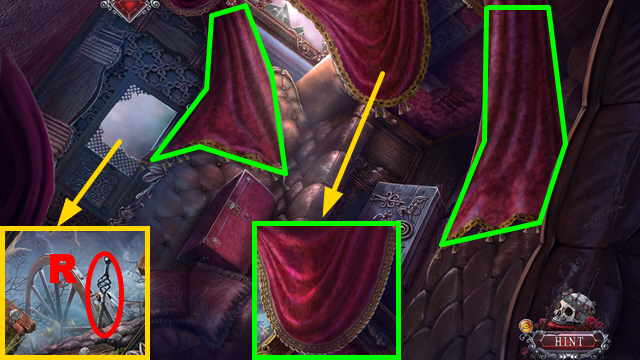
- Take 3 CURTAINS (green).
- Select 3 CURTAINS 3 times and fold the ropes 3 times; take the LASSO.
- Use the LASSO to acquire the ROD (R).
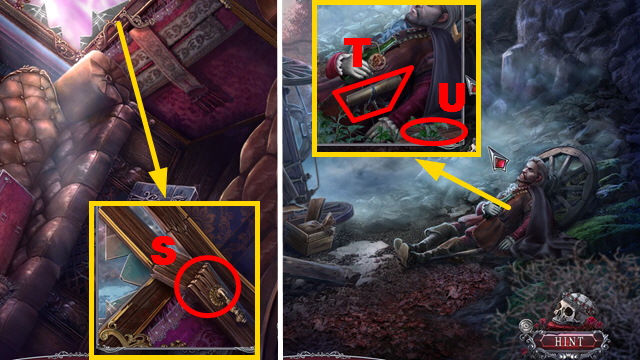
- Use the ROD (S).
- Turn right.
- Take the scroll and KEYS twice (T); take BOARD 1/5 (U).
- Select the KEYS.
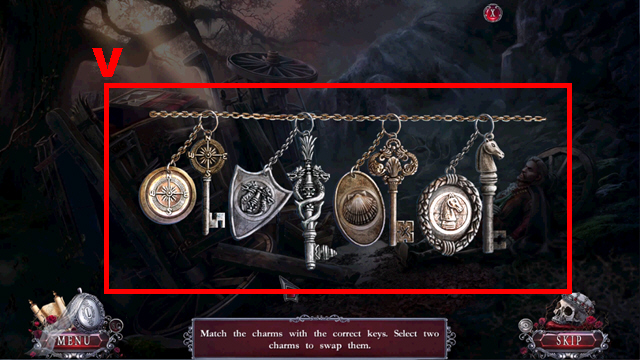
- Play the mini-game.
- Solution: (V).
- Take the HORSE BOX KEY.
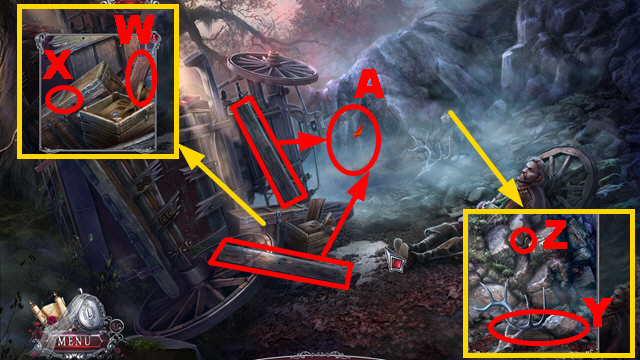
- Take BOARD 2/5 (W); open the crate and take the POUCH (X).
- Open the POUCH; remove 3 items and take the TWEEZERS.
- Take BOARD 3/5 and the STONE (Y); use the TWEEZERS to collect the TOOL SYMBOL (Z).
- Move 2 boards (A).
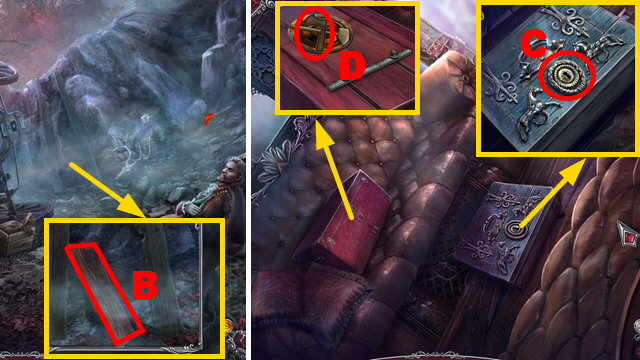
- Take BOARD 4/5 (B).
- Turn left.
- Insert the HORSE BOX KEY, remove 3 items, take NAIL 2/10, remove the box, and take BOARD 5/5 (C).
- Place the TOOL SYMBOL (D).
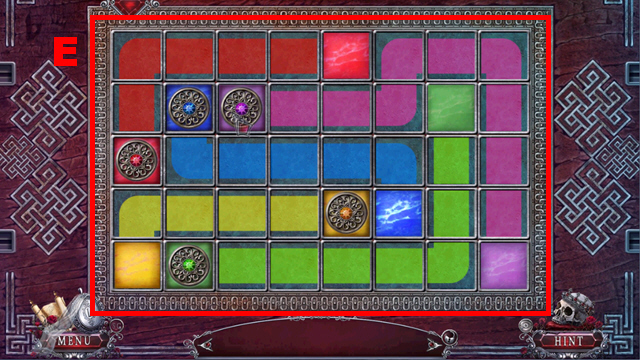
- Play the mini-game.
- Solution: (E).
- Take 2 NAILS and the PINCERS.
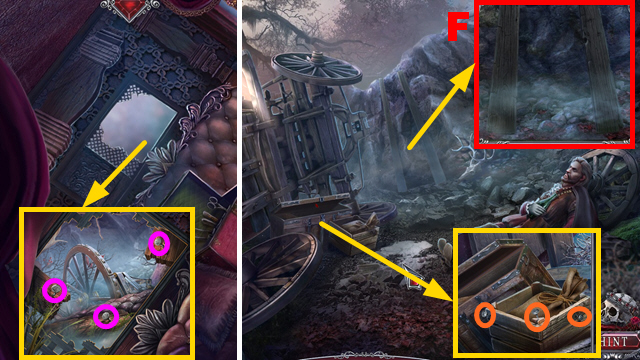
- Use the PINCERS to collect 3 NAILS (purple).
- Turn right.
- Use the PINCERS to collect 3 NAILS (orange).
- Place BOARDS, NAILS, and use the STONE twice (F).
- Go forward.
Chapter 2: The Forest Road
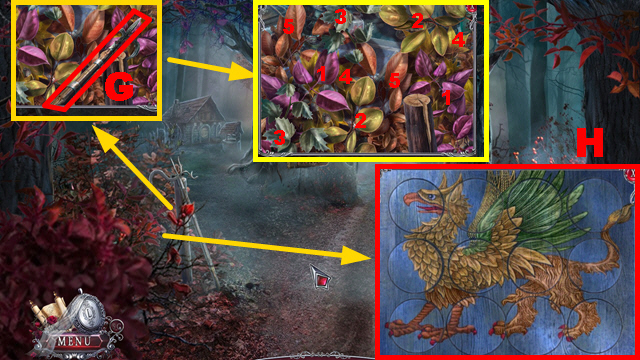
- Take the PIKE POLE (G); match pairs 1-5 and play the HOP.
- Mini-game solution: (H).
- Receive MAP PIECE 1/6.
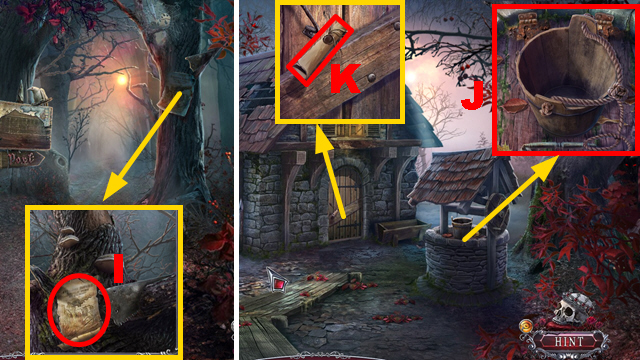
- Take the note (I).
- Turn left.
- Take the EMPTY BUCKET (J) and scroll (K).
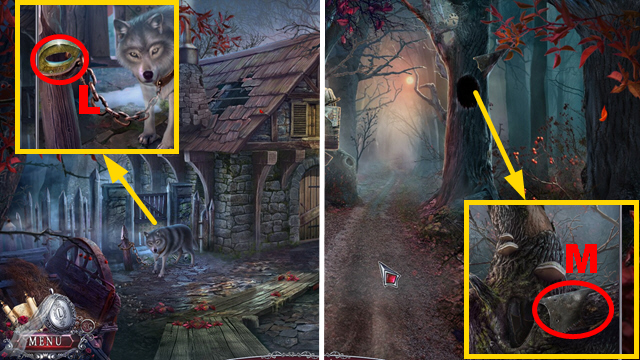
- Take the SAW HANDLE (L).
- Walk down.
- Place the SAW HANDLE and take the HANDSAW (M).
- Turn left.
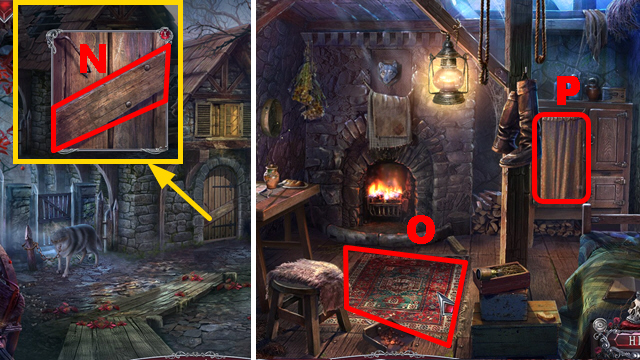
- Use the HANDSAW (N).
- Go forward.
- Move the rug (O) and curtain (P).
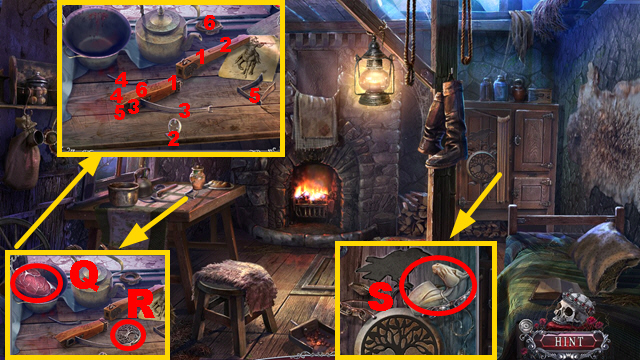
- Take the MEAT (Q) and TREE EMBLEM (R).
- Assemble the crossbow 1-6 and take the CROSSBOW.
- Take the HORSE TOKEN (S).
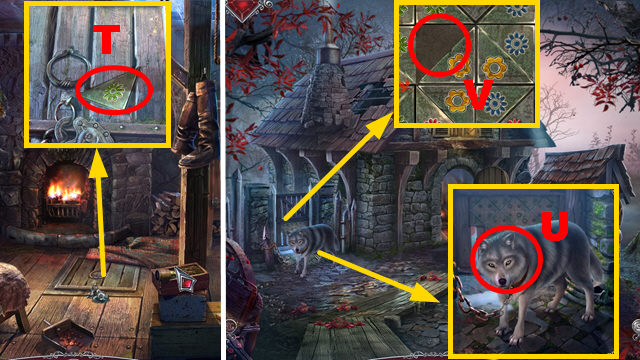
- Take the GATE PIECE (T).
- Walk down.
- Use the MEAT and free the wolf (U).
- Place the GATE PIECE (V).
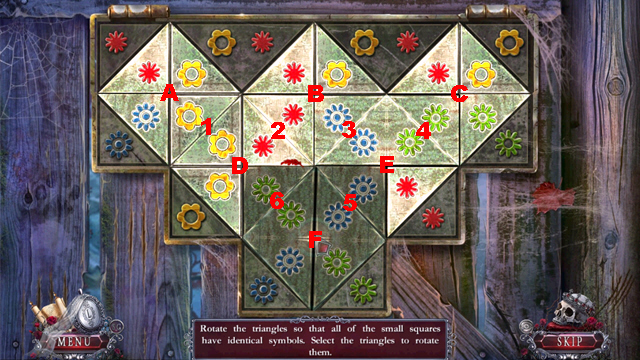
- Play the mini-game.
- Solution: F-6-F-4-C-3-Ex3-4-C-Ax3-Bx2-2-3-Bx3-6-4-Ex3-4-3-Ex2-5-E-2-Dx2-6-1-Dx2-1-D-6-D-6-Dx3-5-F-6-D-6-Dx2-6-Dx2-6-Dx2-6-Dx3-Fx3.
- Turn left.
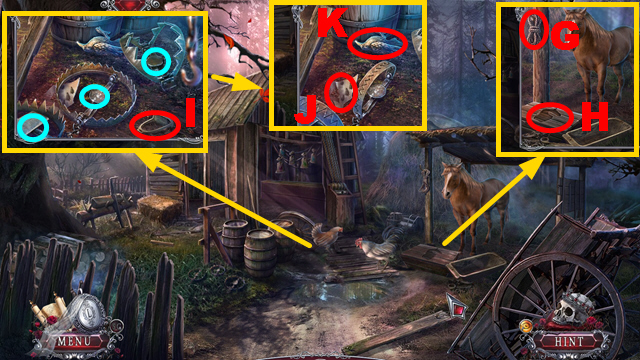
- Take the ROPE (G); place the HORSE TOKEN and take the CELLAR KEY (H).
- Take STIRRUP 1/2 (I) and use the PIKE POLE 3 times (blue).
- Take MAP PIECE 2/6 (J) and the RAVEN (K).
- Go to the House Interior.
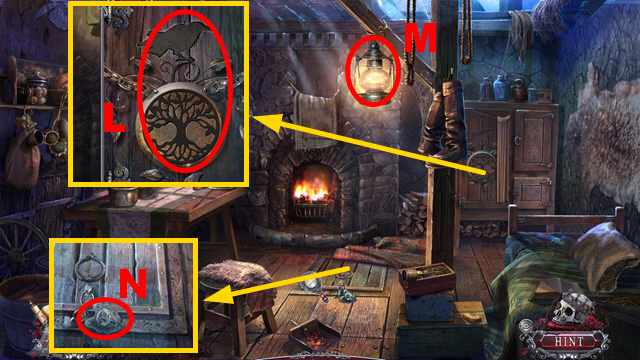
- Place the TREE EMBLEM, RAVEN, and take the LEVER and MAP PIECE 3/6 (L).
- Take the LAMP (M).
- Insert the CELLAR KEY, place the LAMP (N), and play the HOP.
- Receive the SADDLE.
- Take CANNON EMBLEM 1/2 from the SADDLE.
- Walk down twice.
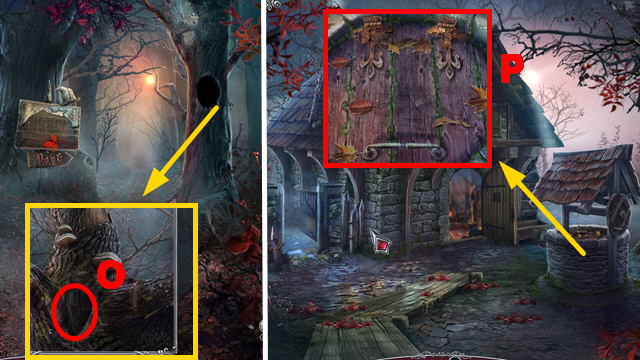
- Use the LAMP and take the OIL CAN and MAP PIECE 4/6 (O).
- Turn left.
- Use the OIL CAN, PIKE POLE, and EMPTY BUCKET (P); receive the REINS and BUCKET WITH WATER.
- Turn left.
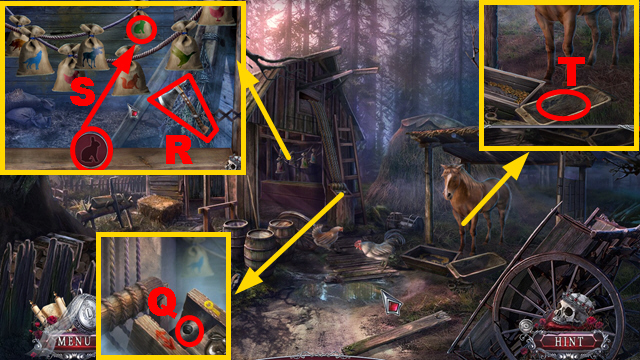
- Place the LEVER (Q).
- Play the mini-game.
- Solution: Select the axe (R) and hit the sack shown in the circle (S).
- Receive the SACK.
- Open the SACK; take the CROSSBOW BOLT and MAP PIECE 5/6.
- Place the CROSSBOW BOLT and ROPE on the CROSSBOW; take the FUNCTIONAL CROSSBOW.
- Use the BUCKET WITH WATER (T).
- Walk down twice.
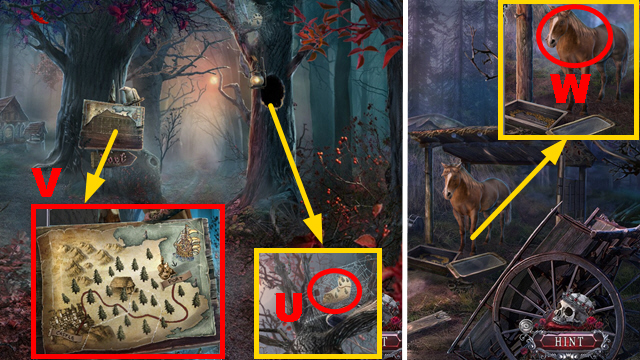
- Shoot the FUNCTIONAL CROSSBOW (U).
- Take MAP PIECE 6/6 and STIRRUP 2/2 from the CROSSBOW BOLT.
- Place 6 MAP PIECES and assemble the map (V).
- Turn left twice.
- Place 2 STIRRUPS and the REINS on the SADDLE; take the HARNESS.
- Place the HARNESS (W).
- Walk down twice, turn right.
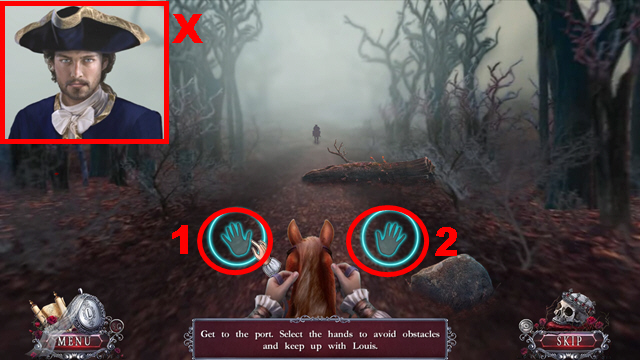
- Give the STAMPED ROYAL CERTIFICATE (X).
- Play the mini-game.
- Solution: Select buttons 1-2 to avoid obstacles.
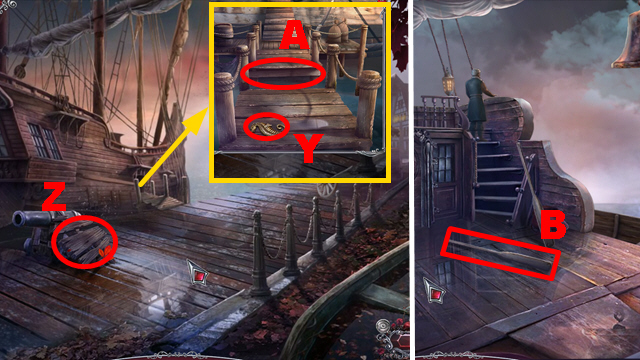
- Take SEAHORSE TOKEN 1/2 (Y).
- Use Louis to collect the HEAVY BOARD (Z).
- Give the HEAVY BOARD to Louis to create the makeshift bridge (A).
- Take the OARS (B).
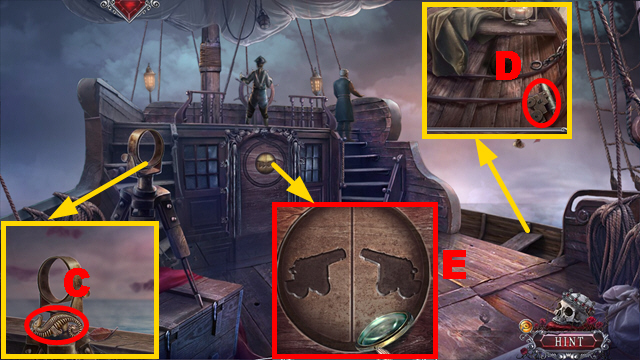
- Take SEA HORSE TOKEN 2/2 (C) and CANNON EMBLEM 2/2 (D).
- Take the LENS and place 2 CANNON EMBLEMS (E).
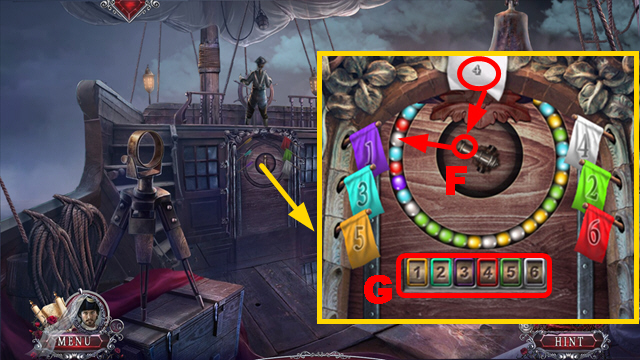
- Play the mini-game.
- Solution: Shoot colored orbs according to the hint on top (F).
- Enter the code '531624' (G).
- Go forward.
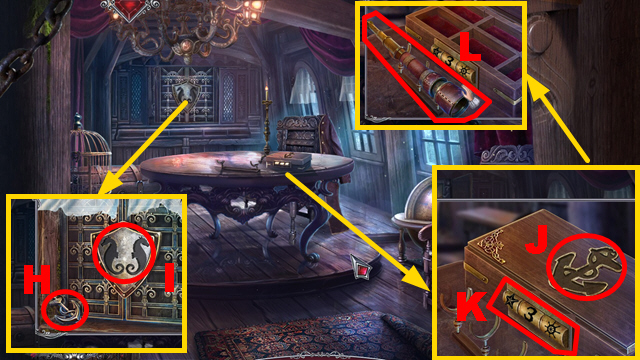
- Take the ANCHOR SYMBOL (H), place 2 SEAHORSE TOKENS (I), and play the HOP.
- Receive the code.
- Place the ANCHOR SYMBOL (J) and enter the correct code (K).
- Assemble and take the SPYGLASS WITHOUT LENS (L).
- Place the LENS on the SPYGLASS WITHOUT LENS; take the SPYGLASS.
- Walk down.
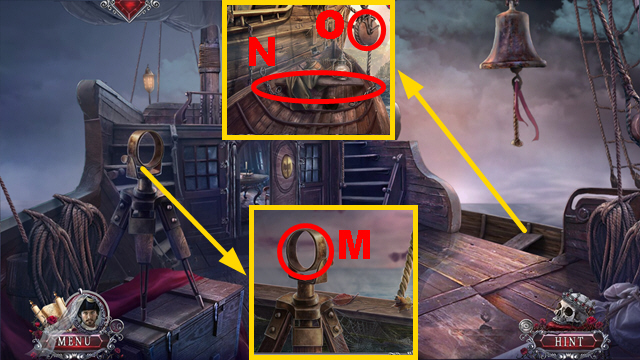
- Place the SPYGLASS (M).
- Place the OARS (N) and use Louis (O).
Chapter 3: The Dock
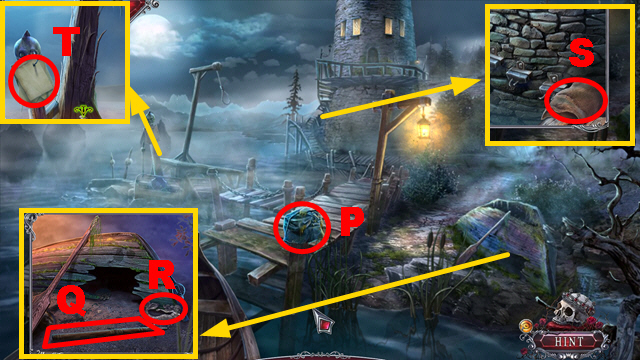
- Take ROBERT'S TORN JACKET (P), the PIKE POLE (Q), SIREN 1/3 (R), and the EMPTY SACK (S).
- Select ROBERT'S TORN JACKET three times; take the note and EXECUTIONER STATUETTE 1/4.
- Select 3 notes; take the CHEST CLUE (T).
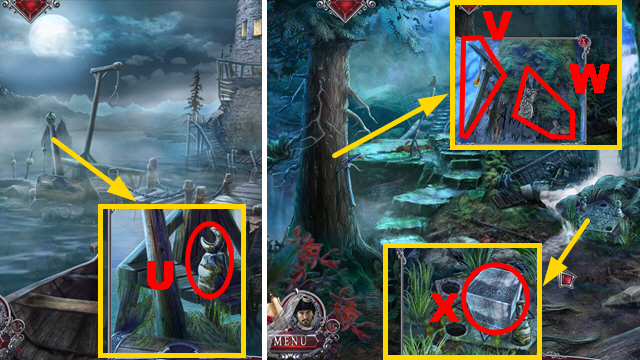
- Look down; take the MOON STONE (U).
- Turn right.
- Take the PICK HAMMER (V), SIREN 2/3 (W), and the GLASS CUBE (X).
- Use the DIAMOND RING to open the GLASS CUBE; take the CROSS INSIGNIA.
- Try to go forward.
- Walk down.
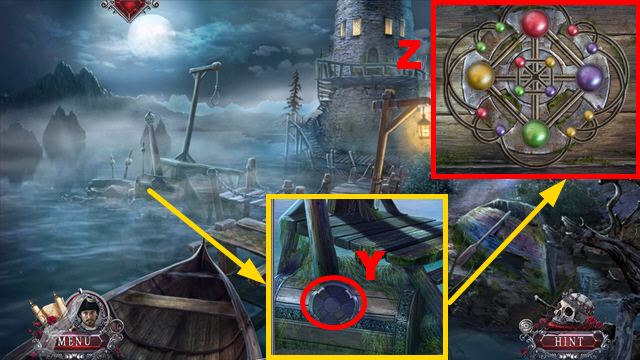
- Place the CROSS INSIGNIA and inspect the chest (Y).
- Place the CHEST CLUE (Z).
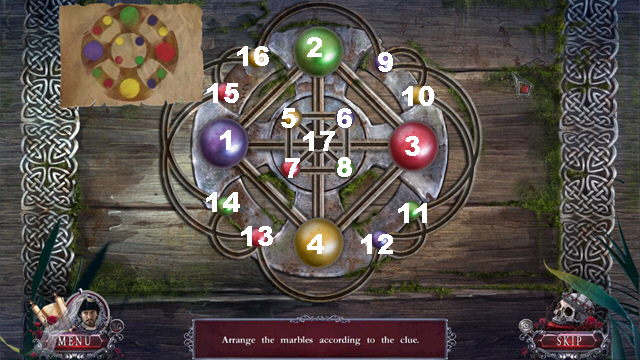
- Play the mini-game.
- Solution: 4-1-17-2-3-17-1-2-17-6-8-7-5-17-(12-13)-(16-9)-(13-15)-(13-14)-(15-16)-(9-11)-(9-10).
- Take the WATER STONE.
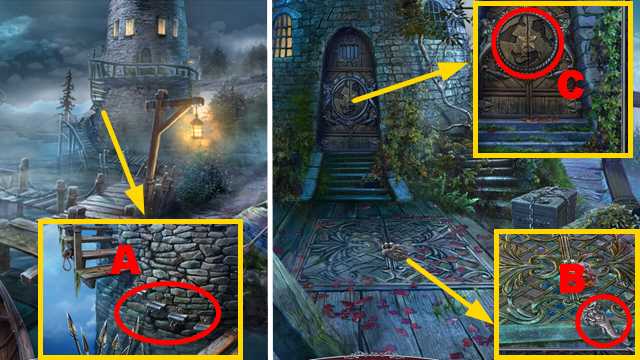
- Give Louis the PICK HAMMER to get across the gap (A).
- Go upstairs.
- Take SIREN 3/3 (B).
- Place 3 SIRENS (C).
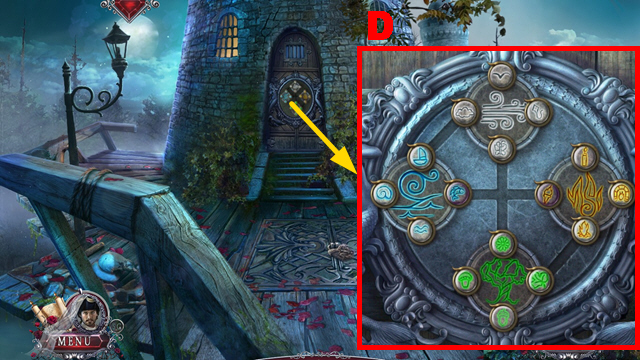
- Play the mini-game.
- Solution: (D).
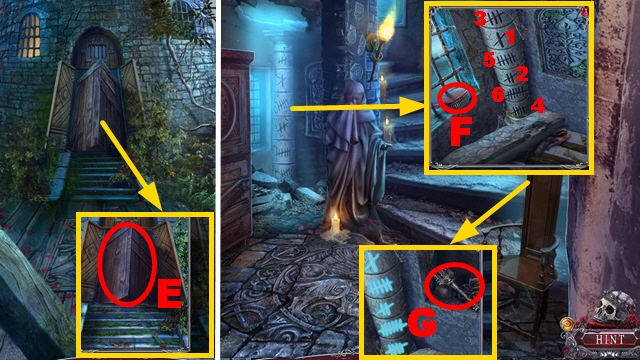
- Use Louis (E).
- Go forward.
- Take the BRUSH (F); activate sections 1-6 and take the TRIDENT (G).
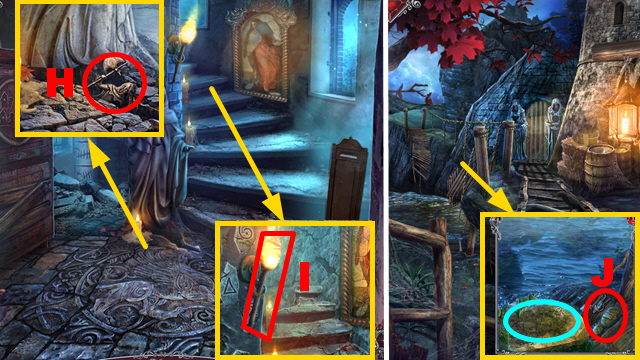
- Use the PIKE POLE to collect EXECUTIONER STATUETTE 2/4 (H).
- Take the TORCH (I).
- Walk down, turn right.
- Take the SUN STONE and use the PIKE POLE to collect EXECUTIONER STATUETTE 3/4 (J); use the BRUSH to acquire the STONE CIRCLE CLUE (blue).
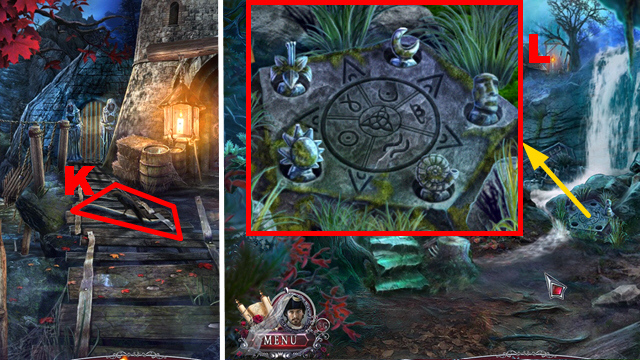
- Chase the raven and take the CROWBAR (K).
- Walk down twice, turn right.
- Place the MOON STONE, SUN STONE, WATER STONE, STONE CIRCLE CLUE, and arrange them correctly (L) to play the HOP; receive the FISH.
- Walk down.
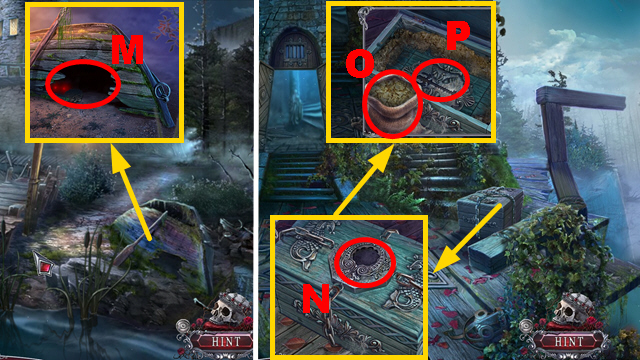
- Use the FISH and take the SEASHELL (M).
- Go forward.
- Place the SEASHELL and use the EMPTY SACK (N).
- Take the SACK OF SAWDUST (O); place the TRIDENT and take the note and MOSAIC PIECE (P).
- Go forward.
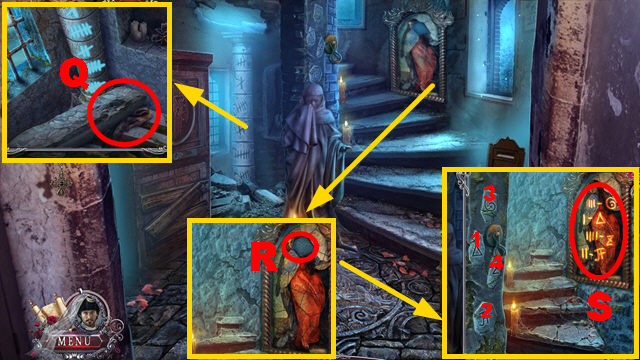
- Use the CROWBAR and take the GLOVES (Q).
- Place the MOSAIC PIECE (R); select buttons 1-4 and take the HACKSAW (S).
- Walk down.
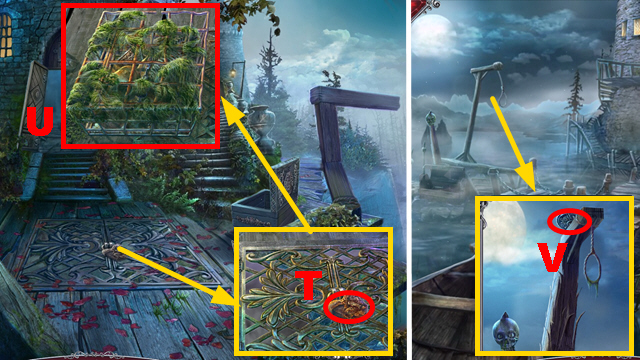
- Use the HACKSAW and pull the cage (T); remove the moss and take the photo and TRIANGLE BREASTPLATE (U).
- Walk down.
- Give the GLOVES to Louis to collect the ROUND BREASTPLATE (V).
- Turn right.
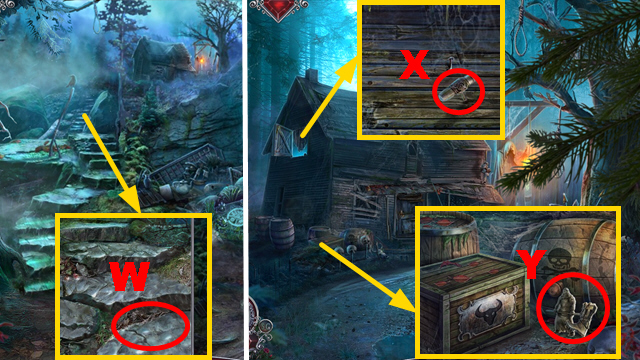
- Use the SACK OF SAWDUST (W).
- Go forward.
- Take the CORKSCREW (X).
- Take EXECUTIONER STATUETTE 4/4, use the CORKSCREW, and take the DIARY KEY (Y).
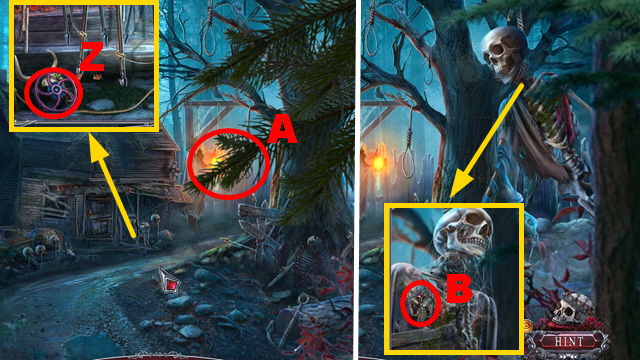
- Take the CENTRAL VALVE (Z).
- Move aside the branch (A).
- Grab the BROOCH twice (B).
- Flip the BROOCH and take the SAFETY PIN from it.
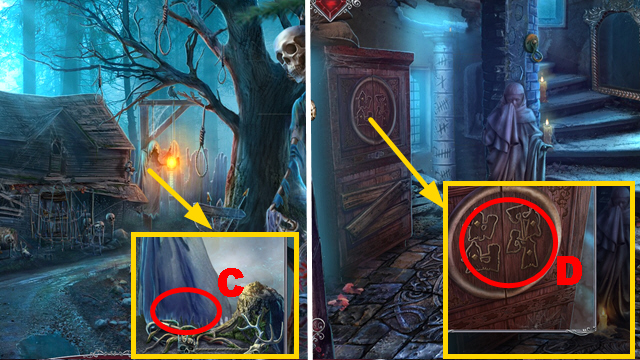
- Select the robe (C).
- Go to the Tower Interior.
- Place 4 EXECUTIONER STATUETTES and select them (D).
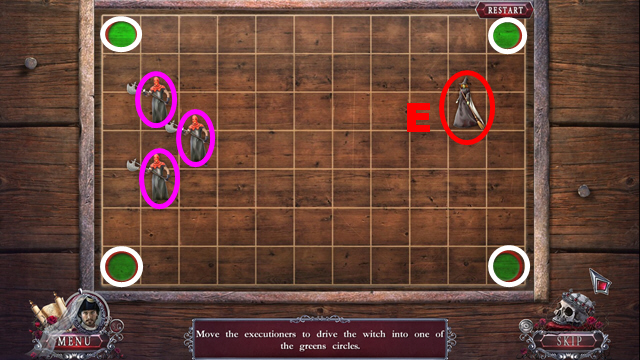
- Play the mini-game.
- Solution: Use the executioner figurines (purple) to drive the witch figurine (E) in one of the green areas (white).
- This puzzle is randomized.
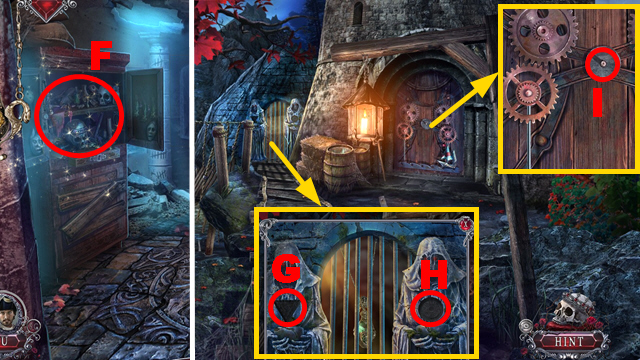
- Play the HOP (F); receive the SCISSORS.
- Walk down, turn right.
- Place the TRIANGLE BREASTPLATE (G) and ROUND BREASTPLATE (H) to play the HOP; receive the FIRST ESSENCE BOTTLE.
- Use the CENTRAL VALVE and TORCH (I).
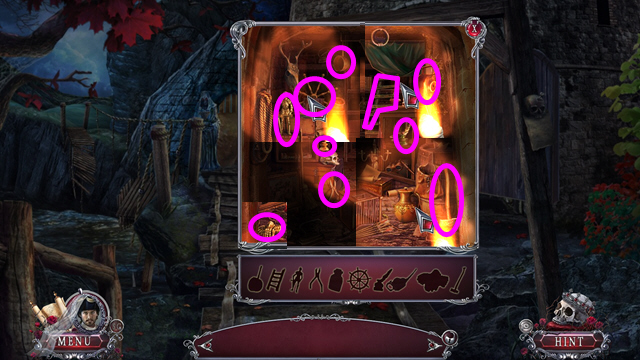
- Collect 10 items (purple); receive the LADDER.
- Go to the Cabin.
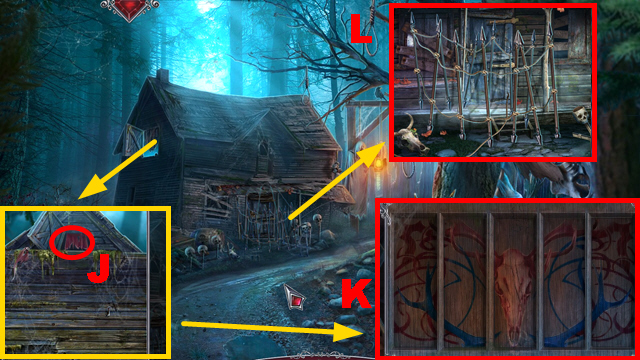
- Place the LADDER (J) and play the HOP.
- Mini-game solution: (K).
- Receive the SHOVEL.
- Use the SCISSORS and Louis (L).
- Enter the Cabin.
Chapter 4: The Cabin Interior
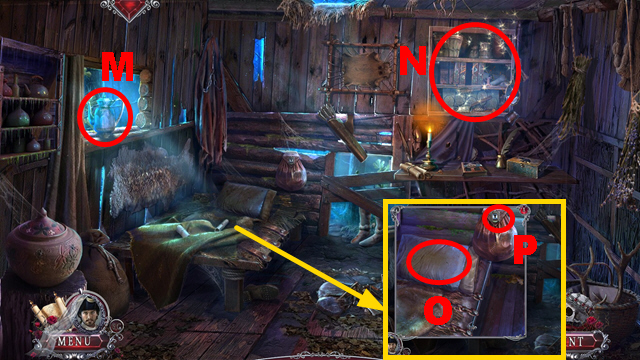
- Take the KETTLE WITH WATER (M).
- Play the HOP (N); receive the MIRROR.
- Move the pillow and take the AXE (O); use the SAFETY PIN and take the ELEPHANT (P).
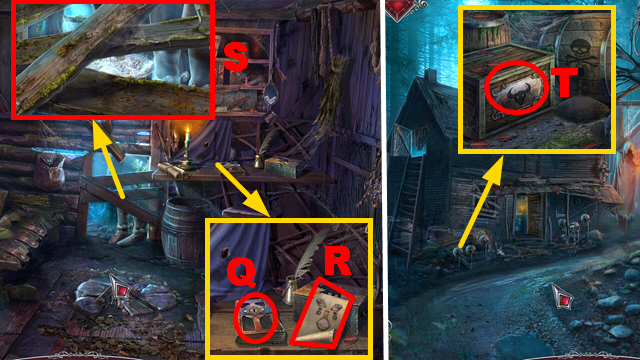
- Insert the DIARY KEY and select the diary (Q); read the note, place the ELEPHANT, and take the BULL'S HEAD (R).
- Remove 3 boards (S).
- Walk down.
- Place the BULL'S HEAD and take the BOOK and BROOM (T).
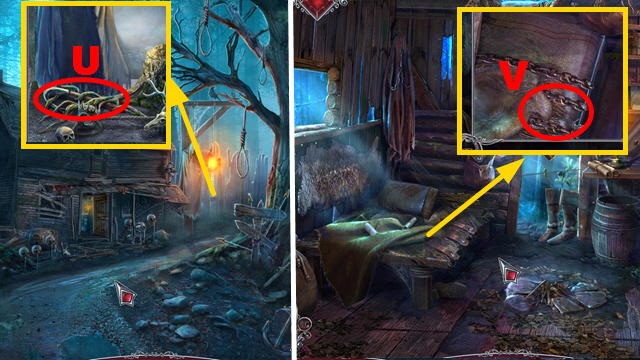
- Use the AXE and take the NAIL PULLER (U).
- Go forward.
- Use the NAIL PULLER, move the mattress, and take the SCROLL (V).
- Select the SCROLL twice.
- Read the SCROLL and give the MIRROR to Louis; receive the CIRCLE NOTE.
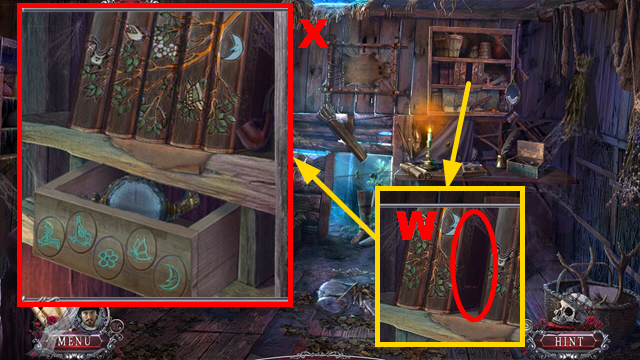
- Place the BOOK (W).
- Play the mini-game.
- Solution: (X).
- Take the EMPTY SPRAYER.
- Walk down.
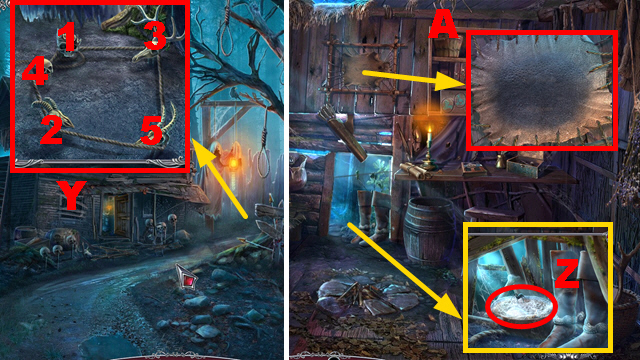
- Place the CIRCLE NOTE (Y).
- Play the mini-game.
- Solution: (1-2)-(2-3)-(3-4)-(4-5)-(5-1).
- Give the SHOVEL to Louis; take the SECOND ESSENCE VIAL.
- Go forward.
- Use the BROOM and take the SPRAYER TOP (Z).
- Apply the KETTLE WITH WATER, FIRST ESSENCE BOTTLE, SECOND ESSENCE VIAL, and SPAYER TOP to the EMPTY SPRAYER; take the SPRAYER.
- Use the SPRAYER (A).
- Walk down twice.
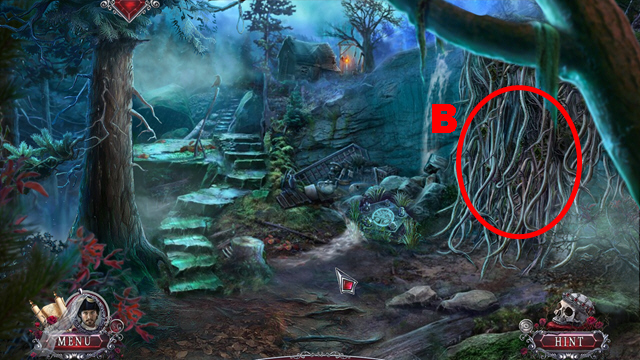
- Inspect the THICKET (B); give LOUIS the AXE.
- Turn right.
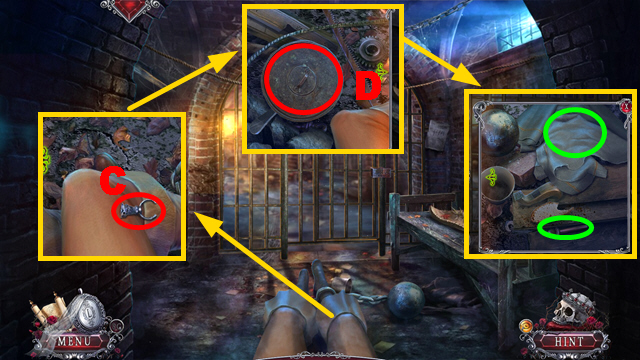
- Take the BOOT ADORNMENT (C).
- Select the BOOT ADORNMENT twice; take the LOCK PICK.
- Zoom left; remove the cover and take the detail (D).
- Zoom right twice; remove the blanket and take 2 details (green).
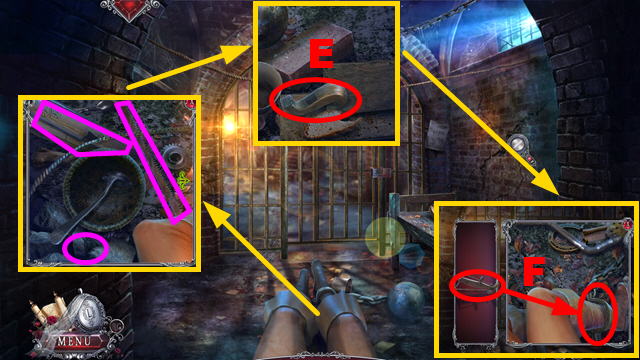
- Zoom left twice; remove the stones and take 3 details (purple).
- Zoom right twice; take the detail (E).
- Use the saw (F); receive the HEAVY BALL.
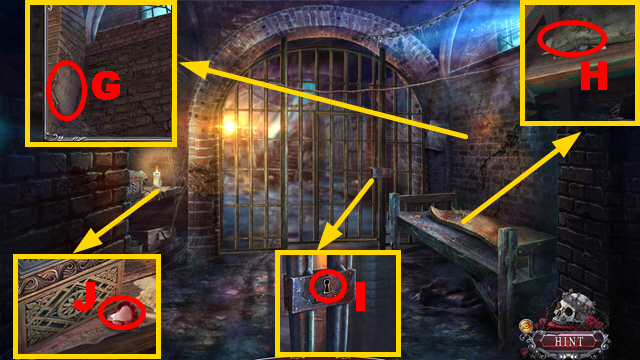
- Grab the note (G).
- Move the mattress (H).
- Use the LOCK PICK (I).
- Take the HEART (J).
- Go forward.
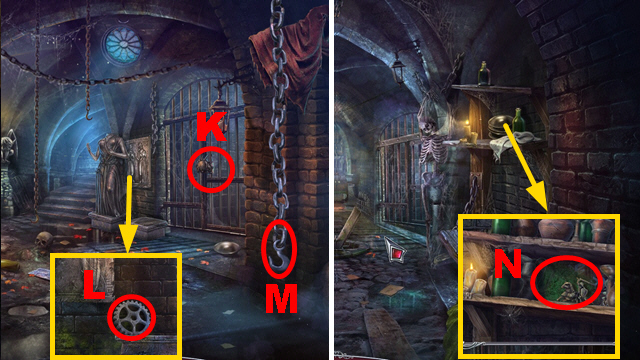
- Inspect the cell (K).
- Take the COGWHEEL (L).
- Try to go forward.
- Pull the chain and place the HEAVY BALL (M).
- Go forward.
- Move 4 jugs and take LOW RELIEF 1/2 (N).
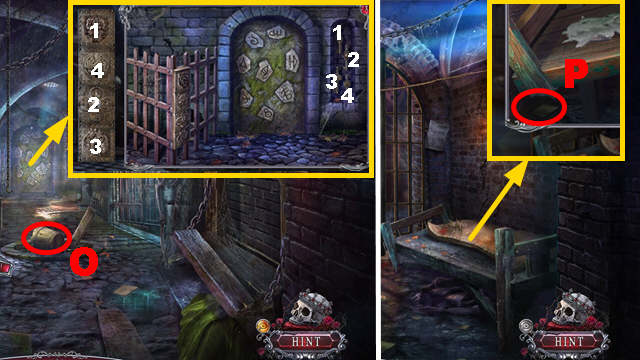
- Take the BUCKET (O).
- Insert keys 1-4.
- Walk down twice.
- Place the BUCKET (P).
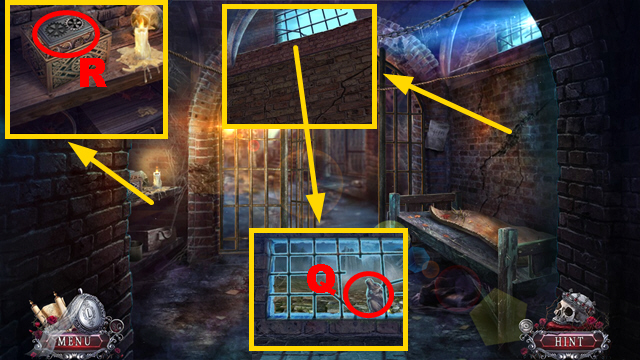
- Take LOW RELIEF 2/2 twice and take the BUNDLE WITH PROVISIONS (Q).
- Unfold the BUNDLE WITH PROVISIONS; take the CHEESE, WITCH'S FACE, and MEAL FOR LOUIS.
- Place the COGWHEEL and select the box (R).
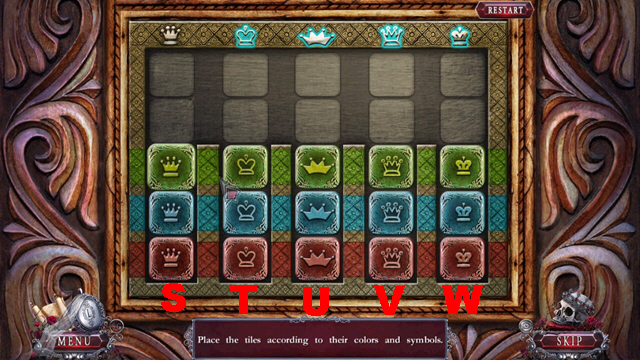
- Play the mini-game.
- Solution: (U-W)-(U-V)-(U-S)-(T-U)-(S-U)-(T-S)-(T-U)-(S-U)-(S-T)-(V-T)-(V-S)-(V-S)-(V-T)-(U-V)-(S-T)-(S-V)-(S-V)-(W-S)-(W-V)-(W-U)-(W-S)-(U-W)-(V-W)-(T-W)-(S-U)-(S-T)-(U-S)-(T-S).
- Take the CROWNED WITCH.
- Go forward.
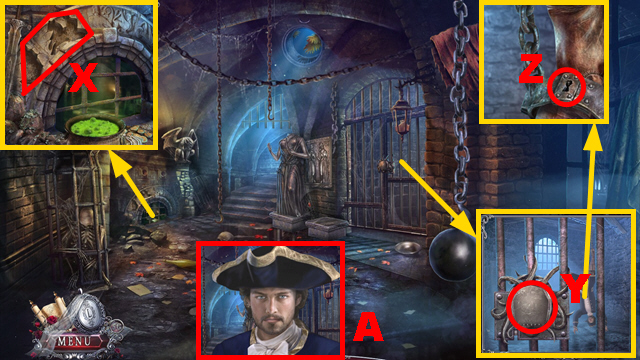
- Place 2 LOW RELIEFS (X) and play the HOP; receive the TROWEL.
- Place the WITCH'S FACE (Y); insert the LOCK PICK (Z).
- Give the MEAL FOR LOUIS (A).
- Walk down.
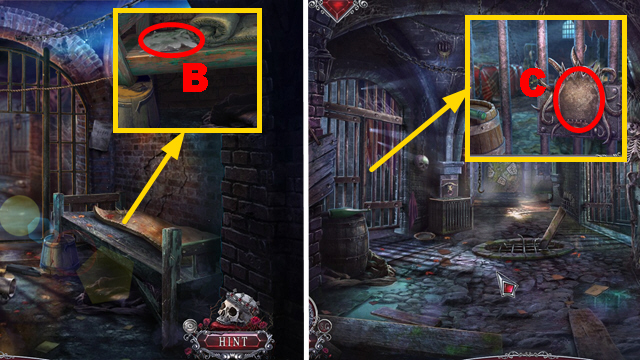
- Use the TROWEL and take TRIANGLE 1/3 (B).
- Go forward twice.
- Place the CROWNED WITCH (C).
Chapter 5: Anne's Cell
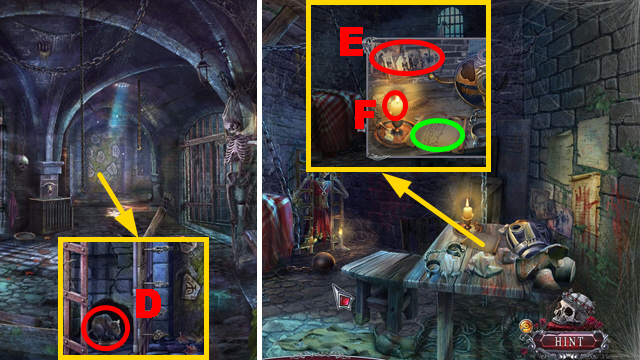
- Give the CHEESE and take TRIANGLE 2/3 (D).
- Turn left.
- Take the notes (E); select 3 notes to receive the NOTE WITH INVISIBLE INK.
- Read the note (green); place the NOTE WITH INVISIBLE INK and take the CACHE SCHEME (F).
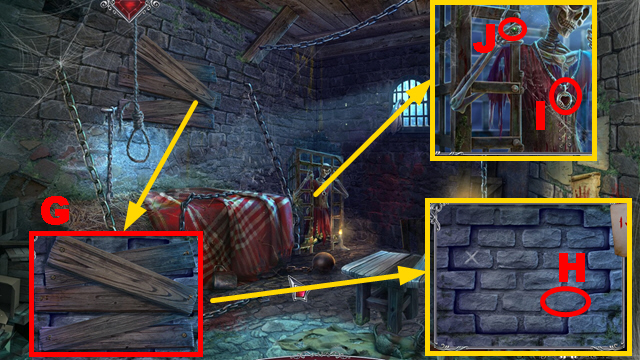
- Select 5 boards and place the CACHE SCHEME (G).
- Activate the stone (H).
- Take the MEDALLION (I); select the hand and take the RING (J).
- Place the HEART on the MEDALLION; unfold and take the SCHEME PIECE.
- Open the RING; take the note and RING'S NEEDLE.
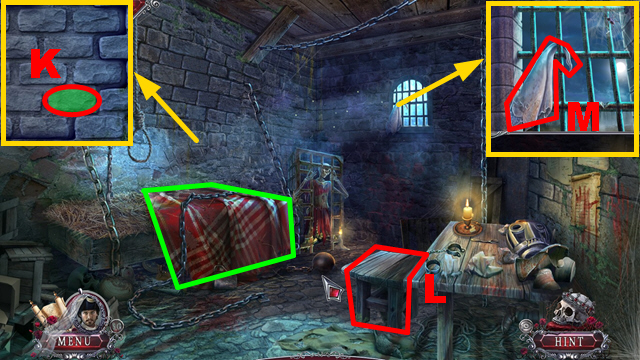
- Remove the blanket (green) and play the HOP; receive the METAL ROD.
- Place the METAL ROD (K).
- Move the stool (L).
- Take the HANDKERCHIEF (M).
- Walk down.
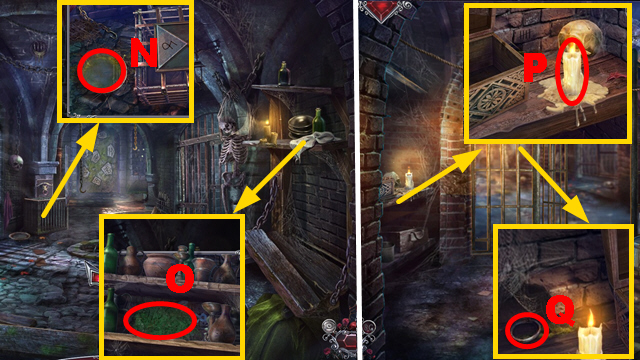
- Place the HANDKERCHIEF (N); receive the WET HANDKERCHIEF.
- Use the WET HANDKERCHIEF and take the PAPER WITH CLUE (O).
- Walk down twice.
- Use the WET HANDKERCHIEF (P); take the NOSE RING (Q).
- Go forward twice.
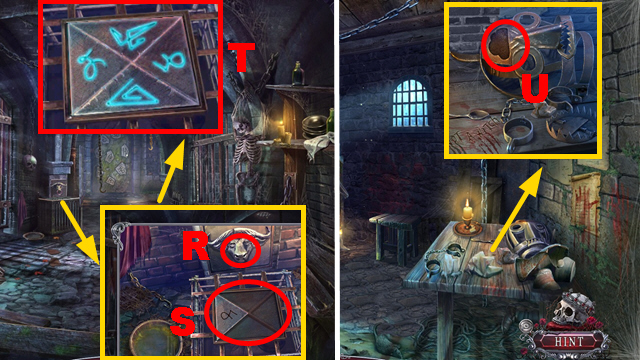
- Place the NOSE RING and take TRIANGLE 3/3 (R); place 3 TRIANGLES and the PAPER WITH CLUE (S).
- Arrange the symbols correctly and take the LEATHER BALL (T).
- Cut the LEATHER BALL with the RING'S NEEDLE; take the FOREHEAD TOKEN.
- Turn left.
- Place the FOREHEAD TOKEN and take the STATUE'S HEAD (U).
- Walk down twice.
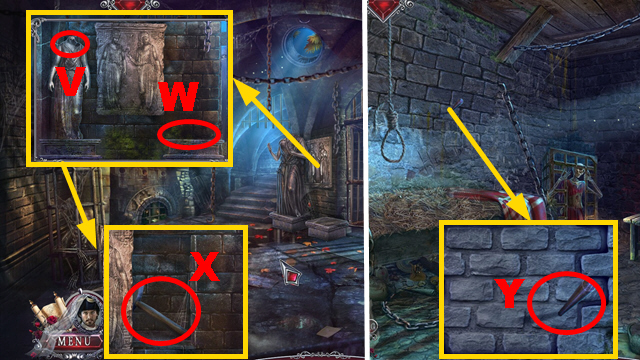
- Place the STATUE'S HEAD (V) and Louis (W); take the HAMMER (X).
- Go forward, turn left.
- Use the HAMMER and take the note and SCHEME (Y).
- Place the SCHEME PIECE on the SCHEME; receive the CODE DOOR CLUE.
- Walk down.
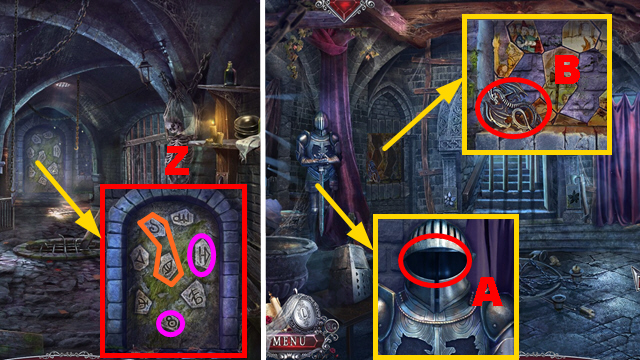
- Place the CODE DOOR CLUE (Z); use Louis (orange) and activate 2 symbols (purple).
- Go forward.
- Open the helmet and take FLOWER PETAL 1/2 (A).
- Take the DRAGON SHAPE (B).
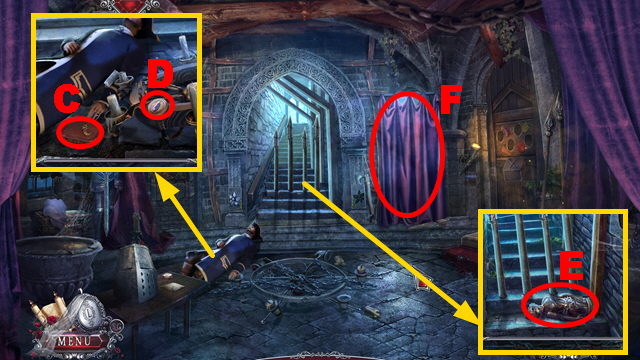
- Take the BOOK (C), VEGETABLE TOKEN 1/4 (D), and HOLLOW STATUE (E).
- Move the curtain (F).
- Shake the HOLLOW STATUE.
- Try to walk down, go forward.
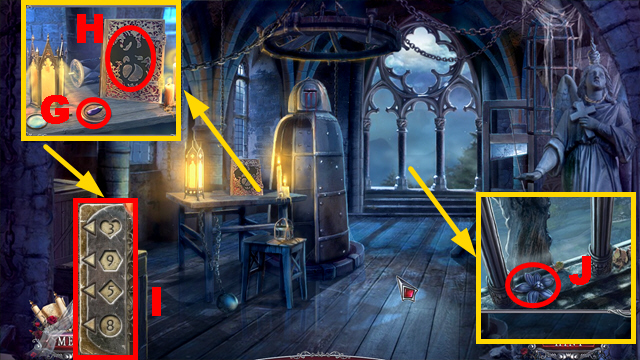
- Take VEGETABLE TOKEN 2/4 (G) and place the DRAGON SHAPE (H) to play the HOP.
- Mini-game solution: (I).
- Receive the FORK AND KNIFE.
- Take the FLOWER EMBLEM (J).
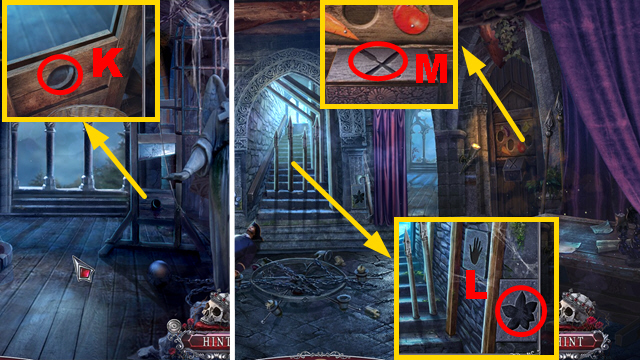
- Place the HOLLOW STATUE (K).
- Walk down.
- Place the FLOWER EMBLEM and take IRON MAIDEN PATTERN 1/2 and the PAGE WITH FACE (L).
- Place the FORK AND KNIFE and take VEGETABLE TOKEN 3/4 (M).
- Go forward.
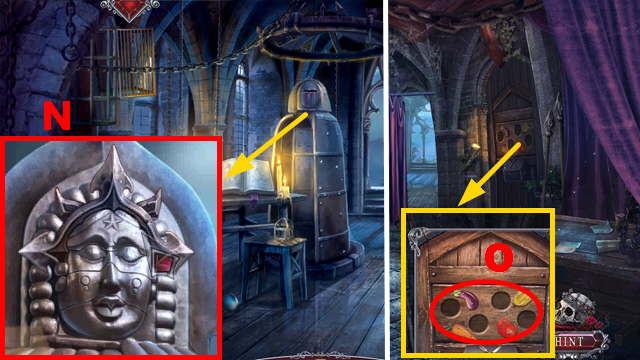
- Place the PAGE WITH FACE and adjust the face correctly (N); take VEGETABLE TOKEN 4/4.
- Walk down.
- Place 4 VEGETABLE TOKENS (O).
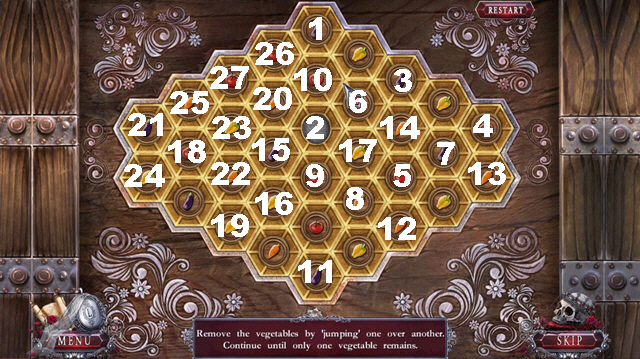
- Play the mini-game.
- Solution: (1-2)-(3-1)-(4-3)-(5-4)-(6-7)-(4-5)-(8-6)-(9-10)-(11-9)-(12-11)-(13-12)-(12-14)-(1-2)-(14-10)-(15-6)-(3-2)-(16-17)-(18-16)-(19-9)-(11-19)-(20-18)-(21-22)-(19-23)-(24-19)-(17-16)-(19-9)-(25-15)-(9-23)-(26-6)-(27-22)-(6-15)-(22-2).
- Turn right.
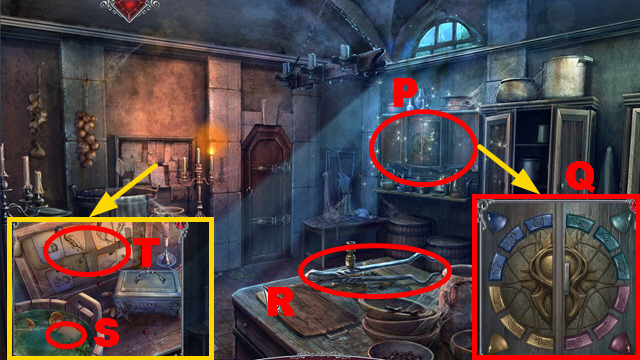
- Play the HOP (P).
- Mini-game solution: (Q).
- Receive the BREASTPLATE TOKEN.
- Take the TONGS (R).
- Use the TONGS to collect the RECIPE PAGE (S); place the RECIPE PAGE and inspect the recipes (T).
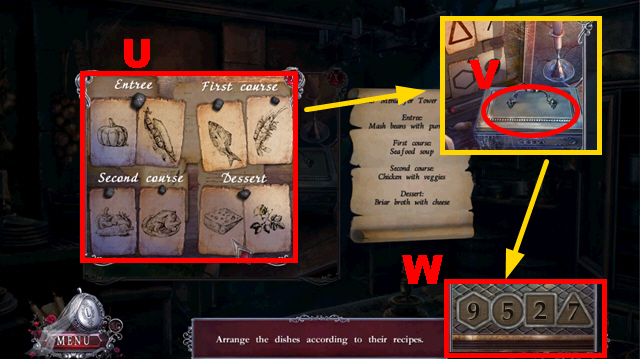
- Play the mini-game.
- Solution: (U).
- Inspect the box (V); enter the correct code and take BREASTPLATE TOKEN (W).
- Walk down.
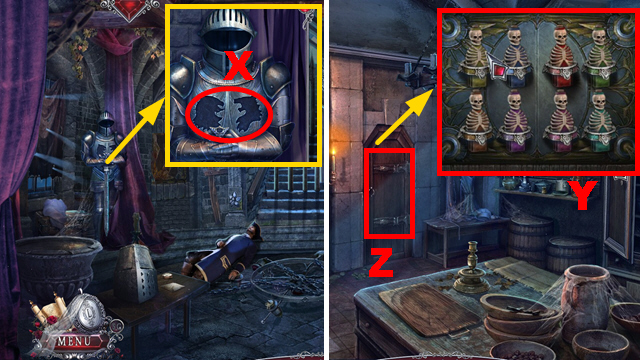
- Place 2 BREASTPLATE TOKENS and take the SKELETON FLASK and SWORD (X).
- Turn right.
- Place the SKELETON FLASK and assemble the flasks correctly (Y); select the door (Z).
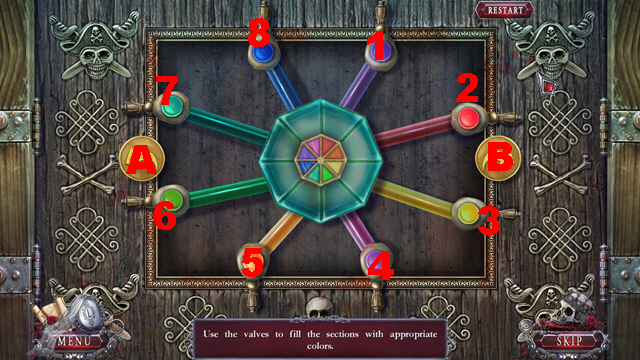
- Play the mini-game.
- Solution: 3-B-6-7-8-1-Ax2-4-A-2-Ax2-5.
- Go forward.
Chapter 6: The Doctor Room
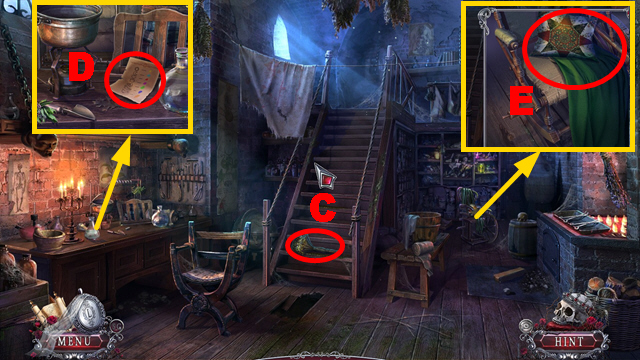
- Take the BUNCH OF HERBS (C).
- Unfold the BUNCH OF HERBS; take the DRIED HERBS.
- Take the BOOK DECIPHERING CODE (D).
- Remove the pillow, blanket, and take the GRINDSTONE (E).
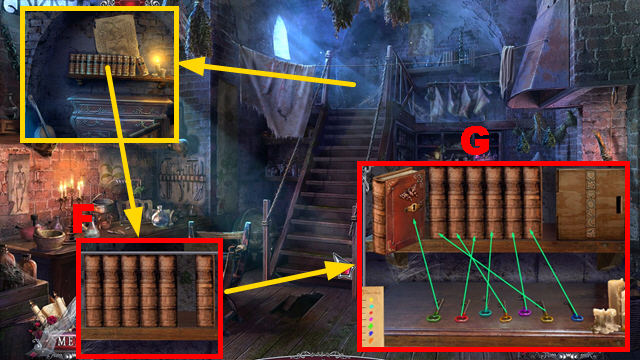
- Place the BOOK and BOOK DECIPHERING CODE (F).
- Play the mini-game.
- Solution: (G).
- Take the RECIPE BOOK.
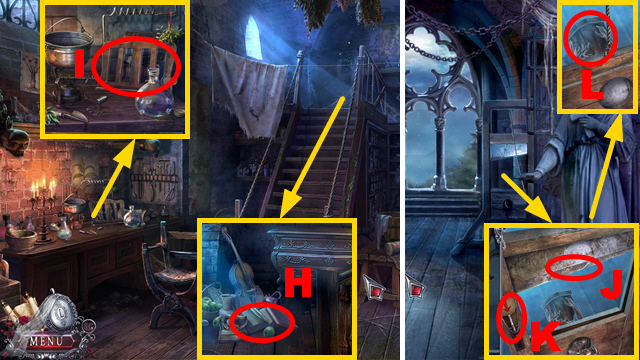
- Remove 3 items and take the SIEVE (H).
- Place the RECIPE BOOK and SIEVE (I).
- Go to the Torture Room.
- Use the GRINDSTONE (J), pull the lever (K), and take the HEADLESS STATUE (L).
- Flip the HEADLESS STATUE; receive the WINDOW HANDLE.
- Go to the Doctor Room.
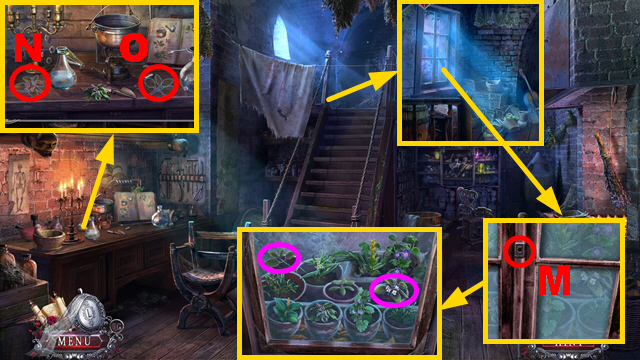
- Place the WINDOW HANDLE (M); take the MINT and BALM (purple).
- Place the BALM (N) and MINT (O).
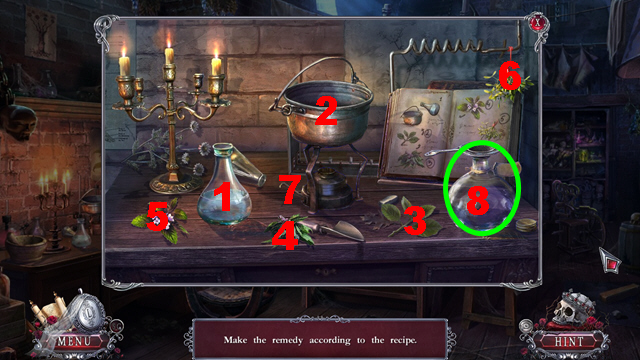
- Prepare the recipe: (1-2)-(3-2)-(4-2)-(5-2)-(6-2)-7-(2-8).
- Take the CONCUSSION REMEDY (green).
- Walk down twice.
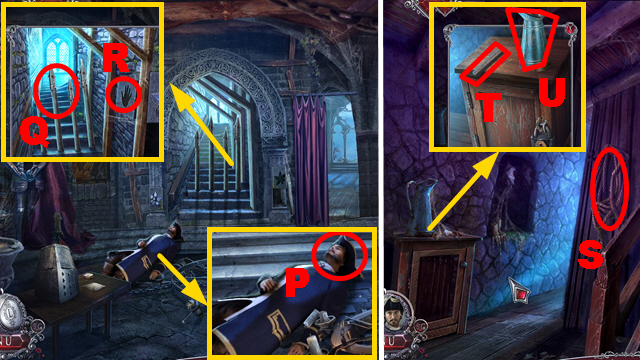
- Give the CONCUSSION REMEDY (P).
- Use Louis (Q) and push the plate (R).
- Go upstairs.
- Take the ROPE (S), WHEEL SPOKE 1/4 (T), and PITCHER (U).
- Go to the Tower Kitchen.
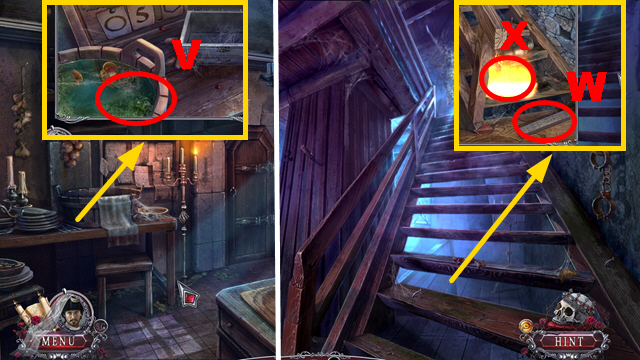
- Place the PITCHER and take the PITCHER OF WATER (V).
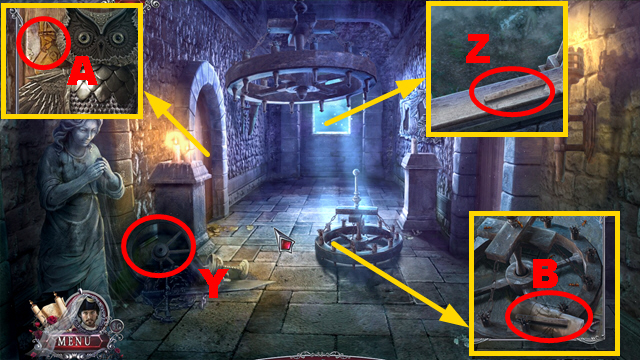
- Go to the Tower Staircase.
- Take WHEEL SPOKE 2/4 (W) and use the PITCHER OF WATER (X).
- Go upstairs.
- Take the BROKEN WHEEL (Y), WHEEL SPOKE 3/4 (Z), FRESCO FRAGMENT 1/3 (A), WHEEL SPOKE 4/4, and the BUNDLE (B).
- Place 4 WHEEL SPOKES on the BROKEN WHEEL; take the CHAIR WHEEL.
- Unfold the BUNDLE; take the LOCK KEY.
- Walk down.
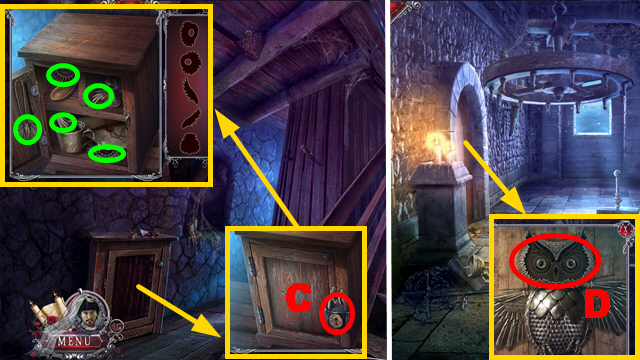
- Insert the LOCK KEY and open the door (C).
- Collect 5 parts (green); take the OWL MASK.
- Go upstairs.
- Place the OWL MASK (D).
- Turn left.
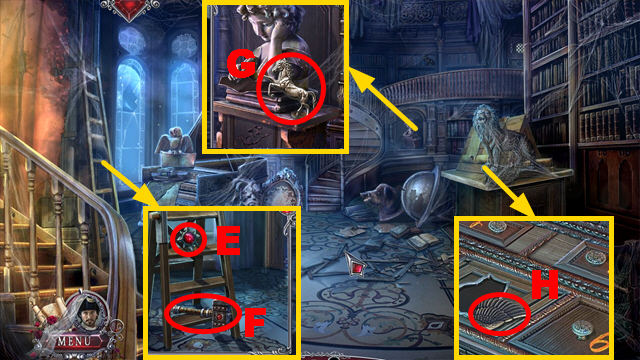
- Take IRON MAIDEN PATTERN 2/2 (E), the HAMMER (F), SHIELD ADORNMENT (G), and DOOR TOKEN 1/3 (H).
- Go to the Torture Room.
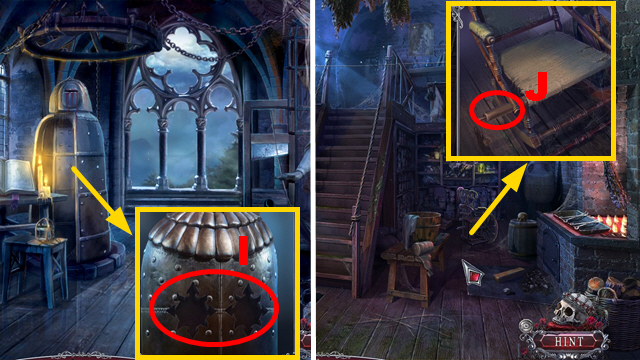
- Place 2 IRON MAIDEN PATTERNS and take the CREATURE'S HORN (I).
- Go to the Doctor Room.
- Place the CHAIR WHEEL (J) and play the HOP; receive the HELMET'S FEATHER.
- Go to the Tower Staircase.
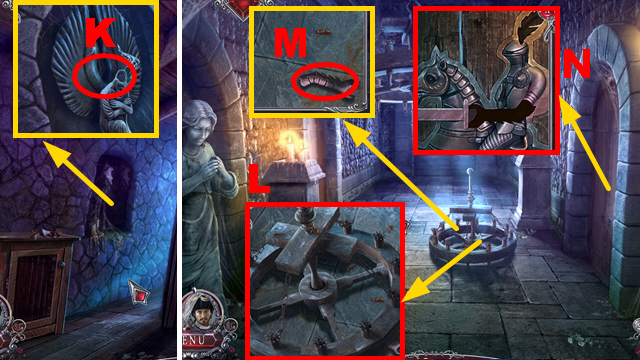
- Place the CREATURE'S HORN and take the EMPTY SMOKER (K).
- Put the DRIED HERBS into the EMPTY SMOKER, close it, and take the SMOKER.
- Go upstairs.
- Use the SMOKER and LOUIS (L).
- Take the GAUNTLET (M).
- Place the HELMET'S FEATHER and GAUNTLET (N).
- Turn right.
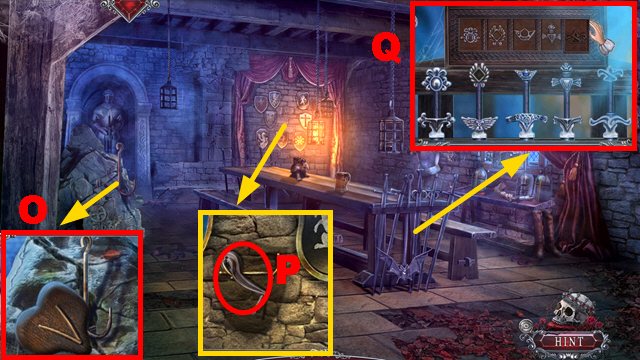
- Take FLOWER PETAL 2/2, use the HAMMER, and take the HOOK (O).
- Place the HOOK on the ROPE; take the ROPE WITH HOOK.
- Take the LADDER PART (P).
- Place the SWORD, arrange the swords and symbols correctly, and take the SHIELD ADORNMENT and DESK DETAIL (Q).
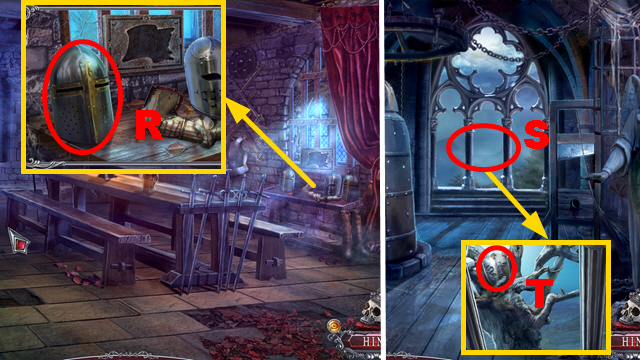
- Remove 3 helmets and take the PRUNER (R).
- Go to the Torture Room.
- Inspect the area (S) and give the ROPE WITH HOOK to Louis; take the SHIELD (T).
- Place 2 SHIELD ADORNMENTS on the SHIELD; take the SHIELD.
- Go to the Library.
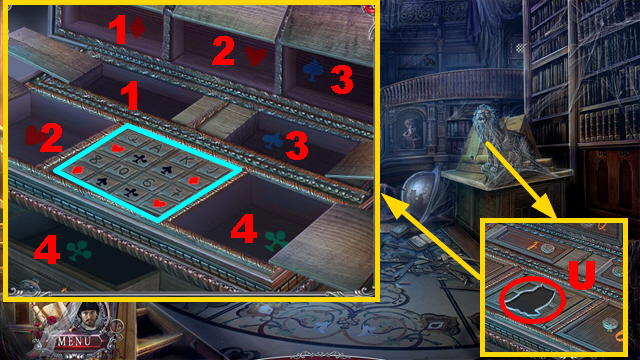
- Place the DESK DETAIL (U).
- Collect pairs 1-4 and arrange the suits (blue); take the PILE OF LETTERS and FRESCO FRAGMENT 2/3.
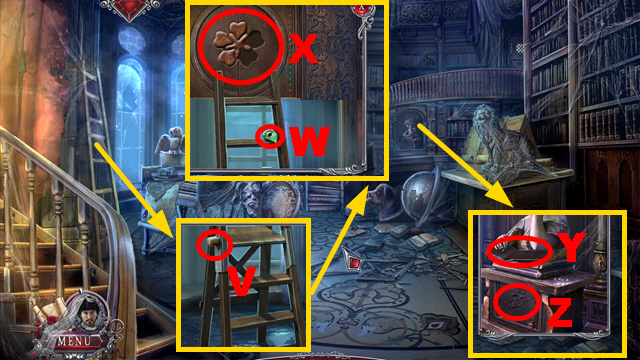
- Place the LADDER PART (V).
- Take the GARGOYLE'S EYE (W); place 2 FLOWER PETALS and take the STONE BOOK (X).
- Place the STONE BOOK (Y) and take the BAS-RELIEF PART (Z).
- Walk down, turn right.
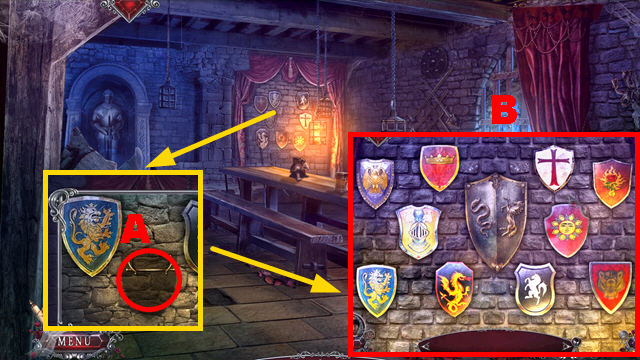
- Place the SHIELD (A).
- Play the mini-game.
- Solution: (B).
- Take FRESCO FRAGMENT 3/3.
- Walk down three times.
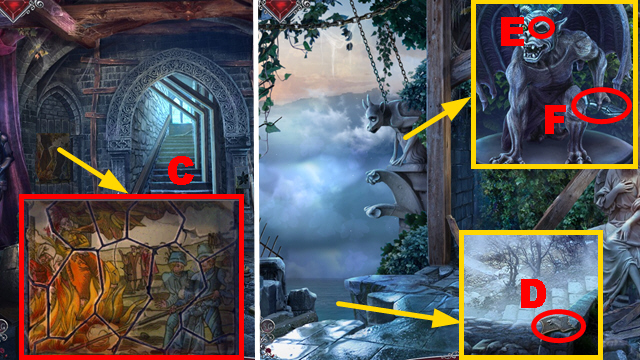
- Place 3 FRESCO FRAGMENTS and arrange the correct image (C).
- Turn left.
- Take the FLAG SYMBOL (D).
- Place the GARGOYLE'S EYE (E); take the BAS-RELIEF PART (F).
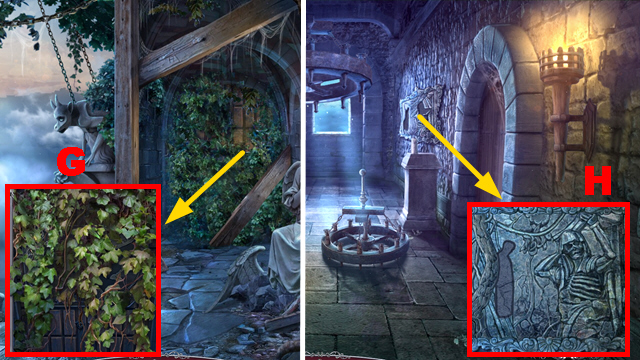
- Use the PRUNER (G).
- Go to the Second Hall Floor.
- Place 2 BAS-RELIEF PARTS and take DOOR TOKEN 2/3 (H).
- Turn right.
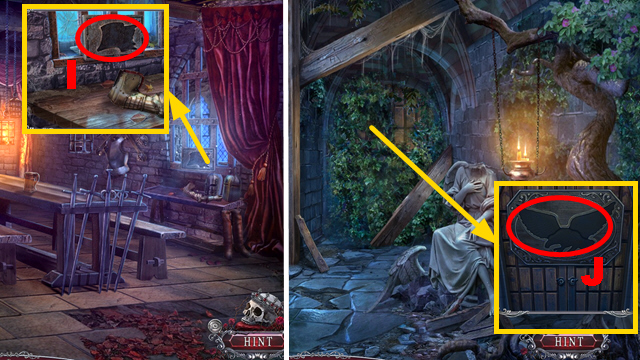
- Place the FLAG SYMBOL and take DOOR TOKEN 3/3 (I).
- Go to the Balcony.
- Place 3 DOOR TOKENS (J).
- Go forward.
- Congratulations! You have completed Secrets of Great Queens: Old Tower.
Created at: 2016-12-02

