Walkthrough Menu
- General Tips
- Chapter 1: Louise
- Chapter 2: The Tunnel
- Chapter 3: The Ship
- Chapter 4: The Lighthouse
- Chapter 5: The Port
- Chapter 6: The Hotel (First Floor)
- Chapter 7: The Study
- Chapter 8: The Hotel (Second Floor)
- Chapter 9: The Secret Room
- Chapter 10: The Lab
- Chapter 11: The Sawmill
General Tips
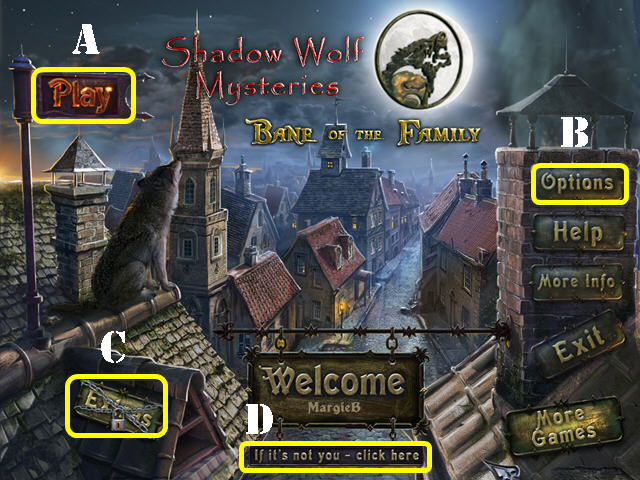
- This is the Official Guide for Shadow Wolf Mysteries: Bane of the Family Standard Edition.
- Click on Play (A) to begin your adventure.
- The Options (B) Button allows you to adjust the screen size (wide screen and fullscreen), music, cursor, and sound.
- The Extras (C) Button is only accessible in the Collector's Edition.
- The 'If it's not you – click here' button (D) can be used to manage your profiles in the game.
- This guide will refer to Hidden Object Scenes as 'HOS'.
- Items will stay in inventory until they are no longer needed.
- Some puzzle solutions and HOS are random. Items written in orange in HOS require an action to be performed before the item(s) can be visible.
- The HINT button is accessible in both HOS and in quest scenes but you must wait for it to recharge in between uses.
- All mini-games can be skipped once the skip button has recharged. Most puzzles have a RESET button; use it if you want to follow the solutions shown in this guide.
Chapter 1: Louise
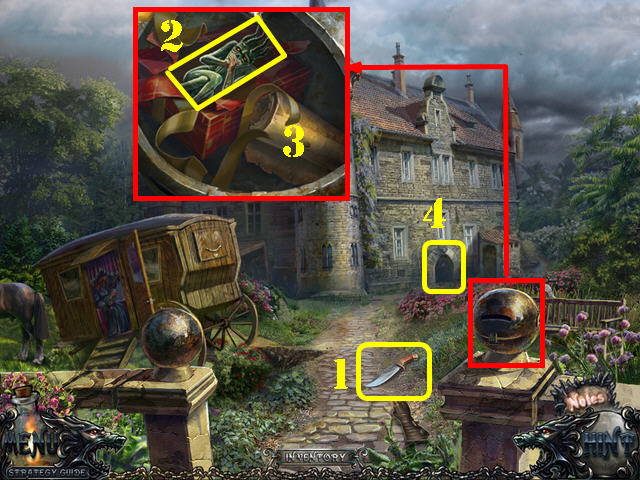
- Click on the wolf.
- The Louise will give you the MEDALLION after you scare off the wolf.
- Take the KNIFE (1).
- Look at and examine the mailbox.
- Cut the package with the KNIFE and take the IDOL (2).
- Open the scroll (3).
- Go towards the door (4).
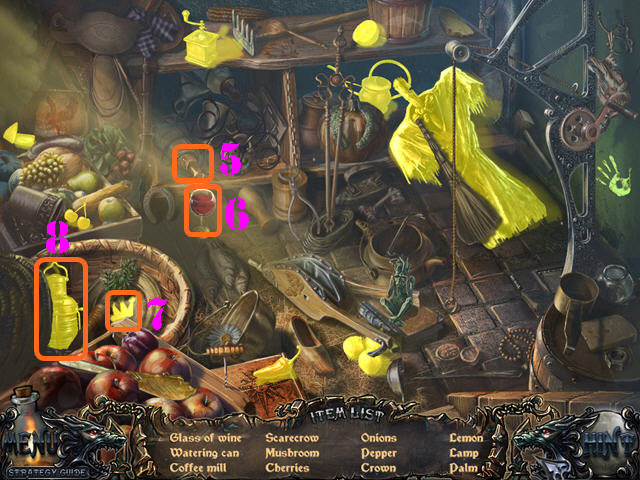
- Play the HOS.
- Click on the bottle (5) and take the glass of wine (6).
- Open the basket; take the crown (7) and the lamp (8).
- The SCARECROW will be added to inventory.
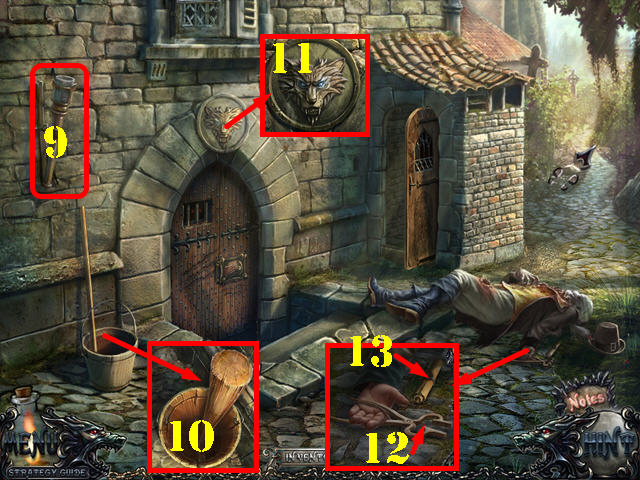
- Take the TORCH (9).
- Examine the bucket and take the STICK (10).
- Examine the top of the arch and take the WOLF HEAD (11).
- Take a closer look at the dead body; open the hand and take the PLIERS (12).
- Click on the Note (13).
- Go right.
- Click on the wolf.
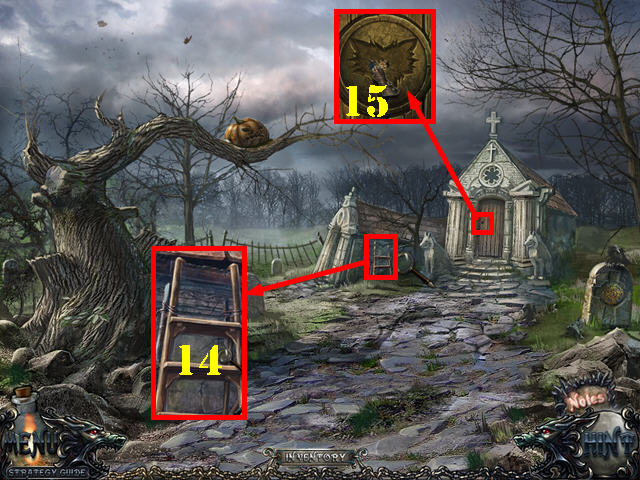
- Look at the stepladder; cut the 2 wires with the PLIERS and take the STEPLADDER (14).
- Look at the door; use the WOLF HEAD in the slot and go through the door (15).
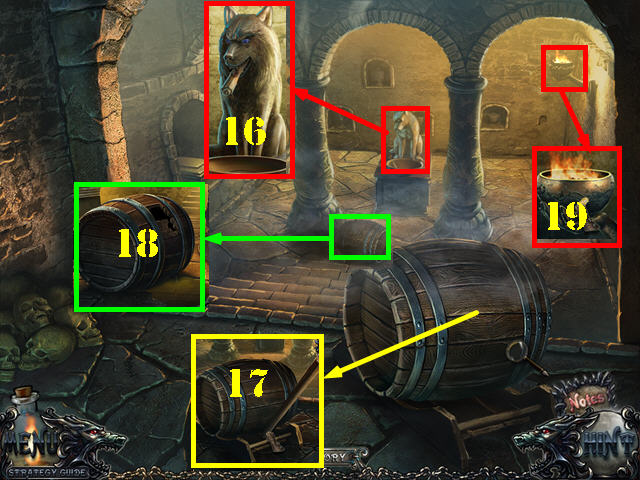
- Look at the wolf statue; open its mouth and take the Note (16).
- Look at the barrel; put the STICK on it (17) and click on the stick to move the barrel.
- Look at the barrel again and click on it.
- Use the TORCH on the oil to create the TORCH WITH OIL (18).
- Zoom into the fire; put the TORCH WITH OIL on the fire to create the BURNING TORCH (19).
- Walk down 3 times.
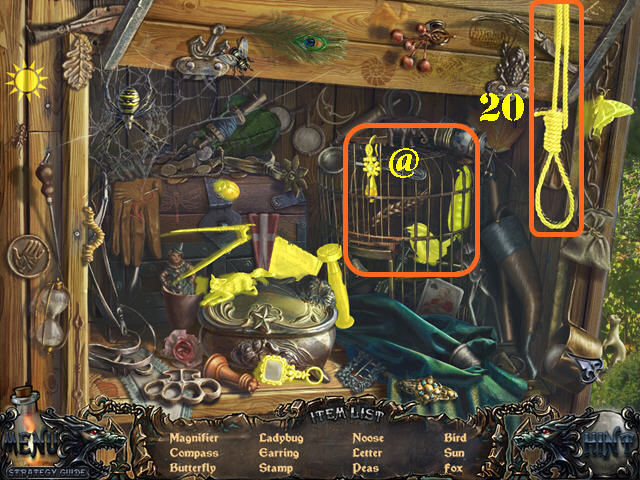
- Look at the back of the coach and place the STEPLADDER on it.
- Open the small door to activate a HOS.
- Remove the cloth; take the items listed in orange inside the cage (@).
- Click on the rope and take the noose (20).
- The NOOSE will be added to inventory.
- Go towards the door and then right.
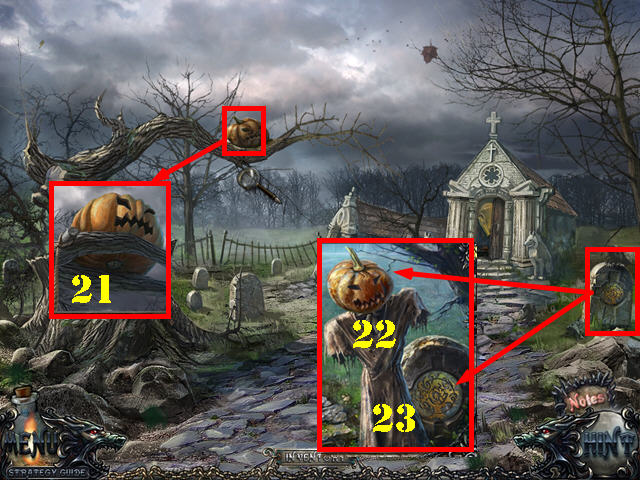
- Zoom into the pumpkin; attach the NOOSE to the branch.
- Click on the rope and take the PUMPKIN (21).
- Examine the tombstone; put the SCARECROW in the field (22).
- Put the PUMPKIN on the scarecrow and take the SYMBOL (23).
- Go back into the crypt.
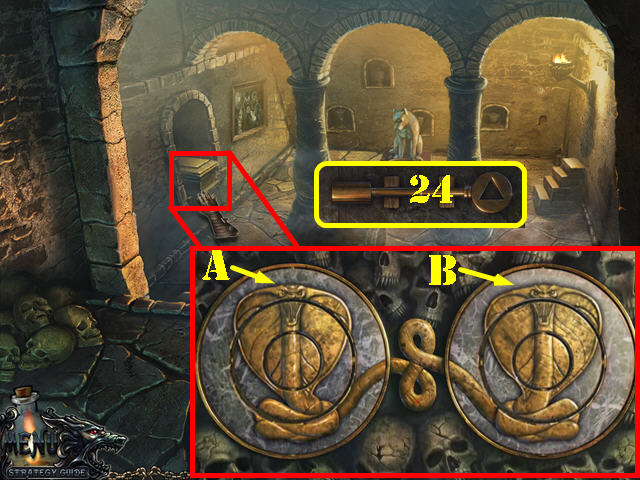
- Look at and examine the casket; put the SYMBOL in the slot to activate a puzzle.
- Click on the rings to change the images to form the symbols of two snakes.
- To solve the puzzle, click on the rings in this order: A and B.
- Take the SCREWDRIVER (24).
- Walk down twice.
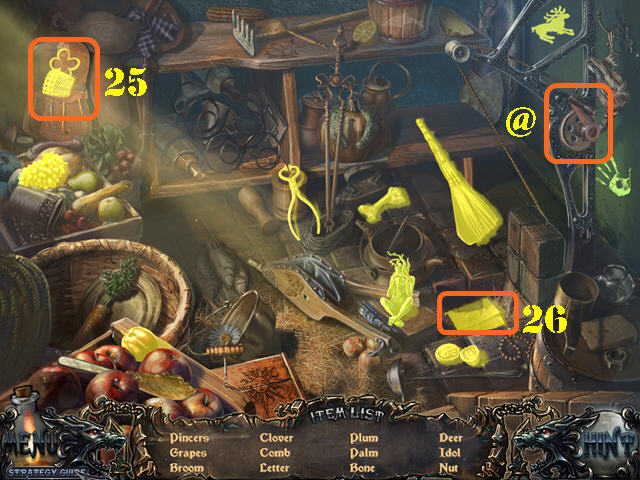
- Play the HOS.
- Open the purse; take the comb and the clover (25).
- Crank the handle (@) and take the letter (26).
- The IDOL will be added to inventory.
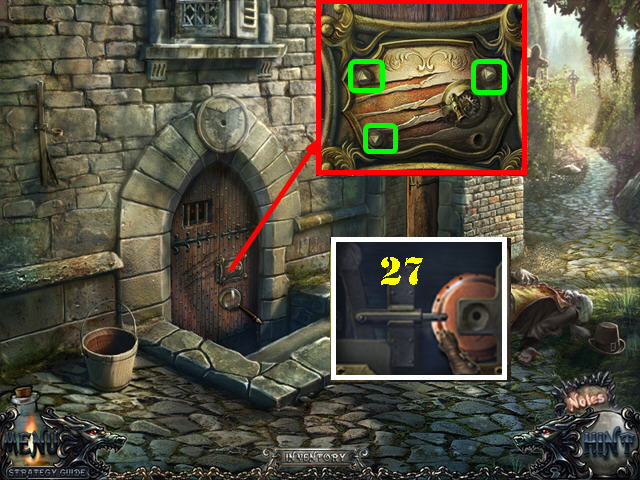
- Look at the door; remove the 3 screws (green) with the SCREWDRIVER.
- Open the cover and drag the lock to the counterclockwise as shown in the screenshot (27).
- Go through the door.
Chapter 2: The Tunnel
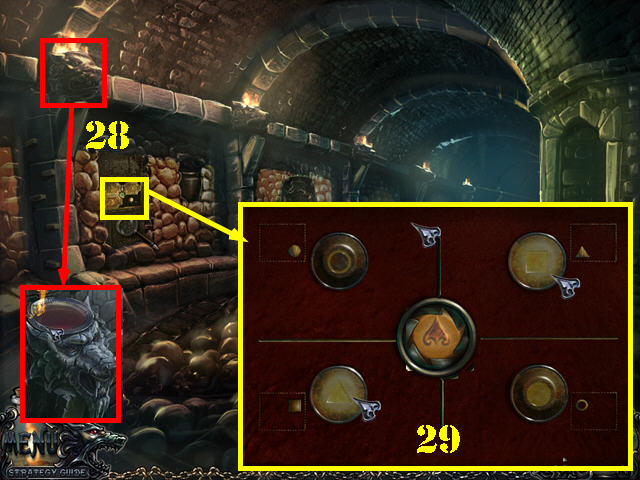
- Look at the wolf head; put the BURNING TORCH in the bowl to light the tunnel (28).
- Look at the puzzle on the left wall.
- Click on the arrows to move the blocks aside.
- Look at the symbols below each block. Your goal is to click on the buttons to place the correct symbols in the right spots.
- Please look at the screenshot for the solution (29).
- Click on the center button to activate a HOS; play it.
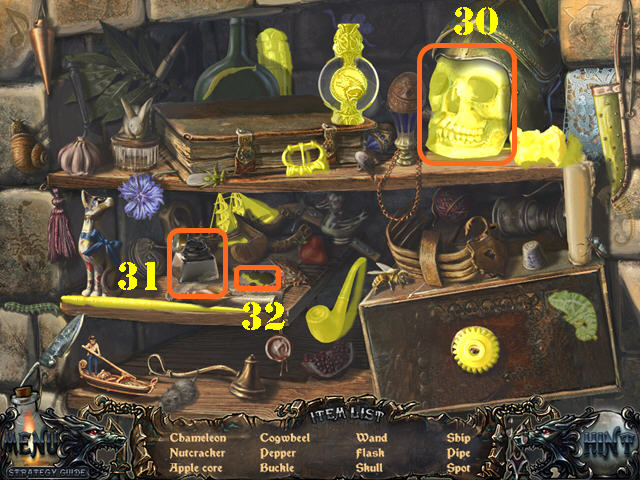
- Open the helmet; take the skull (30).
- Click on the ink pot (31) and take the spot (32).
- The EMPTY FLASK will be added to inventory.
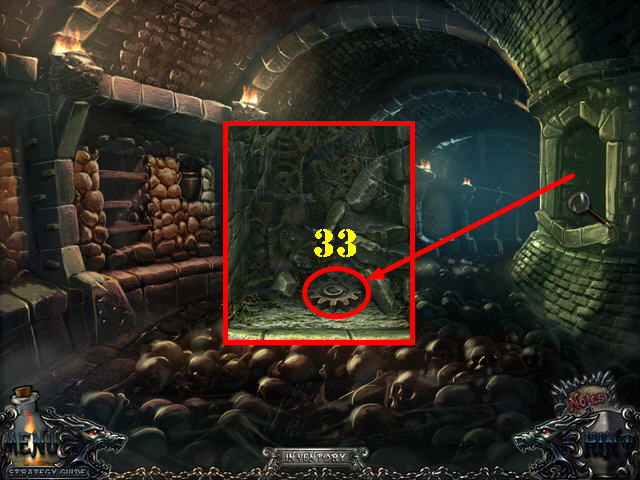
- Examine the right niche; move the debris aside and take the COGWHEEL (33).
- Go forward.
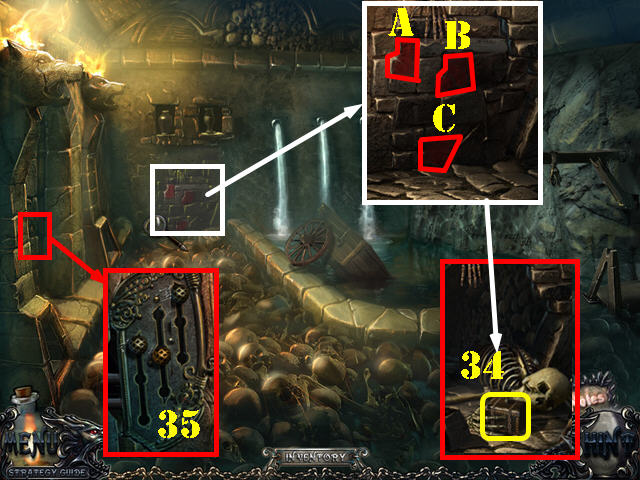
- Look at the back wall; click on the 3 red stones in this order: A, C, A, B, and A.
- Take the CASKET (34).
- Look at the left door; move the buttons in the positions shown in the screenshot (35).
- Go through the door.
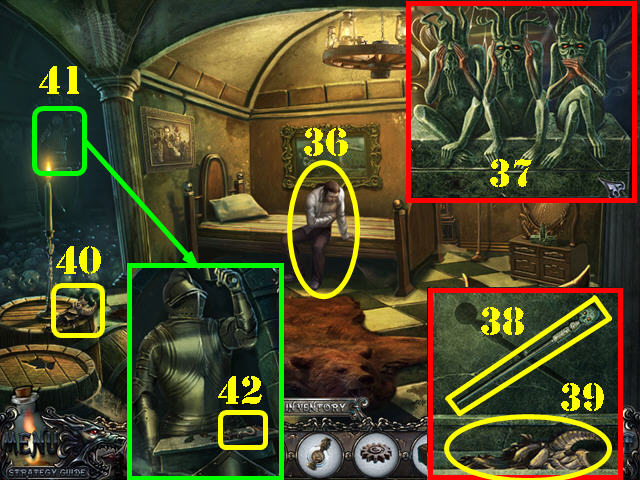
- Give the MEDALLION to the count (36).
- Examine the dresser; put the 2 IDOLS in the slots.
- Click on the idols to move the positions of the hands. From left to right: over the eyes, over the ears, and over the mouth (37).
- Take the PIN (38) and the DRAGON PART (39).
- Take the second DRAGON PART on the left barrel (40).
- Look at the armor (41); put the CASKET on the table.
- Click on the armor's arm and take the HOOK (42).
- Walk down.
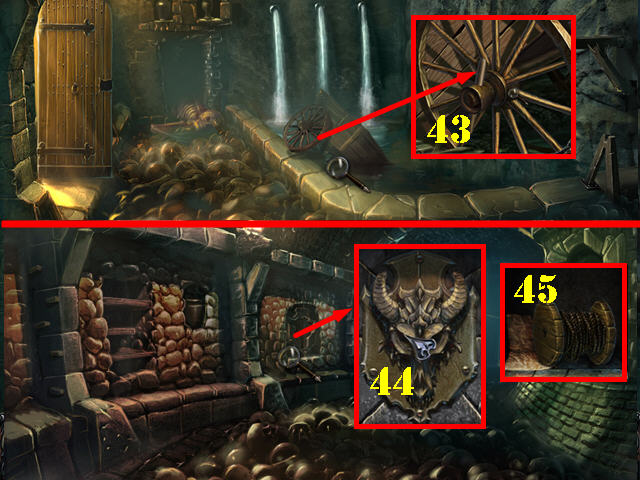
- Zoom into the wheelbarrow; use the PIN on the stick and take the WHEEL (43).
- Walk down.
- Examine the niche to the far left; put the 2 DRAGON PARTS into the slots (44).
- Take the ROPE COIL and the Note (45).
- Go forward.
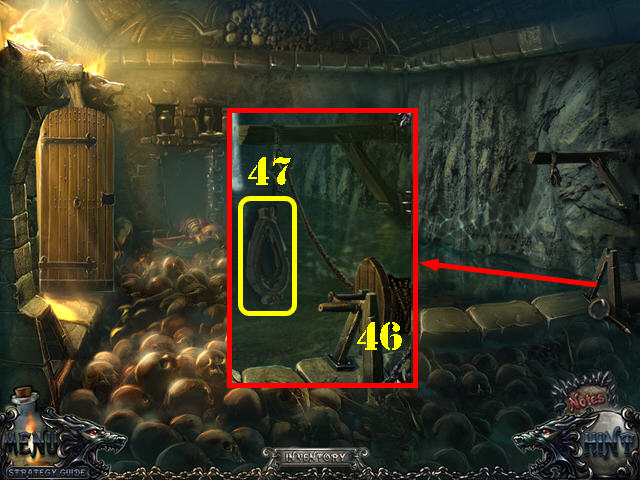
- Look at the crane; use the ROPE COIL on the crane (46).
- Put the HOOK on the rope.
- Click on the handle and take the YOKE (47).
- Walk down.
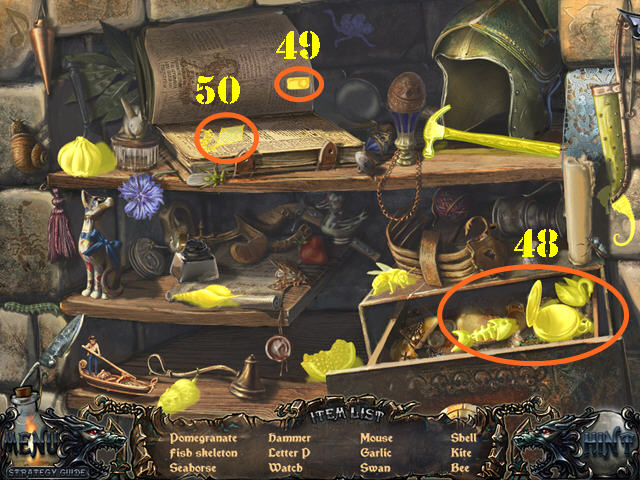
- Play the HOS on the left side of the tunnel.
- Open the safe; take the items listed in orange (48).
- Open the book; take the letter P (49) and the kite (50).
- The HAMMER will be added to inventory.
- Walk down twice.
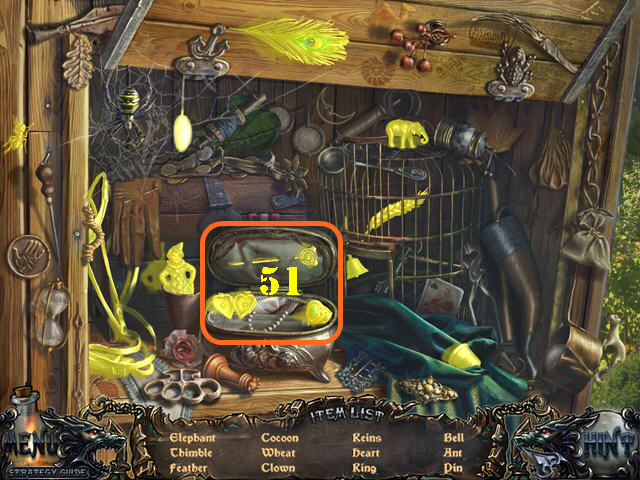
- Play the carriage HOS.
- Open the lid; take the heart, ring, and pin (51).
- The REINS will be added to inventory.
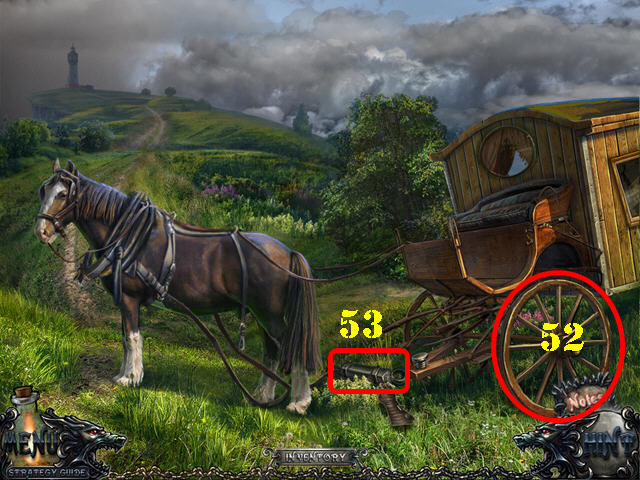
- Head left towards the horse.
- Put the WHEEL on the carriage (52).
- Put the REINS and the YOKE on the horse.
- Click on the pin (53) on the ground.
- Click on the inside of the carriage to talk to the Louise.
- Open the coach door and go outside.
Chapter 3: The Ship
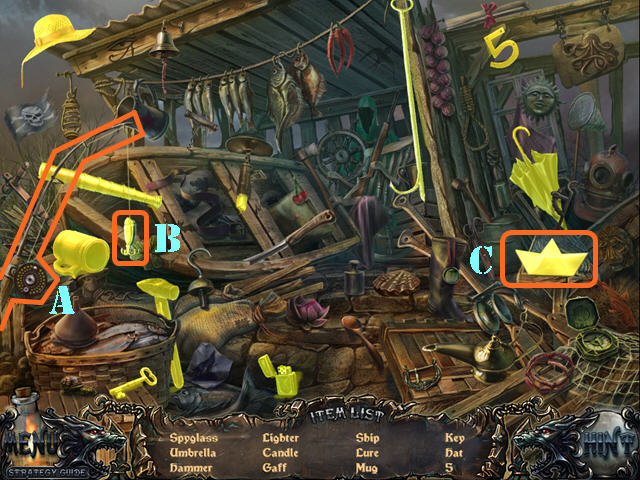
- Click on the wolf.
- Play the HOS.
- Click on the fishing rod (A); take the lure (B).
- Click on the paper; take the ship (C).
- The GAFF will be added to inventory.
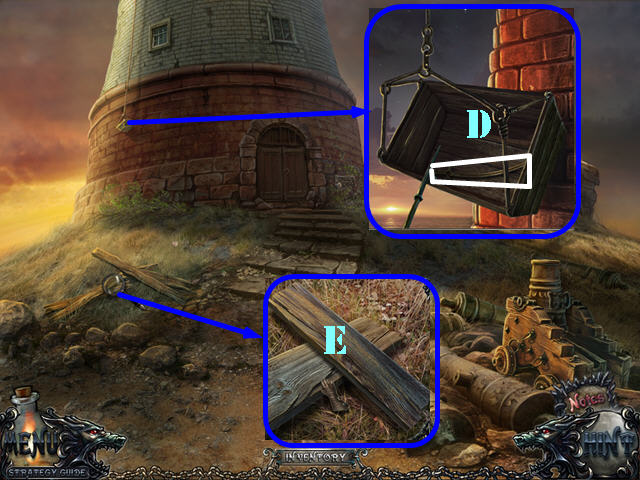
- Go towards the lighthouse.
- Look at and take the BOARDS (D).
- Look at the box; use the GAFF on it and take the SABER (E).
- Walk down.
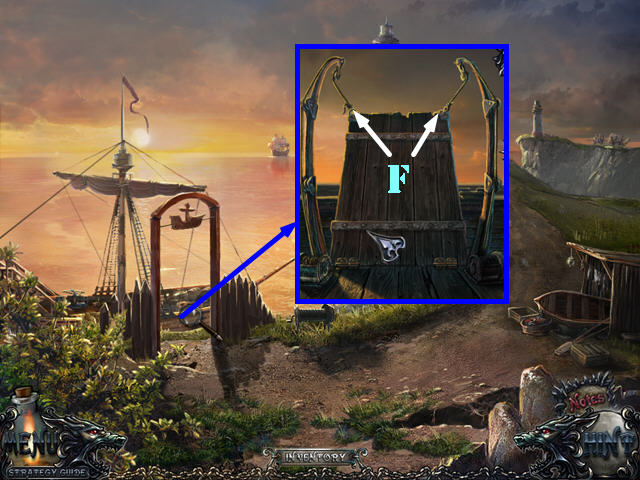
- Look at the gangway; cut the ropes with the SABER (F).
- Board the ship.
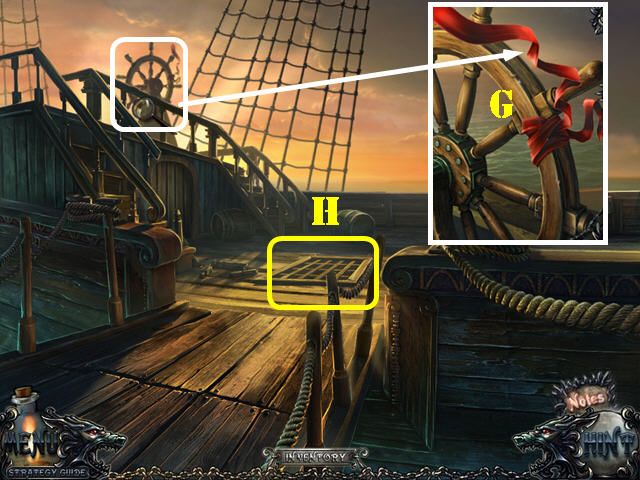
- Click on the wolf.
- Look at the ship's wheel; take the RIBBON (G).
- Open the trapdoor and go through it (H).
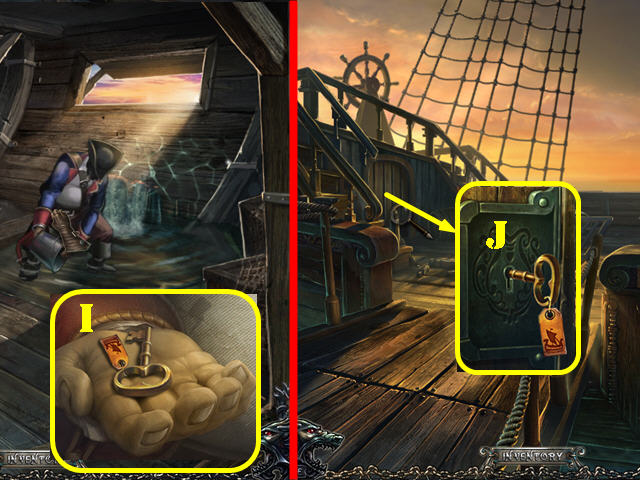
- Click on the captain and take the CAPTAIN'S KEY from his hand (I).
- Click down.
- Zoom into the left door; use the CAPTAIN'S KEY in the lock (J).
- Click on the key and go through the door.
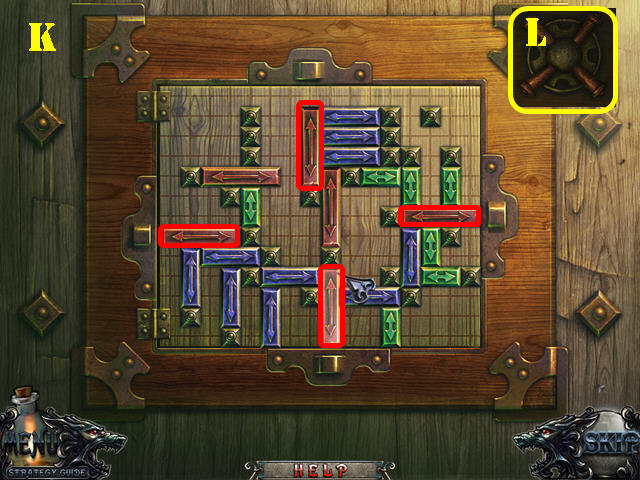
- Zoom into the left side of the desk to activate a puzzle.
- Slide the pieces out of the way so you can remove the red pieces from the 4 latches.
- You can only move the pieces with the arrows above them.
- Please look at the screenshot for the solution (K).
- Take the LEVER (L).
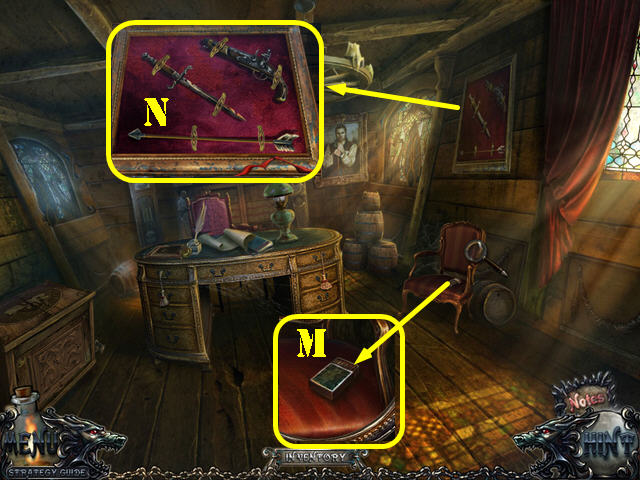
- Examine the chair and take the MATCHES (M).
- Examine the case (N); use the RIBBON to remove the clamps and to automatically receive the HARPOON.
- Walk down.
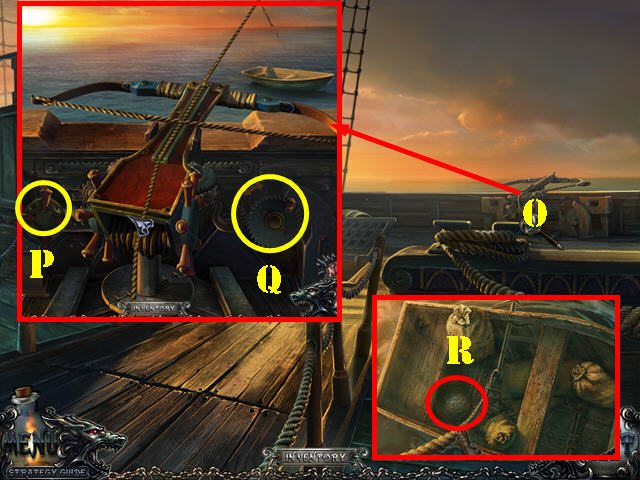
- Look at the ballista; put the HARPOON in it (O).
- Put the LEVER on the side (P).
- Adjust the lever and the gear (Q) to point the harpoon towards the boat.
- Click on the harpoon to launch it.
- Take the CANNONBALL from inside the boat (R).
- Walk down twice.
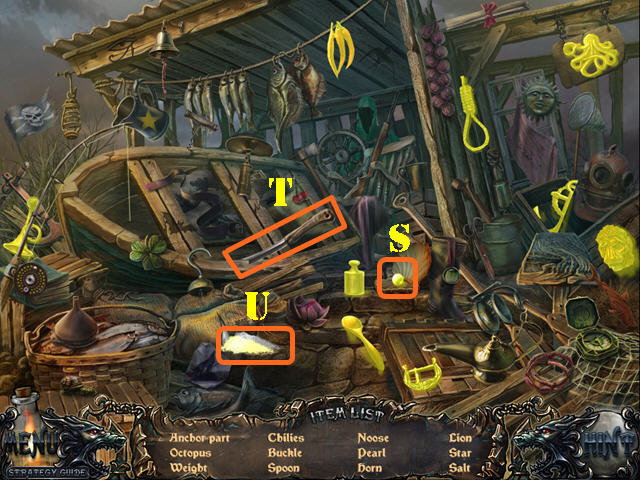
- Play the HOS.
- Open the clam; take the pearl (S).
- Click on the machete (T) and take the salt (U).
- The ANCHOR PART will be added to inventory.
- Go towards the lighthouse.
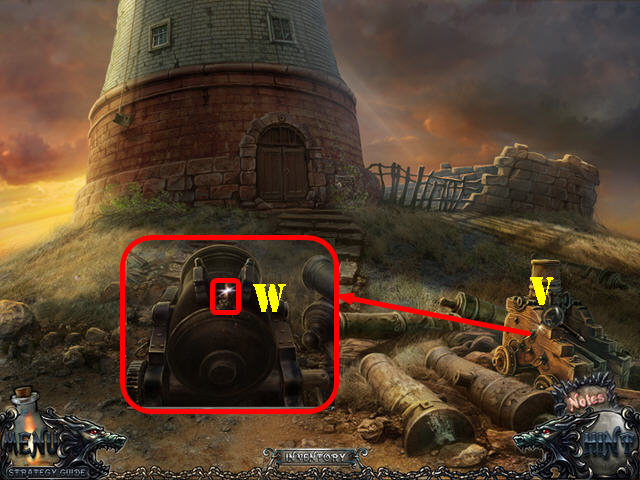
- Zoom into the cannon (V) and insert the CANNONBALL in it.
- Click on the cannon and light the fuse with the MATCHES (W).
- Go into the lighthouse.
Chapter 4: The Lighthouse
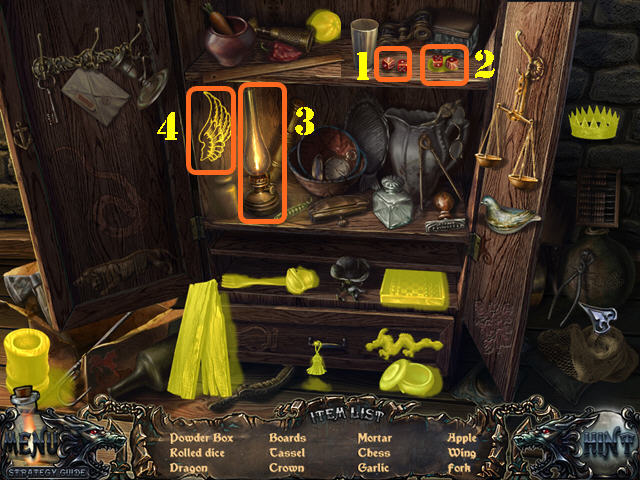
- Play the HOS.
- Click on the dice (1) and take the rolled dice (2).
- Click on the lamp (3) and take the wing (4).
- The BOARDS will be added to inventory.
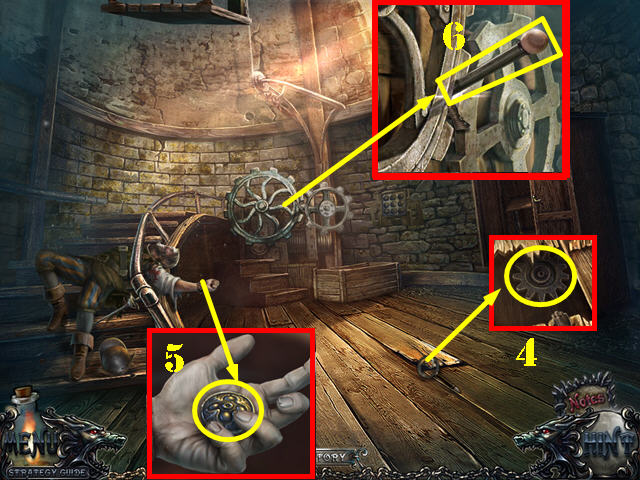
- Look at and click on the loose floorboard; take the COGWHEEL (4).
- Look at and open the hand; take the BUTTON (5).
- Zoom into the gears and take the LEVER (6).
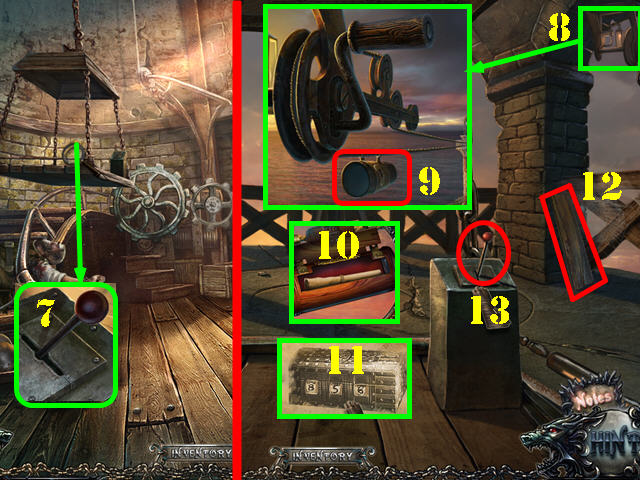
- Look at the lift; put the LEVER in the slot, click on the lever to go upstairs (7).
- Zoom into the handle (8) and click on the it.
- Look at and open the container (9); take the Note (10) to view the code (11).
- Take the BOARD (12).
- Click on the lever (13) to go back down.
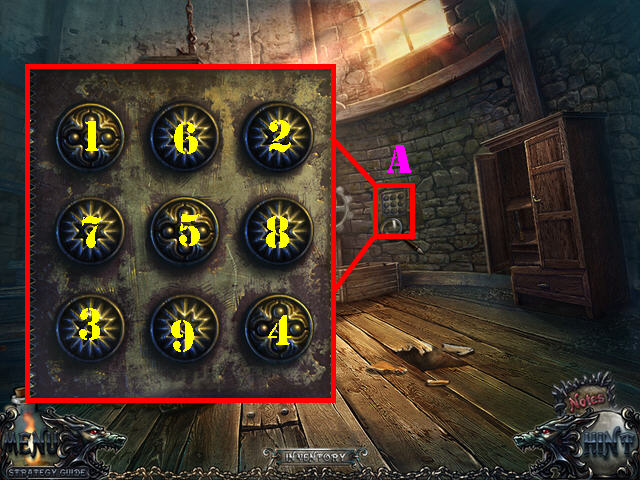
- Look at the puzzle on the right wall; put the BUTTON in it to activate it.
- You must solve 3 rounds of this puzzle.
- In the first round, click on the buttons until they all light up.
- To solve the first round, click on the buttons in the order shown in the screenshot (A).
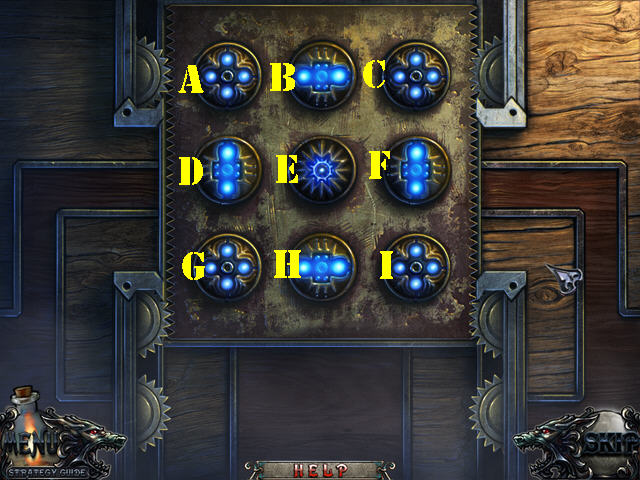
- In the second round, click on the buttons until they all light up.
- To solve the second round, click on the buttons in this order: I, D, E, B, A, G, H, F, and C.
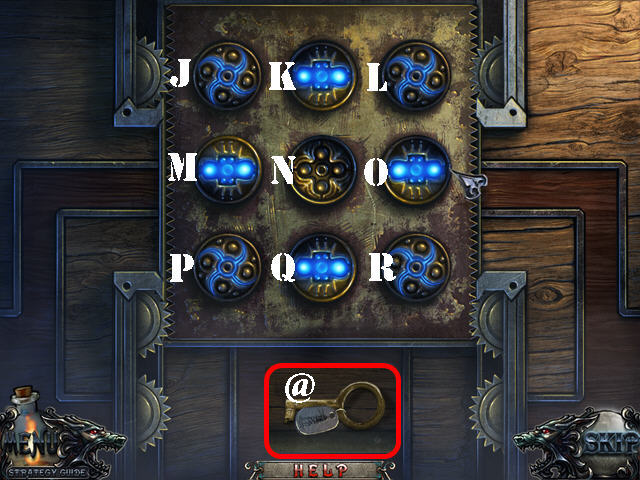
- In the third round, you must light up all the buttons as well, but in this round, you must rotate some of the buttons before others can be lit.
- To solve the third round, click on the buttons in this order: M, K, K, Q, and N.
- Take the LIGHTHOUSE KEY (@).
- Walk down.
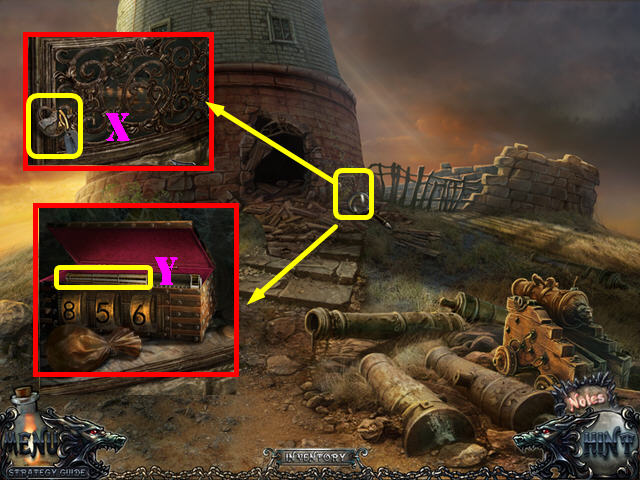
- Examine the side of the building; put the LIGHTHOUSE KEY in the lock (X).
- Turn the key to open the gate.
- Change the numbers on the chest to 856.
- Take the SPYGLASS (Y).
- Go back into the lighthouse.
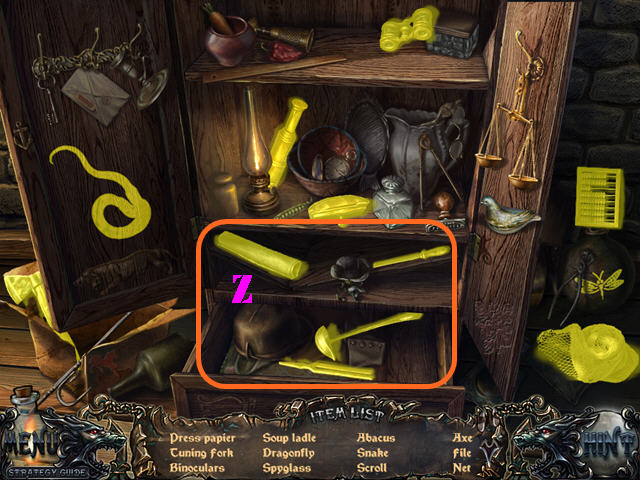
- Play the HOS.
- Open the drawers and click on the shelf; take all the items listed in orange (Z).
- The FISH NET will be added to inventory.
- Take the lift back up.
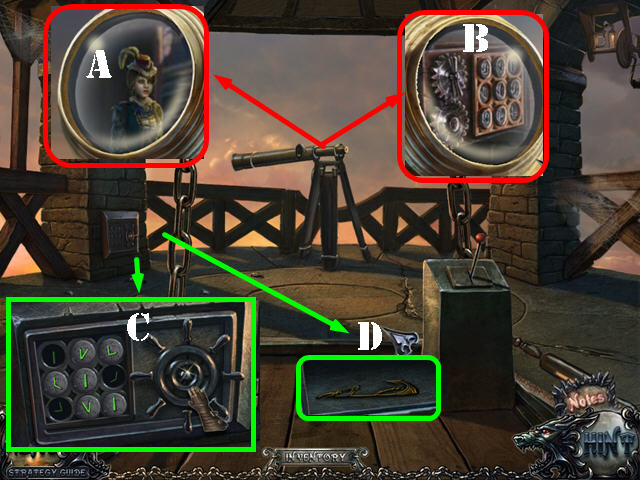
- Put the SPYGLASS on the tripod.
- Look at the spyglass; you will see the image of the countess (A).
- Click on the spyglass again to view the combination (B).
- Zoom into the keypad on the left; click on the symbols as shown in the screenshot (C).
- Turn the wheel to open the safe; take the second ANCHOR PART (D).
- Click on the lever to go back down and walk down twice.
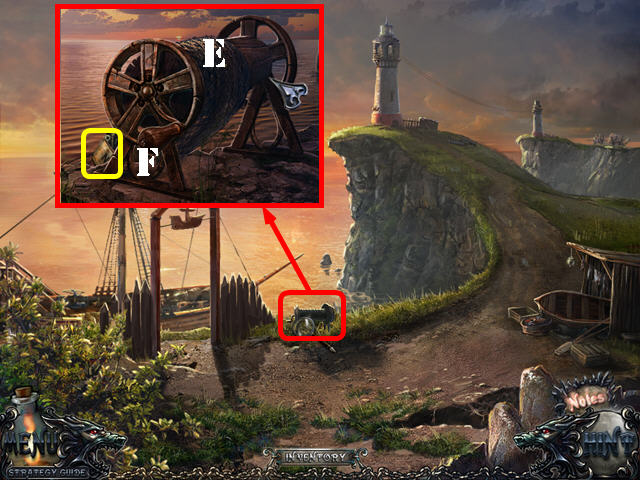
- Look at the winch and add the FISH NET to it (E).
- Click on the handle and take the NAILS (F).
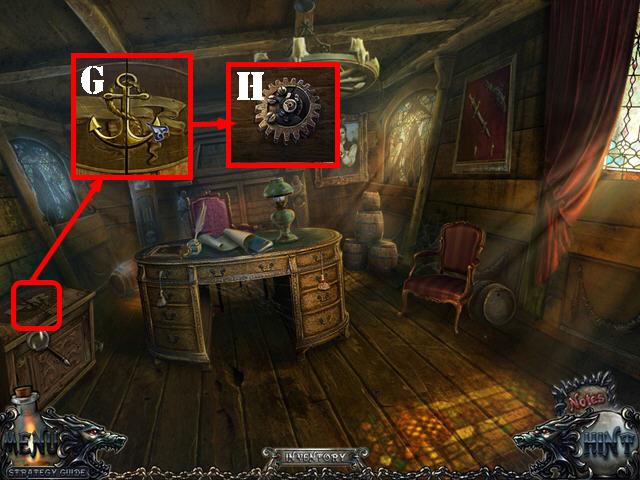
- Return to the captain's cabin.
- Zoom into the left cabinet; put both ANCHOR PARTS into it (G).
- Take the third COGWHEEL (H).
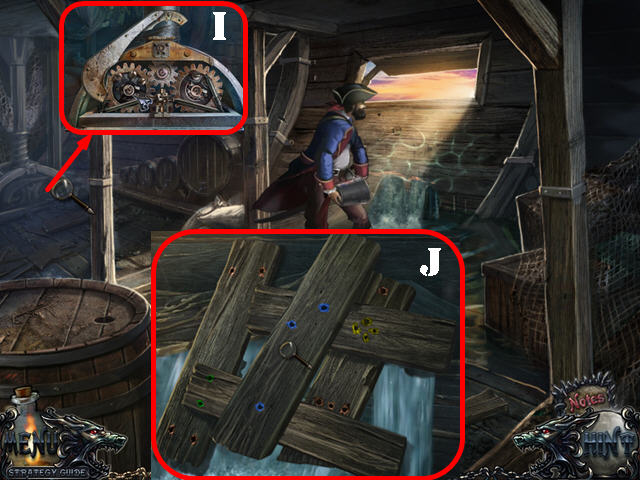
- Go back into the cargo hold.
- Zoom into the steering mechanism; put the 3 COGWHEELS on it (I).
- Zoom into the gushing water; put the 2 BOARDS and the BOARDS on the scene.
- Arrange the boards as shown in the screenshot (J).
- Attach the NAILS to the boards.
- Use the HAMMER on the nails and watch a cut scene.
Chapter 5: The Port
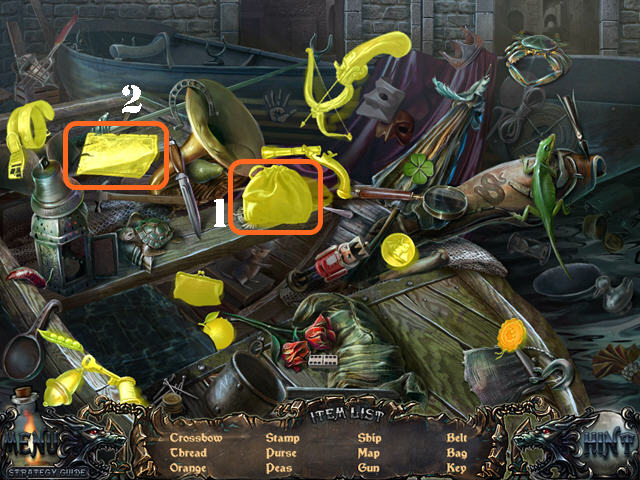
- Click on the wolf.
- Play the HOS.
- Move the cloth; take the bag (1).
- Open the scroll; take the map (2).
- The DISK will be added to inventory.
- Go left.
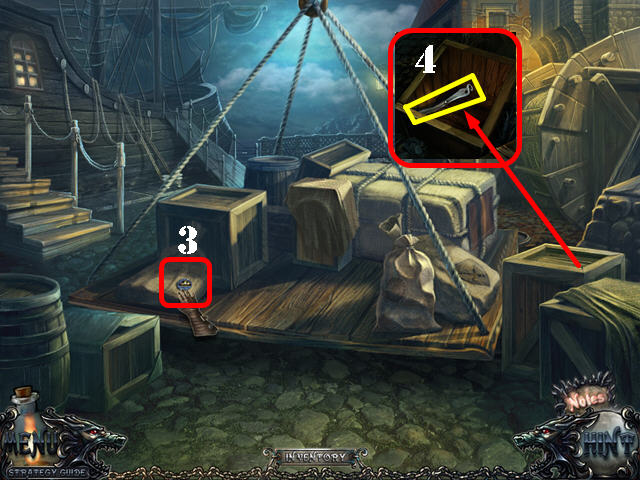
- Take the DISK (3).
- Open the crate; look into it and take the PART OF TONGS (4).
- Walk down and go forward.
- Click on the wolf.
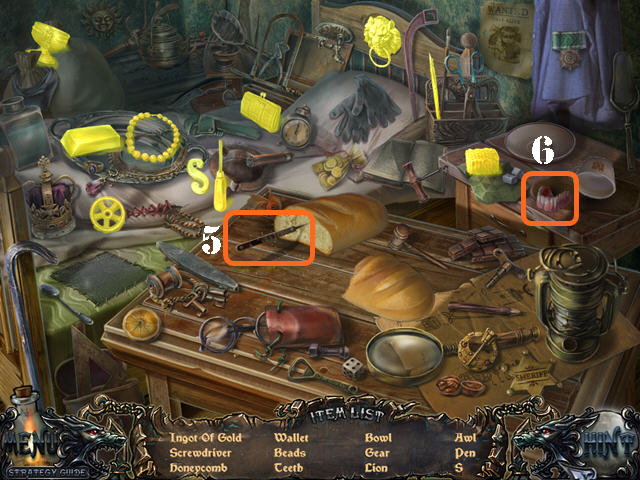
- Open the left door to activate a HOS; play it.
- Click on the bread; take the awl (5).
- Click on the cup and take the teeth (6).
- The SCREWDRIVER will be added to inventory.
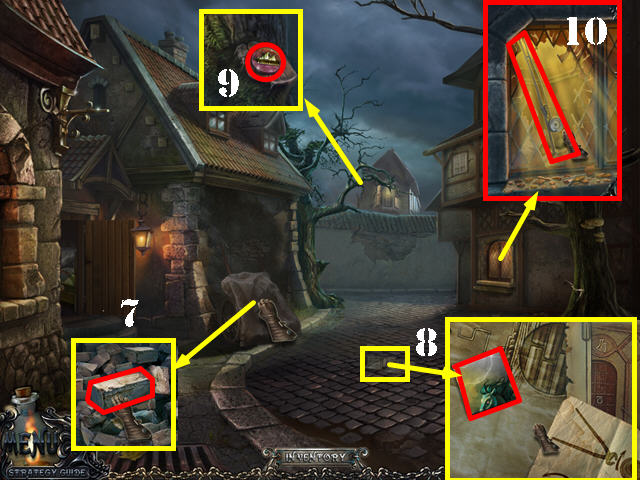
- Remove the cloth; look at the cart and take the BRICK (7).
- Look at the note; click on it and take the PUZZLE PIECE (8).
- Examine the tree and take the DISK (9).
- Zoom into the right window; break it with the BRICK 3 times and take the FISHING ROD (10).
- Walk down and go left.
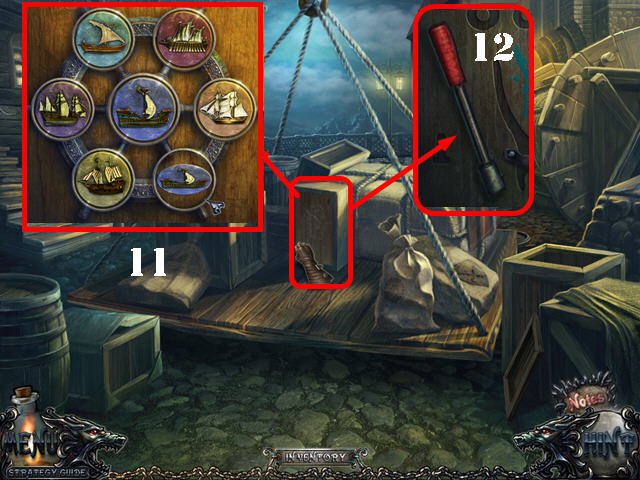
- Remove the cloth; open the box and zoom into it.
- Place the 3 DISKS in the empty slots to activate a puzzle.
- Match the image in the center by clicking on the correct image on the side.
- The solution is shown on the screenshot (11).
- Take the LEVER (12).
- Walk down.
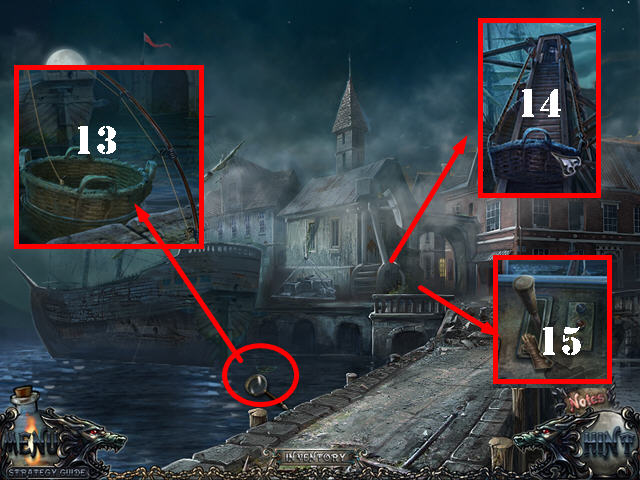
- Zoom into the water.
- Use the FISHING ROD on the basket; take the BASKET (13).
- Look at the crane and put the BASKET on it (14).
- Put the LEVER in the slot and click on it (15).
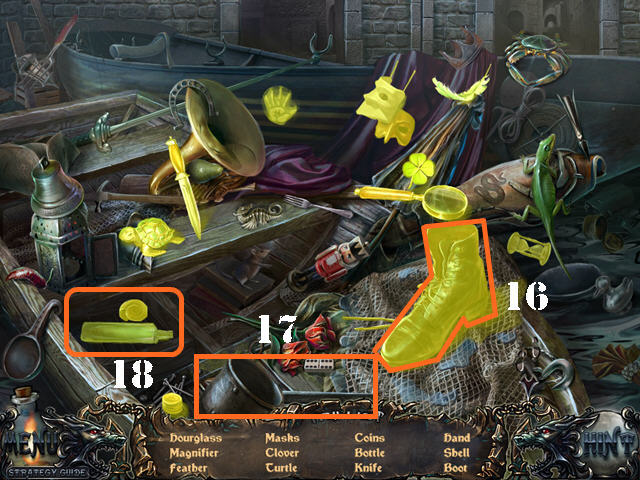
- Play the HOS in the lower right.
- Click on the net and take the boot (16).
- Click on the ladle (17); take the bottle and the shell (18).
- The KNIFE will be added to inventory.
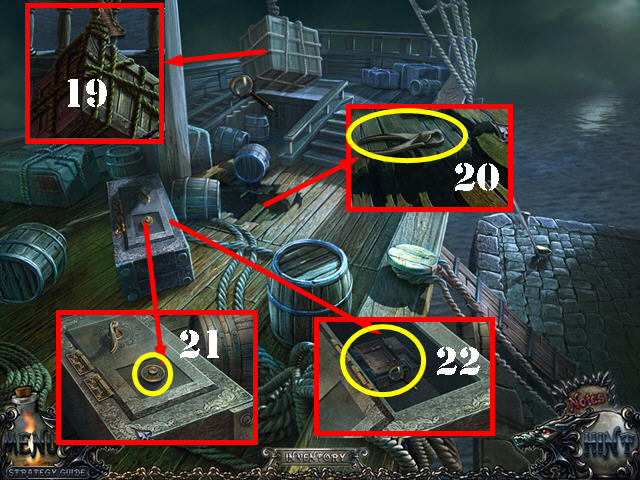
- Board the ship and go up the left steps.
- Look at the crate; cut the rope with the KNIFE 3 times (19).
- Look at the hole in the floor; put the PART OF TONGS on the other piece and take the PLIERS (20).
- Zoom into the safe; look at the dial and put the PLIERS on it followed by the SCREWDRIVER (21).
- Click on the handle and zoom into the puzzle in the chest (22).
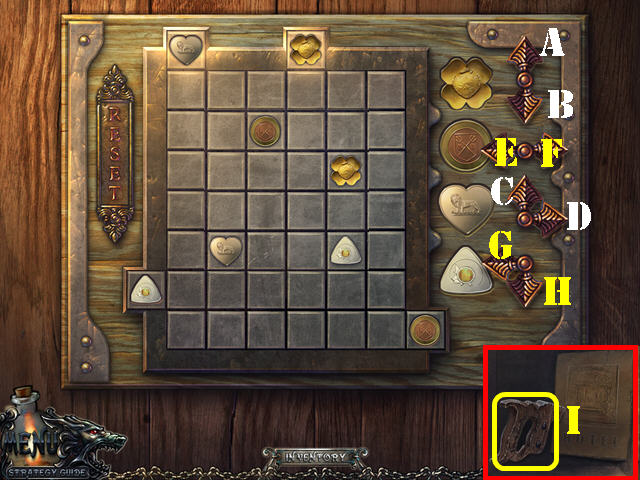
- Put the pawns into the right slots.
- Click on the arrows next to each piece to move the matching symbol on the board.
- To solve the puzzle, click on the arrows in this order: F x 3, A, E, A, E, B x 3, F, E x 3, F x 2, B x 2, A x 6, F x 3,C x 5, H, and G x 6.
- Take the HANDLE (I).
- Walk down.
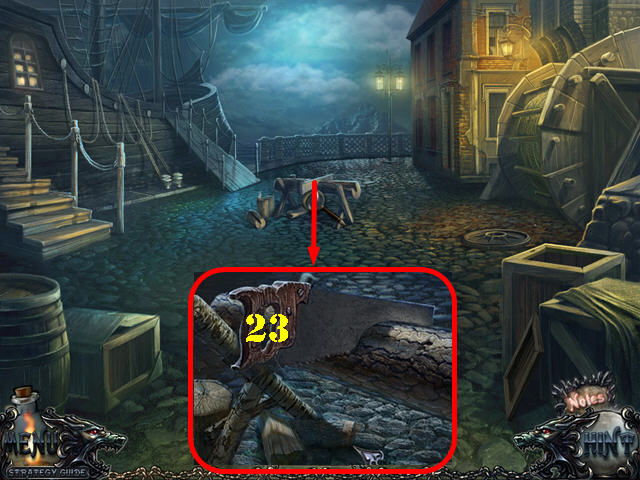
- Look at the logs; put the HANDLE on the saw blade and take the SAW (23).
- Walk down and go forward.
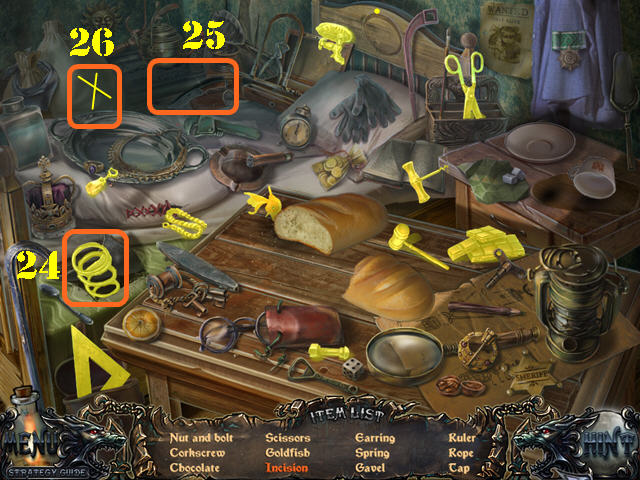
- Play the HOS.
- Click on the cloth; take the spring (24).
- Click on the knife (25); take the incision (26).
- The GAVEL will be added to inventory.
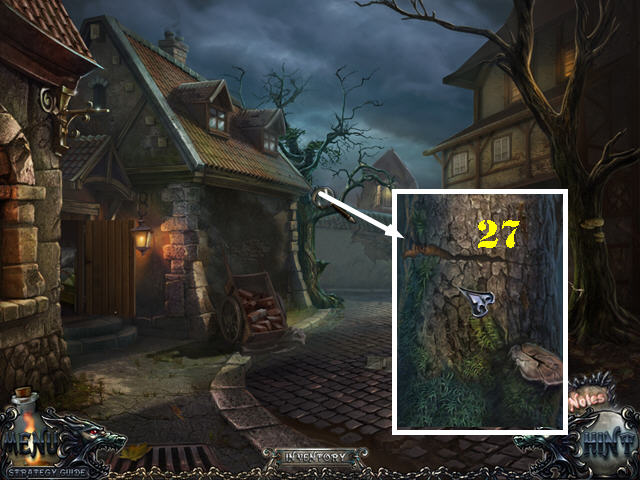
- Look at the tree; use the SAW on the tree (27).
- Go forward.
Chapter 6: The Hotel (First Floor)
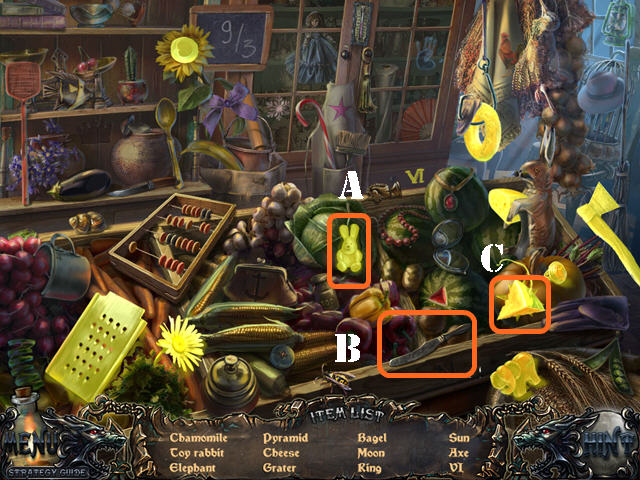
- Click on the wolf.
- Play the HOS.
- Click on the lettuce; take the toy rabbit (A).
- Select the knife (B); take the pyramid (C).
- The AXE will be added to inventory.
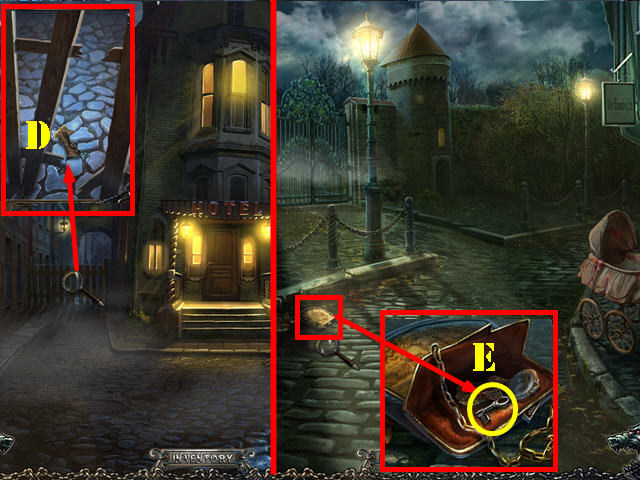
- Examine the left fence; cut it with the AXE 3 times (D).
- Go through the fence.
- Click on the wolf.
- Look at and open the purse; take the HOTEL KEY (E).
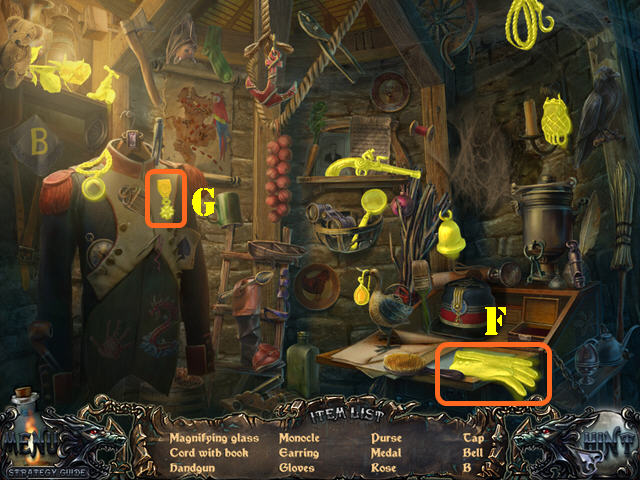
- Play the HOS.
- Select the hat and take the gloves (F).
- Click on the coat and take the medal (G).
- The CORD WITH HOOK will be added to inventory.
- Walk down.
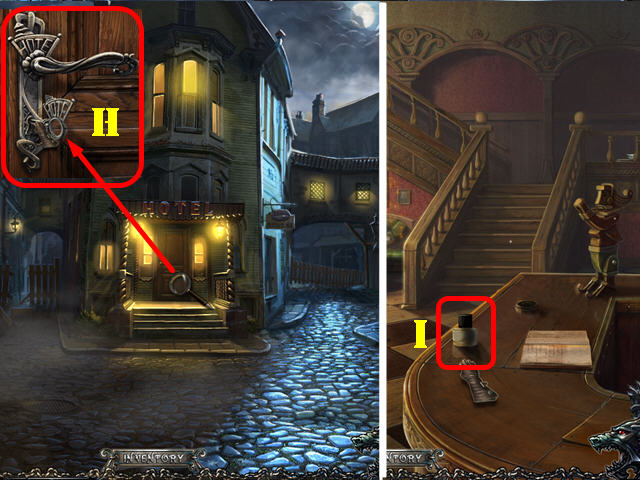
- Zoom into the front door; use the HOTEL KEY in the lock (H).
- Turn the key; click on the handle and enter the hotel.
- Take the GLUE (I).
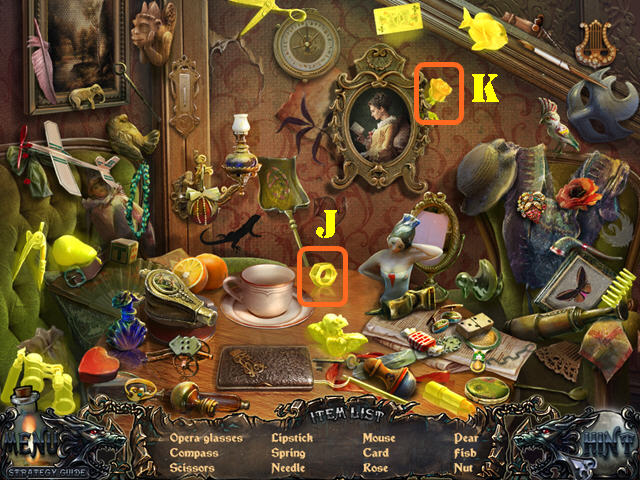
- Play the HOS.
- Select the cup and take the nut (J).
- Select the picture and take the rose (K).
- The SCISSORS will be added to inventory.
- Go left.
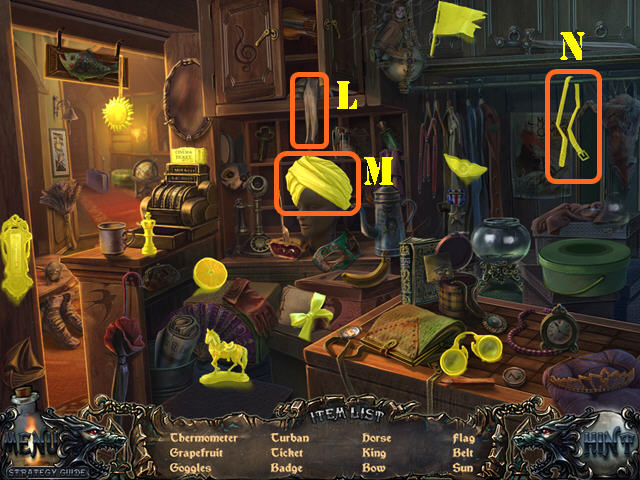
- Play the HOS.
- Click on the towel (L) and take the turban (M).
- Remove the cloth and take the belt (N).
- The PART OF BELL will be added to inventory.
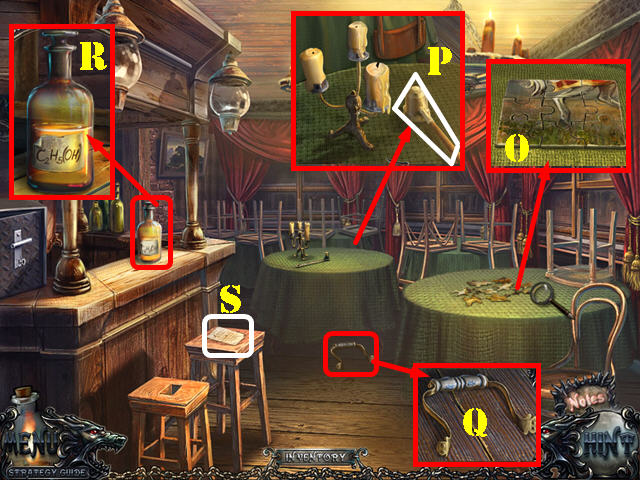
- Go left to reach the restaurant.
- Look at the right table; click on the puzzle pieces several times to obtain the PUZZLE PIECE (O).
- Look at the other table; take the SNUFFER (P).
- Examine the ground; take the HANDLE (Q).
- Zoom into the bar and take the ALCOHOL (R).
- Take the Note on the stool (S).
- Walk down twice.
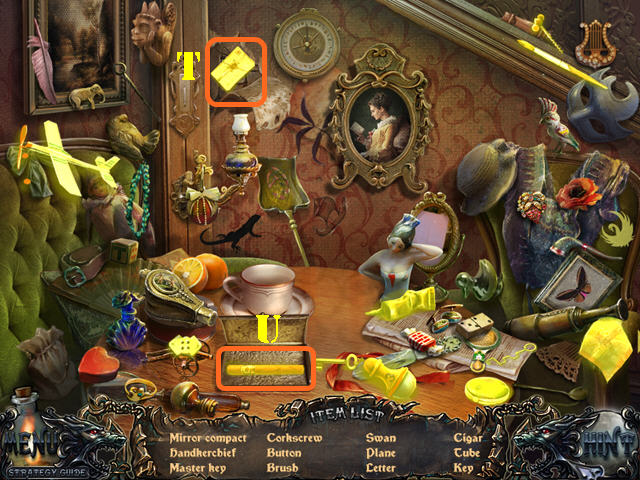
- Play the HOS.
- Click on the wallpaper; take the letter (T).
- Open the case; take the cigar (U).
- The MASTER KEY will be added to inventory.
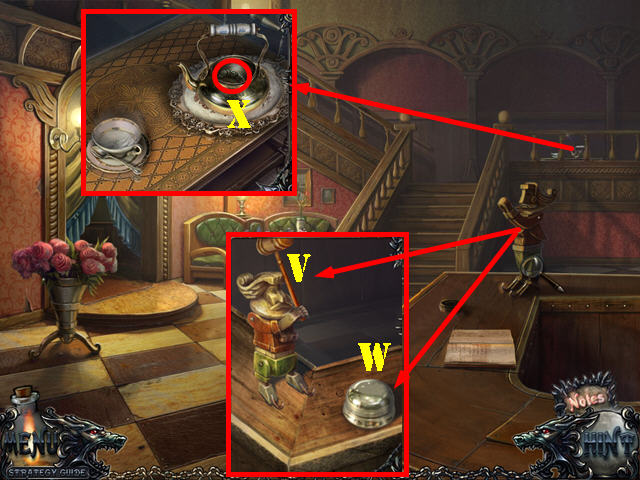
- Zoom into the doll; put the GAVEL in its hand (V).
- Put the PART OF BELL on the stand (W) for the concierge to appear.
- Examine the tea set; put the GLUE on the teapot.
- Put the HANDLE on the teapot.
- Click on the teapot and take the 1ST PORTRAIT (X).
- Go up the left side of the steps.
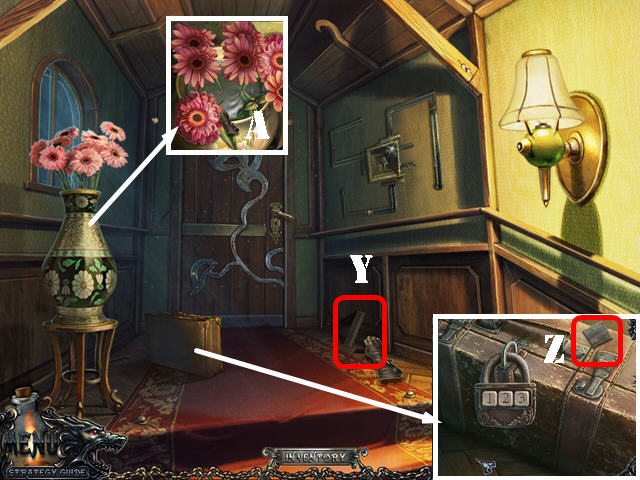
- Take the PARQUET (Y).
- Look at the suitcase; take the PUZZLE PIECE (Z).
- Examine the vase; click on the flowers and take the VASE WITH WATER (A).
Chapter 7: The Study
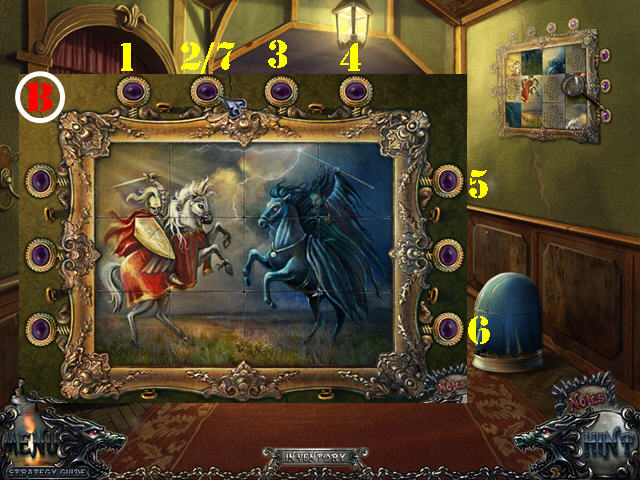
- Return to the hallway by the restaurant.
- Examine the picture; put the 3 PUZZLE PIECES on the picture to activate a puzzle.
- Click on the buttons to change the panels.
- To solve the puzzle, click on the buttons in the order shown in the screenshot (B).
- Take the PICTURE.
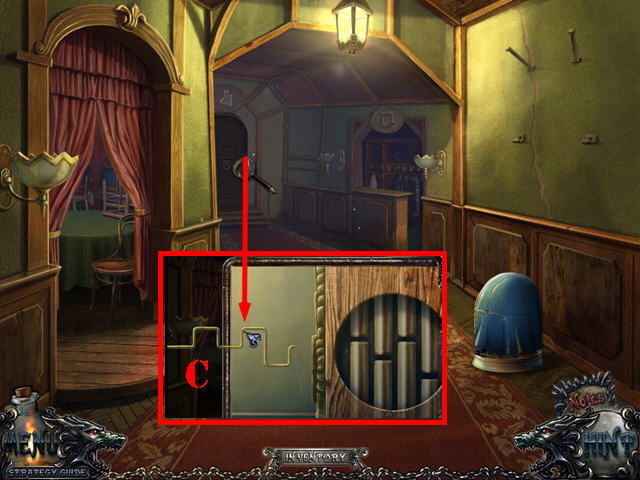
- Examine the back door; put the MASTER KEY in the keyhole to activate a puzzle.
- Click on the 4 key parts until they match the shape of the lock. Once the key has the right shape it will automatically enter through the keyhole.
- Please look at the screenshot for the solution (C).
- Go through the door.
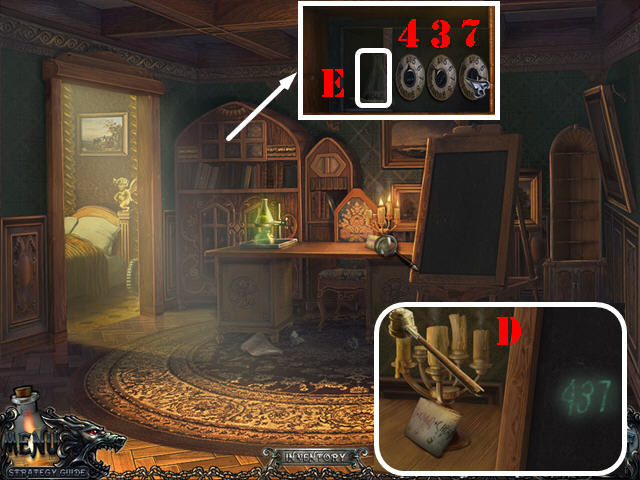
- Look at the right side of the desk; put the SNUFFER over the lit candles and note the number 437 (D).
- Examine the top of the bookcase; open the drawer and enter the 437 code on the dials.
- Take the PERMANGANATE ACID (E).
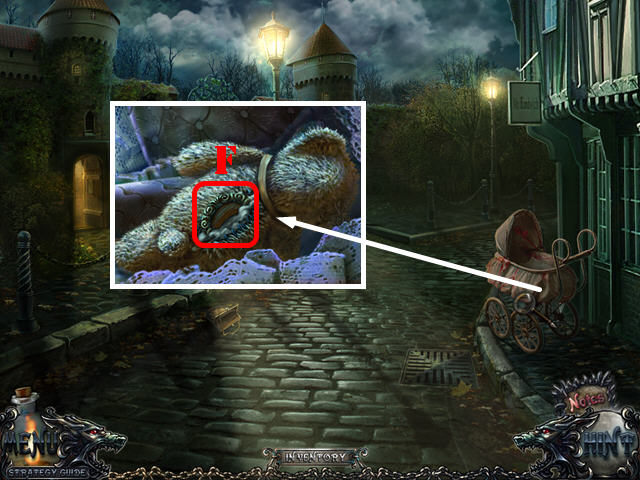
- Exit the hotel and go through the left fence.
- Zoom into the baby carriage; click on the bear and cut it with the SCISSORS.
- Take the 2ND PORTRAIT (F).
- Walk down.
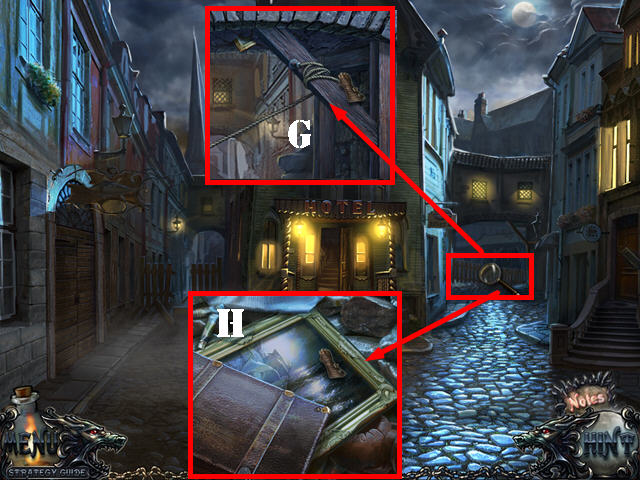
- Zoom into the right fence; use the CORD WITH HOOK on the wooden beam (G).
- Click on the rope and examine the broken fence.
- Click on the area 2 times and take the PAINTING (H).
- Go back to the second floor in the hotel.
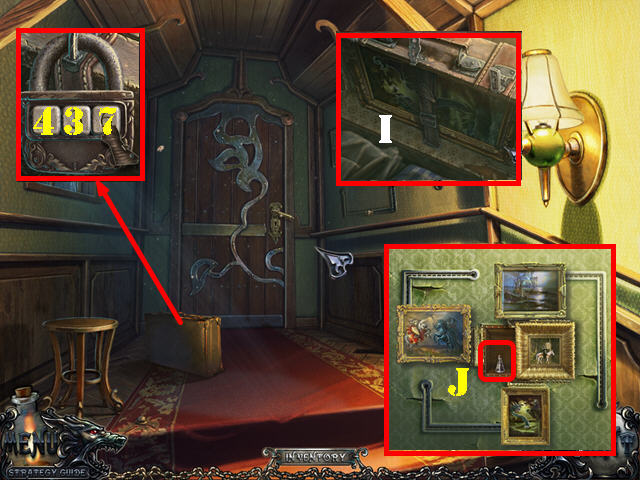
- Zoom into the briefcase; enter the code 437 on the lock.
- Open the belt and take the PAINTING (I).
- Look at the right side of the wall; put the 3 PAINTINGS on the wall to activate a puzzle.
- Click on the 3 paintings you just added to the wall.
- Take the IODINE (J).
- Return to the study.
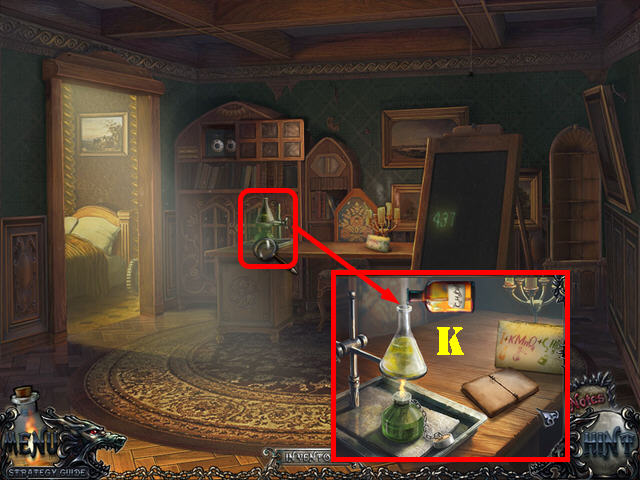
- Look at the left side of the table; add the PERMANGANATE ACID, ALCOHOL, and IODINE into the beaker (K).
- Take the REVEALING REAGENT.
- Walk down.
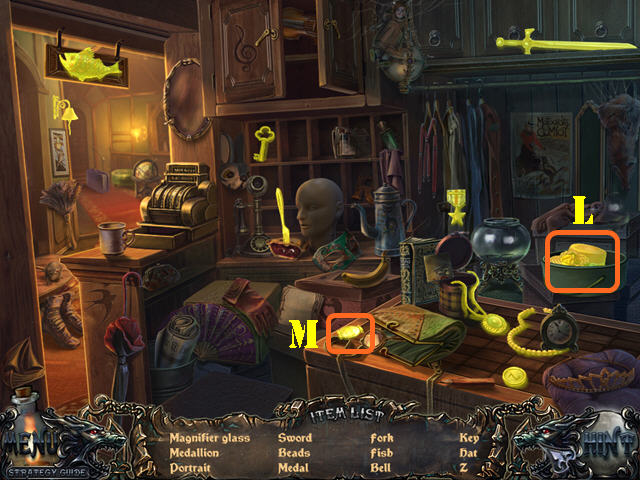
- Play the HOS.
- Open the box and take the hat (L).
- Open the purse and take the magnifier glass (M).
- The 3RD PORTRAIT will be added to inventory.
- Walk down.
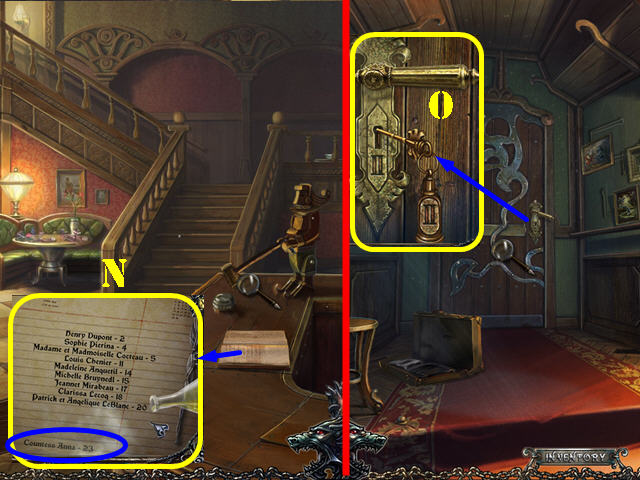
- Zoom into the reception desk; put the REVEALING REAGENT on the book (N).
- The concierge gives you a KEY.
- Go back to the second floor.
- Examine the back door; use the KEY in the keyhole (0).
- Turn the key; click on the handle and go through the door.
Chapter 8: The Hotel (Second Floor)
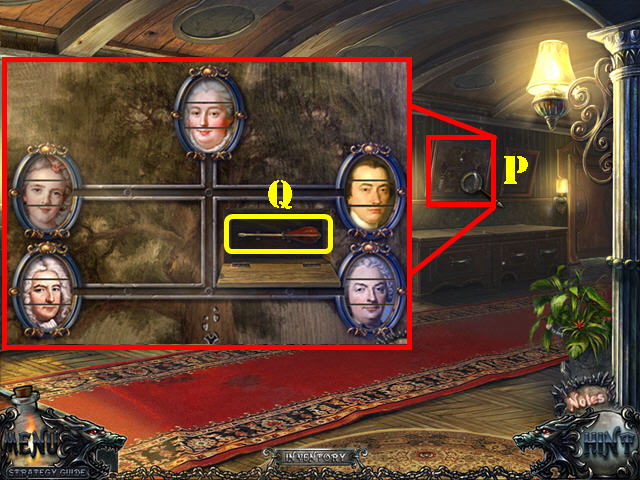
- Examine the painting (P); put the 3 PORTRAITS on it to activate a puzzle.
- Slide the pieces onto the bar to switch the pieces around until you form the correct images.
- Please look at the screenshot for the solution.
- Take the SCREWDRIVER (Q).
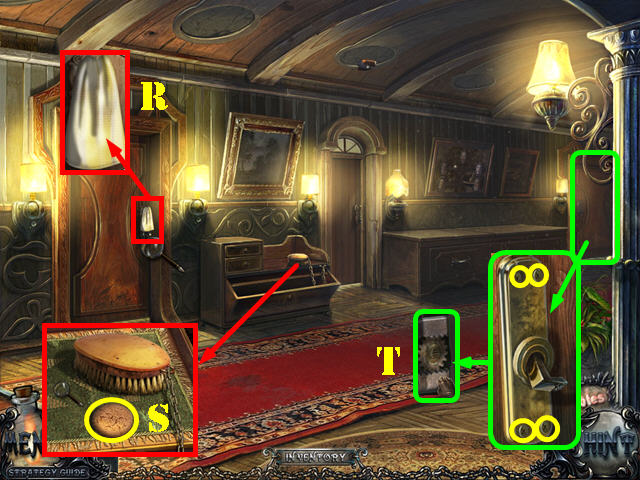
- Look at the left door and take the TOWEL (R).
- Look at the desk and take the COOKIE (S).
- Examine the last door; use the SCREWDRIVER on the 4 screws (yellow).
- Remove the handle and click on the mechanism (T); go through the door.
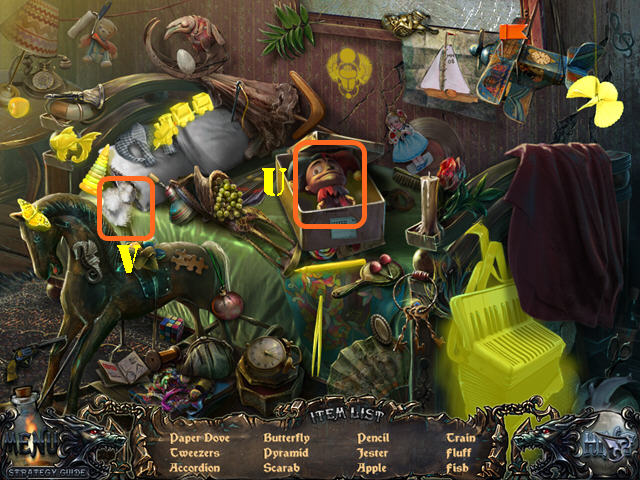
- Play the HOS.
- Open the box; take the jester (U).
- Click on the pillow; take the fluff (V).
- The TWEEZERS will be added to inventory.
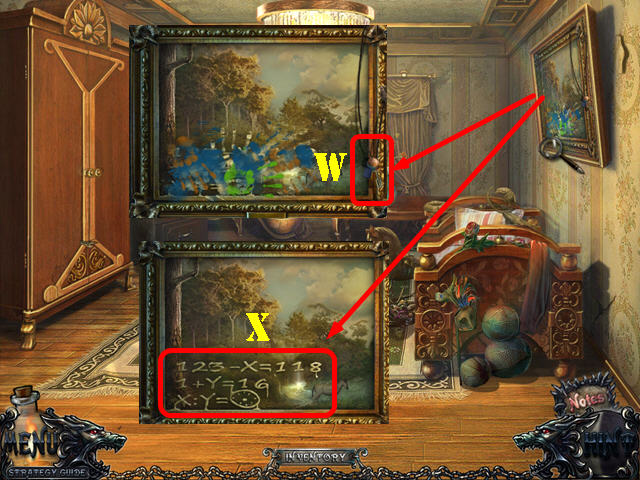
- Look at the painting; take the blue ALLEN KEY (W).
- Use the TOWEL on the painting; note the equation on the painting (X).
- Walk down.
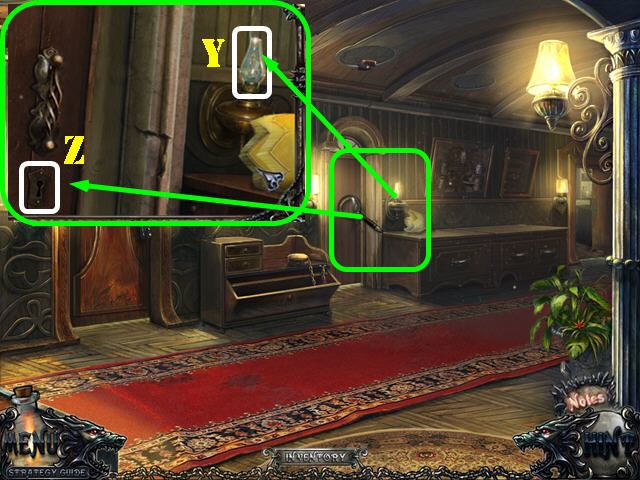
- Look at the middle door; remove the lampshade and pour the VASE WITH WATER in the glass.
- Use the TWEEZERS to retrieve the CLOSET KEY from inside the glass (Y).
- Insert the CLOSET KEY in the lock to activate a HOS; play it (Z).
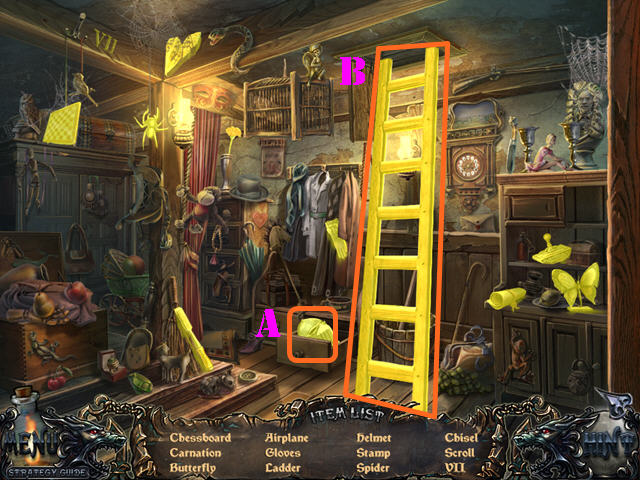
- Open the drawer; take the helmet (A).
- Open the trapdoor and take the ladder (B).
- The CHISEL will be added to inventory.
- Go back into the bedroom.
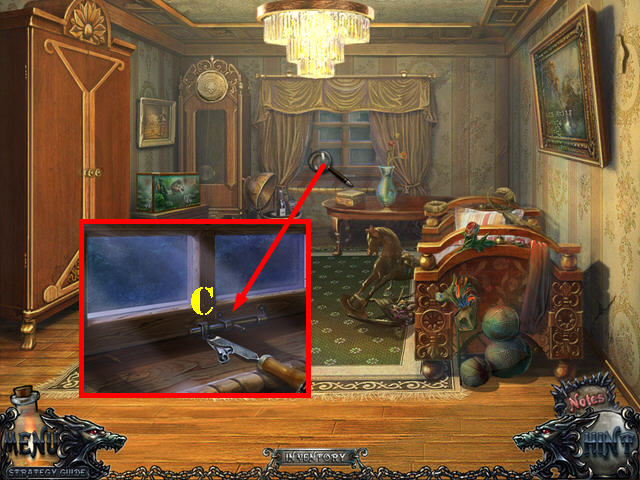
- Zoom into the back window.
- Use the CHISEL on the latch and go out the window (C).
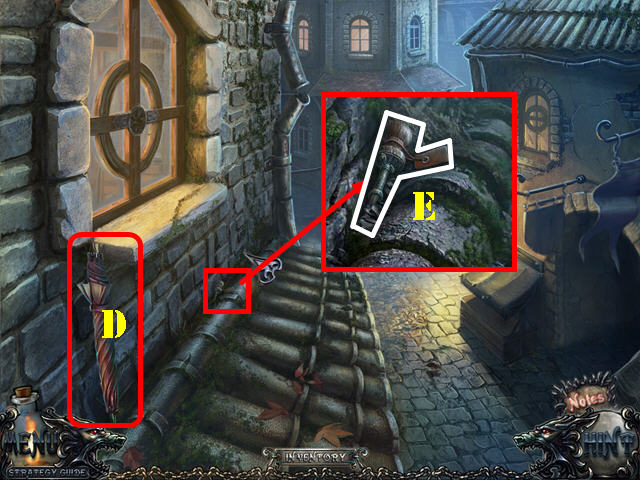
- Take the UMBRELLA (D).
- Zoom into the key; take the red ALLEN KEY (E).
- Walk down to go back into the bedroom.
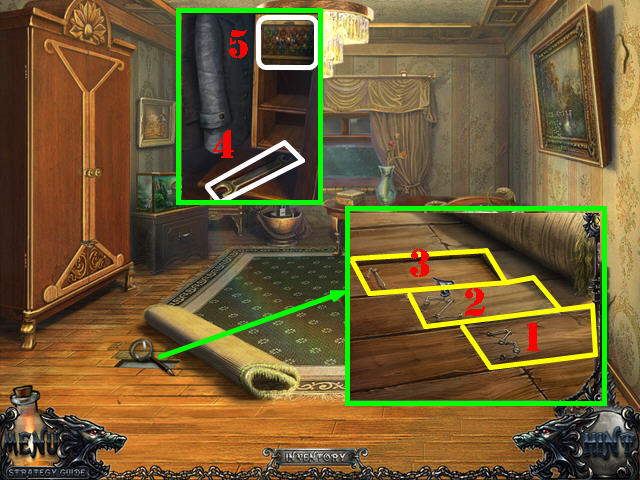
- Click on the edge of the carpet 3 times and take a closer look at the floorboard.
- Put the PARQUET in the gap; click on the 3 wooden slats in this order: 1, 2, 3, 2, and 1.This action opens the wardrobe.
- Look in the wardrobe; take the WRENCH (4).
- Click on the puzzle inside the wardrobe (5).
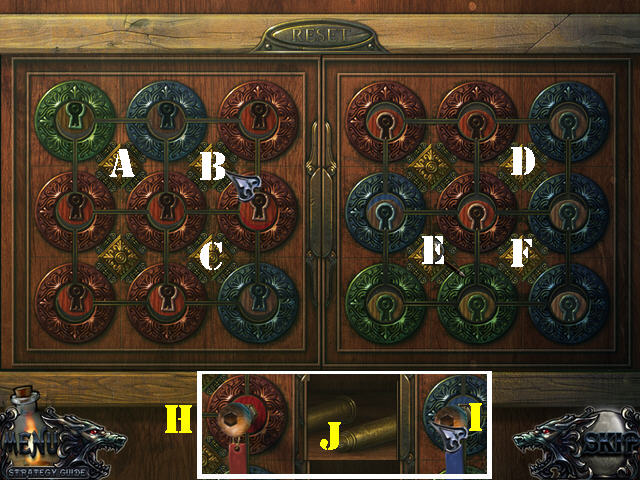
- Put the keyholes into the right locks. Click on the gold diamonds to shift the keyholes around.
- To solve the puzzle, click on the golden diamonds in this order: A x 2, C x 2, and B x 2, This solves the left side of the puzzle.
- To solve the right side of the puzzle, click on the golden diamonds in this order: F, D, F x 2, E x 3, F x 3, and E x 3.
- Put the red ALLEN KEY (G) and the blue ALLEN KEY in the keyholes (H).
- Take the WEIGHTS (I).
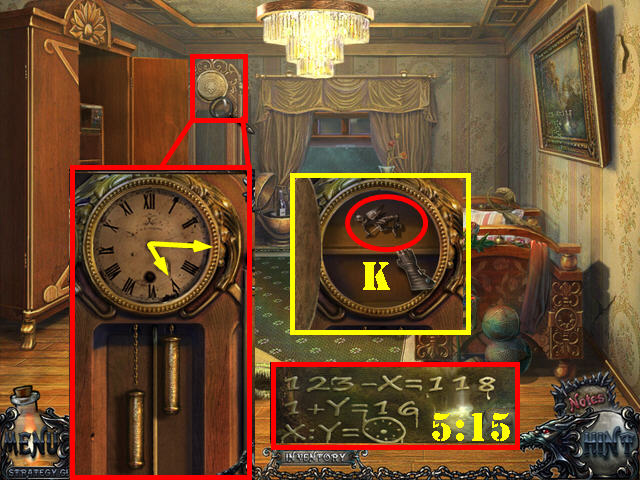
- Examine the clock; put the WEIGHTS in it ().
- Using the code found on the painting set the clock to the right time.
- The code on the painting states: 123 – X (5) = 118, 1 + Y (15) = 16, and that X (5) equals 5:15.
- Set the clock to 5: 15.
- Take the KNIGHT (K).
Chapter 9: The Secret Room
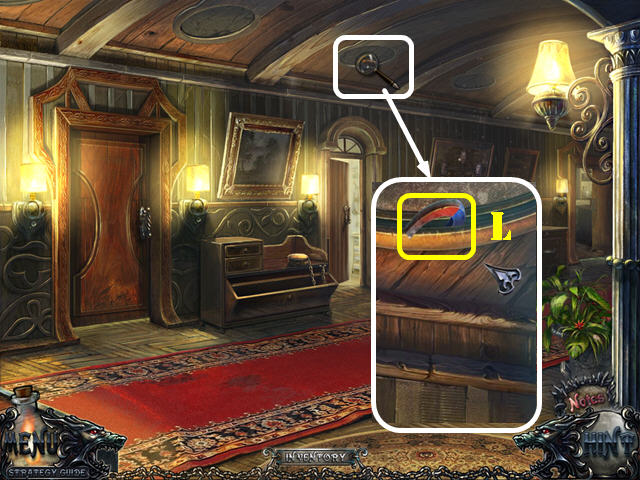
- Go back to the hallway.
- Zoom into the ceiling.
- Use the UMBRELLA to retrieve the MAGNET (L).
- Go back into the bedroom and go out the window.
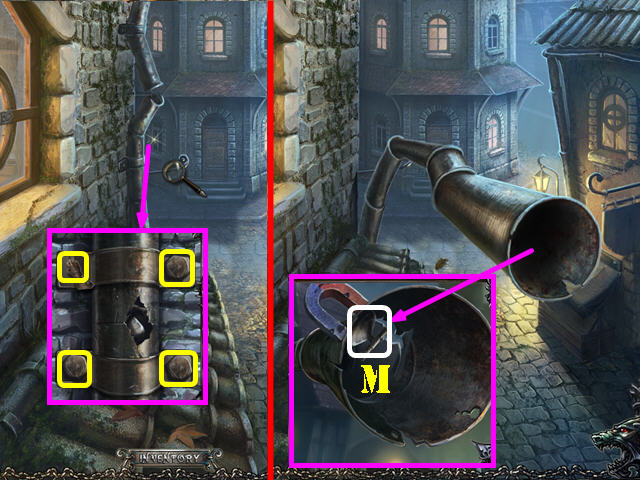
- Examine the pipe; use the WRENCH on the 4 bolts (yellow).
- Look at the broken pipe; put the MAGNET on the outside of the pipe and take the DIRTY STAMP (M).
- Walk down twice.
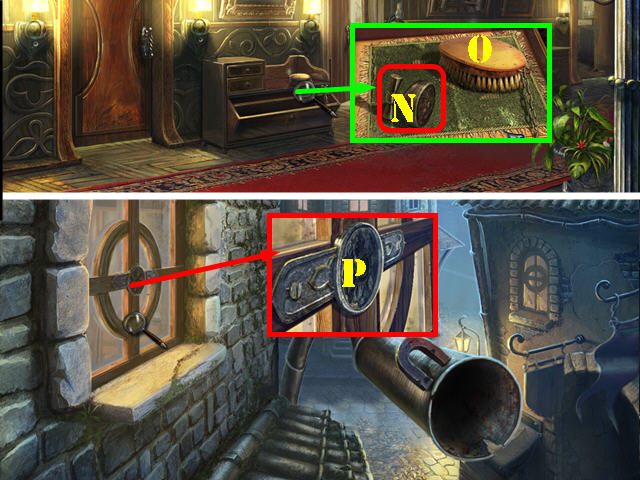
- Zoom into the desk and put the DIRTY STAMP on it (N).
- Click on the brush (O) and take the CLEAN STAMP.
- Go back into the bedroom and go out the window.
- Zoom into the left window; put the CLEAN STAMP on it and go through the window (P).
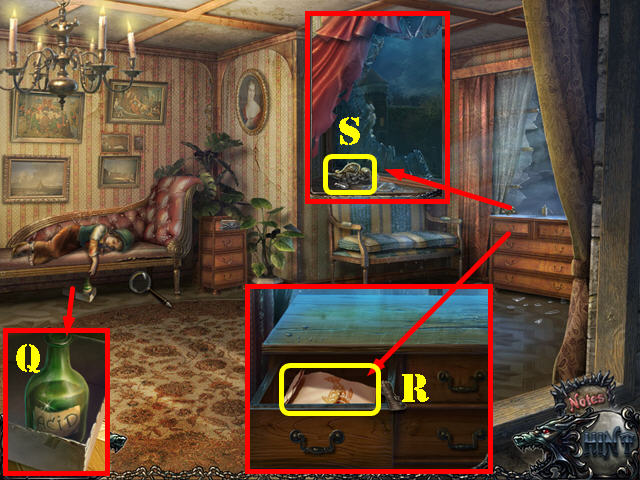
- Talk to the countess.
- Zoom into the box; pull the box out and take the ACID (Q).
- Look at the dresser; open the left drawer and take the FISH FOOD (R).
- Examine the window; take the first ANGEL (S).
- Walk down twice.
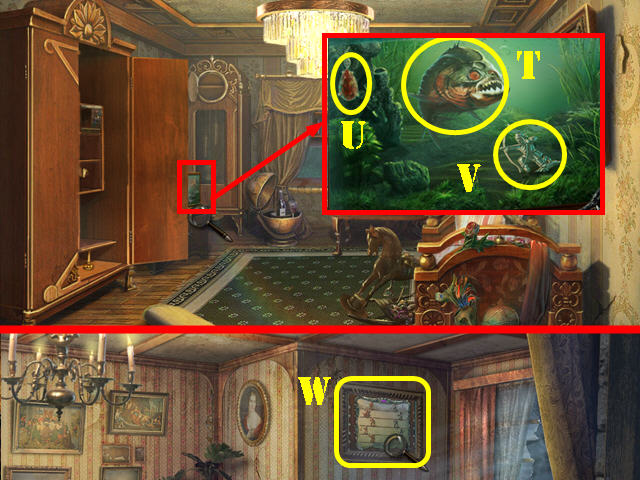
- Zoom into the fish tank; Give the FISH FOOD to the large fish (T).
- Take the RED EARRING (U) and the ARCHER (V).
- Go out the window and go into the left window.
- Zoom into the mechanism on the wall (W); place the ARCHER and the KNIGHT on the board to activate a puzzle.
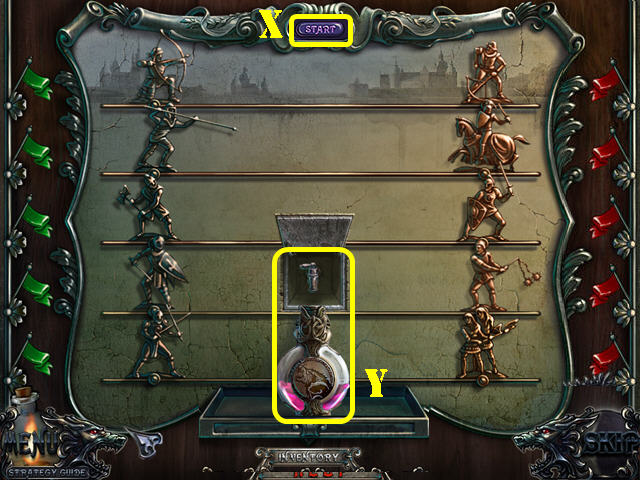
- Position the pieces on the left so they can defeat the pieces on the right.
- Click on any 2 left pieces to swap their positions. Once all the pieces are in place, click on the Start button (X) in the upper center.
- The flags marked in green on the left, and the flags in red on the right, symbolize that a piece is in the right spot.
- Please look at the screenshot for the solution and click on the Start button (X).
- Put the EMPTY FLASK below the ELIXIR; click on the handle and take it once the bottle has been filled (Y).
- Walk down twice.
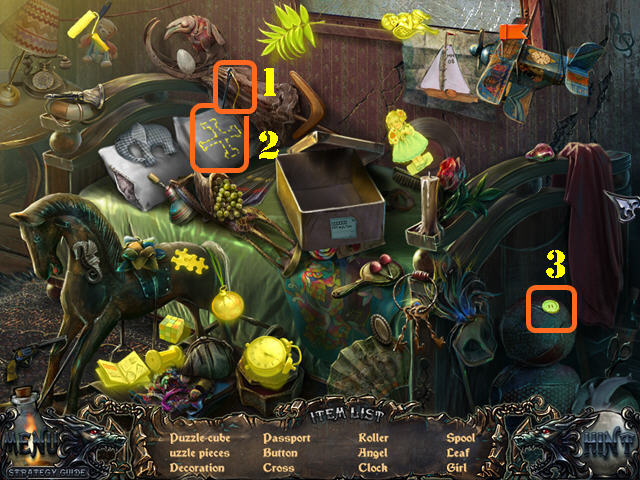
- Play the HOS.
- Click on the needle (1); take the cross (2).
- Click on the cloth; take the button (3).
- The second ANGEL will be added to inventory.
- Walk down.
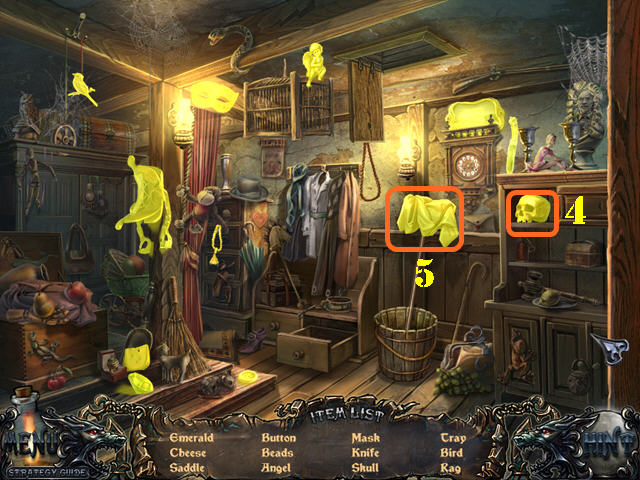
- Play the HOS.
- Open the drawer; take the skull (4).
- Click on the stick; take the rag (5).
- The third ANGEL will be added to inventory.
- Walk down twice and go into the left door.
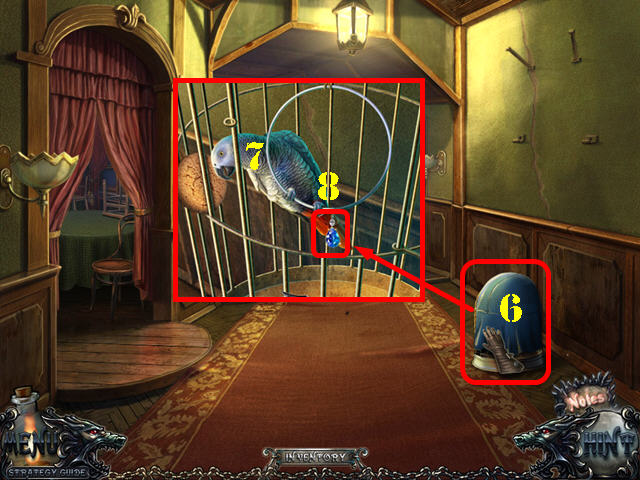
- Remove the cage cover (6) and zoom into the birdcage.
- Give the COOKIE to the bird (7); open the latch in the cage and take the BLUE EARRING (8).
- Go forward and look into the bedroom on the left.
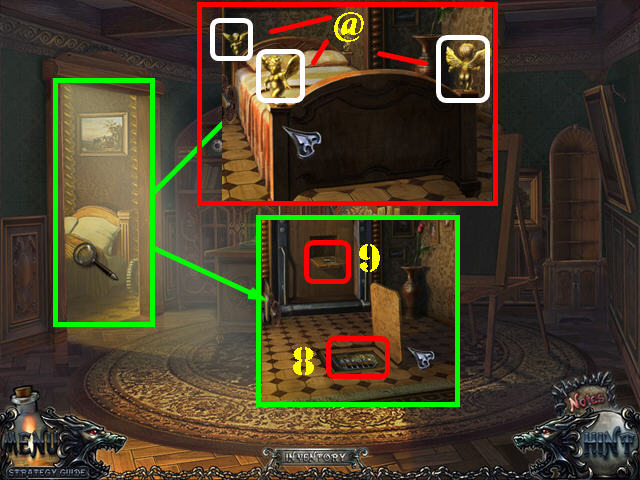
- Place the 3 ANGELS on the bedposts (@).
- Open the trapdoor below the bed; look at the puzzle. Note that you need 2 skulls (8).
- Open the secret compartment and take the KEY (9).
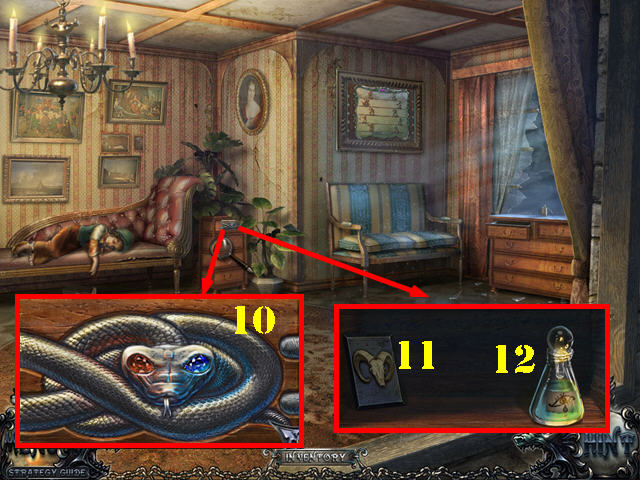
- Return to the bedroom in the second floor; go out the back window and into the left window.
- Zoom into the small dresser; put the RED EARRING and the BLUE EARRING into the snake's eye sockets (10).
- Take the TEARS (12) and the SKULL (11).
- Exit the hotel.
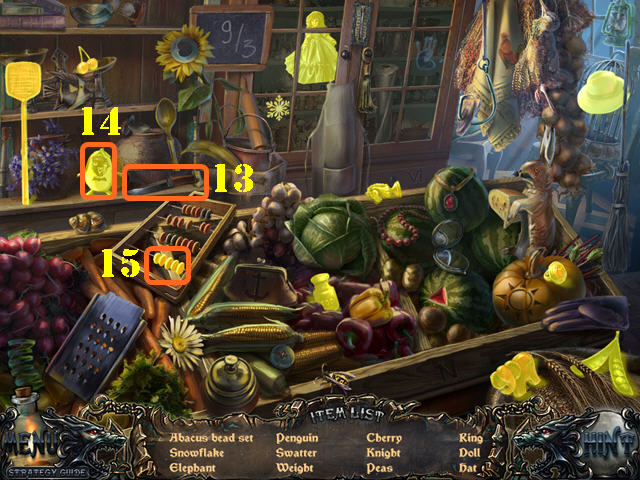
- Play the HOS.
- Click on the knife (13); take the penguin (14).
- Click on the abacus; take the abacus bead set (15).
- The KNIGHT will be added to inventory.
- Go through the left fence.
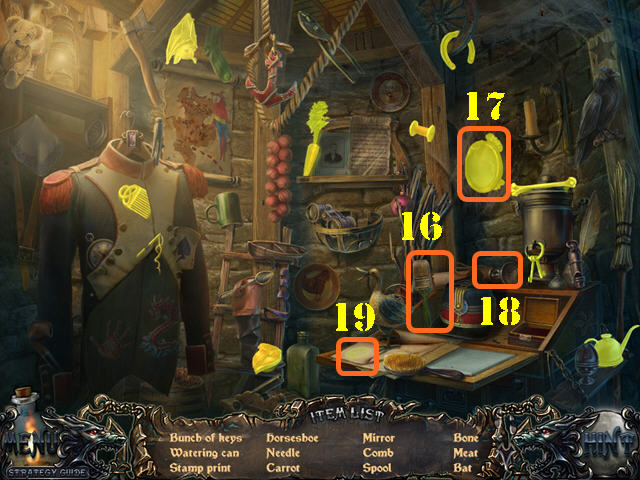
- Play the HOS.
- Click on the brush (16); take the mirror (17).
- Click on the stamp (18); take the stamp print (19).
- The MEAT will be added to inventory.
- Walk down.
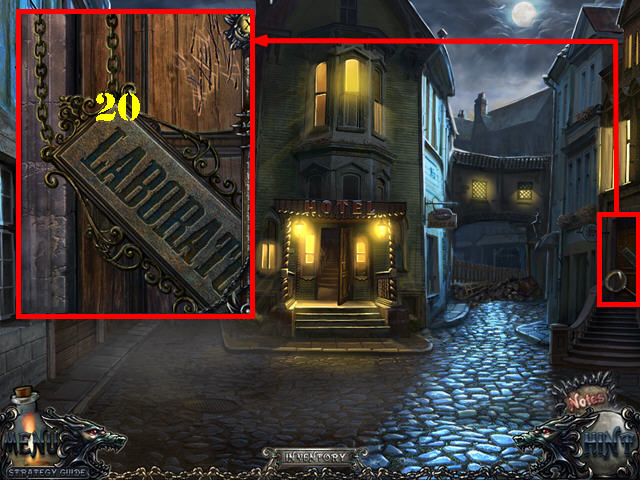
- Zoom into the right door; use the ACID on the lab sign (20).
- Put the KEY in the lock and enter the lab.
Chapter 10: The Lab
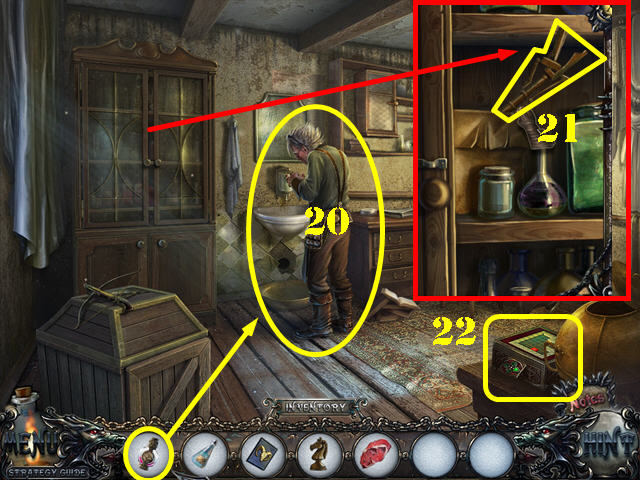
- Talk to the professor (21); give him the ELIXIR.
- Examine the cabinet; open the latch and take the SNAKE CATCHER (22).
- Look at the device in the lower right to activate a puzzle (23).
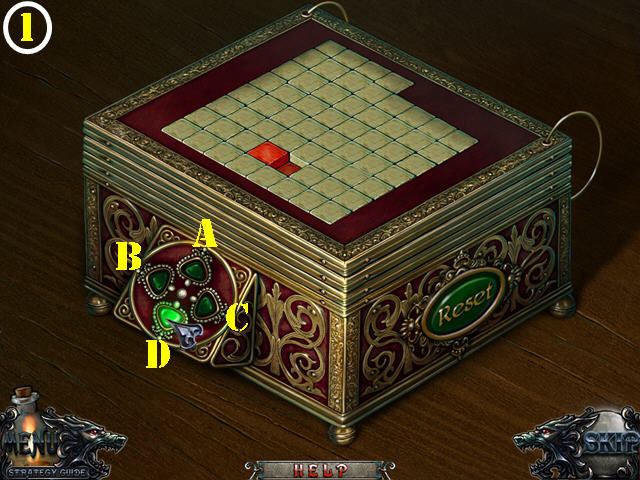
- Use the green arrows to move the red square around the board.
- You must fill the board completely. Sections marked in blue must be passed over twice.
- To solve the first round (1), click on the arrows in this order: C x 2, A, B x 2, A x 2, C x 2, A, B x 4, A, B, D x 2, C x 2, D, B x 2, D x 2, C, A, C, D, and C.
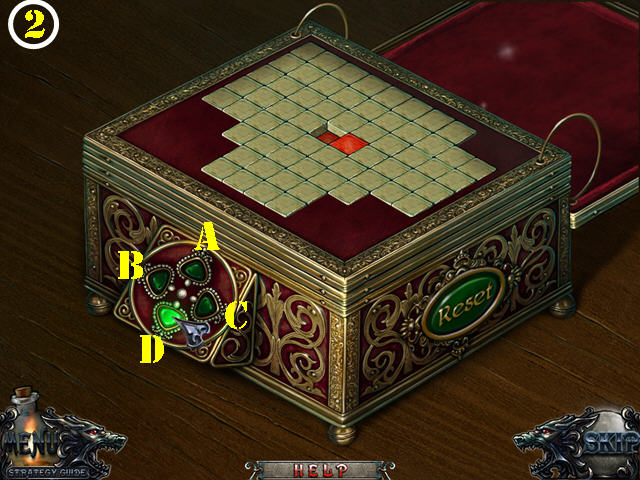
- To solve the second round (2), click on the arrows in this order: B, D, C, D x 2, C, A x 2, C, A, C x 2, A, B x 2, A, B x 5, D x 2, C, A, C x 3, D, and B.
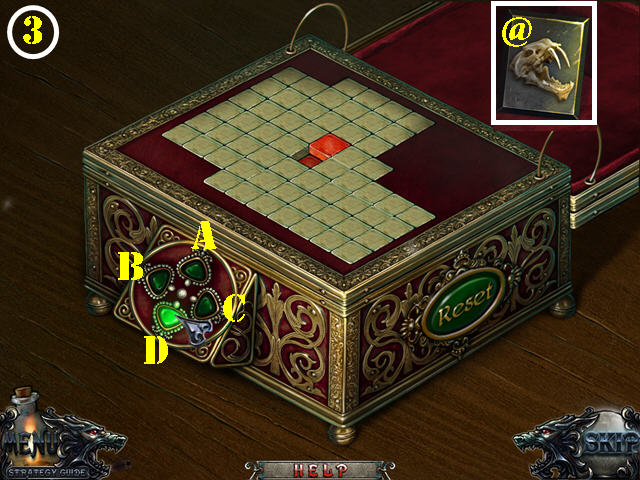
- To solve the third round (3), click on the arrows in this order: C, D, C x 3, D, B, A, D, B, A, D, B x 2, A, B x 2, C, B x 2, A, C x 2, A, C, A, B, D, B x 2, A, C x 2, A, C, and D x 3.
- Take the TIGER SKULL (@).
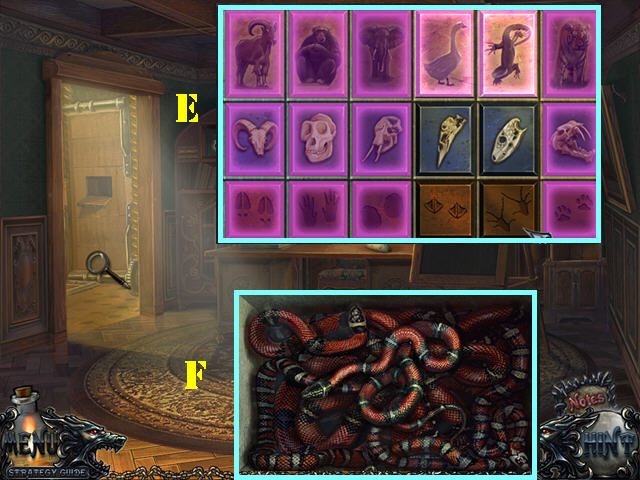
- Go back into the hotel; go left, forward, and look into the left door.
- Zoom into the trapdoor; put the SKULL and the TIGER SKULL into the empty slots to activate a puzzle.
- Move the skulls and the symbols into the correct spots so they match the animals above them and the marks at the bottom.
- Click on any 2 skulls or any 2 symbols to swap their positions.
- Please look at the screenshot for the solution (E).
- Use the SNAKE CATCHER to grab a SNAKE (F).
- Return to the lab. As soon as you go through the door, the professor will tell you that you have to get the venom yourself.
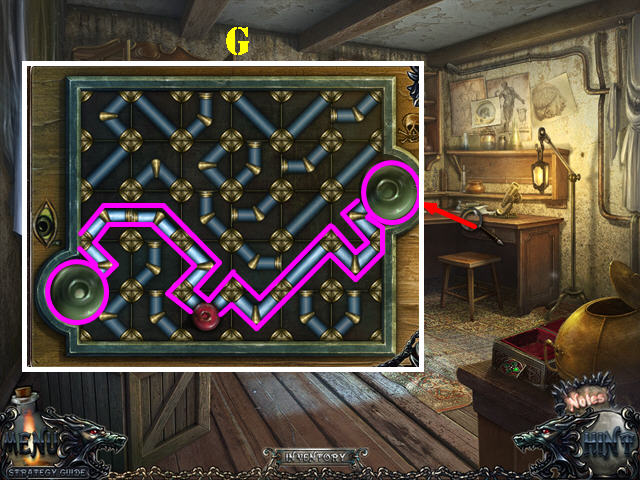
- Zoom into the desk; put the SNAKE and TEARS on the board to activate a puzzle.
- Click on the pipes to rotate them until both liquid vessels are connected.
- Please look at the screenshot for the solution (G).
- The GREEN ELIXIR will be added to inventory.
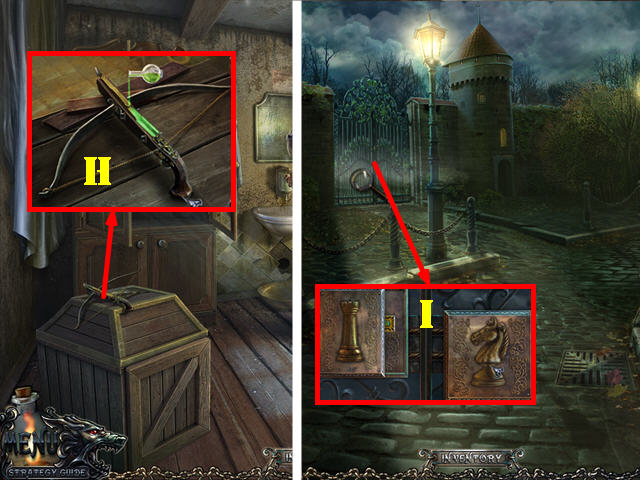
- Zoom into the crossbow; pour the GREEN ELIXIR into it (H).
- Take the CROSSBOW.
- The professor will give you the ROOK KEY.
- Exit the lab and go through the left gate.
- Zoom into the gate in the back; add the ROOK KEY and the KNIGHT to the gate (I).
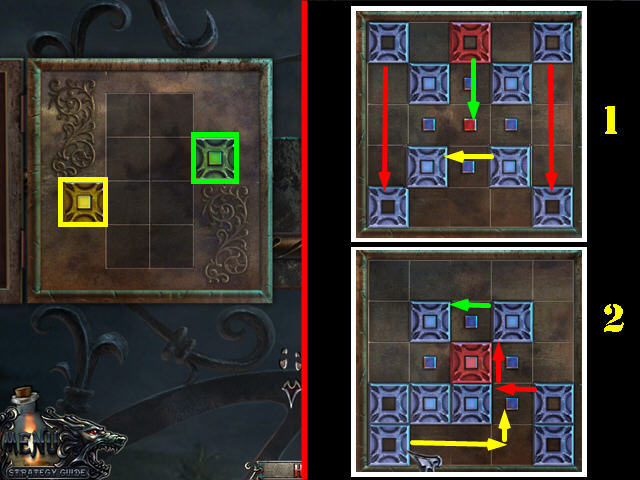
- Click on any of the 4 sides of the square for an arrow to appear.
- Move the large squares over to their matching smaller squares.
- Click on the edge of the square to move it in that direction.
- To solve the left puzzle, please make the following moves: Move green right. Move yellow left. Move green down, and left. Move yellow down. Move Green, right, up, left, down and right. Lastly, move yellow left.
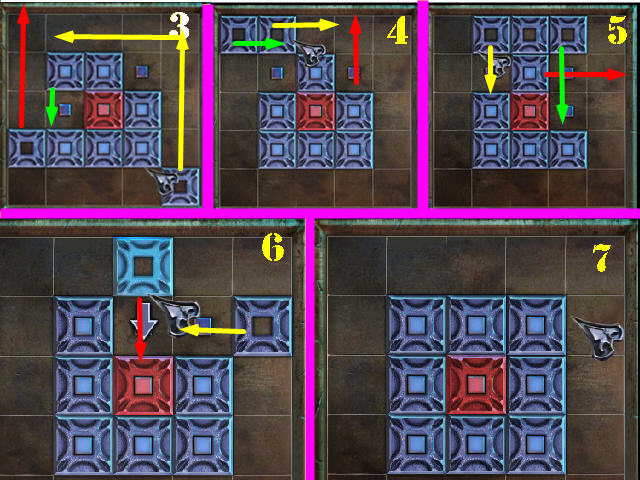
- To solve the right puzzle, please follow the steps in the screenshots (1 through 7). Move the arrows in this order: Red, Yellow, and Green.
- Go through the gate.
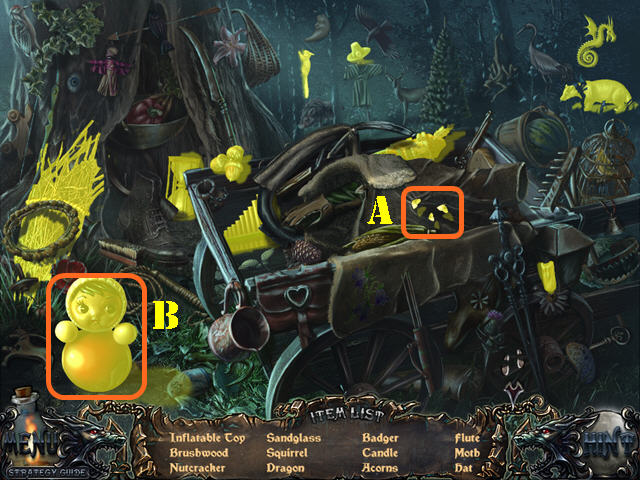
- Play the HOS.
- Open the sack; take the moth (A).
- Remove the branch; take the inflatable toy (B).
- The BRUSHWOOD will be added to inventory.
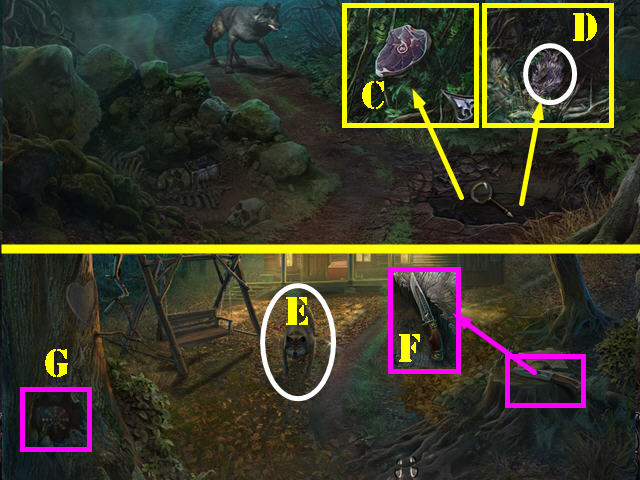
- Zoom into the hole; add the BRUSHWOOD and the MEAT to it (C). The wolf will fall into the hole.
- Look in the hole again and take the WOLF WOOL (D).
- Go towards the cabin on the left.
- Use the CROSSBOW on the wolf (E).
- Look at the tree stump and take the KNIFE (F).
- Zoom into the puzzle in the tree hollow (G).
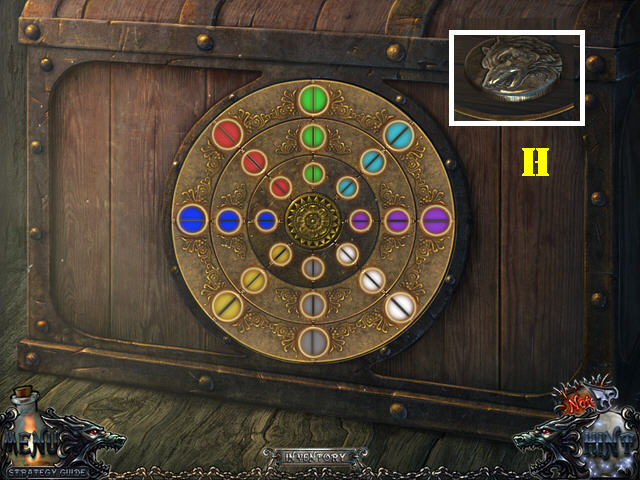
- Click on the pieces to change their positions.
- Place the matching circles in the same column as the color wheel in the middle.
- Please look at the screenshot for the solution.
- Take the MEDALLION (H).
- Go right.
Chapter 11: The Sawmill
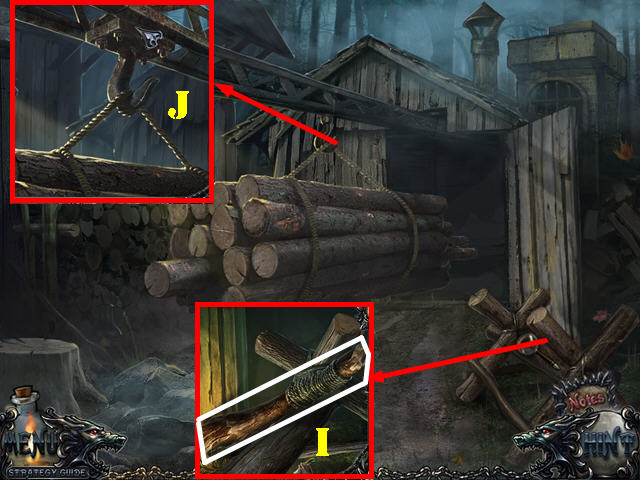
- Look in the lower right corner; take the MACE (I).
- Take a closer look at the hook; cut the rope around it with the KNIFE 3 times (J).
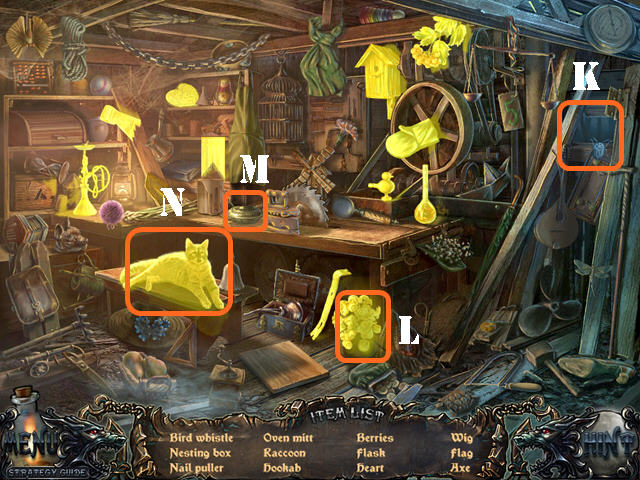
- Play the HOS.
- Open the window (K); take the wig (L).
- Click on the paintbrush (M); take the raccoon (N).
- The NAIL PULLER will be added to inventory.
- Walk down twice.
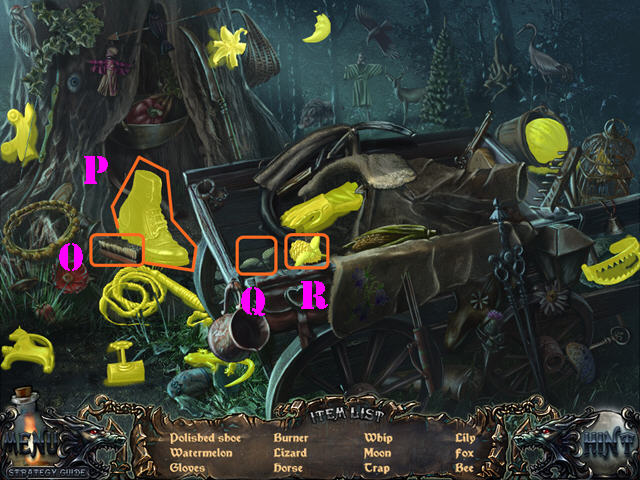
- Play the HOS.
- Click on the brush (O); take the polished shoe (P).
- Click on the wings (Q); take the bee (R).
- The BURNER PART will be added to inventory.
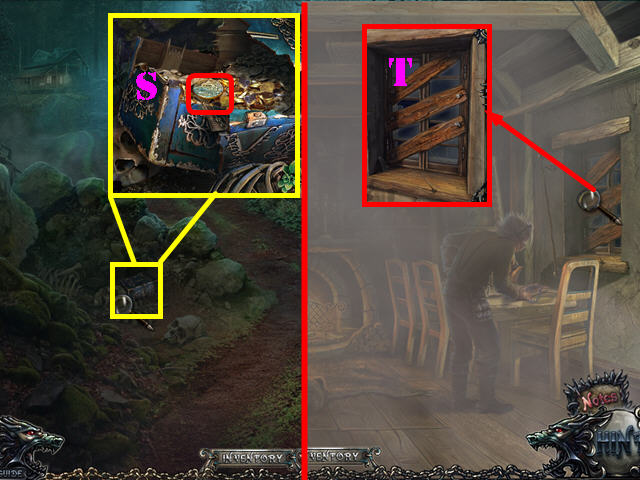
- Look at the chest; break it with the MACE.
- Take the MEDALLION from inside the chest (S).
- Go into the cabin.
- Zoom into the right window; pull the nails on the 3 boards with the NAIL PULLER (T).
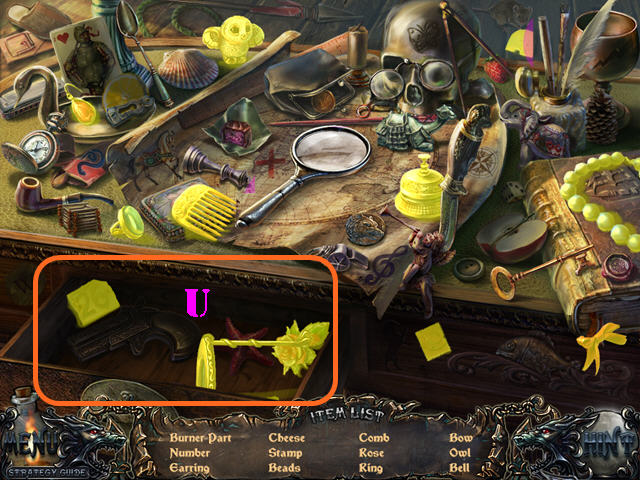
- Play the HOS.
- Open the drawer; take the items listed in orange (U).
- The BURNER PART will be added to inventory.
- Go through the left door.
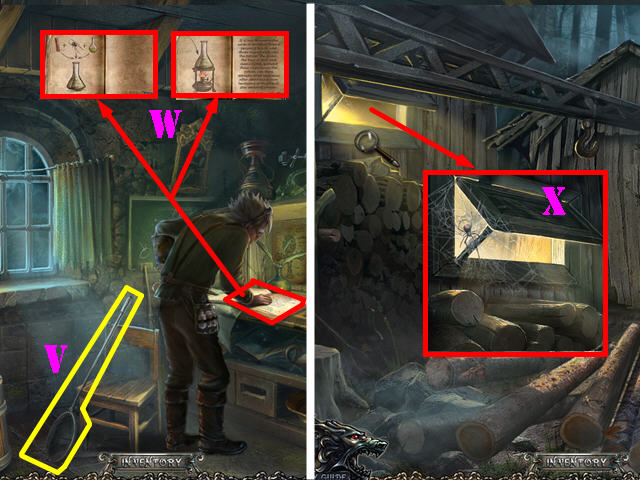
- Take the SCOOP-NET (V).
- Look at the book the professor is reading. Click on the lower right corner of the right page to flip it. Note the instructions on the page (W).
- Walk down twice and head right.
- Examine the window; take the SPIDER with the SCOOP-NET (X).
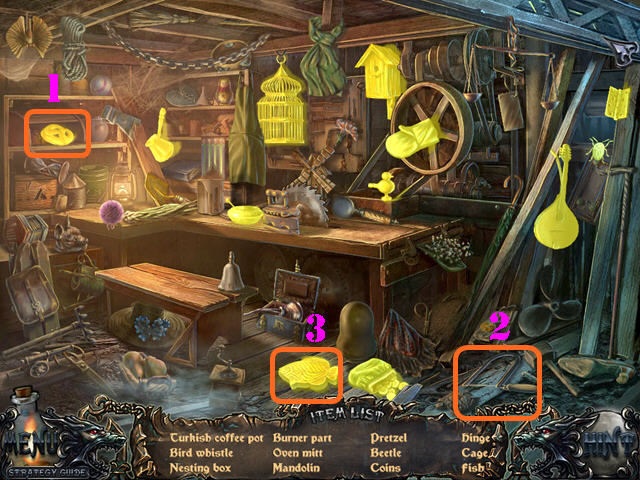
- Play the HOS.
- Open the breadbox; take the pretzel (1).
- Click on the saw (2); take the fish (3).
- The BURNER PART will be added to inventory.
- Go back into the cabin.
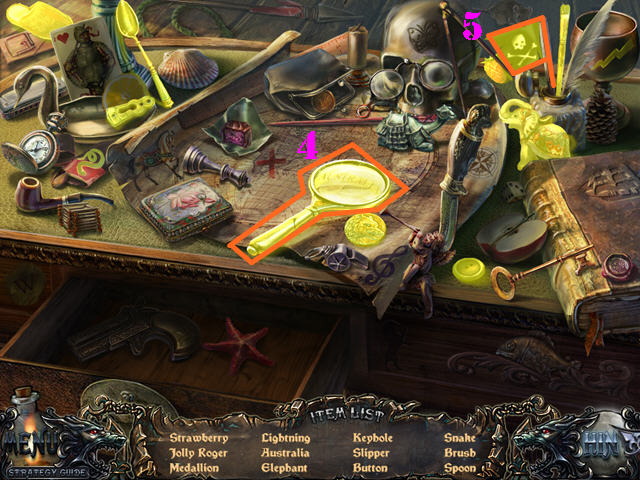
- Play the HOS.
- Select the magnifying glass; take Australia (4).
- Click on the pole; take the Jolly Roger (5).
- The MEDALLION will be added to inventory.
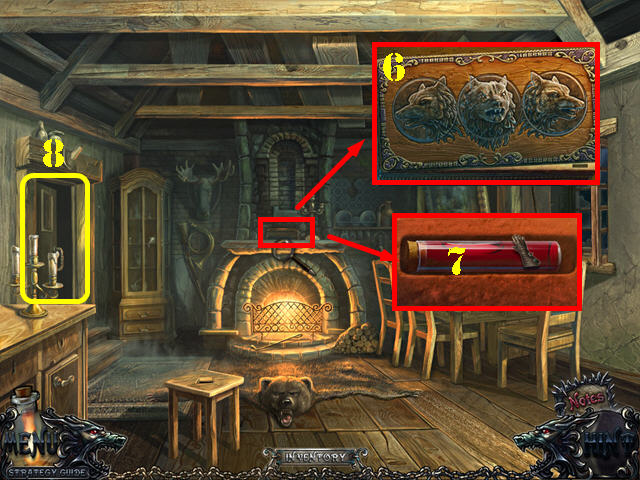
- Examine the box above the fireplace; add the 3 MEDALLIONS to the box.
- Rotate the 3 medallions so the ears match the head of the wolves (6).
- Take the TUBE WITH BLOOD (7).
- Go through the left door (8).
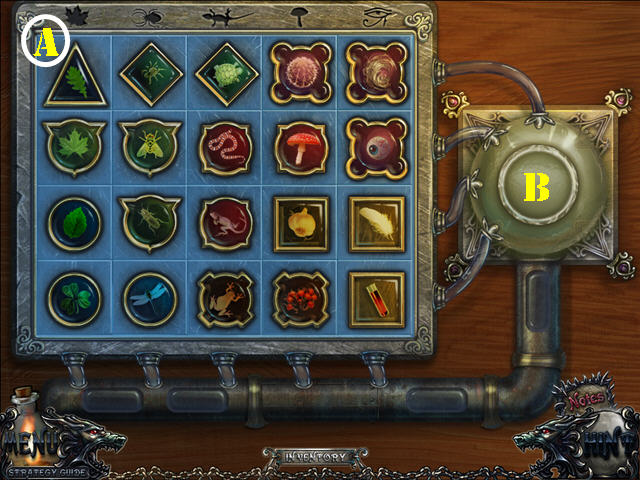
- Examine the right side of the desk; put the SPIDER, TUBE WITH BLOOD, and the WOLF WOOL into the board to activate a puzzle.
- Please read the instructions in the game for this puzzle.
- Please look at the screenshot for the solution (A).
- Take the ELIXIR (B).
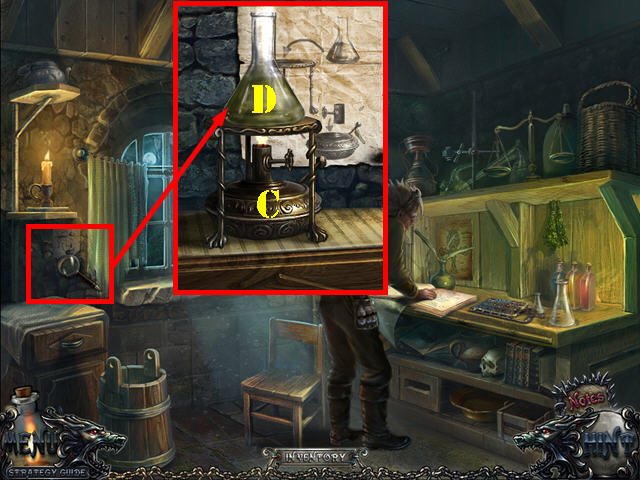
- Examine the table on the left; put the 3 BURNER PARTS on it to assemble the burner (C).
- Put the ELIXIR over the burner (D).
- Congratulations! You have completed Shadow Wolf Mysteries: Bane of the Family Standard Edition!
Created at: 2012-01-27

