

Walkthrough Menu
- General Tips
- Chapter 1: Small Street
- Chapter 2: Shadow Bridge
- Chapter 3: Shadow Cave Camp
- Chapter 4: Shadow Zeppelin Crash
- Chapter 5: Return to Shadow Arsenal
General Tips
- This is the official guide for Shrouded Tales: The Shadow Menace.
- This guide will not mention each time you have to zoom into a location; the screenshots will show each zoom scene.
- Hidden-object puzzles are referred to as HOPs. This guide will not show HOP solutions. It will identify the location of the HOP and the inventory item acquired.
- This guide will show solutions for non-random puzzles. Please read the in-game instructions for each puzzle.
- In this game, you will sometimes have to select the new scene to trigger dialog, cut-scenes, or tasks prior to interacting with the scene.
Chapter 1: Small Street
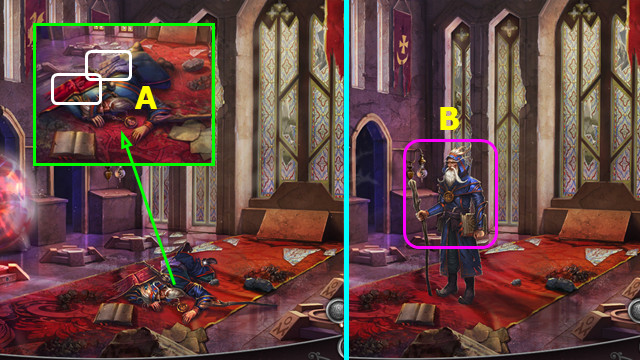
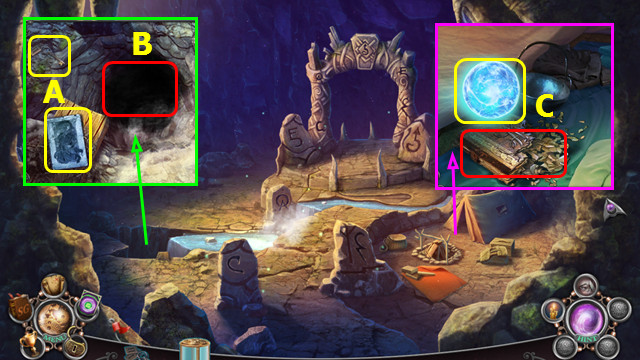
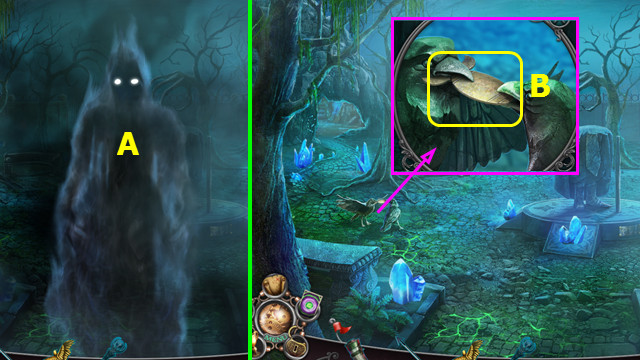
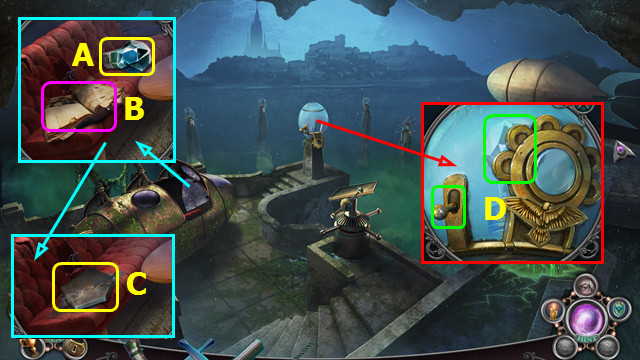
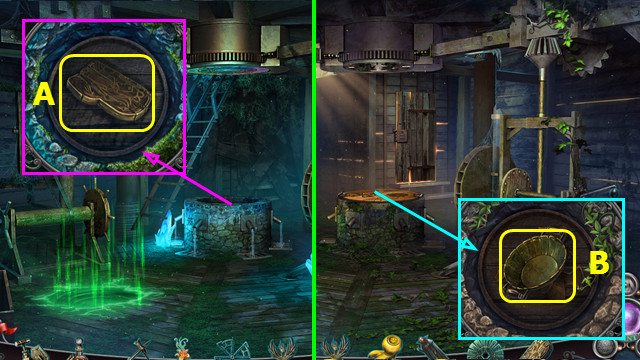
- Move the debris 2x (A).
- Talk to Archie and earn the LIGHT SPELL (B).

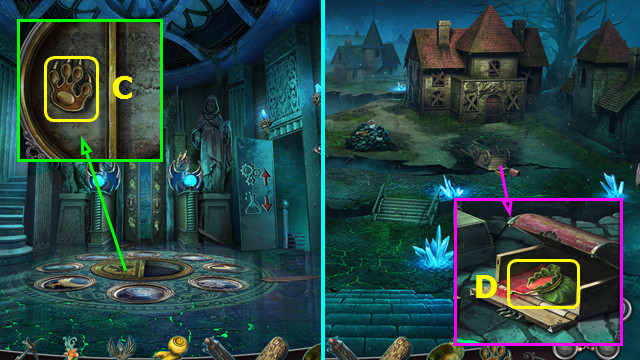
- The LIGHT SPELL sits on your menu bar (C).
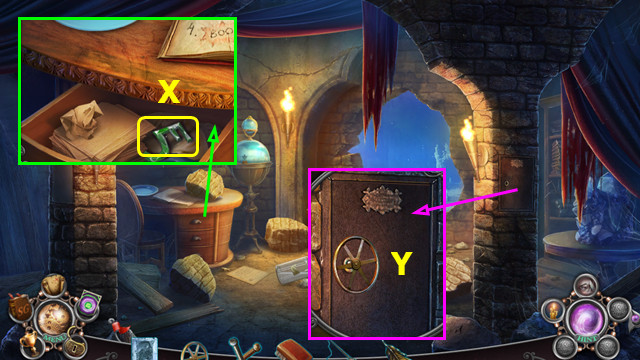
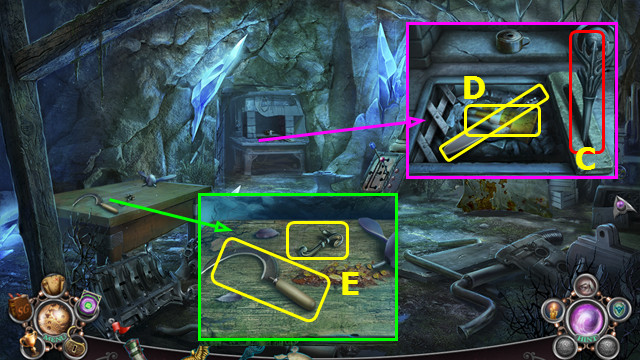
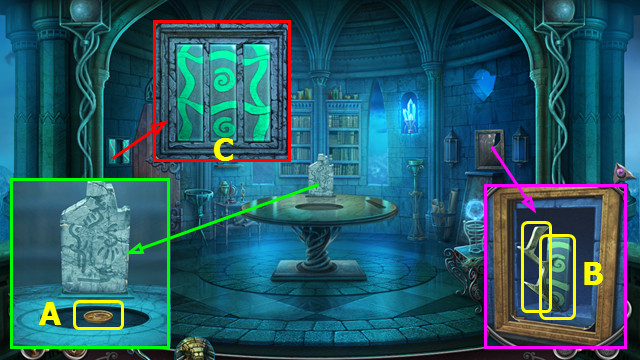
- Use the LIGHT SPELL; move the book and take the ORB KEY (D).
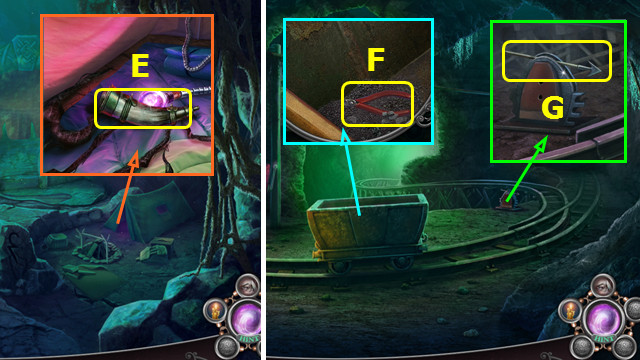
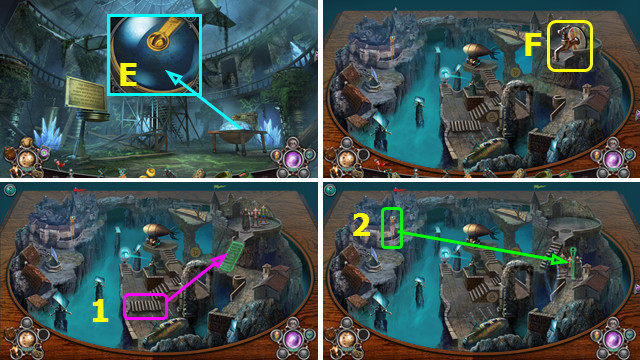
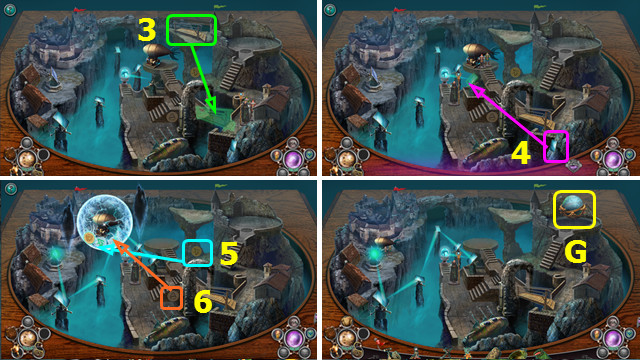
- Move the items and read the note; take the CHARGED CRYSTAL (E).
- Use the ORB KEY; select (F).
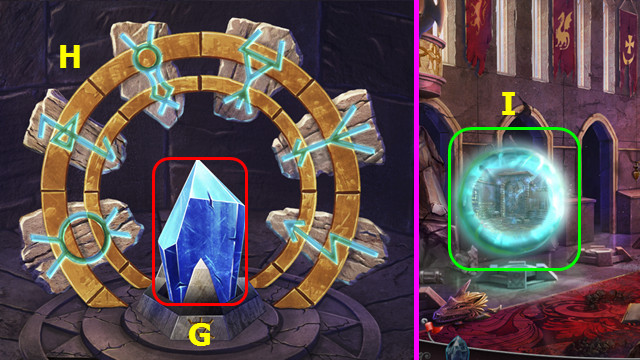
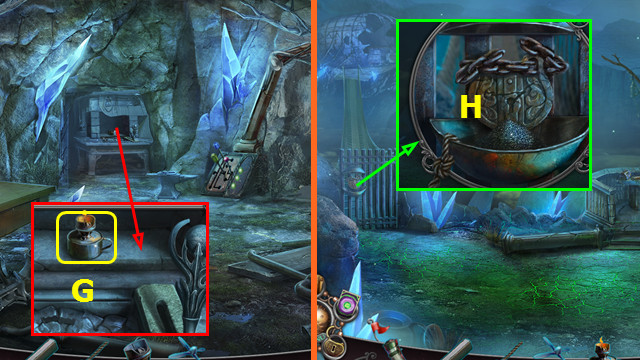
- Take the UNCHARGED CRYSTAL and place the CHARGED CRYSTAL (G).
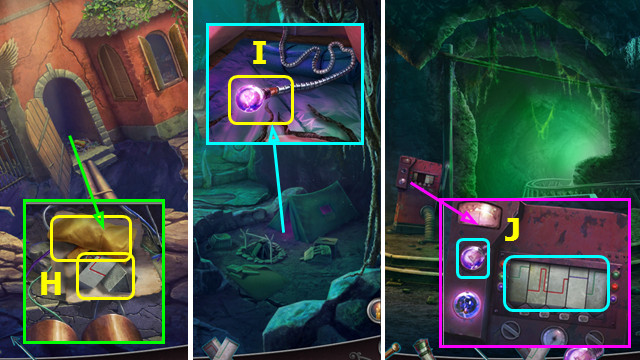
- Restore the symbols (H).
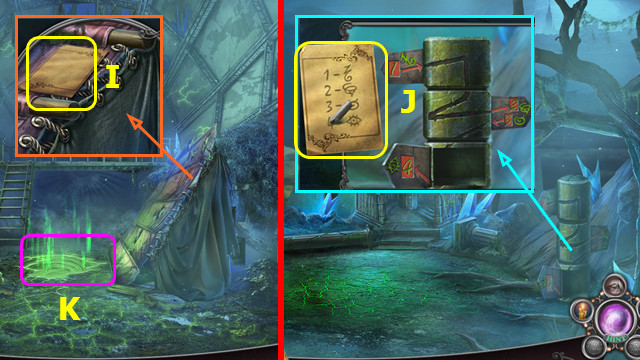
- Enter the portal (I).
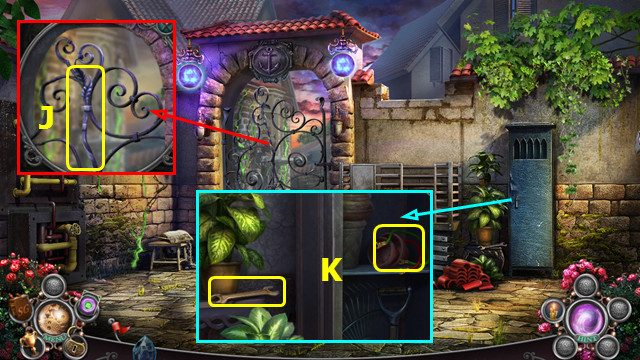
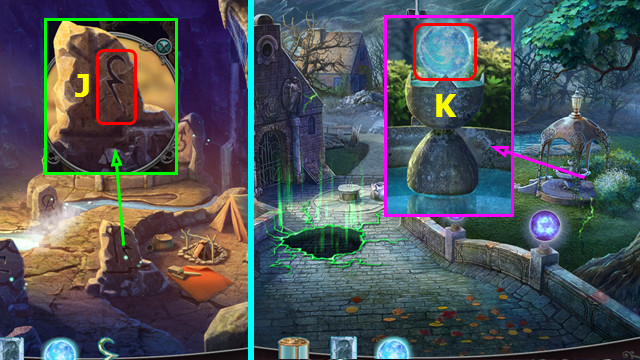
- Take the IRON BAR (J).
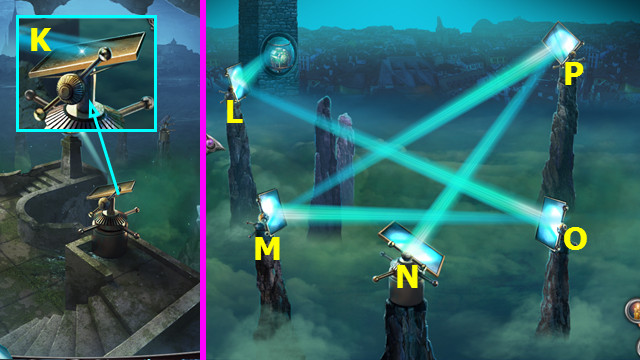
- Take the WRENCH; use the IRON BAR and take the WIRES (K).
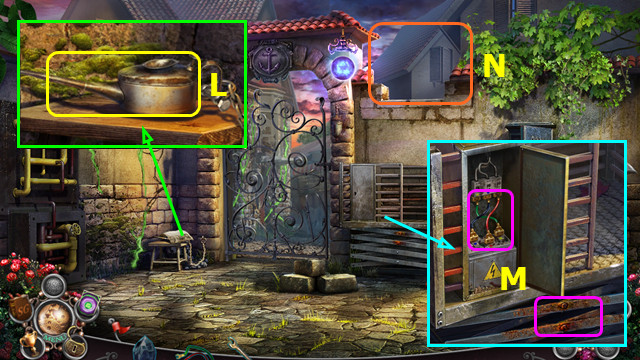
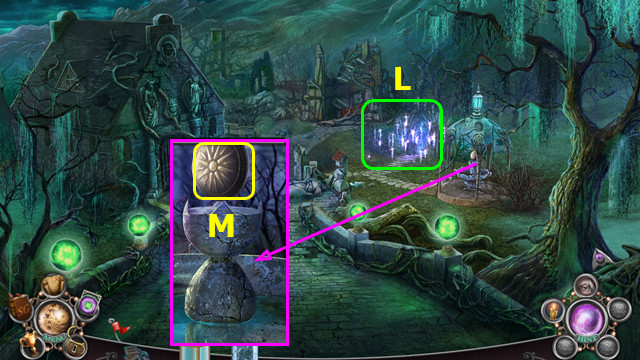
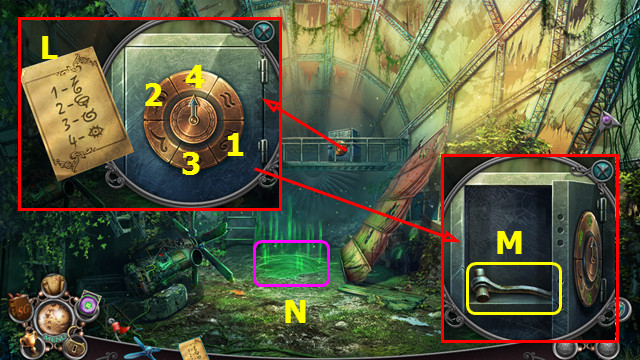
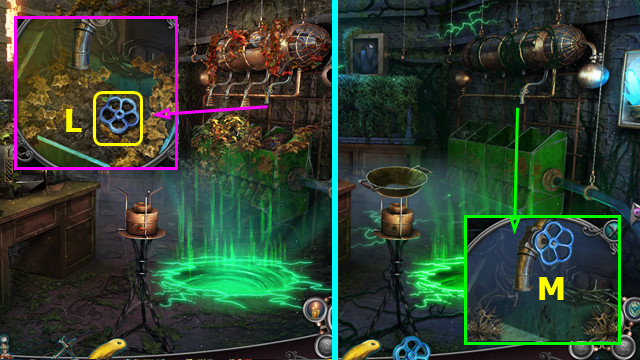
- Remove the paper and use the WRENCH; take the OIL (L).
- Use the OIL; open the door and replace the WIRES (M).
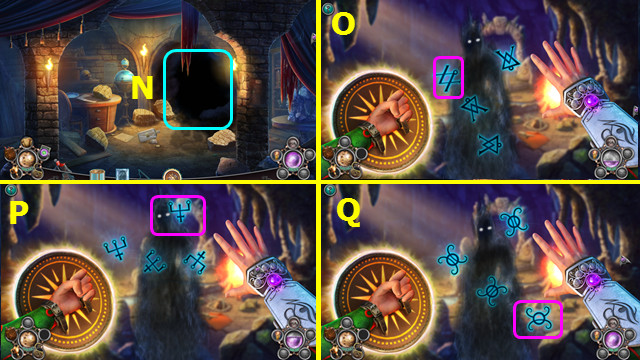
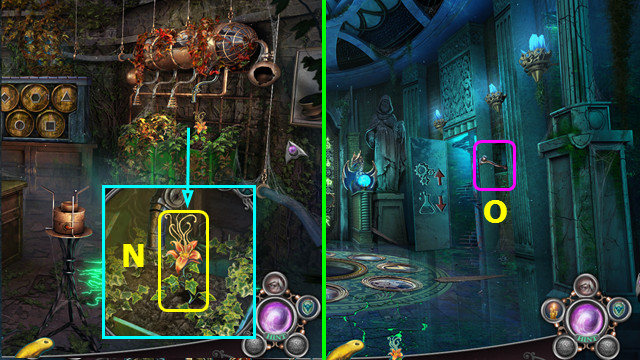
- Play the HOP (N).
- Go forward.
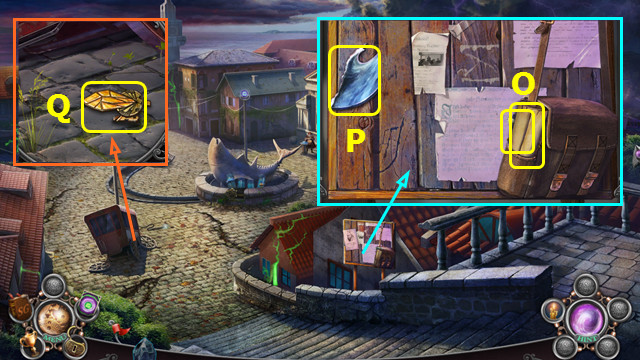
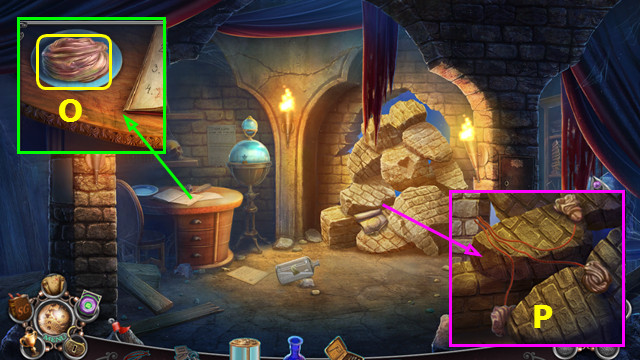
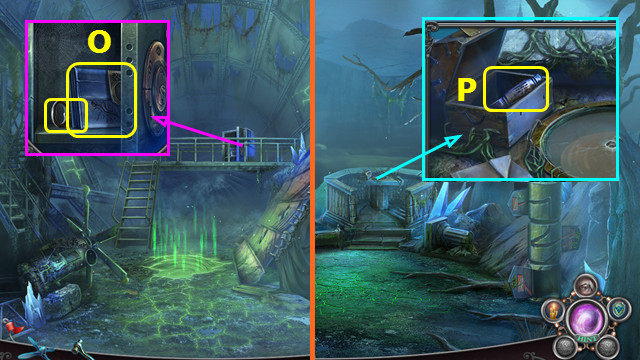
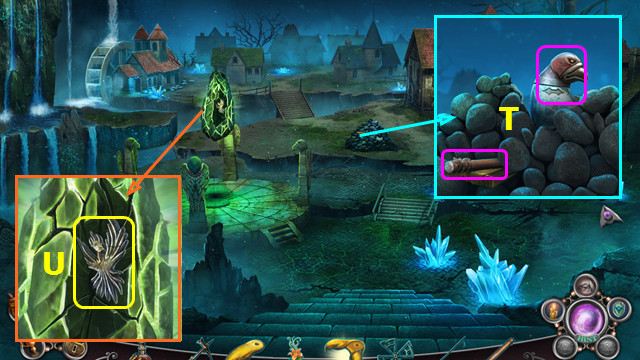
- Take the MAP and 1/2 FISH LEVERS (O).
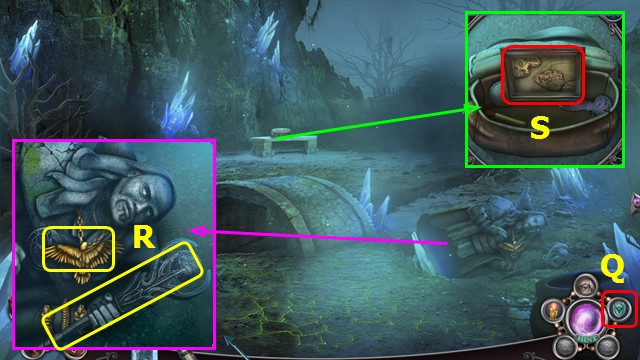
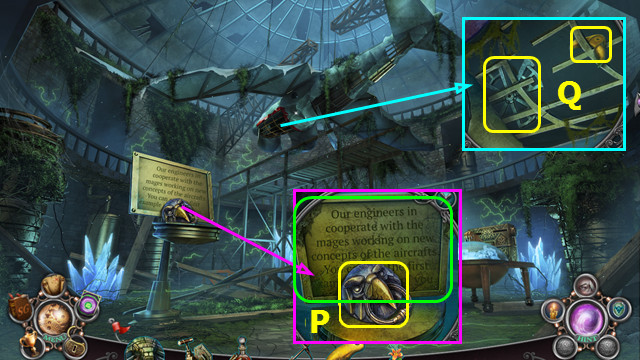
- Read the petition; take the WAVE EMBLEM (P).
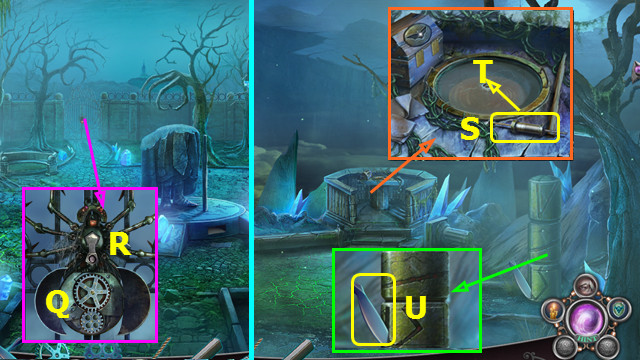
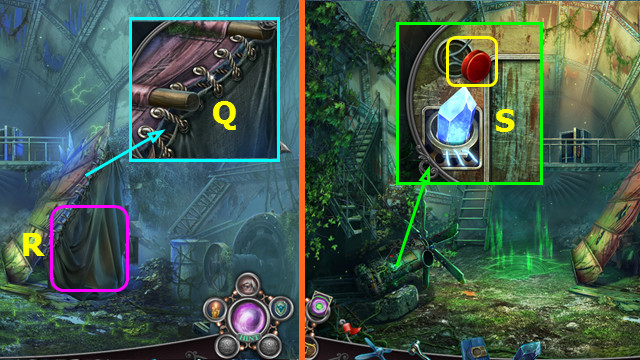
- Move the debris; take the COLUMN KEY (Q).
- Restore the COLUMN KEY.
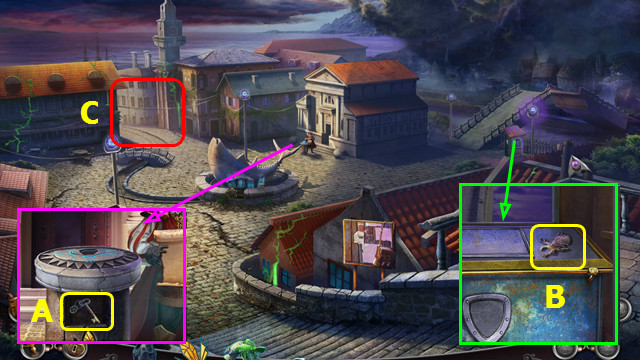
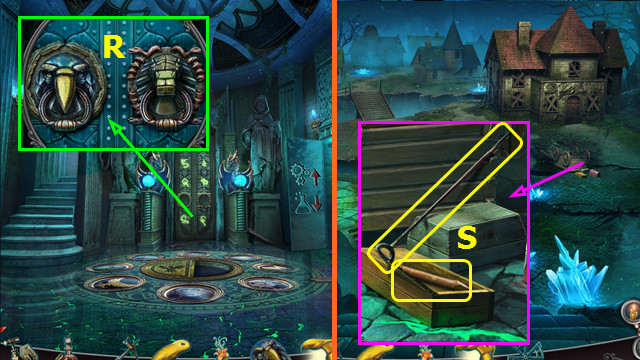
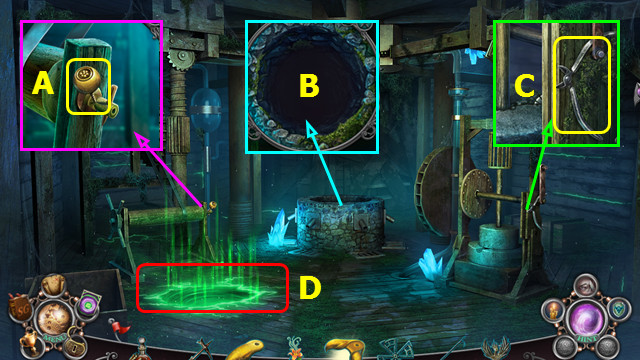
- Place the COLUMN KEY; take the GEAR KEY (A).
- Use the GEAR KEY; take the EAGLE EMBLEM (B).
- Walk left (C).
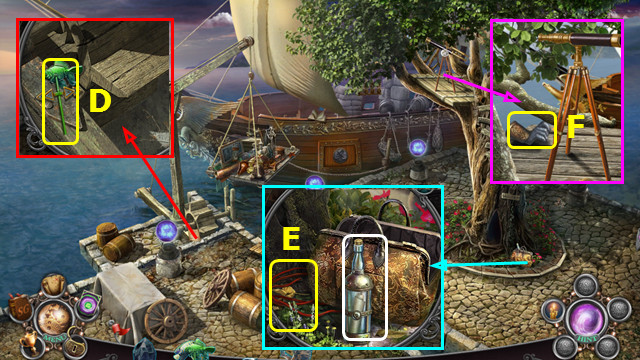
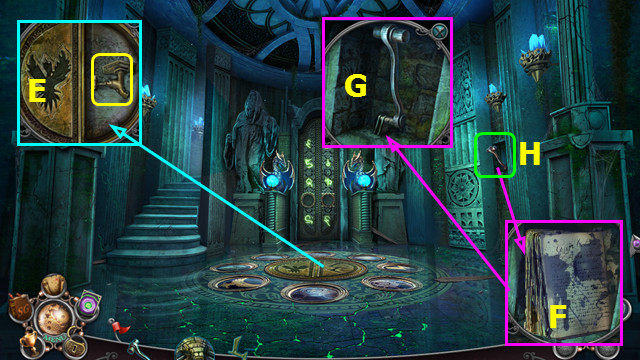
- Read the note; take the 2/2 FISH LEVERS (D).
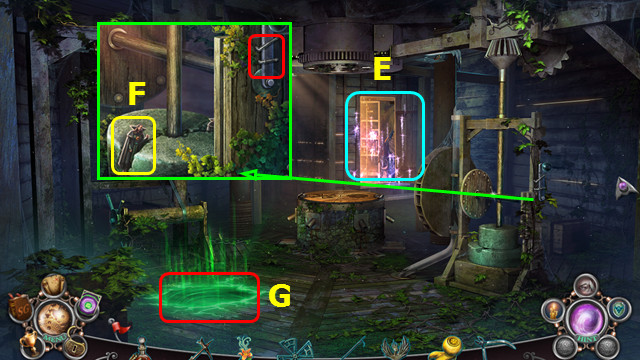
- Open the bag and remove the bottle; take the FUSES (E).
- Take the STONE HAND (F).
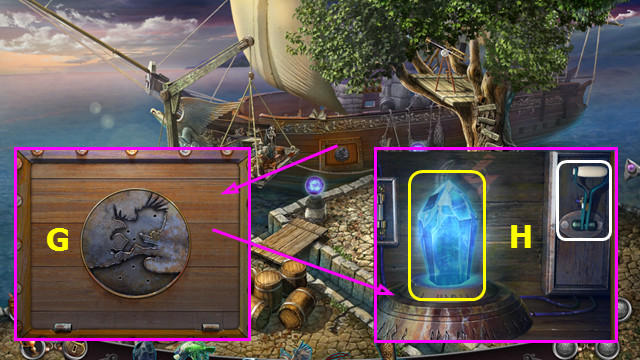
- Place the WAVE EMBLEM and EAGLE EMBLEM (G).
- Use the LIGHT SPELL, place the UNCHARGED CRYSTAL, and pull the lever; take the CHARGED CRYSTAL (H).
- Walk down.
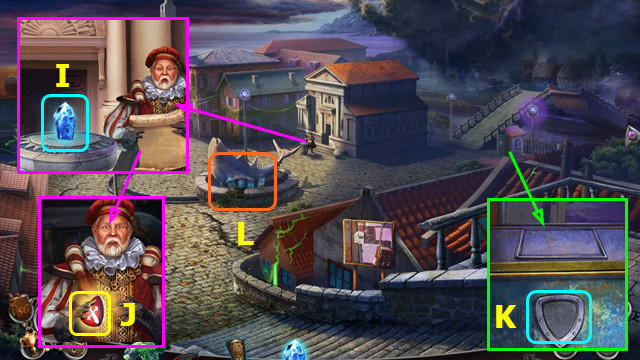
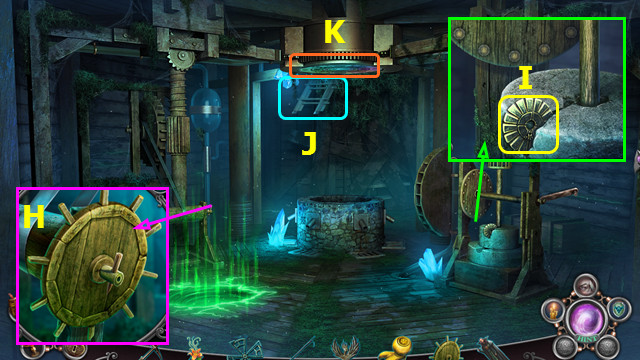
- Place the CHARGED CRYSTAL (I).
- Take the SHIELD KEY (J).
- Place the SHIELD KEY (K).
- Select (L).
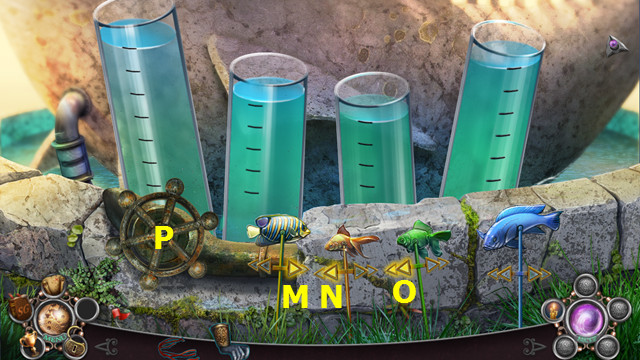
- Place the 2 FISH LEVERS in the grass.
- Select M-N-Ox2-P.
- Walk left.
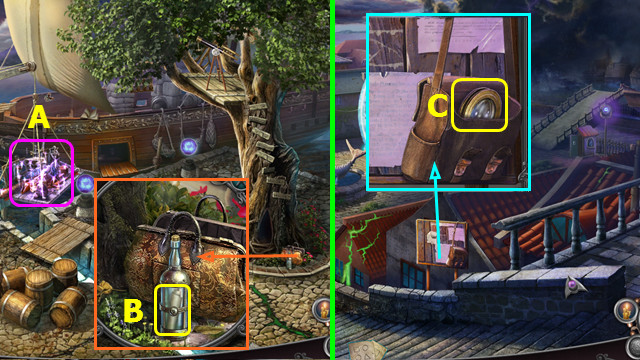
- Play the HOP; earn the MULTI-TOOL (A).
- Open the MULTI-TOOL.
- Use the MULTI-TOOL; take the 1/2 CODE (B).
- Walk down.
- Use the MULTI-TOOL; take the LENS (C).
- Walk left.
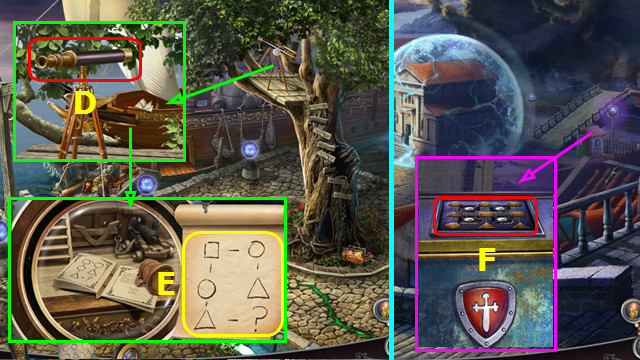
- Place the LENS; select the telescope (D).
- Select the pencil; take the 2/2 CODE (E).
- Walk down.
- Select (F).
- Place the 2 CODES on the mechanism.
- Select Ix3-G-Ix3-Jx2.
- Walk right.
Chapter 2: Shadow Bridge
- The BROKEN BRACELET goes to inventory.
- Play the HOP; earn the 1/2 BRACELET PARTS (K).
- Read the note and place the STONE HAND (L).
- Enter the portal (M).
- Take the SWORD (N).
- Take the GLOBE KEY (O).
- Use the SWORD (P).
- Go forward.
- Take the 2/2 BRACELET PARTS (A).
- Take the EMPTY VASE and 1/2 NUMERAL KEY (B).
- Take the GLASS CYLINDER (C).
- Select and open the BROKEN BRACELET.
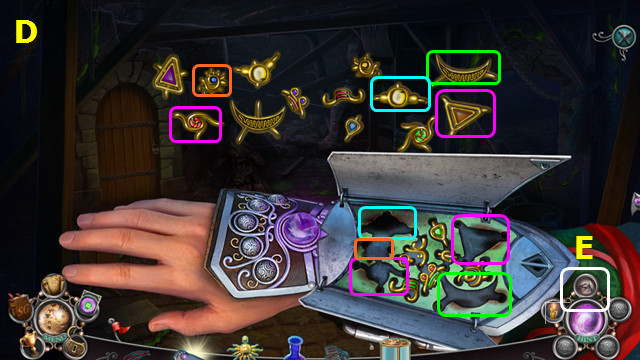
- Remove the burned-out jewels; place the 2 BRACELET PARTS.
- Restore the pieces to the color-coded spot (D).
- You earn the MEMORY SPELL; now on the menu bar (E).
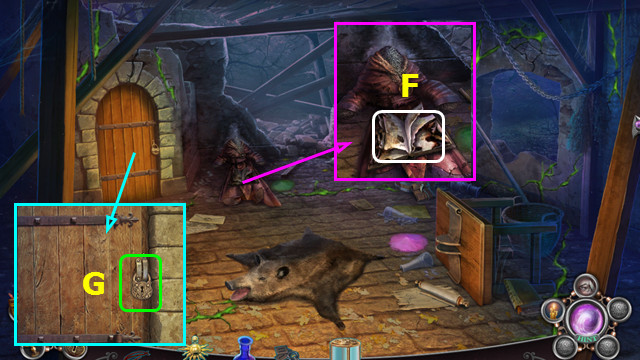
- Use the MEMORY SPELL (F).
- Play the HOP; earn the CELLAR KEY.
- Use the CELLAR KEY (G).
- Walk left.
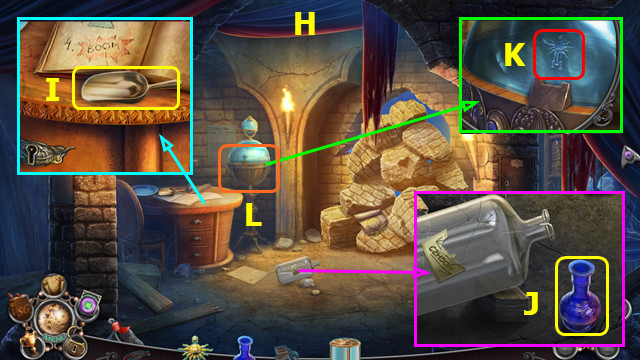
- Use the LIGHT SPELL on the dark room (H).
- Take the SCOOP (I).
- Place the EMPTY VASE; select the jug and take the ALCOHOL (J).
- Use the GLOBE KEY (K).
- Play the HOP; earn the MATCHES (L).
- Walk down.
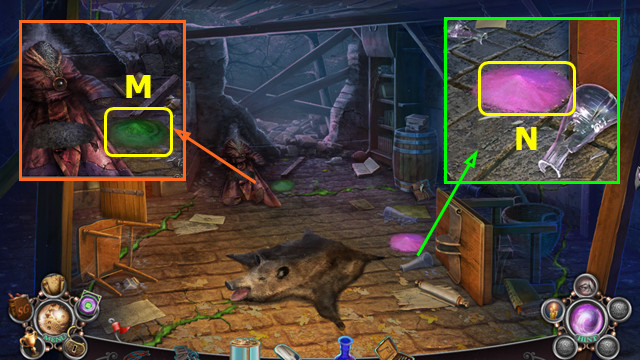
- Use the SCOOP to take the GREEN POWDER (M).
- Use the SCOOP to take the PINK POWDER (N).
- Walk left.
- Place the PINK POWDER, GREEN POWDER, and ALCOHOL; take the EXPLOSIVE (O).
- Read the note. Use the EXPLOSIVE, FUSES, and MATCHES (P).
- Walk forward.
- Take the THIN METAL PORTRAIT and 2/2 NUMERAL KEY (A).
- Use the LIGHT SPELL (B).
- Take the WATER SPHERE and use the MEMORY SPELL (C).
- Restore the items D-I.
- Earn the 1st RUNE.
- Place the 1st RUNE (J).
- Walk down 2x.
- Place the WATER SPHERE (K).
- Enter the portal.
- Play the HOP; earn the FISHING POLE (L).
- Take the SHIELD OF LIGHT (M).
- Use the LIGHT SPELL on the SHIELD OF LIGHT.
- Return to the Cellar.
- Use the SHIELD OF LIGHT (N).
- Select the runes that are different (O-Q).
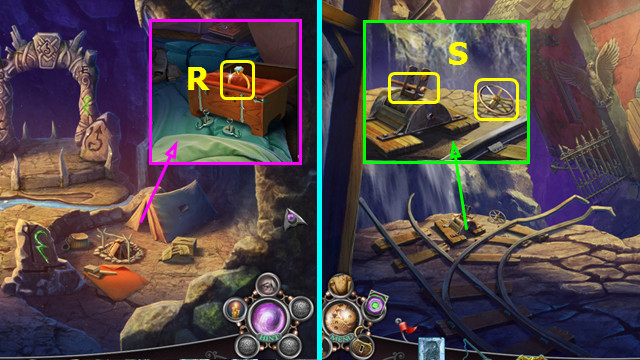
- Use the 2 NUMERAL KEYS; take the DIAMOND RING (R).
- Use the DIAMOND RING on the GLASS CYLINDER; take the EAGLE EMBLEM.
- Walk left.
- Take the 1/2 BOLTS and the VALVE (S).
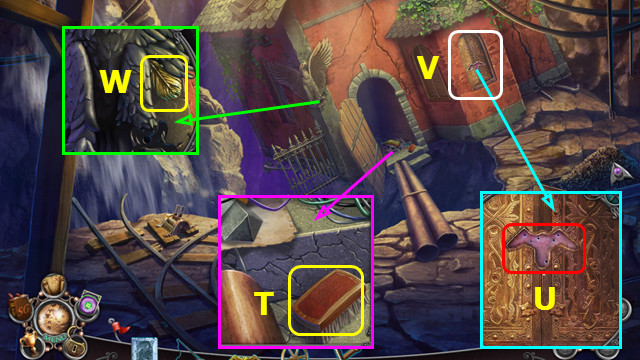
- Take the BRUSH (T).
- Use the EAGLE EMBLEM (U).
- Play the HOP; earn the HOOK (V).
- Add the HOOK to the FISHING POLE.
- Take the FEATHER LOCKPICK (W).
- Walk down 2x.
- Use the FEATHER LOCKPICK; take the 2nd RUNE (X).
- Place the VALVE (Y).
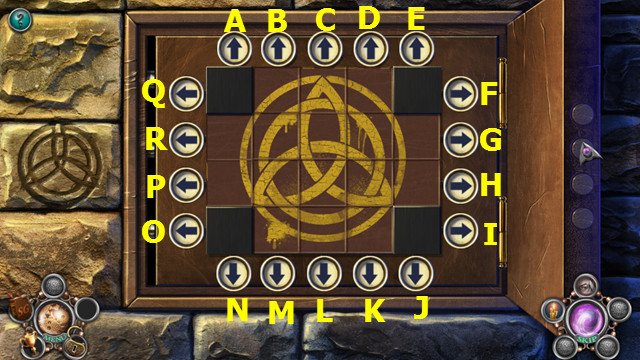
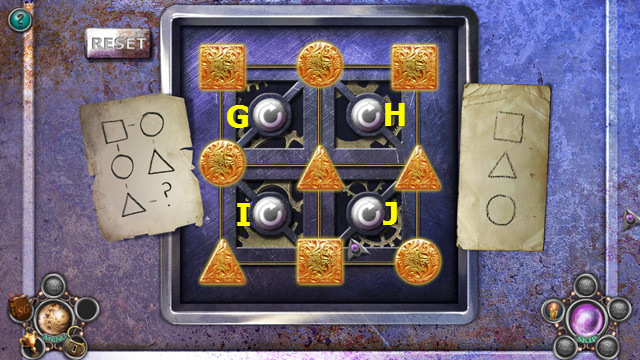
- Select N-M-R-Lx2-I-K-O-Lx2-I-Cx2-K-R-.
- D-G-K-R-D-G-R-D-G-J-G-E-R-E.
- Take the EAGLE CLAW and 3rd RUNE.
- Go forward and left.
- Place the EAGLE CLAW; take the 2/2 BOLTS (S).
- Walk down.
- Use the FISHING POLE to take the 4th RUNE (T).
- Use the BRUSH; take the 5th RUNE (U).
- Place the 2nd RUNE (A).
- Place the 3rd RUNE (B).
- Place the 4th RUNE (C).
- Place the 5th RUNE (D).
- Walk forward.
Chapter 3: Shadow Cave Camp
- Take the POWDER FLASK (E).
- Walk left.
- Take the WIRE CUTTERS (F).
- Take the METAL ARROW (G).
- Return to the Falling House.
- Use the WIRE CUTTERS; take the OVEN MITT and ETCHED PRISMS (H).
- Walk down and forward.
- Use the OVEN MITT; take the ENERGY SOURCE (I).
- Walk left.
- Replace the ENERGY SOURCE; place the ETCHED PRISMS (J).
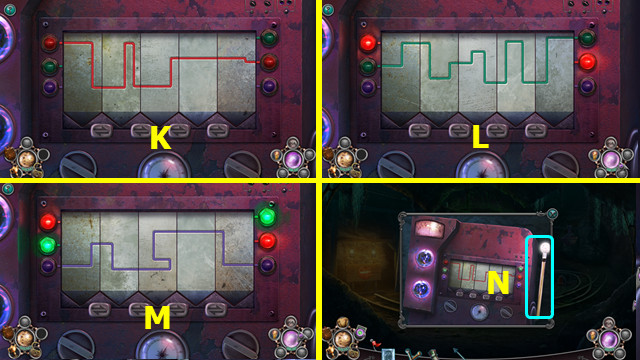
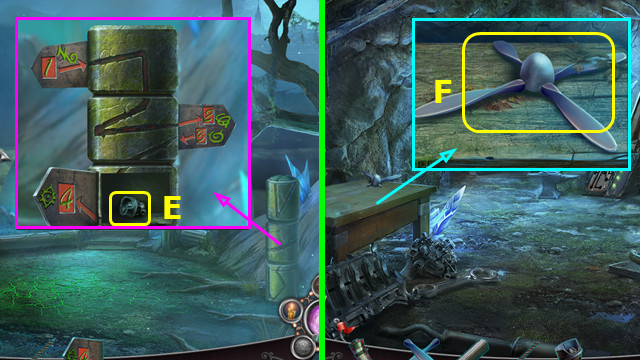
- Change all the panels to red and arrange as shown (K).
- Change all the panels to green and arrange as shown (L).
- Change all the panels to purple and arrange as shown (M).
- Pull the lever (N).
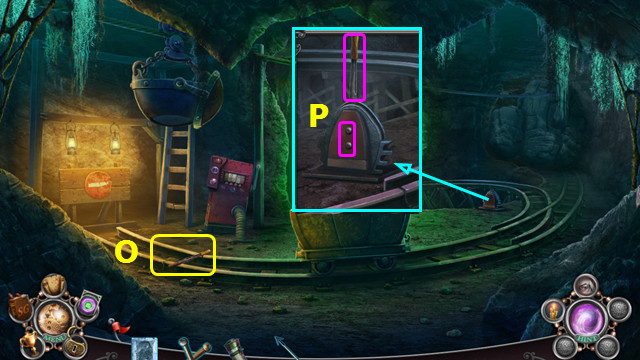
- Take the STEEL LEVER (O).
- Place the STEEL LEVER and 2 BOLTS; select the lever (P).
- You earn the SHIELD SPELL (Q).
- Take the BIRD PENDANT; use the METAL ARROW and take the STONE STAFF (R).
- Place the THIN METAL PORTRAIT; read the note and select (S).

- Restore the pieces.
- Take the MAP (T).
- Walk forward.
- Use the SHIELD SPELL (A).
- Use the METAL ARROW; take the MINIATURE AIRSHIP (B).
- Walk left.
- Place and select the STONE STAFF (C).
- Take the GLOVE and 1/2 PROPELLER BLADE (D).
- Take the SICKLE and 1/2 DOOR HANDLE (E).
- Walk down 2x.

- Use the SICKLE; take the 2/2 DOOR HANDLE and BIG GEAR (F).
- Go forward and right.
- Place the BIRD PENDANT; take the SMALL GEAR (G).
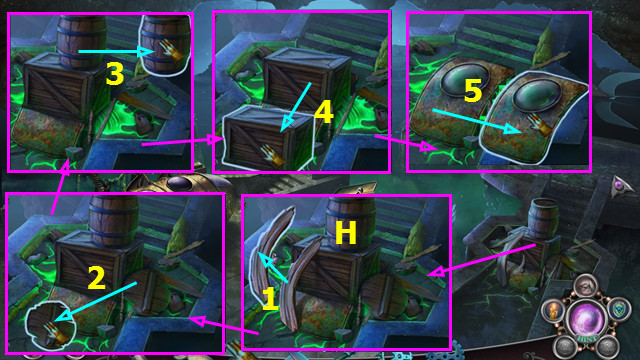
- Use the GLOVE on the debris pile (H).
- Move the items to their outlines (1-5).
- Take the GREEN LEVER (I).
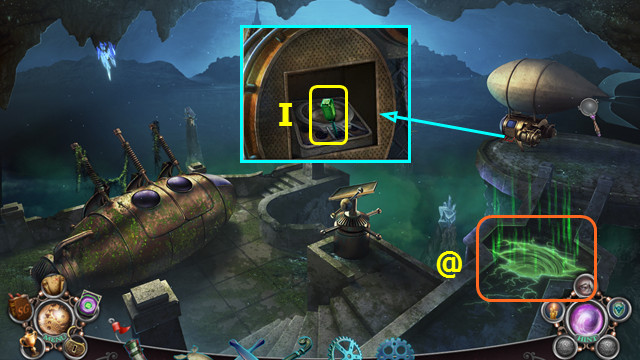
- Enter the portal (@).
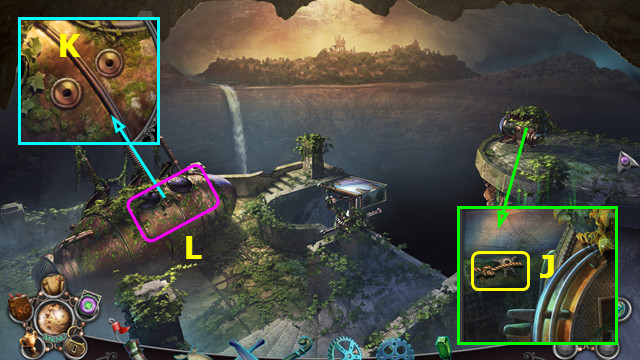
- Take the ROPE (J).
- Place the 2 DOOR HANDLES (K).
- Play the HOP; earn the COBRA CANE (L).
- Return to Shadow Park.
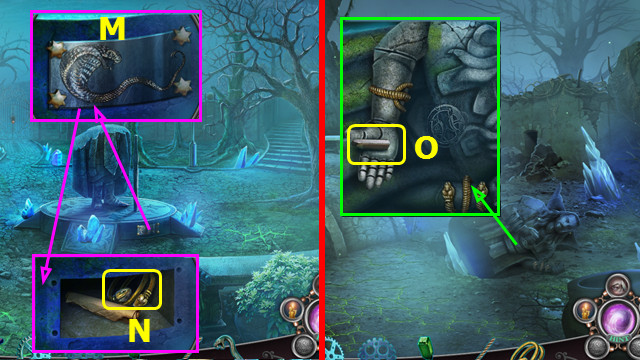
- Use the COBRA CANE (M).
- Use the LIGHT SPELL; read the note and take the SPIRAL BRACELET (N).
- Walk down.
- Place the SPIRAL BRACELET; take the GRAPHITE (O).
- Go forward and left.
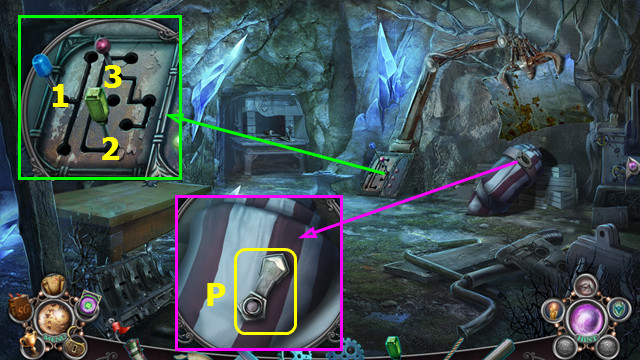
- Place the GREEN LEVER; select 1-3.
- Place the MINIATURE AIRSHIP; move the cloth and take the WINDING KEY (P).
- Walk down.
- Open the spider body and place the BIG GEAR and SMALL GEAR (Q); place and select the WINDING KEY (R).
- Walk forward.
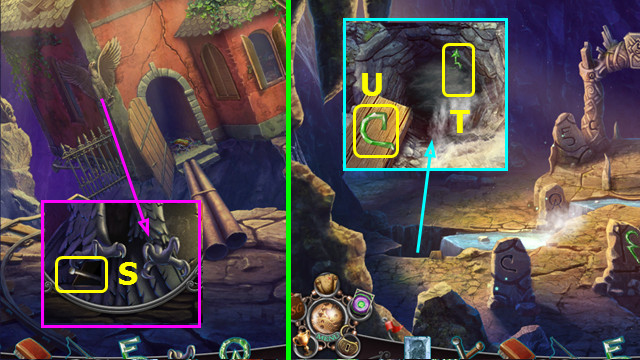
- Use the syringe (S) on the hole (T) to take the SYRINGE WITH OIL.
- Use the SYRINGE WITH OIL on the ROPE to make the OILED ROPE.
- Take the 2/2 PROPELLER BLADE (U).
- Walk down and right.
- Move the cloth and take the CRYSTAL BULB (A).
- Use the MEMORY SPELL (B).
- Play the HOP.
- Take the DIRECTION POINTER (C).
- Place the CRYSTAL BULB and select the lever (D).
- Walk down and forward.
- Place the DIRECTION POINTER and rotate the pieces as shown; take the LAMP BURNER (E).
- Walk down and left.
- Place the 2 PROPELLER BLADES; take the PROPELLER (F).
- Place the LAMP BURNER; take the KEROSENE LAMP (G).
- Walk down and forward.
- Place the OILED ROPE and POWDER FLASK; use the KEROSENE LAMP (H).
- Walk left.
Chapter 4: Shadow Zeppelin Crash
- Move the tarp and take the PAPER (I).
- Walk down.
- Use the PAPER and GRAPHITE; earn the SAFE HINT (J).
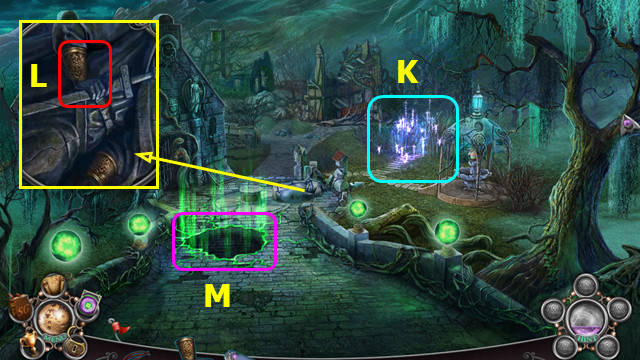
- Walk left and enter the portal (K).
- Place the SAFE HINT (L).
- Select 1-4.
- Take the SWITCH (M).
- Enter the portal (N).
- Take the CAPTAIN'S DIARY and BAT KEY (O).
- Walk down.
- Use the BAT KEY; read the note and take the KNIFE (P).
- Walk left.
- Use the KNIFE (Q).
- Play the HOP; earn the DRAINED CRYSTAL (R).
- Enter the portal.
- Place the DRAINED CRYSTAL and press the button; take the BUTTON (S).
- Enter the portal.
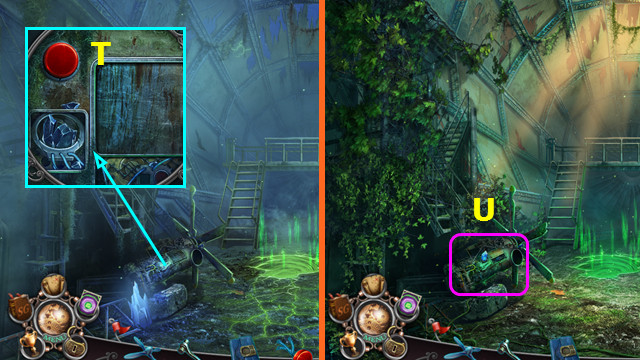
- Place and select the BUTTON (T).
- Enter the portal.
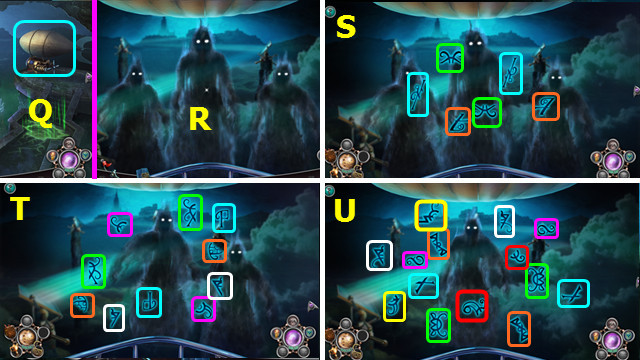
- Select (U).
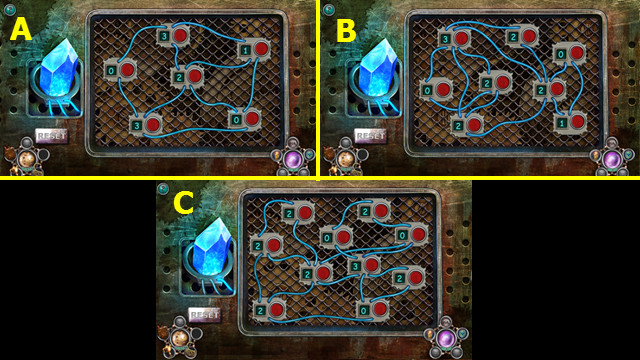
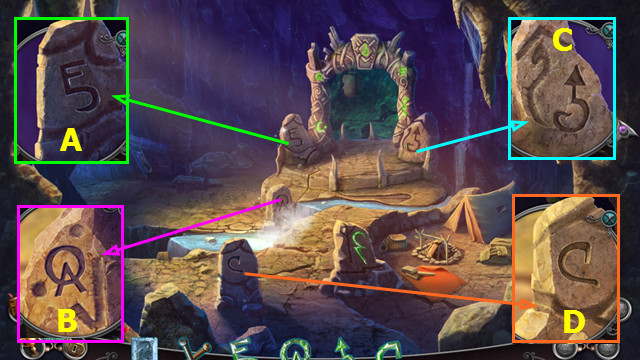
- This mini-game is randomly generated.
- A possible solution for each level is shown (A-C).
- You earn the CHARGED CRYSTAL.
- Enter the portal.
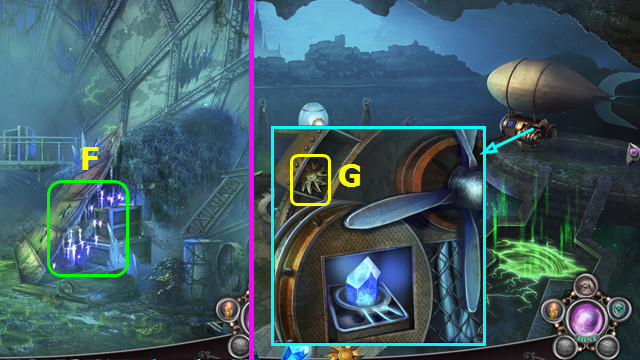
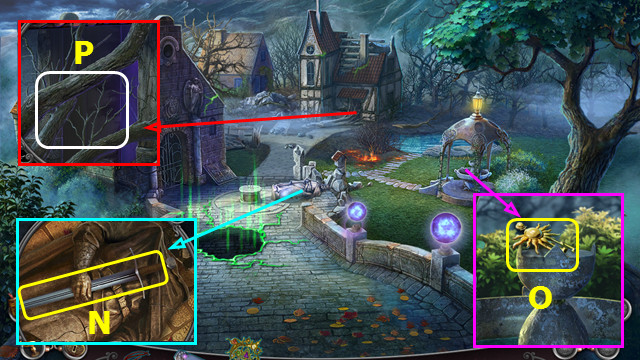
- Play the HOP; earn the 1/2 SUN EMBLEM (F).
- Walk down 2x; go right.
- Place the PROPELLER and CHARGED CRYSTAL; take the 2/2 SUN EMBLEM (G).
- Enter the portal.
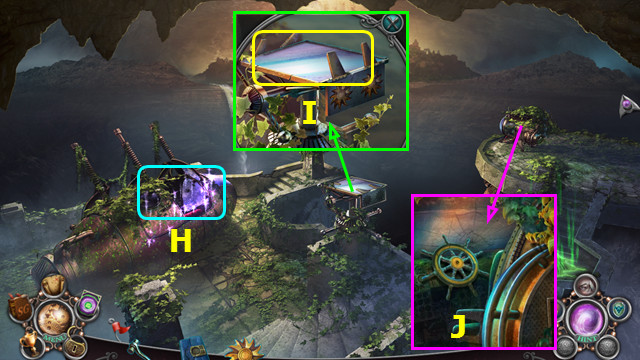
- Play the HOP; earn the SHIP WHEEL (H).
- Place the 2 SUN EMBLEMS; take the MIRROR (I).
- Place the SHIP WHEEL (J).
- Enter the portal.
- Place the MIRROR (K).
- This mini-game is randomly generated.
- Our solution was N-Px2-Ox2-L; yours may differ.
- Select (Q).
- Use the SHIELD SPELL (R).
- Select the color-coded pairs (S-U).
- Select and automatically use the LIGHT SPELL; take the CE COIN (A).
- Combine the CAPTAIN'S DIARY and CE COIN; read the notes and take the SNAKE HANDLE.
- Remove the 2 pieces; take the LIGHTNING BOLT and SWIRL TILE (B).
- Place the SWIRL TILE; restore the image (C).
- Walk left.
- Place the LIGHTNING BOLT; take the 1/2 TAP (E).
- Use the MEMORY SPELL (F).
- Play the HOP.
- Take the POISON; place the SWITCH (G).
- Select (H).
- Walk right.

- Take the TALON (I).
- Take the HAMMER (J).
- Enter the portal (K).
- Take the LITTLE VALVE (L).
- Enter the portal.
- Place the LITTLE VALVE (M).
- Enter the portal.
- Take the LIVING FLOWER (N).
- Enter the portal and walk down.
- Select (O).
- Walk right.
- Take the EAGLE HANDLE; select and read the plaque (P).
- Take the BROKEN CLAW; move the pieces and take the WINDMILL EMBLEM (Q).
- Walk down.
- Place the EAGLE HANDLE and SNAKE HANDLE (R).
- Go forward.
- Take the GAFF; open the chest and take the SHARP STICK (S).
- Place and select the SHARP STICK 2x; select the head (T).
- Take the PHOENIX EMBLEM (U).
- Walk left.
- Take the SCREW KNOB (A).
- Combine the BROKEN CLAW, TALON, and SCREW KNOB to make the GOLDEN CLAW.
- Use the LIGHT SPELL (B).
- Take the BOLT CUTTER (C).
- Enter the portal (D).
- Play the HOP; earn the COGWHEEL (E).
- Use the BOLT CUTTER; take the SELDOR FIGURINE (F).
- Enter the portal (G).
- Place the COGWHEEL (H).
- Take the MILL WHEEL EMBLEM (I).
- Use the GAFF (J).
- Select (K).

- Restore the 2 wheels (L).
- Start with the inner wheel.
- Move the debris 2x; take the WOODEN PLATE (A).
- Enter the portal.
- Place the WINDMILL EMBLEM and MILL WHEEL EMBLEM; take the BOWL (B).
- Enter the portal and walk down 2x.
- Place the PHOENIX; take the PAW EMBLEM (C).
- Walk forward.
- Place the PAW EMBLEM; take the RUBY DUST (D).
- Go to the Shadow Arsenal.
Chapter 5: Return to Shadow Arsenal
- Use the GOLDEN CLAW (E).
- Take the 2/2 TAP; place the SELDOR FIGURINE (F).
- Restore the items 1-6.
- Take the TALISMAN ORB (G).
- Go to the Laboratory.
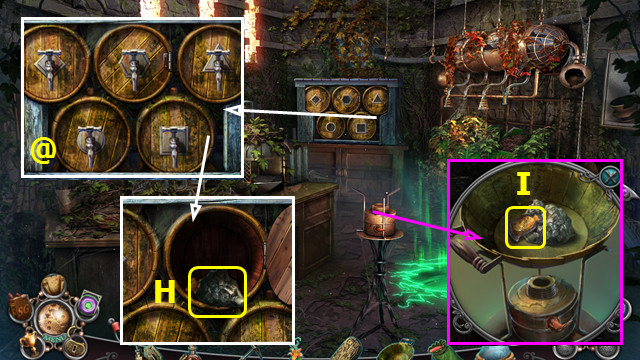
- Place the 2 TAPS; restore the taps (@).
- Take the SILVER ORE (H).
- Place the BOWL and SILVER ORE; use the HAMMER and take the WHEAT TOKEN (I).
- Go to the Watermill.

- Place the WHEAT TOKEN (J).
- Play the HOP; earn the BURNER LEVER (K).
- Go to the Shadow Tower Upper Level.
- Place the WOODEN PLATE; earn the RUNIC PLATE (L).
- Go to the Shadow Laboratory.
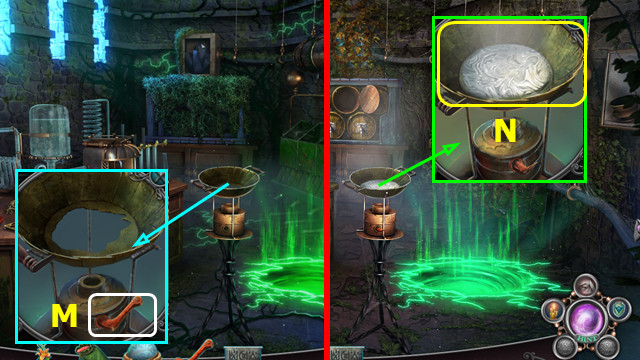
- Place and select the BURNER LEVER (M).
- Enter the portal.
- Take the MOLTEN SILVER (N).
- Enter the portal.
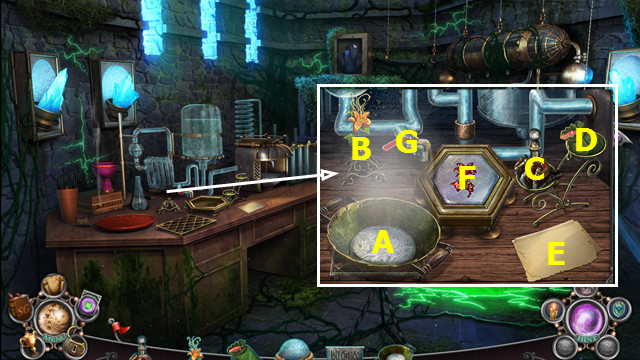
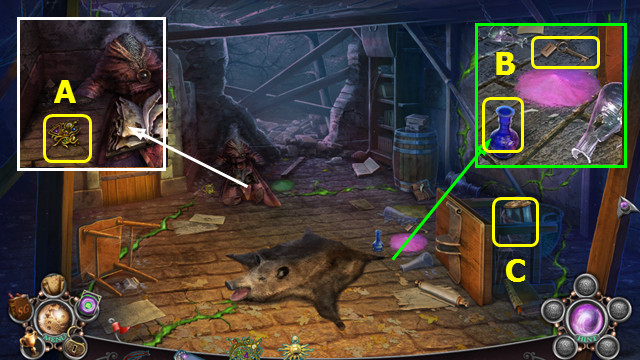
- Place the MOLTEN SILVER (A), LIVING FLOWER (B), POISON (C), and RUBY DUST (D).
- Read the instructions (E).
- Use A on F; select G.
- Use C on F; use B on F.
- Use D on F.
- Take the RUBY LILY PLATE (F).
- Walk down and left.
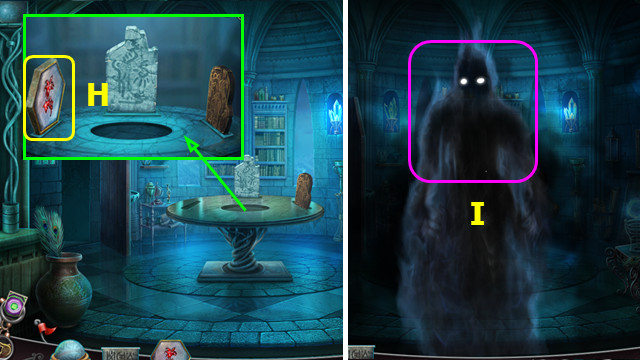
- Place the RUBY LILY PLATE (H).
- Use the SHIELD SPELL (I).
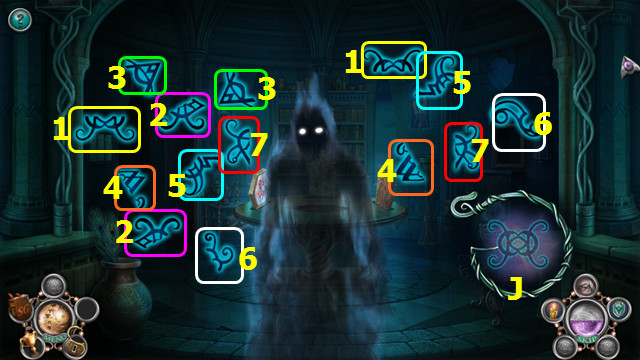
- Place the 2 pieces that comprise the shown symbol (J).
- The order is randomly generated. Our solution was (1-7); yours may differ.
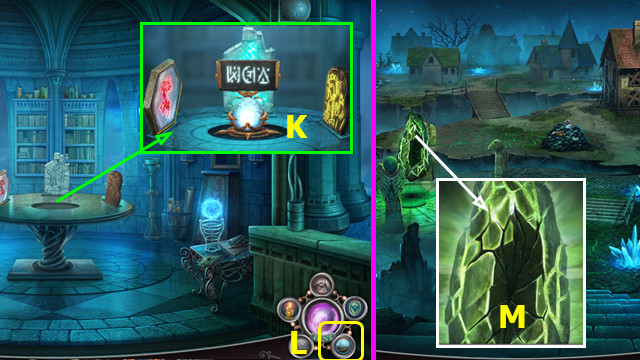
- Place the RUNIC PLATE and TALISMAN ORB (K).
- You earn the REPAIR SPELL (L).
- Walk left and forward.
- Use the REPAIR SPELL (M).
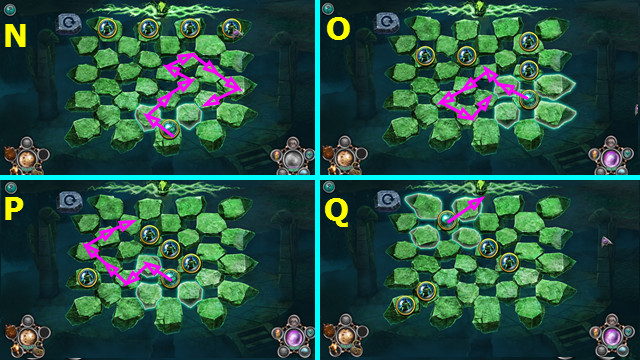
- The path for a winning solution is shown (N-Q).
- Congratulations! You have completed Shrouded Tales: The Shadow Menace!
Created at: 2017-02-19