Walkthrough Menu
- General Tips
- Chapter 1: Searching for Clues
- Chapter 2: Opening the Suitcase
- Chapter 3: Finding Reginald
- Chapter 4: The Dragon's Cocktail
- Chapter 5: The Village
- Chapter 6: The Labyrinth
- Chapter 7: crossing the Ravine
- Chapter 8: The Healing Potion
- Chapter 9: Freeing Uncle Arthur
- Chapter 10: Saving Belle
General Tips
- Select Options to adjust the Music, Voice and Sound Effects Volume. You may also select or de-select Full Screen and Custom Cursor. You may also change the Difficulty level of play.
- Select the difficulty level that suits your style of play: Casual, Adventure or Hard. The level may be changed during play by selecting the Menu tab in the lower left corner and selecting Options.
- The Diary records events and tips and is updated during play. New entries are indicated by a glowing diary.
- The Tasks tab in the Diary shows the current objectives. A completed task is marked with a green checkmark.
- The Achievements bookmark in the Diary allows you to replay hidden object scenes and puzzles as you progress. These may also be accessed from the Achievements tab on the Main Menu. Once the standard game is complete, you cannot access them.
- Coins are used for purchasing Backstory Sketches, Game Sketches and Audio Clips from the in-game store.
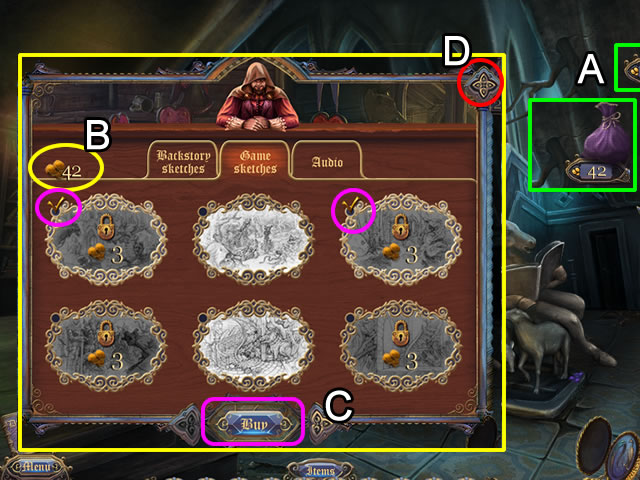
- Access the store by clicking the tab on the upper right side of the screen (A). It slides out to reveal a moneybag and the number of coins collected. Click the moneybag to open the store.
- The Store shows the amount you can spend (B).Click an item to select it. A checkmark appears in the corner of the item (pink). Click Buy (C) to open the items. Return to the game by clicking the X in the upper right corner (D).
- The Store may also be accessed from the Main Menu.
- Obtain coins by solving Hidden Object Scenes (maximum of 3) and puzzles (maximum of 3).Two purple flowers in each major scene are worth 1 coin each.
- Hints are available for Hidden Object Scenes (HOS) and general game play. HOS items can also be eliminated by playing an optional match-3 game.
- Puzzles may be skipped.
- Game play is not linear. This guide attempts to show the most efficient way through the game. Not all inventory items are collected when first encountered. If you are missing an inventory item or cannot complete a scene as indicated in this guide, check previous entries.
Chapter 1: Searching for Clues
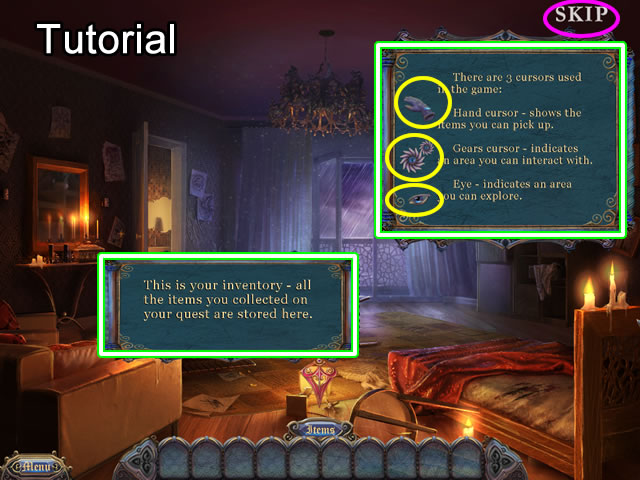
- You may select the optional tutorial to familiarize yourself with how to interact with the game, or follow these steps:
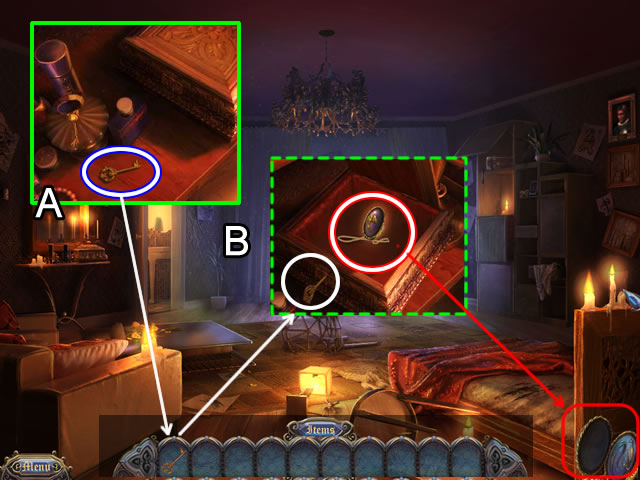
- Pick up the CASKET KEY on the dresser (A).
- Slide the cursor over the lower part of the screen to open inventory and take the CASKET KEY.
- Insert the key in the casket lock (B); the locket inside becomes the Hint icon.
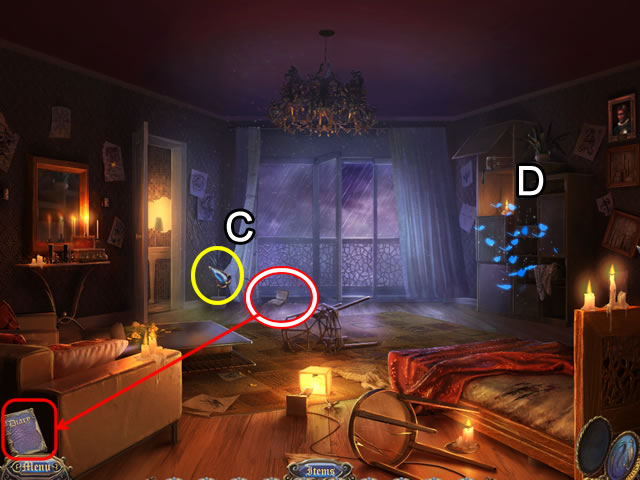
- Click and hold the left mouse button down on the curtain (C); drag the curtain to the left.
- Uncover the Diary. It contains story information and hints to help with game play. It also includes a Tasks tab to track goal progress.
- Picking up the diary triggers a Hidden Object Scene (HOS) indicated by fluttering butterflies (D).
- Most HOS contain items listed in yellow. These items require an extra step to find.
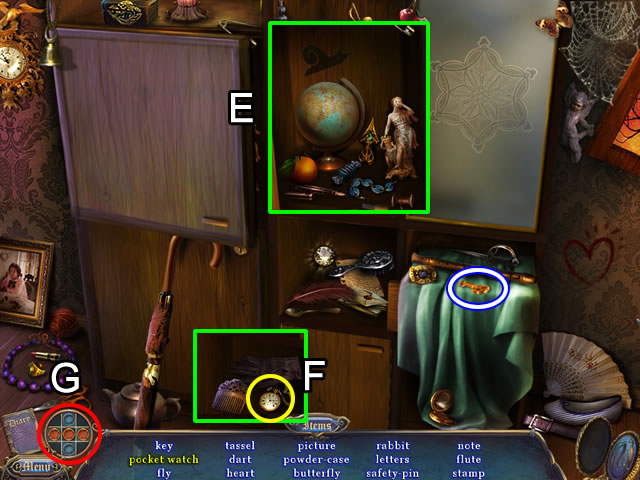
- Drag the cursor around the scene until it turns into a hand to discover the interactive areas (E and F).
- The items in each scene are random. This guide only shows the location of the interactive areas and the inventory item.
- Clicking the Hint locket will locate a random object.
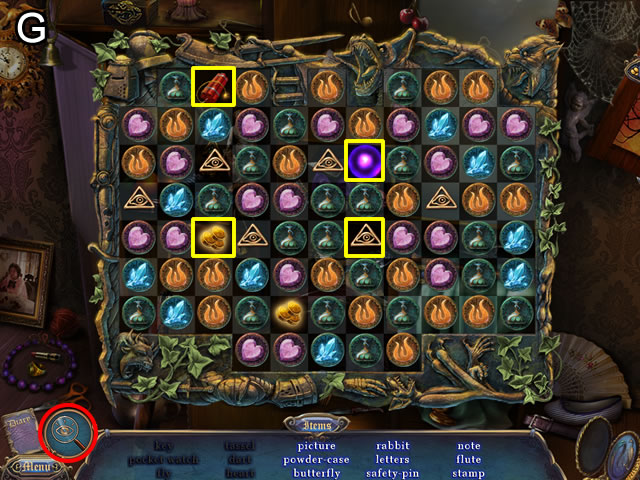
- Items can also be found by playing a match-3 game (G).
- Dropping a tile with an eye on it to the bottom of the board removes one hidden object item.
- A glowing ball eliminates one tile. Click the ball and then the tile you wish to eliminate. The tile above the eliminated tile drops down.
- The dynamite eliminates all tiles immediately around it when dropped onto a line of three tiles.
- Click the magnifying glass with the eye to return to the original HOS.
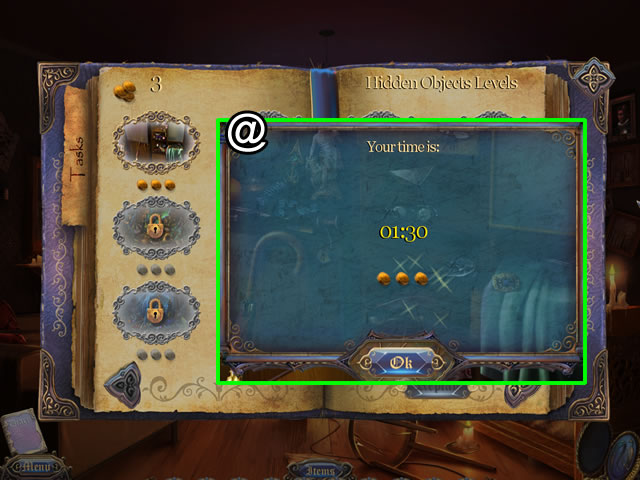
- Completing a HOS earns coins based on the completion time (@).
- The coins are used later in the game for purchasing items in the in-game store.
- Open the Diary and click the Achievements bookmark to replay a hidden object scene.
- Please review the General Tips section of this guide for a complete explanation of the store and collecting coins.
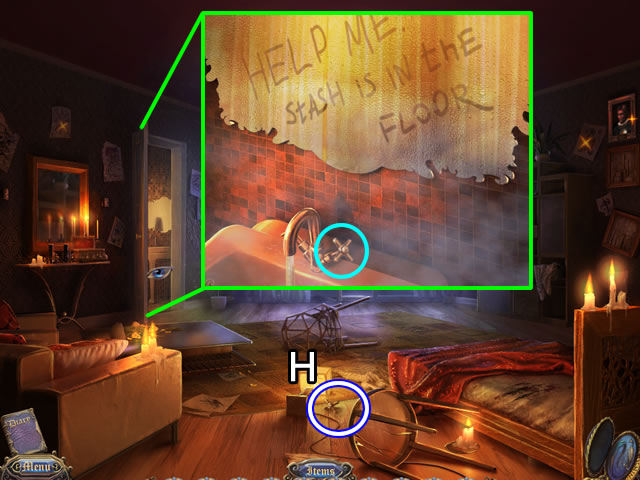
- Pick up the VALVE on the floor (H).
- Enter the bathroom.
- Place the VALVE on the tap. Click to turn the water on and see a message appear.
- Exit the bathroom.
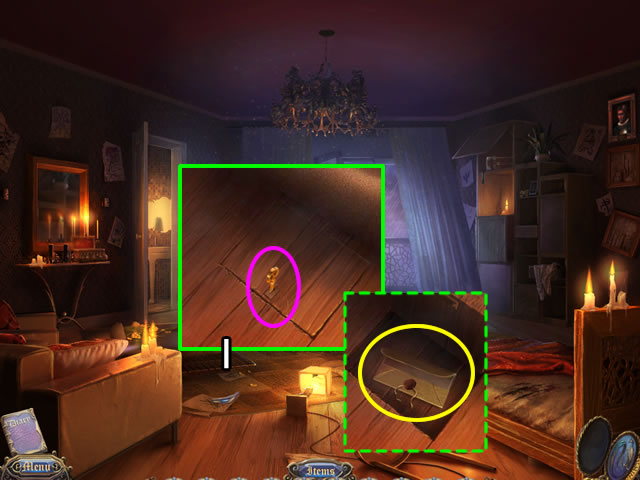
- Lift up the edge of the carpet (I); insert the CACHE KEY in the lock.
- Read the letter.
Chapter 2: Opening the Suitcase
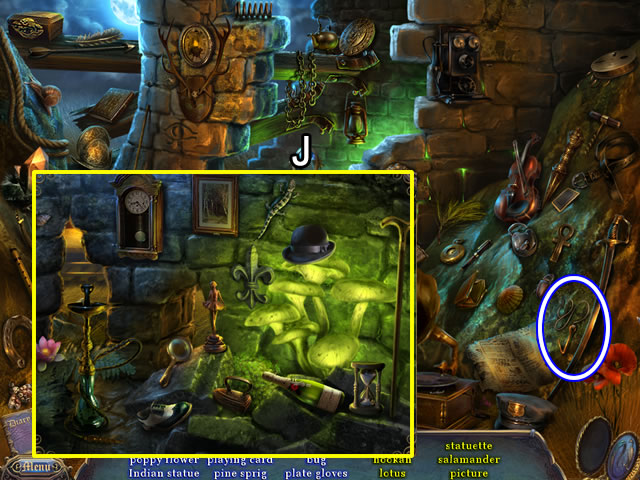
- Speak with the woman on the platform.
- Play the HOS.
- Open the interactive area under the stairs (J) to fine the items listed in yellow.
- Locate all of the items on the list; receive a HOOK WITH ROPE.
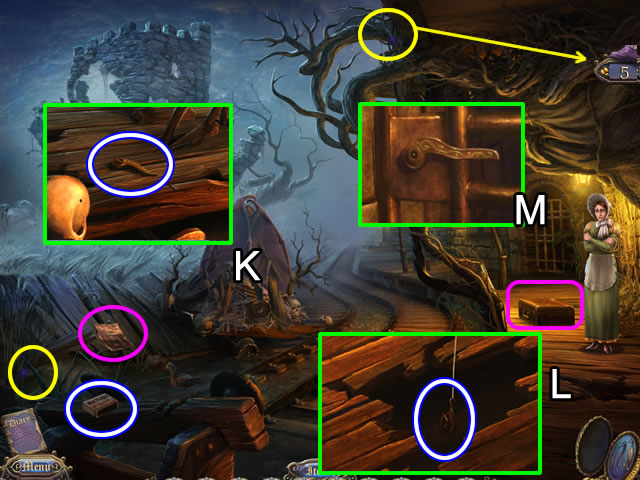
- Pick up the box of MATCHES; move the debris pile (K) to find a GATE HANDLE.
- Read the note (pink) for diary information.
- Each scene has two purple flowers. Find them both (yellow) to receive two coins.
- Peer down the hole in the platform (L); use the HOOK WITH ROPE to retrieve a VALVE.
- Look closer at the suitcase (pink).
- Zoom in on the barred door (M); attach the GATE HANDLE and click to open the door.
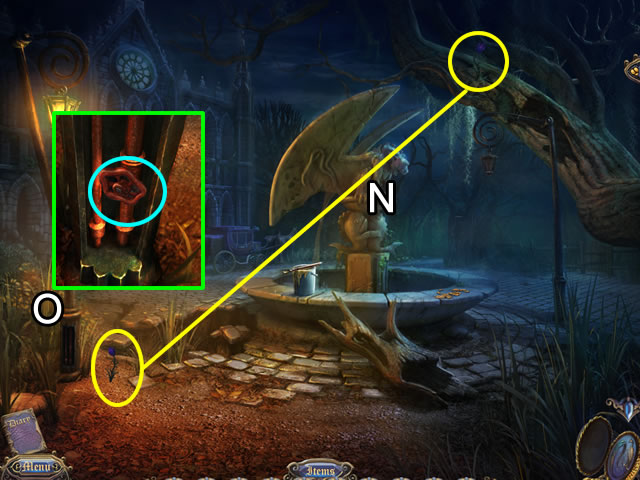
- The purple flowers in each scene are circled in yellow (N).
- Examine the base of the lamppost (O); attach the VALVE to the pipe.
- Turn the valve to summon Uncle Arthur.
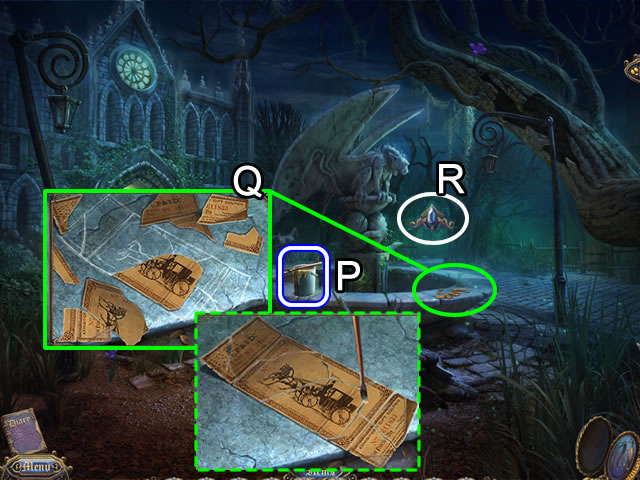
- Pick up the VALVE again for inventory.
- Pick up the can of GLUE (P).
- Examine the pieces of paper (Q) to open a puzzle.
- Place the pieces in the outline. Pieces lock into place when correctly positioned.
- Use the GLUE to repair the tears. Take the COACH TICKET.
- Go forward between the two trees (R).
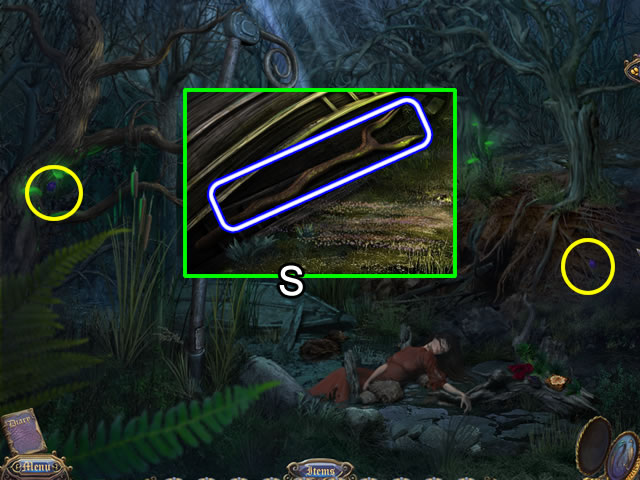
- Look under the boat (S) at the murder scene; take the LONG POLE.
- Return to the fountain.
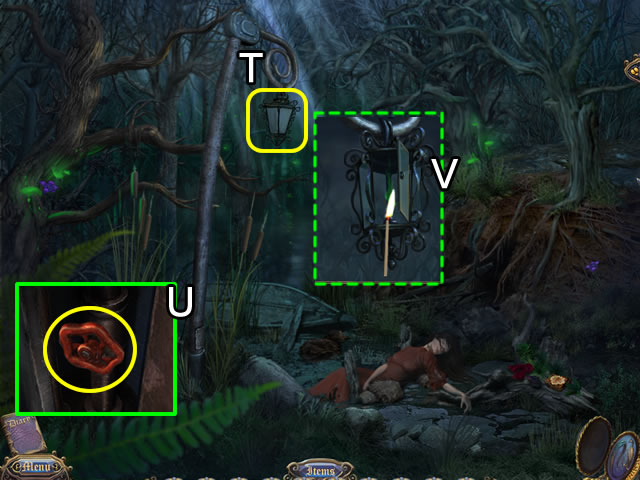
- Use the LONG POLE to remove the LANTERN by the fountain.
- Return to the murder scene.
- Attach the LANTERN to the light pole (T); examine the base of the pole (U).
- Open the cover and attach the VALVE; click to turn on the gas.
- Open the glass door on the lantern (V); use a MATCH to light the lantern.
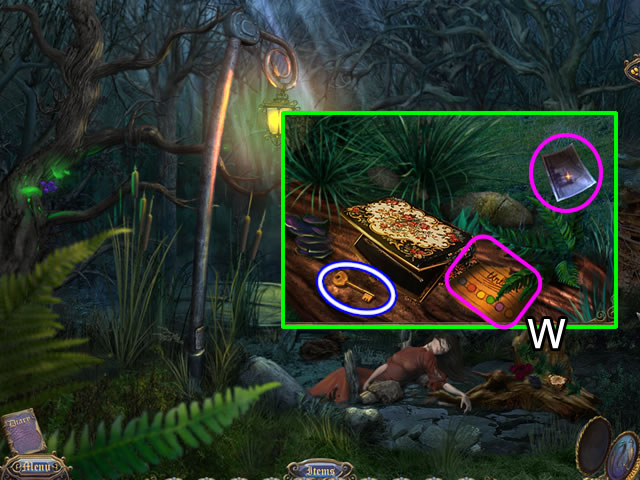
- Look at the area around the log (W).
- Pick up the picture to add diary information.
- Click the strange looking paper next to the box to add puzzle information to the diary.
- Open the box; take the KEY.
- Go down twice to the train platform.
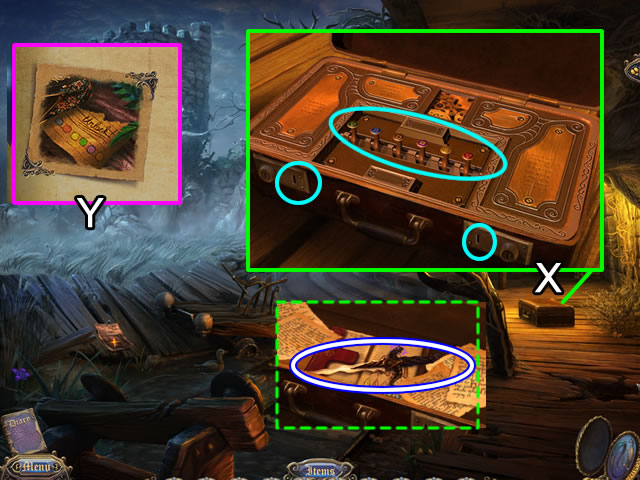
- Inspect the abandon suitcase (X).
- Insert the KEY in both locks (aqua) to open the case and play a puzzle.
- The goal is to flip the switches in the correct order; refer to the diary for the solution (Y).
- Solution. Flip the colored switches in this order: Blue-Red-Yellow-Green-Pink-Brown.
- Move the papers around to collect diary information and uncover the STRANGE DAGGER.
- Go forward.
Chapter 3: Finding Reginald
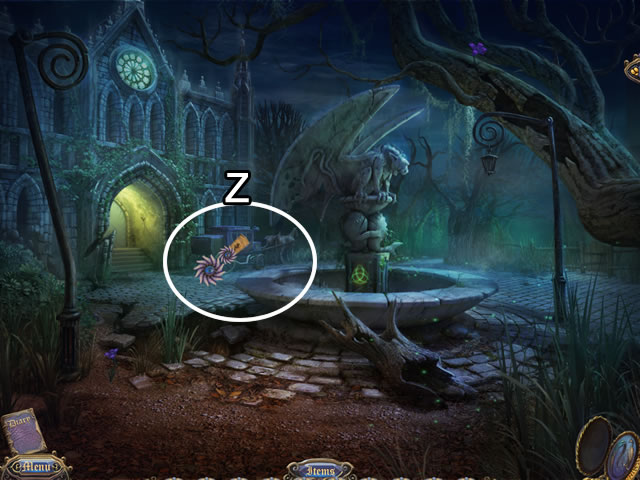
- Place the COACH TICKET on the carriage (Z).
- An animated horse and carriage appear; click to change scenes.
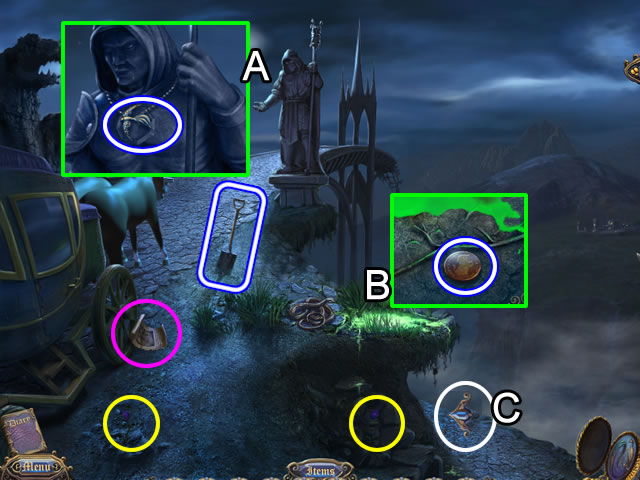
- Zoom in on the statue (A); take the GUARDIAN ORDER SYMBOL.
- Read the diary page (pink); take the SHOVEL.
- Look closer at the green puddle (B); take the GOLD COIN.
- Head down the path (C) to the well area.
- Play the HOS.
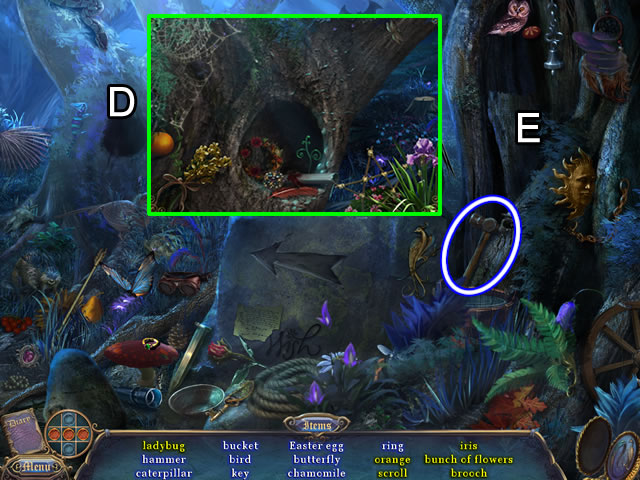
- Look into the tree hollow (D) to find the yellow listed items.
- Turn the board (E) over to find the Ladybug.
- Find the rest of the listed objects.
- The HAMMER goes to inventory.
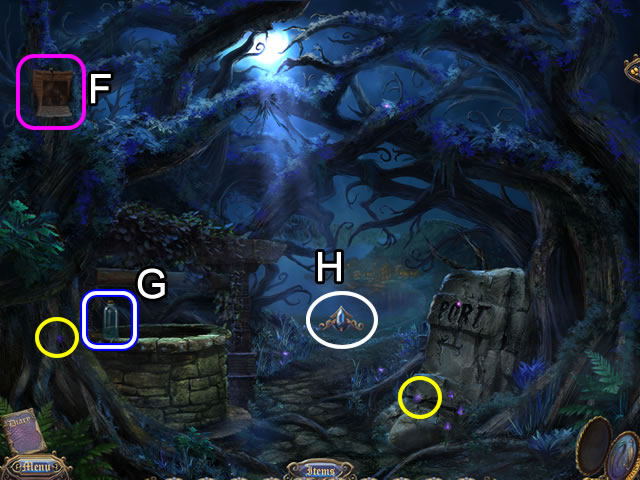
- Read the diary page (F); pick up the MEDICINE BOTTLE (G).
- Continue forward to the port (H).
- Speak to the boy.
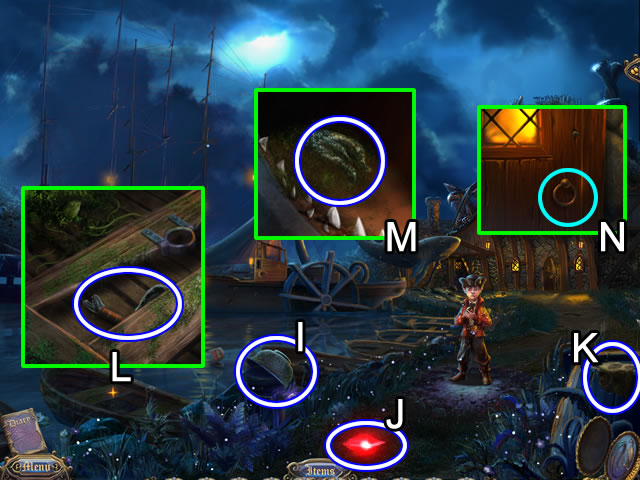
- Take the BUCKET off the stump (I).
- Pick up the RED CRYSTAL on the path (J); grab the PARCHMENT FRAGMENT off the barrel (K).
- Look closer at the boat (L); take the WELL HANDLE.
- Open the whale's mouth (M); take the CORAL COVERED RUNE.
- Zoom in on the tavern door (N); use the knocker to summon the saloonkeeper.
Chapter 4: The Dragon's Cocktail
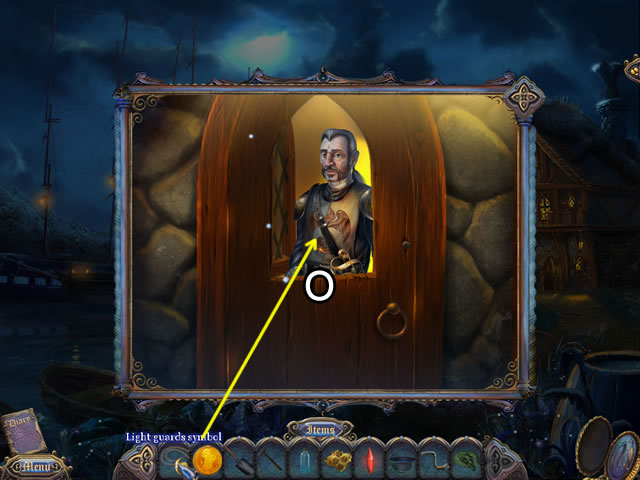
- Speak with the saloonkeeper; give him the GUARDIAN ORDER SYMBOL (O).
- Enter the tavern.
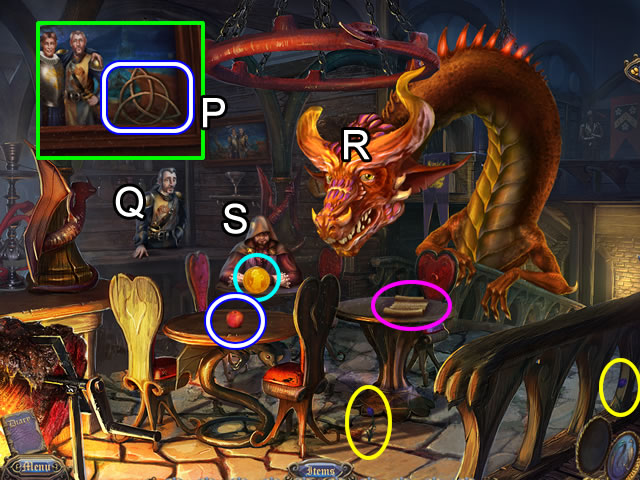
- Earn the patron's trust and cooperation by taking the TRIBUTARY SYMBOL from the picture above the bar (P).
- Speak with the saloonkeeper (Q); next speak to the old dragon (R); speaking to the magician (S) opens the store.
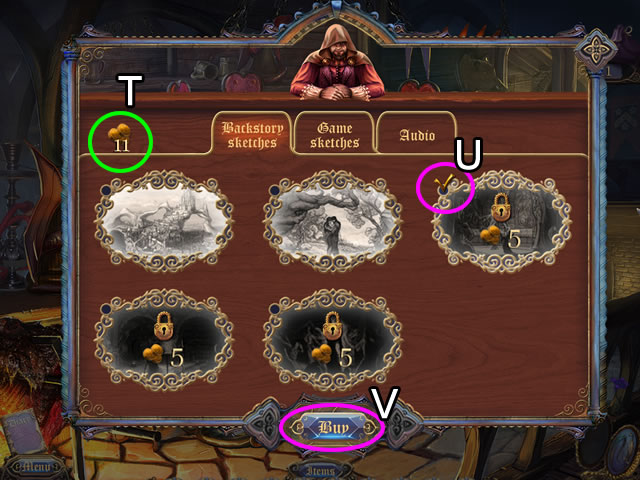
- Here is where the accumulated coins come in handy (T).
- Click the blue dot on a locked item; a checkmark appears next to it (U); click the 'Buy' button (V) to open the purchased items.
- Please review the General Tips section for more information about the store.
- Exit the store. Give the magician the GOLD COIN (aqua) and receive MOONFLOWER SEEDS.
- Take the APPLE on the table; pick up the document (pink) for diary information.
- Go down the steps to the cellar.
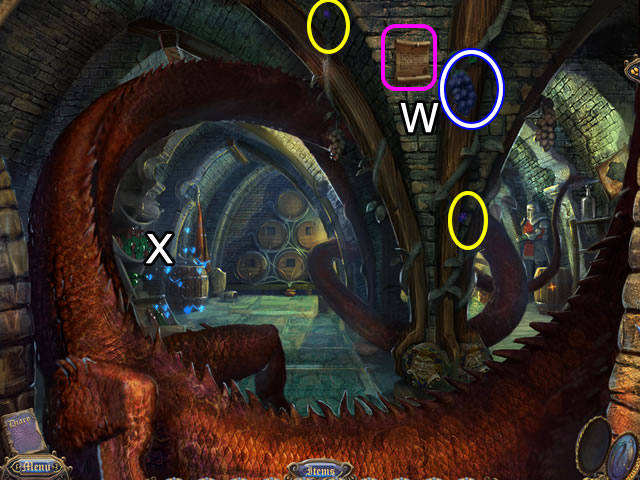
- Take the GRAPES and the parchment (W).
- Play the hidden object scene (X).
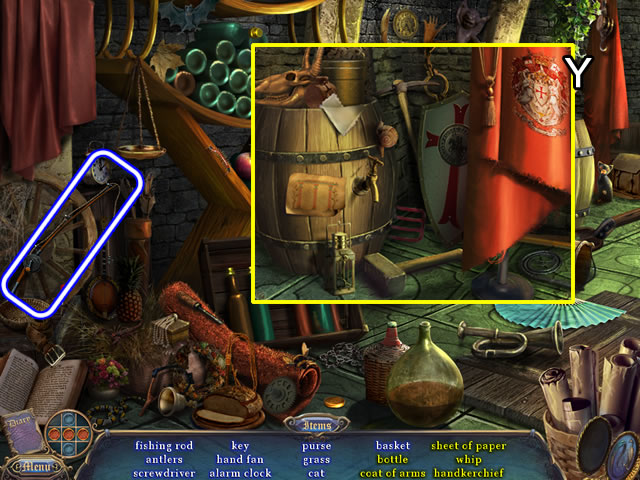
- Look behind the cloth (Y) to find the items listed in yellow.
- Find the rest of the listed objects.
- The FISHING ROD goes to inventory.
- Exit the tavern.
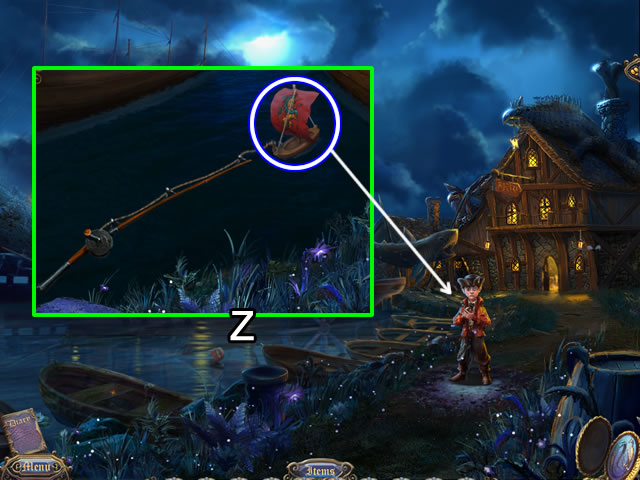
- Zoom in on the TOY BOAT (Z); use the FISHING ROD to retrieve it.
- Give the TOY BOAT to Reginald; he gives you the SEAL OF GUARD.
- Go down once to the well area.
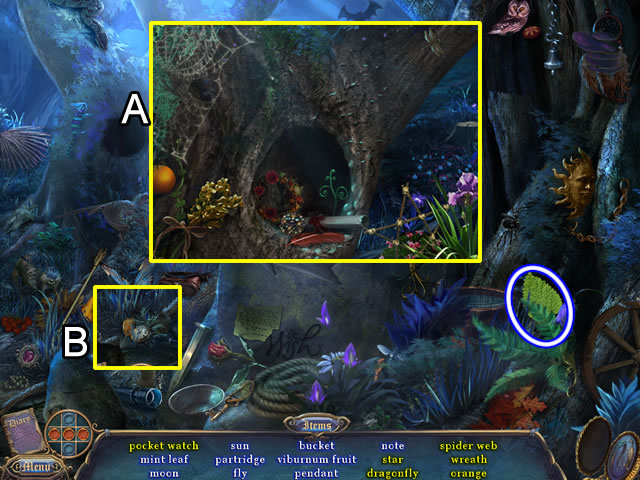
- Play the HOS.
- Peer into the tree hollow (A) to find most of the items listed in yellow.
- Knock over the rock (B) to locate the pocket watch or move the leaves on the right to find the apple.
- Find the rest of the listed objects; the MINT LEAF goes to inventory.
- Go down once to the destroyed bridge.
- Place the cursor over the carriage; it turns into an animated horse and carriage.
- Click to return to the fountain.
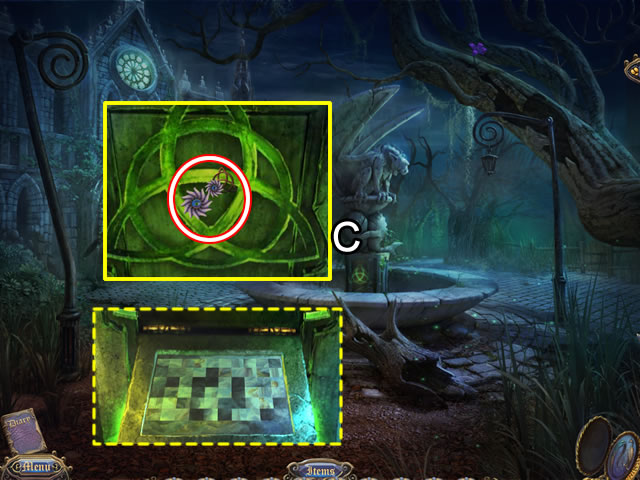
- Zoom in on the glowing symbol on the fountain (C); place the TRIBUTARY SYMBOL in the inlay to open the compartment.
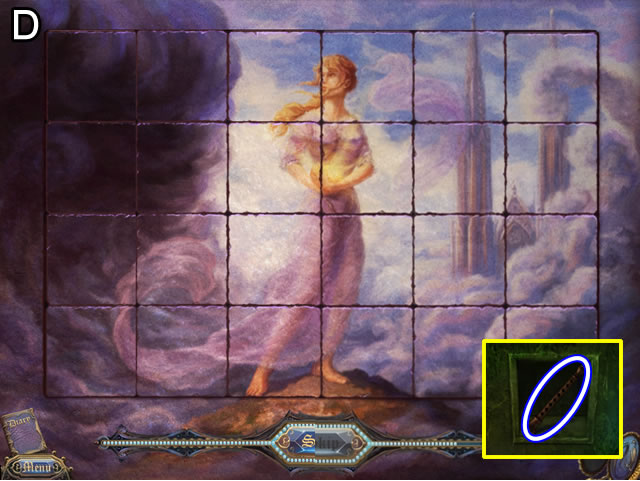
- Click the board to open a swap-the-tiles-puzzle.
- The best strategy is to match shapes and colors around the edges and next to the woman.
- See the solution for the completed puzzle (D).
- Take the MAGIC REED from the secret compartment.
- Click the carriage to return to the destroyed bridge.
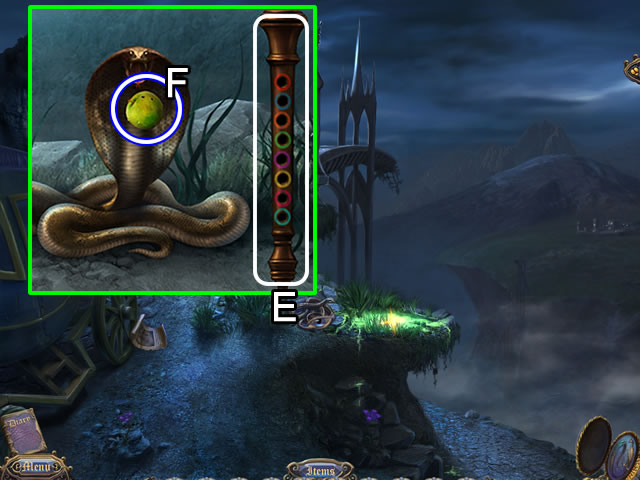
- Look closer at the snake (E).
- Place the MAGIC REED on the snake to open three rounds of a repeat-the-sequence puzzle.
- Give the snake the APPLE; receive a POISONED APPLE (F).
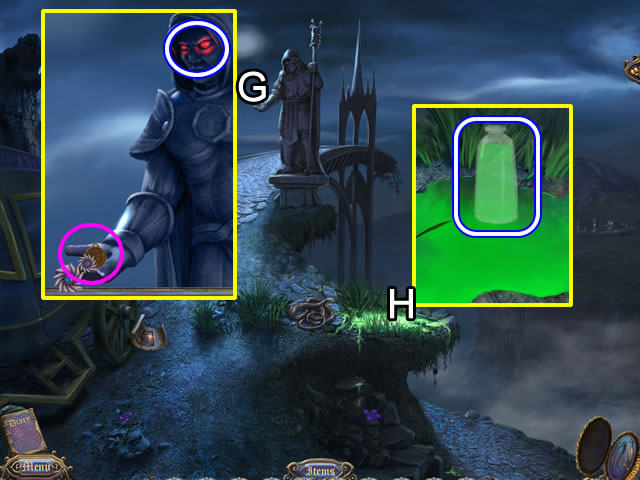
- Zoom in on the statue (G).
- Place the SEAL OF GUARD in its hand (pink); pluck a RUBY EYE.
- Inspect the green puddle behind the snake (H); dip the MEDICINE BOTTLE into the puddle.
- Take the BOTTLE OF ACID.
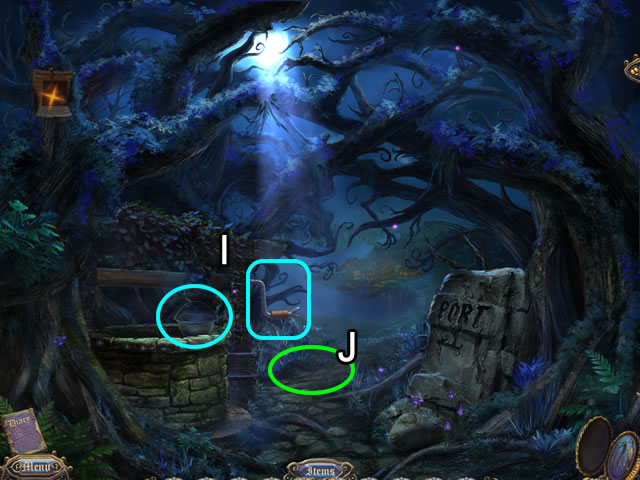
- Go down the path to the well.
- Place the WELL HANDLE on the side of the windlass (I); attach the BUCKET to the rope.
- Click the handle to lower the bucket; click again to pull up a BUCKET OF WATER.
- Look closer at the loose soil (J).
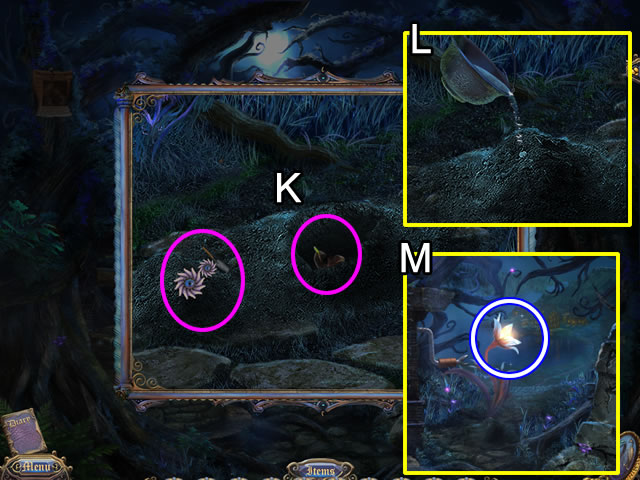
- Use the SHOVEL three times to dig a hole for the MOONFLOWER SEEDS (K).
- Cover the seeds using the SHOVEL; pour the BUCKET OF WATER on the mound (L).
- Pluck the MOONFLOWER PETALS (M).
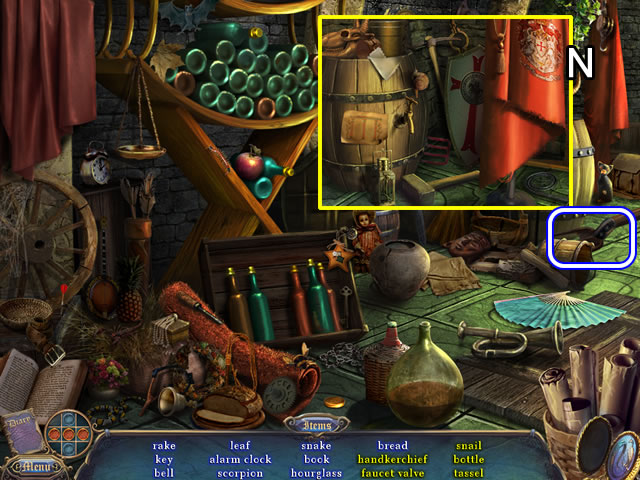
- Go forward three times to enter the tavern cellar.
- Play the HOS.
- Look behind the red cloth (N) to find the area for the items listed in yellow.
- Find the rest of the listed objects.
- The RAKE goes to inventory.
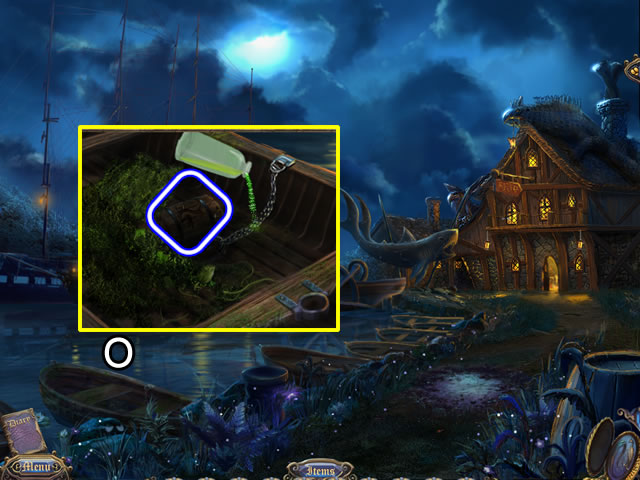
- Exit the tavern.
- Look in the bottom of the boat (O).
- Use the RAKE to uncover a mug; pour the BOTTLE OF ACID on the chain to free the DRAGON CUP.
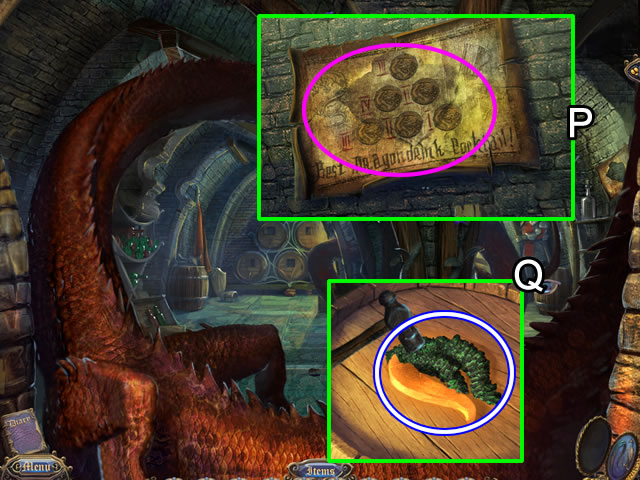
- Return to the tavern cellar.
- Look at the old parchment on the wall (P).
- Put the PARCHMENT FRAGMENT in center; the information goes into the diary.
- Zoom in on the barrel (Q).
- Put the CORAL COVERED RUNE on the top; use the HAMMER three times to remove the coral.
- Take the RUNE OF FIRE.
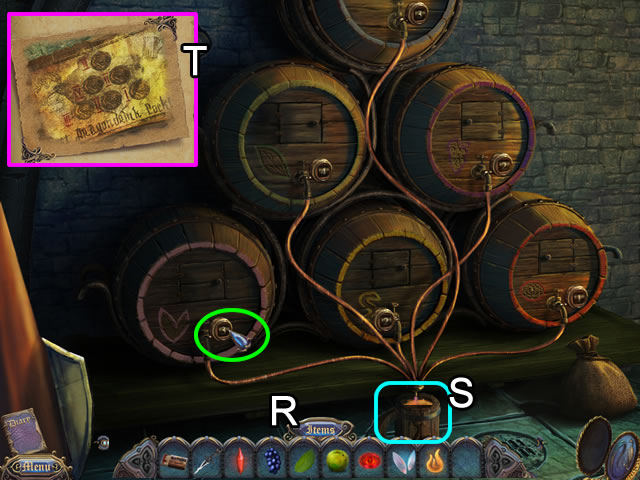
- Go toward the barrels in the back.
- Put the DRAGON CUP on the floor below all of the tubes (R).
- Match the ingredients (S) with the symbols on the barrels (MINT LEAF, GRAPES, MOONFLOWER PETALS, POISONED APPLE and RUBY EYE).
- Refer to the diary page (T) for the number of times to press the tap on each barrel.
- Press near the tap and watch the counter. Use the Reset button if necessary.
- Order doesn't matter, just the amount of each ingredient.
- Take the DRAGON COCKTAIL.
- Solution: Top barrel - 3; mint - 4; grapes - 2; moonflower petals - 3; poisoned apple - 2; ruby eye - 1.
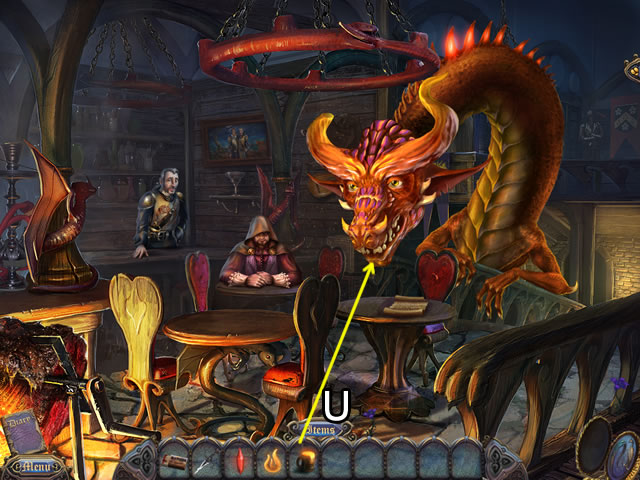
- Give the dragon the DRAGON COCKTAIL (U).
- Receive ENCHANTED CHALK.
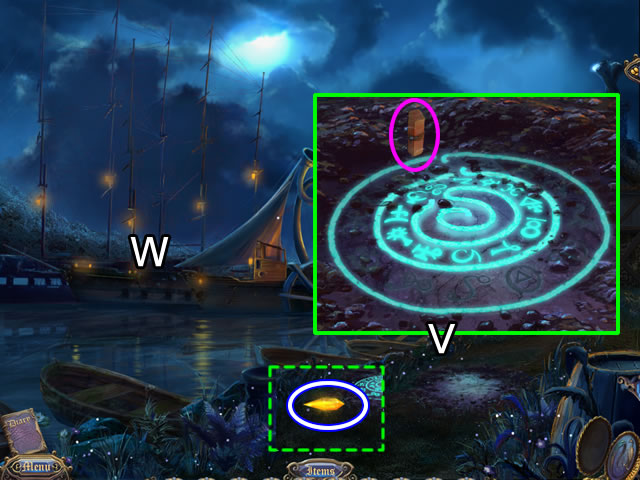
- Exit the tavern.
- Look closer at the ground where the winged creature was (V).
- Click the ENCHANTED CHALK three times on the drawing; take the YELLOW CRYSTAL.
- Board the boat (W).
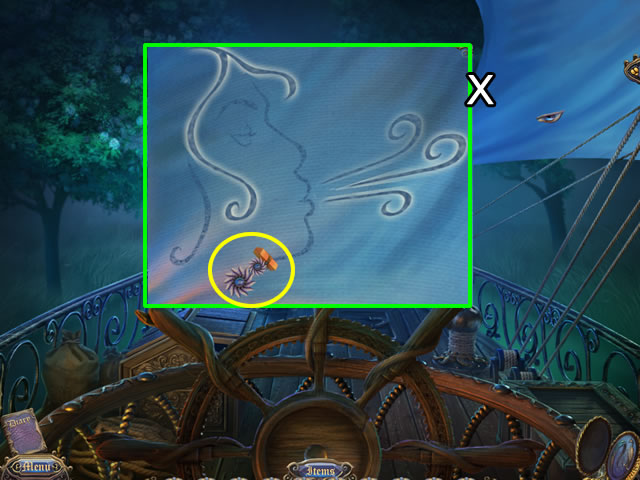
- Zoom in on the sail (X) to open a puzzle.
- The goal is to use the ENCHANTED CHALK to highlight the outline.
- A correctly highlighted line turns white.
- Place the chalk on a line (yellow) and click to highlight it.
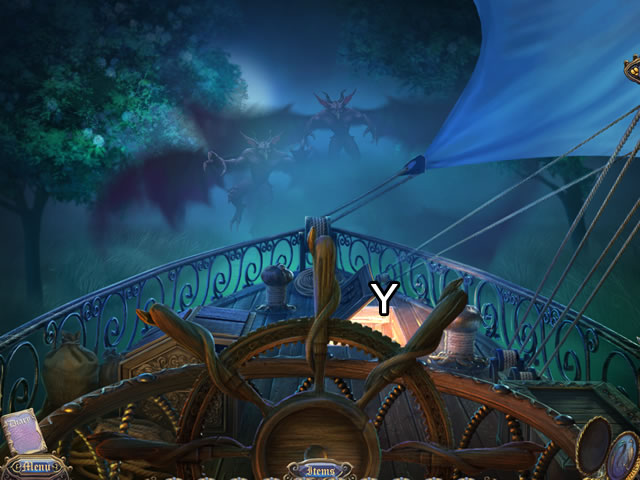
- Open the hatch (Y).
- Go below the deck.
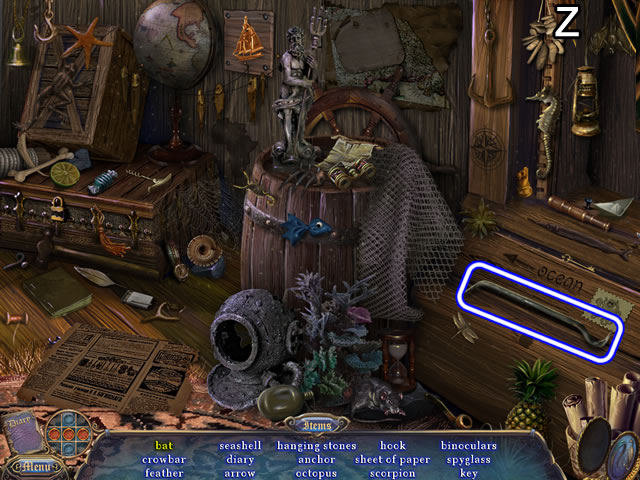
- Play the hidden object scene.
- Move the curtain (Z) to find the bat.
- Find the rest of the listed objects.
- The CROWBAR goes to inventory.
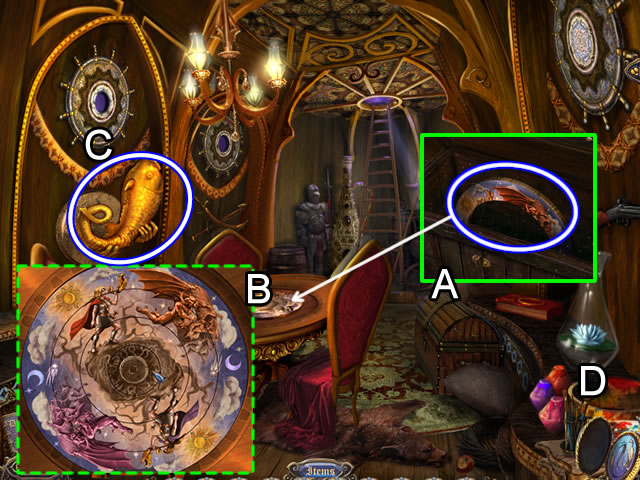
- Zoom in on the trunk (A).
- Use the CROWBAR to pry off the lock; take the PIECE OF PAINTED WHEEL and place it on the table to open a puzzle (B).
- Click each ring until it locks into place.
- Completing the puzzle releases the hands holding the fish-shaped HORN (C).
- Look closer at the table (D) to open a puzzle.
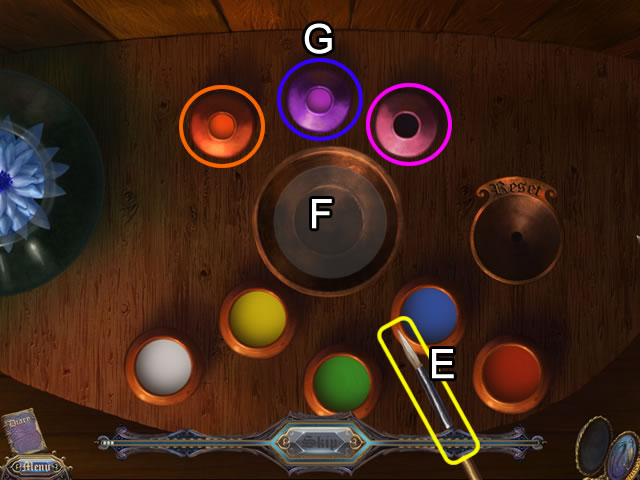
- The goal is to use the paintbrush (E) to combine two colors in the bowl (F) to fill the three empty bottles (G) with ORANGE, PURPLE and PINK ESSENCES.
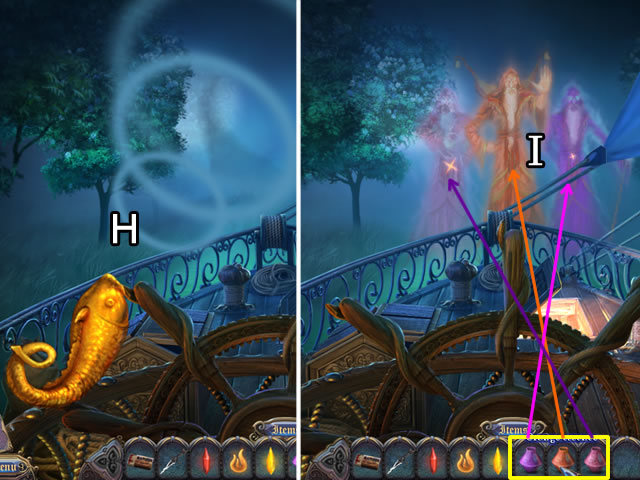
- Solution: Orange = red and yellow; Purple = blue and red; Pink = red and white.
- Return to the deck.
- Use the HORN to blow (H) the creatures away.
- Pour the correct color essence (I) on the river guardians.
Chapter 5: The Village
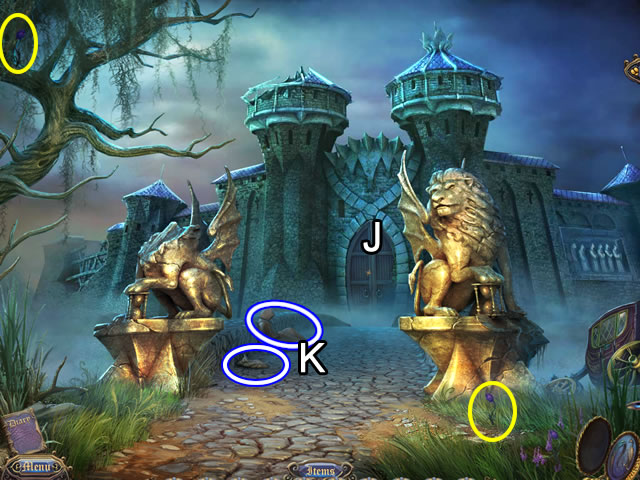
- Attempt to enter the gates (J).
- Pick up the EMPTY SACK and CULTIST'S ROBE (K).
- Place the CULTIST'S ROBE on the door to gain entrance.
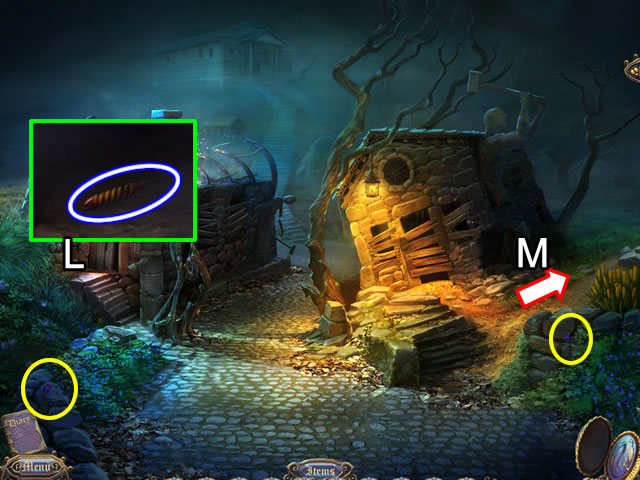
- Look at the door of the cabin on the left (L); take the FIRECRACKER.
- Take the right path (M) to the old battle site.
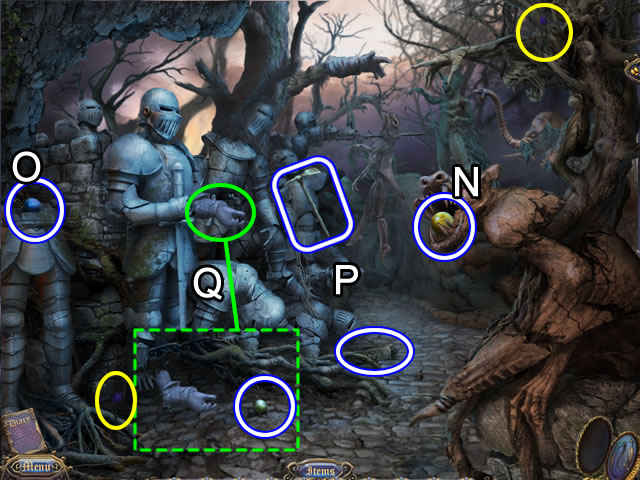
- Pick up the YELLOW BALL (N) and BLUE BALL (O).
- Take the PICKAXE and RUNE STONE (P).
- Knock the gauntlet off the armor (Q); pick up the GREEN BALL.
- Go forward.
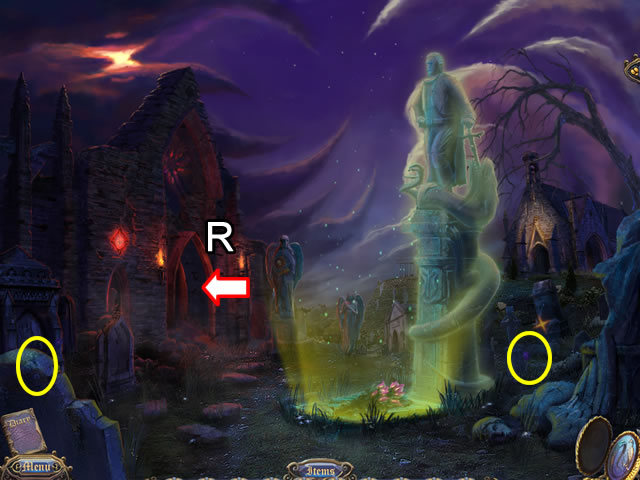
- Go left through the archway (R) to the tomb area.
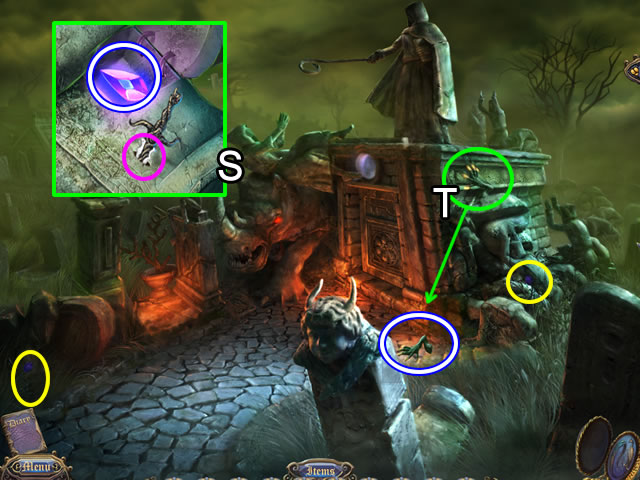
- Play the hidden object scene.
- Find the STATUE'S GOBLET.
- Examine the statue on the left (S).
- Insert the STRANGE DAGGER in the slit (pink); take the DARK DIAMOND from the compartment.
- Yank on the claw on the side of the tomb (T) three times to free it; pick up the MONSTER'S PAW.
- Back out to return to the cemetery.
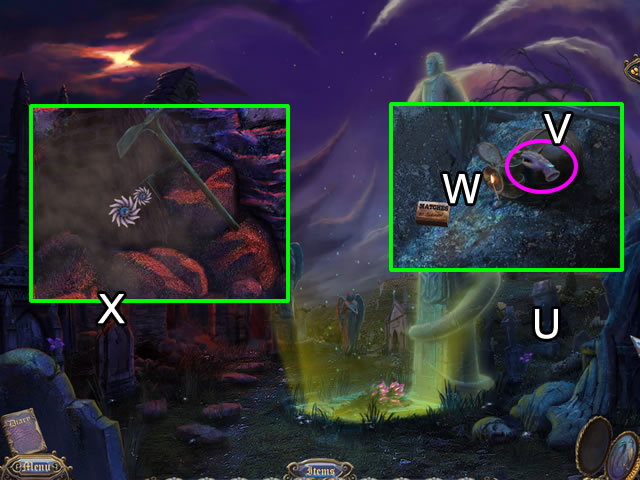
- Look closer at the tombstone on the right (U).
- Grasp the miner's helmet (V) to open the lens for the light.
- Use the MATCHES to light (W) the MINER'S HELMET.
- Zoom in on the tombstone on the left (X).
- Use the PICKAXE three times to clear away the rocks.
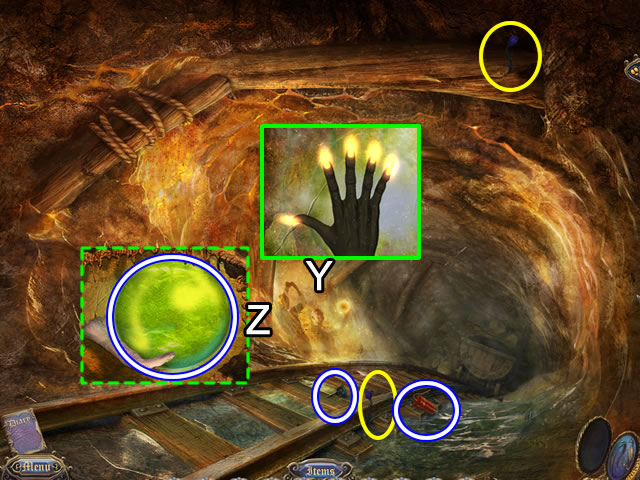
- Place the MINER'S HELMET at the mine entrance to illuminate the area.
- Examine the left back wall (Y).
- Place the MONSTER'S PAW on the wall three times to reveal the SPHERE OF LIGHT ENERGY (Z).
- Pick up the OIL CAN and DYNAMITE from the floor of the mine.
- Exit the mine; go down once to return to the old battle site.
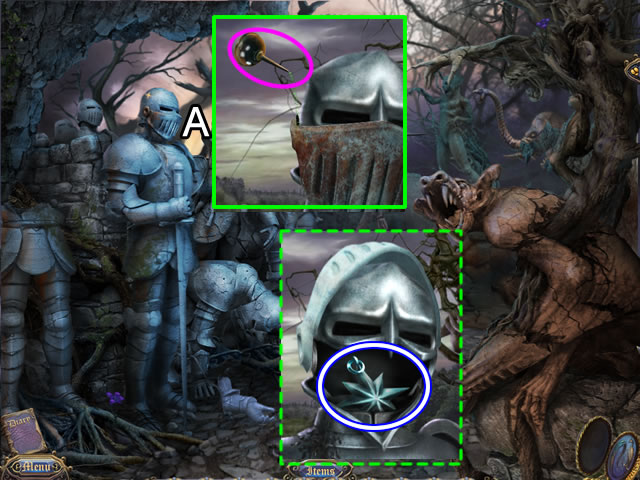
- Zoom in on the armor helmet (A).
- Apply the contents of the OIL CAN to the visor; open the visor and remove the STAR SYMBOL.
- Go down once to the crossroads; take the left path up the hill.
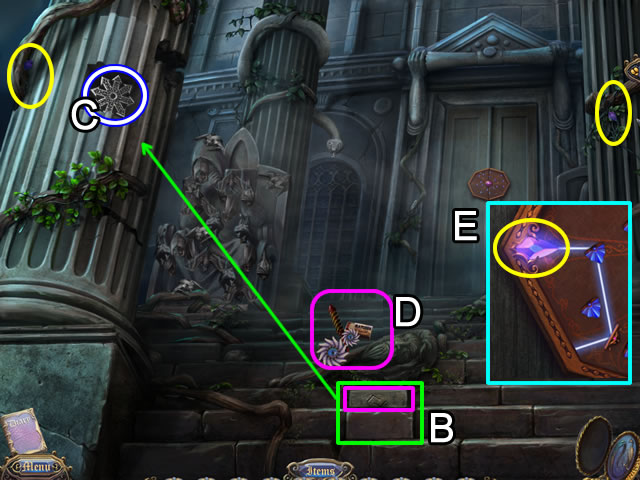
- Place the RUNE STONE on the step brick (B) to open a secret compartment.
- Take the CHAOS SYMBOL from the compartment (C); pick up the RUNE STONE for later use.
- Put the FIRECRACKER on the statue's head (D).
- Use the MATCHES to light the firecracker and scare the bats off the statue.
- Zoom in on the door (E); place the DARK DIAMOND on the board (yellow) to open a puzzle.
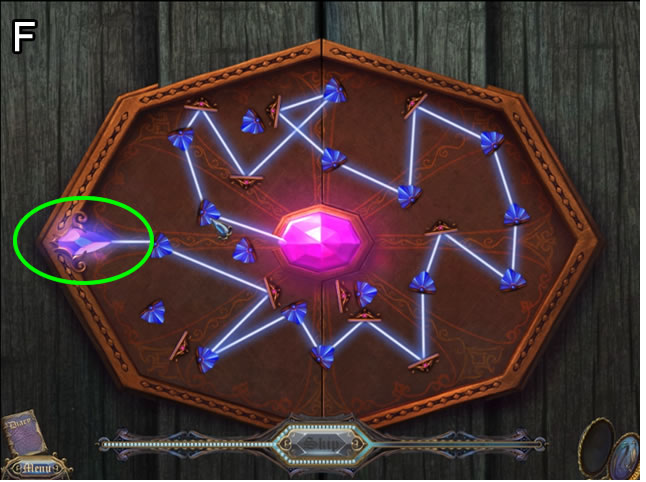
- The goal is to rotate the reflectors to direct the beam to the mirrors and into the gem in the center.
- Click the blue reflectors to change the direction of the beam.
- Solution is shown (F).
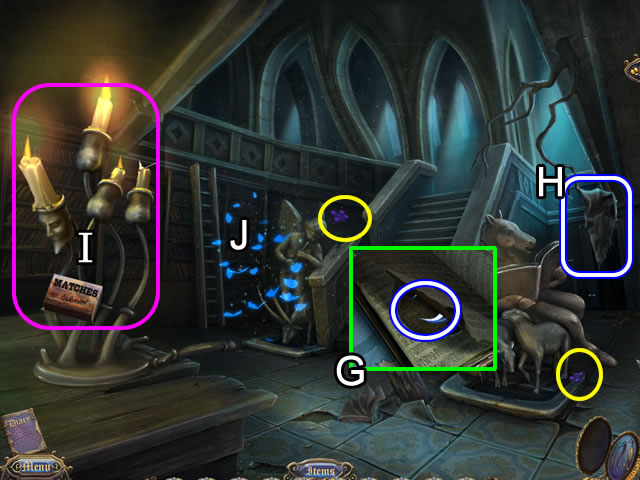
- Examine the book on the floor (G); take the MOON SYMBOL.
- Pick up the PIECE OF CLOTH (H).
- Use the MATCHES to light the candelabra (I) to trigger a hidden object scene (J).
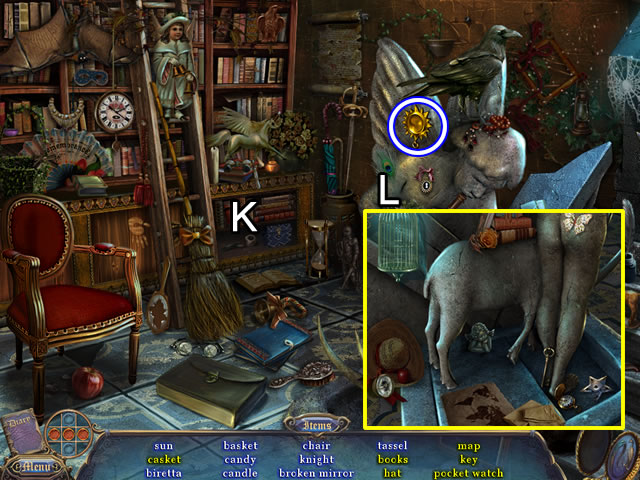
- Open the cabinet door (K) and look behind the statue (L) to find the yellow-listed items.
- Find the rest of the objects; the SUN SYMBOL goes to inventory.
- Exit the library.
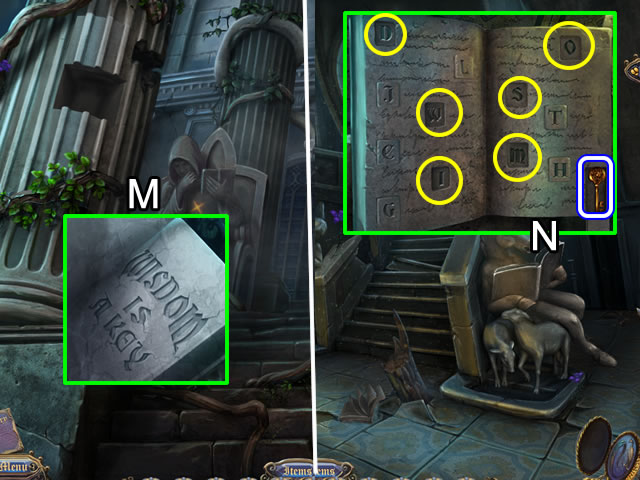
- Look closer at the statue on the left (M).
- Use the PIECE OF CLOTH to remove the dust covering the book and uncover a message.
- Enter the library.
- Examine the book the horse is holding (N).
- Depress the letters W-I-S-D-O-M to open a secret compartment .Take the BOOK KEY.
- Go up the stairs.
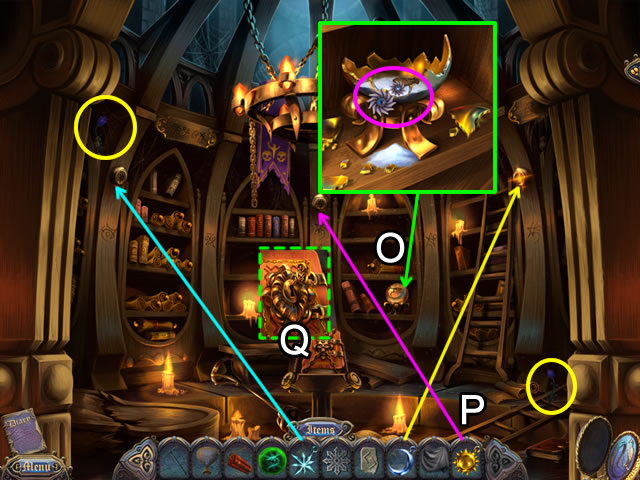
- Examine the bottom shelf (O). Use the RUNE STONE to break the glass; fill the EMPTY SACK with a SACK OF MAGIC DUST. (Missing the RUNE STONE? Check the front steps).
- Insert the SUN, MOON and STAR SYMBOLS in their matching inset (P). The beams remove the chains from the book.
- Insert the BOOK KEY in the book lock (Q) to open a connect-the-pipes puzzle.
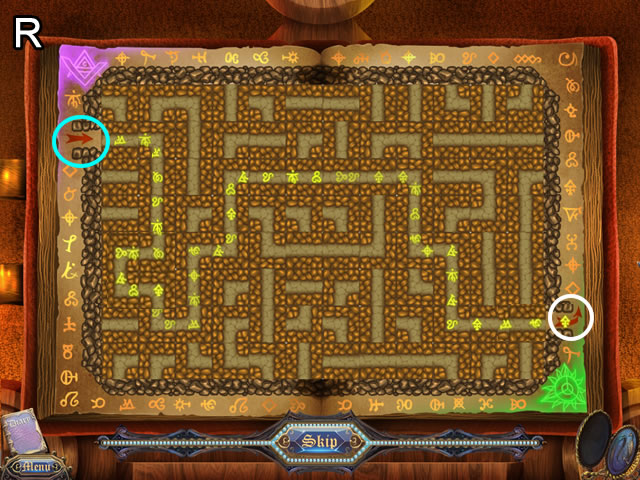
- Rotate the pipes to form a complete path from the left arrow (aqua) to the right arrow (white). Pipe positions are random. Exit and reenter the scene to reset the pipes.
- A possible solution is shown (R); receive a LABYRINTH MAP.
- Go down stairs.
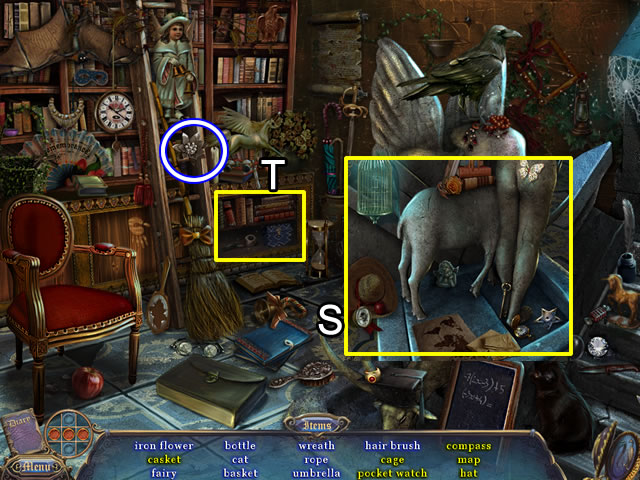
- Play the HOS.
- Look at the floor tile (S) and open the bookshelf door (T) to find the yellow-listed items.
- Find the rest of the objects.
- Receive a FLOWER for inventory.
- Go down three times to the entrance gates.
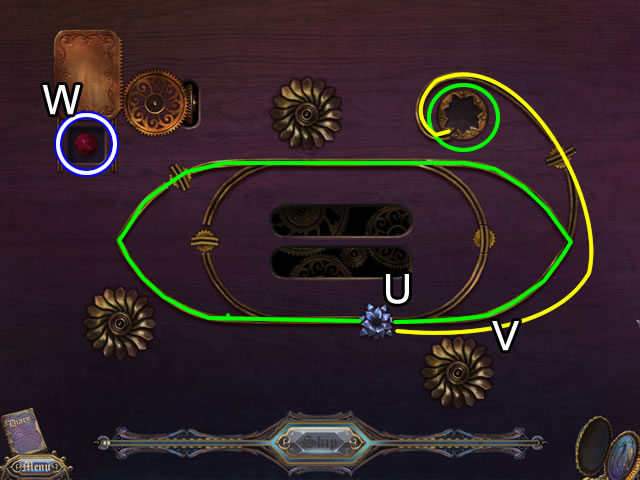
- Zoom in on the carriage.
- Place the FLOWER in the lock to open a puzzle.
- Guide the flower around the tracks. Pass the fixed flowers to rotate track segments to open or closed.
- One solution is to follow the outside track around and back to the starting position (U). Go forward on the outer track (V) to the ending point.
- Take the RED BALL (W).
- Go up, right, up and left to return to the tomb.
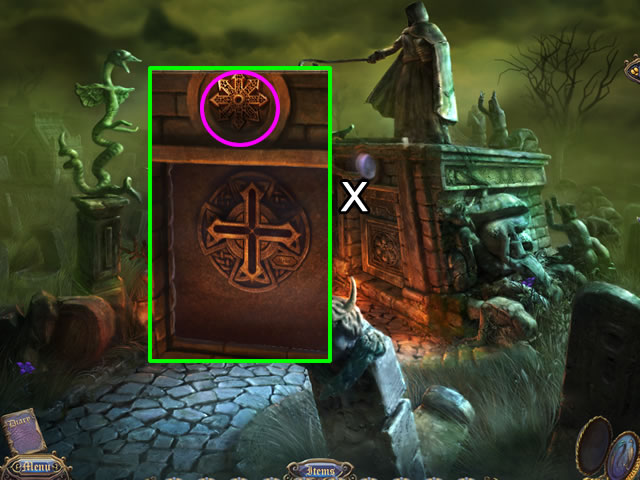
- Insert the CHAOS SYMBOL in the outline on the front of the tomb (X) to open a compartment.
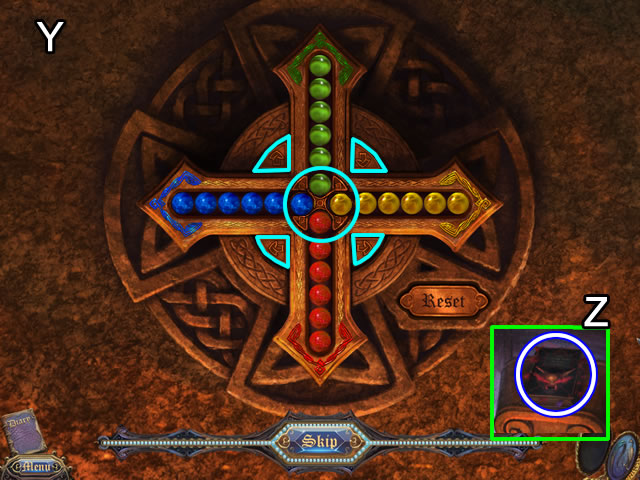
- Zoom in on the compartment; add the RED, BLUE, GREEN and YELLOW BALLS to open a puzzle (Y).
- The goal is to arrange the balls according to the color at the end of the row or column. The screenshot shows the completed puzzle.
- Use the four arrows (aqua) to move the balls along a row or column. Click the center to rotate the balls.
- Take the BOOK OF DARKNESS from the compartment (Z).
- Exit to the cemetery.
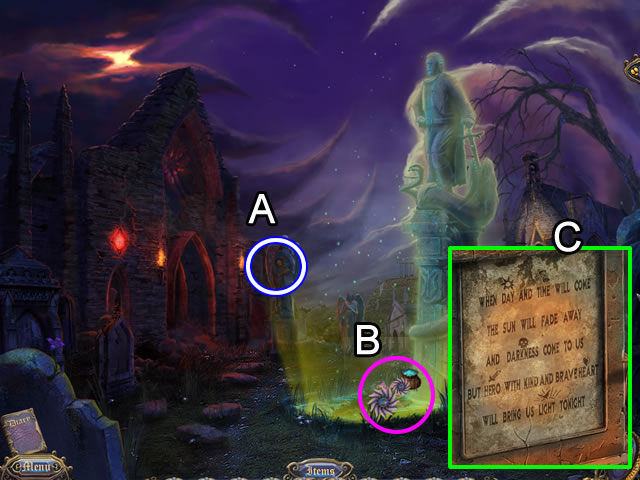
- Take the BOOK OF LIGHT from the statue (A).
- Pour the SACK OF MAGIC DUST in the circle (B).
- Remove the drawing and watch the cutscene. Read the inscription on the base of the statue (C); make a note of the symbols.
- Go back to the second floor of the library.
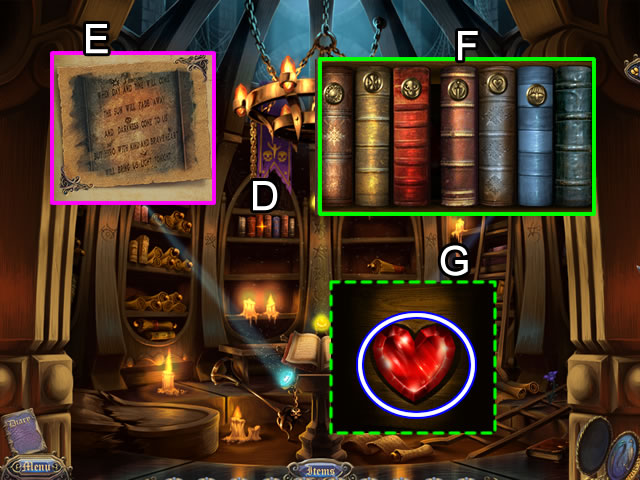
- Zoom in on the books (D); add the BOOK OF LIGHT and BOOK OF DARKNESS to the shelf.
- Refer to the diary entry (E) and note the symbols; swap the books on the shelf so they are in the same symbol order (F).
- Take the CRYSTAL HEART from the compartment (G).
- Return to the cemetery.
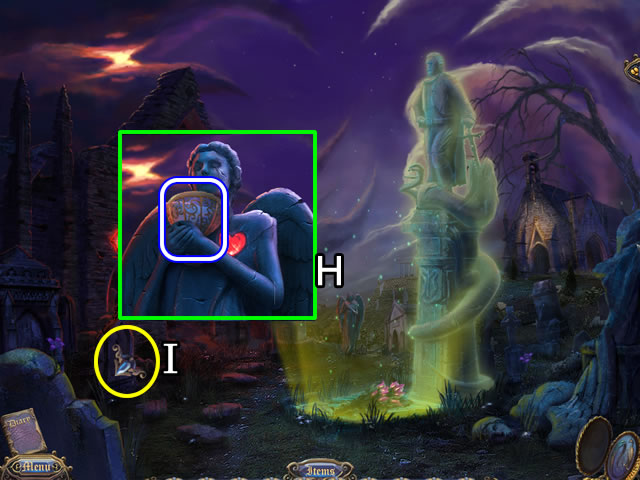
- Look closer at the angel (H).Place the STATUE'S GOBLET in her hands; insert the CRYSTAL HEART in the heart-shaped inset.
- Take the GOBLET OF ANGEL'S TEARS.
- Enter the mine (I).
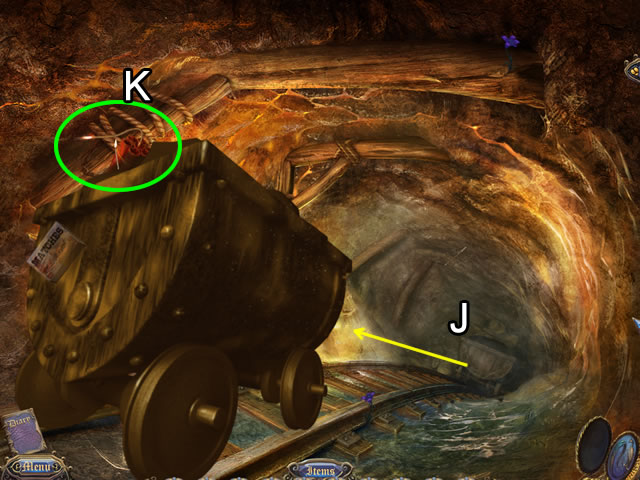
- Click the cart lodged against the rocks (J) to pull it back.
- Place the DYNAMITE on the cart (K); use the MATCHES to light the fuse.
- Enter the cave.
Chapter 6: The Labyrinth
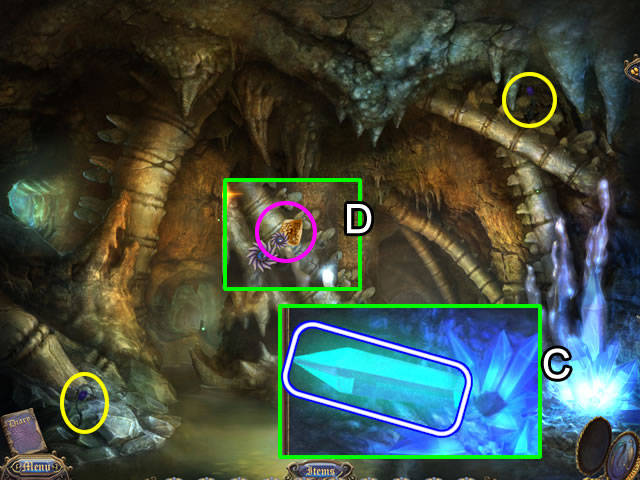
- Use the PICKAXE to chip off the BLUE CRYSTAL (C).
- Put the LABYRINTH MAP on the tunnel entrance (D) to open a puzzle.
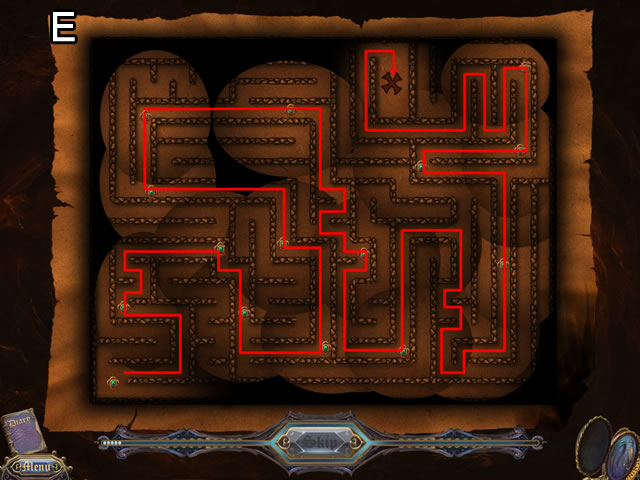
- The goal is to find the path through the maze from the lower left corner to the 'X'.
- The solution is shown (E). Choose any path to go forward.
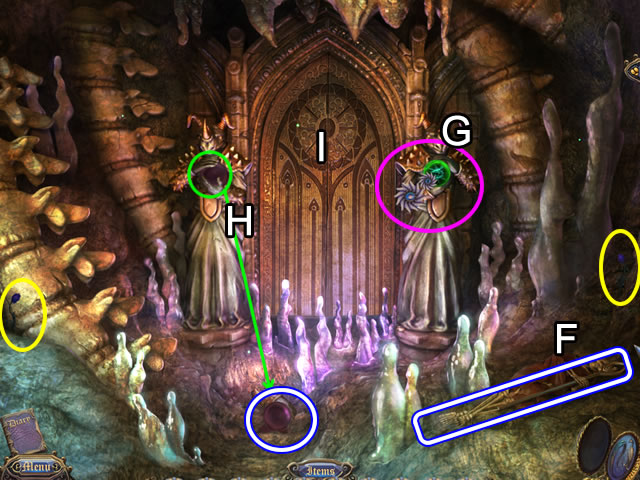
- Pick up the STAFF (F).
- Place the SPHERE OF LIGHT ENERGY in the hands of the statue (G); pick up the SPHERE OF DARK ENERGY the other statue drops (H).
- Zoom in on the door to open a puzzle (I).
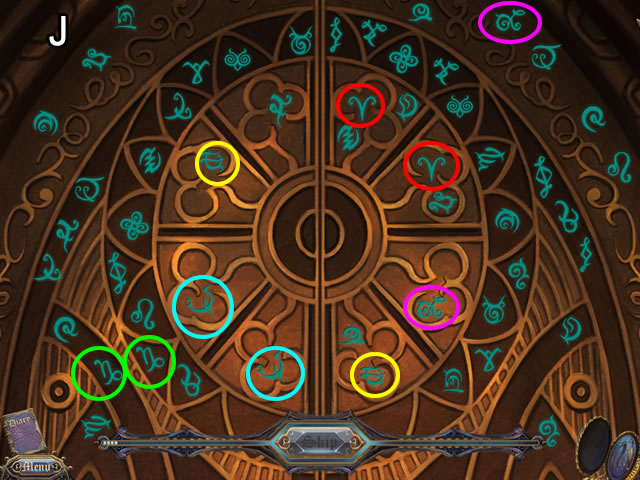
- Find each pair of matching symbols on the door (J) to enter.
- A correctly matched symbol lights up.
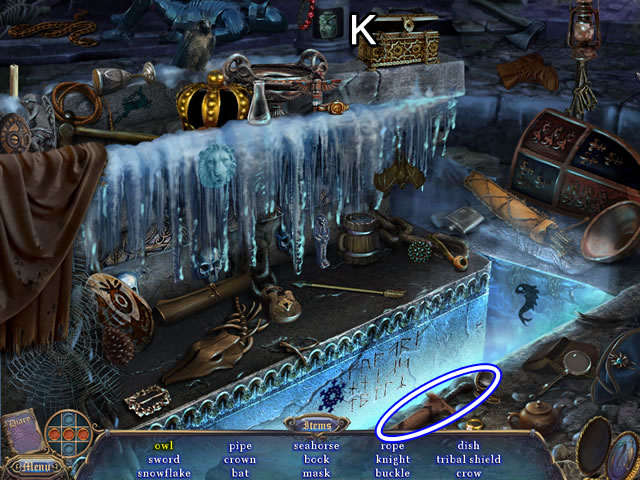
- Enter the chamber; play the HOS.
- Open the plate (K) in the column to find the yellow-listed object.
- Find the rest of the items; receive the SWORD.
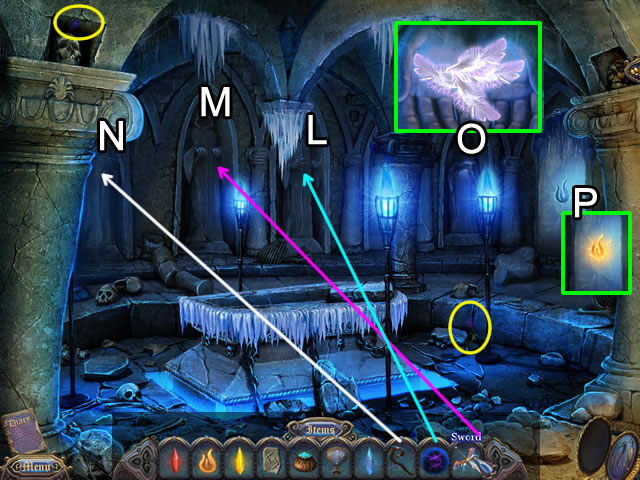
- Place the SPHERE OF DARK ENERGY (L); the SWORD (M) and STAFF (N) in the hands of the statues.
- Take the ENCHANTED FEATHERS from the statue (O).
- Place the RUNE OF FIRE on the door (P).
Chapter 7: Crossing the Ravine
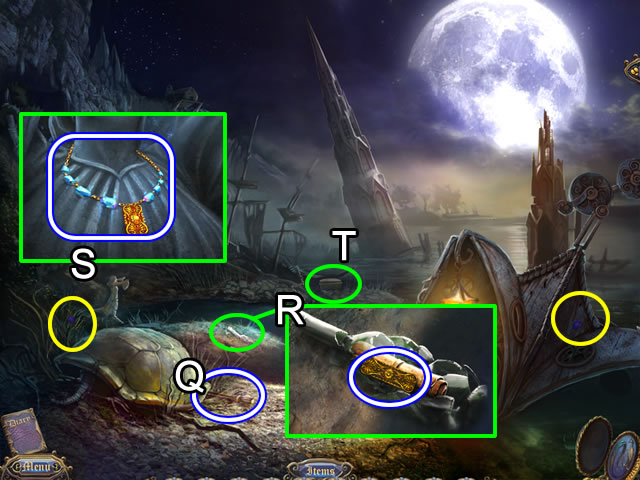
- Pick up the LEVER from beneath the turtle (Q).
- Use the RUNE STONE to smash the bottle (R) and get an ORNAMENT FOR PUZZLE.
- Look at the angel (S). Take the second ORNAMENT FOR PUZZLE.
- Zoom in on the chest (T). Place the two ORNAMENT FOR PUZZLE pieces on the board to open a slider puzzle.
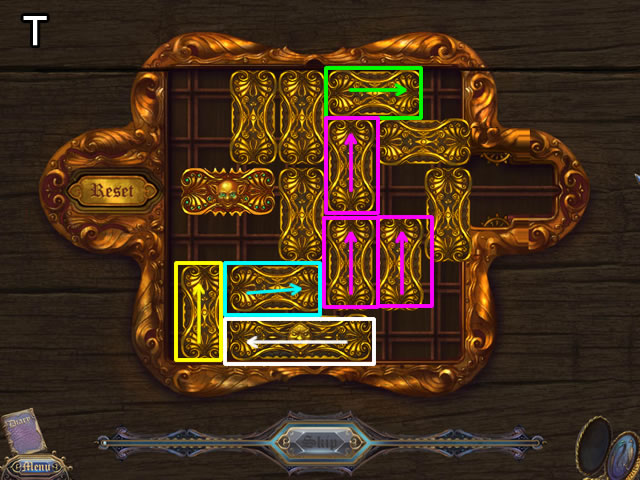
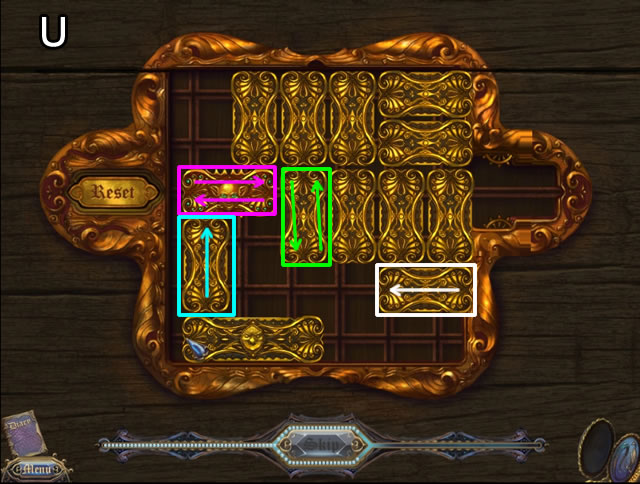
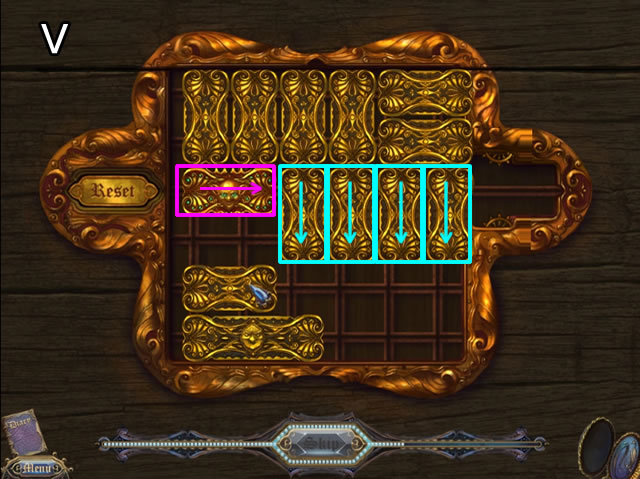
- Follow these steps to solve the puzzle (T): Slide the top tile (green) to the right; slide the three pink tiles up; slide the aqua tile to the right; slide the yellow tile up; slide the white tile to the left. Look at (U) for the results and the next steps.
- Next (U): Slide the green tile down; slide the pink tile right; slide the aqua tile up; slide the pink tile left; slide the green tile up; slide the white tile left. Look at (V) for the results and the last steps.
- Finally (V), slide the four aqua tiles down and side the pink tile right to the exit.
- Collect the CRYSTAL SKULL WITH FUEL.
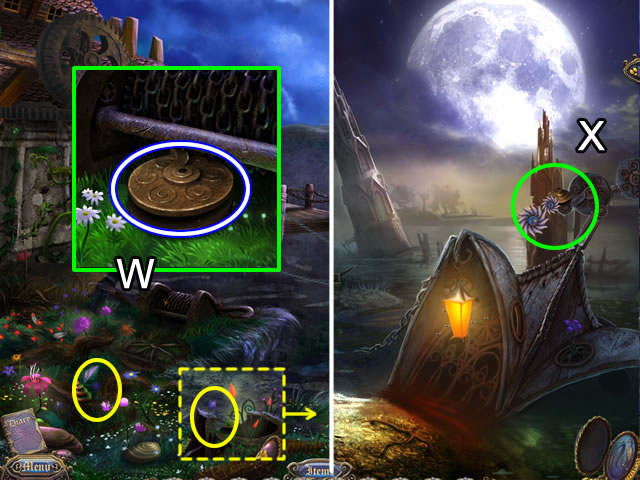
- Go up the steps to the cable terminal.
- Take the WAGON ROLLER from beneath the chain spool (W). Note: The second flower (dashed yellow) is on the far right side of the cliff above the Hint locket.
- Go down to the marsh and place the WAGON ROLLER on the broken wagon (X).
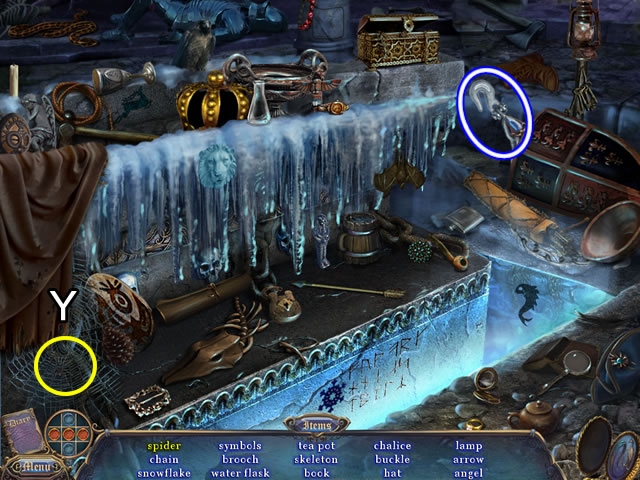
- Go down once to the crystal crypt; play the HOS.
- Wipe away the spider web to find the spider (Y).
- Find the rest of the objects; receive the CHAIN WITH HOOKS.
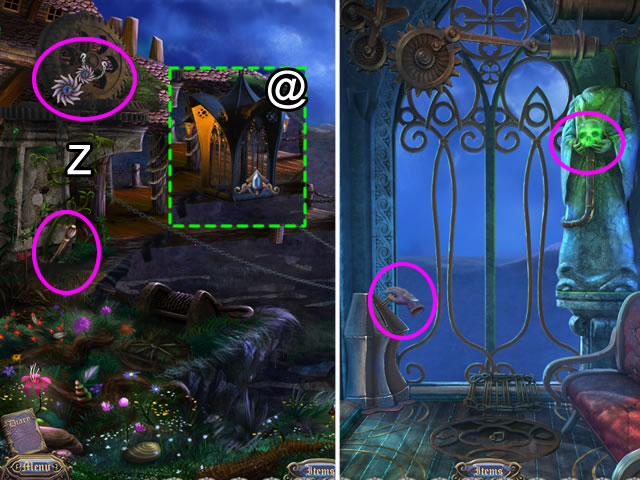
- Exit the crypt; go up the steps to the terminal.
- Attach the CHAIN WITH HOOKS to the wheel (Z); insert and pull the lever to retrieve the cable wagon (@).
- Place the CRYSTAL SKULL WITH FUEL in the statue's hands and pull the lever.
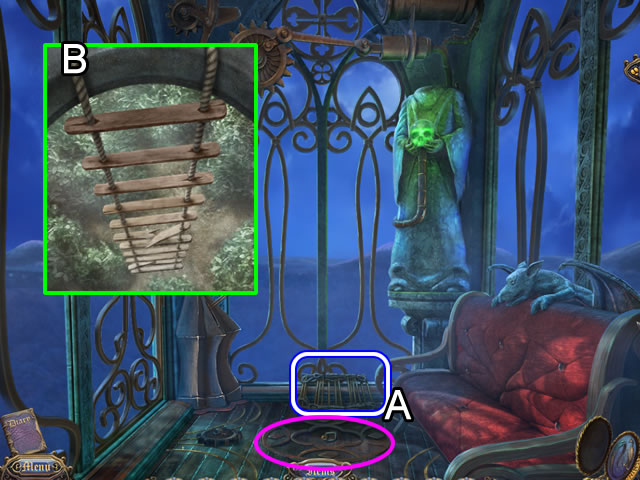
- Pick up the ROPE LADDER and open the hatch (A).
- Peer down the hatch opening (B) and attach the ROPE LADDER to exit.
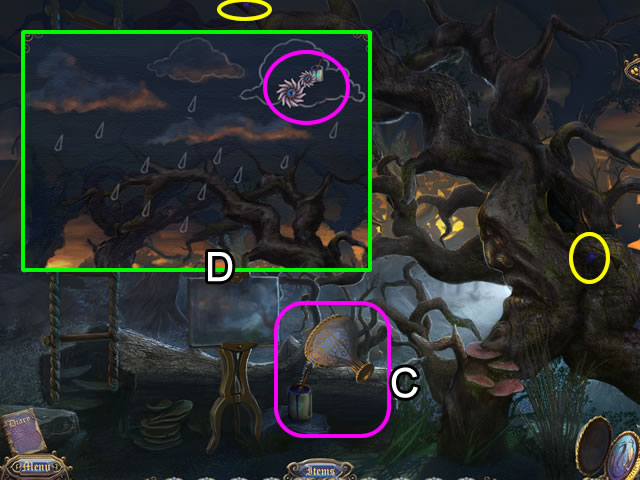
- Pour the GOBLET OF ANGEL'S TEARS into the dry paint (C); take the CAN OF PAINT.
- Zoom in on the unfinished painting (D). Place the CAN OF PAINT on the four clouds to start the rain; Take the WOOD KEEPER'S TWIG.
- Play the HOS. Receive a YOKE.
- Go forward to follow the path.
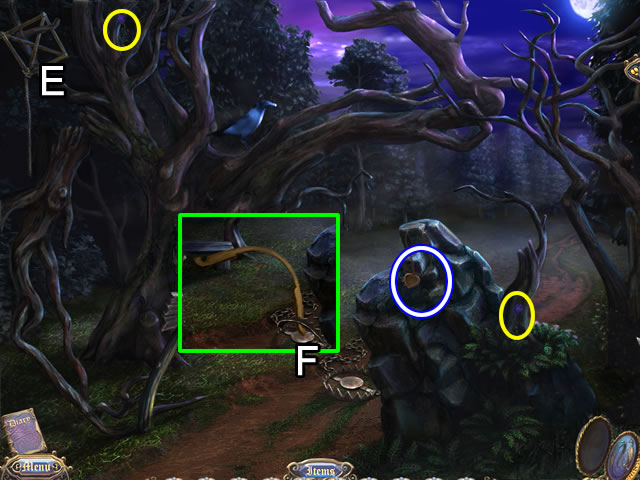
- Pull on the branch (E) three times to dislodge the kite.
- Use the YOKE to spring the trap (F); pick up the LOCKET PART on the rock.
- Go forward.
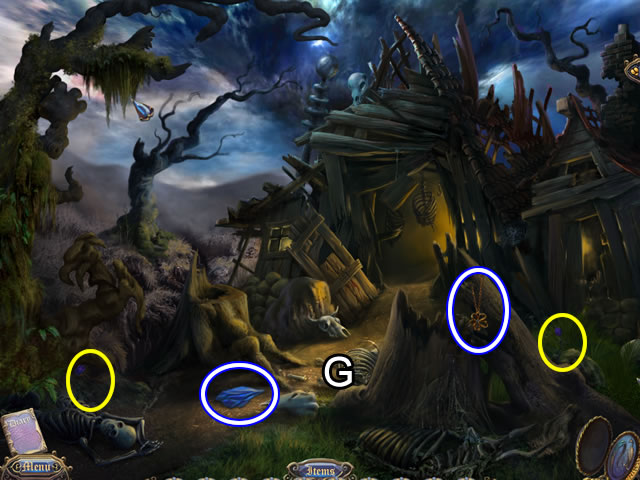
- Pick up the PIECE OF CLOTH and FLOWER ORNAMENT (G).
- Go forward.
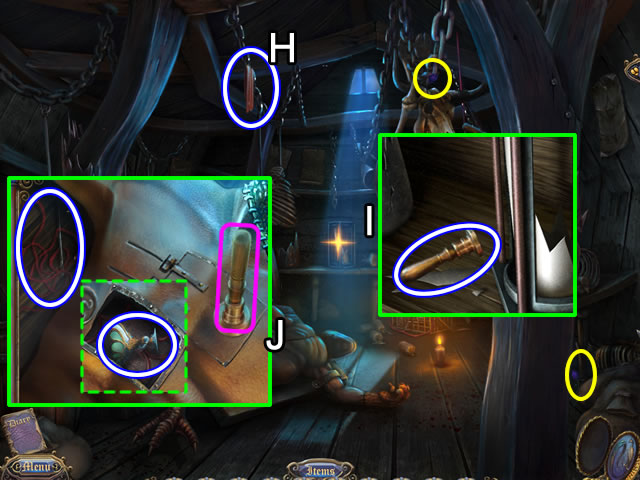
- Take the PIECE OF CLOTH (H).
- Zoom in on the back shelf (I). Use the RUNE STONE to break the glass; take the MONSTER'S STAMP.
- Look closer at the creature (J). Place the MONSTER'S STAMP in the inset to open its chest; take the ANGEL'S FLASK; pick up the NEEDLE AND THREAD by the side of the body.
- Go down three times.
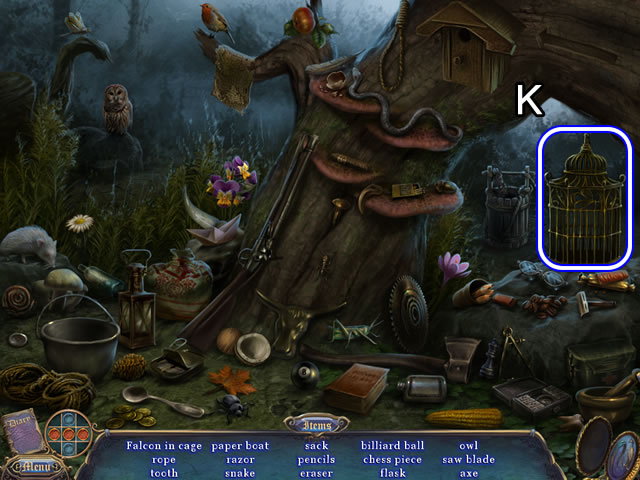
- Play the HOS by the old tree.
- Find the listed objects.
- The FALCON IN A CAGE (K) goes to inventory.
- Go forward.
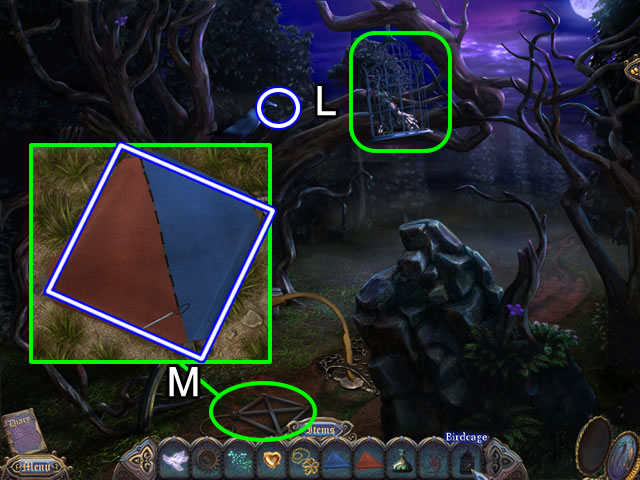
- Hang the FALCON IN A CAGE next to the crow (L) to receive the piece of CHEESE in its beak.
- Attach the two PIECES OF CLOTH to the kite frame with the NEEDLE AND THREAD (M). Take the KITE.
- Go forward.
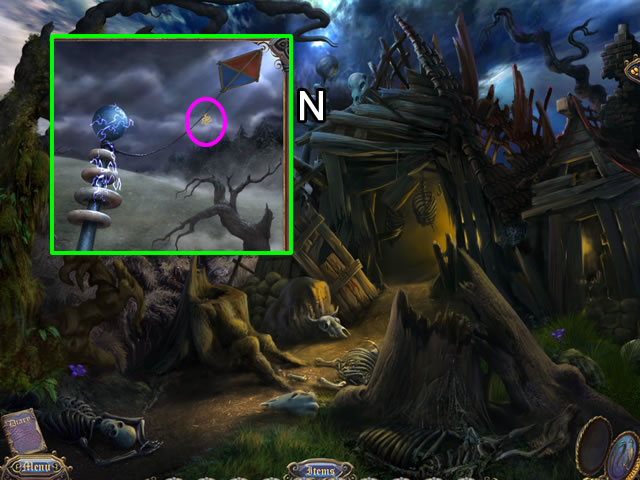
- Examine the antenna (N). Attach the KITE. Put the FLOWER ORNAMENT on the kite string to turn the power on.
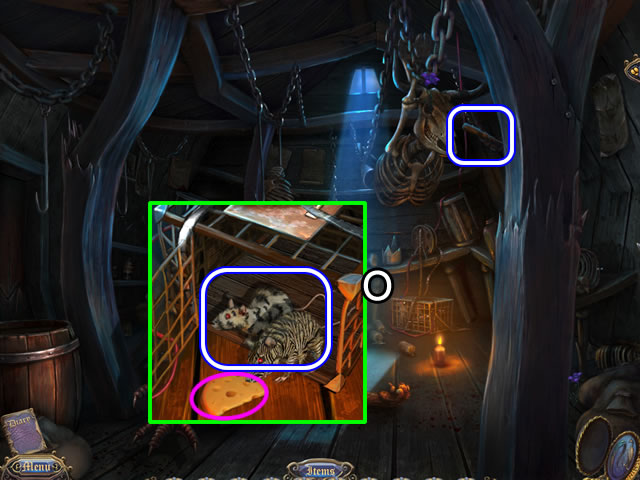
- Go into the shed.
- Zoom in on the mouse cage (O). Coax the STRANGE MICE out of their cage with the piece of CHEESE.
- Take the SCREWDRIVER from the post.
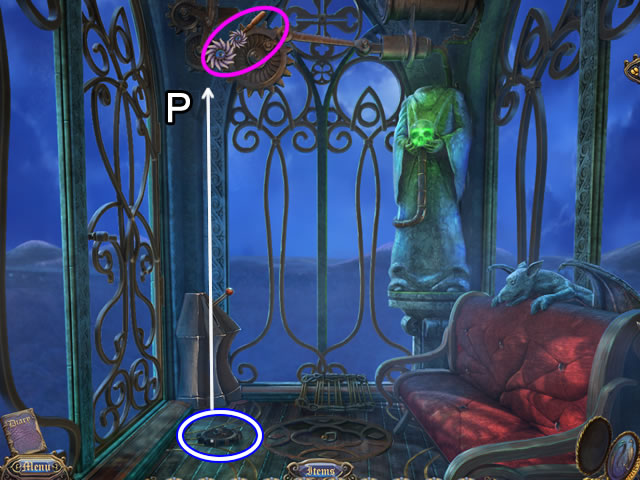
- Go down three times and up the rope ladder to the cable wagon.
- Pick up the COG WHEEL and reattach it to the gears (P). Use the SCREWDRIVER to secure the cog and complete the journey.
Chapter 8: The Healing Potion
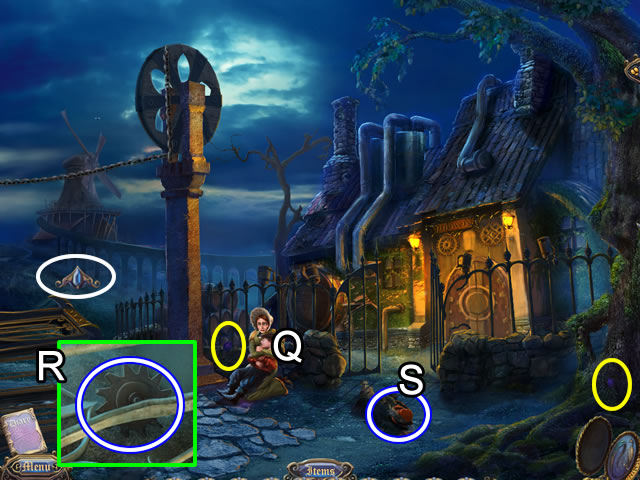
- Speak to the woman (Q).
- Examine the crashed cable wagon (R) and take the COG WHEEL; grab the FANCY HAT (S).
- Go toward the windmill in the distance.
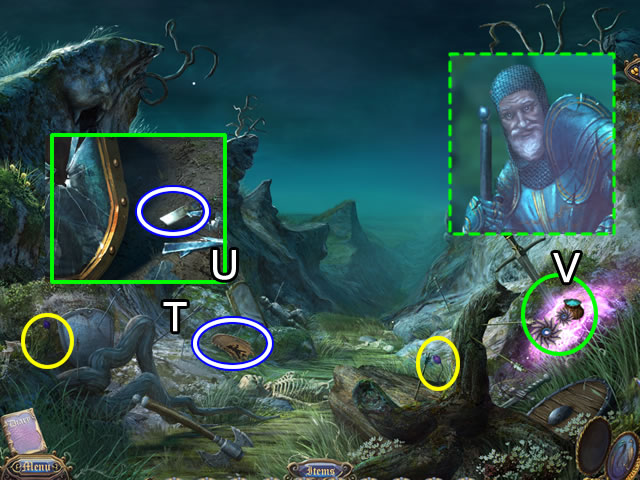
- Pick up the SHIELD FRAGMENT (T).
- Touch the mirror (U) to break it; take the MIRROR FRAGMENT.
- Sprinkle some dust from the BAG OF MAGIC DUST (V) on the sword. Speak to the old crusader.
- Go forward.
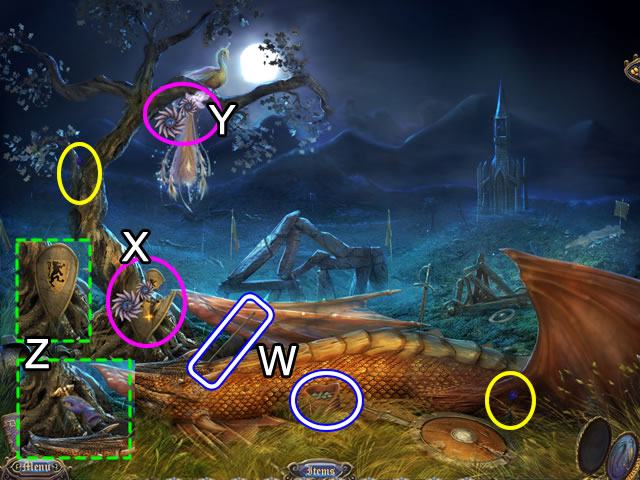
- Take the MARBLES and ARROW WITH DRAGON'S BLOOD (W).
- Place the SHIELD FRAGMENT on the broken shield (X).
- Put the ENCHANTED FEATHERS on the bird (Y).
- Take the restored SHIELD and the RED BIRD that was hiding behind the shield (Z).
- Go back once.
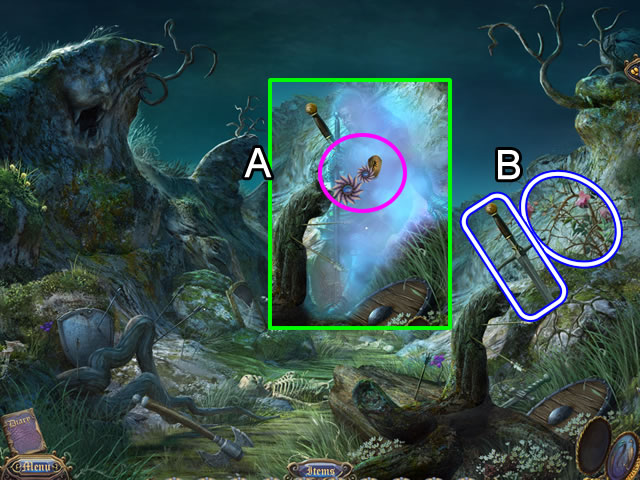
- Give the SHIELD to the ghost of the crusader (A).
- Take the THORN FLOWER and SWORD after the crusader vanishes (B).
- Go down once.
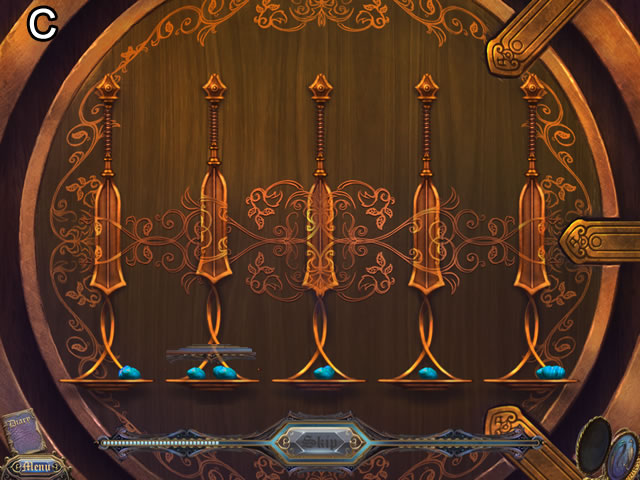
- Zoom in on the brewery door.
- Place the MARBLES on the door to open a puzzle.
- Distribute the stones across the scale pans until they are all at the same height (C).
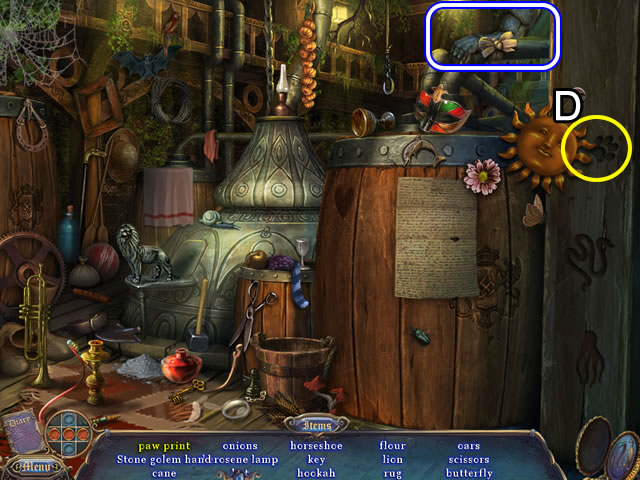
- Enter the brewery.
- Play the HOS.
- Move the sun to find the Paw print (D).
- Find the rest of the listed objects; receive a STONE GOLEM ARM.
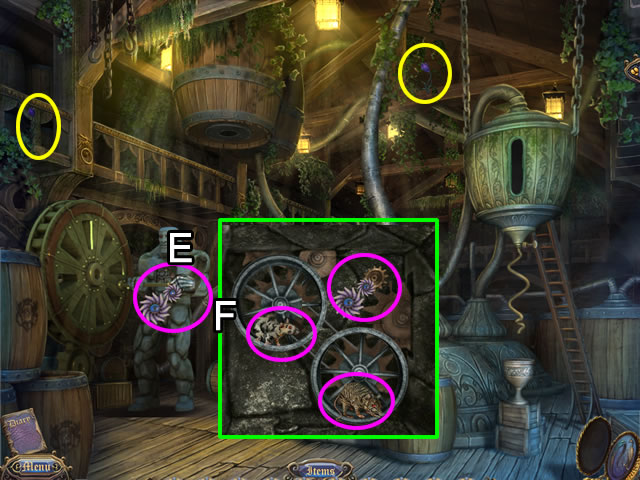
- Place the STONE GOLEM ARM on the golem (E).
- Open the golem's chest plate (F).Add the COG WHEEL and STRANGE MICE.
- This triggers a hidden object scene.
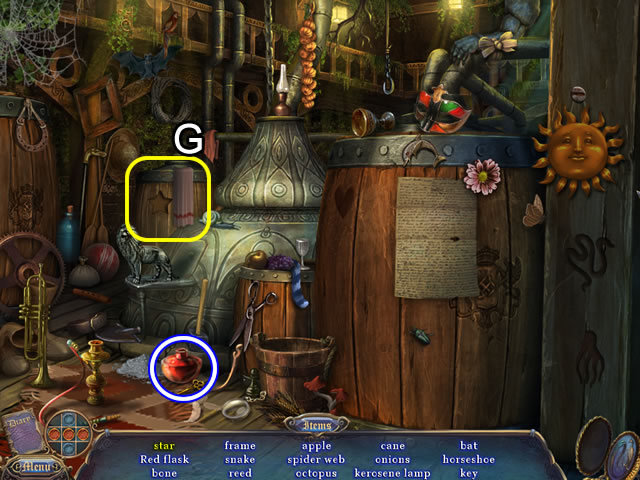
- Move the cloth to find the Star (G).
- Find the rest of the listed objects.
- Receive a FLASK OF DRAGON BLOOD.
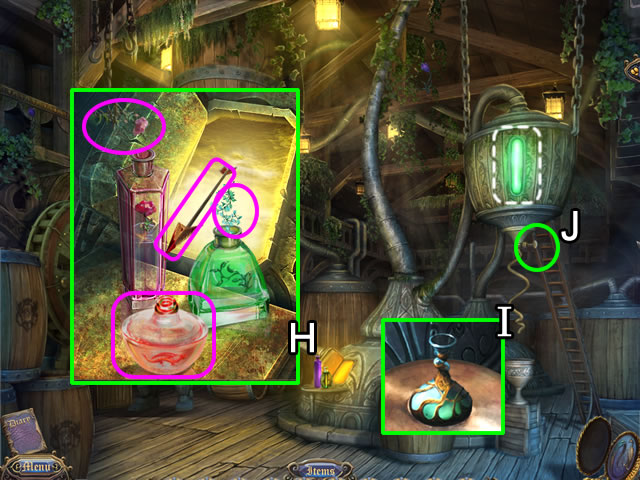
- Add the FLASK OF DRAGON BLOOD to the other two bottles (H).
- Put the THORN FLOWER in the red bottle; the WOOD KEEPER'S TWIG in the green bottle and the ARROW WITH DRAGON'S BLOOD in the pink bottle. They combine and fill the vat (dashed white).
- Put the ANGEL'S FLASK under the spigot (I); pull the tap (J) and take the HEALING ELIXIR.
- Exit the brewery.
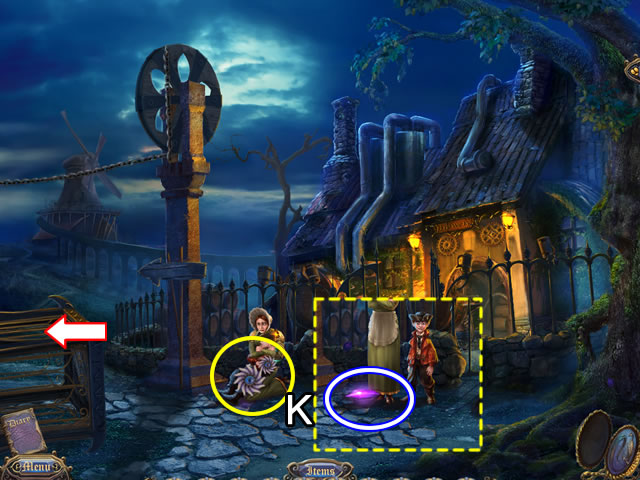
- Give the HEALING ELIXIR to Reginald (K); receive a PURPLE CRYSTAL.
- Go left.
Chapter 9: Freeing Uncle Arthur
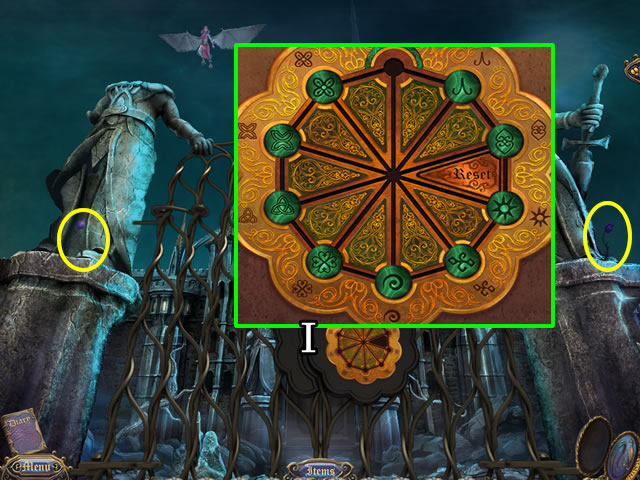
- Zoom in on the gate (I) to open a puzzle.
- The goal is to slide the green symbols along the path to their matching symbol in the gold border. The solution is shown.
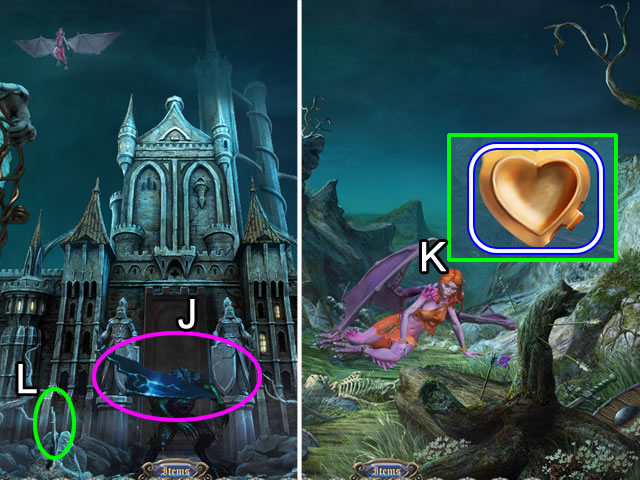
- Use the MIRROR FRAGMENT to summon the harpy to carry off the monster (J).
- Follow the harpy to the old battle site (down twice and up once).
- Speak to the harpy (K); receive the second LOCKET PART.
- Return to the Castle. Pull the lever (L) to lower the drawbridge; enter the main hall.
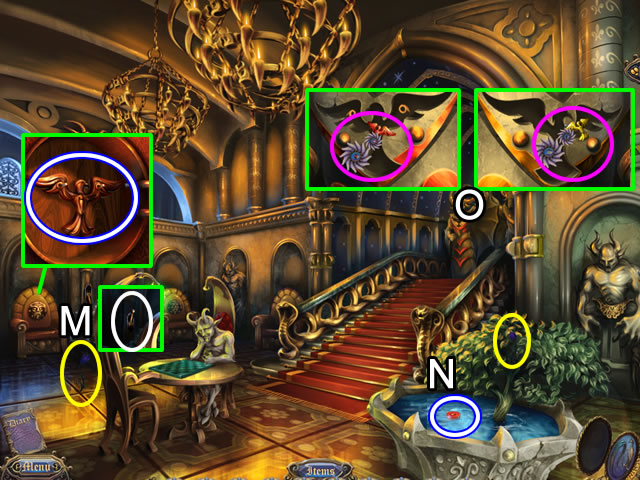
- Pull the lever (M) to light the chandeliers. Open the lion's head on the chair; take the YELLOW BIRD.
- Pick up the RED CHECKER (N).
- Zoom in on each of the stair guardians (O); place the YELLOW and RED BIRDS in the color-coded outlines.
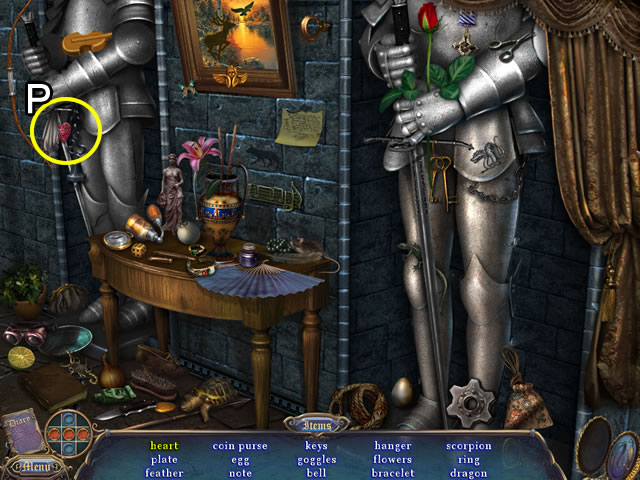
- Go forward; play the HOS.
- Move the cloth to find the heart (P).
- Find the rest of the listed objects; receive a MORTAR.
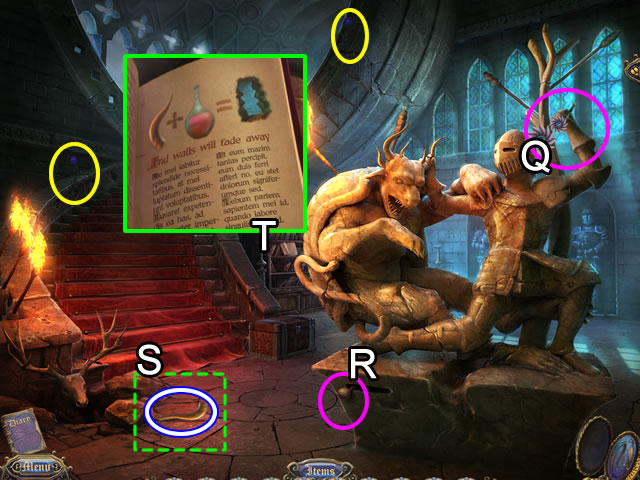
- Put the SWORD in the knight's hand (Q); pull the lever (R) and pick up the MONSTER'S HORN that gets lopped off (S).
- Look closer at the bookcase (T). Read the recipe.
- Continue up the stairs.
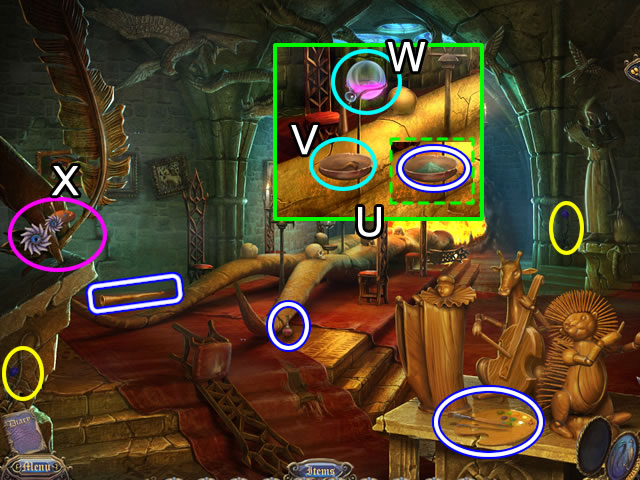
- Pick up the COLOR PALETTE, STRANGE BREW and SMALL FLUTE.
- Look closer at the table (U). Put the MORTAR in the alchemy tray; add the MONSTER'S HORN to the mortar; click the mortar for a pestle to appear and grind the horn (V).
- Place the STRANGE BREW on the top of the tray (W); take the MAGIC POWDER.
- Put the COLOR PALETTE on the hand (X). Look closer to open a puzzle.
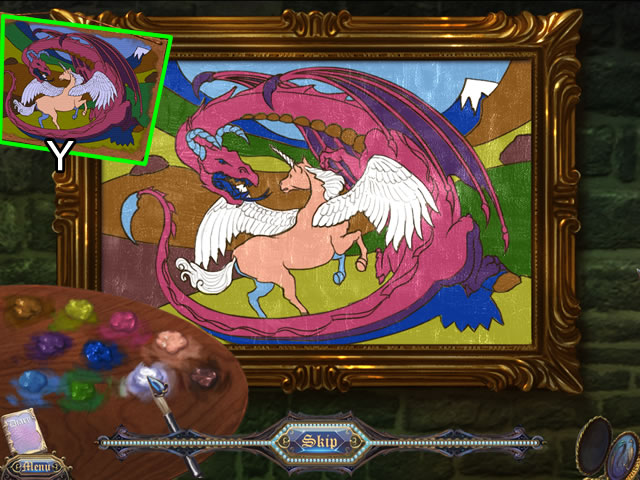
- Use the picture in the corner (Y) as a guide to paint the picture as shown.
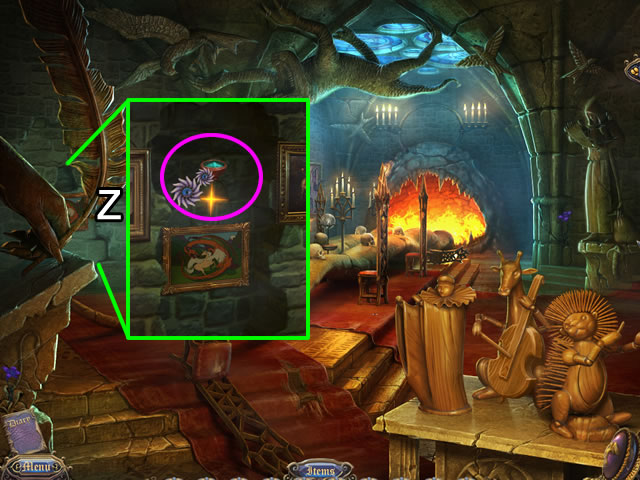
- Completing the painting causes an indentation in the wall (Z).
- Examine the wall closer; throw the MAGIC POWDER on the wall.
- Enter the secret room.
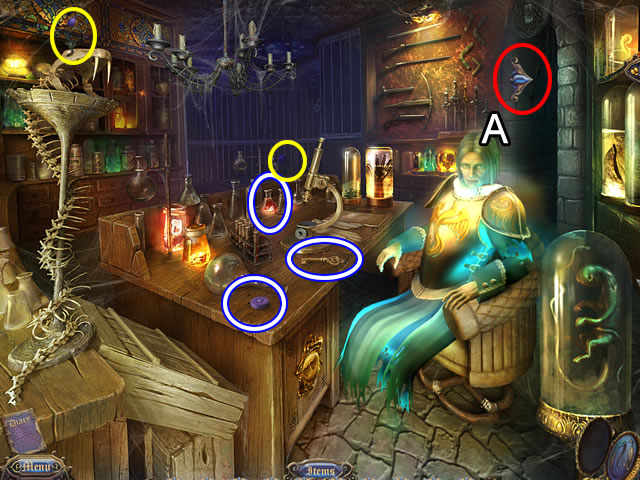
- Speak with Uncle Arthur (A).
- Take the PURPLE CHECKER, KEY and FLASK OF BLOOD.
- Go right to exit the secret room. Go down once.
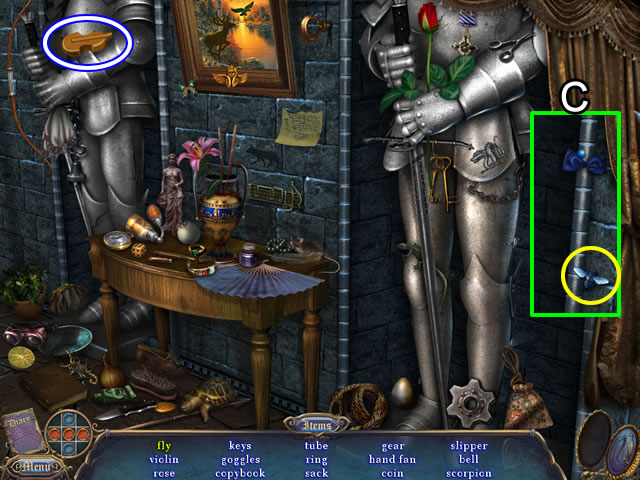
- Play the HOS.
- Move the curtain to find the fly (C).
- Find the rest of the listed objects.
- Receive a SMALL VIOLIN.
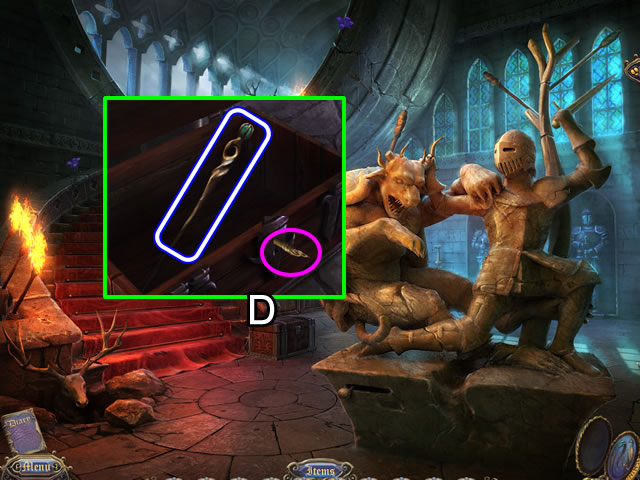
- Use the KEY to open the chest (D).
- Take the INTRICATE CANE.
- Go down once to the entry hall.
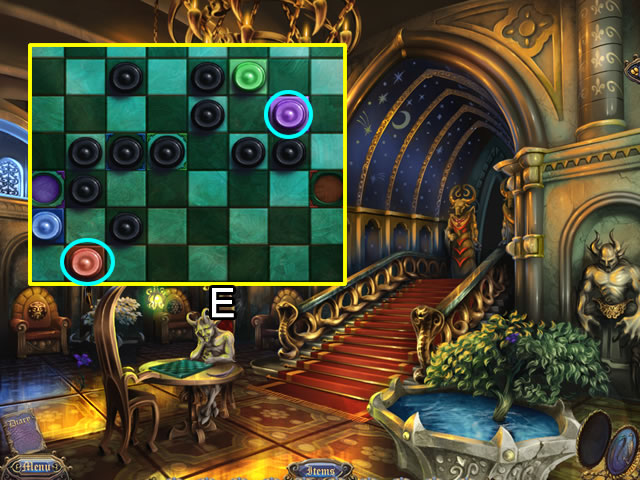
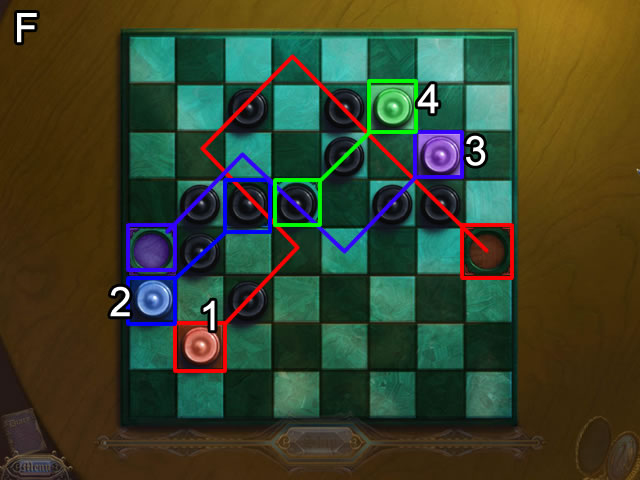
- Zoom in on the table (E); place the RED and PURPLE CHECKERS on the red and purple squares on the board to open a puzzle.
- The goal is to move the colored checkers into their same colored holes.
- Clicking a checker will show a move if it is available.
- See the solution (F) for the order and path for the checkers.
- Pick up the GREEN CRYSTAL that falls on the floor.
- Go up twice.
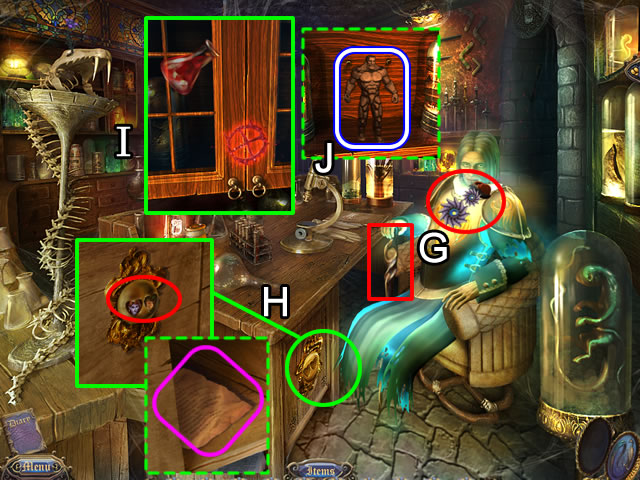
- Enter the secret room.
- Give Uncle Arthur (G) the INTRICATE CANE and FANCY HAT (in that order.
- Insert the two LOCKET PARTS in the cabinet door (H) to open it; read the document inside the cabinet.
- Pour the contents of the FLASK OF BLOOD on the cabinet symbol (I); take the GOLEM STATUE (J).
- Exit the room.
Chapter 10: Saving Belle
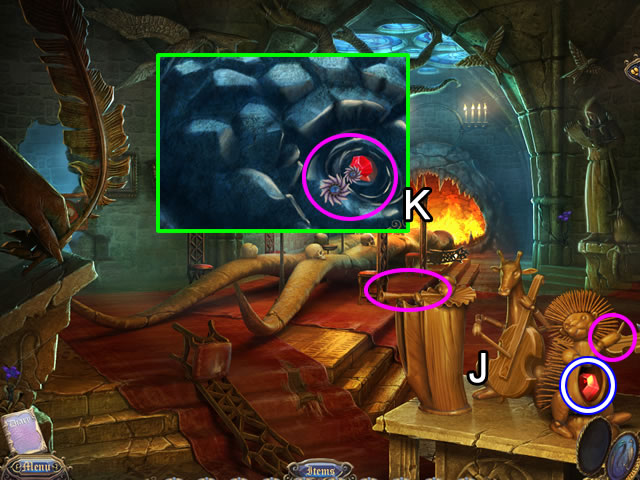
- Place the SMALL FLUTE and SMALL VIOLIN on the wooden figures (J); take the FIREPLACE EYE.
- Zoom in on the head of the table (K); insert the FIREPLACE EYE.
- Go forward.
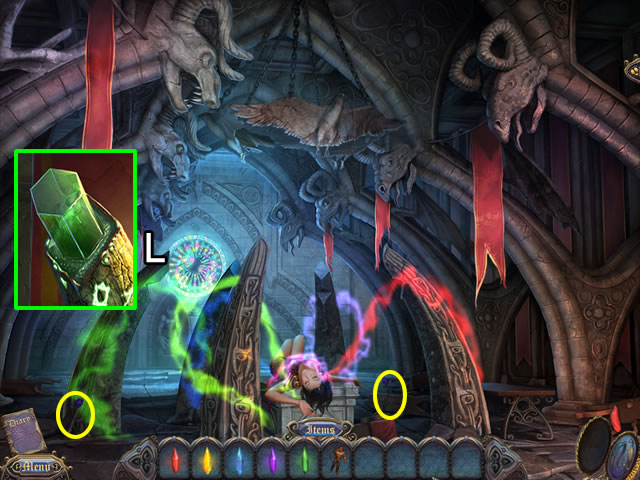
- Look at the top of each tube and insert the matching colored CRYSTAL (L).
- Later that same day…
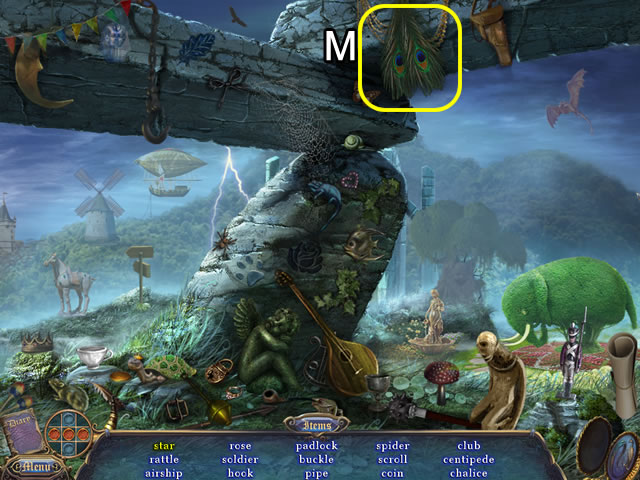
- Play the HOS.
- Move the peacock feathers aside (M) to find the Star.
- Find the rest of the listed objects.
- Receive a BELL CLAPPER.
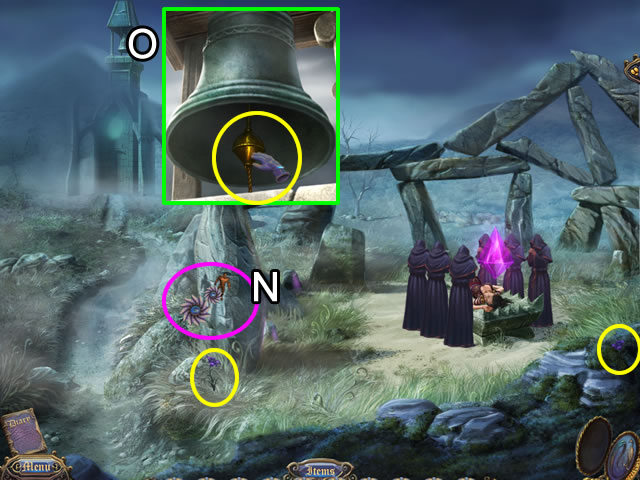
- Place the GOLEM STATUE in the inset in the rock (N).
- Put the BELL CLAPPER in the bell (O); ring it to wake up the golem.
- Watch the final scene.
- Congratulations, you have completed Sister's Secrecy: Arcanum Bloodline!
Created at: 2012-07-20

