

Walkthrough Menu
- General Tips & Information
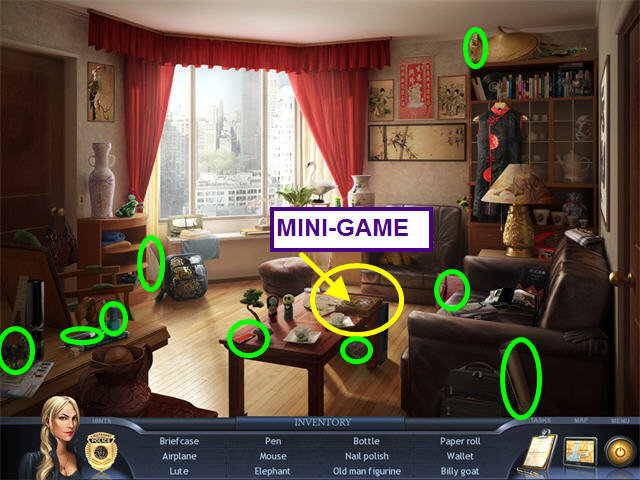
- Chapter One: The Murder Scene
- Chapter Two: On The Trail Of The Boyfriend
- Chapter Three: The Victim's Best Friend
- Chapter Four: The Murder Weapon
- Chapter Five: A New Suspect
- Chapter Six: The Homeless Refuge
- Chapter Seven: A Vital Clue
- Chapter Eight: Secrets at the Refuge
- Chapter Nine: The Drugs Connection
- Chapter Ten: Conspiracy to Murder
- Chapter Eleven: A Summons From The Mayor
- Chapter Twelve: Hunting Down The Killer
General Tips & Information
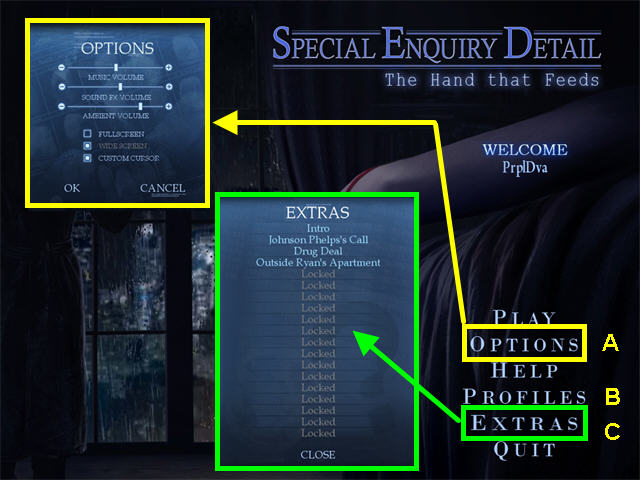
- The options menu allows for the adjustment of music and sounds volume (A).
- You may play this game in windowed or full screen mode.
- The custom cursor may be disabled.
- From the main screen you may manage player profiles (B).
- The Extras menu has the game videos that unlock as you play the game (C).

- The help button on the main menu provides a quick reference on the different aspects of game-play.
- Refer to this page for the basics on the different areas.
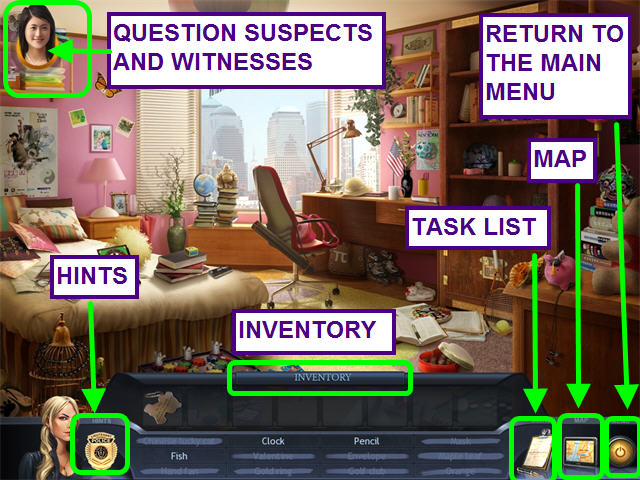
- Click on the badge to use a hint.
- Hints are unlimited, but you must wait for the meter to refill.
- You may skip mini-games, but you must wait for the skip meter to fill.
- The Inventory hides behind the hidden object lists.
- Click on the Inventory bar to make it appear.
- Talk to people by clicking on their picture in the upper left corner.
- Look at the task list to see the current tasks.
- Select the map to move to other areas.
Chapter One: The Murder Scene

- Locate all the items on the list.
- Acquire the inventory items, MAGNIFYING GLASS, SCALPEL, MEASURING TAPE. TWEEZERS, STICKY TAPE, TEST TUBE, and FLASHLIGHT.
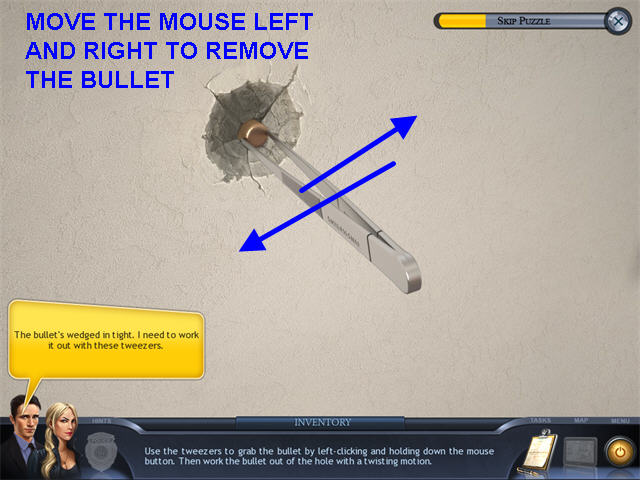
- Look at the close-up of the bullet hole on the wall.
- Use the TWEEZERS to remove the BULLET.
- Click, hold and drag the mouse left and right to edge the bullet from the wall.
- Click on the body to investigate closer.
- Click on each of the sparkling areas until they are gone.
- Select Will Sheng's icon in the upper left corner, he will automatically take the BULLET.
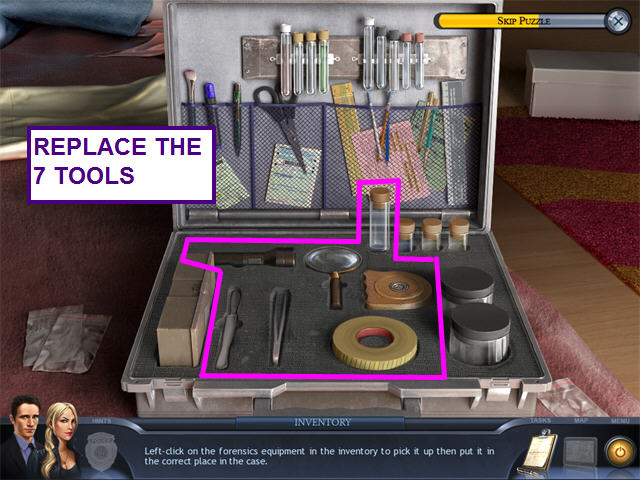
- Select the sparkling tool case on the bed.
- Place all the tools from your inventory into the matching niches in the case.
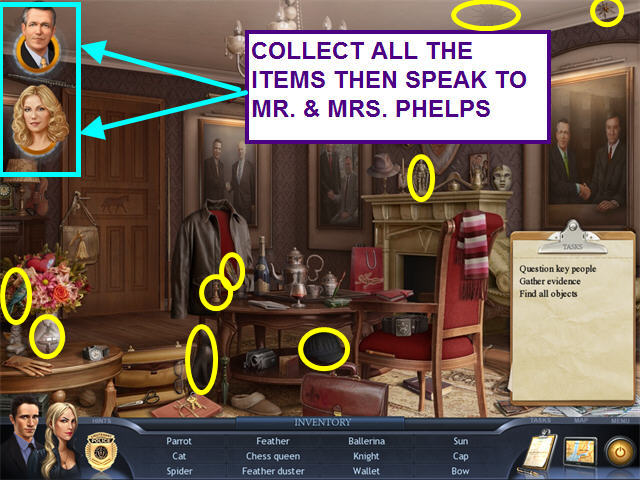
- Collect all the hidden objects on the list.
- Speak to both Mr. Phelps and Mrs. Phelps.
- From the map, select the Supervisor's place.
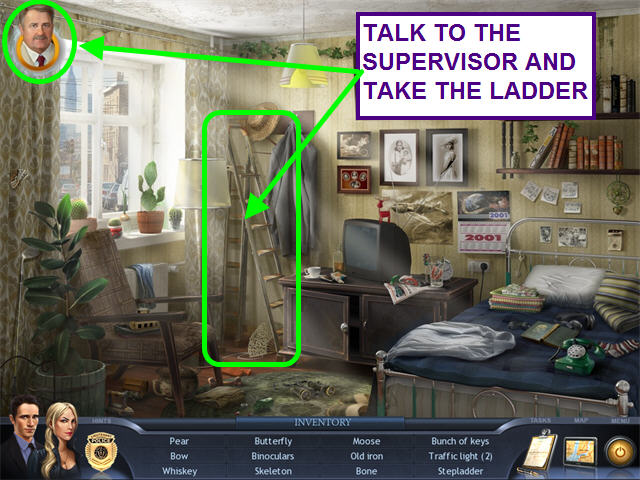
- Collect all the hidden objects on the list.
- Take the STEP LADDER.
- Talk to the supervisor.
- Select the Alley from the map.
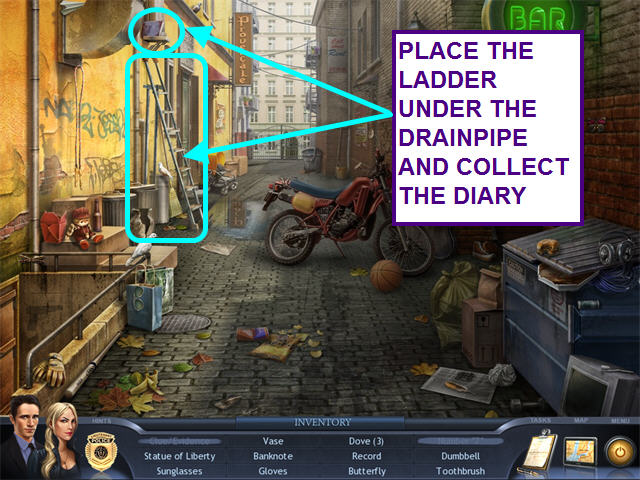
- Place the STEP LADDER under the drainpipe and collect the DIARY.
- Collect all the remaining hidden objects on the list.
Chapter Two: On The Trail Of The Boyfriend
- After you speak with the Buckley's, locate all the hidden objects on the list.
- Select Ryan Buckley's apartment on the map.
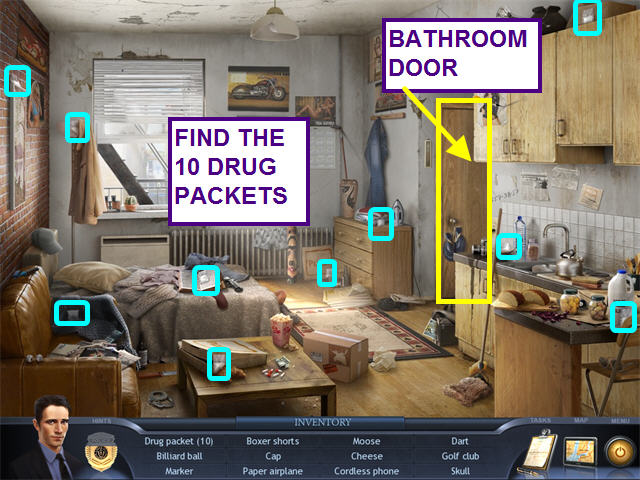
- Locate all the hidden objects including the 10 drug packets.
- Select the bathroom door.
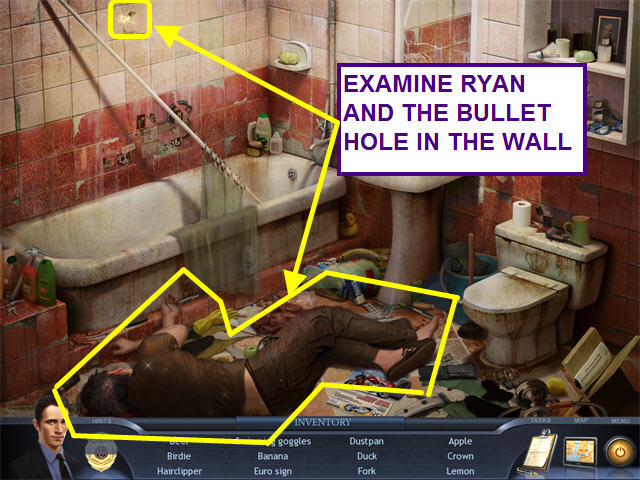
- Examine Ryan and you will automatically call 9-1-1.
- Examine his head wound and hands.
- Look at the bullet hole in the wall.
- Locate all the hidden objects on the list.
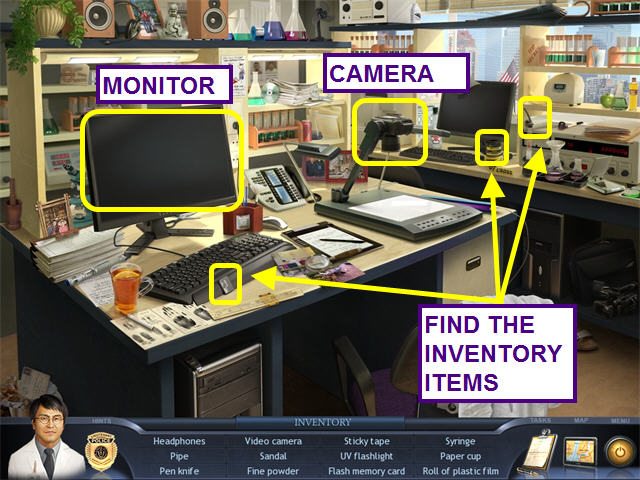
- Locate all the hidden objects on the list.
- Find the FINE POWDER, MEMORY CARD, and ROLL OF PLASTIC FILM.
- Click on the camera for a close-up view.
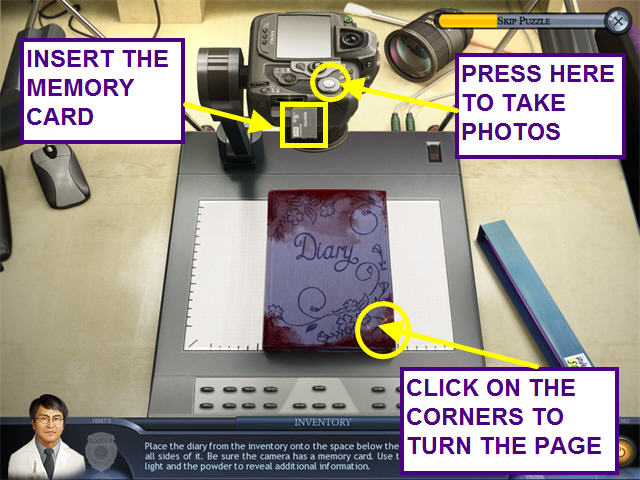
- Place the MEMORY CARD into the camera.
- Place the DIARY onto the white area.
- Take photos of the front and back covers as well as the inside of the diary.
- Click on the sparkling corners to turn the page.
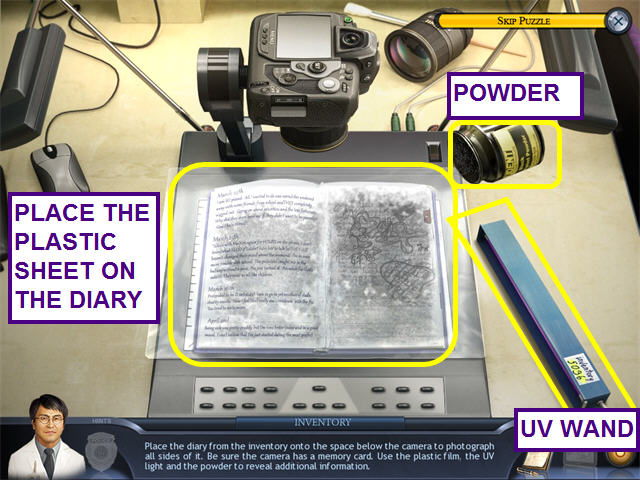
- With the diary open, use the ROLL OF PLASTIC FILM on the diary.
- Wave the UV Wand over the diary to create an electrostatic charge.
- Dust the diary with the FINE POWDER until Will says you need to take a photo.
- Press the button to take the photo and take the MEMORY CARD from the camera.
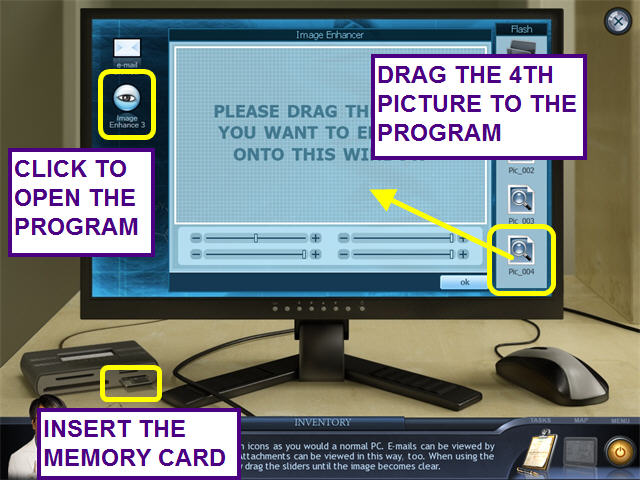
- Select the monitor on the desk.
- Insert the MEMORY CARD into the drive.
- Click on the program Image Enhance 3 to open.
- Drag picture number 4 to the program.
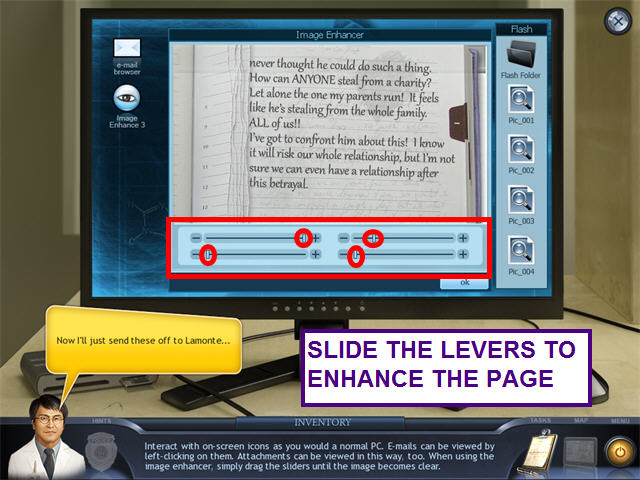
- Slide the 4 levers under the image to uncover the writing.
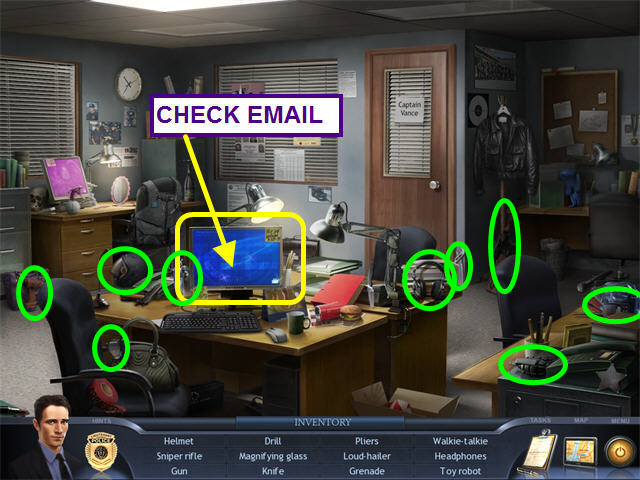
- From the map, select the SED Squad room.
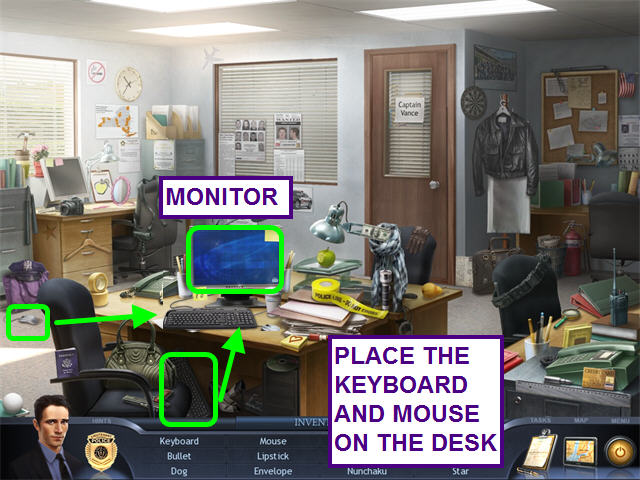
- Locate all the hidden objects on the list.
- Find the KEYBOARD and MOUSE.
- Place the KEYBOARD and MOUSE on the desk in front of the monitor.
- Select the monitor.
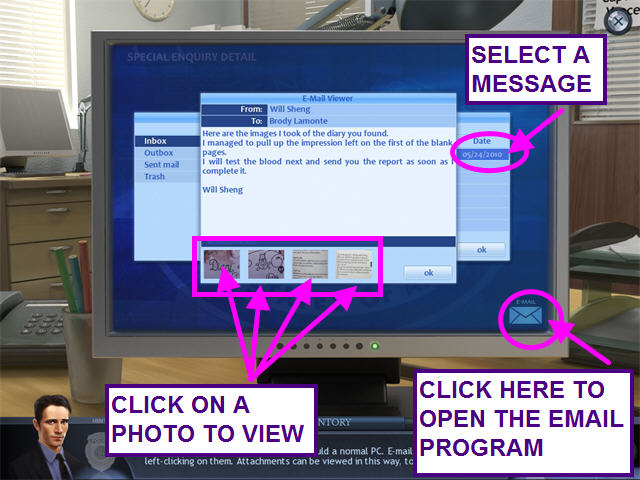
- Select the envelope icon in the lower right corner to open the email program.
- Click on the item in the in-box.
- Look at each of the 4 photos.
Chapter Three: The Victim's Best Friend
- After speaking with Mai's mother, locate all the hidden objects.
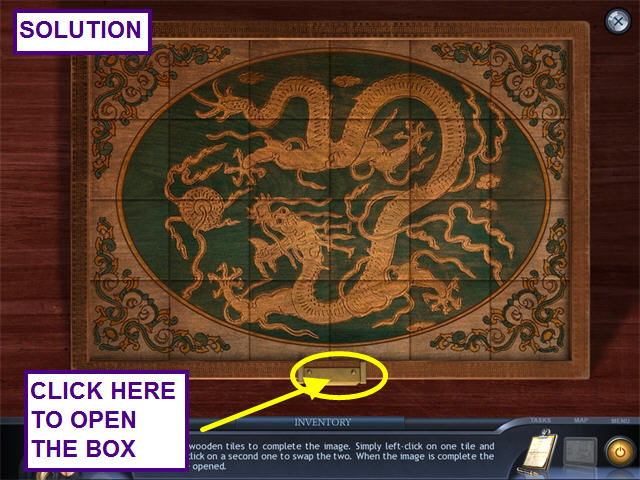
- Select the sparkling box on the coffee table for a mini-game.
- Restore the picture on the box.
- Left-click on two tiles to swap positions.
- Once the puzzle is solved, click on the clasp at the bottom to open the box.
- Take the PANDA KEY CHAIN from the box.
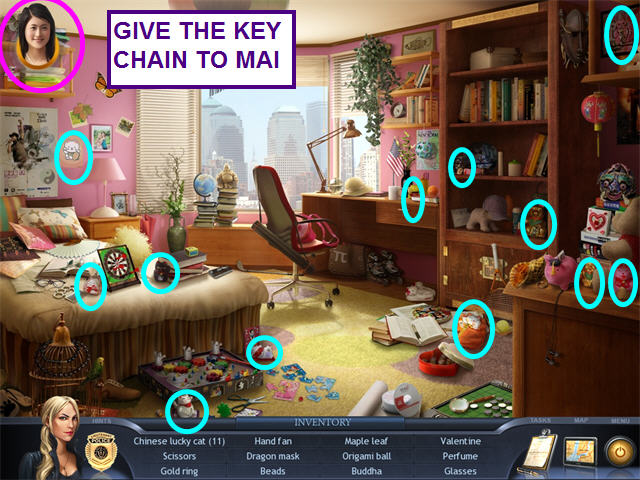
- Locate all the hidden objects on the list including the 12 lucky cats.
- Talk to Mai the show her the KEY CHAIN from your inventory.
- Talk to Mai again.
- From the map, select Carmody Phelps's locker.
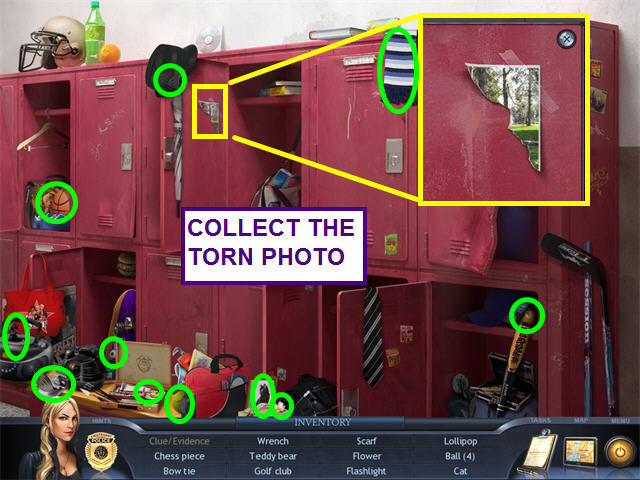
- Locate all the hidden objects on the list.
- Collect the TORN PHOTO as evidence.
- Select the Lee Apartment Living Room from the map.
Chapter Four: The Murder Weapon
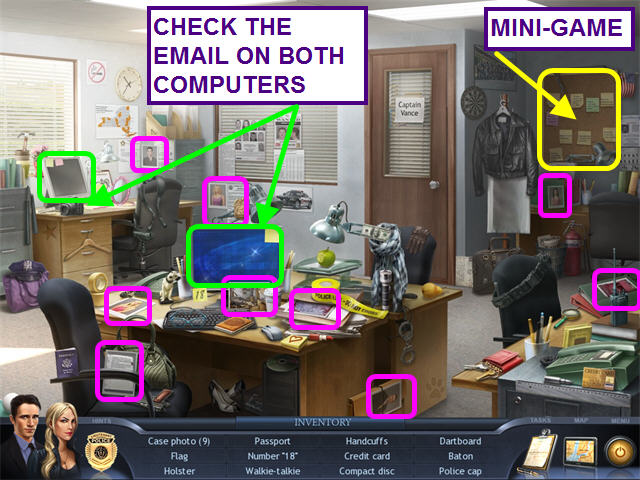
- Locate all the hidden objects on the list including the 9 CASE FILE PHOTOS.
- Check the email on both computers by selecting the monitors.
- Look at the close-up of the bulletin board for a mini-game.
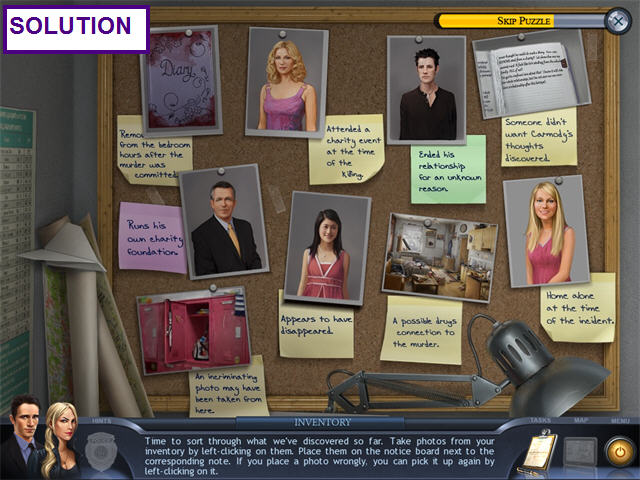
- Place each CASE FILE PHOTO with the note that best describes it.
- From the map, select the Phelps's Apartment Building.

- After speaking with the reporter, locate all the hidden objects.
- Press the doorbell to go to the Phelps's apartment.
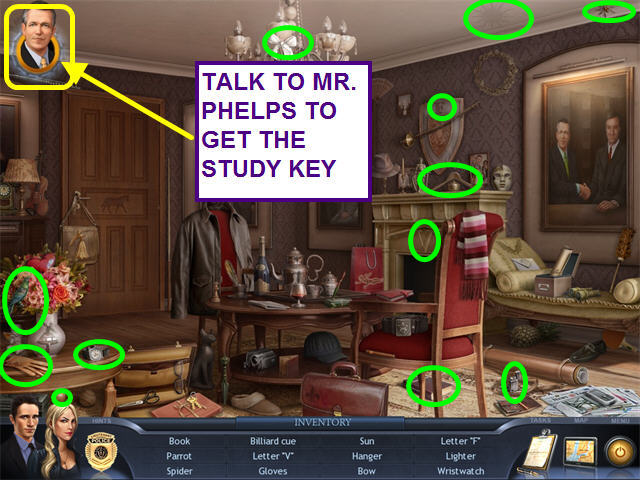
- Locate all the hidden objects.
- Talk to Mr. Phelps and receive the key to the study.
- Once at the map, select Carmody's Room.
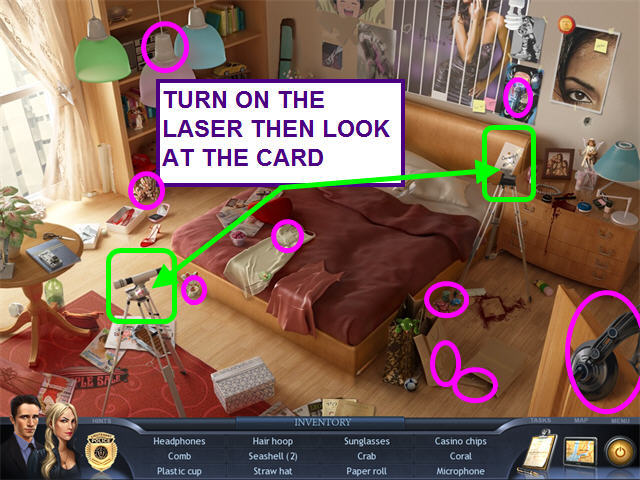
- Locate all the hidden objects.
- Turn on the laser.
- Look at the card the laser beam is hitting.
- Once at the map, select Phelps's Study.
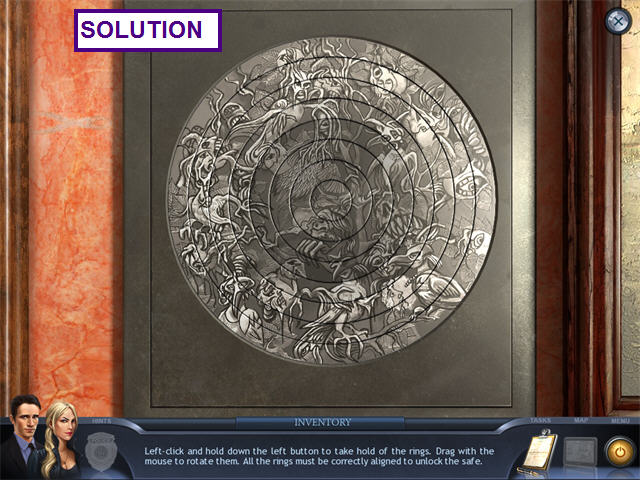
- Click on the painting on the left wall for a mini-game.
- Rotate the rings to restore the picture.
- Start at the center and work your way out.
- Left-click, hold and drag each ring into place.
- The rings will lock when correctly aligned.
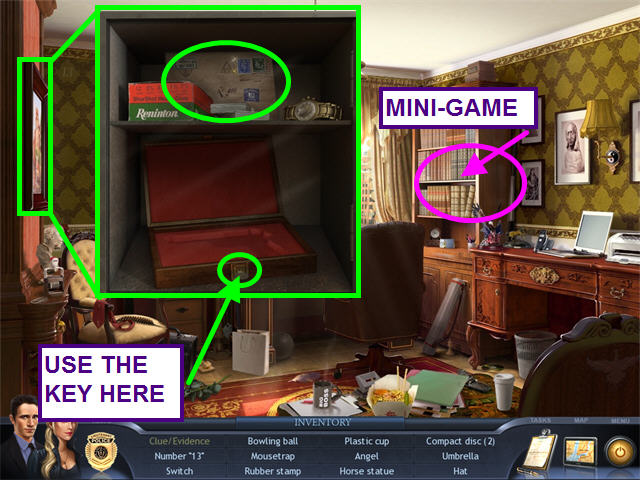
- Use the KEY to unlock the gun case.
- Take the LETTER.
- Locate all the hidden objects.
- Talk to Mr. Phelps.
- Select the sparkling bookshelf for a mini-game.
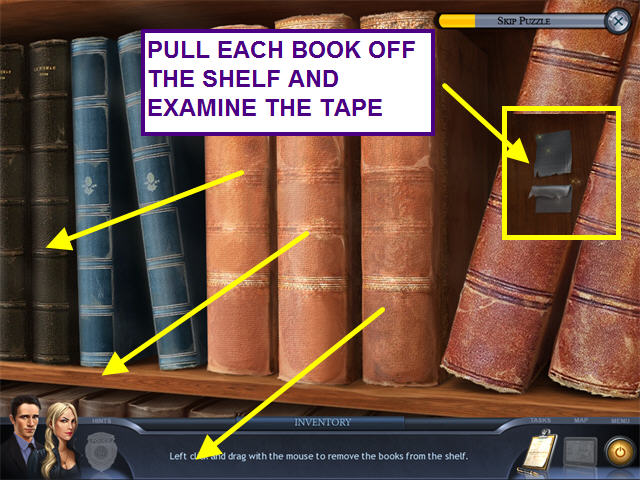
- Left-click, hold and drag each book off the shelf.
- Examine the torn tape that held the spare key.
Chapter Five: A New Suspect

- Locate all the hidden objects.
- Talk to the manager, Pete.
- When Pete leaves the room, get on the elevator.
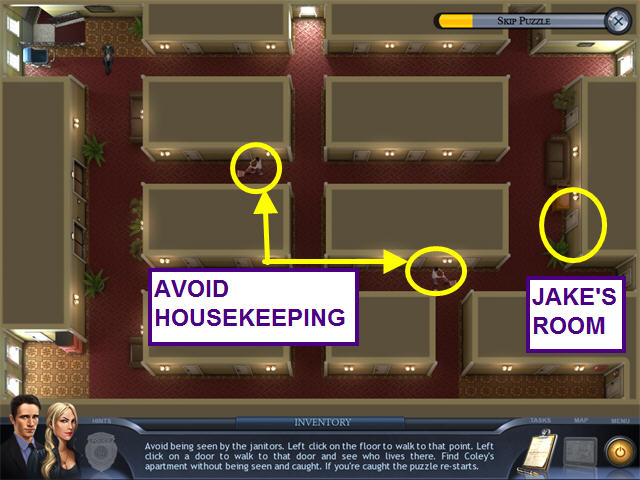
- You must get to Jake Foley's apartment without being seen.
- If you are caught, the puzzle will reset.
- Left-click to walk and look at doors.
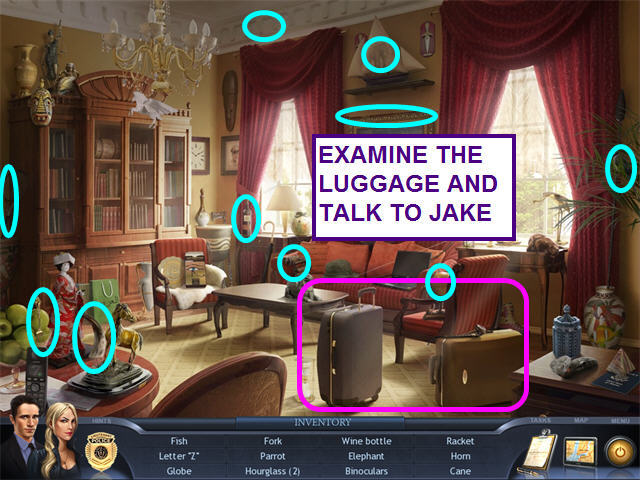
- Locate all the hidden objects.
- Look at the luggage.
- Talk to Jake Foley.
Chapter Six: The Homeless Refuge
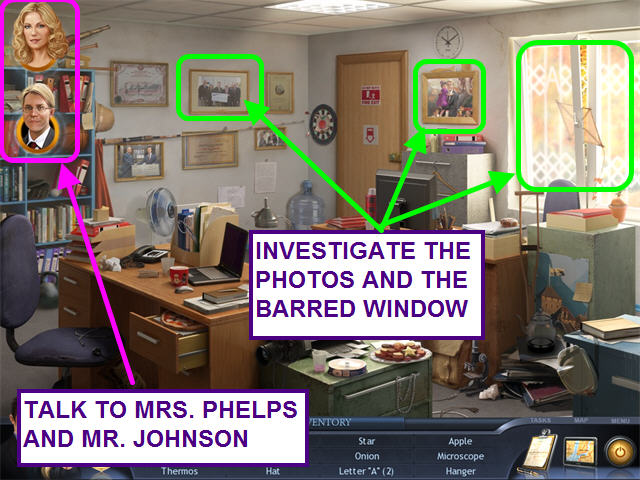
- Locate all the hidden objects.
- Investigate the photos.
- Look at the barred window.
- Talk to Mrs. Phelps and Mr. Daniels.
- From the map, chose the Refuge Alley.
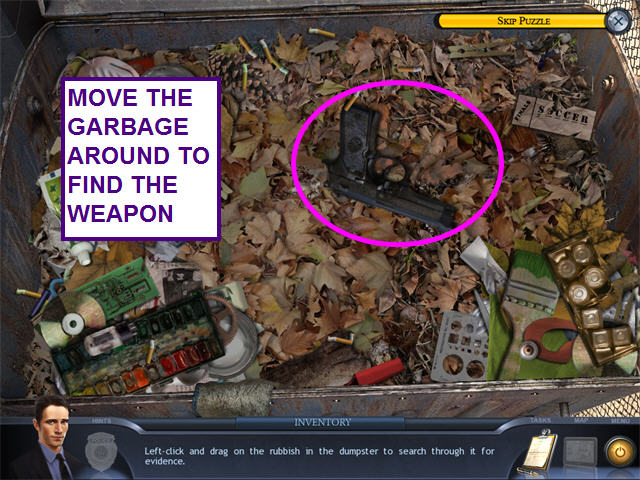
- Click on the large gray dumpster.
- Left-click, hold and drag the garbage around to uncover the weapon.
- Click on the gun to take it into evidence.
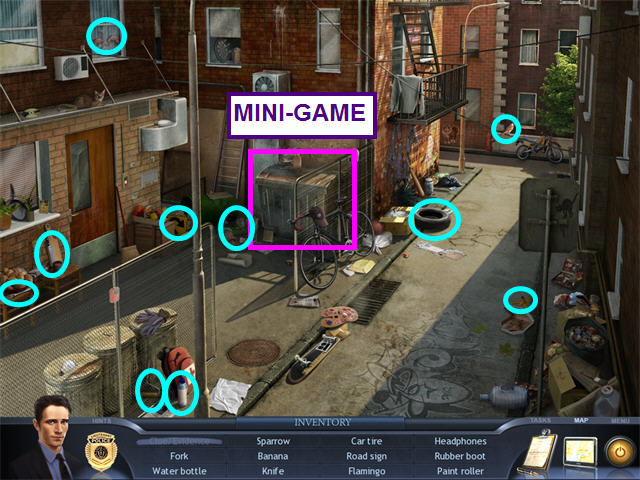
- Locate all the hidden objects.
- Once at the map, select the Refuge Lobby.
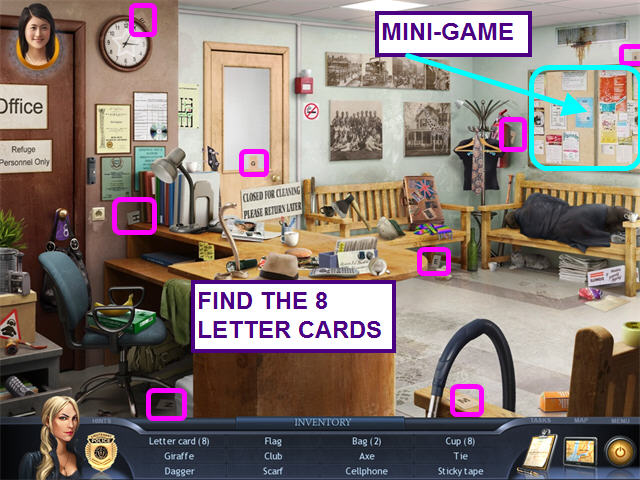
- Locate all the hidden objects.
- Find the 8 LETTER CARDS.
- Talk to Mai Lee.
- Click on the bulletin board for a mini-game.
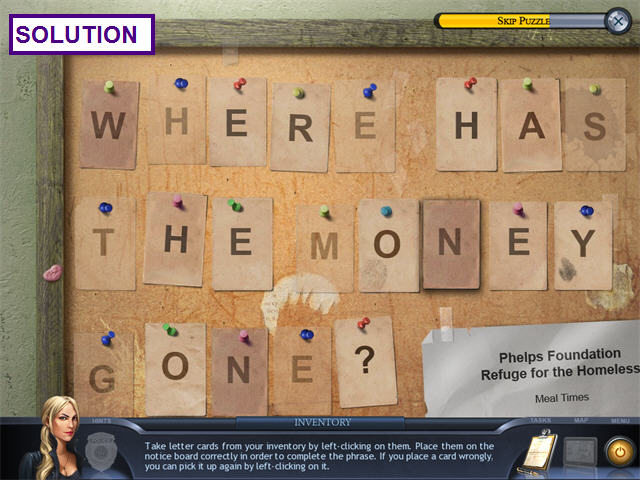
- Place the 8 LETTER CARDS onto the board to spell out a phrase.
- Click on the “X” in the upper right corner to exit.
Chapter Seven: A Vital Clue
- Select the Hospital Room on the map.

- Locate all the hidden objects.
- Talk to Ryan.
- Back at the map, select the Lee Apartment Living Room.
- Locate all the hidden objects.
- Talk to Mrs. Lee.
- Click on the sparkling wood box for a mini-game.

- Click on two tiles to swap position.
- Swap the tiles to restore the picture.
- Click on the clasp at the bottom to open the box.
- Take the KEY.
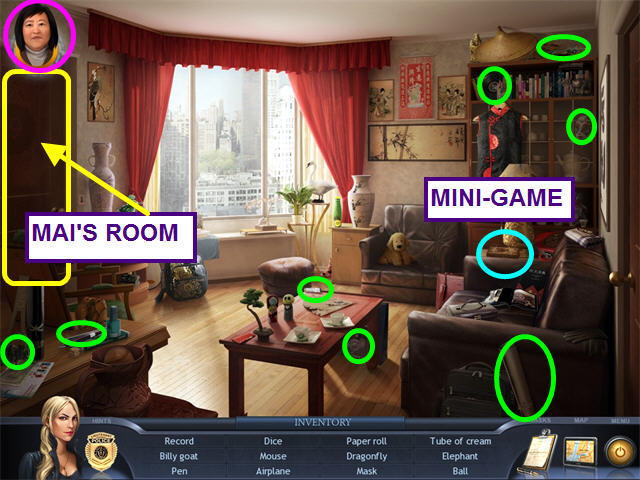
- Click on the door on the left to return to Mai's room.
- Locate all the hidden objects.
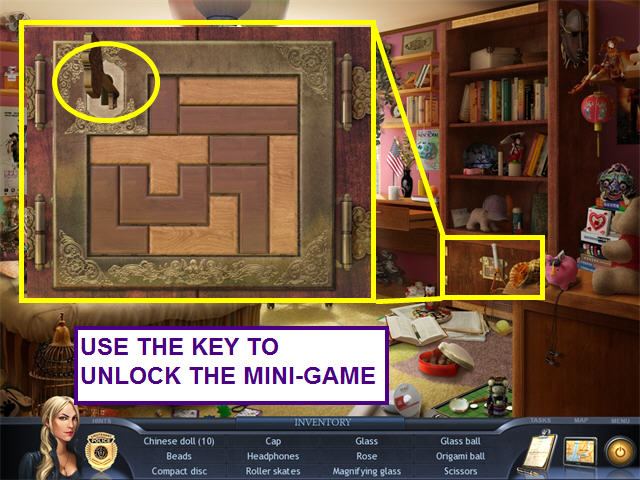
- Click on the sparkling cabinet for a mini-game.
- Use the KEY to unlock the mini-game.
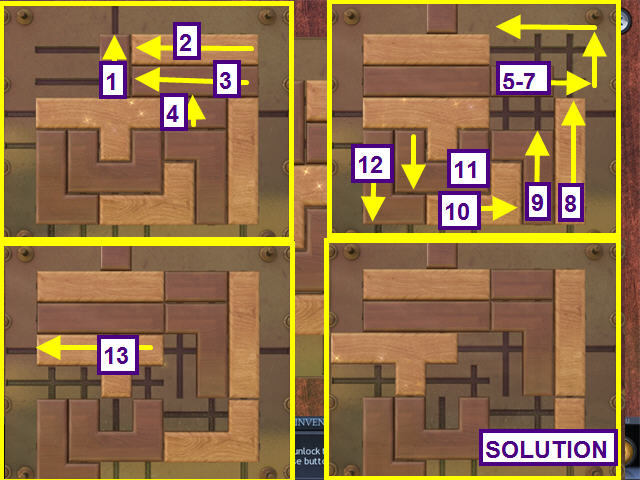
- Slide the wood pieces so that the sparkling pieces of wood can be moved out of the grid.
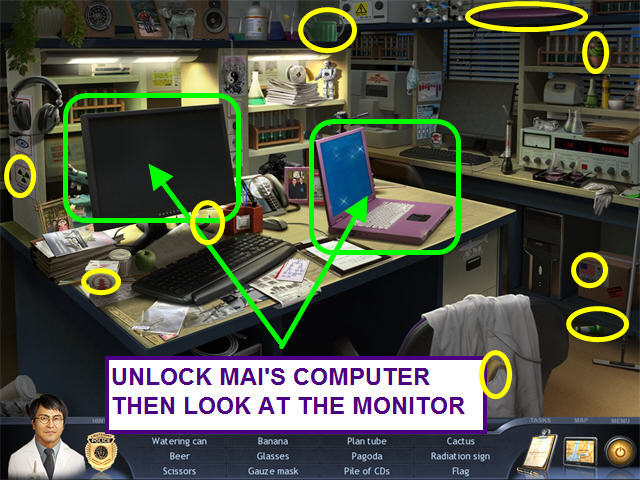
- Take Mai's computer.
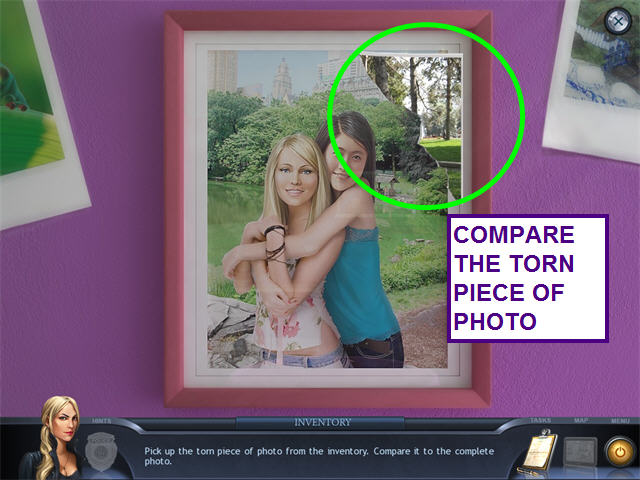
- Look at the photo on the wall.
- Compare the torn piece of photo to the photo on the wall.
- Select Will Sheng's Forensic Lab at the map.
- Locate all the hidden objects.
- Place Mai's computer on the desk.
- Look at the laptop to trigger a mini-game.
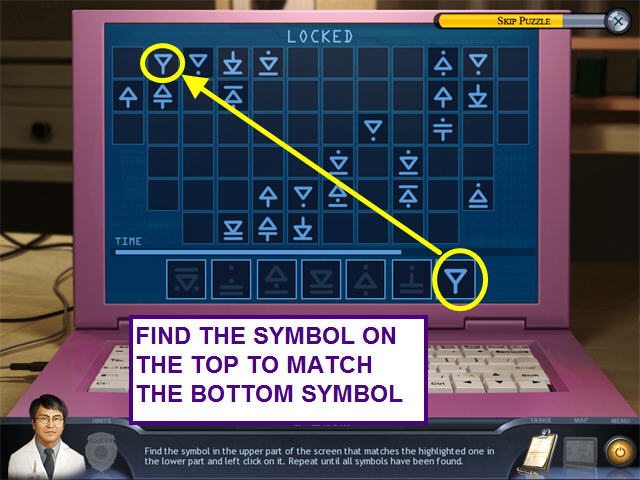
- Look at the symbol on the bottom row and find the matching symbol above.
- There are seven symbols to match.
- Select the sparkling monitor on the desk.
- When the screen what data to search for, enter GAMES.
- Select the SED Squad Room from the map.
- Locate all the hidden objects.
- Click on the blue screened monitor and check th email.
Chapter Eight: Secrets at the Refuge

- Locate all the hidden objects.
- Talk to Mai Lee.
- Select the Office of Lenora Mendez from the map.
- Locate all the hidden objects.
- Select the Refuge Lobby from the map.
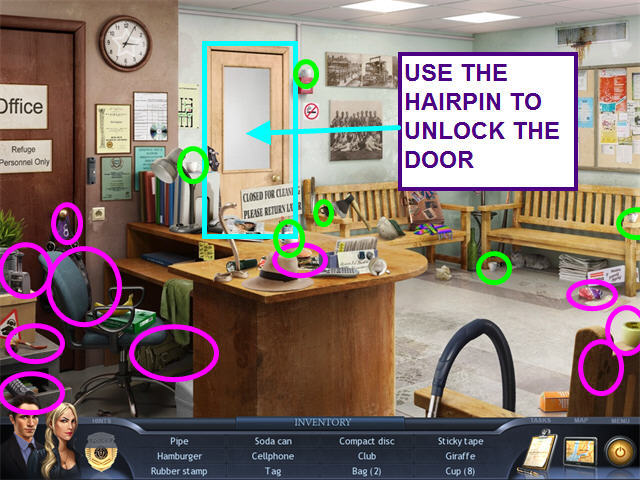
- Locate all the hidden objects.
- Use the HAIRPIN to unlock the door.
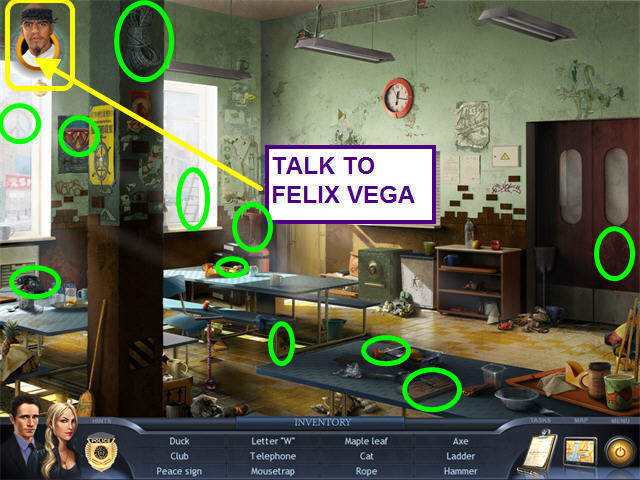
- Locate all the hidden objects.
- Talk to Felix Vega.
- Back at the station, talk to Felix Vega again.
- Select the Refuge Main Hall from the map.
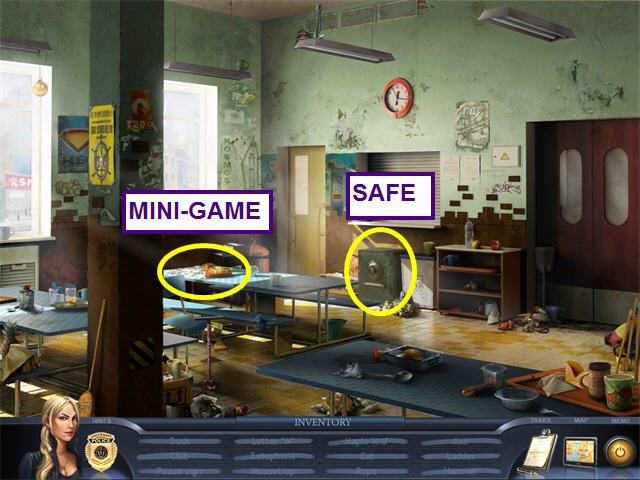
- Select the sparkling area on the table for a mini-game.
- Repair the torn note.
- Left-click to take or place a piece and right-click to rotate the piece.
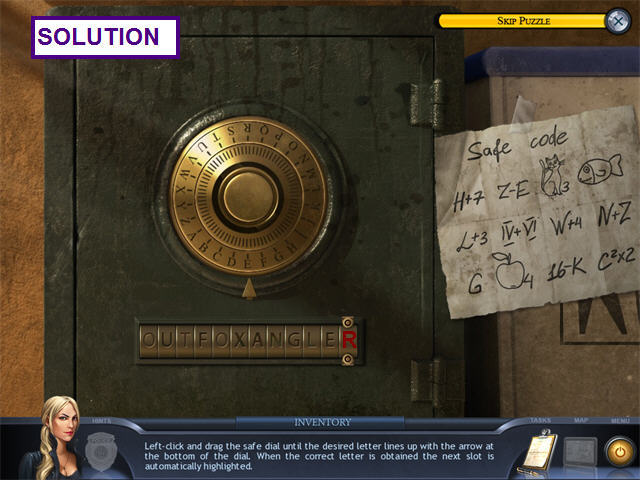
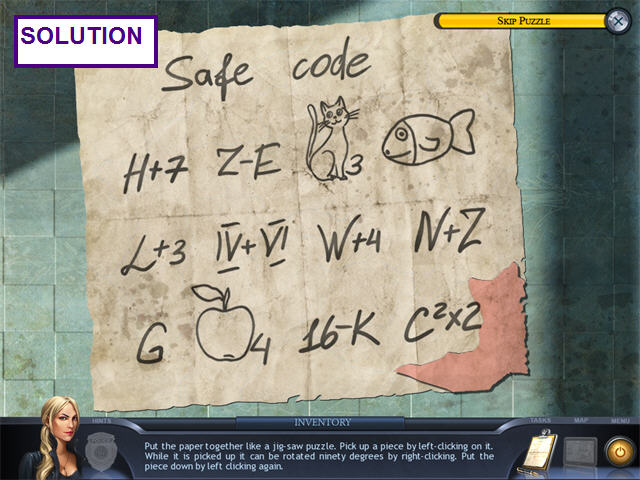
- Look at the close-up of the safe.
- Place the safe code on the sparkling area.
- Turn the dial to enter the letters from the paper.
- An example is: “H” plus 7 letters brings you to “O”.
- Another example is: A drawing of a cat with a 3 means use the 3rd letter- “T”.
- Click on the items in the safe.
Chapter Nine: The Drugs Connection
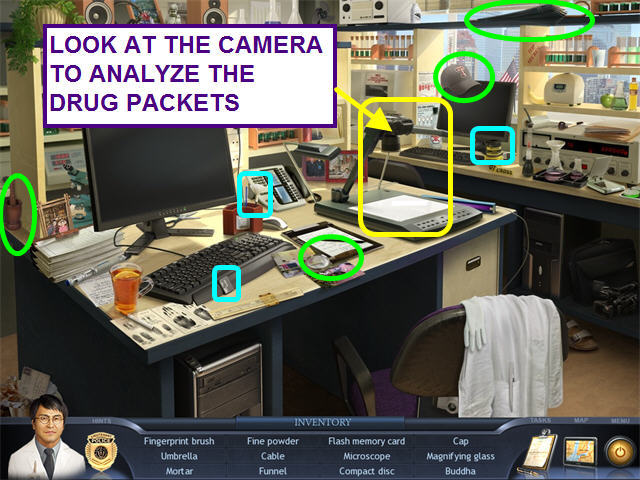
- Locate all the hidden objects.
- Take the inventory items: FINE POWDER, FINGERPRINT BRUSH, FLASH DRIVE.
- Look at the close-up of the camera.
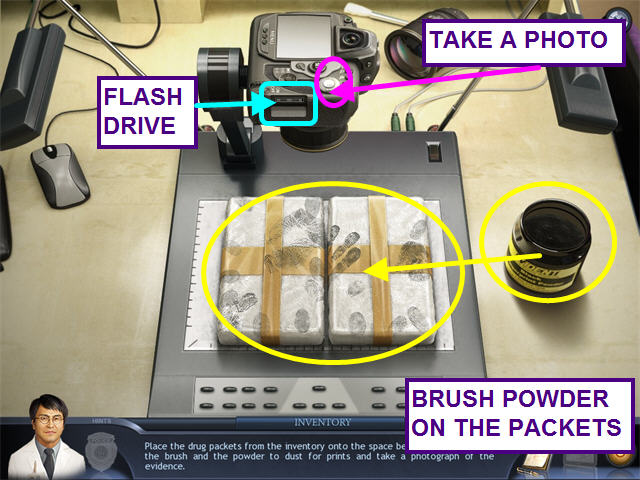
- Place the FLASH DRIVE into the camera.
- Place the DRUG PACKETS on the center surface.
- Place the FINE POWDER on the right counter.
- Take the FINGERPRINT BRUSH and dip it into the FINE POWDER.
- Brush the packet until the prints are clear.
- Take a photo, then take the FLASH DRIVE.
- Select the monitor and insert the FLASH DRIVE in to the slot on the lower left.
- Once at the map, chose the SED Interview room.
- Locate all the hidden objects.
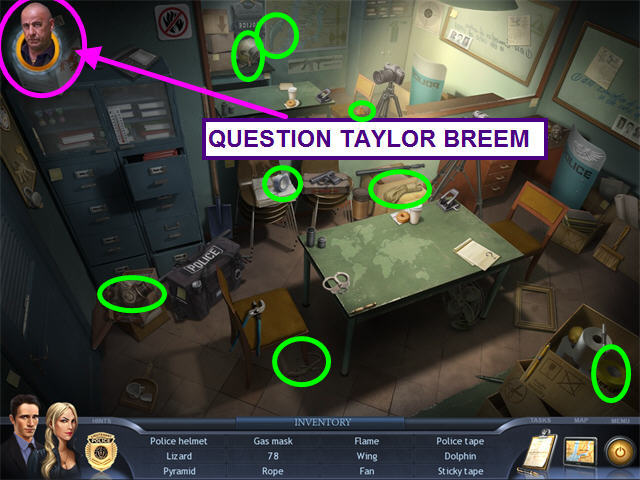
- Talk to Taylor Breem.
- From the map, select the SED Squad room.
- Locate all the hidden objects.
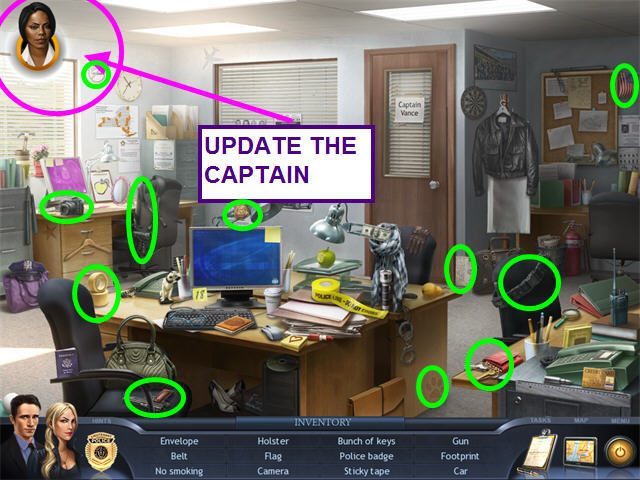
- Report your findings to the Captain.
- Select Phelps's Living Room from the map.
- Locate all the hidden objects.
- Question Mr. Phelps.
- Talk to the reporter.
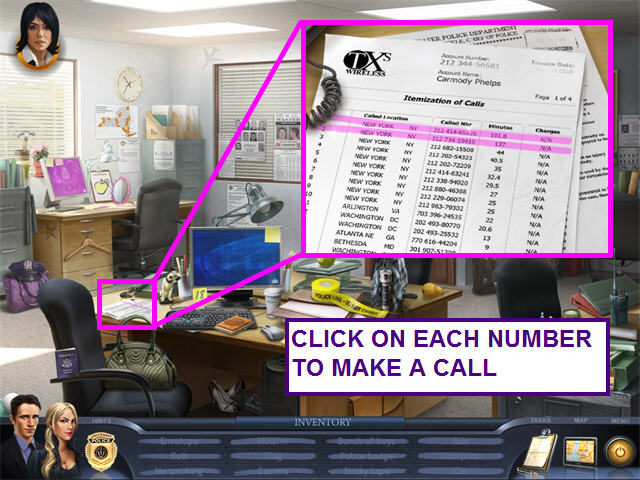
- Look at the phone records on the desk..
- Click on each of the highlighted numbers to investigate.
Chapter Ten: Conspiracy to Murder
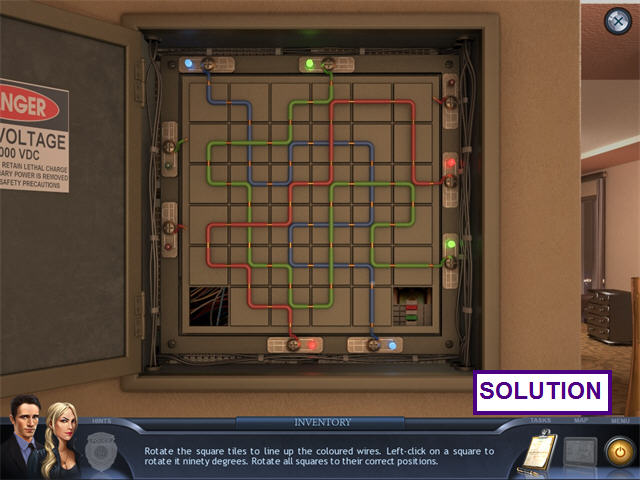
- Click on the sparkling fuse box for a mini-game.
- Click on each square to rotate the wire pieces until each color is completely connected.
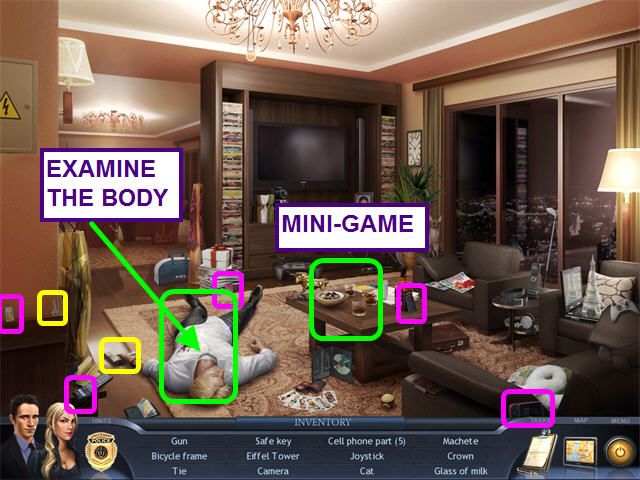
- Locate all the hidden objects.
- Find the GUN, SAFE KEY and CELL PHONE PARTS.
- Look at the close-up of the coffee table.
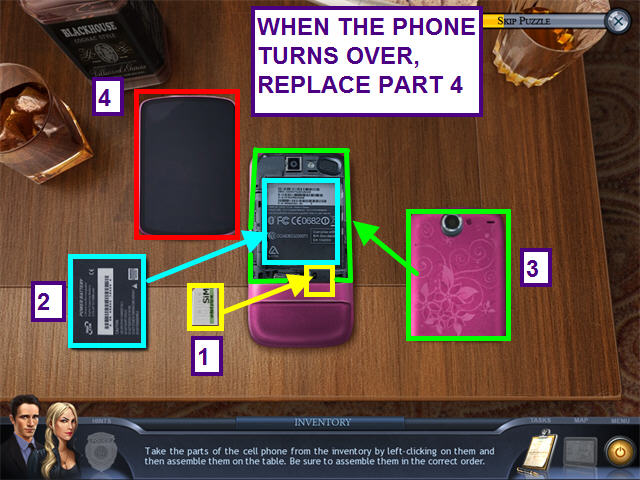
- Place all the CELL PHONE PARTS onto the table.
- Reassemble the phone.
- Exit the close-up and examine the body.
- Select the Select Will Sheng's Forensic Lab from the map.
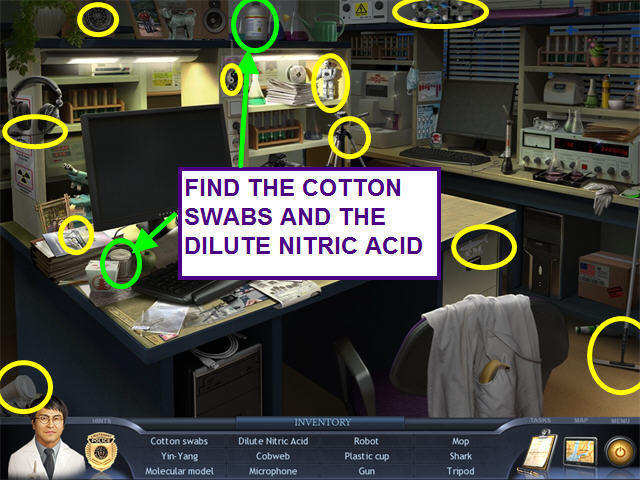
- Locate all the hidden objects.
- Find the COTTON SWABS and the DILUTE NITRIC ACID.
- Return to the map and select the Autopsy Room.
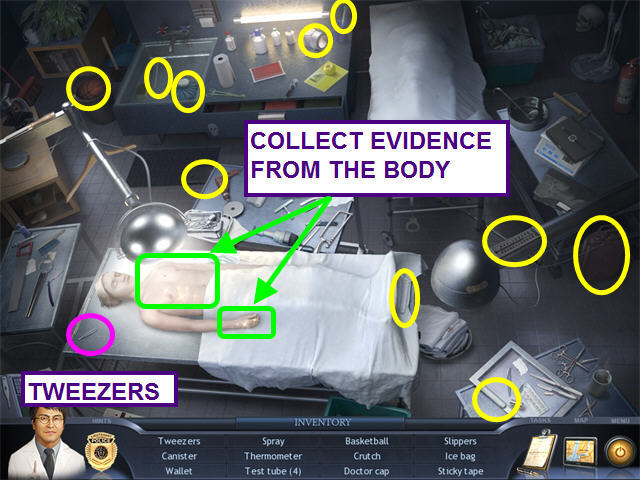
- Locate all the hidden objects.
- Collect the TWEEZERS.

- Look at the upper body of the victim.
- Use the TWEEZERS to remove the bullet.
- Use the mouse to twist and pull the TWEEZERS.
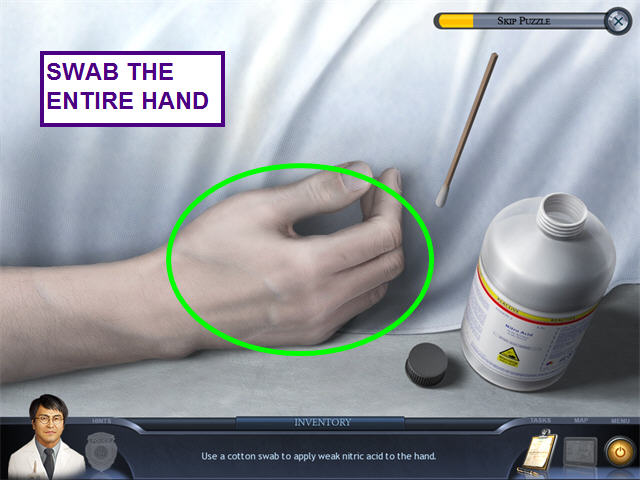
- Look at the hand of the victim.
- Place the DILUTE NITRIC ACID on the table.
- Use the SWABS on the acid then swab the entire hand.
- Once at the map, select the forensics lab.
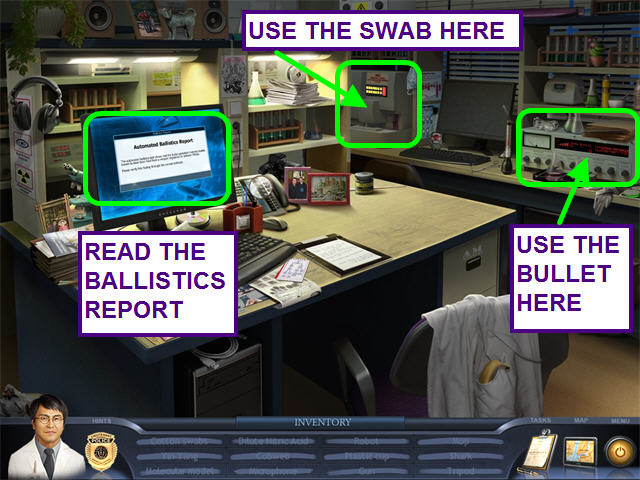
- Use the SWAB on the left sparkling machine.
- Use the BULLET on the right sparkling machine.
- Click on the monitor to read the ballistics report.
- Exit to the map and select the SED Squad Room.

- Locate all the hidden objects.
- Click on one of the monitors to check email.
- Select the SED Interview Room from the map.
- Locate all the hidden objects.
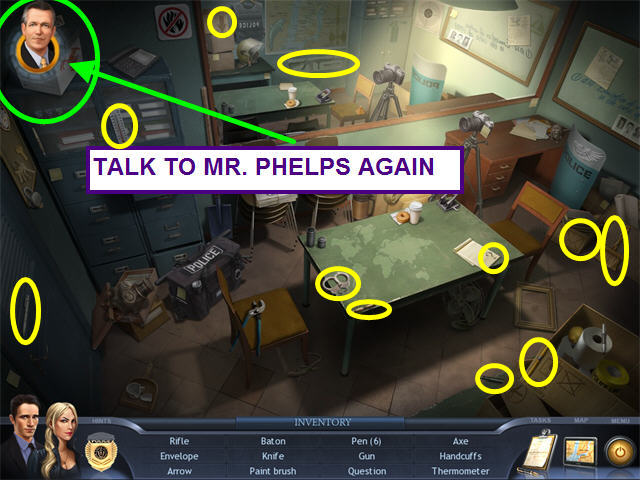
- Talk to Mr. Phelps again.
Chapter Eleven: A Summons From The Mayor
- Locate all the hidden objects.
- Talk to the Mayor.
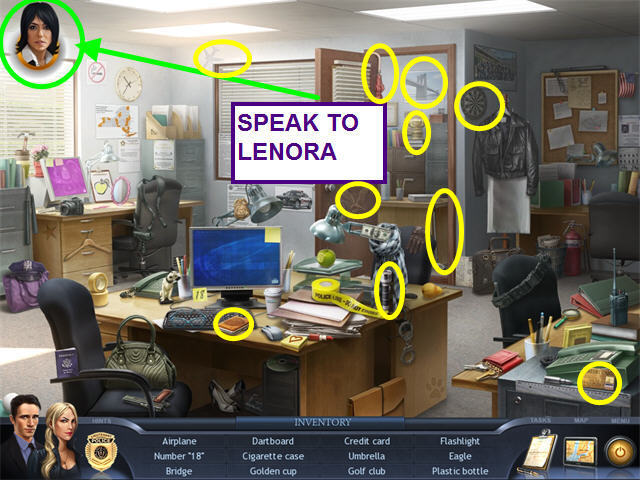
- Select the Office of Lenora Mendez from the map.
- Locate all the hidden objects.
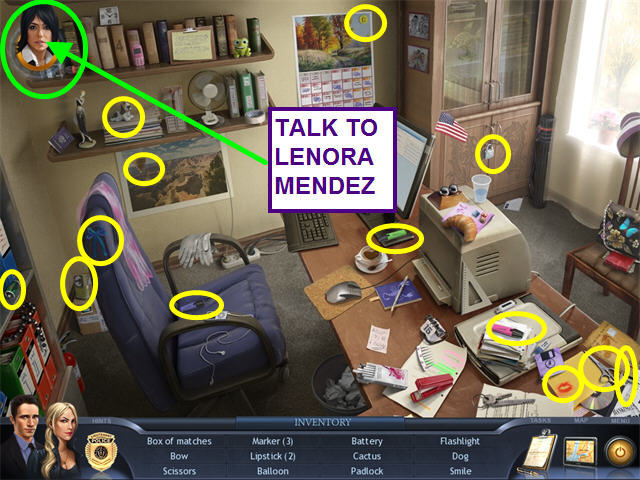
- Talk to Lenora Mendez.
- Select the Piermont Hotel Lobby from the map.
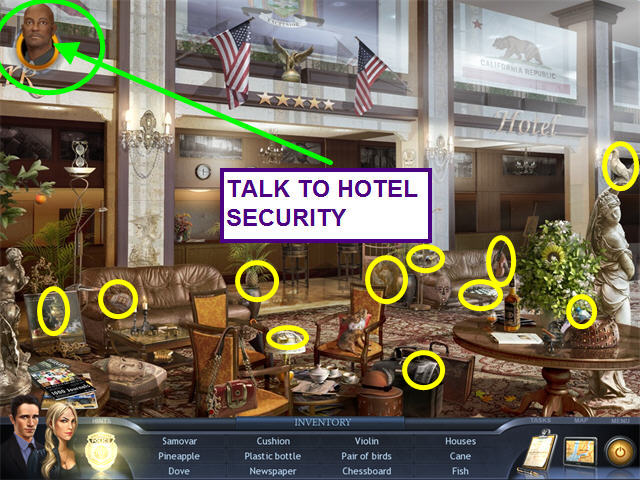
- Locate all the hidden objects.
- Talk to hotel security.
- Return to the SED Squad Room via the map.
- Locate all the hidden objects.
- Talk to Lenora again.
- Select the Piermont Hotel Lobby from the map.
- Speak with hotel security once again.
Chapter Twelve: Hunting Down The Killer
- Locate all the hidden objects.
- Talk to Mr. Phelps again.
- Select the Phelps's Study from the map.
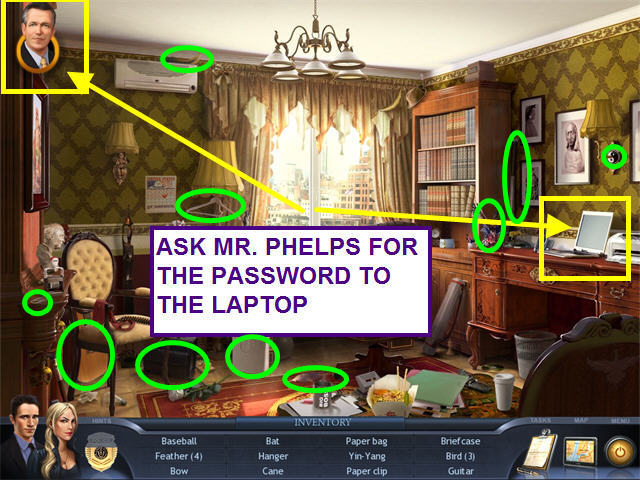
- Locate all the hidden objects.
- Look at the laptop to learn you need a password.
- Ask Mr. Phelps for the password.
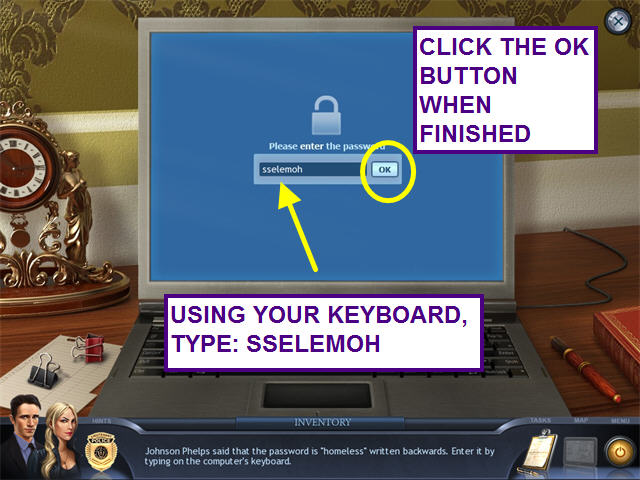
- Look at the close-up of the laptop and type on your keyboard: sselemoh.
- Read the email to learn that Mrs. Phelps has booked a flight.
- Exit to the map and select the airport.
- Locate all the hidden objects.
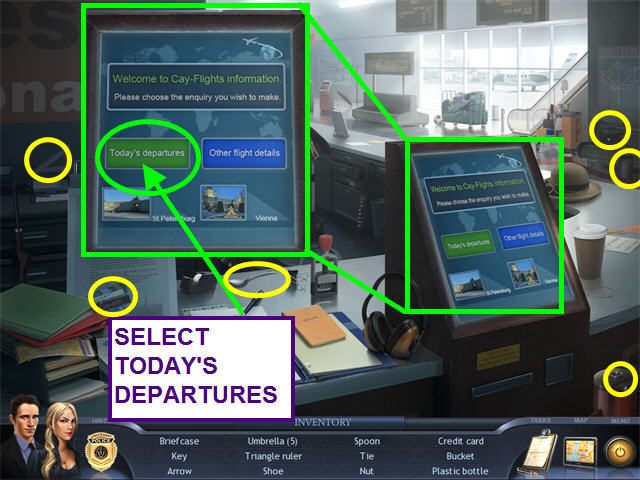
- Look at the information kiosk and select today's flights.
- Exit the close-up view.
- Select the Hospital ER Cubicle from the map.
- Locate all the hidden objects.
- Question Mrs. Phelps.
Created at: 2010-05-26