Walkthrough Menu
- General Tips
- Chapter 1: At Home
- Chapter 2: The Child's Room
- Chapter 3: The Dressmaker
- Chapter 4: The Gazebo
- Chapter 5: The Classroom
- Chapter 6: The Town Square
General Tips
- This is the official guide for Stranded Dreamscapes: The Doppelganger.
- Hidden-object puzzles are referred to as HOPs. This guide will not show screenshots of the HOPs, however, it will mention when an HOP is available and the inventory item you'll collect from it.
- This guide will not mention each time you have to zoom into a location; the screenshots will show each zoom scene.
Chapter 1: At Home
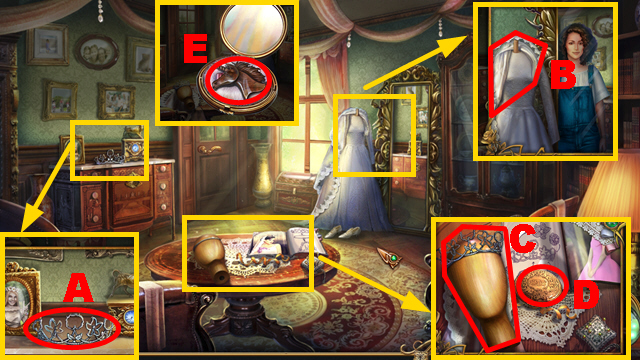
- Take the TIARA (A) and VEIL (B).
- Place the TIARA and VEIL (C); take the COMPACT (D).
- Open the COMPACT; take the UNICORN EMBLEM (E).
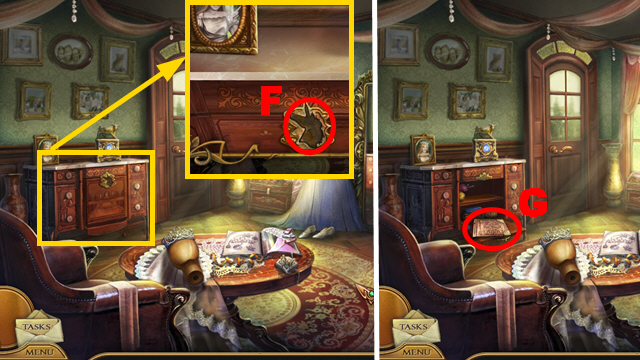
- Place the UNICORN EMBLEM (F).
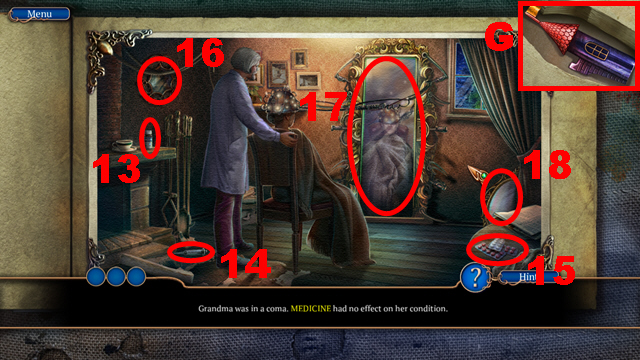
- Inspect the photo album (G).
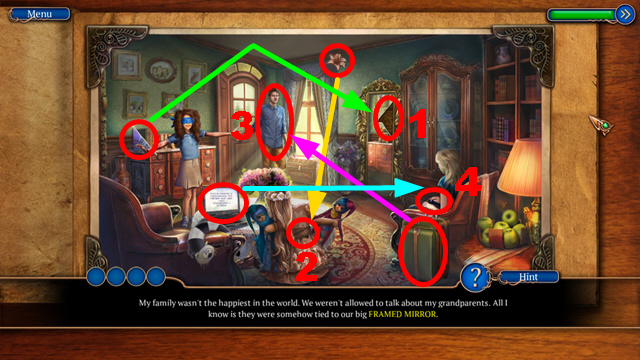
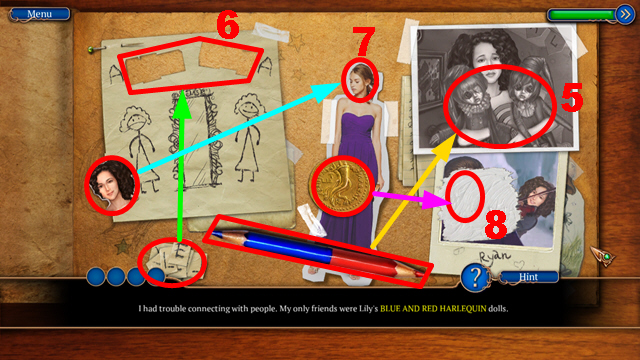
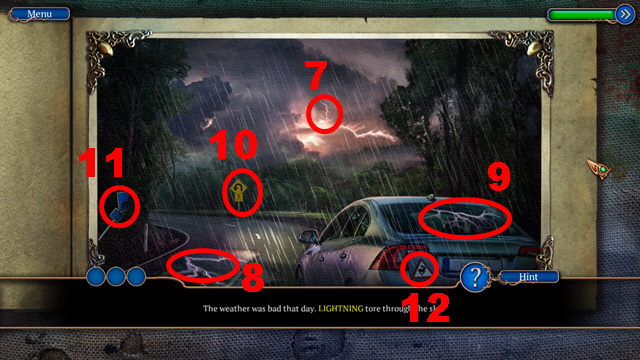
- Play the mini-game.
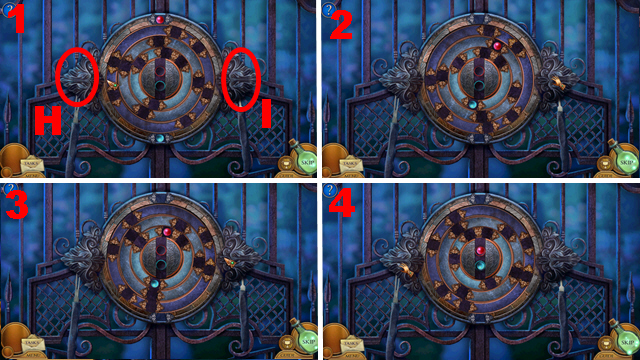
- Solution: 1-8.
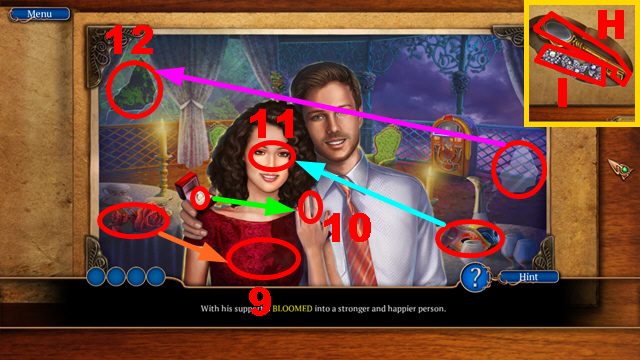
- Solution: 9-12.
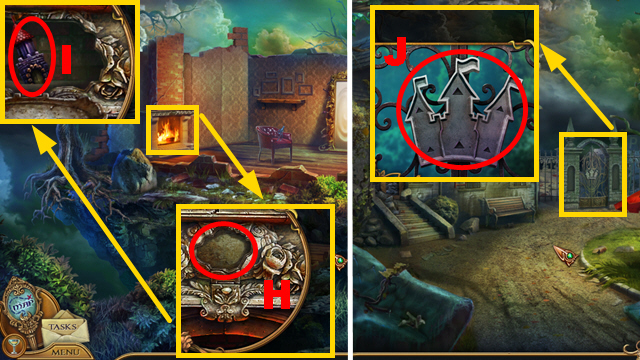
- Take the OLD KEY (H) and JEWELED FLOWERS (I).
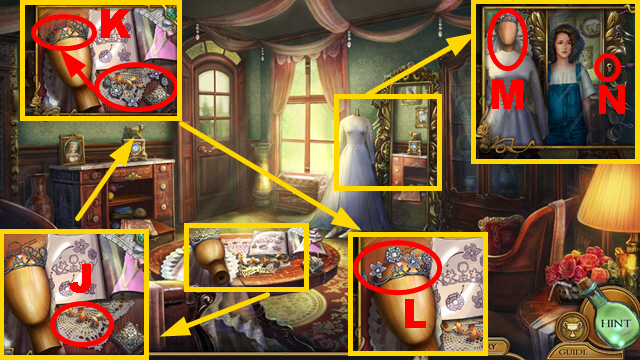
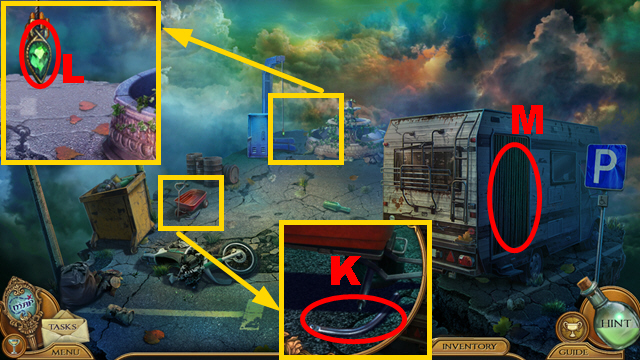
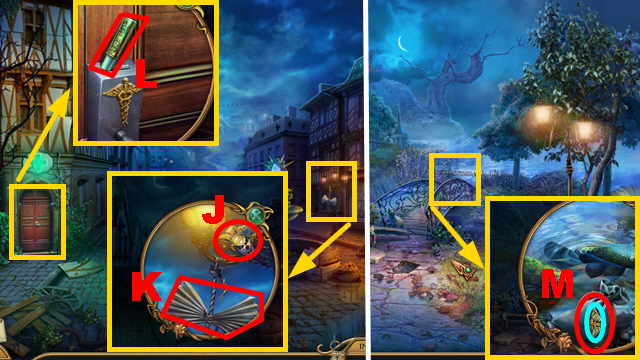
- Place the JEWELED FLOWERS (J): connect them to the tiara (K).
- Take the BRIDAL VEIL (L).
- Place the BRIDAL VEIL (M) and OLD KEY (N).
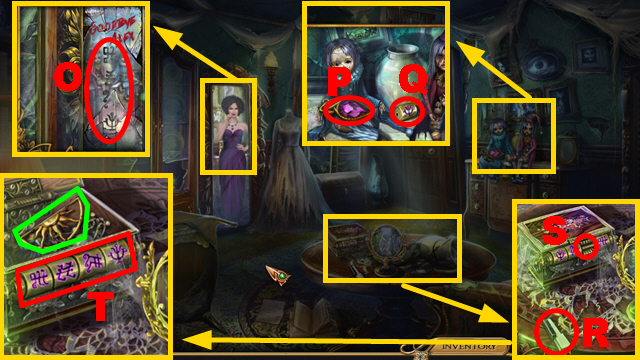
- Select the mirror; use the COMPACT (O).
- Take the MEMORY SHARD (P) and LOCK DIAL (Q).
- Take PIANO KEY 1/4 (R); place the LOCK DIAL (S).
- Select the correct code (T); take the SUNSET EMBLEM (green).
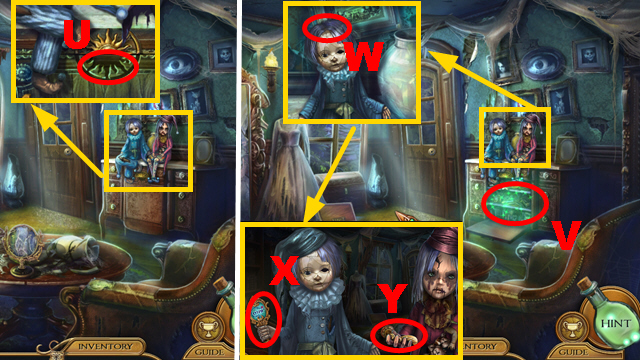
- Place the SUNSET EMBLEM (U).
- Play the HOP (V) to acquire the HARLEQUIN CAP.
- Place the HARLEQUIN CAP (W); take the map (X) and DOOR HANDLE (Y).
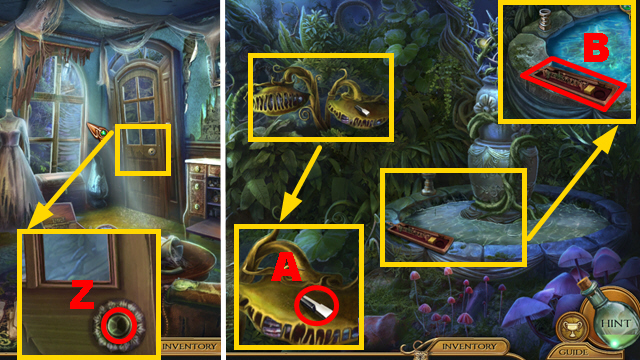
- Place the DOOR HANDLE (Z); open the door.
- Move forward.
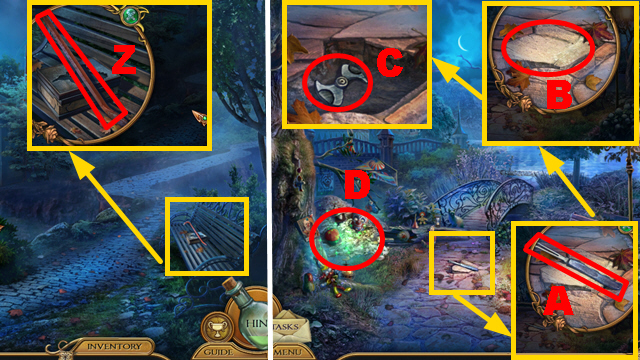
- Take PIANO KEY 2/4 (A) and the FLUTE CASE (B).
- Move forward.
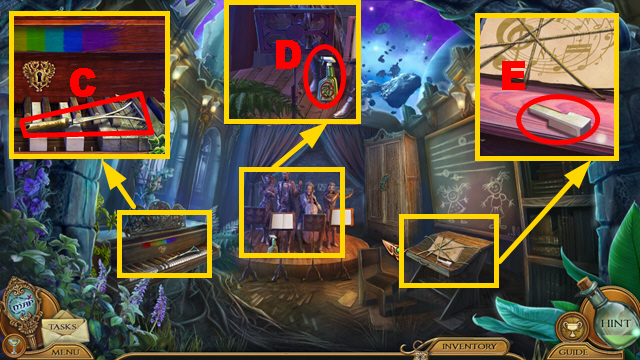
- Take the RAKE (C), HERBICIDE (D), and PIANO KEY 3/4 (E).
- Walk down.
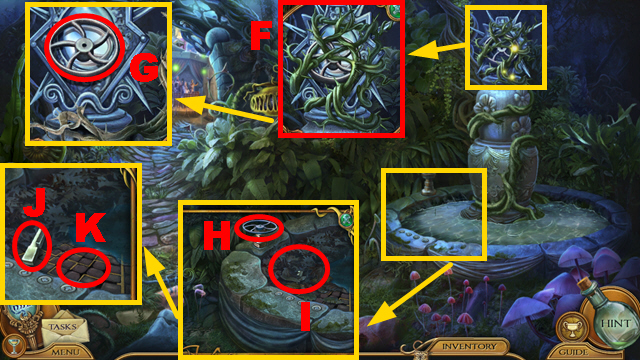
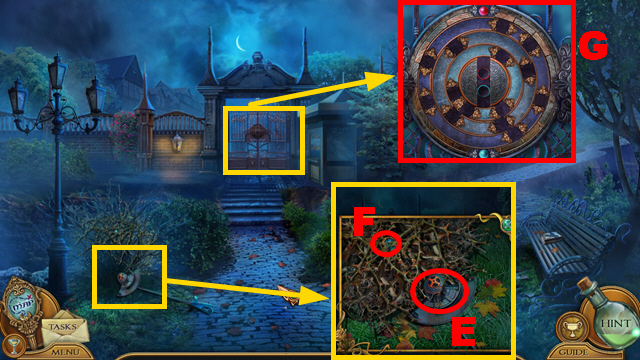
- Use the HERBICIDE (F); take the VALVE (G).
- Place the VALVE (H); use the RAKE (I).
- Take PIANO KEY 4/4 (J); examine the area (K).
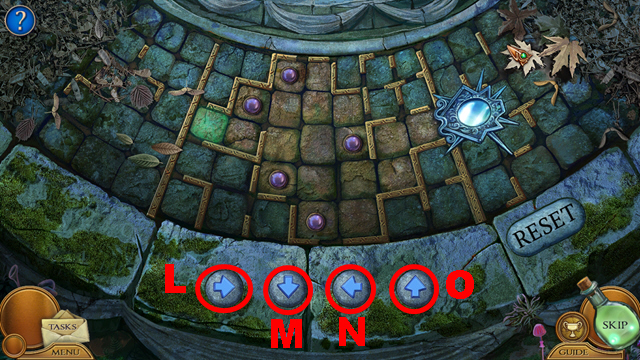
- Play the mini-game.
- Solution: L-Nx2-Lx3-Nx3-M-O-Mx2-O-Mx2-Ox2.
- Turn right.
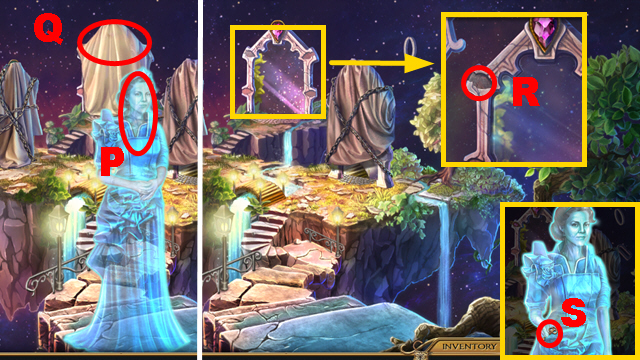
- Talk to the woman (P).
- Remove the blanket (Q).
- Place the MEMORY SHARD (R).
- Talk to the woman; take the BRASS KEY (S).
- Move forward.
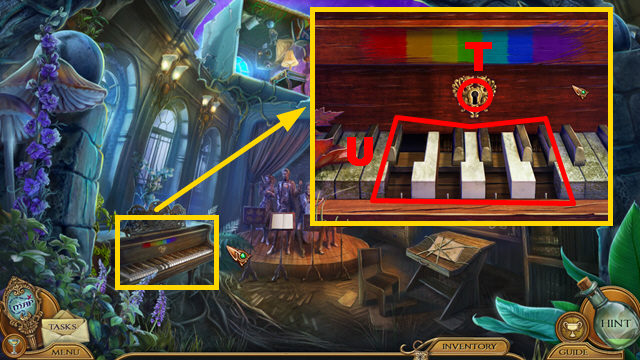
- Insert the BRASS KEY (T).
- Place 4 PIANO KEYS (U).
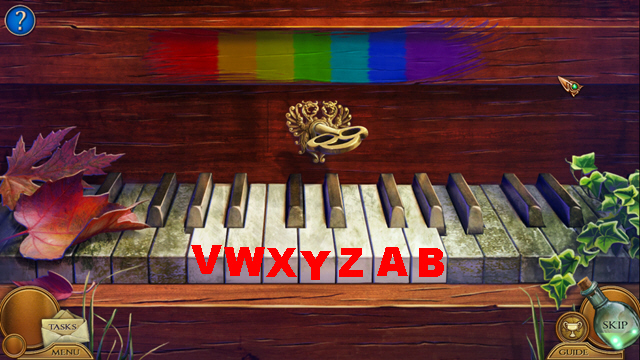
- Play the mini-game.
- Solution: Y-V-B-X-A-W-Z.
- Go upstairs.
Chapter 2: The Child's Room
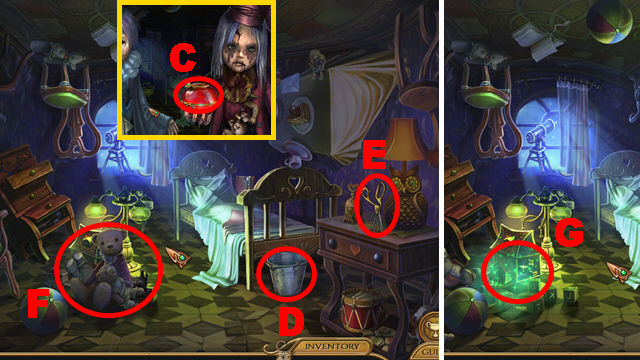
- Take the JEWELRY BOX (C), EMPTY BUCKET (D), and SCISSORS (E).
- Move toys three times (F).
- Play the HOP (G) to acquire the HELMET.
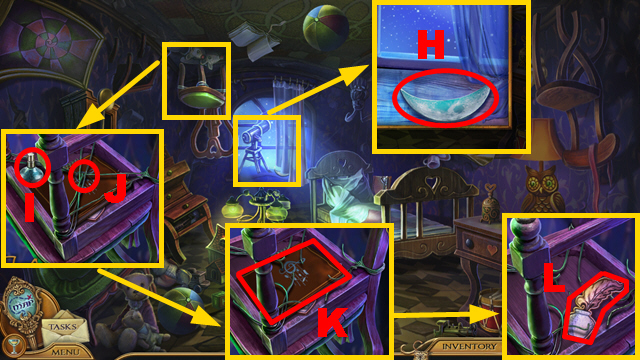
- Take the CRESCENT MOON (H) and CLEANING FLUID (I); use the SCISSORS (J).
- Take the SHEET-MUSIC BOOK 1/2 (K) and INKWELL EMBLEM (L).
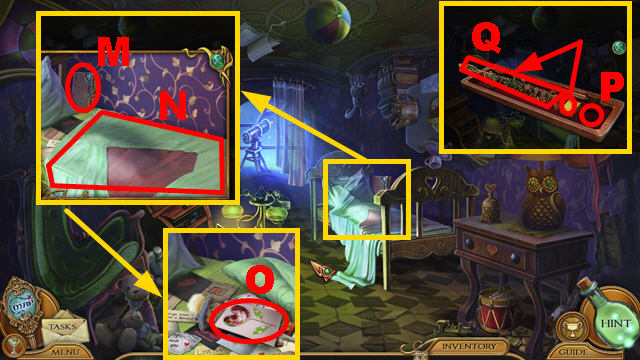
- Take BOOK 1/2 (M); remove the blanket (N).
- Read the note (O).
- Place the CLEANING FLUID on the FLUTE CASE (P); clean the flute with the sponge (Q) to acquire the FLUTE.
- Walk down.
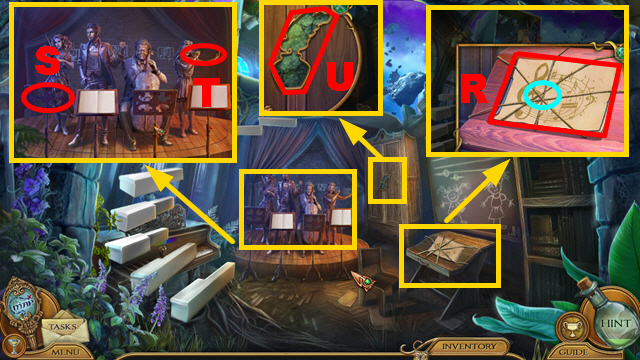
- Use the SCISSORS (blue); take SHEET-MUSIC BOOK 2/2 (R).
- Place 2 SHEET-MUSIC BOOKS (S) and the FLUTE (T).
- Place the INKWELL EMBLEM (U).
- Walk down.
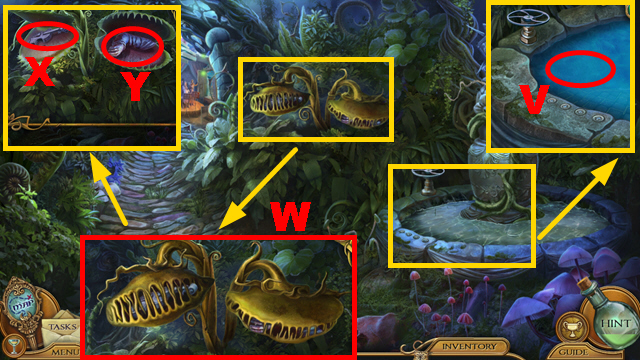
- Hold the EMPTY BUCKET (V) to acquire the BUCKET OF WATER.
- Use the BUCKET OF WATER (W); take the STONE VIOLIN (X) and STONE ARM (Y).
- Move forward.
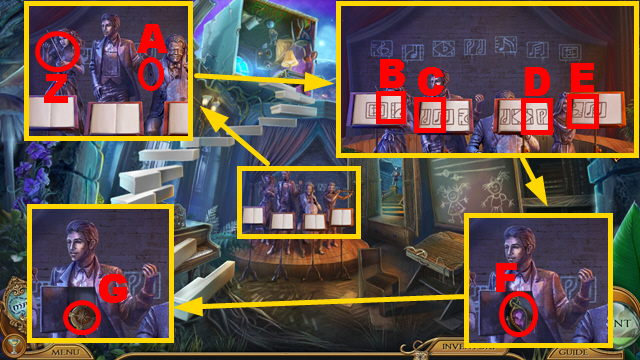
- Place the STONE VIOLIN (Z) and STONE ARM (A).
- Play the mini-game.
- Solution: Bx3-Cx2-Dx2-Ex3.
- Take MEMORY SHARD 1/3 (F) and the COMPASS EMBLEM (G).
- Turn right.
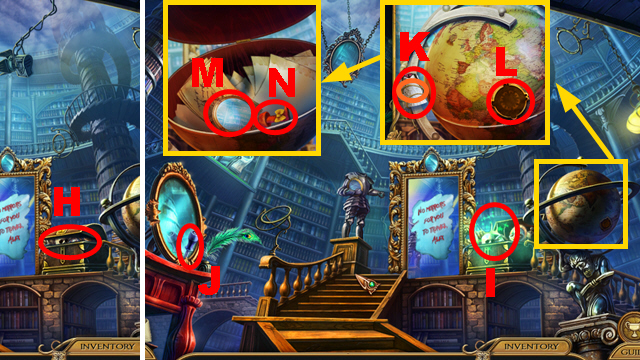
- Open the chest (H).
- Play the HOP (I) to acquire MIRROR PART 1/4.
- Take the SCREWDRIVER (J).
- Use the SCISSORS (orange); take BRIDE FIGURINE 1/2 (K).
- Place the COMPASS EMBLEM (L); take MIRROR PART 2/4 (M) and the TOY BOOT (N).
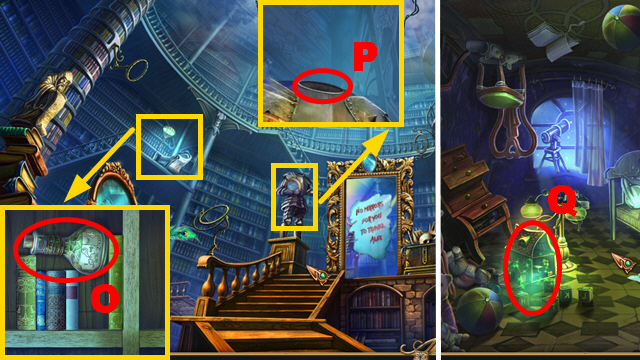
- Take the GROWTH POTION (O).
- Place the HELMET (P).
- Walk down, go upstairs.
- Play the HOP (Q) to acquire BOOK 2/2.
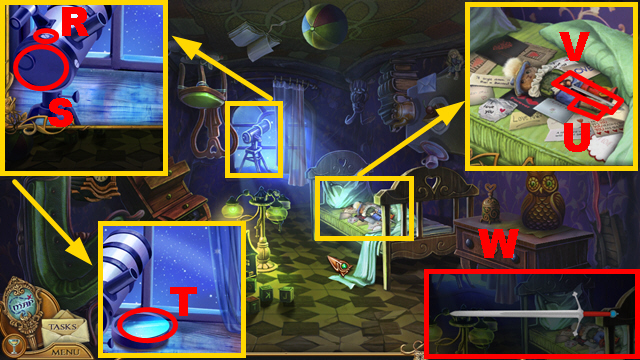
- Use the SCREWDRIVER (R); remove the cover (S).
- Take MIRROR PART 3/4 (T).
- Place the TOY BOOT (U); take the LITTLE SWORD (V).
- Pour the GROWTH POTION over the LITTLE SWORD (W) to acquire the SWORD.
- Walk down, turn right.
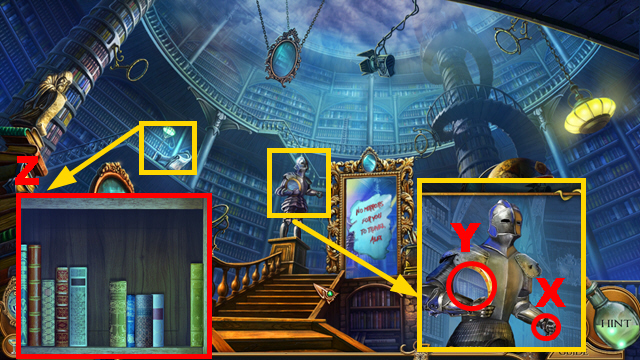
- Place the SWORD (X); take MIRROR PART 4/4 (Y).
- Place 2 BOOKS (Z).
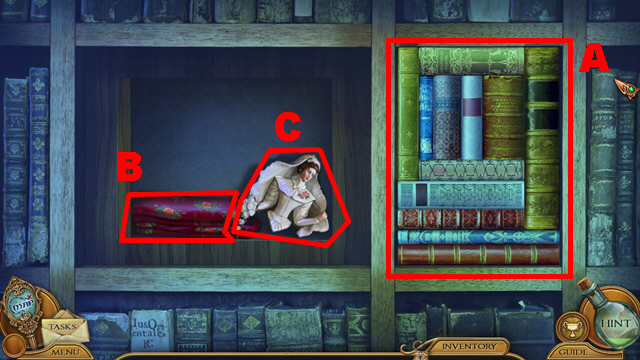
- Play the mini-game.
- Solution: (A).
- Take the ROSE FABRIC (B) and BRIDE FIGURINE 2/2 (C).
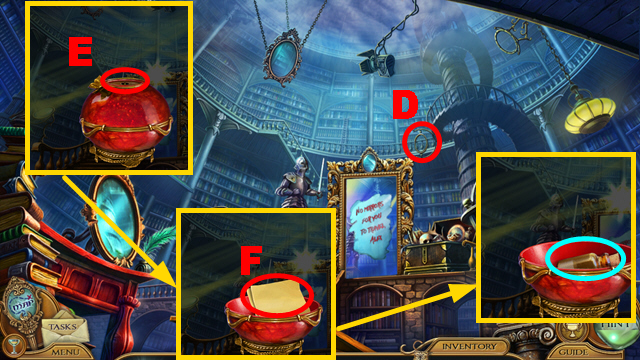
- Place 4 MIRROR PARTS (D).
- Place 2 BRIDE FIGURINES on the JEWELRY BOX (E); take the note (F) and POWDERED SILVER (blue).
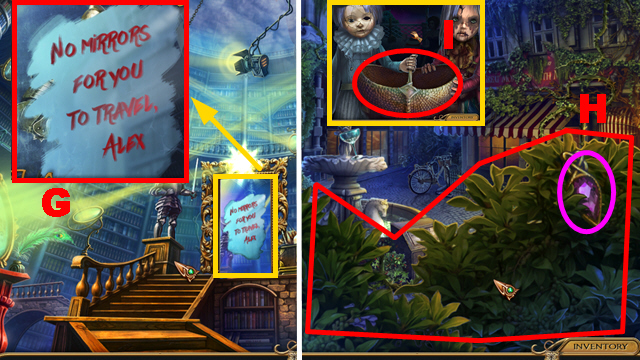
- Use the POWDERED SILVER (G).
- Move forward.
- Take MEMORY SHARD 2/3 (purple); remove the branches twice (H).
- Turn right.
- Take the BASKET (I).
- Walk down.
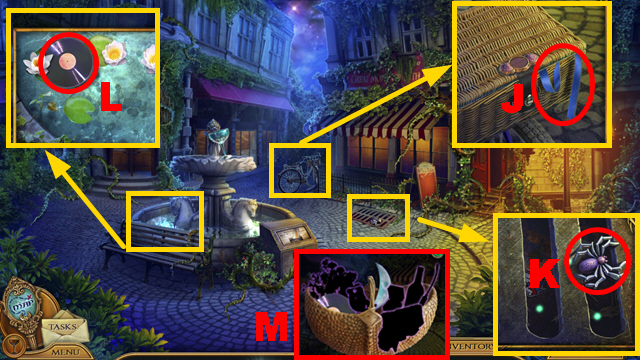
- Take the BLUE RIBBON (J), SPIDER EMBLEM (K), and RECORD (L).
- Place the CRESCENT MOON and RECORD in the BASKET (M).
- Turn left.
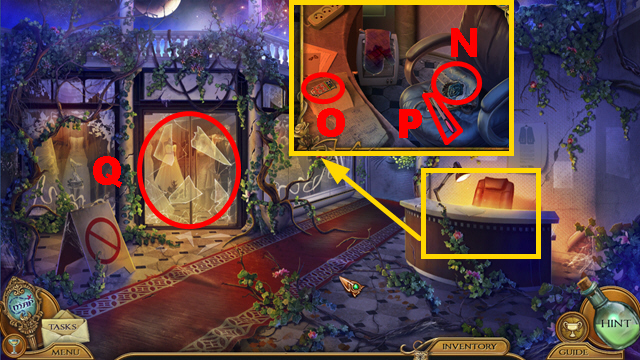
- Open the bag (N); take the MAGNET (O) and NAIL FILE (P).
- Inspect the area (Q).
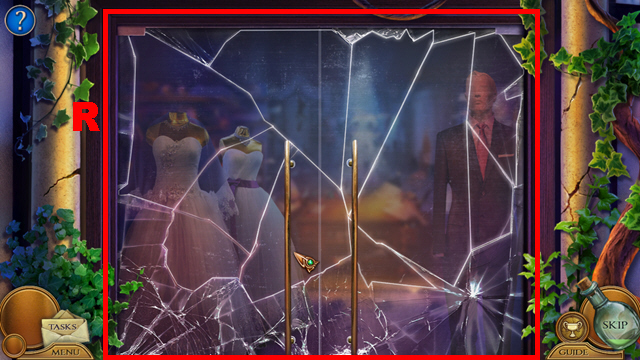
- Play the mini-game.
- Solution: (R).
- Move forward.
Chapter 3: The Dressmaker
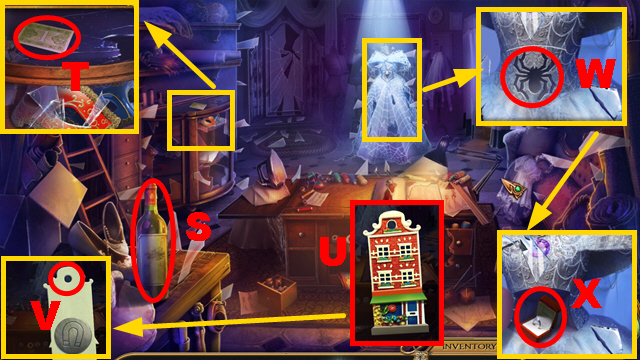
- Take the WINE (S) and DOLLAR (T).
- Flip the MAGNET (U); connect the BLUE RIBBON to it (V) to acquire the HANGING MAGNET.
- Place the SPIDER EMBLEM (W); take the RING BOX (X).
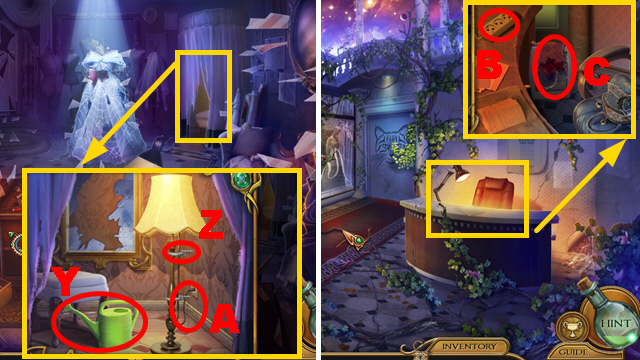
- Take the EMPTY WATERING CAN (Y).
- Use the NAIL FILE (Z); take the EXTENSION CORD (A).
- Walk down.
- Place the EXTENSION CORD (B); take the OVEN MITT (C).
- Walk down.
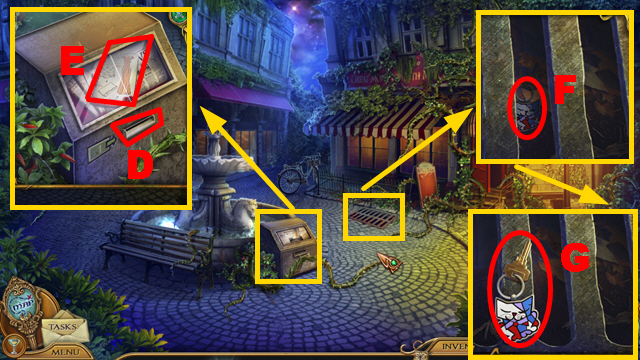
- Insert the DOLLAR (D); take the DRESS PATTERN (E).
- Use the HANGING MAGNET (F); take the CAT KEY (G).
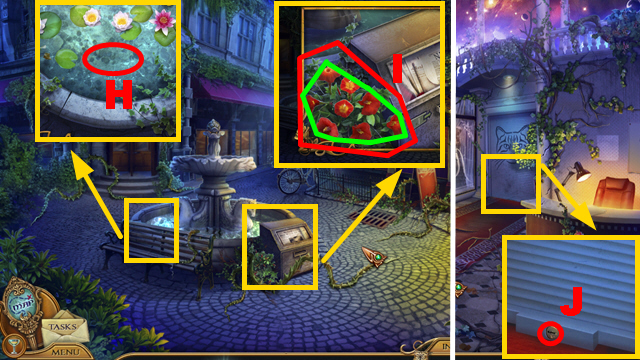
- Hold the EMPTY WATERING CAN (H) to acquire the WATERING CAN.
- Use the WATERING CAN (I); take the FLOWERS (green).
- Turn left.
- Insert the CAT KEY (J).
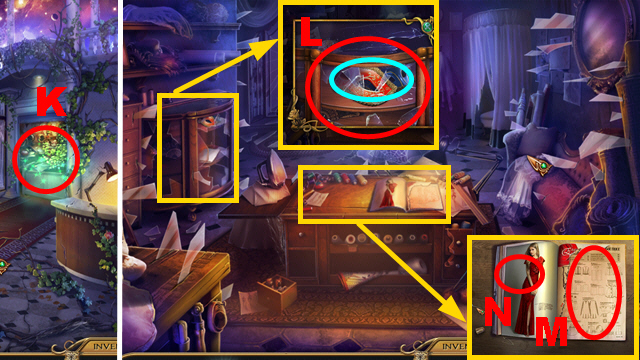
- Play the HOP (K) to acquire the ROSE EMBLEM.
- Move forward.
- Use the OVEN MITT (L); take the MASKS (blue).
- Place the DRESS PATTERN (M) and ROSE FABRIC (N).
- Walk down twice.
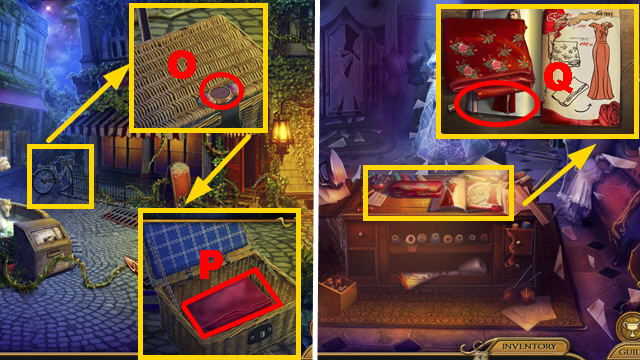
- Place the ROSE EMBLEM (O); take the RED FABRIC (P).
- Turn left, move forward.
- Place the RED FABRIC (Q).
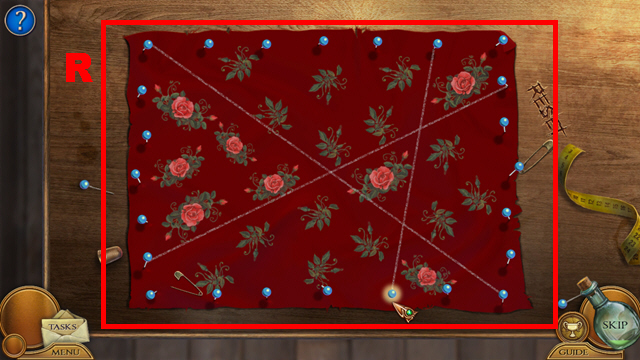
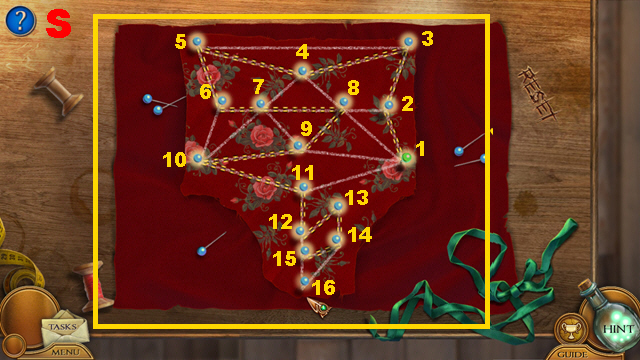
- Play the mini-game.
- Solution: (R).
- Solution (S): 1-16.
- Receive the RED DRESS.
- Walk down.
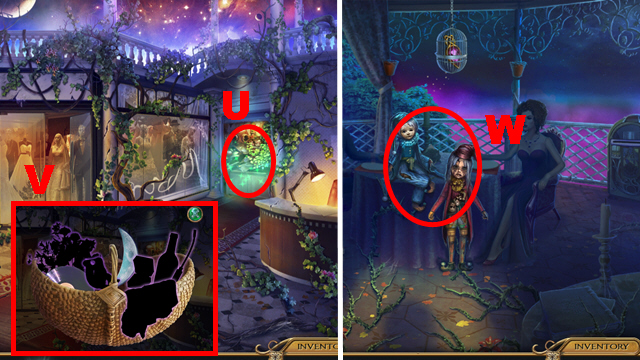
- Play the HOP (U) to acquire the LIGHTER.
- Place the WINE, RING BOX, FLOWERS, MASKS, RED DRESS, and LIGHTER in the BASKET (V) to acquire the MEMORY ITEMS.
- Walk down, turn right.
- Use the MEMORY ITEMS (W).
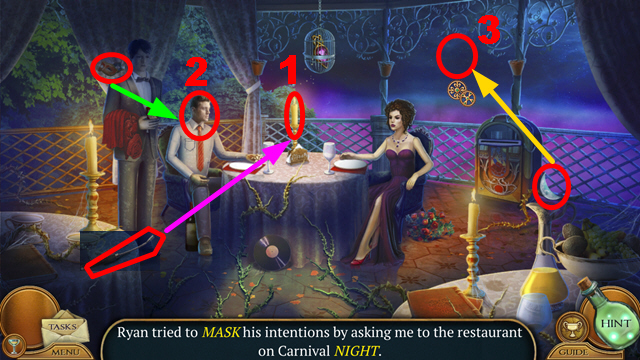
- Play the mini-game.
- Solution: 1-3.
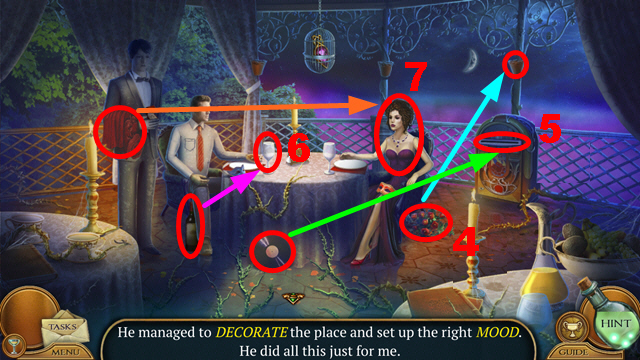
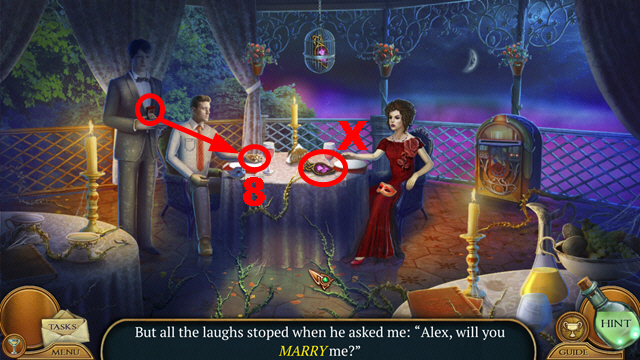
- Solution: 4-8.
- Take MEMORY SHARD 3/3 (X).
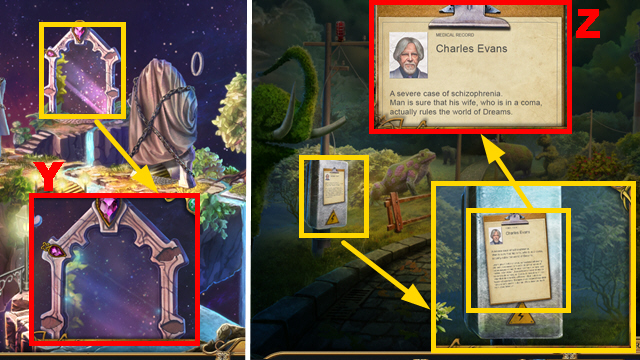
- Place 3 MEMORY SHARDS (Y).
- Move forward.
- Take the clipboard (Z).
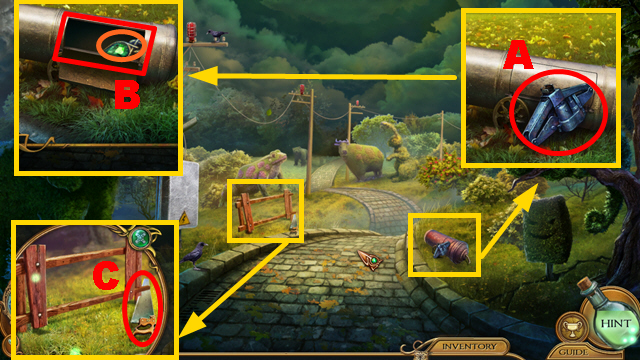
- Take the JACK (A).
- Open the compartment (B); take MEMORY SHARD 1/4 (orange).
- Use the saw (C) to acquire the HANDMADE LADDER.
- Move forward.
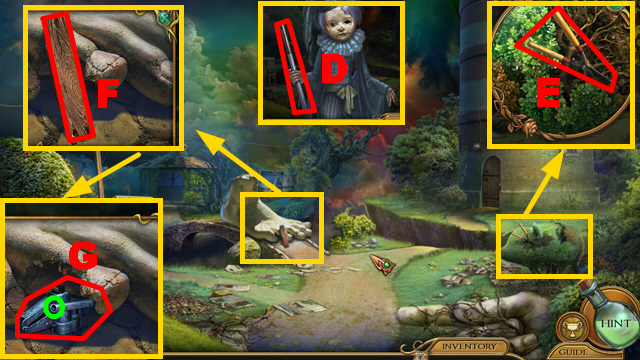
- Take the JACK HANDLE (D), PRUNERS (E), and PLANK 1/3 (F).
- Place the JACK (G) and JACK HANDLE (green); pull it.
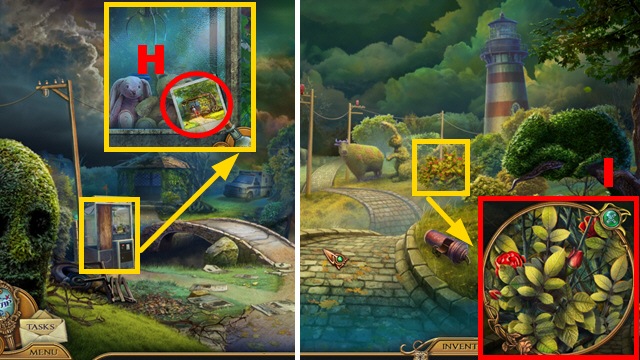
- Take the photo (H).
- Walk down.
- Use the PRUNERS (I).
Chapter 4: The Gazebo
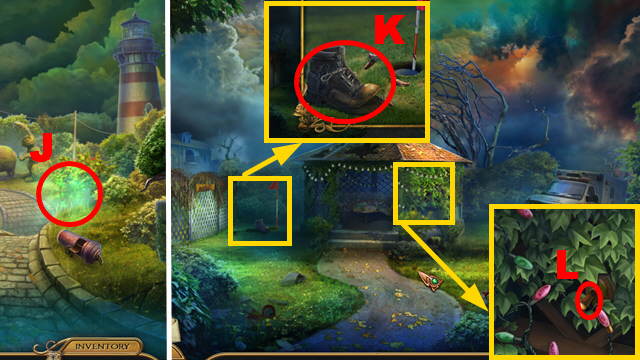
- Play the HOP (J) to acquire the MATCHES.
- Move forward, turn left.
- Take the OLD BOOT (K).
- Turn the switch (L).
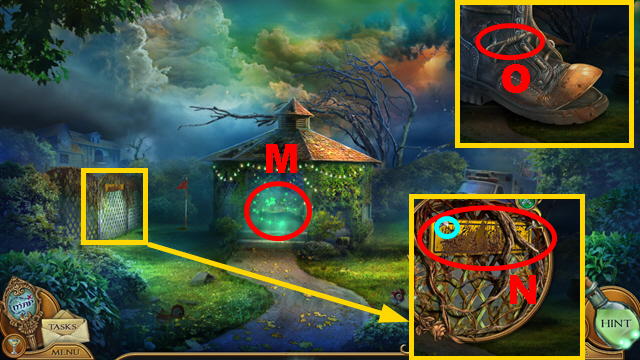
- Play the HOP (M) to acquire the PLIERS.
- Use the PLIERS (blue); take PLANK 2/3 (N).
- Take the SHOELACE from the OLD BOOT (O).
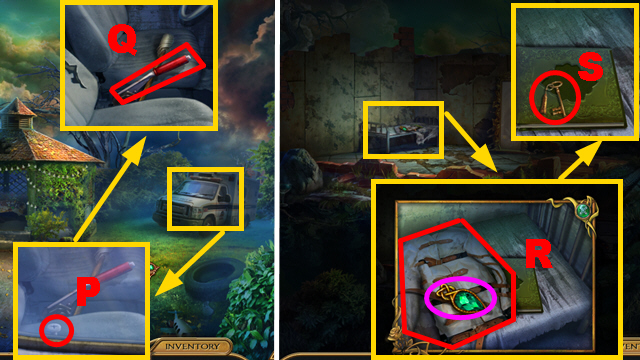
- Use the SHOELACE (P); open the door.
- Take the DRY TORCH (Q).
- Turn right.
- Take MEMORY SHARD 2/4 (purple); remove the jacket (R).
- Take the LIGHTHOUSE KEY (S).
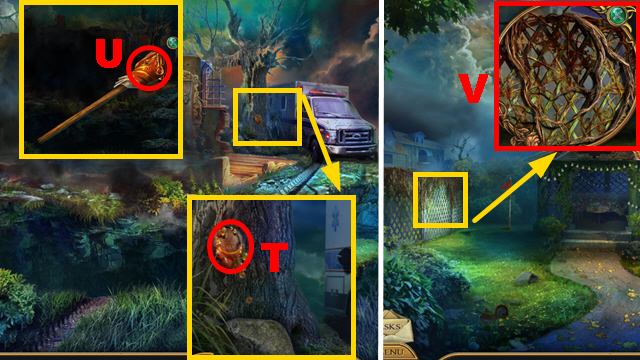
- Hold the DRY TORCH (T) to acquire the TORCH WITH RESIN.
- Light the TORCH WITH RESIN with the MATCHES (U) to acquire the LIT TORCH.
- Walk down.
- Use the LIT TORCH (V).
- Turn left.
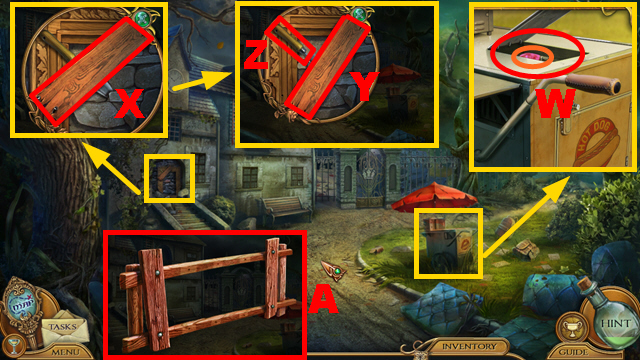
- Open the cover (W); take FLUORESCENT BULB 1/2 (orange).
- Use the PLIERS (X); take PLANK 3/3 (Y) and the TROWEL (Z).
- Connect 3 PLANKS to the HANDMADE LADDER (A).
- Turn right.
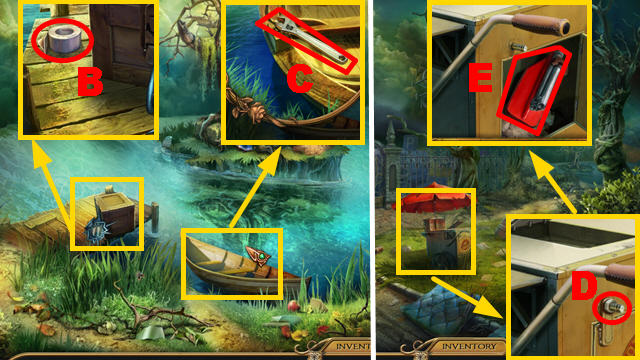
- Take the TAPE (B) and WRENCH (C).
- Walk down.
- Use the WRENCH (D); take the OAR (E).
- Turn right.
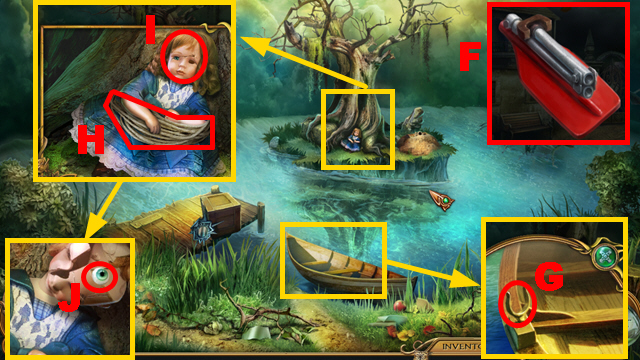
- Unfold the OAR twice (F); take the OAR.
- Place the OAR (G).
- Take the ROPE (H); use the OLD BOOT (I).
- Take GLASS EYE 1/3 (J).
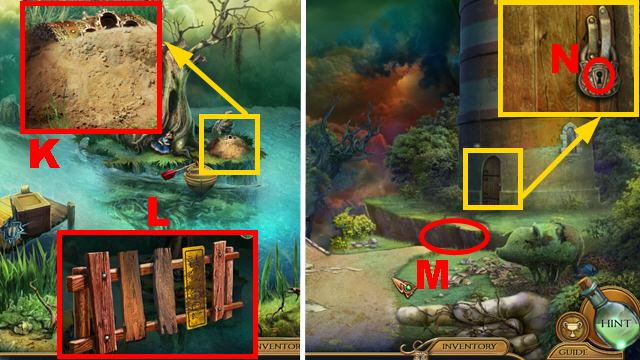
- Use the TROWEL (K).
- Connect the ROPE to the HANDMADE LADDER (L) to acquire the LADDER.
- Walk down three times.
- Place the LADDER (M).
- Insert the LIGHTHOUSE KEY (N).
- Turn right.
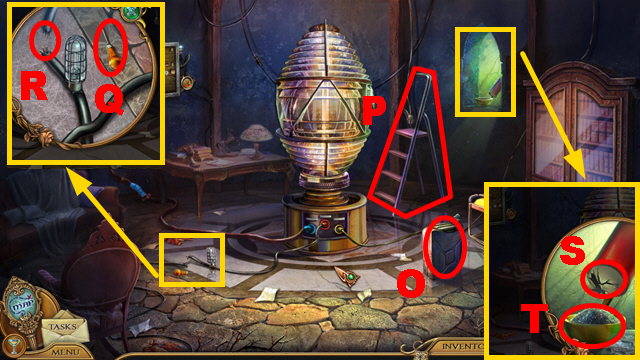
- Take the JERRICAN (O).
- Move the ladder (P).
- Take the AWL (Q); use the TAPE (R).
- Use the AWL (S); take the GUNPOWDER (T).
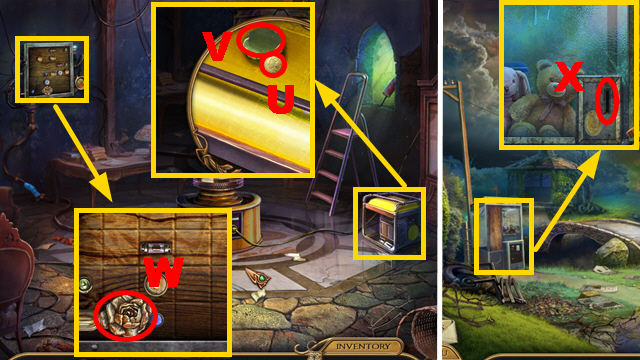
- Take the COIN (U); open the cover (V).
- Take the ROSE ORNAMENT (W).
- Walk down.
- Insert the COIN (X).
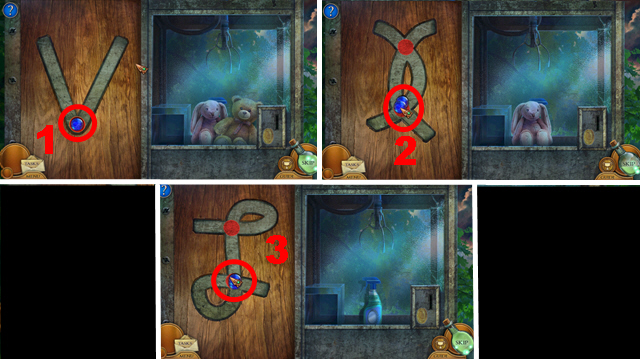
- Play the mini-game.
- Solution: 1-3.
- You receive the GLASS CLEANER.
- Turn left, turn right.
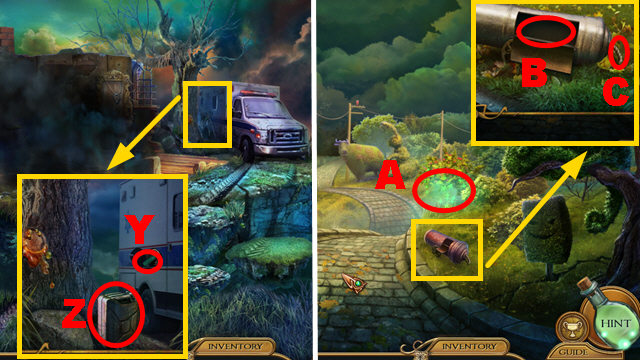
- Use the JERRICAN (Y); take the GAS (Z).
- Walk down three times.
- Play the HOP (A) to acquire SAFE BUTTON 1/2.
- Use the GUNPOWDER (B) and MATCHES (C).
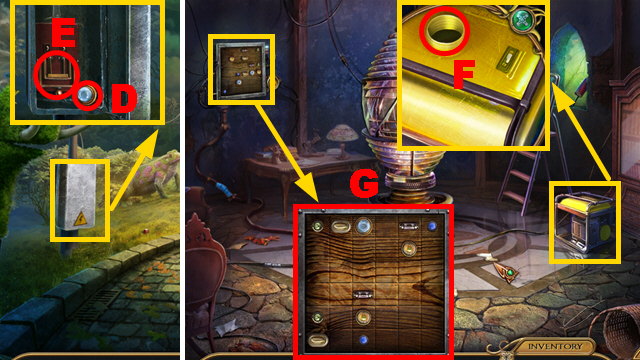
- Open the compartment; take the FLAT BULB (D).
- Pull the lever (E).
- Move forward, turn right.
- Use the GAS (F).
- Place the FLAT BULB (G).
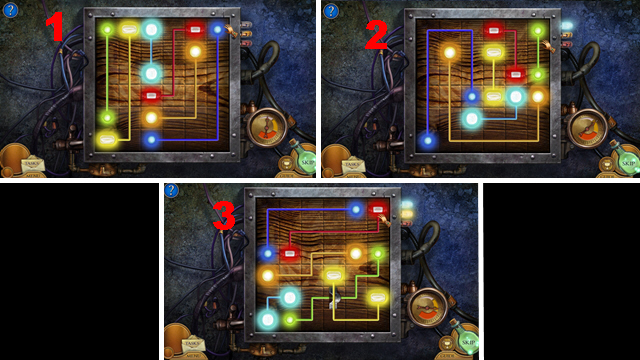
- Play the mini-game.
- Solution: 1-3.
- Walk down, turn left, turn right.
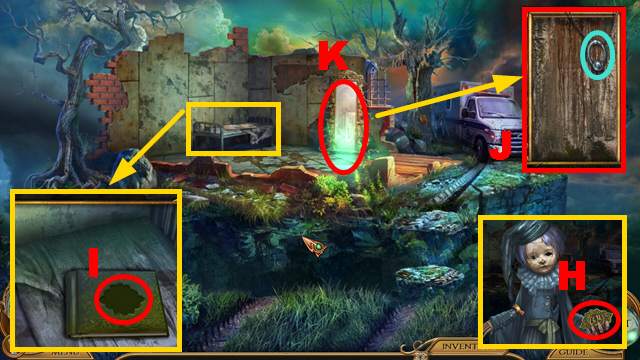
- Take the ALBUM MEDALLION (H).
- Place the ALBUM MEDALLION (I).
- Take the CABINET HANDLE (blue); use the GLASS CLEANER (J).
- Play the HOP (K) to acquire the BUG SPRAY.
- Walk down.
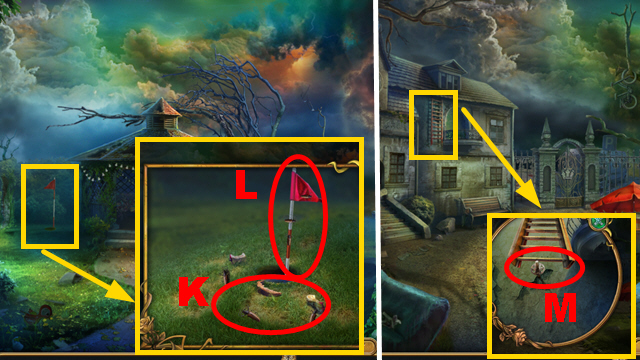
- Use the BUG SPRAY (K); take the FLAG (L).
- Turn left.
- Use the FLAG (M).
- Move forward.
Chapter 5: The Classroom
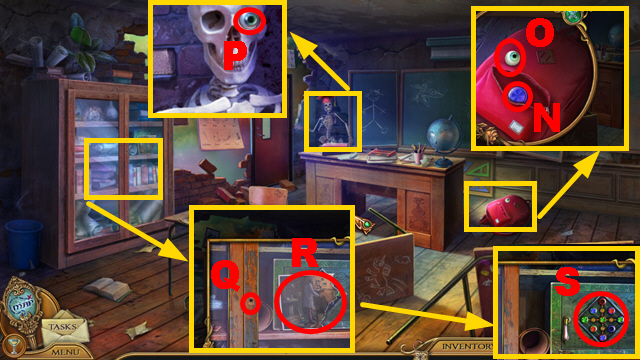
- Open the pocket; take SAFE BUTTON 2/2 (N) and GLASS EYE 2/3 (O).
- Take GLASS EYE 3/3 (P).
- Place the CABINET HANDLE (Q); pull it.
- Take PHOTO SCRAP 1/3 (R).
- Place 2 SAFE BUTTONS (S).
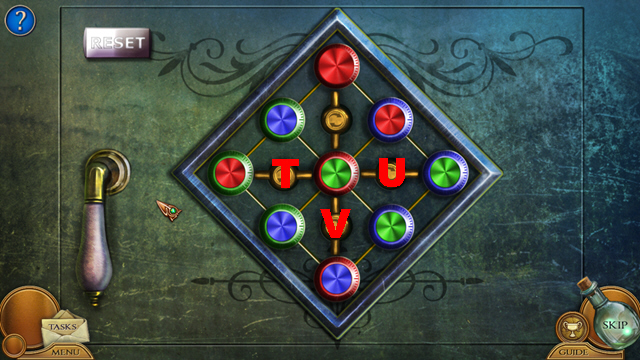
- Play the mini-game.
- Solution: T-U-T-U-T-Vx2-U-Vx3-Ux2.
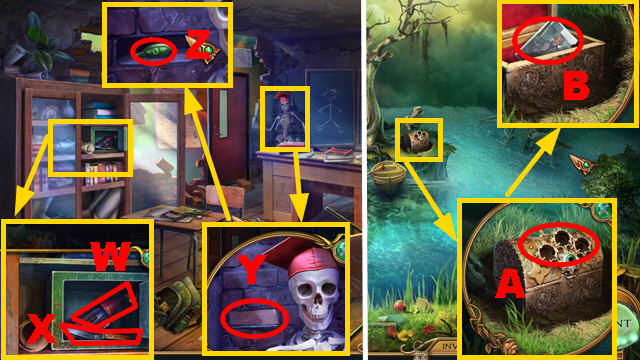
- Take GATE LOCK PART 1/3 (W) and the SPATULA (X).
- Use the SPATULA (Y); take FLUORESCENT BULB 2/2 (Z).
- Walk down, turn right.
- Place 3 GLASS EYES (A); take PHOTO SCRAP 2/3 (B).
- Walk down twice.
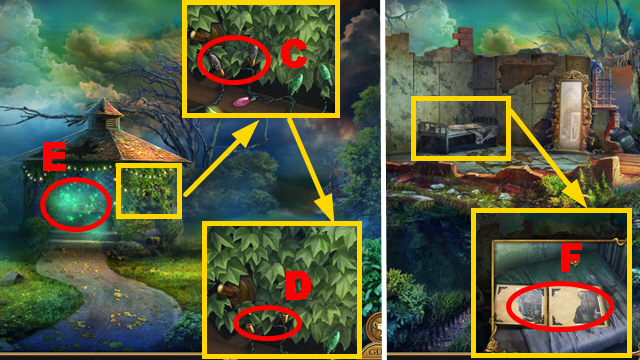
- Remove 2 bulbs (C); place 2 FLUORESCENT BULBS (D).
- Play the HOP (E) to acquire PHOTO SCRAP 3/3.
- Turn right.
- Place 3 PHOTO SCRAPS (F).
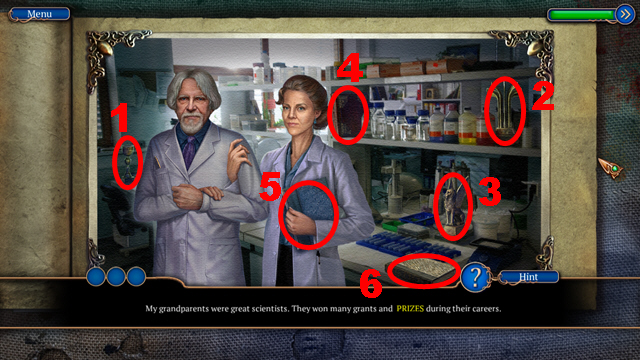
- Play the mini-game.
- Solution: 1-6.
- Solution: 7-12.
- Solution: 13-18.
- Take GATE LOCK PART 2/3 (G).
- Place the ROSE ORNAMENT (H); take GATE LOCK PART 3/3 (I).
- Walk down, turn left.
- Place 3 GATE LOCK PARTS (J).
- Move forward.
- Take the GRABBER PART (K) and MEMORY SHARD 3/4 (L).
- Move the curtain (M).
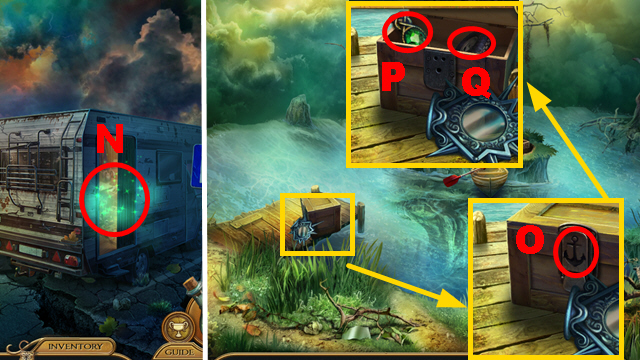
- Play the HOP (N) to acquire the ANCHOR EMBLEM.
- Walk down, turn right.
- Place the ANCHOR EMBLEM (O); take MEMORY SHARD 4/4 (P) and the WHEEL (Q).
- Walk down twice, turn right.
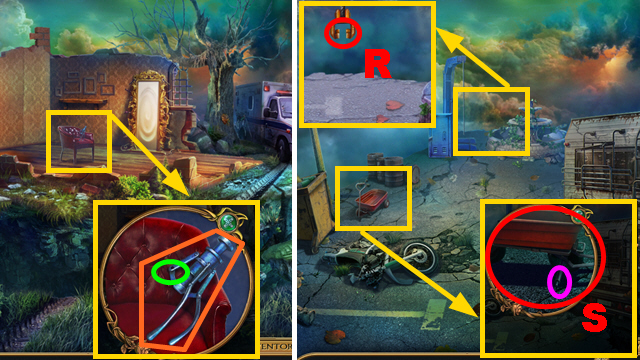
- Place the GRABBER PART (green); take the CRANE GRABBER (orange).
- Walk down, turn left, move forward.
- Place the CRANE GRABBER (R) and WHEEL (purple); take the TOY WAGON (S).
- Walk down, turn right.
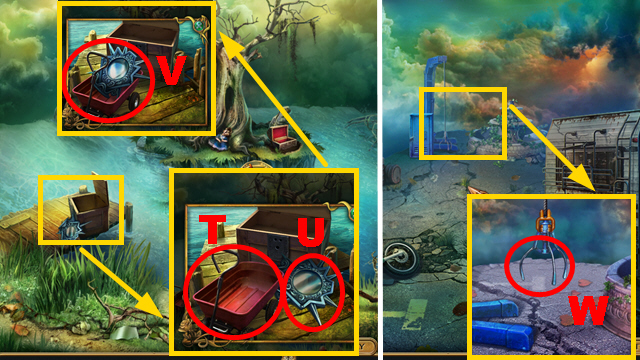
- Place the TOY WAGON (T); move the fountain head (U).
- Take the FOUNTAIN HEAD (V).
- Walk down, move forward.
- Place the FOUNTAIN HEAD (W).
- Move forward.
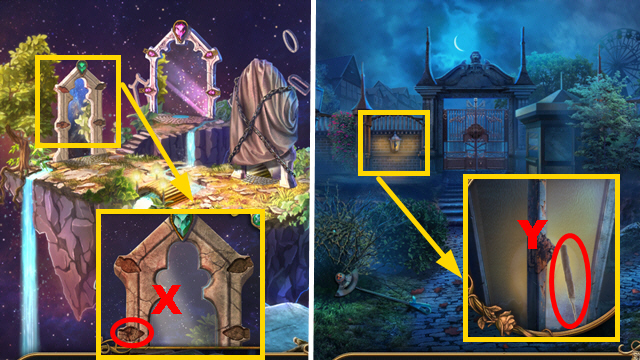
- Place 4 MEMORY SHARDS (X).
- Go through the mirror.
- Take LOCKPICK 1/2 (Y).
- Take the CROWBAR (Z).
- Turn right.
- Take LOCKPICK 2/2 (A).
- Use the CROWBAR (B); take FAN BLADE 1/2 (C).
- Play the HOP (D) to acquire the CIRCULAR BLADE.
- Walk down.
- Use the CIRCULAR BLADE (E); take MEMORY SHARD 1/4 (F).
- Use 2 LOCKPICKS (G).
- Play the mini-game.
- Use lockpicks to guide both balls into the gaps at the same time.
- Solution: Hx2-I-H-I-H.
- Move forward.
Chapter 6: The Town Square
- Take CLOWN EMBLEM 1/2 (J); inspect the drawing (K).
- Take the STITCH RIPPER (L).
- Walk down, turn right.
- Use the STITCH RIPPER (M); take the CADUCEUS KEY (blue).
- Walk down, move forward.
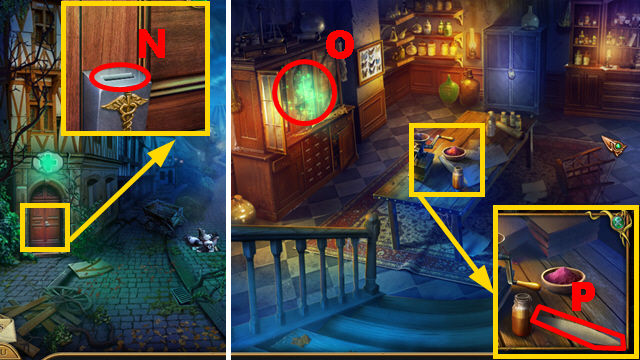
- Insert the CADUCEUS KEY (N).
- Turn left.
- Play the HOP (O) to acquire the BIRD ORNAMENT.
- Take the SHARPENING STONE (P).
- Walk down twice.
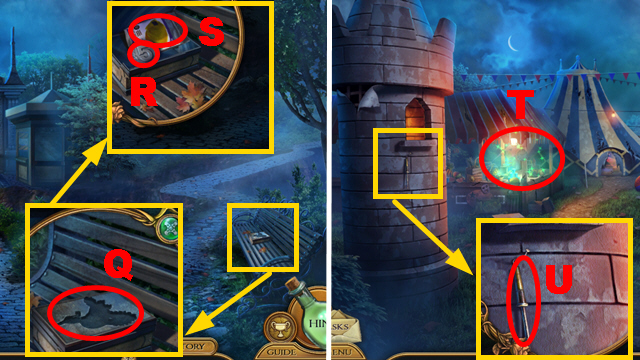
- Place the BIRD ORNAMENT (Q); take the COIN (R) and FISH FOOD (S).
- Move forward twice.
- Play the HOP (T) to acquire the BREAD.
- Take the SOLDERING IRON (U).
- Move forward.
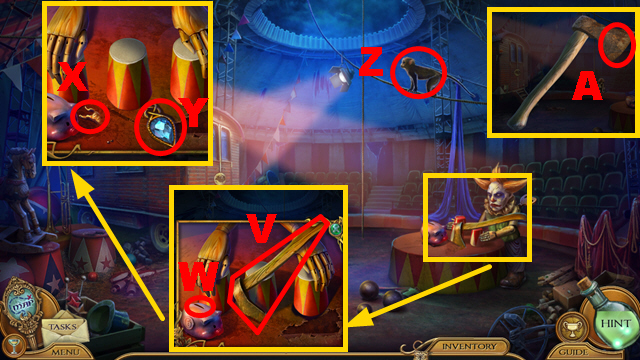
- Take the AXE (V); use the COIN (W).
- Take HORSE EMBLEM 1/3 (X) and MEMORY SHARD 2/4 (Y).
- Inspect the monkey (Z).
- Use the SHARPENING STONE to sharpen the AXE (A); you acquire the SHARP AXE.
- Walk down twice.
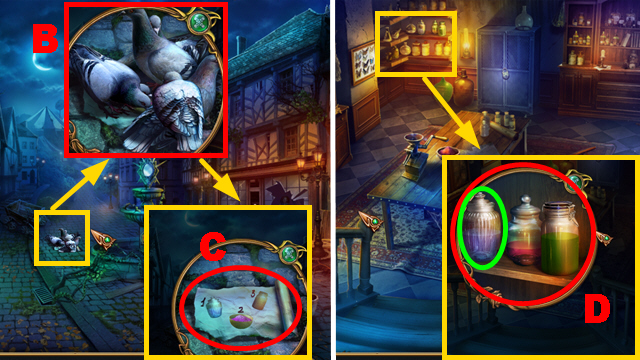
- Use the BREAD (B); take the RECIPE (C).
- Turn left.
- Place the RECIPE (D); take the CATALYST (green).
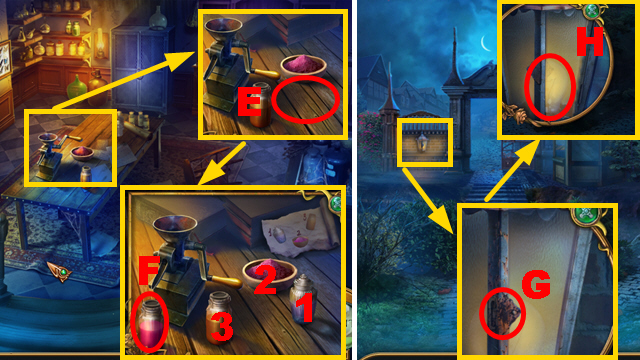
- Place the CATALYST and RECIPE (E).
- Use ingredients 1-3; take the RUST REMOVER (F).
- Walk down twice.
- Use the RUST REMOVER (G); open the lantern.
- Take the LIGHTBULB (H).
- Turn right.
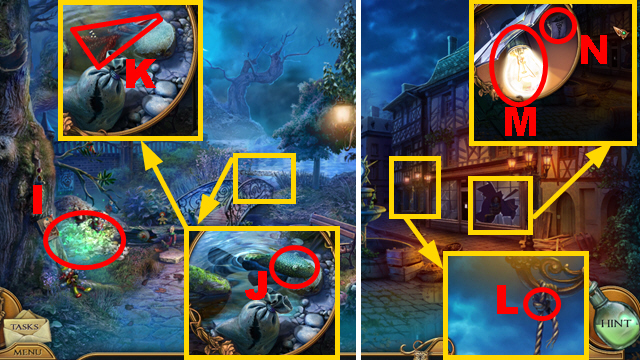
- Play the HOP (I) to acquire CLOWN EMBLEM 2/2.
- Use the FISH FOOD (J); take the SHARP CORAL (K).
- Walk down, move forward.
- Use the SHARP CORAL (L) to acquire the ROPE.
- Place the LIGHTBULB (M); take the LOCKER KEY (N).
- Turn left.
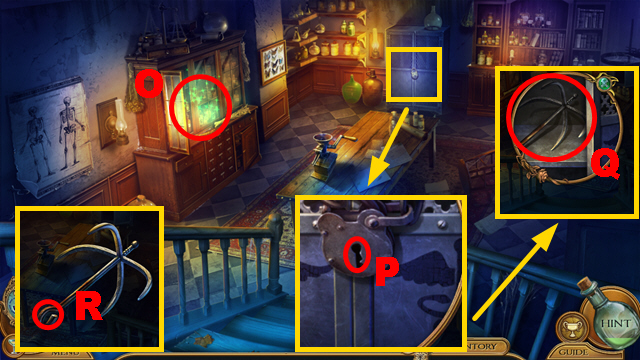
- Play the HOP (O) to acquire HORSE EMBLEM 2/3.
- Use the LOCKER KEY (P); take the HOOK (Q).
- Connect the ROPE to the HOOK (R) to acquire the GRAPPLING HOOK.
- Walk down, move forward.
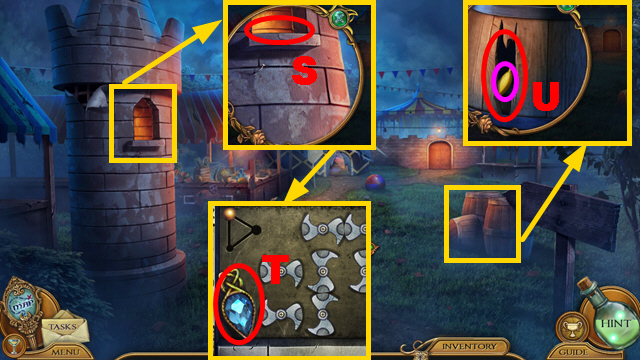
- Throw the GRAPPLING HOOK (S); take MEMORY SHARD 3/4 (T).
- Use the SHARP AXE (U); take the BANANA (purple).
- Move forward.
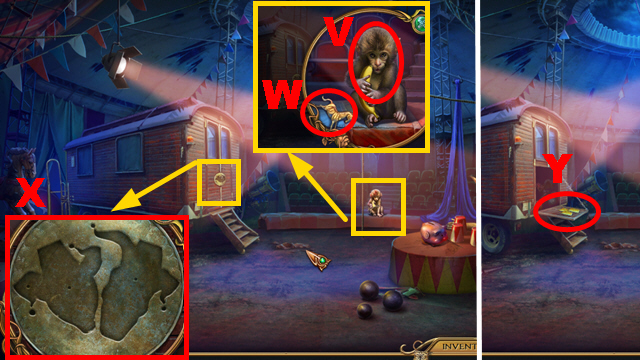
- Give the BANANA to the monkey (V); take HORSE EMBLEM 3/3 (W).
- Place 2 CLOWN EMBLEMS (X).
- Inspect the area (Y).
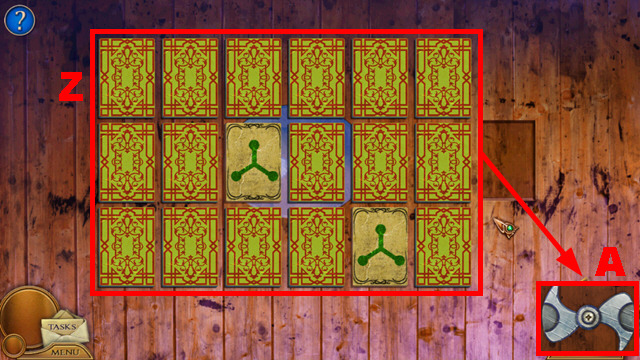
- Play the mini-game.
- Solution: Collect all pairs (Z).
- This puzzle is randomized.
- Take FAN BLADE 2/2 (A).
- Walk down.
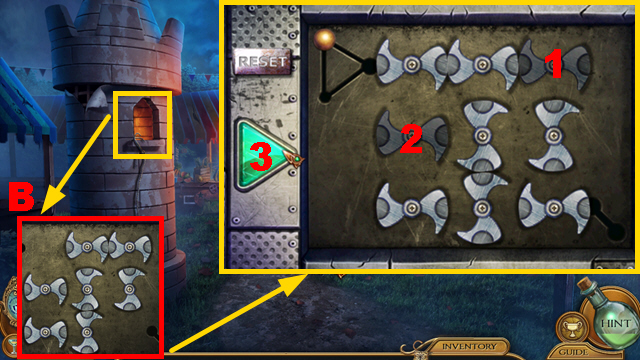
- Place 2 FAN BLADES (B).
- Play the mini-game.
- Solution: 1-3.
- Go through the gate.
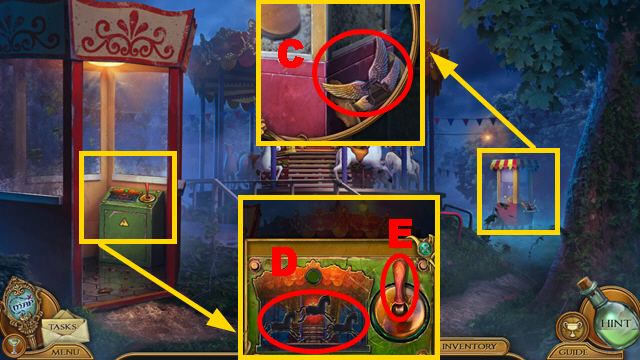
- Take KEY PART 1/2 (C).
- Place 3 HORSE EMBLEMS (D); pull the lever (E).
- Move forward.
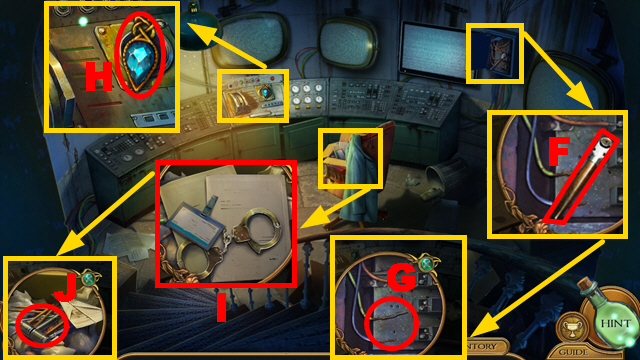
- Take the GLASS CUTTER (F); remove the broken wires (G).
- Take MEMORY SHARD 4/4 (H).
- Remove trash twice (I); take the LEVER (J).
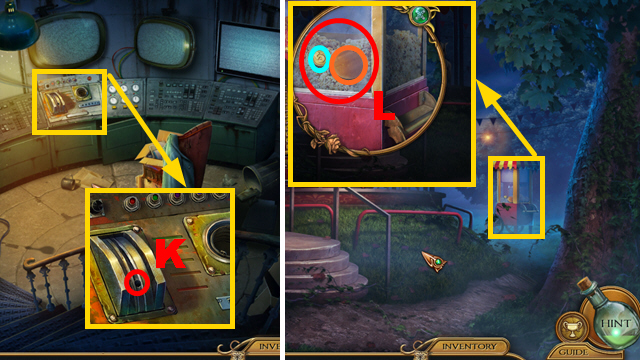
- Place the LEVER (K).
- Walk down.
- Use the GLASS CUTTER (L); take the COIN (blue) and RED BUTTON (orange).
- Walk down, enter the tent.
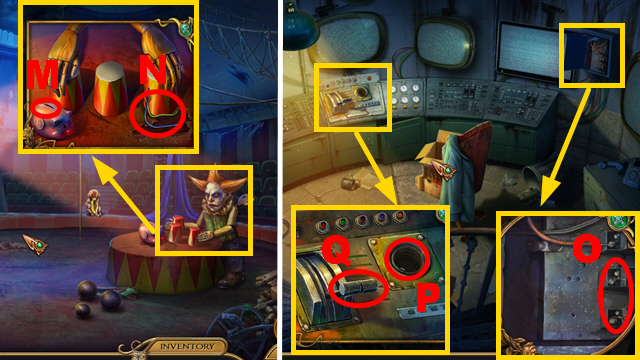
- Use the COIN (M); take the WIRES (N).
- Walk down, go through the gate, go forward.
- Use the WIRES and SOLDERING IRON (O).
- Place the RED BUTTON (P); push it.
- Push the lever (Q).
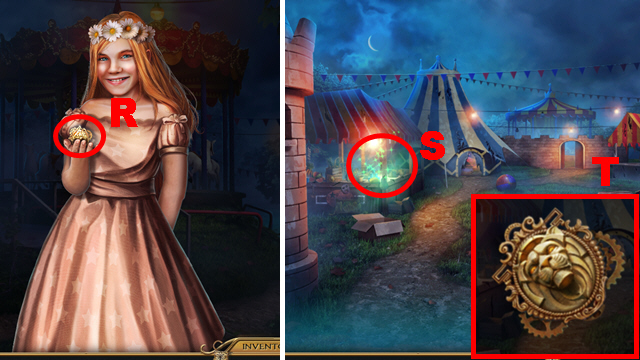
- Take the FOUNTAIN KEY (R).
- Walk down.
- Play the HOP (S) to acquire KEY PART 2/2.
- Place 2 KEY PARTS on the FOUNTAIN KEY (T) to acquire the FOUNTAIN KEY.
- Walk down.
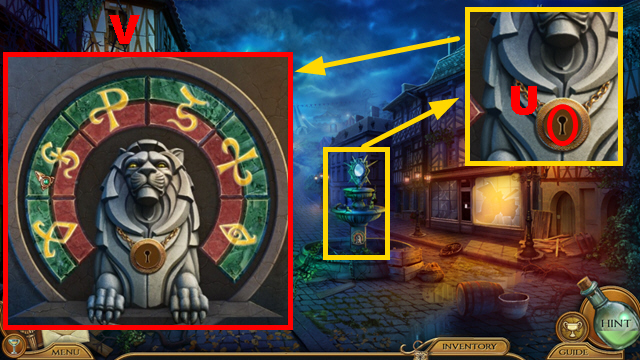
- Place the FOUNTAIN KEY (U).
- Play the mini-game.
- Solution: (V).
- Move forward.
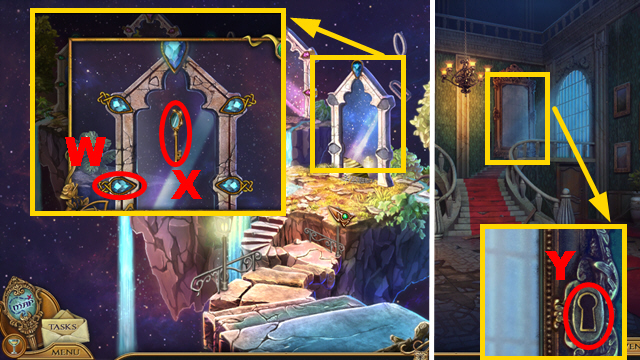
- Place 4 MEMORY SHARDS (W); take the MIRROR KEY (X).
- Move forward.
- Use the MIRROR KEY (Y).
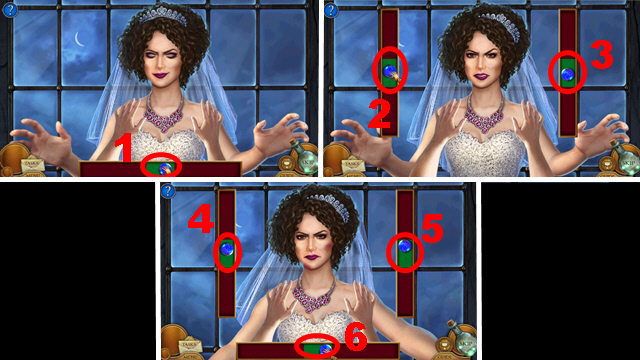
- Play the mini-game.
- Solution: 1-6.
- Congratulations! You have completed Stranded Dreamscapes: The Doppelganger.
Created at: 2016-10-26

