

Walkthrough Menu
- General Tips
- Chapter 1: The Game
- Chapter 2: Maggie
- Chapter 3: Kevin
- Chapter 4: Jim
- Chapter 5: The Gods
General Tips
- This is the official guide for Surface: Game of the Gods.
- This guide will not mention each time you have to zoom into a location; the screenshots will show each zoom scene.
- Hidden-object puzzles are referred to as HOPs. This guide will not show HOP solutions. It will identify the location of the HOP and the inventory item acquired.
- This guide will show solutions for non-random puzzles. Please read the in-game instructions for each puzzle.
Chapter 1: The Game
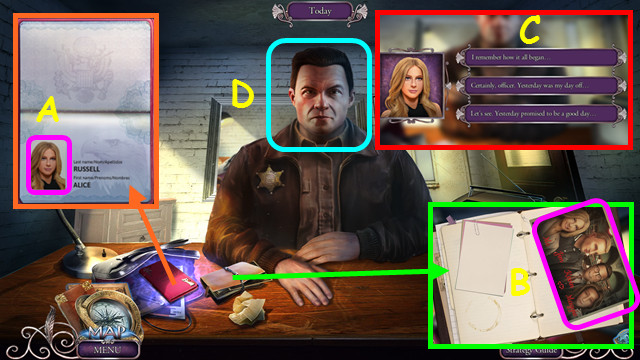
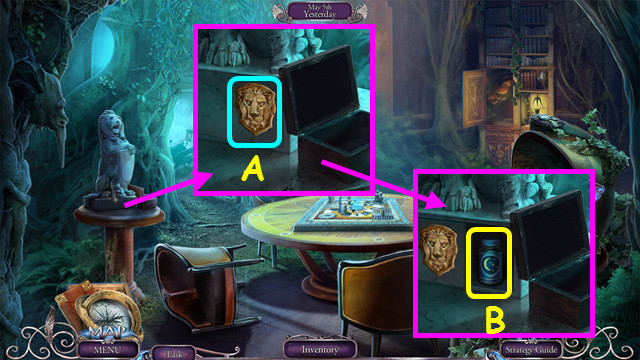
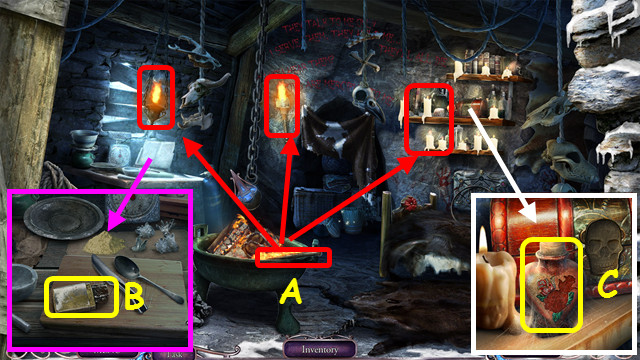
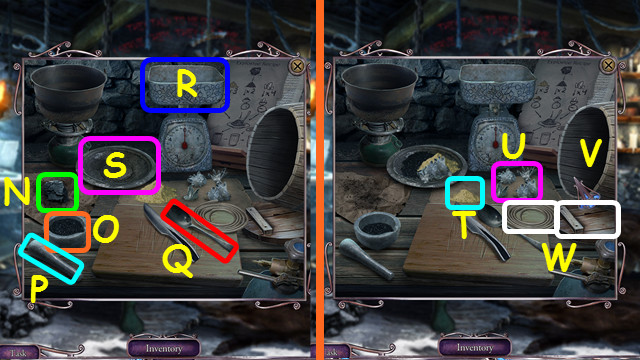
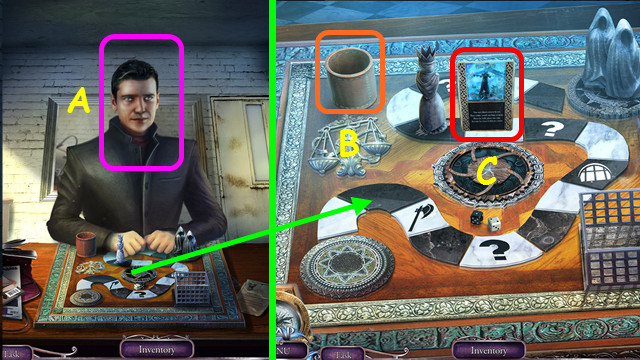
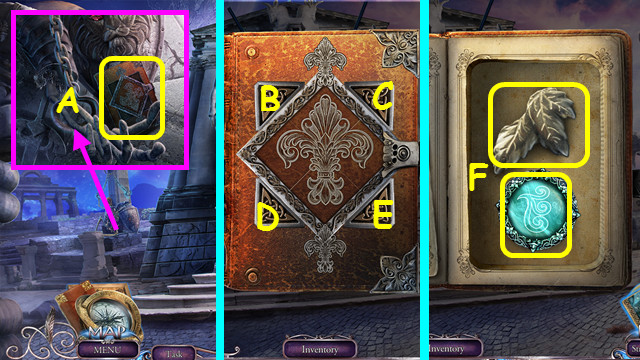
- Open the passport; select the photo (A).
- Open the journal, turn the pages, and select the photo (B).
- Select a dialog line for a HOP (C).
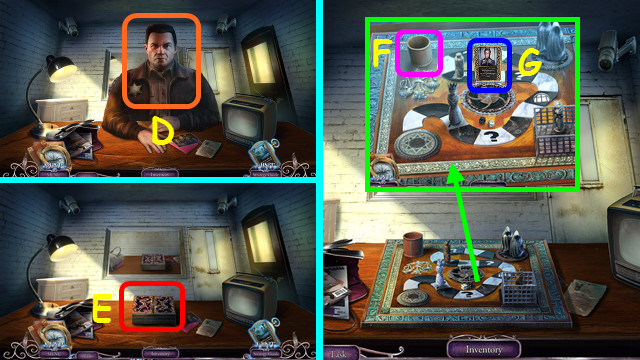
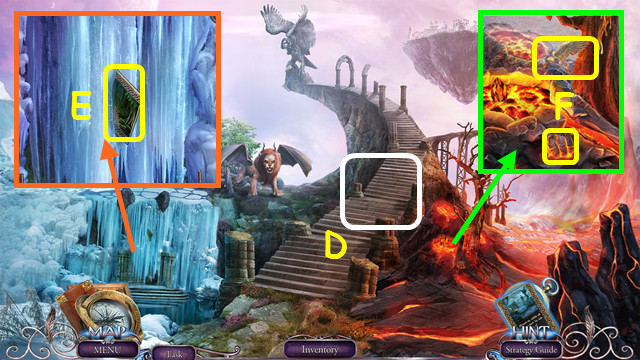
- Select the Policeman (D).
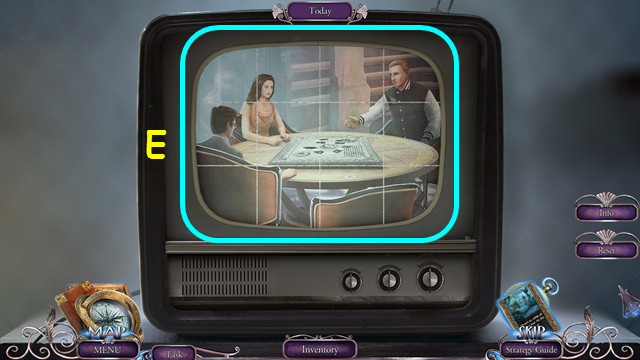
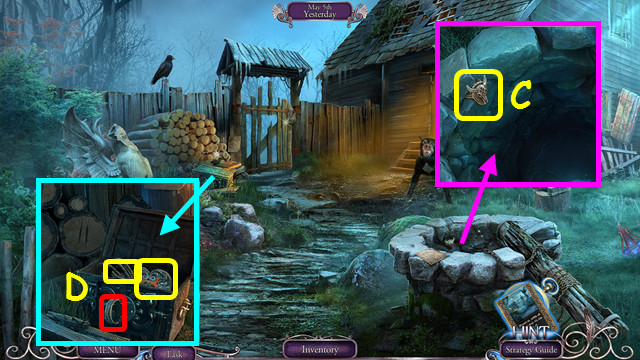
- Restore the image (E).
- Select 2 pieces to swap positions.
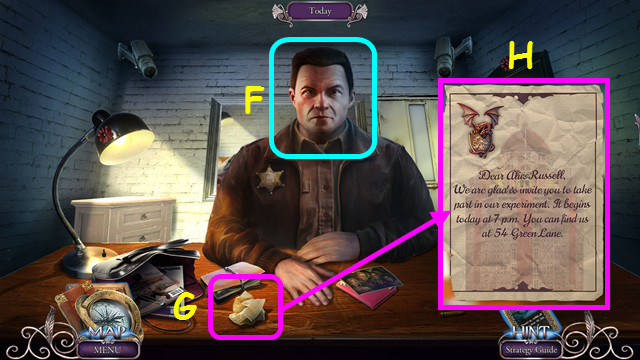
- Select the Policeman (F).
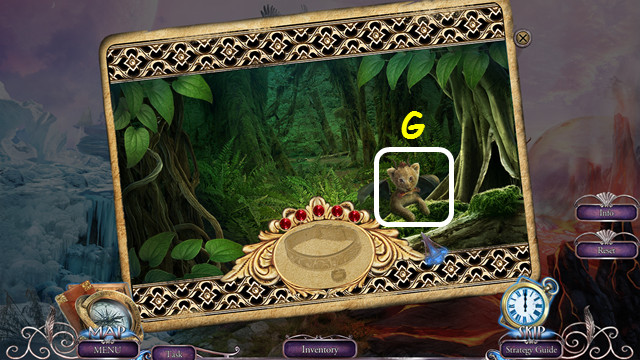
- Open the crumpled wad of paper (G).
- Restore the invitation (H).
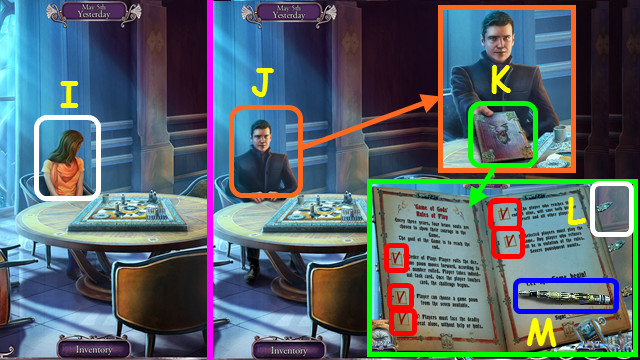
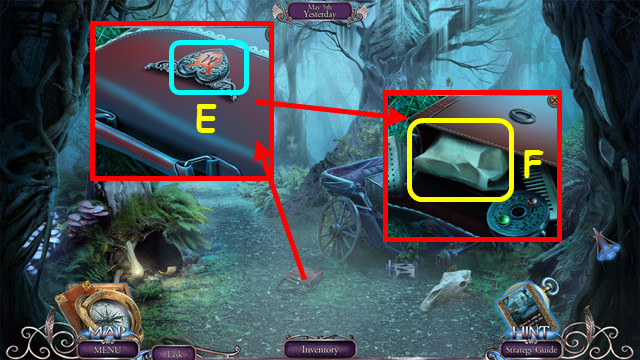
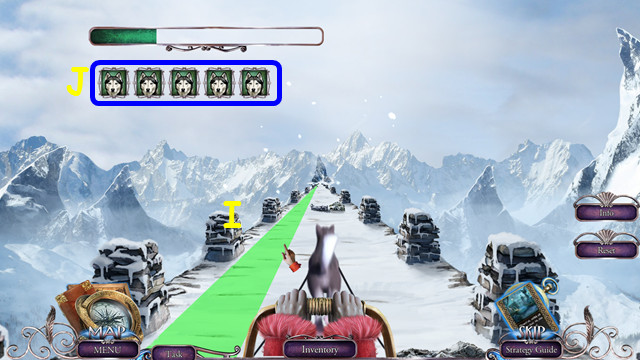
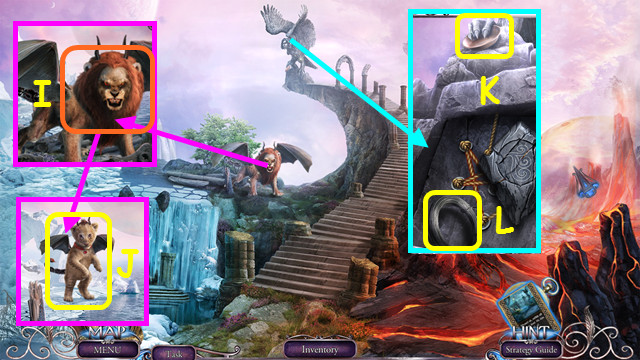
- Select Maggie (I).
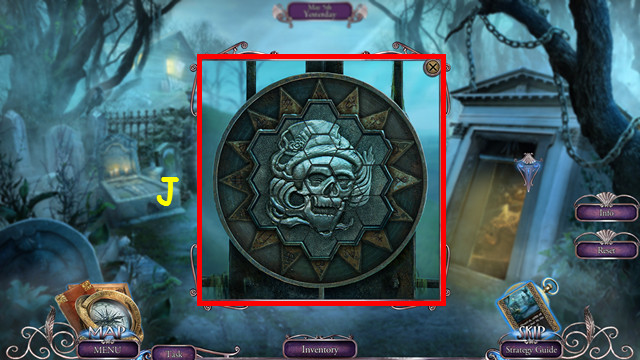
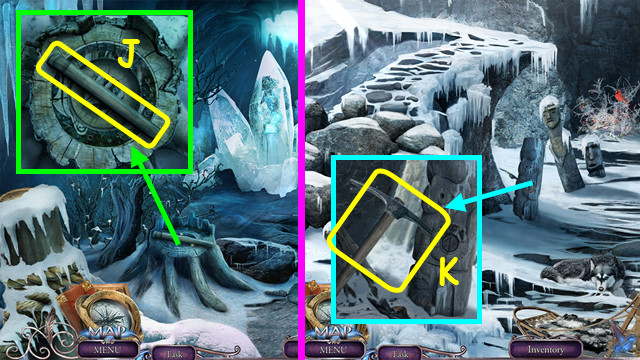
- Select the Stranger (J).
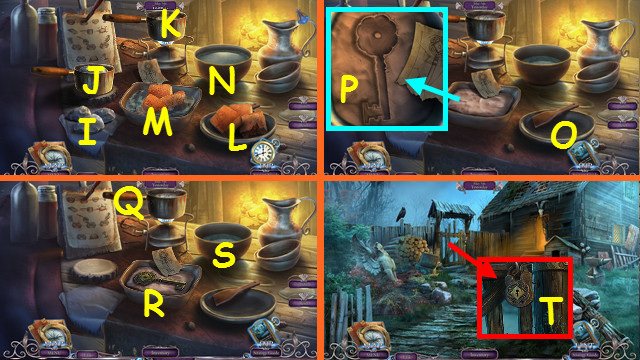
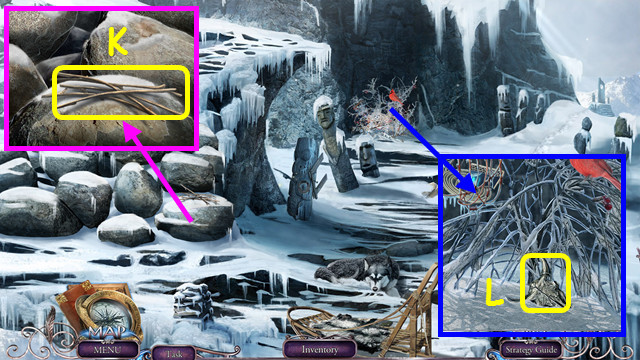
- Select the book and open it (K).
- Select outside the book (L).
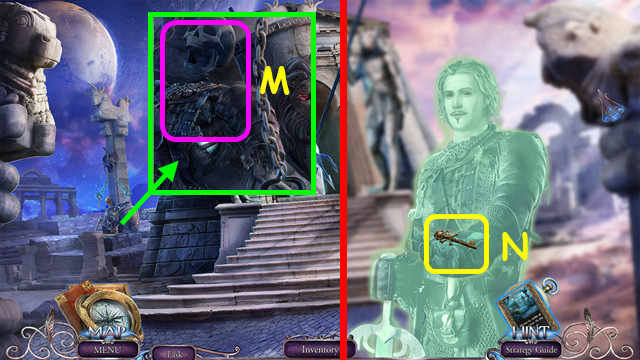
- Select the pen (M) and check each box (red).
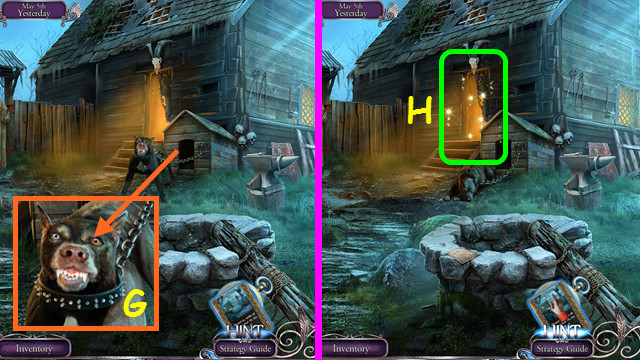
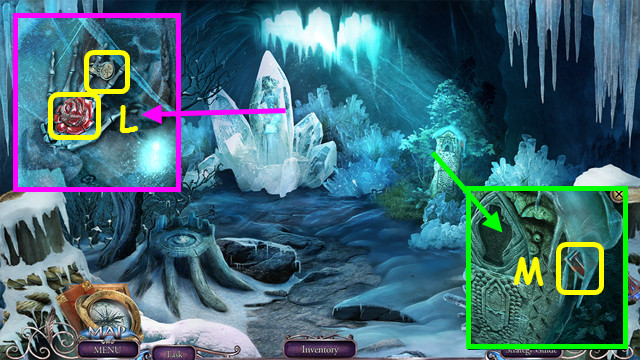
- Select the pen again to sign; close the book.
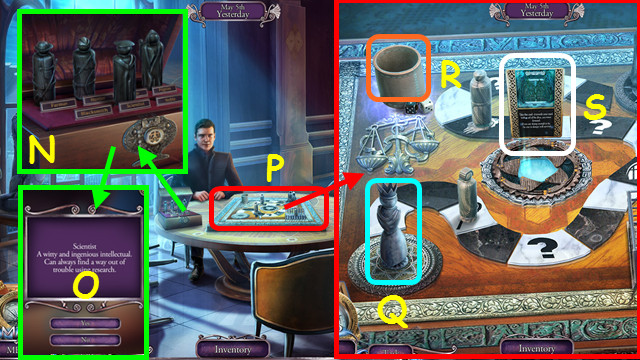
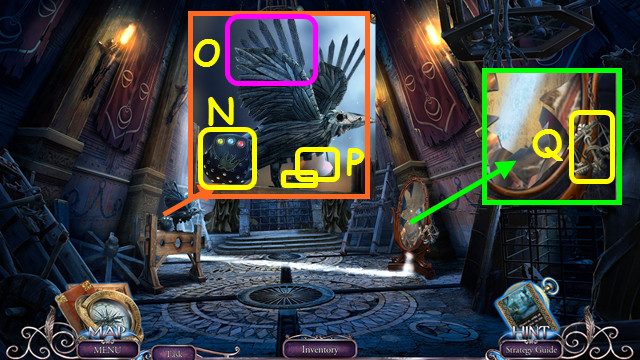
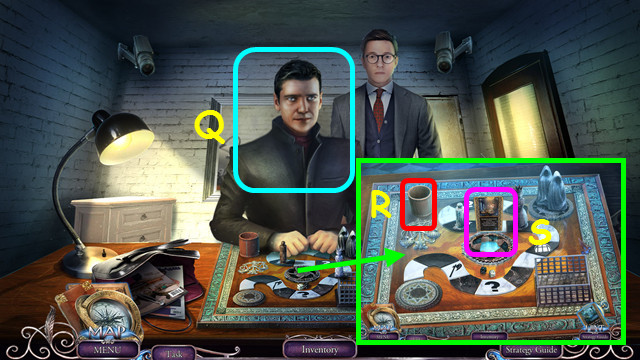
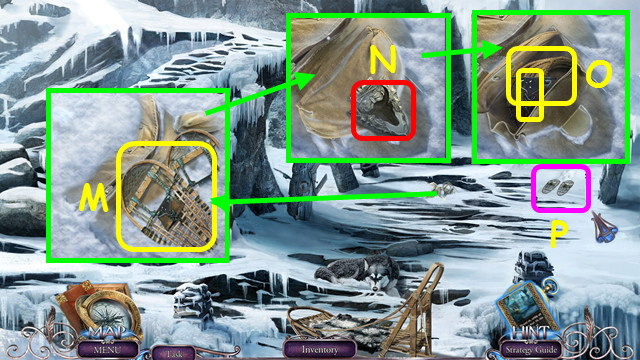
- Select a GAME PAWN (N); press yes to make your decision or no to select another (O).
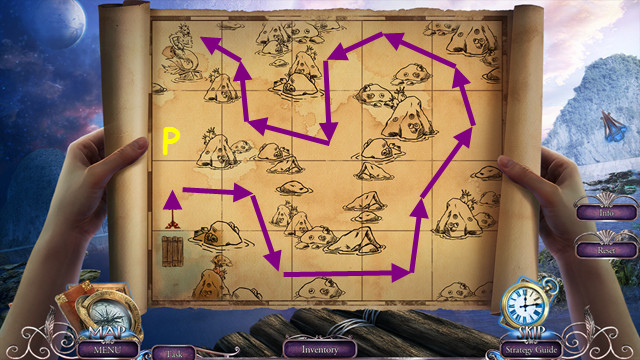
- Select the board (P).
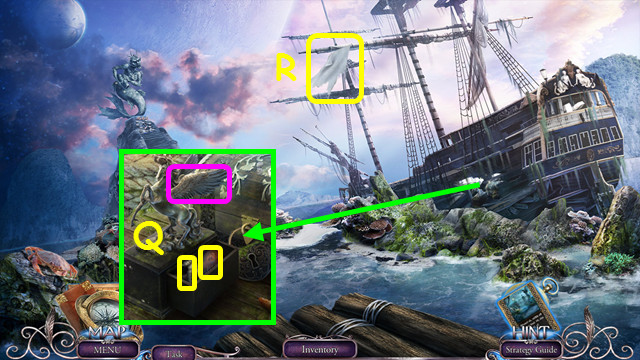
- Place the GAME PAWN on the board (Q).
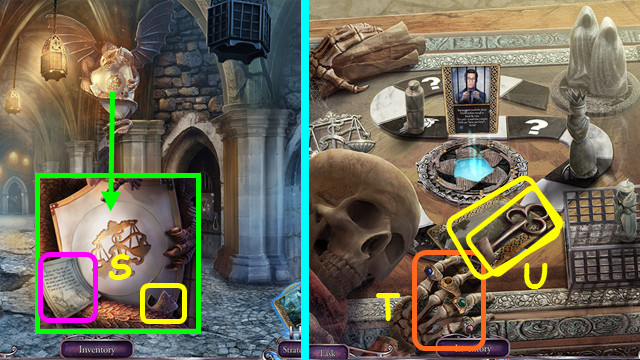
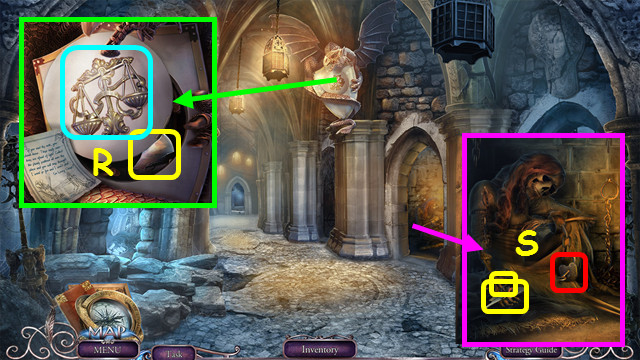
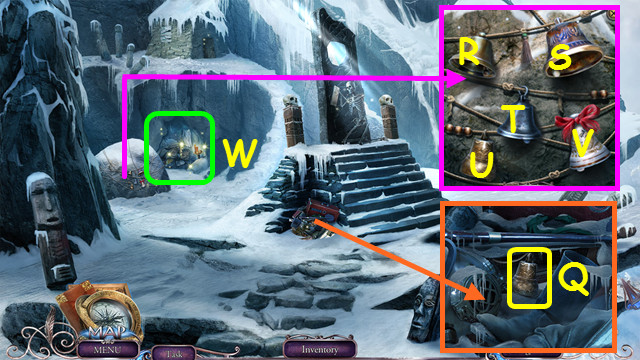
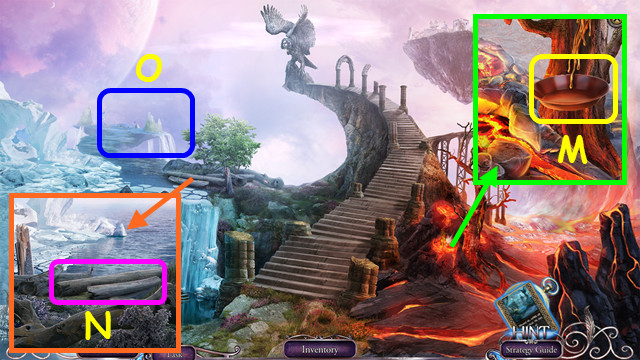
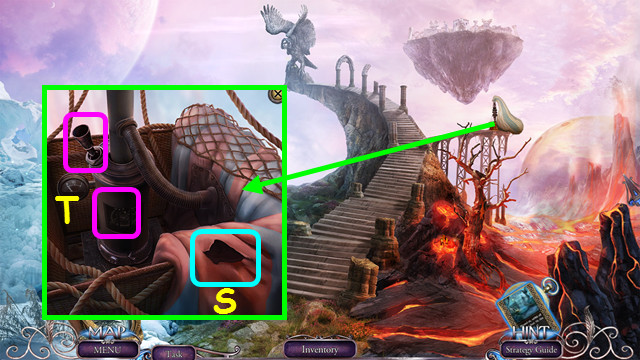
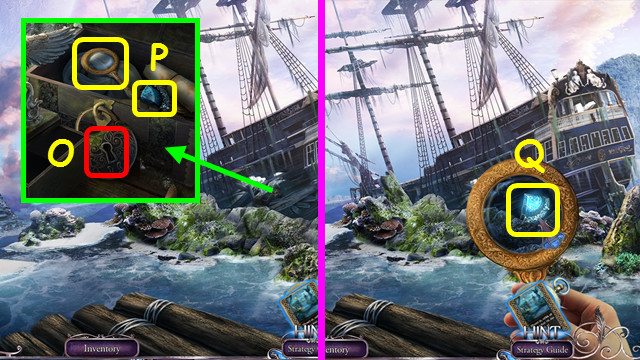
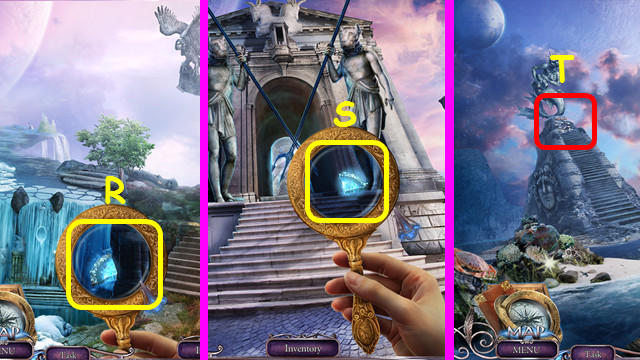
- Select the cup (R).
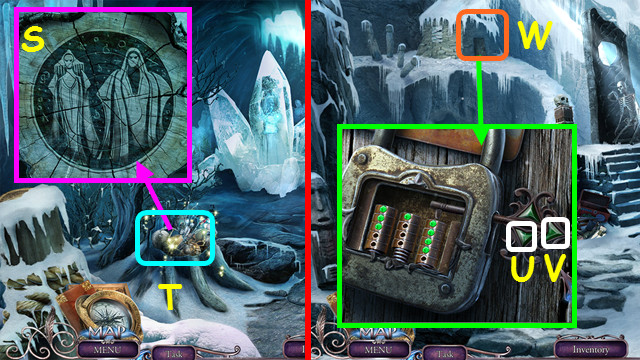
- Read the card (S).
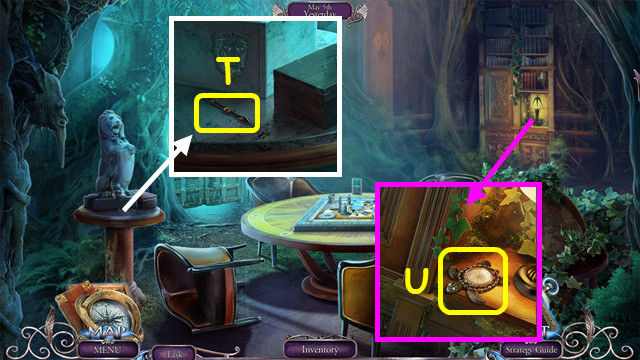
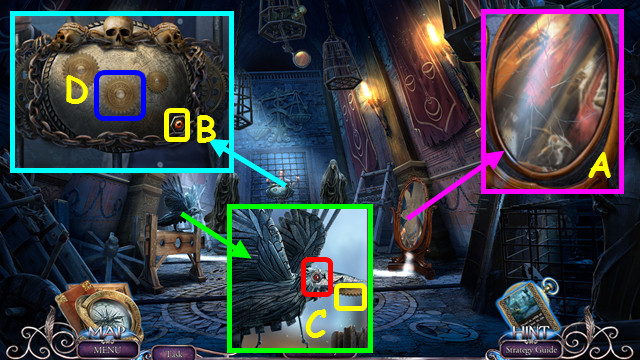
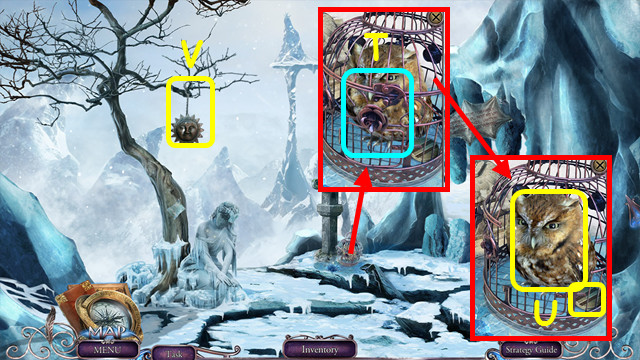
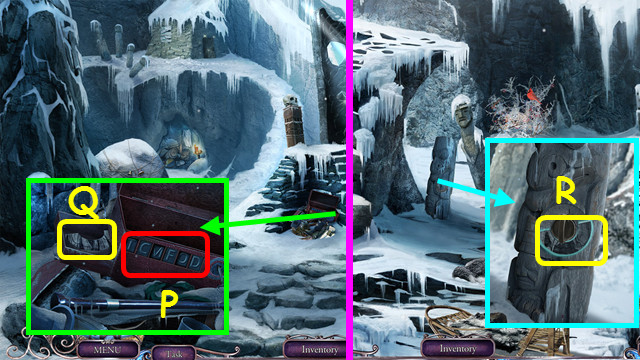
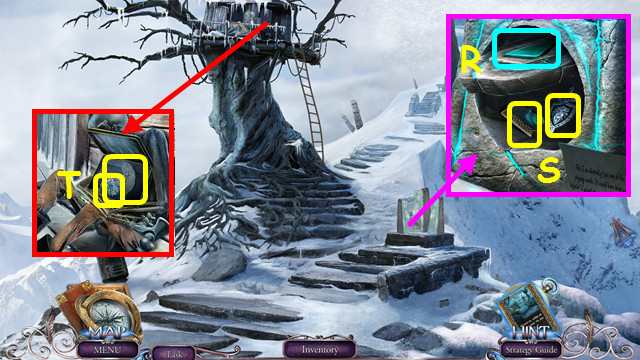
- Take the COMPASS NEEDLE (T).
- Take the BROKEN COMPASS (U).
- Combine the BROKEN COMPASS and the COMPASS NEEDLE to make the COMPASS (inventory).

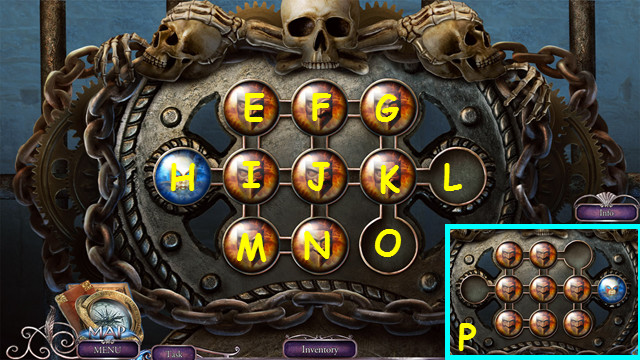
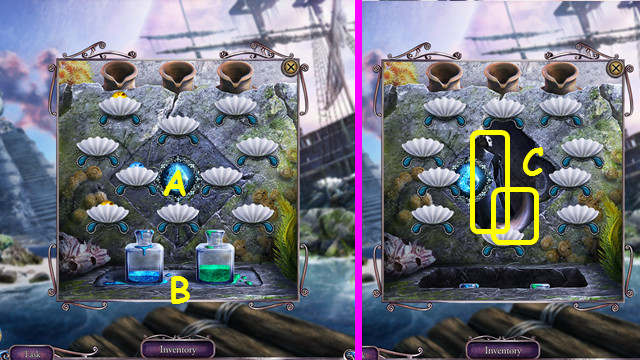
- Place the COMPASS (V).
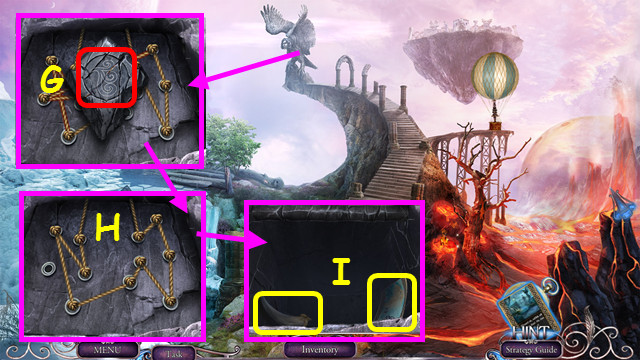
- Play the HOP to earn the SABER (W).
- Use the SABER (X).
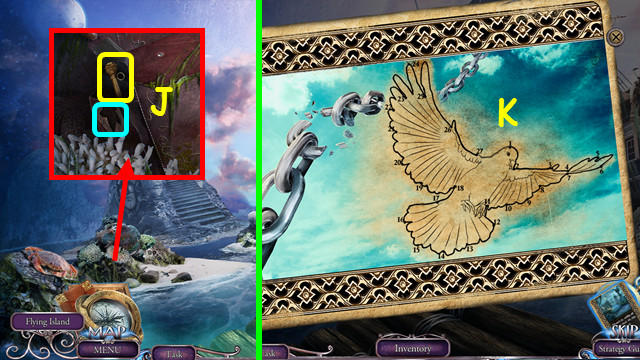
- Walk forward.
Chapter 2: Maggie
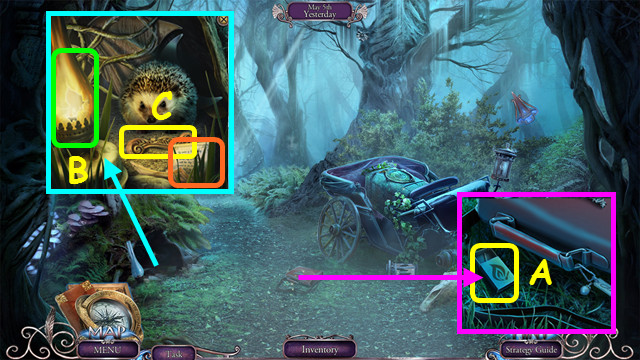
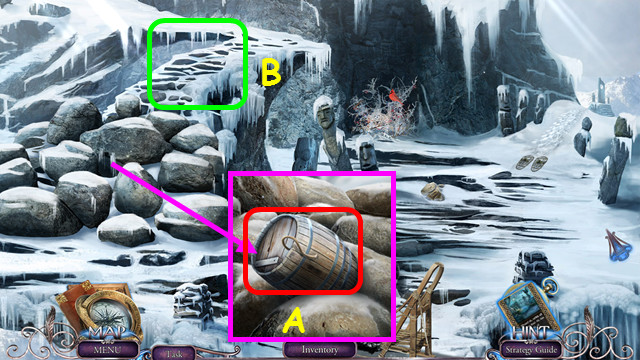
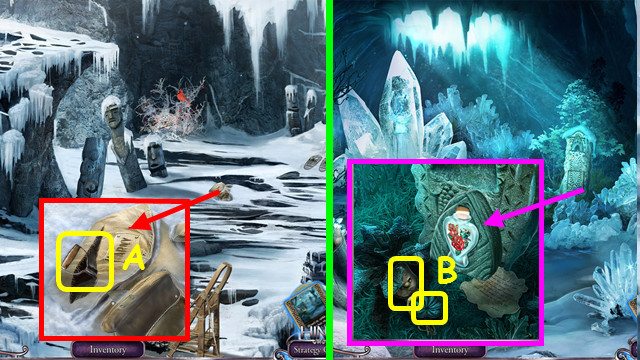
- Take the MATCH (A).
- Use the MATCH (B).
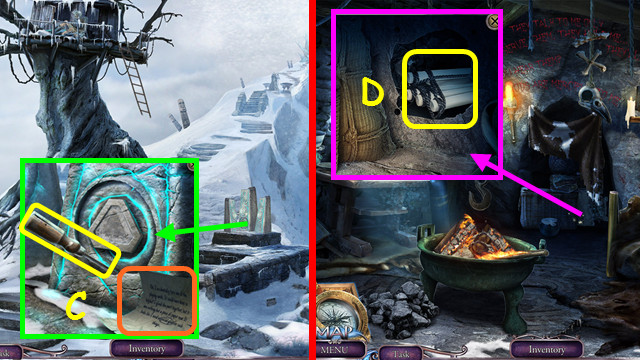
- Take the HANDLE and read the note (C).
- Walk down.
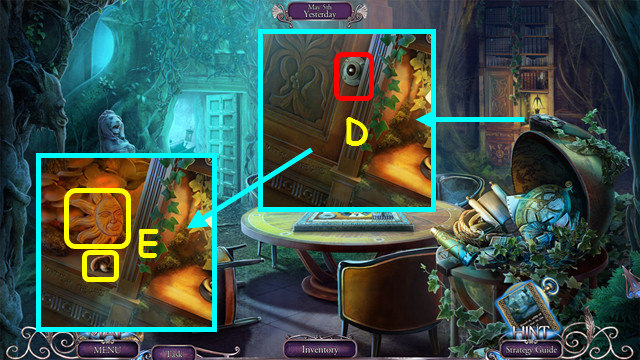
- Place and turn the handle (D).
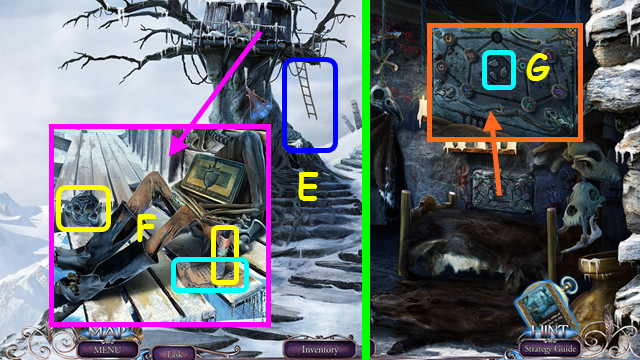
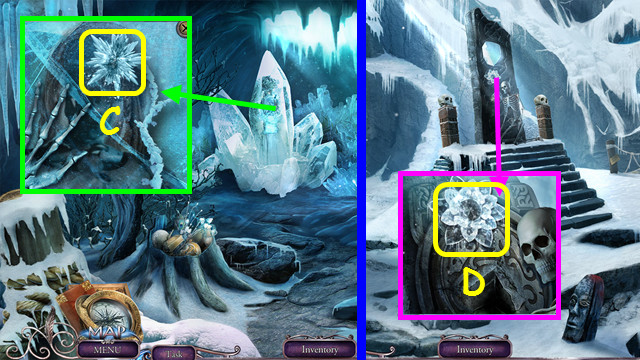
- Take the MUSHROOM and SUN (E).
- Walk forward.
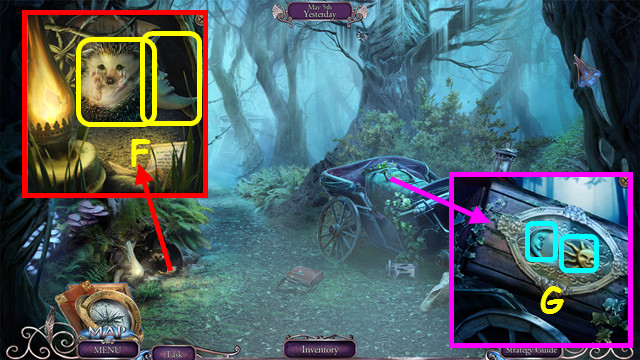
- Give the MUSHROOM; take the HEDGEHOG and MOON (F).
- Place the MOON and SUN, and then press them (G).
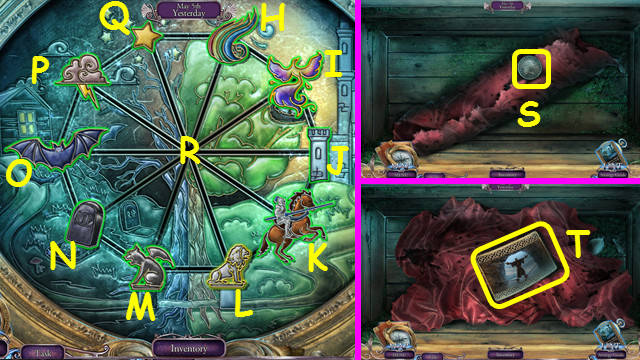
- Select the locations P-Q-H-R-M-L-K-J-I-H-R-N-O-P-R-M-L-K-R-L-M-N-R-M-L-R.
- Take the COIN (S); open the cloth and take the GAME CARD (T).
- Select the GAME CARD (inventory).
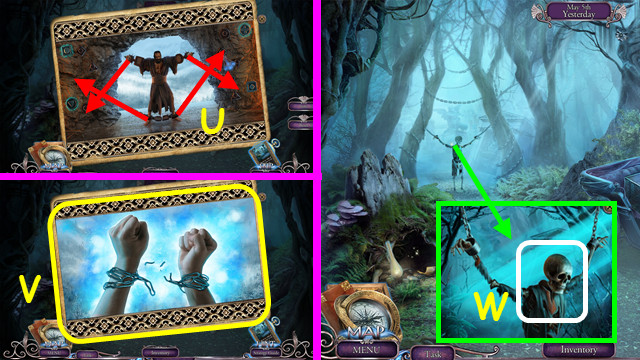
- Move the chains as shown (U).
- Take the RELEASE CARD (V).
- Use the RELEASE CARD (W).
- Walk forward.
- Read the note (A).
- Use the HEDGEHOG; take the BOX KEY (B).
- Walk down 2x.
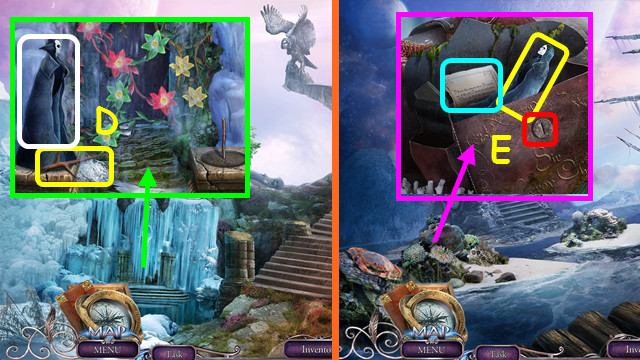
- Use the BOX KEY; take the ANGEL WREATH and 1st SHEARS HALF (C).
- Walk forward 2x.

- Place the ANGEL WREATH: take the 2nd SHEARS HALF and 1st MOSAIC PART (D).
- Combine the 2 SHEARS HALVES to make the SHEARS (inventory).
- Walk down.
- Use the SHEARS; take the GARGOYLE WING (E).
- Walk forward.

- Place the GARGOYLE WING (F).
- Play the HOP to earn the ANGEL LYRE (G).
- Place the ANGEL LYRE; take the BUCKET HANDLE and 2nd MOSAIC PART (H).
- Select the gate (I).
- Place the 2 MOSAIC PARTS.
- Restore the image (J).
- Walk forward.
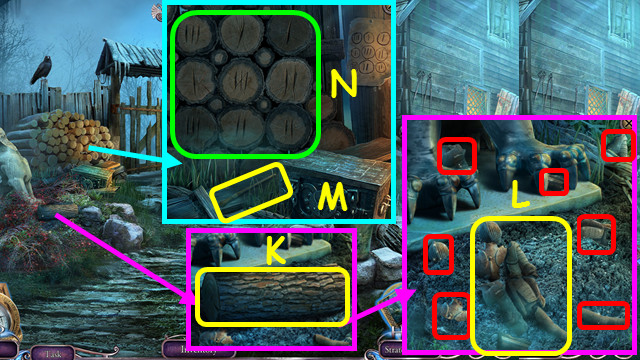
- Take the LOG (K).
- Select all the pieces (red); take the BROKEN STATUE (L).
- Take the GLUE BRUSH (M).
- Place the LOG in the opening; arrange the logs as shown (N).
- Take the GLUE (O).
- Combine the BROKEN STATUE, GLUE, and BRUSH to make the KNIGHT STATUE (inventory).
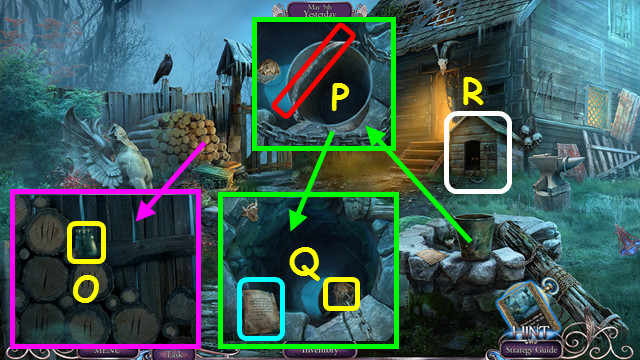
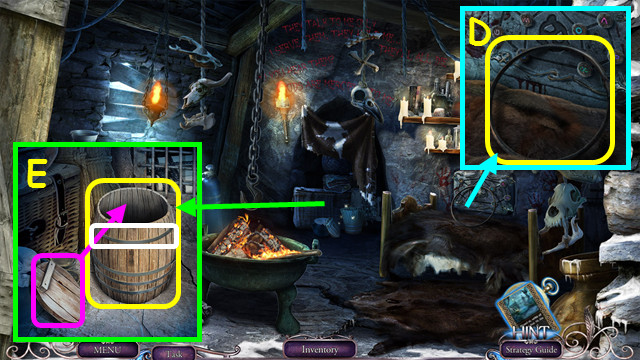
- Place the BUCKET HANDLE; select the bucket 2x (P).
- Take the LION AMULET and read the note (Q).
- Look in the doghouse (R).
- Walk down.
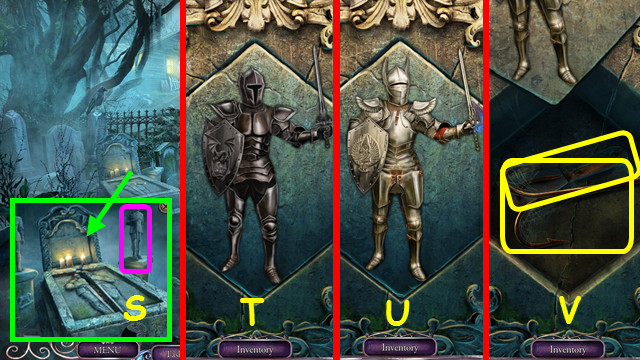
- Place the KNIGHT STATUE (S).
- Restore the dark knight (T).
- Restore the light knight (U).
- Take the TRIPLE HOOK and the SCRAPER (V).
- Walk down 2x.
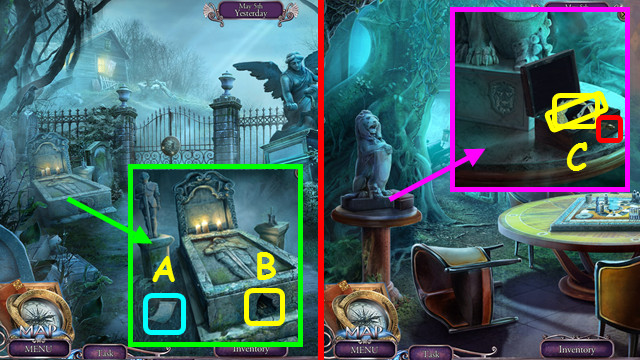
- Place the LION AMULET and press it (A).
- Take the SLEEPING PILLS (B).
- Walk forward 3x.
- Use the SCRAPER; take the IRON RING (C).
- Place the IRON RING; take the ROPE and HEART MEDALLION (D).
- Combine the TRIPLE HOOK and ROPE to make the CLIMBING HOOK (inventory).
- Walk down 2x.
- Place the HEART MEDALLION and push it (E).
- Move the items; take the WRAPPER (F).
- Open the WRAPPER and add the SLEEPING PILLS to make the DRUGGED HAMBURGER (inventory).
- Walk forward 2x.
- Use the DRUGGED HAMBURGER (G).
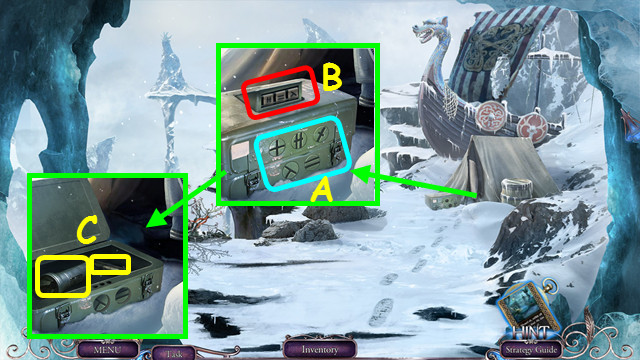
- Play the HOP (H).
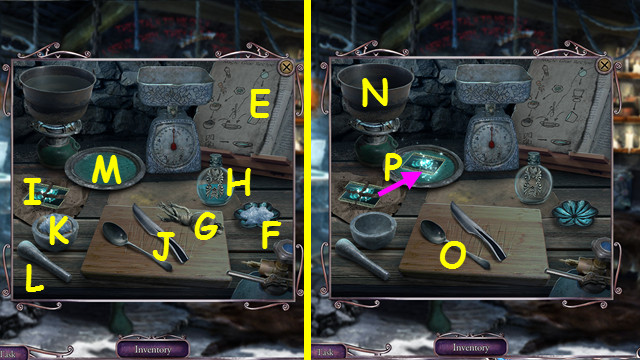
- Place the 3 metal chunks (I) in the pan (J); move the pan to the burner (K).
- Place the 3 wax chunks (L) in the square bowl (M).
- Pour water (N) into the square bowl.
- Use the spatula (O) in the square bowl.
- Select the wax several times to make the key impression (P).
- Select the pan (Q) and pour it into the key impression (R).
- Pour water (S) on the key; turn over the mold and take the GATE KEY.
- Use the GATE KEY (T); open the gate and walk forward.
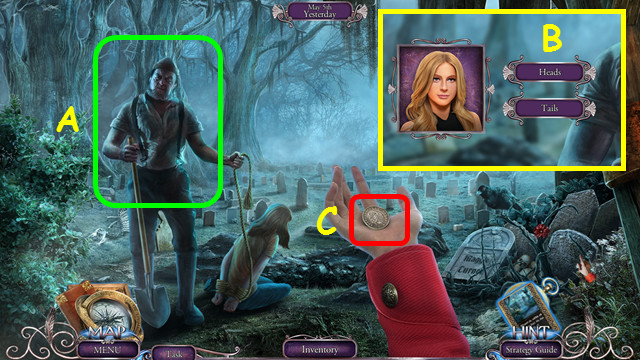
- Talk to the Lumberjack (A).
- Select heads or tails (B).
- Take the COIN (C).

- Use the CLIMBING HOOK (D).
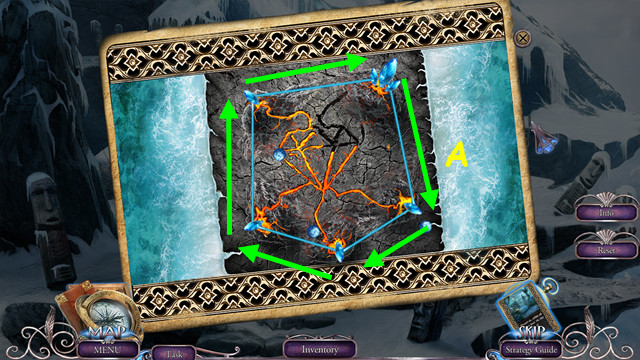
- Select matching runes (color-coded).
- There are 3 set of runes (1-3).
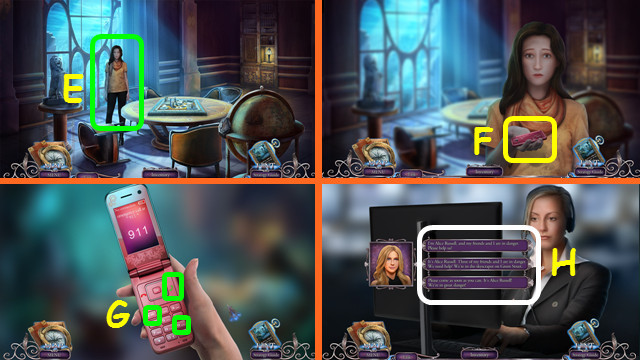
- Talk to Maggie (E).
- Take the cell phone (F).
- Press 9-1-1 and the green phone button (G).
- Select a response (H).
Chapter 3: Kevin
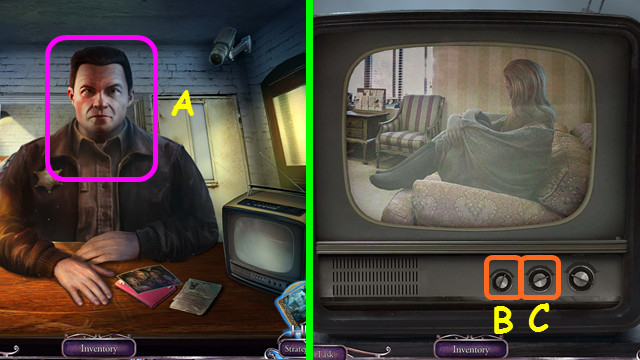
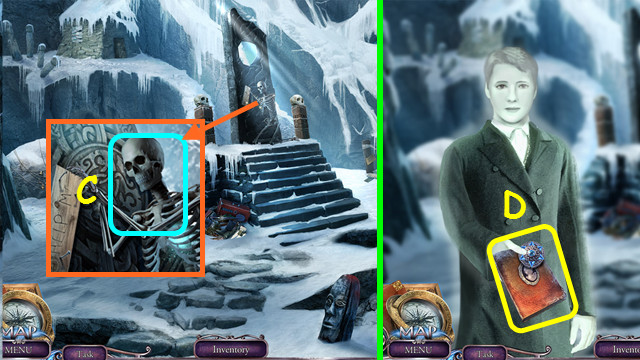
- Select the Policeman (A).
- Select Bx2-Cx3.
- Select the Policeman (D).
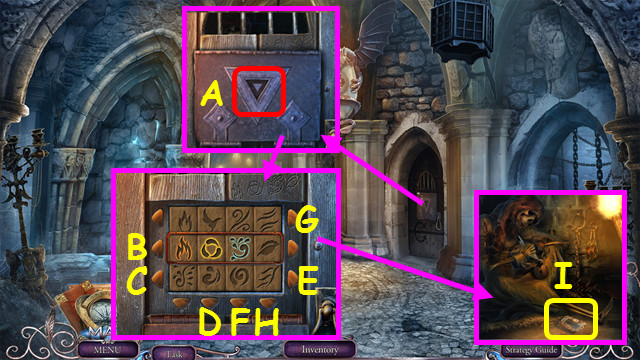
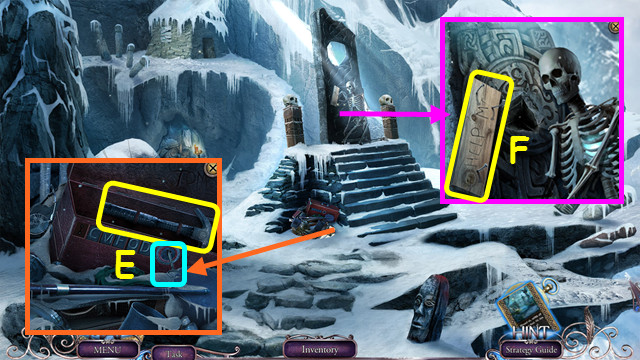
- Select the box (E).
- Select the cup (F).
- Read the card (G).
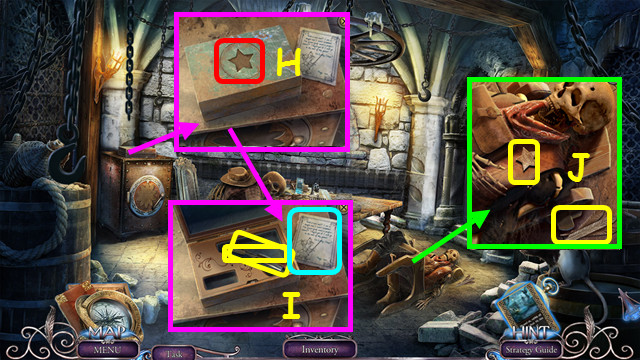
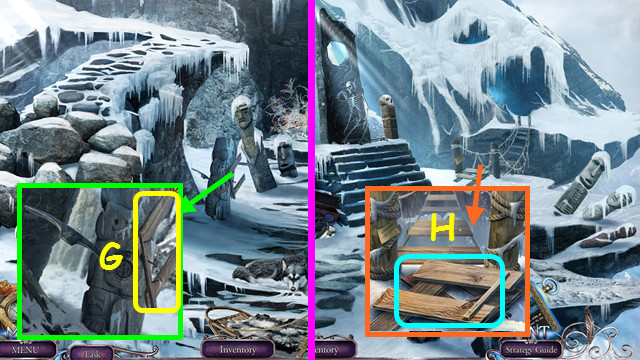
- Take the SHERRIFF'S BADGE and FEATHERS (J).
- Place the SHERRIFF'S BADGE; push it (H).
- Take the RAMROD and RAZOR BLADE; read the note (I).
- Use the RAZOR BLADE; take the SAFE EMBLEM and 1st RING PART (K).
- Read the note; take the UNLOADED REVOLVER (L).
- Place the SAFE EMBLEM (M).
- Select N-O-Nx2-O-Nx2-O-P-O-Px3-O-Px2-O-N-O-Nx2-O-Px5.
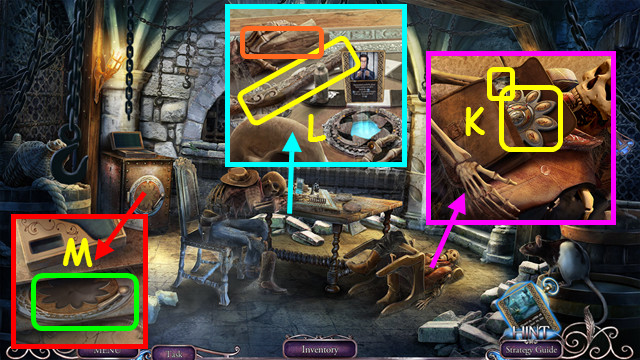
- Take the BULLET and GUNPOWDER (Q).
- Combine the UNLOADED REVOLVER, GUNPOWDER, BULLET, and RAMROD to make the REVOLVER (inventory).
- Use the REVOLVER (R).
- Walk forward.
- Read the note; take the 2nd RING PART (S).
- Combine the 2 RING PARTS to make the SKELETON'S RING (inventory).
- Walk down and select the table.
- Place the SKELETON'S RING; arrange the rings as shown (T).
- Take the TRIANGULAR KEY and MYSTERIOUS CARD (U).
- Walk forward.
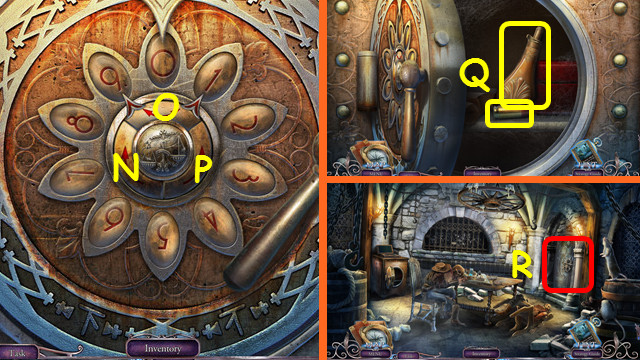
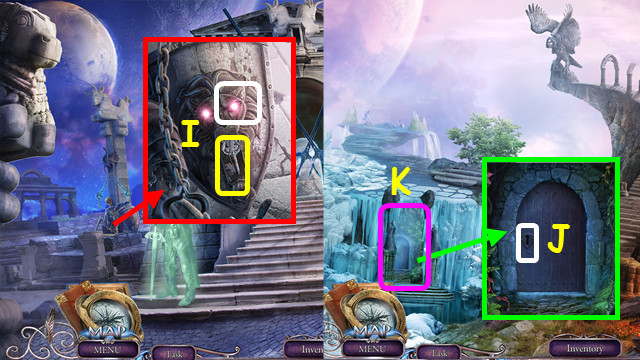
- Use the TRIANGULAR KEY (A).
- Press B-Cx2-Dx2-E-Fx2-Gx2-H.
- Take the VIEWFINDER (I).
- Combine the MYSTERIOUS CARD and the VIEWFINDER (inventory).
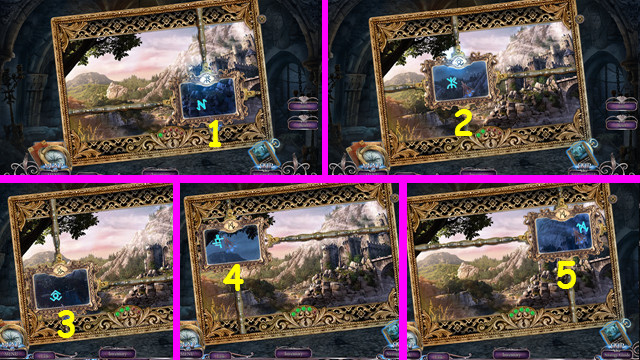
- Find the symbols in order (1-5).
- Take the HIDDEN MYSTERY CARD.
- Use the HIDDEN MYSTERY CARD (K).
- Play the HOP to earn the EAGLE RING (L).
- Place the EAGLE RING (M).
- Walk forward.
- Take the LADY'S HANDBAG (N).
- Place the FEATHERS; arrange them as shown (O).
- Take the SHACKLE KEY and 1/4 MIRROR SHARDS (P).
- Take the SCALE EMBLEM (Q).
- Walk down.
- Place the SCALE EMBLEM; take the 2/4 MIRROR SHARDS (R).
- Use the SHACKLE KEY; take the 3/4 MIRROR SHARDS and BIRD MEDALLION (S).
- Combine the LADY'S HANDBAG and BIRD MEDALLION; press blue-yellow-red, take the 4/4 MIRROR SHARDS and 1st PRECIOUS FLOWER (inventory).
- Walk forward.
- Place the 4 MIRROR SHARDS and restore the mirror (A).
- Select the MIRROR 3x.
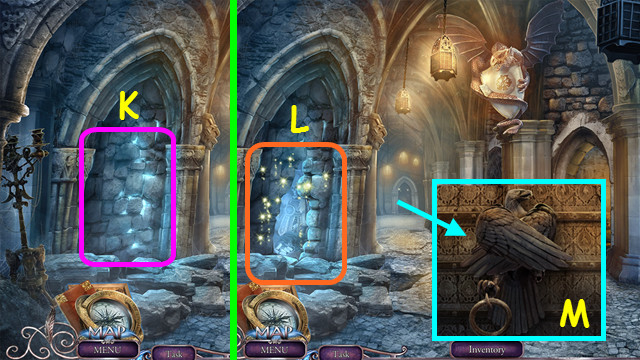
- Take the RAVEN EYE (B).
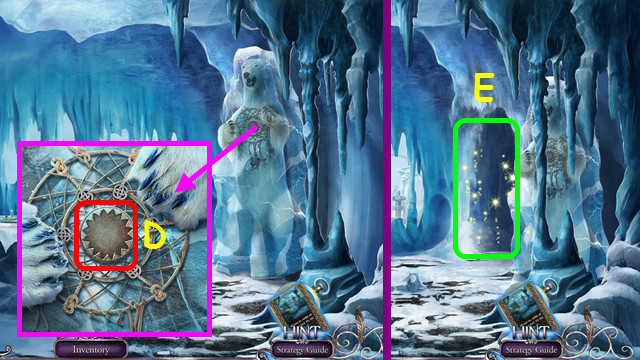
- Place the RAVEN EYE; take the GEAR (C).
- Place the GEAR (D).
- Drag the discs K-L, K-O, F-G, I-E, I-H, N-M, J-N, E-F, I-E, N-M, J-N, G-F, K-L, K-G, I-H, K-O, K-L.
- Final solution (P).
- Talk to the Stranger (Q).
- Select the cup (R).
- Read the card for a HOP; you earn the FROZEN CARD (S).
- Select the cup and read the card once more.
Chapter 4: Jim
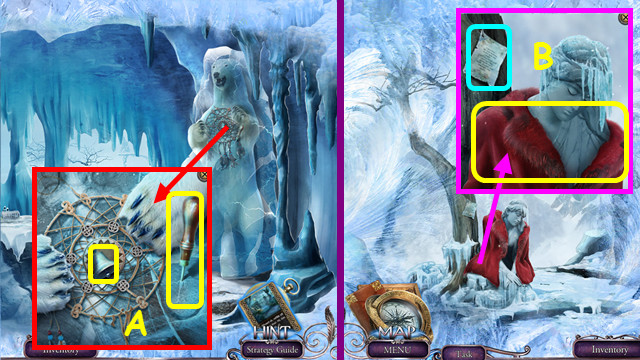
- Take the 1st BELL and AWL (A).
- Walk forward.
- Read the note; take the COAT (B).
- Use the AWL; take the CLOTH (C).
- Open the CLOTH; take the 1/2 SWITCHES and SNOWFLAKE AMULET (inventory).
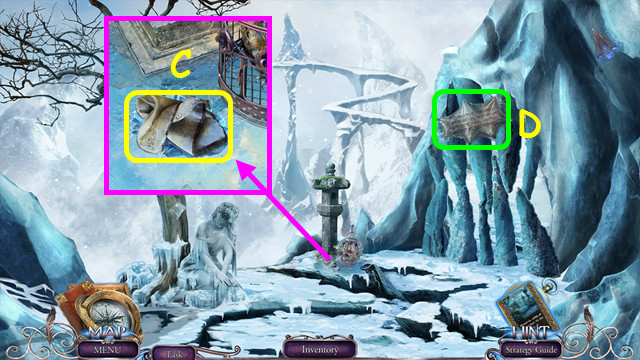
- Read the note (D).
- Walk down.
- Place the SNOWFLAKE AMULET (F).
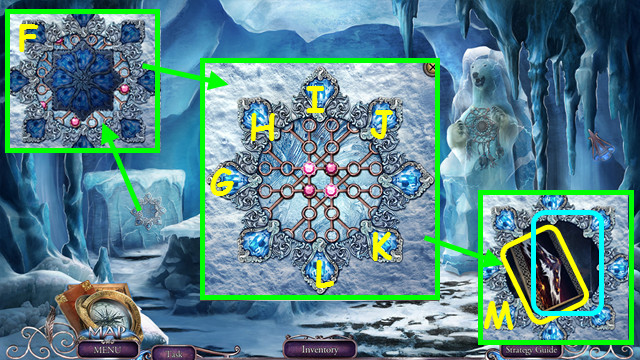
- Select Gx3-I-K-G-H-I-J-L-J-Kx2.
- Take the MAGIC CARD and read the note (M).
- Select the MAGIC CARD (inventory).
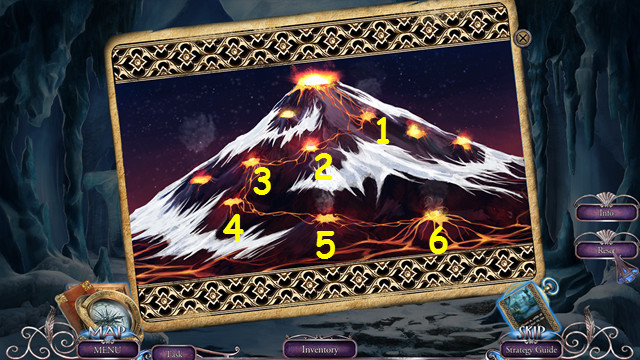
- Select 1-6.
- Take the LAVA CARD.
- Walk forward.
- Place the LAVA CARD (O).
- Walk forward.
- Read the note; take the FROST RUNE and ZIPPER (P).
- Combine the FROZEN CARD and the FROST RUNE (inventory).
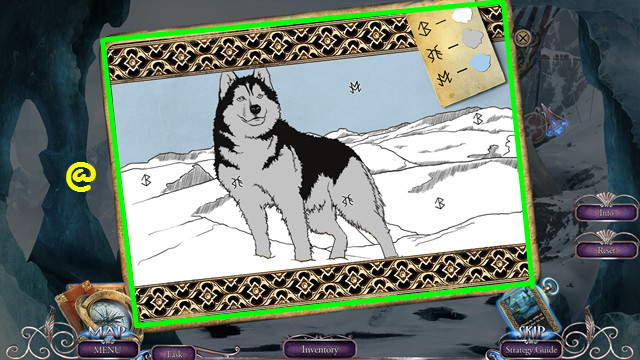
- Color the card as shown (@).
- Take the SNOWDOG CARD.
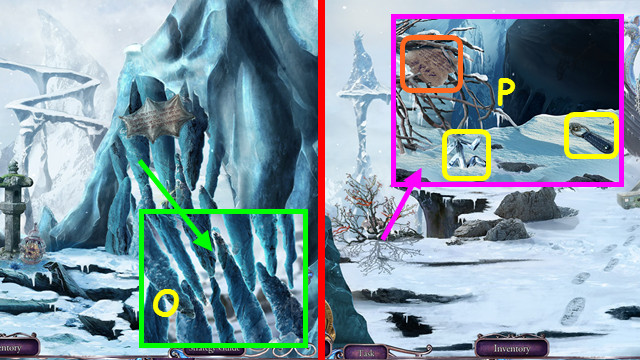
- Read the instructions and take the FILE (Q).
- Use the ZIPPER; take the PENKNIFE (R).
- Read the note (S).
- Walk down.
- Use the FILE (T).
- Take the OWLET and 2/2 SWITCHES (U).
- Use the OWLET to take the SUN TOTEM and HOOK (V).
- Walk forward.
- Place the 2 SWITCHES (A).
- Press the 3 switches that match these symbols (B).
- These change with every attempt.
- Take the FLASHLIGHT and BOLT (C).
- Walk down 2x.
- Place the SUN TOTEM (D).
- Play the HOP to earn the FISHING ROD (E).
- Combine the FISHING ROD and HOOK to make the FISHING ROD (inventory).
- Go forward twice.
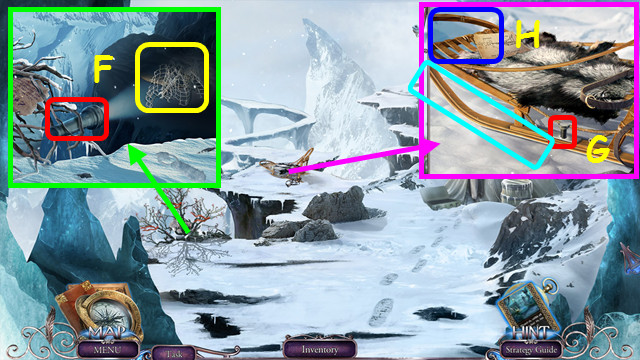
- Place the FLASHLIGHT; use the FISHING ROD to take the ENTANGLED NET (F).
- Combine the ENTANGLED NET and PENKNIFE; take the WRENCH and SKI (inventory).
- Place the SKI, BOLT, and use the WRENCH (G).
- Place the SNOWDOG CARD (H).
- Move the dog left, center, or right to avoid the obstacles (I).
- Solution center-right-right-left-center-right-center-left-center-right-center-right-center-right-right-right-right-left-center-right-center-right-center-left-right.
- If you hit 5 obstacles, the mini-game will restart (J).
- Take the PILE OF STICKS (K).
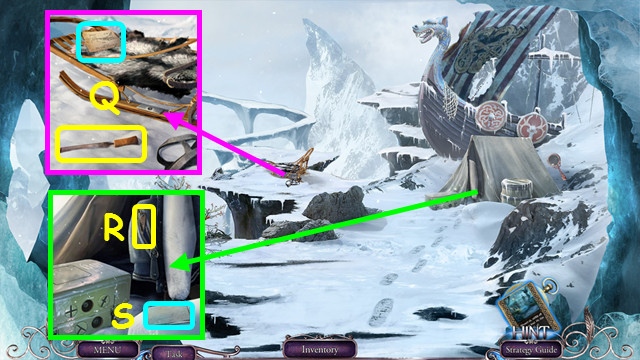
- Take the KNAPSACK BUTTON (L).
- Take the DAMAGED SNOWSHOES and remove the snow (M).
- Place the KNAPSACK BUTTON and push it (N).
- Take the BELT and ROPE (O).
- Combine the DAMAGED SNOWSHOES, PILE OF STICKS, ROPE, and BELT to make the SNOW SHOES (inventory).
- Place the SNOW SHOES; walk forward (P).
- Take the 2nd BELL (Q).
- Place the 2 BELLS; repeat the sequences R-S-T, U-V-V-R, R-R-R-V-T.
- Play the HOP to earn the MYSTERIOUS CARD (W).
- Select the MYSTERIOUS CARD (inventory).
- Connect the 5 crystals (A).
- Do not let a ball hit the line you are making.
- Take the RELEASE PRISONER CARD.
- Use the RELEASE PRISONER CARD (C).
- Take the DEFENSE AMULET and GHOST'S BOOK (D).
- Open the GHOST'S BOOK, turn the pages, restore the 3 photos, and take the SILVER KEY (inventory).
- Use the SILVER KEY; take the HAMMER (E).
- Use the HAMMER to take the 1-3/6 NAILS and the 1st WOODEN PLANK (F).
- Walk down.
- Use the HAMMER to take the 4-6/6 NAILS and the 2nd WOODEN PLANK (G).
- Combine the 2 WOODEN PLANKS, 6 NAILS, and HAMMER to make the BRIDGE FRAGMENT (inventory).
- Walk forward.
- Place the BRIDGE FRAGMENT (H).

- Restore the bridge (I).
- Walk forward.
- Take the PICKAXE HANDLE (J).
- Walk down 2x.
- Use the PICKAXE HANDLE to take the PICKAXE (K).
- Walk forward 2x.
- Use the PICKAXE; take the 2nd PRECIOUS FLOWER and SIGNET RING (L).
- Use the PICKAXE; take the LETTER T (M).
- Walk down.

- Place the DEFENSE AMULET (N).
- Drag the amulet through the rune (O).
- Place the LETTER T; press T-O-M (P).
- Take the 1st WOODEN DISK HALF (Q).
- Walk down.
- Place the SIGNET RING; take the 2nd WOODEN DISK (R).
- Go forward 2x.
- Place the 2 WOODEN DISKS; restore the image (S).
- Play the HOP to earn the LOCKPICK (T).
- Walk down.
- Use the LOCKPICK; press Ux3-V-U-V-Ux4-V.
- Enter the Madman's Hut (W).
- Take the STICK (A) and use it 3x (red).
- Take the LIGHTER (B).
- Take the HEART BOTTLE (C).
- Combine the HEART BOTTLE and the 2 PRECIOUS FLOWERS to make the 0/2 VIAL OF SOULS (inventory).
- Take the BARREL RIM (D).
- Place the BARREL RIM, add the lid, and take the BARREL (E).
- Walk down.
- Use the 0/2 VIAL OF SOULS to make the 1/2 VIAL OF SOULS (G).
- Go to the Ice Meadow.
- Use the 1/2 VIAL OF SOULS to make the VIAL OF SOULS (H).
- Place the VIAL OF SOULS (I).
- Take the SILVER SKULL and 1/4 CARD PIECES (J).
- Go to the Madman's Hut.
- Place the SILVER SKULL; take the WIRE CUTTERS and EXPLOSIVE RECIPE (K).
- Walk down twice.
- Use the WIRE CUTTERS; take the 2/4 CARD PIECES and FUSE (L).
- Return to the Madman's Hut.
- Select the table (M).
- Place the BARREL, FUSE, and EXPLOSIVES RECIPE on the table.
- Move the charcoal (N) to the mortar (O); use the PESTLE (P).
- Use the spoon 2x (Q) to put the charcoal into the scale bowl (R).
- Pour the scale bowl onto the plate (S).
- Do the same with 3 spoonfuls of sulfur (T).
- Place the 4 saltpeter crystals (U) in the scale and move them to the plate.
- Use the spoon to stir the mixture on the plate; pour the plate into the barrel (V).
- Place the lid and fuse (W) on the barrel to earn the BARREL OF EXPLOSIVE.
- Walk down twice.
- Place the BARREL OF EXPLOSIVE and use the LIGHTER (A).
- Walk to the Mountain Slope (B).
- Take the SCREWDRIVER and read the note (C).
- Return to the Madman's Hut.
- Use the SCREWDRIVER; take the ROPE LADDER PIECE (D).
- Return to the Mountain Slope.
- Place the ROPE LADDER PIECE (E).
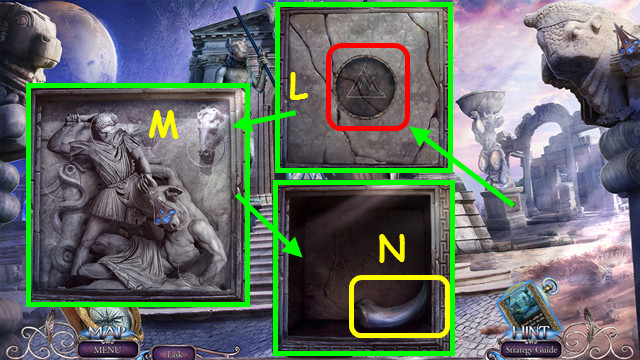
- Take the AMULET OF RAVENS, SHARP STONE, and read the note (F).
- Return to the Madman's Hut.
- Place the AMULET OF RAVENS (G).

- Select O-P-N-K-I-H-J-L-O-P-N-K-I-H-L-M-N-K-I-H-J-L-H-I-K-J-L.
- Take the GEM and 3/4 CARD PIECES (Q).
- Return to the Mountain Slope.
- Place the GEM (R).
- Take the 4/4 CARD PIECE and KNIGHT'S AMULET (S).
- Place the KNIGHT'S AMULET; take the BOTTLE OF VISCOUS LIQUID and MAGIC GLUE RECIPE (T).
- Walk down.
- Use the SHARP STONE; take the SHOVEL (A).
- Go to the Ice Meadow.
- Use the SHOVEL; take the 0/2 ICE FLOWER POLLEN and MANDRAKE ROOT (B).
- Use the 0/2 ICE FLOWER POLLEN to get the 1/2 ICE FLOWER POLLEN (C).
- Walk down.
- Use the 1/2 ICE FLOWER POLLEN to get the 2/2 ICE FLOWER POLLEN (D).
- Enter the Madman's Hut and select the potion table on the left.
- Place the MAGIC GLUE RECIPE (E), ICE FLOWER POLLEN (F), MANDRAKE ROOT (G), BOTTLE OF VISCOUS LIQUID (H), and 4 CARD PIECES (I).
- Use the knife (J) on the mandrake; move the pieces to the mortar (K) and add the ice flower pollen.
- Use the pestle (L).
- Pour the mixture onto the plate (M).
- Pour the viscous liquid into the bowl (N), and then onto the plate.
- Use the spoon (O) on the plate.
- Use the card pieces on the plate to make the ANTI-MAGIC CARD (P).
- Go to the Mountain Slope and walk forward.
- Use the ANTI-MAGIC CARD (Q).
- Place and drag the DEFENSE AMULET through the rune (R).
Chapter 5: The Gods
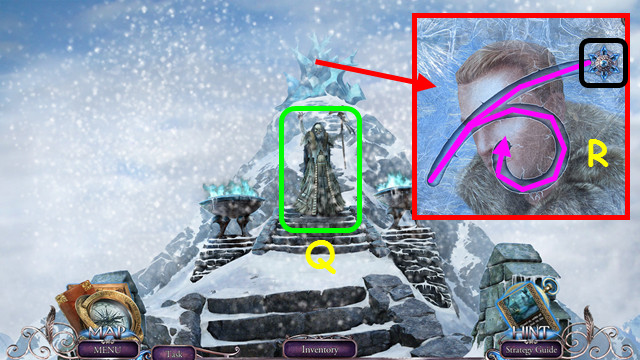
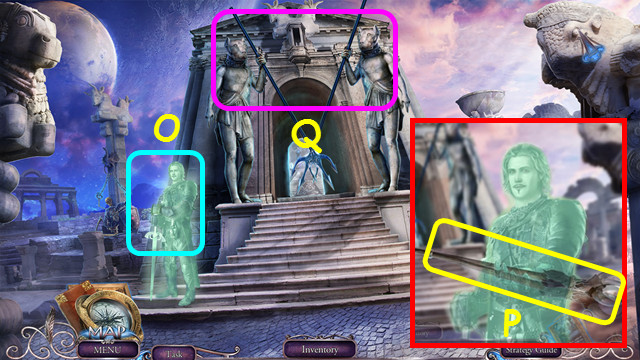
- Talk to the Stranger (A).
- Select the cup (B).
- Select the card for a HOP (C); you earn the STAFF BASE.
- Select the cup and card again.
- Select the path (D).
- Take the PEGASUS WING and HOT COAL (F).
- Use the HOT COAL; take the MYSTERIOUS CARD (E).
- Select the MYSTERIOUS CARD (inventory).
- Select the creature as it pops up 5x (G).
- Take the ANIMAL COLLAR CARD.
- Use the ANIMAL COLLAR CARD (I).
- Take the TAMED ANIMAL (J).
- Use the TAMED ANIMAL to take the PLATE (K).
- Take the SPOOL OF WIRE (L).
- Use the PLATE to take the PLATE OF RESIN (M).
- Use the SPOOL OF WIRE (N).
- Go to the Sea Island (O).
- Use the arrows to guide the raft.
- Follow the marked path (P).
- Place the PEGASUS WING; take the 1/2 LEAF CLASP and FUEL (Q).
- Use the TAMED ANIMAL to take the SAIL PART (R).
- Walk down.
- Use the PLATE OF RESIN and SAIL PART (S).
- Use the FUEL and the LIGHTER (T).
- Try to walk forward.
- Take SIR LEROY'S DIARY (A).
- Select SIR LEROY'S DIARY (inventory).
- Press E-C-Bx2.
- Open the diary and move the page; take the 2/2 LEAF CLASP and WIND STONE (F).
- Walk down.
- Place the WIND STONE (G).
- Move the ropes as shown (H).
- Take the 1/3 STAFF HEAD and MYSTERIOUS CARD (I).
- Go to the Sea Island.
- Place the LEAF CLASP; take the ENCHANTED PEN (J).
- Combine the MYSTERIOUS CARD and ENCHANTED PEN (inventory).
- Select the dots in numerical order; also connect 27-1 (K).
- Take the FREEDOM RUNE CARD.
- Go to Outside The Temple.
- Use the FREEDOM RUNE CARD (M).
- Talk to Sir Leroy and take the PIRATE KEY (N).
- Return to Sea Island.
- Use the PIRATE KEY (O).
- Take the TREASURE HUNT LENS and 1/4 WATER STONE PART (P).
- Use the TREASURE HUNT LENS to take the 2/4 WATER STONE PART (Q).
- Walk down.
- Use the TREASURE HUNT LENS to take the 3/4 WATER STONE PART (R).
- Go to Outside The Temple.
- Use the TREASURE HUNT LENS to take the 4/4 WATER STONE PART (S).
- Return to Sea Island.
- Select the mini-game (T).
- Place the WATER STONE (A).
- Move 4 drops each of green and blue to the correct bottles; dump the yellow drops (B).
- Take the STATUETTE OF THE GODDESS and 2/3 STAFF HEAD (C).
- Walk down.
- Place the STATUETTE OF THE GODDESS; take the SHARP THORN (D).
- Go to Sea Island.
- Use the SHARP THORN; read the note and take the STATUETTE OF THE GODS (E).
- Walk down.

- Place the STATUETTE OF THE GODS (F).
- Select the buds in numerical order (1-9).
- Take the FIREPROOF GLOVE (G).
- Use the FIREPROOF GLOVE to take the FIRE RUBY (H).
- Go to Outside The Temple.
- Place the FIRE RUBY; take the STONE KEY (I).
- Walk down.
- Use the STONE KEY (J).
- Play the HOP to earn the EARTH STONE (K).
- Go to Outside The Temple.
- Place the EARTH STONE (L).
- Restore the carving (M).
- Take the 3/3 STAFF HEAD (N).
- Combine the STAFF BASE and STAFF HEAD to make the STAFF (inventory).
- Use the STAFF (O).
- Take the STAFF OF THE DEAD (P).
- Use the STAFF OF THE DEAD (Q).
- Walk forward.
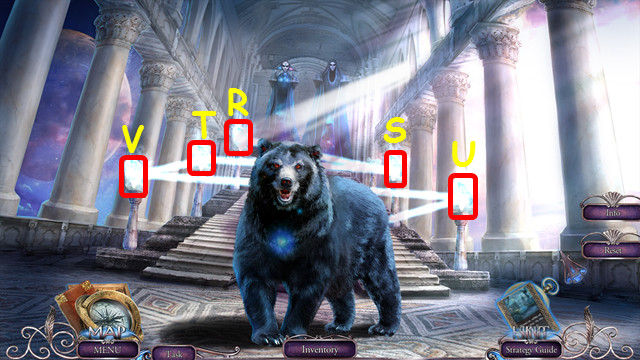
- Select the crystals R-S-T-U-V.
- Aim the light at the bear.
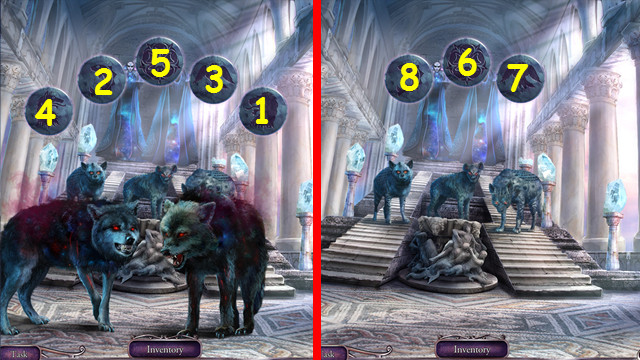
- Repeat the sequence 1-5.
- Repeat the sequence 6-8.
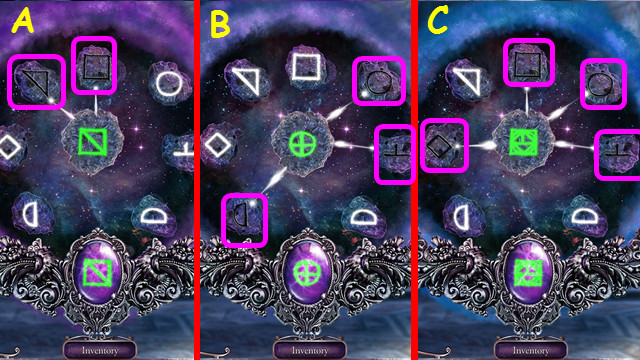
- Select the 3 sets of runes (A-C).
- Congratulations! You have completed Surface: Game of the Gods.
Created at: 2014-12-26