

Walkthrough Menu
- General Tips
- Chapter 1: The Therapist's Office
- Chapter 2: Outside the Castle
- Chapter 3: The Deep Forest
- Chapter 4: The Mermaid's Hospital Room
- Chapter 5: The House Garden
General Tips
- This is the official guide for Surface: Lost Tales.
- This guide will not mention each time you have to zoom into a location; the screenshots will show each zoom scene.
- Hidden-object puzzles are referred to as HOPs. This guide will not show HOP solutions. It will identify the location of the HOP and the inventory item acquired.
- This guide will show solutions for non-random puzzles. Please read the in-game instructions for each puzzle.
- In this game, you will sometimes have to select the new scene to trigger dialog, cut-scenes, or tasks prior to interacting with the scene.
Chapter 1: The Therapist's Office
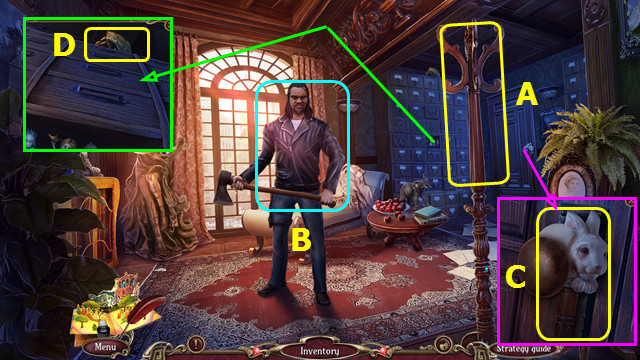
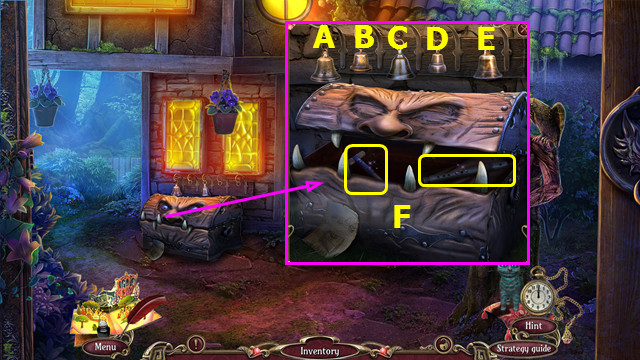
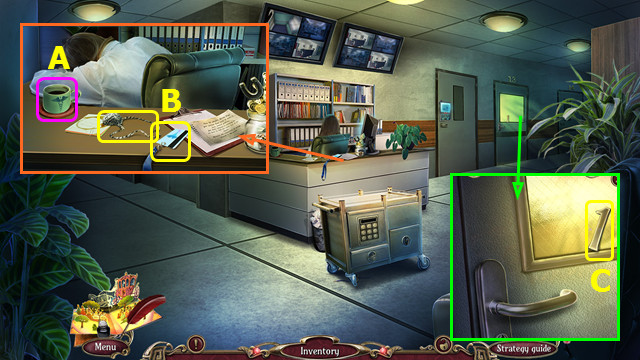
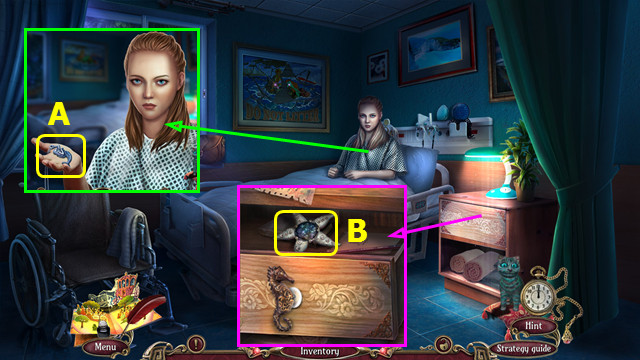
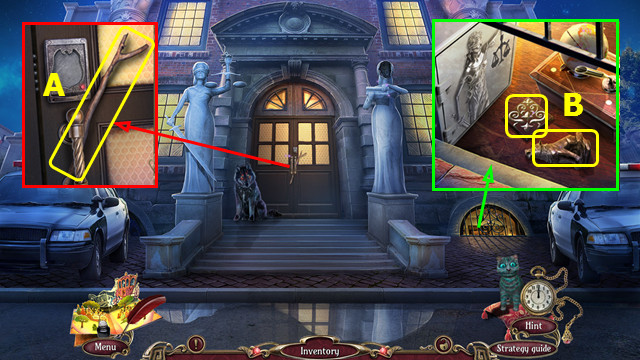
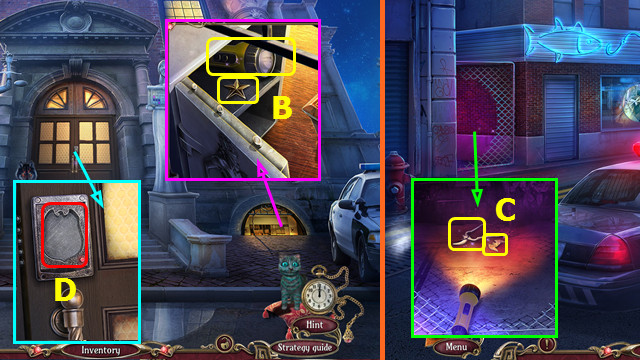
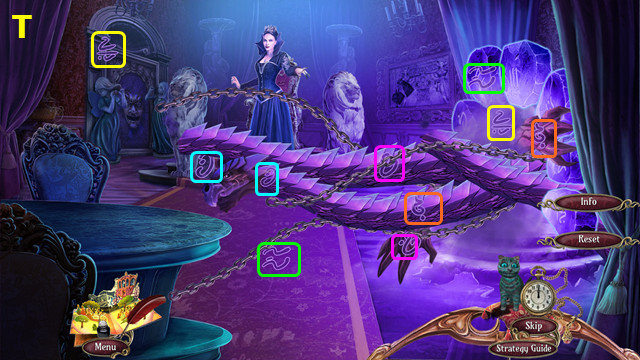
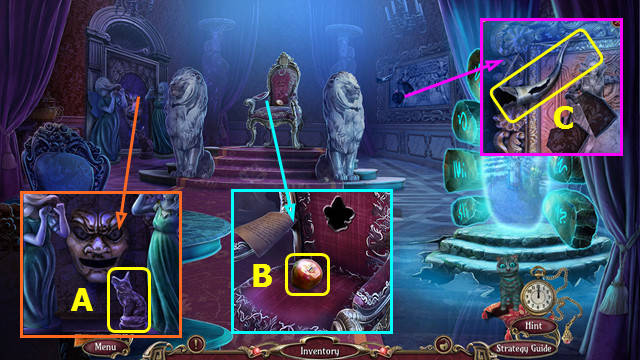
- Select (A).
- Select 3x (B).
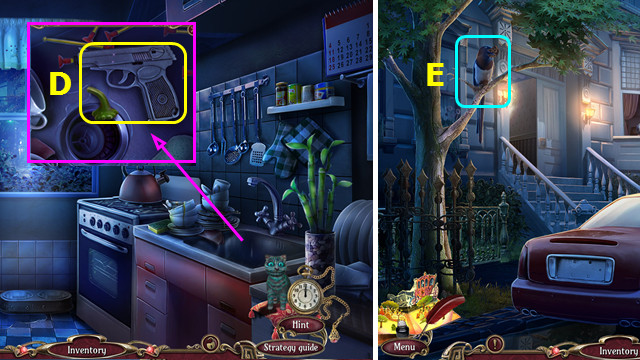
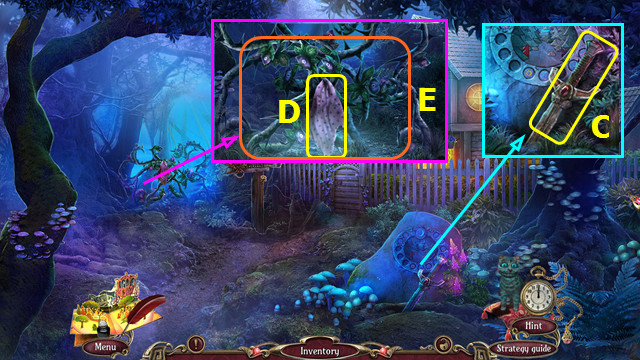
- Take the CANE (C).
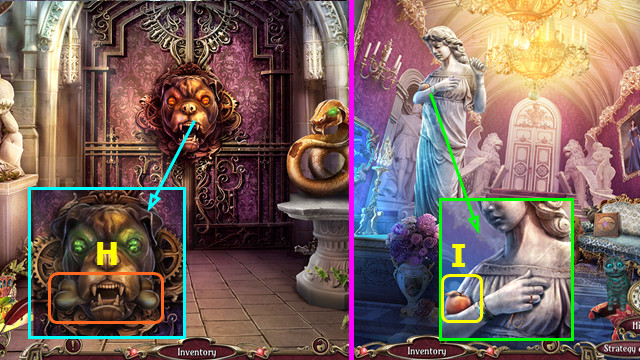
- Pan up; use the CANE to take the SNAKE HEAD (D).
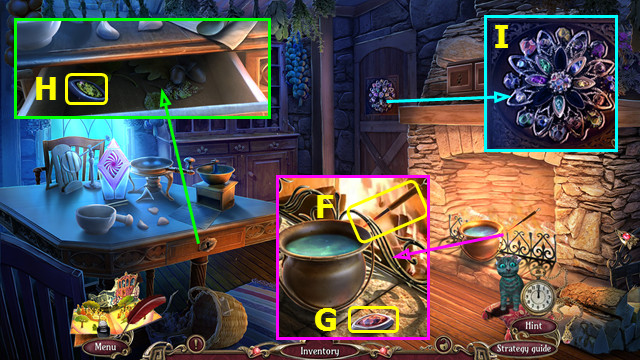
- Place the SNAKE HEAD; take the CARD REGISTER PLATE and GOLDEN RING (E).
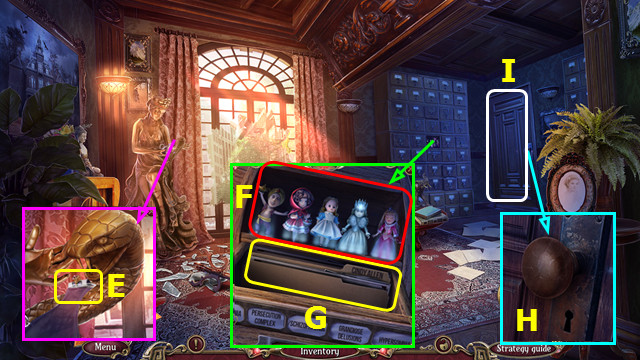
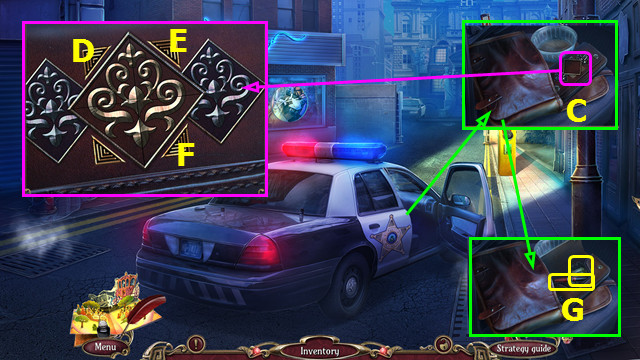
- Pan down and place the CARD REGISTER PLATE; arrange the figures as shown (F).
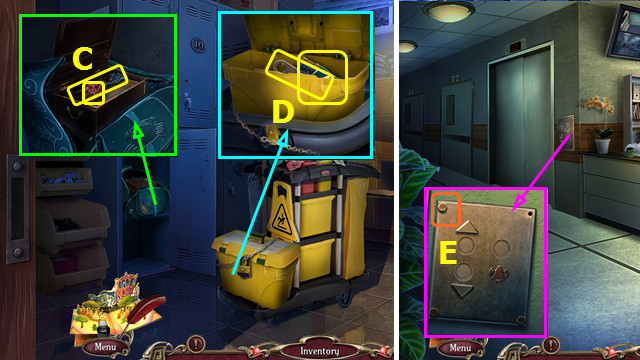
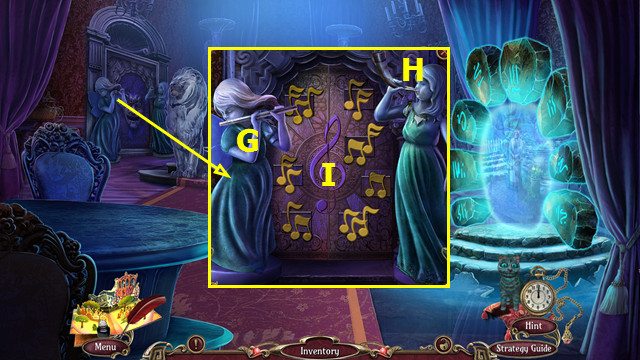
- Remove the 1st two folders; take the FOLDER (G).
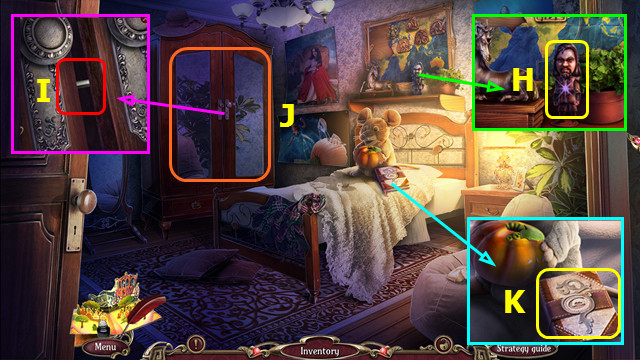
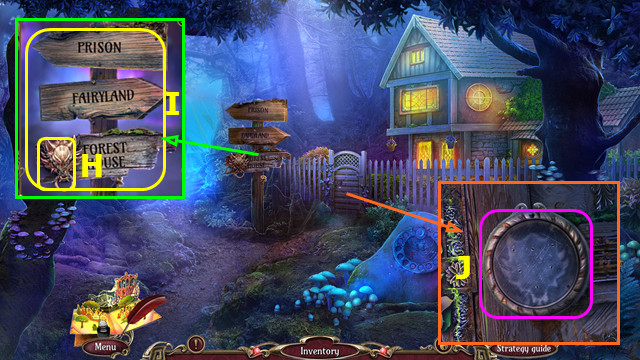
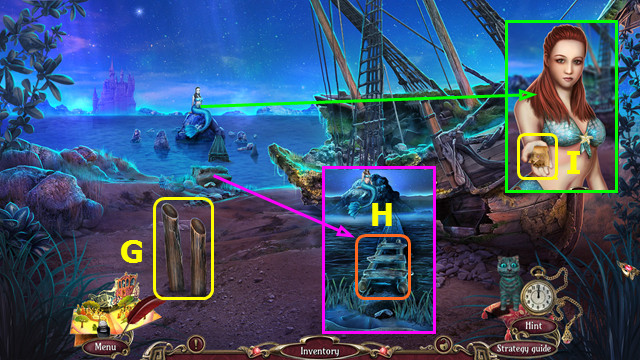
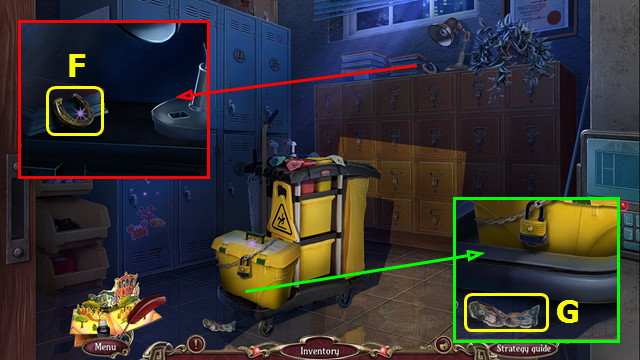
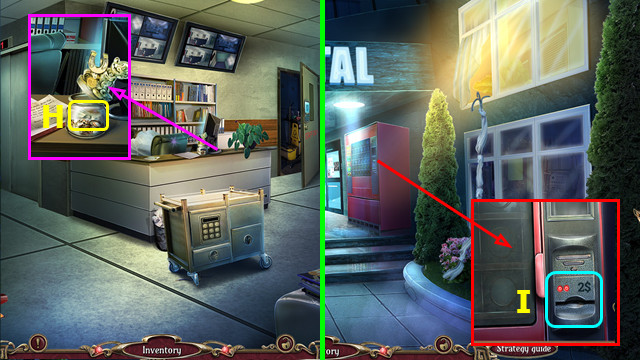
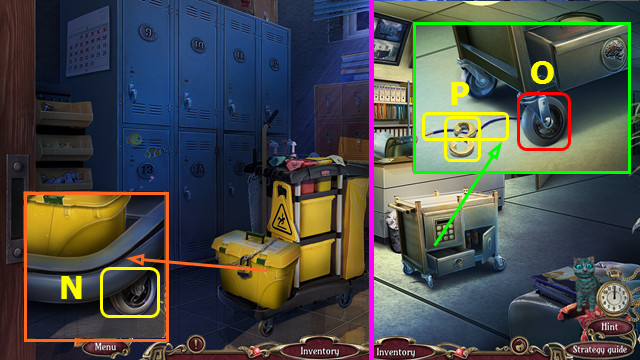
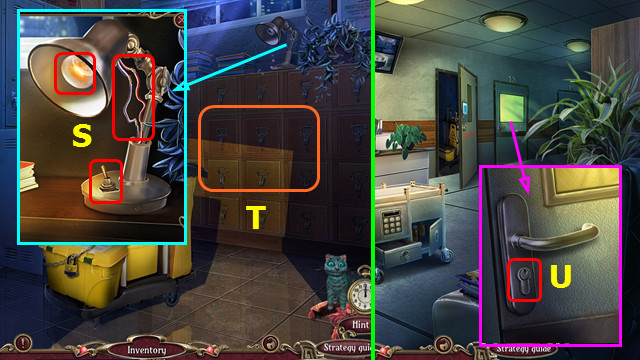
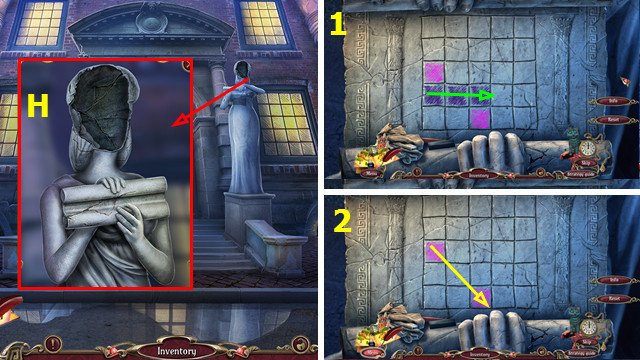
- Read the FOLDER; take the PENCIL and STORAGE KEY (inventory).
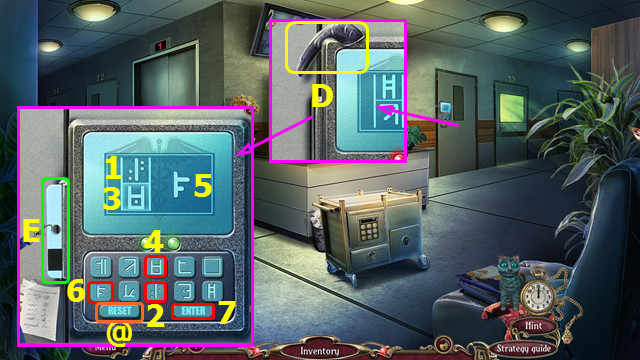
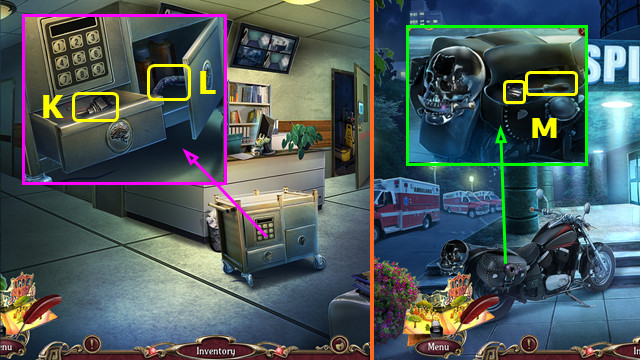
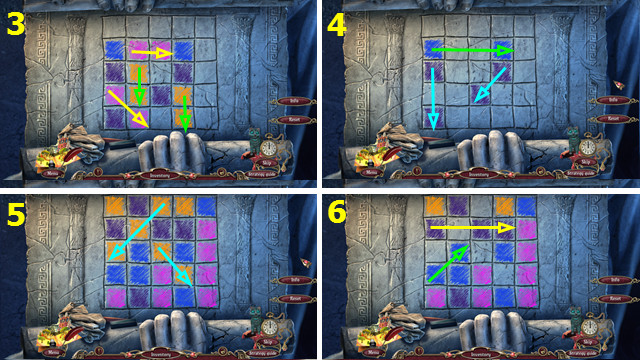
- Use the STORAGE KEY (H).
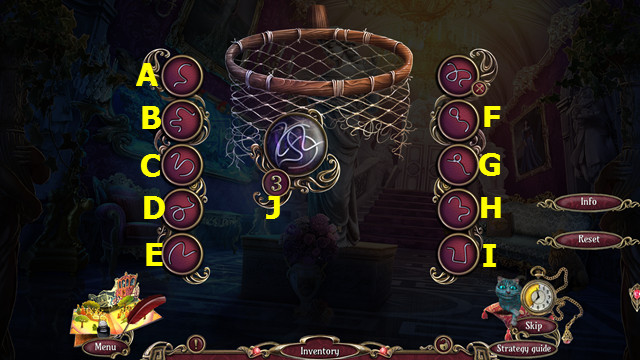
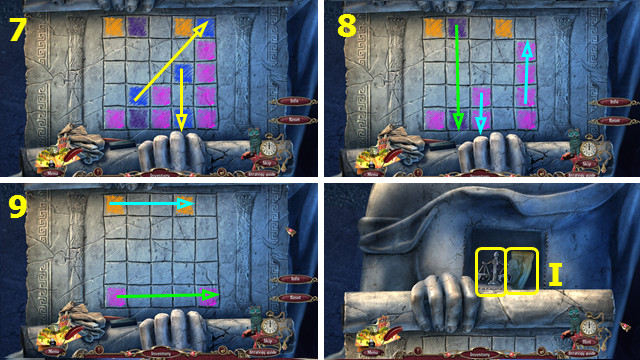
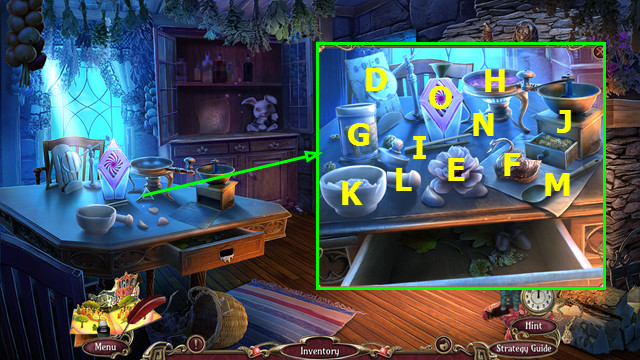
- Play the HOP (I).
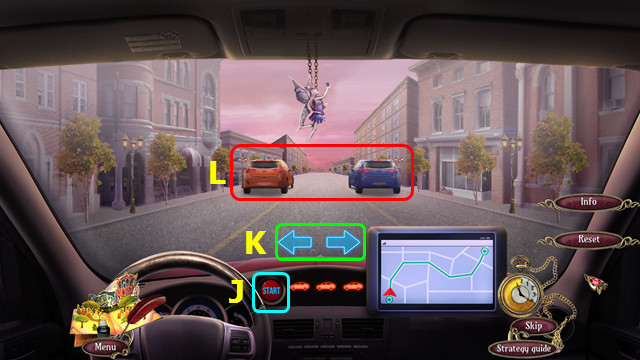
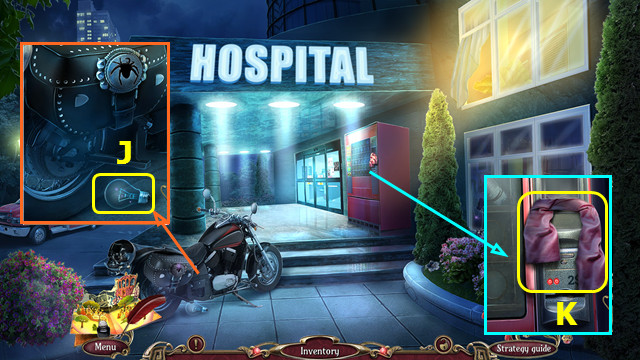
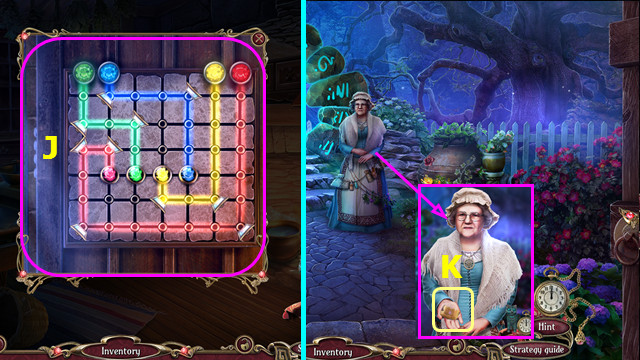
- Press start (J).
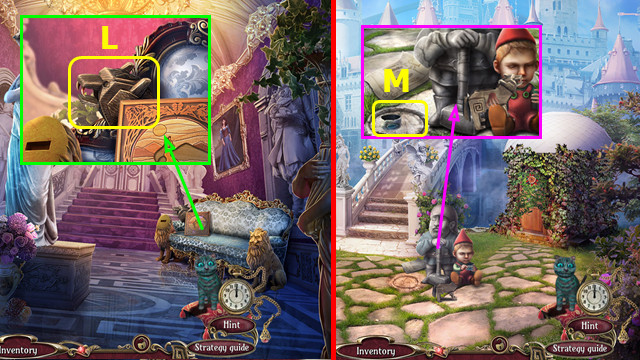
- Use the arrows (K) to navigate around the obstacles (L).
- The course is randomly generated.
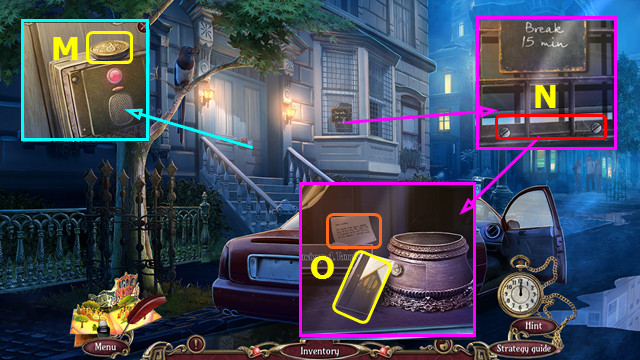
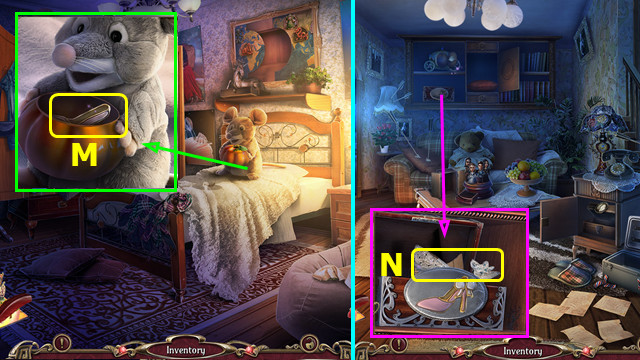
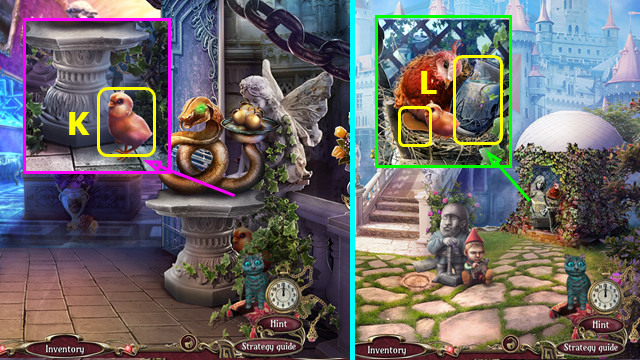
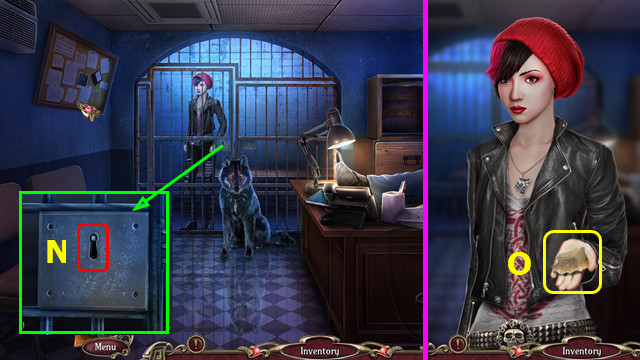
- Take the COIN (M).
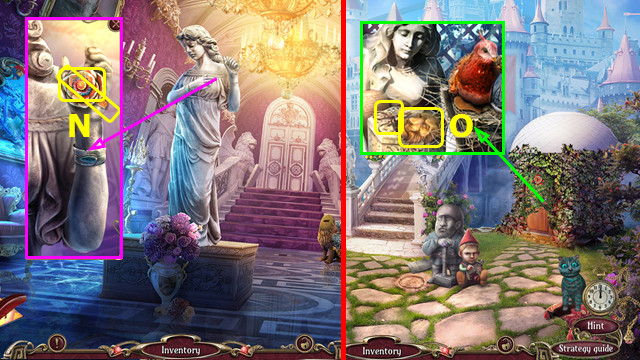
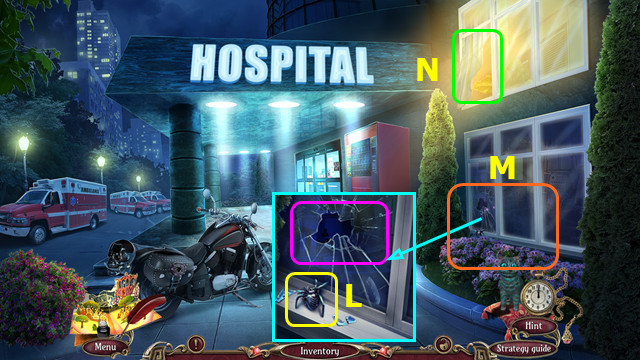
- Use the COIN (N).
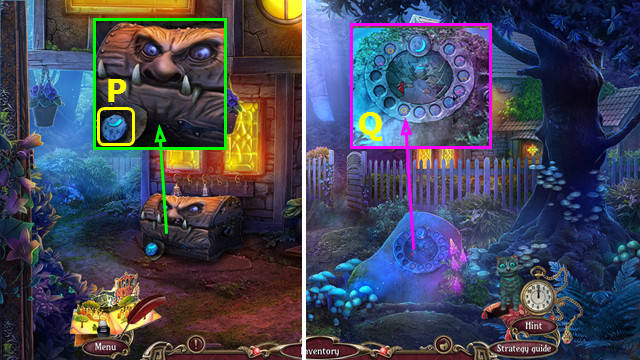
- Open the window; take the MAGNET KEY and read the note (O).
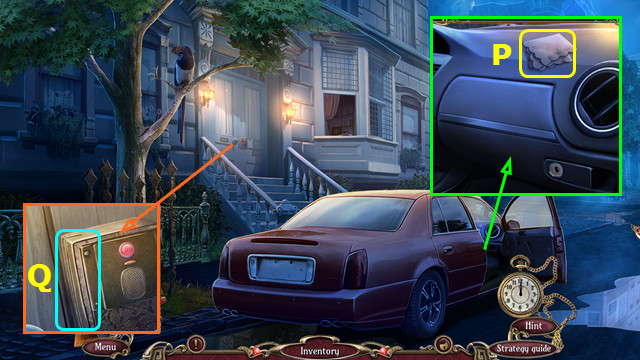
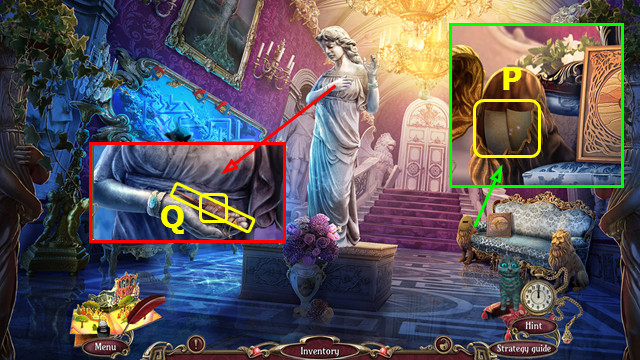
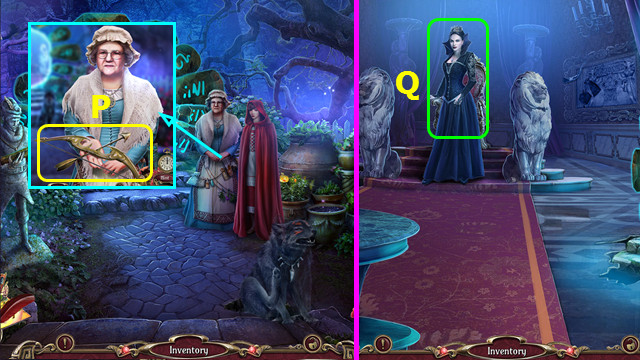
- Take the CLEAN HANDKERCHIEF (P).
- Use the MAGNET KEY (Q).
- Walk forward.
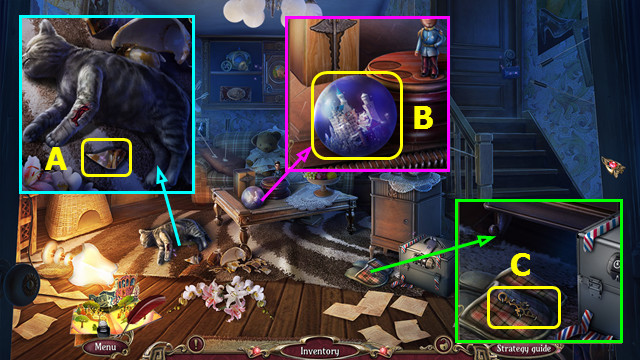
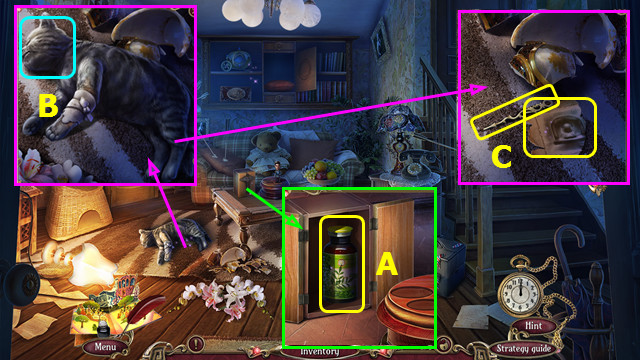
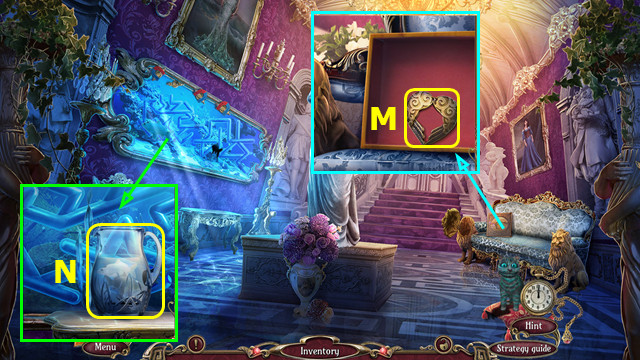
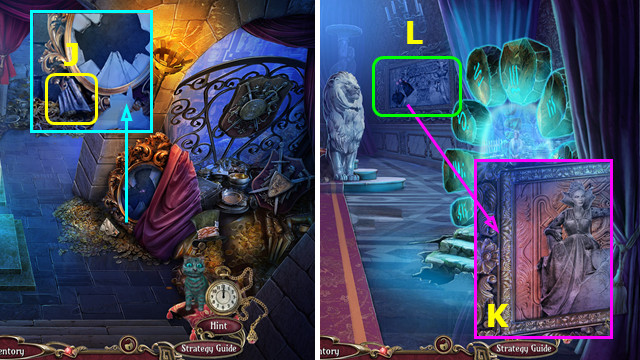
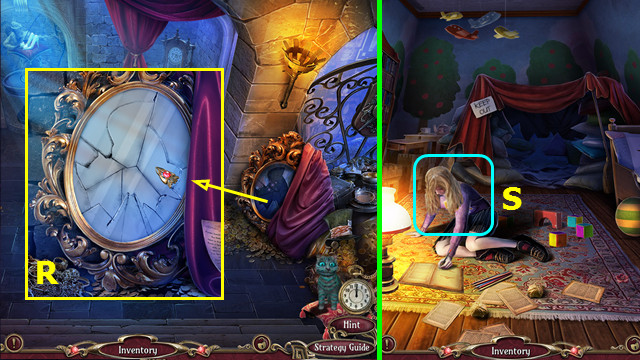
- Take the GLASS SHARD (A).
- Take the SNOW GLOBE (B).
- Use the GLASS SHARD; take the 1/3 CLOCK HANDS (C).
- Walk down.
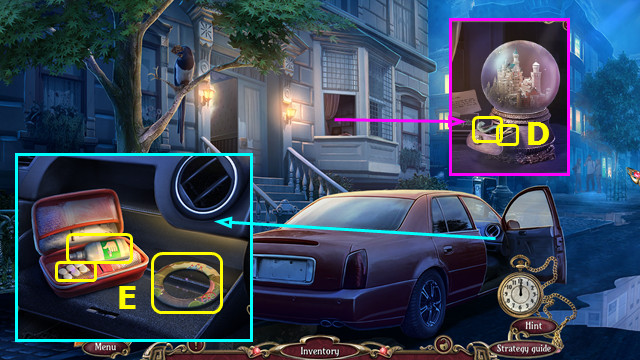
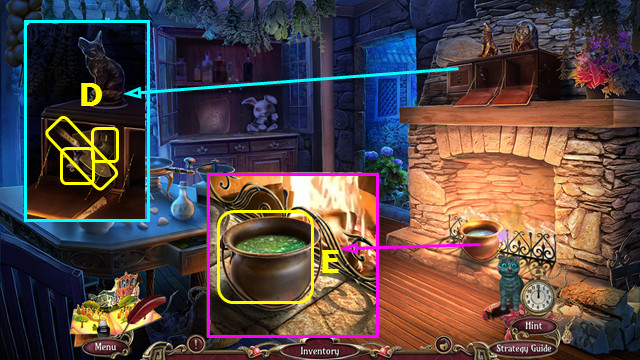
- Place the SNOW GLOBE; take the SILVER SNAKE and PIN (D).
- Use the PIN and open the first aid kit; take the ANTISEPTIC, SLEEPING PILLS, and WOODEN RING (E).
- Walk forward.
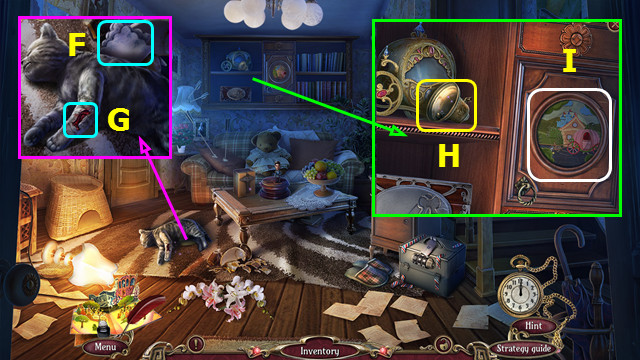
- Place the CLEAN HANDKERCHIEF (F); use the ANTISEPTIC (G).
- Take the 1st BELL (H) and place the WOODEN RING (I).
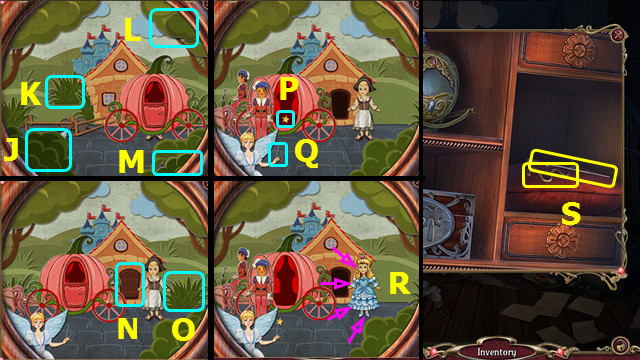
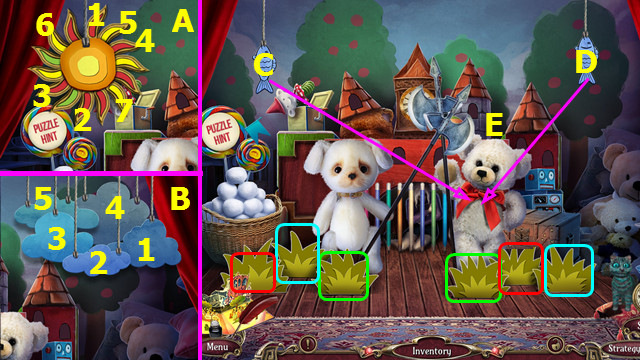
- Select J-K-L-M.
- Select N-O.
- Move (P) to (Q).
- Change the outfit to match (R).
- Take the 2/3 CLOCK HANDS and BRONZE SNAKE (S).
- Place the SILVER SNAKE and BRONZE SNAKE; take the CATNIP (A).
- Use the CATNIP (B).
- Take the 3/3 CLOCK HANDS and 1/4 MAGIC PAGE PIECES (C).
- Walk down.
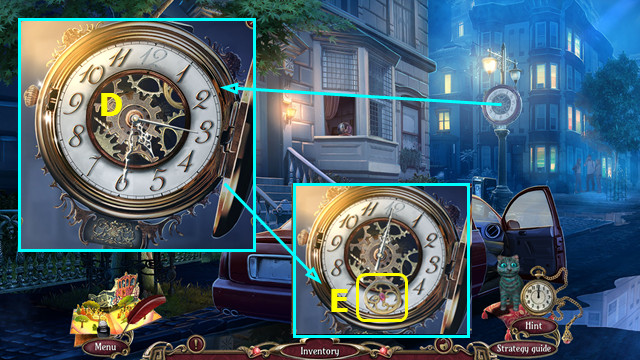
- Open the clock and place the 3 CLOCK HANDS; set the clock to 5:30:15 (D).
- Take the WHEEL (E).
- Walk forward.
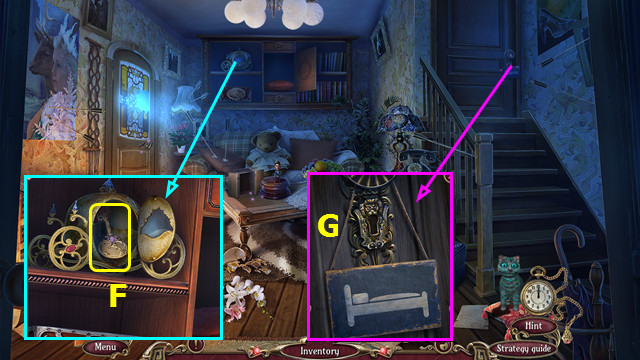
- Place the WHEEL; take the BEDROOM KEY (F).
- Use the BEDROOM KEY (G).
- Walk right.
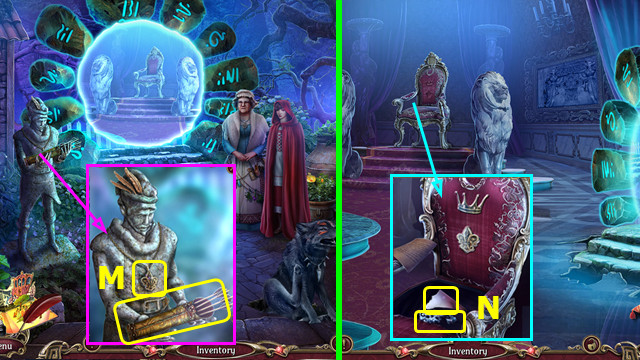
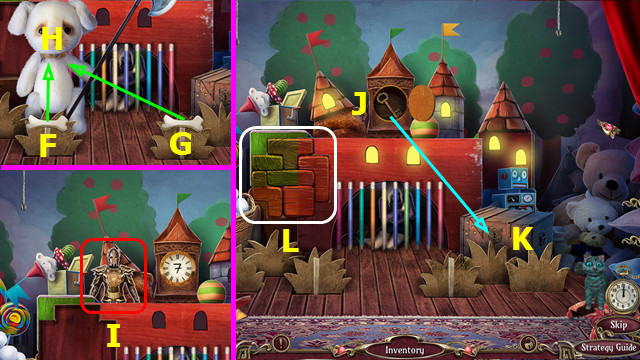
- Take the HUNTSMAN FIGURINE (H).
- Use the PENCIL (I).
- Play the HOP; earn the COIN PURSE (J).
- Use the GLASS SHARD on the COIN PURSE; take the GEM and CODE (inventory).
- Take the DIARY (K).
- Walk down.
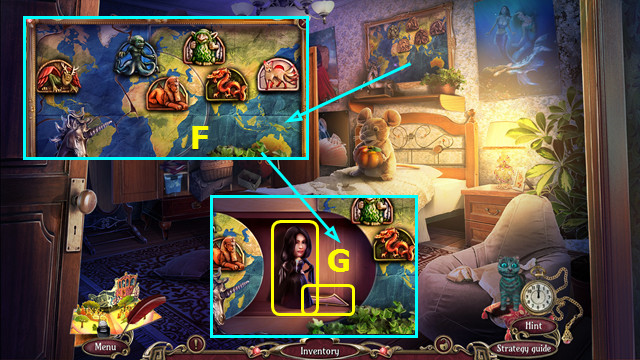
- Place the CODE; set the dials to match (L).
- Take the MAP PART, CINDERELLA FIGURINE, and NUMBER 12 (M).
- Walk down.
- Place the NUMBER 12 (N).
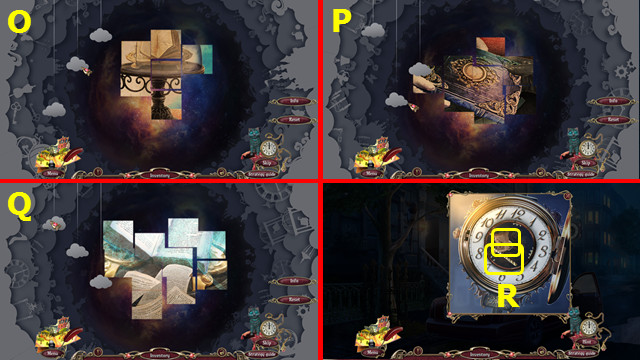
- Drag the clouds to the shown positions (O-Q).
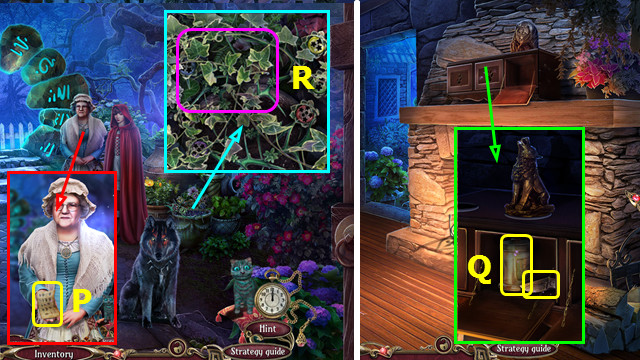
- Take the 2/4 MAGIC PAGE PIECES and UNICORN HORN (R).
- Go forward and right.
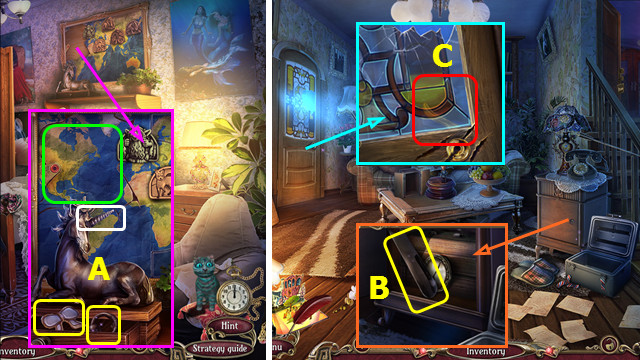
- Place the MAP PART and UNICORN HORN; take the GLASS BOW and CABINET HANDLE (A).
- Walk down.
- Place the CABINET HANDLE; take the SHOEHORN (B).
- Use the SHOEHORN (C).
- Walk left.
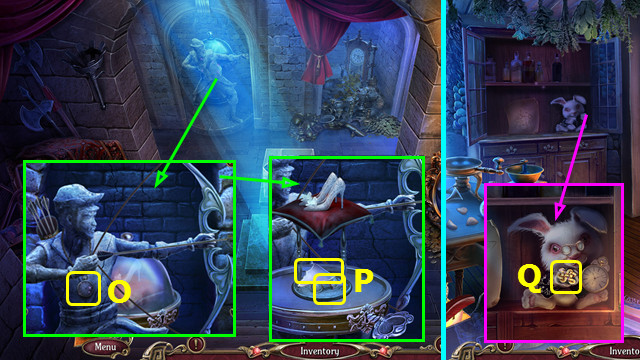
- Take the TOY GUN (D).
- Walk down 2x.
- Use the TOY GUN; earn the DRAGON FIGURINE (E).
- Walk forward and right.
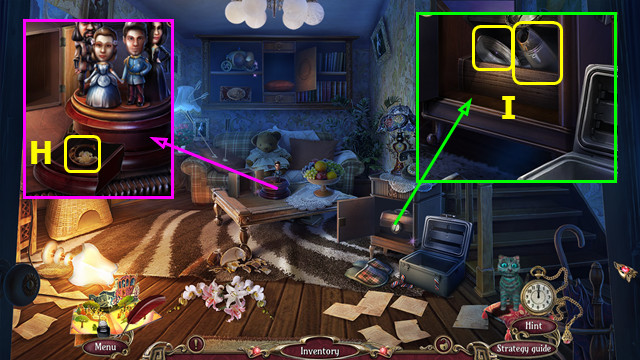
- Place the DRAGON FIGURINE; arrange the figurines as shown (F).
- Take the WICKED QUEEN FIGURINE and the GLASS HEEL (G).
- Walk down.
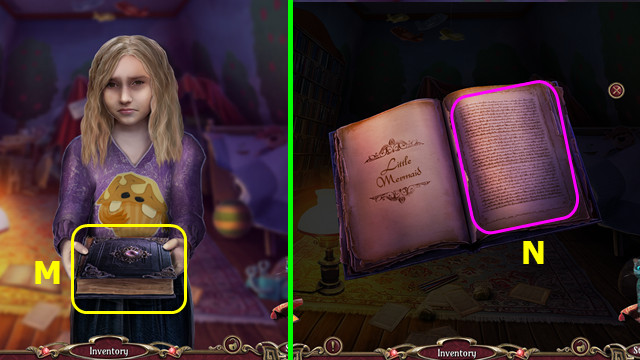
- Place the HUNTSMAN FIGURINE, CINDERELLA FIGURINE, and WICKED QUEEN FIGURINE; take the LETTER C (H).
- Combine the DIARY and LETTER C; take the 3/4 MAGIC PAGE PIECES and BROOM TOKEN (inventory).
- Place the BROOM TOKEN; take the FISHING LINE and HAIR DRYER (I).
- Walk left.
- Use the HAIR DRYER (J).
- Play the HOP; earn the HOOK (K).
- Combine the FISHING LINE and HOOK to make the FISHING LINE WITH HOOK (inventory).
- Use the FISHING LINE WITH HOOK; take the PUMPKIN STEM (L).
- Walk down and right.
- Place the PUMPKIN STEM; take the GLASS SLIPPER PART (M).
- Walk down.
- Place the GLASS BOW, GLASS HEEL, and GLASS SLIPPER PART; take the 4/4 MAGIC PAGE PIECES and GLASS SLIPPER (N).
- The MAGIC PAGE PIECES become the CINDERELLA STORY PAGE.
Chapter 2: Outside The Castle
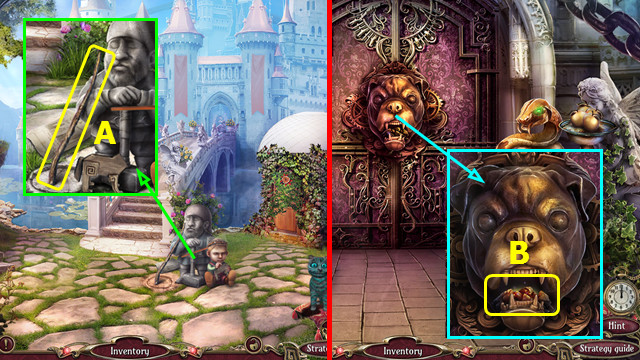
- Take the STICK (A).
- Combine the STICK and FISHING LINE WITH HOOK to make the FISHING ROD (inventory).
- Walk forward.
- Take the COAL (B).
- Walk down.
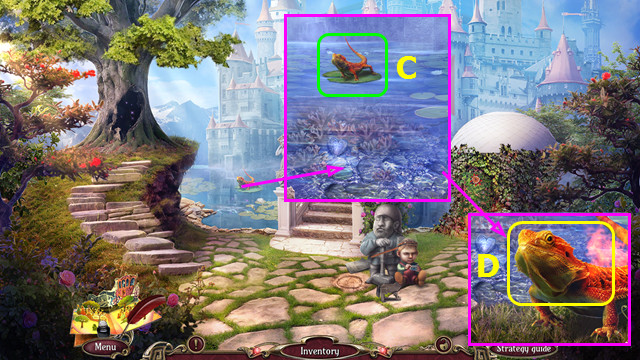
- Use the FISHING ROD (C).
- Give the COAL; take the FIRE SALAMANDER (D).
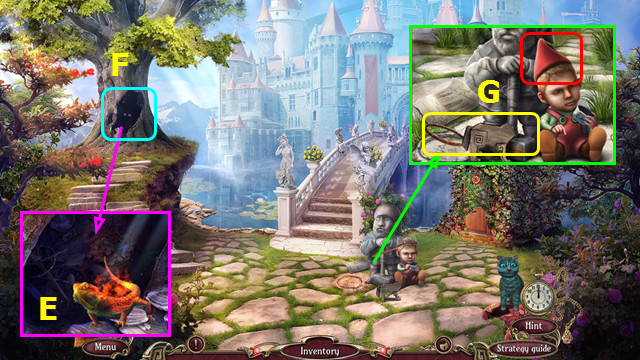
- Place the FIRE SALAMANDER (E).
- Play the HOP; earn the PACKAGE (F).
- Open the PACKAGE; take the GNOME HAT and GOLDEN BONE (inventory).
- Place the GNOME HAT; take the TORN SCOOP NET (G).
- Go forward.
- Place the GOLDEN BONE (H).
- Walk forward.
- Take the APPLE (I).

- Select the 5 scales (green); take the SCALES (J).
- Walk down.
- Pan up; place the SCALES and APPLE. Take the SHARP FANG (K).
- Walk forward.
- Place the SHARP FANG; take the WOLF'S HEAD (L).
- Walk down 2x.
- Place the WOLF'S HEAD; take the BRACELET (M).
- Go forward 2x.
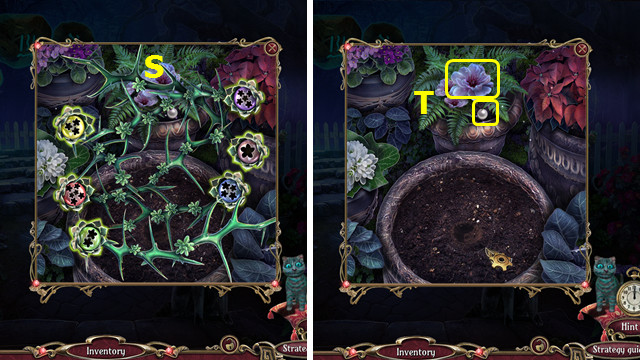
- Place the BRACELET; take the FLOWER and 1/3 MOSAIC PIECES (N).
- Walk down 2x.
- Place the FLOWER; take the SCISSORS and LION HEAD (O).
- Go forward 2x.
- Place the LION HEAD; take the NOTE (P).
- Read the NOTE; take the 2/3 MOSAIC PIECE, SILVER RING, and BEANS (inventory).
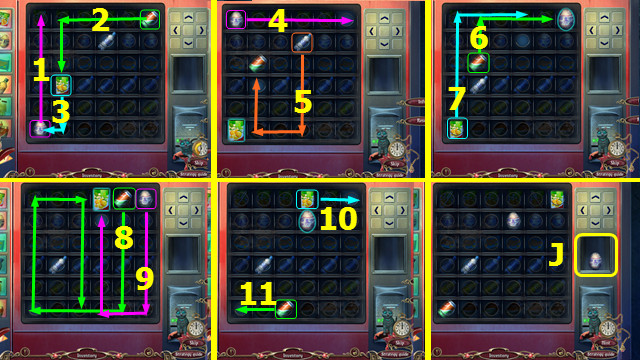
- Place the GOLDEN RING and SILVER RING; take the SPINDLE WITH THREAD and HEART MEDALLION (Q).
- Combine the TORN SCOOP NET, SPINDLE WITH THREAD, and SCISSORS (inventory).
- Solution: A-C-E-J, B-H-I-J, D-G-H-J, A-B-F-J.
- Take the SCOOP NET.
- Walk down.
- Pan down and place the BEANS; take the NESTLING (K).
- Walk down.
- Place the NESTLING; take the 3/3 MOSAIC PIECES and JUG (L).
- Go forward 2x.
- Place the 3 MOSAIC PIECES; take the WING DECORATIONS (M).
- Place the JUG and use the SCOOP NET; take the YIN AND YANG FISH (N).
- Walk down 2x.
- Use the YIN AND YANG FISH; earn the RUBY HEART (O).
- Combine the HEART MEDALLION, GEM, RUBY HEART, and WING DECORATIONS to make the LOVE TOKEN (inventory).
- Place the LOVE TOKEN; take the FEMALE GNOME STATUE (P).
- Place the FEMALE GNOME STATUE; take the MAGNET and GNOME HAMMER (Q).
- Walk forward 2x.
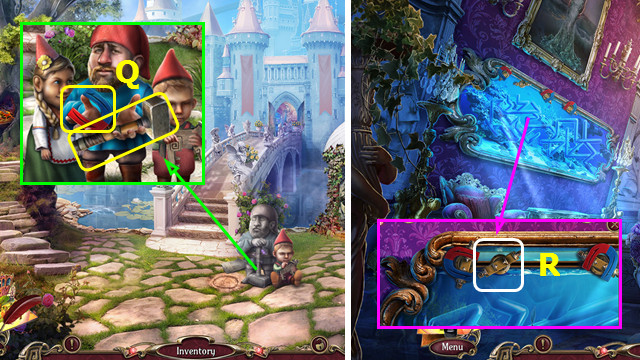
- Place the MAGNET (R).

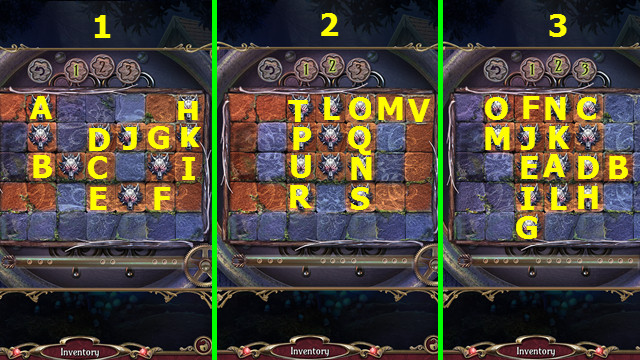
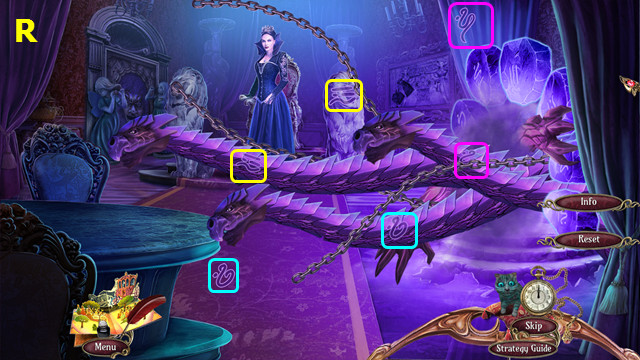
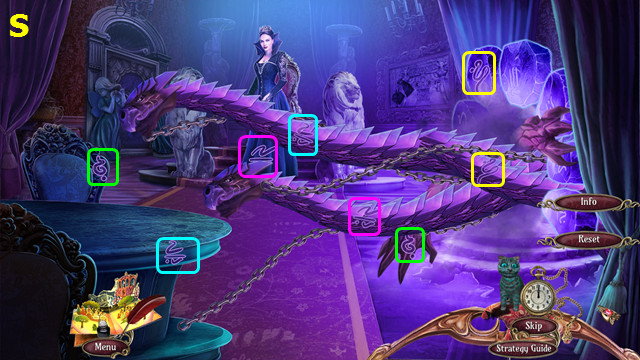
- Select A-G-A-G-B-E-C-A-E-G.

- Select I-N-K-M-K-M-I-N-N-I.
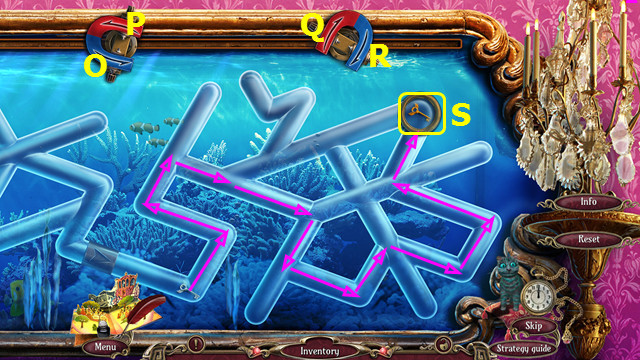
- Select Q-P-Q-O-O-R-O-Q-O-Q-P-Q.
- Take the WINGED KEY (S).
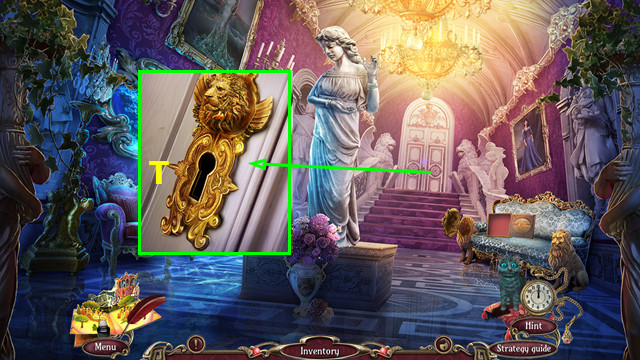
- Use the WINGED KEY (T).
- Walk forward.
Chapter 3: The Deep Forest
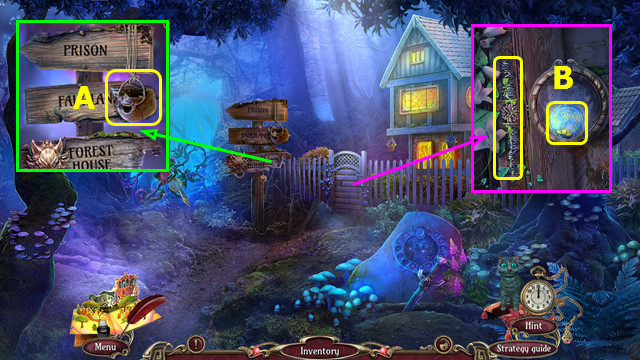
- Play the HOP.
- Take the SKULL (A).
- Use the SKULL to take the ANTIRUST ACID; take the 1/3 GLOWING STONES (B).
- Take the RUSTY BLADE (C).
- Take the CLOTH (D).
- Combine the RUSTY BLADE, ANTIRUST ACID, and CLOTH to make the BLADE (inventory).
- Use the BLADE (E).
- Walk left.
- Take the FILE (F).
- Take the 2/3 GLOWING STONES (G).
- Walk down.
- Use the FILE to take the WOLF EMBLEM (H).
- Use the GNOME HAMMER to take 3 PLANKS (I).
- Place the WOLF EMBLEM (J).
- Select AB, BC, DE, EF, FG, HI, JK, IH (1).
- Select LM, NO, PQ, RP, ON, SQ, TU, UN, NO, OV (2).
- Select AB, CD, BA, EF, GE, HI, IJ, KL, MK, NA, ON, LK, NA (3).
- Walk right.
- Take the 3/3 GLOWING STONES (P).
- Walk down.
- Place the 3 GLOWING STONES (Q).
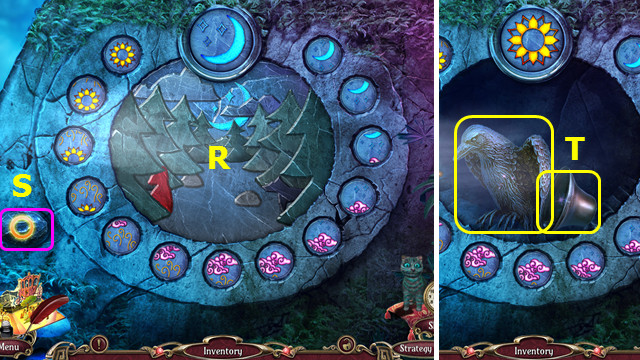
- Arrange the stones as shown (R).
- Select (S).
- Take the CROW FIGURINE and 2nd BELL (T).
- Walk right.
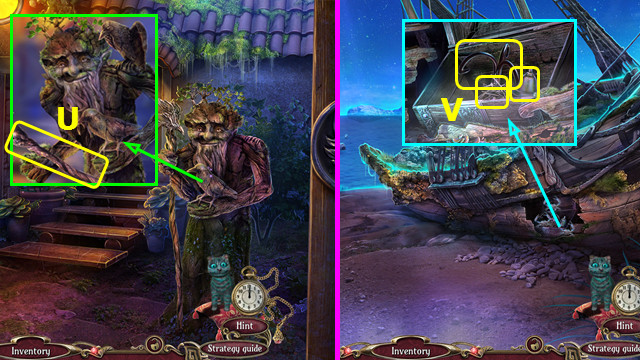
- Place the CROW FIGURINE; take the STAFF (U).
- Walk down and left.
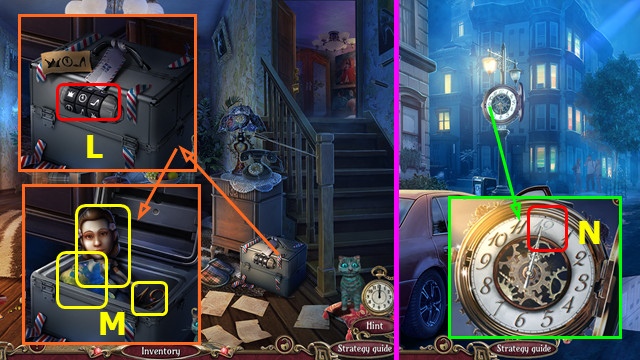
- Use the STAFF; take the GRAPPLING HOOK, NAILS, and 3rd BELL (V).
- Walk down and right.
- Place the 3 BELLS; select A-E-C, B-D-D-A, A-A-E-D-C.
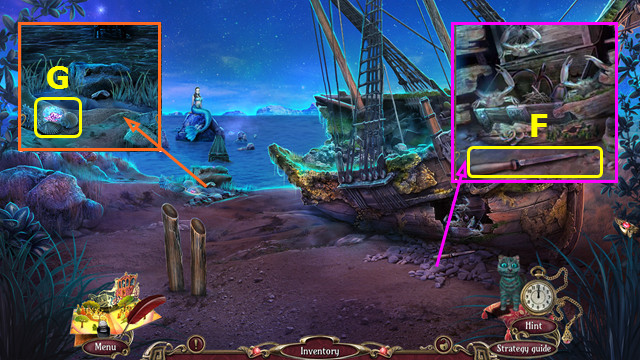
- Take the SHOVEL and ENCHANTED FLUTE (F).
- Walk down and left.
- Use the SHOVEL; take the BRIDGE BASE (G).
- Combine the BRIDGE BASE, 3 PLANKS, NAILS, and GNOME HAMMER to make the CRUDE BRIDGE (inventory).
- Place the CRUDE BRIDGE (H).
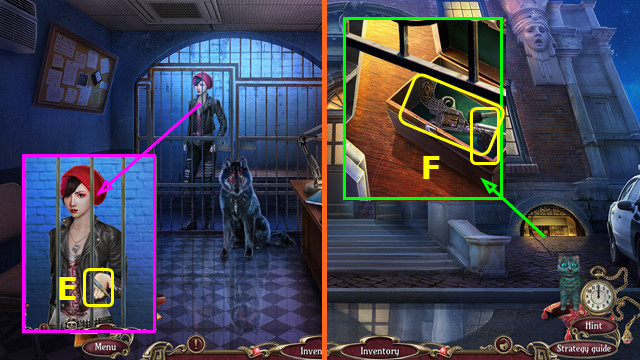
- Show Veronica the GLASS SLIPPER; take the 1/6 MAGIC PAGE (I).
- Move the branches aside.
- Take the BULB (J).
- Take the SCARF (K).
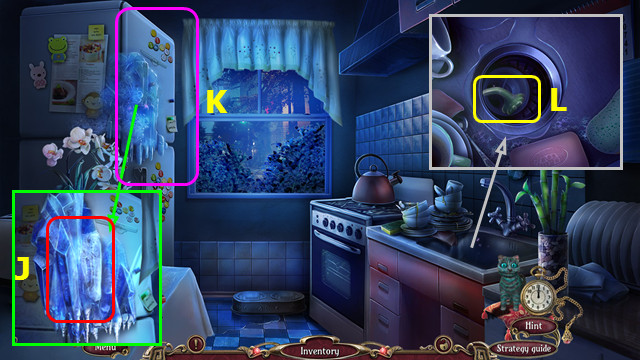
- Take the BROKEN METAL SPIDER; use the SCARF on the glass (L).
- Play the HOP; earn the PILE OF SHEETS (M).
- Take the 1/3 SPIDER LEGS from the PILE OF SHEETS. Tie the sheets together and add the GRAPPLING HOOK to make the IMPROVISED ROPE WITH HOOK (inventory).
- Use the IMPROVISED ROPE WITH HOOK (N).
- Go right.
- Use the SLEEPING PILLS (A).
- Take the BRAIN INSIGNIA and ACCESS CARD (B).
- Take the NUMBER 1 (C).
- Take the 2/3 SPIDER LEG (D).
- Use the ACCESS CARD (E) and select (@).
- Select 1-7.
- Go forward.
- Take the HORSESHOE (F).
- Take the 1st DOLLAR (G).
- Walk down.
- Place the HORSESHOE; take the 2nd DOLLAR (H).
- Walk down.
- Place the 2 DOLLARS (I).
- Move the items on the indicated paths in numerical order (1-11).
- Take the GIFT EGG (J).
- Open and eat the GIFT EGG; take the 2/6 MAGIC PAGE and HEART INSIGNIA (inventory).
- Go right.
- Place the BRAIN INSIGNIA; take the SWITCH (K).
- Place the HEART INSIGNIA; take the 3/3 SPIDER LEGS (L).
- Combine the BROKEN METAL SPIDER and 3 SPIDER LEGS to make the SPIDER (inventory).
- Walk down.
- Place the SPIDER; take the SCREWDRIVER and 1st TOKEN (M).
- Go right and forward.
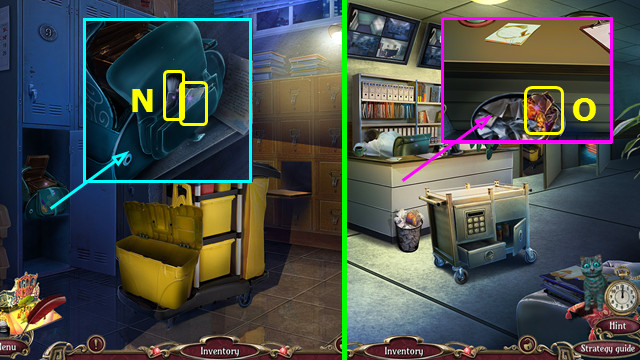
- Use the SCREWDRIVER; take the WHEEL and SCREW (N).
- Walk down.
- Use the WHEEL, SCREW, and SCREWDRIVER (O).
- Move the cart; take the NUMBER 3 and BLUE WIRE (P).
- Walk forward.
- Place the NUMBER 1 and NUMBER 3; open the door (Q).
- Open the case; take the NOTEBOOK and RED WIRE (R).
- Place the BULB, SWITCH, RED WIRE, and BLUE WIRE (S).
- Play the HOP; earn the ROOM KEY (T).
- Walk down.
- Use the ROOM KEY (U).
- Walk right.
Chapter 4: The Mermaid's Hospital Room
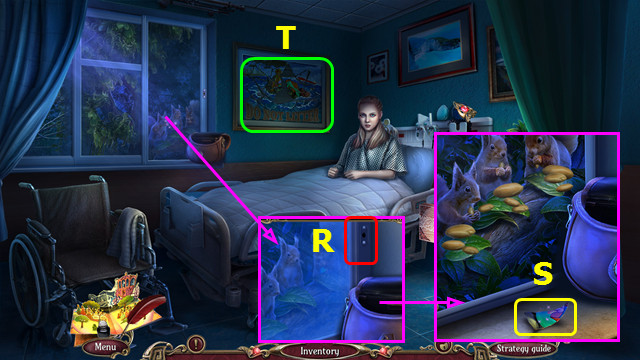
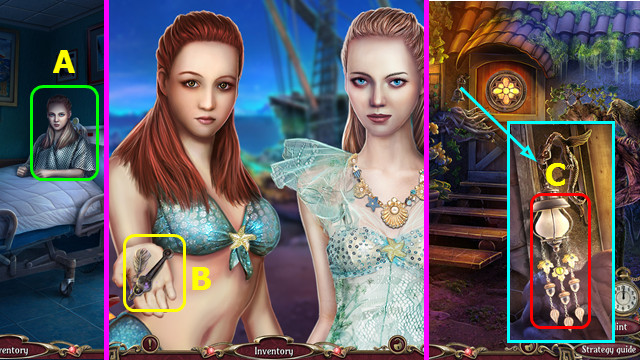
- Talk to the Little Mermaid; take the MERMAID'S MEDALLION (A).
- Combine the NOTEBOOK and MERMAID'S MEDALLION; take the SEAHORSE WITH SUCTION CUP and 3/6 MAGIC PAGE (inventory).
- Use the SEAHORSE WITH SUCTION CUP; take the STARFISH AMULET (B).
- Walk down and forward.
- Place the STARFISH AMULET; take the SEASHELL and SHARP HAIRPIN (C).
- Use the SHARP HAIRPIN; take the PANEL KEY and 1st POSTER FRAGMENT (D).
- Walk down.
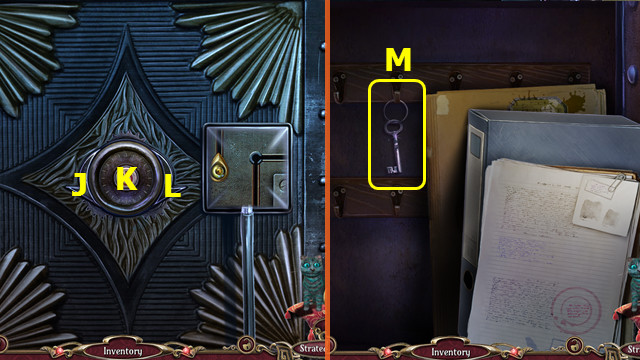
- Use the PANEL KEY (E).

- Set the connectors as shown (F).
- Take the BULLDOG INSIGNIA (G).
- Walk down.

- Place the BULLDOG INSIGNIA; take the 4/6 MAGIC PAGE, KNIFE, and 2nd POSTER FRAGMENT (L).
- Go right 2x.
- Use the KNIFE; take the COSMETICS BAG and TWEEZERS (M).
- Open the COSMETICS BAG; take the METAL CRAB and POWDER (inventory).
- Walk down and forward.
- Place the METAL CRAB; take the 3rd POSTER FRAGMENT and POWDER BRUSH (N).
- Walk down.
- Use the TWEEZERS to take the CRUMPLED PACKAGE (O).
- Open the CRUMPLED PACKAGE; take the NUTS (inventory).
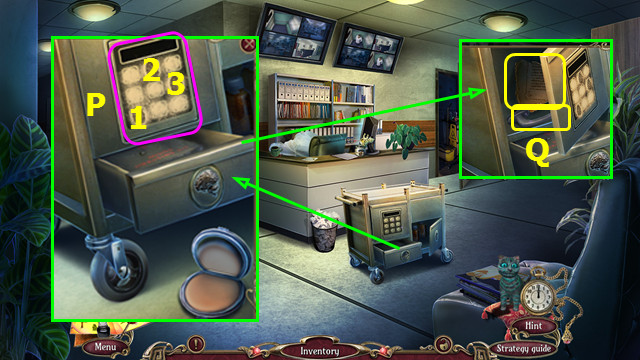
- Use the POWDER and POWDER BRUSH (P); press (1-3).
- Take the 5/6 MAGIC PAGE and WINDOW HANDLE (Q).
- Walk right.
- Use the WINDOW HANDLE (R).
- Place the NUTS and distribute as shown; take the 4th POSTER FRAGMENT (S).
- Select (T).
- Place the 4 POSTER FRAGMENTS.
- Restore the picture (U).
- Take the STETHOSCOPE, BEAR FIGURINE, and 6/6 MAGIC PAGE.
- Use the 6 MAGIC PAGE (A).
- The 6 MAGIC PAGE pieces become the MERMAID STORY PAGE.
- Take the BELL CLAPPER (B).
- Walk down and right.
- Place the BELL CLAPPER (C).
- Walk forward.
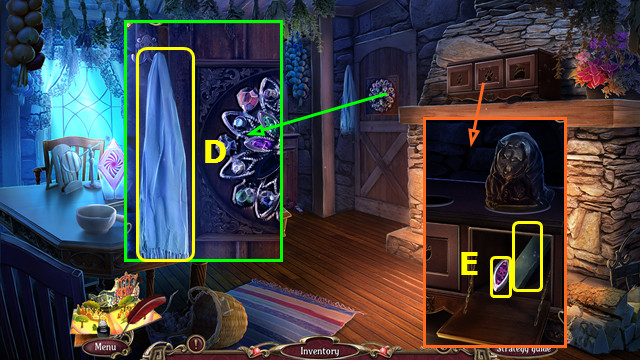
- Take the SCARF (D).
- Place the BEAR FIGURINE; take the 1/3 PETALS and GRINDSTONE (E).
- Use the SCARF to take the RED-HOT POKER (F).
- Take the 2/3 PETALS (G).
- Use the RED-HOT POKER; take the 3/3 PETALS (H).
- Place the 3 PETALS (I).
- Arrange the mirrors as shown (J).
- Walk forward.
- Talk to Red Riding Hood's Grandmother; take the 1/4 RED RIDING HOOD STORY PAGE (K).
- Take the WIRE (L).
- Bend the wire 3x to make the LOCK PICK (inventory).
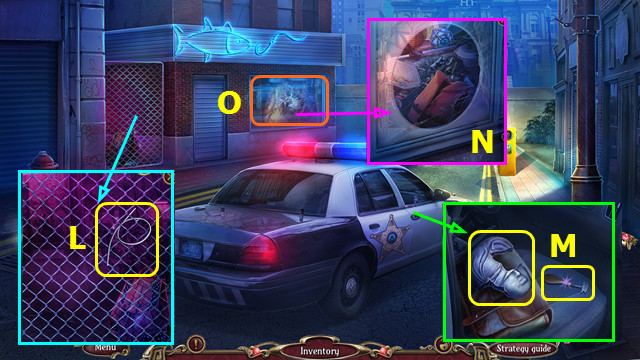
- Use the LOCK PICK; take the GLASSCUTTER and STATUE FACE FRAGMENT (M).
- Use the GLASSCUTTER (N).
- Play the HOP; earn the WIRE CUTTERS (O).
- Use the WIRE CUTTERS. Open the container and take the BURGER; take the 1/2 FACE PARTS (P).
- Use the WIRE CUTTERS; give the BURGER to the wolf (Q).
- Take the 2/2 FACE PARTS and RED RIDING HOOD'S BACKPACK (R).
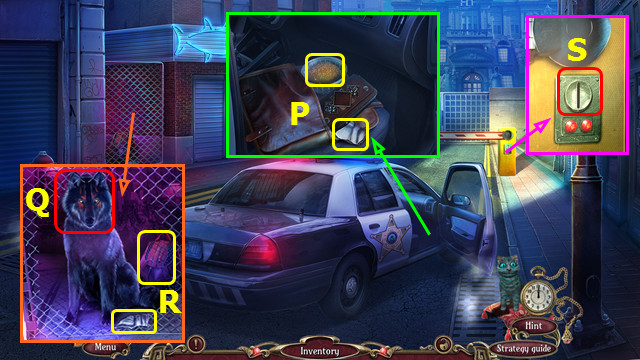
- Open RED RIDING HOOD'S BACKPACK; take and answer the cellphone. Take the 2/4 RED RIDING HOOD STORY PAGE and 2nd TOKEN (inventory).
- Use the 2 TOKENS (S).
- Walk forward.
- Take the STURDY STICK (A).
- Use the STURDY STICK; take the SQUARE EMBLEM and WOLF FIGURINE (B).
- Walk down.
- Place the SQUARE EMBLEM (C).
- Select Dx2-E-F.
- Take the GLUE and POLICE BADGE BASE (G).
- Combine STATUE FACE FRAGMENT, 2 FACE PARTS, and GLUE to make THEMIS' FACE (inventory).
- Walk forward.
- Place THEMIS' FACE (H).
- Remove the indicated groups (1-9).
- Take the SCALES and 3/4 RED RIDING HOOD STORY PAGE (I).
- Place the SCALES; take the FLASHLIGHT and STAR (B).
- Walk down.
- Use the FLASHLIGHT; take the OLD PRUNERS and EAGLE (C).
- Combine the POLICE BADGE BASE, STAR, and EAGLE to make the POLICE BADGE (inventory).
- Walk forward.
- Place the POLICE BADGE (D).
- Walk forward.
- Talk to Red Riding Hood; take the AWARD PEN (E).
- Walk down.
- Place the AWARD PEN; take the CAR KEY and 1st REVOLVER (F).
- Walk down.

- Use the CAR KEY; take the 2nd REVOLVER (G).
- Walk forward 2x.
- Place the 2 REVOLVERS; read the file (H).
- Use the STETHOSCOPE (I).
- Select K-J-Kx2-J-K-L-K-J-K-L-K for the center bolt.
- Select Lx2-K-J-K-L-K-J-K-L-K-J-K-J-K-J-K-L-K for the top bolt.
- Select Jx2-K-J-K-L-Kx2-L-K-J-K-L-K-L-K-J-K-L-K-J-K-L-K-L-K-J-K for the lower bolt.
- Move the files 3x; take the CELL KEY (M).
- Use the CELL KEY (N).
- Talk to Red Riding Hood; take the 4/4 RED RIDING HOOD STORY PAGE (O).
Chapter 5: The House Garden
- Talk to Grandmother; take the MAGIC AMULET RECIPE (P).
- Walk down.
- Place the WOLF FIGURINE; take the MOONFLOWER HONEY and BLUNT BLADE (Q).
- Combine the OLD PRUNERS, BLUNT BLADE, and GRINDSTONE to make the PRUNERS (inventory).
- Walk forward.
- Use the PRUNERS. (R).
- Swap the flowers as shown (S).
- Take the PEARL and FERN FLOWER (T).
- Walk down.
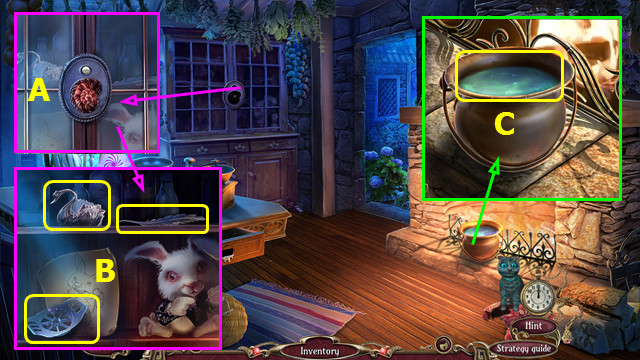
- Place the SEASHELL and PEARL (A).
- Take the SWAN BOWL, 1/2 COPPER FEATHERS, and APPLE CUTTER (B).
- Use the SWAN BOWL to take the CLEAR WATER (C).
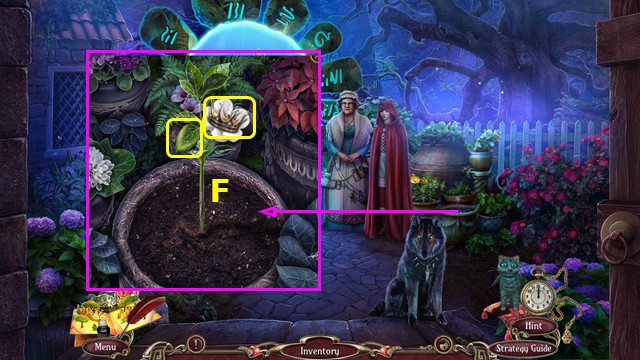
- Place the MAGIC AMULET RECIPE (D), FERN FLOWER (E), and CLEAR WATER (F).
- Place the MOONFLOWER HONEY and remove the lid (G).
- Place (F) in (H) pan. Use (I) on (G) and (J). Place (J) in (H).
- Place (E) in (K); use (L) on (K). Place (K) in (H).
- Use (M) on (H). Place (N) on (O); use (H) on (O).
- Take the TELEPORTATION AMULET (O).
- Walk forward.
- Give the TELEPORTATION AMULET; take the MAGIC BOW (P).
- Play the HOP.
- Use the MAGIC BOW (Q).
- Select pairs (color coded) (R); select the 3 crows to shoot them.
- Select pairs (color coded) (S); select the 3 crows to shoot them.
- Select pairs (color coded) (T); select the 3 crows to shoot them.
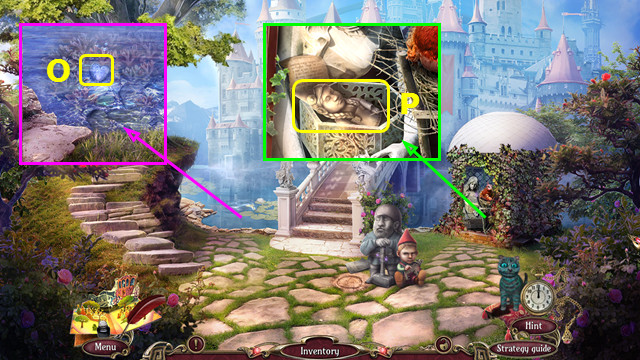
- Take the FOX FIGURINE (A).
- Take the GLOWING APPLE (B).
- Use the APPLE CUTTER on the GLOWING APPLE; take the POISONOUS SEEDS (inventory).
- Take the BROKEN BUGLE (C).
- Walk right and down.
- Place the FOX FIGURINE; take the SCOOP, MAGIC FERTILIZER, and 1/2 BAS-RELIEF PARTS (D).
- Use the MAGIC FERTILIZER; take the FERTILIZER MIXTURE (E).
- Go forward.
- Use the SCOOP, POISONOUS SEEDS, and FERTILIZER MIXTURE; take the GOLDEN CROWN and LEAF WITH STICKY DEW (F).
- Combine the BROKEN BUGLE and LEAF WITH STICKY DEW to make the ENCHANTED HORN (inventory).
- Walk forward.
- Place the ENCHANTED FLUTE (G) and ENCHANTED HORN (H).
- Restore the notes (I).
- Walk left.
- Take the 2/2 BAS-RELIEF PARTS (J).
- Walk down.
- Place the 2 BAS-RELIEF PARTS (K).
- Play the HOP; earn the BOX (L).
- Take the 2/2 COPPER FEATHERS from the BOX (inventory).
- Walk right.
- Place the 2 COPPER FEATHERS; take the FLEUR-DE-LIS and QUIVER WITH GOLDEN ARROWS (M).
- Go forward.
- Place the GOLDEN CROWN and FLEUR-DE-LIS; take the 1/3 MIRROR SHARDS and CRYSTAL KEY (N).
- Walk left.
- Place the QUIVER WITH GOLDEN ARROWS and MAGIC BOW; take the POCKET WATCH (O).
- Use the CRYSTAL KEY and place the GLASS SLIPPER; take the 2/3 MIRROR SHARDS and PINCE-NEZ (P).
- Walk down, right, and down.
- Place the PINCE-NEZ and POCKET WATCH; take the KNOTWORK AMULET (Q).
- Combine the BOX and KNOTWORK AMULET; take the 3/3 MIRROR SHARDS (inventory).
- Walk forward 2x, and then go left.
- Place the 3 MIRROR SHARDS and restore the mirror (R).
- Select the mirror 2x.
- Talk to Gretel (S).
- Open each curtain panel.
- Select 1-7 (A); select 1-5 (B).
- Give (C-D) to (E); select pairs (color-coded).
- Give (F) and (G) to (H).
- Select the knight 7 times as he pops up in different locations (I).
- Hitting Cinderella will increase the number of times you need to hit the knight.
- Use (J) on (K); restore the design (L).
- Take the BOOK OF FAIRY TALES (M).
- Open the BOOK OF FAIRY TALES (inventory); add the MERMAID STORY PAGE, RED RIDING HOOD STORY PAGE, and CINDERELLA STORY PAGE (N).
- Congratulations! You have completed Surface: Lost Tales!
Created at: 2016-07-15