Walkthrough Menu
General Tips
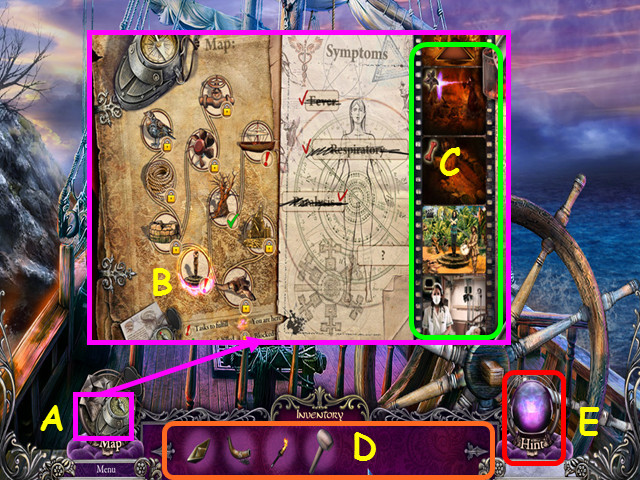
- Hidden Object Scenes and mini-games are often randomized - your solution may vary.
- Hidden Object Scenes will be referred to as HOS in this walkthrough.
- The journal will collect videos and has an interactive map (A).
- The glowing circle will show your current location (B).
- Exclamation marks indicate there are tasks to complete and check marks indicate you have finished a location.
- A question mark indicates you have not yet visited an area, while a lock indicates an area is not available.
- Select a previously visited area to travel there.
- You can also replay certain videos (C).
- Your inventory is in the bottom panel - click on an item to select it for use (D).
- The inventory panel auto-hides, move your mouse down to reveal the panel.
- Hints are unlimited, but you must wait for the hint meter to refill (E).
Chapter 1: Fever
- You will have the option of a brief tutorial.
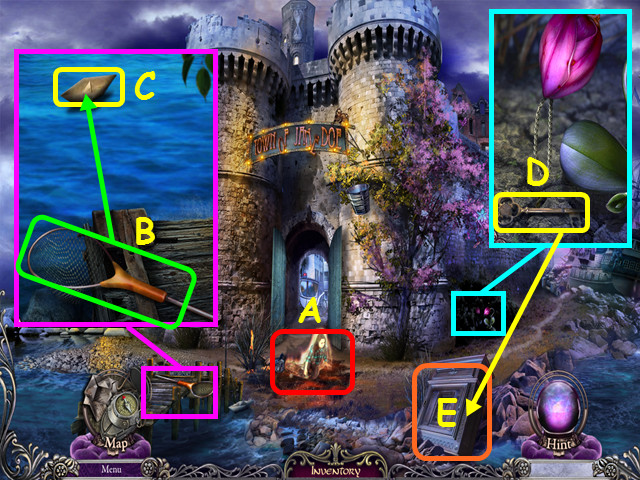
- Select Jane (A) to learn her symptom is fever; you must put out the fire that represents the fever.
- Look at the dock; take the NET (B) and use it to collect the PAPER BOAT (C).
- Look at the flower and take the KEY (D).
- Look at the wardrobe and use the KEY in the lock (E).
- Select the wardrobe for a HOS.
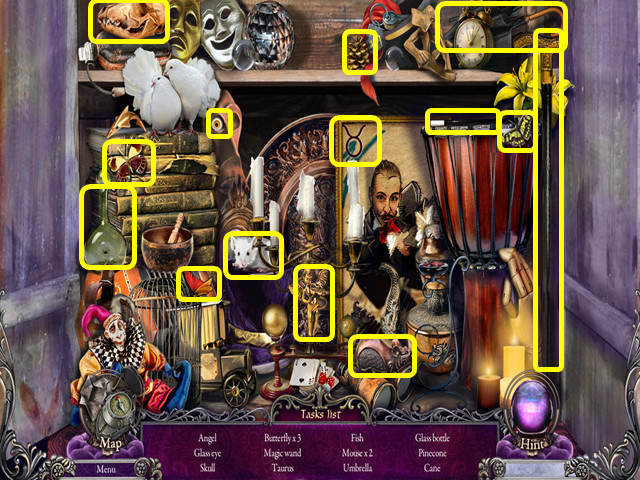
- Locate all the items on the list.
- You will earn the MAGICIAN'S WAND.
- Walk right to Near the Wrecked Ship.
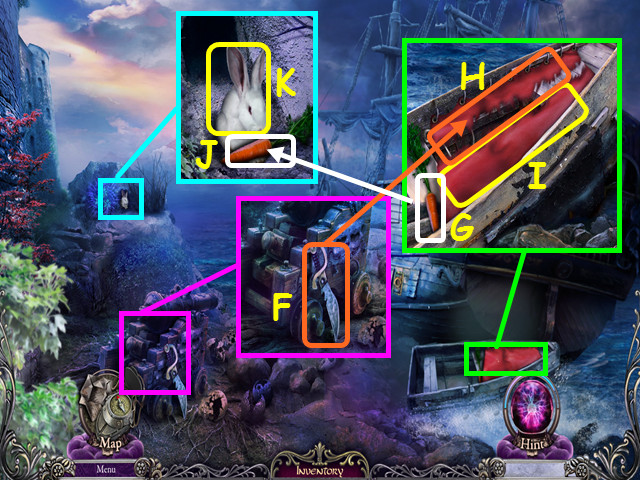
- Look at the cannon and take the SHARP KNIFE (F).
- Look at the boat and take the CARROT (G).
- Use the SHARP KNIFE to cut the red cloth (H); take the PIECE OF CLOTH (I).
- Look at the rabbit hole and use the CARROT on the rabbit (J); take the RABBIT (K).
- Walk down to the Town Gate, then go left to Near the Decrepit House.
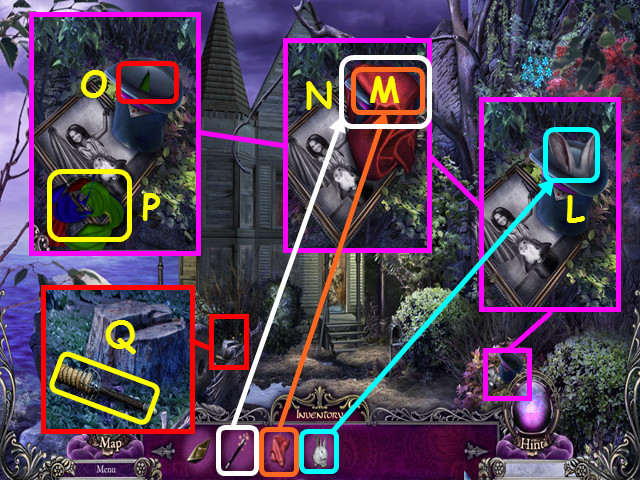
- Look at the top hat and place the RABBIT inside (L).
- Place the PIECE OF CLOTH over the top hat (M).
- Use the MAGICIAN'S WAND on the top hat (N).
- Pull on the end in the hat (O).
- Take the MAGICIAN'S SCARVES (P).
- Look at the stump and take the TORCH (Q).
- Look at your map and return to Near the Wrecked Ship.
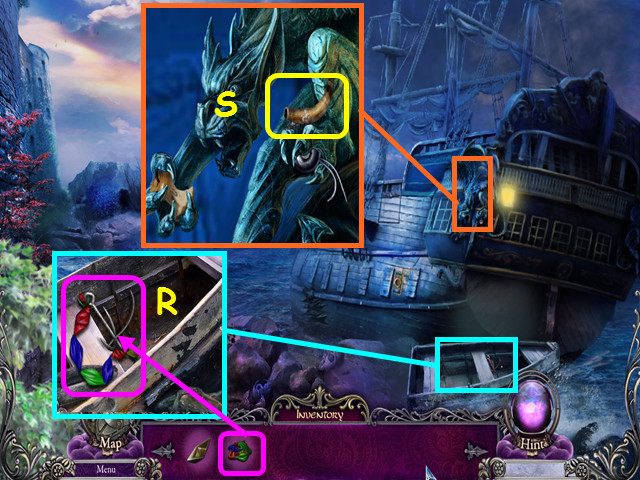
- Look at the boat and use the MAGICIAN'S SCARVES on the hook to make the GRAPPLING HOOK (R).
- Look at the gargoyle and take the GUNPOWDER (S).
- Walk down once to the Town Gate.
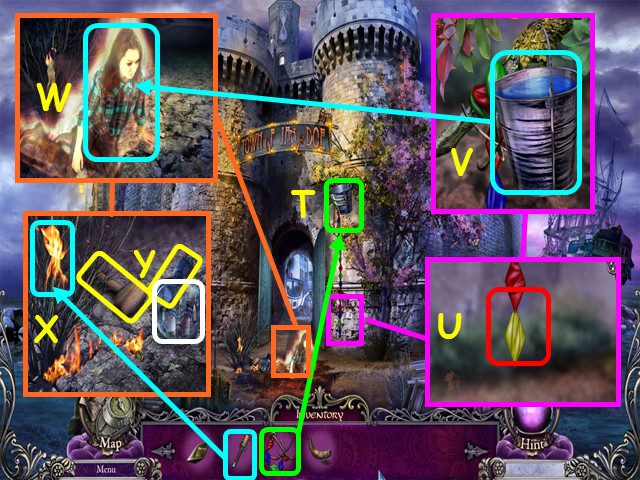
- Use the GRAPPLING HOOK on the tree (T).
- Look at the scarves and pull the end (U).
- Take the BUCKET OF WATER (V).
- Look at Jane and use the BUCKET OF WATER on her to break the fever (W).
- After the cut-scene, look where she was sitting and use the TORCH on the flame to get the BURNING TORCH (X).
- Take the HAMMER, glass globe, and the LEVER (Y).
- Note- you will have a cut-scene once you take the globe.
- Walk right to Near the Wrecked Ship.
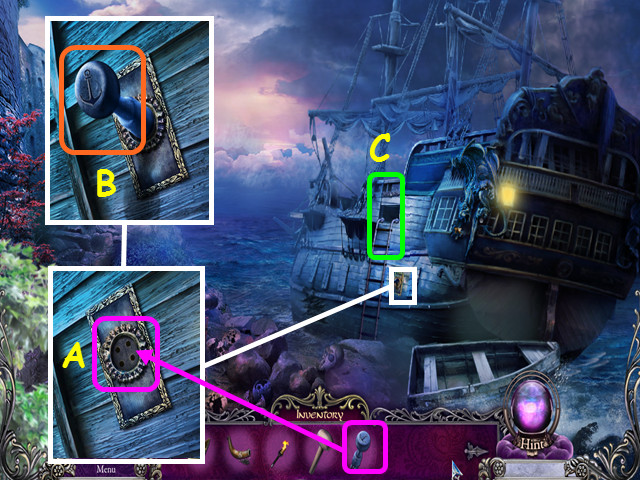
- Look at the ladder control and place the LEVER into the socket (A).
- Pull the lever down (B).
- Go up the ladder to the Wrecked Ship (C).
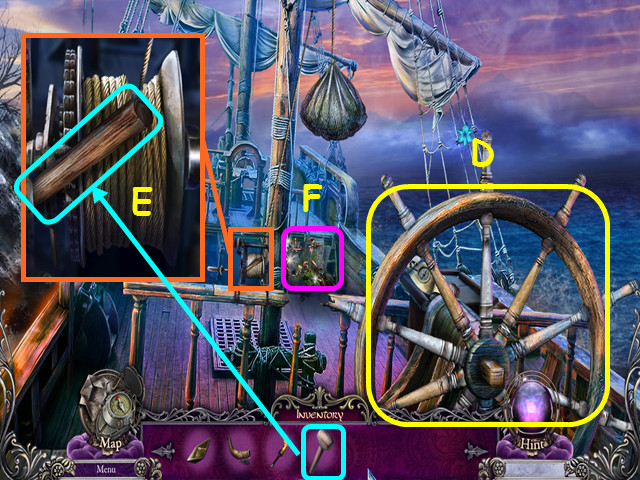
- Take the SHIP'S WHEEL (D).
- Look at the winch and use the HAMMER on the wedge (E).
- Select the dropped net for a HOS (F).
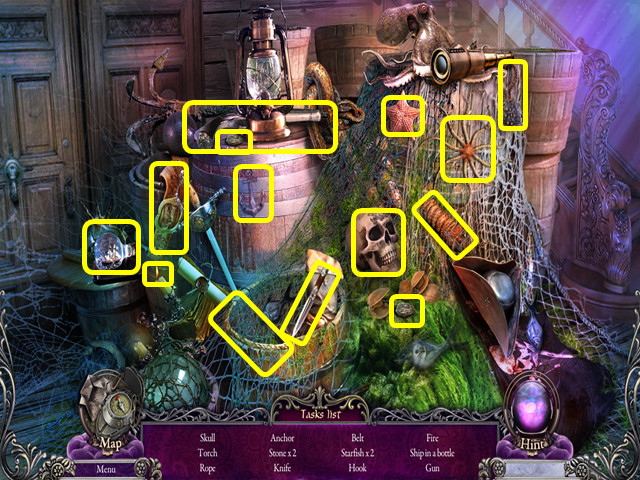
- Locate all the items on the list.
- You will earn the SKULL.
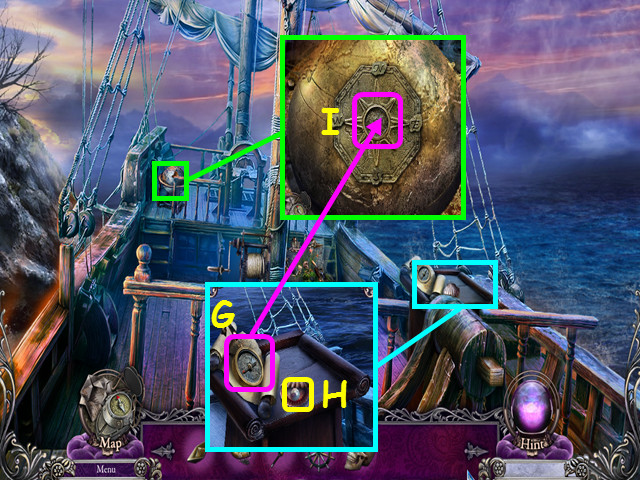
- Look at the map table and take the COMPASS (G).
- Open the shell and take the 1/3 PEARL (H).
- Look at the globe and place the COMPASS in the center for a mini-game (I).
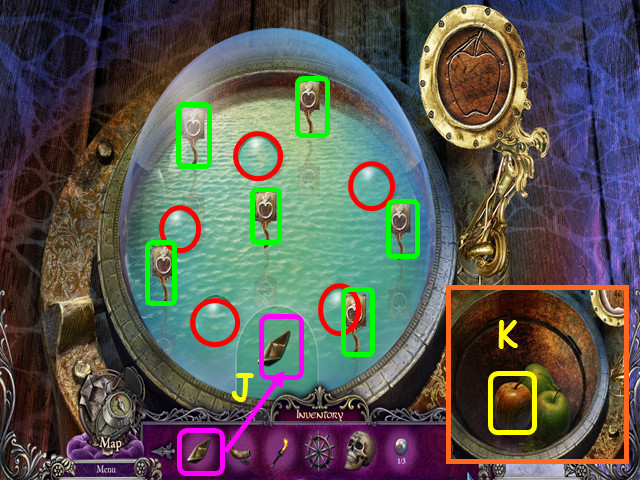
- Place the PAPER BOAT into the opening (J).
- Use the 5 bubbles (red) to propel the boat into the 6 apple flags (green).
- Press a bubble to push the boat away; you may need to press several bubbles in sequence.
- Once the basin opens, take the WOODEN APPLE (K).
- Walk down once.
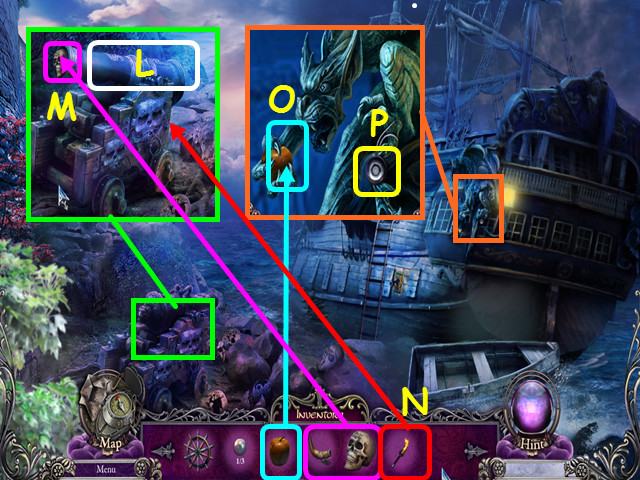
- Look at the cannon and turn the barrel so the opening faces to your left (L).
- Use the GUNPOWDER, then the SKULL on the opening (M).
- Flip the barrel back to the left, then use the BURNING TORCH on the end to fire the cannon (N).
- Look at the gargoyle and give him the WOODEN APPLE (O).
- Take the DOORBELL (P).
- Look at the map and select Near the Decrepit House.
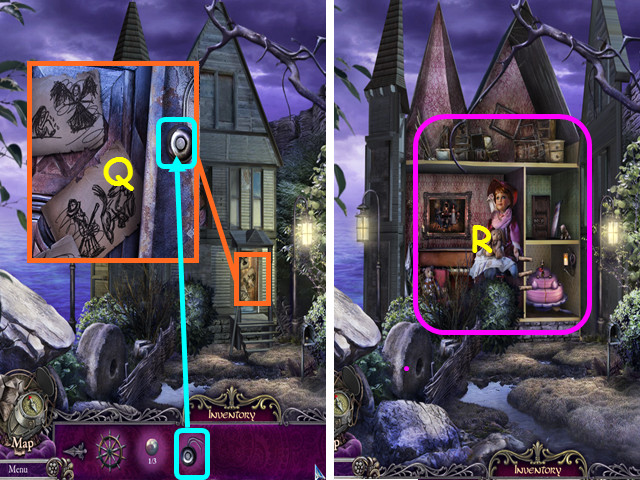
- Look at the front door; place the DOORBELL on the wires, then ring the bell (Q).
- Walk forward to the Dollhouse (R).
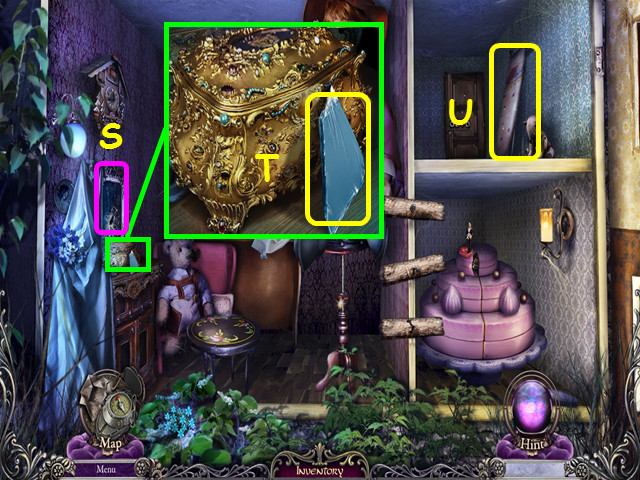
- Look at the mirror (S).
- Look at the music box and take the MIRROR SHARD (T).
- Take the IRONING BOARD (U).
- Look at the map and return to Near the Wrecked Ship.
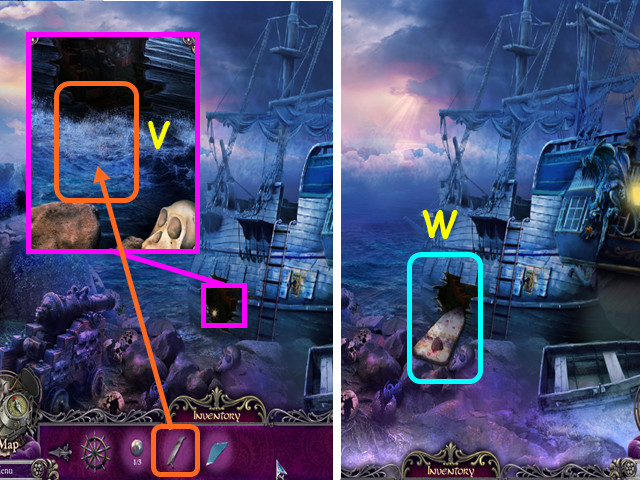
- Look at the hole in the hull of the ship and place the IRONING BOARD across the gap (V).
- Enter the Wrecked Ship's Hold (W).
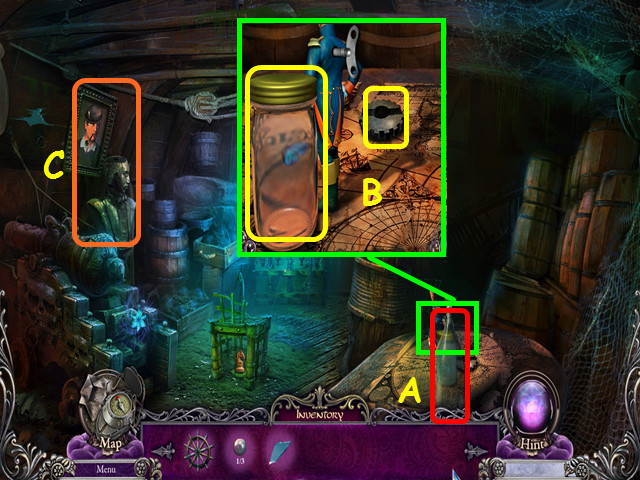
- Tip over the bottle (A).
- Look at the table: take the GEAR and the BUTTERFLY IN A JAR (B).
- Note the portrait and the statue differ by 3 items (C).
- Look at the map and select the Town Gate.
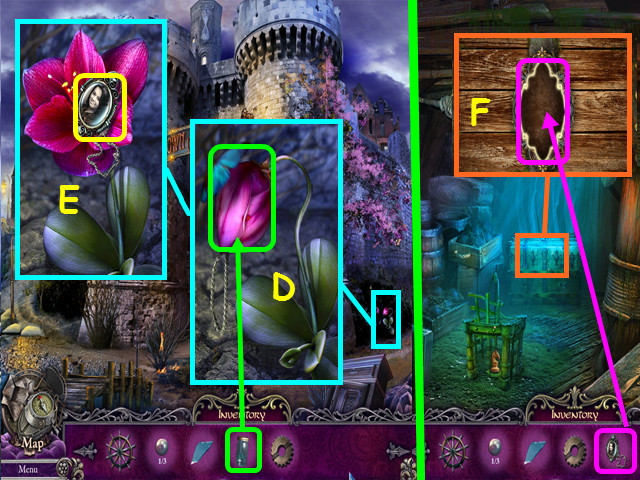
- Look at the flower and use the BUTTERFLY IN A JAR on it (D).
- Take the MEDALLION (E).
- Look at the map and go to the Wrecked Ship's Hold.
- Look at the chest in the rear and use the MEDALLION on the indentation (F).
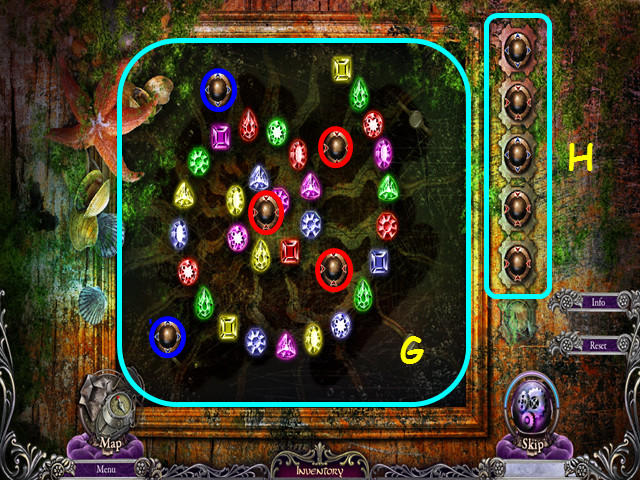
- Move all the gems to their outlines so they can glow (G) using the 5 magnets (H).
- Red magnets attract the gems and the blue magnets repel the gems.
- Drag the magnets into position and release.
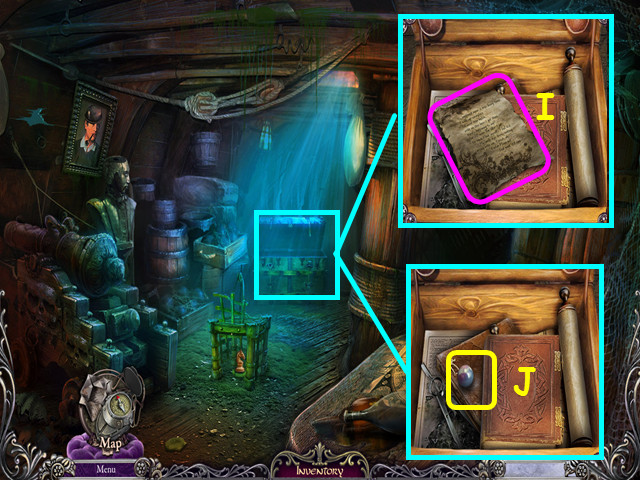
- Look in the chest and take the page from Jane's memory (I).
- After the cut-scene, take the 2/3 PEARLS (J).
- Look at the map and go to the Dollhouse.
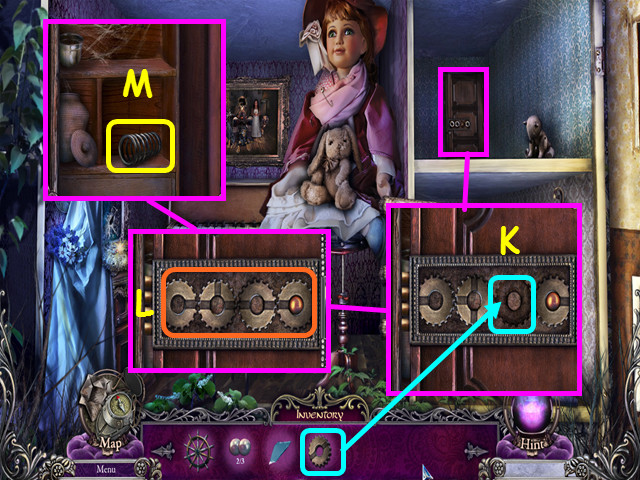
- Look at the cabinet and place the GEAR in the mechanism (K).
- Turn each of the gears so the ball bearing can roll through all the gears to the left (L).
- Take the SPRING (M).
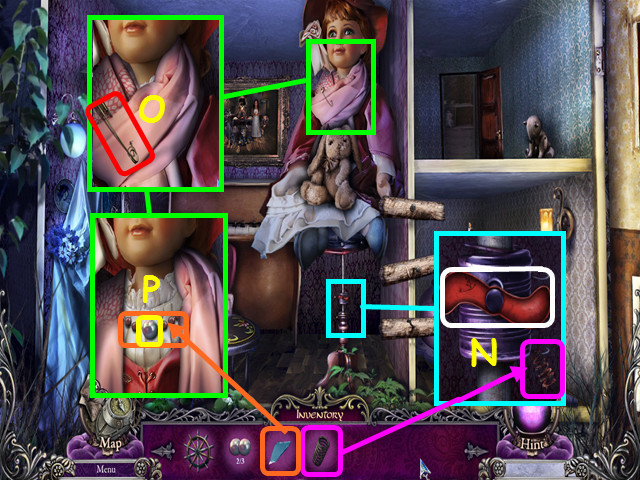
- Look at the chair and replace the SPRING, then turn the handle 3 times to lower the chair (N).
- Look at the doll and remove the PIN (O).
- Use the MIRROR SHARD to cut the necklace, then take the 3/3 PEARLS (P).
- Look at the map and select the Town Gate.
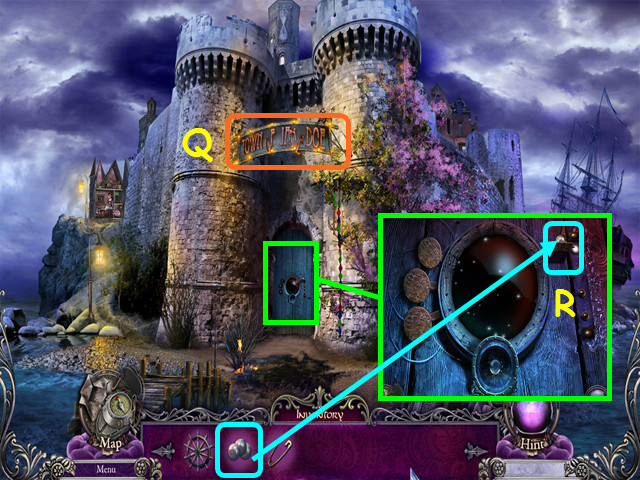
- Look at the sign with Jane Doe's name real name (Q).
- Look at the door and place the 3 PEARLS on the small shelf to trigger a mini-game (R).
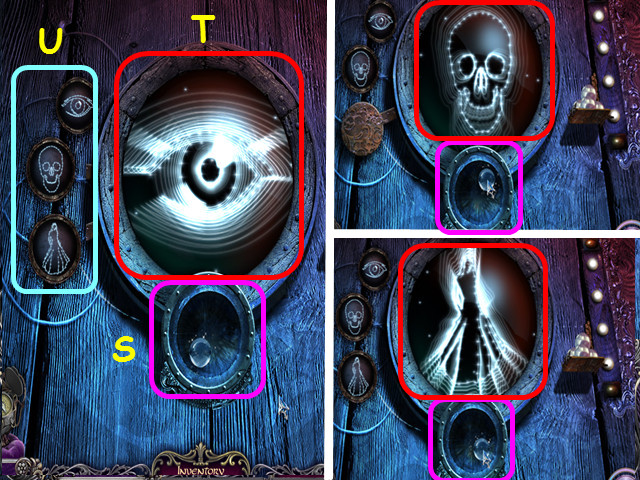
- Use the control (S) to move the stars (T) around to match the symbol (U).
- There are 3 symbols to match.
- Walk forward to Main Street.
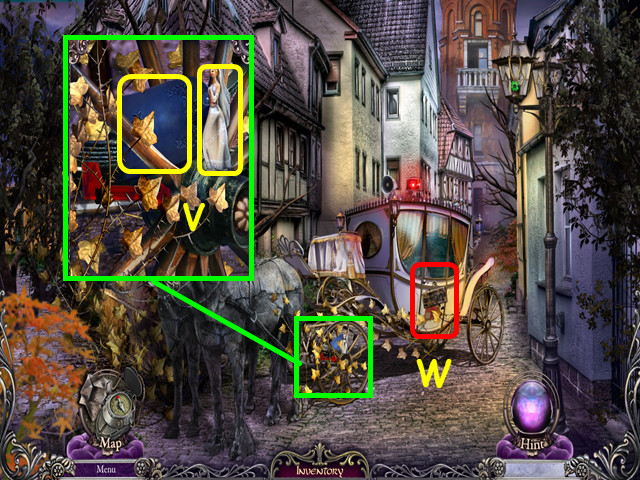
- Look at the carriage wheel; take the BRIDE FIGURINE and the MAILBOX DOOR (V).
- Note the sign on the carriage door (W).
- Walk forward to the Tower Gate.
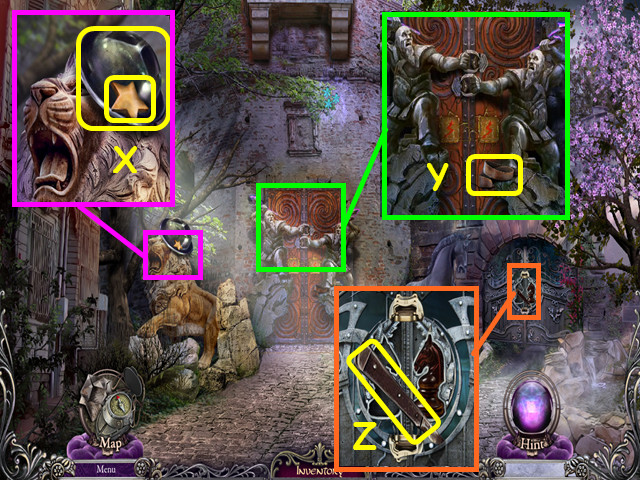
- Look at the lion; take the STAR and the STATUE'S HAT (X).
- Look at the gate and take the BELT (Y).
- Look at the stable gate and take the SCALPEL (Z).
- Look at the map and return to the Wrecked Ship's Hold.
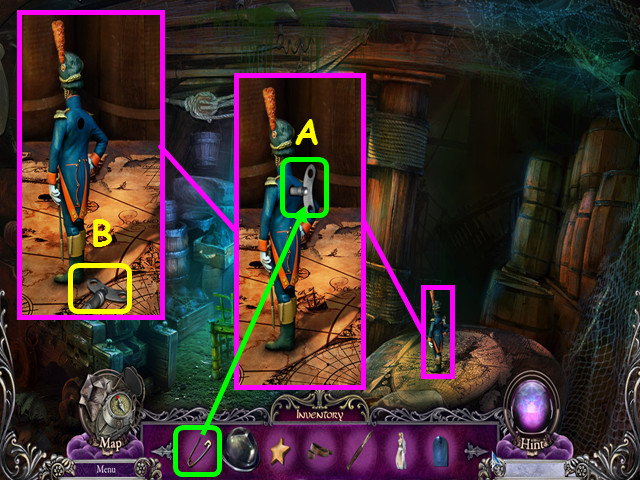
- Look at the toy soldier and use the PIN on the key (A).
- Take the WINDUP KEY (B).
- Use the map to travel to the Dollhouse.
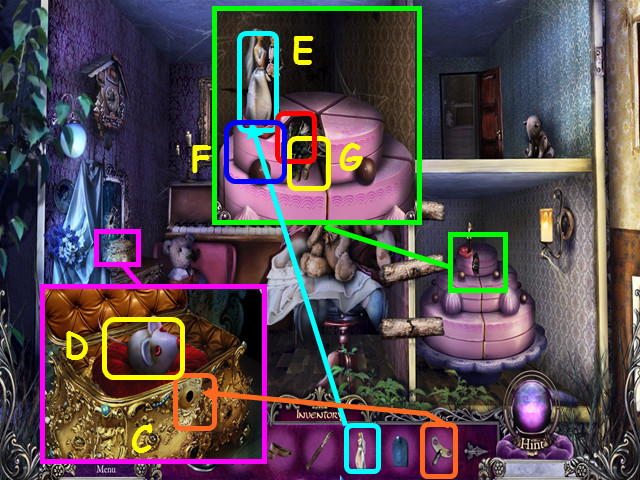
- Look at the music box and use the WINDUP KEY on the lock (C).
- Take the MOUSE (D).
- Look at the wedding cake and place the BRIDE FIGURINE next to the groom (E).
- Move the piece with the bride and groom on it to the left (F).
- Take the flower that triggers a cut-scene and the MECHANICAL HAND (G).
- Look at the map and go to Main Street.
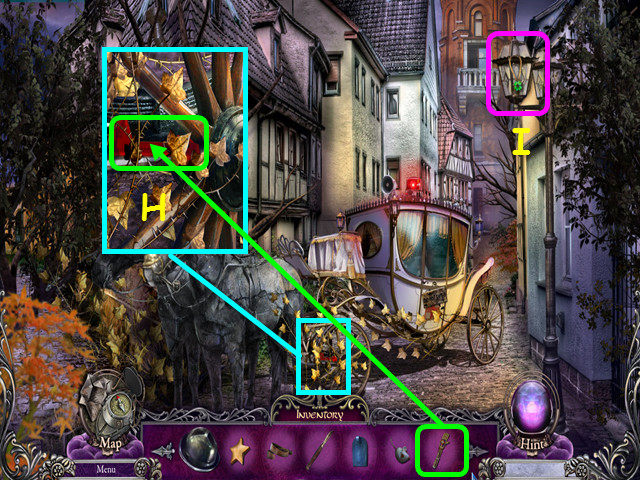
- Look at the carriage wheel and use the MECHANICAL HAND to take the MAILBOX FLAG (H).
- Note the item on the lamp (I).
- Use the map to return to Near the Decrepit House.
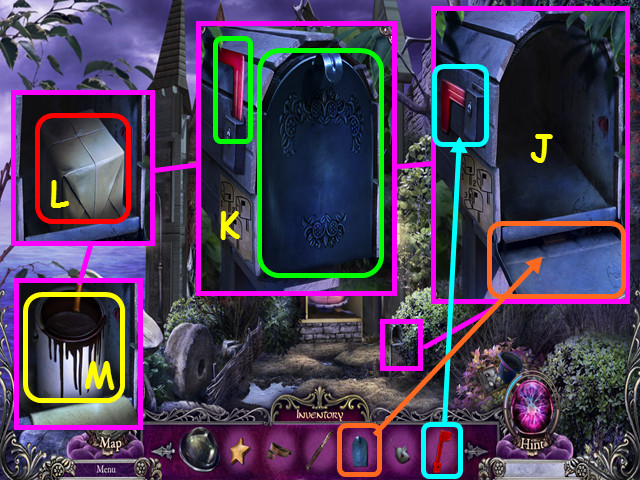
- Look at the mailbox; place the MAILBOX DOOR and the MAILBOX FLAG on the mailbox (J).
- Close the mailbox door and raise the mailbox flag (K).
- Open the mailbox door to find the package (L).
- Open the package and take the BLACK PAINT (M).
- Look at the map and go to Main Street.
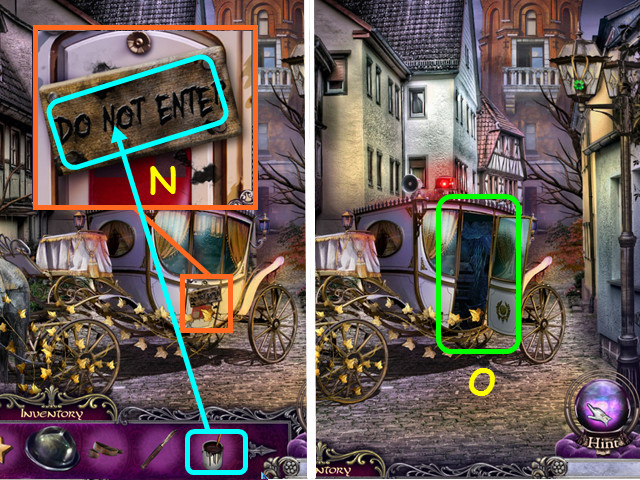
- Look at the carriage door and use the BLACK PAINT on the sign (N).
- Enter the Ambulance Carriage (O).
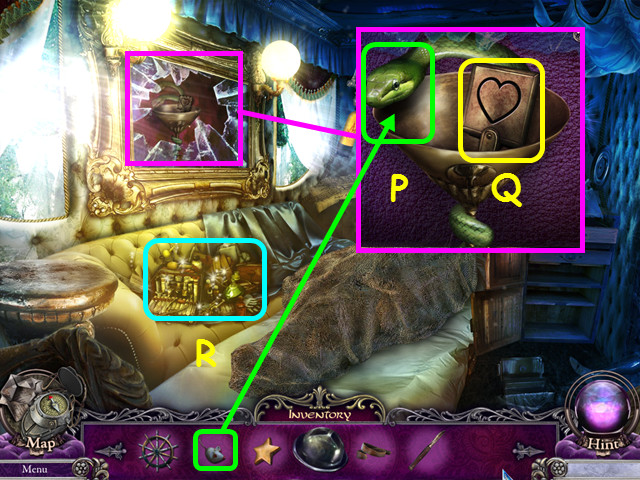
- Look inside the frame and give the MOUSE to the snake (P).
- Take the HEART (Q).
- Select the items on the couch for a HOS (R).
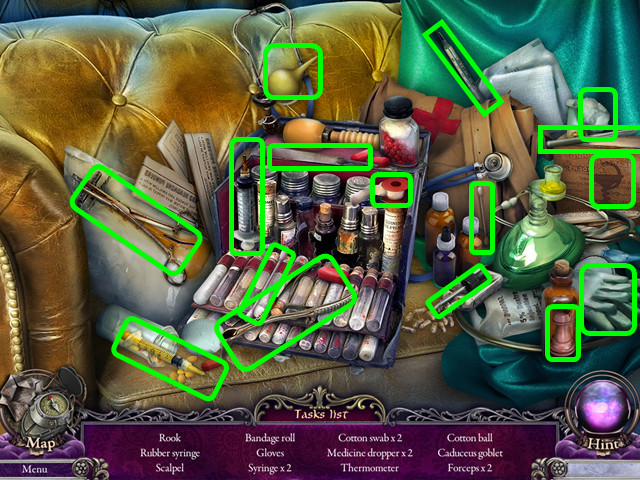
- Locate all the items on the list.
- You will earn the ROOK.
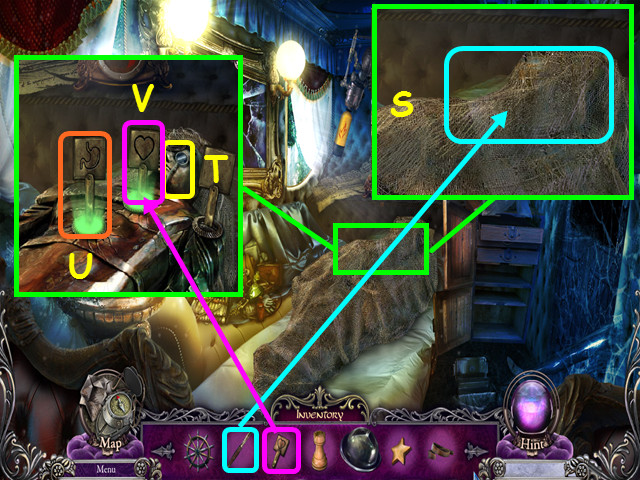
- Look at the burlap cover; use the SCALPEL to cut a slit then pull it open (S).
- Take the MONOCLE (T).
- Move the stomach sign to the slot (U).
- Place the HEART in the empty slot (V).
- Use the map to travel to the Hold of the Wrecked Ship.
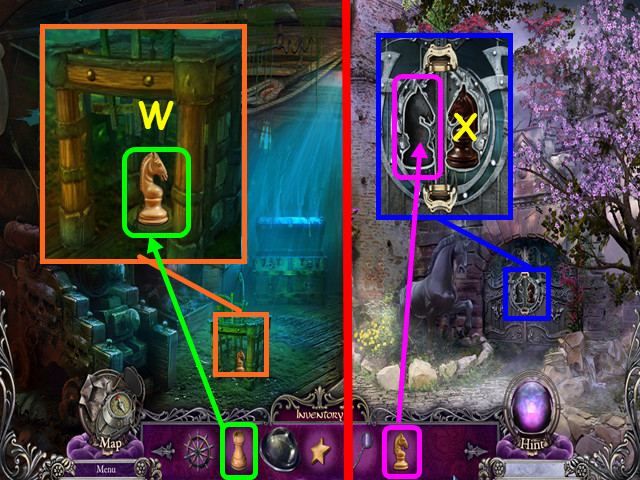
- Look at the cage and swap the ROOK for the KNIGHT (W).
- Use the map to return to the Tower Gate.
- Look at the stable door and place the KNIGHT into the lock (X).
- Enter the Stables on the right.
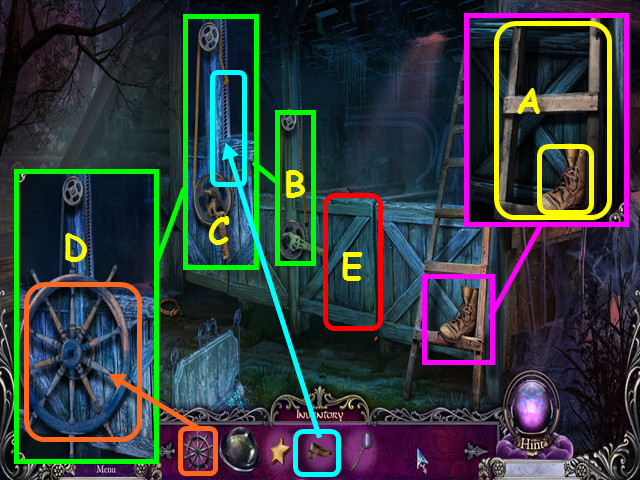
- Look at the ladder; take the BOOT and the LADDER (A).
- Look at the stall control and try to open the stall (B).
- Use the BELT to replace the rope (C).
- Place the SHIP'S WHEEL on the control and use it to open the stall (D).
- Look in the stall for a HOS (E).
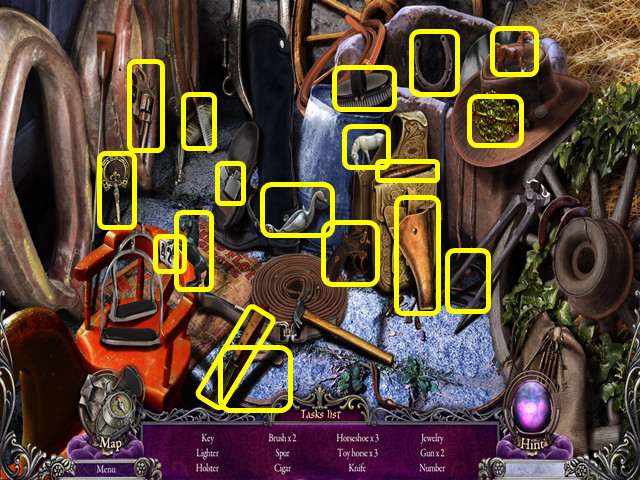
- Locate all the items on the list.
- You will earn the HORSESHOE.
- Walk down twice to Main Street.
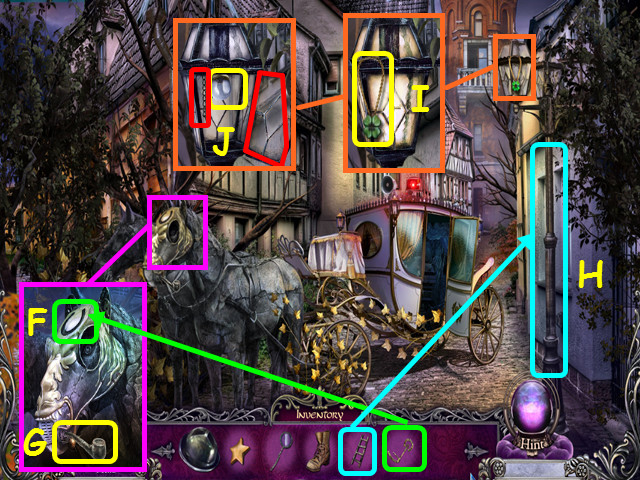
- Look at the horse's head and place the HORSESHOE in the indentation (F).
- Take the STONE PIPE (G).
- Use the LADDER on the lamppost (H).
- Look at the streetlamp and take the GOOD LUCK MEDALLION (I).
- Open the streetlamp, pull the chain and take the LAMP (J).
- Enter the Ambulance Carriage.
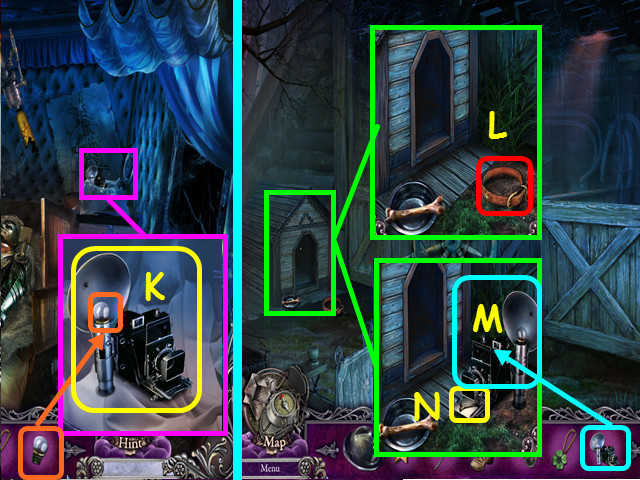
- Look at the counter and place the LAMP into the flash; take the CAMERA (K).
- Use the map to travel to the Stables.
- Look at the dog house and take the collar for a cut-scene (L).
- Place the CAMERA in front of the dog house (M).
- Select the camera to take a photo of the bone, then take the PICTURE OF A BONE (N).
- Use the map to go to the Wrecked Ship's Hold.
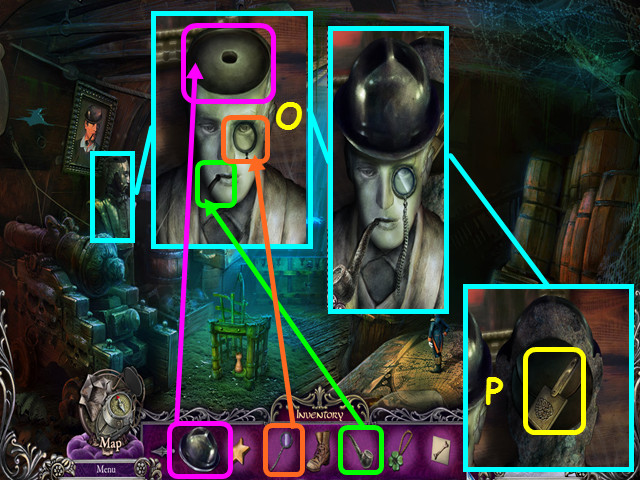
- Look at the statue; place the STONE PIPE, MONOCLE, and the STATUE'S HAT on the statue (O).
- Take the BRAIN from the opening (P).
- Return to the Ambulance Carriage using the map.
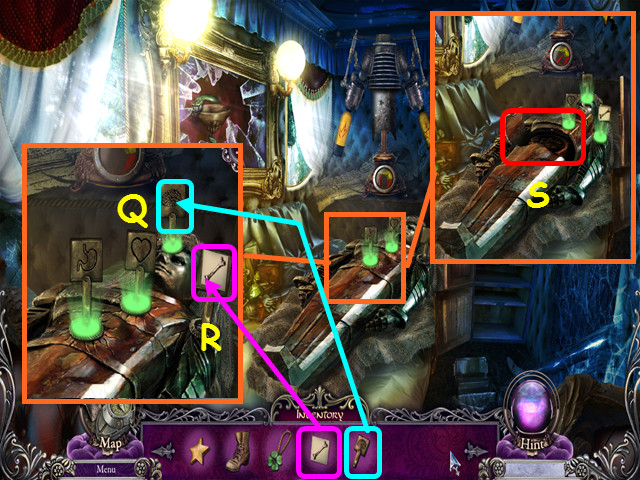
- Look at the metal man and place the BRAIN into the head opening (Q).
- Place the PICTURE OF A BONE on the right sign (R).
- Look inside the mid-section for a mini-game (S).
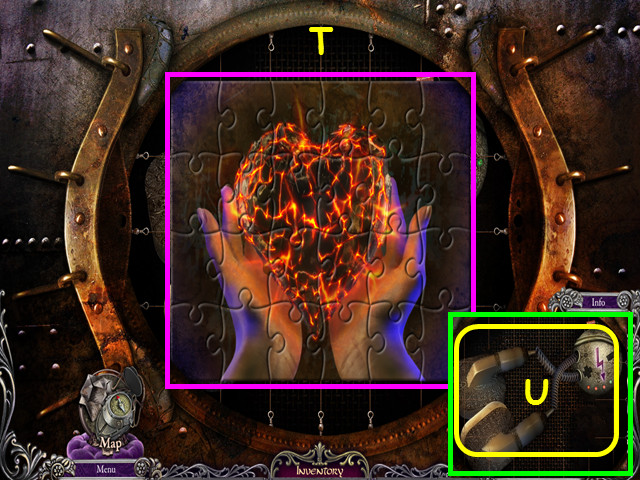
- Assemble the jigsaw by dragging the pieces onto the grid (T).
- Take the DEFIBRILLATOR (U).
- Use the map to go to the Tower Gate.
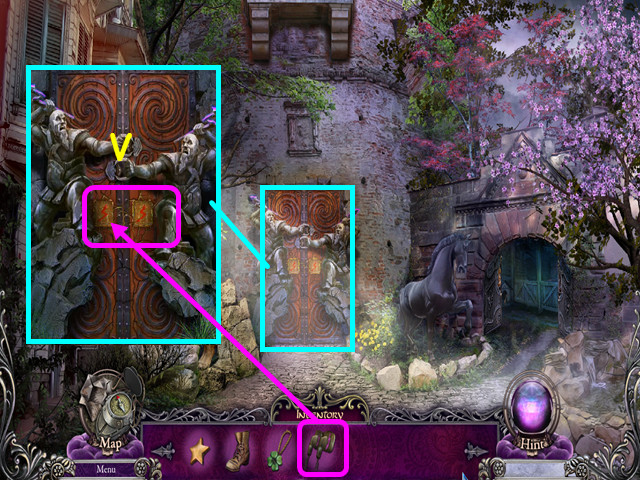
- Look at the tower door and use the DEFIBRILLATOR on the lock (V).
- Walk forward to the Throne Room.
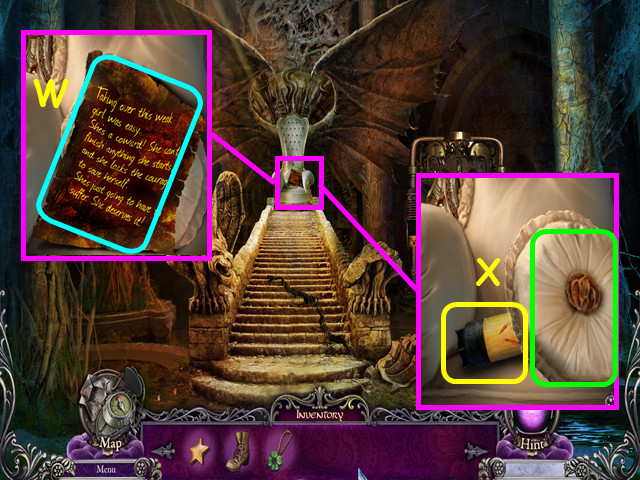
- Look at the throne and take the memory page for a cut-scene (W).
- Move the pillow aside and take the GAS (X).
- Return to the Ambulance Carriage using the map.
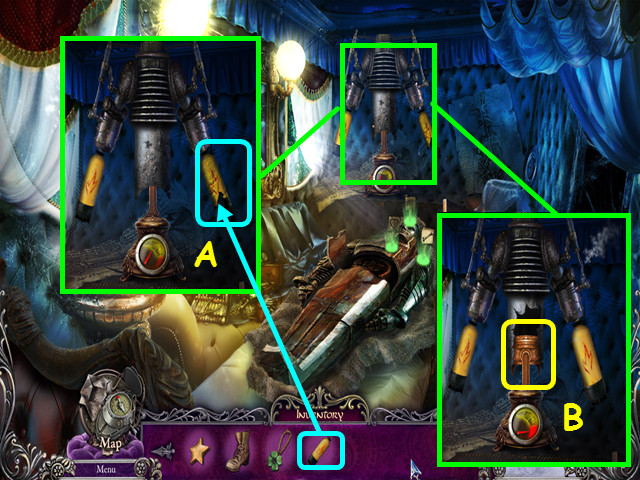
- Look at the hydraulics and replace the broken tank with the GAS (A).
- Take the PLUNGER (B).
- Return to the Throne Room using the map.
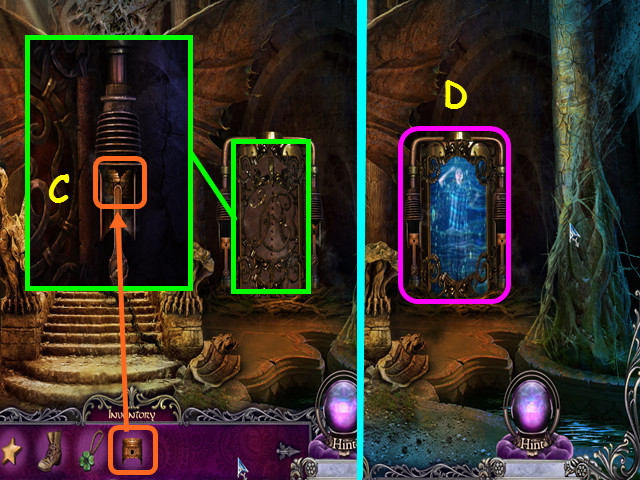
- Look at the metal door and replace the PLUNGER (C).
- Look at the reservoir (D).
Chapter 2: Respiratory
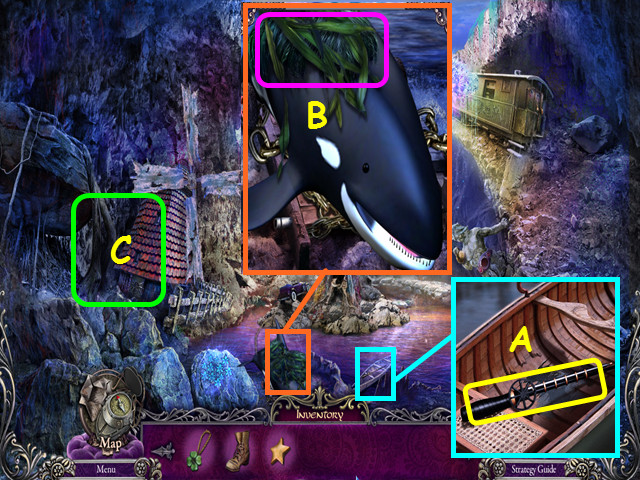
- Look at the boat and take the FISHING ROD (A).
- Look at the whale and remove the seaweed (B).
- Walk left to Near the Windmill (C).
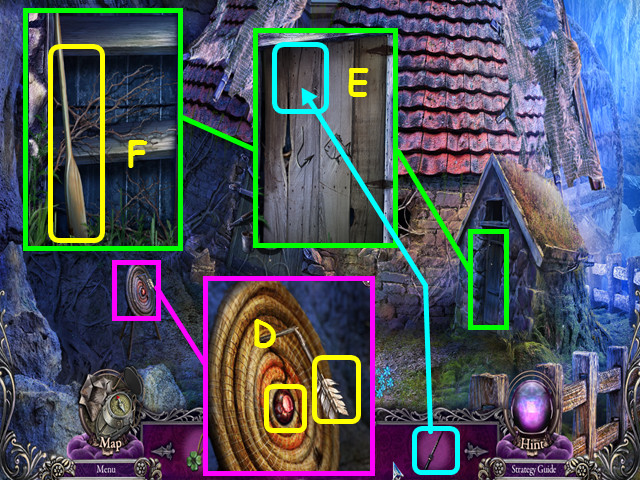
- Look at the target; take the RUBY and the ARROW FLETCHING (D).
- Look at the shed door and use the FISHING ROD to unlatch the door (E).
- Take the OAR (F).
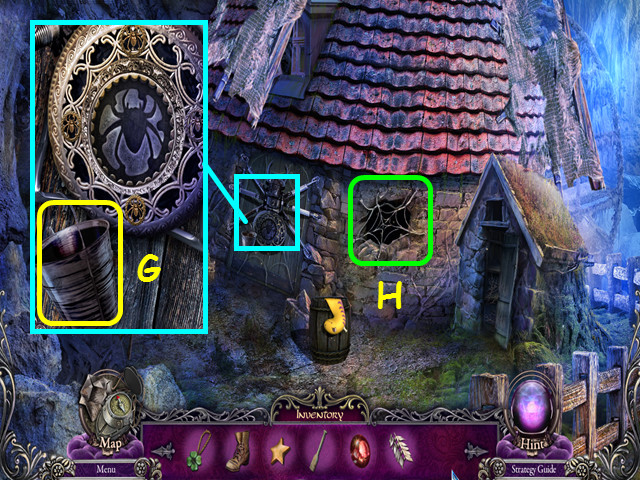
- Look at the bottom part of the spider on the door and take the BUCKET WITH TAR (G).
- Look in the window for a cut-scene (H).
- Walk down to the Lake Coast.
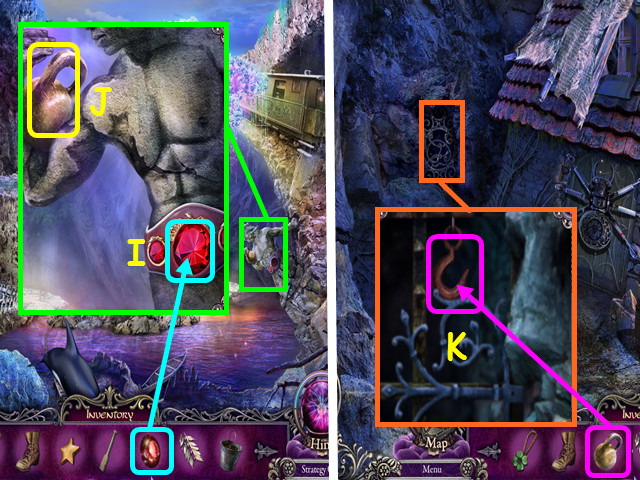
- Look at the statue; place the RUBY in his belt (I) then take the WEIGHT (J).
- Walk left to Near the Windmill.
- Look at the gate and use the WEIGHT on the hook (K).
- Enter the gate to the Cave.
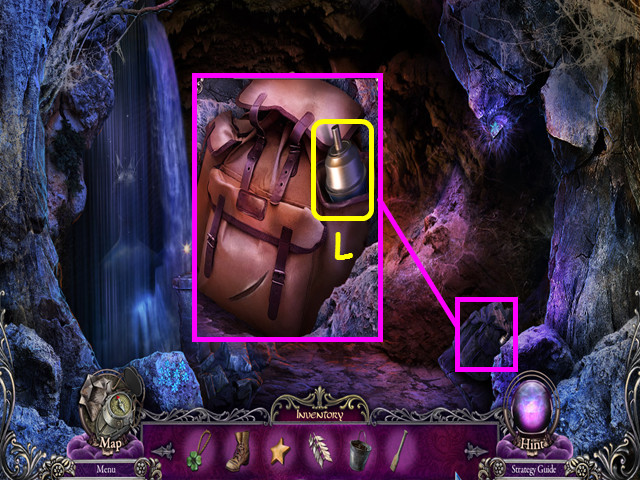
- Look at the backpack and take the SPRAY CAN (L).
- Walk down once.
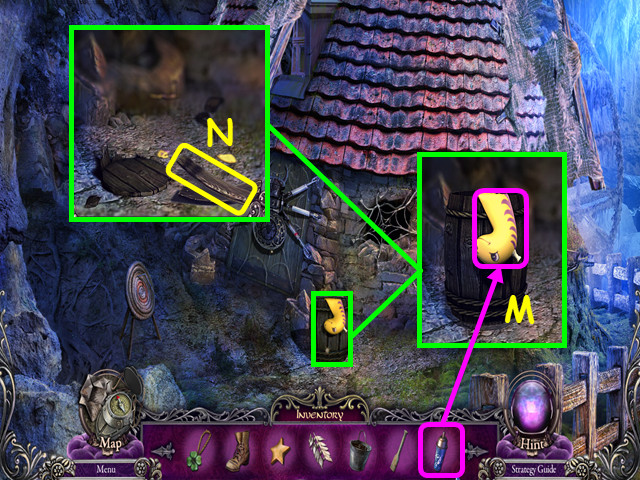
- Look at the pool toy and use the SPRAY CAN to blow it up (M).
- Take the BOARD (N).
- Walk down once to the Lake Coast.
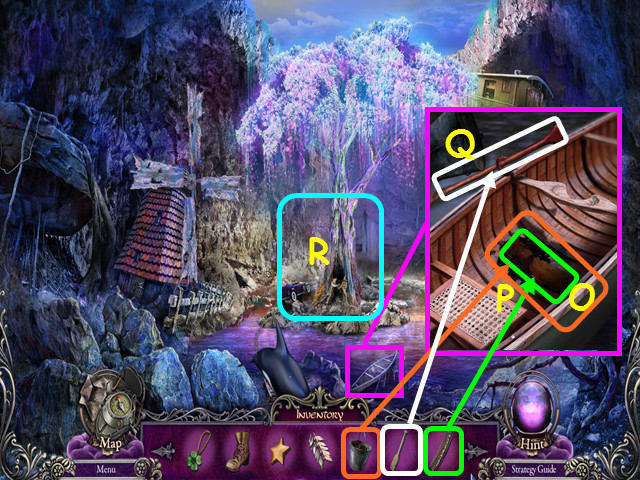
- Look at the boat and place the BOARD over the hole (O).
- Pour the BUCKET OF TAR over the board (P).
- Place the OAR in the boat (Q).
- Go forward to the Island (R).
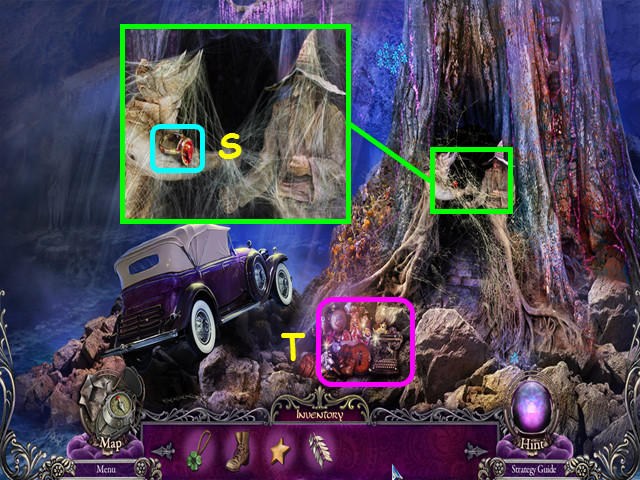
- Look at the figures and take the ring (S).
- Select the trash heap for a HOS (T).
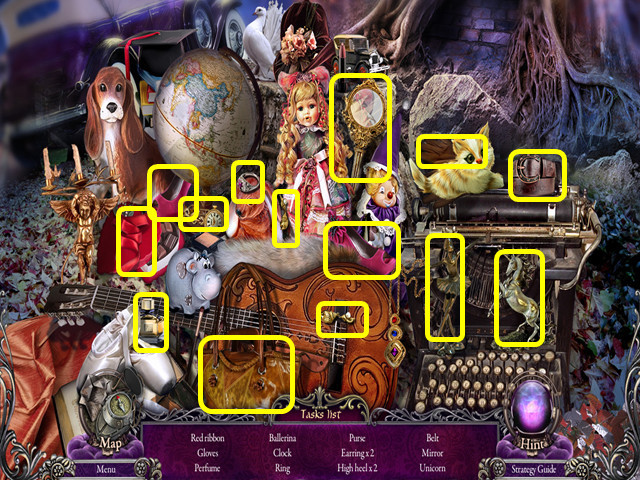
- Locate all the items on the list.
- You will earn the RIBBON.
- Use the map to travel to Near Windmill.
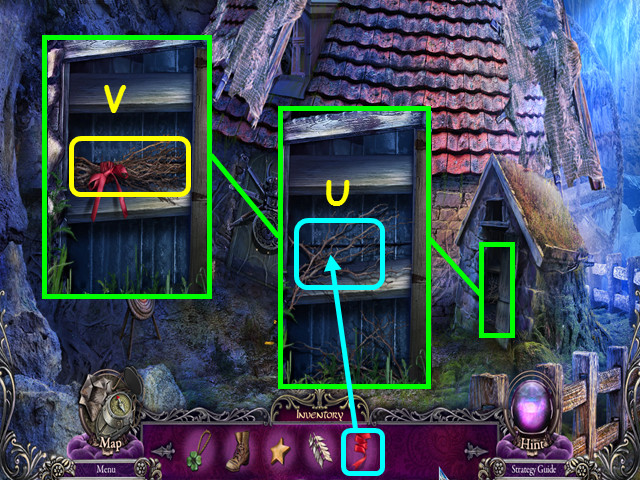
- Look in the shed and use the RIBBON on the twigs (U).
- Take the BROOM (V).
- Use the map to travel to the Island.
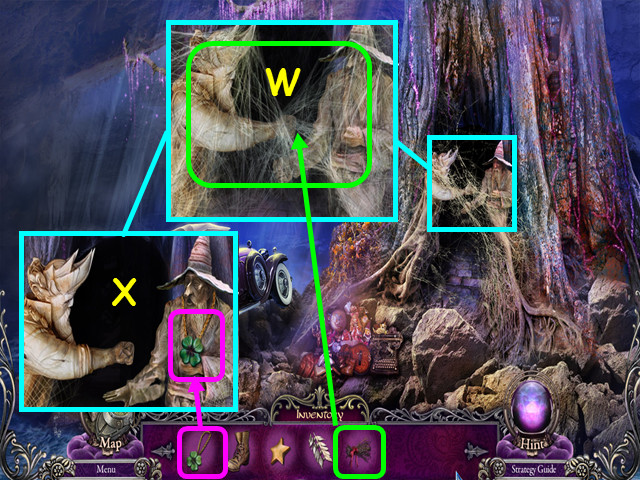
- Look at the figures and use the BROOM to remove the cobwebs (W).
- Give the GOOD LUCK MEDALLION to one of the figures (X).
- Walk forward to enter the Tree of Wishes.
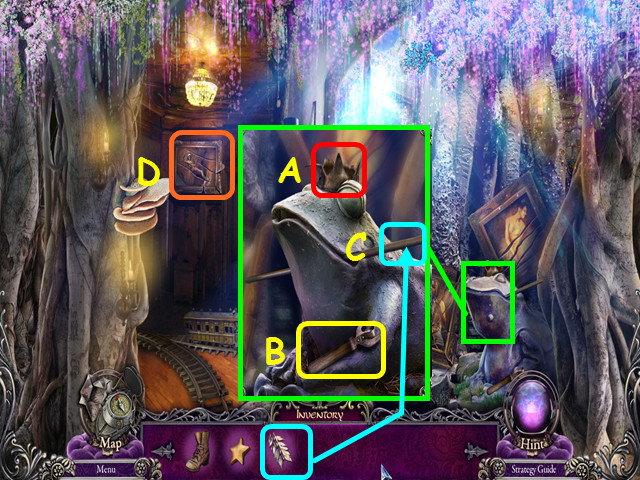
- Look at the frog; remove the crown (A) and take the OPENER (B).
- Place the ARROW FLETCHING on the end of the stick (C).
- Look at the painting (D).
- Walk down once.
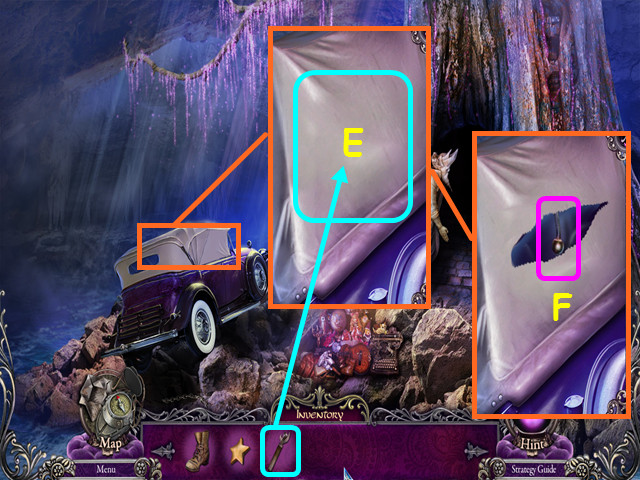
- Look at the convertible top and use the OPENER to cut a hole (E).
- Pull the lever (F).
- Enter the Car.
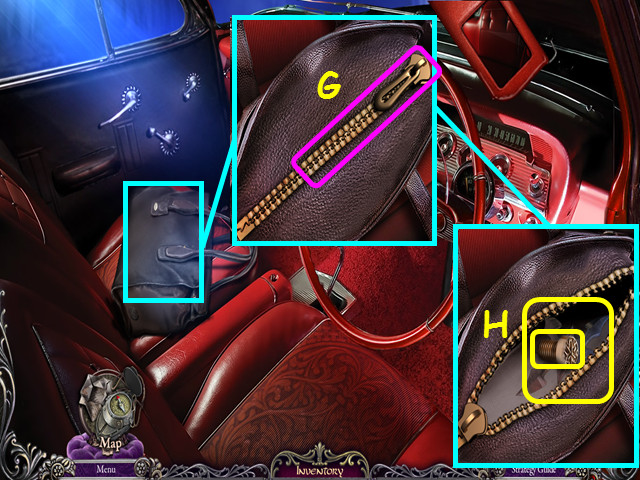
- Look at the bag and open the zipper (G).
- You will earn the CLAPPER.
- Take the SCREW and the THROWING STAR (H).
- Use the map to travel to Near Windmill.
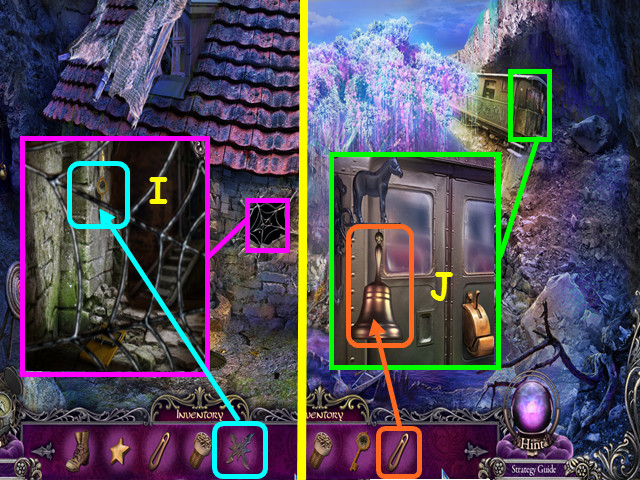
- Look in the window and use the THROWING STAR to get the KEY (I).
- Walk down once to the Lake Coast.
- Look at the train car and place the CLAPPER in the bell; take the BELL (J).
- Use the map to return to the Tree of Wishes.
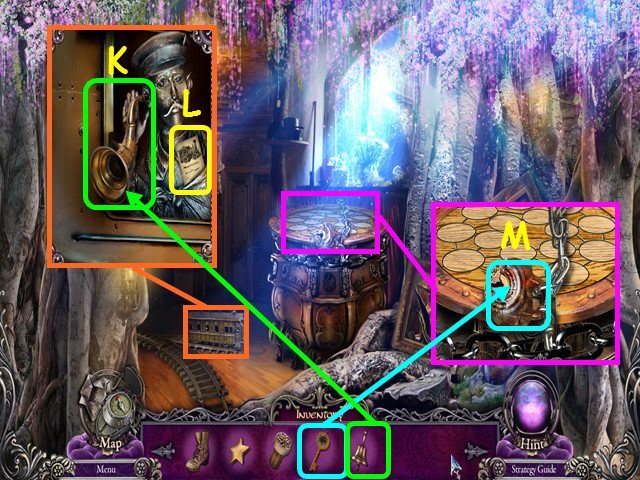
- Look at the toy train and use the BELL on the ear trumpet (K).
- Take the TICKET (L).
- Look at the table and use the KEY to take the LOCK (M).
- Return to the Lake Coast using the map.
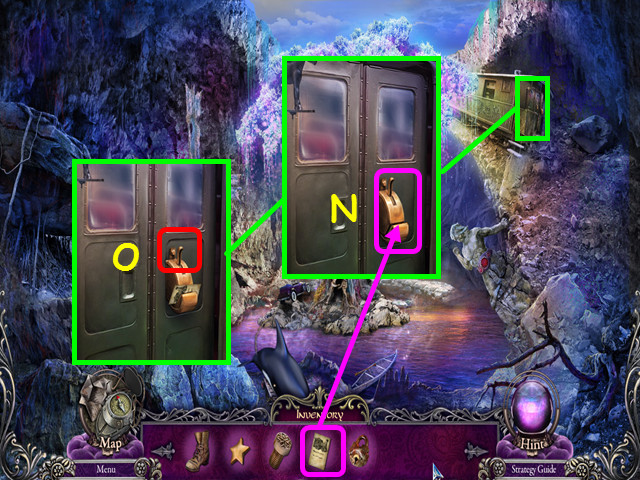
- Look at the train and place the TICKET into the stamper (N).
- Pull down the lever (O).
- Enter the Train.
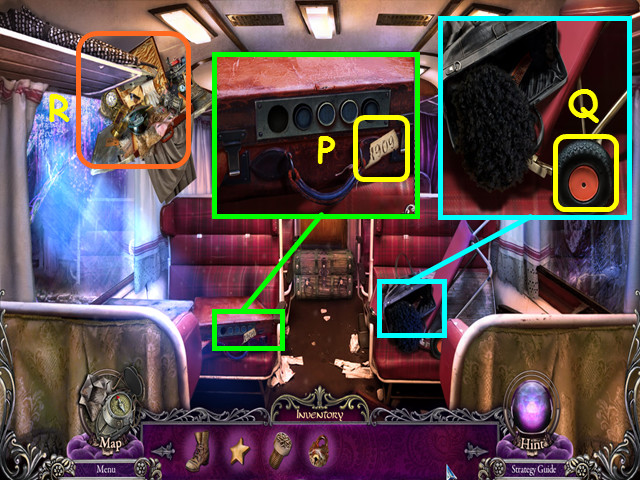
- Look at the case and take the CODE PAPER (P).
- Look at the open bag and take the WHEELS (Q).
- Select the open case for a HOS (R).
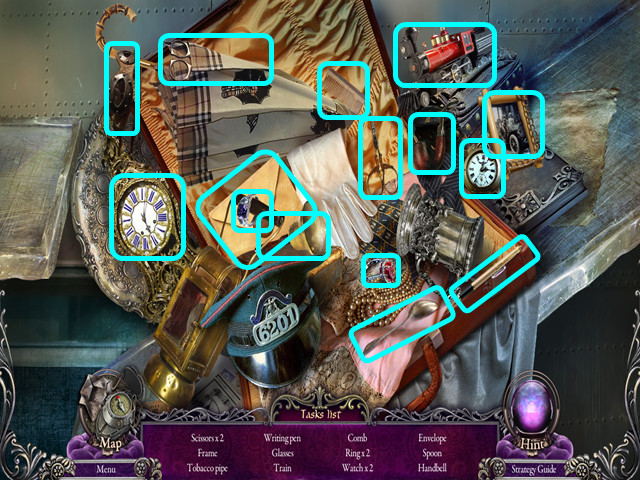
- Locate all the items on the list.
- You will earn the SCISSORS.
- Walk down once to the Lake Coast.
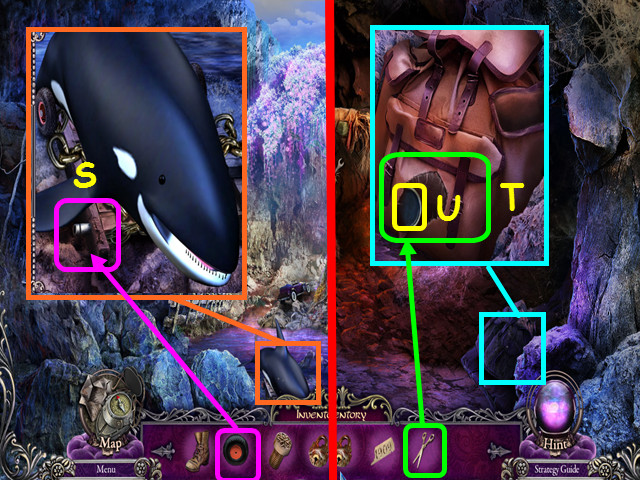
- Look at the whale and place the WHEELS on the cart (S).
- Use the map to travel to the Cave.
- Look at the backpack and use the SCISSORS to cut it open (T).
- Take the BUTTON (U).
- Return to the train using the map.
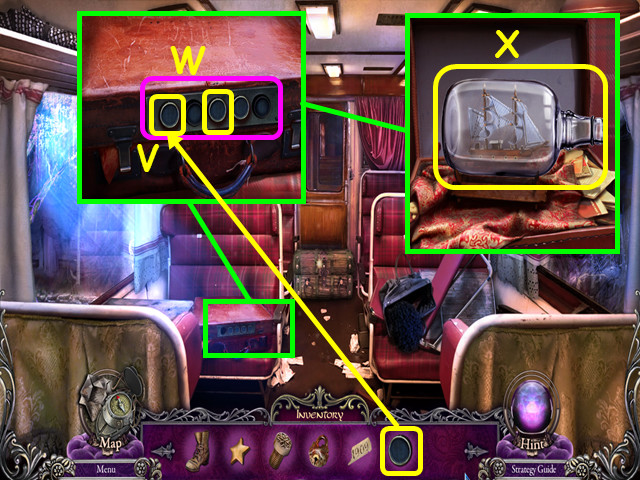
- Look at the case and place the BUTTON on the left (V).
- Press the left button, then the center button (W).
- Open the case and take the ship in a bottle (X).
- The ship in a bottle will separate and become the BOTTLE and SHIP.
- Go to the Car using the map.
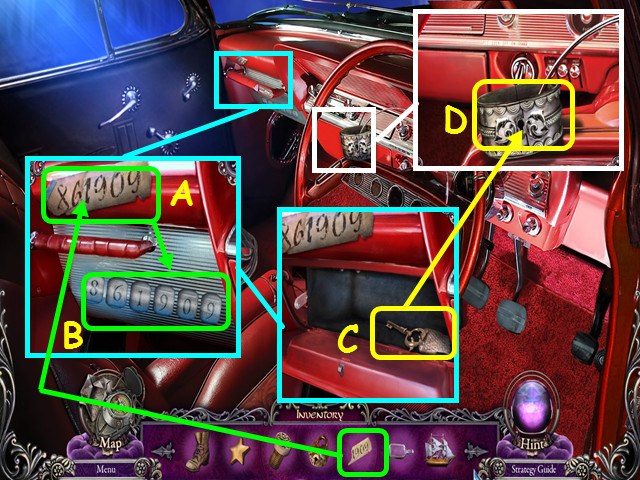
- Look at the glove box and place the CODE PAPER next to the torn paper (A).
- Enter the code 8-6-1-9-0-9 (B).
- Open the glove box and take the KEY (C).
- Look at the steering wheel and use the KEY on the bracelet (D).
- Take the BRACELET PIECE.
- Travel to the train using the map.
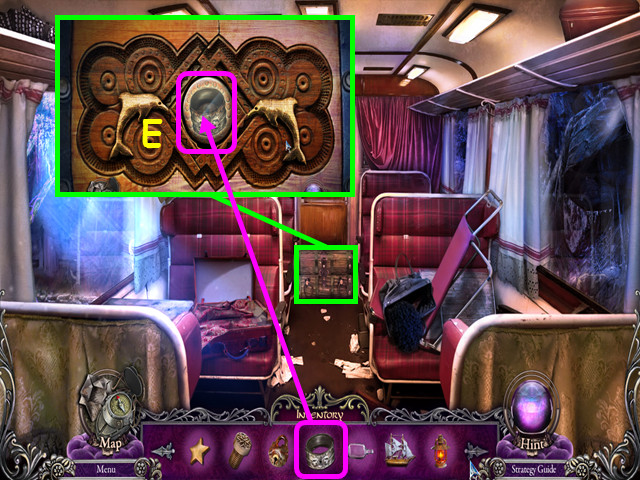
- Look at the chest and place the BRACELET PIECE into the lid (E).
- This will trigger a mini-game.
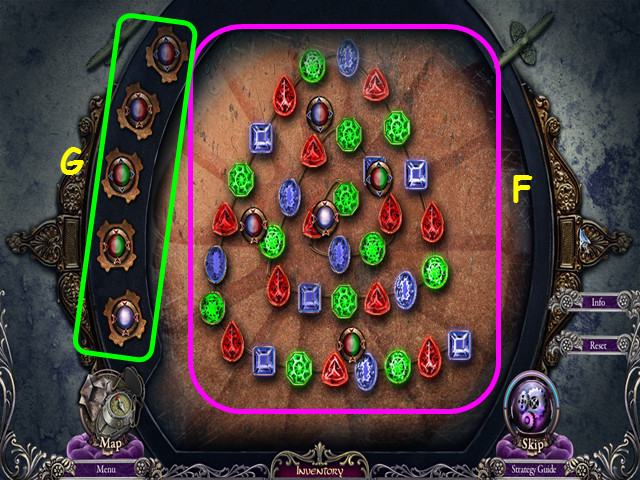
- Move all the gems to their outlines so they can glow (F) using the 5 magnets (G).
- Magnets will repel or attract only the colors on that magnet.
- Drag the magnets into position and release.
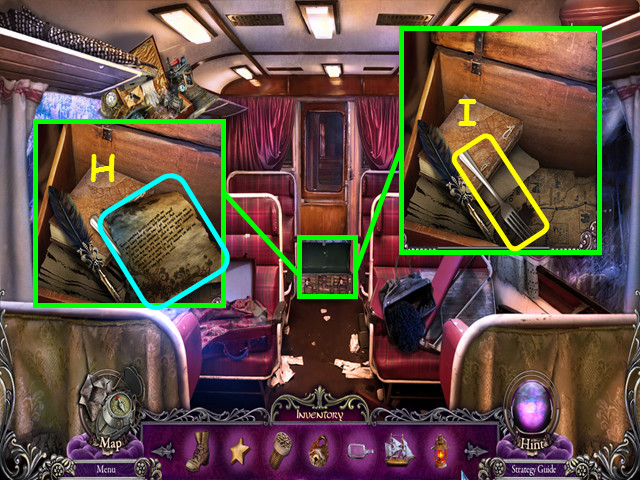
- Look inside the chest and take the memory page (H).
- After the cut-scene, take the FORK (I).
- Use the map to get to the Island.
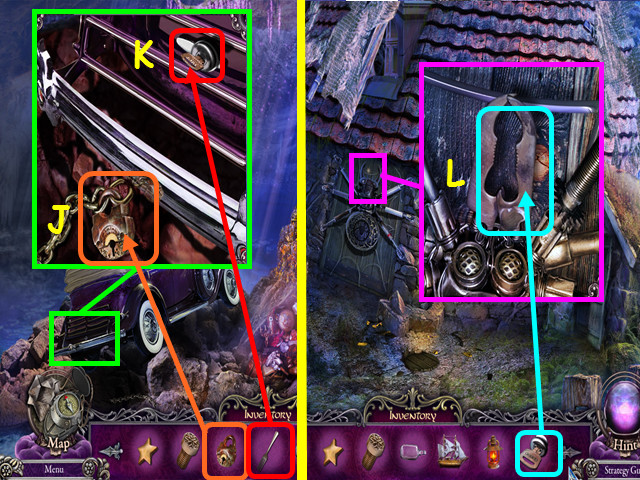
- Look at the rear of the car and use the LOCK on the chain (J).
- Use the FORK to take the KEY (K).
- Travel to Near Windmill using the map.
- Look at the top of the spider and use the KEY on the jaws to get the CAR KEY (L).
- Return to the Car using the map.
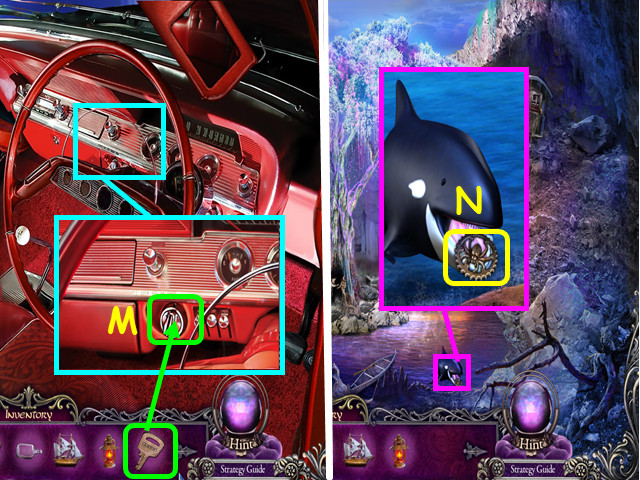
- Look at the dash, put the CAR KEY in the ignition, then turn it (M).
- You will automatically return to the Lake Coast.
- Look at the whale and take the spider KEY (N).
- Walk left to the Near Windmill.
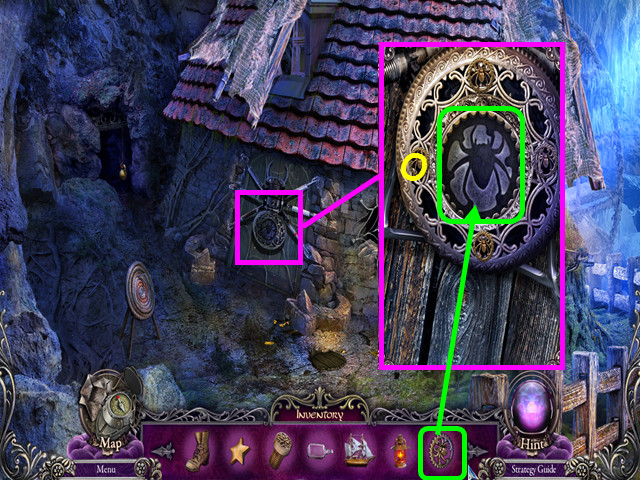
- Look at the lower portion of the spider on the door and place the spider KEY into the body (O).
- Enter the Windmill.
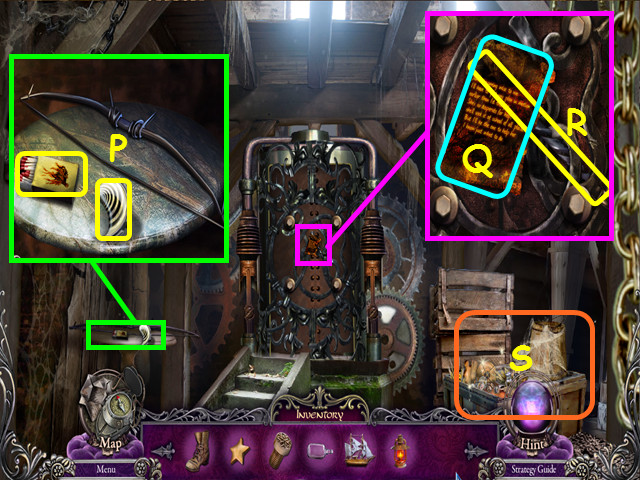
- Look at the table; take the HANDLE and the MATCHES (P).
- Look at the tank and read the page (Q).
- After the cut-scene, look again at the tank and take the DRILL BIT (R).
- Select the crate for a HOS (S).
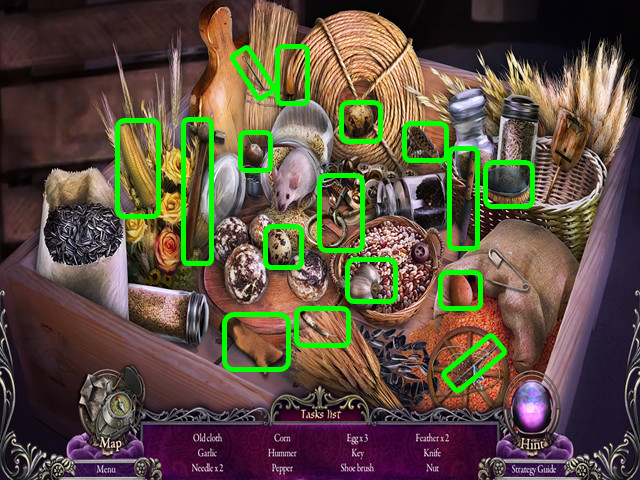
- Locate all the items on the list.
- You will earn the OLD RAG.
- Travel to the Island using the map.
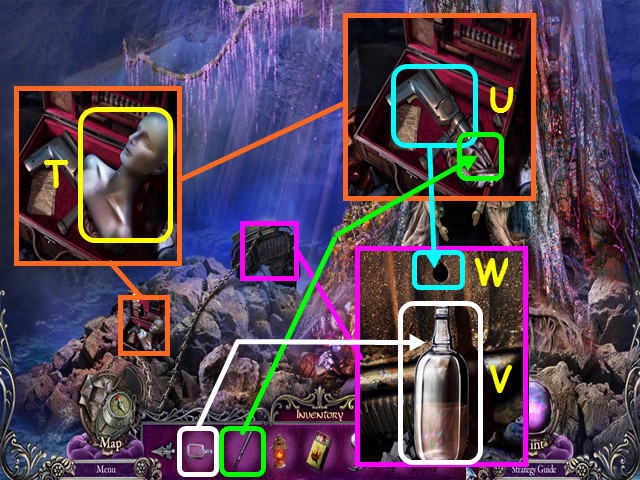
- Look at the case and take the PLASTER HEAD (T).
- Place the DRILL BIT on the drill in the case then take the DRILL (U).
- Look at the rear of the car and place the BOTTLE under the drip (V).
- Use the DRILL to make the hole bigger (W).
- Take the BOTTLE WITH FUEL.
- Use the map to travel to the Cave.
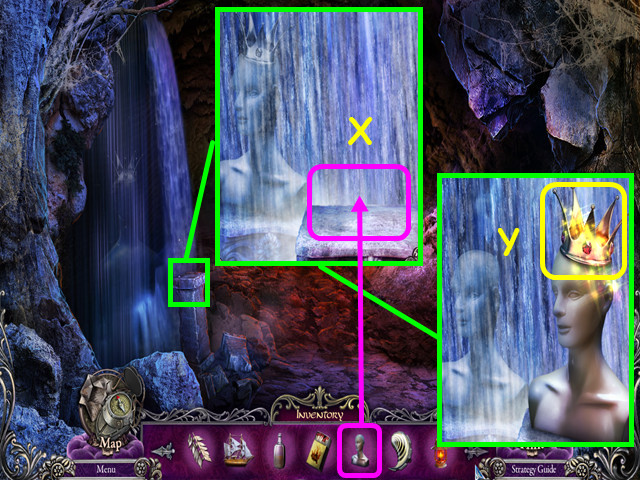
- Look at the pedestal and place the PLASTER HEAD on top (X).
- Take the TIARA (Y).
- Use the map to return to the Tree of Wishes.
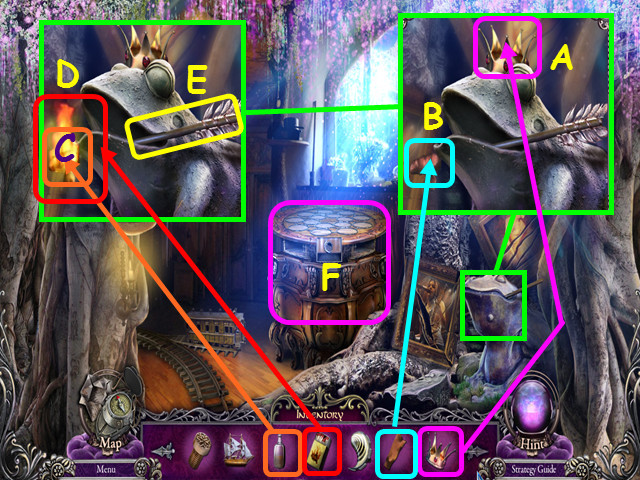
- Look at the frog and place the TIARA on his head (A).
- Place the OLD RAG on the tip of the arrow (B).
- Use the BOTTLE OF FUEL on the tip of the arrow (C).
- Use the MATCHES to light the tip of the arrow (D).
- Take the BURNING ARROW (E).
- Look at the round chest for a mini-game (F).
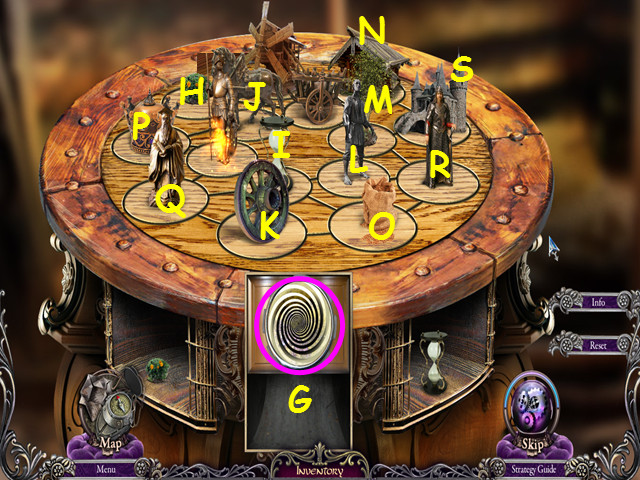
- Place the HANDLE next to the similar piece to trigger the mini-game (G).
- Combine 2 items on the board, then press the center button to create a third item/figure.
- Repeat this process until the board is filled.
- Combine the bush (H) and the hourglass (I) to make the tree.
- Combine the horse (J) and the wheel (K) to make the cart.
- Combine the man (L) and the tree (M) to make the house.
- Combine the house (N) and the grain (O) to make the windmill.
- Combine the man and the hourglass to get the wise man.
- Combine the crown (P) and the wise man (Q) to make the king.
- Combine the king (R) and the house to make the castle.
- Combine the man and the castle (S) to make the knight.
- Take the LANTERN when the center opens.
- Look at the map and select the Windmill.
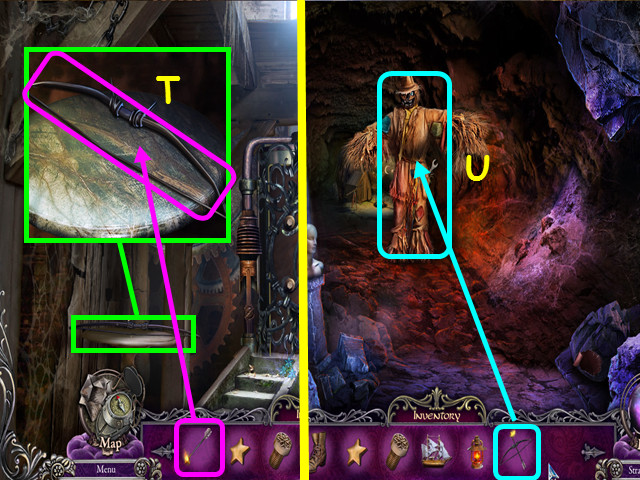
- Look at the table and place the BURNING ARROW with the bow; Take the LONGBOW (T).
- Travel to the Cave with the map.
- Use the LONGBOW on the scarecrow (U).
- Walk forward to the Tent in the Cave.
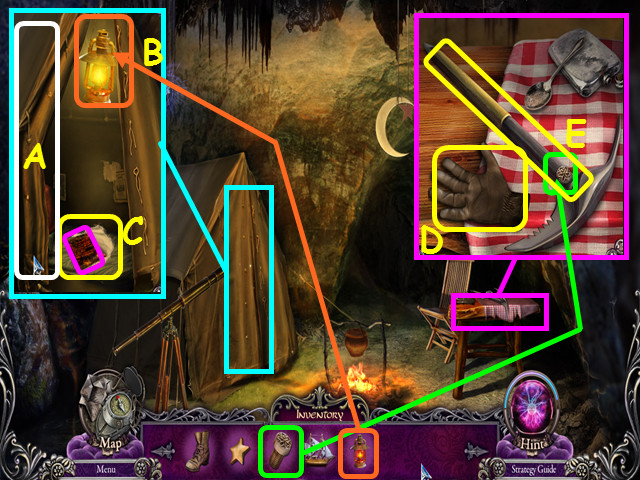
- Look at the tent and open the flap (A).
- Place the LANTERN inside the tent (B).
- Take the memory page for a cut-scene, then take the HANDKERCHIEF (C).
- Look at the table and take the GLOVES (D).
- Use the SCREW to repair the ax, then take the ICE AXE (E).
- Walk down once.
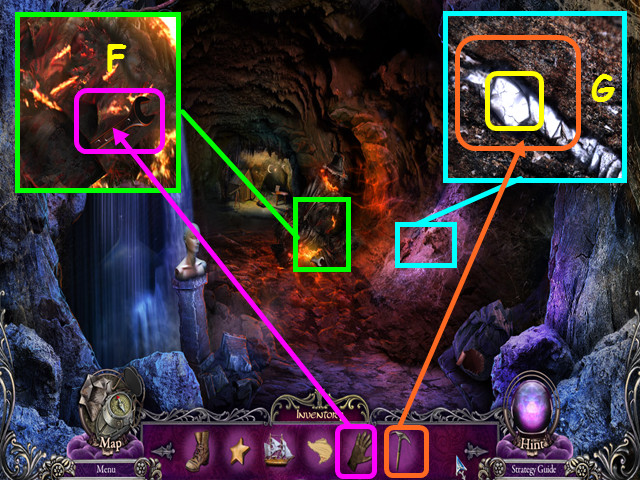
- Look at the flames and use the GLOVES to take the WRENCH (F).
- Look at the cave wall; use the ICE AXE on the white vein then take the CHALK (G).
- Walk forward.
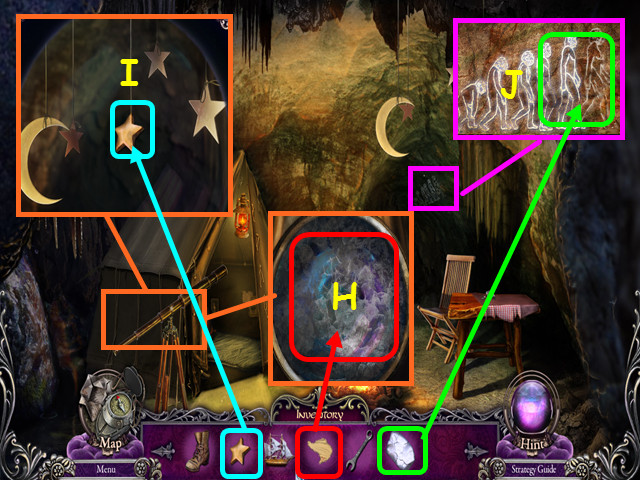
- Look at the telescope and use the HANDKERCHIEF to clean the lens (H).
- Hang the STAR on the string (I).
- Look at the drawing and use the CHALK to finish the drawing and trigger a mini-game (J).
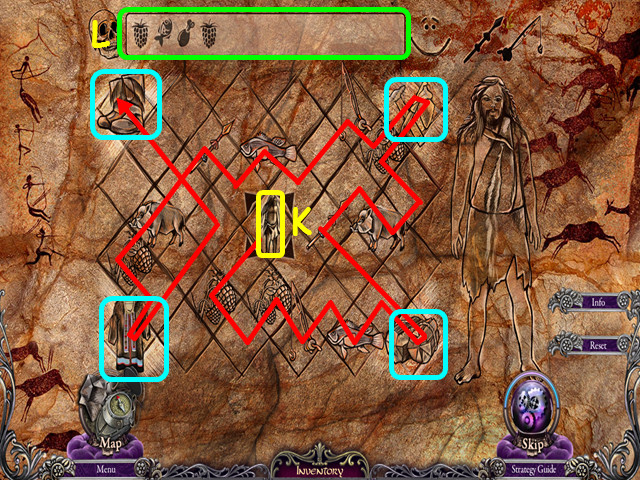
- Using the arrows, move the caveman (K) through the fields to collect all his belongings (blue).
- Watch the food meter at the top (L); you consume food with every step.
- Make sure you take the fishing rod before you try to capture the fish and get the spear before you capture the boar.
- Take the STOPWATCH from the center.
- Use the map to travel to the Windmill.
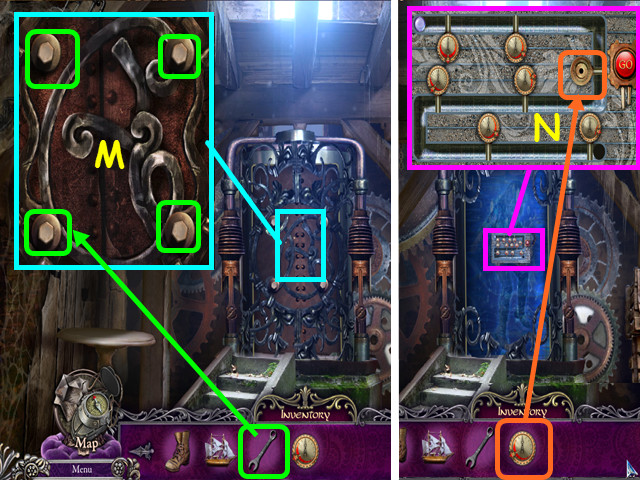
- Look at the reservoir cover and use the WRENCH to remove the bolts (M).
- Look at the reservoir control; place the STOPWATCH on the device for a mini-game (N).
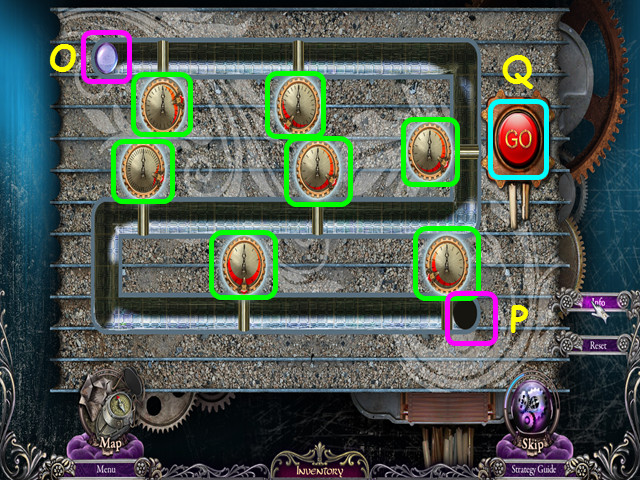
- Position the timers (green) to open the gates so the glass ball travels from the top left (O) to the lower right (P) without breaking.
- Select 2 timers to swap positions.
- Once all the timers are in place, press the red button (Q).
Chapter 3: Paralysis
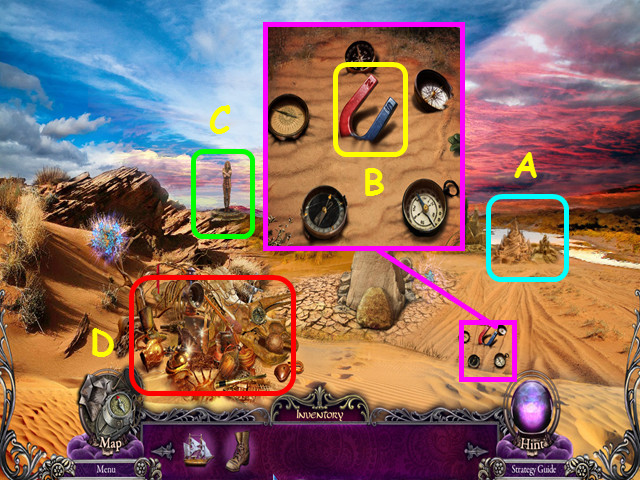
- Note the path to Sand River (A).
- Look at the ring of compasses and take the MAGNET (B).
- Note the path to the Statue (C).
- Select the debris pile for a HOS (D).
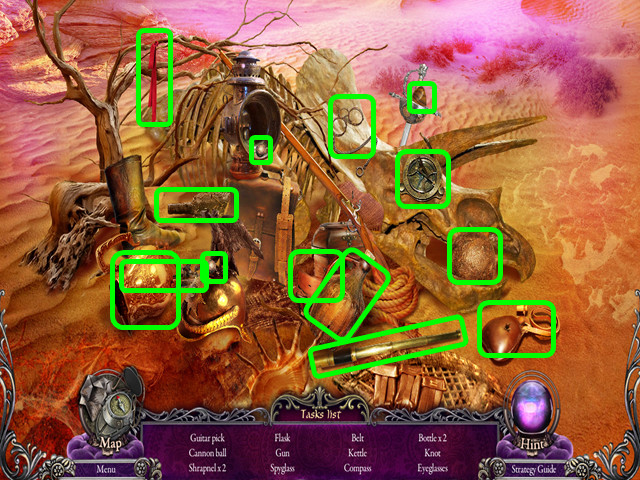
- Locate all the items on the list.
- You will earn the GUITAR PICK.
- Walk forward on the right to the Sand River.
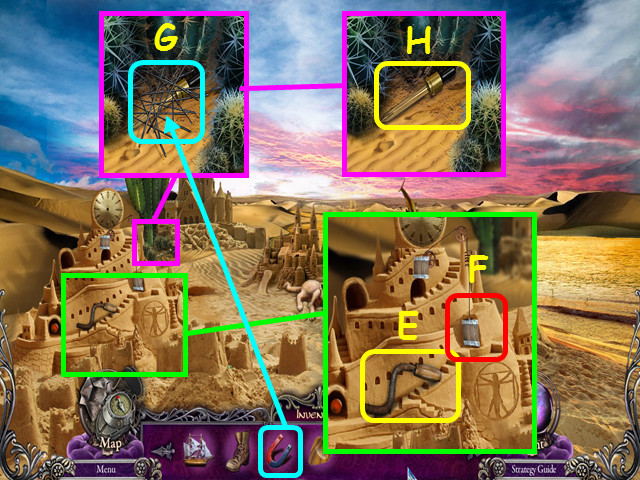
- Look at the structure on the left; take the LEVER (E) and raise the gate (F).
- Look at the base of the cactus and use the MAGNET on the needles (G).
- Take the DROPPER (H).
- Walk down, then go forward on the left to the Statue.
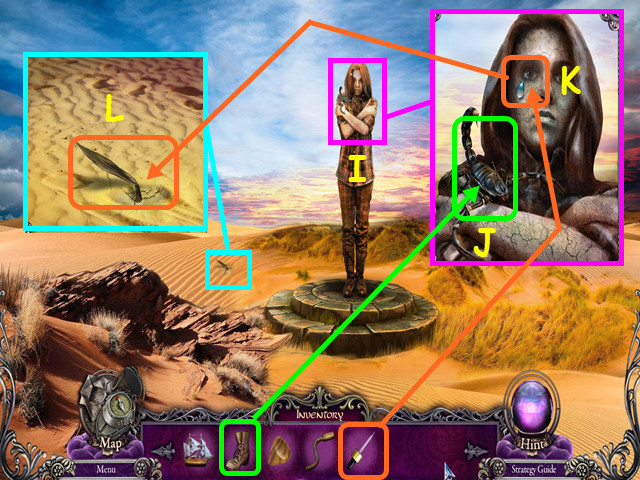
- Look at the statue to learn Jane's symptom (I).
- Look at the statue again and use the BOOT on the scorpion (J).
- Use the DROPPER to collect the TEAR (K).
- Look at the ground and use the TEAR on the plant (L).
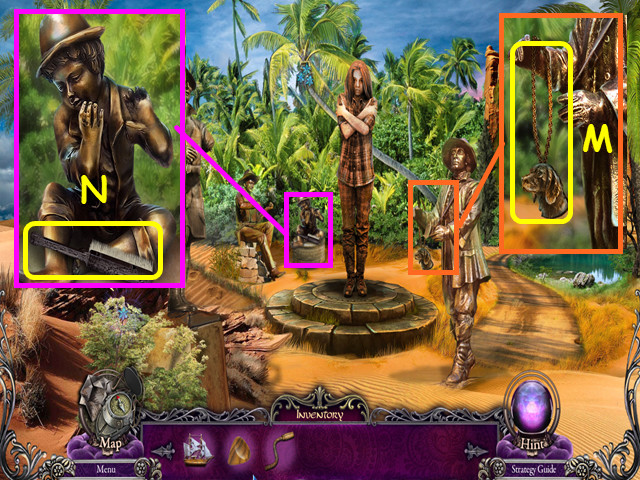
- Look at any of the statues for a cut-scene.
- Look at the drummer and take the MEDALLION WITH THE DOG (M).
- Look at the piper and take the BRUSH (N).
- Take the right path to the Oasis.
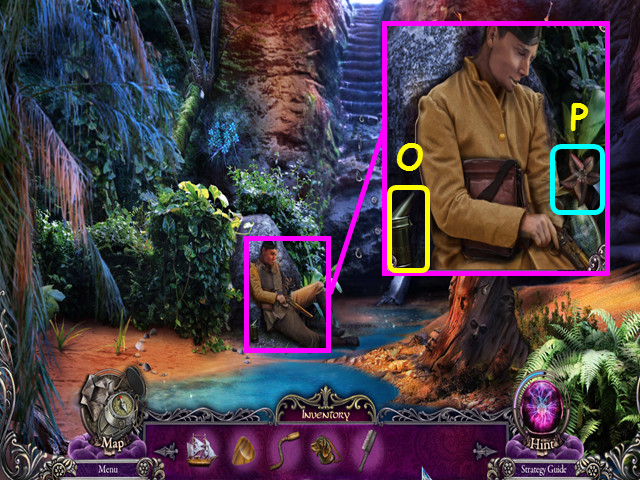
- Look at the soldier and take the SMOKE BOMB (O).
- Remove the dead flower from the vase (P).
- Walk down then take the left path to the Fork in the Road.
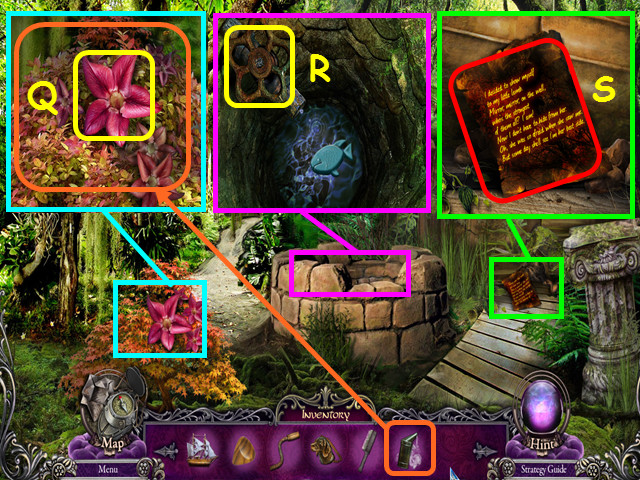
- Look at the flowers; use the SMOKE BOMB to scare away the bees then take the FLOWER (Q).
- Look in the well and take the VALVE (R).
- Look at the fallen column and read the page (S).
- Walk forward on the left to the Hall of Ropes.
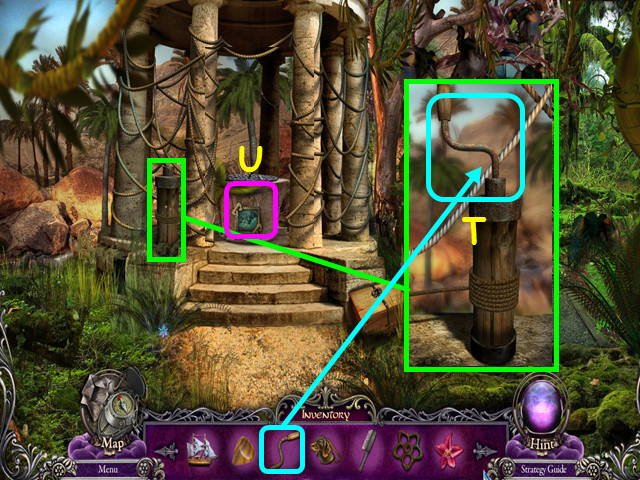
- Look at the winch and place the LEVER on top (T).
- Select the base of the platform for a mini-game (U).
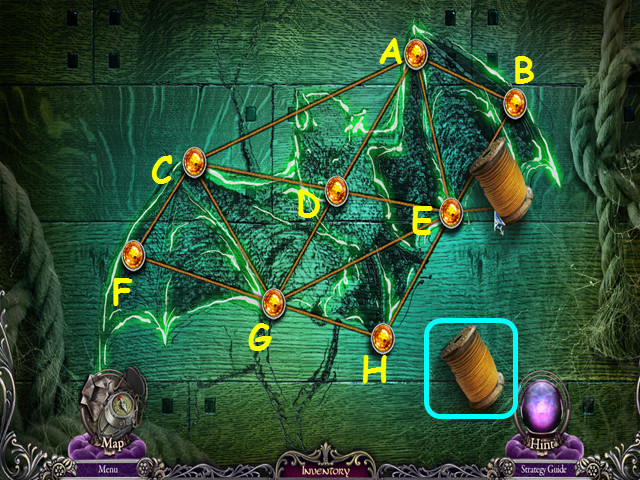
- Use the spool of rope to trace all the lines once without retracing your path.
- Drag the spool to: G-E-H-G-F-C-G-D-C-A-D-E-A-B-E.
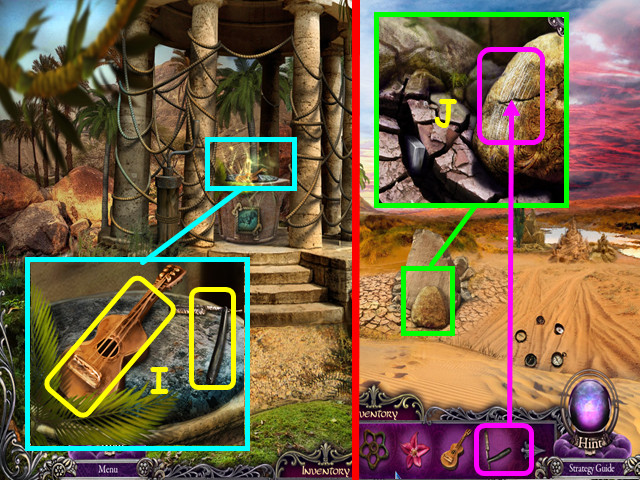
- Look at the platform; take the GUITAR and the BLUNT BLADE (I).
- Use the map to travel to the Desert.
- Look at the large rock; use the BLUNT BLADE on the rock to make the SHARP BLADE (J).
- Use the map to return to the Hall of Ropes.
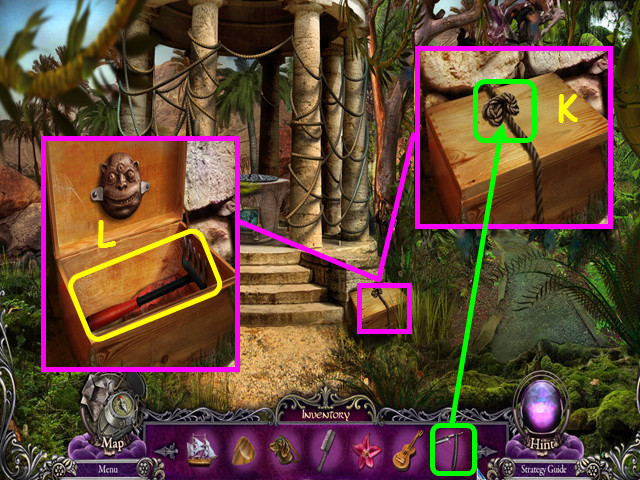
- Look at the box and use the SHARP BLADE to take the ROPE (K).
- Take the RAKE (L).
- Travel to the Oasis using the map.
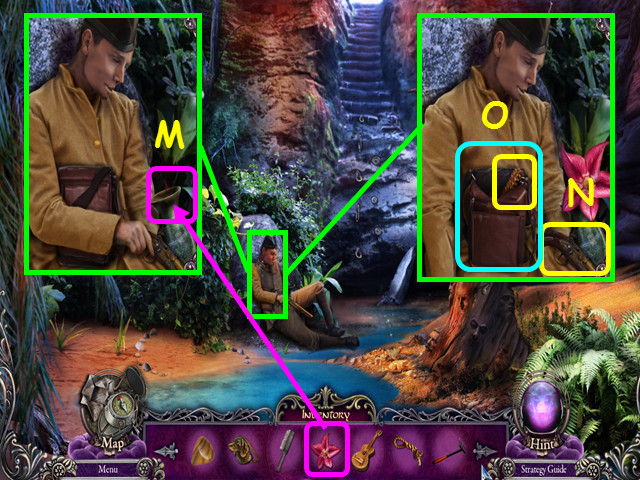
- Look at the soldier and place the FLOWER in the vase (M).
- Take the NON-LOADED MUSKET (N).
- Open the bag and take the PIPE BRUSH (O).
- Use the map and go to the Fork in the roads.
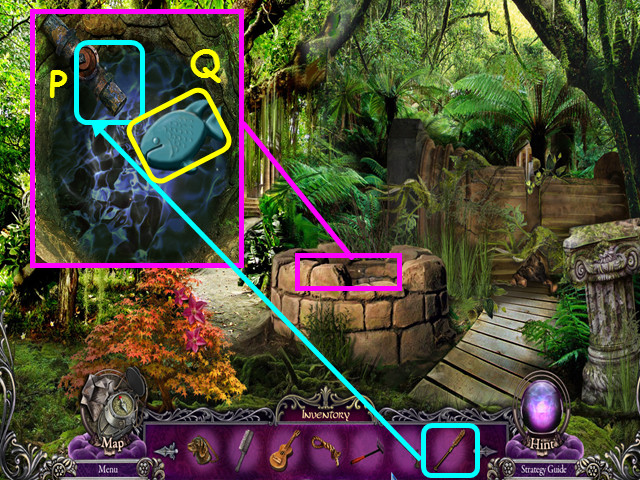
- Look in the well and use the PIPE BRUSH in the pipe (P).
- Take the FORM (Q).
- Return to the Oasis using the map.
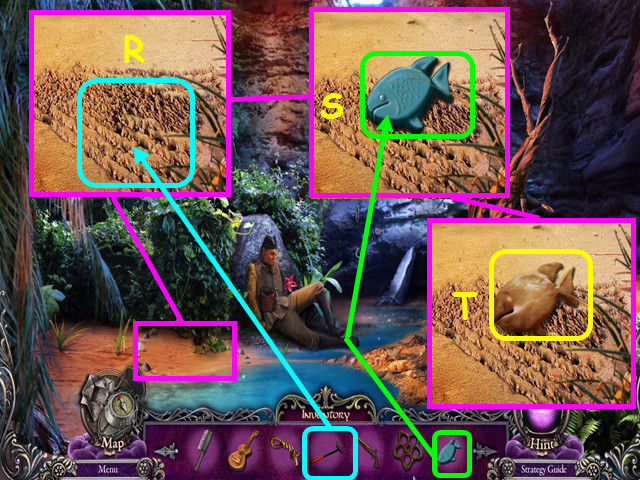
- Look at the beach and use the RAKE on the sand (R).
- Place the FORM on the raked sand (S).
- Remove the mold and take the SAND FISH (T).
- Use the map to travel to the Sand River.
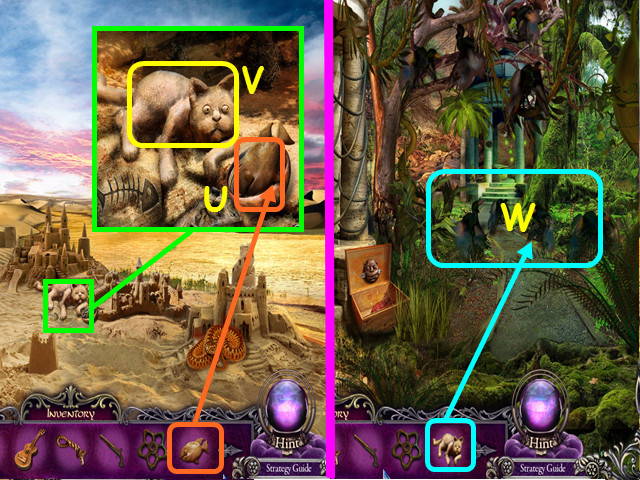
- Look at the cat, place the SAND FISH in the bowl (U), then take the SAND CAT (V).
- Go to the Hall of Ropes using the map.
- Use the SAND CAT on the birds (W).
- Walk forward to the Hall of Birds.
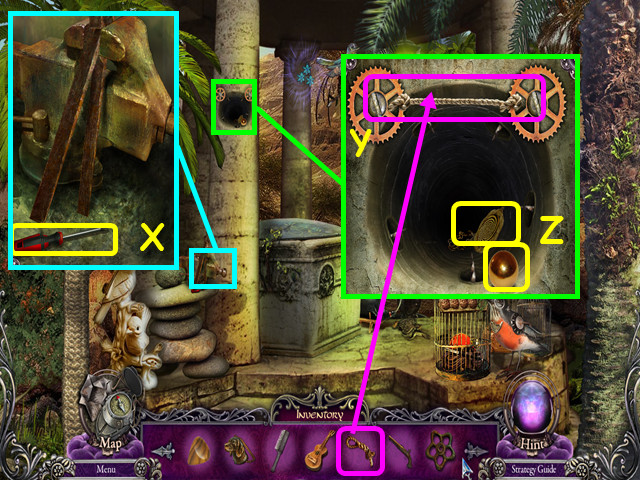
- Look at the tools and take the SCREWDRIVER (X).
- Look at the hole in the column and place the ROPE on the gears (Y).
- Take the IRON BALL and the HYPNO-MEDALLION (Z).
- Walk down once.
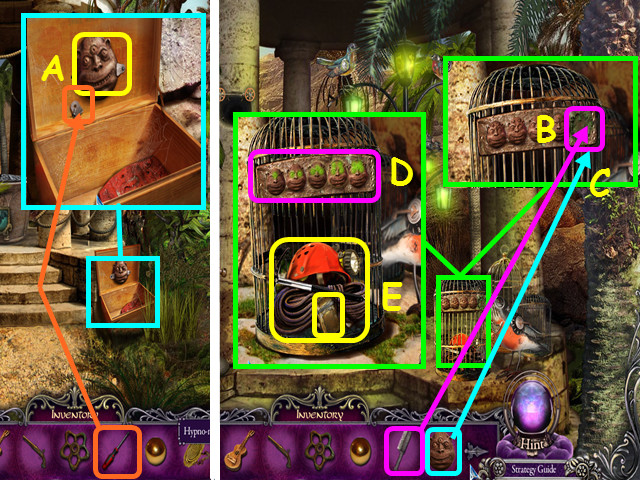
- Look at the box, use the SCREWDRIVER to remove the clamp, then take the THREE-EYED MUZZLE (A).
- Walk forward to the Hall of Birds.
- Look at the cage and use the BRUSH on the last spot (B).
- Place the THREE-EYED MUZZLE on the last spot (C).
- Each face has a different number of eyes; arrange the faces from left to right, according the number of eyes each has (D).
- Select 2 faces to swap positions; the eyes will turn green when correctly placed.
- Take the CLIMBING EQUIPMENT and the LIGHTER (E).
- Travel to the Oasis using the map.
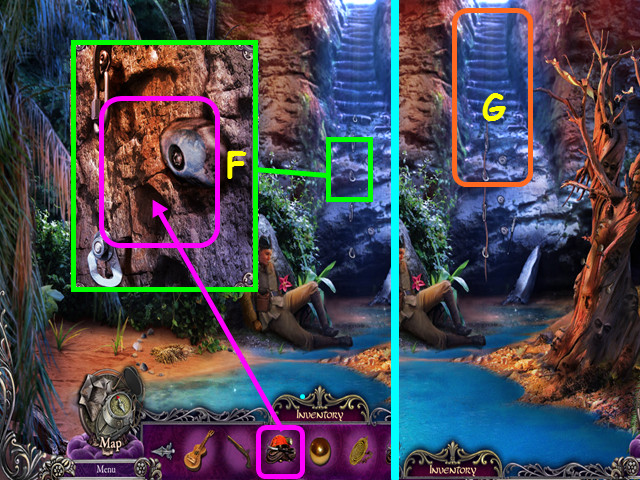
- Look at the back wall and use the CLIMBING EQUIPMENT on the gear in the rock (F).
- Go forward, up to the Rocky Slope (G).
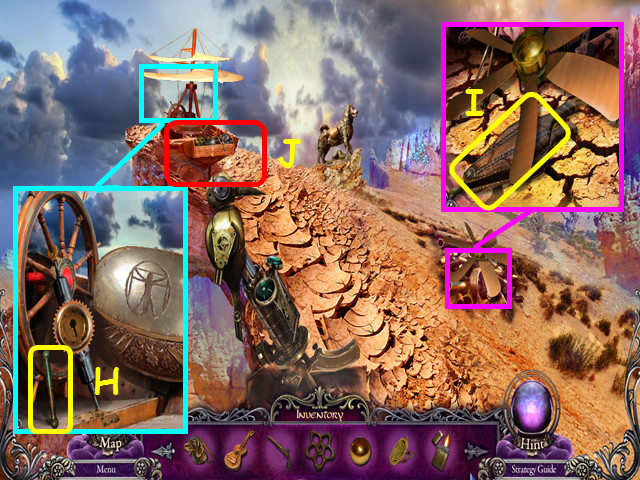
- Look at the flying machine and take the LEVER (H).
- Look at the fan and take the BELLOWS (I).
- Select the area at the base of the flying machine for a HOS (J).
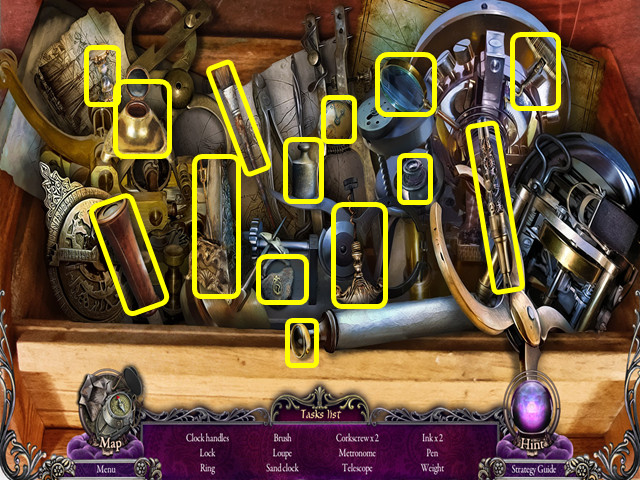
- Locate all the items on the list.
- You will earn the CLOCK HANDS.
- Use the map to return to the Hall of Birds.
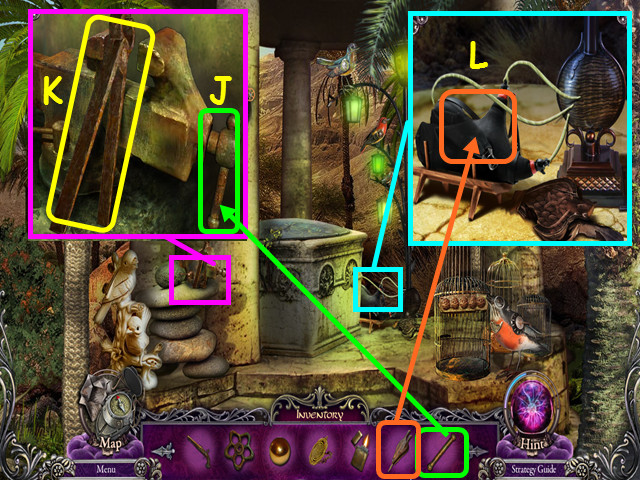
- Look at the tools and use the LEVER on the vice (J).
- Turn the lever to open the vice, then take the TONGS (K).
- Look at the base of the post and use the BELLOWS on the air bag (L).
- Travel to the Sand River using the map.
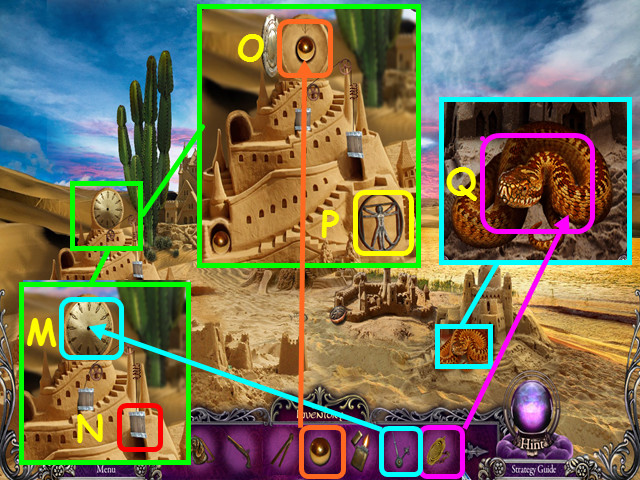
- Look at the left sand structure and place the CLOCK HANDS on the clock face (M).
- If you did not lift the lower gate on the previous visit, please do so now (N).
- Place the IRON BALL into the opening, then push (O).
- Take the VITRUVIAN MAN (P).
- Look at the snake, use the HYPNO-MEDALLION to charm him, then take the SNAKE (Q).
- Walk down once.
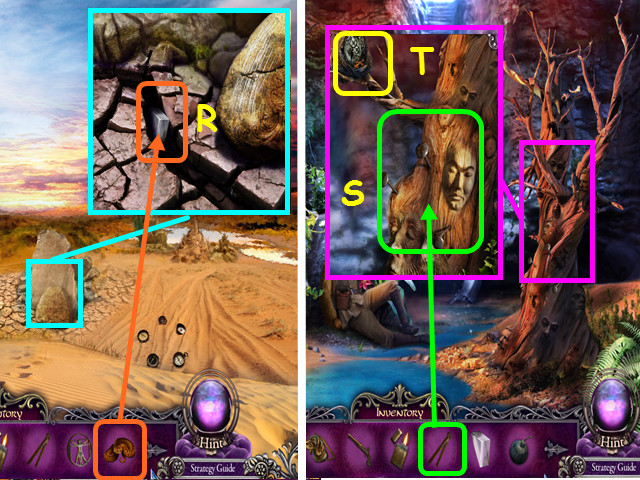
- Look at the large rock and use the SNAKE to retrieve the PRISM (R).
- Use the map to return to the Oasis.
- Look at the tree and use the TONGS to remove the nails (S).
- Take the MECHANICAL EGG (T).
- Walk forward to the Rocky Slope.
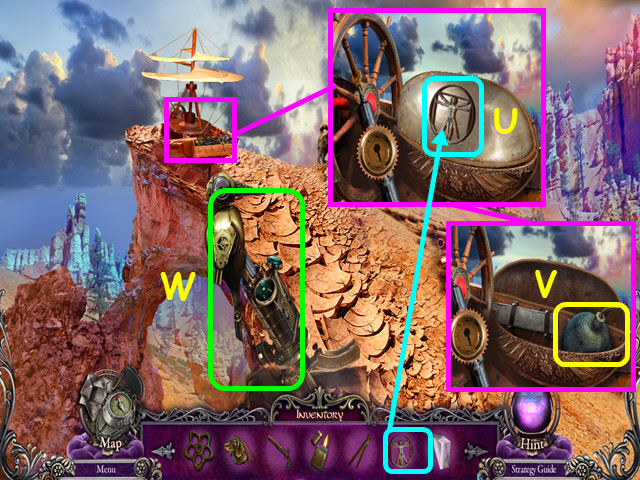
- Look at the flying machine and place the VITRUVIAN MAN on the case (U).
- Take the BOMB (V).
- Select the bird device for a mini-game (W).
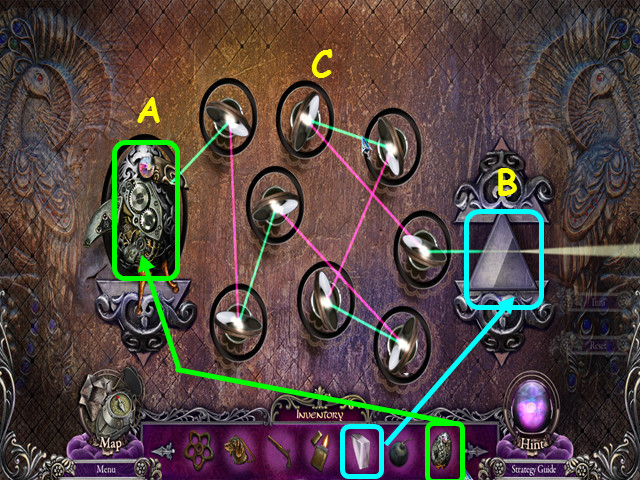
- Place the MECHANICAL EGG in the left holder (A) and the PRISM in the right holder (B).
- Turn the mirrors so the laser hits the center of the egg (C).
- The laser color must alternate colors between mirrors and be green when it hits the egg.
- Take the MECHANICAL BIRD from the left holder.
- Return to the Hall of Birds using the map.
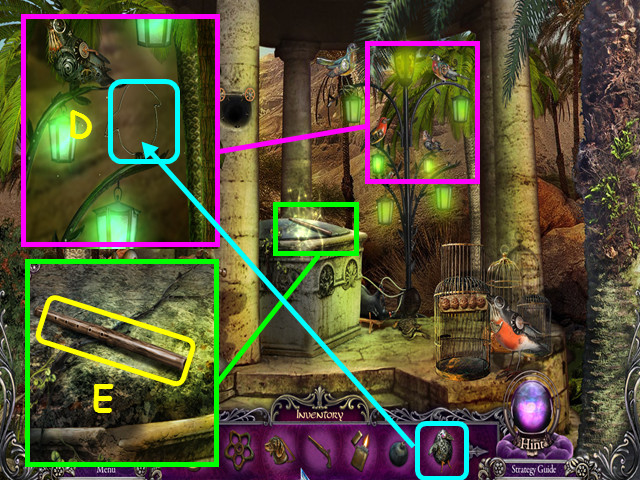
- Look at the metal tree and place the MECHANICAL BIRD on the empty branch (D).
- Look at the pedestal and take the FLUTE (E).
- Go to the Statue using the map.
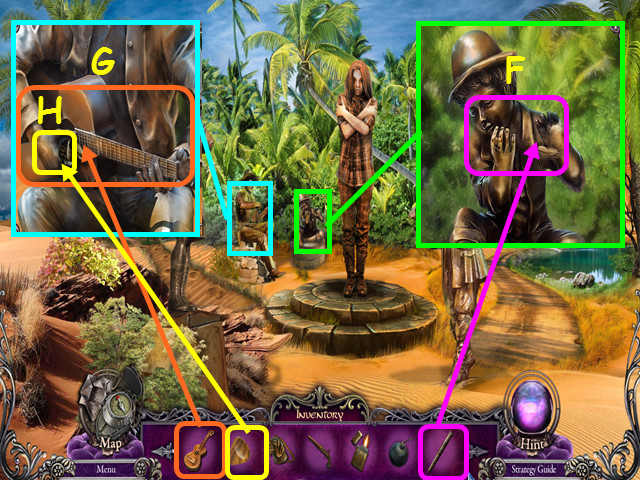
- Look at the piper and give him the FLUTE (F).
- Look at the guitarist; give him the GUITAR (G) and the PICK (H).
- Walk forward on the left to the Fork in the Road.
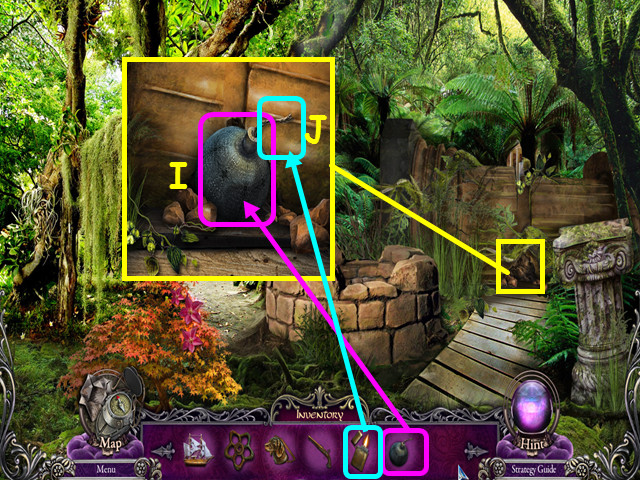
- Look at the fallen column and place the BOMB in the crack (I).
- Use the LIGHTER on the fuse (J).
- Take the right path to the Hall of Wind then walk forward again to the Hall of Rain.
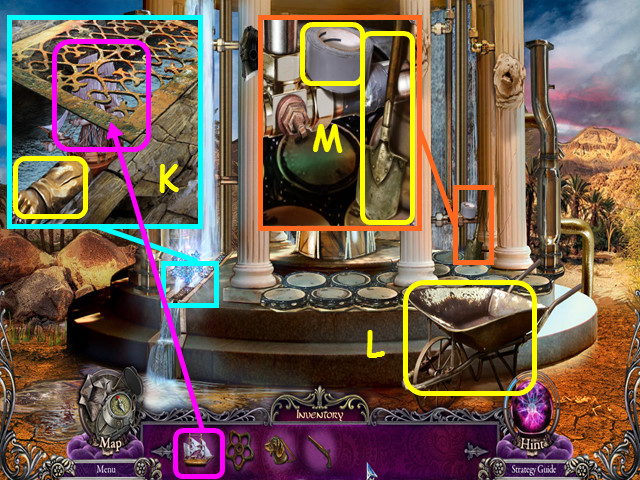
- Look at the drain and use the SHIP to push out the HAND; take the HAND (K).
- Take the CART (L).
- Look at the pipes; take the SPADE and the ADHESIVE TAPE (M).
- Use the map to travel to the Rocky Slope.
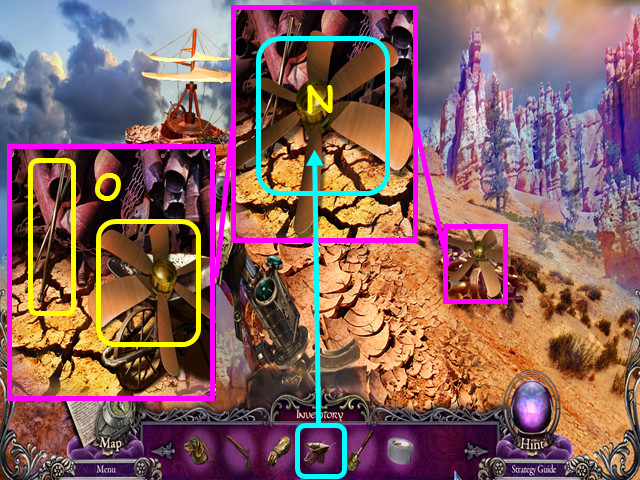
- Use the CART on the fan blade (N).
- Take the FAN and the DRUM STICKS (O).
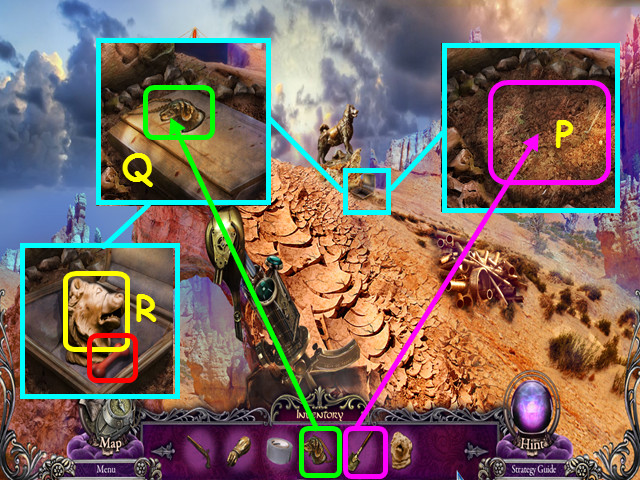
- Look at the dog's grave and use the SPADE to dig a hole (P).
- Place the MEDALLION WITH THE DOG on the lid (Q).
- Open the box; take the bone for a cut-scene, then take the PLASTER HEAD (R).
- Use the map and go to the Hall of Wind.
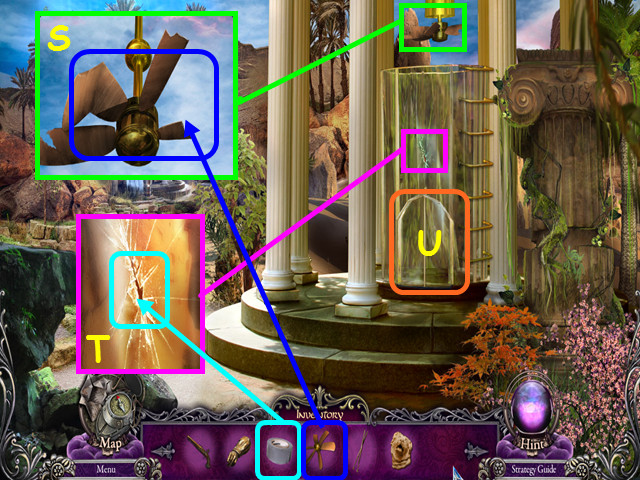
- Look at the broken fan and replace the FAN BLADE (S).
- Look at the hole in the glass and use the ADHESIVE TAPE to close the hole (T).
- Open the doors for a mini-game (U).
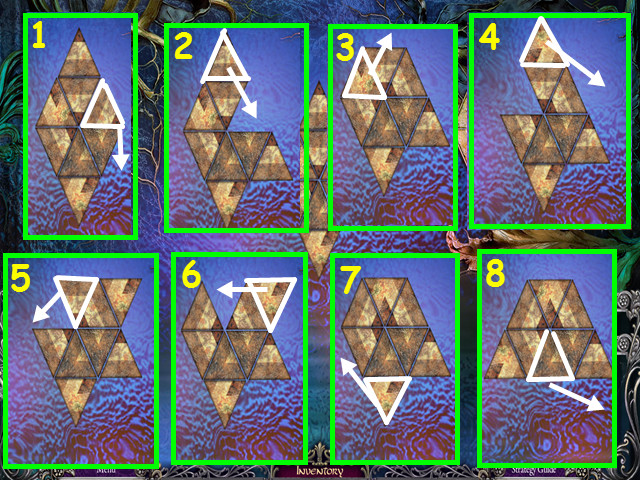
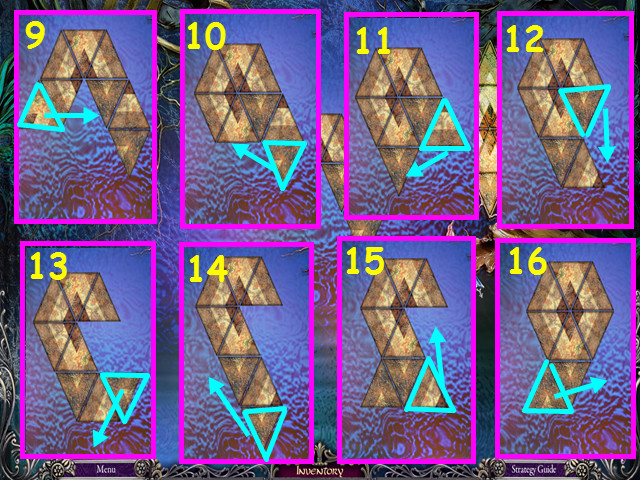
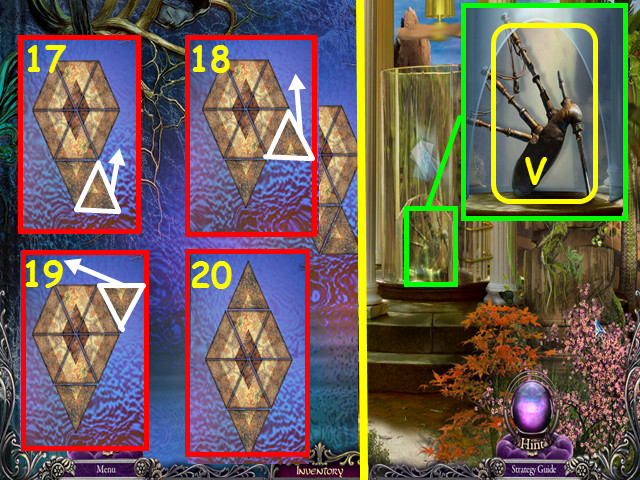
- Flip the triangles around each other to recreate the pattern on the right.
- Select an outer triangle and you will see the possible moves; select a location to move to.
- The first 8 moves are shown here (1-8).
- The second 8 moves are shown here (9-16).
- The final 3 moves are shown here (17-19) with the final solution (20).
- Look in the door and take the BAGPIPE (V).
- Walk forward to the Hall of Rain.
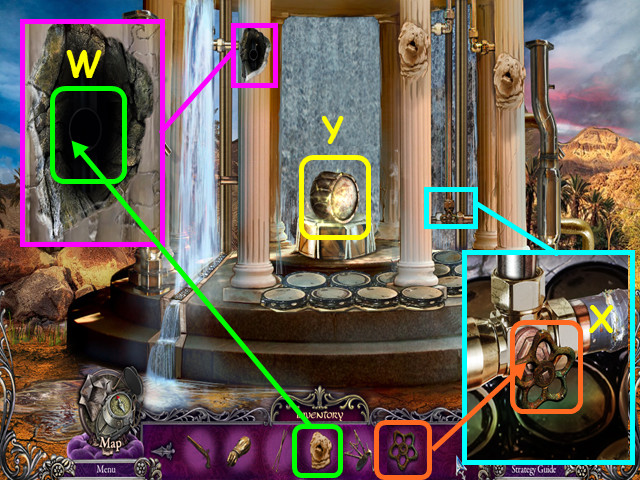
- Look at the hole and use the CERAMIC HEAD to repair the column (W).
- Look at the pipes and use the VALVE on the stem, then turn the valve a few times (X).
- Look at the platform and take the DRUM (Y).
- Travel to the Statue using the map.
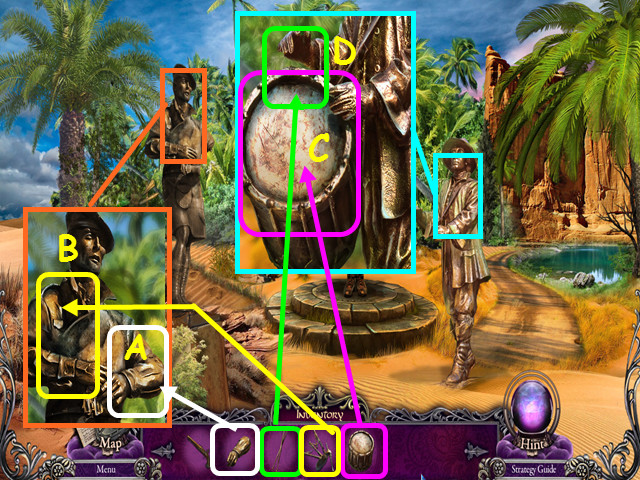
- Look at the bagpiper and place the HAND on his arm (A).
- Place the BAGPIPES in his arms (B).
- Look at the drummer and give him the DRUM (C).
- Place the DRUM STICKS in his hand (D).
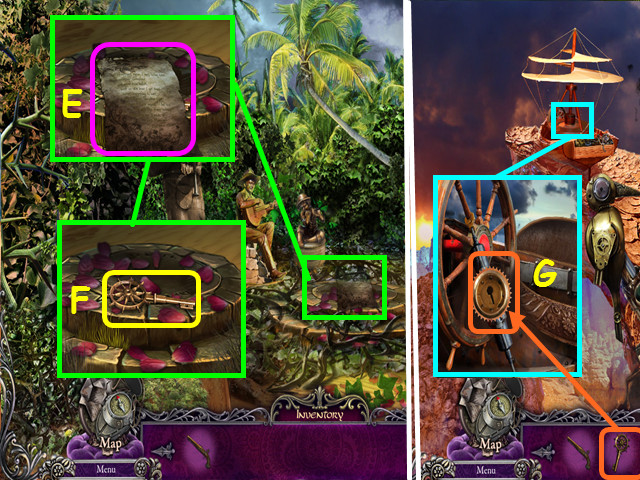
- Look at the platform and take the memory page for a cut-scene (E).
- Take the SIGNAL KEY (F).
- Use the map to travel to the Rocky Slope.
- Look at the flying machine and use the SIGNAL KEY in the lock (G).
Chapter 4: Nightmares
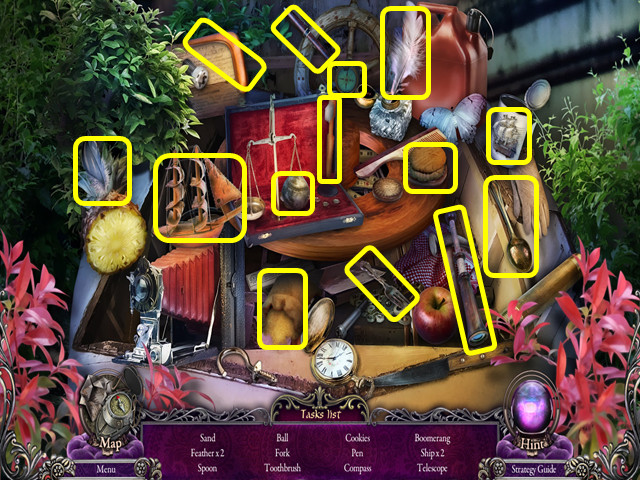
- Select the crashed flying machine for a HOS.
- Locate all the items on the list.
- You will earn the SAND.
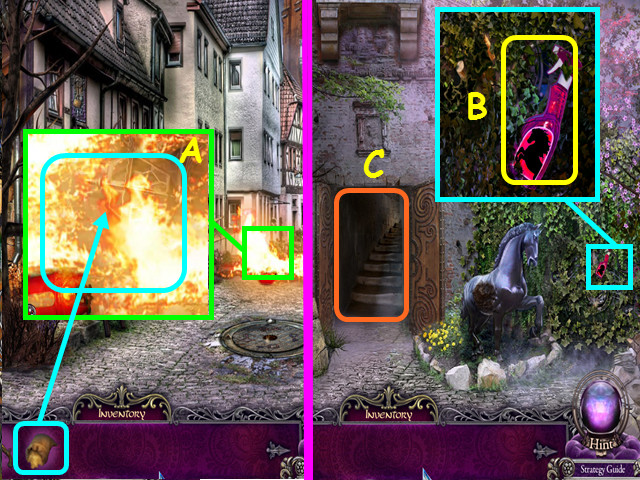
- Zoom into the fire and throw the SAND on it (A).
- Go forward to the Tower Entrance.
- Examine the bushes; take the DETERGENT (B).
- Walk up the steps to the Throne Room (C).
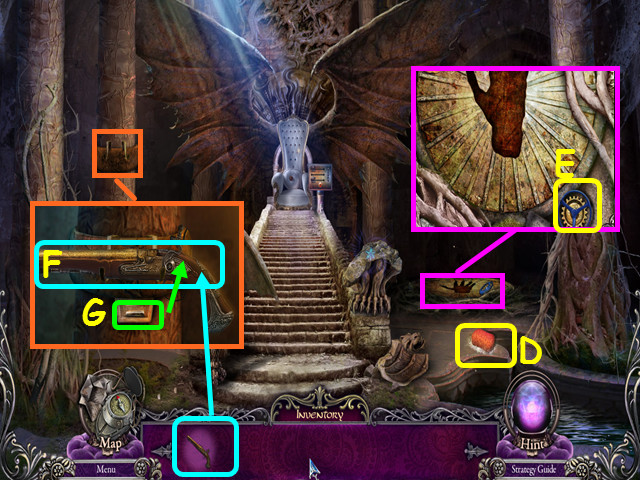
- Examine the ground; take the SPONGE (D).
- Take a closer look at the handprint and take the VALVE (E).
- Examine the tree; put the MUSKET (F) on it and take the BULLET (G).
- Put the BULLET back in the MUSKET and take the LOADED MUSKET.
- Walk down.
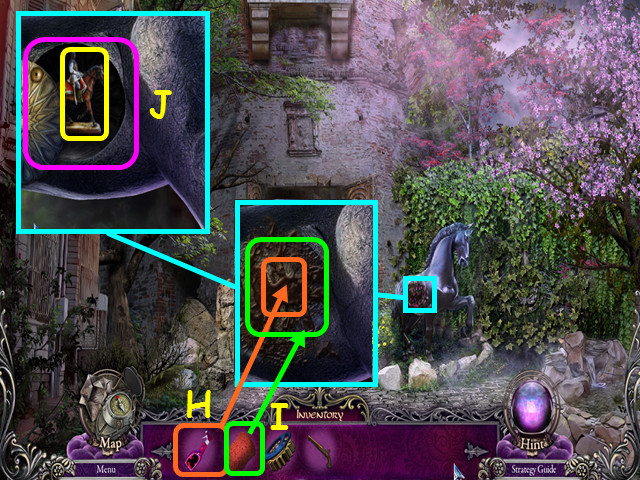
- Zoom into the horse; use the DETERGENT (H) followed by the SPONGE (I) on the horse.
- Open the compartment and take the HORSE-RIDER (J).
- Return to the throne room.
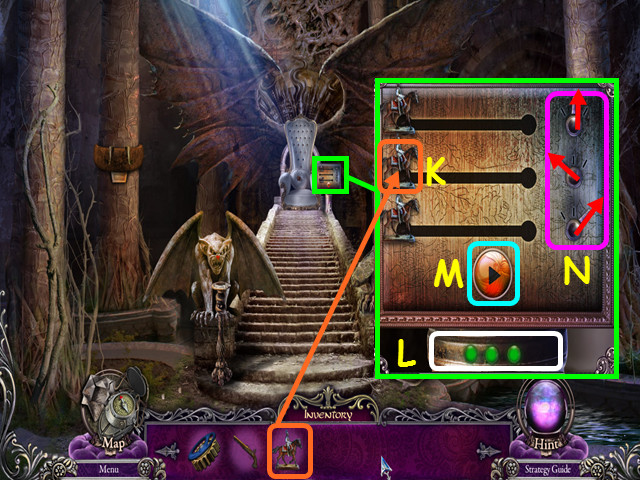
- Examine the device by the throne; put the HORSE-RIDER on it to activate a mini-game (K).
- Move the buttons on the side until all the horses are at the same speed.
- Once you get a green light (L) for each correct setting, push the button (M).
- Please look at the screenshot for the solution (N).
- Go forward to the Secret Room behind the throne.
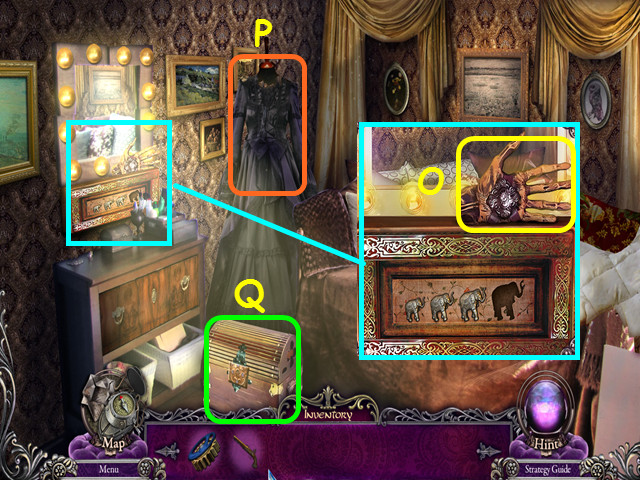
- Examine the vanity and take the PLASTIC HAND (O).
- Remove the dress from the form (P).
- Note the chest (Q).
- Walk down to the throne room.
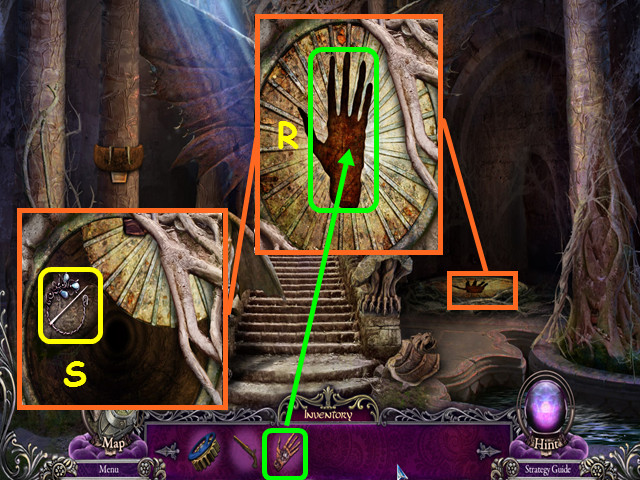
- Look at the handprint on the floor; put the PLASTIC HAND on it (R), then take the PIN (S).
- Walk forward.
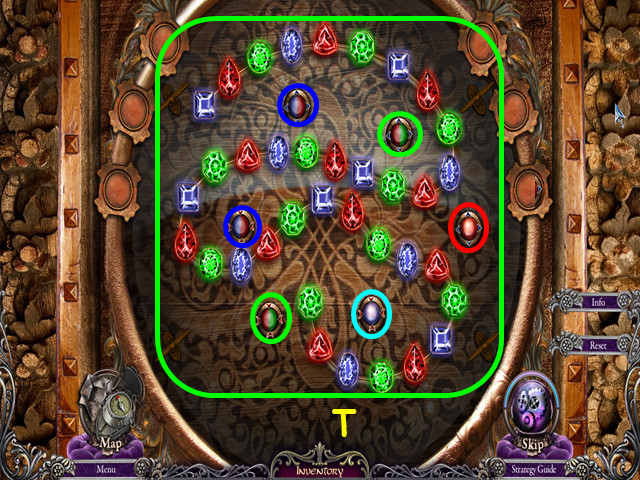
- Zoom into the chest; put the PIN in the center to activate a mini-game.
- Move all the gems to their outlines (T) using the 6 magnets.
- Magnets will repel or attract only the colors on that magnet.
- Drag the magnets into position and release.
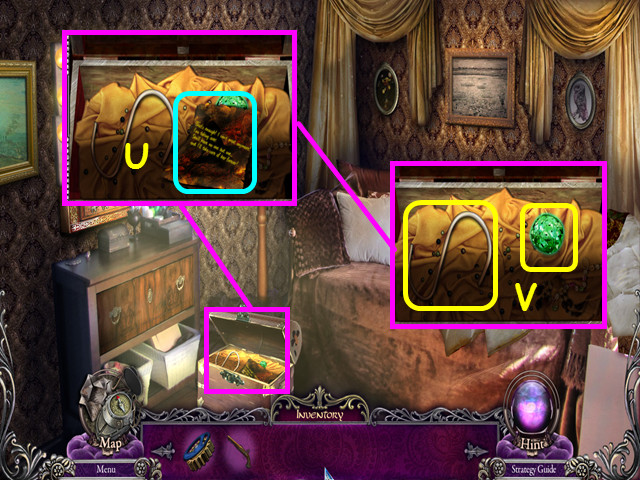
- Zoom into the chest; take the page for a cut-scene (U).
- Take the HOOK and the GREEN GEM (V).
- Use the map to return to Main Street.
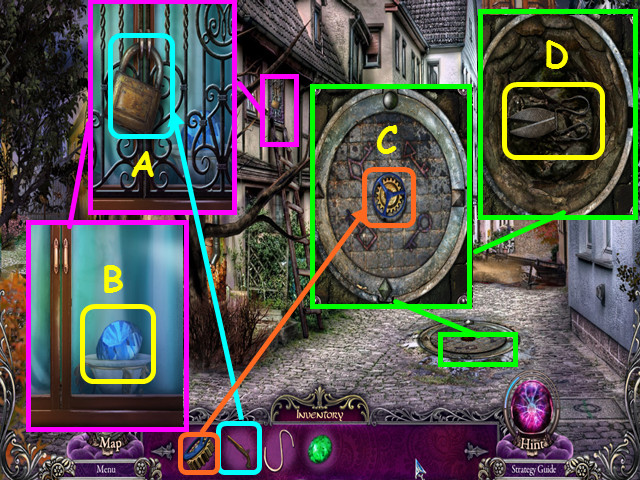
- Examine the window above the ladder; shoot the lock with the LOADED MUSKET (A).
- Open the window and take the BLUE GEM (B).
- Examine the manhole cover; put the VALVE in the center (C).
- Rotate the lid 5 times so the heads of the keys match the outer symbols; take the GARDENING SCISSORS (D).
- Walk forward to the Tower Entrance.
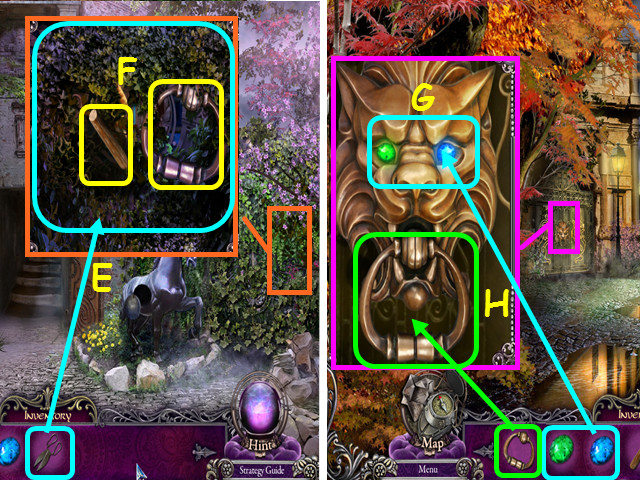
- Zoom into the ivy and cut it with the GARDENING SCISSORS (E); take the PEG and the DOOR KNOCKER (F).
- Walk down and go left into the Dark Alley.
- Zoom into the door; put the GREEN GEM and the BLUE GEM into the eye sockets (G).
- Put the DOOR KNOCKER in the mouth (H); hit the door knocker and enter the Memorial.
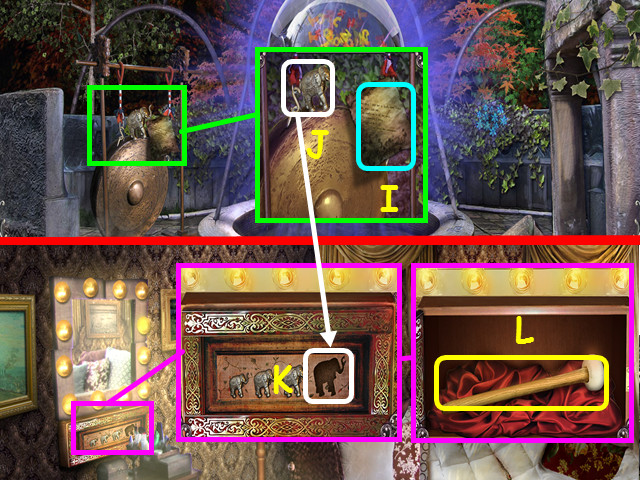
- Examine the gong; take the page for a cut-scene (I) and then the ELEPHANT FIGURINE (J).
- Return to the Secret Room using the map.
- Examine the mirror; put the ELEPHANT FIGURINE in the slot (K) and take the GONG MALLET (L).
- Return to the Memorial.
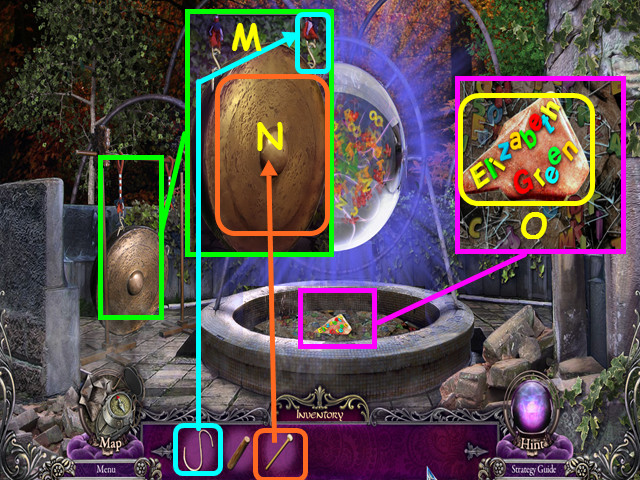
- Zoom into the gong; put the HOOK on it (M) and then hit the gong with the GONG MALLET (N).
- Look in the fountain; take the NAMEPLATE (O).
- Walk down to the Dark Alley.
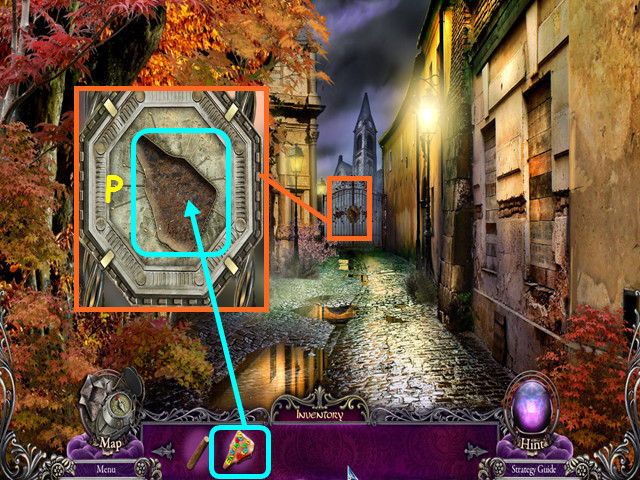
- Zoom into the back gate; put the NAMEPLATE in the niche (P).
- This will activate a mini-game.
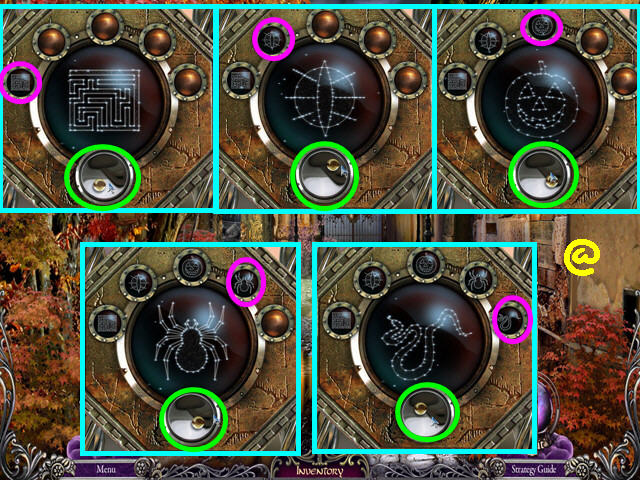
- Move the glass ball (green) to position it correctly so it can show the constellation (pink) in the center.
- Please look at the screenshot for the 5 solutions (@).
- Walk forward to Near the Old Chapel.
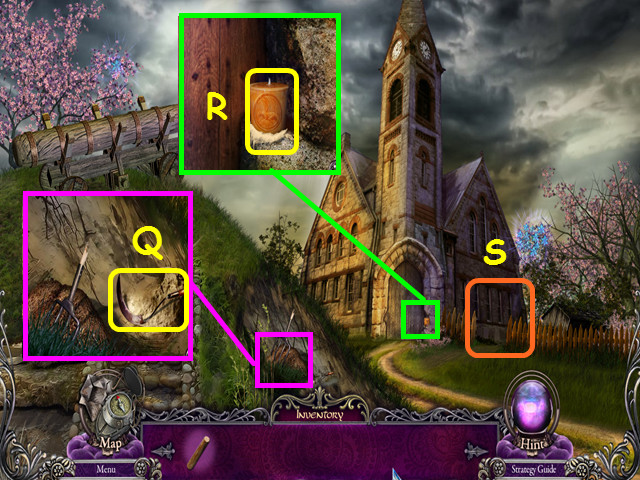
- Examine the mound; take the SCYTHE (Q).
- Zoom into the door; take the CANDLE (R).
- Go towards the Backyard on the right (S).
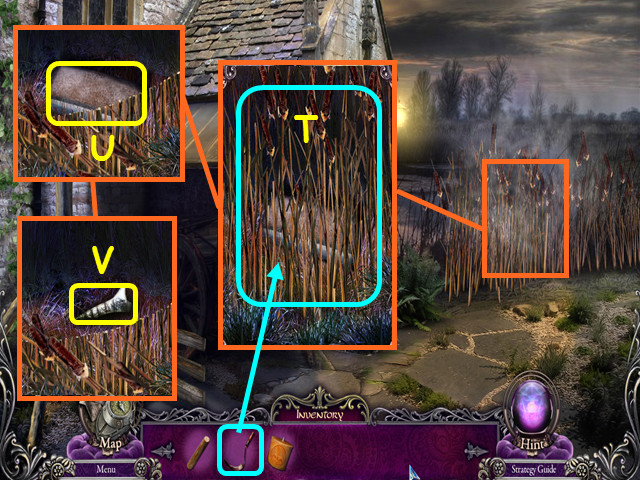
- Examine the reeds and cut them with the SCYTHE (T).
- Take the RAG (U) and the DRAGON TOOTH (V).
- Return to the throne room.
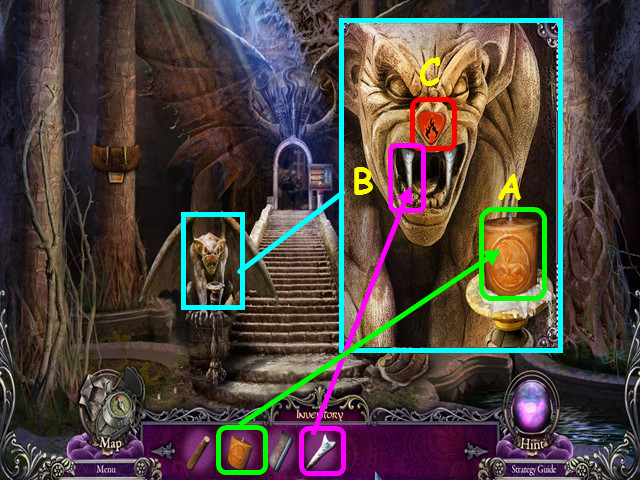
- Examine the left statue; put the CANDLE on the candleholder (A) and the DRAGON TOOTH in the mouth (B).
- Press on the nose (C) and take the LIT CANDLE.
- Return to the Backyard.
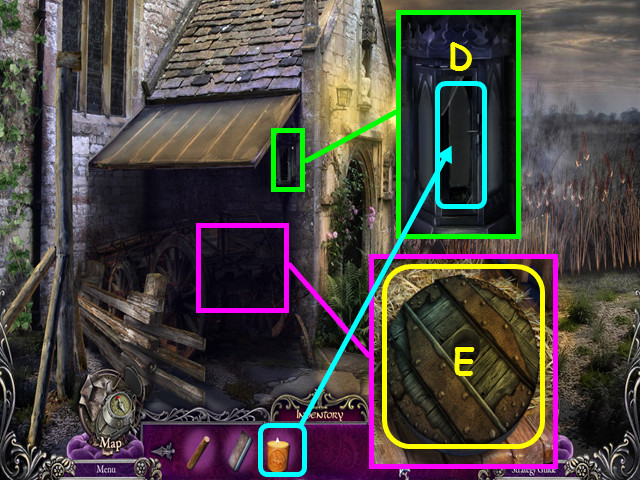
- Examine the lantern; put the LIT CANDLE into it (D).
- Examine the cart; take the WHEEL (E).
- Return to Near the Old Chapel.
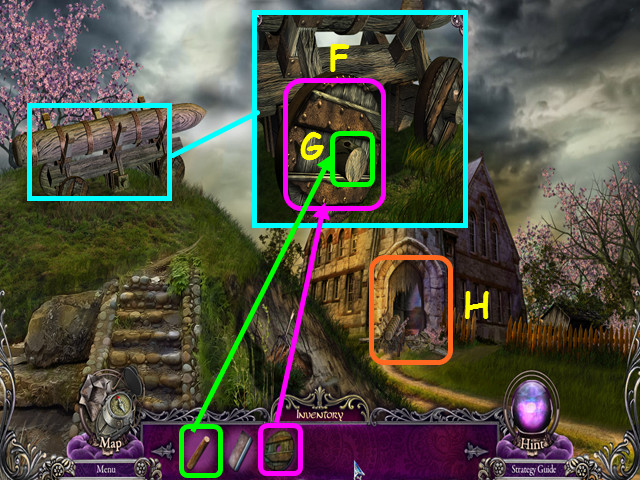
- Inspect the battering ram; put the WHEEL on it (F).
- Put the PEG on the wheel (G) and then push the wheel forward.
- Go into the Old Chapel (H).
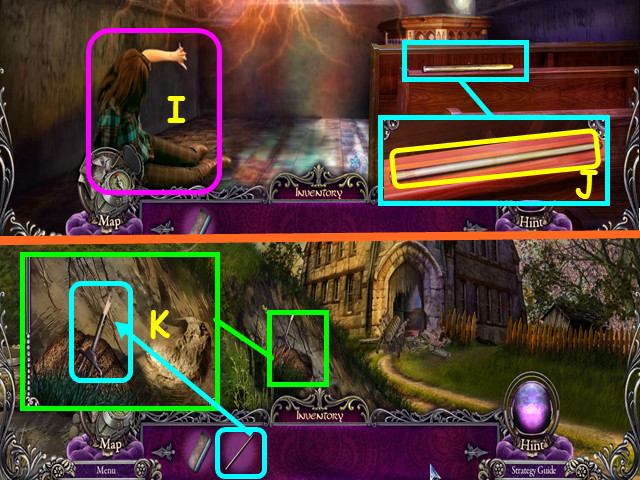
- Try to talk to Liza (I).
- Examine the pew; take the STICK (J).
- Walk down.
- Zoom into the broken pitchfork; put the STICK on it (K).
- Take the PITCHFORK.
- Walk forward on the right to return to the Backyard.
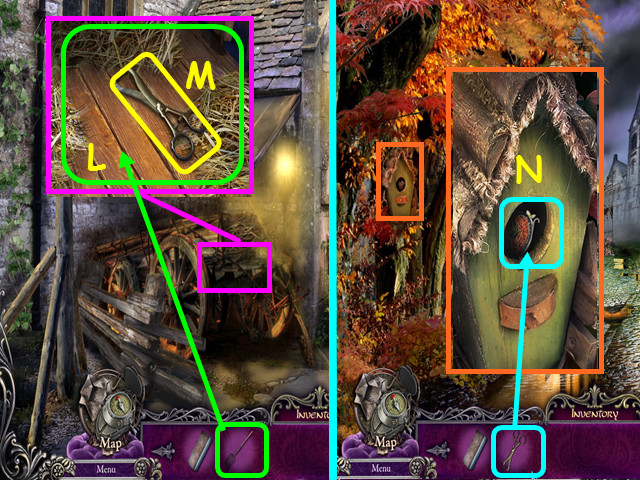
- Examine the cart; use the PITCHFORK on the hay (L) and take the FORCEPS (M).
- Go back to the Dark Alley using the map.
- Examine the birdhouse; use the FORCEPS to retrieve the HEART-SHAPED BADGE (N).
- Use the map to return to the Secret Room.
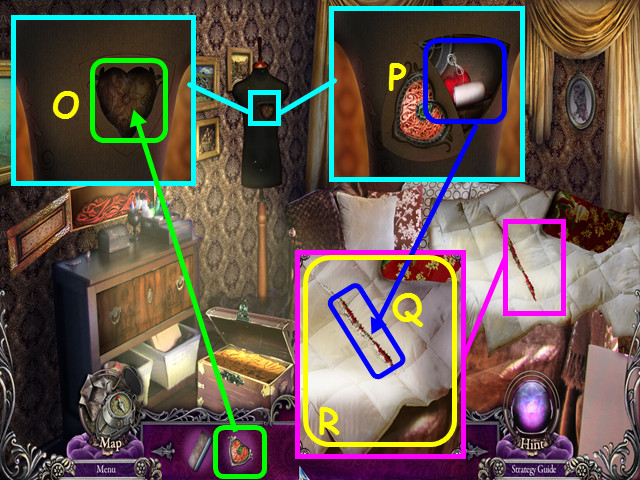
- Look at the dress form and place the HEART-SHAPED BADGE into the niche (O).
- Take the NEEDLE AND THREAD (P).
- Examine the blanket; use the NEEDLE AND THREAD on the tear (Q), then take the BLANKET (R).
- Return to the Old Chapel using the map.
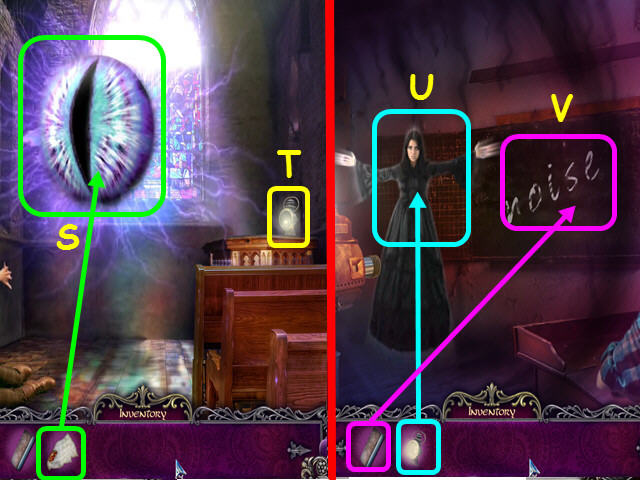
- Throw the BLANKET on the eye (S).
- Zoom into and take the LANTERN (T). You will be transported to the School.
- Use the LANTERN on Noise (U).
- Take a closer look at the chalkboard; use the RAG on it (V).
- You will be transported to the Hospital.
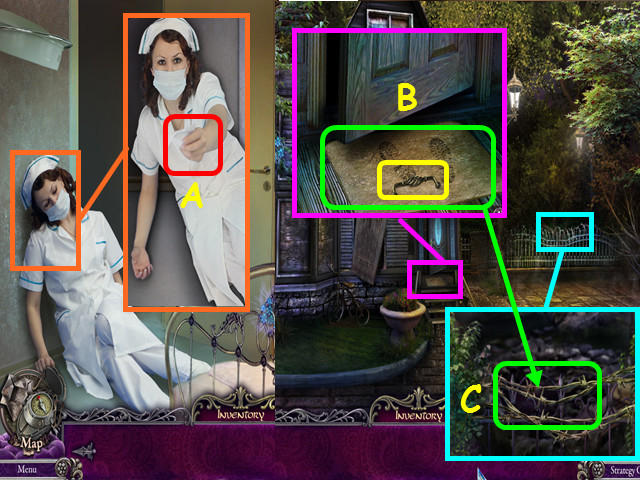
- Look at the nurse and take the note (A). You will be transported near the hut.
- Examine the door; take the MAT and KNOB (B).
- Examine the fence; put the MAT on it (C).
- Go over the fence into the Backyard of the Hut.
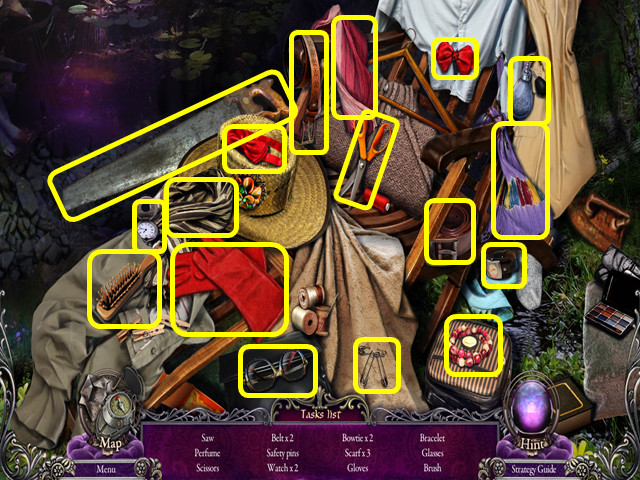
- Select the lounge chair for a HOS.
- Locate all the items on the list.
- You will earn the SAW.
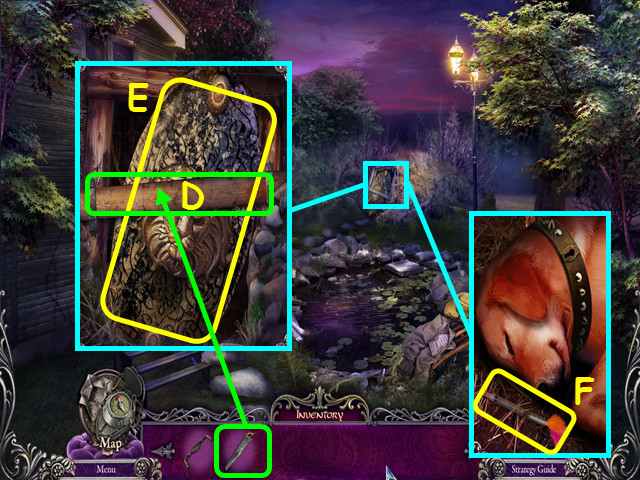
- Look at the well; cut the beam with the SAW (D).
- Take the WELL LID (E).
- Take the EMPTY TRANQUILIZER DART (F).
- Walk down.
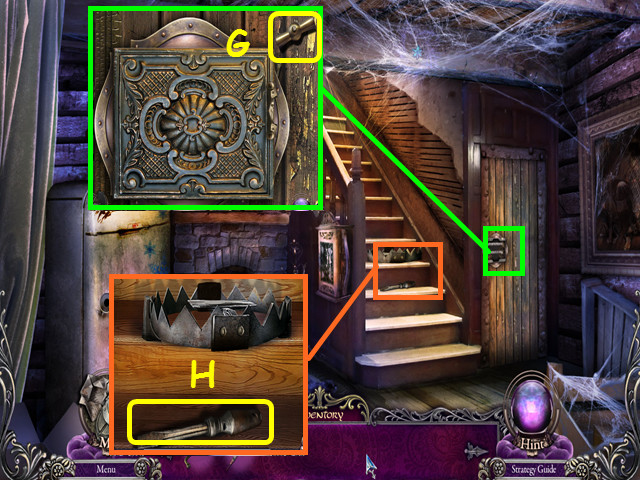
- Look the front door; use the WELL LID on the door.
- Enter the Living Room.
- Inspect the door; take the SWITCH BUTTON (G).
- Look at the steps; take the SCREWDRIVER (H).
- Use the map to return to the Backyard of the Hut.
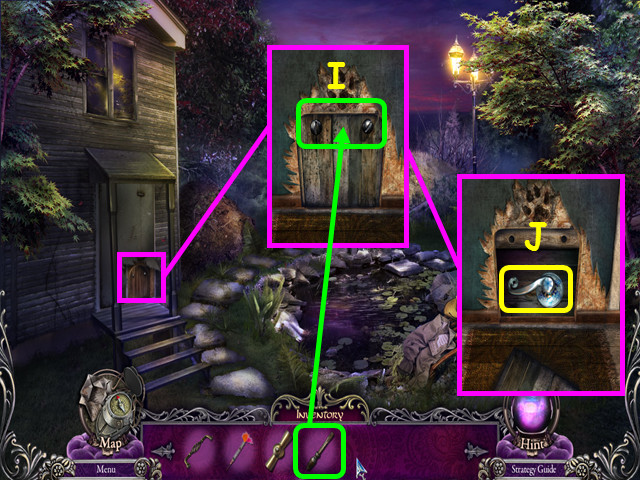
- Examine the door; remove the screws with the SCREWDRIVER (I).
- Take the FRIDGE HANDLE (J).
- Return to the Living Room using the map.
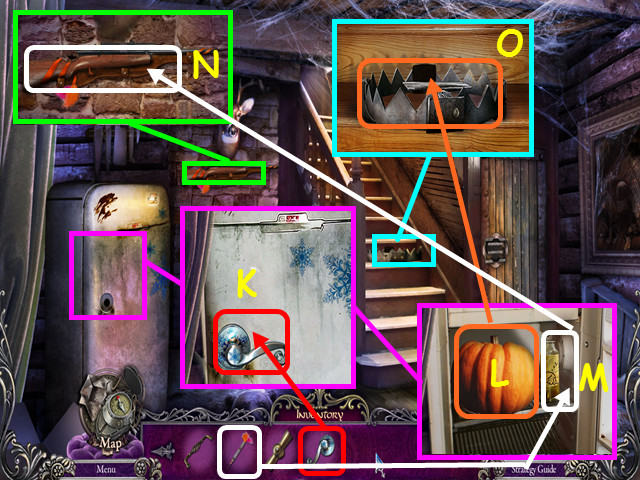
- Zoom into the fridge; put the FRIDGE HANDLE on the door (K).
- Turn the handle and take the PUMPKIN (L).
- Put the EMPTY TRANQUILIZER DART into the bottle to get the FULL TRANQUILIZER DART (M).
- Inspect the dart gun; put the FULL TRANQUILIZER DART in it to get the LOADED TRANQUILIZING GUN (N).
- Inspect the stairs; put the PUMPKIN on the trap (O).
- Go up to the Second Floor.
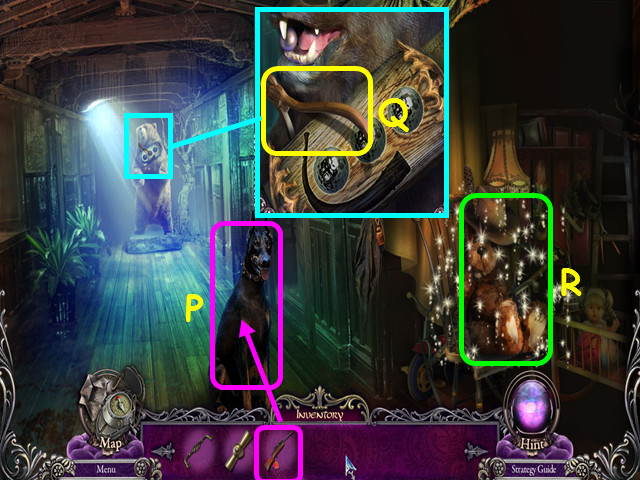
- Use the LOADED TRANQUILIZING GUN on the dog (P).
- Inspect the trophy bear; take the NIPPERS (Q).
- Select the teddy bear for a HOS (R).
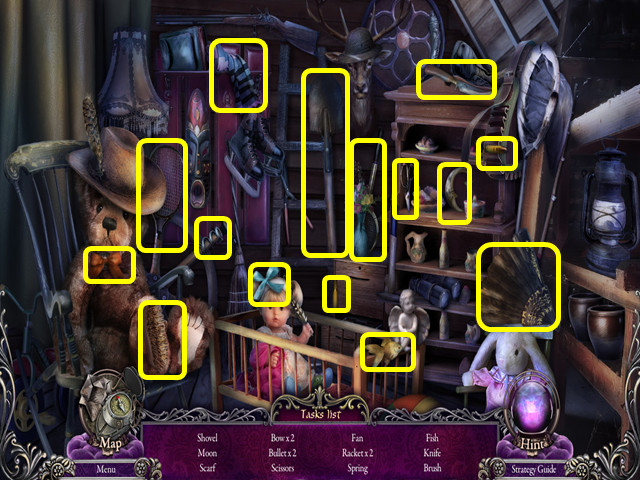
- Locate all the items on the list.
- You will earn the SHOVEL.
- Return to the Backyard of the Hut.
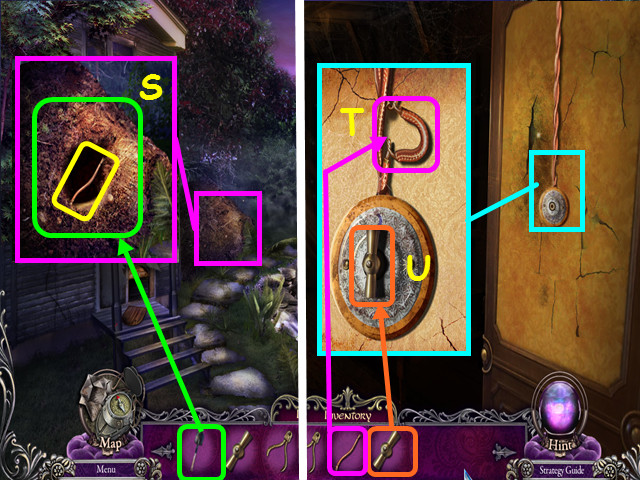
- Inspect the mound; use the SHOVEL in the dirt and take the WIRE (S).
- Use the map to go to the Second Floor and then go into Liza's Room on the right.
- Examine the switch and put the WIRE over the faulty one (T).
- Place the SWITCH BUTTON on the switch, then turn the switch on (U).
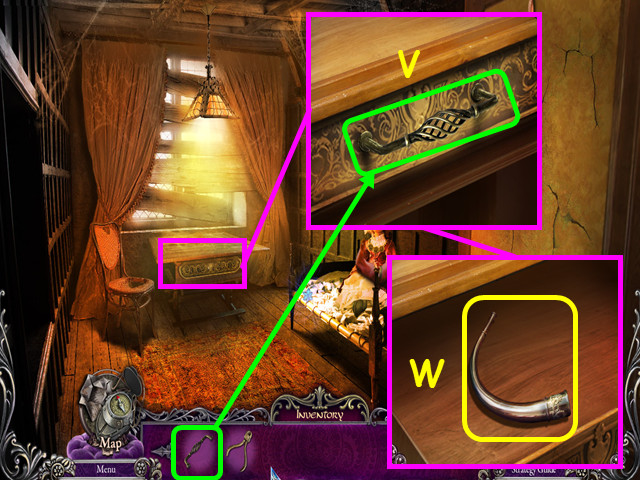
- Look at the drawer; put the KNOB on it (V).
- Open the drawer and take the HUNTING HORN (W).
- Walk down.
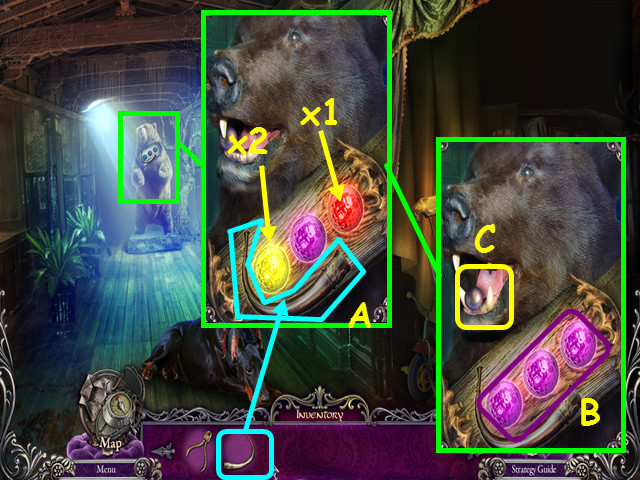
- Look at the bear; put the HUNTING HORN in the slot (A).
- Press the left button twice, then press the right button once to make all 3 purple (B).
- Take the 1/3 PEARL (C).
- Walk down.
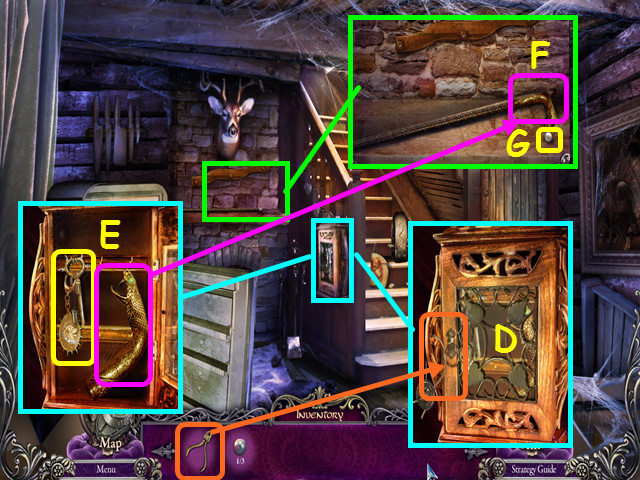
- Examine the key cabinet; break the seal with the NIPPERS (D).
- Take the SNAKE HEAD and the KEY FOR BYRON'S FETTERS (E).
- Examine the mantle; put the SNAKE HEAD on the cane (F) and take the 2/3 PEARLS (G).
- Return to the Backyard of the Hut.
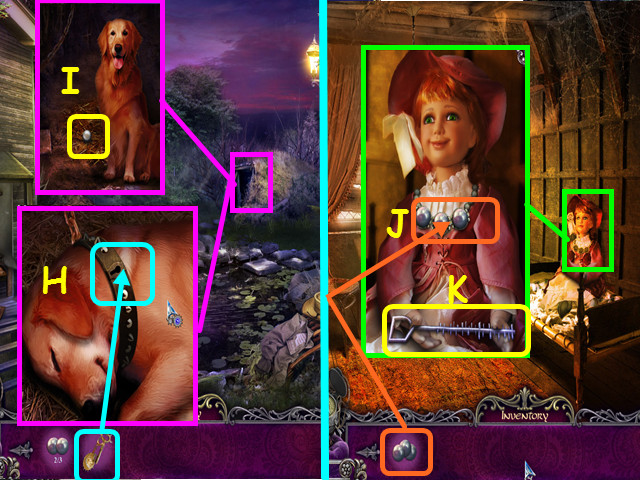
- Examine the well; use the KEY FOR BYRON'S FETTERS in the keyhole (H) to free Man's Best Friend.
- Take the 3/3 PEARL (I).
- Go to Liza's Room.
- Zoom into the doll; put the 3 PEARLS into the necklace (J) and take the LOCKPICK (K).
- Return to the Living Room using the map.
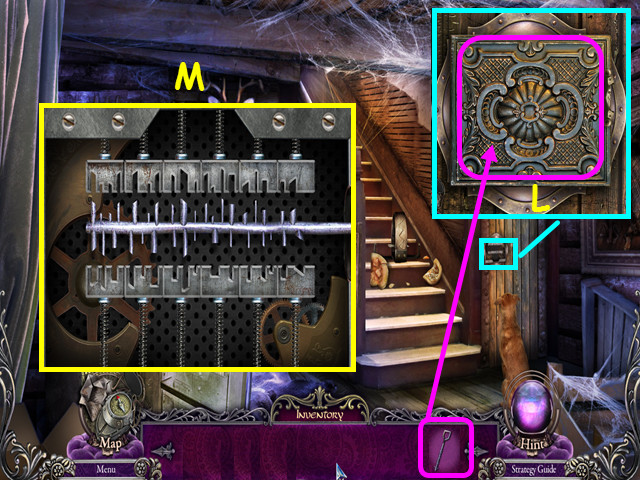
- Inspect the door; add the LOCKPICK to it to activate a mini-game (L).
- Move the forms so they will fit on the lockpick; select 2 pieces to swap positions.
- Pieces can swap with any piece next to them, or with a piece in the same column.
- Please look at the screenshot for the solution (M).
- Congratulations, you have completed Surface: The Noise She Couldn't Make
Created at: 2012-08-24

