Walkthrough Menu
- General Tips
- Chapter 1: Tunnel
- Chapter 2: Stone Trap
- Chapter 3: Hut
- Chapter 4: Train
- Chapter 5: Briefcase
- Chapter 6: Platform
- Chapter 7: Bors
- Chapter 8: Temple
General Tips
- This is the official guide for Surface: The Pantheon.
- This guide will not mention each time you have to zoom into a location; the screenshots will show each zoom scene.
- We will use the acronym HOP for Hidden-object puzzles. Interactive items will be color-coded and you will need to use Inventory items to complete them.
- The HOP lists may be random; our lists may vary from yours.
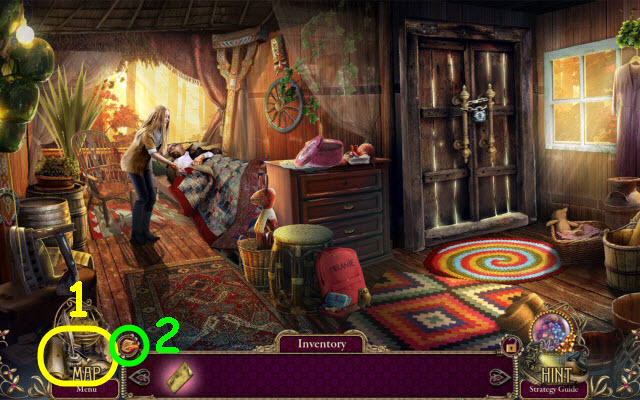
- Use the map (1) to fast travel to a location.
- Select the note pad (2) to check your current task.
Chapter 1: Tunnel
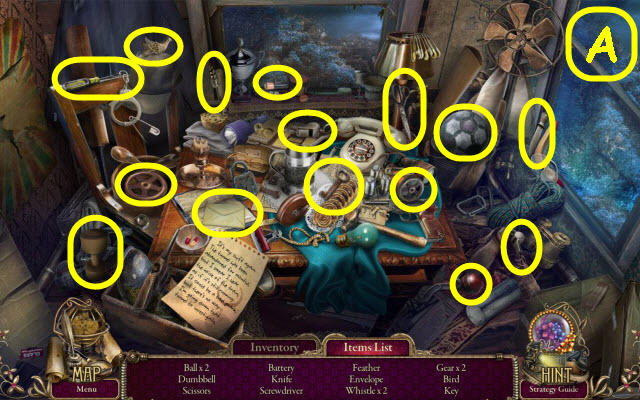
- You receive a LOCKET.
- Examine the booth to access a HOP.
- Play the HOP.
- You receive the KEY (A).
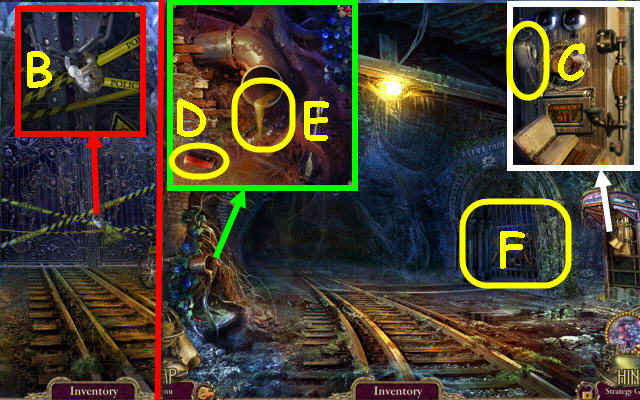
- Use the KEY on the lock; turn it (B).
- Go forward and receive a TICKET.
- Take the CAN (C).
- Take the BATTERY 1/3 (D).
- Use the CAN on the oil; receive an OIL CAN (E).
- Use the OIL CAN on the lock to trigger a puzzle (F).
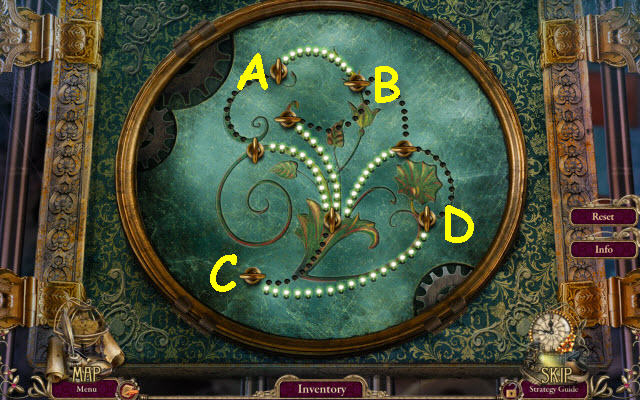
- Light up all the lights.
- Select the following: C, D, A and B.
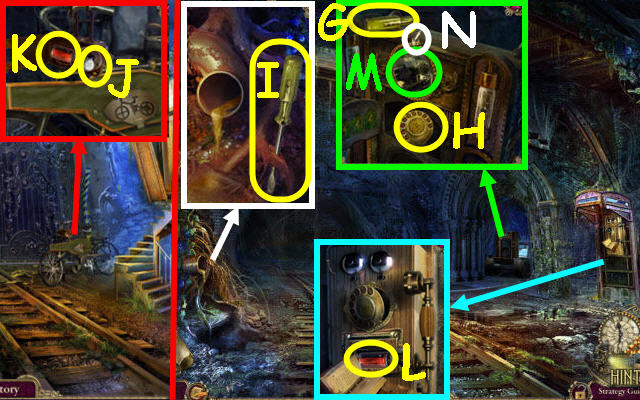
- Take the SCREWDRIVER HANDLE (G) and DIAL (H).
- Place the SCREWDRIVER HANDLE on the shaft; select it twice to get a SCREWDRIVER (I).
- Back out.
- Use the SCREWDRIVER on the panel; take the BULB (J) and BATTERY 2/3 (K).
- Go forward.
- Remove the dial; place the DIAL on it. Lift the receiver and dial 911; take the BATTERY 3/3 (L).
- Place the BULB in the socket (M) and the BATTERY in the compartment; flip the switch (N).
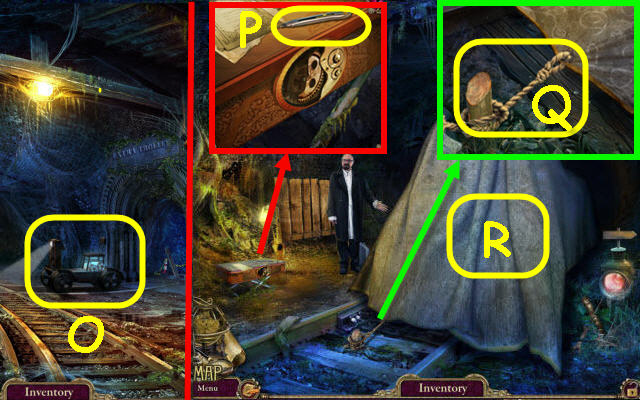
- Select the trolley (O).
- Take the UTILITY KNIFE (P).
- Use the UTILITY KNIFE on the rope (Q); remove the cover (R).
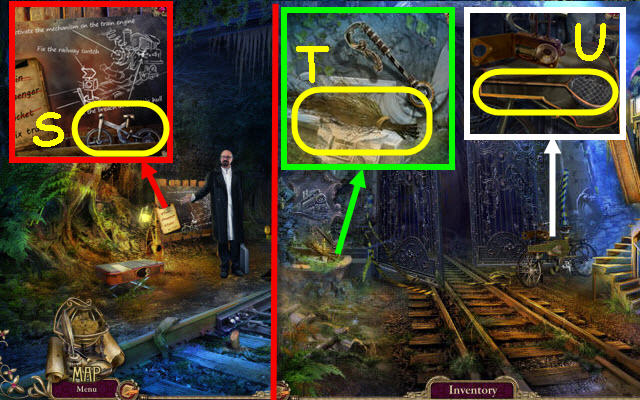
- Take the BICYCLE BADGE (S).
- Back out twice.
- Use the ROPE on the branches; take the BROOM (T).
- Use the BICYCLE BADGE on the case; take the NET (U).
- Go forward.
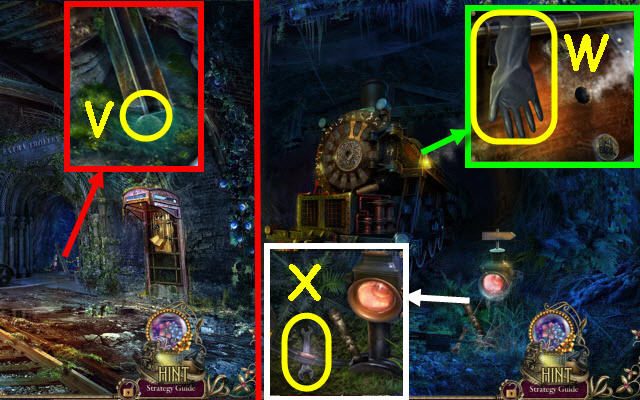
- Use the NET to get the TRAIN RIVET (V).
- Go forward.
- Take the WELDING GLOVE (W).
- Use the BROOM on the web and select the lever twice. Use the WELDING GLOVE to get the WRENCH (X).
- Back out twice.
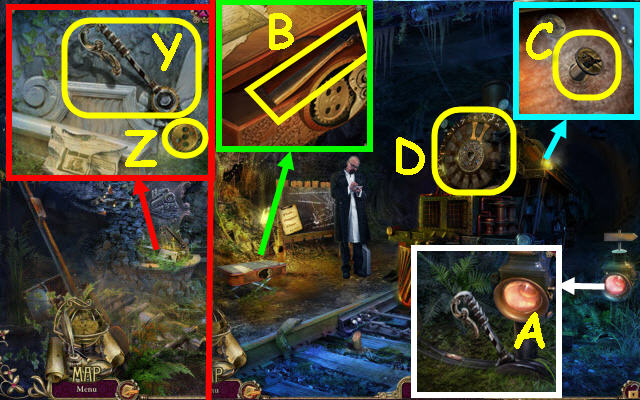
- Use the WRENCH on the bolt; receive a LEVER FOR THE RAILWAY SWITCH (Y) and take the GEAR (Z).
- Go forward twice.
- Place the LEVER FOR THE RAILWAY SWITCH on the mechanism; pull the lever (A).
- Place the GEAR on the lock; take the HAMMER (B).
- Place the TRAIN RIVET in the hole; use the HAMMER on it (C).
- Place the LOCKET in the slot to trigger a puzzle (D).
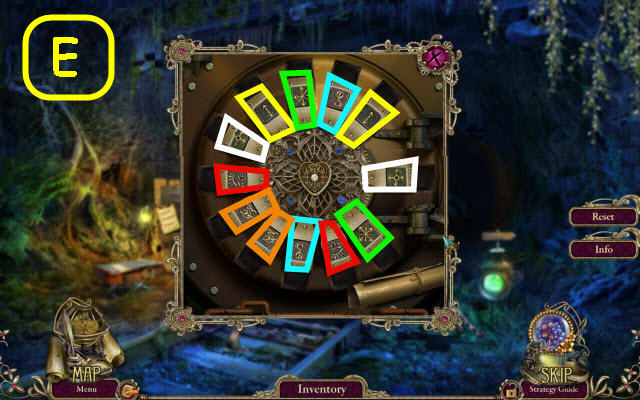
- Find the matching pairs.
- See screenshot for solution (E).
Chapter 2: Stone Trap
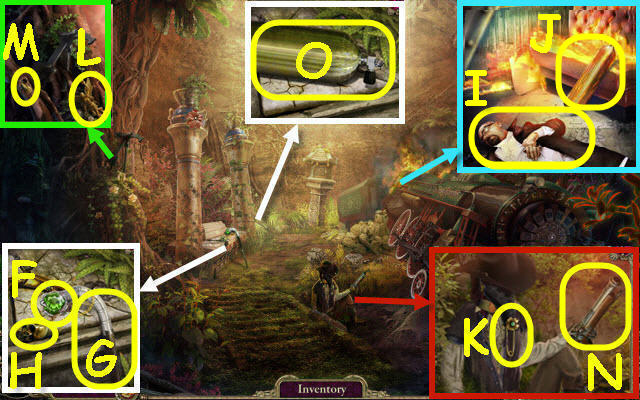
- Take the EMERALD EYE (F), CANE (G) and SKULL MEDALLION (H).
- Take DR. BORS (I) by moving him 4x.
- Use the CANE to get the GAS TANK (J).
- Take the PIN (K).
- Take the FIGURINE 1/3 (L).
- Use the PIN on the bullet; take the BULLET (M).
- Place the BULLET in the musket; take the MUSKET (N).
- Use the GAS TANK on the crack and the MUSKET on the tank (O).
- Examine the sarcophagus to access a HOP.
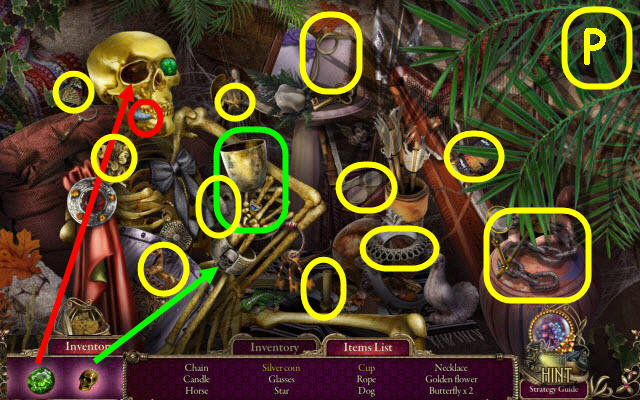
- Play the HOP.
- You receive a CHAIN (P).
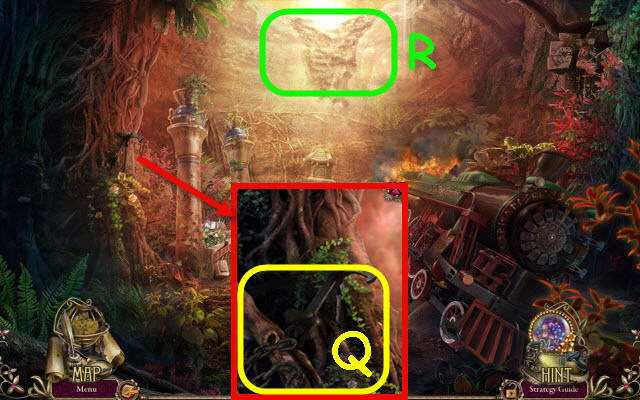
- Place the CHAIN on the hook; take the GRAPPLING HOOK (Q).
- Use the GRAPPLING HOOK on the opening (R).
- Go up.
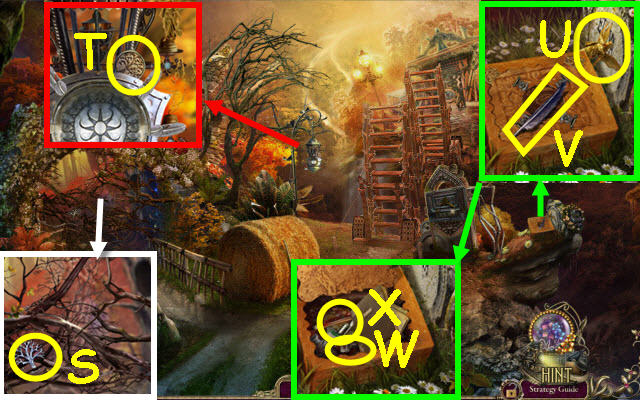
- Take the TREE INSIGNIA (S).
- Take the MEDALLION (T).
- Take the FIGURINE 2/3 (U) and FEATHER (V).
- Place the MEDALLION and then the TREE INSIGNIA on the box; select the book. Take the VAN KEY (W) and BLADE (X).
- Back out.
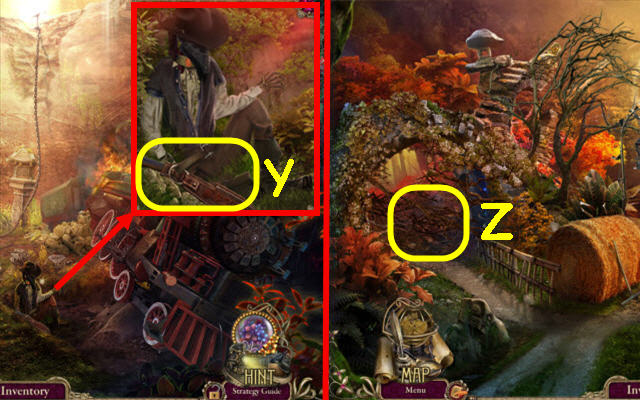
- Use the BLADE on the belt; take the MACHETE (Y).
- Go up.
- Use the MACHETE on the thicket (Z).
- Go left.
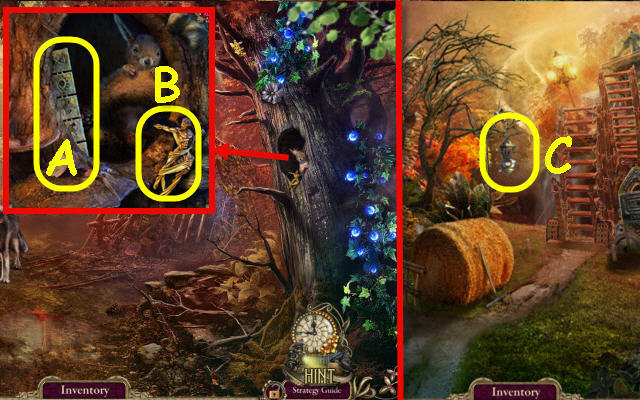
- Take the CODE PLATE (A) and FIGURINE 3/3 (B).
- Back out.
- Place the FIGURINE on the lantern to trigger a puzzle (C).
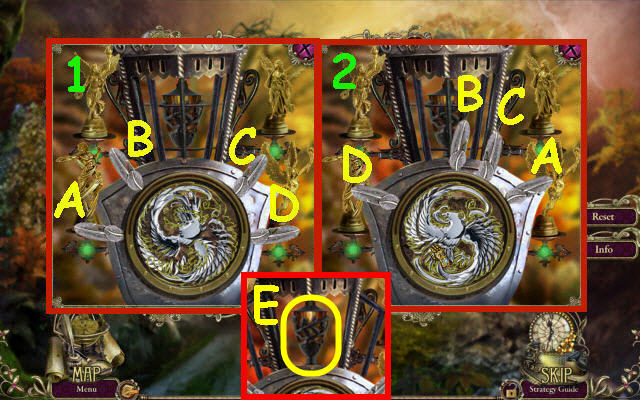
- Complete the image.
- See screenshot for feather (A-D) positions before (1) and after (2).
- Take the TORCH (E).
- Back out.
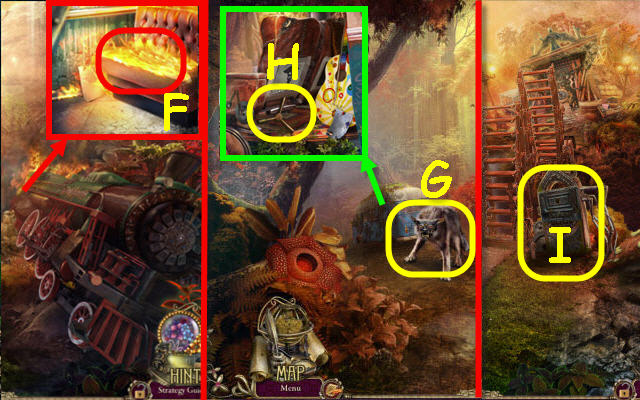
- Use the TORCH on the fire (F); receive a BURNING TORCH.
- Go to Thicket.
- Use the BURNING TORCH on the beast (G).
- Use the VAN KEY on the van; read the note and take the VALVE (H).
- Back out.
- Select the handle twice. Place the VALVE and then the CODE PLATE on it to trigger a puzzle (I).
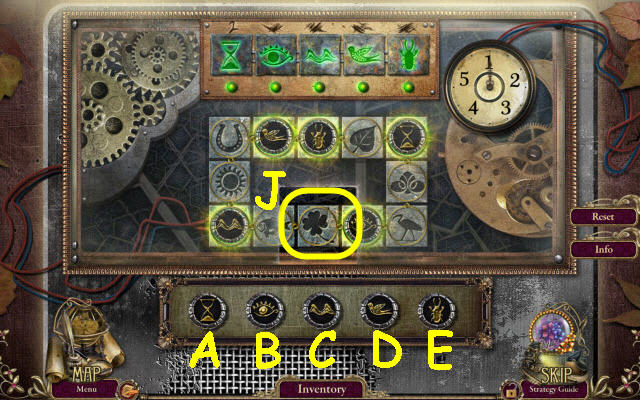
- Place the disks in the slot (J) so they land on their matching symbol when lit.
- Place the following disks when the timer reaches the number as follows: A-2, B-1, C-3, D-2 and E-4. It is easiest to do one at a time and wait for it to come around again.
- Cross the bridge.
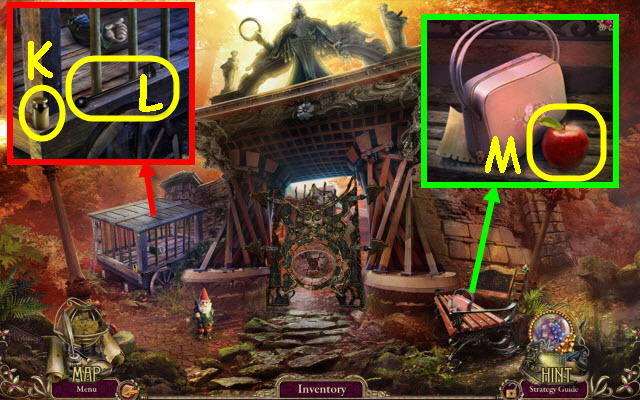
- Take the WEIGHT (K) and SEAT LEVER (L).
- Take the APPLE (M); read the note.
- Go to Thicket.
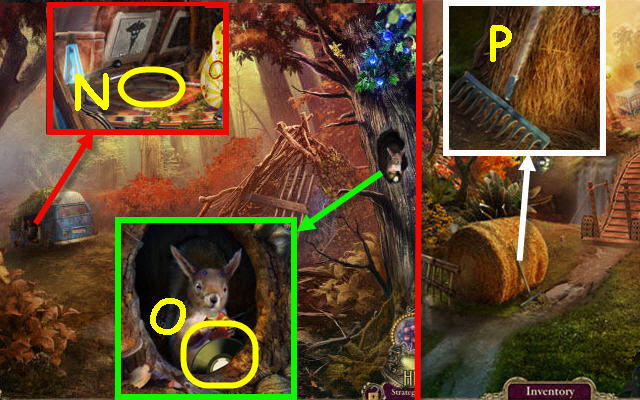
- Place the SEAT LEVER in the slot and move it; take the BRUSH (N).
- Give the APPLE to the squirrel; take the RECORD (O).
- Back out.
- Use the BRUSH on the mud; take the RAKE (P).
- Go forward.
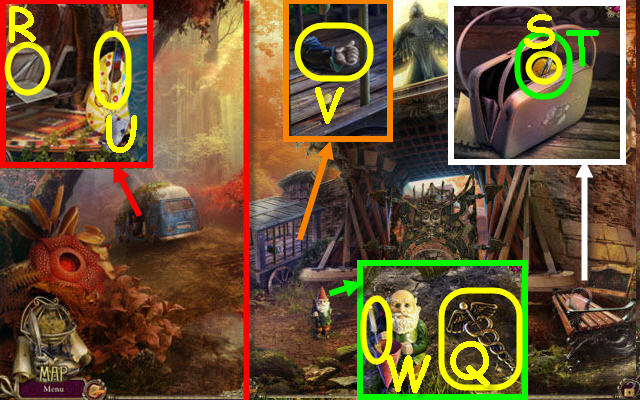
- Use the RAKE on the dirt; take the MEDICAL BADGE (Q).
- Go to Thicket.
- Place the MEDICAL BADGE on the panel; take the TWEEZERS (R).
- Go to Settlement entrance.
- Use the TWEEZERS on the zipper; take the RUNE STONE (S) and NAIL SCISSORS (T).
- Go to Thicket.
- Use the NAIL SCISSORS to get a GUITAR STRING (U).
- Go to Settlement entrance.
- Use the GUITAR STRING on the bars; take the PLASTER ARM (V).
- Place the PLASTER ARM on the gnome; take the CHISEL (W).
- Go to Thicket.
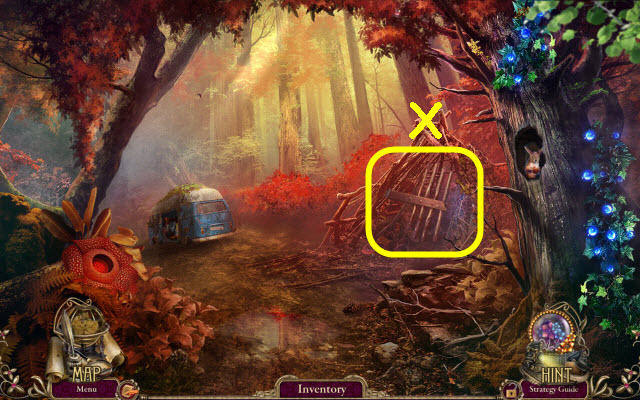
- Use the CHISEL on the latch (X).
- Examine the opened hut to access a HOP.
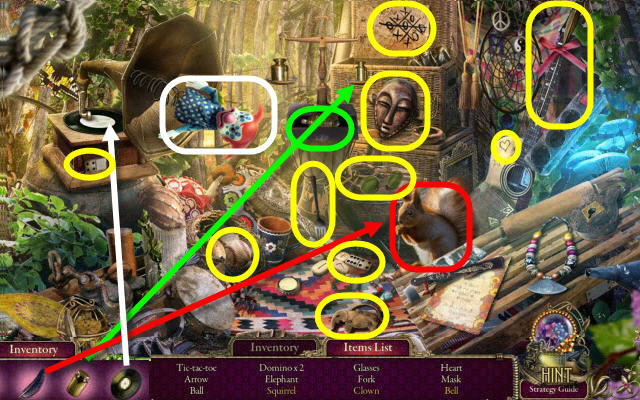
- Play the HOP.
- You receive a BELL (Y).
- Go to Pit.
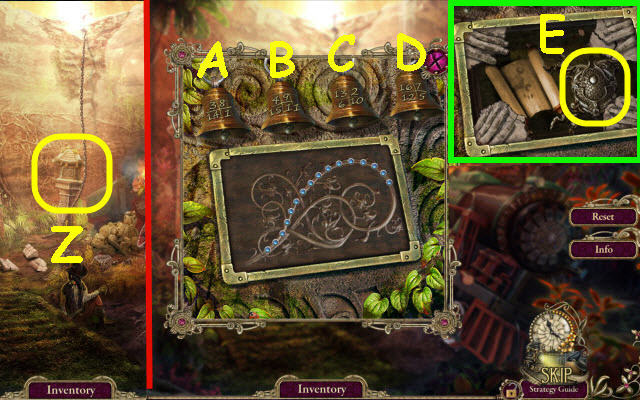
- Place the BELL on the pedestal to trigger a puzzle (Z).
- Ring the bells in correct order.
- Ring the following bells: A, C, A, B, D, C, D, A, B, C, B, D, C, A, B and D.
- Place the RUNE STONE in the slot; take the MASTER'S KEY (E).
- Go to Settlement entrance.
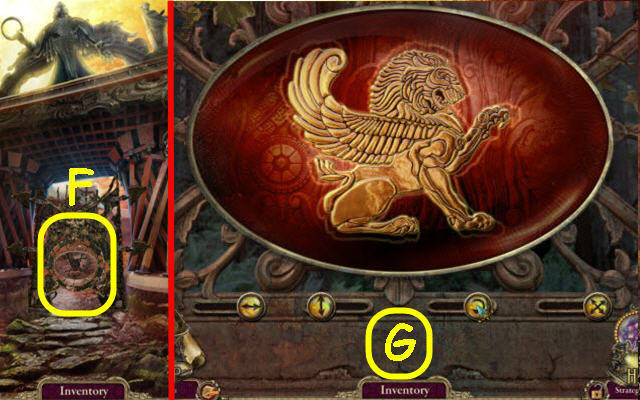
- Place the MASTER'S KEY on the gate to trigger a puzzle (F).
- Slide the bars to complete the image.
- See screenshot for position of bars (G).
Chapter 3: Hut
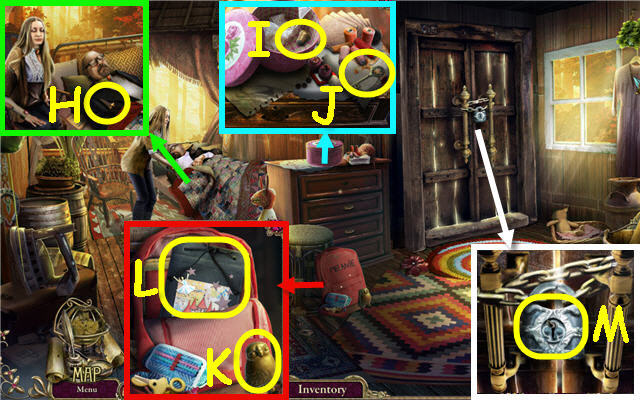
- Take the PLIERS (H).
- Remove the lid; take the THIMBLE (I) and KEY (J).
- Take the OWL ORNAMENT (K).
- Use the THIMBLE on the needle; take the book (L).
- Use the PLIERS and then the KEY on the lock; turn the key (M).
- Go through the door.
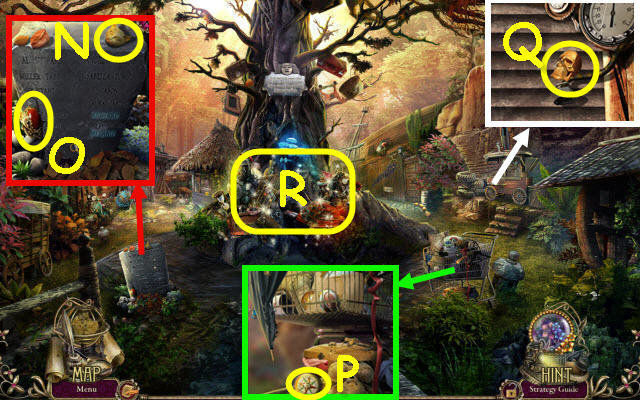
- Move the leaves; select the gravestone. Take the CAT EMBLEM (N) and MASTER'S STONE 1/3 (O).
- Take the COMPASS (P).
- Take the CLAY SKULL (Q).
- Examine the debris to access a HOP (R).
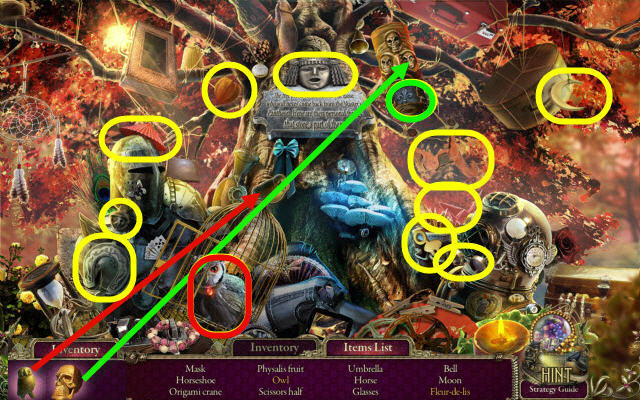
- Play the HOP.
- You receive a SCISSORS HALF (S).
- Go forward up the right of the tree.
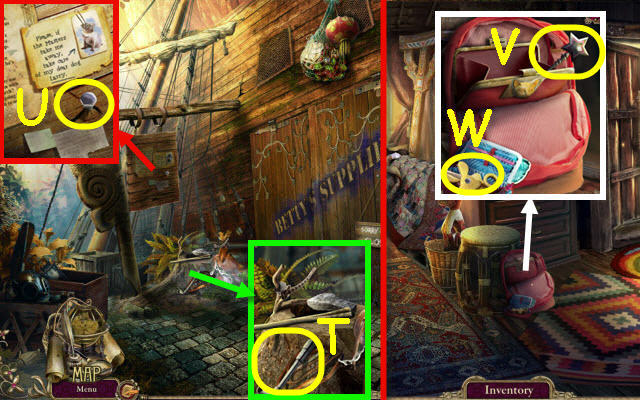
- TAKE THE HEX KEY (T).
- Use the HEX KEY on the bolt; take the BOLT (U).
- Go to Hut.
- Place the CAT EMBLEM on the clutch; take the WAND (V).
- Place the SCISSORS HALF and BOLT on the scissors; take the CHILD'S SCISSORS (W).
- Go to Square.
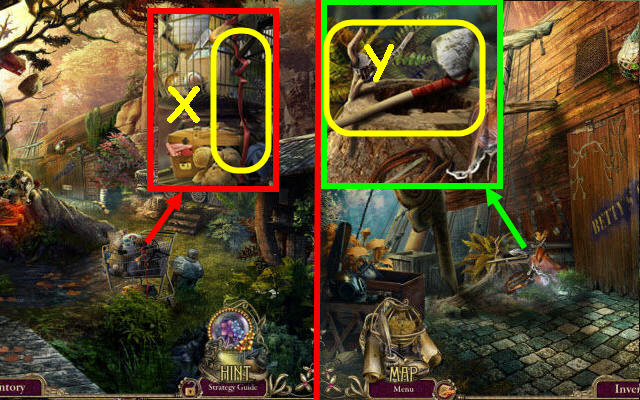
- Use the CHILD'S SCISSORS to get the RIBBON (X).
- Go to Supply store yard.
- Use the RIBBON on the broken axe; take the STONE AXE (Y).
- Back out and go up on the left.
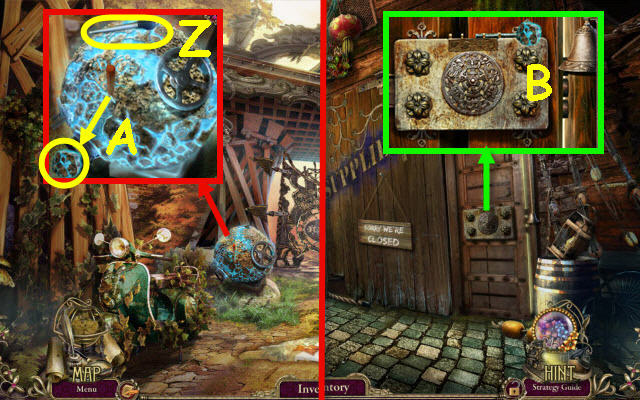
- Take the TURKEY BASTER (Z).
- Use the STONE AXE on the spike; take the MAGNET FRAGMENT (A).
- Go to the Supply store yard.
- Use the MAGNET FRAGMENT on the panel to trigger a puzzle (B).
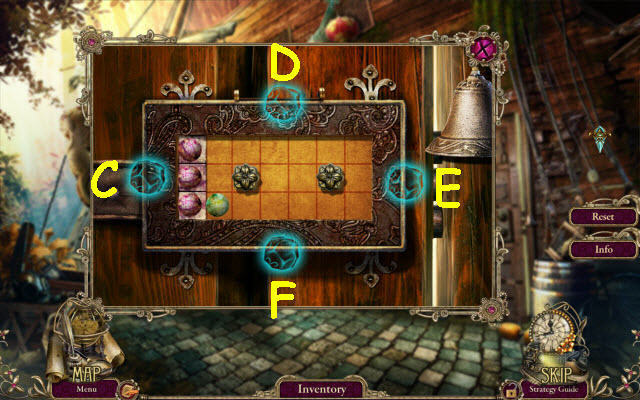
- Guide the balls to the squares.
- Select F, E, F, C, F, C, D, C, E, F, C, D, C, E, F, C, D, E, F, C, D, C, F and C.
- Go through the door.
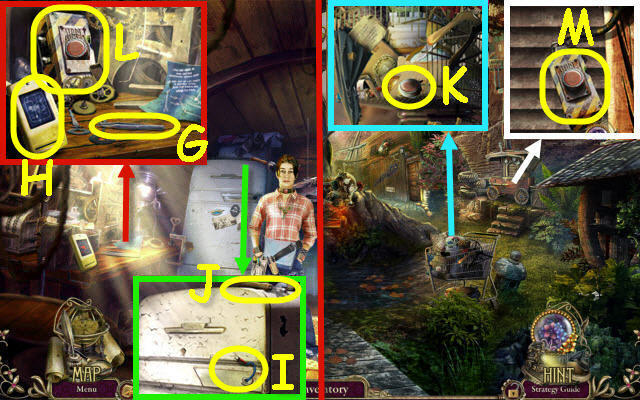
- Read the note; take the WATCHMAKER'S TWEEZERS (G) and SCANNER (H).
- Use the WATCHMAKER'S TWEEZERS to get the WIRE (I).
- Take the CAN OPENER (J).
- Go to Square.
- Use the CAN OPENER on the cart; take the RED BUTTON (K).
- Go to Supply store.
- Place the WIRE and RED BUTTON on the controls; take the LIFT CONTROLLER (L).
- Go to Square.
- Place the LIFT CONTROLLER on the panel; press the button to trigger a puzzle (M).
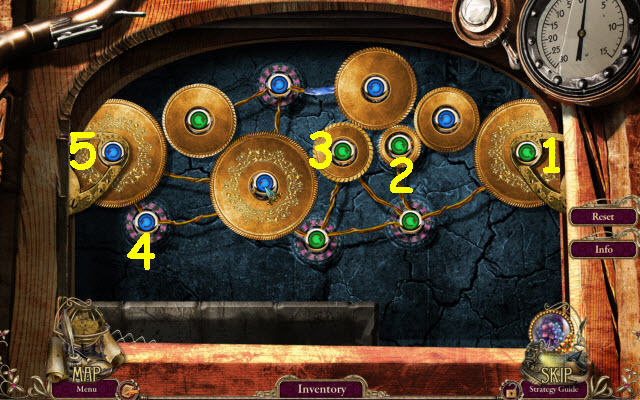
- Place the gears and set the arrows so the gears spin.
- Select the arrows in the order shown (1-5) and then place the gears.
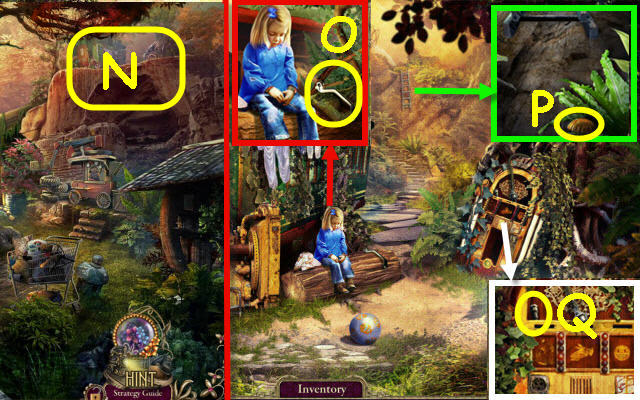
- Go up to Capital Express clearing (N).
- Take the FOOTPLATE (O).
- Take the DRAWER HANDLE (P).
- Take the SPARK PLUG (Q).
- Go to the Hut.
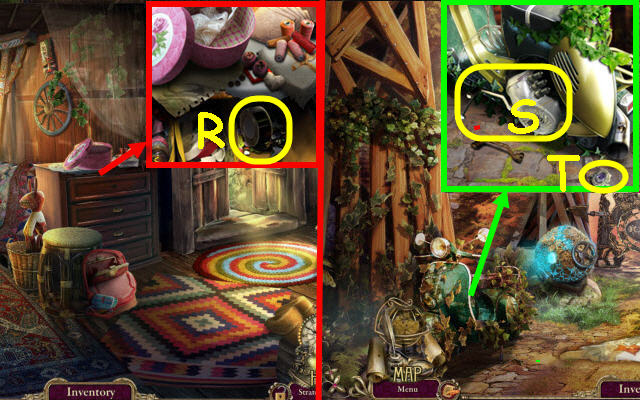
- Place the DRAWER HANDLE on the drawer; take the ADHESIVE TAPE (R).
- Go to Gates.
- Place the FOOTPLATE and the SPARK PLUG on the motorcycle (S). Select the motorcycle; take the MASTER'S STONE 2/3 (T).
- Go to Capital Express clearing.
Chapter 4: Train
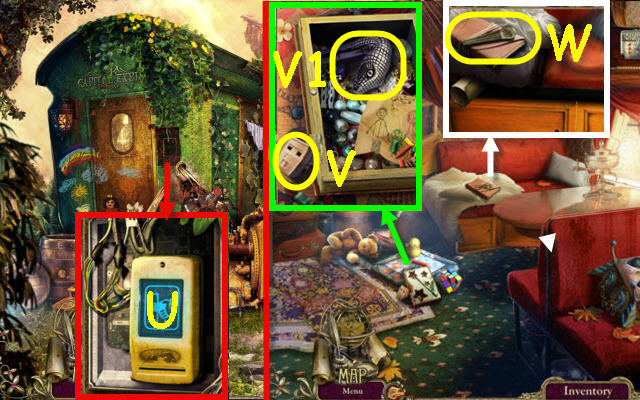
- Place the SCANNER and the ADHESIVE TAPE on the panel. Use the TICKET on the scanner (U).
- Enter the train.
- Take the ADAPTER (V).
- Place the WAND on the book; examine the drawing and take the SNAKE'S HEAD (V1).
- Take the FRIDGE HANDLE (W).
- Go to Supply Store.
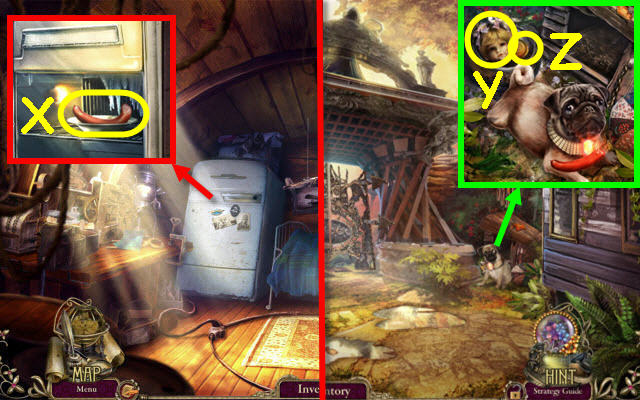
- Place the FRIDGE HANDLE on the fridge and select it; take the SAUSAGE (X).
- Go to the Gates.
- Give the SAUSAGE to the dog; take the DOLL'S HEAD (Y) and SMILEY TOKEN (Z).
- Go to Capital Express clearing.
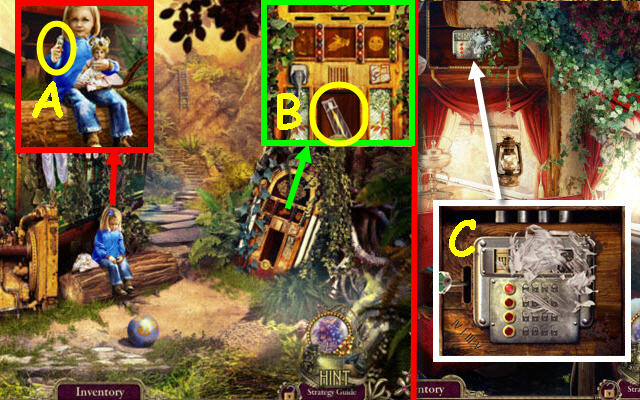
- Put the DOLL'S HEAD on the doll; take the CODE LOCK PART (A).
- Place the ADAPTER in the socket and plug in the cord. Place the SMILEY TOKEN in the right slot; take the TOOTHBRUSH (B).
- Enter the train.
- Use the TOOTHBRUSH and CODE LOCK PART on the lock to trigger a puzzle (C).
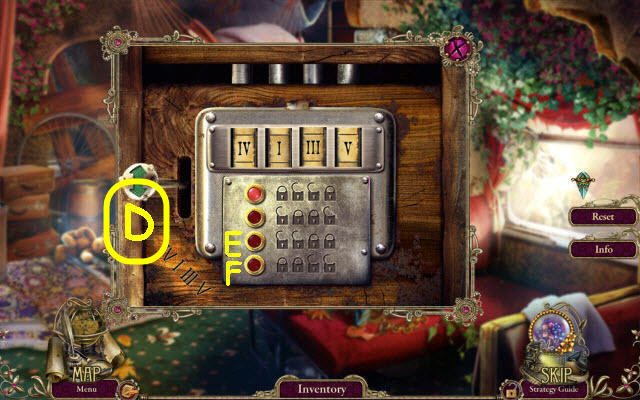
- Set the correct code.
- Select the following: E, D, F, Dx2.
- Examine the cupboard to access a HOP.
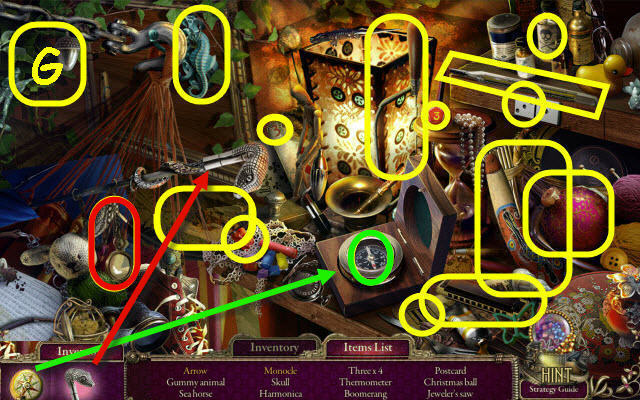
- Play the HOP.
- You receive a JEWELER'S SAW (G).
- Go to Supply store yard.
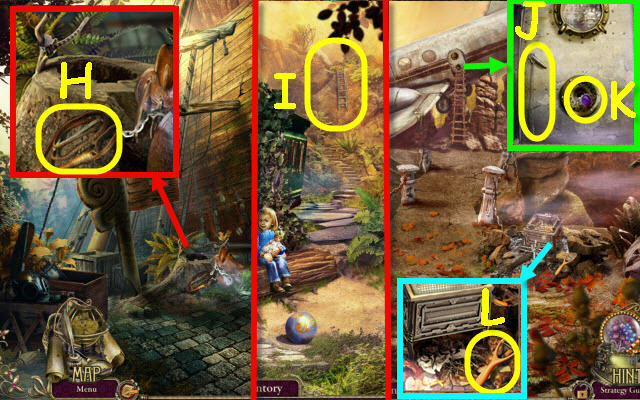
- Use the JEWELER'S SAW on the chain; take the WHIP (H).
- Go to Capital Express clearing.
- Use the WHIP on the ladder (I).
- Go up the ladder.
- Take the WIRE HOOK (J) and MASTER'S STONE 3/3 (K).
- Take the POTATO PEELER (L).
- Go to Capital Express car.
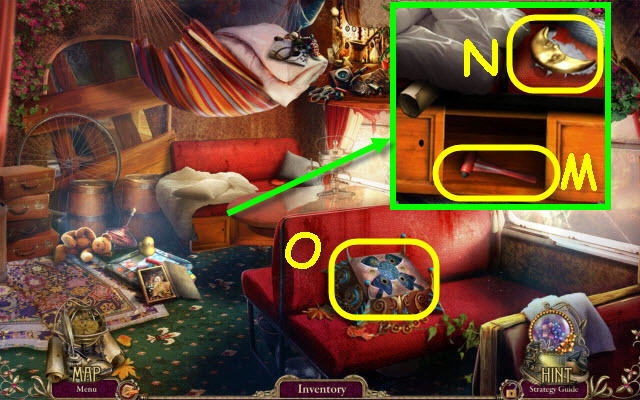
- Use the WIRE HOOK on the cabinet; take the EMERGENCY MALLET (M).
- Use the POTATO PEELER on the cushion; take the MOON AMULET (N).
- Examine the device and place the MASTER'S STONE on it to trigger a puzzle (O).
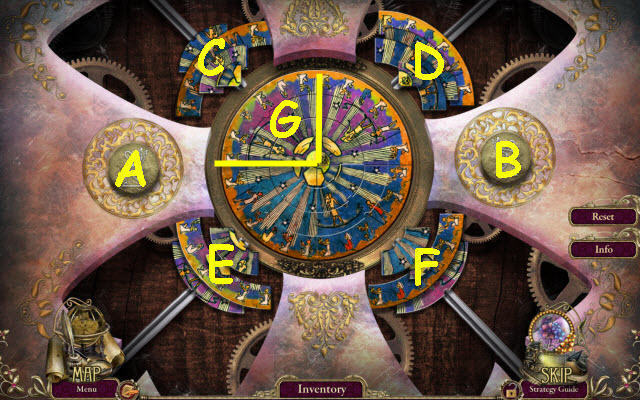
- Complete the image.
- Select the following: C, Ax2, D, A, C, Ax2, E, B, G, Bx2, E, A, F, A, F, Ax2, C, D, A, C, A, C, B, Gx2, A, C, D, A, E, B, E, A, C, F, B, F, G, Ax2, C, A, G, A, C, Bx2 and D.
- Take the LIGHTER and FUSE.
- Go to Cliff.
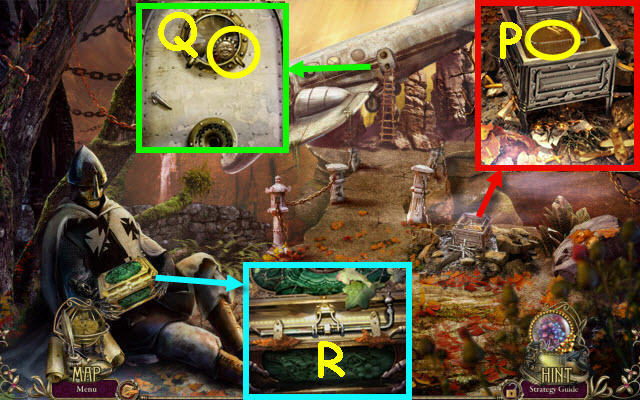
- Use the LIGHTER on the twigs; use the TURKEY BASTER to get OIL (P).
- Use the EMERGENCY MALLET on the glass; take the SUN AMULET (Q).
- Use the OIL on the lock; select the lock (R).
- Examine the box to access a HOP.
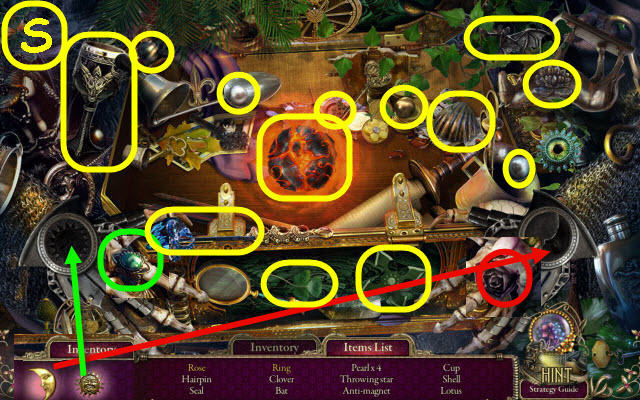
- Play the HOP.
- You receive an ANTI-MAGNET (A).
- Go to Gates.
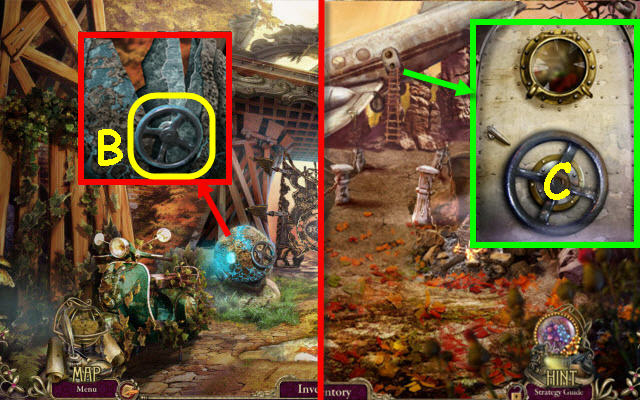
- Use the ANTI-MAGNET on the stone; take the VALVE (B).
- Go to Cliff.
- Place the VALVE on the door; turn it (C).
- Enter the plane.
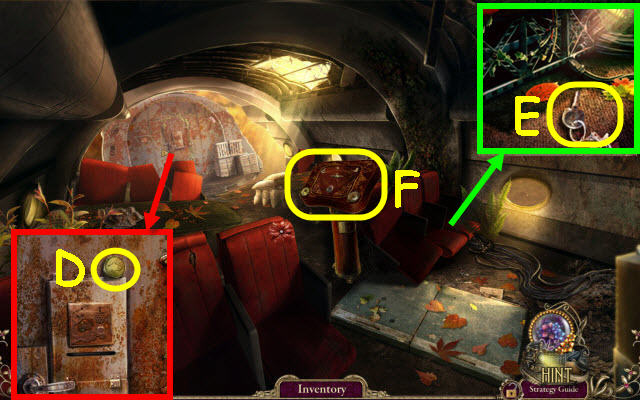
- Take the HANDS TOKEN (D).
- Take the AIR HOSTESS KEY (E).
- Use the AIR HOSTESS KEY on the console to trigger a puzzle (F).
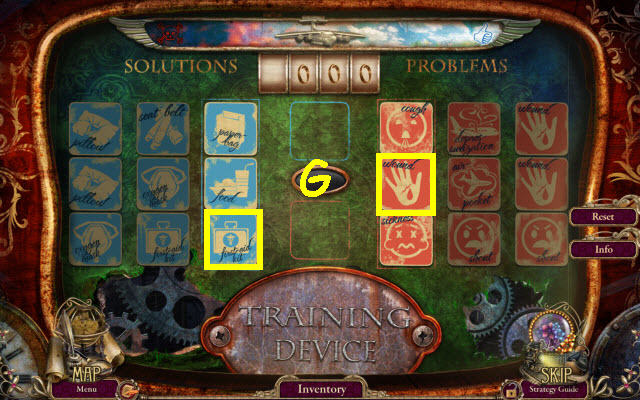
- Match the solutions to the problems.
- Selecting the reset button will give you a new board.
- Matching pairs: Sleep-pillow/food, hunger-food/water, air pocket-seat belt/paper bag/smile, depressurization-oxygen mask/seat belt, cough-water/oxygen mask/first aid kit, wound-first aid kit/water, sickness-paper bag/first aid kit/water, shout-smile (G).
- Back out twice.
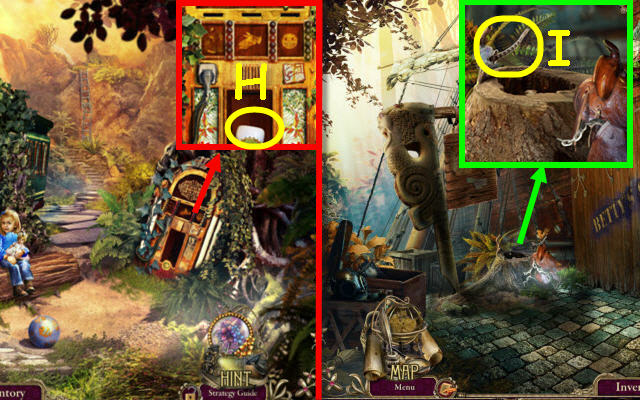
- Place the HANDS TOKEN in the center slot; take the SOAP (H).
- Go to Supply store yard.
- Use the SOAP on the band; take the CLAMPBAND (I).
- Go to the Airplane.
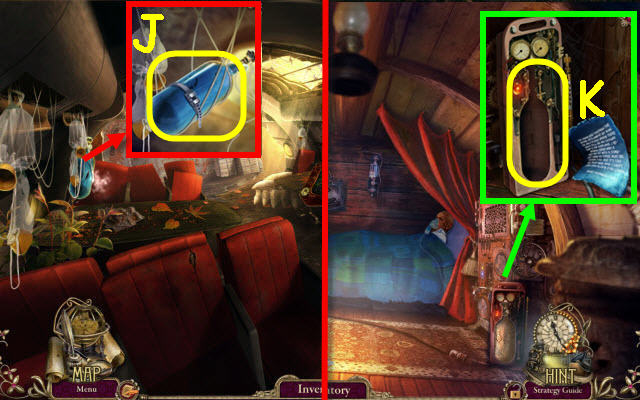
- Place the CLAMPBAND on the tank; take the OXYGEN TANK (J).
- Go to Supply store.
- Place the OXYGEN TANK in the holder (K) and receive the BLACK BOX.
- Go to the Airplane.
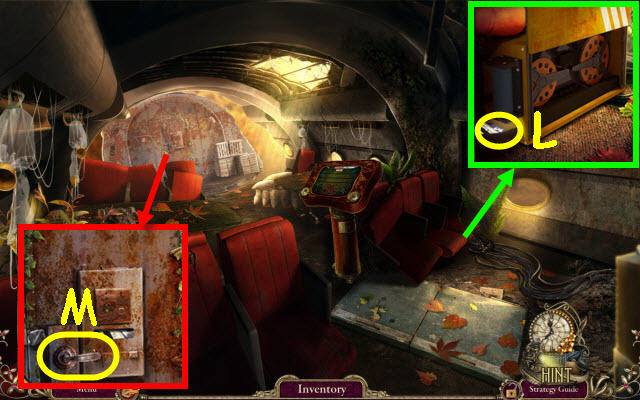
- Place the BLACK BOX by the seats; take the PILOT'S ID CARD (L).
- Use the PILOT'S ID CARD on the lock; turn the handle (M).
- Go forward.
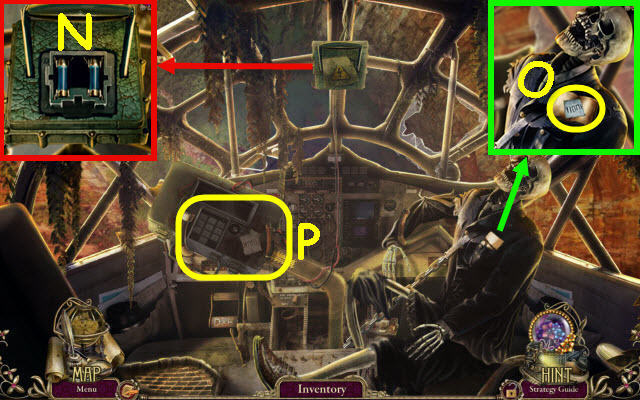
- Remove the paper and place the FUSE in the left slot. Pull the lever (N).
- Select the paper; take the PAPER (O).
- Place the PAPER on the controls to trigger a puzzle (P).
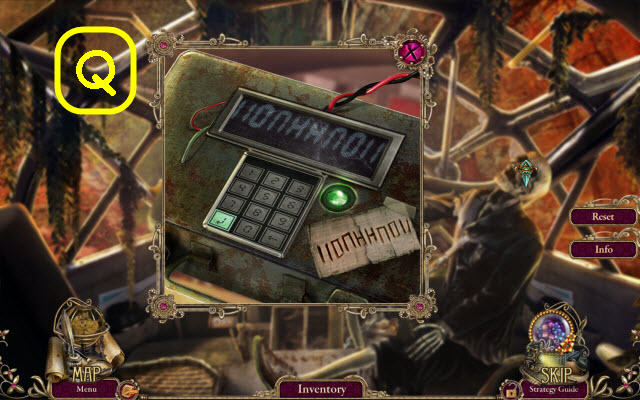
- Duplicate the code from the paper.
- Select 1, 0, 7, 4, 4, 7, 0 and 1 and then the bottom left button (Q).
- Take the NEUROSTIMULANT.
- Go to Hut.
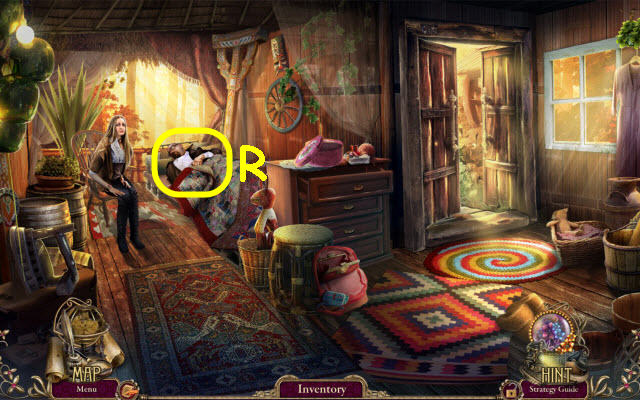
- Use the NEUROSTIMULANT on Bors (R).
- Speak to Bors.
Chapter 5: Briefcase
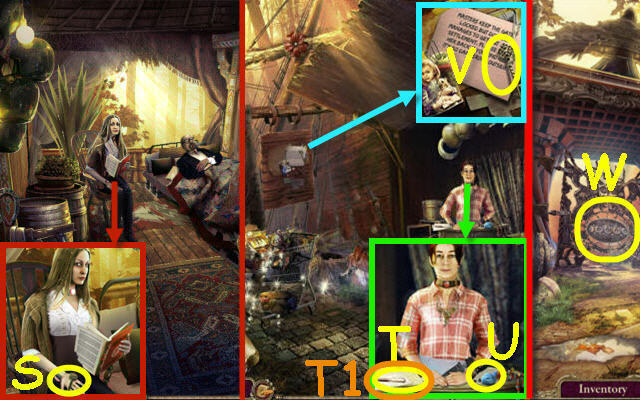
- Speak to Shauna; take SHAUNA'S KEY (S).
- Go out the door and up the right.
- Speak to Betty; take the PEN (T), PAPER (T1) and MODELING CLAY (U).
- Take BETTY'S KEY (V).
- Back out and go forward on the left.
- Place SHAUNA'S KEY and BETTY'S KEY in the keyholes to trigger a puzzle (W).
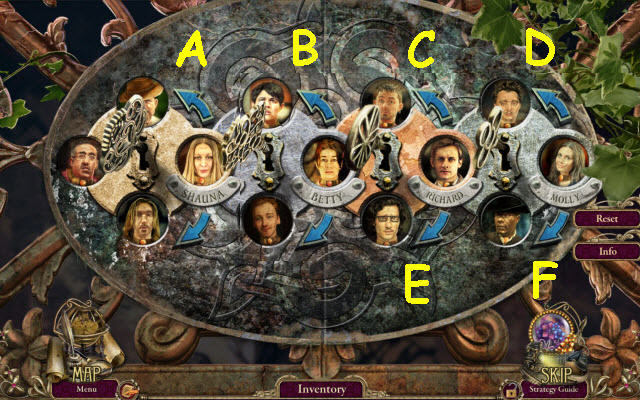
- Place the proper images to their names.
- Select the following: A, Bx2, D, E, Fx2 and C.
- Go forward.
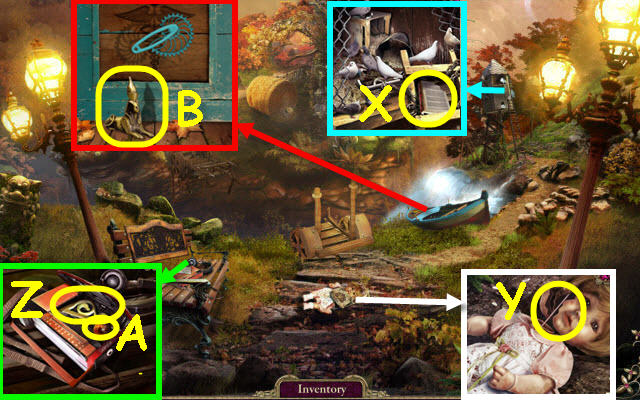
- Take the BOOK HALF (X).
- Take the note; take the KNITTING NEEDLE (Y).
- Use the KNITTING NEEDLE in the hole; take the SUNDIAL PART (Z) and GLASS EYE (A).
- Take the SPHINX FIGURINE (B).
- Go to Hut.
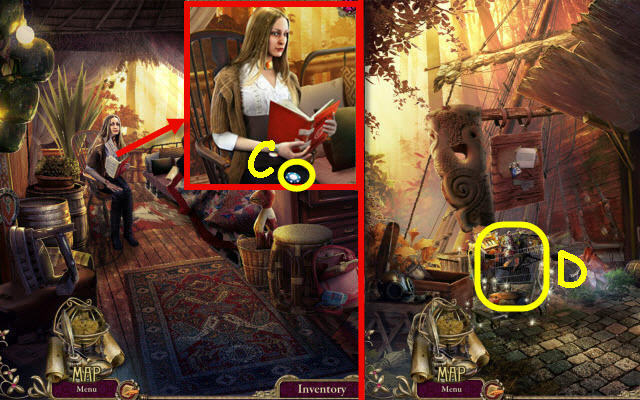
- Give the BOOK HALF to Shauna; take the PLAYING CHIP (C).
- Go to Supply store.
- Examine the cart to access a HOP (D).
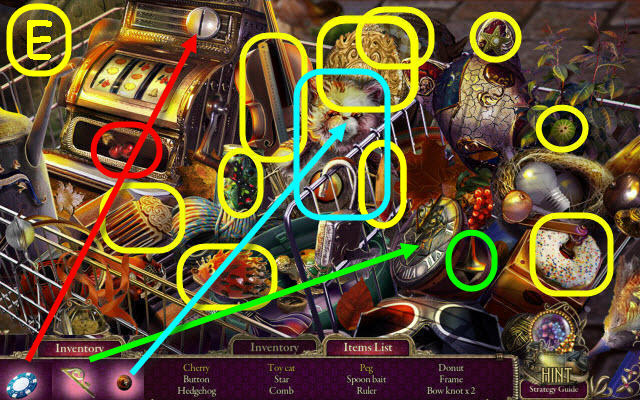
- Play the HOP.
- You receive the TOY CAT (E).
- Go to Bridge.
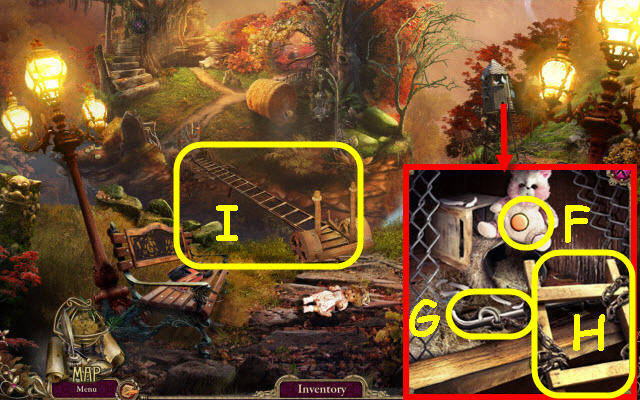
- Place the TOY CAT by the birds; push the button (F).
- Remove the bar (G); take the LADDER (H).
- Place the LADDER across the chasm (I).
- Go forward.
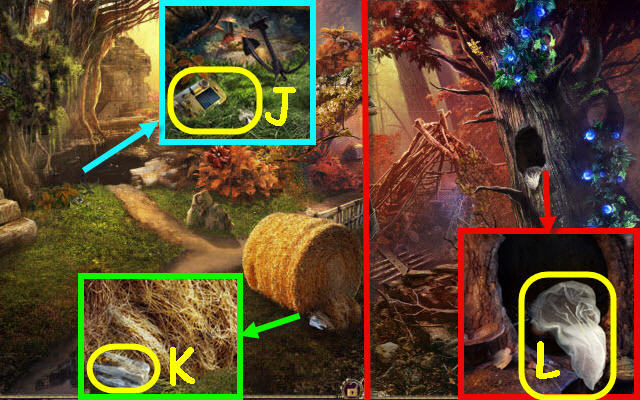
- Take the LISTENING DEVICE (J).
- Take the DIAMOND TOOTH 1/5 (K).
- Go right up the path.
- Take the NET (L).
- Go to Square.
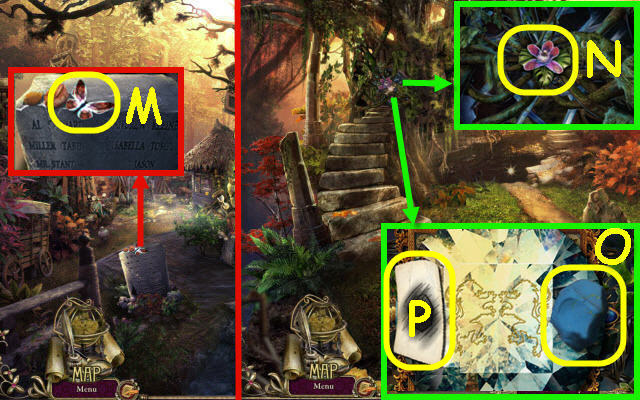
- Use the NET to get the BUTTERFLY (M).
- Go to Rocks.
- Place the BUTTERFLY on the flower (N).
- Use the MODELING CLAY on the medallion; take the MEDALLION IMPRINT (O).
- Place the PAPER on the slot; use the PEN on the paper. Take the SLOT IMAGE (P).
- Go to Supply store.
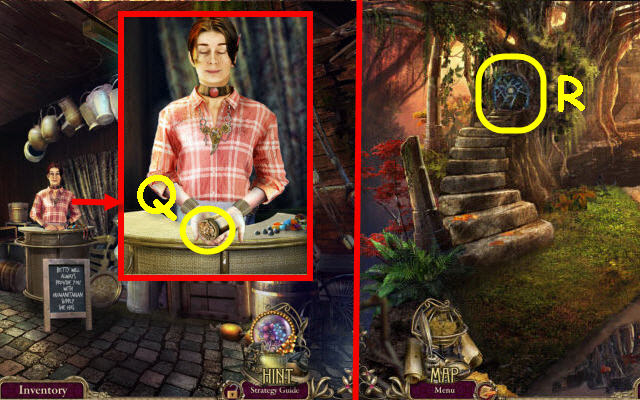
- Give the SLOT IMAGE and MEDALLION IMPRINT to Betty; take the MEDALLION (Q).
- Go to Rocks.
- Place the MEDALLION in the slot to trigger a puzzle (R).
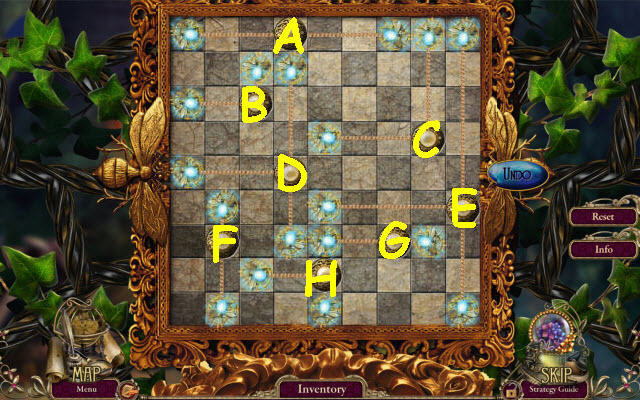
- Shoot the bugs in the spaces.
- Select the bugs in the following order: E, D, C, A, B, F, H, Ex2 and G.
- Go upstairs.
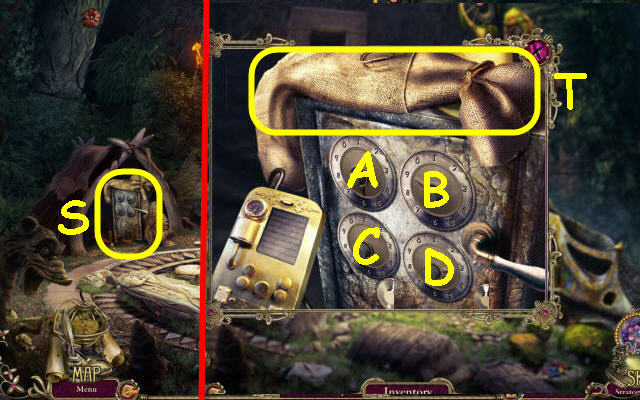
- Place the LISTENING DEVICE on the safe to trigger a puzzle (S).
- Take the SACK (T).
- Set the dials to the loudest setting.
- Set the dials as follows: A-6, B-9, C-8 and D-3.
- Take the DART and DIAMOND TOOTH 2/5.
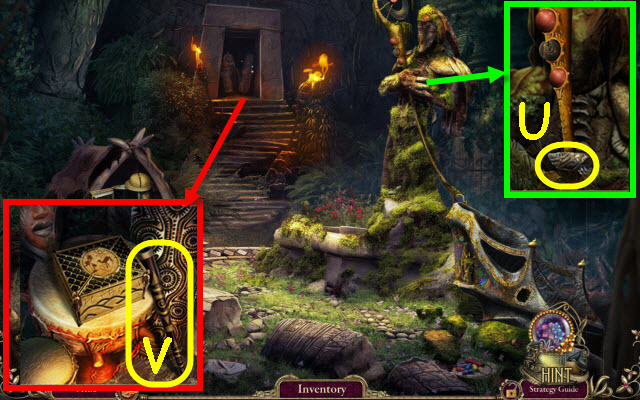
- Take the MECHANICAL FINGER (U).
- Place the DART in the pipe; take the BLOWGUN (V).
- Back out.
Chapter 6: Platform
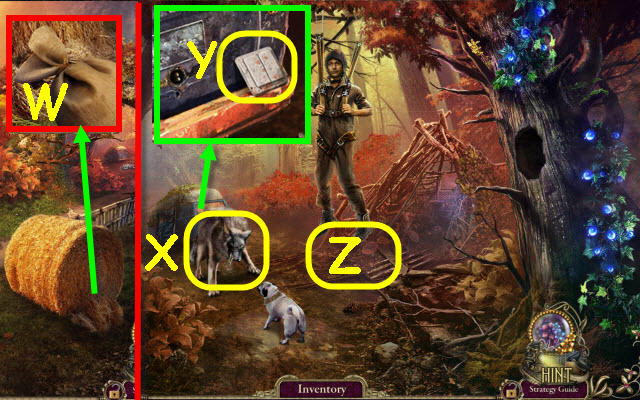
- Use the SACK on the hay; take the SACK OF HAY (W).
- Go to Hermit's van.
- Use the BLOWGUN on the beast (X).
- Take the SWITCH (Y).
- Use the SACK OF HAY under the man (Z).
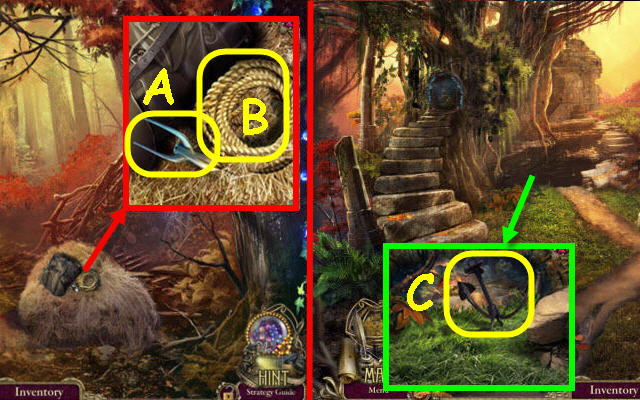
- Take the ROCKET INSIGNIA (A) and ROPE (B).
- Back out.
- Place the ROPE on the grapple hook (C).
- Go forward.
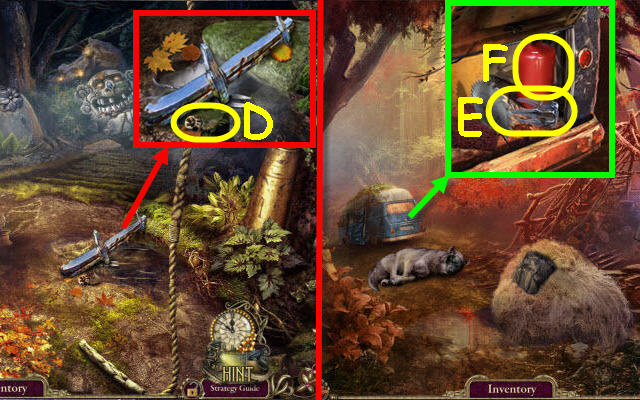
- Take the LOCK BUTTON (D).
- Go to Hermit's van.
- Place the LOCK BUTTON on the lock and turn it. Take the DIAMOND TOOTH 3/5 (E) and FIRE EXTINGUISHER (F).
- Go to Gates.
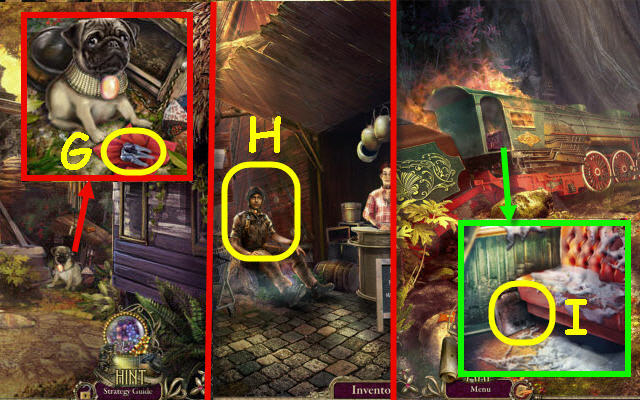
- Select Larry and then the bow; take the DIAMOND TOOTH 4/5 (G).
- Go to Supply store; receive a SIGNAL FLARE from the man (H).
- Go to Train cave.
- Use the FIRE EXTINGUISHER on the fire; take the BRIEFCASE (I).
- Go to the Hut.
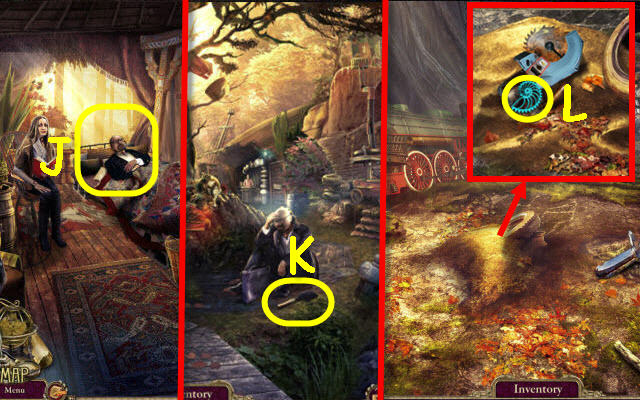
- Give the BRIEFCASE to Bors (J).
- Take the SHOVEL (K).
- Go to Train cave.
- Use the SHOVEL to get SAND; take the SNAIL-SHAPED GEAR (L).
- Go to the Bridge.
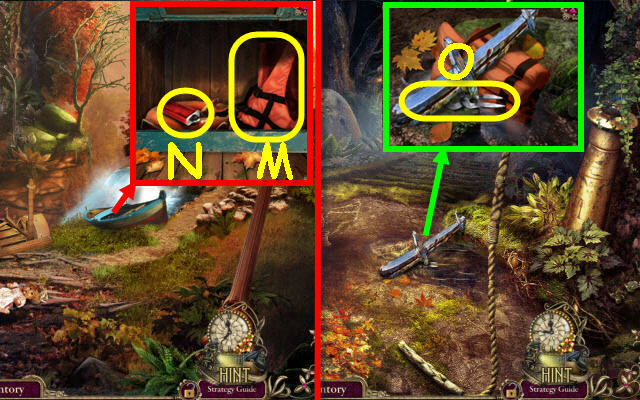
- Place the SNAIL-SHAPED GEAR on the door; take the LIFE JACKET (M) and FUEL (N).
- Go to Train cave.
- Place the LIFE JACKET under the bumper and pull the cord; take the TONGS (O).
- Go to Hermit's van.
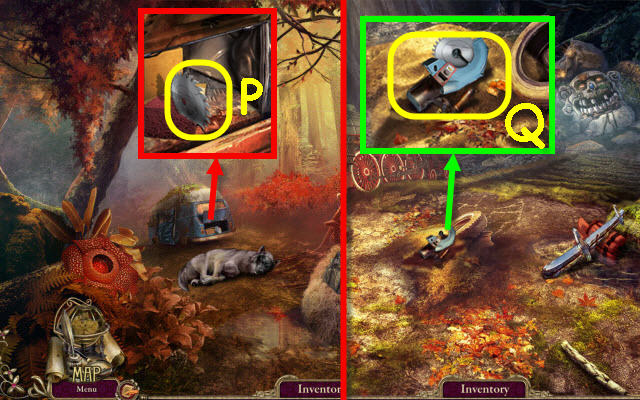
- Use the TONGS to get the CIRCULAR SAW BLADE (P).
- Go to Train cave.
- Remove the blade and place the CIRCULAR SAW BLADE and FUEL on the saw. Take the CIRCULAR SAW (Q).
- Go to the Square.
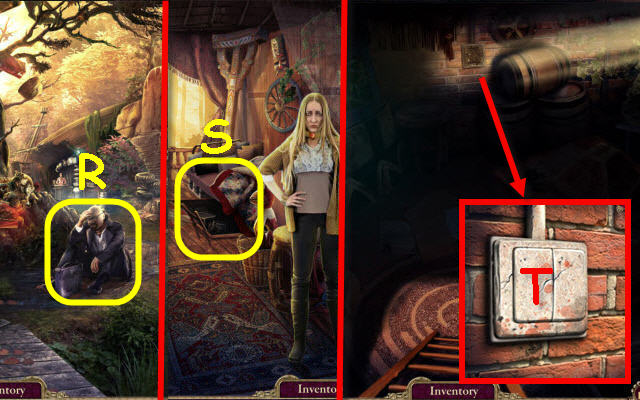
- Give the CIRCULAR SAW to Bors (R).
- Go down the hatch (S).
- Use the SIGNAL FLARE anywhere.
- Place the SWITCH on the panel; push the button (T).
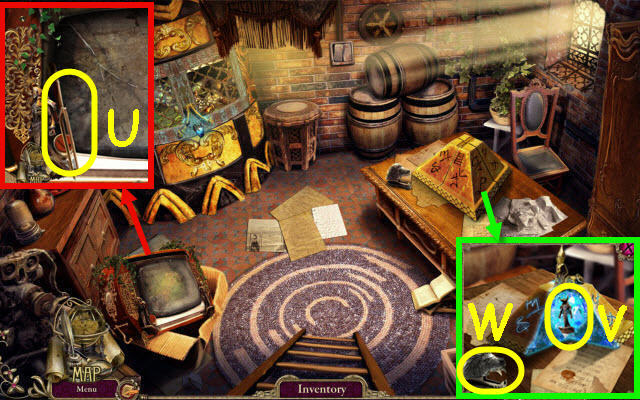
- Take the FORKED ROD (U) and press the button.
- Place the SPHINX FIGURINE on the pyramid; take the MASKED MASTER STATUETTE (V) and STAPLE REMOVER (W). Read the note.
- Go to Square.
- Examine the briefcase to access a HOP.
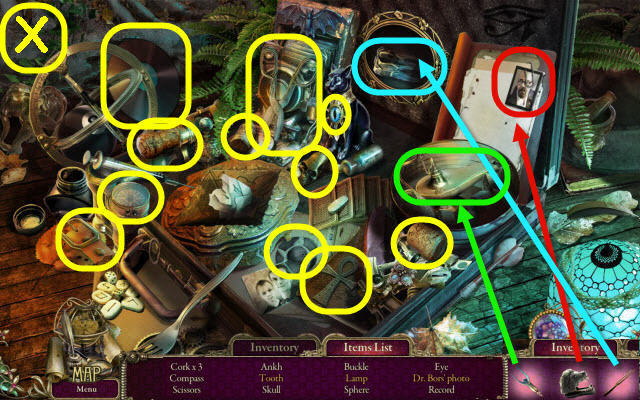
- Play the HOP.
- You receive a DIAMOND TOOTH 5/5 (X).
- Go to Ruins.
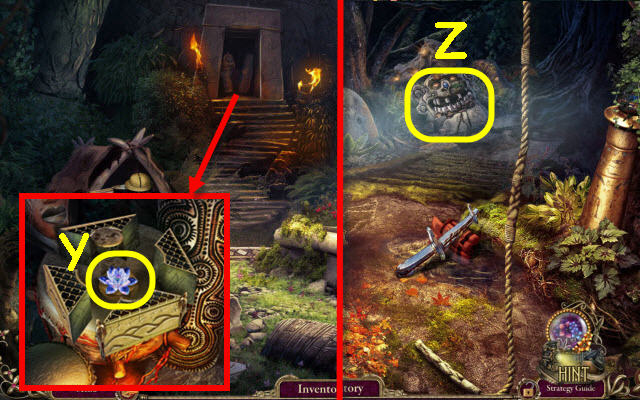
- Place the SAND in the box; take the CRYSTAL FLOWER (Y).
- Go to Train Cave.
- Place the DIAMOND TOOTH in the mouth to trigger a puzzle (Z).
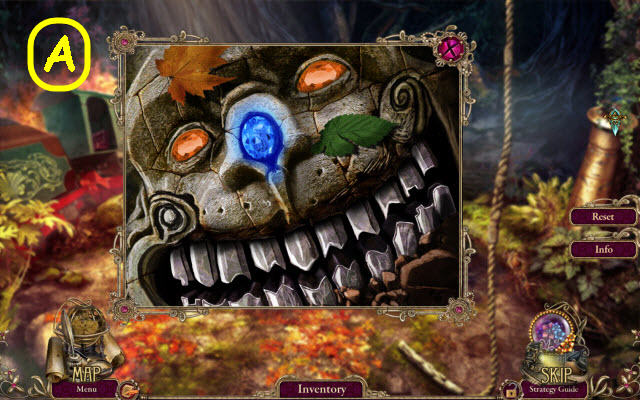
- Arrange the teeth in the correct order.
- See screenshot for solution (A).
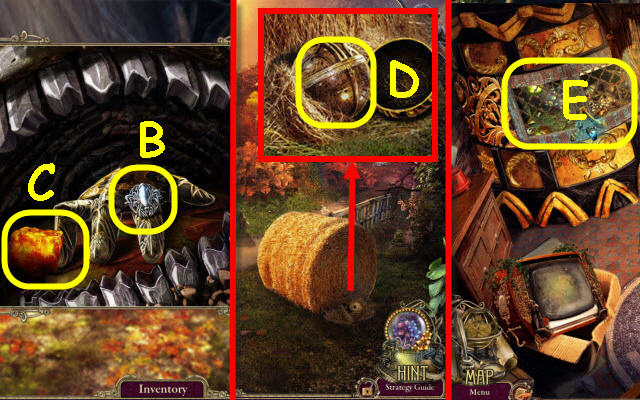
- Place the MECHANICAL FINGER on the hand; take the MASTER'S RING (B) and RED ORE (C).
- Go to Rocks.
- Use the MASTER'S RING on the sphere and turn it; take the UNIVERSE ATLAS (D).
- Go to Hut basement.
- Place the RED ORE on the lock (E).
- Examine the cabinet to access a HOP.
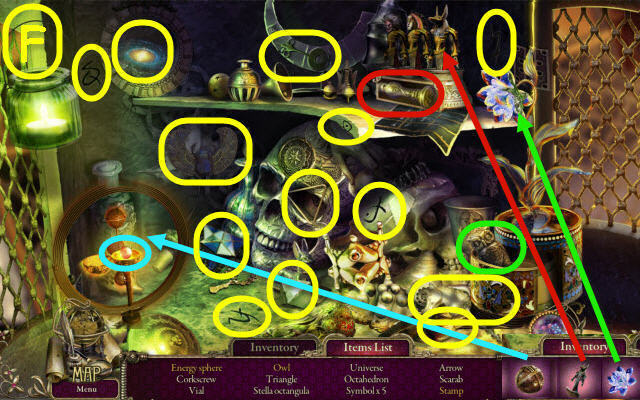
- Play the HOP.
- You receive the ENERGY SPHERE (F).
- Go to Ruins.
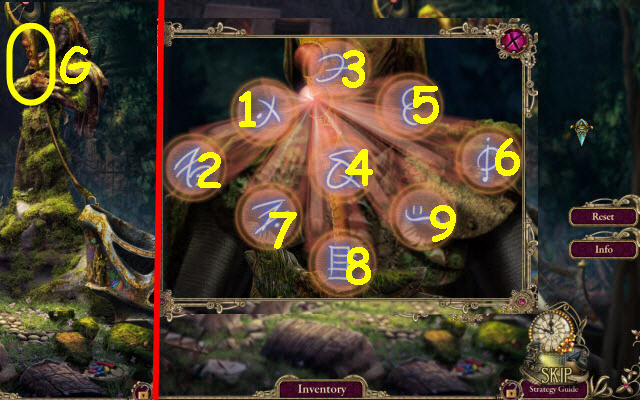
- Place the ENERGY SPHERE on the scepter to trigger a puzzle (G).
- Select the symbols in correct order.
- See screenshot for order (1-9).
- Go to Hut basement.
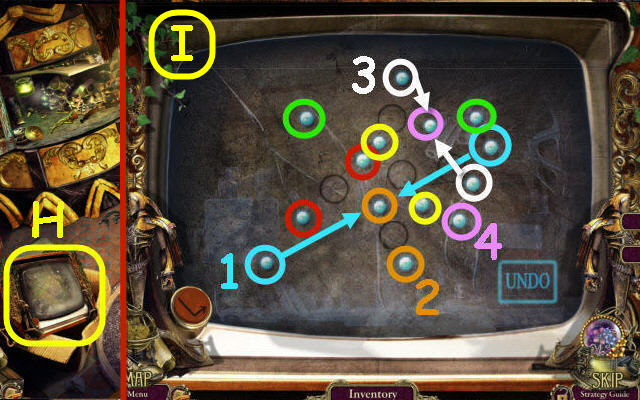
- Select the button to trigger a puzzle (H).
- Form pairs of balls to join in the circles.
- See screenshot for matches (I). Do the numbered ones first in order (1-4).
- Take the POWER UNIT.
- Go to Ruins.
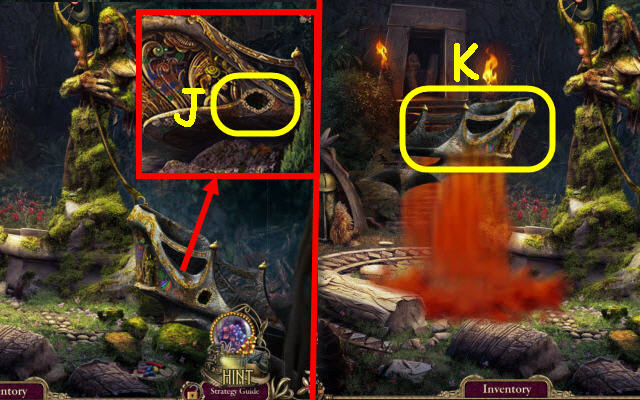
- Examine the note; place the POWER UNIT on the platform (J).
- Select the platform (K).
Chapter 7: Bors
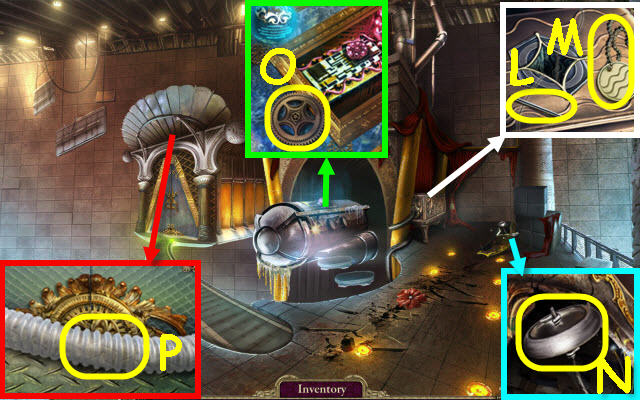
- You will receive a COLLAR.
- Take the BLUNT NAIL (L) and SYMBOL (M).
- Use the BLUNT NAIL on the wheel; receive a SHARP NAIL (N).
- Take the GEAR (O).
- Select the door twice; use the SHARP NAIL on the tube (P).
- Go through the door.
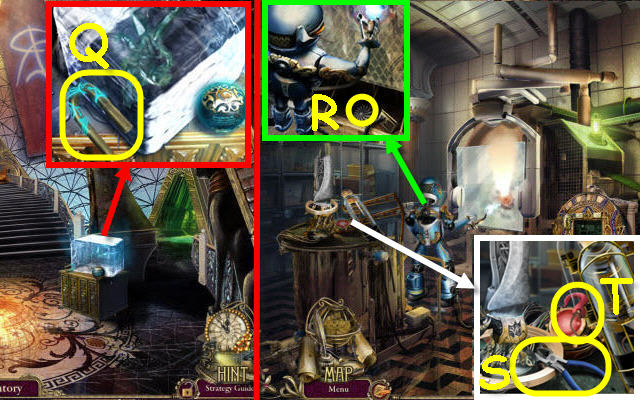
- Take the METAL U 1/3 (Q).
- Go up the right.
- Take the PROPELLER (R).
- Take the CUTTERS (S) and HOOK (T).
- Back out; go into the Loading bay on the left.
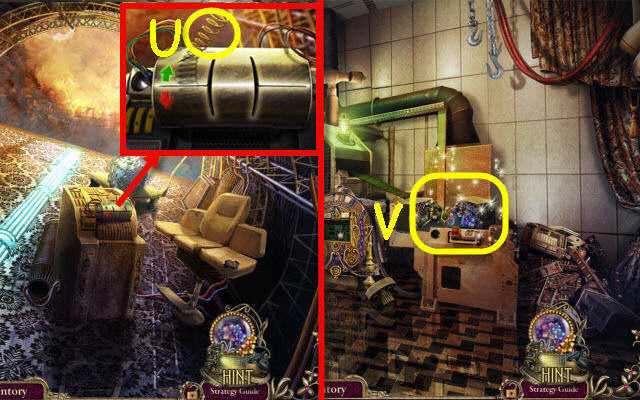
- Use the CUTTERS to get a SPRING (U).
- Go to the Technology center.
- Examine the table to access a HOP (V).
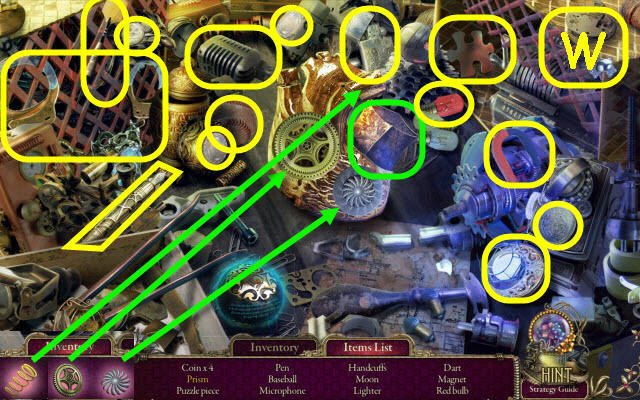
- Play the HOP.
- You receive an EMPTY PRISM (W).
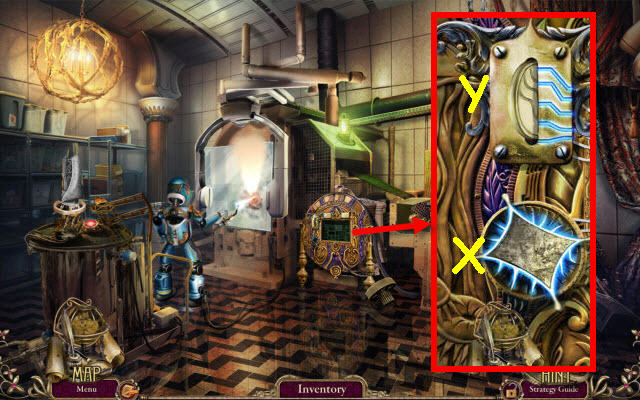
- Place the EMPTY PRISM in the slot (X).
- Place the SYMBOL on the top left to trigger a puzzle (Y).
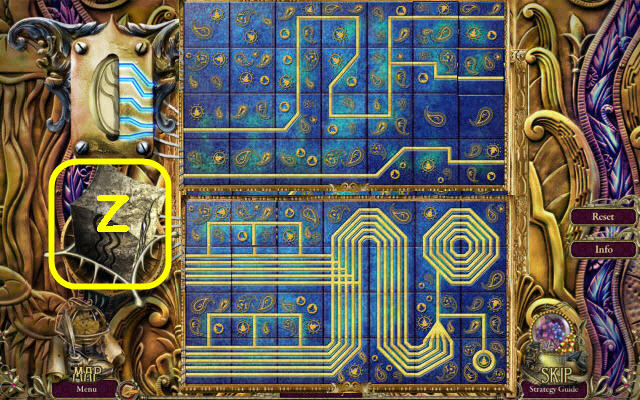
- Arrange the squares to complete the pattern on both sides.
- See screenshot for solution.
- Take the PRISM KEY (Z).
- Go to Landing area.
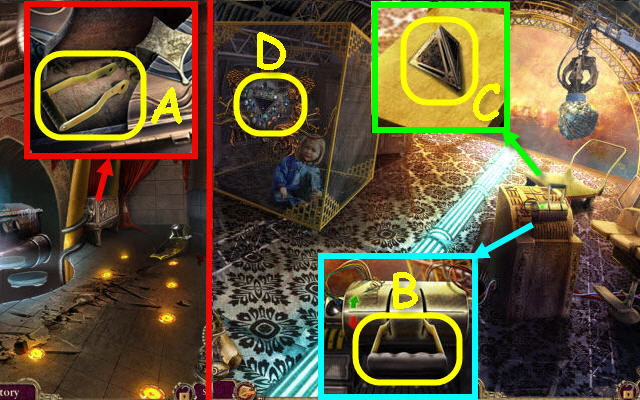
- Place the PRISM KEY on the cabinet; take the LEVER (A).
- Go to Loading bay.
- Place the LEVER on the mechanism; pull it (B).
- Take the INTERFACE PYRAMID (C).
- Place the INTERFACE PYRAMID on the panel to trigger a puzzle (D).
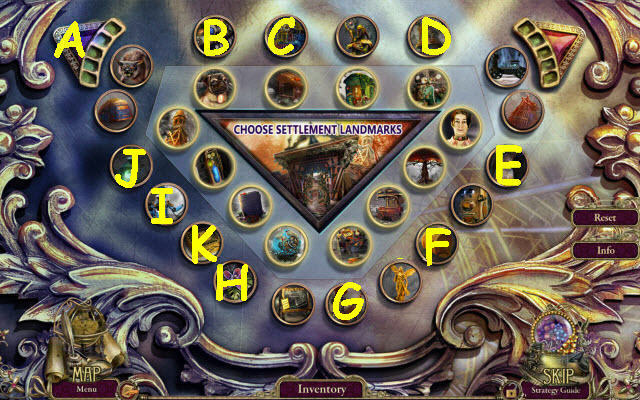
- Place the safe tokens in the center.
- Select the following: A, B, C, D, E, F, G, H, I, J, Ax3 and K.
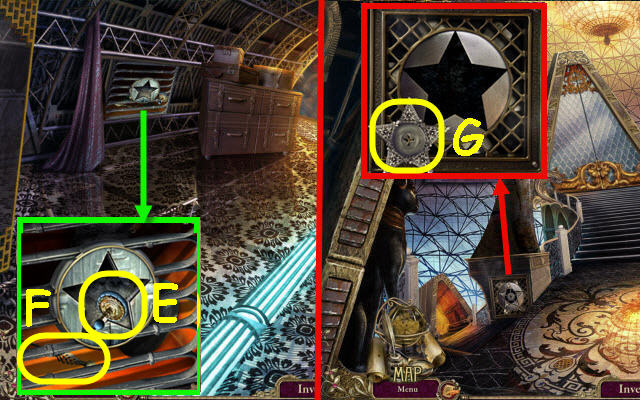
- Take the ROBOT SWITCH (E).
- Use the HOOK on the key; pull twice and take the CROSS KEY (F).
- Back out.
- Use the CROSS KEY on the grate; take the STAR KEY (G).
- Return to Loading Bay.
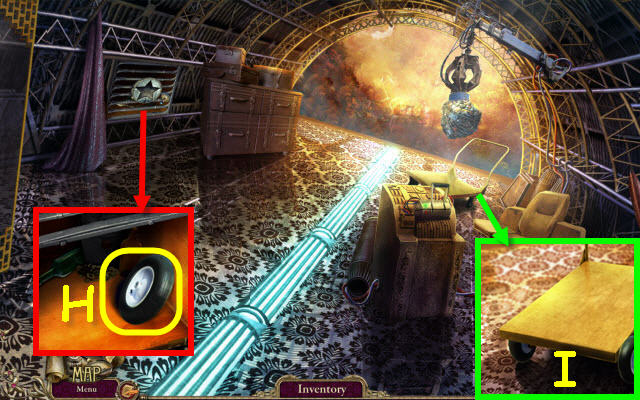
- Use the STAR KEY on the grate; take the WHEEL (H).
- Place the WHEEL on the cart; take the CART (I).
- Go to Technology center.
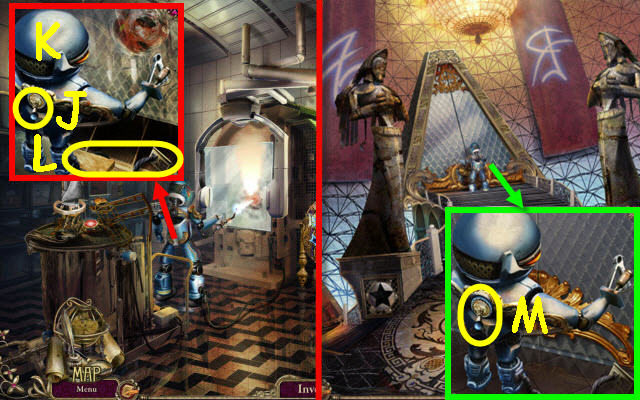
- Place the ROBOT SWITCH on the robot; flip the switch (J).
- Use the CART on the robot; take the CART WITH ROBOT (K) and CABLE (L).
- Back out.
- Place the CART WITH ROBOT by the door; use the CABLE on it and flip the switch (M).
- Go forward.
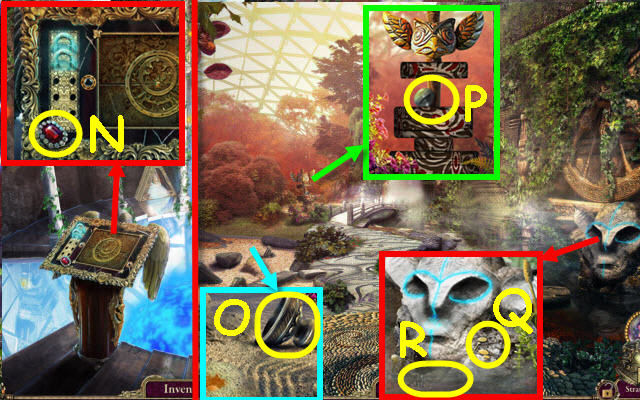
- Take the RUBY (N).
- Go forward on the right path.
- Take the BOWL (O).
- Take the DIAL (P).
- Take the CROP CIRCLES SYMBOL (Q). Use the BOWL on the water; get HOT WATER (R).
- Back out.
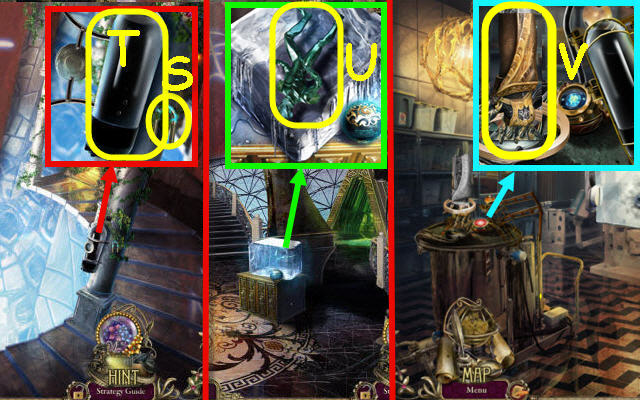
- Place the DIAL on the lock and turn it. Take the BLACK TANK (S) and METAL U 2/3 (T).
- Back out.
- Use the HOT WATER on the ice; take the FISH-HEADED FIGURINE (U).
- Go to Technology center.
- Place the BLACK TANK in the holder. Press the button; take the MECHANICAL HAND (V).
- Go to Landing area.
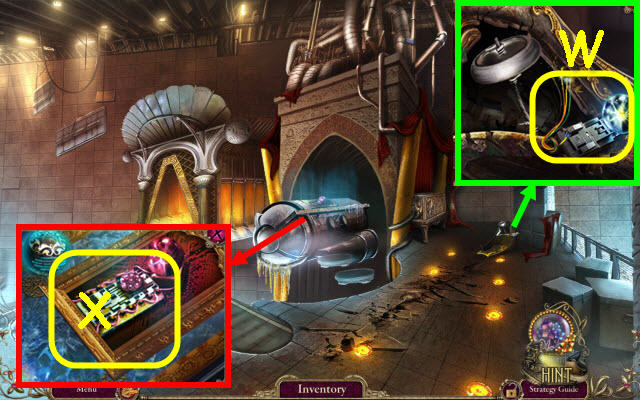
- Use the MECHANICAL HAND to get the POWER ELEMENT (W).
- Place the POWER ELEMENT on the capsule (X).
- Examine the capsule to access a HOP.
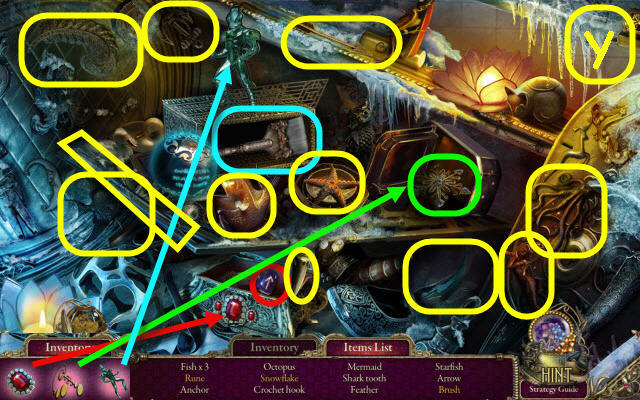
- Play the HOP.
- You receive an ARCHEOLOGIST'S BRUSH (Y).
- Go to Pleasure gardens.
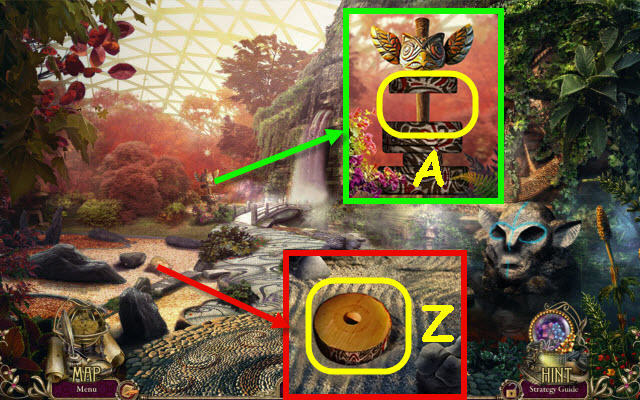
- Use the ARCHEOLOGIST'S BRUSH on the sand; take the TOTEM PIECE (Z).
- Place the TOTEM PIECE on the totem to trigger a puzzle (A).
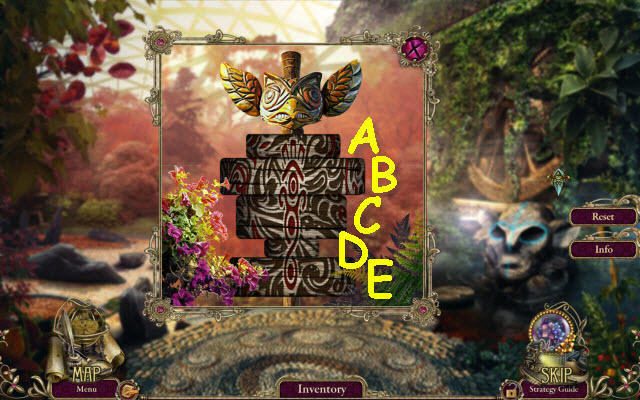
- Rotate the pieces to complete the pattern.
- Select the following: Ax3, B, Cx2, Dx4 and Ex5.
- Enter the temple.
Chapter 8: Temple
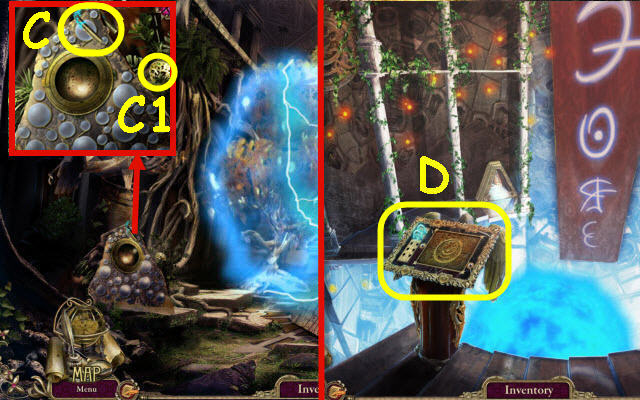
- Take the METAL U 3/3 (C) and EGG (C1).
- Go to Core corridor.
- Place the METAL U on the mechanism to trigger a puzzle (D).
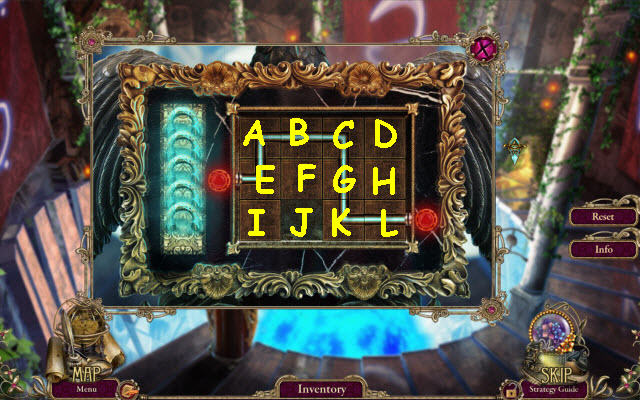
- Connect the pipes.
- Select the following: K, J, I, E, A, B, C, D, H, L, K, G, C, D, H, L, K, G, F, J, I, E, A, B, C, G, H, D, C, G, F, E, A, B, F, G, H, D, C, B, F, J, I, E, F, G, C, B, F, G, C, B, F, E, A, B, C, G, F, B, A, E, F, G, C, B, F, J, K, G, C, B, F, G, C, D, H, G, C, B, F, G, C, D, H, G, C, D, H, G, K and J.
- Enter the left staircase doorway.
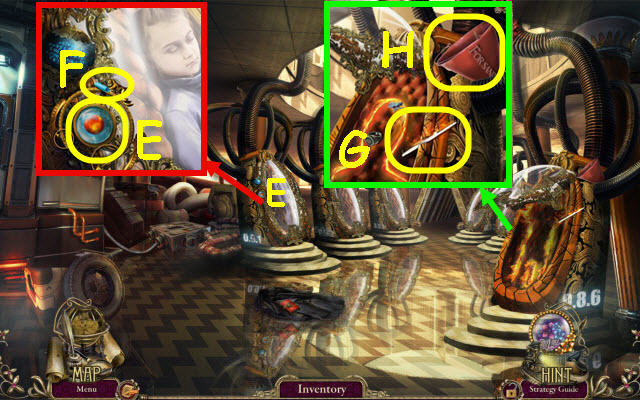
- Take the SPHERE WITH EVIL PLANET (E) and GLOWING CHALK (F).
- Take the BURNING SPLINTER (G) and BUCKET (H).
- Go to Pleasure gardens.
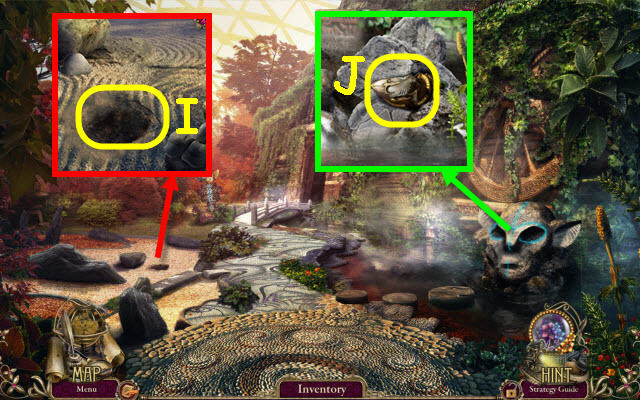
- Use the BUCKET to get SAND (I).
- Use the GLOWING CHALK on the head; take the MASTER'S MASK (J).
- Go to Departure zone.
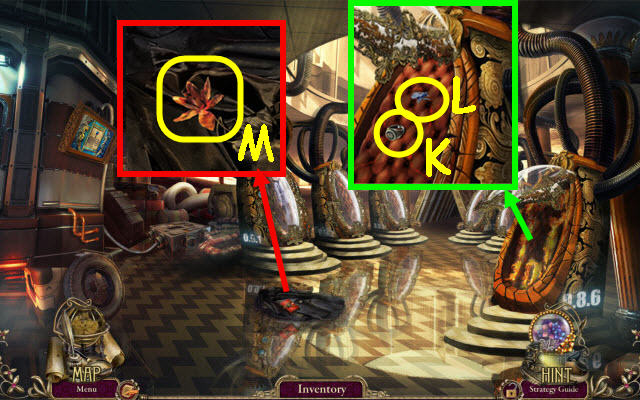
- Use the SAND on the fire; take BORS' RING (K) and CRYSTAL FLY (L).
- Use BORS' RING on the lock; take the notebook and METAL FLOWER (M).
- Go to Master's temple.
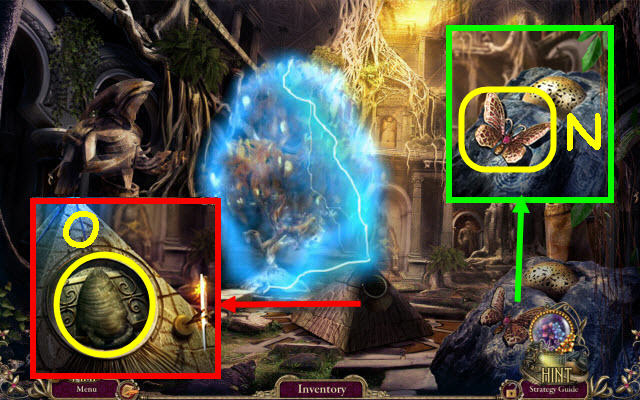
- Place the METAL FLOWER by the butterfly; take the BUTTERFLY (N).
- Place the BURNING SPLINTER in the holder and then the MASTER'S MASK in the recess (O).
- Examine the tree to access a HOP.
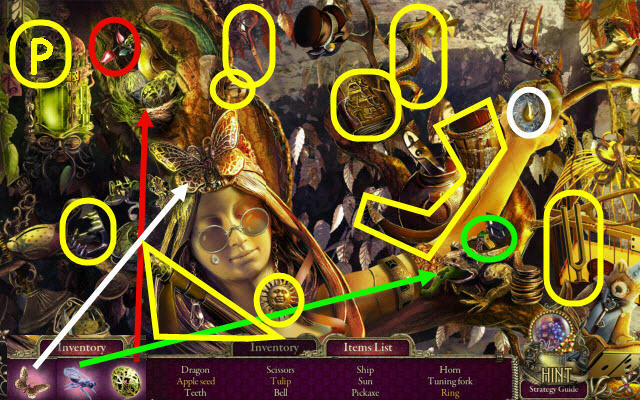
- Play the HOP.
- You receive a PICKAXE (P).
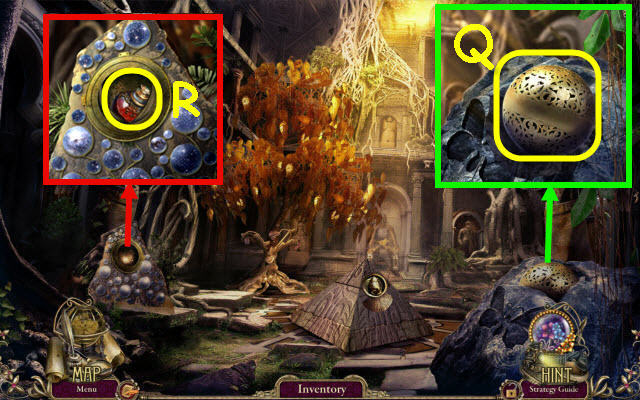
- Use the PICKAXE on the stone; take the MEMORY SPHERE (Q).
- Use the MEMORY SPHERE in the recess and select it; take the ANCESTOR'S BLOOD (R).
- Go to Departure zone.
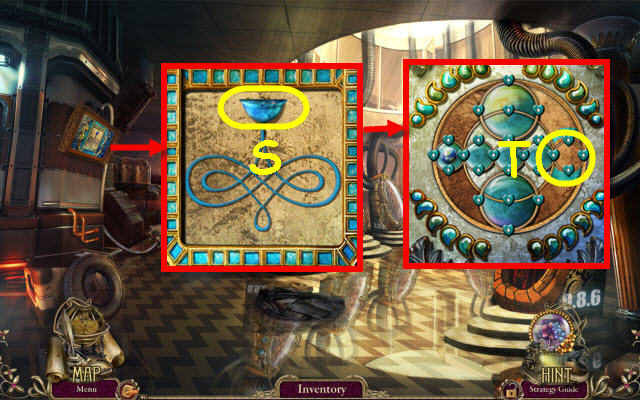
- Place the ANCESTOR'S BLOOD in the receptacle (S).
- Place the SPHERE WITH EVIL PLANET in the circle to trigger a puzzle (T).
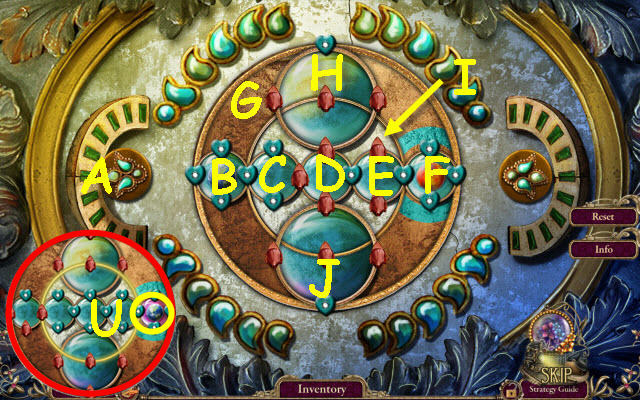
- Move the earth to the red planet.
- Select the following: E, A, H, Ax2, D, A, F, Ax2, G, A, J, Ax2, G, A, B, A, H, Ax2, G, Ax2, E, A, E, A, I and Ax2.
- Take the SPHERE WITH EARTH (U).
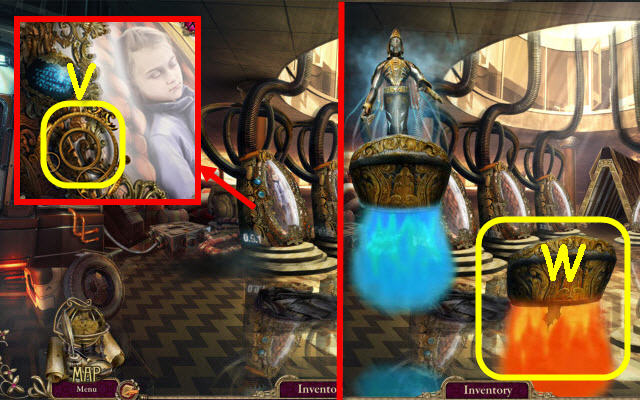
- Place the SPHERE WITH EARTH in the mechanism (V).
- Select the platform (W).
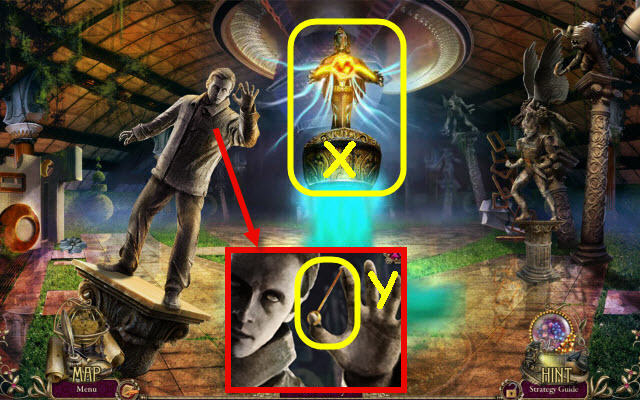
- Use the COLLAR on the statue (X).
- Take the LUCKY PIN (Y).
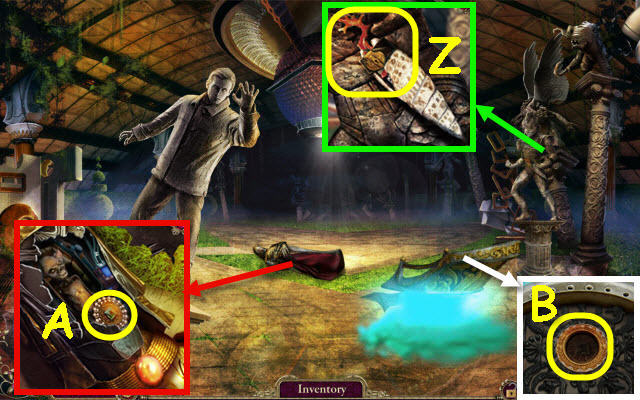
- Use the LUCKY PIN on the lock; take the STRANGE DAGGER (Z).
- Use the STRANGE DAGGER on the mask; take the MEDALLION (A).
- Place the MEDALLION in the slot (B).
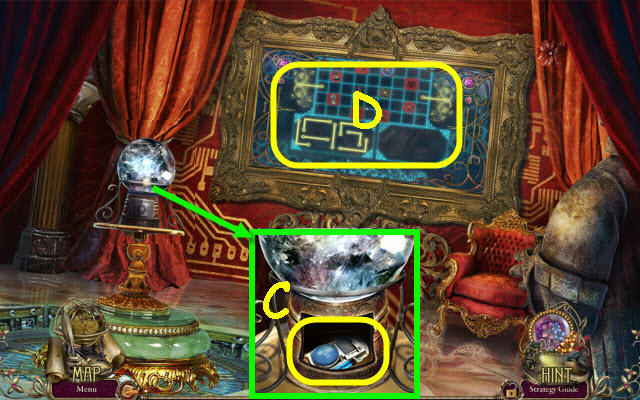
- Open the panel; take the REMOTE CONTROL (C).
- Use the REMOTE CONTROL on the mirror and then examine the mirror to trigger a puzzle (D).
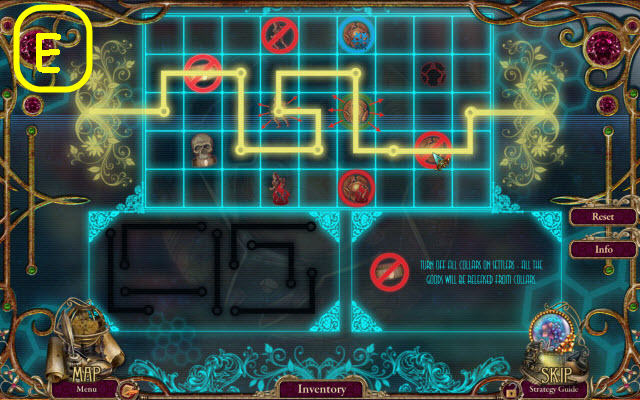
- Make a path through all the needed icons.
- See screenshot for solution (E).
- Congratulations! You have successfully completed Surface: The Pantheon.
Created at: 2013-10-18

