

Walkthrough Menu
- General Tips
- Chapter 1: The Estate Entrance
- Chapter 2: The Corridor
- Chapter 3: The Garden Maze
- Chapter 4: The Tower
- Chapter 5: The Corridor
General Tips
- This is the official guide for Tales of Terror: Estate of the Heart.
- This guide will not mention each time you have to zoom into a location; the screenshots will show each zoom scene.
- Hidden-object puzzles are referred to as HOPs. This guide will not show HOP solutions. It will identify the location of the HOP and the inventory item acquired.
- This guide will show solutions for non-random puzzles. Please read the in-game instructions for each puzzle.
- In this game, you will sometimes have to select the new scene to trigger dialog, cut-scenes, or tasks prior to interacting with the scene.
Chapter 1: The Estate Entrance
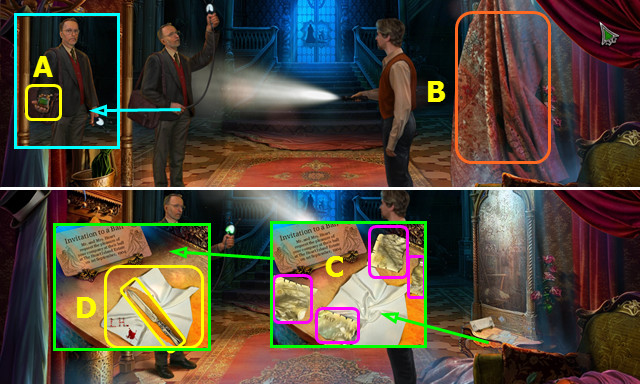
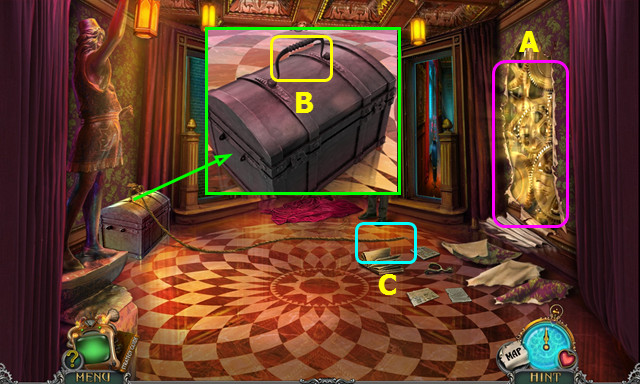
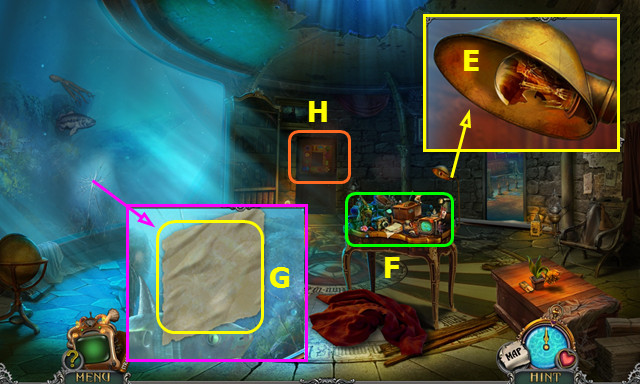
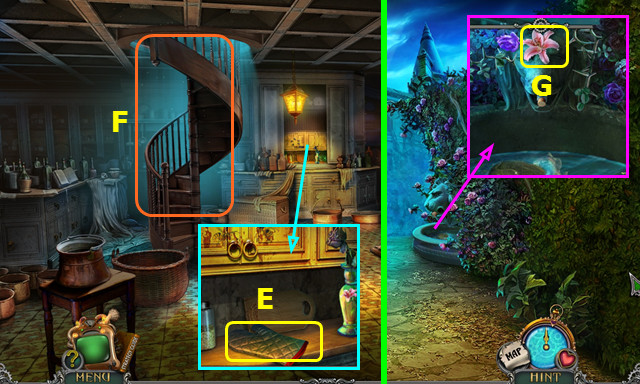
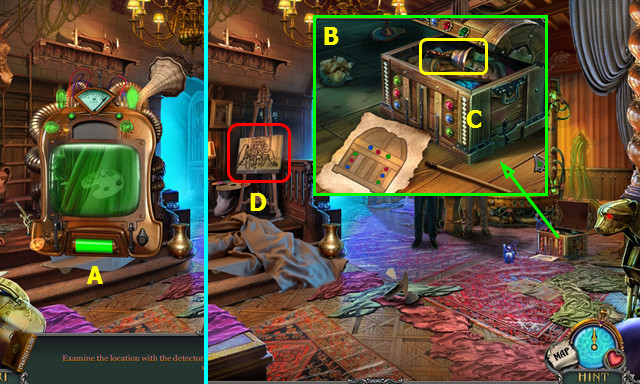
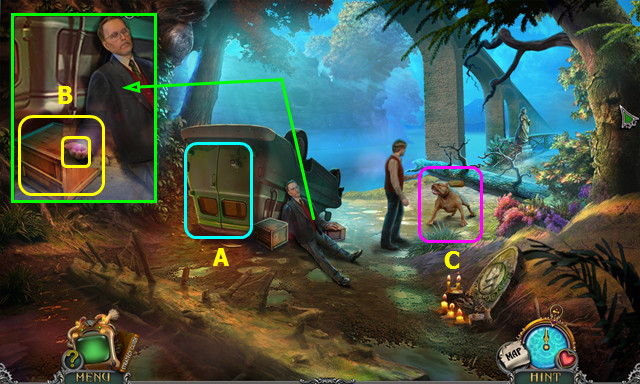
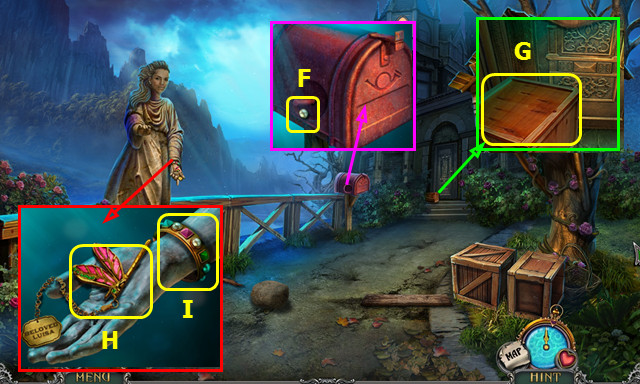
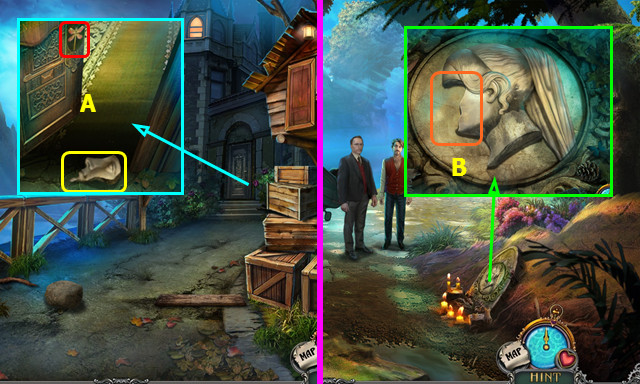
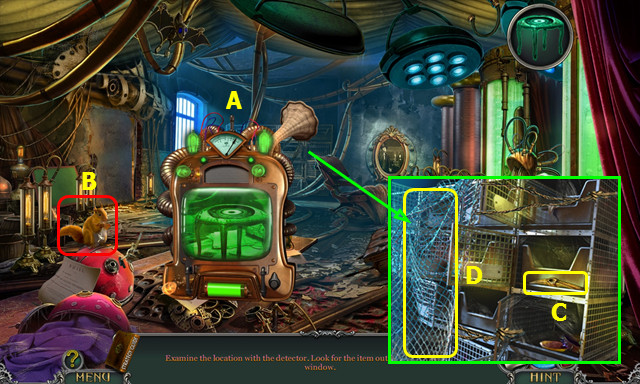
- Take the UNCHARGED DETECTOR (A).
- Remove the drape (B).
- Select the 4 pieces; take the MAP (C).
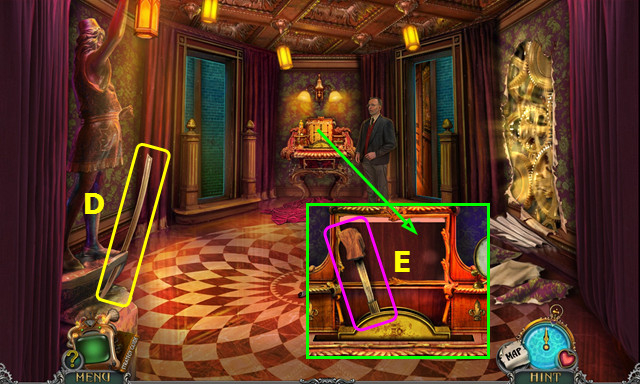
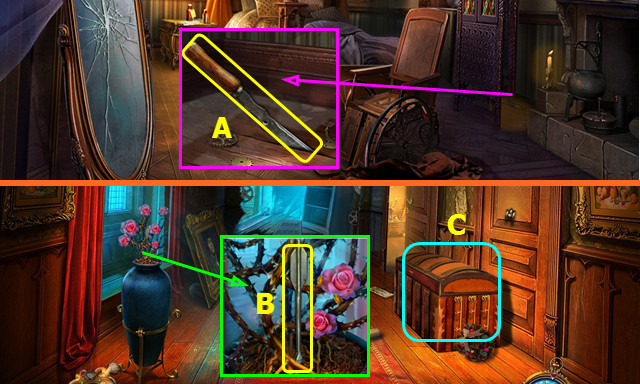
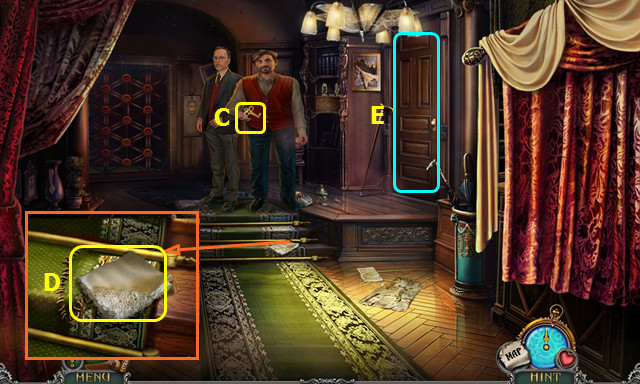
- Take the CLOTH, and LETTER KNIFE (D).
- Take the UMBRELLA (E); use it on the locket (F).
- Use the LETTER KNIFE; take the LOCKET (G).
- Open the LOCKET; take IMAGE OF LUISA (inventory).
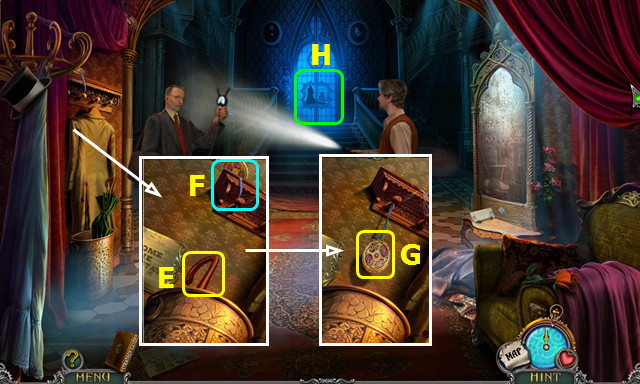
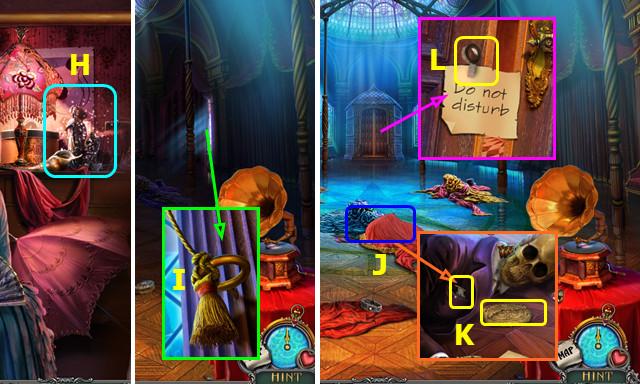
- Select (H).
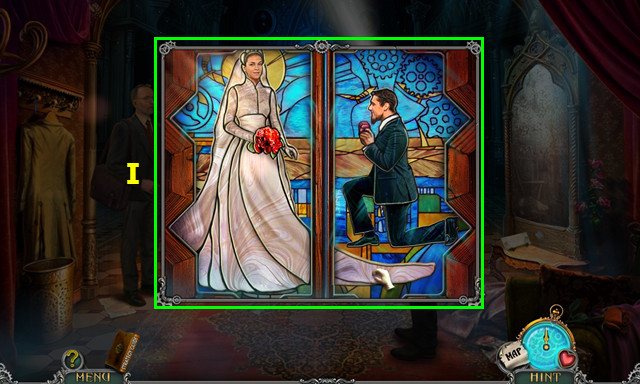
- Place IMAGE OF LUISA and restore the stained glass (I).
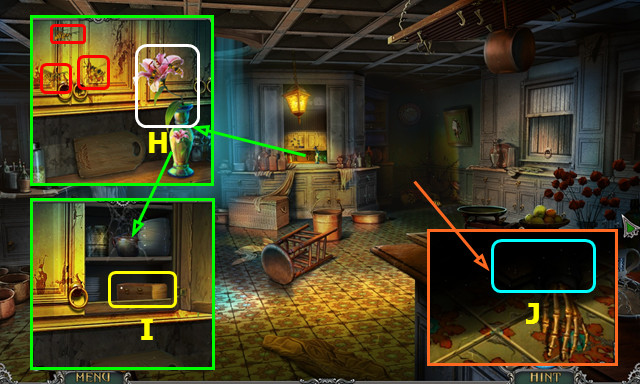
- Walk forward.
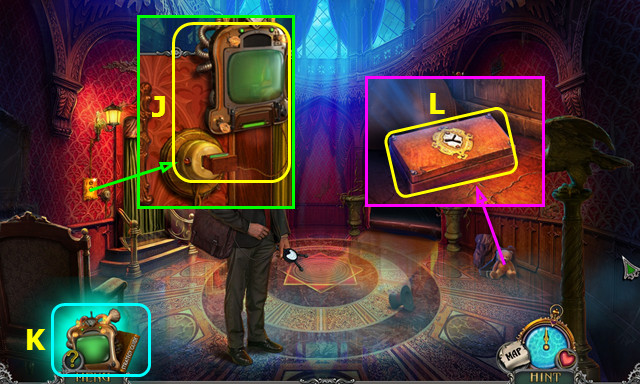
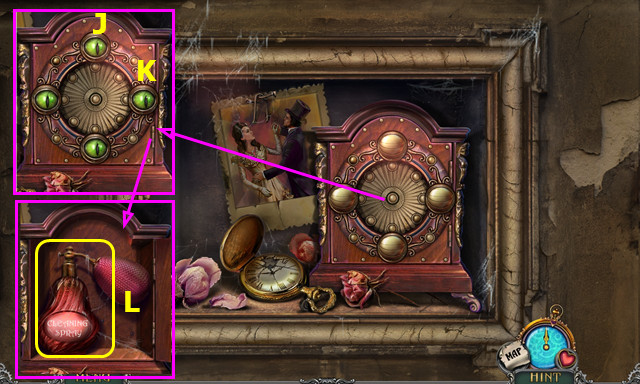
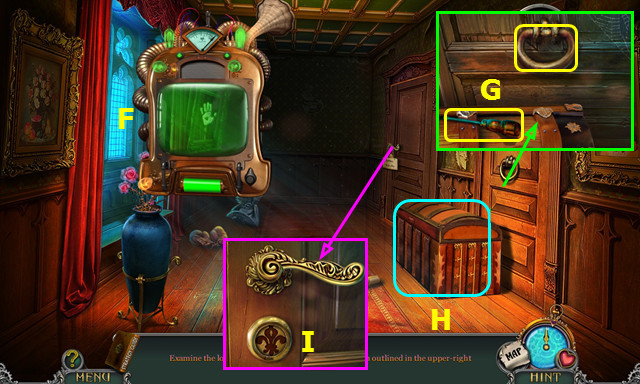
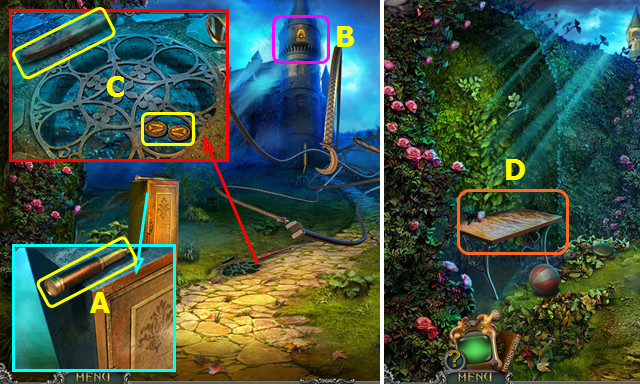
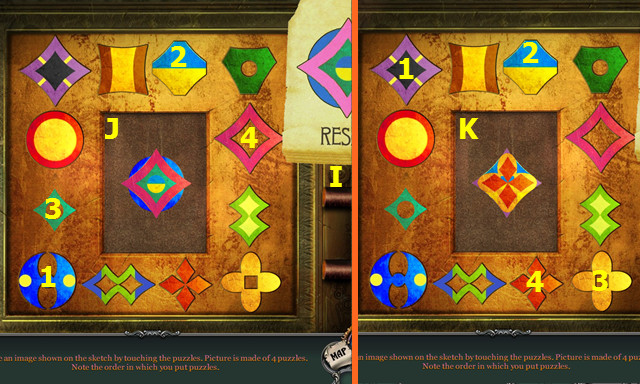
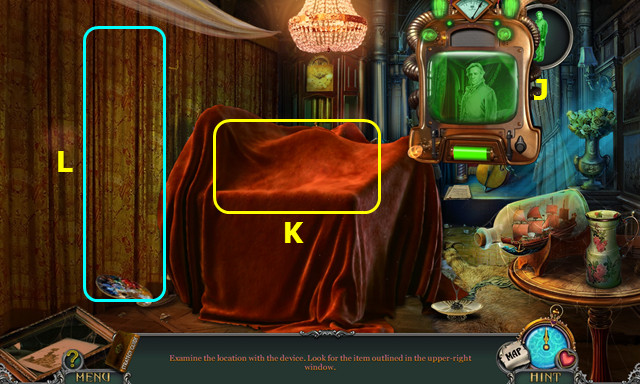
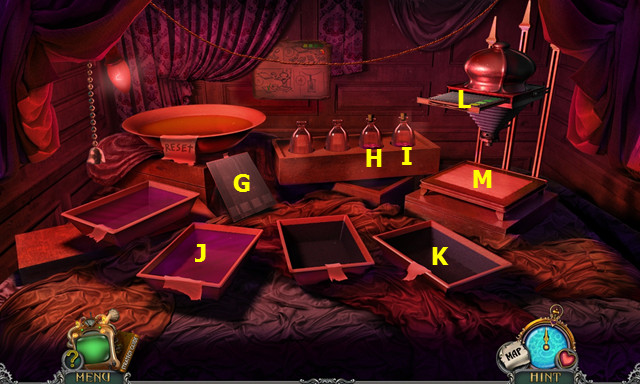
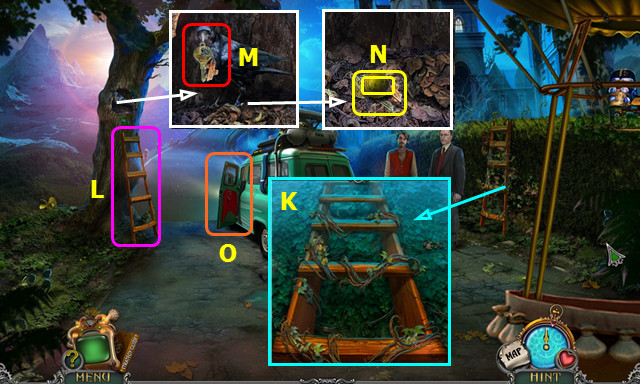
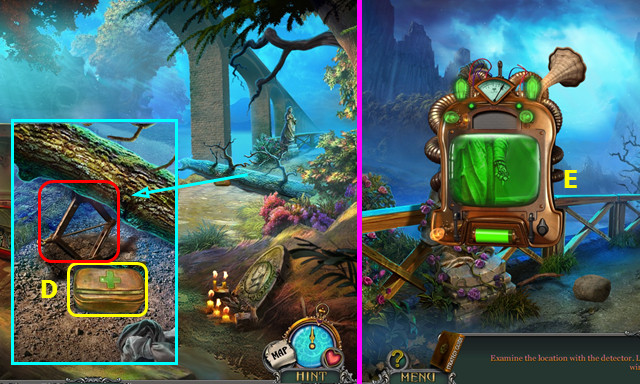
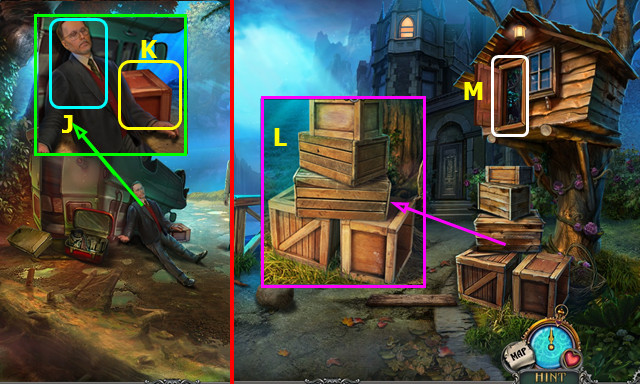
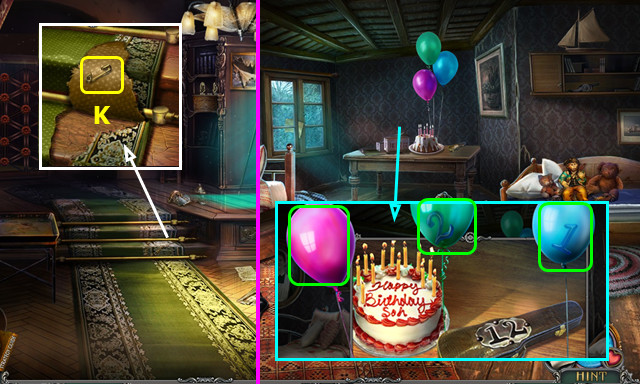
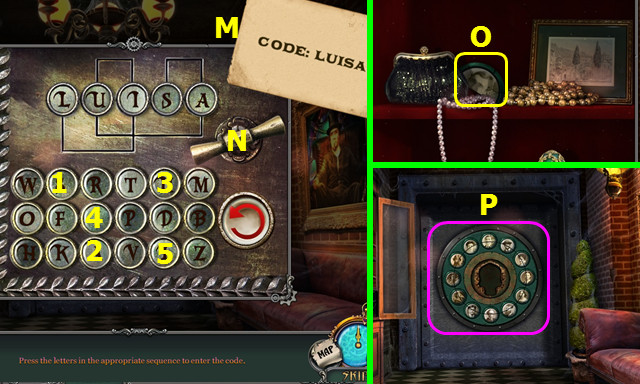
- Use the UNCHARGED DETECTOR to make the DETECTOR (J). The DETECTOR will now sit on your menu bar (K).
- Move the items; take the REPAIR KIT (L).
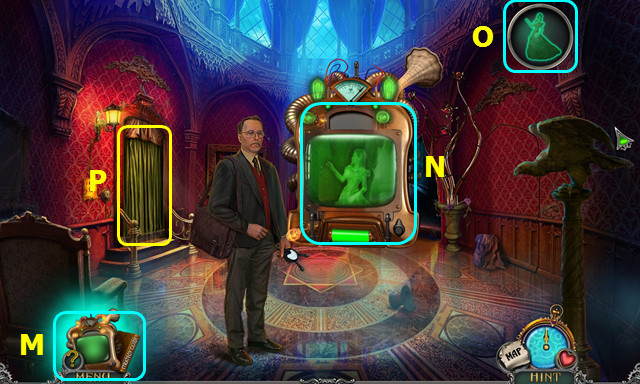
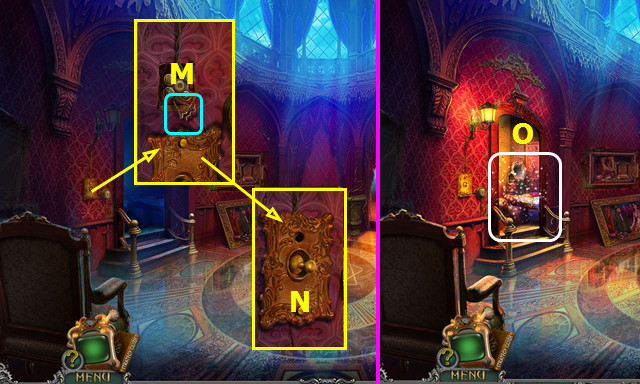
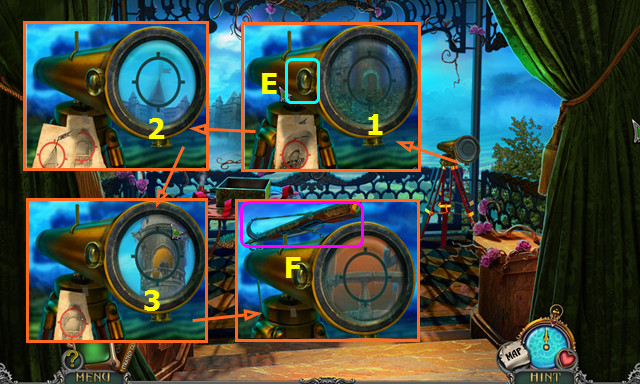
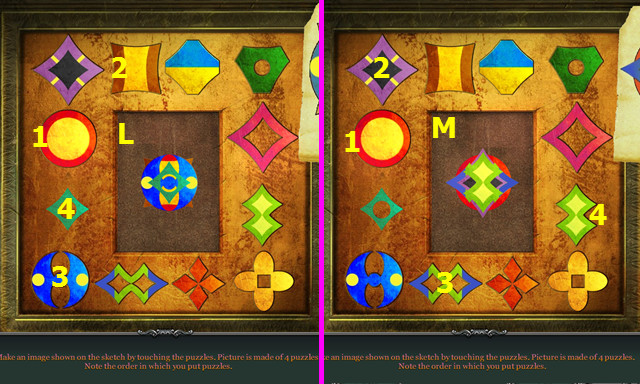
- Select the DETECTOR (M).
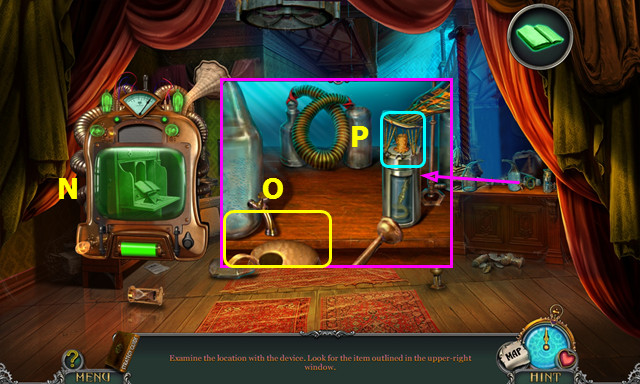
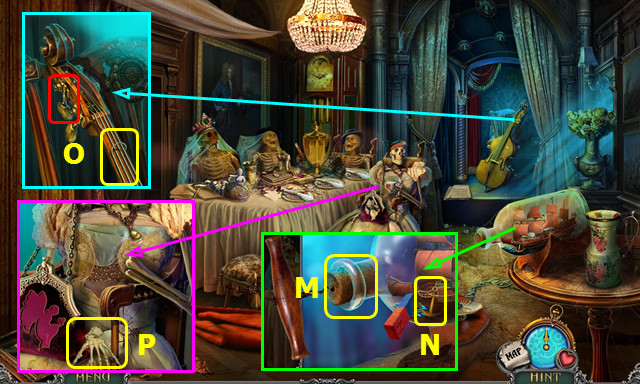
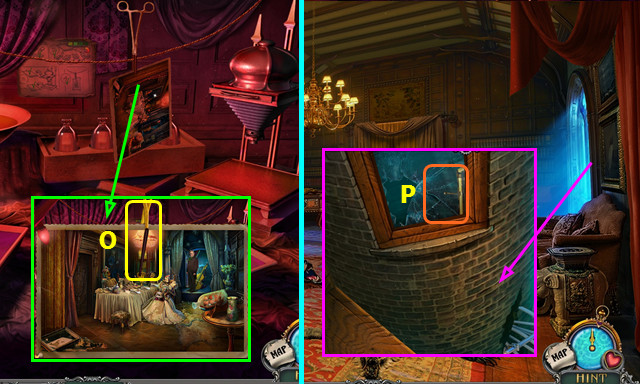
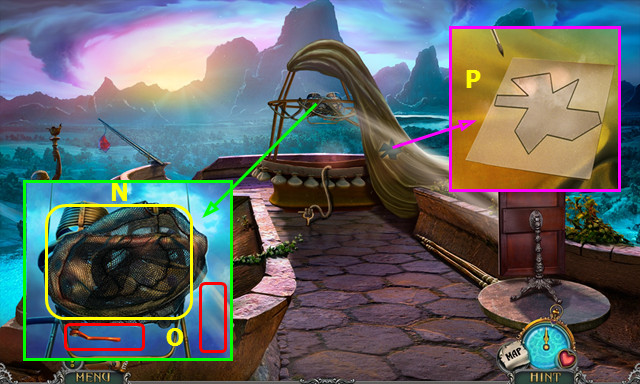
- Find and select the image (N) that matches the window (O).
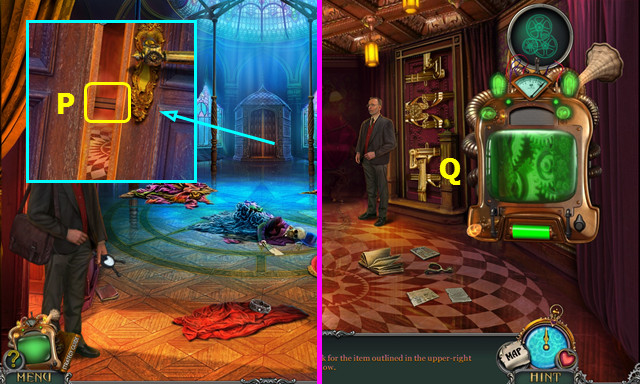
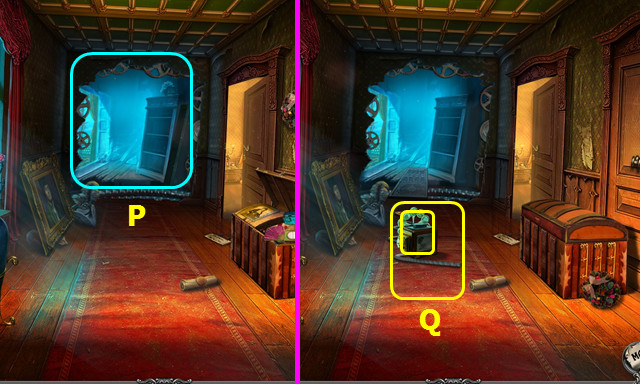
- Remove the curtain; play the HOP to earn the PHOTO (P).
- Examine the PHOTO; take the SKELETON KEY (inventory).
- Walk forward.
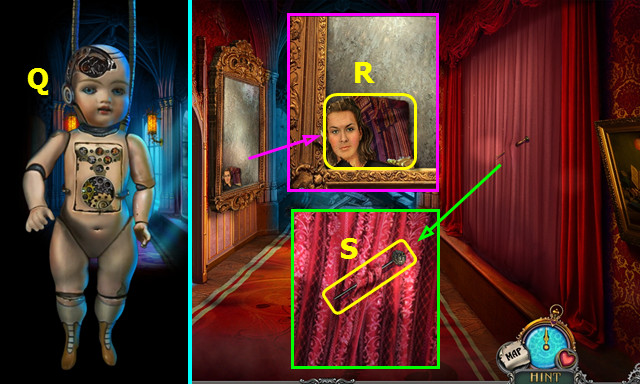
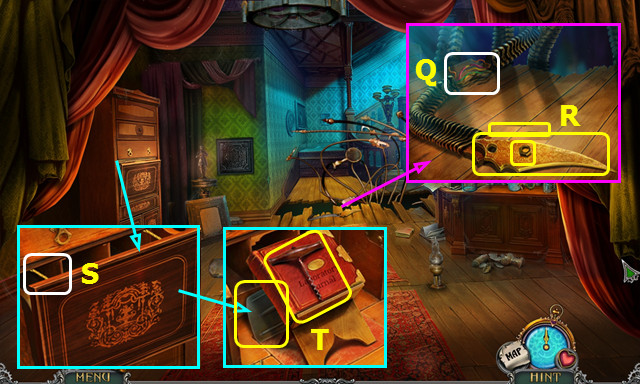
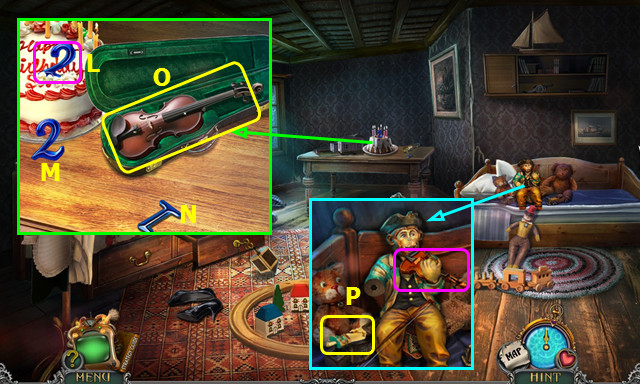
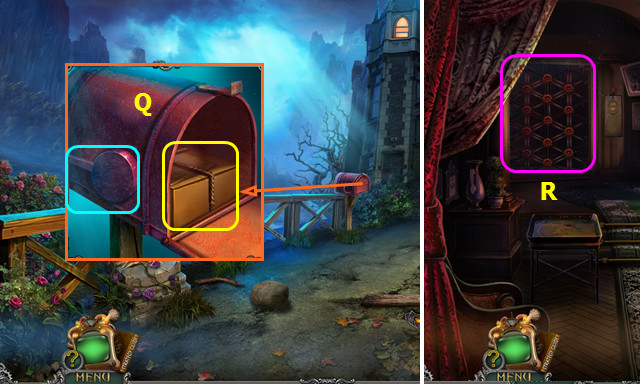
- Try to take the doll (Q).
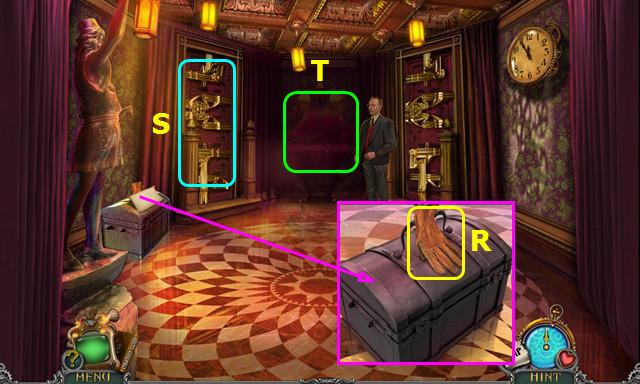
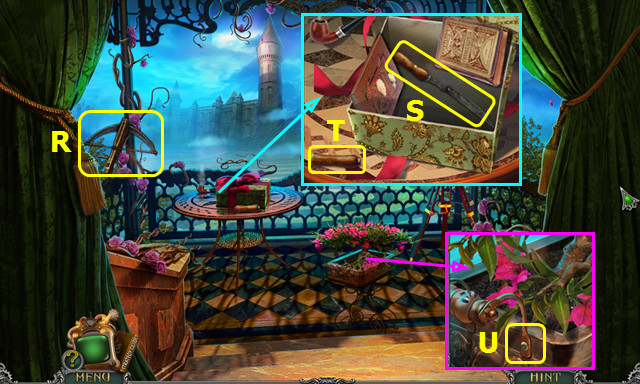
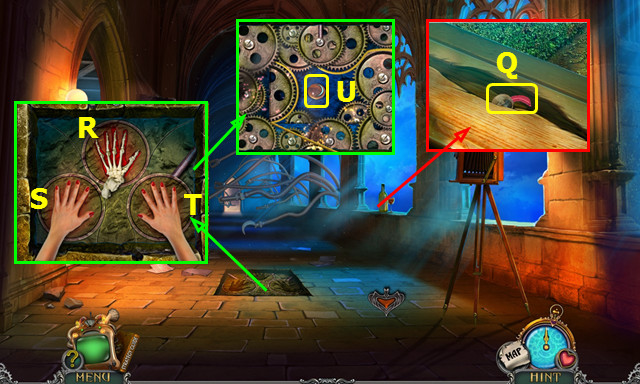
- Take the CANVAS PIECE (R).
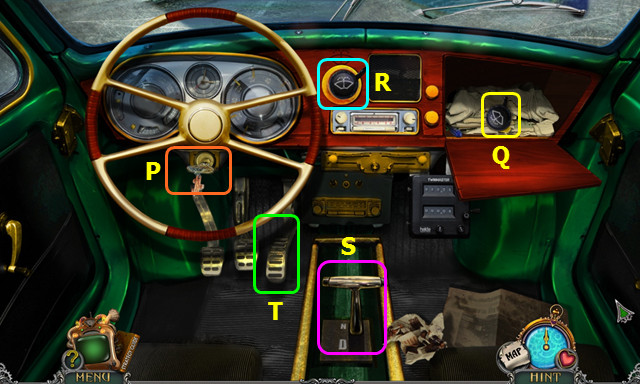
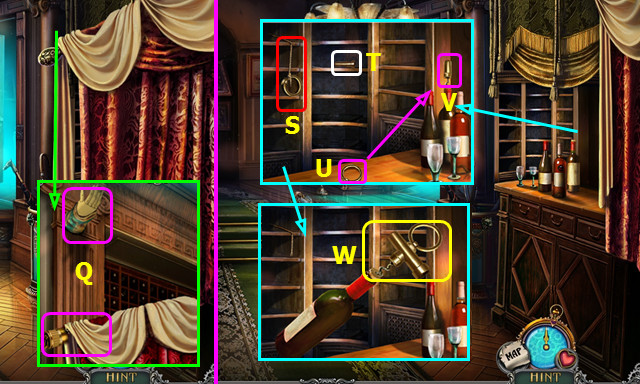
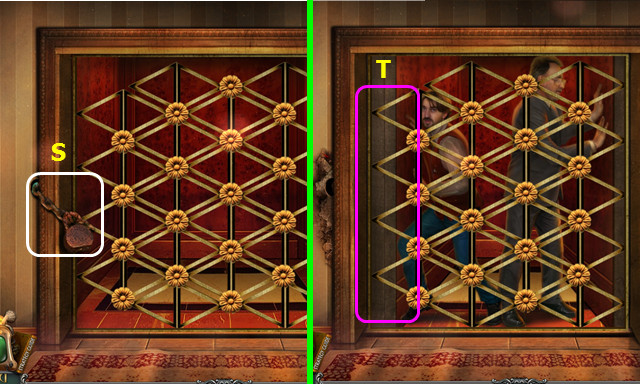
- Take the PIN and open the curtains (S).
- Select the PIN 5x to make the LOCK PICK (inventory).
- Use the LOCK PICK on the REPAIR KIT; remove the items and take the SOCKET WRENCH (inventory).
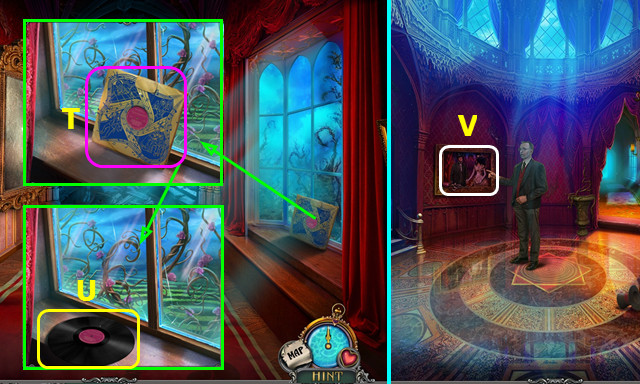
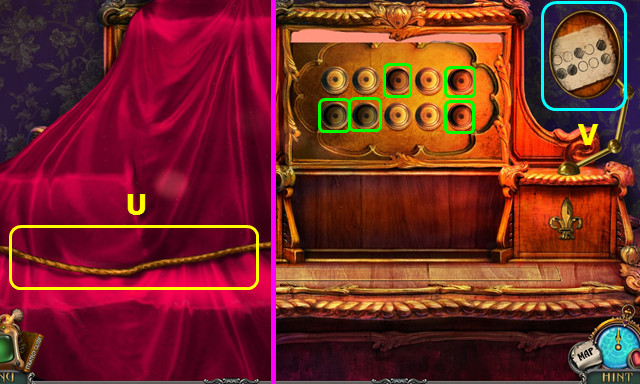
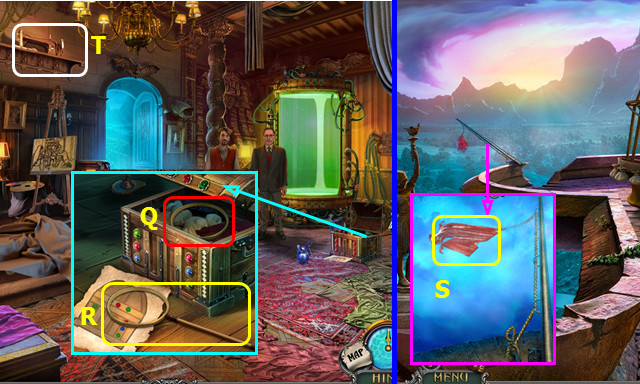
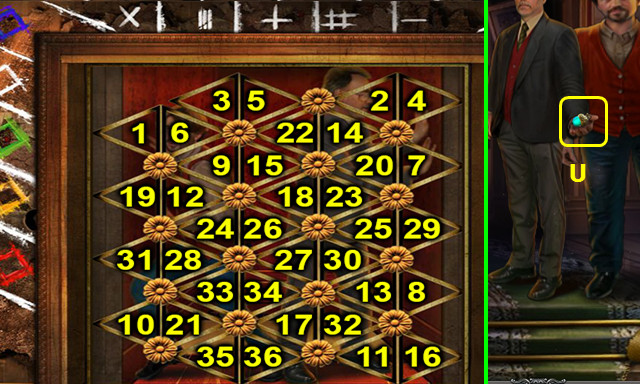
- Play the HOP and remove the record (T).
- Take the RECORD (U).
- Walk down.
- Select (V).
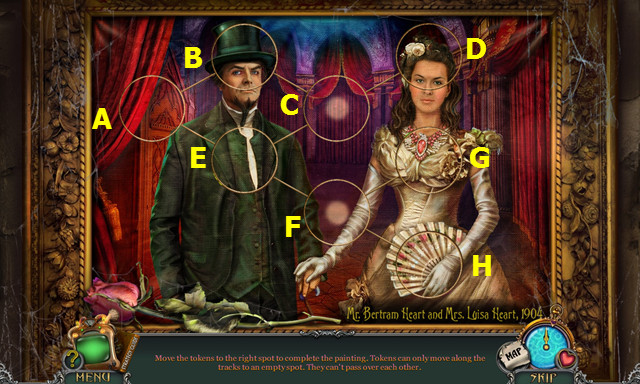
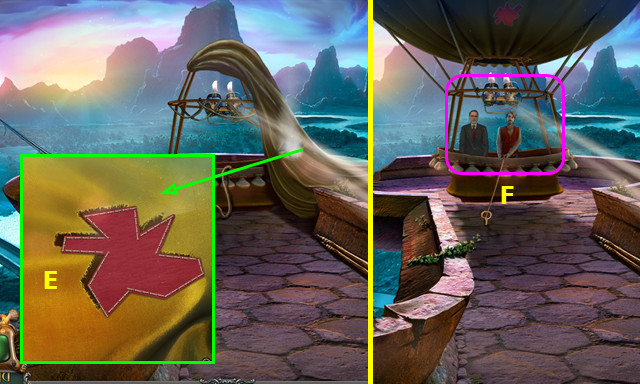
- Place the CANVAS PIECE.
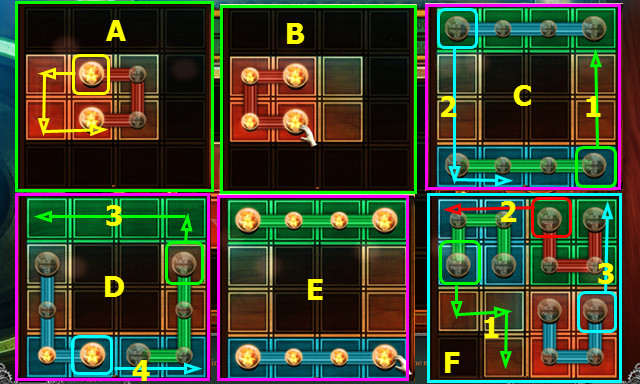
- Select FC-GA-CG-DF-AD-FC-HA-CH-BE-AB.
- Select J-K.
- Take the CLOTH and CLEANING SPRAY to make the WET CLOTH (inventory).
- Walk forward.
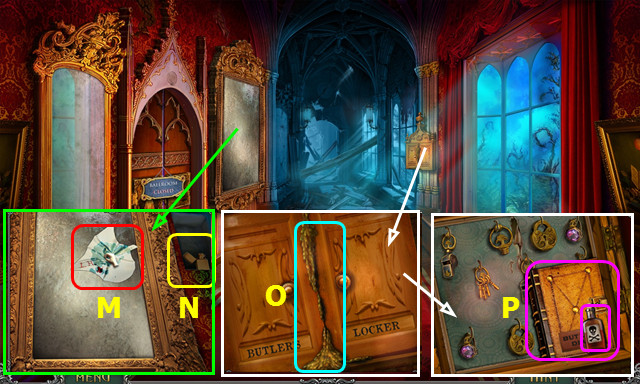
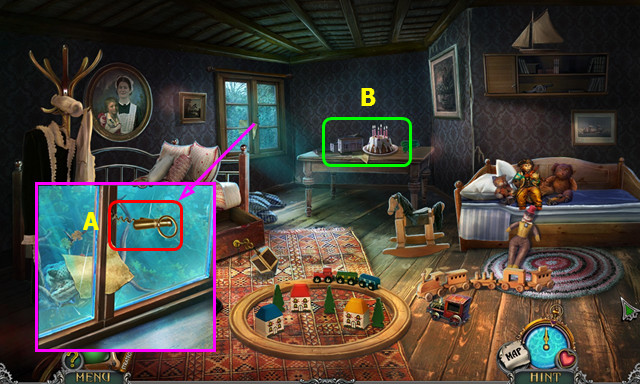
- Use the WET CLOTH; drag across the mirror until clean (M).
- Remove the grill; take the LIGHTER (N).
- Use the LIGHTER (O).
- Open the doors: move the bottle and read the diary (P).
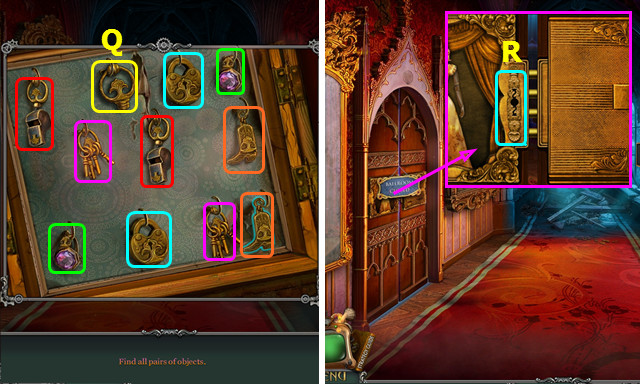
- Select pairs (color-coded).
- Take the KEY PART (Q).
- Combine the SKELETON KEY and KEY PART; select several times to make the BALLROOM KEY (inventory).
- Remove the sign and use the BALLROOM KEY (R).
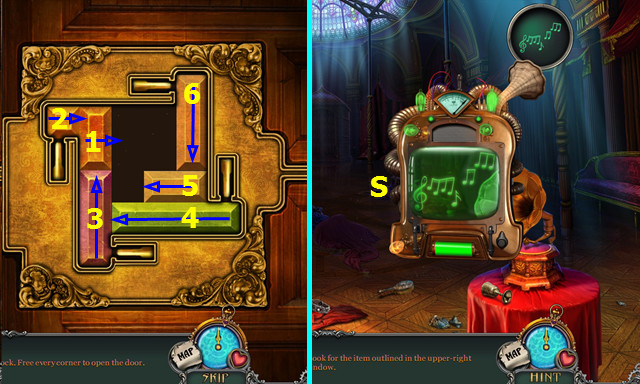
- Slide the bars (1-6).
- Use the DETECTOR (S).

- Take the GRAMOPHONE CRANK (A).
- Place the RECORD and GRAMOPHONE CRANK; turn the crank (B).
- Take the WARDROBE KEY (C).
- Use the WARDROBE KEY (D).
- Select (E).

- Swap the items on the 3 dresses (F).
- Use the pull cord to rotate the dresses (G).
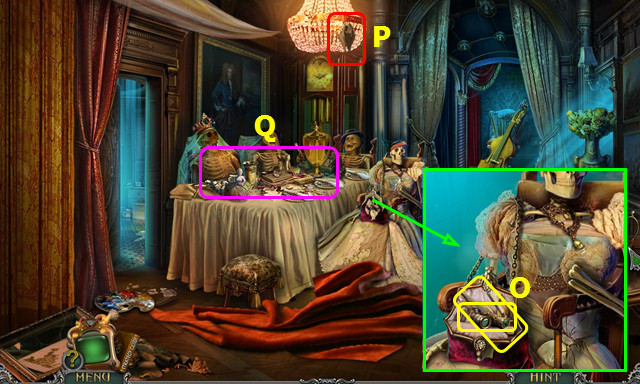
- Play the HOP; earn BERTRAM'S CANE (H).
- Use BERTRAM'S CANE (I).
- Select (J).
- Remove the items; take the BROKEN ETUI and CIGAR GUILLOTINE (K).
- Open the BROKEN ETUI, move the comb pieces, and take the ROUND MIRROR (inventory).
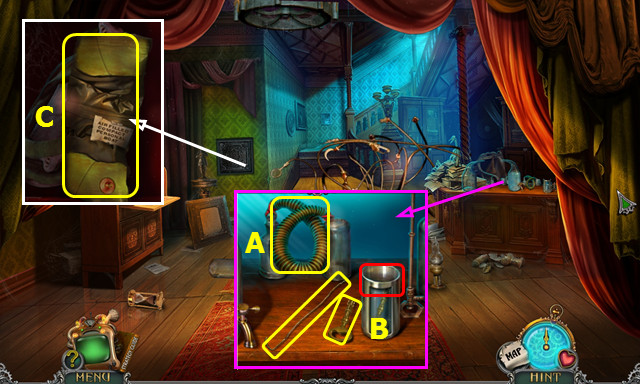
- Take the note and INSULATION TAPE (L).
- Walk down 2x.
- Use the SOCKET WRENCH, and then use the INSULATION TAPE (M).
- Flip the switch (N).
- Play the HOP; earn the TRIANGLE RING (O).
- Combine the CIGAR GUILLOTINE and TRIANGLE RING to find the THIN BLADE (inventory).
- Walk forward and left.
- Use the THIN BLADE (P).
- Go forward.
- Use the DETECTOR and select the item (Q).
- Read the note and take the GLOVE (R).
- Select (S).
- Select (T).
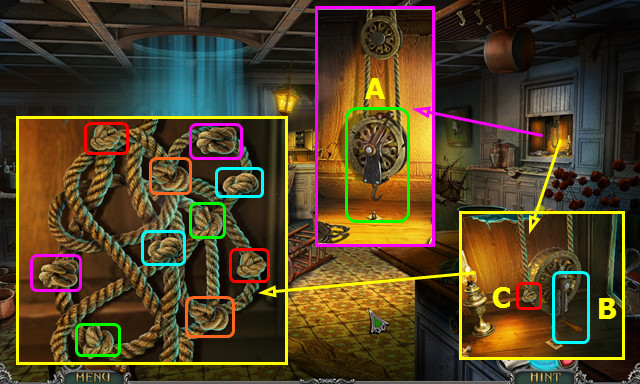
- Use the THIN BLADE; take the ROPE (U).
- Place the ROUND MIRROR; select it 2x (V).
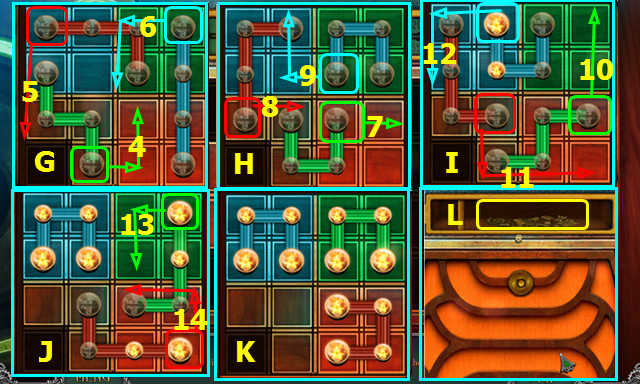
- Push the marked buttons (green).
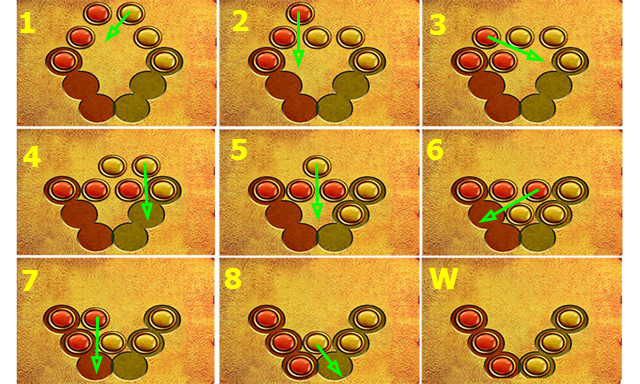

- Make the moves (1-8); final solution (W).
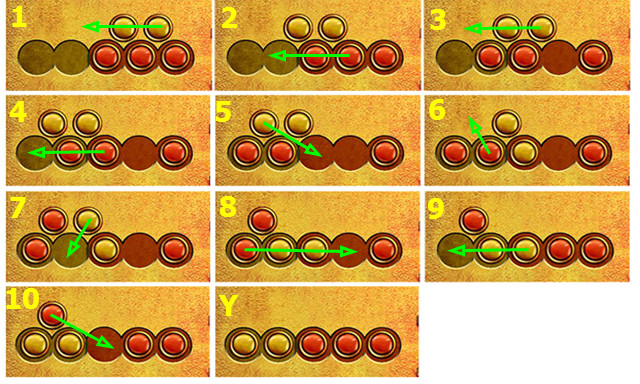
- Make the moves (1-7); final solution (X).
- Make the moves (1-10); final solution (Y).
- Exit the scene.
- Use the THIN BLADE (A).
- Use the ROPE (B).
- Select the rope end (C).
- Use the GLOVE; take the BENT SABER (D).
- Place and select the BENT SABER (E).
Chapter 2: The Corridor
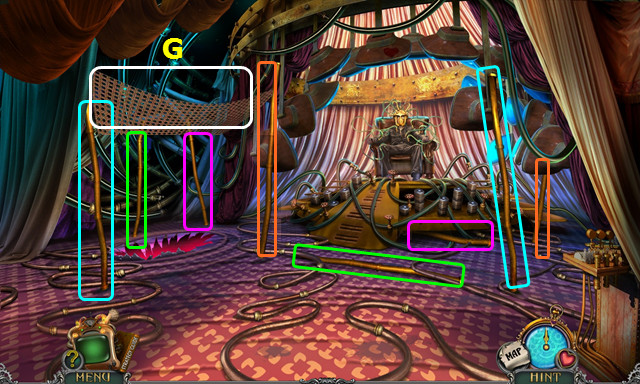
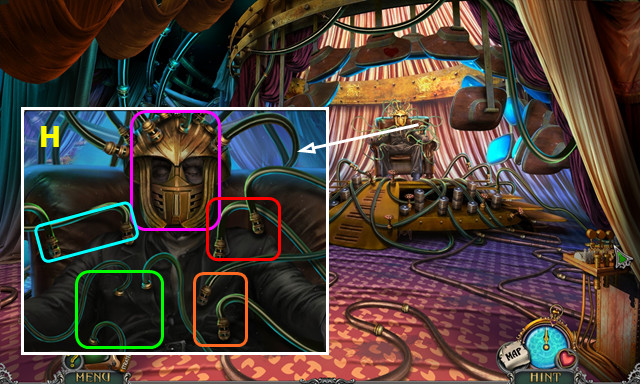
- Use the DETECTOR (F).
- Take the SCREWDRIVER; select and take the DOOR KNOCKER (G).
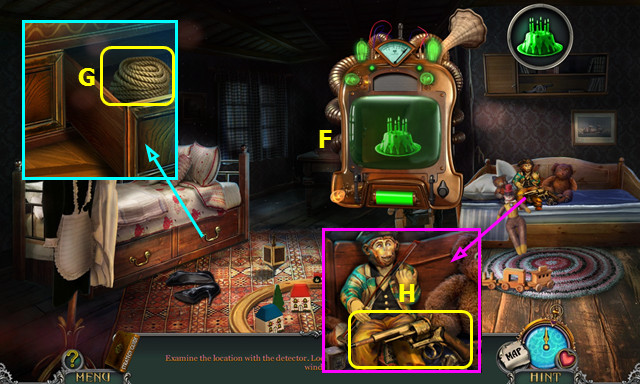
- Open the chest and play the HOP; earn the ZOETROPE (H).
- Turn the crank on the ZOETROPE; take the BEDROOM KEY (inventory).
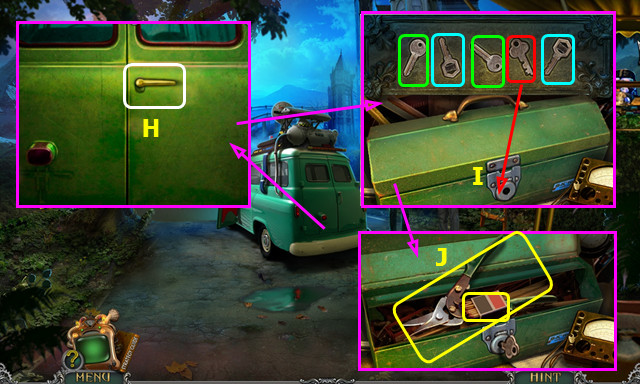
- Remove the sign; use the BEDROOM KEY (I).
- Walk right.
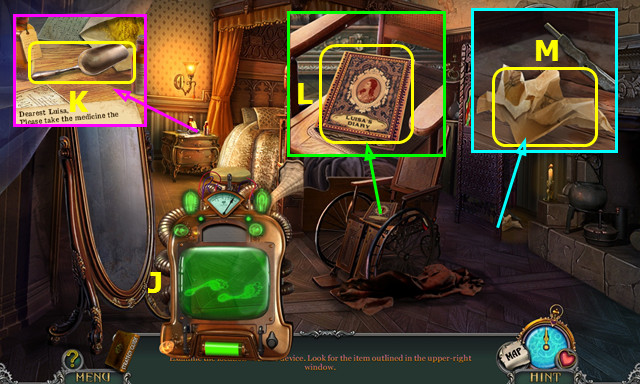
- Use the DETECTOR (J).
- Take the SCOOP (K).
- Take LUISA'S DIARY (L).
- Read LUISA'S DIARY; take the GLOVES (inventory).
- Take the MACHINE SCHEMATIC (M).
- Open the MACHINE SCHEMATIC to find the MONOCLE (inventory).
- Walk down.
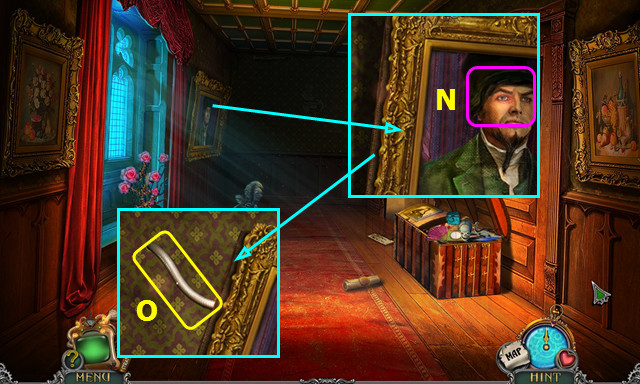
- Use the MONOCLE (N).
- Take the LONG CABLE (O).
- Combine the DOOR KNOCKER and LONG CABLE to make the GRAPPLING HOOK (inventory).
- Use the GRAPPLING HOOK (P).
- Take the SLIDE VIEWER and GRAPPLING HOOK (Q).
- Select the SLIDE VIEWER several times to view the slides; take the TELESCOPE ADJUSTOR (inventory).
- Walk forward.
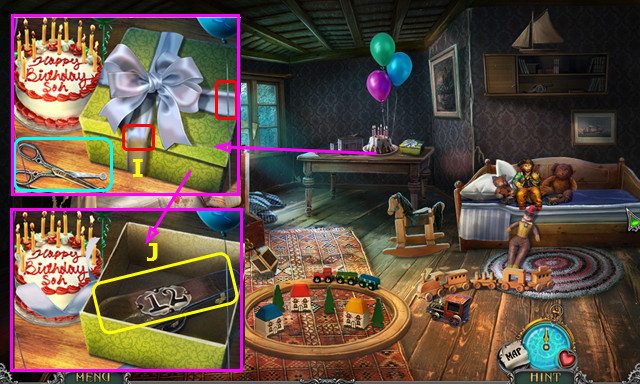
- Take the CROSSBOW (R).
- Read the note and open the gift. Move the books and take the BROKEN CLIPPERS (S).
- Take the CLIPPER HANDLE (T). Use the SCREWDRIVER; take the SCREW (U).
- Walk down and right.
- Use the CLIPPER HANDLE and GLOVES; take the CLIPPER HALF (A).
- Combine the BROKEN CLIPPERS, CLIPPER HALF, SCREW, and SCREWDRIVER to make the CLIPPERS (inventory).
- Walk down.
- Use the CLIPPERS; take the BOLT (B).
- Open the chest and play the HOP; earn the PARCEL (C).
- Open the PARCEL, look at the photos, and take the ZIP LINE HARNESS (inventory).
- Combine the CROSSBOW, BOLT, and GRAPPLING HOOK to make the CROSSBOW WITH HOOK (inventory).
- Go forward.
- Place the TELESCOPE ADJUSTOR (E).
- Use your mouse to guide the telescope to find the 3 places (1-3).
- Place the CROSSBOW WITH HOOK (F).
- Use the CLIPPERS and SCOOP; take the CARABINER (G).
- Add the CARABINER to the ZIP LINE HARNESS (inventory).
- Place the ZIP LINE HARNESS (H).
- Go forward.
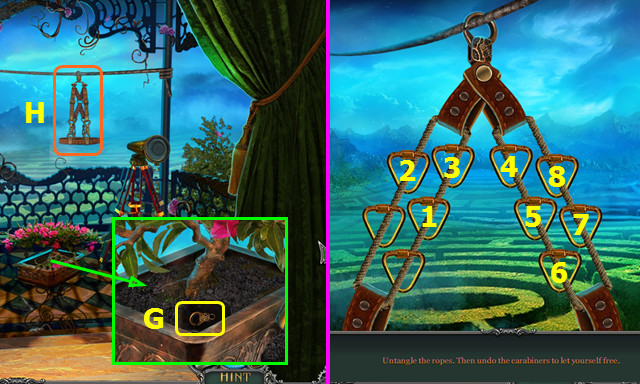
- Untangle the ropes, and then select 1-8.
- Use the DETECTOR (J).
- Take the TOOL HANDLE (K).
- Use the CLIPPERS (L).
- Try to go forward.
- Take the CARABINER; move the arm and take the EMPTY EXTINGUISHER (M).
- Select (N).
- Remove the items and take the DRY SPONGE (O).
- Use the CARABINER (P).
- Use the DRY SPONGE to make the WET SPONGE; use the EMPTY EXTINGUISHER to make the EXTINGUISHER (Q).
- Use the EXTINGUISHER (R).
- Use the WET SPONGE and SCREWDRIVER (S).
- Open and remove the lock (T).
- Take the CHAIN (U).
- Go forward.
- Take the SPYGLASS (A).
- Use the SPYGLASS (B).
- Use the EXTINGUISHER; take the WOODEN TILES and GRINDSTONE (C).
- Walk down.
- Select (D).
- Place the WOODEN TILES.
- Select Ex3, Fx2; press start (G).
- Once Margie passes it, press Ex2.
- Once Margie passes it, press Ex3.
- Once Margie passes it, press Fx2.
- Take the INTRICATE KEY.
- Go forward.

- Use the INTRICATE KEY (I).
- Use the CHAIN; take the BLUNT SCYTHE (J).
- Combine the TOOL HANDLE, BLUNT SCYTHE, and GRINDSTONE to make the SCYTHE (inventory).
- Use the SCYTHE (K).
- Go forward.

- Take the BLOWTORCH (L).
- Remove the drape and play the HOP; earn the LEVER (M).
- Use the LEVER; take the CHEESE and LEVER (N).
- Place the CHEESE (O).
- Arrange the books as shown (P).
- Take the 1st MOON AMULET; place and use the LEVER (Q).
- Go right.
- Take the POWDER and EMPTY WATERING CAN (A).
- Take the WRENCH (B).
- Open the lantern: read the note and take the LIGHTBULB (C).
- Take the SHAFT (D).
- Walk down.
- Replace the LIGHTBULB (E).
- Play the HOP; earn the PUMP PILLOW (F).
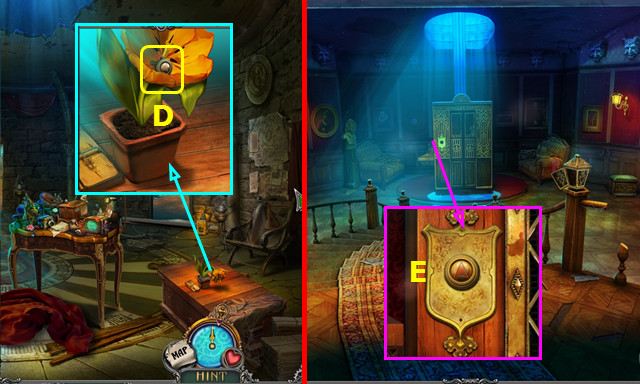
- Use the POWDER; take the SYMBOL SKETCH (G).
- Select (H).
- Place the SYMBOL SKETCH (I).
- Select 1-4 for each image (J-M).
- Go forward.
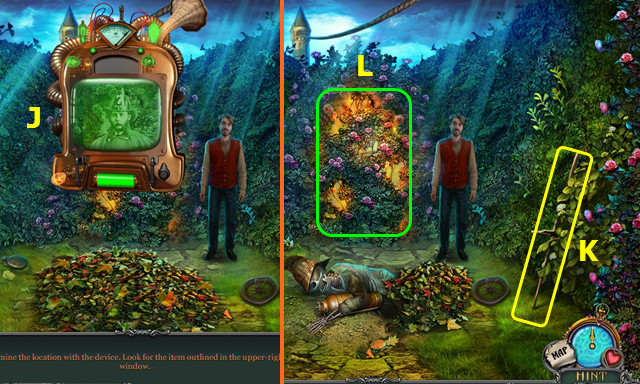
- Use the DETECTOR (N).
- Use the EMPTY WATERING CAN; take the WATERING CAN (O).
- Use the BLOWTORCH (P).
- Try to go forward.
- Use the WATERING CAN (Q).
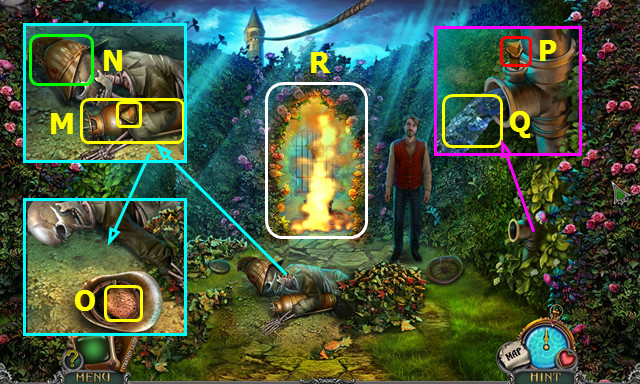
- Use the WRENCH; take the NUT, CLAW BLADE, and LONG HOOK (R).
- Use the CLAW BLADE (S).
- Take the CORKSCREW, read and remove the book, and take the PADDLE BLADE (T).
- Use the CLAW BLADE; take the HOSE (A).
- Combine the PUMP PILLOW and HOSE to make the PUMP (inventory).
- Use the LONG HOOK; take the PIN KEY and WIRE (B).
- Combine the SHAFT, PADDLE BLADE, and WIRE to make the PADDLE (inventory).
- Use the PIN KEY; read the notes and take the RUBBER BOAT (C).
- Walk down.
- Use the WATERING CAN; take the ELEVATOR BUTTON (D).
- Go right.
- Place and press the ELEVATOR BUTTON (E).
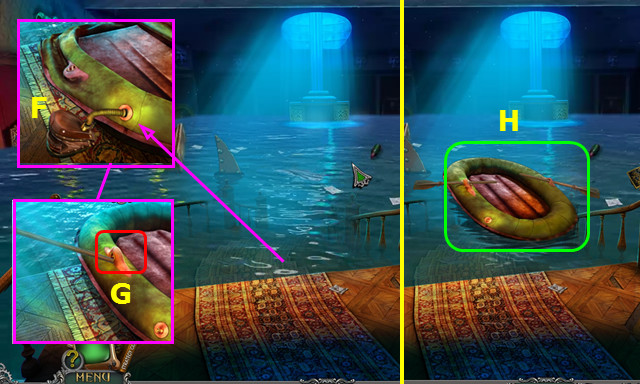
- Place the RUBBER BOAT. Place, attach, and select the PUMP (F).
- Place the PADDLE (G).
- Select (H).
- Select Jx2-Kx2-L-Kx2-L.
- There are several solutions to this mini-game.
Chapter 3: The Garden Maze
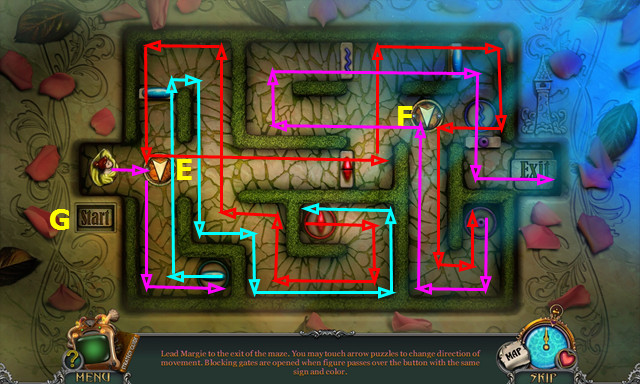
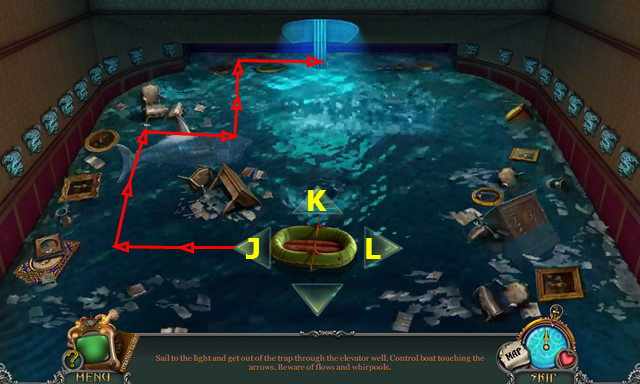
- Use the DETECTOR (M).
- Walk left.
- Take the TORCH (N).
- Take the AXE and remove the leaves (O).
- Select the 7 wood pieces (red); take the MECHANICAL FIGURE (P).
- Select (Q).
- Use the ROPE (A).
- Select 1-5; select (B).
- Use the AXE (C).
- Select pairs (color-coded); select (D).
- Use the TORCH (E).
- Select (6-8).
- Place and arrange the MECHANICAL FIGURE (F).
- Move the items to the left (G).
- Pull the switch (H).
- Open the camera; take the PHOTO PLATE (I).
- Open the door and walk left.
- Use the DETECTOR (J).
- Remove the drape and play the HOP; earn the MAGNET (K).
- Open the curtain (L).
- Use the CORKSCREW; take the CORK (M).
- Use the MAGNET; drag the ANCHOR to the opening and take it (N).
- Turn the tuning knobs; take the STRING (O).
- Touch and take the SKELETON HAND (P).
- Walk down.
- Move the bottle and glass; use the ANCHOR to take the RADIO BULB (Q).
- Place the SKELETON HAND (R); select (S-T).
- Use the STRING; take the 2nd MOON AMULET (U).
- Walk down.
- Place the NUT and turn the valve (A).
- Place the CORK; take the 3rd MOON AMULET (B).
- Go forward and left.
- Select (C).

- Place the 3 MOON AMULETS; arrange as shown (D).
- Walk left.
- Take the OVEN MITT (E).
- Select the stairs (F).
- Walk down 3x.
- Use the OVEN MITT; take the SWEET LILY (G).
- Go forward; go left 2x.
- Remove the dead flower; place the SWEET LILY (H).
- Select the bees (red).
- Open the cupboard and move the items; take the SMOKING SET (I).
- Open the SMOKING SET; read the note and take the LIGHTER (inventory).
- Use the LIGHTER (J).

- Select the lighter (L).
- Open the paper and take the DEFENSE AMULET; take the LIT KEROSENE LAMP (M).
- Open the dumb waiter; place the LIT KEROSENE LAMP. Take the HANDBAG ORNAMENT (N).
- Walk down.
- Place the HANDBAG ORNAMENT; take the OPERA GLASSES and NAIL FILE (O).
- Select (P).
- Play the HOP; earn the PULLEY (Q).
- Walk left.
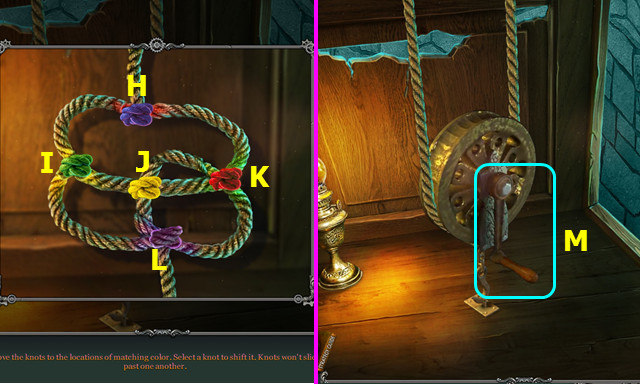
- Move the items; place and select the PULLEY (A).
- Turn the crank (B). Select (C).
- Select matching pairs (color-coded).
- Turn the crank (D). Select (E).
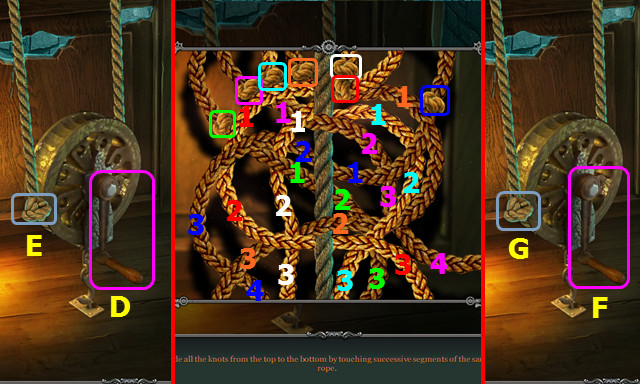
- Remove the knots by selecting the ropes in numerical order (color-coded).
- Turn the crank (F). Select (G).
- Select K-H-I-L-K-H-I-J.
- Select (M).
- Go right.
- Select (N).
- Move the paper dolls 2x (O).
- Take the QUIVER and PHOTO; select the paper (P).
- Exit the darkroom.
- Use the OVEN MITT 2x (Q).
- Remove the knob and use the NAIL FILE (R).
- Place the RADIO BULB.
- Drag the chain (A); final position 1st puzzle (B).
- Drag the chain in numerical order (C-D); final position 2nd puzzle (E).
- Drag the chain in numerical order (F-J); final position 3rd puzzle (K).
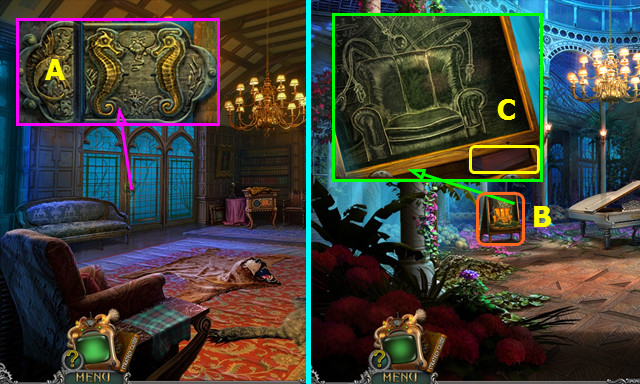
- Remove the glass; take the SEAHORSE PARTS (L).
- Restore the SEAHORSE PARTS to make the SEAHORSE (inventory).
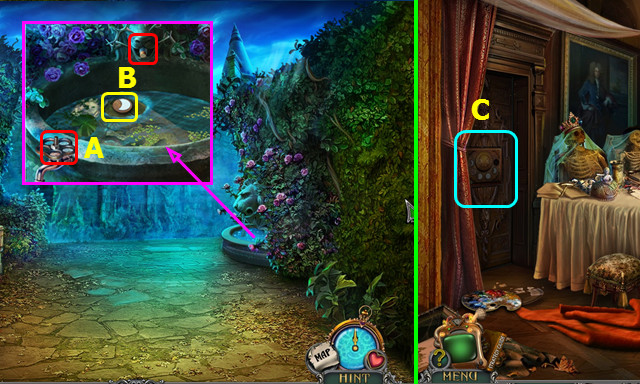
- Remove the ivy 3x; place the SEAHORSE (A).
- Walk left.
- Stand up the easel (B).
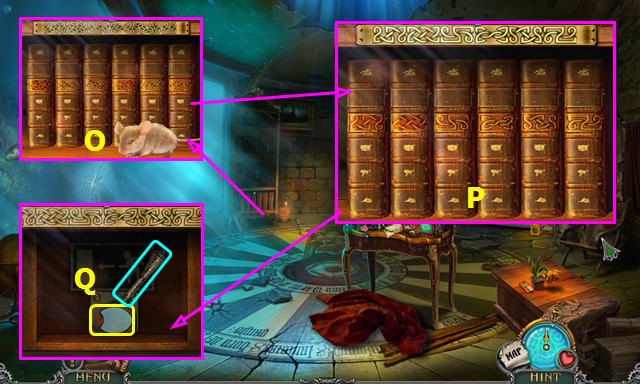
- Restore the chair; take the CARVED BOX (C).
- Take the PAPER KNIFE (D).
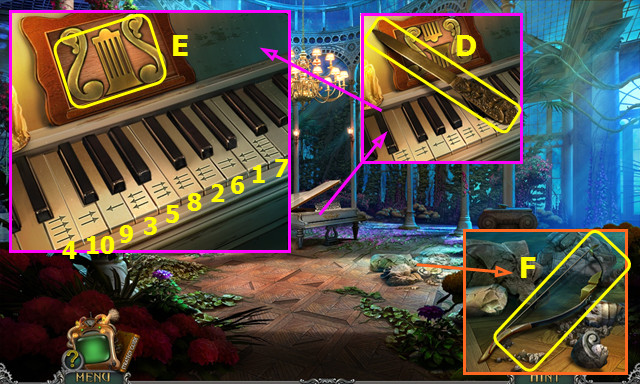
- Select 1-10; take the HARP (E).
- Combine the CARVED BOX and HARP; take the DEVELOPER (inventory).
- Remove the rubble; take the RECURVE BOW (F).
- Combine the RECURVE BOW and QUIVER to make the BOW AND ARROWS (inventory).
- Walk down and look forward.
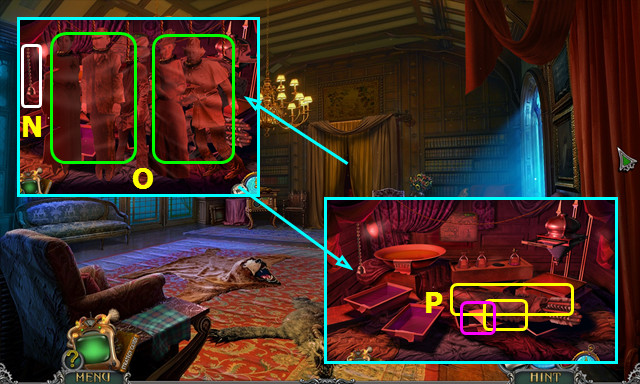
- Place the PHOTO PLATE (G) and DEVELOPER (H).
- Select H, then I.
- Use G on J and Kx2; select the plate to move it to L.
- Select L, then M.
- Look at the photo; take the LONG TWEEZERS (O).
- Use the LONG TWEEZERS (P).
- Enter the window.
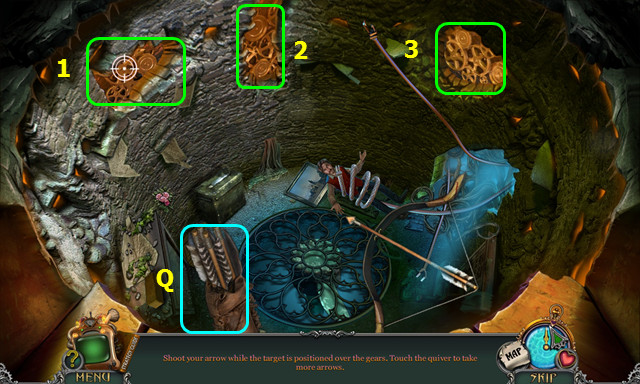
- Place the BOW AND ARROWS.
- Fire when the target is over each set of gears (1-3).
- Select the quiver to load an arrow (Q).
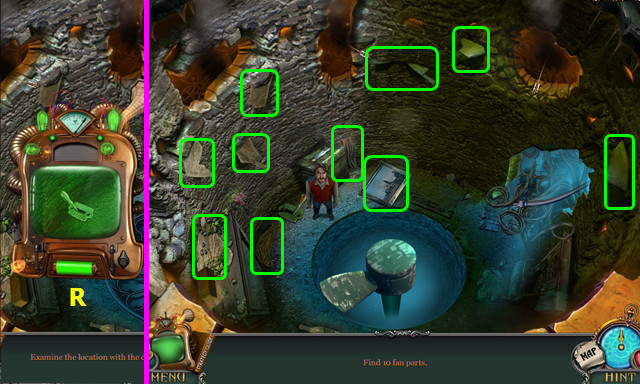
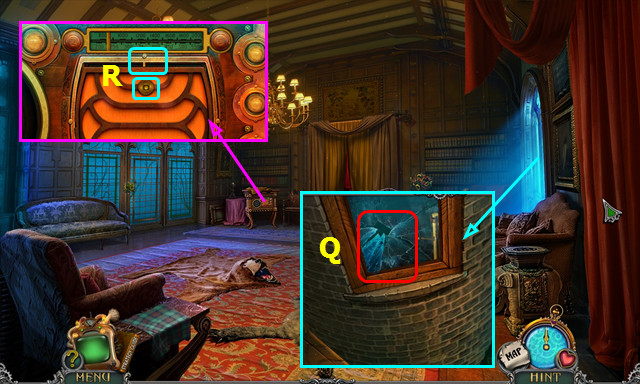
- Use the DETECTOR (R).
- Locate the parts (green).
- Go forward.
Chapter 4: The Tower
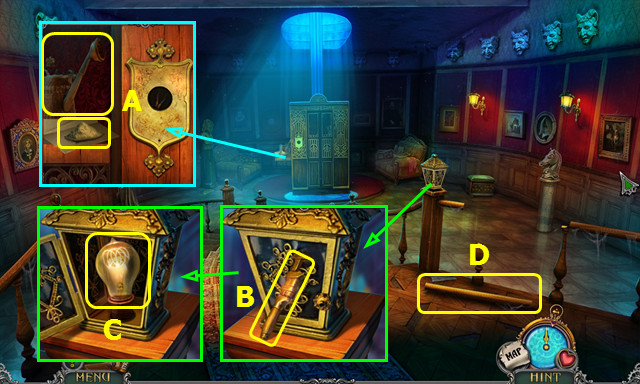
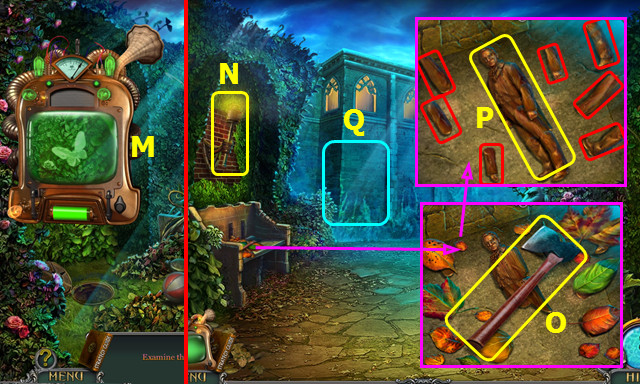
- Use the DETECTOR (A).
- Move the items and select the paper (B).
- Change the colors to match the diagram; take the BELL (C).
- Select (D).
- Place the PHOTO.
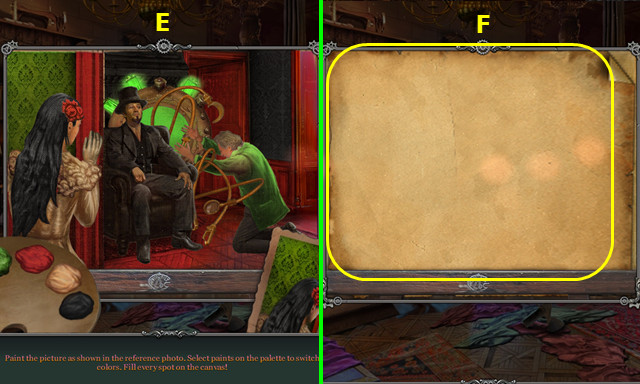
- Use the brush and paints to match the canvas to the photo (E).
- The PAINTBRUSH will go into your inventory.
- Take the PAPER (F).
- Select (G).
- Use the PAPER KNIFE (H).

- Arrange the wires as shown (I).
- Use the DEFENSE AMULET (J).
- Walk forward.
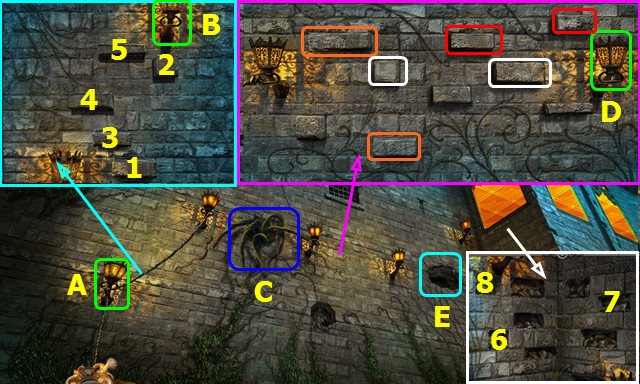
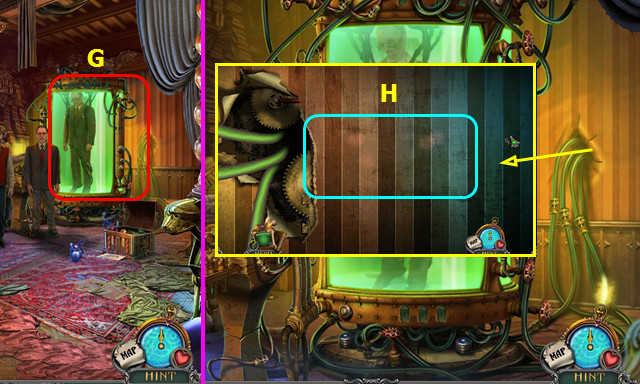
- Select the poles 5x (K).
- Select the mirror 3x (L).
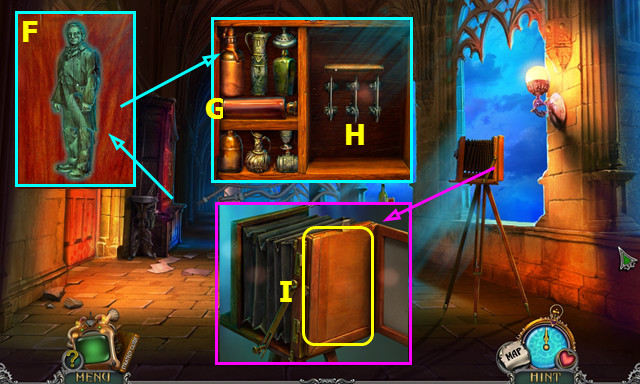
- Take the DOLL (M).
- Open the DOLL and take the SUCTION CUP (inventory).
- Combine the OPERA GLASSES and the SUCTION CUP to find the LENS (inventory).
- Take the NET (N).
- Turn the lever and use the LENS (O).
- Use the PAPER and PAINTBRUSH: take the PATTERN (P).
- Walk down.
- Move the items and select the net frame (Q).
- Place the NET; take the SCOOP NET (R).
- Go forward.
- Use the SCOOP NET and untie the rope; take the FLAG (S).
- Walk down.
- Select (T).

- Place the FLAG and PATTERN.
- Select B-Cx7-B-Ax4-B-Ax5-B-Ax3-B-Cx4-B-Ax7-B-Ax4-B-Cx7-B-Ax7-B-Ax4-B-Cx9-B-Ax9-B-Ax5-B-Cx6-B.
- Take the NEEDLE AND THREAD and the PATCH (D).
- Go forward.
- Use the PATCH and NEEDLE AND THREAD (E).
- Go forward (F).
- Open the door and play the HOP (H).
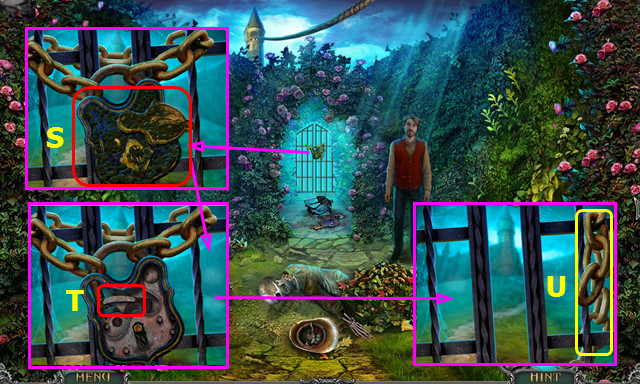
- Select the 2 pairs (color-coded); use the remaining key on the lock (I).
- Take the MATCHES and PRUNER (J).
- Use the PRUNER; take the LADDER (K).
- Place the LADDER (L).
- Use the BELL (M).
- Move the leaves 3x; take the BALL and CAR KEY (N).
- Select (O).
- Use the CAR KEY (P).
- Open the glove box, move the postcard, and take the WIPER SWITCH (Q).
- Place and select the WIPER SWITCH (R).
- Select (S).
- Remove the garbage and select (T).
- Open the doors and play the HOP; earn the CAR JACK (A).
- Take the 1st BOX and 1st GEM (B).
- Use the BALL (C).
- Take the MEDICAL KIT; place and select the CAR JACK (D).
- Walk right.
- Use the DETECTOR (E).
- Take the 2nd GEM (F).
- Take the 2nd BOX (G).
- Take the DRAGONFLY KEY (H).
- Place the 2 GEMS; take the BRACELET (I).
- Open the BRACELET; take the CLASP (inventory).
- Combine the MEDICAL KIT and CLASP; remove the items and take the SMELLING SALTS (inventory).
- Walk down.
- Use the SMELLING SALTS (J).
- Take the 3rd BOX (K).
- Walk forward.
- Place the 3 BOXES (L).
- Select (M).
- Use the MATCHES 3x (red).
- Open the curtain (N).
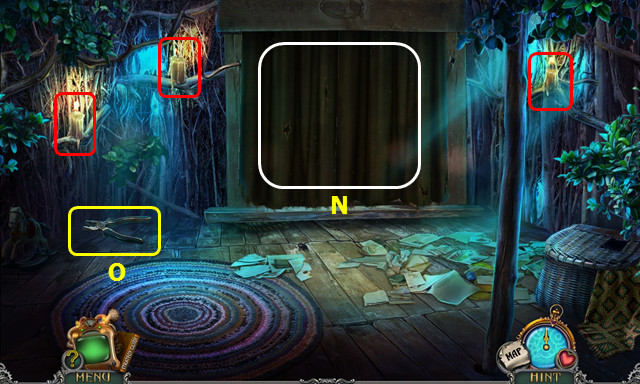
- Move the 5 toys; take the PLIERS (O).
- Walk down 2x.

- Move the ivy; use the PLIERS to take the HOOK (P).
- Return to the treehouse.
- Place the HOOK and select the curtain (Q).
- Select the rifle (R).
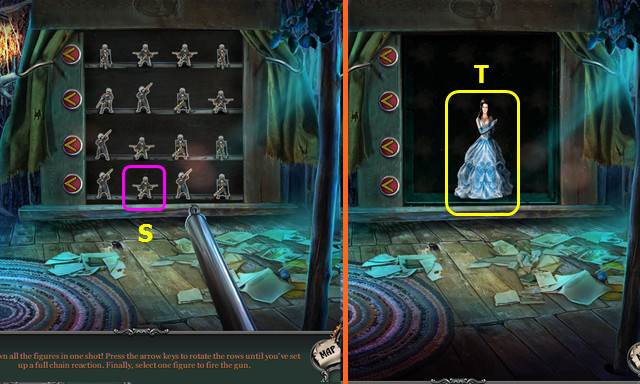
- Arrange the figures as shown; select (S).
- Take LUISA'S STATUETTE (T).
- Open LUISA'S STATUETTE; take the DRAGONFLY HALF (inventory).
- Add the DRAGONFLY HALF to the DRAGONFLY KEY (inventory).
- Use the DRAGONFLY KEY; take the BAS-RELIEF FRAGMENT (A).
- Walk down.
- Place the BAS-RELIEF FRAGMENT (B).
- Play the HOP; earn the DEATH'S HEAD.
- Go forward 2x.
Chapter 5: The Corridor
- Take the DRAWER KEY (C).
- Take the NAPKIN (D).
- Open the door and walk right (E).
- Use the DETECTOR (F).
- Use the DRAWER KEY; take the COILED ROPE (G).
- Take the TOY REVOLVER (H).
- Use the SCISSORS (I) on the ribbon 2x (red).
- Remove the ribbon and lid; read the note and remove the case (J).
- Walk down.
- Use the SCISSORS; take the SAFETY PIN (K).
- Walk right.
- Use the SAFETY PIN 3x (green).
- Use the NAPKIN (L).
- Select (M-N).
- Take the CHILD'S VIOLIN (O).
- Place the CHILD'S VIOLIN; take the MONKEY HAND (P).
- Walk down.
- Place the MONKEY HAND; select the curtain rod (Q).
- Open the curtain and remove all the shelved bottles; use the SCISSORS (S); select (T).
- Move U to V.
- Take the CORKSCREW (W).
- Walk right.
- Remove the handle; use the CORKSCREW (A).
- Select (B).

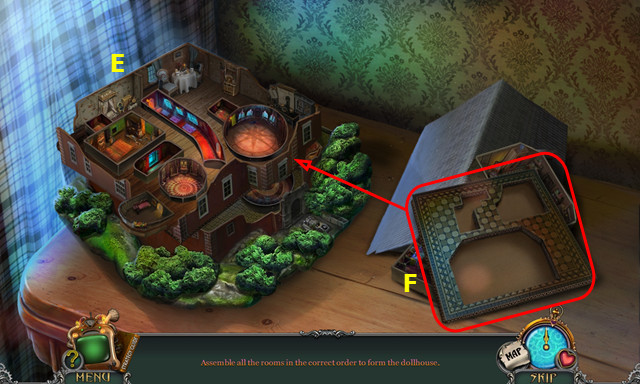
- Restore the rooms (C).
- Move the 2nd floor over the 1st (D).
- Restore the rooms (E).
- Move the 3rd floor over the 2nd (F).
- Restore the rooms (G).
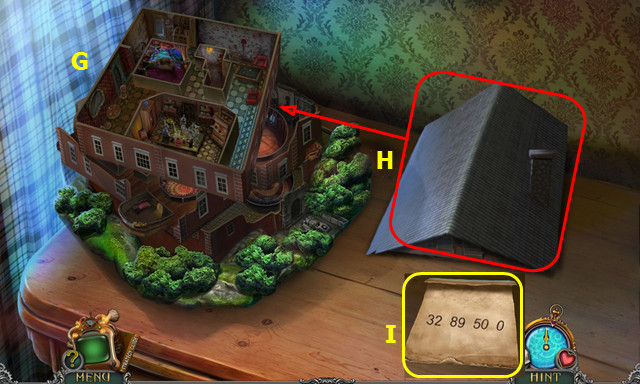
- Move the roof onto the 3rd floor (H).
- Take the SAFE COMBINATION (I).
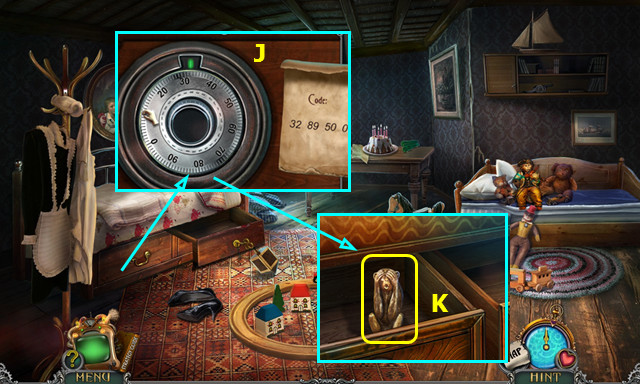
- Turn the dial right to 32, left to 89, right to 50, left to 0 (J).
- Take the MONKEY STATUETTE (K).
- Walk down.
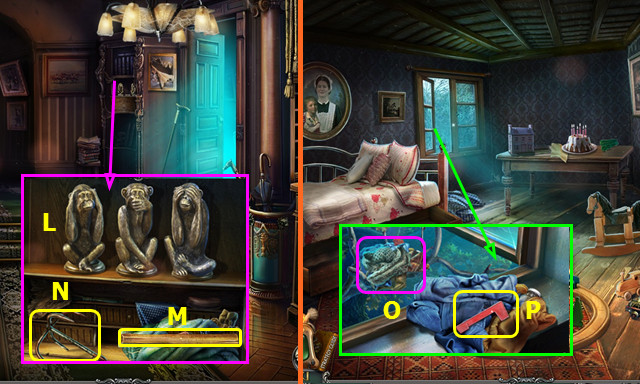
- Place the MONKEY STATUETTE; change them as shown (L).
- Take the HAFT (M).
- Move the items and take the GRAPPLING HOOK (N).
- Combine the COILED ROPE and GRAPPLING HOOK to make the GRAPPLING HOOK (inventory).
- Go right.
- Use the GRAPPLING HOOK (O).
- Move the items; take the MAILBOX FLAG (P).
- Walk down 2x.
- Place and lower the MAILBOX FLAG; take the PACKAGE (Q).
- Read the note on the package; use the SCISSORS on the string. Take the BLOWTORCH (inventory).
- Go forward.
- Select (R).
- Use the BLOWTORCH (S).
- Go forward 2x.
- Use the HALF-EMPTY BLOWTORCH (T).
- Select 1-36.
- Take the DEFENSE AMULET (U).
- Go forward.
- Use the DETECTOR (A).
- Select (B).
- Open the cage; take the PICKAX HEAD (C).
- Combine the PICKAX HEAD and HAFT to make the PICK (inventory).
- Use the SCISSORS; take the LARGE NET (D).
- Take the 1st HALF PORTRAIT (E).
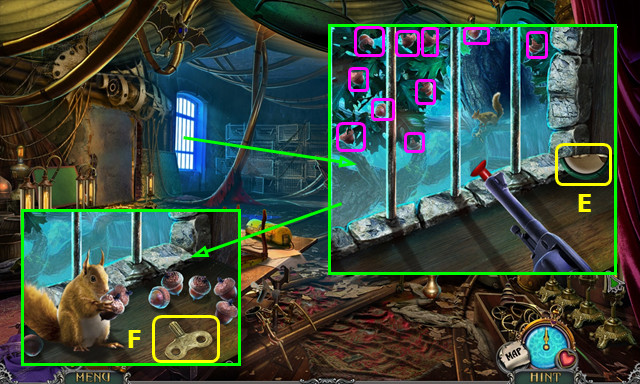
- Place the TOY REVOLVER; select the 10 acorns (pink).
- Take the CLOCK KEY (F).
- Use the DEFENSE AMULET (G).
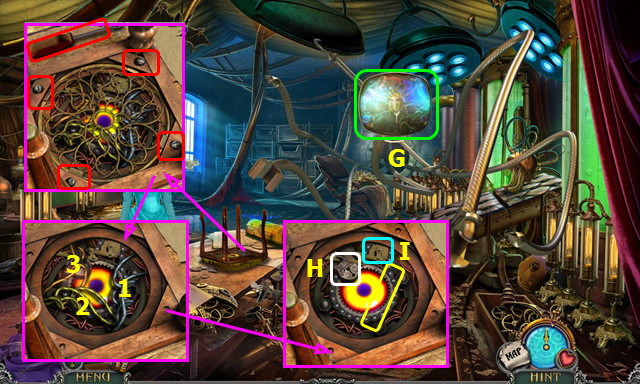
- Take and use the screwdriver 4x (red).
- Remove the grill; pull the 3 wires (1-3).
- Use the CLOCK KEY (H).
- Select the arm and take the CHAIN (I).
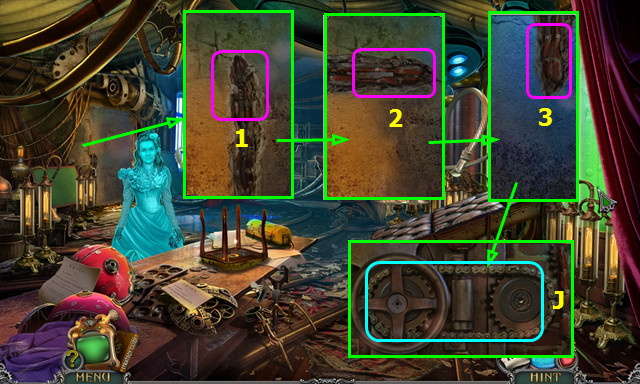
- Use the PICK (1-3).
- Place the CHAIN (J).
- Walk left.
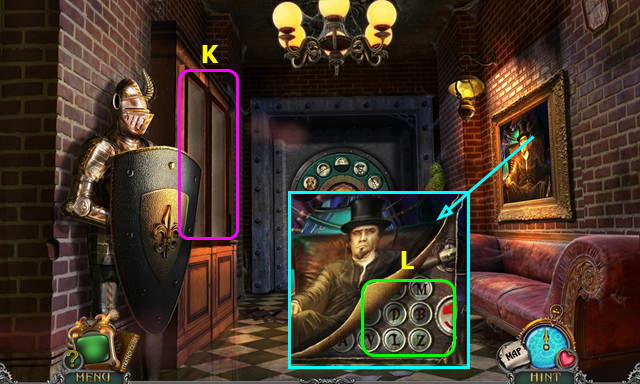
- Open the cabinet and play the HOP; earn the SAFE CODE (K).
- Use the SCISSORS; select the safe (L).
- Place the SAFE CODE (M).
- Select 1-5.
- Select (N).
- Take the 2nd HALF PORTRAIT (O).
- Select (P).
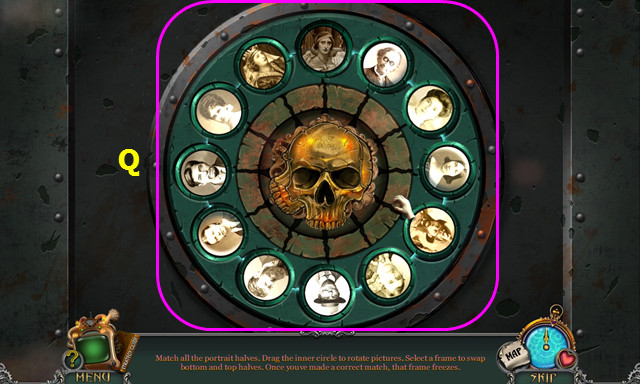
- Place the 2 HALF PORTRAITS and the DEATH'S HEAD.
- Restore the photos as shown (Q).
- Walk forward.
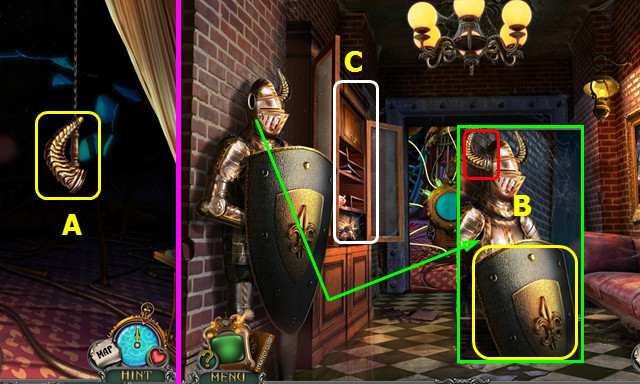
- Take the HORN (A).
- Walk down.
- Place the HORN; take the SHIELD (B).
- Play the HOP; earn the SHIELD STRAPS (C).
- Add the SHIELD STRAPS to the SHIELD (inventory).
- Walk forward.
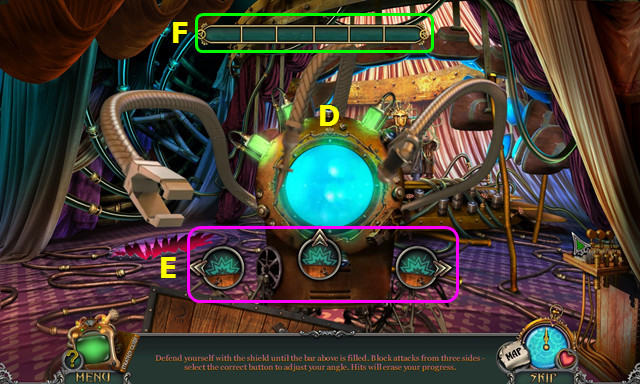
- Use the SHIELD on the machine (D).
- Select the buttons based on the machine's attack (E).
- The arm will raise slightly before attacking; select the corresponding button.
- Track your progress; you will lose ground if you are hit (F).
- Restore the 4 pipes (color-coded).
- Place the LARGE NET (G).
- Remove all the wires and mask (H).
- Congratulations! You have completed Tales of Terror: Estate of the Heart!
Created at: 2016-03-13