

Walkthrough Menu
General Tips
- This is the official guide for Tales of Terror: The Fog of Madness.
- This guide won't tell you when to zoom into a location; the screenshots show each zoom scene.
- Hidden-object puzzles are referred to as HOPs. Only the locations of the HOPs will be shown.
- Use the Map to fast travel to a location.
Chapter 1: Mr. Fogg

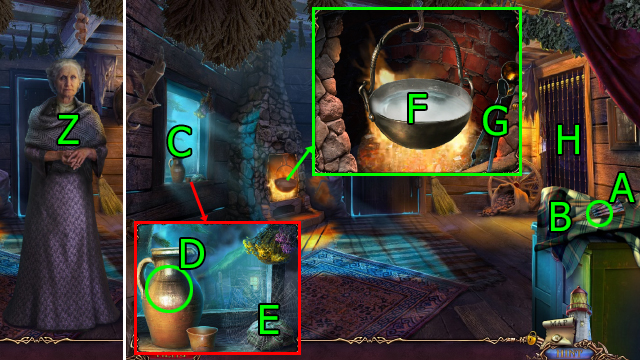
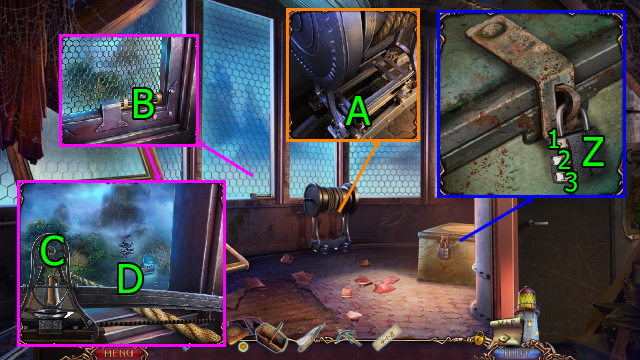
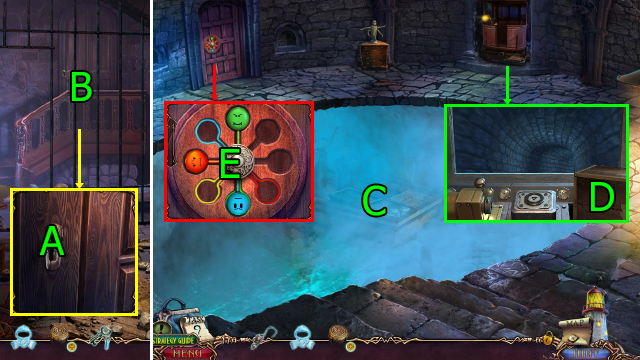
- Press (A).
- Get GLASS OF WATER (B).
- Press and solve HOP (C); get CLUTCH.
- Use CLUTCH; get HAIRPINS.
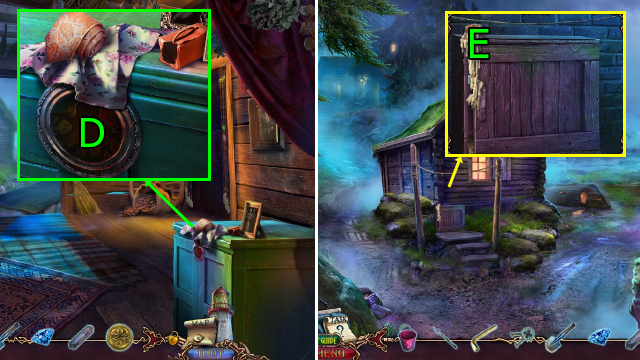
- Press (D).
- Use HAIRPINS on (E).
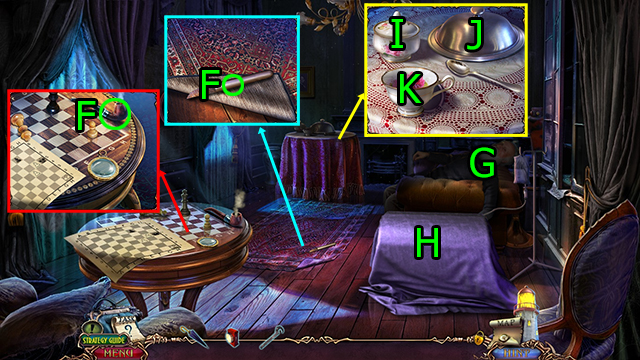
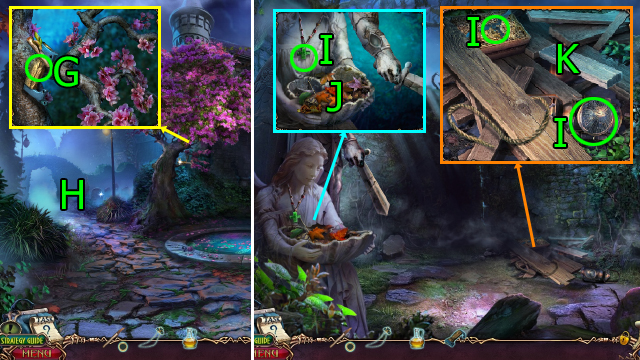
- Drag (F)-(G).
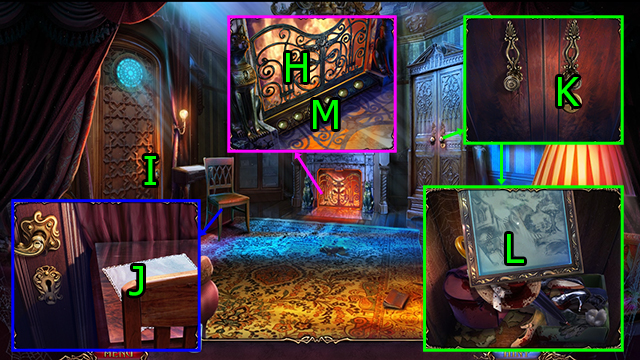
- Press and use GLASS OF WATER on (H); get CHARCOAL.
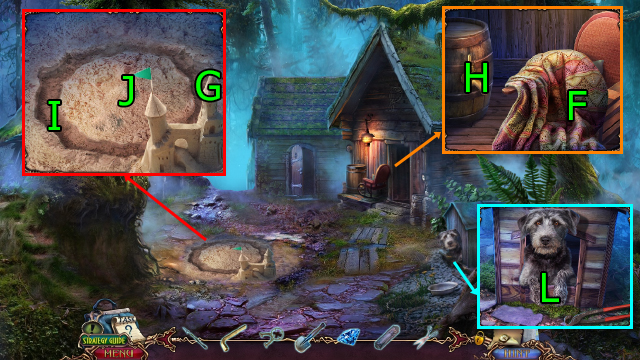
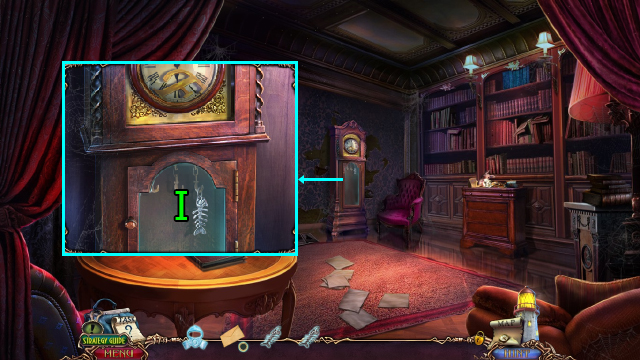
- Press (I).
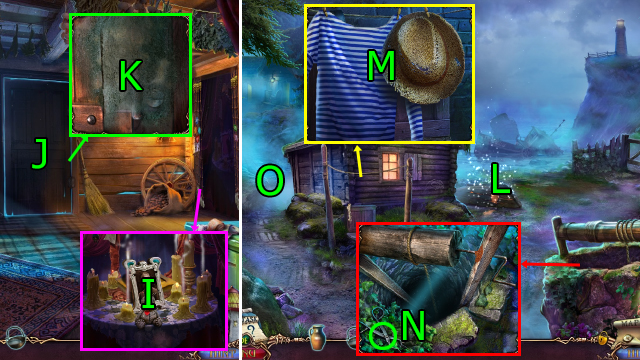
- Press (Jx3); get KERCHIEF and WARDROBE KEY.
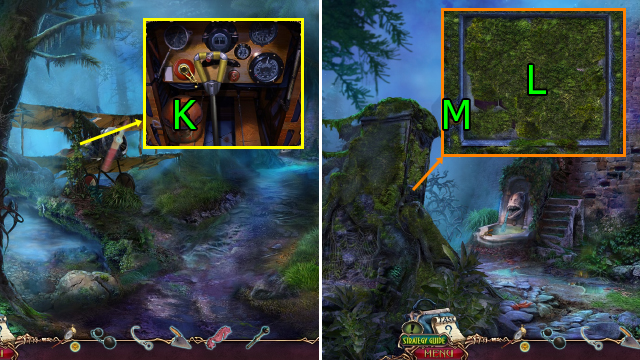
- Use WARDROBE KEY on and press (K).
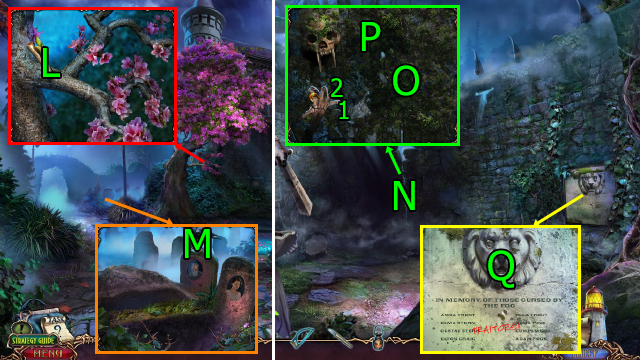
- Press and use KERCHIEF on (L); get Map, UMBRELLA, and SECRET NOTE.
- CHARCOAL on SECRET NOTE; get FIREPLACE CODE.
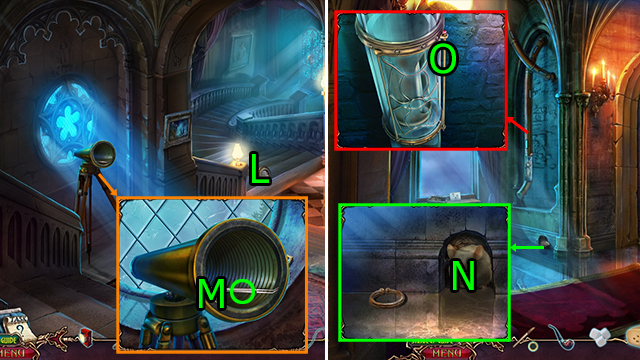
- Use FIREPLACE CODE on (M).

- Solution (@1): Press (1-2-3).
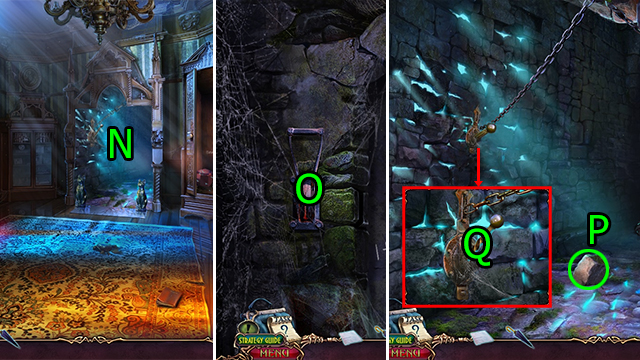
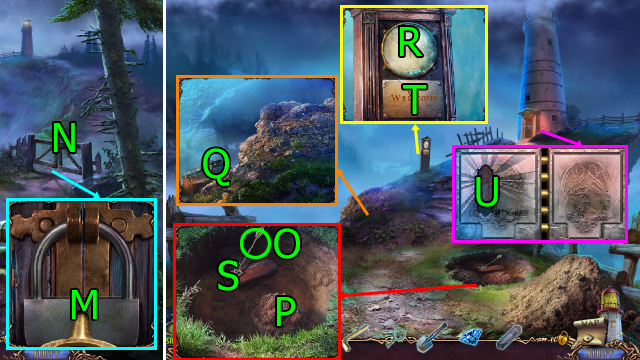
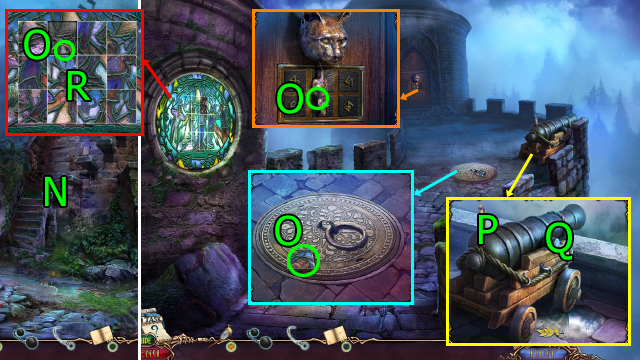
- Go (N).
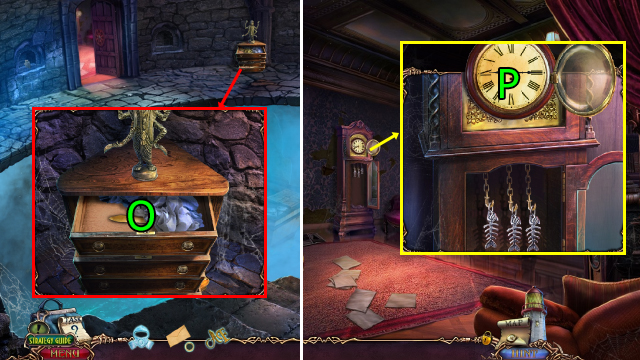
- Press (O).
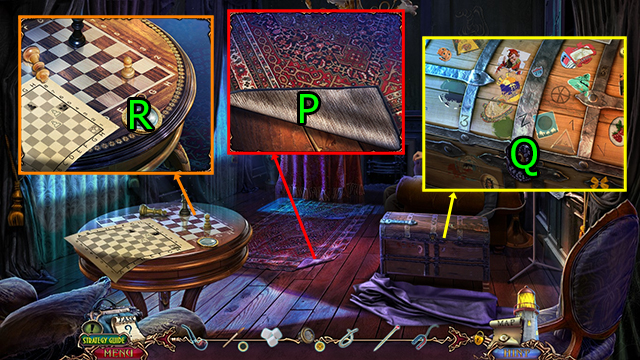
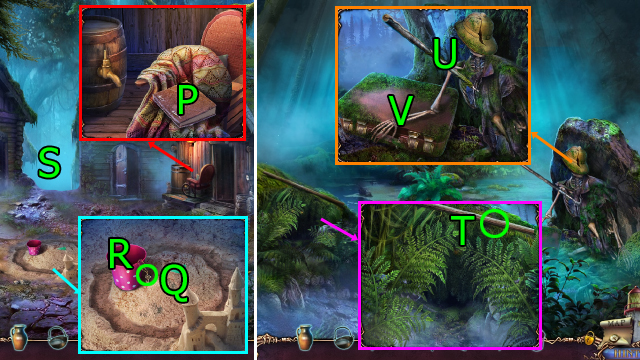
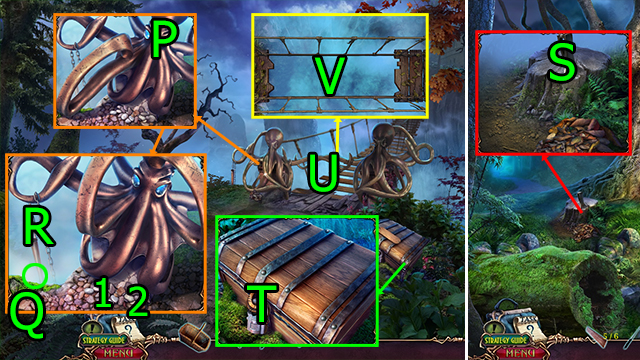
- Get HEAVY STONE (P).
- Use HEAVY STONE on (Q); get LEVER.
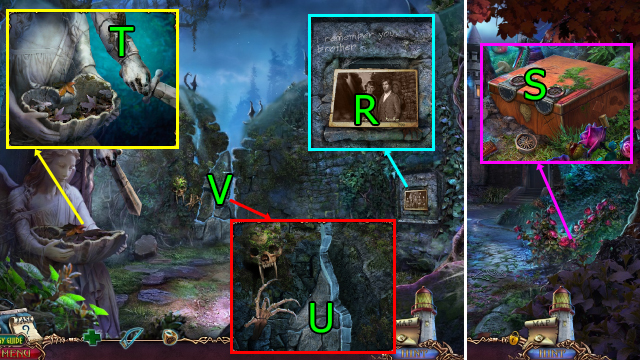
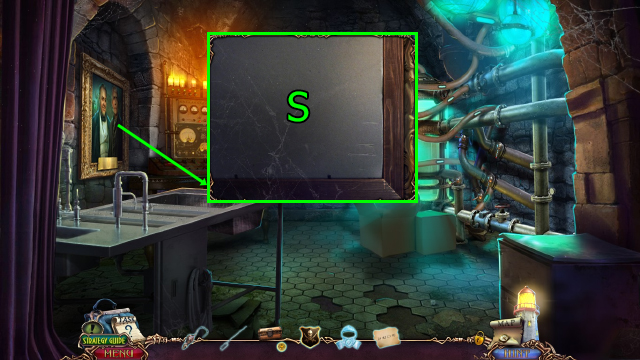
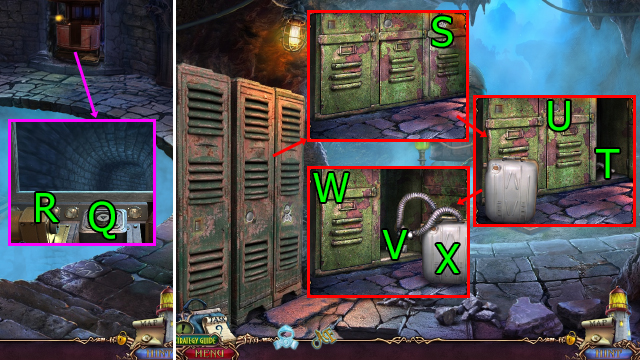
- Press (R).
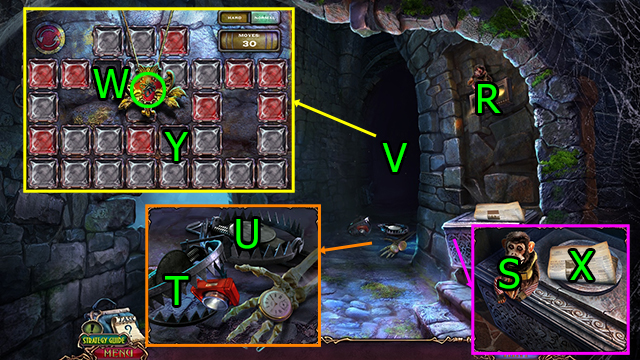
- Press (Sx4); get BATTERY.
- Use LEVER on (T) and (U); get UNCHARGED FLASHLIGHT.
- BATTERY on UNCHARGED FLASHLIGHT; get FLASHLIGHT.
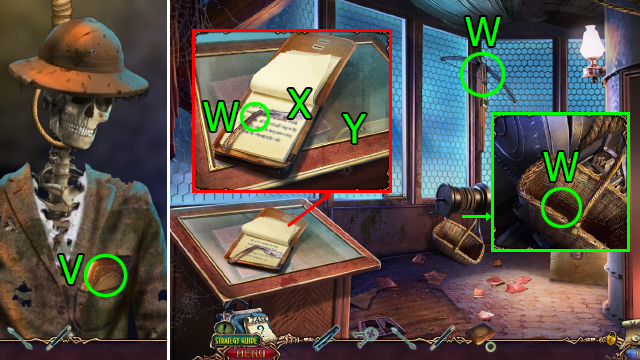
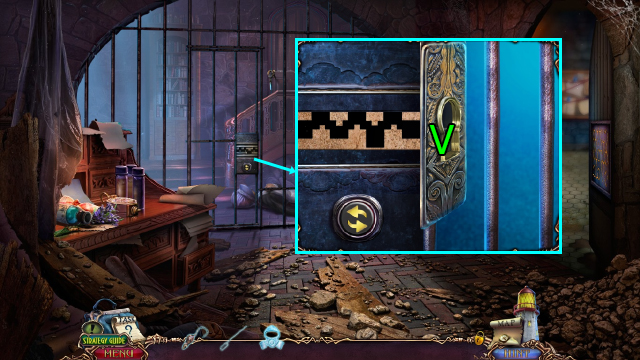
- Use FLASHLIGHT on (V).
- Get GOLDEN CHESTPLATE (W).
- Press and use GOLDEN CHESTPLATE and KERCHIEF on (X); get GEMS.
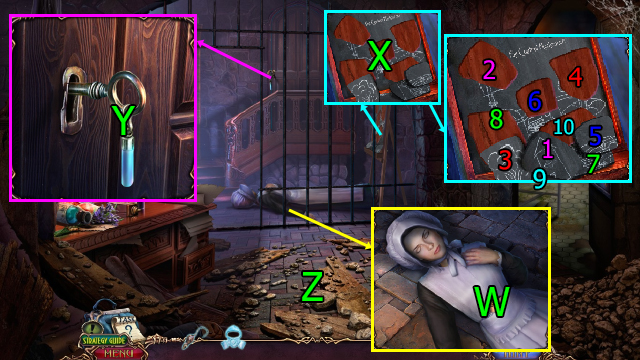
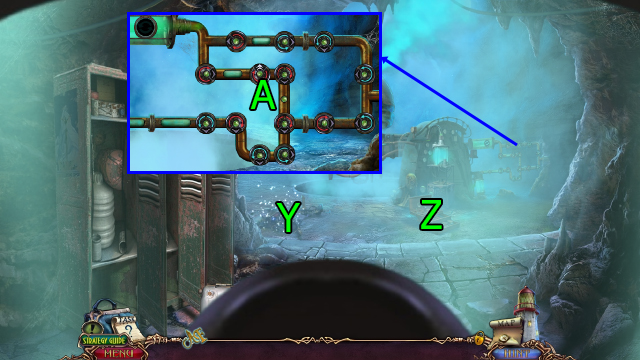
- Use GEMS on (Y).

- Solution (@2).
- Press (Z); get WINDING KNOB.
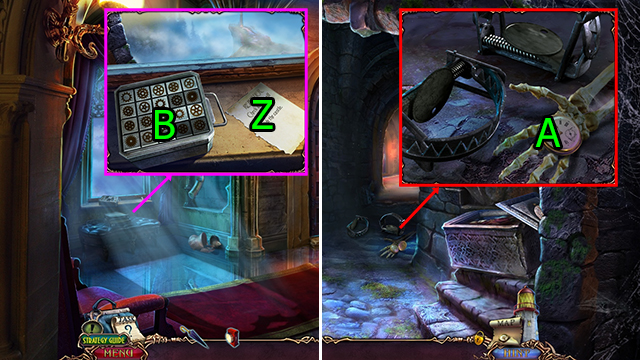
- Go Secret Passage.
- Use WINDING KNOB and press (A); get PUZZLELOCK CODE.
- Go Corridor.
- Use PUZZLELOCK CODE on (B).
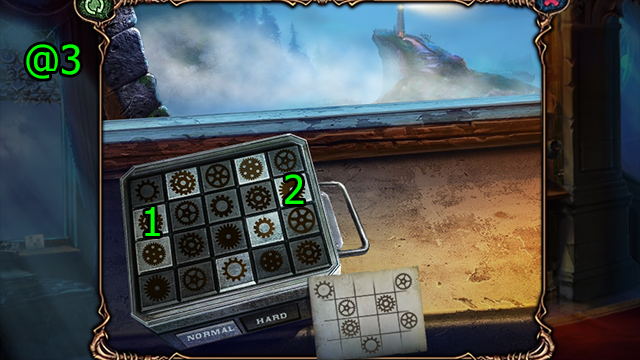
- Normal solution (@3): Press (1-2).
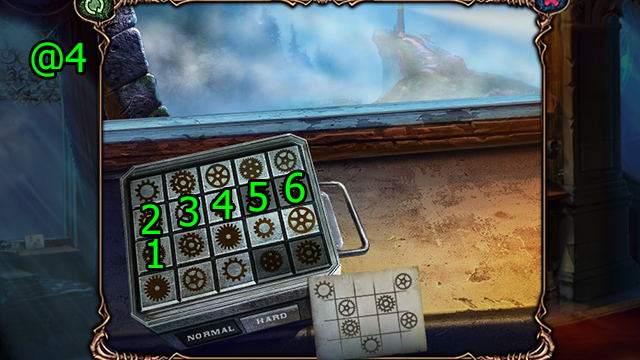
- Hard solution (@4): Press (1-2-3-4-5-6).
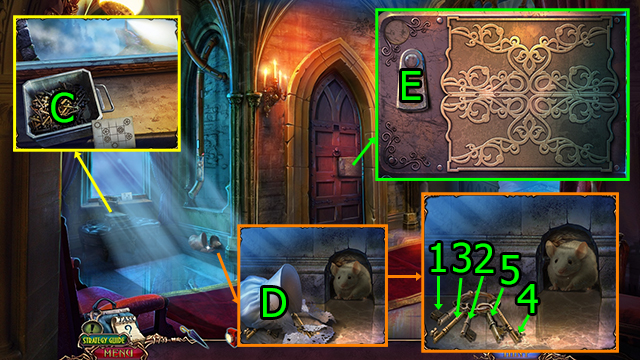
- Press (C); get WRENCH.
- Press (D).
- Press (1-2)-(3-4)-(5); get PARLOR KEY.
- Press and use PARLOR KEY on (E).
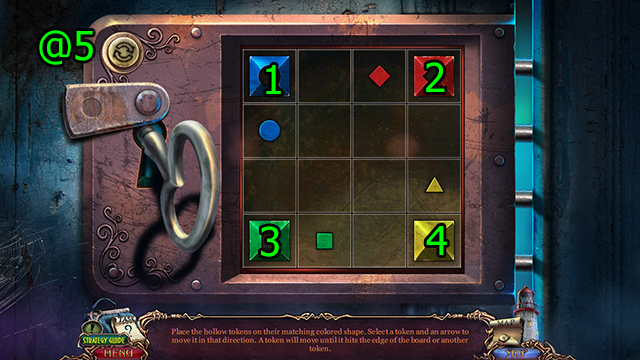
- Solution (@5): Move (2-down)-(1-right-down)-(2-left)-(4-up)-(2-right)-(1-left)-(2-down)-(3-right)-(2-up).
- Get RUSTY KNIFE and SMOLDERING PIPE (F).
- Press (G).
- Press and solve HOP (H); get PLATE.
- Press (I); get SUGAR.
- Press (J); get CHEESE.
- Press and use PLATE on (K); get CHAIN.
- Go Stairway.
- Press and use UMBRELLA on (L); get CRACKED VIEWFINDER.
- Get TWEEZERS (M).
- Go Corridor.
- Use CHEESE on (N); get WICK.
- Use TWEEZERS on, press, and use WRENCH on (O); get PIN and MAGNET.
- CHAIN on MAGNET; get MAGNET ON CHAIN.
- Go Parlor.
- Press and use FLASHLIGHT and MAGNET ON CHAIN on (P); get CHEST KEY.
- Use CHEST KEY on (Q) and solve HOP; get FIRECRACKER BOX.
- Use PIN on (R); get LENS.
- LENS on CRACKED VIEWFINDER; get VIEWFINDER.
- Go Stairway.
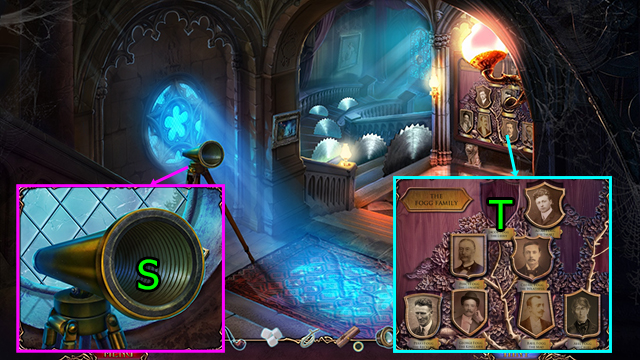
- Use VIEWFINDER on (S); get PORTRAIT.
- Use PORTRAIT on (T).
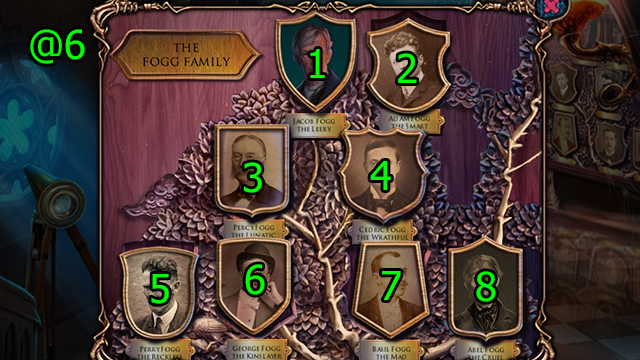
- Solution (@6): Press (2-3)-(8-2)-(4-7)-(6-5)-(4-6).
- Get CHESS PIECES.
- Go Parlor.
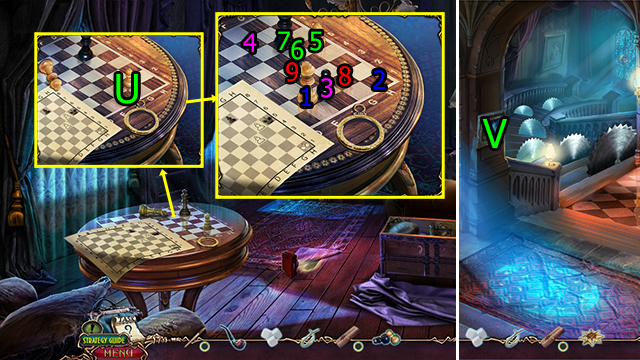
- Use CHESS PIECES on (U).
- Drag (1-2)-(3-4)-(5-6)-(7-5)-(8-9); get GOLDEN STAR.
- Go Stairway.
- Press (V).
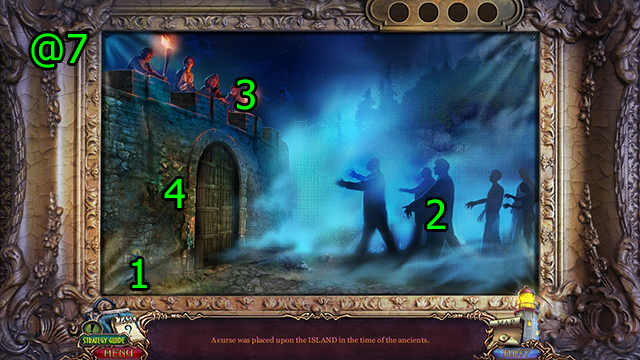
- Solution (@7): Press (1-2-3-4).
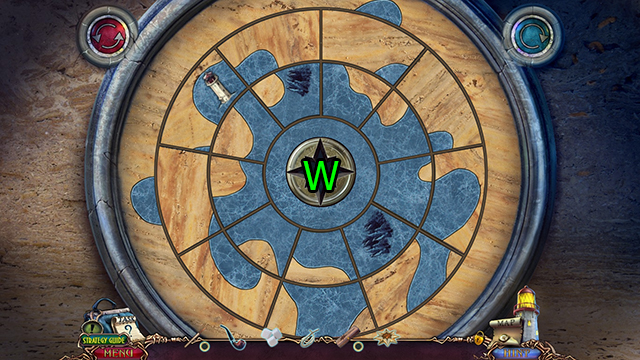
- Use GOLDEN STAR on (W).
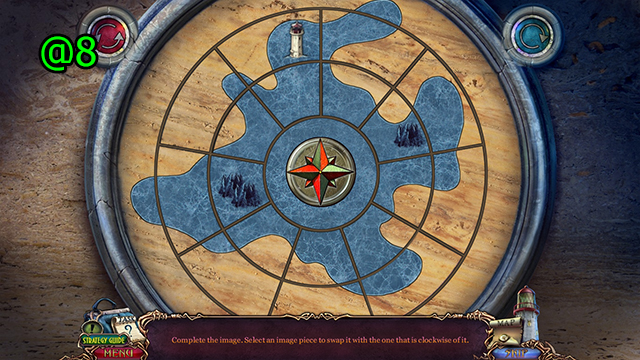
- Solution (@8).
- Press (X).
- Get BLAST SYMBOL (Y).
- BLAST SYMBOL and WICK on FIRECRACKER BOX; get FIRECRACKER.
- Use FIRECRACKER and SMOLDERING PIPE and press (Z).
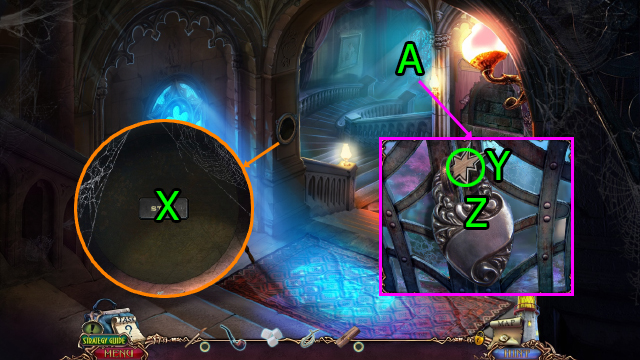
- Go (A).
- Press and solve HOP (B); get METAL HOOK.
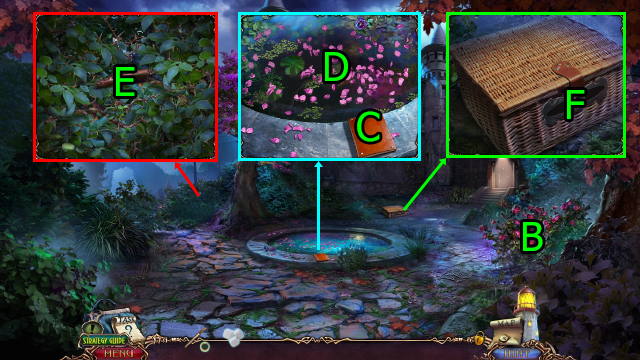
- Press (Cx3); get GOLDEN CLOVER.
- Press and use METAL HOOK on (D); get SICKLE.
- Use SUGAR and SICKLE on (E); get BASKET HANDLE.
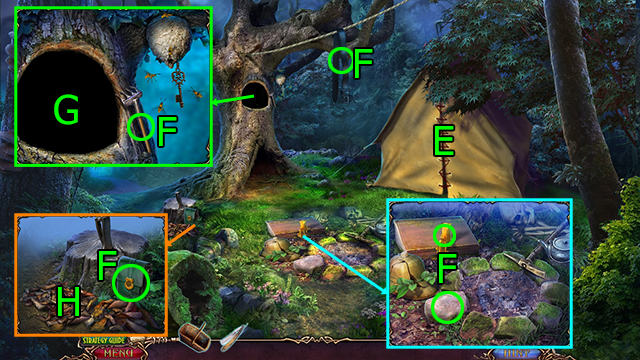
- Use BASKET HANDLE on (F).
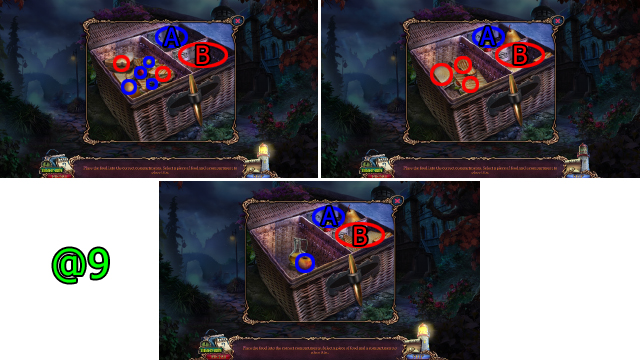
- Solution (@9): Drag objects circled in blue to A, drag objects in red to B.
- Get OIL.
- Get SAW HANDLE (G).
- Go (H).
- Get BROKEN LANTERN, CRACKED SAW, and MEDICAL SIGN (I).
- Press (J); get SHARPENING STONE.
- SHARPENING STONE on RUSTY KNIFE; get SMALL KNIFE.
- SAW HANDLE on CRACKED SAW; get SAW.
- Use SAW, press, and use GOLDEN CLOVER on (K); get FLINT AND STEEL.
- Go Inner Yard.
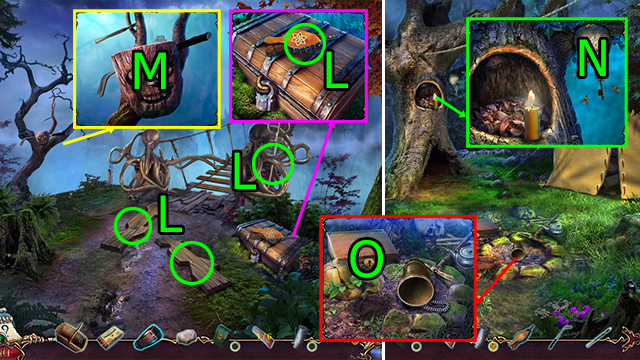
- Use SAW on (L); get WHISTLE STICK.
- SMALL KNIFE on WHISTLE STICK; get WHISTLE.
- Use WHISTLE on (M); get LENS.
- OIL, FLINT AND STEEL, and LENS on BROKEN LANTERN; get LANTERN.
- Go Near Wall.
- Use LANTERN on (N).
- Press (1-2); get ADAM'S RING.
- Use SMALL KNIFE on (O) and (P); get RING HANDLE.
- Use RING HANDLE on (Q).
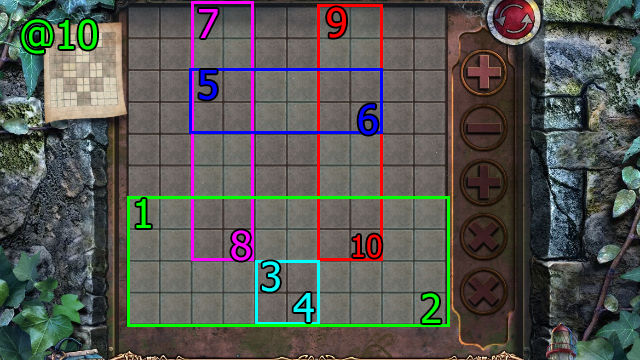
- Solution (@10): Drag (1-2)-(3-4)-(5-6)-(7-8)-(9-10).
- Press (Rx4); get JACOB'S RING.
- Go Inner Yard.
- Use ADAM'S RING and JACOB'S RING on (S).
- Solve HOP; get JEWEL.
- Go Near Wall.
- Use JEWEL on (T); get STONE SWORD.
- Use STONE SWORD on (U).
- Go (V).

- Press (W).
- Press and solve HOP (X); get MEDICAL KIT.
- MEDICAL SIGN on MEDICAL KIT; get BANDAGE.
- Use SAW and BANDAGE on (Y).
Chapter 2: Monsters
- Press (Z).
- Get FAN (A).
- Press and solve HOP (B); get DUSTER.
- Press (C).
- Get MILK (D).
- Use DUSTER on (E); get CLOTH and GLOWING GEM (1/2).
- Use CLOTH on (F); drag (G)-(F), get WET CLOTH.
- Press and use FAN on (F); get HOT WATER and GLOWING GEM (2/2).
- Go (H).
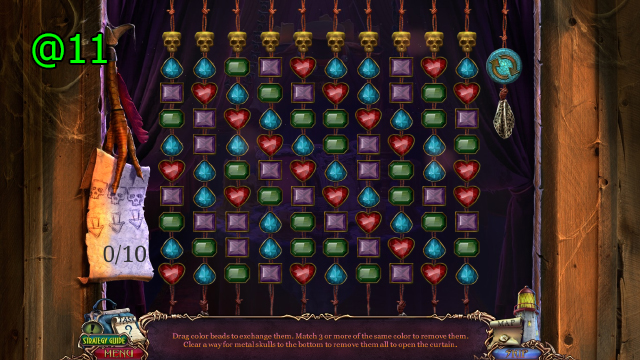
- Solution (@11): Match 3 gems until the skulls all fall to the bottom. Start with the edge columns.
- Press (Ix3); use GLOWING GEM (2/2) and press (I), get BROKEN DAGGER.
- Press (J).
- Use WET CLOTH and BROKEN DAGGER on (K).
- Go (J).
- Solve HOP (L); get MEGALITHIC PLATE.
- Press (Mx2); get BELT.
- Get TWEEZERS (N).
- Go (O).
- Press (P); solve HOP, get BUCKET HANDLE.
- Get PROPHECY KEY (Q).
- Use BUCKET HANDLE on (R); get BUCKET.
- Go (S).
- Get STICK (T).
- Press (U); get HOOKED SPEAR and APOTHECARY BAG KEY.
- Press (V).
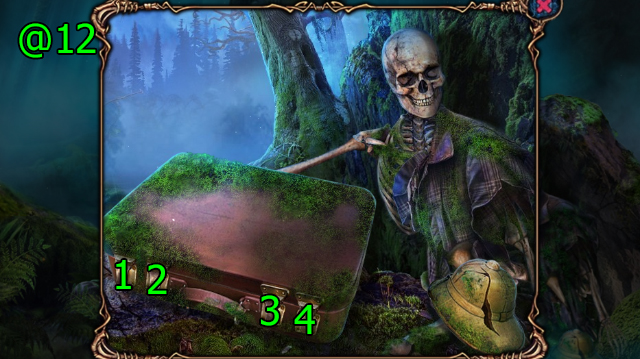
- Solution (@12): Press (1-2-3-4).
- Get BREECH SIGHT and MACHINE OIL.
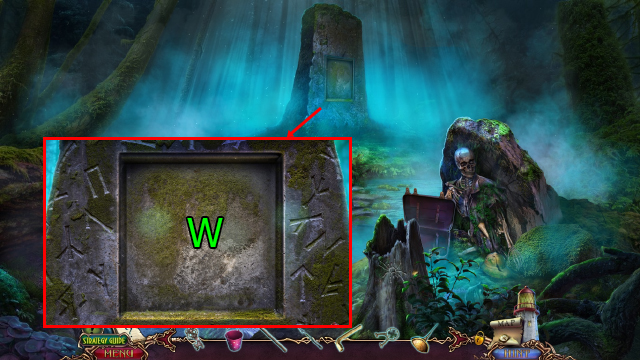
- Use MEGALITHIC PLATE on (W).


- Solution (@13).
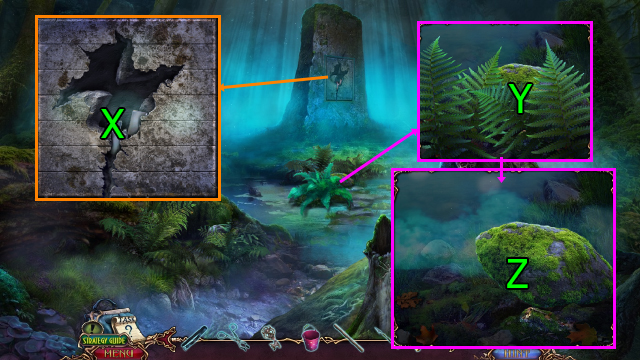
- Use TWEEZERS on (X); get LIGHTER.
- Press (Y).
- Use STICK on (Z); get PROPHECY BOOK and SHOVEL.
- PROPHECY KEY on PROPHECY BOOK; solve HOP, get DIAMOND.
- Go Village.
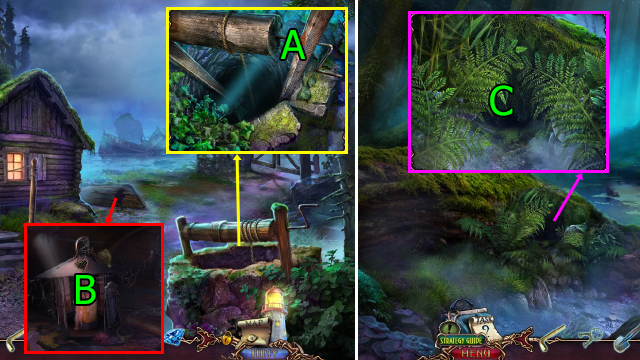
- Use MACHINE OIL and press (Ax2); get BOWL.
- Use LIGHTER on (B); solve HOP, get LIGHTHOUSE TRINKET.
- Go Foggy Forest.
- Press and use LIGHTER, BOWL, and MILK on (C); get ODD EMBLEM.
- Go House.
- Use ODD EMBLEM on (D); solve HOP, get FLAT SHOEHORN.
- Go Village.
- Use HOT WATER and FLAT SHOEHORN and press (E); get SCISSORS.
- Go Village Outskirts.
- Press and use SCISSORS on (F); get FLAG.
- Use FLAG on (G); get VALVE.
- Use VALVE and BUCKET and press (H); get BUCKET OF WATER.
- Use BUCKET OF WATER on (I); get PAPER BOAT.
- Use PAPER BOAT; get SANDBOX MAP.
- Use SANDBOX MAP and SHOVEL on (J); get BONE.
- Use BONE on (L); get PINCERS.
- Press, use PINCERS on, and press (M).
- Go (N).
- Get CROSSBOW BOLT (O).
- Use SHOVEL and press (P); get CONTROL PANELS (1/2).
- Use HOOKED SPEAR and APOTHECARY BAG KEY and press (Qx3); get GLASS CUTTER HANDLE.
- DIAMOND on GLASS CUTTER HANDLE; get GLASS CUTTER.
- Use GLASS CUTTER and press (R); get ZIPPER.
- Use ZIPPER on (S); get FILE.
- Use FILE and press (Tx2); get CONTROL PANELS (2/2).
- Use LIGHTHOUSE TRINKET and CONTROL PANELS (2/2) on (U).
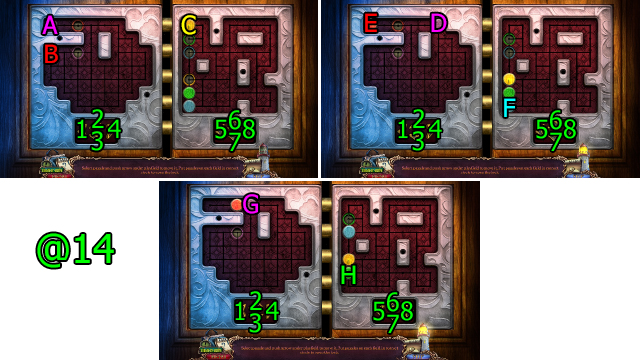
- Solution (@14): Press (A-4)-(B-4-2-1)-(C-7), (D-3-1-2-4-2)-(E-4)-(F-8-6-8-7-5-6-5), (G-3-1-2)-(H-8-7-5-6-5-6-5-7).
- Get CASE (V).
- Get RAZOR, BASKET, and CROSSBOW (W).
- CROSSBOW BOLT and BREECH SIGHT on CROSSBOW; get LOADED CROSSBOW.
- RAZOR on CASE; get WINDOW HANDLE.
- Press (Xx5).
- Use GLASS CUTTER, and press (Yx5); get CODE.
- Use CODE on (Z); press (1x9)-(2x4)-(3x7), get STOP LEVER.
- Use STOP LEVER and press (A).
- Use WINDOW HANDLE and LOADED CROSSBOW on (B).
- Press (C) when the center lines up.
- Use BELT and press (D).
- Use RAZOR and solve HOP (E); get MATCHES.
- Get BELT, SATCHEL, RAKE, ROCK, and CANDLE (F).
- Use CANDLE and MATCHES on (G); get STAR.
- Use RAKE on (H); get SMOKE GENERATOR.

- Press and use STAR on (I); get VALISE CODE.
- Use VALISE CODE on (J).
- Press (1x8)-(2x9)-(3x3); solve HOP, get BRIDGE PLANK (1/6).
- Go (K).
- Get BELLOWS, BRIDGE PLANK (2/6), BRIDGE PLANK (3/6), and TRIDENT (L).
- Use TRIDENT and BELT on (M); get GOLF CLUB, SCALPEL, and BRIDGE PLANK (4/6).
- BELLOWS and MATCHES on SMOKE GENERATOR; get SMOKER.
- Go Ethnographer's Camp.
- Use SMOKER and ROCK on (N); get CASE KEY.
- Use CASE KEY and press (Ox5); get SATCHEL KEY.
- SATCHEL KEY on SATCHEL; get MOONSTONE.
- Go Fault.
- Use MOONSTONE on (P).
- Get AXE HANDLE (Q).
- Use BASKET on (R); drag (1) and (2) to (R), get BAR SPOON and BRIDGE PLANK (5/6).
- Go Ethnographer's Camp.
- Use AXE HANDLE on (S); get AXE.
- Go Fault.
- Use AXE and press (T); get PICKAXE and BRIDGE PLANK (6/6).
- Press (U).
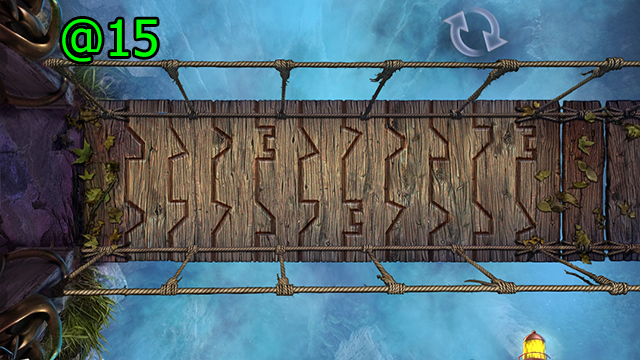
- Use BRIDGE PLANK (6/6) on (V).
- Solution (@15).
Chapter 3: The Fog
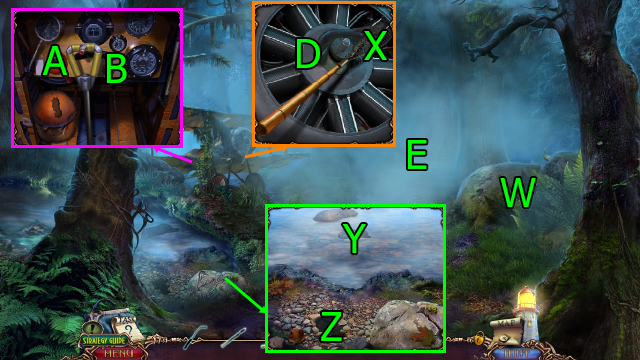
- Press and solve HOP (W); get PROPELLER.
- Use SCALPEL (X); get BROKEN SCOOP NET.
- Use GOLF CLUB on (Y); get NET.
- NET on BROKEN SCOOP NET; get SCOOP NET.
- PICKAXE on (Z); get FUEL CONTROL LEVER.
- Press and use FUEL CONTROL LEVER on (A).
- Press (A-B).
- Use PROPELLER and press (D).
- Go (E).
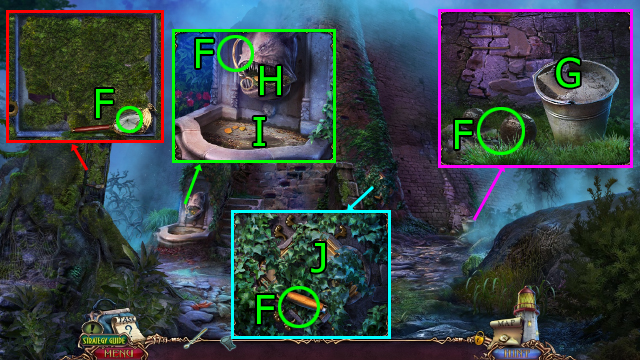
- Get BROKEN MAGNIFYING GLASS, CANNONBALL, MASON'S TROWEL HANDLE, and FISH HOOK (F).
- Use MASON'S TROWEL HANDLE on (G); get MASON'S TROWEL.
- Use BAR SPOON on (H); get SEAHORSE.
- Press and use SCOOP NET on (I); get PRUNING SHEARS.
- Use PRUNING SHEARS on (J).

- Solution (@16): Press (1-2-3-4-5-6-7-8).
- Get STAIRWALL LEVER.
- Go Forest Near the Wall.
- Use SEAHORSE and press (K); get FOGG'S DIARY.
- Go Under the Wall.
- Use MASON'S TROWEL on (L).
- Use STAIRWELL LEVER on (M).

- Solution (@17): Press (1-2-3-4-5).
- Go (N).
- Get MOUSE, STAINED GLASS PUZZLE, and SAFETY FUSE (O).
- Press (P); get FOGG'S NOTES.
- FOGG'S NOTES on FOGG'S DIARY; get CLUE.
- Press (Q); get CLAPPER.
- Use STAINED GLASS PUZZLE on (R).
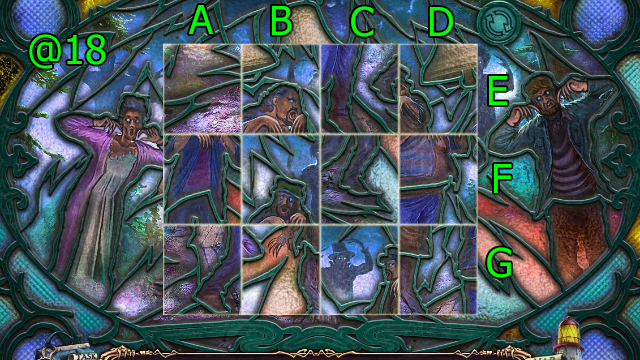
- Solution (@18): (G-1 right)-(C-2 down)-(F-2 left)-(A-1 up)-(F-1 right)-(E-1 right)-(A-1 up)-(E-1 left)-(A-1 down)-(D-2 up)-(E-1 right)-(D-1 up).
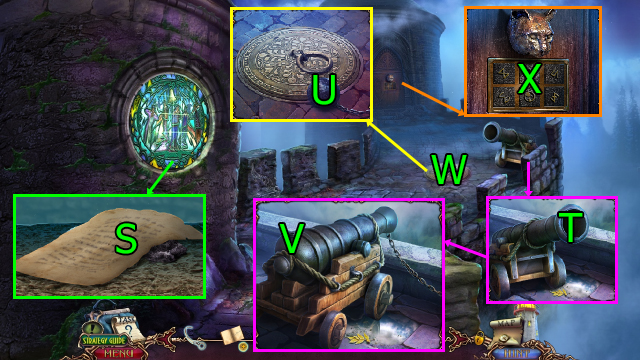
- Press (Sx3); get GUNPOWDER.
- Use CANNONBALL and press (T).
- Press (U); get MAGNIFYING GLASS.
- MAGNIFYING GLASS on BROKEN MAGNIFYING GLASS; get MAGNIFYING GLASS.
- Use GUNPOWDER, SAFETY FUSE, and MAGNIFYING GLASS on (V).
- Solve HOP (W); get TOWER KEY.
- Use CLUE on (X).
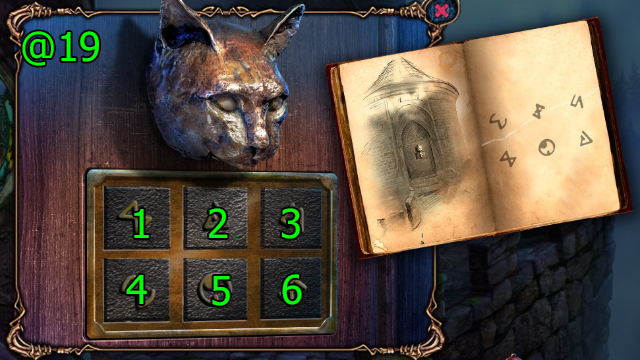
- Solution (@19): Press (1x3)-(2x2)-(4x3)-(6x4).
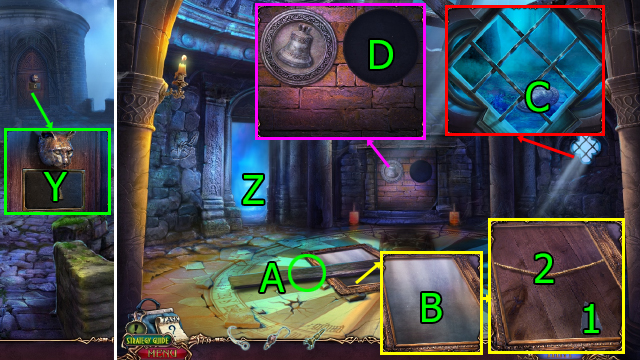
- Use TOWER KEY on (Y).
- Press (Z).
- Get WOODEN BEAM (A).
- Press (Bx5); drag (1-2), get ROPE.
- FISH HOOK on ROPE; get ROPE WITH HOOK.
- Use ROPE WITH HOOK on (C); get DECORATIVE PANEL.
- Use DECORATIVE PANEL on (D).

- Solution (@20): Press (2x7)-(1x7)-(2x4)-(1x4)-(2x5)-(1x4)-(2x1)-(1x2)-(2x2)-(1x1).
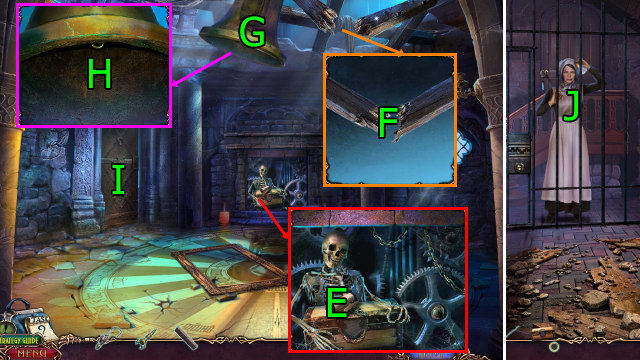
- Press (E); get LOCK PICK, LOCKED TRUNK, and METAL BALL.
- Use WOODEN BEAM on (F).
- Solve HOP (G).
- Use CLAPPER and METAL BALL and press (H).
- Press (Ix3).
- Press (J).
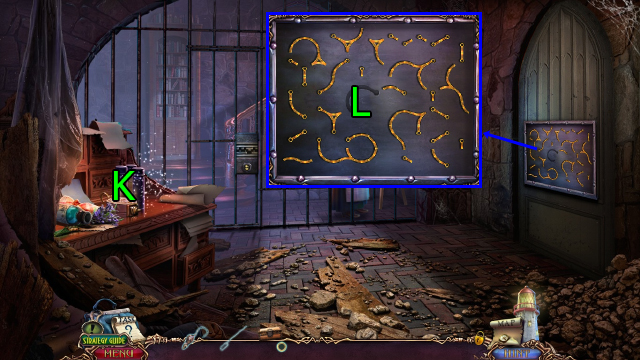
- Solve HOP (K); get METAL UNIT.
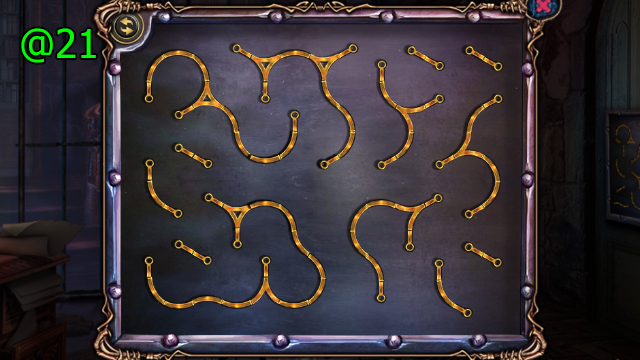
- Use METAL UNIT on (L).
- Solution (@21).
- Go (M).
- Press (N); get JOLLY ROGER and MEDICAL INSTRUMENT.
- Press and use MEDICAL INSTRUMENT on (O); get AUTOPSY RESULTS (1/3) and BALL VALVE.
- Use BALL VALVE on (P).
- Press (P-1-2-3-4-5x2); get AUTOPSY RESULTS (2/3) and RESPIRATOR SYMBOL.
- Press (Qx2); get AUTOPSY RESULTS (3/3).
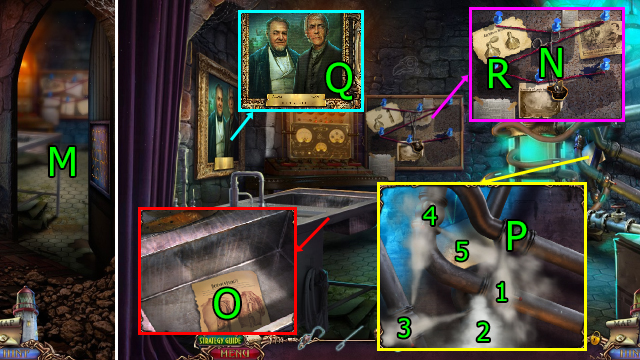
- Use AUTOPSY RESULTS (3/3) on (R).
- Solution (@22): Press (1-3)-(3-6)-(2-5)-(5-4).
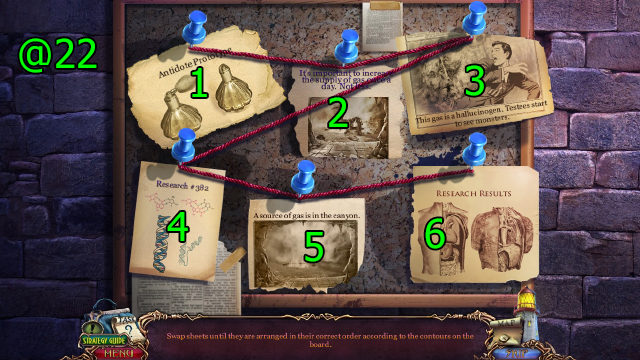
- Solution (@23): Press (1-2)-(3-4)-(5-6)-(7-8).
- Get SAFE CODE.
- Press and use SAFE CODE on (S).
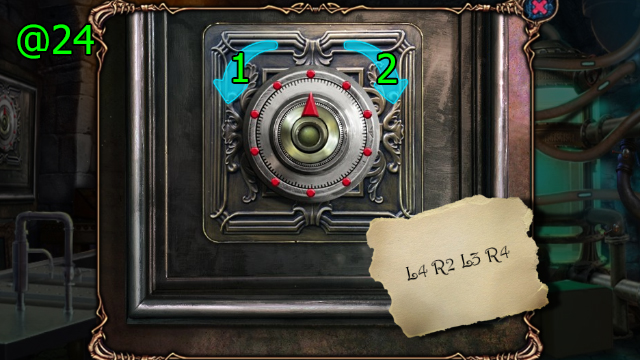
- Solution (@24): Press (1x4)-(2x2)-(1x3)-(2x4).
- Get SOPORIFIC.
- Go Laboratory.
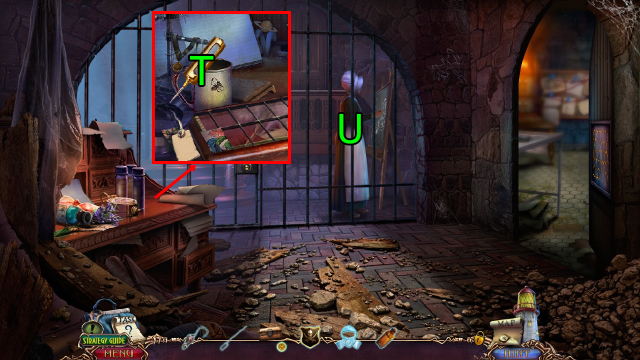
- Use SOPORIFIC on (T); solve HOP, get SOPORIFIC DART.
- Use JOLLY ROGER and SOPORIFIC DART on LOCKED TRUNK; get SOPORIFIC DART PISTOL.
- Use SOPORIFIC DART PISTOL on (U).
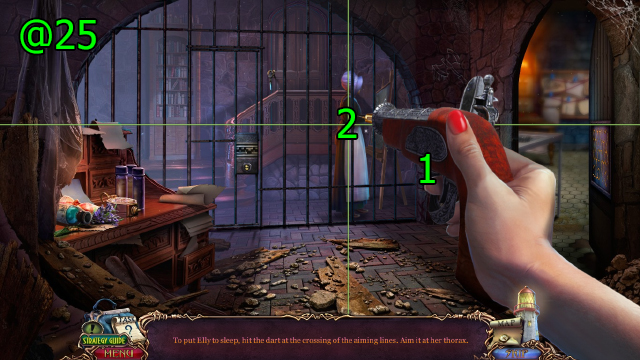
- Solution (@25): Press (1) when the line is on (2).
- Use LOCK PICK on (V).
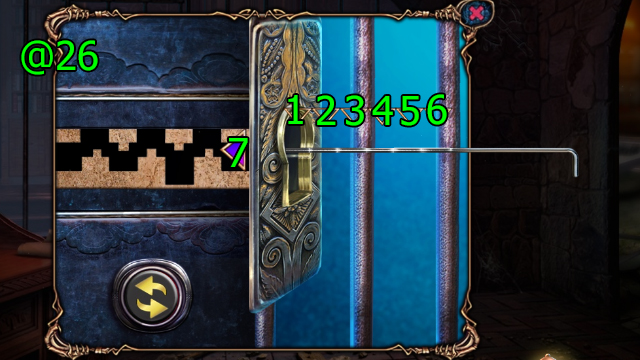
- Solution (@26): Press (1x2)-(2x2)-(3x2)-(4x2)-(5x2)-(6x2)-(7).
- Press (Wx5); get SLATE DRAWING.
- Use SLATE DRAWING on (X).
- Drag (1-2)-(3-4)-(5-6)-(7-8)-(9-10); get WOODEN CASKET.
- MOUSE on WOODEN CASKET; get TUSK.
- Press (Y).
- Press (Z).
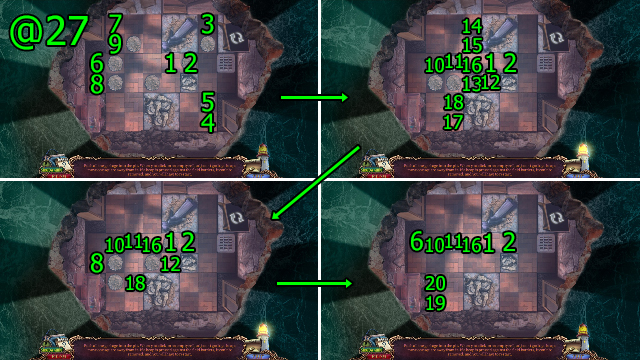
- Solution (@27): (1-2-3-2-4-5-2-6-7-9-8-9)-(10-11-12-13-14-15-16-1-2-17-18-10-11)-(16-1-2-12-18-10-11-16-1-2-8-18)-(10-11-16-1-2-19-20-6-10-11-16-1-2).
- Get LABORATORY KEY.
- Use LABORATORY KEY on (A).
- Go (B).
- Press (C).
- Press (Dx5); get SEALED ENVELOPE and SMILE.
- Use SMILE on (E).
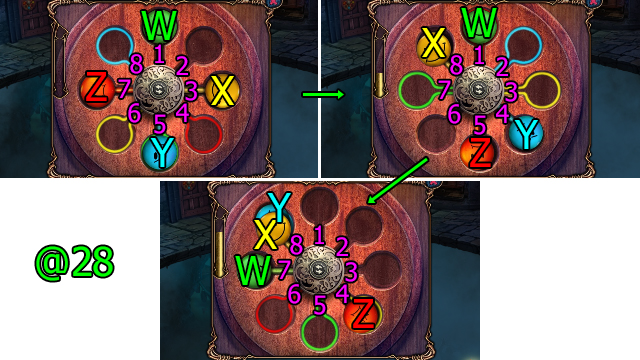
- Solution (@28): Drag (W-5)-(X-6)-(Y-8)-(Z-4), (Y-2)-(W-7)-(X-3), (X-6)-(Y-2)-(Z-6)-(W-5).
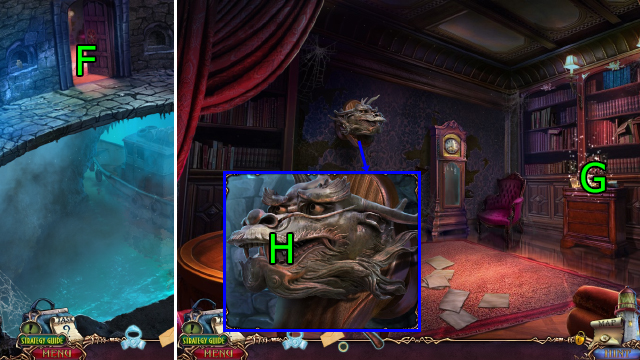
- Go (F).
- Solve HOP (G); get FISH BONE.
- Use TUSK on (H).
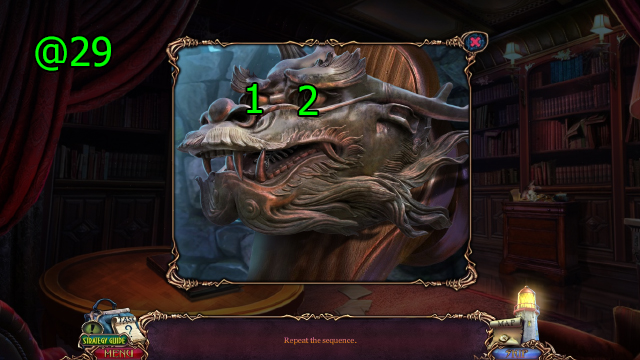
- Solution (@29): Press (1-2-2-1-2-1-1).
- Get FISH BONE.
- Press and use FISH BONE and FISH BONE on (I).
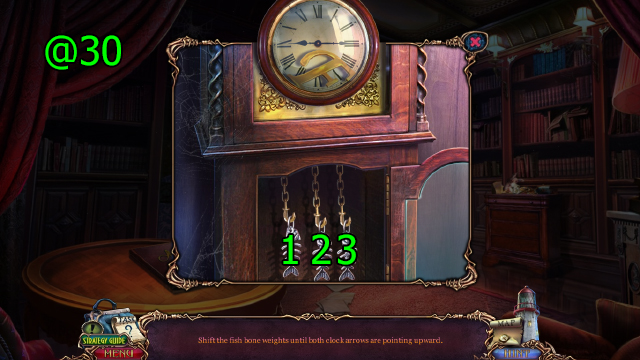
- Solution (@30): Press (1-2-3).
- Get LETTER F.
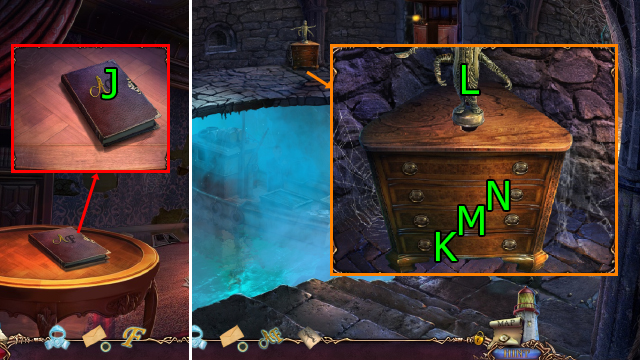
- Use LETTER F and press (Jx2); get AF MONOGRAM and HAND POSITION SKETCH.
- Go Grotto.
- Press (Kx2), drag (K)-(L).
- Press (Mx2), drag (M)-(L).
- Press (Nx3), drag (N)-(L).
- Press and use HAND POSITION SKETCH on (L).
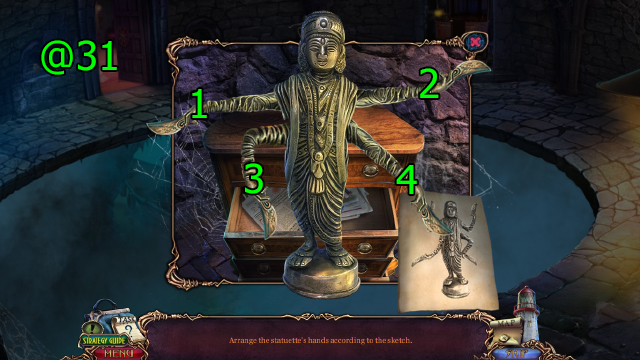
- Solution (@31): Press (1)-(2x2)-(3)-(4).
- Press (Ox2); get LETTER OPENER.
- LETTER OPENER on SEALED ENVELOPE; get BROKEN WATCH.
- Go Library.
- Use BROKEN WATCH on (P).
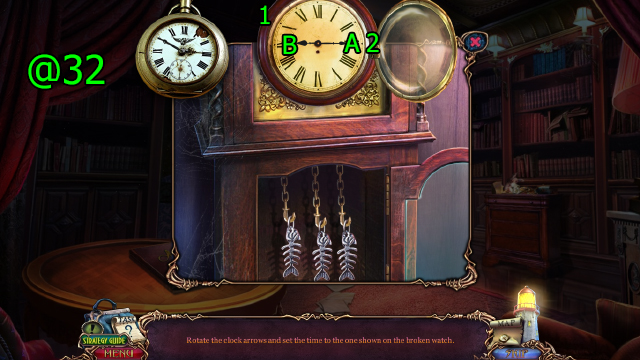
- Solution (@32): Drag (A-1)-(B-2).
- Get IGNITION KEY.
- Go Grotto.
- Use IGNITION KEY on (Q) and press (R).
- Use RESPIRATOR SYMBOL and press (Sx3).
- Drag (T) to and press (Ux3).
- Drag (V) to and press (Wx3); press (X).
- Solve HOP (Y); get NOTEBOOK.
- AF MONOGRAM on NOTEBOOK; get VALVE POSITIONS.
- Solve HOP (Z); get FOG VALVE.
- Use FOG VALVE and VALVE POSITIONS on (A).
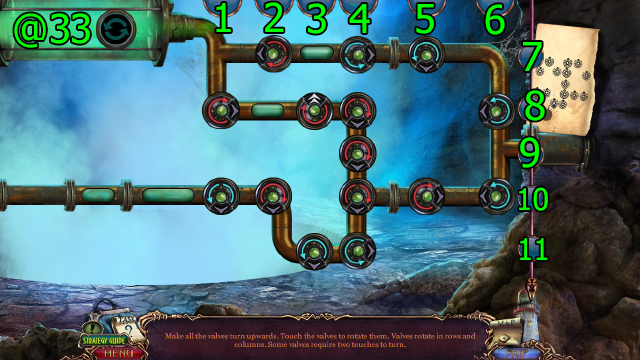
- Solution (@33): Press (7)-(8x3)-(10x3)-(11)-(2x3)-(7)-(2x4)-(3)-(9x2).
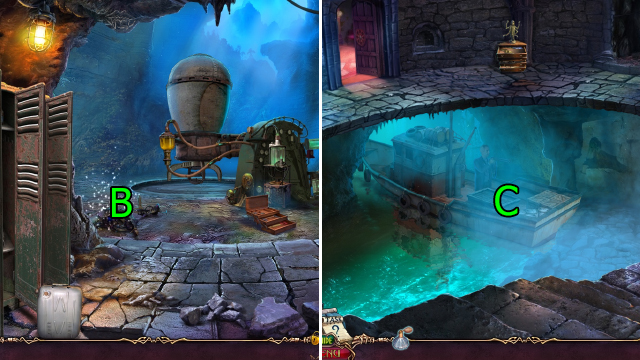
- Solve HOP (B); get ANTIDOTE VIAL.
- Go Grotto.
- Use ANTIDOTE VIAL and press (C).
- Congratulations! You've completed Tales of Terror: The Fog of Madness!
Created at: 2018-07-29