Welcome to the Tesla’s Tower: The Wardenclyffe Mystery Walkthrough
In a fading world devoid of color, the ghost of Nikola Tesla reaches through the Ether and invites you on an incredible adventure through time and space.
Whether you use this document as a reference when things get difficult or as a road map to get you from beginning to end, we’re pretty sure you’ll find what you’re looking for here.
This document contains a complete Tesla’s Tower: The Wardenclyffe Mystery game walkthrough featuring annotated screenshots from actual gameplay!
We hope you find this information useful as you play your way through the game. Use the walkthrough menu below to quickly jump to whatever stage of the game you need help with.
Remember to visit the Big Fish Games Forums if you find you need more help. Have fun!
This walkthrough was created by prpldva, and is protected under US Copyright laws. Any unauthorized use, including re-publication in whole or in part, without permission, is strictly prohibited.
Walkthrough Menu
- General Tips
- Chapter 1: Investigating Tesla
- Chapter 2: Tesla’s 5th Avenue Labs
- Chapter 3: Getting Home
- Chapter 4: The Butterfly Effect
- Chapter 5: Wardenclyffe Tower
General Tips
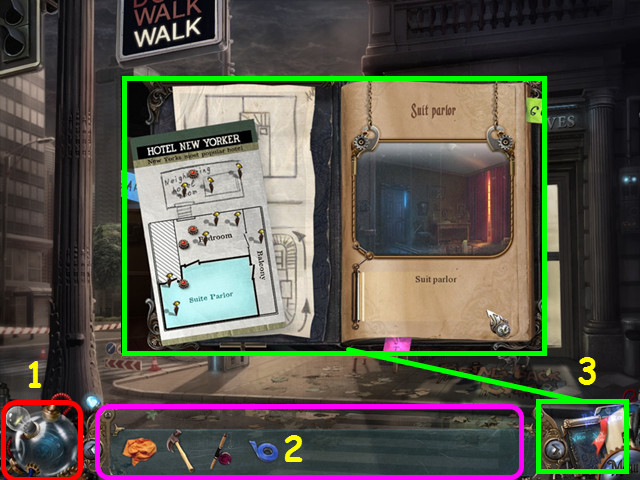
- Hidden Object Scenes and mini-games are often randomized – your solution may vary.
- Hidden Object Scenes will be referred to as HOS in this walkthrough.
- Items listed in yellow in HOS require additional steps.
- Hints are unlimited, but you must wait for the meter to refill (1).
- Your inventory is in the bottom panel – select an item to choose it for use (2).
- Read your journal for current goals, story and location maps (3).
Chapter 1: Investigating Tesla
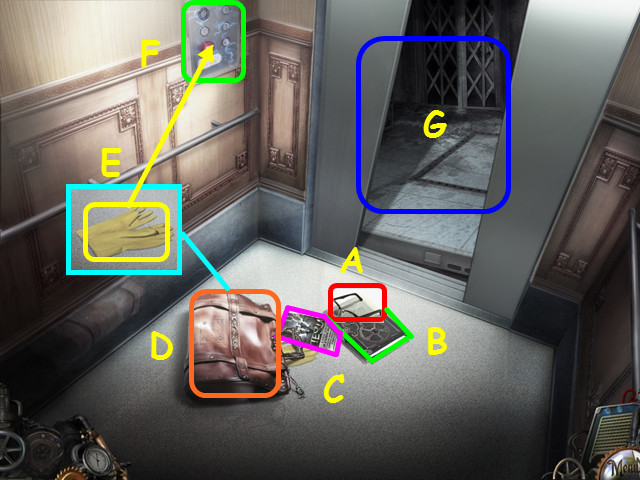
- Pick up your glasses from the elevator floor (A). The scene will become clearer.
- You will have the option of some interactive help.
- Take your journal (B).
- Read and take the flyer to find a map (C).
- Take your inventory bag (D), then the RUBBER GLOVES that are under the bag (E).
- Use the RUBBER GLOVES on the control panel (F).
- Walk forward to exit the broken elevator and enter the abandoned basement (G).
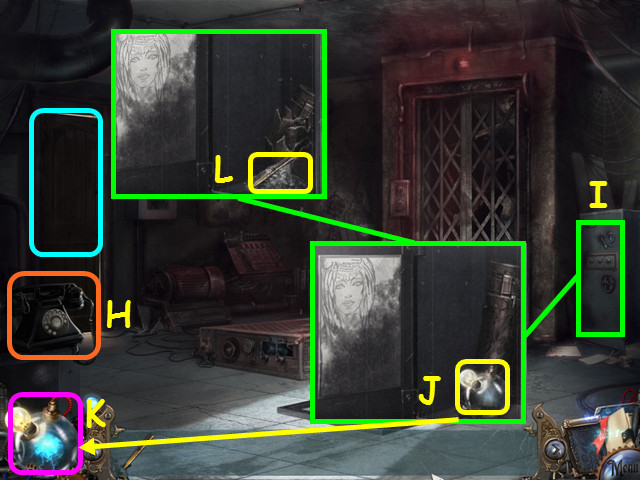
- Answer the telephone (H).
- After talking to Nikolai Tesla, open the safe (I).
- Look inside and take the Ether Sphere (J), this will provide you hints (K).
- Select the blueprints canister, then take the KNIFE (L).
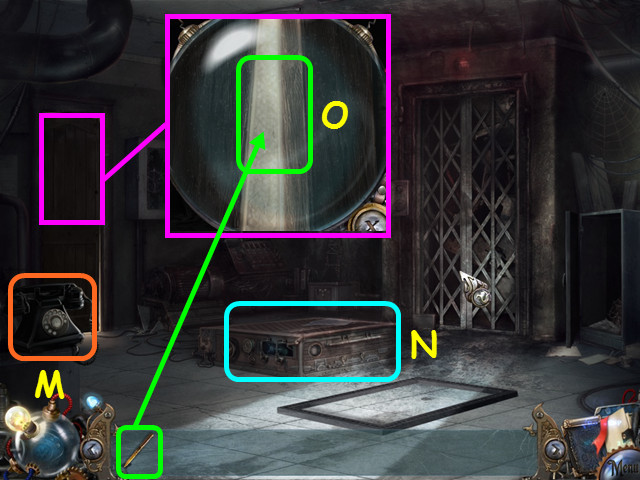
- Answer the phone again (M).
- Look at the platform in the center of the room (N).
- Exit the close-up, then look at the door and use the KNIFE to cut the opening (O).
- Walk left to the basement laundry room.
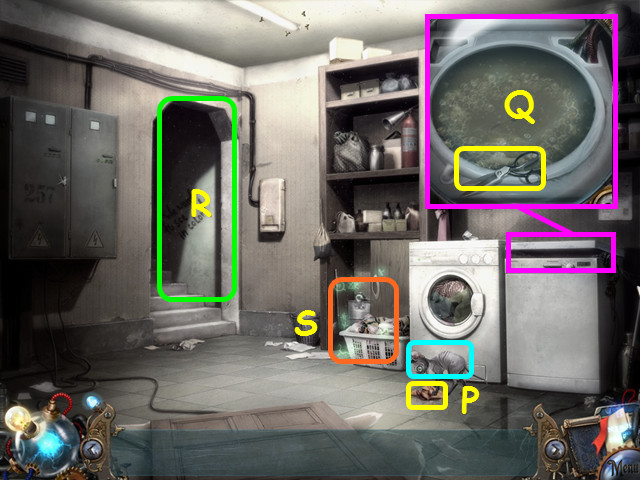
- Pet the cat, then take the RAG (P).
- Open the lid, then look in the washing machine and take the SCISSORS (Q).
- Note the stairs (R).
- Look at the laundry basket for a HOS (S).
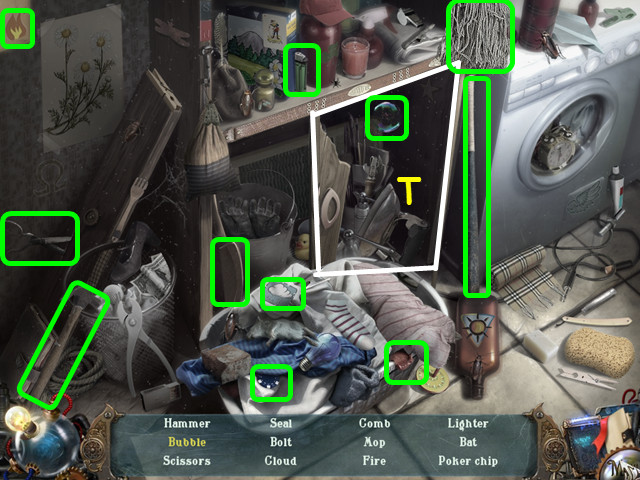
- Locate all the items on the list.
- Slide the cabinet door to find the BUBBLE (T).
- You will earn the HAMMER.
- Walk up the stairs to the apartment lobby.
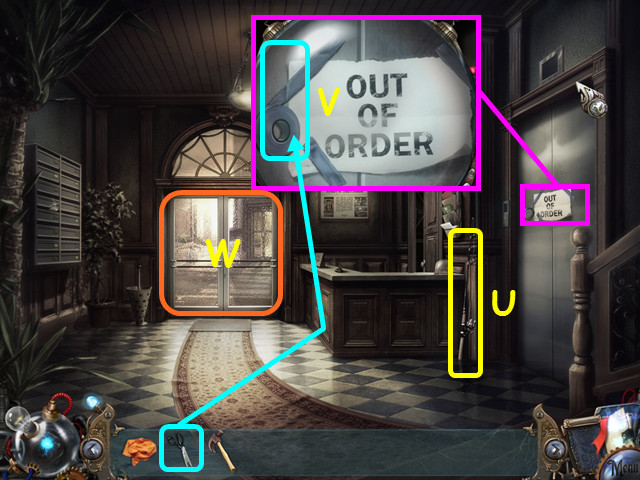
- After talking to the concierge, take the FISHING ROD (U).
- Look at the elevator ‘Out of Order’ sign and use the SCISSORS to get the INSULATING TAPE (V).
- Walk forward to the street (W).
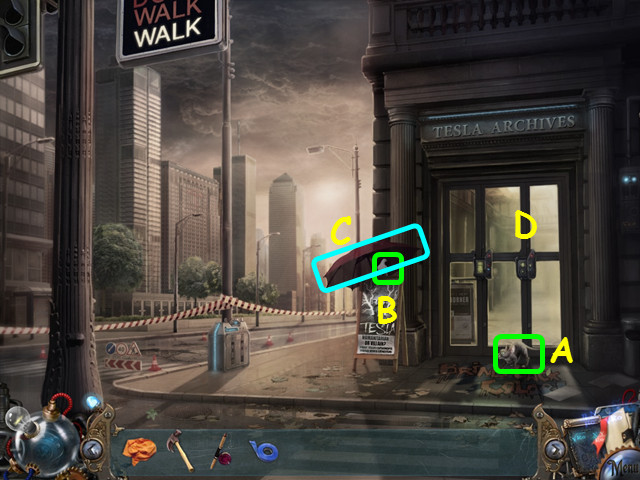
- Pet the cat (A) or the dove (B).
- Take the UMBRELLA (C).
- Look at the lock on the door (D).
- Exit the close-up, then walk down 3 times to the basement.
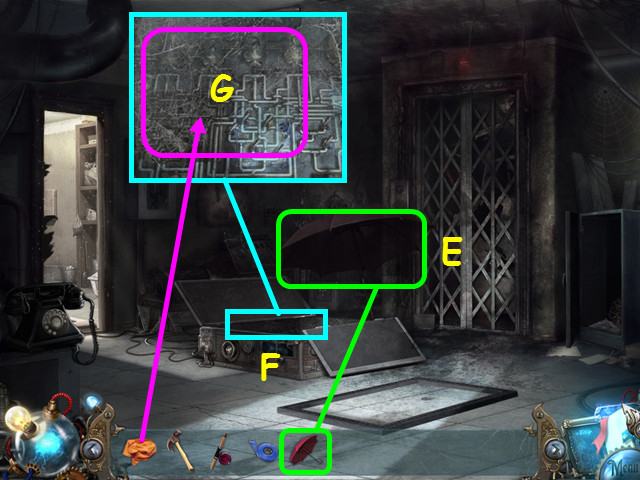
- Use the UMBRELLA on the Time Machine platform (E).
- Open the platform and look inside (F).
- Use the RAG to clean the dust and cobwebs (G).
- Exit the close-up and walk left to the laundry room.
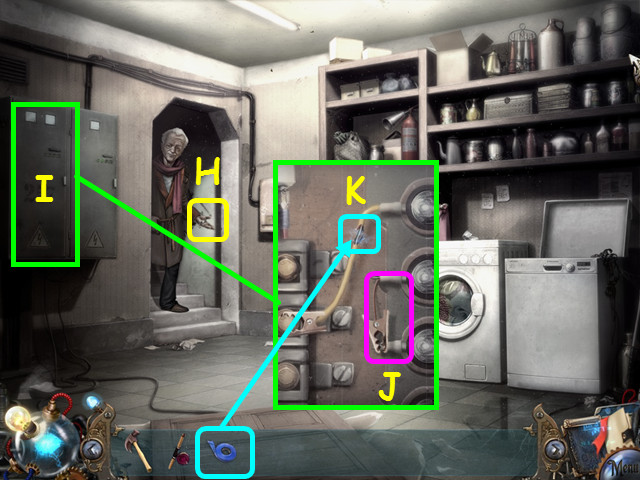
- Take the MAILBOX KEY from the concierge (H).
- Open the power panel and look inside (I).
- Remove the alligator clip (J), and use the INSULATION TAPE on the wire (K).
- Exit the close-up, then go up the stairs to the lobby.
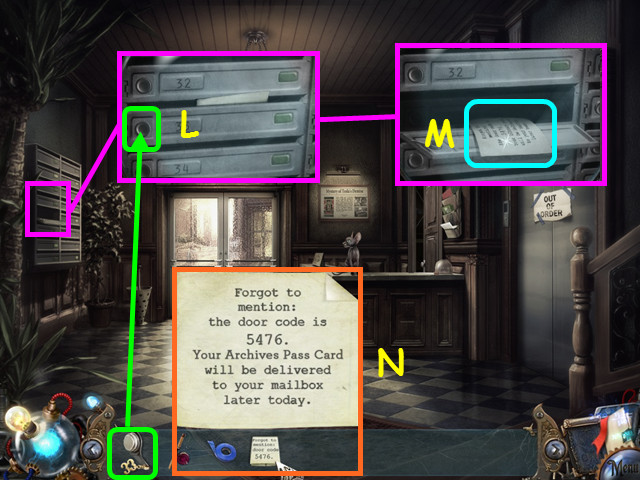
- Look at the mailboxes and use the MAILBOX KEY on number 33 (L).
- Take the message (M), then hover your cursor over it in the inventory to read the message (N).
- Walk forward.
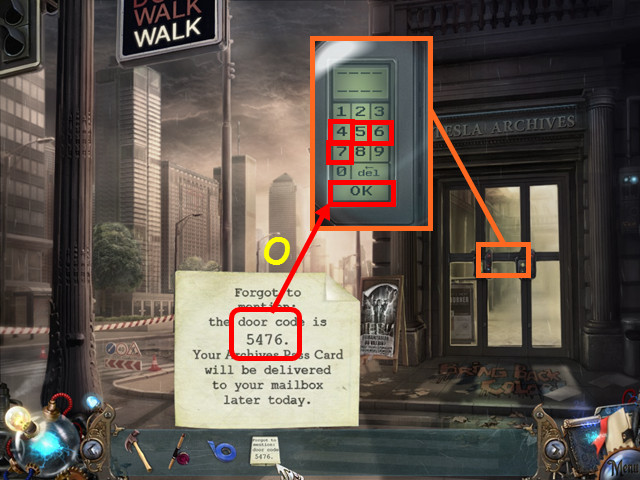
- Look at the door and enter the code from the message (O).
- Press 5476, then press OK.
- Enter the Tesla Archives.
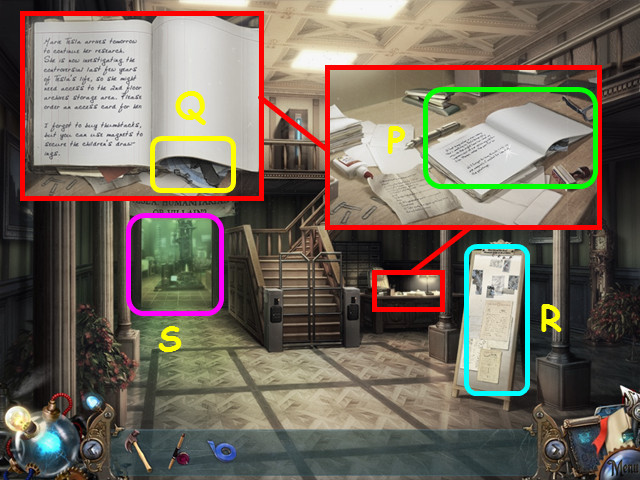
- Look at the desk and read the ledger (P).
- Take the first PICTURE (Q).
- Note the bulletin board (R).
- Walk forward to the exhibition room (S).
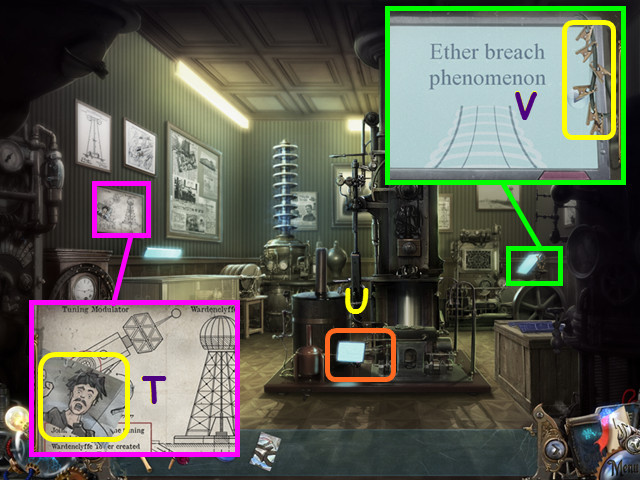
- Look at the drawing and take the second PICTURE (T).
- Look at the center display for a commentary (U).
- Look at the monitor and take the CLAMPS (V).
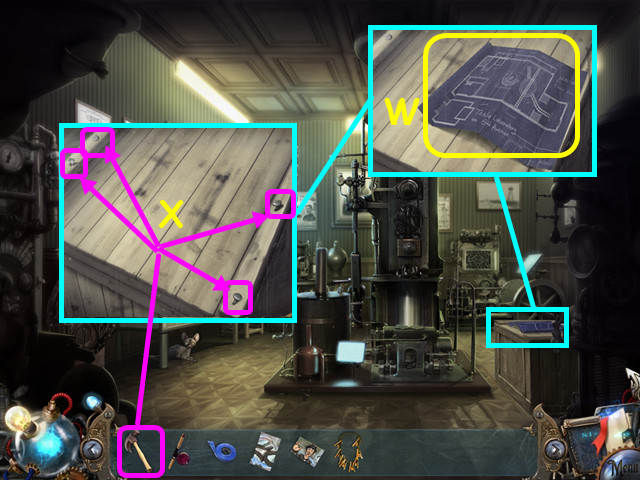
- Look at the crate and take the floor plan (W).
- Use the HAMMER to remove the 4 nails (X).
- Remove the lid for a mini-game.
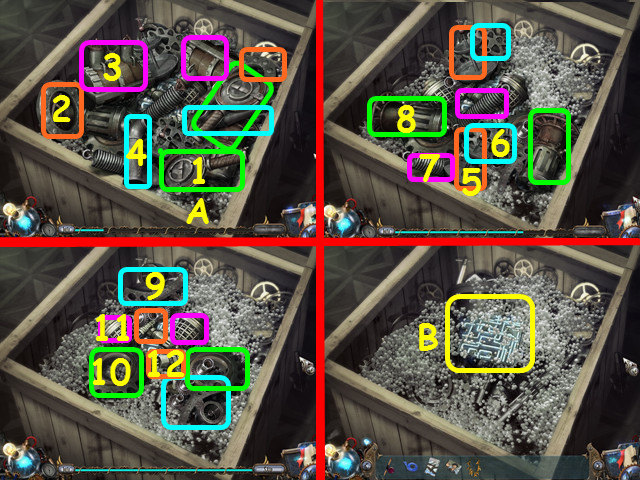
- Collect matching pairs of parts, taking the topmost pair available (A).
- There are 12 pairs to collect; remove them in numerical order (1-12).
- Wipe away the packing material, then take the ETHER CHARGED CIRCUIT BOARD (B).
- Walk down.
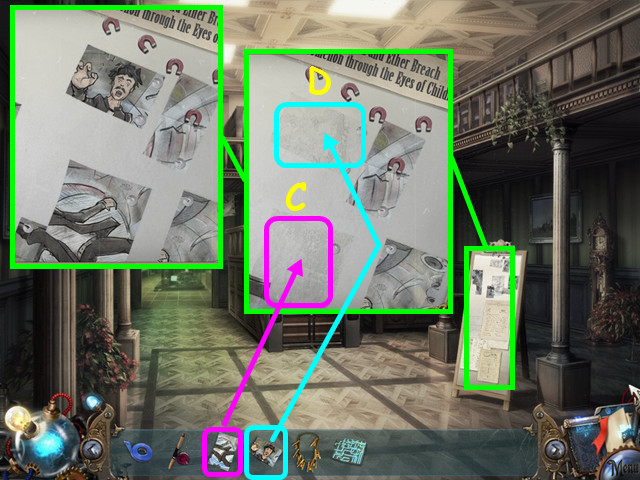
- Look at the bulletin board and place the 2 PICTURES into the empty spots (C-D).
- This will trigger a mini-game.
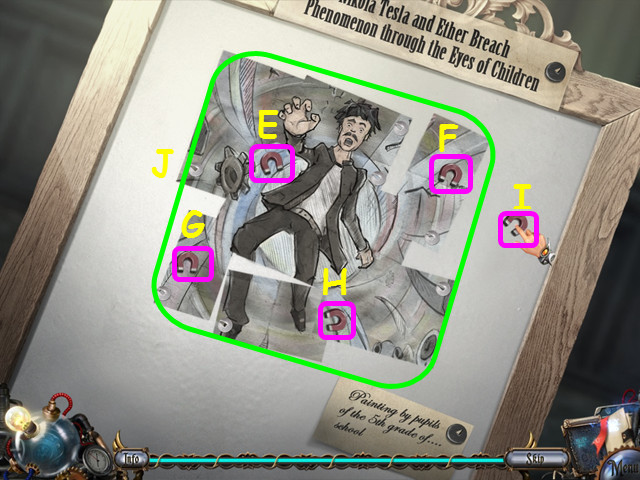
- Rotate the images to create the picture, securing them with the magnets.
- Move 4 of the magnets to the positions indicated (E-H).
- You must have one extra magnet that is not in use (I).
- Drag the images to match up with the other pieces (J).
- You will earn the MAGNET and it will combine with the FISHING ROD to make the FISHING ROD WITH MAGNET.
- Walk down 3 times to the laundry room.
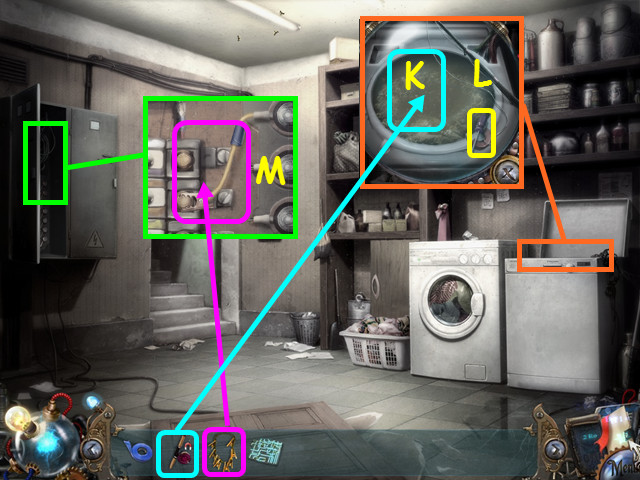
- Look in the washing machine and use the FISHING ROD WITH MAGNET on the water (K).
- Take the SCREWDRIVER (L).
- Look at the power box and place the CLAMPS inside for a mini-game (M).
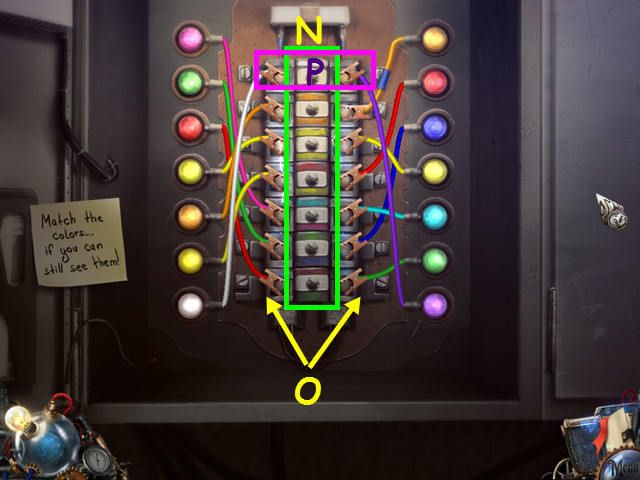
- Connect all the wires using the color scheme in the center (N).
- Drag the clips to the bolts (O).
- Each row has 2 possible colors; the top row has white and purple, so there is only one possibility (P).
- A light will go on if on the correct color but if there is more than one of a color it may not be the correct spot.
- Walk down to the basement.
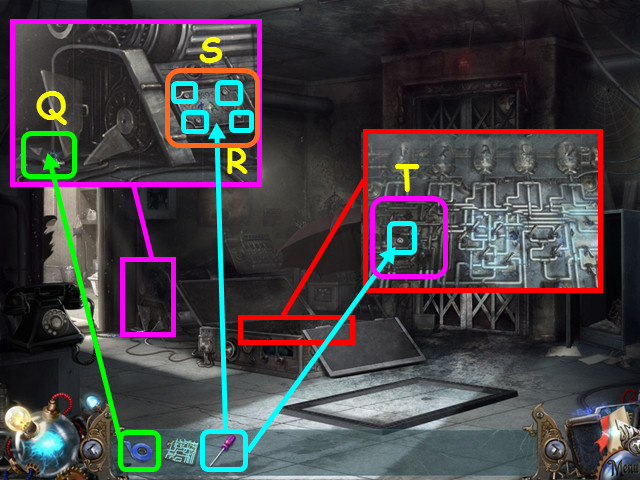
- Look at the machine by the wall and use the INSULATING TAPE on the wire (Q).
- Use the SCREWDRIVER to remove the 4 screws (R).
- Take the ADDRESS PLATE (S).
- Look at the platform and use the SCREWDRIVER to remove the screw, then take the old circuit board (T).
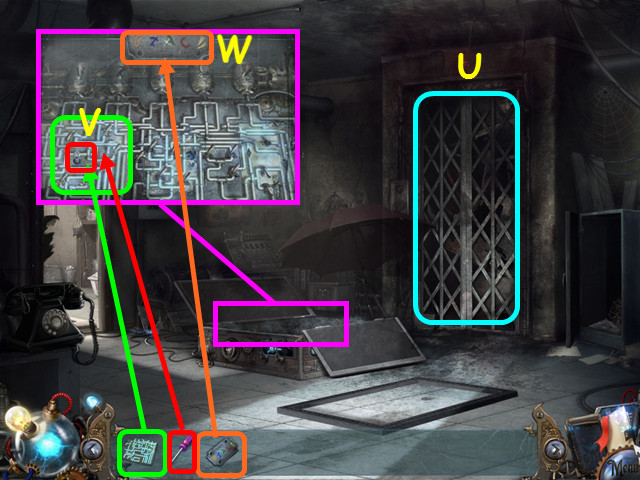
- Note the door (U).
- Look at the platform; place the ETHER CHARGED CIRCUIT BOARD into the spot, then use the SCREWDRIVER to tighten the screw (V).
- Place the ADDRESS TABLET in the upper slot for a mini-game (W).
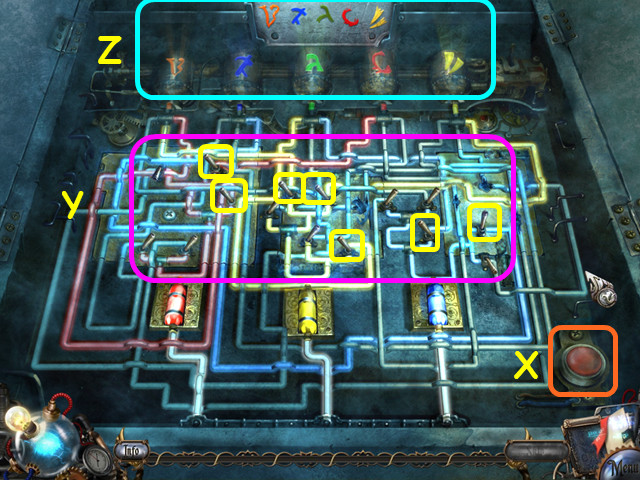
- Press the red button in the bottom right corner (X).
- Turn the levers to move the colored liquids to the symbols (Y) so they match the plate (Z).
- You will need to combine some liquids to get the desired color.
- Enter the glowing door.
Chapter 2: Tesla’s 5th Avenue Lab
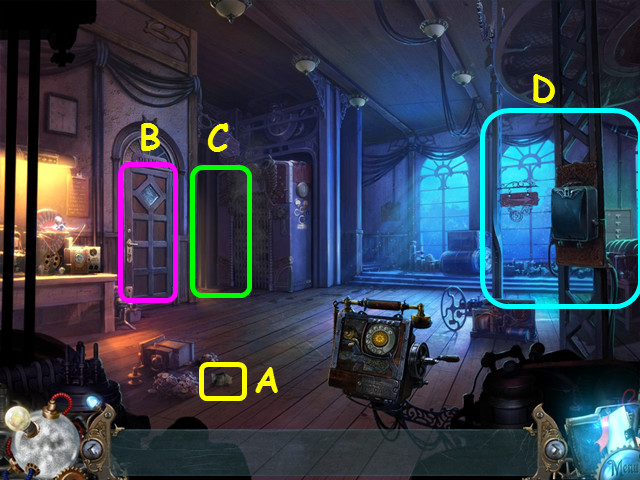
- Take the 1/12 TORN DRAWING PIECE (A).
- Note the office door (B).
- Note the path to the back door (C).
- Walk right to the main room corner (D).
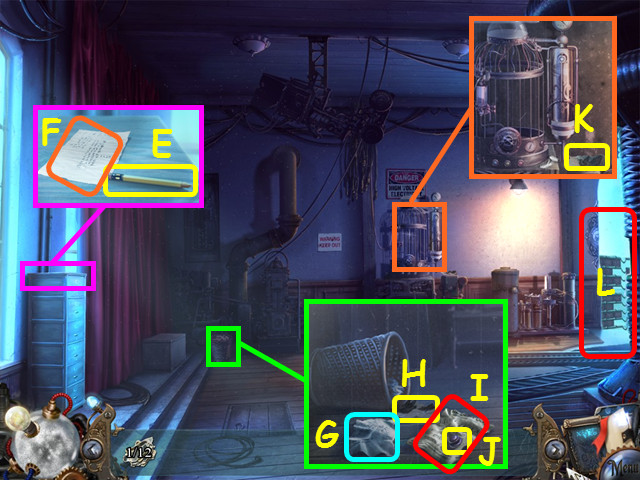
- Look at the chest of drawers and take the BLUNT PENCIL (E).
- Take the note on the safe code (F).
- Tip over the basket, read the note (G), take the 2/12 TORN DRAWING PIECE (H).
- Open the crushed newspaper (I), take the FURNITURE KNOB (J), then take the newspaper.
- Look at the bars and take the 3/12 TORN DRAWING (K).
- Walk right to the laboratory hall (L).
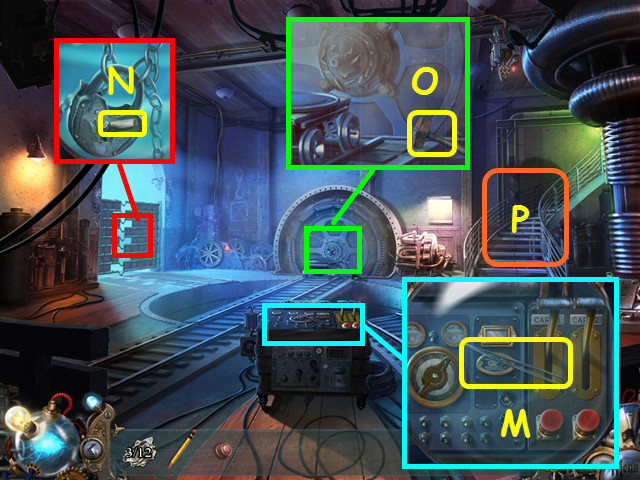
- Look at the rail control panel and take the TWEEZERS (M).
- Look at the gate and take the 4/12 TORN DRAWING PIECE (N).
- Look at the generator and take the SLEDGEHAMMER (O).
- Try to walk up the stairs (P).
- Walk down twice, then go left to the back door.
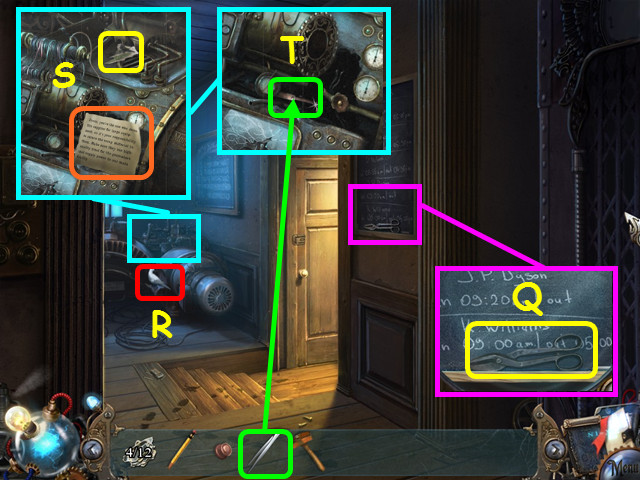
- Look at the chalkboard and take the SCISSORS (Q).
- Pet the dove (R).
- Look at the machine; take the 5/12 TORN DRAWING PIECE and read the note (S).
- Use the TWEEZERS to get the LOCK PICK (T).
- Walk down once.
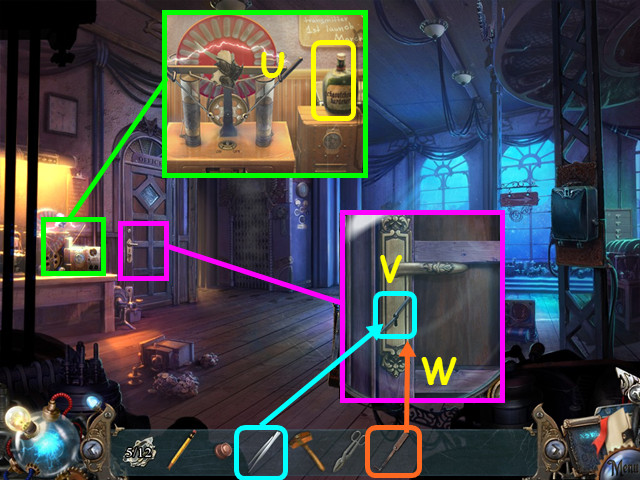
- Look at the device and take the RUBBER HARDENER (U).
- Look at the office door and use the TWEEZERS to remove the pin (V).
- Use the LOCK PICK on the lock for a mini-game (W).
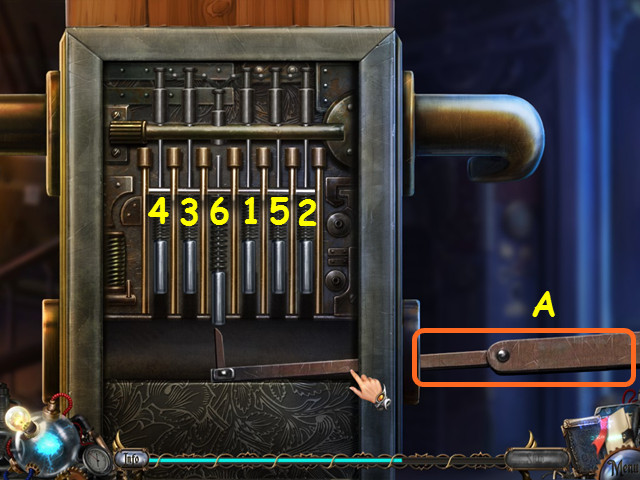
- Push the pins up in the correct order; pushing the wrong pin will cause the previous pins to fall.
- Select the lock pick (A), then release; you can now move it with your mouse.
- Push the pins in numerical order (1-6).
- Enter the office.
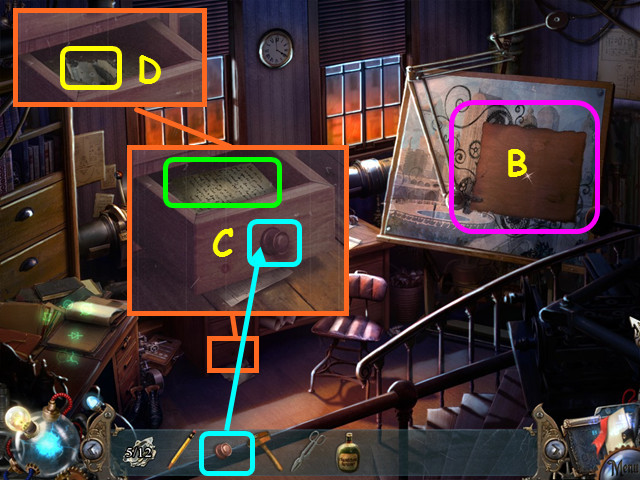
- Look at the circuit plans board (B).
- Look at the desk drawer; use the FURNITURE KNOB on the hole, then pull it open to read the letter (C).
- Take the 6/12 TORN DRAWING PIECE that was under the letter (D).
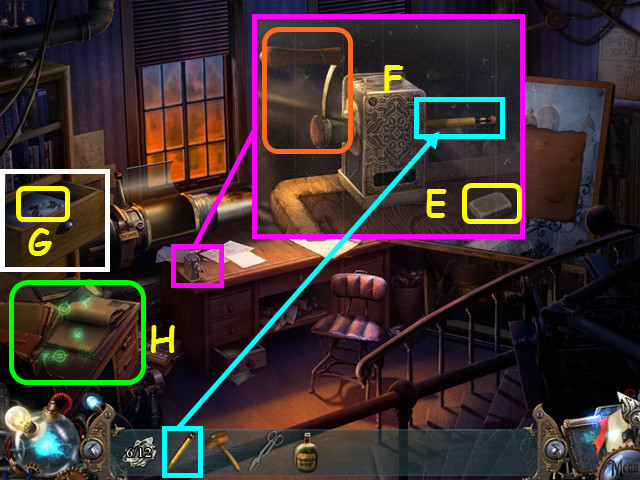
- Look at the corner of the desk and take the ERASER (E).
- Place the BLUNT PENCIL into the sharpener; turn the crank then take the SHARPENED PENCIL (F).
- Open the drawer and take the 7/12 TORN DRAWING PIECE (G).
- Look at the left desk for a HOS (H).
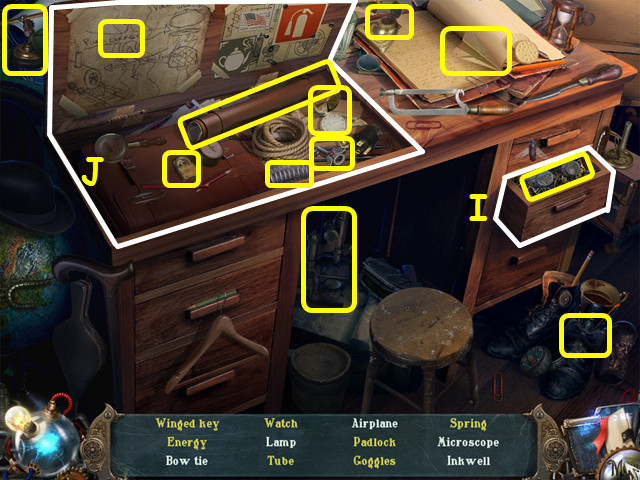
- Locate all the items on the list.
- Open the middle right drawer to find the goggles (I).
- Lift the carved desktop to find several items, including the winged key (J).
- You will earn the WINGED KEY.
- Walk down once.
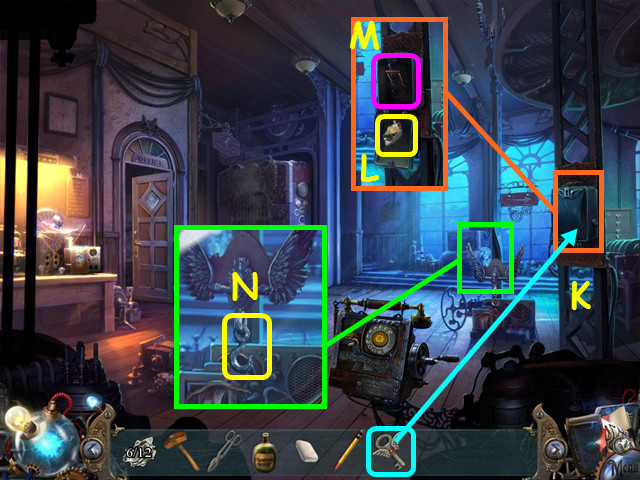
- Use the WINGED KEY to open the control box (K).
- Take the 8/12 TORN DRAWING PIECE (L).
- Pull the lever down (M).
- Look at the wings and take the HOOK (N).
- Push the lever back up.
- Walk right to the main room corner, then right again to the laboratory hall.
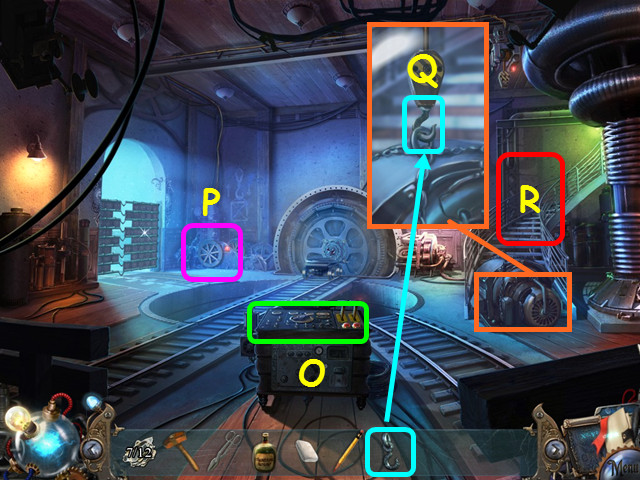
- Look at the controls to learn about the auxiliary generator (O).
- Turn the wheel on the left (P).
- Look at the engine on the stairs and place the HOOK on the cable (Q).
- Turn the wheel on the left again to clear the stairs.
- Walk up the stairs (R).
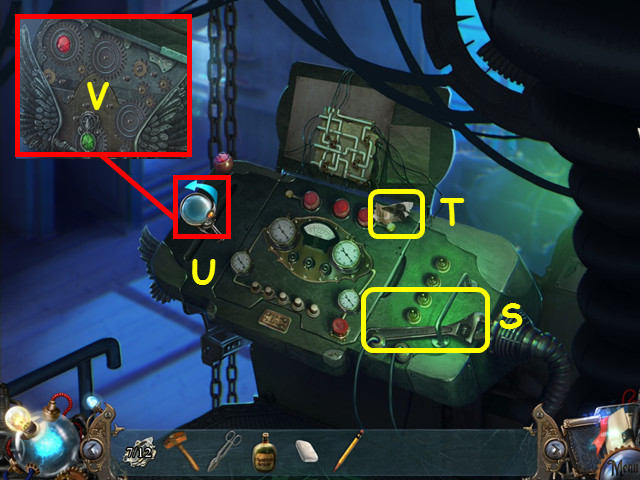
- Take the WRENCH (S).
- Take the 9/12 TORN DRAWING PIECE (T).
- Move your cursor to the left side of the device; select the arrow (U) to view the side and learn some gears are missing (V).
- Exit the close-up and walk down once.
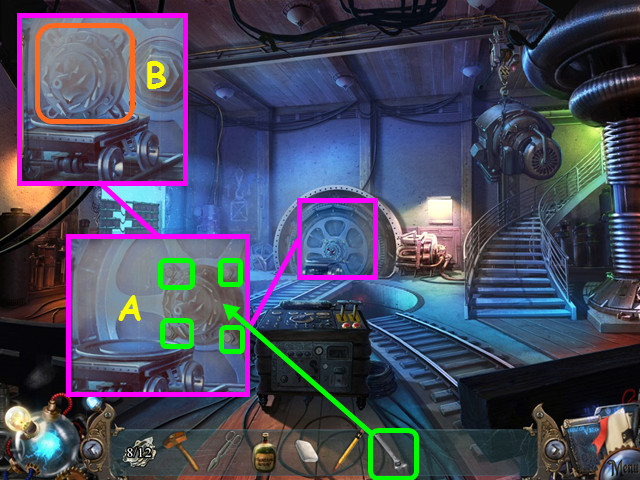
- Look at the generator and use the WRENCH to take the 4 GENERATOR BOLTS (A).
- Move the case cap onto the cart (B).
- Walk down twice and select the area just left of the window for a HOS.
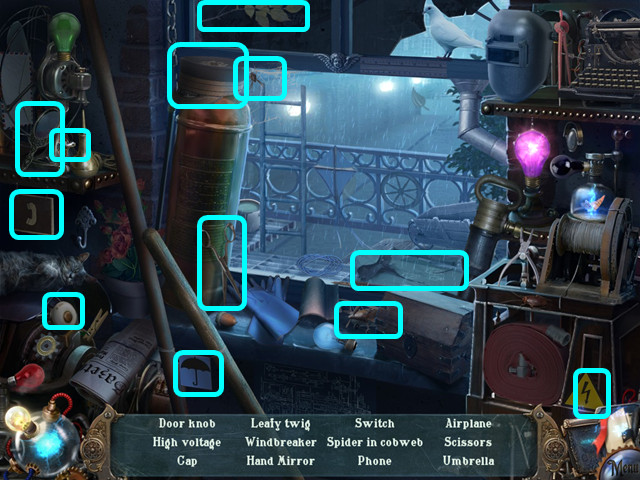
- Locate all the items on the list.
- You will earn the DOOR KNOB.
- Walk left to the back door.
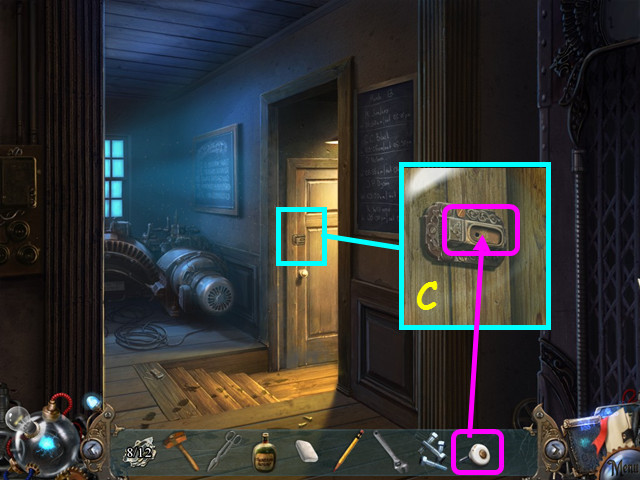
- Look at the door; place the DOOR KNOB in the latch and slide it open (C).
- Enter the basement.
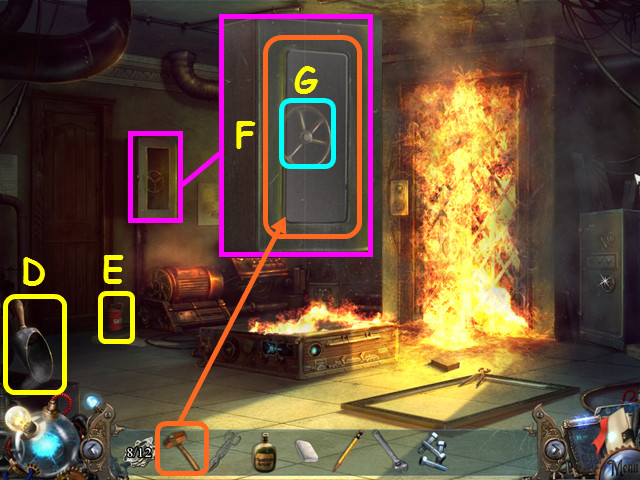
- Take the SCOOP (D), and the CAN OF FUEL (E).
- Look at the cabinet and use the SLEDGEHAMMER on the glass (F).
- Turn the wheel inside the cabinet (G).
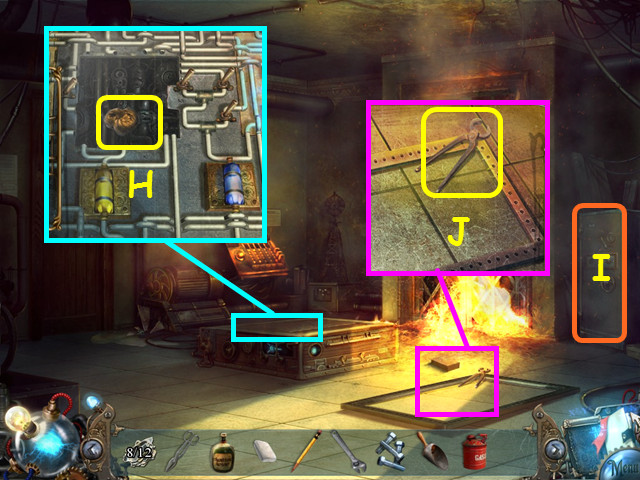
- Open the platform; look inside and take the RUBBER CEMENT (H).
- Look at the safe to learn you will need to get it open (I).
- Look at the frame and take the CUTTING PLIERS (J).
- Walk down twice, then enter the office on the left.
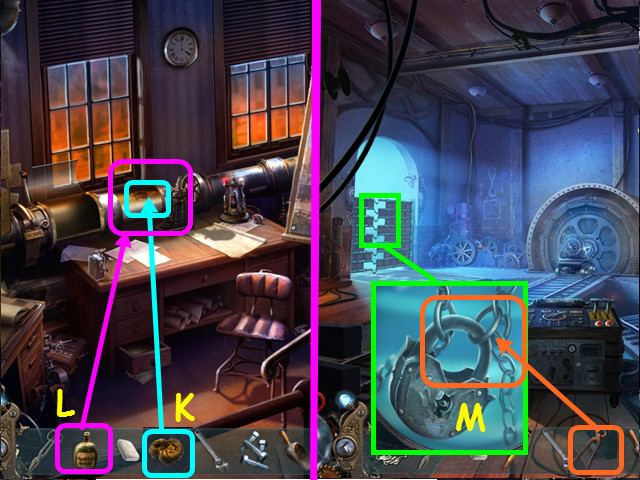
- Place the RUBBER CEMENT on the hole in the tube (K).
- Place the RUBBER HARDENER on the rubber cement (L).
- Walk down, then go to the right twice.
- Look at the gate and use the CUTTING PLIERS on the lock (M).
- This will trigger a mini-game.
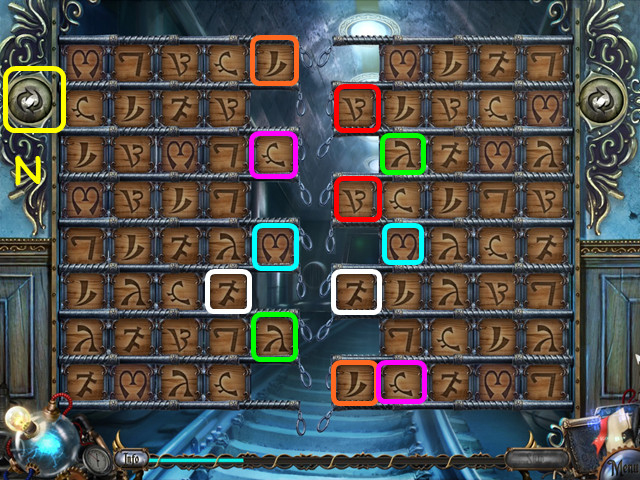
- Remove the matching pairs on the edges of each row (colored pairs).
- Continue until all the pairs are gone.
- If you get stuck and cannot make another match press the reset button (N).
- Walk forward to the assembly room.
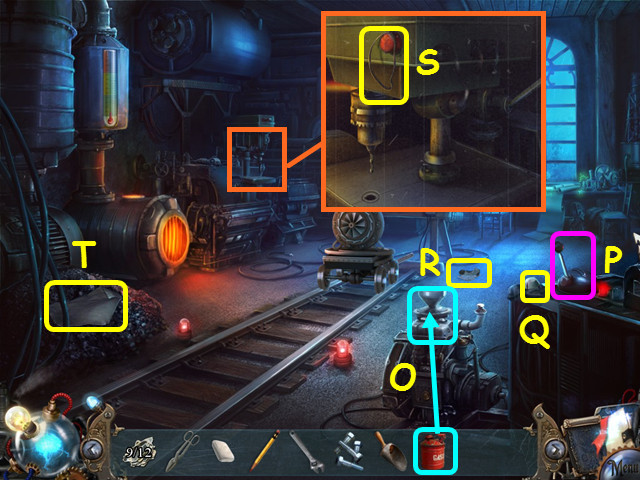
- Use the CAN OF FUEL on the small generator (O).
- Pull the lever on the right (P).
- Take the LITTLE KNOB (Q).
- Take the 10/12 TORN DRAWING PIECE (R).
- Look at the drill and take the BELT (S).
- Take the ASBESTOS CLOTH (T).
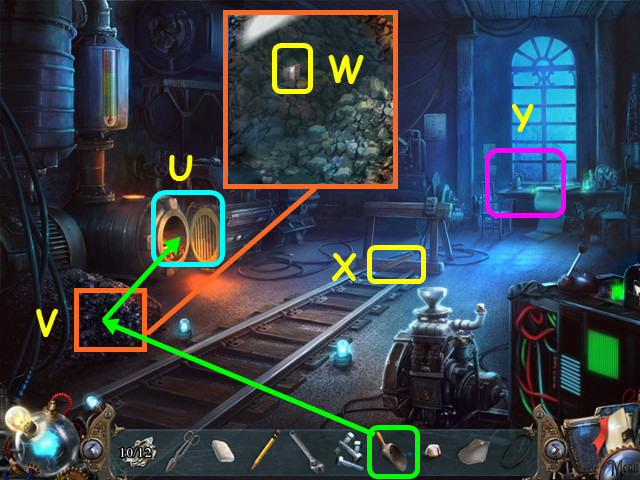
- Open the furnace (U).
- Use the SCOOP on the pile to get the SCOOP WITH COAL (V).
- Place the SCOOP WITH COAL into the furnace then repeat.
- The third time you must zoom in; take a scoop and it will go into your inventory.
- Take the WOODEN BLOCK (W).
- Place the third SCOOP WITH COAL into the furnace.
- Take the RULER (X).
- Select the table under the window for a HOS (Y).
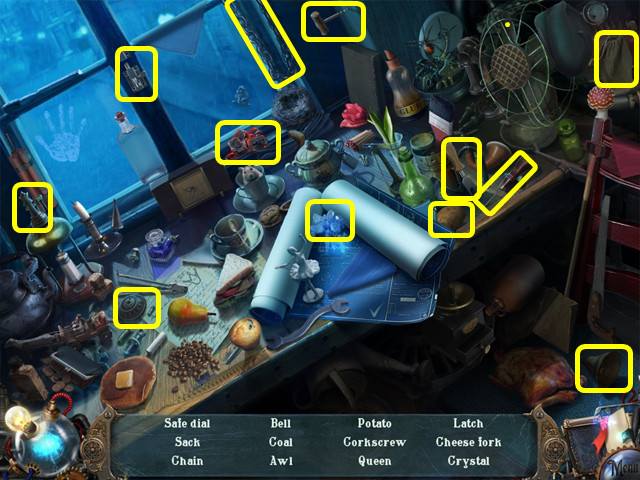
- Locate all the items on the list.
- You will earn the SAFE DIAL.
- Walk down.
Chapter 3: Getting Home
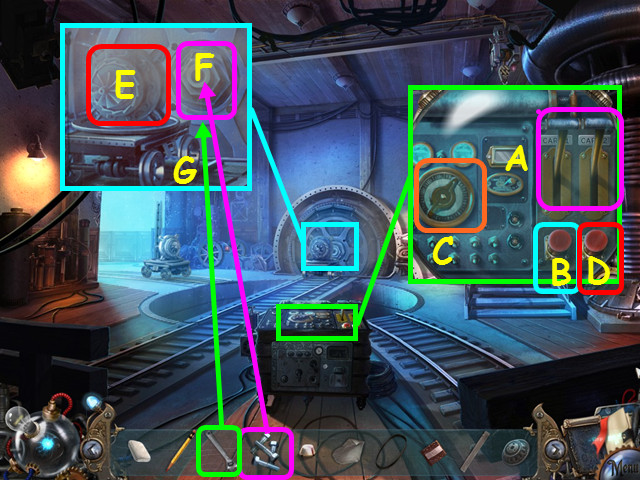
- Look at the control and pull down the 2 levers (A).
- Press the left red button twice (B). Turn the left dial (C).
- Press the right red button (D).
- Turn the left dial, lift the right lever, then press the right red button again.
- Look at the generator and move the cap cover from the cart (E).
- Place the GENERATOR BOLTS on the cap (F), then use the WRENCH on each bolt (G).
- Walk down twice.
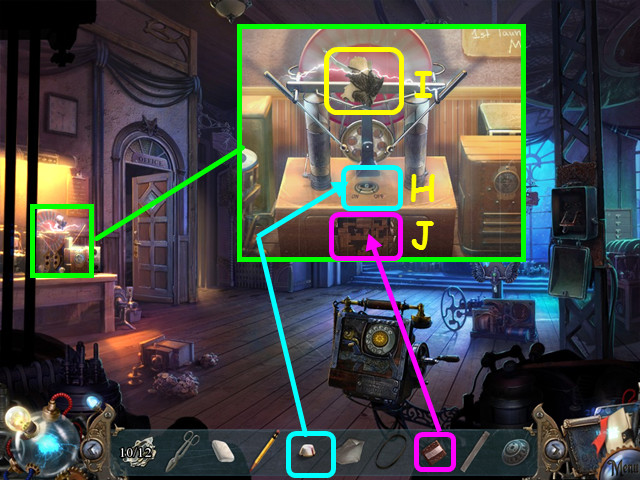
- Look at the device on the left and place the LITTLE KNOB in the center then turn the knob (H).
- Take the 11/12 TORN DRAWING PIECE (I).
- Place the WOODEN BLOCK in the base for a mini-game (J).
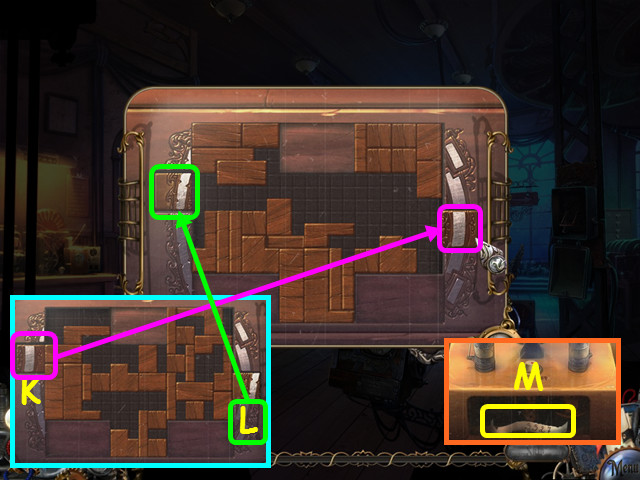
- Slide the pieces so you can swap the 2 pieces of the lock (K-L).
- Move the wooden pieces out of the way so you can slide the lock pieces.
- Take the CODE PAPER (M).
- Select the area left of the window for a HOS.
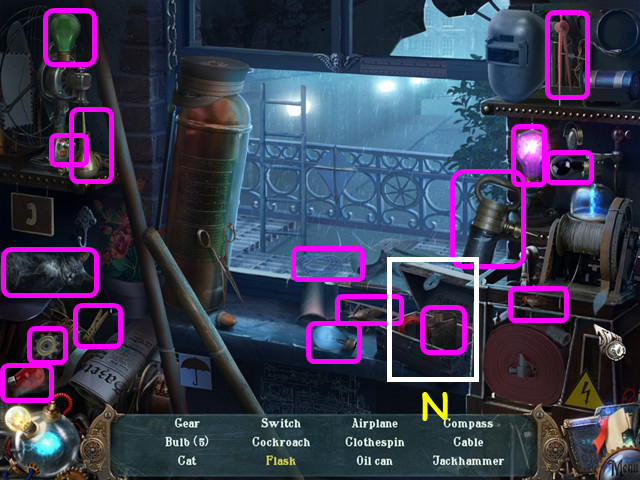
- Locate all the items on the list.
- Open the toolbox to find the flask (N).
- You will earn the 1/3 GEAR.
- Walk left twice to the basement.
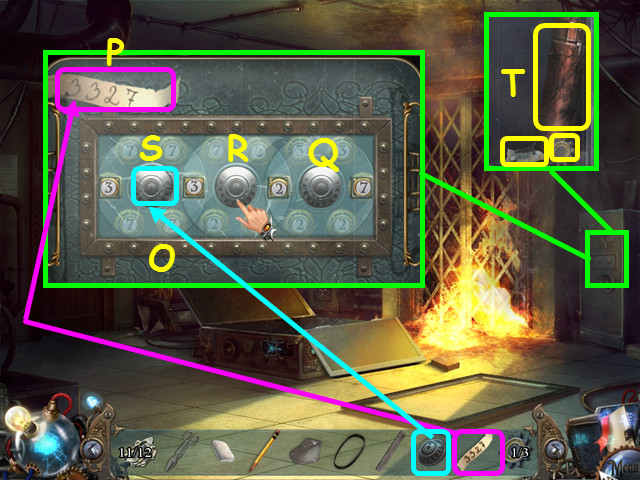
- Look at the safe and place the SAFE DIAL on the left (O). Place the CODE PAPER on the safe (P). You need to turn the dials to match the code.
- Drag the right dial one space clockwise (Q). Turn the center dial 3 places clockwise (R).
- Turn the left dial 3 places clockwise (S). Turn the center dial 1 place clockwise.
- Drag the right dial one space clockwise.
- Turn the center 2 spaces clockwise, then turn the right dial 3 spaces clockwise.
- Turn the center dial 1 space clockwise.
- Take the CAPSULE WITH DOCUMENTS, GEAR WITHOUT A HOLE, and the 12/12 TORN DRAWING PIECE (T).
- Walk down twice, then enter the office on the left.
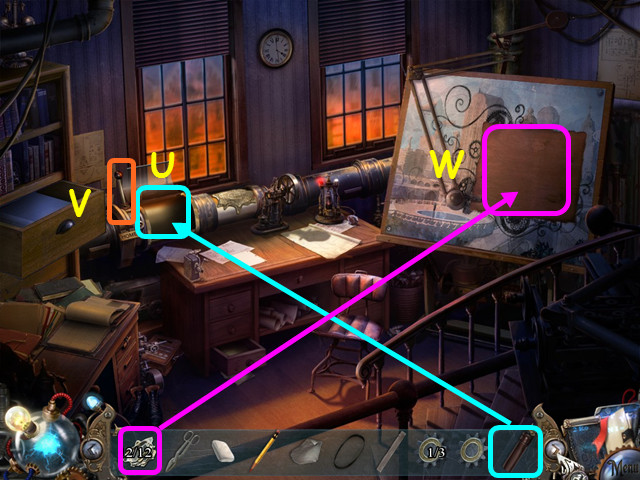
- Place the CAPSULE WITH DOCUMENTS into the tube and close the cover (U).
- Pull the lever (V).
- Place the 12 TORN DRAWING PIECES on the board for a mini-game (W).
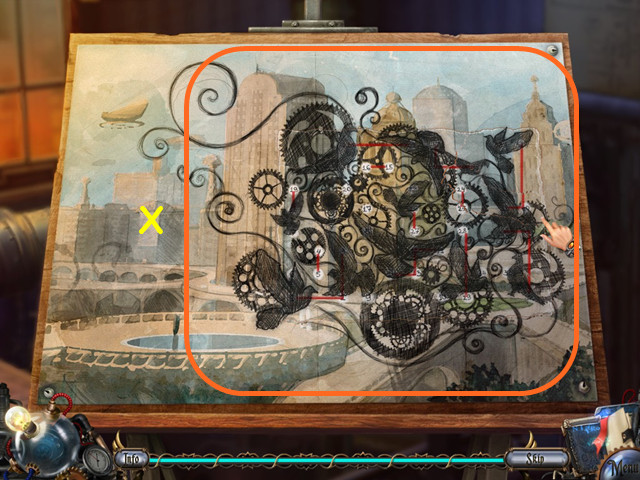
- Restore the drawing by placing the pieces into the rectangle (X).
- Right-click a piece to rotate it in place, then drag the piece into position.
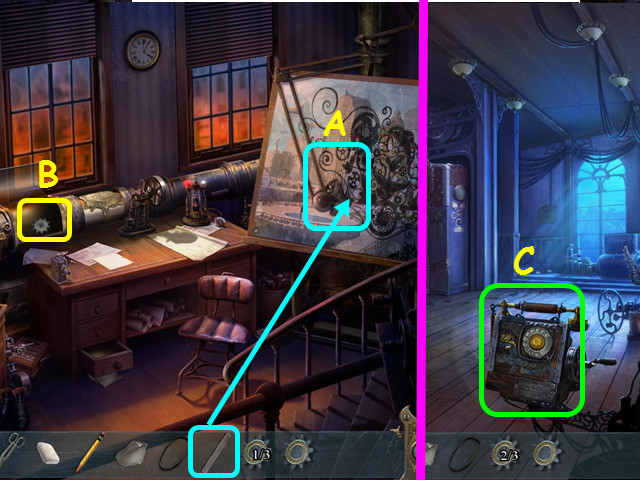
- Place the RULER on the drawing (A).
- Open the tube and take the 2/3 GEAR (B).
- Walk down, then answer the telephone (C).
- Walk to the right twice, then go left to the assembly room.
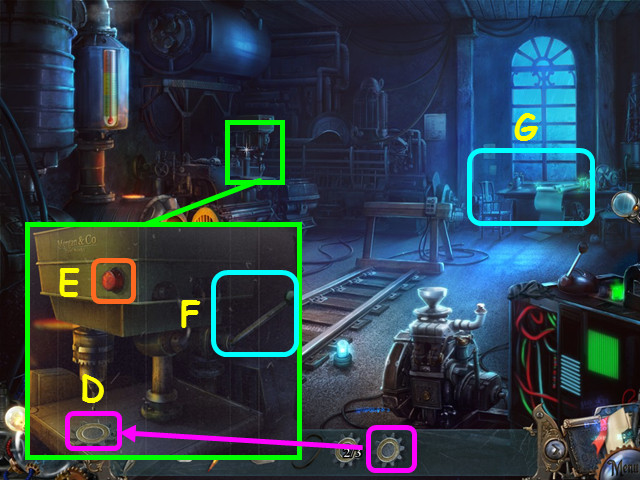
- Look at the drill and place the GEAR WITHOUT A HOLE on the platform (D).
- Press the red button (E).
- Lower the drill with the lever (F).
- Take the 3/3 GEAR.
- Select the table by the window for a HOS (G).
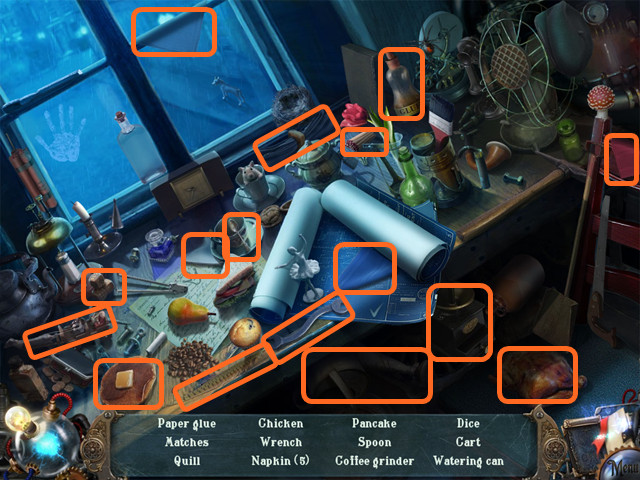
- Locate all the items on the list.
- You will earn the PAPER GLUE.
- Walk down 3 times, then enter the office on the left.
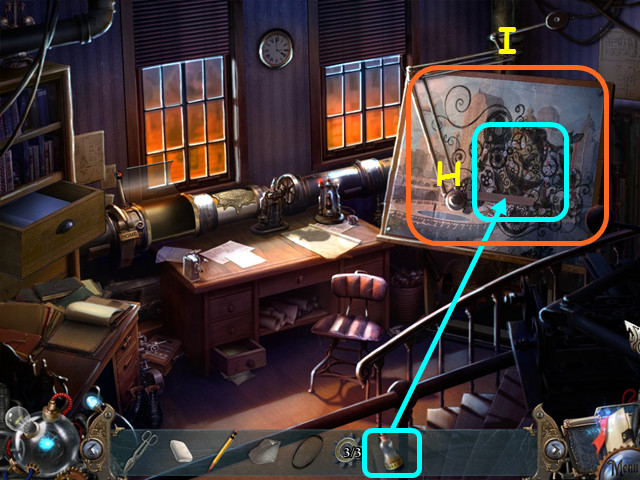
- Use the PAPER GLUE on the drawing board (H).
- Select the board for a HOS (I).
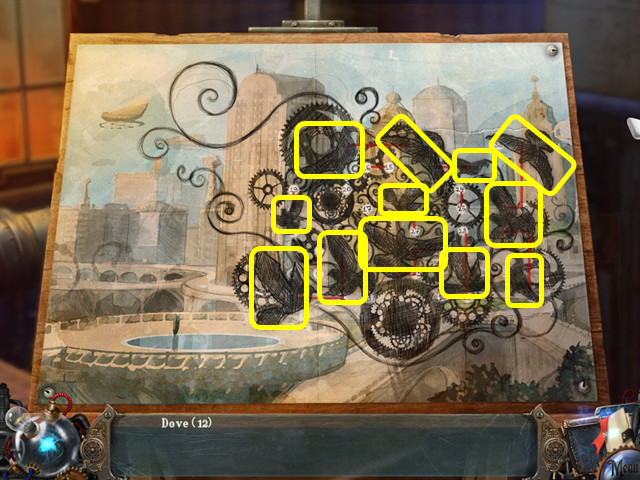
- Locate the 12 doves.
- You will automatically use the ERASER to remove the doves.
- Use the SHARPENED PENCIL on the drawing for a mini-game.
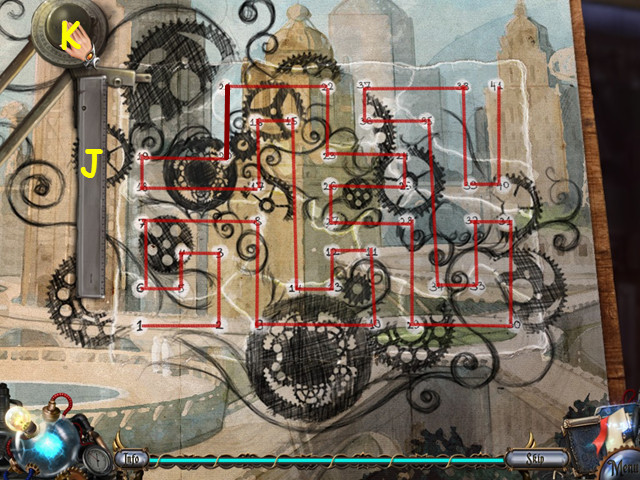
- Connect the dots using the ruler and the pencil.
- Drag the ruler (J) to the angle you want, then move the round piece to the location you want (K).
- Draw from one dot to the next numeric dot; from 4 to 5, then 5 to 6 for example.
- Connect all the dots and you will automatically take the DRAWING.
- Select the desk on the left for a HOS.
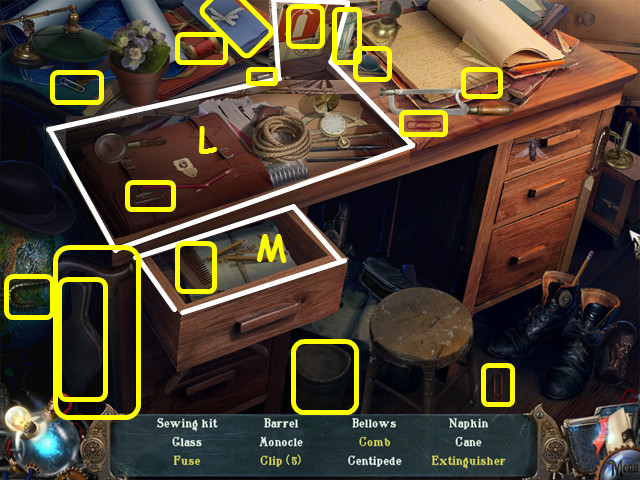
- Locate all the items on the list.
- Open the desk lid to find the 5/5 clip and extinguisher (L).
- Open the left drawer to find the comb (M).
- You will earn the SEWING KIT.
- Walk down, go left, then forward to the basement.
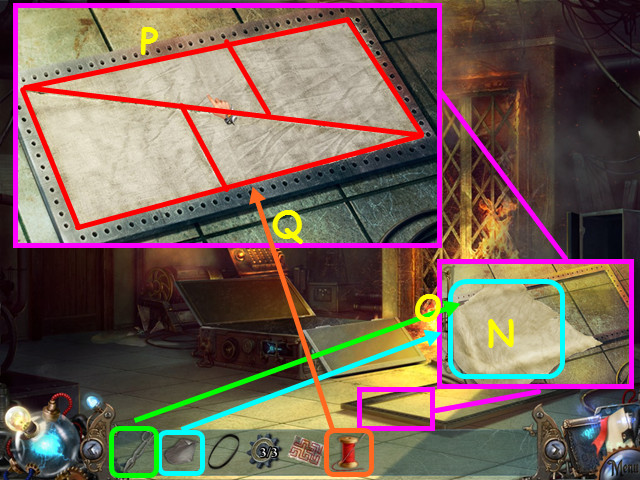
- Look at the frame and place the ASBESTOS CLOTH on the frame (N).
- Use the SCISSORS on the cloth for a mini-game (O).
- Right-click a piece to rotate it in place, then drag the piece into position (P).
- Use the sewing kit on the 3 seams and the outer edge (Q).
- Select the frame and it will move to protect the platform from the fire.
- Walk down twice, go right twice, then go up the stairs to the control room.
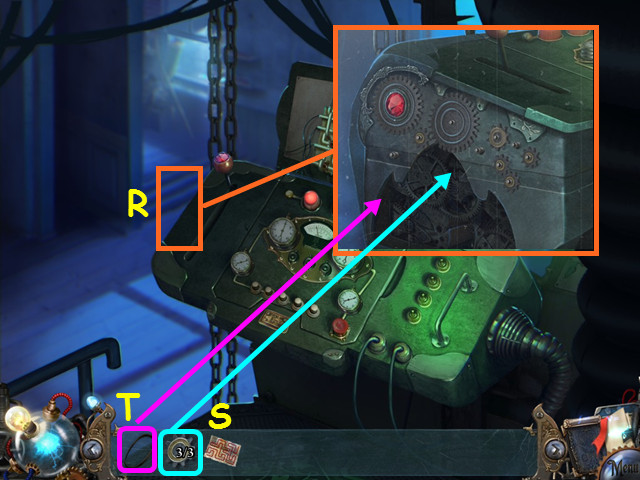
- Look at the side of the control (R).
- Place the 3 GEARS (S), then the BELT (T) on the panel to trigger a mini-game.
- If you cannot place the gears and belt, return to the control box opened with the winged key and flip the lever.
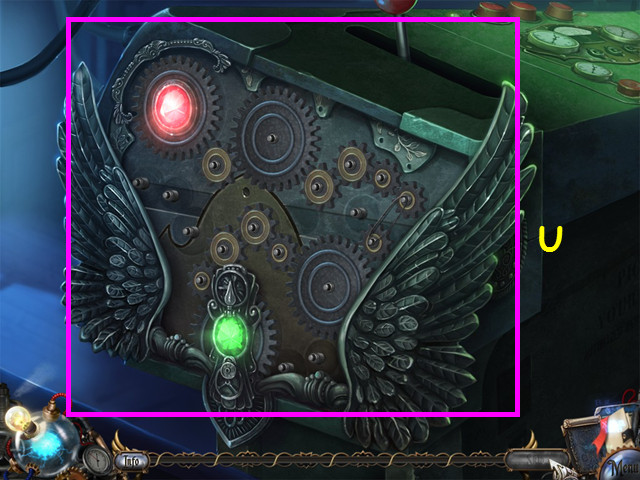
- Move the 8 smaller gears to make the larger gears rotate (U).
- Drag and drop the gears onto open pins.
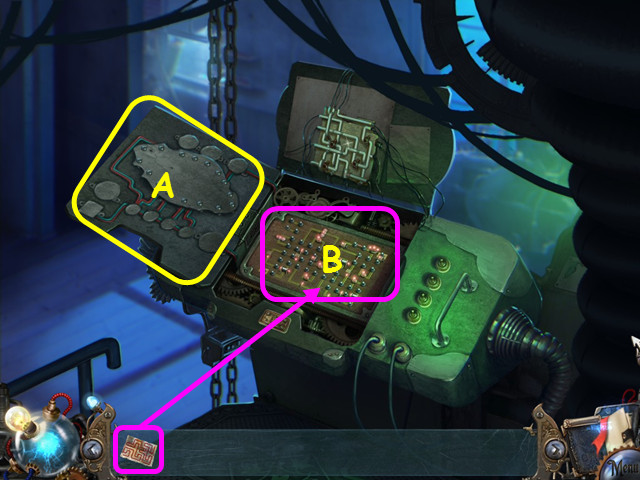
- Pull the lever to open the cover (A).
- Place the DRAWING on the inner panel for a mini-game (B).
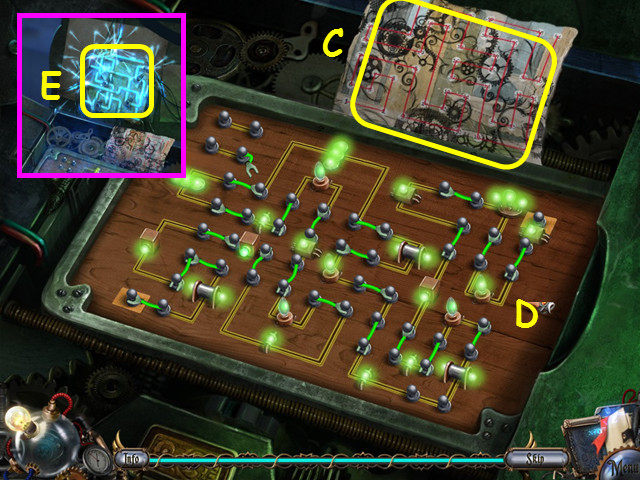
- Attach all the clips so the power follows the path on the diagram (C).
- Drag a clip to a peg, then release.
- When correct, all the lights will be green (D).
- Take the 2nd CIRCUIT BOARD (E).
- Walk down 3 times, go left, then enter the basement.
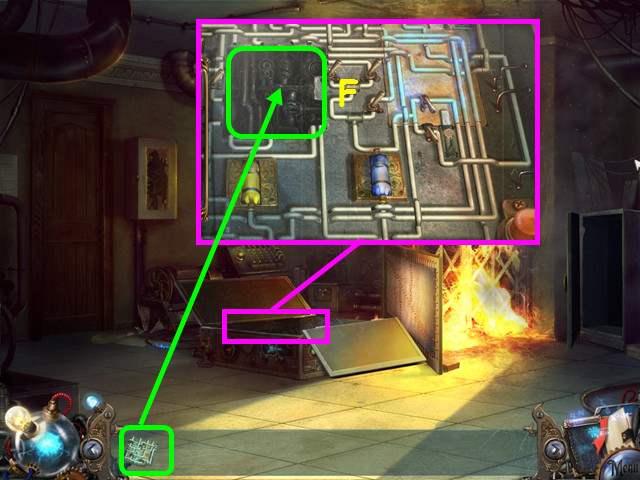
- Look at the platform and place the 2nd CIRCUIT BOARD on the left (F).
- This will trigger a mini-game.
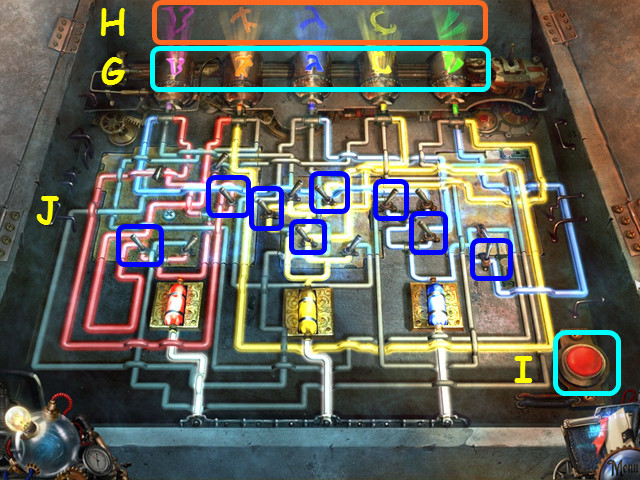
- Flip the switches to fill the metal vessels (G) with the colors that match the address (H).
- Press the red button (I).
- Flip the indicated switches (J).
- Enter the glowing elevator shaft.
Chapter 4: The Butterfly Effect
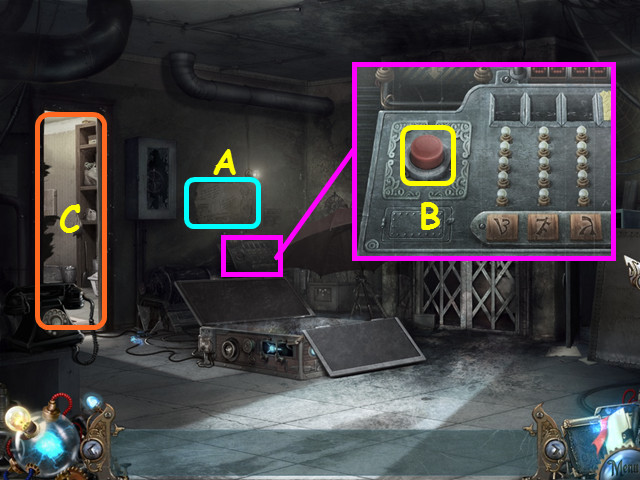
- Look at the diagram on the wall (A).
- Look at the machine by the wall and press the red button (B).
- You will need to find more foils.
- Exit the close-up, then go through the door to the laundry room (C).
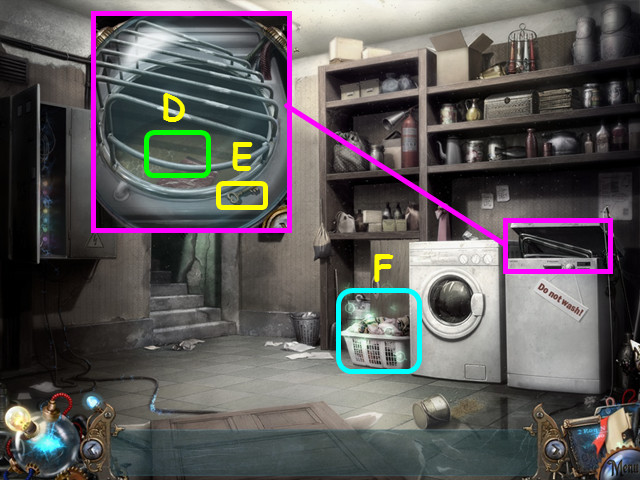
- Look inside the washing machine to note you need more water to get the red foil (D).
- Take the DRAWER KEY (E).
- Select the laundry basket for a HOS (F).
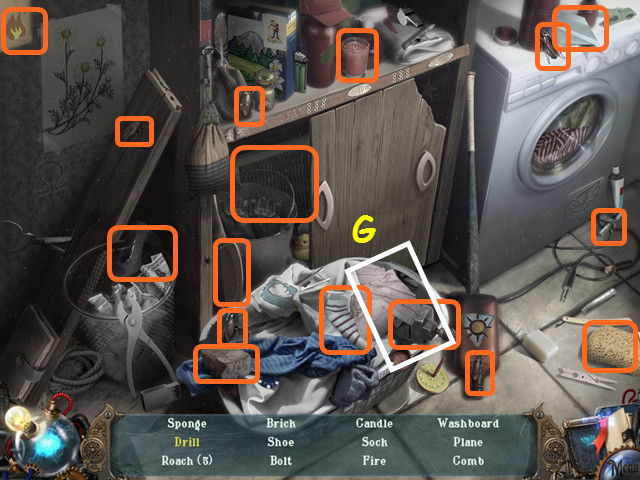
- Locate all the items on the list.
- Move the towel to find the drill (G).
- You will earn the SPONGE.
- Walk up the stairs.
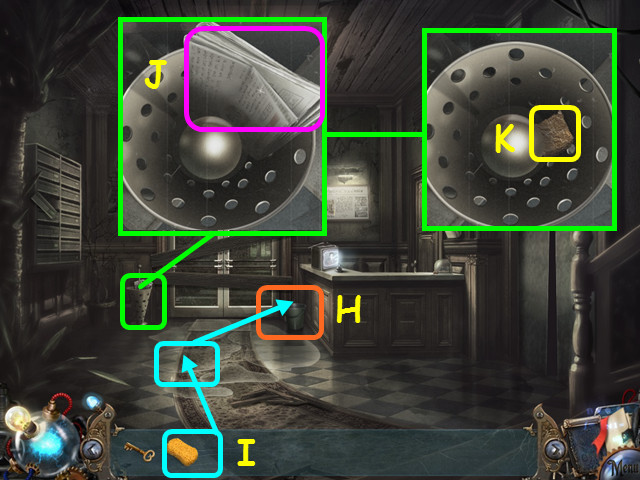
- After talking to the concierge, stand up the bucket (H).
- Use the SPONGE on the water puddles, then wring it out in the bucket (I).
- You will need to do this about 10 times to get all the water off the floor.
- Take the BUCKET WITH WATER.
- Look in the umbrella stand, read the newspaper (J) then take the ORANGE FOIL PACK (K).
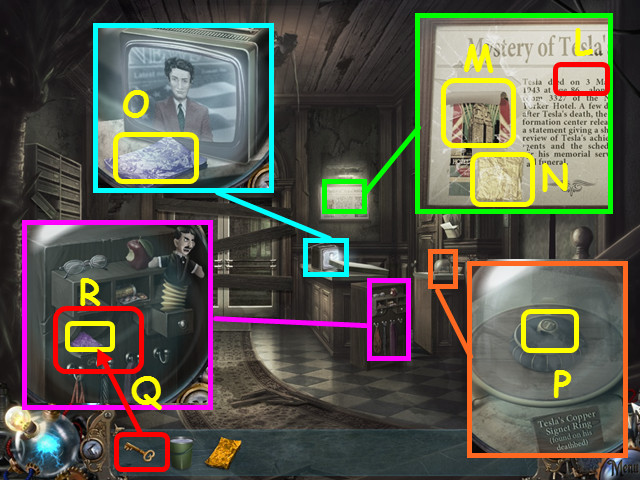
- Look at the article and note the date of March 3, 1943 (L).
- Take the Hotel New Yorker card for a new map (M).
- Take the YELLOW FOIL PACK (N).
- Look at the television; watch the broadcast, then take the BLUE FOIL PACK (O).
- Look at, then open the dome; take the SIGNET RING (P).
- Open the top counter then the desk door; use the DRAWER KEY on the left tiny drawer (Q).
- Turn the key, open the drawer, then take the PURPLE FOIL PACK (R).
- Walk down to return to the laundry room.
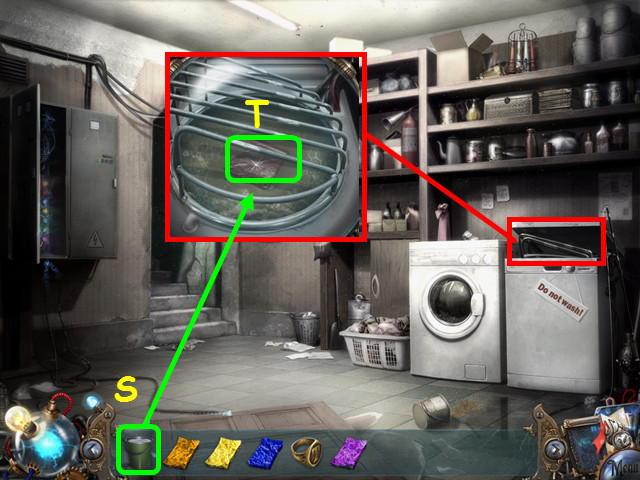
- Look at the washing machine and pour the BUCKET WITH WATER inside (S).
- Take the RED FOIL PACK (T).
- Walk down to the basement.
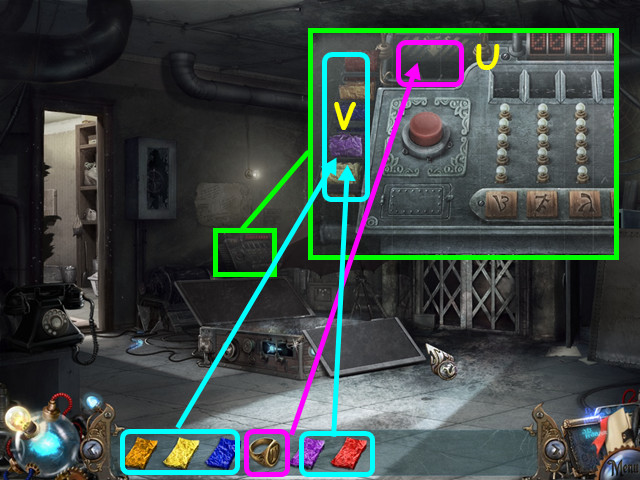
- Look at the machine against the wall and place the SIGNET RING by the arrow (U).
- Place the 5 FOIL PACKS into the left compartment for a mini-game (V).
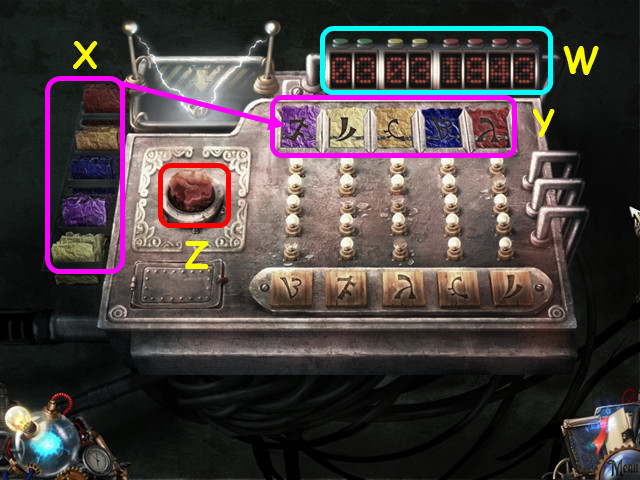
- Set the date to 03031943 per the newspaper article (W).
- Place the colored foils (X) from left to right in the slots (Y): purple-yellow-orange-blue-red.
- Press the red button 5 times to activate each symbol on the foils (Z).
- Foils in the wrong spot will burn up.
- You will earn the HOTEL ADDRESS PLATE.
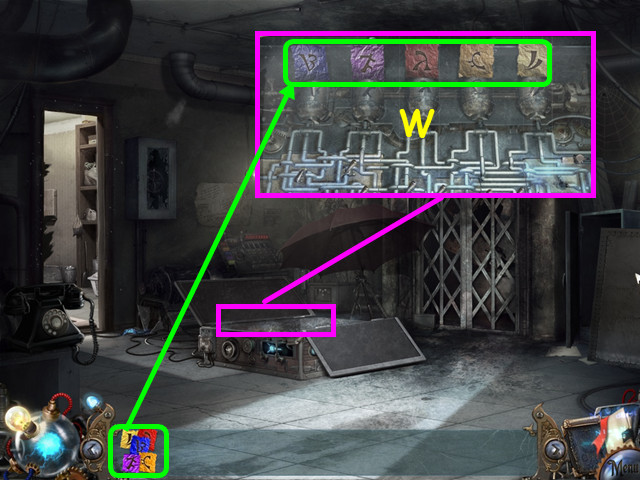
- Look at the platform and place the HOTEL ADDRESS PLATE at the top (W).
- This will trigger a mini-game.
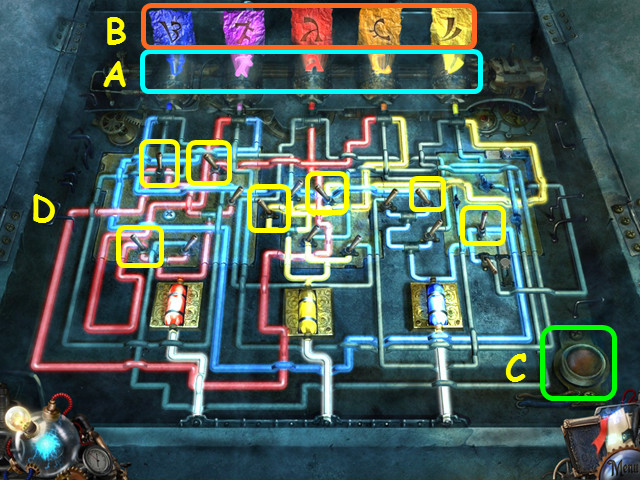
- Flip the switches to fill the metal vessels (A) with the colors that match the address (B).
- Press the red button (C).
- Flip the indicated switches (D).
- Enter the glowing elevator shaft.
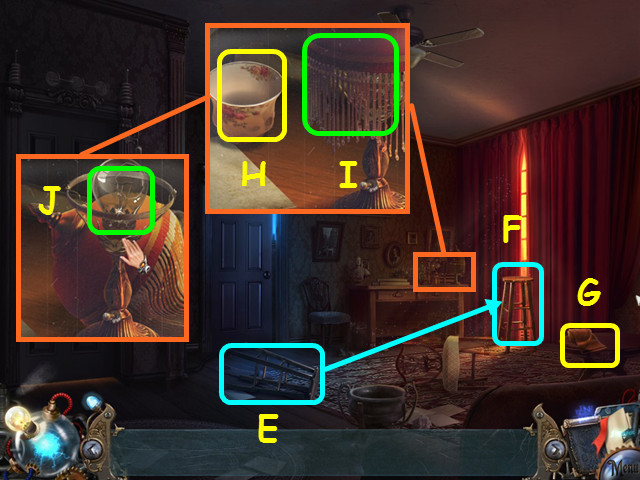
- Take the STOOL (E) and place it in front of the curtains (F).
- Take the TOWEL (G).
- Look at the desk and take the EMPTY CUP (H).
- Remove the lampshade (I) and unscrew the bulb (J).
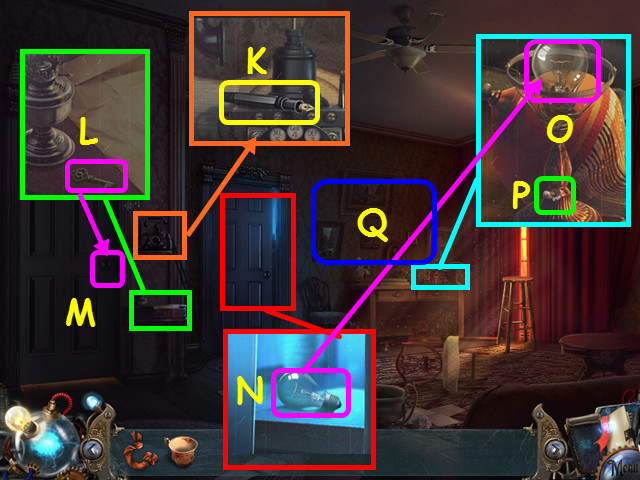
- Look at the phone and take the PEN (K).
- Look at the small table and take the DOOR KEY (L).
- Use the DOOR KEY on the left door (M).
- Open the center door and take the LIGHT BULB (N).
- Look at the table and place the LIGHT BULB in the lamp, then replace the lampshade (O).
- Flip the switch on the lamp base (P).
- Select the photos over the table for a HOS (Q).
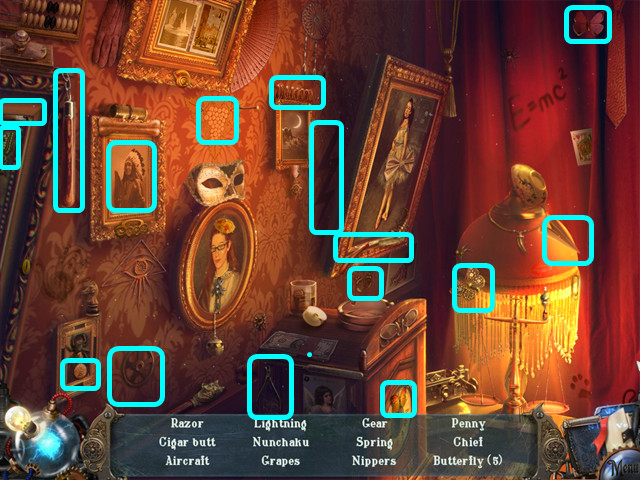
- Locate all the items on the list.
- You will earn the RAZOR.
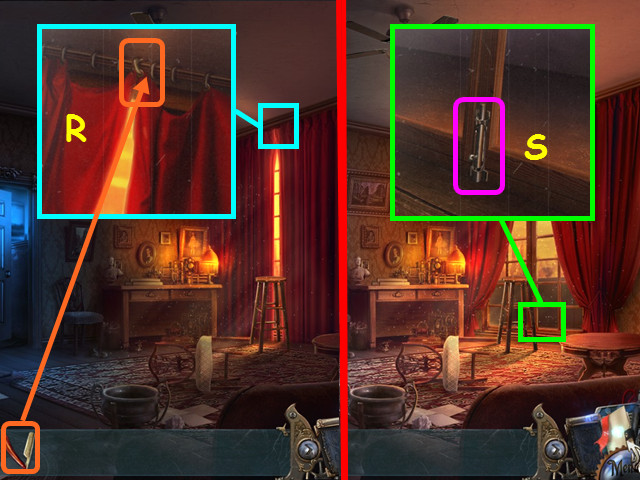
- Look at the top of the curtains and use the RAZOR to cut the string (R).
- Open the curtains.
- Look at the base of the door an open the latch (S).
- Walk right to the balcony.
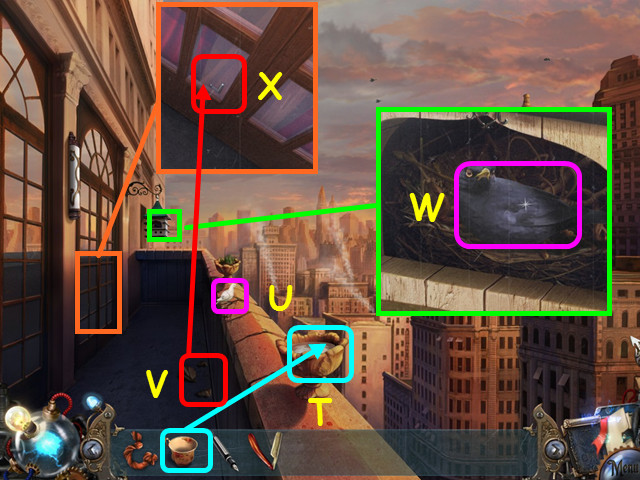
- Use the EMPTY CUP on the water to get the CUP FILLED WITH WATER (T).
- Pet the dove (U), then take the PARAPET STONE (V).
- Look at the birdhouse and try to pet the bird (W).
- Look at the far door and use the PARAPET STONE to break the glass (X).
- Open the latch, then the door.
- Walk inside the far door.
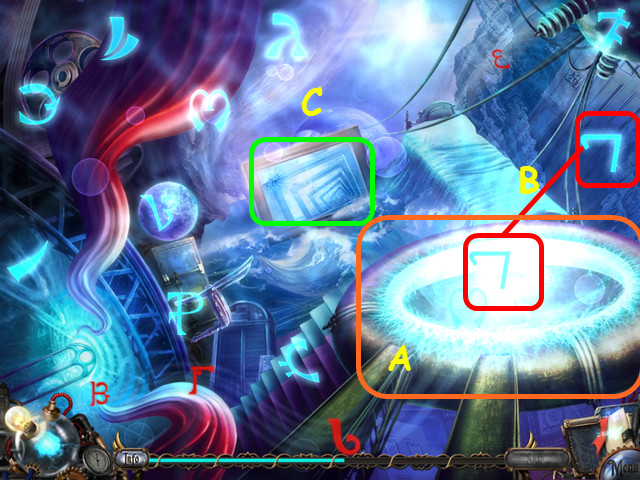
- Once Tesla is finished talking, look at the large ring on the right (A).
- Note blue symbol that is flashing over the ring, then find the same symbol floating around the room (B).
- Once a red symbol flashes, walk forward to find it in the next room (C).
- The large ring will be on the left.
- Go back and forth between the two rooms until you have matched all the symbols.
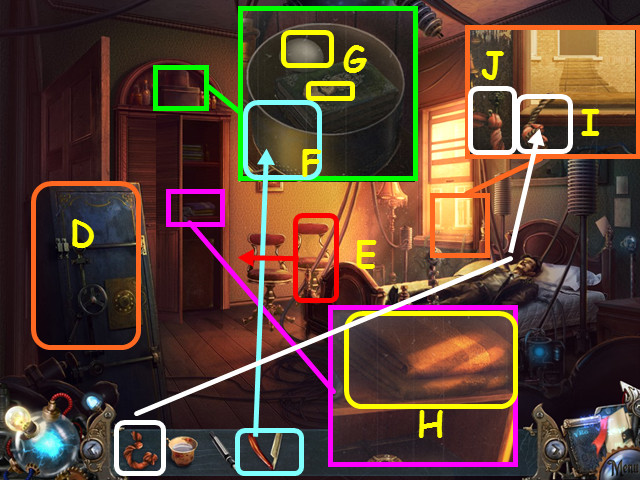
- Look at the safe on the left (D).
- Move the chair to the left (E).
- Look at the hatbox and use the RAZOR to cut the string (F).
- Take the CRUMBLED COOKIE and the X-RAY BULB (G).
- Open the closet; look inside and select the 2 towels (H).
- They will combine with the first TOWEL to make the 3 TIED TOWELS.
- Look at the window and use the 3 TIED TOWELS on the rope (I), then fasten it to the hook (J).
- Walk forward.
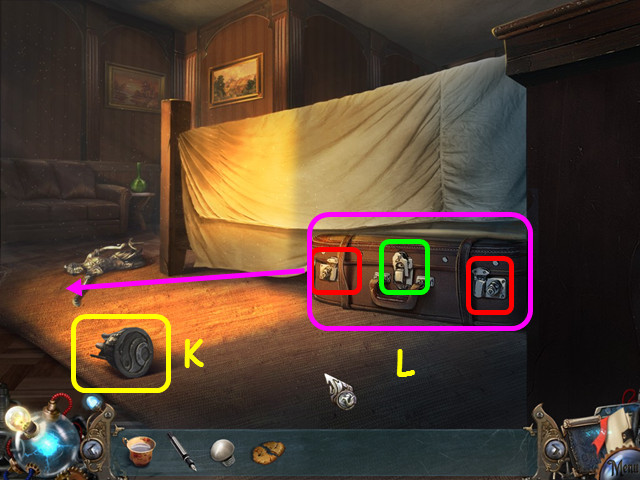
- Take the STATUETTE (K).
- Pull out the suitcase and open the 2 latches and then left the lid (L).
- Select the inside of the suitcase for a HOS.
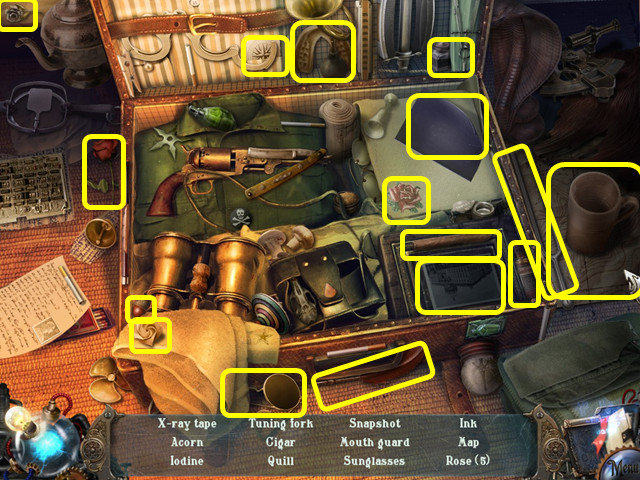
- Locate all the items on the list.
- You will earn the X-RAY TAPE.
- Walk forward.
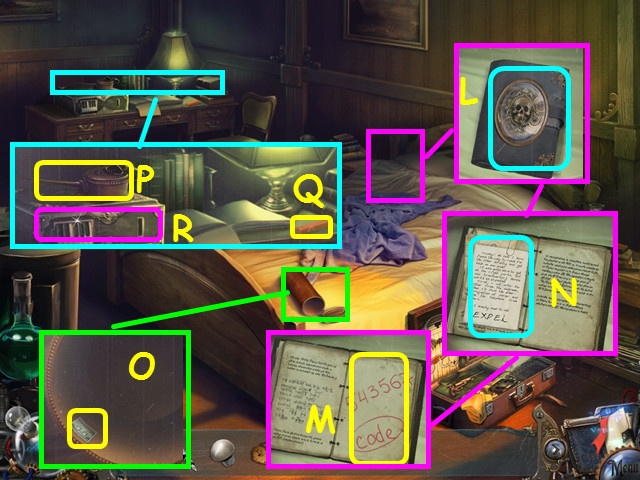
- Move the pillow and read the journal (L).
- Turn the pages until you find the FAKE SAFE CODE (M) and the telephone code (N).
- Look inside the capsule and take the POSTAGE STAMP (O).
- Look at the desk; take the BURNING OIL LAMP (P) and the SEALING WAX (Q).
- Note you need something to operate the music box (R).
- Walk down twice to the balcony.
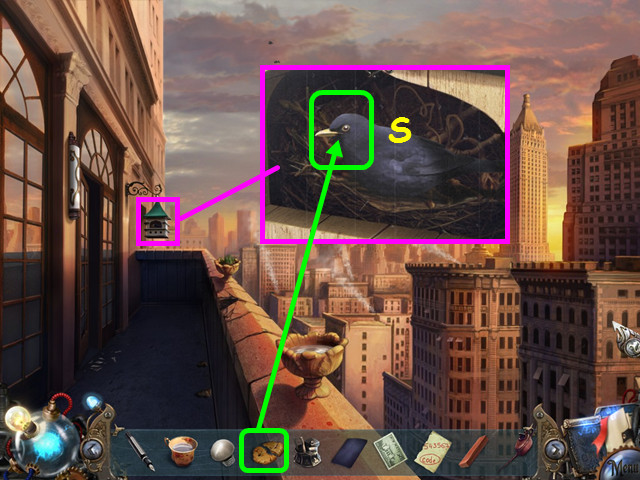
- Look at the birdhouse and give the CRUMBLED COOKIE to the bird (S).
- Select the birdhouse for a mini-game.
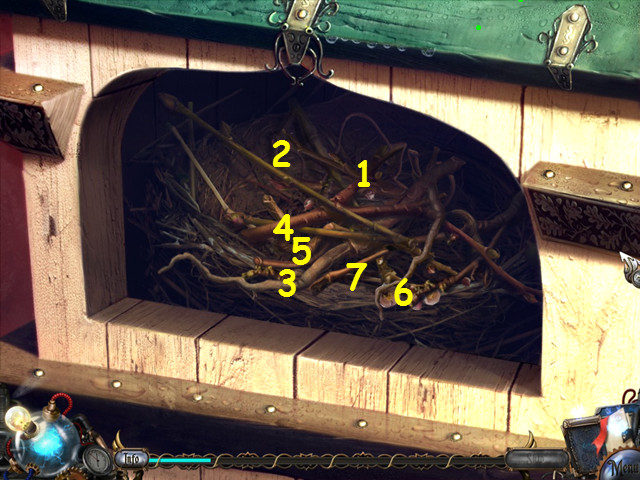
- Remove the branches one at a time, from top to bottom.
- Just select the twig you wish to move; do not try to drag the twigs.
- Select the twigs in numerical order (1-7).
- Once all the branches are cleared, take the STRING.
- Walk down once.
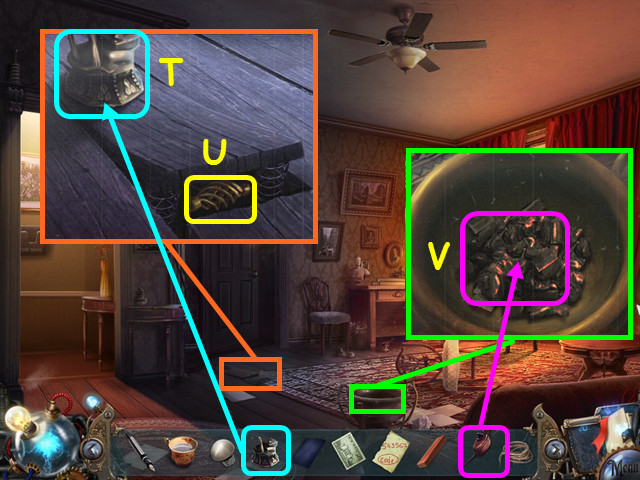
- Look at the floorboards and place the STATUETTE in the indentation (T).
- Take the LOCKET KEY (U).
- Look at the urn and use the BURNING OIL LAMP on the coals (V).
- Go out to the balcony then enter the bedroom.
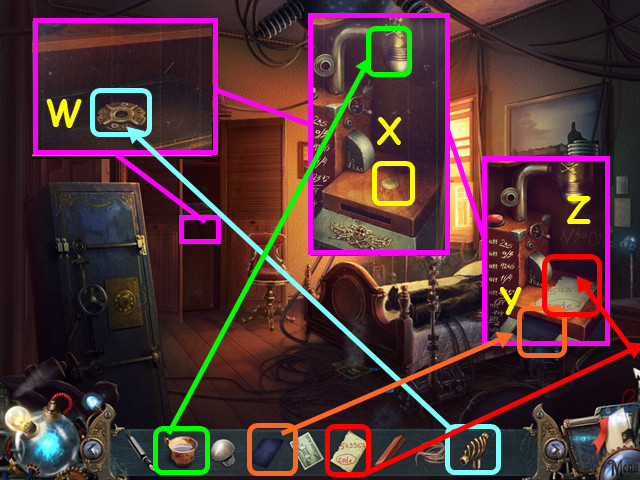
- Look in the closet and use the LOCKET KEY on the lock (W).
- Turn the lock to reveal the x-ray machine.
- Place the X-RAY BULB in the socket and take the COIN (X).
- Place the X-RAY TAPE in the slot (Y).
- Place the FAKE SAFE CODE where the coin was to trigger a mini-game (Z).
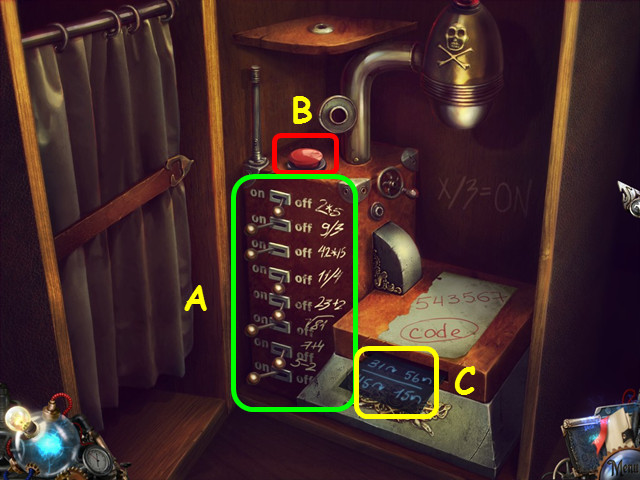
- Turn the switches on that have a number that is a multiple of 3.
- Turn on the switches labeled: 9/3, 42×15, √81, and 5-2 (A).
- Press the red button (B).
- Take the SAFE COMBINATION (C).
- Look at the safe on the left and place the SAFE COMBINATION over the dial for a mini-game.
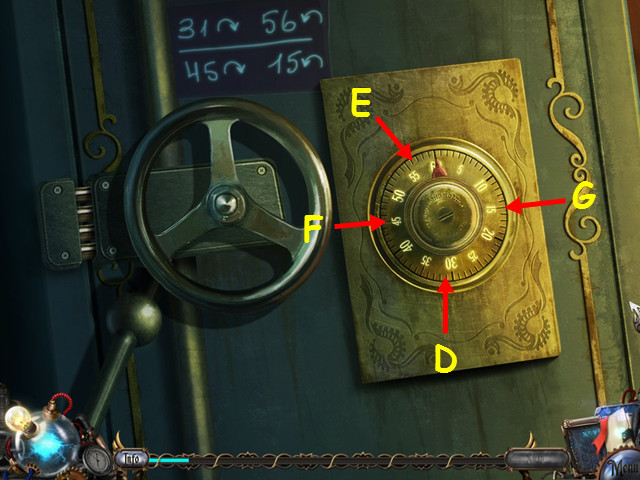
- Left-click, hold, and drag the center dial to move the arrow; if you release on the wrong number the combination will reset.
- Drag the inner dial clockwise so the arrow points to 31 (D).
- Drag the inner dial counterclockwise so the arrow points to 56 (E).
- Drag the inner dial clockwise so the arrow points to 45 (F).
- Drag the inner dial counterclockwise so the arrow points to 15 (G).
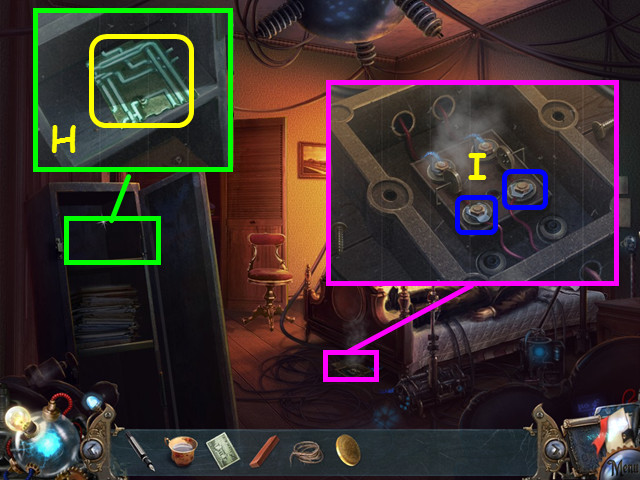
- Look in the safe and take the THIRD CHARGED ETHER CIRCUIT (H).
- Look at the telephone power box and attach the 2 clips (I).
- Go out the window.
- Look at the desk and use the COIN on the music box for a mini-game.
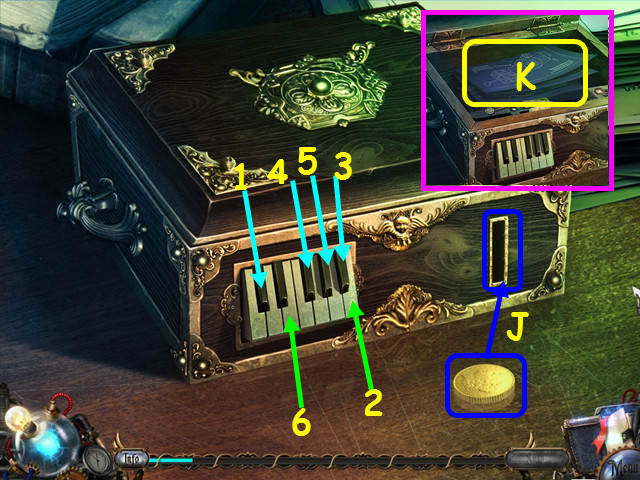
- Place the COIN into the slot (J).
- Watch the piano keys play, then repeat the sequence.
- Press the keys in numerical order (1-6).
- Take TESLA’S BLUEPRINTS from inside the box (K).
- Zoom into the suitcase, then select it for a HOS.
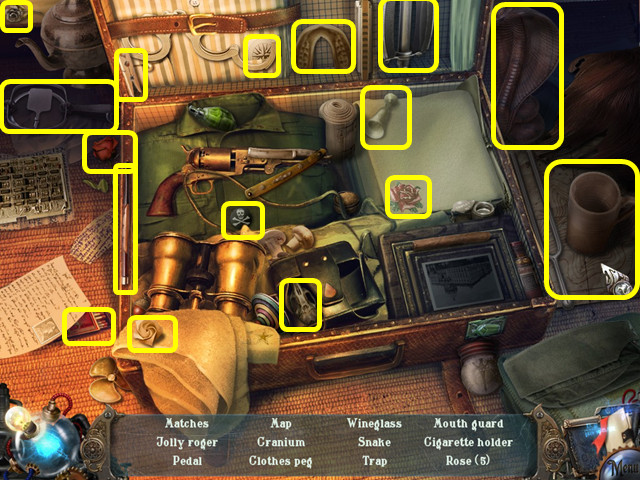
- Locate all the items on the list.
- You will earn the MATCHES.
- Go forward, then walk down 3 times.
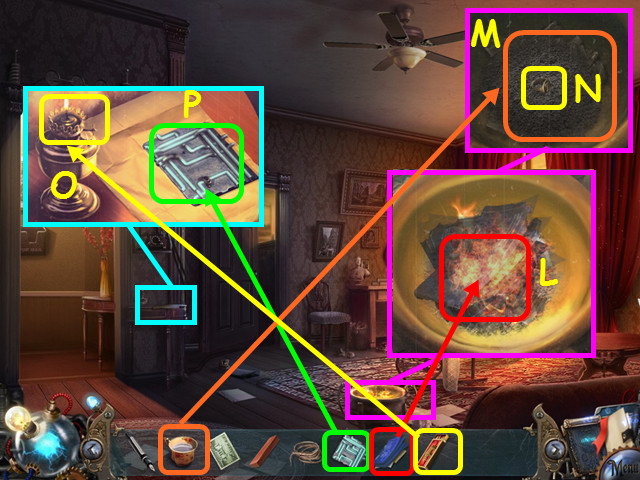
- Look at the urn and place TESLA’S BLUEPRINTS on the coals (L).
- Pour the CUP FILLED WITH WATER on the flames (M).
- Take the SIGNET RING from the ashes (N).
- Look at the table and use the MATCHES on the lamp (O).
- Place the THIRD CHARGED ETHER CIRCUIT on the paper (P).
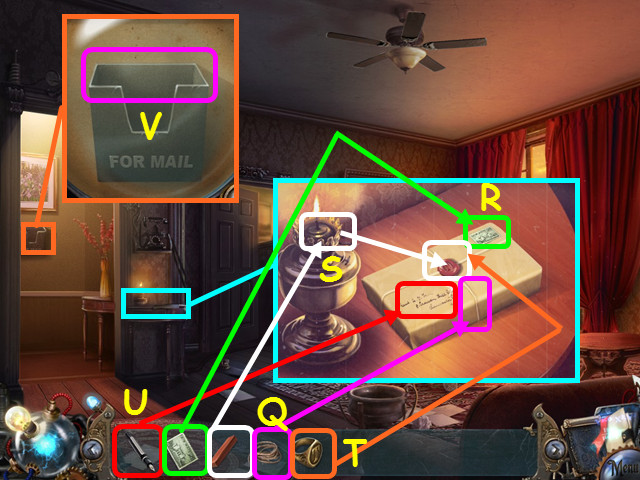
- Wrap the paper around the circuit, then tie the package with the STRING (Q).
- Place the STAMP on the package (R).
- Use the SEALING wax on the lamp and then on the package (S).
- Use the SIGNET RING on the wax blob (T).
- Use the PEN to write an address (U), then take the MAIL PACKAGE.
- Look out the door and place the MAIL PACKAGE into the mailbox (V).
- Select the table near the curtains for a HOS.
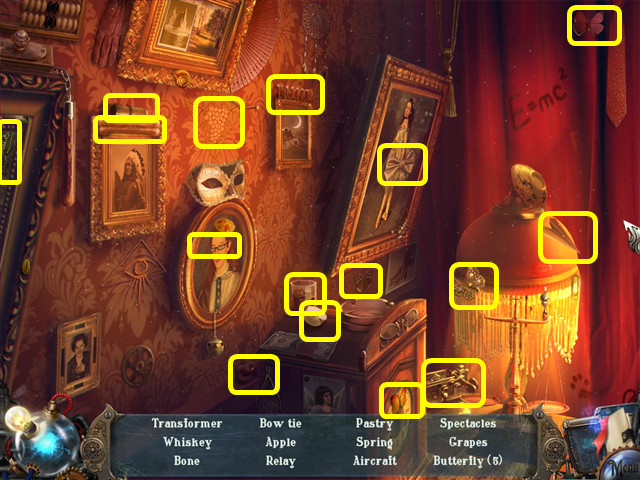
- Locate all the items on the list.
- You will earn the TRANSFORMER.
- Go out to the balcony then enter the bedroom.
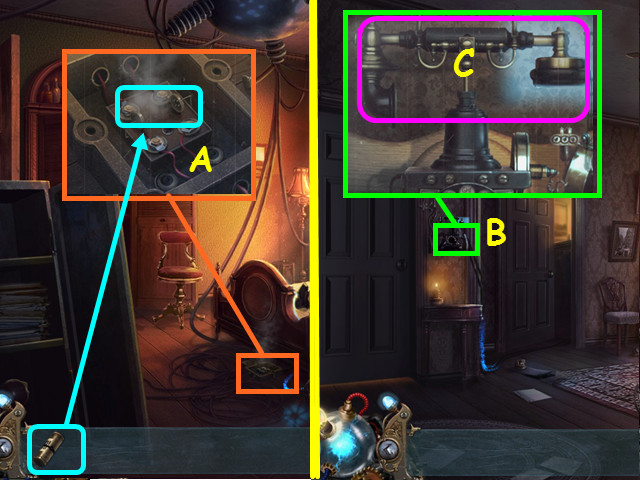
- Look at the telephone power box under the bed and place the TRANSFORMER in the center (A).
- Walk down twice, then look at the telephone (B).
- Take the receiver for a mini-game (C).
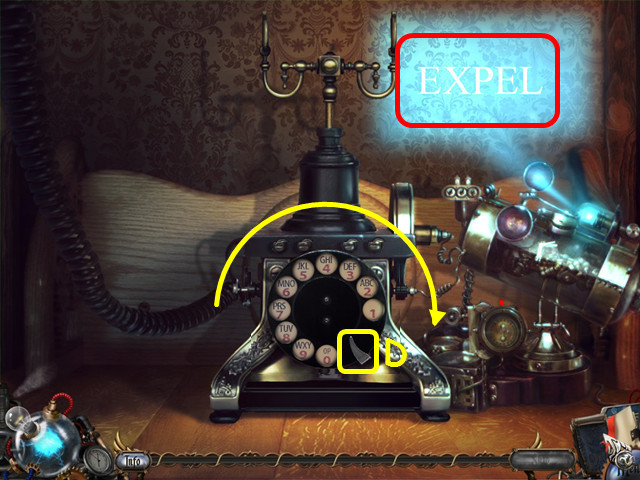
- Drag the rotary wheel clockwise from the number to the silver bar (D).
- Since each number has 3 letters, you may need to drag the rotary 1 or 2 more times to get the letter you want.
- For example, number 5 has J-K-L. To get the K, you need to drag the wheel twice from number 5.
- You need to spell out E-X-P-E-L, so dial 3-3-9-9-7-3-3-5-5-5.
- Walk through the glowing door.
Chapter 5: Wardenclyffe Tower
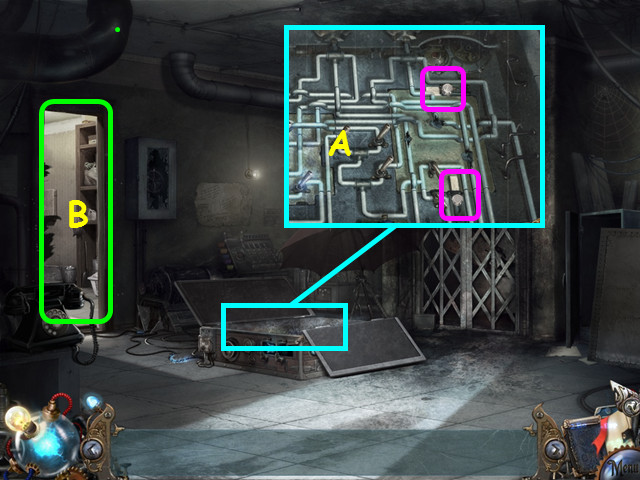
- Look at the platform; flip the 2 switches and remove the old electric circuit (A).
- Exit the close-up, then go left to the laundry room (B).
- Walk up the stairs to the lobby.
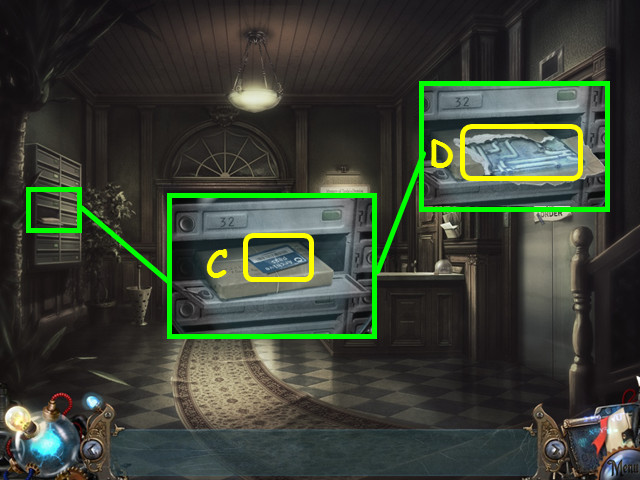
- Look at the mailboxes and take the ARCHIVE PASS (C).
- Open the package and take the THIRD ETHER CHARGED CIRCUIT (D).
- Walk forward twice to the archives, then go forward to the exhibit.
- Look at the device in the back left corner for a HOS.
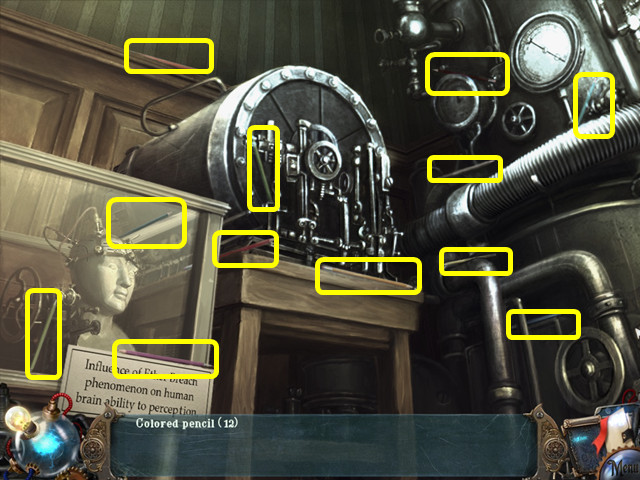
- Locate the 12 colored pencils.
- You will earn the COLORED PENCILS.
- Walk down once.
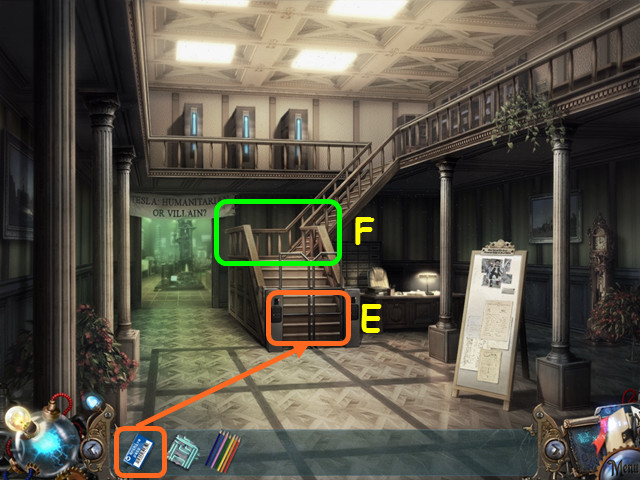
- Use the ARCHIVE PASS on the gates (E).
- Walk up the stairs (F).
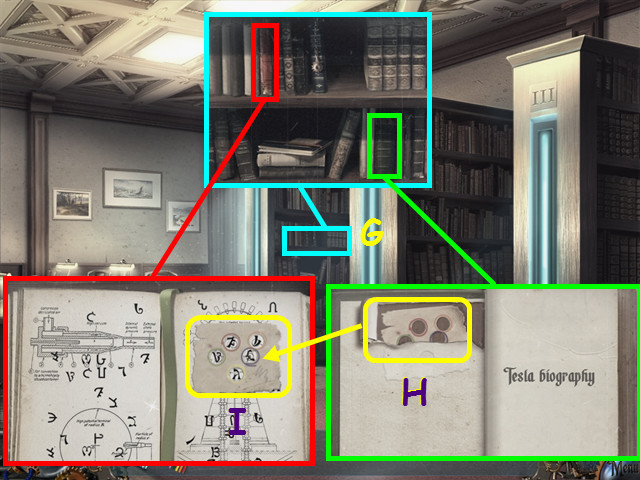
- Look at the number 1 bookshelf (G).
- Take the lower right green book titled, Tesla’s Biography; open the book, then tear the inside cover to find the STENCIL (H).
- Take the upper left red book titled, The Unknown Inventions of Tesla; open the book and place the stencil on the pages for a mini-game (I).
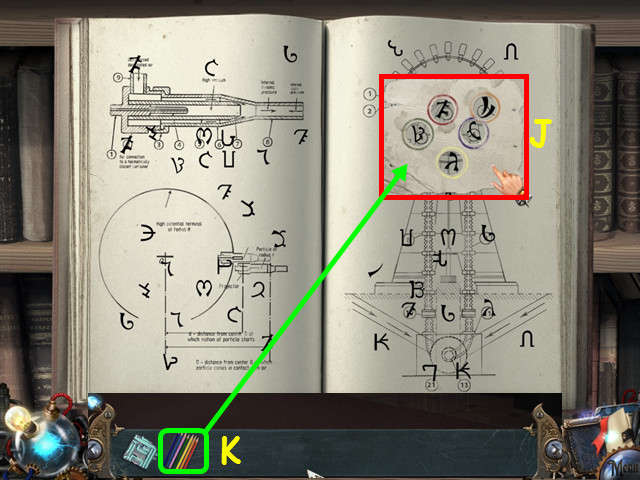
- Move the stencil around to where there are symbols in all the circles of the stencil (J).
- Use the COLORED PENCILS on the stencil (K).
- Tear out the WARDENCLYFFE ADDRESS.
- Walk down 5 times to return to the basement.
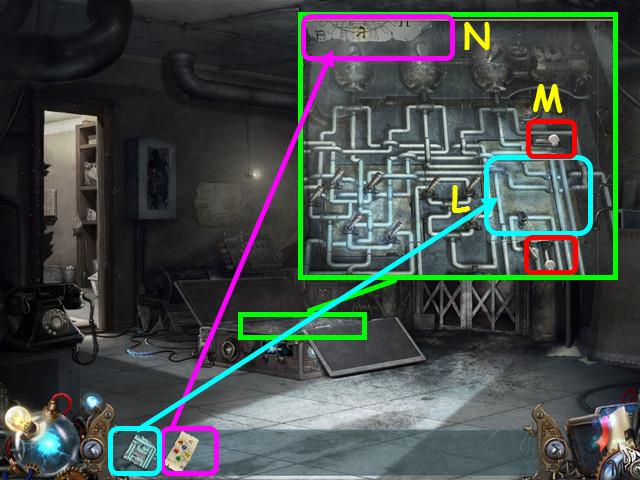
- Look at the platform and place the THIRD ETHER CHARGED CIRCUIT on the right (L).
- Close both latches (M).
- Place the WARDENCLYFFE ADDRESS on the circuits to trigger a mini-game (N).
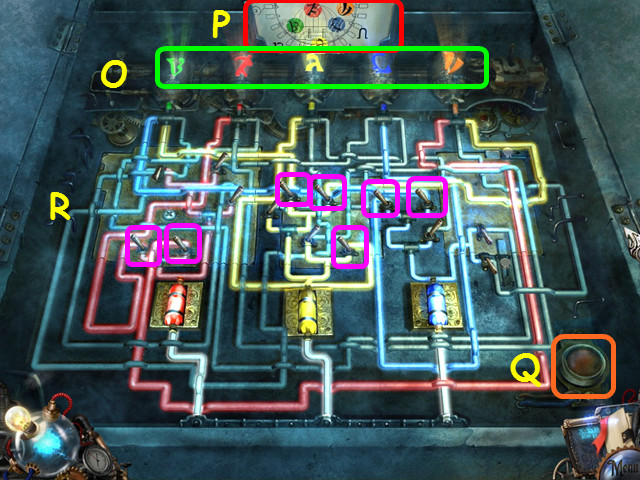
- Flip the switches to fill the metal vessels (O) with the colors that match the address (P).
- Press the red button (Q).
- Flip the indicated switches (R).
- Enter the glowing elevator shaft.
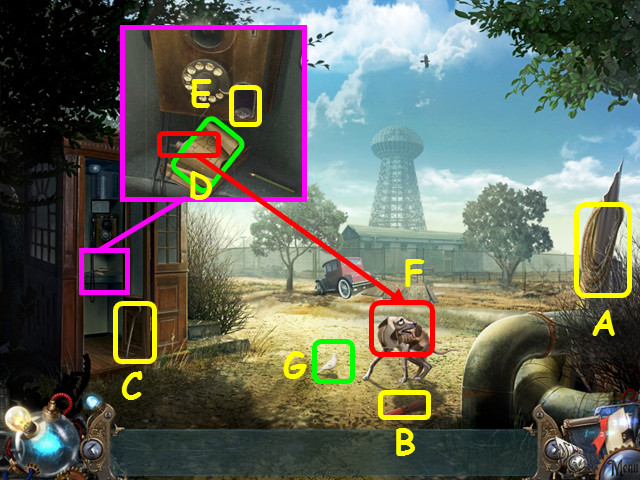
- Take the ROPE (A).
- Take the 1/5 VALVE (B).
- Take CROWBAR (C).
- Look at the telephone and take the map (D).
- Take the FLAP and the 1/5 COIN (E).
- Use the FLAP to scare away the dog (F).
- Look at the dove to see it is wounded (G).
- Exit the close-up, then walk forward.
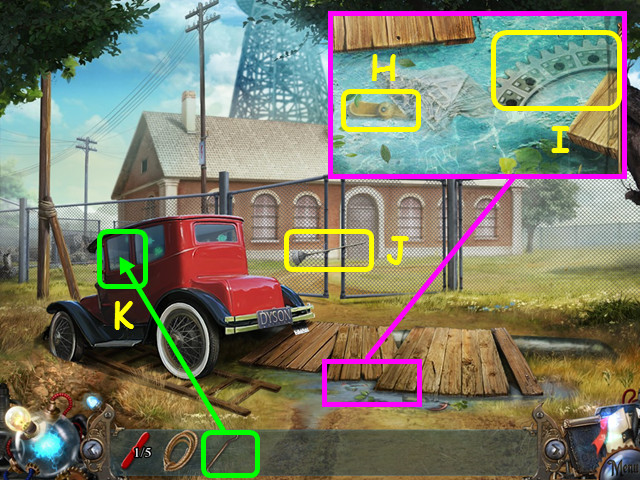
- Look in the water; remove things to find the 2/5 VALVE (H).
- Move the board to find the 1/7 HATCH PART (I).
- Take the RAKE from the gate (J).
- Use the CROWBAR on the car’s window (K).
- Select the car window for a HOS.
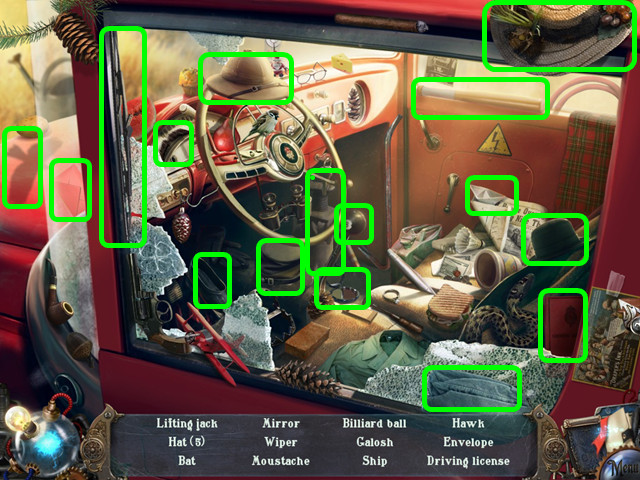
- Locate all the items on the list.
- You will earn the LIFTING JACK.
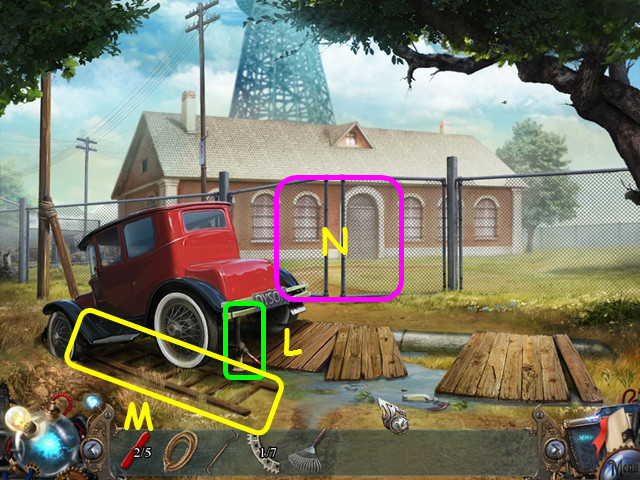
- Place the lifting jack under the car; pump the handle on the jack several times (L).
- You will earn the LADDER (M).
- Open the gate and walk forward (N).
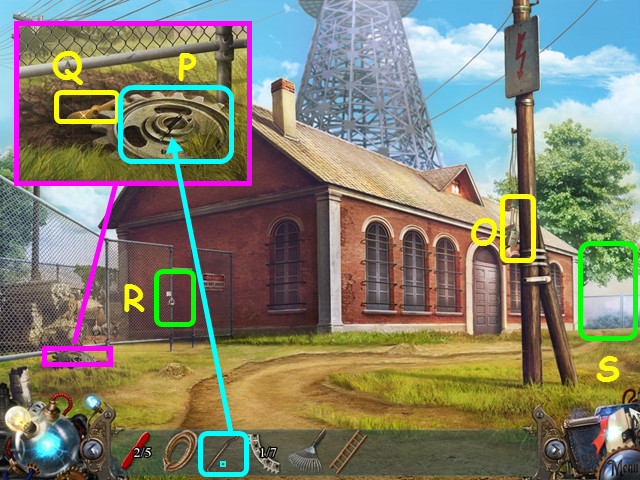
- Take the NUMBER PLATE 1 (O).
- Look at the gear; use the CROWBAR to remove the GEAR (P).
- Take the 3/5 VALVE (Q).
- Look at the lock on the gate (R).
- Follow the path to the right (S).
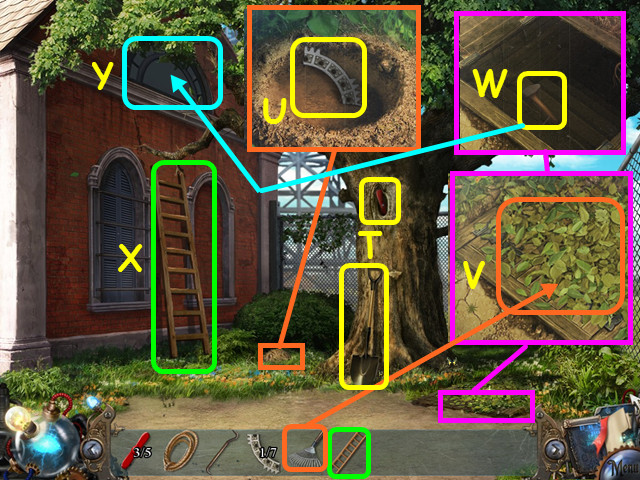
- Take the SPADE and the 4/5 VALVE (T).
- Use the SPADE to dig up the 2/7 HATCH PART (U).
- Look at the trapdoor and use the RAKE 3 times to remove the leaves (V).
- Open the door and take the HAMMER (W).
- Place the LADDER between the windows (X).
- Use the HAMMER to break the arched window (Y).
- Enter the window.
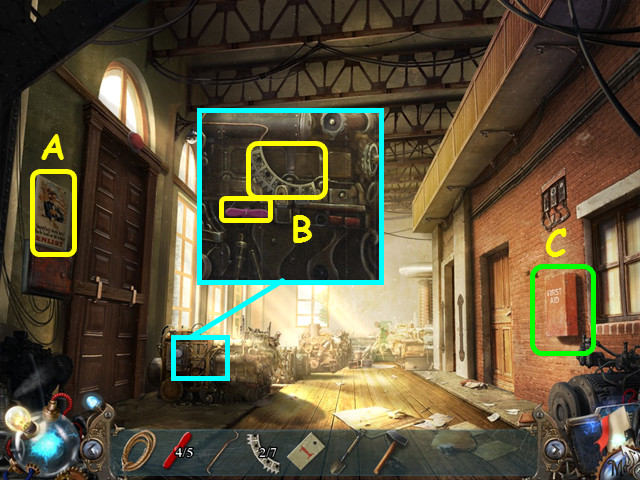
- Take the POSTER (A).
- Look at the machinery; take the 5/5 VALVE and the 3/7 HATCH PART (B).
- Select the first aid box for a HOS (C).
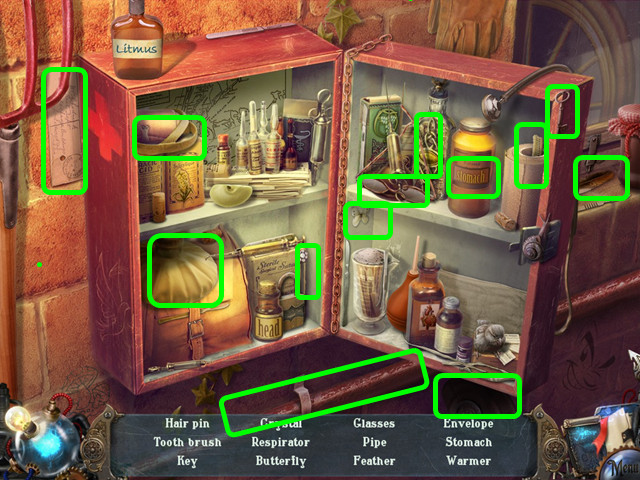
- Locate all the items on the list.
- You will earn the HAIR PIN.
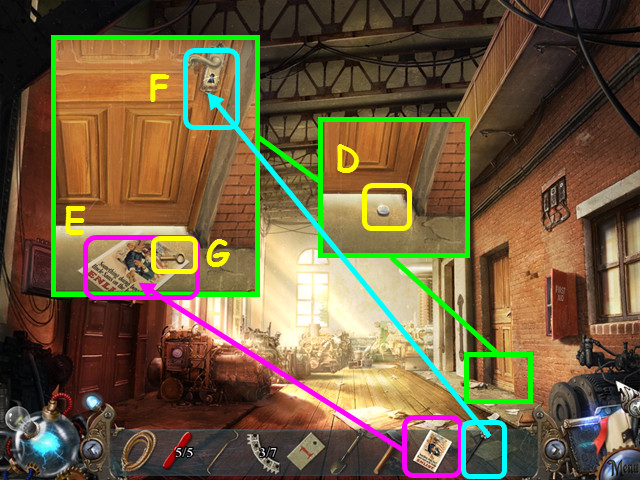
- Look at the door on the right and take the 2/5 COIN (D).
- Place the POSTER under the door, then push it almost into the next room (E).
- Use the HAIR PIN in the lock (F).
- Pull the poster out and take the LABORATORY KEY (G).
- Use the LABORATORY KEY in the lock, then go through the door.
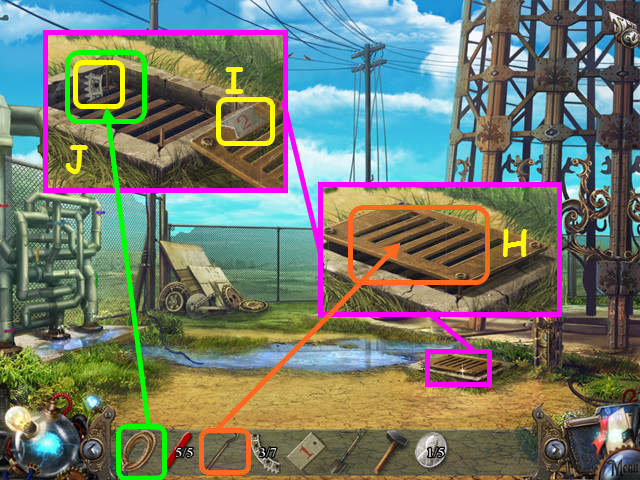
- Look at the grate and use the CROWBAR to open the cover (H).
- Take the NUMBER PLATE 2 (I).
- Tie the ROPE to the hatch part; Pull the rope and take the 4/7 HATCH PART (J).
- Walk to the right.
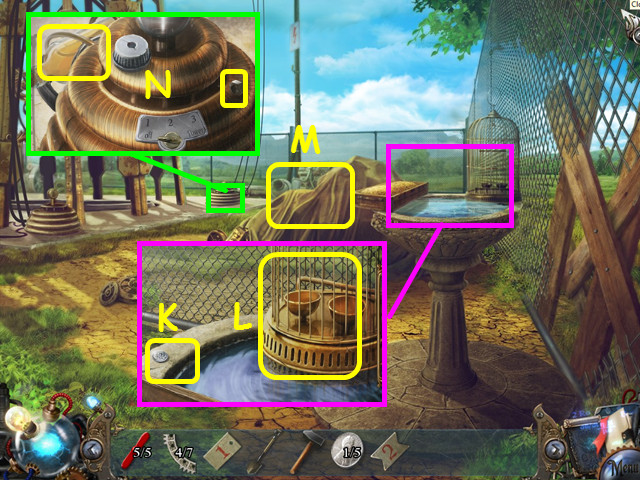
- Look at the birdbath and take the 3/5 COIN (K).
- Take the DOVE CAGE and the 5/7 HATCH PART that is hidden under the cage (L).
- Take the RUBBER TARPAULIN (M).
- Look at the rear transmitter; take the RUST REMOVER and the 1/4 NUT (N).
- Walk down once.
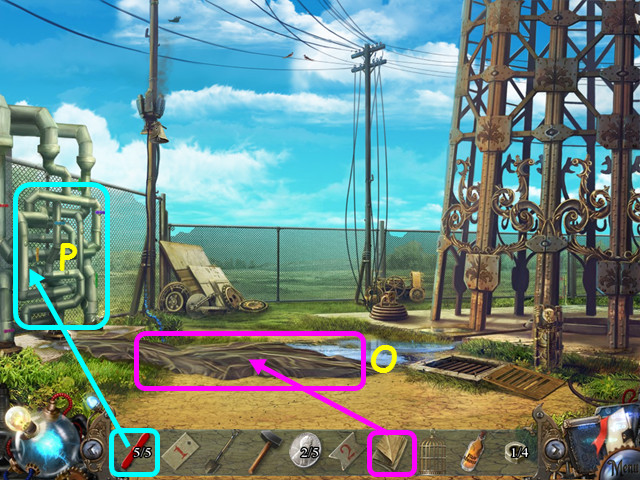
- Place the RUBBER TARPAULIN on the puddle (O).
- Use the 5 VALVES on the pipes for a mini-game (P).
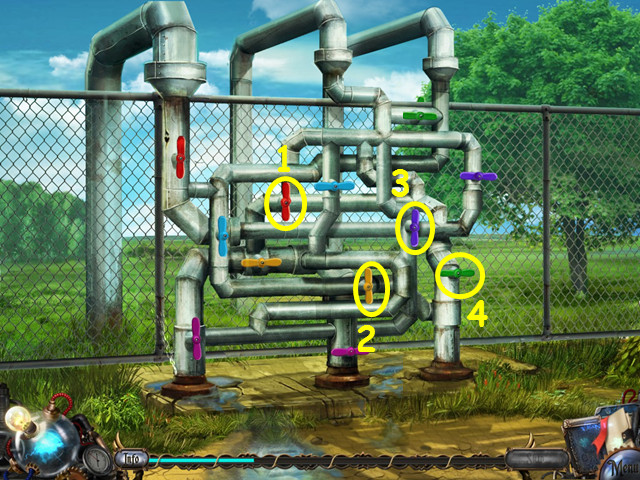
- Close the valves in the correct order to stop the water flowing.
- Turning a valve will turn the other valve of the same color.
- Turn the valves in numerical order (1-4).
- Walk forward.
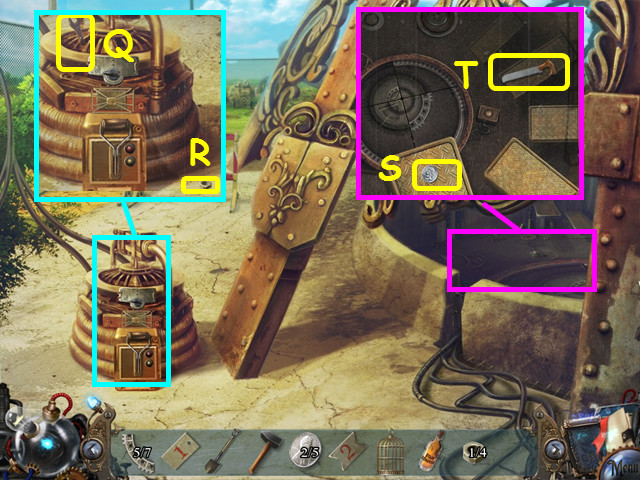
- Look at the transmitter; take the WRENCH (Q) and the 2/4 NUT (R).
- Look in the shaft; take the 4/5 COIN (S) and the SAW (T).
- Exit the close-up, then walk down twice.
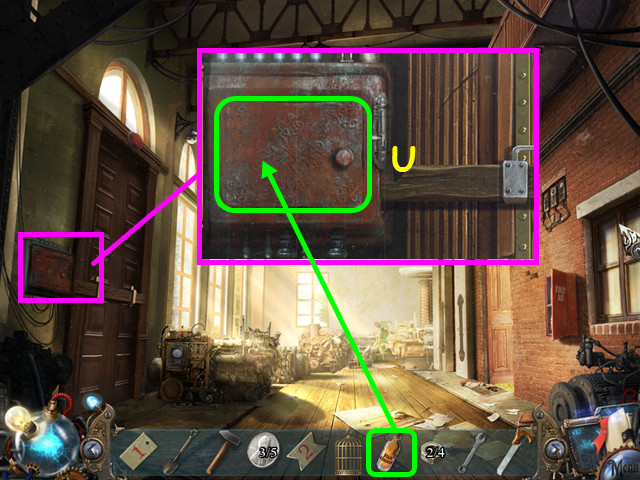
- Look at the lock box and use the RUST REMOVER on the case (U).
- Open the cover for a mini-game.
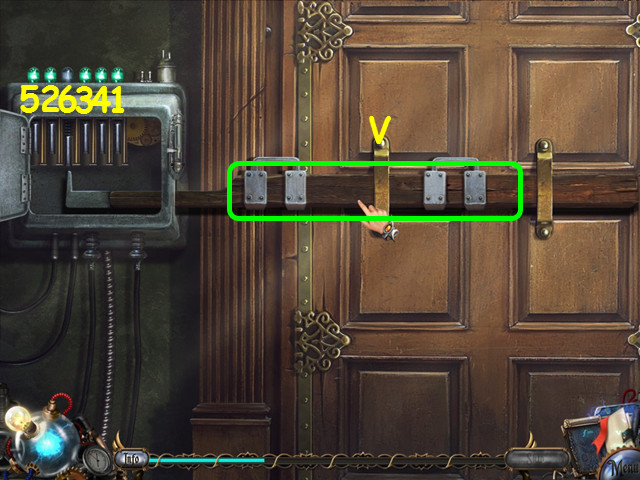
- Push the pins up in the correct order; pushing the wrong pin will cause the previous pins to fall.
- Select the door bar (V), then release; you can now move it with your mouse.
- Push the pins in numerical order (1-6).
- Walk left out the door.
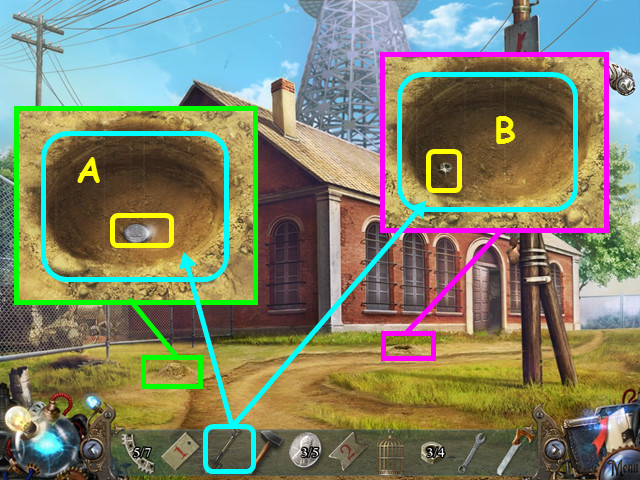
- Look at the first mound of dirt; use the SPADE to dig up the 5/5 COIN (A).
- Look at the second mound; use the SPADE to dig up the 3/4 NUT (B).
- Walk down, then select the car for a HOS.
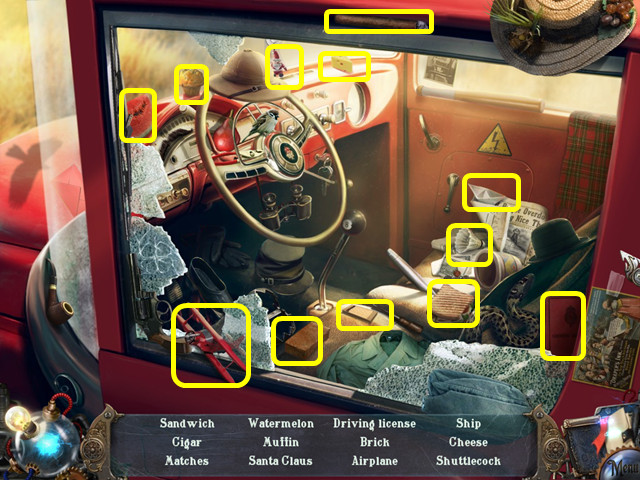
- Locate all the items on the list.
- You will earn the SANDWICH.
- Walk down once.
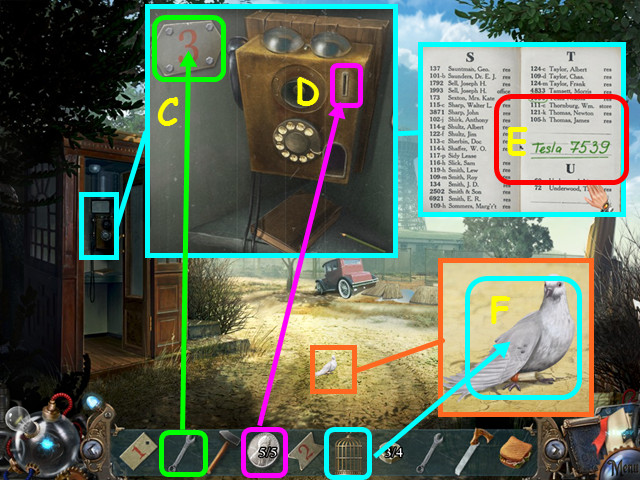
- Look in the telephone booth and use the WRENCH to take the 4 BOLTS and the NUMBER PLATE 3 (C).
- Place the 5 COINS into the slot (D).
- Take the GENERATOR AREA CODE (E).
- Look at the dove and use the DOVE CAGE on him for a mini-game (F).
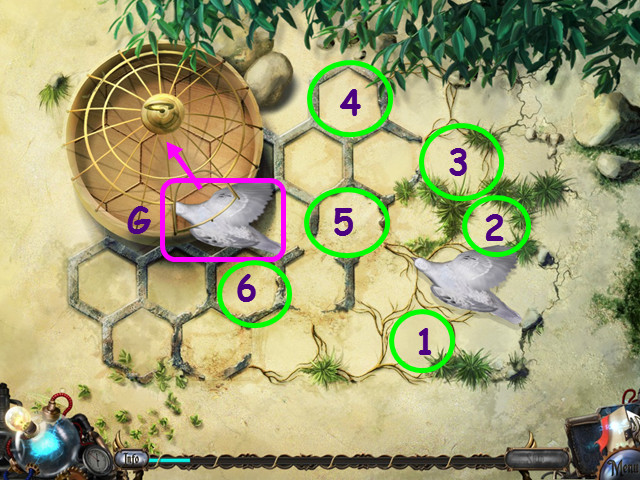
- Get the dove into the cage by clapping near him.
- Select a space near the dove to herd him towards the cage opening (G).
- Our steps are shown here (1-6).
- You will earn the CAGED DOVE.
- Walk forward twice.
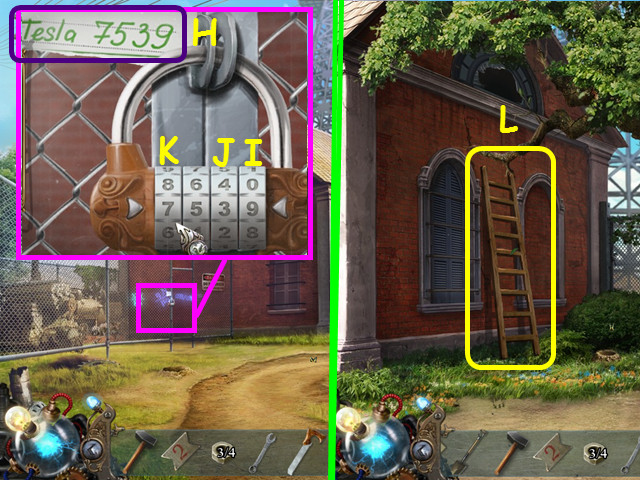
- Look at the gate and enter the code (H) on the lock. Drag the dials to the correct number; turning some dials will cause others to turn.
- Turn the rightmost dial to 9 (I). Turn the second from the right to 3 (J). Turn the left most dial to 7 (K). Note these instructions may not work if you have already turned the dials.
- Walk right to the tower backyard.
- Take the LADDER (L).
- Walk down then enter the gate on the left.
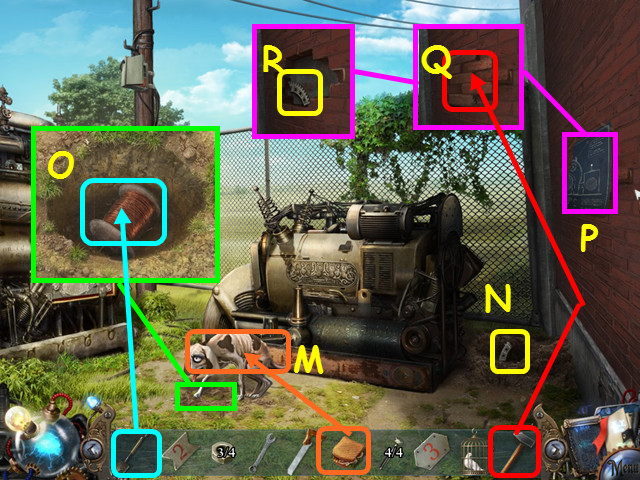
- Give the SANDWICH to the dog (M).
- Take the 6/7 HATCH PART (N).
- Look at the dirt and use the SPADE to dig up the COPPER WIRE REEL (O).
- Take the PART OF SCHEME from the wall (P).
- Look at the bricks underneath the part of scheme and use the HAMMER to remove them (Q).
- Take the 7/7 HATCH PART (R).
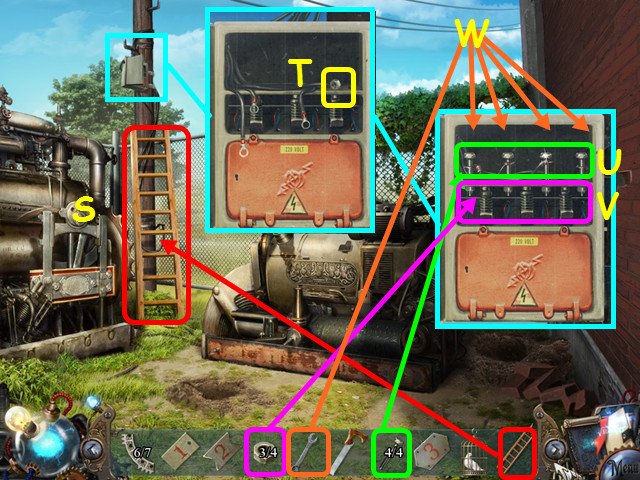
- Place the LADDER against the light pole (S).
- Look inside the power box and take the 4/4 NUT (T).
- Place the 4 BOLTS (U), then the 4 NUTS (V) into the box.
- Use the WRENCH to tighten the 4 bolts (W).
- This will trigger a mini-game.
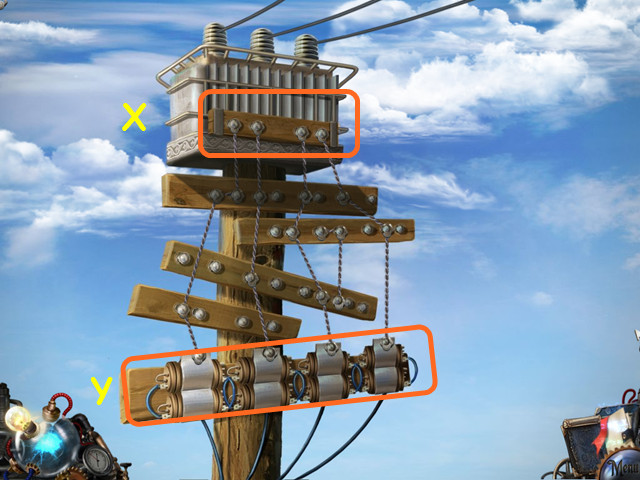
- Connect the top 4 points (X) to the bottom 4 points (Y).
- Select an attachment point on a wire to remove it from a post, then select the post you want to move to.
- If the wires touch a post the connectors will not attach to the post you were trying.
- Tip: attach the bottom wires last.
- Walk down and enter the building; select the first aid box on the right for a HOS.
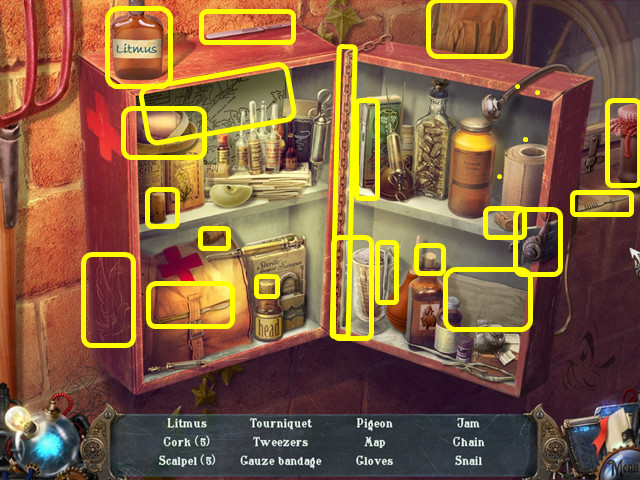
- Locate all the items on the list.
- You will earn the LITMUS.
- Go out the right door, then walk to the right.
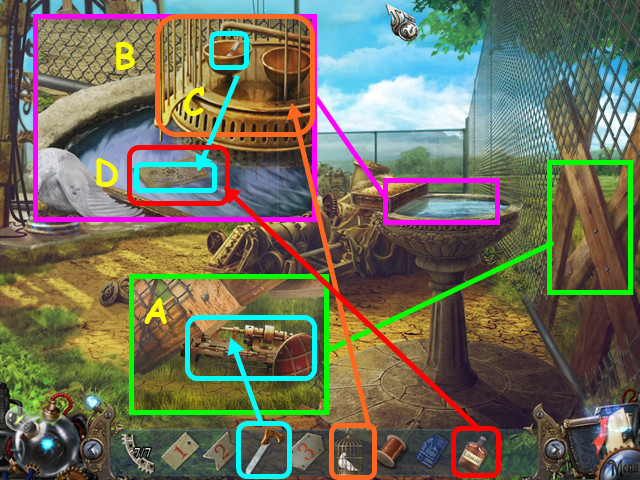
- Look at the fence and use the HACKSAW on the boards; remove the boards and take the DEVICE PART (A).
- Look at the birdbath; place the CAGED DOVE on the edge and open the cage door (B).
- Take the EMPTY SCHEME and place it in the water (C).
- Use the LITMUS on the paper (D) and take the TRANSMITTER DIAGRAM.
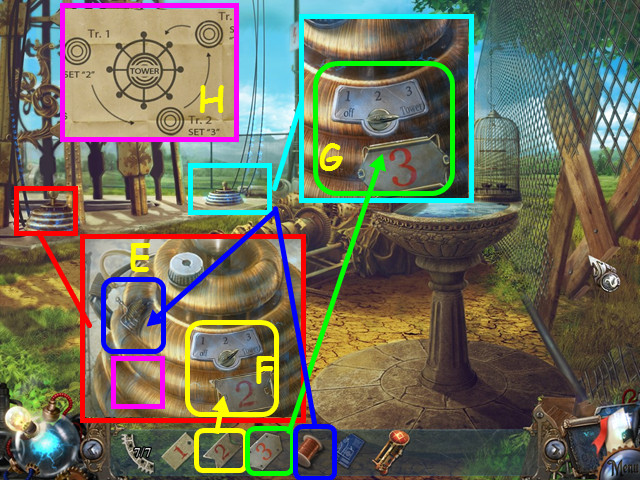
- Look at the left transmitter and use the COPPER WIRE REEL to repair the damage (E).
- Place the NUMBER PLATE 2 into the holder turn the switch to ’3′ (F).
- Look at the far transmitter and place the NUMBER PLATE 3 into the holder; Turn the switch to ‘tower’ (G).
- You can refer to the transmitter diagram (H).
- Walk down, then go forward.
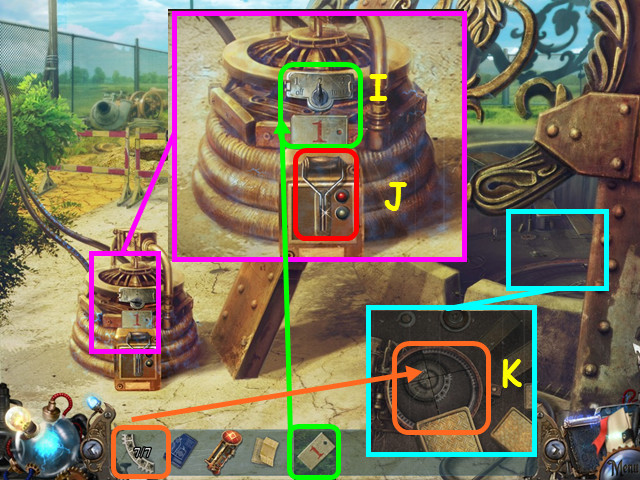
- Look at the transmitter and place the NUMBER PLATE 1 into the holder; turn the switch to ’2′ (I).
- Pull the lever down (J).
- Look into the shaft; use the 7 HATCH PARTS on the hatch for a mini-game (K).
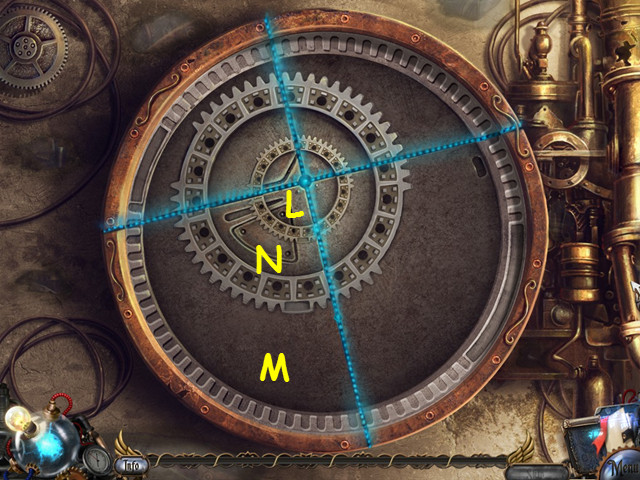
- Match up the lines by rotating the discs.
- Turn the inner disc to match with the 2nd set of lines (L).
- Turn the outer disc until the outermost lines match up (M).
- Turn the 2nd disc until its lines match up with the outer lines (N).
- You will need to go back and forth between the discs to ‘tweak’ them into position.
- Walk down to the underground shaft.
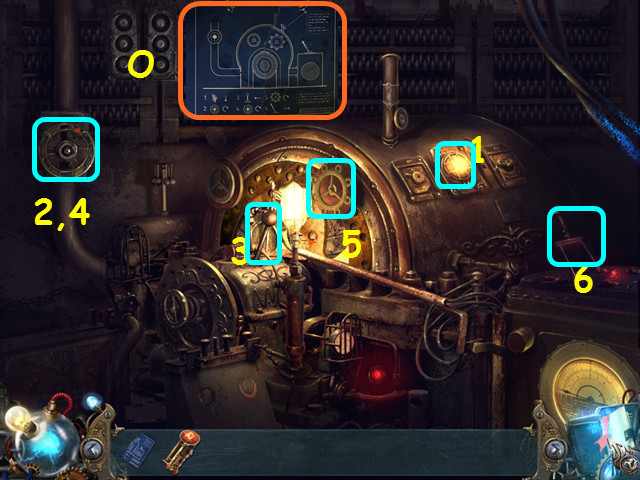
- Place the PART OF SCHEME on the wall (O).
- Look at the scheme to learn the sequence of steps to take.
- Place the DEVICE PART in the hole, then push it down twice so it lights (1).
- Turn the valve on the left clockwise (2).
- Flip the lever in the center to the left (3).
- Turn the valve on the left clockwise a second time (4).
- Turn the gear on the right clockwise (5).
- Flip the switch on the right (6).
- Walk down to exit.
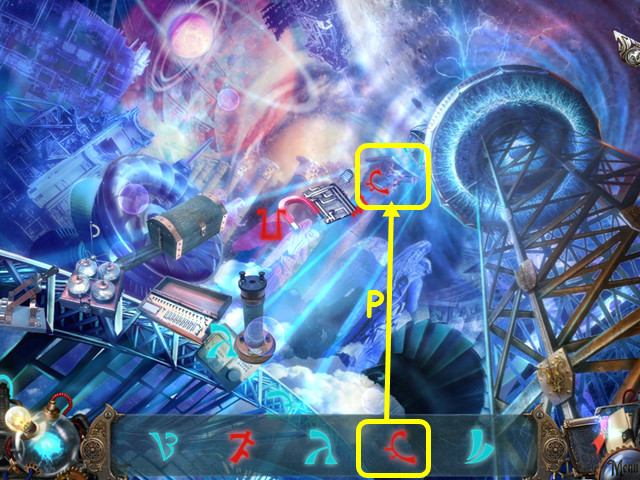
- Once Tesla is finished talking, locate all the symbols listed (P).
- The symbols are moving, but will reappear if you miss any.
- Back at the lobby; walk forward once the concierge finishes talking.
- Congratulations! You have completed Tesla’s Tower: The Wardenclyffe Mystery!

