Walkthrough Menu
- General Tips
- Chapter 1: the Microscope
- Chapter 2: the Movie Camera
- Chapter 3: the Phonograph
- Chapter 4: the Combustion Engine
- Chapter 5: the Light Bulb
- Chapter 6: the Telegraph
- Chapter 7: the Piano Forte
- Chapter 8: Electrical Conductivity
- Chapter 9: the Submarine
- Chapter 10: the Steam Engine
- Chapter 11: the Bicycle
- Chapter 12: the Telescope
- Chapter 13: Camera Obscura
- Chapter 14: the Printing Press
- Chapter 15: the Spinning Wheel
- Chapter 16: Gunpowder
- Chapter 17: Magnetic Compass
- Chapter 18: Distillation
- Chapter 19: Soap
- Chapter 20: Paper
- Chapter 21: Glass
- Chapter 22: Water Mill
- Chapter 23: Ironworks
- Chapter 24: Writing
- Chapter 25: the Pulley
- Chapter 26: the Bakery
- Chapter 27: Pottery Wheel
- Chapter 28: the Wheel
- Chapter 29: the Boat
- Chapter 30: the Sun Dial
General Tips
- This is a Hidden Object Adventure Game with a variety of different mini-games.
- You collect items that you see in the Find List. Some of these items are Tools that can be used later in the game.
- Items are generally relevant to the scene unless they are "improper items." They are approximately the right color and size, although there is some variation.
- Items are often partially hidden behind grass, rocks, or other items.
- The Find List is a row of pictures across the top of the screen.
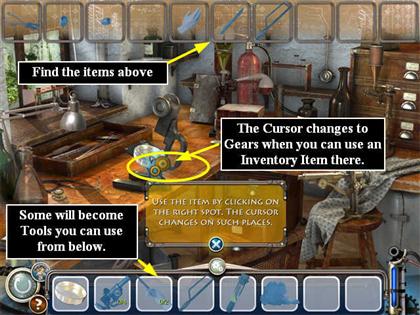
- When an item in the Find List is blacked out, that means you will have to do something else in the scene before you can access it.
- Most locations have one or two zoom scenes. Sometimes you will need to find a Tool in a zoom scene and bring it back to the main scene or another zoom scene to do something with it there.
- Areas will sparkle when you can open up a zoom scene there.
- When you click where the cursor turns into gears, you can use an inventory object there, although you may not have the object yet.
- The Tool Inventory will usually be open. However, in one or two locations you will have to close it in order to get to an object. To close or open the Tool Inventory, click on the tiny gears icon.
- For each location you will have to repair an invention that was damaged by the butterfly effect. This will involve first collecting objects, and then using the Tools you have collected to repair the mechanism.
- All of the Tools will first appear on the Find List. Then once they’re in your Tools Inventory, you can mouse over them to get a text label of what they are.
- Many Tools are combinations assembled from multiple items. When you mouse over the Tool, you will see a list of all the objects it includes.
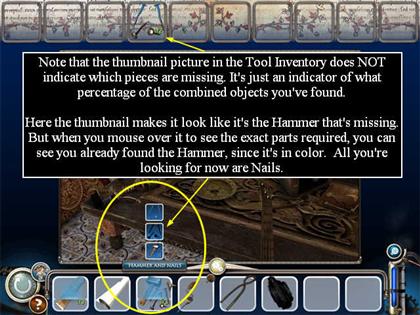
- The game is somewhat inconsistent in how it identifies multiples in the Find List. Sometimes they are listed with a counter, and sometimes each occurrence gets its own entry.
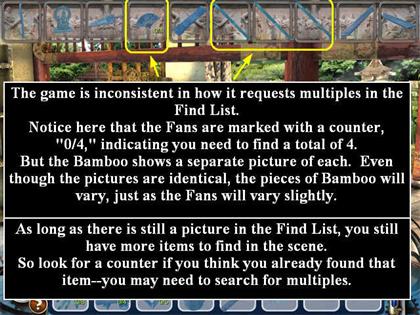
- There is no timer.
- After you have repaired each invention you will have to collect improper objects that have fallen through a ripple in time. There is no Find List for these tasks—you just have to recognize the items because they don’t belong in that time, or because they weren’t in the scene before.
- Sometimes the ‘improper items" have a theme that matches the invention you just repaired. For example, on the Bakery level, most (but not all) of the improper items have to do with food or cooking.
- Sometimes some of the improper items are the inventions that you’ve fixed on previous levels.
- The game autosaves automatically.
- Click on the grey button in the lower left to return to the Main Menu.
- You can use the ESC key to skip the cut-scenes if desired.
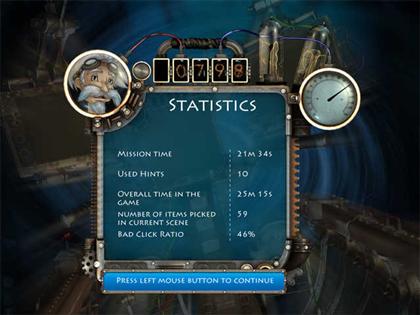
- There is no penalty for wrong clicks, but at the end of each level you will get a scorecard showing you the total time you took and your percentage of wrong clicks.
- There is a HINT button in the lower left corner.
- You get an unlimited number of hints, but you have to wait for the HINT button to recharge each time. It recharges quite quickly.
- The hint is just a large sparkle circle in the general area of one of the items. Do not expect the item to always be in the exact center of the circle—it may be off to one side.
- When you click on a spot where the cursor turns into gears, you will often get a helpful hint about what to do there.
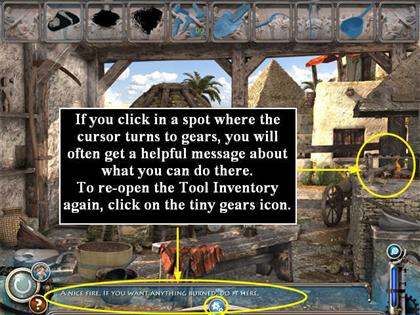
- There are no hints for the mini-games, but you can click on the SKIP button to skip them if desired.
- Once you get to the end of each level, you will get a scorecard showing how you did.
Chapter 1: the Microscope
- During the tutorial you will collect the PETRIE DISH and place it on the Microscope.
- Now collect the remaining items on the Find List. Most of these will be parts of Inventory Items.
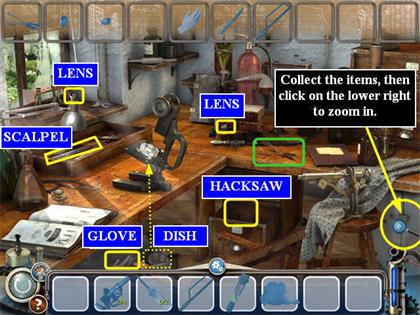
- Once you have collected all the items you can in the main scene, click on the small refrigerator in the lower right to open the zoom scene.
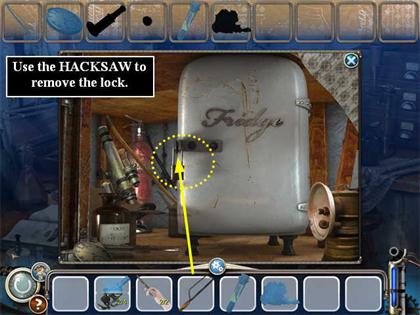
- Use the HACKSAW to remove the lock.
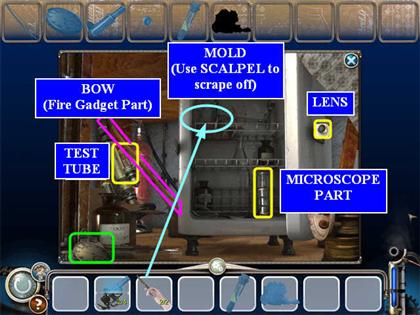
- Collect the additional items here.
- The "blocked" item is the MOLD, which is growing on the back wall of the refrigerator on the left side of the top shelf.
- Use the SCALPEL from the Inventory Items to scrape off a sample of the MOLD. You have not collected the MOLD until this item turns white (not blue) in the inventory tray.
- The BOW is part of a "gadget." You’ll get a little tutorial about this, but you can’t do anything with it until you collect more parts later.
- Once you’ve collected everything in this scene, including the MOLD, close the zoom scene.
- Now it’s time to put the Inventory Items into the scene.
- Put the assembled MICROSCOPE onto the Microscope body.
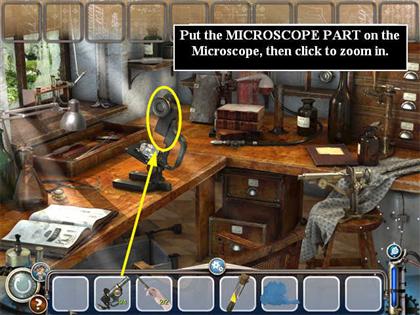
- Click on the Microscope to open a Zoom scene of the PETRIE DISH.
- Put the VIRUS from the test tube on the PETRIE DISH.
- Put the MOLD on the PETRIE DISH.
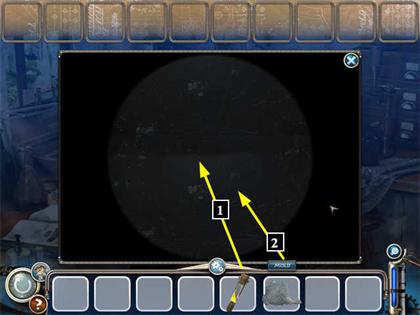
- Close the zoom scene.
- You have succeeded in fixing the mechanism, but a time ripple has brought some "improper" items to the location. You have to collect them.
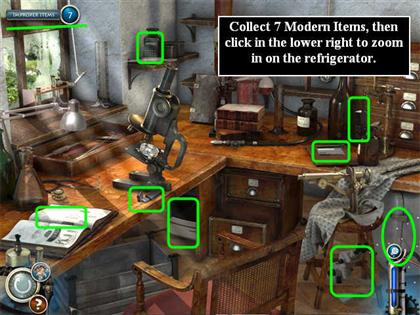
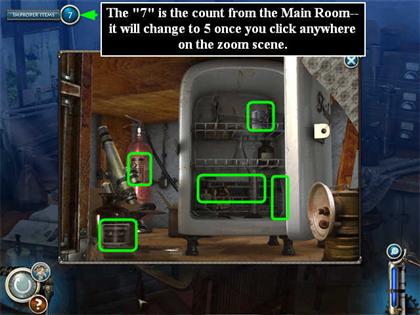
- Once you have collected all of these, click on the lower right corner to open the zoom scene.
- Collect the rest of the improper items here.
Chapter 2: the Movie Camera
- Collect the items on the Find List. Most of these will be parts of Inventory Items.
- Click on the closet door on the right to open it.
- Use the SNIPS to cut up the Box on the table as shown.
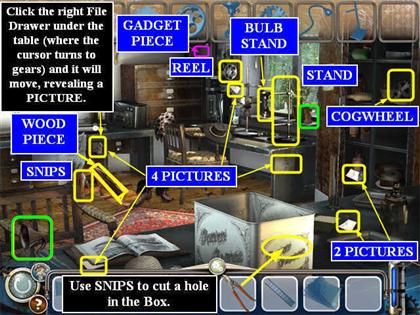
- This location has two zoom areas: the Editing Tray on the left table and the Desk on the right.
- Once you have collected all the items you can in the main scene, click on the Editing Tray to open the zoom scene.
- Collect the additional items here.
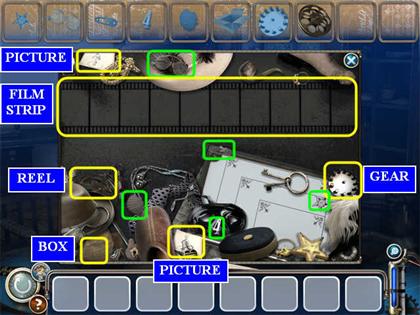
- Once you return to the main scene, click on the Desk and collect more items there.
- Once you’ve finished collecting the PICTURES, put them on the desk as shown. The NEGATIVES will appear above them.
- Collect the NEGATIVES.
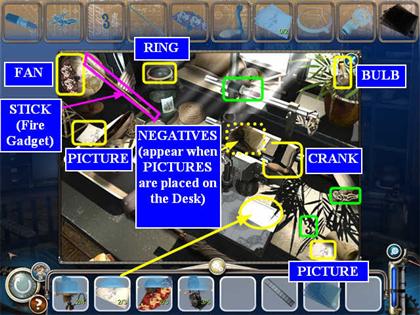
- Once you’ve collected everything in this scene including the NEGATIVES, the zoom scene will close automatically.
- Now it’s time to put the Inventory Items into the main scene.
- Put the FAN in the box behind the square cut-out. You will need to click below and to the left of the cut-out—look for the place where the cursor changes to gears.
- Next put the PROJECTOR behind the FAN.
- Third place the LIGHT behind the PROJECTOR.
- Fourth take the FILMSTRIP and put it on the Projector. No pictures! You’ll have to go back to the Editing Tray.
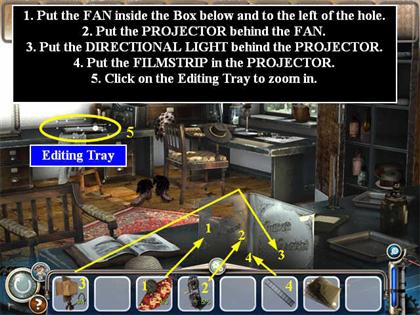
- Click on the Editing Tray to open a Zoom scene.
- Put the NEGATIVES on the Editing Tray. They will spread out so you can see each of the individual pictures.
Picture Sequence Mini-game
- The instructions tell you to look at the man’s feet, but it’s easier to look at the clock marking in the upper right corner and put each picture in order based on how far around the clock timer has gone.
- Click on a picture and it will jump into the next open slot.
- Should you place a picture incorrectly, click on it and it will move back to its original position.
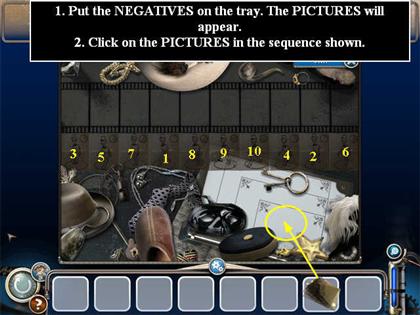
- Once you have all the pictures in the right order, the zoom scene will close automatically.
- You have succeeded in fixing the mechanism, but a time ripple has brought some "improper" items to the location. You have to collect them.
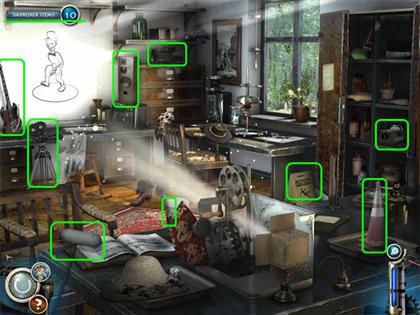
- Once you have collected all of these, click on the Editing Tray to open the zoom scene.
- Collect more items here.
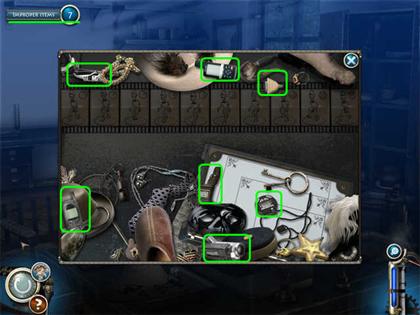
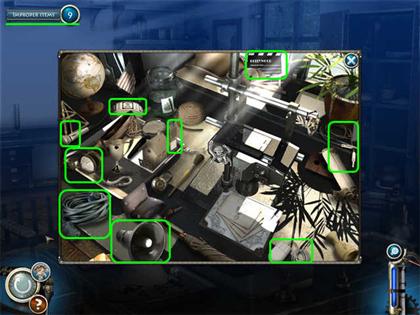
- Now click on the Desk on the right to open the zoom scene.
- Collect the rest of the improper items here.
Chapter 3: the Phonograph
- Collect the items on the Find List. Most of these will be parts of Inventory Items.
- The CRANK is inside the drawer on the front right of the cabinet.
- The PHONOGRAPH HEAD PART is inside the drawer on the front left of the cabinet.
- The CYLINDER is inside the clock.
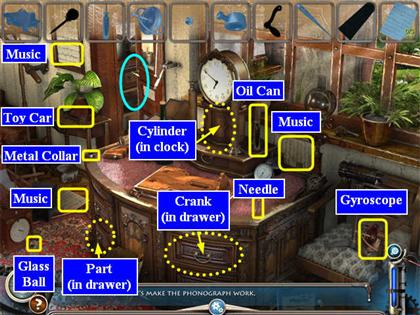
- This location has two zoom areas: by the stairs on the left, and then inside the cupboard.
- Once you have collected all the items you can in the main scene, click on the Stairs to open the zoom scene.
- Collect the additional items here.
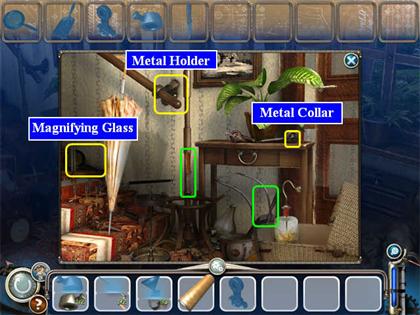
- Once you return to the main scene, click on the Cupboard and collect more items there.
- The FUNNEL is inside the drawer on the right.
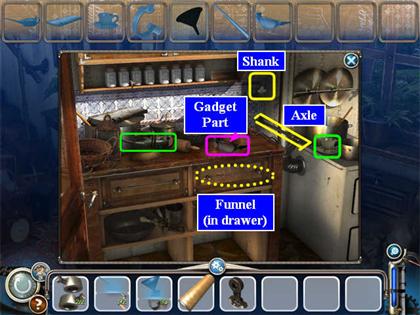
- Once you’ve collected everything in this scene, the zoom scene will close automatically.
- Now it’s time to put the Inventory Items into the main scene.
- Whenever you are going to put an item back into the scene, look for the place where the cursor turns into gears.
- Put the HOLDER on the left side of the wooden piece in the center of the scene.
- Put the AXLE in the HOLDER.
- Put the CYLINDER on the AXLE.
- Put the "REPRODUCING PART" (the part with the Funnel) near the Cylinder.
- Put the SCREWS on the left side of the Holder.
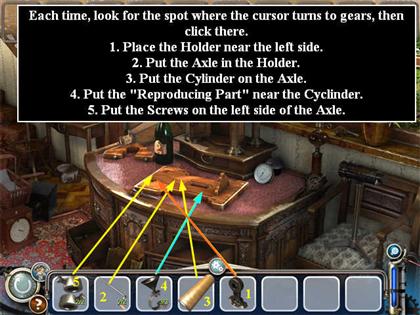
- You have succeeded in fixing the mechanism, but a time ripple has brought some "improper" items to the location. You have to collect them.
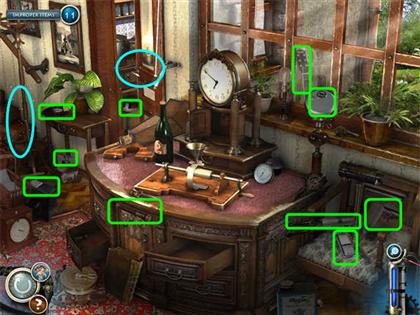
- Once you have collected all of these, click on the Steps to open the zoom scene.
- Collect more items here.
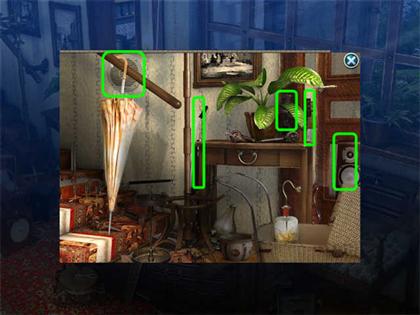
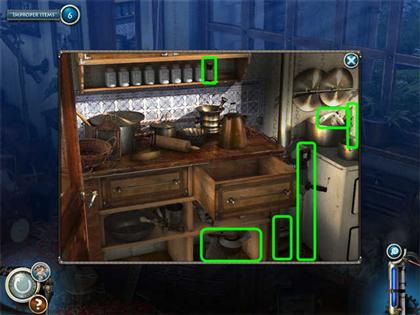
- Now click on the Cupboard to open the zoom scene.
- Collect the rest of the improper items here.
Chapter 4: the Combustion Engine
- Collect the items on the Find List. Most of these will be parts of Inventory Items.
- Click on the Lever on the left wall and the window will open, revealing more items on the windowsill.
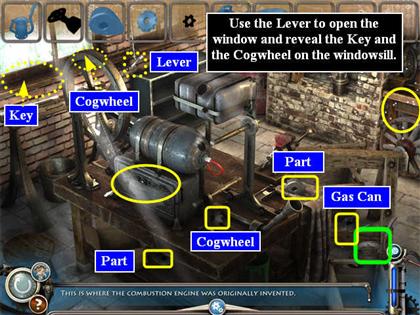
- This location has two zoom areas: the Gear Box on the front of the machine and the Workbench in the back on the right.
- Once you have collected all the items you can in the main scene, click on the Workbench to open the zoom scene.
- Collect the additional items here.
- You will need to open the drawer to collect some items.
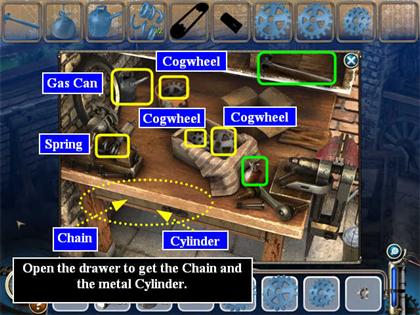
- Once you return to the main scene, click on the Gearbox.
- It’s locked! Use the KEY you collected from the windowsill in the main scene.
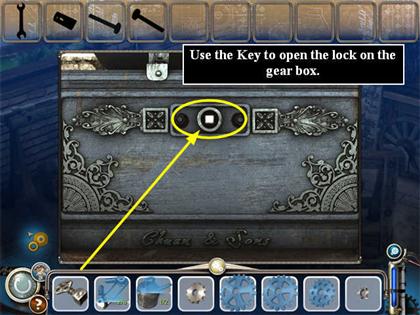
Gearbox Mini-game
- Note that you cannot complete this game until you’ve collected all the items from the workbench as well as the main scene.
- Place the Cogwheels going right to left.
- Each Cogwheel will only go in one place.
- You can only place a Cogwheel when it will fit into the chain from the right, so you may have to wait until you’ve put some others in first.
- The positions are shown in the screenshot.
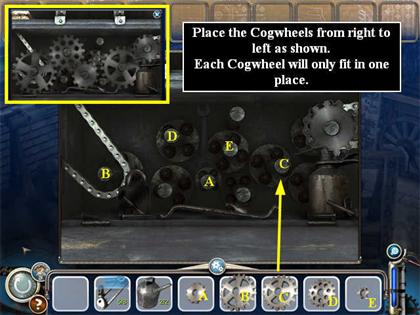
- Now collect the items on the Find List at the top of the screen.
- Several items look like the VALVES, but the two that you need are leaning at an angle.
- The Wrench is on the back wall behind the gears.
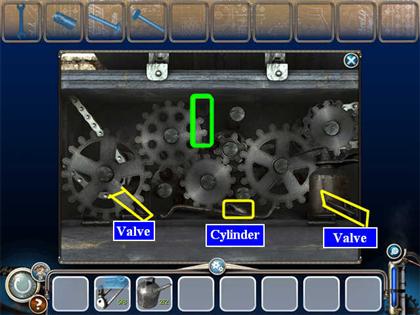
- Once you’ve collected everything in this scene, the zoom scene will close automatically.
- Now it’s time to put the Inventory Items into the main scene.
- Whenever you are going to put an item back into the scene, look for the place where the cursor turns into gears.
- Put the VALVES on the right side of the engine.
- Put the GAS in the fuel tank.
- You have succeeded in fixing the mechanism, but a time ripple has brought some "improper" items to the location. You have to collect them.
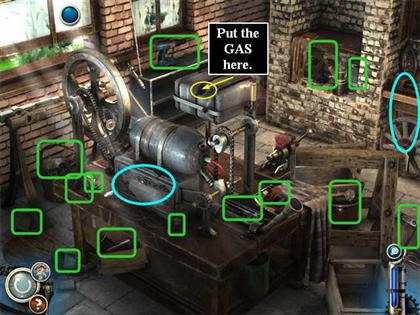
- Once you have collected all of these, click on the workbench in the back right to open the zoom scene.
- Collect more items here.
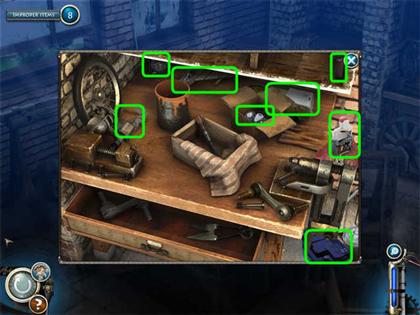
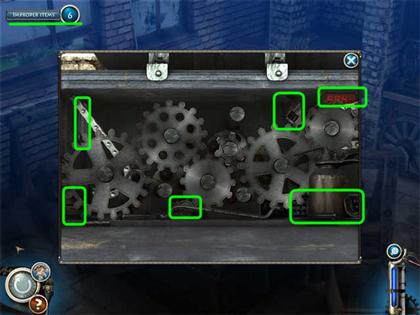
- Now click on the gear box to open the zoom scene.
- Collect the rest of the improper items here.
Chapter 5: the Electric Light bulb
- Collect the items on the Find List. Most of these will be parts of Inventory Items.
- You will have to close the Tool Inventory at the bottom of the screen (click on the tiny gear icon in the center of it) in order to collect the ring from the top of the bucket at the bottom of the screen.
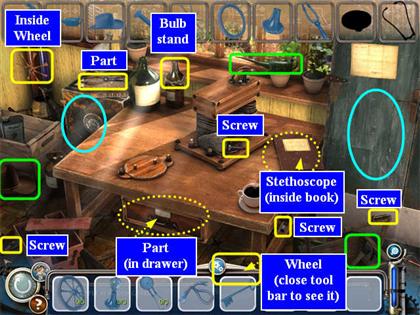
- This location has two zoom areas: the Safe on the left of the table and the Cupboard on the right.
- Once you have collected all the items you can in the main scene, click on the Safe to open the zoom scene.
- It’s locked! Use the Listening Device you built with the stethoscope by placing it in the upper right of the safe.
Listening Device Mini-game
- There are 3 dials on the safe that move independently. You have to set each of the three to the correct number.
- Begin by clicking on any of the three dials. Watch the Listening Device. When the needle jumps into the red, stop—that’s the correct number for that dial.
- Repeat for the other two dials.
- When all three dials are set correctly, click the handle to open the safe.
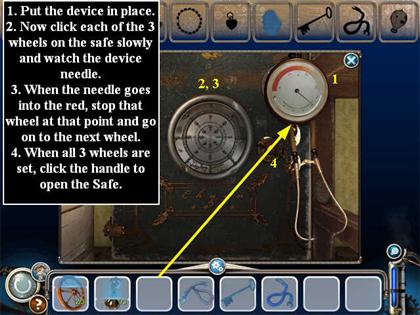
- Now collect the items on the Find List at the top of the screen.
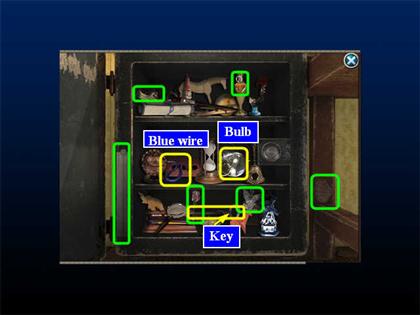
- Once you’ve collected everything in this scene, the zoom scene will close automatically.
- You can use the Key you found in the Safe to open the Cupboard on the right side of the table.
- Click on the Cupboard to zoom in.
- Take the Key from the Tool Inventory and click it on the Cupboard to open it.
- Now collect the items on the Find List at the top of the screen.
- Once you’ve collected everything in this scene, the zoom scene will close automatically.
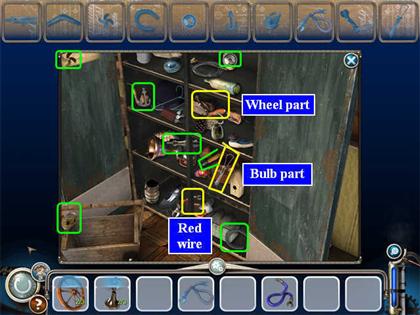
- Now it’s time to put the Inventory Items into the main scene.
- Whenever you are going to put an item back into the scene, look for the place where the cursor turns into gears.
- Put the WHEEL on the Dynamo.
- Put the BULB on the wooden board.
- Use the RED WIRE and the BLUE WIRE to connect the BULB to the Dynamo.
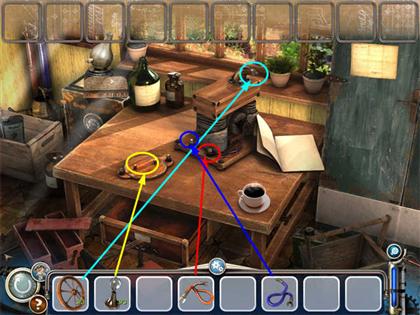
- You have succeeded in fixing the mechanism, but a time ripple has brought some "improper" items to the location. You have to collect them.
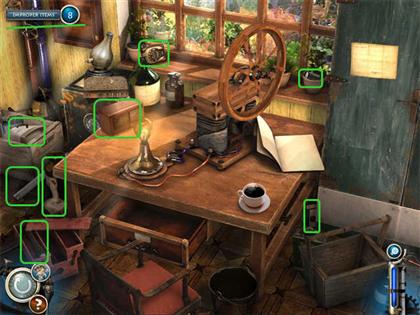
- Once you have collected all of these, click on the Safe on the left to open the zoom scene.
- Collect more items here.
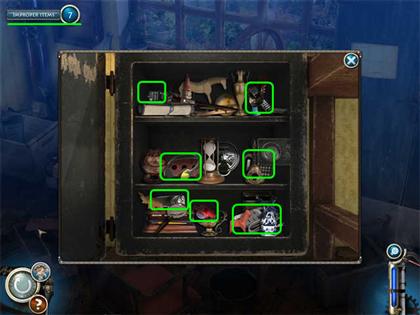
- Now click on the Cupboard to open the zoom scene.
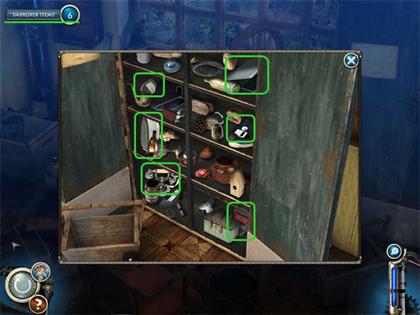
- Collect the rest of the improper items here.
Chapter 6: the Telegraph
- Collect the items on the Find List. Most of these will be parts of Inventory Items.
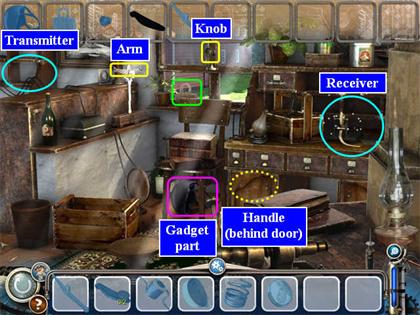
- This location has two zoom areas: the Transmitter on the left shelf and the Receiver on the right.
- You have to repair both the Transmitter and the Receiver, then test your repairs by sending a message from the Transmitter to the Receiver.
- Once you have collected all the items you can in the main scene, click on the Transmitter to open the zoom scene.
- Collect the additional items here.
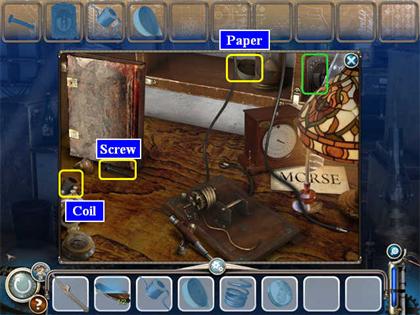
- This is all you can here for now. You will come back later. Close the zoom scene.
- Now you have to go fix the Receiver.
- Once you return to the main scene, click on the Receiver.
- Click on the two cables to connect them.
- Now collect the items on the Find List at the top of the screen.
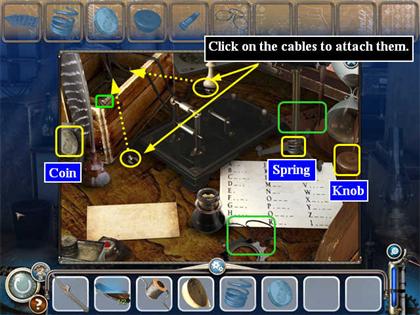
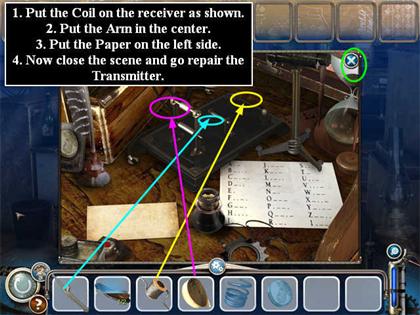
- Put the COIL on the Receiver.
- Put the ARM in the center.
- Put the PAPER on the left side.
- Once you’ve done everything in this scene, you’re ready to go back to the Transmitter and send a test message.
- Click on the Transmitter to zoom in.
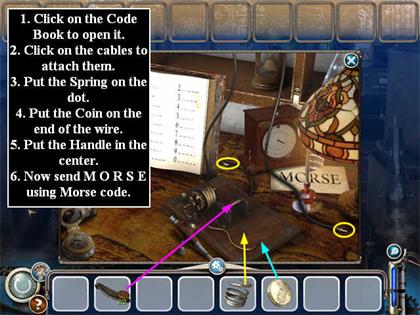
- Click on the two cable ends to connect the cables.
- Click on the Code Book to open it.
- Place the SPRING on the spot.
- Place the COIN at the end of the cable as shown. You can’t do this until you’ve put the SPRING on.
- Place the HANDLE in the center. You can’t do this until the SPRING and the COIN are in place.
Transmitter Mini-game
- You must click the HANDLE to send the message M O R S E.
- Read each letter in the code book.
- Hold the HANDLE down for two seconds for a dash, and just a quick click for a dot.
- When you do the transmission correctly the zoom scene will close automatically so you can go back to the Receiver and check the message.
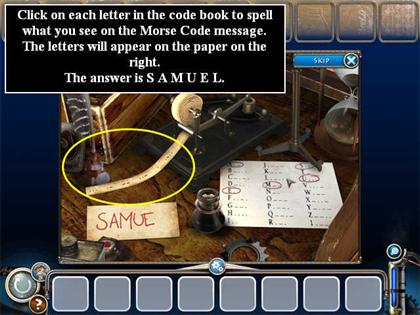
- You have received a message. Now you have to see if it was sent correctly. You need to click the letters in the Code Book that match the Morse code on the PAPER TAPE.
- The message is S A M U E L.
- You have succeeded in fixing the mechanism, but a time ripple has brought some "improper" items to the location. You have to collect them.
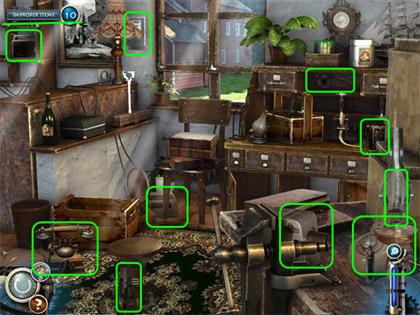
- Once you have collected all of these, click on the Transmitter on the left to open the zoom scene.
- Collect more items here.
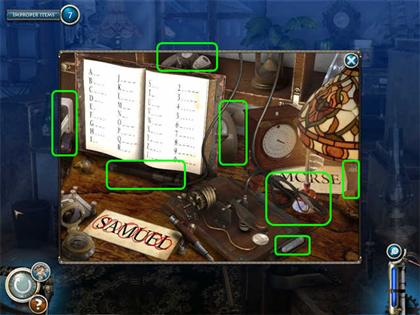
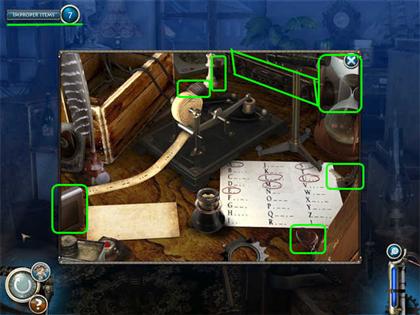
- Now click on the Receiver to open the zoom scene.
- Collect the rest of the improper items here.
Chapter 7: the Piano Forte
- Collect the items on the Find List. Most of these will be parts of Inventory Items.
- Note that the KEYS are much larger than the keys on a modern piano, they will just look like a large piece of wood.
- Also the BLACK KEYS have not yet been painted, so both the black keys and the white keys just look like plain board.
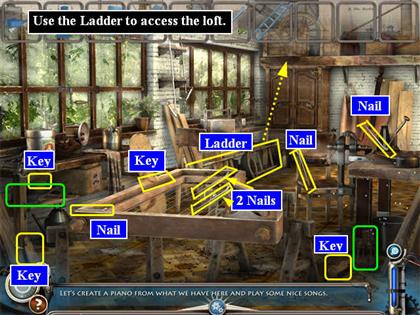
- This location has two zoom areas: the Loft on the upper left of the table and under the table on the lower right.
- Once you have collected all the items you can in the main scene, click under the table to open the zoom scene.
- Collect the additional items here.
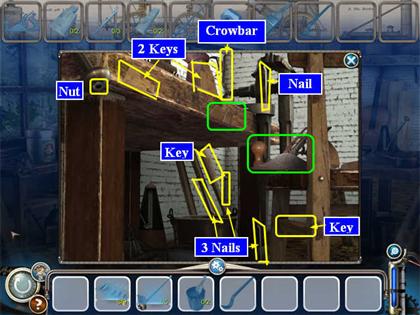
- Once you return to the main scene, take the LADDER from the Tools Inventory and use it to access the loft.
- Once you have the zoom scene for the Loft, collect the items from the Find List.
- Now use the CROWBAR to open the crate on the left and collect the last two items.
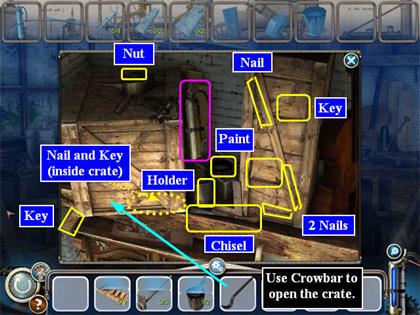
- Once you’ve collected everything in this scene, the zoom scene will close automatically.
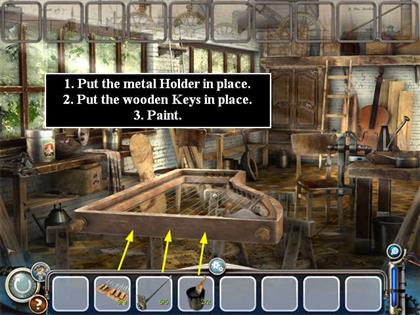
- Now it’s time to put the Inventory Items into the main scene.
- Whenever you are going to put an item back into the scene, look for the place where the cursor turns into gears.
- Put the METAL HOLDER, then the piano KEYS, then the PAINT on the front of the piano.
- You have succeeded in fixing the mechanism, but a time ripple has brought some "improper" items to the location. You have to collect them.
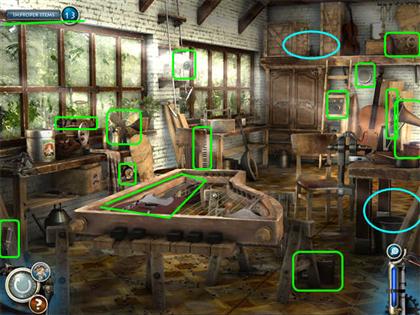
- Once you have collected all of these, click on the Loft to open the zoom scene.
- Collect more items here.
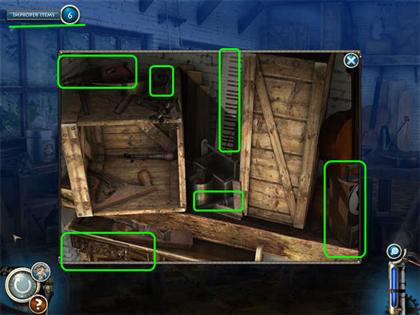
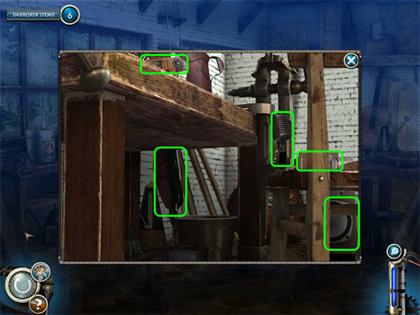
- Now click under the Table on the right to open the zoom scene.
- Collect the rest of the improper items here.
Chapter 8: Electrical Conductivity
- Collect the items on the Find List. Most of these will be parts of Inventory Items.
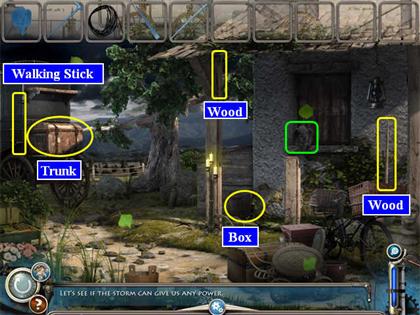
- This location has two zoom areas: the Trunk on the back of the carriage on the left and the large gray Box next to the house on the right.
- Once you have collected all the items you can in the main scene, click on the Trunk to open the zoom scene.
- Click once more on the Trunk to open the buckles.
- Collect the additional items here.
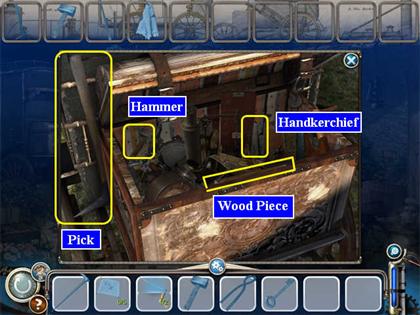
- Once you return to the main scene, click near the pail to get the zoom scene for the Box.
- Collect the items on the Find List at the top of the screen.
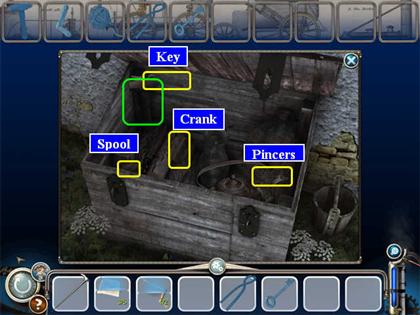
- Once you’ve collected everything in this scene, the zoom scene will close automatically.
- Now it’s time to put the Inventory Items into the main scene.
- Whenever you are going to put an item back into the scene, look for the place where the cursor turns into gears.
- Use the PINCERS from the Tool Inventory to cut the WIRE to the right of the carriage.
- The WIRE will fall down in front of the tree. Collect it.
- Put the wooden WINCH on the post in front of the house.
- Tie the KITE to the WINCH crossbar.
- Put the metal WALKING STICK in the ground to the left of the WINCH.
- Put the KEY on the wire just above the WALKING STICK.
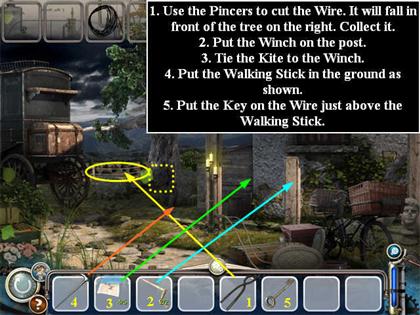
- You have succeeded in fixing the mechanism, but a time ripple has brought some "improper" items to the location. You have to collect them.
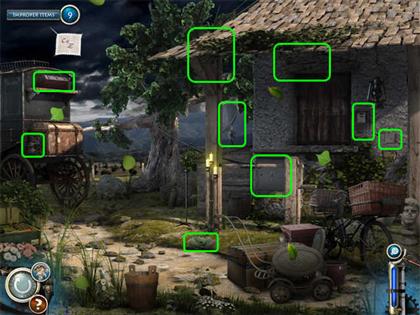
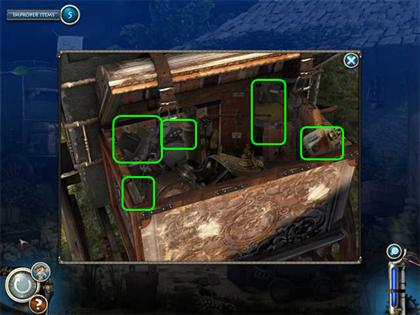
- Once you have collected all of these, click on the Trunk to open the zoom scene.
- Collect more items here.
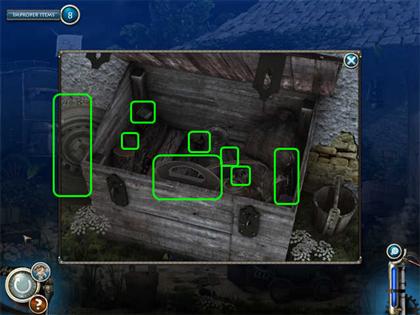
- Now click on the Box to open the zoom scene.
- Collect the rest of the improper items here.
Chapter 9: the Submarine
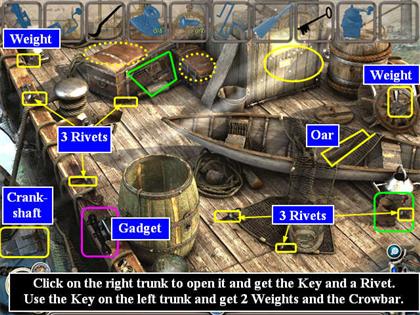
- Collect the items on the Find List. Most of these will be parts of Inventory Items.
- Click on the right trunk to open it and collect the KEY and a RIVET.
- Use the KEY to open the left Trunk and collect more items.
- This location has one zoom area: the Crate at the back right of the scene.
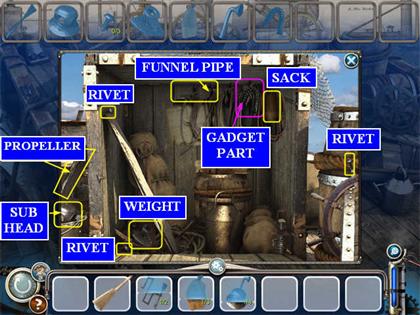
- Once you have collected all the items you can in the main scene, click on the Crate to open the zoom scene.
- Use the HAMMER to open the Crate.
- Collect the additional items here.
- Once you’ve collected everything in this scene, the zoom scene will close automatically.
- Now it’s time to put the Inventory Items into the main scene.
- Whenever you are going to put an item back into the scene, look for the place where the cursor turns into gears.
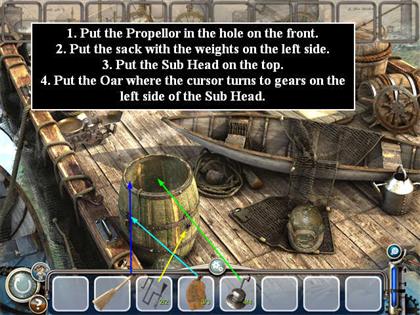
- Put the PROPELLER in the small hole on the front of the Barrel.
- Put the WEIGHTS on the left side of the Barrel.
- Put the SUB HEAD on top of the Barrel.
- The OAR is going to go on the back of the Barrel, but the place where you click is on the left side of the SUB HEAD where the cursor turns into gears.
- This will trigger a mini-game.
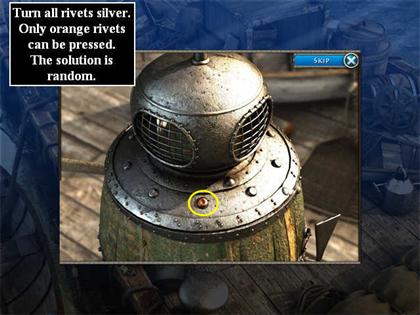
Submarine Rivet Mini-game
- You must press the rivets so that all of them turn from orange to silver.
- You can only press an orange rivet. Pressing it once it is silver will not change anything.
- The pattern is random.
- Should you prefer, you can use the SKIP button.
- You have succeeded in fixing the mechanism, but a time ripple has brought some "improper" items to the location. You have to collect them.
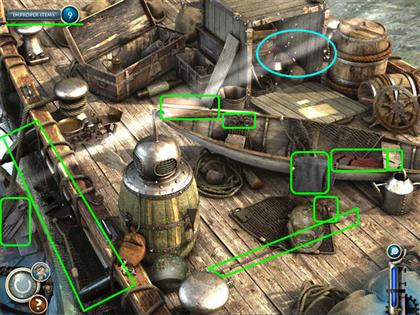
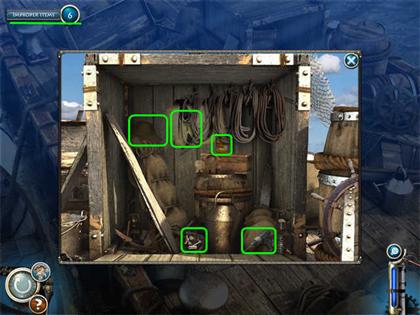
- Once you have collected all of these, click on the Crate to open the zoom scene.
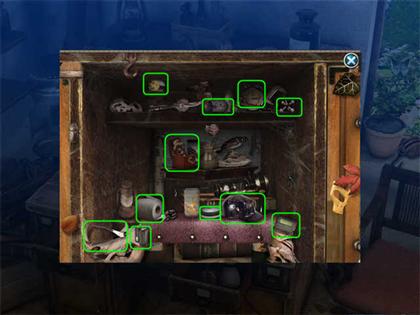
- Collect more items here.
Chapter 10: the Steam Engine
- Collect the items on the Find List. Most of these will be parts of Inventory Items.
- Open the stove to get the HOT COAL.
- Open the drawer to find more items.
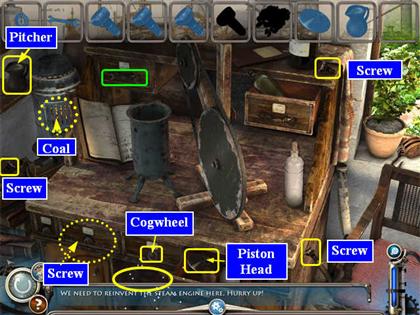
- This location has one zoom area: under the Desk.
- Once you have collected all the items you can in the main scene, open the zoom scene.
- Collect the additional items here.
- The Padlock is behind the SHOVEL.
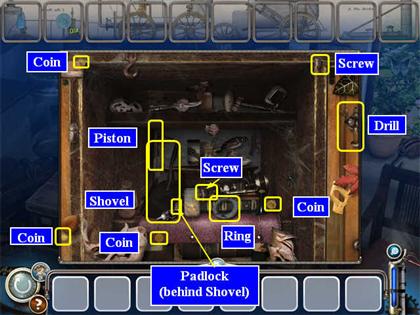
- Once you’ve collected everything in this scene, the zoom scene will close automatically.
- Now it’s time to put the Inventory Items into the main scene.
- Whenever you are going to put an item back into the scene, look for the place where the cursor turns into gears.
- Put the SHOVEL under the cylinder.
- Put the WATER in the top of the cylinder. You have to move the cursor slightly to the right to get the gears.
- Put the PISTON in the cylinder.
- Put the LID (which looks like a ring) on top of the Cylinder.
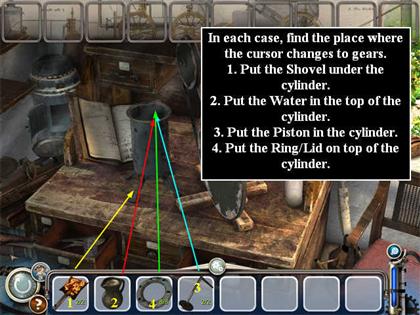
- You have succeeded in fixing the mechanism, but a time ripple has brought some "improper" items to the location. You have to collect them.
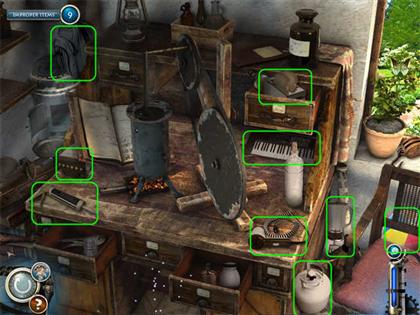
- Once you have collected all of these, click to open the zoom scene.
- Collect more items here.
Chapter 11: the Bicycle
- Collect the items on the Find List. Most of these will be parts of Inventory Items.
- Click on the cabinet doors on the right to open them and find two more items.
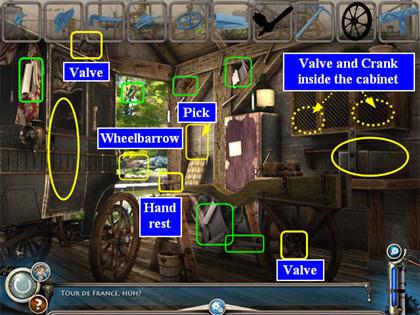
- This location has two zoom areas: the Carriage on the left and the Tool Box on the table on the right.
- Once you have collected all the items you can in the main scene, click on the Carriage to open the zoom scene.
- Initially you just get a change in perspective, you haven’t opened the Carriage door yet.
- Collect the BRICK here.
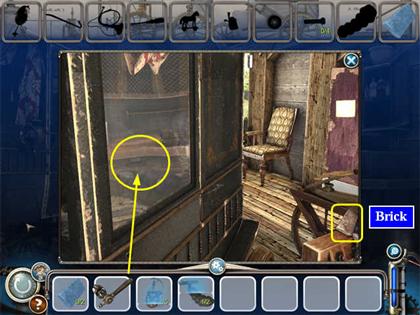
- Now use the DOOR HANDLE you got from the cabinets to open the Carriage door and collect the items from the Find List.
- Note that the Toy Horse is at the top right of the scene you see through the open carriage door. It’s behind a screen. You will only be able to collect it if you click on the part above the screen.
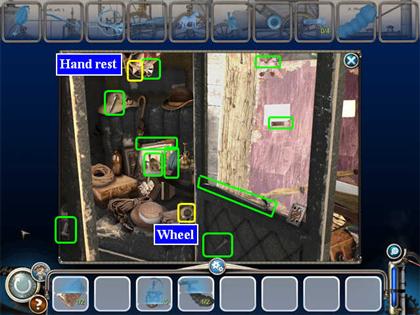
- Once you return to the main scene, click on the Tool Box on the right.
- Once you have the zoom scene for the Tool Box, collect the items from the Find List.
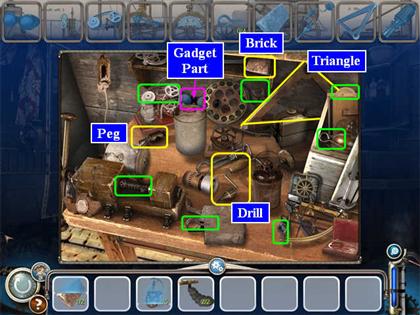
- Once you’ve collected everything in this scene, the zoom scene will close automatically.
- Now it’s time to put the Inventory Items into the main scene.
- Whenever you are going to put an item back into the scene, look for the place where the cursor turns into gears.
- Start by putting the BRICKS from the Tool Inventory under the Carriage. Then you can collect the WHEEL.
- Put the WHEEL ASSEMBLY at the front of the bicycle.
- Put the SADDLE ASSEMBLY in the middle.
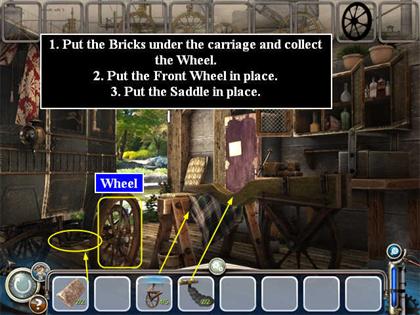
- You have succeeded in fixing the mechanism, but a time ripple has brought some "improper" items to the location. You have to collect them.
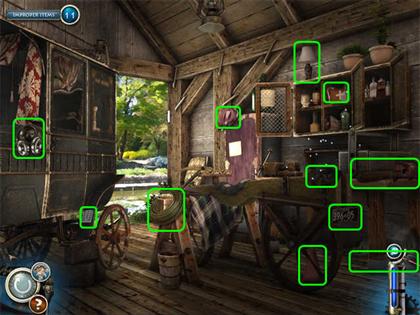
- Once you have collected all of these, click on the Carriage on the left to open the zoom scene.
- Collect more items here.
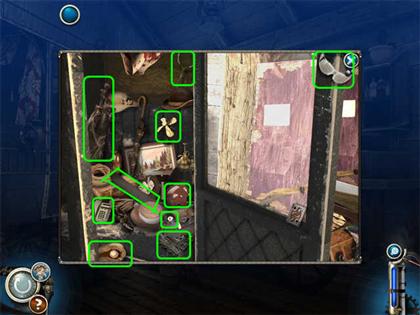
- Now click on the Tool Box to open the zoom scene.
- Collect the rest of the improper items here.
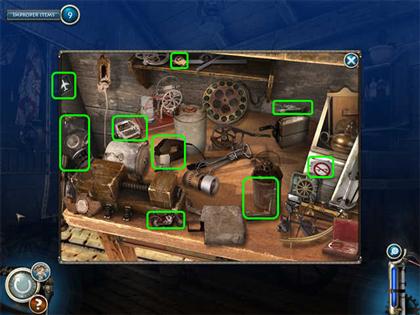
Chapter 12: the Telescope
- Collect the items on the Find List. Some of these will be parts of Inventory Items.
- Any cluster of Stars will count as one Star for the Find List. For example, the bottle with three Stars on it will only count as one.
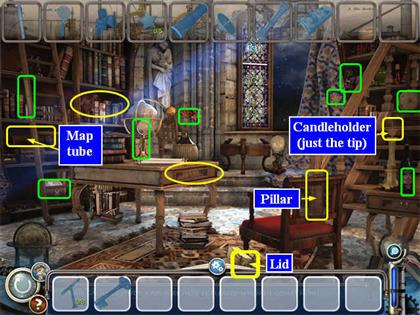
- This location has two zoom areas: the Bookshelf on the left and the Drawer in the center table.
- Once you have collected all the items you can in the main scene, click on the Bookshelf to open the zoom scene.
- Collect the first items here.
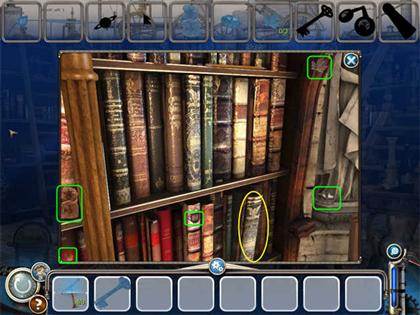
- Now click on the book that is leaning forward to open the secret panel and collect the items from the Find List.
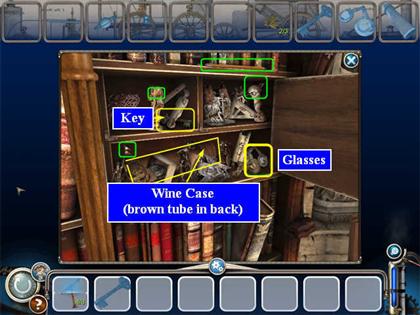
- Once you return to the main scene, click on the Drawer in the center table.
- Once you have the zoom scene use the KEY to unlock the Drawer, then collect the items from the Find List.
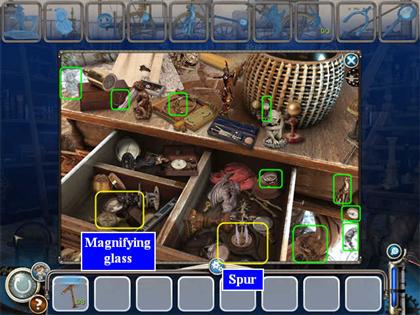
- Once you’ve collected everything in this scene, the zoom scene will close automatically.
- Now it’s time to put the Inventory Items into the main scene.
- Whenever you are going to put an item back into the scene, look for the place where the cursor turns into gears.
- Put the TELESCOPE onto the stand at the back.
- Click on it one more time to trigger the mini-game.
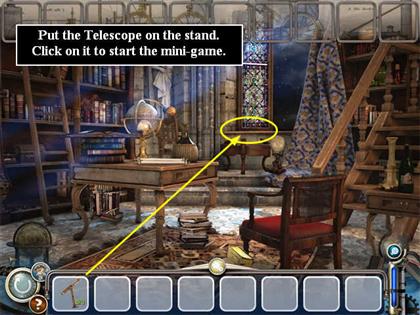
The Telescope Mini-Game
- You must adjust the lenses until you can see Mars.
- You can rotate the left and right lenses by clicking on the "I" or the "0" on the left and right sides.
- You can zoom in by clicking on the + or – in the center.
- Here is one solution so you can see the end result you’re trying for.
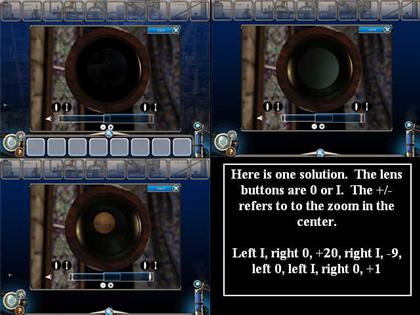
- You have succeeded in fixing the mechanism, but a time ripple has brought some "improper" items to the location. You have to collect them.
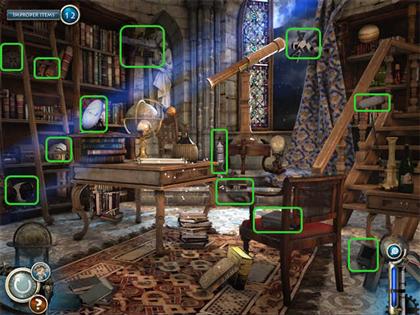
- Once you have collected all of these, click on the Bookshelf on the left to open the zoom scene.
- Collect more items here.
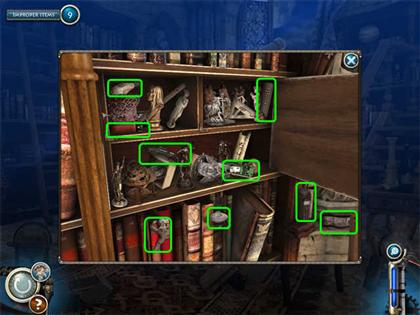
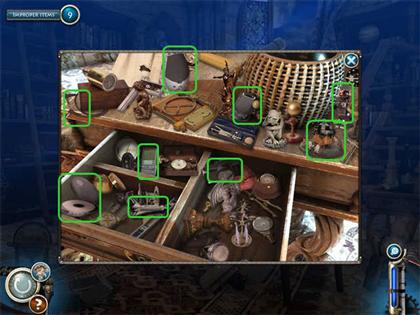
- Now click on the Drawer in the center table to open the zoom scene.
- Collect the rest of the improper items here.
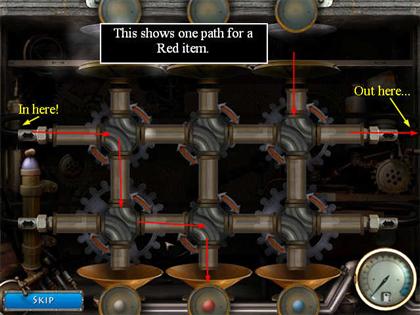
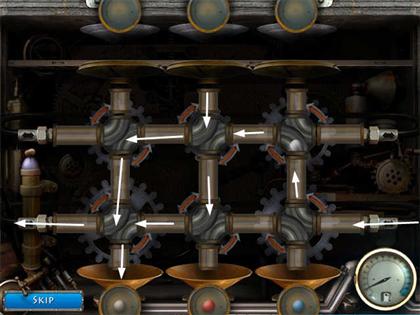
Refueling Mini-game
- Objects will fall into one of the chutes and turn into a marble that is either red, white, or blue.
- You must guide the marble to the bottom funnel that matches its color.
- Tubes can only be rotated half way.
- When the marble goes out the right or left side, it will return from the other side of the screen.
- When the marble goes out the top, it evaporates and you can’t use it.
- When the marble goes into the wrong color funnel at the bottom, it evaporates and you can’t use it.
- There is no penalty for not guiding a marble all the way through except that you can’t use it.
- Once you have guided enough marbles to fill the meter on the lower right, the machine is refueled.
- Should you prefer, you can skip the game by using the SKIP button.
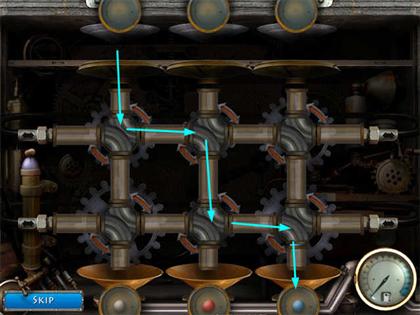
- Here is an example of one path to guide a red marble from the rightmost funnel.
Chapter 13: Camera Obscura
- Collect the items on the Find List. Some of these will be parts of Inventory Items.
- Click the right window to close the shutters there.
- This location has many items that look similar, but vary slightly. For example, there are several oil lamps, but the one that you need is behind the Tool Inventory. Click on the tiny gears icon to close the Tool Inventory so you can collect the LAMP.
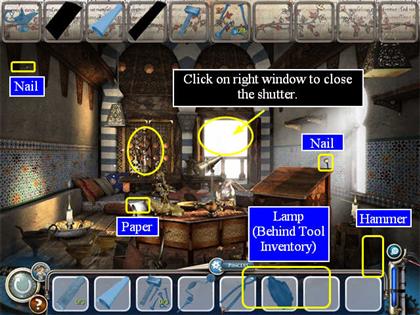
- This location has one zoom area: the Table on the back left, although you may need to click on the left shutter to open the zoom scene.
- Once you have collected all the items you can in the main scene, click on the Table to open the zoom scene.
- Now collect the items from the Find List.
- There are two Pincers in the scene. The one you need is standing against the back shutter.
- The DRILL is on the back shutter.
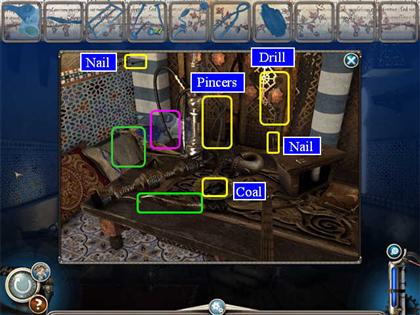
- Once you’ve collected everything in this scene, the zoom scene will close automatically.
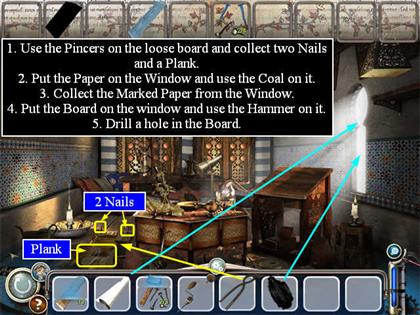
- Now that you have the PINCERS, you can collect the last items in the main scene. Use the PINCERS on the loose board on the left.
- Collect the last two NAILS and the PLANK.
- Now it’s time to put the Inventory Items into the main scene.
- Whenever you are going to put an item back into the scene, look for the place where the cursor turns into gears.
- Begin by putting the PAPER on the window on the right wall.
- Use the COAL to trace an outline of the window on the paper.
- Collect the PAPER again, and it will combine with the WOOD on the left of the Tool Inventory to make the CARVED BOARD.
- Put the CARVED BOARD back on the window.
- Use the HAMMER AND NAILS to attach it.
- Now use the DRILL to make a hole in the CARVED BOARD.
- You have succeeded in fixing the mechanism, but a time ripple has brought some "improper" items to the location. You have to collect them.
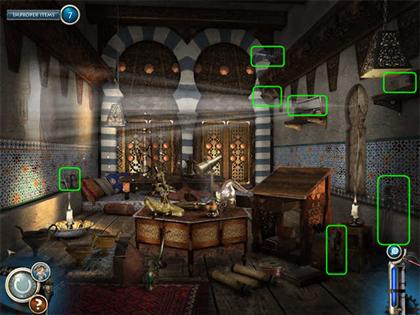
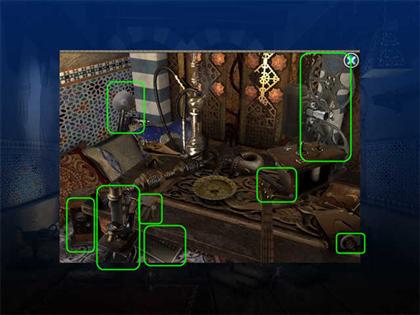
- Once you have collected all of these, click on the Table on the back left to open the zoom scene.
- Collect more items here.
Chapter 14: the Printing Press
- Collect the items on the Find List. Some of these will be parts of Inventory Items.
- Try the drawers. Some will open to reveal items, and one drawer front will be collectible.
- The Bottles look just like a wrinkle in the cloth on the table on the right.
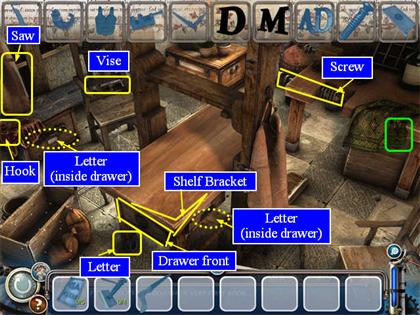
- This location has two zoom areas: A Box on the floor on the left, and a Crate under the table on the right.
- Once you have collected all the items you can in the main scene, click on the Box to open the zoom scene.
- Now collect the items from the Find List.
- The "L" is behind the Gavel on the right.
- The Clamp and the SAW are both in the back left corner of the Box.
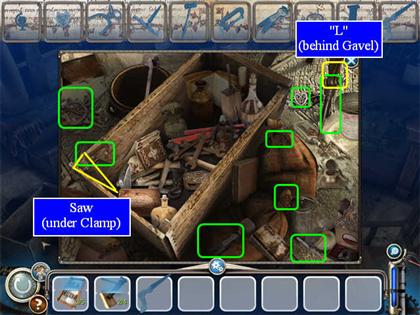
- Once you’ve collected everything in this scene, the zoom scene will close automatically.
- Now click on click on the Crate under the table on the right to open the zoom scene.
- Collect the items on the Find List.
- The area inside the Crate is quite dark, so you may just have to try clicking in a few places to find items.
- The PAPER is stuck below the front of the Crate.
- One of the Wrenches is tiny, and is placed horizontally inside the Crate to the right of the Lever. This one can be hard to find even with a hint.
- Once you have collected all of the items on the Find List, the zoom scene will close automatically.
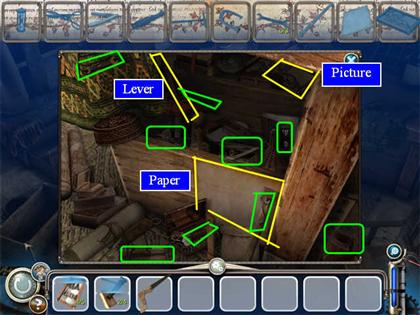
- Now it’s time to put the Inventory Items into the main scene.
- Whenever you are going to put an item back into the scene, look for the place where the cursor turns into gears.
- Begin by putting the PICTURE on the table
- Use the SAW to cut a hole in the shelf above the table.
- Put the PRESS ASSEMBLY into the hole.
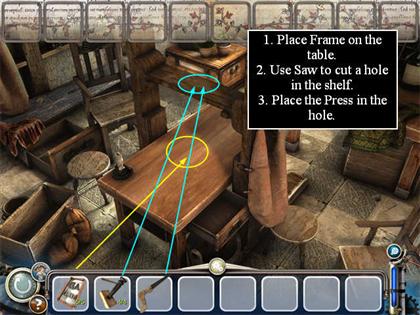
- You have succeeded in fixing the mechanism, but a time ripple has brought some modem items into the past. You have to collect them.
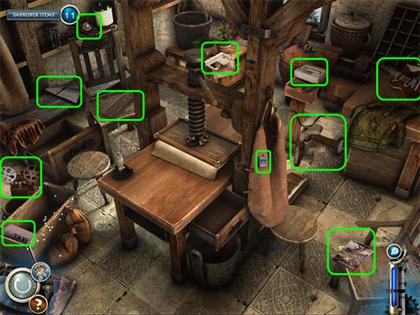
- Once you have collected all of these, click on the Box on the floor on the left to open the zoom scene.
- Collect more items here.
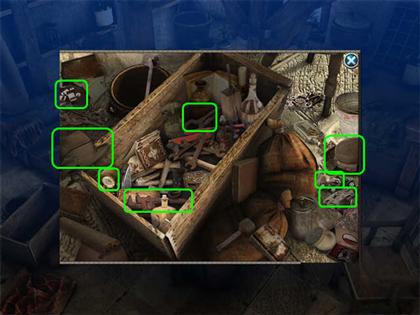
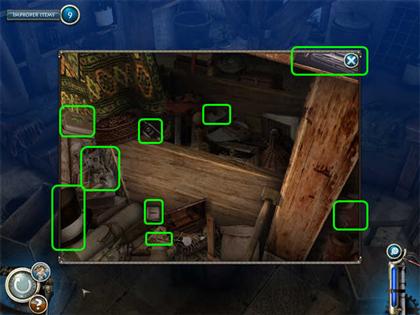
- Once you have collected all the items, the zoom scene will close automatically. Now click on the Crate below the table on the right to open the zoom scene.
- Collect more items here.
Chapter 15: the Spinning Wheel
- Collect the items on the Find List. Some of these will be parts of Inventory Items.
- Click on the table and it will flip over.
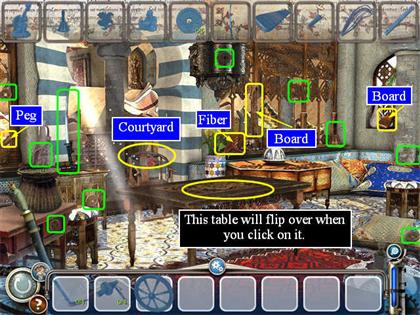
- This location has one zoom area: the Courtyard.
- Once you have collected all the items you can in the main scene, click on the Courtyard to open the zoom scene.
- Now collect the items from the Find List.
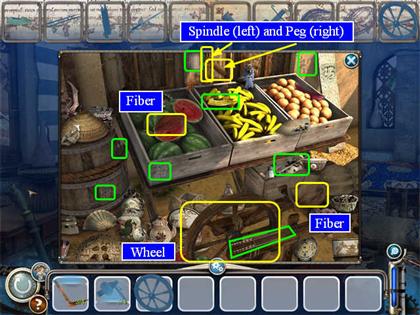
- Once you’ve collected everything in this scene, the zoom scene will close automatically.
- Now it’s time to put the Inventory Items into the main scene.
- Whenever you are going to put an item back into the scene, look for the place where the cursor turns into gears.
- Begin by putting the WHEEL on the right end of the table
- Put the PEDAL ASSEMBLY on the right side of the Wheel.
- Put the SPINDLE in the center of the table as shown.
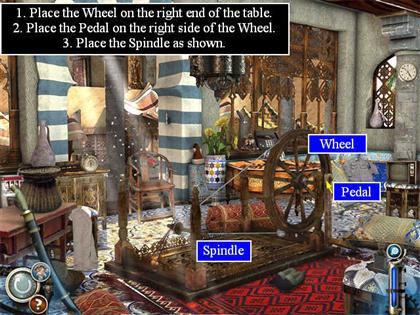
- You have succeeded in fixing the mechanism, but a time ripple has brought some "improper" items to the location. You have to collect them.
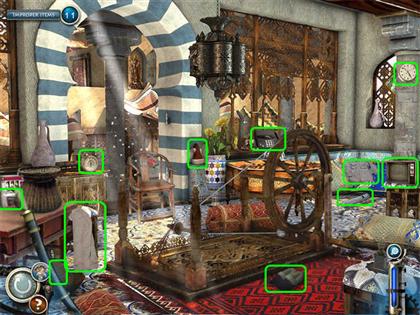
- Once you have collected all of these, click on the Courtyard to open the zoom scene.
- Collect more items here.
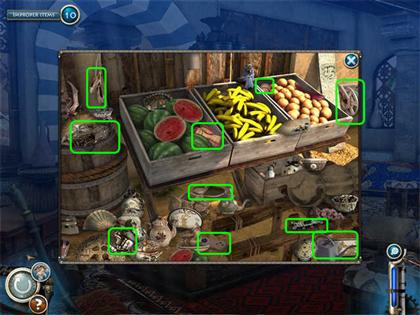
Chapter 16: Gunpowder
- Collect the items on the Find List. Some of these will be parts of Inventory Items.
- Open the grate and collect the ASH.
- Use the ASH on the Mulch on the right, then collect the SALTPETRE that will form there.
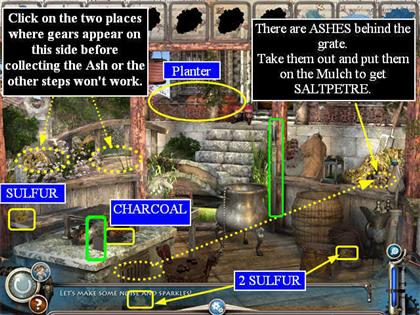
- This location has one zoom area: a Planter on the back left.
- Once you have collected all the items you can in the main scene, click on the Planter to open the zoom scene.
- This will trigger a mini-game.
Sun and Moon Mini-game
- You must click the tiles so that the middle row is all Suns and all the other tiles are Moons.
- The solution is random.
- When the solution is complete (or you skip the mini-game), the lock will open.
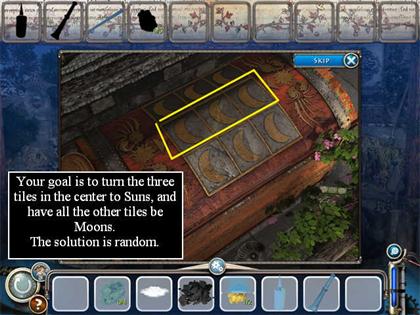
- Now collect the items from the Find List.
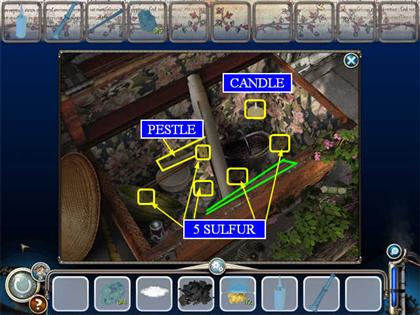
- Once you’ve collected everything in this scene, the zoom scene will close automatically.
- Now you must test the SULFURLIKE CRYSTALS to find out which ones are really sulfur. Place them in the fire.
- The true SULFUR will burn with a purple flame. The crystal on the top right has two purple flames, but it only counts as one crystal. Collect the four SULFUR.
- Put the SULFUR, the SALTPETRE, and the CHARCOAL into the Pot in the center.
- Use the PESTLE to mix the ingredients.
- Put the CANDLE underneath the Pot. The gunpowder will explode.
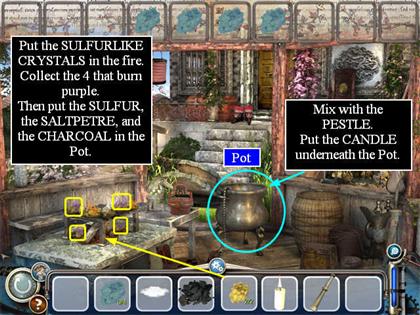
- You have succeeded in fixing the mechanism, but a time ripple has brought some "improper" items to the location. You have to collect them.
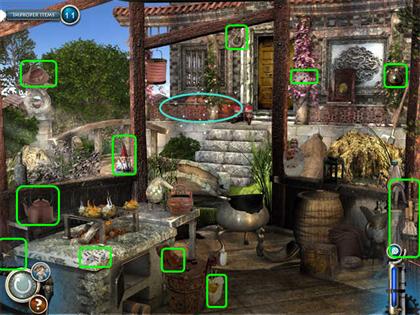
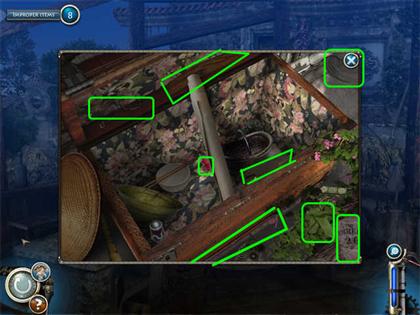
- Once you have collected all of these, click on the Planter in the back left to open the zoom scene.
- Collect the rest of the improper items here.
Chapter 17: Magnetic Compass
- Collect the items on the Find List. Some of these will be parts of Inventory Items.
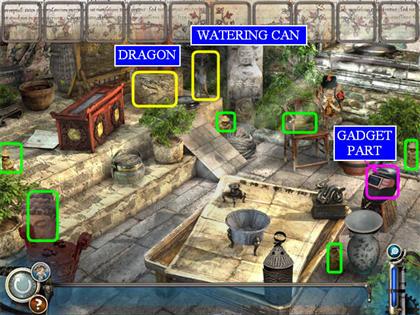
- This location has two zoom areas: the red Chest on the left and the Window on the back right. In this location you will need to go back and forth between them several times.
- Once you have collected all the items you can in the main scene, click on the Window to open the zoom scene.
- Now collect the items from the Find List.
- You will need to come back here later.
- Once you’ve collected everything in this scene, close the zoom scene.
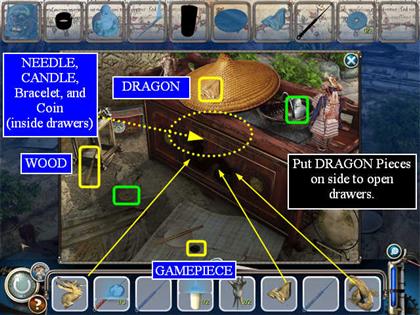
- Now click on the red Chest to open the zoom scene there.
- Collect the items from the Find List.
- Place the 3 parts of the DRAGON on the front of the chest. This will open it.
- Check the drawers and you will find more items.
- Once you have collected all the items on the Find List, the zoom scene will close automatically.
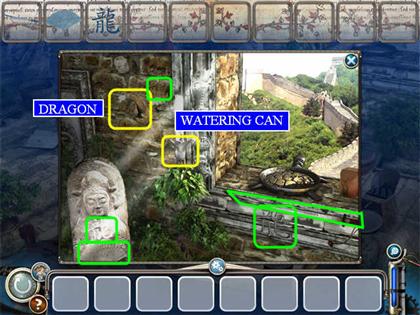
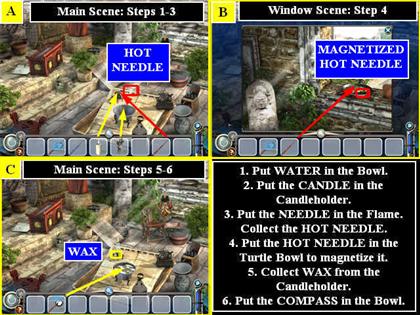
- Before we can complete the compass, you must heat and magnetize the NEEDLE.
- Put the WATER into the Bowl on the table.
- Put the CANDLE in the Candleholder on the table.
- Put the NEEDLE into the Candle Flame. It will turn red hot and drop to the table.
- Collect the RED HOT NEEDLE.
- Click on the Window to open the zoom scene.
- Put the RED HOT NEEDLE into the Turtle Bowl, then collect it again.
- The zoom scene will close automatically.
- There is one more thing to do to complete the compass.
- Collect a small bit of WAX from the front of the Candleholder.
- Now take the assembled COMPASS and put it in the Bowl of water.
- You have succeeded in fixing the mechanism, but a time ripple has brought some "improper" items to the location. You have to collect them.
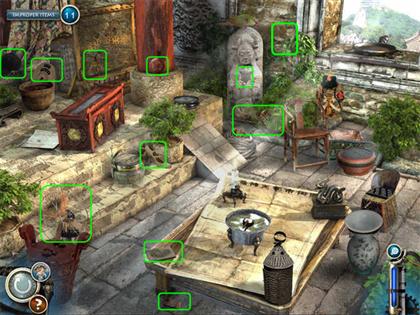
- Once you have collected all of these, click on the Chest on the left to open the zoom scene.
- Collect the rest of the improper items here.
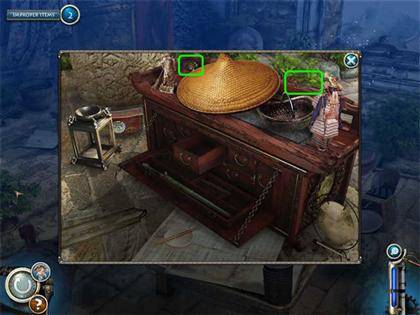
- After you return to the main scene, click on the Window on the back right to open its zoom scene.
- Collect the last of the improper items for this chapter.
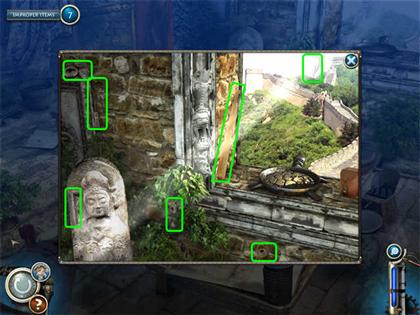
Chapter 18: Distillation
- Collect the items on the Find List. Some of these will be parts of Inventory Items.
- Open the Grate to collect the KEY.
- Open the Basket on the floor to collect some WOOD.
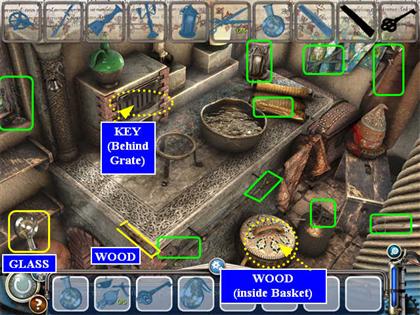
- This location has one zoom area: the small Chest on the floor on the right.
- Once you have collected all the items you can in the main scene, click on the Chest to open the zoom scene.
- Now collect the items from the Find List.
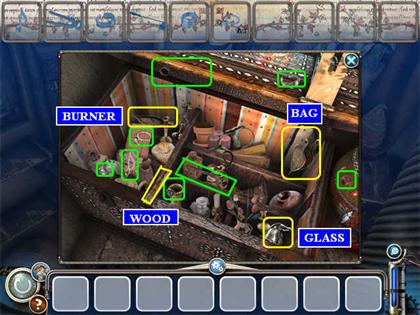
- Once you’ve collected everything in this scene, the zoom scene will close automatically.
- Now it’s time to put the Inventory Items into the main scene.
- Whenever you are going to put an item back into the scene, look for the place where the cursor turns into gears.
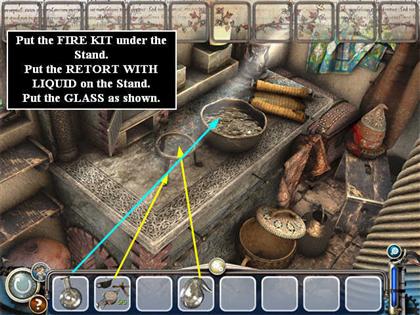
- Begin by putting the FIRE KIT underneath the Stand on the Table.
- Put the RETORT WITH LIQUID (the bottle with the long neck) on the Stand.
- Put the GLASS as shown.
- You have succeeded in fixing the mechanism, but a time ripple has brought some "improper" items to the location. You have to collect them.
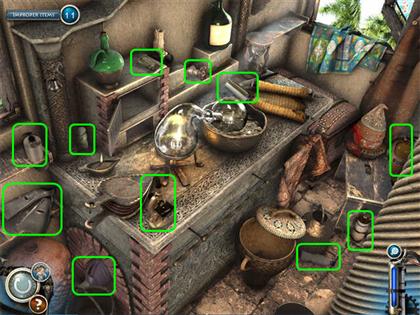
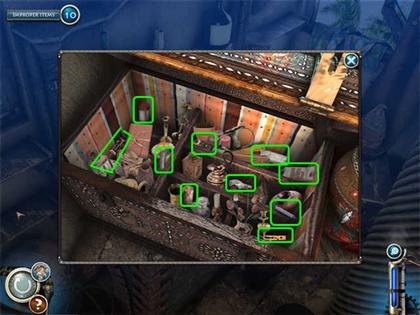
- Once you have collected all of these, click on the Chest to open the zoom scene.
- Collect the rest of the improper items here.
Refueling Mini-game
- This is the same as the last time. Objects will fall into one of the chutes and turn into a marble that is either red, white, or blue.
Chapter 19: Soap
- Collect the items on the Find List. Some of these will be parts of Inventory Items.
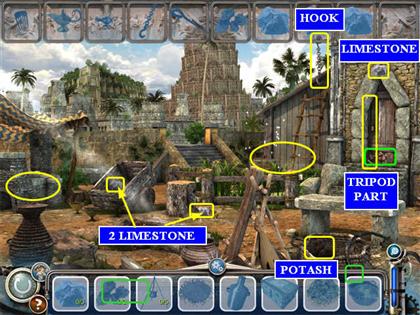
- This location has two zoom areas: the Kiln on the left and the garden. You will have to go back and forth between the locations to complete all the tasks.
- Once you have collected all the items you can in the main scene, click on the Kiln to open the zoom scene.
- Now collect the items from the Find List.
- The KETTLE is behind the post on the right—you can just barely see part of the handle.
- The ORNAMENTED BOX is on the ground to the right of the Kiln.
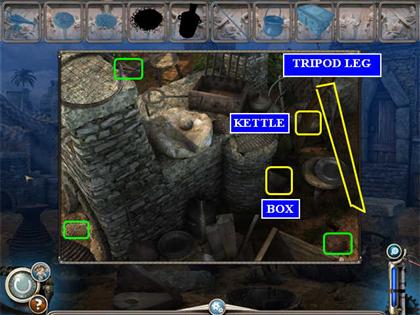
- Once you’ve collected everything you can for now in this scene, close the zoom scene.
- After you return to the main scene, click on the Garden to open that zoom scene.
- Collect the items from the Find List.
- Once you have collected all the items, the zoom scene will close automatically.
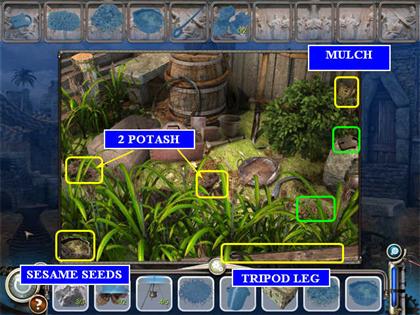
- Return to the Kiln.
- Put the POTASH in the Shredder Box and it will become SHREDDED POTASH. Collect it.
- Put the SESAME SEEDS on the flat white stone. The SESAME OIL will drip down and fill the Bottle. Collect the Bottle.
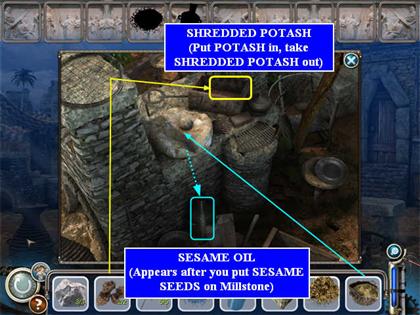
- The zoom scene will close automatically.
- Now it’s time to put the Inventory Items into the main scene.
- Whenever you are going to put an item back into the scene, look for the place where the cursor turns into gears.
- Begin by putting the TRIPOD AND KETTLE on the Fire.
- Put the SHREDDED POTASH, LIMESTONE, MULCH, and SESAME OIL in the KETTLE. It will begin to bubble over.
- Put the BOX on the flat stone to the right of the KETTLE. The Soap will flow into it.
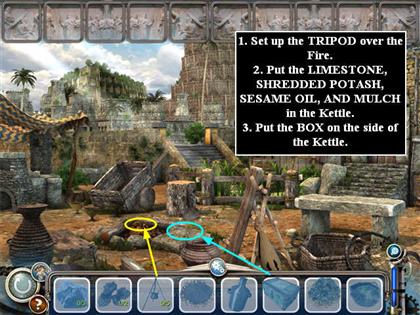
- You have succeeded in fixing the mechanism, but a time ripple has brought some "improper" items to the location. You have to collect them.
- The Airplane and the Hot Air Balloon will fly through the sky. Click on them to collect them.
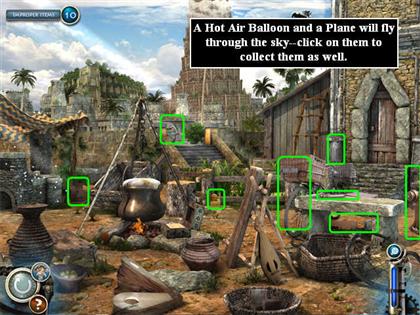
- Once you have collected all of these, click on the Kiln to open the zoom scene.
- Collect the rest of the improper items here.
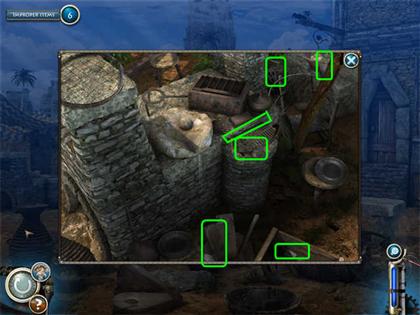
- Now click on the Garden to open the zoom scene there.
- Collect the last of the improper items for this chapter.
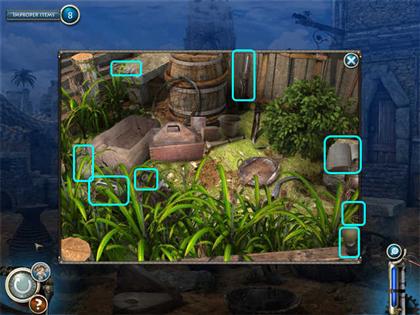
Chapter 20: Paper
- Collect the items on the Find List. Some of these will be parts of Inventory Items.
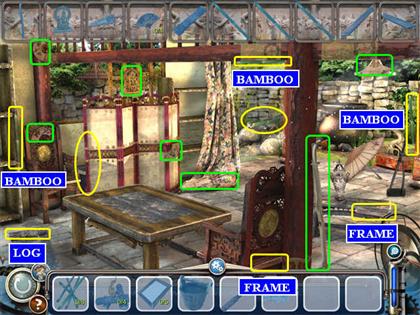
- This location has three zoom areas: the Screen on the left, the Pond in the center, and the Pot to the right of the Pond.
- Once you have collected all the items you can in the main scene, click on the Screen to open the zoom scene.
- Now collect the items from the Find List.
- The Boar is gold and is on top of the gold pillow in the lower left.
- The Straw Hat is much smaller than you would expect, and is on top of a jar towards the back of the scene.
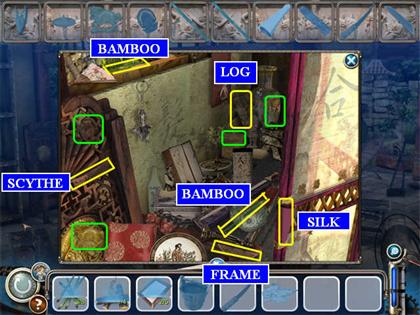
- Once you’ve collected everything you can for now in this scene, close the zoom scene.
- After you return to the main scene, click on the Pond to open that zoom scene.
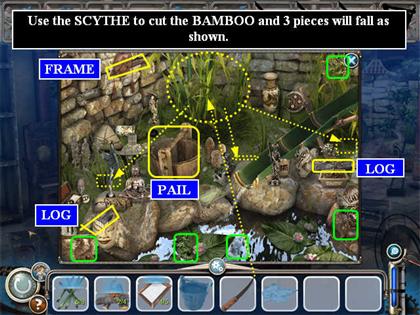
- Collect the items from the Find List.
- When you click on the PAIL the first time, it will fill with water. Click on it again to collect it.
- Use the SCYTHE to cut the stand of BAMBOO. 3 sticks will fall as shown in the screenshot. Collect them.
- Once you have collected all the items, the zoom scene will close automatically.
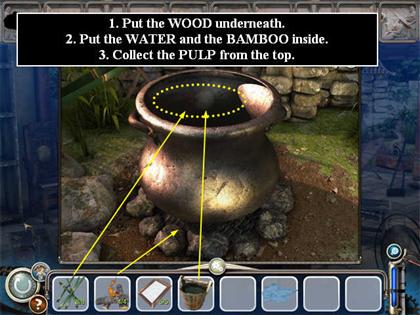
- Now click on the Pot to zoom in on it.
- Put the WOOD under the Pot and it will start to burn.
- Put the WATER and the BAMBOO in the Pot.
- PULP will form and float to the surface. Collect it.
- The zoom scene will close automatically.
- Now it’s time to put the Inventory Items into the main scene.
- Whenever you are going to put an item back into the scene, look for the place where the cursor turns into gears.
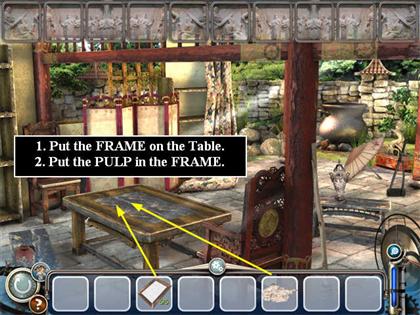
- Begin by putting the FRAME on the Table.
- Put the PULP in the FRAME.
- You have succeeded in fixing the mechanism, but a time ripple has brought some "improper" items to the location. You have to collect them.
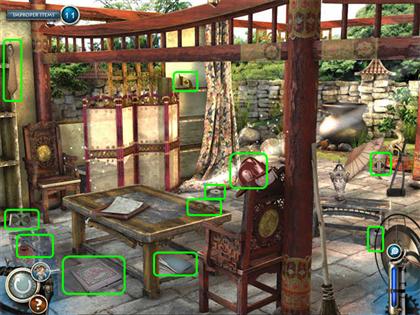
- Once you have collected all of these, click on the Screen to open the zoom scene.
- Collect the rest of the improper items here.
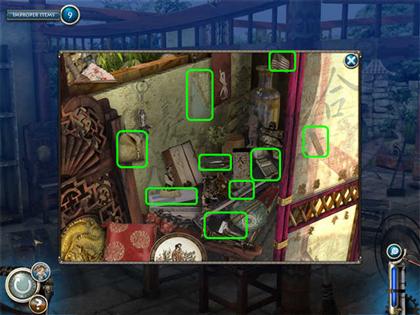
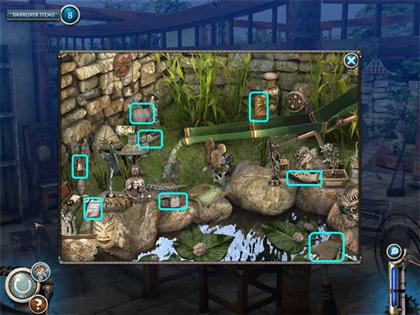
- Now click on the Pond to open the zoom scene there.
- Collect the last of the improper items for this chapter.
Chapter 21: Glass
- Collect the items on the Find List. Some of these will be parts of Inventory Items.
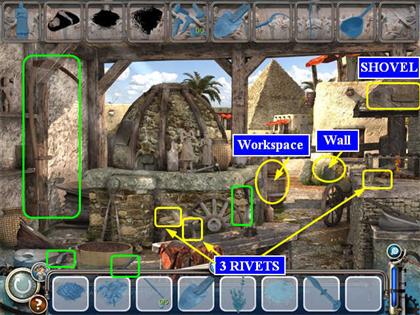
- This location has two zoom areas: a Workspace on the right side of the Kiln and the Wall, straight back and a little to the right of the Workspace. It’s usually easiest to get to the Workspace by clicking near the large barrel there.
- There are also three "hot spots" where the cursor will turn to gears—the small door on the left side of the Kiln, where you will put things inside, the wall to the left of the Kiln, and the fire burning on the right.
- Once you have collected all the items you can in the main scene, click on the Workspace (or the Barrel next to it) to open the zoom scene.
- Now collect all the items you can from the Find List. You will come back here again later.
- The DAGGER is lying on top of the Pincers that are on top of the Wheel on the left of the slab.
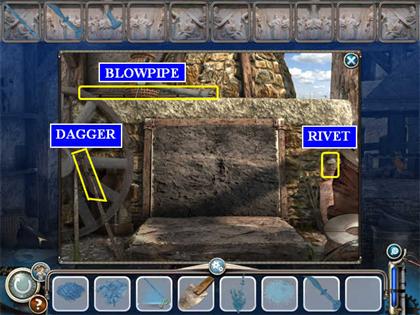
- Once you’ve collected everything you can for now in this scene, close the zoom scene.
- After you return to the main scene, click on the Wall to open that zoom scene.
- Collect the items from the Find List.
- Use the SHOVEL to dig in the dirt pile on the left of the scene, then collect the SAND.
- Once you have collected all the items, the zoom scene will close automatically.
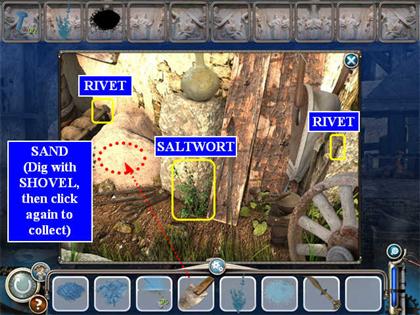
- Now click on the Kiln door to open it if you haven’t already.
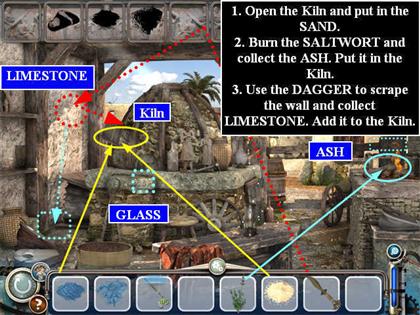
- Put the SALTWORT in the Fire and it will burn. Collect the Saltwort ASH from the grate just above the Fire and put it in the Kiln.
- Put the SAND in the Kiln.
- Use the DAGGER on the Wall to the left of the Kiln. The LIMESTONE will fall down onto the ground. Collect it and put it in the Kiln.
- GLASS will flow out of a small door on the front of the Kiln. Collect it.
- Click on the Workspace (or the Barrel next to it) to zoom in.
- Put the GLASSBLOWING MATERIALS on the Slab. This will trigger a mini-game.
Glassblowing Mini-game
- The instructions for this game are simple, but the game itself is very challenging.
- Click on the white arrow to get the glass flowing inside the bottle form (the white outline),. The glass will start to rise inside the form.
- Should you click too quickly or hold too long the glass will expand too far horizontally, breaking the form, and you will have to try again.
- You can tell how wide the glass is by the red horizontal line under the form.
- Should you click too slowly, the glass will cool and stop rising and you will have to start again.
- You must make 3 bottles to complete the game.
- For those who find it too difficult, the SKIP button is available.
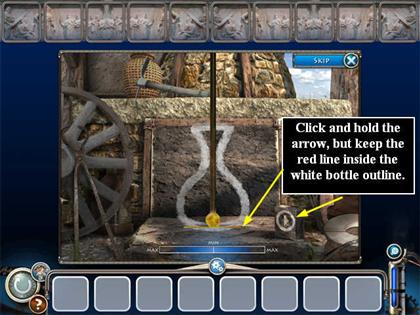
- You have succeeded in fixing the mechanism, but a time ripple has brought some "improper" items to the location. You have to collect them.
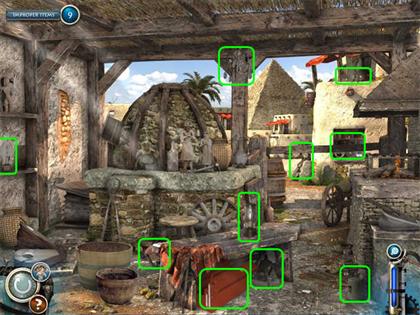
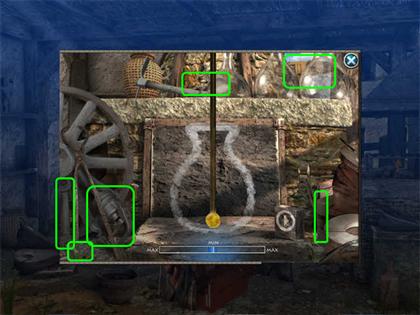
- Once you have collected all of these, click on the Workspace (or the Barrel next to it) to open the zoom scene.
- Collect the rest of the improper items here.
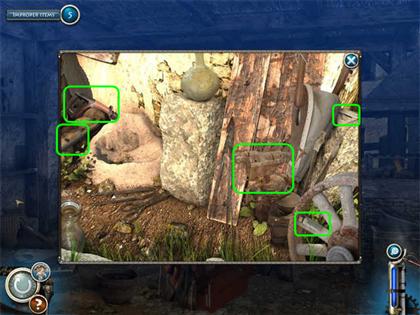
- Now click on the Wall to open the zoom scene there.
- Collect the last of the improper items for this chapter.
Chapter 22: Water Mill
- Collect the items on the Find List. Some of these will be parts of Inventory Items.
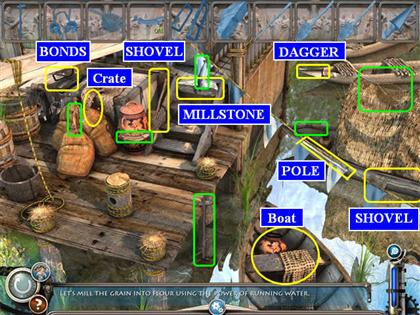
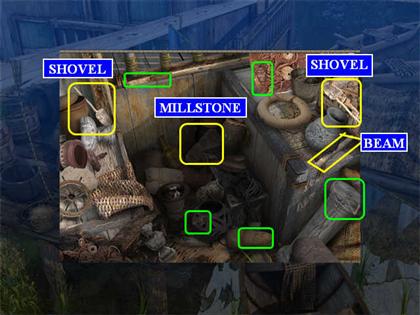
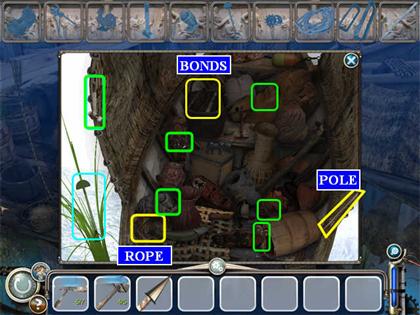
- This location has two zoom areas: a Crate on the left and a Boat on the right.
- Once you have collected all the items you can in the main scene, click on the Crate to open the zoom scene.
- Now collect all the items you can from the Find List. The zoom scene will close automatically.
- After you return to the main scene, click on the Boat to open that zoom scene.
- Collect the items from the Find List.
- Once you have collected all the items, the zoom scene will close automatically.
- Now it’s time to put the Inventory Items into the main scene.
- Whenever you are going to put an item back into the scene, look for the place where the cursor turns into gears.
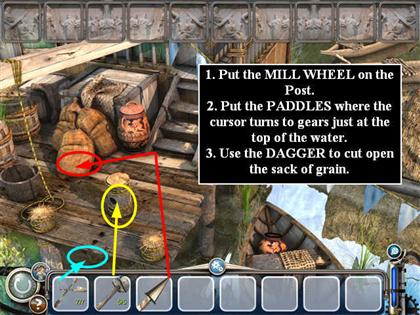
- Put the MILLSTONE on the small post near the edge of the wharf.
- Put the PADDLES under the wharf. Click where the cursor turns into gears right near the edge of the wharf.
- Use the DAGGER on the sack of grain to the left of the MILLSTONE.
- You have succeeded in fixing the mechanism, but a time ripple has brought some "improper" items to the location. You have to collect them.
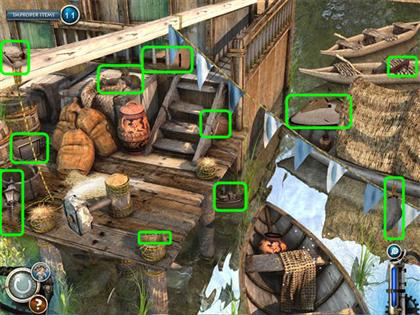
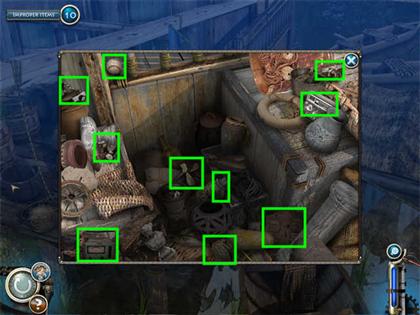
- Once you have collected all of these, click on the Crate to open the zoom scene.
- Collect the rest of the improper items here.
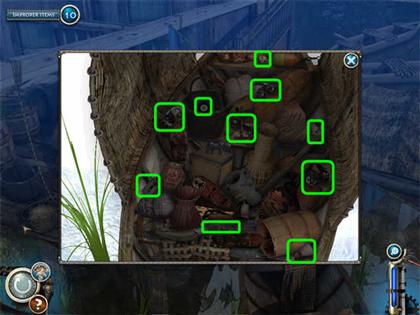
- Now click on the Boat to open the zoom scene there.
- Collect the last of the improper items for this chapter.
Chapter 23: Ironworks
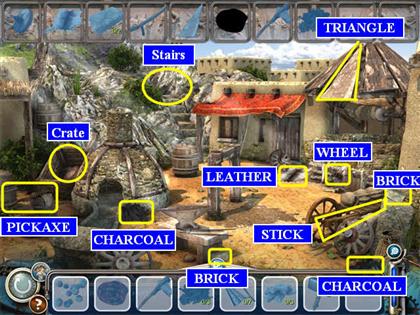
- Collect the items on the Find List. Some of these will be parts of Inventory Items.
- There are several wheels in the scene. See the screenshot for the only one that counts for the Find List.
- This location has two zoom areas: a Crate on the left and the Stairs in the back.
- Once you have collected all the items you can in the main scene, click on the Crate to open the zoom scene.
- Now collect all the items you can from the Find List. The zoom scene will close automatically.
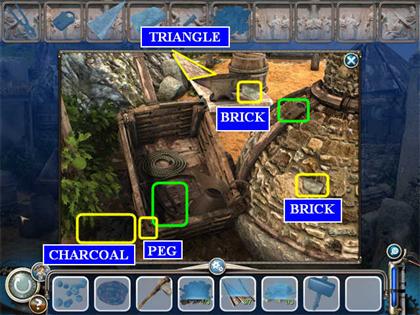
- Once you have collected all the items, the zoom scene will close automatically.
- Now click on the Stairs to open the zoom scene.
- Collect all the items you can from the Find List.
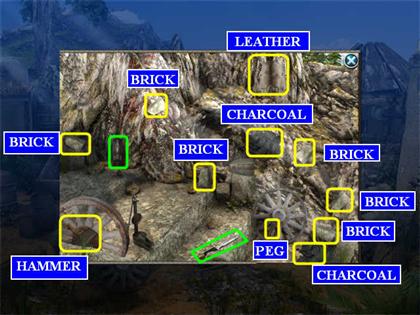
- Now use the PICKAXE on the vein of IRON ORE on the side of the hill.
- Twelve pieces of IRON ORE will fall down. They are rocks with bits of visible red. Collect them.
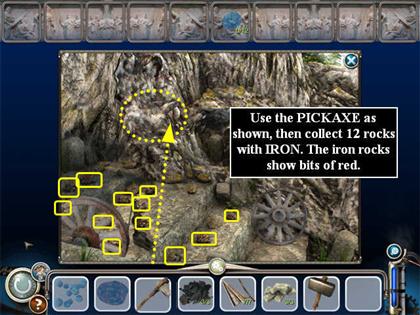
- The zoom scene will close automatically.
- Now it’s time to put the Inventory Items into the main scene.
- Whenever you are going to put an item back into the scene, look for the place where the cursor turns into gears.
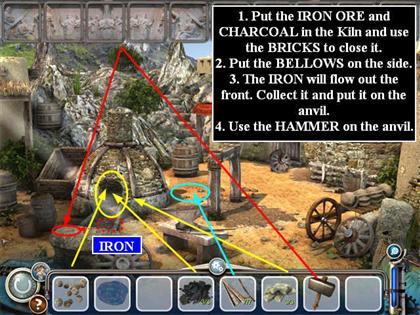
- Put the IRON ORE and the CHARCOAL into the Kiln.
- Use the BRICKS to close up the Kiln.
- Put the BELLOWS on the right side of the Kiln.
- The IRON will start to flow out of the front of the Kiln. Collect it.
- Put the IRON on the stone anvil in front of the Kiln.
- Use the HAMMER on the IRON.
- You have succeeded in fixing the mechanism, but a time ripple has brought some "improper" items to the location. You have to collect them.
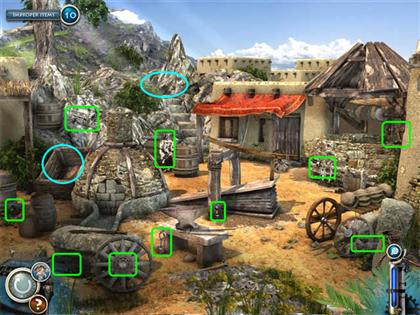
- Once you have collected all of these, click on the Crate to open the zoom scene.
- Collect the rest of the improper items here.
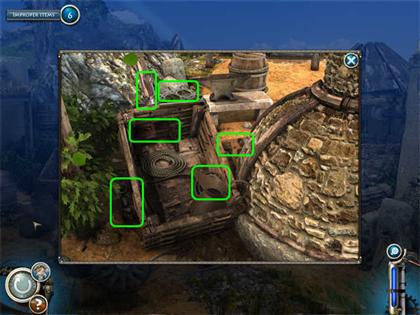
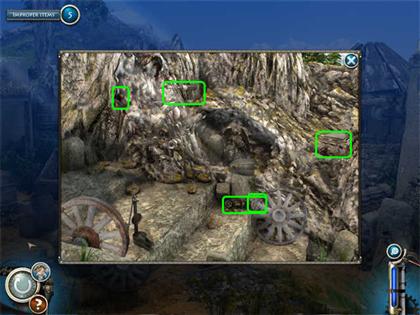
- Now click on the Stairs to open the zoom scene there.
- Collect the last of the improper items for this chapter.
Chapter 24: Writing
- Collect the items on the Find List. Some of these will be parts of Inventory Items.
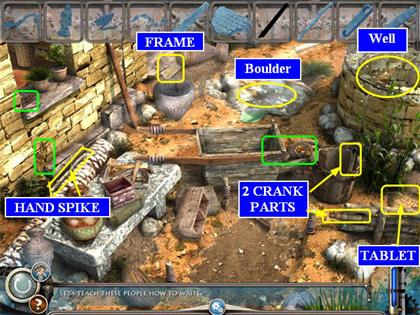
- This location has two zoom areas: a Boulder in the back and a Well on the right..
- Once you have collected all the items you can in the main scene, click on the Boulder to open the zoom scene.
- Collect the items from the Find List.
- Use the HAND SPIKE to lift up the Boulder and collect more items.
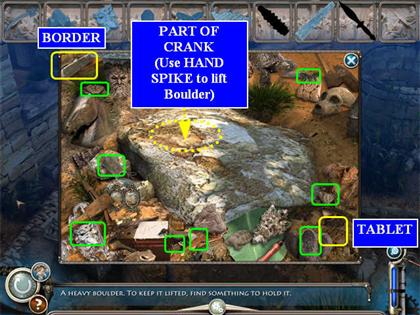
- Once you have collected all the items, the zoom scene will close automatically.
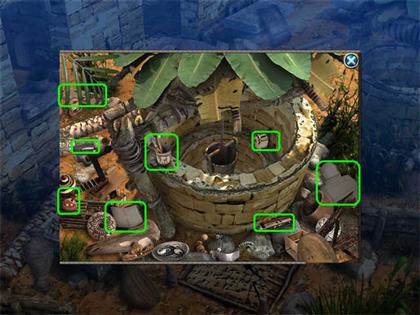
- Now click on the Well to open the zoom scene.
- Collect all the items you can from the Find List.
- Now use the CRANK on the Well to repair it.
- The bucket will come up and the TABLET will be in it. Collect it.
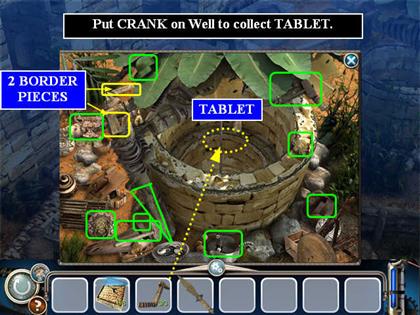
- The zoom scene will close automatically.
- Use the KNIFE on the Reeds on the right. The CUT REED will drop to the ground. Collect it.
- Now it’s time to put the Inventory Items into the main scene.
- Whenever you are going to put an item back into the scene, look for the place where the cursor turns into gears.
- Put the TABLET on the ground as shown.
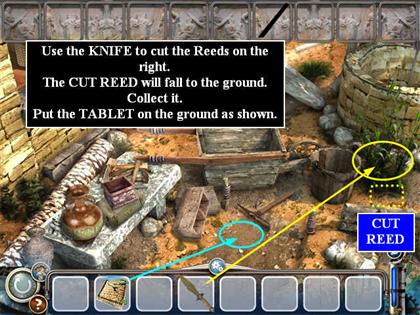
- You have succeeded in fixing the mechanism, but a time ripple has brought some "improper" items to the location. You have to collect them. Many of these will have to do with writing.
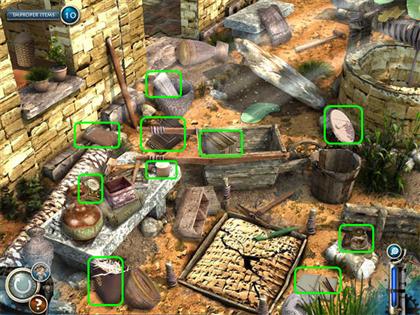
- Once you have collected all of these, click on the Boulder to open the zoom scene.
- Collect the rest of the improper items here.
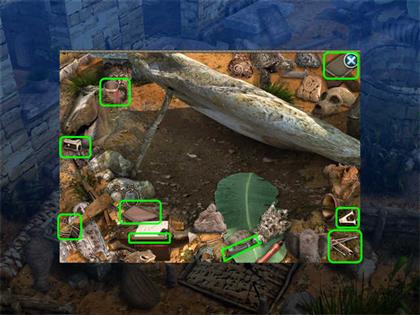
- Now click on the Well to open the zoom scene there.
- Collect the last of the improper items for this chapter.
Refueling Mini-game
- This is the same as the last time. Objects will fall into one of the chutes and turn into a marble that is either red, white, or blue.
Chapter 25: the Pulley
- Collect the items on the Find List. Some of these will be parts of Inventory Items.
- For some reason, many of the items in this chapter are anachronistic for the defined location. Just ignore them, and treat the search for "impropers" as a Before-and-After quiz instead.
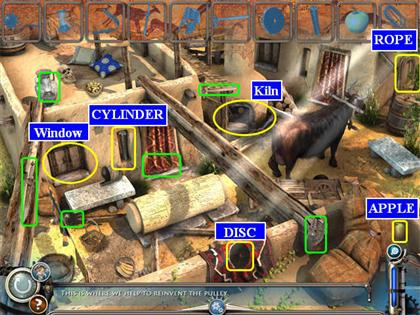
- This location has two zoom areas: a Window on the left and a Kiln on the right.
- Once you have collected all the items you can in the main scene, click on the Kiln to open the zoom scene.
- Now collect all the items you can from the Find List. The zoom scene will close automatically.
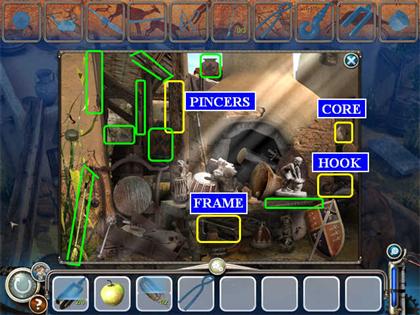
- After you return to the main scene, click on the Window to open that zoom scene.
- Use the PINCERS that you got from the Kiln zoom scene to open the Window.
- Collect the items from the Find List.
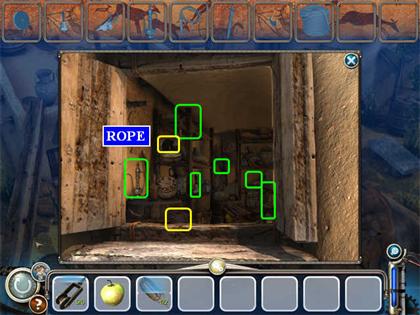
- Once you have collected all the items, the zoom scene will close automatically.
- Now it’s time to put the Inventory Items into the main scene.
- Whenever you are going to put an item back into the scene, look for the place where the cursor turns into gears.
- Use the PULLEY ASSEMBLY and the LONG ROPE on the end of the beam closest to you, and the Pulley will be installed.
- Give the APPLE to the animal.
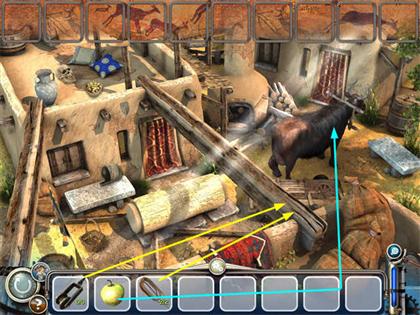
- You have succeeded in fixing the mechanism, but a time ripple has brought some "improper" items to the location. You have to collect them.
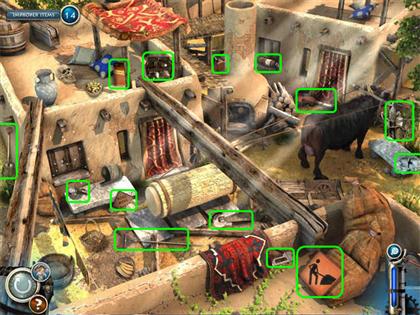
- Once you have collected all of these, click on the Kiln to open the zoom scene.
- Collect the items here that were not here the first time.
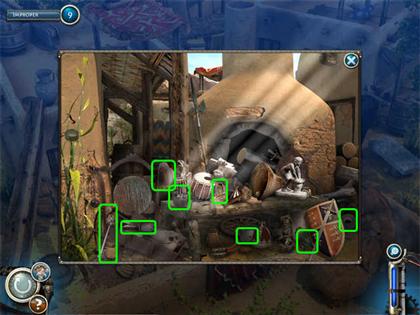
- Now click on the Window to open the zoom scene there.
- Collect the last of the improper items for this chapter.
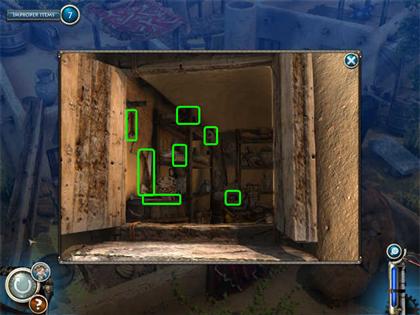
Chapter 26: the Bakery
- Collect the items on the Find List. Some of these will be parts of Inventory Items.
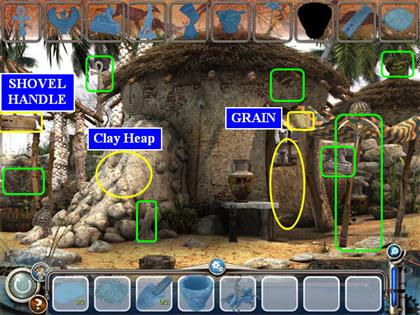
- This location has two zoom areas: a Clay Heap on the left and a Door on the right.
- Once you have collected all the items you can in the main scene, click on the Door to open the zoom scene.
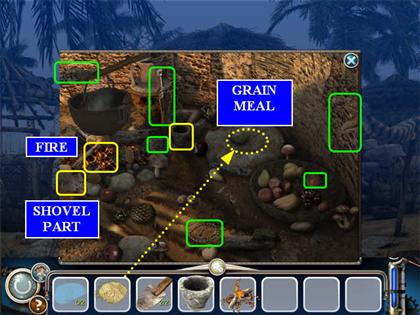
- Now collect all the items you can from the Find List.
- Take the GRAIN and put it in the Grinding Bowl. It will automatically grind to GRAIN MEAL. Collect it.
- The zoom scene will close automatically.
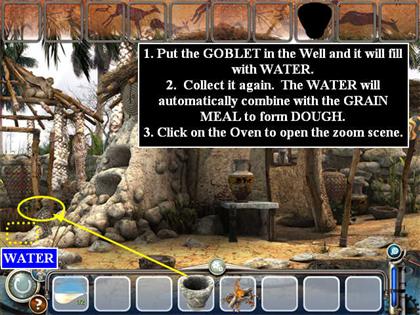
- After you return to the main scene, take the GOBLET that you got indoors and use it on the Well. It will fill with WATER.
- Collect it again and it will automatically combine with the GRAIN MEAL to form DOUGH.
- Now click on the Clay Heap to open that zoom scene.
- Collect the items from the Find List.
- Use the SHOVEL to dig out the shelves of the Oven.
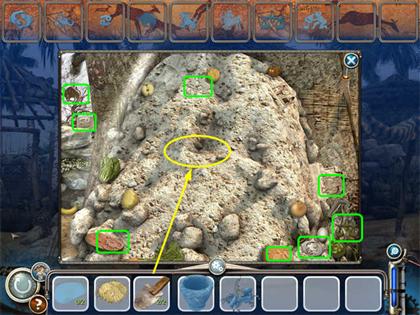
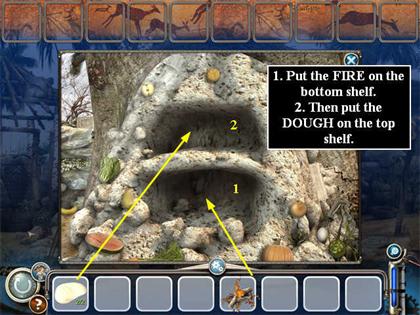
- Put the FIRE that you got indoors on the bottom shelf.
- Put the DOUGH on the top shelf. You can’t do this until after you put the FIRE in place.
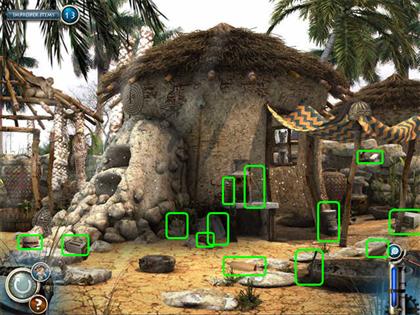
- You have succeeded in fixing the mechanism, but a time ripple has brought some "improper" items to the location. You have to collect them. Many of these will have a cooking or eating theme.
- Once you have collected all of these, click on the Door to open the zoom scene.
- Collect the improper items here.
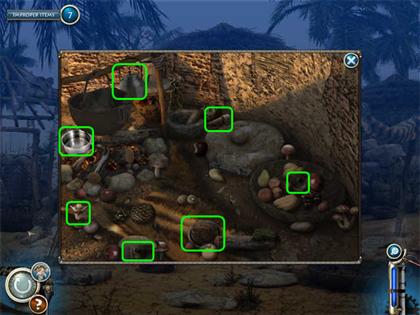
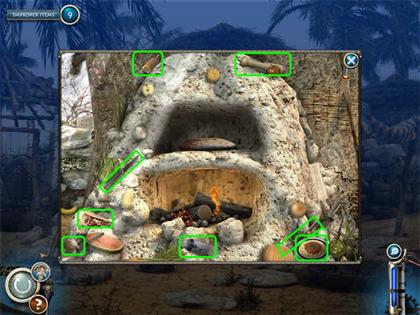
- Now click on the Clay Heap/Oven to open the zoom scene there.
- Collect the last of the improper items for this chapter.
Chapter 27: the Pottery Wheel
- Collect the items on the Find List. Some of these will be parts of Inventory Items.
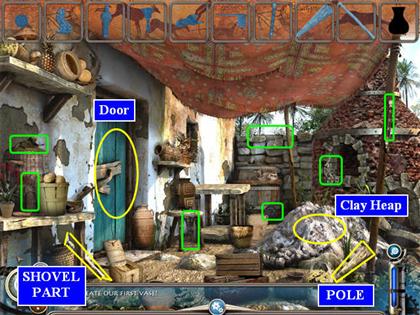
- This location has two zoom areas: a Door on the left and a Clay Heap on the right.
- Once you have collected all the items you can in the main scene, click on the Door to open the zoom scene.
- Now collect all the items you can from the Find List.
- The zoom scene will close automatically.
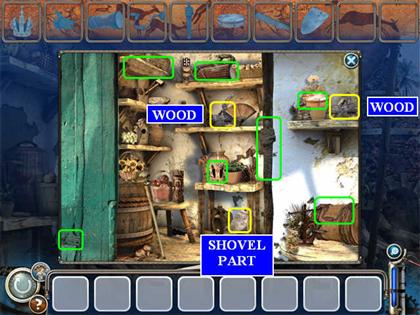
- Now click on the Clay Heap to open that zoom scene.
- Collect the items from the Find List.
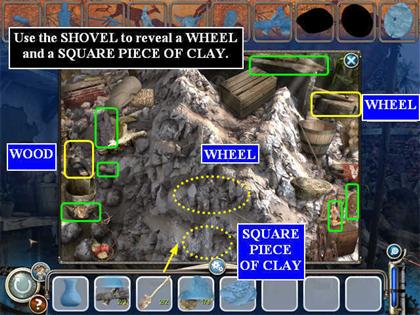
- Use the SHOVEL to reveal a WHEEL and a SQUARE PIECE OF CLAY.
- Now it’s time to put the Inventory Items into the main scene.
- Whenever you are going to put an item back into the scene, look for the place where the cursor turns into gears.
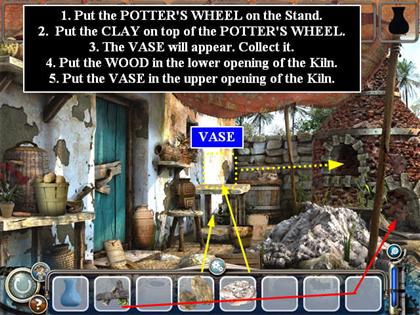
- Put the POTTER’S WHEEL on the Stand.
- Put the CLAY on top of the POTTER’S WHEEL. The VASE will appear.
- Put the WOOD into the lower opening in the Kiln.
- Put the VASE into the upper opening in the Kiln.
- You have succeeded in fixing the mechanism, but a time ripple has brought some "improper" items to the location. You have to collect them.
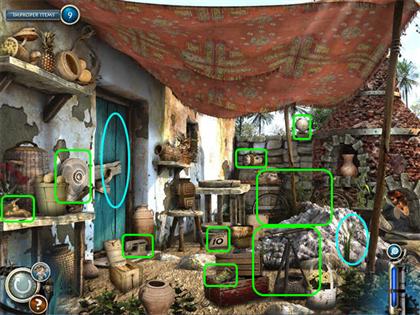
- Once you have collected all of these, click on the Door to open the zoom scene.
- Collect the improper items here.
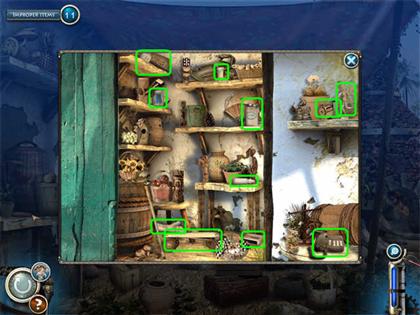
- Now click on the Clay Heap to open the zoom scene there.
- Collect the last of the improper items for this chapter.
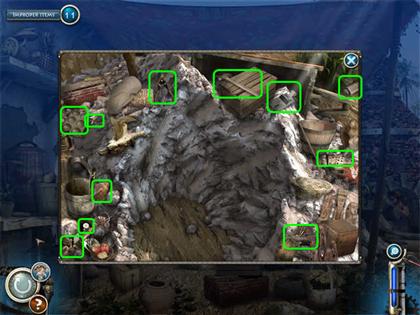
Chapter 28: the Wheel
- Collect the items on the Find List. Some of these will be parts of Inventory Items.
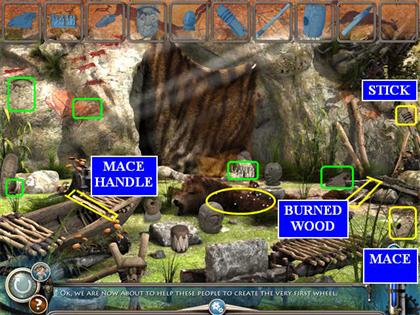
- This location has one zoom area: the Bearskin in the center of the scene.
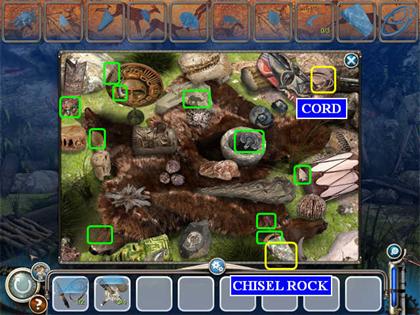
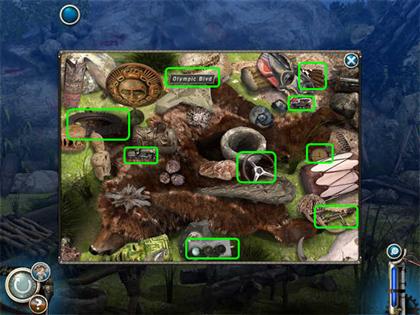
- Once you have collected all the items you can in the main scene, click on the Bearskin to open the zoom scene.
- Now collect all the items you can from the Find List.
- The zoom scene will close automatically.
- Now it’s time to put the Inventory Items into the main scene.
- Whenever you are going to put an item back into the scene, look for the place where the cursor turns into gears.
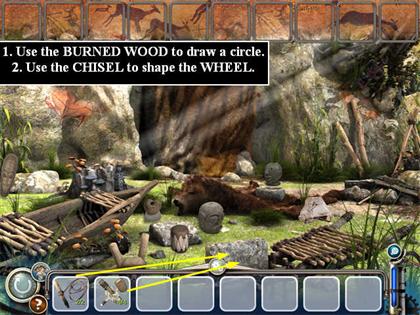
- Use the BURNED WOOD to draw a circle on the stone.
- Use the CHISEL to complete the Wheel.
- You have succeeded in fixing the mechanism, but a time ripple has brought some "improper" items to the location. You have to collect them. Many of these will have a parks and recreation theme.
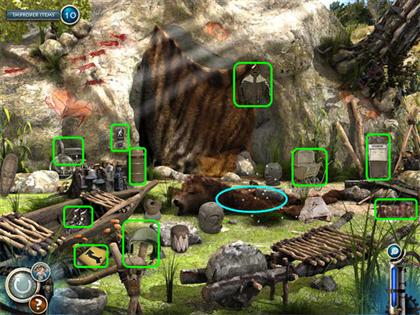
- Once you have collected all of these, click on the Bearskin to open the zoom scene.
- Collect the last of the improper items for this chapter.
Chapter 29: the Boat
- Collect the items on the Find List. Some of these will be parts of Inventory Items.
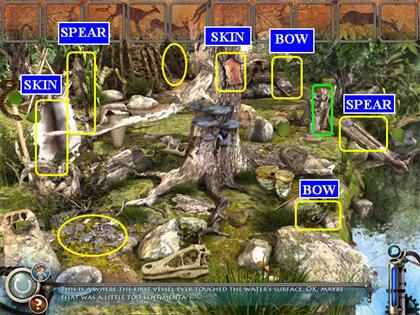
- This location has two zoom areas: the ground on the left and a Hut in the back.
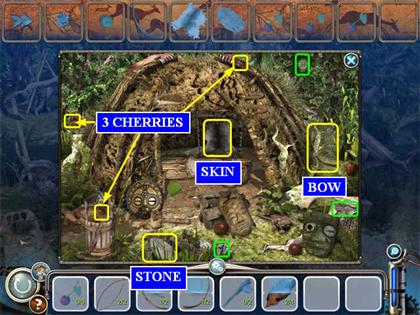
- Once you have collected all the items you can in the main scene, click on the Hut to open the zoom scene.
- Now collect all the items you can from the Find List.
- The zoom scene will close automatically.
- Now click on the ground in the lower left to open that zoom scene.
- Collect the items from the Find List.
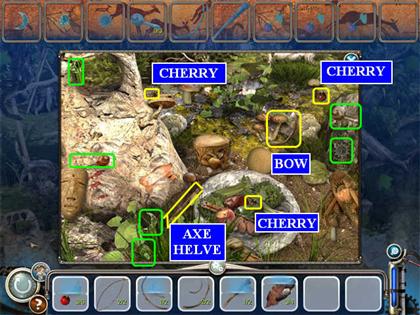
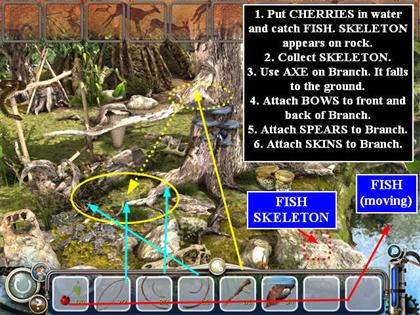
- You need to catch a fish in order to collect the final item.
- Start by tossing the CHERRIES in the water.
- One FISH will start swimming near the CHERRIES. You must click on it while it’s moving to catch it.
- The FISH SKELETON will appear on the rock next to the water. Collect it.
- Use the AXE to chop the Branch sticking out to the left of the scene.
- The Branch will fall down to the ground below the tree. You don’t have to collect it—you’re going to work with it where it is.
- Now it’s time to put the Inventory Items into the main scene.
- Whenever you are going to put an item back into the scene, look for the place where the cursor turns into gears.
- Put the BOWS on each end of the Branch. One will go on the right end and one will go on the left end. These will be the ribs of the Boat.
- Put the SPEARS over the BOWS.
- Put the SKINS onto the BOWS. You can’t do this until you have caught the FISH as described above.
- You have succeeded in fixing the mechanism, but a time ripple has brought some "improper" items to the location. You have to collect them.
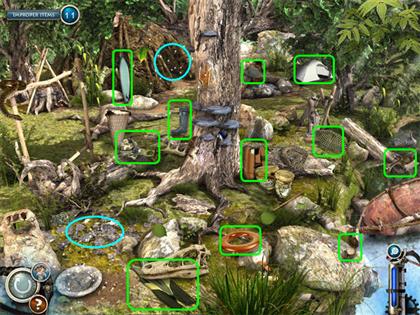
- Once you have collected all of these, click on the Hut to open the zoom scene.
- Collect the improper items here. Many will have a fishing theme.
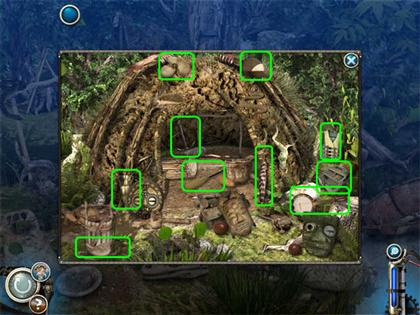
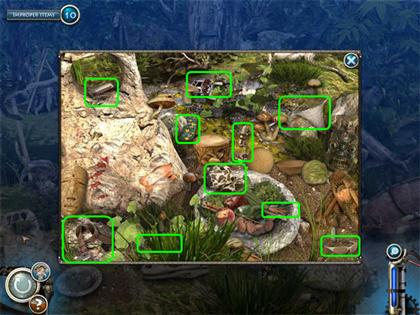
- Now click on the ground on the left to open the zoom scene there.
- Collect the last of the improper items for this chapter.
Chapter 30: the Sundial
- Collect the items on the Find List. Some of these will be parts of Inventory Items.
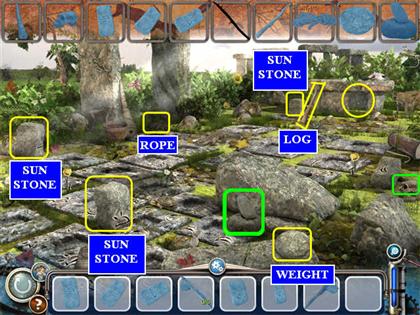
- This location has one zoom area: the Altar at the back right of the scene.
- Once you have collected all the items you can in the main scene, click on the Altar to open the zoom scene.
- Now collect all the items you can from the Find List.
- The zoom scene will close automatically.
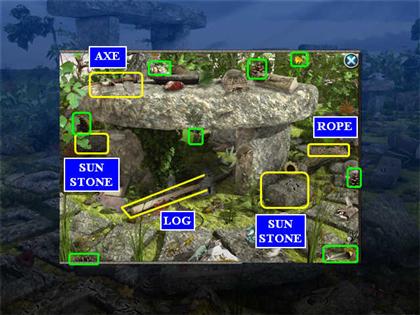
- Use the AXE to cut the tree on the left side of the scene. The LOG will fall to the ground. Collect it.
- Put the LEVER on the stone on the right side. Click again to trigger a mini-game.
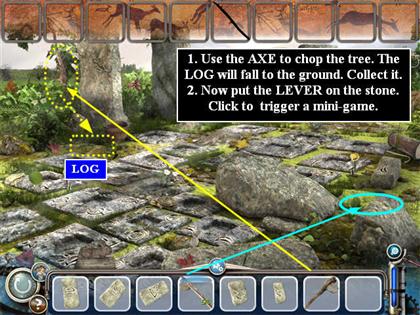
The Lever Mini-game
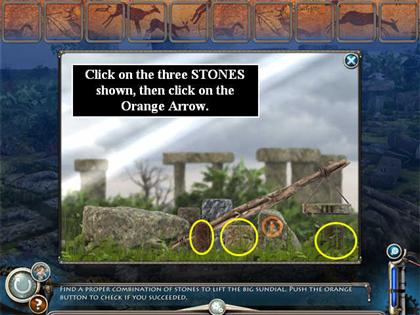
- You need to figure out what combination of the stones available in the scene will balance the big Sun Stone so you can stand it up.
- When you don’t use enough weight, the Sun Stone won’t stand up.
- When you use too much weight, the Lever will break and you’ll have to start over.
- Click on the Orange Arrow when you want to test your solution.
- Our solution:
- Now it’s time to put the Inventory Items into the main scene.
- Whenever you are going to put an item back into the scene, look for the place where the cursor turns into gears.
- Each SUN STONE will only fit into one slot. You just have to find the right slot for each stone.
- Here is our solution:
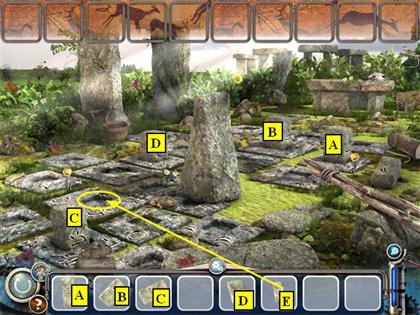
- You have succeeded in fixing the mechanism, but a time ripple has brought some "improper" items to the location. You have to collect them.
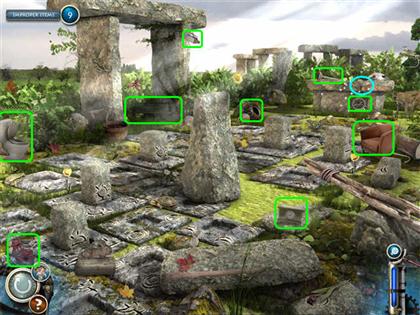
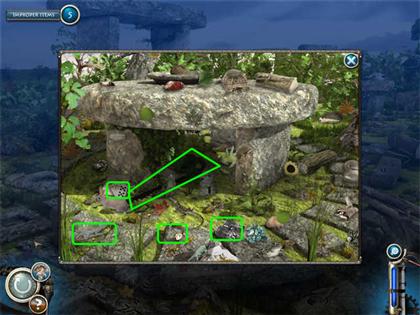
- Once you have collected all of these, click on the Altar to open the zoom scene.
- Collect the last of the improper items for this chapter.
 Watch the ending.
Created at: 2010-01-30

