

Walkthrough Menu
- General Tips
- Introduction
- Chapter 1: Mesina
- Chapter 2: The Water Tower
- Chapter 3: The Air Tower
- Chapter 4: The Earth Tower
- Chapter 5: Gabriel's House
- Chapter 6: The Main Tower
General Tips
- This is the official guide for The Curio Society: Eclipse Over Mesina.
- This guide will not mention when you have to zoom into a location; screenshots will show each zoom scene.
- The screenshots will show where to play a Hidden-Object Puzzle (HOP) and what inventory item will be received.
- Some inventory items require further actions.
- A Match 3 game can be played instead of an HOP.
- This guide will give step-by-step solutions for all puzzles which are not random. Read the instructions in the game for each puzzle.
Introduction
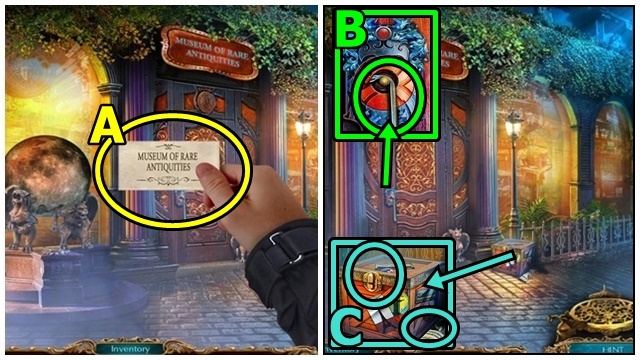
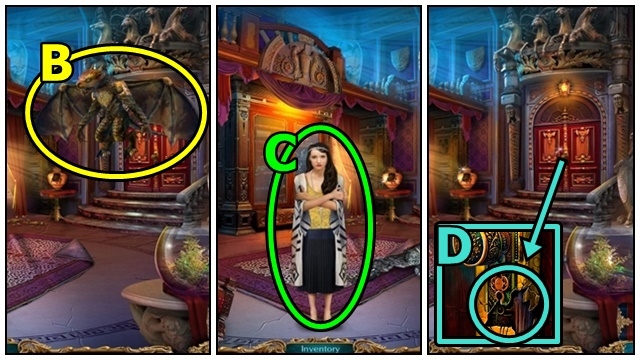
- Read the card (A).
- Take the CROWBAR (B).
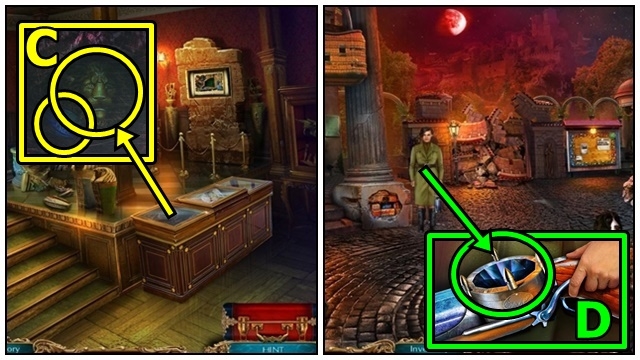
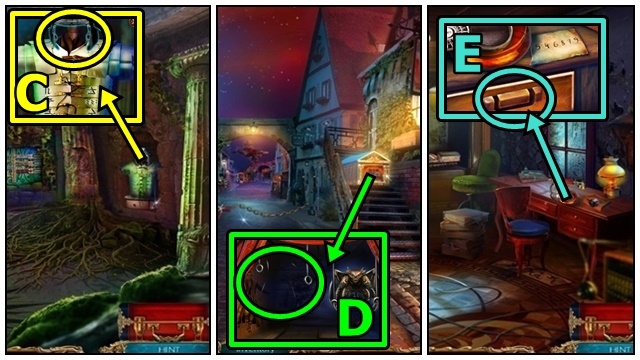
- Read the note (C). Use the CROWBAR; take the GEARS.
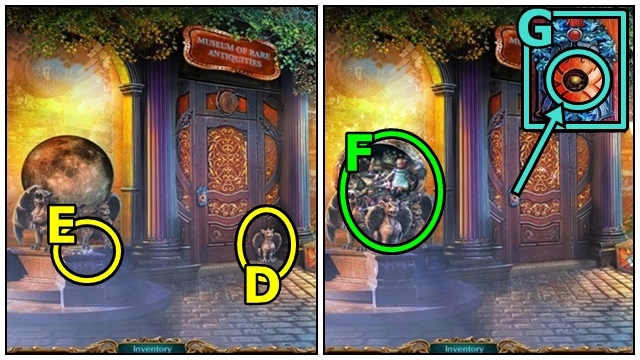
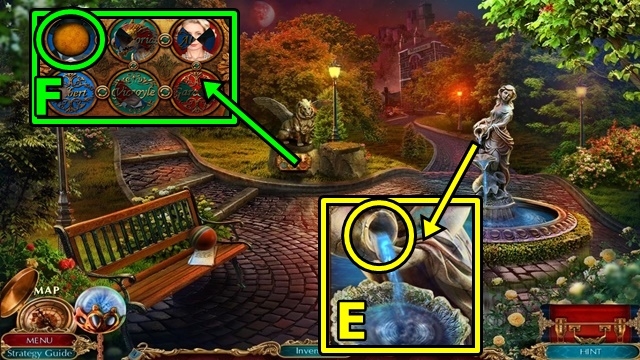
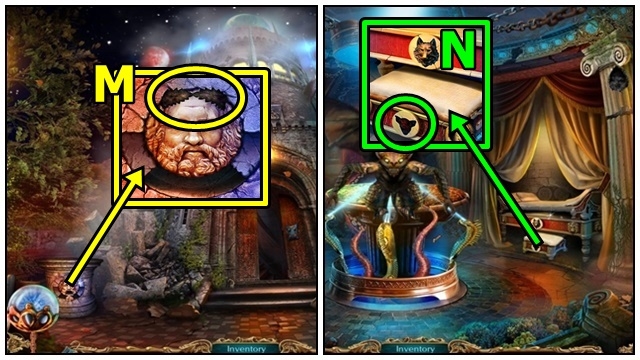
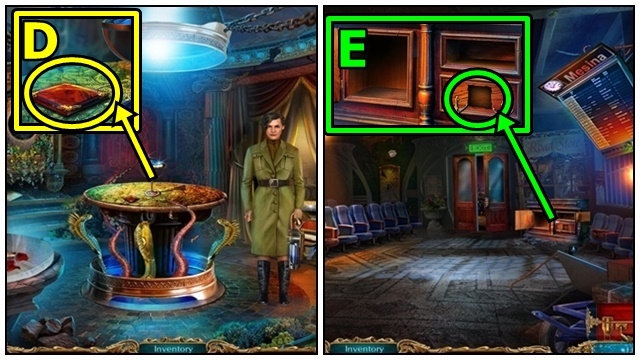
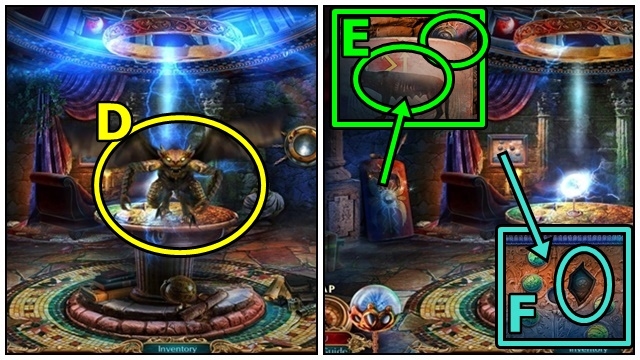
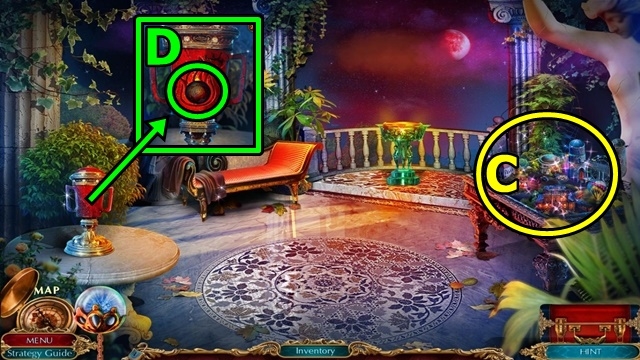
- Take the GARGOYLE (D), then place it (E).
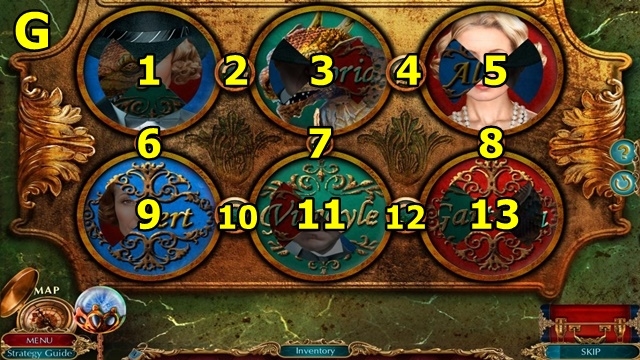
- Play the HOP (F); receive the DOOR HANDLE.
- Insert the DOOR HANDLE (G).
- Enter the Gallery.
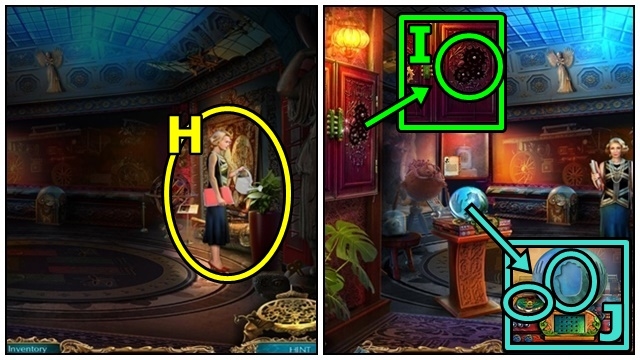
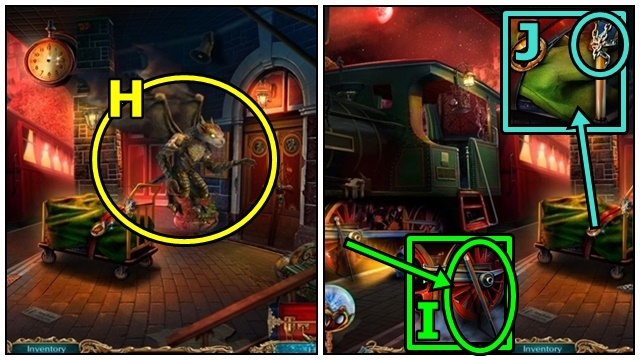
- Talk to Victoria (H).
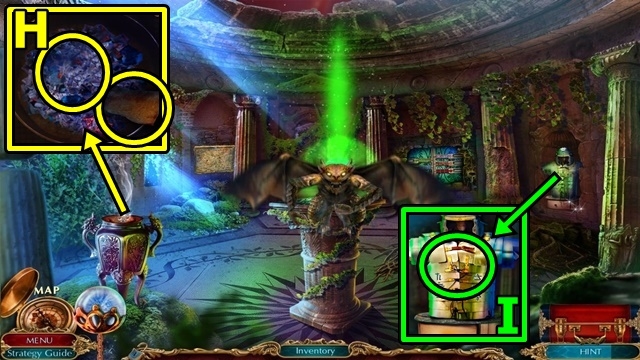
- Insert the GEARS (I); take the HAND and PACKAGE.
- Take the EGYPTIAN AMULET (J). Place the HAND; take the SAFE PART.
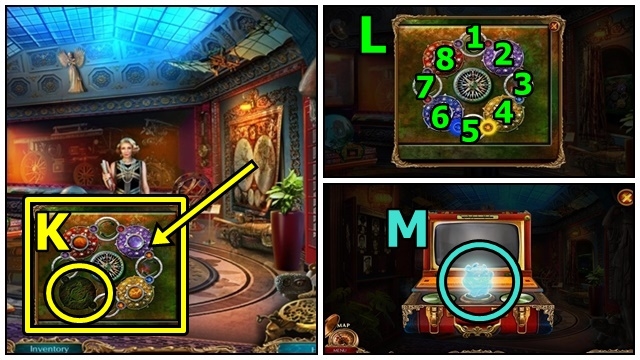
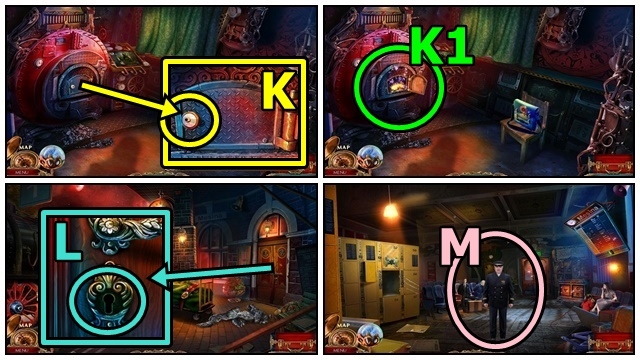
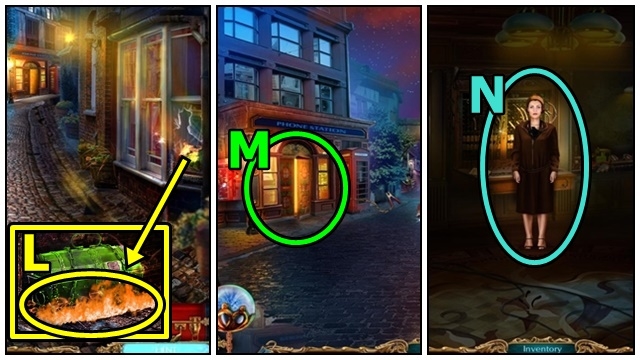
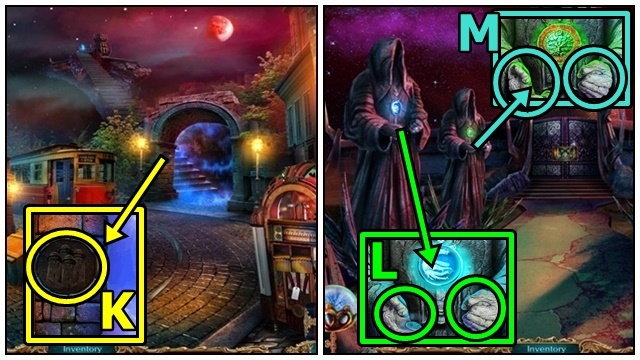
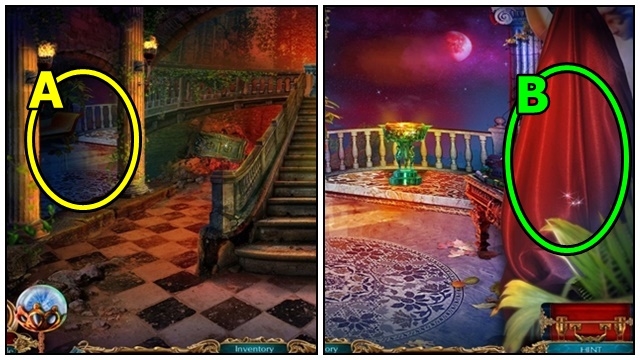
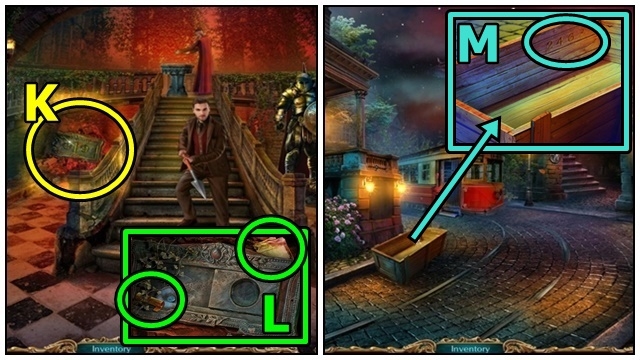
- Move the curtain (K). Insert the SAFE PART; play the mini-game.
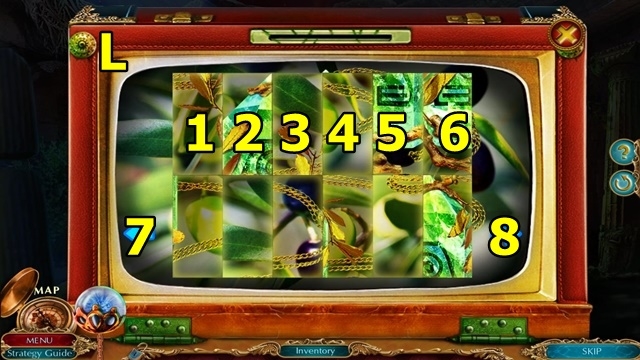
- Solution: 1-7-6-5-4-3-5 (L). Read the note; take the suitcase.
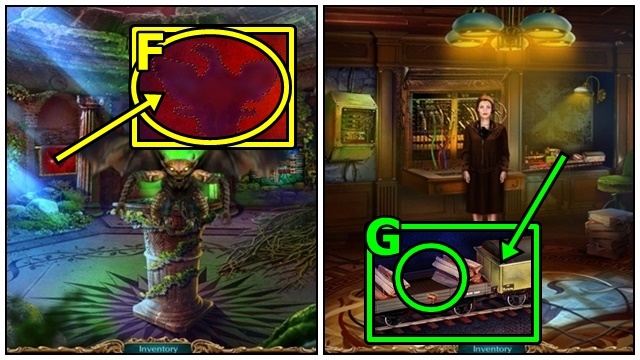
- Read the note off the PACKAGE (inventory); pull the strings; take the GARGOYLE STATUETTE.
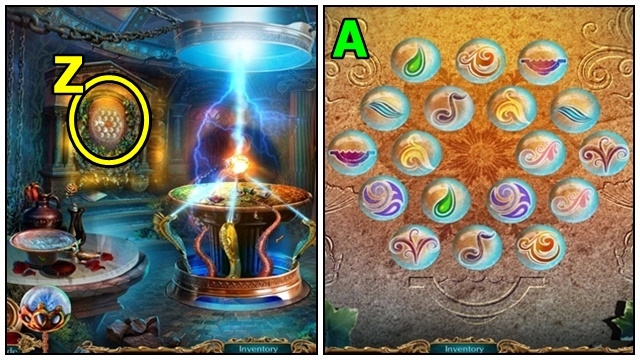
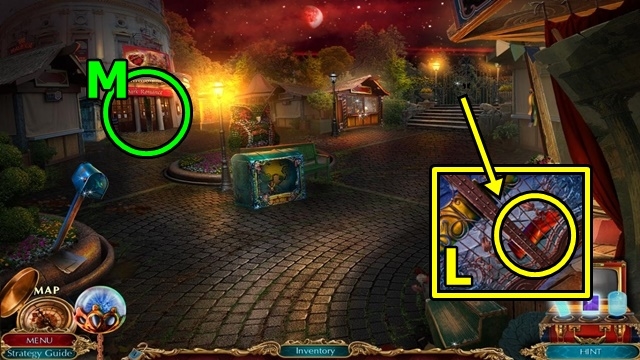
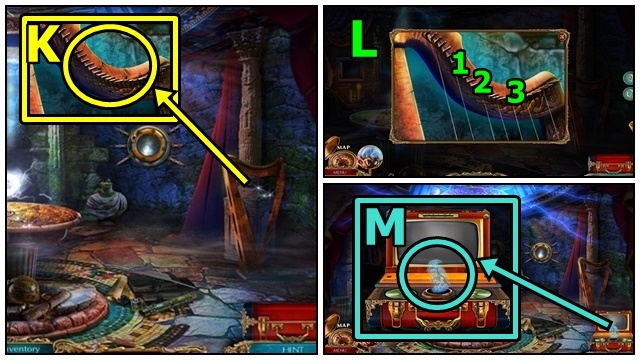
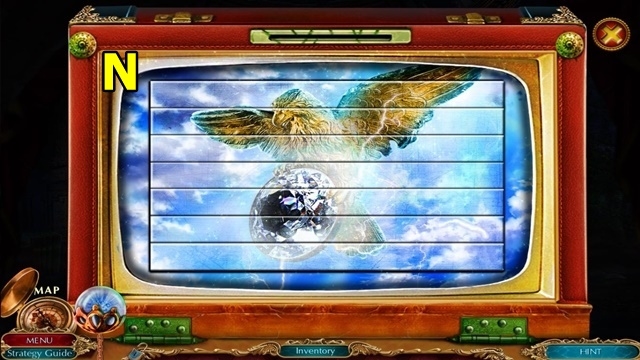
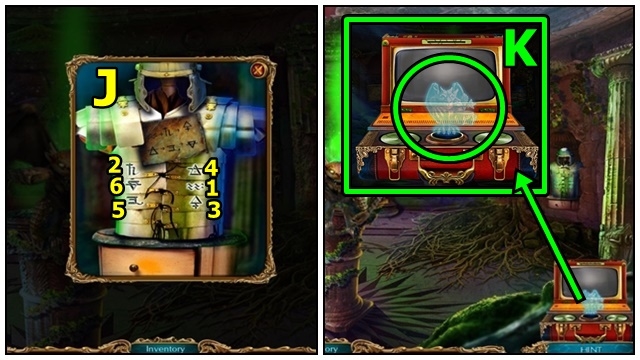
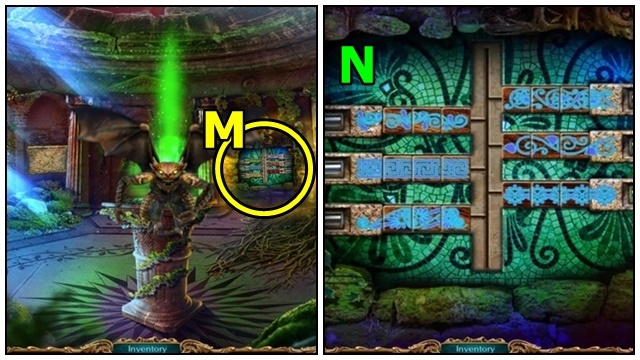
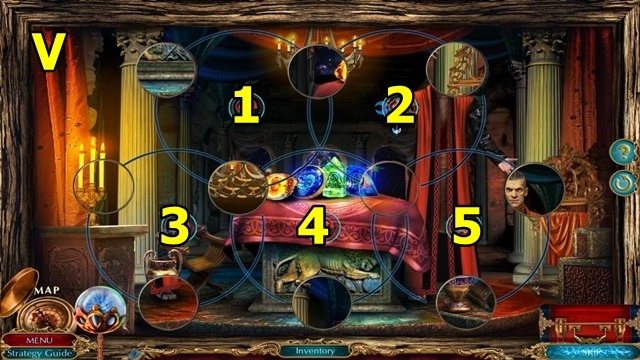
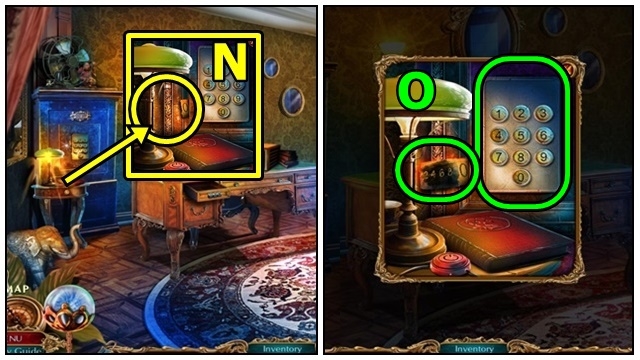
- Place the GARGOYLE STATUETTE (M); play the mini-game.
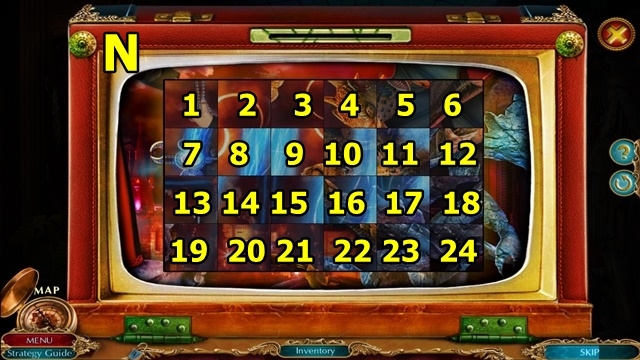
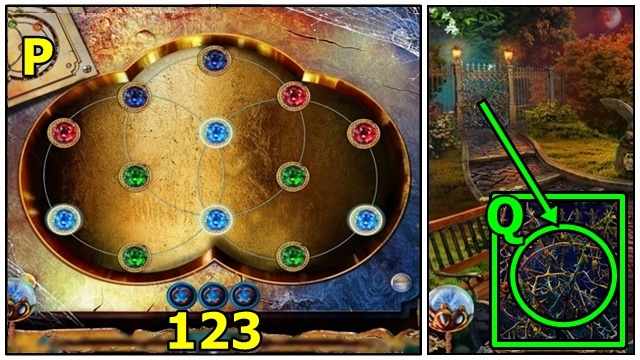
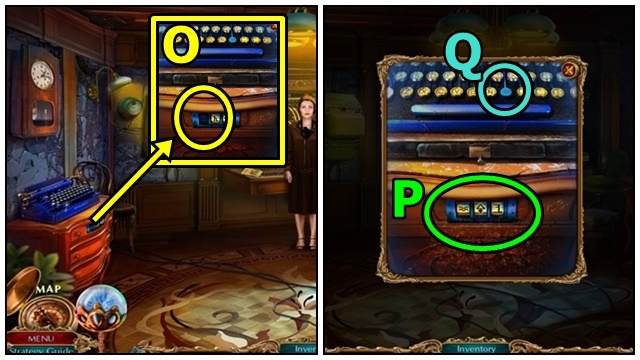
- Solution: 9x3, 10, 15x3, 16x3, 14x2, 13, 20x2, 19x3, 11, 12, 5, 6x2, 8x2, 3x3, 2x3, 1x3 (N). Take the PHOTO CLUE.
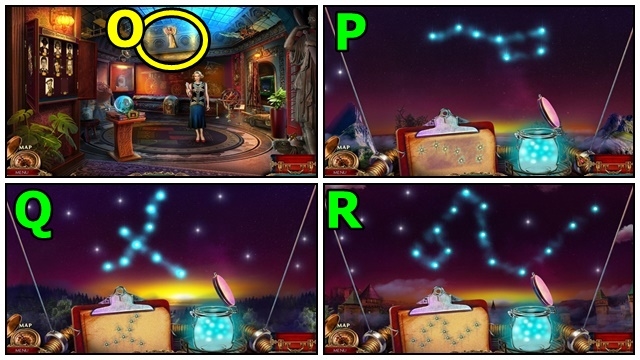
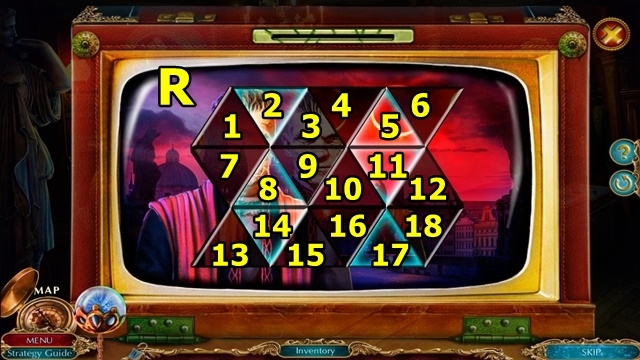
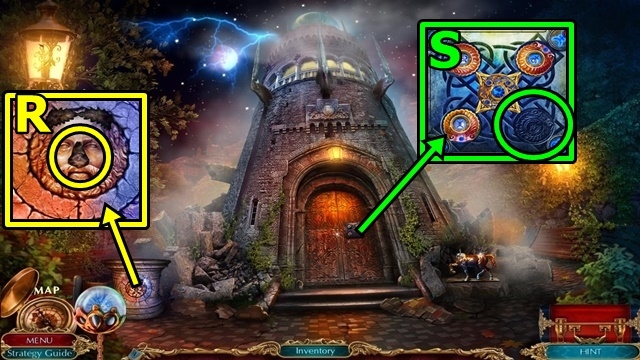
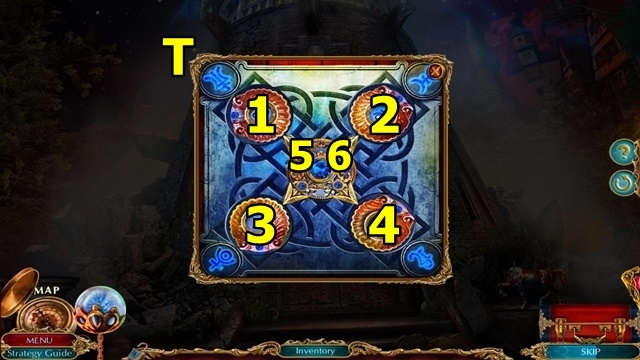
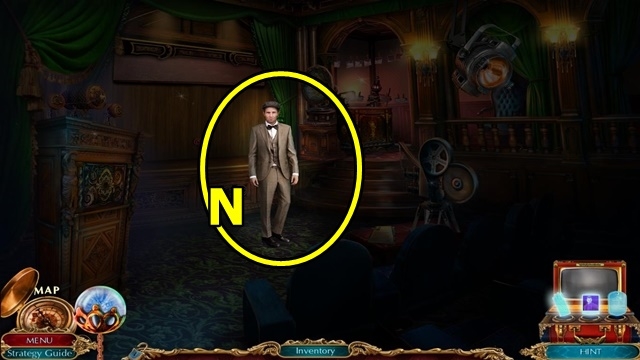
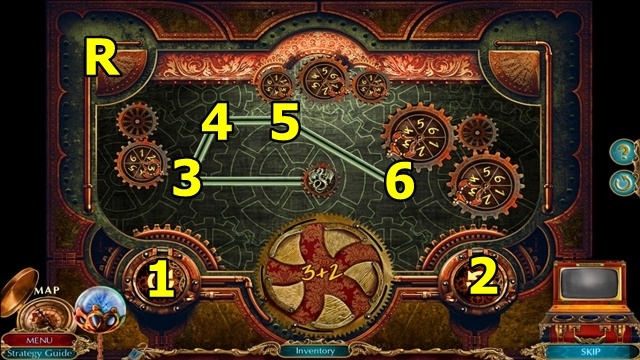
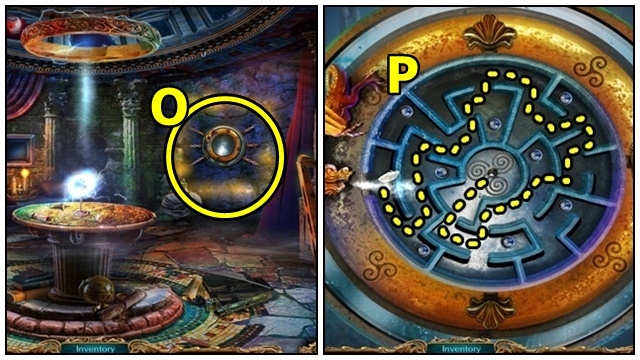
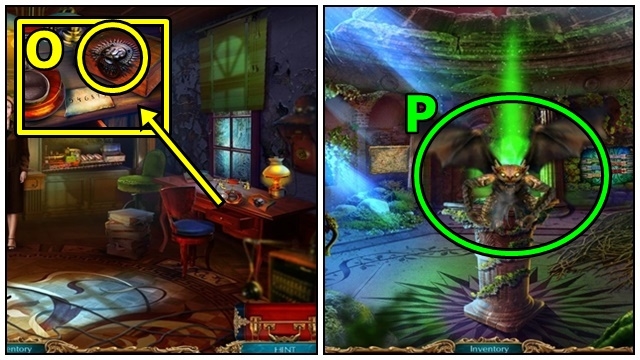
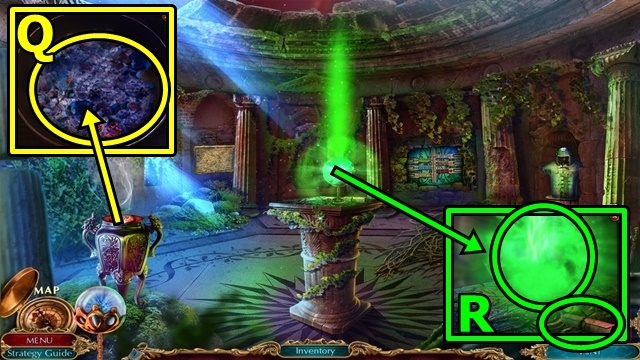
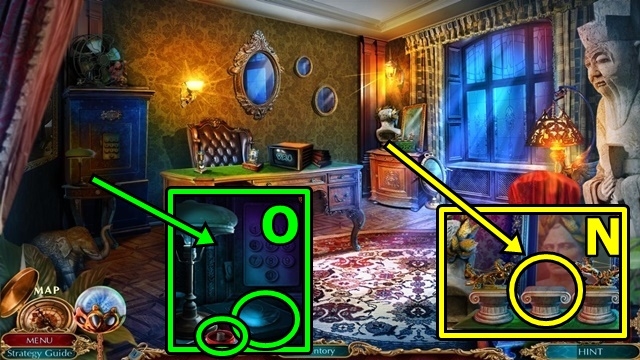
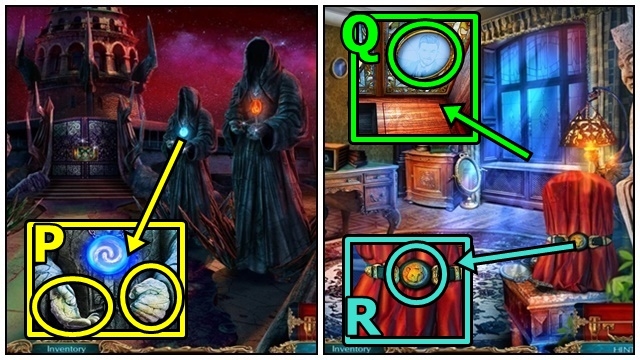
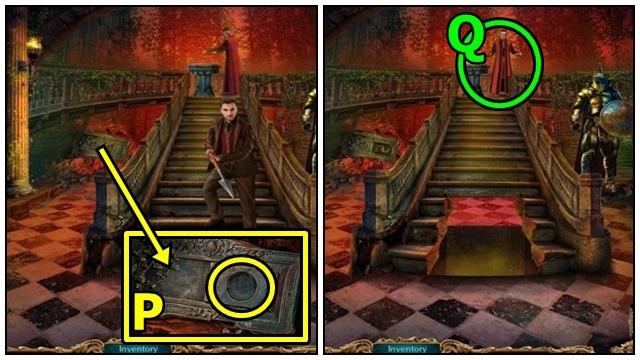
- Use the PHOTO CLUE (O). Play the mini-game.
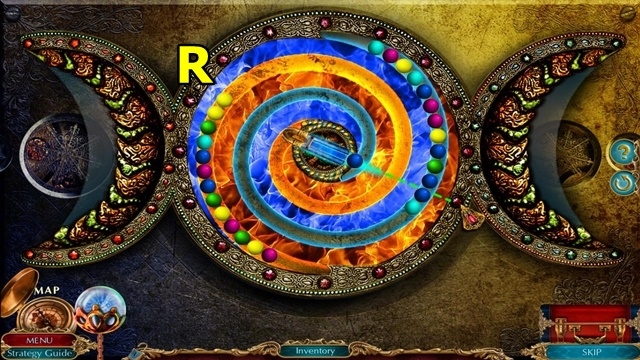
- Solution: (P-R).
Chapter 1: Mesina
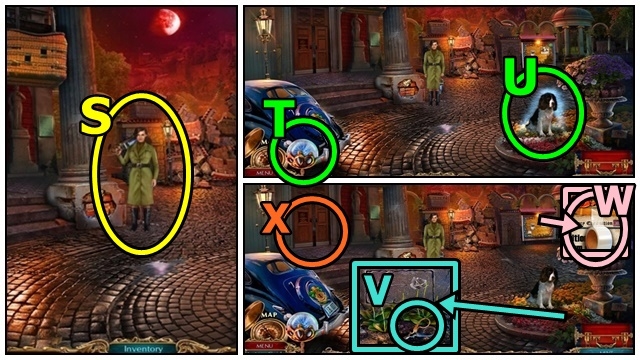
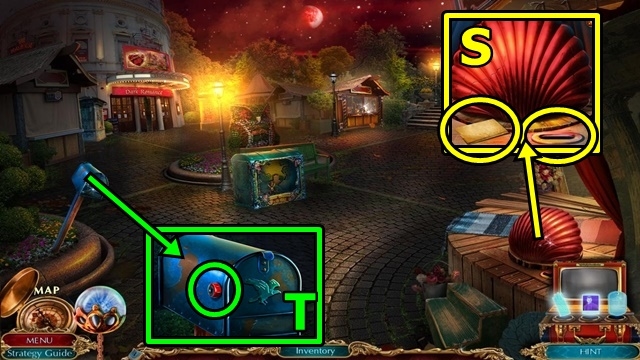
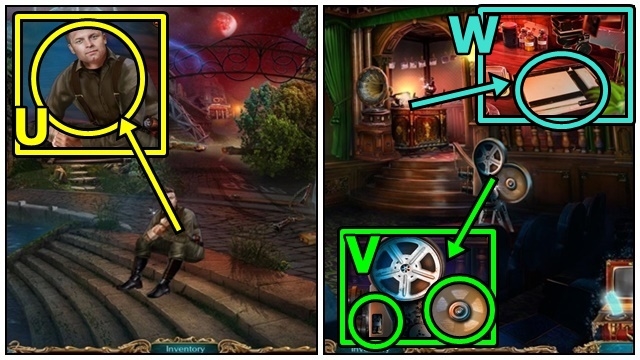
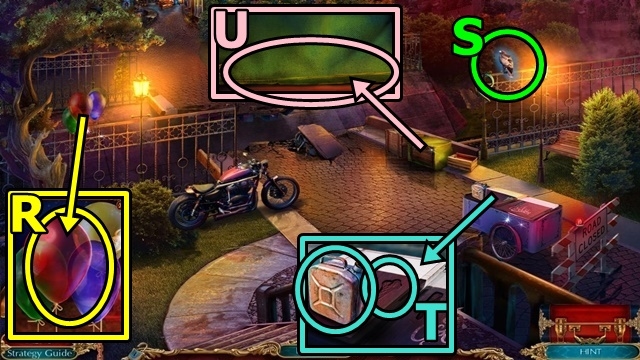
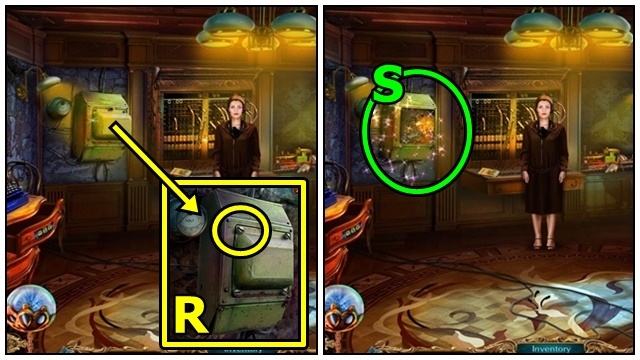
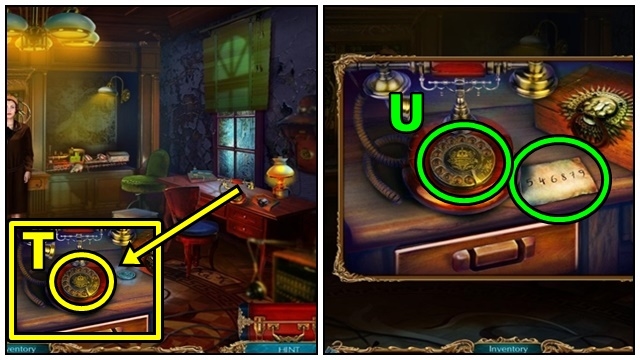
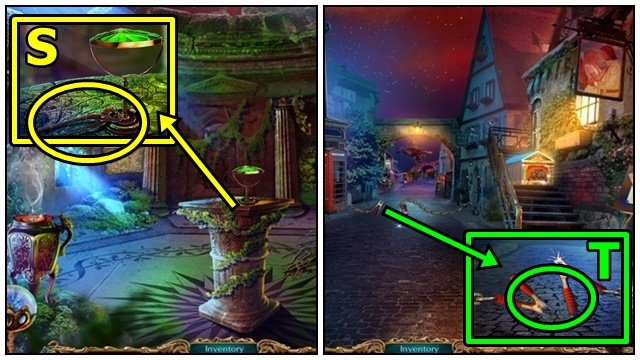
- Talk to Barbara (S).
- Use HARRY (T) on the dog (U).
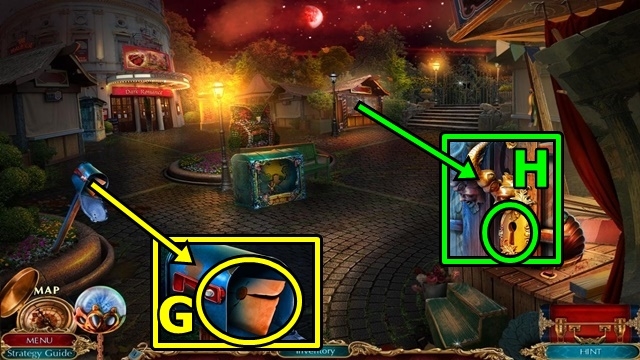
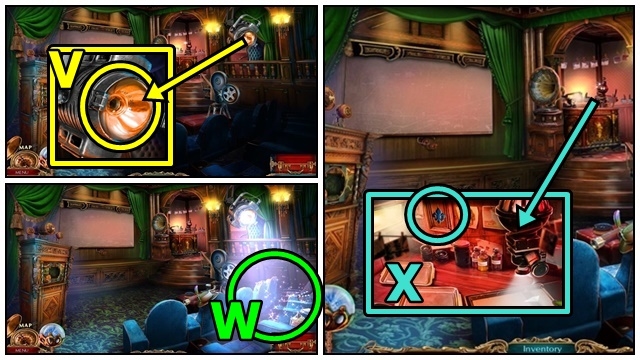
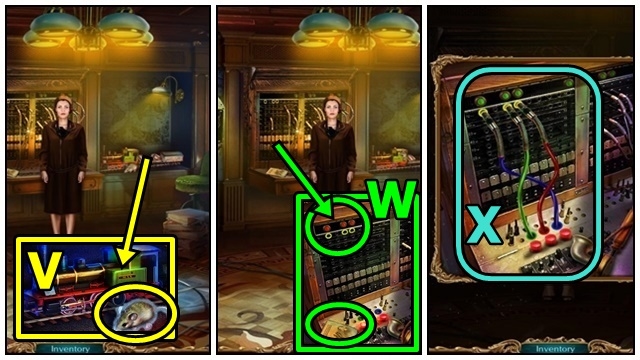
- Take the SCISSORS (V).
- Use the SCISSORS (W); receive the TAPE.
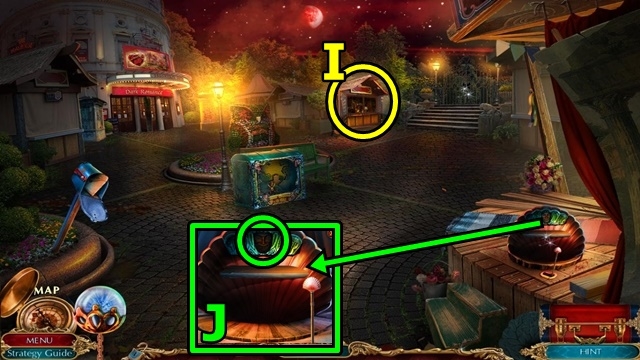
- Enter the Museum (X).
- Receive the CAR KEY.
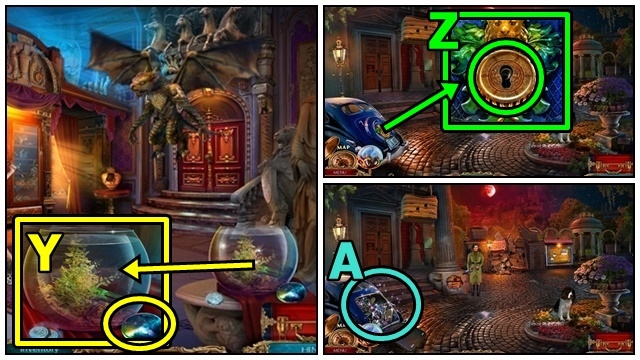
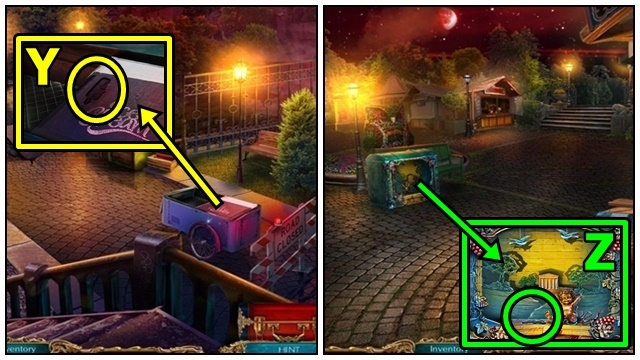
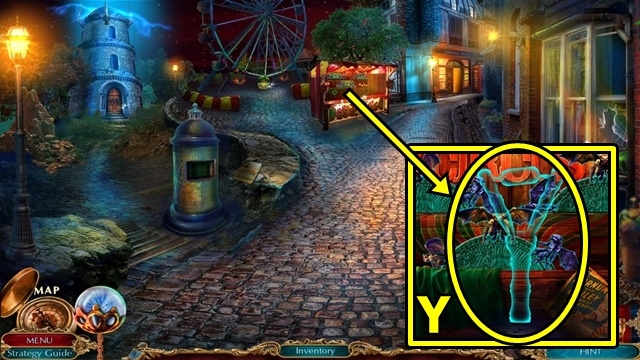
- Take the MOON MIRROR (Y).
- Move down.
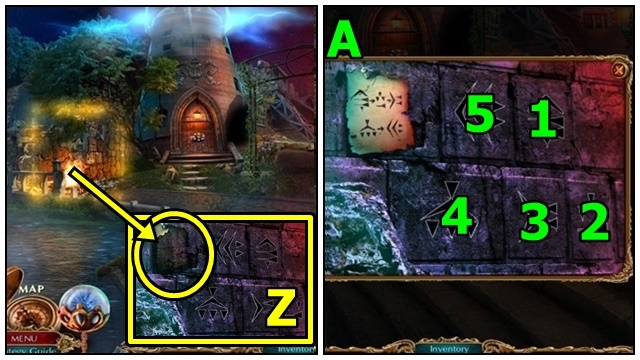
- Use the CAR KEY (Z).
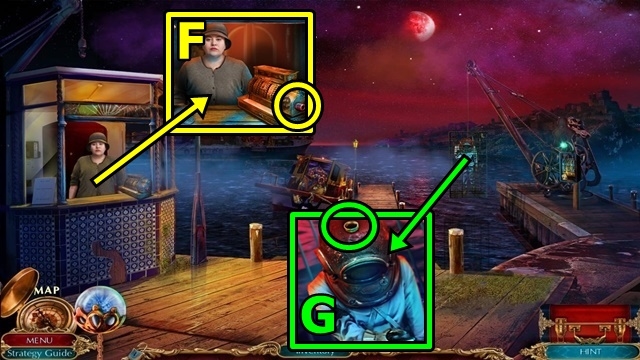
- Play the HOP (A). Receive the CASE.
- Enter the Museum.
- Look at the diagram, then open the CASE (inventory). Reassemble the gun.
- Add the MOON MIRROR to the LIGHT CANNON (inventory); take the LIGHT CANNON.
- Use the LIGHT CANNON (B).
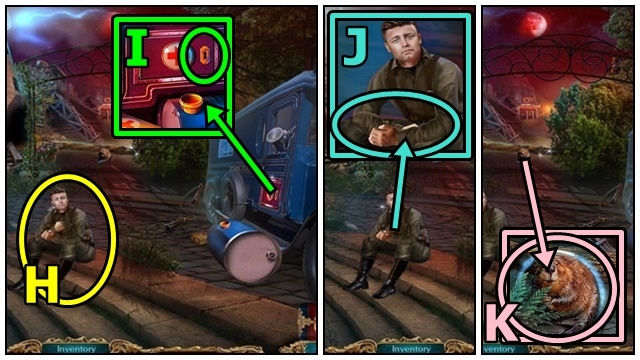
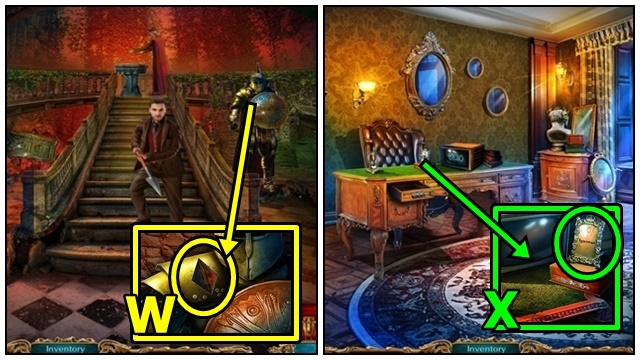
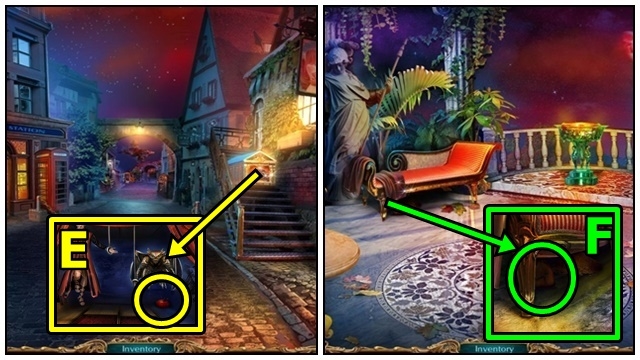
- Talk to the woman (C); receive the CROWBAR.
- Use the CROWBAR (D). Enter the Hall of Antiquities.
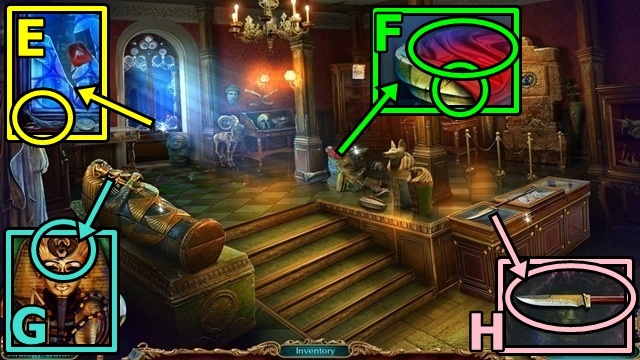
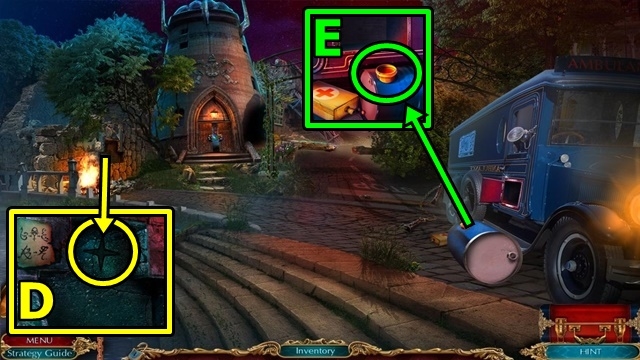
- Take the HAIR SAMPLE (E).
- Move the cloth (F). Use the TAPE; receive the FINGERPRINT.
- Add the EGYPTIAN AMULET (G); open the case, take the WIRE CUTTER.
- Take the SPEAR (H).
- Move down.
- Place the SPEAR (I); play the mini-game.
- Solution: (J). Take the PLATE.
- Move down.
- Take the note (K); insert the PLATE. Take the AMPHORA PART and CORK.
- Enter the Museum.
- Insert the AMPHORA PART (L); take the CUPBOARD HANDLE and PUZZLE FRAGMENT.
- Insert the CUPBOARD HANDLE (M).
- Play the HOP (N); receive the FISH FOOD.
- Add the FISH FOOD (O). Use Harry; receive the TWEEZERS.
- Enter the Hall of Antiquities.

- Use the TWEEZERS (P); receive the FABRIC SAMPLE.
- Add the HAIR SAMPLE (Q); FINGERPRINT and FABRIC SAMPLE; play the mini-game.
- Solution: 1-2, 2-3, 1-2, 4-5, 5-6, 4-5, 7-8, 8-9, 7-8, 10-11, 11-12, 10-11, 13-14, 14-15, 13-14, 16-17, 17-18, 16-17 (R). Take the PHOTO.
- Use the PHOTO (S); play the mini-game.
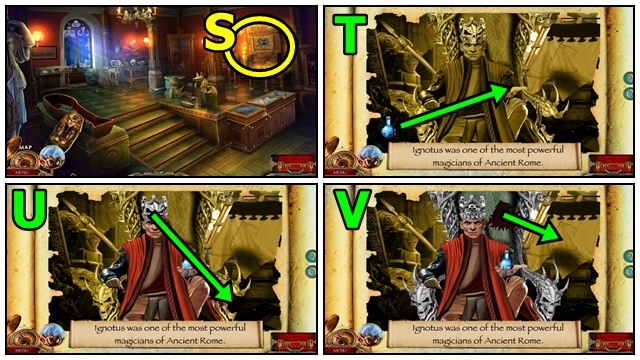
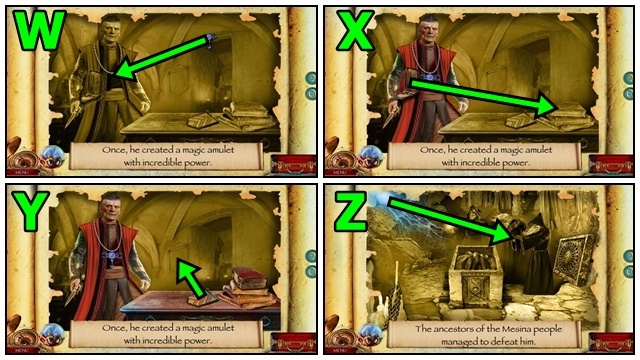
- Solution: (T-Z).
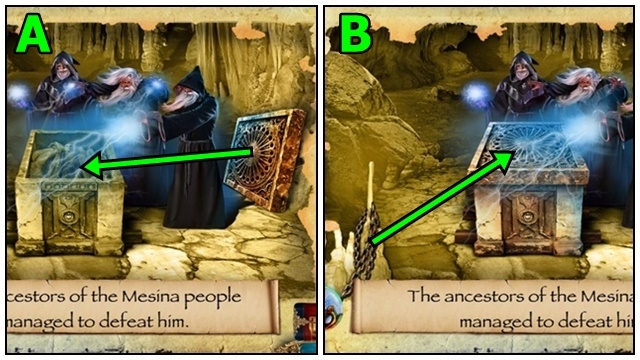
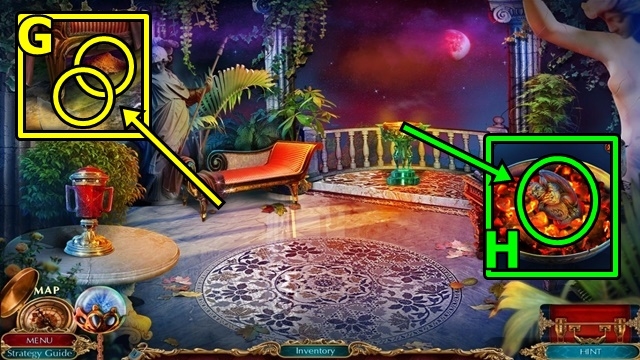
- Solution: (A-B). Take the JEWELED RING.
- Use the JEWELED RING (C); take the CANNON CRYSTAL.
- Return to Mesina.
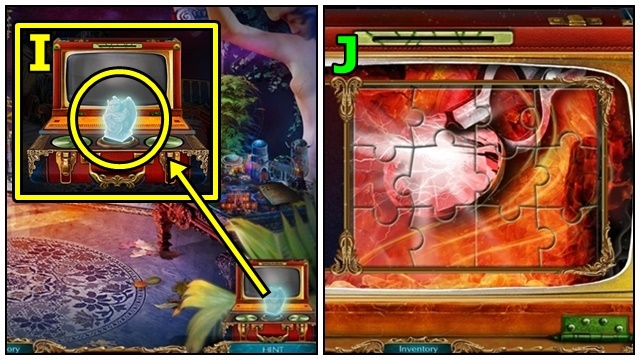
- Add the CANNON CRYSTAL (D).
- Move forward.
- Insert the CORK (E); take the BOILER HANDLE.
- Insert the PUZZLE FRAGMENT (F); play the mini-game.
- Solution: 1x2-2-1x2-3x2-2-3x2-5x2-4-13x2-12-11x3-3-7-3x3-5-8-13x3-11x2-9x2- 10- 9x3-6-1-11-9-10-9x3-6-1x3-11-12-13-8-5-11x2-9-10-9x2-12-11x2-13x2-12-11x3-13x2-12-11x3-13-12-13x2-12-13x2-12-13x3 (G). Take the MOON MIRROR.
- Move forward.
- Insert the MOON MIRROR into the LIGHT CANNON (inventory); take the LIGHT CANNON.
- Use the LIGHT CANNON (H).
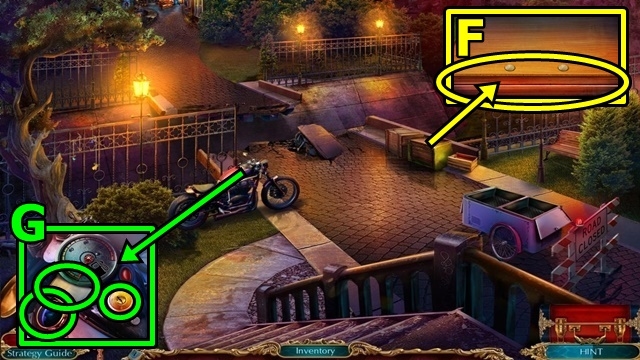
- Take the CANE (I).
- Use the WIRE CUTTER (J); receive the SCHEDULE NUMBER.
- Enter the Engine.
- Insert the BOILER HANDLE (K).
- Play the HOP (K1); receive the WAITING ROOM KEY.
- Move down.
- Insert the WAITING ROOM KEY (L). Enter the Waiting Room.
- Talk to the Engineer (M).

- Insert the SCHEDULE NUMBER (N); take the NOSE and DRAGON AMULET.
- Insert the DRAGON AMULET (O); play the mini-game.
- Solution: 1x3, 2, 3x2, 2x3, 3, 2x3, 1x5 (P). Take the PLANT POISON.
- Return to the Park.
- Use the PLANT POISON (Q). Enter the Garden.
Chapter 2: The Water Tower
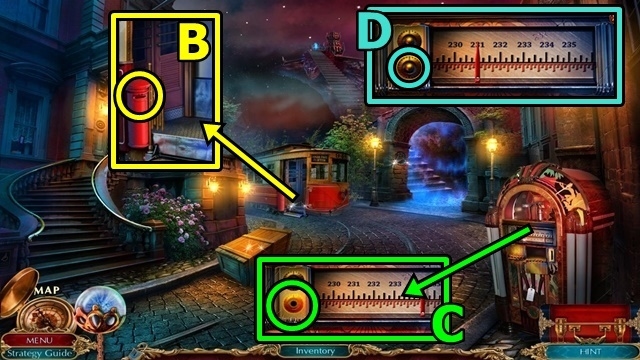
- Insert the NOSE (R); take the WATER KEY and RAKE.
- Insert the WATER KEY (S); play the mini-game.
- Solution: 6-5-1x6-3x4-2x7-4x6 (T).
- Enter the Water Tower.
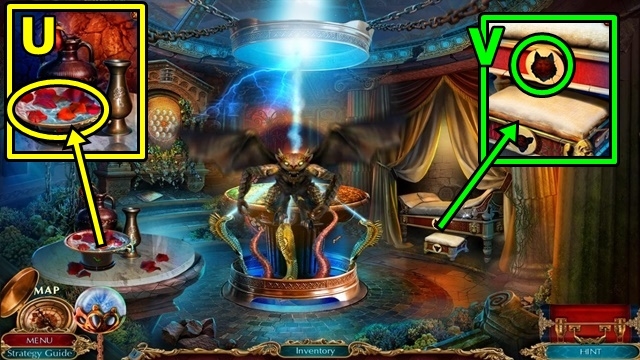
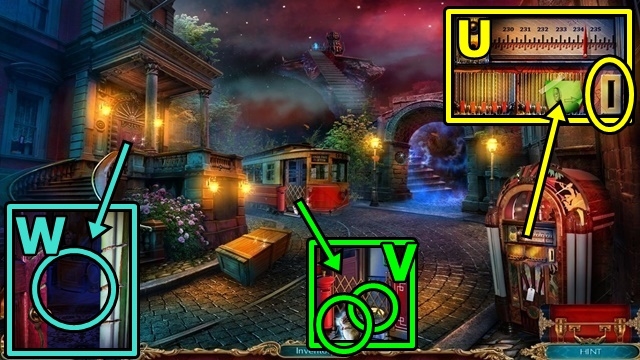
- Use the RAKE (U); take the WOLF AMULET.
- Insert the WOLF AMULET (V); take the DRAGON ICON, read the note.
- Return to the Train Station.
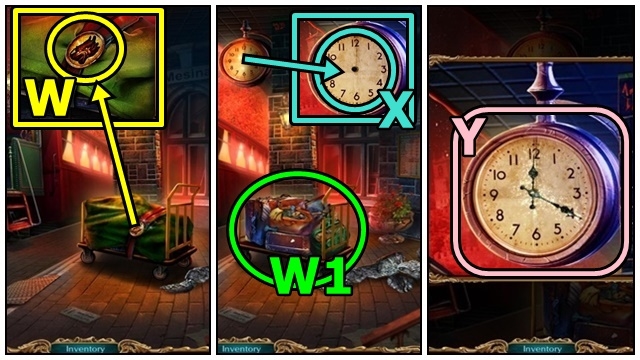
- Insert the DRAGON ICON (W).
- Play the HOP (W1); receive the CLOCK HANDS.
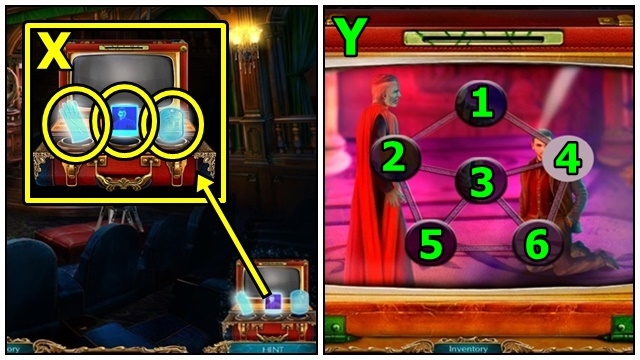
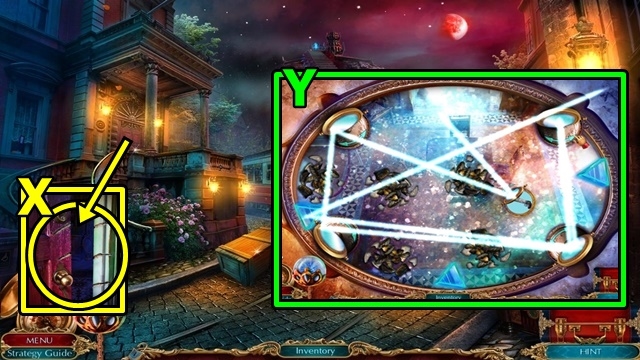
- Add the CLOCK HANDS (X); play the mini-game.
- Solution: (Y). Take the GEAR AMULET.
- Enter the Engine.
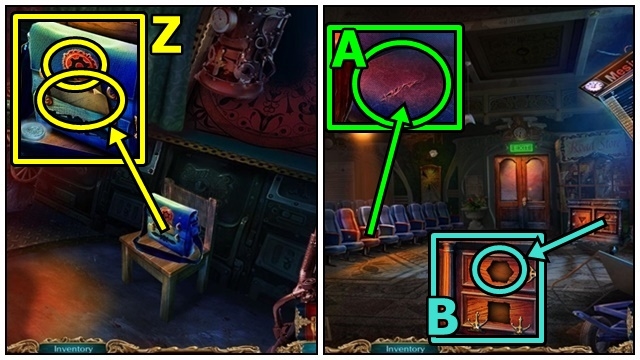
- Read the note (Z); insert the GEAR AMULET; take the GLASS, HEXAHEDRON and SILICONE.
- Return to the Waiting Room.
- Use the GLASS (A); take the PLASTER.
- Insert the HEXAHEDRON (B); take the PITCHER.
- Return to the Park.
- Use the PITCHER (C); receive the WATER PITCHER.
- Return to the Water Tower.
- Add the SILICONE (D); take the SILICONE MOLD.
- Pour the WATER PITCHER, then PLASTER into the SILICONE MOLD (inventory); take the IONIC ELEMENT.
- Insert the IONIC ELEMENT (E); take the ANCIENT ROMAN CLASP.
- Return to the Engine.
- Insert the ANCIENT ROMAN CLASP (F); take the PANEL BUTTON.
- Insert the PANEL BUTTON (G); play the mini-game.
- Solution: (H). Take the FIRST AID KEY and TRAIN PARTS.
- Move down.
- Attach the TRAIN PARTS (I); receive the PIER KEY.
- Enter the Waiting Room.
- Insert the PIER KEY (J). Go to the Pier.
- Talk to the woman (K). Receive the LEVER.
- Use Harry (L); take the LAUREL CROWN.
- Return to the Garden.
- Insert the LAUREL CROWN (M); take the GARGOYLE AMULET.
- Enter the Water Tower.
- Insert the GARGOYLE AMULET (N); take the BOARDS (1/2) and CENTAUR TORSO.
- Move down.

- Insert the CENTAUR TORSO (O); take the MASTER KEY.
- Return to the Pier.
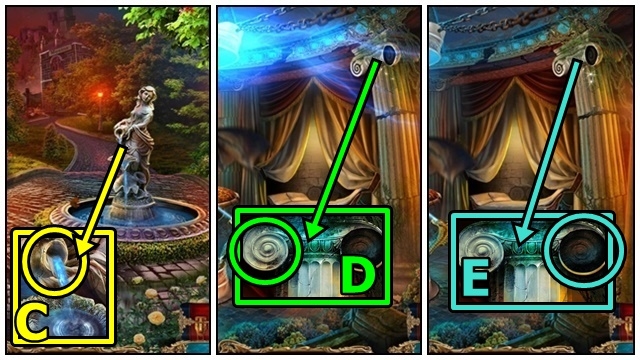
- Insert the MASTER KEY (P). Take the MOON MIRROR; read the note. Insert the LEVER.
- Take the BOAT KEY (Q).
- Insert the BOAT KEY (R).
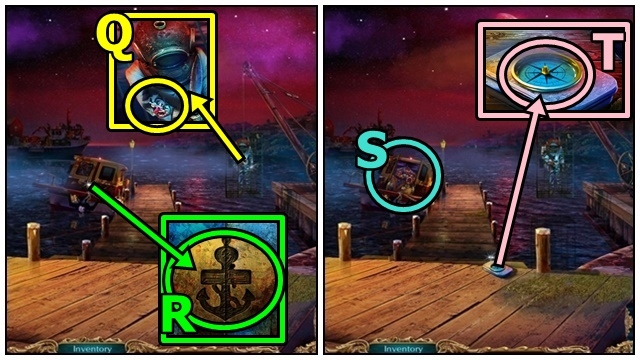
- Play the HOP (S); receive the COMPASS ARROW.
- Insert the COMPASS ARROW (T); take the TRIANGLE.
- Move down.
- Insert the TRIANGLE (U). Use Harry; take the METAL ROSE.
- Return to the Water Tower.
- Insert the MOON MIRROR into the LIGHT CANNON (inventory); take the LIGHT CANNON.
- Use the LIGHT CANNON (V).

- Insert the METAL ROSE (W); take the GARGOYLE AMULET.
- Insert the GARGOYLE AMULET (X); play the mini-game.
- Solution: (Y). Take the PHOTO.
- Use the PHOTO (Z); play the mini-game.
- Solution: (A). Take the OIL.
- Return to the Pier.

- Use the OIL (B); take the STEEL SWORD.
- Return to the Water Tower.
- Read the note (C). Use the STEEL SWORD.
- Take the SQUARE (D).
- Return to the Waiting Room.
- Insert the SQUARE (E); take the REGISTER HANDLE and RING.
- Move forward.
- Insert the REGISTER HANDLE (F); take the HOSE.
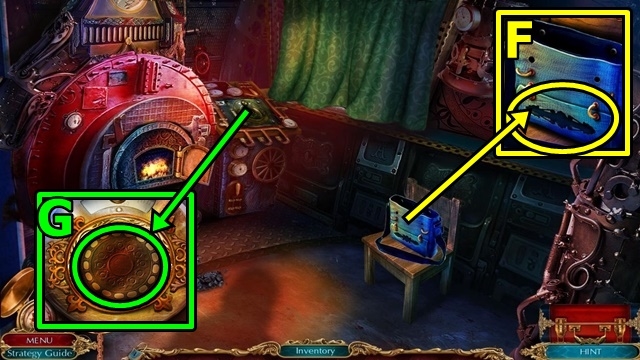
- Insert the HOSE (G); play the HOP.
Chapter 3: The Air Tower
- Talk to Bill (H).
- Insert the FIRST AID KEY (I). Take the BOARDS (2/2) and BANDAGE. Read the note.
- Add the two BOARDS (J) and BANDAGE; receive the TOKEN.
- Use Harry (K). Move forward.
- Use the CANE (L), receive the GLOVE.
- Enter the Cinema (M).
- Talk to the man (N).

- Take the SHELL LEVER (O).
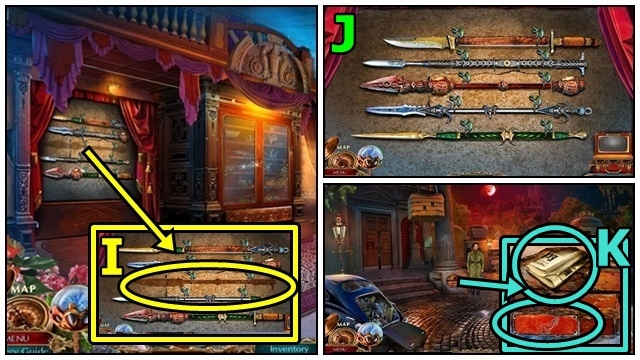
- Attach the RING (P); take the TWEEZERS and COGWHEEL.
- Attach the COGWHEEL (Q); play the mini-game.
- Solution: 5-1-6-1x2-5-1-3-1x4 (R). Take the SWITCH.
- Move down.
- Read the note (S); insert the SHELL LEVER. Take the MAILBOX TOKEN and NEEDLE.
- Insert the MAILBOX TOKEN (T); take the BROKEN FILM REEL and RAG.
- Move down.
- Offer the BROKEN FILM REEL (U); receive the FILM REEL.
- Return to the Cinema.
- Insert the SWITCH (V) and the FILM REEL. Press the switch. Take the NOTE WITH CODE. Use the TWEEZERS; receive the FILM.
- Add the FILM (W); take the PHOTO.
- Add the GLOVE (X), PHOTO and TOKEN; play the mini-game.
- Solution: 3-2-5-6-3-4-1-2-3 (Y). Take the PHOTO.
- Return to the River Park.
- Use the PHOTO (Z). Attach the NOTE WITH THE CODE; play the mini-game.
- Solution: (A). Take the AIR KEY and MOON MIRROR.
- Insert the AIR KEY (B); play the mini-game.
- Solution: (C). Enter the Air Tower.
- Insert the MOON MIRROR into the LIGHT CANNON (inventory); take the LIGHT CANNON.
- Use the LIGHT CANNON (D).
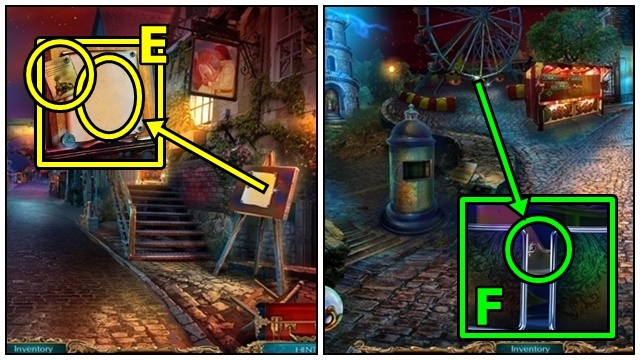
- Use the RAG (E); take the PLASTER PATTERN.
- Insert the PLASTER PATTERN (F). Read the note; take the LETTER OPENER.
- Return to the Shopping District.
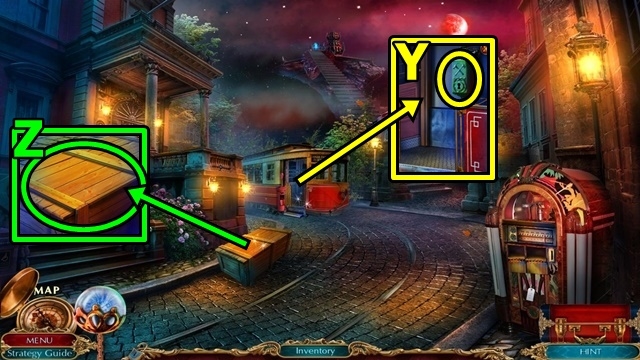
- Use the LETTER OPENER (G); take the SHOP KEY.
- Use the SHOP KEY (H).
- Play the HOP (I); receive the COMEDY MASK.
- Insert the COMEDY MASK (J); receive the STRINGS.
- Return to the Air Tower.
- Attach the STRINGS (K); play the mini-game.
- Solution: 2-1-3 (L). Take the EAGLE STATUETTE.
- Add the EAGLE STATUETTE (M); play the mini-game.
- Solution: (N). Take the PHOTO.
- Use the PHOTO (O); play the mini-game.
- Solution: (P). Take the FILE and COIN.
- Return to the Shopping District.

- Use the FILE (Q). Move forward.
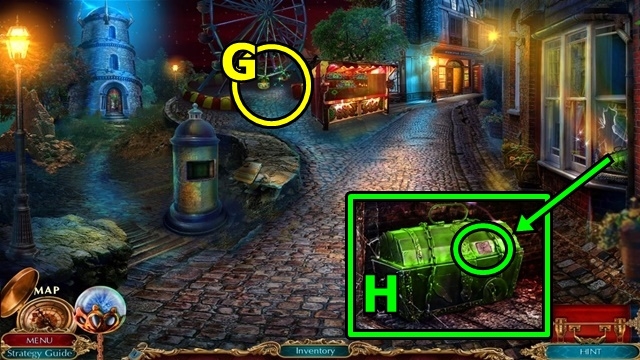
- Use the NEEDLE (R); receive the CONE.
- Use Harry (S); receive the HOSE.
- Take the CAN WITH HOSE (2/2) (T). Insert the CONE; take the PIZZA KNIFE.
- Use the PIZZA KNIFE (U); take the LIGHTBULB.
- Return to the Cinema.
- Insert the LIGHTBULB (V).
- Play the HOP (W); receive the FLEUR-DE-LIS.
- Insert the FLEUR-DE-LIS (X); take the ICE CREAM BAR.
- Return to the Bridge.
- Insert the ICE CREAM BAR (Y); take the CHERUB and CLOWN MASK.
- Move down.
- Insert the CHERUB (Z); take the WOLF FIGURE.
- Return to the Air Tower.

- Insert the WOLF FIGURE (A); take the BRONZE SPEAR.
- Read the note (B); use the BRONZE SPEAR.
- Take the FOUR-POINTED STAR (C).
- Move down.
- Insert the FOUR-POINTED STAR (D); take the HELMET and the FORK.
- Use the CAN WITH HOSE (E); receive the FILLED CAN.
- Return to the Bridge.
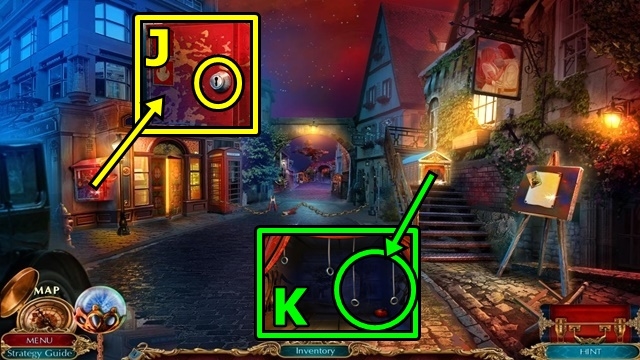
- Use the FORK (F); take the GARGOYLE PUPPET and MOTORCYCLE KEY.
- Read the note (G). Insert the FILLED CAN, then the MOTORCYCLE KEY. Turn the key.
Chapter 4: The Earth Tower

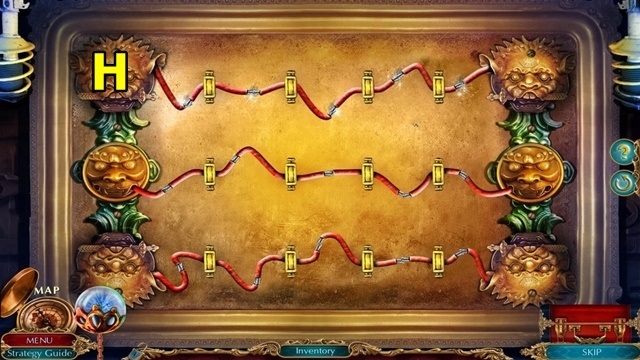
- Insert the CLOWN MASK (H); play the mini-game.
- Solution: 7x3-26-21-26x3-22-17x7-18x3-12x3-18x2 (I). Take the FLAME KEY.
- Move forward.
- Insert the FLAME KEY (J); take the EXTINGUISHER.
- Add the GARGOYLE PUPPET (K); take the SCREWDRIVER.
- Move down.
- Use the EXTINGUISHER (L); take the LOCKBOX CODE.
- Move forward.
- Enter the Telephone Exchange (M).
- Talk to the woman (N).
- Add the LOCKBOX CODE (O); play the mini-game.
- Solution: (P). Take the TYPEWRITER BUTTON and WIRES (1/3). Add the TYPEWRITER BUTTON (Q); take the WIRES (2/3).
- Use the SCREWDRIVER (R).
- Play the HOP (S); receive the NUMBERED NOTE.
- Add the NUMBERED NOTE (T); play the mini-game.
- Solution: 5-4-6-8-7-9 (U). Take the TRAIN WHEEL.
- Use Harry (V). Add the TRAIN WHEEL. Take the WIRES (3/3).
- Read the note (W); add the three WIRES; play the mini-game.
- Solution: (X). Receive the SLINGSHOT.
- Return to the Circus.
- Insert the SLINGSHOT (Y); play the mini-game.
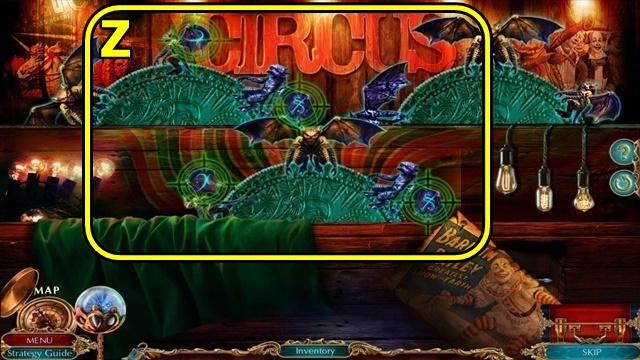
- Solution: Match the symbols on each wing. Shoot the wheel to make it rotate. The screenshot shows an example of matching the symbols (Z). Take the CROSSBOW and AMULET KEY.
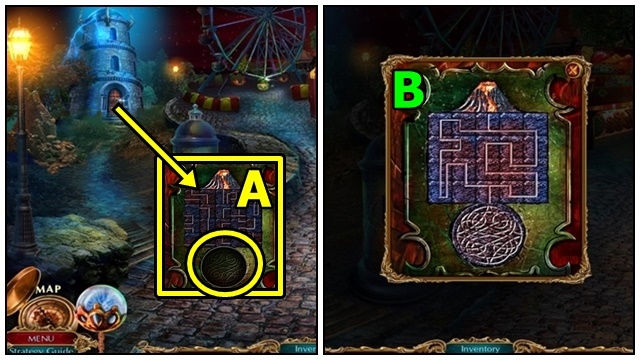
- Insert the AMULET KEY (A); play the mini-game.
- Solution: (B). Enter the Earth Tower.
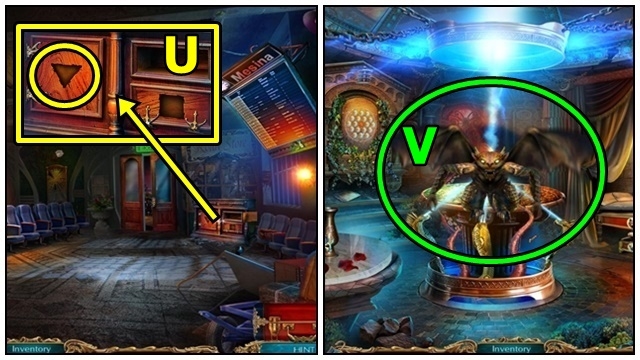
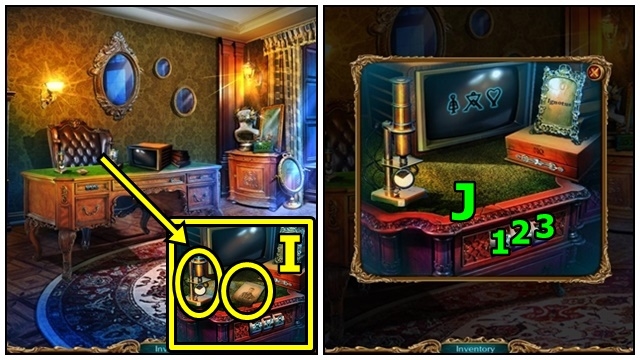
- Add the HELMET(C); take the IGNOTUS PUPPET.
- Return to Main Street.
- Add the IGNOTUS PUPPET (D); take the ARROW SHAFT and DRAWER PULL.
- Enter the Telephone Exchange.
- Add the DRAWER PULL (E); take the EAGLE FIGURE.
- Return to the Earth Tower.
- Add the EAGLE FIGURE (F); play the HOP; receive the FIREWOOD.
- Return to the Telephone Exchange.
- Place the FIREWOOD (G); take the INCENSE and the ARROWHEAD MOLD.
- Return to the Earth Tower.
- Pour the INCENSE (H). Take the CODE.
- Add the CODE (I); play the mini-game.
- Solution: (J). Take the CLAY GARGOYLE and BELLOWS.
- Place the CLAY GARGOYLE (K); play the mini-game.
- Solution: 3-7-1-2-8-3-7x2-4-7x3-5-8x2-6-8-5-8x2-5-7x2-5-8x2 (L). Take the PHOTO.
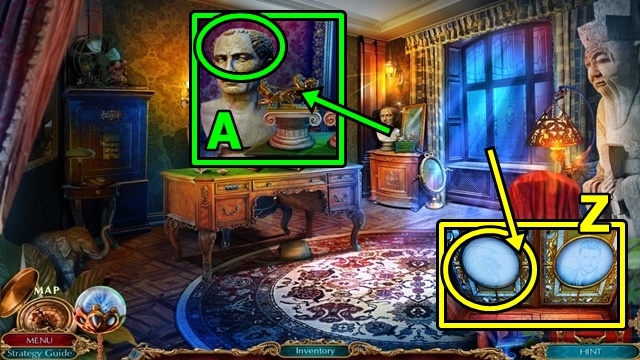
- Use the PHOTO (M); play the mini-game.
- Solution: (N). Take the LION RING and COPPER.
- Return to the Telephone Exchange.
- Insert the LION RING (O). Open the box; take the MOON MIRROR.
- Return to the Earth Tower.
- Insert the MOON MIRROR into the LIGHT CANNON (inventory); take the LIGHT CANNON.
- Use the LIGHT CANNON (P).
- Place the ARROWHEAD MOLD (Q); add the COPPER, then use the BELLOWS. Take the ARROWHEAD.
- Add the ARROW SHAFT and ARROWHEAD to the CROSSBOW (inventory); add the arrow; take the CROSSBOW.
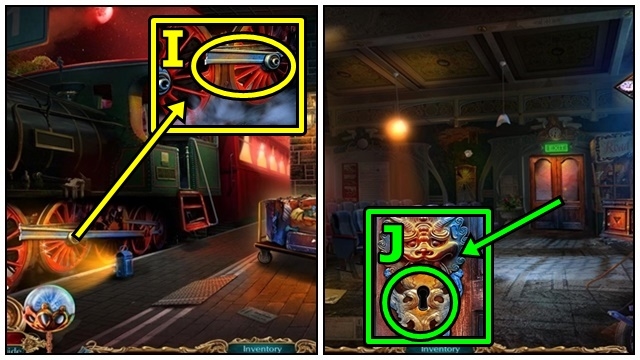
- Read the note (R); use the CROSSBOW.
- Take the NIPPERS (S).
- Return to Main Street.
- Use the NIPPERS (T). Move forward.
Chapter 5: Gabriel's House
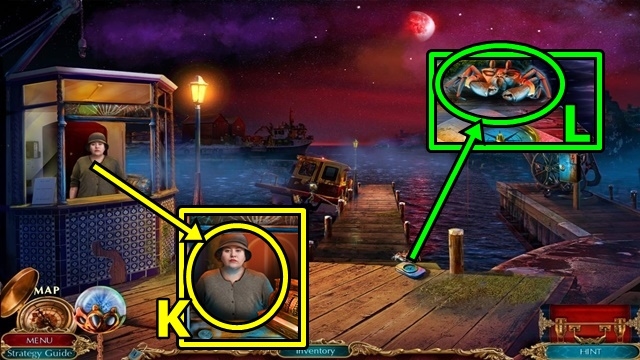
- Insert the COIN (U); take the MIRROR.
- Use Harry (V); take the GARGOYLE..
- Try to open the door (W). Use the MIRROR; play the HOP; receive the RED MOON MIRROR.
- Insert the RED MOON MIRROR into the LIGHT CANNON (inventory); take the LIGHT CANNON.
- Use the LIGHT CANNON (X); play the mini-game.
- Solution: (Y).
- Add the GARGOYLE (Z); take the LAURELS.
- Place the LAURELS (A); take the LEVER.
- Move down.
- Insert the LEVER (B); take the DIAL.
- Add the DIAL (C); play the mini-game.
- Solution: (D). Take the BRUSH.
- Move down.
- Read the note (E); use the BRUSH; take the RULER.
- Move down.
- Use the RULER (F).
- Play the HOP (G); receive CHEST KEY.
- Use CHEST KEY (H); take the LENS.
- Return to Gabriel's House.
- Read the note (I); insert the LENS; play the mini-game.
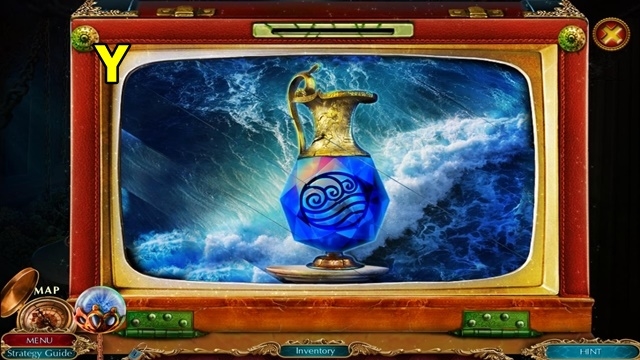
- Solution: 1x3, 2x4, 3x3 (J). Take the PORTAL KEY and WATER BOTTLE.
- Move down.
- Insert the PORTAL KEY (K). Move forward.
- Add the WATER BOTTLE (L); take the DIRT.
- Add the DIRT (M); take the CHARIOT.
- Return to Gabriel's House.
- Place the CHARIOT (N); read the note, take the SWITCH.
- Add the SWITCH (O); press the button. Take the FEATHER.
- Return to the Floating Island.
- Place the FEATHER (P); take GABRIEL'S PORTRAIT.
- Return to Gabriel's House.
- Insert the GABRIEL'S PORTRAIT (Q); take the LOCKET.
- Insert the LOCKET (R). Use Harry; take the BUCKLE and TORCH.
- Return to the Earth Tower.
- Add the TORCH (S); receive the BURNING TORCH.
- Return to the Floating Island.
- Place the BURNING TORCH (T); take the ELEMENTAL CIRCLE.
- Insert the ELEMENTAL CIRCLE (U); play the mini-game.
- Solution: 5-4-3x2-4-3-2x2-1-4x2-1-4x2-1x2-2-5-2x2-5 (V). Move forward.
Chapter 6: The Main Tower
- Insert the BUCKLE (W); take the PORTRAIT.
- Return to Gabriel's House.
- Insert the PORTRAIT (X); take the BUS KEY.
- Move down.
- Use the BUS KEY (Y); take the CROWBAR and HOOK.
- Use the CROWBAR (Z); take the STICK and RUBY.
- Return to the Main Tower.
- Go to the Balcony (A).
- Move the sheet (B).
- Play the HOP (C); receive the BROKEN COMPACT.
- Insert the RUBY (D); take the ROPE and SCOOP.
- Return to Main Street.
- Attach the HOOK and ROPE to the STICK (inventory); take the HOOK.
- Use the HOOK (E); receive the PINCUSHION.
- Return to the Balcony.
- Use the BROKEN COMPACT (F); take the POUCH.
- Add the PINCUSHION to the POUCH (inventory); take the POUCH.
- Place the POUCH (G), then use the SCOOP; take the SANDBAG.
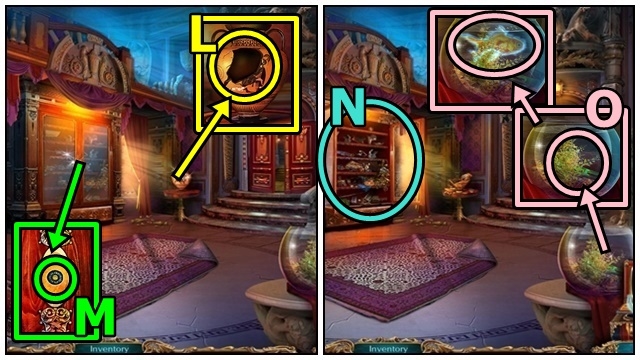
- Dump the SANDBAG (H); take the GARGOYLE and COAL.
- Add the GARGOYLE (I); play the mini-game.
- Solution: (J). Take the PHOTO.
- Move down.
- Use the PHOTO (K).
- Read the note (L); take the PARCHMENT.
- Return to Mesina Square.
- Place the PARCHMENT (M), then use the COAL. Take the CODE.
- Enter Gabriel's House.
- Place the CODE (N); play the mini-game.
- Solution: 2-4-6-8-0 (O). Take the STRANGE MEDALLION and the SUPER MOON MIRROR.
- Return to the Main Tower.
- Insert the STRANGE MEDALLION (P).
- Insert the SUPER MOON MIRROR into the LIGHT CANNON (inventory); take the SUPER LIGHT CANNON.
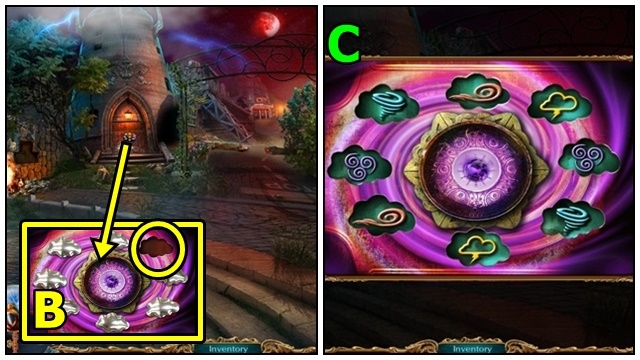
- Use the SUPER LIGHT CANNON (Q); play the mini-game.
- Solution: Aim for multiple groupings of marbles (R).
- Congratulations! You've completed The Curio Society: Eclipse Over Mesina.
Created at: 2015-12-27