Walkthrough Menu
- General Tips
- Chapter 1: Headquarters
- Chapter 2: Near the Tower
- Chapter 3: Outside the Hospital
- Chapter 4: Ainsley's Hut
- Chapter 5: Hospital Back Alley
General Tips
- This is the official guide for The Curio Society: The Thief of Life.
- This guide will not mention each time you have to zoom into a location; the screenshots will show each zoom scene.
- Hidden-object puzzles are referred to as HOPs. This guide will not show HOP solutions. It will identify the location of the HOP and the inventory item acquired.
- This guide will show solutions for non-random puzzles. Please read the in-game instructions for each puzzle.
- In this game, you will sometimes have to select the new scene to trigger dialog, cut-scenes, or tasks prior to interacting with the scene.
Chapter 1: Headquarters
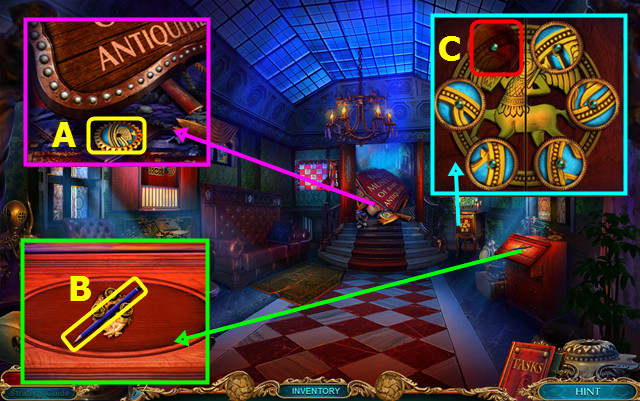
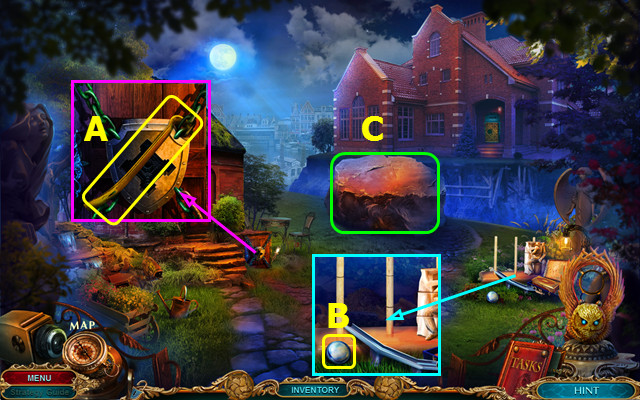
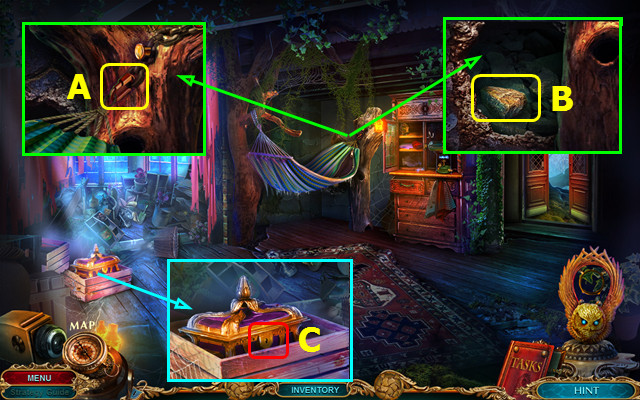
- Take the COGWHEEL (A).
- Take the 1/2 PENCIL AND TRACING PAPER (B).
- Place the COGWHEEL (C).
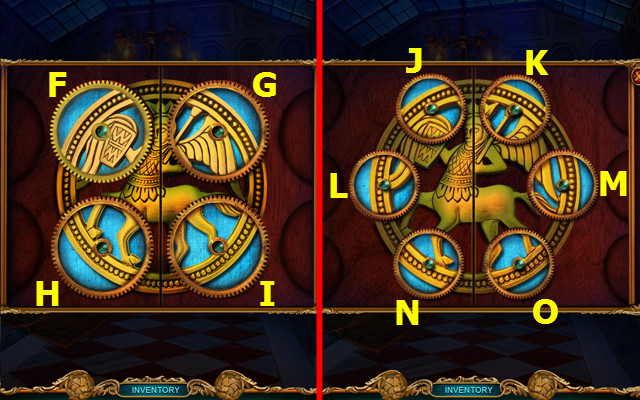
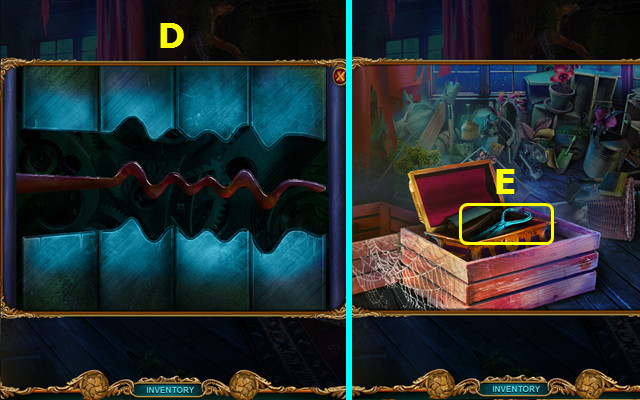
- Easy solution: Ix11-Gx9-Hx2-Fx4.
- Hard solution: Mx5-Nx3-Kx4-Jx3.
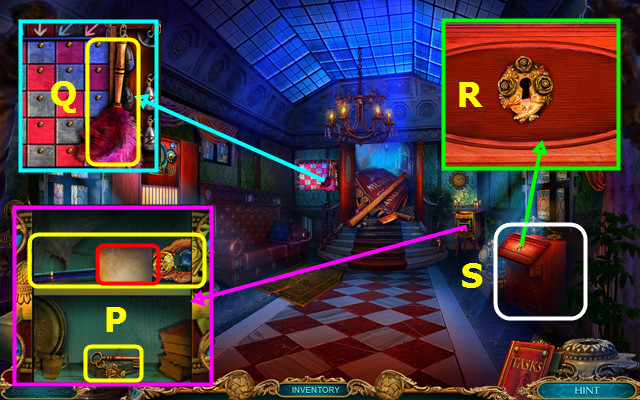
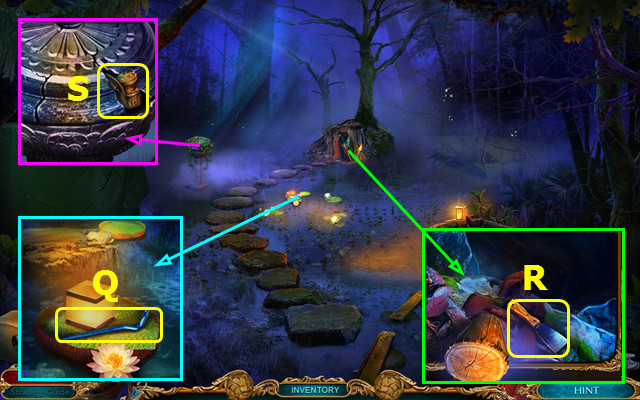
- Read the note; take the ANTIGRAVITY SCEPTER and the BUREAU KEY (P).
- Take the DUSTER (Q).
- Use the BUREAU KEY (R).
- Play the HOP; earn the ROLLING INDEX (S).
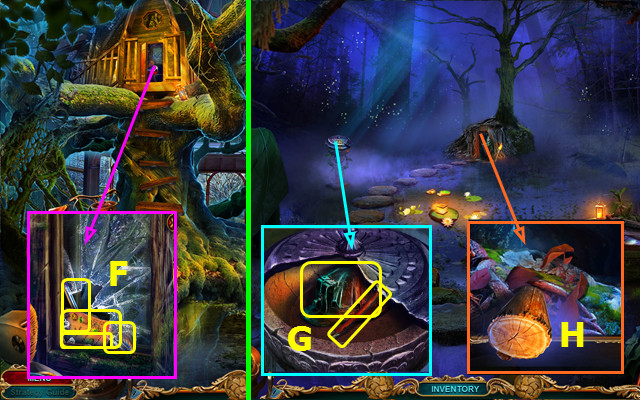
- Select the ROLLING INDEX and read the note.
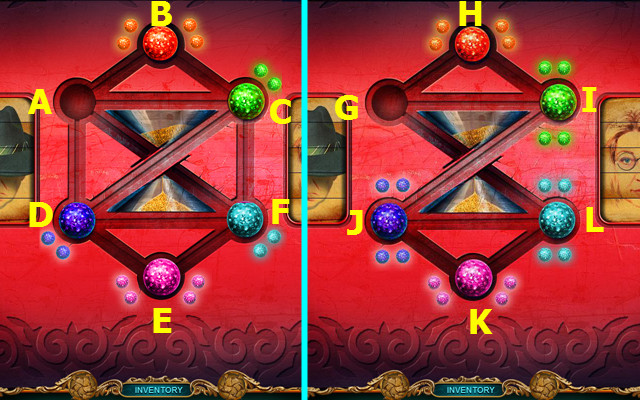
- Easy solution: D-A-B-C-F-D-E-F-A.
- Hard solution: J-L-G-H-I-J-K-L-G.
- Take MARY FINCHER'S NUMBER.
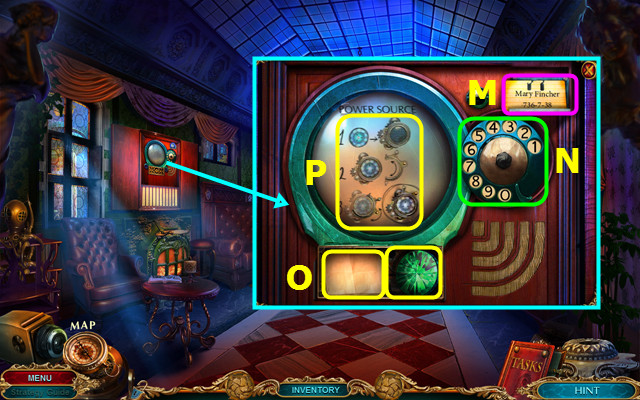
- Take the ELECTRICAL TAPE and place MARY FINCHER'S NUMBER (M).
- Select the numbers 7-3-6-7-3-8 (N).
- Take the 2/2 PENCIL AND TRACING PAPER and the ANTIGRAVITY CRYSTAL (O).
- Use the PENCIL AND TRACING PAPER to make the ARTIFACT SKETCH (P).
- Select the ANTIGRAVITY SCEPTER.
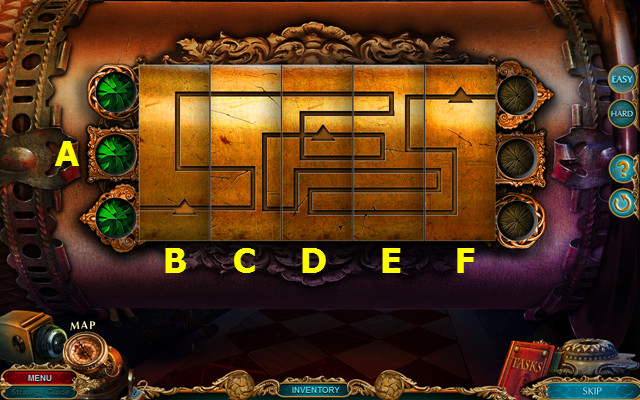
- Place the ANTIGRAVITY CRYSTAL (A).
- Easy solution; Dx2-Fx2-Ex2; D-F-Cx2-B-E; D-Fx2-Bx2-E-C.
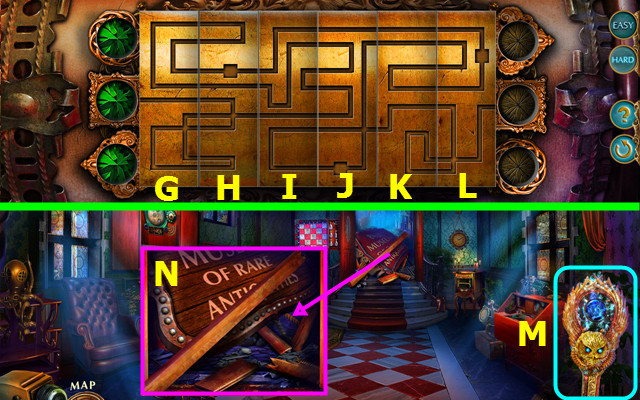
- Hard Solution: G-K-J; G-Hx2-L-Kx2-Jx2; G-H-L-Kx2-J.
- The ANTIGRAVITY SCEPTER is now on your menu bar (M).
- Use the ANTIGRAVITY SCEPTER (N).
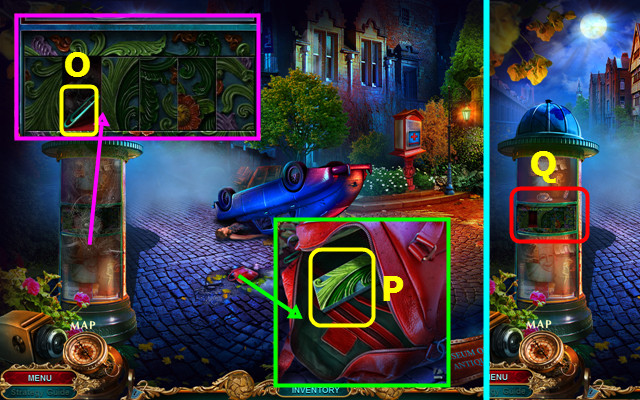
- Use the DUSTER; take the PAPER CLIP (O).
- Use the PAPER CLIP; take the FRAME DECORATION (P).
- Select (Q).
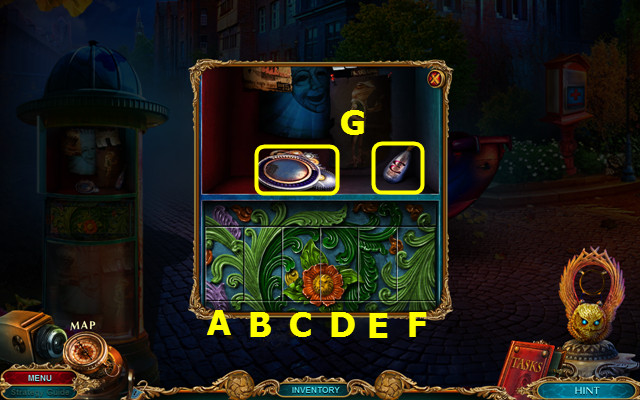
- Place the FRAME DECORATION.
- Easy solution: (A-F)-(B-C)-(D-E).
- Hard solution: E-C-A-F-C-E-B-A-B.
- Take the 1st ARTIFACT DETAIL and WEIGHT (G).
- Walk down.
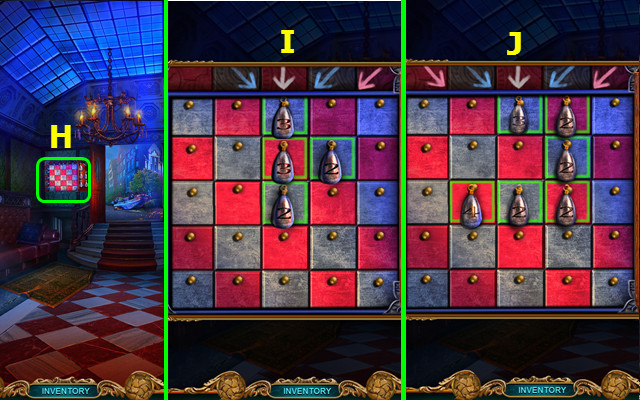
- Select (H).
- Place the WEIGHT.
- Place the weights as shown; easy solution (I) and hard solution (J).
- Take the antigravity lens and the GUEST HOUSE KEY.
- The ANTIGRAVITY SCEPTER is now charged.
- Go forward.
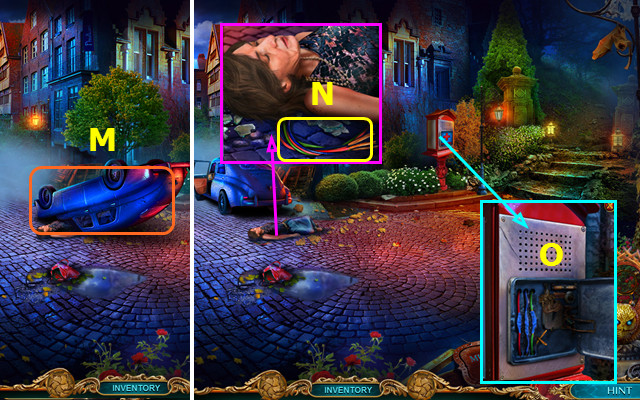
- Use the ANTIGRAVITY SCEPTER (M).
- Take the WIRES (N).
- Open the door and remove the old wires; use the WIRES and ELECTRICAL TAPE. Close the door and press (O).
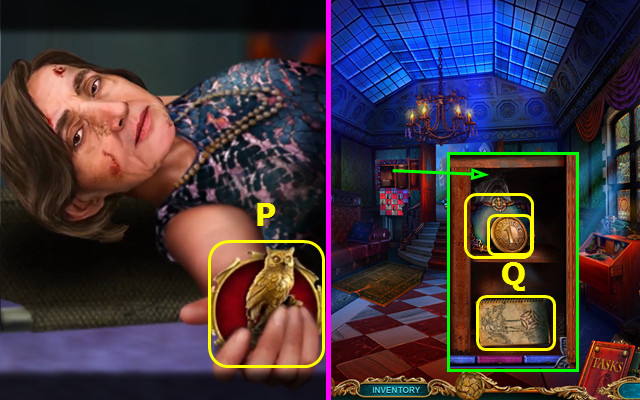
- Take the OWL INLAY (P).
- Walk down.
- Place the OWL INLAY; take the COIN and 1/2 OCULAR AND GUIDE. Take the 2/2 OCULAR AND GUIDE and read the note (Q).
- Walk forward and right.
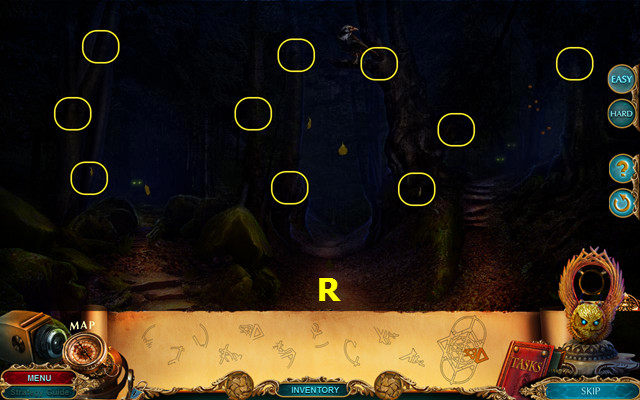
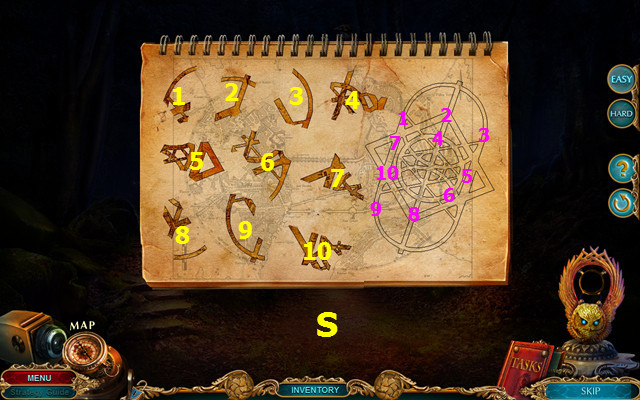
- Place the 2/2 OCULAR AND GUIDE on the scene.
- Easy solution part 1 (R).
- Easy solution part 2 (S).
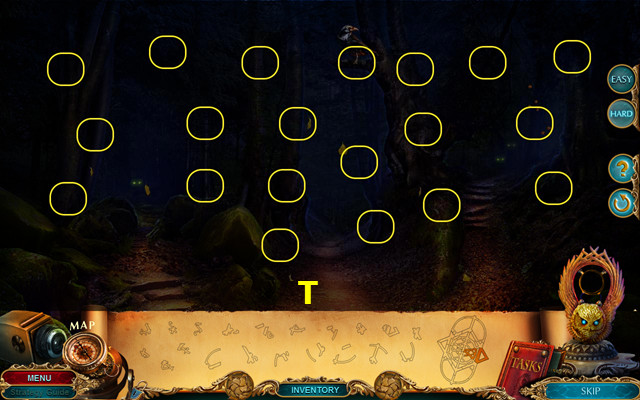
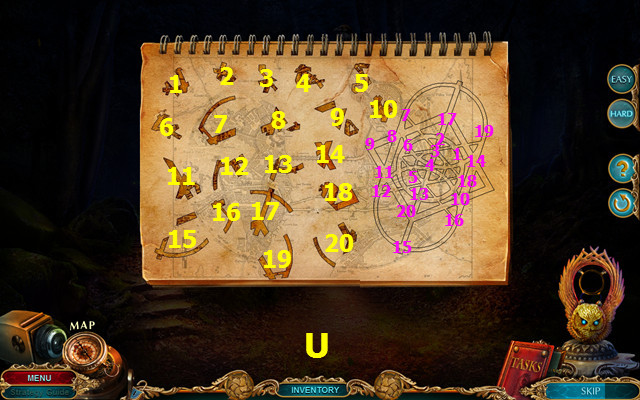
- Hard solution part 1 (T).
- Hard solution part 2 (U).
- Walk left.
- Take the CROWBAR (A).
- Take the antigravity lens (B).
- Use the ANTIGRAVITY SCEPTER (C).
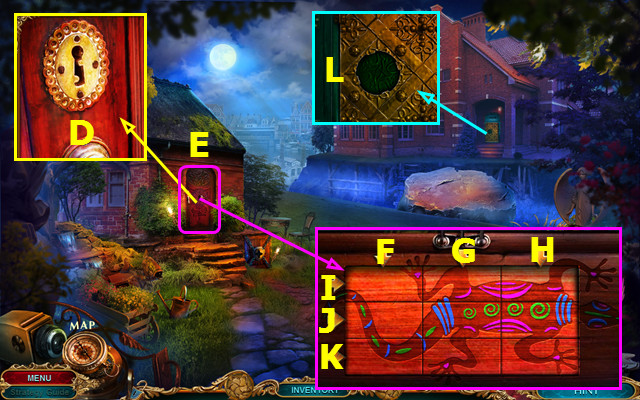
- Use the GUEST HOUSE KEY (D).
- Play the HOP (E).
- Select F-G-K-Gx2-Kx2-H-K-H.
- Take the HOUSE TOKEN.
- Place the HOUSE TOKEN (L).
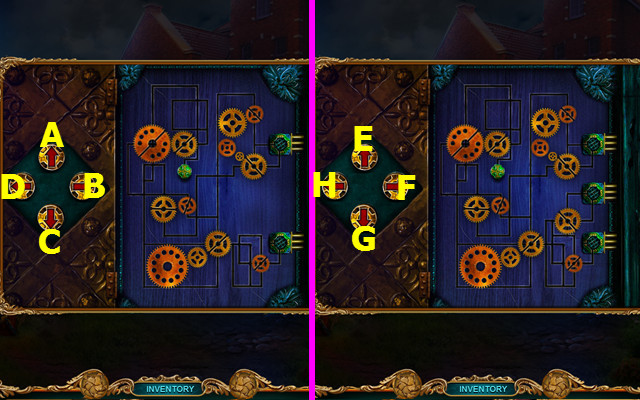
- Easy solution: A-B-Ax2-D-A-Bx2-Cx2-D-Ax3-D-Cx3-D-Cx3-B-Ax4-B-C-B.
- D-A-D-Cx4-D-A-Bx4-Cx2-D-A-Bx2-Cx2-D-A-Bx2-Cx2-D-A-B-C-Bx3-A.
- Hard solution: E-F-Ex2-H-E-Fx2-Gx2-H-Ex3-H-Gx3-H-Gx3-F-Ex4-F-G-F.
- H-E-H-Gx4-H-E-Fx3-G-F-E-H-G-F-E-H-G-Fx3-E.
- G-Hx2-E-H-G-F-E-H-G-F-E-H-G-F-E-Hx2-G-Fx2-Ex2-Hx2-G-H-G-Fx2.
- E-F-Ex2-Hx2-G-H-G-Fx2-Ex2-Hx2-G-H-E-Fx3-E.
- Go forward.
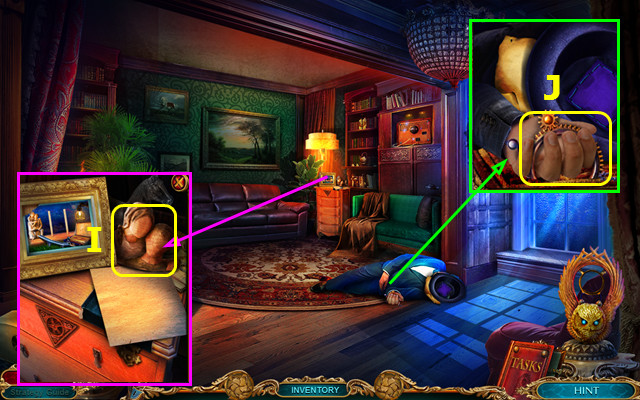
- Read the note and take the STATUE HEAD (I).
- Open the hand and take the 2nd ARTIFACT DETAIL; read the note (J).
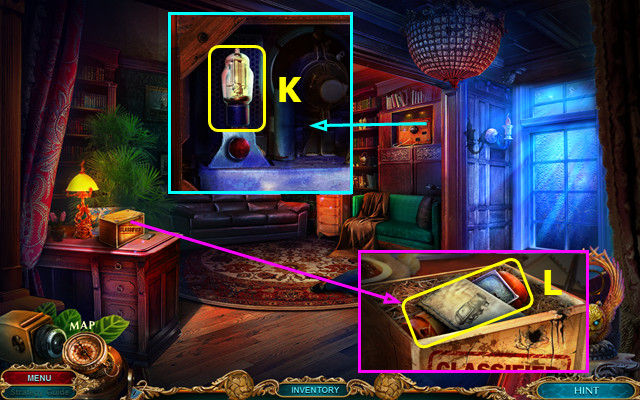
- Use the COIN; take the ELECTRONIC AMPLIFIER (K).
- Use the CROWBAR; read the note and take the PROTECTIVE CUFF (L).
- Walk down.
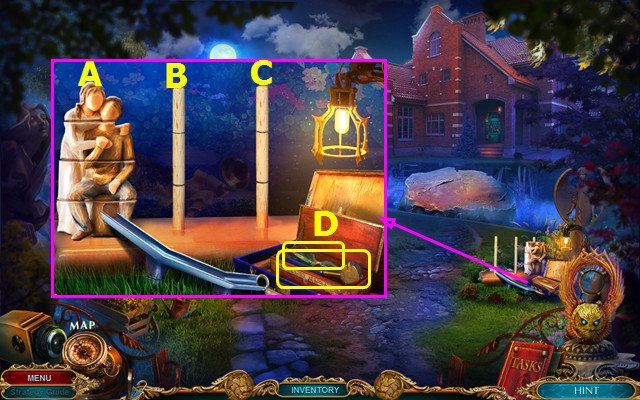
- Place the STATUE HEAD (C).
- Easy solution: (C-A)-(C-B)-(A-B)-(C-A)-(B-C)-(B-A)-(C-A).
- Hard solution: (C-B)-(C-A)-(B-A)-(C-B)-(A-C)-(A-B)-(C-B).
- (C-A)-(B-A)-(B-C)-(A-C)-(B-A)-(C-B)-(C-A)-(B-A).
- Take the GLASS CUTTER and SCISSORS PART (D).
- Go forward.
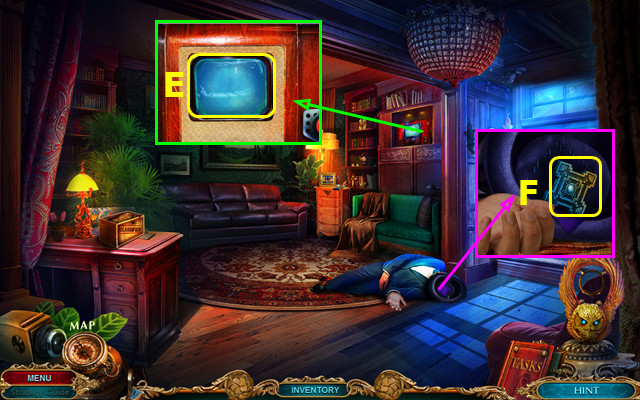
- Use the GLASS CUTTER to take the GLASS DISPLAY (E).
- Look at the PROTECTIVE CUFF and remove the broken glass. Place the ELECTRONIC AMPLIFIER and GLASS DISPLAY.
- Use the SCISSORS PART; take the CELLAR INLAY (F).
- Walk down.
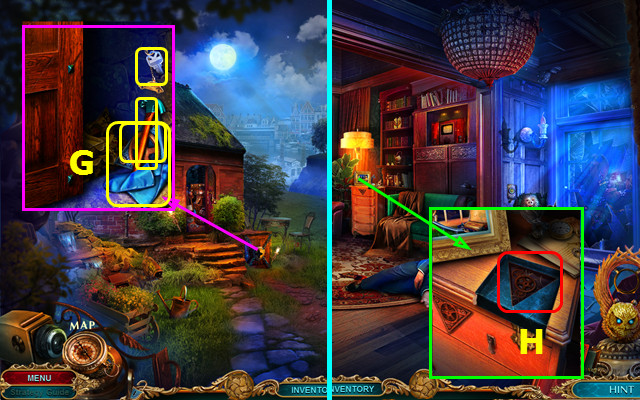
- Place the CELLAR INLAY; take the RAG, HAMMER, TRIANGLE HANDLE, and CAR KEY (G).
- Go forward.
- Place the TRIANGLE HANDLE (H).
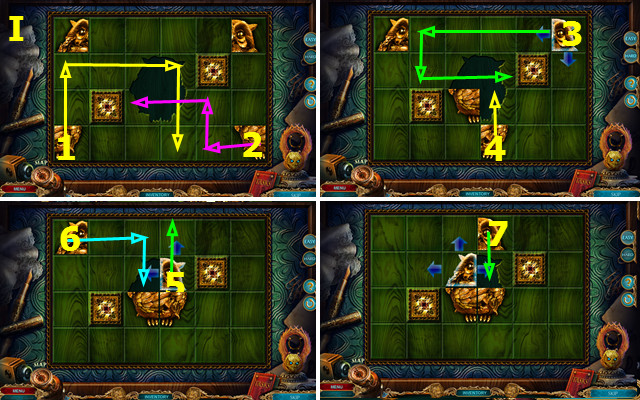
- Move the pieces as shown.
- Easy solution 1-7 (I).
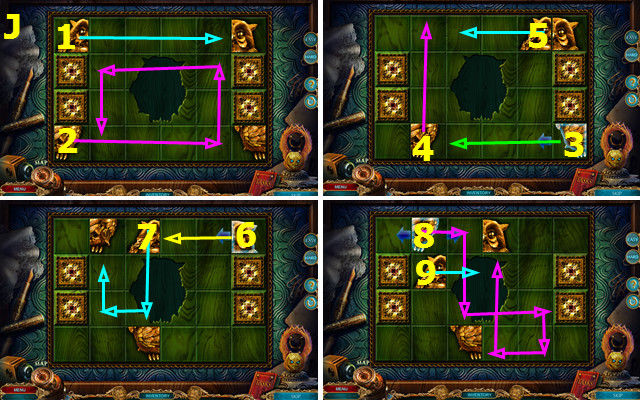
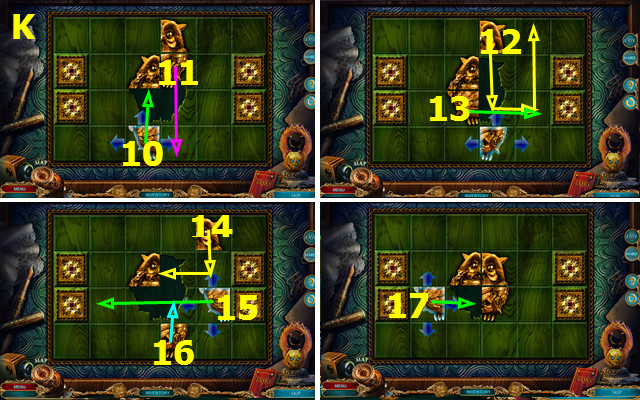
- Hard solution 1-17 (J-K).
- Take the POD CODE and the antigravity lens.
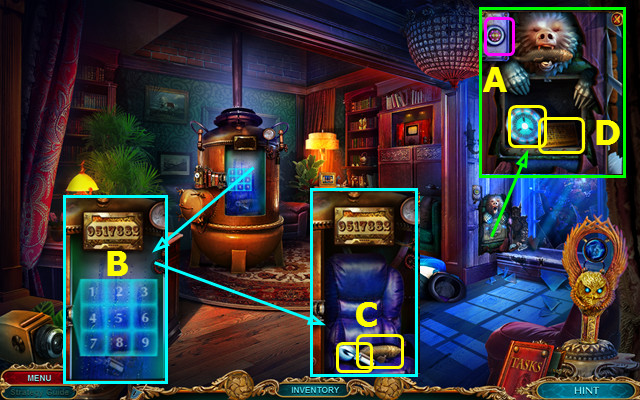
- Press the button (A).
- Place the POD CODE; enter 9-5-1-7-3-8-2 (B).
- Take the KNOB and STONE FISH (C).
- Place the STONE FISH; take the 3rd ARTIFACT DETAIL and ADDRESS PUNCH CARD (D).
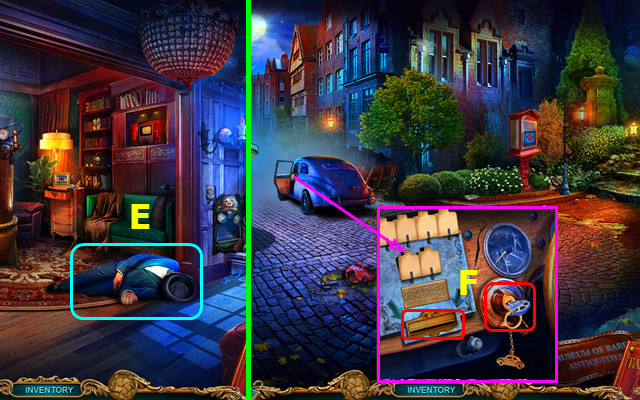
- Use the ANTIGRAVITY SCEPTER (E).
- Combine the ARTIFACT SKETCH and 3 ARTIFACT DETAILS to make the POWER SOURCE.
- Walk down 2x.
- Use the ADDRESS PUNCH CARD and CAR KEY (F).
Chapter 2: Near the Tower
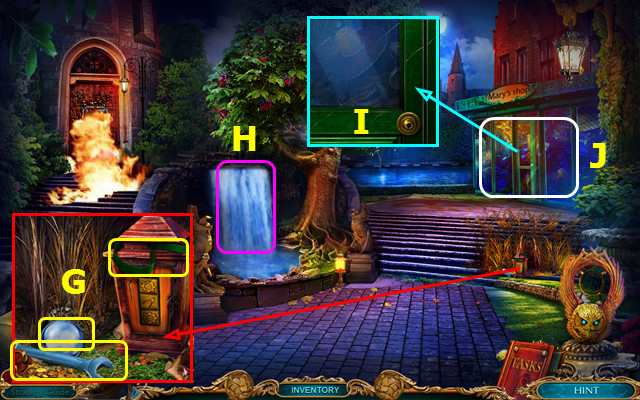
- Take the WRENCH, antigravity lens, and BELT (G).
- Use the ANTIGRAVITY SCEPTER (H).
- Use the HAMMER (I).
- Select (J).
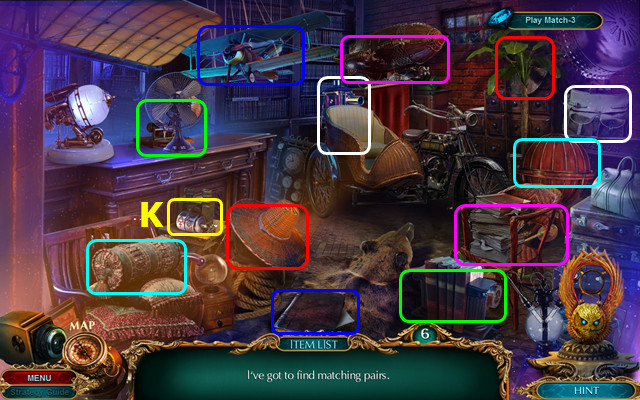
- Select the pairs (color-coded).
- Take the DOOR CYLINDERS (K).
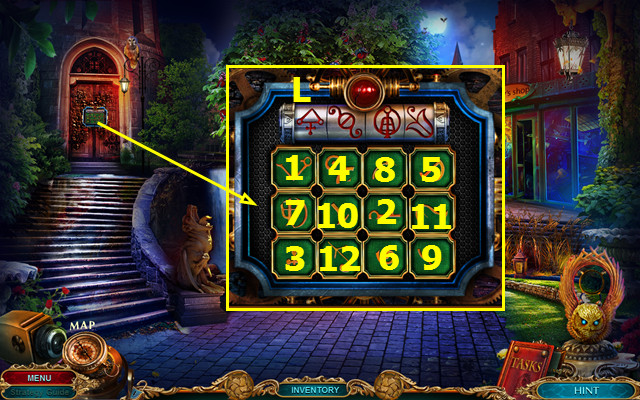
- Place the DOOR CYLINDERS (L).
- Select 1-12.
- Walk left.
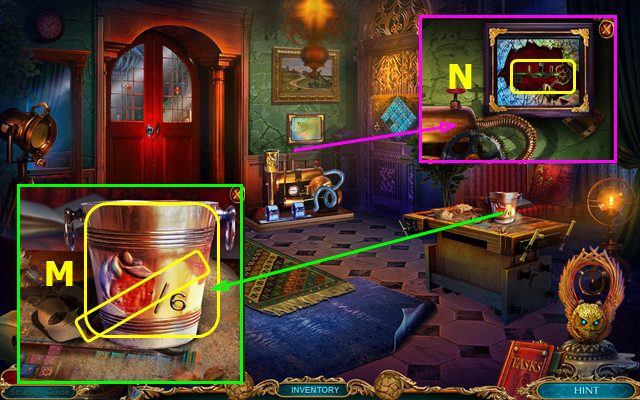
- Take the BUCKET and CARVING KNIFE (M).
- Use the HAMMER; take the TROPHY CLOSET KEY (N).
- Walk down.
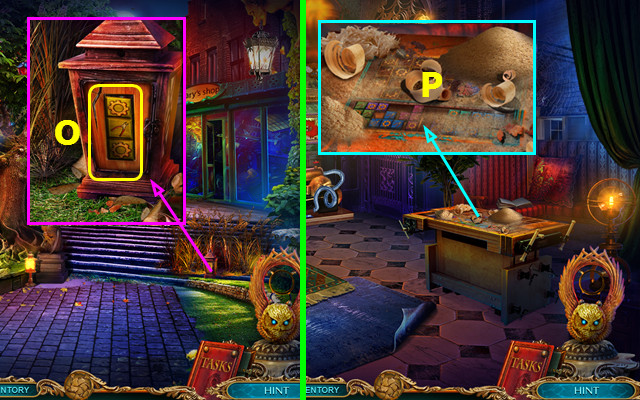
- Use the CARVING KNIFE to take the PUZZLE PIECE (O).
- Walk left.
- Use the RAG and place the PUZZLE PIECE (P).
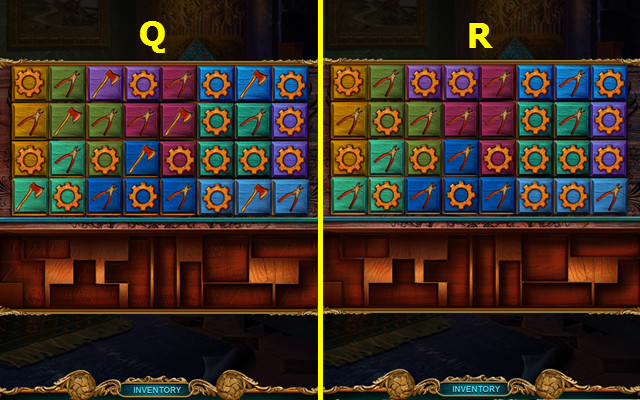
- Easy solution (Q).
- Hard solution (R).
- Take the CARVER.
- Combine the KNOB and CARVER to make the DOOR HANDLE.
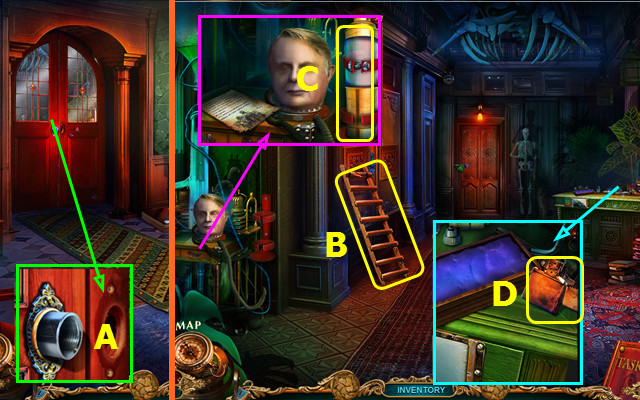
- Use the DOOR HANDLE (A).
- Walk forward.
- Take the BROKEN LADDER (B).
- Combine the BROKEN LADDER and BELT to make the REPAIRED LADDER.
- Read the note, use the WRENCH, and take the EMPTY GAS TANK (C).
- Take the LIGHTER (D).
- Walk down 2x.
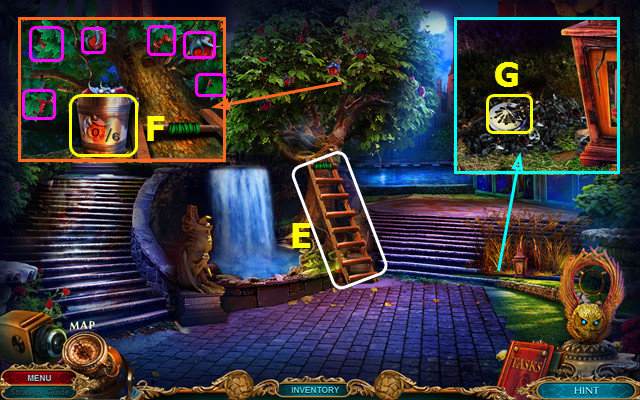
- Use the REPAIRED LADDER (E).
- Place the BUCKET; collect the 6 fruit (pink) and take the FUEL FRUITS (F).
- Use the LIGHTER; take the NEEDLE (G).
- Walk left.
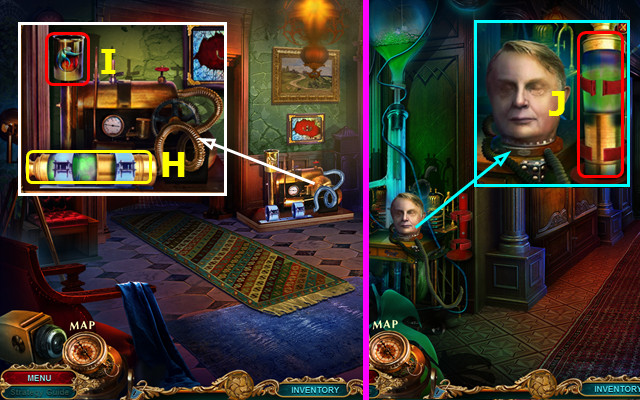
- Place the EMPTY GAS TANK (H) and use the FUEL FRUITS (I); take the GAS TANK.
- Walk forward.
- Place the GAS TANK (J).
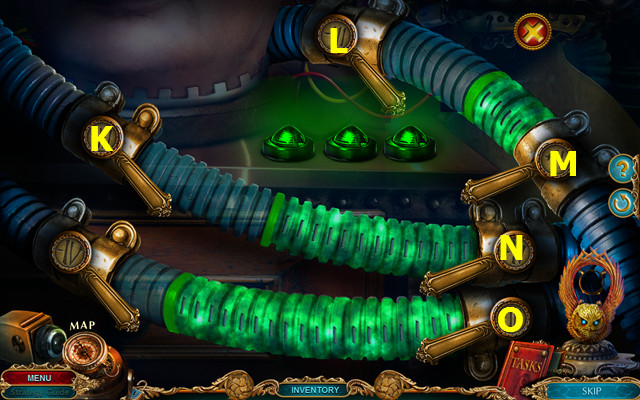
- Select M-O-L-O-L-K-O-Kx2-M-Ox2.
- Kx3-Ox2-Kx2-O-Kx3-N-K-N-K.
- Take the CUPBOARD KEY.
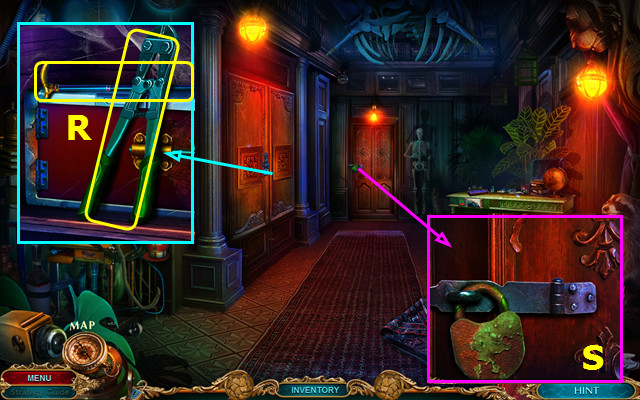
- Use the CUPBOARD KEY; take the BOLT CUTTER and CANE (R).
- Use the BOLT CUTTER (S).
- Go forward.
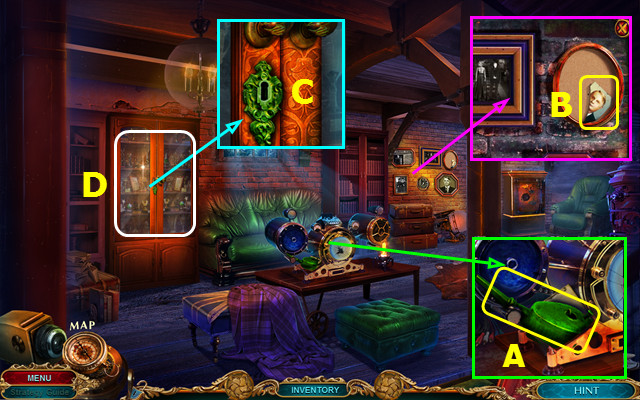
- Take the OILER and read the note (A).
- Take the PROFESSOR'S PHOTO (B).
- Use the TROPHY CLOSET KEY (C).
- Select (D).
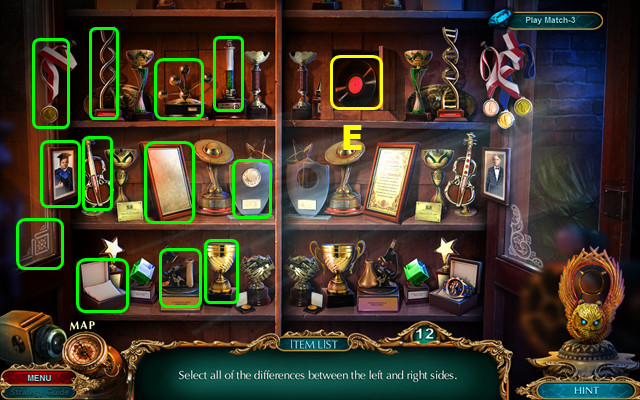
- Select the differences (green).
- Take the RECORD (E).
- Walk down.
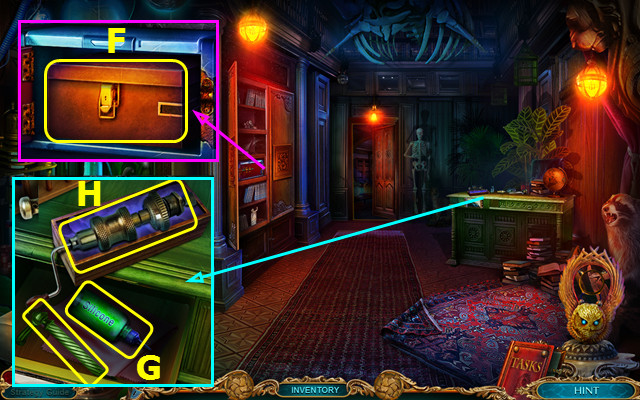
- Use the OILER; take the BROKEN PHONOGRAPH (F).
- Place the PROFESSOR'S PHOTO; take the SILICONE and DRAWER HANDLE (G).
- Open the BROKEN PHONOGRAPH and use the SILICONE; take the CRANK MOLD.
- Place the CRANK MOLD and select; take the PHONOGRAPH CRANK (H).
- Combine the BROKEN PHONOGRAPH, PHONOGRAPH CRANK, RECORD, and NEEDLE to make the PHONOGRAPH.
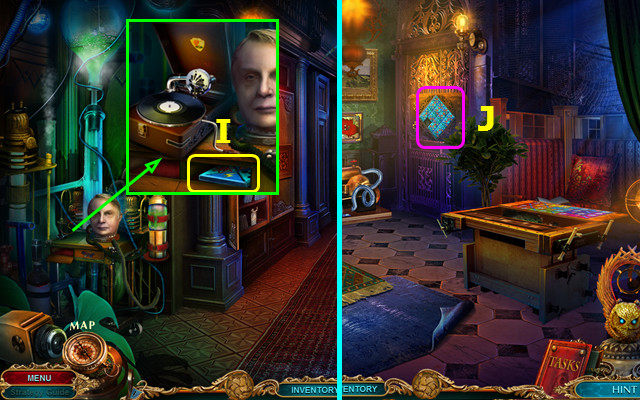
- Place the PHONOGRAPH; take the PUZZLE PIECE (I).
- Walk down.
- Select (J).
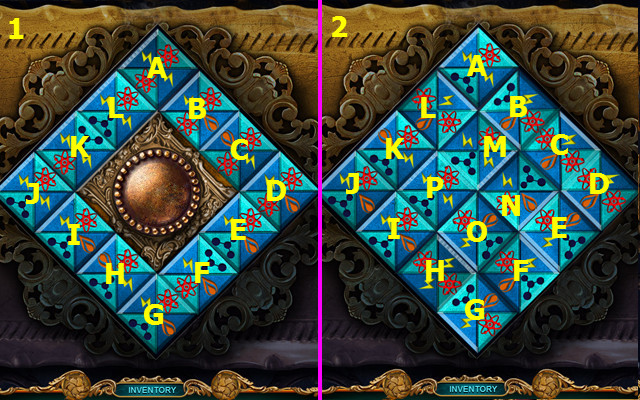
- Place the PUZZLE PIECE in the grid. Swap the pieces in parentheses.
- Easy solution (1): Hx2-A-(G-H)-Hx3-(H-G)-(D-H)-Hx3-(H-D)-(J-H)-H-(H-J).
- Hard solution (2): (H-A)-(E-G)-(E-D)-Kx1-(K-D)-Dx1-(N-K)-Kx2-(K-E).
- (E-N)-(I-E)-(D-E)-(L-F)-Ox3-Nx3-Cx2-Jx3-(N-H)-(N-P)-Jx1-(J-I).
- Jx2-(J-N)-(M-L)-Kx3-(K-P)-(I-J)-Jx1-(I-J)-Lx4-(K-L)-Kx1-(K-L).
- Press the button.
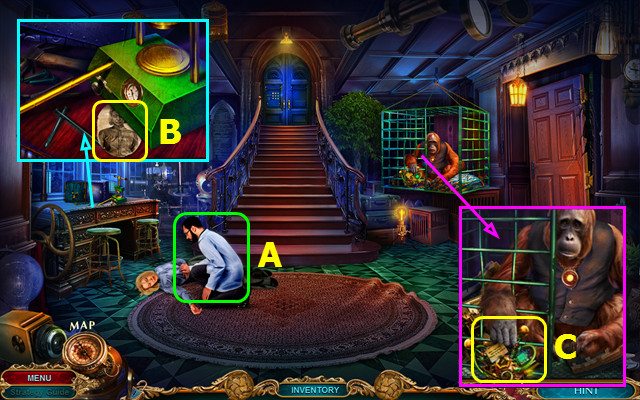
- Talk to Vincent (A).
- Take the PICTURE OF MARY (B).
- Take the BROKEN HELMET (C).
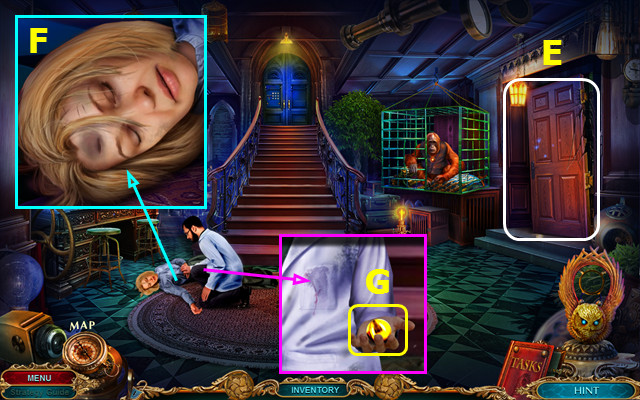
- Use the CANE, and then select to play the HOP; earn the BANDAGE (E).
- Use the BANDAGE (F).
- Take the METAL SPHERE (G).
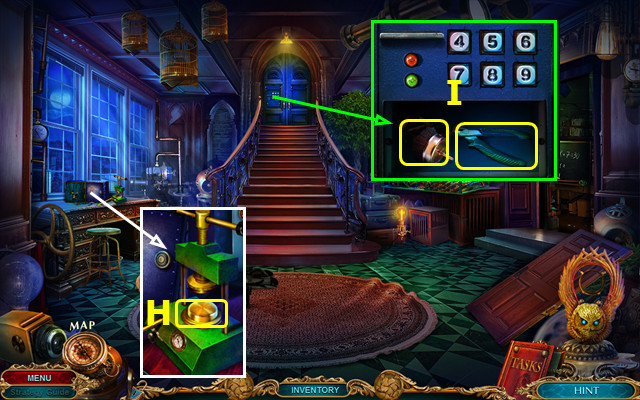
- Place the METAL SPHERE; take the PRESSED METAL (H).
- Use the PRESSED METAL; take the BRUSH and 1/2 NIPPERS AND GLOVES (I).
- Go to the Trophy Room.
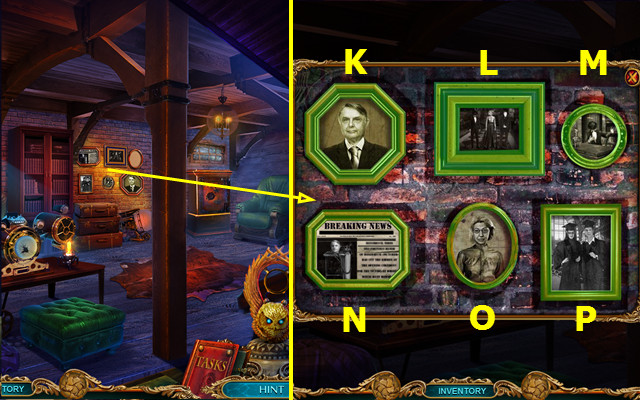
- Place the PICTURE OF MARY (M).
- Easy solution: O-P-N-O-K.
- Hard solution: M-N-K.
- Take the HOOK, LENS, and RETRACTOR.
- Return to the Laboratory.
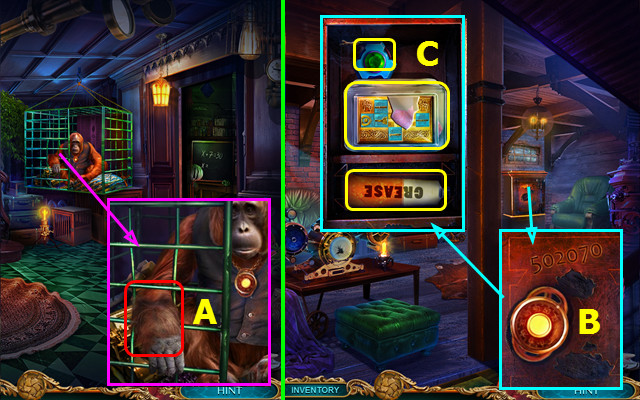
- Use the RETRACTOR; earn the SAFE DIAL (A).
- Go to the Trophy Room.
- Use the BRUSH and place the SAFE DIAL (B).
- Take the HELMET PART and PUZZLE CHEST; place the DRAWER HANDLE and take the GREASE (C).
- Read the note and add the HELMET PART to the BROKEN HELMET.
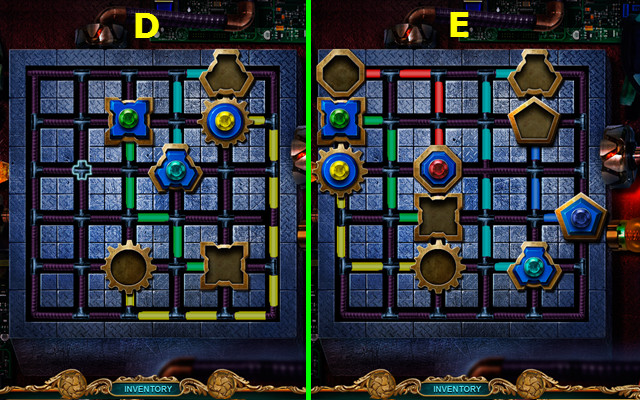
- Easy solution (D).
- Hard solution (E).
- You earn the HELMET.
- Return to the Laboratory.
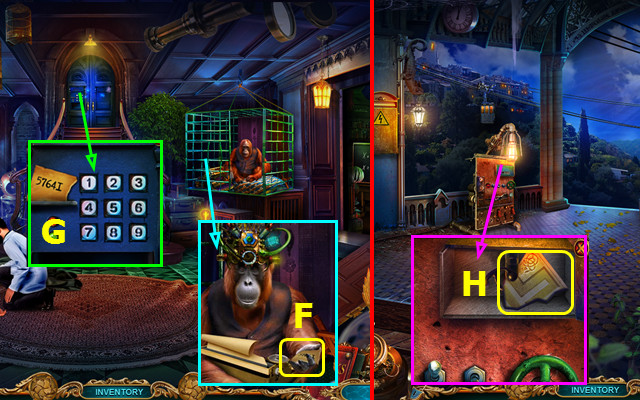
- Place the HELMET; take the DOOR CODE (F).
- Place the DOOR CODE and enter the numbers 5-7-6-4-1 (G).
- Go forward.
- Use the HOOK; take the CHEST PART (H).
- Combine the PUZZLE CHEST and CHEST PART.
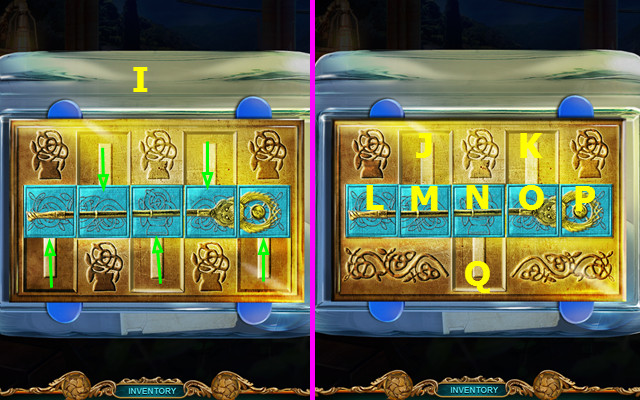
- Easy solution (I).
- Hard solution: (M-K)-(Q-O)-(L-Q)-(O-L)-(P-M)-(Q-P)-(K-O)-(M-N)-(J-M).
- Take the antigravity lens and read the note.
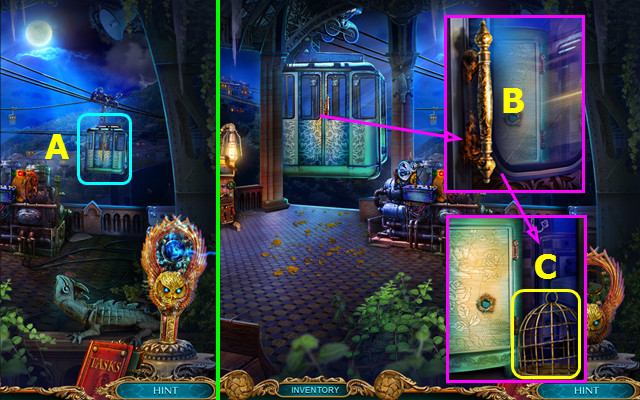
- Use the ANTIGRAVITY SCEPTER (A).
- Use the GREASE and select the handle (B).
- Take the CAGE (C).
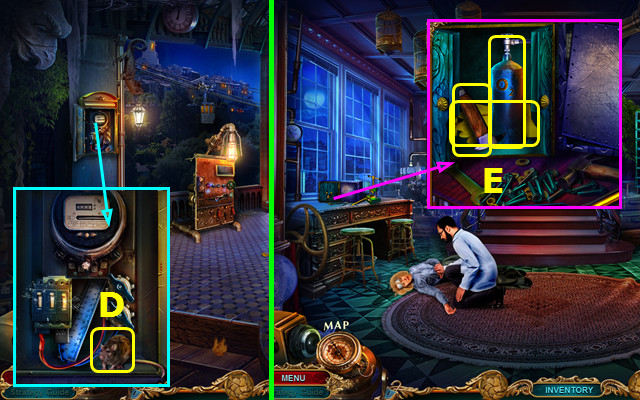
- Open the panel; use the CAGE to take the MOUSE (D).
- Walk down.
- Use the MOUSE; take the ICE PICK, OXYGEN TANK and 2/2 NIPPERS AND GLOVES (E).
- Go forward.
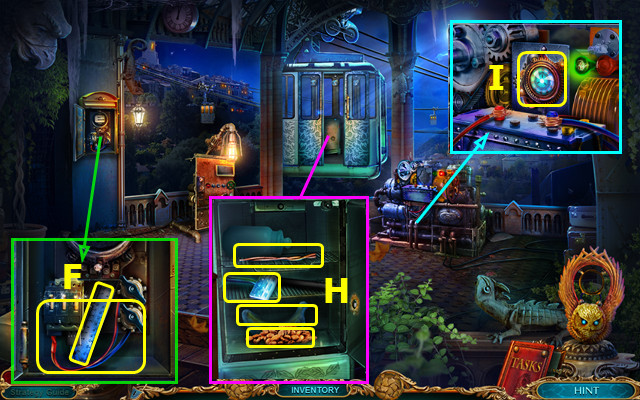
- Use the NIPPERS AND GLOVES to take the WIRES; take the RULER (F).
- Use the OXYGEN TANK and ICE PICK; take the COFFEE BEANS, METAL ROD, PEDAL, and FROZEN BANANA (H).
- Place the POWER SOURCE and WIRES; take the ARTIFACT (I).
- Walk down.
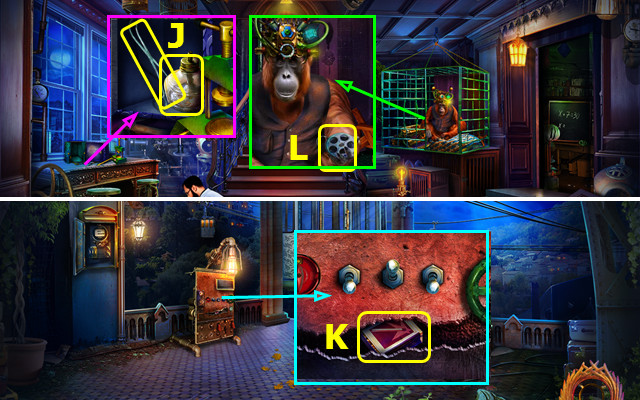
- Use the RULER; take the FORCEPS and BURNER (J).
- Go forward.
- Use the FORCEPS to take the MATCHES (K).
- Combine the BURNER, MATCHES, and FROZEN BANANA to make the BANANA and LIT BURNER.
- Walk down.
- Give the BANANA; take the REEL (L).
- Return to the Trophy Room.
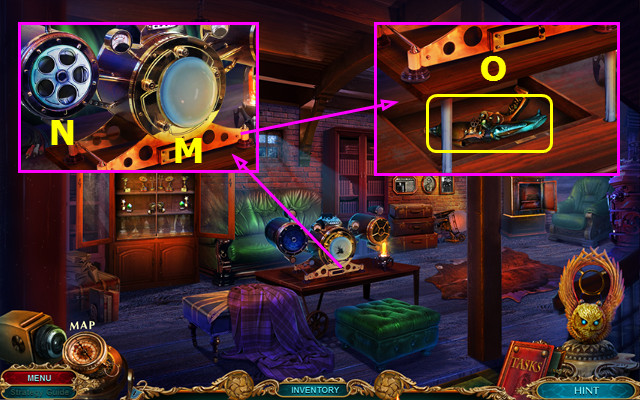
- Remove the broken lens and place the LENS (M).
- Place the REEL (N).
- Take the GUN (O).
- Go to the Laboratory.
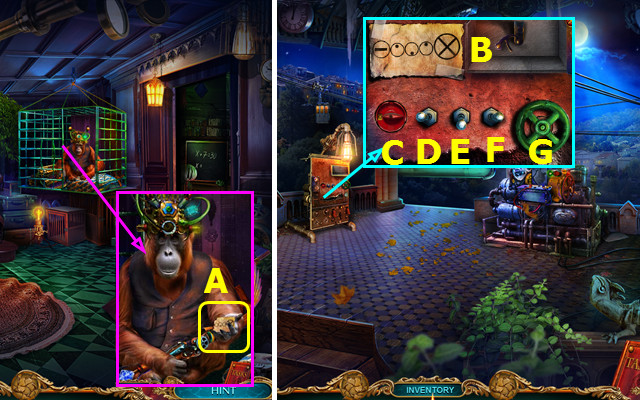
- Give the GUN and ARTIFACT; take the CONTROL PANEL SEQUENCE (A).
- Go forward.
- Place the CONTROL PANEL SEQUENCE (B).
- Easy solution: C-Ex2-Fx3-G.
- Hard solution: C-D-Ex2-Fx3.
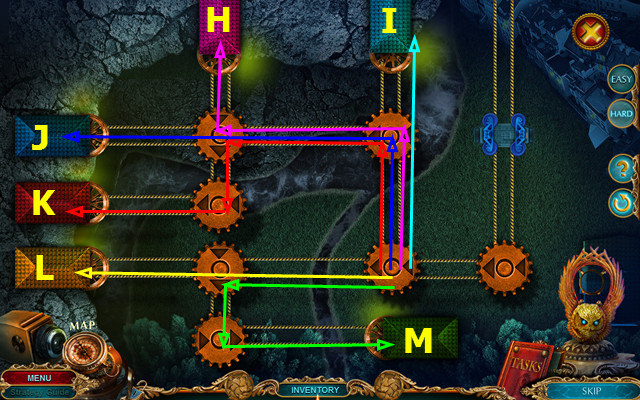
- Change the gears to guide the pieces to the correct home.
- Paths are color-coded.
- The sequence is J-K-M-L-J-I-H-L-M-H-I-K-L, or blue-red-green-yellow-blue-light blue-pink-yellow-green-pink-light blue-red-yellow.
Chapter 3: Outside the Hospital
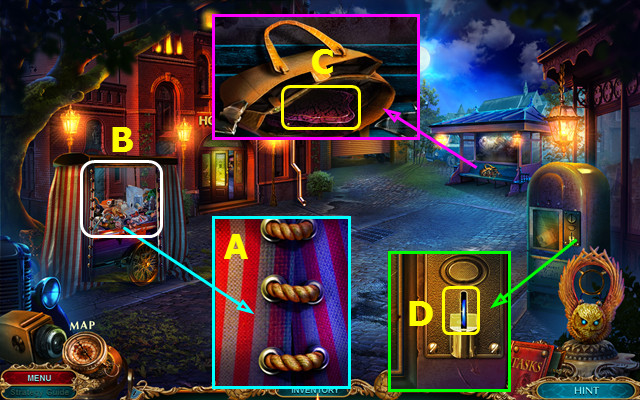
- Use the LIT BURNER (A).
- Play the HOP; earn the BROOM (B).
- Use the BROOM; take the MANICURE KIT (C).
- Use the METAL ROD to take the COIN (D).
- Walk left.
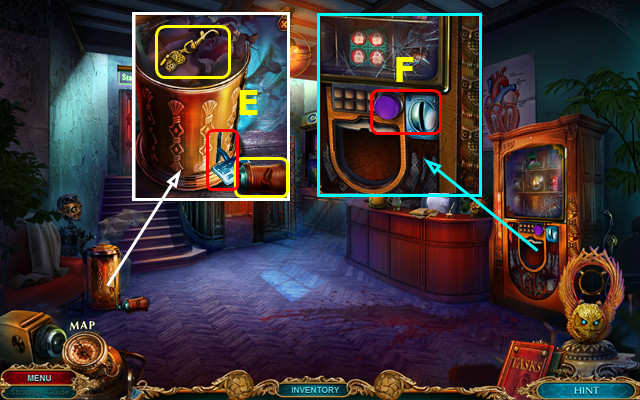
- Take the COFFEE GRINDER; place the PEDAL and take the BUTTERFLY TRINKET (E).
- Use the BUTTERFLY TRINKET on the MANICURE KIT; take the RING and SCISSORS.
- Use the COIN and push the button (F).
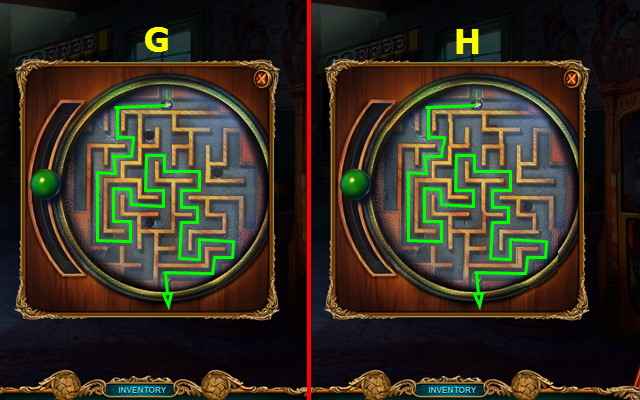
- Easy solution (G).
- Hard solution (H).
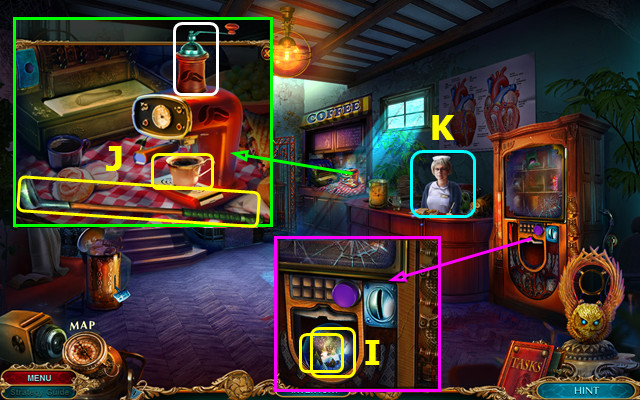
- Take the GLASS BALL and PUZZLE FRAGMENT (I).
- Place the COFFEE GRINDER and COFFEE BEANS; take the CUP OF COFFEE and the GOLF CLUB (J).
- Talk to the Nurse (K).
- Walk down.
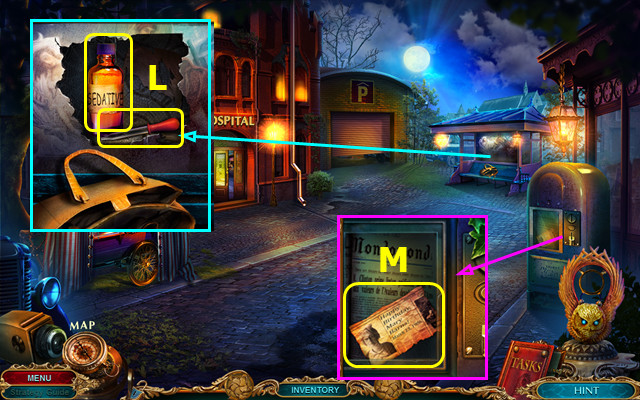
- Use the GOLF CLUB; take the SLEEPING POTION and DROPPER (L).
- Open the SLEEPING POTION; add the CUP OF COFFEE and DROPPER to make the SPIKED COFFEE.
- Use the RING; take the NURSE'S BIRTHDAY (M).
- Walk left.
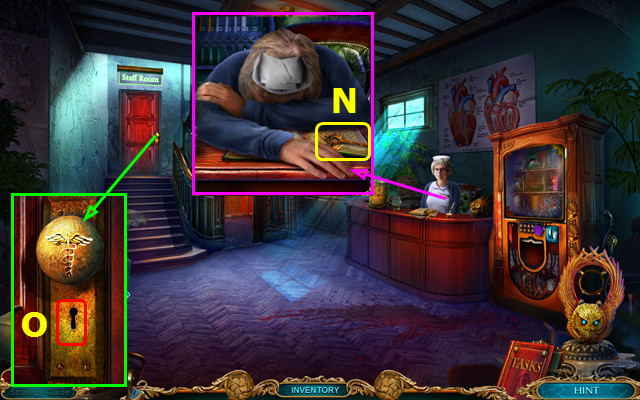
- Give the SPIKED COFFEE; take the KEY (N).
- Use the KEY (O).
- Walk forward.
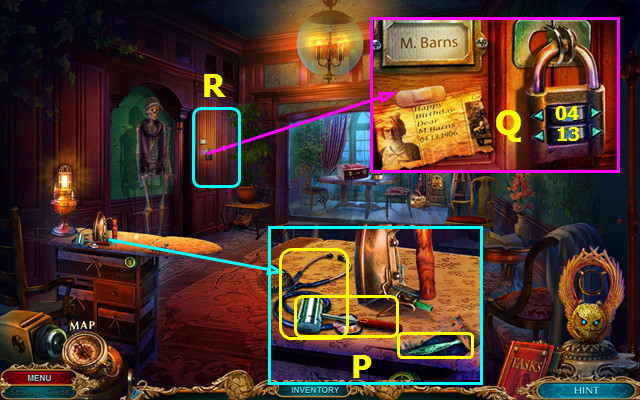
- Take the METAL HAMMER and STETHOSCOPE; use the SCISSORS and take the HANDLE (P).
- Place the NURSE'S BIRTHDAY; change the lock to 04-13 (Q).
- Play the HOP; earn the CANDLE (R).
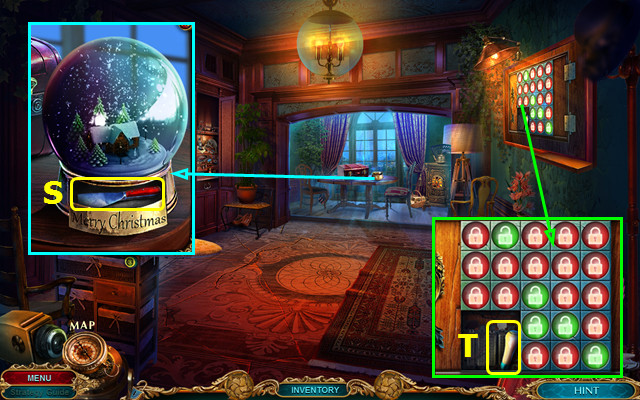
- Place the GLASS BALL; take the SCRAPER (S).
- Take the CASH HANDLE and place the PUZZLE FRAGMENT (T).
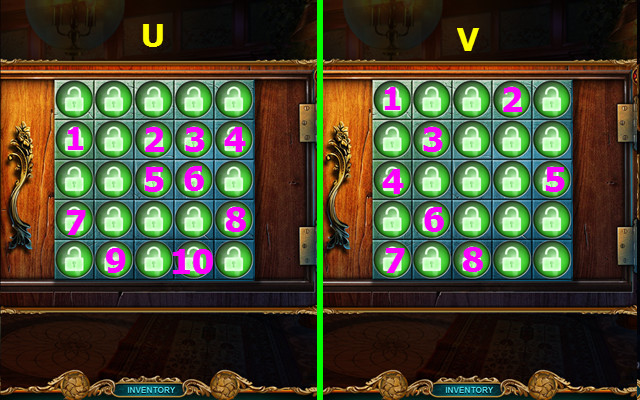
- Easy solution: 1-10 (U).
- Hard solution: 1-8 (V).
- Take the FLOOR NUMBER.
- Walk down.
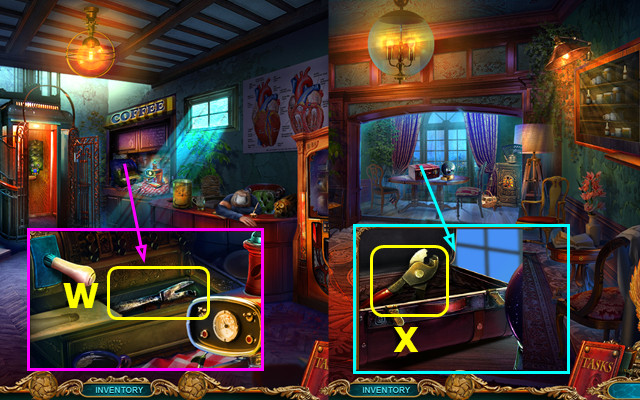
- Use the CASH HANDLE; take the CAN OPENER (W).
- Go forward.
- Use the CAN OPENER; take the CABLE CUTTER (X).
- Walk down.
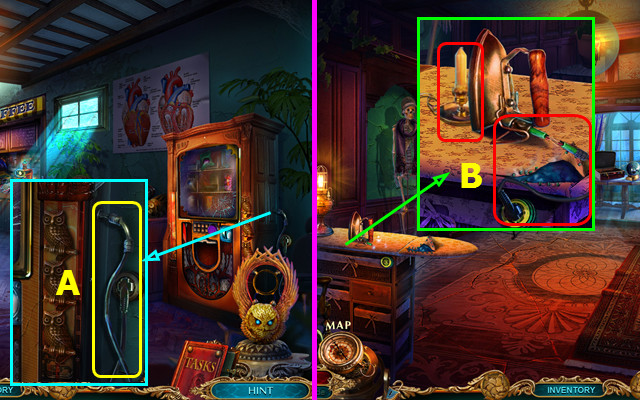
- Use the CABLE CUTTER to take the POWER CORD (A).
- Walk forward.
- Use the POWER CORD and CANDLE to earn the MELTED WAX (B).
- Walk down.
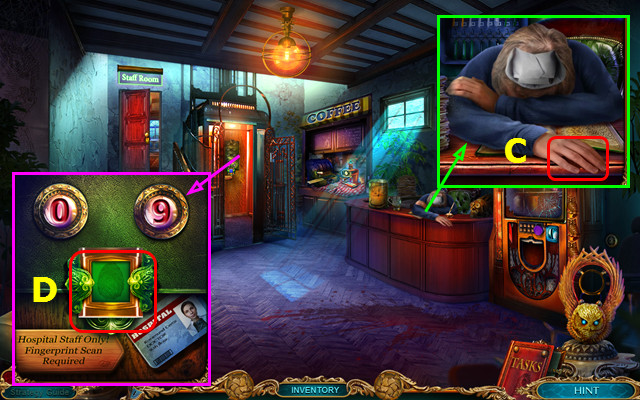
- Use the MELTED WAX to take the FINGERPRINT (C).
- Use the FINGERPRINT and FLOOR NUMBER (D).
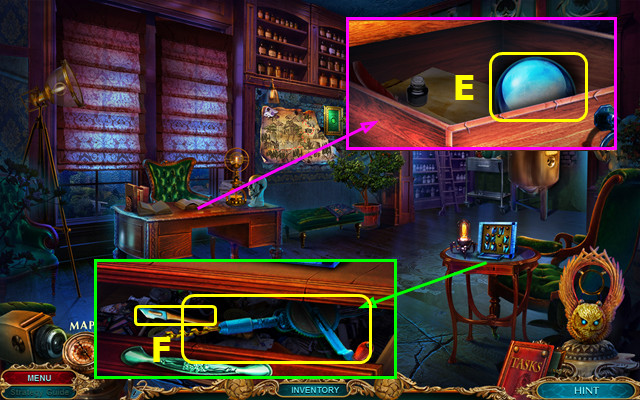
- Use the SCRAPER; take the antigravity lens (E).
- Use the HANDLE; take the MANUAL DRILL And SCALPEL (F).
- Walk down 2x.
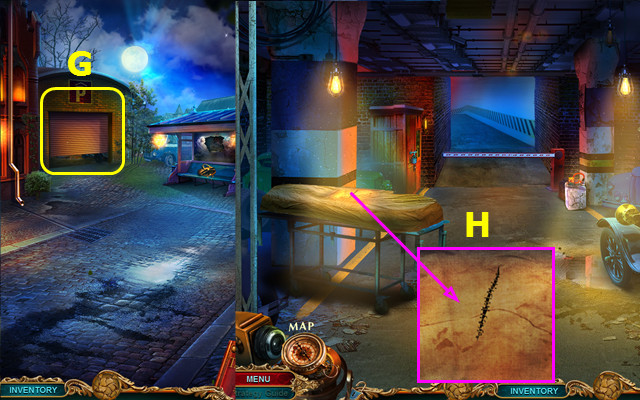
- Use the ANTIGRAVITY SCEPTER (G).
- Go forward.
- Use the SCALPEL (H).
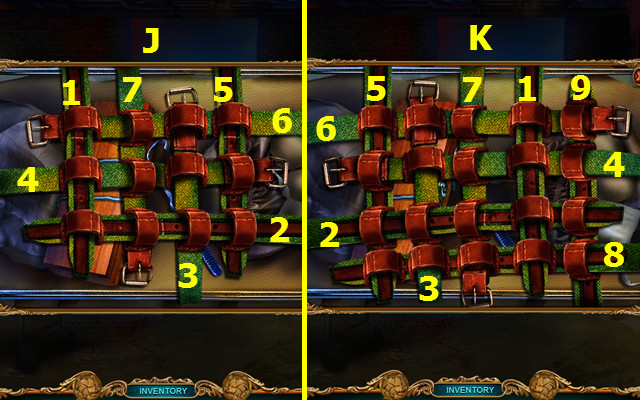
- Easy solution: 1-7 (J).
- Hard solution: 1-9 (K).
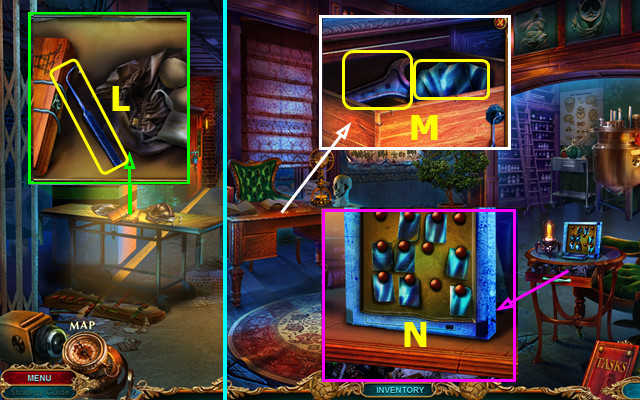
- Take the SMALL HOOK (L).
- Go to Rosamund's Office.
- Use the SMALL HOOK; take the WRENCH and SLIDES (M).
- Place the SLIDES (N).
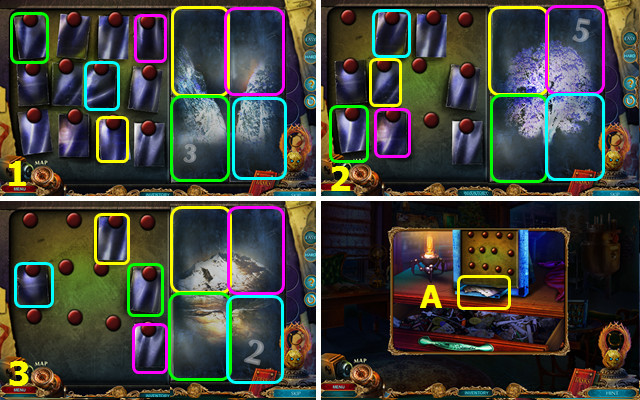
- Restore the slides as shown (1-3).
- Take the COORDINATES (A).
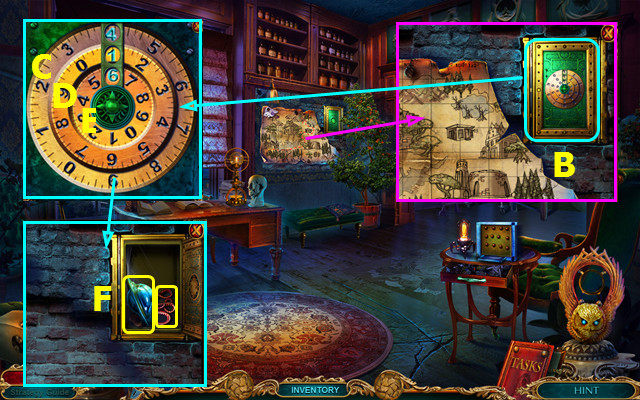
- Use the STETHOSCOPE (B).
- Easy solution: Cx7-Ex5.
- Hard solution: C-Dx6-Ex4.
- Take the HANDLE and OCTOPUS INLAY (F).
- Go to the Parking Garage.
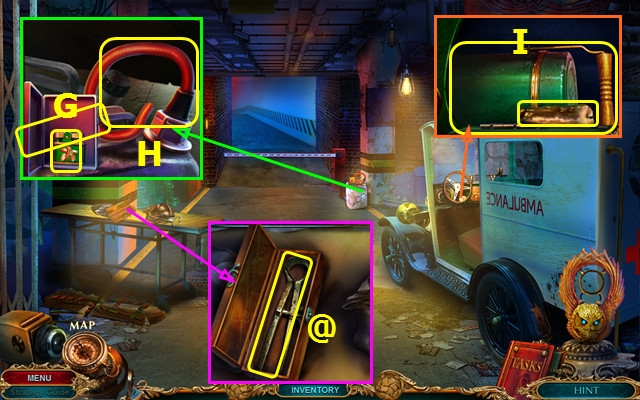
- Place the OCTOPUS INLAY; take the LIGHTER and the NIPPERS (G).
- Use the WRENCH to take the HOSE (H).
- Place the HANDLE; take the CANDLE and INSULATED BOTTLE (I).
- Use the MANUAL DRILL on the INSULATED BOTTLE to make the PUNCTURED BOTTLE.
- Use the NIPPERS; take the CALIPERS (@).
- Return to Rosamund's Office.
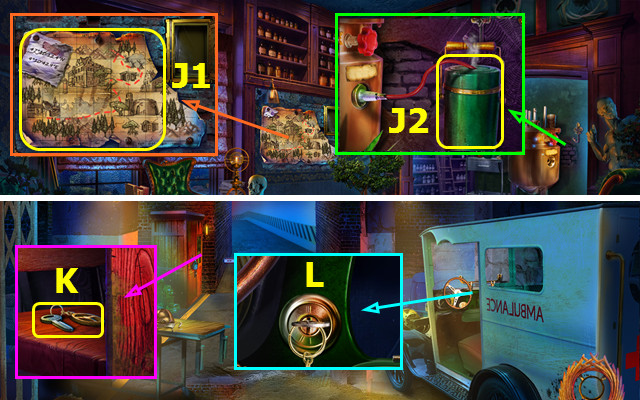
- Place the COORDINATES and CALIPERS; take the MAP (J1).
- Use the PUNCTURED BOTTLE and HOSE; take the LIQUID NITROGEN (J2).
- Go to the Parking Garage.
- Use the LIQUID NITROGEN and METAL HAMMER; take the AMBULANCE KEY (K).
- Use the AMBULANCE KEY and MAP (L).
Chapter 4: Ainsley's Hut
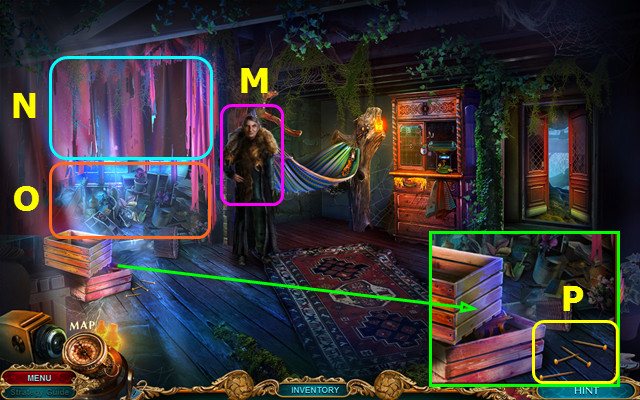
- Talk to Ainsley (M).
- Select (N).
- Play the HOP; earn the EMPTY BOX (O).
- Use the EMPTY BOX to take the 1/3 HAMMER, NAILS, BOARDS (P).
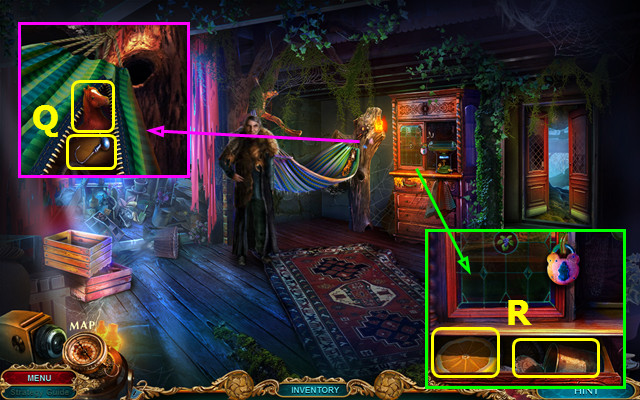
- Use the CANDLE; take the HOOK and STUFFED HORSE (Q).
- Use the LIGHTER; take the LEMON and TIN CAN (R).
- Walk right.
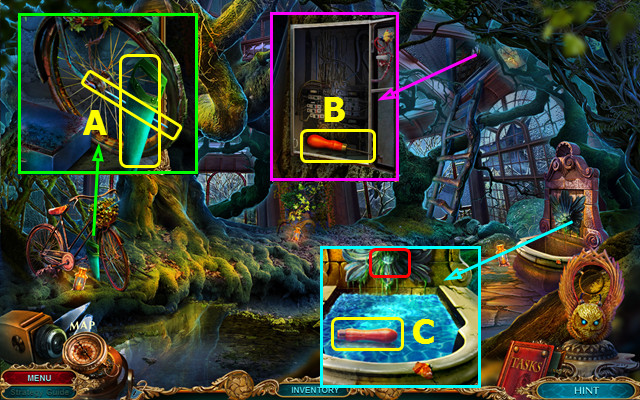
- Take the SAW; use the NIPPERS to take the SPOKE (A).
- Use the LEMON; take the AWL (B).
- Use the AWL on the STUFFED HORSE to find the FISHING LINE; take the GRINDSTONE.
- Use the GRINDSTONE on the TIN CAN to make the SHARPENED TIN CAN.
- Use the SPOKE; take the HANDLE (C).
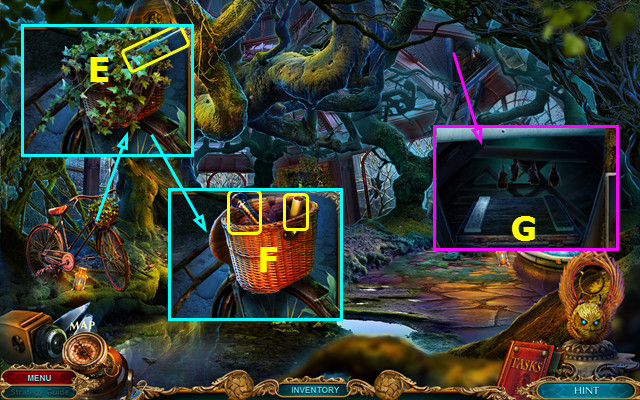
- Use the HANDLE to take the RASP (E).
- Use the SHARPENED TIN CAN and open the basket; take the FLASHLIGHT and DYNAMITE (F).
- Use the FLASHLIGHT (G).
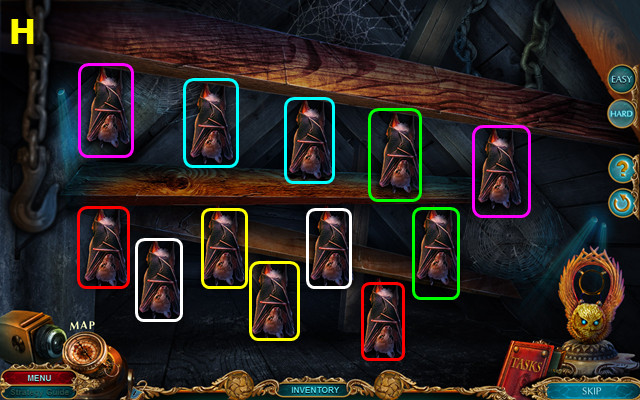
- Select the color-coded pairs (H).
- You earn the FORMULA.
- Walk down.
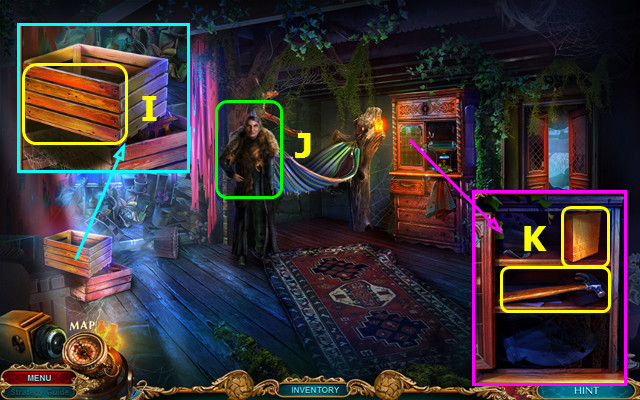
- Use the SAW to take the 2/3 HAMMER, NAILS, BOARDS (I).
- Give the FORMULA; take the HERBICIDE (J).
- Use the RASP; take the 1/2 PAPER BAG AND GRATER and 3/3 HAMMER, NAILS, BOARDS (K).
- Walk right.
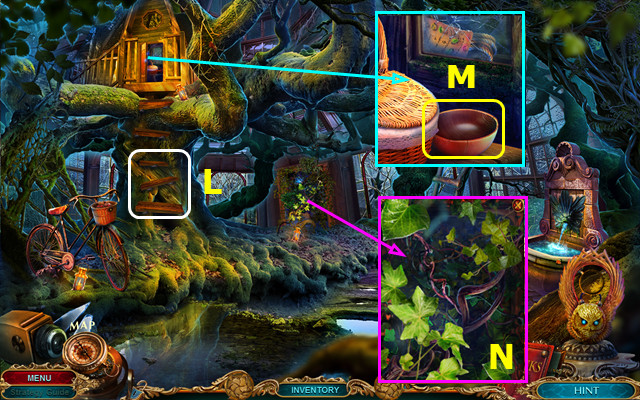
- Use the HAMMER, NAILS, BOARDS (L).
- Take the BOWL (M).
- Use the HERBICIDE (N).
- Go forward.
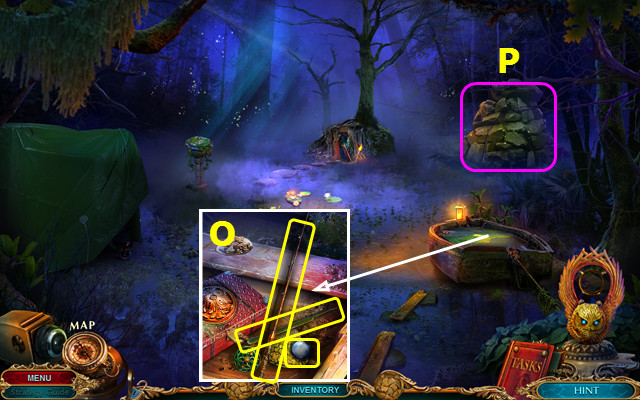
- Use the BOWL; take the UNEQUIPPED FISHING ROD, LOCKPICK, and antigravity lens (O).
- Combine the UNEQUIPPED FISHING ROD, FISHING LINE, and HOOK to make the FISHING ROD.
- Use the ANTIGRAVITY SCEPTER (P).
- Play the HOP.
- Use the FISHING ROD; take the NAIL PULLER (Q).
- Take the SCRAPER (R).
- Use the SCRAPER; take the LAMP (S).
- Walk down 2x.
- Use the NAIL PULLER to take the 1/3 CARABINER, ROPE, HELMET (A).
- Take the STONE (B).
- Use the LOCKPICK (C).
- Solution (D).
- Take the TONGS (E).
- Walk right.
- Use the STONE; take the RECIPE, FLINT, 2/3 CARABINER, ROPE, HELMET, and 2/2 PAPER BAG AND GRATER (F).
- Go forward.
- Use the DYNAMITE and FLINT; take the STICK and HELMET (G).
- Combine the HELMET and LAMP to make the 3/3 CARABINER, ROPE, HELMET.
- Use the CARABINER, ROPE, HELMET (H).
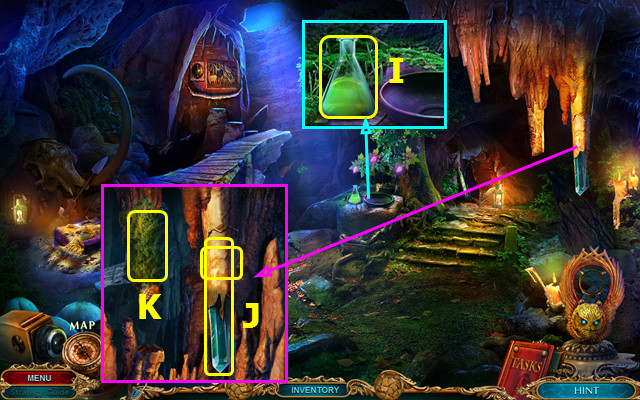
- Take the ACID (I).
- Use the TONGS to take the SHARP STALACTITE; take the STONE SYMBOL (J).
- Use the PAPER BAG AND GRATER to take the CAVE MOSS (K).
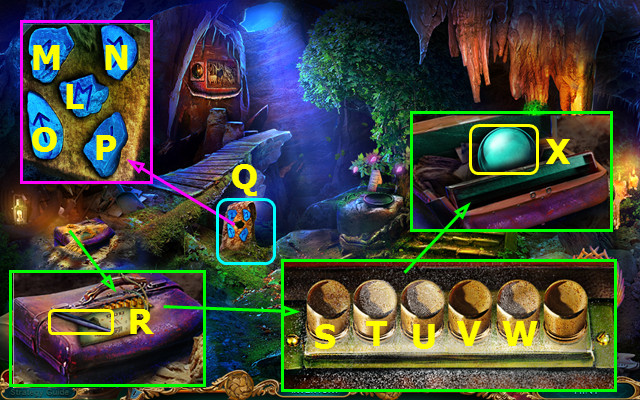
- Place the STONE SYMBOL (L).
- Easy solution: M-O-L-P-N.
- Hard solution: N-L-O.
- Play the HOP; earn the FAN (Q).
- Use the FAN; take the TWEEZERS and read the note (R).
- Easy solution: T-U-V-W.
- Hard solution: S-T-U.
- Take the antigravity lens (X).
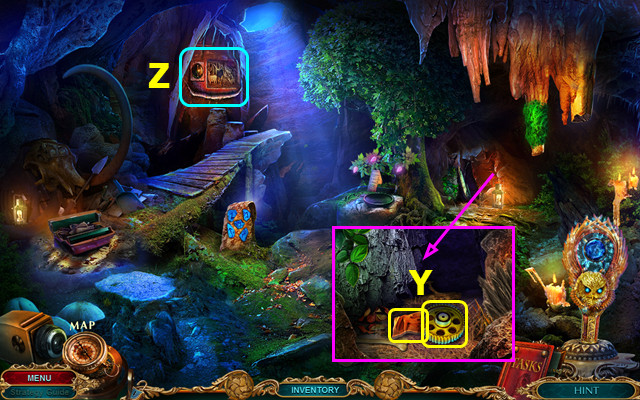
- Use the ANTIGRAVITY SCEPTER; take the COGWHEEL and BAS-RELIEF PART (Y).
- Select (Z).
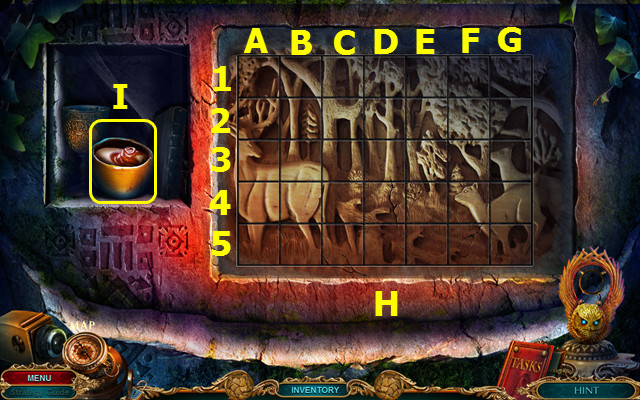
- Place the BAS-RELIEF PART.
- Hard solution: (A-G)-(A-F)-(A-E)-(A-D)-(A-C)-(A-B)-(2-5)-(2-4)-(2-3).
- Easy solution: swap the pieces to restore the image as shown (H).
- Take the DEVIL'S TAR (I).
- Walk down 2x.
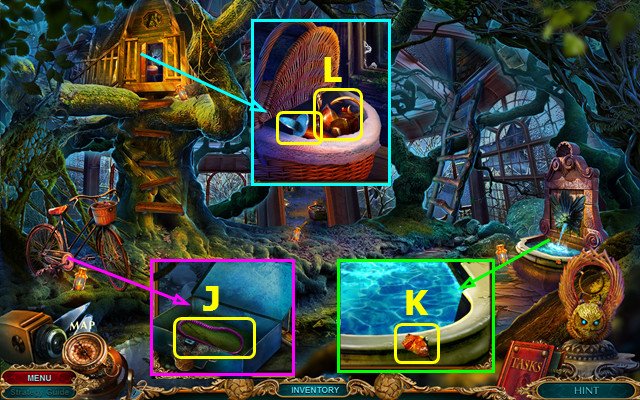
- Use the ACID; take the BELT (J).
- Use the TWEEZERS to take the AMBER (K).
- Open the basket and use the STICK; take the OYSTER KNIFE and CUP (L).
- Go forward.
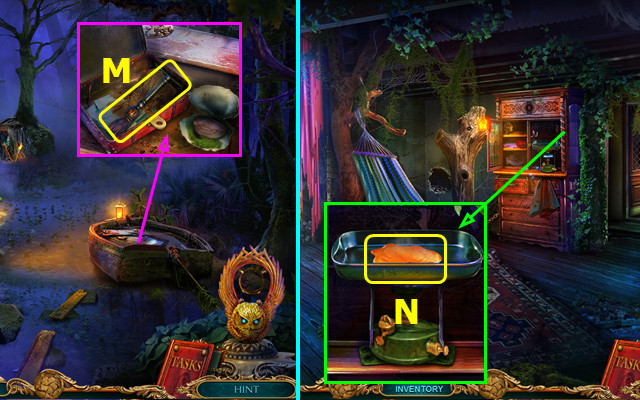
- Use the OYSTER KNIFE, remove the rope, and take the BRUSH (M).
- Walk down 2x.
- Place the AMBER and use the BRUSH to earn the AMBER ON A BRUSH (N).
- Use the AMBER ON A BRUSH on the CUP to make the AMBER CUP.
- Walk right.
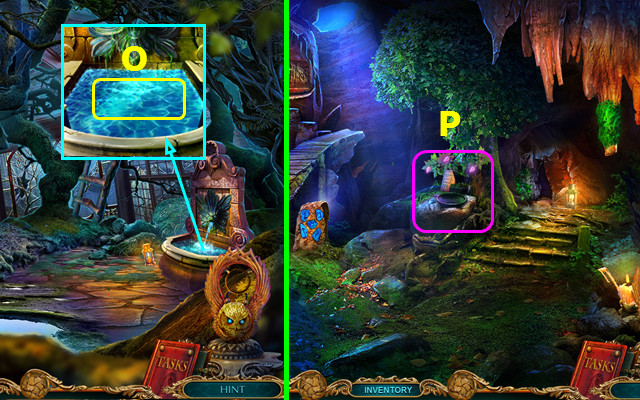
- Use the AMBER CUP to take the CUP OF WATER (O).
- Go forward 2x.
- Select (P).
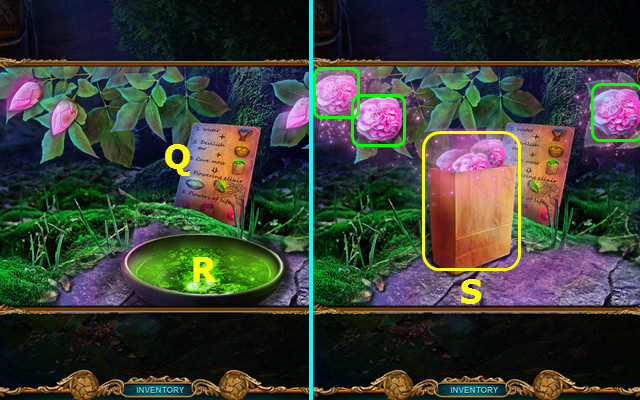
- Place the RECIPE (Q).
- Use the CUP OF WATER, DEVIL'S TAR, and CAVE MOSS; select the bowl (R).
- The PAPER BAG returns to inventory.
- Place the PAPER BAG and select the 3 flowers (green); take the FLOWERS (S).
- Walk down.
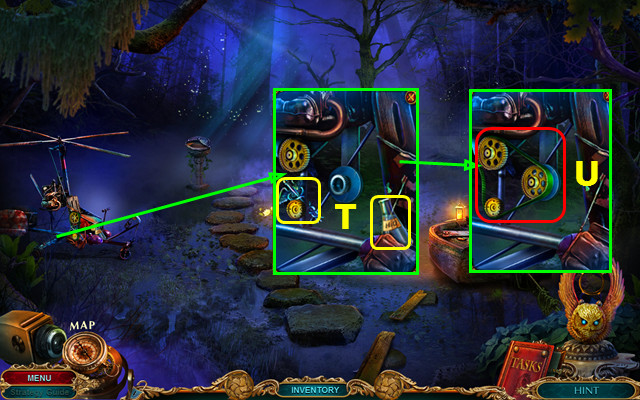
- Take the MEDICINE INLAY and DISTILLED WATER (T).
- Place the COGWHEEL and BELT (U).
Chapter 5: Hospital Back Alley
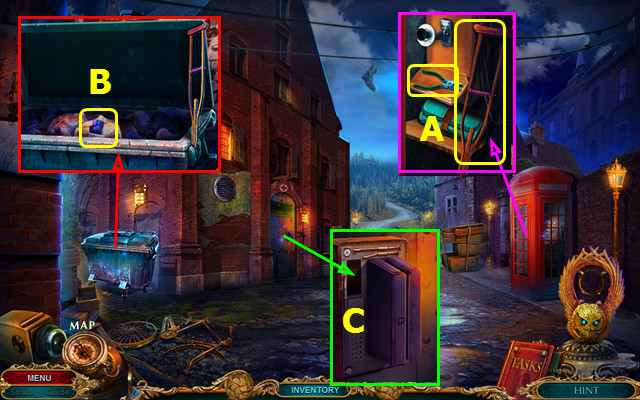
- Use the SHARP STALACTITE; take the PLIERS and CRUTCH (A).
- Use the CRUTCH; take the KEY CARD (B).
- Use the KEY CARD (C).
- Walk left.
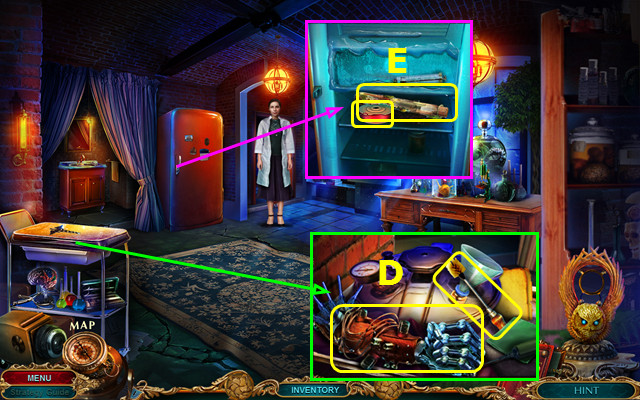
- Place the MEDICAL INLAY; take the MECHANICAL ARM and BRUSH. Read the note (D).
- Remove the handle and use the PLIERS; take the SURGICAL THREAD and DIRTY TEST TUBE (E).
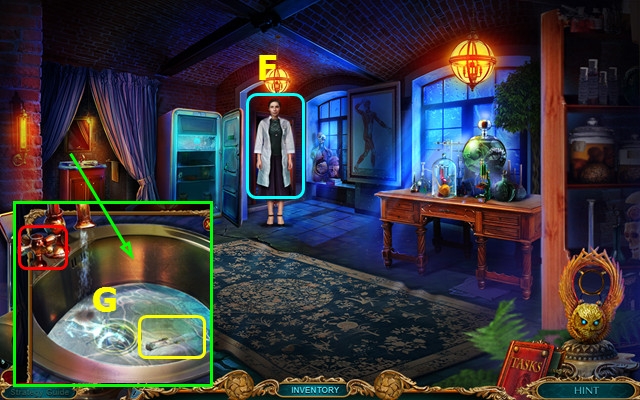
- Talk to Rosamund; take the MEDICINE RECIPE (F).
- Turn on the faucet; use the DIRTY TEST TUBE and BRUSH to earn the TEST TUBE (G).
- Turn off the faucet.
- Walk forward.
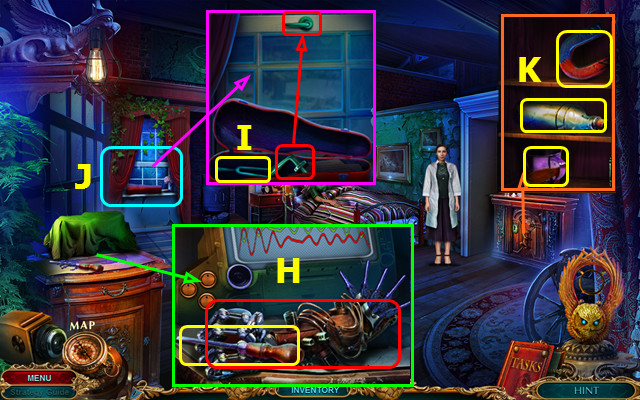
- Take the SCREWDRIVER, remove the cloth, and place the MECHANICAL ARM (H).
- Open the case and take the FORK. Take the handle and place it on the window (I).
- Play the HOP; earn the CUPBOARD KEY (J).
- Use the CUPBOARD KEY; take the MAGNET, ALCOHOL, and METAL MUG (K).
- Combine the MAGNET and SURGICAL THREAD to make the STRUNG MAGNET.
- Walk down.
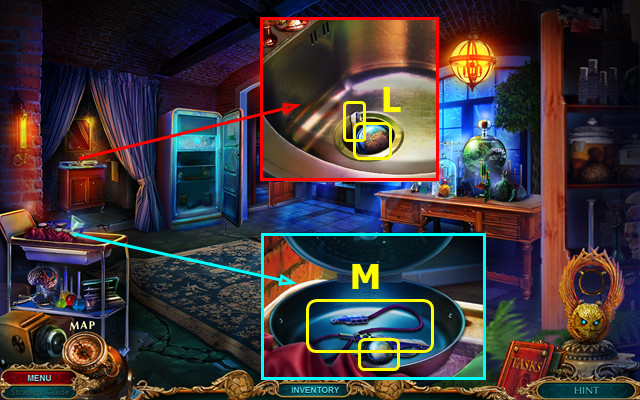
- Use the FORK; take the DIRTY LENS and DIRTY CABLE (L).
- Open the lid and place the DIRTY LENS and DIRTY CABLE inside. Close the lid and add the ALCOHOL; take the antigravity lens and the CABLE (M).
- Walk down.
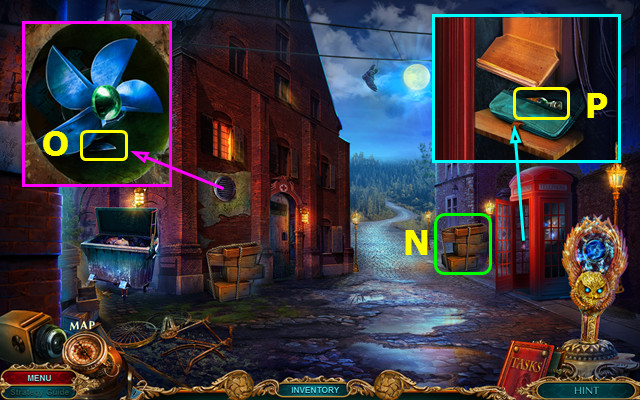
- Use the ANTIGRAVITY SCEPTER (N).
- Use the SCREWDRIVER and METAL MUG; use the STRUNG MAGNET to take the SHARP BLADE (O).
- Use the SHARP BLADE; take the ACETONE (P).
- Walk left.
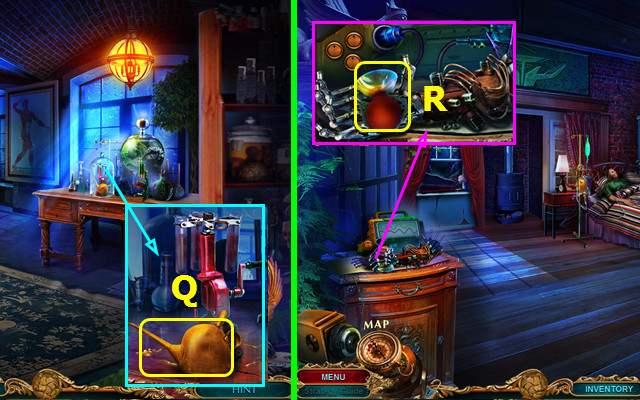
- Use the ACETONE and remove the dome; take the GREASE (Q).
- Go forward.
- Place the CABLE; take the SUCTION CUP (R).
- Walk down.
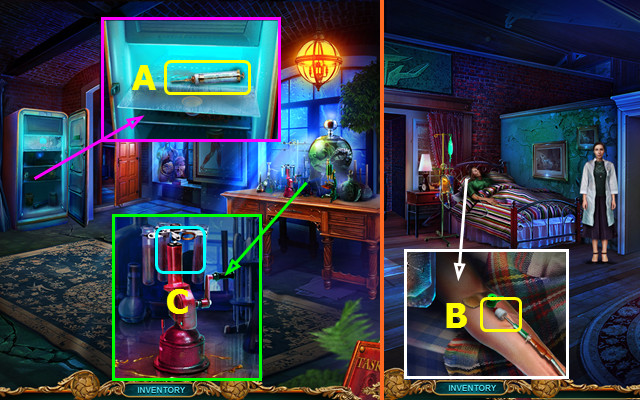
- Use the SUCTION CUP; take the SYRINGE (A).
- Walk forward.
- Use the SYRINGE (B).
- Combine the TEST TUBE, MEDICINE RECIPE, DISTILLED WATER, FLOWERS, and SYRINGE to make TED'S MEDICINE.
- Walk down.
- Place TED'S MEDICINE (C).
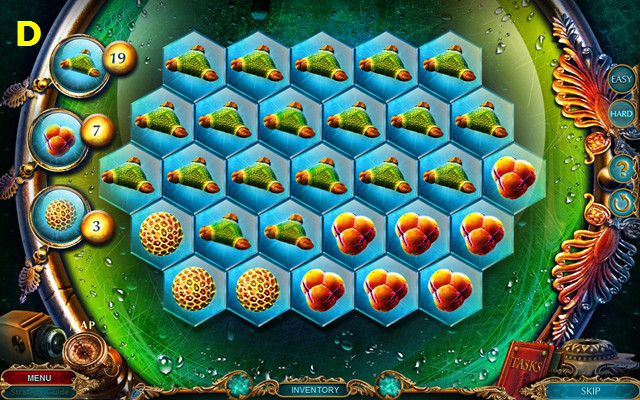
- This mini-game is randomly generated (D).
- The easy level has one opponent, while the hard level has two.
- You earn the SYRINGE.
- Walk forward.
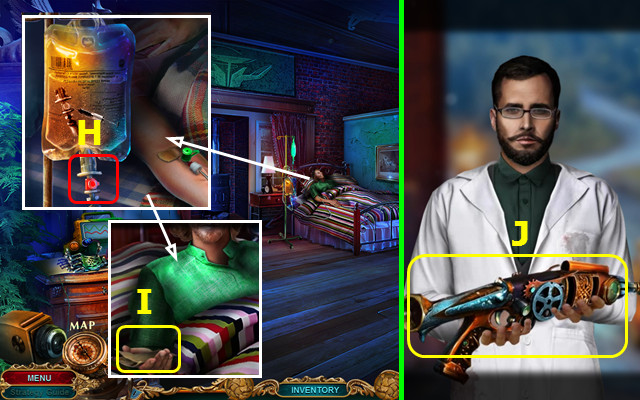
- Use the SYRINGE (H).
- Talk to Ted; take the MAP (I).
- Walk down 2x.
- Take the UNFINISHED GUN (J).
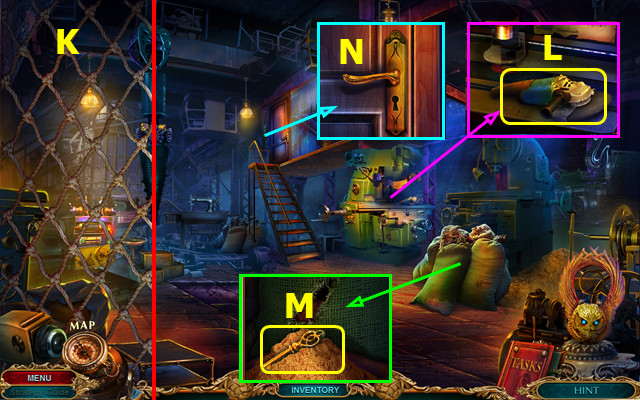
- Use the SHARP BLADE (K).
- Take the ANGLE GRINDER (L).
- Use the SHARP BLADE; take the OFFICE KEY (M).
- Use the OFFICE KEY (N).
- Go forward.
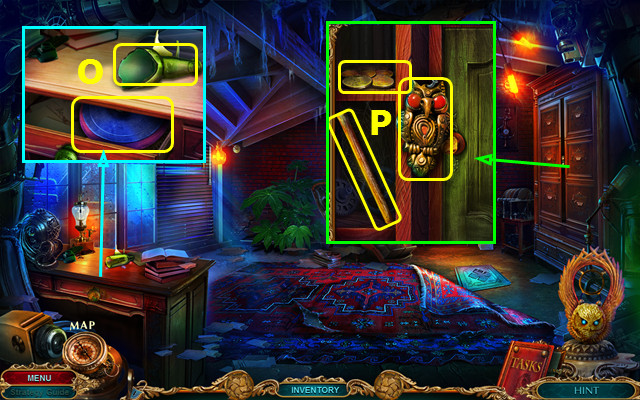
- Take the BROKEN BOTTLE; use the GREASE and take the GRINDSTONE (O).
- Use the ANGLE GRINDER; take the OWL INLAY, HANDLE, and COPPER COINS (P).
- Walk down.
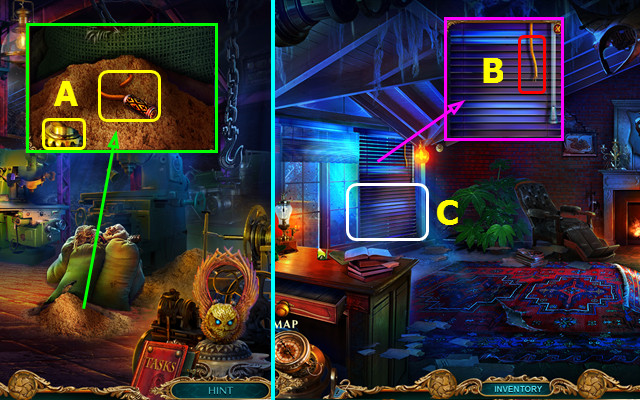
- Use the BROKEN BOTTLE; take the STRING and DRILL PART (A).
- Go forward.
- Place the STRING (B).
- Play the HOP; earn the ELECTRICAL WEAPON (C).
- Walk down.
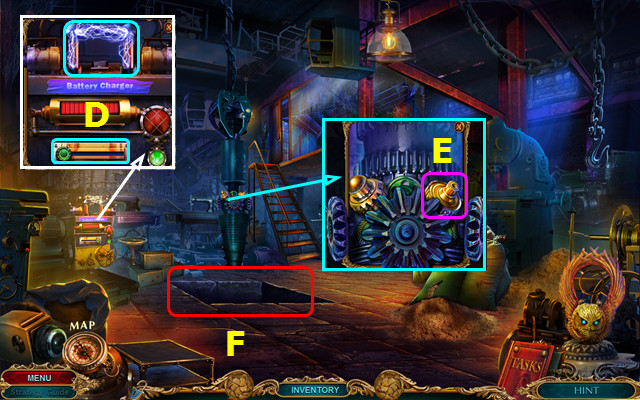
- Use the ELECTRICAL WEAPON and move the switch (D).
- Place the DRILL PART (E).
- Enter the floor (F).
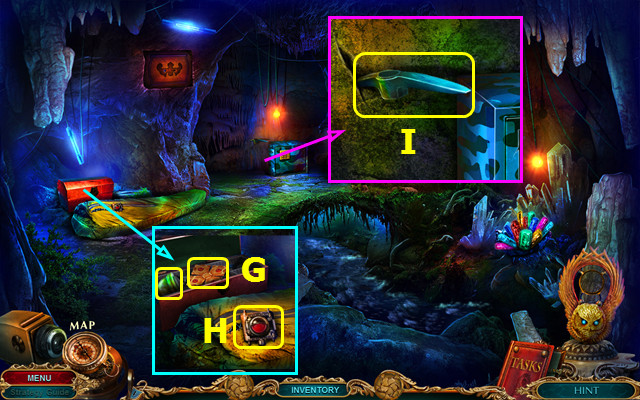
- Place the OWL INLAY; take the CACHE HANDLE and MORTAR (G).
- Take the CONTROLLER (H).
- Use the HANDLE to take the PICKAXE (I).
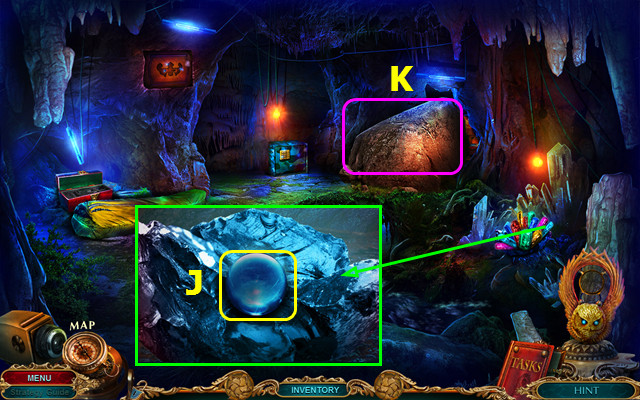
- Use the PICKAXE and select pairs of colored crystals; take the antigravity lens (J).
- Use the ANTIGRAVITY SCEPTER (K).
- Go forward.
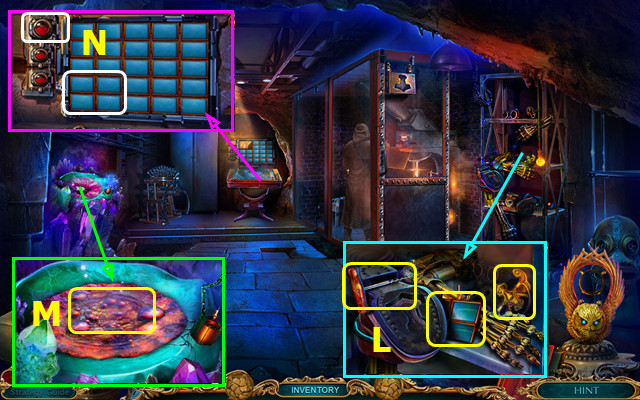
- Take the CORKSCREW, DISPLAY PART, and PLATE (L).
- Use the COPPER COINS and MORTAR to take the MELTED COPPER (M).
- Place the CONTROLLER and DISPLAY PART (N).
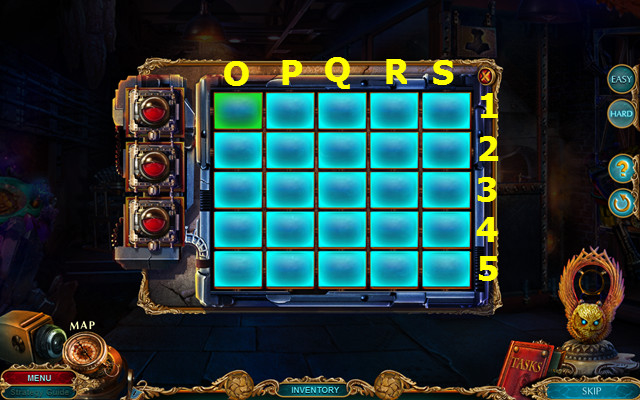
- Easy solution: S4-R4-R5-O5-O1-S1; R1-R5-P5-P3-O3; P3-P5-Q5-Q1-S1.
- Hard solution: O5-R5-R3-Q3-Q1; Q4-R4-R2-S2-S5-P5-P3-O3.
- P3-P1-Q1-Q4-P4-P5-S5-S4-R4-R3-S3-S2-R2-R1-S1.
- Take the BLUNT BOOMERANG.
- Walk down.
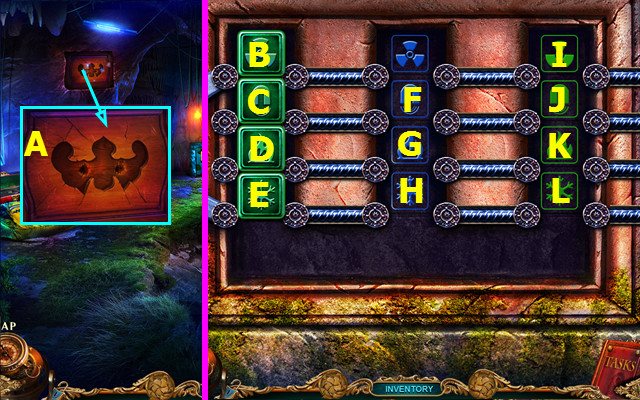
- Place the PLATE (A).
- Solution: (E-H)-(D-K)-(H-L)-(C-F)-(L-E)-(K-G)-(E-H).
- (B-I)-(H-L)-(G-D)-(L-E)-(F-J)-(E-H)-(D-K)-(H-L).
- Take the HEX WRENCH.
- Walk down.
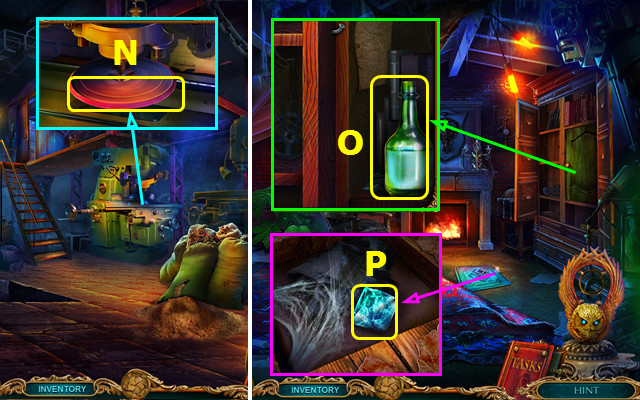
- Use the GRINDSTONE and BLUNT BOOMERANG to make the SHARP BOOMERANG (N).
- Go forward.
- Use the CORKSCREW; take the BOTTLE OF WATER (O).
- Place the CACHE HANDLE; take the DISCHARGED CRYSTAL (P).
- Return to Jack's Hideout.
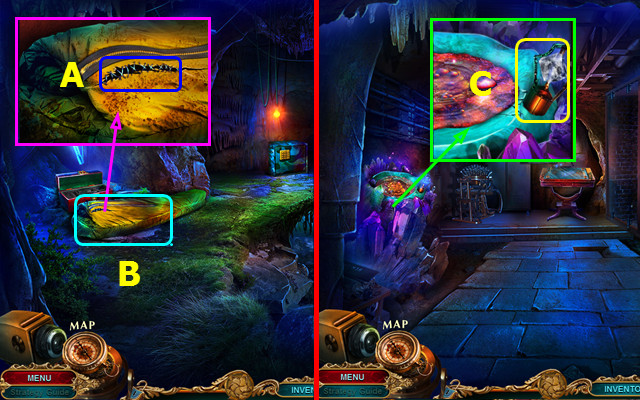
- Use the SHARP BOOMERANG (A).
- Play the HOP; earn the BATTERY (B).
- Go forward.
- Use the DISCHARGED CRYSTAL to make the CHARGED CRYSTAL (C).
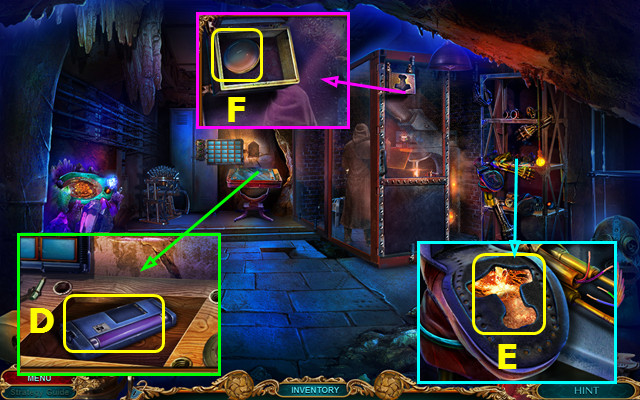
- Use the HEX WRENCH; take the UV LAMP (D).
- Place the BATTERY in the UV LAMP.
- Use the MELTED COPPER and BOTTLE OF WATER; take the HAMMER INLAY (E).
- Place the HAMMER INLAY; take the 1st LENS (F).
- Walk down.
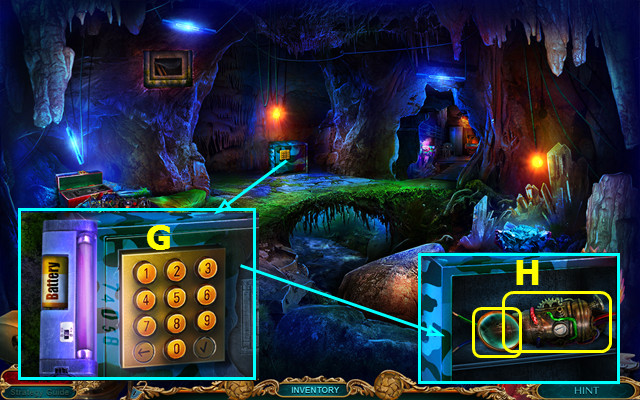
- Place the UV LAMP; select 7-4-0-5-8 (G).
- Take the ENGINE and 2nd LENS (H).
- Combine the UNFINISHED GUN and the 1st LENS to find the COGWHEEL. Add the CHARGED CRYSTAL and 2nd LENS to make the FINISHED GUN.
- Go forward.
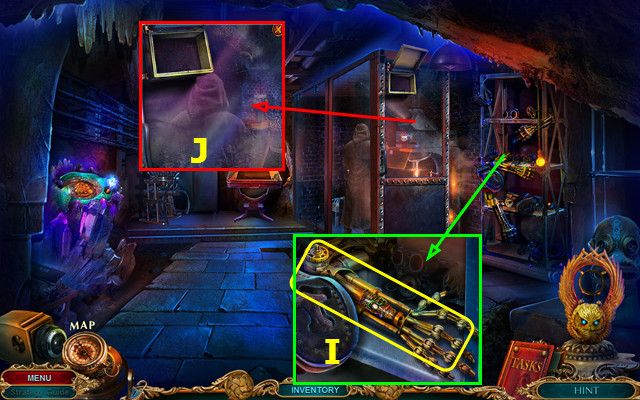
- Place the COGWHEEL and ENGINE; take the MECHANICAL ARM (I).
- Use the MECHANICAL ARM (J).
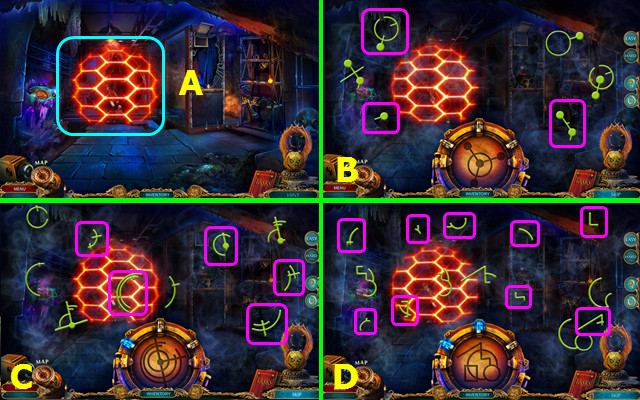
- Use the FINISHED GUN (A).
- Easy solution (B-C-D).
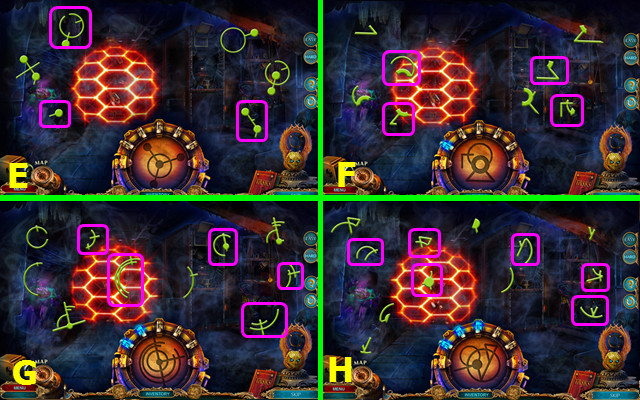
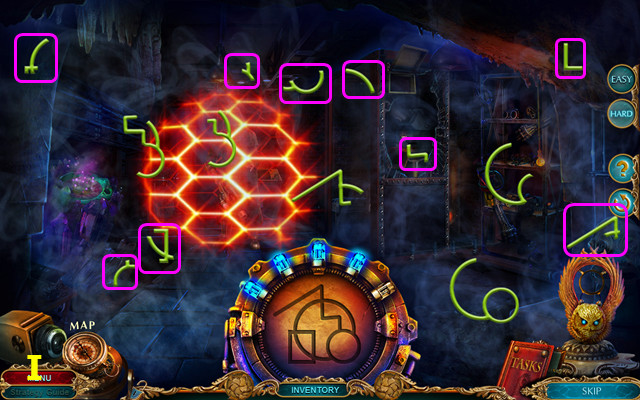
- Hard solution (E-F-G-H-I).
- Incorrect selections will restart the mini-game.
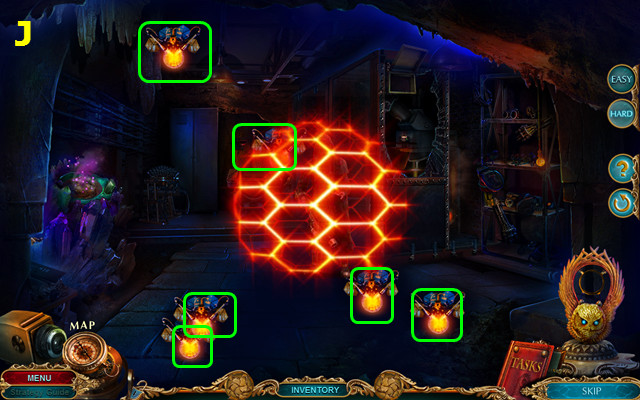
- Shoot the drones (J).
- Congratulations! You have completed The Curio Society: The Thief of Life!
Created at: 2017-01-04

