
Walkthrough Menu
- General Tips
- Chapter 1: Robbery
- Chapter 2: 1985
- Chapter 3: Shop
- Chapter 4: Saving the Family
- Chapter 5: City Square
General Tips
- This is the official guide for The Keeper of Antiques: Shadows from the Past.
- This guide won't tell you when to zoom into a location; the screenshots show each zoom scene.
- Hidden-object puzzles are referred to as HOPs. Only the locations of the HOPs will be shown.
- Use the Map to fast travel to a location.
Chapter 1: Robbery
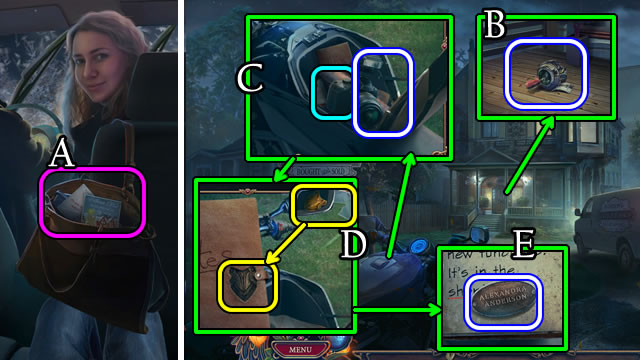
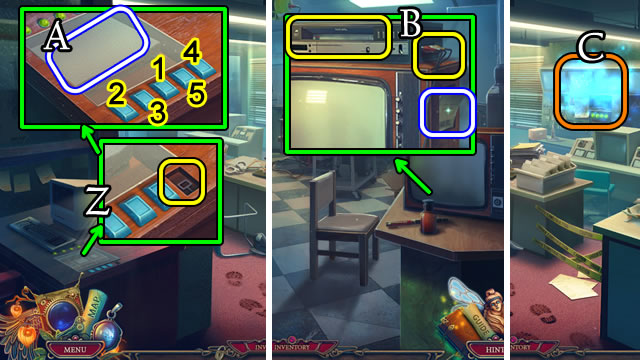
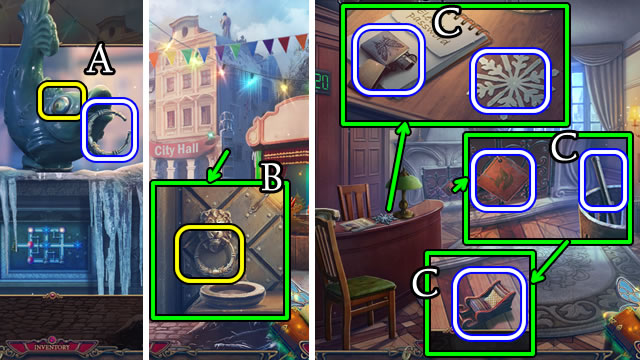
- Interact with characters. Open purse; take card, envelope and camera (A). Interact with characters.
- Take BROKEN MECHANICAL EYE (B).
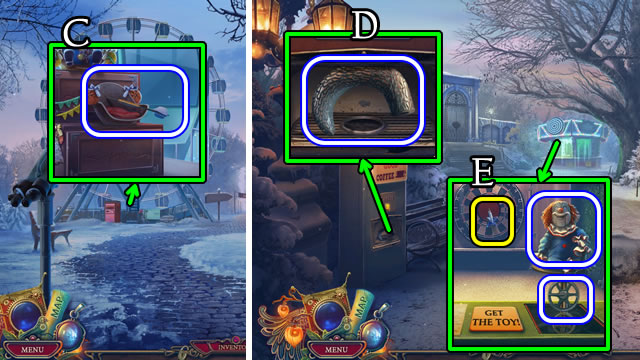
- Open, take CAMERA, Map (C). Open, take, place diary lock (D); open and take ALEXANDRA' S PLATE (E).
- Assemble BROKEN MECHANICAL EYE.
- CAMERA lens on BROKEN MECHANICAL EYE for CAMERA and MECHANICAL EYE.
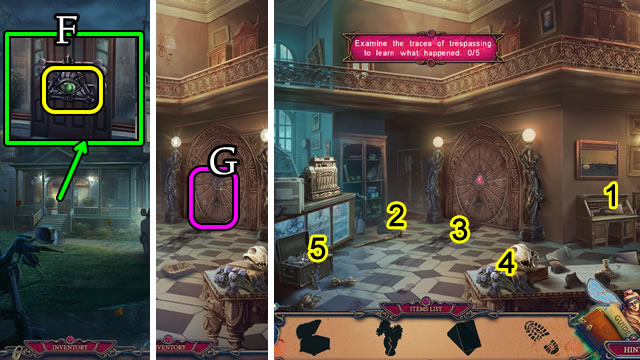
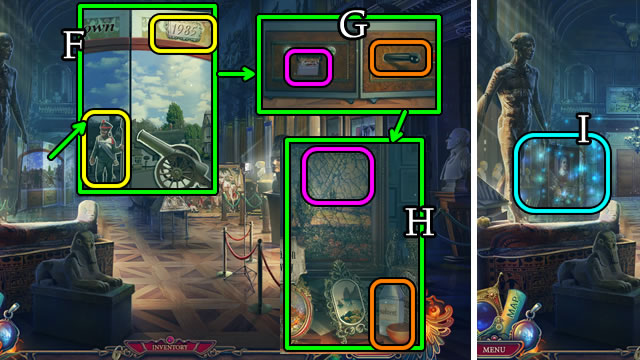
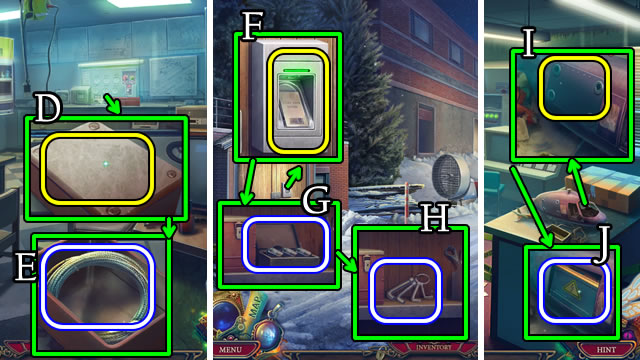
- Place MECHANICAL EYE; speak with character (F).
- Go forward.
- Speak with character; speak with security (G).
- Select 1-5; speak with security.
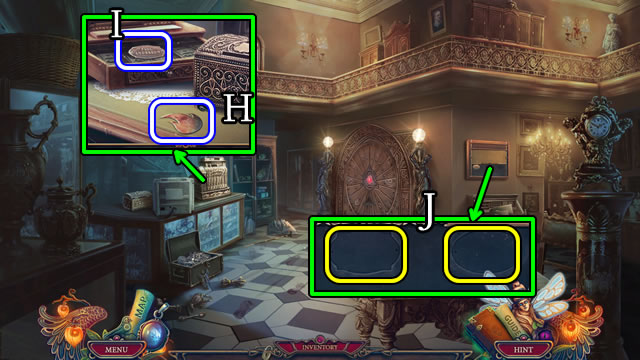
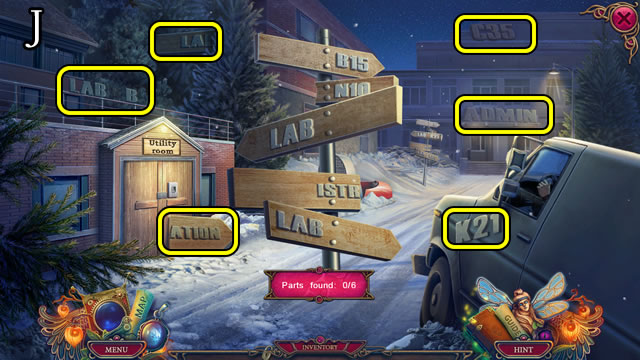
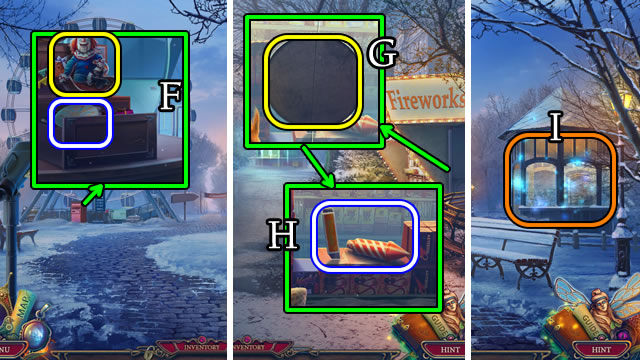
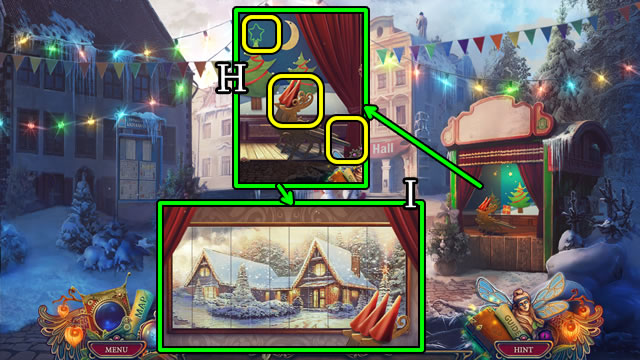
- Take FLAME EMBLEM (H).
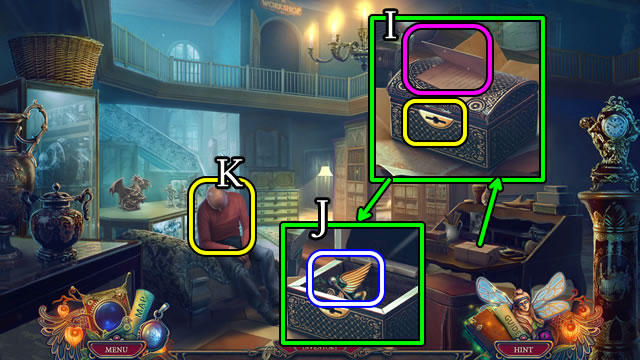
- Open, take PAUL'S PLATE (I).
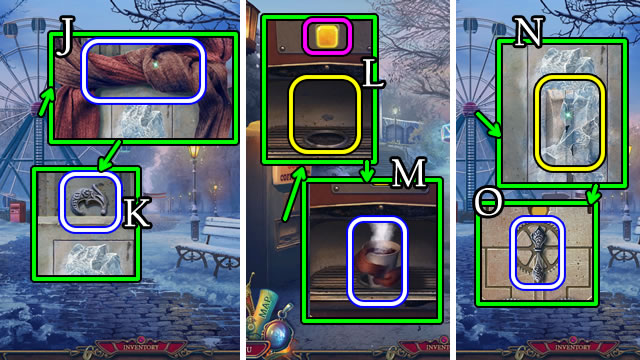
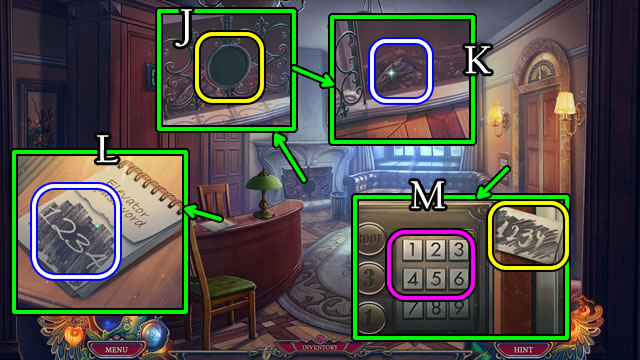
- Place ALEXANDRA'S and PAUL'S PLATES (J).
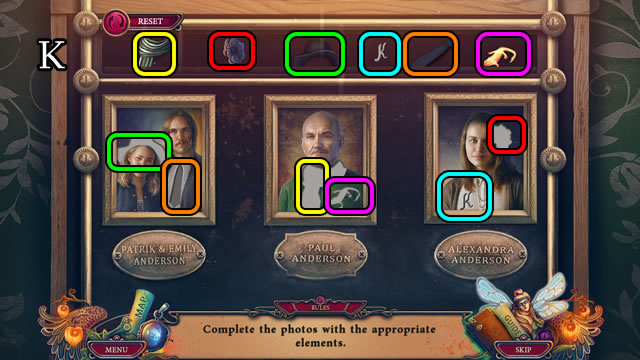
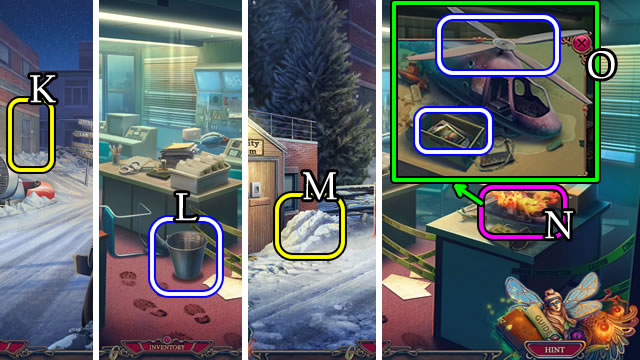
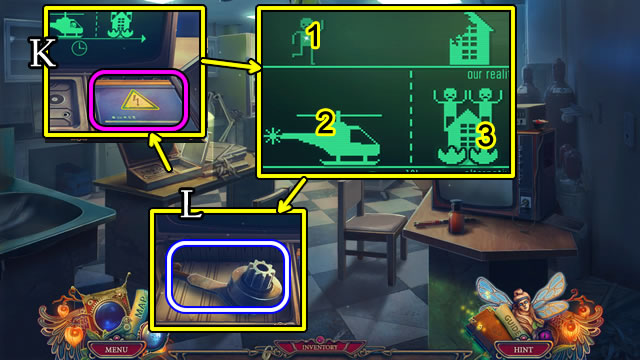
- Solution (K).
- Take folder, Device.
- Go down.
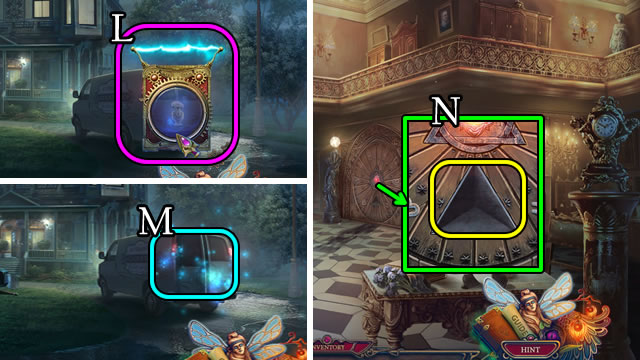
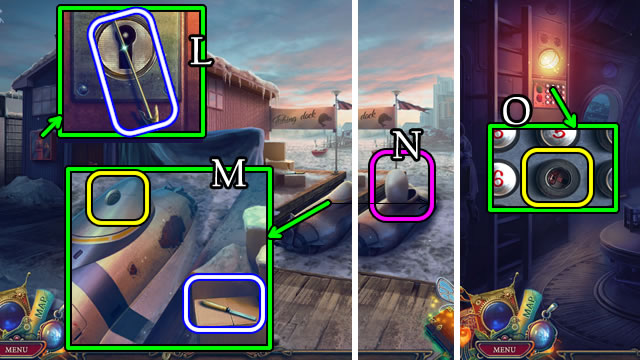
- Use Device (L).
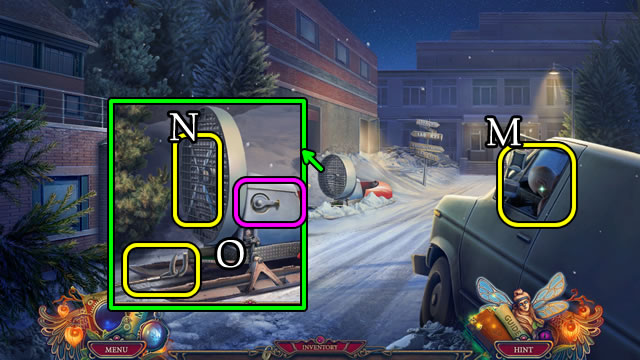
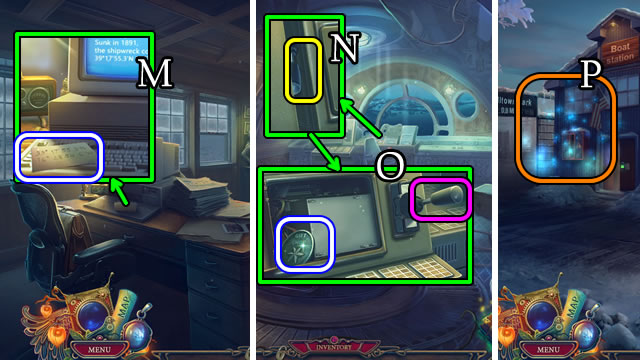
- Play HOP (M) for CRYSTAL PRISM.
- Go forward.
- Place CRYSTAL PRISM (N).
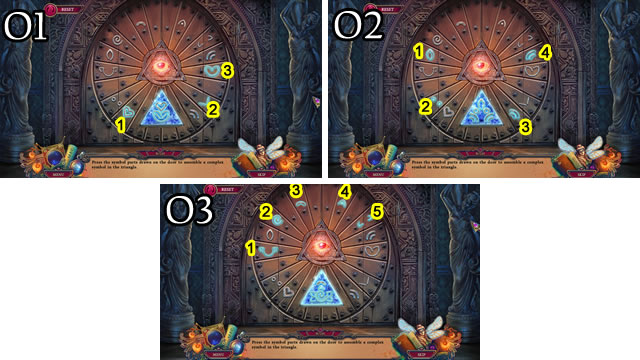
- Solution (O1-O3).
- Go right.
- Interact with characters.
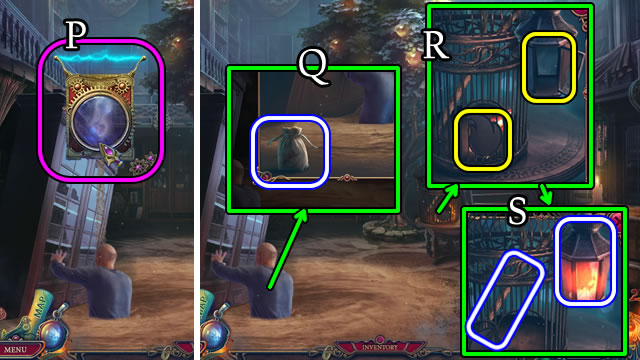
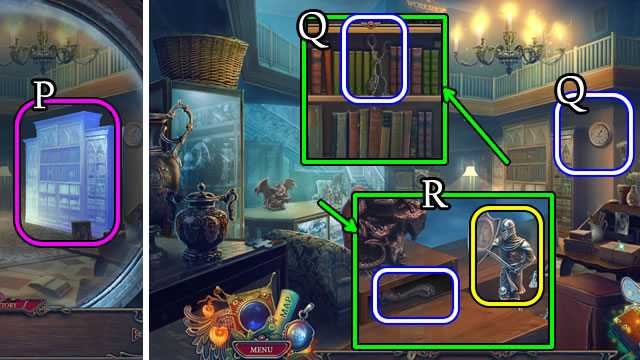
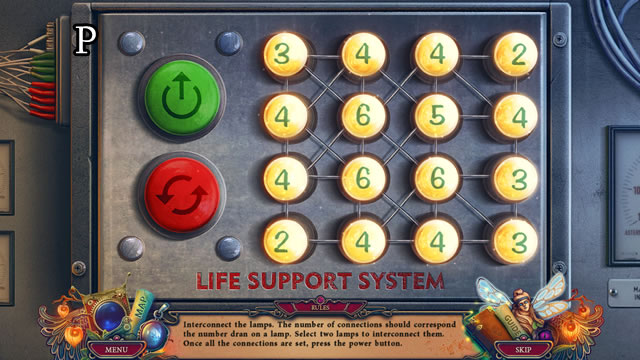
- Use Device (P).
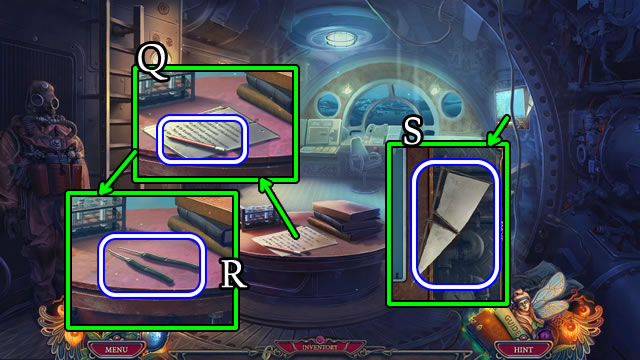
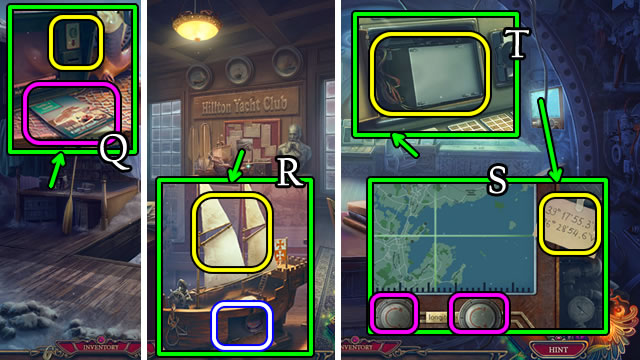
- Take SALAMANDER'S TREAT (Q).
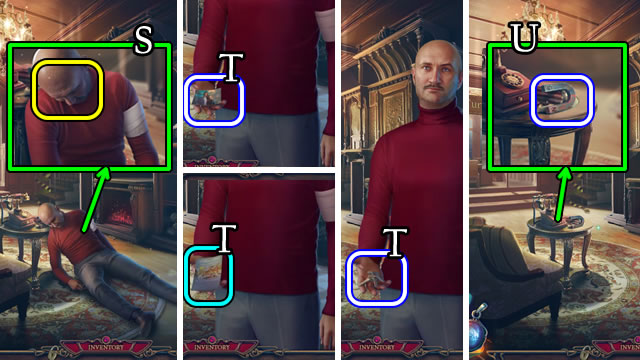
- Place FLAME EMBLEM and SALAMANDER'S TREAT (R); take SALAMANDER LANTERN and LONG BRANCH (S).

- Use LONG BRANCH (T).
- Speak to character; take UNCLE'S CARD (U).
- Go down.
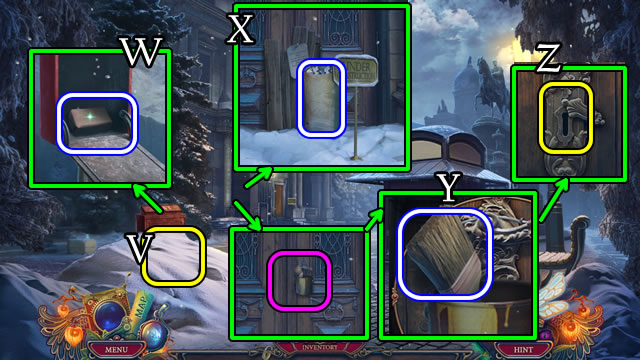
- Use UNCLE'S CARD (V); take note, UNCLE PAUL'S WATCH and ARCHIVE KEY (W).
- Go right.
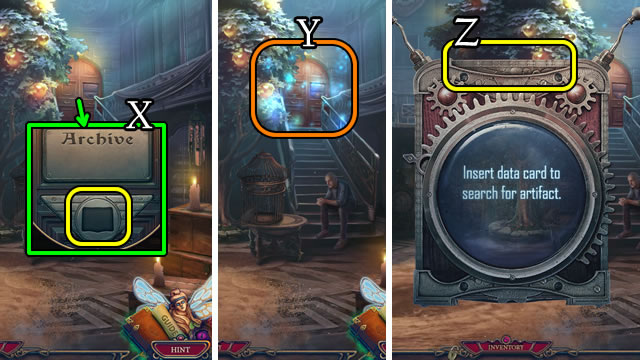
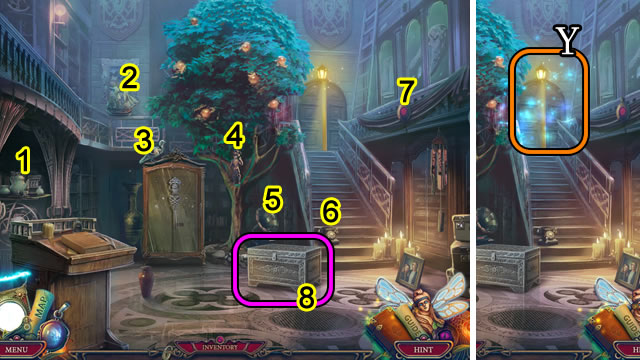
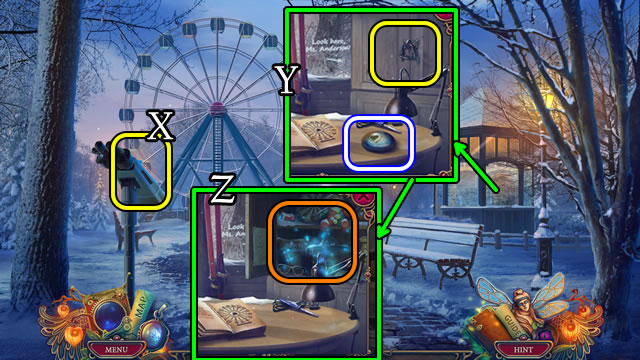
- Use ARCHIVE KEY (X).
- Play HOP (Y) for PUNCH CARD.
- Speak to character.
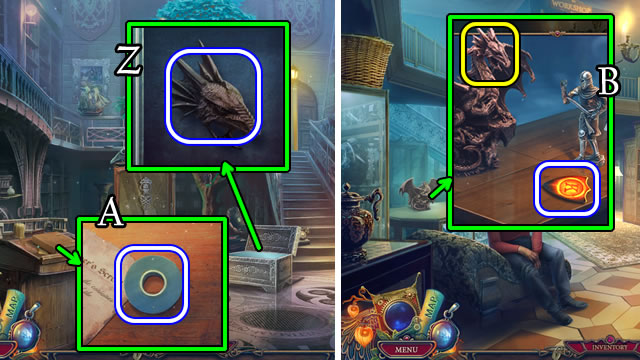
- Select Device; use PUNCH CARD (Z).
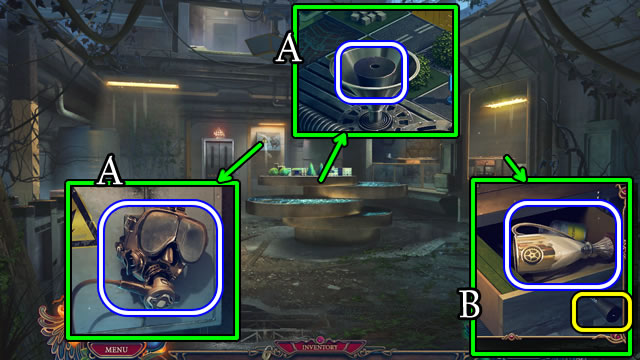
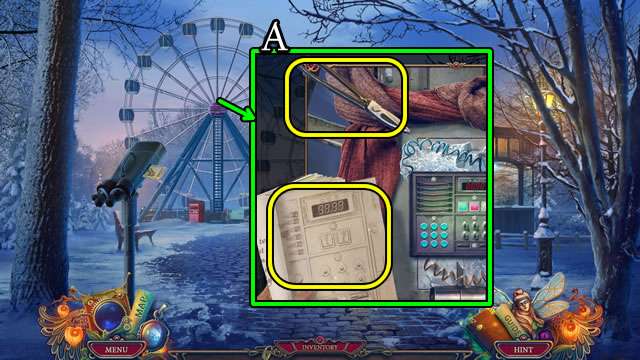
- Take PLUG; RESPIRATOR MASK (A).
- Use PLUG; take note, TROPHY EMBLEM and FLASK OF ACID (B).
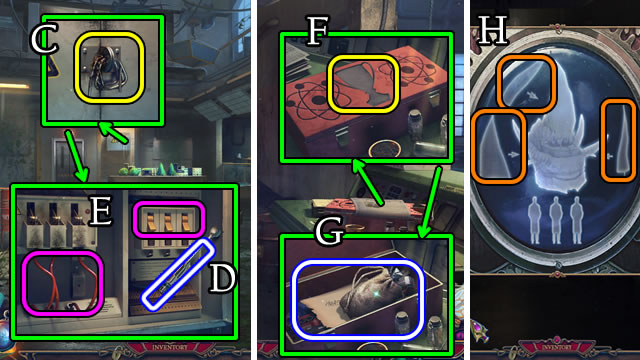
- Use FLASK OF ACID (C).
- Open, take GEAR LEVER (D); select each wire and each switch (E).
- Go forward.
- Take newspaper, place TROPHY EMBLEM (F); open; take BAG WITH PADS and diagram (G).
- Use Device; select pieces (H).
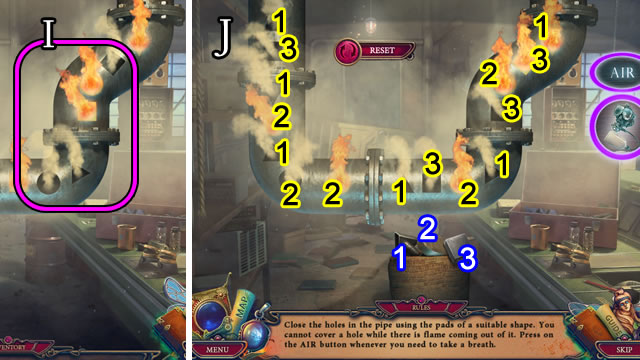
- Use RESPIRATOR MASK and BAG WITH PADS (I).
- Solution (J).
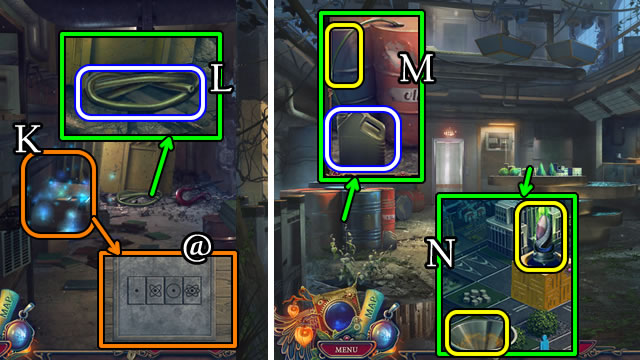
- Play HOP (K); solution (@); receive LAMP OF SHADOWS MODEL.
- Take HOSE (L).
- Go down.
- Use HOSE; take OIL CAN (M).
- Use OIL CAN and LAMP OF SHADOWS MODEL (N).
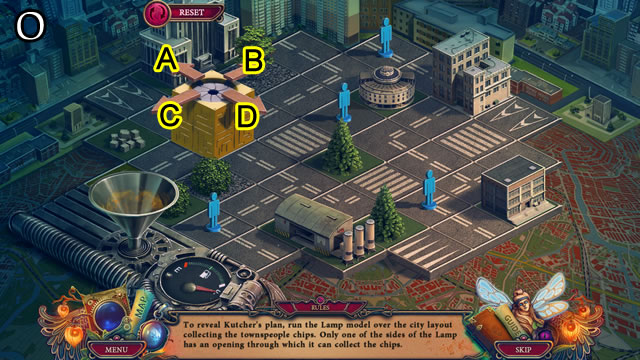
- Solution (O). B-D-B-C-A-B-Dx3-C-D-A-C-A-Cx2-Bx2-Ax2-Bx4.
- Take MAGNET DEVICE, CHAIN.
- Go forward.
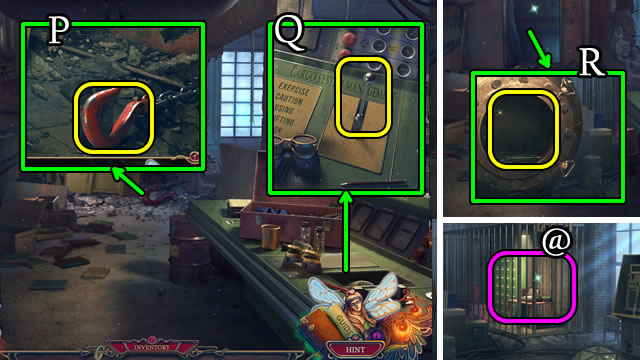
- Use CHAIN (P).
- Place and select GEAR LEVER (Q).
- Place SALAMANDER LANTERN (R).
- Take note, picture (@).
Chapter 2: 1985
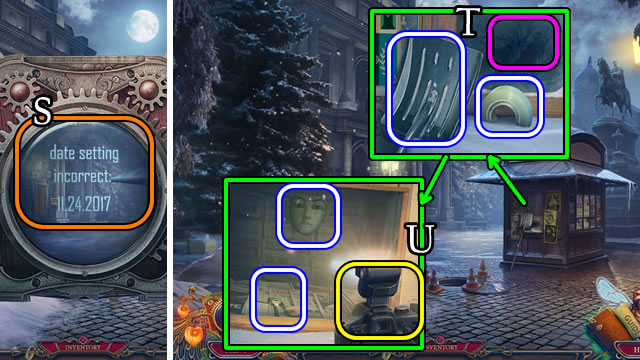
- Select Device 4x (S).
- Take TAPE, SNOW SHOVEL, open (T); use CAMERA, take MUSEUM KEYS and PHARAOH MASK (U).
- Use SNOW SHOVEL (V); open, take newspaper and PLATE WITH DATE (W).
- Take BAG OF LIMESTONE; take note, move sign, boards (X); take PAINT BRUSH (Y); use MUSEUM KEYS (Z).
- Go forward.

- Use Device (A).
- Take BAY LAUREL WREATH (B).
- Place PHARAOH MASK (C); take BANDAGE (D) and CANNONEER FIGURINE (E).
- Place CANNONEER FIGURINE and PLATE WITH DATE (F); select lever take card (G); select button, then painting 3x, open solvent; use PAINT BRUSH (H); select painting.
- Play HOP (I), use Device 3x for DOOR CODE.
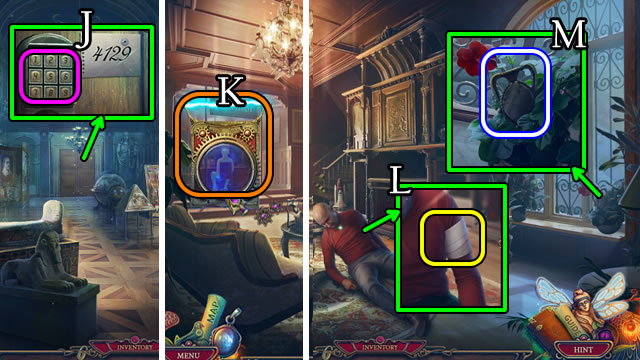
- Place DOOR CODE; enter 4-1-2-9 (J).
- Go forward.
- Use Device (K); speak to character; give UNCLE PAUL'S WATCH; speak to character.
- Use BANDAGE (L).
- Take SMALL AMPHORA (M).
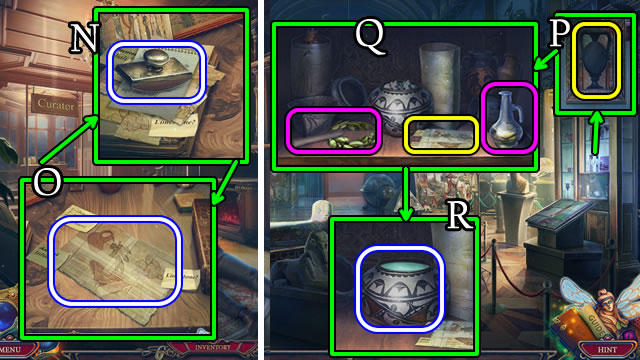
- Take PAPERWEIGHT, note (N); select papers, use TAPE, take STIMULANT RECIPE (O).
- Go down.
- Use SMALL AMPHORA (P); place STIMULANT RECIPE, BAG OF LIMESTONE, BAY LAUREL WREATH; use pestle, oil and wreath (Q); take STIMULANT (R).
- Go forward.
- Use STIMULANT (S); speak to character; take PHOTO FROM SHOP (T), festival card (T); CAR KEYS (T).
- Take MAGNET (U).
- MAGNET and TAPE on MAGNETIC DEVICE for MAGNETIC SPLITTER.

- Place MAGNETIC SPLITTER, select button (V); use CAR KEYS (W).
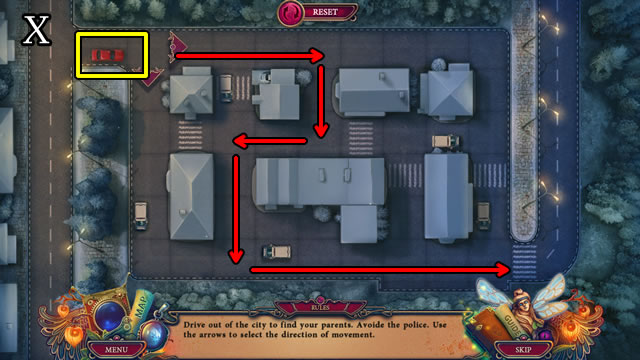
- Solution (X).
- Speak to character.
- Select car; solution (1-5).
- Receive KUTCHER'S DIARY.
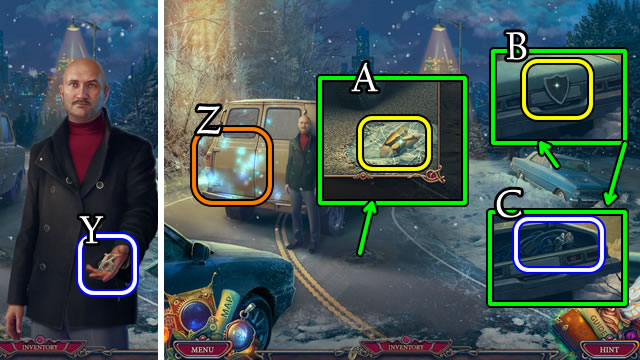
- Speak to character; take EMBLEM K (Y).
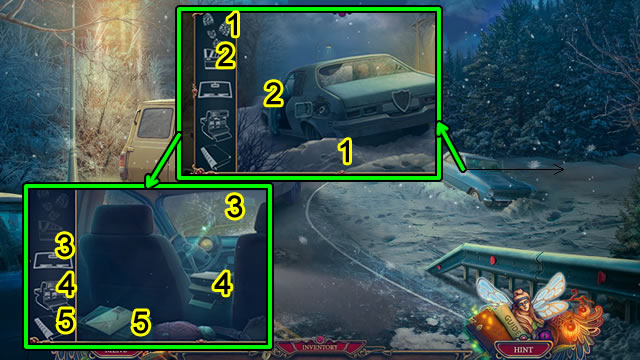
- Play HOP (Z) for 1/2 CAN WITH HOSE.
- Use PAPERWEIGHT; take SHIELD BADGE (A).
- Place SHIELD BADGE and EMBLEM K (B); take KNIGHT FIGURINE, 2/2 CAN WITH HOSE (C).
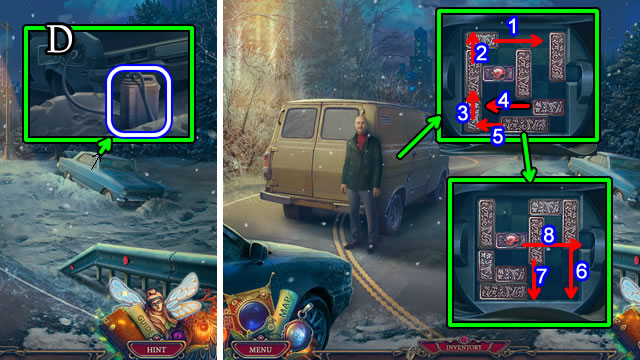
- Use 2/2 CAN WITH HOSE; take GAS CAN (D).
- Open gas tank; solution (1-8); use GAS CAN.
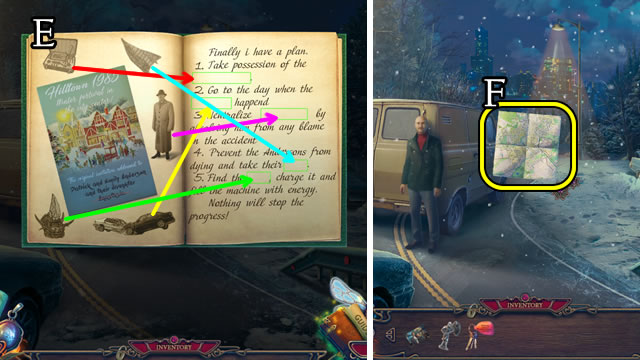
- KUCTHER'S DIARY; solution (E).
- Take LABORATORY KEYS and MAP OF HILLTOWN.
- Place MAP OF HILLTOWN (F).
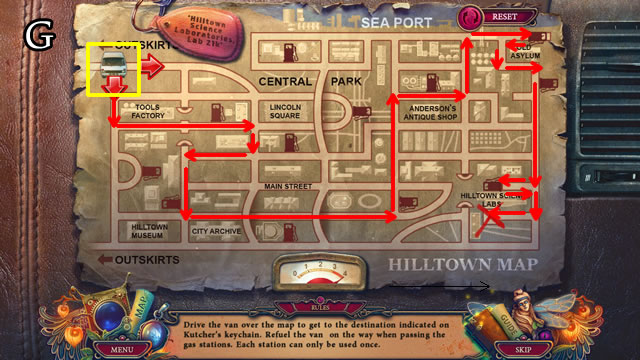
- Solution (G).
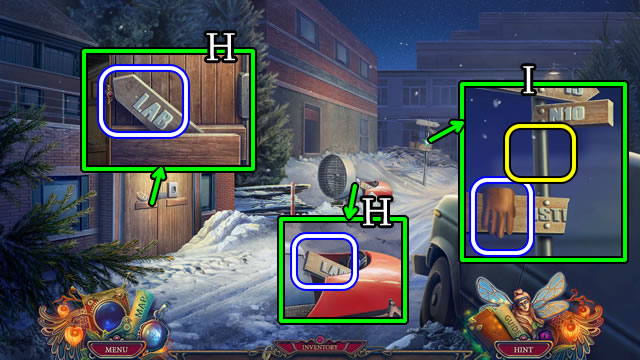
- Speak to character; take 1/2 SIGN; 2/2 SIGN (H).
- Take RUBBER GLOVE; place 2/2 SIGNS (I).
- Solution (J).
- Use LABORATORY KEYS (K).
- Go left.
- Take BUCKET (L).
- Go down.
- Use BUCKET for SNOW BUCKET (M).
- Go left.
- Use SNOW BUCKET (N).
- Open; take picture, VIDEOTAPE and ROTOR BLADES (O).

- Play HOP for CARTRIDGE (P).
- Take note and FLASK EMBLEM (Q).
- Take note; place CARTRIDGE (R); select Start.
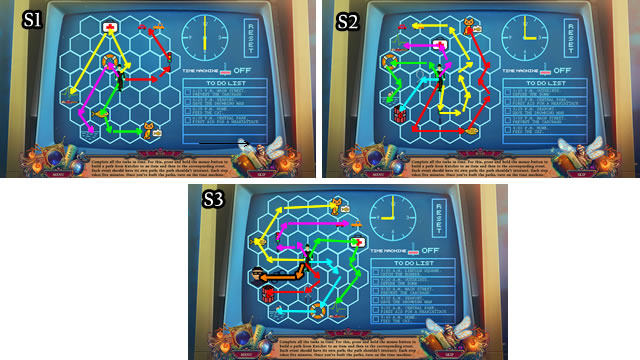
- Solution (S1-S3).
- Go left.
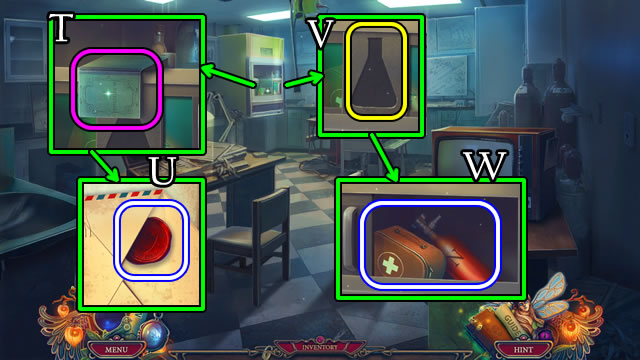
- Select, uncover (T), take FATHER'S SEAL (U).
- Place FLASK EMBLEM (V); take FIRST AID KIT and LIQUID NITROGEN (W).

- Take VIDEO CABLES; use RUBBER GLOVE for BUTTON (X).
- Select 1-4, 5-7. Take OIL CAN (Y).
- Go down.
- Place BUTTON (Z); select 1-5; take VCR (A).
- Go left.
- Place VCR, VIDEO CABLES and VIDEOTAPE; take PASS (B).
- Go down.
- Play HOP (C); receive HAMMER.
- Go left.
- Use LIQUID NITROGEN and HAMMER (D); take STEEL CABLE (E).
- Go down 2x.
- Speak to character.
- Use PASS (F); take LIFE SUPPORT LIGHTS (G), HEXAGONAL KEYS (H).
- Go left.
- Use HEXAGONAL KEYS (I); take BATTERY (J).
- Go left.
- Use BATTERY (K); select 1-3; take STARTER (L).
- Go down 2x.
- Use FIRST AID KIT; speak to character (M).
- Open, place ROTOR BLADES (N). Place STARTER and STEEL CABLE; select starter (O).
Chapter 3: Shop
- Speak to character; use Device, place PHOTO FROM SHOP; select (P).
- Take TOKYO CLOCK; TONGS (Q).
- Place KNIGHT FIGURINE; take DOOR HANDLE (R).
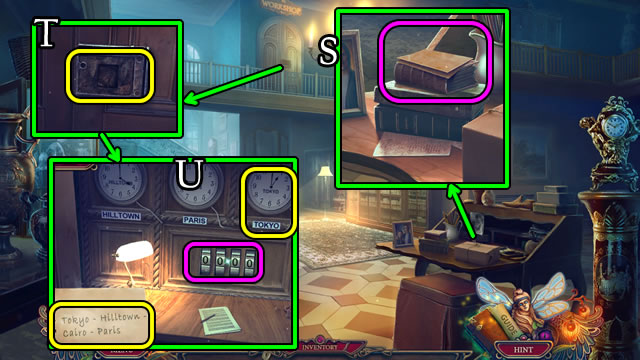
- Take note and DOOR CODE (S).
- Use OIL CAN; place DOOR HANDLE (T).
- Place TOKYO CLOCK and DOOR CODE; enter 1-4-8-9 (U).
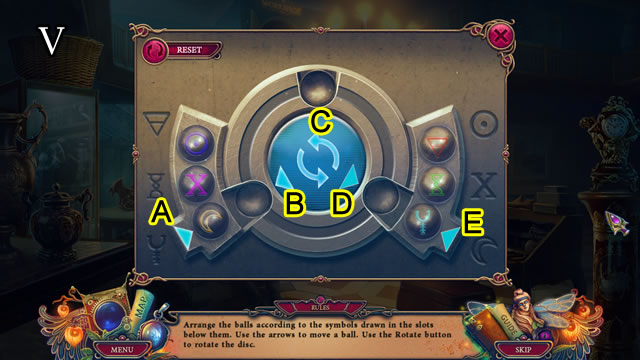
- Solution (V). A-E-C-A-D-Cx2-A-C-B-C-B-E-C-E-C-B-C-E-Cx2-D-C.
- D-C-A-D-C-A-C-A-C-B-C-B-E-C-E-C-D-C-D-C-A-C-A-C-B-C-E-Cx2-B-D-C-B.
- Take note, SHUTTER and BOOK.
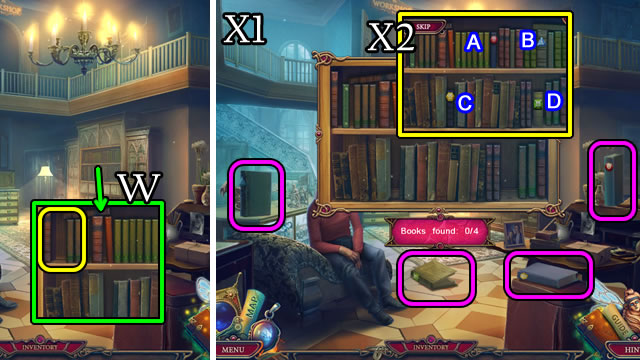
- Place BOOK (W).
- Solution (X1-X2). B-C-A-D.
- Speak to character.
- Go right.
- Use Device; select 1-8.
- Play HOP (Y); receive MOTHER'S SEAL.
- Take DRAGON'S HEAD (Z).
- Open, select matches; take TAPE (A).
- Go down.
- Place DRAGON'S HEAD; use TONGS for RED-HOT SHIELD (B).
- Go right.
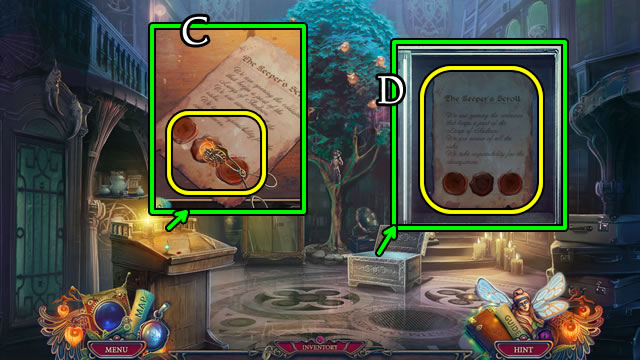
- Place FATHER'S SEAL and MOTHER'S SEAL, RED-HOT SHIELD. Take SCROLL WITH SEALS (C).
- Place SCROLL WITH SEALS (D).
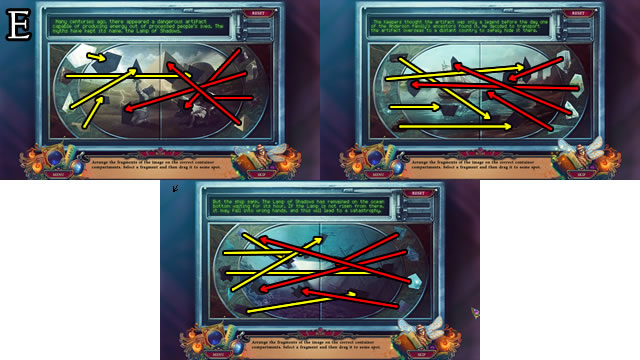
- Solution (E).
- Take note, LAMP OF SHADOWS KEY and METAL WINGS.

- Place METAL WINGS (F).
- Solution (G).
- Take SKELETON KEY (H).
- Go down.
- Unwrap package, take note, use SKELETON KEY (I); take CADUCEUS (J).
- Use CADUCEUS (K); receive keys.
Chapter 4: Saving the Family
- Take HARPOON DART (L).
- Take CHISEL; use SHUTTER (M).
- Go (N).
- Use LIFE SUPPORT LIGHTS (O).
- Solution (P).
- Take PENCIL (Q), note and LOCKPICKS (R).
- Take MAST (S).
- Go up.
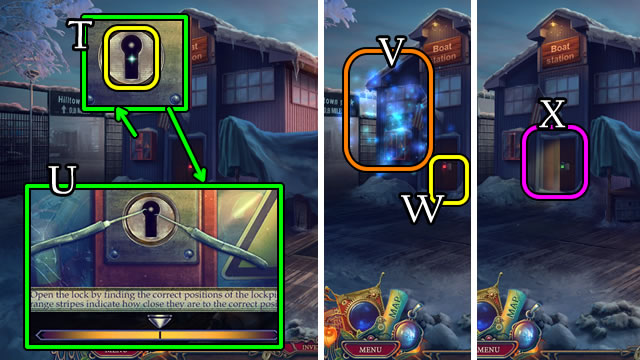
- Use LOCKPICKS (T).
- Solution (U).
- Play HOP (V); receive DOCK KEYCARD.
- Use DOCK KEYCARD (W).
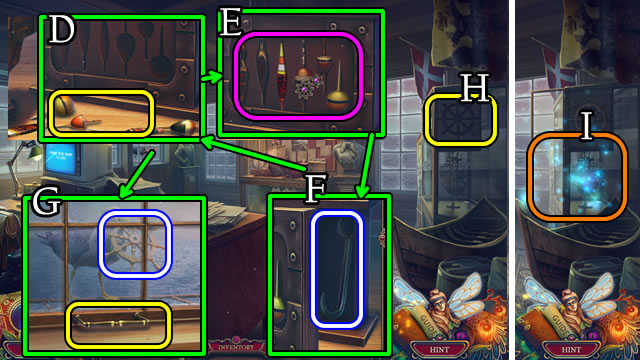
- Go (X).
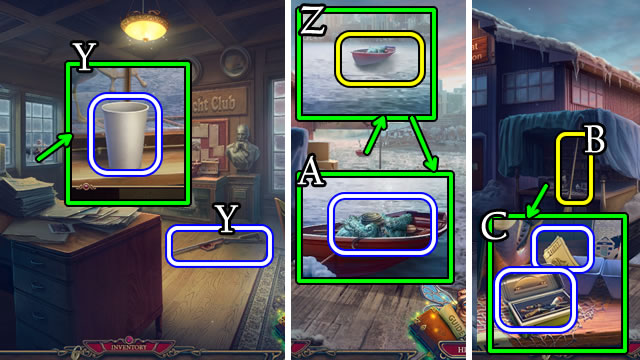
- Take UNLOADED HARPOON; EMPTY CUP (Y).
- Go down.
- HARPOON DART on UNLOADED HARPOON for HARPOON GUN.
- Use HARPOON GUN (Z); take ROPE WITH HOOK, PADDLE and FISH (A).
- Use PADDLE (B).
- Take FLOATS and BINOCULAR TICKET (C).
- Go right.
- Take newspaper; Place FLOATS (D).
- Solution (E).
- Take LARGE HOOK (F).
- Use CHISEL; give FISH; take STEERING WHEEL EMBLEM (G).
- Place STEERING WHEEL EMBLEM (H) for HOP (I); receive SHIP SKETCH.
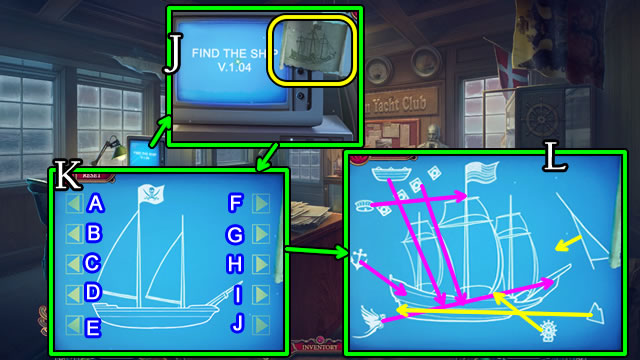
- Take note; place, select SHIP SKETCH (J).
- Solution (K-L). Fx2-G-Hx3-Ix3-Jx2.
- Use PENCIL; take PAPER WITH COORDINATES (M).
- Return to Submarine.
- Use LARGE HOOK (N); select lever; take SOUVENIR COIN (O).
- Go up.
- Play HOP (P); receive ECHO SOUNDER.
- Use SOUVENIR COIN; open magazine; take SAILS (Q).
- Go right.
- Place MAST, SAILS. Take LONGITUDE TOGGLE (R).
- Return to Submarine.
- Place PAPER WITH COORDINATES and LONGITUDE TOGGLE. Select 2 buttons (S).
- Place, select ECHO SOUNDER (T).
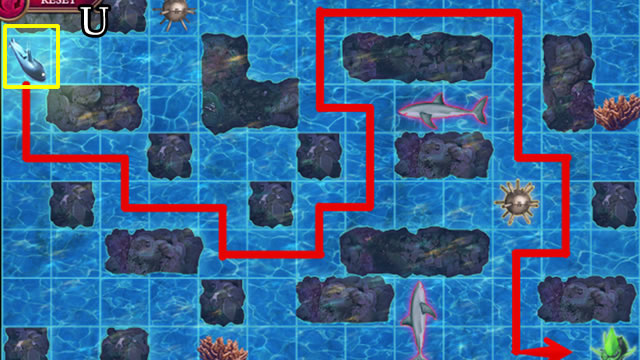
- Solution (U).
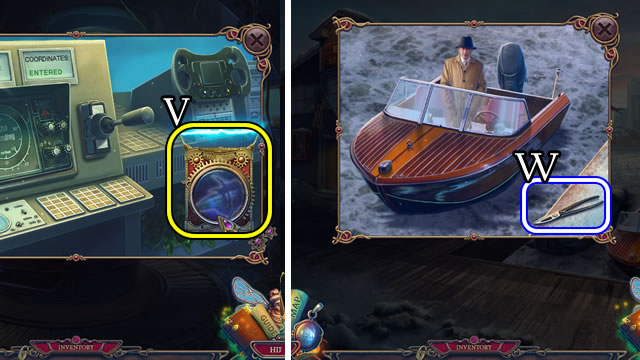
- Use Device; take LAMP OF SHADOWS (V).
- Go up.
- Speak to character; give LAMP OF SHADOWS; speak to character; give LAMP OF SHADOWS KEY; speak to character; take NIPPERS (W).
- Go left.
- Use BINOCULAR TICKET (X).
- Take FISH EYE; use NIPPERS (Y).
- Play HOP (Z); receive DEFUSION MANUAL.
- Use DEFUSION MANUAL and NIPPERS (A).
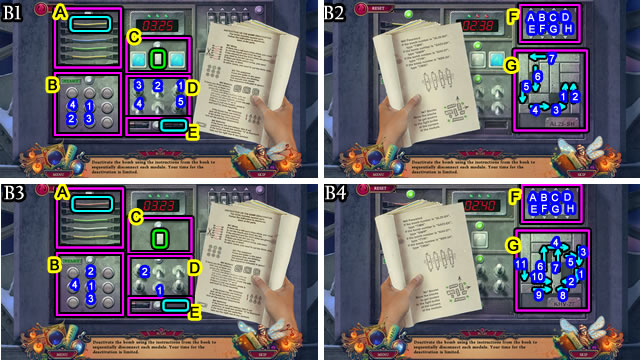
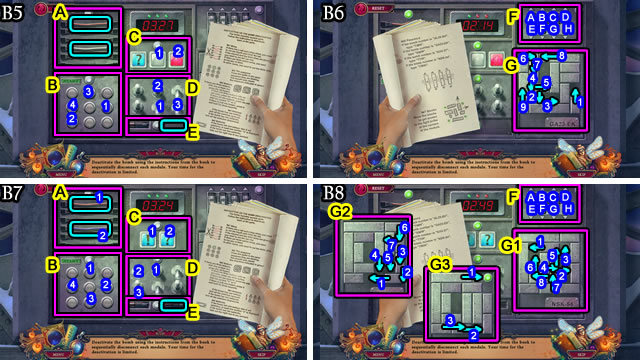
- Possible solution (B1-B2). E: Press any time; F: Ex4-Fx2-Gx3-Hx3.
- Possible solution (B3-B4). E: Press when timer displays at least 1 number 3; F: Ex4-Fx3-Gx4-Hx3.
- Possible solution (B5-B6). E: Press when timer displays at least 1 number 3; F: Ex5-Fx2-Gx3-Hx2.
- Possible solution (B7-B8). E: Press any time; F: Ex4-Fx5-Gx4-Hx3.
- Receive WICK.
- Take DART (C).
- Go forward.
- Take CANE HANDLE (D).
- Use DART; solutions vary; take TOY CLOWN, GEAR (E).
- Go down.
- Place TOY CLOWN; take FIREWORKS EMBLEM (F).
- Go forward.
- Place FIREWORKS EMBLEM (G); take FIREWORK and BOX CUTTER (H).
- Go down.
- Play HOP (I); receive AUDIO PLAYER.
- Use BOX CUTTER; take SCARF (J) and 1/3 METAL ORNAMENT (K).
- Go forward.
- Place EMPTY CUP; select button (L); use SCARF, take HOT COFFEE (M).
- Go down.
- Use HOT COFFEE (N); select lever; take 2/3 METAL ORNAMENT; place GEAR (O).
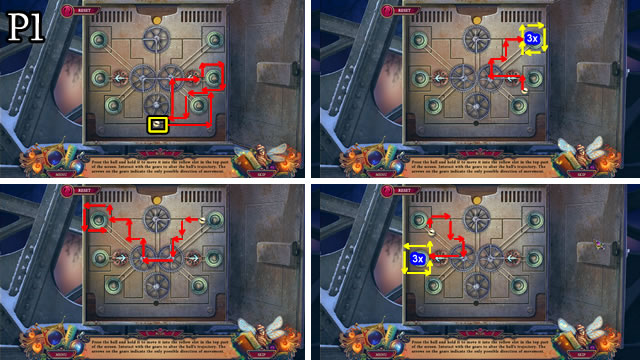
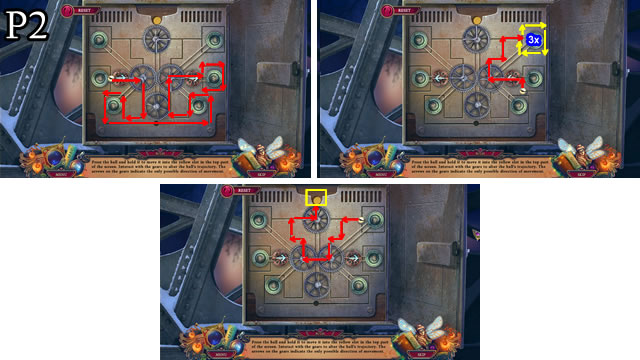
- Solution (P1-P2).

- Speak to characters; give AUDIO PLAYER; speak to characters; take 3/3 METAL ORNAMENT (Q).
- Go forward.
- Use 3/3 METAL ORNAMENT (R).
- Go forward.
Chapter 5: City Square
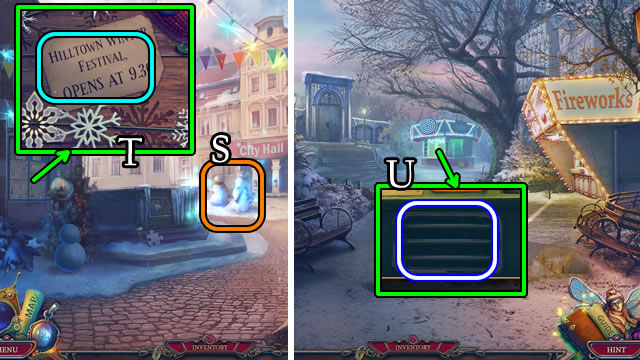
- Play HOP (S); receive LONG CROWBAR.
- Read notice (T).
- Go down.
- Use LONG CROWBAR for METAL RUNGS (U).
- Go forward.
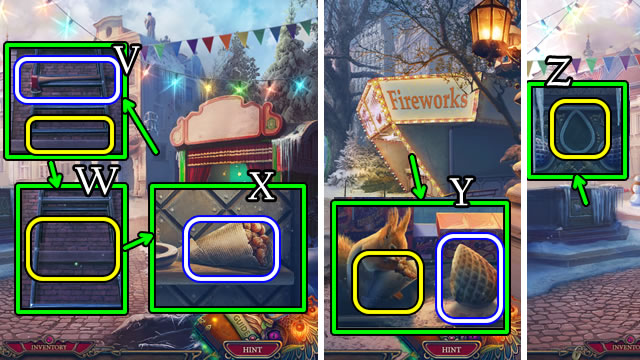
- Use ROPE WITH HOOK; take FIRE AXE (V).
- Use METAL RUNGS (W); take PACK OF NUTS (X).
- Go down.
- Give PACK OF NUTS; take STONE PINE CONE (Y).
- Go forward.
- Place STONE PINE CONE (Z).
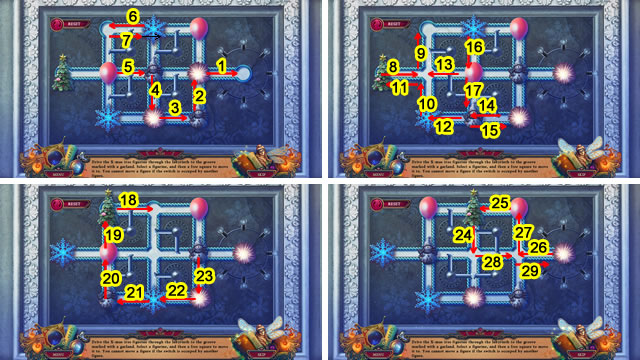
- Solution (1-29).
- Place FISH EYE; take DOORBELL (A).
- Place DOORBELL (B).
- Go forward.
- Take PAPER SNOWFLAKE, LIGHTER; FIRE SIGN, CANE and TOY SLED (C).
- Go down.

- Place SNOWFLAKE (D).
- Solution (E).
- Take STAR (F).
- Play HOP (G); receive RED CAP.
- Place TOY SLED, STAR and RED CAP (H).
- Solution (I).
- Take FIREWOOD EMBLEM.
- Go forward.
- Place FIREWOOD EMBLEM (J); take COAL (K).
- Use COAL; take CODE PAPER (L).
- Place CODE PAPER; enter 1-2-3-4 (M).
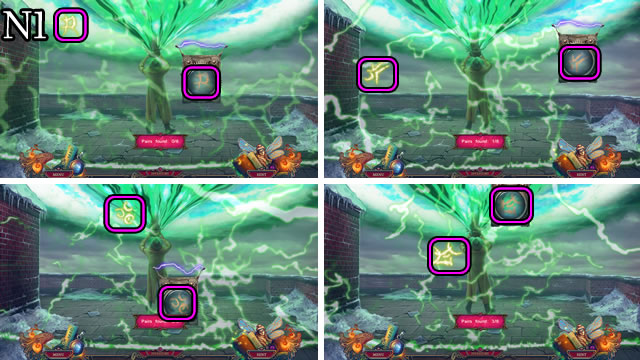
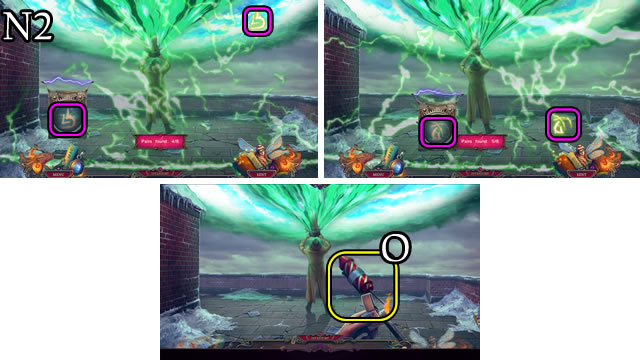
- Use Device; solution (N1-N2).
- FIREWORK, WICK, TAPE, CANE HANDLE on CANE for FIRE-CANE.
- Use FIRE-CANE; use LIGHTER (O); speak to characters.
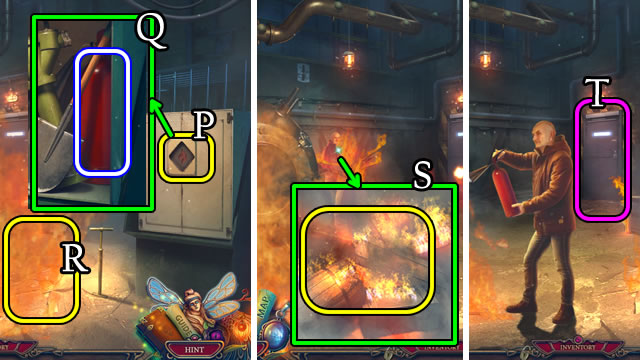
- Use FIRE SIGN (P); take FIRE EXTINGUISHER (Q).
- Use FIRE EXTINGUISHER (R).
- Use FIRE AXE (S); speak to character.
- Select (T).
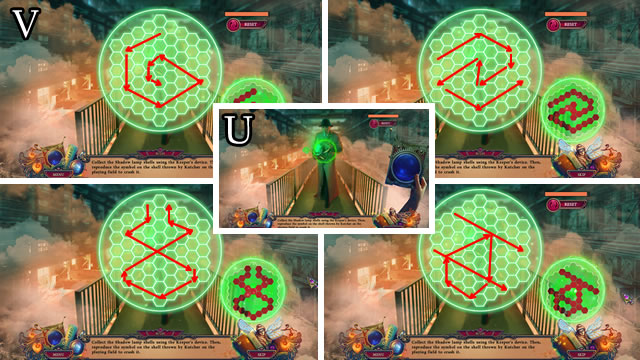
- Solutions vary (U).
- Solutions (V).
- Speak to character.
- Congratulations, you've completed The Keeper of Antiques: Shadow from the Past!
Created at: 2018-07-08