

Walkthrough Menu
- General Tips
- Chapter 1: Town Square
- Chapter 2: House
- Chapter 3: Kitchen
- Chapter 4: Workshop
- Chapter 5: Junk Room
- Chapter 6: Museum
General Tips
- This is the official guide for The Keeper of Antiques: The Last Will.
- This guide won't tell you when to zoom into a location; the screenshots show each zoom scene.
- Hidden-object puzzles are referred to as HOPs. Only the locations of the HOPs will be shown.
- Use the Map to fast travel to a location.
Chapter 1: Living Room
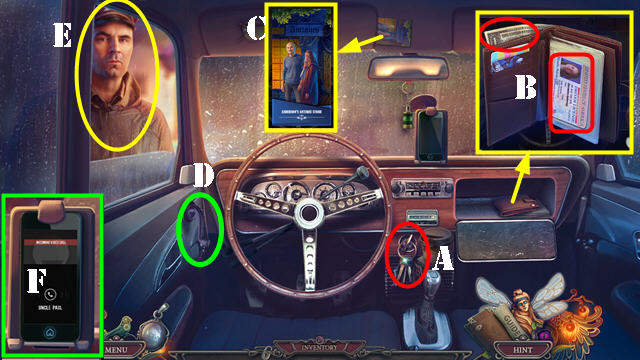
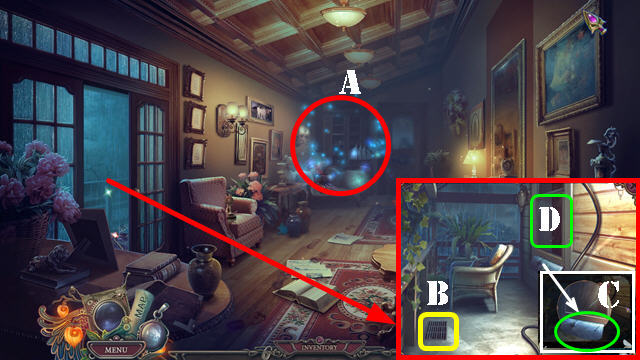
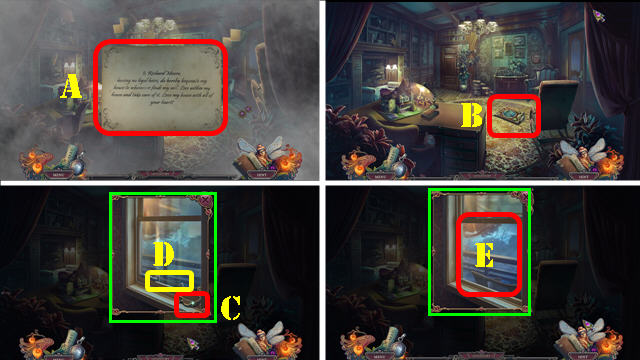
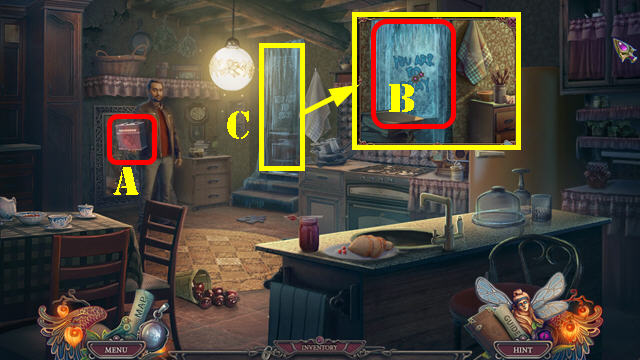
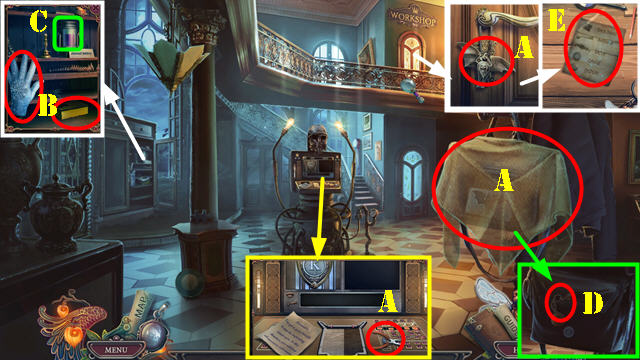
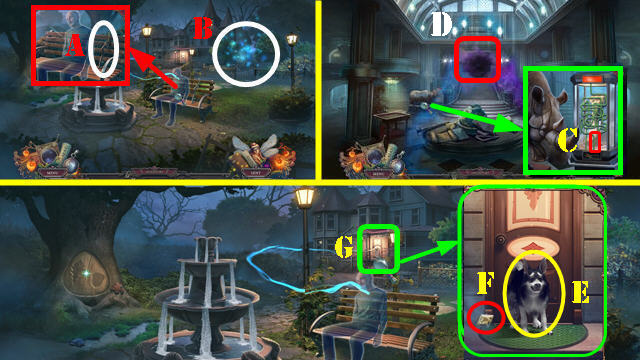
- Take TRUNK KEY (A).
- Open glove compartment; take DRIVER'S LICENSE and ONE DOLLAR (B).
- Look at pamphlet (C).
- Roll window down (D); show DRIVER'S LICENSE (E).
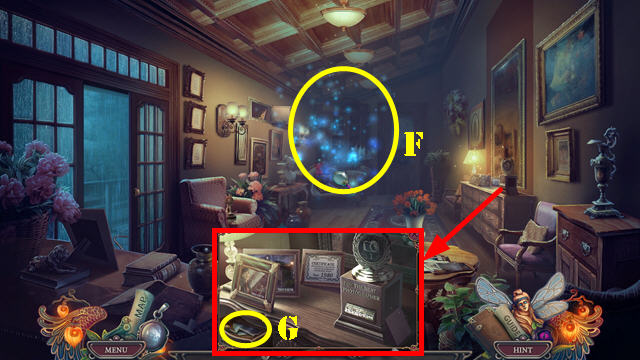
- Answer phone on screen; receive PHONE (F).
- Exit car.
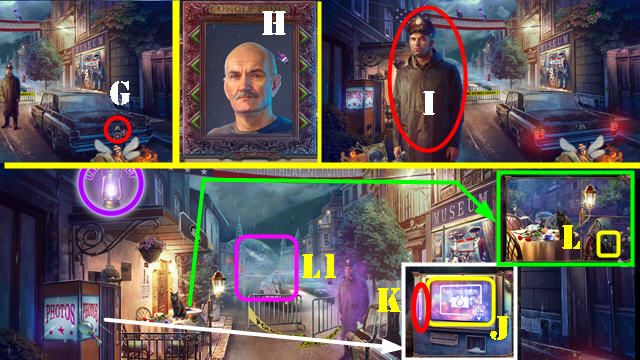
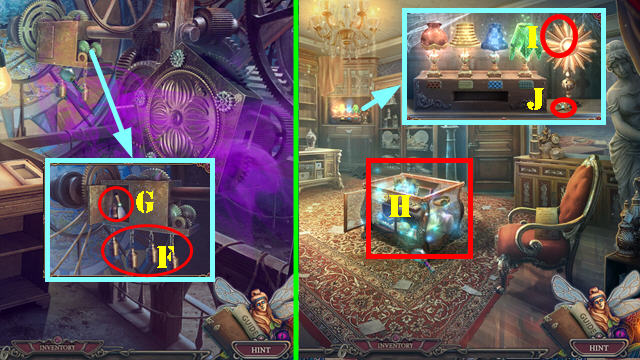
- Use TRUNK KEY (G). Play HOP; receive MESMERIZING LAMP. HOP solution (H).
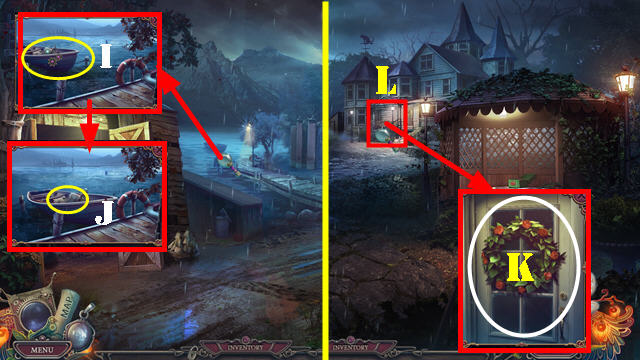
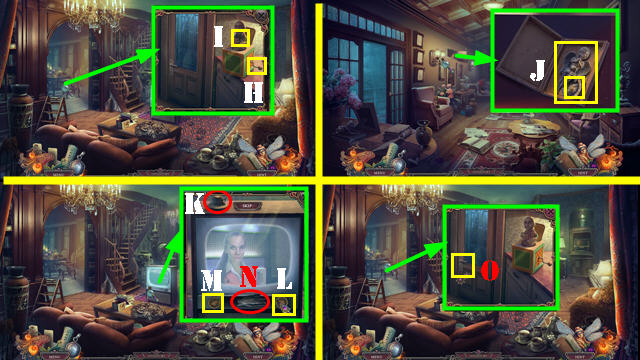
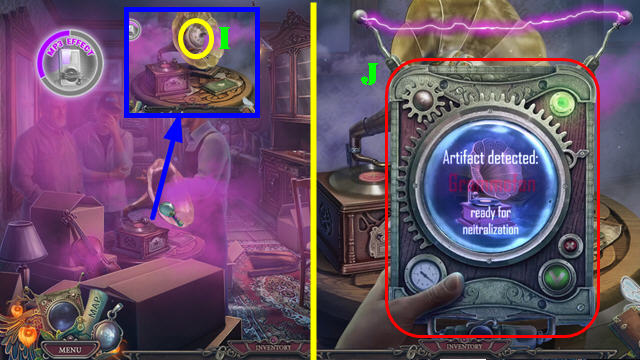
- Use MESMERIZING LAMP (I).
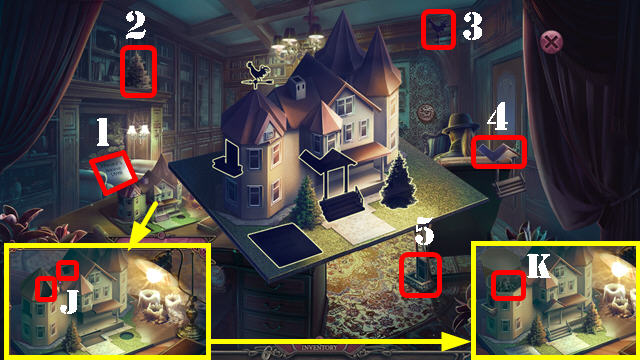
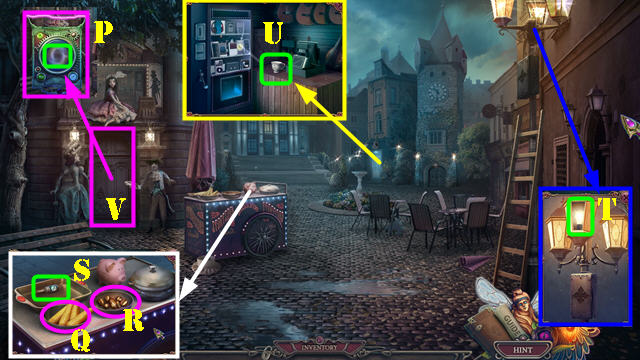
- Select screen (J). Take UV LAMP (K).
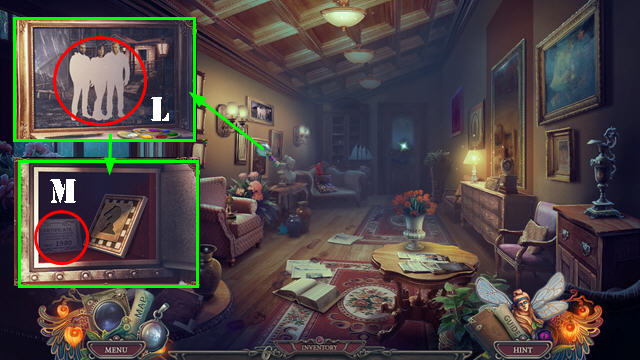
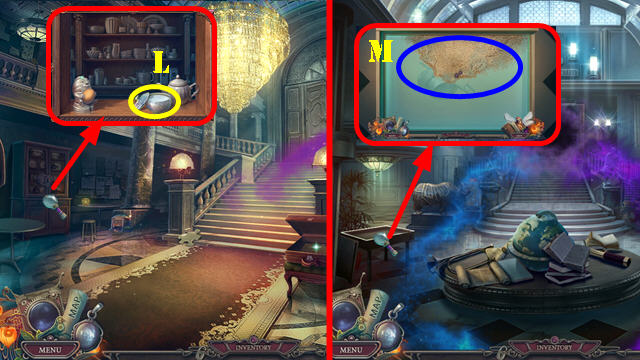
- Look at newspaper; take WHEEL TOKEN (L).
- Go (L1).
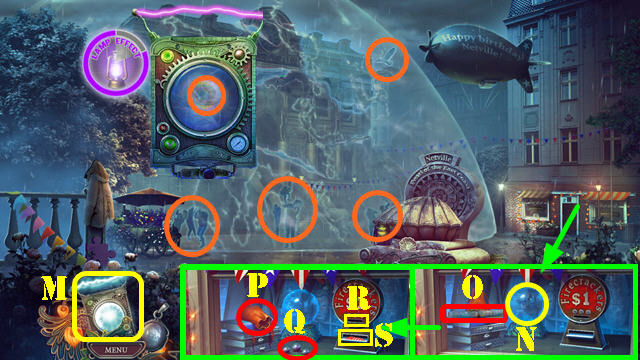
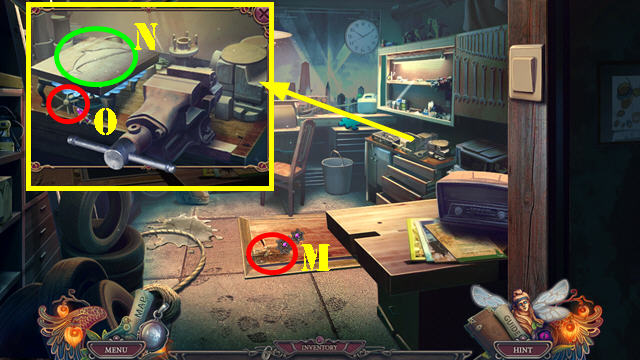
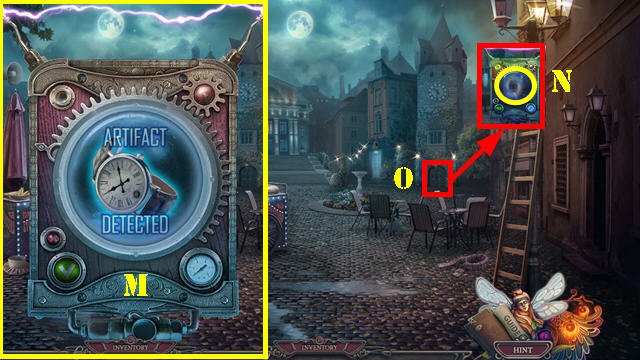
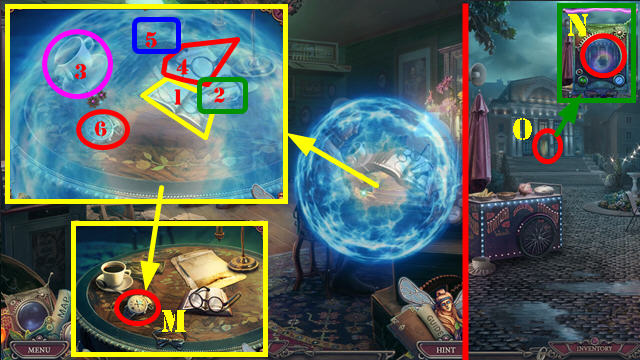
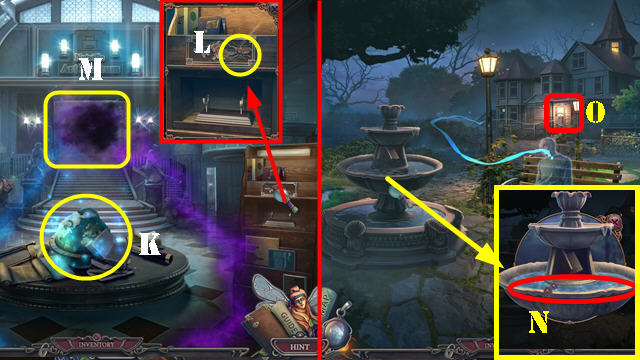
- Place Keeper's Tool (M) on scene. Use KEEPER'S TOOL 5x (orange).
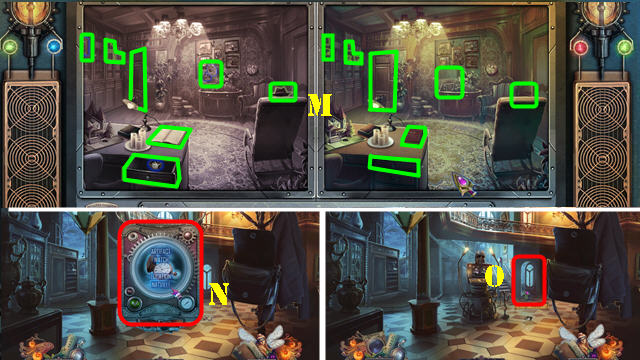
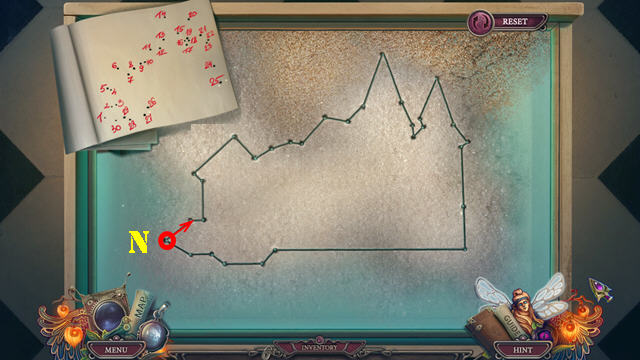
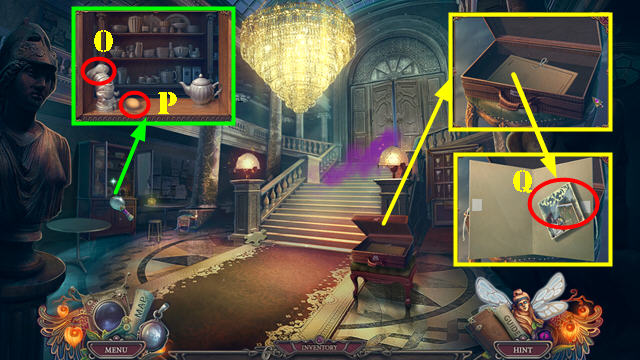
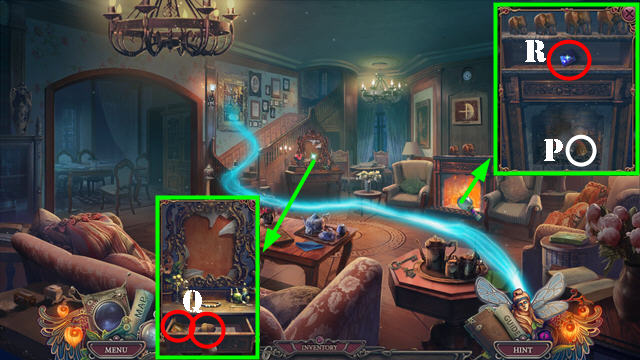
- Place WHEEL TOKEN. Select crystal ball (N) and take Map (O).
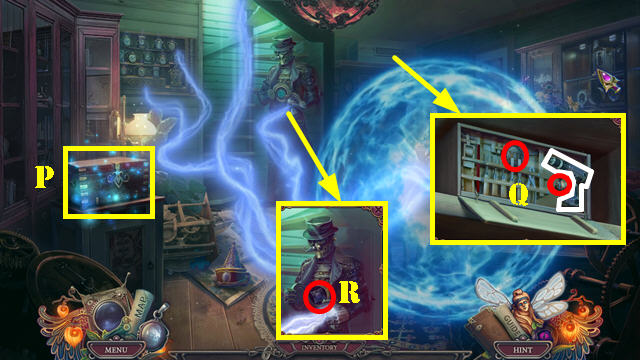
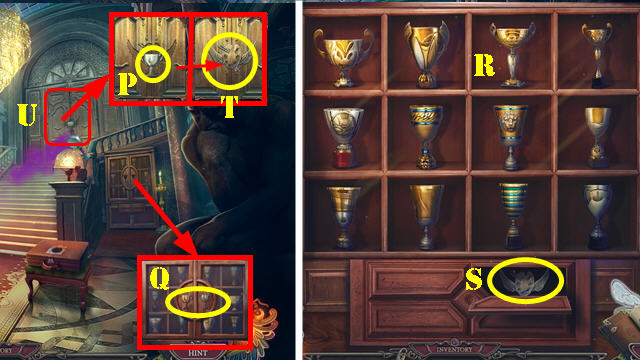
- Select bag (P); take METAL SPHERES (Q).
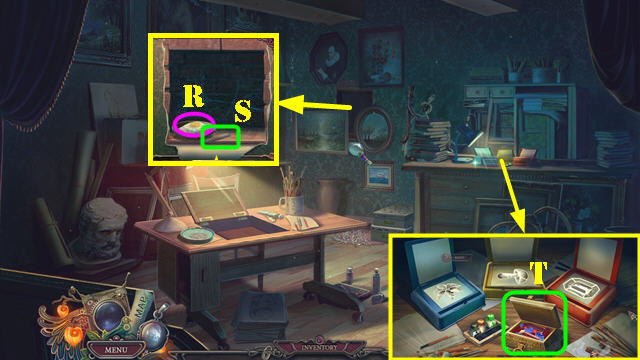
- Use ONE DOLLAR (R); take FIRECRACKER WITH GUNPOWDER (S).
- Walk down.
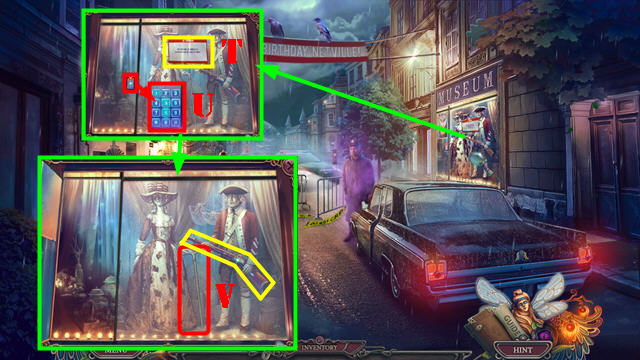
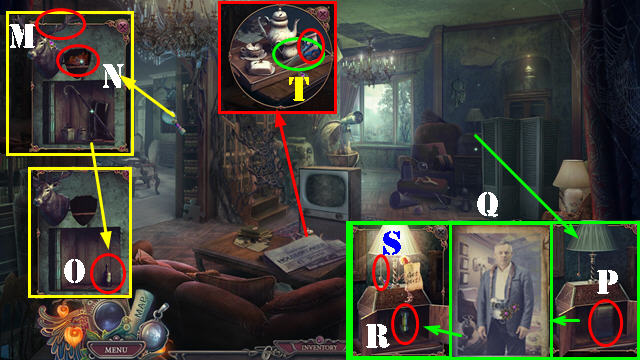
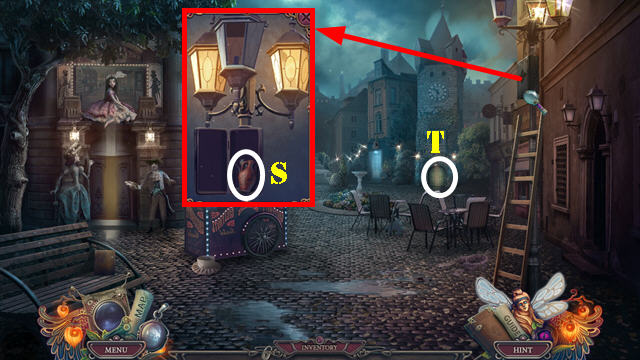
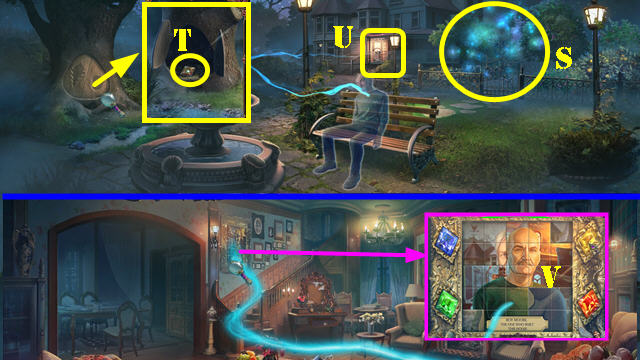
- Look at sign (T).
- Use UV LAMP; select 1-5-8 (U).
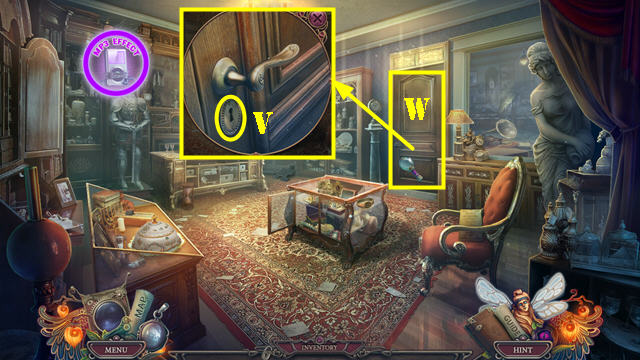
- Take CANE and UNLOADED MUSKET (V).
- FIRECRACKER WITH GUNPOWDER and METAL SPHERES on UNLOADED MUSKET; receive LOADED MUSKET.
- Go forward.
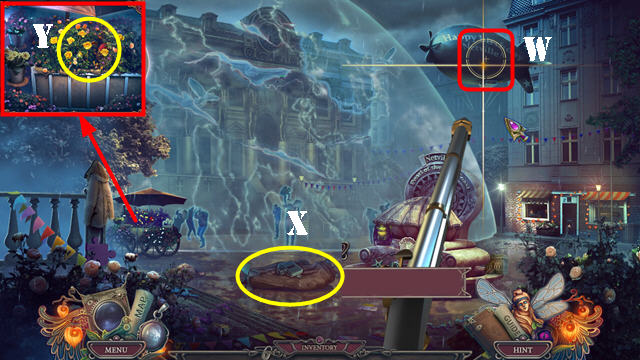
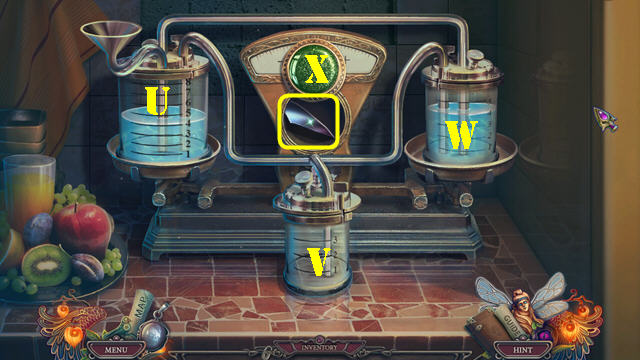
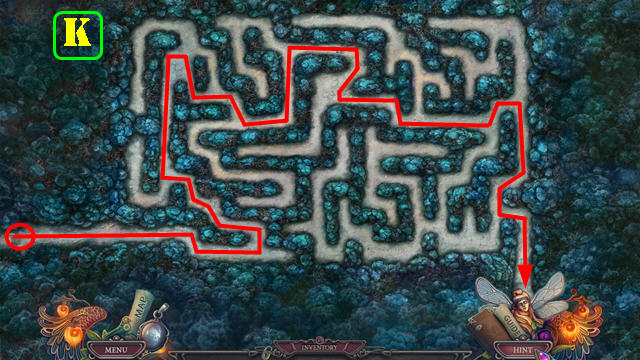
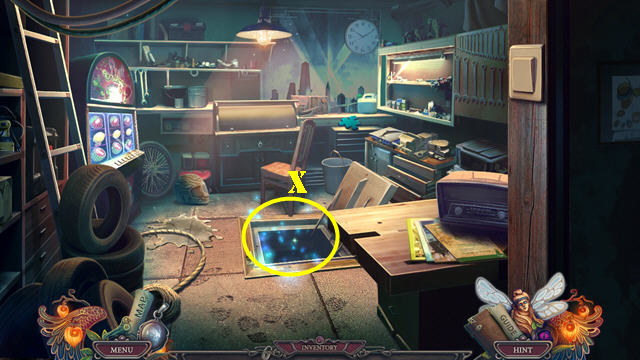
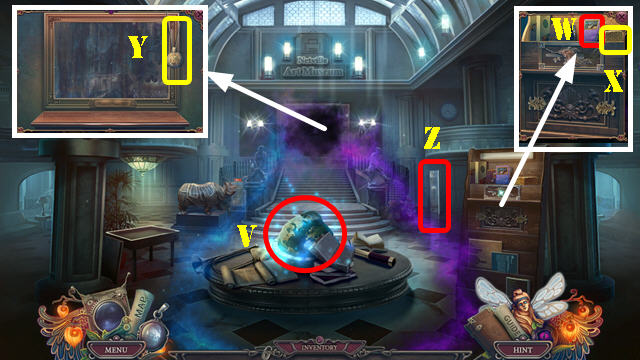
- Use LOADED MUSKET. Select when both lines intersect blimp (W).
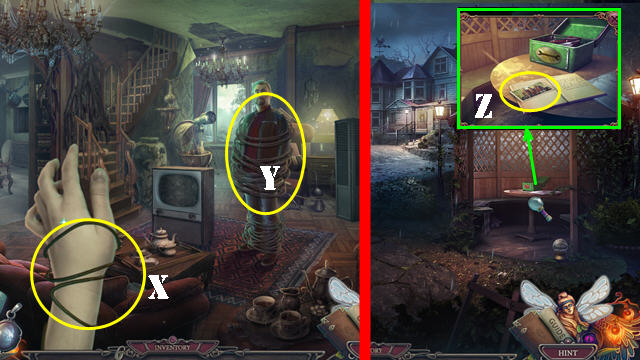
- Take BLIMP (X).
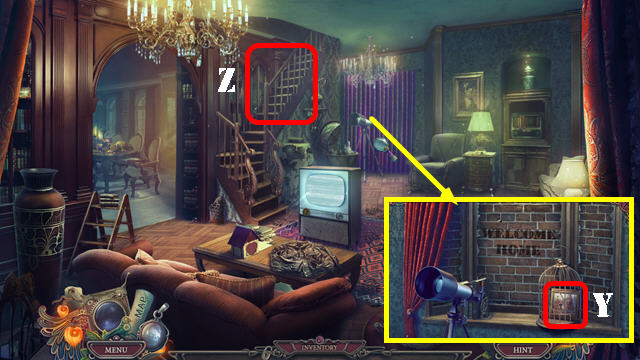
- Use CANE (Y); receive BLUNT SAW and YARN.
- Walk down.
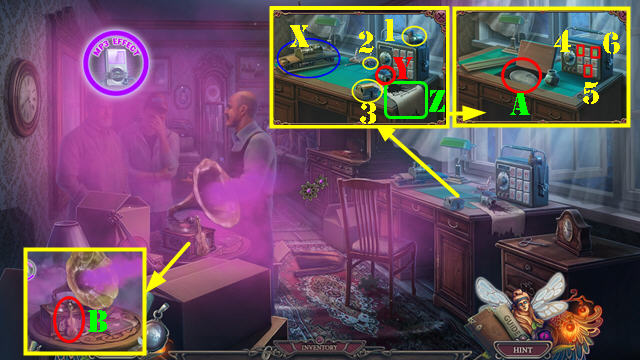
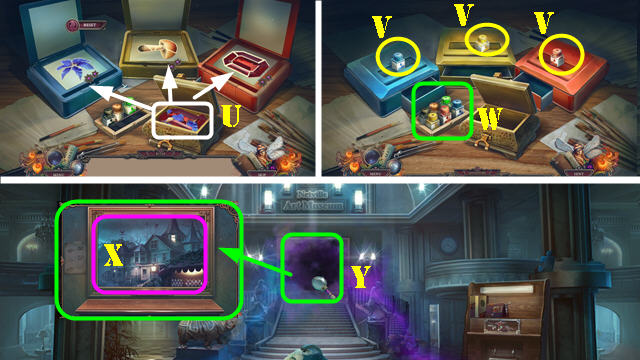
- Take FILM and PROPELLER from BLIMP.
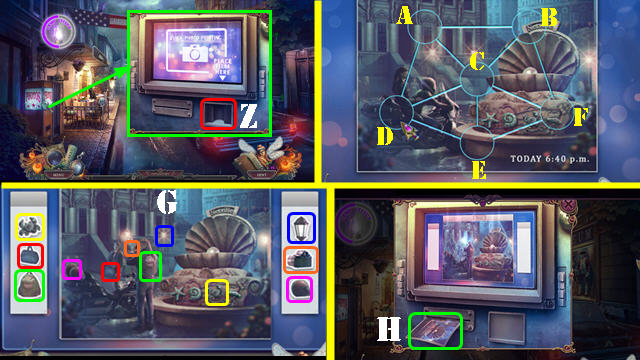
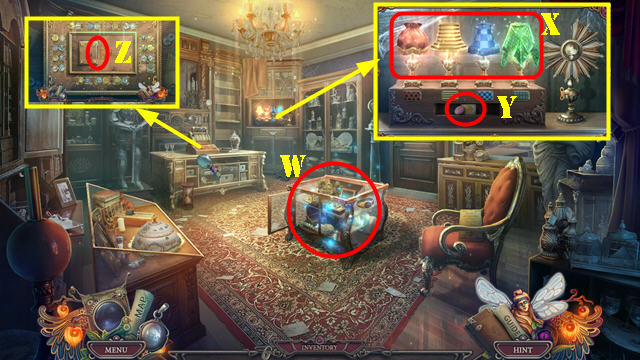
- Place FILM (Z).
- Solution: (E-C)-(C-B)-(A-C)-(C-F)-(A-D).
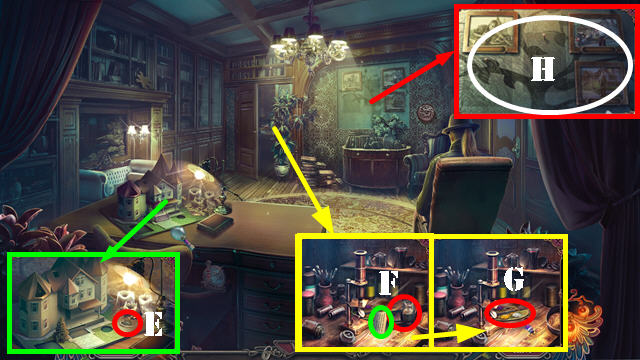
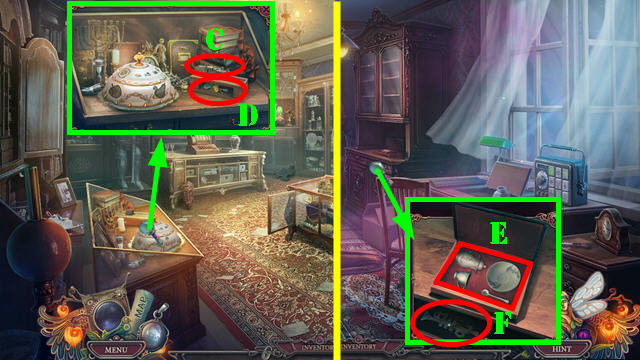
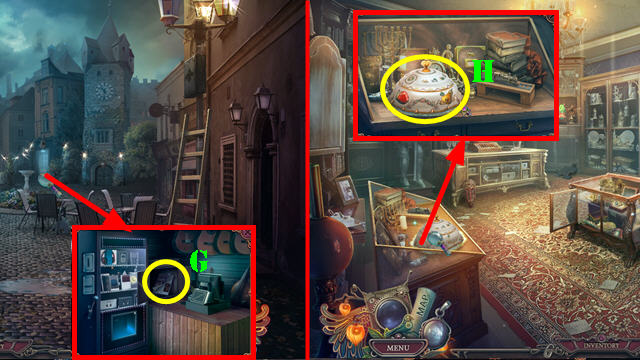
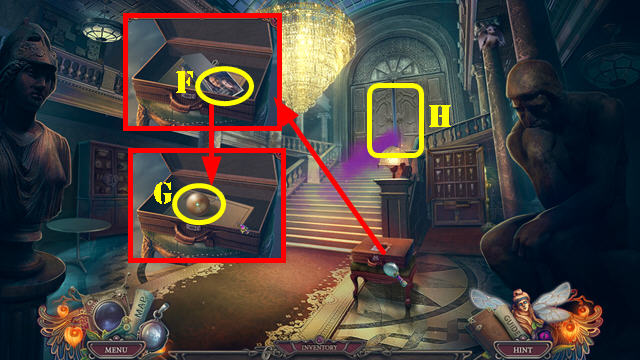
- Place missing items (G). Select screen.
- Take SCULPTURE PHOTO (H).
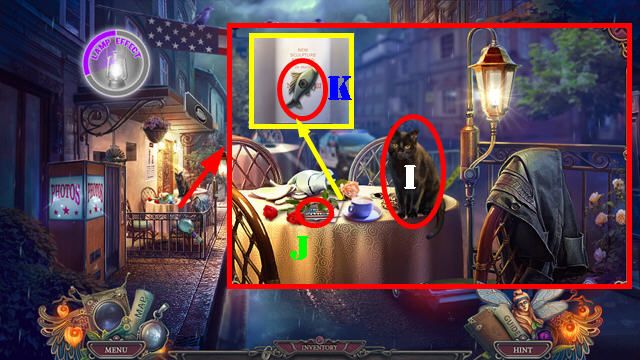
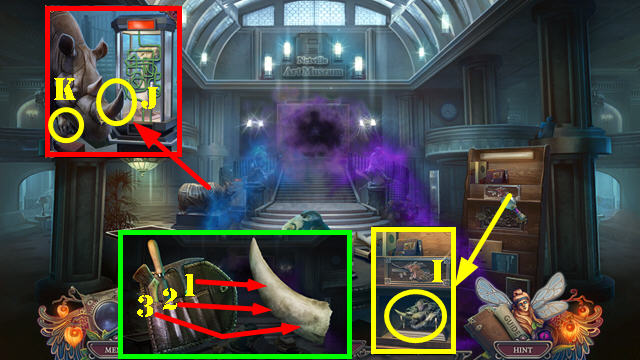
- Give YARN (I); take PIN (J).
- Open envelope; take FISH FIGURINE (K).
- Go forward.
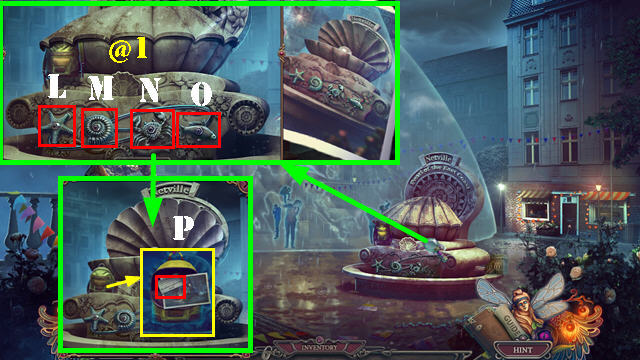
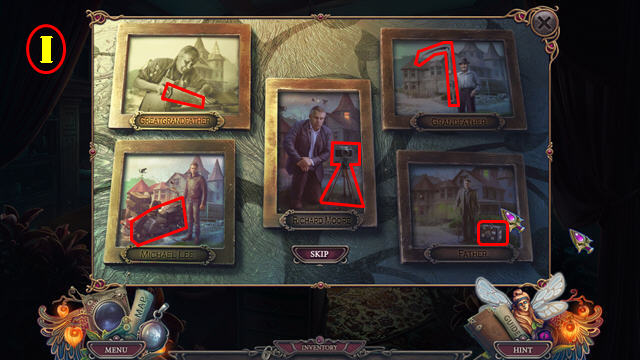
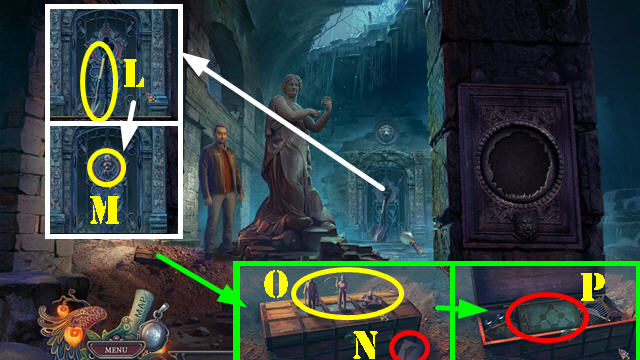
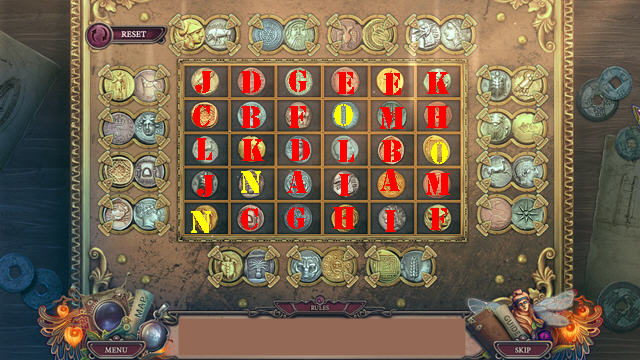
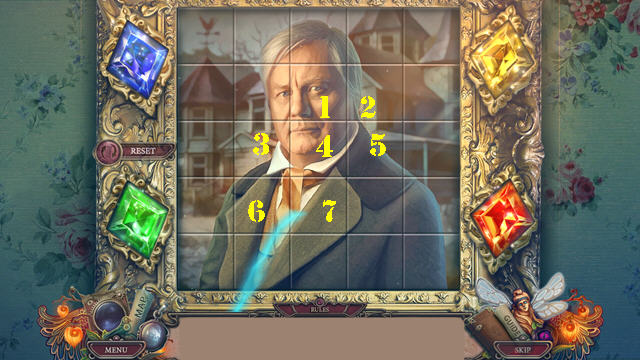
- Place FISH FIGURINE and SCULPTURE PHOTO. Solution (@1): (N-M)-(M-O)-(M-N)-(N-L)-(M-N).
- Open backpack; select twice and take ADDRESS CARD (P).
- Walk down.
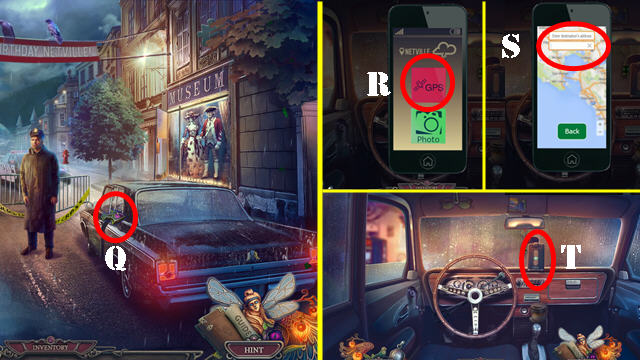
- Enter car (Q).
- Select GPS (R) on PHONE; place ADDRESS CARD (S). Receive PHONE WITH GPS.
- Place PHONE WITH GPS (T).
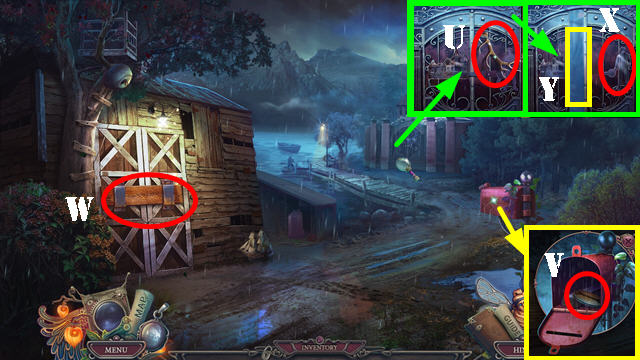
- Take ANTLER (U).
- Use PIN and look at letter; take WRENCH TOKEN and WHETSTONE (V).
- WHETSTONE on BLUNT SAW; receive SHARP SAW.
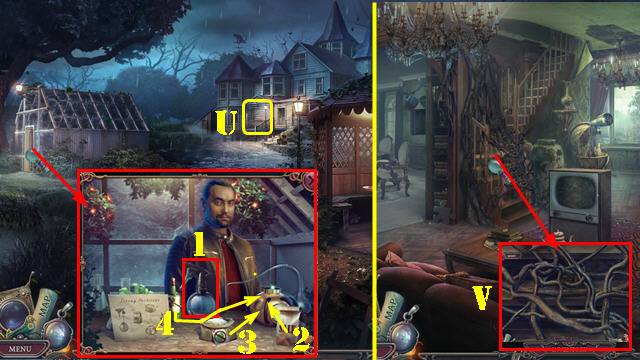
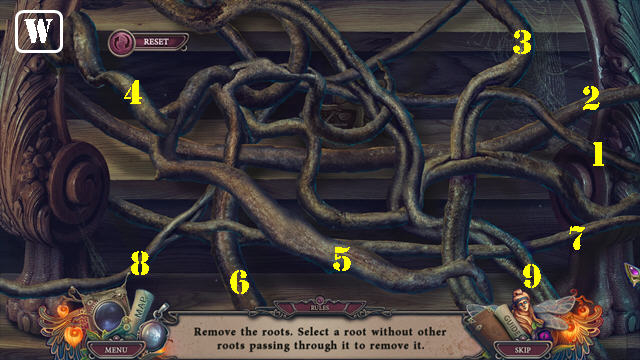
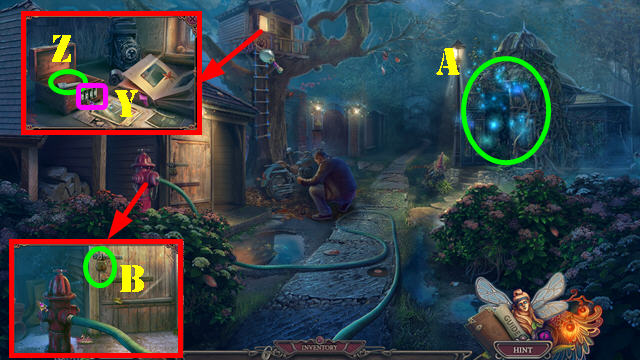
- Use SHARP SAW (W). Play HOP; receive HOST FIGURINE.
- Place HOST FIGURINE (X) and go (Y).
- Use Keeper's Tool on scene.
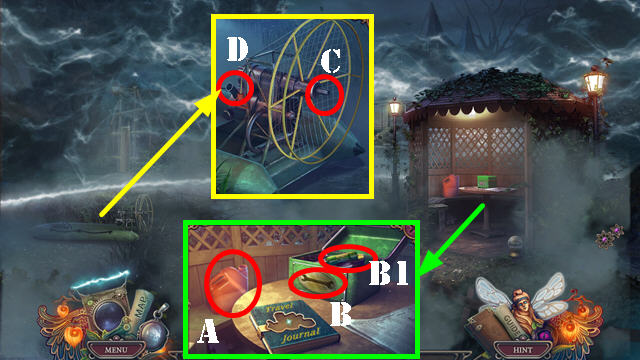
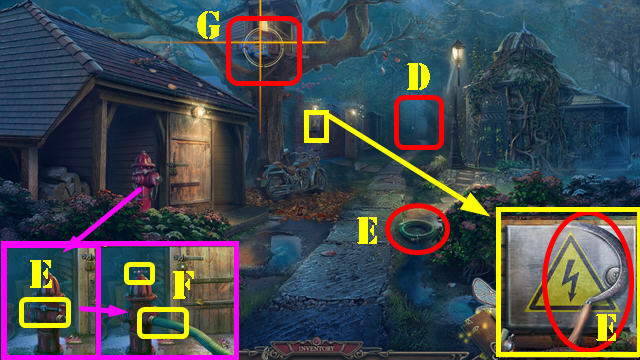
- Take GASOLINE (A). Look at note; place WRENCH TOKEN (B); take FUSE and SCREWDRIVER (B1).
- Place PROPELLER and use SCREWDRIVER (C). Pour GASOLINE and select (D).
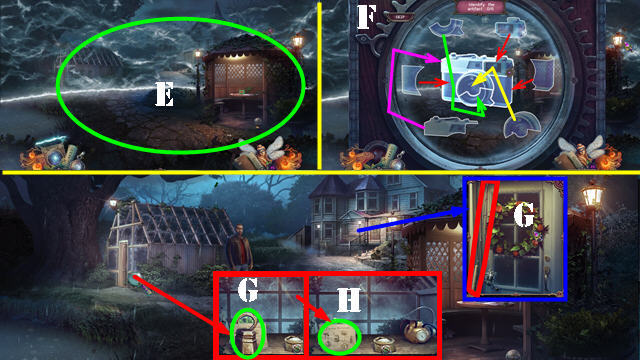
- Use Keeper's Tool on scene (E).
- Assemble camera (F).
- Take FISHING ROD and WEIGHT (G).
- Look at note (H).
- Walk down.
- Use FISHING ROD (I). Look at book; take PUMP and CROWBAR (J).
- Go forward.
- Use CROWBAR (K).
- Go (L).
Chapter 2: Living Room
- Place ANTLER (M); take LIGHTER and HOUSE INLAY (N).
- Open door and hang WEIGHT; take UMBRELLA, move items and take POISON (O).
- Place HOUSE INLAY; open book (P) and arrange puzzle pieces (Q). Take MUSIC PAPER.
- Remove old fuse; place FUSE (R). Pull string (S). Play HOP; receive EMPTY BOTTLE.
- Select 4x; take SCISSORS and SALT (T).
- Walk down.
- Place EMPTY BOTTLE, SALT, and POISON. Select empty bottle (1). Place 2-4.
- Take HERBICIDE (1).
- Go (U).
- Use HERBICIDE (V).
- Select 1-9 (W).
- Take BIKER FIGURE.
- Use SCISSORS (X-Y).
- Place BIKER FIGURE. Look at note (Z).
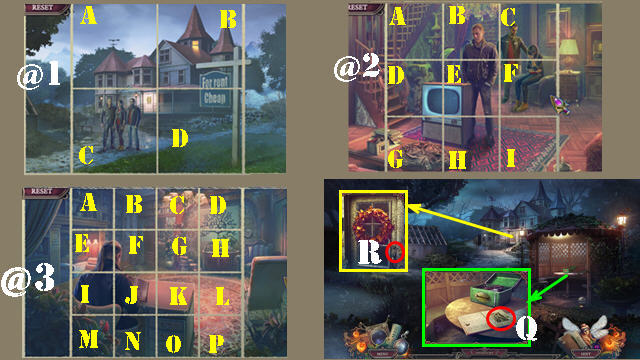
- Solution one (@1): (A-B)-(A-C)-(C-D).
- Solution two (@2): (C-B)-(B-A)-(E-H)-(H-G)-(B-E)-(C-B)-(C-F).
- Solution three (@3): (K-G)-(G-F)-(F-E)-(O-N)-(P-O)-(G-K)-(C-G)-(G-F)-(G-C).
- Take HOUSE KEY (Q).
- Use HOUSE KEY (R) and enter.
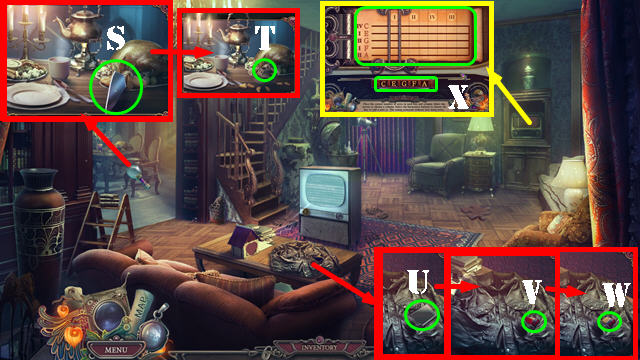
- Take MIRROR FRAGMENT 1/3 (S).
- Open 3 fortune cookies; take CHIMNEY PIECE (T).
- Look at phone (U); select video one and video two.
- Look at ring box and note (V); take HARMONICA (W).
- Place HARMONICA and MUSIC PAPER (X).
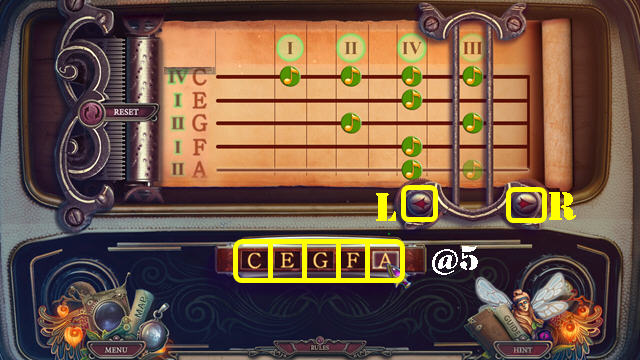
- Solution (@5): C-R-C-R-C-R-C-L-E-L-G-Rx2-G-L-F-A-R-A.
- Take CLAMP and RICHARD'S PORTRAIT.
- Open curtain; use CLAMP; take MICHAEL'S PORTRAIT (Y).
- Go (Z).
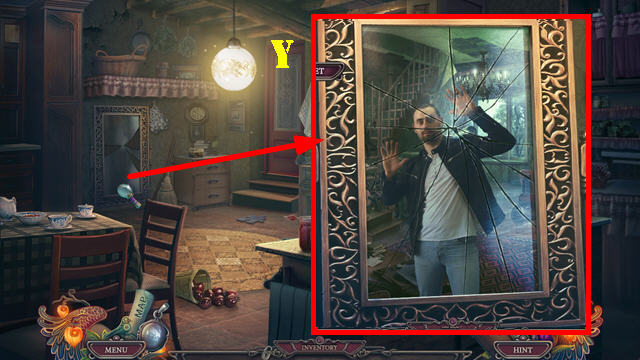
- Play HOP (A); receive TAPE.
- Use UMBRELLA (B).
- Use TAPE and PUMP (C).
- Go (D).
- Use LIGHTER; take HEART (E).
- Look at note and take CAMERA FLASH (F). Take PAINTS (G).
- Place MICHAEL'S PORTRAIT and RICHARD'S PORTRAIT (H).
- Solution (I).
- Take EMPTY BURNER and ROOF PIECE.
- Place CHIMNEY PIECE and ROOF PIECE (J).
- Select 1-5.
- Take EMBLEM PART (K).
- Walk down.
- Use PAINTS (L).
- Place EMBLEM PART. Look at picture; take RICHARD'S CERTIFICATE (M).
- Walk down.

- Place HEART (N); take INK and CYLINDER (O).
- Go to Second Floor.
- Select two frames; place RICHARD'S CERTIFICATE (P).
- Place CYLINDER and select 1980 (Q); take CAMERA BAG TOKEN (R).
- Go to Study.
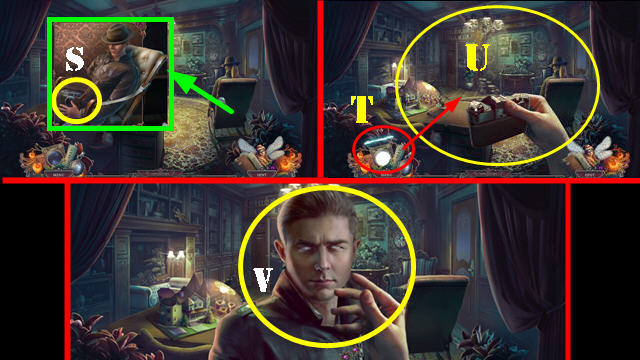
- Place CAMERA BAG TOKEN and select camera (S).
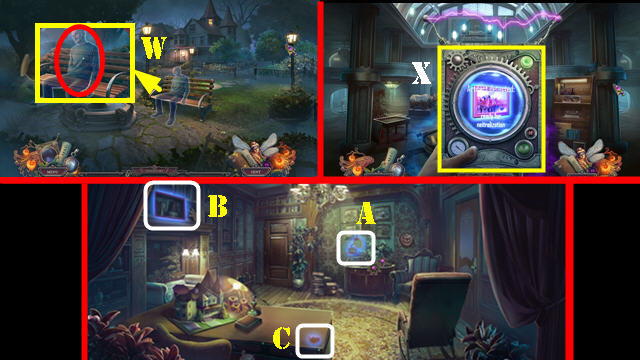
- Use Keeper's Tool (T) on scene (U).
- Use CAMERA FLASH (V).
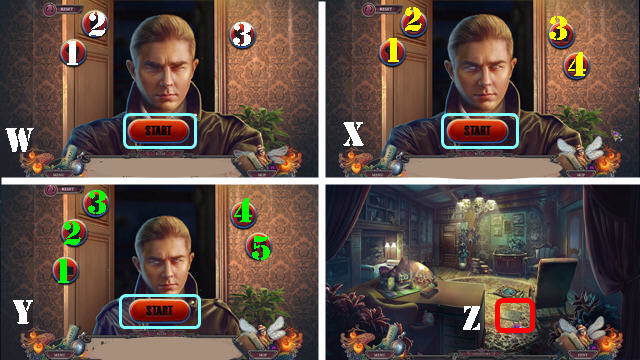
- Press start in each round (light blue).
- Solution one (W): (3-1-1-2).
- Solution one (X): (3-2-1-4).
- Solution three (Y): (4-2-1-3-5).
- Select note (Z).
Chapter 3: Kitchen
- Use INK (A).
- Take BROKEN KEEPER'S DEVICE (B).
- Select BROKEN KEEPER'S DEVICE twice; receive KEEPER'S DEVICE PANEL and take MAGNET.
- Try to walk down; take DRAWER HANDLE (C).
- Use MAGNET (D).
- Go (E).
- Play HOP (F); receive ANTENNA.
- Place DRAWER HANDLE; take BOX LEVER and MIRROR FRAGMENT 2/3 (G).
- Walk down.
- Place BOX LEVER (H); take CHESS KNIGHT (I).
- Go to Second Floor.
- Place CHESS KNIGHT; take ANGEL and SWITCH (J).
- Walk down.
- Place ANTENNA (K) and SWITCH (L).
- Solution: Mx3-Lx9.
- Take FATHER FIGURE and KITCHEN KEY (N).
- Use KITCHEN KEY and go (O).
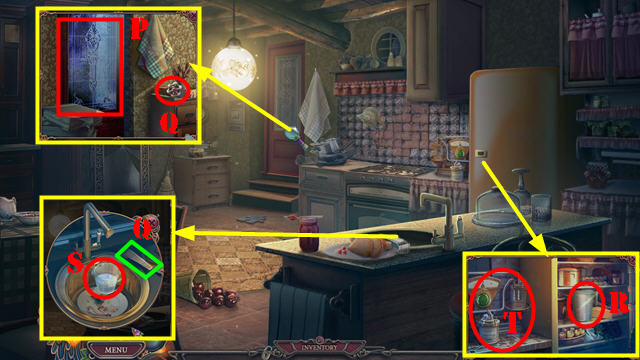
- Select door (P).
- Take HYDRANT KNOB and FRIDGE HANDLE (Q).
- Place FRIDGE HANDLE; take MEASURING CUP (R).
- Use MEASURING CUP (S); receive CUP OF WATER.
- Place CUP OF WATER (T).
- Solution: (U-W)-(W-V)-(V-U)-(W-V)-(U-W)-(W-V)-(V-U).
- Take MIRROR FRAGMENT 3/3 (X).
- Place MIRROR FRAGMENT 3/3. Solution (Y).
- Take KEROSENE (A).
- KEROSENE on EMPTY BURNER; receive KEROSENE BURNER.
- Use KEROSENE BURNER (B).
- Go (C).
- Select gate (D).
- Take HOSE, VISE HANDLE, and SICKLE (E).
- Place HYDRANT KNOB and HOSE (F).
- Intersect both lines (G).

- Take GRANDFATHER FIGURE and LIGHTBULB (H).
- Use SICKLE (I). Play HOP; receive FLASHLIGHT WITHOUT BULB.
- LIGHTBULB on FLASHLIGHT WITHOUT BULB; receive FLASHLIGHT.
- Use FLASHLIGHT (J).
- Solution (K).
- Select scene.
- Take SHOVEL (L).
- Place ANGEL (M). Play HOP; receive GREAT-GRANDFATHER FIGURE.
- Use SHOVEL; take MOLD (N).
- Place FATHER FIGURE, GRANDFATHER FIGURE and GREAT-GRANDFATHER FIGURE (O).
- Select puzzle (P).
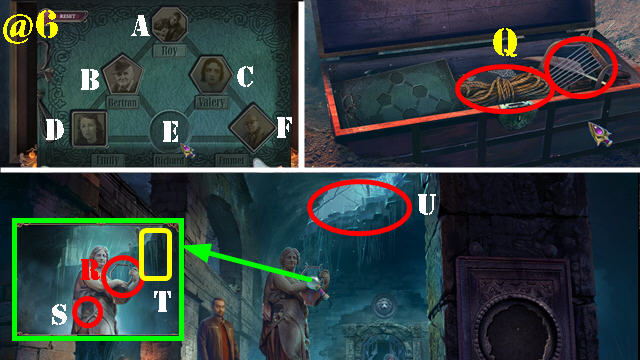
- Solution (@6): D-B-A-C-F-E-D-B-A-C-F-E-D-B-A-C-E.
- Take ROPE and LYRE (Q).
- Place LYRE (R); take MOORE'S PHOTO and TREBLE CLEF (S).
- Use ROPE (T).
- Go (U).
- Place TREBLE CLEF; take PINECONE (V).
- Give PINECONE (W); take CYLINDER (X).
- Go to Backyard.
- Place CYLINDER (Y); take PIANO KEY 1/2 (Z).
- Play HOP (A); receive BOLTCUTTERS.
- Use BOLTCUTTERS (B) and enter Workshop.
Chapter 4: Workshop
- Flip switch (C).
- Take WRENCH (D).
- Place VISE HANDLE and turn (E). Take GEAR (F).
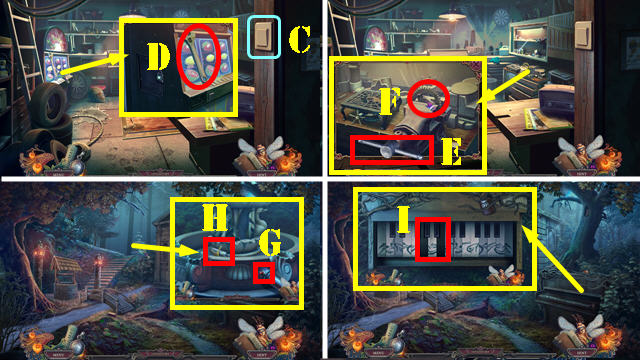
- Go to Grove.
- Use WRENCH (G); take ELECTRIC PANEL KEY and PIANO KEY 2/2 (H).
- Place PIANO KEY 2/2 (I).
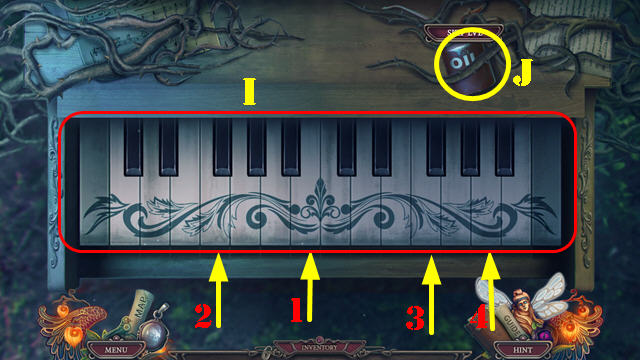
- Solution (I).
- Select 1-4.
- Take OILCAN (J).
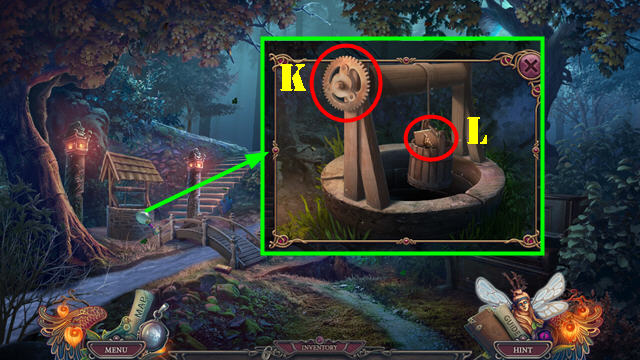
- Place GEAR and select (K); take BLACKSMITH TILE (L).
- Go to Workshop.
- Use OILCAN and select (M). Play HOP; receive TIN INGOT.
- Place MOLD and TIN INGOT (N). Select valve (O); take DOLPHIN.
- Go to Grove.
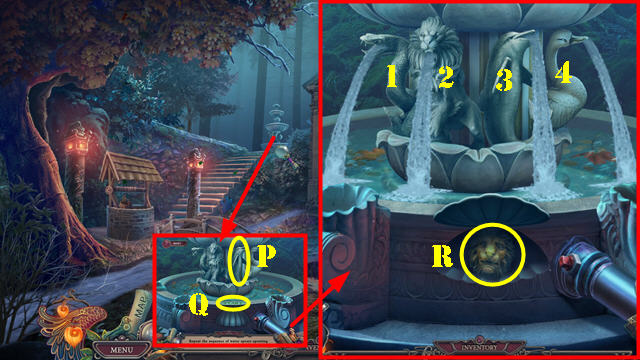
- Place DOLPHIN (P). Press start (Q).
- Round one: 2-1-3-4.
- Round two: 1-1-3-4-1-2.
- Take LION'S HEAD (R).
- Go to Family Vault.
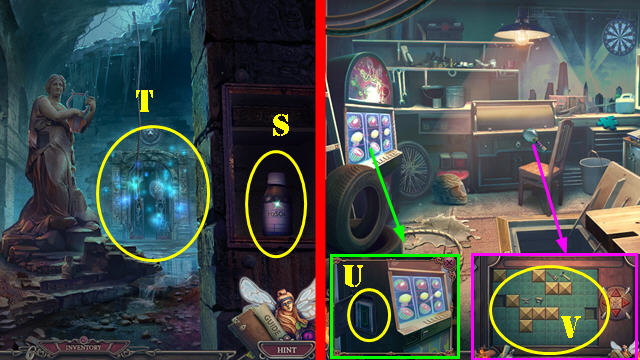
- Place LION'S HEAD; take ACID (S).
- Play HOP (T); receive CARPENTER TILE.
- Go to Workshop.
- Use ACID; take DISCHARGED BATTERY (U).
- Place BLACKSMITH TILE and CARPENTER TILE (V).
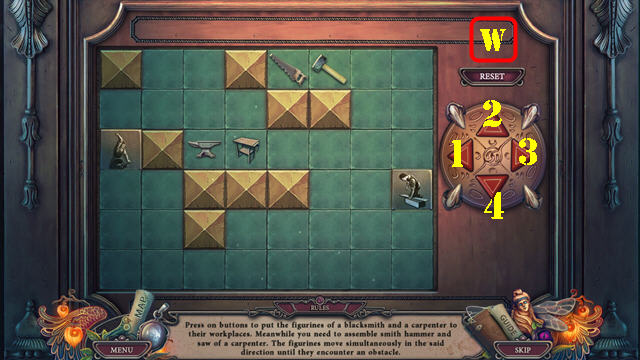
- Solution (W): (2-1-3-4)-(3-2-1-3)-(4-1-2-4)-(1-2-1-2)-(3-2-3-4).
- Take TERMINAL WIRES.
- Play HOP (X); receive DYNAMO.
- DYNAMO and TERMINAL WIRES on DISCHARGED BATTERY; select dynamo and take BATTERY.
- Walk down.
- Use ELECTRIC PANEL KEY and place BATTERY (Y).
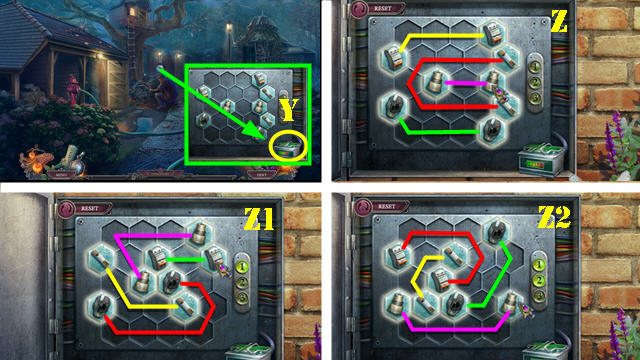
- Solution (Z-Z1-Z2).
- Take YELLOW SHAWL, MANTICORE CHARM, and PLIERS (A).
- Look at two flyers; take FROST GLOVE and IDEAL STAIN REMOVER (B).
- Use PLIERS (C); receive ETERNAL BATTERY.
- Place MANTICORE CHARM; take WORKSHOP KEY (D).
- Use WORKSHOP KEY; take note (E).

- Select items on list (F).
- Place KEEPER'S DEVICE PANEL. Place parts as shown (G). Select (H); receive Keeper's Tool.
- Look at note; place ETERNAL BATTERY (I).
- Place Keeper's Tool (J); select 3x.
- Select panel (K).
- Place MOORE'S PHOTO (L).
- Find differences (M).
- Select Keeper's Tool on screen 3x (N).
- Go (O).
- Use Keeper's Tool on scene; place it and select it (P).
- Use FROST GLOVE (S); place corn and chestnuts in matching bowls (Q-R); take BLUE DYE (S).
- Open; take WHITE BULB (T).
- Take PORCELAIN CUP (U).
- Enter (V).
- Play HOP (W); receive SPRING.
- BLUE DYE on WHITE BULB; receive BLUE BULB.
- Place YELLOW SHAWL and BLUE BULB. Swap shades as shown (X).
- Take BUTTON and REGISTER CARD (Y).
- Use REGISTER CARD (Z).
- Solution (A-O).
- Take THREE DOLLARS and SCREWS.
- Walk down.
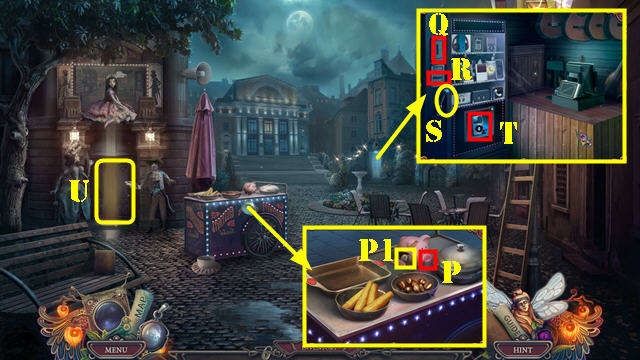
- Place BUTTON (P); take 50 CENTS (P1).
- Insert 50 CENTS (Q) and THREE DOLLARS (R). Pull lever (S).
- Select MP3 and take GUITAR HAIRPIN (T).
- Go (U).
- Use GUITAR HAIRPIN (V).
- Enter (W).
Chapter 5: Junk Room
- Use Keeper's Tool on scene.
- Select 1-3; take LOCOMOTIVE MODEL (X).
- Select ink bottle (Y). Use IDEAL STAIN REMOVER and look at note (Z).
- Select 4-6; take PORCELAIN SAUCER and AMBER PEAR (A).
- Take VIOLIN TOKEN (B).
- Walk down.
- Place LOCOMOTIVE MODEL (C); take WEIGHT 1 and PORCELAIN SPOON (D).
- Go to Junk Room.
- Place PORCELAIN SAUCER, PORCELAIN CUP, and PORCELAIN SPOON (E). Take TRUMPET TOKEN (F).
- Walk down twice.
- Place TRUMPET TOKEN and VIOLIN TOKEN; take PAPER and RUBY APPLE (G).
- Go to Gift Shop.
- Place AMBER PEAR and RUBY APPLE; take DISH COVER (H).
- Go to Junk Room.
- Place PAPER and DISH COVER (I).
- Use Keeper's Tool on scene (J).

- Solution: K-L-L-K-L-K-K-L-L-L-K-K-L-K-K-L.
- Receive PHONOGRAPH ARTIFACT.
- Walk down twice.
- Use Keeper's Tool on scene (M).
- Use Keeper's Tool (N).
- Enter (O).
- Use Keeper's Tool on scene.
- Play HOP (P); receive MECHANICAL HAND.
- Place SPRING; take OIL, CORDLESS SCREWDRIVER, and NUMBER (Q).
- Place MECHANICAL HAND and SCREWS; use CORDLESS SCREWDRIVER; take DIAMOND SHAPE (R).
- Walk down.
- Place DIAMOND SHAPE; take RED AMPHORA and CUCKOO (S).
- Go (T).
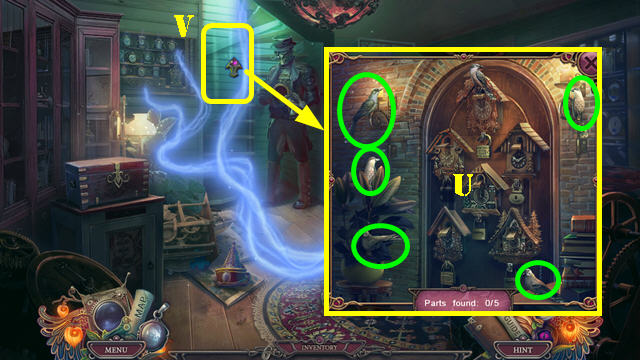
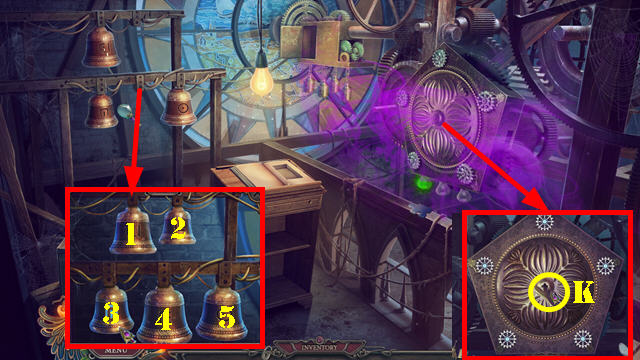
- Place CUCKOO. Select five birds (U).
- Go (V).
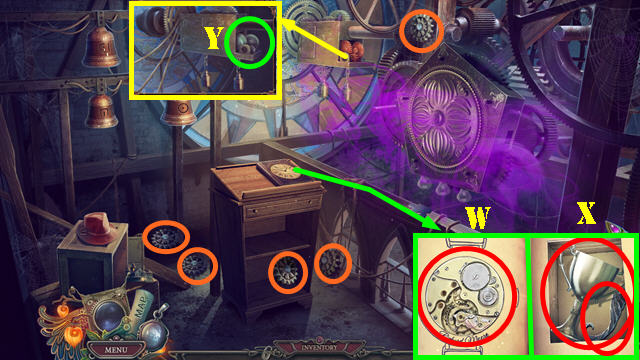
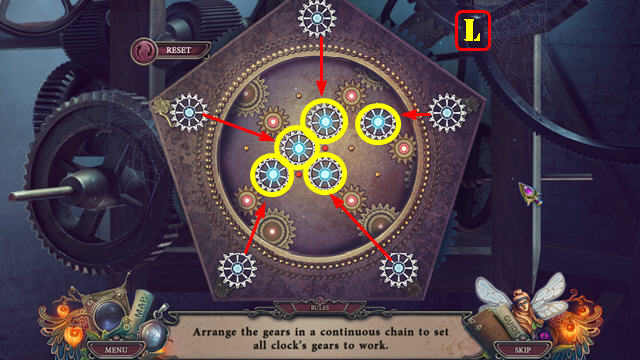
- Select gears (orange).
- Place NUMBER and ssemble puzzle (W).
- Select book; take SILVER CUP and MUSTACHE (X).
- Use OIL (Y); receive ALARM CLOCK BELL.
- Walk down.
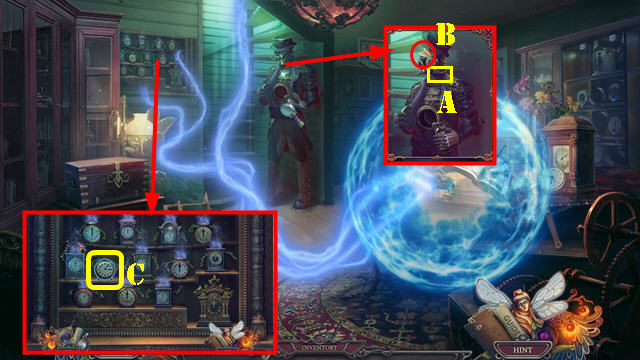
- Place MUSTACHE (A); take LAMP RAY (B).
- Place ALARM CLOCK BELL (C).
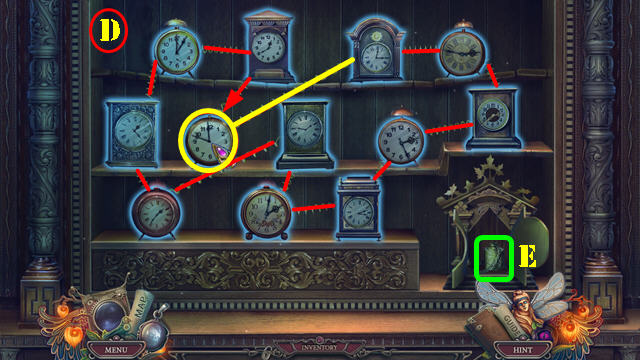
- Solution (D).
- Take WEIGHT 2 (E).
- Go to Clocktower.
- Hang WEIGHT 1 and WEIGHT 2 (F).
- Take PUTTY KNIFE and BELL 1 (G).
- Go to Gift Shop.
- Play HOP (H); receive BELL 2.
- Place LAMP RAY (I); take WINDING KEY (J).
- Go to Clocktower.
- Place BELL 1 and BELL 2. First Sequence: 4-1-5-3.
- Second Sequence: 2-4-5-1-3.
- Place WINDING KEY (K).
- Solution (L).
- Walk down.
- Use Keeper's Tool 1-6.
- Take WATCH ARTIFACT (M).
- Walk down.
- Use Keeper's Tool on scene; place and select (N).
- Go (O).
Chapter 6: Museum
- Take GOLDEN CUP (P).
- Place GOLDEN CUP and SILVER CUP (Q).
- Solution (R).
- Take MUSEUM EMBLEM (S).
- Place MUSEUM EMBLEM (T).
- Go (U).
- Use Keeper's Tool on scene.
- Play HOP (V); receive BLACK AMPHORA.
- Look at pamphlet (W); take DRY SPONGE (X).
- Take KEEPER SYMBOL (Y).
- Go (Z).

- Select wall (A). Select frames (orange).
- Open book; take RESTORATION INSTRUCTIONS (B). Take CHEST (C).
- Dip DRY SPONGE (D); receive WET SPONGE.
- Place BLACK AMPHORA and RED AMPHORA; take ARTIST TILE 1 and ARCHAEOLOGIST KIT (E).
- Walk down twice.
- Place KEEPER SYMBOL; remove items; take FAMILY PHOTO (F) and WARMTH SPHERE (G).
- Go (H).
- Place WARMTH SPHERE and use PUTTY KNIFE; take PETRIFIED HORN (I).
- ARCHAEOLOGIST KIT on PETRIFIED HORN; use 1-3 on horn; receive RHINO HORN.
- Place RHINO HORN (J); take LARGE ELEPHANT and MALACHITE GRAPES (K).
- Walk down.
- Place MALACHITE GRAPES; take SUGAR (L).
- Go to Gallery.
- Use SUGAR (M).
- Solution (N).
- Take WIRE and CHEF'S HAT.
- Walk down.
- Place CHEF'S HAT (O); take EGG (P).
- Use WIRE; open card and take ARTIST TILE 2 (Q).
- Go to Restoration Room.
- Crack egg (R) and stir with stick (S); receive PAINTER'S PUTTY.
- ARTIST TILE 1 and ARTIST TILE 2 on CHEST; receive VINTAGE PIGMENTS.
- Place VINTAGE PIGMENTS (T).
- Take pieces from box and place them in boxes of matching colors (U).
- Select three bottles (V); take PAINTS (W).
- Walk down.
- Place RESTORATION INSTRUCTIONS. Use WET SPONGE, PAINTER'S PUTTY, and PAINTS (X).
- Go (Y).
- Take PRUNERS HALF 1/2 (A).
- Play HOP (B): receive PRUNERS HALF 2/2.
- Walk down.
- Use PRUNERS HALF 2/2 twice; select middle wire (C) and open case; take DINOSAUR BONE.
- Go (D).
- Give DINOSAUR BONE (E); take SOUTHERN CRYSTAL (F).
- Enter (G).

- Select mirror 3x; take WATER SYMBOL (H).
- Walk down.
- Place WATER SYMBOL; select book (I).
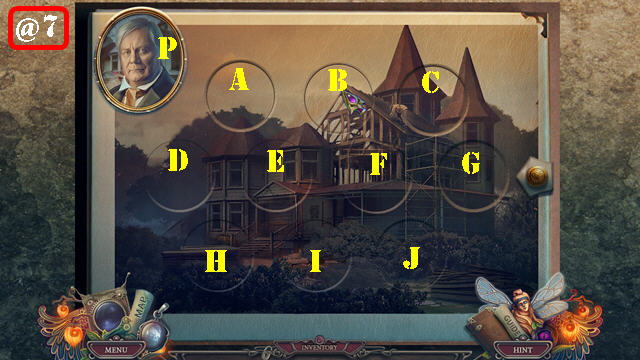
- Solution (@7): (H-G)-(H-F)-(B-I)-(P)-(A-E)-(P)-(D-J)-(B-C).
- Take STAG BEETLE.
- Walk down.
- Play HOP (K); receive CLAY BOWL.
- Place STAG BEETLE (L); receive LEAF.
- Go (M).
- Use CLAY BOWL (N); receive BOWL OF WATER.
- Go (O).
- Use BOWL OF WATER; take KNOB (P).
- Place KNOB; take ACORN and SMALL ELEPHANT (Q).
- Place SMALL ELEPHANT and LARGE ELEPHANT; take NORTHERN CRYSTAL (R).
- Walk down.
- Play HOP (S); receive WESTERN CRYSTAL.
- Place LEAF and ACORN; take EASTERN CRYSTAL (T).
- Go (U).
- Place SOUTHERN CRYSTAL, NORTHERN CRYSTAL, WESTERN CRYSTAL, and EASTERN CRYSTAL (V).
- Solution (1-7).
- Give FAMILY PHOTO (W).
- Use Keeper's Tool on scene; receive PICTURE ARTIFACT (X).
- Use Keeper's Tool on scene 3x: (A-B-C).
- Place PHONOGRAPH ARTIFACT (A), PICTURE ARTIFACT (B), and WATCH ARTIFACT(C).
- Congratulations, you've completed The Keeper of Antiques: The Last Will!
Created at: 2017-09-29