Walkthrough Menu
- General Tips
- Chapter 1: The Main Hall
- Chapter 2: The Deserted Village
- Chapter 3: The Hall with Crystal
- Chapter 4: The Harpy Tree
- Chapter 5: The Secret Path
General Tips
- This is the official guide for The Legacy: Forgotten Gates.
- This guide will not mention each time you have to zoom into a location; the screenshots will show each zoom scene.
- Hidden-object puzzles are referred to as HOPs. This guide will not show HOP solutions. It will identify the location of the HOP and the inventory item acquired.
- This guide will show solutions for non-random puzzles. Please read the in-game instructions for each puzzle.
- In this game, you will sometimes have to select the new scene to trigger dialog, cut-scenes, or tasks prior to interacting with the scene.
Chapter 1: The Main Hall
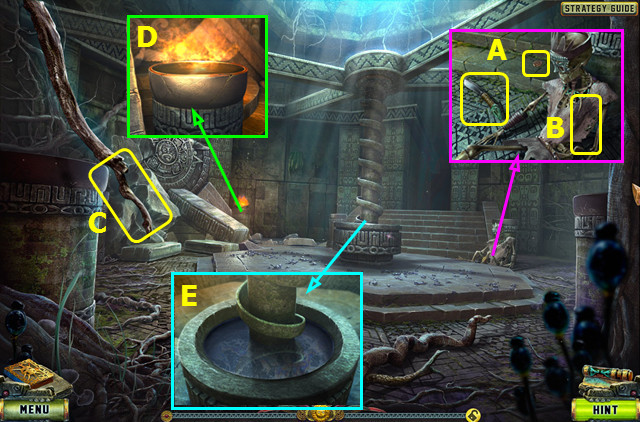
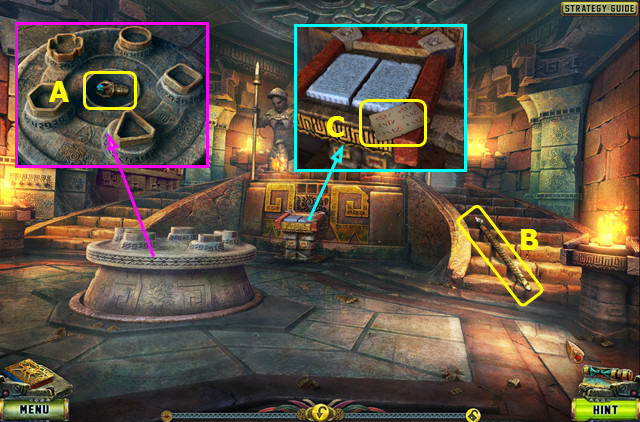
- Take the 1/10 COIN and MACHETE (A). Use the MACHETE to take the PIECE OF CLOTH (B).
- Use the MACHETE to take the STICK (C).
- Combine the STICK and PIECE OF CLOTH to make a TORCH.
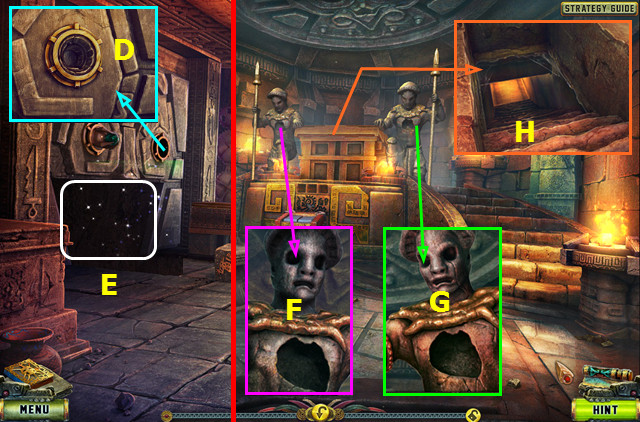
- Use the TORCH to make the BURNING TORCH (D).
- Use the BURNING TORCH (E).
- Go forward.
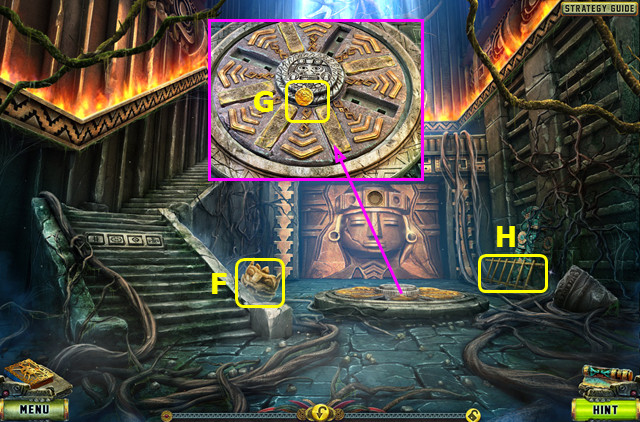
- Take the HEAD (F).
- Take the 2/10 COIN (G).
- Take the LADDER (H).
- Walk down.
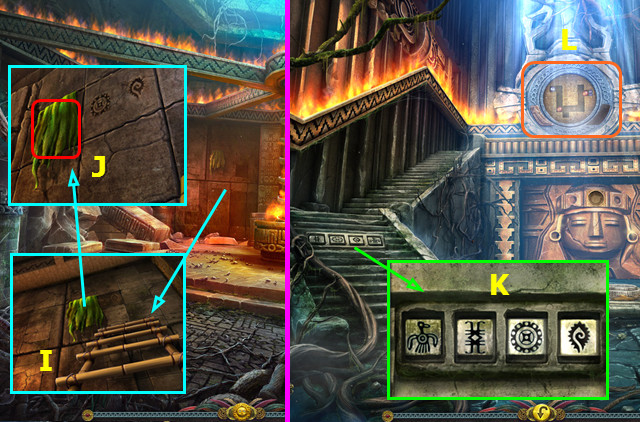
- Place the LADDER (I).
- Remove the cloth and note the symbols (J).
- Walk forward.
- Arrange the symbols as shown (K); take the FRAGMENT.
- Select (L).
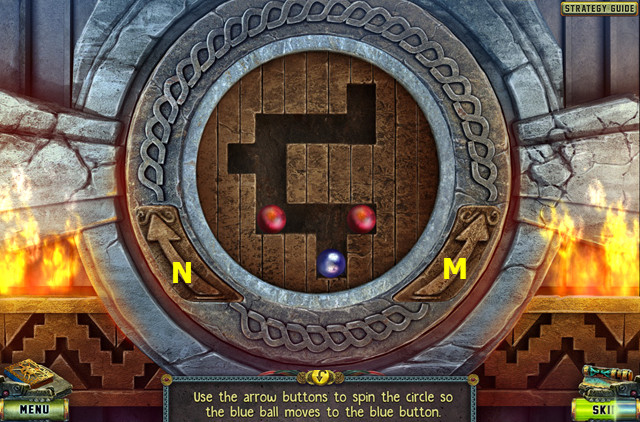
- Place the FRAGMENT (M).
- Select N-Mx2-Nx3-M-N-M.
- Go forward.
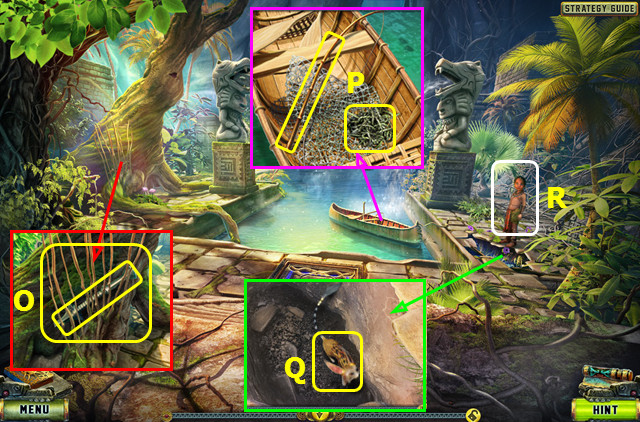
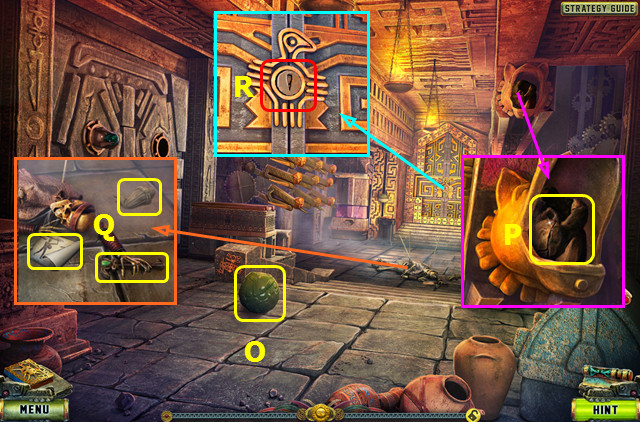
- Talk to the Boy (R).
- Use the MACHETE to take the RODS; take the LEVER (O).
- Take the FISHING ROD and ROPE (P).
- Combine the RODS and ROPE. Select the rope, and then select the rods 3x. Select the ropes to make the BASKET.
- Use the BASKET to take the ANIMAL (Q).
- Give the ANIMAL (R).
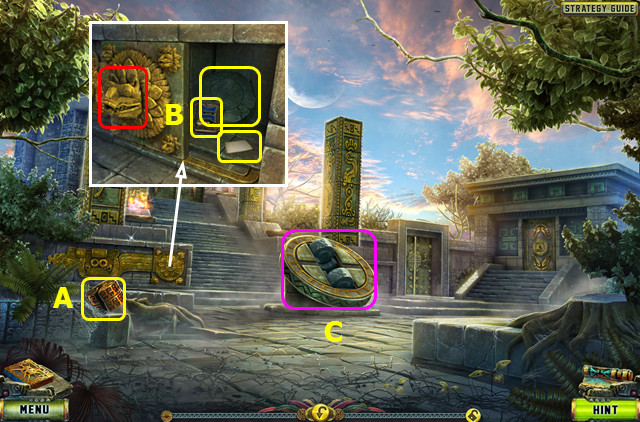
- Take the 1st WEIGHT (A).
- Place the HEAD; take the FRAGMENT, STONE ROLLER, and CHART (B).
- Select (C).
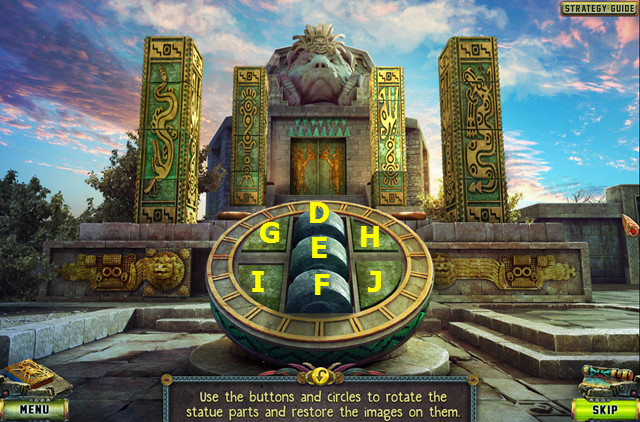
- Place the STONE ROLLER (E).
- Select Dx2-F-G-Fx2-Ex3-D-H-F-Dx3-J-Fx2-E.
- Go left.
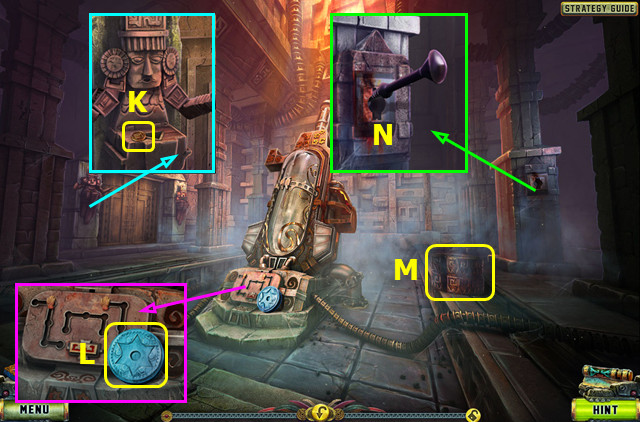
- Take the 3/10 COIN (K).
- Take the KEY (L).
- Take the 2nd WEIGHT (M).
- Place and select the LEVER (N).
- Walk down 2x.
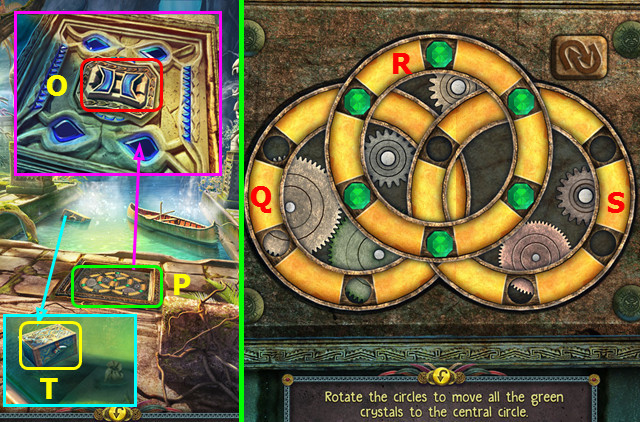
- Place the FRAGMENT (O).
- Select (P).
- Rotate S counterclockwise one space. Rotate R clockwise two spaces. Rotate S counterclockwise one space. Rotate Q clockwise two spaces.
- Take the SMALL BOX (T).
- Open the SMALL BOX; take the BOWL OF LAMP.
- Go forward and left.
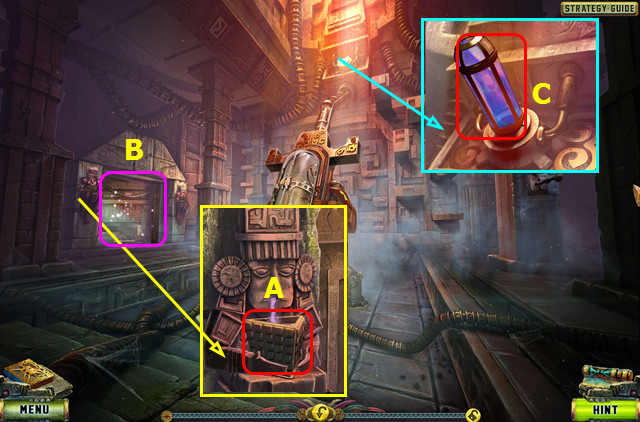
- Place the BOWL OF LAMP (A).
- Play the HOP; earn the SCROLL (B).
- Open the SCROLL; take the HAND, CAPSULE, and note the symbols.
- Place the CAPSULE (C).
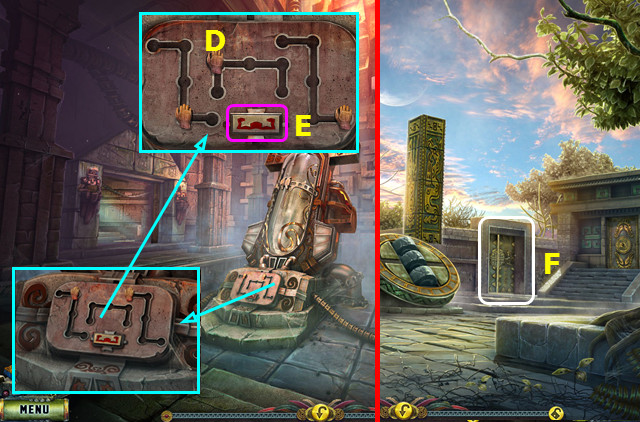
- Place the HAND (D); move the hands to the positions shown; press (E).
- You earn the DISC.
- Walk down.
- Select (F).
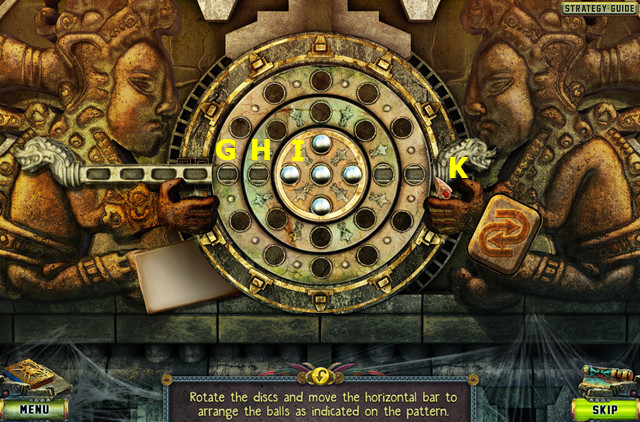
- Place the CHART and DISC on the device.
- Rotate H two spaces clockwise. Slide K right one space. Rotate I one space clockwise. Rotate H four spaces clockwise. Slide K left three spaces.
- Go forward.
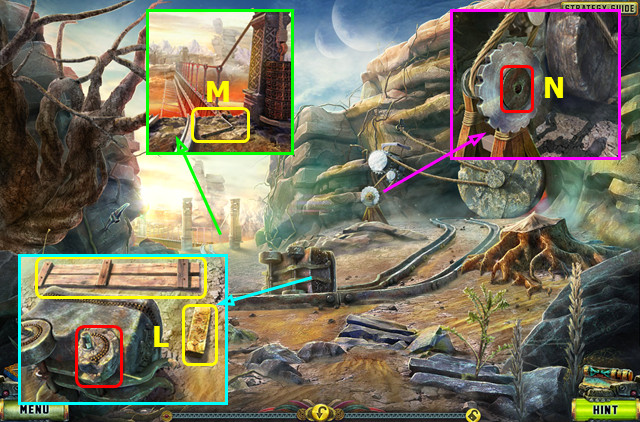
- Take the PLANK and 1/3 STONE BLOCK; remove the broken wheel (L).
- Take the HANDLE (M).
- Place the HANDLE (N).
- Walk right.
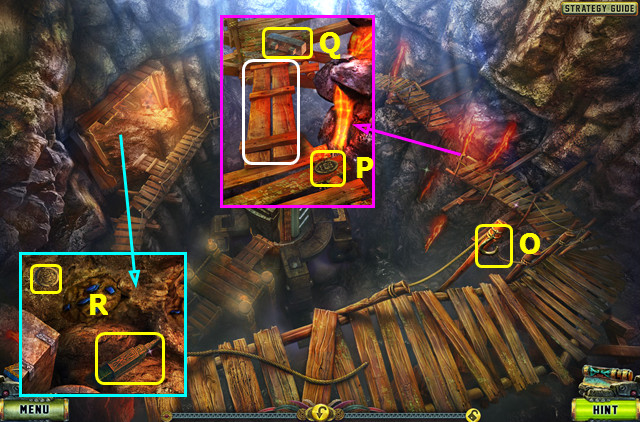
- Use the MACHETE to take the HOOK (O).
- Add the HOOK to the FISHING ROD.
- Take the 4/10 COIN (P).
- Place the PLANK and take the 2/3 STONE BLOCK (Q).
- Take the 5/10 COIN and KEY (R).
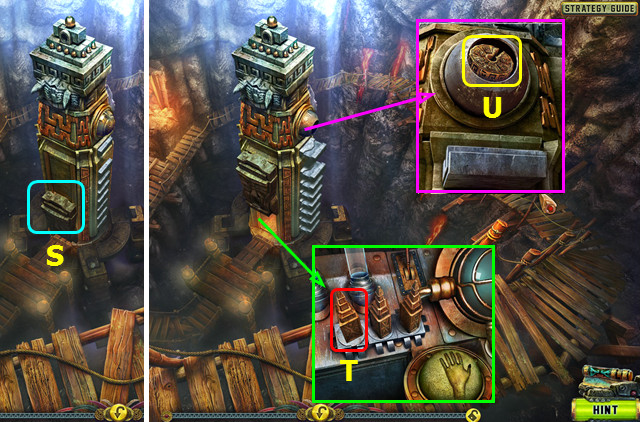
- Select (S).
- Place the KEY (T).
- Select the dome; take the 3rd WEIGHT (U).
- Walk down.
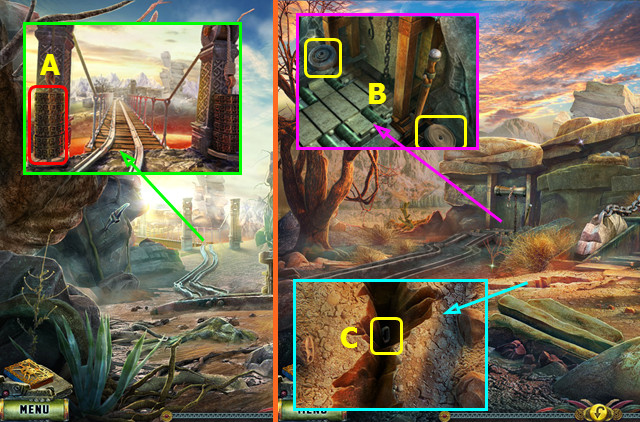
- Place the 3 WEIGHTS (A).
- Go forward.
- Take the WHEEL and COIL OF ROPE (B).
- Use the FISHING ROD to take the CARABINER (C).
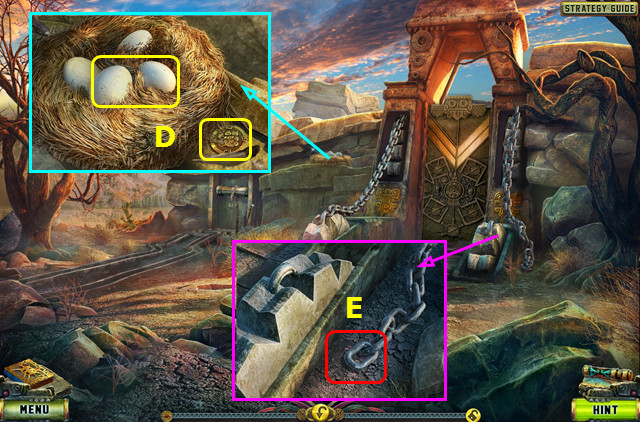
- Take the EGGS and 6/10 COIN (D).
- Use the CARABINER (E).
- Walk down.
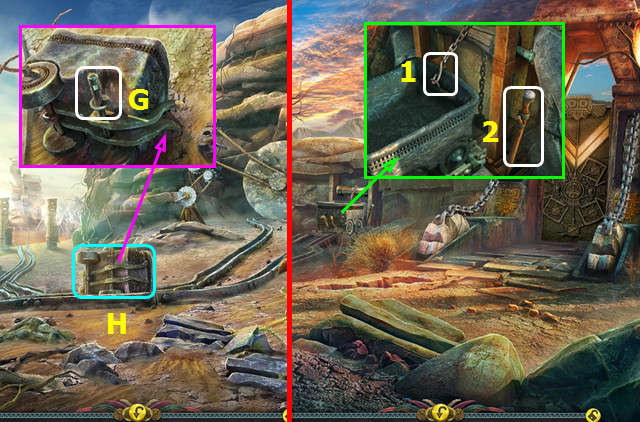
- Place the WHEEL (G).
- Select (H).
- Go forward.
- Select the hook (1) and lever (2).
- Go forward.
Chapter 2: The Deserted Village
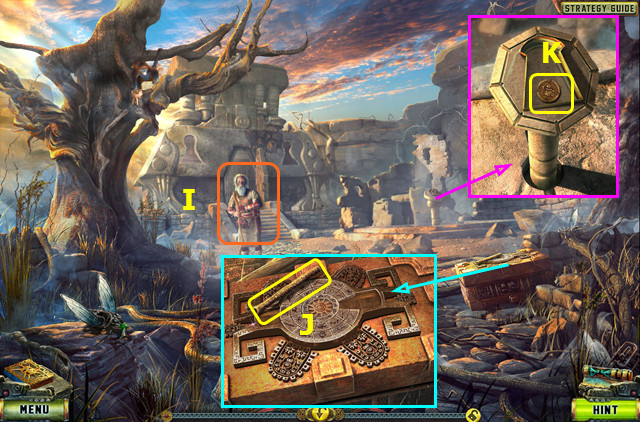
- Speak to the Engineer (I).
- Take the STICK (J).
- Take the 7/10 COIN (K).
- Go forward.
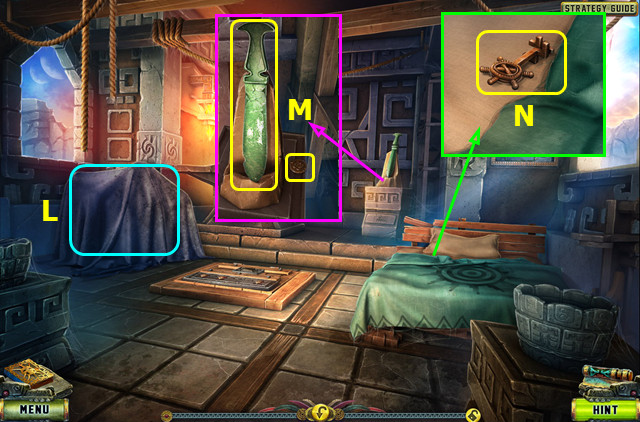
- Select (L).
- Take the NEPHRITE SWORD and 8/10 COIN (M).
- Move the cover and take the KEY (N).
- Walk down 3x.
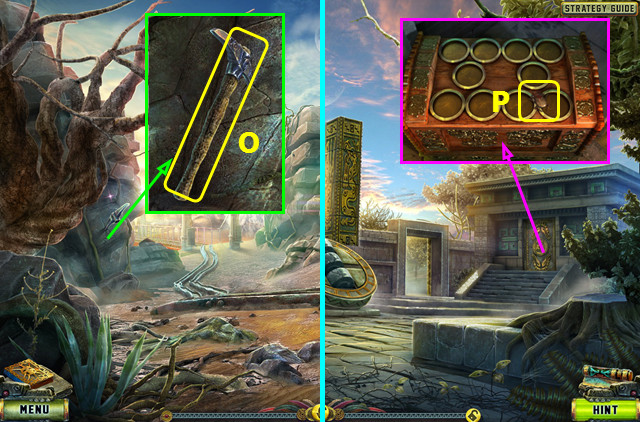
- Place the STICK; take the PICK-AXE (O).
- Walk down.
- Use the KEY; select the chest and take the BEETLE FIGURINE (P).
- Go forward and right.
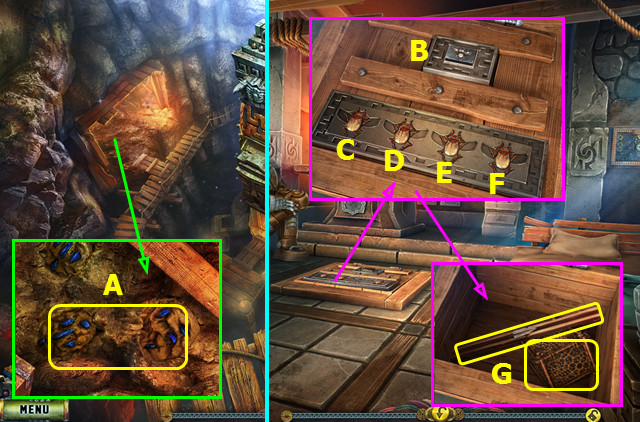
- Use the PICK-AXE to take the CRYSTALS (A).
- Walk down; go forward 3x.
- Place the BEETLE FIGURINE (E).
- Press B; select F-C-E-F-C-D-C-F.
- Take the 1st CROSSBOW PART; place the EGGS and take the CAGE (G).
- Walk down 3x.
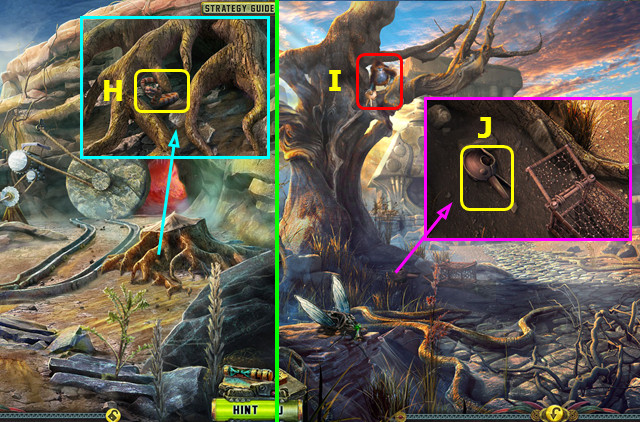
- Use the CAGE to take the CAGE WITH SNAKE (H).
- Go forward 2x.
- Use the CAGE WITH SNAKE (I).
- Take the FRAGMENT (J).
- Go forward.
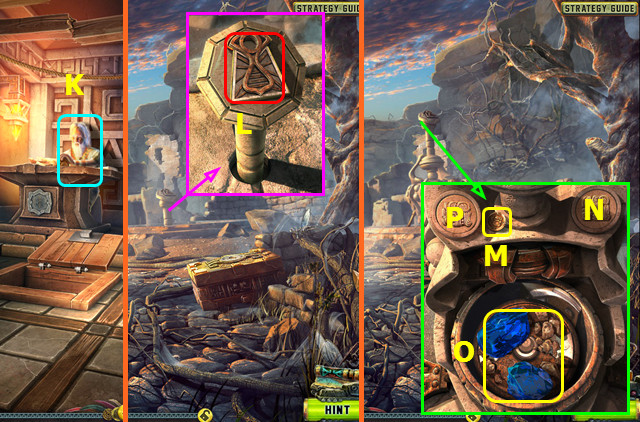
- Give the FRAGMENT; earn the FRAGMENT (K).
- Walk down.
- Place the FRAGMENT (L).
- Take the 9/10 COIN (M) and press (N).
- Place the CRYSTALS (O) and press (P).
- Take the CRYSTALS.
- Walk down 2x; go right.
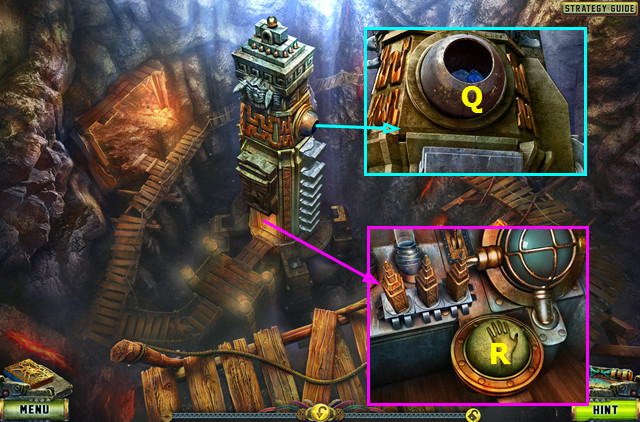
- Place and select the CRYSTALS (Q).
- Select (R).
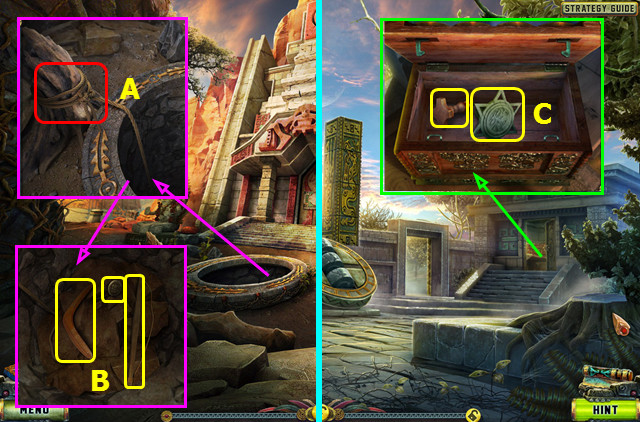
- Place and select the COIL OF ROPE (A).
- Take the BOOMERANG, 10/10 COIN, and 2nd CROSSBOW PART (B).
- Combine the 2 CROSSBOW PARTS to make the CROSSBOW.
- Walk down 3x.
- Select the chest and place the 10 COINS; take the KEY PART and RED PEDESTAL PART (C).
- Add the KEY PART to the KEY.
- Walk down 2x.
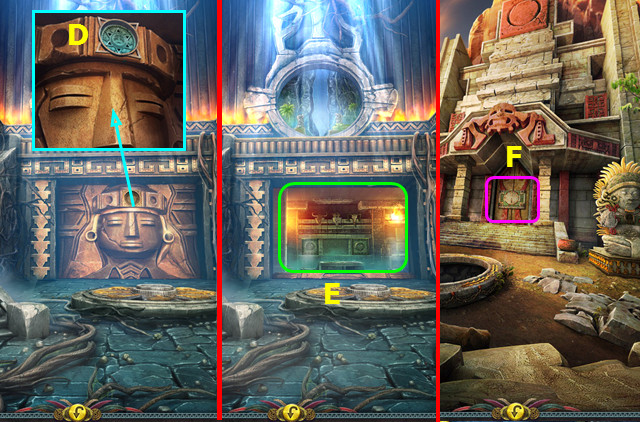
- Place the KEY (D).
- Play the HOP; earn the CHIP (E).
- Return to the Temple of the Sun Entrance.
- Select (F).
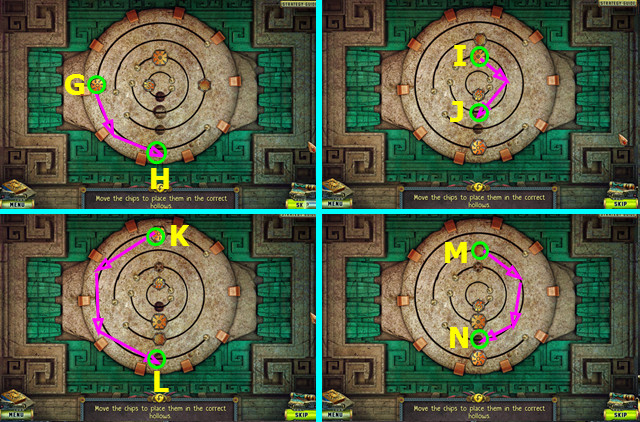
- Place the CHIP on the device.
- Move (G-H)-(I-J)-(K-L)-(M-N).
- Go forward.
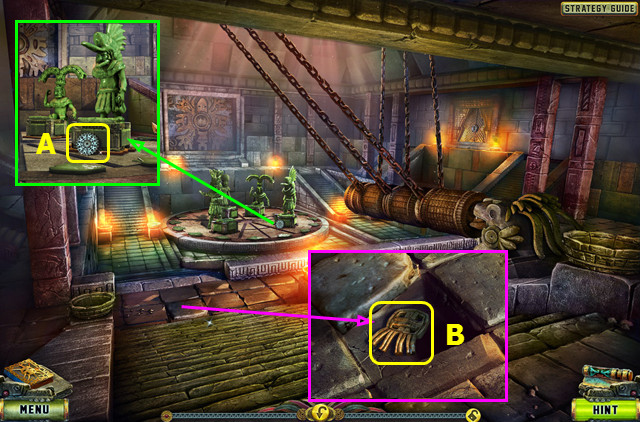
- Take the GEAR (A).
- Use the MACHETE; take the MEDALLION (B).
- Walk down.
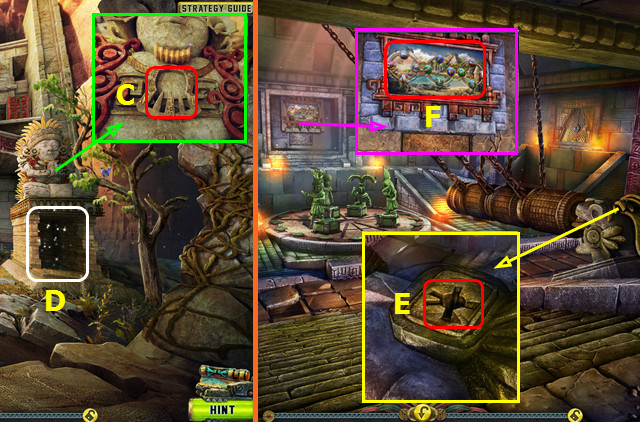
- Place the MEDALLION (C).
- Play the HOP; earn the KEY (D).
- Go forward.
- Place the KEY (E).
- Select (F).
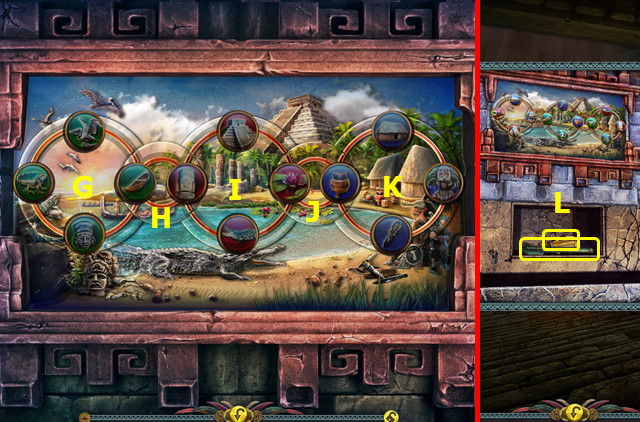
- Select H-Gx2-J-Ix2-H-G-Kx3-J-I-H-Gx2.
- I-H-Gx3-I-Kx2-J-I-K-J-I-K-J-Kx3-J-I-Kx2.
- Take the NEPHRITE BATTLE-AXE and BLUE PEDESTAL PART (L).
- Return to the Engineer's House.
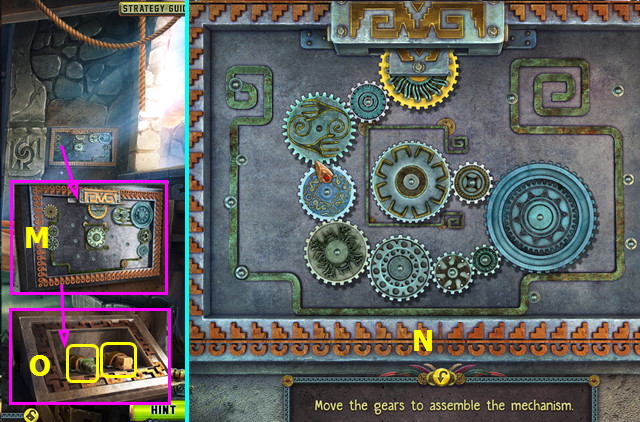
- Place the GEAR (M).
- Restore the gears (N).
- Take the NEPHRITE DAGGER and the 3/3 STONE BLOCK (O).
- Walk down 6x.
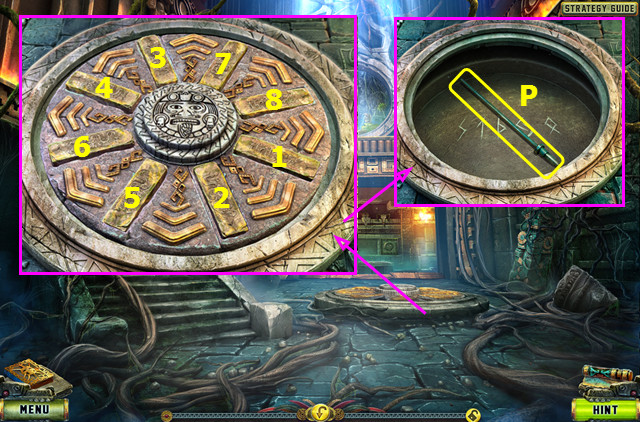
- Place the 3 STONE BLOCKS on the device; select 1-8.
- Take the NEPHRITE SPEAR and note the symbols (P).
- Return to the Temple of the Sun.
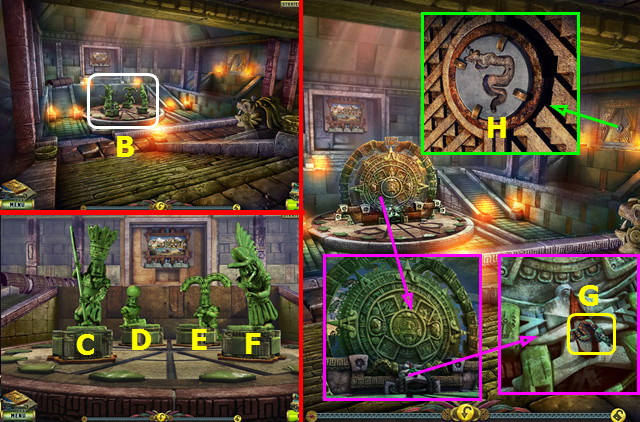
- Select (B).
- Place the NEPHRITE SPEAR (C), NEPHRITE BATTLE-AXE (D), the NEPHRITE DAGGER (E), and the NEPHRITE SWORD (F).
- Take the SNAKE FIGURINE (G).
- Place the SNAKE FIGURINE (H).
- Walk right.
Chapter 3: The Hall with Crystal
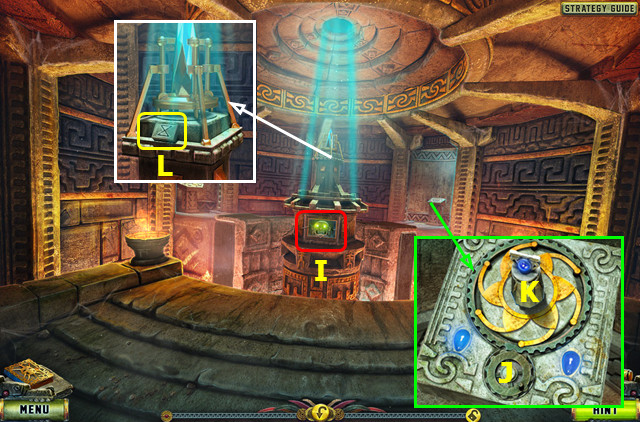
- Use the CROSSBOW (I).
- Select (J); place the BLUE PEDESTAL PART (K).
- Take the RUNE (L).
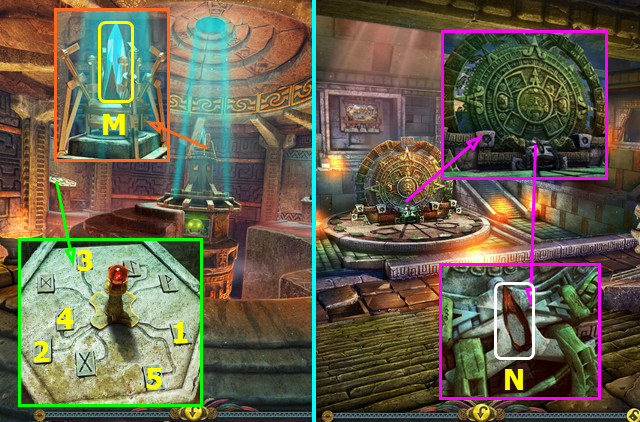
- Place the RUNE and the RED PEDESTAL PART; select 1-5.
- Take the CRYSTAL (M).
- Walk down.
- Place the CRYSTAL (N).
- Take the SPHERE (O).
- Take the 1st HEART and place the SPHERE (P).
- Take the NOTE and HORN; move the arm and take the KEY (Q).
- Use the KEY (R).
- Walk forward.
- Take the EYE (A).
- Take the SPEAR (B).
- Take the HINT and read the tablets (C).
- Walk down.
- Place the EYE (D).
- Play the HOP; earn the 2nd HEART (E).
- Go forward.
- Place the 1st HEART (F).
- Place the 2nd HEART (G).
- Enter the passage (H).
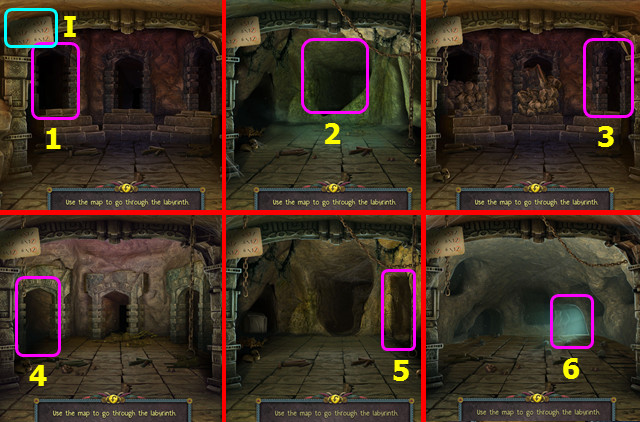
- Place the HINT (I).
- Select 1-6.
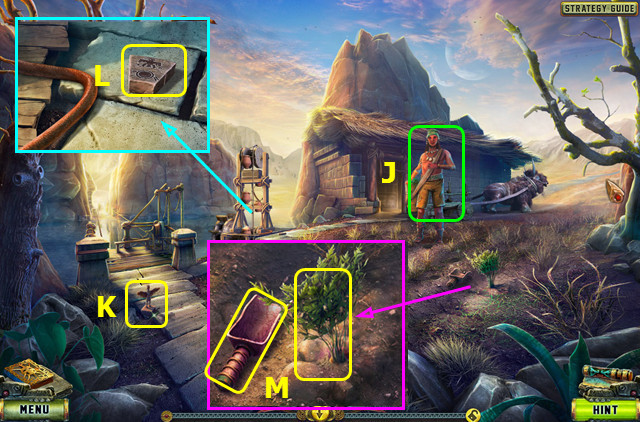
- Talk to the Farmer (J).
- Take the 1st FIGURINE (K).
- Take the STONE DISC PART (L).
- Take the LADLE and CARROT (M).
- Go forward.
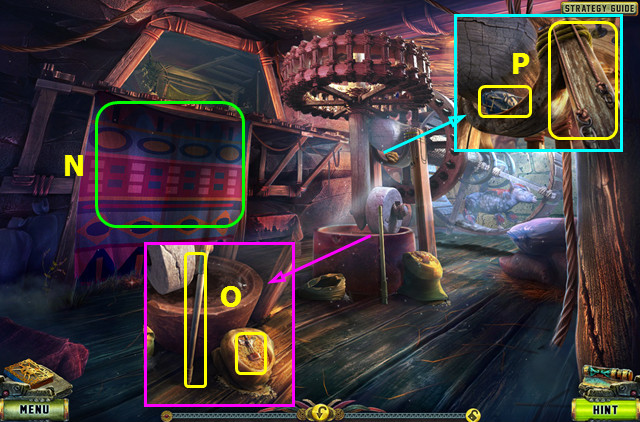
- Select (N).
- Take the STICK; take the 2nd FIGURINE and use the LADLE on the grain (O).
- Take the REINS; use the SPEAR to take the MAGNETIC STONE (P).
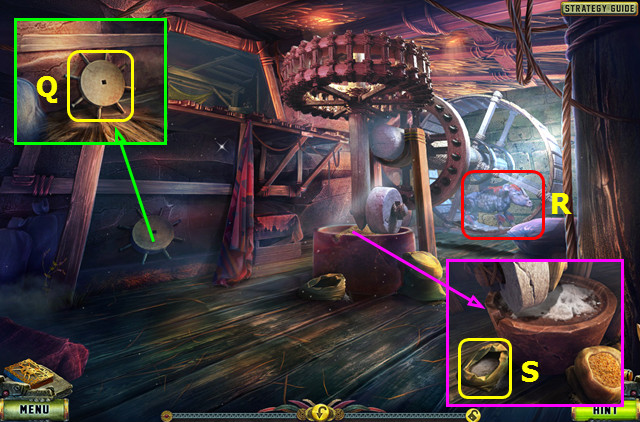
- Take the FLYWHEEL (Q).
- Use the CARROT (R).
- Take the SACK OF FLOUR (S).
- Walk down.
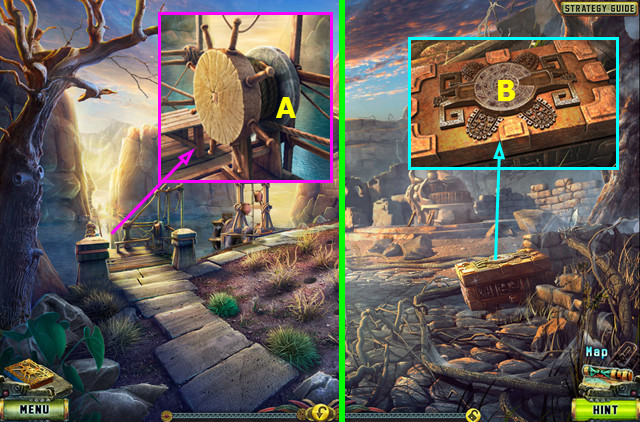
- Place the FLYWHEEL (A).
- Return to the Deserted Village.
- Select (B).
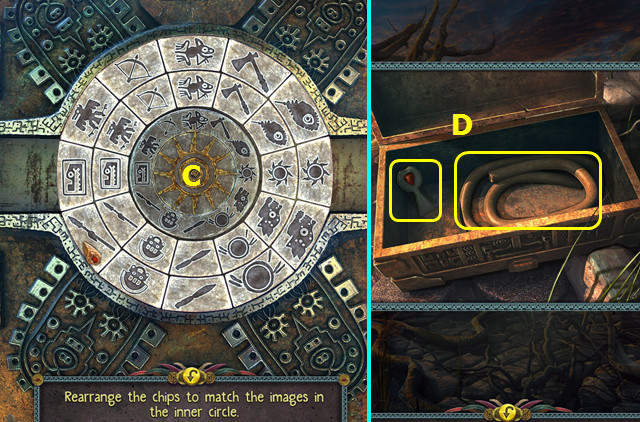
- Place the STONE DISC PART on the device.
- Arrange the inner and outer rings as shown (C).
- Take the KEY and HOSE (D).
- Go forward.
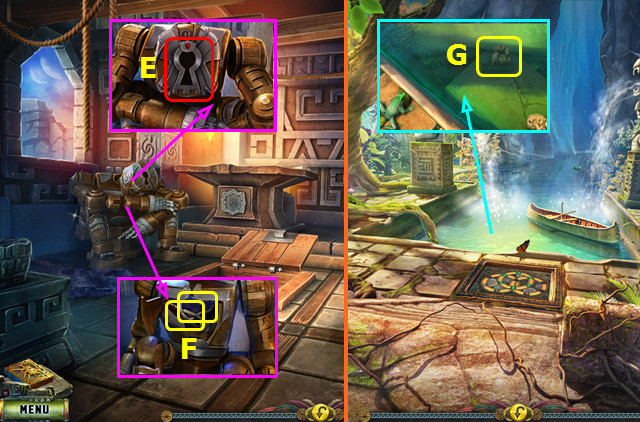
- Place the KEY (E).
- Take the BUTTERFLY NET PART and TONGS (F).
- Combine the STICK and BUTTERFLY NET PART to make the BUTTERFLY NET.
- Walk down 5 times.
- Use the BUTTERFLY NET to take the SACK (G).
- Open the SACK; take the BAMBOO PIPE and 3rd FIGURINE.
- Return to the Field.
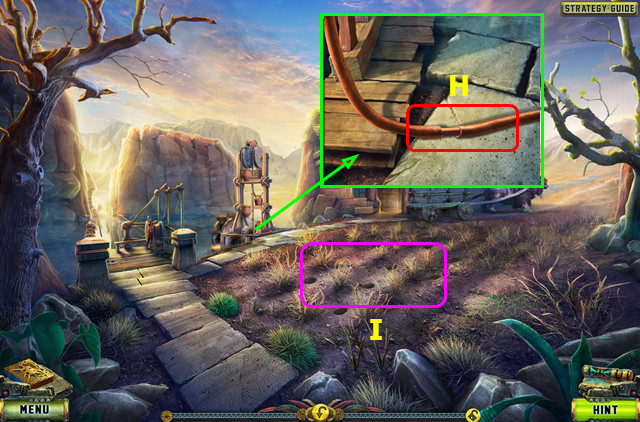
- Place the HOSE and BAMBOO PIPE (H).
- Select (I).
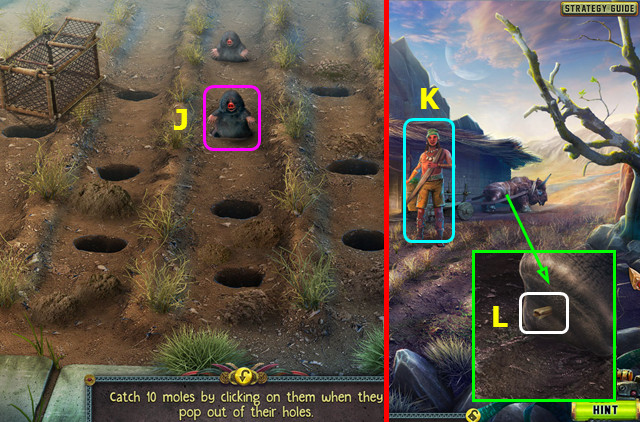
- Select 10 moles (J).
- Give the SACK OF FLOUR (K).
- Use the TONGS (L).
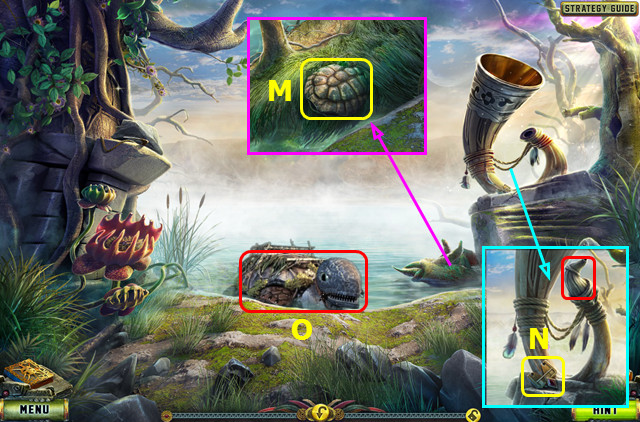
- Use the MACHETE; take the HARD SHELL (M).
- Take the 1st KEY PART and place the HORN (N).
- Use the REINS (O).
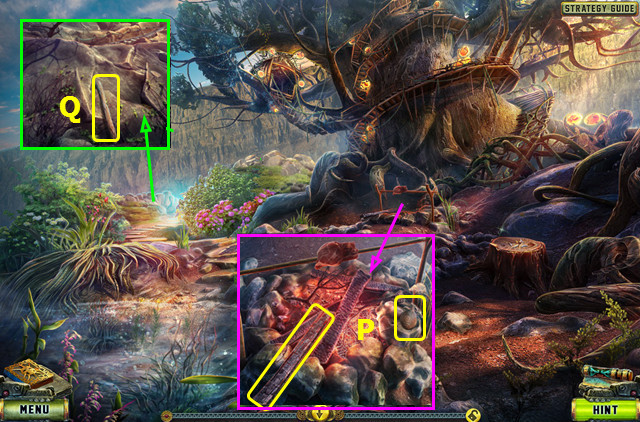
- Take the CLAY FLASK and STICK (P).
- Select the end of the STICK several times to make the BURNING STICK.
- Take the STICK (Q).
- Walk down.
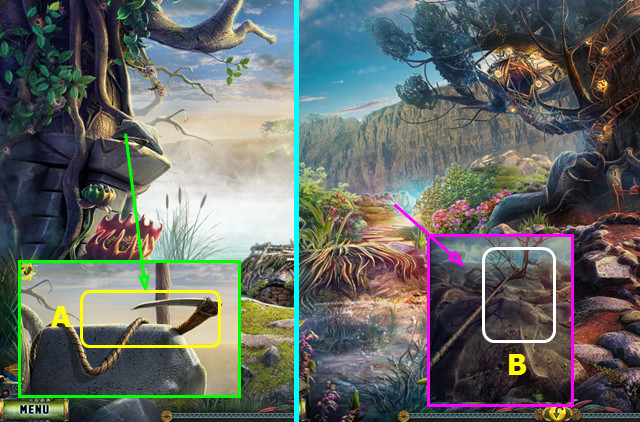
- Use the STICK; take the GRAPPLING HOOK (A).
- Go forward.
- Use the GRAPPLING HOOK (B).
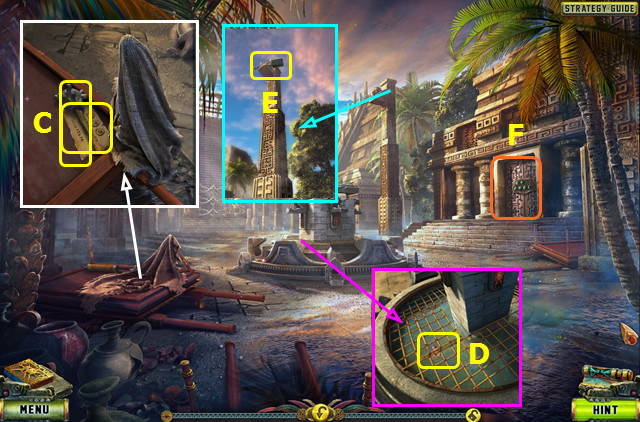
- Move the cloth; take the HINT and MACE (C).
- Use the MAGNETIC STONE to take the FIGURINE PART (D).
- Use the BOOMERANG to take the GARDEN TROWEL (E).
- Select (F).
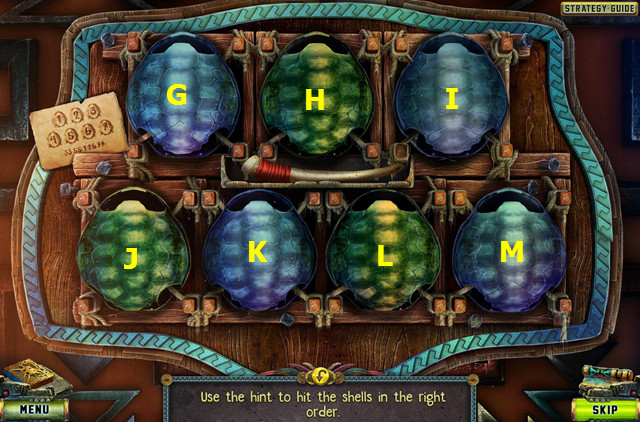
- Place the HARD SHELL and the HINT on the device.
- Select Ix2-Kx2-G-H-L-Mx2.
- Walk right.
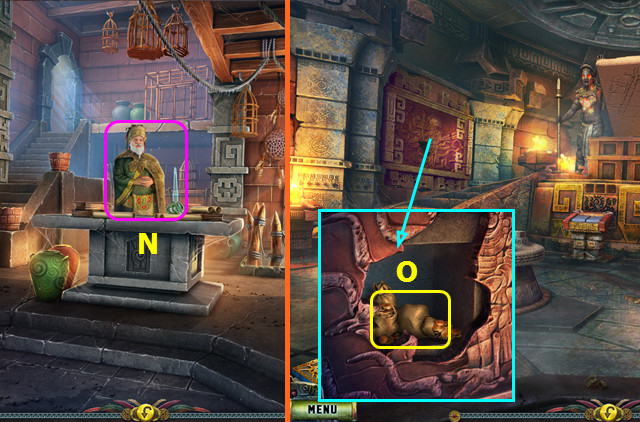
- Talk to the Merchant; earn the 2nd KEY PART (N).
- Combine the 2 KEY PARTS to make the CACHE KEY.
- Return to the Tomb.
- Use the MACE; take the SACK OF GOLD (O).
- Walk down.
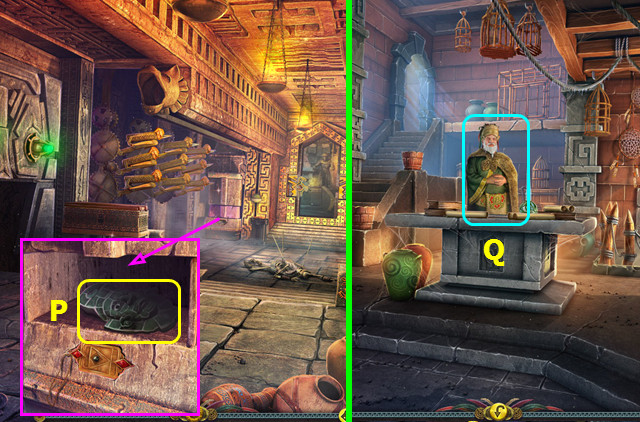
- Place the CACHE KEY; take the MASK OF REINCARNATION (P).
- Return to the Merchant's Shop.
- Give the MASK OF REINCARNATION; you earn the POTION (Q).
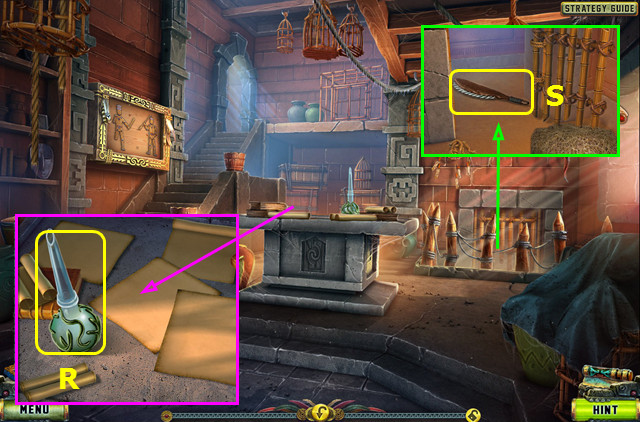
- Take the FLASK (R).
- Use the MACHETE and open the gate; take the BONE SAW (S).
- Walk down 2x.
Chapter 4: The Harpy Tree
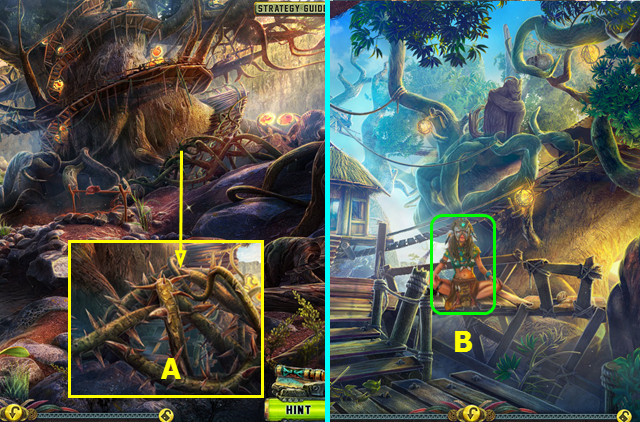
- Use the POTION (A).
- Go right.
- Talk to the Raider; give the SACK OF GOLD and earn the POTION OF BONDING RECIPE (B).
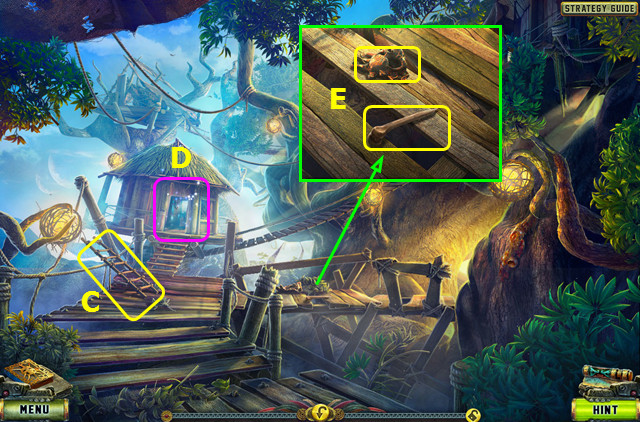
- Take the LADDER (C).
- Play the HOP; earn the 4th FIGURINE (D).
- Take the LARGE BONE and the 1st SKULL FIGURINE (E).
- Walk down 2x.
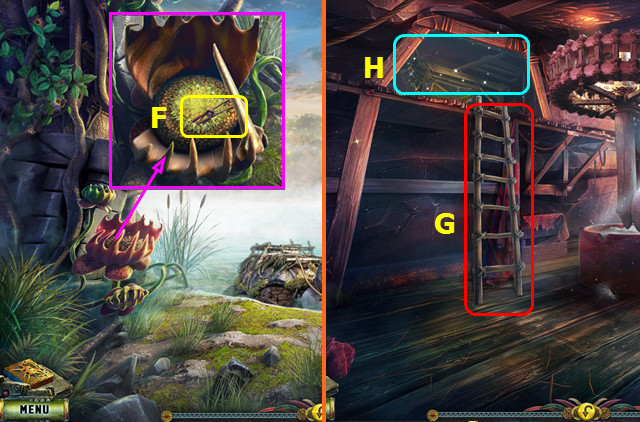
- Place the LARGE BONE and take the TWEEZERS (F).
- Return to the Windmill.
- Place the LADDER (G).
- Play the HOP; earn the 2nd SKULL FIGURINE (H).
- Go to the Village Entrance.
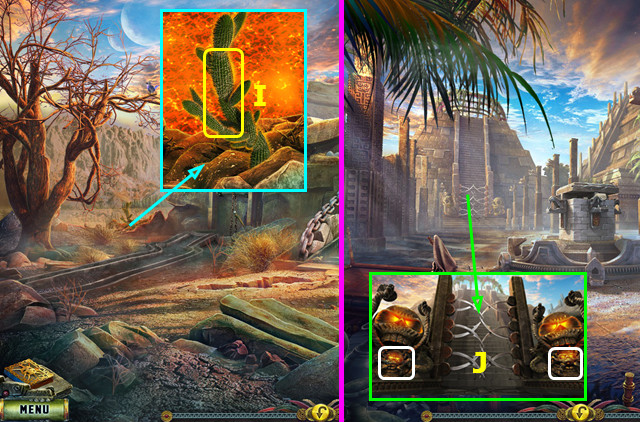
- Use the FLASK to take the CACTUS SAP (I).
- Return to the Square.
- Place the 2 SKULL FIGURINES (J).
- Go forward.
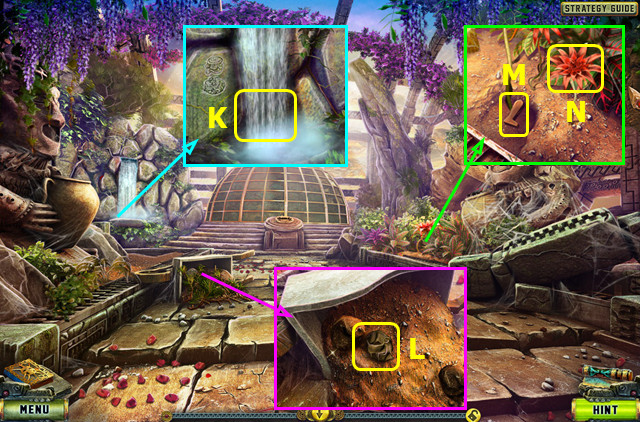
- Use the CLAY FLASK to take the FLASK OF WATER (K).
- Remove the branches 2x; take the EMPTY SACK (L).
- Use the GARDEN TROWEL; take the 2nd FIGURINE PART (M).
- Use the MACHETE to take the MAGIC FLOWER (N).
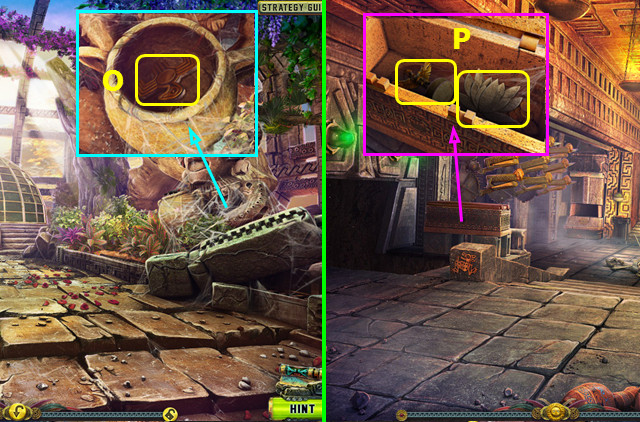
- Use the BURNING STICK; take the BIRD FIGURINE (O).
- Return to Outside the Tomb.
- Place the BIRD FIGURINE; take the 5th FIGURINE and the FLOWER FIGURINE (P).
- Go forward.
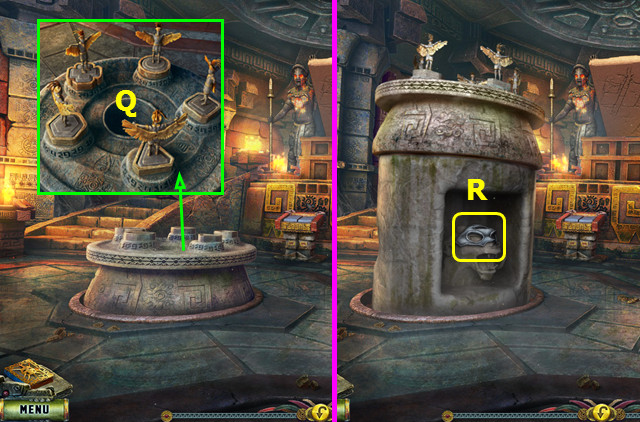
- Place the 5 FIGURINES (Q).
- Take the HARPY HELMET (R).
- Go to the Swamp.
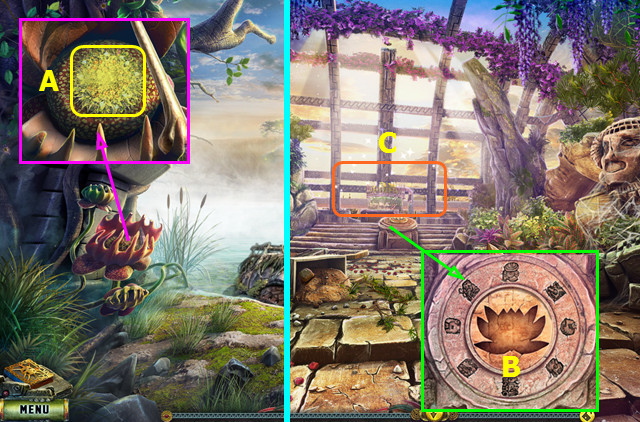
- Use the EMPTY SACK to take the PREDATOR FLOWER POLLEN (A).
- Return to the Garden.
- Place the FLOWER FIGURINE (B).
- Play the HOP; earn the MAGIC FRUIT (C).
- Walk down and right.
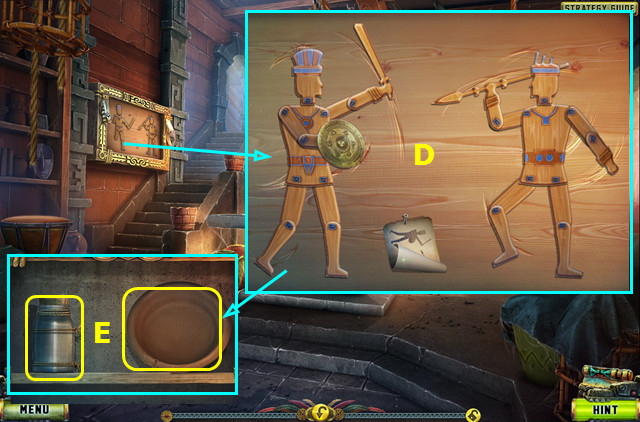
- Place the NOTE and 2 FIGURINE PARTS; arrange the figures as shown (D).
- Take the CLAY PLATE and JAR (E).
- Walk down 2x.
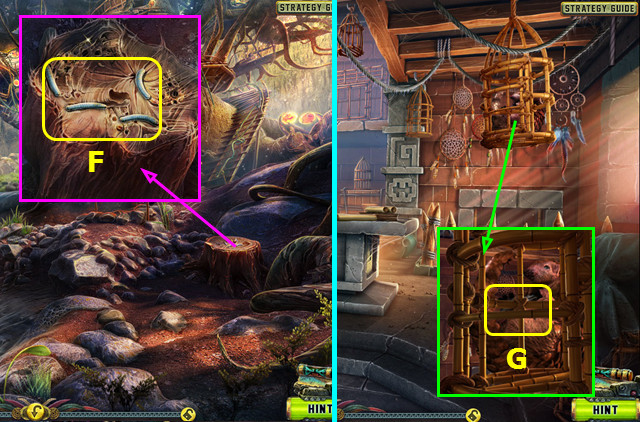
- Use the JAR and TWEEZERS to take the JAR OF INSECTS (F).
- Go forward and right.
- Use the JAR OF INSECTS to earn the SCRAPER (G).
- Walk down 2x and go right.
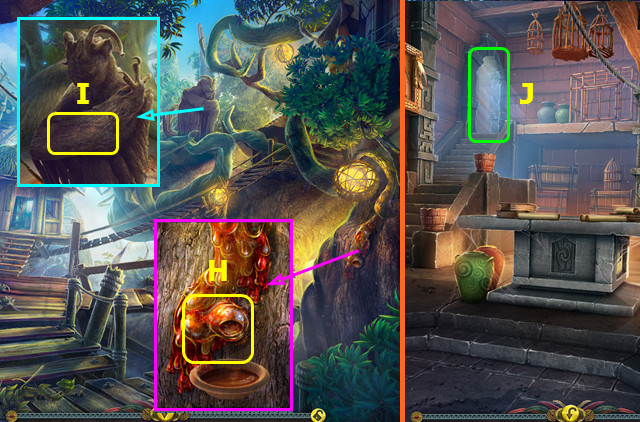
- Use the CLAY PLATE and MACHETE to take the PLATE OF RESIN (H).
- Use the SCRAPER to take the HARPY TREE BARK (I).
- Walk down; go forward and right.
- Select (J).
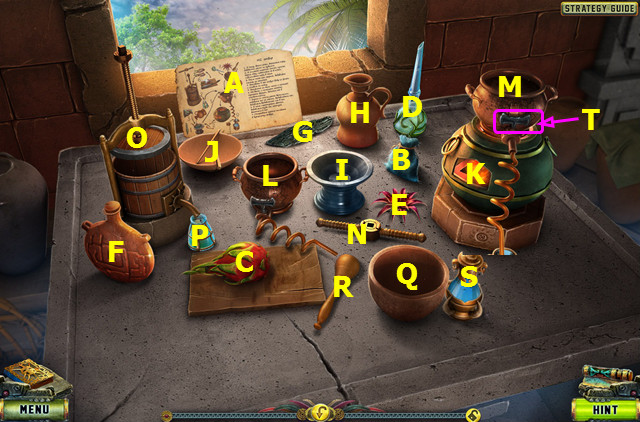
- Place the POTION OF BONDING RECIPE (A), PREDATOR FLOWER POLLEN (B), MAGIC FRUIT (C), CACTUS SAP (D), MAGIC FLOWER (E), FLASK OF WATER (F), and HARPY TREE BARK (G).
- Place G and H into I; use J on K. Use B on I; place L on K. Select and use F on M; use I on M. Place N on O.
- Use the MACHETE (C). Place C in O and select the handle. Use P in M. Place E in Q; use R on Q. Use D in Q; pour Q into M. Select S and T.
- Take the POTION FOR HARPY (S).
- Return to the Harpy Tree.
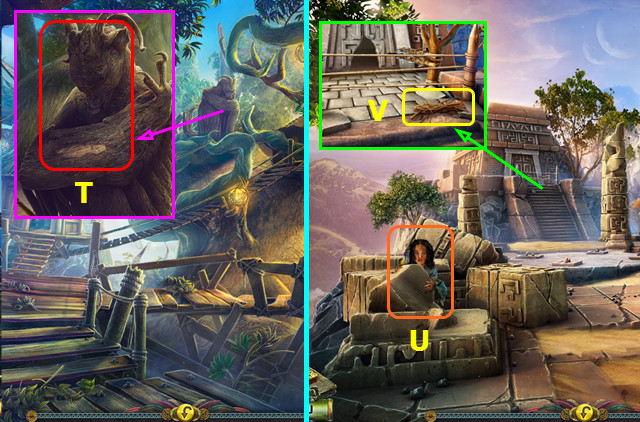
- Use the POTION FOR HARPY (T).
- Talk to the Girl (U).
- Take the BRUSHWOOD (V).
- Walk down 2x.
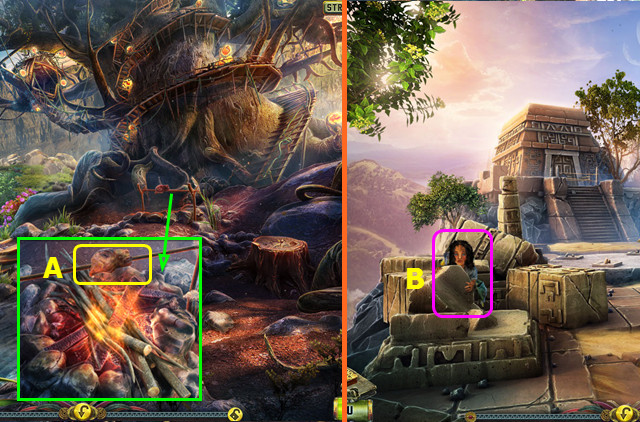
- Use the BRUSHWOOD; take the MEAT (A).
- Go right and forward.
- Give the MEAT (B).
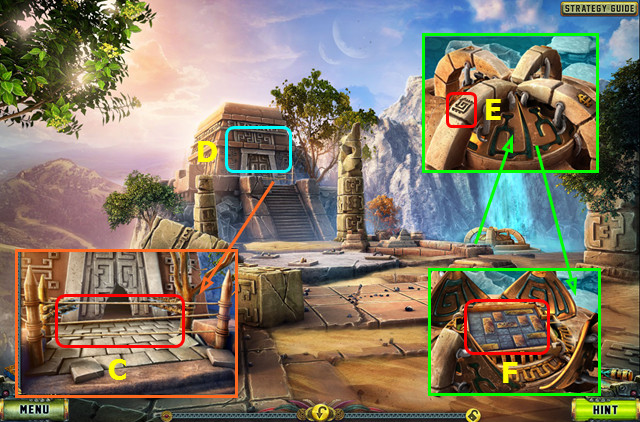
- Use the MACHETE (C).
- Play the HOP; earn the SYMBOL (D).
- Place the SYMBOL (E); select (F).
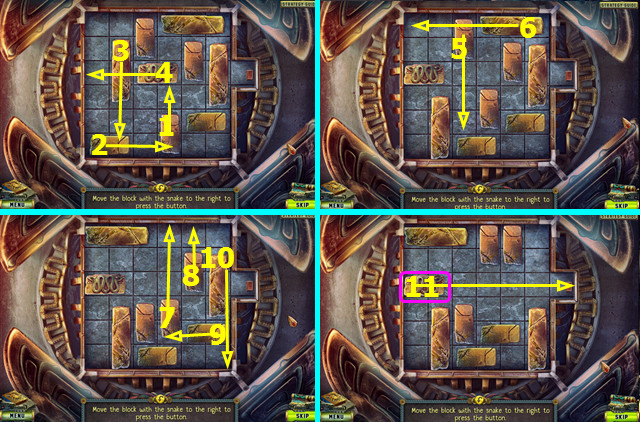
- Move the steps 1-11.
- Go right.
Chapter 5: The Secret Path
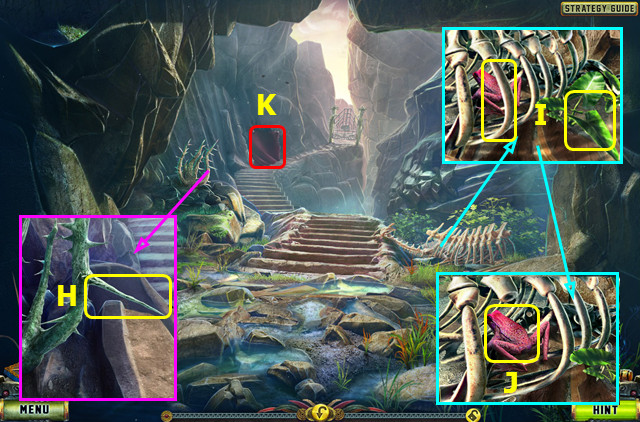
- Take the THORN (H).
- Use the BONE SAW to take the RIB; take the LARGE LEAF (I).
- Use the THORN on the frog (J).
- Combine the LARGE LEAF, PLATE OF RESIN, and THORN to make the PIPE WITH SLEEPING POTION.
- Select (K).
- Walk down.
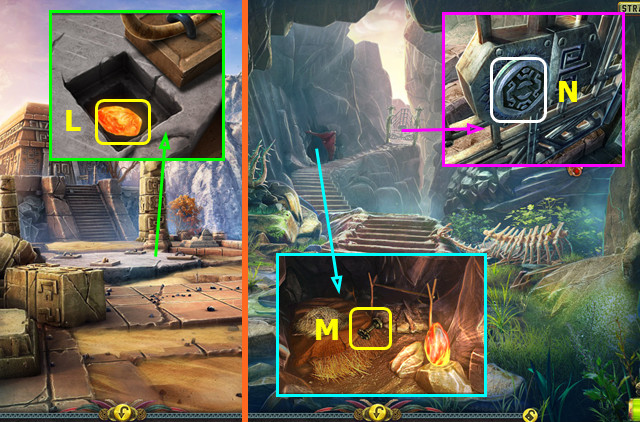
- Use the RIB; take the GLOWING CRYSTAL (L).
- Go right.
- Use the GLOWING CRYSTAL; move the debris 2x and take the KEY (M).
- Use the KEY (N).
- Go forward.
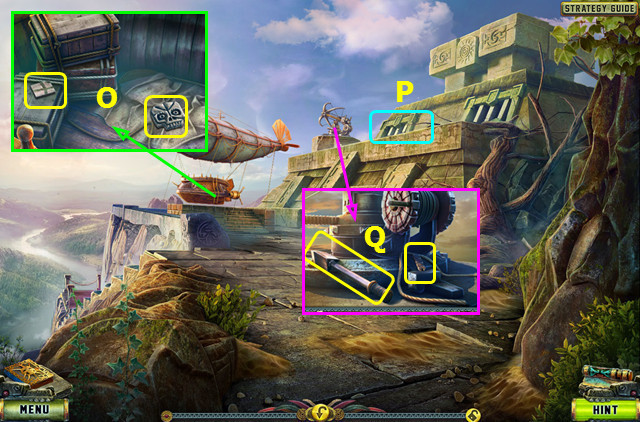
- Take the 1/3 MOSAIC PARTS and BAS-RELIEF PART (O).
- Select (P).
- Take the LEVER and the 1st LOCK PART (Q).
- Walk left.
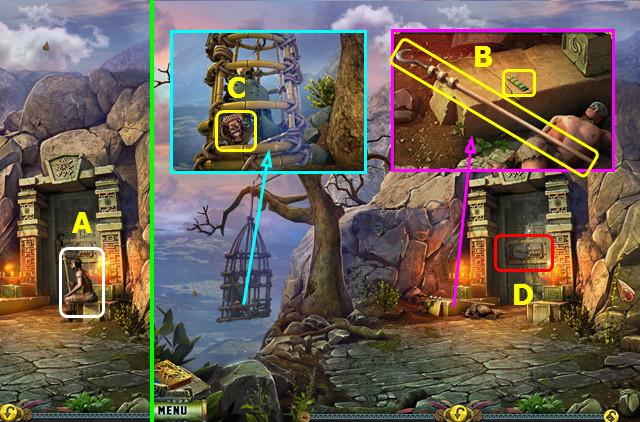
- Use the PIPE WITH SLEEPING POTION (A).
- Take the 2nd LOCK PART and STICK WITH HOOK (B).
- Use the STICK WITH HOOK; take the 1st MASK (C).
- Select (D).
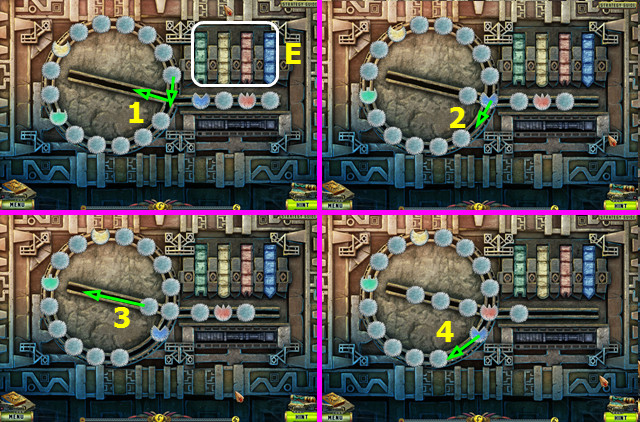
- Place the 2 LOCK PARTS (E).
- Slide the pieces as shown 1-4.
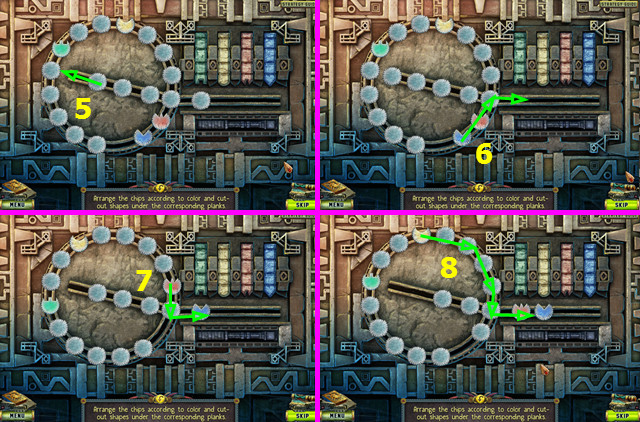
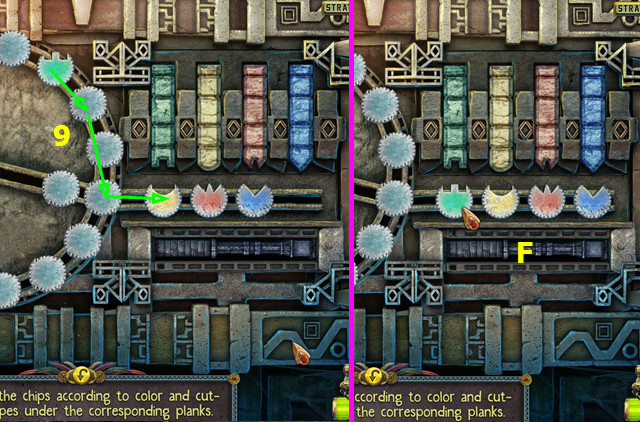
- Continue to move the pieces as shown 5-9.
- Final solution (F).
- Go forward.
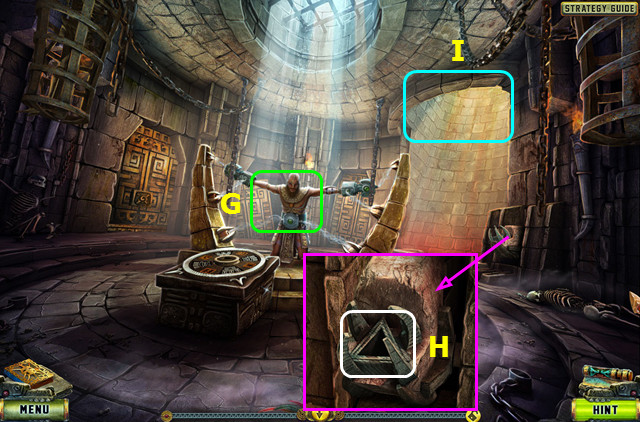
- Talk to the Shaman (G).
- Place the LEVER (H).
- Go up (I).
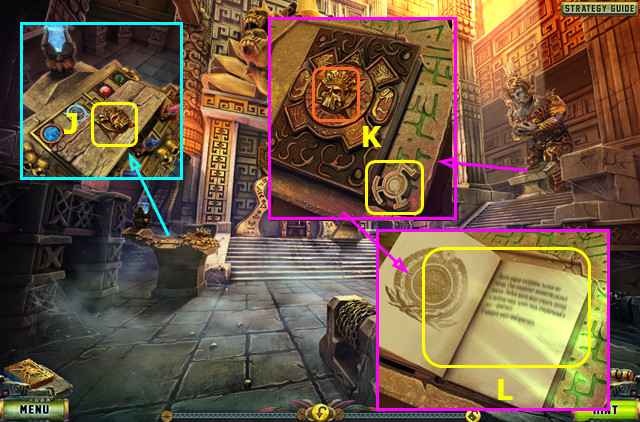
- Take the FIGURINE (J).
- Take the 1st KEY and place the FIGURINE (K).
- Read the book and take the 2nd KEY (L).
- Walk down.
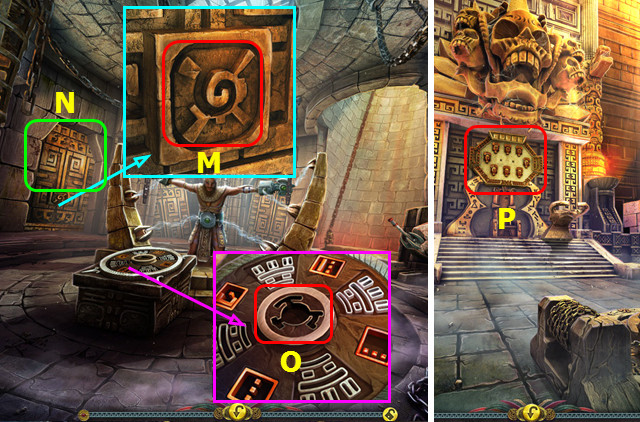
- Place the 2nd KEY (M).
- Play the HOP; earn the CRYSTAL (N).
- Place the 1st KEY (O); you earn the 2nd MASK.
- Go up.
- Select (P).
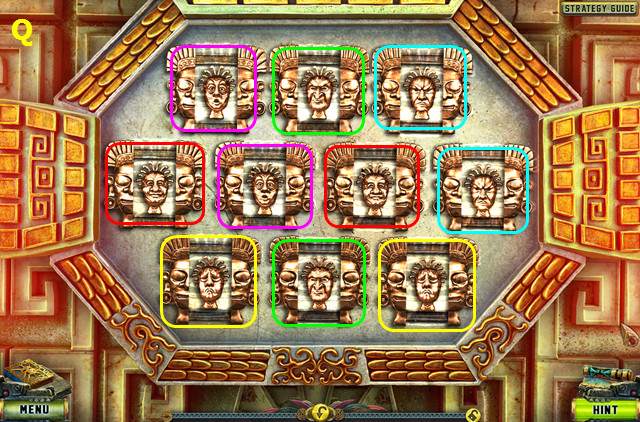
- Place the 2 MASKS on the board (Q).
- Select the pairs (color-coded).
- Go forward.
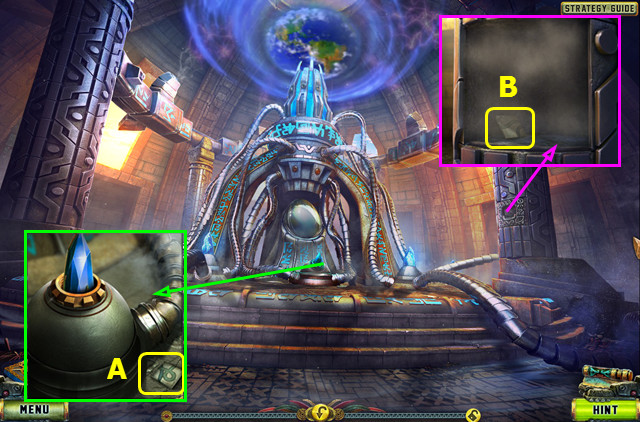
- Take the 2/3 MOSAIC PARTS (A).
- Place the BAS-RELIEF PART; take the 3/3 MOSAIC PARTS (B).
- Walk down.
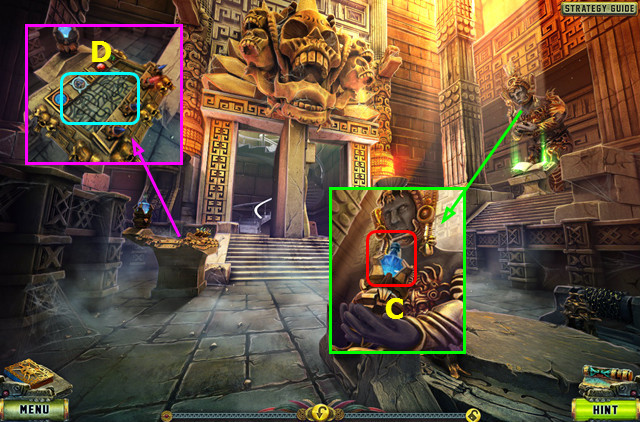
- Place the CRYSTAL (C).
- Select (D).
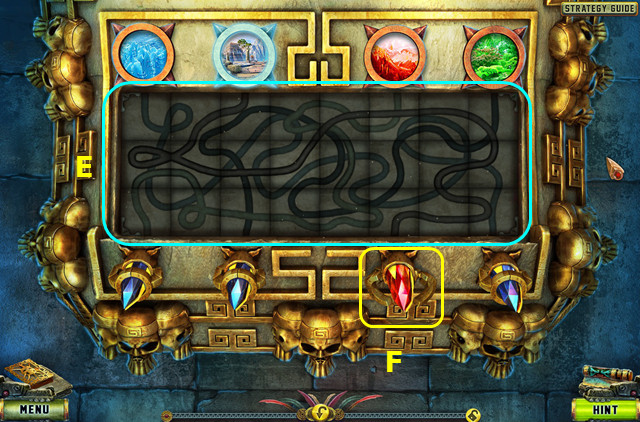
- Place the 3 MOSAIC PARTS on the board.
- Restore the image (E).
- Take the CRYSTAL (F).
- Go forward.
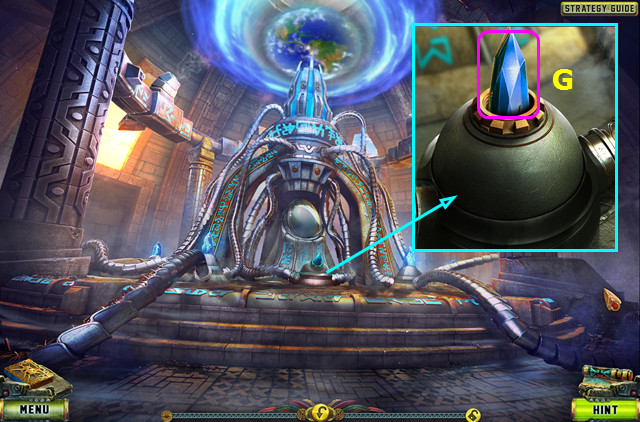
- Use the CRYSTAL (G).
- Congratulations! You have completed The Legacy: Forgotten Gates!
Created at: 2017-04-09

