Walkthrough Menu
- General Tips
- Case 1: Staying at the Standing Stones
- Case 2: The Harbor Pirates Prisoner
- Case 3: The Curious Chrononaut
- Case 4: The Return of Jack the Ripper
- Case 5: The Lost Blade of Calcutta
- Case 6: The Murdered Musician
- Case 7: The Vulnerable Pugilist
- Case 8: The Haunting at Marlsbury Castle
- Case 9: The Pups of Baskerville
- Case 10: The Tainted Truffle
- Case 11: The Case of the Unwanted Suitor
- Case 12: The Secret of Father Christmas Club
- Case 13: The Sticky-fingered Dinner Guest
- Case 14: The Disappearing Doomsday Formula
- Case 15: The Mystery of the Millionaire’s Daughter
- Case 16: The Bohemian Crown Heist
General Tips
- Choose Timed or Untimed Mode at the beginning of the game.
- The locations of the items in the Hidden Object Scenes are randomized.
- This walkthrough solves the Cases from left to right, though you may play them in any order you wish.
- Hints will help you find random item locations. Your hints are limited; discovering pipes hidden in each scene will grant further hints.
- You can skip any puzzle once the skip button is available. Puzzles can also be reset by clicking the reset button.
- The Magnifying Glass will give you a closer view of the items in a scene. Click on the Magnifying Glass Icon in the lower left to activate it. Right-click to release it.
Suspects
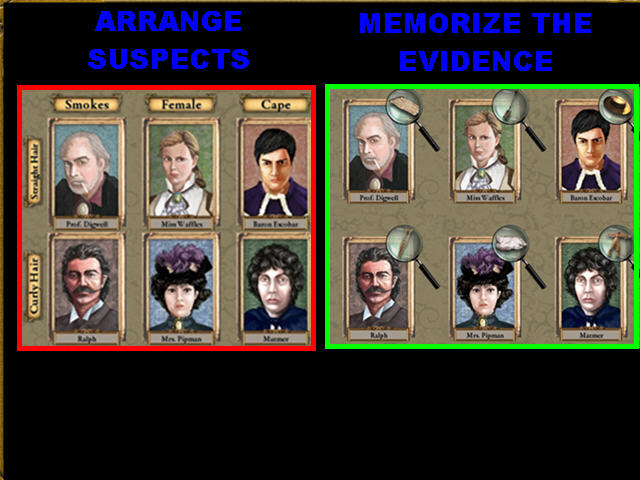
- Your goal is to arrange the suspects in the correct rows and columns using the information attached to each card.
- Hold your cursor over a card to read its description.
- Click on two of the suspect cards to swap their positions.
- Some suspects can fall into more than one category.
- The solution is always the same, but the description plaques may not be.
- Once you finish arranging the suspects, memorize each suspect’s evidence.
- Take a good look at the evidence and click on “Continue” to begin.
- You will be shown one piece of evidence that is incorrect; click on the incorrect evidence to move on to the next one.
- The cards will reshuffle after each incorrect guess.
- The game will end after all the evidence has been examined.
Case 1: Staying at the Standing Stones
Pipman’s Tent
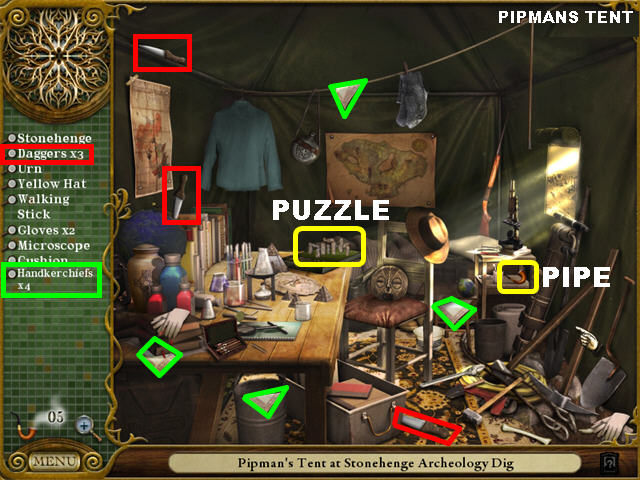
- The PIPE is on the right.
- Click on the miniature STONEHENGE to trigger a puzzle.
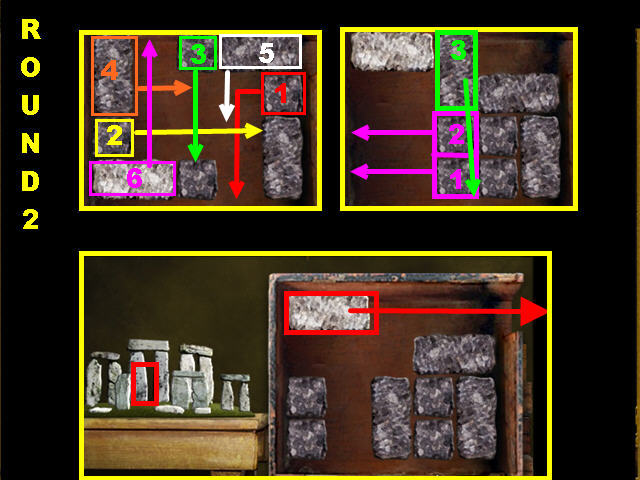
- Slide the stones around so you can remove the white stone from the box.
- You must complete 3 rounds of this puzzle in order to solve it.
- Slide the stones in the direction and order shown in the screenshot. Once you solve the puzzle, place the white stone on the Stonehenge Model on the left.
- Please look at the next set of screenshots for the solutions:
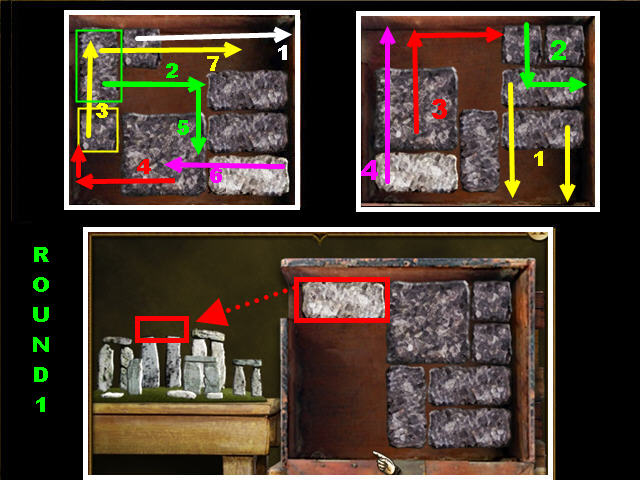
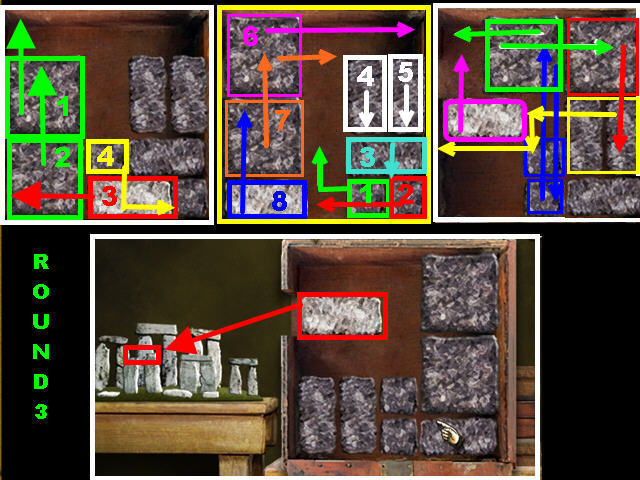
- On the third box please follow the steps in this order:
- Follow the steps on the last box and move the white stone to the exit area. Place the white stone on the Stonehenge Model on the left.
Excavation Pit
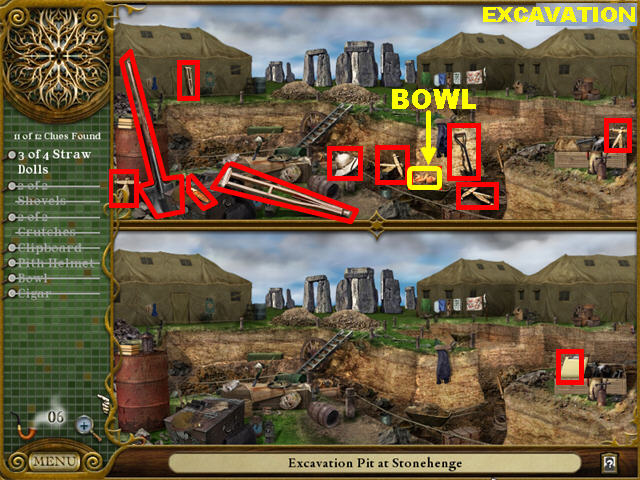
- Find the Differences by picking up the items marked in red in the screenshot.
- Click on the BOWL in the scene to trigger a puzzle.
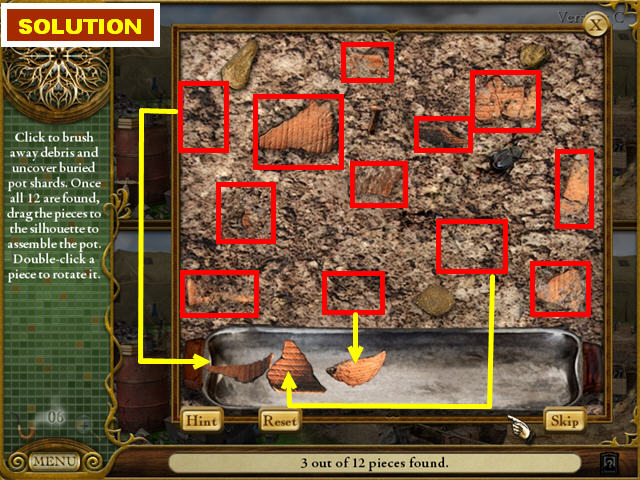
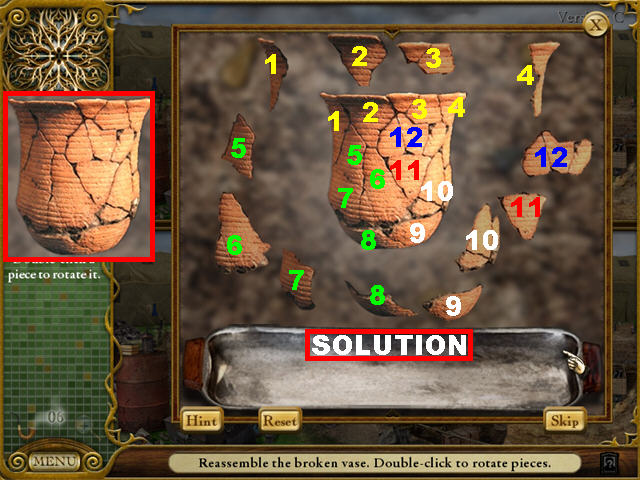
- Use the brush attached to your cursor to find the pot shards in the scene.
- A puzzle will appear after all the shards have been picked up.
- Drag the shards into the silhouette of the pot in the center of the screen.
- Right-click on the shards to rotate them. Correct pieces will lock into place.
- Please look at the screenshot for the solution.
Suspects
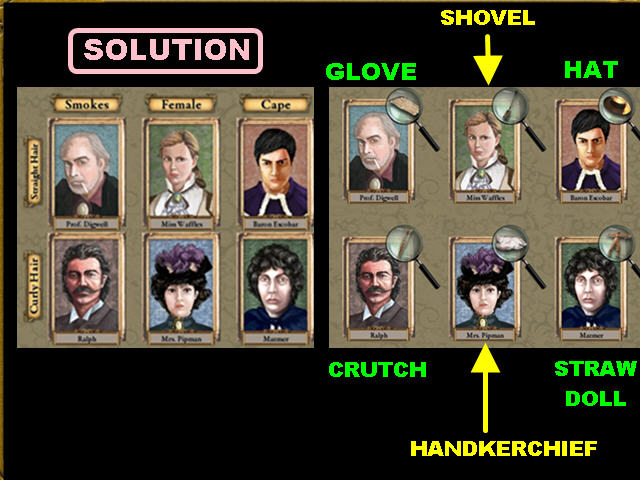
- Arrange the suspects under the correct name plaques by using the descriptions attached to each of them.
- Once you finish arranging the suspects, memorize their evidence.
Case 2: The Harbor Pirates Prisoner
Quaking Buccaneer Pub
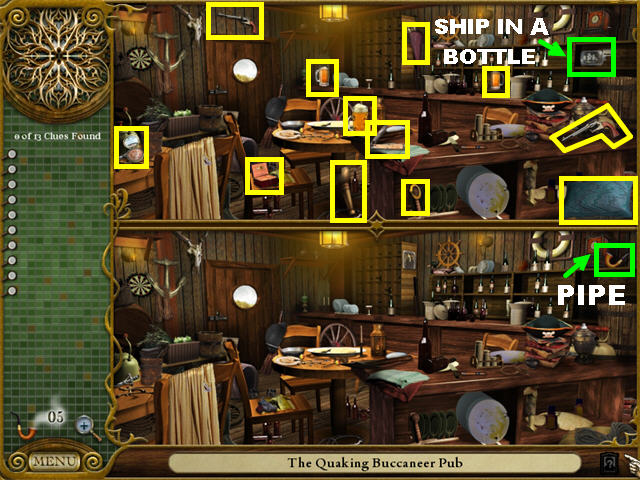
- Find the differences between the images.
- The PIPE is in the upper right corner of the lower image.
- Click on the SHIP IN A BOTTLE in the upper right to trigger a puzzle.
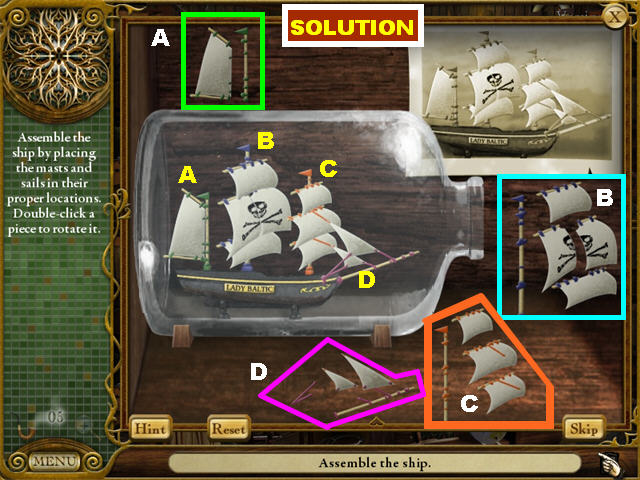
- Arrange all the ship fragments inside the bottle until they form the image in the upper right corner.
- Some pieces may have to be turned sideways before they can fit in the bottle’s neck.
- Correct pieces will lock into place.
The Lady Baltic
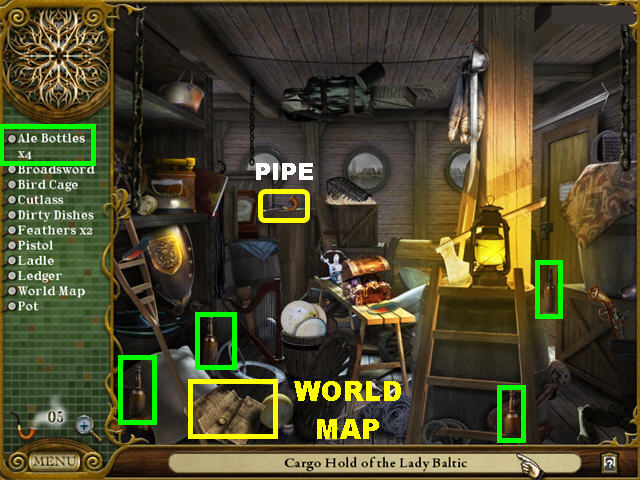
- The PIPE is in the center of the scene.
- Click on the WORLD MAP in the lower left to trigger a puzzle.
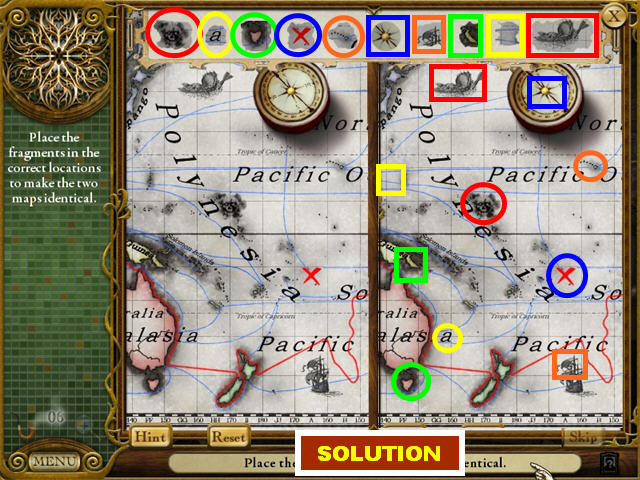
- Your goal is to place the pieces above the map in their correct spots on the right side of the page.
- Correct pieces will lock into place.
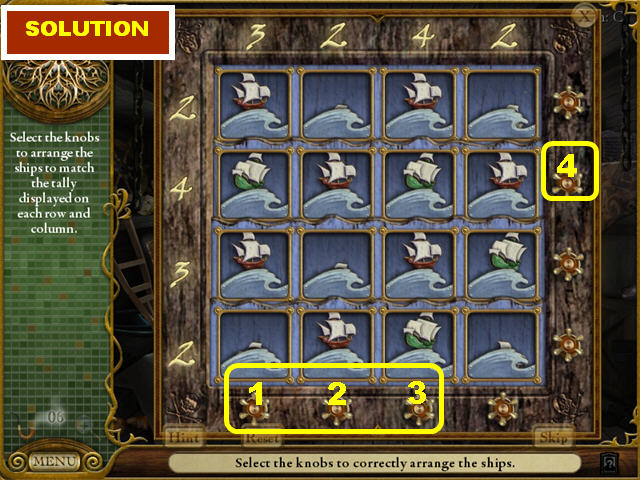
- Click on the knobs in the correct order so they match the numbers in the rows and columns.
- The knobs on the right affect the rows; the knobs at the bottom control the columns.
- Please click on the knobs in the order shown in the screenshot.
Suspects
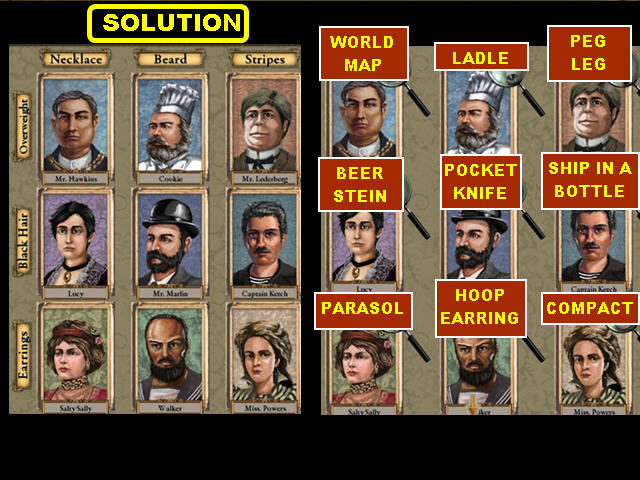
- Arrange the suspects under the correct name plaques by using the descriptions attached to each of them.
- Once you finish arranging the suspects, memorize their evidence.
Case 3: The Curious Chrononaut
Davenport Atrium
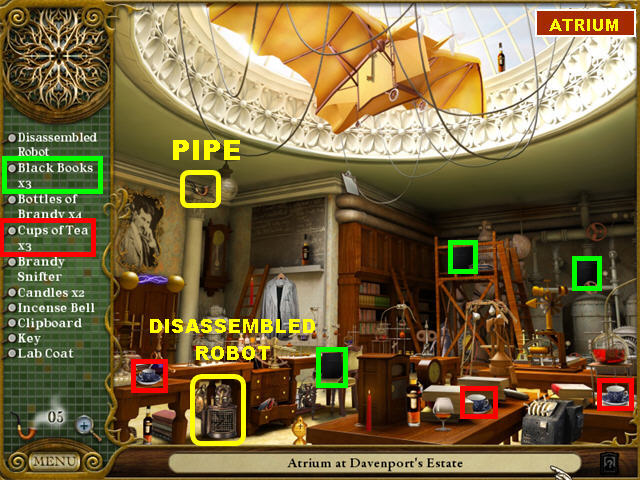
- The PIPE is in the upper left.
- Click on the DISASSEMBLED ROBOT in the lower left to trigger a puzzle.
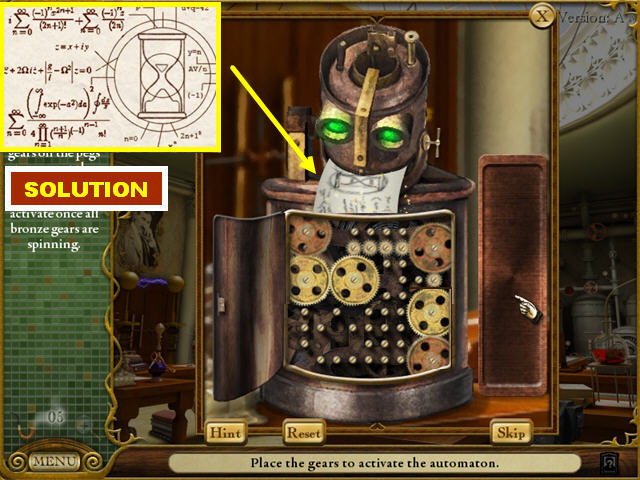
- Your goal is to connect the gold gears on the pegs to the bronze ones.
- Drag the gear pieces onto the pegs as shown in the screenshot.
- Click on the paper that comes out of the robot’s mouth after the puzzle has been solved.
Davenport Lab
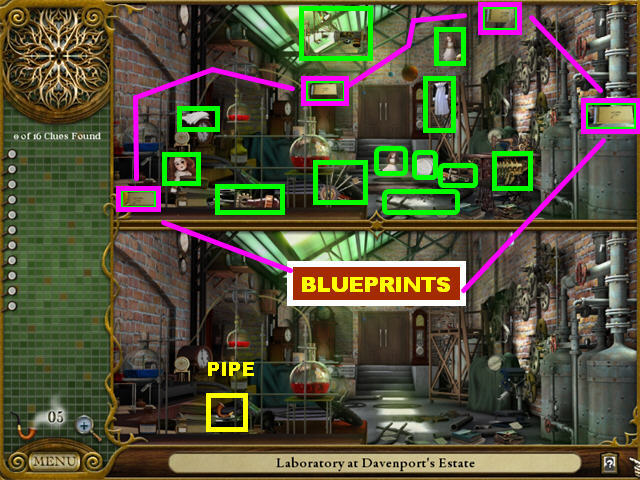
- The PIPE is in the lower left corner of the image at the bottom.
- The BLUEPRINTS are marked in purple. After you click on the fourth BLUEPRINT, a puzzle will appear.
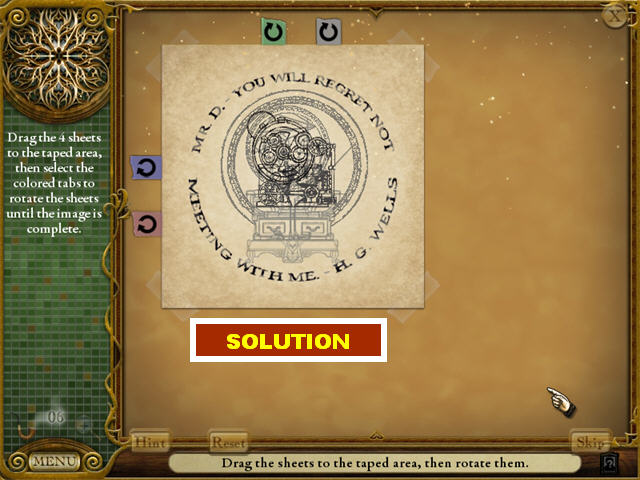
- Drag the 4 sheets of paper onto the outline on the left side of the screen.
- Once you have the papers in place, click on the colored arrows to rotate them.
- The dark blue arrows, and the pink arrows, should face to the left.
- The green arrows, and light blue arrows should be placed on top.
- Please look at the screenshot for the solution.
HG Wells’ Den
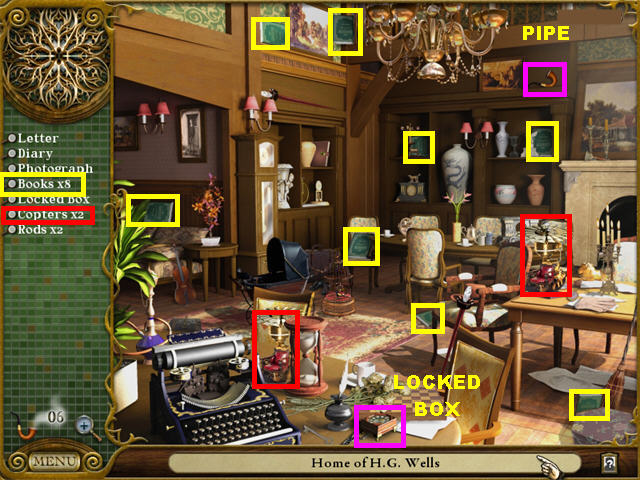
- The PIPE is in the upper right side.
- Click on the LOCKED BOX in the lower center to trigger a puzzle.
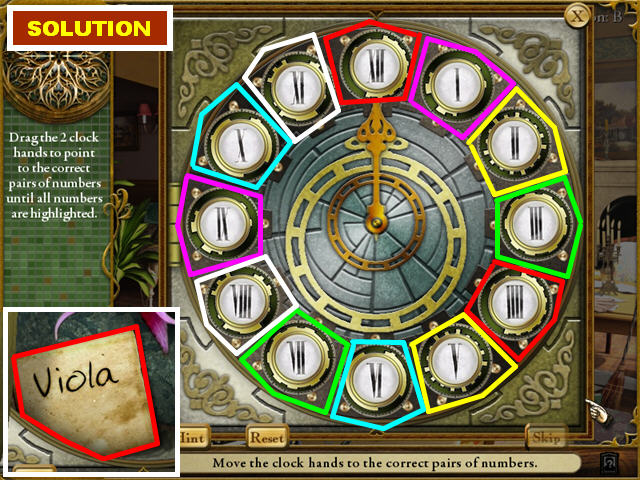
- Drag the clock hands to the two pairs of numbers that have the same design on the outside.
- When 2 correct numbers are selected, they will be highlighted. Highlight all the numbers to win the game.
- Pair I to IX, II to V, III to VII, IIII to XII, VI to X, and VIII to XI to solve the puzzle.
- Click on the note marked “Viola” inside the clock once the puzzle has been solved.
Suspects
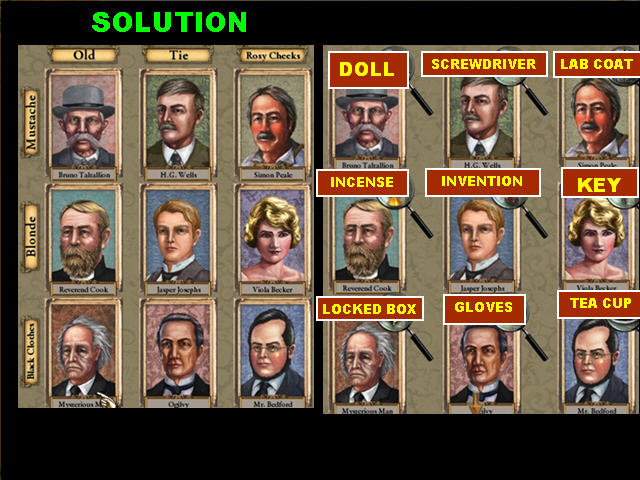
- Arrange the suspects under the correct name plaques by using the descriptions attached to each of them.
- Once you finish arranging the suspects, memorize their evidence.
4 – The Return of Jack the Ripper
Ian Lurie’s Home
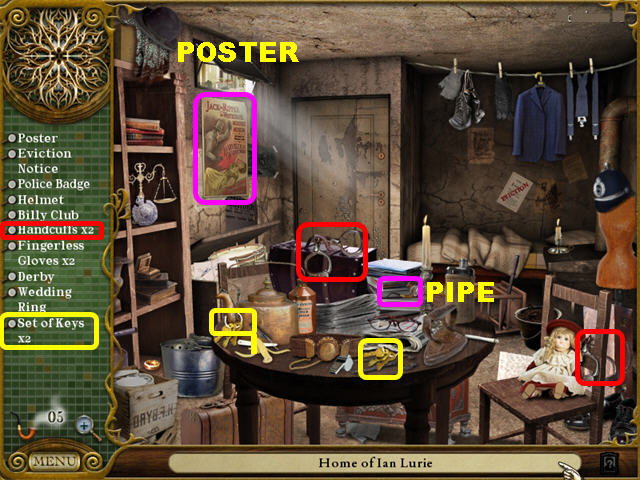
- The PIPE is on the table.
- Click on the POSTER on the left to trigger a puzzle.
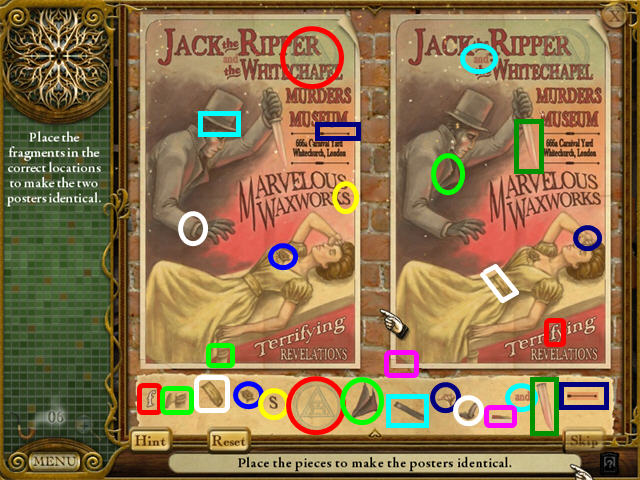
- Place the fragments at the bottom of the scene in the correct spots on the poster on the right.
- Correct pieces will lock into place. Please look at the screenshot for the solution.
Wax Museum
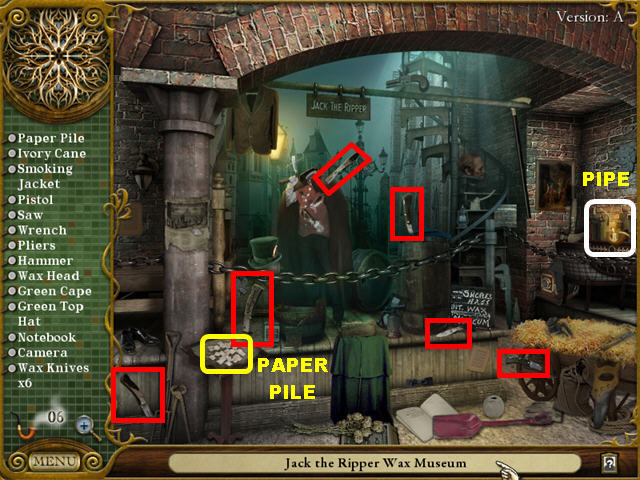
- The PIPE is on the right edge of the scene.
- The 6 wax knives are marked in red.
- Click on the PAPER PILE, marked in yellow, in the lower left to trigger a puzzle.
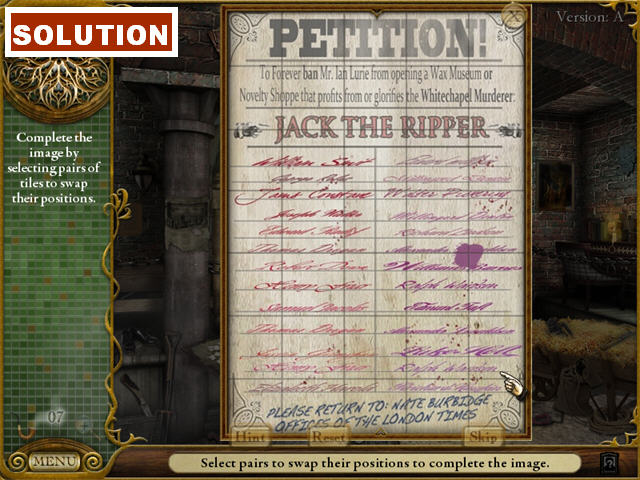
- Click on any 2 scraps to swap their positions.
- Completed columns will light up when correct.
- Please look at the screenshot for the solution.
Newspaper Office
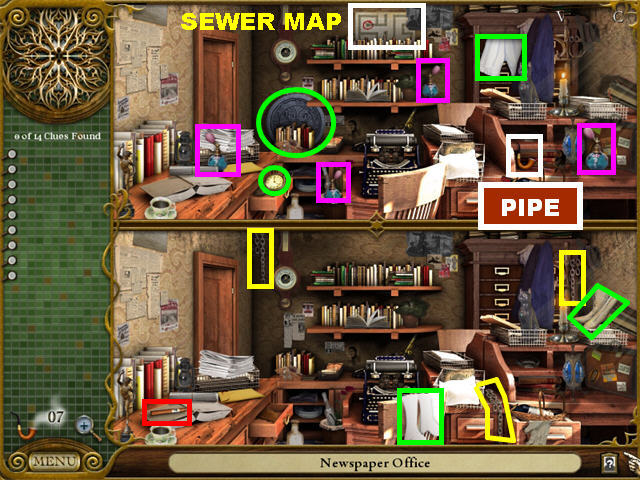
- The 4 PERFUME BOTTLES are marked in purple.
- The 3 CHAINS are marked in yellow.
- Pick up the PIPE on the desk.
- Click on the SEWER MAP in the upper center to trigger a puzzle.
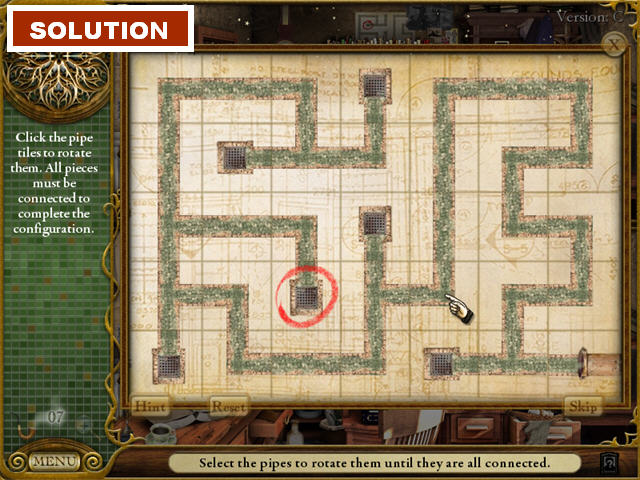
- Click on the pipe tiles to rotate them. All pipes must be connected to beat the game.
- Use the stoppers to cover any open ends.
- Please look at the screenshot for the solution.
London Sewer
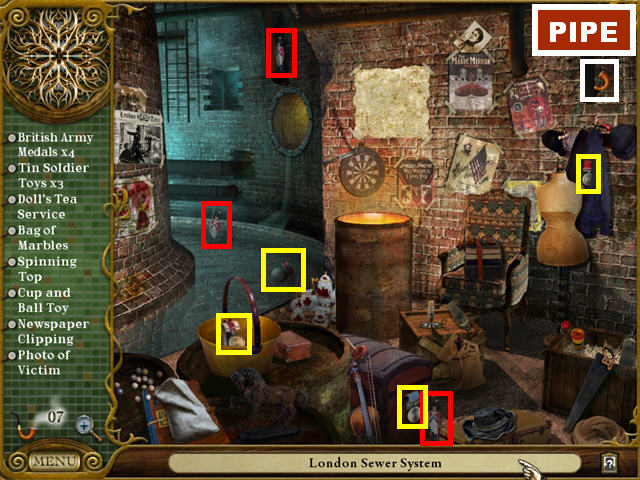
- The 3 TIN SOLDIER TOYS are marked in red.
- The PIPE is in the upper right.
- The 4 BRISTISH ARMY MEDALS are marked in yellow. The puzzle will be triggered once you pick up your fourth medal.
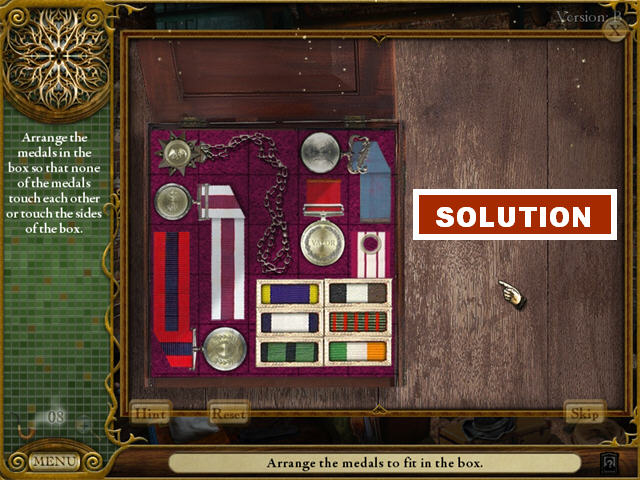
- Arrange the medals in the box so that no pieces overlap.
- Please look at the screenshot for the solution.
Suspects
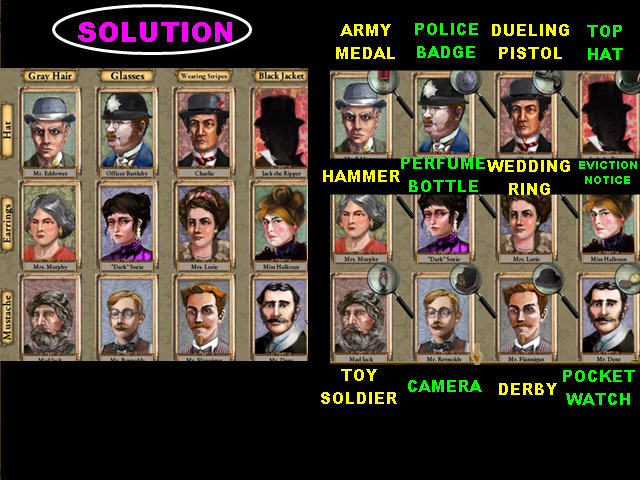
- Arrange the suspects under the correct name plaques by using the descriptions attached to each of them.
- Once you finish arranging the suspects, memorize their evidence.
- The first Bonus Story “The Adventure of Musgrave Ritual” is unlocked!
Case 5 – The Lost Blade of Calcutta
Kipper’s Study
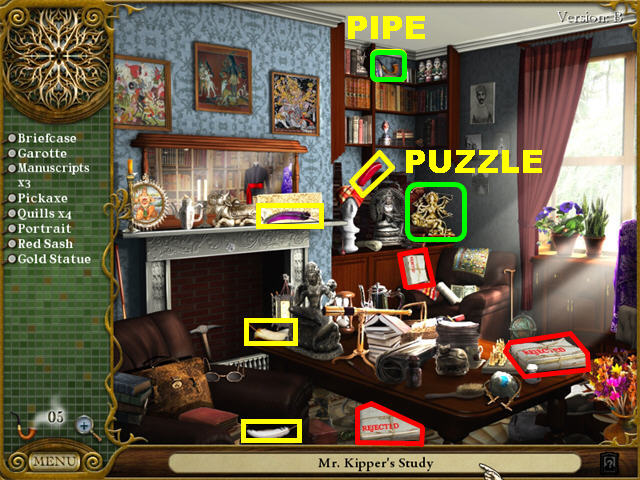
- The PIPE is in the upper right.
- The 3 MANUSCRIPTS are marked in red.
- The QUILLS are marked in yellow.
- Click on the statue on the right to trigger a puzzle.
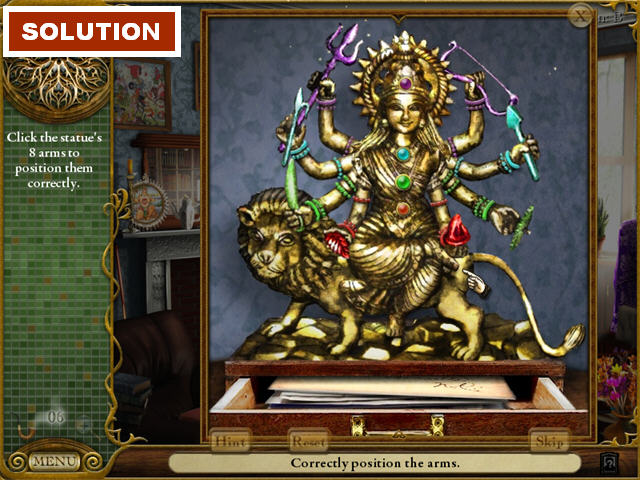
- Click on the statue’s arms to position them correctly.
- Please look at the screenshot for the solution.
Pawn Shop
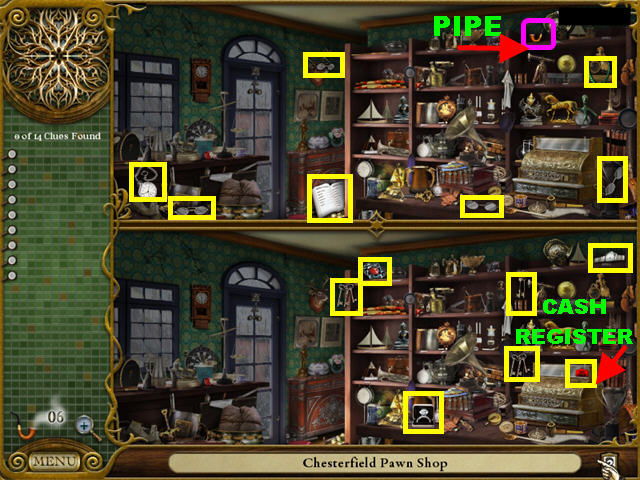
- The PIPE is in the upper right.
- Please look at the screenshot for all the differences in the picture.
- Click on the red cloth on the register in the lower right to activate a puzzle.
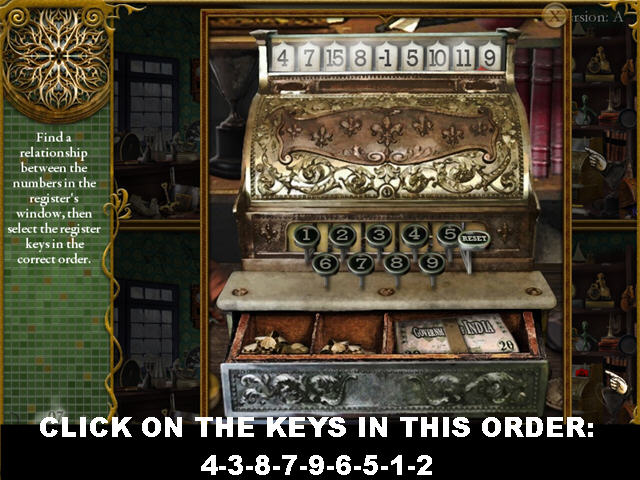
- Click on the cash register keys so that all the keys stay in the downward position.
- If you click on the wrong keys, a No Sale sign will appear in the register’s window.
- Click on these keys in this order to solve the puzzle: 4-3-8-7-9-6-5-1-2.
Suspects
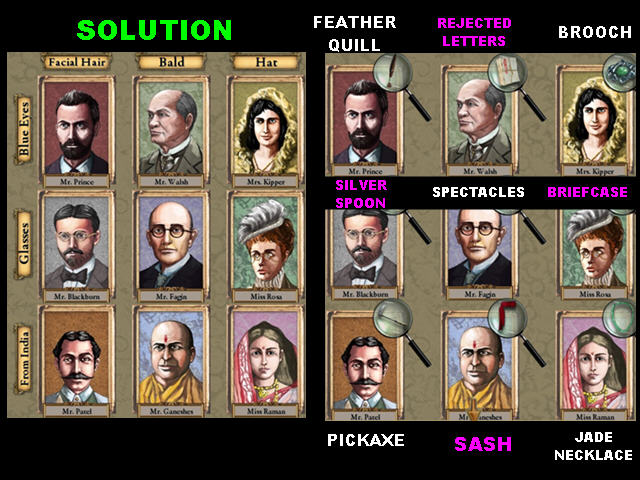
- Arrange the suspects under the correct name plaques by using the descriptions attached to each of them.
- Once you finish arranging the suspects, memorize their evidence.
Case 6: The Murdered Musician
Thorncraft’s Flat
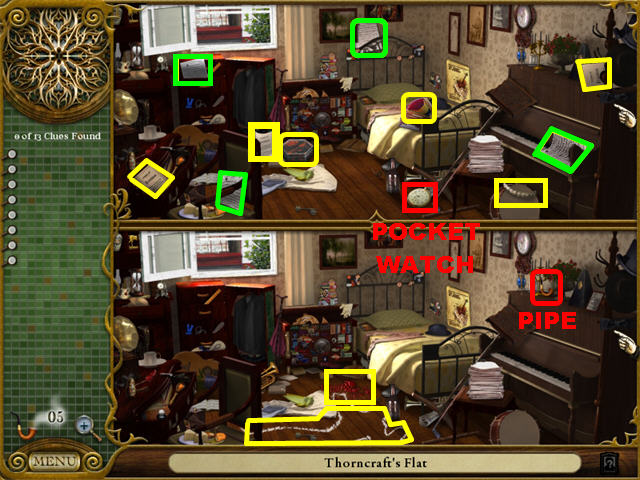
- Find the differences between the 2 images.
- Pick up the PIPE on the piano in the lower image.
- The 4 MUSIC SHEETS are marked in green.
- Click on the POCKET WATCH by the piano in the upper image to trigger a puzzle.
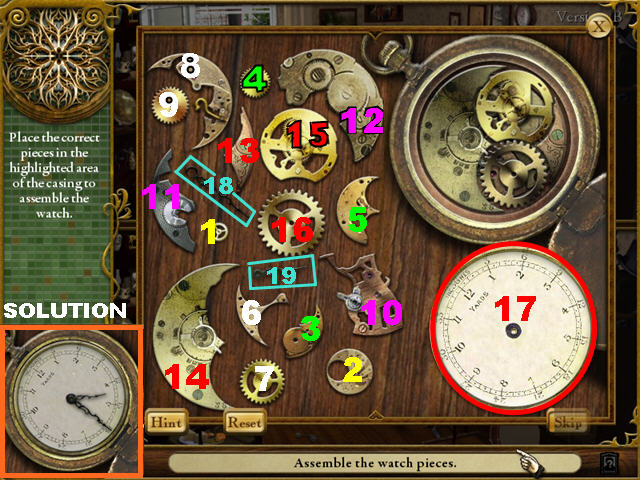
- Place the assorted clock parts in the highlighted areas of the clock casing.
- The screenshot shows you the order in which you will be asked to assemble the clock.
The Diogenes Club
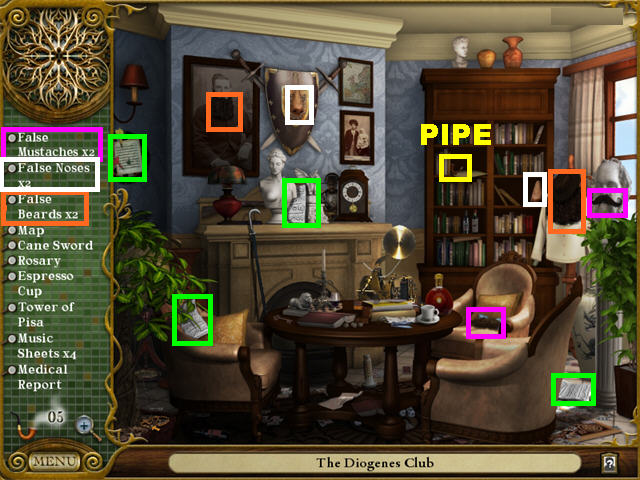
- The PIPE is in the upper left side of the bookcase.
- Once you pick up the 4 MUSIC SHEETS marked in green, a puzzle will appear.
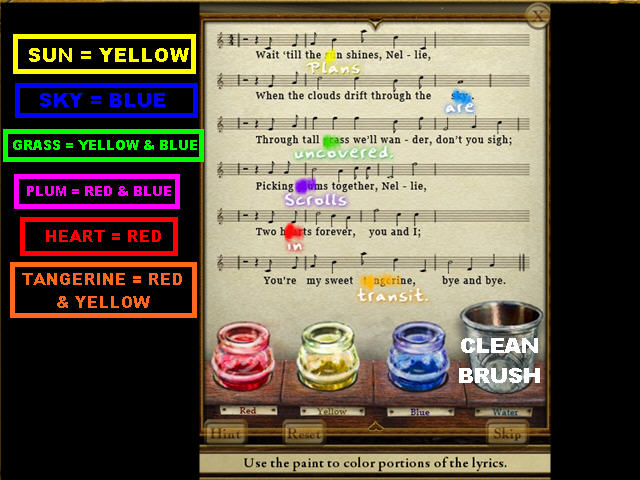
- Dip the brush in one of the paints to color a single word on the lyrics. Move your brush back and forth until a word appears below the selected word.
- Look for key words that could be represented by a color and use your brush to mark them.
- You will have to mix some of the colors to obtain the correct color.
- Dip your brush in the water to clean it.
- For the solution, paint the following words in these colors, top to bottom:Sun = Yellow Sky = Blue Grass = Yellow & Blue (Green) Plums = Red & Blue (Purple) Hearts = Red Tangerine = Red & Yellow (Orange)
- The message: “Plans are uncovered. Scrolls in transit” will appear below the colored words.
Thorncraft’s Flat
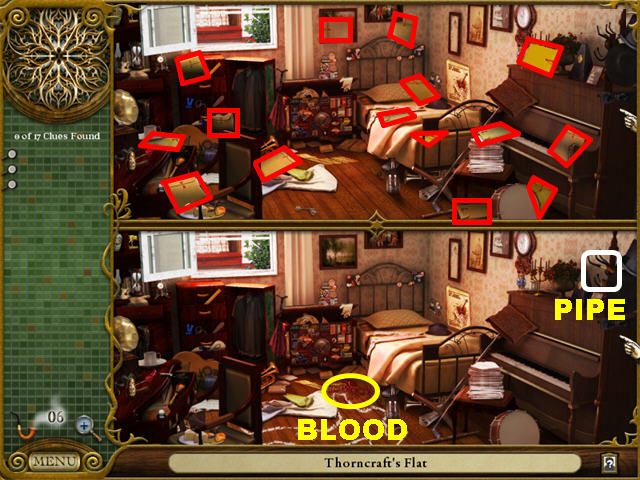
- Find the differences between the images.
- The PIPE is above the piano on the lower image.
- The 15 ENVELOPES are marked in red.
- The BODY OUTLINE is in the lower center.
- The BLOOD is in the lower center.
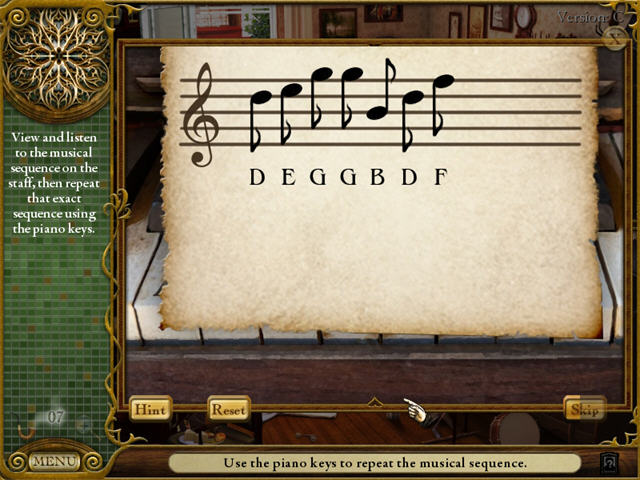
- Repeat the musical sequences shown on the paper.
- If you make a mistake, you will be shown the same sequence again.
- The sequences are random; solutions may vary. Repeat 4 sequences to win the game.
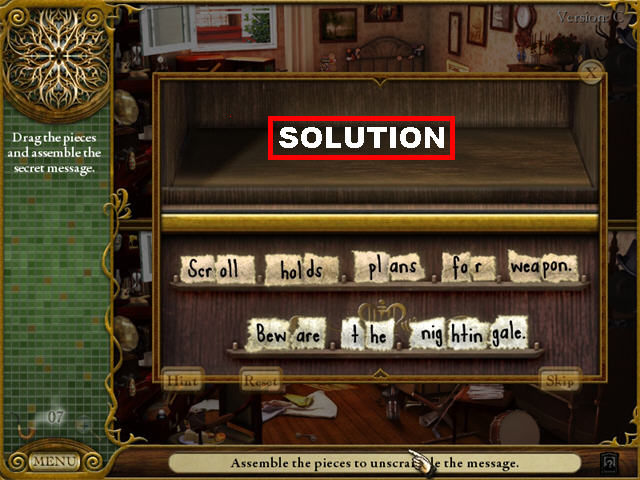
- Drag the paper pieces to the bottom slot to form the desired message.
- There are 2 sentences to form; once a sentence is complete, it will lock in place.
- The solution is “Scroll holds plans for weapon. Beware the nightingale.”
Suspects
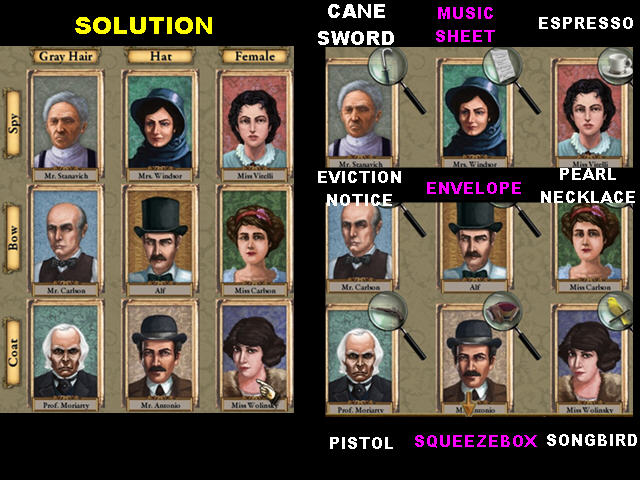
- Arrange the suspects under the correct name plaques by using the descriptions attached to each of them.
- Once you finish arranging the suspects, memorize their evidence.
Case 7: The Vulnerable Pugilist
Gymnasium
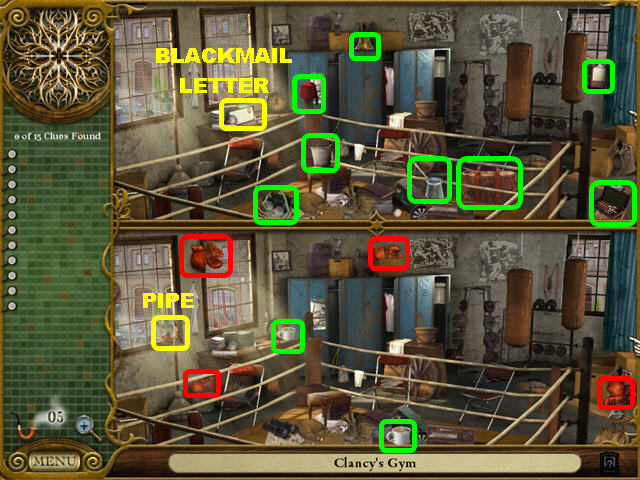
- Find the differences in both images.
- Pick up the PIPE on the left window of the lower image.
- The 4 BOXING GLOVES are marked in red.
- Click on the BLACKMAIL LETTER by the right window in the upper image to trigger a puzzle.
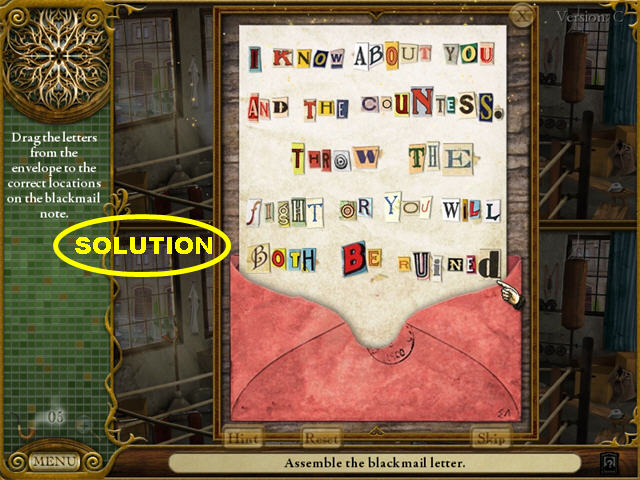
- Drag the letters from the envelope to the note above it.
- Letters placed correctly will lock in place.
- The solution is: “I know about you and the countess. Throw the fight or you will both be ruined.”
Manager’s Office
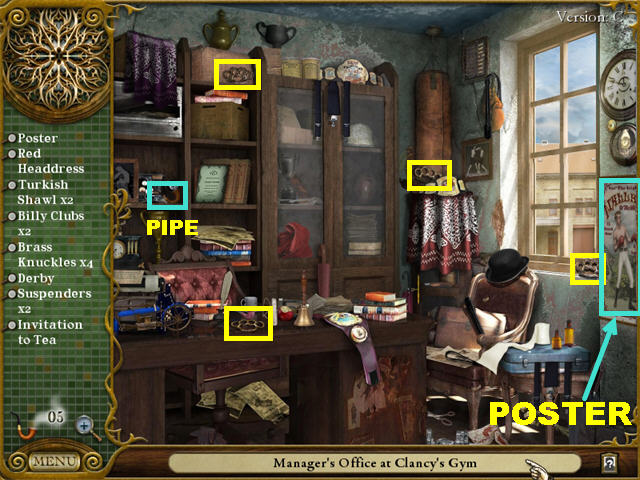
- The PIPE is on the left side of the cabinet.
- The 4 BRASS KNUCKLES are marked in yellow.
- Click the POSTER on the right to trigger a puzzle.
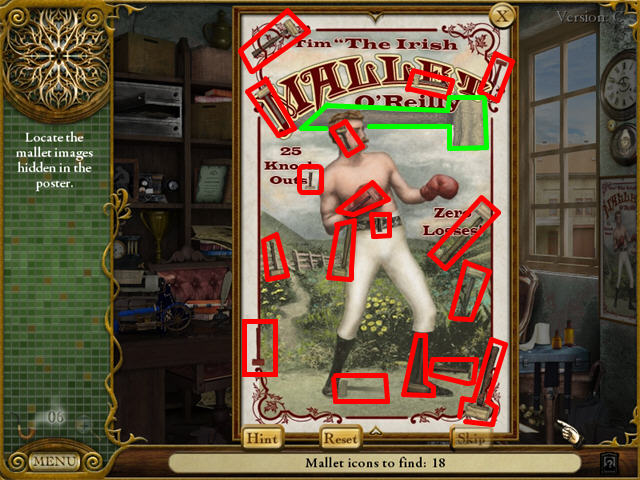
- Pick up the 18 MALLETS marked in red on the poster.
St. Elizabeth’s Church
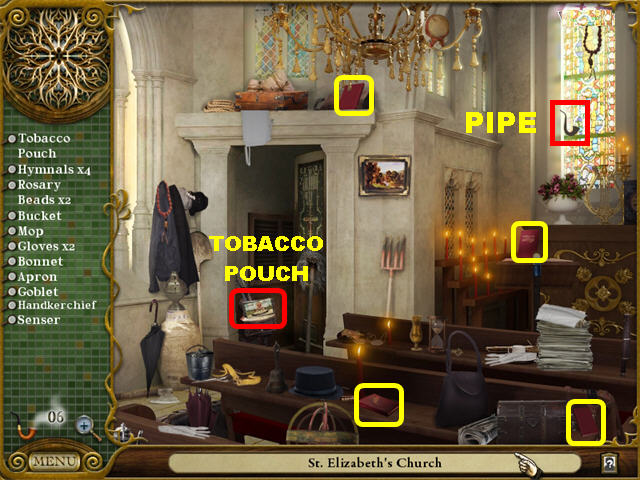
- The PIPE is on the stained glass window.
- The 4 HYMNALS are marked in yellow.
- Click on the TOBACCO POUCH in the lower left to trigger a puzzle.
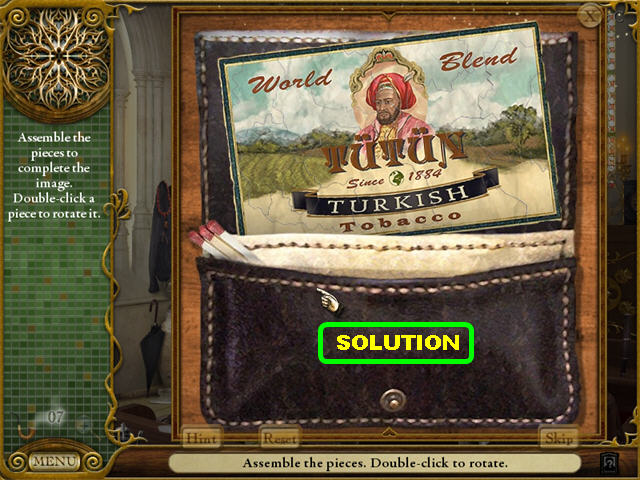
- Complete the image as shown in the screenshot.
- Double-click on a scrap to rotate it.
- Correct pieces will lock in place.
Suspects
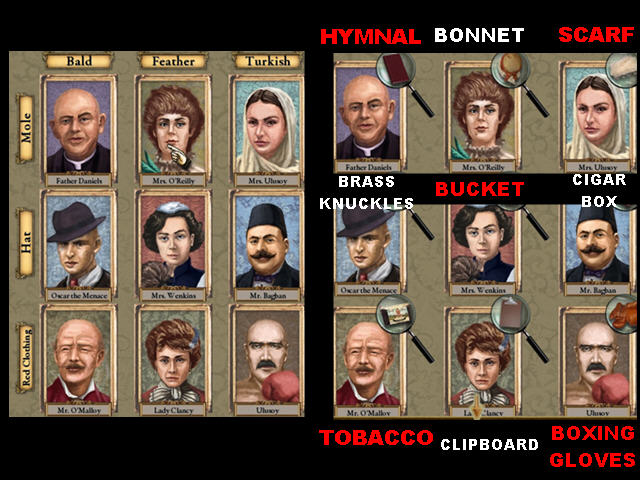
- Arrange the suspects under the correct name plaques by using the descriptions attached to each of them.
- Once you finish arranging the suspects, memorize their evidence.
Case 8: The Haunting at Marlsbury Castle
Dining Hall
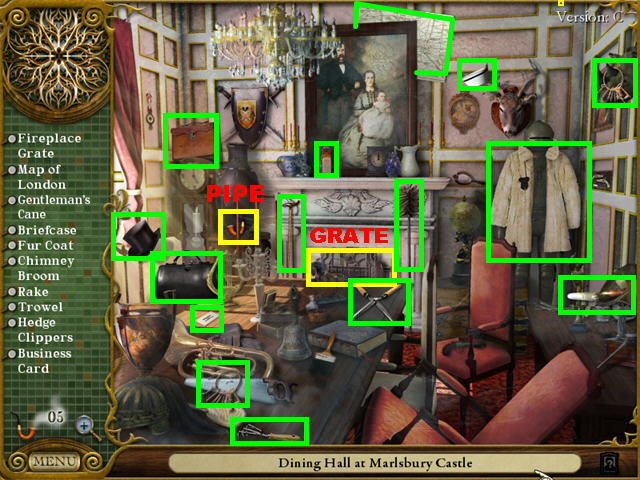
- Pick up the PIPE below the black vase on the left.
- Click on the FIREPLACE GRATE to trigger a slider puzzle.
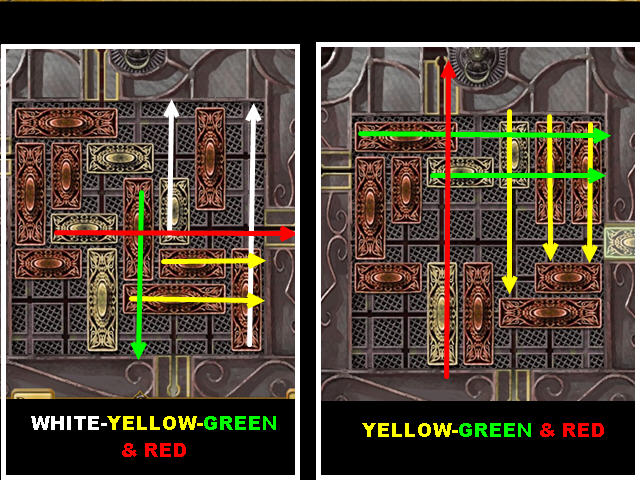
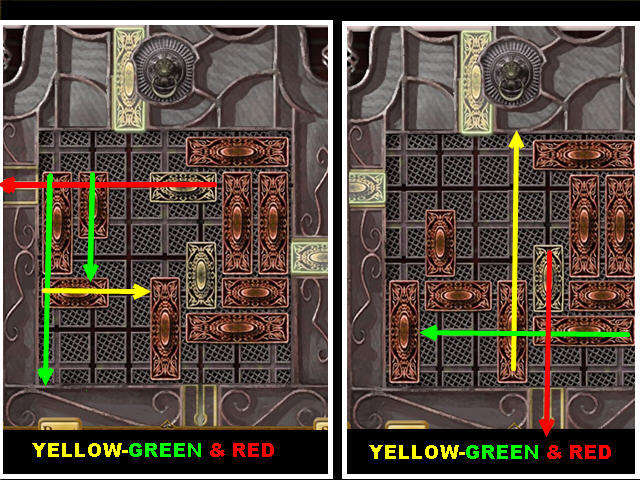
- Slide the bronze bars so you can free the 4 gold bars from the grid.
- There are 4 exits, one on each side of the puzzle.
- Please follow the direction of the arrows and the order of the colors in the screenshots to solve the puzzle.
Master Bedroom
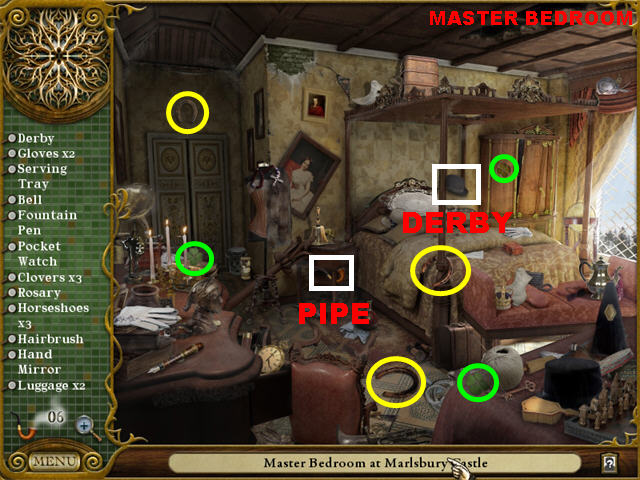
- The PIPE is below the nightstand.
- The 3 CLOVERS are marked in green.
- The 3 HORSESHOES are marked in yellow.
- Click on the DERBY HAT to trigger a puzzle.
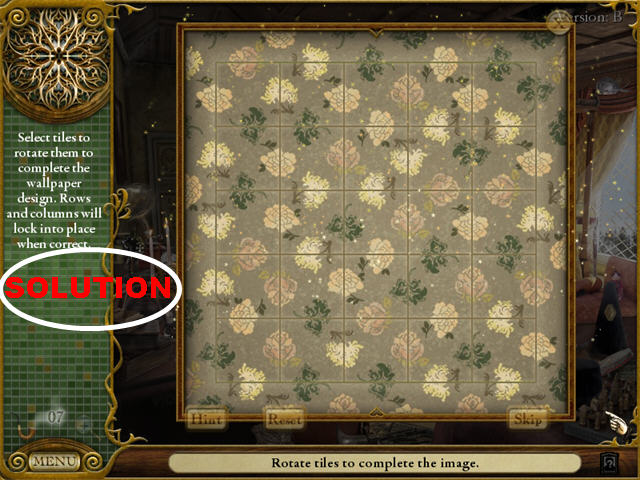
- Click on the tiles to rotate them.
- Correct rows and columns of tiles will light up and lock in place.
- Please look at the screenshot for the solution.
Secret Chamber
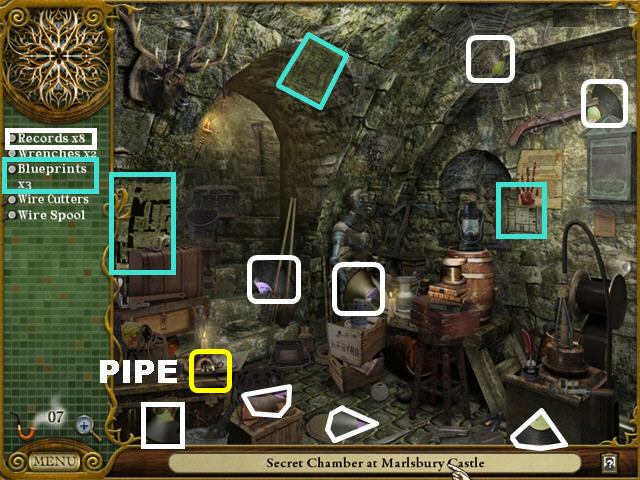
- The PIPE is in the lower left.
- The 3 BLUEPRINTS are marked in blue.
- The 8 RECORDS are marked in white and will trigger a puzzle once found.
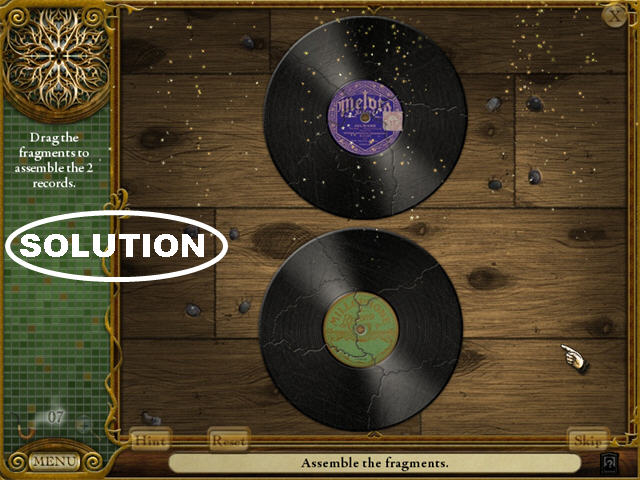
- Drag the record fragments together to recreate 2 records.
- You can assemble the records anywhere on the playing field.
- Correct pieces will lock in place.
- Please look at the screenshot for the solution.
Dungeon
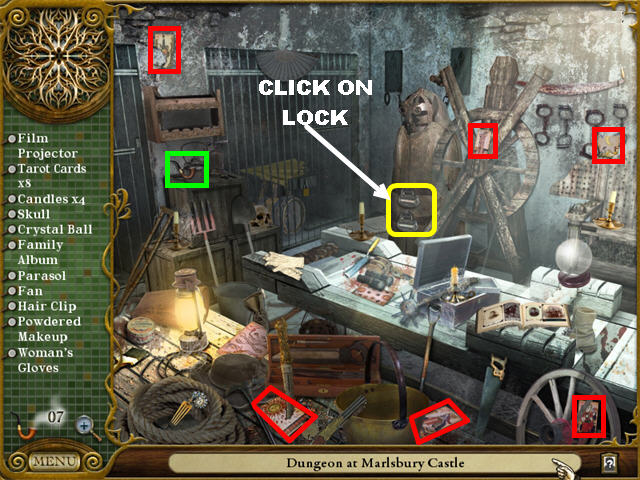
- The PIPE is in the upper left.
- The 4 CANDLES are marked in yellow.
- The 8 TAROT CARDS are marked in red and will trigger a puzzle once found.
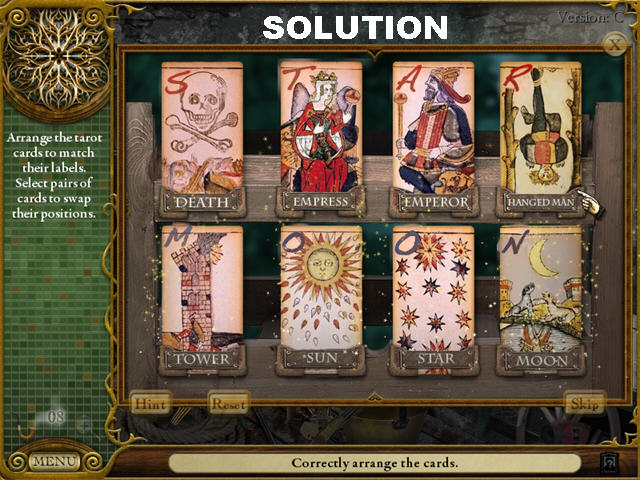
- You must arrange the cards to match their labels.
- Click on 2 cards to swap their positions.
- The cards will spell out the words “STAR,” on top, and “MOON,” at the bottom, when placed correctly.
- Click on the sparkly lock on the right to trigger another puzzle after the Tarot Card puzzle has been solved.
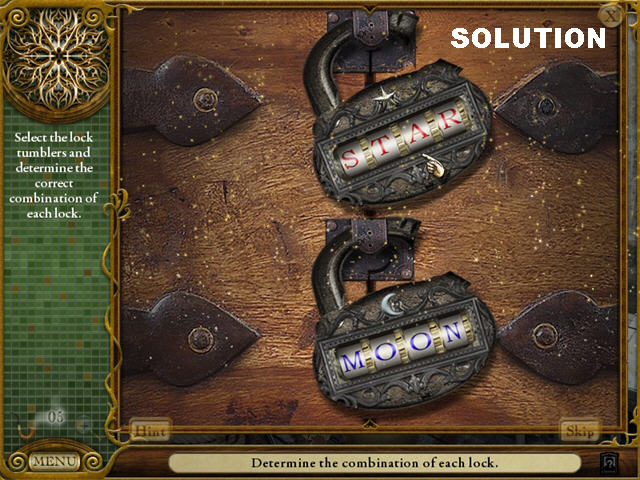
- Click on the tumblers of each lock to switch the letters and form the right word on each lock.
- The solution for the top lock is “STAR;” the bottom lock solution is “MOON.”
- The FILM PROJECTOR will be taken off your list after the puzzle is completed.
Suspects
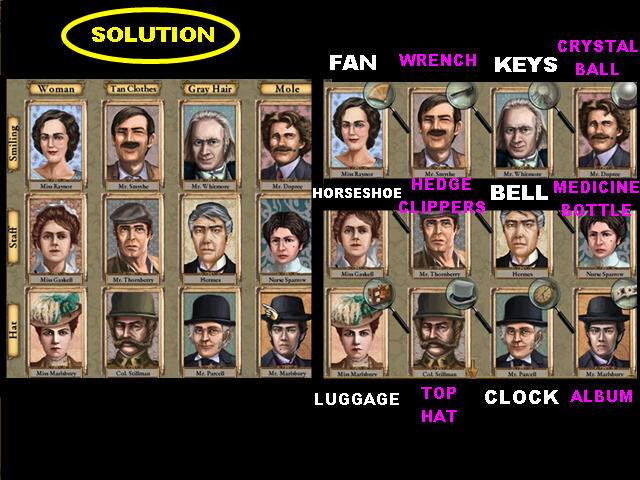
- Arrange the suspects under the correct name plaques by using the descriptions attached to each of them.
- Once you finish arranging the suspects, memorize their evidence.
- The Second Bonus Story is now available in the main menu!
Case 9: The Pups of Baskerville
The Kennel
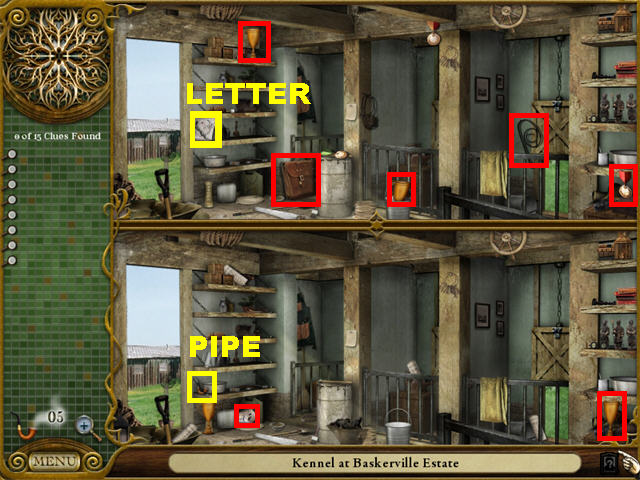
- Find the differences between the 2 images.
- The PIPE is in the last shelf on the bottom image.
- Click on the LETTER on the left side of the top image to trigger a puzzle.
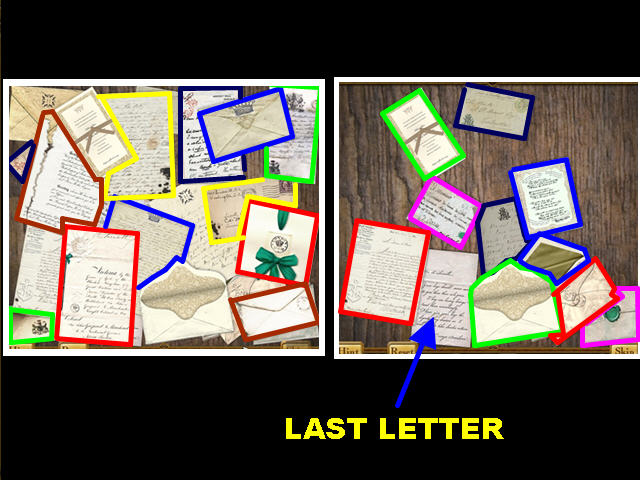
- You have to match the envelopes to their corresponding letters.
- Keep matching pairs until one letter remains.
- Please look at the screenshot for the solution.
The Basement
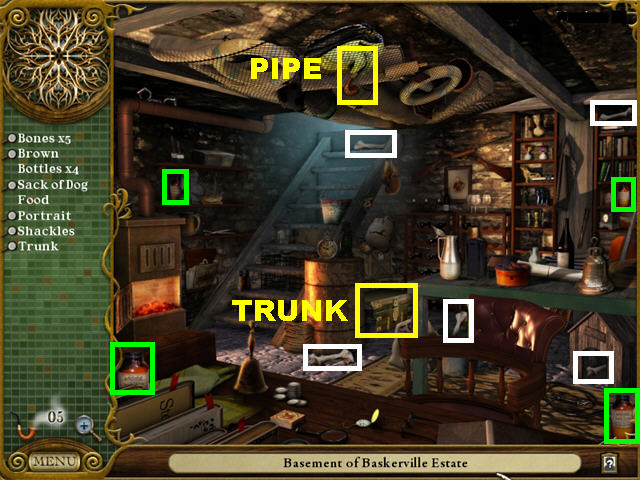
- Pick up the PIPE in the center of the ceiling.
- The 5 BONES are marked in white.
- The 4 BROWN BOTTLES are marked in green.
- Click on the TRUNK by the side of the steps to trigger a puzzle.
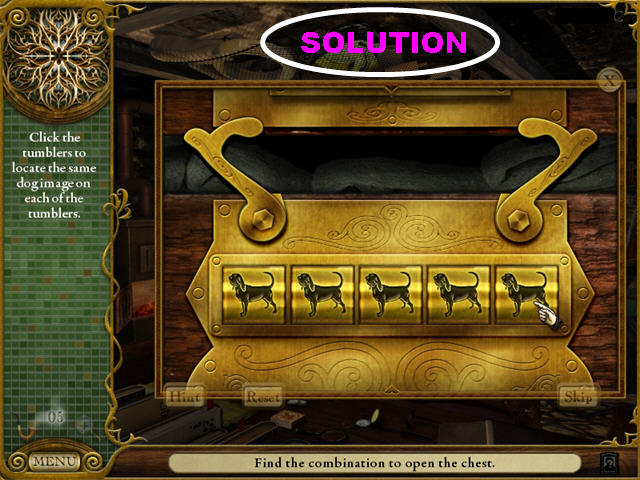
- Click on the tumblers to change their images so that all dog images are the same.
- Please look at the screenshot for the solution.
Suspects
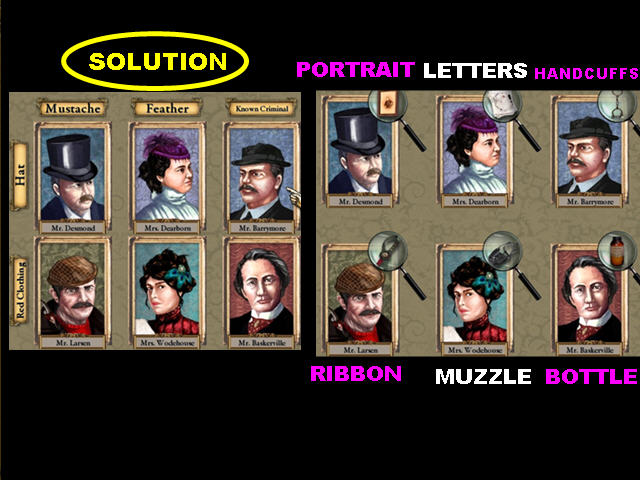
- Arrange the suspects under the correct name plaques by using the descriptions attached to each of them.
- Once you finish arranging the suspects, memorize their evidence.
Case 10: The Tainted Truffle
The Restaurant
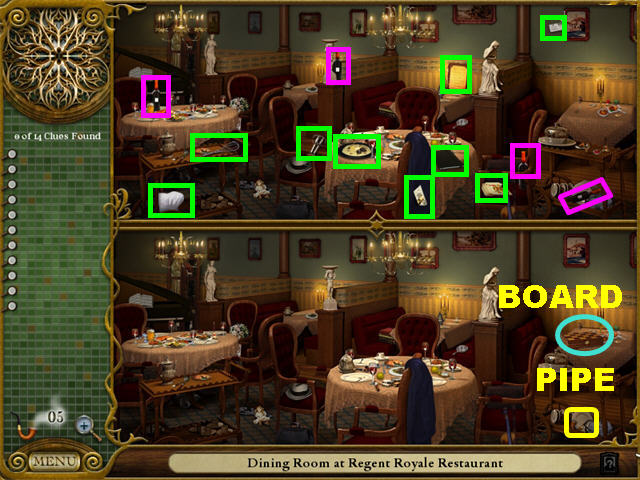
- Find the differences between the images.
- The PIPE is in the lower right corner of the scene.
- The 4 BOTTLES of wine are marked in purple.
- Click on the BOARD, on the table in the lower right, to trigger a puzzle.
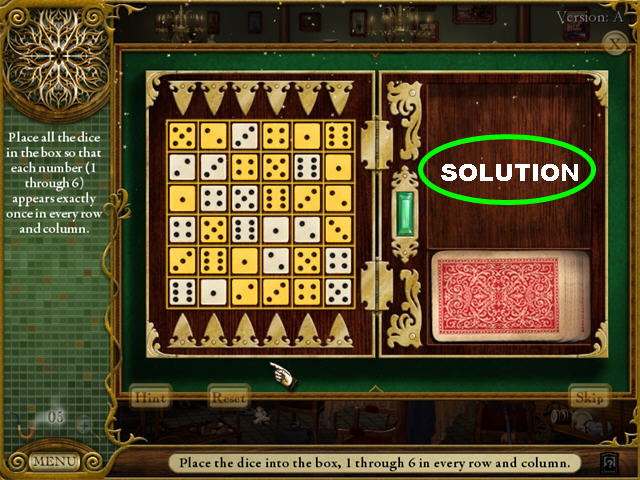
- Your goal is to place the dice in the box so that each number appears only once in each row or column.
- Drag the dice from the right side of the board onto the left spaces.
- The white pieces on the left side of the board cannot be moved. Use those pieces as a guide.
- Rows and columns placed correctly will lock. Red tiles are in the wrong spot.
- Please look at the screenshot for the solution.
The Kitchen
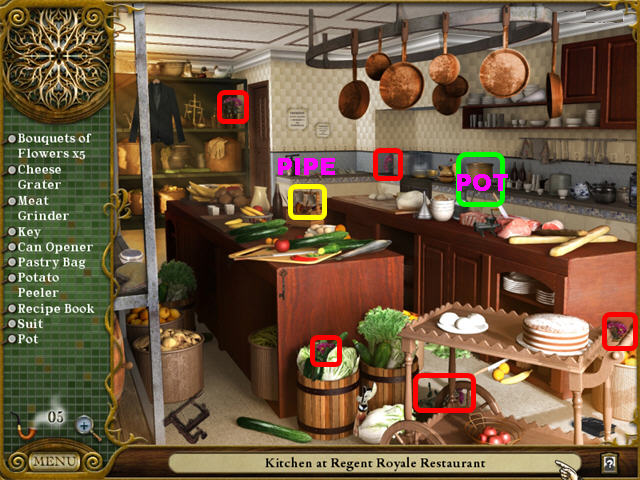
- The PIPE is in the wooden toolbox in the center aisle.
- The 5 BOUQUETS OF FLOWERS are marked in red.
- Click on the POT to trigger a puzzle.
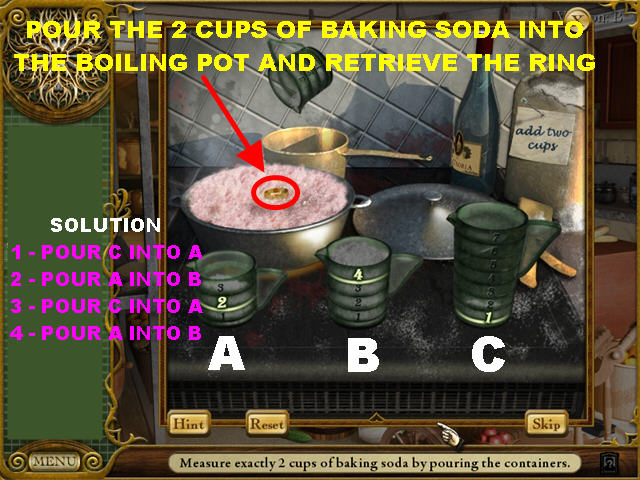
- You must measure 2 cups of baking soda by pouring it from one container to another.
- For the solution, the cups are labeled A through C, from left to right: Pour C into A, A into B, C into A, and A into B.
- Place the 2 cups of baking soda into the boiling pot and retrieve the RING.
The Pantry
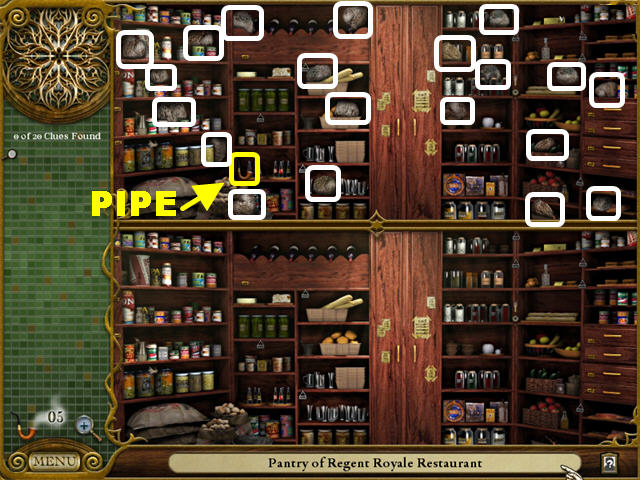
- Find the differences between the 2 images.
- The PIPE is on the left side of the top image.
- The 20 TRUFFLES are marked in white and will trigger a puzzle once found.
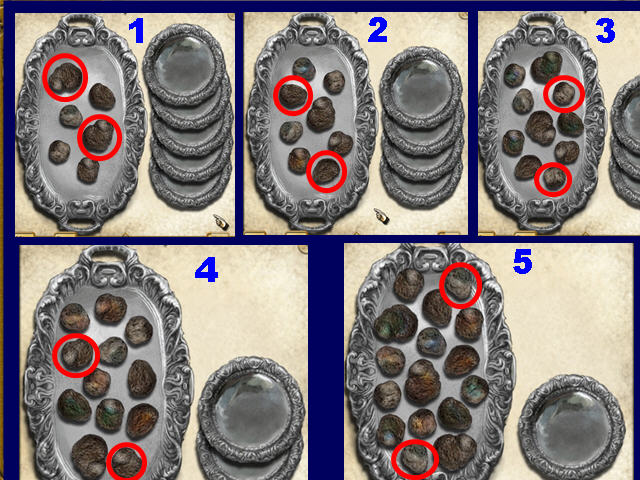
- Select the identical pairs of truffles in the scene.
- You will have to beat 5 rounds of this game.
Suspects
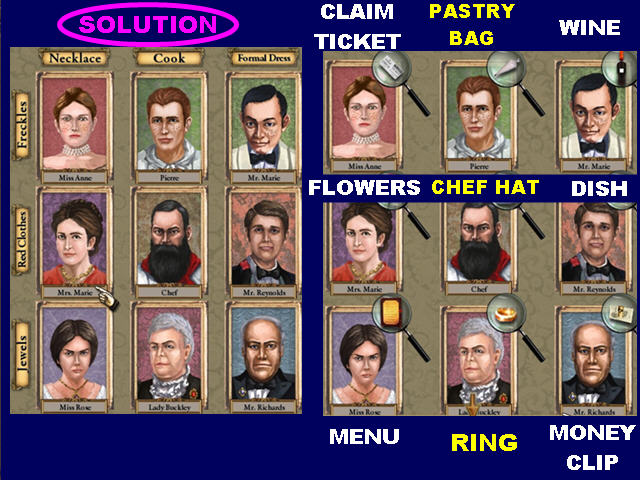
- Arrange the suspects under the correct name plaques by using the descriptions attached to each of them.
- Once you finish arranging the suspects, memorize their evidence.
Case 11: The Case of the Unwanted Suitor
Boarding House
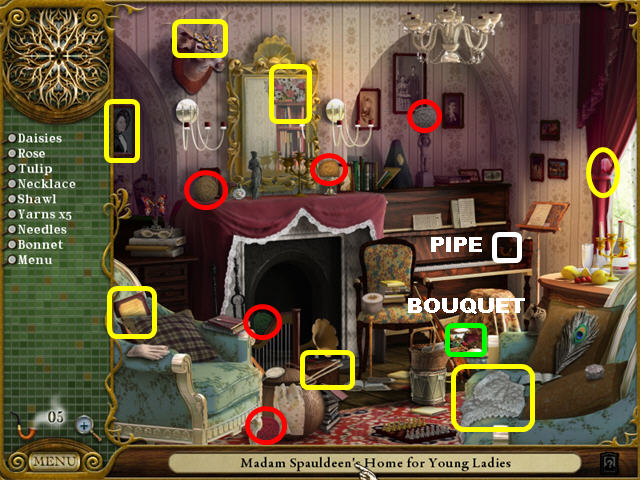
- The PIPE is on the piano.
- The 5 YARNS are marked in red.
- Click on the BOUQUET in the lower right to trigger a puzzle.
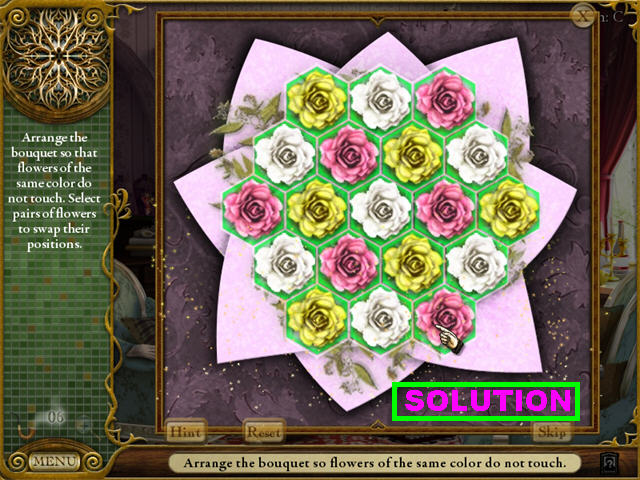
- Place the flowers on the bouquet so that identical colors do not touch.
- Click on 2 flowers to swap their positions.
- Flowers with green backgrounds have been placed correctly.
- Please look at the screenshot for the solution.
Rococo Room
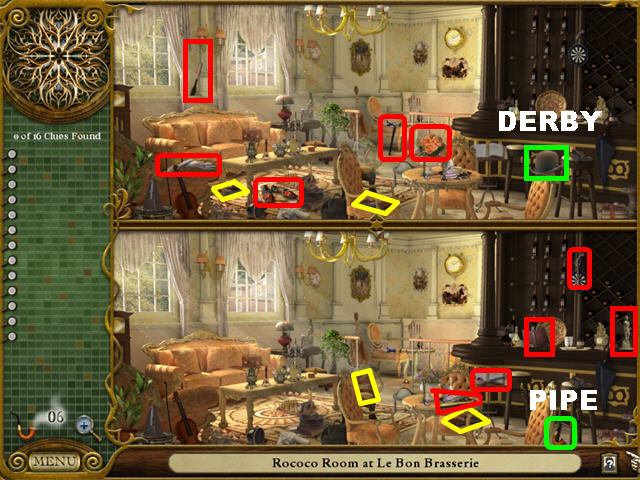
- Find the differences between the 2 images.
- The PIPE is on the stool in the lower right corner.
- Click on the DERBY by the bar to trigger a puzzle.
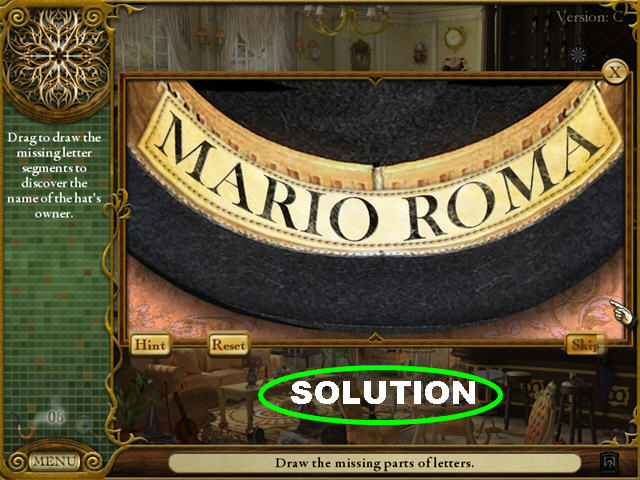
- Trace your mouse over the letters on the hat to form the words “MARIO ROMA.”
- A blue line will appear over areas you’ve traced.
Suspects
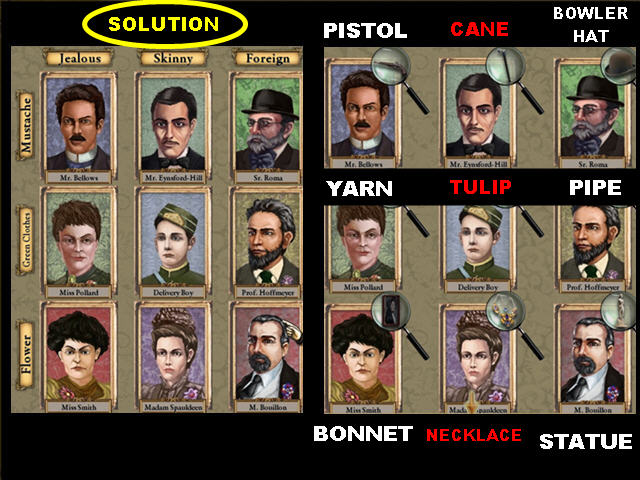
- Arrange the suspects under the correct name plaques by using the descriptions attached to each of them.
- Once you finish arranging the suspects, memorize their evidence.
Case 12: The Secret of Father Christmas Club
Oak Tavern
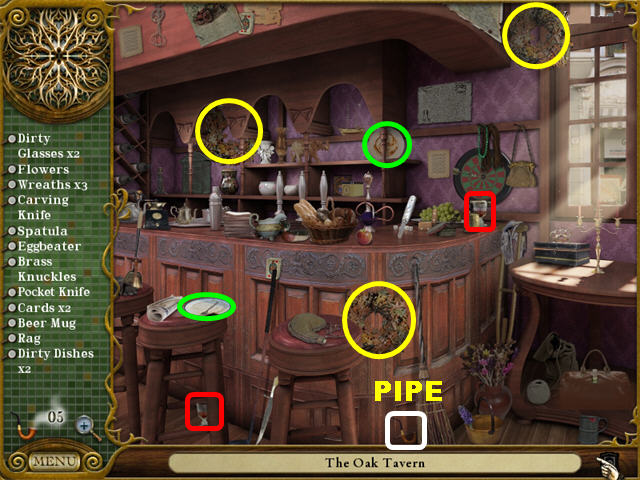
- The PIPE is in the lower center, next to the broom.
- The 3 WREATHS are circled in yellow.
- The 2 DIRTY DISHES are marked in green.
- The 2 DIRTY GLASSES are marked in red and will trigger a puzzle once found.
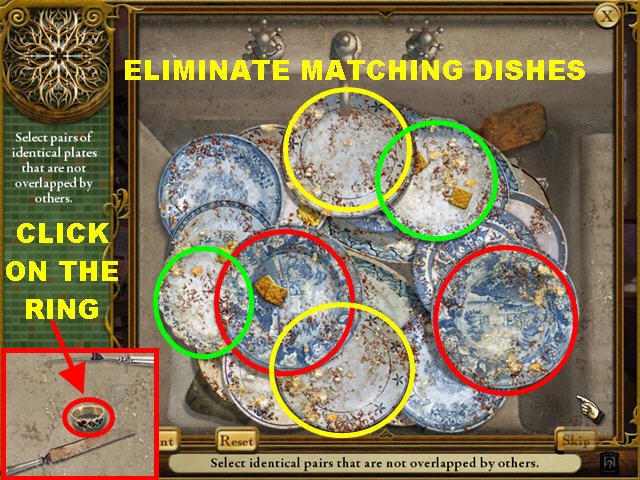
- Select the pairs of dirty dishes that are not overlapping.
- Click on the RING at the bottom of the pile to end the round.
Willow’s Office
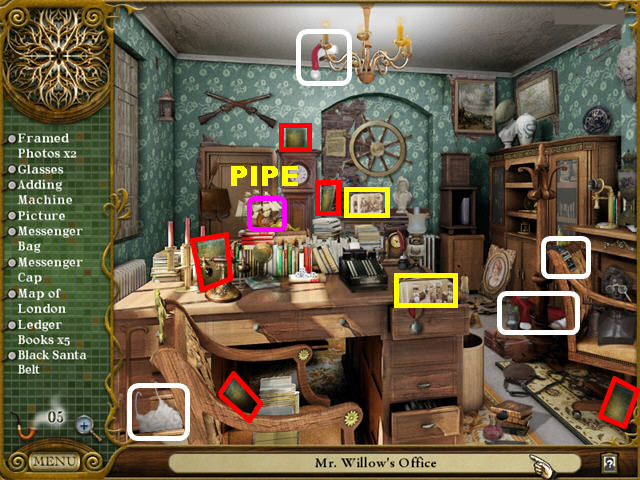
- The PIPE is on the left.
- The 5 LEDGER BOOKS are marked in red.
- The SANTA HAT, BELT, COAT, and BEARD are marked in white.
- The FRAMED PHOTOS are marked in yellow and will trigger a puzzle once found.
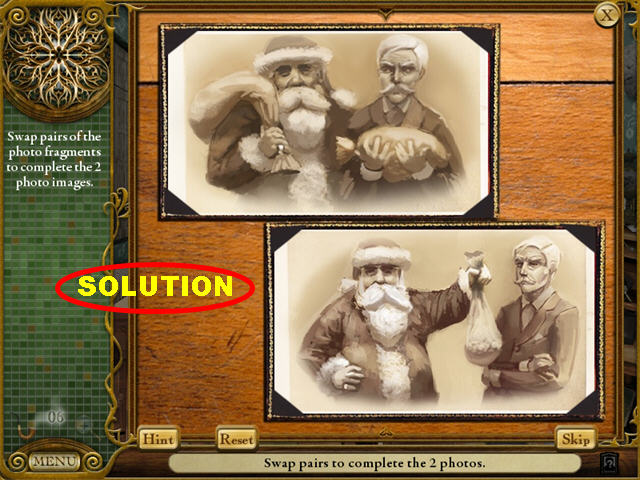
- Click on any two photo fragments, regardless of which frames they are in, to swap their positions until you form the 2 correct images.
- Correct pieces will lock in place.
- Please look at the screenshot for the solution.
Ponti’s Office
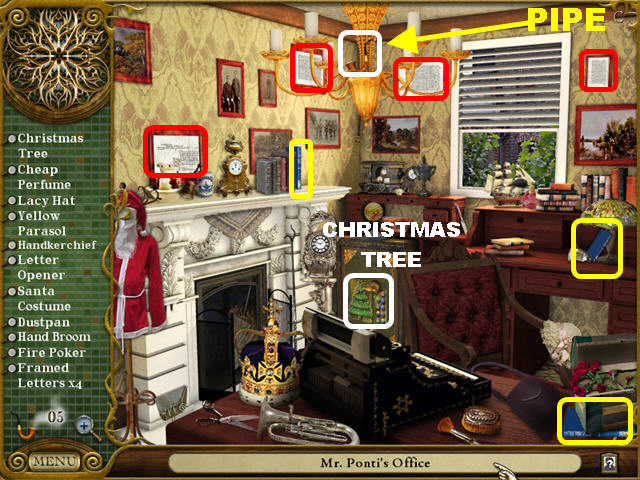
- The PIPE is on the chandelier.
- The 4 FRAMED LETTERS are marked in red.
- The 3 LEDGER BOOKS are marked in yellow.
- Click on the CHRISTMAS TREE, next to the fireplace, to trigger a puzzle.
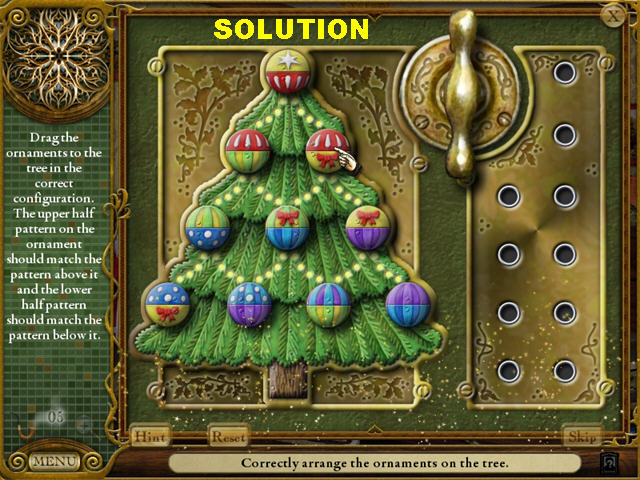
- Place the ornaments on the tree in the right spots.
- The upper pattern on the ornament should match the pattern above it and the lower pattern should match the pattern below it.
- The string of lights attached to the ornaments will light up when placed correctly.
- Please look at the screenshot for the solution.
Secret Storeroom
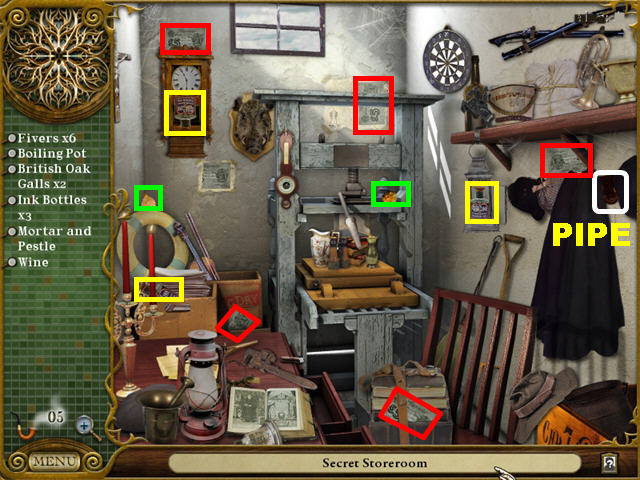
- The PIPE is in the upper right, next to the black coat.
- The 3 INK BOTTLES are marked in yellow.
- The 2 BRITISH OAK GALLS are marked in green.
- The 6 FIVERS are marked in red and will trigger a puzzle once found.
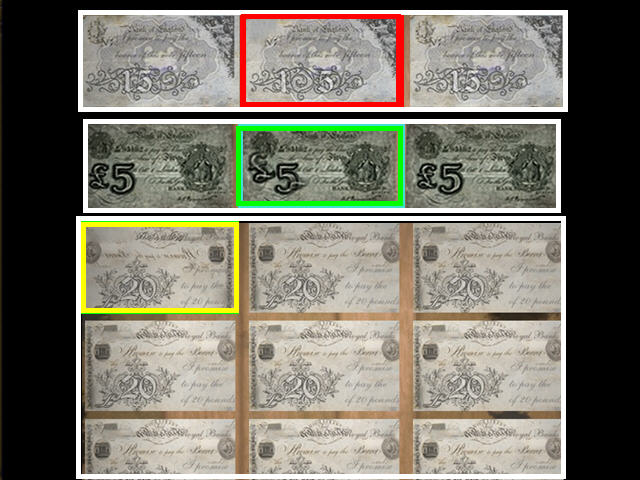
- Click on the image that is different from the others.
- You will have to complete 3 rounds of this game.
Suspects
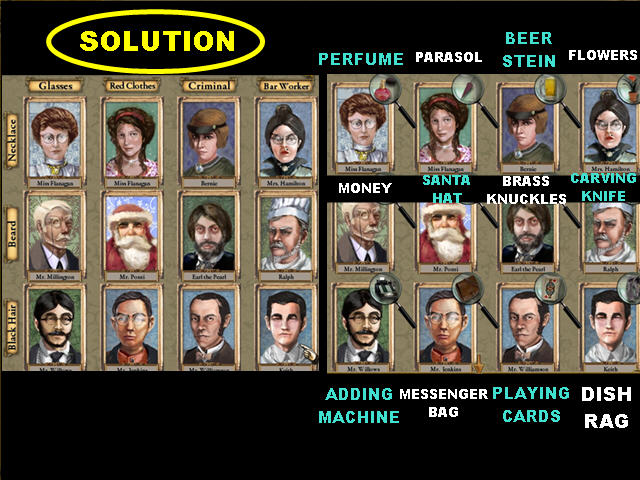
- Arrange the suspects under the correct name plaques by using the descriptions attached to each of them.
- Once you finish arranging the suspects, memorize their evidence.
- The Third Bonus Story is now unlocked from the main menu!
Case13: The Sticky-fingered Dinner Guest
Rutledge Manor
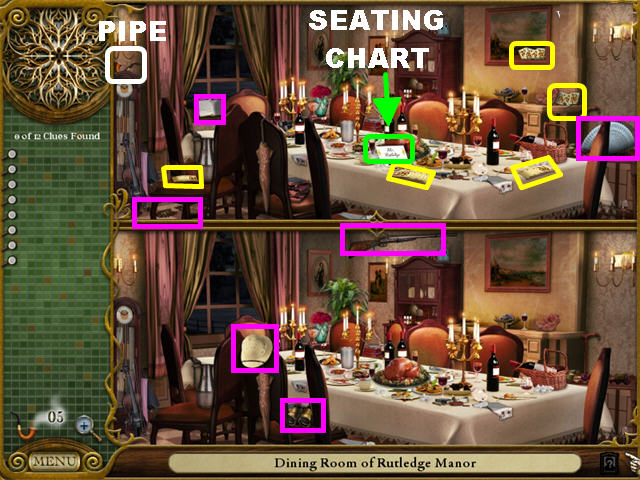
- Find the differences between the images.
- The PIPE is in the upper left corner.
- The 5 CARDS are marked in yellow.
- Click on the SEATING CHART on the table to trigger a puzzle.
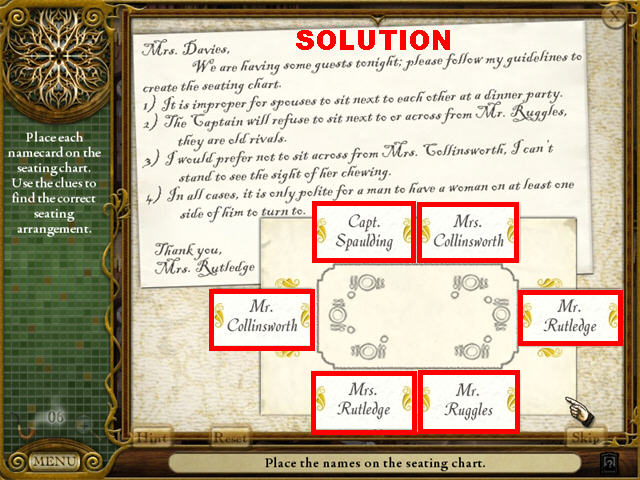
- Place the name cards in the correct spots on the seating chart using the clues written on the note above.
- The solution from left to right is as follows:Top Row: Capt. Spaulding and Mrs. Collinsworth Middle Row: Mr. Collinsworth and Mr. Rutledge Bottom Row: Mrs. Rutledge and Mr. Ruggles
Mansion Kitchen
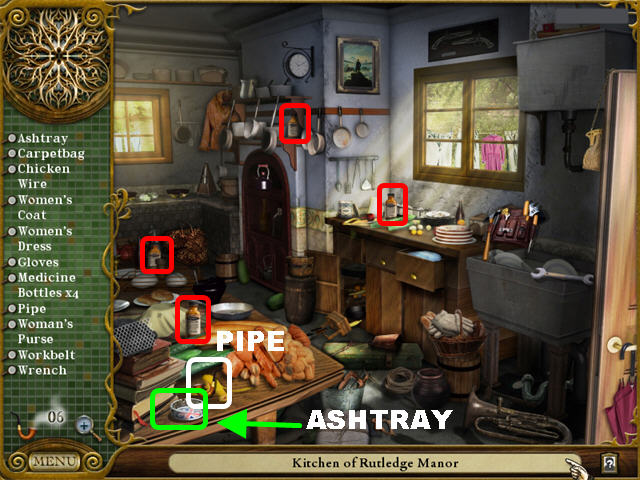
- The PIPE is in the lower left corner.
- The 4 MEDICINE BOTTLES are marked in red.
- Click on the ASHTRAY in the lower left corner to trigger a puzzle.
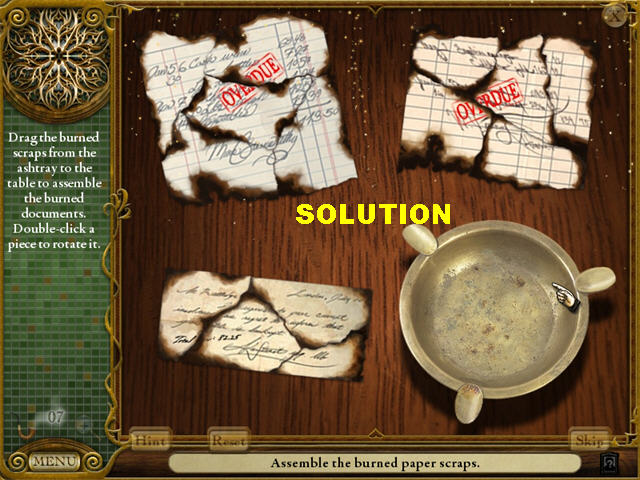
- Assemble the 3 burned documents on the puzzle by using the burnt scraps in the ashtray.
- Double-click on a scrap to rotate it.
- Correct pieces will lock in place anywhere on the board.
- Please look at the screenshot for the solution.
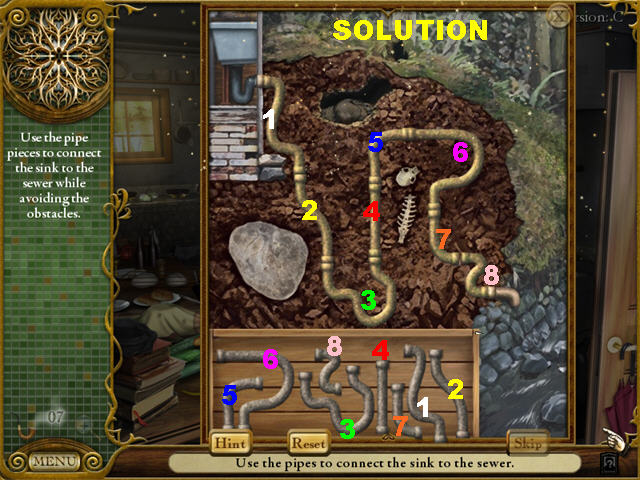
- Connect the pipe pieces from the sink to the sewer while avoiding obstacles.
- Incorrect pieces will glow red; correct pieces will be gold.
- Please look at the screenshot for the solution.
Suspects
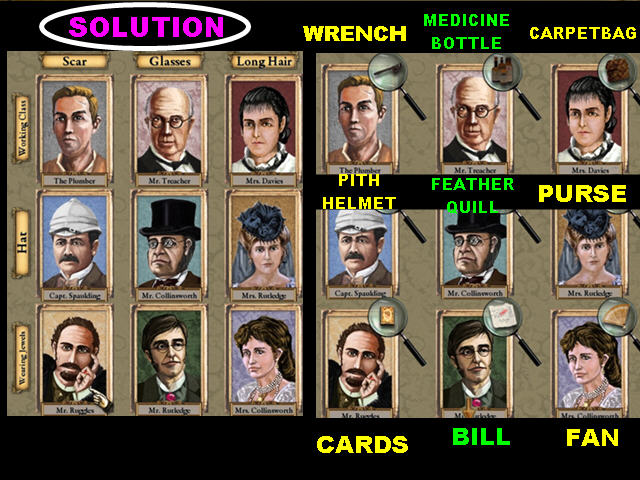
- Arrange the suspects under the correct name plaques by using the descriptions attached to each of them.
- Once you finish arranging the suspects, memorize their evidence.
Case14: The Disappearing Doomsday Formula
British Library
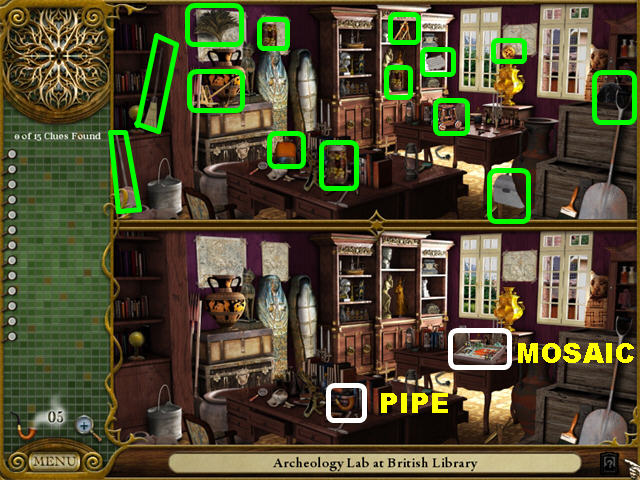
- Find the differences between images.
- The PIPE is on the desk in the lower image.
- Click on the MOSAIC on the desk to trigger a puzzle.
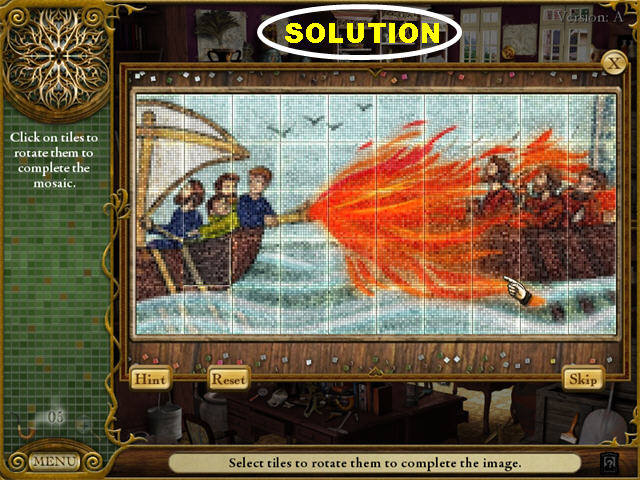
- Click on the tiles to rotate them into their correct positions.
- Correct rows and columns will lock into place when placed correctly.
- Please look at the screenshot for the solution.
Raymond’s Study
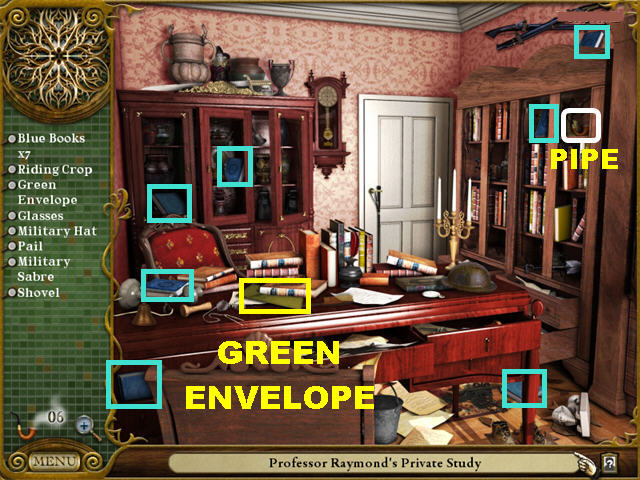
- The PIPE is in the upper right.
- The 7 BLUE BOOKS are marked in blue.
- Click on the GREEN ENVELOPE, on the desk, to trigger a puzzle.
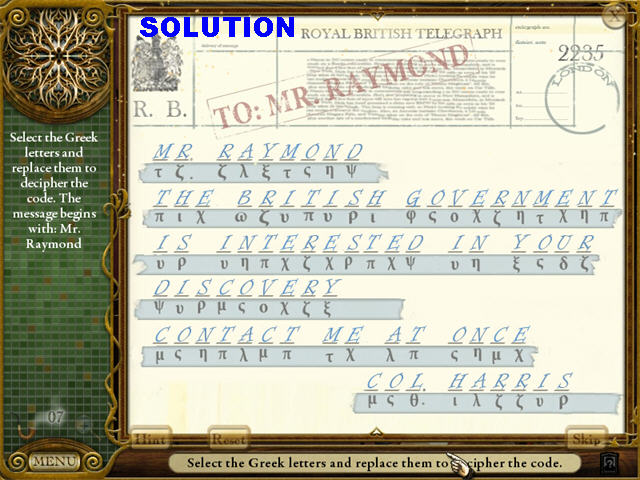
- Replace the Greek letters to decipher the code.
- Click on a Greek Letter to bring up the alphabet. Select the letter you want to use to replace the Greek letter. The letters in gray are letters that have not been used yet.
- The letters in blue on the page are correct; the black ones are incorrect.
- Clicking on the hint button will fill an extra letter for you.
- The solution is “MR. RAYMOND THE BRITISH GOVERNMENT IS INTERESTED IN YOUR DISCOVERY CONTACT ME AT ONCE COL. HARRIS.”
Greek Amphitheater
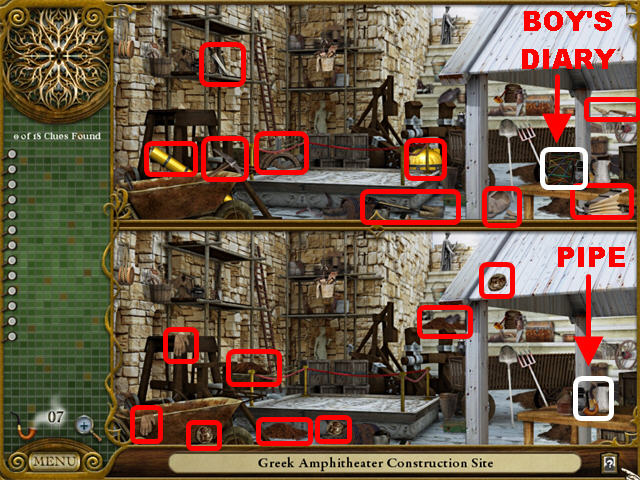
- Find the differences between the images.
- The PIPE is in the lower right corner.
- Click on the BOY’S DIARY to trigger a puzzle.
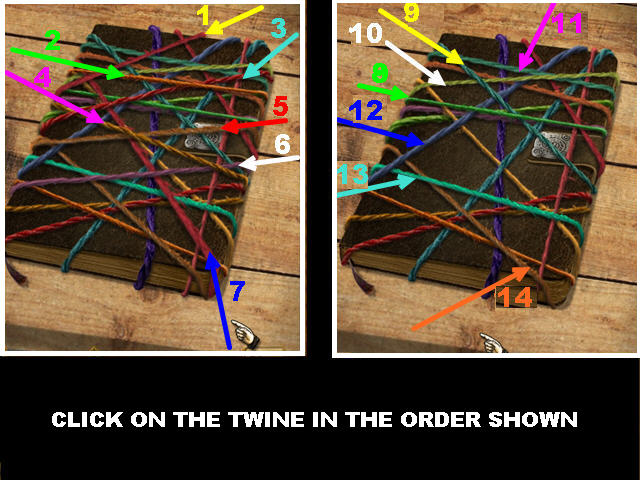
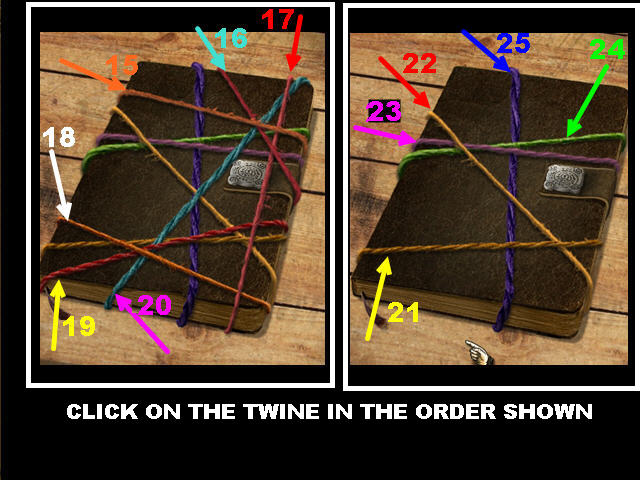
- You must eliminate all the twine on top of the diary by eliminating the top twine each time.
- Please look at the screenshots for the solution.
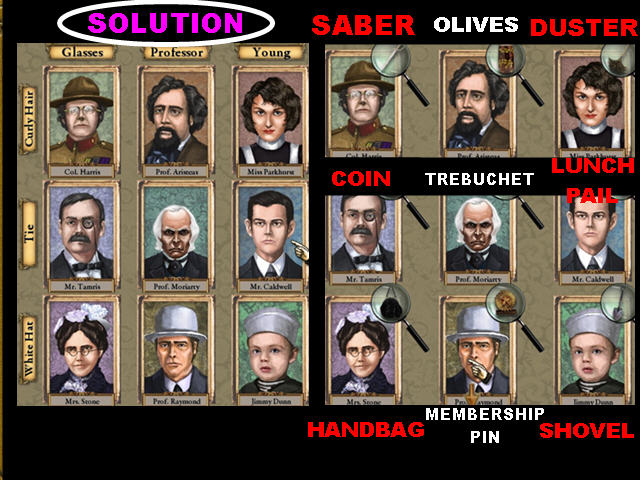
Suspects
Case15: The Mystery of the Millionaire’s Daughter
Hotel Lobby
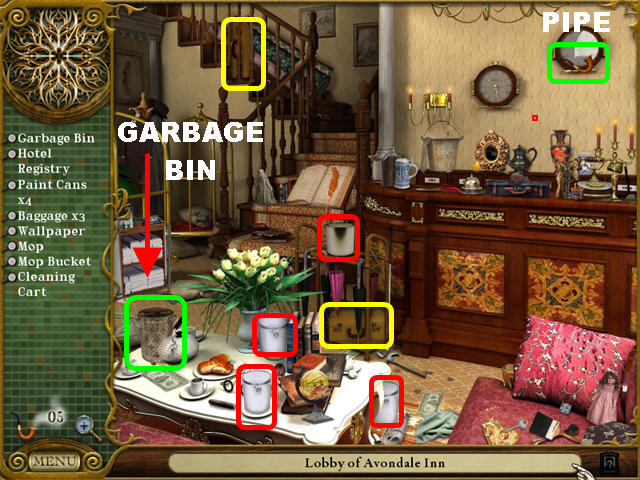
- The PIPE is in the upper right.
- The 4 PAINT CANS are marked in red.
- The 3 pieces of BAGGAGE are marked in yellow.
- Click on the GARBAGE BIN to trigger a puzzle.
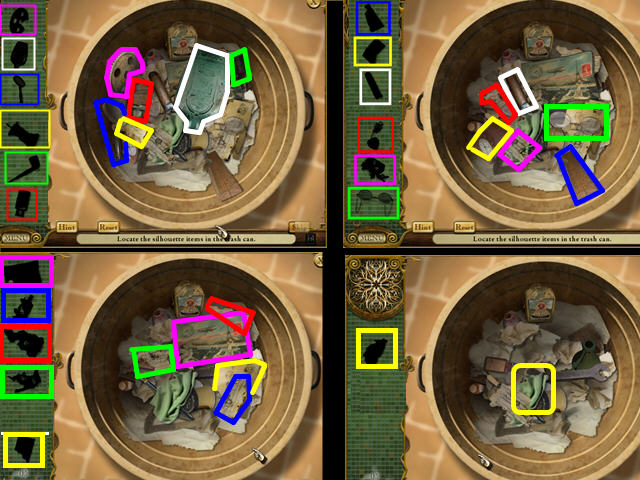
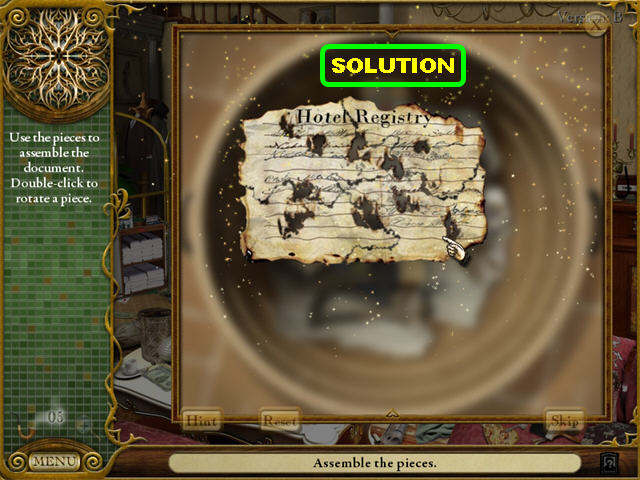
- Find all the items in silhouette inside the trash bin.
- Piece the papers together after the puzzle has been solved.
- Please look at the screenshots for the solutions.
Fairgrounds
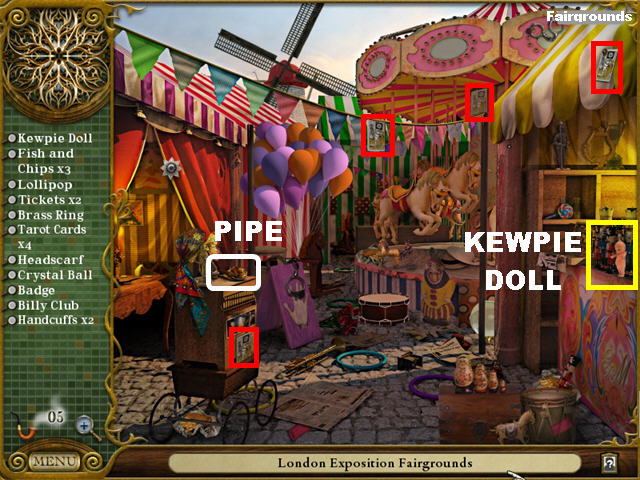
- The PIPE is on the stand on the left.
- The 4 TAROT CARDS are marked in red.
- Click on the KEWPIE DOLL on the right to trigger a puzzle.
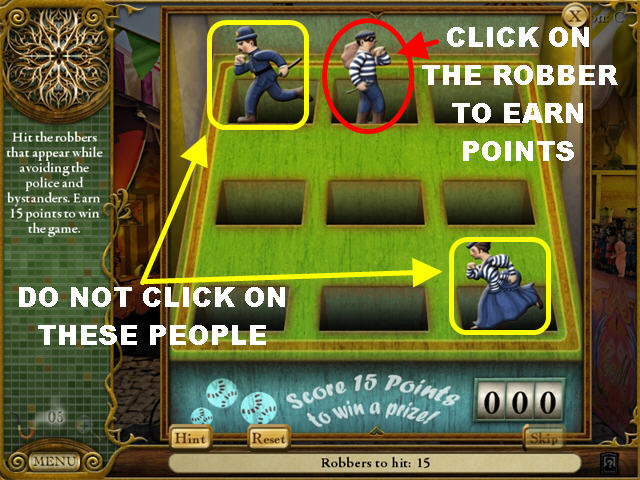
- Click on the Male Robbers with striped shirts only, not the bystanders with striped shirts, or the policemen.
- You will earn 1 point for each Robber you click, and lose points for clicking on anyone else.
- Earn 15 points to win the game.
Visitor’s Center
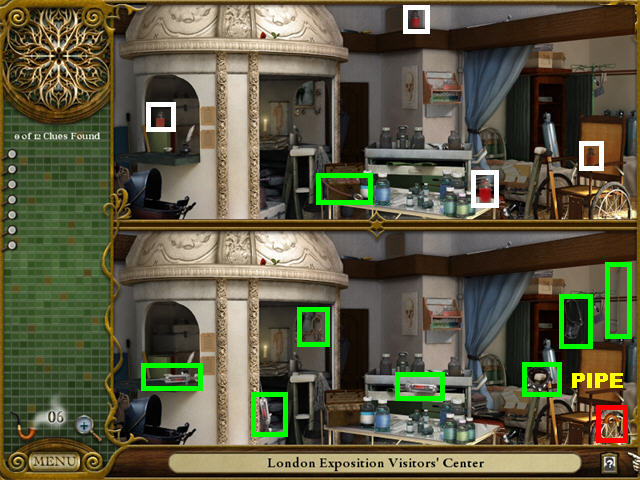
- Find the differences between the images.
- The PIPE is on the lower right corner.
- The 4 SEDATIVES are marked in white and will trigger a puzzle once found.
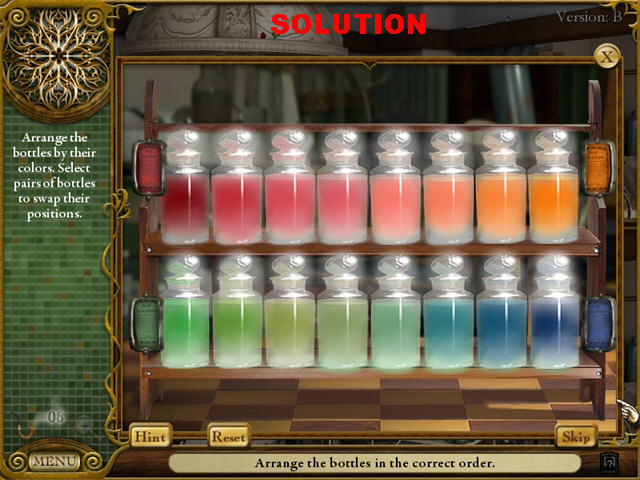
- Arrange the bottles by color.
- Click on any 2 bottles to swap their positions.
- The colors go from darkest to lightest. Use the bottles on each end as a guide. Bottles in the right spots will lock into place.
- Please look at the screenshot for the solution.
Suspects
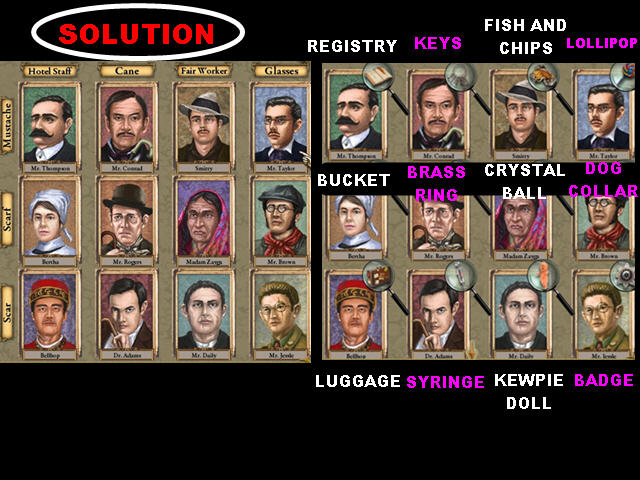
- Arrange the suspects under the correct name plaques by using the descriptions attached to each of them.
- Once you finish arranging the suspects, memorize their evidence.
- The fourth and final Bonus Story is now available!
Case16: The Bohemian Crown Heist
Coded Message Puzzle
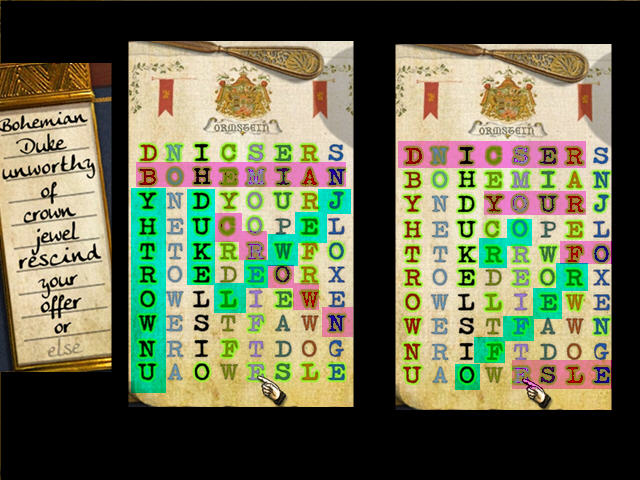
- You must decode the message by clicking on the correct words on the right side of the scene using the set of numbers provided.
- Drag your mouse over the letters that form the word you desire.
- The solution is “Bohemian Duke unworthy of crown jewel rescind your offer or else.”
Tower of London
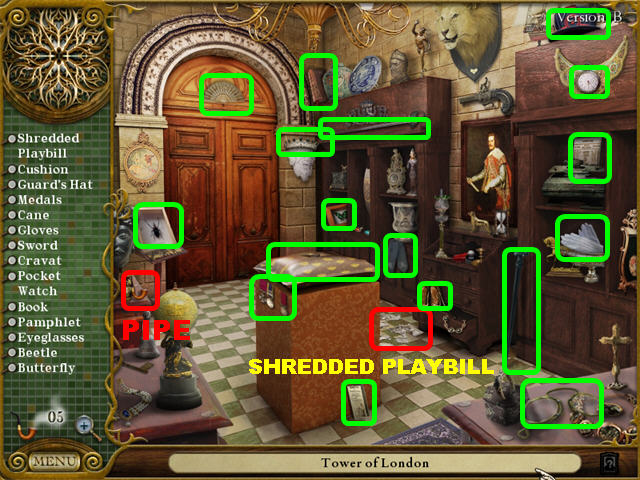
- The PIPE is on the left edge of the scene.
- Pick up the SHREDDED PLAYBILL on the ground to trigger a puzzle.
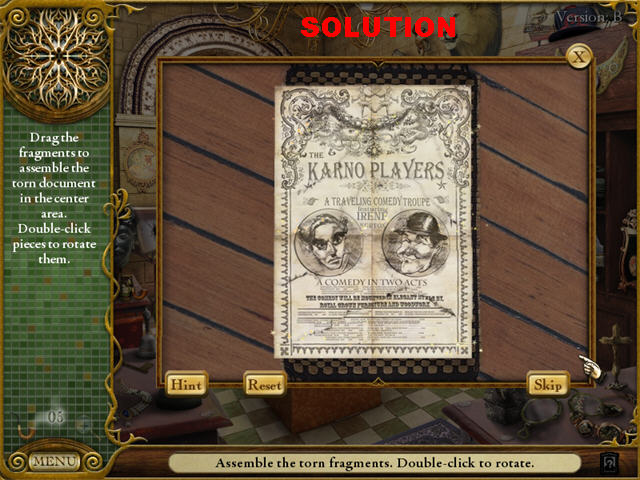
- Reassemble the image on the playbill.
- Double-click on a piece to rotate it.
- Correct pieces will lock in place anywhere on the board.
- Please look at the screenshot for the solution.
Adler’s Dressing Room
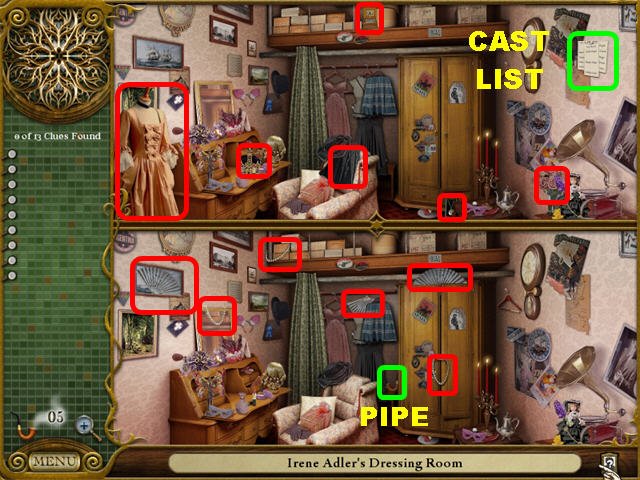
- Find the differences between the images.
- The PIPE is in the lower center.
- Click on the CAST LIST in the upper right to trigger a puzzle.
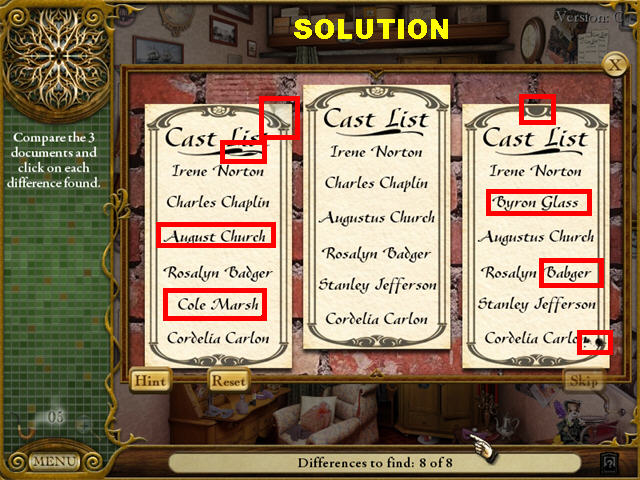
- Find the 8 differences between both images.
- Please look at the screenshot for the solution.
Actor’s Dressing Room
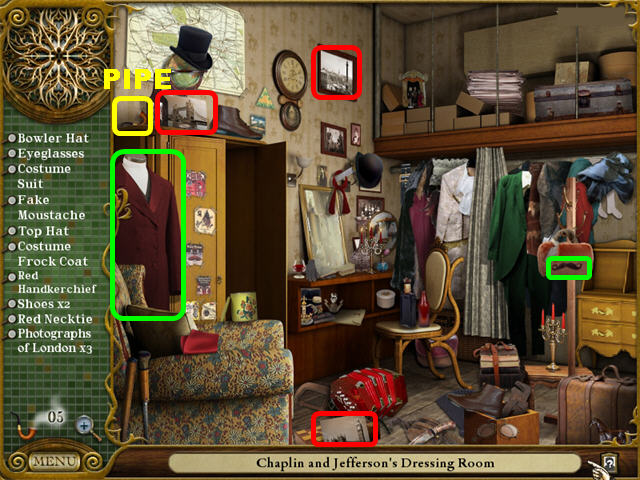
- Pick up the PIPE in the upper left.
- The 3 PHOTOGRAPHS OF LONDON are marked in red.
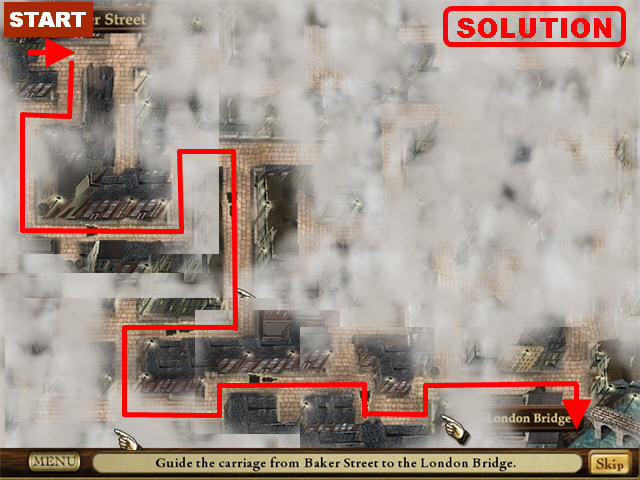
- Guide the carriage from Baker Street to the London Bridge.
- Click the parts of the road on which you want the carriage to travel and the fog will lift as the carriage rides along.
- Please look at the screenshot for the solution.
Beneath London Bridge
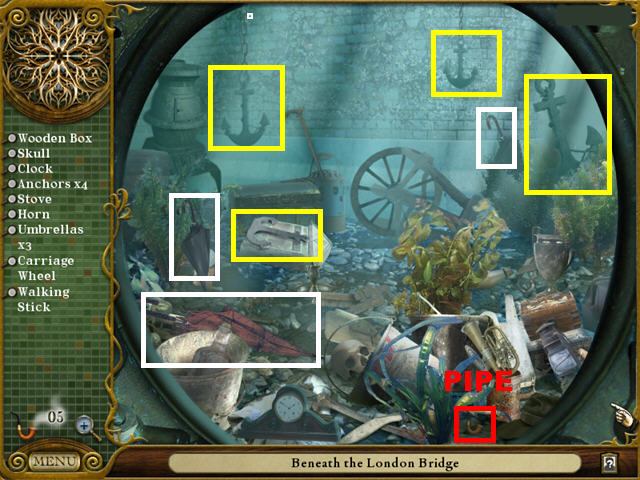
- The PIPE is in the lower right.
- The 4 ANCHORS are marked in yellow.
- The 3 UMBRELLAS are marked in white.
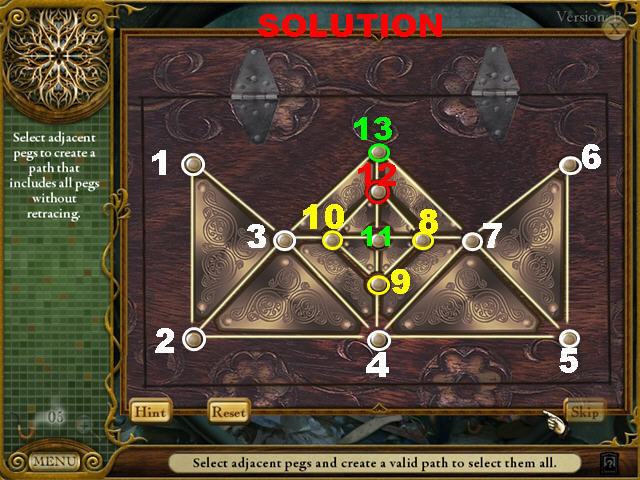
- Your goal is to select adjacent pegs to create a path that includes all pegs without retracing.
- Click on a peg; areas that can be traveled to will have a green line attached to them.
- When you make a mistake all lines will turn red and you will have to start over.
- Please look at the screenshot for the solution.
Newspaper Office
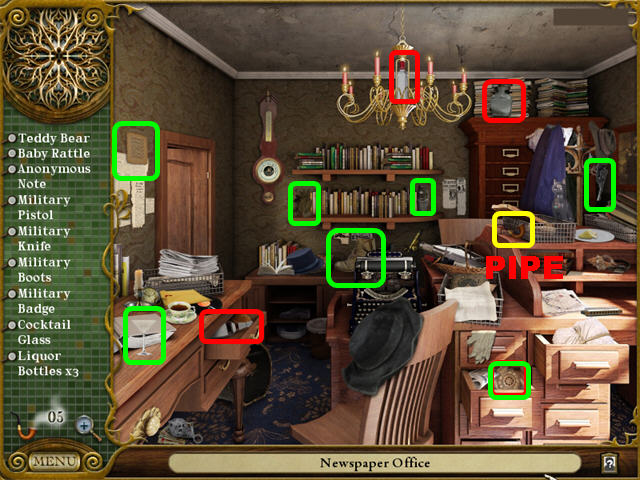
- The PIPE is on the right.
- The 3 LIQUOR BOTTLES are marked in red.
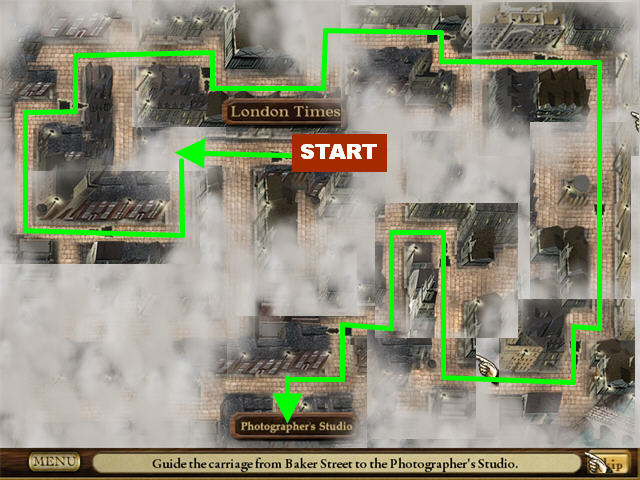
- Guide the carriage from Baker Street to the Photographer’s Studio.
- Click the parts of the road on which you want the carriage to travel and the fog will lift as the carriage rides along.
- Please look at the screenshot for the solution.
Photographer’s Studio
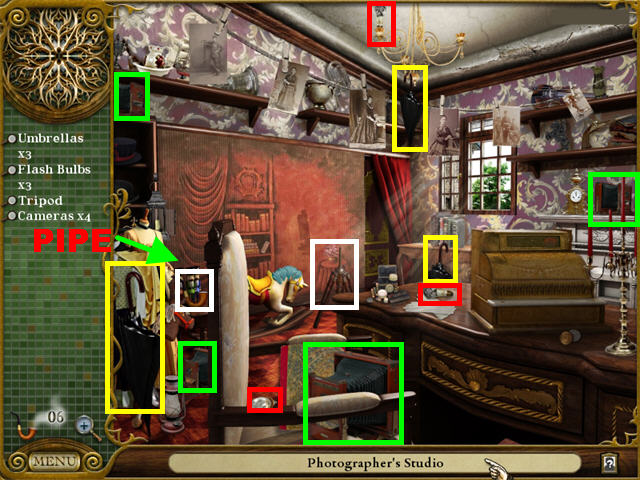
- The PIPE is in the lower left.
- The 3 UMBRELLAS are marked in yellow.
- The 4 CAMERAS are marked in green.
- The 3 FLASH BULBS are marked in red.
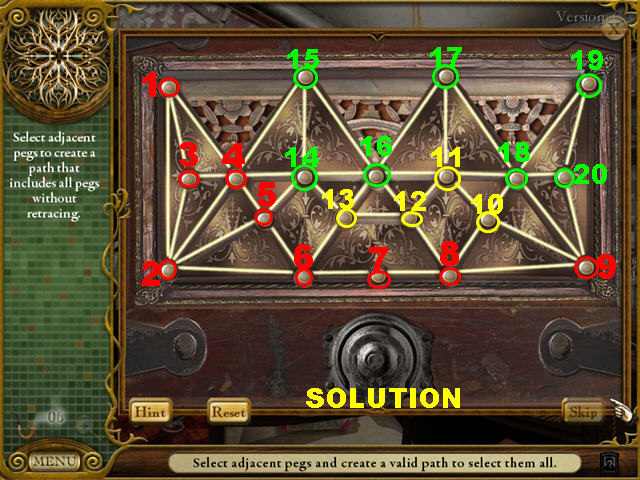
- Your goal is to select adjacent pegs to create a path that includes all pegs without retracing.
- Click on a peg; the areas that can be traveled to will have a green line attached to them.
- When you make a mistake all lines will turn red and you will have to start over.
- Please look at the screenshot for the solution.
- Congratulations! You’ve completed The Lost Cases of 221B Baker St!
Created at: 2010-03-23

