Walkthrough Menu
- General Tips
- Chapter 1: Time Stone
- Chapter 2: London
- Chapter 3: Aeronheart
- Chapter 4: Inner City
- Chapter 5: Ancient Gods' Field
- Chapter 6: Zerina
- Chapter 7: Ice Kingdom
- Chapter 8: The Crystal
General Tips
- This is the official guide for The Secret Order: Ancient Times.
- This guide will not mention each time you have to zoom into a location; the screenshots will show each zoom scene.
- We will use the acronym HOP for Hidden-object puzzles. Interactive items will be color-coded and some will be numbered; please follow the numbers in sequence.
- The HOP lists may be random; our lists may vary from yours.
- You may choose to play a Mah-jongg game instead of a HOP.
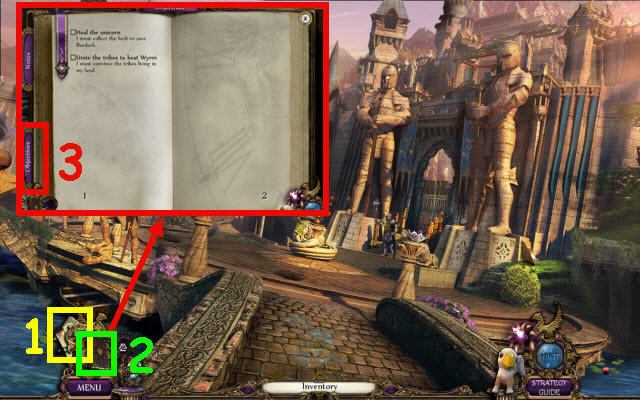
- Use the map (1) to fast travel to previously unlocked locations.
- Select the diary (2) for story updates and objectives (3).
Chapter 1: Time Stone
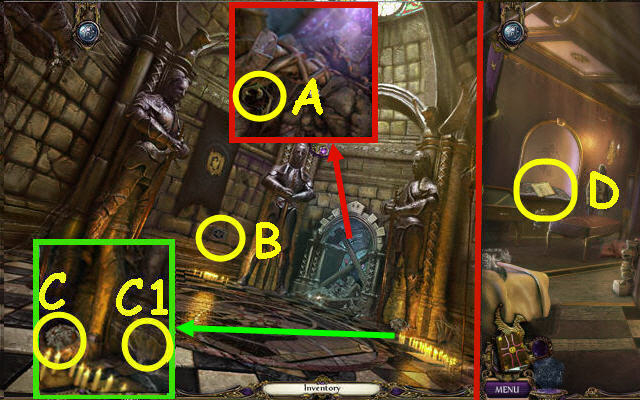
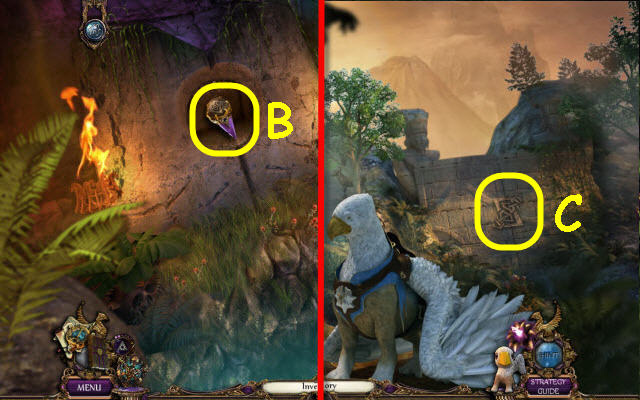
- Speak to the gentlemen; take the GRIFFIN SYMBOL (A).
- Place the GRIFFIN SYMBOL on the brick; push it (B).
- Take the SHELL PIECE (C1) and ROYAL TOKENS 1/4 (C).
- Go down.
- Read the note to trigger a puzzle (D).
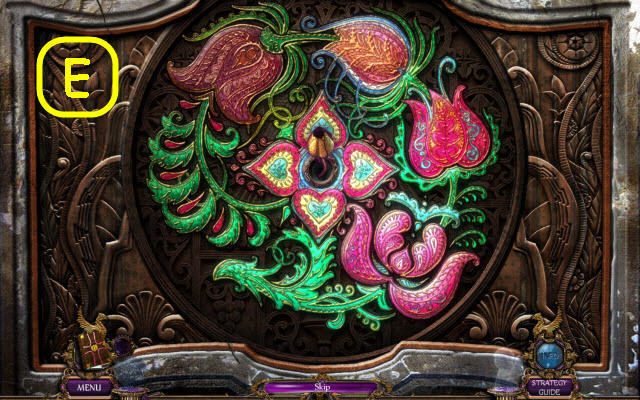
- Assemble the image.
- See screenshot for solution (E).
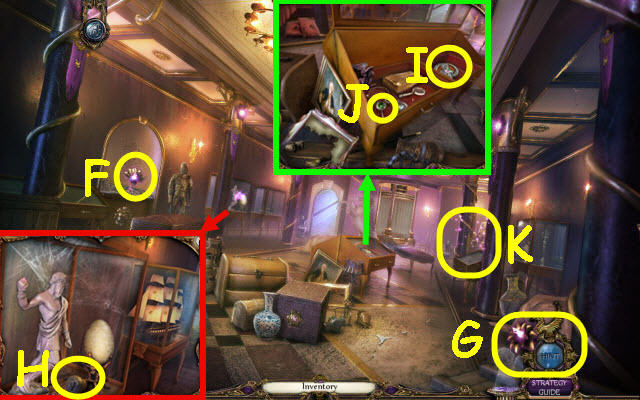
- Take the flower (F) which will be added to your toolbar as a hint button (G).
- Open the case; take the CANNON HANDLE (H).
- Open the case and read the note. Take the ROYAL TOKENS 2/4 (I) and EMERALD (J).
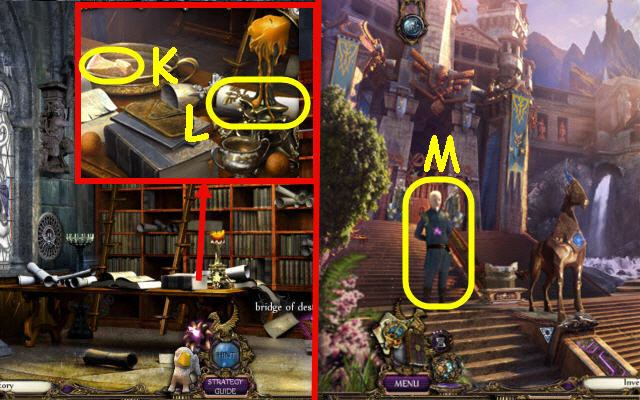
- Examine the display to access a HOP (K).
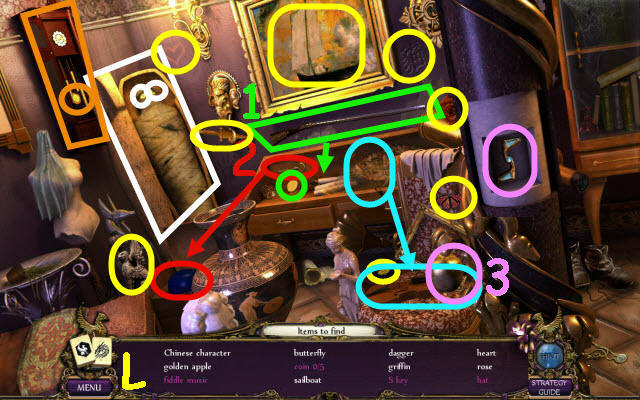
- Play the HOP.
- You receive an S-SHAPED KEY (L).
- Go forward to the hall; open the curtain.
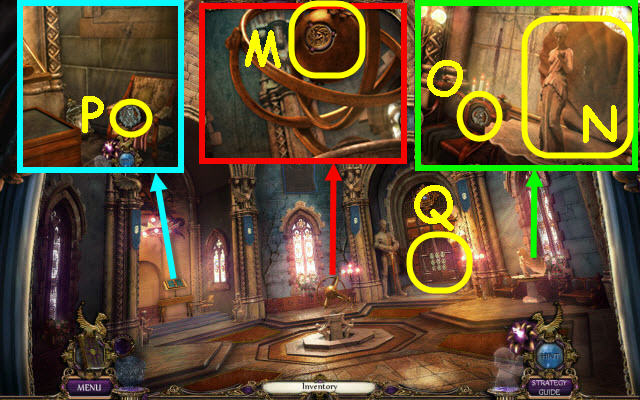
- Take the BROOCH (M).
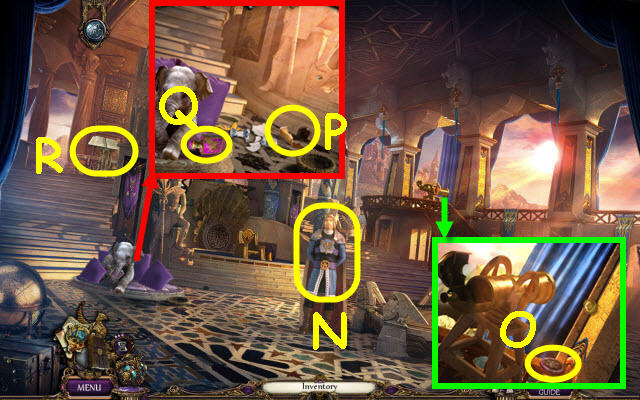
- Place the SHELL PIECE on the shell; take the APHRODITE STATUE (N) and ROYAL TOKENS 3/4 (O).
- Take the ROYAL TOKENS 4/4 (P).
- Back out.
- Place the 4 ROYAL TOKENS on the lock to trigger a puzzle (Q).
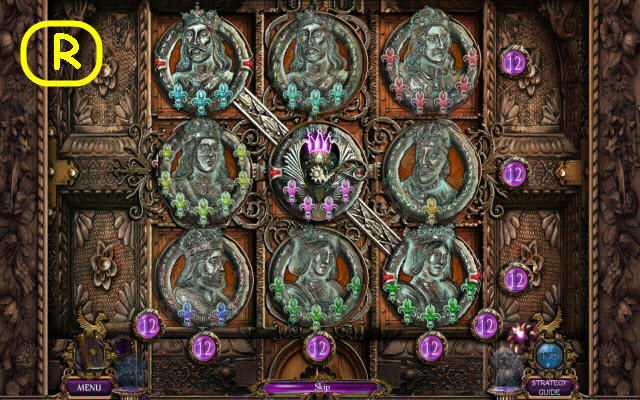
- Arrange the tokens.
- Solution (R).
- Go forward.
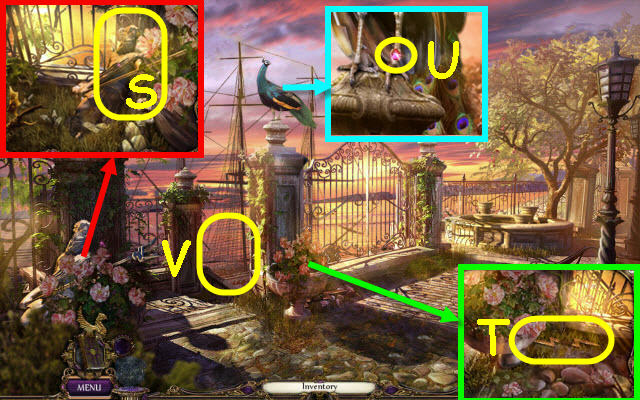
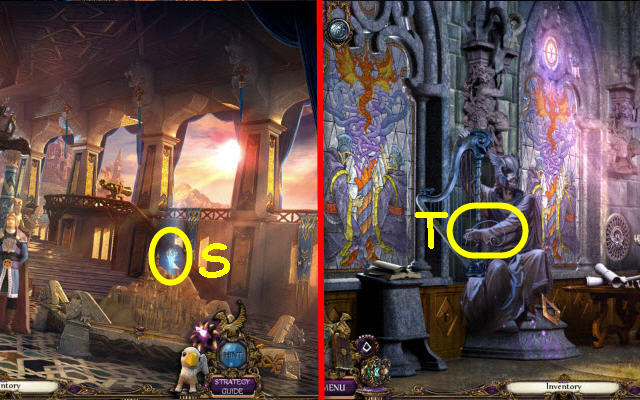
- Take the POSEIDON STATUE (S).
- Take ZEUS' LIGHTNING BOLT (T).
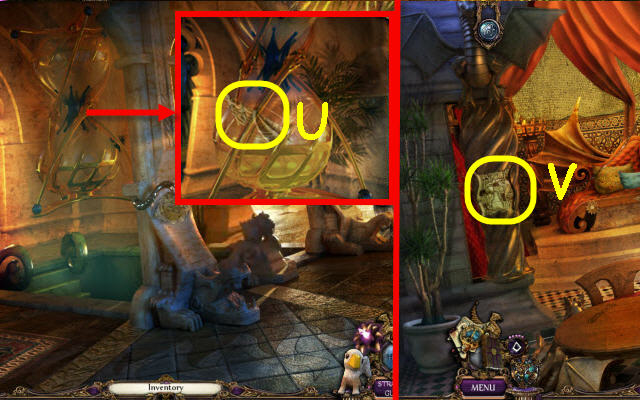
- Take the RUBY (U).
- Go down the stairs (V).
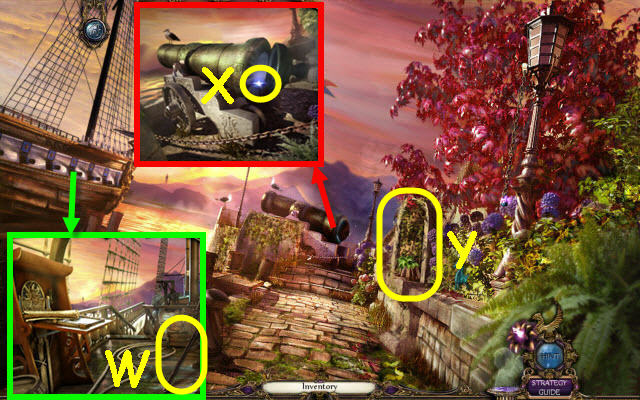
- Read the scroll; take the CROWBAR (W).
- Place the CANNON HANDLE on the cannon and open it; take the SAPPHIRE (X).
- Move the branch to start a HOP (Y).
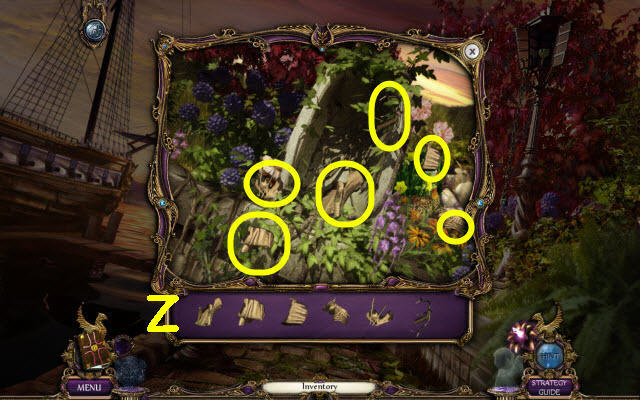
- Move the leaves to find the items.
- You receive an ARTEMIS STATUE (Z).
- Go to the ceremony hall.
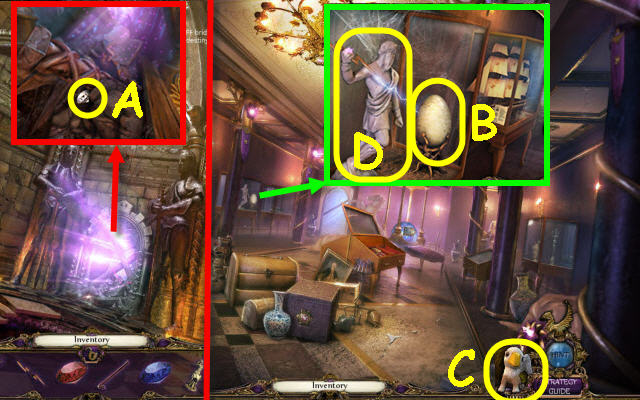
- Use the CROWBAR on the DIAMOND (A); take it.
- Go down.
- Place ZEUS' LIGHTNING BOLT on the statue; select the egg (B) and get a griffin added to your toolbar (C). Take the ZEUS STATUE (D).
- Go to the garden.
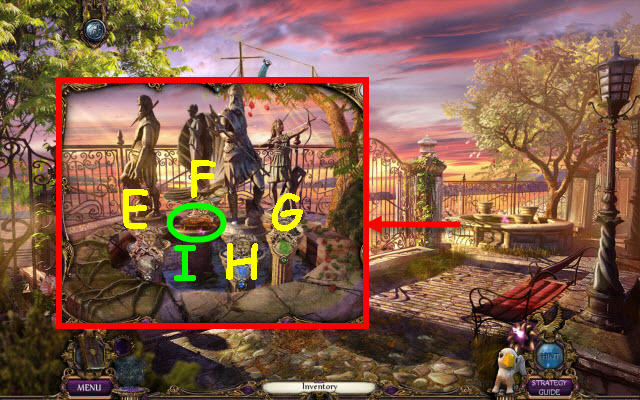
- Place the 4 statues on top of the pedestals and the gems on the side as follows: ZEUS STATUE and DIAMOND (E), APHRODITE STATUE and RUBY (F), ARTEMIS STATUE and EMERALD (G), POSEIDON STATUE and SAPPHIRE (H).
- Take the CHARGING DISK (I).
- Go to the pier.
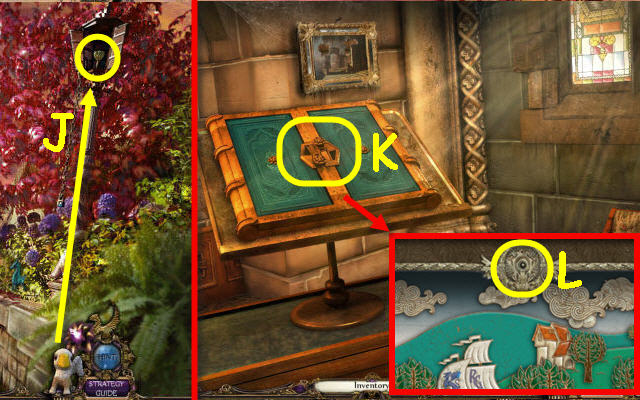
- Open the lantern; use the griffin to get the WINDER (J).
- Go to the codex.
- Place the S-SHAPED KEY on the lock (K) and the WINDER in the slot (L); turn it to trigger a puzzle.
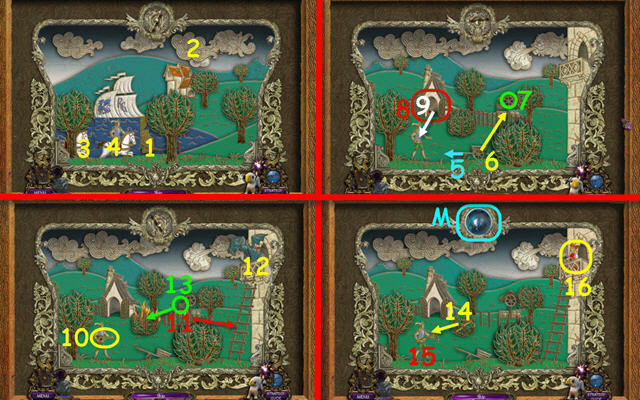
- Complete the actions in order.
- Solution (1-16).
- Take the TIME STONE (M).
- Go to the secret treasury.
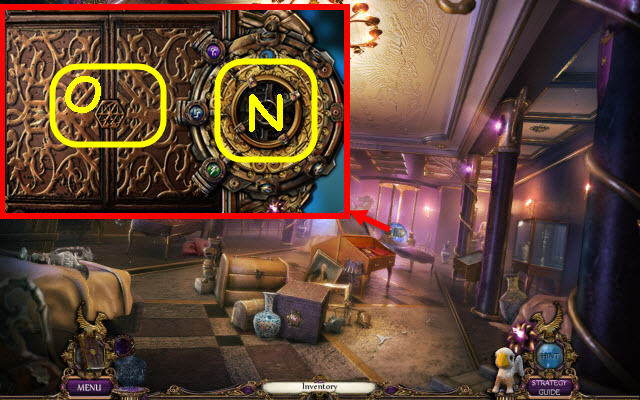
- Place the CHARGING DISK and TIME STONE on the device (N).
- Open the panel to trigger a puzzle (O).
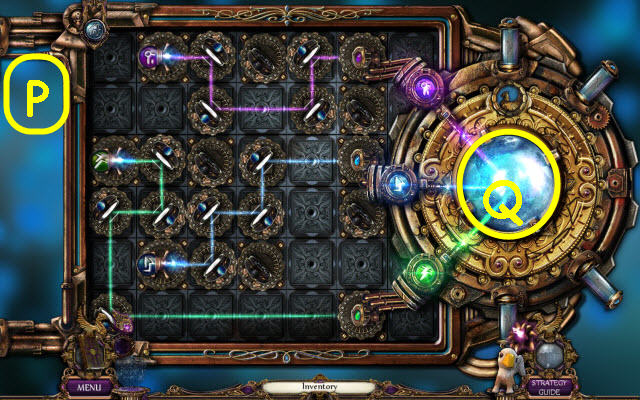
- Complete the beams.
- Solution (P).
- Take the CHARGED TIME STONE (Q).
- Go to the pier.
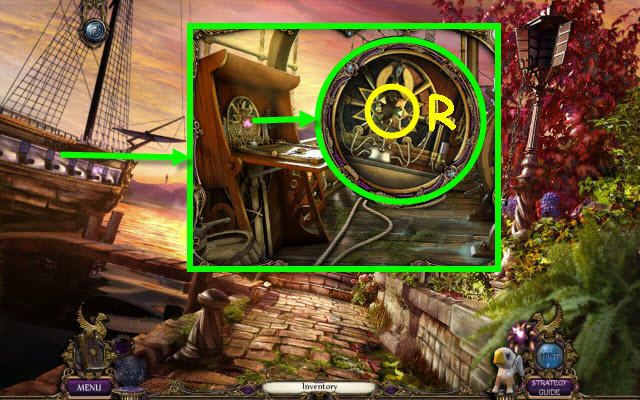
- Place the CHARGED TIME STONE on the device (R).
Chapter 2: London
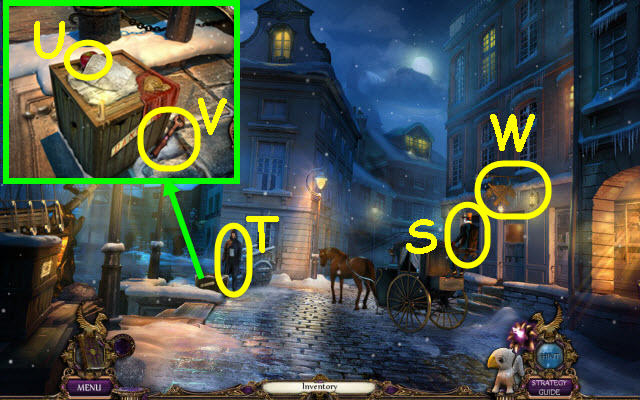
- Speak to the driver (S) and the gentleman (T).
- Read the note; take the APPLE (U) and WINCH LEVER (V).
- Use the griffin on the sign (W); receive a PLANET 1/5.
- Go forward on the left.
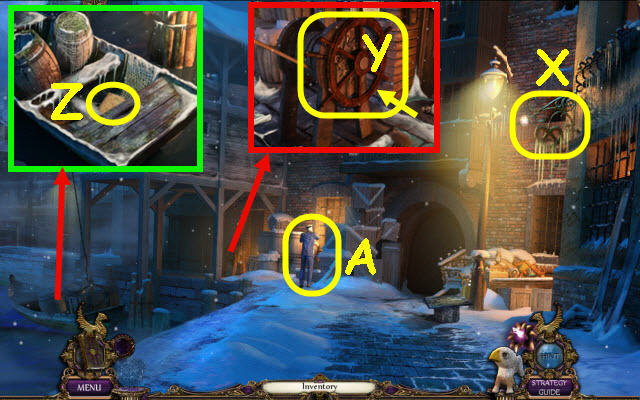
- Use the griffin on the sign; receive a PLANETS 2/5 (X).
- Place the WINCH LEVER and the wheel on the winch; turn it (Y).
- Read the note; take the CAPTAIN'S LOG (Z).
- Give the CAPTAIN'S LOG to the captain (A).
- Select the Captain to trigger a puzzle.
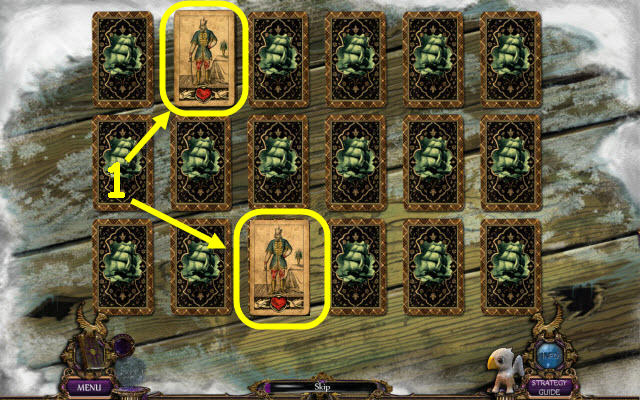
- Find the matches (1).
- Starting layout is random.
- Examine the crates on the right to trigger a HOP.
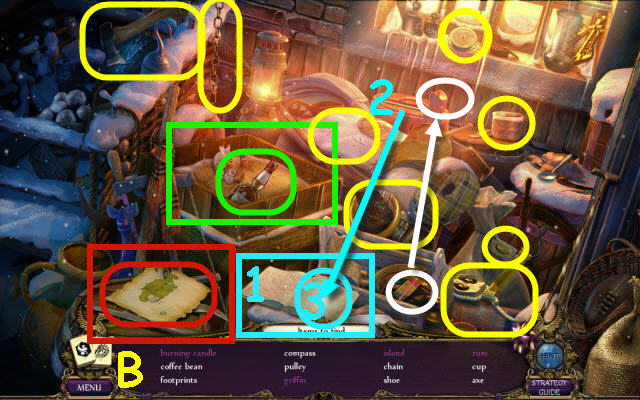
- Play the HOP.
- You receive a RUM (B).
- Back out.
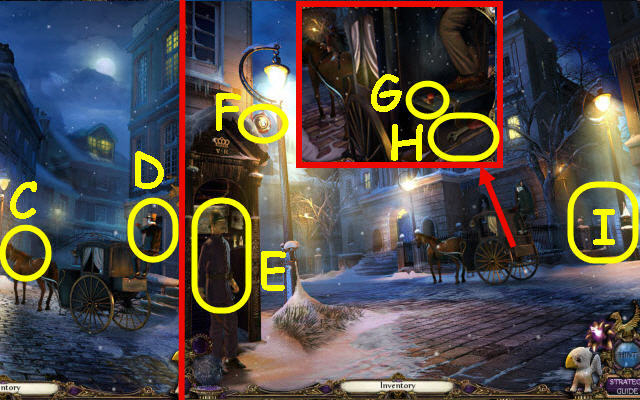
- Give the APPLE to the horse (C) and the RUM to the driver (D).
- Go forward on the right.
- Speak to the officer (E).
- Use the griffin to retrieve the PLANETS 3/5 (F).
- Read the note; take the PIPE (G) and WRENCH (H).
- Go up the path (I).
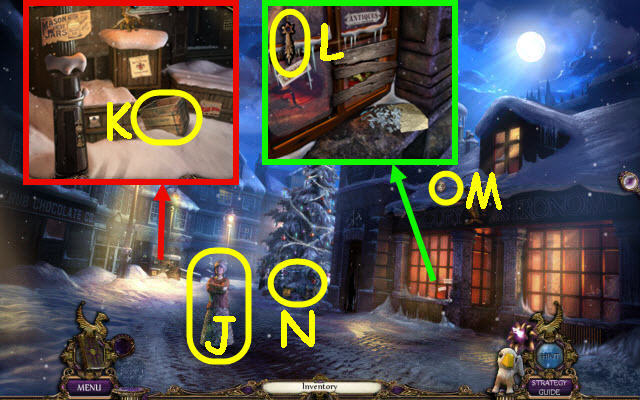
- Speak to the girl (J).
- Take the WOODEN BOX (K).
- Take the COMET (L).
- Use the griffin on the planet (M).
- Examine the tree to access a HOP (N).
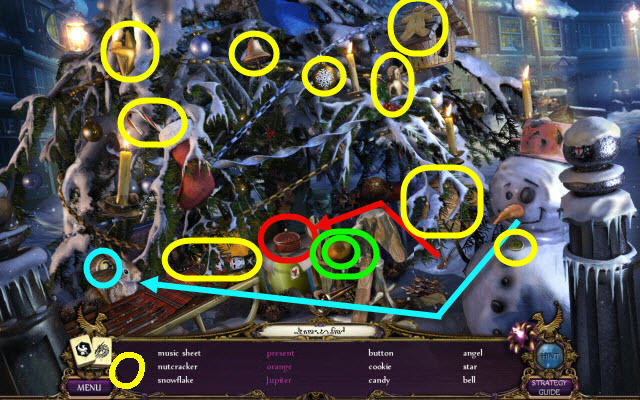
- Play the HOP.
- You receive a PLANETS 4/5 (O).
- Go to the London docks.
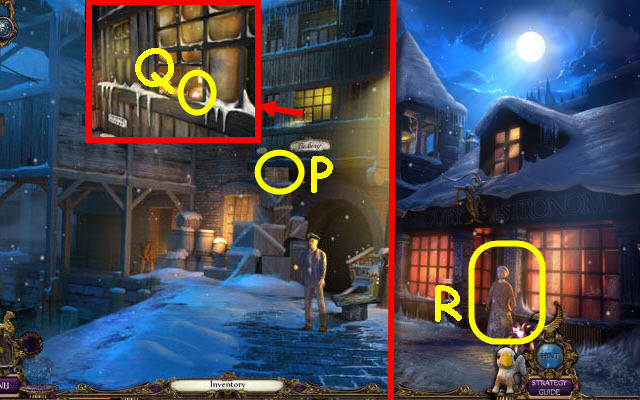
- Place the WOODEN BOX on the crates (P).
- Open the window; take the BREAD (Q).
- Go to the London bell tower.
- Give the BREAD to the girl (R).
- Back out.
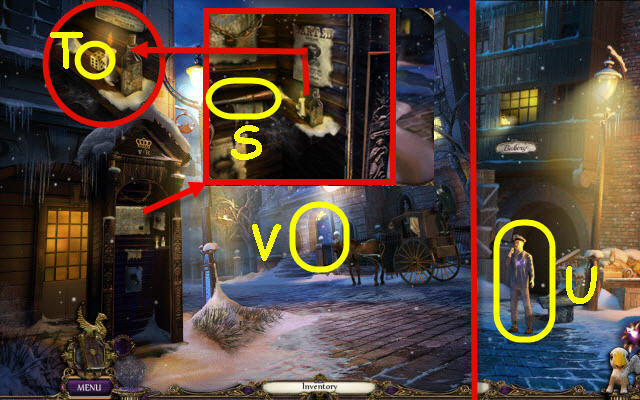
- Take the CHISEL (S) and GOLDEN DIE (T).
- Go to the London docks.
- Give the GOLDEN DIE to the Captain (U); receive a LOCKPICK.
- Go to the London Museum.
- Use the LOCKPICK on the lock to trigger a puzzle (V).
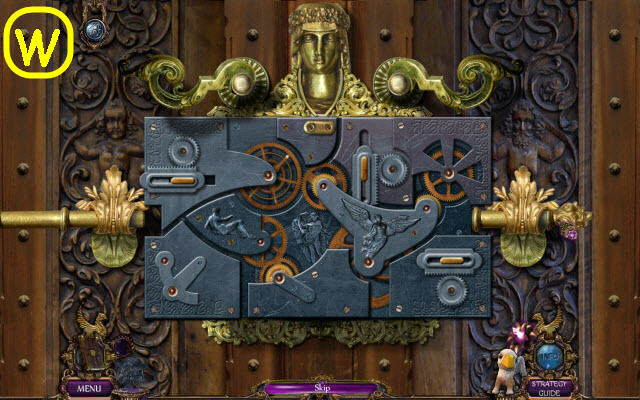
- Place the lock parts on the lock.
- Solution (W).
- Enter the treasure hall.
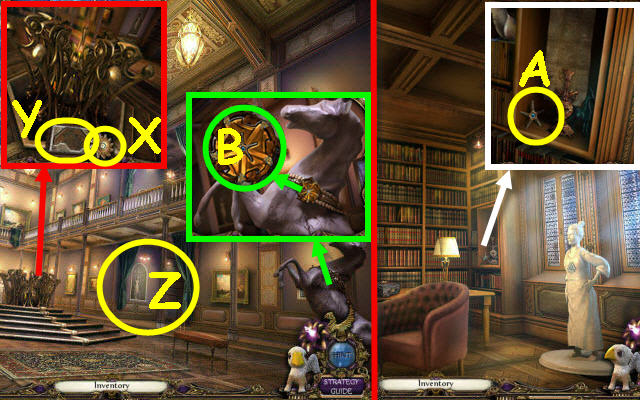
- Take the SUN (X) and OCTAGON HALF (Y).
- Go forward (Z).
- Take the STAR KEY (A).
- Back out.
- Place the STAR KEY in the key; take the UPGRADED STAR KEY (B).
- Return to the study corner.
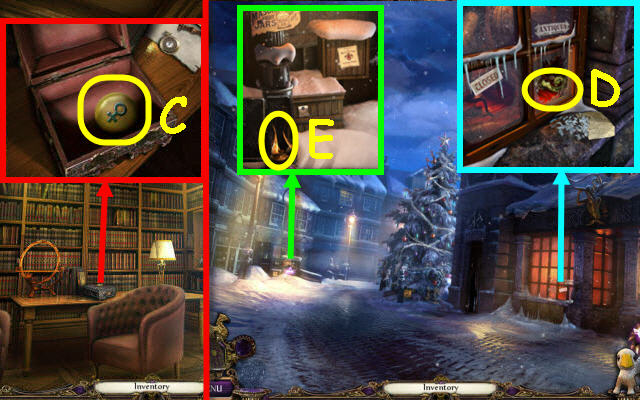
- Place the UPGRADED STAR KEY on the lid and open it; take the PLANETS 5/5 (C).
- Go to the London bell tower.
- Use the CHISEL on the boards 3x; take the DOOR HANDLE (D).
- Place the DOOR HANDLE on the door; turn it and open it. Take the TORCH HEAD (E).
- Go to the treasure hall.
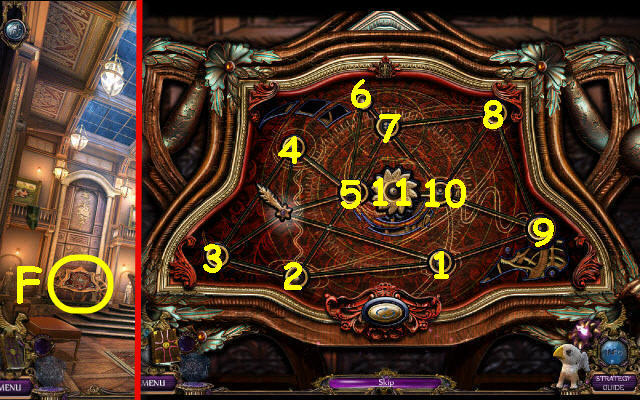
- Place the OCTAGON HALF, 5 PLANETS, SUN and COMET on the device to trigger a puzzle (F).
- Guide the comet through the planets.
- Solution (1-11).
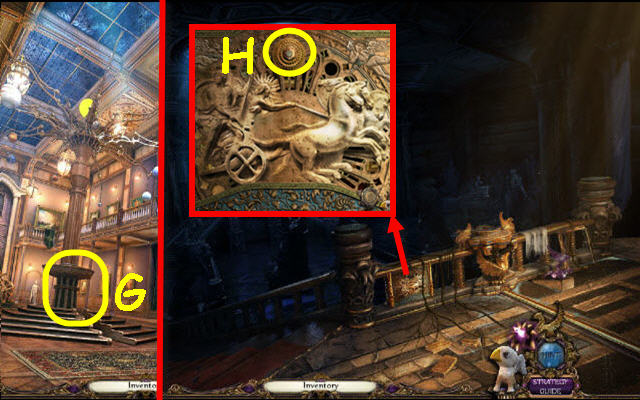
- Enter the secret storage (G).
- Use the WRENCH on the nut (H); remove the panel to trigger a puzzle.
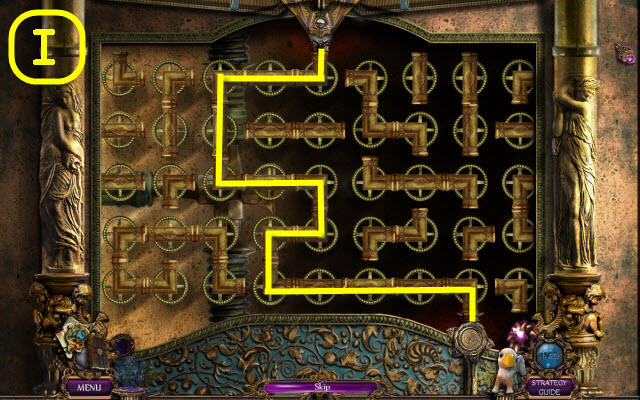
- Connect the pipes.
- Solution (I).
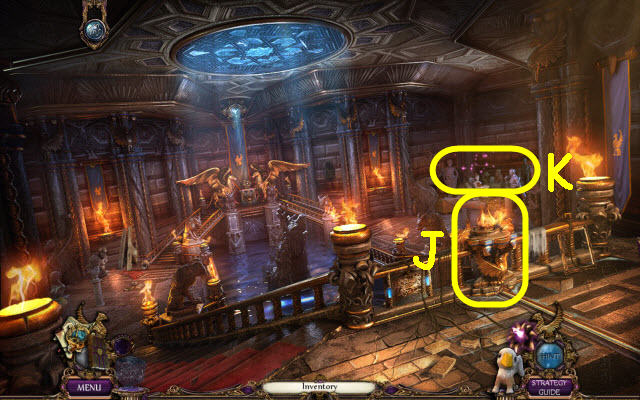
- Place the TORCH HEAD on the holder; light it with the PIPE (J).
- Examine the corner to access a HOP (K).
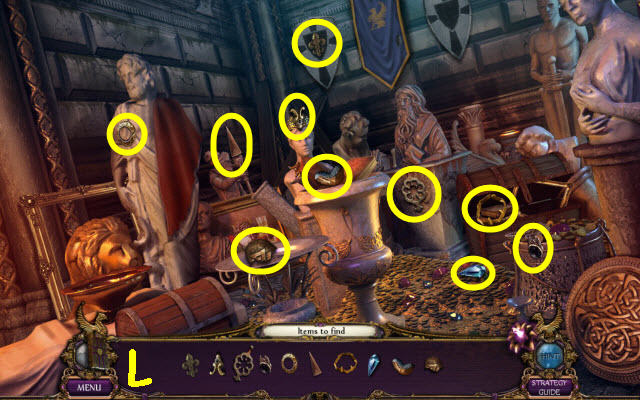
- Play the HOP.
- You receive an ODIN RUNE (L).
- Go forward to the altar.
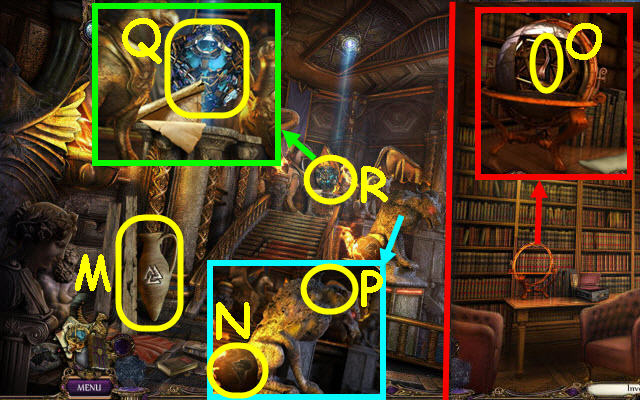
- Take the AMPHORA (M).
- Take the GLOBE (N).
- Go to the study corner.
- Place the GLOBE in the stands; take the MYSTIC HORN (O).
- Return to the altar.
- Place the MYSTIC HORN on the creature (P).
- Read the scroll; place the ODIN RUNE on the heart (Q).
- Take the Golem's heart which is added to you toolbar (R).
- Go to the study corner.
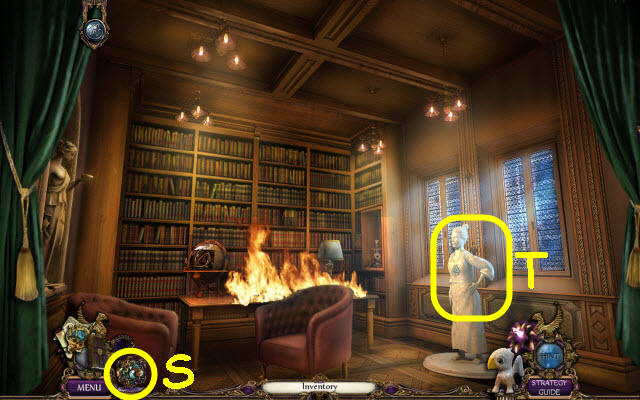
- Use the Golem heart (S) and AMPHORA on the statue (T).
- Back out.
Chapter 3: Aeronheart
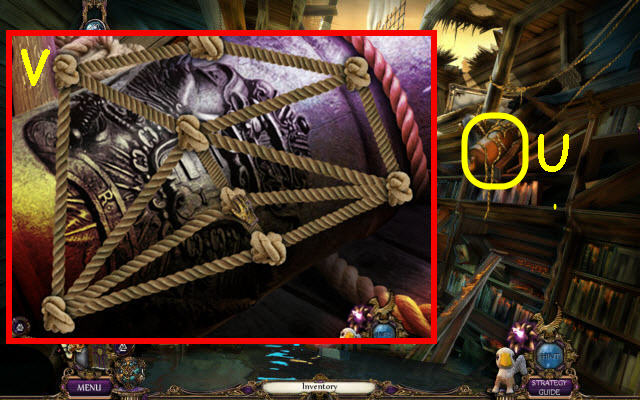
- Examine the rope (U).
- Detangle it (V).
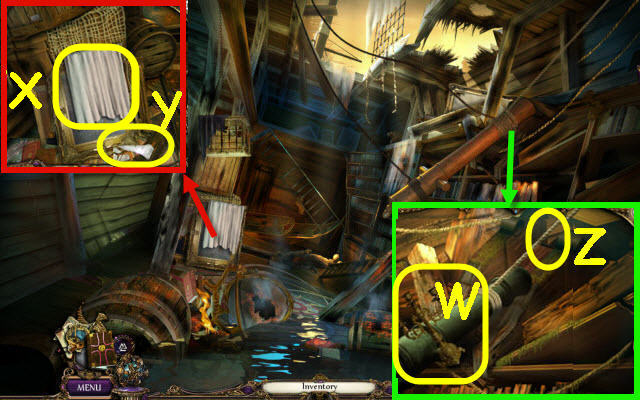
- Take the CANDLESTICK (W).
- Take the RAG (X).
- Use the CANDLESTICK on the mirror; place the RAG on the MIRROR SHARD (Y) and take it.
- Use the MIRROR SHARD on the rope (Z).
- Exit through the hole.
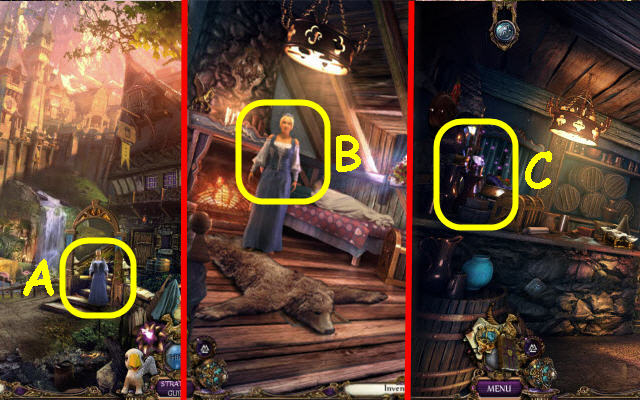
- Speak to the innkeeper (A); follow her to the tavern gallery.
- Speak to the innkeeper (B); receive a BLOSSOMING-POTION RECIPE.
- Back out.
- Examine the bar to access a HOP (C).
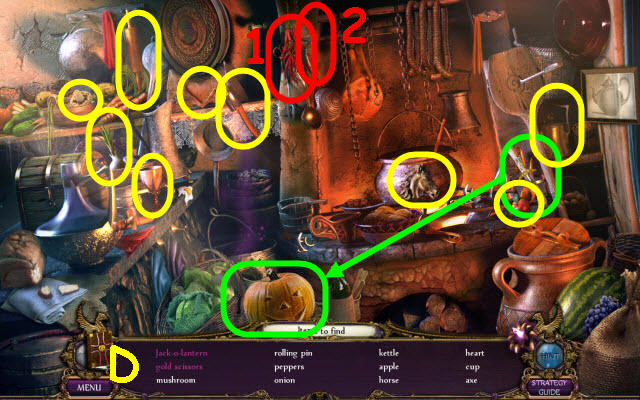
- Play the HOP.
- You receive a GOLD SCISSORS (D).
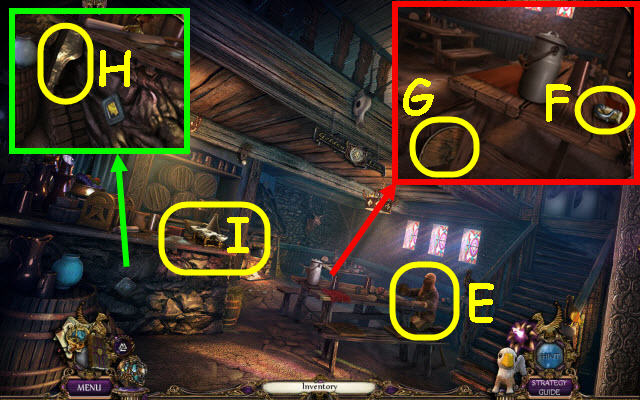
- Speak to the gentleman (E); receive a HAMMER.
- Take the SEQUENCE PART 1/5 (F) and PART OF WHEEL SET 1/4 (G).
- Take the STATUE PART 1/7 (H).
- Place the BLOSSOMING-POTION RECIPE on the bar to trigger a puzzle (I).
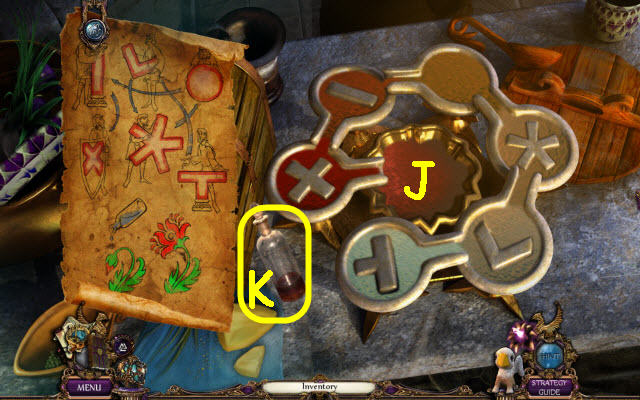
- Change the symbols per the clues.
- Solution (J).
- Take the BLOSSOMING POTION (K).
- Back out.
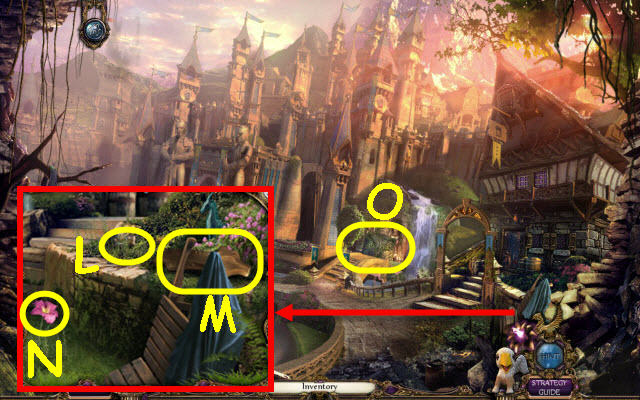
- Take the SEQUENCE PARTS 2/5 (L) and STATUE PARTS 2/7 (M).
- Use the BLOSSOMING POTION on the bud; take the FLOWER 1/4 (N).
- Go forward (O).
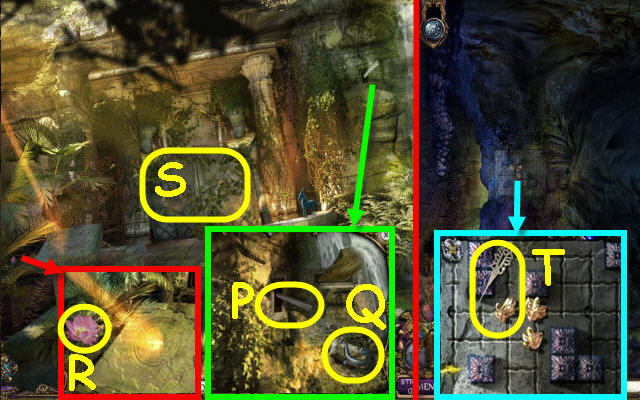
- Use the griffin on the lever (P); take the SEQUENCE PARTS 3/5 (Q).
- Use the BLOSSOMING POTION on the bud; take the FLOWERS 2/4 (R).
- Use the GOLD SCISSORS on the vines (S) and the Golem heart on the door; go forward.
- Take the ANTIQUE HAIRPIN (T).
- Back out twice; go forward to the main square.
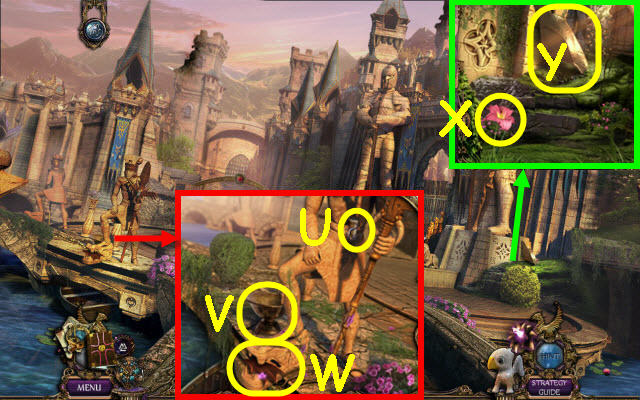
- Take the SEQUENCE PARTS 4/5 (U), EMPTY BOWL (V) and WING (W).
- Use the BLOSSOMING POTION on the bud; take the FLOWERS 3/4 (X) and STATUE PARTS 3/7 (Y).
- Go forward.
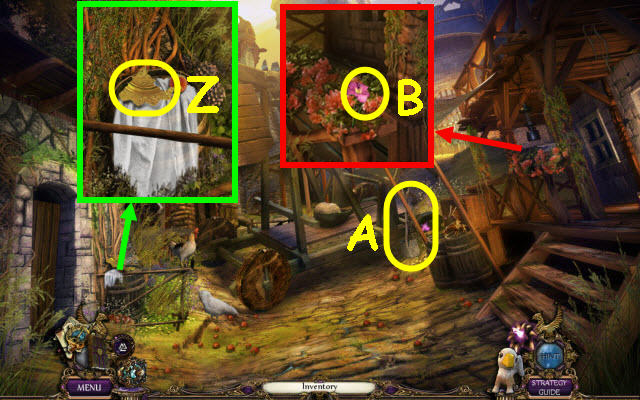
- Take the MOSAIC PIECE 1/4 (Z).
- Take the SPADE (A).
- Use the BLOSSOMING POTION on the bud; take the FLOWERS 4/4 (B).
- Back out.
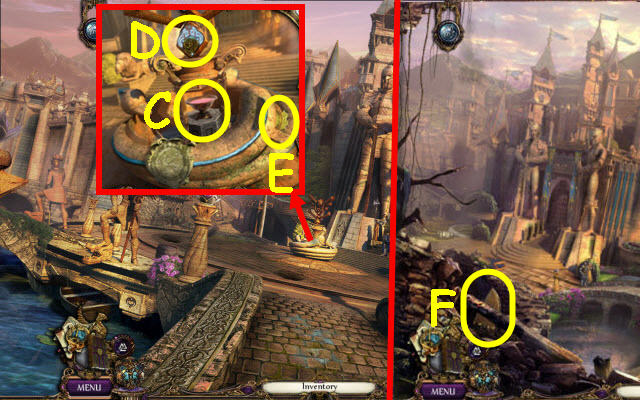
- Place the EMPTY BOWL in the center, the 4 FLOWERS in the bowl (C) and the BROOCH in the slot (D). Take the ESSENCE OF LIFE POTION (C).
- Use the ANTIQUE HAIRPIN on the MOSAIC PIECES 2/4 (E); take it.
- Back out.
- Use the SPADE on the WHEEL SET 2/4 (F); take it.
- Enter the tavern.
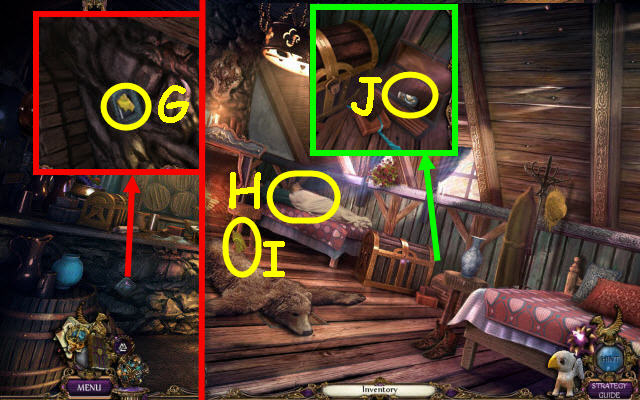
- Use the ANTIQUE HAIRPIN on the MOSAIC PIECES 3/4 (G); take it.
- Go up.
- Use the ESSENCE OF LIFE POTION on the Champion (H); receive an AMULET.
- Take the MOSAIC PIECES 4/4 (I).
- Open the box; take the SEQUENCE PARTS 5/5 (J).
- Go to the catacomb entrance.
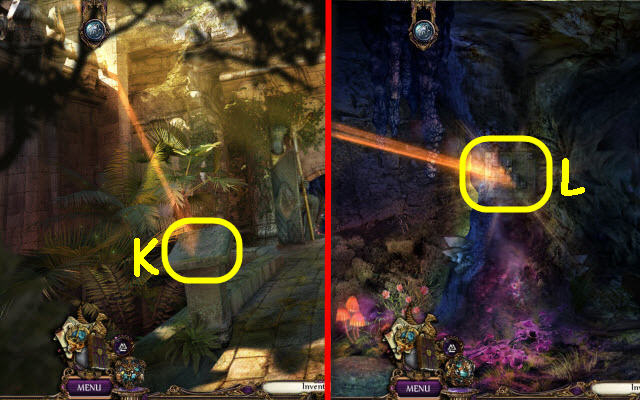
- Place the 4 MOSAIC PIECES on the pedestal (K).
- Go forward.
- Play the puzzle (L).
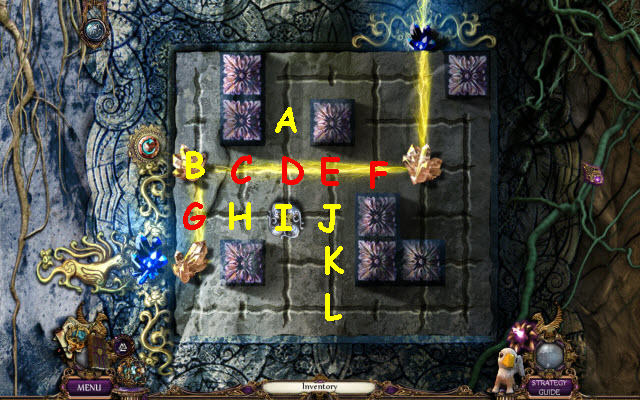
- Move the crystals.
- Select the following: A, D, E, F, E, J, I, H, B, G, L, K, J, F, E, D and C.
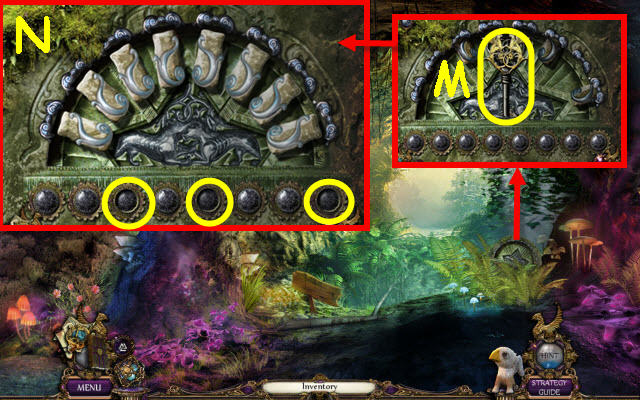
- Pull out the UNIQUE KEY (M); take it.
- Place the 5 SEQUENCE PARTS on the carving to trigger a puzzle.
- Select the correct buttons.
- Solution (N).
- Go forward.
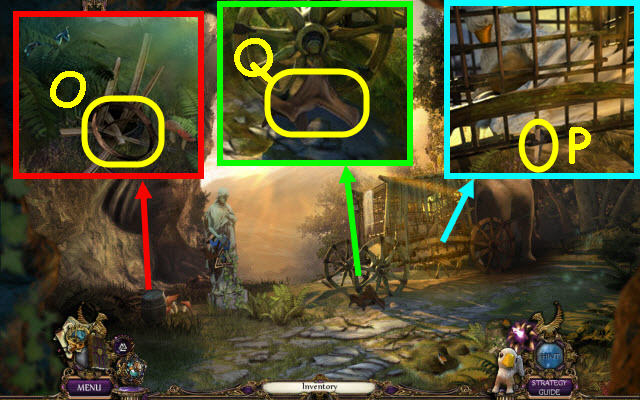
- Use the HAMMER on the barrel; take the WHEEL SET 3/4 (O).
- Use the UNIQUE KEY on the padlock; take the WHEEL SET 4/4 (P).
- Take the GRIFFIN HARNESS KIT 1/3 (Q).
- Go to the apple street.
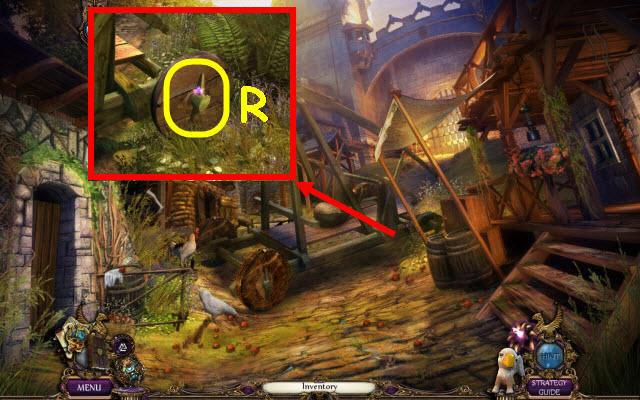
- Place the 4 WHEEL SET on the axle; use the HAMMER on it (R).
- Go forward.
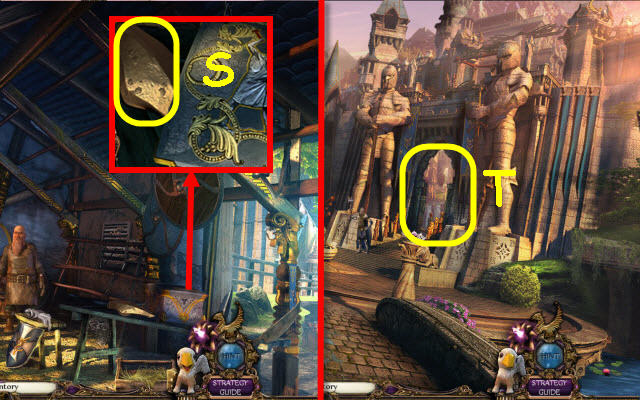
- Receive a PICKAXE.
- Take the STATUE PARTS 4/7 (S).
- Back out twice; enter the Bridge of Destiny (T).
Chapter 4: Inner City
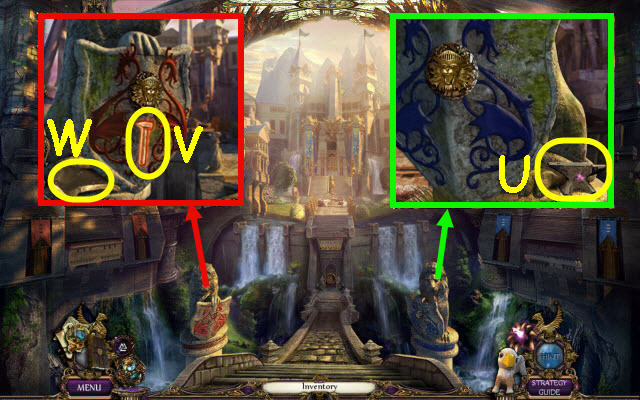
- Take the STONE ANVIL (U).
- Place the WING in the slot; take the STONE HAMMER (V) and STATUE PARTS 5/7 (W).
- Go to the catacombs.
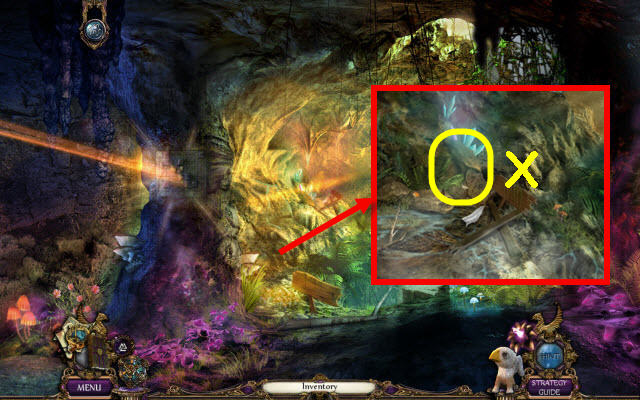
- Use the PICKAXE on the stone (X).
- Reexamine the area to access a HOP.
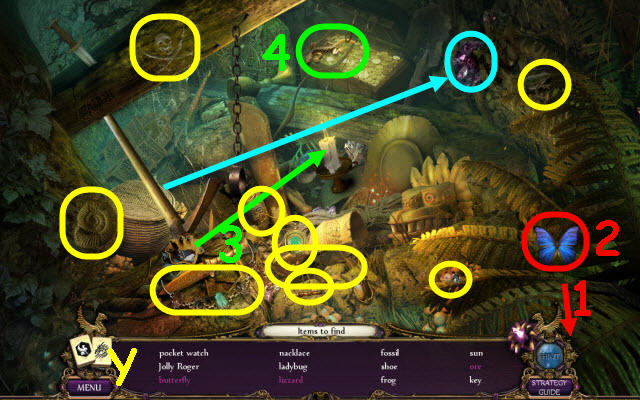
- Play the HOP.
- You receive a SPECIAL ORE (Y).
- Go to the smithy.
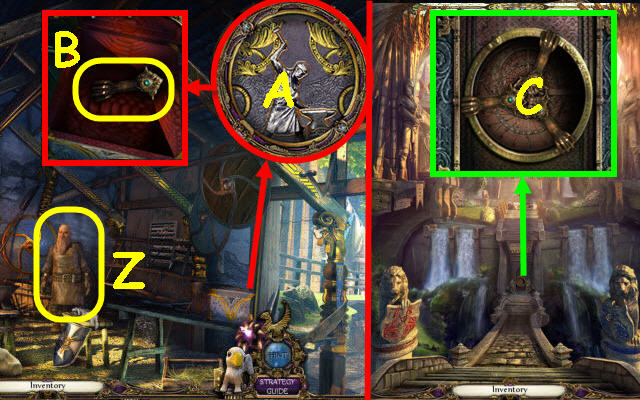
- Give the SPECIAL ORE to the smithy (Z).
- Place the STONE ANVIL and STONE HAMMER in the recesses (A); open the lid.
- Read the scroll; take the LION PAW (B).
- Go to the Bridge of Destiny.
- Place the LION PAW on the device; select it (C).
- Go forward.
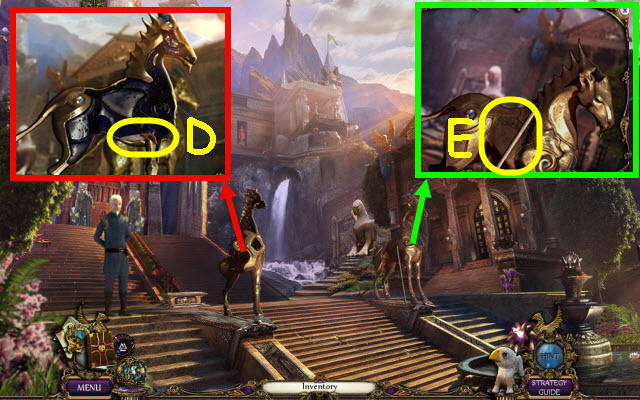
- Receive an ANCIENT GODS' FIELD MAP PIECE.
- Take the HANDSAW (D).
- Take the ROD WITH HOOK (E).
- Go forward.
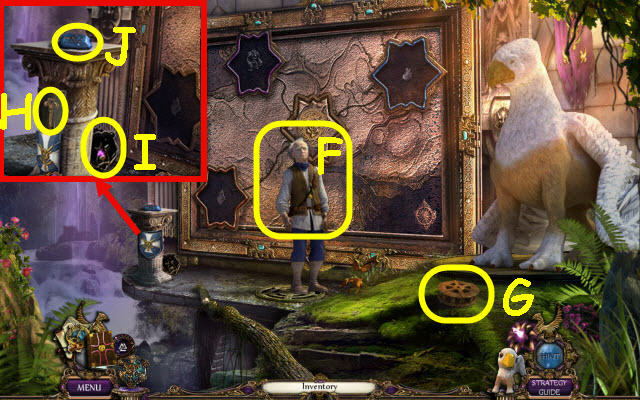
- Speak to the man; receive a BROKEN TUBE (F).
- Take the WOODEN GEAR (G).
- Open the panel; take the PADLOCK KEY (H), BEAR FIGURE (I) and TURQUOISE GEM (J).
- Go to the tavern gallery.
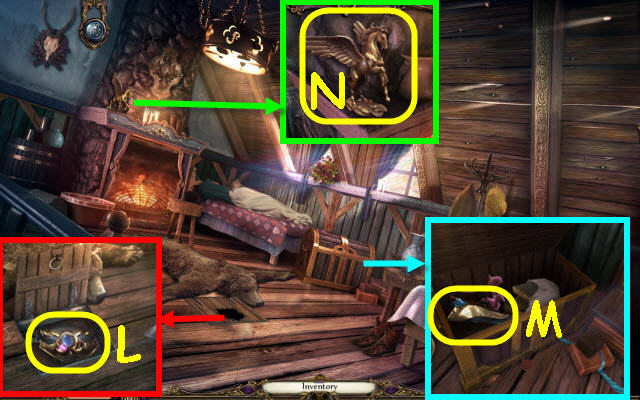
- Move the bear; place the BEAR FIGURE on the hatch. Open it; take the GRIFFIN HARNESS KIT 2/3 (L).
- Use the PADLOCK KEY on the padlock; turn it and open the lid. Take the UNICORN HORN (M).
- Use the HANDSAW on the base; take the BRONZE STATUE (N).
- Go to the smithy.
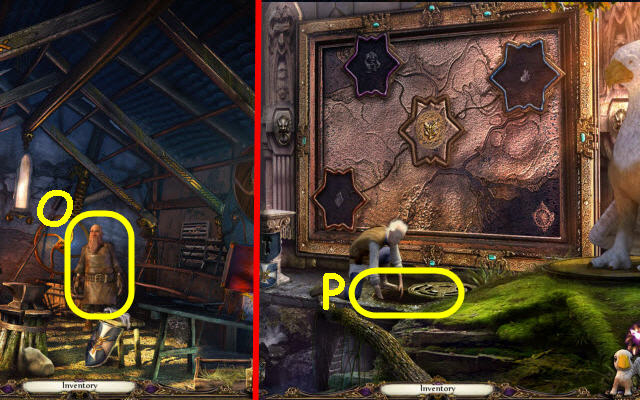
- Give the BROKEN TUBE to the smithy; receive a FIXED TUBE (O).
- Go to the griffin nest.
- Place the FIXED TUBE on the pipes to trigger a puzzle (P).
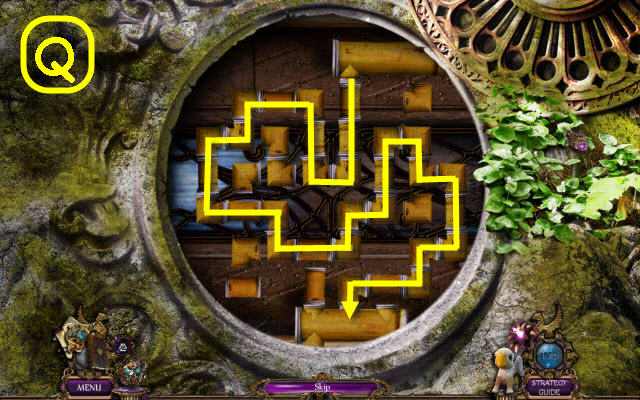
- Connect the pipes.
- Solution (Q).
- Back out; go right into polymath's workshop.
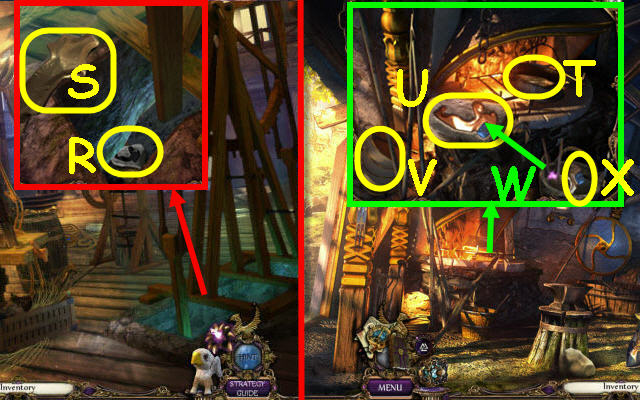
- Use the ROD WITH HOOK on the mold; take the MOLD (R) and STATUE PARTS 6/7 (S).
- Go to the smithy.
- Place the BRONZE STATUE in the kettle (T) and place the MOLD next to it (U): push the bellows (V).
- Pour the kettle into the mold and place the TURQUOISE GEM into it; use the tongs (W) twice on the mold and place in the bucket. Take the STATUE PARTS 7/7 (X).
- Go to the palace court.
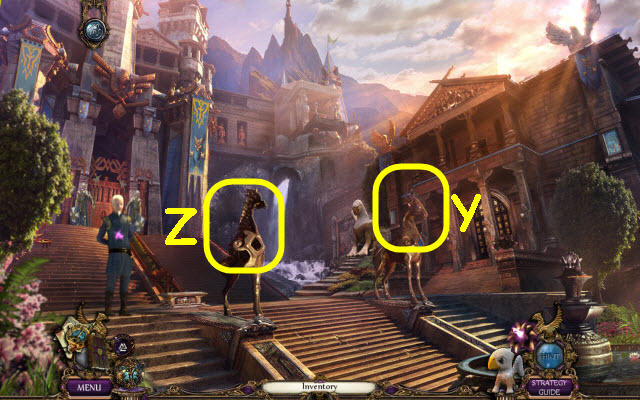
- Place the UNICORN HORN on the unicorn (Y).
- Place the 7 STATUE PARTS on the statue to trigger a puzzle (Z).
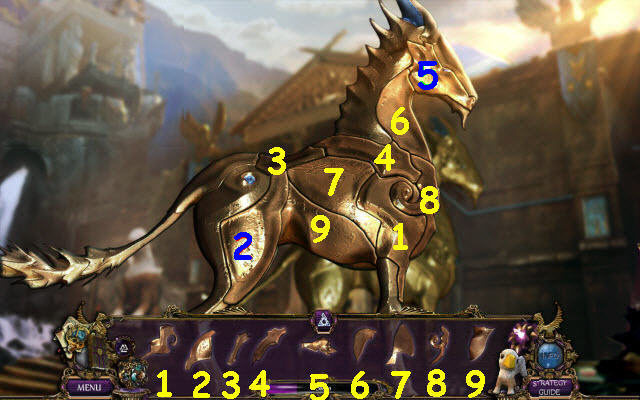
- Assemble the statue.
- Solution (1-9).
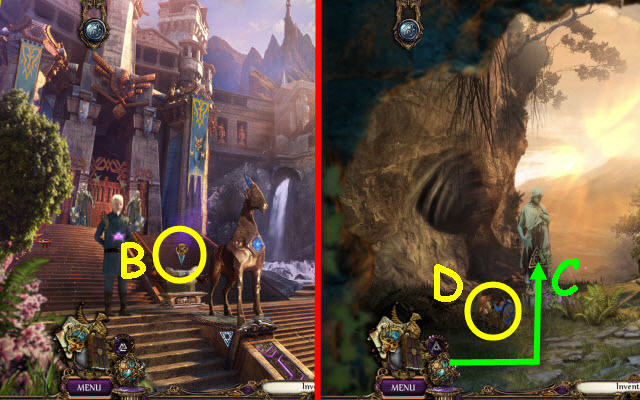
- Take the Heimdal rune (B) which is added to your Golem heart.
- Go to the griffin cage.
- Use the Golem heart on the statue (C); take the GRIFFIN HARNESS KIT 3/3 (D).
- Go to the griffin nest.
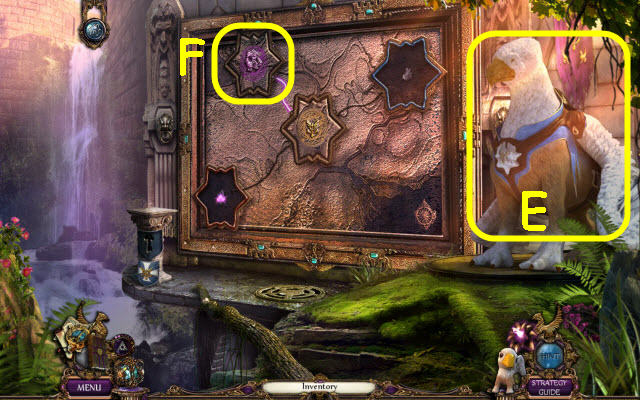
- Place the GRIFFIN HARNESS KIT 3/3 and AMULET on the griffin (E).
- Place the ANCIENT GODS' FIELD MAP PIECE on the map; select it (F).
Chapter 5: Ancient's Gods' Field
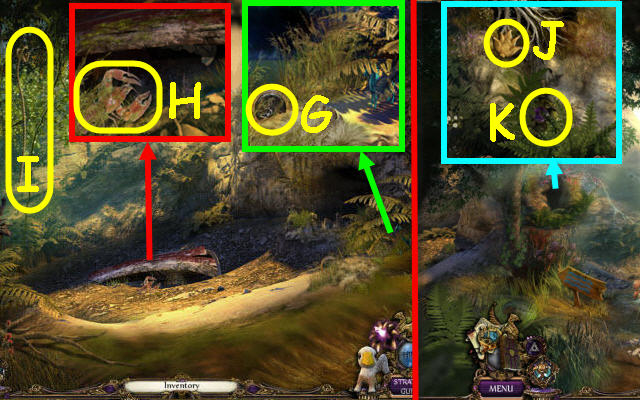
- Go left.
- Take the STANDARD SYMBOL 1/5 (G).
- Take the CRAYFISH (H).
- Use the CRAYFISH on the ROPE 1/2 (I); take it.
- Back out.
- Use the CRAYFISH on the roots; take the ORNAMENT PIECE (J) and CENTER CRYSTAL (K).
- Go forward.
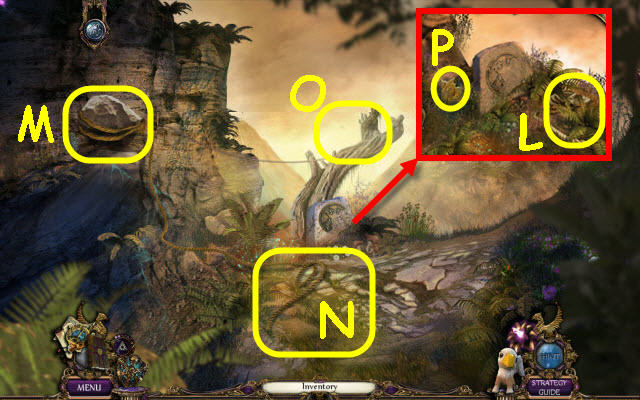
- Take the ROPE 2/2 (L).
- Use the ROPES 2/2 on the boulder (M); pull the rope (N).
- Use the griffin on the tree (O).
- Take the EARTH STONE (P).
- Back out.
- Examine the waterfall base to access a HOP.
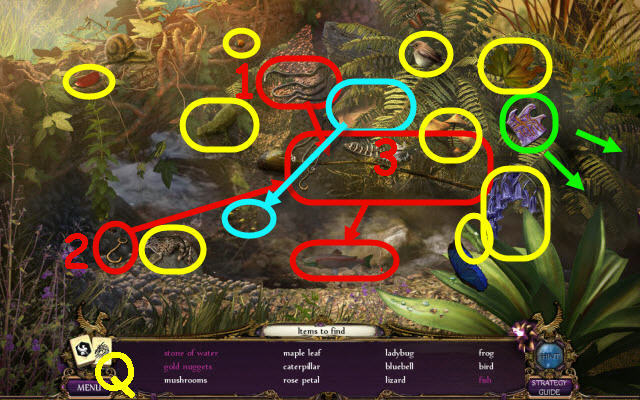
- Play the HOP.
- You receive a WATER STONE (Q).
- Go left.
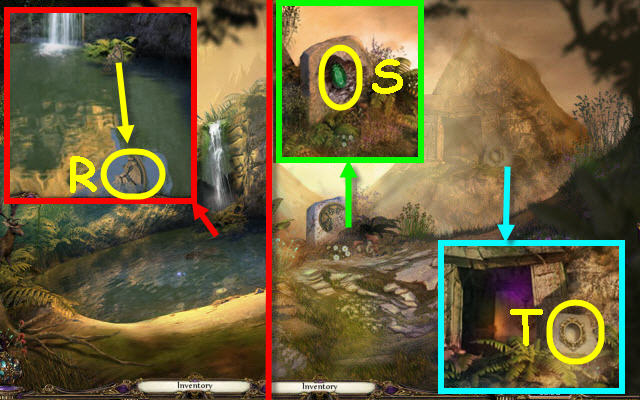
- Use the ROD WITH HOOK on the symbol; take the BIRD SYMBOL (R).
- Go to the bridge.
- Place the BIRD SYMBOL on the relief; select it and take the EGG SYMBOL (S).
- Place the EGG SYMBOL in the recess (T).
- Go forward.
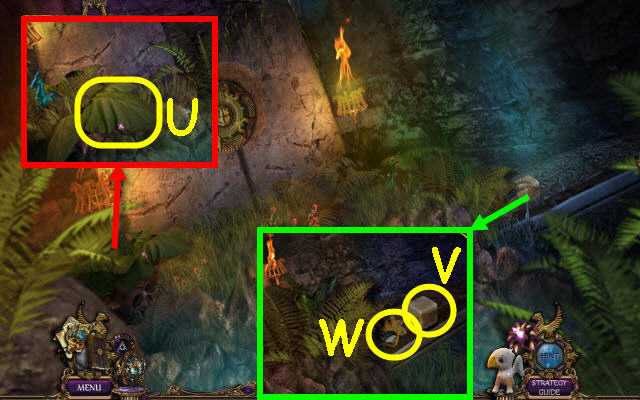
- Take the BURDOCK LEAF (U).
- Take the BLOCK OF SALT (V) and FLINT (W).
- Back out.
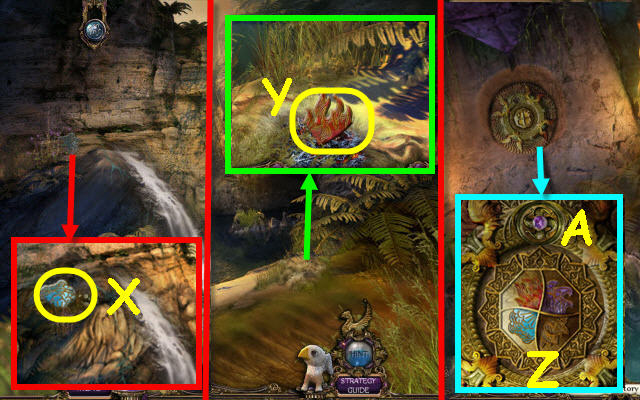
- Use the BURDOCK LEAF on the symbol; take the AIR STONE (X).
- Go to the lake bed.
- Use the FLINT on the grass; take the FIRE STONE (Y).
- Go to the stone of elements.
- Place the EARTH STONE, WATER STONE, AIR STONE and FIRE STONE in their matching slots (Z).
- Place the CENTER CRYSTAL in the top to trigger a puzzle (A).
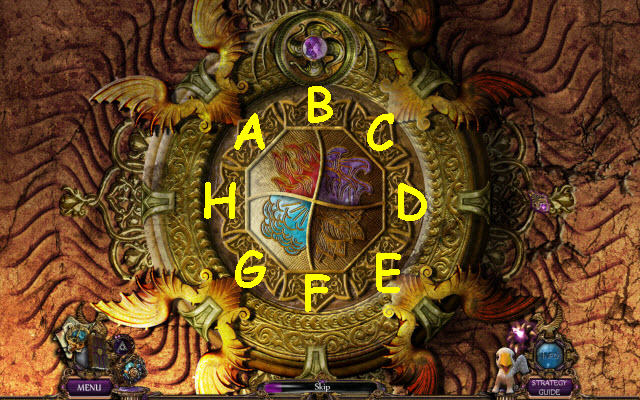
- Duplicate the sequences.
- Solution: B-D-F-H, B-D-F-H-C-E and B-D-F-H-C-E-G-A.
- Open the panel; take the Loki rune (B) which will be added to your Golem heart.
- Go to the stone guardians.
- Use the Golem heart on the symbol (C); go through the opening.
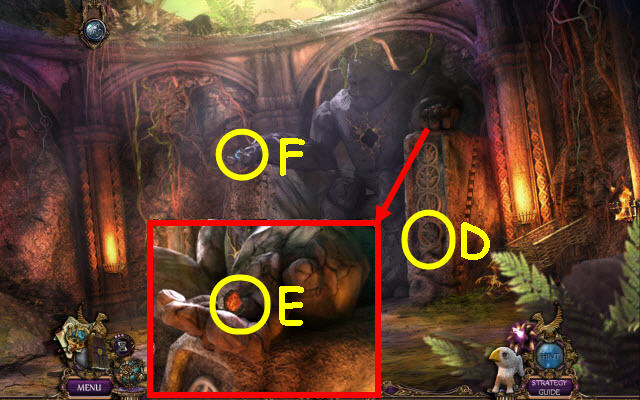
- Place the ORNAMENT PIECE on the pillar (D).
- Select the key 3x; receive a FIRE KEY (E).
- Use the griffin to retrieve the ICICLE KEY (F).
- Go to the Bridge of Destiny.
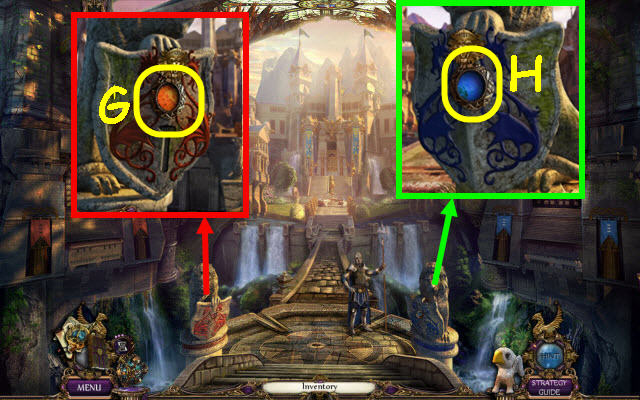
- Select the lion head; place the FIRE KEY on the left shield (G).
- Select the lion head; place the ICICLE KEY on the right shield (H).
- Go left.
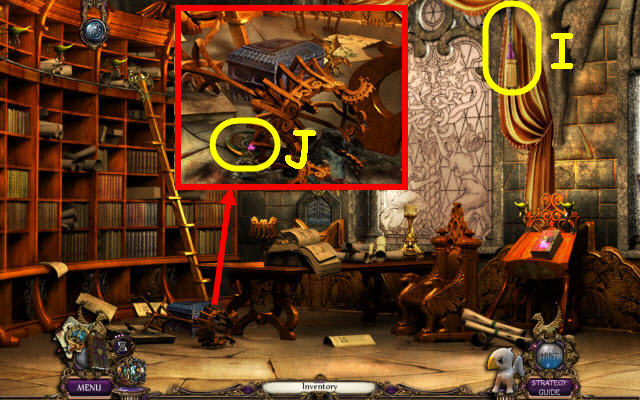
- Use the griffin to retrieve the CURTAIN BINDER (I).
- Take the STANDARD SYMBOLS 2/5 (J).
- Back out; go right.
- Take the CHEESE (K) and DEFENSE STRATEGY PLAN (L).
- Go to the palace court.
- Give the DEFENSE STRATEGY PLAN to the Counselor (M).
- Go up the left stairs.
- Speak to the man; receive ZERINA'S SEAL (N).
- Take the STANDARD SYMBOL 3/5 (O).
- Place the CHEESE by the hole (P); take the WIND PHIAL 1/4 (Q).
- Examine the book to trigger a puzzle (R).
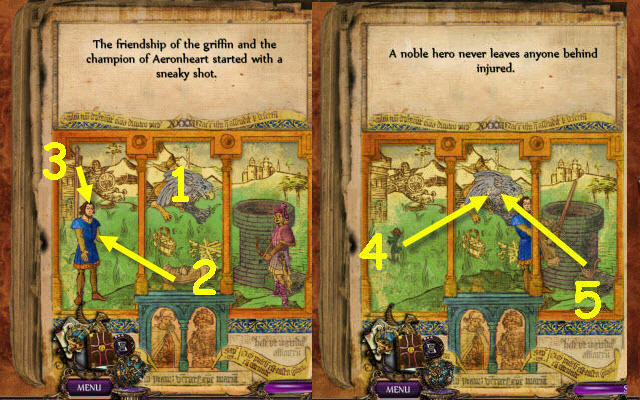
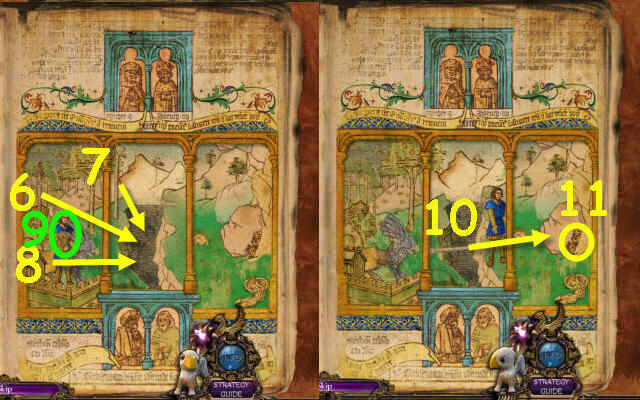
- Act out the story.
- Solution (1-11).
- Take the KING FIGURE.
- Go to Zerina's library.
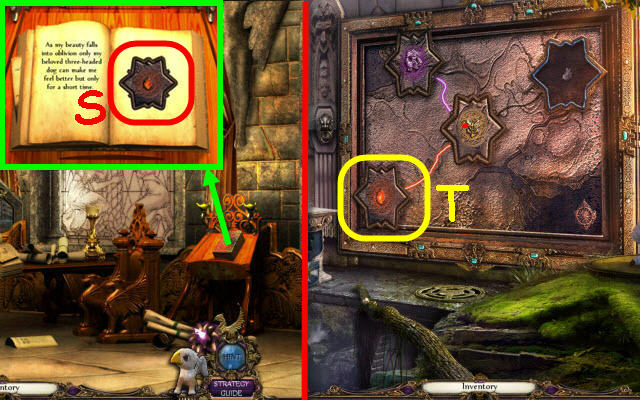
- Use ZERINA'S SEAL on the seal; open the book and turn the page. Take the ZERINA MAP PIECE (S).
- Go to the griffin nest.
- Place the ZERINA MAP PIECE in the slot; select it (T).
Chapter 6: Zerina
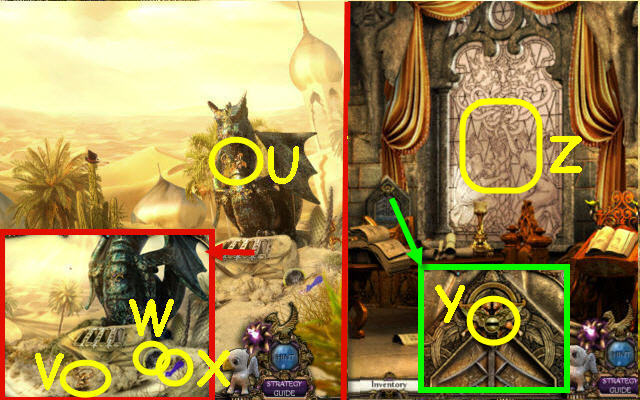
- Use the griffin on the ring (U); take the RING (V), STANDARD SYMBOLS 4/5 (W) and CYRUS' SEAL (X).
- Go to Zerina's library.
- Place the RING in the slot (Y).
- Examine the window to trigger a puzzle (Z).
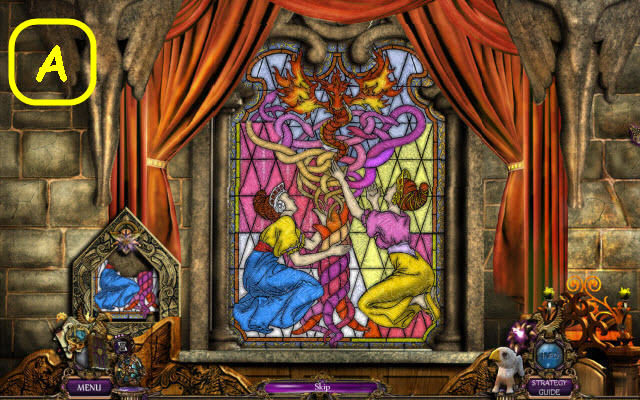
- Complete the image.
- Solution (A).
- Receive an UPGRADED RING.
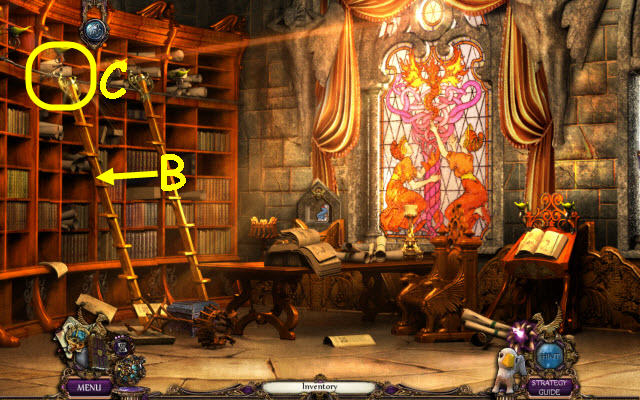
- Move the ladder (B).
- Examine the shelf to trigger a puzzle (C).
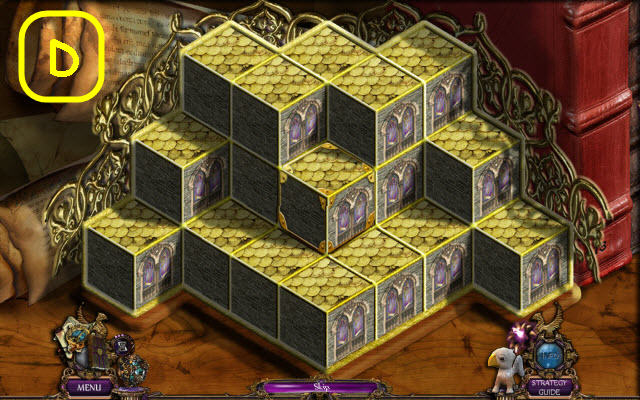
- Swap the pieces to complete the image.
- Solution (D).
- Take the WIND PHIALS 2/4.
- Go to Cyrus's library.
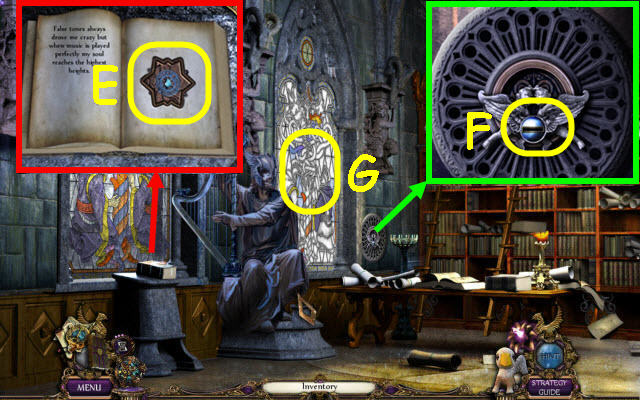
- Use CYRUS' SEAL on the seal; open the book and turn the page. Take the CYRUS MAP PIECE (E).
- Place the UPGRADED RING in the slot (F).
- Examine the window to trigger a puzzle (G).
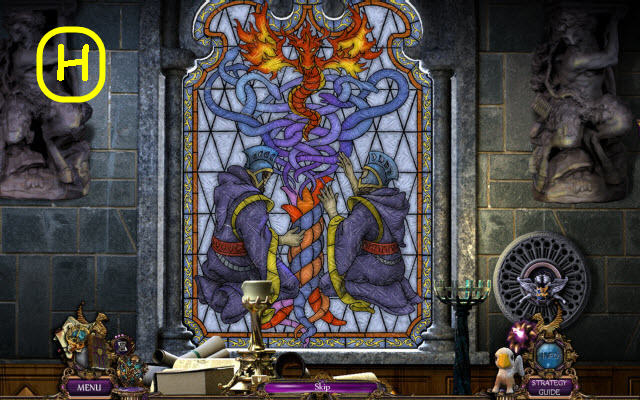
- Complete the image.
- Solution (H).
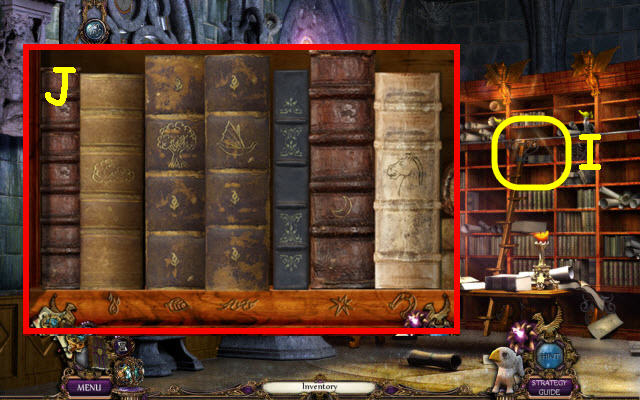
- Examine the shelf to trigger a puzzle (I).
- Arrange the books.
- Solution (J).
- Take the WIND PHIALS 3/4.
- Go to the griffin nest.
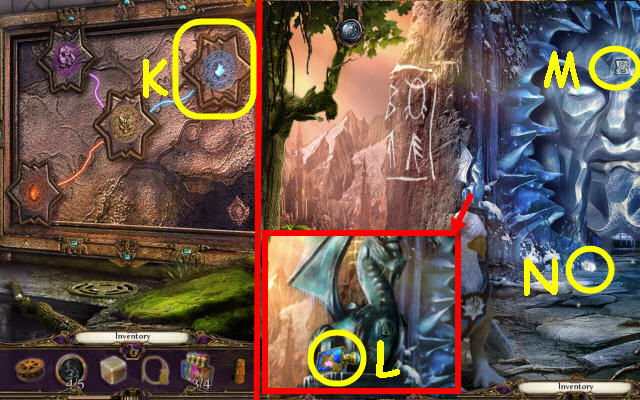
- Place the CYRUS MAP PIECE in the slot; select it (K).
- Take the WIND PHIALS 4/4 (L).
- Use the Golem heart on the symbol (M); take the MOUNTAIN CRYSTAL (N).
- Go to the dune.
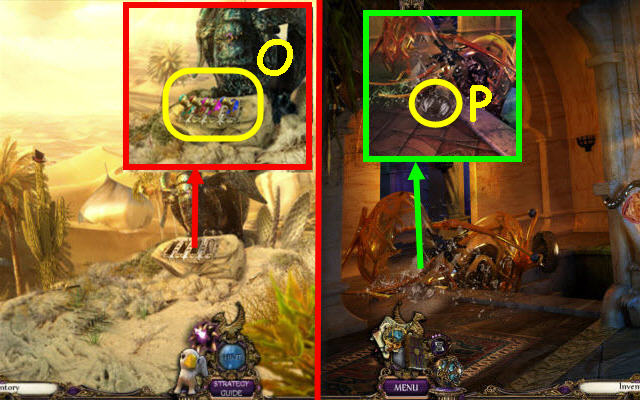
- Place the 4 WIND PHIALS in the slots (O).
- Go forward.
- Take the LENS 1/2 (P).
- Go to the polymath's workshop.
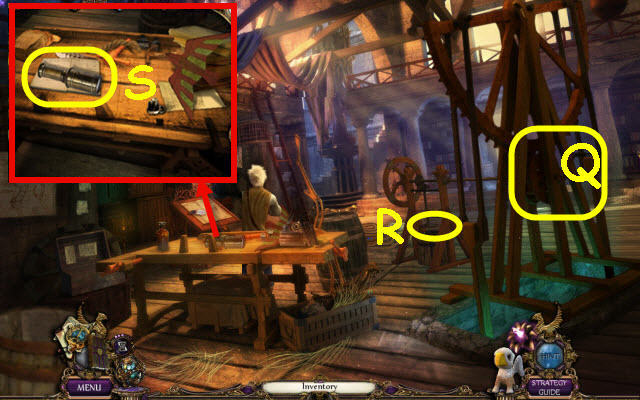
- Place the WOODEN GEAR on the mechanism (Q).
- Place the MOUNTAIN CRYSTAL on the polisher (R); receive a LENS 2/2.
- Place the 2 LENSES on the scope; take the SPYGLASS (S).
- Go to the throne room.
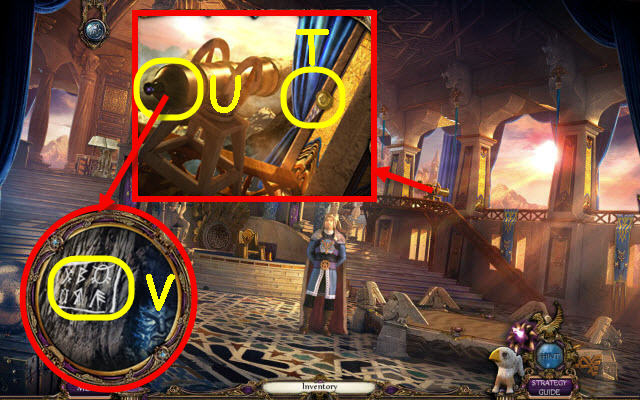
- Use the CURTAIN BINDER on the curtain (T) and the SPYGLASS in the telescope (U).
- Select the scope; take the LINE OF CODES (V).
- Go to the ice face.
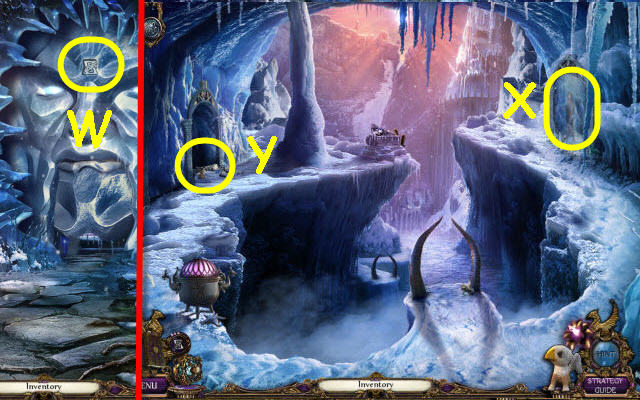
- Use the LINE OF CODES on the symbol (W).
- Go forward.
- Speak to the girl (X).
- Examine the doorway to access a HOP (Y).
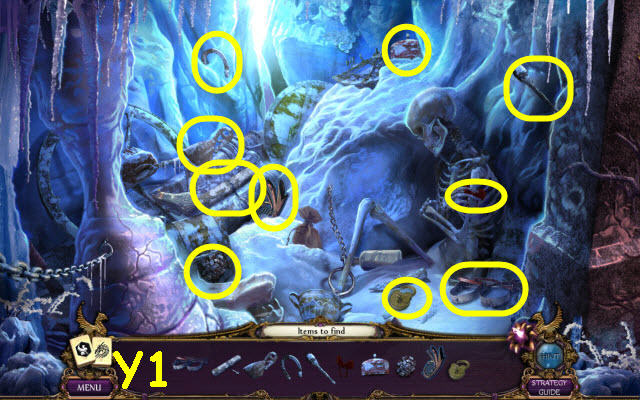
- Play the HOP.
- You receive an ICE-HORN MEDALLION (Y1).
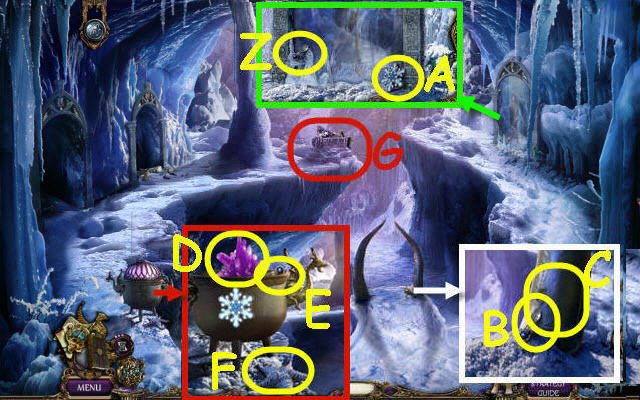
- Take the HORN KEYS 1/3 (Z) and ICY BREEZE (A).
- Take the HORN KEYS 2/3 (B).
- Open the compartment (C); place the ICE-HORN MEDALLION inside.
- Place the ICY BREEZE in the slot; take the GLOWING CRYSTAL (D), HORN KEYS 3/3 (E) and ICE STARFISH (F).
- Place the 3 HORN KEYS on the horn to trigger a puzzle (G).
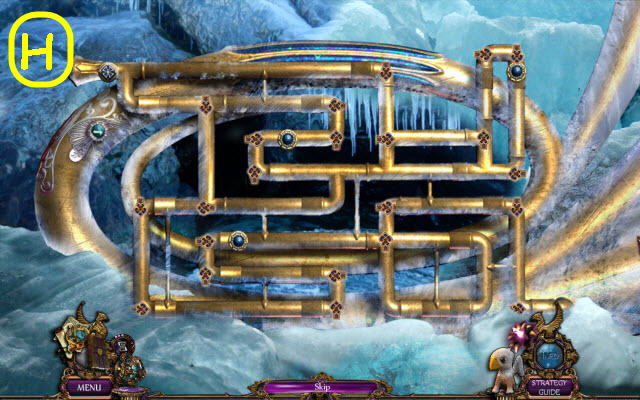
- Place the arrows.
- Solution (H).
- Go forward.
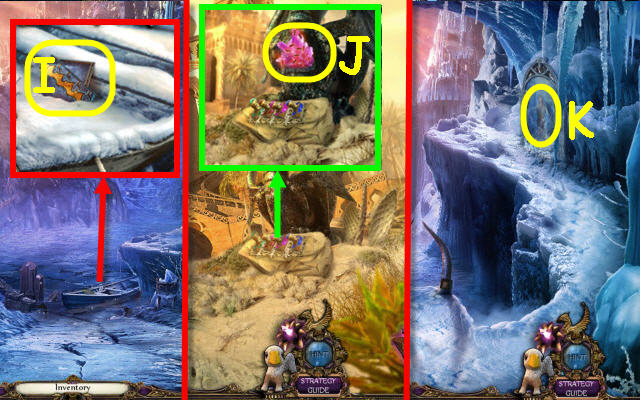
- Take the STAIRS SYMBOL (I).
- Go to the dune.
- Use the GLOWING CRYSTAL on the bugs; take the FIRE BUGS (J).
- Go to the prison.
- Use the FIRE BUGS on the symbols on the ice (K).
- Go forward.
- Go up the left stairs.
Chapter 7: Ice Kingdom
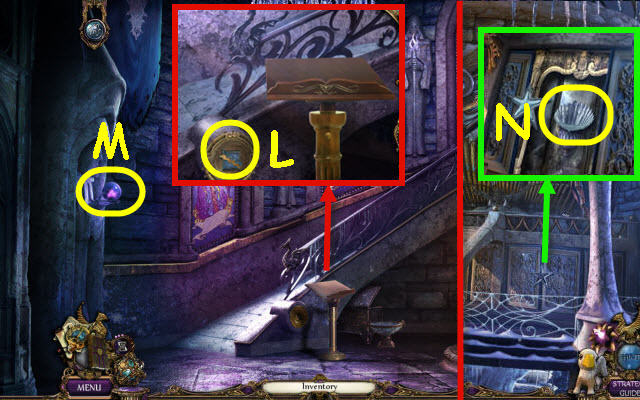
- Place the STAIRS SYMBOL in the slot (L).
- Take the UNCHARGED BLUE ORB (M).
- Go up the stairs.
- Place the ICE STARFISH on the panel; take the SHELL FORM (N).
- Back out twice.
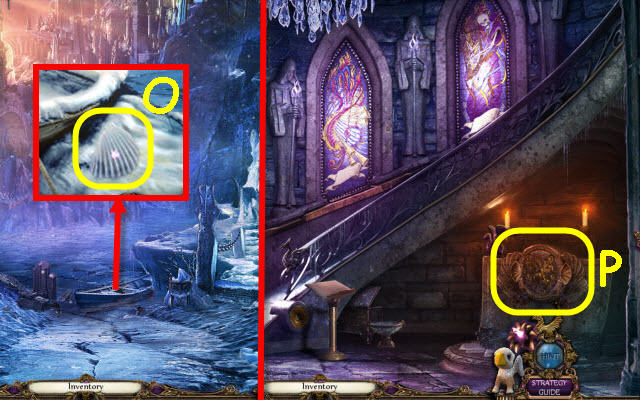
- Use the SHELL FORM on the snow; take the SNOW SHELL (O).
- Go upstairs.
- Place the SHELL FORM and SNOW SHELL in the matching slots to trigger a puzzle (P).
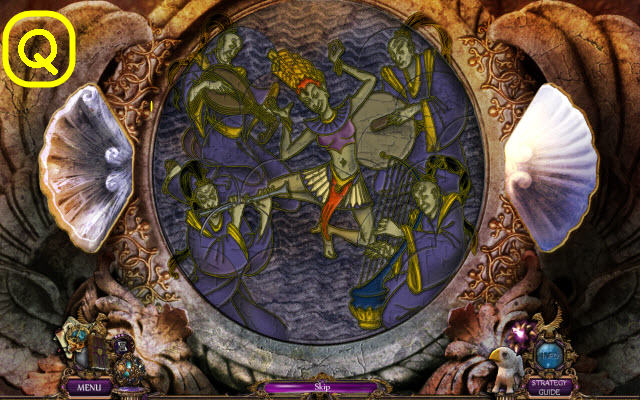
- Complete the image.
- Solution (Q).
- Take the Freya rune.
- Go to the concert hall.
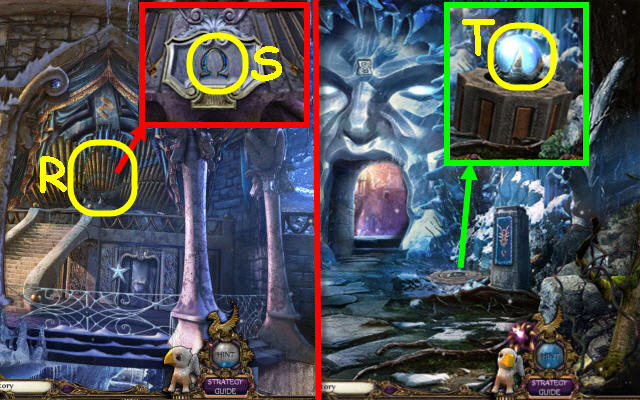
- Use the Golem heart on the pipes; receive a TABLET (R).
- Take the OMEGA SYMBOL (S).
- Go to the ice face.
- Place the OMEGA SYMBOL on the stone and place the UNCHARGED BLUE ORB in the claws; take the CHARGED BLUE ORB (T).
- Go to the icicle stairs.
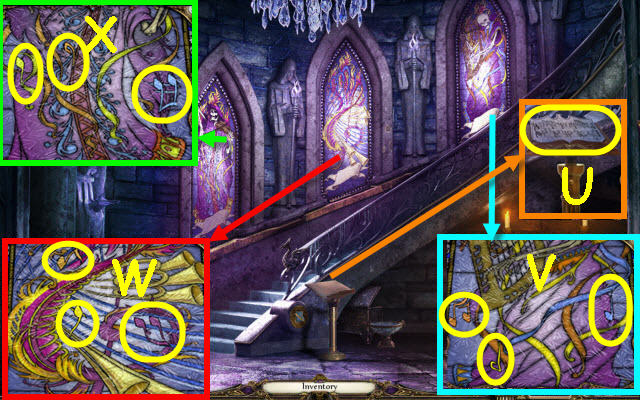
- Place the TABLET on the stand (U).
- Take the NOTES 1-3/9 (V), NOTES 4-6/9 (W) and NOTES 7-9/9 (X).
- Place the 9 NOTES on the tablet; take the FULL TABLET (U).
- Go up.
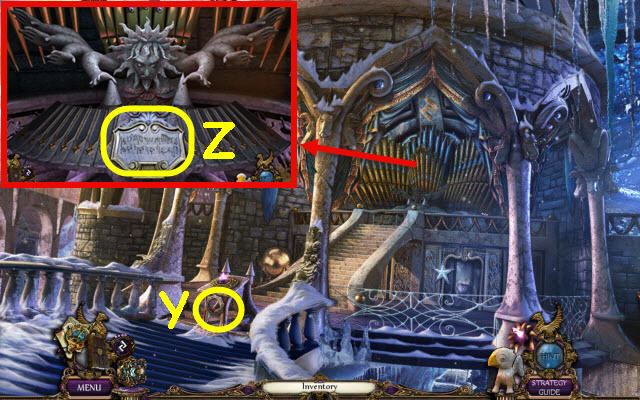
- Place the CHARGED BLUE ORB in the slot (Y).
- Place the FULL TABLET in the holder to trigger a puzzle (Z).
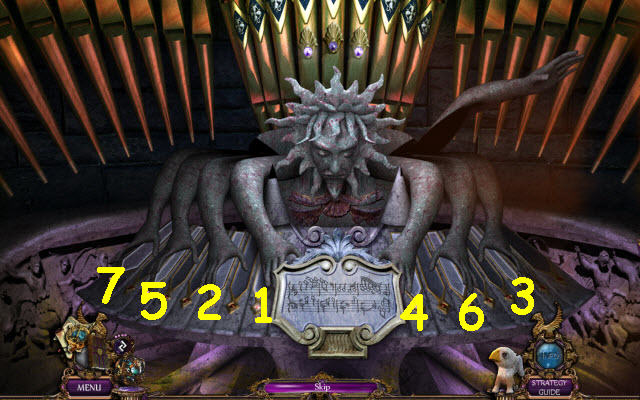
- Repeat the notes.
- Solution: 1-2-3-4, 1-2-3-4-5 and 1-2-3-4-5-6-7.
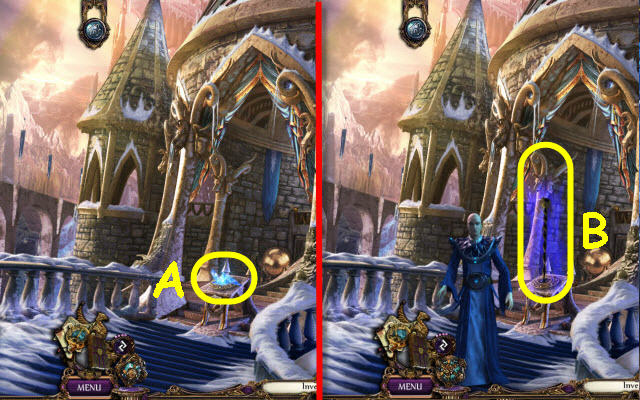
- Take the BROKEN CRYSTAL PIECES 1/2 (A).
- Speak to the man; take the ICE STAFF (B).
- Back out; go to the hourglass.
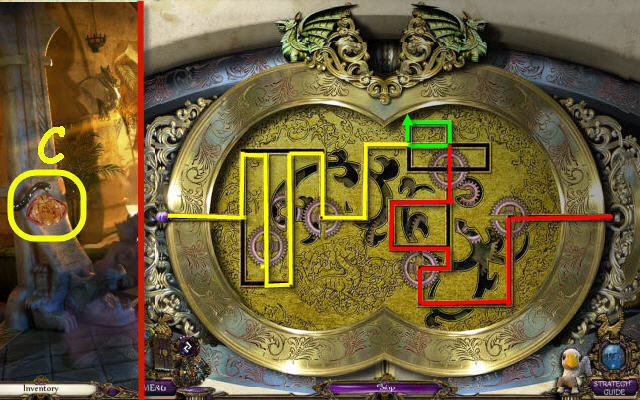
- Use the ICE STAFF on the symbol(C); examine it to trigger a puzzle.
- Guide the gem through the gears.
- Solution yellow, green x3 and red.
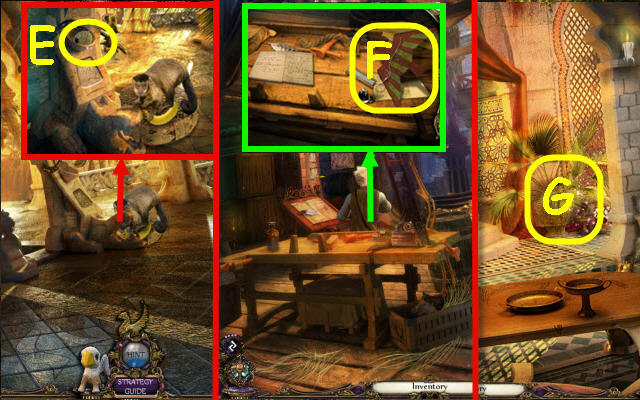
- Take the STRING (E).
- Go to the polymath's workshop.
- Tie the STRING on the bird; take the EAGLE SHADOW MAKER (F).
- Return to the hourglass; go through the archway on the left.
- Examine the plant to access a HOP (G).
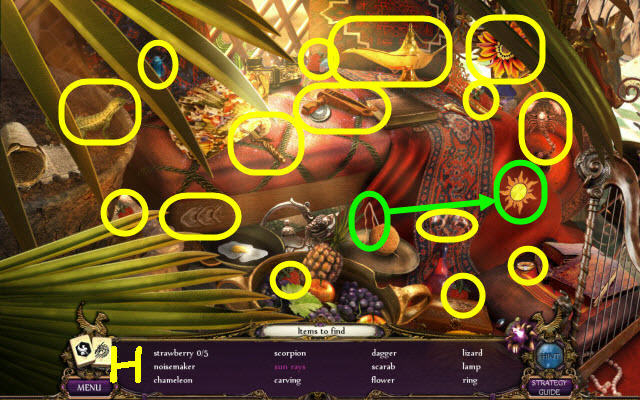
- Play the HOP.
- You receive a DAGGER (H).
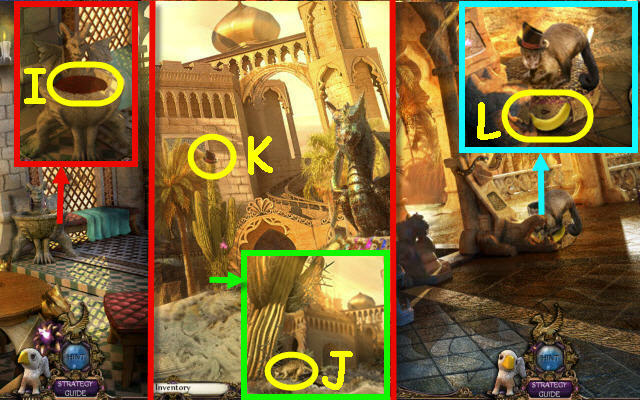
- Dip the DAGGER in the basin; receive a BLOODY DAGGER (I).
- Go to the dune.
- Use the EAGLE SHADOW MAKER on the meerkat (J).
- Use the griffin to retrieve the HAT (K).
- Go forward.
- Put the HAT on the monkey; take the BANANA (L).
- Go to the throne room.
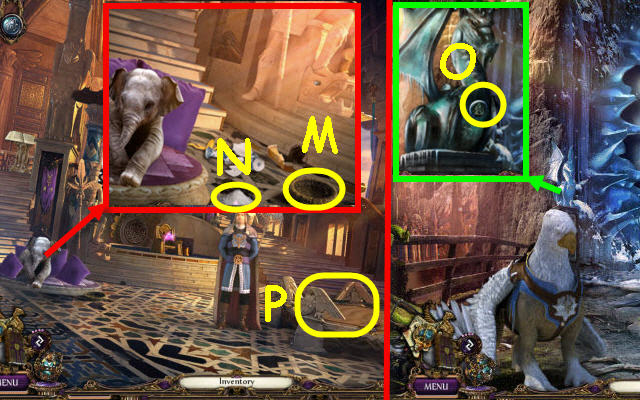
- Place the BLOCK OF SALT on the ground and the BANANA in the basket (M); take the SALT (N).
- Go to the ice face.
- Use the SALT on the symbol; take the STANDARD SYMBOLS 5/5 (O).
- Return to the throne room.
- Place the 5 STANDARD SYMBOLS on the platform to trigger a puzzle (P).
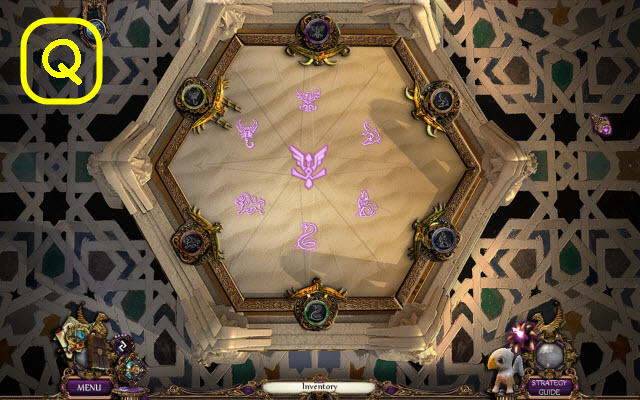
- Place the disks by their matching symbols.
- Solution (Q).
- Place the KING FIGURE on the sand castle to trigger a puzzle.
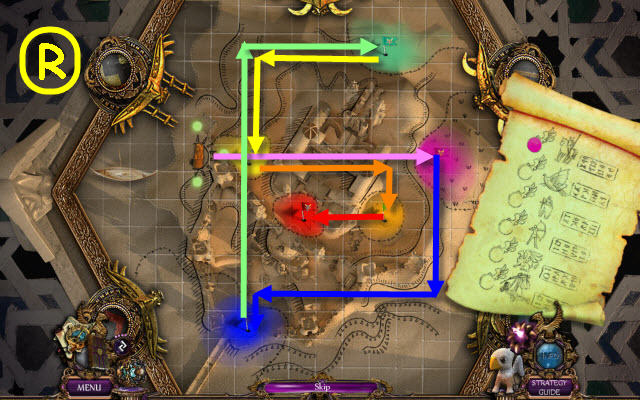
- Move the king to the kingdoms.
- Solution (R).
- Take the Aegir rune (S) which is added to your Golem heart.
- Go to Cyrus' library.
- Use the Golem heart on the statue; take the SPIRAL (T).
- Go to the hourglass.
Chapter 8: The Crystal
- Use the SPIRAL in the bulb; take the PILLAR PIECE (U).
- Go to the dragon hall.
- Place the PILLAR PIECE on the pillar to trigger a puzzle (V).
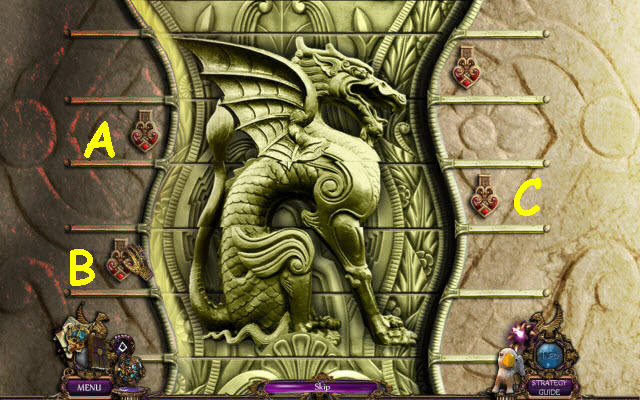
- Complete the image.
- Use the arrows until the row is correct as follows: B, C and A.
- Take the Thor rune, which will be added to your Golem heart.
- Back out; go down to the Cerberus.
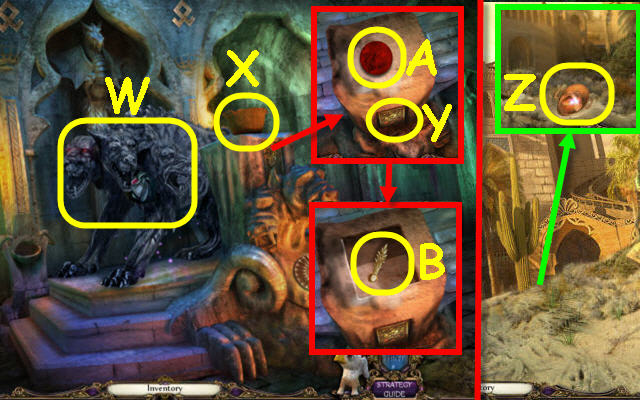
- Use the Golem heart on the Cerberus (W).
- Take the POT (X) and examine the diagram (Y).
- Go to the dune.
- Place the POT by the sand; take the POT OF SAND (Z).
- Return to the Cerberus.
- Place the POT OF SAND on the pedestal; use the BLOODY DAGGER on it. Take the UNCHARGED RED ORB (A) and THRONE RELIEF (B).
- Go to the dragon hall.
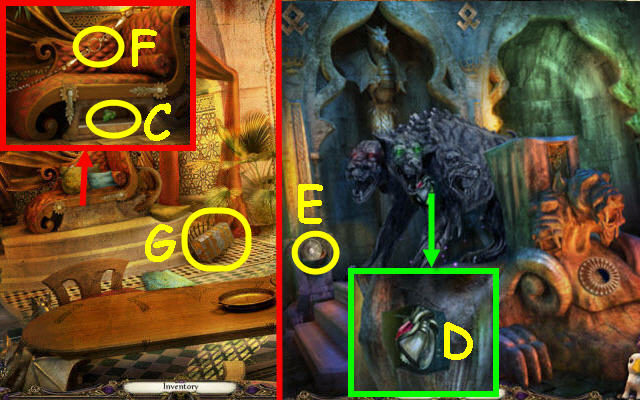
- Place the THRONE RELIEF on the throne; select it and take the GREEN HEART PIECE (C).
- Return to the Cerberus.
- Place the GREEN HEART PIECE on the heart (D); take the DIAL (E).
- Return to the dragon hall.
- Place the DIAL on the chain (F); take the CHAINED CHEST (G).
- Return to the Cerberus.
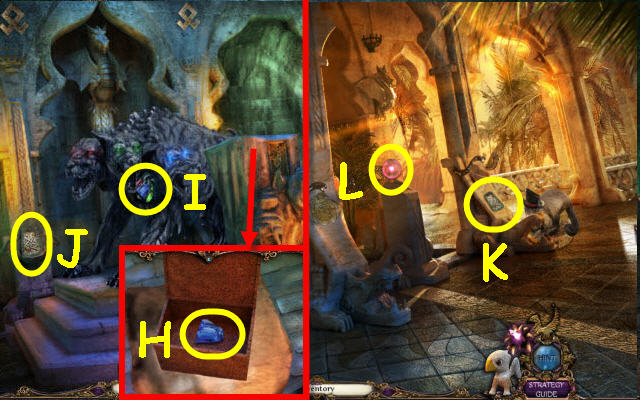
- Place the CHAINED CHEST on the pedestal; take the BLUE HEART PIECE (H).
- Place the BLUE HEART PIECE on the heart (I); take the ENDLESS SYMBOL (J).
- Back out.
- Place the ENDLESS SYMBOL in the recess (K).
- Set the UNCHARGED RED ORB on the pedestal; take the CHARGED RED ORB (L).
- Return to the Cerberus.
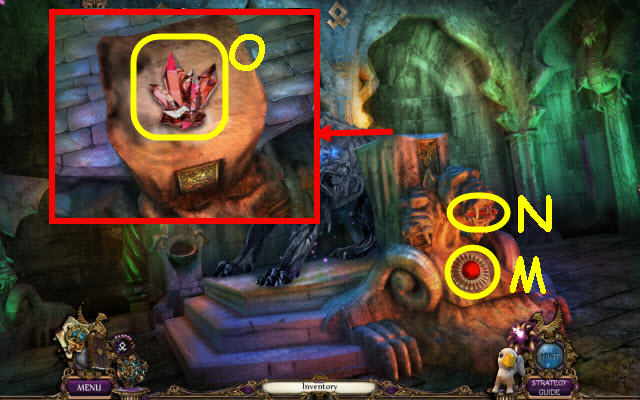
- Place the CHARGED RED ORB in the slot (M); take the RED CRYSTAL (N).
- Place the RED CRYSTAL on the pedestal; take the BROKEN CRYSTAL PIECES 2/2 (O).
- Back out; go to the throne room.
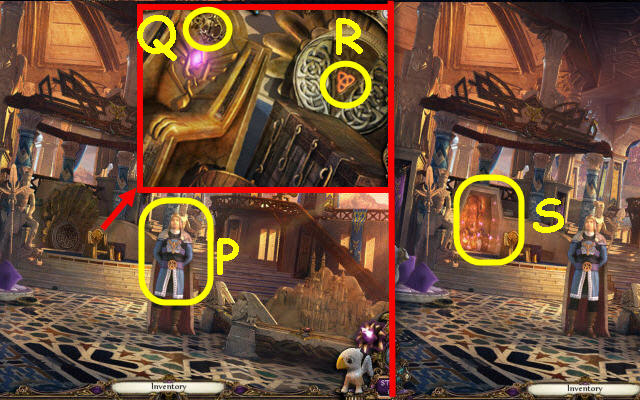
- Give the 2 BROKEN CRYSTAL PIECES to the King (P); receive the KING'S KEY.
- Place the KING'S KEY in the keyhole (Q); take the THOR SYMBOL (R).
- Examine the alcove to access a HOP (S).
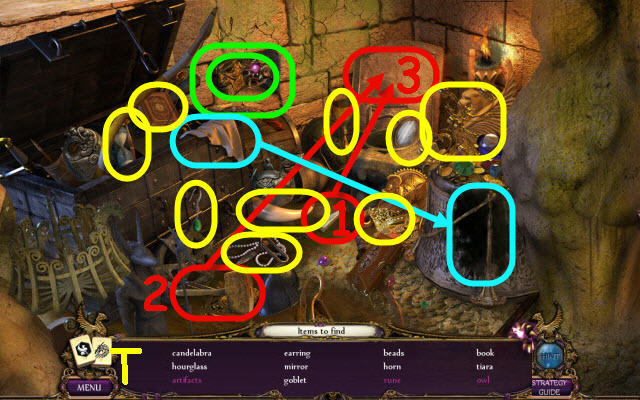
- Play the HOP.
- You receive the ROYAL ARTIFACTS (T).
- Go to the golem's cave.
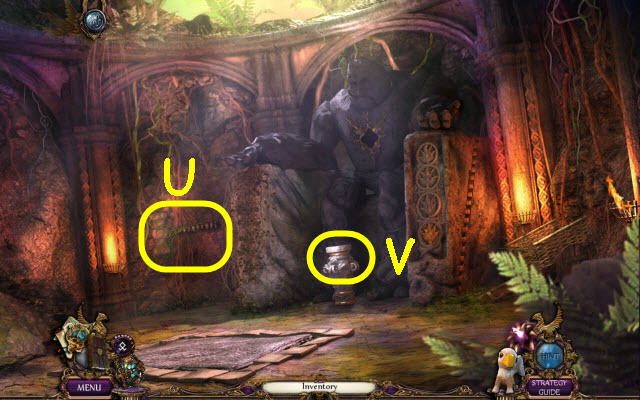
- Use the THOR SYMBOL on the hammer (U).
- Place the Golem heart in the center of the pedestal to trigger a puzzle (V).
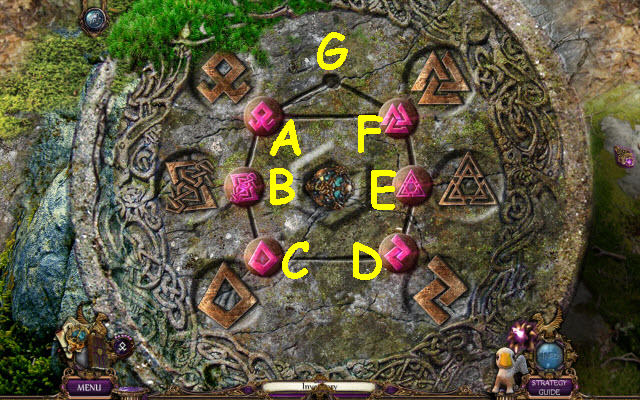
- Move the runes to their matching locations.
- Select the following: A, F, G, A, B, C, D, E, F, G, A, F, E, D, C, B, A, G, F, E, D, C, B, A, F, E, D, C, B, A, F and G.
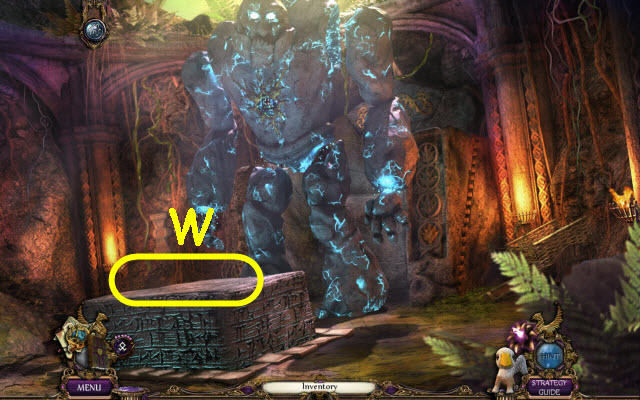
- Place the ROYAL ARTIFACTS on the platform (W).
- Congratulations! You have successfully completed The Secret Order: Ancient Times.
Created at: 2014-05-25

