

Walkthrough Menu
- General Tips
- Chapter 1: Creating the Portal
- Chapter 2: Ancient Egypt
- Chapter 3: Crocodile Tribe
- Chapter 4: Jaguar Tribe
- Chapter 5: Eagle Tribe
- Chapter 6: The Ceremony
General Tips
- This is the official guide for The Secret Order: Beyond Time!
- This guide does not mention each time you have to zoom into a location; the screenshots show each zoom scene.
- Hidden-object puzzles are referred to as HOPs. This guide does not show screenshots of the HOPs, however, it is mentioned when a HOP is available and the inventory item collected.
- This guide gives step-by-step solutions for all puzzles that are not random. Please read the instructions in the game for each puzzle.
- Use the map to quickly travel to a location.
Chapter 1: Creating the Portal

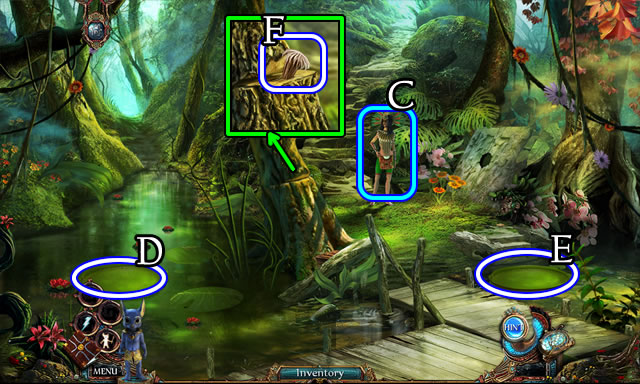
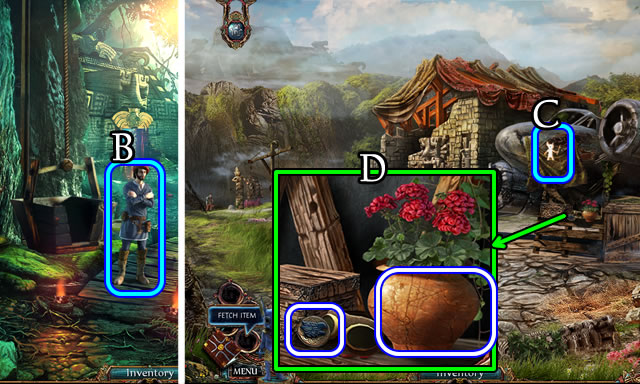
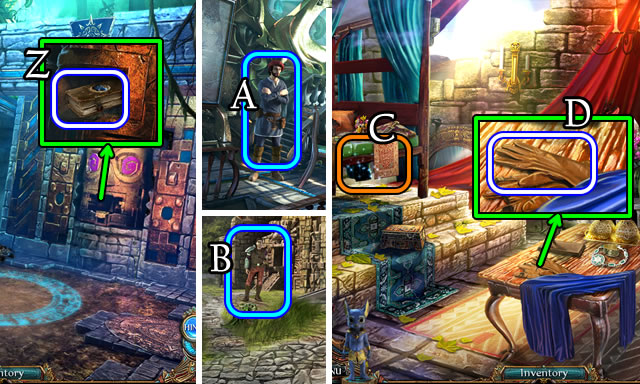
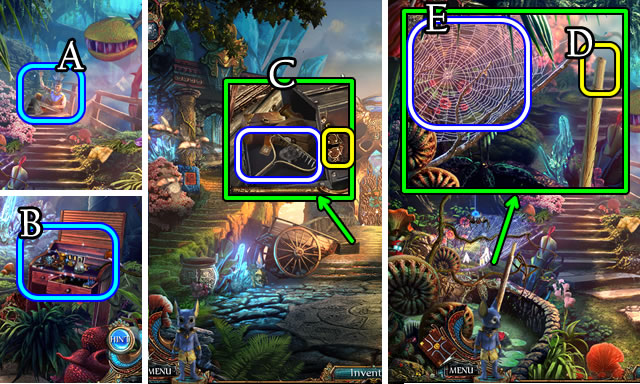
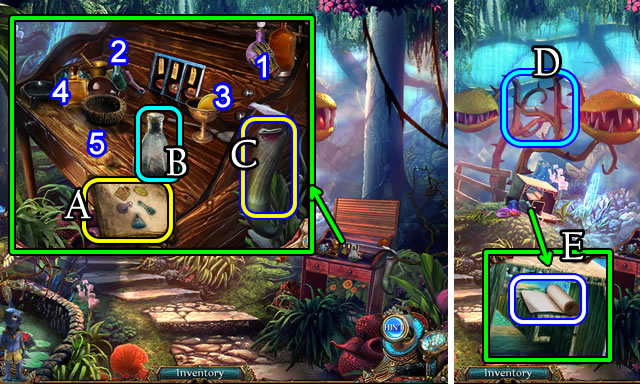
- Speak to Flavius (A).
- Take the Hint wing (B) for the user interface.
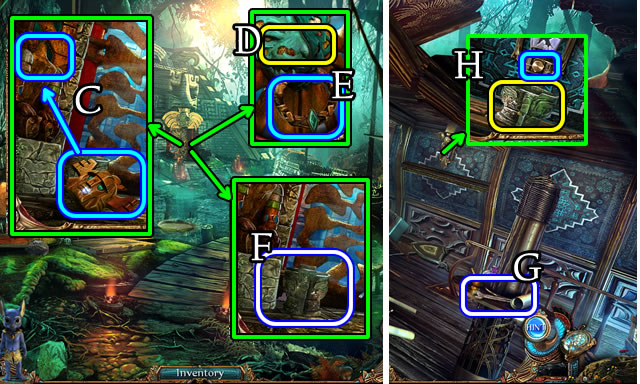
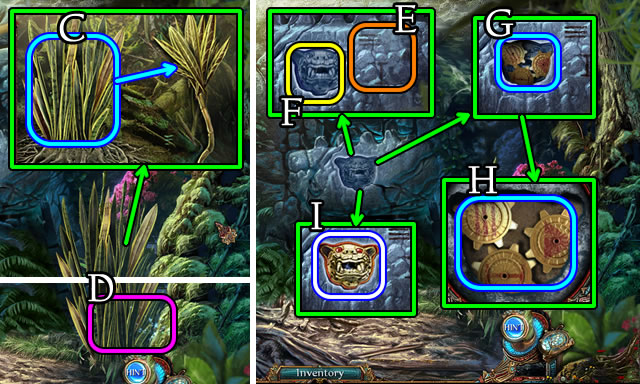
- Take the ROD and KEY (C).
- Open the bag; take the HANDLE (D).
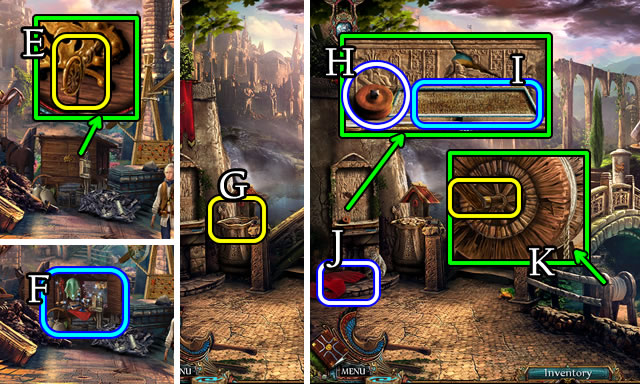
- Insert and turn the KEY (E) for a HOP (F). Receive BREAD.
- Walk forward.
- Place the BREAD (G).
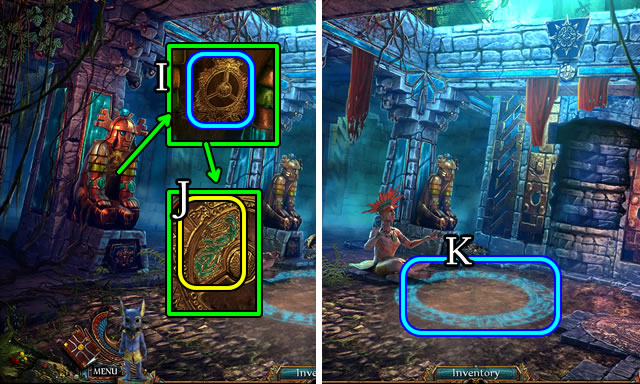
- Take the PULLEY (H); read the plaque (I).
- Take the TORN BANNER (J).
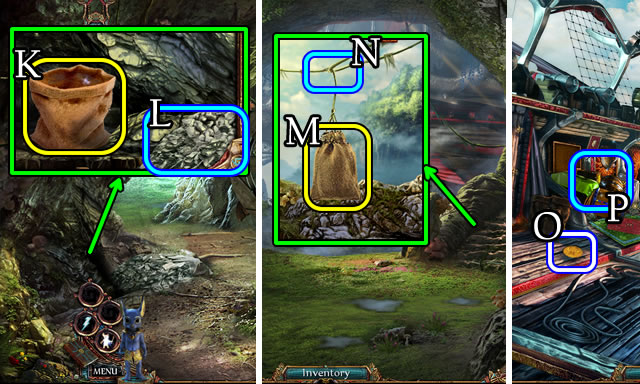
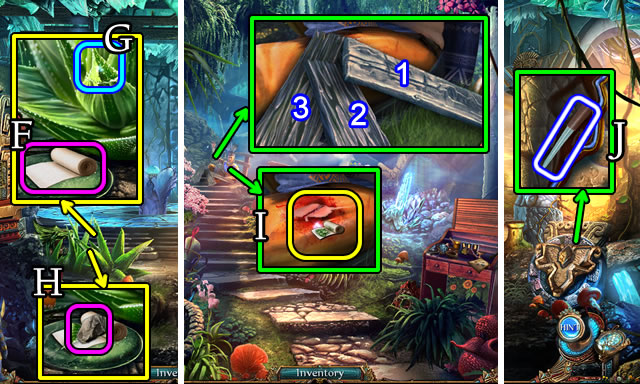
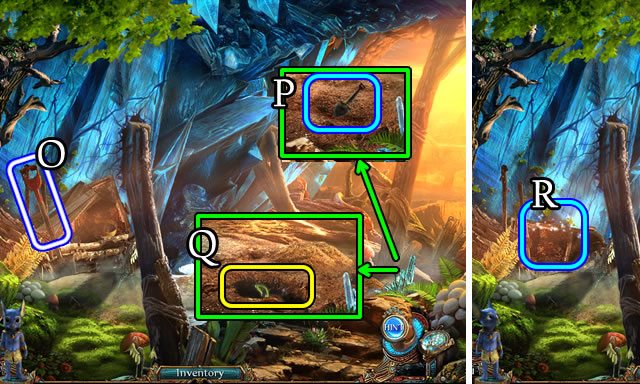
- Place the HANDLE (K); receive a ROPE.
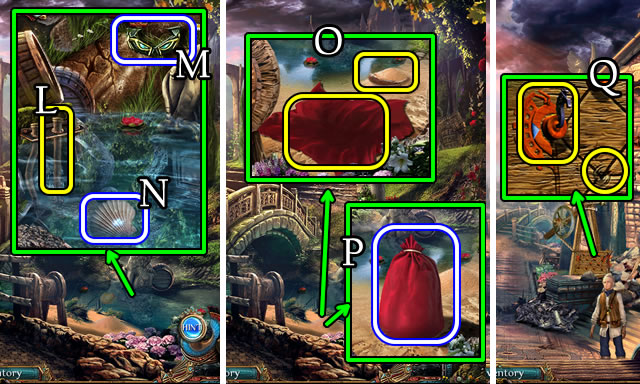
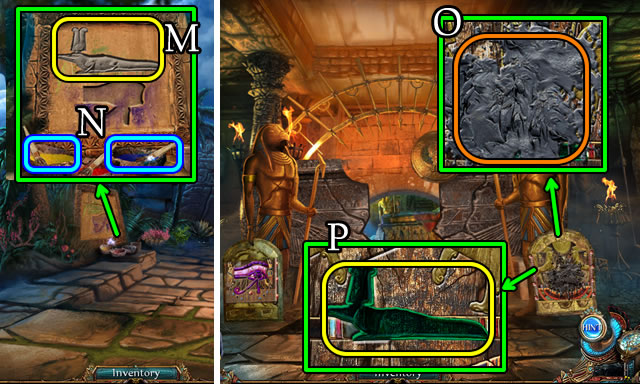
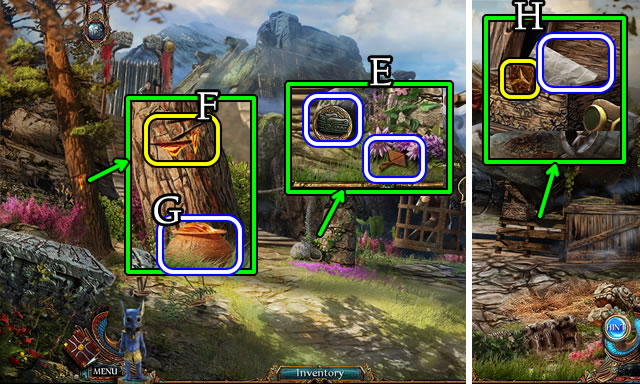
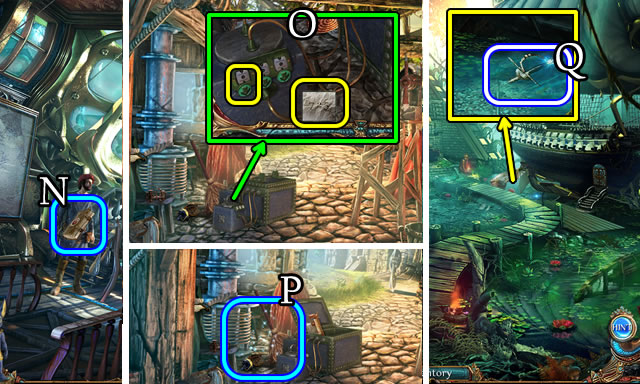
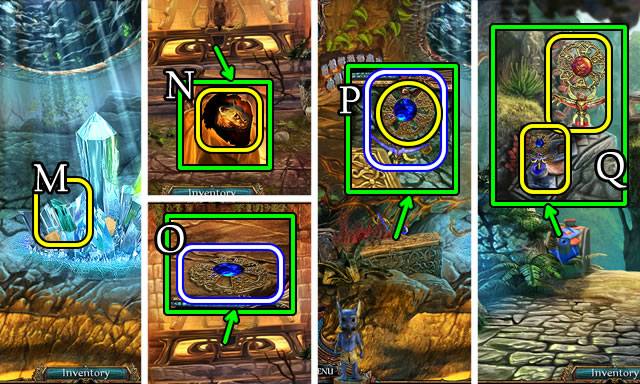
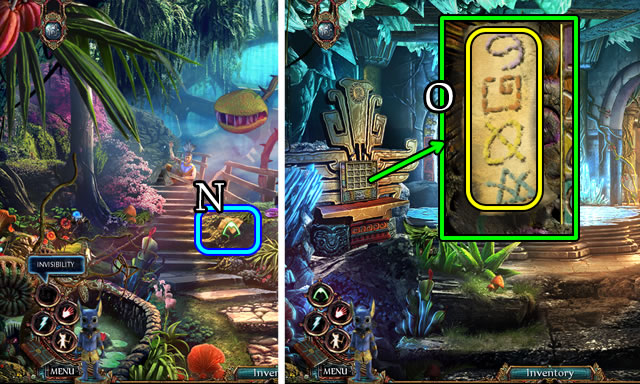
- Place the ROD (L); take ANUBIS EYES (M) and SHELL (N).
- Place the SHELL and TORN BANNER (O).
- Select the SHELL; place the sand on the banner; select the TORN BANNER; take a SANDBAG (P).
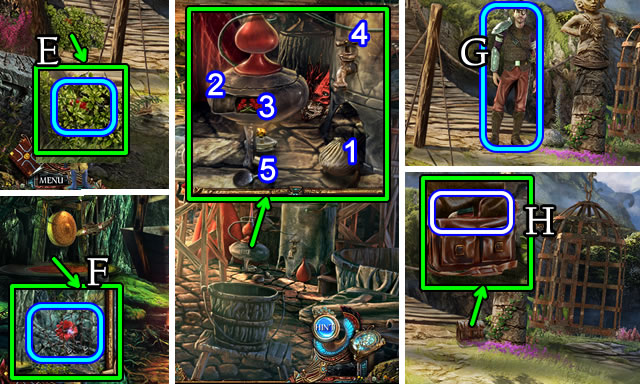
- Walk down.
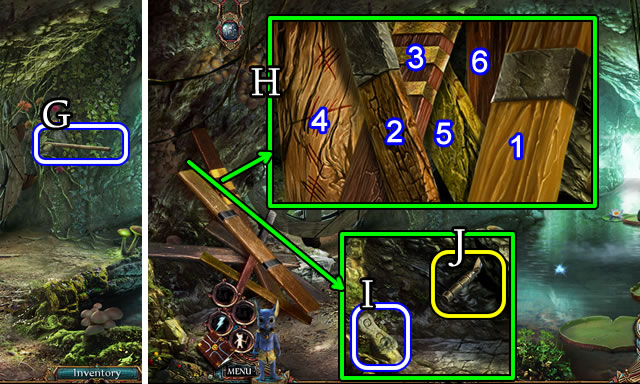
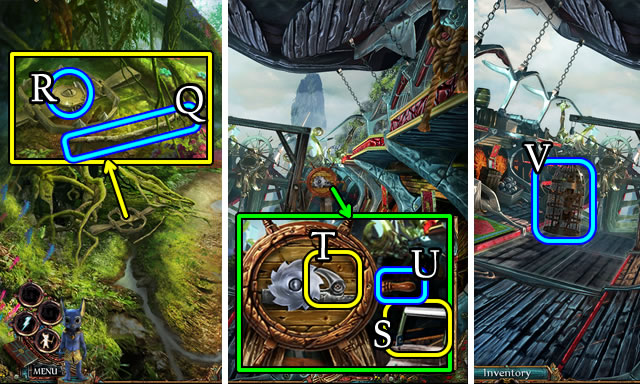
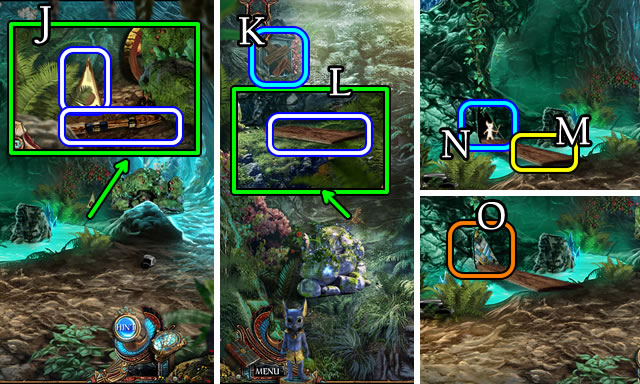
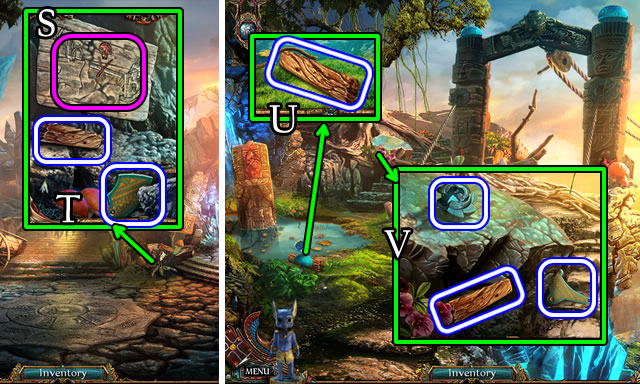
- Place the PULLEY and ROPE (Q) for a puzzle.

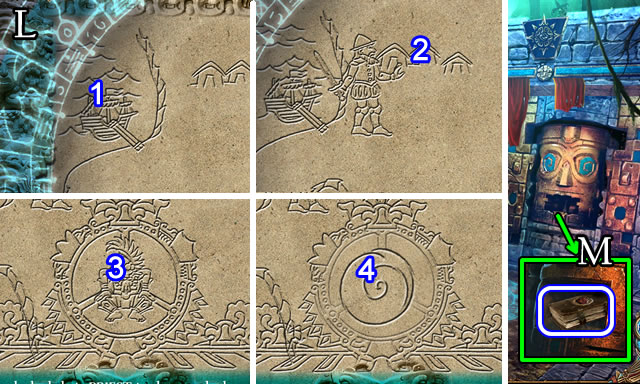
- Solution, part one (R). 1-2.
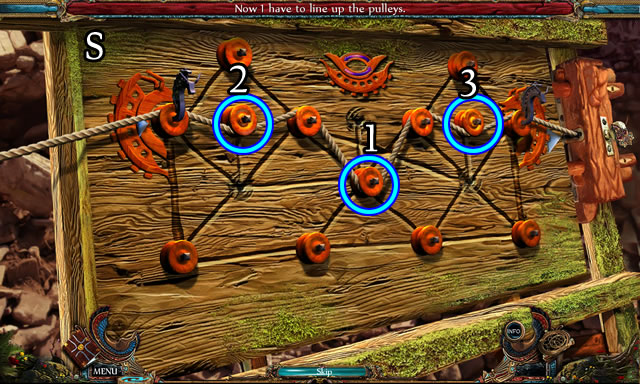
- Solution, part two (S). 1-2-3.
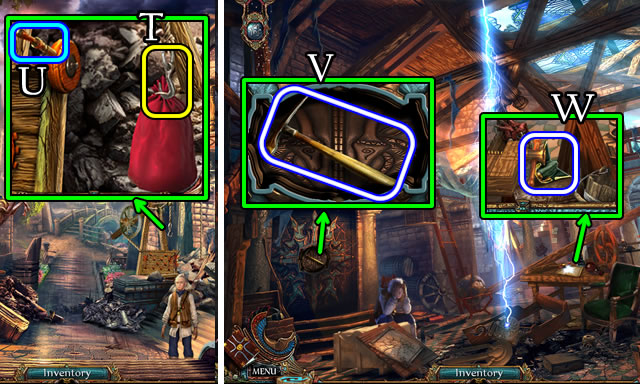
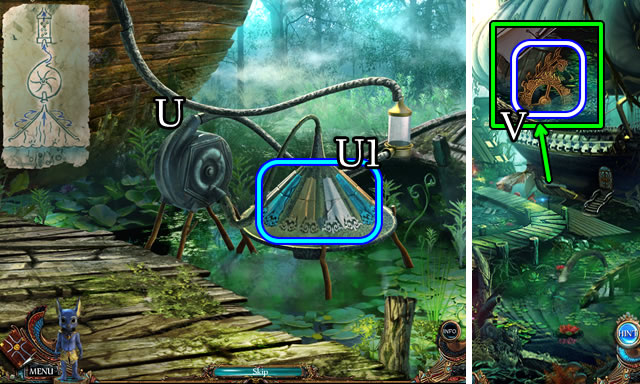
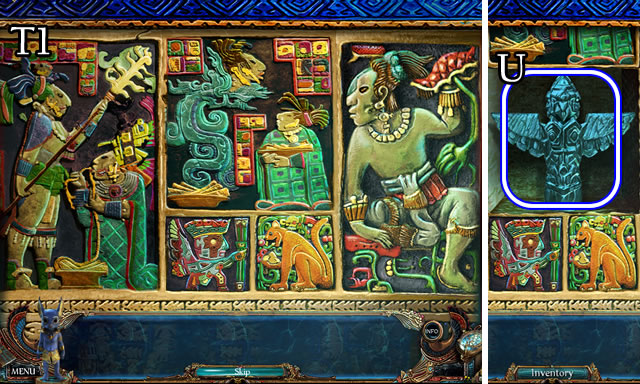
- Place the SANDBAG (T); pull the lever (U).
- Walk right.
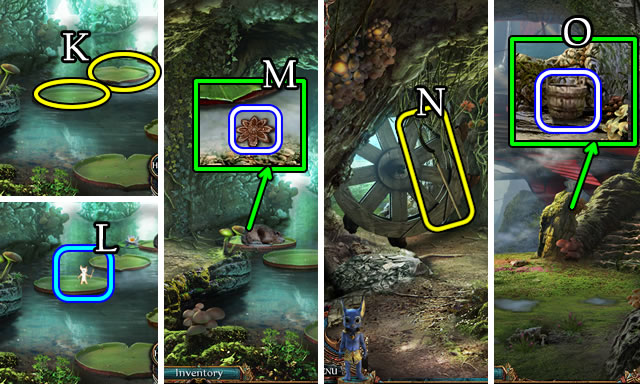
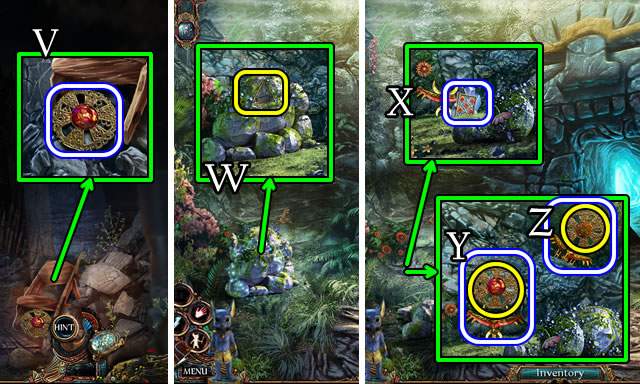
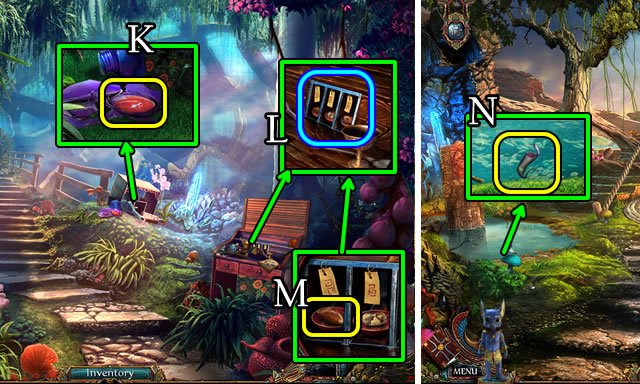
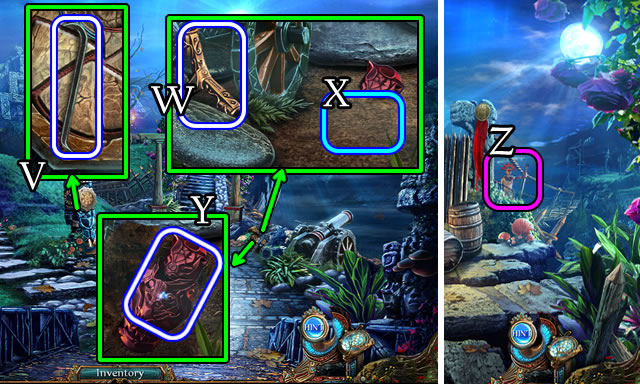
- Take the PICKAXE (V).
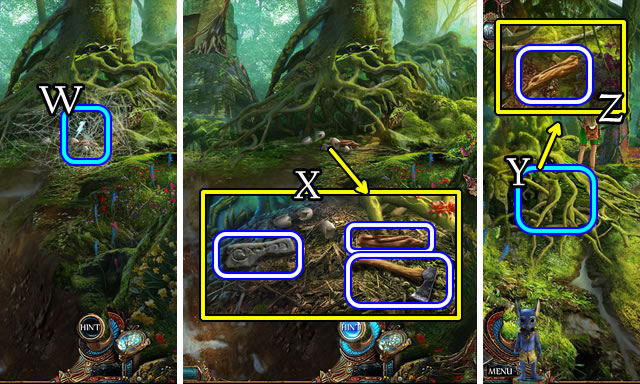
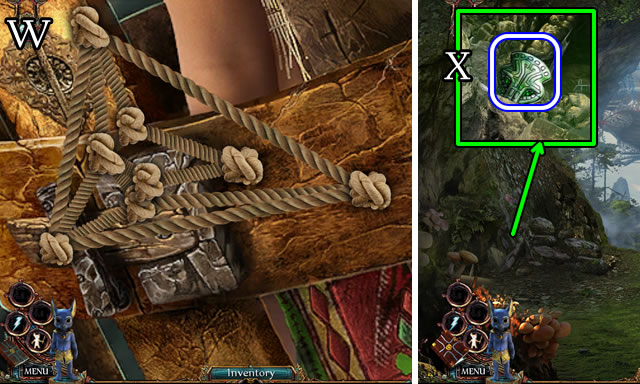
- Take the ANUBIS MUZZLE (W).
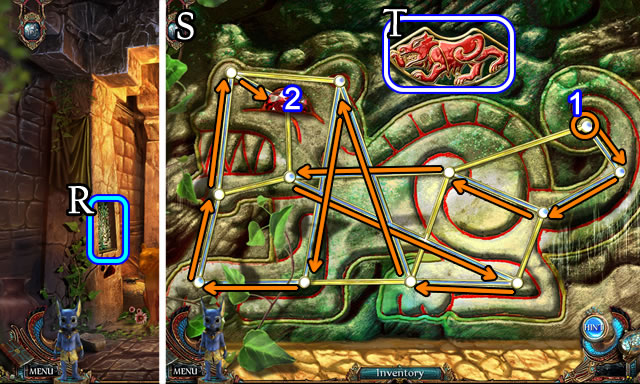
- Return to the Garden.
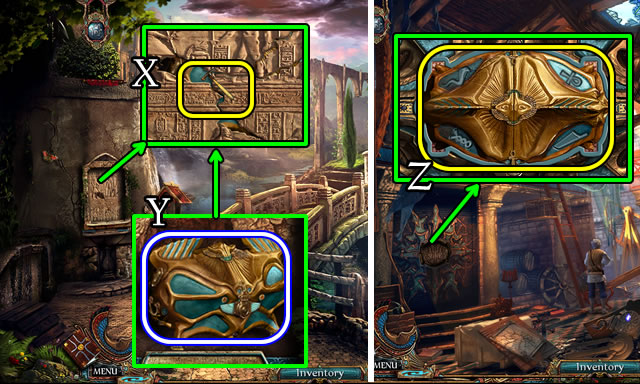
- Use the PICKAXE 2x (X).
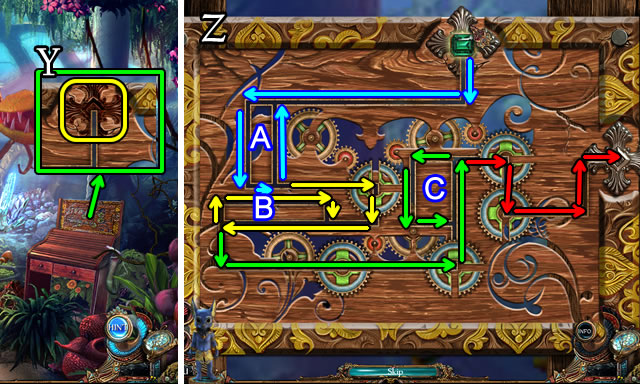
- Select, then take the CHEST (Y).
- Return to Flavius's Workshop.
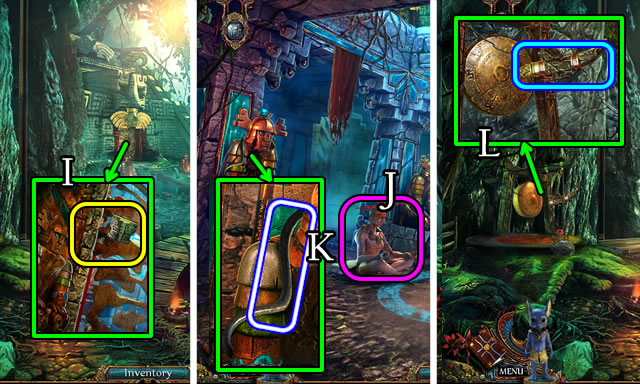
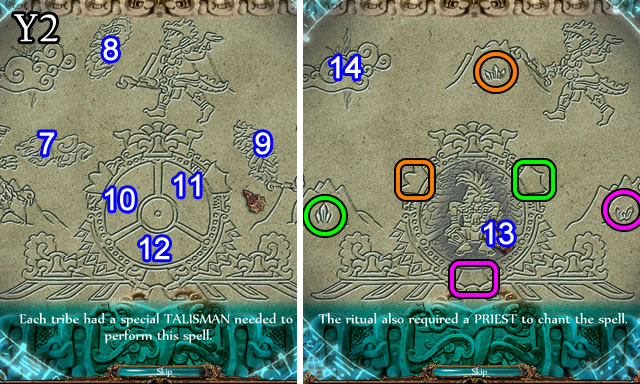
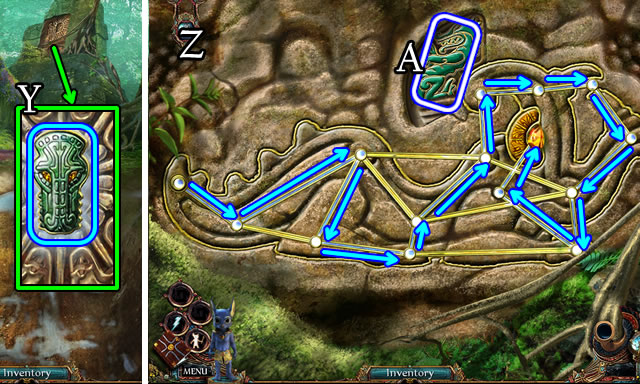
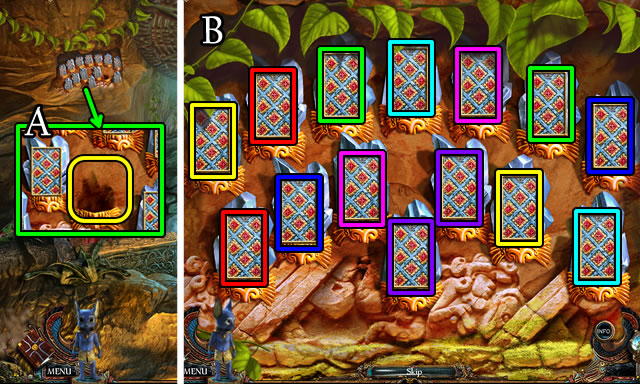
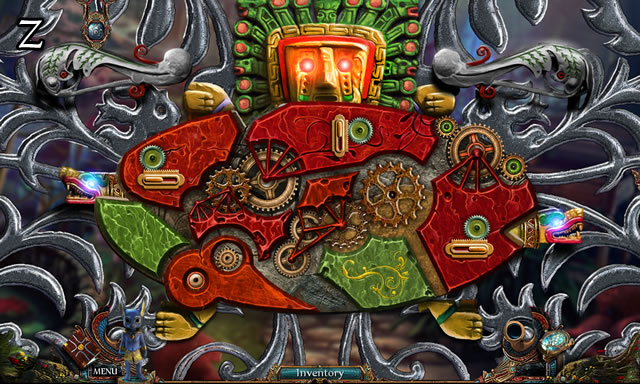
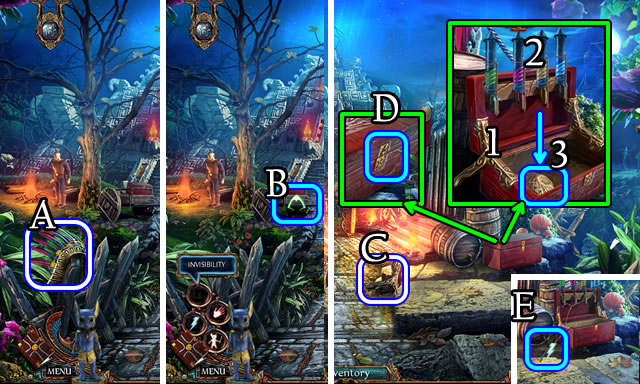
- Place the CHEST (Z) for a puzzle.
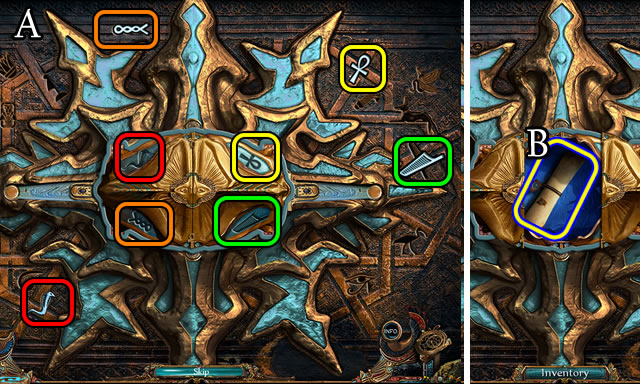
- Solution (A).
- Select the scroll (B), then take the user interface Map.
- Return to the Garden; walk forward.

- Select the flamingo; take the FEATHER (C).
- Return to Flavius's Workshop.
- Place the FEATHER (D).
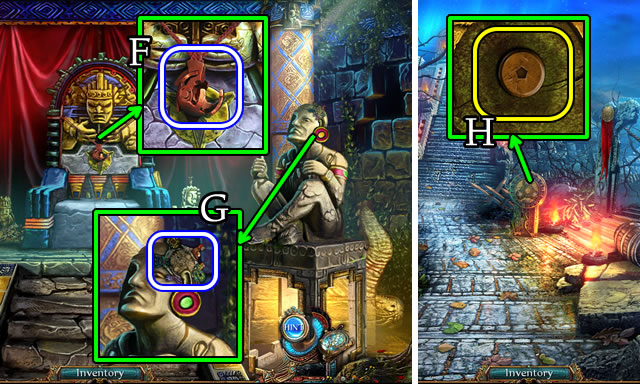
- Select and place the FEATHER (E). Read, then take the LETTER.
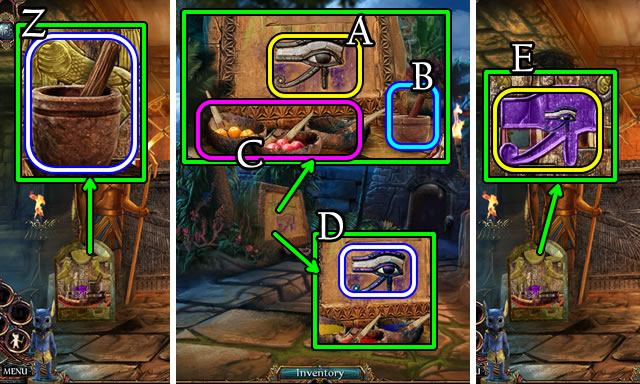
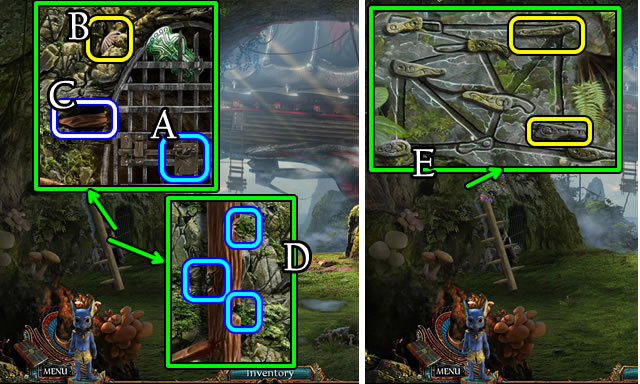
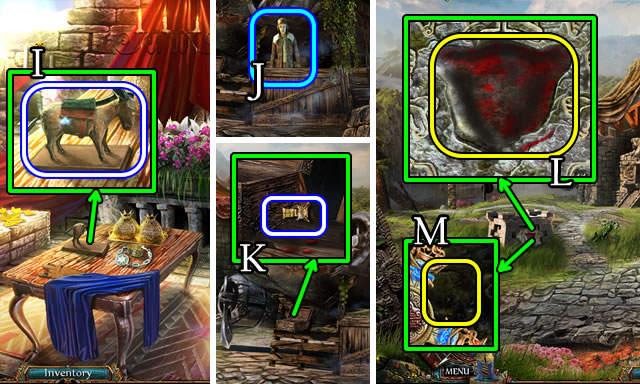
- Take the EYE OF HORUS (F).
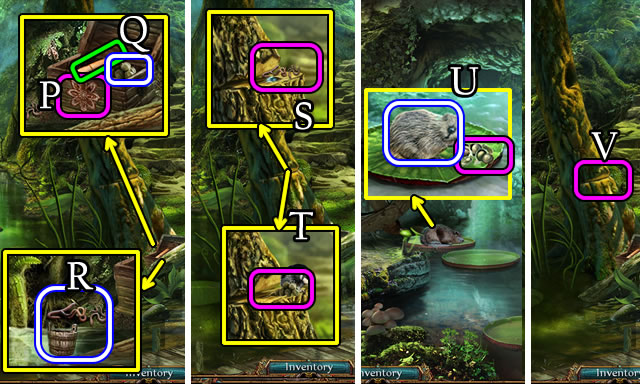
- Place the LETTER (G); take the CHEST (H).
- Take the SHENDYT (I).
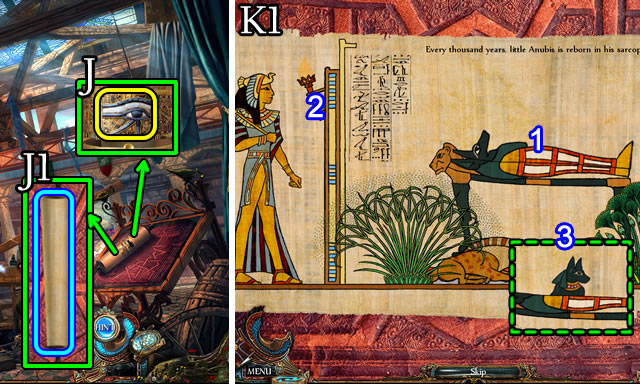
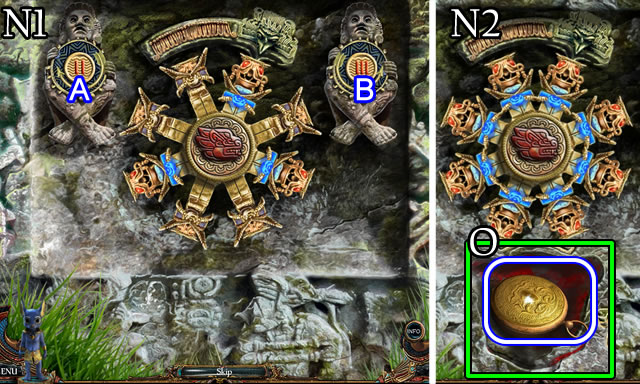
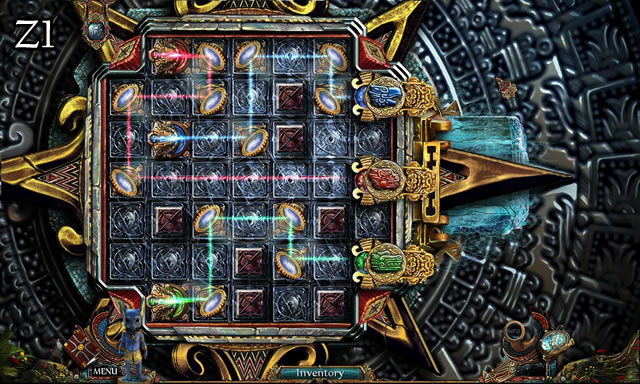
- Place the EYE OF HORUS (J); open the case; select the scroll (J1) for a mini-game.
- Solution, part one (K1). Open the sarcophagus (1). Select the torch (2). Select (3).
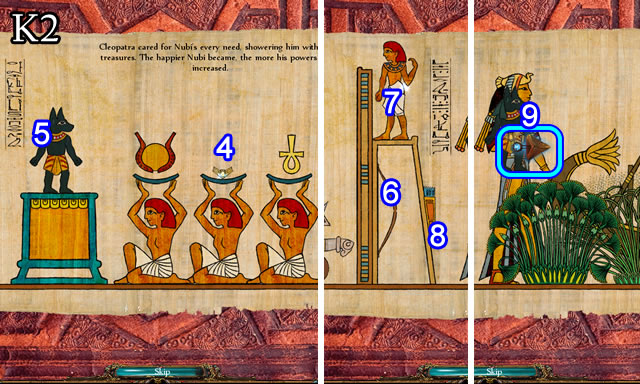
- Solution, part two (K2). Place (4) on Nubi (5). Select Nubi. Place the bow (6) on the archer (7), place arrows (8) on the archer and select (7). Scroll right (9).
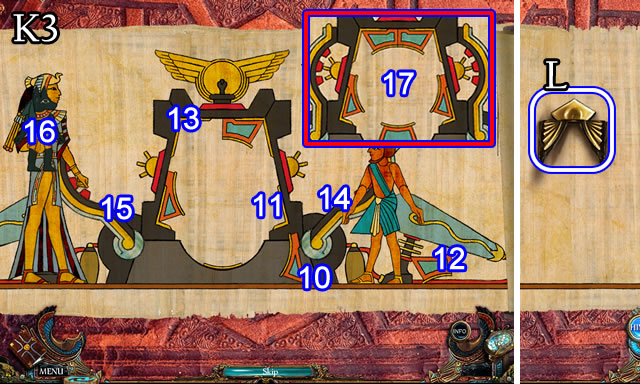
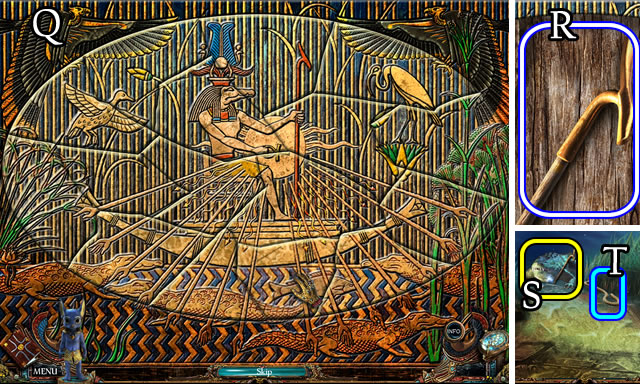
- Solution, part three (K3). Place part (10) at position (11), part (12) at position (13). Select (14) and (15). Select Nubi (16) for the portal (17). Take ANUBIS EARS (L).
- Return to Omar's Shelter.
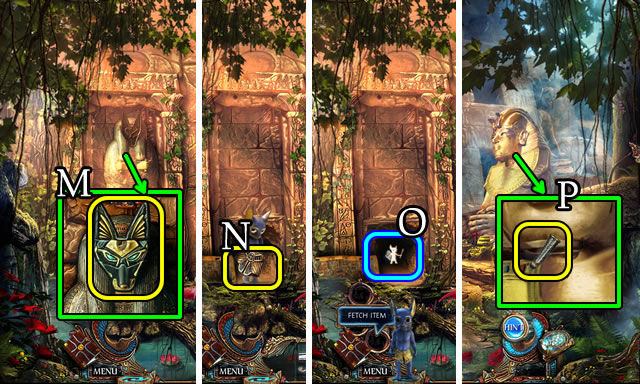
- Place the ANUBIS EARS, ANUBIS EYES and ANUBIS MUZZLE (M).
- Place the SHENDYT (N); receive Nubi for the user interface.
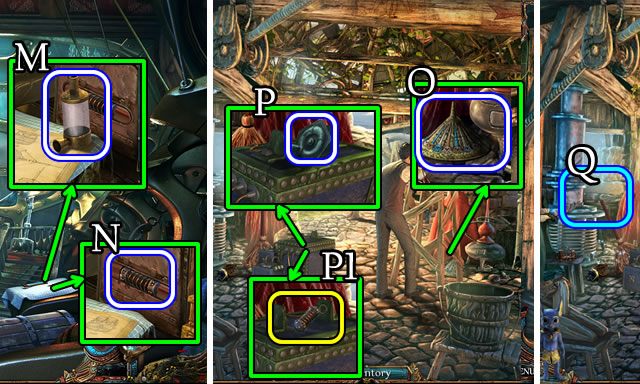
- Select Nubi; select and place the Fetch Item skill (O); receive a STONE BEARD.
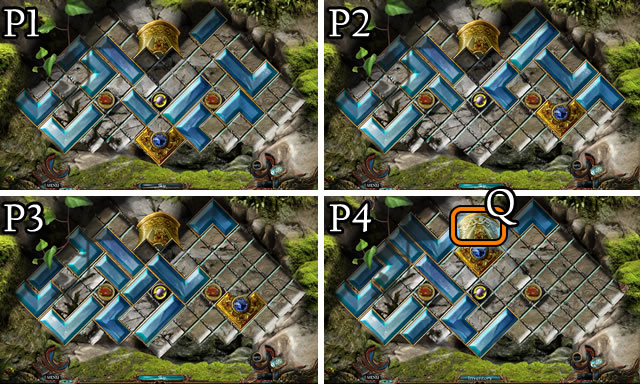
- Place the STONE BEARD (P) for a mini-game.
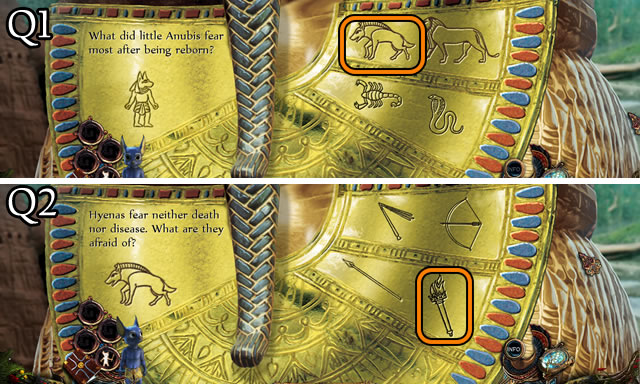
- Solution. Q1-Q2.
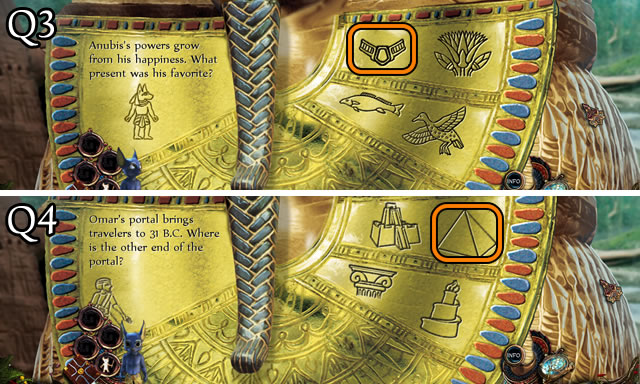
- Solution. Q3-Q4.
- Walk forward.
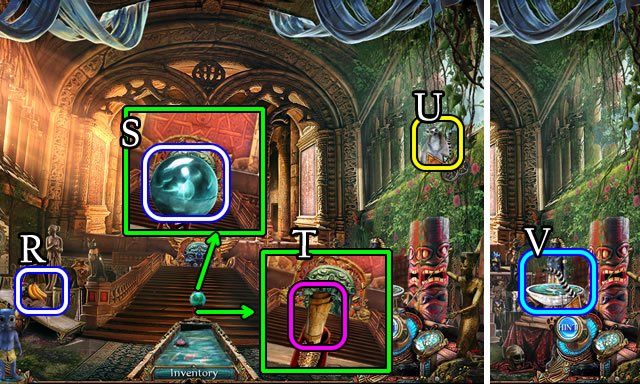
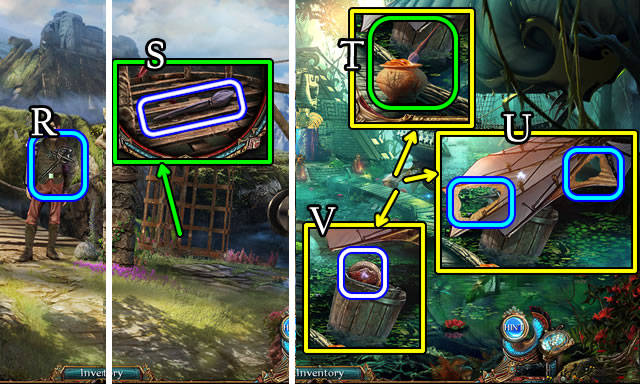
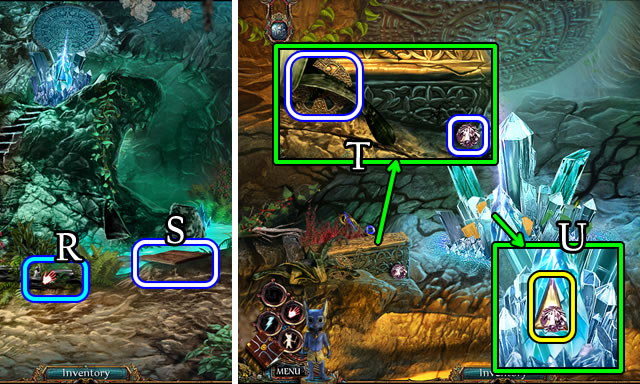
- Take the BANANA (R).
- Take the METALLIC ORB (S).
- Select and examine the scroll (T).
- Give the BANANA (U) for a HOP (V). Receive a BLUE TRIANGLE.
- Walk down.
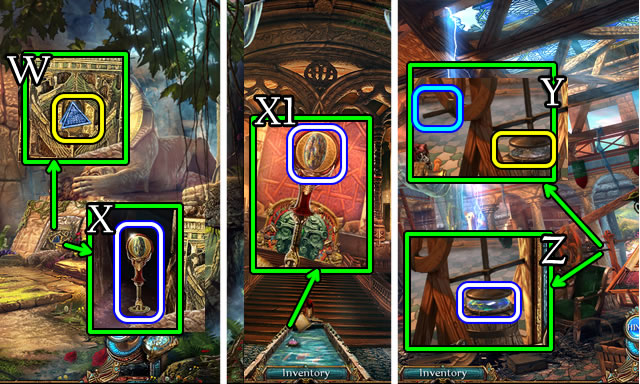
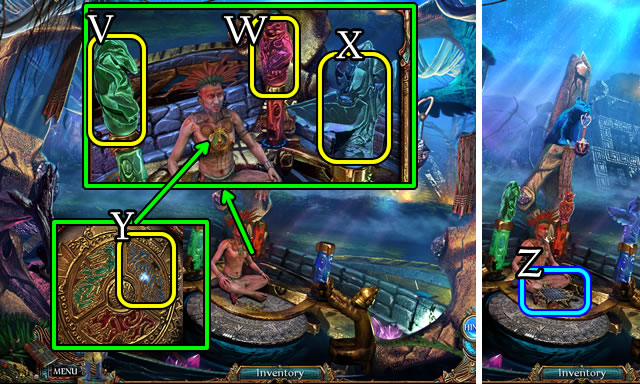
- Place the BLUE TRIANGLE (W). Take the OPAL STAFF (X).
- Walk forward.
- Place the OPAL STAFF; remove the TARNISHED OPAL (X1).
- Return to Flavius's Workshop.
- Place the TARNISHED OPAL, turn the handle 2x (Y); take a POLISHED OPAL (Z).
- Return to the Portal.
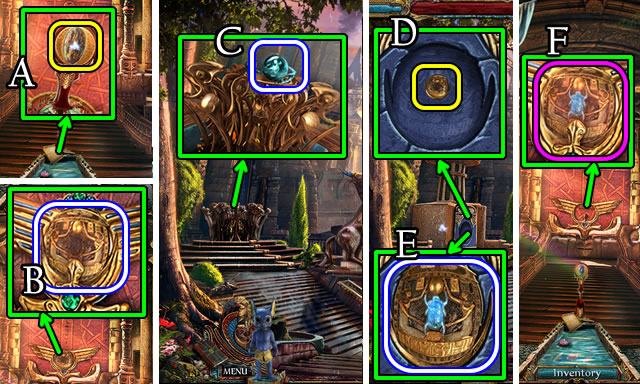
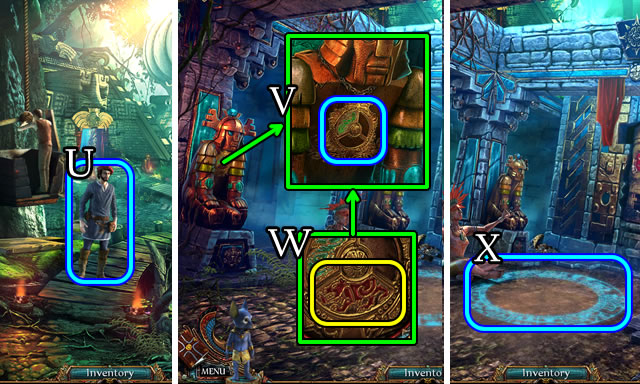
- Place the POLISHED OPAL (A).
- Select the altar; take KHONSU'S MOON DISC (B).
- Return to the Courtyard.
- Place the METALLIC ORB (C).
- Place KHONSU'S MOON DISC (D). Take the CHARGED MOON DISC (E).
- Return to the Portal.
- Place the CHARGED MOON DISC (F).
- Walk forward.
Chapter 2: Ancient Egypt
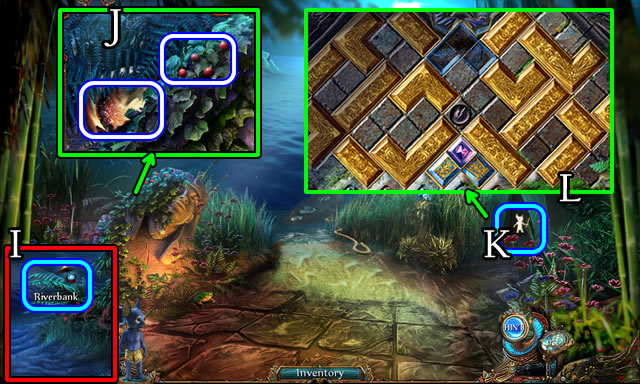
- Walk left (I).
- Move the fronds 3x; take the GOLDEN FRAGMENT and RED BERRIES (J).
- Select and place Nubi's Fetch Item skill. (K).
- Select the sealed entrance for a puzzle (L).
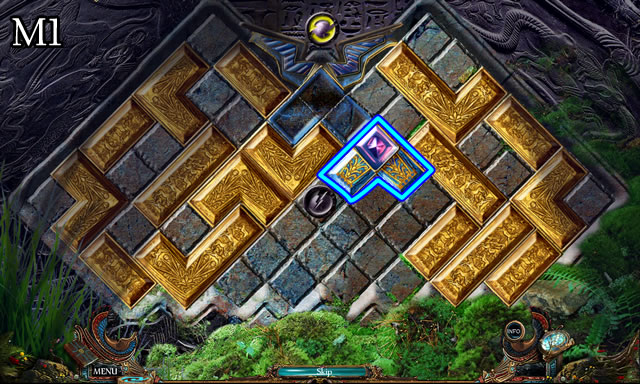
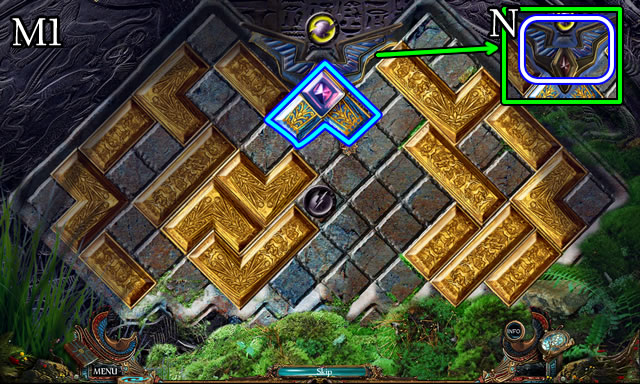
- Solution, part 1 (M1).
- Solution, part two (M2).
- Take Nubi's item (N).
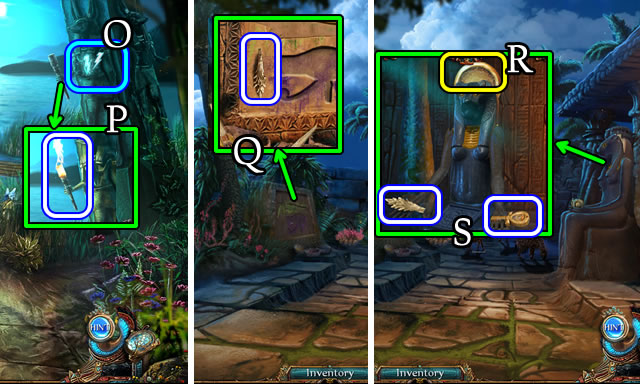
- Select and place the lightning skill (O). Take the BURNING TORCH (P).
- Walk down.
- Take STONE LEAF 1/2 (Q).
- Place the GOLDEN FRAGMENT (R). Take the ANKH and STONE LEAVES 2/2 (S).
- Walk left.
- Place the ANKH and STONE LEAVES 2/2 (T). Take the LEAVES SYMBOL (U).
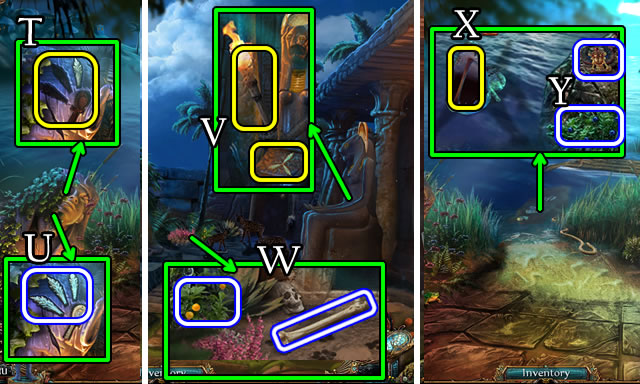
- Walk down.
- Place the LEAVES SYMBOL and BURNING TORCH (V).
- Take the FEMUR and YELLOW BERRIES (W).
- Walk left.
- Select the water; place the FEMUR (X); take the BLUE BERRIES and SCARAB (Y).
- Walk down, then forward.
- Take the PESTLE (Z).
- Walk down.
- Place the EYE OF HORUS (A), PESTLE (B), YELLOW BERRIES, RED BERRIES and BLUE BERRIES (C).
- Crush the berries with the pestle; apply red and blue paint; take the PAINTED HORUS EYE (D).
- Walk forward.
- Place the PAINTED HORUS EYE (E) for a puzzle.
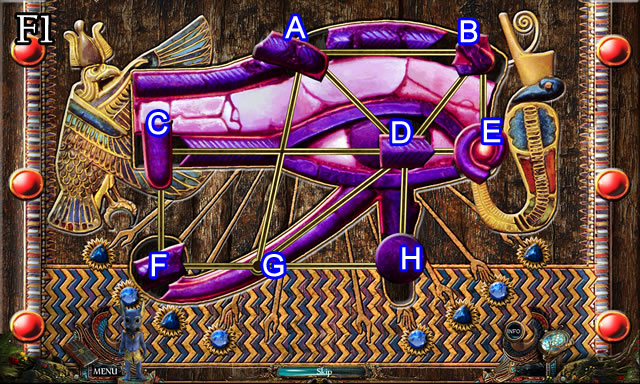
- Solution (F1). H-D-E-B-A-G-F-C-D-H-G-F-C-D-A-G-H-D-G-A-D-H-G.
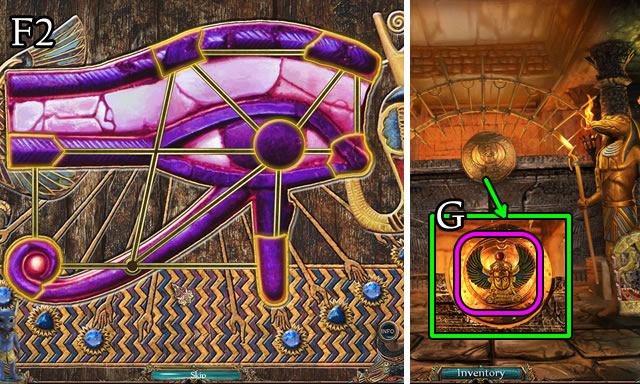
- Solved (F2).
- Place the SCARAB (G).
- Walk forward.
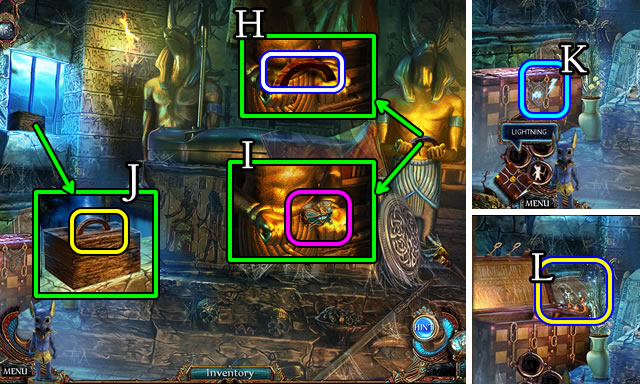
- Take the HANDLE (H); place the CHEST (I).
- Place the HANDLE (J), open, take the SCRAPER.
- Select and place Nubi's lightning skill (K).
- Play the HOP (L); receive a SOBEK SYMBOL.
- Walk down twice.
- Place the SOBEK SYMBOL (M); apply yellow and blue paint (N); take the COLORED SOBEK SYMBOL.
- Walk forward.
- Use the SCRAPER 3x (O).
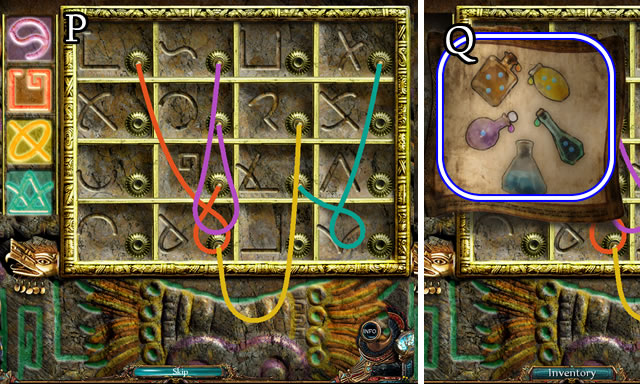
- Place the COLORED SOBEK SYMBOL (P) for a puzzle.
- Solution (Q).
- Take SOBEK'S STAFF (R).
- Return to the Riverbank.
- Place SOBEK'S STAFF (S); grab the rope (T); approach the ship.
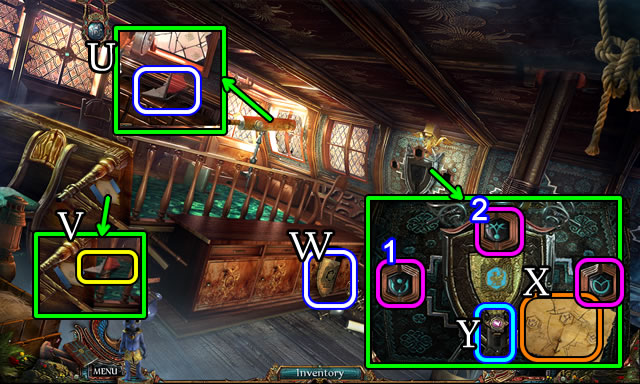
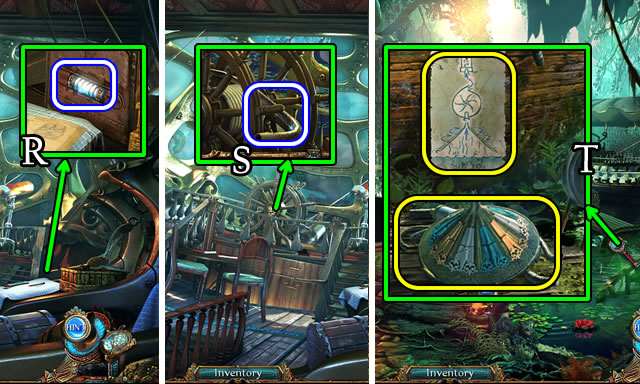
- Select the telescope; take the GLASS (U).
- Use the GLASS (V); take the CODE.
- Take the SHIELD (W).
- Place the SHIELD and CODE (X).
- Scroll the symbol buttons (1-2-3) to match the code.
- Slide the control (Y).
- Enter the Secret Room.
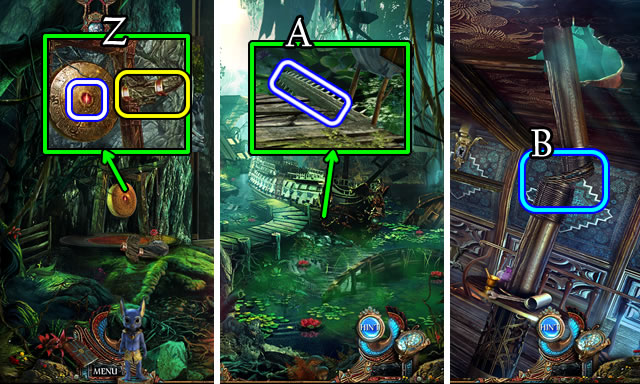
- Select and place the gong striker; take the JAGUAR EYE (Z).
- Take the SAWFISH ROSTRUM (A).
- Enter the Royal Griffin.
- Use the SAWFISH ROSTRUM (B).
- Walk down.
- Replace the head (C).
- Place the JAGUAR EYE (D); select the knocker (E).
- Take the BOWL (F).
- Return to the Royal Griffin.
- Grab the WRENCH (G).
- Place the BOWL; use the WRENCH (H); take the BOWL OF OIL.
- Walk down.
- Use the BOWL OF OIL (I).
- Walk forward.
- Speak to the Priest (J); receive a GONG HAMMER HEAD.
- Take GAS COLLECTOR KIT 1/5 (K).
- Walk down.
- Place the GONG HAMMER HEAD; select the striker (L).
- Return to the Royal Griffin.
- Take GAS COLLECTOR KIT 2/5 (M) and the DRAINED BATTERY (N).
- Walk down; enter the Peristyle.
- Take GAS COLLECTOR KIT 3/5 (O).
- Take GAS COLLECTOR KIT 4/5 (P); place the DRAINED BATTERY (P1).
- Play the HOP (Q); receive a CHARGED BATTERY.
- Return to the Royal Griffin.
- Place the CHARGED BATTERY (R). Receive a SKETCH.
- Take GAS COLLECTOR KIT 5/5 (S).
- Walk down.
- Place the GAS COLLECTOR KIT 5/5 and the SKETCH (T) for a mini-game.
- Solution (U). Align the colored panels and base (U1).
- Take the TOKEN OF ALLIANCE (V).
- Walk forward.
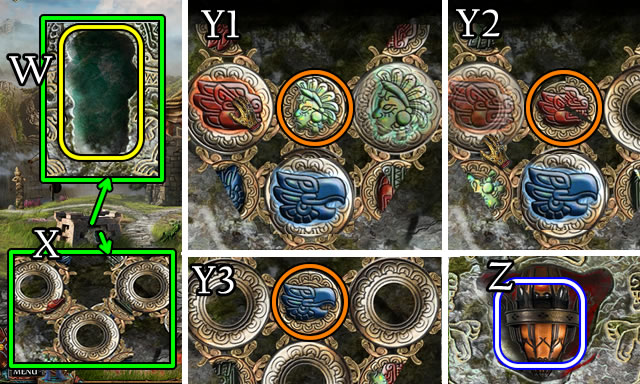
- Place the TOKEN OF ALLIANCE (W).
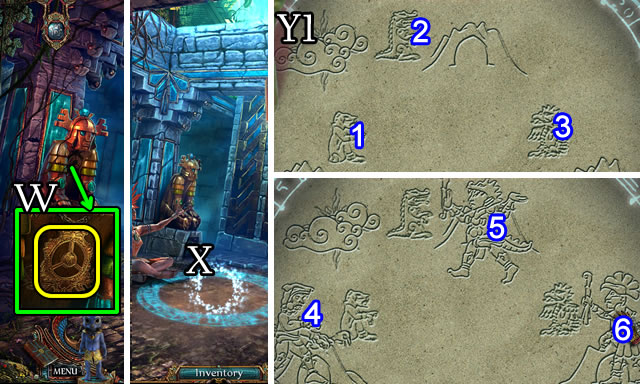
- Select (X) for a mini-game.
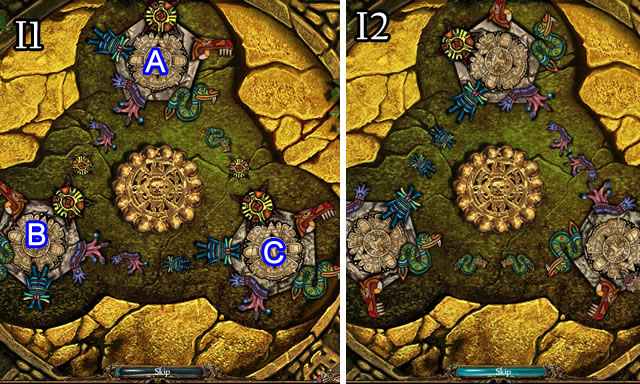
- Solution, part one (Y1). Select each tribe (1-2-3), then elders (4-5-6).
- Solution, part 2 (Y2). Place the talismans in sections (7-12, 8-10, 9-11). Select the priest (13). Place the crystals in their corresponding color area. Move the clouds (14); select the sun.
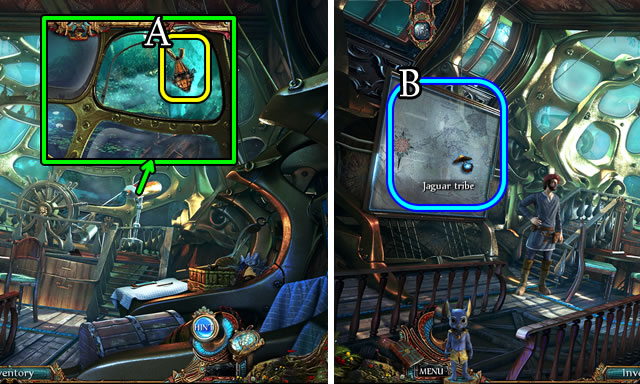
- Take the CROCODILE TRIBE BOOK (Z).
- Return to the Royal Griffin.
- Give the CROCODILE TRIBE BOOK (A).
- Enter the map (B).
Chapter 3: Crocodile Tribe
- Speak with the Princess (C).
- Take LILY PAD 1/2 (D) and LILY PAD 2/2 (E).
- Remove and take the WEDGE (F).
- Walk forward.
- Take the ROD (G).
- Remove the boards (H) in order (1-2-3-4-5).
- Take CARVED STONE 1/2 (I). Place the ROD (J); receive a SICKLE.
- Place LILY PAD 2/2 (K).
- Select and place Nubi's Fetch Item skill. (L).
- Take the WOODEN FLOWER (M).
- Use the SICKLE (N).
- Walk forward.
- Take the BUCKET (O).
- Walk down 2x.
- Place the WOODEN FLOWER (P). Examine the scroll; take the SEEDS (Q).
- Place the BUCKET (R); receive WORMS.
- Place the WORMS (S); place the SEEDS (T). Take the SHELLED SEEDS.
- Walk forward.
- Give the SHELLED SEEDS; take the BEAVER (U).
- Walk down.
- Place the BEAVER (V).
- Walk left.
- Speak to the Princess.
- Select and place Nubi's lightning skill (W).
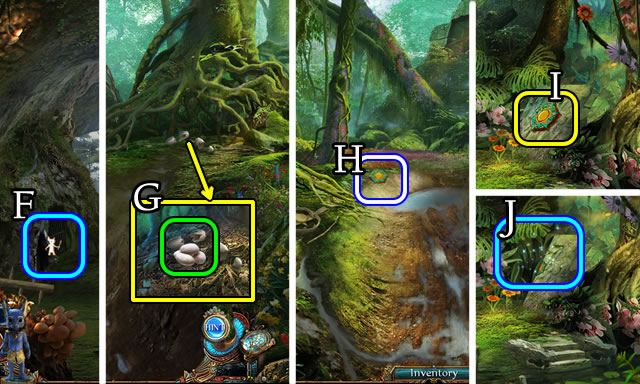
- Take the CARVED STONE 2/2, HATCHET and RUNG 1/3 (X).
- Move the roots (Y); take RUNG 2/3 (Z).
- Return to the Cliff.
- Select the latch (A); place the WEDGE (B); take RUNG 3/3 (C).
- Use the HATCHET 3x (D); place RUNG 3/3.
- Place CARVED STONE 2/2 (E). for a puzzle.
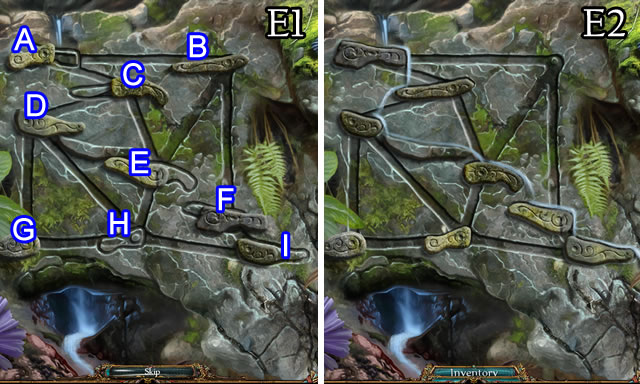
- Solution (E1). D-C-A-B-F-I-H-D-C-A-B-F-I-H-E-B-A-C E-H-D-C-A-B-E-H-G-D-H-I-F-B-E-H-D-G.
- Solved (E2).
- Select and place Nubi's Fetch Item skill (F). Receive CROCODILE EGGS.
- Return to the Nest.
- Place the CROCODILE EGGS (G).
- Take the STONE SUN (H).
- Walk down.
- Place the STONE SUN (I).
- Play the HOP (J); receive a SACK.
- Walk forward.
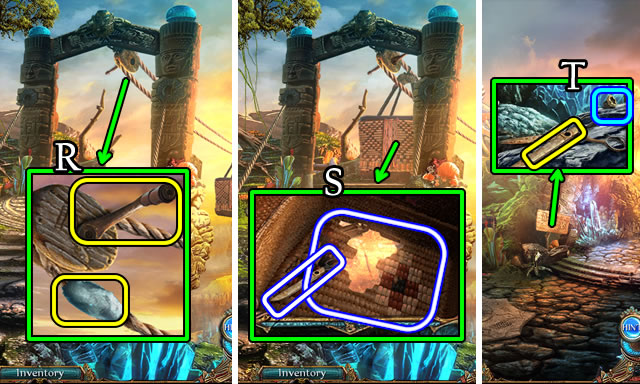
- Place the SACK (K).
- Select and place the rocks 3x (L). Select, then take the HEAVY SACK.
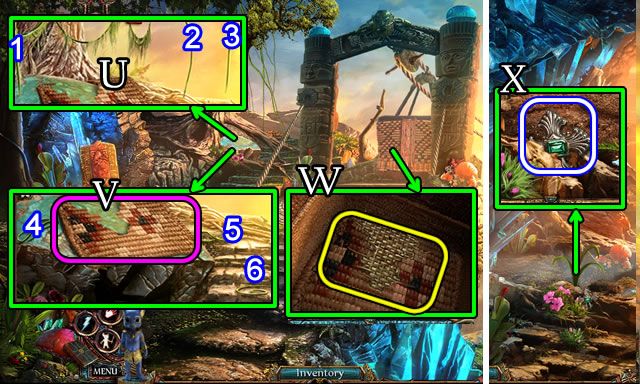
- Walk forward.
- Place the HEAVY SACK (M); use the HATCHET (N).
- Enter Cortes's Airship.
- Take the COIN (O); play the HOP (P); receive a LEVER.
- Return to the Nest.
- Place the stick (Q) on the trap; use the COIN (R).
- Take the PAWL and BOLT.
- Return to Cortes's Airship.
- Place the LEVER (S), PAWL and BOLT (T). Select the handle (U). Pull the lever.
- Select the cage (V) for a puzzle.
- Solution (W).
- Walk down.
- Take the CROCODILE SYMBOL (X).
- Return to the Nest.
- Place and select the CROCODILE SYMBOL (Y) for a puzzle.
- Solution (Z).
- Take the CROCODILE TALISMAN (A).
- Select the scene to return to the Swamp.
- Speak to Leonardo (B).
- Enter the Peristyle; walk forward.
- Select and place Nubi's Fetch Item skill (C). Receive a CLOTH.
- Take DISC 1/3. Remove the flowers; take the POT (D).
- Walk left. Speak to the caged man.
- Take the SPECIAL-SHAPED KEY and DISCS 2/3 (E).
- Place the POT (F); take the POT OF RESIN (G).
- Walk down.
- Use the SPECIAL-SHAPED KEY; take the CODE (H).
- Return to the Sanctuary.
- Select (I) and place the CROCODILE TALISMAN (J).
- Select (K) for a mini-game.
- Solution (L). Select the ship (1), the village (2), the priest (3), then the hole (4).
- Take the JAGUAR TRIBE BOOK (M).
- Return to the Royal Griffin.
- Give the JAGUAR TRIBE BOOK (N); receive a CYLINDER.
- Return to the Peristyle.
- Place the CYLINDER and CODE (O). Set the cylinders to 7-2-5.
- Play the HOP (P). Receive a MAGNET ROD.
- Walk down.
- Place the MAGNET ROD (Q); receive a SWORD.
- Return to the Suspension Bridge.
- Give the SWORD (R).
- Take the BRUSH (S).
- Walk down 3x.
- Place the POT OF RESIN and BRUSH (T). Use the BRUSH (U). Place the CLOTH.
- Take DISCS 3/3 (V).
- Return to the Main Square.
- Place the CROCODILE SYMBOL (W).
- Place DISCS 3/3 (X) for a puzzle.
- Solution (Y1-Y2-Y3).
- Take the LANTERN (Z).
- Return to the Royal Griffin.
- Open the window; place the LANTERN (A).
- Enter the map (B).
Chapter 4: Jaguar Tribe
- Place the leaves (C) 3x; take the BROOM.
- Play the HOP (D); receive a JAGUAR SYMBOL.
- Use the BROOM (E); place the JAGUAR SYMBOL (F).
- Select the gears (G), select 2x (H); take the JAGUAR SYMBOL (I).
- Walk forward.
- Take the CRYSTAL FACET and ROD (J).
- Walk down.
- Use the ROD (K). Take the WOODEN PLANK (L).
- Walk forward.
- Place the WOODEN PLANK (M).
- Select and place Nubi's Fetch Item skill (N).
- Select (O) for a puzzle.
- Solution (P1-P2-P3-P4).
- Take Nubi's item (Q).
- Select and place Nubi's Levitation skill (R).
- Take the HALF PLANK (S).
- Walk forward.
- Take the CRYSTAL and BROWN STANDARD SYMBOL (T).
- Place the CRYSTAL FACET; insert the CRYSTAL (U).
- Take the RECHARGED CRYSTAL.
- Walk down, then left.
- Take the RED STANDARD SYMBOL (V).
- Walk down 2x.
- Place the RECHARGED CRYSTAL (W).
- Take the PUZZLE PIECE (X).
- Place the RED STANDARD SYMBOL (yellow); take the RED STANDARD (Y).
- Place the BROWN STANDARD SYMBOL (yellow); take the BROWN STANDARD (Z).
- Return to the Crystal Precipice.
- Place the PUZZLE PIECE (A) for a puzzle.
- Solution (B).
- Walk down.
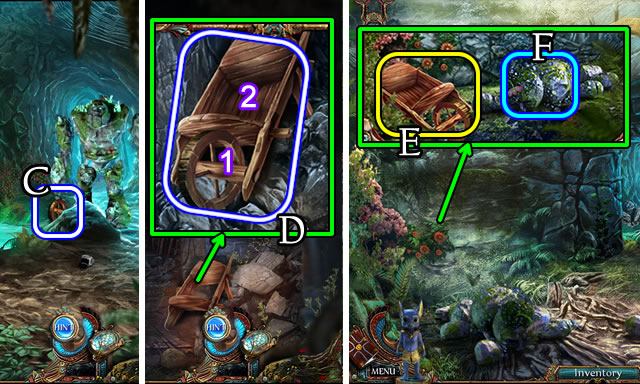
- Take the WHEEL (C).
- Walk left.
- Place the WHEEL (1) and HALF PLANK (2). Take the EMPTY WHEELBARROW (D).
- Walk down 2x.
- Place the EMPTY WHEELBARROW (E).
- Select and place the rocks 3x (F). Take the FULL WHEELBARROW.
- Walk forward.
- Give the FULL WHEELBARROW (G).
- Enter the Valley.
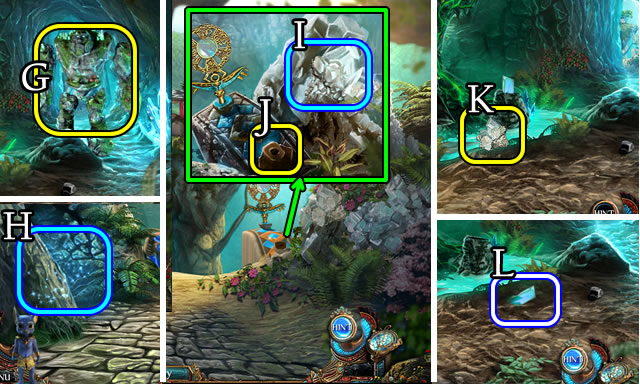
- Play the HOP (H); receive a JAGUAR HEAD.
- Use the ROD (I); take the SALT BLOCK.
- Place the BROWN STANDARD (J).
- Walk down.
- Place the SALT BLOCK (K); take the CRYSTAL (L).
- Walk to the Crystal Precipice.
- Place the CRYSTAL (M).
- Return to Jaguar Hall.
- Place the JAGUAR HEAD (N).
- Take the BLUE STANDARD SYMBOL (O).
- Return to the Crystal Precipice.
- Place the BLUE STANDARD SYMBOL (yellow); take the BLUE STANDARD (P).
- Return to the Valley.
- Place the RED STANDARD and BLUE STANDARD (Q).
- Return to Jaguar Hall.
- Select (R) for a puzzle.
- Solution (S). 1-2.
- Take the JAGUAR TALISMAN (T).
- Select the scene to return to the Swamp.
- Speak to Leonardo (U).
- Enter the Sanctuary.
- Select (V) and place the JAGUAR TALISMAN (W).
- Select (X) for a mini-game.
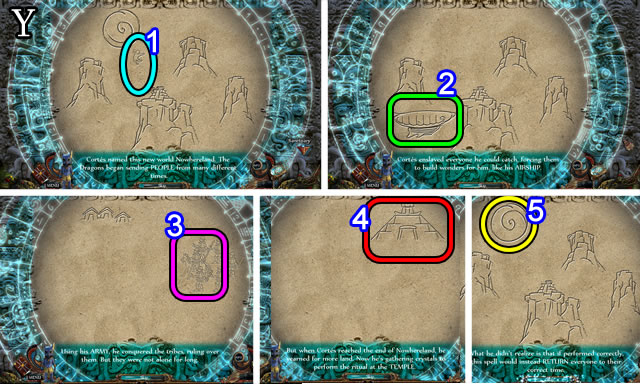
- Solution. (Y) Select the people (1), airship (2), army (3), temple (4) and hole (5).
- Take the EAGLE TRIBE BOOK (Z).
- Walk to the Royal Griffin.
- Give (A) the EAGLE TRIBE BOOK.
- Walk to the Main Square.
- Speak to the man (B); receive a PHIAL.
- Enter Cleopatra's House.
- Play the HOP (C); receive FLOWER 1/3.
- Take the GLOVE (D).
- Walk to the Suspension Bridge.
- Use the GLOVE (E); take FLOWERS 2/3.
- Return to the Swamp.
- Use the GLOVE (F); take FLOWERS 3/3.
- Walk to the Peristyle.
- Place the PHIAL (1); open the hatch (2); place FLOWERS 3/3 (3); close the hatch and turn the tap (4); place the attachment (5); take the PERFUME.
- Return to the Suspension Bridge.
- Give the PERFUME (G).
- Open the satchel; take the WOODEN DONKEY PART (H).
- Return to Cleopatra's House.
- Place the WOODEN DONKEY PART; take the WOODEN DONKEY (I).
- Walk down.
- Give the WOODEN DONKEY (J); take the PUZZLE FIGURINE (K).
- Place the JAGUAR SYMBOL (L).
- Place the PUZZLE FIGURINE (M) for a puzzle.
- Solution (N1). Bx5.
- Solved (N2).
- Take the COMPASS (O).
- Return to the Royal Griffin.

- Place the COMPASS (P) for a puzzle.
- Solution (Q).
- Enter the map (R).
Chapter 5: Eagle Tribe
- Read the sign (S). Take FIREWOOD 1/3 and LOCK PIECE 1/2 (T).
- Walk right.
- Take FIREWOOD 2/3 (U).
- Take FIREWOOD 3/3, LOCK PIECES 2/2 and KEY 1/2 (V).
- Walk down.

- Take the ROCK (W).
- Use the ROCK (X).
- Place LOCK PIECES 2/2 (Y) for a puzzle.
- Solution (Z).
- Enter the Greenhouse.
- Speak to the Shaman (A).
- Play the HOP (B); receive a KEY.
- Walk down.
- Use the KEY; take the RAKE HEAD (C).
- Walk forward.
- Place the RAKE HEAD (D). Take the RAKE and SPIDER SILK (E).
- Return to the Ravine.

- Use the RAKE 3x (F). Take the WET LEAVES (G).
- Walk down.
- Place FIREWOOD 3/3 and WET LEAVES (H).
- Select and place Nubi's lightning skill (I).
- Walk left.
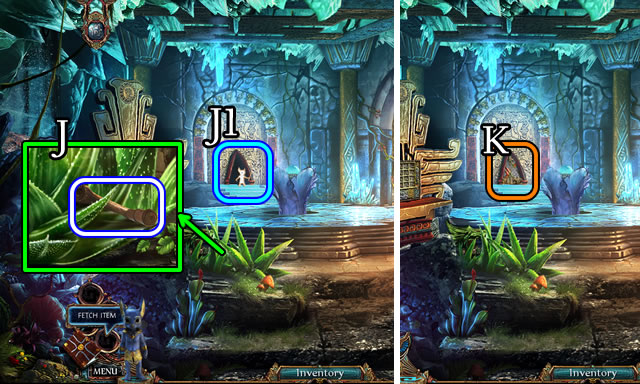
- Take the HANDLE (J).
- Select and place Nubi's Fetch Item skill (J1).
- Select (K) for a puzzle.

- Solution (L1-L2-L3-L4).
- Take Nubi's item (M).
- Return to the Greenhouse.
- Select and place Nubi's Invisibility skill (N); receive NOTES.
- Walk down, then left.
- Place the NOTES (O) for a puzzle.
- The symbol positions are random. One possible Solution (P).
- Take the RECIPE (Q).
- Return to the Ravine.
- Place the HANDLE and SPIDER SILK (R); turn the handle.
- Take the SCISSORS HALF and FRAME (S).
- Walk down.
- Place the SCISSORS HALF, add the bolt (T); take the SCISSORS.
- Walk right.
- Place the FRAME (U). Use the SCISSORS (1-2-3). Place the vines (4-5-6) on the frame (V); take the FIXED BOTTOM.
- Place the FIXED BOTTOM (W).
- Ride to the Pedestal.
- Take the DESK PUZZLE PIECE (X).
- Return to the Greenhouse.
- Place the DESK PUZZLE PIECE (Y) for a puzzle.
- Solution (Z). Ax2-Bx2-Cx3.
- Place the RECIPE (A). Place (1-2-3-4) in the bottle (B), add the cork (5). Take the ANTIDOTE.
- Use the SCISSORS (C); take the PITCHER PLANT.
- Place the ANTIDOTE (D).
- Take the BANDAGE (E).
- Walk down, then left.
- Place the BANDAGE (F); select the plant part (G) and place on the bandage; use the ROCK 2x (H). Take the HERBAL BANDAGE.
- Return to the Greenhouse.
- Remove the boards (1-2-3); place the HERBAL BANDAGE (I).
- Walk down, then left.
- Take the PIPETTE (J).
- Return to the Greenhouse.
- Place the PIPETTE (K); receive SERUM.
- Select (L); place the SERUM (M); take the MAGIC SEED.
- Return to the Ravine.
- Place the PITCHER PLANT (N); receive a FILLED PITCHER PLANT.
- Return to the Pedestal.
- Grab the SPADE (O).
- Use the SPADE (P); place the MAGIC SEED (Q); use the SPADE 2x; place the FILLED PITCHER PLANT.
- Play the HOP (R); receive the EAGLE SYMBOL.
- Return to the Hall of Eagles.

- Place the EAGLE SYMBOL (S) for a puzzle.
- Solution (T).
- Take the EAGLE TALISMAN (U).
- Select the scene to launch the airship.
Chapter 6: The Ceremony
- Take the CROWBAR (V).
- Take BRACE 1/2 (W). Use the SPADE 2x (X); take the JAGUAR STATUE (Y).
- Walk forward.
- Speak with the Priest (Z).
- Take the RED HEADDRESS (A).
- Select and place Nubi's Invisibility skill (B).
- Pick up BRACE 2/2 (C).
- Use the CROWBAR (D).
- Place BRACE 2/2 (1) Place the color-coded rockets (2); place the fuse (3).
- Select and place Nubi's lightning skill (E).
- Walk forward.
- Take KEY 2/2 (F).
- Take the PUZZLE PIECE (G); place the RED HEADDRESS.
- Walk down.
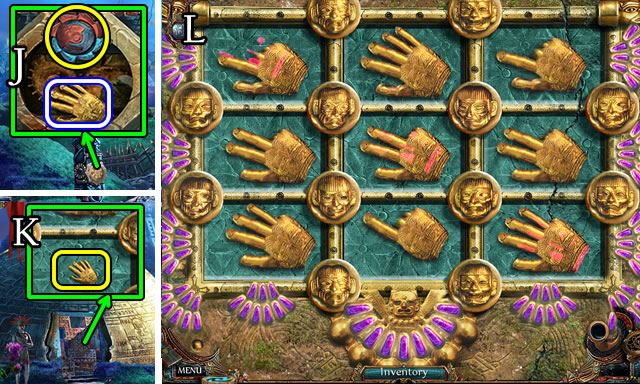
- Place the PUZZLE PIECE (H) for a puzzle.
- Solution (I1). A-Bx2-Cx3.
- Solved (I2). Take the CROCODILE STATUE.
- Walk down.
- Place KEY 2/2; take the HAND TOKEN (J).
- Place the HAND TOKEN (K) for a puzzle.
- This puzzle solution is random. One possible solution (L).
- Enter the Ritual Sphere.
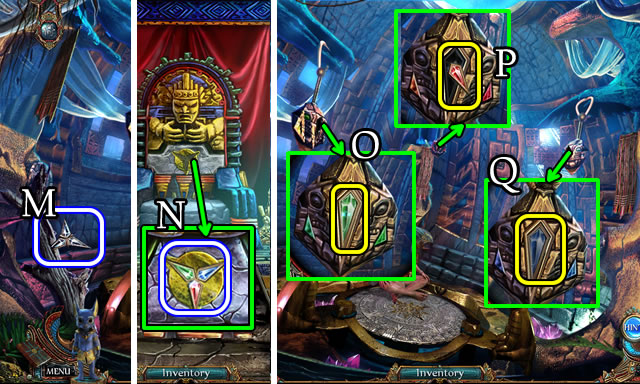
- Grab the STAR SYMBOL (M).
- Return to the Main Temple.
- Place the STAR SYMBOL (N); take the RED CRYSTAL, GREEN CRYSTAL and BLUE CRYSTAL.
- Return to the Ritual Sphere.
- Place the GREEN CRYSTAL (O), RED CRYSTAL (P) and BLUE CRYSTAL (Q).
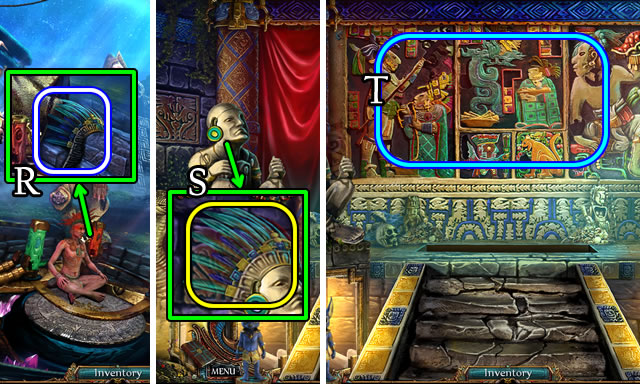
- Take the BLUE HEADDRESS (R).
- Return to the Main Temple.
- Place the BLUE HEADDRESS (S) for a puzzle (T).
- Solution (T1).
- Take the EAGLE STATUE (U).
- Return to the Ritual Sphere.
- Place the CROCODILE STATUE (V), JAGUAR STATUE (W) and EAGLE STATUE (X).
- Place the EAGLE TALISMAN (Y) to open a puzzle (Z).
- Solution (Z1).
- Congratulations! You have completed playing The Secret Order: Beyond Time.
Created at: 2015-04-18