Walkthrough Menu
- General Tips
- Chapter 1: The Nephew
- Chapter 2: Time Travel
- Chapter 3: The Obsidian Ring
- Chapter 4: The Emerald Ring
- Chapter 5: The Sapphire Ring
- Chapter 6: The Ruby Ring
- Chapter 7: The Diamond Ring
- Chapter 8: Fixing the Past
General Tips
- Hidden Object Scenes and mini-games are often randomized - your solution may vary.
- Hidden Object Scenes will be referred to as HOS in this walkthrough.
- Items listed in blue are hidden or require additional steps.
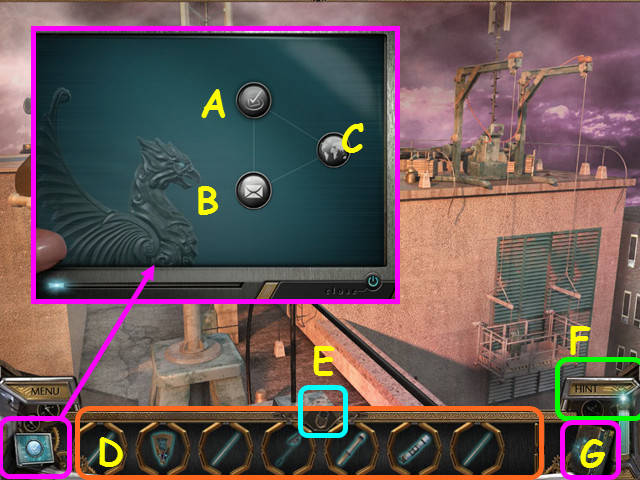
- You communicator has your current objective (A), past messages (B), and current floor plan (C).
- Your inventory is in the bottom panel - click on an item to select it for use (D).
- The inventory panel auto-hides, click on the lock in the center to keep the panel open (E).
- Hints are unlimited, but you must wait for the hint meter to recharge (F).
- Look at the Griffin Codex to track your progress in finding the rings (G).
Chapter 1: The Nephew
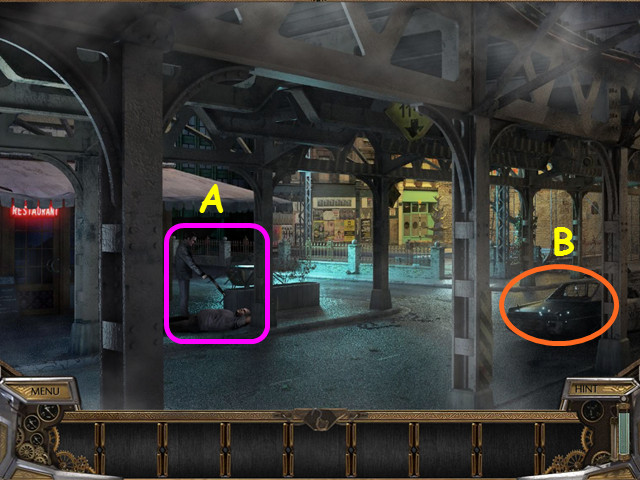
- You will have the option of a brief tutorial.
- Note your attacker (A).
- Select the police car for a HOS (B).
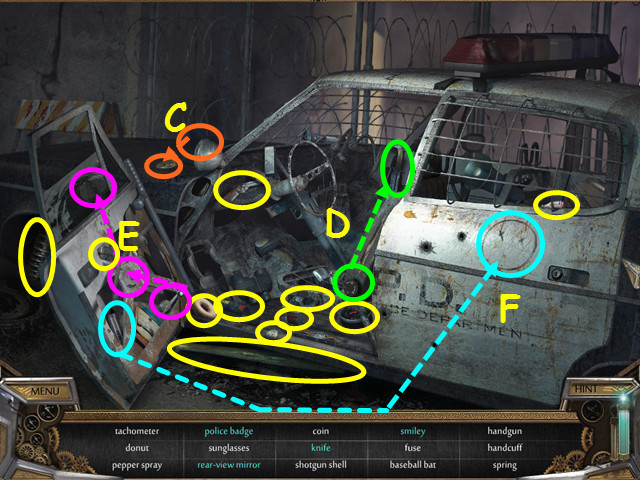
- Locate all the items on the list.
- Items listed in blue are hidden or require additional steps.
- Move the hat to find the police badge (C).
- Adjust the seat to find the knife (D).
- Use the crank on the window to find the rear-view mirror (E).
- Use the marker on the circle to create the smiley (F).
- You will earn the HANDCUFFS and the FUSE.
- Look at your attacker.
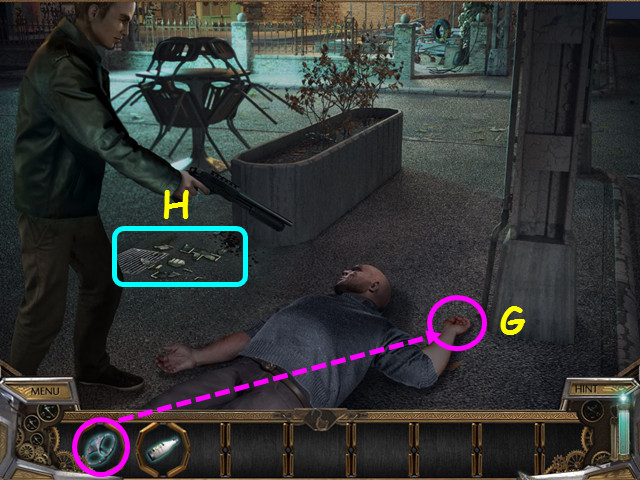
- Use the HANDCUFFS on the killer's wrist (G).
- Look at the drain area for a mini-game (H).
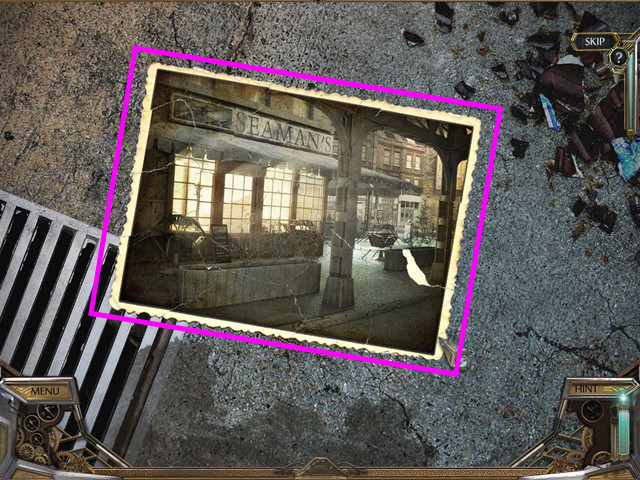
- Drag the photograph pieces into place to restore the picture.
- Pieces will lock in place when properly positioned.
- Walk forward to enter the restaurant.
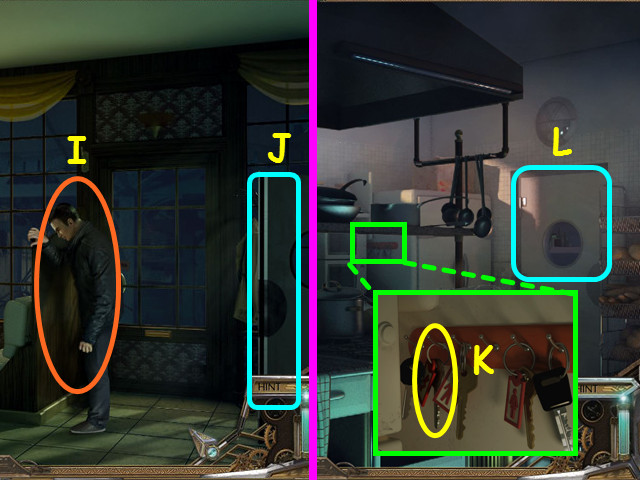
- Look at Mike (I).
- Walk right to the kitchen (J).
- Look at the key rack and take the KEY with the electric symbol on the tag (K).
- Walk right to the storeroom (L).
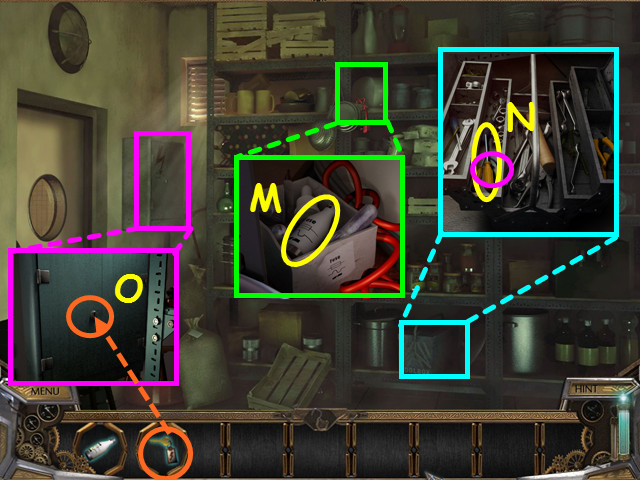
- Look at the upper shelf and take a second FUSE (M).
- Look at the toolbox and take the SCREWDRIVER and the WIRE (N).
- Look at the power box and use the KEY on the lock (O).
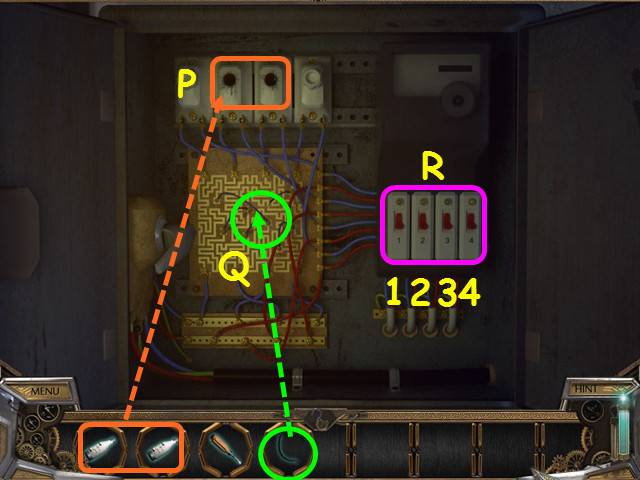
- Place the 2 FUSES into the holes (P).
- Use the WIRE to repair the center (Q).
- Turn the lever (R).
- Flip the 4 switches so that all stay on: 1-4-3-2.
- Walk left to the kitchen.
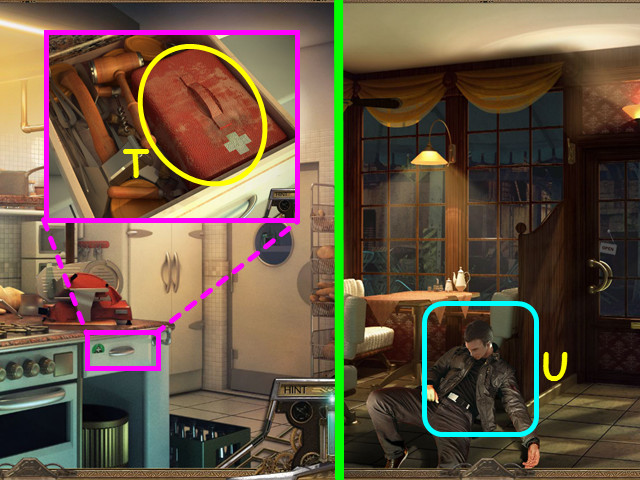
- Look in the drawer and take the FIRST-AID KIT (T).
- Walk left to the restaurant area.
- Look at Mike (U).
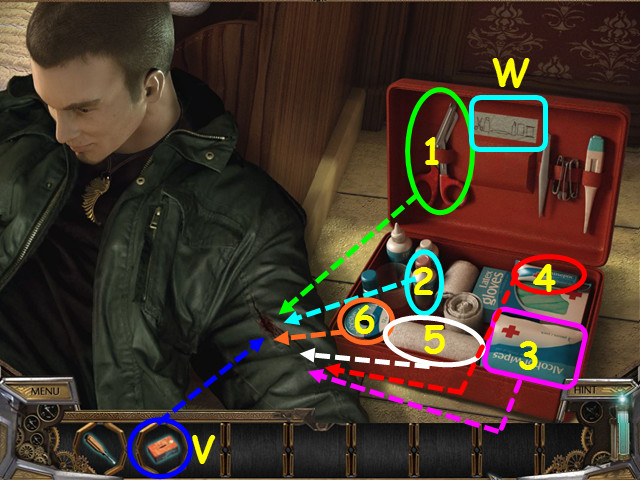
- Use the FIRST-AID KIT on the wound (V).
- Open the kit and look at the diagram (W).
- Follow the order from the diagram.
- Use the scissors on the wound (1).
- Use the painkiller on the wound (2).
- Next, use the alcohol wipe (3) followed by the antiseptic (4).
- Place the bandage on the wound (5).
- Finally, use the adhesive tape to secure the bandage (6).
Chapter 2: Time Travel
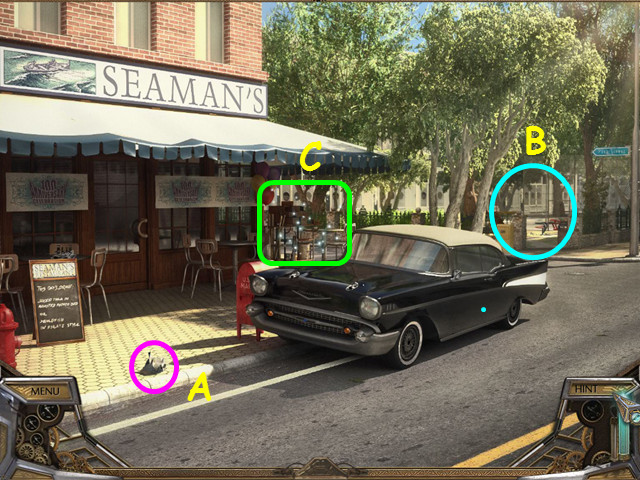
- Read the newspaper (A).
- Note the path to the crossroads (B).
- Select the workbench for a HOS (C).
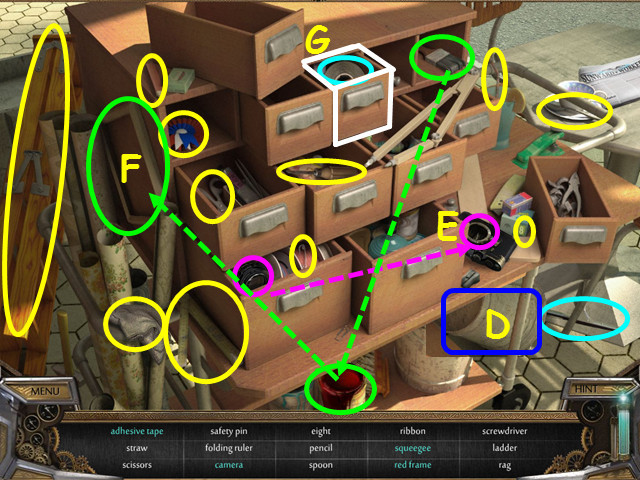
- Locate all the items on the list.
- Tip over the white bucket to find the squeegee (D).
- Place the lens on the camera (E).
- Use the paintbrush on the red paint, then paint the frame red (F).
- Open the drawer to find the adhesive tape (G).
- You will earn the LADDER, DUCT TAPE, and the DRY RAG.
- Walk to the crossroads.
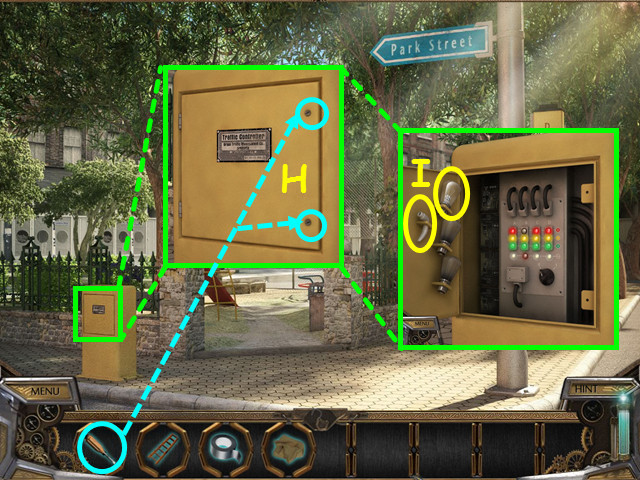
- Look at the yellow control box and use the SCREWDRIVER to open the panel (H).
- Take the HANDLE and the BULB (I).
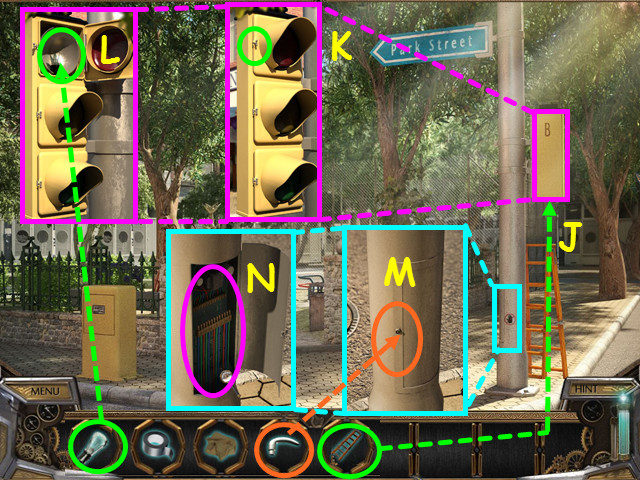
- Use the LADDER on the traffic light (J).
- Look at the traffic light, undo the clasp and open the red light cover (K).
- Remove the broken bulb and place the BULB into the socket and close the cover (L).
- Look at the base of the pole and use the HANDLE on the door (M).
- Open the door and select the circuitry for a mini-game (N).
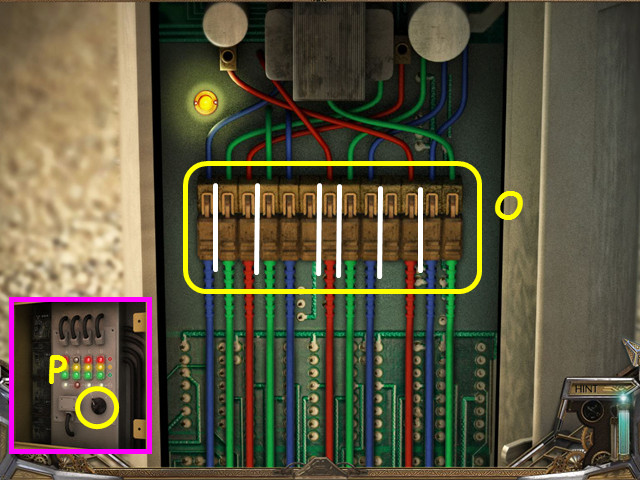
- Place the wire groupings so that all are attached with the correct colors (O).
- Look at the yellow control box and turn the switch (P).
- After the cut-scene you will receive the GRIFFIN WING.
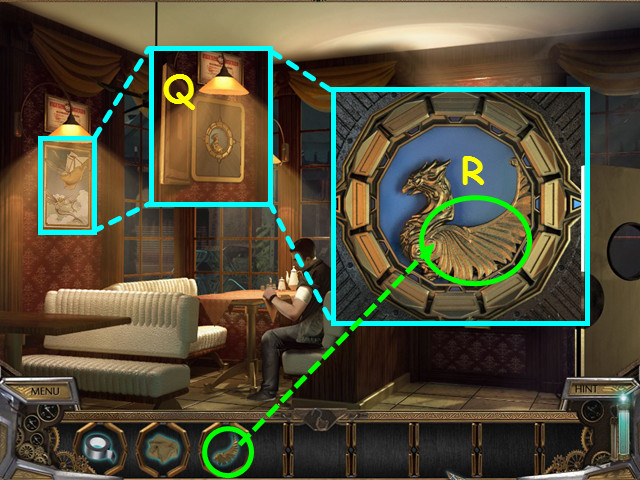
- Open the painting and look at the safe (Q).
- You will receive the COMMUNICATOR.
- Look at the safe and place the GRIFFIN WING on the griffin (R).
- Press the griffin for a mini-game.
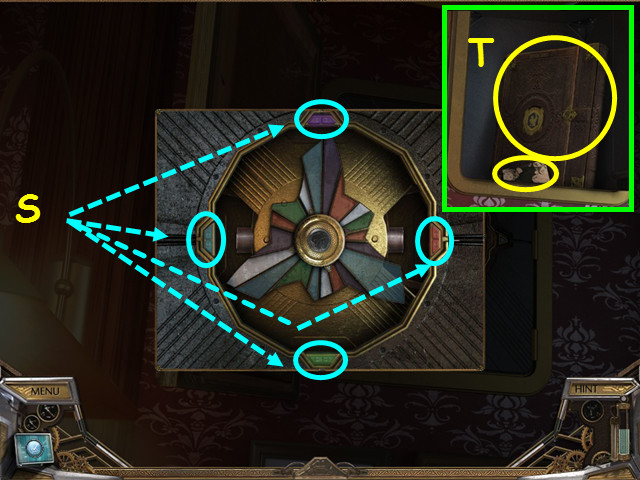
- Use the colored buttons to rotate the fans so that all are visible (S).
- Note – the white blades do not move.
- Take the 1/2 PHOTO FRAGMENT and the GRIFFIN CODEX (T).
- Read the codex, then exit the book.
- Read the communication, then close the communicator.
- Try to exit through the front door of the restaurant.
- Look at the dog by the front door.
- Walk right twice to the storeroom.
- Select the center of the shelves for a HOS.
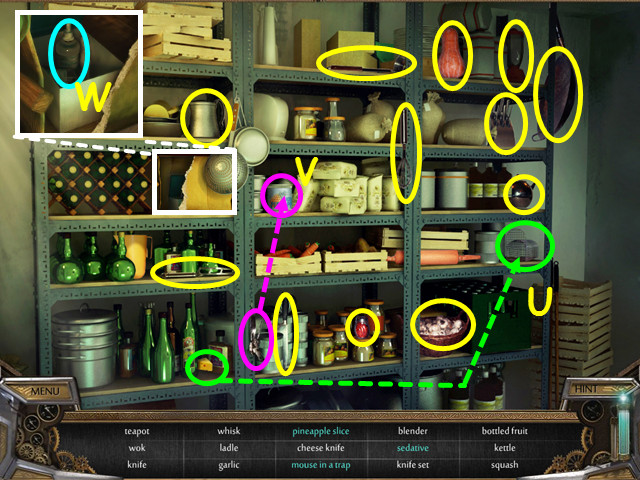
- Locate all the items on the list.
- Use the cheese on the trap to catch the mouse (U).
- Use the can opener on the can to get the sliced pineapple (V).
- Tear the paper and look at the close-up to find the sedative (W).
- You will earn the SEDATIVE.
- Walk left to the kitchen.
- Select the refrigerator for a HOS.
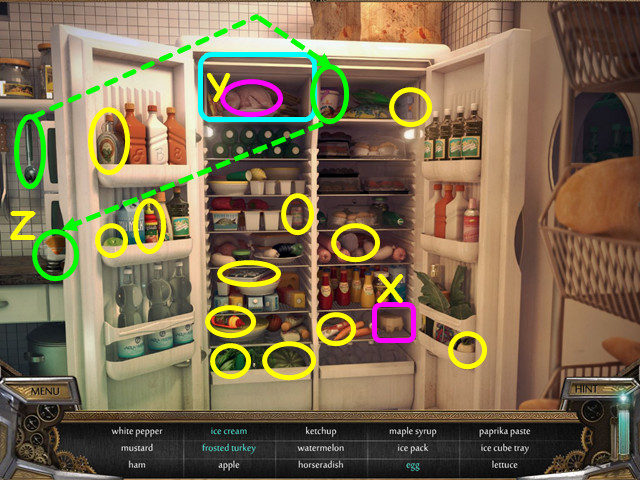
- Locate all the items on the list.
- Look at the egg carton to find the egg (X).
- Open the freezer door to find the frosted turkey (Y).
- Use the scoop on the ice cream, then place it in the cup (Z).
- You will earn the HAM.
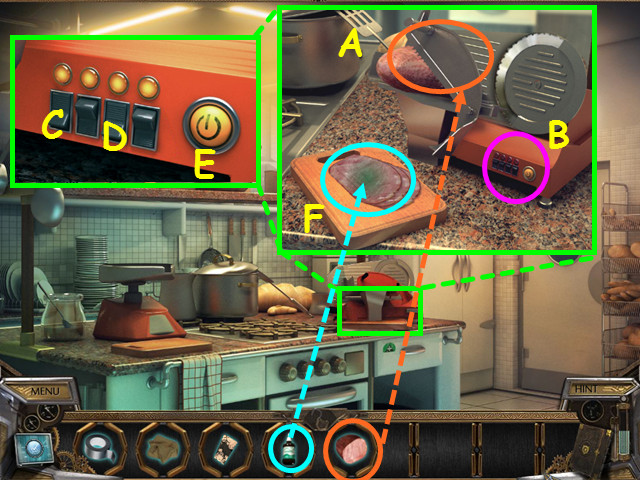
- Look at the slicer and place the HAM on the machine (A).
- Look at the buttons (B).
- Press the first (C) and third (D) black switches so all the lights turn on; then press the power button (E).
- Use the SEDATIVE on the sliced ham; take the DOCTORED HAM (F).
- Walk left to the restaurant.
- Use the DOCTORED HAM on the dog at the front door.
- Walk forward to exit the restaurant.
Chapter 3: The Obsidian Ring
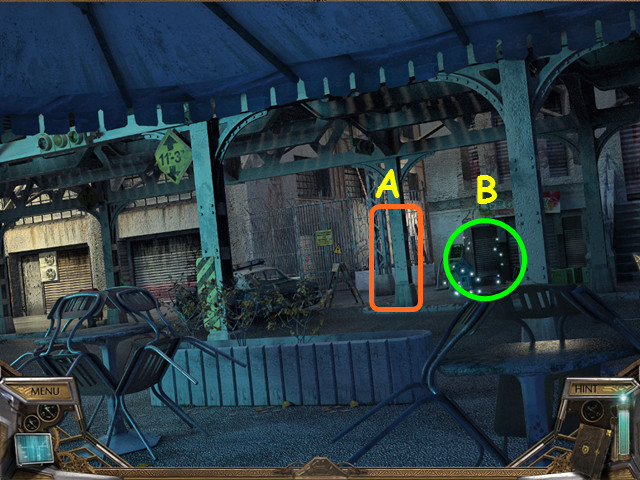
- Note the solid column (A).
- Select the storefront for a HOS (B).
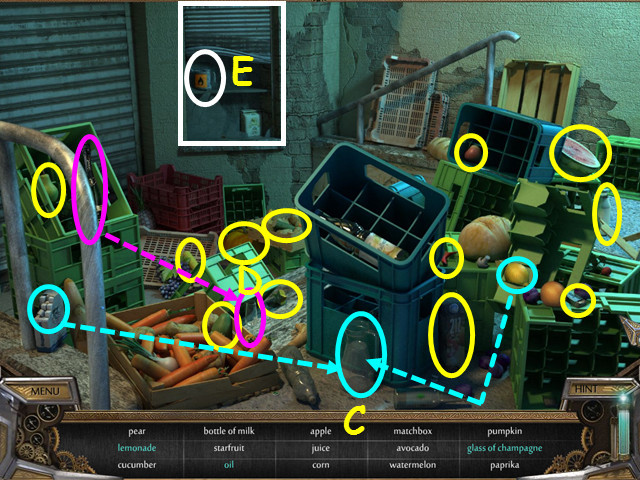
- Locate all the items on the list.
- Use the lemon and the sugar on the pitcher to make lemonade (C).
- Pour the champagne in the glass for the glass of champagne (D).
- Open the cover to find the oil (E).
- You will earn the MATCHES and the OIL.
- Walk to the left.
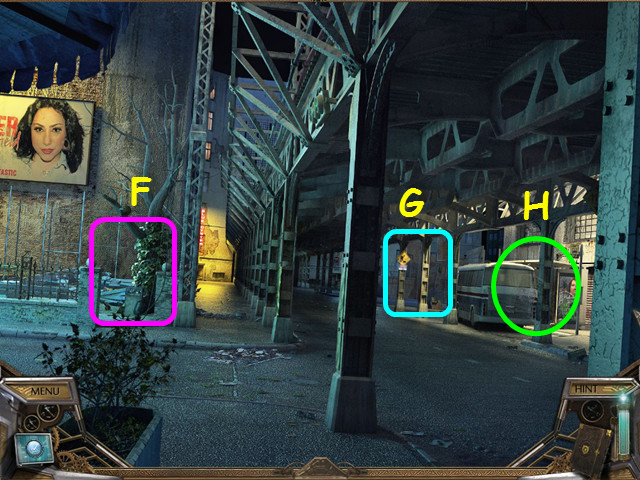
- Note the playground entrance (F).
- Note the construction site entrance (G).
- Walk to the bus (H).
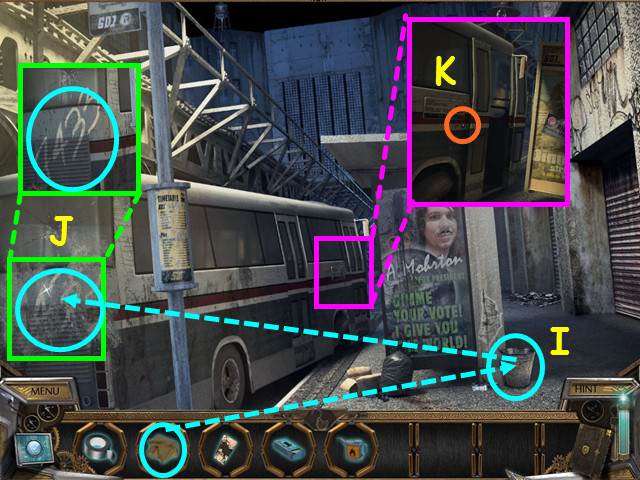
- Use the DRY RAG in the bucket to get the WET RAG (I).
- Use the WET RAG on the bus window to find a code (J).
- Look at the bus door and press the button (K).
- Enter the bus.
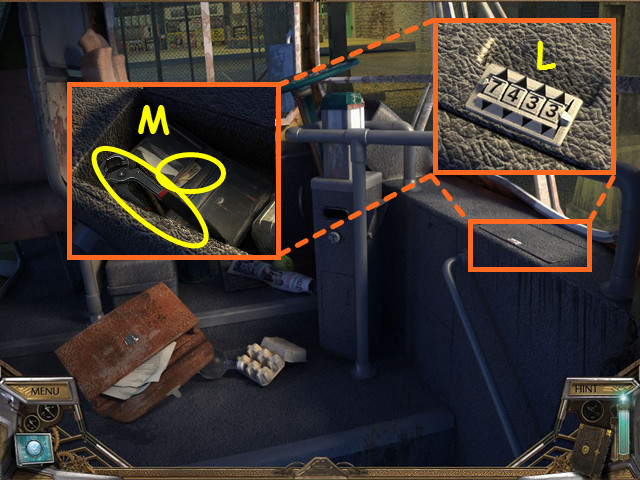
- Look at the glove-box and enter the code from the rear window (L).
- Take the PINCERS and the ID CARD (M).
- Note – the wallet will automatically open once you take the pincers.
- Walk down 3 times, then walk to the construction site entrance.
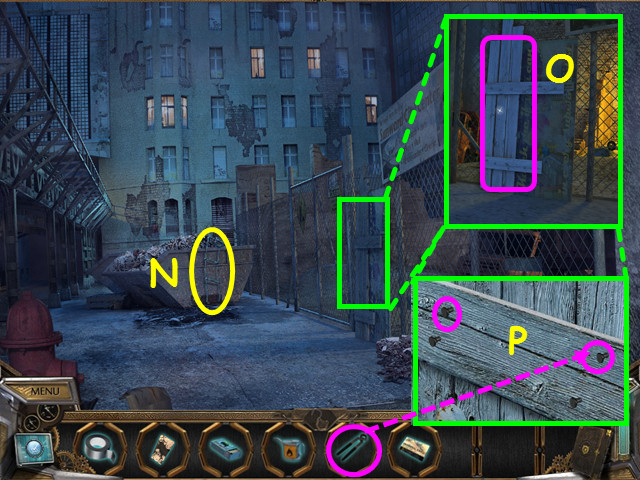
- You will hear from Mike on the communicator.
- Take the LADDER from the dumpster (N).
- Look at the gate, then look at the wood panel (O).
- Use the PINCERS to remove the nails (P).
- Push the wood panel aside and enter the construction site.
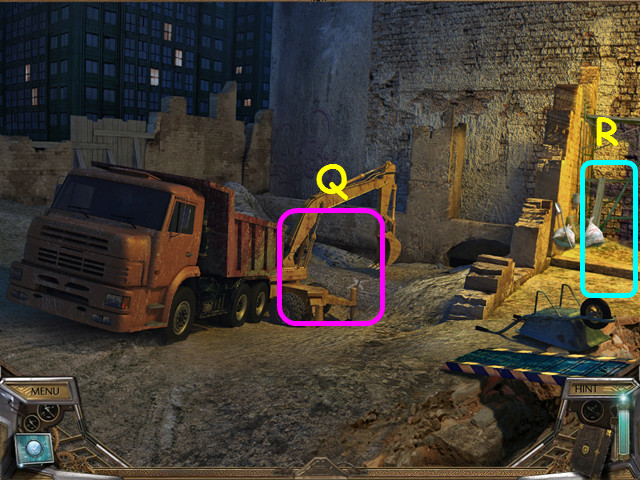
- Note the excavator (Q).
- Walk right to the trailer (R).
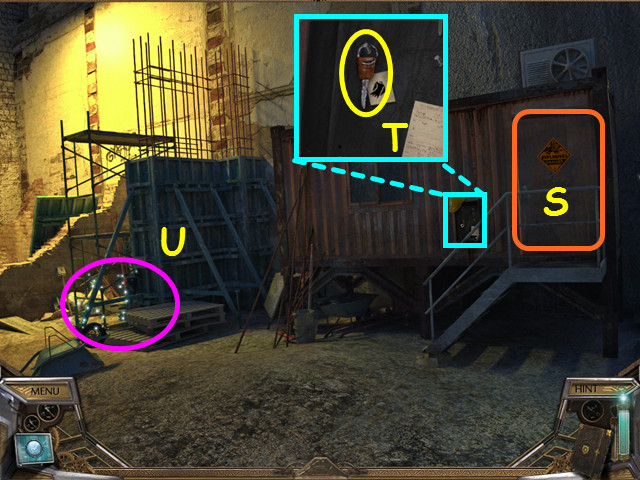
- Look at the door and note the alarm is activated (S).
- Look in the key box and take the IGNITION KEY (T).
- Select the pallet area for a HOS (U).
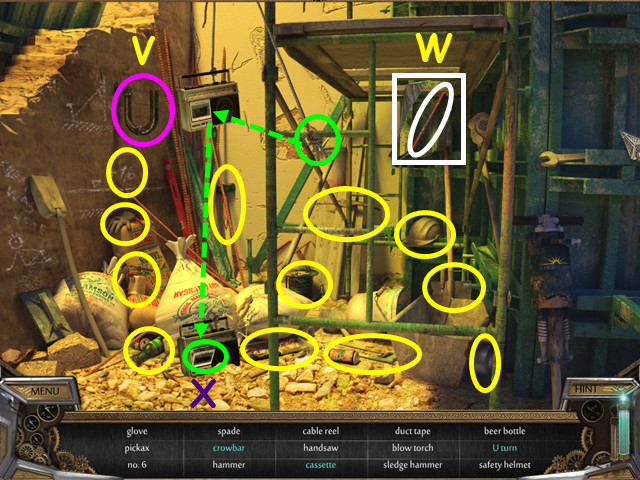
- Locate all the items on the list.
- Turn the pipe up to make the u-turn (V).
- Remove the rag to find the crowbar (W).
- Untie the rope so the cassette player falls – inside is the tape (X).
- You will earn the CROWBAR.
- Walk to the left, then go forward to the excavator.
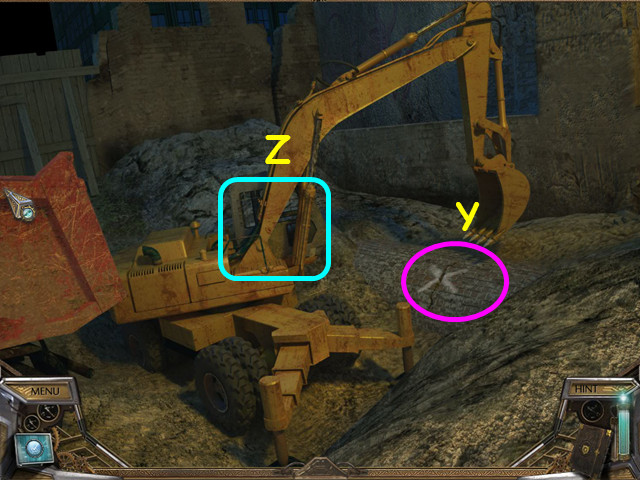
- Note the area you need to collapse (Y).
- Enter the excavator (Z).
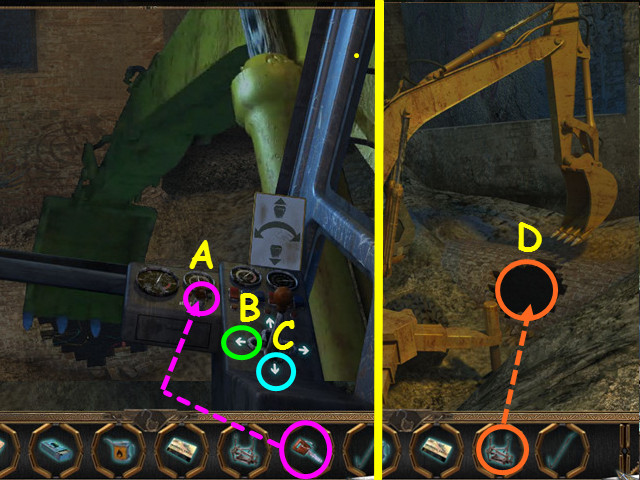
- Use the IGNITION KEY on the ignition (A).
- Press the left arrow twice (B).
- Press the down arrow twice (C).
- Exit the excavator.
- Use the LADDER on the hole (D).
- Enter the hole.
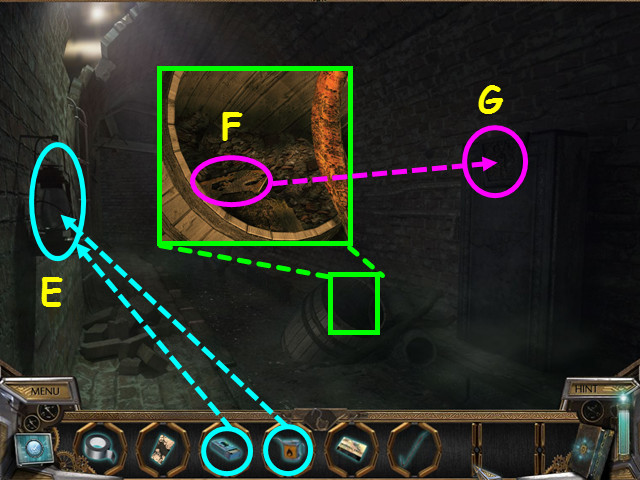
- Use the OIL, then the MATCHES on the lamp (E).
- Look in the barrel and take the RIGHT-HAND RELIEF PIECE (F).
- Look at the cabinet and use the RIGHT-HAND RELIEF PIECE on the face for a mini-game (G).
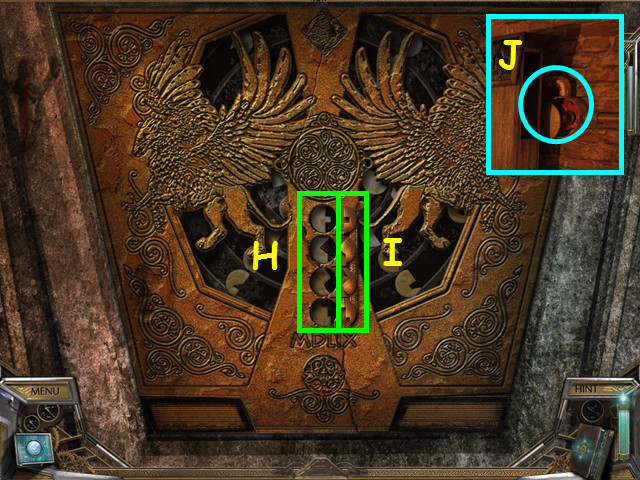
- Change the silver pieces on the left (H) so they match the cut-out pieces on the right (I).
- Click on a silver piece to change to the next one in line.
- Look behind the cabinet (J).
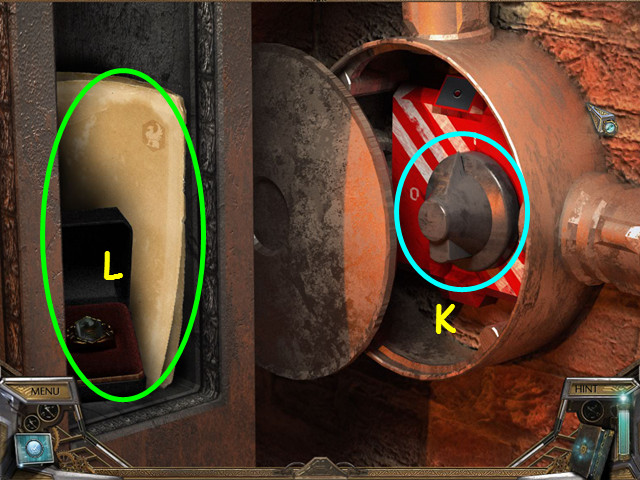
- Turn off the alarm system (K).
- Take the CODEX PAGE and the OBSIDIAN RING (L).
- Exit the sewer and you will receive a communication from Mike.
- Return to the trailer.
Chapter 4: The Emerald Ring
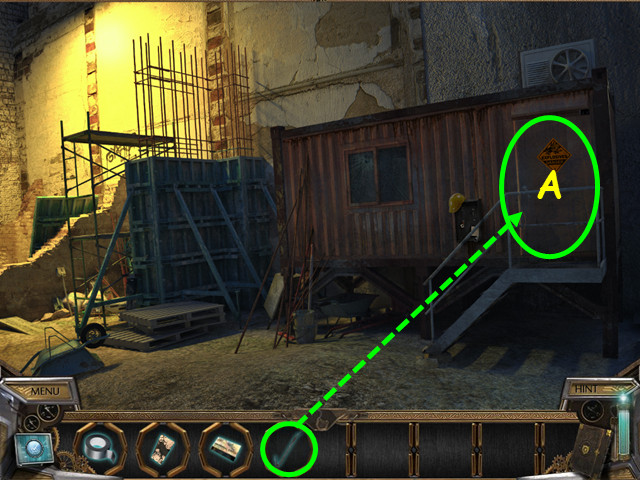
- Use the CROWBAR on the trailer door (A).
- Enter the trailer.
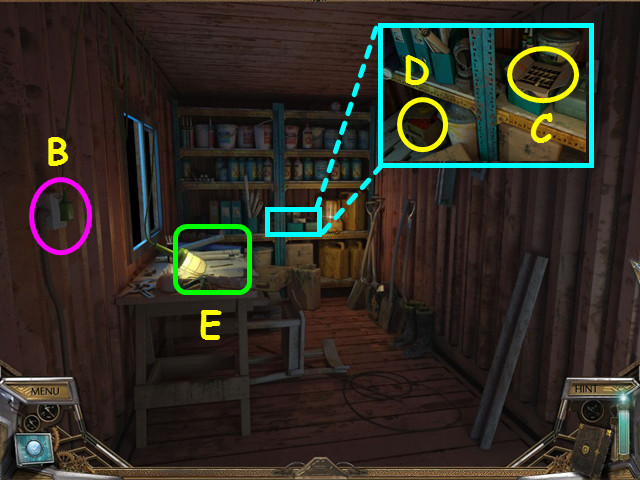
- Select the hanging plug to turn on the light (B).
- Look at the shelving; open the box and take the TIMER (C), open the crate and take the EXPLOSIVE (D).
- Look at the table (E).
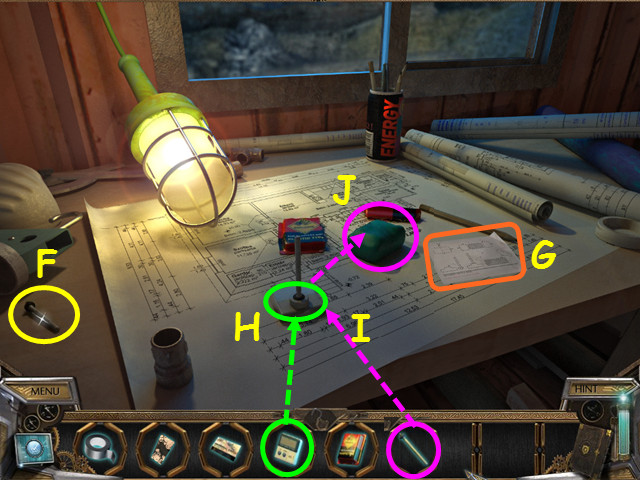
- Take the DETONATOR (F).
- Read the bomb plans (G).
- Place the TIMER on the table (H).
- Add the DETONATOR to the timer (I).
- Place the EXPLOSIVE on the table then add the timer/detonator to the explosive (J).
- Take the BOMB.
- Exit the trailer and walk down 4 times; look at the solid column.
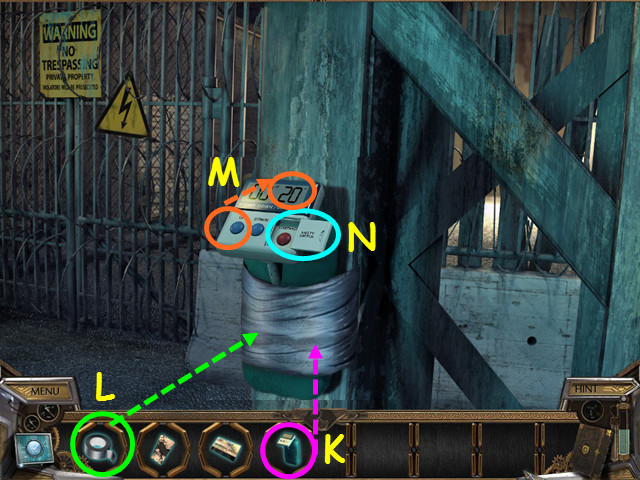
- Place the BOMB on the beam (K).
- Use the DUCT TAPE to fasten the bomb to the beam (L).
- Use the blue button on the right to set the timer to 20 seconds (M).
- Open the panel on the right and push the red button to activate the bomb (N).
- Walk left then enter the playground.
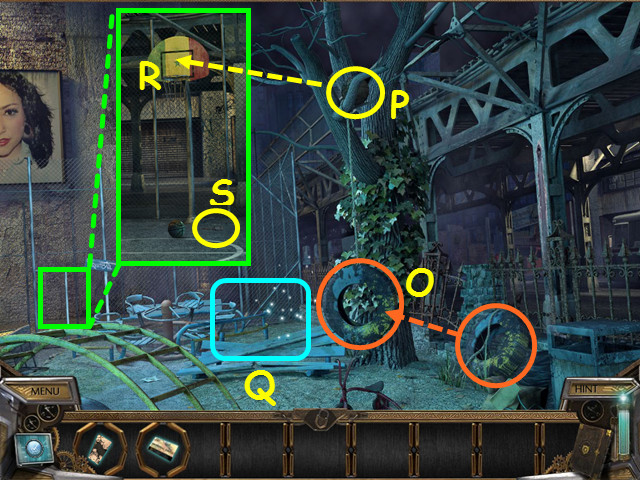
- Take the tire swing and hang it from the rope (O).
- Take the BASKETBALL (P).
- Note the play area (Q).
- Enter the basketball court and use the BASKETBALL on the hoop (R).
- Take the CHAIN that falls to the ground (S).
- Exit the basketball court and select the play area for a HOS.
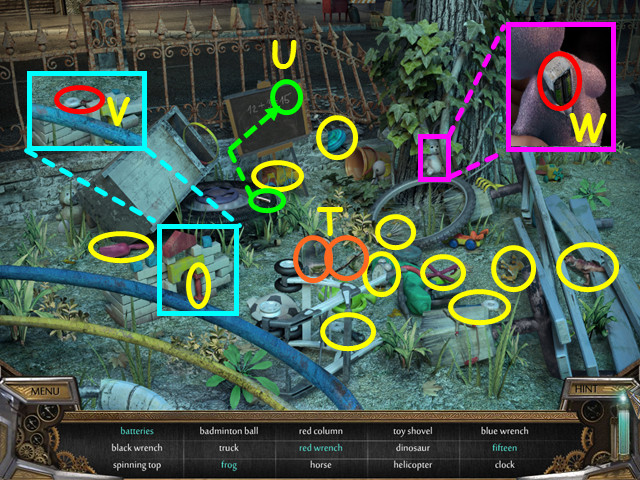
- Locate all the items on the list.
- Move the stick to free the frog (T).
- Use the chalk on the blackboard to make 15 (U).
- Take the red column to collapse the structure and find the red wrench (V).
- Look at the bunny; unzip the back to find the batteries (W).
- You will earn the RED WRENCH, BLACK WRENCH, BLUE WRENCH, and 3 BATTERIES.
- Walk down 3 times, go right and look at the turnstile.
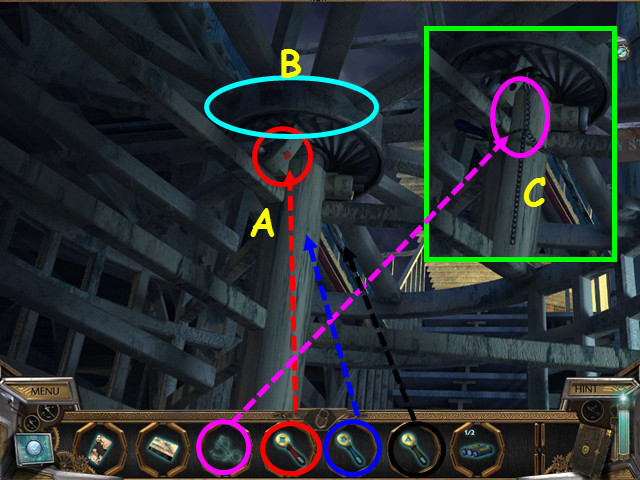
- Place the RED WRENCH on the red coded latch (A).
- Click on the turnstile to rotate it one position (B).
- Place the BLUE WRENCH on the blue coded latch, rotate the turnstile then place the BLACK WRENCH.
- Once all 3 wrenches are in place, attach the CHAIN then pull on the chain (C).
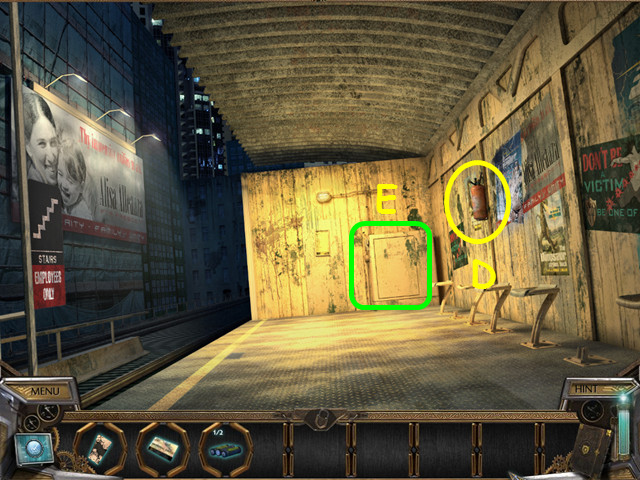
- You will receive a communication form Mike.
- Take the FIRE EXTINGUISHER (D).
- Note the control box (E).
- Walk left to the metro rail.
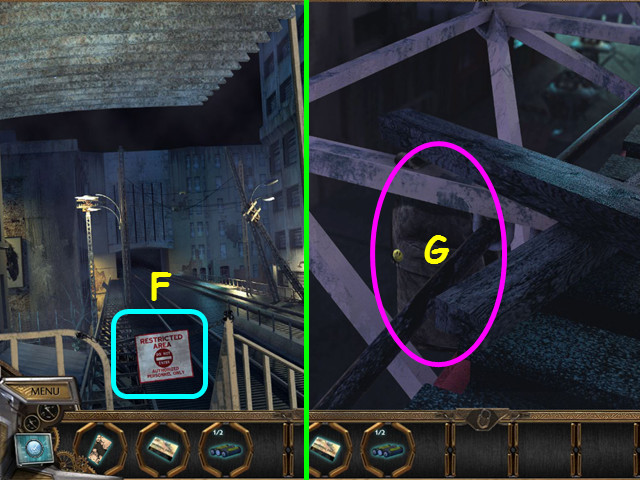
- Remove the restricted sign and look down at the track (F).
- Try to get the backpack (G).
- Walk down 3 times to the turnstile area.
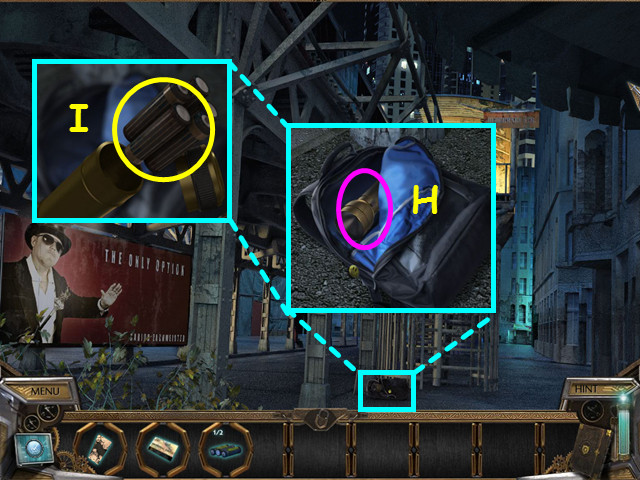
- Look at the backpack and pick up the flashlight (H).
- Open the flashlight and take the batteries (I).
- Return to the metro station and look at the control box.
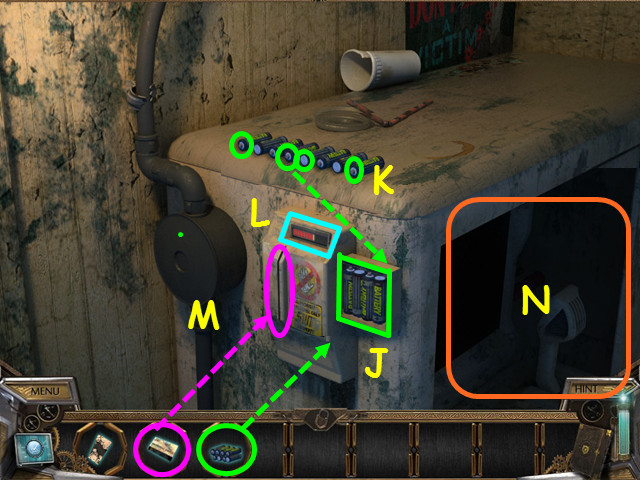
- Open the battery compartment and use the BATTERIES on it – the batteries will lay out on the control box (J).
- You need to find batteries with enough power for the card reader.
- Place the 4 batteries indicated into the compartment (K).
- The power indicator will go to green, the battery compartment will close then the indicator will say card (L).
- Use the ID CARD on the reader (M).
- After the panel opens, select the control for a mini-game (N).
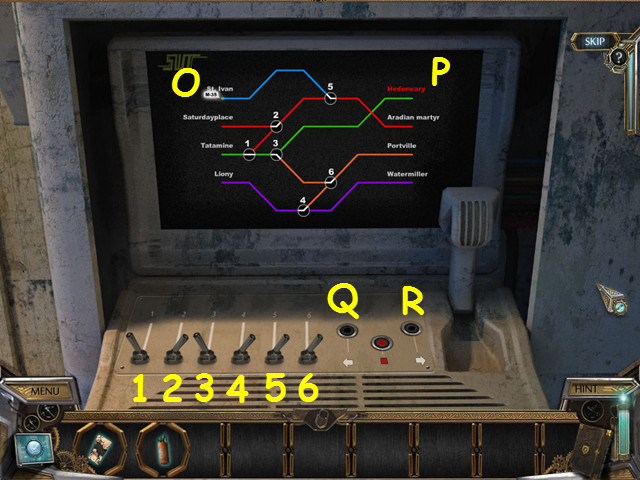
- Move the train (O) to Hederway station (P) by using the switches (1-6) and the left (Q) and right (R) arrows.
- This mini-game is randomized- your start point and solution may differ.
- Press the right button (R) and let the train travel all the way to the right.
- Flip switches 5, 1, and 2, then press the left button (Q).
- Flip switches 1 and 3, then press the right button (R).
- Walk forward to the subway car.
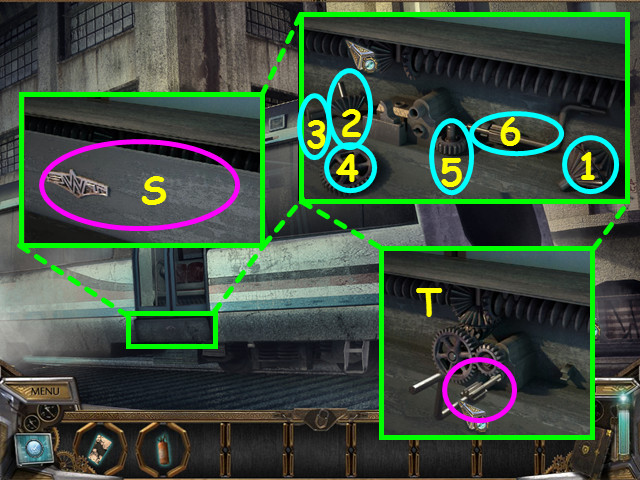
- Look below the door and open the panel (S).
- Place the gears in numerical order on the device (1-6).
- Once all the parts are in place, turn the crank to open the door (T).
- Enter the subway car.
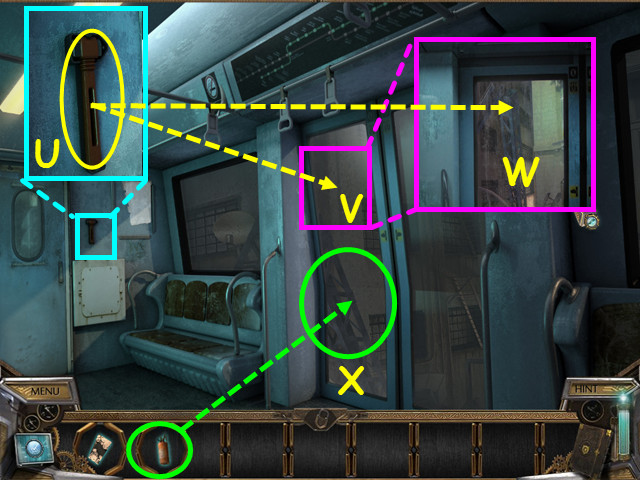
- Look at and take the SAFETY HAMMER (U).
- Use the SAFETY HAMMER on the door to see the close-up (V).
- Use the safety hammer on the glass (W).
- Use the FIRE EXTINGUISHER on the door (X).
- Walk forward twice to the alley.
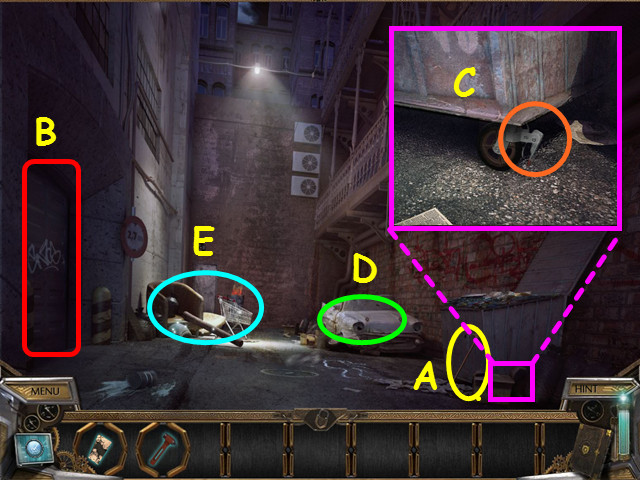
- After the communication from Mike, take the MOP (A).
- Note the garage door on the left (B).
- Look at the base of the dumpster and move the wheel lock so it rolls under the fire escape ladder (C).
- Note the car (D).
- Select the trash pile for a HOS (E).
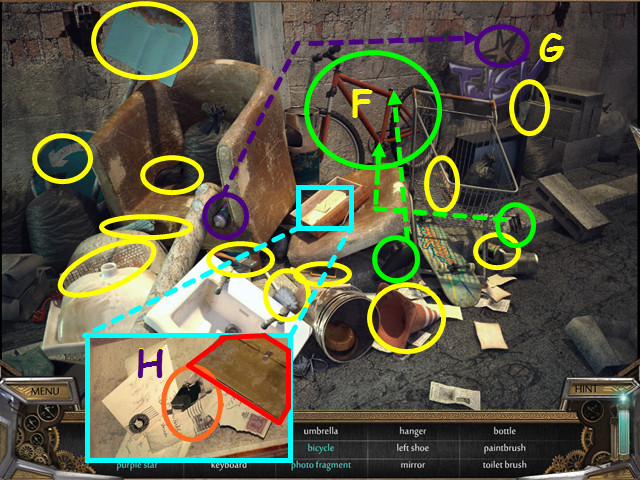
- Locate all the items on the list.
- Place the seat and the pedal on the frame to complete the bicycle (F).
- Use the spray paint to make the star purple (G).
- Look in the box, move the brown envelope to find the picture fragment (H).
- You will earn the UMBRELLA and the 2/2 PHOTO FRAGMENT.
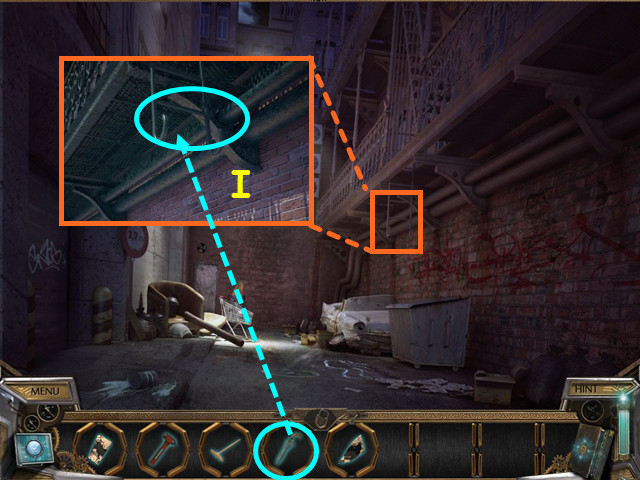
- Look at the fire escape ladder and use the UMBRELLA to lower the ladder (I).
- Climb up the fire escape.
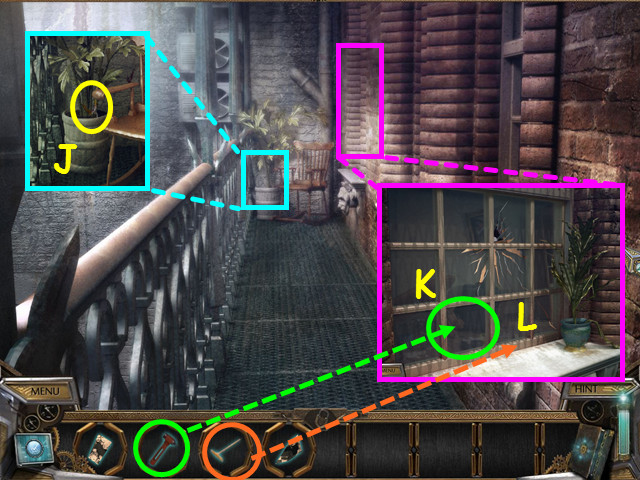
- Look at the plant and take the SECATEURS (J).
- Look at the window and use the SAFETY HAMMER to break the glass (K).
- Try to open the window, but it will not stay open.
- Use the MOP on the window to prop it open (L).
- Select the table for a HOS.
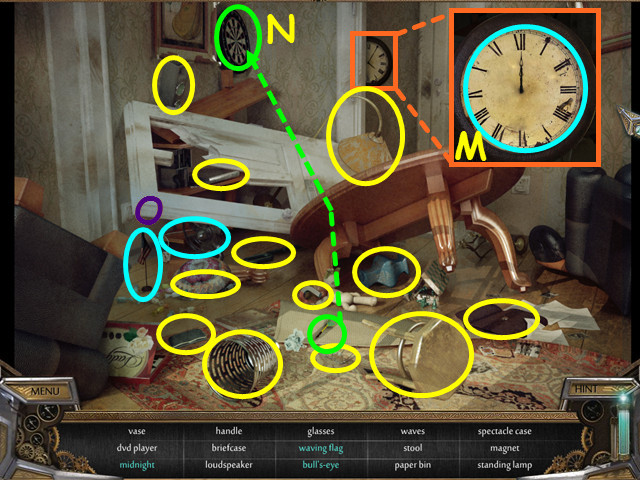
- Locate all the items on the list.
- Look at the clock and set the time to 12:00 to get midnight (M).
- Use the dart on the dartboard for a bulls-eye (N).
- Turn on the fan to make the flag wave (O).
- You will earn the MAGNET and the HANDLE.
- Climb into the room.
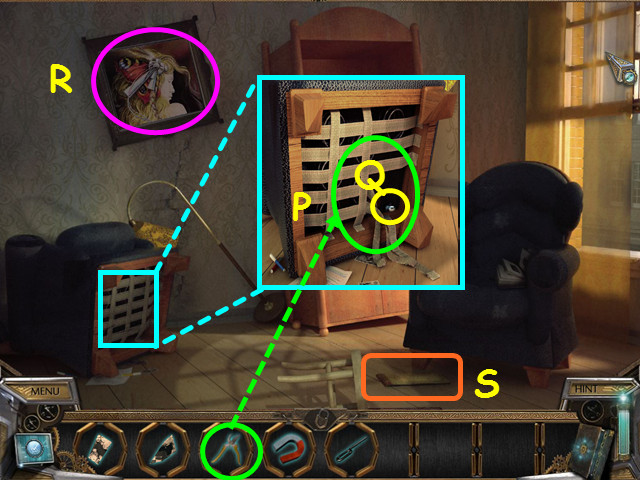
- Look at the bottom of the chair and use the SECATEURS to cut the bands (P).
- Take the TRUNK PULL (Q).
- Note the painting on the wall (R).
- Look at the photo album for a mini-game (S).
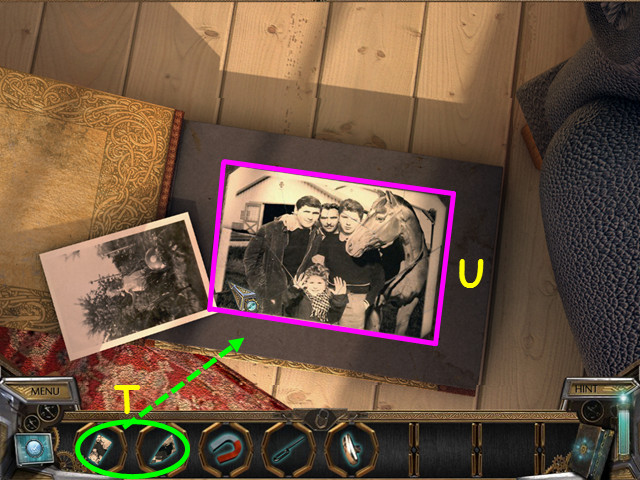
- Place the 2 PHOTO FRAGMENTS onto the play area to trigger the mini-game (T).
- Drag the photo fragments into place to restore the photo (U).
- Note the diagram on the back is the same as the painting.
- Look at the painting for a mini-game.
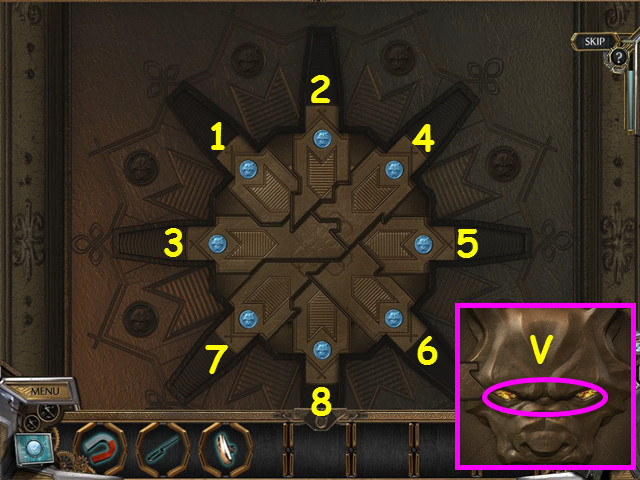
- Due to the shape of each piece, they can only slide open in a certain order.
- Select the pieces in numerical order (1-8).
- Take the LION EYES (V).
- Exit to the fire escape balcony.
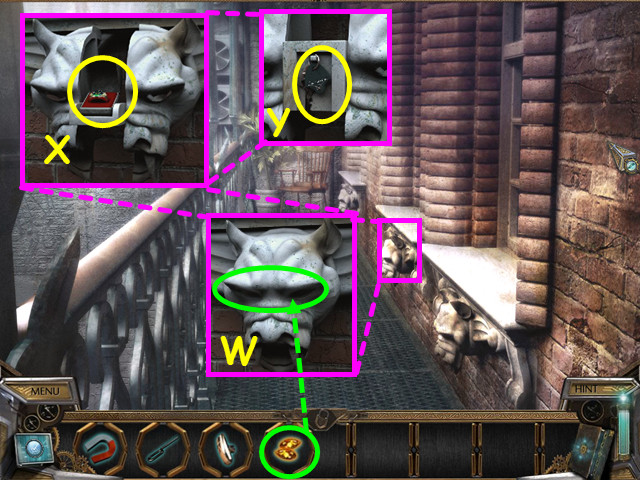
- Look at the center lion head and place the LION EYES in the sockets (W).
- Take the EMERALD RING (X) and the GLOVE COMPARTMENT KEY (Y).
- Walk down to the alley and zoom into the car interior.
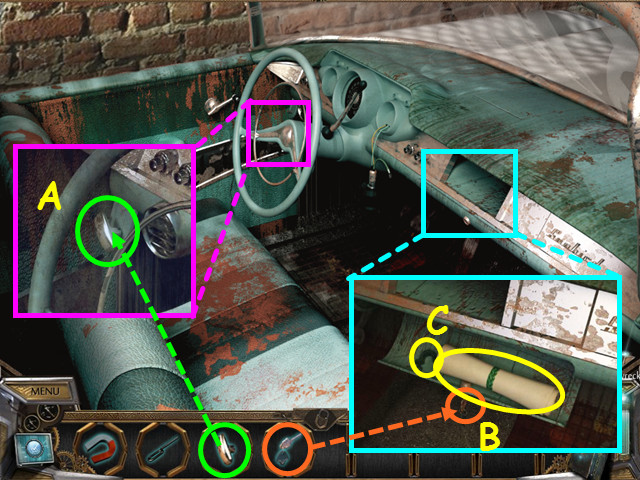
- Look at the steering wheel area and place the TRUNK PULL on the knob (A).
- Pull the trunk pull to open the trunk.
- Look at the glove compartment and use the GLOVE COMPARTMENT KEY on the lock (B).
- Take the 1/2 SHACKLE and the CODEX PAGE (C).
- Read the codex page for the clue to the next ring.
- After the communication from Mike, exit the car.
- Look at the trunk for a HOS.
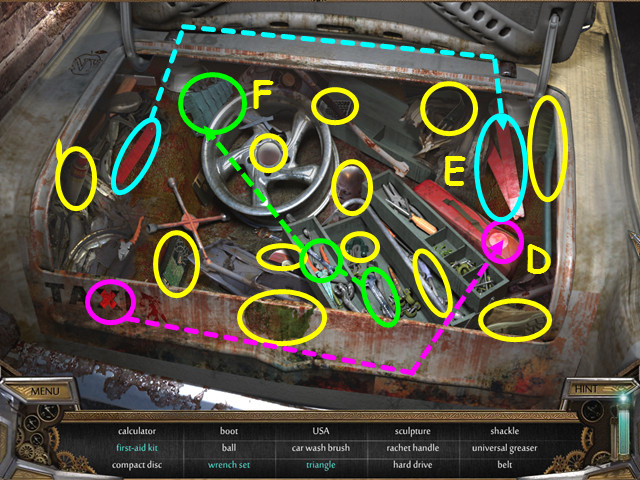
- Lift open the trunk door.
- Locate all the items on the list.
- Place the red cross on the white circle to make the first aid kit (D).
- Move the red piece of wood to the others to make the triangle (E).
- Place the 2 wrenches in the kit to make the wrench set (F).
- You will earn the 2/2 SHACKLE and a WRENCH.
- Walk down to the alley.
Chapter 5: The Sapphire Ring
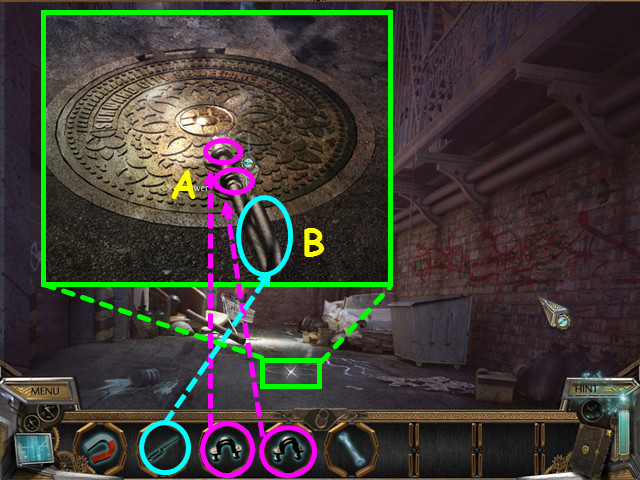
- Place the 2 SHACKLES into the hole on the sewer lid (A).
- Click on each shackle to lock them into place.
- Use the HANDLE on the shackles to open the lid (B).
- Enter the sewer.
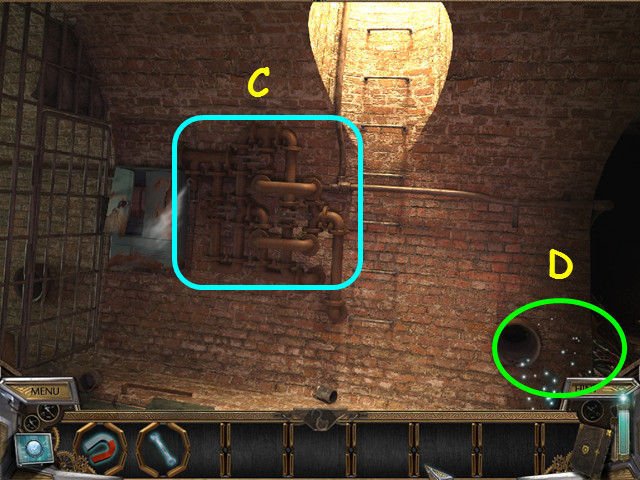
- Note the pipe array on the left (C).
- Select the trash pile for a HOS (D).
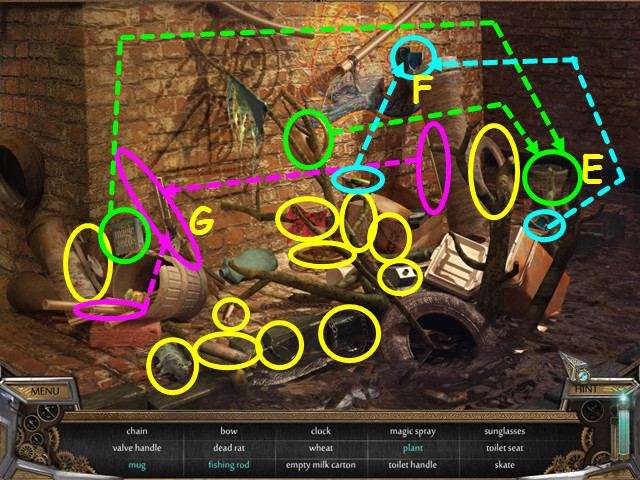
- Locate all the items on the list.
- Use the magic seed and the water jug on the pot to grow the plant (E).
- Use the glue, then the chip on the broken mug to get the mug (F).
- Use the bamboo pole then the stick to repair the fishing rod (G).
- You will earn the VALVE HANDLE, FISHING ROD, and CLEANER SPRAY.
- Look at the pipe assembly on the wall.
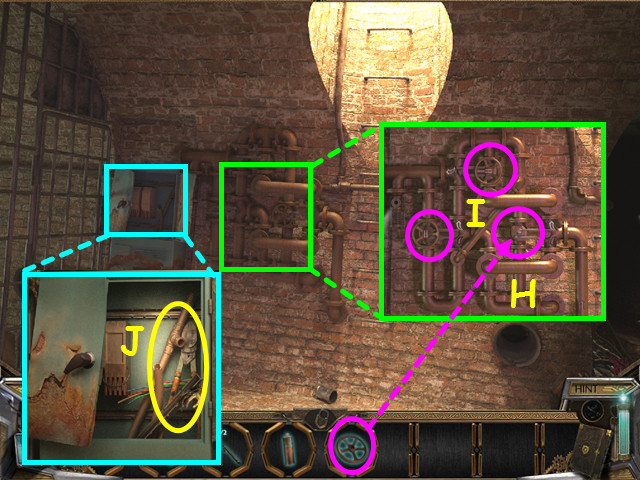
- Place the VALVE HANDLE on the valve (H).
- Select all 3 valve handles to turn off the steam (I).
- Look at the cabinet, open the right door and take the BOLT CUTTERS (J).
- Exit the sewer and look at the garage door on the left.
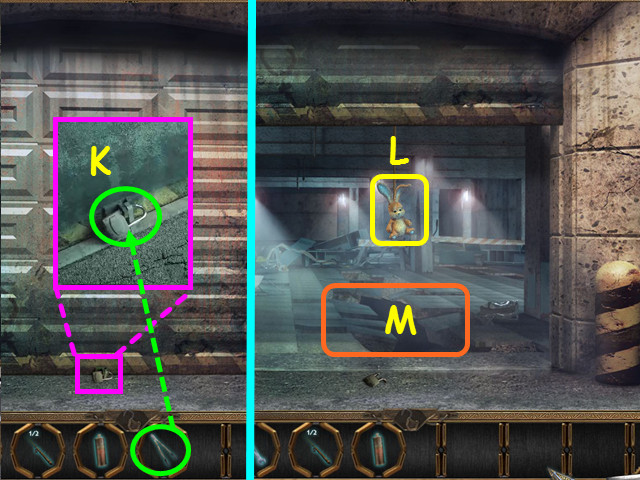
- Look at the lock and use the BOLT CUTTERS to break the lock (K).
- Look at the bunny (L).
- Look at the hole in the floor for a mini-game (M).
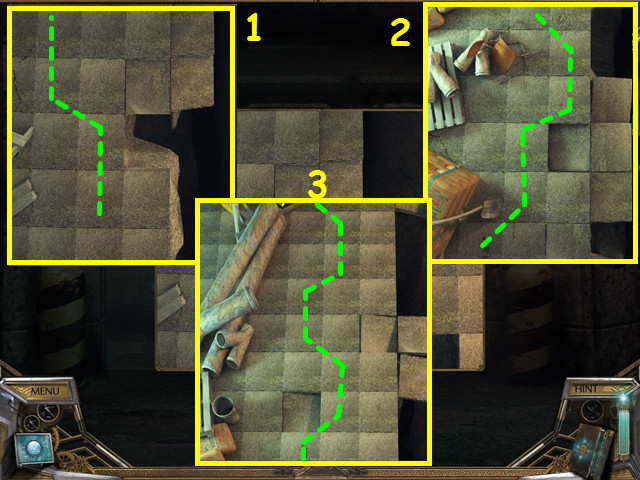
- Walk across the tiles using forward or diagonal steps; after 2 forward steps, you must step diagonally.
- Walk forward 2 steps, then go diagonally one tile and forward again; continue this process to the next area.
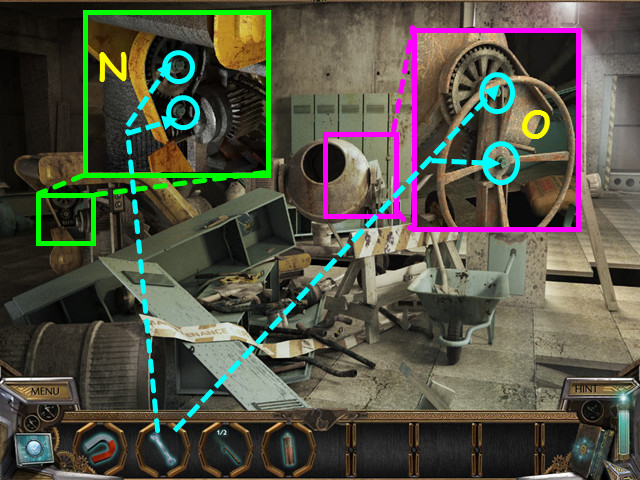
- Look at the machinery and use the WRENCH on the 2 bolts to get 2 COG WHEELS (N).
- Look at the cement mixer; use the WRENCH on the 2 bolts to get 2 more COG WHEELS (O).
- Walk to the right.
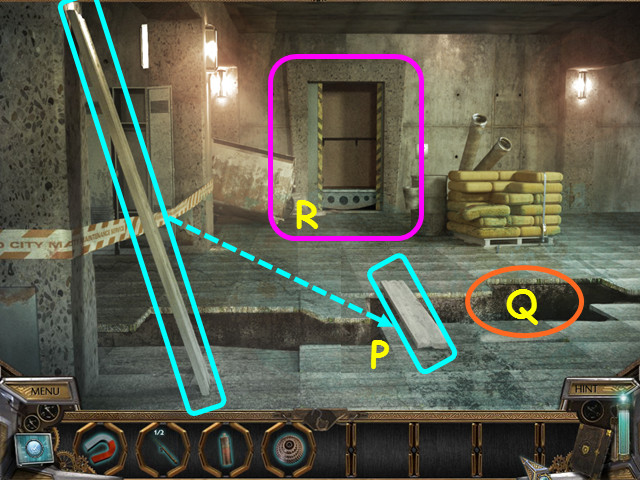
- Take the plank and lay it across the hole in the floor (P).
- Look in the chasm to see something just out of reach (Q).
- Walk forward to the elevator (R).
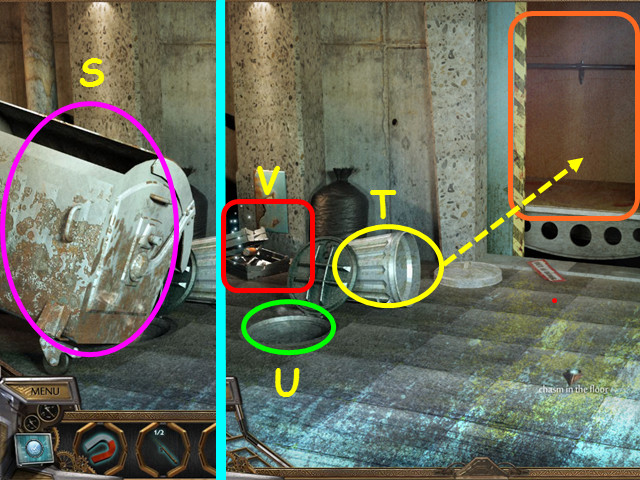
- Push the dumpster to the left (S).
- Take the trashcan and place it in the elevator (T).
- Note the sewer entrance (U).
- Select the trays for a HOS (V).
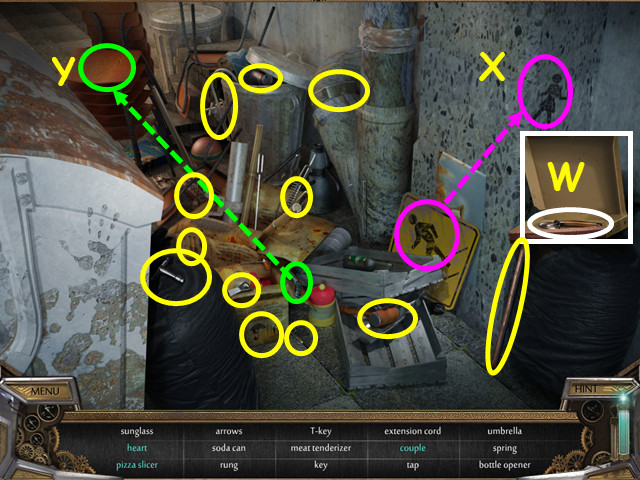
- Locate all the items on the list.
- Open the pizza box to find the pizza cutter (W).
- Move the man figure to the woman to make the couple (X).
- Use the knife on the chair to make the heart (Y).
- You will earn the T KEY and the 1/3 RUNG.
- Enter the sewer.
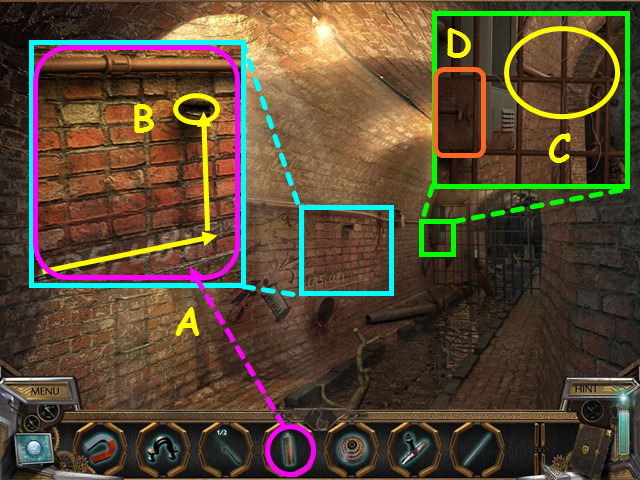
- Use the CLEANER SPRAY on the graffiti (A).
- Note the wall has R5, U8; start in the bottom left corner of the grid, count 5 bricks to the right then go up 8 bricks.
- Take the 1/3 METAL SHEET (B).
- Look at the gate and take the fishing line which will combine with the FISHING ROD (C).
- Look at the lock for a mini-game (D).
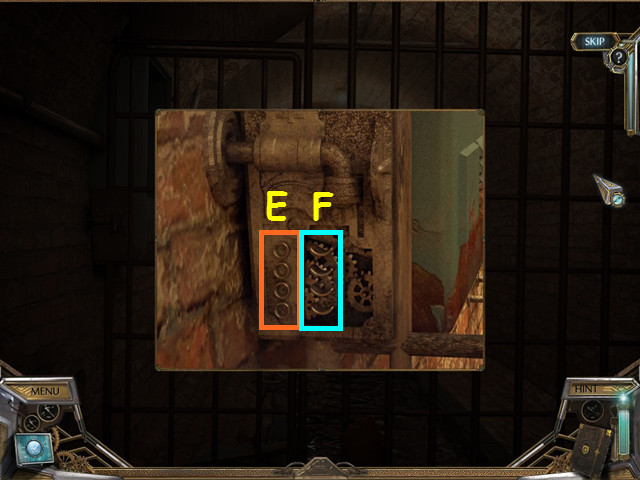
- Replay the sequences as they are shown on the left (E) by pressing the levers on the right (F).
- This mini-game is randomly generated, your solution may vary.
- Our 4 sequences were: red, red-yellow, red-yellow-yellow, red-yellow-yellow-blue.
- Should you make an error, the sequence will reset.
- Return to the chasm in the floor with the board over the hole and look in the chasm.
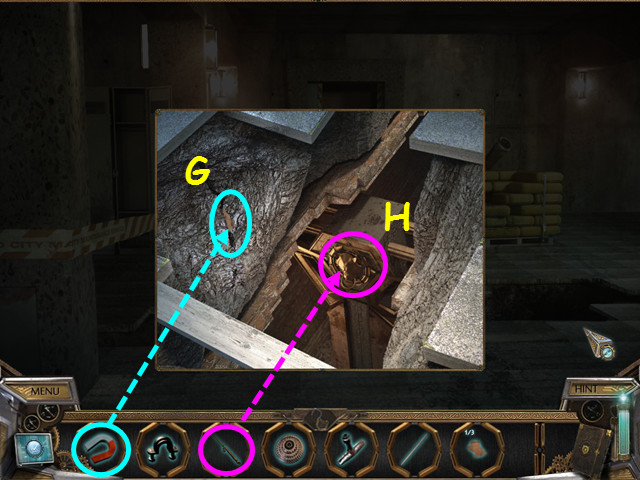
- Use the MAGNET to get the 2/3 METAL SHEET (G).
- Use the FISHING ROD on the handle (H).
- Return to the sewer and walk past the graffiti.
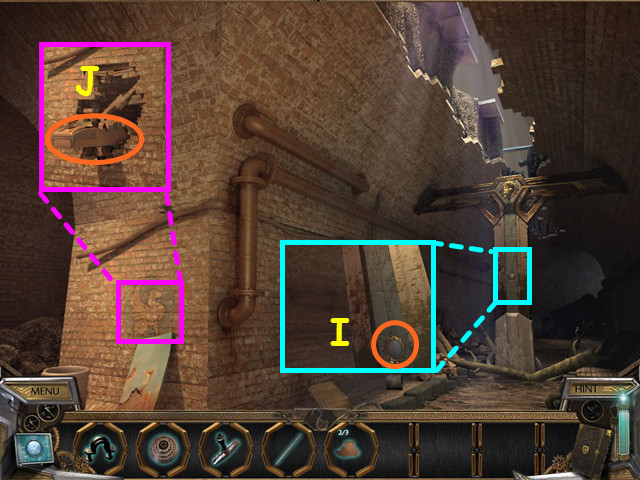
- Look at the totem pole and press the button (I).
- Look at the hidden drawer for a mini-game (J).
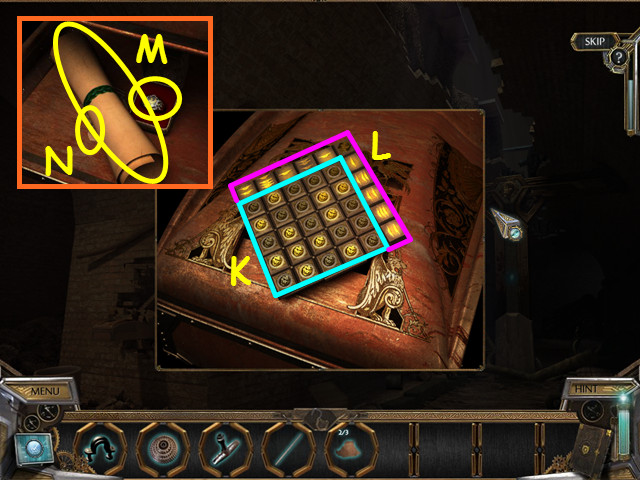
- Press the buttons in the inner square (K) so the sequences match the outer symbols (L).
- Take the SAPPHIRE RING and CODEX PAGE (M).
- Read the codex then exit the book.
- Take the 3/3 METAL SHEET that will form the COMPLETE METAL SHEET (N).
- After the communication from Mike, return to the elevator.
Chapter 6: The Ruby Ring
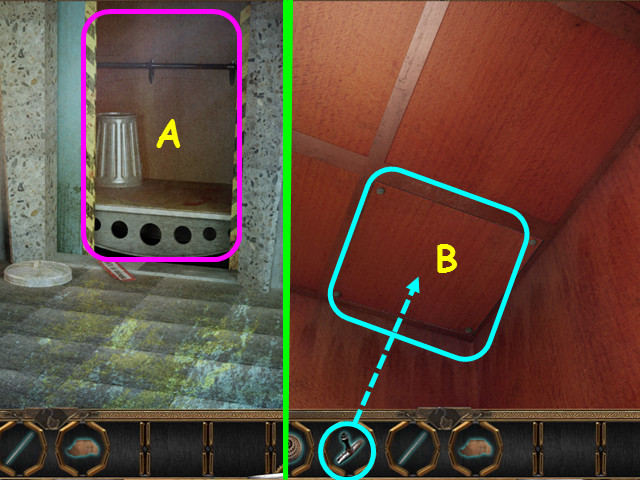
- Enter the elevator (A).
- Use the T KEY on the hatch (B).
- Climb up through the hatch.
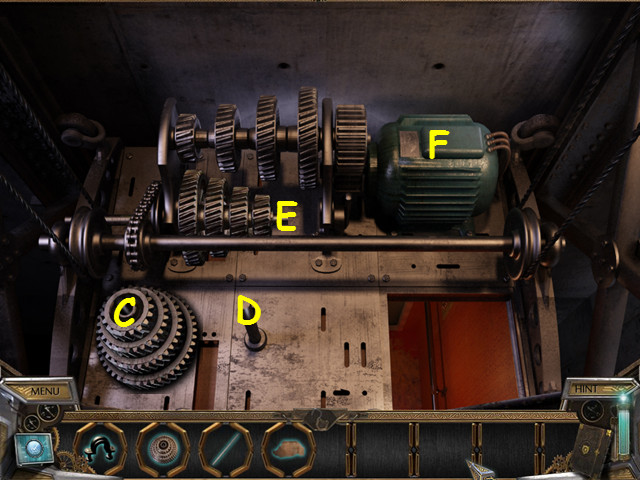
- Place the 4 COG WHEELS on post C.
- Move the cog wheels one at a time to post E.
- You can use posts C, D, and E, but you cannot place a larger cog atop of a smaller cog.
- Moving the top cog on each pile, make the following moves: C-D, C-E, D-E, C-D. E-C, E-D, C-D, C-E, D-E, D-C, E-C, D-E, C-D, C-E, D-E.
- Look at the engine and open the lid (F).
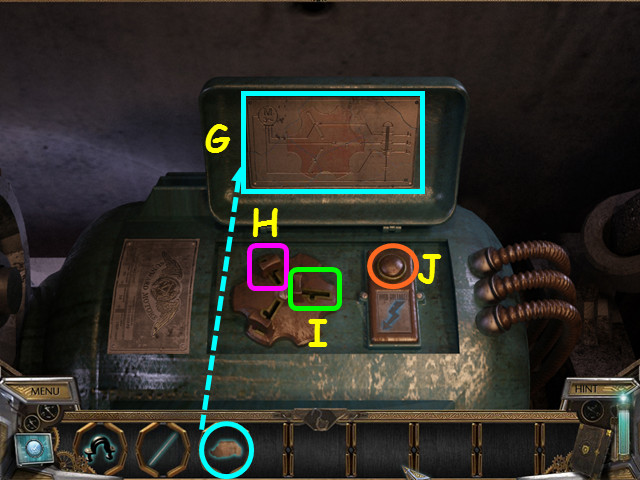
- Place the COMPLETE METAL SHEET into the lid and read the diagram (G).
- Per the diagram, move the upper lever one click to the middle position (H).
- Move the right lever 2 clicks to the center position (I).
- Press the power button (J).
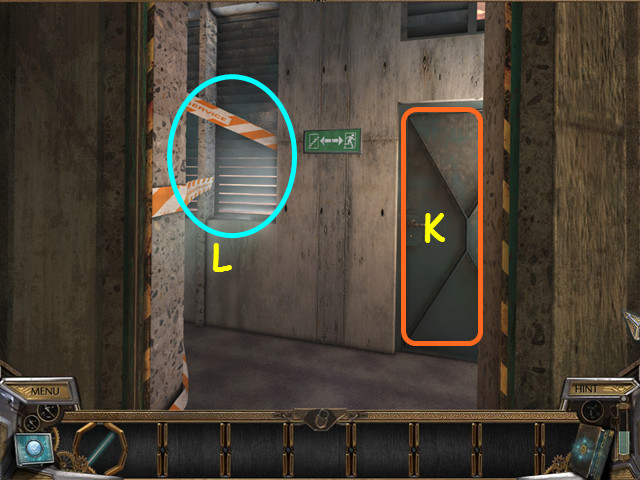
- Open the elevator door.
- Note the locked door (K).
- Look at the warning tape; remove the tape and select the construction area for a HOS (L).
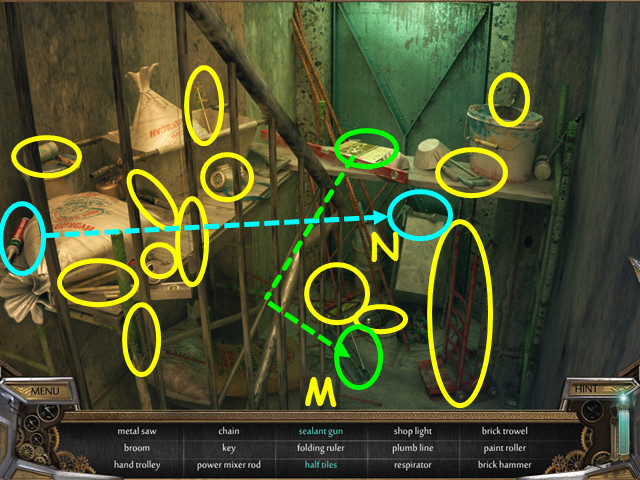
- Locate all the items on the list.
- Use the tiles on the cutter to get the half tiles (M).
- Use the sealant on the holder to get the sealant gun (N).
- You will earn the KEY.
- Return to the locked door and use the KEY on the lock.
- Walk to the roof.
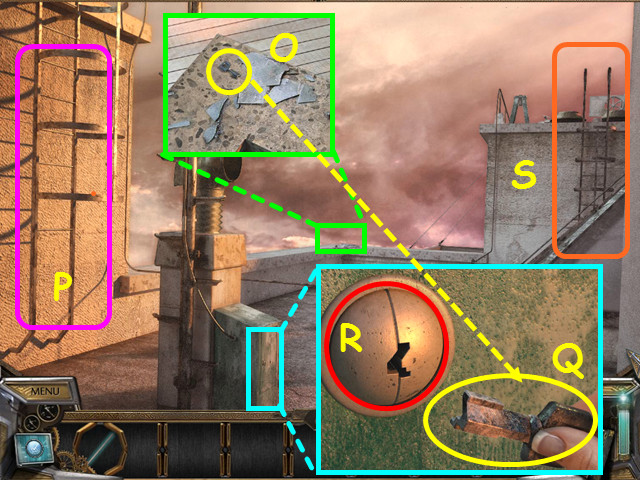
- After Mike's communication, walk forward.
- Look at the roof edge, move the debris and take the CABINET KEY (O).
- Note the left ladder is missing rungs (P).
- Zoom into the cabinet lock and try to use the CABINET KEY (Q).
- Change the shape of the lock to match the key, then click on the key to open the cabinet (R).
- Take the AQUARIUS SIGN from inside the cabinet.
- Walk to the right ladder (S).
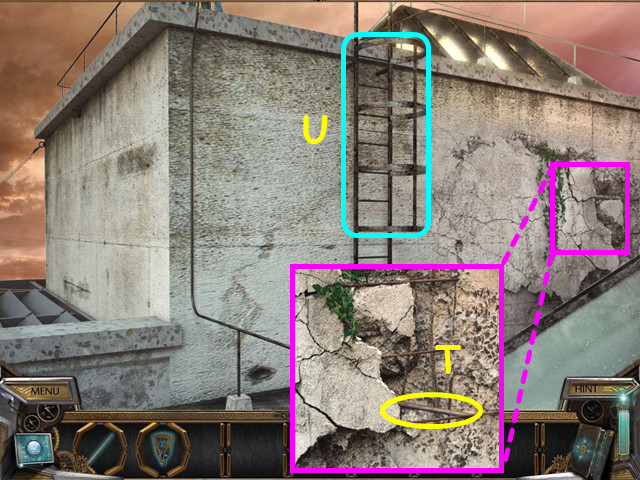
- Look at the wall and take the 2/3 RUNG (T).
- Climb up the ladder (U).
- Select the air vents straight ahead for a HOS.
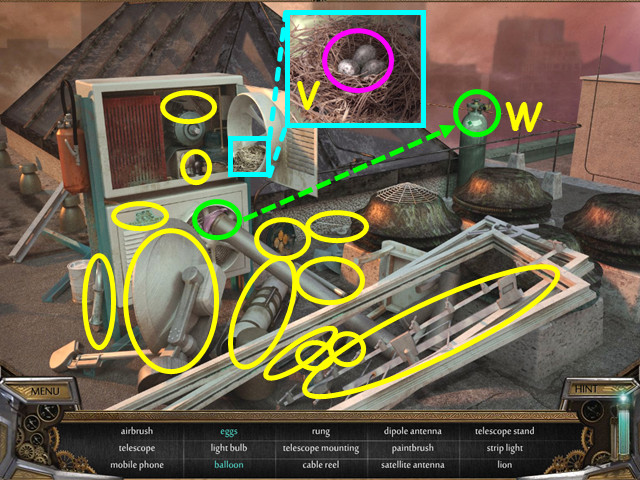
- Locate all the items on the list.
- Look in the nest for the egg (V).
- Use the unfilled balloon on the take to get the balloon (W).
- You will earn the TELESCOPE, TELESCOPE MOUNTING, TELESCOPE STAND, AND 3/3 RUNG.
- Walk left to the roof view.
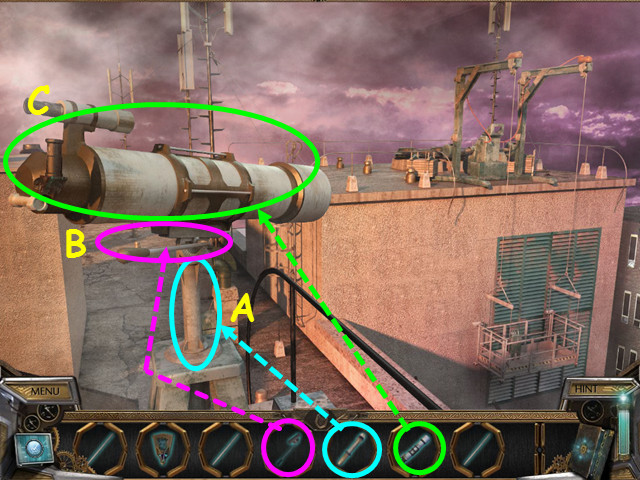
- Place the TELESCOPE STAND into the base (A).
- Place the TELESCOPE MOUNTING on the stand (B).
- Place the TELESCOPE on the mounting (C).
- Look into the telescope.
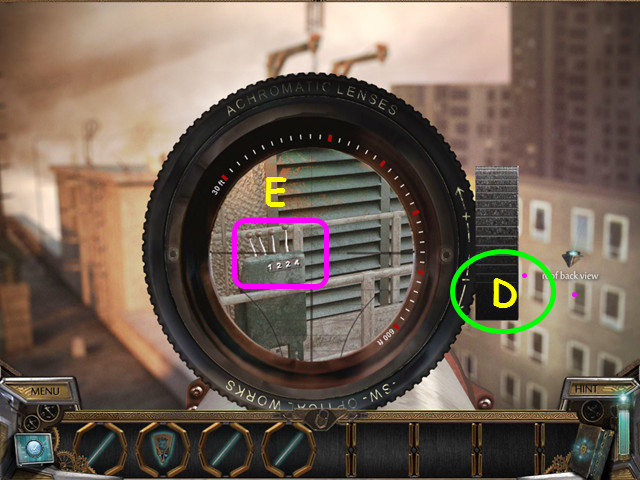
- Turn the dial down to bring the image into focus (D).
- Note the numbers on the window left controls (E).
- Exit the telescope, walk down 3 times.
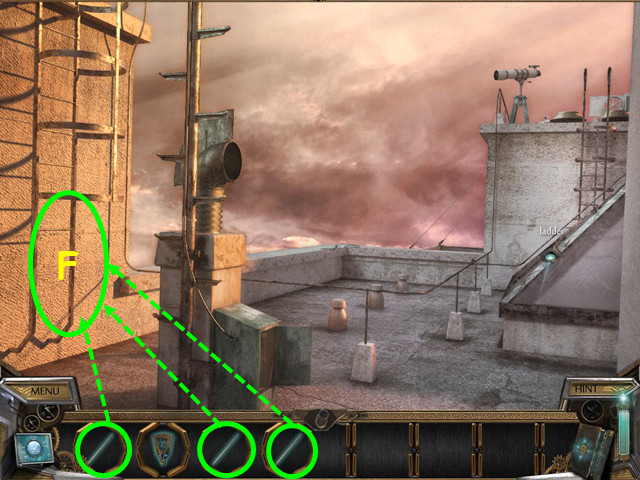
- Place the 3 RUNGS into the ladder (F).
- Climb up the ladder.
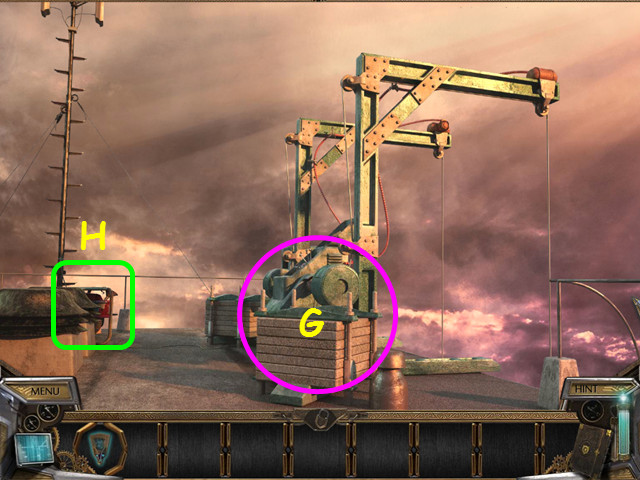
- Note the lift winch (G).
- Walk to the generator (H).
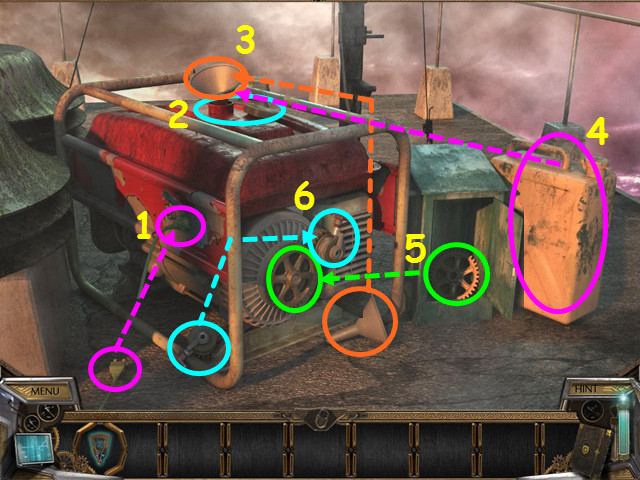
- Plug in the cord (1).
- Open the fuel cover (2).
- Place the funnel in the tank (3).
- Pour the fuel in the tank (4).
- Open the cabinet and place the gear on the fly wheel (5).
- Place the pull cord on the fly wheel and pull the cord (6).
- Look at the lift winch.
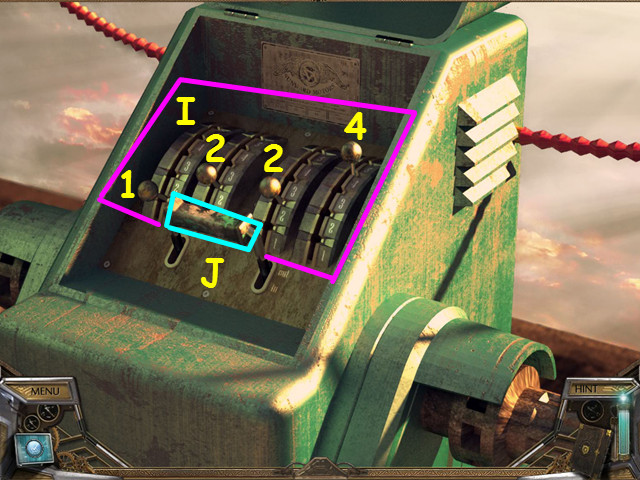
- Open the cover and set the numbers to the ones seen in the telescope (I).
- Pull the lever down (J).
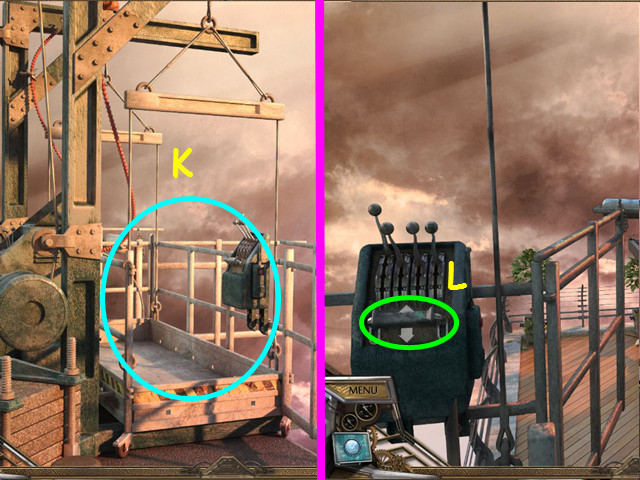
- Enter the window lift.
- Pull the lever.
- Select the debris on the right for a HOS.
- Locate all the items on the list.
- Open the fan cover, press the power switch and take the fan.
- Place the cleaning head on the end and attach the hose to make the vacuum cleaner.
- You will earn the PISCES SIGN.
- Walk forward.
- Look at the plant, move the leaf and take the CANCER SIGN.
- Note the front door.
- Look at the grill area.
- Take the ARIES SIGN from the planter.
- Take the SWITCH LEVER.
- Open the grill and take the CAPRICORN SIGN.
- Walk down and look at the front door.
- Place the ARIES SIGN, AQUARIUS SIGN, PISCES SIGN, CAPRICORN SIGN, and the CANCER SIGN into the door lock.
- Rotate the center dial so the color between each sign is the sum of the 2 colors (red and yellow equal orange).
- Take the RUBY RING from the center.
Chapter 7: The Diamond Ring
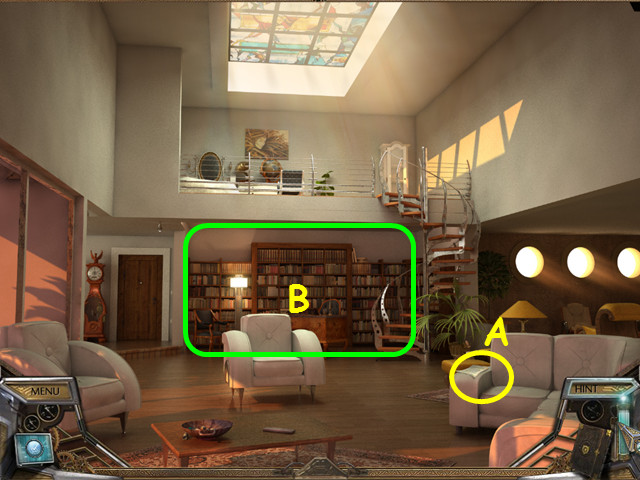
- After the communication from Mike, read the note on the couch (A).
- Walk forward to the bookshelf (B) and select the desk for a HOS.
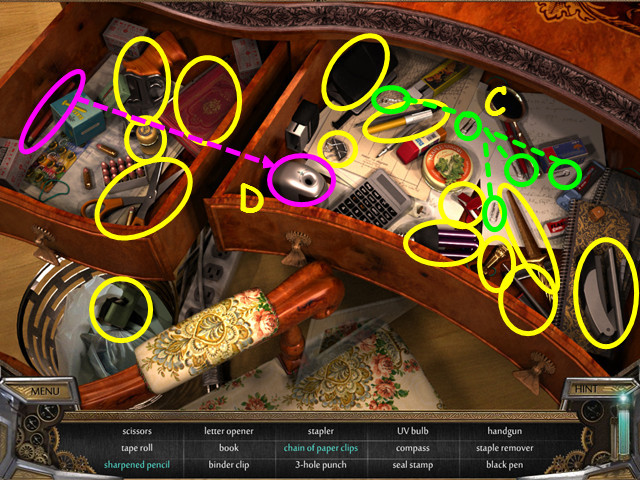
- Locate all the items on the list.
- Select the 5 paperclips to make the chain of paperclips (C).
- Use the pencil on the sharpener to get the sharpened pencil (D).
- You will earn the UV BULB.
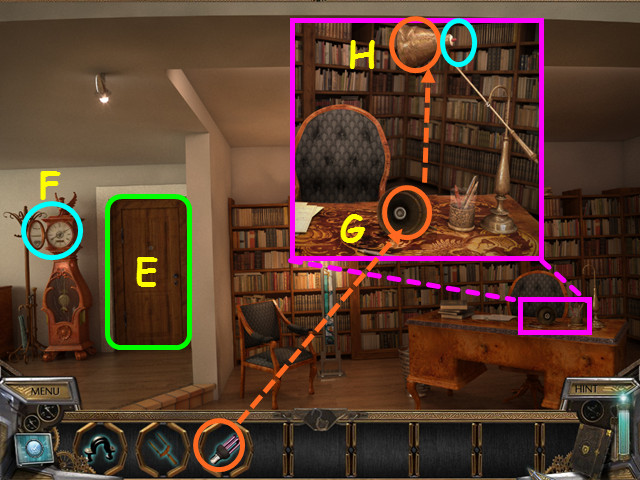
- Look at the door to learn it is being guarded (E).
- Look at the clock; open the face to learn it is missing hands (F).
- Look at the desk and place the UV BULB in the lamp (G).
- Place the lamp on the stand and turn it on (H).
- Walk down, then forward to the spiral staircase.
- Walk up the staircase to the bedroom.
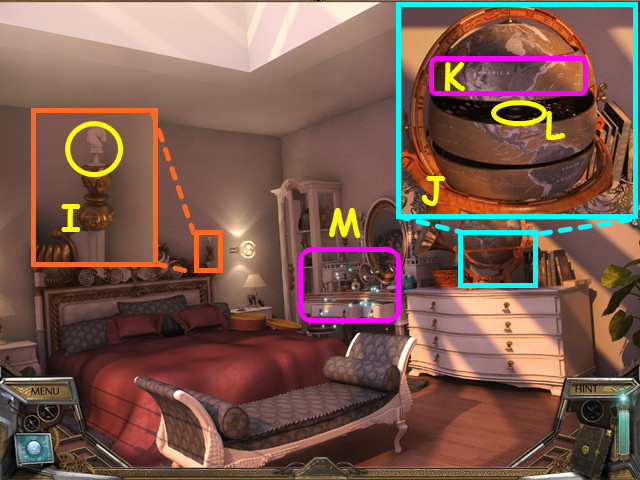
- Look at the bedpost and take the KNIGHT (I).
- Look at the globe and rotate the pieces to reform the Americas (J).
- The 2nd piece that has North America written on it does not move (K).
- Once the globe is reformed, it will open and you can take the CLOCK HANDS (L).
- Select the vanity for a HOS (M).
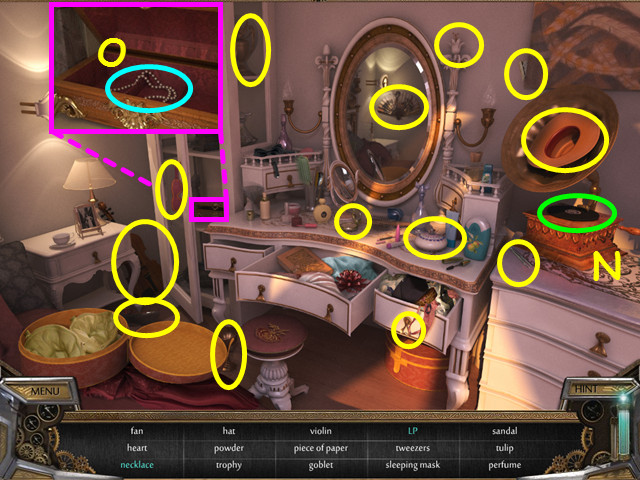
- Locate all the items on the list.
- Look at the Victrola to find the LP (N).
- Look at and open the jewelry box for the necklace (O).
- You will earn the PIECE of NOTE and the TWEEZERS.
- Exit the bedroom then look at the bookshelf behind the desk.
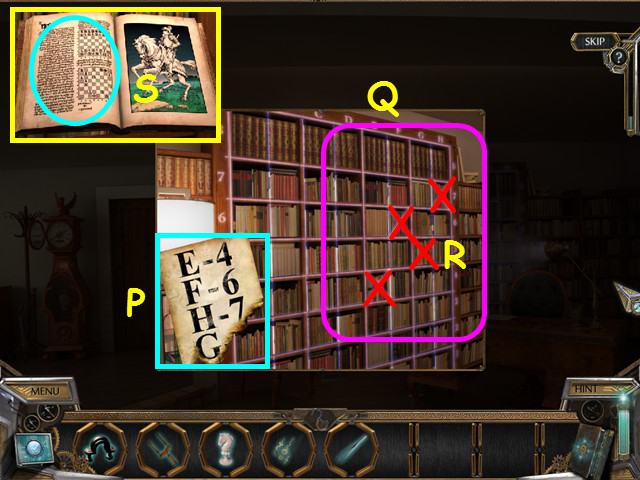
- Place the PIECE of NOTE on the bookshelf (P).
- Select the shelves indicate by the note (Q).
- Since G is missing the number you will need to do trial and error, starting the sequence over if you select wrong.
- The final location is G-4 (R).
- Take the CHESS SHEET from the book that appears (S).
- Look at the clock.
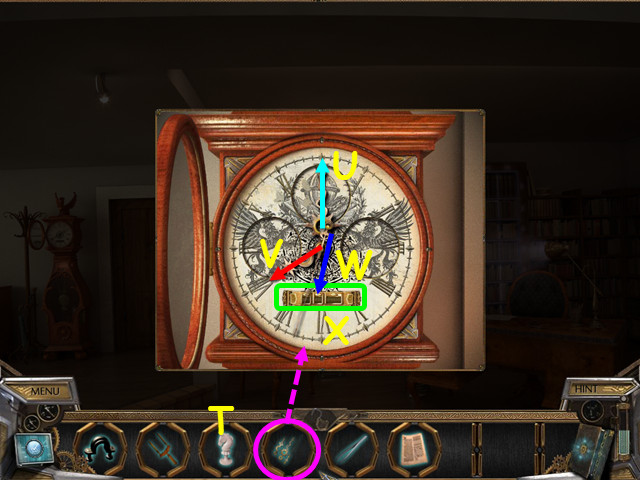
- Place the CLOCK HANDS on the face for a mini-game (T).
- Move the clock hands to rotate the circles and complete the pictures.
- Move the minute hand 4 times (U).
- Move the hour hand 3 times (V).
- Moe the second hand 5 times (W).
- Take the TIME CASSETTE (X).
- Walk down, then forward to the spiral staircase.
- Look at the chessboard on the right.
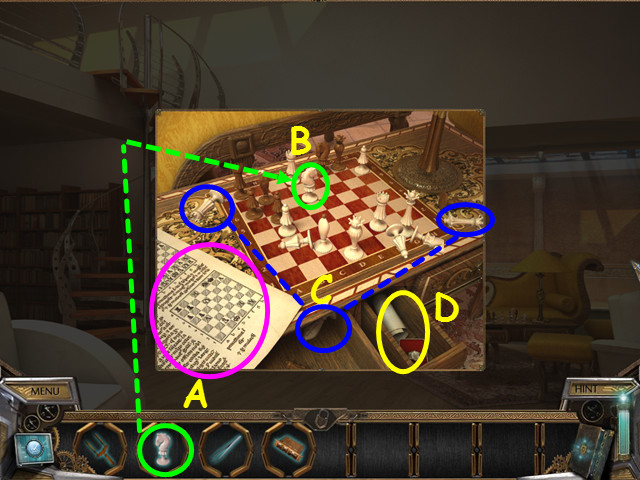
- Place the CHESS SHEET on the table (A).
- Look at the paper to find there is no knight on D6.
- Place the KNIGHT on D6 (B).
- Make the chess board have the same configuration as the diagram.
- Click on the 3 white pieces not on the board (C).
- Take the DIAMOND RING and CODEX PAGE (D).
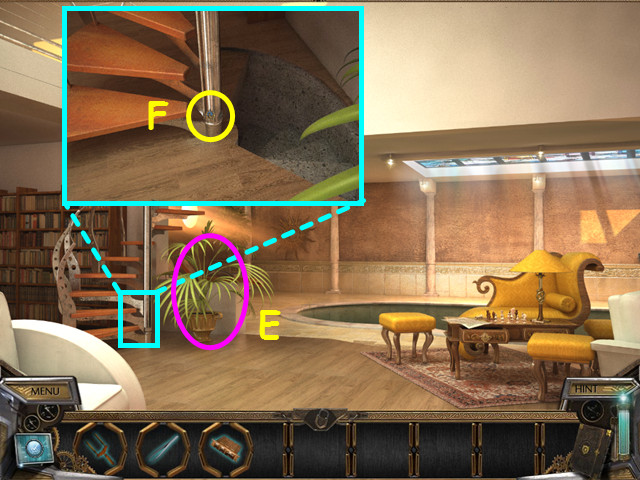
- Move the potted plant (E).
- Look at the base of the stairs and push the button (F).
- Walk down the stairs to the power source room.
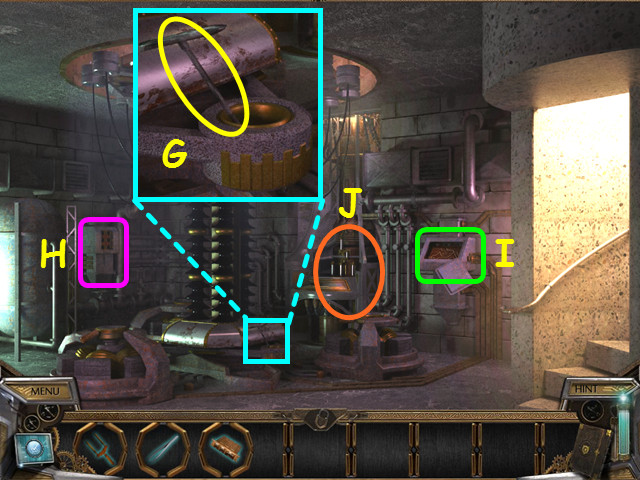
- After the communication from Mike, look at the center base and take the T KEY (G).
- Note the switch box on the left (H).
- Note the mini-game on the right (I).
- Select the center console for a mini-game (J).
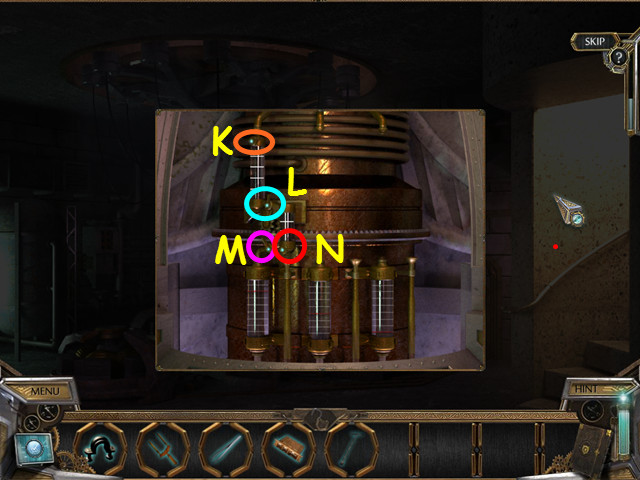
- Fill the 3 lower vials with liquid to the indicated height.
- The top button fills the upper vial (K).
- The center button puts fluid into the center vial (L).
- The lower left button puts fluid into the lower vial (M).
- The lower right button empties the center vial (N).
- For the first bottom vial, press K-L-M-L-M-K-L-N-L-M.
- For the center bottom vial, press: K-L-N-L-M-K-L-N-L-M.
- For the last vial, press: K-L-N-L-K-L-N-L-N-L-M.
- Select the mini-game on the right.
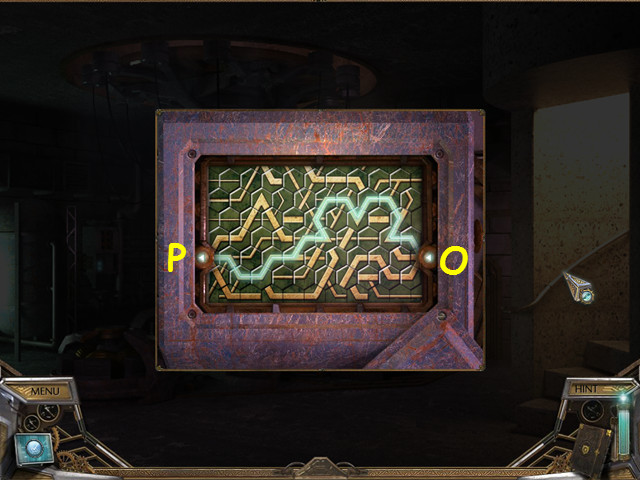
- Rotate the tiles so power flows from right (O) to left (P).
- Click on the tiles to rotate them in place.
- Walk up the stairs and go forward towards the pool.
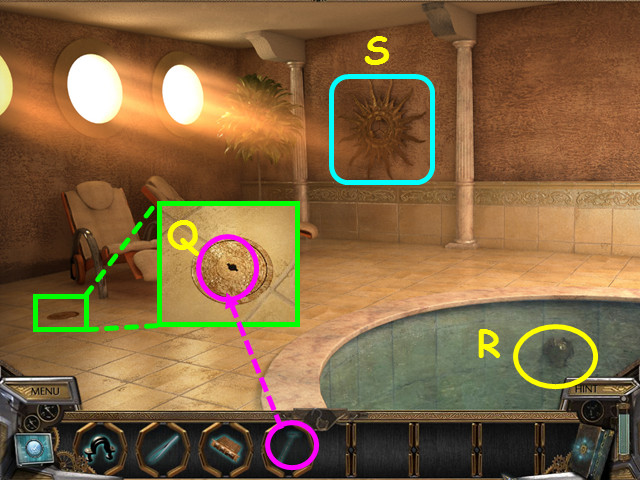
- Look at the access cover and use the T KEY on it to drain the pool (Q).
- Look in the pool and take the LION HEAD (R).
- Note the sun on the wall (S).
- Return to the power source room.
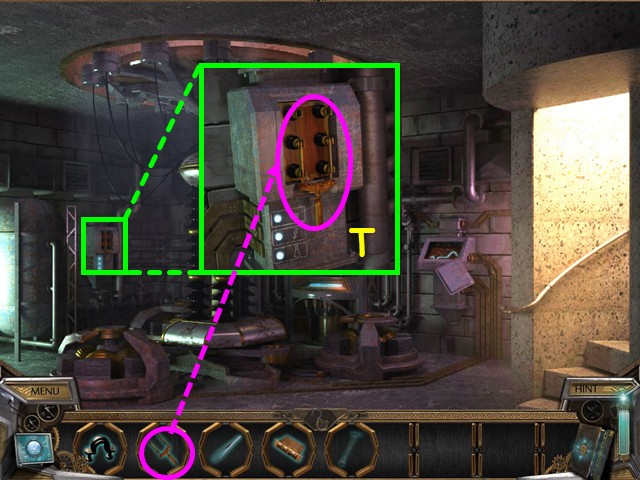
- Look at the switch box and place the SWITCH LEVER inside then pull the lever (T).
- Return to the pool area.
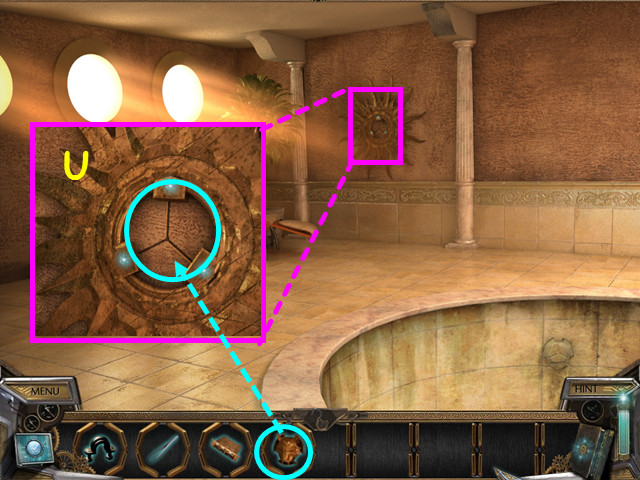
- Look at the sun and place the LION HEAD in the center (U).
- Walk forward to the secret room.
Chapter 8: Fixing the Past
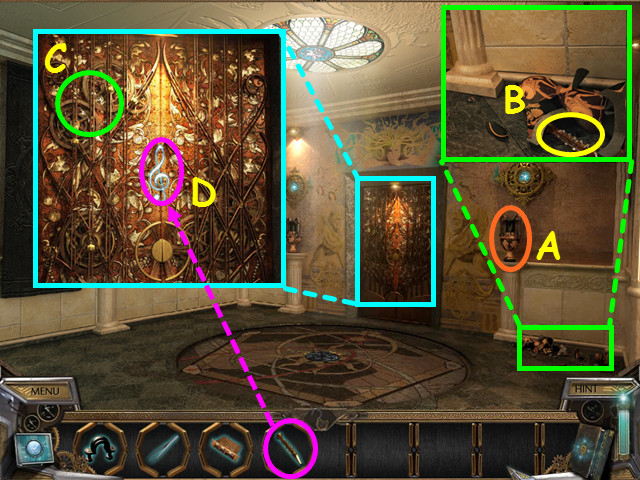
- Knock over the vase (A).
- Look at the broken vase and take the FLUTE (B).
- Look at the door and press the button to move the gears (C).
- Once the treble clef appears, use the FLUTE on the door (D).
- Look at the machine inside the door.
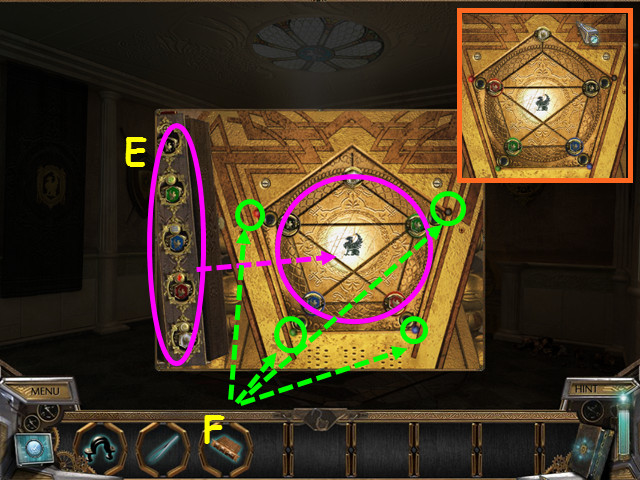
- Place the 5 rings into the matching color locations (E).
- Move the rings so that the color matches the outer colored dots (F).
- Click on the rings in this order: white- black- red-blue-green-black-white.
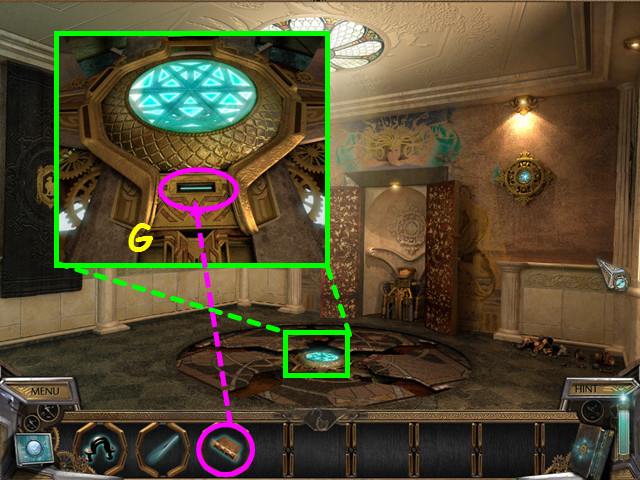
- Look at the floor and place the TIME CASSETTE into the slot (G).
- You will automatically travel back in time.
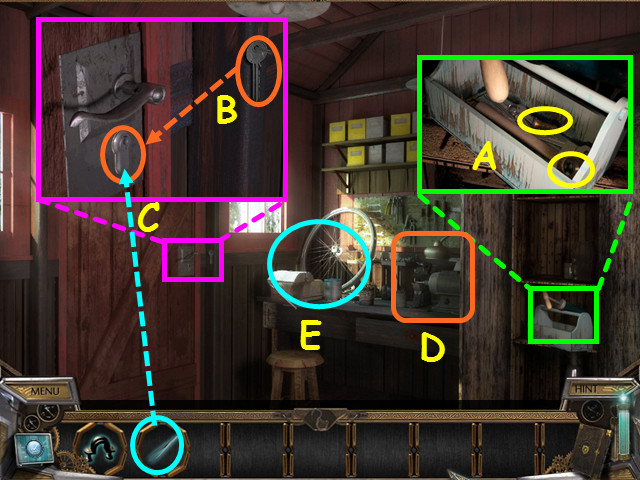
- After communicating with Mike, look in the tool box; take the HOSE ADAPTER and the HOSE CONNECTOR (A).
- Look at the door and use the hanging key in the lock (B).
- Use the TWEEZERS to get the BROKEN KEY (C).
- Note the key grinder on the right side of the bench (D).
- Look at the left side of the bench (E).
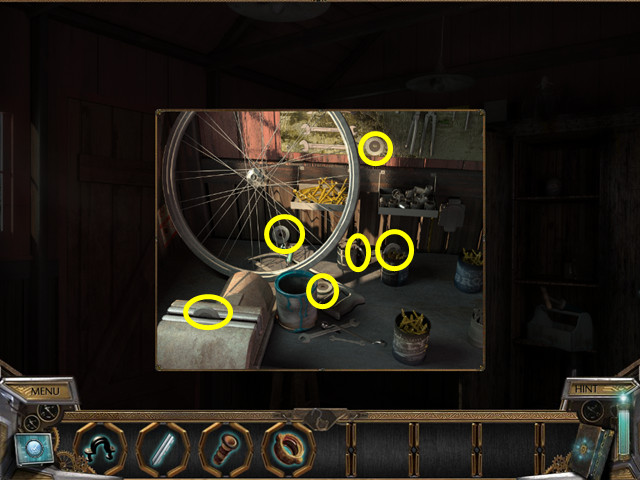
- Collect the 6 GRINDING WHEELS.
- Look at the right side of the bench.
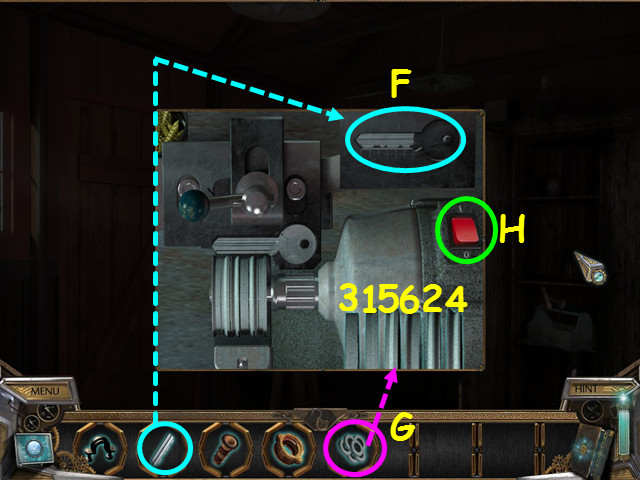
- Place the BROKEN KEY in the upper key cut-out (F).
- Place the 6 GRINDING WHEELS on the grinder to activate a mini-game (G).
- Select the grinding wheels in order to make the same cuts as on the broken key.
- Click on the grinding wheels in numerical order (1-6).
- Press the red power button (H).
- The CUT KEY will go into your inventory.
- Look at the door and use the CUT KEY on the lock.
- Exit the shed.
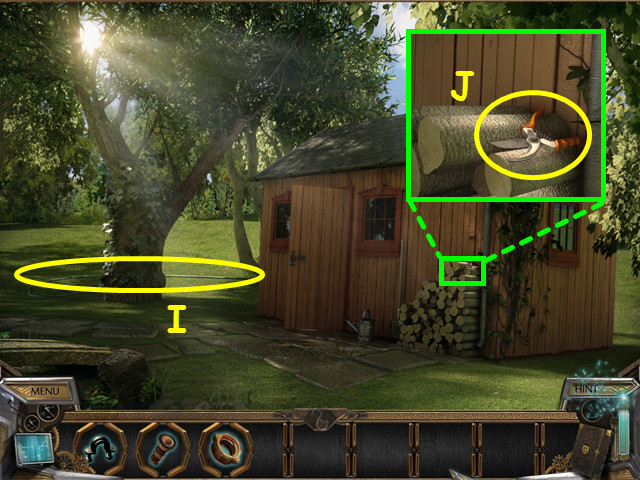
- After the communication from Mike, take the HOSE (I).
- Look at the woodpile and take the PRUNING SHEARS (J).
- Walk left to the house.
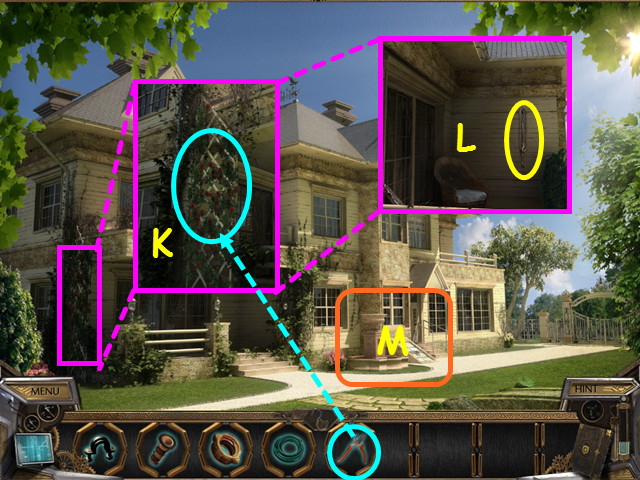
- Look at the rose trellis and use the PRUNING SHEARS 3 times to remove the roses (K).
- Climb up the trellis and take the ROPE (L).
- Walk to the front of the house (M).
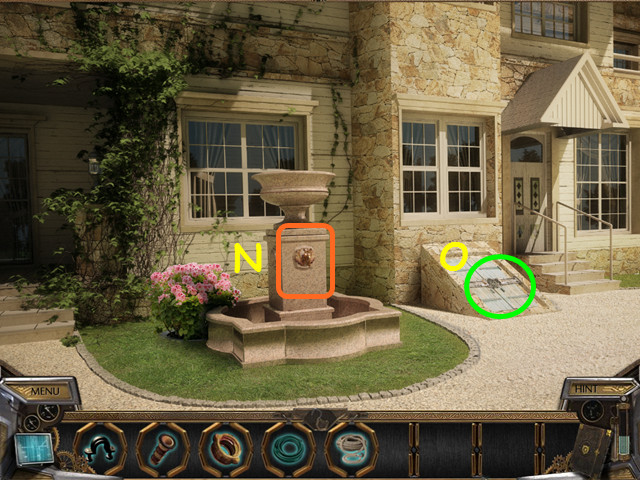
- Note the spigot (N).
- Look at the basement door lock for a mini-game (O).
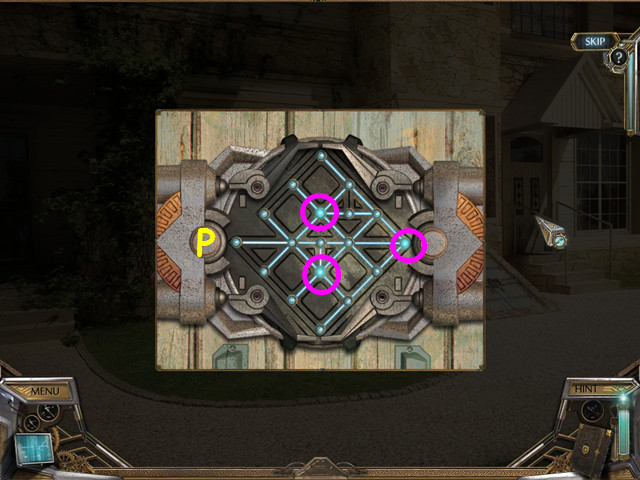
- Turn on all the lights by pressing only 3 lights.
- All the lights in that row and column will light.
- Select the 3 lights indicated (P).
- Enter the basement.
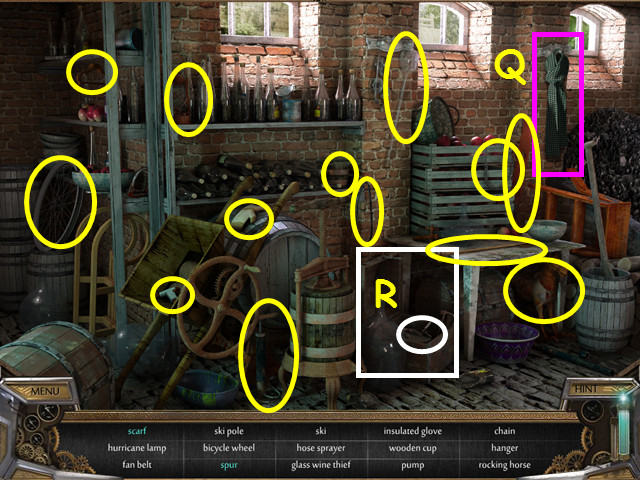
- Select the barrel and woodpile on the left for a HOS.
- Locate all the items on the list.
- Move the jacket to find the scarf (Q).
- Open the chest to find the spur (R).
- You will earn the SPRAY NOZZLE, INSULATED GLOVE, and the FAN BELT.
- Exit the basement and look at the fountain spigot.
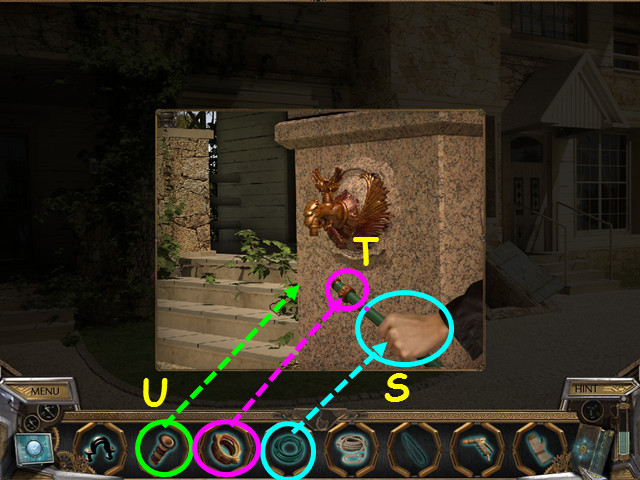
- Use the HOSE on the spigot (S).
- Place the HOSE CONNECTOR (T) then the HOSE ADAPTER on the hose (U).
- Select the hose to connect it to the spigot.
- Return to the basement.
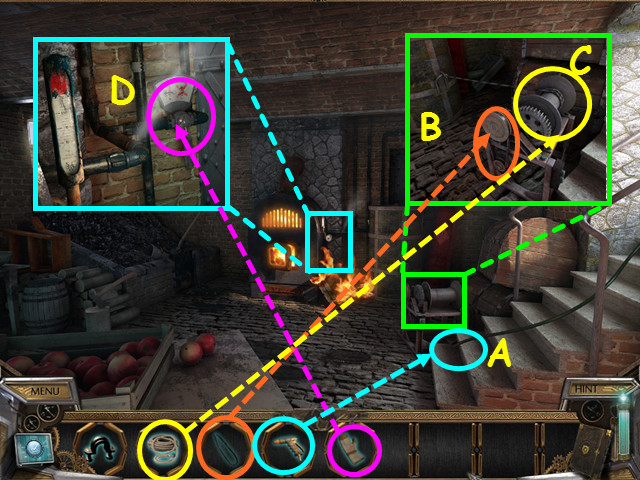
- Use the SPRAY NOZZLE on the hose to put out the fire (A).
- Look at the winch; use the FAN BELT (B) and the ROPE (C) on the winch to move the heavy crate.
- Look at the boiler and use the INSULATED GLOVE on the valve (D).
- You will receive a communication from Mike confirming your success.
- Congratulations! You have completed The Secret Order: New Horizon!
Created at: 2011-12-17

