
Walkthrough Menu
- General Tips
- Chapter 1: The Harbor
- Chapter 2: The Hall
- Chapter 3: The Trance
- Chapter 4: The Tree
- Chapter 5: The Furnace
- Chapter 6: The Throne Room
- Chapter 7: The Cage
General Tips
- This is the official guide for The Secret Order: The Buried Kingdom.
- This guide will not mention when you have to zoom into a location; screenshots will show each zoom scene.
- The screenshots will show where to play a Hidden-Object Puzzle (HOP) and what inventory item will be received.
- Some inventory items require further actions.
- This guide will give step-by-step solutions for all puzzles which are not random. Read the instructions in the game for each puzzle.
Chapter 1: The Harbor
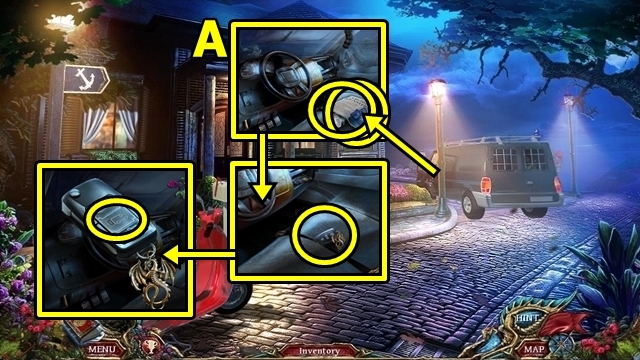
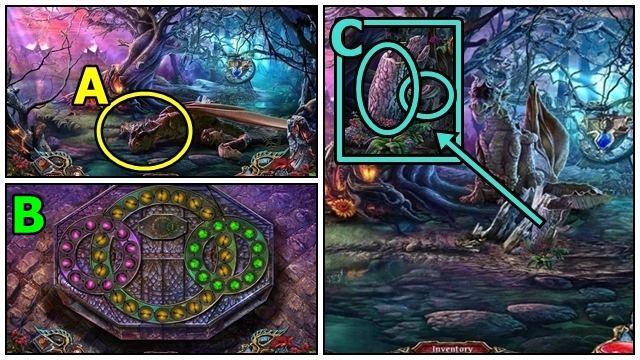
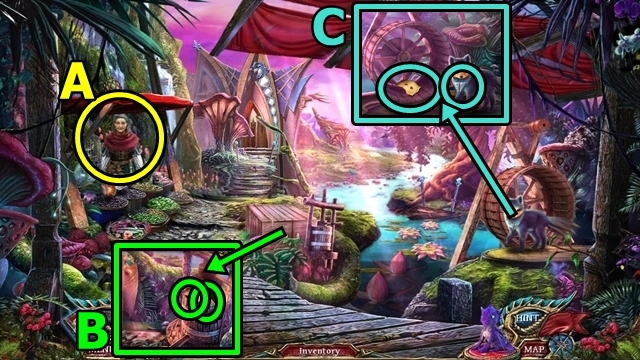
- Read the newspaper (A); take the FLASHLIGHT. Open the trunk.
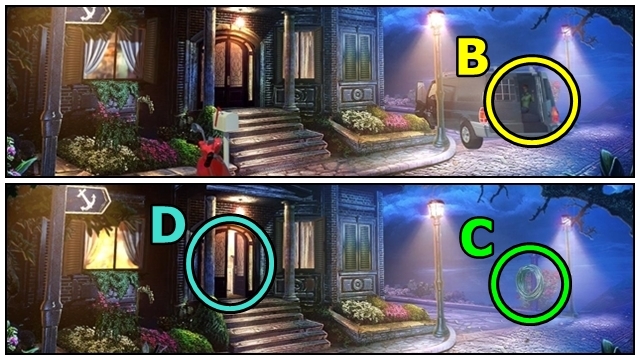
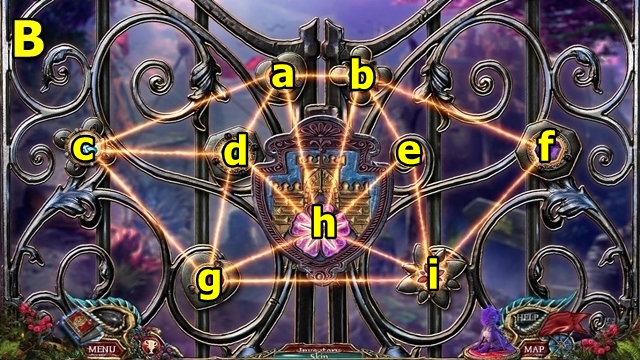
- Talk to Julie (B); receive the DRAGON-EYE AMULET.
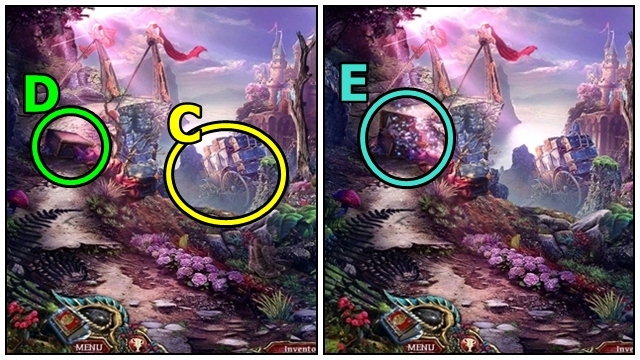
- Take the HOSE (C).
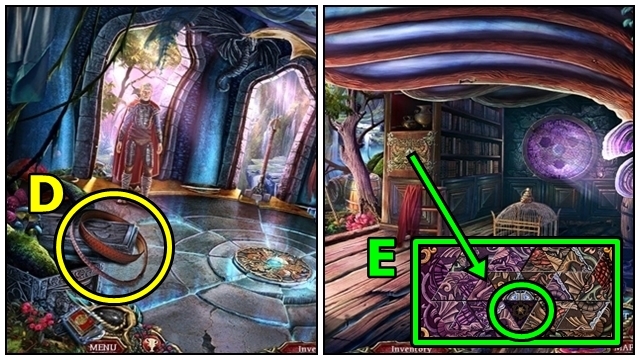
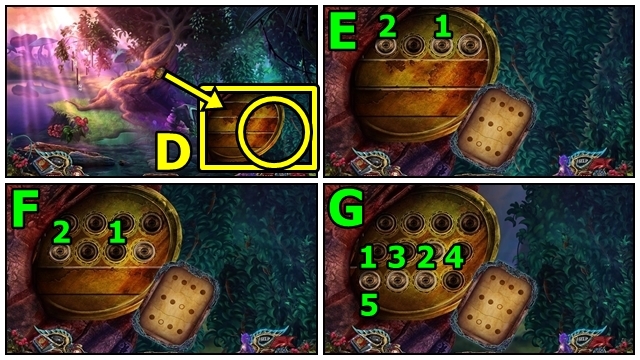
- Enter Julie's house (D).
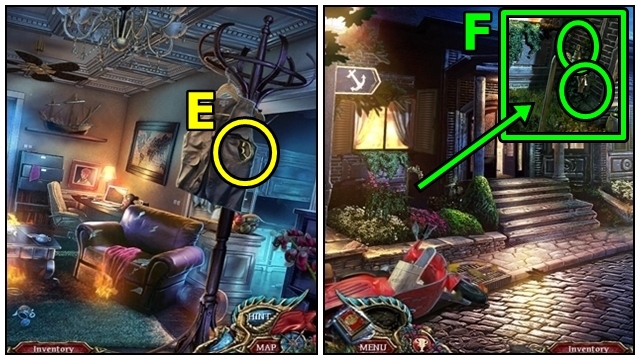
- Take the HANDLE (E).
- Move down.
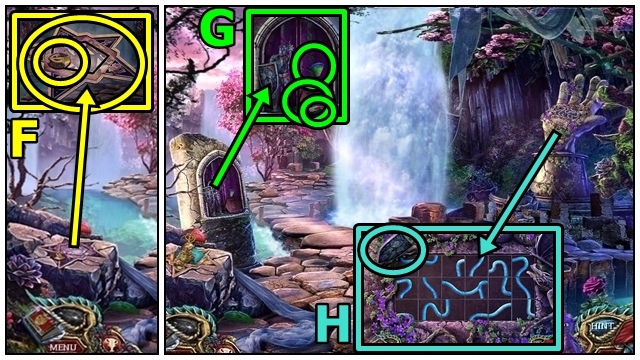
- Insert the HOSE (F) and HANDLE.
- Enter Julie's House.
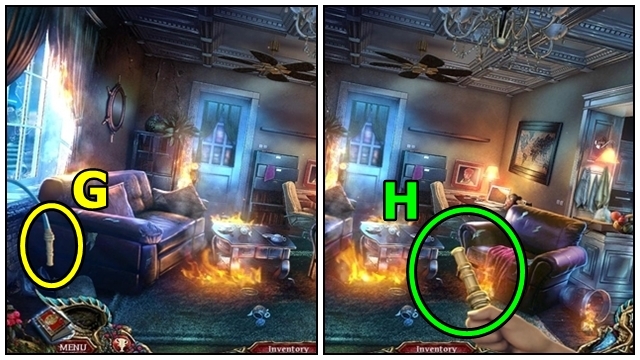
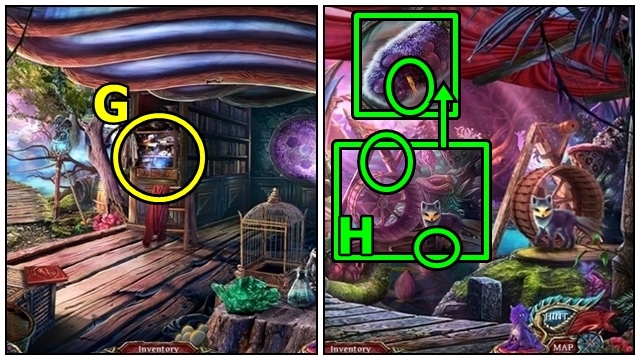
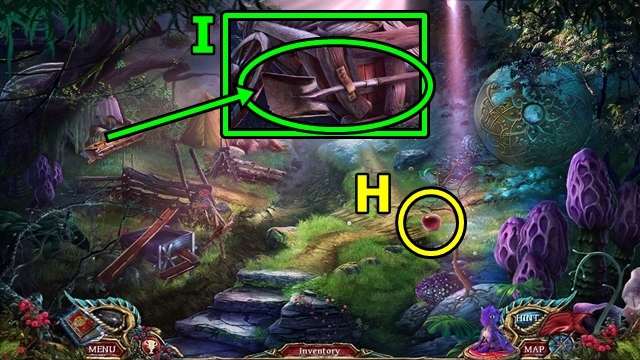
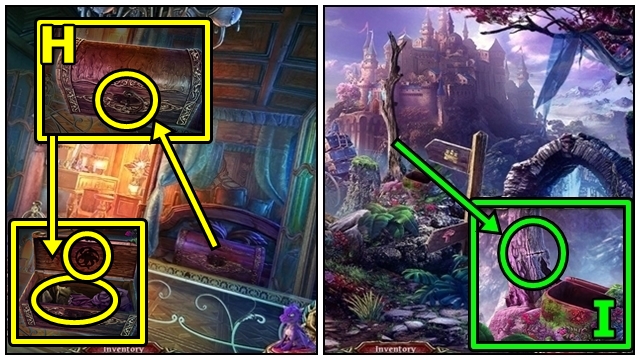
- Take the HOSE (G); press the nozzle (H).
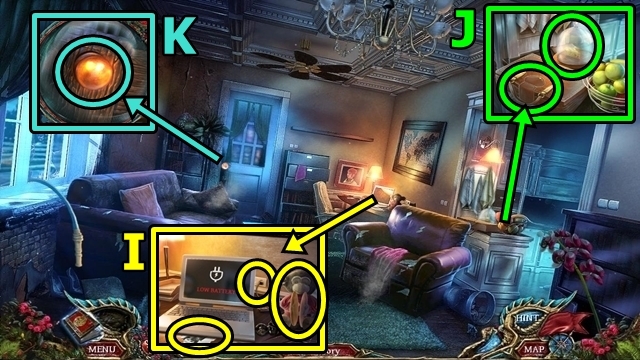
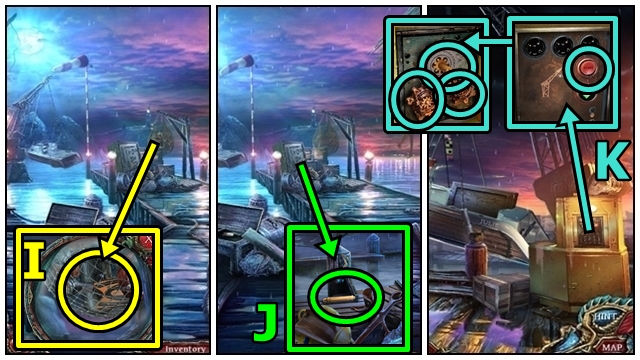
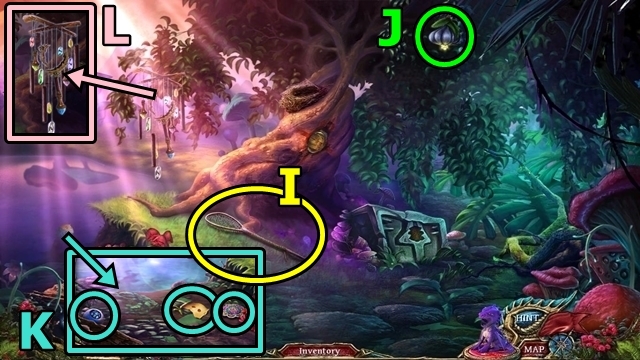
- Turn the monkey around (I); lift the shirt, lower the zipper; take the BATTERY (1/2). Plug in the laptop; take the PICTURE PIECE (1/2).
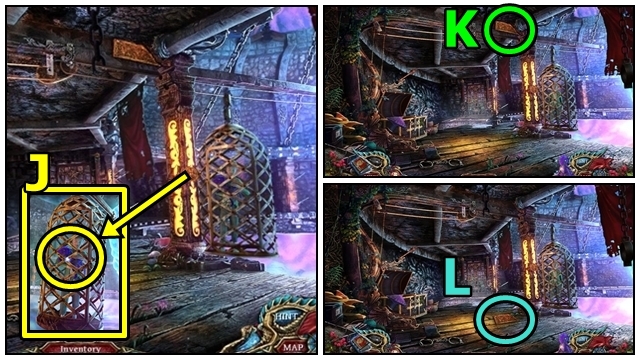
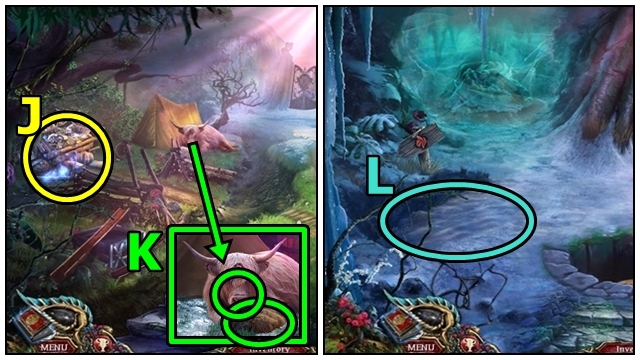
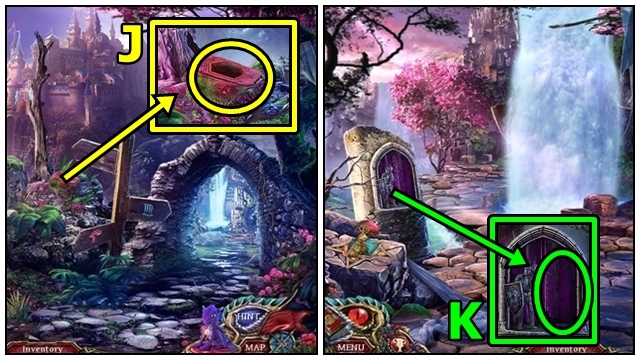
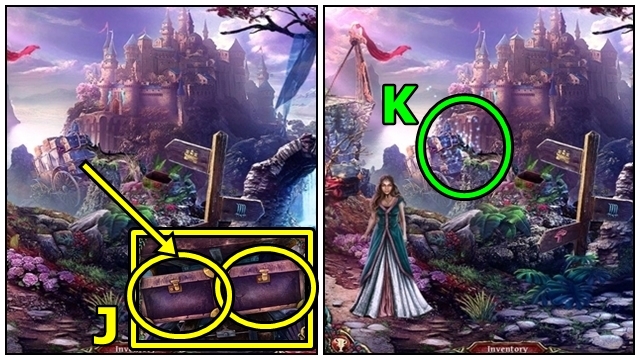
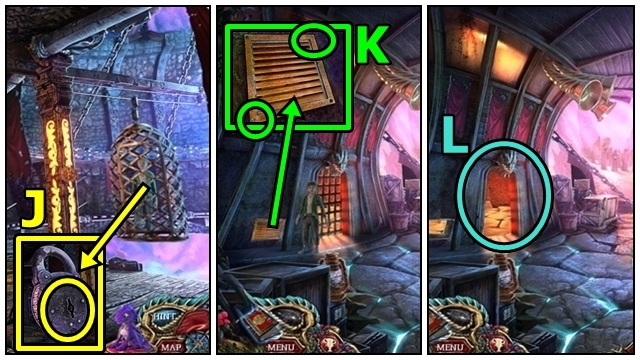
- Open the briefcase (J); take the DICTAPHONE. Lift the cover; take the CHEESE. Take the OVEN MITT.
- Use the OVEN MITT (K).
- Move forward.

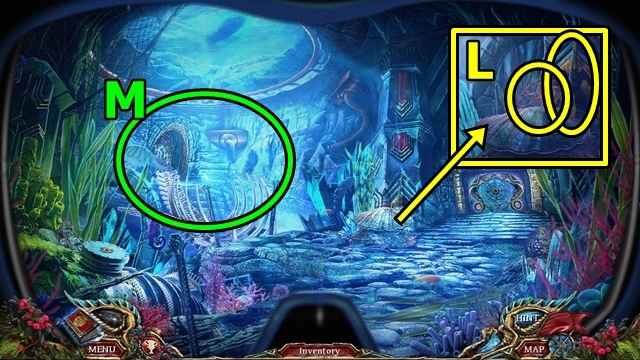
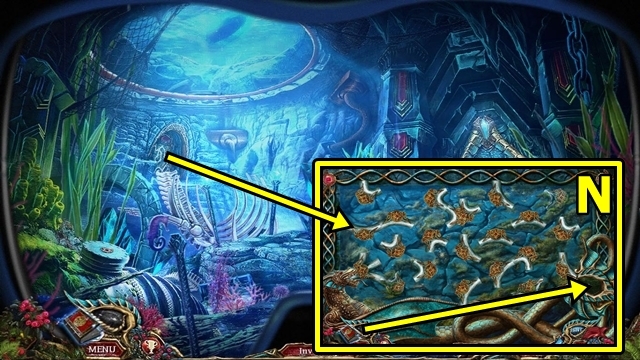
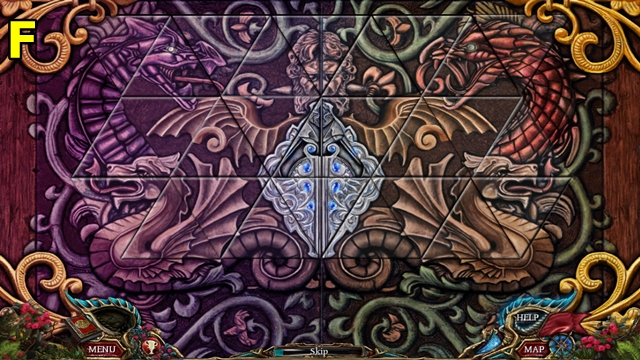
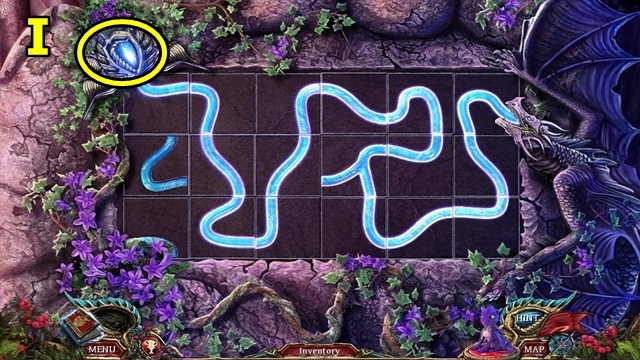
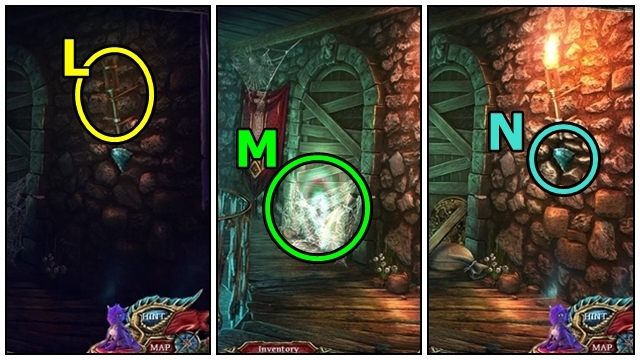
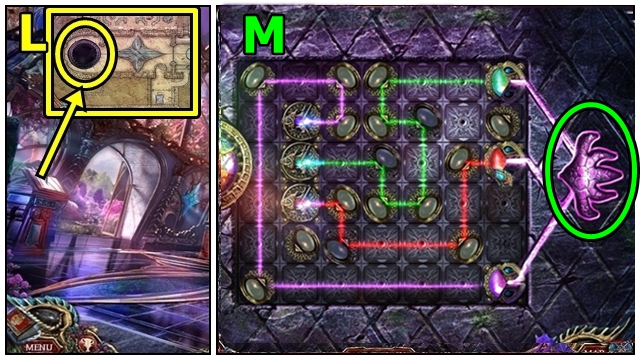
- Insert the DRAGON-EYE AMULET (L); play the mini-game.
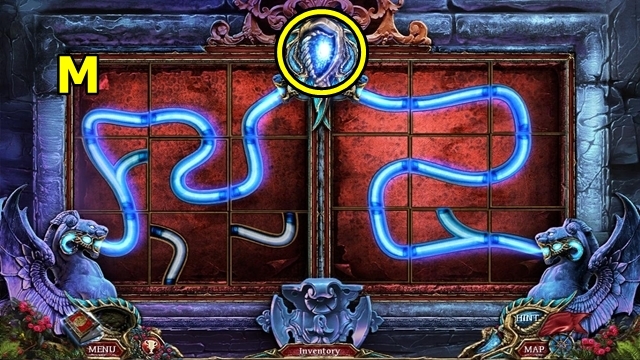
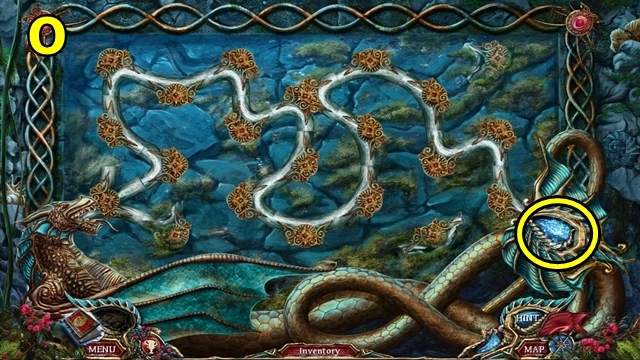
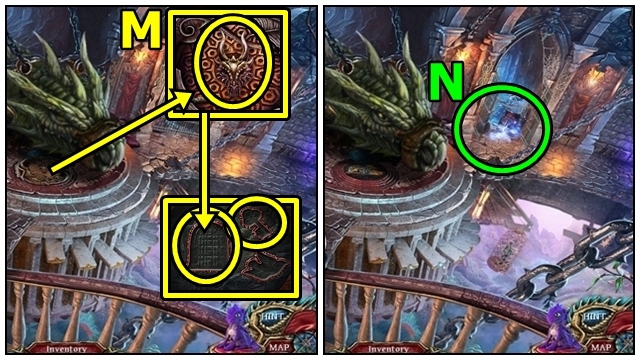
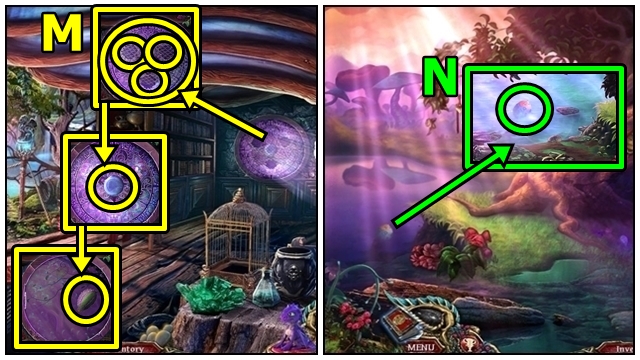
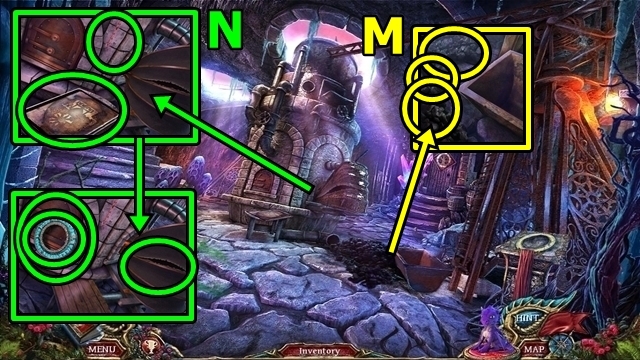
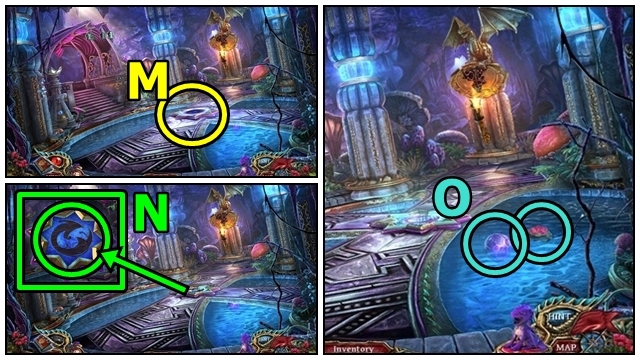
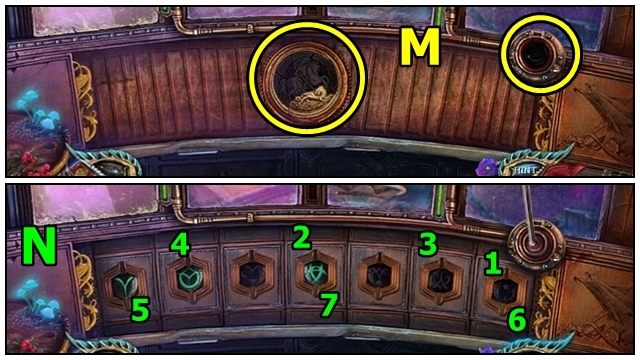
- Solution: (M). Take the CHARGED DRAGON EYE.
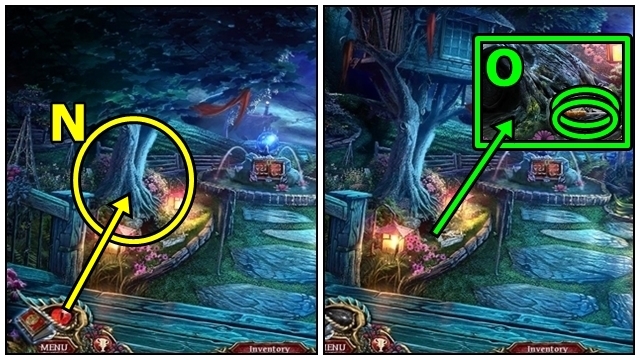
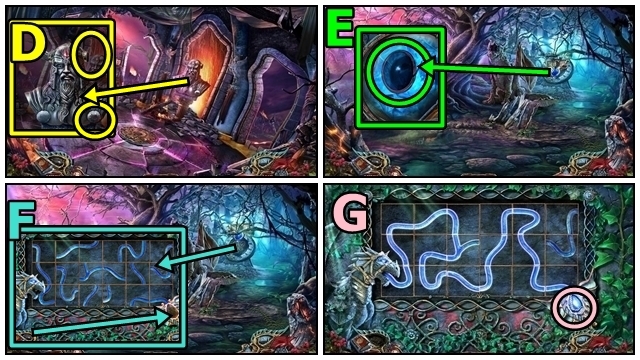
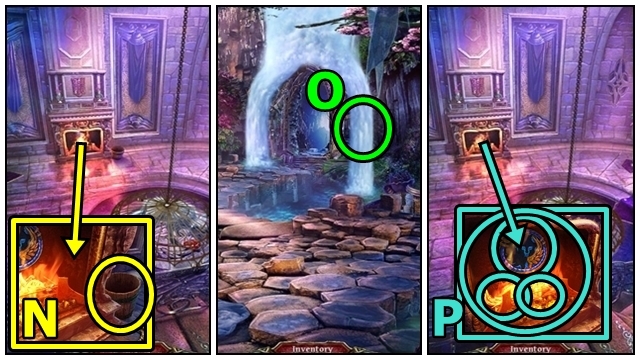
- Use the CHARGED DRAGON EYE (N).
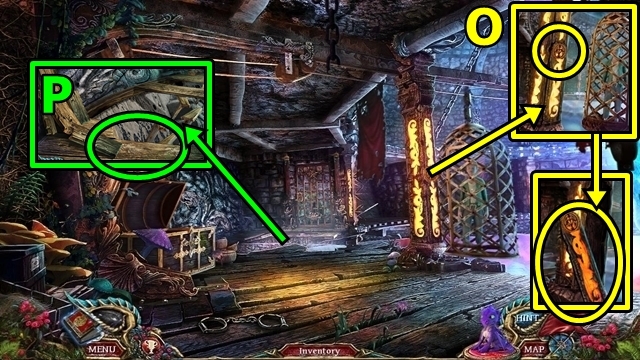
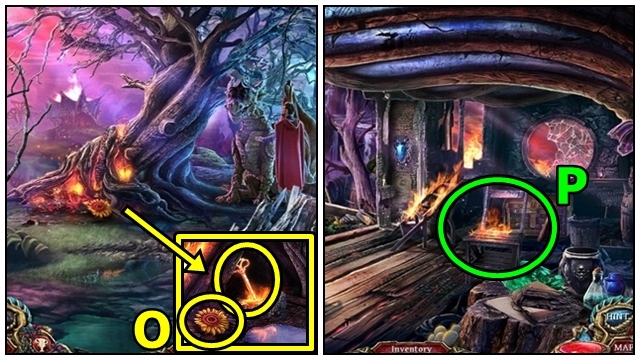
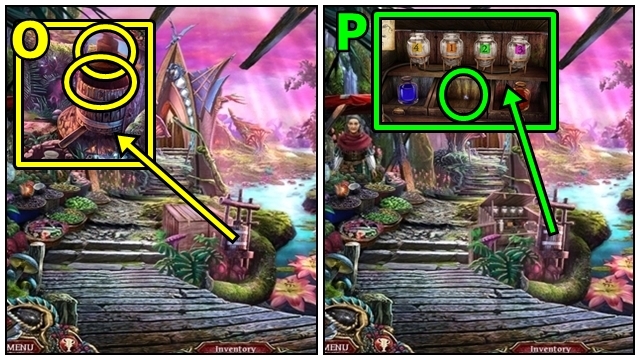
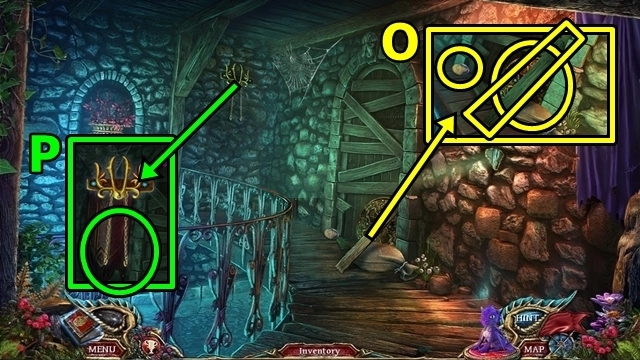
- Take the SCREWDRIVER (O) and SHEARS.
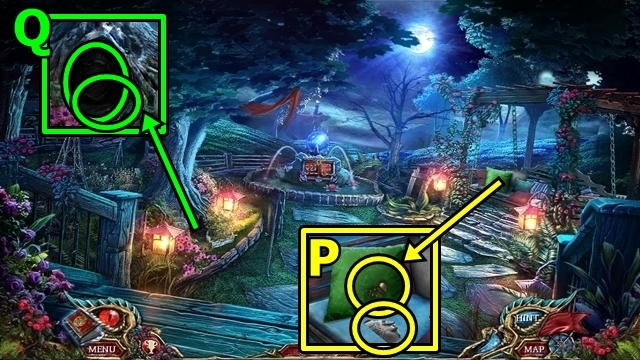
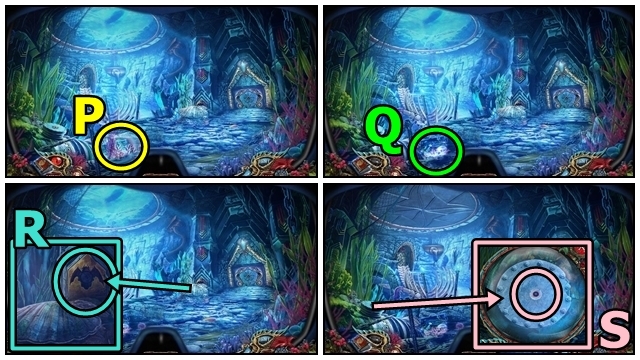
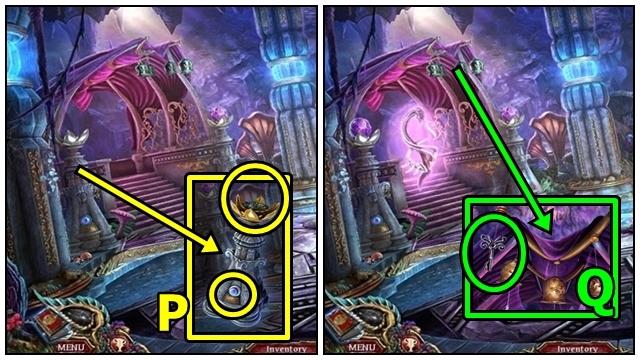
- Take the PICTURE PIECES (2/2) (P). Use the SHEARS; open the book; play the HOP. Take the BADGE.
- Press Play on the DICTAPHONE (inventory); use the SCREWDRIVER; take the BATTERY (2/2).
- Insert the BATTERIES into the FLASHLIGHT (inventory); replace the cap; receive the FLASHLIGHT.
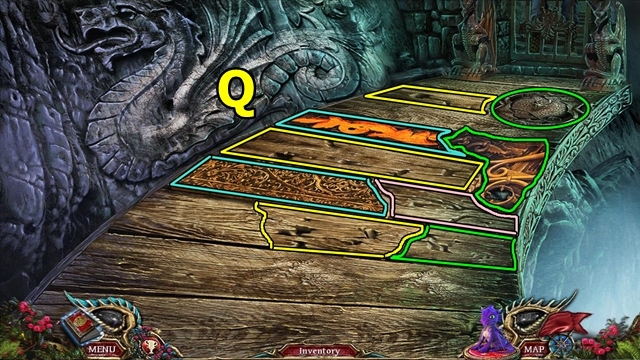
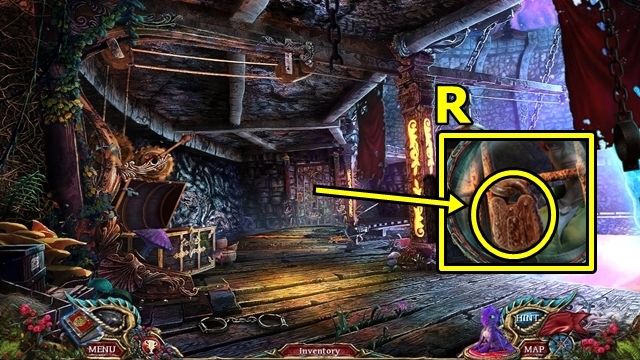
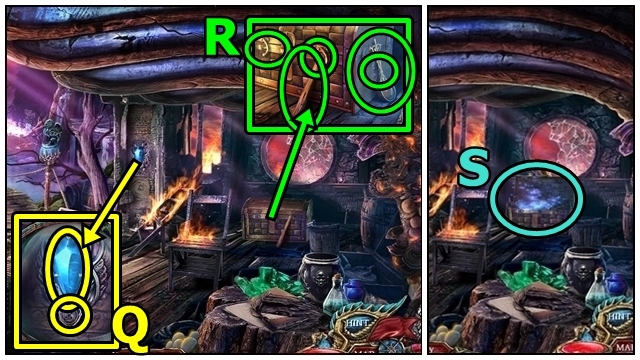
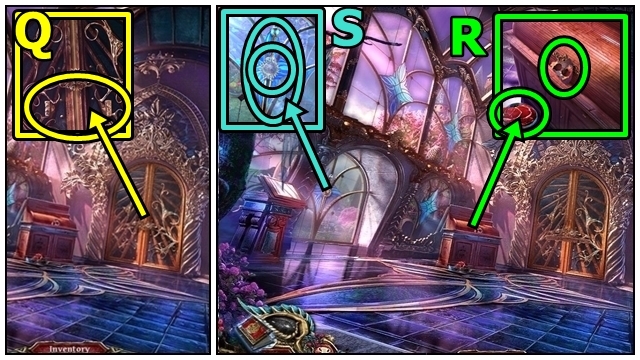
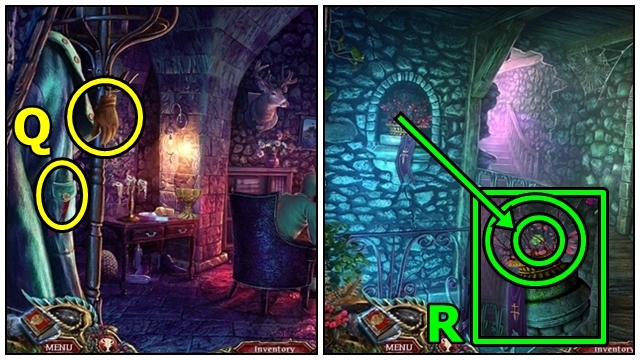
- Place the FLASHLIGHT; insert the BADGE (Q).
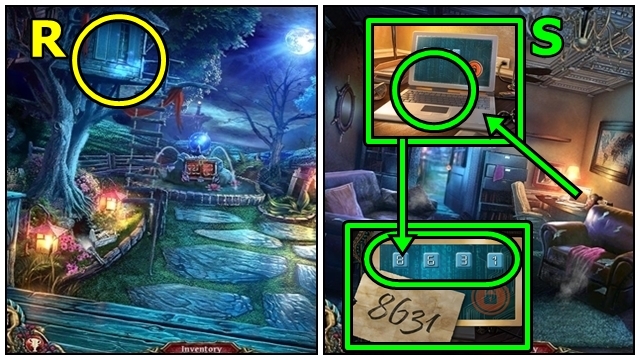
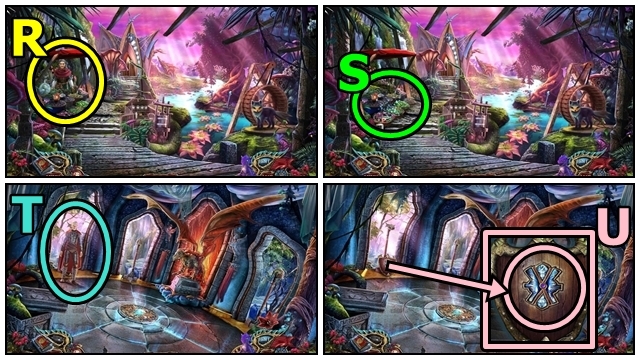
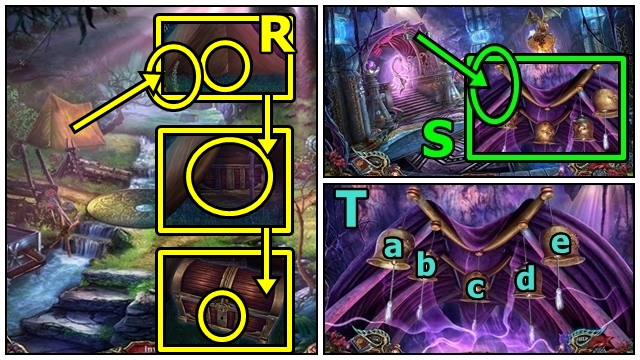
- Play the HOP (R); receive the PINK BOX.
- Move down.
- Open the PINK BOX (inventory); place the PICTURE PIECES; reassemble the image; turn the picture; take the CODE.
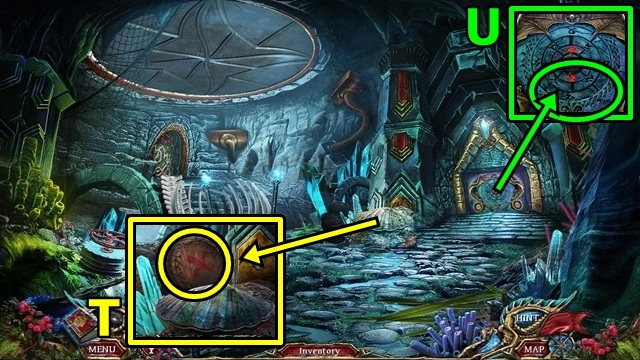
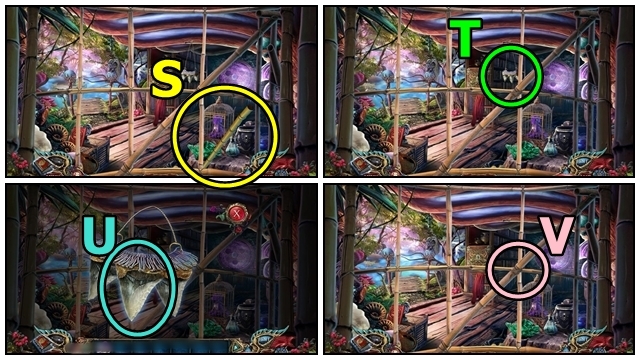
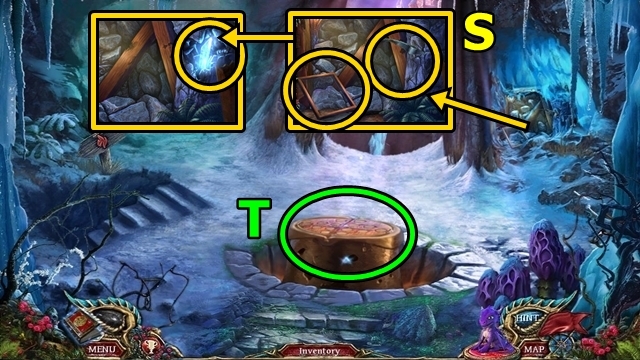
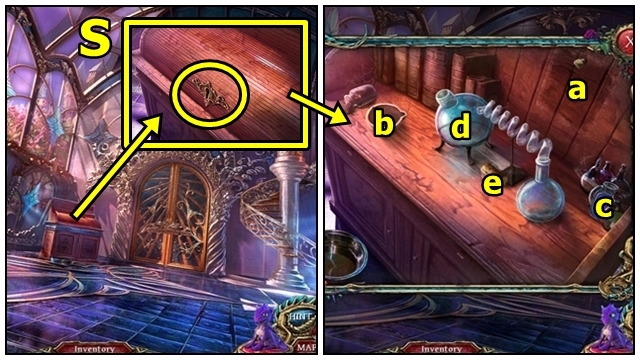
- Add the CODE (S); enter 8-6-3-1; play the mini-game.
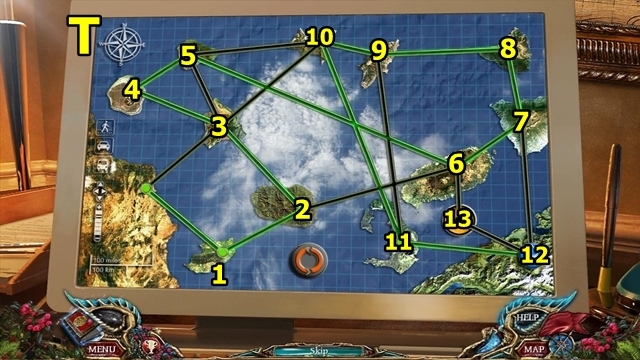
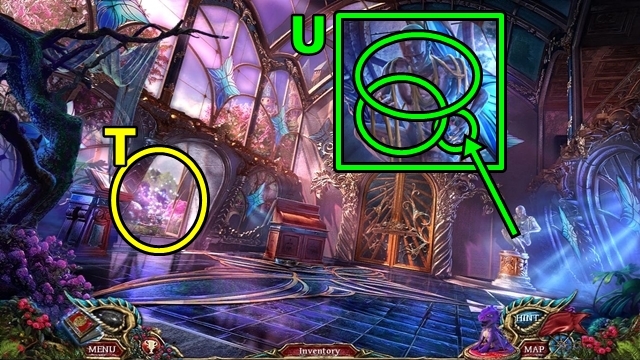
- Solution: (T). Take the NAVIGATION TABLET and MAGNET.
- Move down.
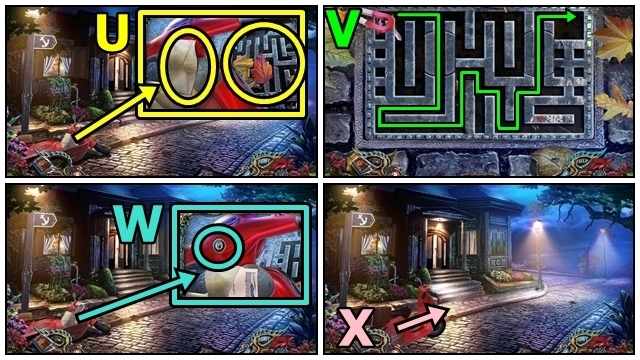
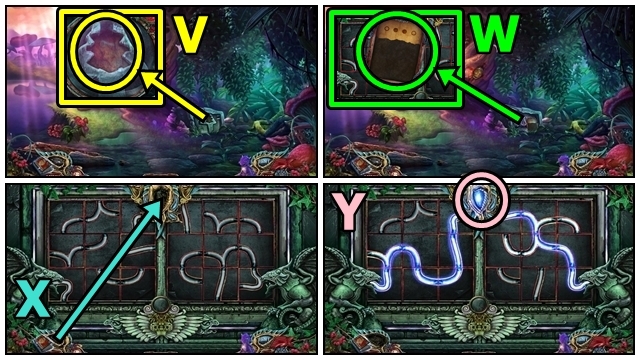
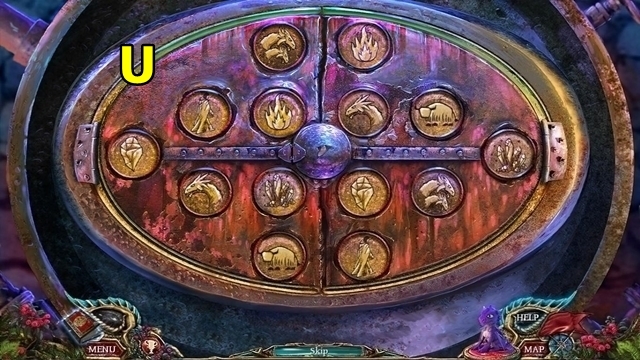
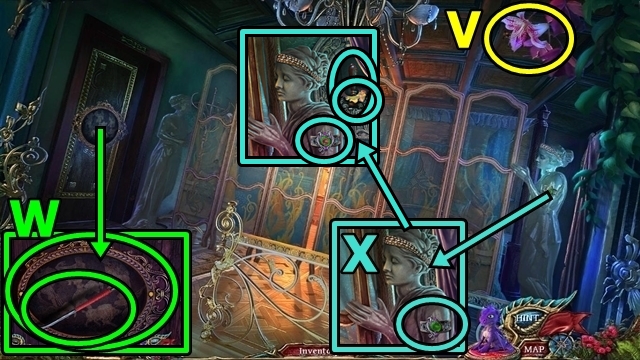
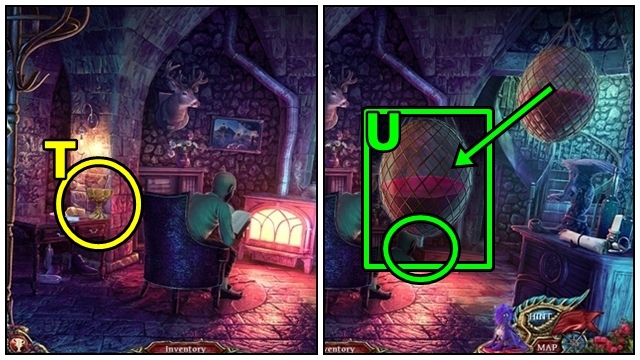
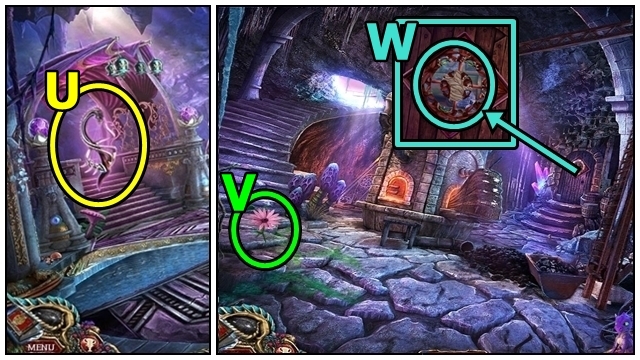
- Open the envelope (U); read the letter. Examine the sewer. Move the leaves; use the MAGNET; play the mini-game.
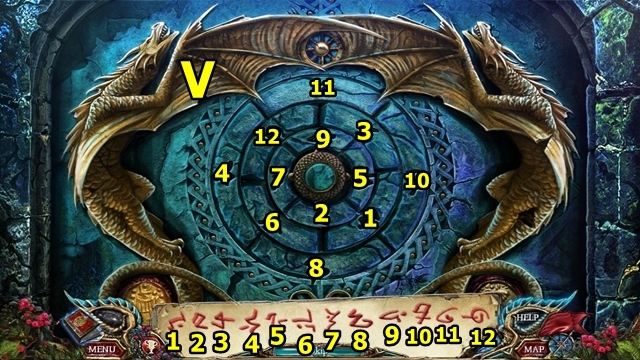
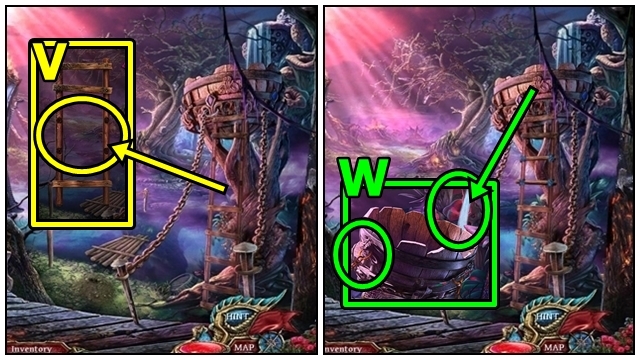
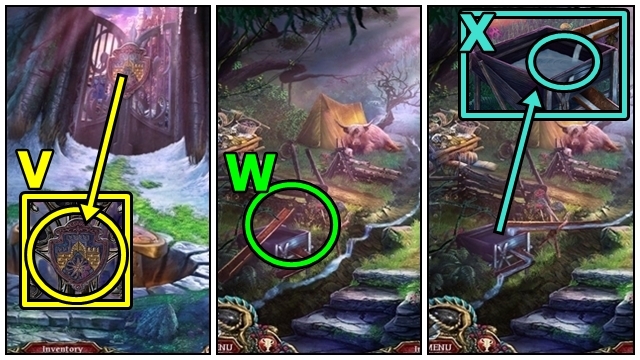
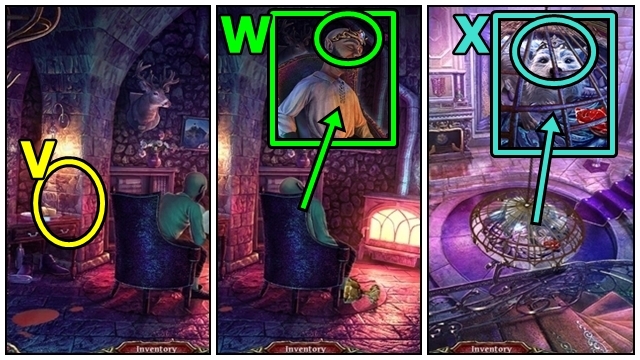
- Solution: (V). Take the IGNITION KEY.
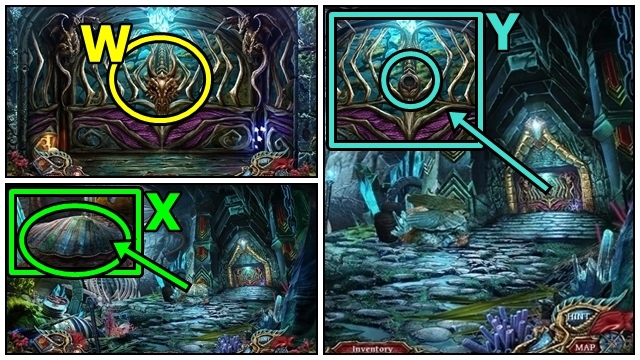
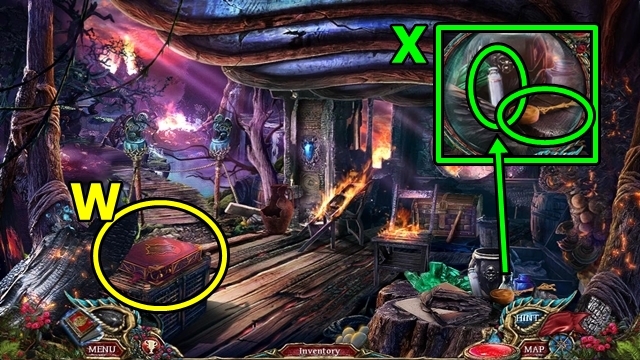
- Insert the IGNITION KEY (W).
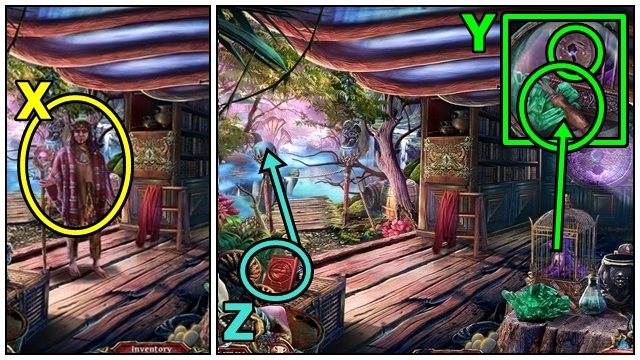
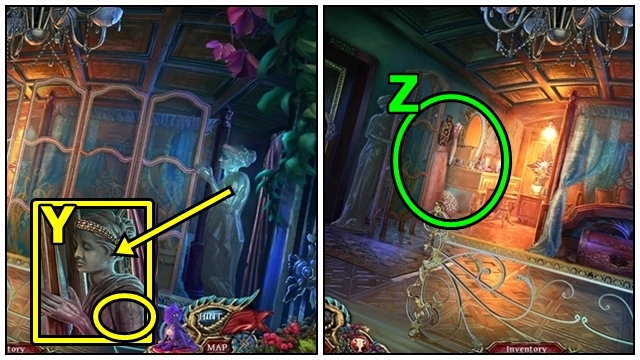
- Go the Harbor (X).
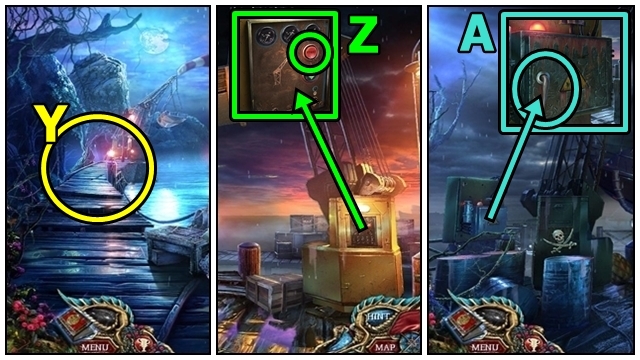
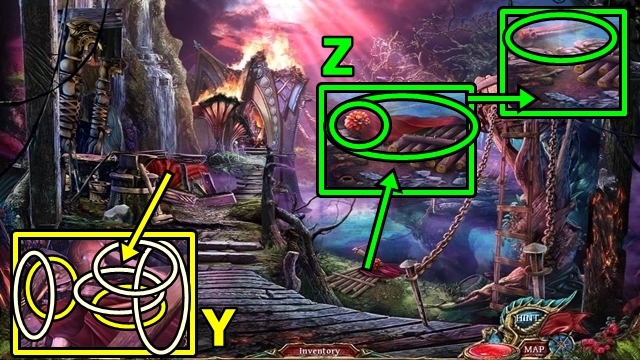
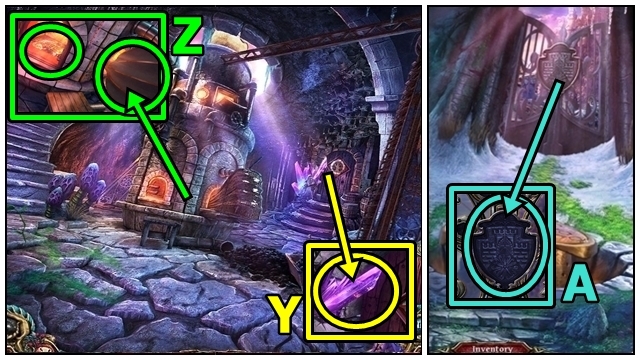
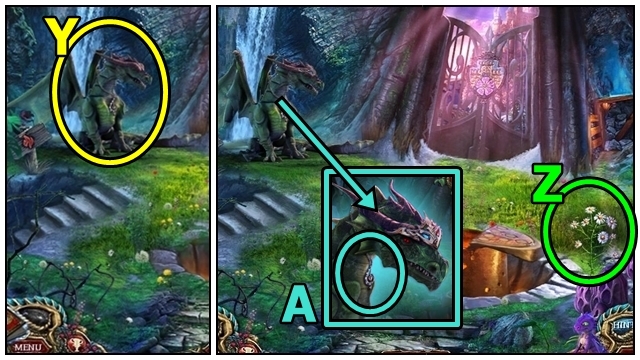
- Move towards the Boat (Y).
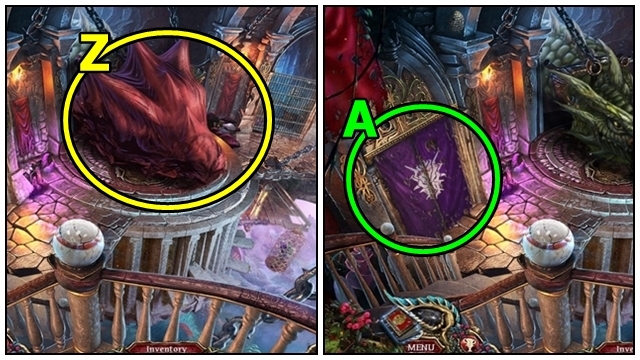
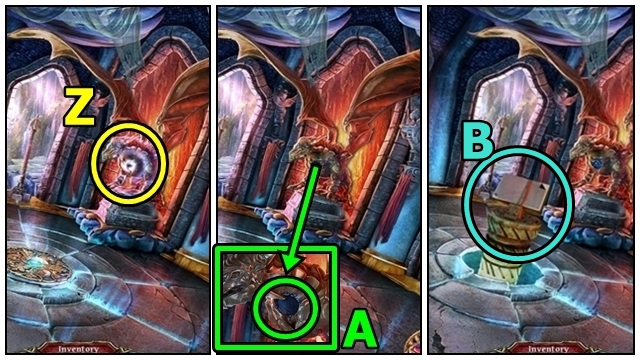
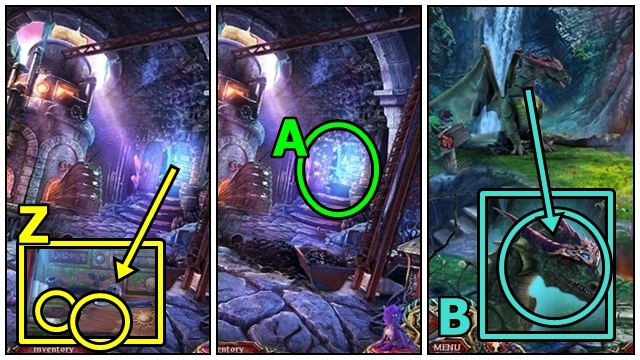
- Press Start (Z).
- Open the panel (A). Take the CROWBAR and BRUSH.
- Move down.
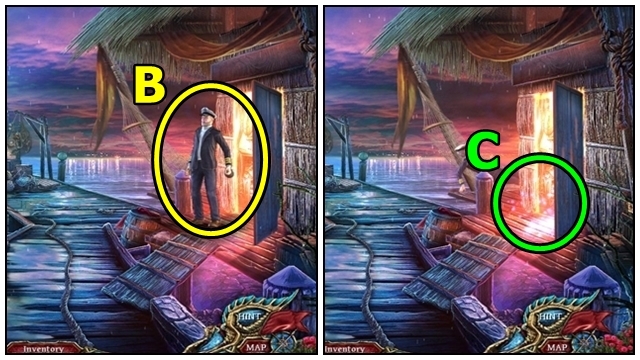
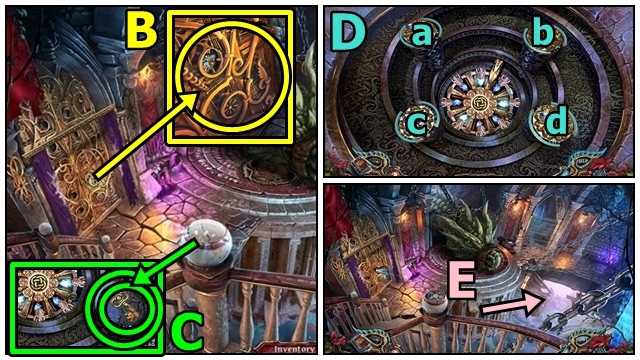
- Talk to the Harbor Master (B). Receive the TOOLBOX KEY.
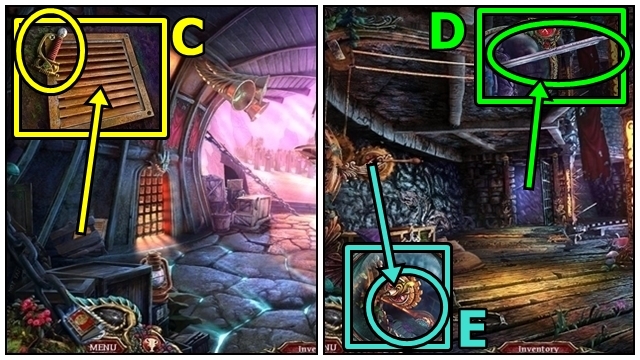
- Play the HOP (C); receive the BUCKET OF TAR.
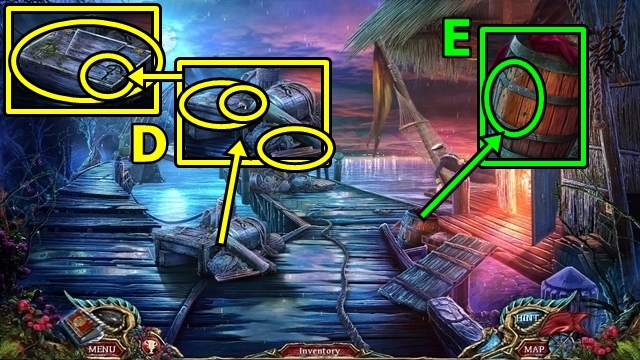
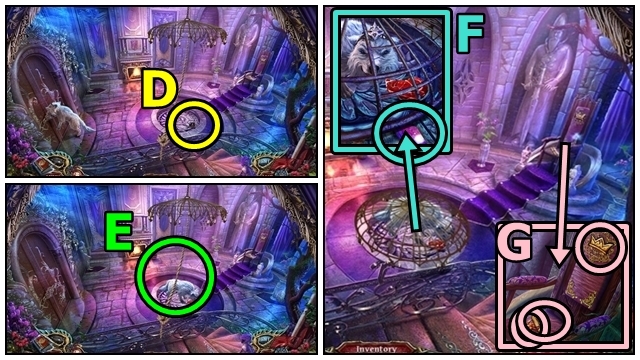
- Take the BOARD (1/3) (D). Offer the CHEESE. Place the TOOLBOX KEY; open the chest; take the CORKSCREW, GEAR PIECE (1/2). Open the box; take the FUSE.
- Use the CROWBAR (E); move the board; take the GEAR PIECE (2/2) and BOARD (2/3).
- Go to the Boat.
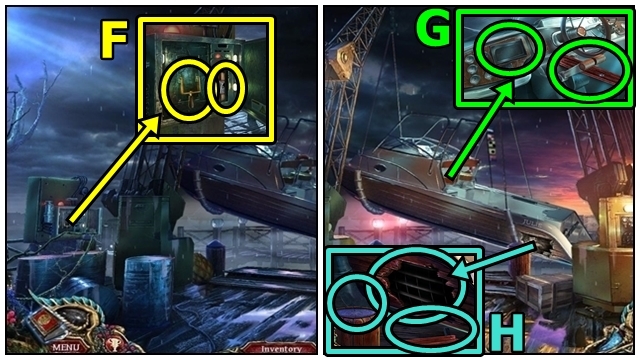
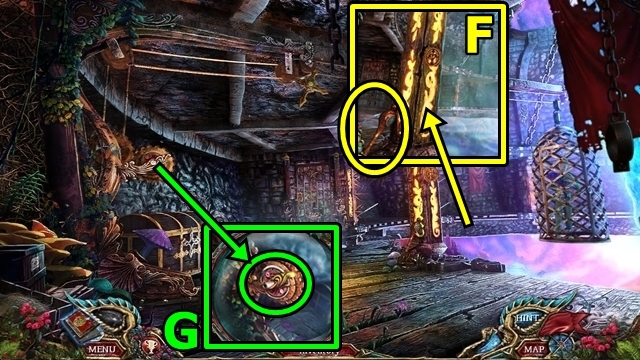
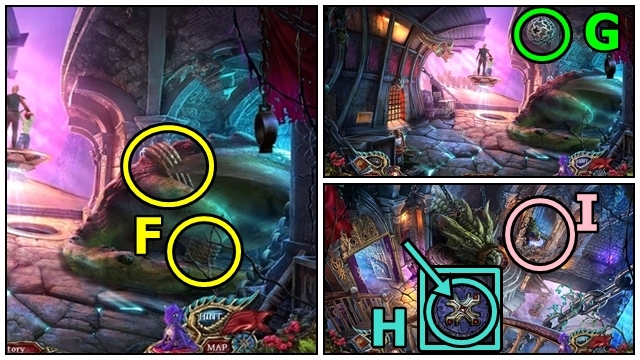
- Remove the broken fuse (F); add the FUSE; lift the lever.
- Take the BOARD (3/3) (G). Add the NAVIGATION TABLET; take the KNIFE.
- Place the BOARDS (H). Insert the boards, place the BUCKET OF TAR, add the BRUSH. Use the brush.
- Move down.
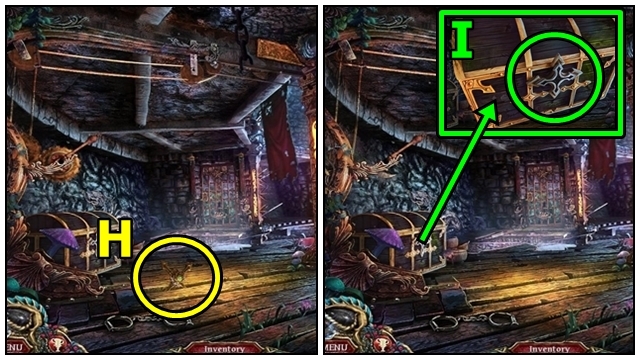
- Use the KNIFE (I).
- Play the HOP (J); take the CRANK.
- Go to the Boat.
- Open the panel (K). Remove the broken gears; add the GEAR PIECES and CRANK. Turn the crank.
Chapter 2: The Hall
- Take the WHEEL (L) and OAR.
- Use the OAR (M).
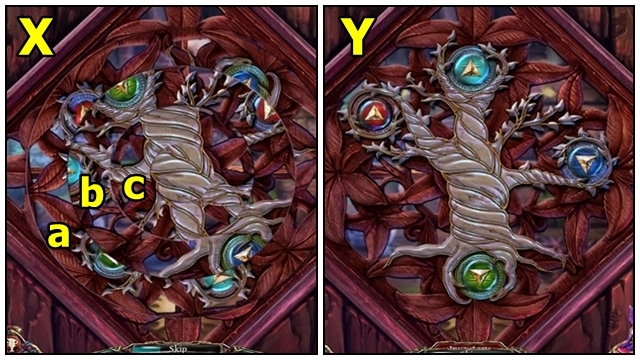
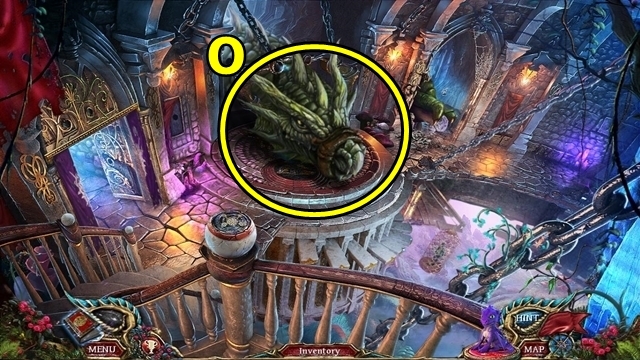
- Add the DEACTIVATED DRAGON EYE (N); play the mini-game.
- Solution: (O). Take the CHARGED DRAGON EYE.
- Use the CHARGED DRAGON EYE (P).
- Play the HOP (Q); receive the SYMBOL.
- Insert the SYMBOL (R).
- Add and turn the WHEEL (S).
- Remove the lid (T). Take the MESSAGE IN A BOTTLE.
- Use the CORKSCREW on the MESSAGE IN A BOTTLE (inventory); take the CODE.
- Add the CODE (U); play the mini-game.
- Solution: (V).
- Take the DRAGON WEDGE (W).
- Move down.
- Use the DRAGON WEDGE (X); open the oyster; take the PEARL.
- Insert the PEARL (Y); press the pearl.
- Lift the covers (Z).
- Open the curtain (A).
- Take the BRASS PLATE (1/4) (B) and DISK.
- Lift the top (C). Take the KEY SYMBOL. Insert the DISK; play the mini-game.
- Solution: cx5 (D).
- Go to the Cells (E).
- Take the CRANK (F).
- Insert the CRANK (G).
- Take the CHEST KEY (H).
- Insert the CHEST KEY (I). Take the CAGED-BIRD SYMBOL and DRAGON FOOD.
- Offer the DRAGON FOOD (J); receive Droi.
- Use Droi (K).
- Take the BRASS PLATE (2/4) (L).
- Move down.
- Take the BRASS PLATE (3/4) (M). Insert the CAGED-BIRD SYMBOL and KEY SYMBOL. Drag the bird to the bird inset.
- Play the HOP (N); receive the BRANDING IRON.
- Go to the Cells.
- Insert the BRANDING IRON (O); take the CELL KEY. Take the BRASS PLATE (4/4).
- Place the BRASS PLATES (P); play the mini-game.
- Solution: (Q).
- Remove the cover (R); insert the CELL KEY.
Chapter 3: The Trance
- Take the WOODEN ROD (S).
- Use the CORKSCREW on the WOODEN ROD (inventory); receive the REACHING STICK.
- Use the REACHING STICK (T); receive the SHARK-TOOTH NECKLACE.
- Remove the TOOTH (U) from the SHARK-TOOTH NECKLACE (inventory).
- Use the TOOTH (V).
- Take the CLOSED BOOK (W).
- Take the PRINTING MOLD (1/2) (X) and PHIAL.
- Go to Trance - Main Square.
- Move the boards (Y); take the LADDER RUNG (1/2) and HAMMER.
- Take the FLOWER OF FURY (Z) and WET CANVAS. Place the post; use the HAMMER.
- Take the raft to the Trance - Tree.
- Play the mini-game (A).
- Solution: This puzzle is randomly generated (B).
- Take the DRAIN (C) and HORN.
- Move down, then forward.
- Add the HORN (D); take the STONE SYMBOL.
- Go to Trance – Tree.
- Insert the STONE SYMBOL (E).
- Add the DEACTIVATED DRAGON EYE (F); play the mini-game.
- Solution: (G). Take the CHARGED DRAGON EYE.
- Return to Trance - Heroes Hall.
- Use the CHARGED DRAGON EYE (H); receive the BLACKSMITH SYMBOL.
- Move down.
- Remove the cloth (I). Insert the BLACKSMITH SYMBOL.
- Play the HOP (J); receive the TIARAS.
- Move forward.
- Separate the TIARAS (inventory) (K); take the HUMAN TIARA.
- Offer the HUMAN TIARA (L); receive the JEWELRY TOOL.
- Take the STRING (M) and HOOK.
- Use the JEWELRY TOOL (N); take the RED CRYSTAL.
- Return to the Trance - Tree.
- Take the FLOWER OF FIERCENESS (O). Use the HOOK; take the KEY.
- Move down twice.
- Use the WET CANVAS (P).
- Use the JEWELRY TOOL (Q); take the CRYSTAL PIECE.
- Take the LADDER RUNG (2/2) (R) and PRINTING MOLD (2/2). Insert and turn the KEY; lift the latches.
- Play the HOP (S); receive the BOOK KEY.
- Return to the Trance - Tree.

- Add the RED CRYSTAL and CRYSTAL PIECE to the INCOMPLETE ANIMAL TIARA (inventory); receive the TIARA.
- Offer the TIARA (T); receive the FLOWER OF FRENZY.
- Move down.
- Use the BOOK KEY on the CLOSED BOOK (inventory). Add (U) the PRINTING MOLDS (1), then the FLOWER OF FURY, FLOWER OF FIERCENESS and FLOWER OF FRENZY (2); then place the PHIAL (3). Press the lever (4); take the ACID.
- Add the LADDER RUNGS (V) and STRING.
- Place the DRAIN (W). Use the ACID.
Chapter 4: The Tree
- Talk to the Shaman (X); receive the KEY.
- Take the NAIL PULLER (Y). Insert the KEY; take Droi.
- Move the book; place the statue (Z).
- Cross the bridge.
- Talk to the woman (A).
- Take the PIECE OF CODE (1/4) (B) and GLASS DAHLIA.
- Take the PIECE OF CODE (2/4) (C) and PUZZLE PIECE.
- Move forward.
- Receive the GLASS TULIP.
- Take the STRAP (D).
- Move down twice.
- Add the PUZZLE PIECE (E); play the mini-game.
- Solution: This puzzle is randomly generated (F).
- Play the HOP (G); receive the TWEEZERS.
- Cross the bridge.
- Add the STRAP (H). Use the TWEEZERS.
- Cross the flower bridge.
- Take the NET HANDLE (I).
- Use Droi (J); receive the MAGIC PEAR.
- Take the DRAGON HEART (K), PIECE OF CODE (3/4) and GLASS PEONY.
- Take the MAGNIFYING-GLASS FRAME (L).
- Move down twice.
- Use the NAIL PULLER (M); receive the NET. Insert the GLASS DAHLIA, GLASS TULIP and GLASS PEONY; take the MAGNIFYING LENS and MAGIC CARAMBOLA.
- Return to the Tree.
- Add the NET to the NET HANDLE (inventory); receive the LANDING NET.
- Use the LANDING NET (N); receive the MAGIC MANGO.
- Move down.
- Insert the MAGIC PEAR (O), MAGIC CARAMBOLA and MAGIC MANGO; press; take the FRUIT JUICE.
- Add the FRUIT JUICE (P); play the mini-game.
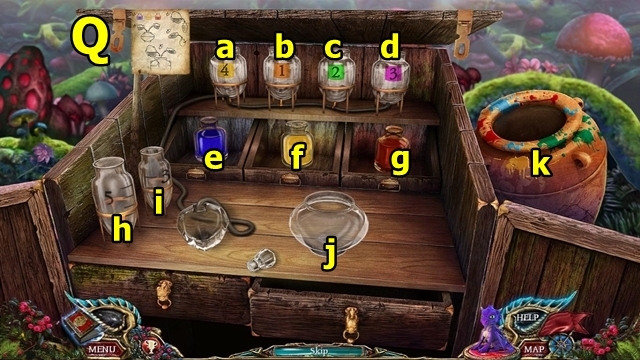
- Solution: f-j, j-h, h-i, i-k, h-i, j-h, h-i, h-a, i-k, g-j, j-i, i-h, j-i, i-h, i-b, h-k, j-k, e-j, f-j, j-h, h-i, h-c, i-k, j-k, e-j, g-j, j-i, i-d. (Q). Remove the tube, add the lid, take the HEALING POTION.
- Offer the HEALING POTION (R).
- Play the HOP (S); receive the GAUNTLETS.
- Move forward.
- Offer the GAUNTLETS (T).
- Take the KEY-SHAPED ARTIFACT (U).
- Return to the Tree.
- Insert the KEY-SHAPED ARTIFACT (V).
- Take the FRAME WITH NOTE PIECE (W).
- Add the DEACTIVATED DRAGON EYE (X); play the mini-game.
- Solution: (Y). Take the CHARGED DRAGON EYE.
- Return to the Hall of Heroes.
- Use the CHARGED DRAGON EYE (Z).
- Insert the DRAGON HEART (A).
- Add the MAGNIFYING LENS to the MAGNIFYING-GLASS FRAME (inventory); receive the MAGNIFYING GLASS.
- Examine the tile (B).
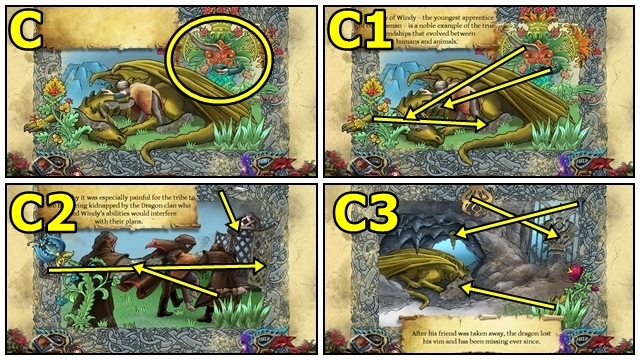
- Use the MAGNIFYING GLASS (C); play the mini-game.
- Solution: (C1-3). Receive the PIECE OF CODE (4/4).
- Return to the Tree.
- Add the PIECE OF CODES to the FRAME WITH NOTE PIECE (inventory); place the pieces; receive the FRAME WITH NOTE PIECE.
- Add the FRAME WITH NOTE PIECE (D); play the mini-game.
- Solution: (E-G).
- Move forward.
Chapter 5: The Furnace
- Take the APPLE (H).
- Take the SHOVEL (I).
- Play the HOP (J); receive the NEEDLE AND THREAD.
- Offer the APPLE (K); take the PILE OF STRAW.
- Move forward.
- Use the SHOVEL (L).
- Go down to the Furnace.
- Use the SHOVEL (M); take the MINI-GAME PIECE and SHOVEL HANDLE.
- Take the CREST (N); pull the chain. Take the FRAME. Use the NEEDLE AND THREAD. Insert the PILE OF STRAW; use Droi. Press the bellows.

- Put the MINI-GAME PIECE into the FRAME (inventory); receive the CONTROL PANEL.
- Insert the CONTROL PANEL (O); play the mini-game.
- Solution: (P-R).
- Move up.
- Take the SIEVE (S). Add the SHOVEL HANDLE; receive the PICKAXE. Use the PICKAXE; take the BLUE ORE.
- Play the mini-game (T).
- Solution: (U).
- Take the MOLD (V).
- Return to the Dry Riverbed.
- Fix the gutter (W).
- Use the SIEVE (X); take the GOLD NUGGETS.
- Return to the Furnace.
- Use the PICKAXE (Y); take the PURPLE ORE.
- Put the MOLD on the CREST (inventory); add the BLUE ORE, GOLD NUGGETS and PURPLE ORE; receive the CREST.
- Insert the CREST (Z). Take the CREST.
- Move up.
- Insert the CREST (A); play the mini-game.
- Solution: b-e, h-b, d-h, a-d, b-a, h-b, i-h, f-i, b-f, a-b, h-a, g-h, d-g, h-d, e-h, b-e, a-b, h-a, b-h, e-b, h-e, d-h, c-d, g-c, h-g, e-h, b-e, a-b, d-a, g-d, h-g, a-h, c-a, g-c, d-g, a-d, b-a, e-b, h-e, d-h, g-d, h-g, e-h (B).
- Move forward.
Chapter 6: The Throne Room
- Talk to the woman (C).
- Open the suitcase (D).
- Play the HOP (E); receive the SYMBOL.
- Go to the Waterfall.
- Take the DISKS (1/5) (F). Insert the SYMBOL.
- Take the KEY SYMBOL (G), GREEN LENS and PUZZLE PIECE (1/4).
- Take the MINI SHIELD (H); add the DEACTIVATED DRAGON EYE. Play the mini-game.
- Solution: (I). Take the CHARGED DRAGON EYE.
- Move down.
- Insert the KEY SYMBOL (J); take the DISKS (2/5), PEACOCK SYMBOL and BRONZE FIGURE.
- Go to the Waterfall.
- Put the MINI SHIELD on the BRONZE FIGURE (inventory); receive the BRONZE FIGURE WITH SHIELD.
- Place the BRONZE FIGURE WITH SHIELD (K); lift the shields.
- Enter the Basement.
- Use Droi (L).
- Use the CHARGED DRAGON EYE (M).
- Take the SHARP CRYSTAL (N).
- Take the DISKS (3/5) (O), SHIELD and BOARD.
- Place the SHIELD (P).
- Enter the Winter Garden.
- Place the BOARD (Q).
- Take the PUZZLE PIECE (2/4) (R) and MEAT.
- Take the SUN SYMBOL (S) and THIN DAGGER.
- Play the HOP (T); receive the HORN.
- Take the TENDRILS (U), DULL AXE and PUZZLE PIECE (3/4). Place the HORN.
- Move up to the Suite.
- Take the FLOWER (V).
- Take the CROWBAR (W) and PUZZLE FRAME.
- Take the INCOMPLETE ARM CUFF (X).
- Insert the SUN SYMBOL and PEACOCK SYMBOL to the INCOMPLETE ARM CUFF (inventory); receive the ARM CUFF.
- Place the ARM CUFF (Y). Take the PUZZLE PIECE (4/4); pull the lever.
- Play the HOP (Z); take the DISKS (4/5).
- Move down twice.

- Use the CROWBAR (A); take the DISKS (5/5).
- Return to the Suite.
- Add the PUZZLE PIECES to the PUZZLE FRAME (inventory); place the pieces; receive the PUZZLE FRAME.
- Place the PUZZLE FRAME (B), then add the DISKS; play the mini-game.
- Solution: (C).
- Enter the Throne Room.
- Offer the MEAT (D).
- Remove the chipped crystal from the DULL AXE (inventory); add the SHARP CRYSTAL; secure the crystal; receive the AXE.
- Use the AXE (E).
- Take the PURPLE LENS (F).
- Read the scroll (G); take the FLOWER SYMBOL. Use the CROWBAR; take the GOLDEN CROWN.
- Move down.
- Lift the latch (H); move the clothes; take the TAP HANDLE. Insert the FLOWER SYMBOL; take the ORANGE LENS.
- Return to the Clearing.
- Use the AXE (I).
- Take the TENDRILS (inventory) apart; take the ROPE.
- Move the suitcases (J); use the THIN DAGGER. Offer the ROPE. Receive the RECIPE.
- Play the HOP (K); receive the MAGIC LENS.
- Return to the Winter Garden.
- Open the MAGIC LENS (inventory); Insert the GREEN LENS, PURPLE LENS and ORANGE LENS; close the brackets; receive the MAGIC LENS.
- Insert the MAGIC LENS (L); play the mini-game.
- Solution: (M). Take the FIRE SYMBOL.
- Return to the Throne Room.
- Take the EMPTY BUCKET (N).
- Return to the Waterfall.
- Place the EMPTY BUCKET (O); receive the BUCKET WITH WATER.
- Return to the Throne Room.
- Use the BUCKET WITH WATER (P); take the GOLDEN HELMET and GOLDEN WING. Place the GOLDEN WING, GOLDEN HELMET, GOLDEN CROWN and FIRE SYMBOL.
- Enter the Courtier's Room.
- Take the GLOVES (Q). Open the pocket; take the KEY.
- Return to the Basement.
- Use the GLOVES (R); take the BERRIES.
- Move forward.
- Insert the KEY (S). Place the RECIPE (a); add the BERRIES (b) and FLOWER; add the purple liquid (c-b); pour the mixture into the flask (b-d); place the cork (e-d); use Droi (d). Take the SLEEPING POTION.
- Return to the Courtier's Room.
- Use Droi (T); receive the EMPTY GOBLET.
- Attach the TAP HANDLE (U); then add the EMPTY GOBLET. Receive the CUP OF WINE.
- Pour the SLEEPING POTION into the CUP OF WINE (inventory); receive the WINE WITH SLEEPING POTION.
- Place the WINE WITH SLEEPING POTION (V).
- Take the Human Tiara (W).
- Move down.
- Take the ANIMAL TIARA (X).
Chapter 7: The Cage
- Offer the ANIMAL TIARA (Y).
- Take the INGREDIENTS (1/4) (Z).
- Take the PENDANT (A).
- Move down.
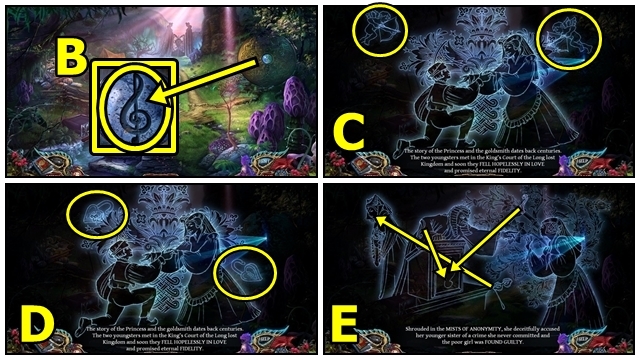
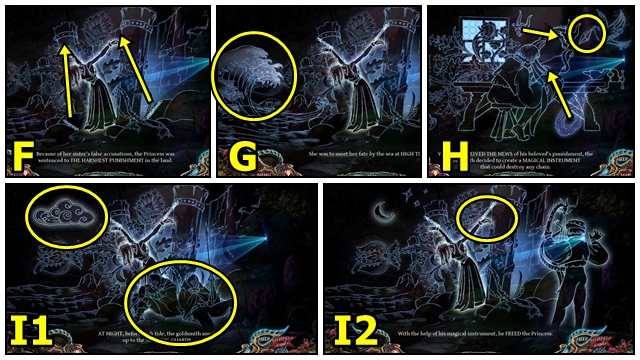
- Insert the PENDANT (B); play the mini-game.
- Solution: (C-I2).
- Enter the Cage.

- Take the RELIEF PIECE (J). Use Droi.
- Insert the DEACTIVATED DRAGON EYE (K); play the mini-game.
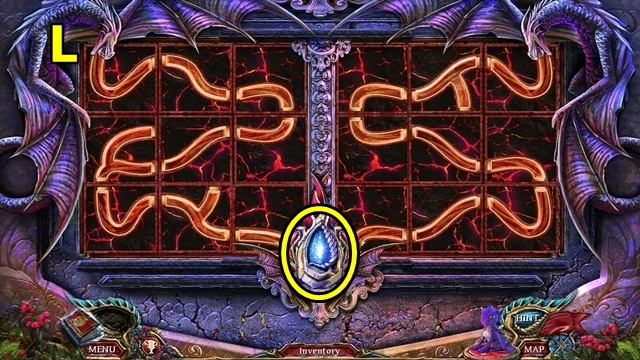
- Solution: (L). Take the CHARGED DRAGON EYE.
- Use the CHARGED DRAGON EYE (M).
- Insert the RELIEF PIECE (N).
- Take the CRYSTAL ORB (O) and INGREDIENTS (2/4).
- Place the CRYSTAL ORB (P); press the button.
- Take the KEY (Q).
- Move down.
- Take the INGREDIENTS (3/4) (R). Open the tent; use the KEY. Take the DOOR RING and MORTAR. Move the cloth; take the BELL.
- Enter the Cage.
- Place the BELL (S); play the mini-game.
- Solution: b-a-c, e-a-d-c, c-e-a-b-d (T).
- Take the LYRE (U).
- Return to the Furnace.
- Take the INGREDIENTS (4/4) (V).
- Insert the DOOR RING (W); play the mini-game.
- Solution: Position a, then b, then c (X-Y).
- Take the POTION INSTRUCTIONS from the LYRE (inventory).
- Place the POTION INSTRUCTIONS (Z), MORTAR and INGREDIENTS.
- Play the HOP (A); receive the HEALING POTION.
- Move up.
- Offer the HEALING POTION (B).
- Move to the Hall.
- Enter the Headquarters.
- Move the boards (C). Take the SWORD GRIP.
- Move down, then down to the Cells.
- Add the SWORD GRIP (D); take the SWORD.
- Press the lever (E); receive the HANDLE.
- Return to the Headquarters.
- Use the SWORD (F).
- Use the Droi (G); receive the CLOSED ORB.
- Move down.
- Take the CROSS (H).
- Play the HOP (I); receive the ACID.
- Return to the Cells.
- Use the ACID (J). Receive the COIN.
- Return to the Headquarters.
- Use the COIN (K).
- Examine the doorway (L).
- Place the CROSS onto the CLOSED ORB (inventory); take the CAVALIER SYMBOL and LYRE PART.
- Add the CAVALIER SYMBOL (M) and HANDLE. Pull the handle; play the mini-game.
- Solution: (N). Take the CRYSTAL.
- Move down.
- Put the LYRE PART and CRYSTAL on the LYRE (inventory); receive the MAGICAL LYRE.
- Play the MAGICAL LYRE (O).
- Congratulations! You've completed The Secret Order: The Buried Kingdom.
Created at: 2016-06-19