Walkthrough Menu
- General Tips
- Chapter 1: The Train
- Chapter 2: Arrival
- Chapter 3: The Town Center
- Chapter 4: The Ghost
- Chapter 5: The Chronometron
General Tips
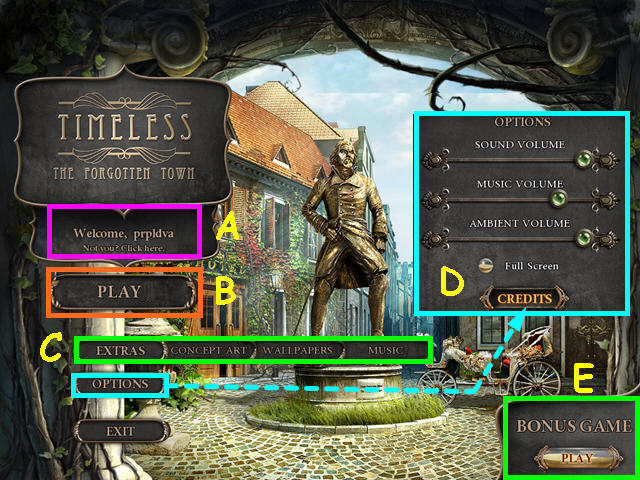
- Select 'Not You - Click here' on the main screen to add or delete player profiles (A).
- You will need to select a level of difficulty when you create a profile.
- The Casual level has helpful sparkles, faster hint and skip recharges, as well as a shorter miss-click penalty in hidden object scenes.
- The Expert level has less sparkles, slower hint and skip recharges, and a longer miss-click penalty in hidden object scenes.
- Select 'Play' to begin or continue your game (B).
- The 'Extras' are only availale in the Collector's Edition(C).
- You may play this game in full screen or windowed mode by changing the settings in the Options menu (D).
- You may adjust the volume of sounds, ambiance, and music in the Options menu.
- The Options menu is accessible from both the main screen and the in-game menu.
- Once you have completed the main game, the bonus game will be available (E).
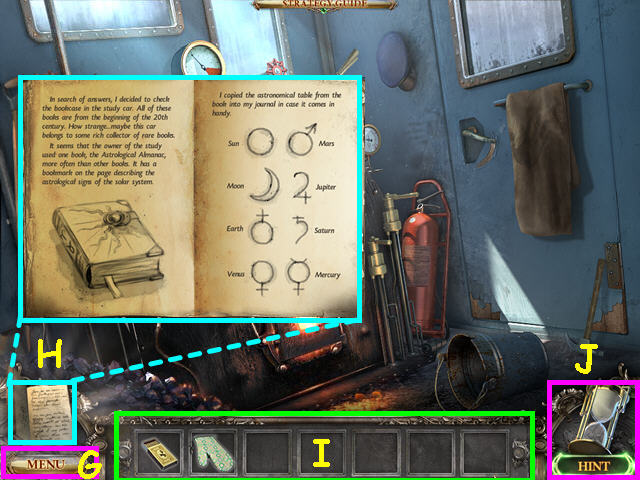
- The Hidden Object Scenes in this game are randomized- your solution may vary.
- The menu button in the lower left will give you access the settings menu or return to the main menu (G).
- Above the menu button is the diary - it will contain all the clues and information you have found in the game (H).
- Your inventory is in the bottom panel- click on an item to select it for use (I).
- Use the scroll buttons at each end to view more inventory.
- Hints are unlimited, but you must wait for the hourglass to refill (J).
- A hint will show an item in a Hidden Object scene, and will point you in the general direction of where you need to go outside the Hidden Object Scenes.
- The Strategy Guide button will take you to the complete game walkthrough (K).
Chapter 1: The Train
- You have the option of a brief tutorial.
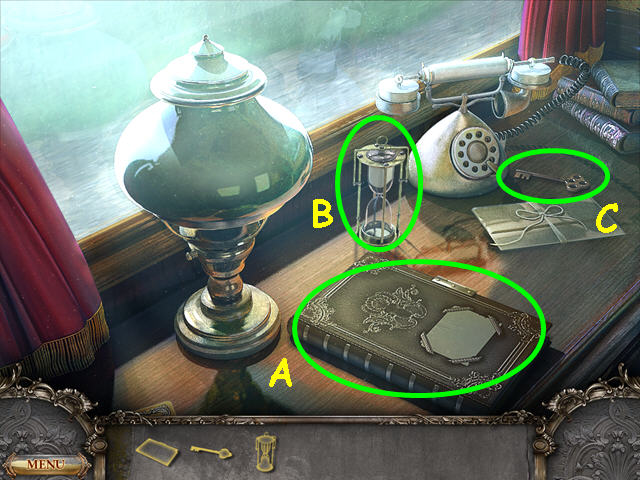
- Select the desk by the window.
- Locate the items by their shape.
- The diary will go in the lower left and you can read it at any time for notes and clues (A).
- The magic sand glass will go in the lower right and will give you hints (B).
- The KEY will go into your inventory (C).
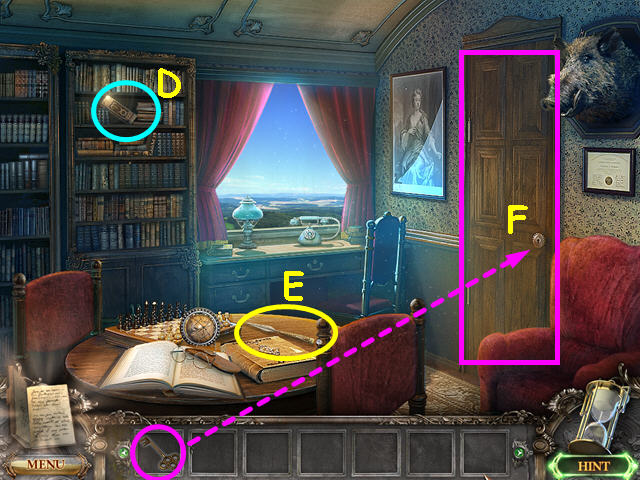
- Look at the astrology book (D).
- Take the KNIFE (E).
- Use the KEY to unlock the door (F).
- Walk to the right, through the door.
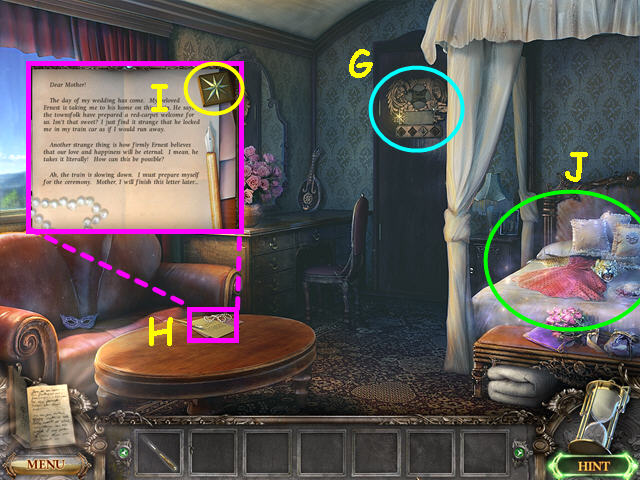
- Note the mini-game on the door (G).
- Look at the papers on the table (H).
- Take the STAR BUTTON (I).
- Look at the bed for a Hidden Object Scene (J).
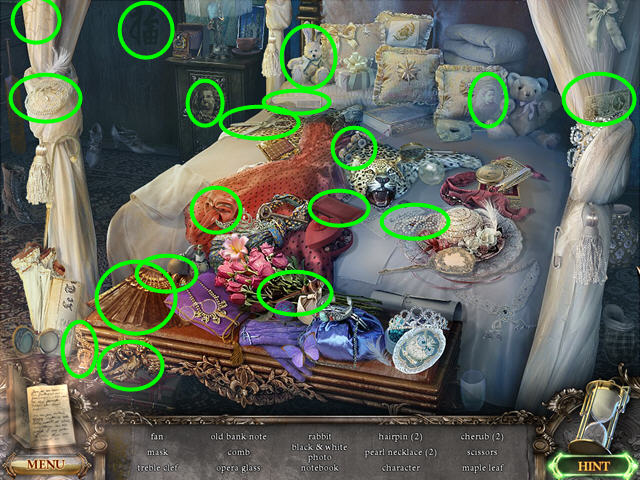
- Locate all the items on the list.
- You will earn the HAIRPINS.
- Walk down to return to the starting room.
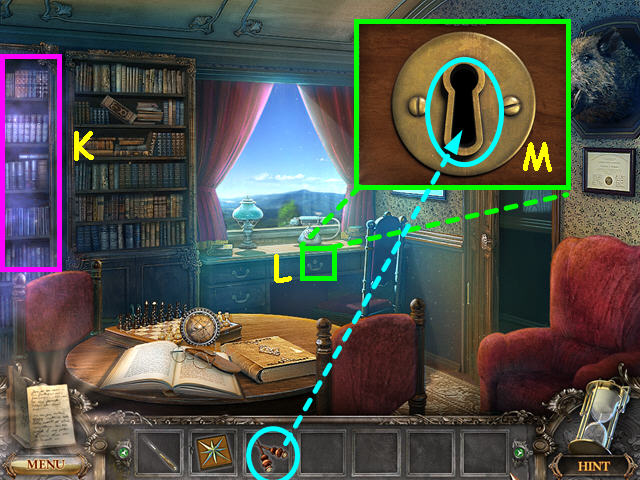
- Note the bookcase on the left (K).
- Look at the lock on the desk drawer (L).
- Use the HAIRPINS on the lock for a mini-game (M).
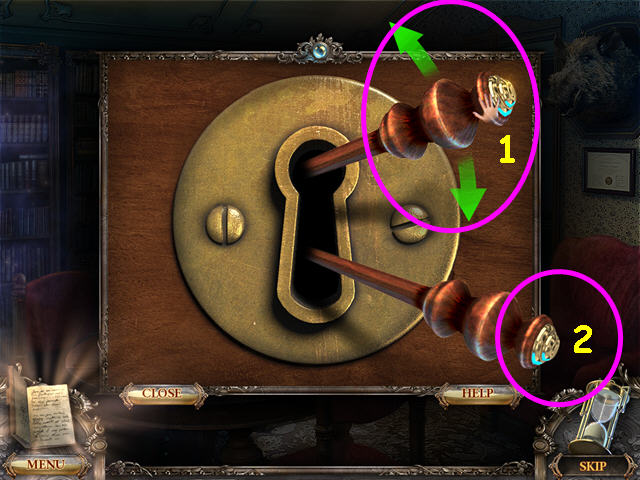
- The object of this mini-game is to move the hairpins so they unlock the drawer.
- Move the upper pin up or down until you see the lower pin move (1).
- Left-click, hold and drag to move the upper pin.
- Push the lower pin (2).
- Repeat steps 1 and 2 twice more to open the drawer for a Hidden Object Scene.
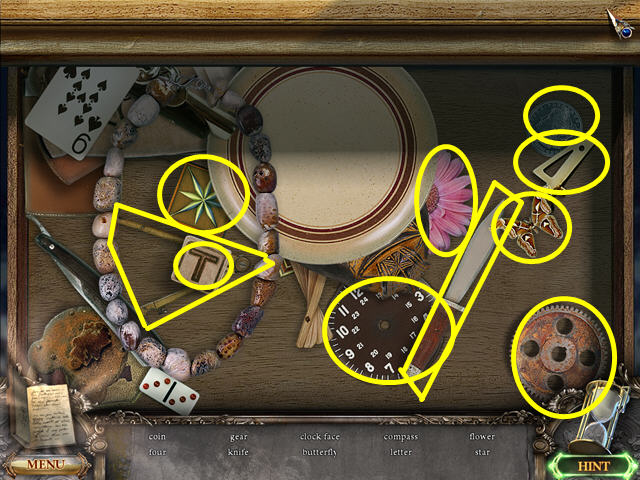
- Left-click, hold and drag items to the side so you can locate the hidden objects.
- Locate all the items on the list.
- You will earn the 2nd STAR BUTTON.
- Select the bookcase on the left for a Hidden Object Scene.
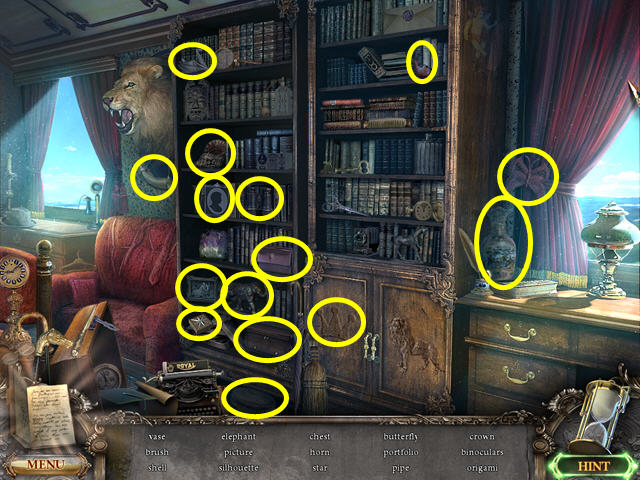
- Locate all the items on the list.
- You will earn the 3rd STAR BUTTON.
- Walk through the door on the right.
- Select the mini-game on the door.
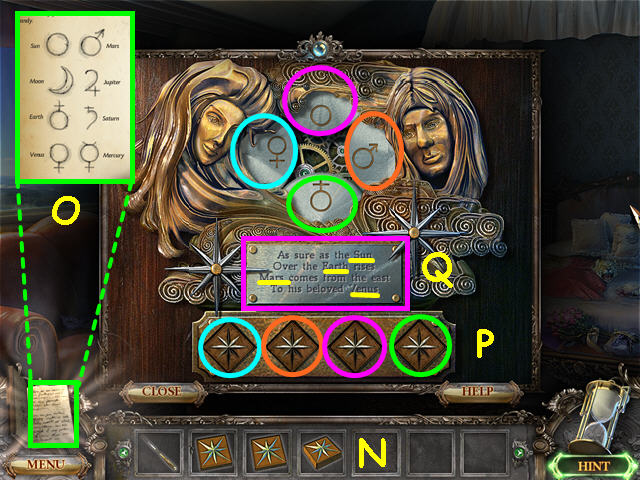
- Place the 3 STAR BUTTONS onto the mechanism to trigger the mini-game (N).
- Refer to your diary for the symbol key (O).
- Click on the buttons to move the symbols (P).
- Match the symbol positions to the poem (Q).
- Walk forward through the door.
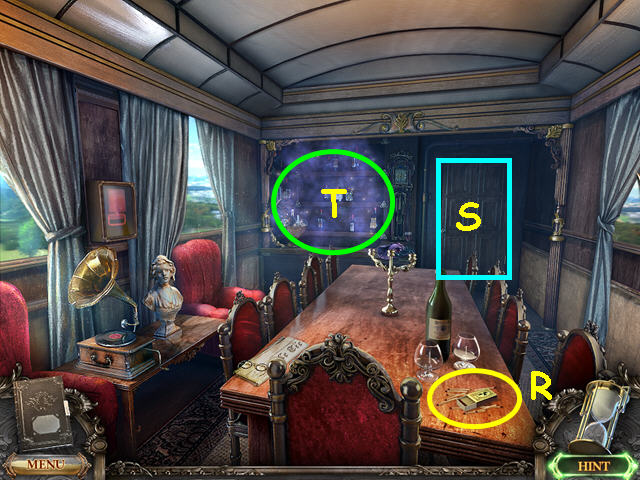
- Take the MATCHES from the table (R).
- Note the door (S).
- Select the bar for a Hidden Object Scene (T).
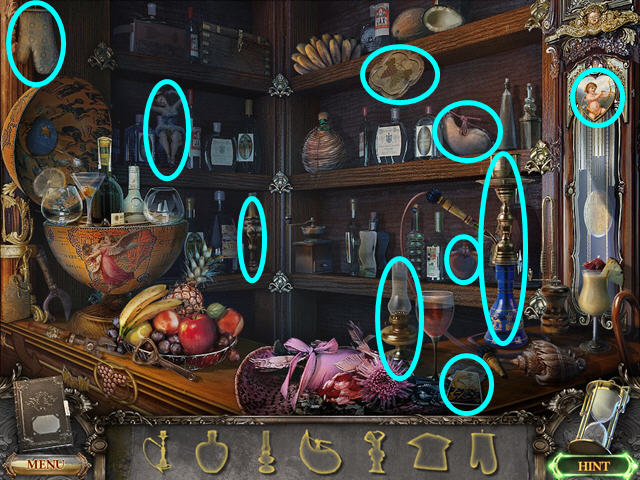
- Locate all the items by their silhouette.
- You will earn the MITTEN.
- Open the door and walk forward.
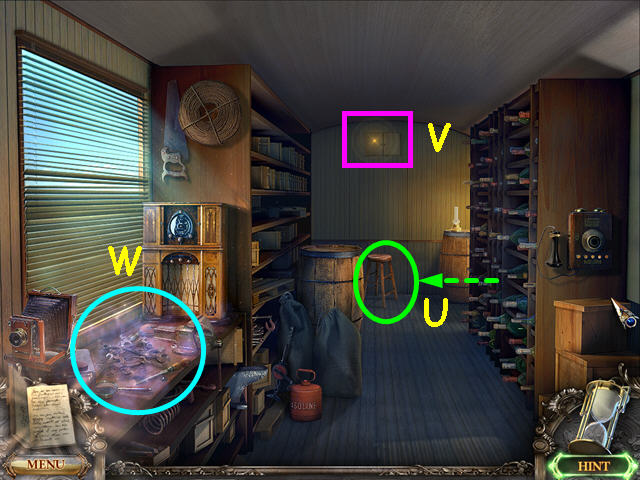
- Left-click, hold and drag the stool to the left so it is in front of the door (U).
- Note the mini-game above the door (V).
- Select the workbench on the left for a Hidden Object Scene (W).
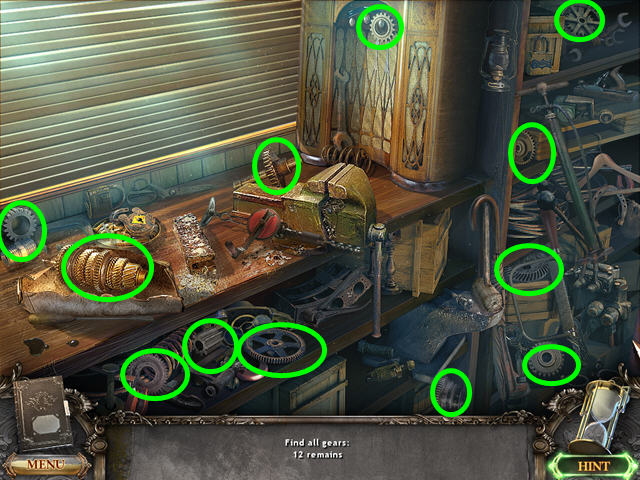
- Locate all the gears.
- You will earn the GEAR.
- Select the mini-game above the door.
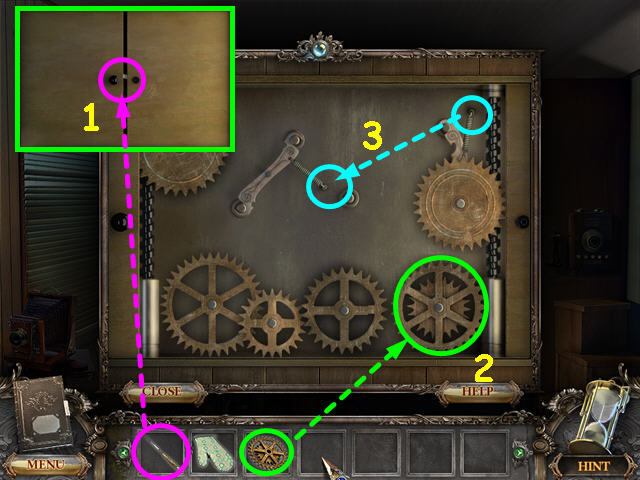
- Use the KNIFE to open the doors (1).
- The object of this mini-game is to connect all the gears.
- Place the gear from your inventory onto the machine (2).
- Click on the spring in the upper right, then move it to the center connection (3).
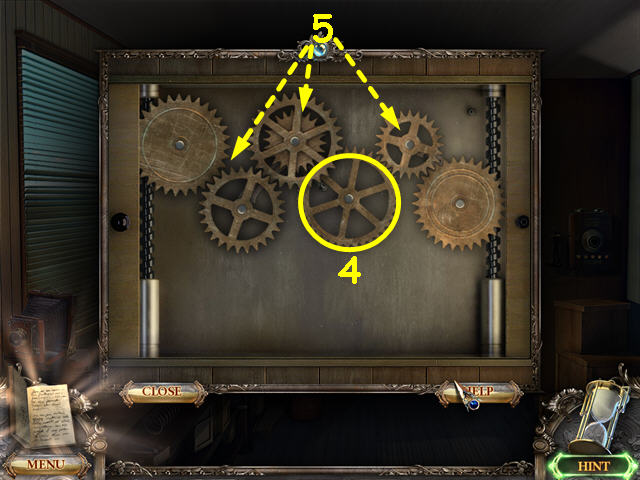
- Place the largest gear first (4).
- Place the remaining gears (5).
- Move the stool to the right.
- Walk forward through the door.
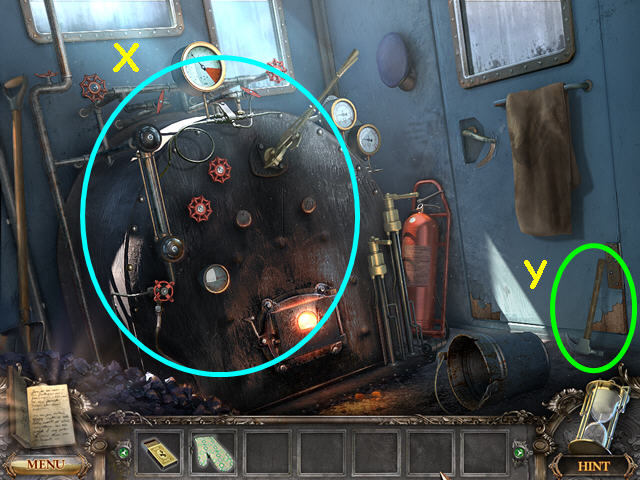
- Note the engine controls (X).
- Take the HAMMER (Y).
- Walk down twice to the dining car.
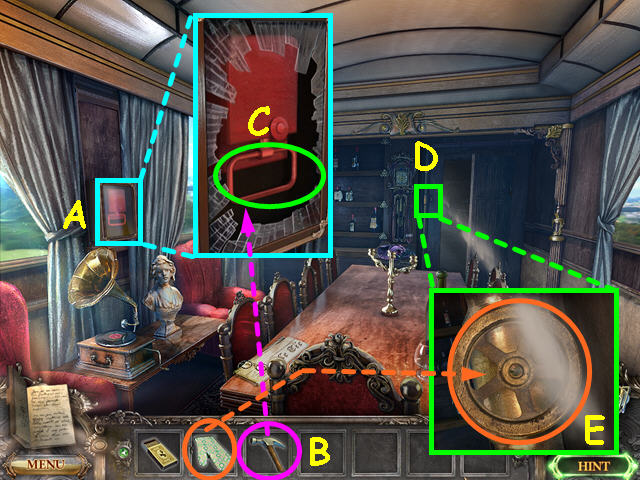
- Look at the close-up of the emergency brake (A).
- Use the HAMMER to break the glass (B).
- Pull the handle (C).
- Look at the close-up of the steam valve (D).
- Use the MITTEN to close the valve (E).
- Walk forward to the next car.
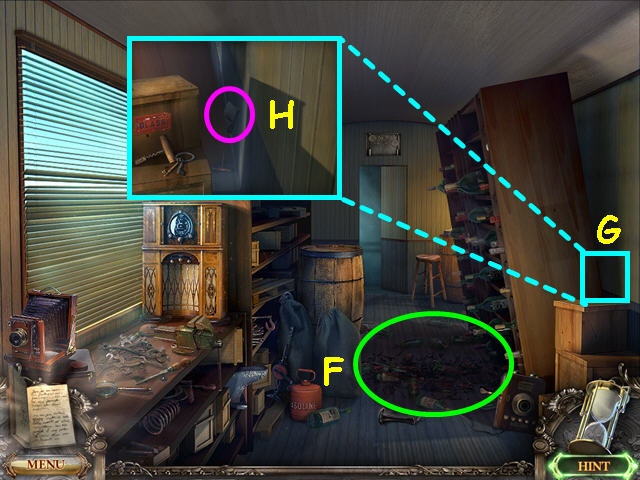
- Look at the mess on the floor (F).
- Look behind the wine rack (G).
- Note the paper just out of reach (H).
- Walk down twice to the bedroom.
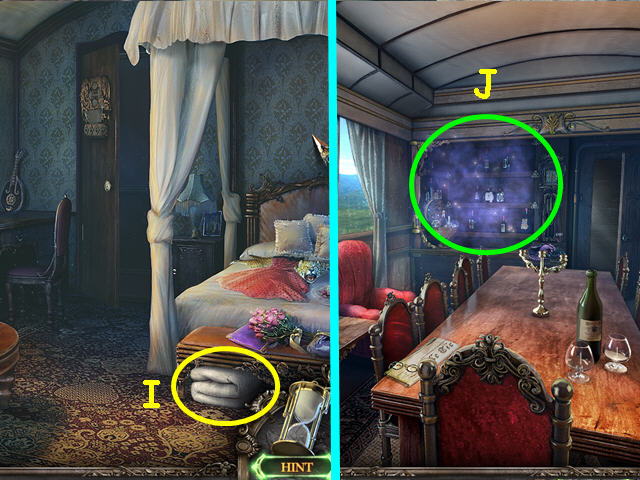
- Take the FEATHERBED (I).
- Walk forward to the dining car.
- Select the bar for a Hidden Object Scene (J).
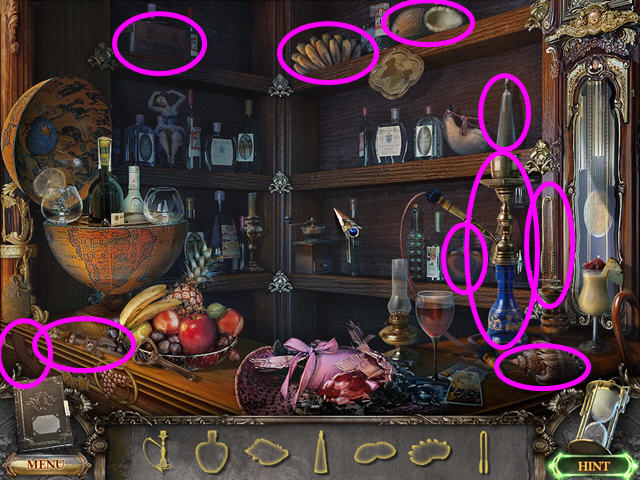
- Locate all the items by their silhouette.
- You will earn the TONGS.
- Walk forward to the next car.
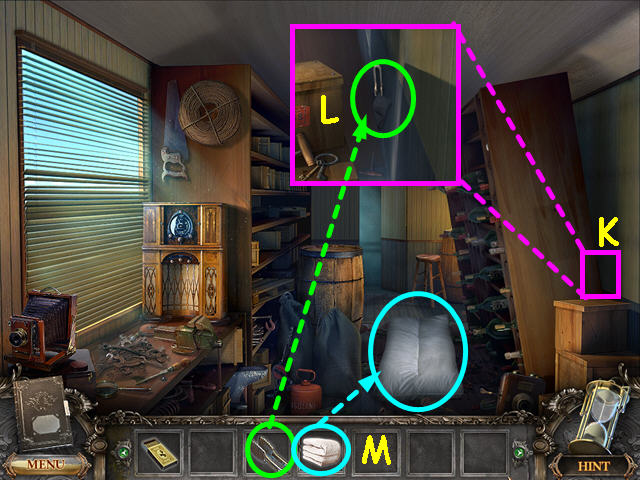
- Look at the close-up behind the wine rack (K).
- Use the TONGS to get the engine instructions (L).
- Place the FEATHERBED on the floor (M).
- Walk forward to the engine room.
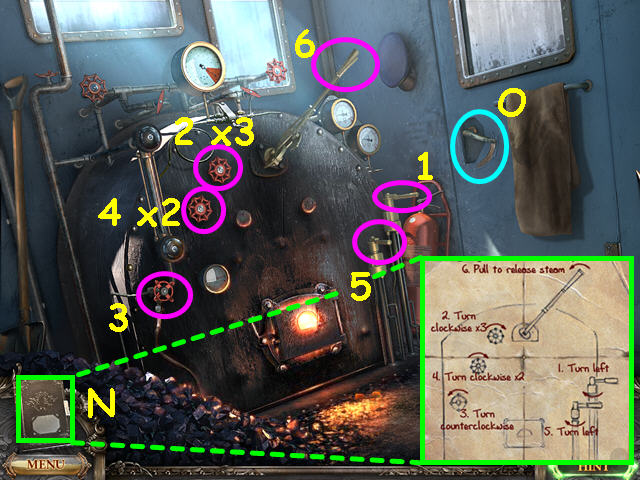
- Refer to the engine instructions in your diary (N).
- Click on the controls in numerical order (1-6).
- Note that steps 2 and 4 require multiple clicks.
- Click on the door handle, then exit the train (O).
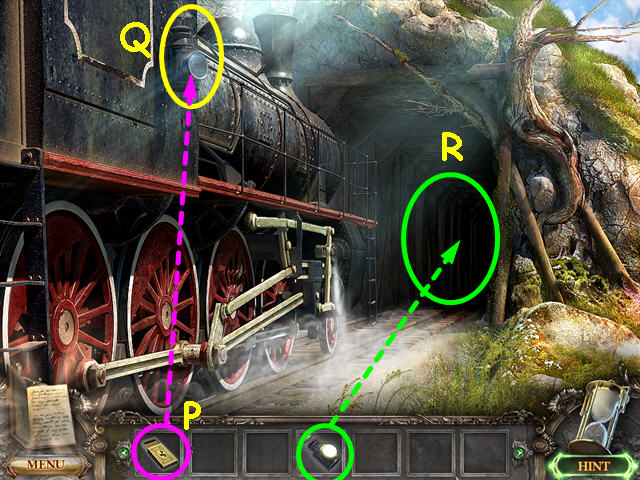
- Use the MATCHES on the lantern (P).
- Take the LANTERN (Q).
- Use the LANTERN on the tunnel (R).
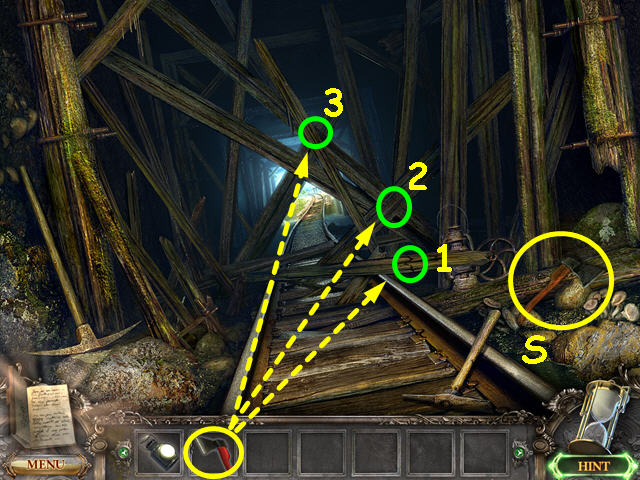
- Take the AXE (S).
- Use the AXE on the weakest points in the wood (1-3).
- Walk forward.
Chapter 2: Arrival
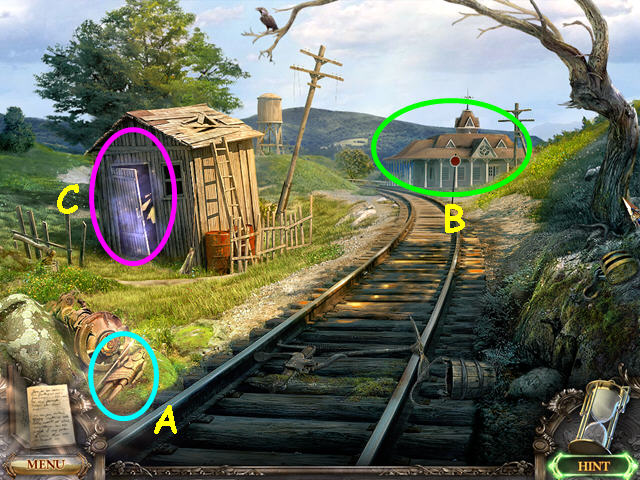
- Take the REAPER DOLL (A).
- Note the station ahead (B).
- Select the shed for a Hidden Object Scene (C).
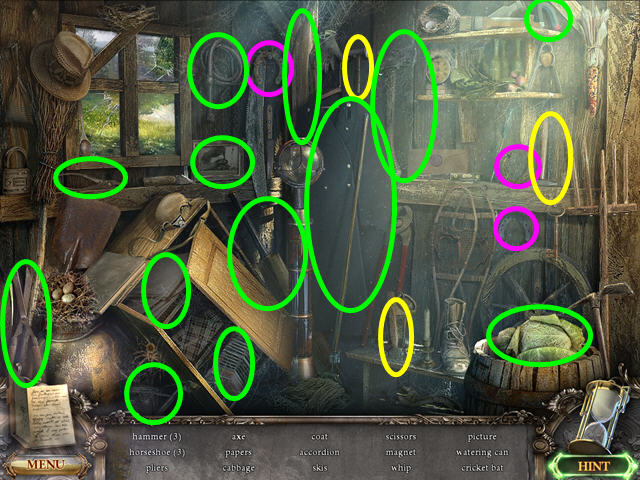
- Locate all the items on the list.
- You will earn the MAGNET.
- Walk forward to the station.
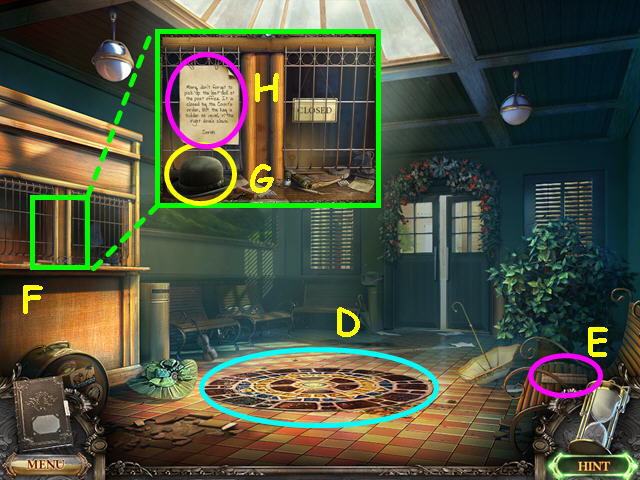
- Note the mosaic on the floor (D).
- Note the diary on the bench (E).
- Look at the ticket windows (F).
- Take the BOWLER HAT (G).
- Read the note about a hidden key (H).
- Walk forward through the double doors.
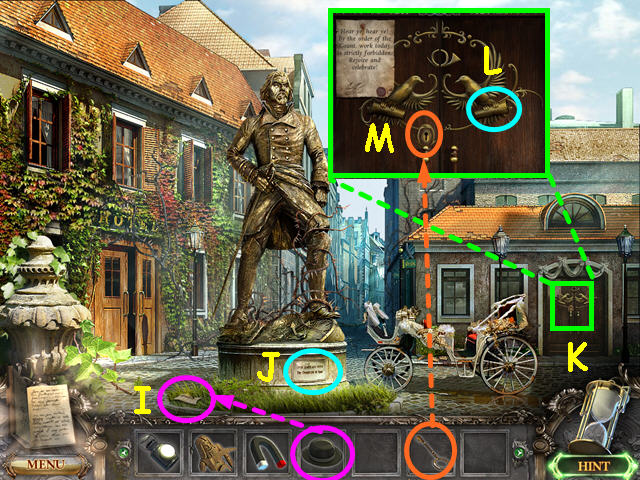
- Use the BOWLER HAT to catch the TORN PAPER (I).
- Note you need a tool to remove the plaque on the statue base (J).
- Look at the door to the post office (K).
- Look in the right dove's claws to find the key per the note (L).
- Use the KEY to unlock the door (M).
- Walk down to the station and look at the diary on the right bench.
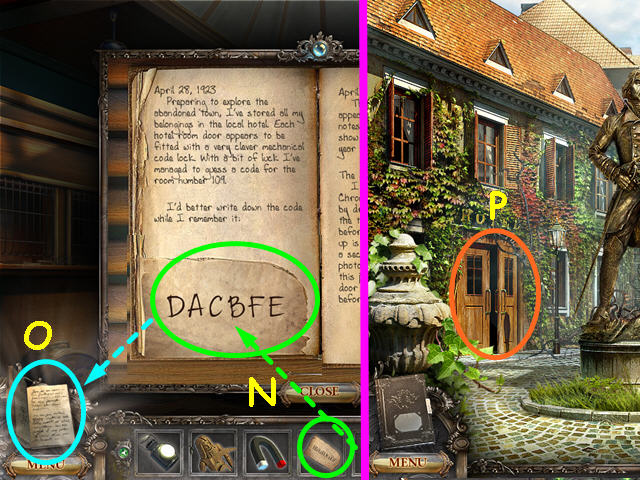
- Use the TORN PAPER on the diary (N).
- The code- D-A-C-B-F-E will be noted in your diary (O).
- Walk forward through the double doors, then enter the hotel on the left (P).
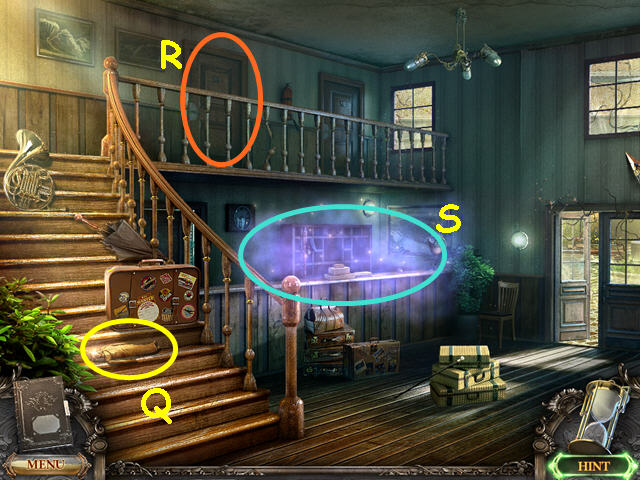
- Take the WOMAN DOLL (Q).
- Note the hotel room door (R).
- Select the counter for a Hidden Object Scene (S).
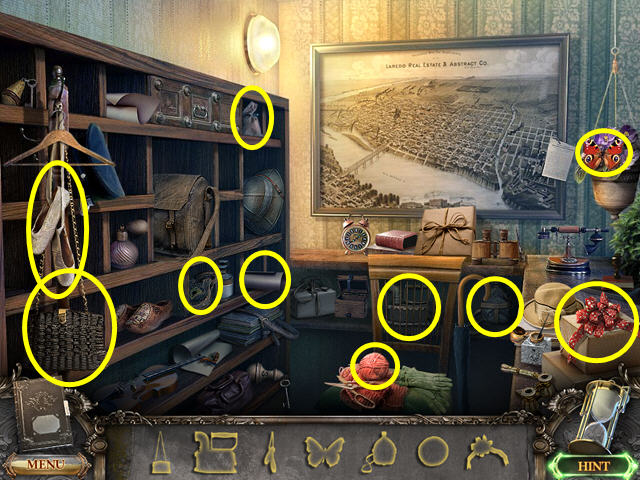
- Locate all the items by their shape.
- You will earn the YARN.
- Look at the hotel room door.
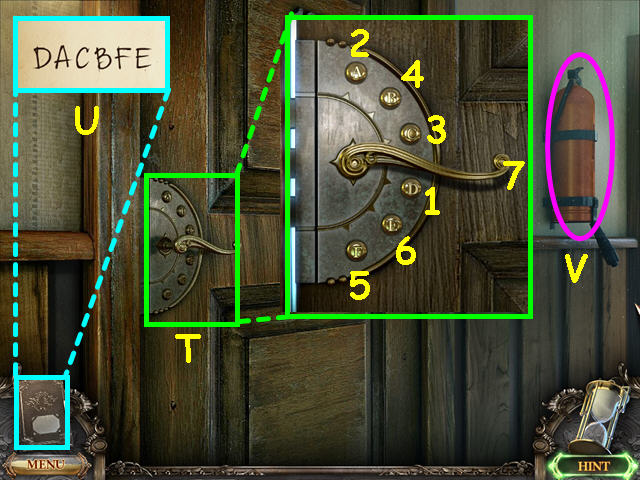
- Look at the close-up of the door lock (T).
- Refer to the code in your journal (U).
- Note- This code is randomized, your solution may vary.
- Press the buttons in numerical order, then click on the handle (1-7).
- Note the fire extinguisher (V).
- Enter the hotel room.
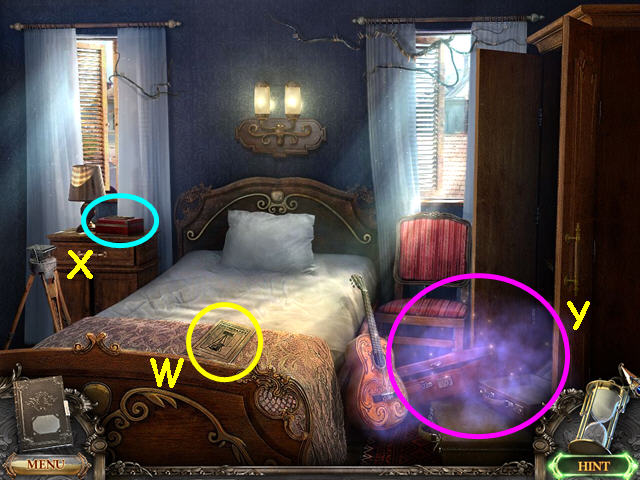
- Take the photography guide from the bed (W).
- Note the mini-game on the left nightstand (X).
- Select the pile of luggage for a Hidden Object Scene (Y).
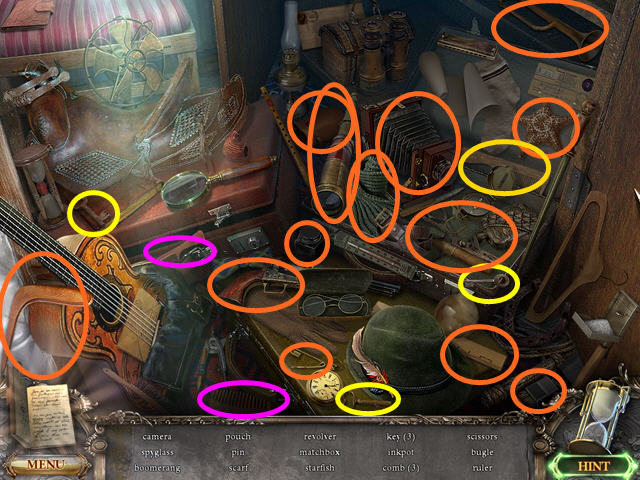
- Locate all the items on the list.
- You will earn the PHOTO CAMERA.
- Select the box on the left nightstand for a mini-game.
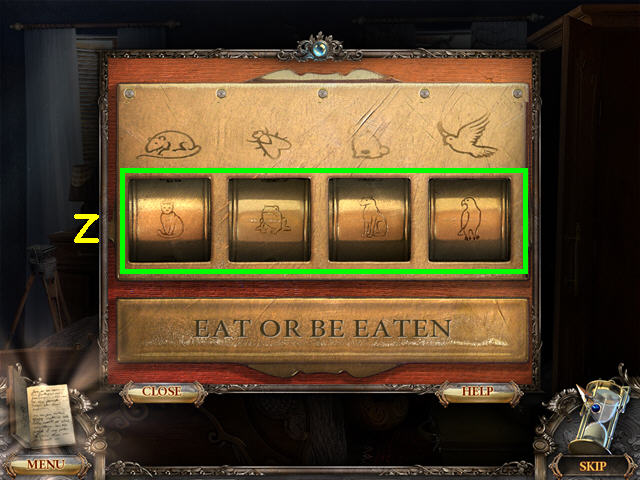
- The object of this mini-game is to move the dials so that the predator is in the below the prey in each column.
- Click on each dial to change the predator (Z).
- Place the cat below the rat and the frog below the fly. The dog goes under the cat and the hawk is below the bird.
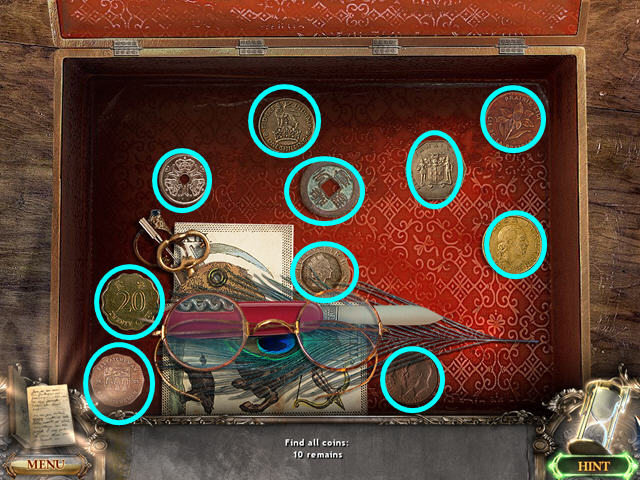
- Click, hold and drag items out of the way to find all the coins.
- You will earn the OLD COIN.
- Walk down twice to the lobby, then walk right to exit the hotel.
- Enter the post office.
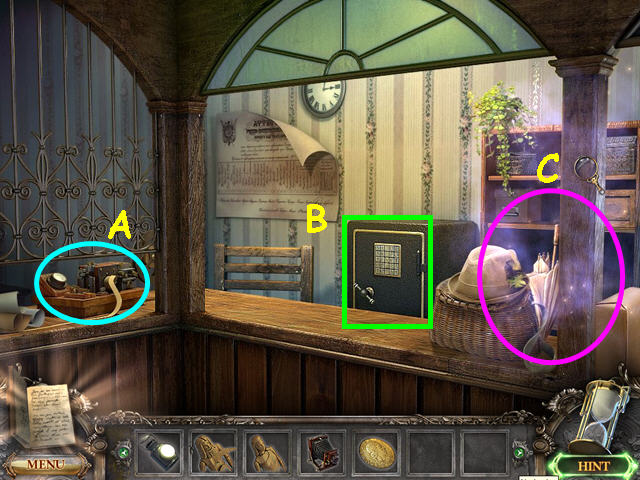
- Read the message on the telegraph machine (A).
- Note the lock on the safe (B).
- Select the area on the right for a Hidden Object Scene (C).
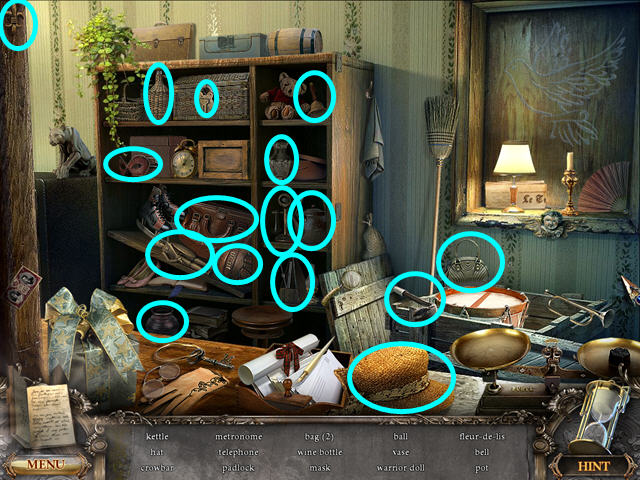
- Locate all the items on the list.
- You will earn the WARRIOR DOLL.
- Exit the post office, then walk forward up the street.
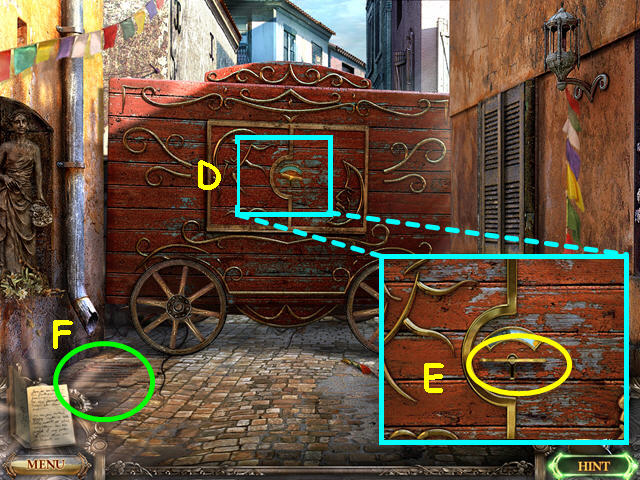
- Look the window door on the wagon (D).
- Turn the key (E).
- Note the drain (F).
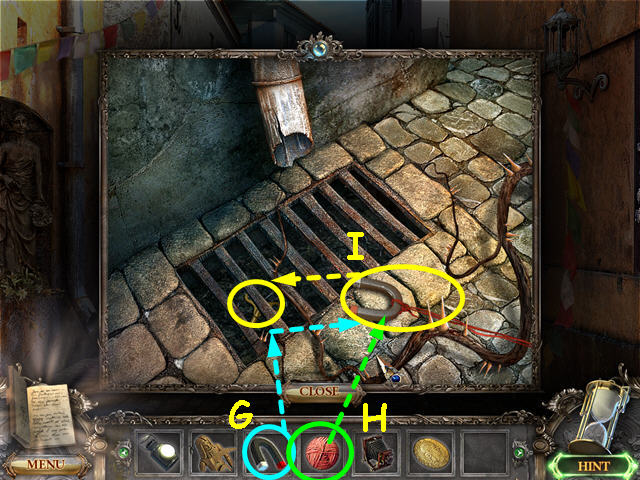
- Try the MAGNET on the key (G).
- Use the YARN on the magnet (H).
- Take the MAGNET on a STRING and use it to retrieve the WINDING KEY (I).
- Look the window door on the wagon again and use the WINDING KEY on the lock.
- Turn the key 7 times to open the window door.
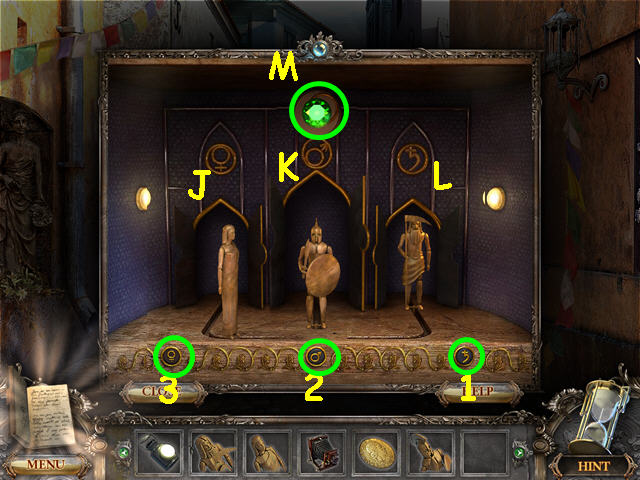
- Place the WOMAN DOLL into the left alcove (J).
- Place the WARRIOR DOLL into the center alcove (K).
- Place the REAPER DOLL into the right alcove (L).
- Note- the doors on each alcove will close when the correct doll is placed inside.
- The object of this mini-game is to have the warrior defeat the reaper and save the woman.
- Push the buttons at the bottom in numerical order (1-3).
- Take the GREEN GEM (M).
- Walk down 3 times, then select the shed for a Hidden Object Scene.
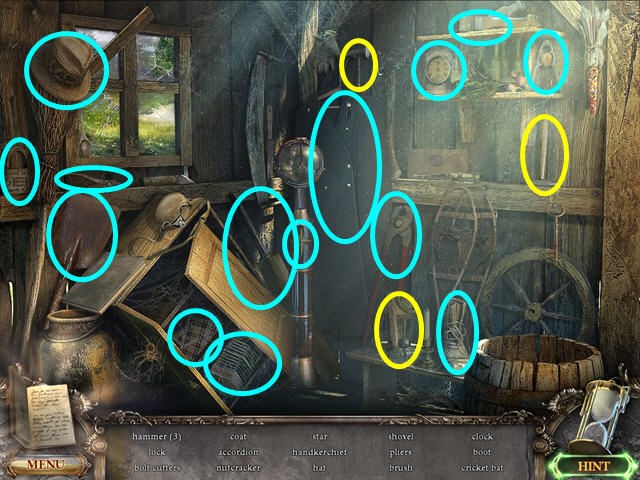
- Locate all the items on the list.
- You will earn the BOLT CUTTERS.
- Walk forward twice, then enter the hotel on the left.
- Select the front desk for a Hidden Object Scene.
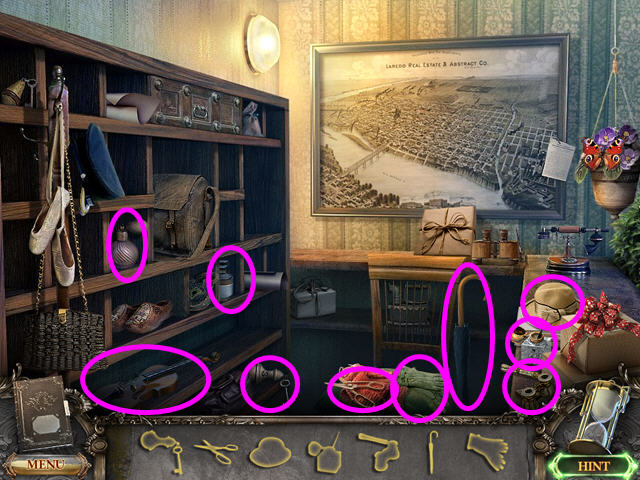
- Locate all the items by their silhouette.
- You will earn the UMBRELLA.
- Exit the hotel, then walk forward twice.
Chapter 3: The Town Center
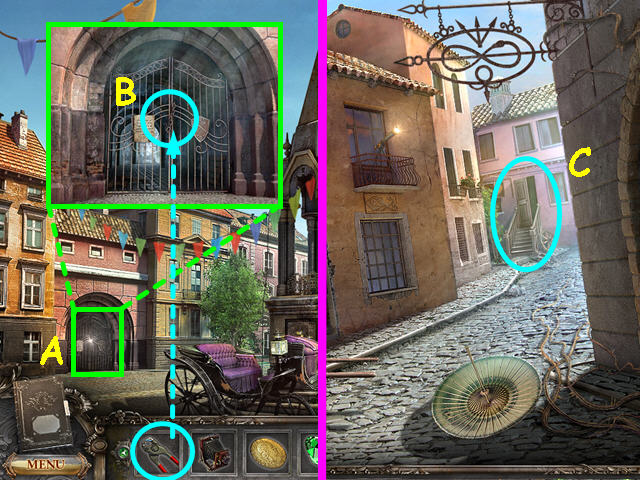
- Look at the gate on the left (A).
- Use the BOLT CUTTERS on the chain (B).
- Walk left, through the gate.
- Walk forward to the general store (C).
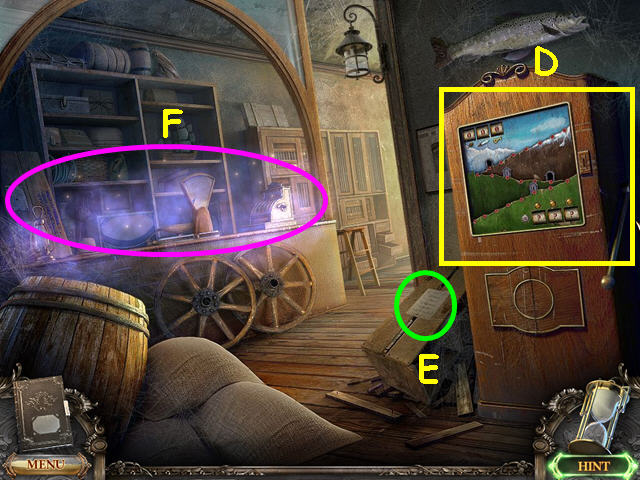
- Note the old slot machine (D).
- Read the note on the box (E).
- Select the counter for a Hidden Object Scene (F).
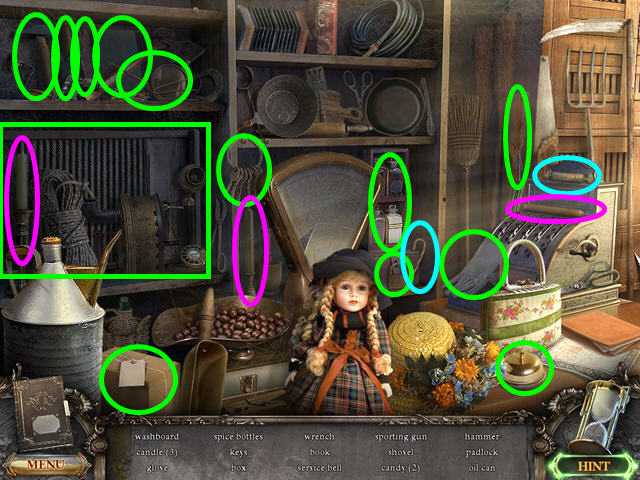
- Locate all the items on the list.
- You will earn the OIL CAN.
- Look at the slot machine for a mini-game.
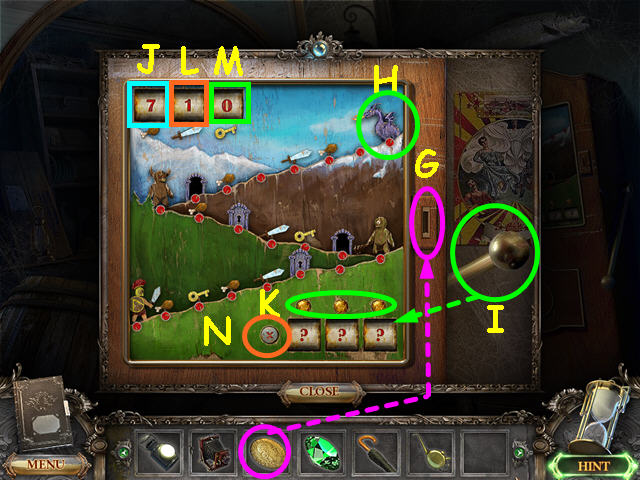
- Use the OLD COIN on the coin slot to activate the mini-game (G).
- The object of this mini-game is to move the hero to the top of the hill (H).
- Generate up to 3 moves by pulling the lever (I).
- Each pull of the lever costs one food point- you start with 7 food points (J).
- Select the button over one of the dice to have the hero move as many spaces as there are dots (K).
- The hero will take the item on the last space or fight a monster.
- You must have a sword to defeat the monsters- you begin with one (L).
- You can avoid the monsters if you have a key and land on a door- you begin with no keys (M).
- Press the 'x' button to reset the mini-game (N).
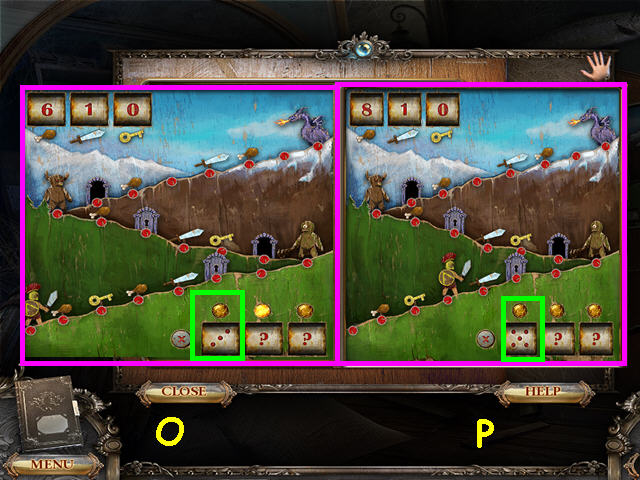
- This game is randomized- your solution may vary.
- Our first pull rolled a 3, which used one food point, but the hero collected 3 more food points (O).
- Our next roll was a 5 and we defeated the first monster (P).
- Note- you will stop on the monster's space even if you roll a higher number.
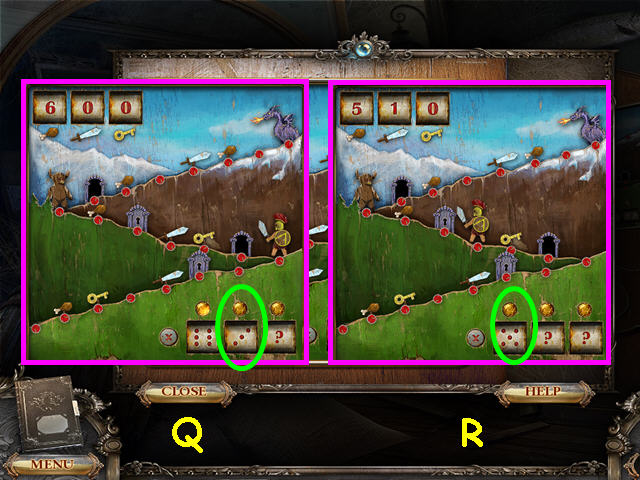
- The next roll was a 6, which would take us to the second monster, but we don't have a sword.
- The second roll was a 3 which puts the hero on the space with a sword (Q).
- Rolling a 5, we defeat the 2nd monster (R).
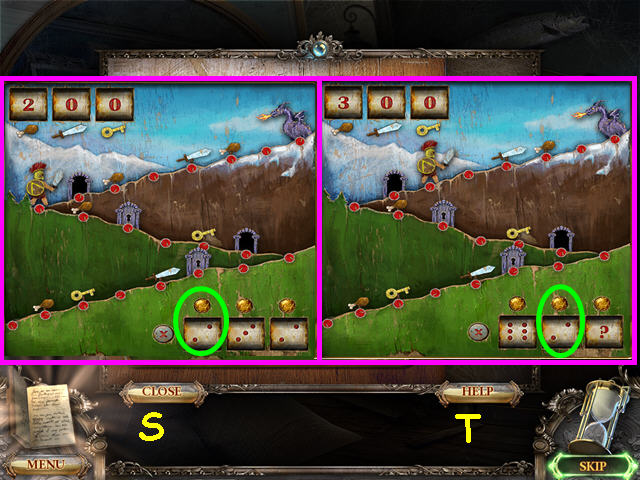
- Although we wanted a 4, the next rolls were 2-3-2. We chose a 2 to gather more food points (S).
- Our next rolls were 6 and 2- the 2 puts the hero on a space with a sword (T).
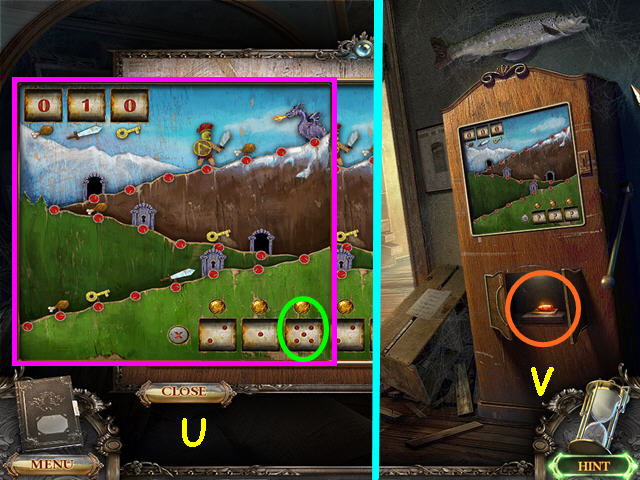
- The last set of rolls produced 2-1-5, with the 5 taking the hero to defeat the dragon (U).
- Take the RED GEM from the lower opening on the slot machine (V).
- Exit the general store, then immediately re-enter the store.
- Select the counter for a Hidden Object Scene.
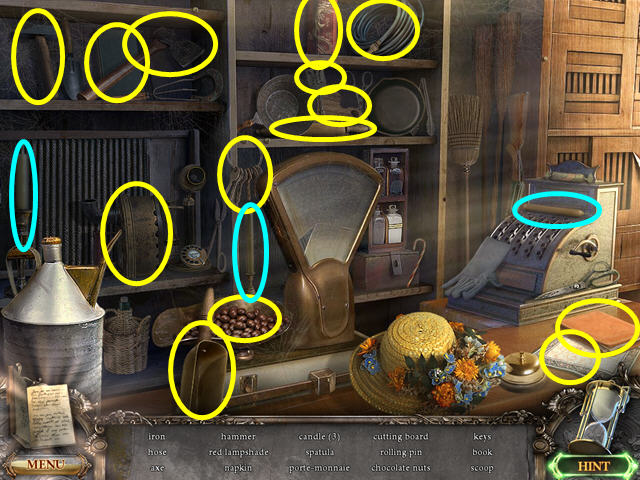
- Locate all the items on the list.
- You will earn the RED LAMPSHADE.
- Walk down twice to the town center, then enter the town hall on the right.
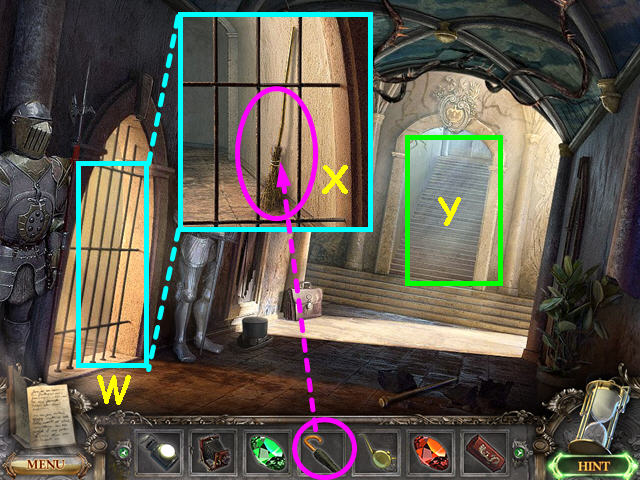
- Look at the gate on the left (W).
- Use the UMBRELLA to knock over the broom (X).
- Take the BROOM.
- Walk up the stairs (Y).
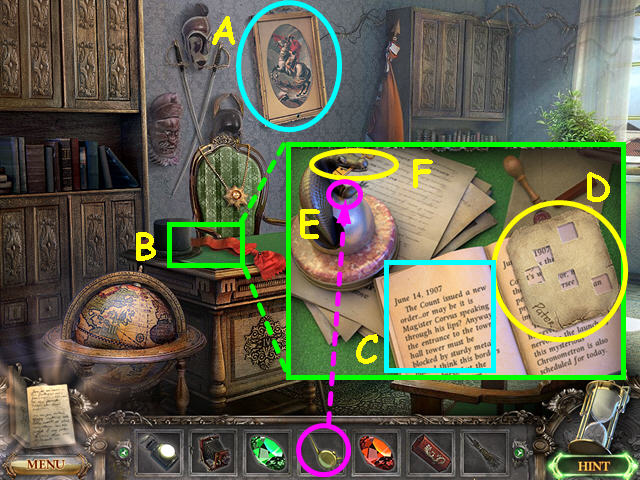
- Knock the painting off the wall (A).
- Look at the close-up of the desk (B).
- Turn the page in the journal (C).
- Take the STRANGE CARD (D).
- Use the OIL CAN on the lizard's elbow (E).
- Click on the lizard's arm.
- Take the BRONZE KEY from the lizard's mouth (F).
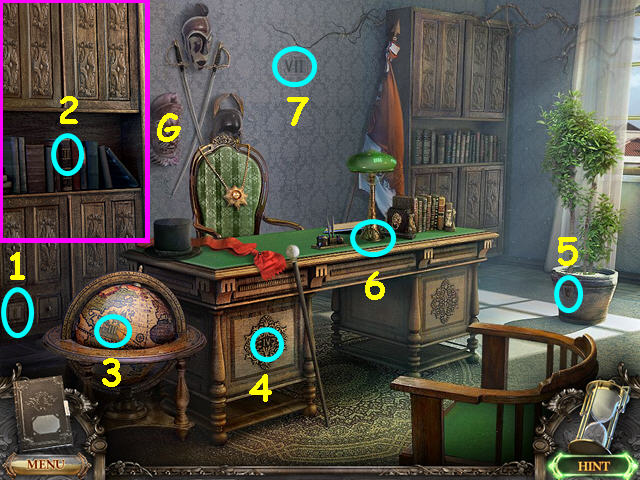
- Find all the locations marked with Roman numerals and press them in numerical order (1-7).
- Select the area behind the bookcase on the left for a Hidden Object Scene (G).
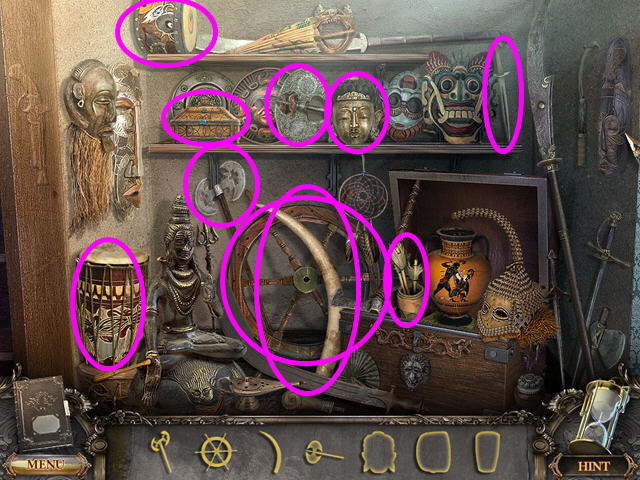
- Locate all the items by their silhouette.
- You will earn the DAGGER.
- Walk down twice to return to the town center, then go forward on the street once.
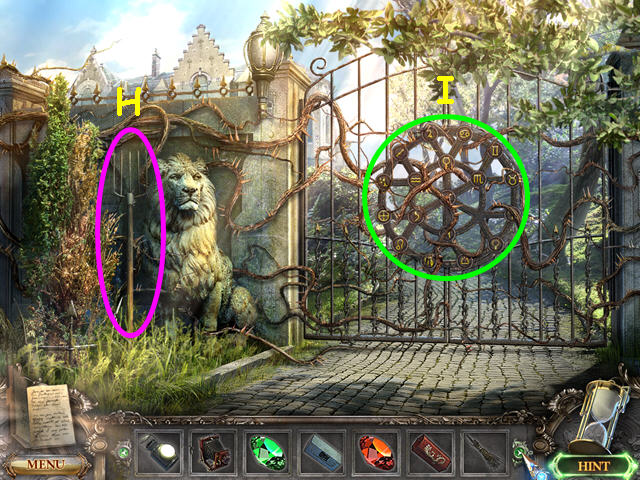
- Take the PITCHFORK (H).
- Note the mini-game covered in spiky vines (I).
- Walk down 4 times to the station.
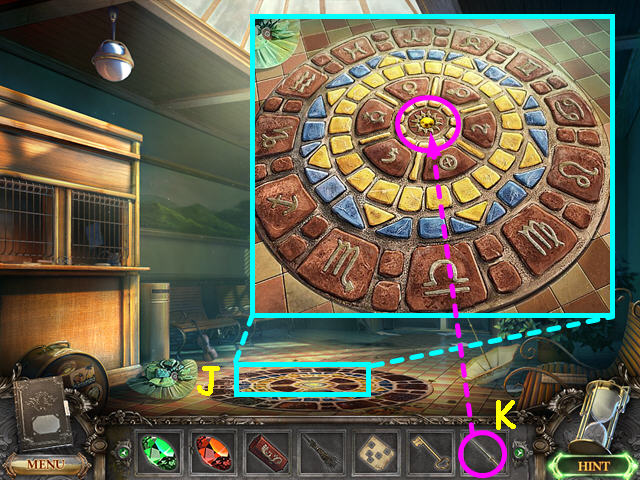
- Look at the mosaic on the floor (J).
- Use the DAGGER in the center of the mosaic to get the YELLOW GEM (K).
- Walk forward once, then enter the post office on the right.
- Select the shelves on the right for a Hidden Object Scene.
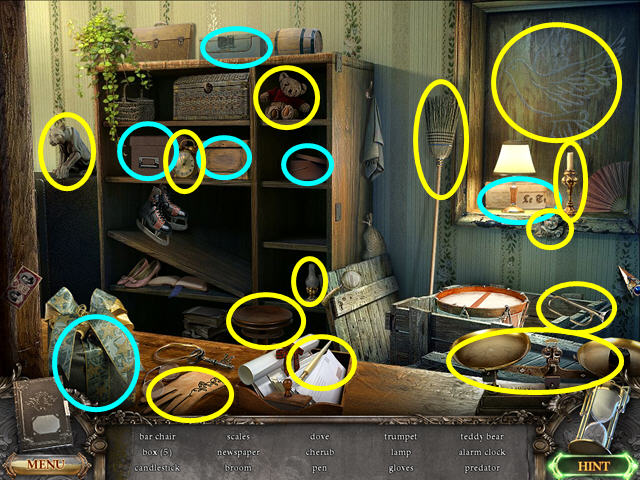
- Locate all the items on the list.
- You will earn the PHOTO CHEMICALS.
- Exit the post office, then walk forward twice.
- Enter the town hall and walk up the stairs.
- Select the area behind the bookcase on the left for a Hidden Object Scene.
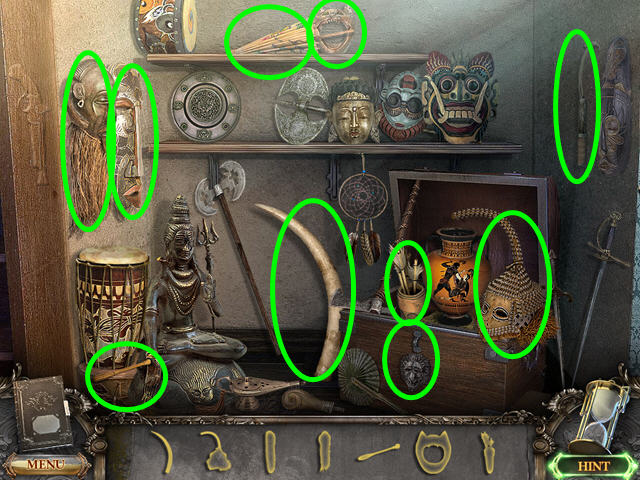
- Locate all the items by their silhouette.
- You will earn the SICKLE.
- Walk down twice to exit the town hall, then walk forward once on the street.
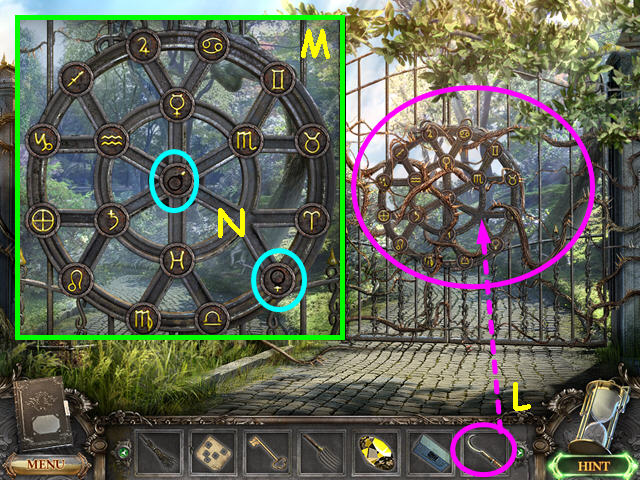
- Use the SICKLE on the spiky vines covering the gate several times (L).
- Look at the close-up of the mini-game to learn this is similar to the mosaic in the station (M).
- Notice that 2 of the pieces are missing rings (N).
- Exit the close-up.
- Walk down, then go left through the gate.
Chapter 4: The Ghost
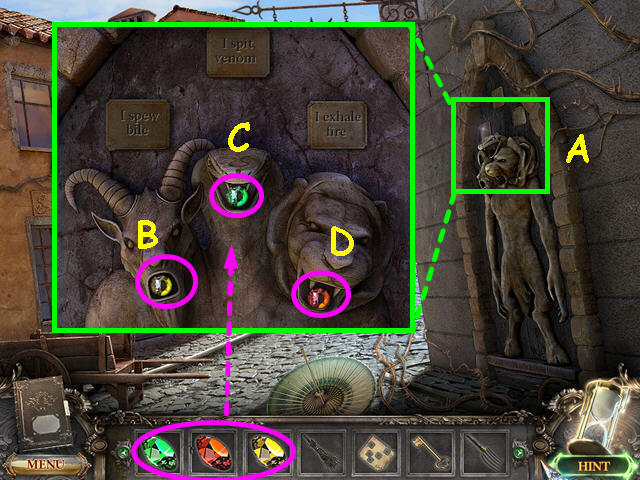
- Look at the close-up of the wall carving on the right (A).
- Place the YELLOW GEM into the mouth of the left head (B).
- Place the GREEN GEM into the mouth of the center head (C).
- Place the RED GEM into the mouth of the right head (D).
- Enter the doorway that opens.
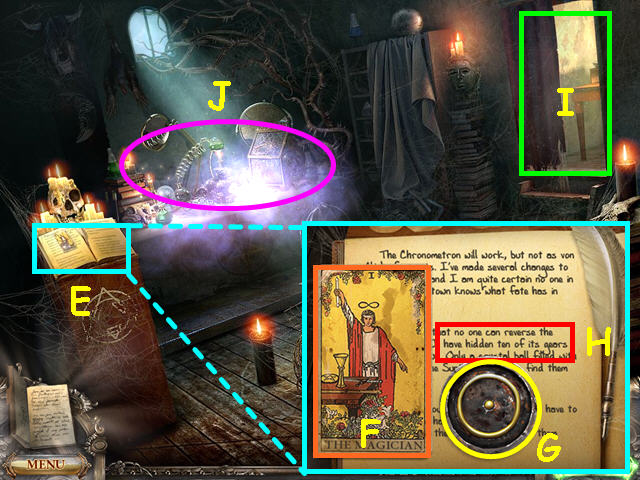
- Look at the close-up of the book (E).
- Left-click, hold and drag the tarot card to the side (F).
- Take the IRON DISC (G).
- Make sure to read the center paragraph about using a crystal ball to locate gears (H).
- Exit the close-up.
- Note the doorway on the right (I).
- Select the altar for a Hidden Object Scene (J).
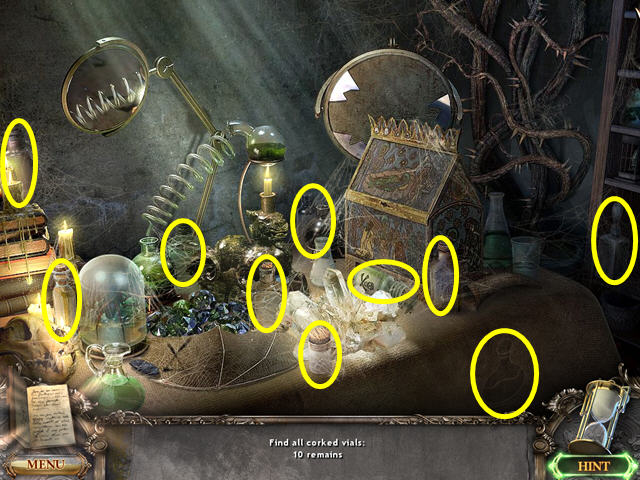
- Locate all the corked vials.
- You will earn the ACID.
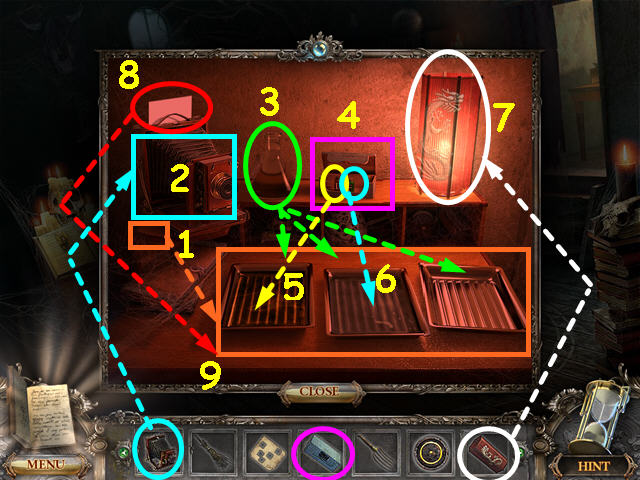
- Select the door on the right.
- Move the 3 trays from the left to the open area (1).
- Place the PHOTO CAMERA in the spot where the trays were (2).
- Use the flask to pour water into the 3 trays (3).
- Place the PHOTO CHEMICALS on the shelf and open the box (4).
- Pour the 'D' chemical into the left tray (5).
- Pour the 'F' chemical into the center tray (6).
- Use the RED LAMPSHADE on the lamp (7).
- Click on the camera to release the photo (8).
- Take the photo and place it in the left tray for a few seconds, then the center tray for a few seconds, and the right tray for a few seconds (9).
- You will now have the MYSTERIOUS PHOTOGRAPH.
- Walk down twice, and then enter the town hall.
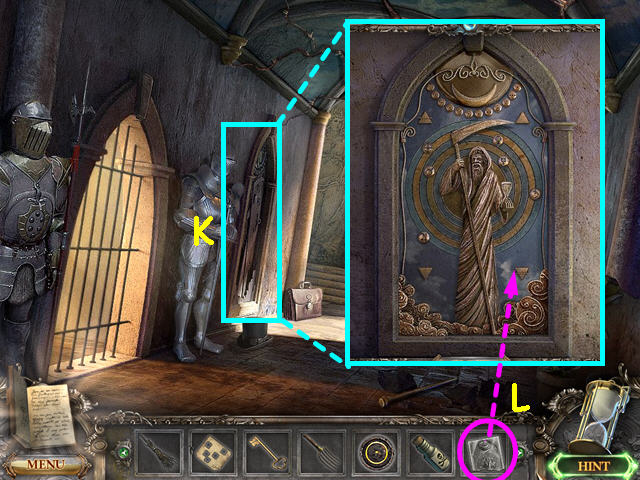
- Look at the bas-relief (K).
- Use the MYSTERIOUS PHOTOGRAPH on the bas-relief for a mini-game (L).
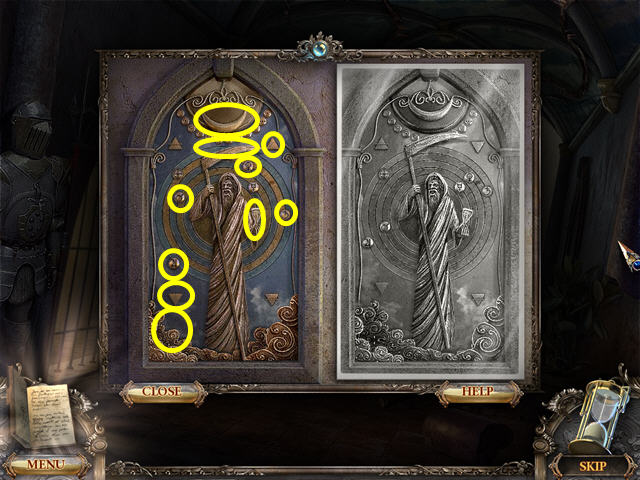
- The object of this mini-game is to make the bas-relief look like the photograph.
- Click on the different elements in the bas-relief to change their position.
- The 10 elements to click on are marked in yellow.
- Enter the doorway that opens behind the bas-relief.
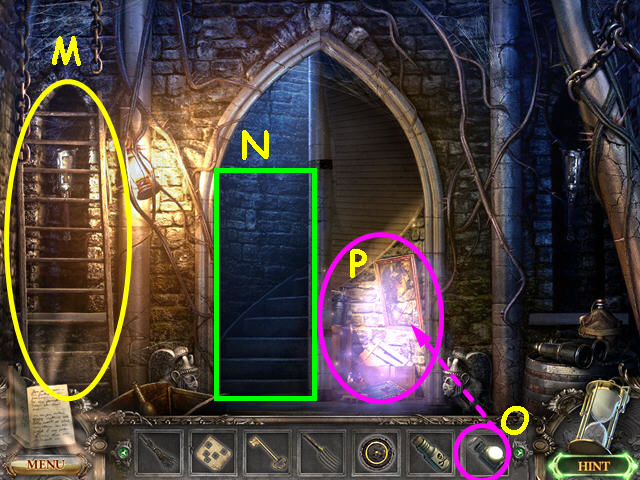
- Take the LADDER (M).
- Note the staircase (N).
- Use the LANTERN on the area under the stairs (O).
- Select the area under the stairs for a Hidden Object Scene (P).
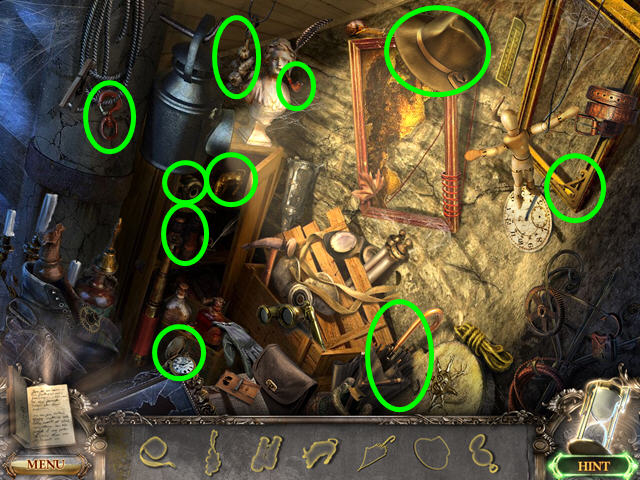
- Locate all the items by their silhouette.
- You will earn the GNOMON.
- Try to go up the stairs and the ghost will stop you with fire.
- Walk down 4 times, then enter the post office on the right.
- Select the safe for a mini-game.
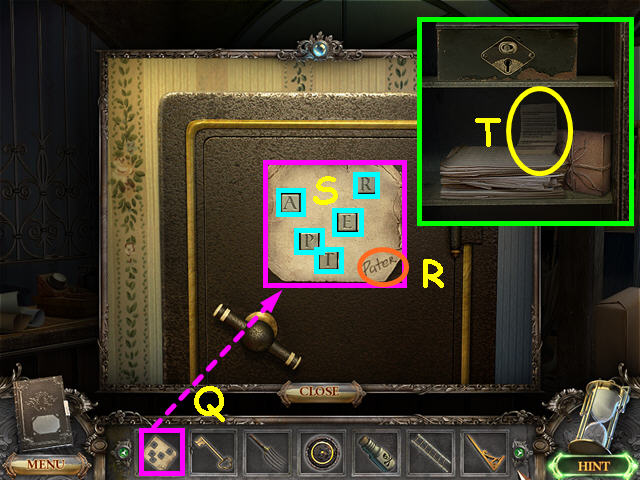
- Place the STRANGE CARD over the keypad letters (Q).
- Note the word 'pater' written on the card (R).
- Press the letters P-A-T-E-R to open the safe (S).
- Take the IMPORTANT TELEGRAM from inside the safe (T).
- Exit the post office and walk down to the station.
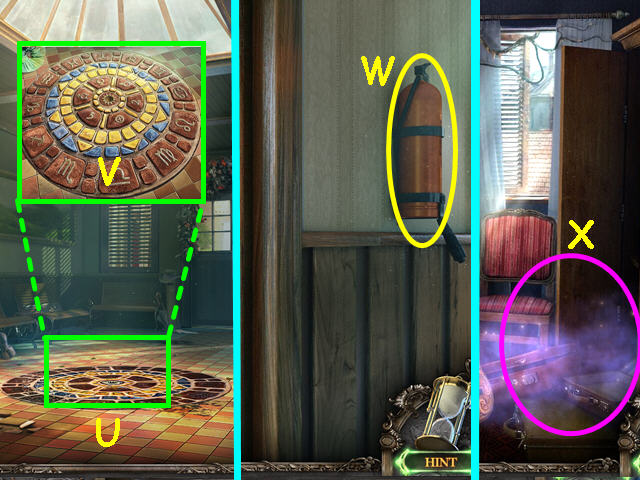
- Look at the close-up of the mosaic (U).
- Click on the mosaic to make sure the pattern is in your diary (V).
- Walk forward to exit the station, then enter the hotel on the left.
- Walk up the stairs and take the FIRE EXTINGUISHER (W).
- Enter the hotel room and select the luggage for a Hidden Object Scene (X).
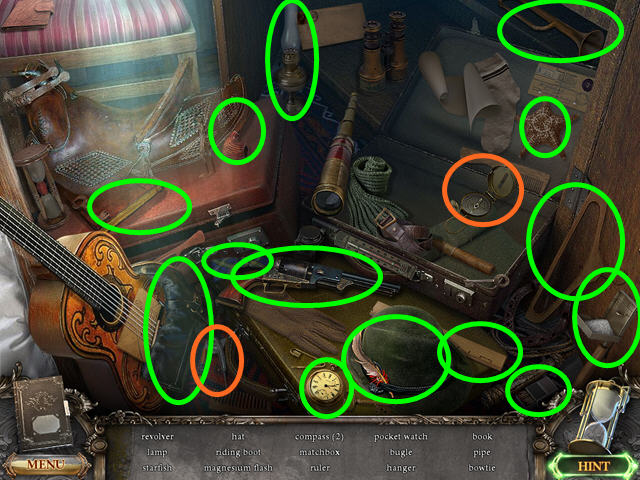
- Locate all the items on the list.
- You will earn the MAGNESIUM FLASH.
- Walk down twice, then right to exit the hotel.
- Walk up the street twice to the town center, then go left through the gate.
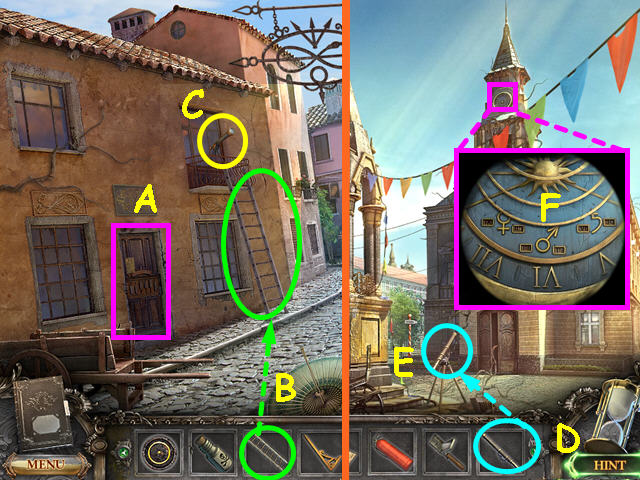
- Note the door with the mini-game (A).
- Use the LADDER on the balcony (B).
- Take the TELESCOPE (C).
- Walk down to return to the town center.
- Place the TELESCOPE on the stand (D).
- Look in the telescope to see the clock tower (E).
- The symbols and numbers will be noted in your diary (F).
- Walk left through the gate and look at the door with the mini-game on the left.
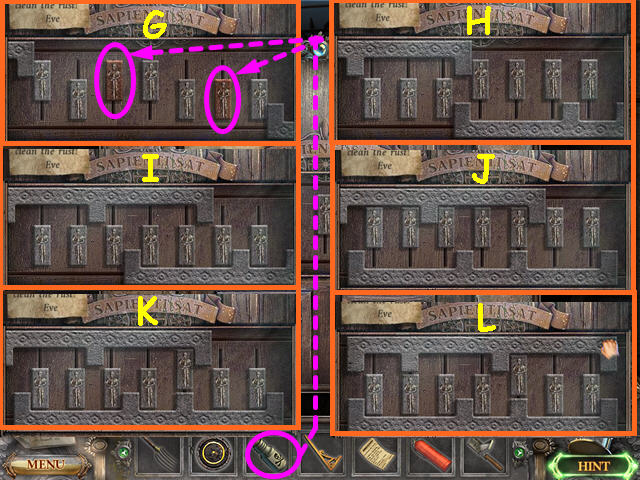
- Use the ACID on the 2 darker tiles (G).
- The object of this mini-game is to move the upper bar all the way to the right and the lower bar to the right.
- Move the tiles up or down to enable the bars to move.
- Move the 3 left tiles to the down position and the 4 right tiles to the up position, then slide the bars in as far as they will go (H).
- Move the 4 right tiles to the down position, then move the upper bar to the right by 2 tiles (I).
- Move all the tiles to the up position, the slide the lower bar all the way to the left (J).
- Move all the tiles to the down position except the 5th from the left (K).
- Slide the upper bar all the way to the right (L).
- Enter the door.
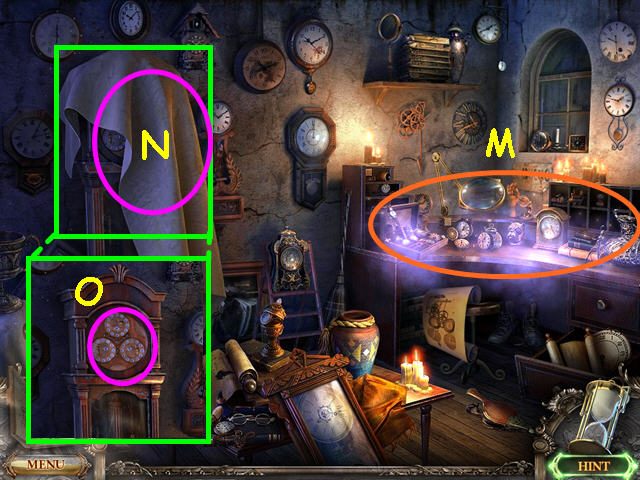
- Note the counter for a Hidden Object Scene (M).
- Pull the cover off of the clock (N).
- Look at the clock face for a mini-game (O).
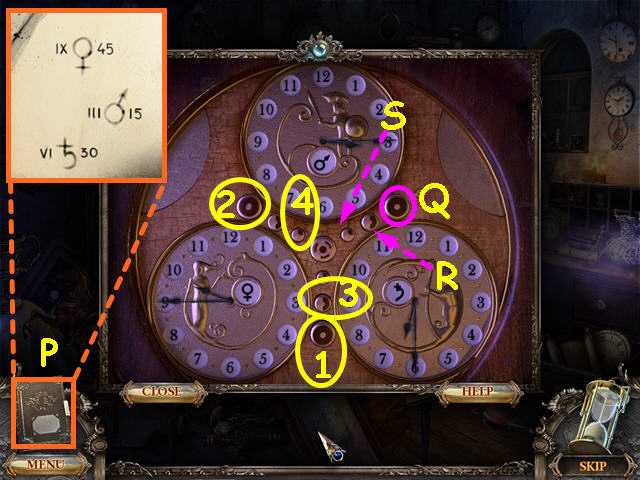
- The object of this mini-game is to set the 3 clocks to the times seen on the clock tower.
- Refer to your diary for the clues (P).
- Each of the buttons turn the hands on the 2 clocks that are adjacent a certain amount of time.
- The buttons with a full circle turn the hour hands 1 hour (Q).
- The buttons with a half-circle turn the minute hands 30 minutes (R).
- The last button turns the minute hands 15 minutes (S).
- The center button will reset the clocks.
- Click the lower hour button 6 times (1).
- Click the left hour button 3 times (2).
- Click the lower 30 minute button once (3).
- Click the left 15 minute button once (4).
- Look in the drawer that opened at the bottom of the clock for a Hidden Object Scene.
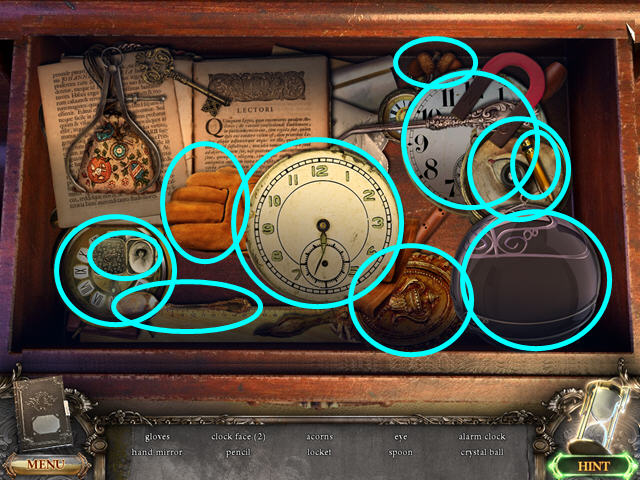
- Locate all the items on the list.
- You may need to move some items out of the way.
- You will earn the CRYSTAL BALL.
- Select the counter for a Hidden Object Scene.
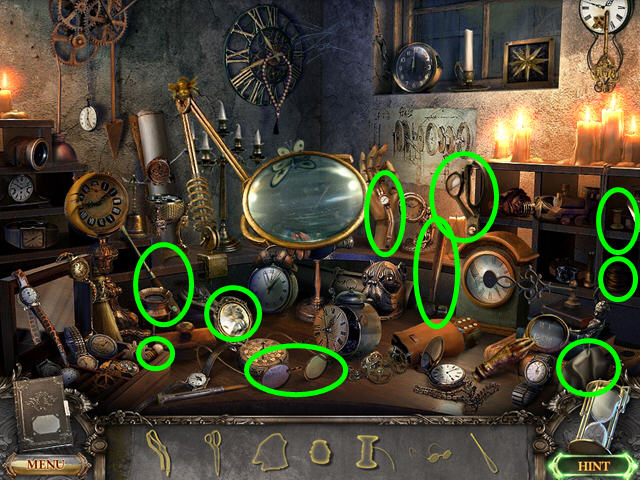
- Locate all the items by their silhouette.
- You will earn the SCREWDRIVER.
- Walk down 4 times to return to the area with the statue.
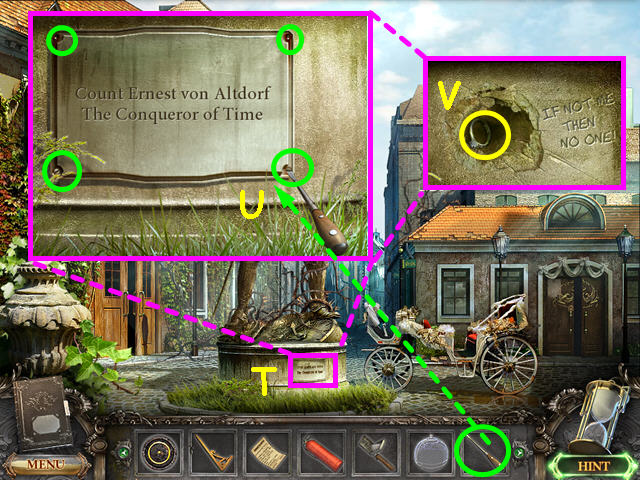
- Look at the close-up of the plaque (T).
- Use the SCREWDRIVER to remove the 4 screws (U).
- Take the WEDDING RING (V).
- Exit the close-up and walk forward twice to the town center.
- Enter the town hall then go left to enter the door behind the bas-relief.
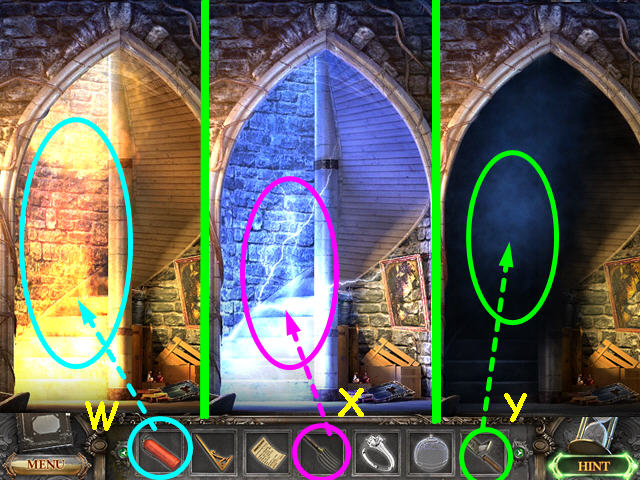
- Use the FIRE EXTINGUISHER on the fire (W).
- Try to walk up the stairs.
- Use the PITCHFORK on the lighting (X).
- Try again to walk up the stairs.
- Use the MAGNESIUM FLASH on the smoke (Y).
- Walk up the stairs.
Chapter 5: The Chronometron
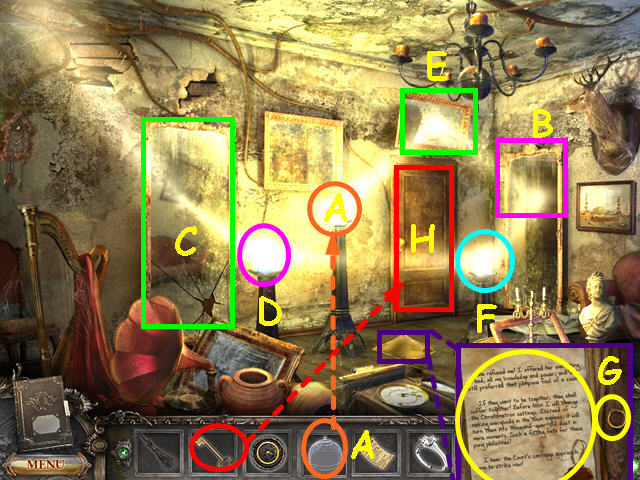
- Place the CRYSTAL BALL on the center pedestal (A).
- Remove the cloth from the right mirror (B).
- Click on the left mirror (C).
- Click twice on the left crystal (D).
- Click on the mirror over the door (E).
- Click on the right crystal twice (F).
- Take the GLOWING CRYSTAL BALL (A).
- Look at the document on the floor and take the WEDDING RING and MAGISTER'S CONFESSION (G).
- Use the BRONZE KEY on the door, then walk forward (H).
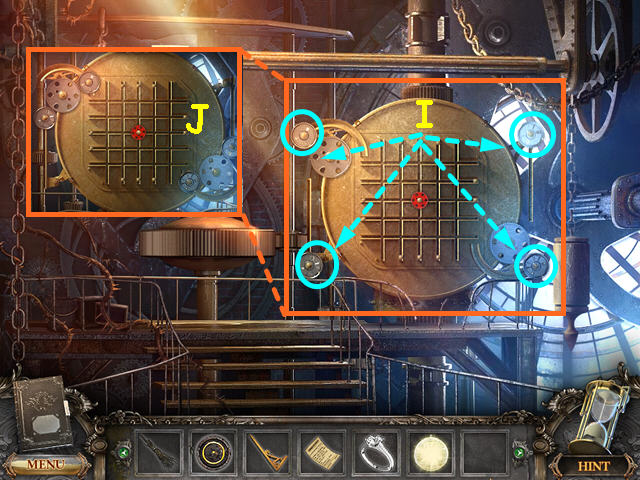
- Click on the 4 gears (I).
- Look at the close-up of the machine to learn you need more gears (J).
- Walk down twice.
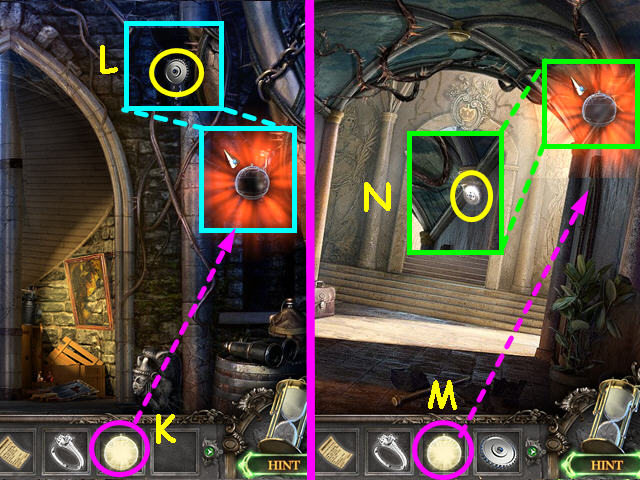
- Take the GLOWING CRYSTAL BALL and move it around the room until it glows orange (K).
- Click on that spot, then take the CHRONOMETRON GEAR #9 that appears (L).
- Walk down to exit the room.
- Take the GLOWING CRYSTAL BALL and move it around the room until it glows orange (M).
- Click on that spot, then take the CHRONOMETRON GEAR #6 that appears (N).
- Walk down to the town center.
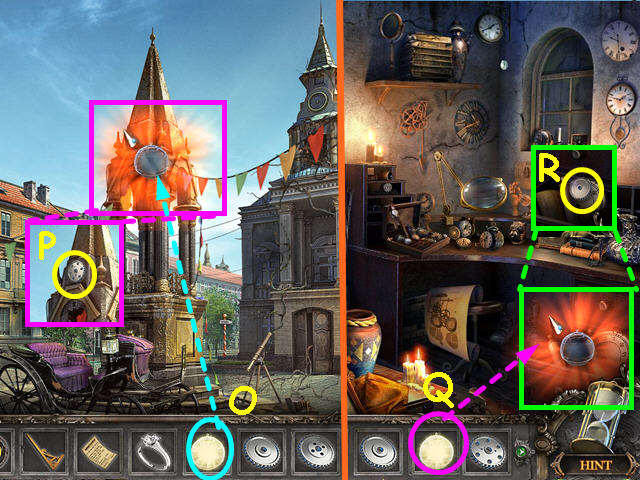
- Take the GLOWING CRYSTAL BALL and move it around the scene until it glows orange (O).
- Click on that spot, then take the CHRONOMETRON GEAR #4 that appears (P).
- Walk left through the gate and enter the clock makers shop on the left.
- Take the GLOWING CRYSTAL BALL and move it around the room until it glows orange (Q).
- Click on that spot, then take the CHRONOMETRON GEAR #8 that appears (R).
- Walk down 3 times to the alley.
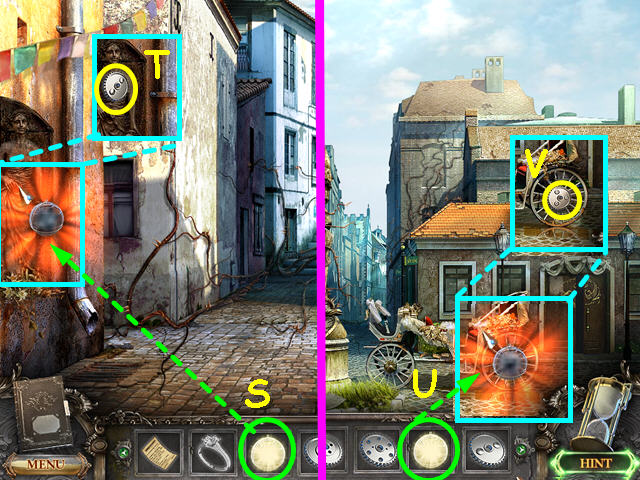
- Take the GLOWING CRYSTAL BALL and move it around the area until it glows orange (S).
- Click on that spot, then take the CHRONOMETRON GEAR #3 that appears (T).
- Walk down to the area with the statue.
- Take the GLOWING CRYSTAL BALL and move it around the area until it glows orange (U).
- Click on that spot, then take the CHRONOMETRON GEAR #2 that appears (V).
- Enter the post office.
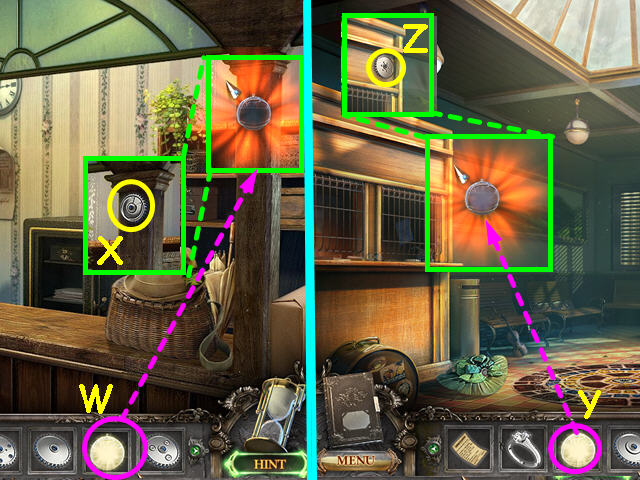
- Take the GLOWING CRYSTAL BALL and move it around the area until it glows orange (W).
- Click on that spot, then take the CHRONOMETRON GEAR #5 that appears (X).
- Walk down twice to the station.
- Take the GLOWING CRYSTAL BALL and move it around the area until it glows orange (Y).
- Click on that spot, then take the CHRONOMETRON GEAR #1 that appears (Z).
- Walk forward 4 times.
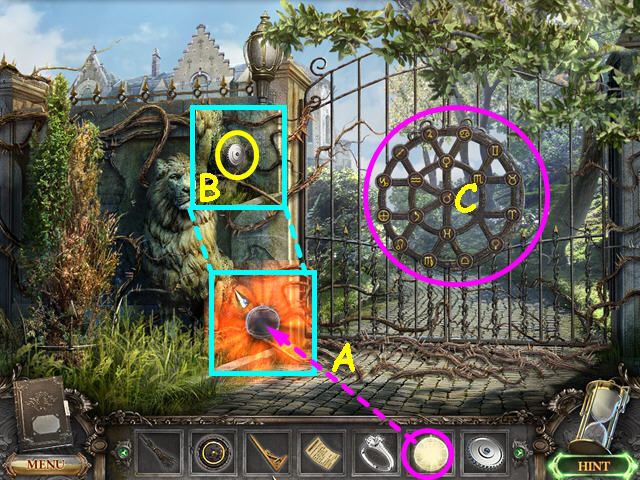
- Take the GLOWING CRYSTAL BALL and move it around the area until it glows orange (A).
- Click on that spot, then take the CHRONOMETRON GEAR #7 that appears (B).
- Select the wheel on the gate for a mini-game (C).
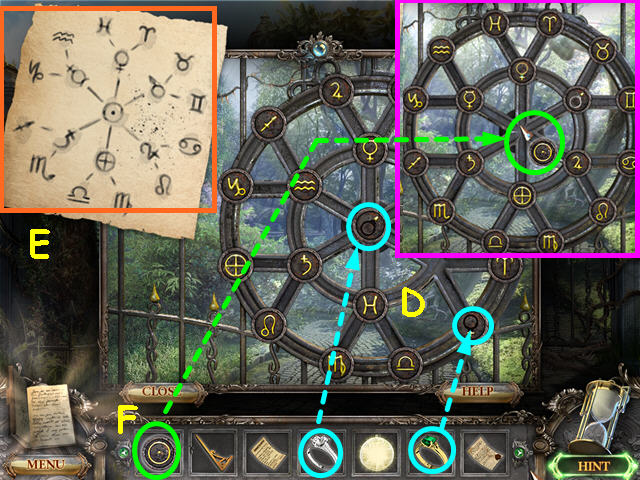
- Place the 2 WEDDING RINGS into the symbols that are incomplete (D).
- Click on a disc to move it to an adjacent empty spot.
- You can turn both the outer and inner wheels.
- Move all the discs to match the mosaic in the station (E).
- Place the IRON DISC in the center (F).
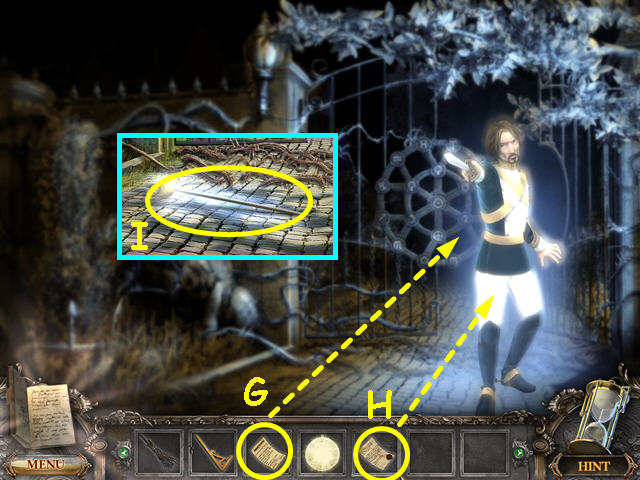
- Give the Count the IMPORTANT TELEGRAM (G).
- Give the count the MAGISTER'S CONFESSION (H).
- Take the GHOSTLY SWORD the Count leaves for you (I).
- Walk forward through the gate.
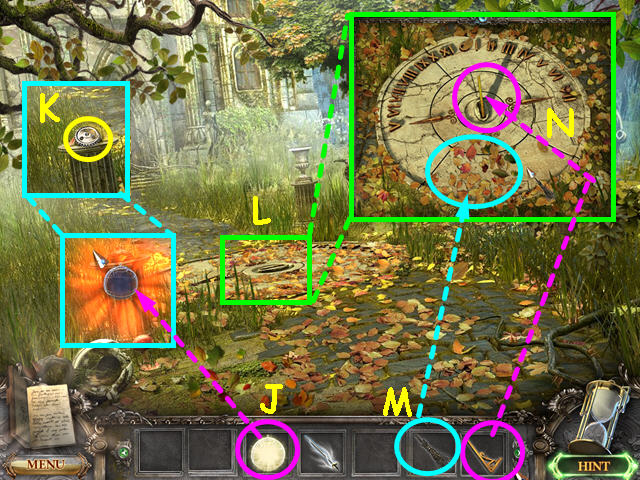
- Take the GLOWING CRYSTAL BALL and move it around the area until it glows orange (J).
- Click on that spot, then take the CHRONOMETRON GEAR #10 that appears (K).
- Look at the close-up of the sundial (L).
- Use the BROOM 5 times to remove all the leaves (M).
- Place the GNOMON in the center to learn the time is 3:00 (N).
- Walk down twice to the town center and enter the town hall.
- Walk left through the bas-relief door, then go up the stairs and through the door.
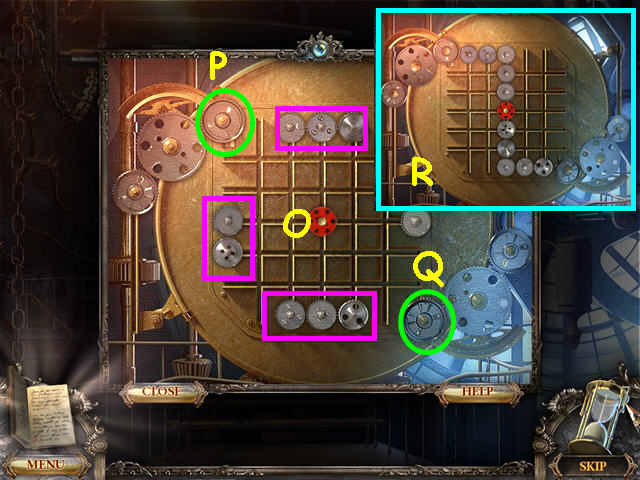
- Look at the machine and place the 10 CHRONOMETRON GEARS on the outer pegs (O).
- The object of this mini-game is to connect all the gears so that the upper left gear (P) and the lower right gear (Q) rotate.
- Click on the gears to push them in a direction- gears will only stop if there is another gear blocking the way, or at the end of the row or column.
- The final solution is shown here (R).
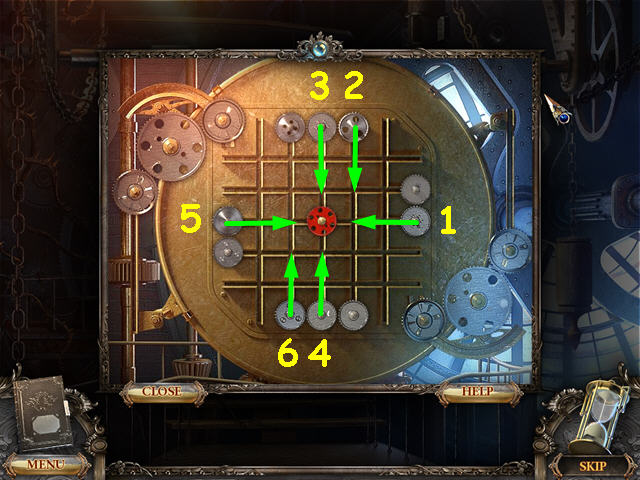
- Move the gears in the indicated direction in numerical order.
- Moves 1-6 are shown here.
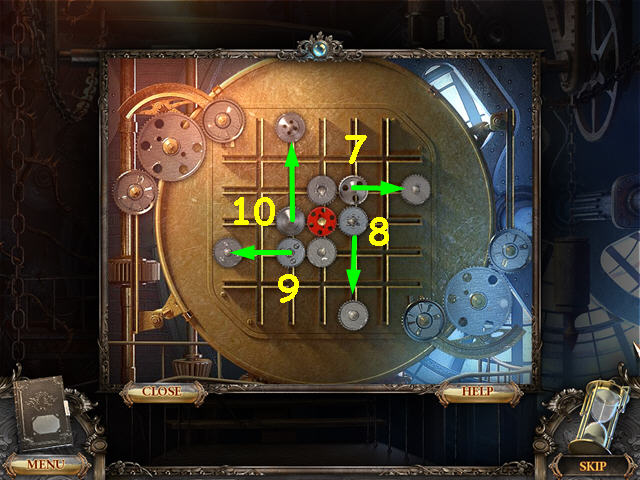
- Move the gears in the indicated direction in numerical order.
- Moves 7-10 are shown here.
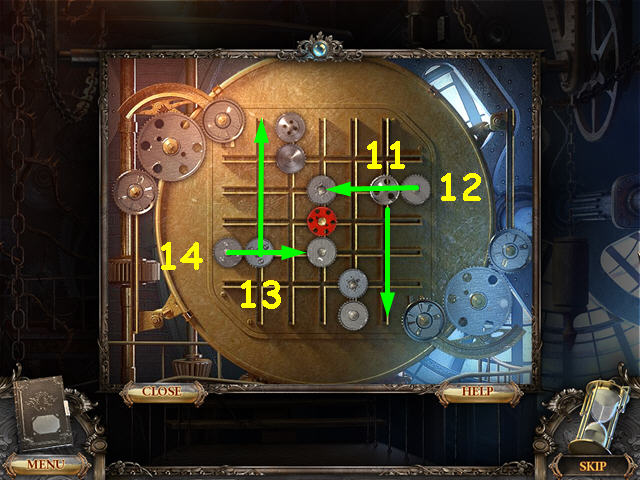
- Move the gears in the indicated direction in numerical order.
- Moves 11-14 are shown here.
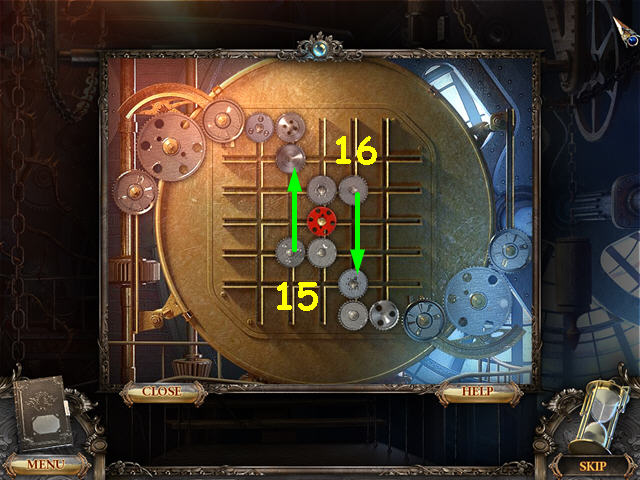
- Move the gears in the indicated direction in numerical order.
- Moves 15-16 are shown here.
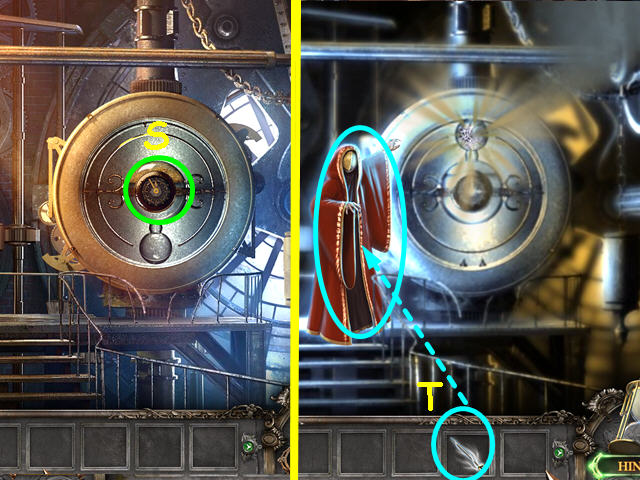
- Look at the close-up of the chronometron and click on the clock in the center (S).
- Use the GHOSTLY SWORD on the ghost (T).
- Walk down 3 times to find the Count.
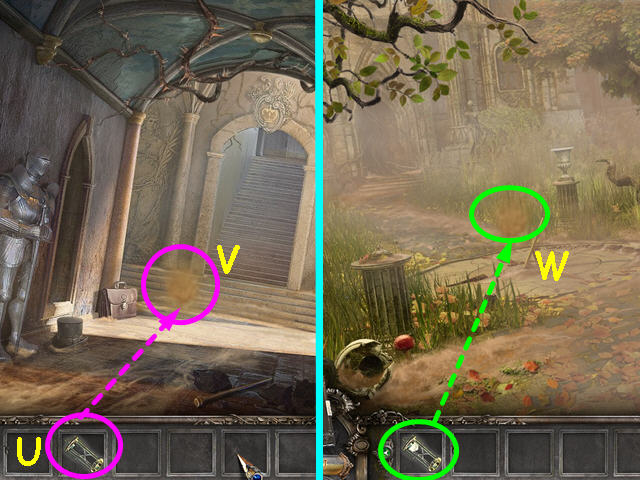
- The Count will give you the EMPTY HOURGLASS (U).
- Use the EMPTY HOURGLASS to catch the magic sand (V).
- Walk down to the town center, then walk up twice.
- Use the ONE-QUARTER FULL HOURGLASS to catch the magic sand (W).
- Walk down twice, then go left through the gate.
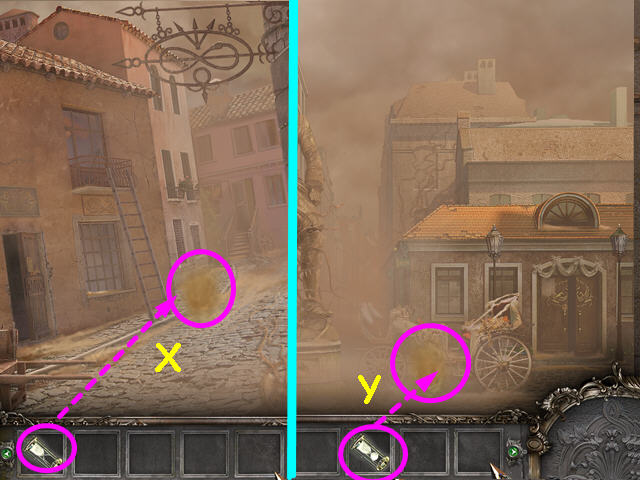
- Use the HALF FULL HOURGLASS to catch the magic sand (X).
- Walk down 3 times to the area with the statue.
- Use the THREE-QUARTERS FULL HOURGLASS to catch the magic sand (Y).
- You will now have the FULL HOURGLASS.
- Walk forward twice and enter the town hall.
- Walk left through the bas-relief door, then go up the stairs and through the door.
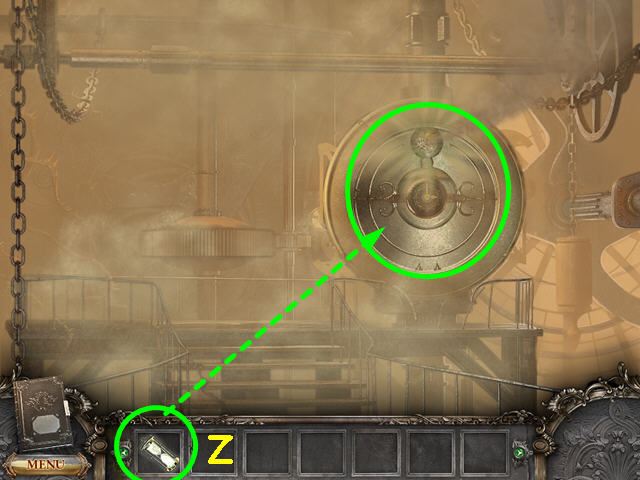
- Use the FULL HOURGLASS on the chronometron (Z).
- Congratulations! You have completed Timeless: The Forgotten Town Standard Edition!
Created at: 2011-08-07

