Walkthrough Menu
- General Tips
- Chapter 1 – Trip
- Chapter 2 – Tornado
- Chapter 3 – The Cave
- Chapter 4 – The Escape
- Chapter 5 – The Mine
- Chapter 6 – Save Amy
General Tips
- This is an Interactive Hidden Object Adventure Game.
- Click on the Options button to adjust the Music, Sound and Background Volume, Brightness, Custom Cursor and cursor speed and Full Screen options.
- There is a skip button on the puzzles.
- You have a choice between easy and hard. The difference is the rate that the help and skip buttons recharge.
- There is no penalty for random clicking.
- The gear icon indicates you can use an inventory item there.
- When you need to go to another area to complete your tasks, you will get a pulsing arrow and compass pointing in that direction.
- Items you need to collect or areas you need to look at closer will get a periodic sparkle.
- Click on the question mark in the middle of the task bar to get a hint.
- Click on Menu on bottom of the task bar to exit the game.
Chapter 1- Trip
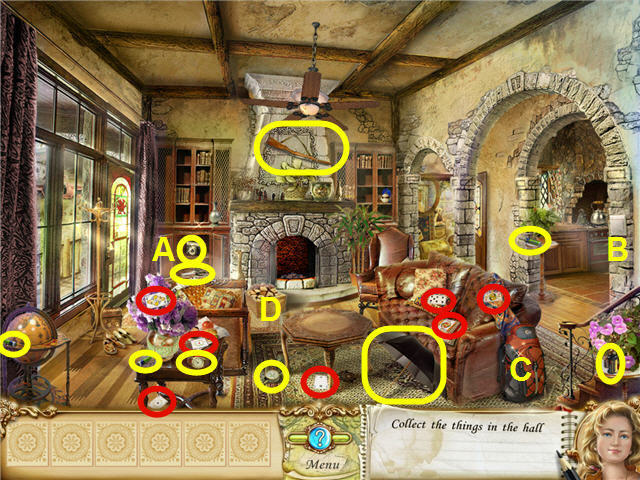
- Open on the lower cabinet (A) to the left of the fireplace.
- Click on the CAMERA.
- Click the switch on the wall (B).
- Click on the BACKPACK (C).
- Click on the fireplace and then click on the crate (D) to get WOOD.
- Place the WOOD in the fire.
- Click on the crate.
- Collect all the items requested, the cards are circled in red in the screenshot.
- Go upstairs.
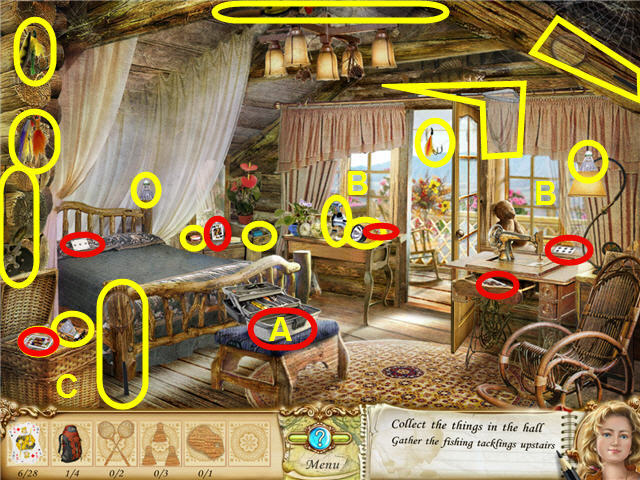
- Click on the tackle box (A).
- Open the curtains (B).
- Open the 2 drawers on the dresser and the one on the sewing machine cabinet.
- Open the wicker basket (C).
- Collect the items requested; the cards are in red.
- Take the CARD from the stool after you get the completed tackle box.
- Go back downstairs and place the BADMINTON RACKETS, SHUTTLECOCKS and FLASHLIGHT in the crate.
- Head through the doorway directly to the right of the fireplace in the rear of the room.
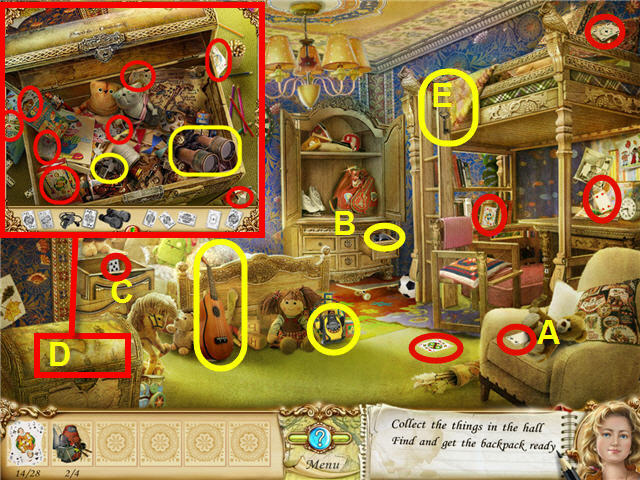
- Click on the teddy bear (A), the armoire top and bottom (B), the bag in the armoire, the drawer (C) and the train on the floor.
- Find the items requested.
- Open the chest (D) with the KEY (E).
- Click on the opened chest and find the items on the bottom of the close-up.
- Place the WHISTLE and the BINOCULARS in the bag in the armoire.
- Go downstairs and place the DECK OF CARDS in the crate.
- Head out the door and talk to Tom.
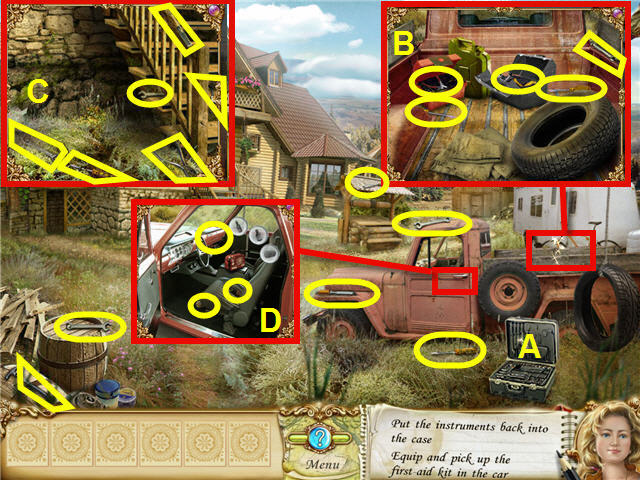
- Click on the tool case (A).
- Click on the truck bed (B) and open the red and black tool chests and take the tools.
- Click under the stairs (C) and take the tools.
- Collect the remainder of the tools.
- Place the PLIERS, CHISELS, WRENCHES, SCREWDRIVERS and DRILLS in the tool case (A).
- Take the KEYS from under the tool case and open the truck.
- Click on the open door of the truck (D).
- Click on the first aid kit and open the glove box.
- Find the items for the first aid kit.
- Talk to Tom and exhaust all conversation.
Chapter 2 - Tornado
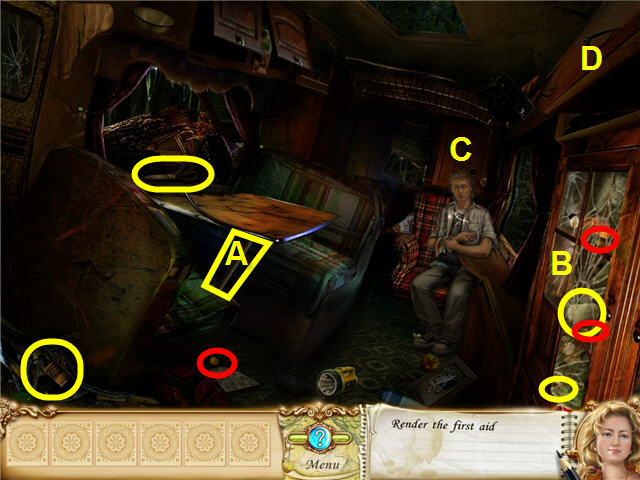
- Click on Tom.
- Take the CROWBAR (A) and use it on the glass (B) multiple times till all the glass panes are gone.
- Collect all of the first aid items.
- Click on the FLASHLIGHT and find the batteries, they are in red in the screenshot.
- Open the cupboard (C) and take the HATCHET.
- Open the cupboard (D) and take the SCREWDRIVER and the MACHETE that falls to the floor.
- Use the CROWBAR on the door to the left and exit.
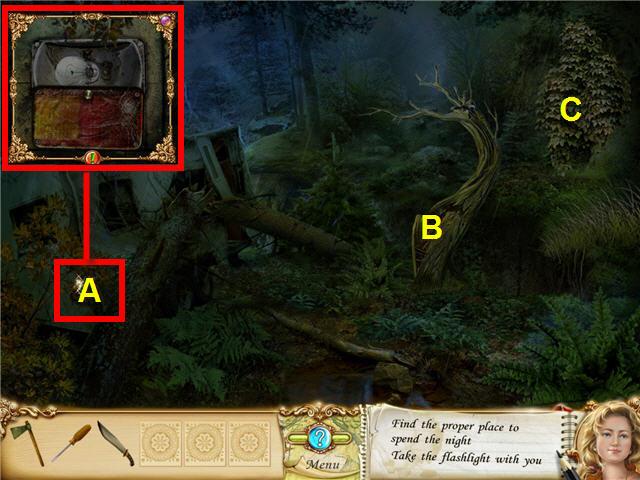
- Click on the tail light of the trailer (A).
- Use the SCREWDRIVER on the screws and take the LIGHTBULB.
- Go back into the camper and place the LIGHTBULB in the FLASHLIGHT.
- Head outside the trailer.
- Use the HATCHET on the chipped tree (B) two times till it falls over.
- Use the MACHETE on the weeds (C) 3 times or until weeds are cleared.
- Enter the cave.
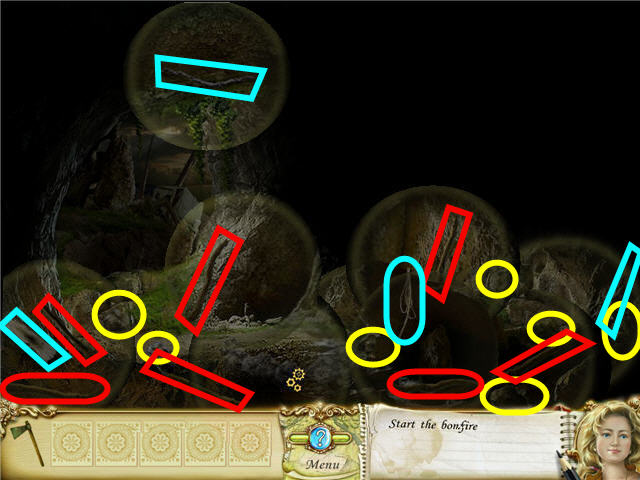
- Collect the STONES circled in yellow in the screenshot and place them on the stone ring around the fire pit.
- Collect the STICKS circled in red in the screenshot and place them on the fire pit.
- Click on the fire pit and locate the items circled in blue on the screenshot.
- After the fire is built, go to the trailer and speak to Tom.
- Talk to Tom in the cave.
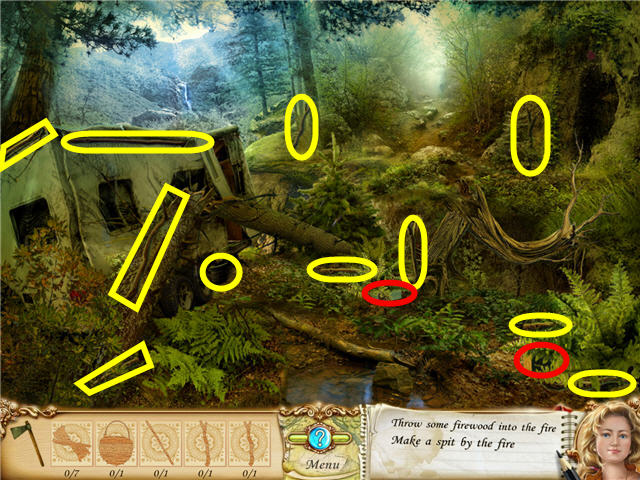
- Head out of the cave and collect the items listed on the task bar and circled in yellow on the screenshot.
- Go into the cave and place the items on the fire.
- Collect the new list of items from the fire.
- Find 2 of the items listed in the woods.
- Head into the trailer.
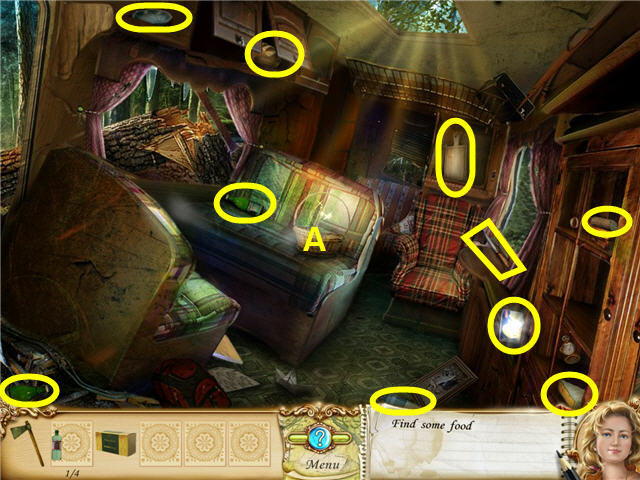
- Click on the basket (A) and collect the food items.
- Collect the rest of the items from the task bar.
- Go to the cave and place the items on the fire.
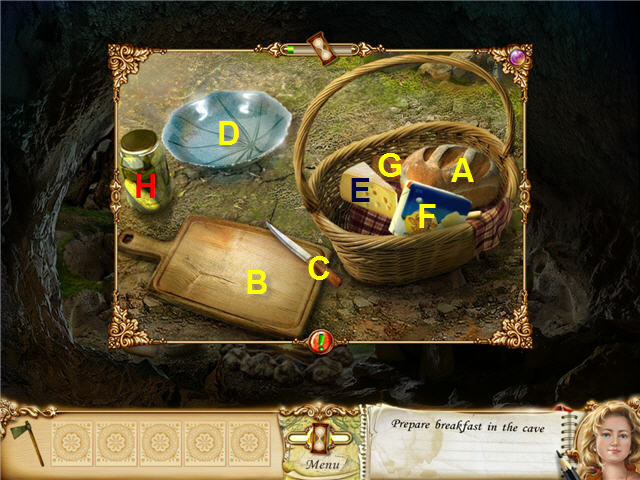
- Click on the basket.
- Place the BREAD (A) on the CUTTING BOARD (B) and use the KNIFE (C).
- Pick up the sliced bread and place on the plate (D).
- Place the CHEESE (E) on the CUTTING BOARD and use the KNIFE.
- Pick up the sliced cheese and place on the bread.
- Place the CHEESE (F) on the CUTTING BOARD and use the KNIFE.
- Pick up the sliced cheese and place on the bread.
- Place the SALAMI (G) on the CUTTING BOARD and use the KNIFE.
- Pick up the sliced salami and place on the bread.
- Take the can opener from the bottom of the basket and use on the pickle jar (H).
- Place the pickle from the basket on the cutting board and use the knife.
- Pick up the sliced pickles and place on the bread.
- Talk to Tom.
- Go straight up the new path on the top of the screen.
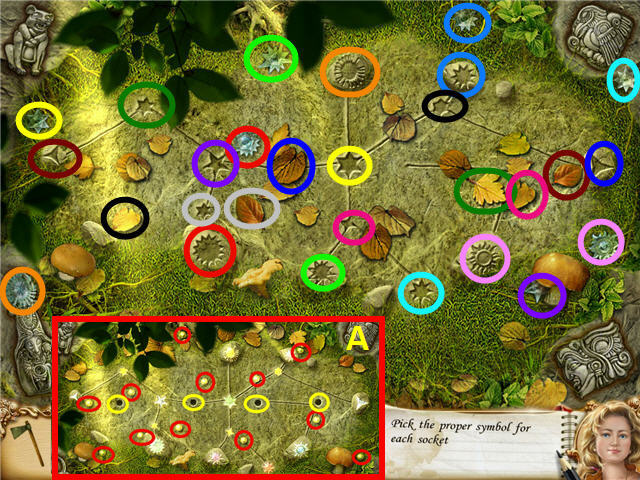
- Click on the statues.
- Place the symbols in their matching socket.
- Click on the leaves to find some underneath. See screenshot for solution.
- When completed, place 3 gold balls in each of the 4 holes.
- Click on the cave entrance.
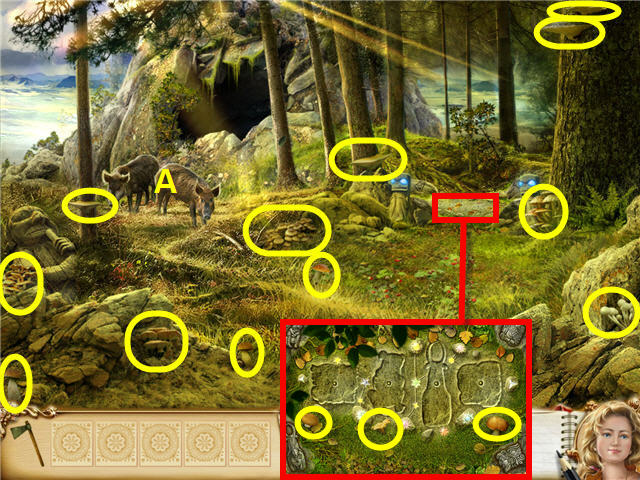
- Click on the boars.
- Find all the MUSHROOMS and feed them to the boars.
- The MUSHROOM from the statue area will go into your inventory and you will feed them from there and the others will need to be fed straight to the boars.
- Head into the cave and speak to Tom.
Chapter 3 – The Cave
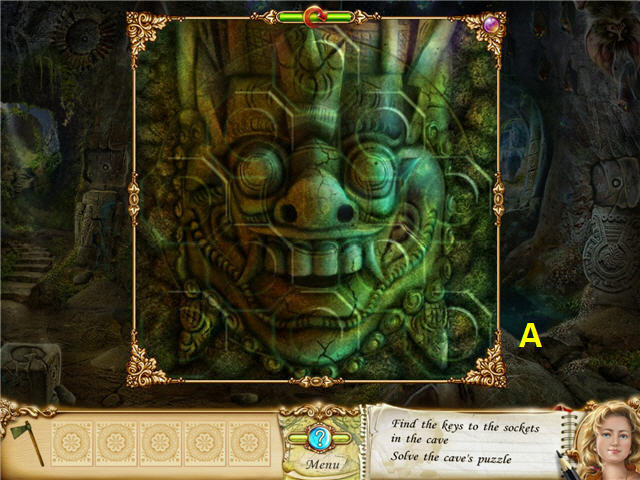
- The goal is to complete the picture by turning the tiles.
- It is easiest to start in the middle and set the nose first and then complete the picture around it. See screenshot (A) for solution.
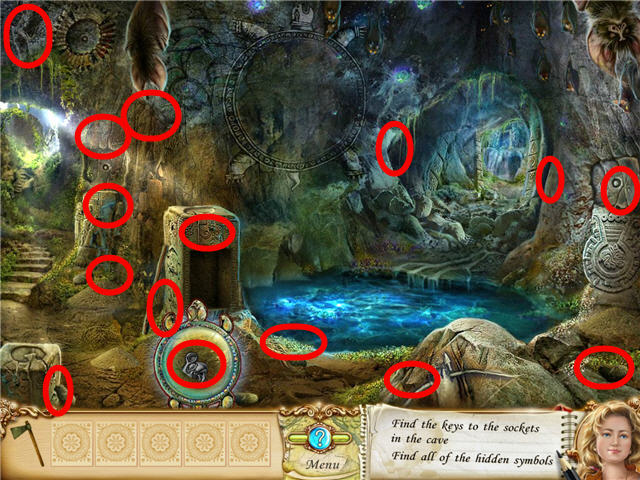
- Speak to Tom.
- Click on the turtle shaped MEDALLION in the opened vault.
- Move the MEDALLION around the screen to find 15 of the hidden SYMBOLS.
- Click on each SYMBOL as you find them. Be sure the SYMBOL is centered in order to collect it.
- Head outside the cave.
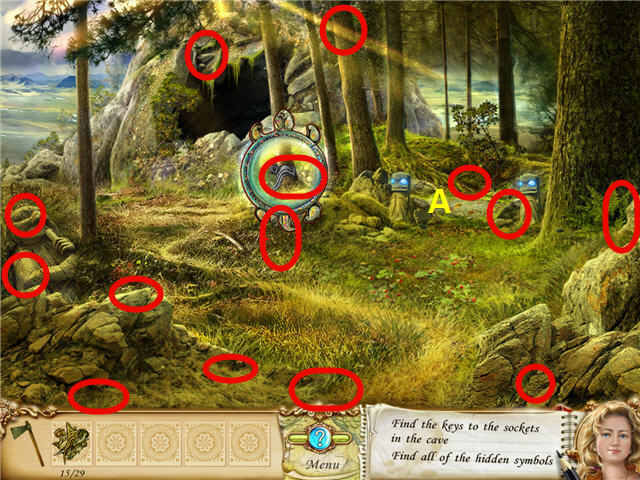
- Find the remaining symbols with the MEDALLION.
- Click on the statue area (A) when complete.
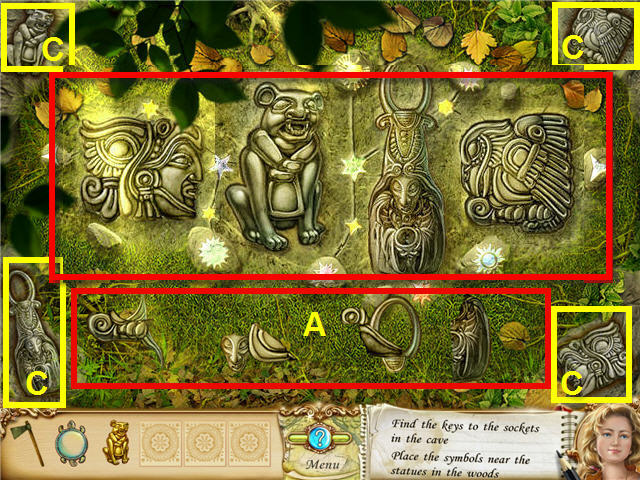
- Place the SYMBOLS (A) into their correct spot in the sockets (B).
- Use the completed pictures of the KEYS (C) as your guide.
- Head into the cave.
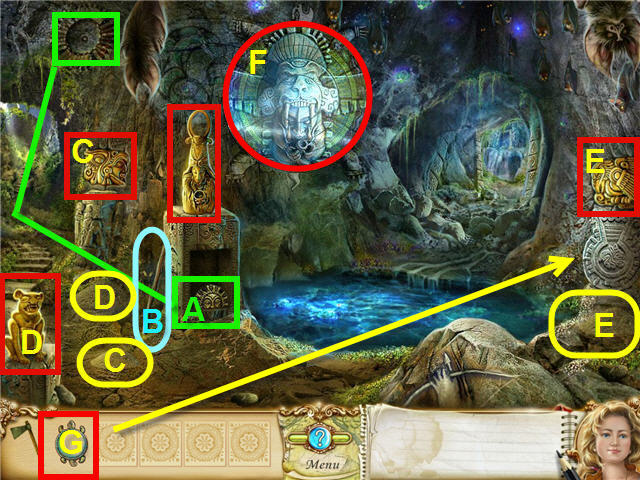
- Place the KEYS into their correct spot.
- Take the SUN KEY (A) and place it on the matching spot on the upper left.
- Use the STICK (B) on the mounds (C), (D) and (E).
- Pick up the crystals and place them in the eye socket of the corresponding KEYS. See screenshot for solution.
- Rotate the rings (F) to complete the picture. See screenshot for solution.
- Place the MEDALLION (G) on the newly opened turtle socket.
- Walk through to the newly opened passage.
- Speak to Tom.
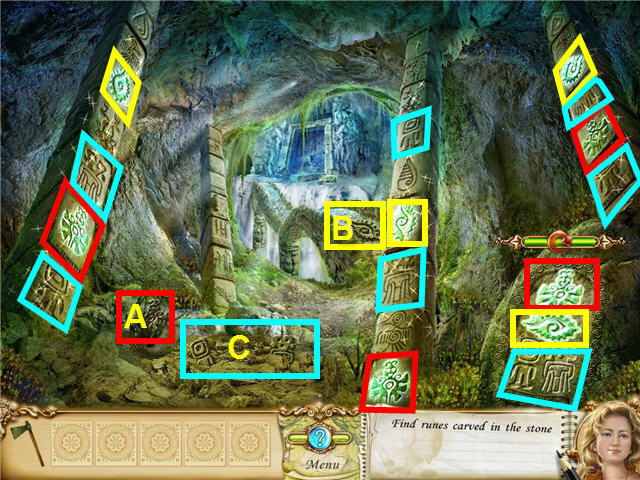
- Take the RUNE (A) and place it on the matching slot in the stone on the right.
- Click on the matching runes on the pillars.
- Take the RUNE (B) and place it on the matching slot in the stone on the right.
- Click on the matching runes on the pillars.
- Take the 2 RUNES (C) and place them on the matching slot in the stone on the right.
- Click on the matching runes on the pillars.
- Walk across the bridge and talk to Tom.
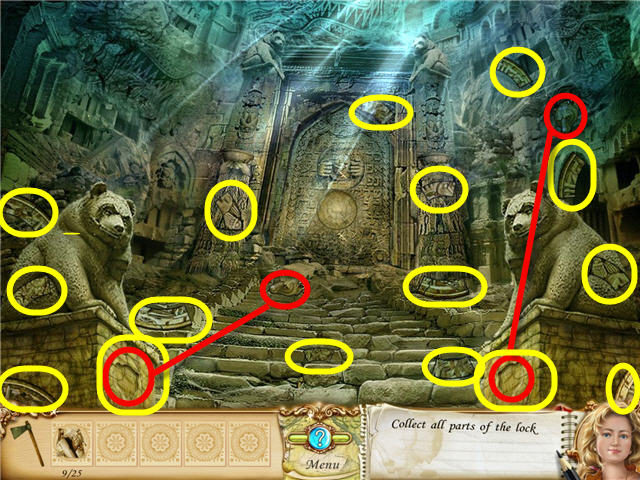
- Collect the DOOR LOCK PARTS.
- Place the BEAR HEADS on the bear sockets under the sculptures and take the DOOR LOCK PARTS from both of them.
- Go down into the next room.
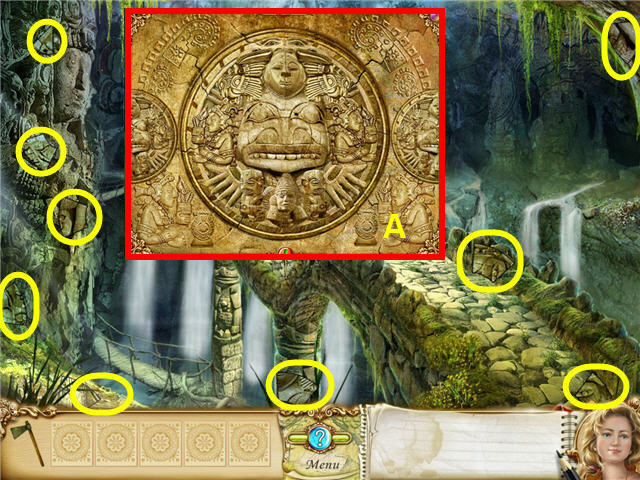
- Collect the DOOR LOCK PARTS.
- Go over the bridges and place the DOOR LOCK PARTS on the door.
- Arrange the pieces to complete the picture (A).
- Go through the doorway.
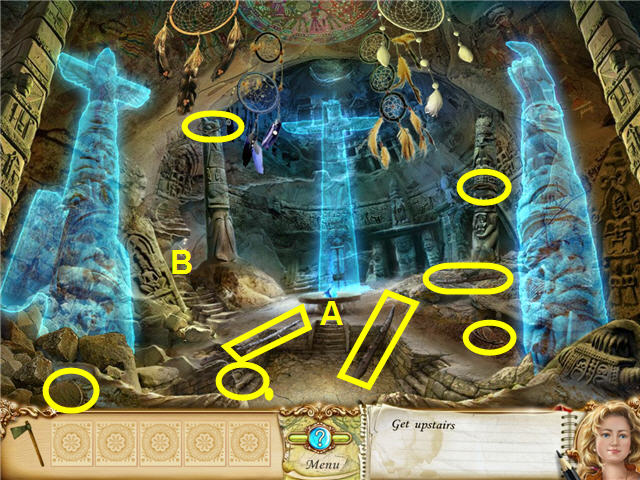
- Place the BLUE CRYSTAL on the table (A) in the middle of the room.
- Click on the broken stairway on the left (B).
- Collect the pieces to fix the stairway.
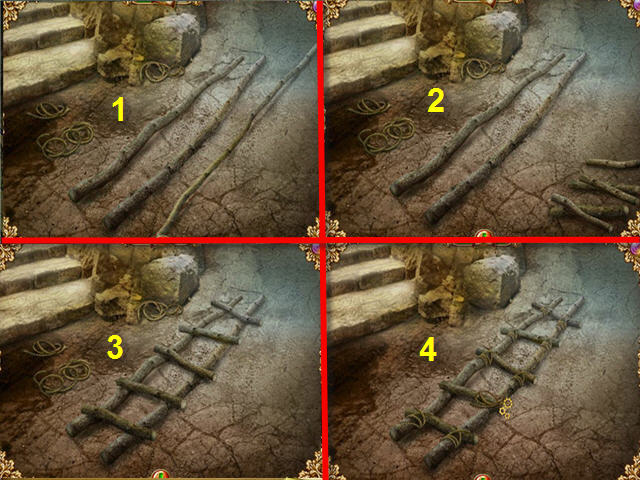
- Lay the STICKS out on the floor (1).
- Use the HATCHET on the far right STICK (2).
- Lay the cut STICKS on the right on top of the two STICKS on the left (3).
- Place a ROPE on each ladder rung (4).
Chapter 4 –The Escape
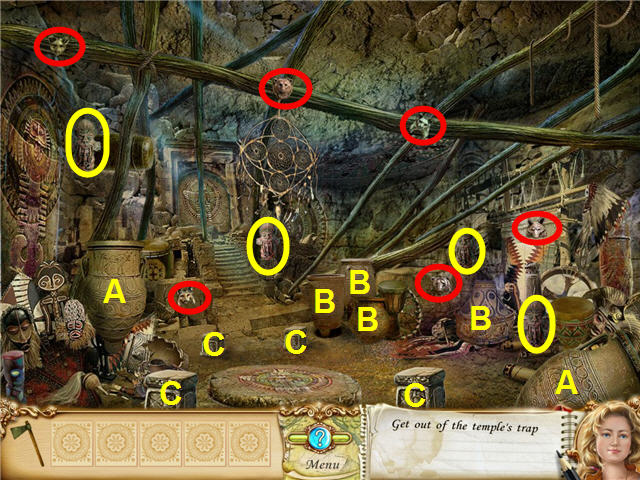
- Speak to Tom.
- Use the HATCHET on the clay pots (A) and (B).
- Take the BLUE CRYSTALS from the two broken clay pots (A).
- Place the 4 TOTEM DOLLS on the stands (C).
- Place the BLUE CRYSTALS in the eye sockets of the center table.
- Click on the table and find the ANIMAL HEADS.
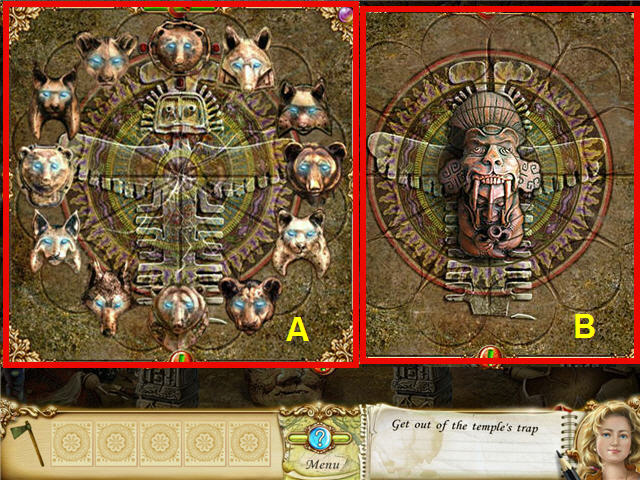
- Arrange the animal heads so that they are matched with the same species across from each other (A).
- Turn the rings to complete the totem. See screenshot (B) for solution.
- Exit the room through the newly opened doorway on the left.
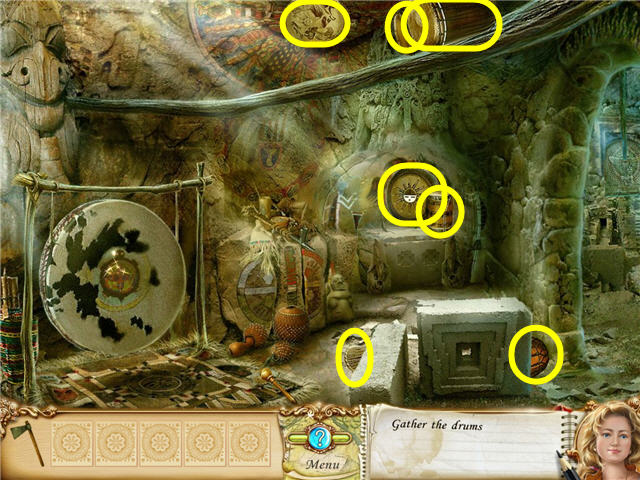
- Speak to the spirit of Sacred Lao.
- Click on the large drum and collect the DRUMS.
- Head to the room on the right to collect the remainder of the DRUMS.
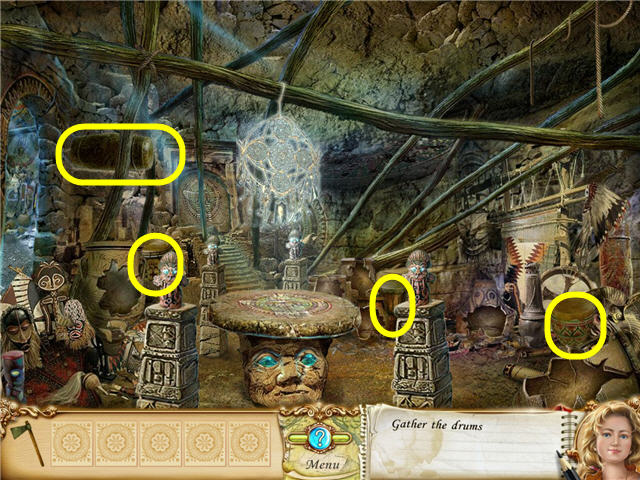
- Collect the 4 DRUMS.
- Go back to the room on the left and place the DRUMS on the large drum.
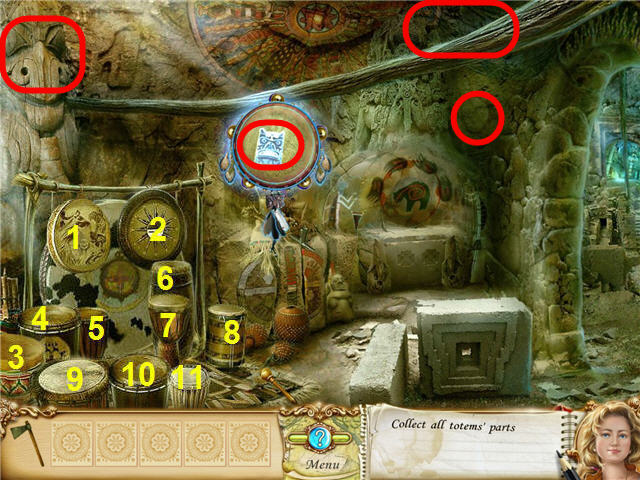
- Speak to the spirit.
- Repeat the melody that the spirit plays on the drums.
- Using the numbering of the drums in the screenshot my solutions were; 8-6-10, 7-4-1-6, 10-8-3-11-2, and 3-5-10-9-8-7. Yours may be different.
- Use the TIMBREL to help you find some of the TOTEM PIECES; the areas to locate them are marked in red on the screenshot.
- Head to the room to the right.
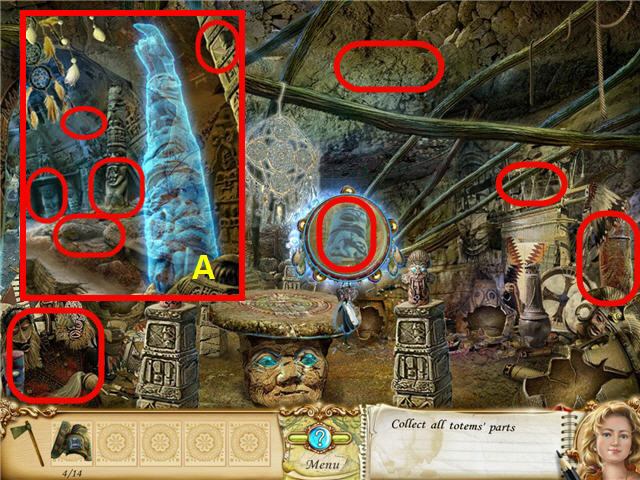
- Use the TIMBREL to help you find more of the TOTEM PIECES.
- The areas the TOTEM PIECES are hidden are marked in red on the screenshot.
- Go through the doorway in the back of the room and collect the remainder of the TOTEM PIECES (A).
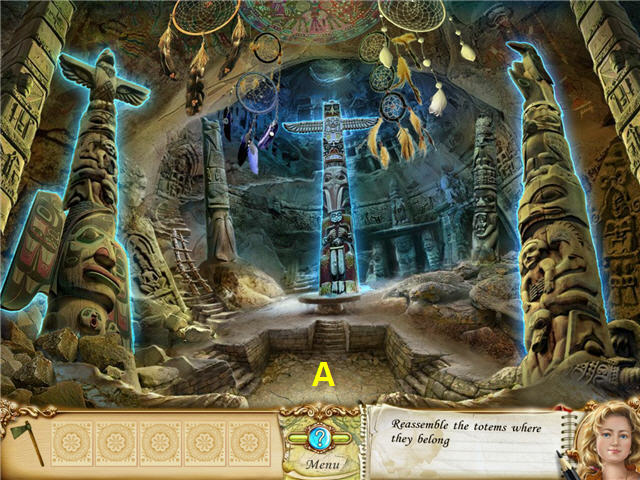
- Place the TOTEM PIECES on the middle front of the floor (A) and rebuild the totems by picking the pieces off the floor and placing on the blue shimmering outlines. See screenshot for solution.
Chapter 5 – The Mine
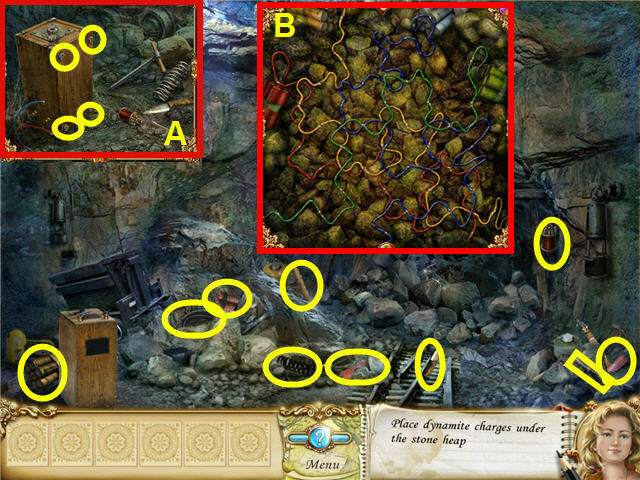
- Crawl down the hole in the floor.
- Collect the DYNAMITE.
- Click on the detonator (A) and collect the parts.
- Use the SCREWDRIVER on the 4 screws.
- Place the PLUNGER on the top.
- Place the SPRING and the COIL TRANSFORMER inside the detonator.
- Use the KNIFE on the end of the RED AND BLUE WIRES.
- Click on the clipped RED AND BLUE WIRES to automatically connect them.
- Place the 4 SCREWS in the holes and use the SCREWDRIVER on them.
- Connect the wires (B) so the red, blue, yellow and green are all connected with their own color from beginning to end.
- Push the detonator.
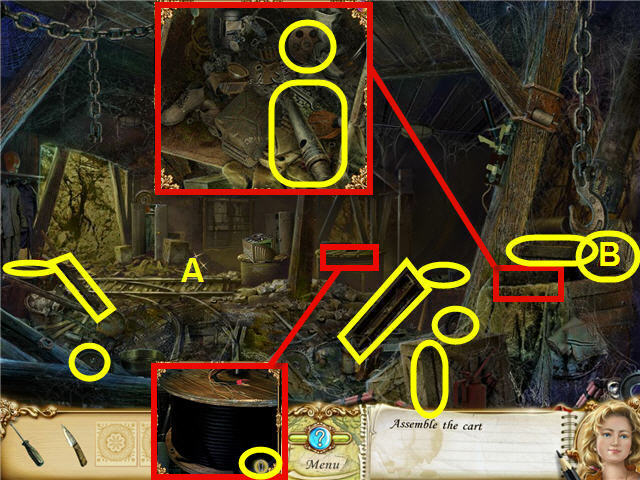
- Head down the mine shaft two times and talk to Tom.
- Head back to the room to the right.
- Speak to Tom.
- Click on the track (A) to the left of the control module and find the items requested.
- Click on the area (B) and take the WHEEL from behind.
- After the cart is completed, take the CROWBAR and use it on the control module (B).
- Head to the room on the left.
- Speak to Tom.
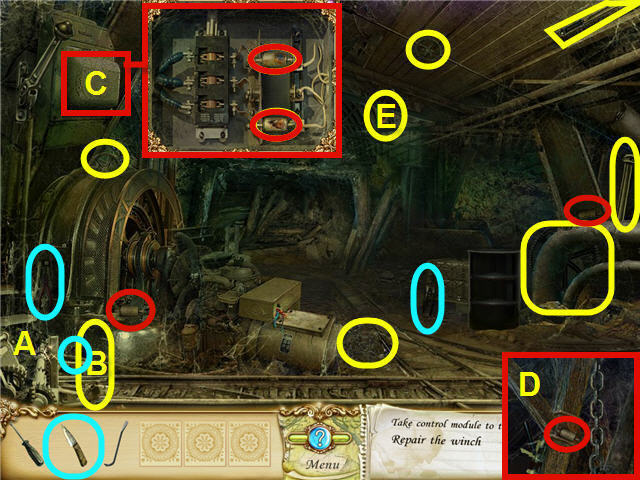
- Click on the winch (A) and find the items.
- Find the HOOK (E).
- Head to the room on the right and connect the HOOK to the chain on the track.
- If the chain is not on the track you have not found all the pieces to the winch yet.
- Connect the chain to the cart.
- Go back to the winch and pull the lever (B) 3 times.
- Use the CROWBAR on the control module.
- Use the SCREWDRIVER on the control panel (C).
- Take out the SAFETY LOCKS and replace them with 3 new SAFETY LOCKS.
- Two of the SAFETY LOCKS are in the room with the generator and the other is in the other room on the beam on the upper right (D).
- Place the SAFETY LOCKS in the control panel.
- Click on the control module and find the items.
- Be sure you have the PLIERS before you go to the room on the right.
- From the room on the right, take the GASOLINE from the box under the large hook and use the PLIERS to cut a PIECE OF WIRE from the top of the large coil.
- Go back to the room with the generator and place the GASOLINE, the KNIFE and PIECE OF WIRE on the generator.
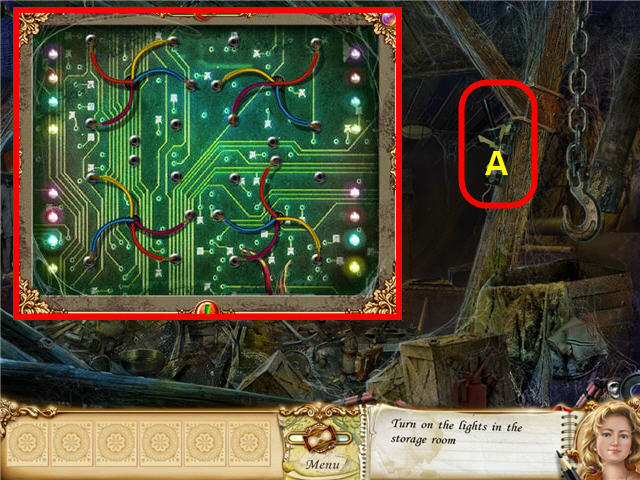
- Click on the wires and arrange them to light up all the lights. See screenshot for the solution.
- Head to the room on the right and pull the lever (A).
- Go straight into the newly opened section in the rear of the room.
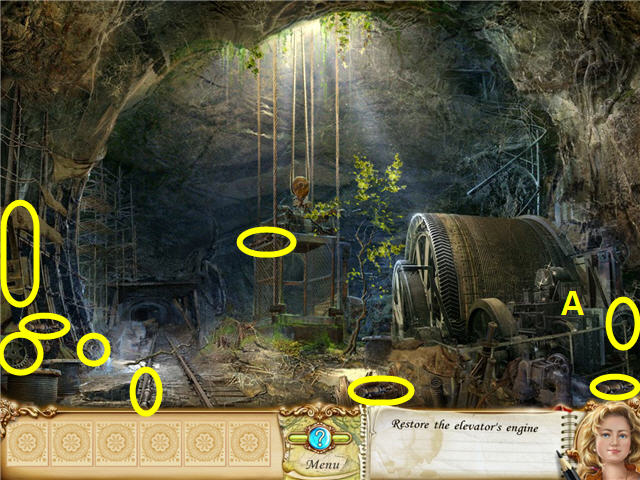
- Click on the elevator machinery (A).
- Find part of the items needed.
- Head through the tunnel up on the top of the screen.
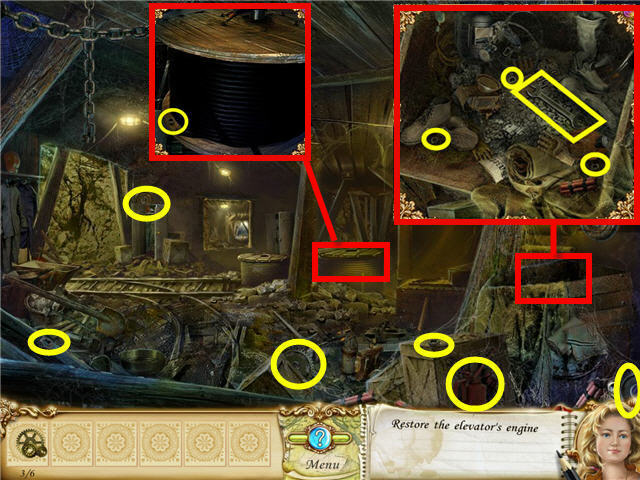
- Find the remainder of the items for the elevator machinery.
- Place the items on the elevator machinery.
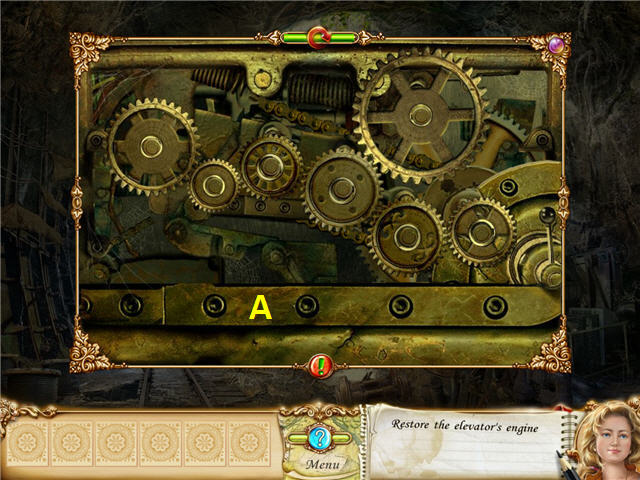
- Place the pegs from the bottom corners on the holes so you can place the gears.
- Arrange the GEARS so that they all turn. See screenshot (A) for solution.
Chapter 6 – Save Amy
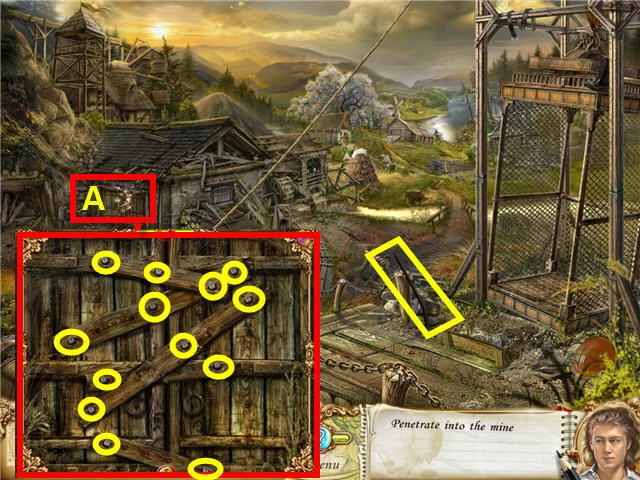
- Pick up the CROWBAR.
- Click on the door to the mine (A).
- Use the CROWBAR on each nail.
- Click on the now opened door.
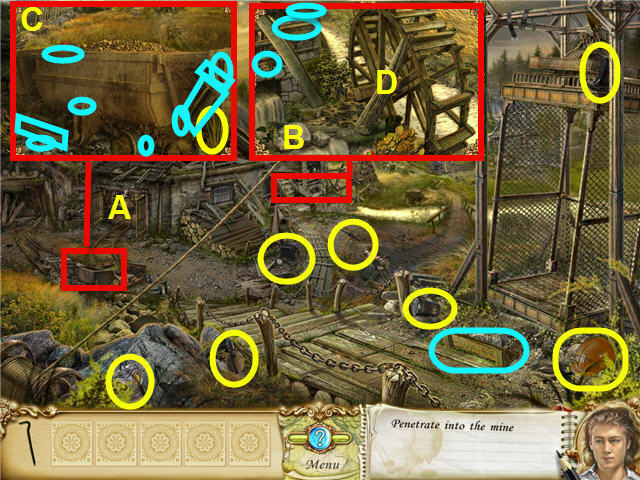
- Find all the items needed to get into the mine.
- Click on the mine entrance (A) and go back to the outside.
- Click on the water wheel (B) in the back of the mine.
- Clear the debris and leaves away from the stuck stick and water wheel.
- Back out of the area and click on the coal car (C).
- Take the AXE circled in yellow on the screenshot.
- Use the AXE two times on the stuck stick (D).
- Click on the rear of the water wheel and collect the items needed, they are circled in blue on the screenshot.
- Use the CROWBAR on the stuck BOARD in the mine cart and take the NAIL from underneath.
- Place all the items on the water wheel.
- Head back into the mine entrance.
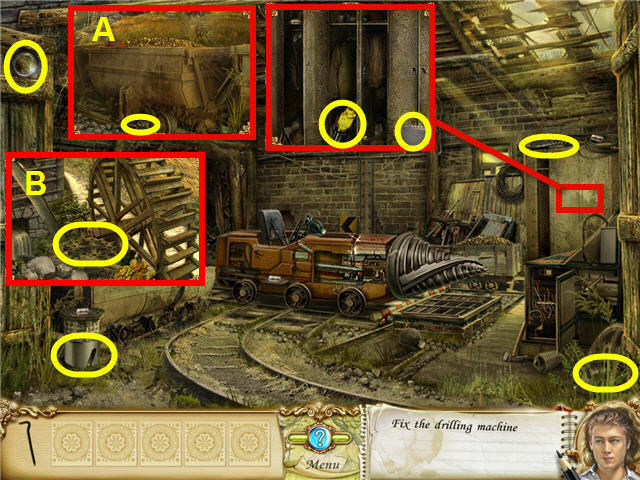
- Click on the drilling machine and find the items needed.
- Head out to the coal car (A) and take the part under the car.
- Click on the water wheel (B) and take the GEAR.
- Place all the pieces on the drilling machine.
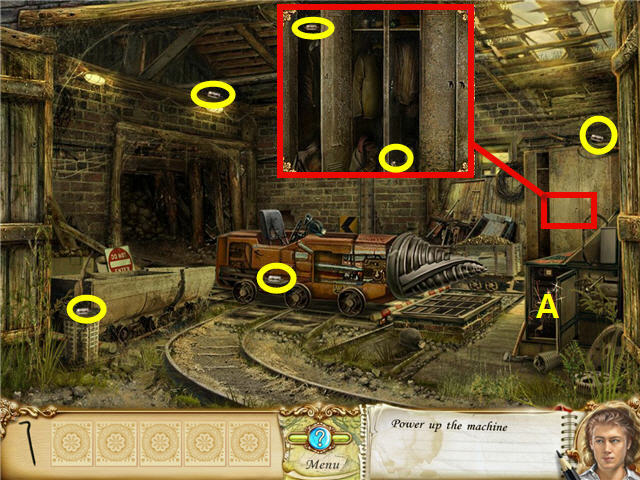
- Click on the power supply (A) and find the items needed.
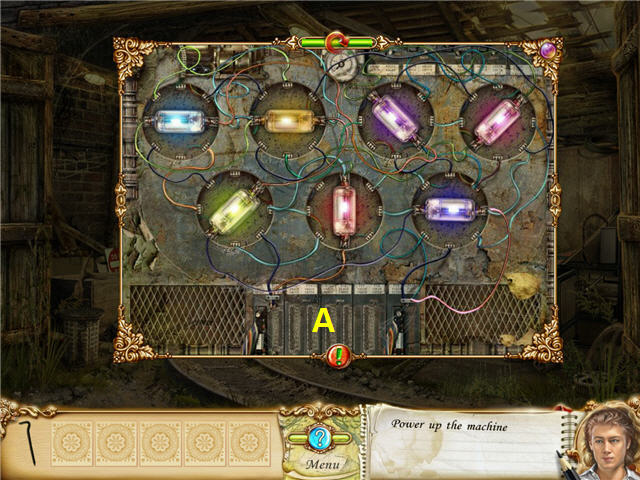
- The goal is to connect two of the bottom fuses to the main circuits on the bottom and conduct a continuous current that goes through all the fuses. See screenshot (A) for solution.
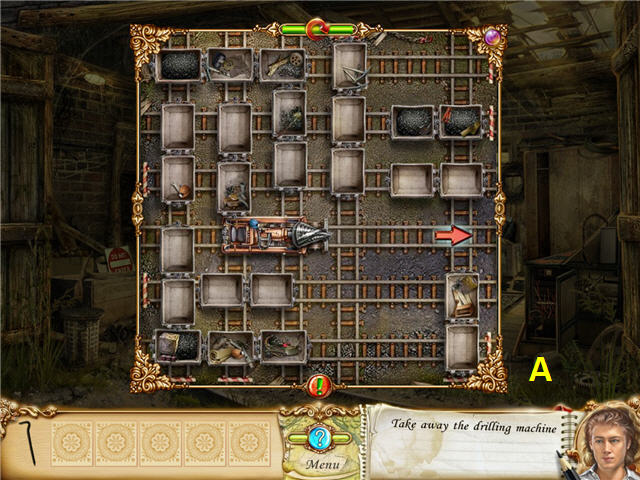
- The goal is to get a clear path for the drilling machine to get out. See screenshot (A) for solution.
- Use the CROWBAR on the grate and go down the passage.
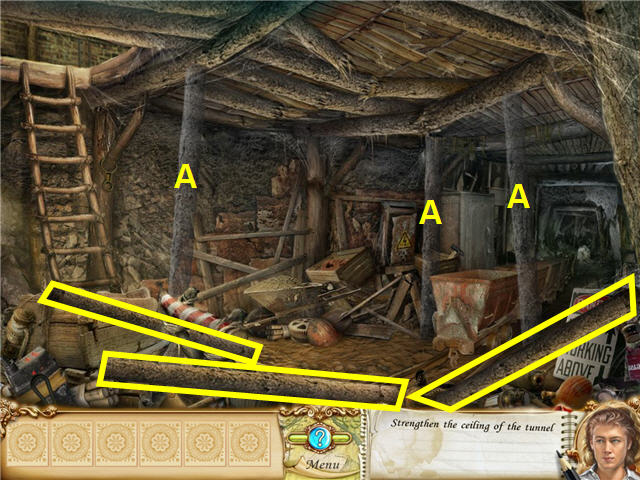
- Pick up the SUPPORT BEAMS and place them on the outlines of the support beams (A).
- Speak to Amy.
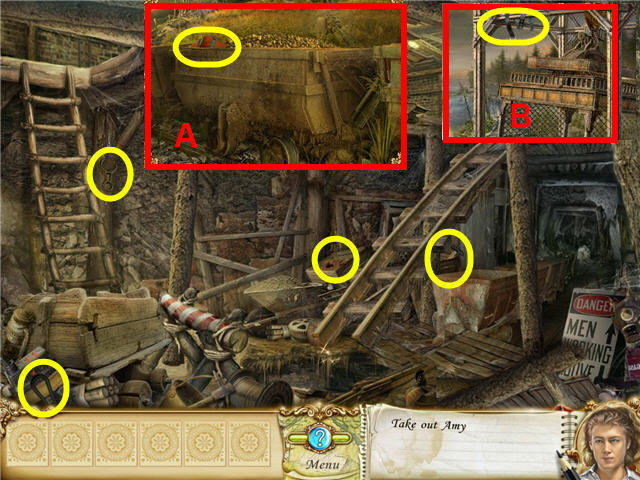
- Click on the hole in the floor and collect the available items.
- Head outside and take the BELT from the top of the elevator shaft (B).
- Take the SLING from the coal car (A).
- Go back inside and place BELT and SLING on the hole.
- Watch the cutscene.
- Congratulations you have just completed Tornado: The Secret of the Magic Cave.
Created at: 2010-09-03

