

Walkthrough Menu
- General Tips and Information
- Level 1: Crash Site
- Level 2: Mountain Base
- Level 3: Cave
- Level 4: Another Side of the Bridge
- Level 5: Fountain Hall
- Level 6: Laboratory
- Level 7: Hangar
- Level 8: Cabin
- Level 9: Landing Area
- Level 10: Pier
- Level 11: Entrance to the Museum
- Level 12: Museum
- Level 13: Meanwhile at the Laboratory...
- Level 14: Meanwhile at the Museum...
- Level 15: Pier
- Level 16: Motorboat
- Level 17: Sea Bottom
- Level 18: Cargo Hold
- Level 19: Meanwhile at the Laboratory...
- Level 20: Shore
- Level 21: Mount Olympus Base
- Level 22: Entrance to the Cave
- Level 23: Olympus
- Level 24: Ancient Mechanism
- Level 25: Lava Lake
- Level 26: Forge Entrance
- Level 27: Hephaestus' Forge
General Tips and Information
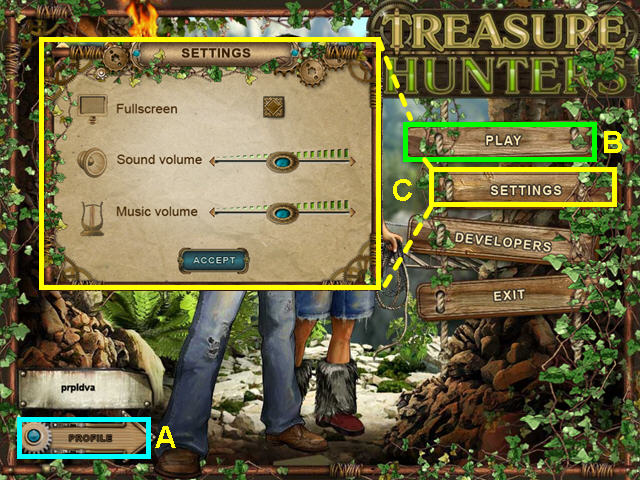
- Click on the profile panel on the main screen to add or delete player profiles (A).
- Select “Play” to begin or continue your game (B).
- You may play this game in full screen or windowed mode by changing the options in the Settings menu (C).
- You may adjust the volume of sounds and music in the Settings menu.
- The Settings menu is accessible from both the main screen and the in-game menu.
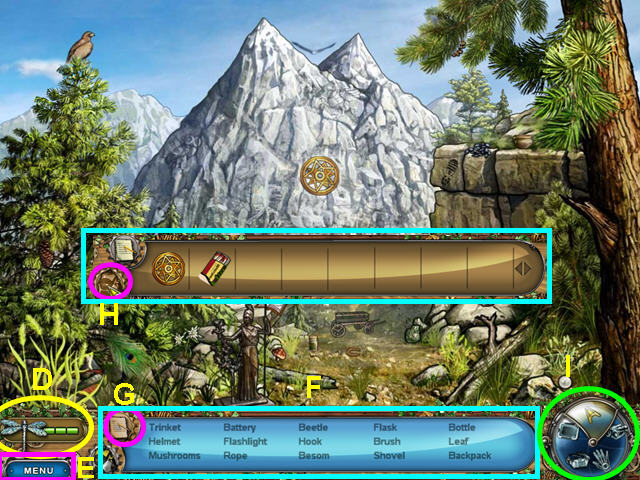
- Hints are unlimited, but you must wait for the dragonfly to re-fill (D).
- Click the menu button to access the settings menu (E).
- Your inventory/hidden object list is at the bottom center (F).
- Click the list button to see the hidden object list (G).
- Click the inventory button to switch to inventory (H).
- Your tools are in the lower right (I).
- Click on a tool to use it in a scene.
- There is a brief tutorial at the start of the game.
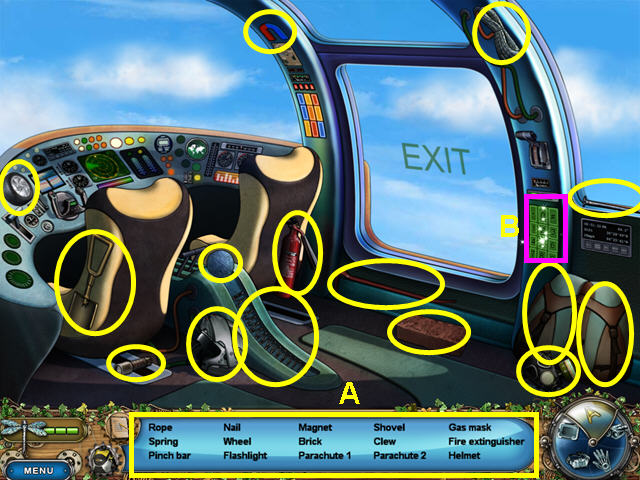
Level 1: Crash Site
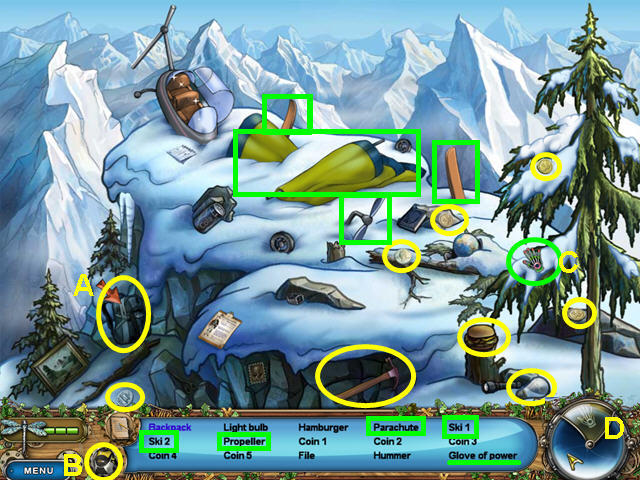
- Per the tutorial, collect the backpack (A).
- This will create your inventory (B).
- Collect the GLOVE OF POWER (C).
- The glove of power will become a tool to use to lift heavy items (D).
- Collect the PROPELLOR, PARACHUTE, and 2 SKIS using the glove of power (green).
- Collect the remaining items on the list.
- Make sure you are using the Glove of Power (E).
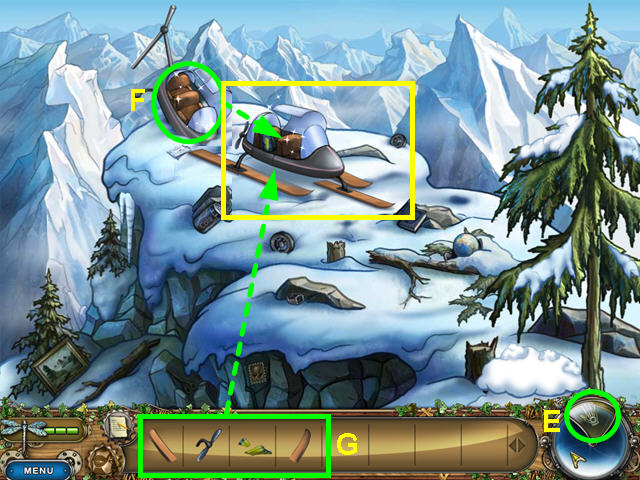
- Move the body of the plane to the clear area (F).
- Place the inventory items on the plane (G).
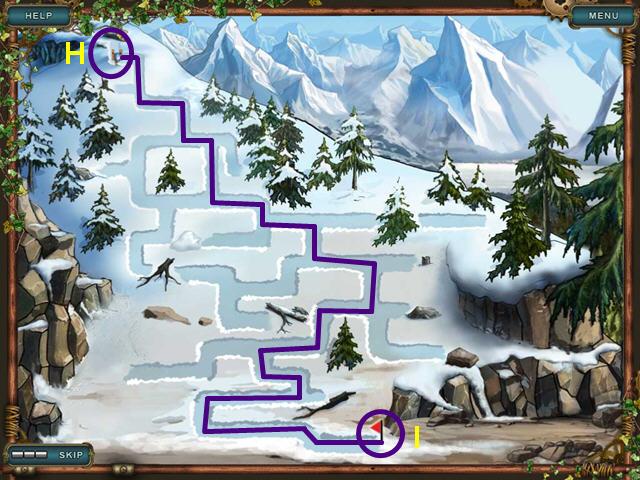
- The object of this mini-game is to move the sled through the maze.
- Start at the top and use your mouse to click and move (H).
- Finish the mini-game bu reaching the end of the maze (I).
Level 2: Mountain Base
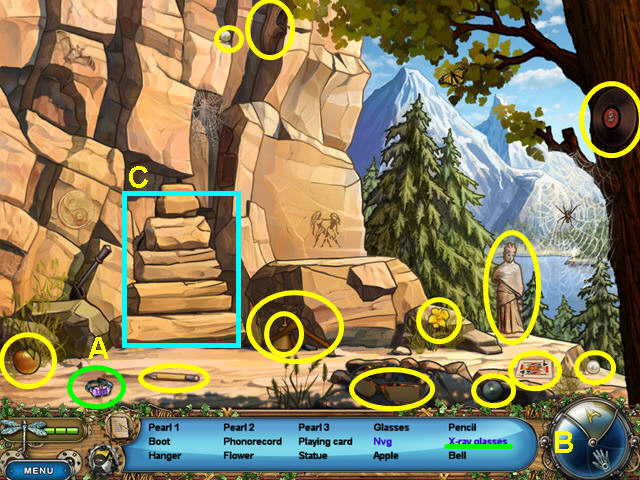
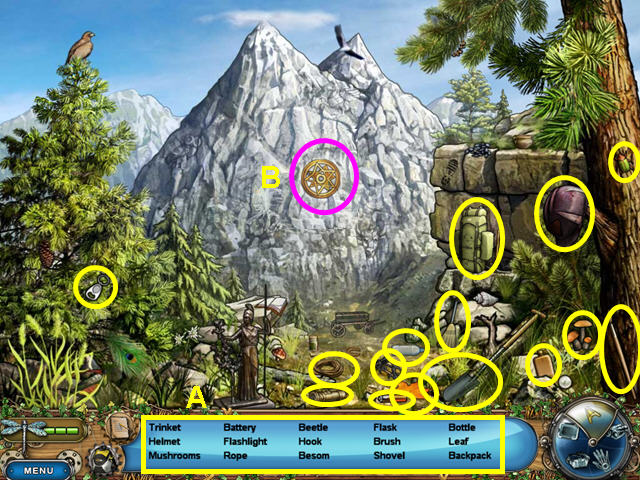
- Collect the X-RAY GLASSES (A).
- Select the x-ray glasses from your tools (B).
- Note the area behind the pile of rocks (C).
- Change back to the primary cursor in your tools.
- Collect all the items except the NVG.
- Select the pile of rocks for a mini-game.
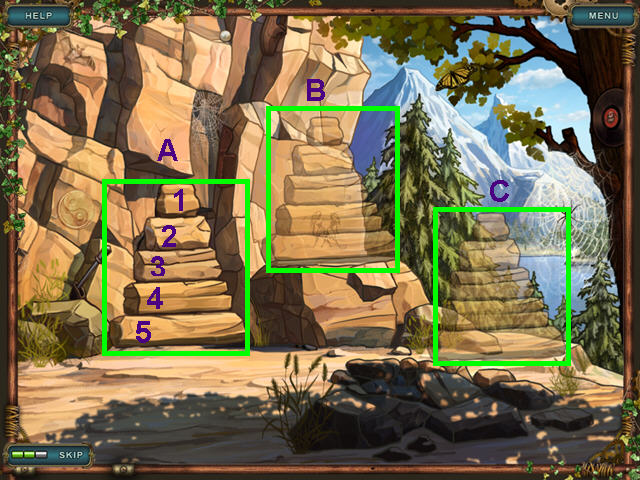
- The object is to move the rocks away from the cave entrance.
- You may only put a smaller rock on top of another.
- Numbering the rocks 1-5, from smallest to largest, and the pile areas A-C, make the following moves: 1-B, 2-C, 1-C, 3-B, 1-A, 2-B, 1-B, 4-C, 1-C, 2-A, 1-A, 3-C, 1-B, 2-C, 1-C, 5-B.
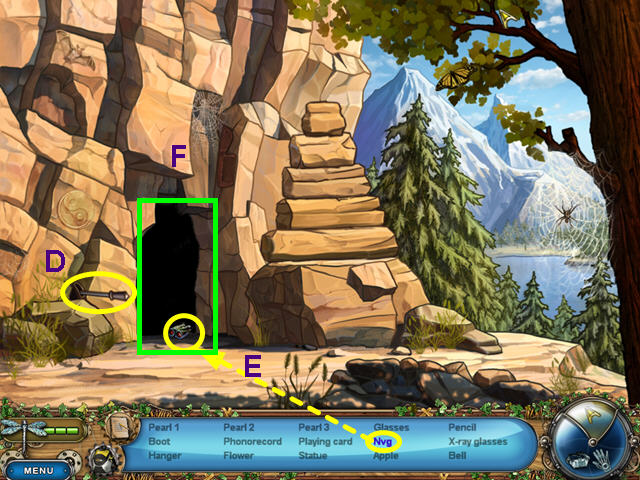
- Pull the lever (D).
- Take the NVG- night vision goggles (E).
- The goggles will be added to your tools.
- Enter the cave (F).
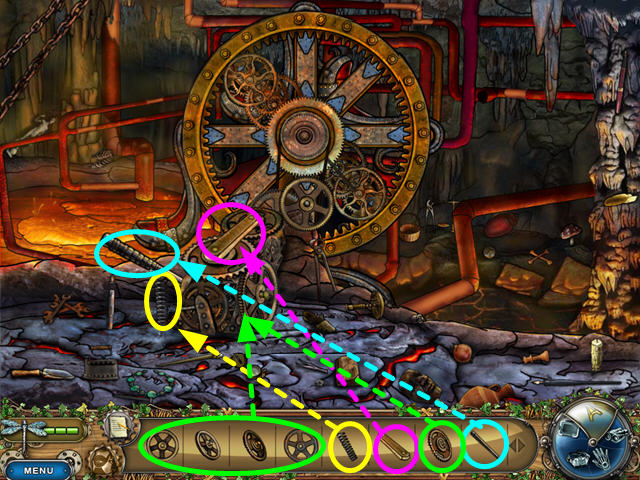
Level 3: Cave
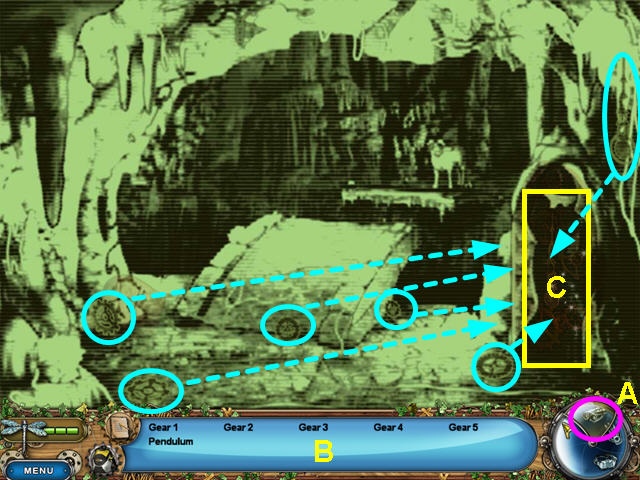
- Select your NVG from the tools (A).
- Locate all the items on the list (B).
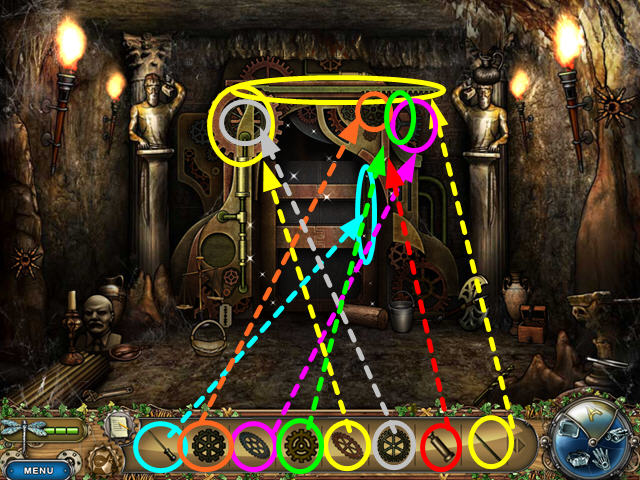
- Place the 5 GEARS and the PENDULUM into the mechanism (C).
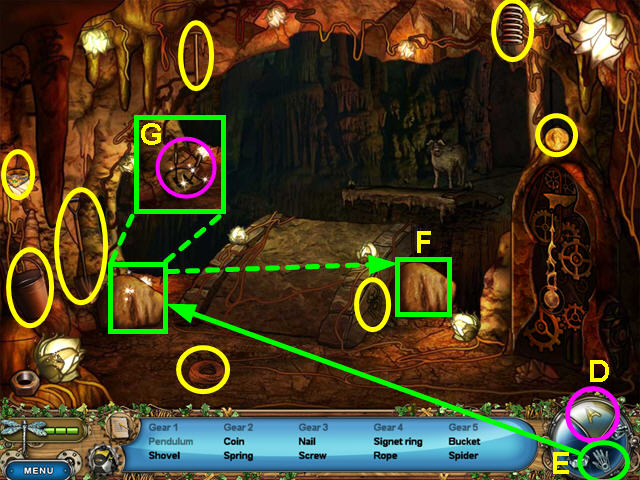
- Select the regular cursor from your tools (D).
- Collect all the items on the list.
- Select the glove of power from your tools (E).
- Move the rock to the spot by the bridge (F).
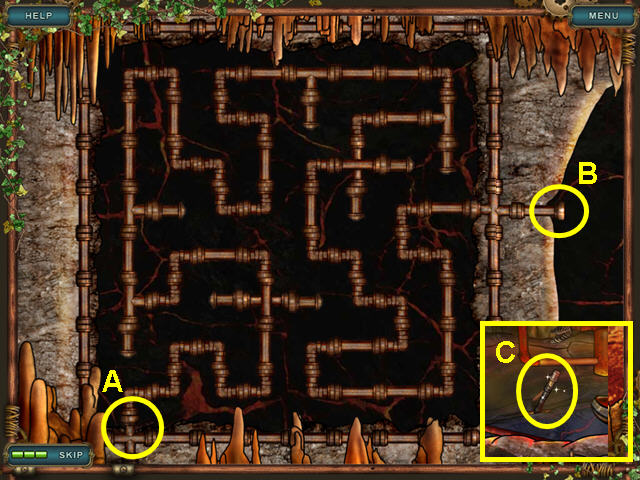
- Select the levers that were behind the rock for a mini-game (G).
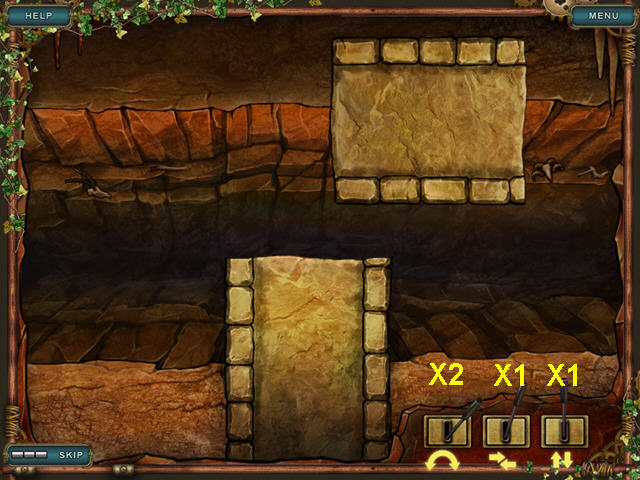
- Use the levers to move the bridge into place.
- Use the first lever twice, and the second and third levers once.
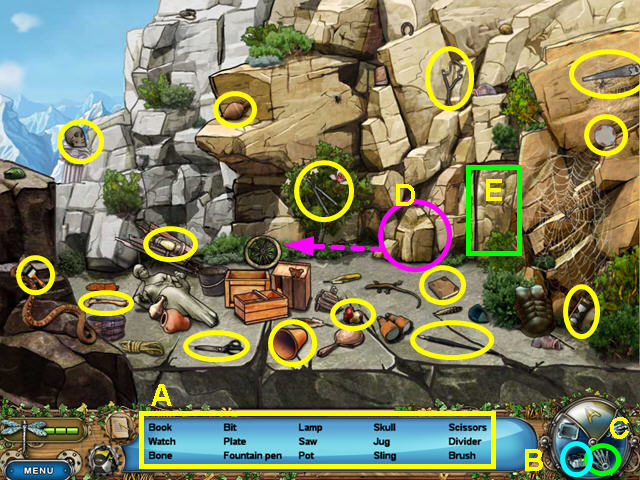
Level 4: Another Side of the Bridge
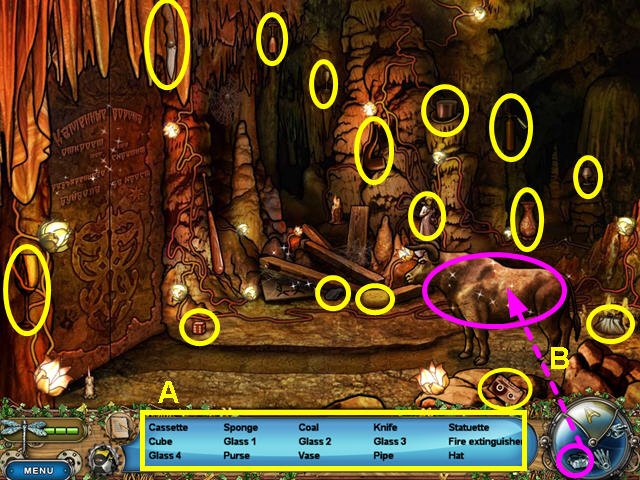
- Collect all the items on the list (A).
- Use the x-ray glasses from tools and look at the bull (B).
- Change back to the regular cursor and click on the bull.
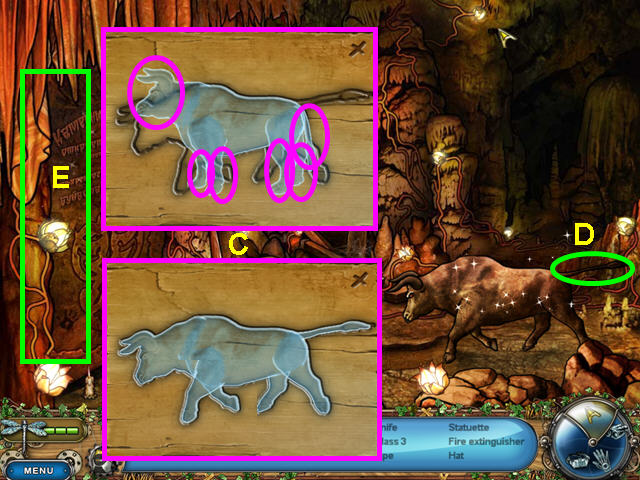
- Click on the head, tail, and 4 legs once to move them into the outline's position (C).
- Pull on the bull's tail (D).
- Walk through the open door (E).
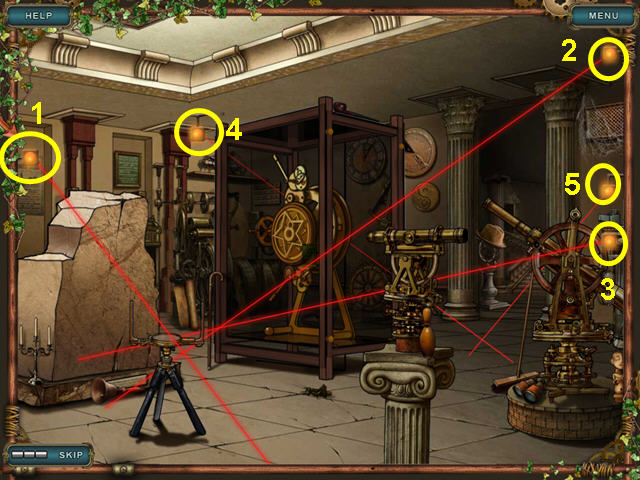
Level 5: Fountain Hall
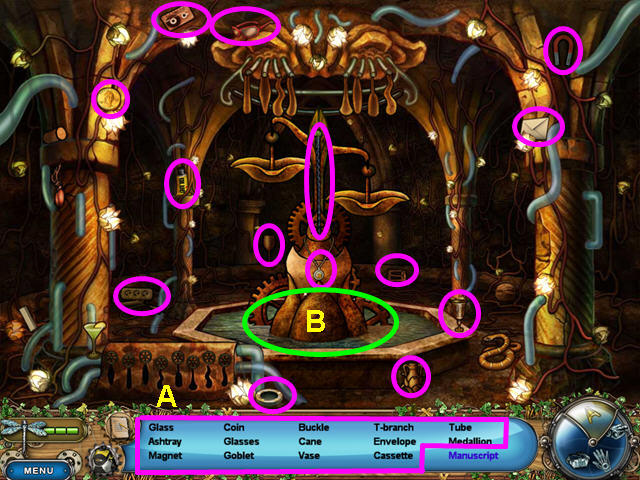
- Collect all the items except the manuscript (A).
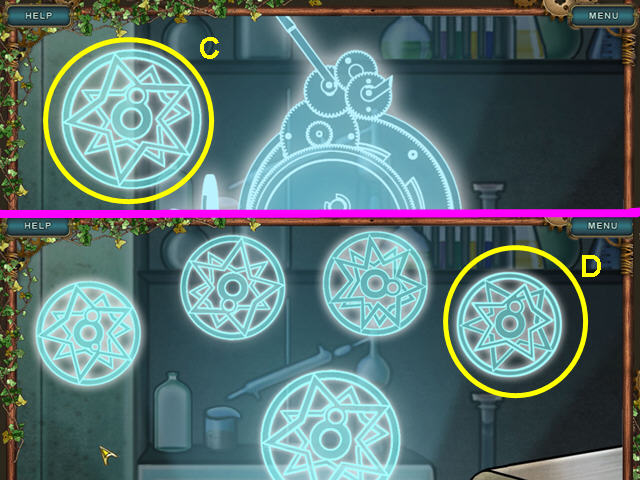
- Click on the fountain for a mini-game (B).
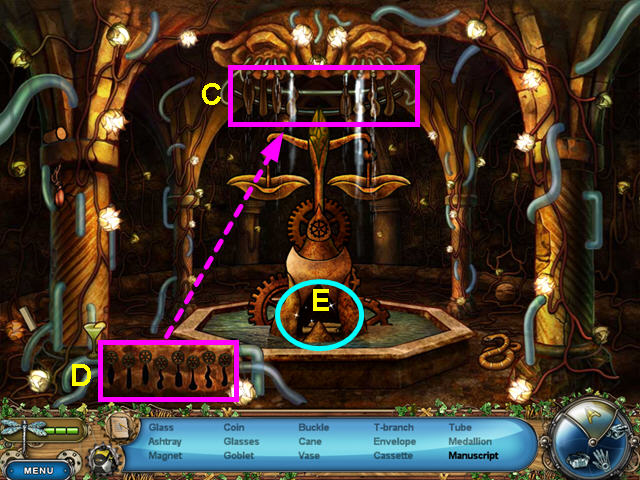
- Click on a tube in the upper portion of the fountain, and swap it with another (C).
- Move the tubes so they match the diagram under the valves (D).
- Take the MANUSCRIPT (E).
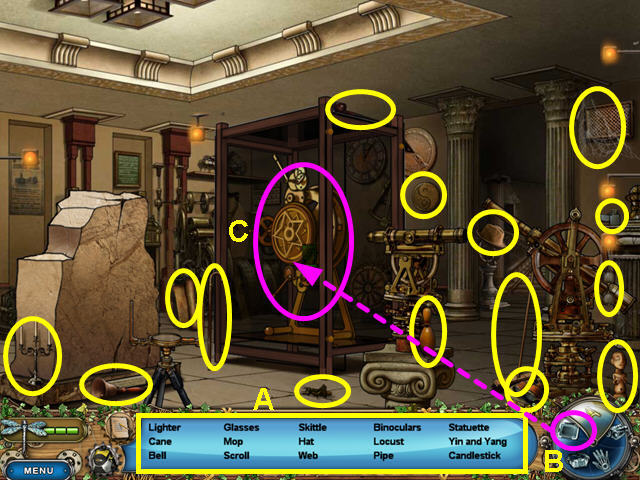
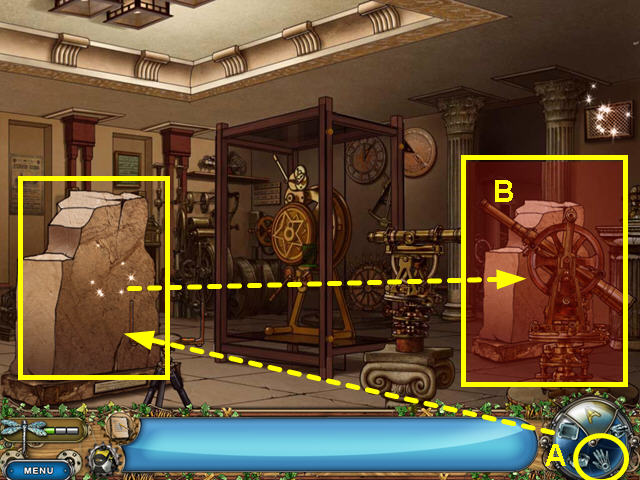
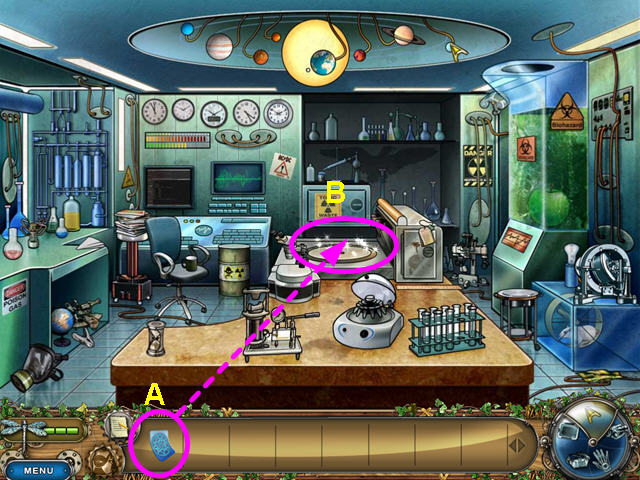
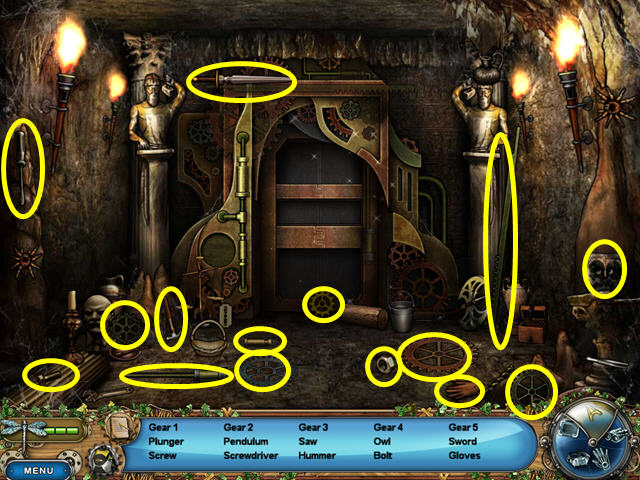
Level 6: Laboratory
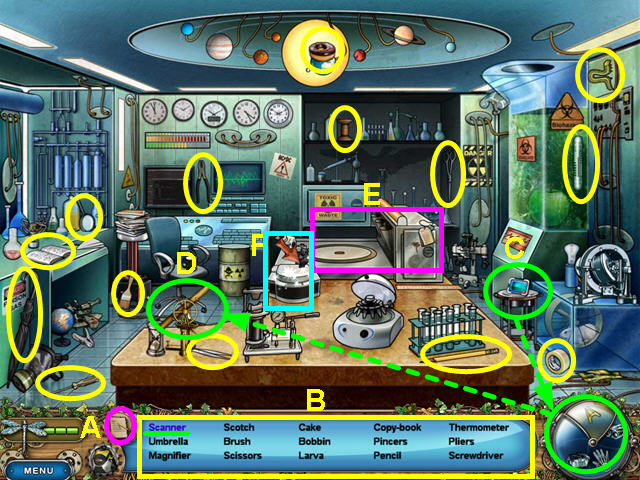
- Select the “List” button (A).
- Locate all the items on the list (B).
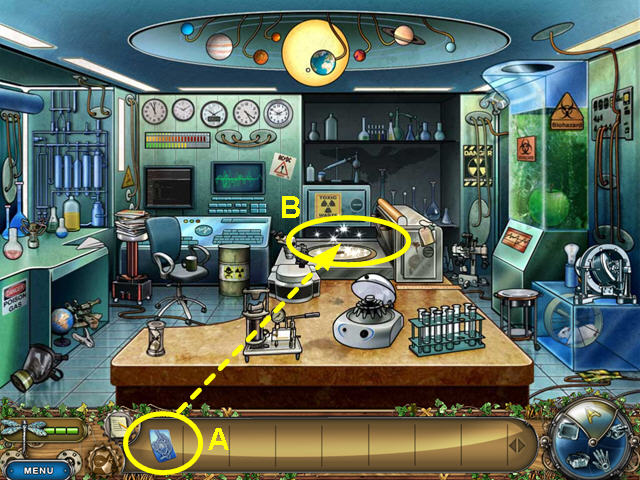
- When you find the SCANNER it will go into your tools (C).
- Select the scanner and use it on the brass device (D).
- Press the scan button to send the image.
- Make note of the large device (E).
- Change to inventory and use the MANUSCRIPT on the microscope (F).
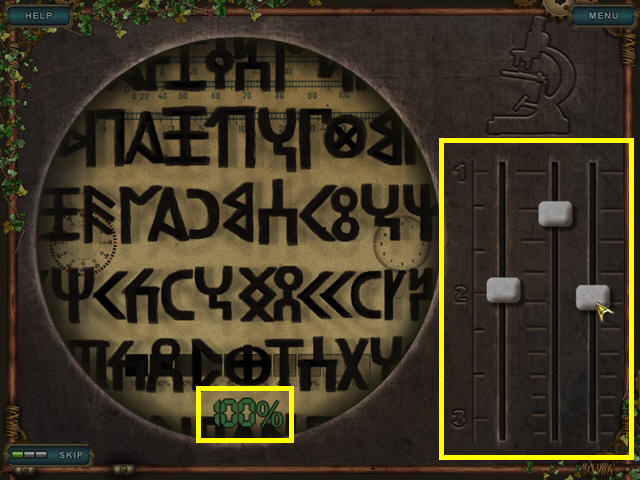
- The object is to bring the writing into focus.
- Move the sliders until the percentage starts to decrease, then go back one space.
- Use the 3 sliders to make 100%.
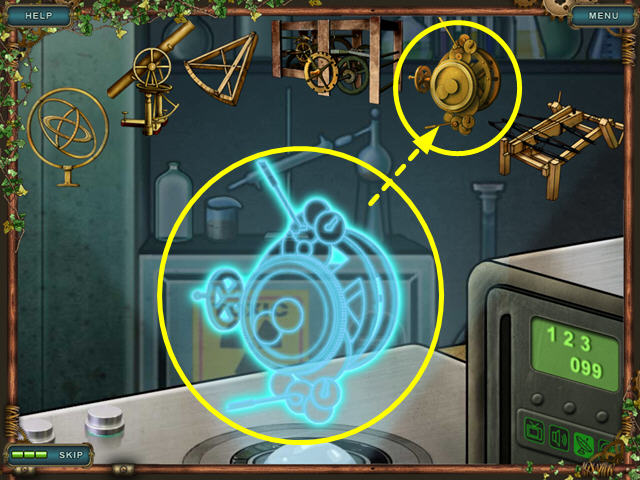
- Use the MANUSCRIPT on the large device.
- Select the mechanism that matches the hologram.
- Read about the Antikyther device then exit the screen.
Level 7: Hangar

- Locate all the items on the list (A).
- Select the glove of power from the tools (B).
- Take the LADDER and use it on the cockpit of the plane (C).
- Select the hangar door control (D).
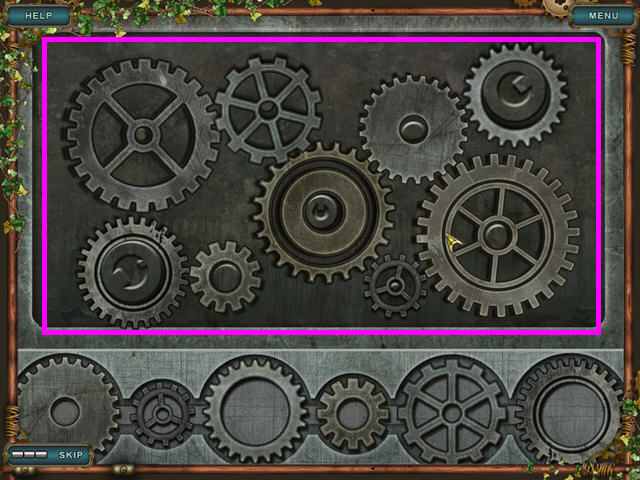
- Move the gears from the bottom area to the top area.
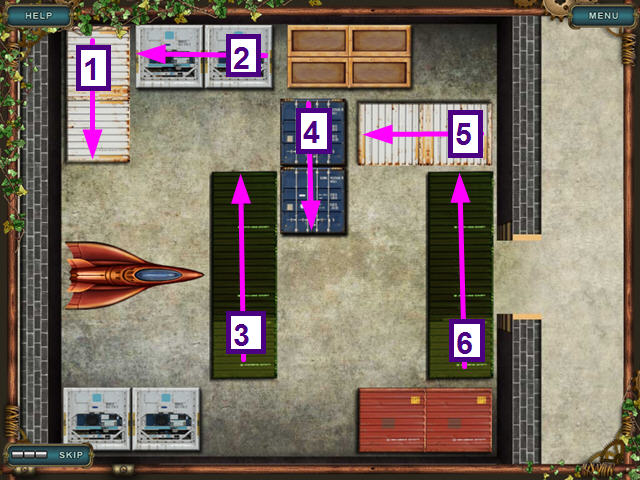
- The object is to move the cargo so the plane can exit.
- Move the cargo in numerical order (1-6).
- Move each piece as far as it will go.
Level 8: Cabin
- Locate all the items on the list (A).
- Look at the door panel (B).
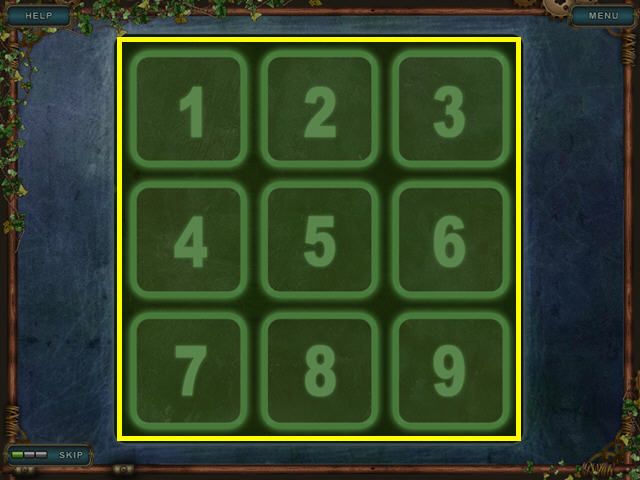
- The object of this mini-game is to place the numbers in order.
- Click on two number to swap positions.
Level 9: Landing Area
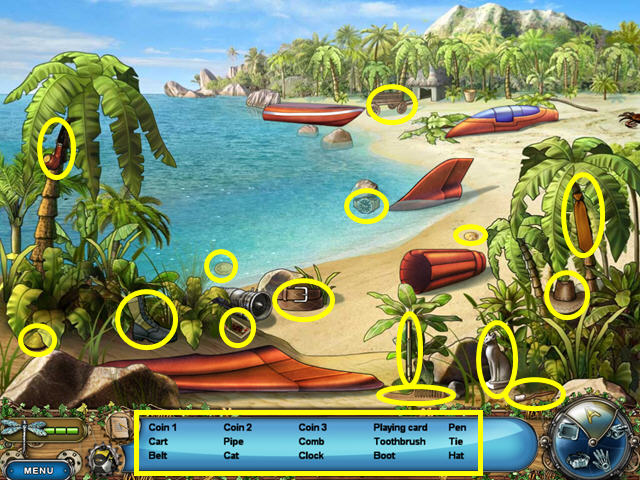
- Locate all the items on the list.
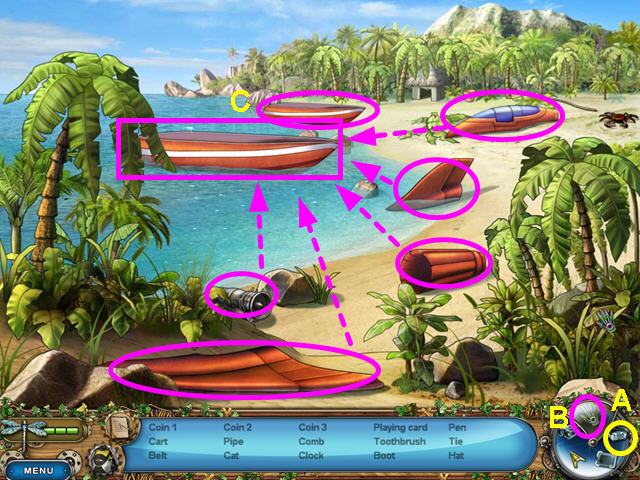
- Select the x-ray glasses from tools (A).
- Switch to the hand of power (B).
- Move the hull to the water (C).
- Place the 5 other pieces on the hull to build the boat.
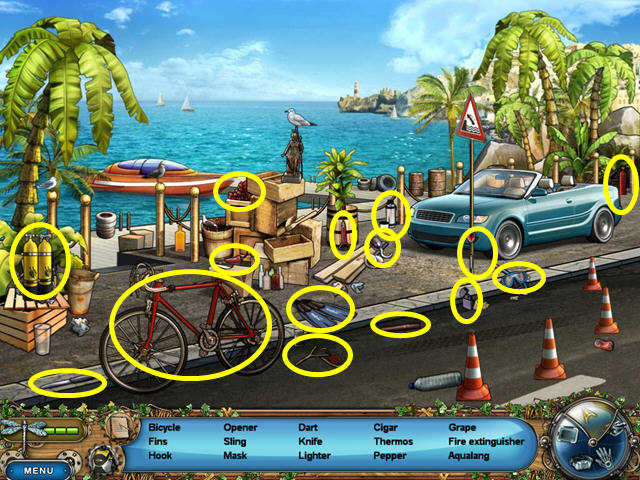
Level 10: Pier
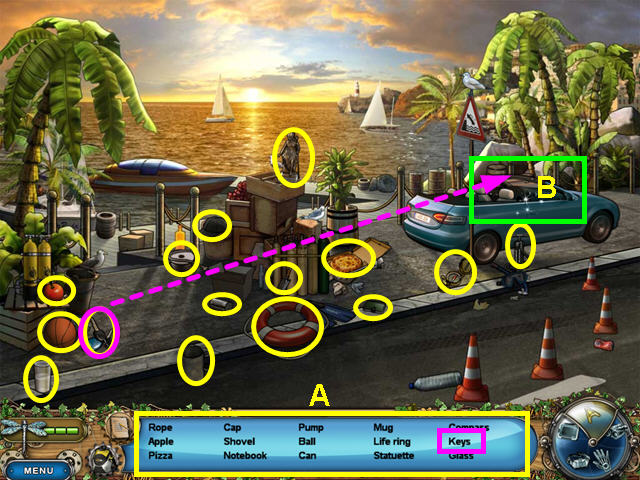
- Locate all the items on the list (A).
- Use the KEYS on the car (B).
Level 11: Entrance to the Museum
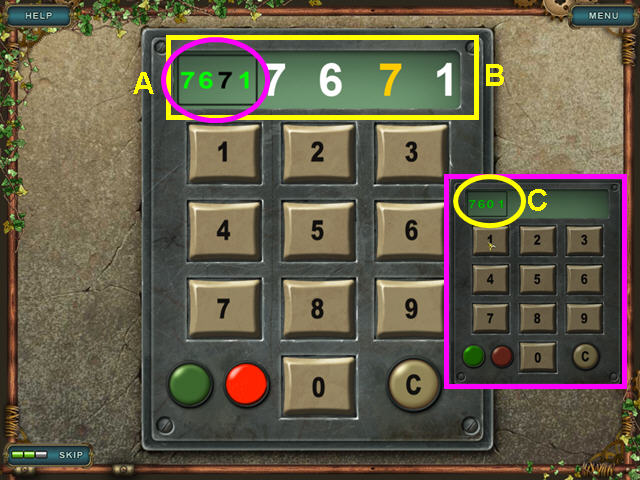
- Select the gate control on the right pillar.
- The object is to find the code.
- Enter numbers using the keypad.
- Numbers in the upper left corner will be green if correct (A).
- On the right, incorrect numbers will be in red, correct numbers in white, and numbers in the wrong position in yellow (B).
- Enter 7-6-0-1 (C).
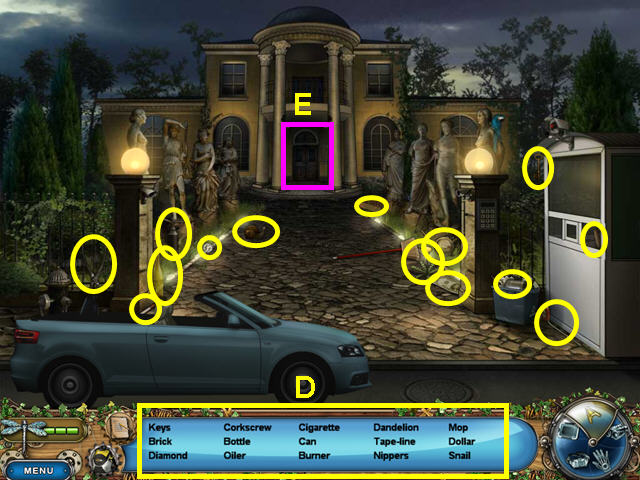
- Locate all the items on the list (D).
- Select the entrance (E).
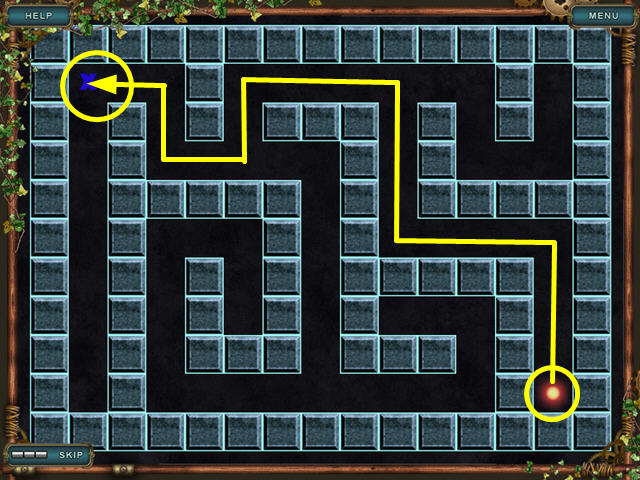
- Look at the map to the right of the door for a mini-game.
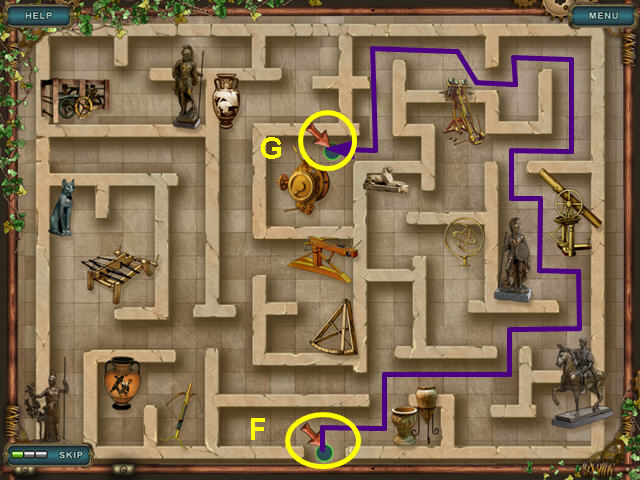
- Draw a continuous path from the entrance (F) to the Antikyther device (G).
- Hold the left mouse button down and draw the path without letting the mouse button up.
- Should you hit the wall or an object, you must start again.
- Click on the door to enter.
Level 12: Museum
- Select the x-ray glasses from the tools.
- Disable the lasers in order as you walk to them.
- Press the buttons in numerical order (1-5).
- Locate all the items on the list (A).
- Select the scanner from the tools (B) and use it on the Antikyther device (C).
- Press the scan button.
Level 13: Meanwhile at the Laboratory...
- Use the HOLOGRAM (A) on the large device (B).
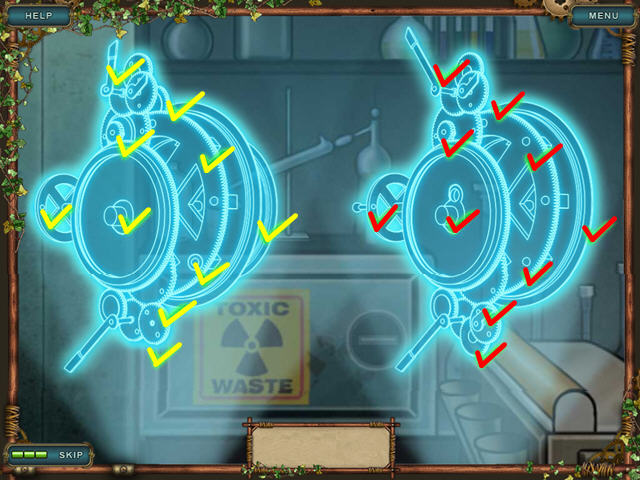
- Locate the 10 differences in the two diagrams.
Level 14: Meanwhile at the Museum...
- Select the hand of power from your tools (A).
- Move the large stone to the area beneath the vent (B).
- Click the cursor on intersections to make the ball move to the “X”.
Level 15: Pier
- Locate all the items on the list.
Level 16: Motorboat
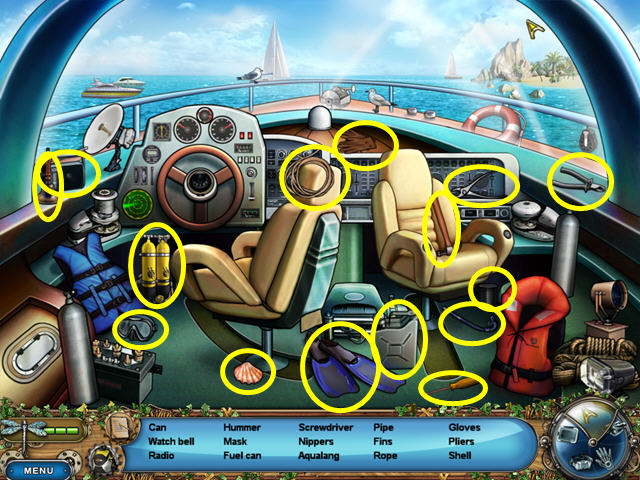
- Locate all the items on the list.
Level 17: Sea Bottom
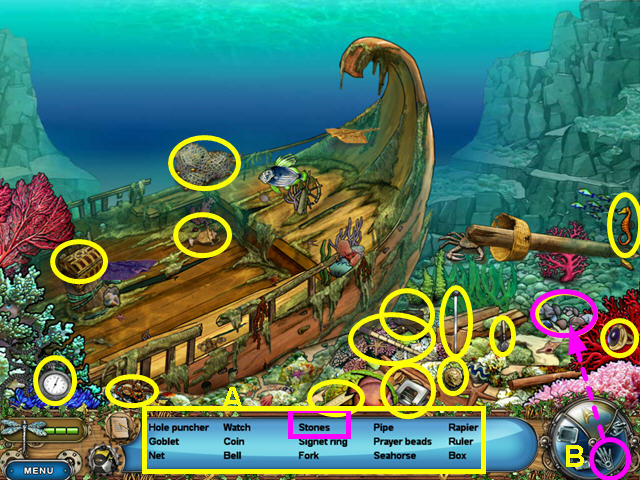
- Locate all the items on the list (A).
- Select the hand of power from tools to take the STONES (B).

- Still using the hand of power, take the mast and use it on the ship (C).
- Use the STONES on the bird's nest (D).
- Enter the reveled hole in the hull (E).
Level 18: Cargo Hold
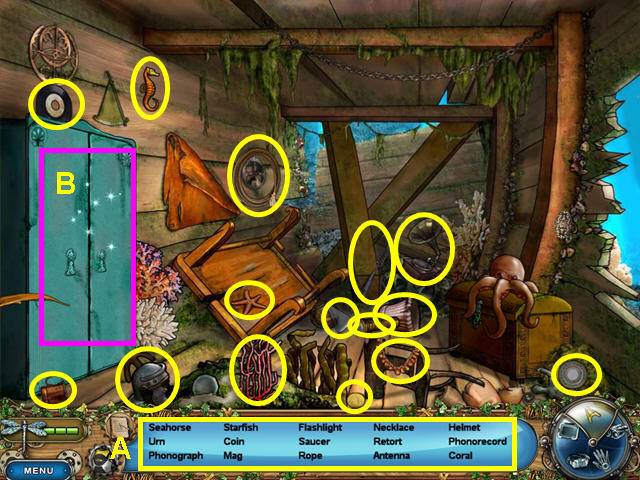
- Locate all the items on the list (A).
- Open the cabinet and click on the shelf of figurines (B).
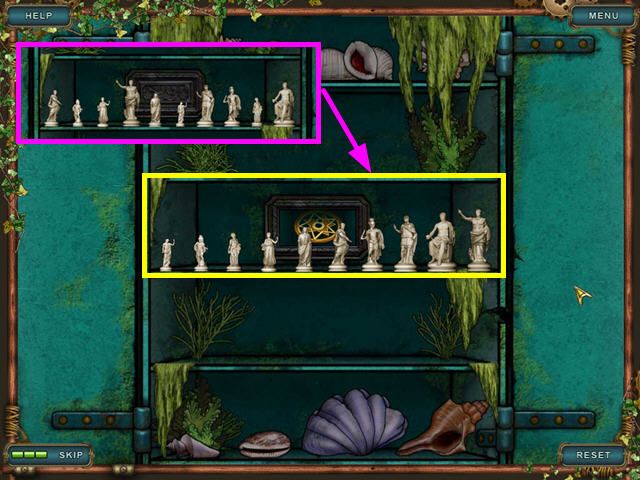
- The object of this mini-game is to place the figurines in ascending order on the middle shelf.
- You may place one figurine each on the top and bottom shelves.
- The second and fourth shelves may be in ascending or descending order.
- You may only take the rightmost figurine from a shelf.
- Watch our video solution of this mini-game.
- Press the “Scan” button.
Level 19: Meanwhile at the Laboratory...
- Use the hologram (A) on the large device (B).
- Select the hologram of the artifact you retrieved (C).
- Choose the duplicate that matches the central artifact (D).
- Read about the Mark of Hephaestus, then click exit.
Level 20: Shore
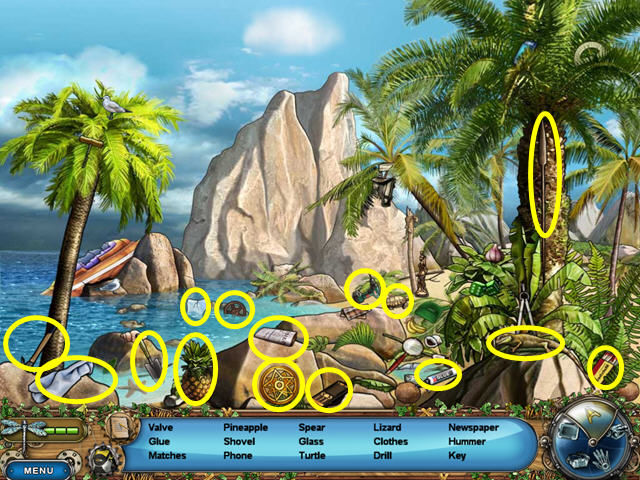
- Locate all the items on the list.
Level 21: Mount Olympus Base
- Locate all the items on the list (A).
- Use the KEY on the mountainside symbol (B).
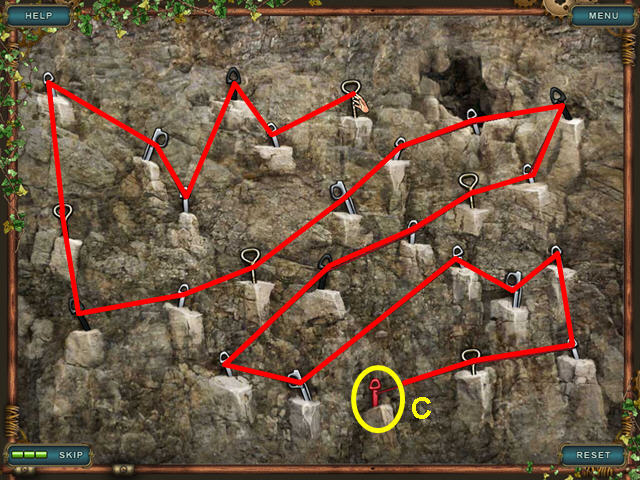
- The object of this mini-game is to link all the climbing hooks with one line that does not cross.
- Start at the red hook and connect them all together (C ).
- There are many solutions to this mini-game.
Level 22: Entrance to the Cave
- Collect all the items on the list (A).
- Use the x-ray glasses from your tools (B).
- Switch to the glove of power (C).
- Move the rock to the left (D).
- Pull the level hidden behind the rock.
- Enter the cave (E).
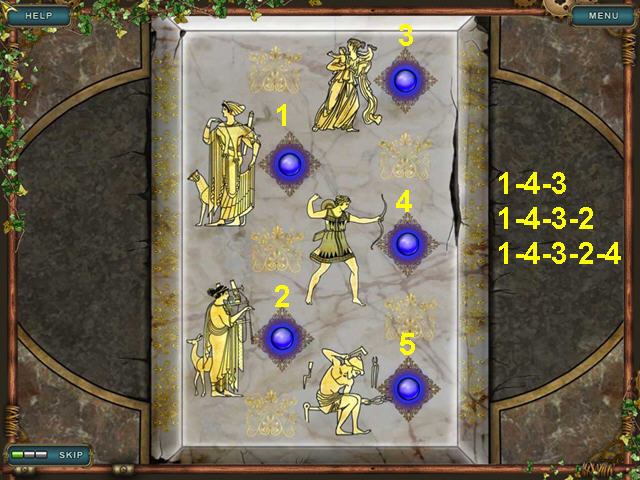
- The object of this mini-game is to repeat the sequences that flash.
- Watch the sequence, then press the buttons to duplicate the pattern.
- The first sequence is 1-4-3.
- The second sequence is 1-4-3-2.
- The third sequence is 1-4-3-2-4.
Level 23: Olympus
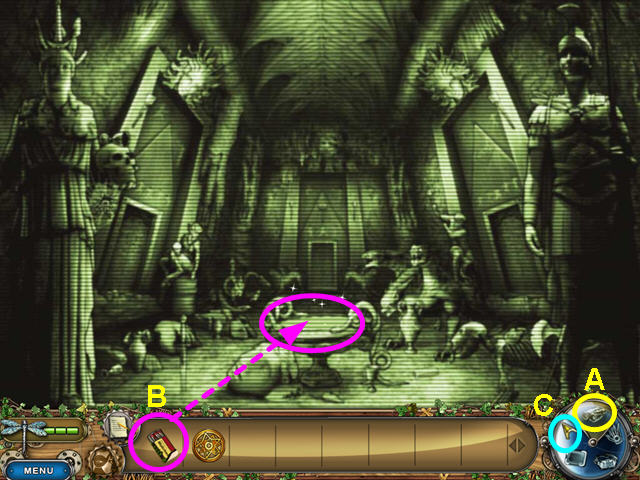
- Select the NVG from your tools (A).
- Use the MATCHES on the lamp (B).
- Select the regular cursor (C).
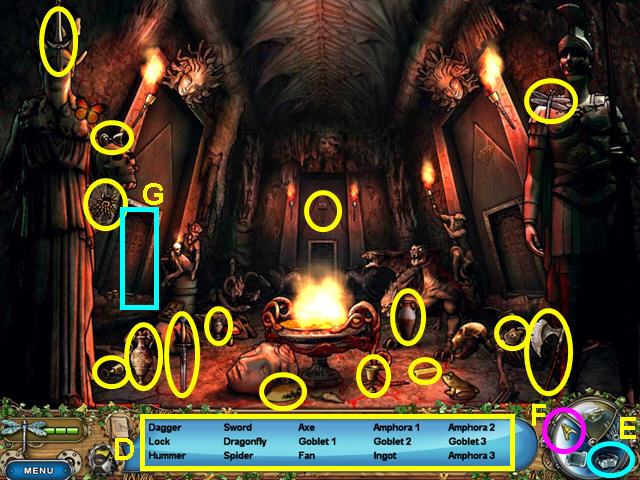
- Collect all the items (D).
- Select the x-ray glasses from your inventory (E).
- Return to using the regular cursor (F).
- Select the door on the left (G).
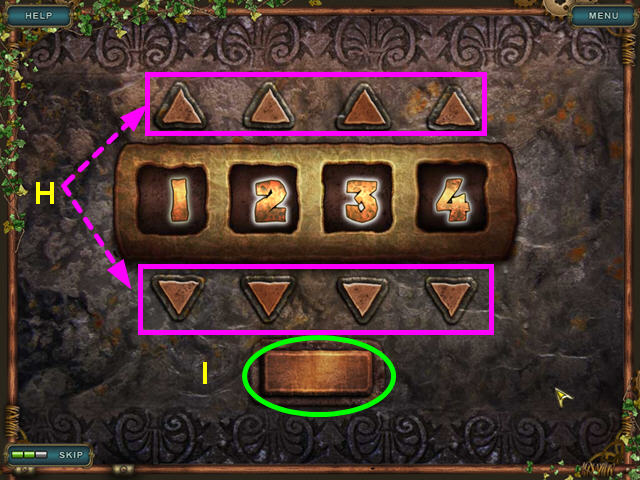
- The object of this mini-game is to find the combination.
- Use the arrows to change the numbers (H).
- Press the button at the bottom to see if you are correct (I).
- Correct numbers will light up.
- Enter 1-2-3-4 and press the button.
Level 24: Ancient Mechanism
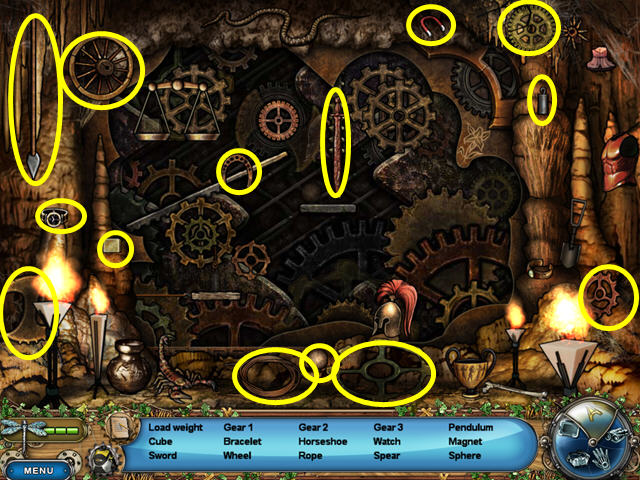
- Locate all the items on the list.
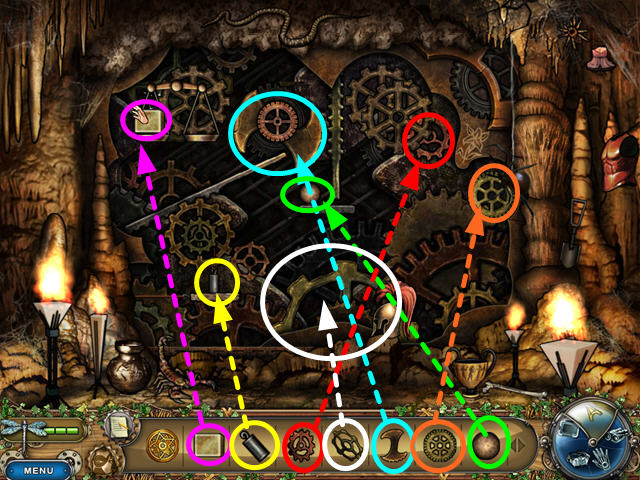
- Place the parts into the machine.
- Enter the center door in Olympus.
Level 25: Lava Lake
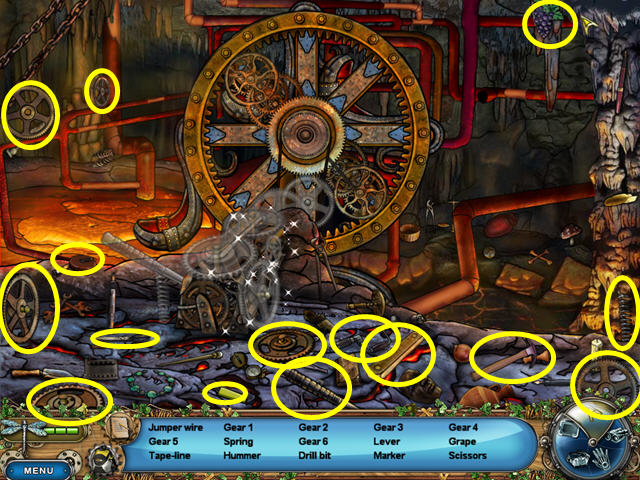
- Locate all the items on the list.
- Place all the parts on the machine.
- The object of this mini-game is to make the lava flow from the lower left inlet (A) to the center outlet on the right (B).
- Click on the pipes to rotate into place.
- Pull the lever that appears in the lava on the left (C).
- Inside Olympus, enter the right door.
Level 26: Forge Entrance
- Locate all the items on the list.
- Place all the parts on the machine.
- Enter the door once it opens.
Level 27: Hephaestus' Forge
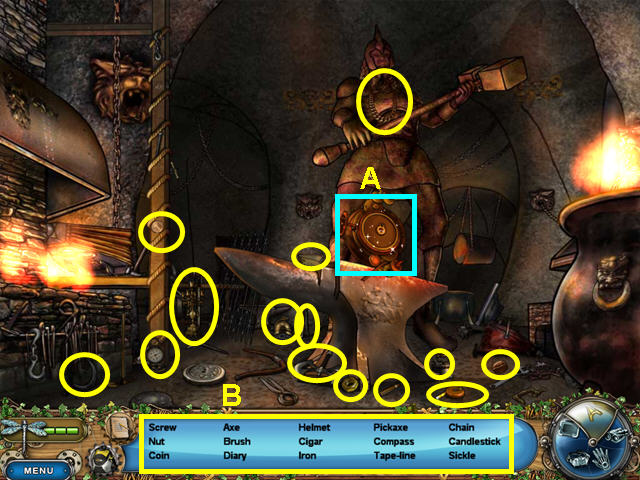
- Use the KEY in the device on the anvil (A).
- Locate all the items (B).
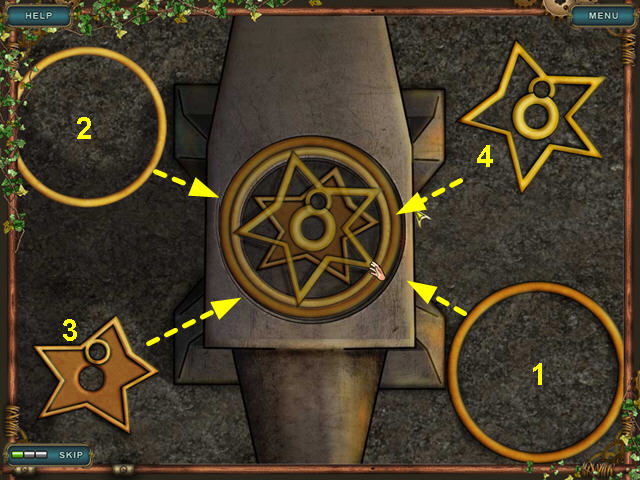
- Place the elements of the key in to the forge in numerical order (1-4).
- Congratulations! You have completed Treasure Hunters!
Created at: 2011-03-13