Walkthrough Menu
- General Tips
- Chapter 1: Paris, France
- Chapter 2: Jerusalem
- Chapter 3: Scotland
- Chapter 4: Yucatan, Mexico
General Tips
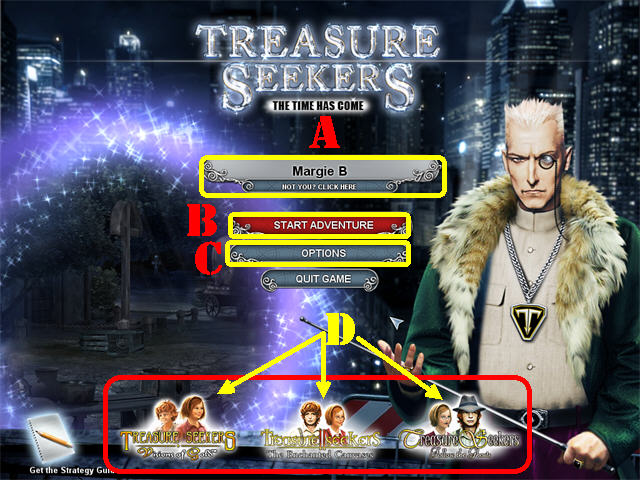
- Click on “NOT YOU? CLICK HERE” (A) to manage your player profiles.
- The “START ADVENTURE” (B) button allows you to begin playing
- Adjust music, sound, difficulty level and screen size under the “OPTIONS” button (C).
- Click on any of the icons at the bottom of the main menu to access the previous titles from this series (D).
- Items written in blue in Hidden Object Scenes are hidden from view or need to be combined with another item.
- The Hidden Object Scene screenshots have been modified to show all the drawers and cabinets open in order to mark all available items.
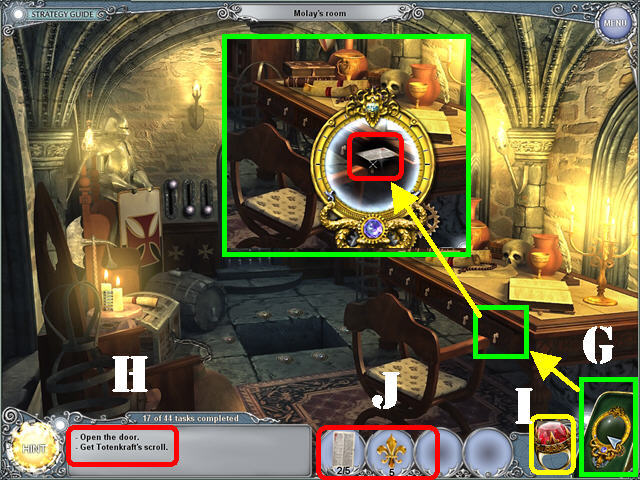
- Use the X-GLASS (G) in the lower right to view hidden items. Take the X-GLASS and click on it once you see an item appear in the center that was not visible before.
- There are several tasks that need to be completed for each level; they are located in the lower left corner of each scene (H).
- A Key Object will appear once you click on certain key items. Look for the objects in the scene that appear in the small circles attached to the key objects.
- Pick up the items shown in the small circles and drag them to the center of the key object.
- You can travel back and forth between times by clicking on the RING (I) in the lower right. In some scenes you will be able to change from day to night using an Hourglass.
- Grab an item from your inventory (J) and place it in an area of your choice. The item will begin to flash when placed over a viable spot.
- All puzzles can be skipped once the Skip button is filled.
- Click on the “?” in the upper left corner to view the instructions for each puzzle.
Chapter 1: Paris, France
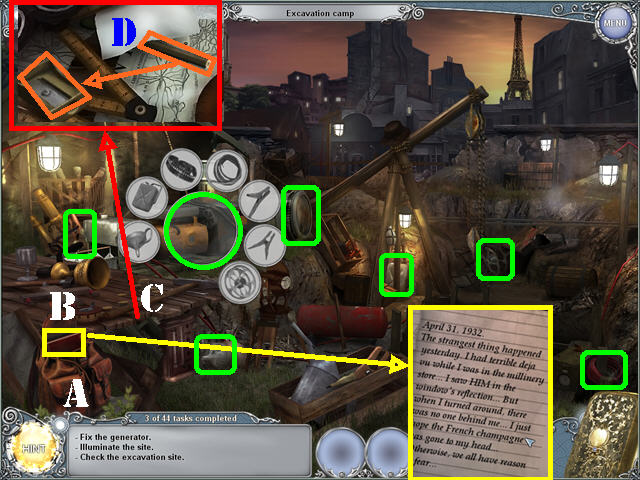
- Click on the BACKPACK (A).
- Open the DIARY (B) inside the backpack; exit that view.
- Examine the table on the left (C).
- Grab the PENCIL (D) and sharpen it with the pencil sharpener.
- Open the DIARY and click the pencil on the page until all the writing is visible.
- Go into the excavation site in the lower right.
- Return to the campsite.
- Click on the generator on the left to open the KEY OBJECT.
- Place all the items marked in green into the key object.
- Go into the excavation site again to trigger 2 new tasks.
- Return to camp.
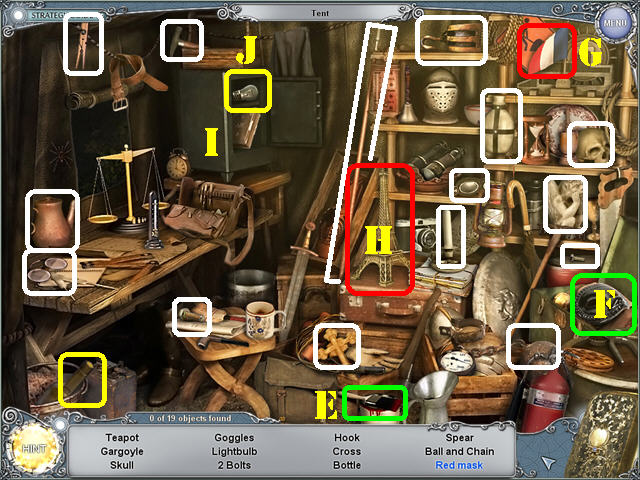
- Play the search scene on the left.
- Grab the BRUSH (E) and place it on the MASK (F) to create the RED MASK.
- Grab the FLAG (G) in the upper right and place it on the EIFFEL TOWER (H) to create the FLAG ON THE TOWER.
- Open the SAFE (I); grab the LIGHT BULB (J).
- The LIGHT BULB will be added to inventory.
- Return to the excavation site.
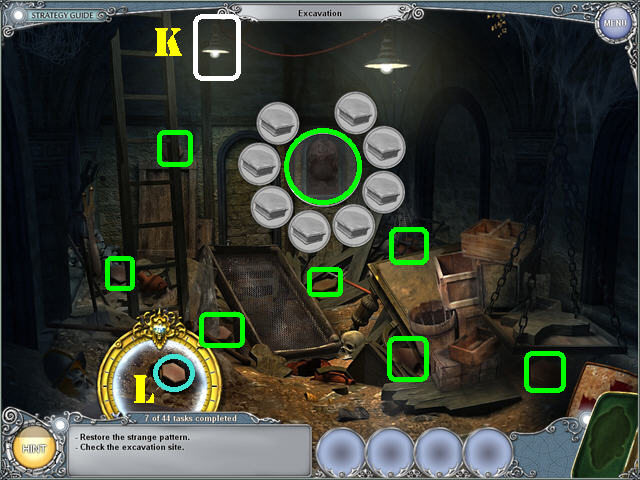
- Place the LIGHT BULB in the left lamp to illuminate the place (K).
- Open the KEY OBJECT by the broken plate.
- Move the shield in the lower right and the panel in the lower left to view some hidden pattern pieces.
- Grab the 7 PATTERN PIECES marked in green.
- Open the X-GLASS in the lower right; pass it on the lower left side of the ground and click (L).
- Return to camp.
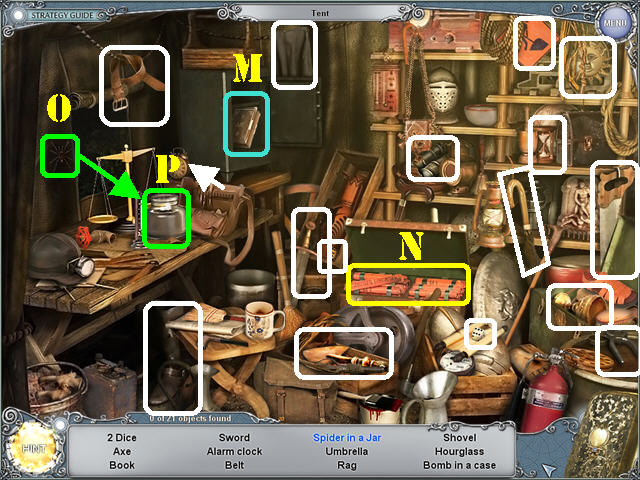
- Play the search scene by the tent.
- Open the SAFE; grab the BOOK (M).
- Open the CASE; grab the BOMBS (N) to obtain the BOMB IN A CASE.
- Grab the SPIDER (O); and place it in the JAR (P) to create the SPIDER IN A JAR.
- The SHOVEL will be added to inventory.
- Return to the excavation site.
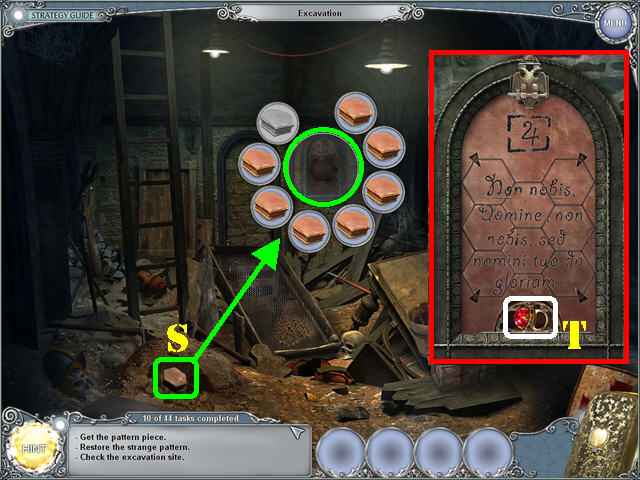
- Place the SHOVEL on the dirt heap in the lower left corner 3 times to dig the hole.
- Take the PATTERN PIECE (S) and place it in the key object.
- Examine the plate on the back wall to trigger a puzzle.
- Click on any 2 hexagons to swap their positions until they resemble the image in the screenshot.
- Click on the RING (T) after the puzzle has been solved to be transported to Molay’s Room.
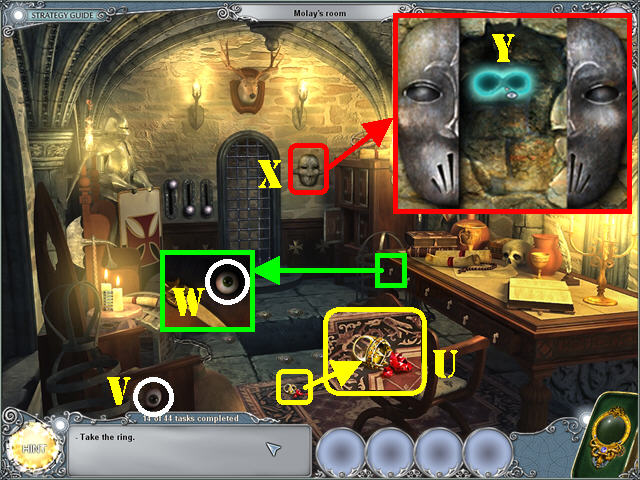
- Examine the edge of the carpet; take the BROKEN RING (U).
- Grab the EYE (V) in the lower left.
- Open the desk’s left drawer; take the other EYE (W).
- Examine the mask on the back wall (X).
- Place the 2 EYES in the mask’s eye sockets.
- Click on the glowing spot behind the mask to activate a new task (Y) and eavesdrop on the conversation.
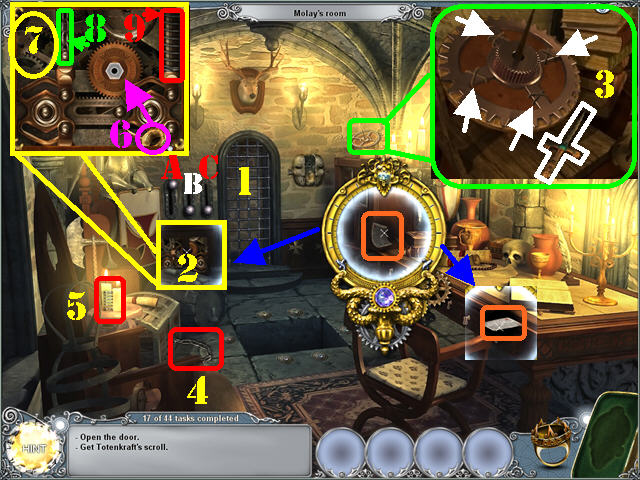
- Use the X-GLASS on the 2 areas marked in orange on the desk to obtain 2 TORN PAGES.
- Click on the gate to trigger a new task (1).
- Use the X-GLASS on the cabinet on the back wall; then click on the cabinet twice to trigger new tasks (2).
- Examine the GEAR; use the DAGGER in the pop-up window to cut the 4 ropes (3).
- Take the GEAR and place it in the key object.
- Take the CHAIN (4) on the ground.
- Grab the SPRING (5) in the lower left.
- Examine the mechanism; grab the NUT (6) and put it in the right spot.
- Place the GEAR (7), CHAIN (8), and SPRING (9) into their appropriate slots.
- Click on the levers in this order: A-B-C to unlock the door.
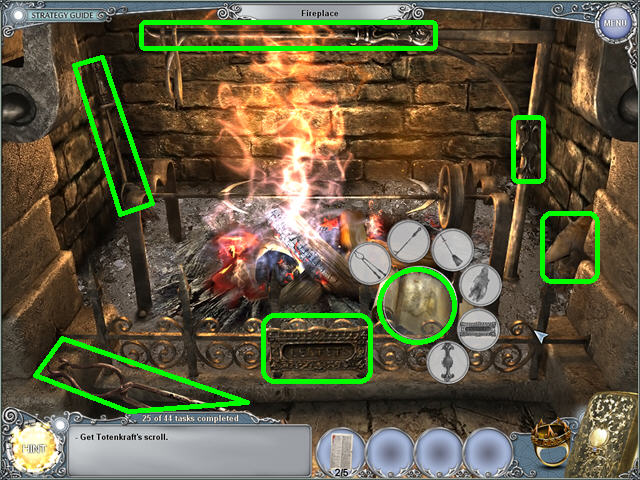
- Go into the Hall.
- Examine the fireplace.
- Open the SCROLL KEY OBJECT in the lower right.
- Place the 6 items marked in green into the key object.
- Click on the SCROLL that appears on the scene.
- Exit the fireplace.
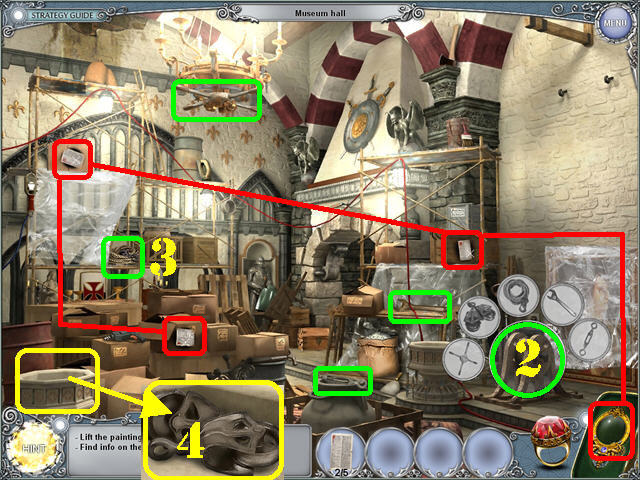
- Examine the edge of the carpet; take the GEM to be transported into the future.
- Open the WINCH KEY OBJECT (2) in the lower right.
- Lift the plastic on the left; take the ROPE (3) and place it in the key object.
- Examine the fountain in the lower left (4); take the PULLEY and place it in the key object.
- Place the 3 items marked in green into the WINCH key object.
- Click on the WINCH to lift the painting and trigger a new task.
- Use the X-GLASS on the boxes marked in red to find 3 TORN PAPERS.
- Use the X-GLASS on the lower right side of the wall to discover the secret door and trigger a new task.
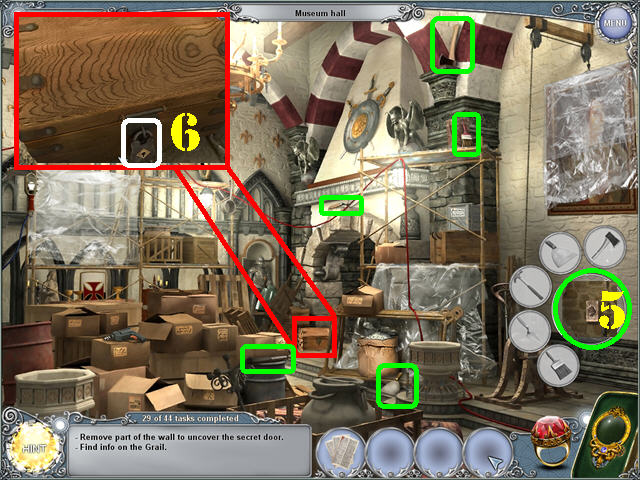
- Open the DOOR KEY OBJECT on the wall.
- Grab the 5 items marked in green and place them in the key object.
- Click on the strange glyph on the wall to trigger a task (5).
- Examine the chest (6); click on the lock to trigger a search scene.
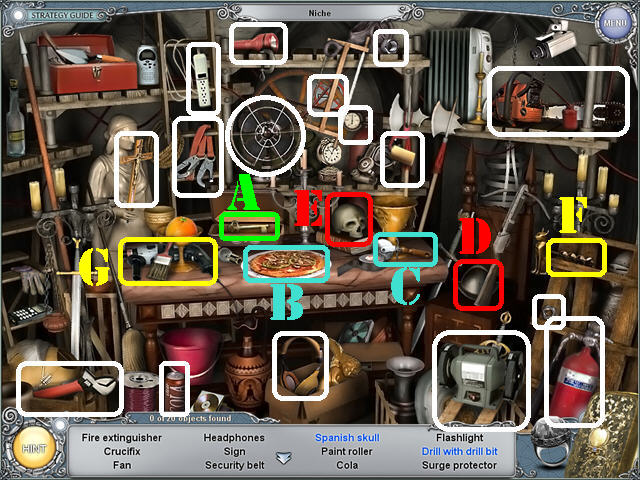
- Play the Hidden Object Scene on the left.
- Open the BOX on the table; take the KEY IN THE BOX (A).
- Cut the PIZZA (B) with the PIZZA CUTTER (C) to create the SLICED PIZZA.
- Place the SPANISH HELMET (D) on the SKULL (E) to create the SPANISH SKULL.
- Place the DRILL BIT (F) on the DRILL (G) to create the DRILL WITH DRILL BIT.
- The KEY will be added to inventory.
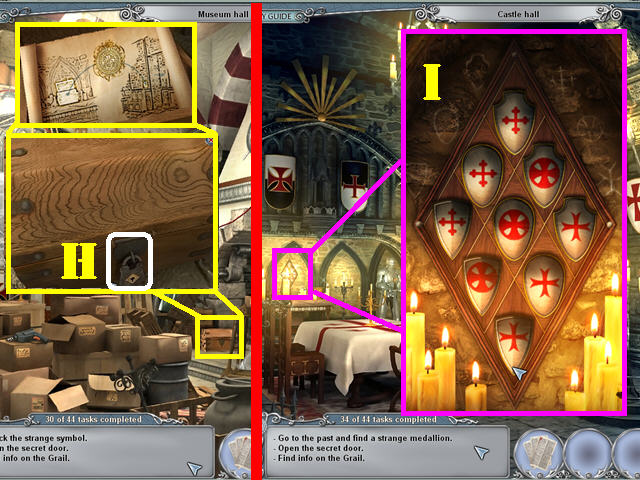
- Examine the chest; open the lock with the KEY (H).
- Inside the chest you find instructions for opening the panel.
- New tasks have been triggered.
- Click on the RING to return to the past.
- Look at the positions of the shields on the wall.
- Examine the puzzle behind the table.
- Click on any 2 shields to swap their positions until they resemble the image in the screenshot (I).
- Examine the chest that appears in front of the puzzle to trigger new tasks and view the image of a seal.
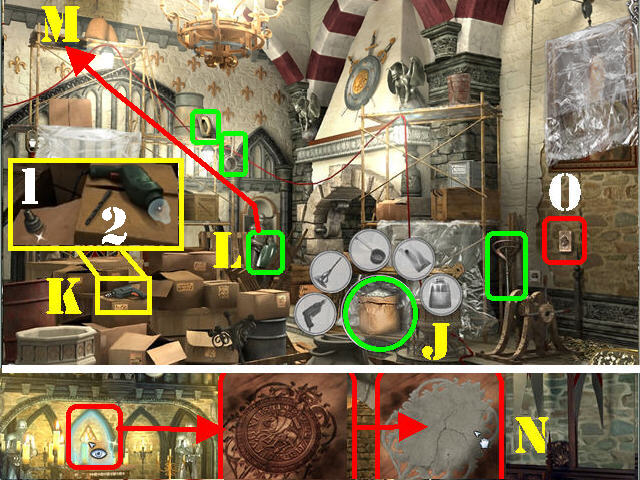
- Click on the ring.
- Open the PLASTER KEY OBJECT (J).
- Examine the drill in the lower left (K). Assemble the drill as shown and place it in the key object.
- Grab the JAR (L) in the lower center and place it below the dripping water in the upper left (M).
- Put the BOTTLE WITH WATER into the key object.
- Place the items marked in green into the key object.
- PLASTER will be added to inventory.
- Click on the ring.
- Examine the medallion in the back; place the PLASTER over it.
- Take the REPLICA (N).
- Return to the present.
- Examine the strange glyph; place the REPLICA over it (O).
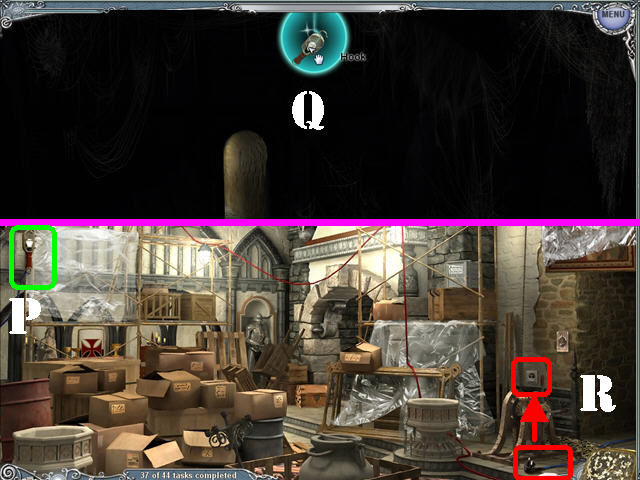
- Go through the secret door.
- Return to the Hall.
- Take the HAND LAMP (P) on the left.
- Return to the secret room.
- Place the HAND LAMP on the hook in the upper center (Q).
- Return to the Main Hall.
- Plug the chord in the lower right into the outlet by the door (R).
- Return to the secret room; the lights are now on. New tasks will be triggered.
- Return to the Main Hall.
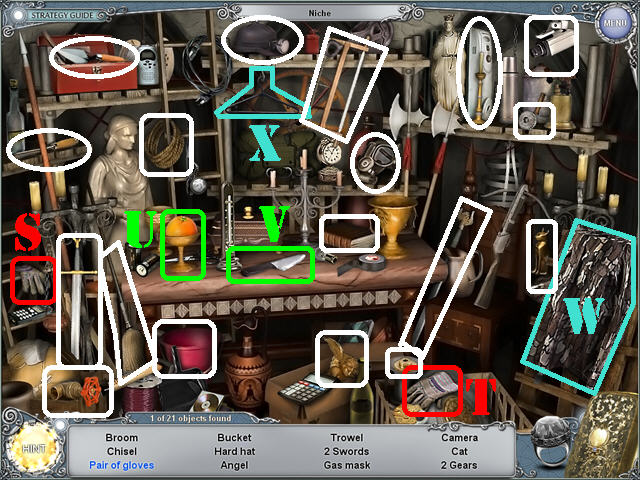
- Play the search scene on the left.
- Grab the GLOVE (S) on the left and place it over the GLOVE (T) on the right to obtain the PAIR OF GLOVES.
- Cut the ORANGE (U) with the KNIFE (V) to obtain the ORANGE HALF.
- Place the SHIRT (W) on the HANGER (X) to obtain the SHIRT ON A HANGER.
- The BROOM will be added to inventory.
- Return to the secret room.
- Sweep the floor with the BROOM until all the dust disappears.
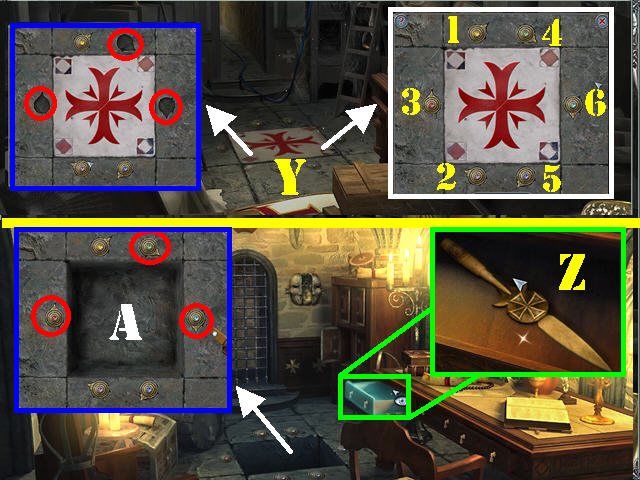
- Examine the tile on the ground (Y).
- Go to the past.
- Open the left drawer; take the DAGGER (Z).
- Examine the hole in the ground; remove the 3 BUTTONS with the DAGGER (A).
- Return to the future.
- Examine the tile on the ground.
- Place the 3 BUTTONS into the matching empty slots.
- Click on the buttons in the order shown in the screenshot.
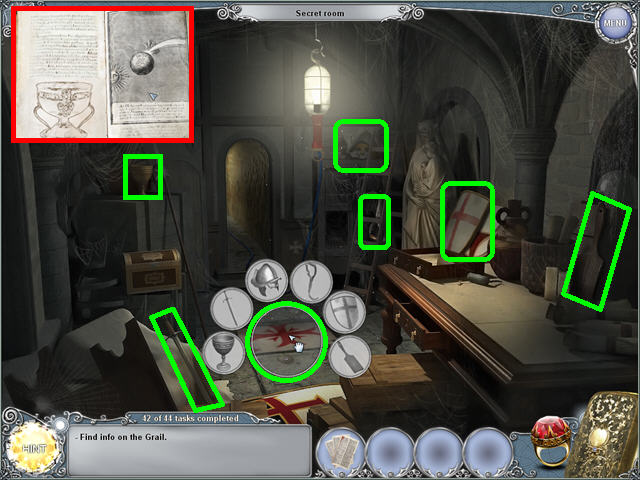
- The tile is stuck; click on it to trigger a key object.
- Place all the items marked in green in the key object.
- Click on the hole after all the key objects have been entered.
- Place the TORN PAGES on the right page to end the chapter.
Chapter 2: Jerusalem
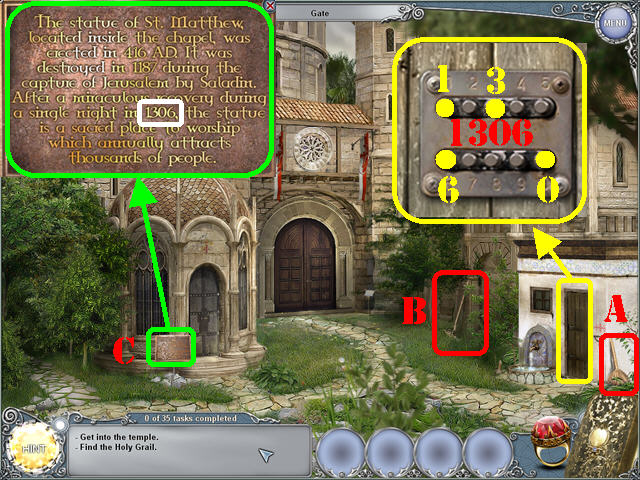
- Take the BROOM (A).
- Grab the RAKE (B).
- Examine the plaque (C) on the left.
- Pass the BROOM over the plaque to clean it.
- Notice the date of 1306 on the plaque.
- Click on the right door to activate a puzzle.
- Enter the numbers: 1, 3, 0, 6 to unlock the door.
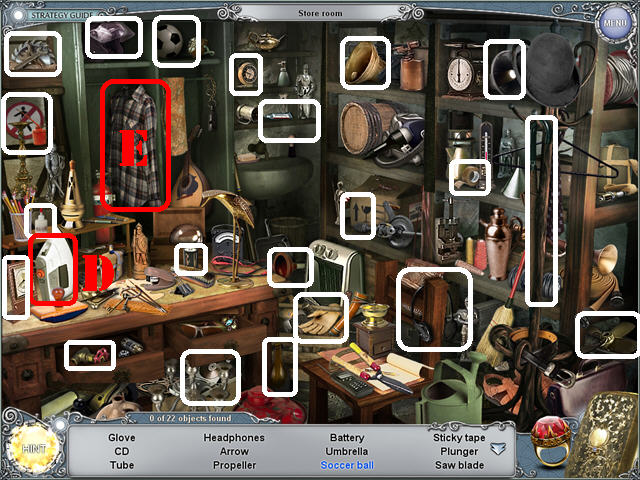
- Go into the store room to play a search scene.
- In this scene you must open and close the locker doors, curtains, and drawers to find all the blue listed items.
- Open the locker on the left; place the IRON (D) on the SHIRT (E) to create the PRESSED SHIRT.
- The GLUE will be added to inventory.
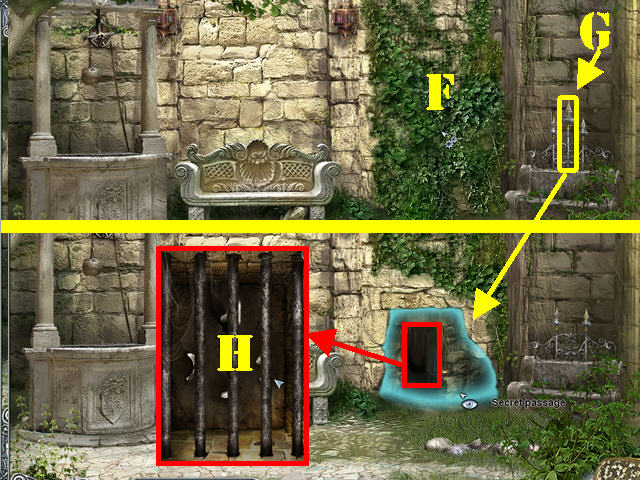
- Go left toward the Temple’s Wall.
- Remove the weed on the back wall with the RAKE 5 times (F).
- Grab the middle SPEAR on the right (G); use it repeatedly on the wall to remove all the stones.
- Examine the secret passage and then click on the rods to trigger a task (H).
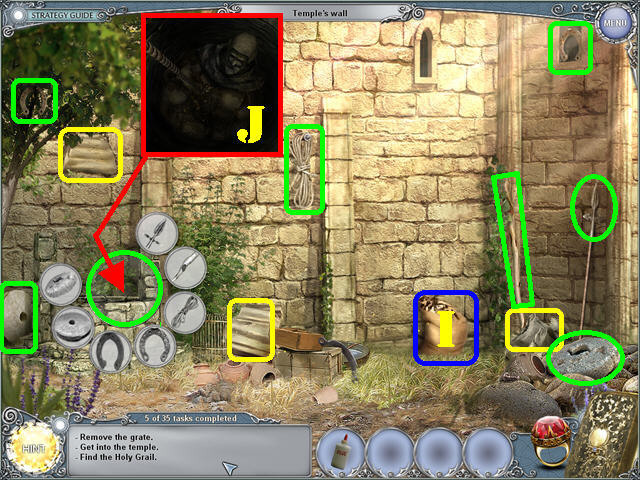
- Click on the ring to return to the past.
- Grab the STATUE PARTS marked in yellow.
- Take the BAG OF STRAW in the lower right (I).
- Examine the well in the lower left; click on the statue part inside to trigger a key object (J).
- Open the WELL KEY OBJECT.
- Place the items marked in green into the key object.
- Look inside the well; take the last STATUE PART (J).
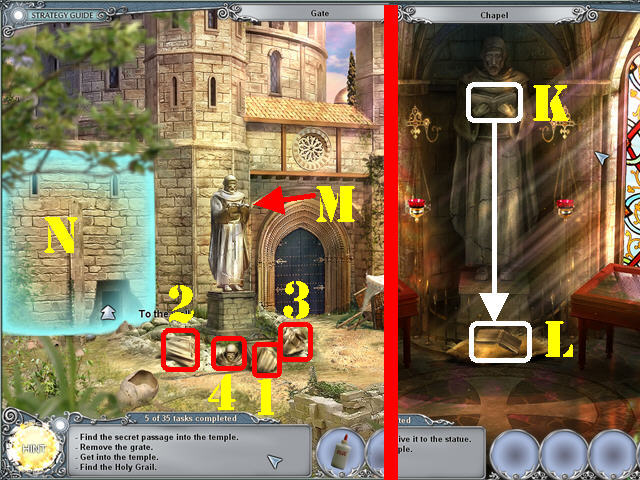
- Click down to go to the Gate.
- Click on the gate to add a task.
- Place the STATUE PARTS at the base of the broken statue by the gate and the parts will land on the ground.
- Place the GLUE on one of the statue parts.
- Reassemble the statue as shown in the screenshot to trigger new tasks.
- Go to the future and enter the Chapel.
- Click twice on the BOOK the statue is holding (K).
- Place the BAG OF STRAW on the ground.
- Grab the BOOK (L) on the bag.
- Go to the past.
- Place the BOOK (M) on the statue on the lower left side of the wall.
- Go through the wall (N).
- Go to the future.
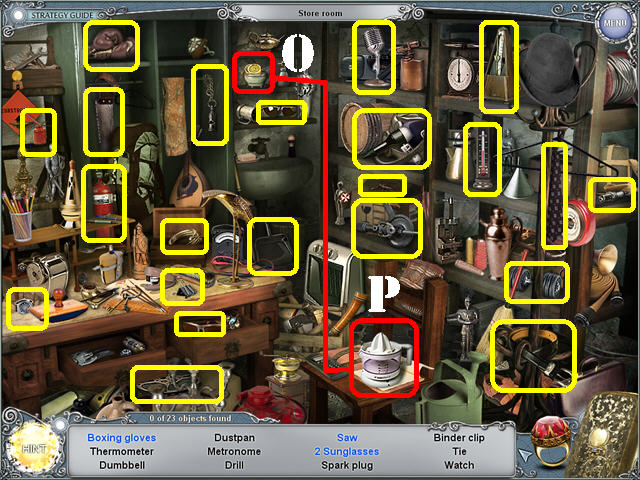
- Play the search scene in the storage room by the Gate.
- Open and close the locker doors, curtains, and drawers to find all the blue listed items.
- Place the LEMON (O) in the JUICER (P) to create the LEMON JUICE.
- The SAW will be added to inventory.
- Return to the Temple’s Wall.
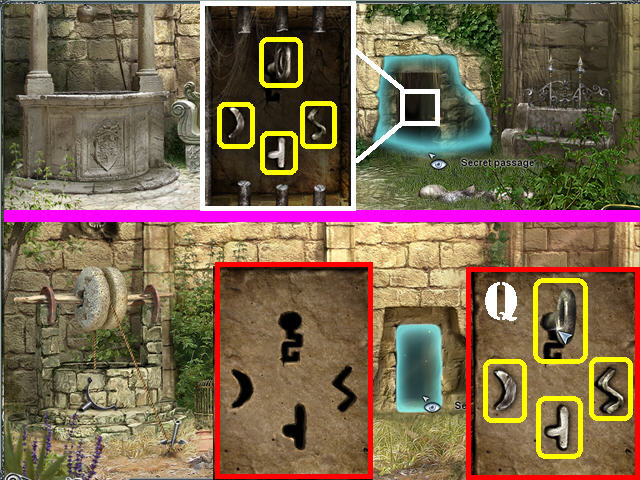
- Examine the bars on the right.
- Cut the 3 center bars with the SAW.
- Take the 4 STRANGE KEY PARTS.
- Go to the past.
- Examine the secret door.
- Place the 4 STRANGE KEY PARTS into their matching slots (Q).
- Enter the Temple.
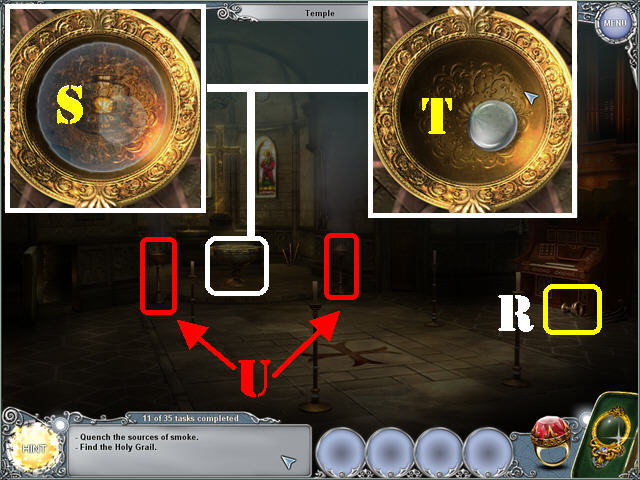
- Grab the GOBLET (R) in the lower right.
- Examine the Bowl; place the GOBLET in the water to create the GOBLET WITH WATER (S).
- Grab the LENS inside the bowl (T).
- Place the GOBLET WITH WATER over the smoke on the right and left sides of the bowl (U).
- The Temple is now lit.
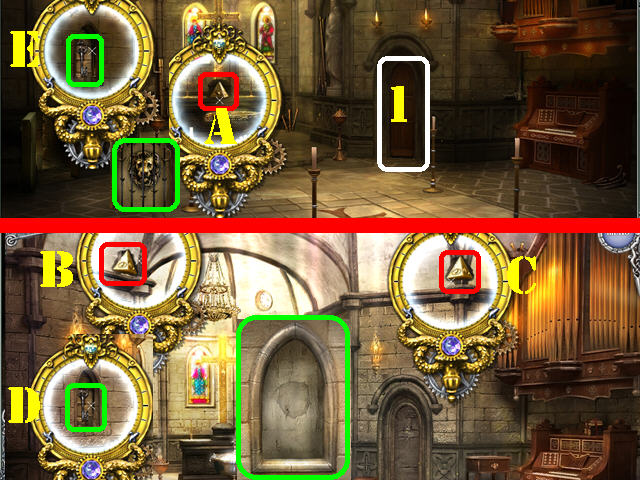
- Click on the right door to trigger a task (1).
- Use the X-GLASS to obtain the EYE OF THE OMNISCIENCE by the altar (A).
- Use the X-GLASS on the left window to locate the CELL’S KEY; examine it to trigger a new task (E).
- Go to the future while you are in the Temple.
- Use the X-GLASS to obtain the EYE OF THE OMNISCIENCE (B) in the upper left.
- Use the X-GLASS to obtain the EYE OF THE OMNISCIENCE (C) in the upper right.
- Use the X-GLASS on the left window to locate the CELL’S KEY, examine it to trigger a new task (D).
- Click on the ring.
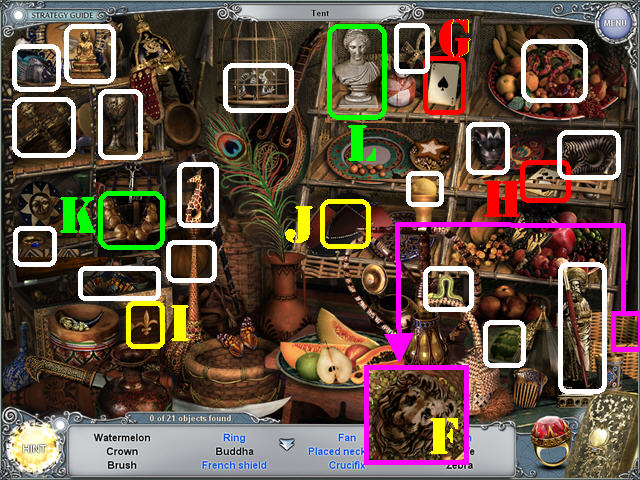
- Go to the Gate and play the Hidden Object Scene.
- Open and close the 4 baskets, the curtain, and the chest to view all available items.
- Examine the basket in the lower right; take the LION HEAD (F).
- Place the ACE OF CLUBS (G) on the 10 OF CLUBS (H) to create BLACKJACK.
- Put the FLEUR-DE-LIS (I) on the SHIELD (J) to create the FRENCH SHIELD.
- Grab the NECKLACE (K) behind the curtain and place it on the BUST (L) to create the PLACED NECKLACE.
- The LION HEAD will be added to inventory.
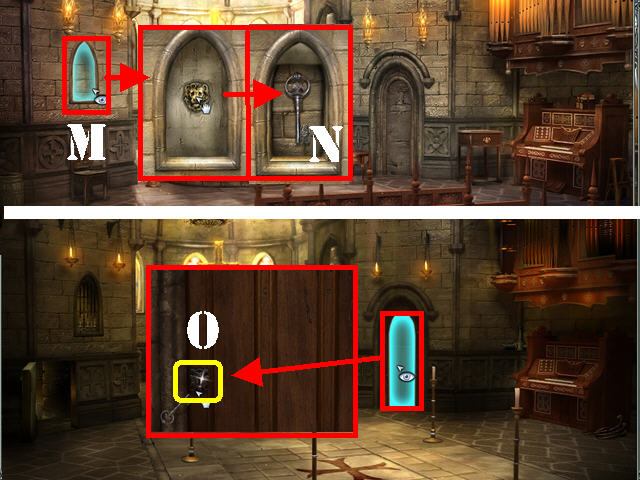
- Return to the Temple and click on the ring.
- Examine the recess on the left side of the wall (M).
- Place the LION HEAD in the recess and grab the KEY (N).
- Return to the past.
- Examine the right door; unlock it with the KEY (O).
- Enter the Cell.
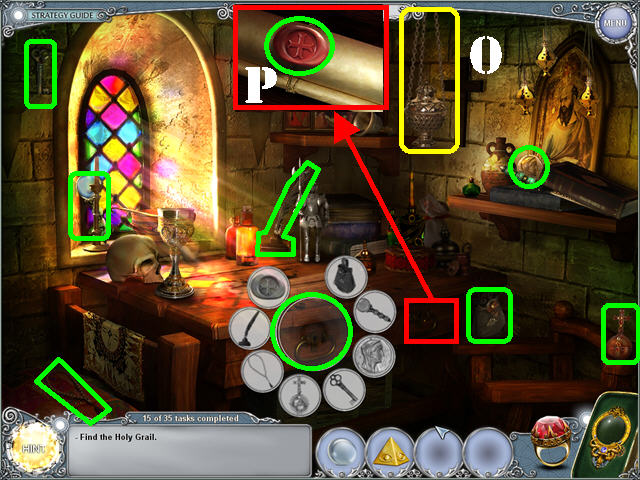
- Open the DRAWER KEY OBJECT.
- Grab the CENSER (O) in the upper right.
- Open the right drawer; take the SEAL (P) and place it in the key object.
- Place the items marked in green into the key object.
- Open the left drawer; click on the BOOK and it will land on the desk.
- Open the book to trigger new tasks.
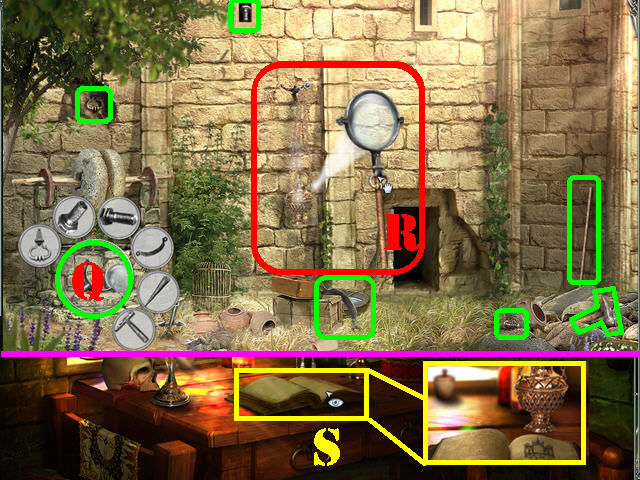
- Return to the Temple’s Wall.
- Place the CENSER on the hook on the wall.
- Place the LENS on the lens frame by the well (Q).
- Open the LENS KEY OBJECT.
- Place the items marked in green into the key object.
- Grab the large MAGNIFYING GLASS next to the well.
- Place the light of the MAGNIFYING GLASS so it shines on the censer; take the CENSER (R).
- Return to the Cell.
- Open the book and place the CENSER on the pages to reveal the text (S).
- Return to the Gate.
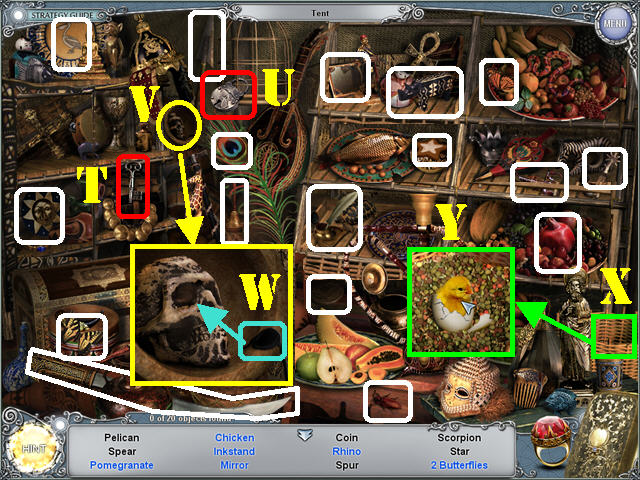
- Play the Hidden Object Scene.
- Grab the KEY (T) on the left and put it in the LOCK (U) to create the UNLOCKED LOCK.
- Examine the SKULL (V) in the upper left; place the EYEPATCH (W) on the skull to create the PIRATE’S SKULL.
- Zoom into the basket (X) on the right. Click on the egg twice to break it and obtain the CHICKEN (Y).
- The MIRROR will be added to inventory.
- Return to the Cell.
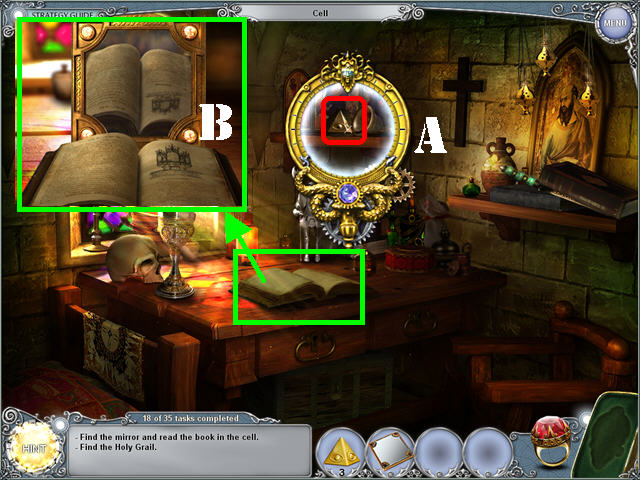
- Use the X-GLASS to grab the last EYE OF OMNISCIENCE (A).
- Examine the book; place the MIRROR on the book to view the pages (B).
- Click down to return to the Temple.
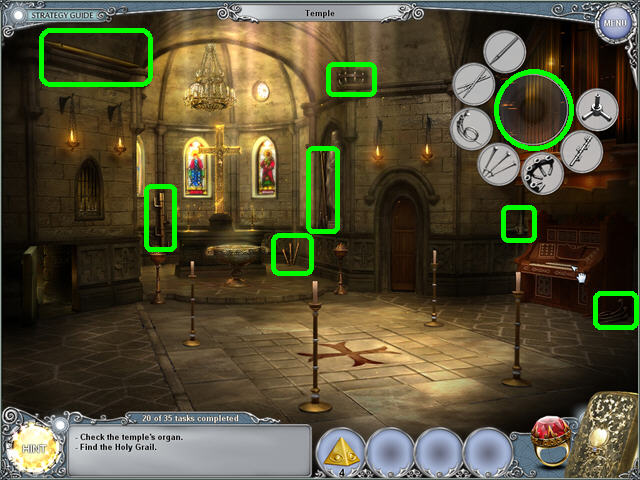
- Open the ORGAN KEY OBJECT.
- Place all the items highlighted in green into the key object.
- Click on the organ twice to trigger new tasks.
- Go to the future.
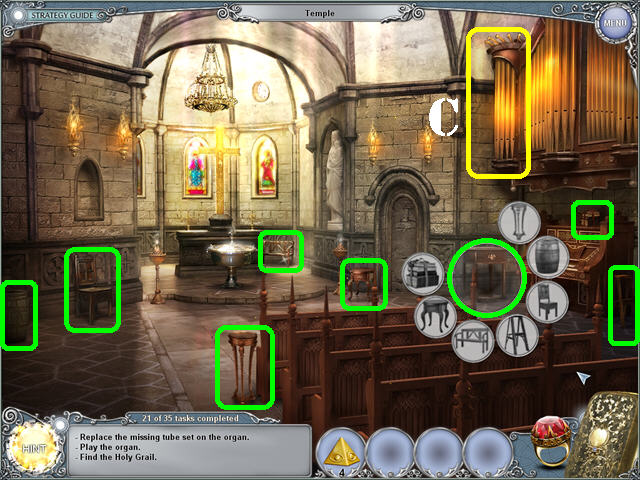
- Open the DESK KEY OBJECT.
- Place all the items highlighted in green into the key object.
- Grab the ORGAN PIPE (C) in the upper right.
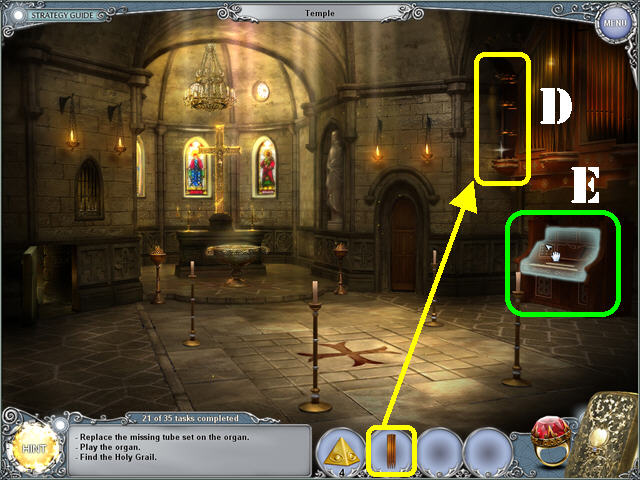
- Return to the past.
- Put the ORGAN PIPE next to the other pipes (D).
- Examine the ORGAN to trigger a task (E).
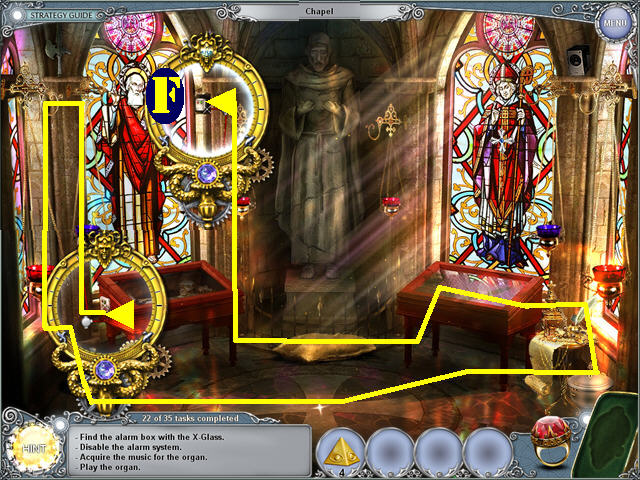
- Go to the Chapel in the future.
- Examine the left case to trigger tasks.
- Trace the X-GLASS through the room starting in the lower left corner as shown by the yellow line in the screenshot.
- Click on the alarm system at the end of the yellow line to activate a key object (F).
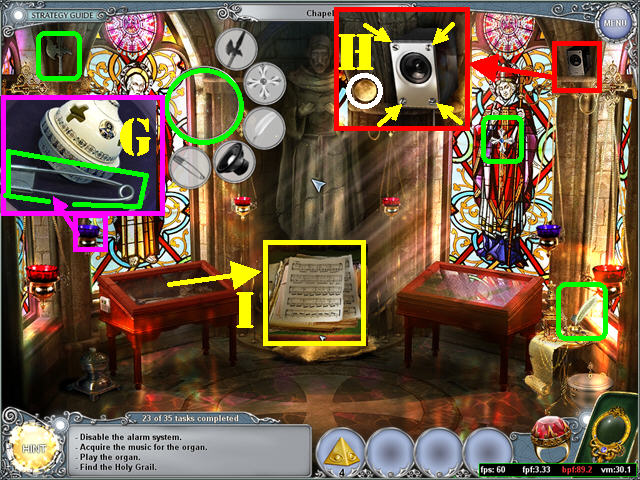
- Open the KEY OBJECT.
- Examine the blue censer hanging on the left; take the SAFETY PIN (G) and place it in the key object.
- Examine the speaker in the upper right; use the COIN to remove the 4 screws (H).
- Remove the cover; take the SPEAKER and place it in the key object.
- Place all the items highlighted in green into the key object.
- Examine the left display case; take the MUSIC (1).
- Return to the past Temple.
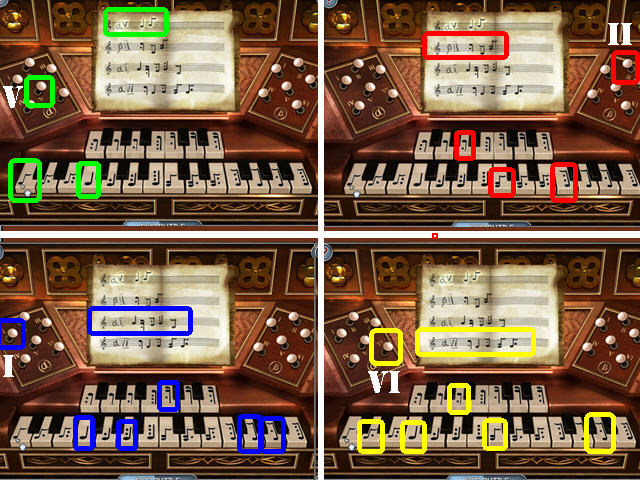
- Zoom into the organ.
- Place the MUSIC on the piano to activate a puzzle.
- You must play the music on the sheet using the code provided.
- There are 2 symbols on each side of the controls (A and B). To play the music from a line choose the letter on that sheet, then click on the keys in the order shown.
- Follow the same steps as above until all lines have been reproduced. Please look at the screenshot for the solution.
- The Secret Room is now available.
- Go down to the secret room through the hole that opened up in the ground of the Temple.
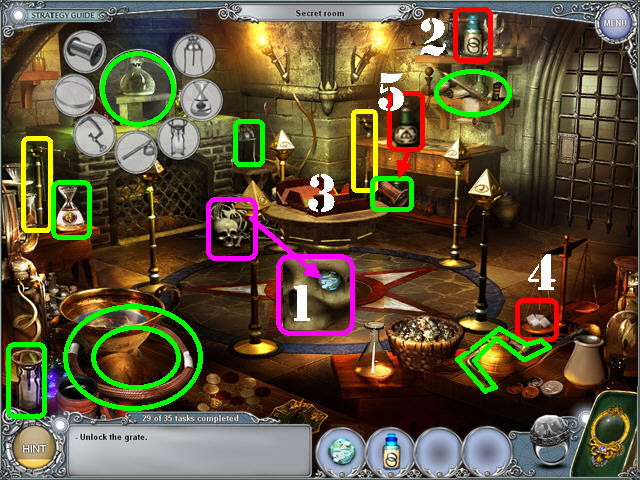
- Place the 2 pillars marked in yellow into the spots in the center.
- Place the 4 EYES OF OMNISCIENCE above each of the 4 pillars.
- Examine the skeleton on the floor; take the GEM (1).
- Take the BOTTLE (2) in the upper right.
- Click on the box on the ground to raise it (3).
- Examine the box; click on the document to trigger a task.
- Take the SUGAR (4) on the lower right.
- Open the FLASK KEY OBJECT.
- Place all the items highlighted in green into the key object.
- Take the BOTTLE (5) on the shelf (it only appears after the spool has been picked up).
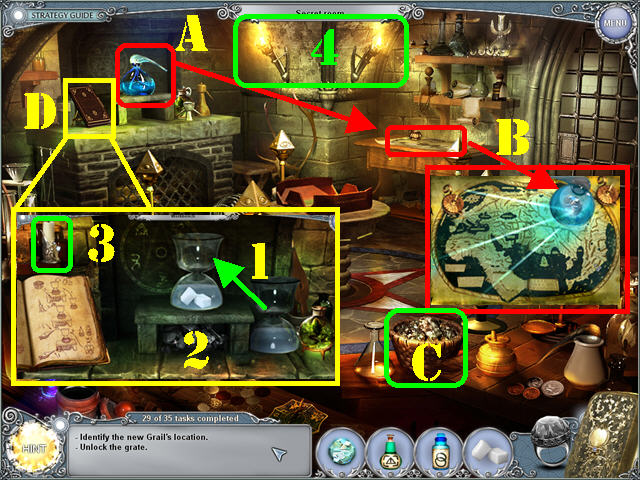
- Drag the FLASK (A) over to the map on the right (B).
- Take the CANDLE from the left side and place it next to the flask.
- Place the GEM into the flask.
- Close the pop-up window.
- Grab the COAL (C) in the lower right.
- Open the STRANGE BOOK (D) on the left and click on it to access the Workbench.
- Hover your mouse over the book for a closer look.
- Place the FLASK (1) above the fireplace.
- Put the SUGAR into the flask.
- Place the COAL (2) into the fireplace.
- Take the CANDLE in the upper left (3).
- Exit the Workbench.
- Light the CANDLE in one of the torches in the upper center (4).
- Return to the Workbench.
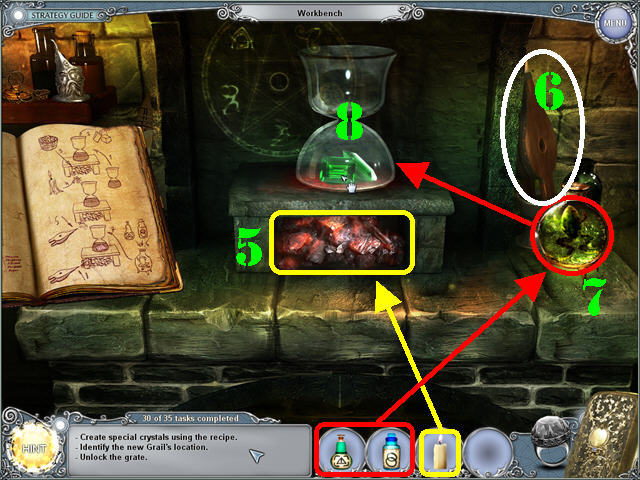
- Place the LIT CANDLE on the coals (5).
- Grab the BELLOWS (6) on the right and place it on the coals.
- The SUGAR CUBES have turned into crystals.
- Place the 2 BOTTLES into the flask with the frog (7).
- Place the small flask into the larger flask.
- Use the BELLOWS on the coals one more time.
- Take the CRYSTALS inside the flask (8).
- Exit the Workbench.
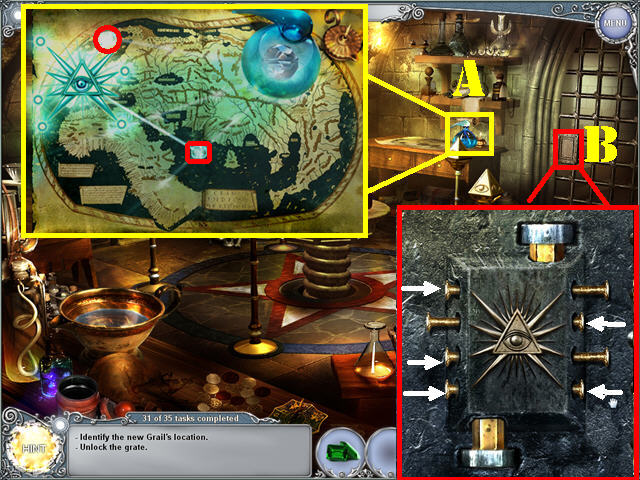
- Zoom into the map on the right (A).
- Put the CRYSTALS on the map.
- Position the 2 CRYSTALS as shown in the screenshot.
- Note the positions of the dots next to the rays by the eye. You will need that combination to solve the next puzzle.
- Click on the gate on the right to activate a puzzle (B).
- Click on the pins marked in the screenshot to solve the puzzle.
- Go through the gate.
Chapter 3: Scotland
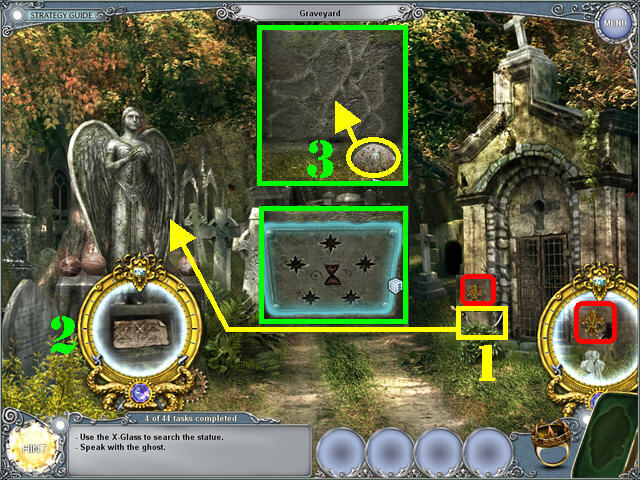
- Talk to the Monk.
- Go forward to the Graveyard.
- Grab the SICKLE (1) in the lower right.
- Cut the branches over the statue on the left with the SICKLE until all the branches are gone.
- Use the X-GLASS on the areas marked in red; take the 2 LILIES.
- Place the X-GLASS at the base of the statue; click on the base again for a closer look (2).
- Use the STONE (3) on the base 4 times to reveal a puzzle.
- Click on the puzzle to trigger new tasks.
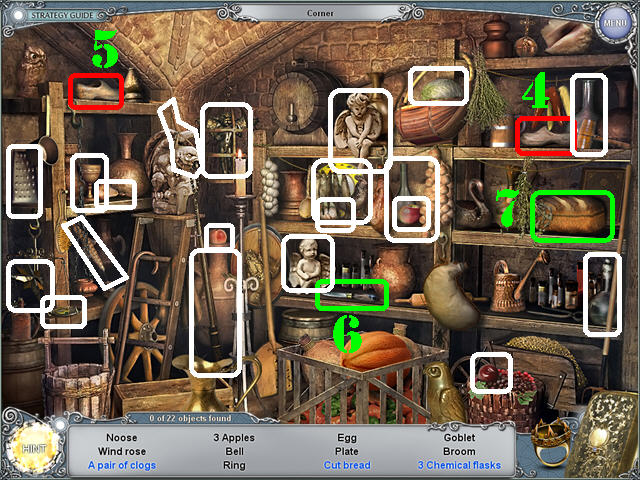
- Return to the Square and talk to the Monk to trigger another task.
- Go through the left door to reach the Dungeon.
- Play the Hidden Object Scene.
- Slide the doors on the shelves to view all available items.
- Grab the CLOG (4) in the upper right and place it next to the other CLOG (5) in the upper left to create A PAIR OF CLOGS.
- Take the KNIFE (6) behind the lower left shelf and place it on the BREAD (7) in the upper right shelf to create the CUT BREAD.
- The WIND ROSE will be added to inventory.
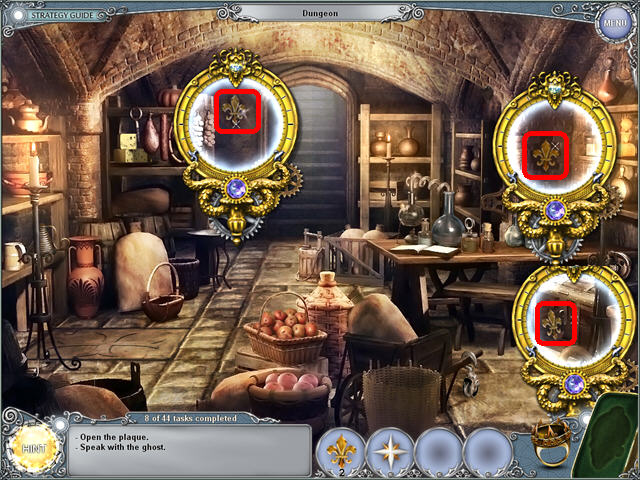
- Use the X-GLASS on the 3 spots marked in red and grab the 3 LILIES.
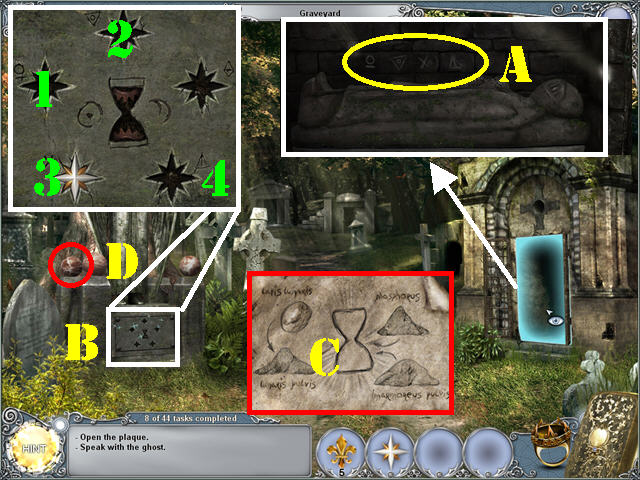
- Return to the Graveyard.
- Click on the gate on the right (note the symbols engraved at the bottom; you need the sequence to solve the next puzzle) (A).
- Examine the base of the statue (B).
- Place the WIND ROSE into any of the slots.
- Move the WIND ROSE to the spots shown in the crypt.
- Examine the base of the statue after the puzzle has been solved (note the blueprint images showing what you need next) (C).
- Grab the MARBLE GLOBE by the statue (D).
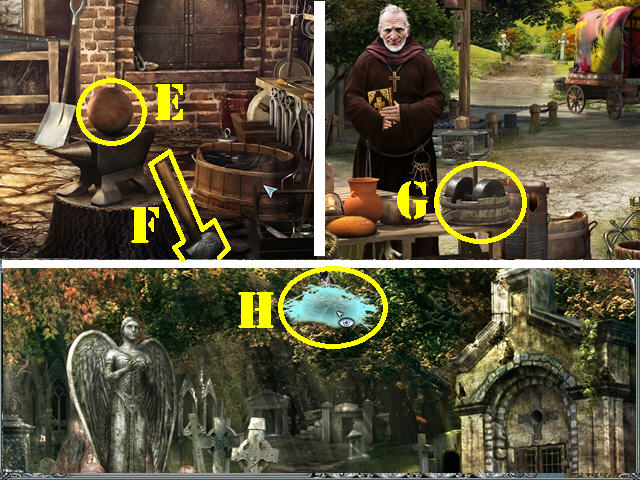
- Return to The Square and go into the Blacksmith’s door on the far right.
- Place the MARBLE GLOBE on the anvil (E).
- Grab the HAMMER (F) next to the anvil and place it on the globe 3 times.
- Take the MARBLE PIECES on top of the anvil.
- Return to the Square.
- Place the MARBLE PIECES in the handmill (G) to create the MARBLE DUST.
- Talk to the Monk to trigger a new task.
- Return to the Graveyard.
- Click on the nest (H) in the upper center to trigger new tasks.
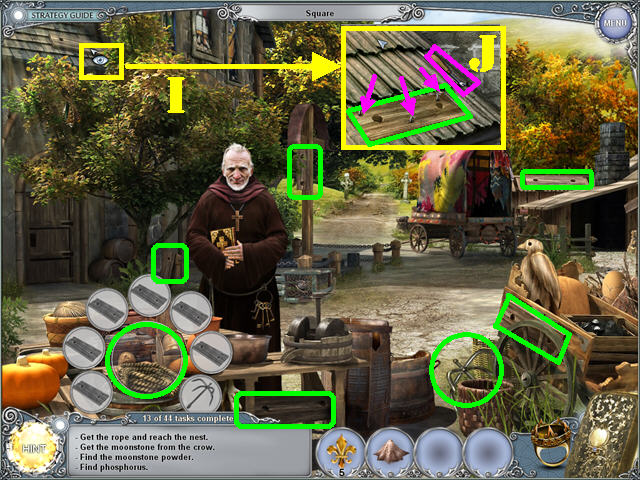
- Return to the Square.
- Open the KEY OBJECT in the lower left.
- Examine the roof in the upper left (I).
- Use the NAIL PULLER (J) to remove the 3 nails; take the PLANK and place it in the key object.
- Place all the items highlighted in green into the key object.
- Take the ROPE LADDER.
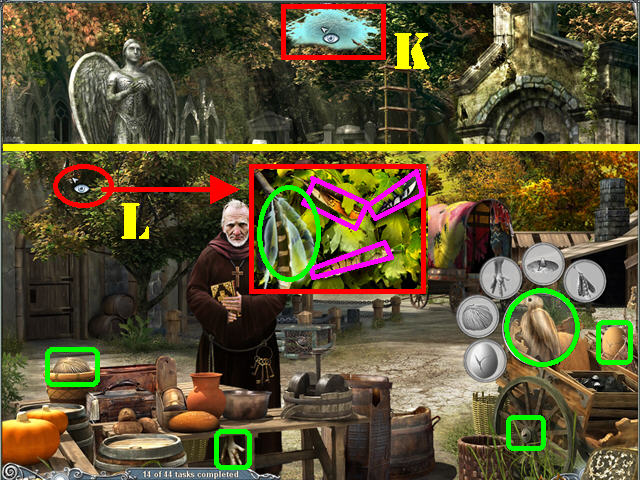
- Return to the Graveyard.
- Place the ROPE LADDER on the nest (K).
- Click on the nest to trigger new tasks.
- Return to the Square.
- Open the WOODEN BIRD KEY OBJECT.
- Examine the feathers in the upper left (L).
- Place the 3 FEATHERS marked in magenta into the silhouettes.
- Take the FEATHERS and place them in the key object.
- A search scene is triggered after the key object has been solved.
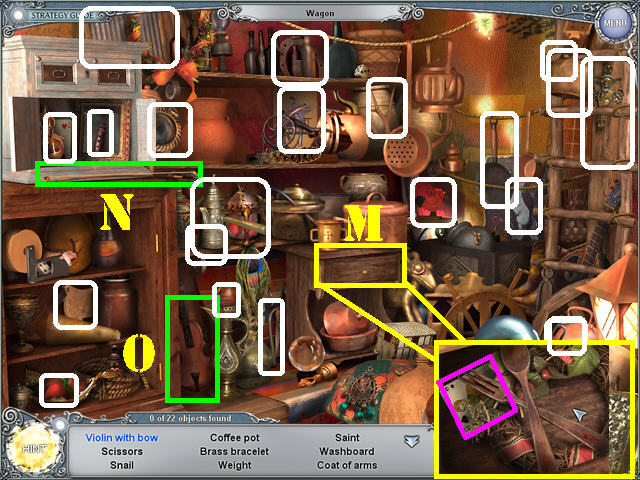
- Play the search scene by the wagon.
- Open the cabinets on the left to view all available items.
- Open the drawer in the center (M) take the CARD.
- Grab the BOW (N) and place it on the VIOLIN (O) to create the VIOLIN WITH BOW.
- The HUNTER’S WHISTLE will be added to inventory.
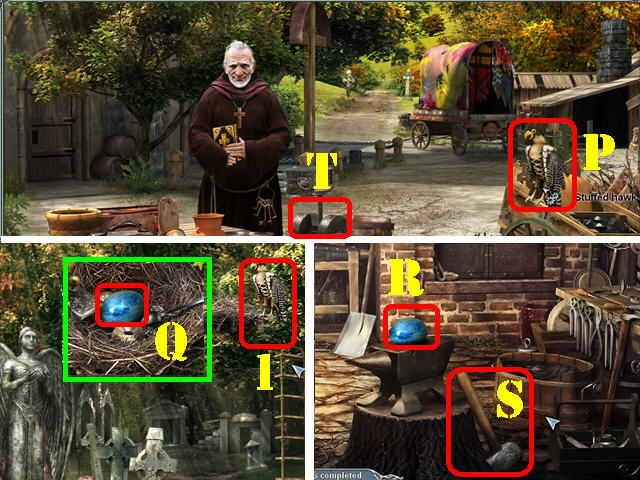
- Place the HUNTER’S WHISTLE on the STUFFED HAWK (P) to add it to inventory.
- Return to the Graveyard.
- Place the STUFFED HAWK on the nest (1).
- Examine the nest and take the MOONSTONE (Q).
- Return to the Blacksmith.
- Place the MOONSTONE on the anvil (R).
- Grab the HAMMER (S) next to the anvil and place it on the MOONSTONE 3 times.
- Take the MOONSTONE PIECES on top of the anvil.
- Return to the Square.
- Place the MOONSTONE PIECES on the handmill (T) to create the MOONSTONE DUST.
- Return to the Dungeon.
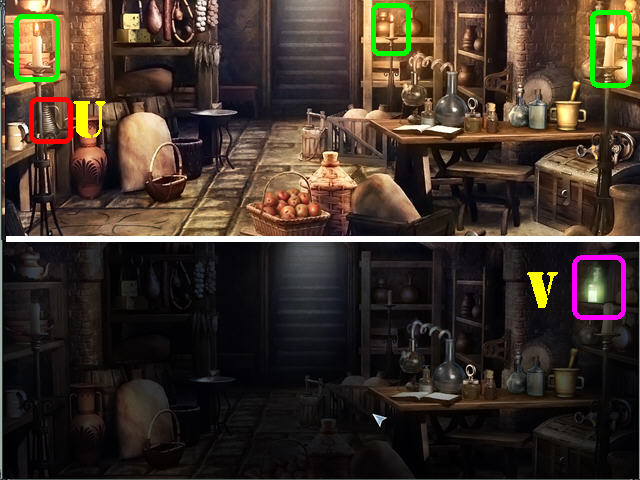
- Grab the CANDLE SNUFFER (U) on the left and place it over the 3 candles marked in green to turn off the lights.
- Grab the PHOSPHOROUS in the upper right (V).
- The PHOSPHOROUS, MOONSTONE DUST, and the MARBLE DUST will combine to create the POWDER MIX.
- Return to the Square and talk to the Monk to trigger new tasks.
- Return to the Blacksmith.
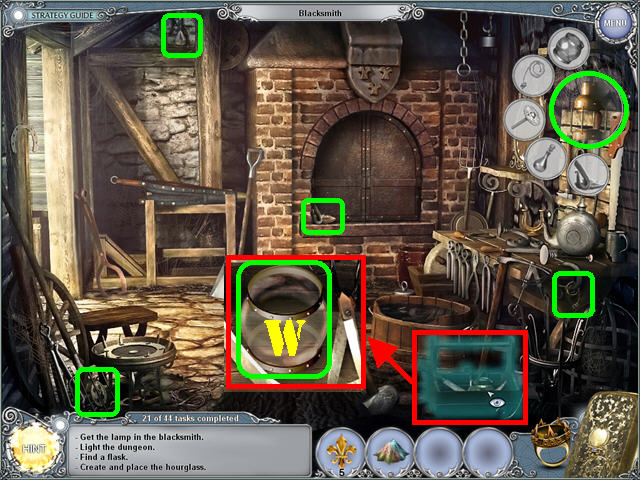
- Open the LAMP KEY OBJECT.
- Examine the toolbox in the lower right; take the LAMP CHIMNEY (W) and place it in the key object.
- Place all the items highlighted in green into the key object.
- Take the LAMP.
- Return to the Dungeon.
- Place the LAMP over the 3 candles to light up the room and trigger a search scene.
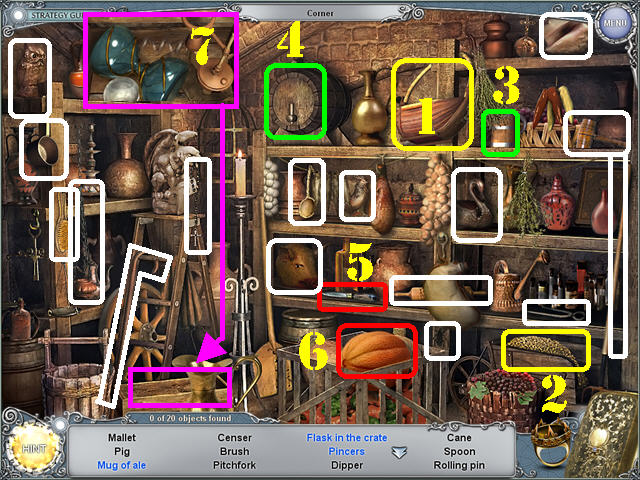
- Play the Hidden Object Scene.
- Place the BASKET (1) into the GRAIN (2) to create the BASKET WITH GRAIN.
- Grab the MUG (3) and place it on the BARREL (4) to create the MUG OF ALE.
- Put the KNIFE (5) on the PUMPKIN (6) to create the HALF PUMPKIN.
- Open the CRATE in the lower left and take the FLASK to eliminate the FLASK IN THE CRATE from the list (7).
- The FLASK will be added to inventory.
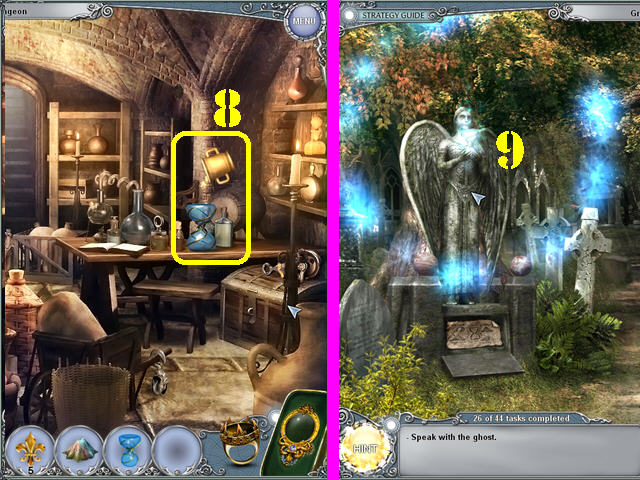
- Place the POWDER MIX into the mortar and pestle on the dungeon’s table (8).
- Place the FLASK on the mortar and pestle to create the HOURGLASS.
- Return to the Graveyard.
- Give the HOURGLASS to the statue (9).
- Click on the hourglass to turn day into night.
- Go to the Square.
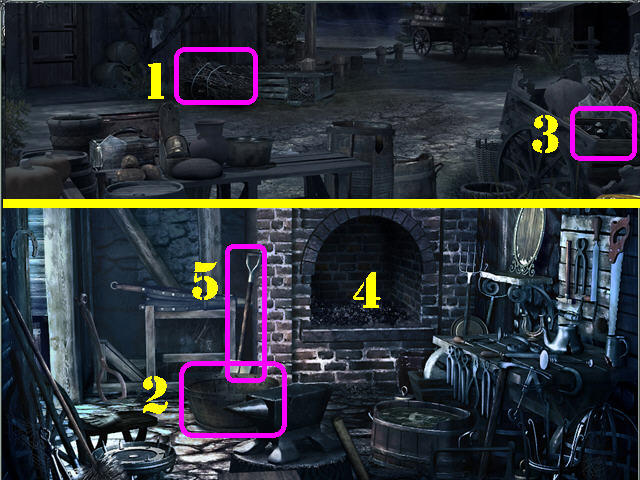
- Grab the BRUSHWOOD (1) on the ground.
- Go into the Blacksmith’s.
- Grab the COAL BASKET (2) on the ground.
- Return to the Square.
- Place the COAL BASKET on the COAL (3) in the lower right to create the FULL BASKET.
- Return to the Blacksmith’s.
- Place the FULL BASKET in the forge (4).
- Grab the SHOVEL (5) next to the forge and place it in the COAL BASKET 3 times.
- Return to the Graveyard.
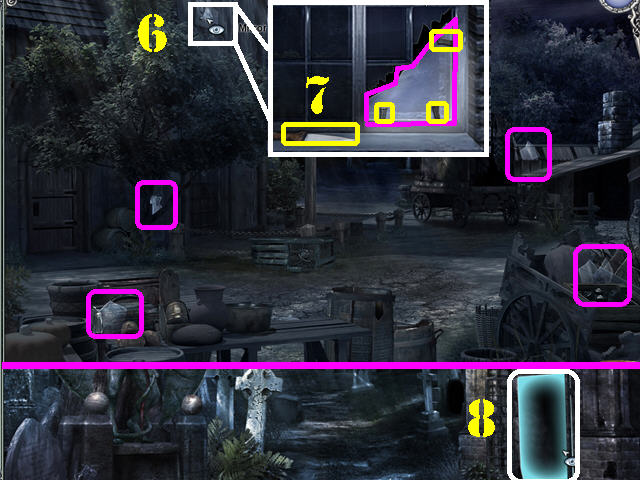
- Zoom into the crypt on the right to trigger tasks (8).
- Return to the Square.
- Examine the upper left window (6).
- Use the KNIFE (7) to remove the nails; take the MIRROR SHARD.
- Grab the 4 MIRROR SHARDS marked in magenta.
- Return to the Graveyard.
- Zoom into the crypt (8).
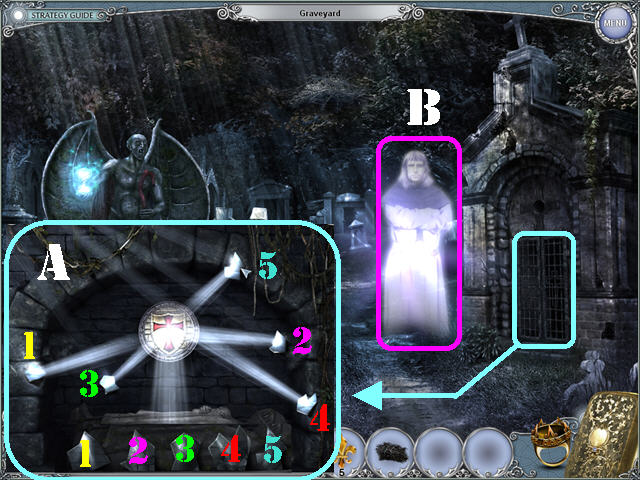
- Place the 5 MIRROR SHARDS at the bottom of the crypt to trigger a puzzle.
- Place the MIRROR SHARDS as shown in the screenshot (A).
- Talk to the ghost (B).
- Click on the statue’s HOURGLASS to return to daylight.
- Return to the Blacksmith’s.
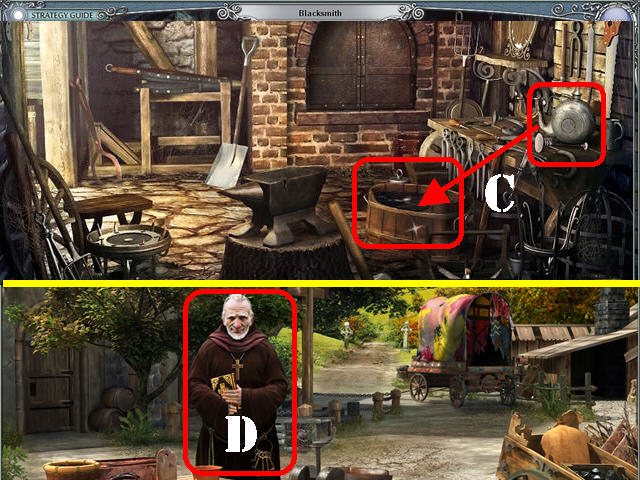
- Place the FLASK in the BARREL OF WATER to add it to your inventory (C).
- Return to the Square.
- Give the FLASK to the Monk to receive the FLASK WITH HOLY WATER (D).
- Return to the Graveyard and click on the HOURGLASS to return to darkness.
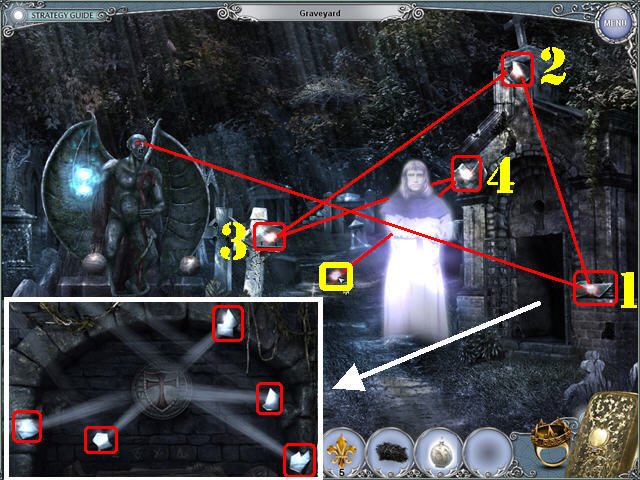
- Give the FLASK WITH HOLY WATER to the devil statue. The devil’s eyes will shine on a spot in the lower right.
- Zoom into the crypt; grab the 5 MIRROR SHARDS.
- Place the MIRROR SHARDS in the scene in the order shown in the screenshot.
- Return to daylight.
- Go to the Square and play the Hidden Object Scene.
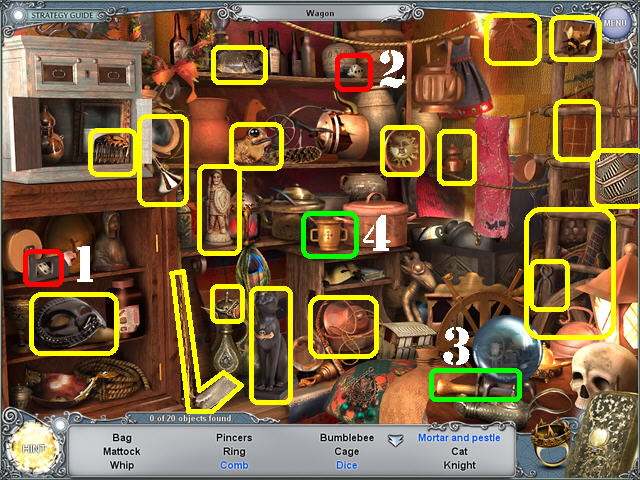
- Open the cabinet in the lower left; grab the DIE (1) and place it next to the other DIE (2) to create the DICE.
- Grab the PESTLE (3) and place it on the MORTAR (4) to create the MORTAR AND PESTLE.
- The MATTOCK will be added to inventory.
- Return to the Graveyard at night.
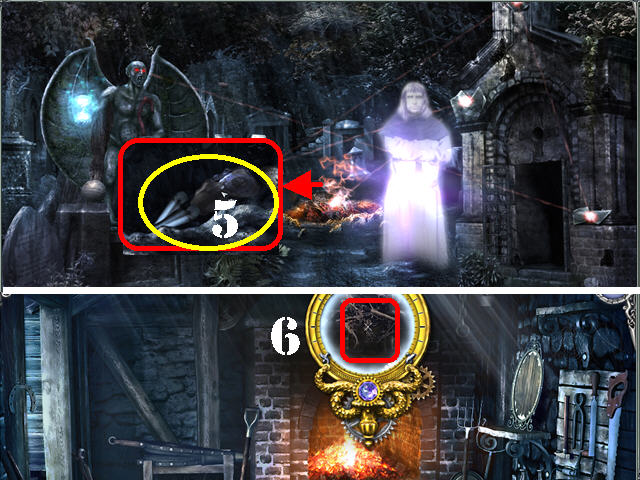
- Use the MATTOCK on the patch of dirt in the lower center.
- Look inside the freshly-dug hole and grab the ARMOR (5).
- Place the BRUSHWOOD into the hole to enter the BURNING BRANCH into inventory.
- Return to the Blacksmith’s.
- Place the BURNING BRANCH into the fireplace.
- Use the X-GLASS on the spot above the fireplace (6).
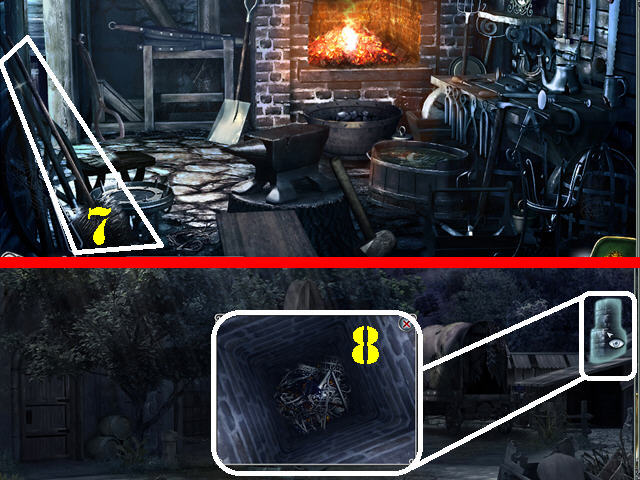
- Grab the BRUSH (7) in the lower left.
- Go to the Square.
- Examine the chimney; remove the debris with the BRUSH (8).
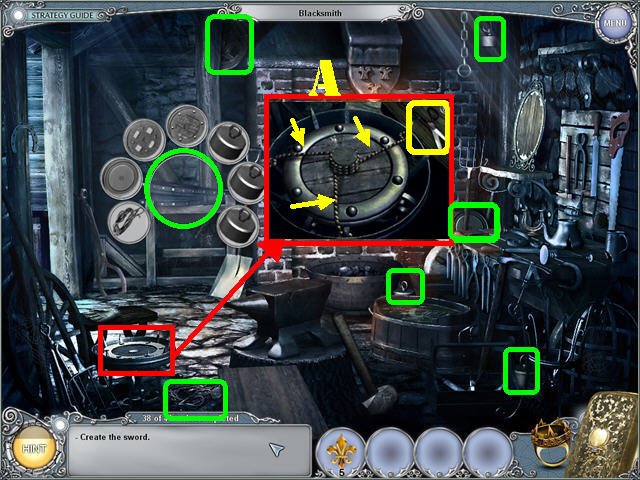
- Return to the Blacksmith’s.
- Place the ARMOR into the fireplace.
- Open the BELLOWS KEY OBJECT.
- Examine the wheel in the lower left (A).
- Use the SCISSORS next to the wheel to cut all 3 ropes around the WHEEL.
- Place the WHEEL into the key object.
- Place all the items highlighted in green into the key object.
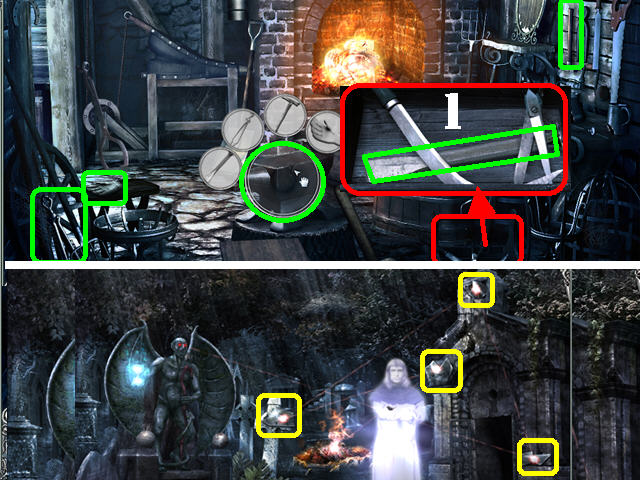
- Open the ANVIL KEY OBJECT.
- Look in the toolbox in the lower right; take the CHISEL (1) and place it in the key object.
- Place all the items highlighted in green into the key object.
- Return to the Graveyard.
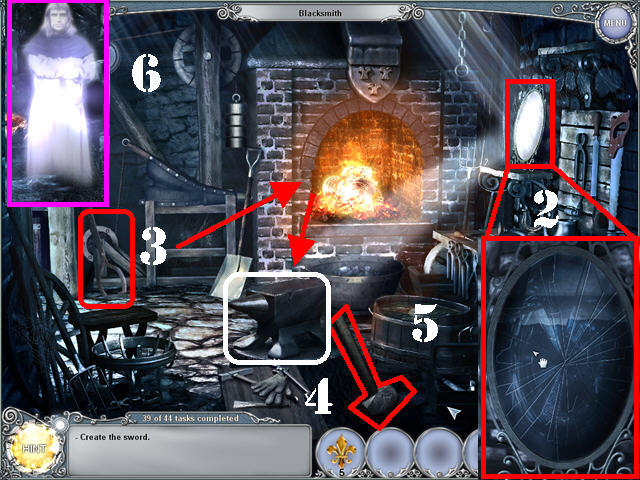
- Grab the 4 MIRROR SHARDS marked in yellow.
- Return to the Blacksmith’s.
- Zoom into the mirror; place the MIRROR SHARDS on the broken mirror to activate a puzzle.
- Place the mirror shards into the right spots.
- Correct pieces will lock in place (2).
- Use the TONGS (3) to grab the RED HOT ARMOR from the fire and place it on the anvil.
- Use the HAMMER (4) on the armor 2 times.
- Grab the SWORD with the TONGS and dip it in the water (5) to add it to your inventory.
- Go to the Graveyard.
- Give the SWORD to the Ghost (6).
- Return to daylight.
- Talk to the Monk in the Square to trigger a new task.
- Return to the Dungeon.
- Use the X-GLASS on the lower left side of the ground to reveal a chest.
- Open the KEY OBJECT in the lower left (A).
- Examine the bucket (B) on the ground; take the BORING TOOL and place it in the key object.
- Examine the area above the chest on the right (C); assemble the items as shown in the screenshot and place the PULLEY into the key object.
- Place all the items highlighted in green into the key object.
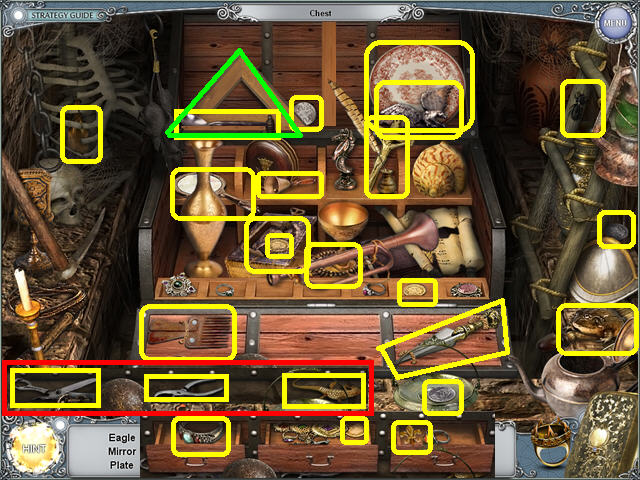
- Examine the hole in the ground in the Dungeon to activate a search scene.
- Open and close the drawers to find all available items.
- The LILY will be added to inventory.
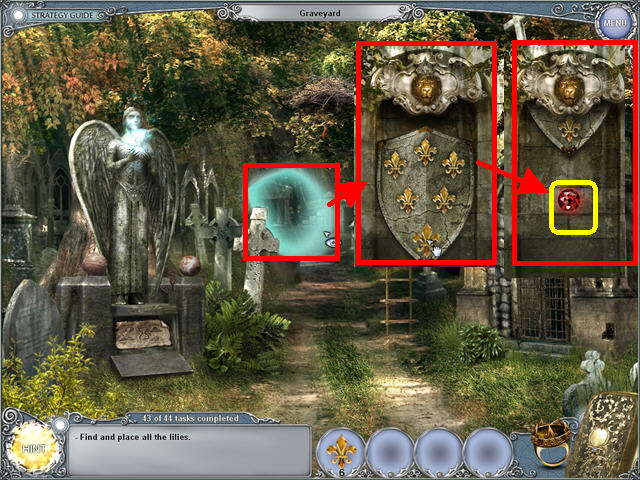
- Return to the Graveyard.
- Examine the door in the back of the scene.
- Place the 6 LILIES into the right spots.
- Click on the RED GEM (D) to end the chapter and travel to Mexico.
Chapter 4: Yucatan, Mexico
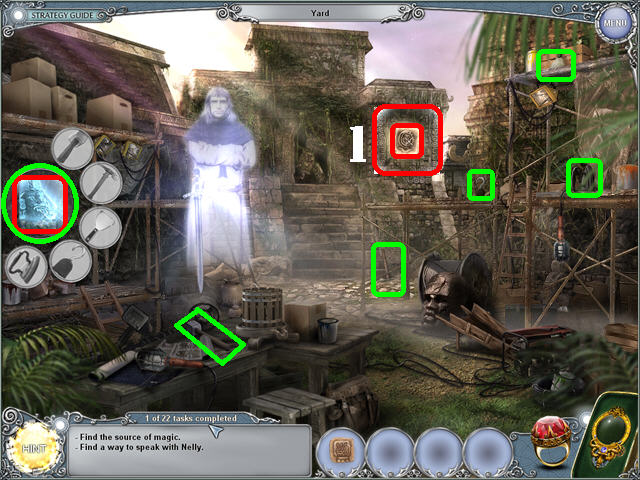
- Head left toward the Yard.
- Talk to the Ghost.
- Use the X-GLASS on the spot shown in red (1); take the STONE TILE 1/4.
- Use the X-GLASS on the left side of the wall to activate a key object.
- Open the DOOR KEY OBJECT.
- Place all the items highlighted in green into the key object.
- Click on the left door to see the idol.
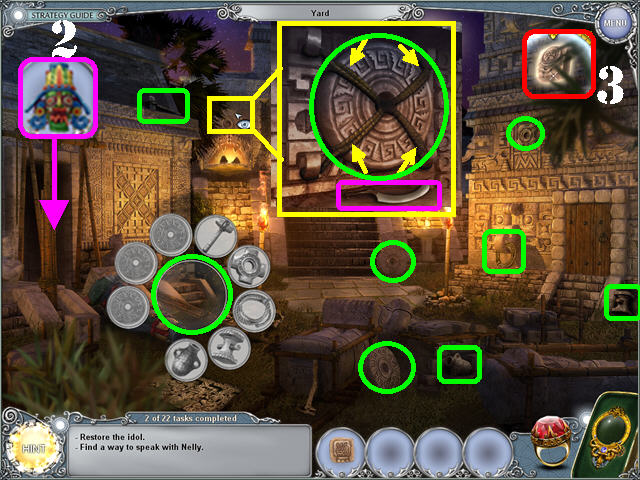
- Go to the past.
- Open the KEY OBJECT in the lower left.
- Examine the WHEEL in the upper left.
- Cut the ropes attached to the wheel with the KNIFE; take the WHEEL and place it in the key object.
- Place all the items highlighted in green into the key object.
- Take the IDOL’S HEAD on the left side of the wall (2).
- Place the X-GLASS in the upper right; take the STONE TILE 2/4 (3).
- Click down to enter the Square.
- Grab the TOMATOES (4) in the lower right.
- Click on the ring to return to the future; return to the Yard.
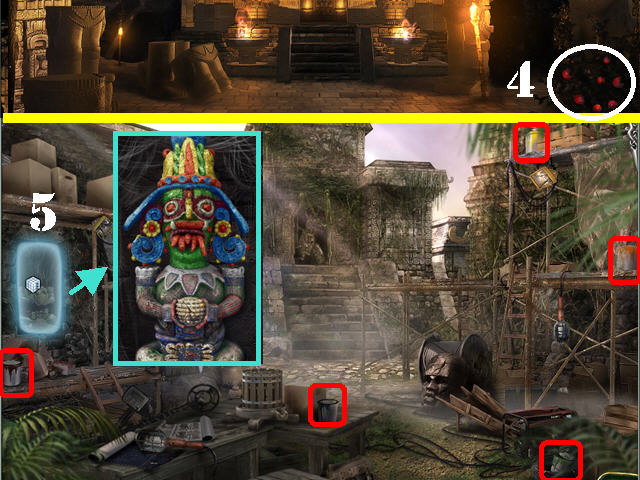
- Examine the left wall (5).
- Place the IDOL’S HEAD on the statue to trigger a task.
- Grab the 5 PAINTS marked in red in the scene.
- A search scene will be activated after you find all the paint.
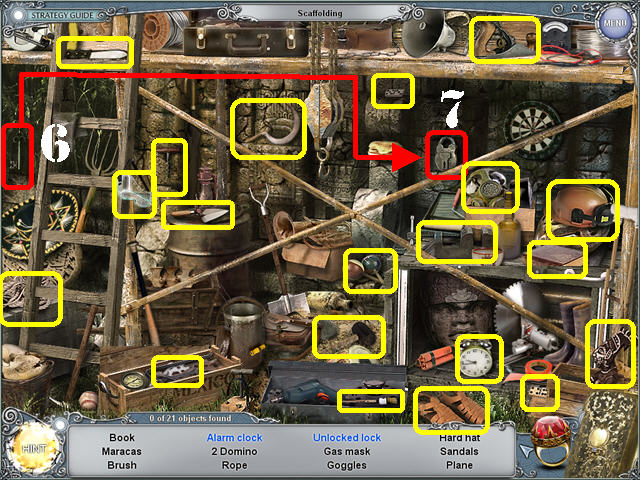
- Play the search scene.
- Open the crate on the right and the 2 boxes in the lower center to view all items.
- Grab the KEY (6) on the left and place it on the LOCK (7) to create the UNLOCKED LOCK.
- The BRUSH will be added to inventory.
- The BRUSH and PAINTS will merge in your inventory.
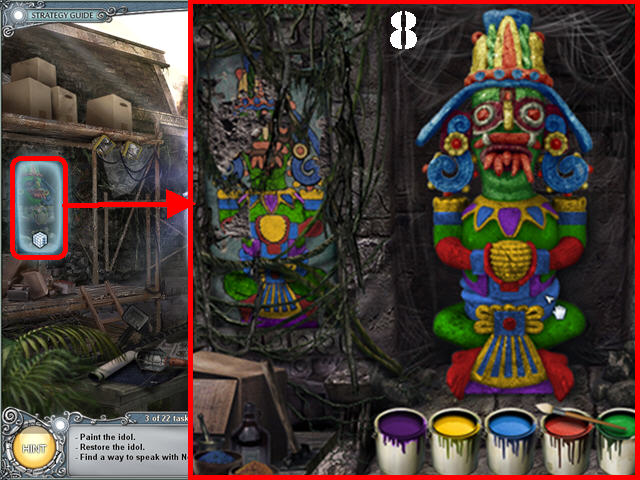
- Examine the idol on the left.
- Place the PAINTS on the idol to activate a puzzle.
- Dip the brush into a color to add it to your cursor.
- Place the color of your choice into the desired area on the idol
- Right-click on the brush to put it back down.
- To correct an area just put on a new color.
- Please look at the screenshot for the solution (8). The brush will return to the paint can when the idol has been painted correctly.
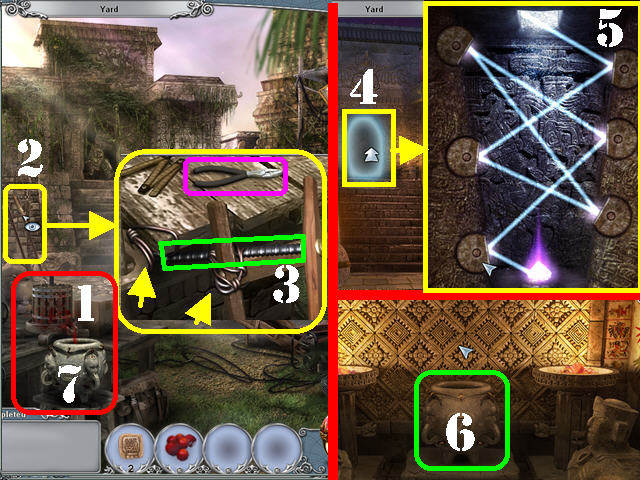
- Place the TOMATOES into the bucket (1).
- Examine the left ladder (2).
- Cut the 2 wires with the WIRE CUTTER.
- Grab the SCREW HANDLE (3) and place it on the bucket.
- If you click on the bucket, Tom will mention that you need something to collect juice in.
- Go to the past.
- Examine the door above the steps in the back of the scene (4).
- Move the circles until the lights shine to the bottom, as shown in the screenshot (5).
- Examine the door; take the POT (6).
- Return to the future.
- Place the POT on the bucket to create the POT WITH RED JUICE (7).
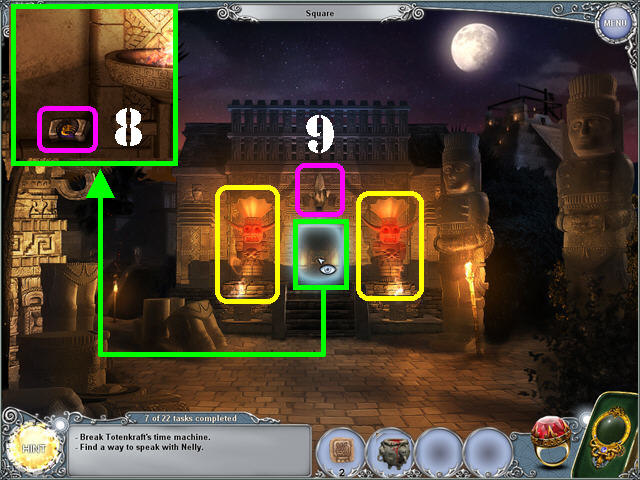
- Go to the past and go to the Square.
- Place the POT WITH RED JUICE on the 2 idols marked in yellow to trigger a new task.
- Examine the area above the steps; take the STONE SLAB 1/2 (8).
- Grab CORNCOB 1/2 above the building (9).
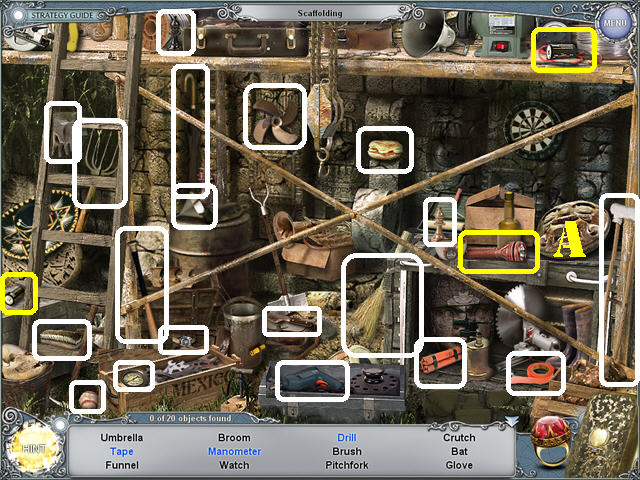
- Go to the Yard in the future.
- Play the Hidden Object Scene on the right.
- Grab the 2 BATTERIES marked in yellow and place them into the FLASHLIGHT (A) to create the WORKING FLASHLIGHT.
- The STONE SLAB 2/2 will be added to inventory.
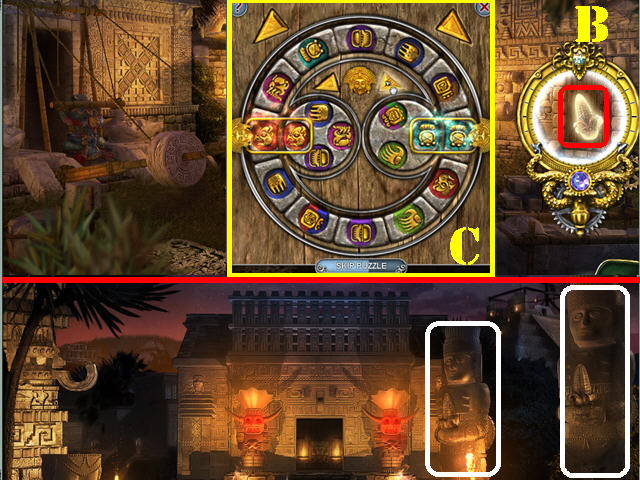
- Return to the past in the Yard.
- Use the X-GLASS on the right door to view a CORNCOB (B).
- Click on the door again; place the 2 STONE SLABS into the puzzle to activate it.
- Rotate the rings using the arrows until the symbols in the frame match the screenshot (C).
- Take CORNCOB 2/2 after the puzzle has been solved.
- Click down toward the Square.
- Place the 2 CORNCOBS in the hands of the 2 large idols marked in white.
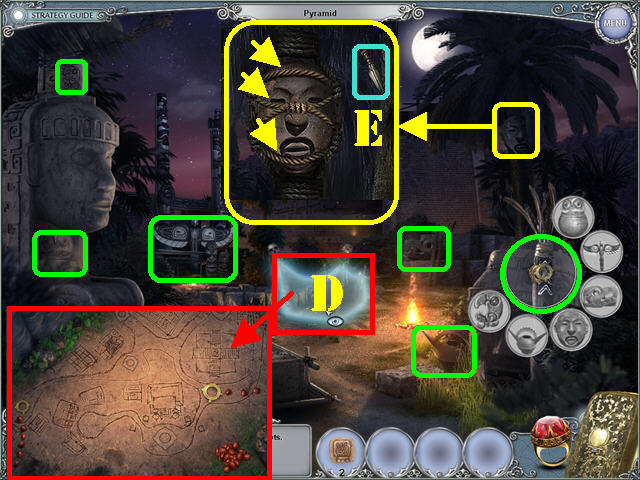
- Head right toward the Pyramid.
- View the map in the center (D).
- Open the KEY OBJECT in the lower right.
- Examine the MASK on the right; use the DAGGER (E) to remove the 3 ropes around the mask.
- Take the MASK and place it in the key object.
- Place all the items highlighted in green into the key object.
- Three RINGS will be added to inventory.
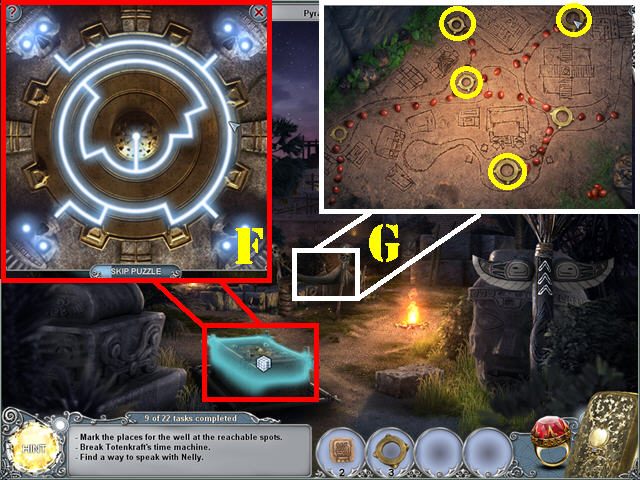
- Zoom into the crate in the lower left to access a puzzle.
- Move the rings until the lines are connected between the skulls and the central hub. Start from the center and work your way out (F).
- One RING will be added to inventory.
- Zoom into the map in the center (G).
- Place the 4 RINGS into the areas marked in yellow.
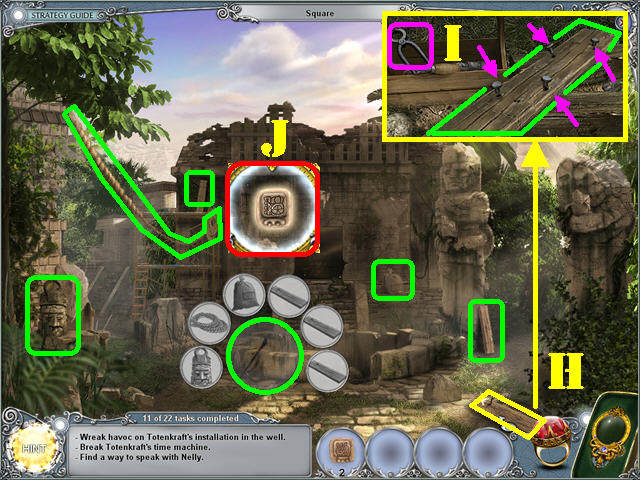
- Go to the Square in the future.
- Open the KEY OBJECT in the lower left.
- Examine the plank in the lower right (H).
- Remove the 4 nails with the PINCERS (I).
- Take the PLANK and place it in the key object.
- Place all the items highlighted in green into the key object.
- The HOOK will be added to inventory.
- Use the X-GLASS on the area marked in red; take STONE TILE 3/4 (J).
- Place the HOOK on the well; enter the well.
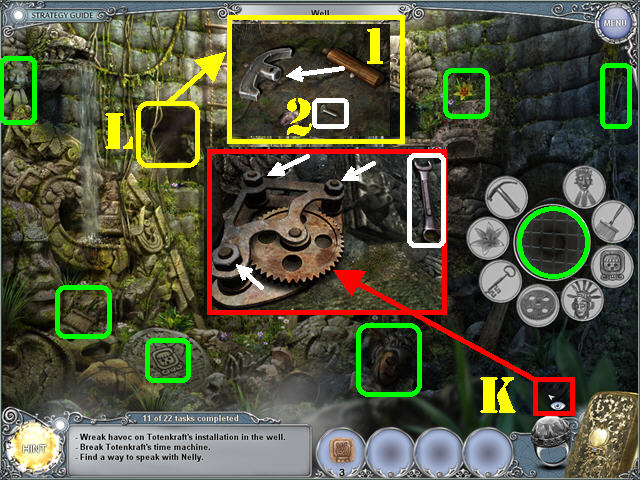
- Open the KEY OBJECT in the lower right.
- Examine the gear in the lower right (K).
- Remove the bolts with the WRENCH; take the GEAR and place it in the key object.
- Examine the left side of the wall (L).
- Assemble the hammer in the order shown in the screenshot.
- Take the HAMMER and place it in the key object.
- Place all the items highlighted in green into the key object.
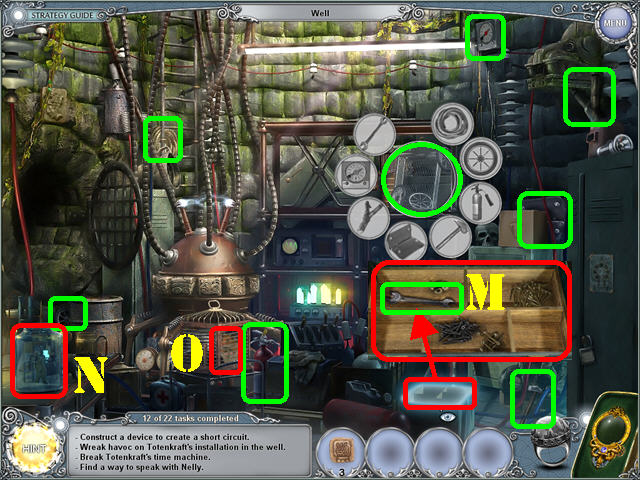
- Head right into the well.
- Open the KEY OBJECT.
- Examine the toolbox in the lower right; take the WRENCH (M) and place it in the key object.
- Place all the items highlighted in green into the key object.
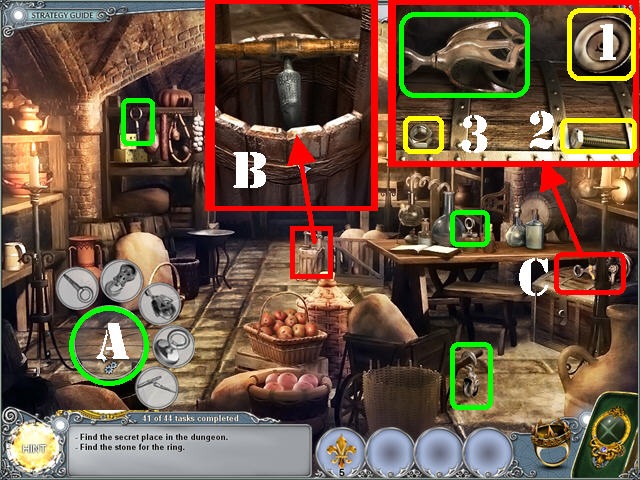
- Grab the JAR (N) in the lower left.
- Take the HAMSTER in the cage (O).
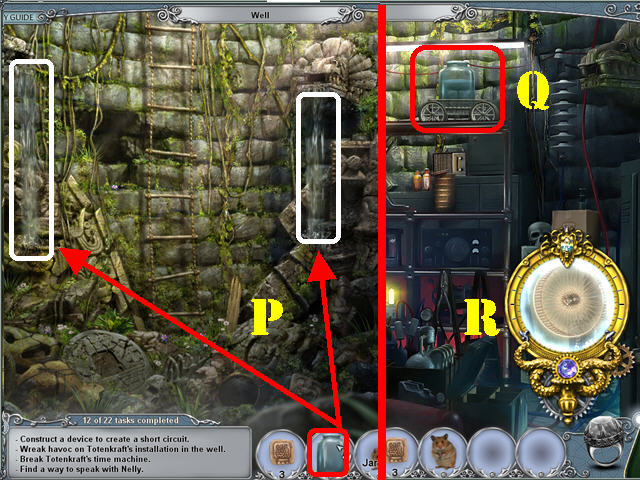
- Head left.
- Place the JAR on any of the 2 waterfalls to create the JAR WITH WATER (P).
- Head right.
- Place the JAR WITH WATER on the cart above the shelf (Q).
- Use the X-GLASS on the safe in the lower right to see the wheel and activate a search scene (R).
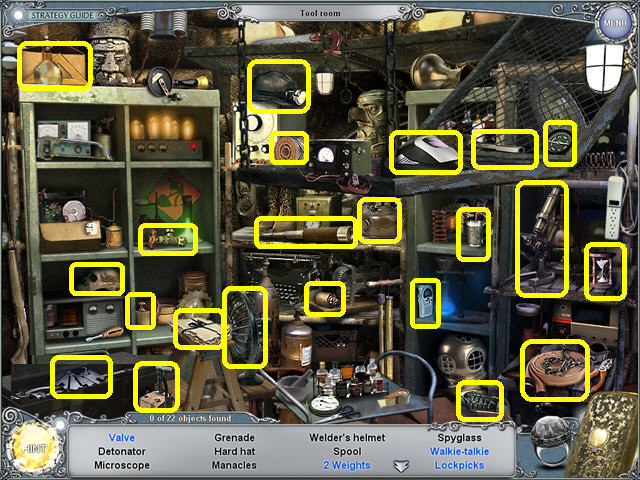
- Play the Hidden Object Scene by the locker.
- Open the chest in the lower left and the locker doors to view all items.
- The LOCKPICKS will be added to inventory.
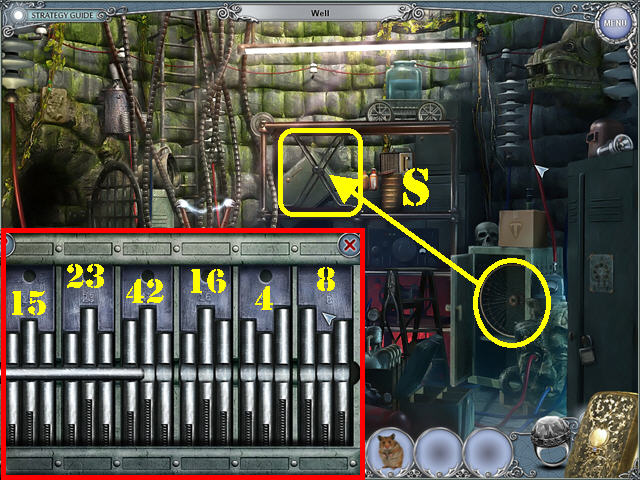
- Examine the safe in the lower right; place the LOCKPICKS on the safe to activate a puzzle.
- Click on any 2 locks to swap their positions.
- Arrange the locks in this order to solve the puzzle: 15, 23, 42, 16,4, and 8.
- Take the WHEEL inside the safe and place it on the contraption (S).
- Put the HAMSTER in the wheel to move the cart. Following, you will be transported to the other side of the well.
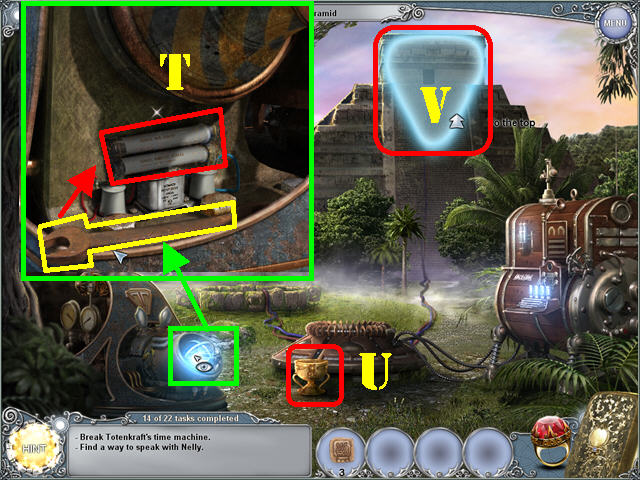
- Go to the Pyramid.
- Zoom into the machine in the lower left.
- Break the FUSES with the WRENCH (T).
- Take the GRAIL (U) in the lower center.
- Go to the Top (V).
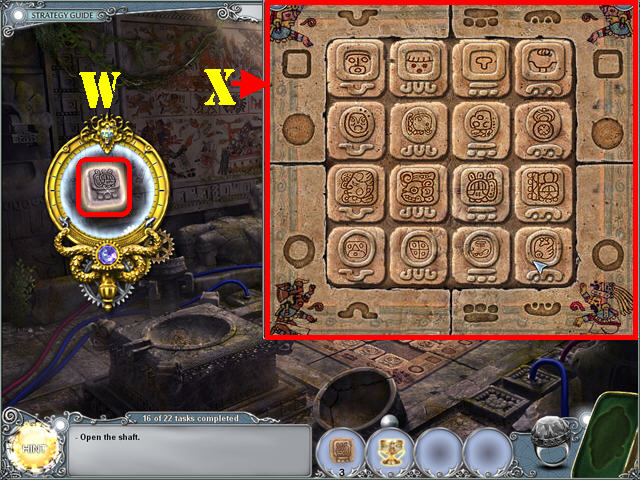
- Talk to Nelly.
- Place the X-GLASS on the left side of the wall; take STONE TILE 4/4 (W).
- Examine the floor; place the 4 STONE TILES on the puzzle to activate it.
- Arrange the tiles in the correct order using the symbols etched into the 4 sides of the puzzle.
- Click on any 2 tiles to switch their positions (X).
- Go to the Pyramid and talk to Nelly to trigger a task.
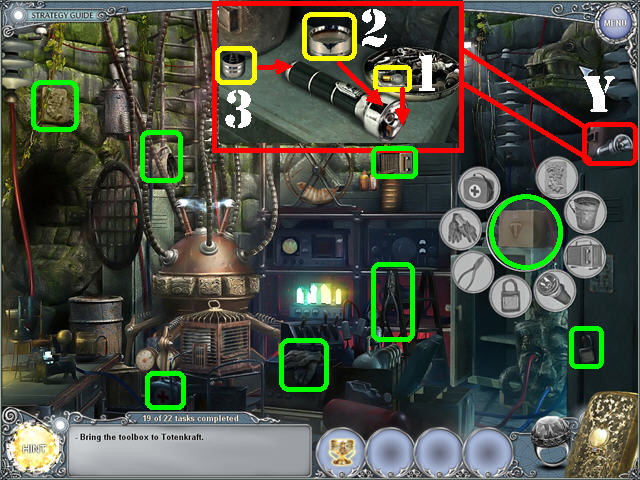
- Go into the well.
- Open the BOX KEY OBJECT.
- Grab the FLASHLIGHT (Y) in the upper right; assemble it as shown in the screenshot.
- Place the FLASHLIGHT in the key object.
- Place all the items highlighted in green into the key object.
- The BOX will be added to inventory.
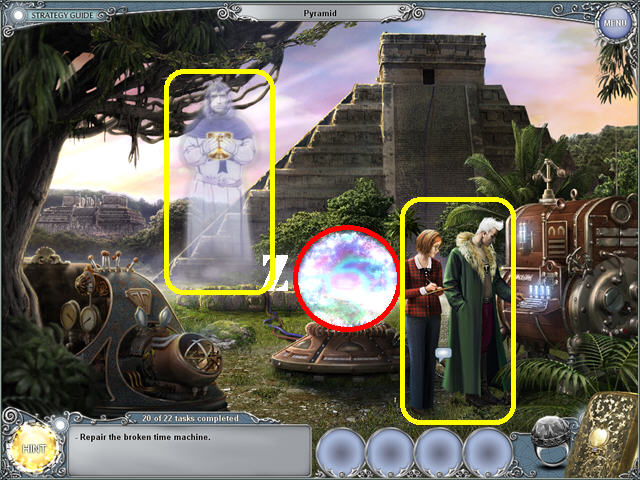
- Return to the Pyramid.
- Give the BOX to Nelly to create a force field.
- Place the GRAIL in the force field to summon a ghost (Z).
- Exhaust all conversation options to trigger a new task.
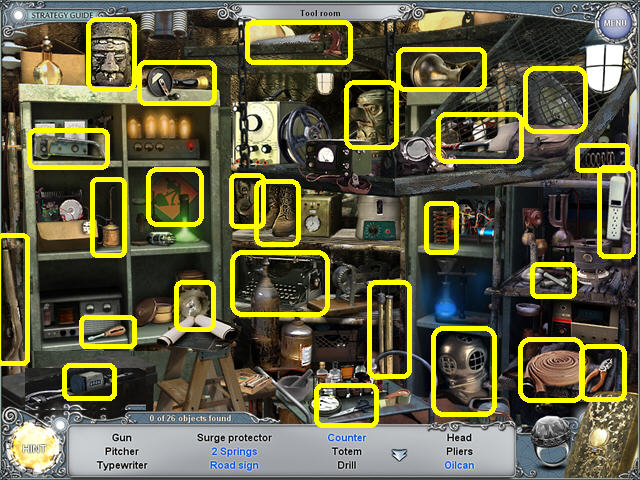
- Go into the well.
- Play the Hidden Object Scene.
- The SET OF FUSES will be added to inventory.
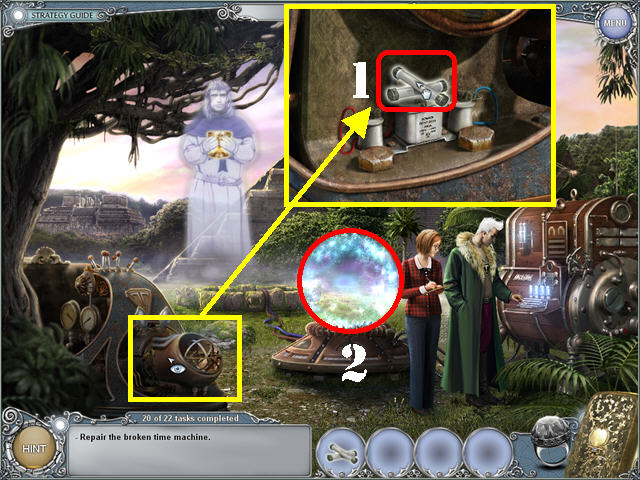
- Return to the Pyramid.
- Examine the broken time machine in the lower left (1).
- Place the SET OF FUSES on the broken time machine.
- The GRAIL returns to your inventory. Put it into the force field (2).
- Congratulations! You’ve Completed Treasure Seekers: The Time Has Come!
Created at: 2011-02-19

