

Walkthrough Menu
- General Tips
- Chapter 1: The Magician
- Chapter 2: The Fairground
- Chapter 3: Professor Spiegel
- Chapter 4: The Museum
- Chapter 5: The Antidote
- Chapter 6
General Tips
- This is the official guide for Twilight Phenomena: The Incredible Show.
- This guide will not mention each time you have to zoom into a location; the screenshots will show each zoom scene.
- Hidden-object puzzles are referred to as HOPs. This guide will not show screenshots of the HOPs, but it will mention when a HOP is available and the inventory item you'll collect from it.
- This guide will give step-by-step solutions for all puzzles that are not random. Please read the instructions in the game for each puzzle.
Chapter 1: The Magician
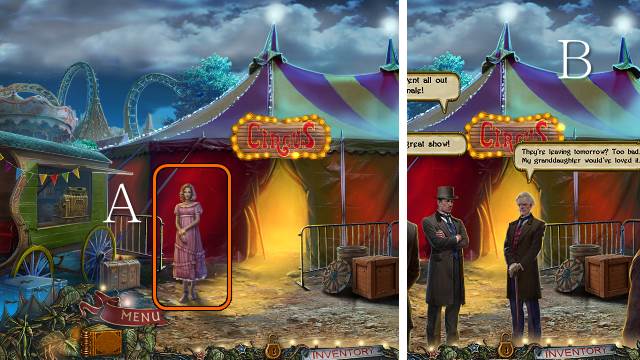
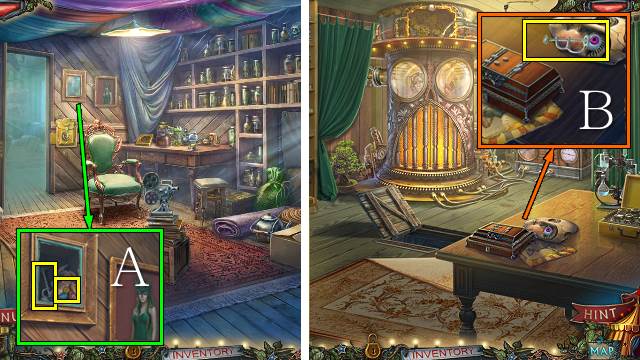
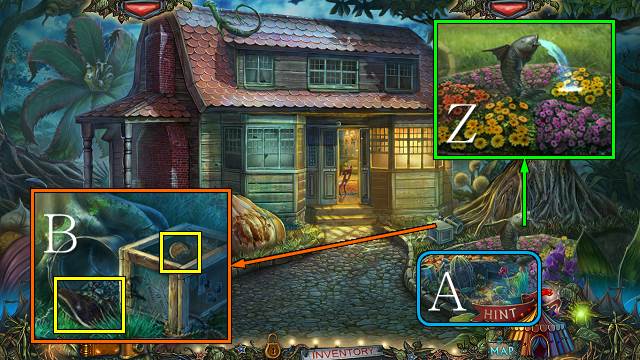
- Talk to Judith (A).
- Walk forward.
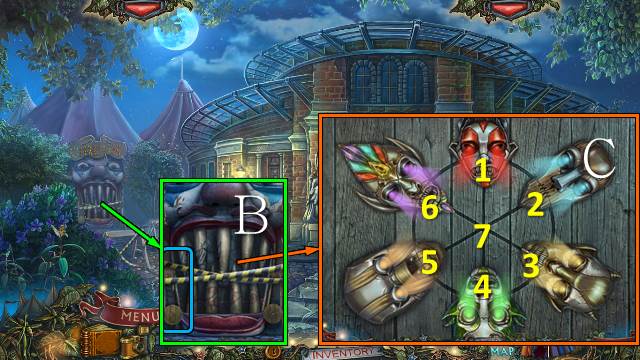
- Interact with the crowd and walk forward (B).
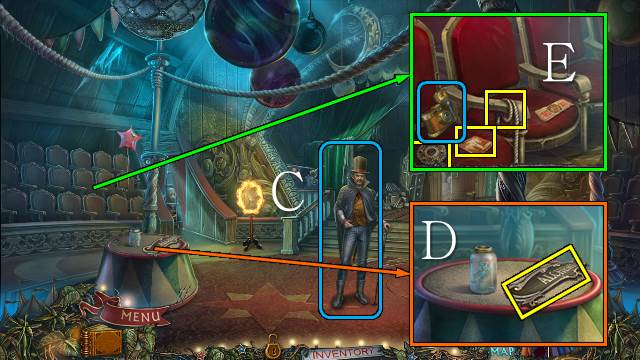
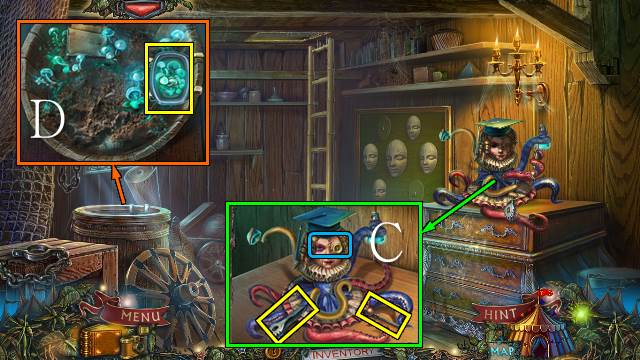
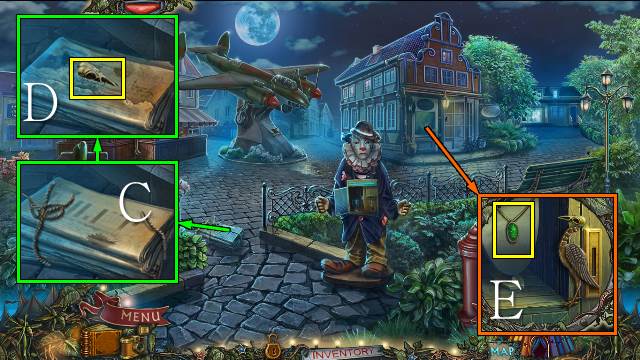
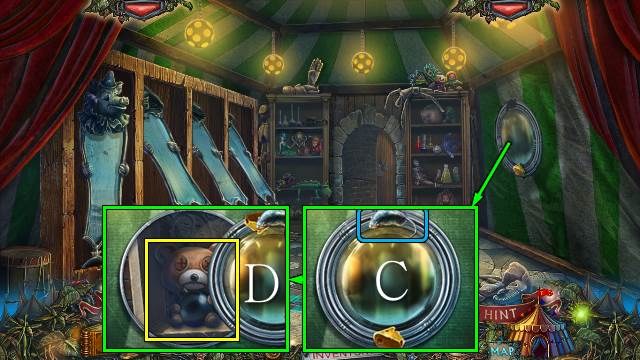
- Talk to the Magician (C).
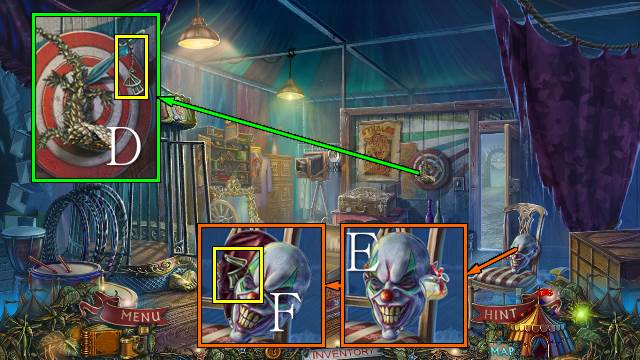
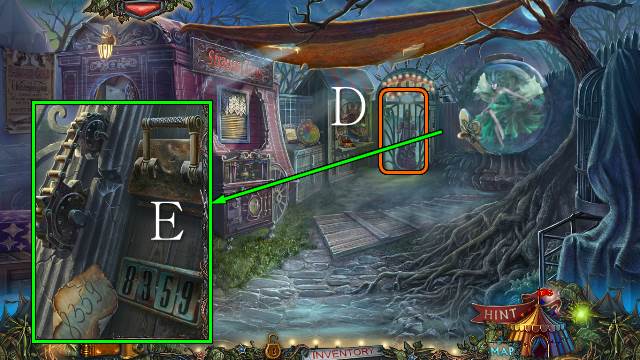
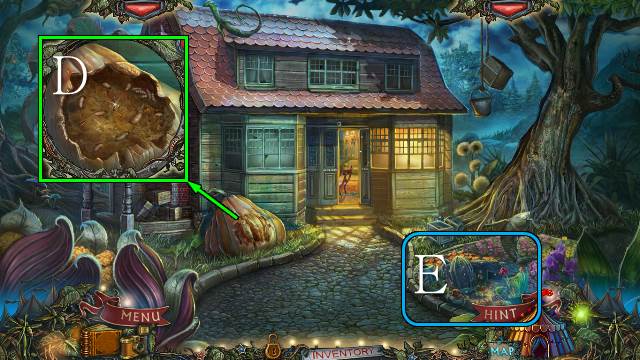
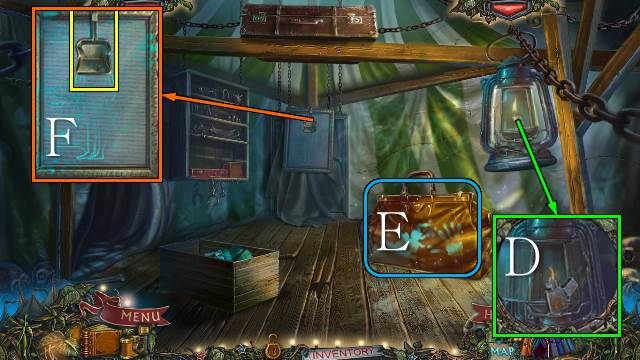
- Take the ALCHEMY PLATE (D).
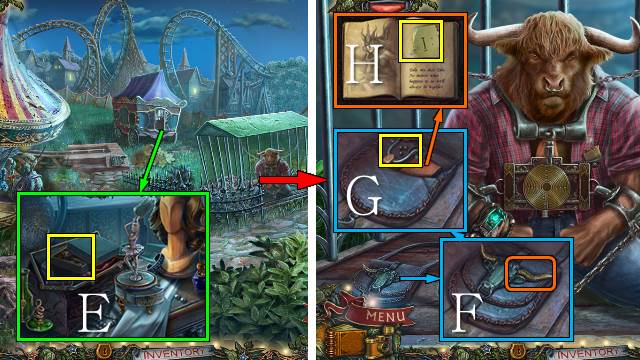
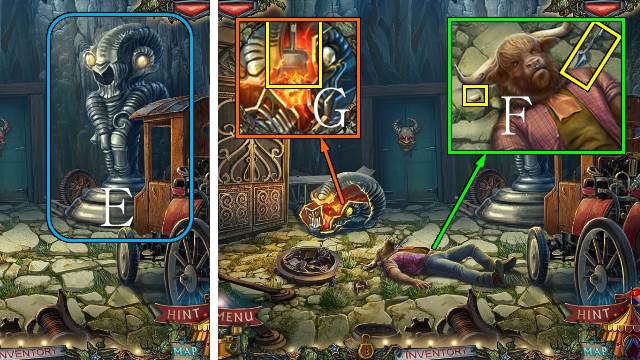
- Take the GEAR, ROPE, PALM TREE PATCH and camera (E).
- Take a picture.
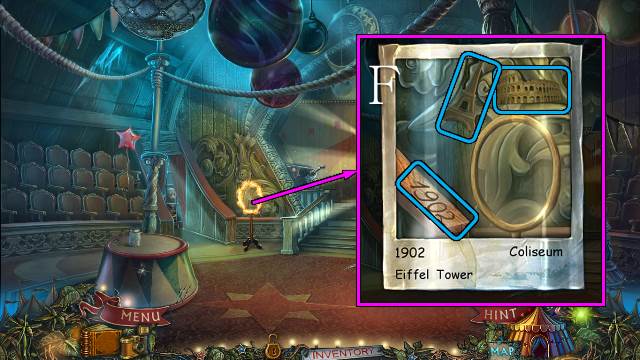
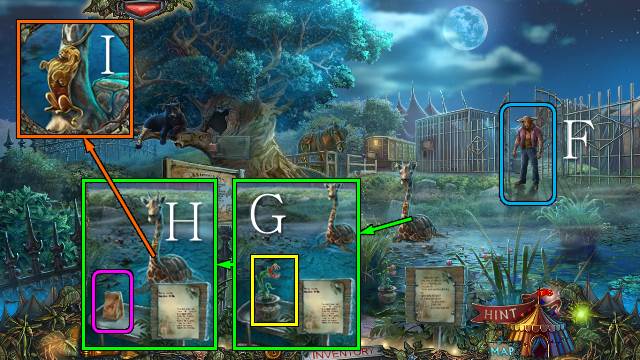
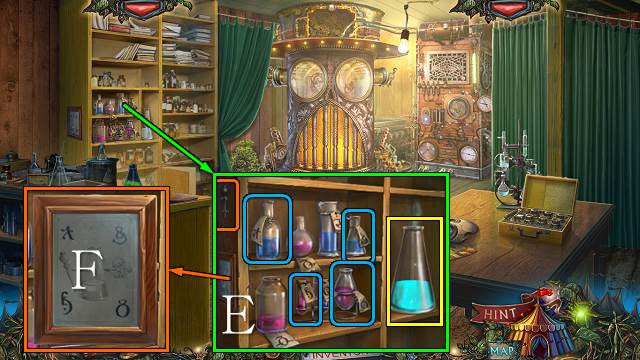
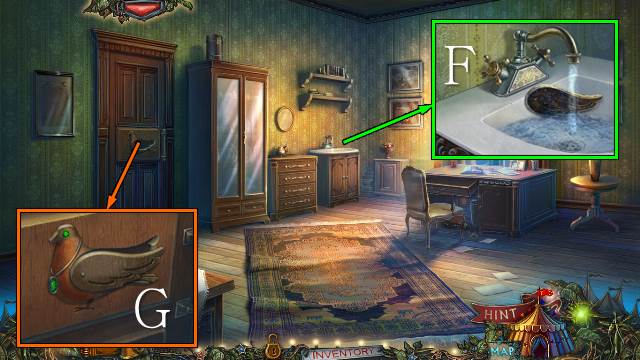
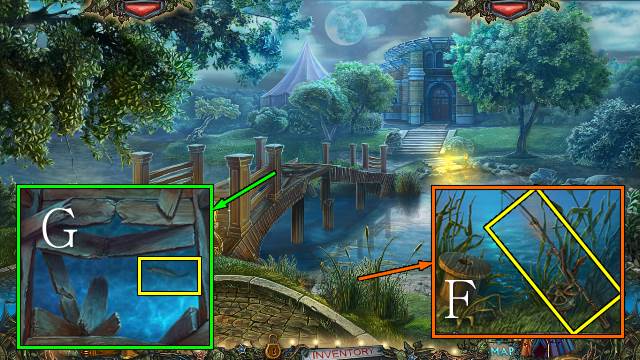
- Find the listed items (F).
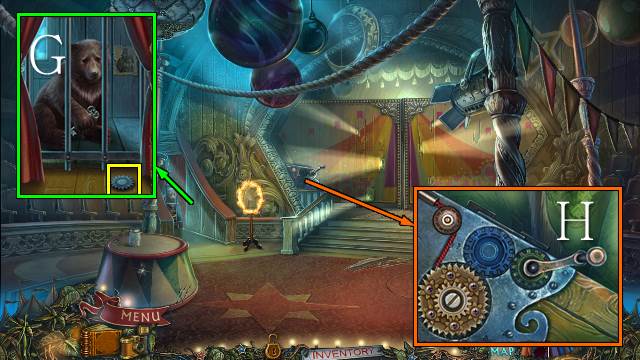
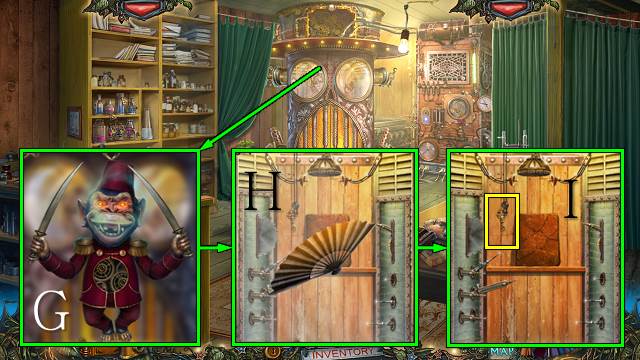
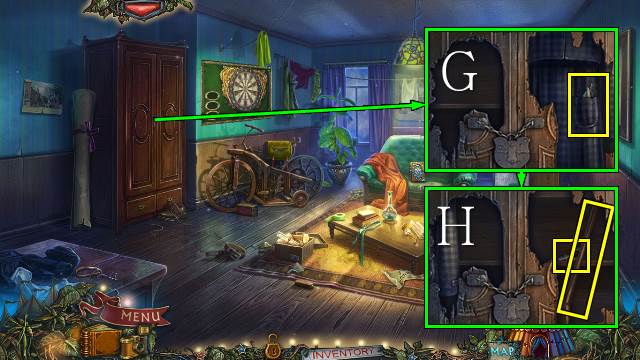
- Take the GEAR and use the ROPE (G).
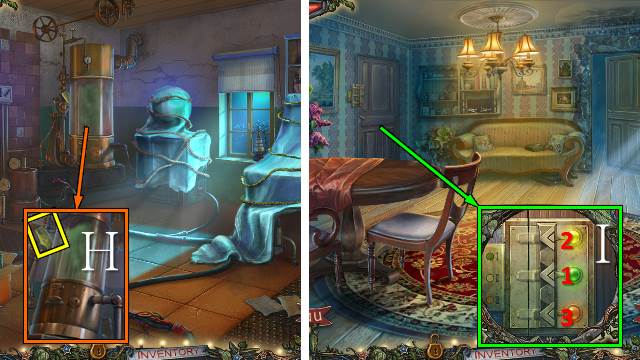
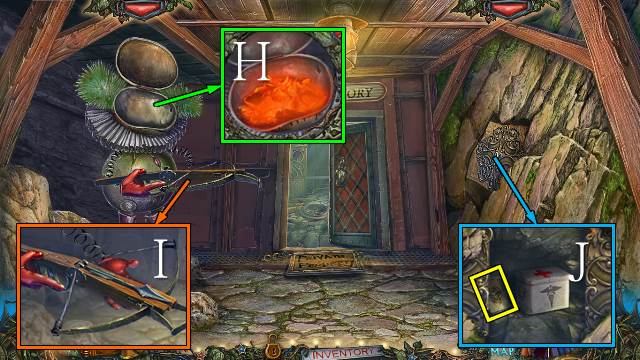
- Place the two GEARS and turn the handle (H).
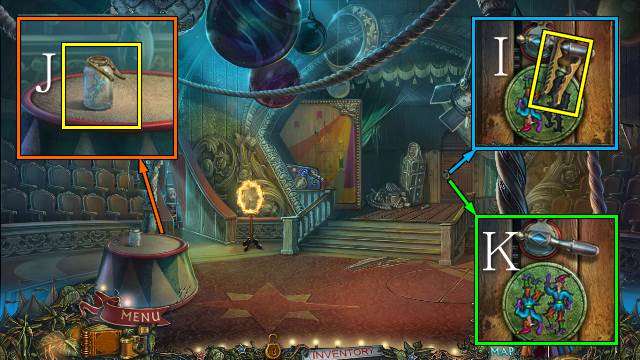
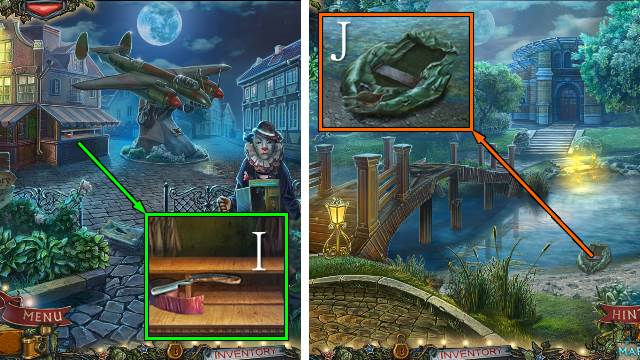
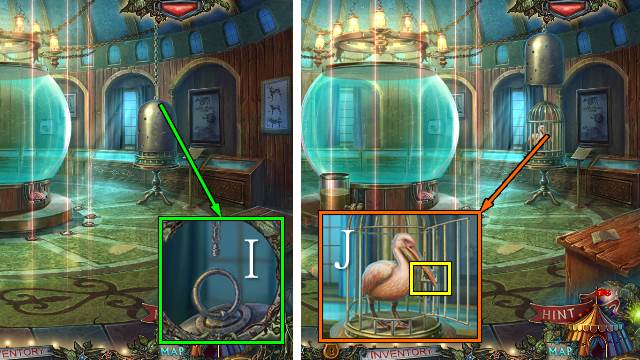
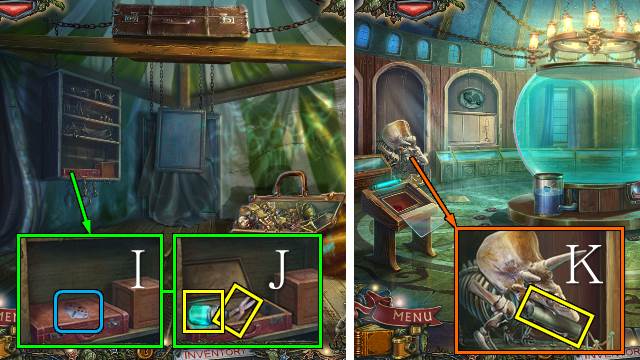
- Take the JAR OPENER (I).
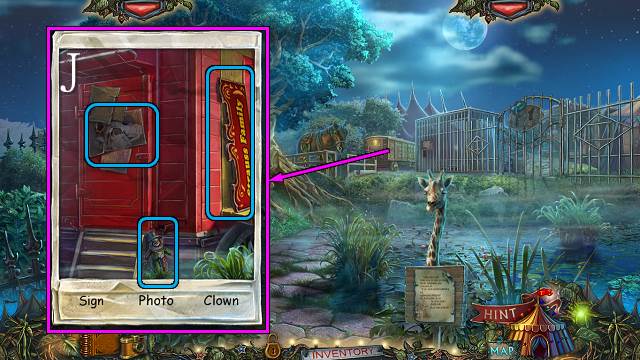
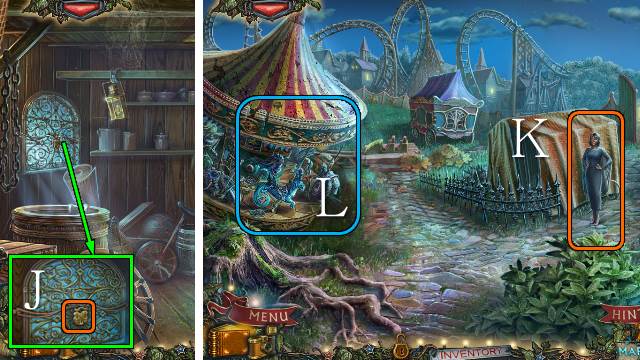
- Use the JAR OPENER; take the JESTER EMBLEM (J).
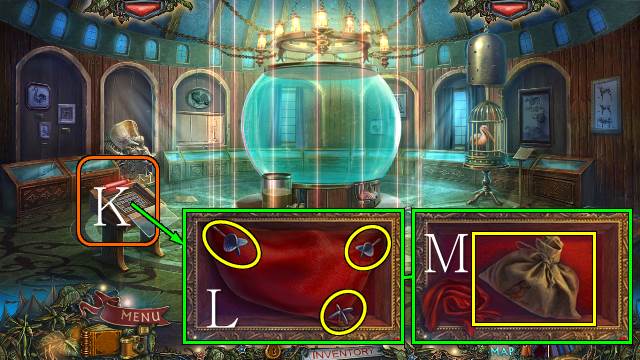
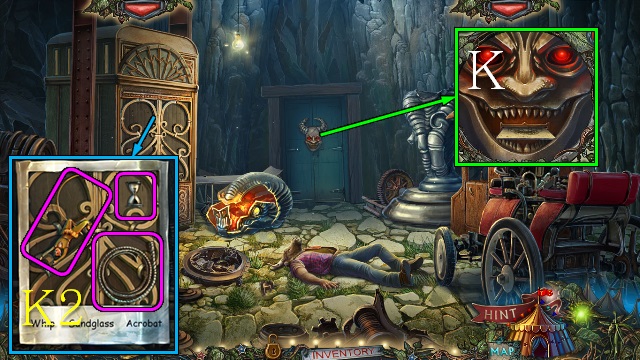
- Place the JESTER EMBLEM and pull the handle (K).
- Walk forward.
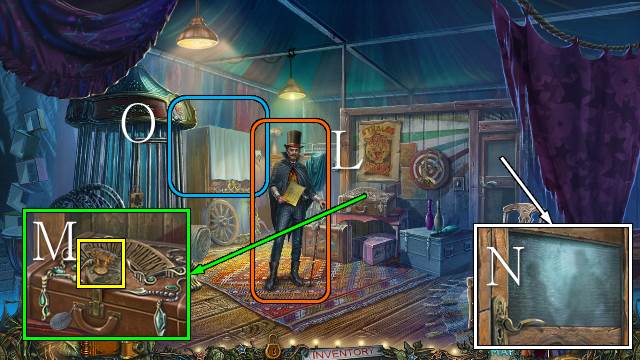
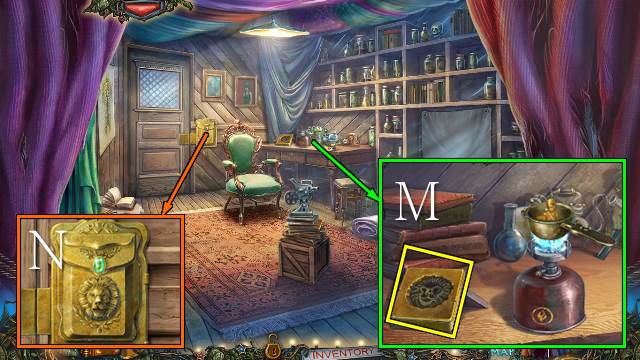
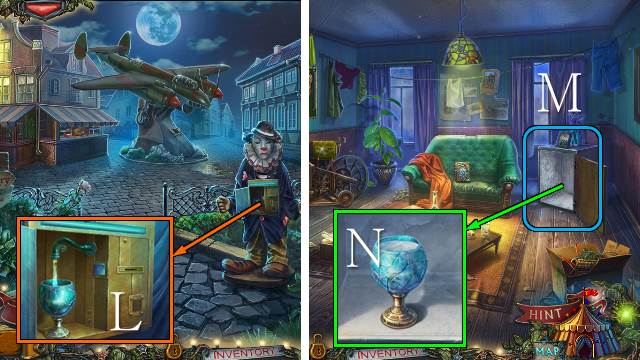
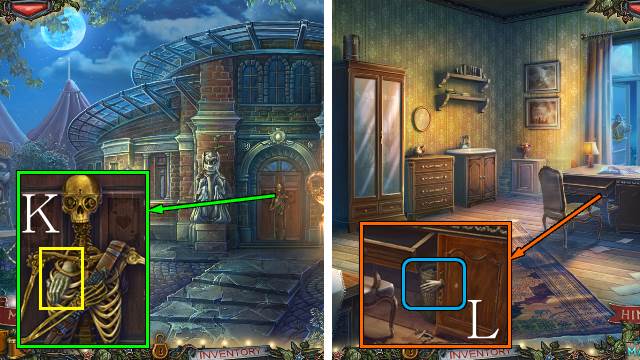
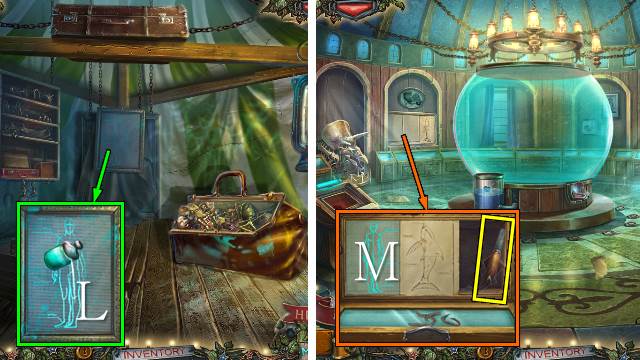
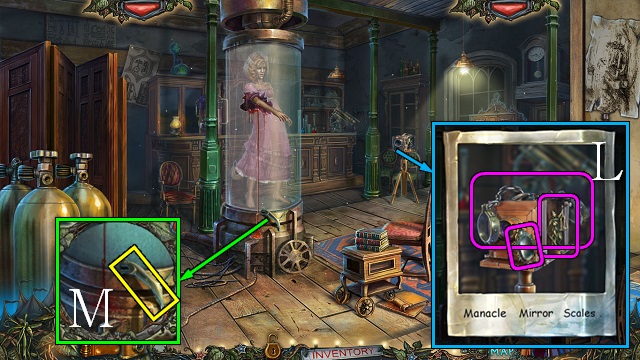
- Talk to the Magician (L).
- Take the ELEPHANT (M).
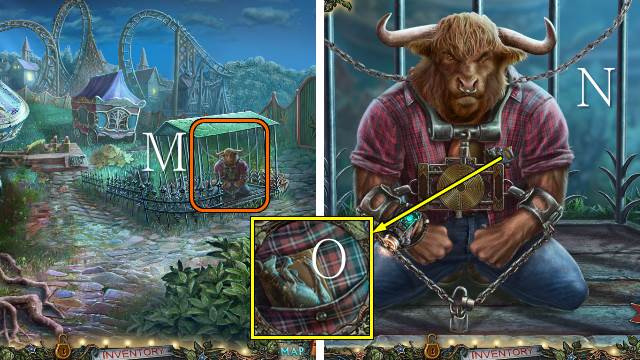
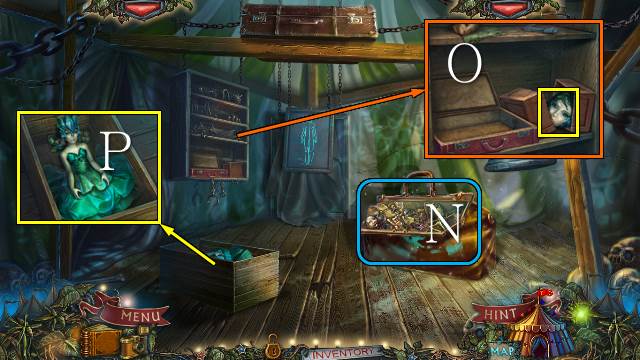
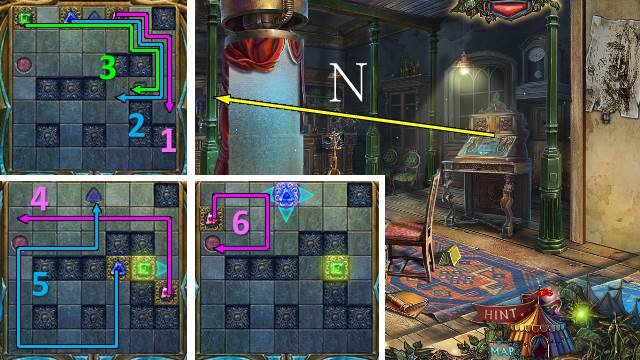
- Look through the door (N).
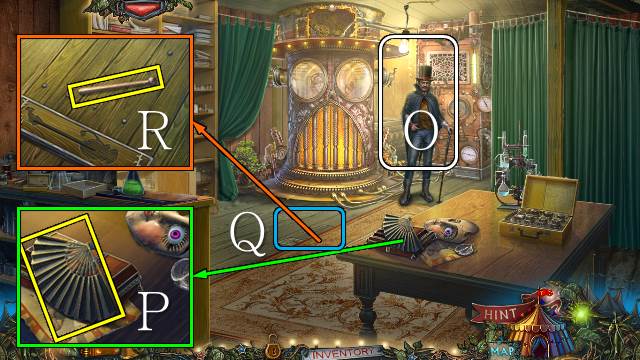
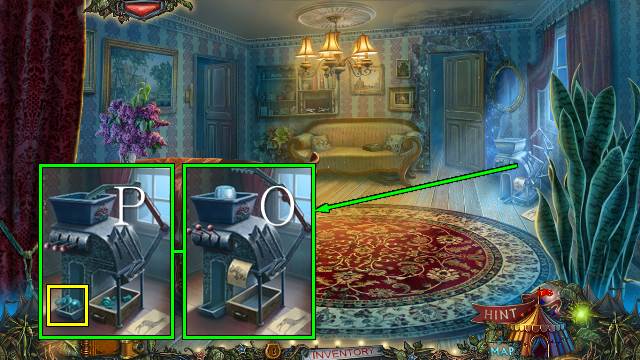
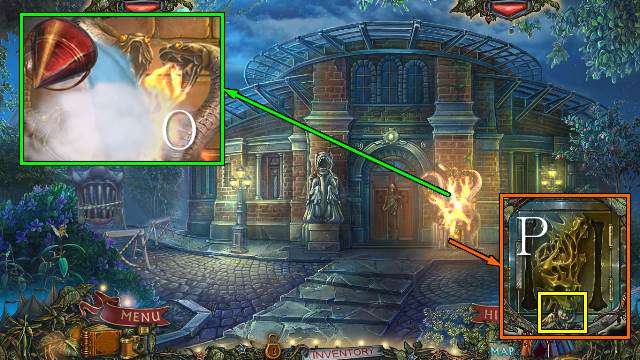
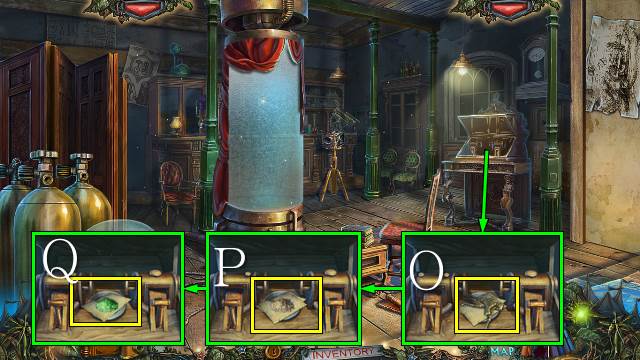
- Play the HOP (O).
- You receive a BEAR EMBLEM.
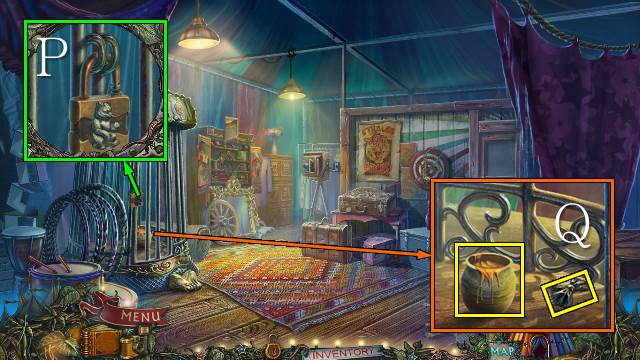
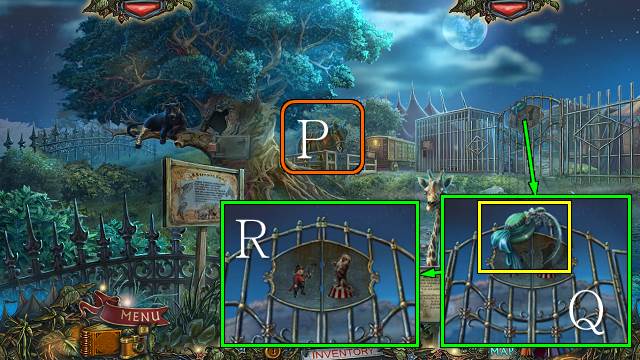
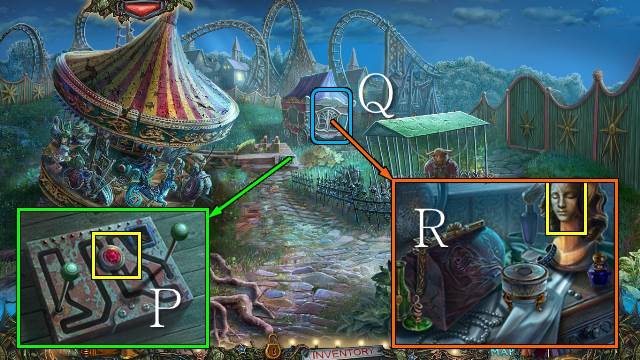
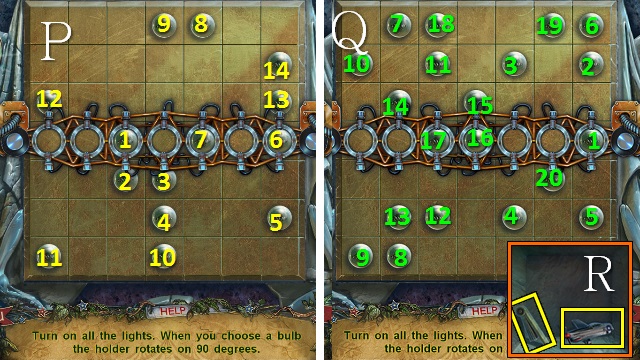
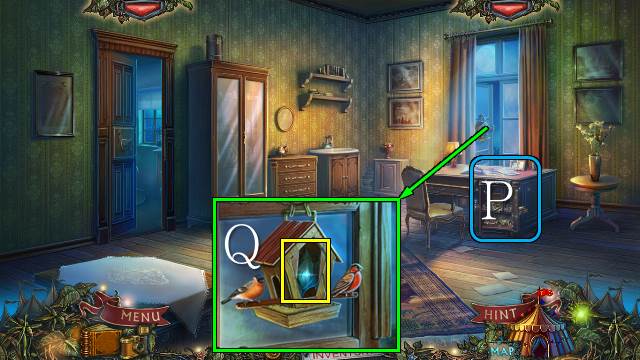
- Place the BEAR EMBLEM; open the lock (P).
- Take the BOW TIE and HONEY POT (Q).
- Walk down.
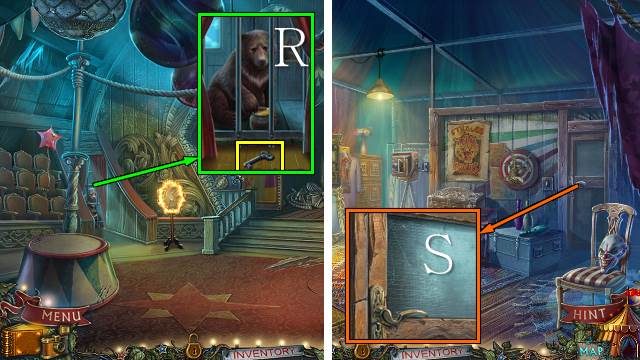
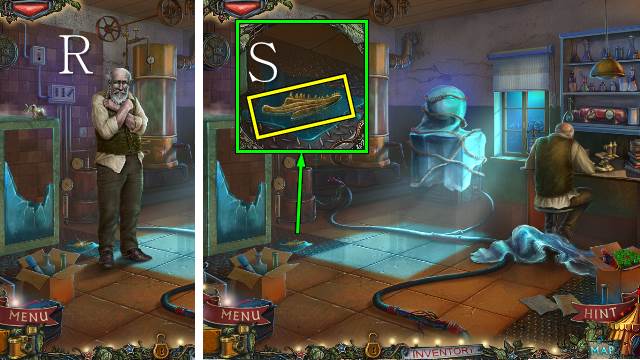
- Give the HONEY POT to the bear; take the SILVER KEY (R).
- Walk forward.
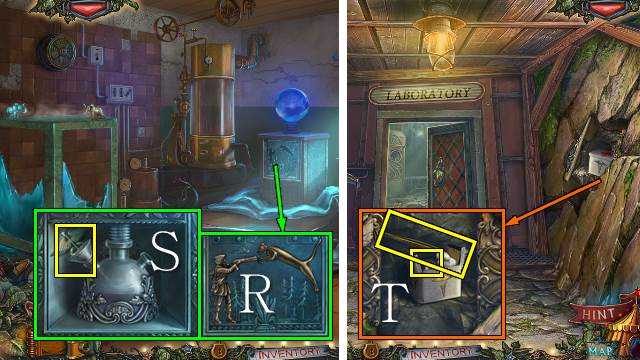
- Use the SILVER KEY; open the door (S).
- Walk forward.
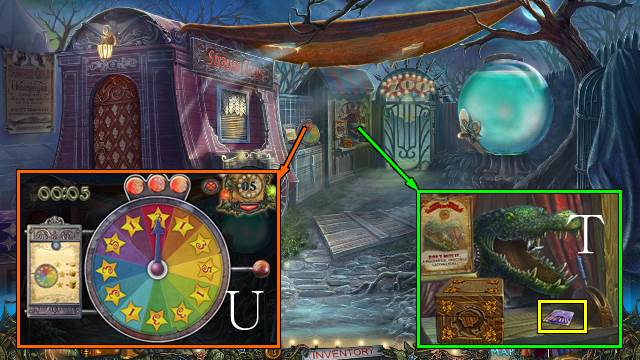
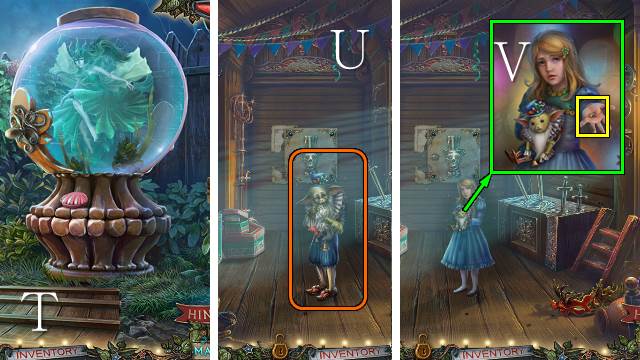
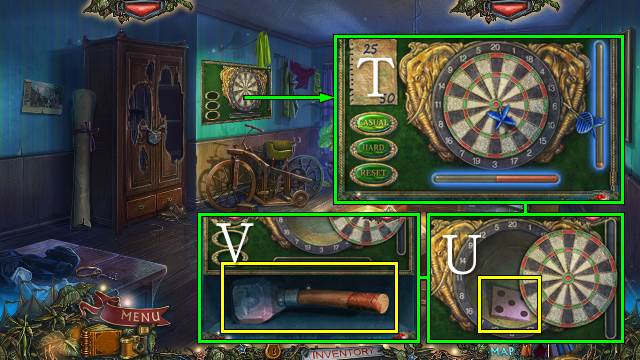
- Take the CIRCUS TENT PATCH (T).
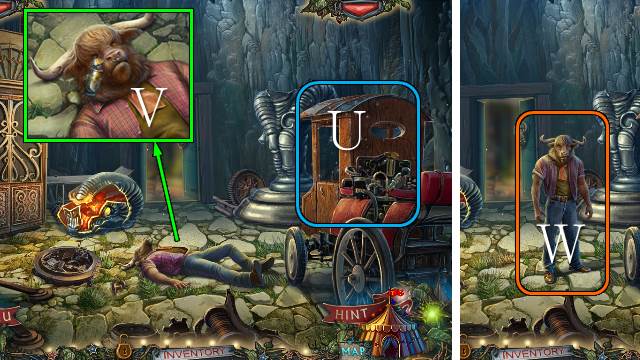
- Play the Wheel of Fortune to collect at least 20 coins (U).
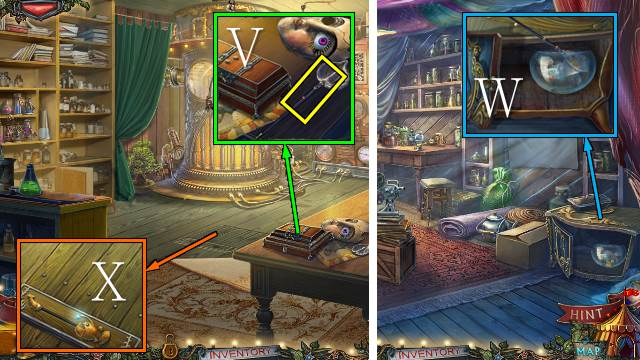
- Zoom into the reservoir.
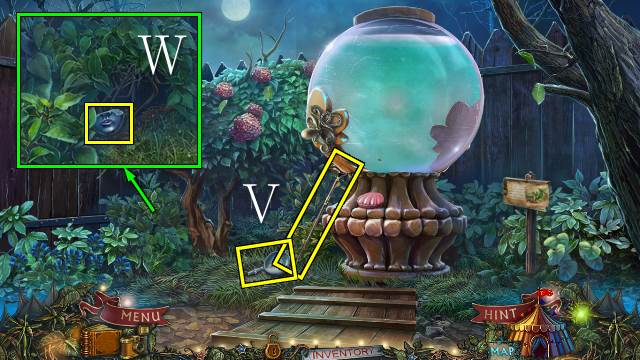
- Take the FLASH BULB and CANE (V).
- Use the CANE and take the MASK (W).
- Back out and walk down.
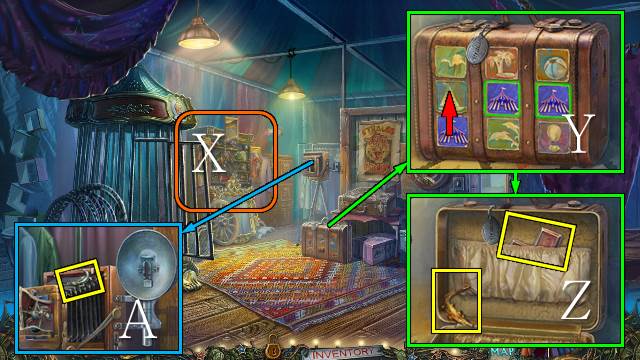
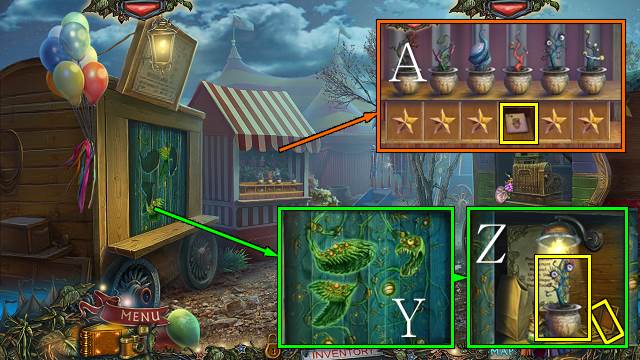
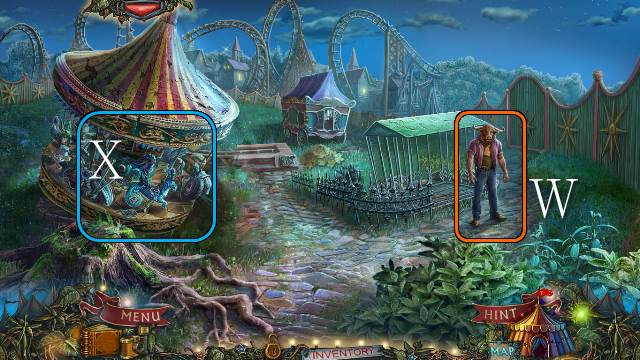
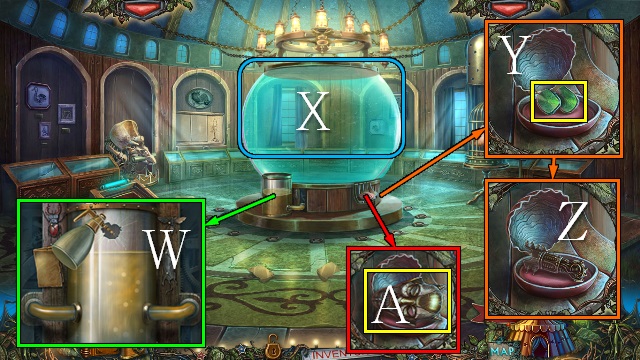
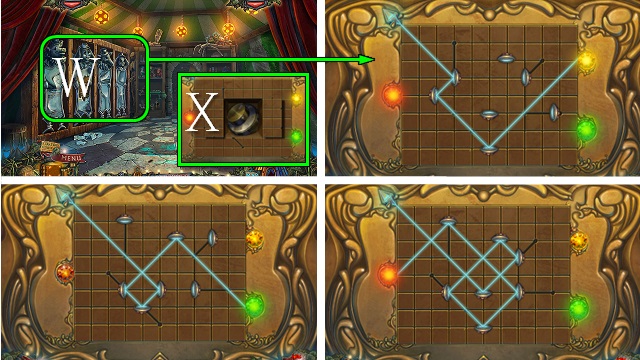
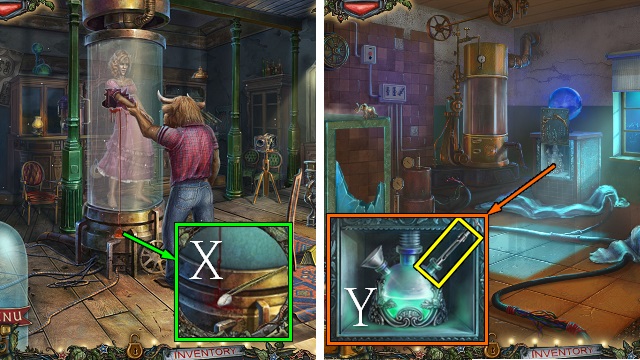
- Play the HOP (X).
- You receive a TOKEN.
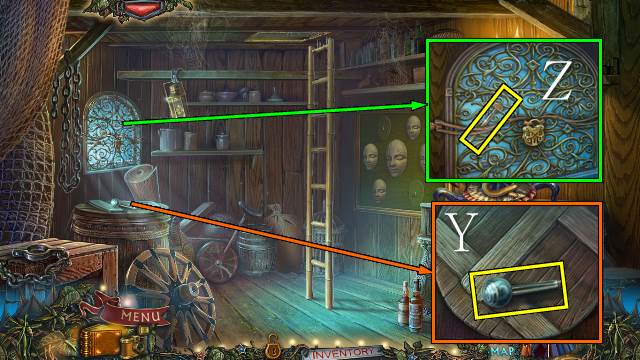
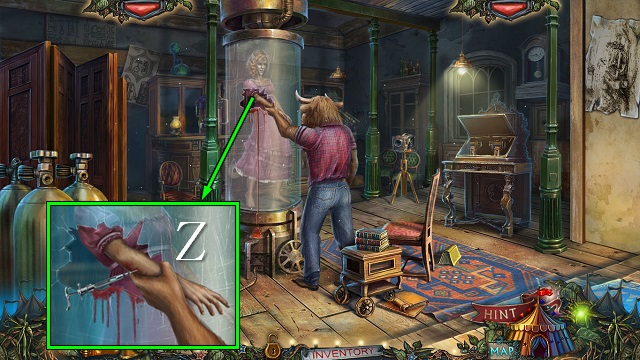
- Place the PALM TREE PATCH and CIRCUS TENT PATCH and move the patches (Y); take the GOLD CROCODILE and CROSS (Z).
- Remove the drape and place the FLASH BULB; take the SILVER CROCODILE (A).
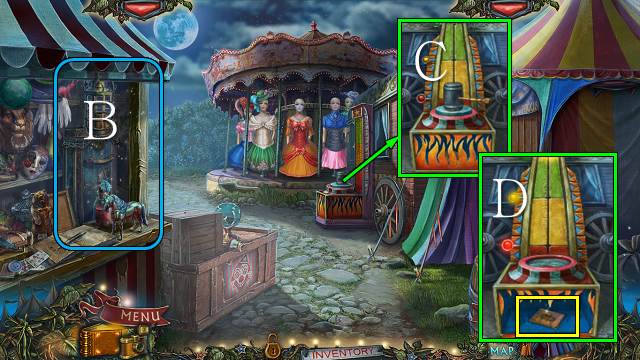
- Go forward.
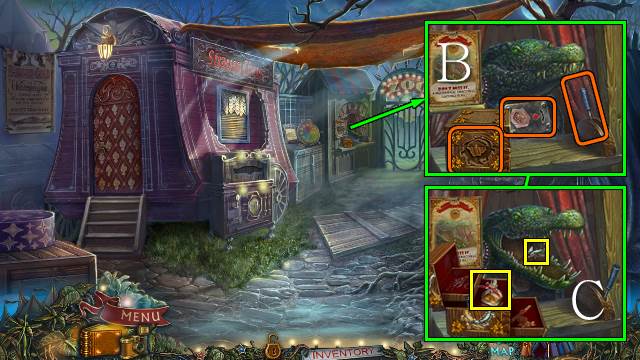
- Close the crocodile mouth, use the TOKEN and place the GOLD CROCODILE and SILVER CROCODILE (B); open the box and pull the lever and take the FLY and OIL (C).
- Walk down.
- Use the FLY; take TENT EMBLEM 1/2 (D).
- Use the OIL and open the zipper (E); take TENT EMBLEM 2/2 (F).
- Go forward.
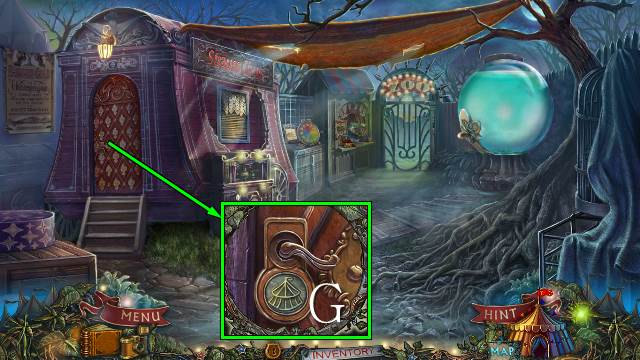
- Place the TENT EMBLEM and open the door (G).
- Go left.
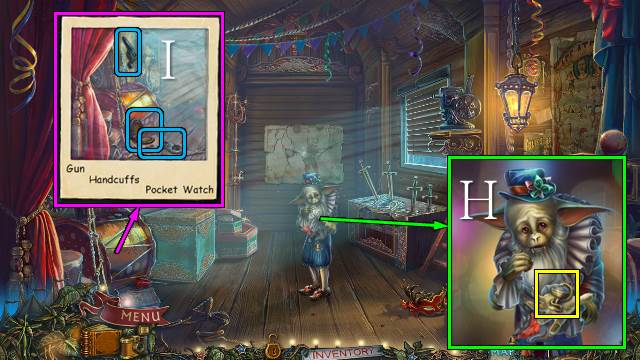
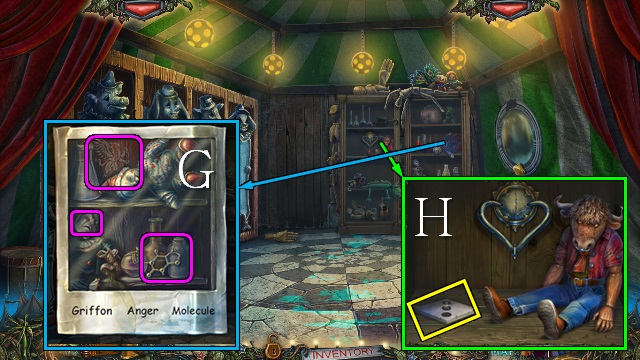
- Talk to the creature; take the MEDICAL SYMBOL (H).
- Take a picture; select the listed items (I).
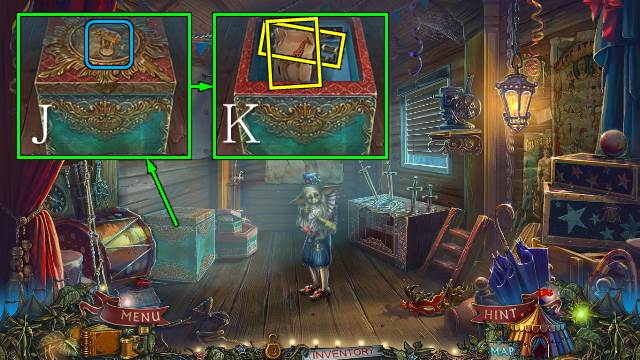
- Place the ELEPHANT and push it (J); take the GIRAFFE FOOD and CHAIN (K).
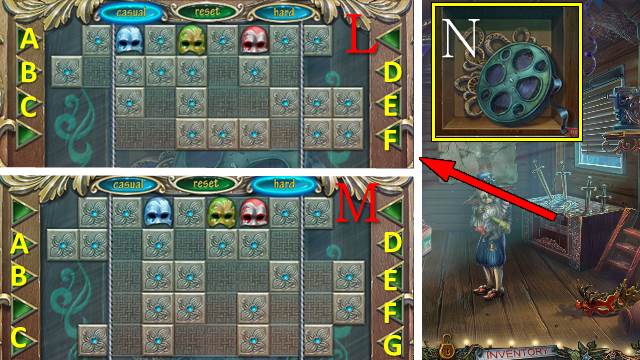
- Place the MASK for a mini-game.
- Casual solution (L): Bx2-A-Dx2-E-F-C-F.
- Hard Solution (M): Ex2-Ax2-D-F-G-Cx2-D-B-F-B.
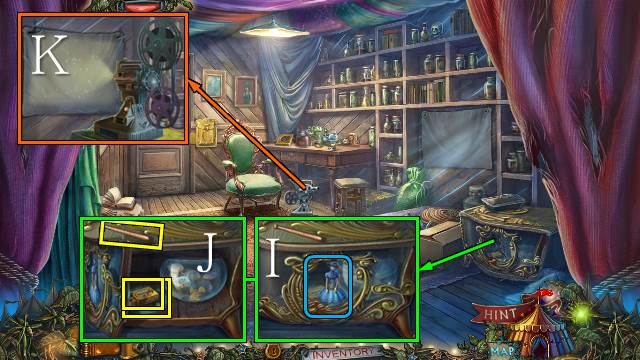
- Take the FILM REEL (N).
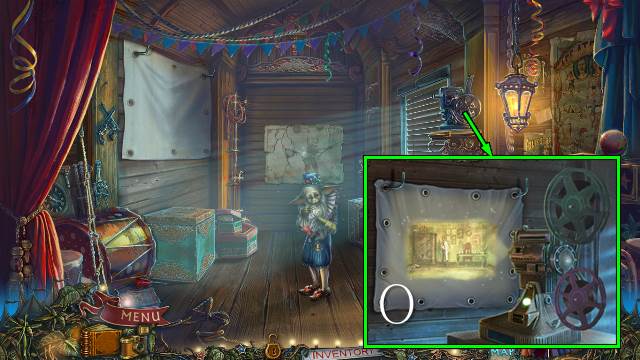
- Place the FILM REEL and play it; zoom in for a HOP (O).
- You receive an AQUARIUM PLUG.
- Walk down twice.
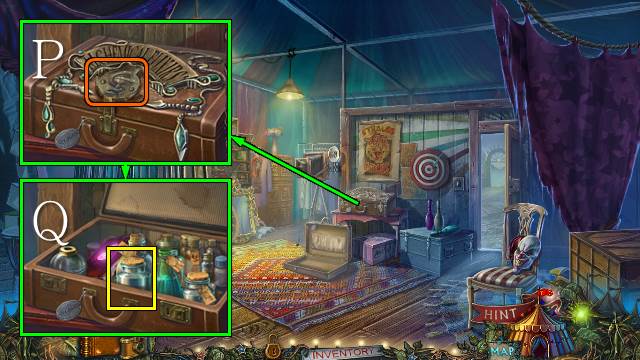
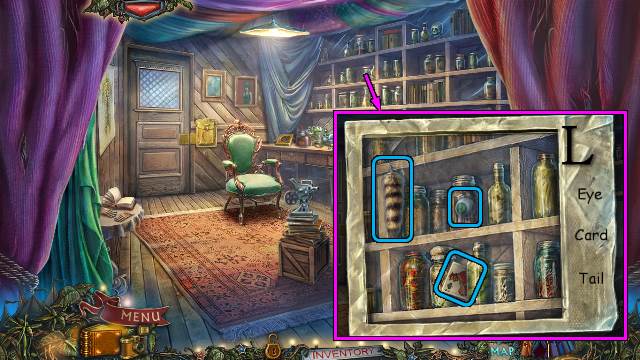
- Place the MEDICAL SYMBOL and open the case (P); take the BLUE LIQUID and read the journal (Q).
- Go forward.
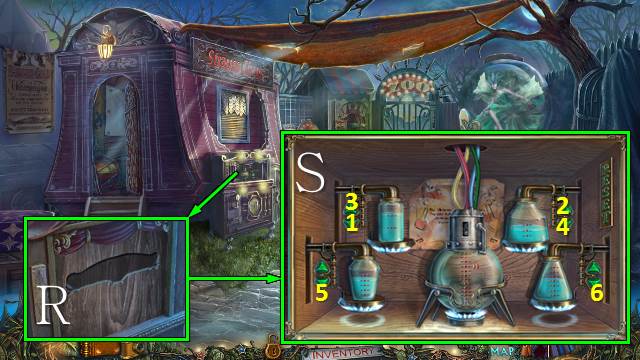
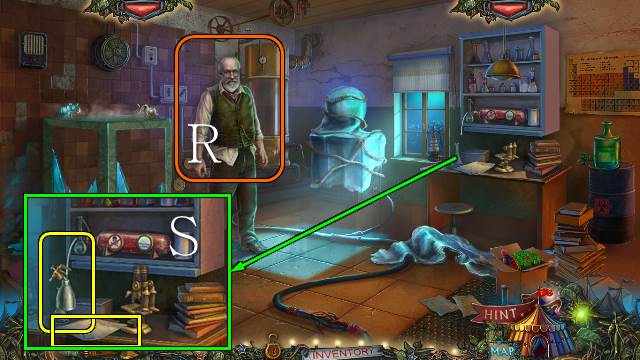
- Place the ALCHEMY PLATE (R); open the cabinet and place the BLUE LIQUID for a mini-game (S).
- You receive the TRANSFIGURATION ELIXIR.
- Zoom into the reservoir.
- Talk to Tula (T).
- Back out and go left.
- Use the TRANSFIGURATION ELIXIR (U).
- Talk to the girl and take JUDITH'S RING (V).
- Walk down and zoom into the reservoir.
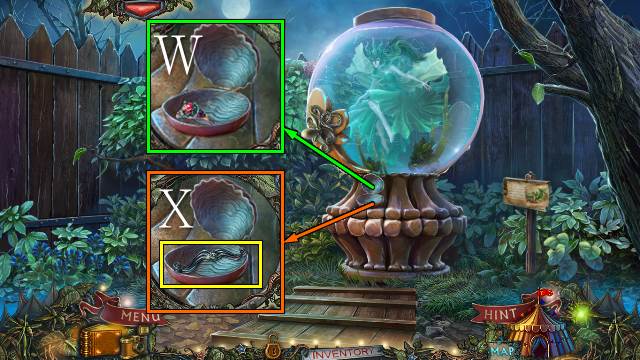
- Open the shell, place JUDITH'S RING and close the shell (W).
- Take the IRON MUSTACHE (X).
- Back out and go left.
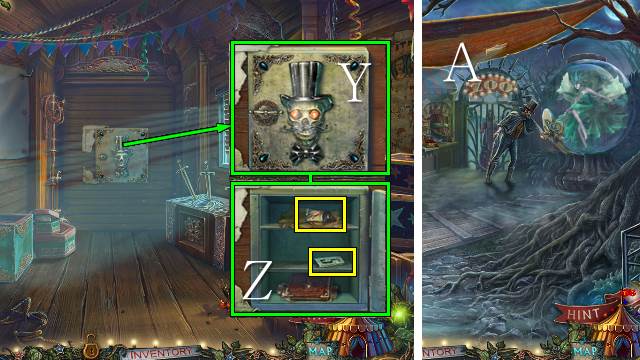
- Remove the poster and place the BOW TIE and IRON MUSTACHE (Y); open the safe, take the GLUE and NUMBER TILE and read the journal (Z).
- Walk down.
- Interact with the Magician (A).
- Zoom into the reservoir.
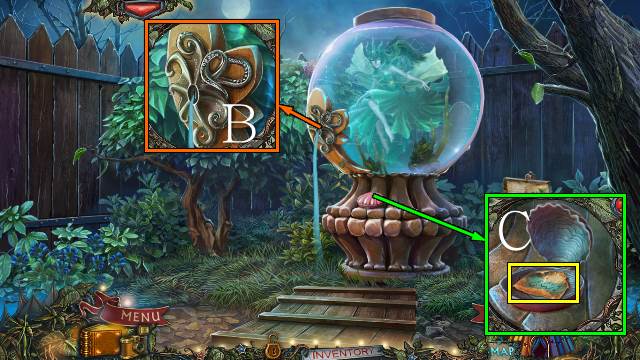
- Place the AQUARIUM PLUG (B).
- Take the GATE CODE (C).
- Back out.
- Talk to Judith (D).
- Pull the lever, remove the chain, and place the CHAIN, NUMBER TILE and GATE CODE; change the code and pull the lever (E).
- Go forward.
- Interact with the creature (F).
- Take the PREDATORY FLOWER (G); place the GIRAFFE FOOD (H) and take the LION EMBLEM (I).
- Take a picture and select the listed items (J).

- Use the CANE and place the CROSS (K); open the box and take the PEROXIDE, BANDAGE and PLANT HEAD (L).
- Donate coins and cure the bear if you like (M).
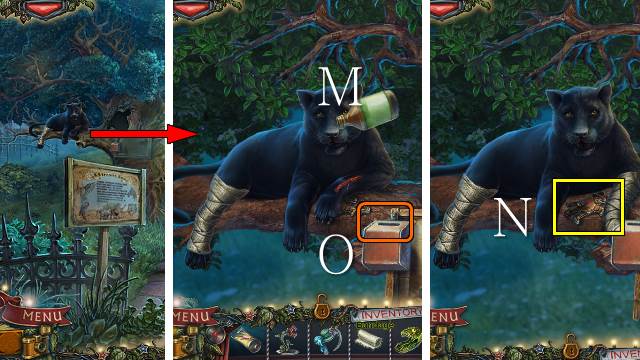
- Use the PEROXIDE and BANDAGE (M); take the TAMER EMBLEM (N).
- Donate coins and cure the panther if you like (O).
- Donate coins and cure the horse if you like (P).
- Take the HAT (Q).
- Place the LION EMBLEM and TAMER EMBLEM, open the gate and go forward (R).
Chapter 2: The Fairground
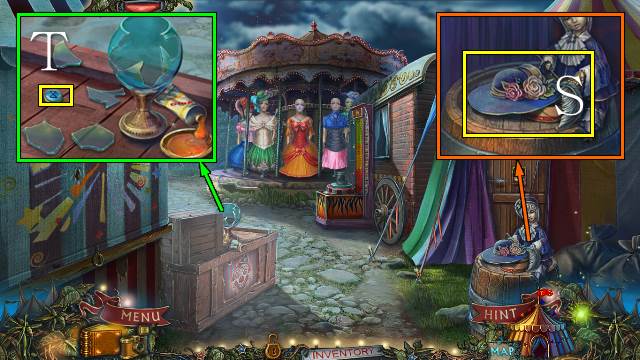
- Take the HAT (S).
- Place the GLUE, move the shards and take the BUTTON (T).
- Go left.
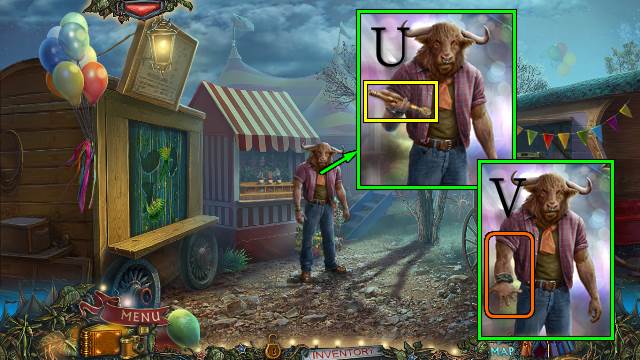
- Talk to Bart.
- Take the HAMMER HANDLE (U) and touch Bart's arm (V).
- Take the HAT and place the BUTTON (W).
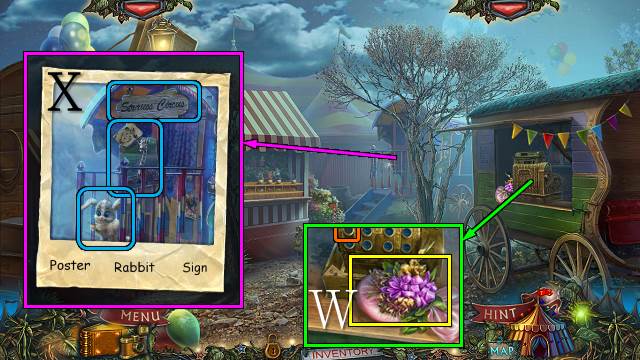
- Take a picture and select the listed items (X).
- Place the PLANT HEAD and put the heads in place (Y); open the compartment, switch on the light and take the BRUSH and EYE FLOWER (Z).
- Place the PREDATORY FLOWER and EYE FLOWER for a mini-game; the solution is random (A); take CARD 1/3.
- Walk down.
- Play the HOP (B).
- You receive the POWDER MAKEUP.
- Place the HAMMER HANDLE (C); use the hammer three times and take CARD 2/3 (D).

- Place the three HATS for a mini-game (E).
- Casual solution: 1-3, 5-6, 7-8, 11, 7-9, 11, 4-5, 11, 4-5, 11, 7-9.
- Hard solution: 1-3, 5-6, 7-8, 11, 4-5, 11, 7-9, 5-6, 11x2, 8-9.
- Take the BLUE DOLL.
- Go left.

- Use the POWDER MAKEUP (F); enter the code and take the TIN SOLDIER and CARD 3/3 (G).
- Walk down.
- Push the buttons in order; place the CARDS and open the door (H).
- Go right.
- Place the BLUE DOLL and turn the handle (I); take DRUMSTICK 1/2, the MATCH and the FILM REEL (J).
- Place the FILM REEL and play it; zoom in for a HOP (K).
- You receive a BURNER PART.
- Take a picture and find the listed items (L).
- Place the BURNER PART and use the MATCH; place the pot and TIN SOLDIER, pour out the tin and take the LION KEY (M).
- Place the LION KEY and open the door (N).
- Go forward.
- Talk to Strauss (O).
- Take the FAN (P).
- Move the rug (Q).
- Take DRUMSTICK 2/2 (R).
- Walk down twice.

- Place the DRUMSTICKS and take the NET HANDLE (S).
- Place the BRUSH; put glue on each of the shards, place the shards and take the GOBLET (T).
- Play the HOP (U).
- You receive a GOLDEN ANGLER.
- Go right and forward.
- Place the NET HANDLE and take the HOOP NET (V).
- Walk down.
- Take the GOLD FISH with the HOOP NET (W).
- Go forward.
- Place the GOLDEN ANGLER and GOLD FISH; open the hatch (X).
- Go down the hatch.
- Take the LEVER (Y).
- Take the GLASS CUTTER (Z).
- Go up and walk down.
- Use the GLASS CUTTER and remove the painting; take YELLOW EYE 1/2 and the STONE REMOVING DEVICE (A).
- Walk forward.
- Take PINK EYE 2/2 with the STONE REMOVING DEVICE (B).
- Go down the hatch.
- Place the MAKESHIFT EYES and take the PIPETTE and FORCEPS (C).
- Open the barrel, use the FORCEPS and take the ACID MUSHROOMS (D).
- Go up.
- Place the PIPETTE and ACID MUSHROOMS (E); add the four solutions (F) to the flask with the pipette and take the CORROSIVE ACID.
- Interact with the reactor; use the CORROSIVE ACID (G).
- Use the FAN (H); take the WINDOW KEY and read the journal (I).
- Back out and go down the hatch.
- Use the WINDOW KEY, open the grate and open the window (J).
- Go left.
- Talk to Mrs. Strauss (K).
- Play the HOP (L).
- You receive a TOREADOR.
- Remove the tarp (M).
- Talk to Bart (N).
- Take the BULL FIGURINE (O).
- Use the FAN, place the LEVER and take CHECKER 1/2 (P).
- Open the shutters (Q).
- Take PLASTER MASK 1/2 (R).
- Walk down and go up.
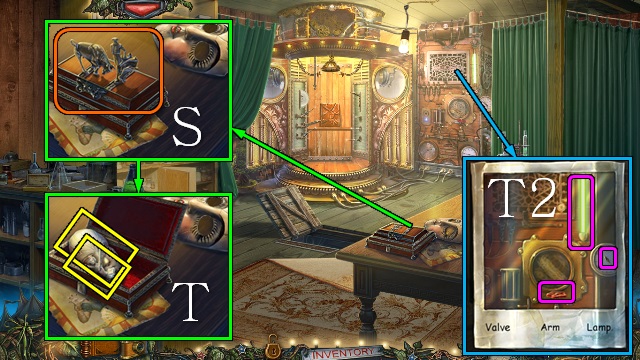
- Place the TOREADOR and BULL FIGURINE (S); take the PRIMA BALLERINA and PLASTER MASK 2/2 (T).
- Take a picture; find the listed items (T2)
- Go down the hatch and go left.

- Place the PRIMA BALLERINA; take CHECKER 2/2 (U).
- Walk down.
- Place the PLASTER MASKS (V).
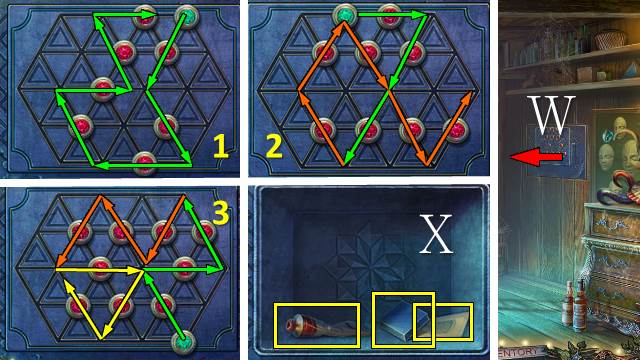
- Place the CHECKERS for a mini-game (W).
- Take the BLUE BUTTON, SODA TICKET and RED DYE (X).
- Go left.
- Place the BLUE BUTTON and push it (Y).
- Ride the rollercoaster (Z).
Chapter 3: Professor Spiegel
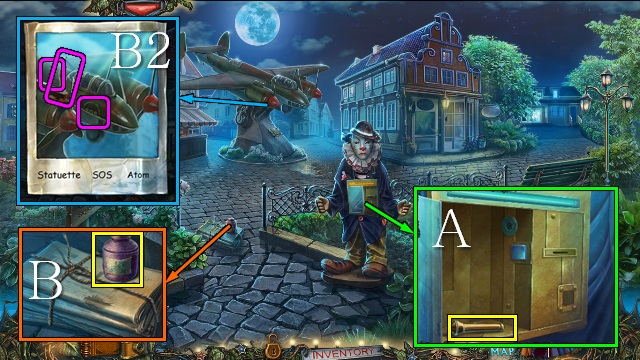
- Enter the SODA TICKET, open the door and take the HANDY HANDLE (A).
- Take the EPOXY RESIN (B).
- Take a picture; find the listed objects (B2).
- Go right.
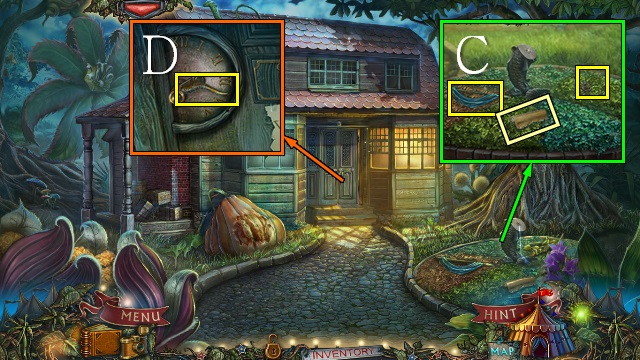
- Move the leaves; take the note, PEARL ROSE and BLUE FLAGPOLE (C).
- Take the GOLDEN HORN (D).
- Walk down twice.
- Place the PEARL ROSE, open the bag, open the box and take the MODEL PLANE (E).
- Place the GOLDEN HORN and open the bag (F); take the POWERFUL SLINGSHOT (G), open the journal and take the TIME SOLUTION (H).
- Go forward and right.
- Use the POWERFUL SLINGSHOT (I).
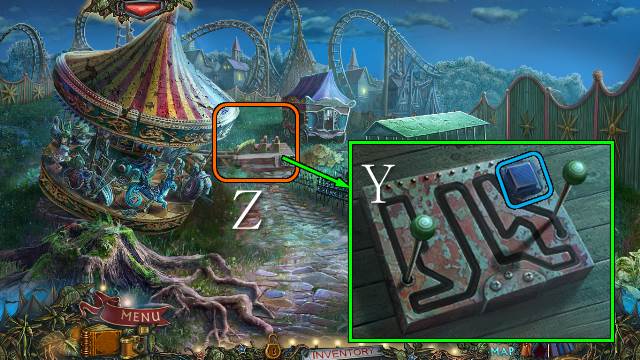
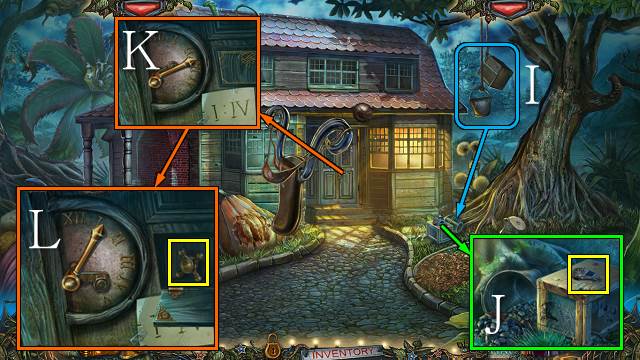
- Take the PLANE WHEEL (J).
- Place the HANDY HANDLE and TIME SOLUTION (K); move the handles to I and IV and take the VALVE (L).
- Go forward.
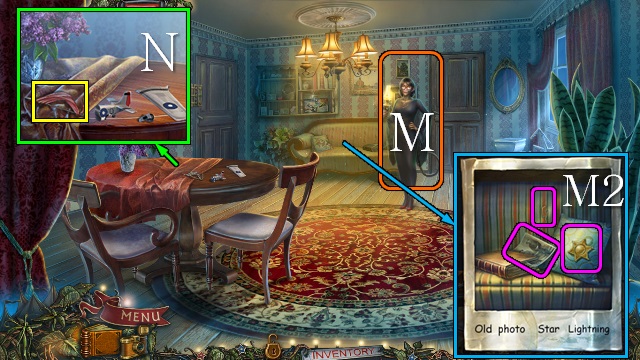
- Talk to Mrs. Strauss (M).
- Take a picture; find the listed objects (M2).
- Place the PLANE WHEEL and use the RED DYE; take the RED FLAGPOLE (N).
- Walk down twice.
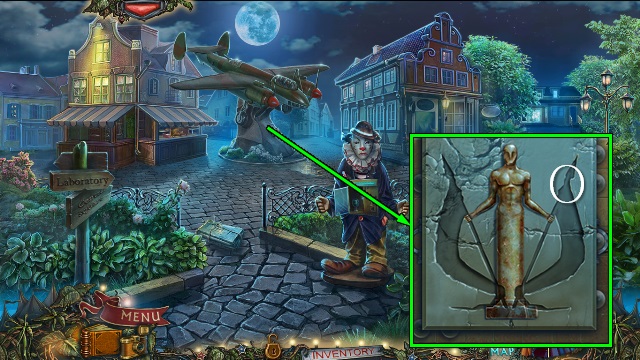
- Place the BLUE FLAGPOLE and RED FLAGPOLE for a mini-game (O).
- Casual (P) and Hard (Q) solutions.
- Take the FIN LEVER and UNFINISHED PLANE MODEL (R).
- Go right and forward.
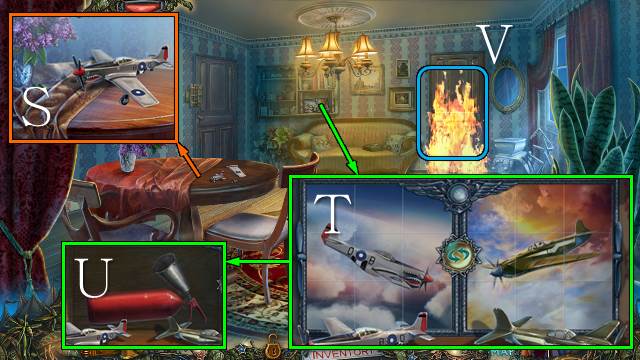
- Place the UNFINISHED PLANE MODEL and EPOXY RESIN; put the MODEL PLANE back together and take it (S).
- Place the two MODEL PLANES for a mini-game (T).
- Take the EXTINGUISHER (U).
- Use the EXTINGUISHER (V).
- Go forward.
- Take the PENKNIFE (W).
- Take the FOUNTAIN STATUE HEAD and ELEPHANT SCHEME; place the VALVE (X).
- Open the drawer and take OLYMPUS (Y).
- Walk down twice.
- Place the FIN LEVER and FOUNTAIN STATUE HEAD; push the lever (Z).
- Play the HOP (A).
- You receive a TROWEL.
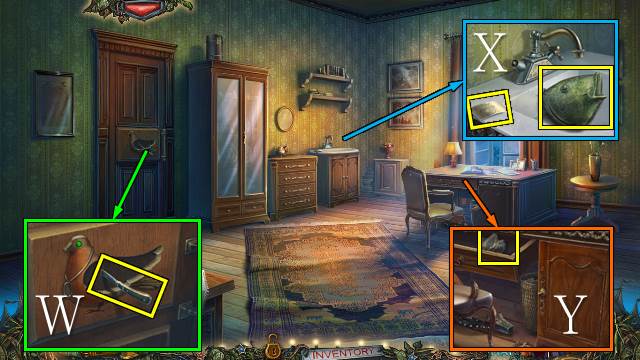
- Use the TROWEL and PENKNIFE; take the BULLFINCH'S DIRTY WING and BIRD'S TOKEN (B).
- Walk down.
- Use the PENKNIFE (C), read the paper and take the BIRD'S HEAD (D).
- Place the BIRD'S HEAD and BIRD'S TOKEN; take the BULLFINCH AMULET (E).
- Go right and twice forward.
- Turn on the tap and wash the BULLFINCH'S DIRTY WING (F); you receive the BULLFINCH'S WING.
- Place the BULLFINCH'S WING and BULLFINCH AMULET (G).
- Go forward.
- Take BART'S ROOM KEY (H).
- Walk down twice.
- Place BART'S ROOM KEY; push the buttons in order and open the door (I).
- Go left.

- Place OLYMPUS and take the FAUCET (J); open the journal, turn the page and take ADRIADNE'S THREAD (K).
- Walk down three times.
- Place the GOBLET and FAUCET; push the button and take the GOBLET WITH WATER (L).
- Go right, forward and left.
- Open the freezer (M).
- Place the GOBLET WITH WATER, break the goblet and take the ICE PIECE (N).
- Walk down.
- Move the papers and place the ELEPHANT SCHEME and ICE PIECE (O); pull the levers and take the ICE ELEPHANT (P).
- Go forward twice.
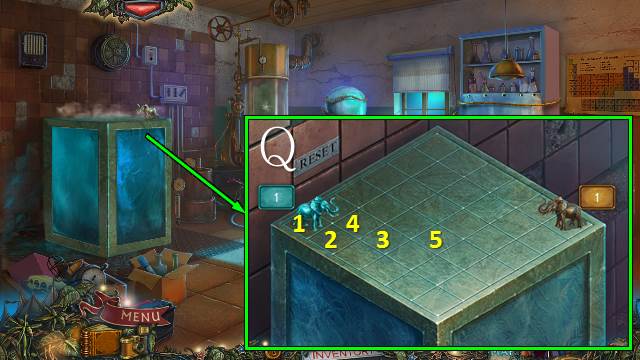
- Place the ICE ELEPHANT for a mini-game (Q).
- Solution: 1-2, 2-3, 2-4, 3-5.
- Talk to Professor Spiegel; you receive SPIEGEL'S COIL (R).
- Take the PREDATOR'S JAW (S).
- Walk down five times.
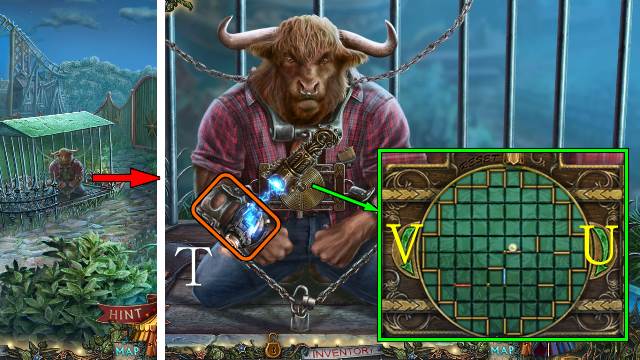
- Use SPIEGEL'S COIL (T).
- Place ARIADNE'S THREAD for a mini-game.
- Solution: Ux5, V.
- Talk to Bart (W).
- Play the HOP (X).
- You receive an EMPTY JAR.
- Go right.
Chapter 4: The Museum
- Use the TROWEL; take BONE 1/2 (Y).
- Take the ROPE (Z).
- Take the PREDATOR'S TAIL (A).
- Go down and forward.
- Place the PREDATOR'S JAW and PREDATOR'S TAIL and open the cabinet (B); take PADDLE 1/2 and the FISH NET (C).
- Walk down and right.
- Use the FISH NET; take the BELLOW'S PIPE (D).
- Go to Spiegel's Office (down, forward, right and forward twice).
- Place the BELLOW'S PIPE and take the BELLOWS (E).
- Go forward.
- Place the EMPTY JAR and use the BELLOWS; take the JAR WITH TERMITES (F).
- Go to Bart's Room (down twice and left).
- Use the JAR WITH TERMITES and take the RAZOR (G); move the coat and take the HOOK and PADDLE 2/2 (H).
- Walk down three times.
- Take the ADHESIVE PATCH with the RAZOR (I).
- Go down and right.
- Place the ADHESIVE PATCH and use the BELLOWS; place the PADDLES (J).
- Go forward.
- Take the BRONZE HAND (K).
- Go to Spiegel's Office.
- Remove the hand and place the BRONZE HAND; open the cabinet and play the HOP (L).
- You receive the LIGHTER.
- Go to the Museum Square (down four times, right and forward).

- Use the LIGHTER and take the EMPTY BUCKET (M).
- Walk down.
- Use the EMPTY BUCKET to get a BUCKET WITH WATER (N).
- Go forward.
- Use the BUCKET WITH WATER (O).
- Take the WINGED SKULL (P).
- Go to Bart's Room.
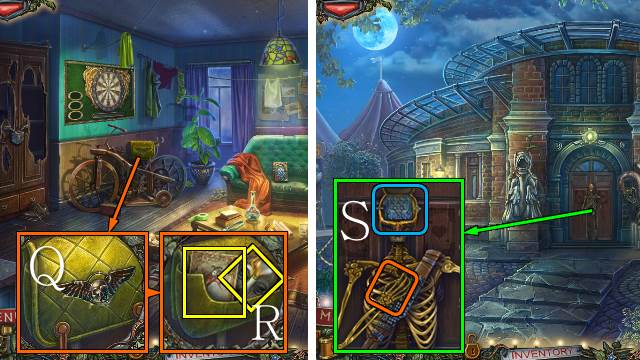
- Place the WINGED SKULL (Q); open the bag and take the JOKER and WOODEN MASK (R).
- Go to the Museum Square.
- Move the skeleton's hand and place the JOKER; zoom in for a mini-game (S).
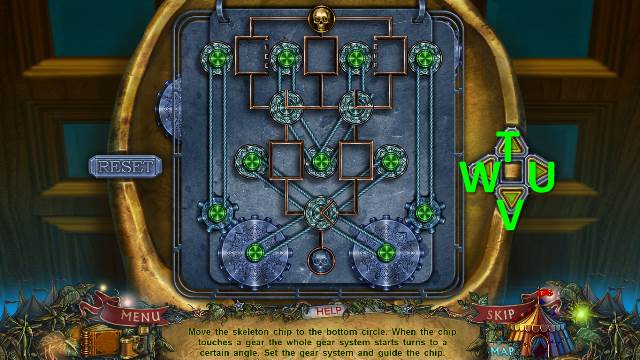
- Solution: U-V-U-V-Wx2-T-U-T-W-V-U-V-W-V-U-V-W-V-U-V-W-V.
- Go forward.
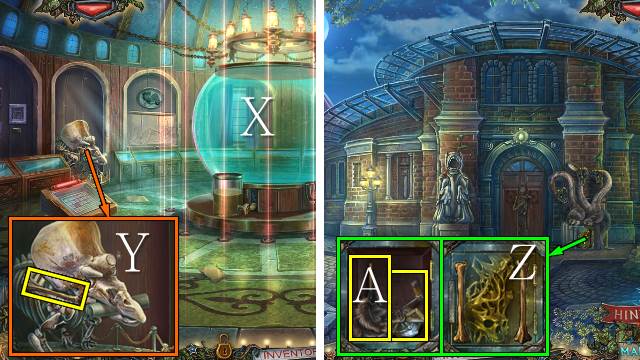
- Remove the tarp (X).
- Take BONE 2/2 (Y).
- Walk down.
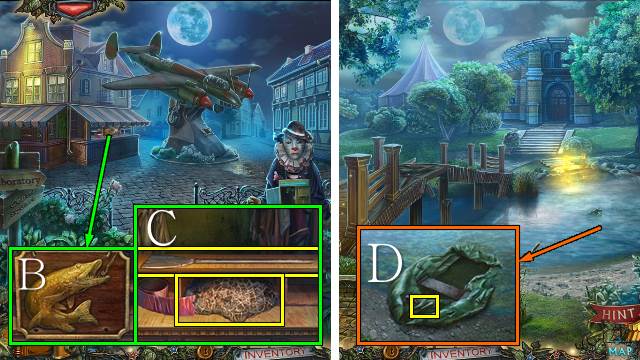
- Place the BONES (Z); open the compartment and take the DUSTER and SEA LINE (A).
- Go forward.
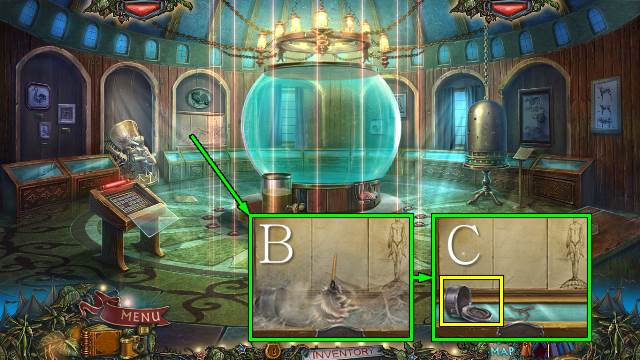
- Use the DUSTER (B); move the worm and take the BAIT CONTAINER (C).
- Go down twice, forward and right.
- Pick out the pumpkin and take the FEEDING WORMS with the BAIT CONTAINER (D).
- Play the HOP (E).
- You receive a MURDERER'S MASK.
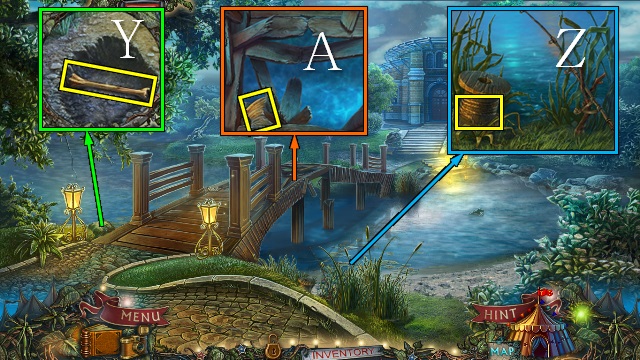
- Go to the River.
- Place the SEA LINE and take the FISHING ROD (F).
- Use the FEEDING WORMS and get the FISH with the FISHING ROD (G).
- Go forward twice.
- Place the HOOK (I).
- Open the cage and use the FISH to get the FISH TILE (J).
- Place the FISH TILE for a mini-game; the solution is random (K).
- Take the three darts for a SET OF DARTS (L); remove the drape and take the BIRD SEED (M).

- Talk to Tula (N).
- Take the LIQUID SAMPLE (O).
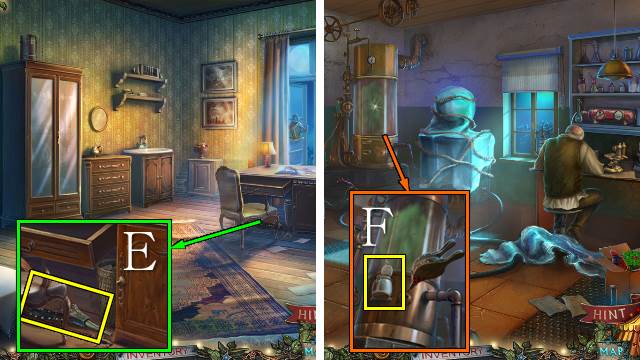
- Go to Spiegel's Office.
- Play the HOP (P).
- You receive an EMPTY SPRAYER.
- Place the BIRD SEED and take TULA'S TIARA (Q).
- Go forward.
- Talk to Professor Spiegel (R).
- Give Spiegel the LIQUID SAMPLE and talk to him again.
- Take the FISH SCHEME and take the TOXIN NEUTRALIZER with the EMPTY SPRAYER (S).
- Go to Bart's Room.
- Place the SET OF DARTS for a mini-game (T).
- Take DICE FACET 1/2 (U); take the SLEDGEHAMMER (V).
- Go to the Museum.
- Use the SLEDGEHAMMER and TOXIN NEUTRALIZER (W).
- Talk to Tula (X).
- Take the DAMAGED SCALES (Y); use SPIEGEL'S COIL (Z).
- Talk to Tula.
- Take the CREEPY MASK (A).
- Walk down.
- Remove the tape and broken rope and place the ROPE (B); place the WOODEN MASKS, MURDERER'S MASK and CREEPY MASK for a mini-game (C).
- Solution: 2-1-7-3-4-5-6-7.
- Go left.
Chapter 5: The Antidote
- Open the lantern and use the LIGHTER (D).
- Open the bag and play the HOP (E).
- You receive a DINO'S HORN.
- Take the SHOVEL (F).
- Go left.
- Take a picture; find the listed items (G).
- Take DICE FACET 2/2 (H).
- Walk down.
- Place the DICE FACETS and open the suitcase (I); take the LUMINESCENT DYE and SCISSORS (J).
- Walk down and forward.
- Place the DINO'S HORN; take the DRAWING PAPER (K).
- Walk down and left.
- Use the LUMINESCENT DYE and DRAWING PAPER; you receive the HUMAN SCHEME (L).
- Go down and forward.
- Place the FISH SCHEME and HUMAN SCHEME; take the SAW FISH (M).
- Walk down and left.
- Play the HOP (N).
- You receive a COGWHEEL.
- Use the SAW FISH and open the crate; take the DOLL'S HEAD (O).
- Place the DOLL'S HEAD and TULA'S TIARA; take TULA'S DOLL (P).
- Go left.

- Place TULA'S DOLL and move Bart and Tula's arms (Q).
- Use the SAW FISH (R), place the COGWHEEL and open the door (S).
- Go forward.

- Open the curtains (T).
- Open the head; take the BRIGHT FLASHLIGHT (U).
- Take the TWEEZERS (V).
- Walk down.
- Use the BRIGHT FLASHLIGHT (W).
- Play the mini-game.
- Take the CODE HANDLE (X).
- Walk forward.
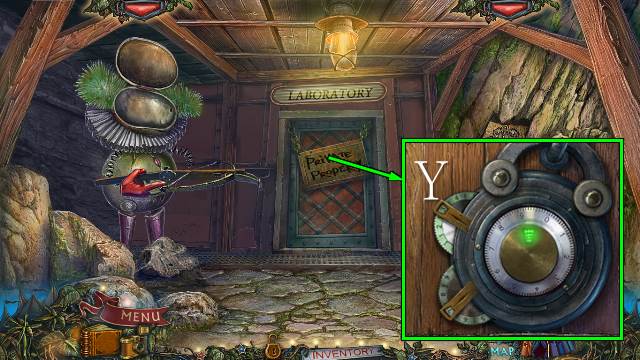
- Use the SCISSORS and place the CODE HANDLE; turn the knobs to 3 and 7 (Y).
- Go forward.

- Talk to Mrs. Strauss (Z).
- Play the HOP (A).
- You receive the CLOWN HAND.
- Take the MECHANICAL RAT (B).
- Walk down twice.
- Place the MECHANICAL RAT (C); take the FRAG BOMB (D).
- Go forward twice.
- Use the FRAG BOMB (E).
- Take the CROSSBOW BOLT and HORN CHUNK (F).
- Use the SHOVEL to get a SHOVEL WITH COAL (G).
- Walk down.
- Use the SHOVEL WITH COAL and close the head (H).
- Place the CLOWN HAND and CROSSBOW BOLT (I).
- Take the MAGNET CARD (J).
- Go forward.
- Use the MAGNET CARD (K).
- Take a picture; find the listed items (K2).
- Go forward.
- Take a picture; find the listed items (L).
- Take the PREDATORY CAT (M).
- Play the mini-game (N).
- Take the CAT HUNTER (O); place the HORN CHUNK and take BART'S DNA SAMPLE (P), and place the DAMAGED SCALES and take TULA'S DNA SAMPLE (Q).
- Go to Spiegel's Lab (down seven times, forward, right and forward three times).
- Place the PREDATORY CAT and CAT HUNTER (R); take the CADUCEUS (S).
- Go down five times, right, forward, left twice and forward.
- Place the CADUCEUS; take the STERILE COTTON with the TWEEZERS and take the SMELLING SALTS (T).
- Walk forward.
- Play the HOP (U).
- You receive an INJECTOR.
- Use the SMELLING SALTS (V).
- Talk to Bart (W).
- Go forward.
- Take JUDY'S BLOOD with the STERILE COTTON (X).
- Go to Spiegel's Lab.
- Use BART'S DNA SAMPLE, TULA'S DNA SAMPLE and JUDY'S BLOOD; take the MUTANT'S ANTIDOTE with the INJECTOR (Y).
- Go down five times, right, forward, left twice, and forward three times.
- Use the MUTANT'S ANTIDOTE (Z).
- Congratulations, you have completed Twilight Phenomena: The Incredible Show.
Created at: 2015-02-15