Walkthrough Menu
- General Tips
- Chapter 1: New Orleans
- Chapter 2: The Cemetery
- Chapter 3: The Tomb
- Chapter 4: Beatrice
- Chapter 5: Into the Bayou
- Chapter 6: The Carters' House
General Tips
- This is the official guide for Vampire Legends: The Count of New Orleans.
- This guide will not show when you have to zoom into a location; the screenshots will show each zoom scene.
- Hidden-object puzzles are referred to as HOPs. This guide will not show screenshots of the HOPs, however, it will mention when an HOP is available and the inventory item you'll collect from it.
- Use the Map to fast travel to a location.
Chapter 1: New Orleans
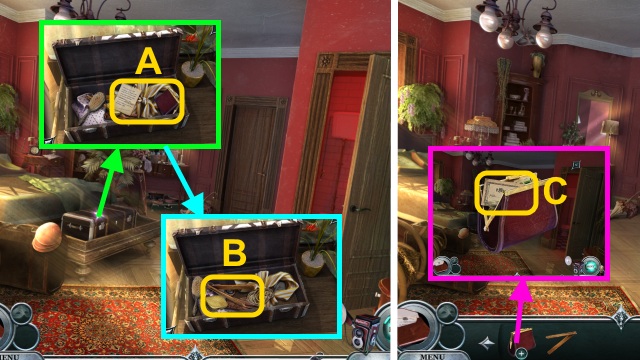
- Open the suitcase; take the note and WALLET (A).
- Move the items; take the TONGS (B).
- Open the WALLET; take the TRAVELER'S CHEQUE (C).
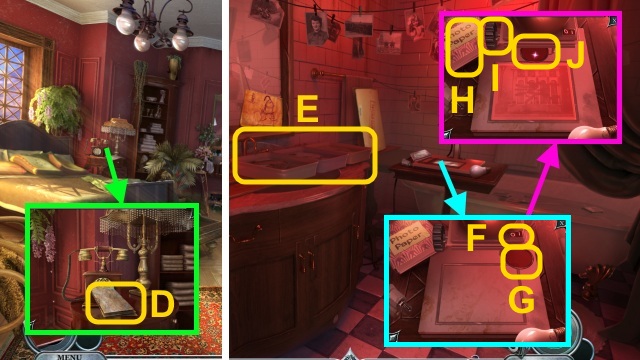
- Take the MAP Of NEW ORLEANS (D).
- Walk right.
- Place the TONGS (E).
- Press the switch (F); examine the filter (G).
- Place the paper (H); turn the dial 3x (I).
- Examine the filter (J); receive the UNDEVELOPED PHOTO.
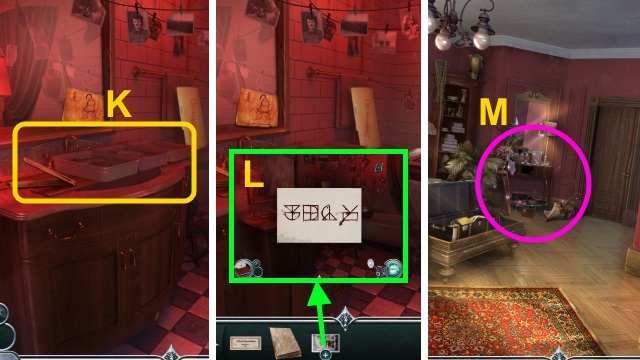
- Use the UNDEVELOPED PHOTO (K).
- Flip the photo (L); take the PHOTO – CARTERS' HOUSE.
- Walk down.
- Play the HOP to receive the IMPORTANT NUMBERS LIST (M).
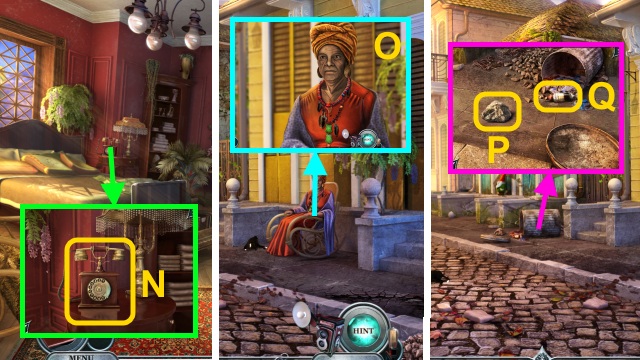
- Use the IMPORTANT NUMBERS LIST (N).
- Walk forward.
- Talk to Rosalie; give the MAP OF NEW ORLEANS (O).
- Receive the Map and VOODOO CHARM.
- Take the ROCK (P) and EPOXY GLUE (Q).
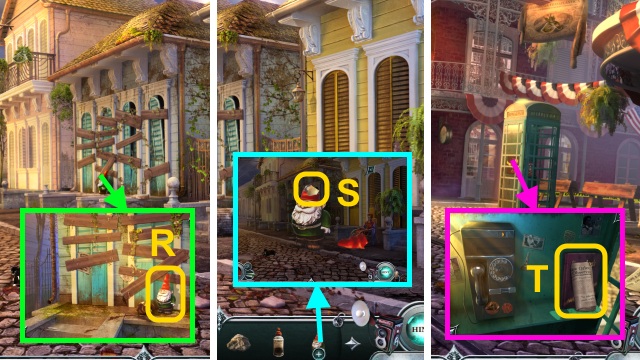
- Take the GARDEN GNOME (R).
- Combine the GARDEN GNOME and ROCK; take the note and MOSAIC PIECES (1/2) (S).
- Walk left.
- Read the newspaper (T); examine the book for a mini-game.
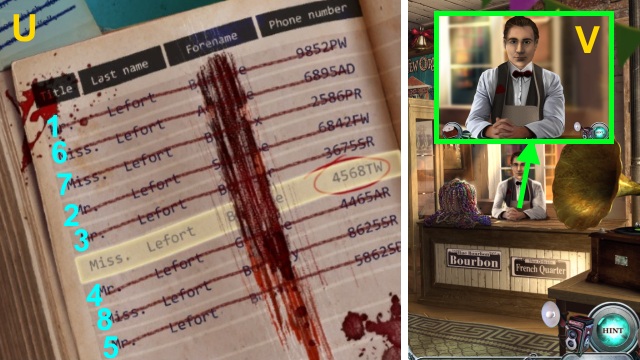
- Solution (U).
- Walk forward.
- Talk to the man (V); give the TRAVELER'S CHEQUE.
- Receive the GAME TOKEN and CHANGE.
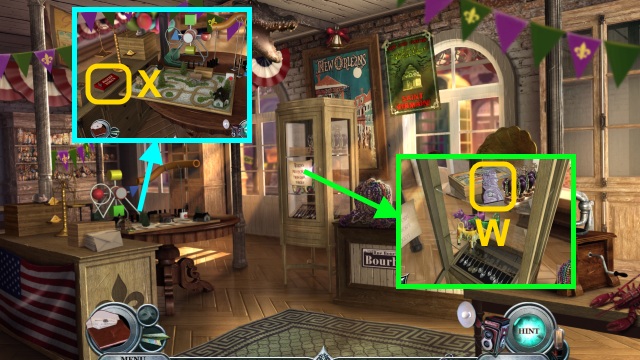
- Open the cabinet; take the MAN TILE (W).
- Use the GAME TOKEN for a mini-game (X).
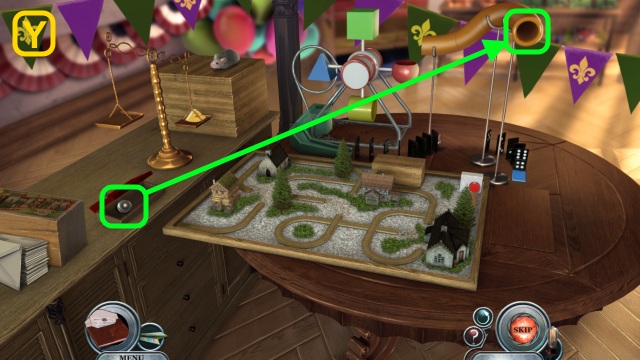
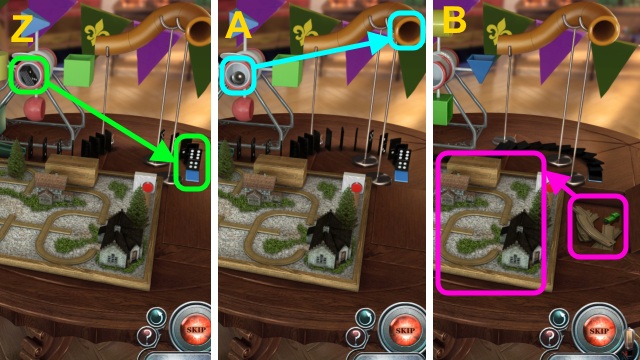
- Solution (Y-B).
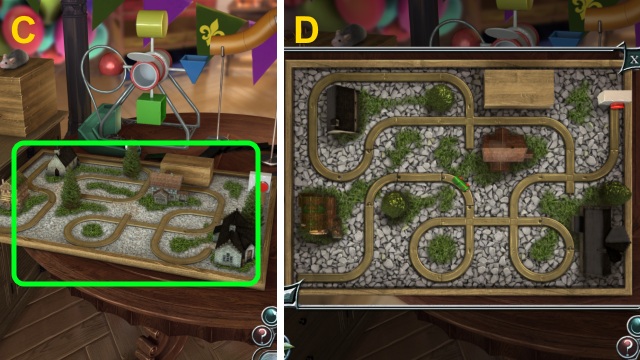
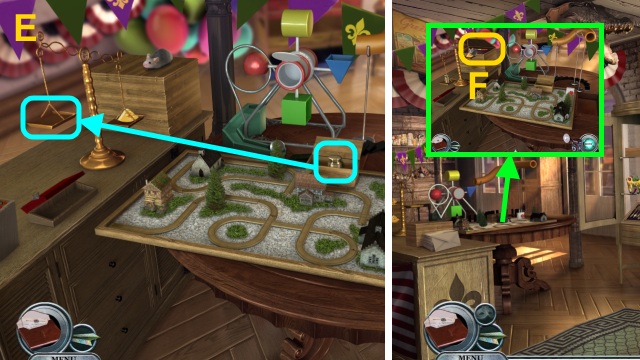
- Solution (C-E).
- Take the MULTI-TOOL (F).
- Walk down.
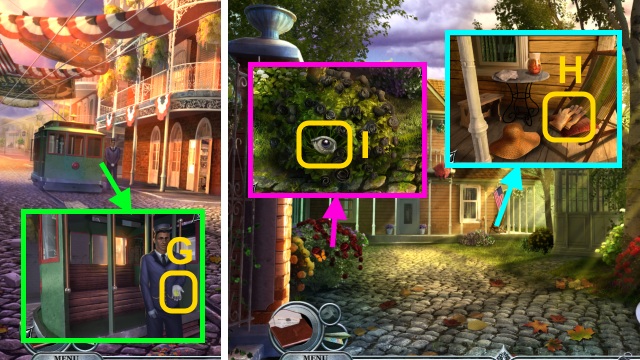
- Give the CHANGE; take the ticket (G).
- Go left, then go to the Manor.
- Move the hat; take the GARDENING GLOVES (H).
- Use the GARDENING GLOVES; take the LEFT BLACK EYE (I).
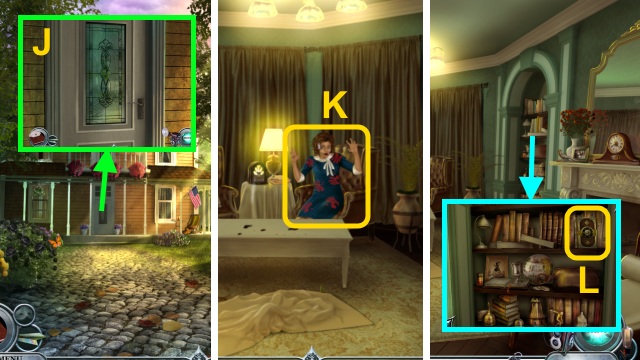
- Examine the door (J).
- Use the VOODOO CHARM (K).
- Take the SCRAPBOOK (L).
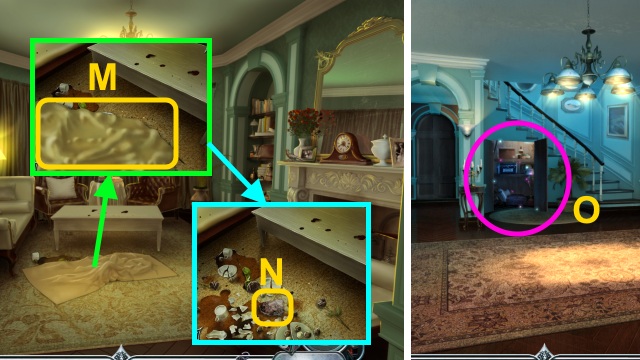
- Move the cloth (M).
- Use the GARDENING GLOVES; take the MOSAIC PIECES (N).
- Walk down.
- Open the closet; play the HOP to receive the MAUSOLEUM LOCK PARTS (1/5) (O).
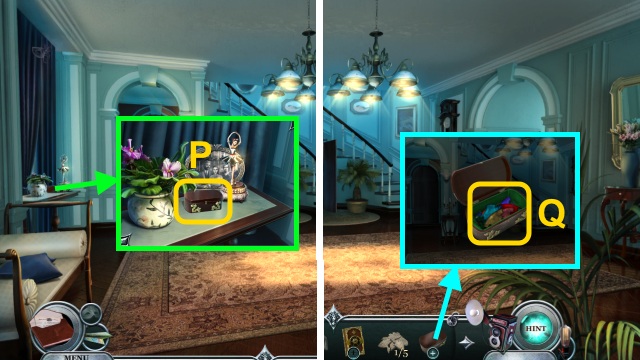
- Take the JEWELRY BOX (P).
- Open the JEWELRY BOX; take the SCRAPBOOK PIECES (Q).
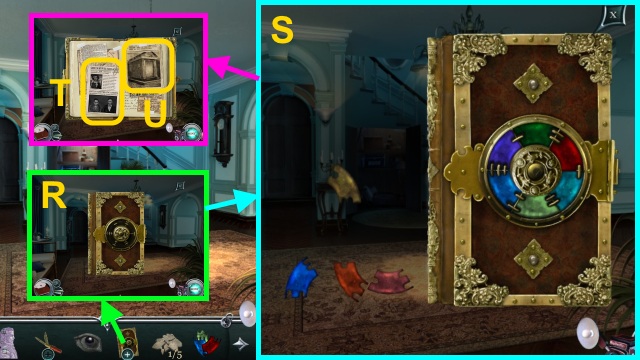
- Combine the SCRAPBOOK and SCRAPBOOK PIECES (R); place the pieces (S).
- Take the newspaper and NEWSPAPER PHOTO (T); read the scrapbook (U).
- Go to the Cemetery.
Chapter 2: The Cemetery
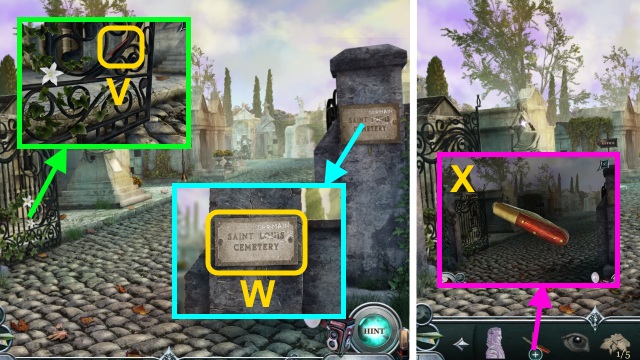
- Take the BRUSH (V).
- Examine the plaque (W).
- Open the MULTI-TOOL (X); receive the SCREWDRIVER.
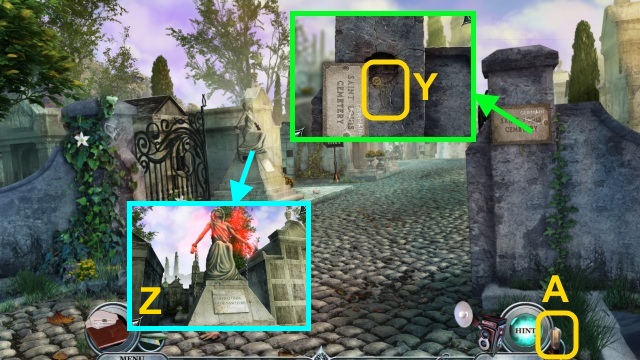
- Use the SCREWDRIVER; take the MEDALLION (Y).
- Use the Camera (Z).
- Go to the Darkroom (A).
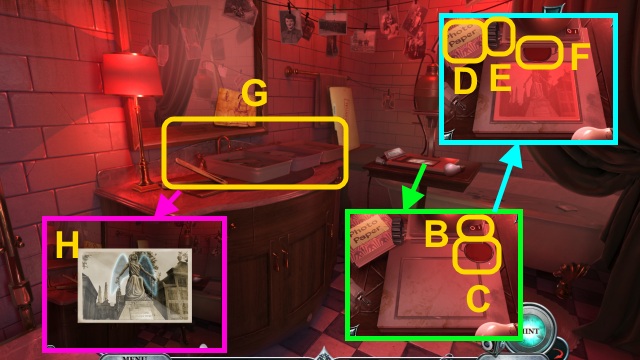
- Press the switch (B); examine the filter (C).
- Place the paper (D); turn the dial 3x (E).
- Examine the filter (F); receive the UNDEVELOPED PHOTO.
- Place the UNDEVELOPED PHOTO (G).
- Take the PHOTO: ANGEL STATUE (H).
- Walk down, then left.
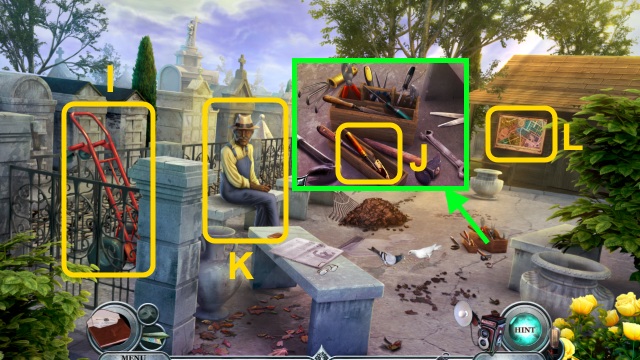
- Take the HAND TRUCK (I).
- Take the TROWEL (J).
- Talk to the man (K).
- Examine the map for a mini-game (L).
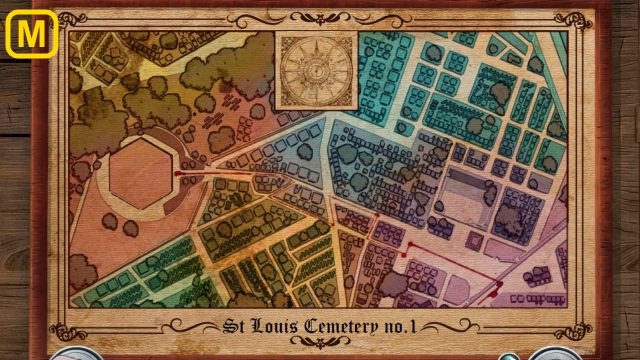
- Solution (M).
- Receive the CEMETERY MAP.
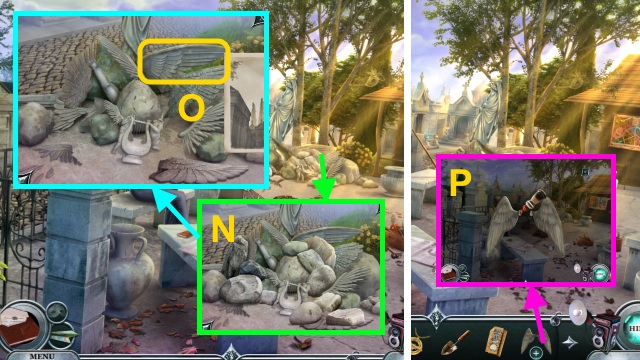
- Use the HAND TRUCK and PHOTO: ANGEL STATUE (N).
- Take the ANGEL WINGS (O).
- Combine the ANGEL WINGS and EPOXY GLUE (P).
- Walk down.
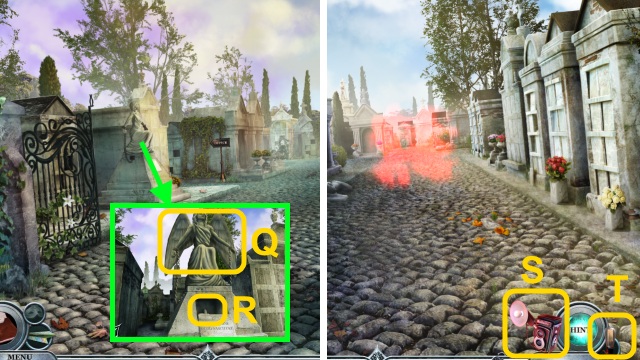
- Place the ANGEL WINGS (Q); take the MAUSOLEUM LOCK PARTS (2/5) (R).
- Walk forward.
- Use the Camera (S).
- Go to the Darkroom (T).
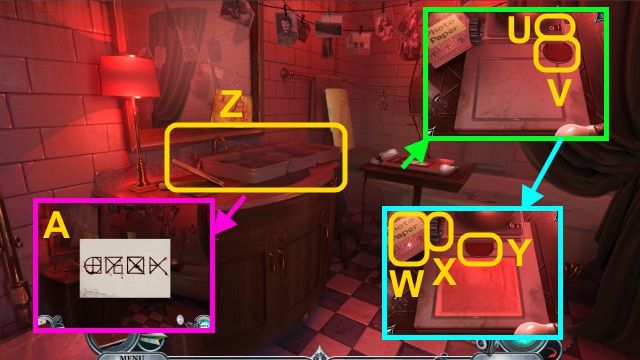
- Press the switch (U); examine the filter (V).
- Place the paper (W); turn the dial 3x (X).
- Examine the filter (Y); receive the UNDEVELOPED PHOTO.
- Place the UNDEVELOPED PHOTO (Z).
- Flip the photo; take the PHOTO: CEMETERY ALLEY (A).
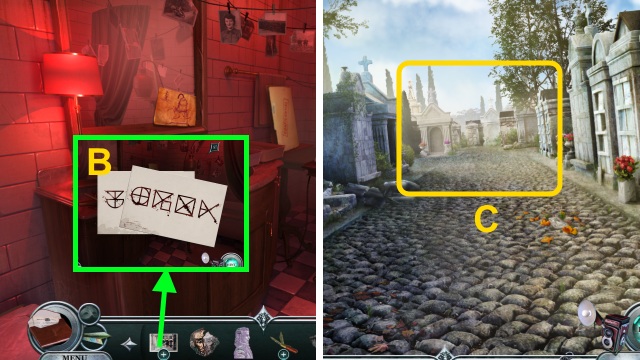
- Combine the PHOTO – CARTERS' HOUSE and PHOTO: CEMETERY ALLEY; receive the COMBINED PHOTOS (B).
- Walk down.
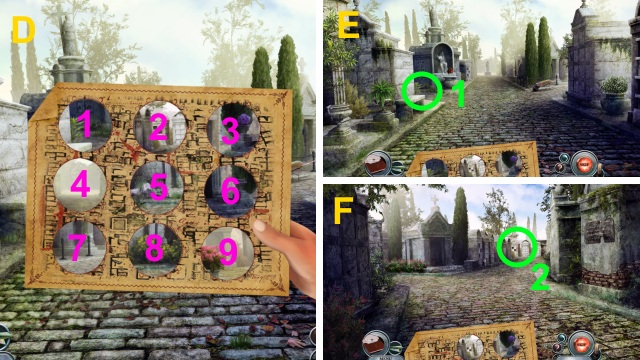
- Use the CEMETERY MAP for a mini-game (C).
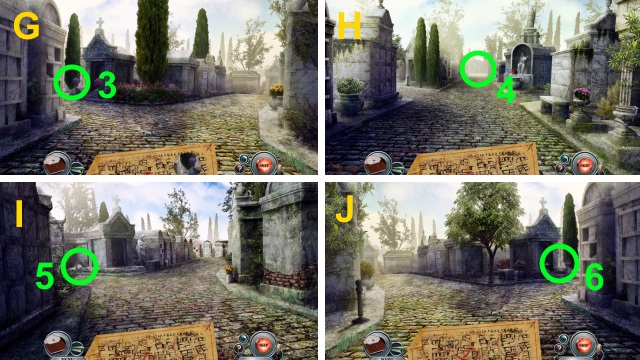
- Solution (D-J).
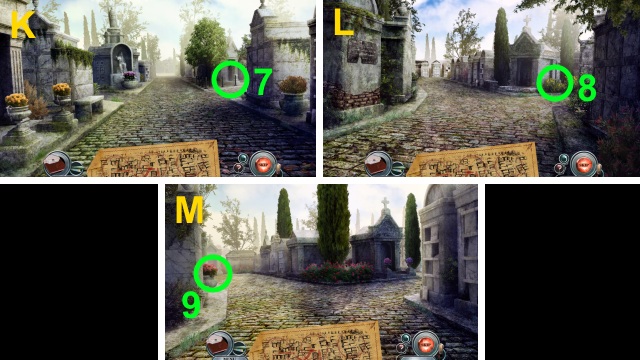
- Solution (K-M).
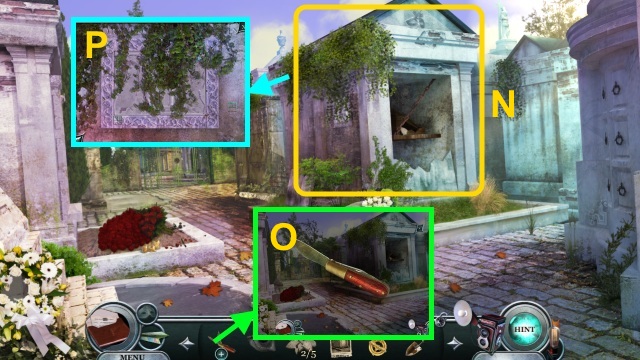
- Use the NEWSPAPER PHOTO (N).
- Examine the MULTI-TOOL (O); receive the KNIFE.
- Use the KNIFE (P).
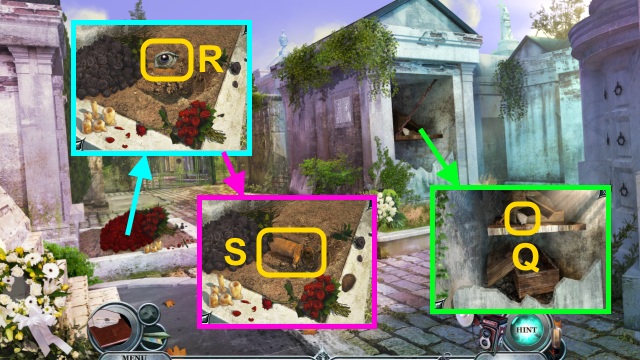
- Take the MAUSOLEUM LOCK PARTS (3/5) (Q).
- Move the roses; take the RIGHT BLACK EYE (R).
- Use the TROWEL; take the CAN (S).
- Walk down.
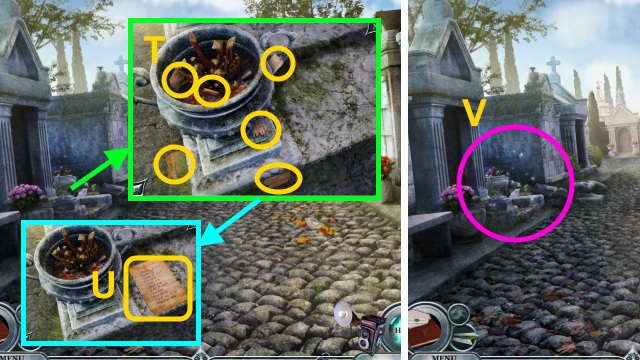
- Gather the scraps (T); take the recipe (U).
- Play the HOP to receive the GRIS-GRIS (V).
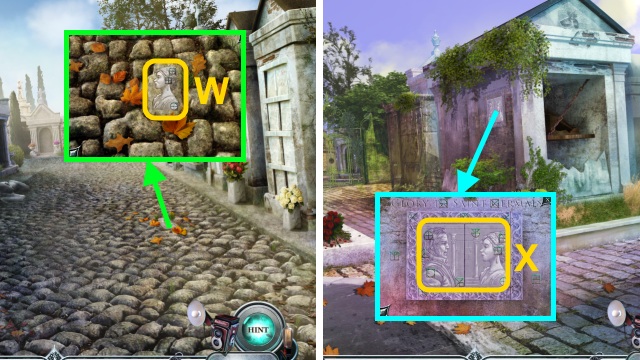
- Use the KNIFE; take the WOMAN TILE (W).
- Walk forward.
- Place the MAN TILE and WOMAN TILE (X); use the COMBINED PHOTOS for a mini-game.
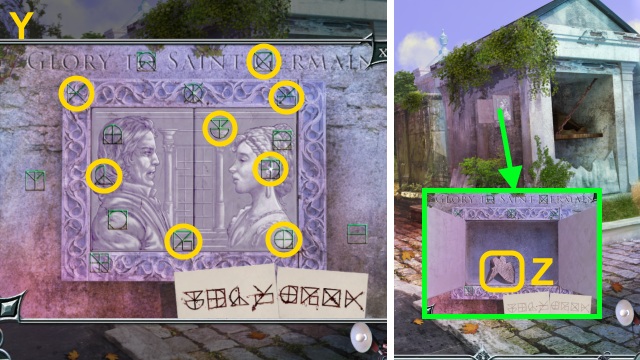
- Solution (Y).
- Take the MASOLEUM LOCK PARTS (4/5) (Z).
- Walk down twice, then left.
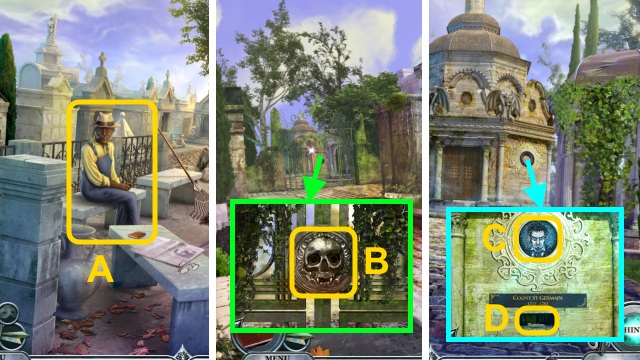
- Give the NEWSPAPER PHOTO (A); receive the GATE KEY.
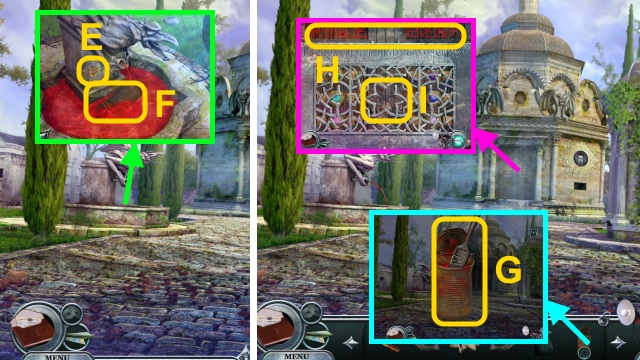
- Walk down, then forward twice.
- Place the GATE KEY (B).
- Walk left.
- Place the MOSAIC PIECES (C); take the MAUSOLEUM LOCK PARTS (D).
- Place the MEDALLION (E); use the CAN (F).
- Receive the RED PAINT.
- Combine the RED PAINT and BRUSH (G); receive the RED PAINTING KIT.
- Use the RED PAINTING KIT (H) and MAUSOLEUM LOCK PARTS (I) for a mini-game.
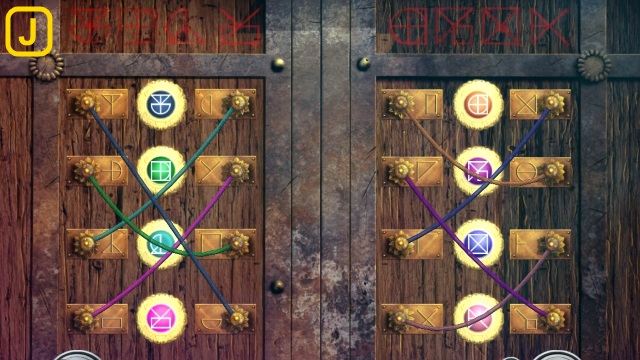
- Solution (J).
- Walk forward.
Chapter 3: The Tomb
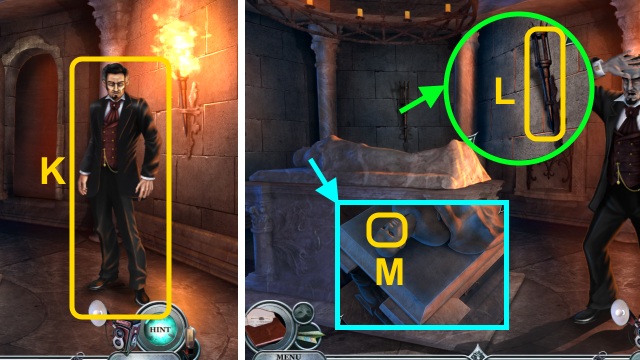
- Talk to the Count (K).
- Take the TORCH (L).
- Place the LEFT BLACK EYE and RIGHT BLACK EYE (M).
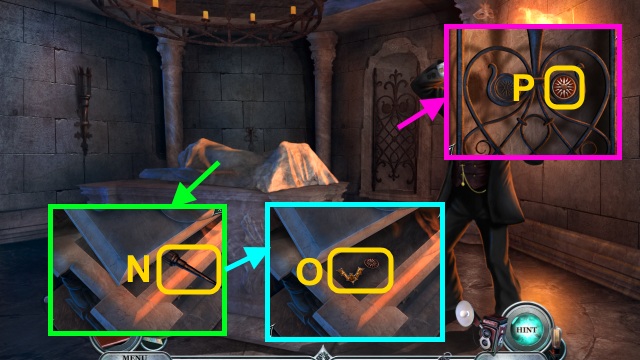
- Use the TORCH (N).
- Take the BATS (1/2) and RED DISC (O).
- Place the RED DISC (P).
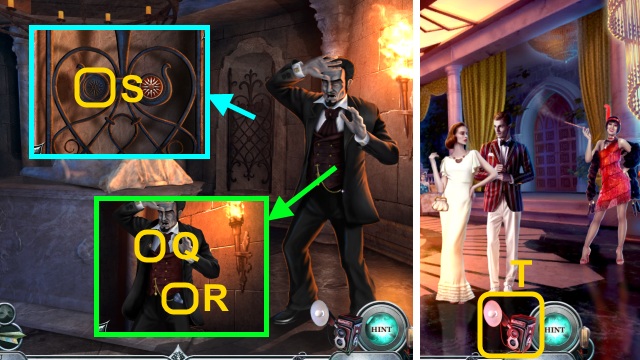
- Open the coat 2x; take the BLACK DISC (Q) and HANDKERCHIEF (R).
- Place the BLACK DISC (S).
- Walk forward twice.
- Use the Camera (T).
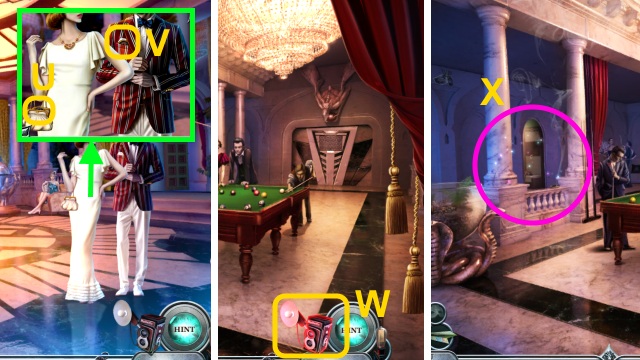
- Open the purse; take the VAMPIRE PORTRAITS (1/4) (U) and VAMPIRE PORTRAITS (2/4) (V).
- Walk right.
- Use the Camera (W).
- Play the HOP to receive the CUE STICK (X).
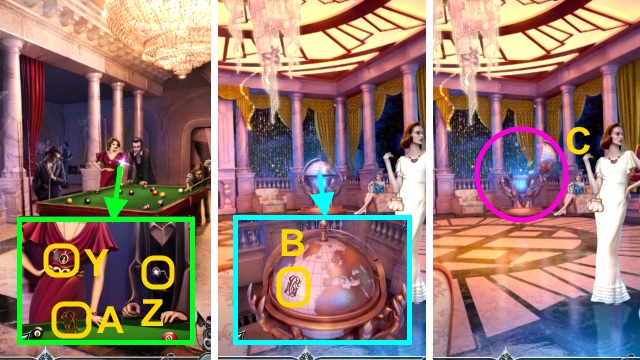
- Open the locket; take the VAMPIRE PORTRAITS (3/4) (Y), VAMPIRE PORTRAITS (Z), and MONOGRAM (A).
- Walk down.
- Place the MONOGRAM (B).
- Play the HOP to receive the DOOR REPLICA (C).
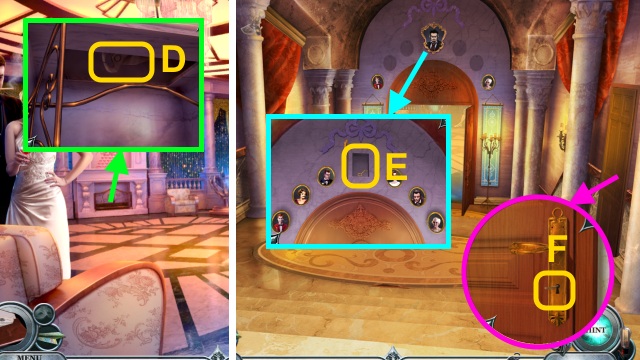
- Use the CUE STICK (D); receive the NIPPER.
- Walk down.
- Place the VAMPIRE PORTRAITS; take the LIBRARY KEY (E).
- Use the LIBRARY KEY (F).
- Walk right.
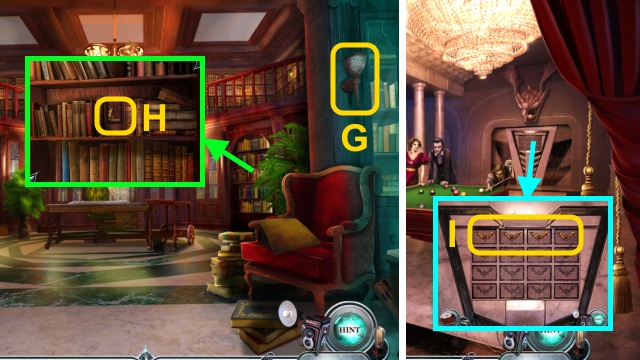
- Examine the torch (G).
- Take the BATS (H).
- Go to the Billiards Room.
- Place the BATS (I); use the bats for a mini-game.
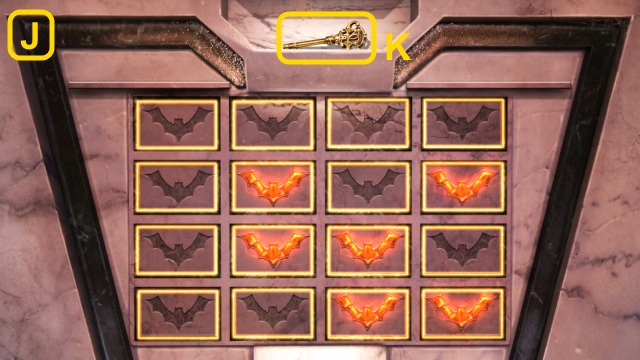
- Solution (J).
- Take the LITTLE KEY (K).
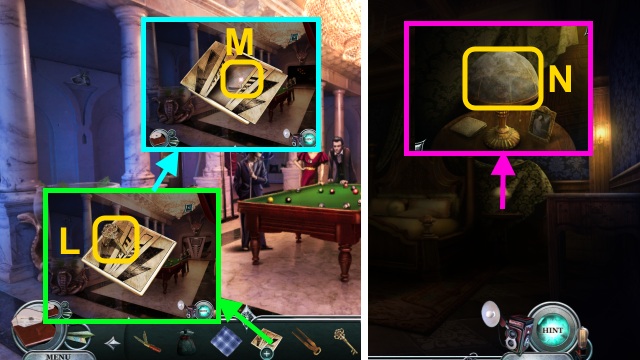
- Combine the DOOR REPLICA and LITTLE KEY (L); take the note (M).
- Walk forward.
- Turn on the lamp (N); use the HANDKERCHIEF.
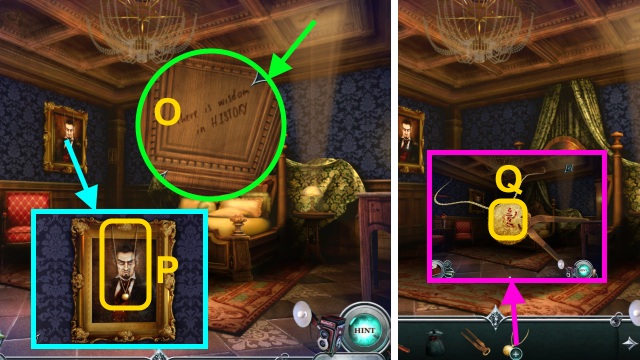
- Examine the ceiling (O).
- Take the PENDANT (P).
- Combine the PENDANT and NIPPER; take the VAMPIRE FIGURINE (Q).
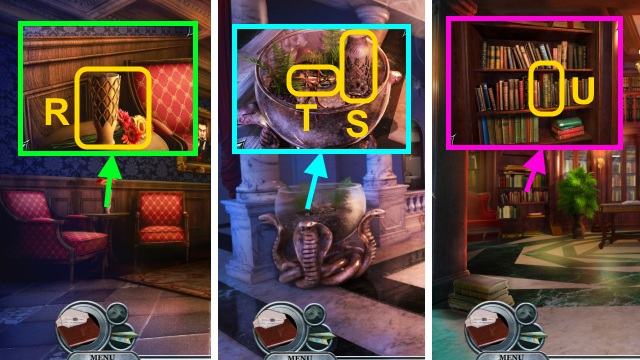
- Remove the flowers; take the VASE (R).
- Walk down.
- Use the VASE (S); take the SOLDIER FIGURE (T).
- Walk down twice, then right.
- Examine the book (U).
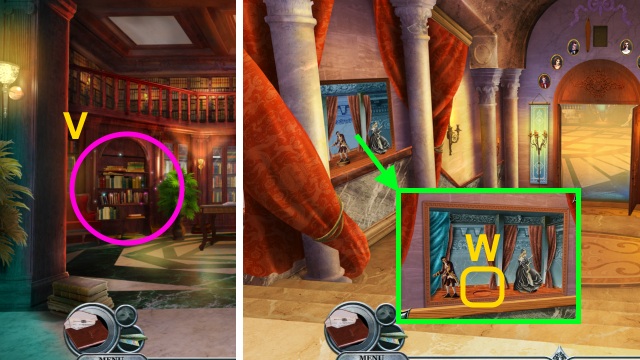
- Play the HOP to receive SAINT GERMAIN'S DOWNFALL (V).
- Walk down.
- Place the SOLDIER FIGURE and SAINT GERMAIN'S DOWNFALL (W).
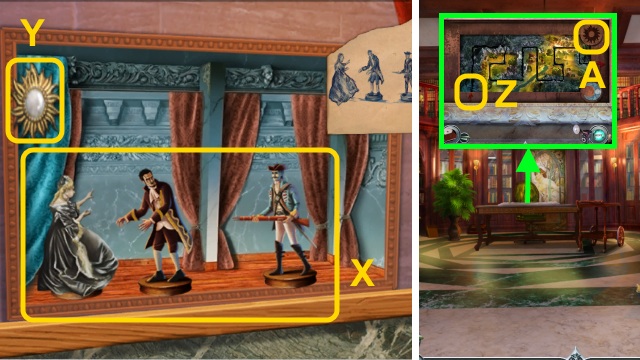
- Arrange the figurines (X); take the SUN LEVER (Y).
- Walk right.
- Place the VAMPIRE FIGURINE (Z) and SUN LEVER (A) for a mini-game.
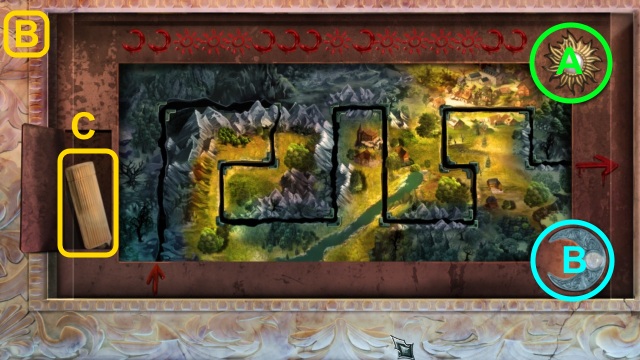
- Solution (B): Bx2-Ax3-Bx3-A-B-Ax4-Bx2.
- Take the LIGHTER and note (C).
- Walk down three times.
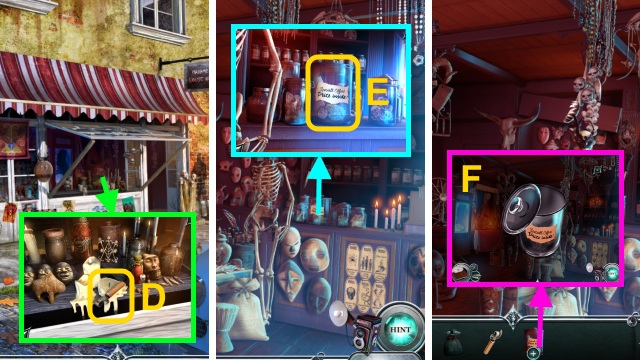
- Use the LIGHTER (D); take the CAN OPENER.
- Walk forward.
- Take the JAR WITH PRIZE (E).
- Combine the JAR WITH PRIZE and CAN OPENER (F); take the TOOTHBRUSH.
- Walk forward.
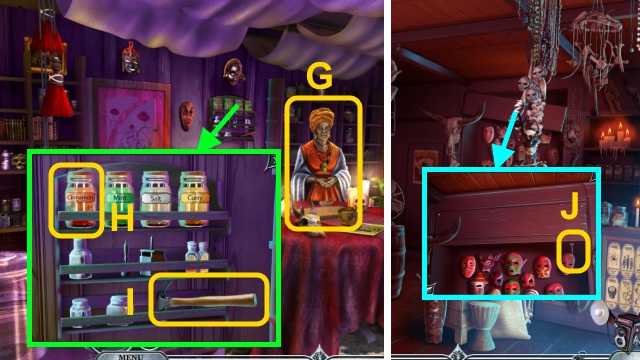
- Talk to Rosalie (G).
- Arrange the labels; take the CINNAMON (H) and HAMMER AND NAILS (I).
- Walk down.
- Use the HAMMER AND NAILS; take the GARDEN DOOR KEY (J).
- Walk forward.
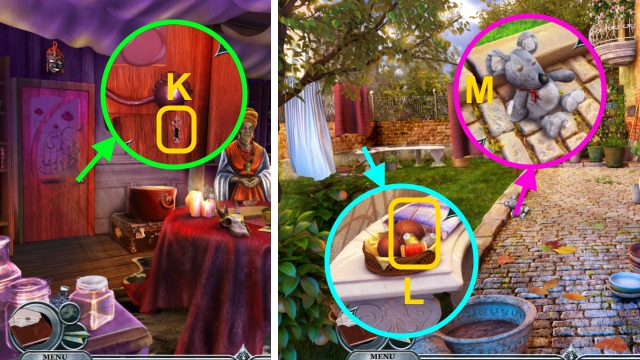
- Use the GARDEN DOOR KEY (K).
- Walk left.
- Take the NEEDLE AND THREAD (L).
- Take the DUSTY, TORN PLUSH MOUSE (M).
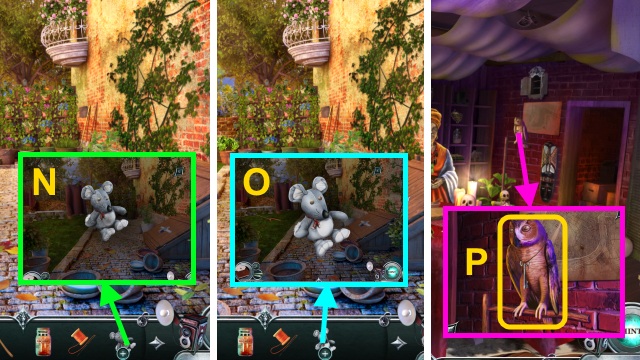
- Combine the DUSTY, TORN PLUSH MOUSE and TOOTHBRUSH (N); receive the TORN PLUSH MOUSE.
- Combine the TORN PLUSH MOUSE and NEEDLE AND THREAD (O); receive the PLUSH MOUSE.
- Walk down.
- Examine Jacques (P); give the PLUSH MOUSE.
- Receive the BASEMENT KEY.
- Walk left.
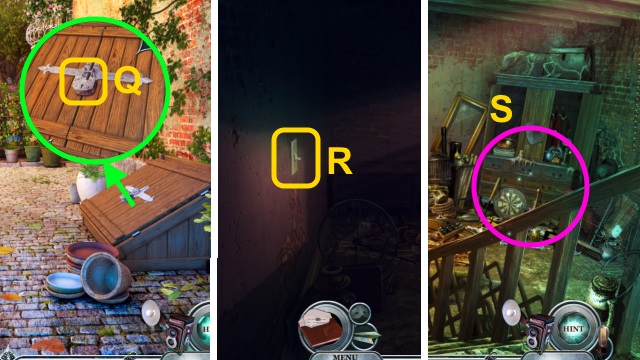
- Use the BASEMENT KEY (Q).
- Go right.
- Examine the switch (R).
- Play the HOP to receive the SHEARS (S).
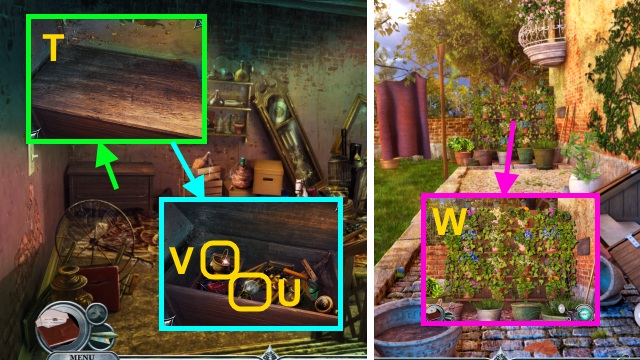
- Open the chest (T); move the junk.
- Take the LIGHT BULB (U) and TOY CLOTHES (1/2) (V).
- Walk down.
- Use the SHEARS for a mini-game (W).
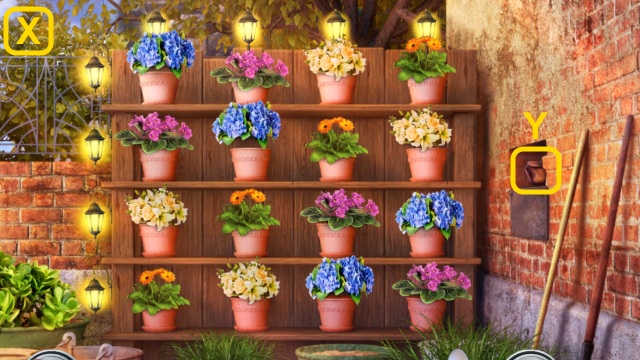
- Solution (X).
- Take the HERBS (Y).
- Walk down.
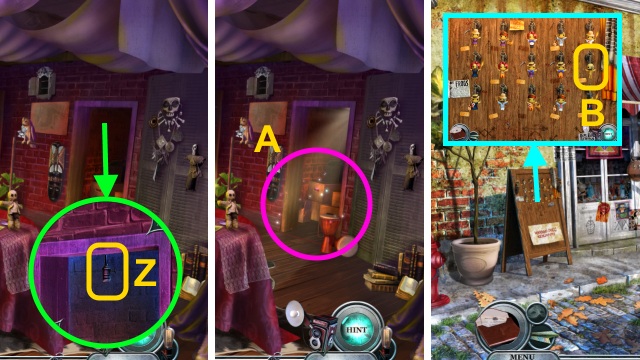
- Place the LIGHT BULB (Z).
- Play the HOP to receive the TOY CLOTHES (A).
- Walk down twice.
- Place the TOY CLOTHES for a mini-game (B).
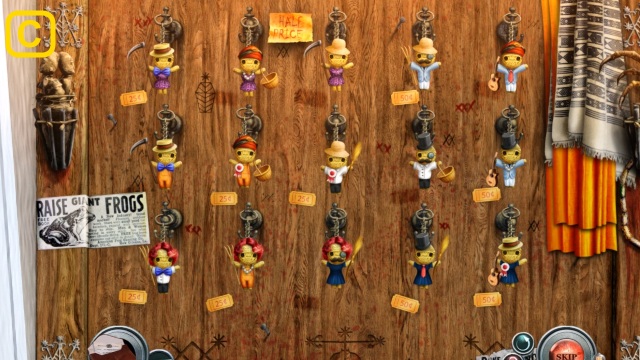
- Solution (C).
- Receive the TOY BASS.
- Go to the Basement.
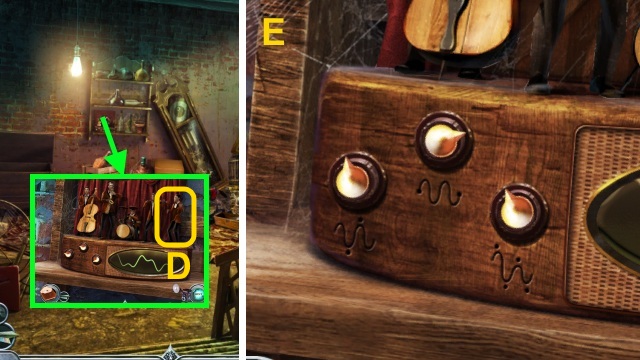
- Give the TOY BASS for a mini-game (D).
- Solution (E).
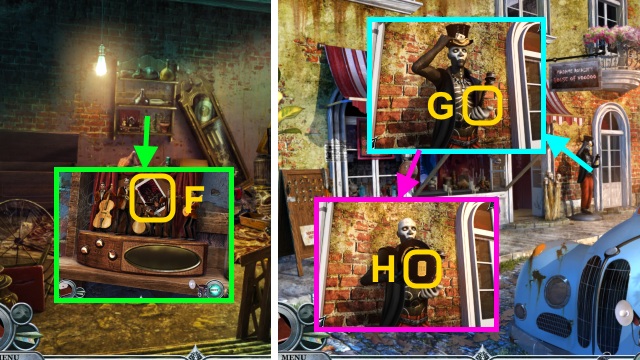
- Take the TAROT CARD (F).
- Walk down four times.
- Give the TAROT CARD (G); take the COUPON (H).
- Walk forward.
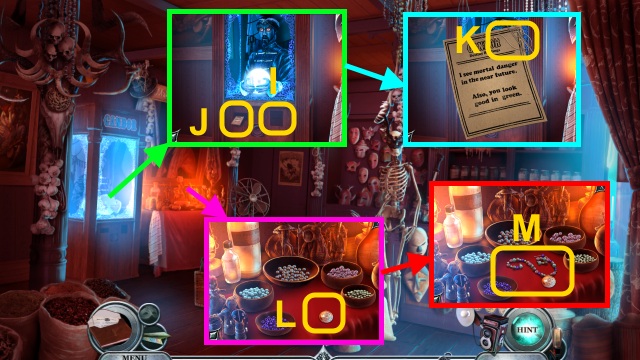
- Use the COUPON (I); examine the paper (J).
- Take the CABLE STRING (K).
- Place the CABLE STRING (L); place the beads.
- Take the NECKLACE (M).
- Walk forward.
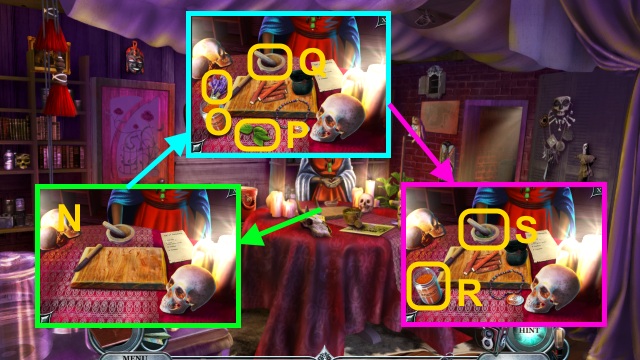
- Place the GRIS-GRIS, CINNAMON, HERBS, and NECKLACE (N).
- Place the lavender (O) and jasmine (P) in the pestle (Q).
- Place the cinnamon (R) in the pestle (S).
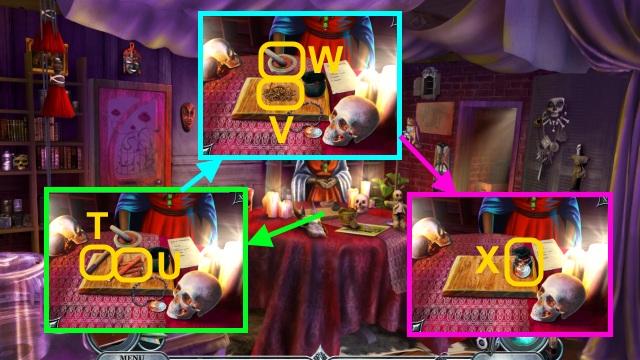
- Use the knife (T) on the root (U).
- Place the root (V) in the pestle (W).
- Place the necklace; take the GRIS-GRIS CHARM (X).
Chapter 4: Beatrice
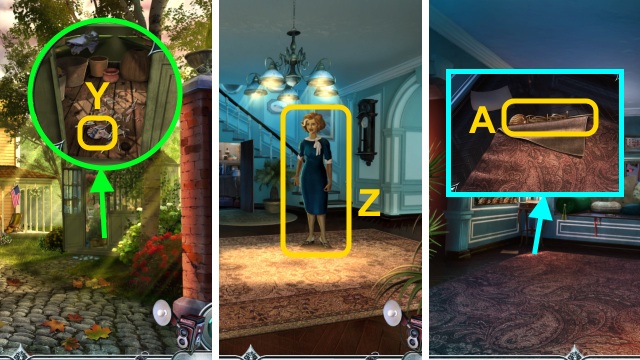
- Take the LOCK PARTS (1/2) (Y).
- Walk forward.
- Talk to Beatrice (Z).
- Walk forward.
- Move the rug; take the PENDULUM (A).
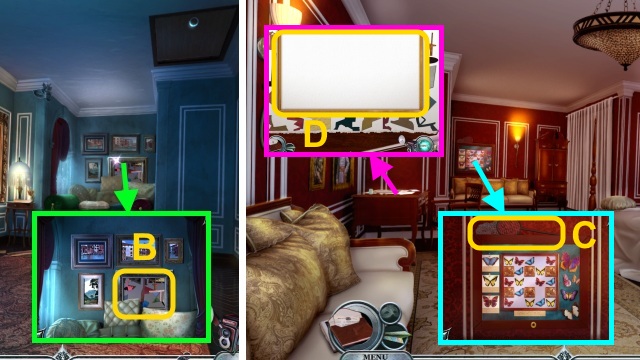
- Take the UNFINISHED COLLAGE (B).
- Walk left.
- Take the BUTTERFLY NET (C).
- Place the UNFINISHED COLLAGE for a mini-game (D).
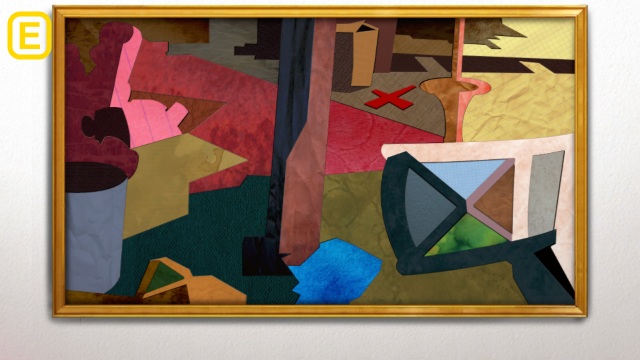
- Solution (E); take the COLLAGE.
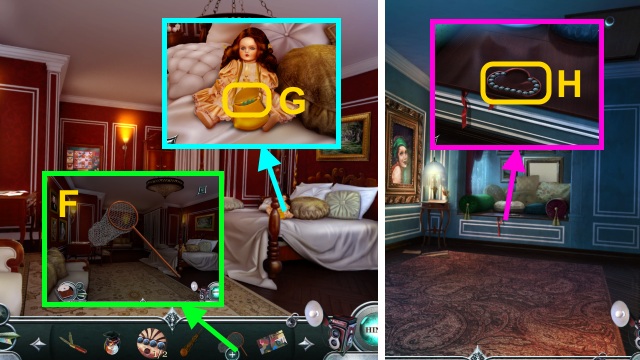
- Examine the BUTTERFLY NET (F); receive the STICK.
- Open the purse; take the LOCK PARTS (G).
- Walk down.
- Place the LOCK PARTS for a mini-game (H).
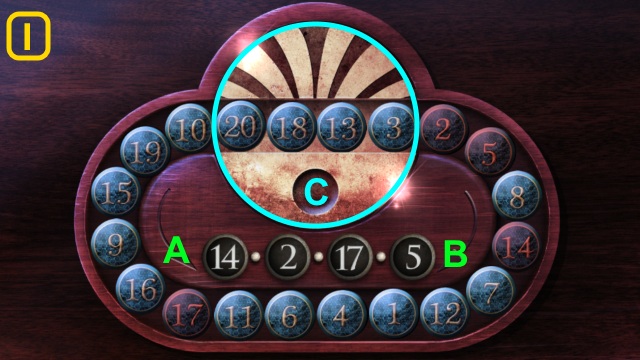
- Solution (I): Ax4-C-Ax2-C-B-C-Ax6-C-Bx3-C-B-C-B-C-A-C-A-C-B-C-Bx3.
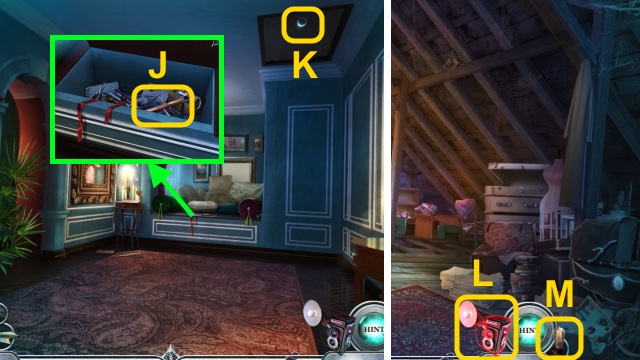
- Take the LONG HOOK (J).
- Use the LONG HOOK (K).
- Go right.
- Use the Camera (L).
- Go to the Darkroom (M).
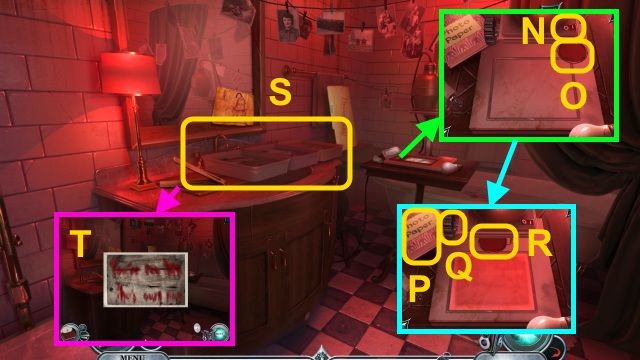
- Press the switch (N); examine the filter (O).
- Place the paper (P); turn the dial 3x (Q).
- Examine the filter (R); receive the UNDEVELOPED PHOTO.
- Place the UNDEVELOPED PHOTO (S).
- Take the PHOTO: ATTIC (T).
- Walk down.
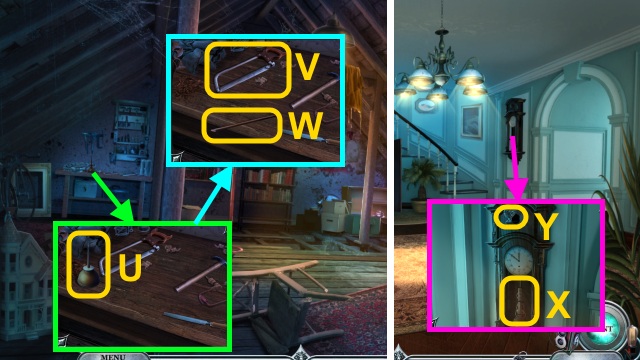
- Take the OIL CAN (U); place the STICK.
- Use the saw (V); take the SHARP STICK (W).
- Walk down twice.
- Place the PENDULUM (X); take the LITTLE TOP HAT (Y).
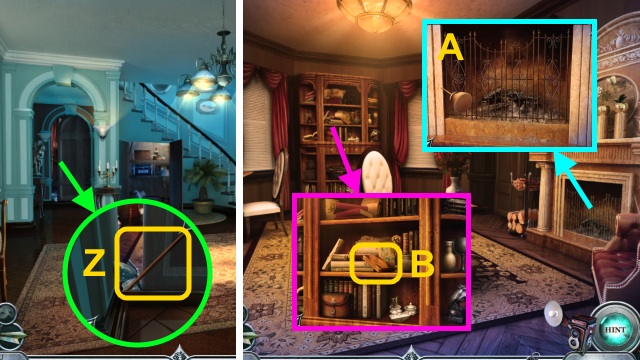
- Use the SHARP STICK; take the METAL BUTTERFLY LEFT HALF (Z).
- Walk left.
- Use the OIL CAN (A); take the IRON RAILING.
- Take the BUTTERFLY BOX (B).
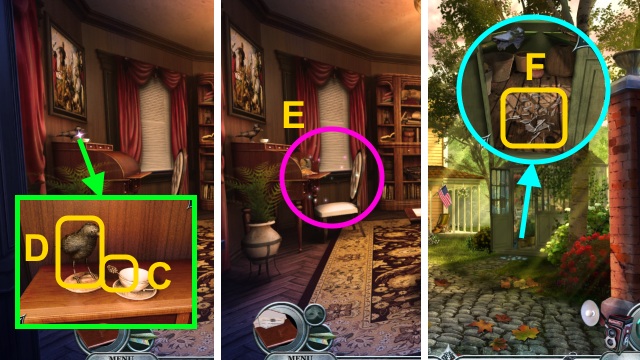
- Take the SPOON (C); place the LITTLE TOP HAT (D).
- Play the HOP to receive the SWEEPING BRUSH (E).
- Go to the Front Garden.
- Use the SWEEPING BRUSH (F).
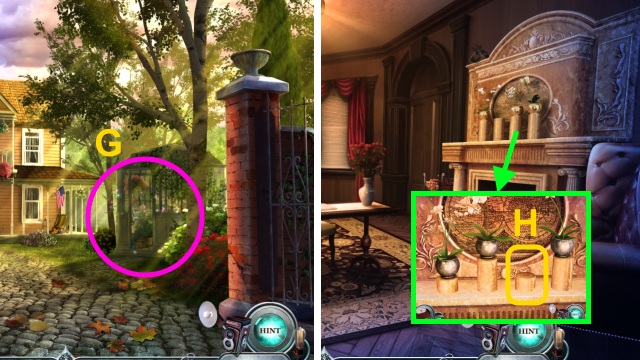
- Play the HOP to receive the ORCHID (G).
- Go to the Study.
- Place the ORCHID for a mini-game (H).
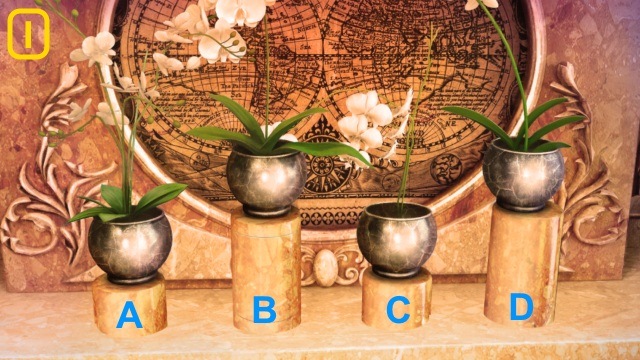
- Solution (I): C-A-D.
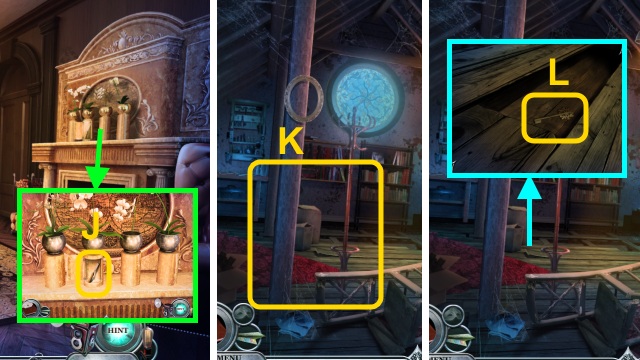
- Take the CHISEL (J).
- Go to the Attic.
- Use the COLLAGE (K).
- Use the CHISEL; take the WARDROBE KEY (L).
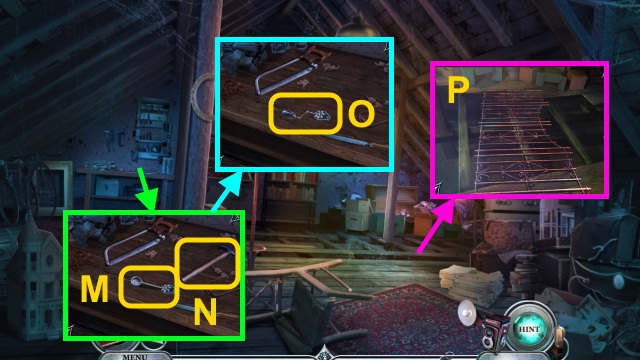
- Place the SPOON (M); use the hammer (N).
- Take the IMPROVISED HANDLE (O).
- Place the IRON RAILING (P).
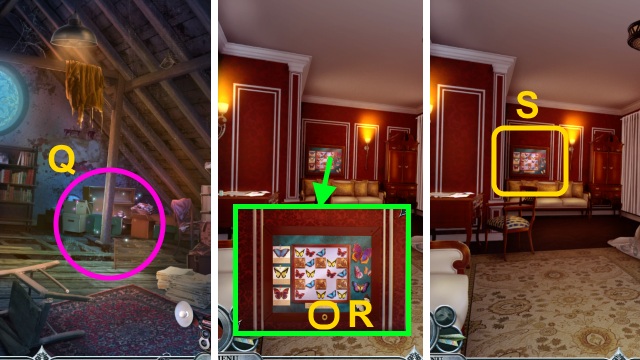
- Play the HOP to receive the PUTTY KNIFE (Q).
- Walk down, then left.
- Place the IMPROVISED HANDLE (R).
- Examine the wall for a mini-game (S).
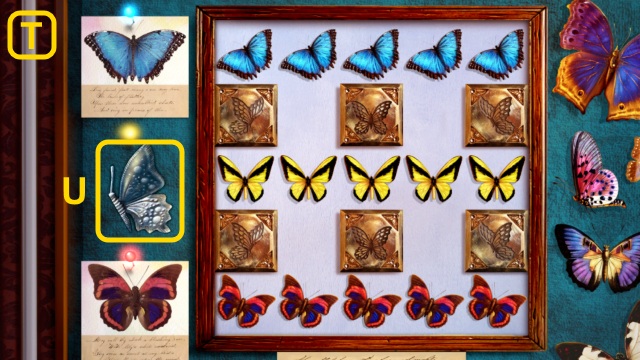
- Starting positions are random; solution (T).
- Take the METAL BUTTERFLY RIGHT HALF (U).
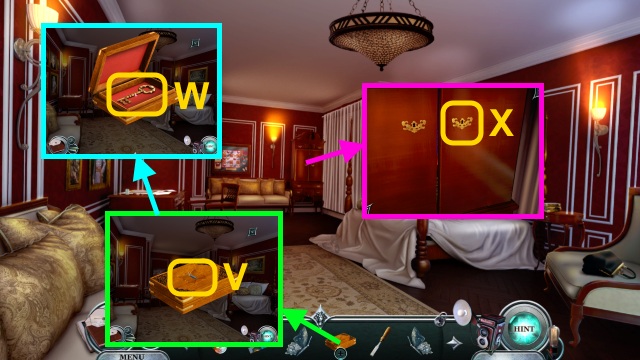
- Combine the BUTTERFLY BOX, METAL BUTTERFLY LEFT HALF, and METAL BUTTERFLY RIGHT HALF (V); take the GAZEBO KEY (W).
- Use the WARDROBE KEY (X).
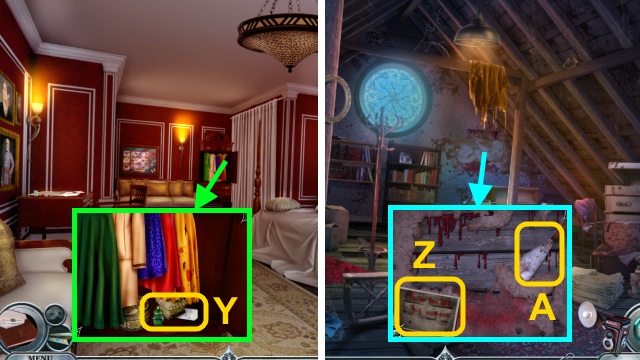
- Take the SMELLING SALTS and note (Y).
- Walk down, then right.
- Use the PHOTO: ATTIC (Z) and PUTTY KNIFE (A).
- Walk down twice, left, then right.
Chapter 5: Into the Bayou
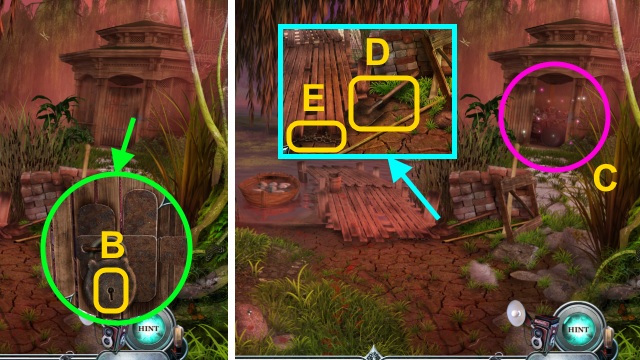
- Use the GAZEBO KEY (B).
- Play the HOP to receive the AXE HEAD (C).
- Take the SHOVEL (D) and CHAIN (E).
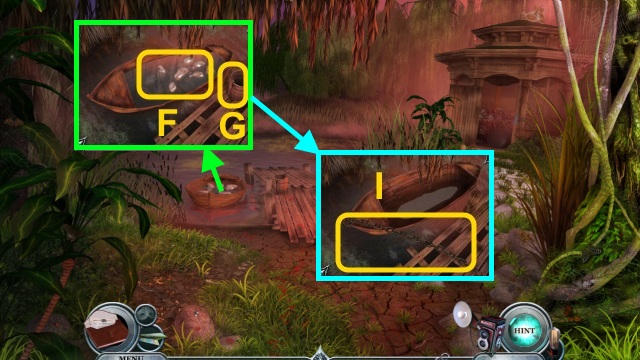
- Use the SHOVEL (F); use the bucket (G).
- Use the CHAIN (I).
- Go forward twice.
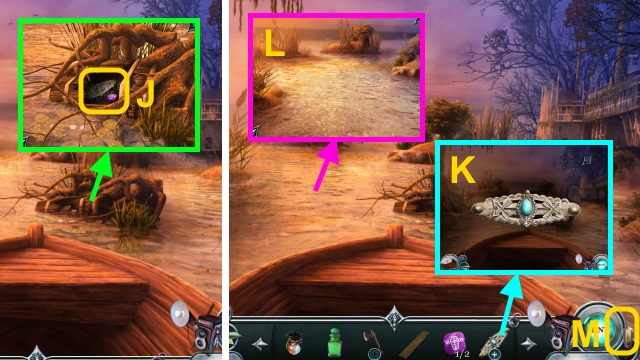
- Take the STONE TILES (1/2) and BEATRICE'S BROOCH (J).
- Examine BEATRICE'S BROOCH (K); receive the PIN.
- Use the Camera (L).
- Go to the Darkroom (M).
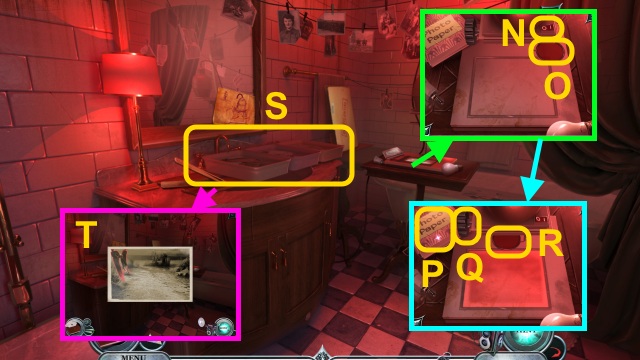
- Press the switch (N); examine the filter (O).
- Place the paper (P); turn the dial 3x (Q).
- Examine the filter (R); receive the UNDEVELOPED PHOTO.
- Place the UNDEVELOPED PHOTO (S).
- Take the PHOTO: RIVER FORK (T).
- Walk down.
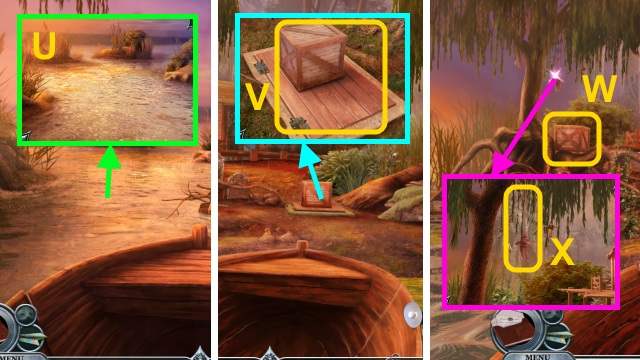
- Use the PHOTO: RIVER FORK (U).
- Go left.
- Take the CRATE and HATCH (V).
- Place the CRATE (W).
- Examine the DOLL (X); take the ROPE.
- Go down.
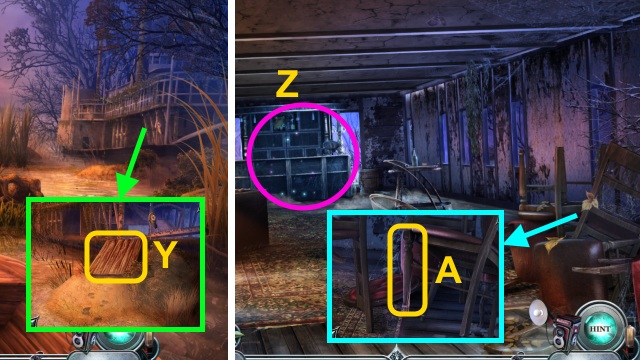
- Place the HATCH (Y).
- Go right.
- Play the HOP to receive the COCKTAIL SHAKER (Z).
- Take the CHAIR LEG (A).
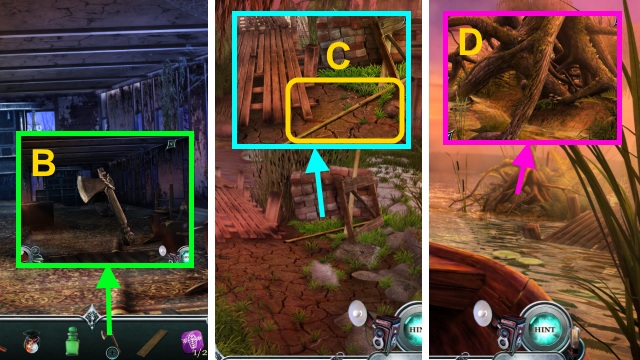
- Combine the AXE HEAD, CHAIR LEG, and ROPE (B); receive the AXE.
- Go to the Pond.
- Use the AXE; take the WOODEN RODS (C).
- Go forward.
- Use the AXE (D).
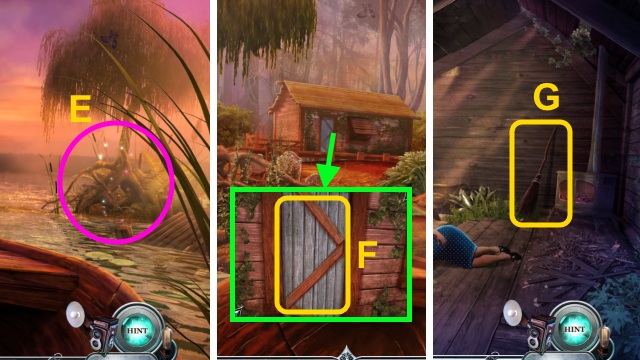
- Play the HOP to receive the IMPROVISED TORCH (E).
- Go forward, then left.
- Use the AXE (F).
- Go forward.
- Take the BROOM (G).
- Go down.
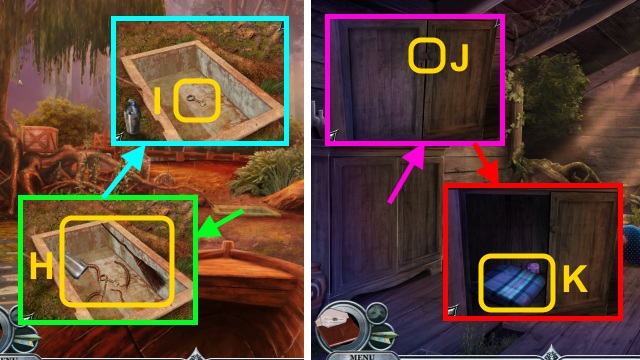
- Use the COCKTAIL SHAKER and BROOM (H); take the RUSTY KEY (I).
- Walk forward.
- Use the RUSTY KEY (J).
- Take the STONE TILES and BLANKET (K).
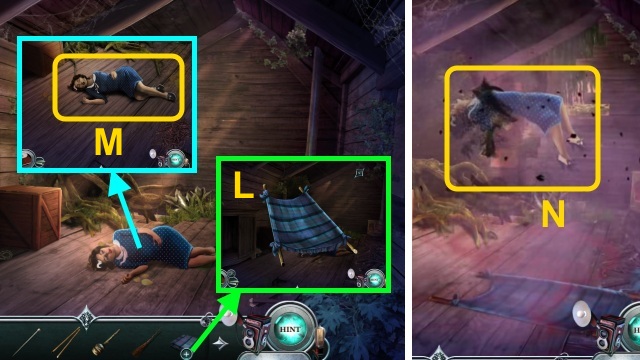
- Open the BLANKET; use the WOODEN POLES (L).
- Take the STRETCHER.
- Use the SMELLING SALTS and STRETCHER (M).
- Use the GRIS-GRIS CHARM (N); receive the INCOMPLETE GRIS-GRIS.
- Go down twice, then right.
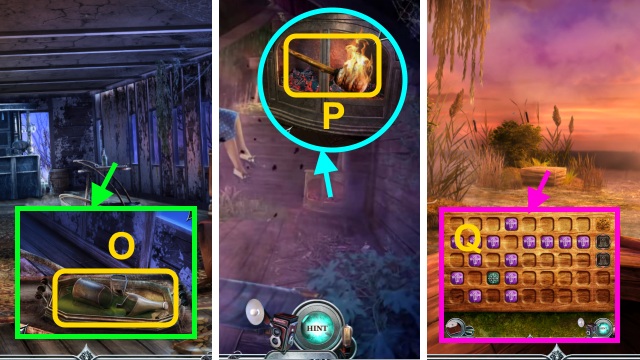
- Examine the bottle (O); use the IMPROVISED TORCH.
- Go to the Hut Interior.
- Use the IMPROVISED TORCH; take the LIT TORCH (P).
- Go down three times.
- Place the STONE TILES for a mini-game (Q).
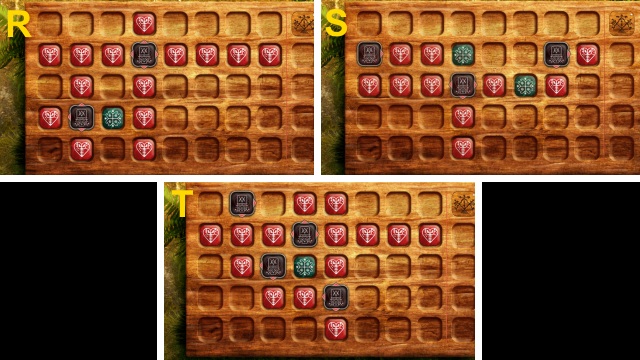
- Solution (R-T).
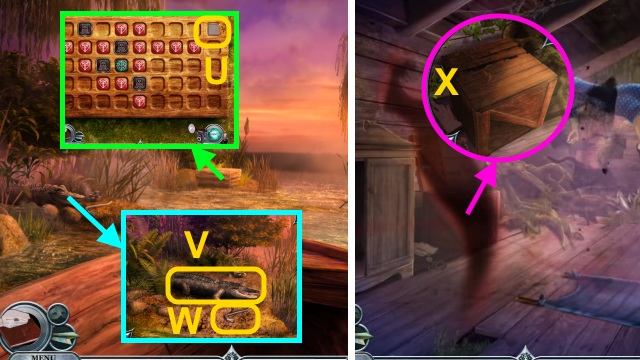
- Take the CHEST TILES (1/2) (U).
- Use the LIT TORCH (V); take the CROWBAR (W).
- Go to the Hut Interior.
- Use the CROWBAR (X).
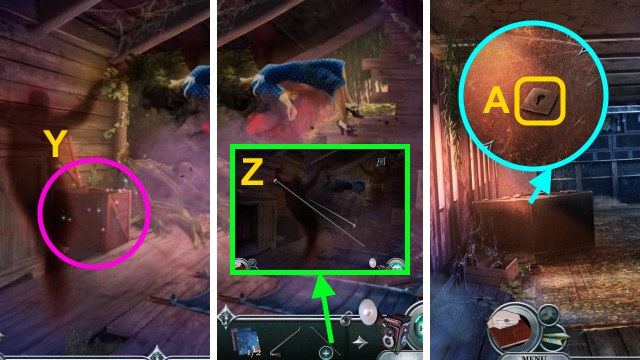
- Play the HOP to receive the BENT WIRE (Y).
- Combine the BENT WIRE and PIN (Z); receive the LOCKPICKING KIT.
- Go down twice, then right.
- Use the LOCKPICKING KIT for a mini-game (A).
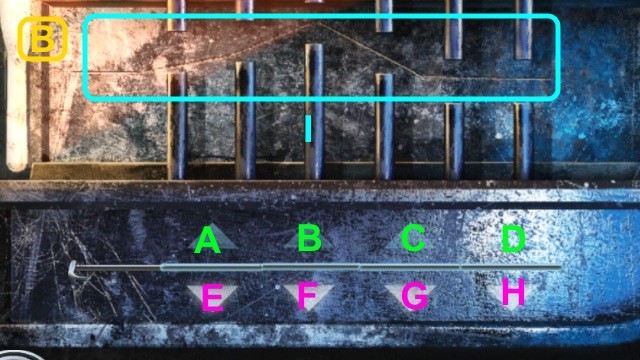
- Solution (B): A-B-Gx5-Dx3-I.
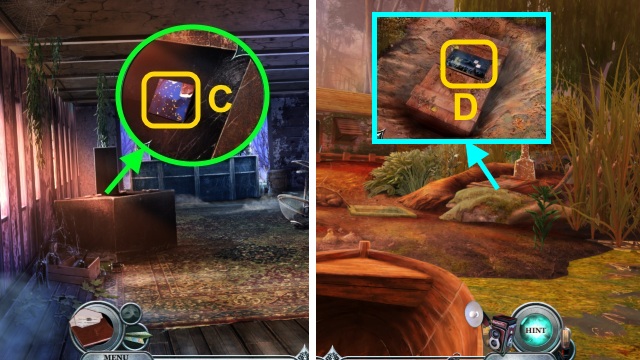
- Take the CHEST TILES (C).
- Go down, then left.
- Use the BROOM; place the CHEST TILES for a mini-game (D).
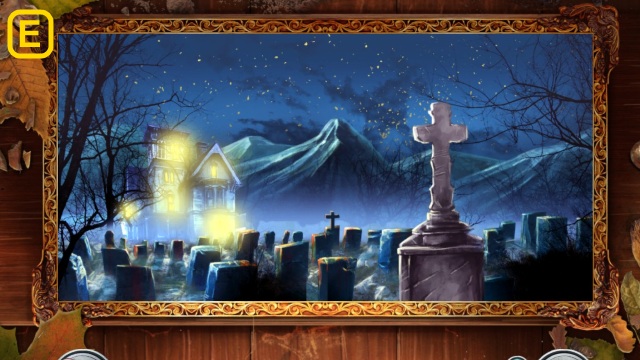
- Solution (E).
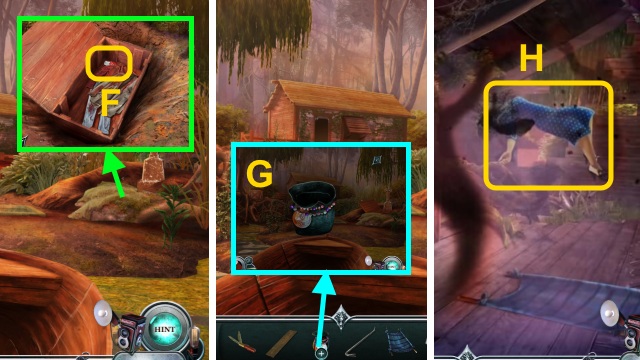
- Open the crate; take the BLOODY HANDKERCHIEF (F).
- Open the INCOMPLETE GRIS-GRIS (G); add the BLOODY HANDKERCHIEF.
- Receive the REINFORCED GRIS-GRIS.
- Walk forward.
- Use the REINFORCED GRIS-GRIS (H).
Chapter 6: The Carters' House
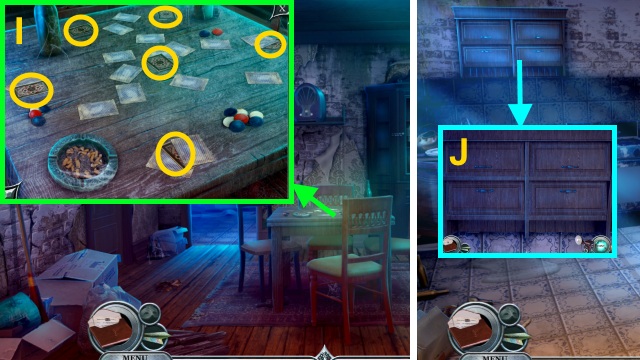
- Flip the cards; collect the cards (I).
- Receive the PLAYING CARDS.
- Walk forward.
- Open the cabinet for a mini-game (J).
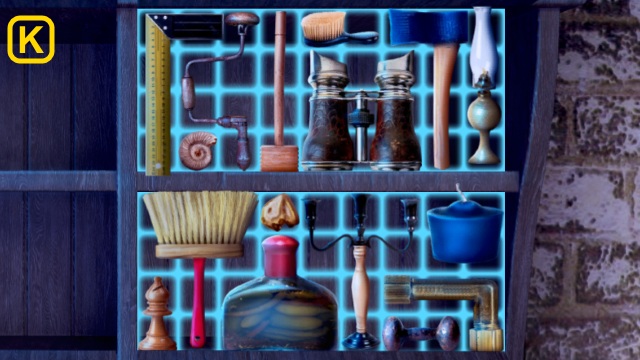
- Solution (K).
- Receive the MEAT MALLET.
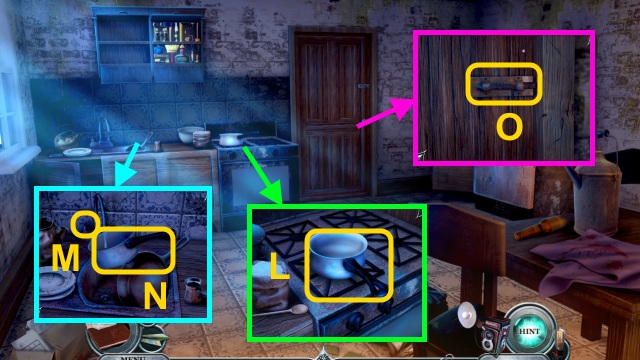
- Take the SAUCEPAN (L).
- Turn the handle (M); use the SAUCEPAN (N).
- Receive the SAUCEPAN WITH WATER.
- Use the MEAT MALLET (O).
- Walk forward.
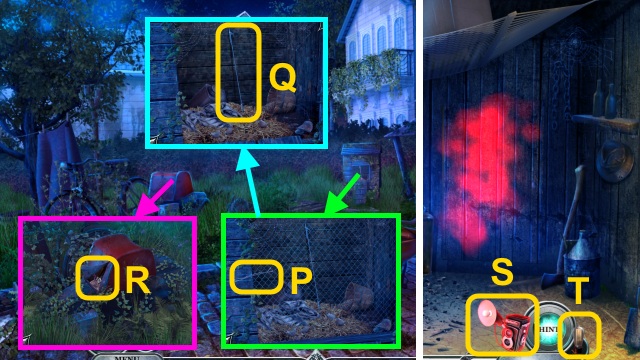
- Take the BOBBY PIN (P).
- Take the POKER (Q).
- Use the KNIFE (R); take the HAND DRILL and PAINTBRUSH.
- Go right.
- Use the Camera (S).
- Go to the Darkroom (T).
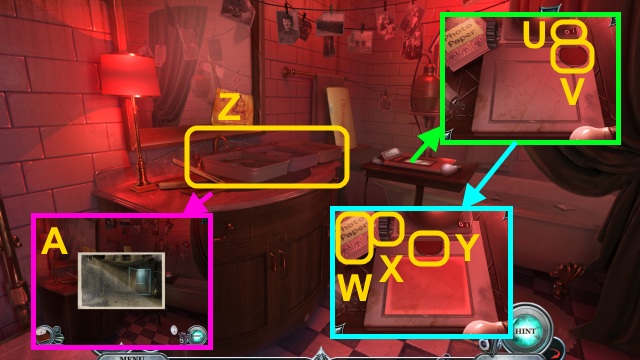
- Press the switch (U); examine the filter (V).
- Place the paper (W); turn the dial 3x (X).
- Examine the filter (Y); receive the UNDEVELOPED PHOTO.
- Place the UNDEVELOPED PHOTO (Z).
- Take the PHOTO: SHED (A).
- Walk down.
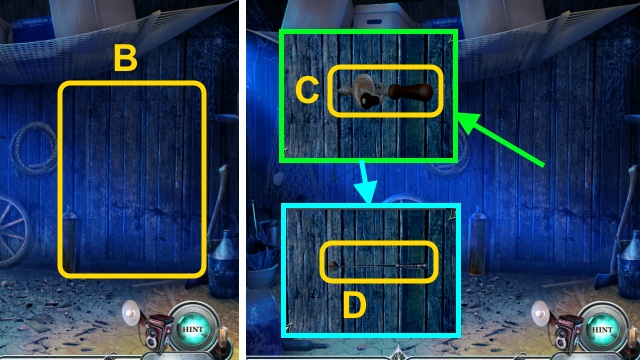
- Use the PHOTO: SHED (B).
- Use the HAND DRILL (C).
- Use the POKER (D).
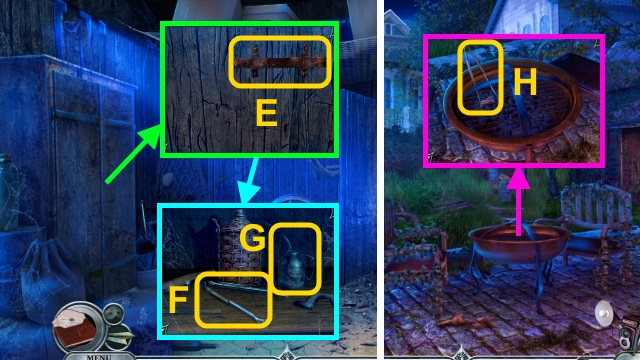
- Open the latch (E); take the BARBECUE TONGS (F) and OIL CAN (G).
- Walk down.
- Use the BARBECUE TONGS (H); receive the MATCHES.
- Walk down.
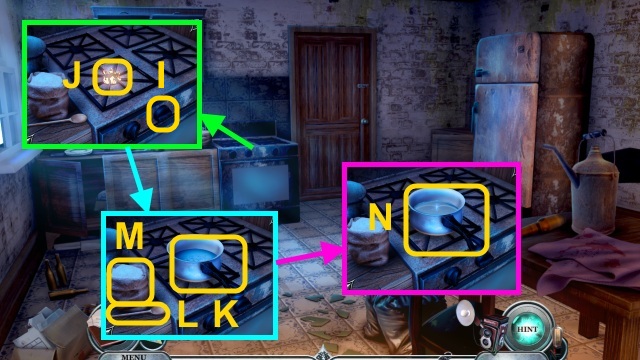
- Turn the dial (I); use the MATCHES (J).
- Place the SAUCEPAN WITH WATER (K); use the spoon (L) on the flour (M).
- Take the PASTE (N).
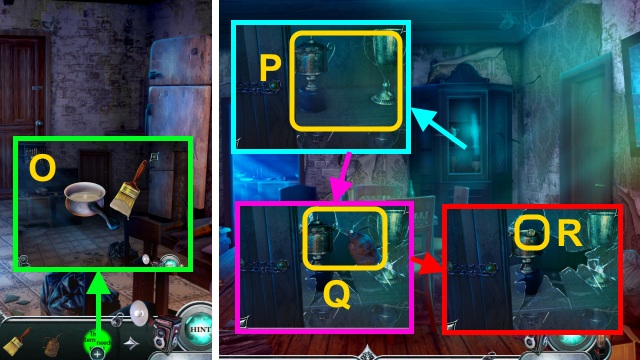
- Combine the PASTE and PAINTBRUSH (O); take the PASTE WITH BRUSH.
- Walk down.
- Use the CROWBAR (P).
- Use the OIL CAN (Q); remove the lid.
- Take WAYNE'S ROOM KEY (R).
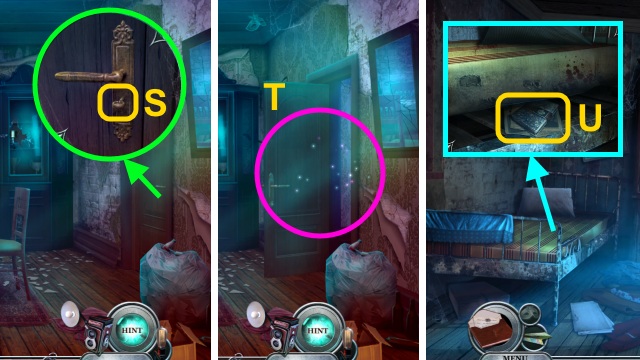
- Use WAYNE'S ROOM KEY (S).
- Play the HOP to receive the KETTLEBELL (T).
- Walk left.
- Move the mattress; take the LEATHER BINDER and newspapers (U).
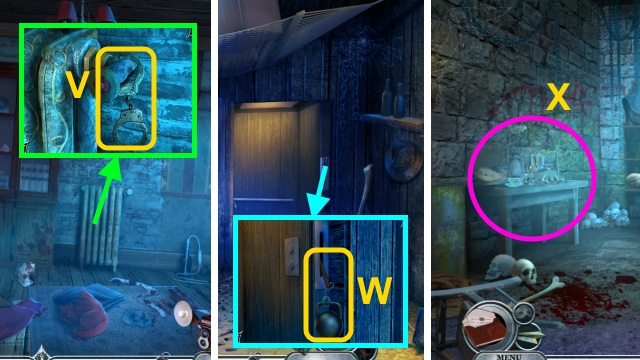
- Use the BOBBY PIN; take the HANDCUFFS (V).
- Go to the Shed.
- Use the HANDCUFFS and KETTLEBELL (W).
- Walk forward.
- Play the HOP (X); receive the WRENCH.
- Go to John's Room.
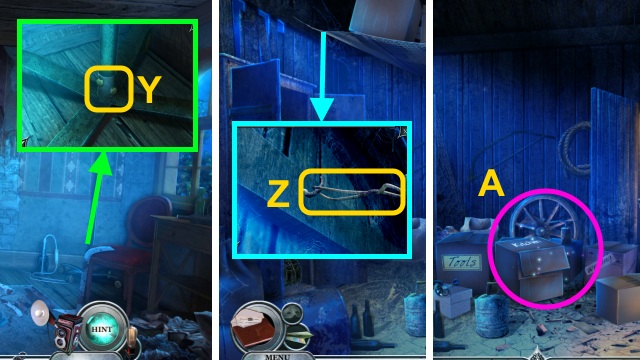
- Use the WRENCH (Y); take the POLE.
- Go to the Shed.
- Use the POLE (Z).
- Play the HOP to receive the SPREADER (A).
- Walk down three times.
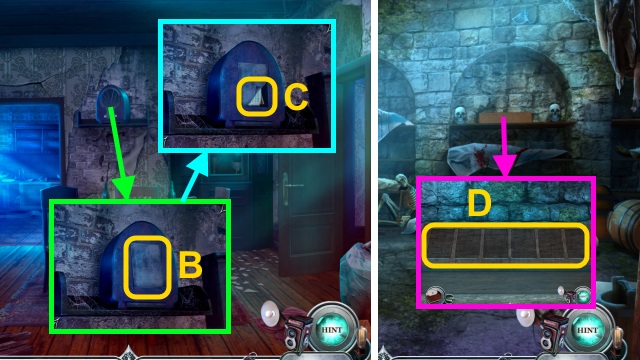
- Turn the radio; use the SPREADER (B).
- Take the POSTER PART and CARD ORDER LIST (C).
- Go to the Secret Room.
- Place the PLAYING CARDS and CARD ORDER LIST for a mini-game (D).
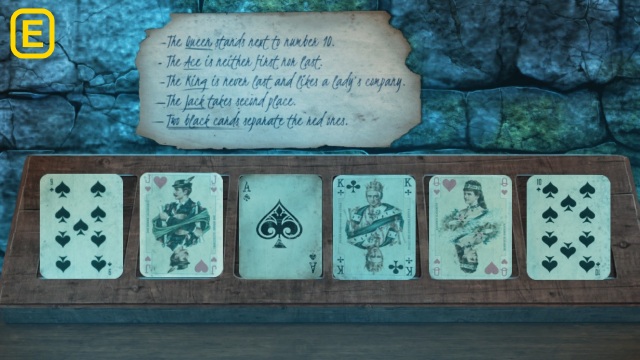
- Solution (E).
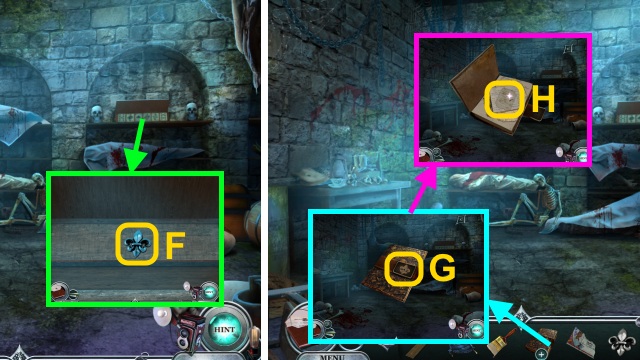
- Take the FLEUR-DE-LIS (F).
- Combine the LEATHER BINDER and FLEUR-DE-LIS (G).
- Take the INVENTORY LIST (H).
- Walk down three times.
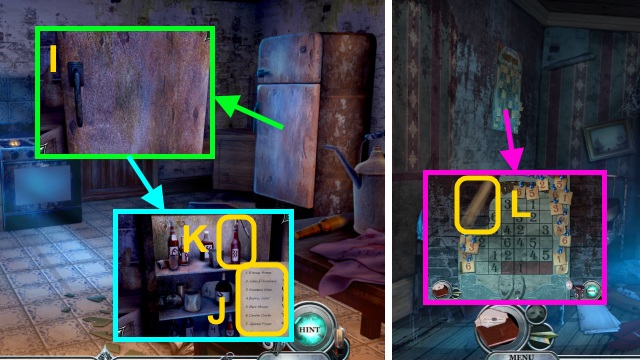
- Open the fridge (I).
- Use the INVENTORY LIST (J); take the BOTTLE WITH BLOOD (K).
- Walk down, then left.
- Use the PASTE WITH BRUSH and POSTER PART for a mini-game (L).
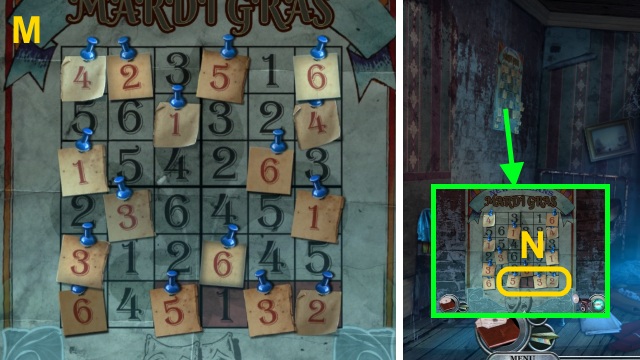
- Solution (M).
- Take the LOCK COMBINATION (N).
- Go to the Secret Room.
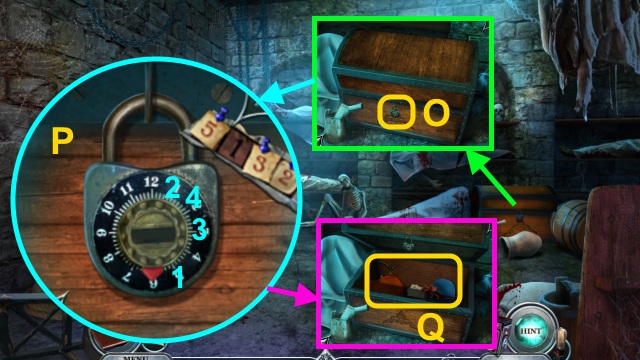
- Examine the lock (O).
- Use the LOCK COMBINATION; enter the combination (P).
- Take BEATRICE'S BELONGINGS (Q).
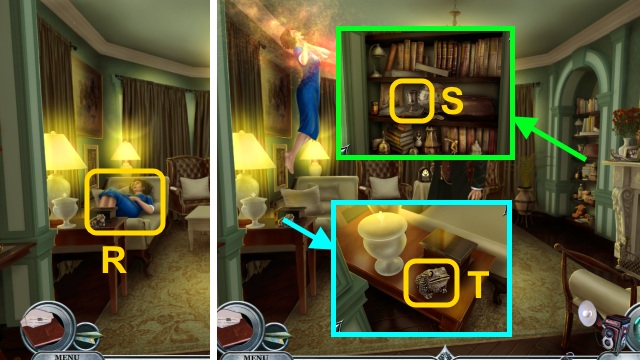
- Give BEATRICE'S BELONGINGS and the BOTTLE WITH BLOOD (R).
- Take the SILVER GOBLET (S).
- Take the SILVER PAPERWIGHT (T).
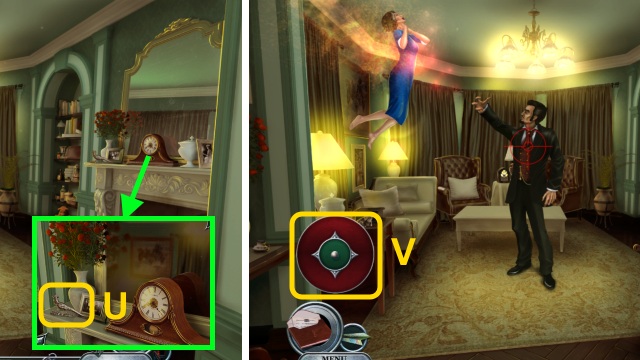
- Take the SILVER FIGURINE for a mini-game (U).
- Solution (V): stop the ball inside the circle 5x.
- Congratulations! You have completed Vampire Legends: The Count of New Orleans.
Created at: 2016-04-24

