Walkthrough Menu
General Tips
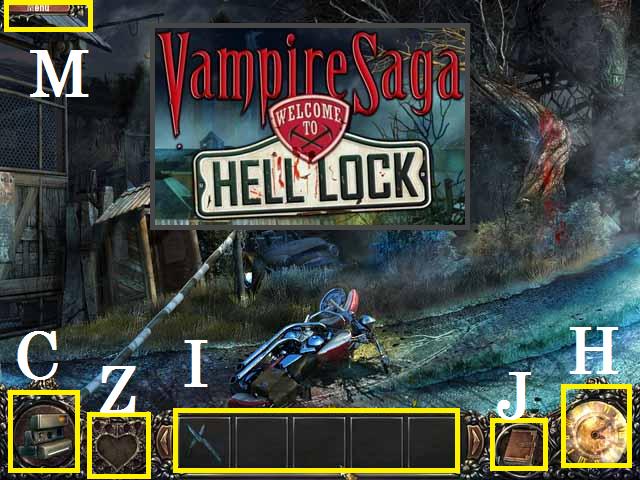
- From the main menu you can Change the player and adjust your options (sound, music, and screen size).
- Click on the Menu (M) button in the upper left corner to exit, pause or resume the game. You can also adjust your options (sound, music, and screen size).
- Sparkling areas indicate a Hidden Object Scene and glints indicate actionable areas.
- If your cursor changes to a magnifying glass you can zoom into the scene.
- During Hidden Object scenes an item list will populate at the bottom of the screen. Collect all of the items in the list to complete the scene and receive a needed Inventory Item.
- Usable items are placed in your Inventory List (I). Scroll over the bottom of the screen to reveal your list.
- When your cursor is near an item in a Hidden Object Scene the items name will change color in your list.
- Once the Hint Button (H) is full you may use it to show you where a hidden object is or the next step in the game.
- You can zoom into your Journal (J) to review clues you have picked up.
- Throughout the game you will need to take photographs of certain scenes to uncover the missing JEWEL for the pendant (Z).
- The Camera (C) will appear when a JEWEL is available. To use the camera drag it across the scene until the view turns green the click to take the photograph. Zoom into the area with the now visible bloody hands to pick up a JEWEL.
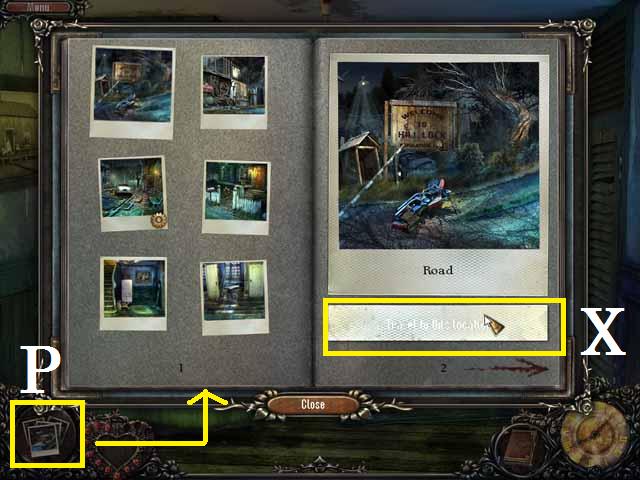
- You can move from scene to scene two ways. When you move your cursor towards an available direction and an Arrow appears, click on it to change scenes.
- When the camera is not available a Photo Album (P) appears. Zoom into it and chose the photograph of the scene you wish to move to then click the “travel to this location” (X).
- If the photograph is sparkling in the album it means a Hidden Object Scene is available and if it has a gear it means that an action is available.
- Each time you play a Hidden Object Scene the items in the inventory list may change. The screenshots in this walkthrough shows the items as listed during the current gameplay.
- You may not need to follow the exact path that this walkthrough follows, however some actions will need to be performed before you can advance in the game.
Chapter 1
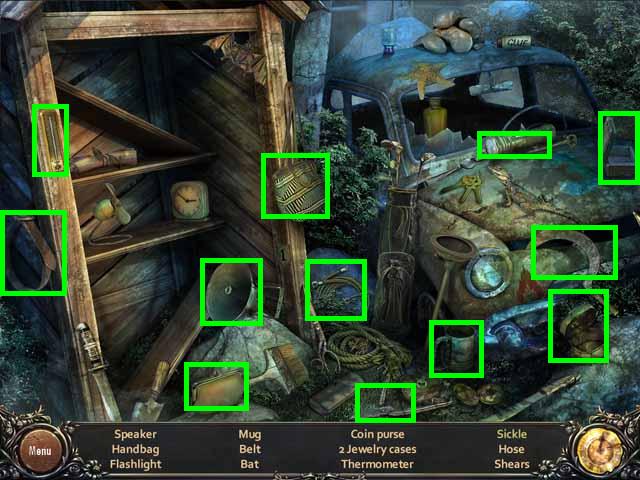
- The game starts on the “Road”. You can choose to play with the tutorial on or off.
- Zoom into the sparkling shack (A) to trigger a Hidden Object Scene.
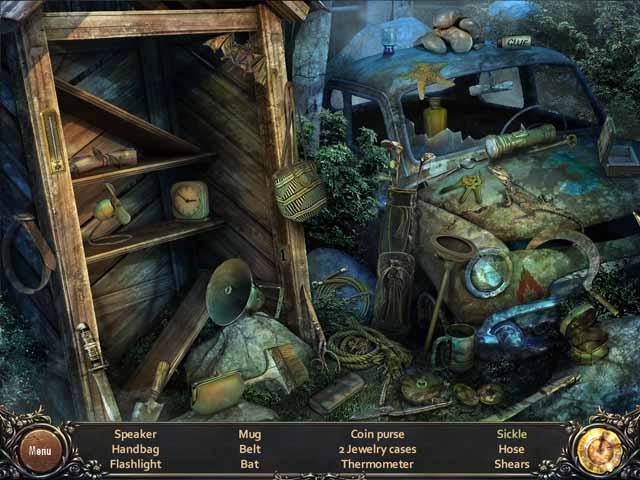
- After you pick up all of the Items in your list (all are marked in green in the screenshot) the SHEARS will automatically be added to your inventory.
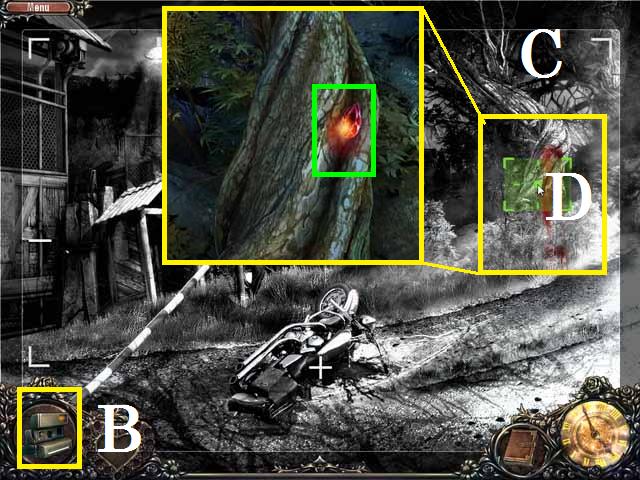
- Drag the Camera (B) over the tree (C) and take a photograph.
- Zoom into the bloody hands (D) and pick up the JEWEL (green).
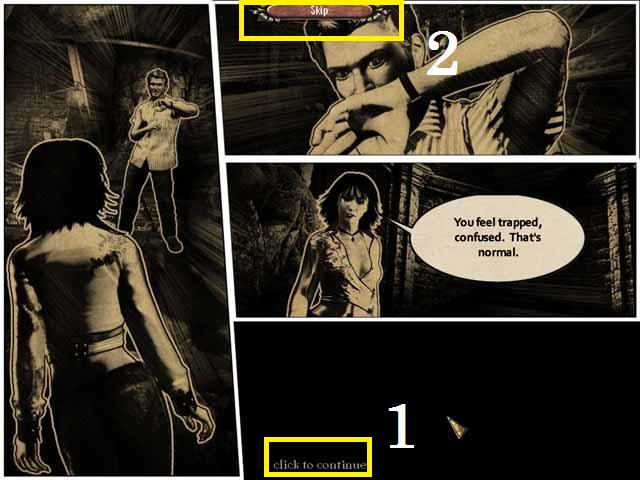
- You can hit the continue button (1) or skip (2) the dialogue.
- Move your curser to the left and click on the arrow when it appears to enter the City Gate scene.
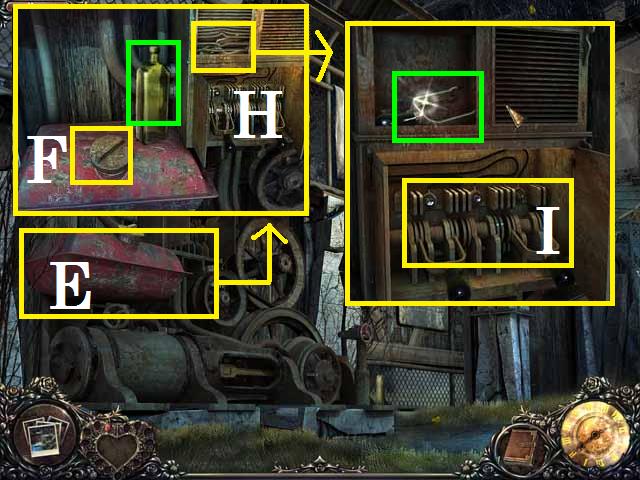
- Zoom into the compressors gas tank (E) and unscrew the cap (F).
- Pick up the BOTTLE (green).
- Zoom into the switch panel (H), to the right of the tank, and remove the screen.
- Pick up the HANDLE (green) and place it on the switch panel (I).
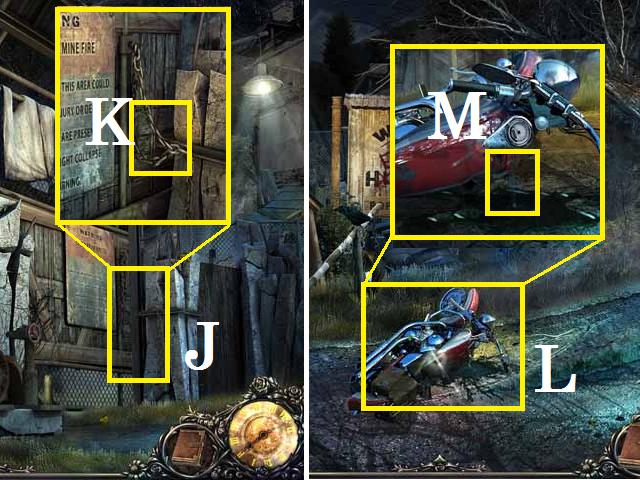
- Zoom into the gate (J) and cut the chain (K) with the SHEARS.
- Return to the previous scene and zoom into the motorcycle (L).
- Place the BOTTLE under the tank (M) to collect the gas.
- Return to the City Gate and pour the BOTTLE of GAS in the tank then switch the HANDLE.
- Go through the gate.
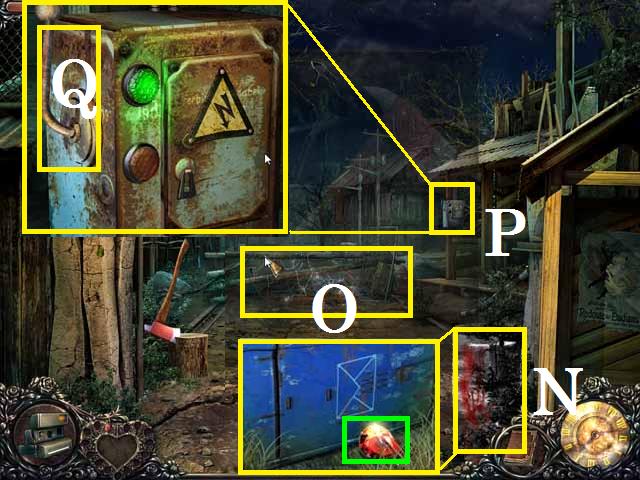
- Take a photograph and zoom into the bloody hands (N) to pick up the JEWEL (green).
- Zoom into the end of the road (O) and back out.
- Zoom into the electric box (P) and flip the switch (Q) to turn off the power.
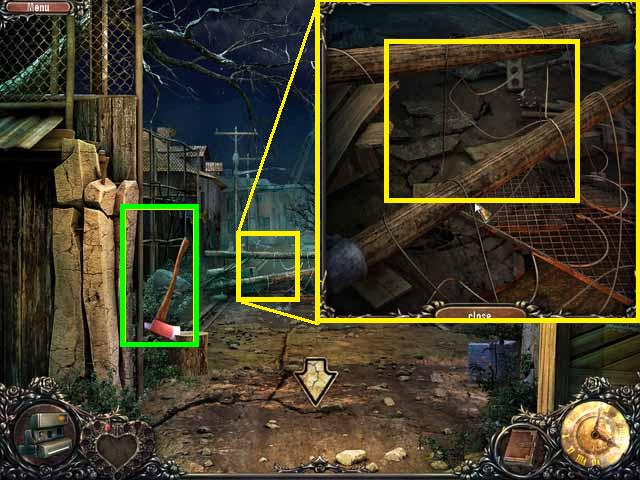
- Pick up the AXE (green) and zoom back into the end of the road.
- Chop the poles (yellow) with the AXE and move on down the road to enter the Street.
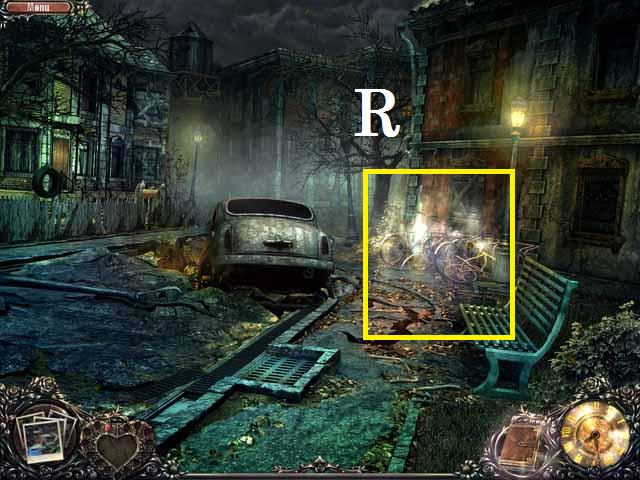
- Zoom into the sparkling bikes (R) to trigger a Hidden Object Scene.
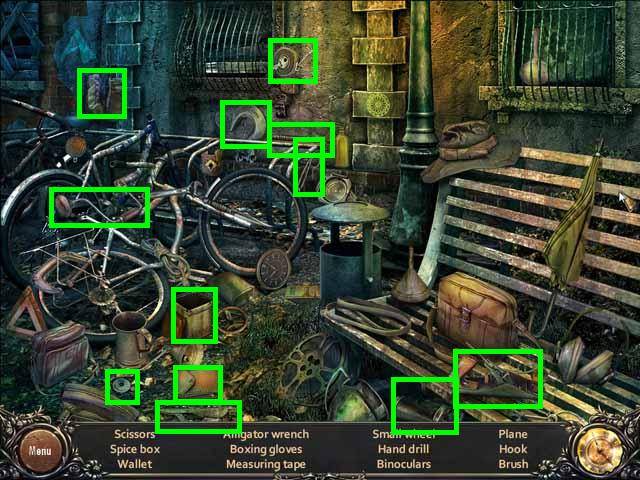
- Once you have picked up all of the items (green) the SMALL WHEEL will be added to your inventory.
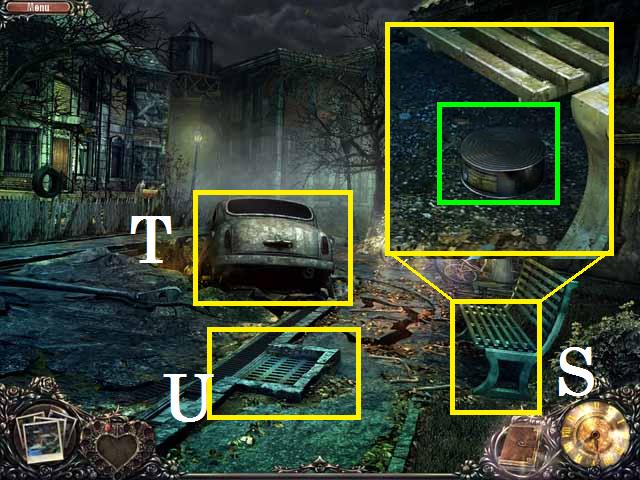
- You can zoom into the bench (S) and then the can (green) then close the windows.
- You can also zoom into the car (T) and the grate (U).
- Move to the left to enter the Front Yard.
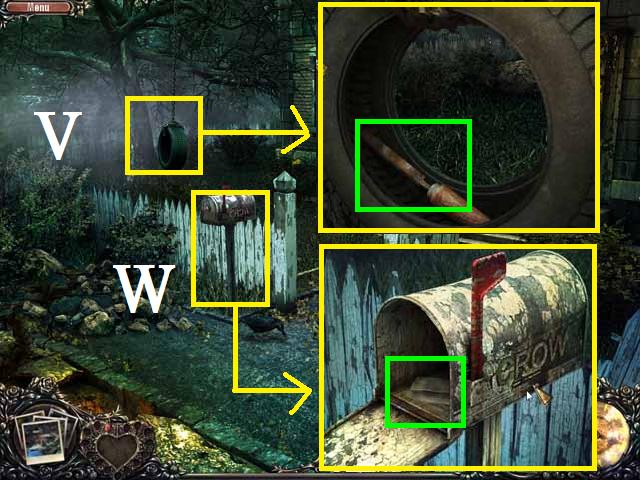
- Zoom into the tire swing (V) and pick up the CHISEL (green).
- Open the mailbox (W) and pick up the LETTER (green).
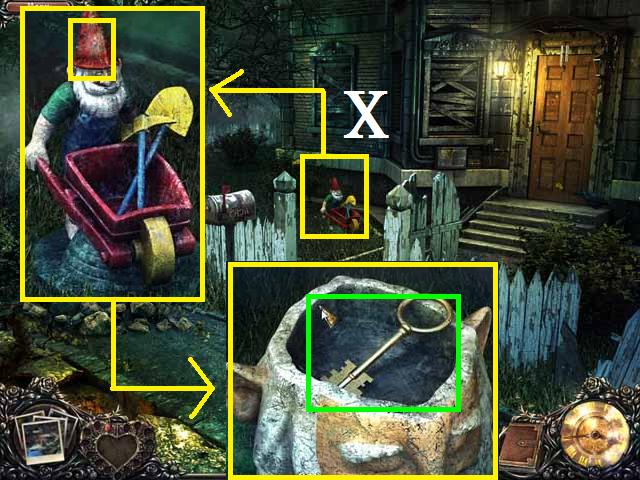
- Knock the hat (yellow) off of the gnome (X), zoom into the head and pick up the KEY (green).
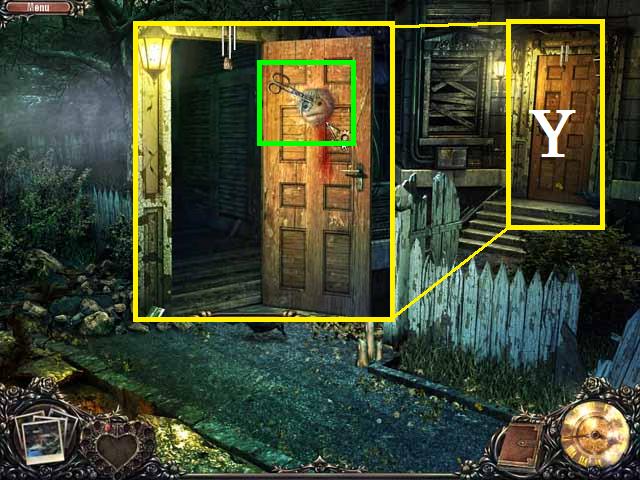
- Open the front door (Y) with the KEY and pick up the DOLL HEAD and SCISSORS (green).
- Enter the house into the Foyer.
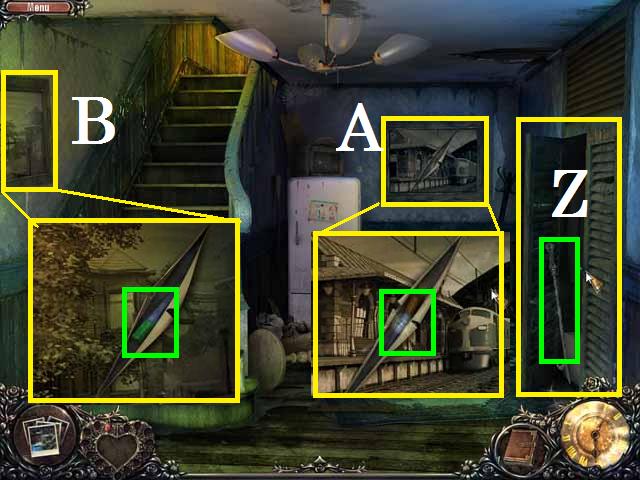
- Open the closet door (Z) and pick up the POKER (green).
- Zoom into the painting (A) on the back wall and pick up the MARKER (green).
- Zoom into the painting (B) next to the stairs, cut it with the SCISSORS and pick up the MARKER (green).
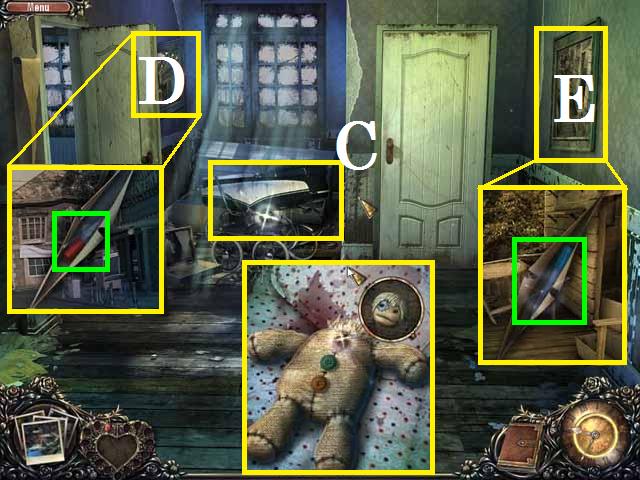
- Go up the stairs to the Hallway and zoom into the carriage (C).
- Go ahead and place the DOLL HEAD in there.
- Cut the two paintings (D and E) and pick up the MARKERS.
- Enter the Childs Room to the left.
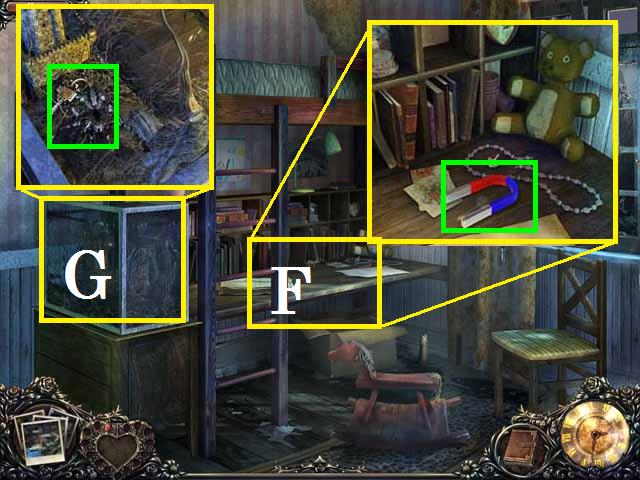
- Zoom into the desk (F) and pick up the MAGNET (green).
- Using the MAGNET remove the CAR TRUNK KEYS (green) from the aquarium (G).
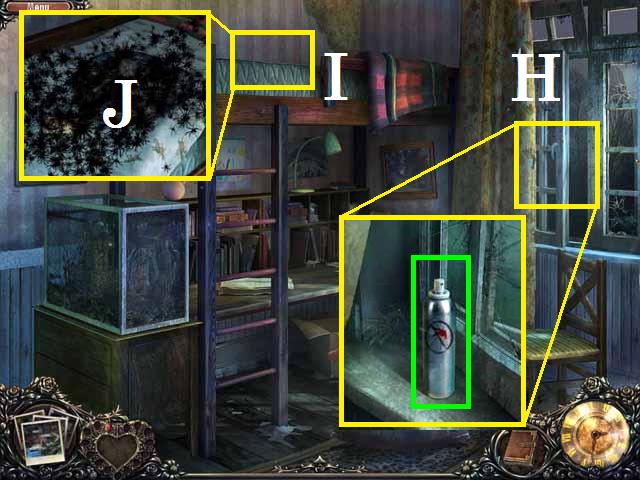
- Zoom into the window (H) and pick up the BUG SPRAY (green).
- Zoom into the bed (I) and spray all of the bugs (J) with the BUG SPRAY.
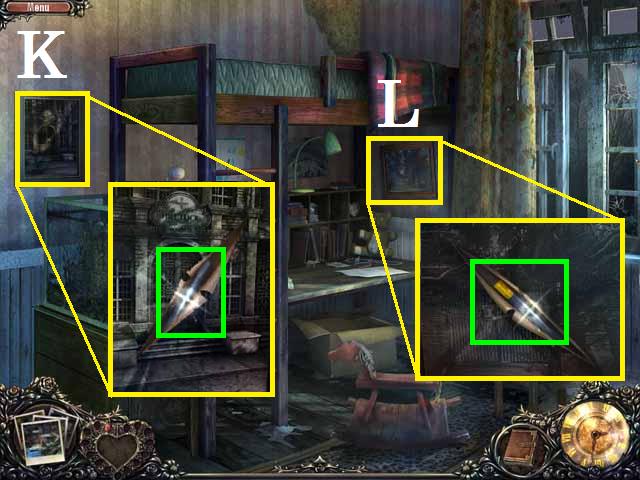
- Cut the two paintings (K and L) and pick up the MARKERS.
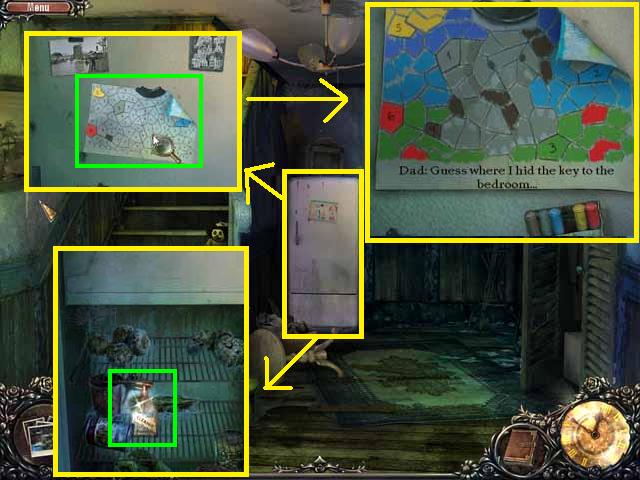
- Go back to the Foyer and zoom into the fridge (M) then the picture (green) on it.
- Drop the MARKERS over the picture.
- Using the MARKERS, fill in each cell the same color as the cells that have already been colored. (1 = grey; 2 = blue; 3 = green; 4 = brown; 5 = yellow; and 6 = red).
- Open the fridge and pick up the CLEANER (green).
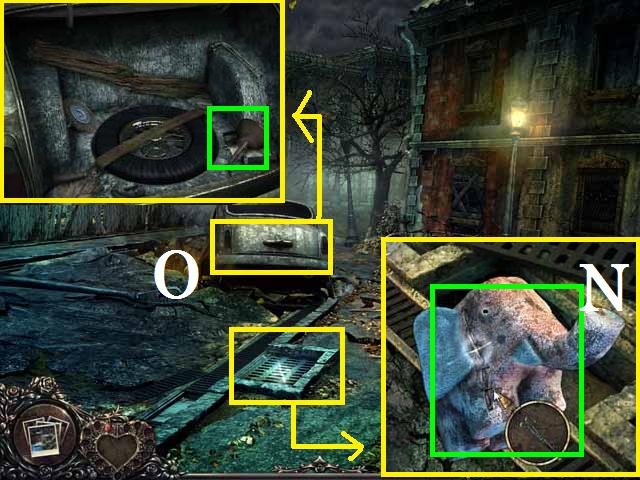
- Return to the Street and zoom back into the grate.
- Remove the grate with the POKER and click on the elephant (N).
- Cut the elephant open with the SCISSORS and pick up the KEY.
- Open the cars’ trunk (O) with the CAR TRUNK KEYS and pick up the OILER (green).
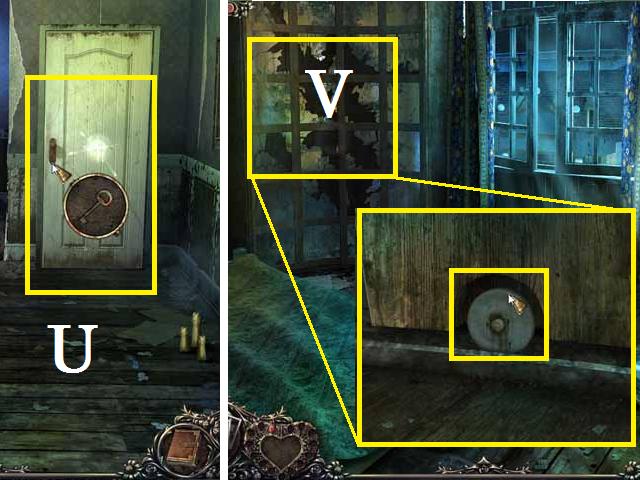
- Return to the Hallway. You can move there quickly by clicking on the photo album and clicking on the Hallway photo then hit the Travel to this Location Button.
- Once in the Hallway open the Bedroom door (U) with the KEY and enter it.
- Zoom into the wardrobe (V) and place the SMALL WHEEL as shown in the screenshot and OIL it.
- Once the window closes zoom back into the wardrobe to trigger a Hidden Object Scene.
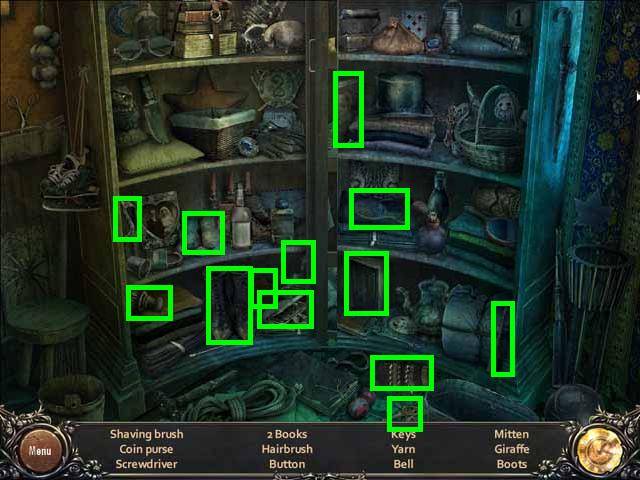
- Slide the doors left and right to reveal different sides.
- Once you have collected all of the items (green) the SCREWDRIVER will be added to your inventory.
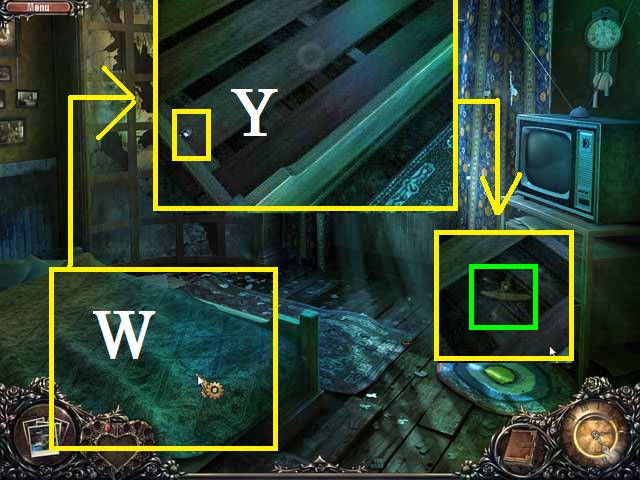
- Remove the comforter (W) and flip the mattress.
- Zoom into the bed and unscrew the screws (Y) to remove the PLANK.
- Pick up the HANDLE (green).
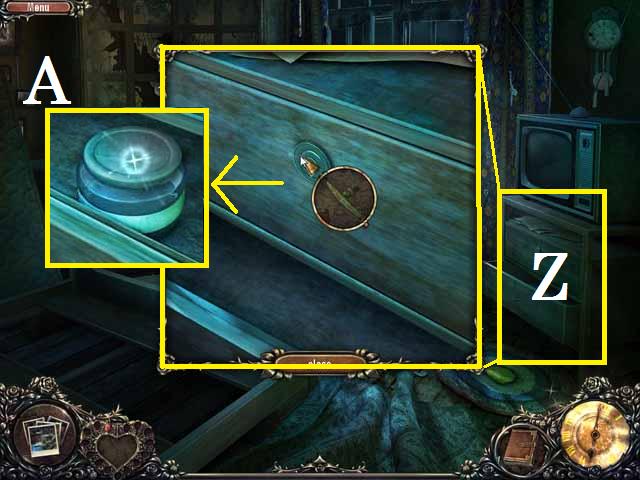
- Place the HANDLE on the TV stand drawer (Z).
- You can go ahead and remove the alcohols lid (A) then close the window.
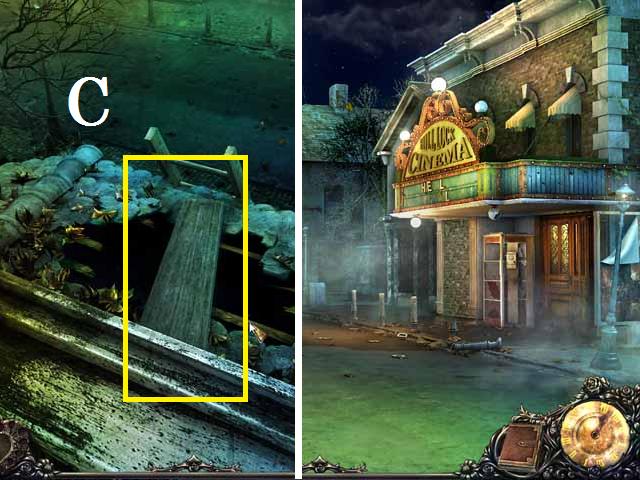
- Go out the window and place the PLANK over the hole (C) and go down the ladder to get to Outside the Theater.
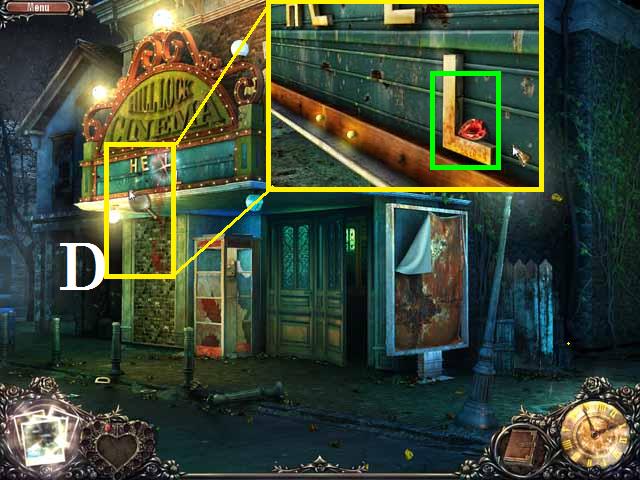
- Move to the right to the Movie Theater and take a photograph.
- Zoom into the bloody hands (D) and pick up the JEWEL (green).
Chapter 2
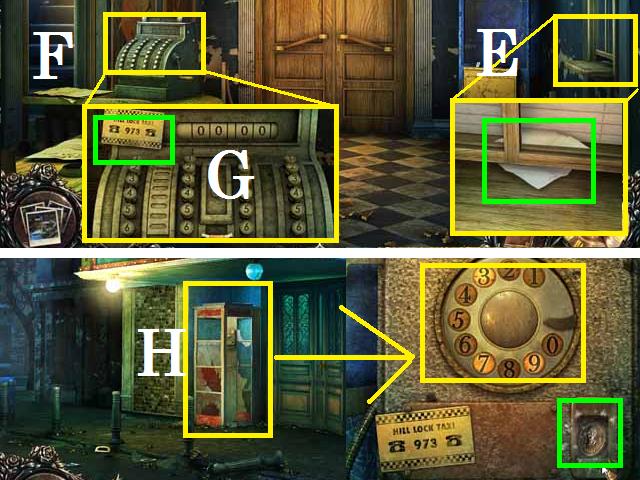
- Enter the Movie Theater Lobby, zoom into the ticket window (E) and click on the paper (green).
- Zoom into the cash register (F) and click on the taxi card (G) then close the windows.
- Go back outside and zoom into the phone booth (H).
- Dial the number on the card 9, 7, and 3 then pick up the COIN (green).
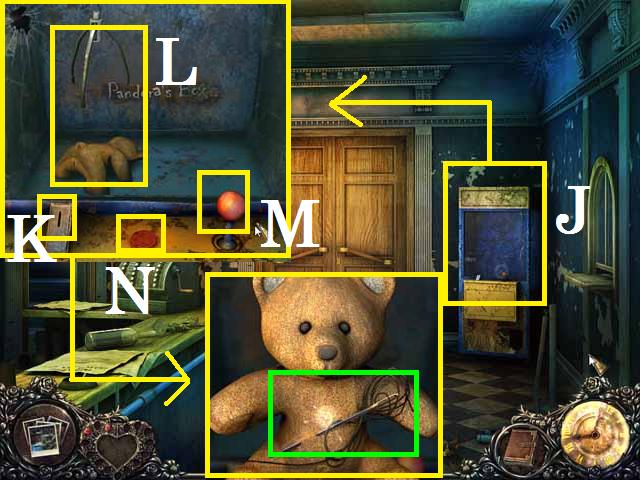
- Enter the Lobby and zoom into the claw machine (J).
- Put the COIN in the slot (K) and position the claw over the bear (L) as shown in the screenshot, using the handle (M) and hit the button (N) to get the bear and click on the NEEDLE and THREAD (green).
- Go up the stairs on the left to get to the Film Projection Booth.
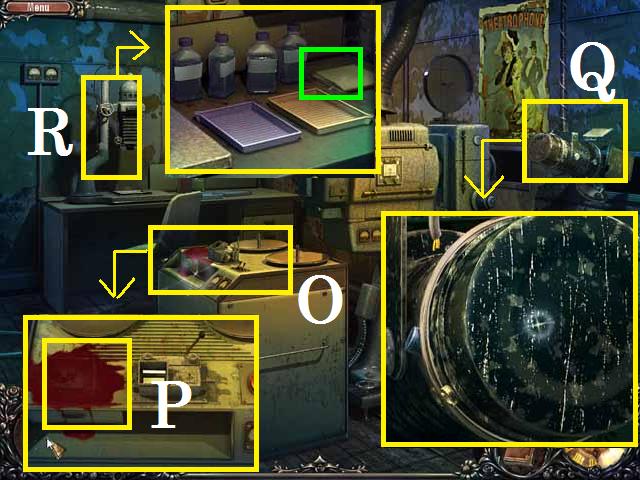
- Zoom into the film re-winder (O) and spray the blood (P) with the CLEANER then close the window.
- Zoom into the stage light (Q) and remove the cap then close the window.
- Zoom into the photo enlarger (R) and pick up the PHOTO PAPER (green) then close the window.
- Exit the Movie Theater and take a right to the Alley.
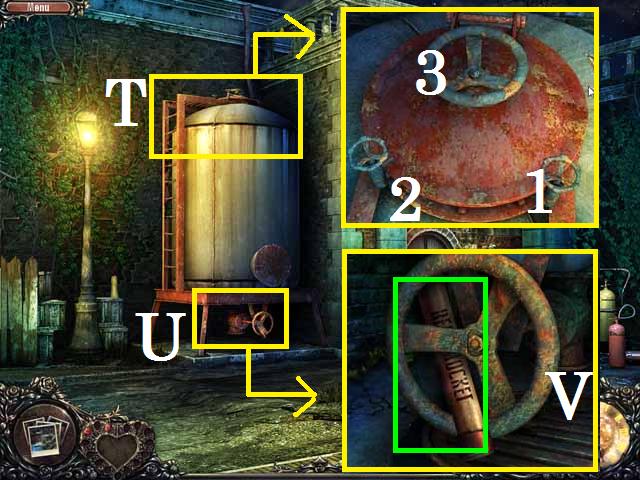
- Zoom into the top of the water tank (T) and turn the valves in the order of (1-3) to open the lid then try to zoom into it.
- Close the window and zoom into the bottom of the tank (U).
- Pick up the FLARE (green) and turn the valve (V) to release the water.
- Drop the FLARE down the tank.
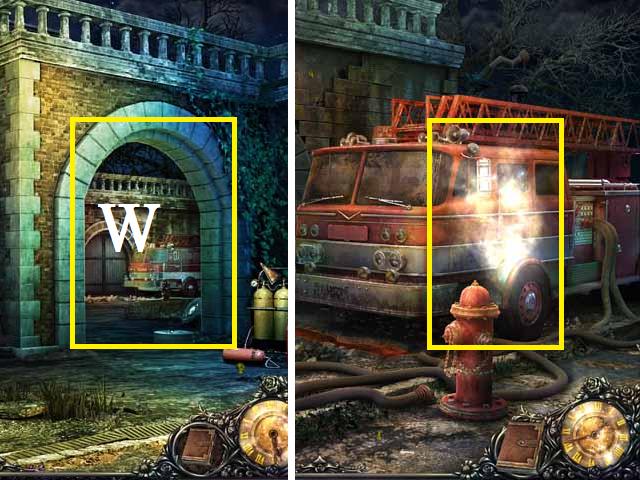
- Move through the arch (W) to the Fire Truck.
- Zoom into the truck to trigger a Hidden Object Scene.
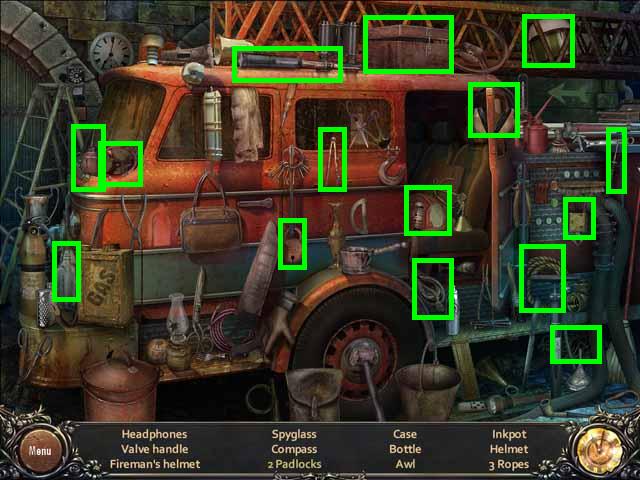
- After you have picked up all of the items (green) the VALVE will be added to your inventory.
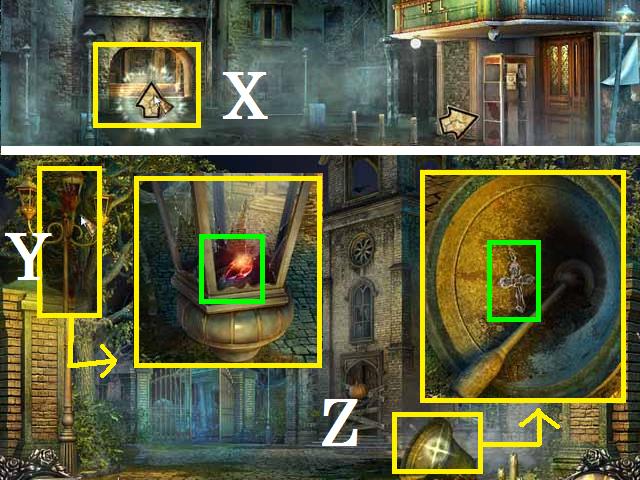
- Return to Outside the Movie Theater and move down the road under the arch (X) to the Church.
- Take a photograph and zoom into the bloody handprints (Y) to pick up the JEWEL (green).
- Zoom into the bell (Z) and pick up the CROSS (green).
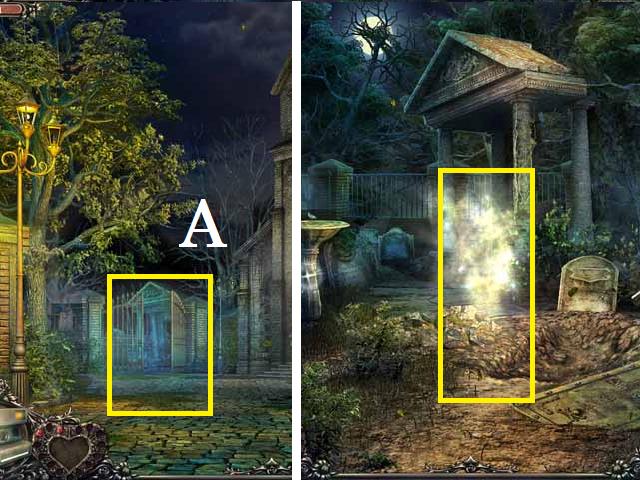
- Go through the gate (A) in the back to enter the Cemetery.
- Zoom into the sparkling pillars to trigger a Hidden Object Scene.
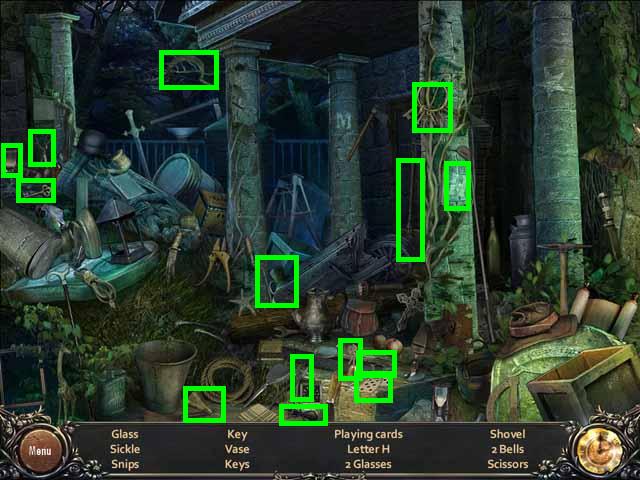
- After you have picked up all of the items (green) the GLASS will be added to your inventory.
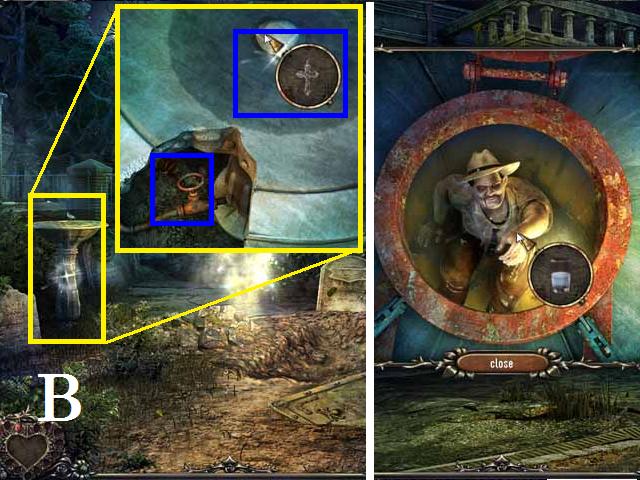
- Zoom into the birdbath (B) and place the VALVE, as shown in the screenshot, and turn it on.
- Place the CROSS in the water and fill the GLASS.
- Return to the Alley and pour the GLASS on the Sherriff in the water tank.
- Pick up the SHERRIFFS KEYS from inside the water tank.
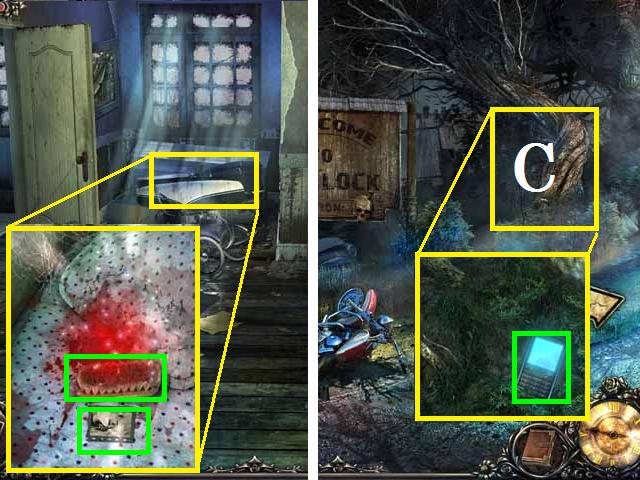
- Return to the Hallway in the house and zoom back into the carriage.
- With the NEDDLE and THREAD sew the doll.
- Pick up the FILM STRIP (green) and the BRUSH (green).
- Return to the Road and zoom into the grassy area below the tree (C).
- Pick up the CELL PHONE (green) and go to the right to the Forest Road.
Chapter 3
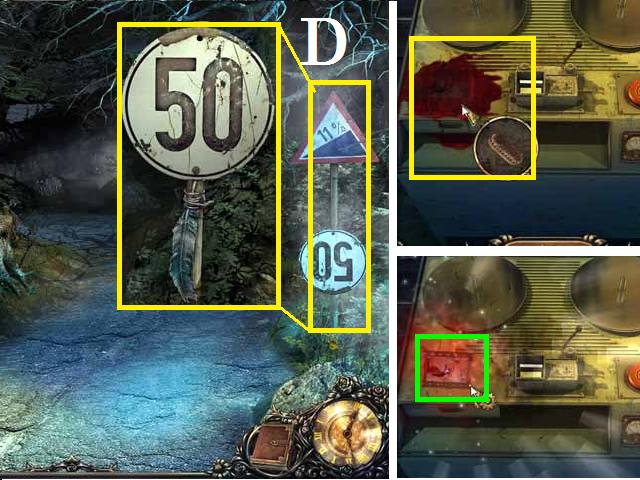
- Zoom into the street sign (D), click on it and try to pick up the FEATHER (green).
- Close the window and return to the Film Projection Booth.
- Zoom back into the film re-winder and BRUSH the blood.
- Pick up the FILM STRIP (green) and go to the Cemetery.
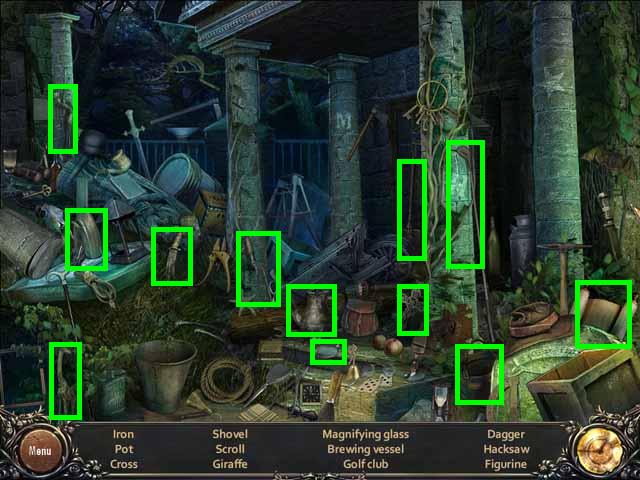
- Zoom back into the pillars to trigger a Hidden Object Scene.
- After you have picked up all of the items (green) the HACKSAW will be added to your inventory.
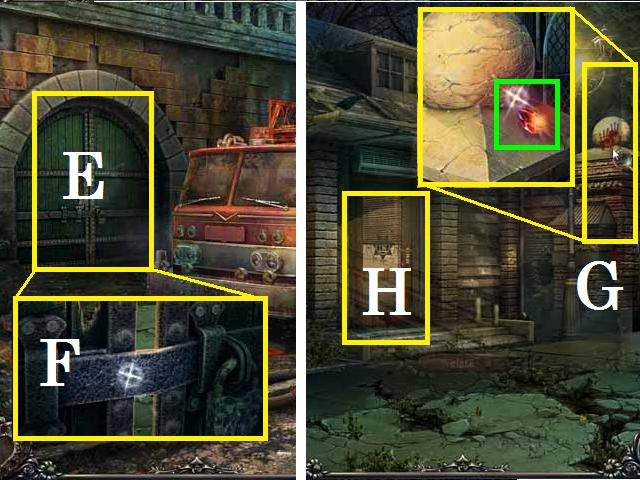
- Return to the Fire Truck and zoom into the gate (E).
- HACKSAW the bar (F) (Hint: you have to click right over the gap or it will not work) and go through the gate to the Police Station.
- Take a photograph and zoom into the bloody handprints (G) to pick up the JEWEL (green).
- Unlock the door (H) with the SHERIFFS KEYS, open the door and enter the Office.
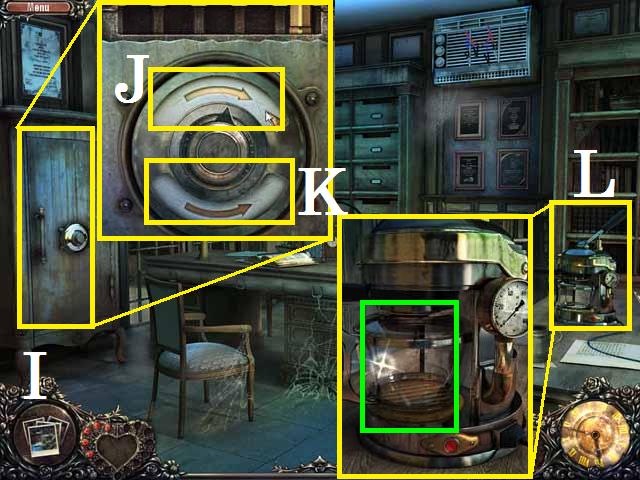
- Zoom into the safe (I) and click on the dial.
- Move the dial back and forth until all of the bolts open. (Hint: Just hit the clockwise button until one opens and then hit the counterclockwise button until one opens and repeat until they are all open).
- Hit the top clockwise arrow (J) five times to release the first bolt.
- Hit the bottom counterclockwise arrow (K) seven times until the next bolt opens then continue with clockwise four times, counterclockwise three times, and clockwise six times.
- Close the window and zoom into the coffee pot (L) and pick up the CARAFE (green).
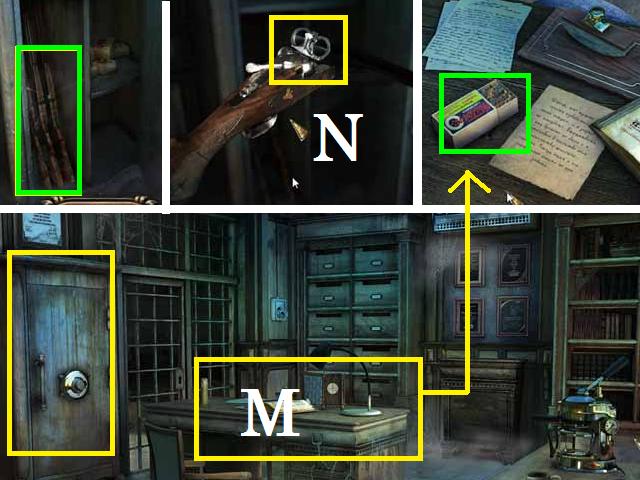
- Zoom into the desk (M) and pick up the BULLETS (green).
- Zoom back into the safe then the GUNS (green) and place a BULLET in the chamber (N).
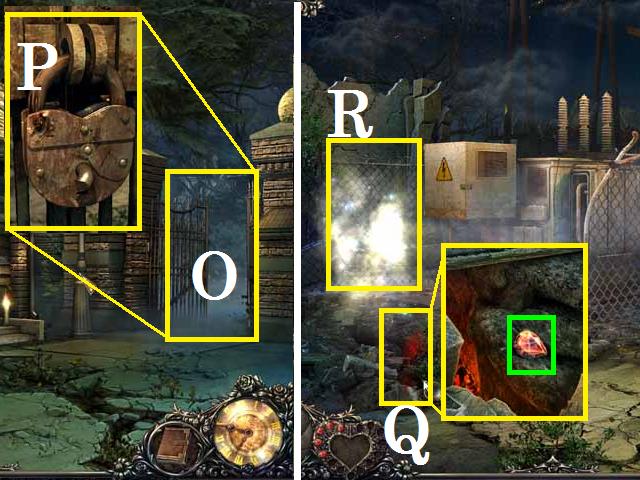
- Exit the office and zoom into the gate (O).
- Shoot the lock (P) with the GUN and go through the gate to the Fuse Box.
- Take a photograph and zoom into the bloody handprints (Q) to pick up the JEWEL (green).
- Zoom into the sparkling area (R) to trigger a Hidden Object Scene.
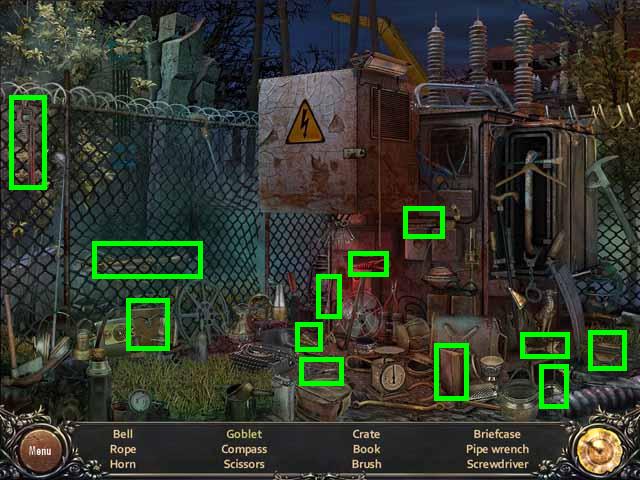
- After you have picked up all of the items (green) the WRENCH will be added to your inventory.
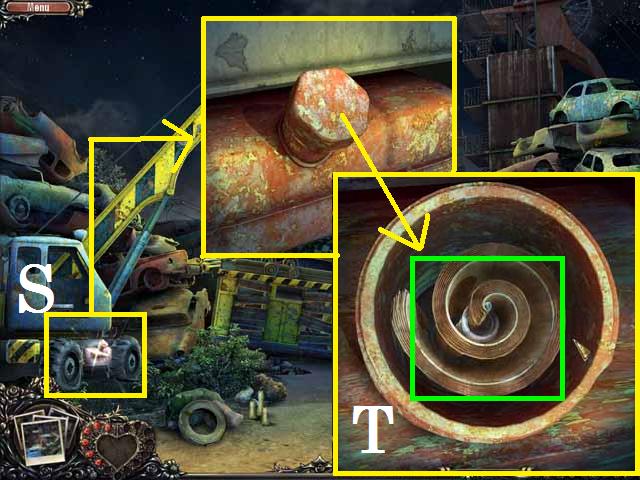
- Move forward to Junkyard No. 1 and zoom into the cranes gas tank (S).
- Remove the lid with the WRENCH and click on the restaurant menu (T).
- Return to the Movie Theater Lobby and zoom into the cash register.
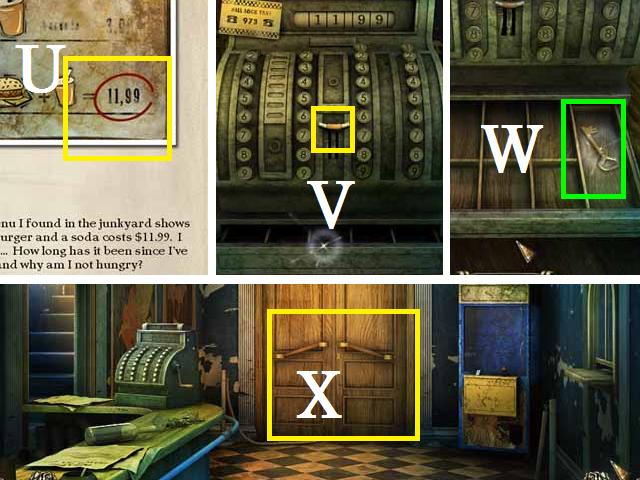
- Enter the price of a burger and drink from the menu (U), you can find this in your journal.
- Type a 1 in the first two columns and 9’s in the last two as shown in the screenshot. If you mess up hit the button (V) in the middle to clear your entries.
- Zoom into the now open drawer (W) and pick up the KEY (green).
- Open the door (X) to the Auditorium with the KEY and enter it.
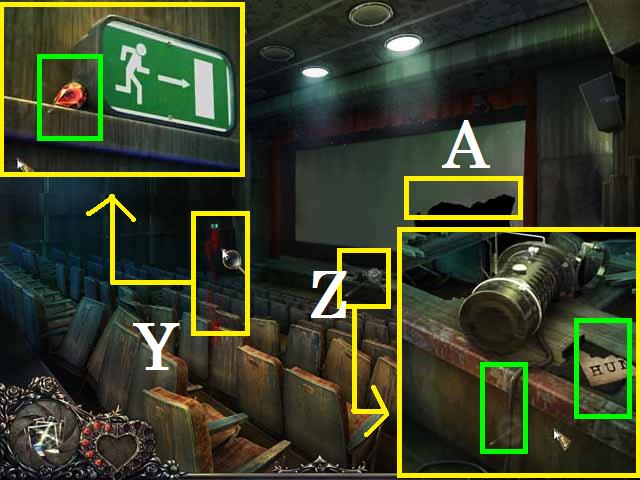
- Take a photograph and zoom into the bloody handprints (Y) to pick up the JEWEL (green).
- Zoom into the light (Z) on the stage and pick up the POSTER PIECE (green) and the WIRE (green).
- You can zoom into the hole in the screen (A) and close the window.
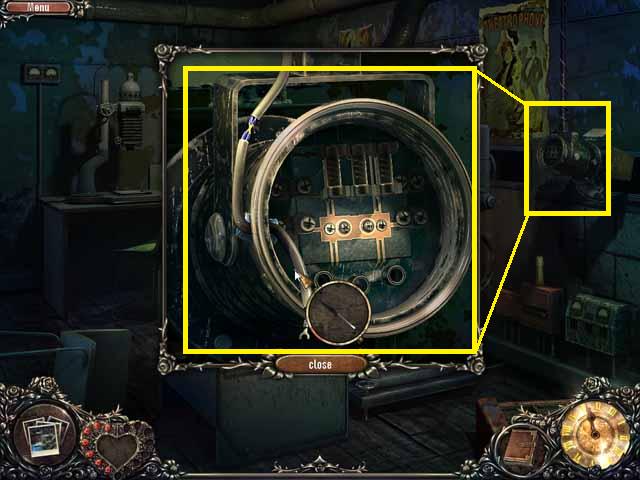
- Go up to the Film Projection Booth and zoom back into the stage light.
- Place the WIRE on the side of the light then click it to attach it to the screws as shown in the screenshot.
- Return to the Fire Truck and zoom into it to trigger a Hidden Object Scene.
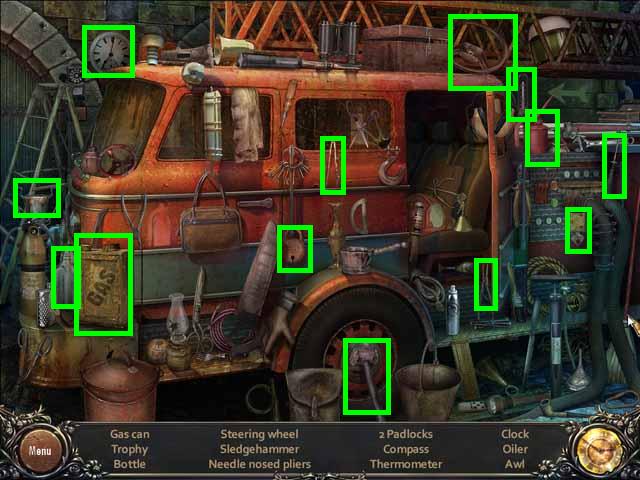
- After you have picked up all of the items (green) the GAS CAN will be added to your inventory.
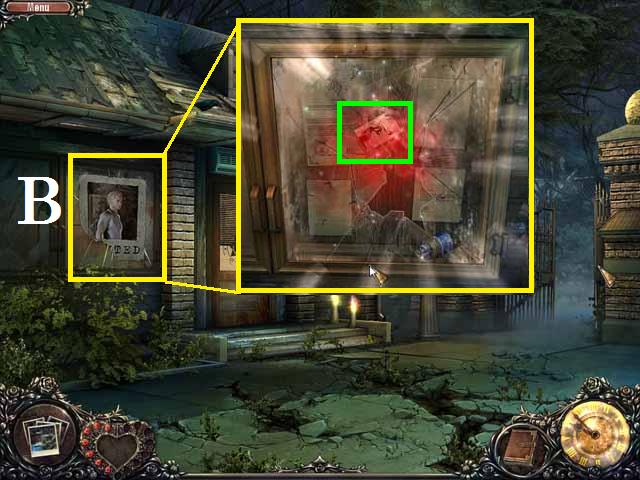
- Move forward to the Sheriff’s Office and zoom into the poster (B).
- Replace the POSTER PIECE then pick up the FILM STRIP (green).
Chapter 4
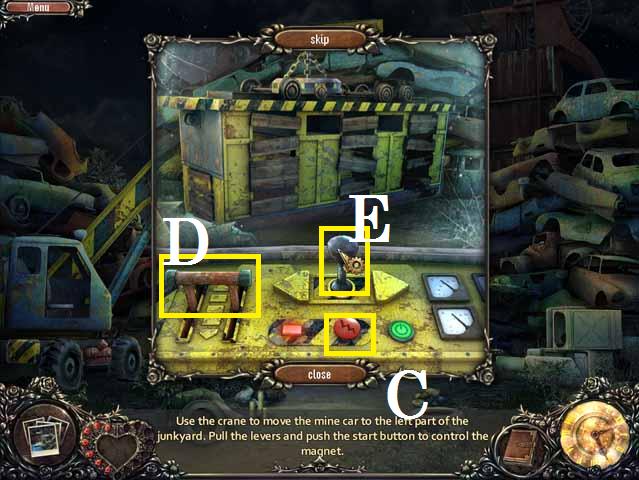
- Go through the gate to the Junkyard No. 1 and fill the cranes gas tank with the GAS CAN.
- Zoom into the crane.
- Turn the magnet on by hitting the power button (C).
- Lower the magnet with the switch (D) all the way down then move it up halfway as shown in the screenshot.
- Once the car is attached to the magnet use the joystick (E) to move it all the way to the left until it will not go any further then turn the power to the magnet off.
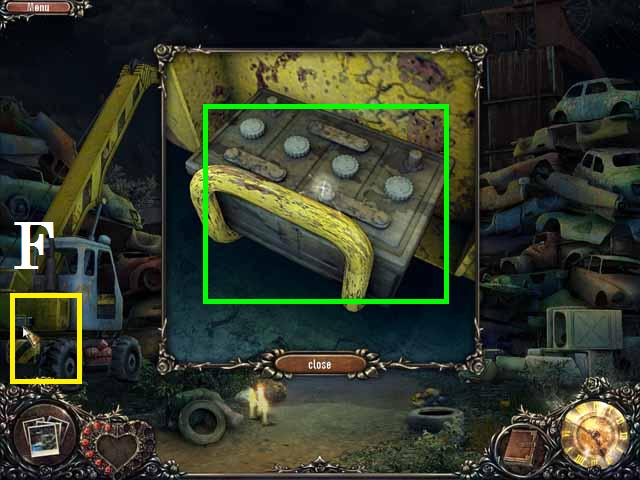
- After you have moved the boxcar zoom into the rear-end (F) of the crane and pick up the BATTERY (green).
- Go to the Fuse Box and zoom in to trigger a Hidden object Scene.
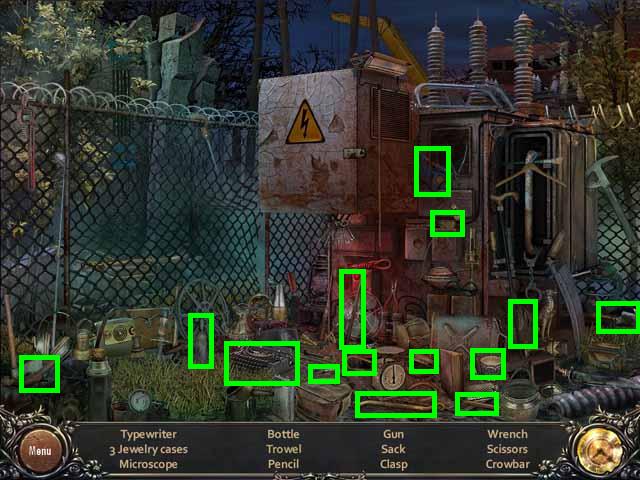
- After you have picked up all of the items (green) the CROWBAR will be added to your inventory.
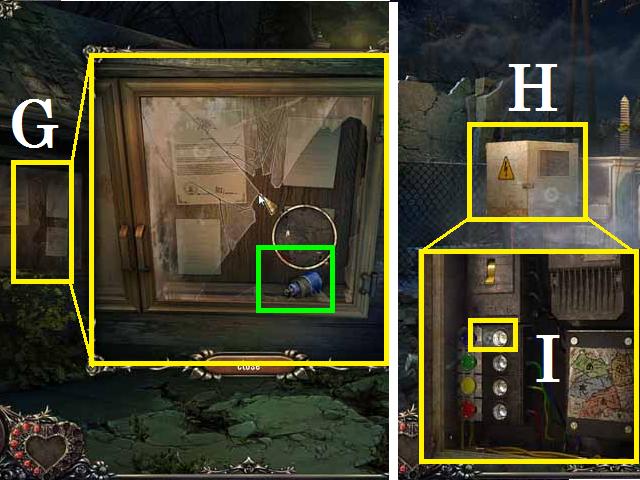
- Zoom back into the case (G) on the wall outside the Police Department and break all the glass with the CROWBAR.
- Pick up the FUSE and return to the Fuse Box.
- Zoom into the Box (H) and place the FUSE in the top hole (I).
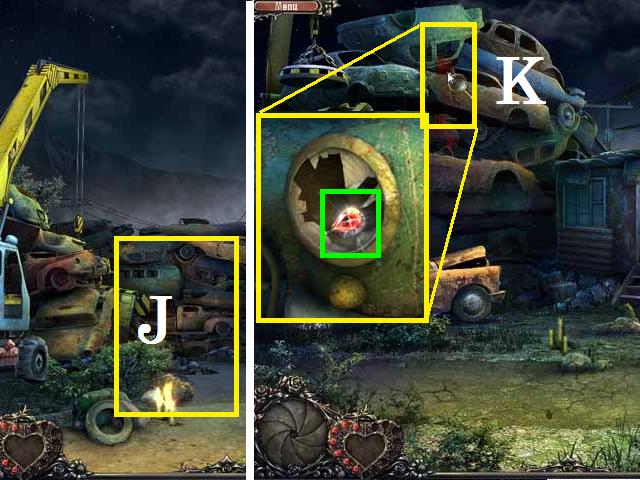
- Return to Junkyard No. 1 and go through the back path (J) to the left to get to Junkyard No. 2.
- Take a photograph and zoom into the bloody handprints (K) to pick up the JEWEL (green).
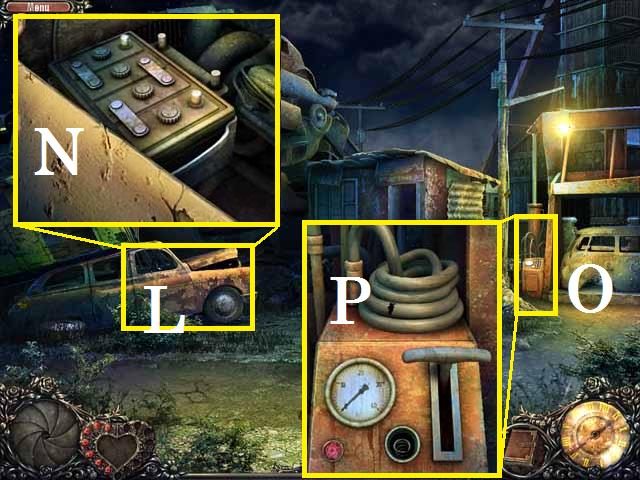
- Zoom into the car (L) open its hood and zoom in again.
- Place the BATTERY in its place (N) then close the window.
- You can zoom into the compressor box (O) and click on the hose (P) to attach it.
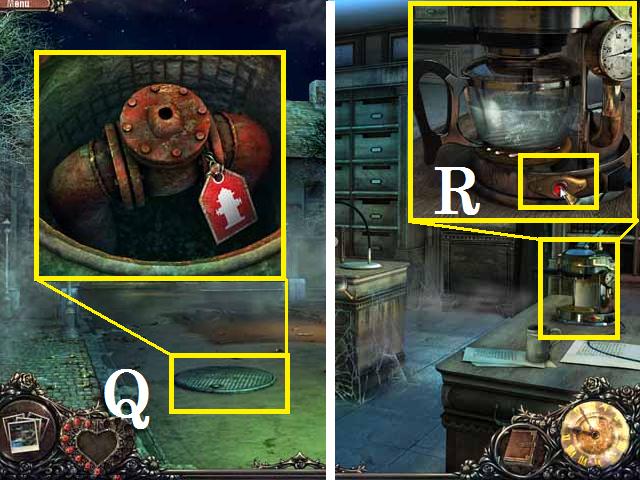
- Outside the Movie Theater zoom into the manhole (Q) and open it with the CROWBAR.
- Zoom into the birdfeeder in the cemetery and fill the CARAFE with water then return to the Sheriff’s Office.
- Place the filled CARAFE in the coffee pot and hit the on button (R) then pick up the CARAFE once the water has boiled.
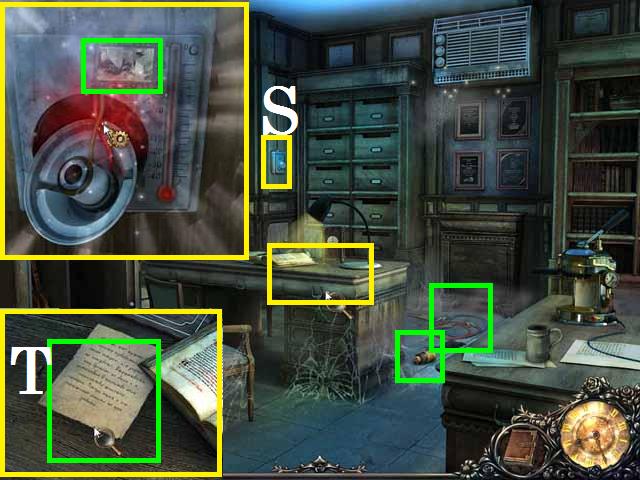
- Zoom into the thermostat (S) and pour the CARAFE with boiling water over it.
- Click on it once to fix it and pick up the FILM STRIP (green) and click the dial one more time.
- Pick up the now available WIRES (green) and FUSE (green).
- Zoom into the desk and the piece of paper (T).
- Return to the Fuse Box and replace the YELLOW FUSE.
- Return to Junkyard No. 2 and zoom back into the car.
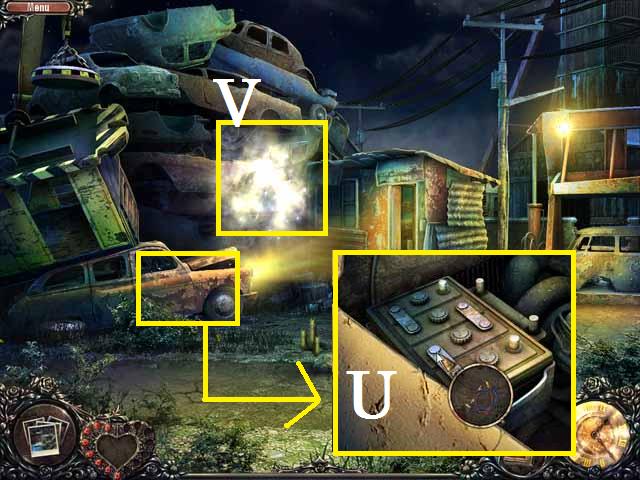
- Place the WIRES on the battery (U).
- Zoom into the light beams (V) to trigger a Hidden Object Scene.
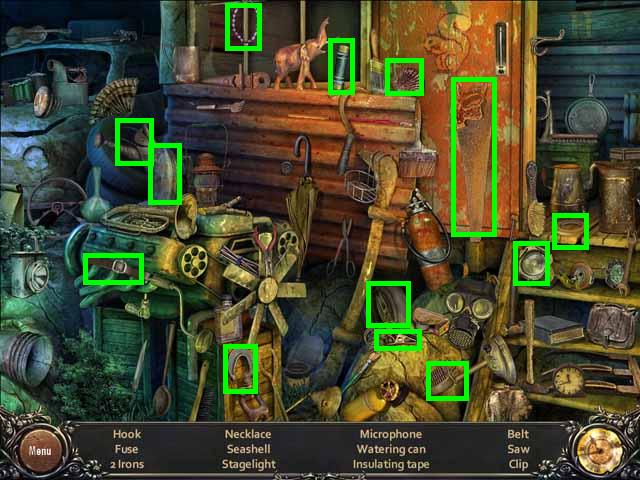
- After you have picked up all of the items (green) the INSULATING TAPE will be added to your inventory.
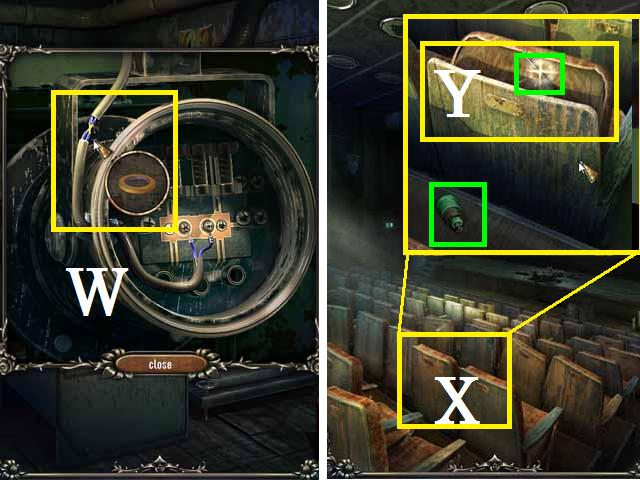
- Return to the Film Projection Room and zoom back into the stage light.
- Place the INSULATING TAPE on the bare wires (W) then click on the light again.
- Close the popup window and go down to the Auditorium.
- Zoom into the seats (X) and click on the seatback (Y).
- Pick up the NAIL (green) and the GREEN FUSE (green).
- Go to the Fire Truck and zoom into it to trigger a Hidden Object Scene.
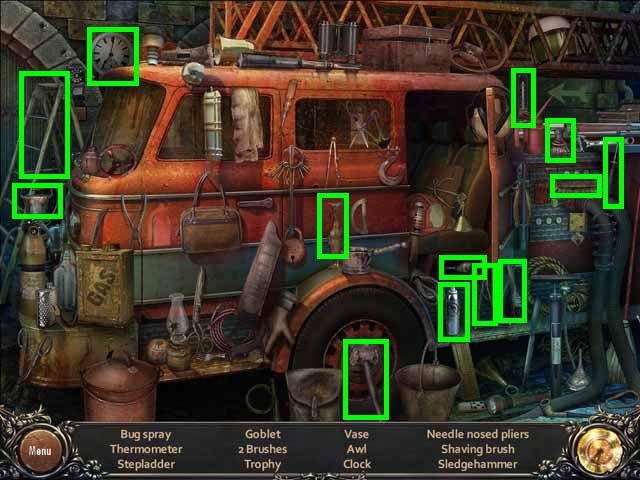
- After you have picked up all of the items (green) the BUG SPRAY will be added to your inventory.
- Replace the GREEN FUSE then return to the Bedroom.
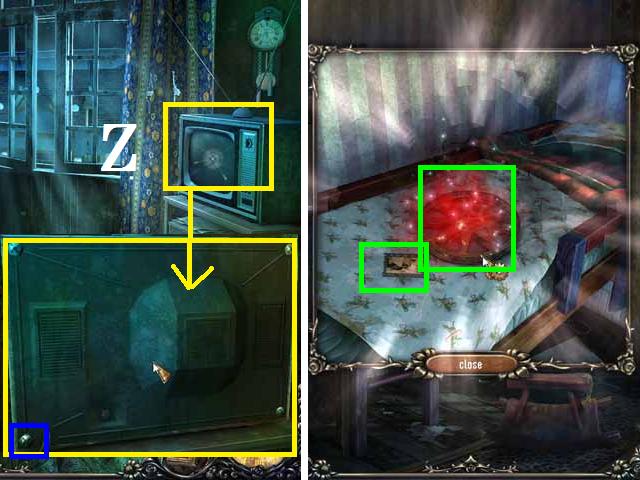
- Zoom into the TV (Z) and push the power button, click on it once then remove the screws (blue) with the screwdriver and click on it again.
- Close the window then move to the Childs Room.
- Zoom back into the bed and use the BUG SPRAY on the remaining bugs then pick up the FILM REEL (green) and the FILM STRIP (green).
- Back in the Bedroom zoom into the wardrobe to trigger a Hidden Object Scene.
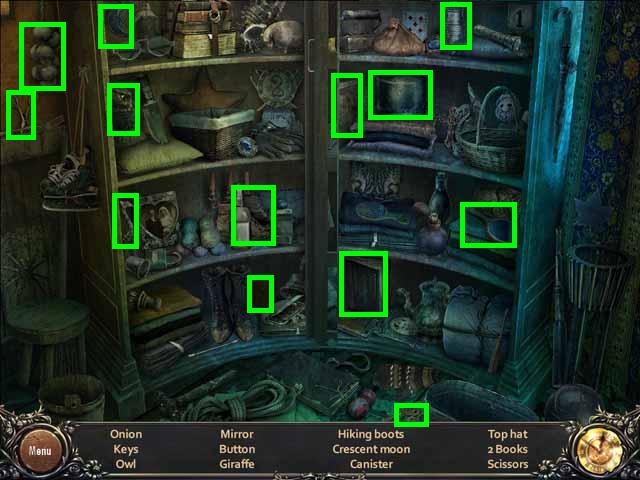
- After you have picked up all of the items (green) the SCISSORS will be added to your inventory.
- Go to the Cemetery and zoom into the pillars to trigger a Hidden Object Scene.
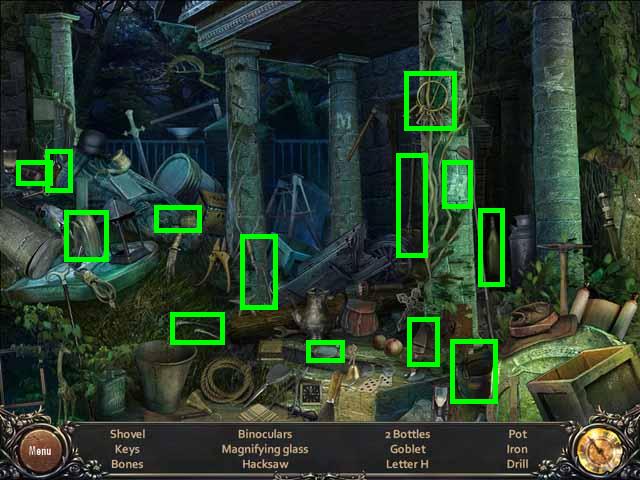
- After you have picked up all of the items (green) the SHOVEL will be added to your inventory.
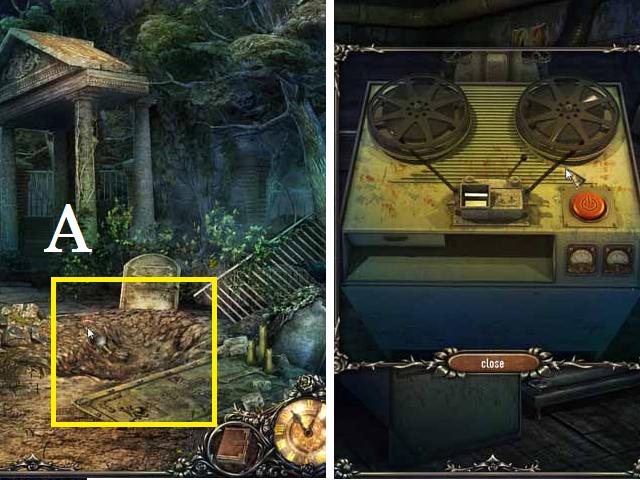
- Go ahead and zoom into the gravestone (A) on the right and dig up the dirt with the SHOVEL.
- Stop by the Film Projection Booth and place the FILM REEL in the film re-winder and trim both ends of the torn film with the SCISSORS as shown in the screenshot.
- Return to the Road and zoom back into the shed to trigger a Hidden Object Scene.
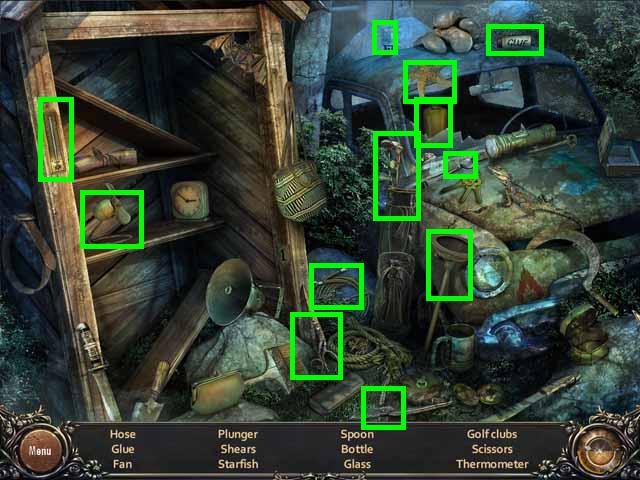
- After you have picked up all of the items (green) the Glue will be added to your inventory.
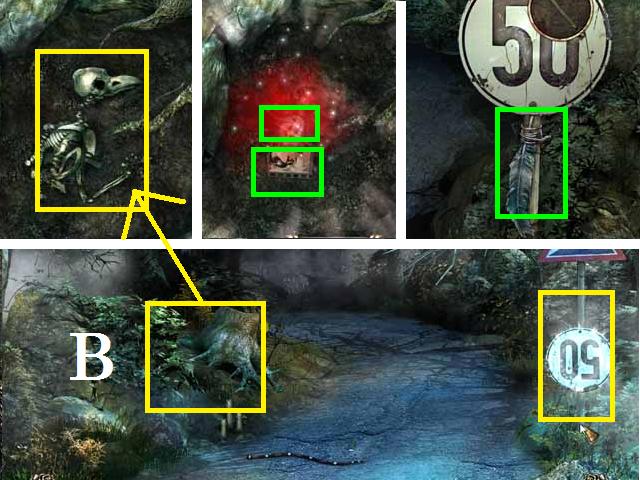
- Move to the right to Forest Road and zoom back into the street sign.
- Use the NAIL on it and cut the FEATHER (green) free with the SCISSORS.
- Zoom into the tree stump (B) and SHOVEL up the bird skeleton.
- Place the FEATHER on the skeleton then pick up the TV KNOB (green) and the FILM STRIP (green).
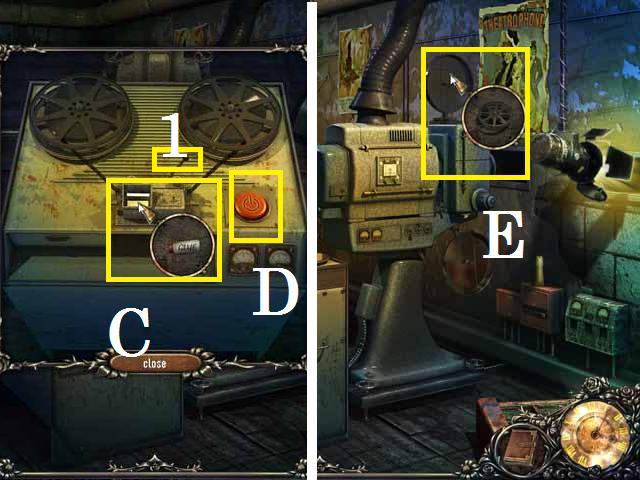
- Return to the Film Projection Booth and zoom into the re-winder. Drop the GLUE on the strip (C), Move the switch (1) then push the button (D) and pick up the FILM REEL.
- Place the REEL on the projector (E).
- In the Bedroom, zoom into the wardrobe to trigger a Hidden Object Scene.
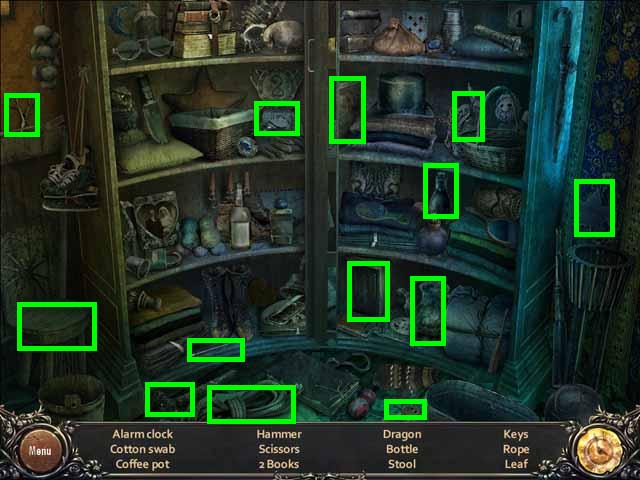
- After you have picked up all of the items (green) the Q-TIP will be added to your inventory.
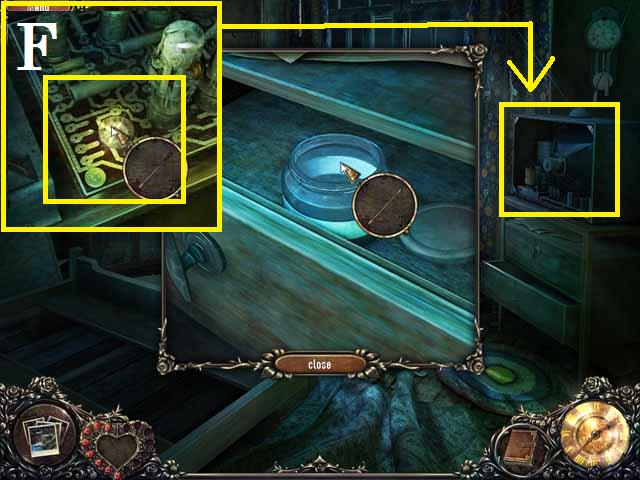
- Zoom into the TV stand drawer and get some alcohol with the Q-TIP.
- You can go ahead and zoom back into the TV and clean the connector (F) with the alcohol soaked Q-TIP.
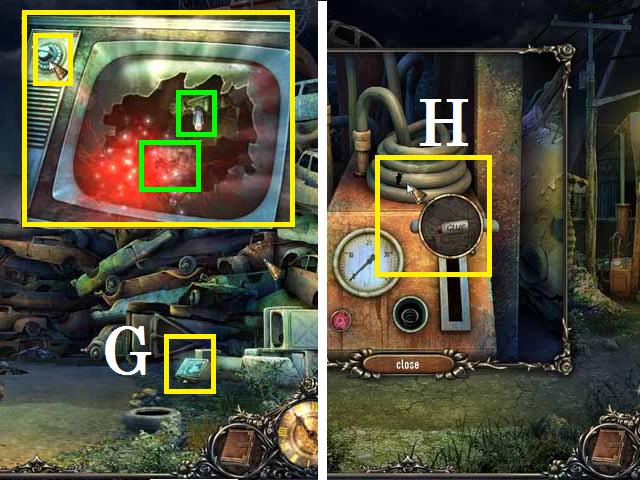
- In Junkyard No. 1 zoom into the TV (G) and replace the KNOB. Pick up the BULB (green) and the FILM STRIP (green).
- You can go ahead and go to Junkyard No. 2 and place the GLUE on the hose (H) in the compressor.
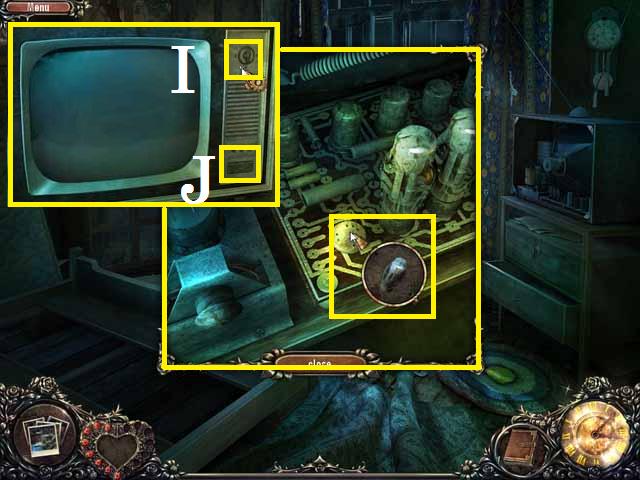
- Return to the Bedroom and replace the BULB in the TV.
- Zoom back into the TV and turn the knob (I) then hit the on button (J).
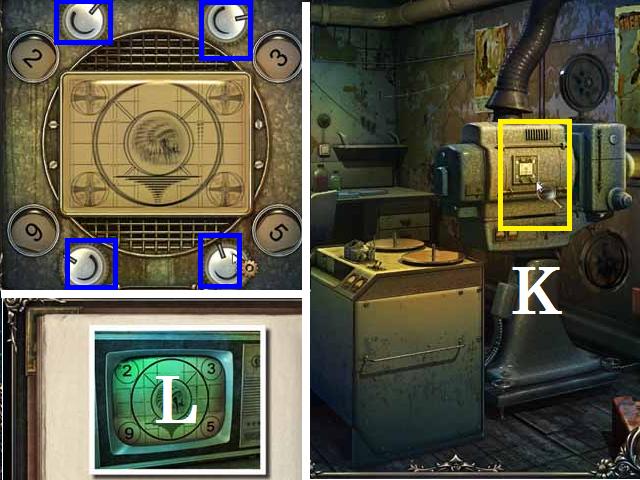
- Return to the Film Projection Booth and zoom into the projector (K).
- Push the buttons (blue) to change the numbers in the dials.
- Set the numbers to match what was on the TV (L), this can be found in your journal, from top left clockwise 2, 3, 9, and 5.
- Go to the Street and zoom into the bikes to trigger a Hidden Object Scene.
Chapter 5
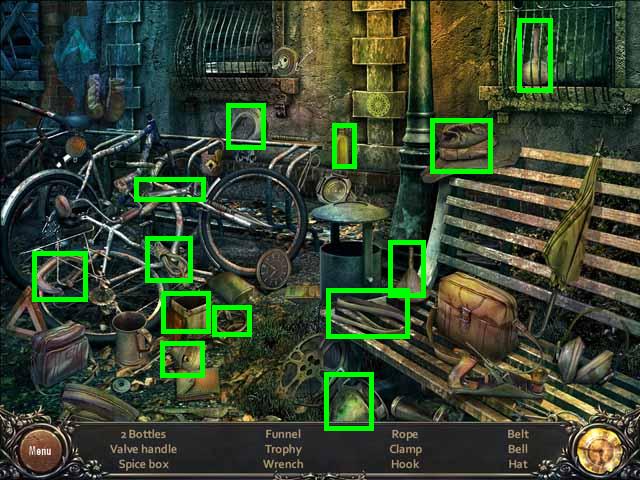
- After you have picked up all of the items (green) the WRENCH will be added to your inventory.
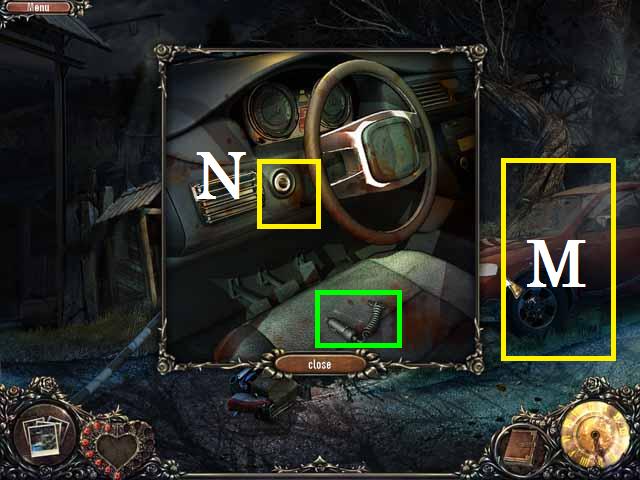
- Move to the Road and zoom into the car (M).
- Pick up the PHONE CHARGER (green) and place it in the cigarette lighter (N).
- Attach the PHONE to the CHARGER.
- Zoom into the Fire Truck to trigger a Hidden Object Scene.
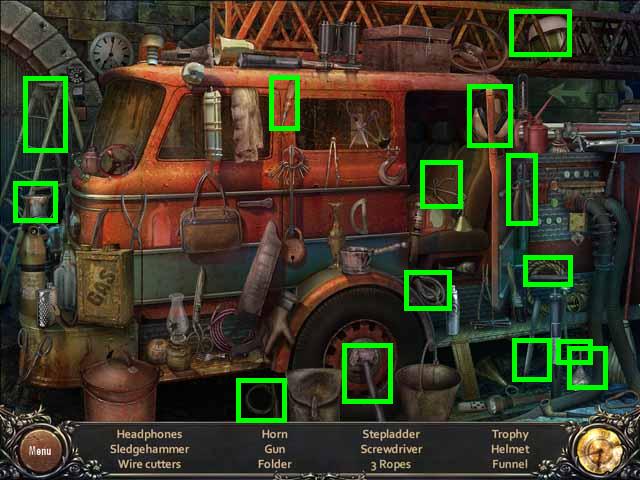
- After you have picked up all of the items (green) the FUNNEL will be added to your inventory.
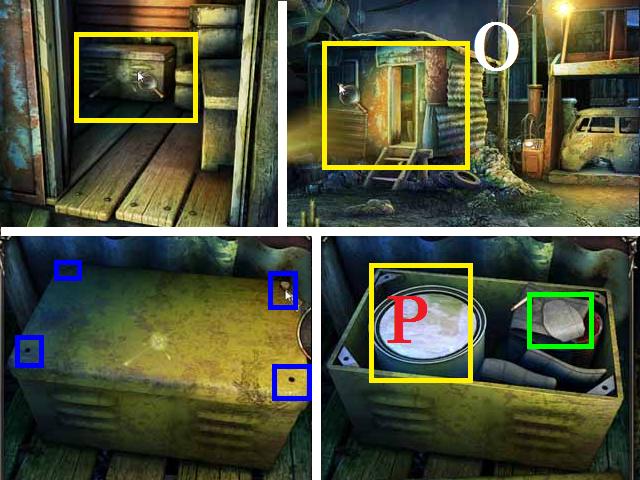
- Go to Junkyard No. 2 and zoom into the shop (O) then zoom in again.
- Remove the bolts (blue) with the WRENCH then the lid and pick up the RUBBER PATCH (green).
- Go ahead and remove the paint lid (P) with the CROWBAR then close the windows.
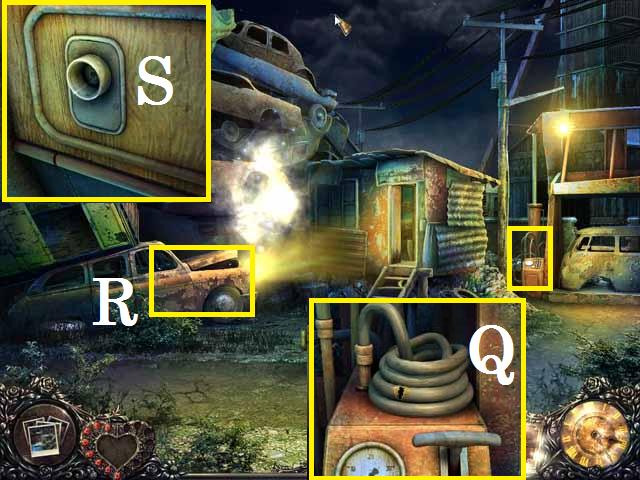
- Zoom back into the compressor and place the RUBBER PATCH over the hose (Q).
- Zoom into the car (R) and plug the CHARGER and PHONE into the cigarette lighter (S).
- Zoom into the light beams to trigger a Hidden Object Scene.
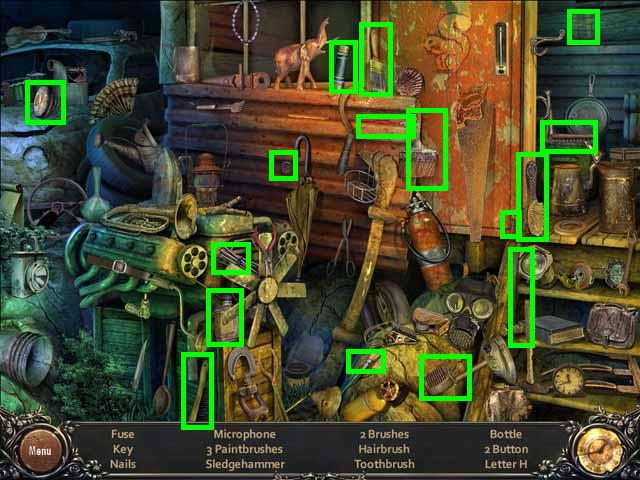
- After you have picked up all of the items (green) the BUTTON will be added to your inventory.
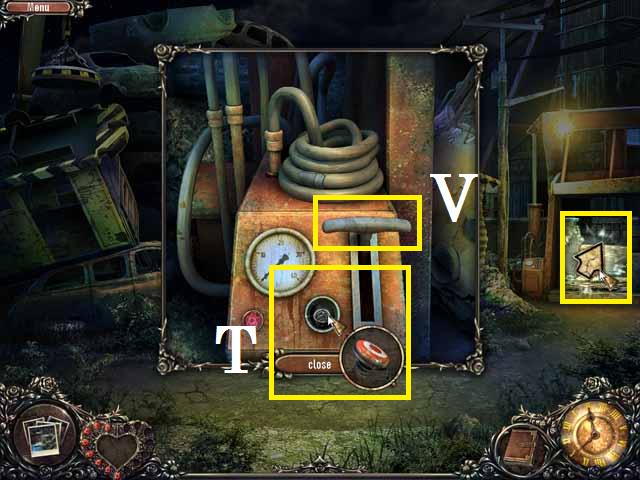
- Zoom back into the compressor and place the BUTTON (T), push it and pull the lever (V).
- Move to the right to the Mine Entrance.
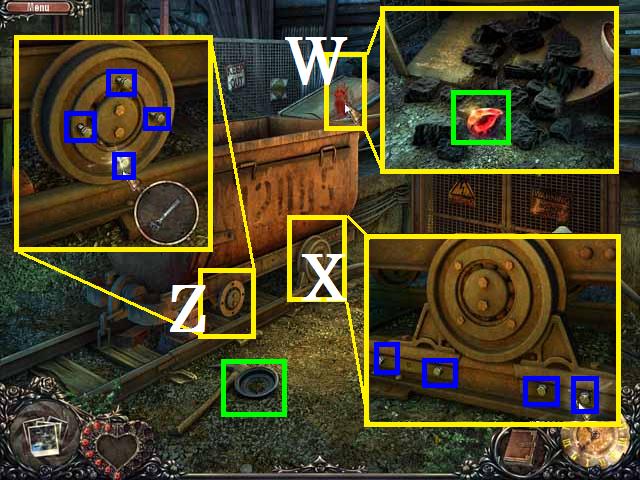
- Take a photograph and zoom into the bloody handprints (W) to pick up the JEWEL (green).
- Zoom into the coal cars front wheel (X).
- Remove the bolts (blue) with the WRENCH, they will be added to your inventory, then click the wheel.
- Pick up the WHEEL (green) and zoom into the rear wheel (Z).
- Place the WHEEL then all four BOLTS as shown in the screenshot.
- Tighten the BOLTS with the WRENCH then push the car down the track.
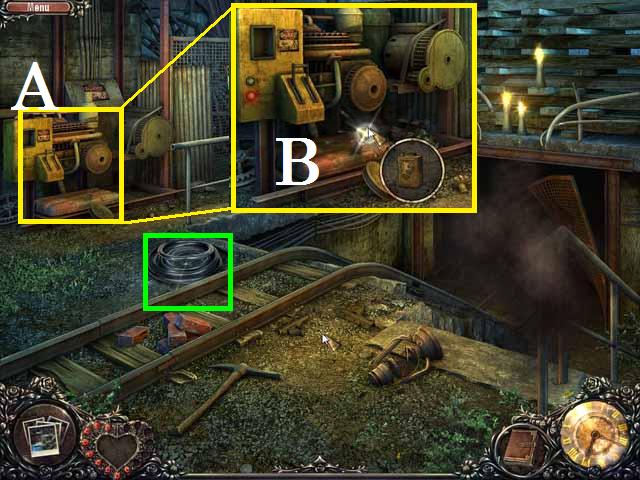
- Pick up the HOSE (green) and zoom into the generator (A).
- Place the FUNNEL in the gas tank (B) and fill with GAS.
- Close the pop-up window and go to Junkyard No. 2.
- Zoom into the light beams to trigger a Hidden Object Scene.
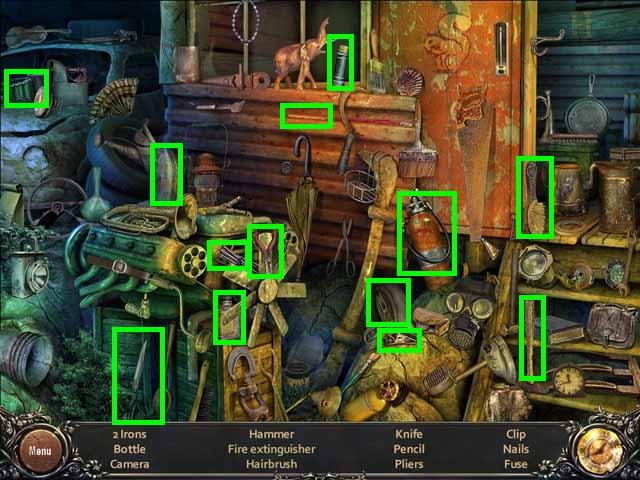
- After you have picked up all of the items (green) the FUSE will be added to your inventory.
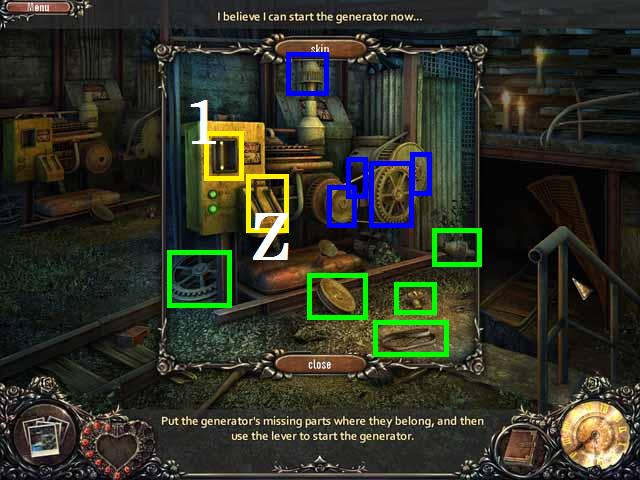
- Return to the Mine Entrance and place the FUSE (1) in the generator as shown in the screenshot.
- Pick up the generator pieces (green) and place as shown (blue) in the screenshot. (Hint: I placed the BELT last).
- Pull the lever (Z). If you have any pieces in the wrong place they will fall off, replace them and pull the lever again.
- Return to the Fuse Box and zoom in to trigger a Hidden Object Scene.
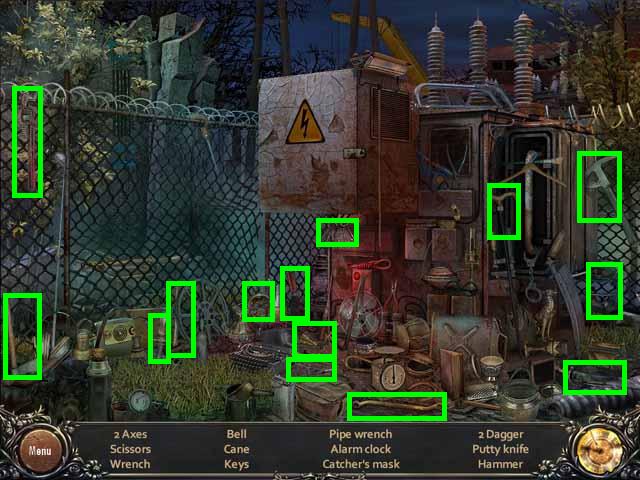
- After you have picked up all of the items (green) the DAGGER will be added to your inventory.
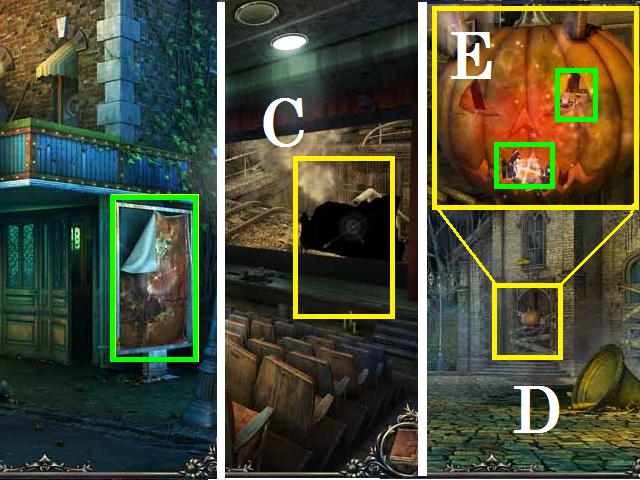
- Return to the Movie Theater and cut the MOVIE POSTER (green) with the DAGGER and then go to the Auditorium.
- Zoom back into the hole in the screen (C) and place the MOVIE POSTER there.
- Go to the Church and zoom into the chained door (D).
- Carve the pumpkin (E) with the DAGGER and pick up the FILM PIECE (green) and the STAPLER (green).
- Staple the MOVIE POSTER in the Auditorium and go back to the Mine Entrance.
Chapter 6
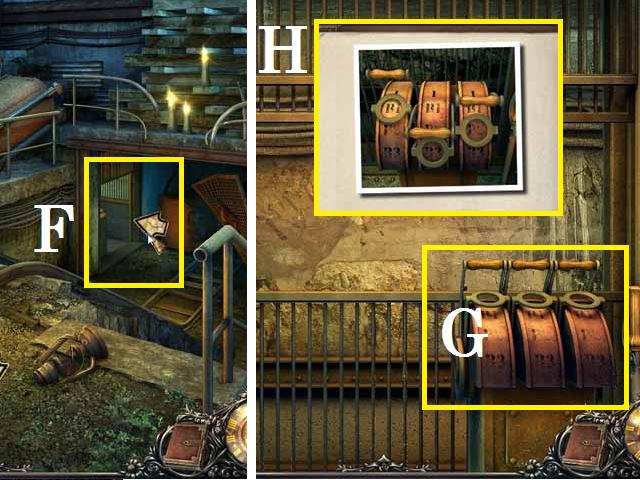
- Enter the Mine (F) to the Elevator.
- Zoom into the controls (G) and set them, from left to right, as follows: B1, B3, and B2. You can find this solution in your Journal (H).
- Click right screen to go down the elevator.
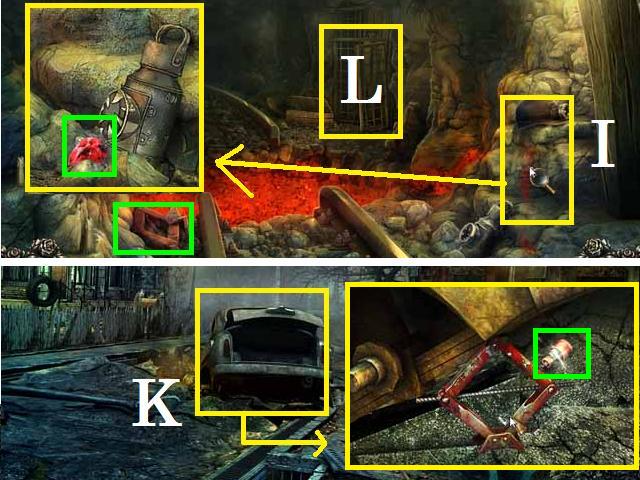
- When you reach Mine No. 1 take a photograph and zoom into the bloody handprints (I) to pick up the JEWEL (green).
- Pick up the JACK (green) and zoom into the ceiling.
- Return to the Street and zoom into the car (K).
- Place the JACK under the car, pick up the FUSE (green) then return to Mine No. 1.
- Zoom into the back room (L) to trigger a Hidden Object Scene.
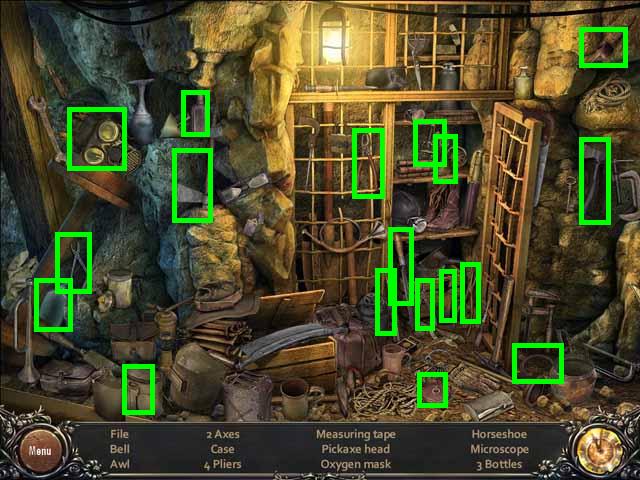
- After you have picked up all of the items (green) the OXYGEN MASK will be added to your inventory.
- Zoom into the Fire Truck to trigger a Hidden Object Scene.
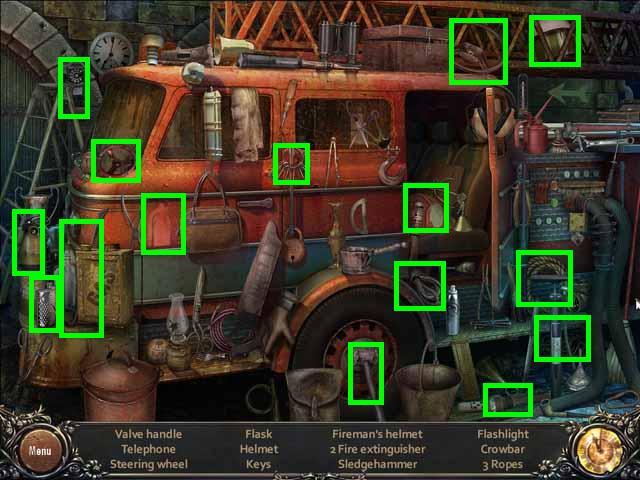
- After you have picked up all of the items (green) the SLEDGEHAMMER will be added to your inventory.
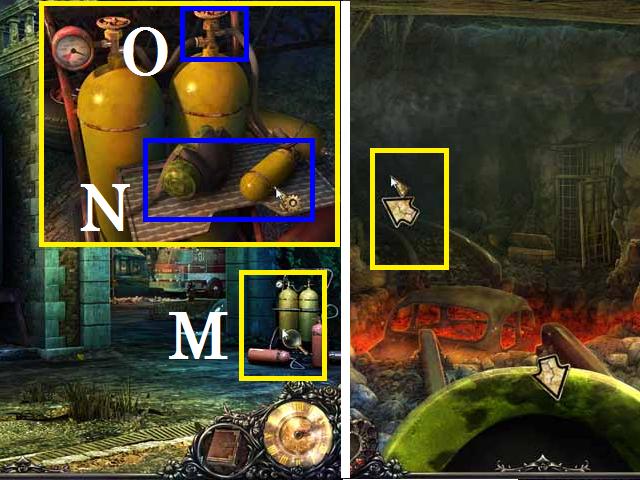
- Move back one scene to the Alley and zoom into the oxygen tanks (M).
- Place the MASK on the ledge (N) and turn the valve (O) then pick the MASK back up.
- Return to Mine No. 1 and place the MASK on by dropping it out in front of you on the path.
- Move forward across the track into Mine No. 2.
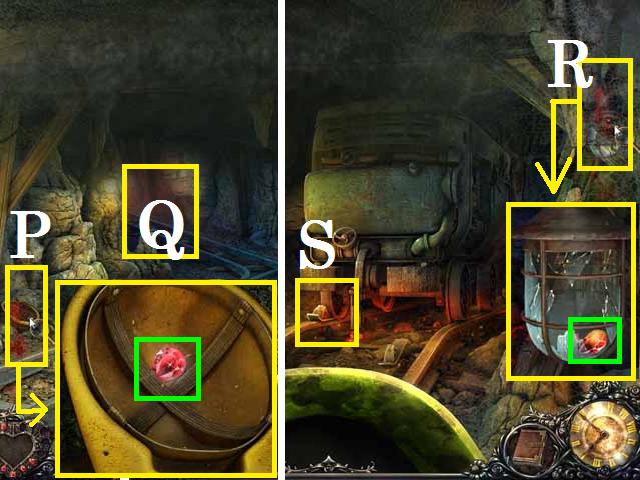
- Take a photograph and zoom into the bloody handprints (P) to pick up the JEWEL (green).
- Move forward and to the left (Q) to enter Mine No. 3.
- Take a photograph and zoom into the bloody handprints (R) to pick up the JEWEL (green).
- Move the rock (S) with the SLEDGEHAMMER then push the car.
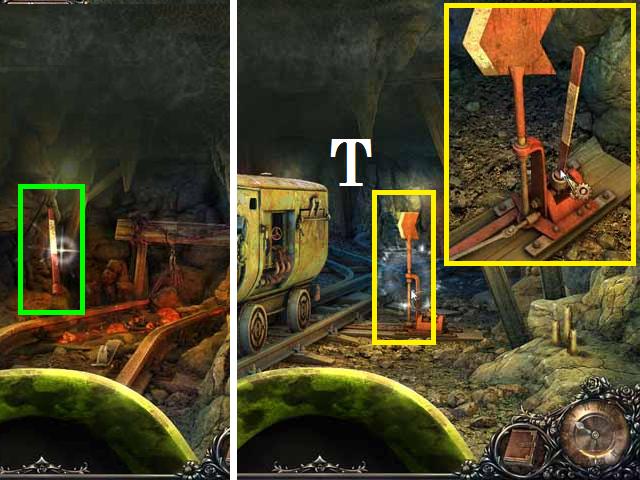
- Pick up the LEVER (green).
- Move back one scene and zoom into the track control (T).
- Place the LEVER in the control as shown in the screenshot and pull it.
- Push the coal car and move to the right to Mine No. 4.
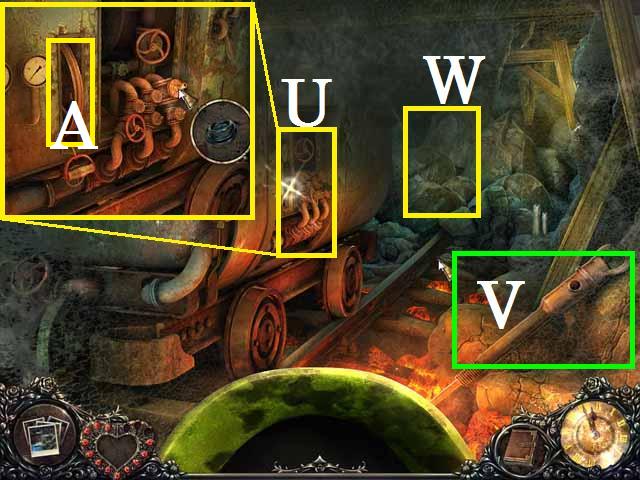
- Zoom into the side of the coal car (U) and place the HOSE there then spin the wheel (A).
- Pick up the JACKHAMMER (V) and use it on the rock wall (W).
- Move forward into Mine No. 5.
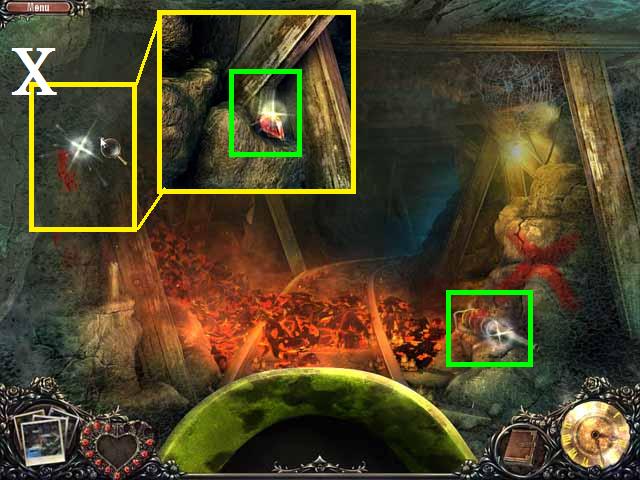
- Take a photograph and zoom into the bloody handprints (X) to pick up the JEWEL (green).
- Pick up the FIREHOSE NOZZLE (green).
- Return to Mine No. 1 and zoom into the back wall to trigger a Hidden Object Scene.
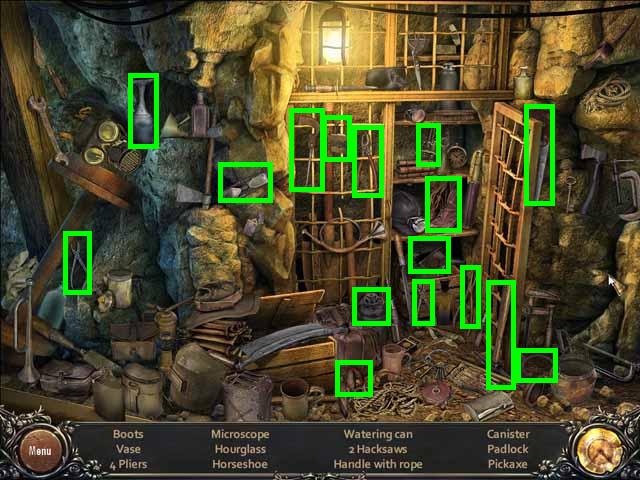
- After you have picked up all of the items (green) the PICKAXE will be added to your inventory.
- Go to the Fuse Box and replace the last FUSE.
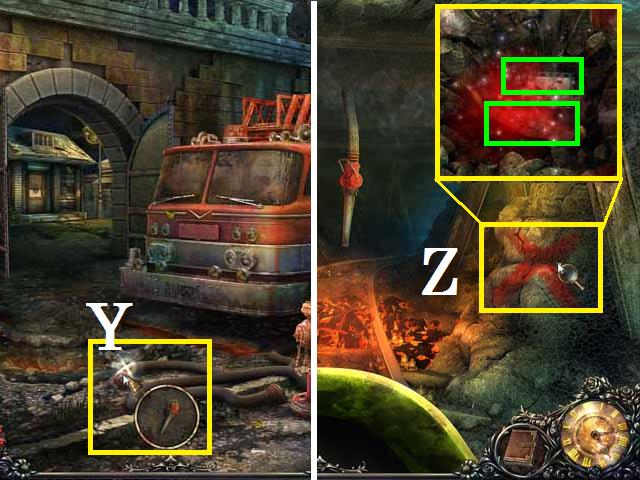
- Go to the Fire Truck and place the FIREHOSE NOZZLE on the hose (Y), click on it once then close the window.
- In Mine No. 5, zoom into the red x (Z) and break the rock with the PICAXE.
- Pick up the PHOTOGRAPH then the FILM STRIP (green) and HANDLE (green).
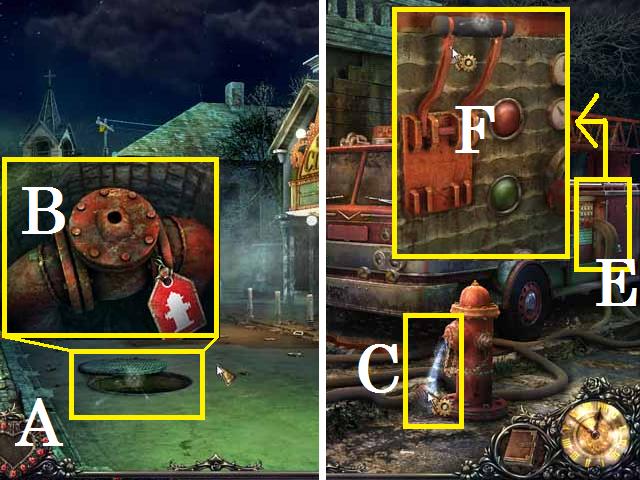
- Return to Outside the Movie Theater and zoom back into the manhole (A).
- Place the HANDLE on the water main (B) and turn it.
- Return to the Fire Truck and attach the hose (C) to the hydrant.
- Zoom into the side of the Truck (E) and flip the switch (F).
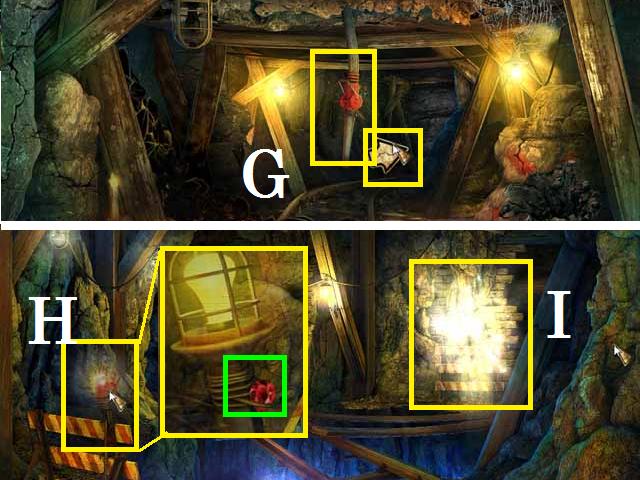
- Return to Mine No. 5 and click on the NOZZLE (G).
- Turn the NOZZLE back off and move forward to the Gap.
- Take a photograph and zoom into the bloody handprints (H) to pick up the JEWEL (green).
- Zoom into the back right wall (I) to trigger a Hidden Object Scene.
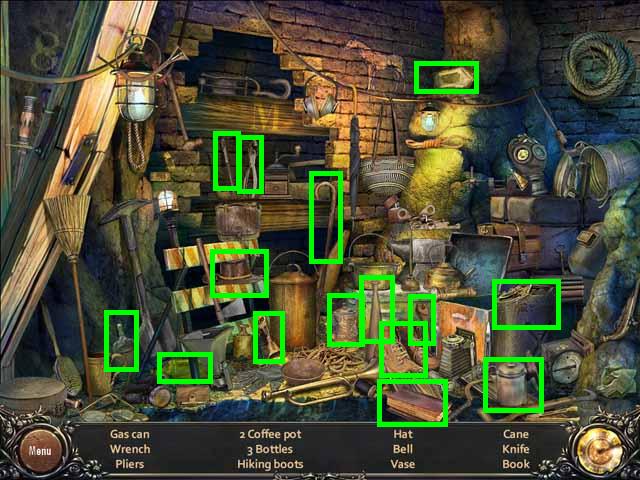
- After you have picked up all of the items (green) the PLIERS will be added to your inventory.
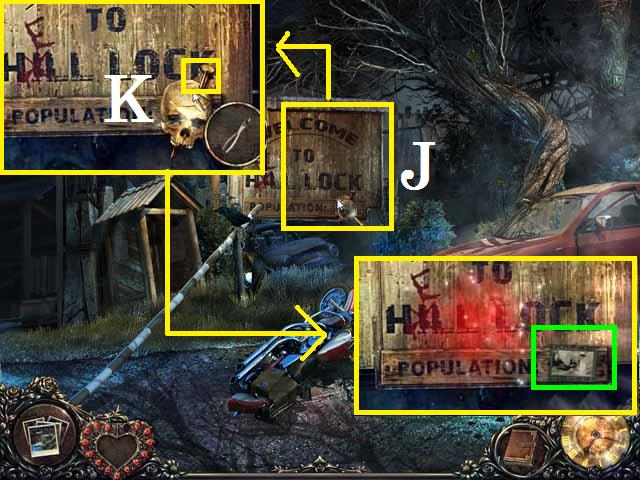
- Go to the Road and zoom into the welcome sign (J).
- Remove the nail (K) with the PLIERS and pick up the FILM STRIP (green).
- Go to the Cemetery and zoom in to trigger a Hidden Object Scene.
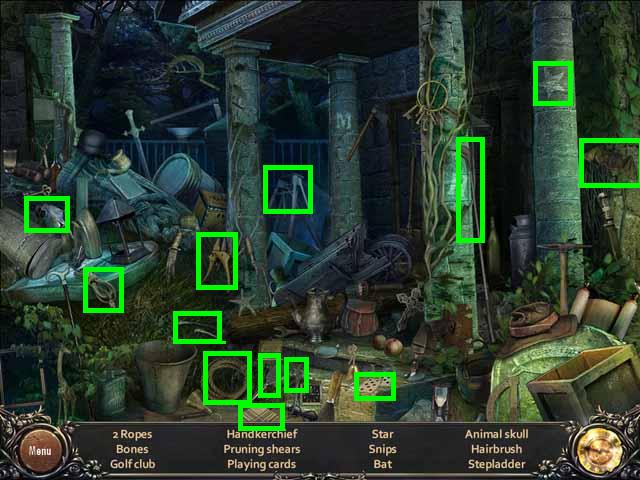
- After you have picked up all of the items (green) the PRUNING SHEARS will be added to your inventory.
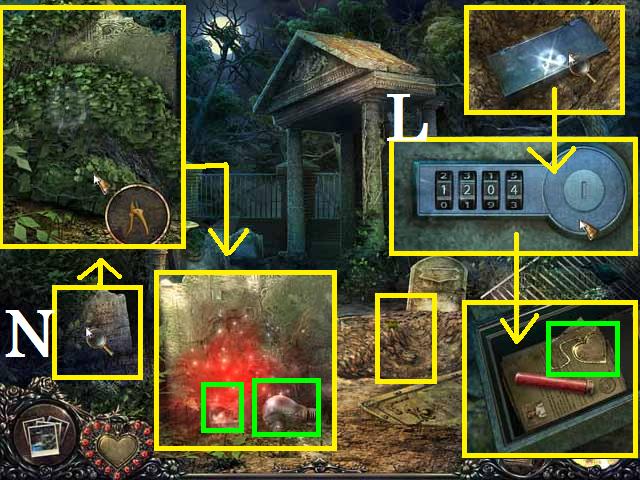
- Zoom into the grave you dug earlier and in on the box.
- Set the code (L) to 1204, found in your Journal.
- Pick up the LOCKET (green).
- Zoom into the gravestone (N) on the left and use the PRUNING SHEARS (click about 3 times).
- Pick up the LIGHT BULB (green) and the FILM STRIP (green).
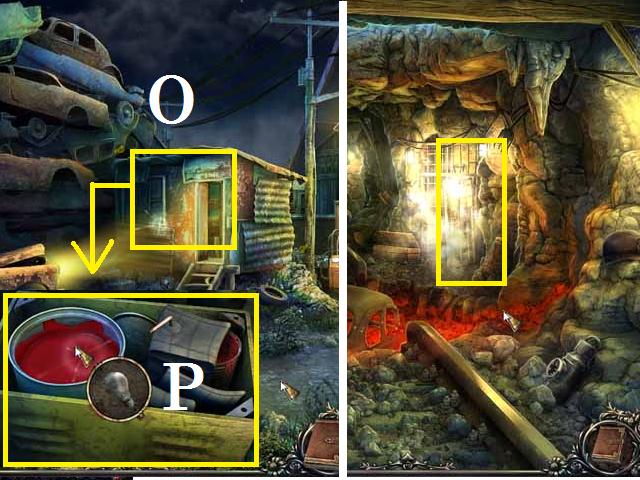
- Return to Junkyard No. 2 and back into the shop (O).
- Zoom into the box and dip the LIGHT BULB in the red paint (P).
- Return to Mine No. 1 and zoom in to trigger a Hidden Object Scene.
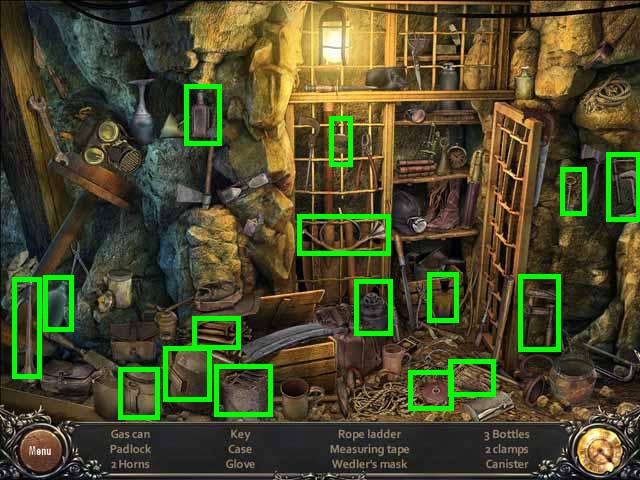
- After you have picked up all of the items (green) the ROPE LADDER will be added to your inventory.
Chapter 7
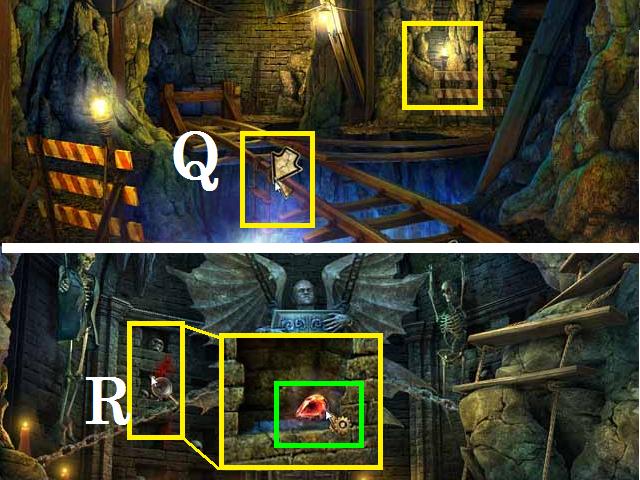
- Place the ROPE LADDER over the track (Q) in the Gap and go down it to the Alter.
- Take a photograph and zoom into the bloody handprints (R) to pick up the JEWEL (green) and complete the PENDANT and have it added to your inventory.
- Go back up to the gap and zoom into the back wall to trigger a Hidden Object Scene.
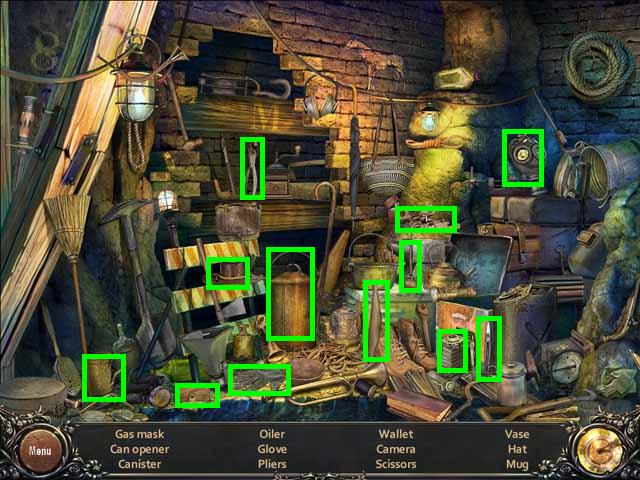
- After you have picked up all of the items (green) the CAN OPENER will be added to your inventory.
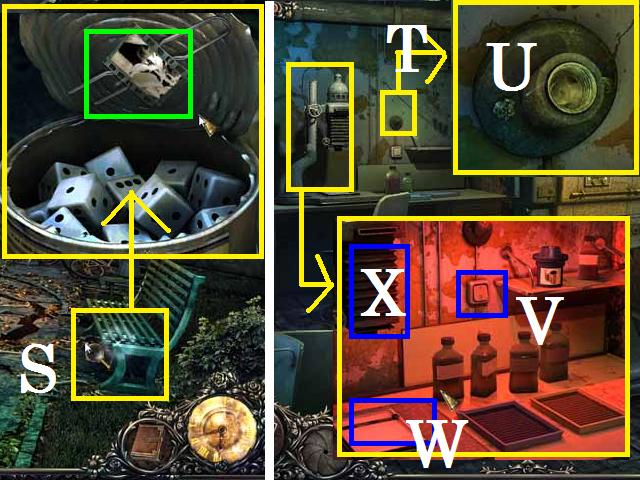
- Go to the Street and zoom back into the bench (S).
- Open the can with the CAN OPENER and pick up the FILM STRIP and HAIRPIN (green).
- Go to the Film Projection Booth and zoom into the wall above the enlarger (T) and place the RED BULB in the socket (U).
- Zoom into the enlarger, turn the light on (V) and place the PHOTO PAPER on the easel (W).
- Place the FILM STRIPS in the enlarger (X).
- Develop all of the photos by clicking on the section of paper that is showing part of the photo until it is all developed. Do this to all of the photos.
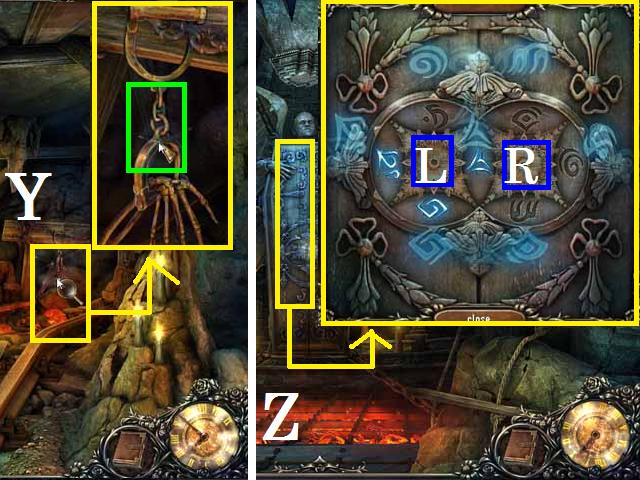
- Return to Mine No. 3 and zoom into the back wall (Y).
- Pick up the HANDCUFFS (green) using the HAIRPIN.
- Go down to the Alter and zoom into the casket (Z).
- Align the symbols by turning them using the left (L) and right (R) buttons.
- Your beginning positions may be different than mine. With the starting positions as shown in the screenshot I hit the left (L) button once then the right (R) button two times until the right side was all in correct order.
- I then hit left (L) three times until the lock opened..
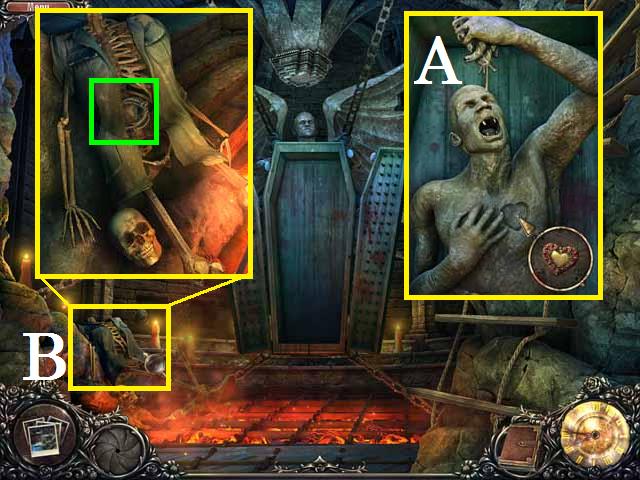
- Place the PENDENT over the vampires’ chest (A).
- Zoom into the skeleton (B) and pick up the FUSE (green).
- Move to Mine No. 1 and zoom in to trigger a Hidden Object Scene.
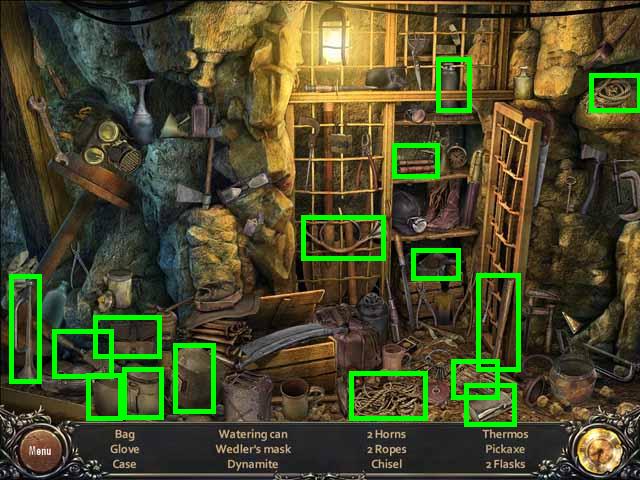
- After you have picked up all of the items (green) the DYNAMITE will be added to your inventory.
- Zoom into the back wall at the Gap to trigger a Hidden Object Scene.
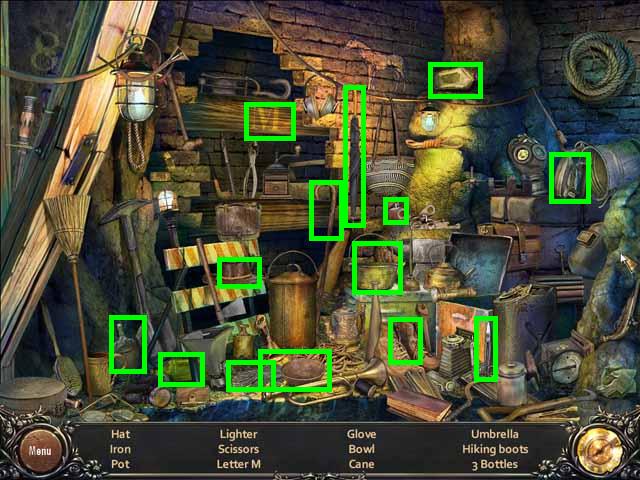
- After you have picked up all of the items (green) the LIGHTER will be added to your inventory.
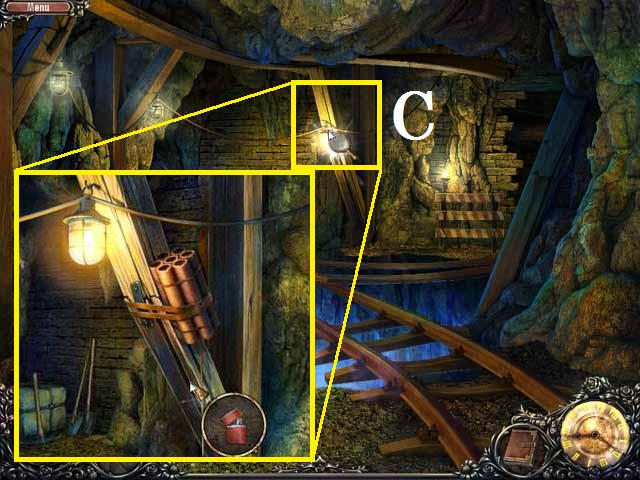
- Zoom into the cracked roof beam (C) and place the DYNAMITE then the FUSE as shown in the screenshot then LIGHT it.
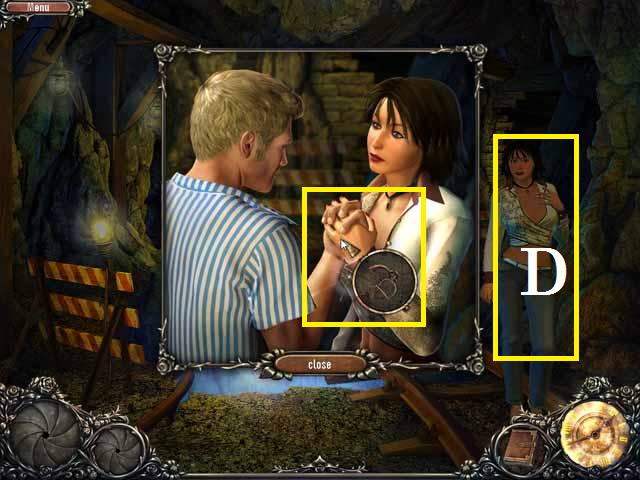
- Zoom into the Girl (D) and place the HANDCUFFS on your hands.
Other Great Vampire Games to Play...

Dracula: Love Kills Collector's Edition
The Queen of Vampires is back and is determined to destroy the world! Help Van Helsing and Dracula as they team up to stop her! Buy ItTry ItCreated at: 2011-07-10

