

Walkthrough Menu
General Tips
- This is the official guide for Wanderlust: The City of Mists.
- This guide won't tell you when to zoom into a location; the screenshots show each zoom scene.
- Hidden-object puzzles are referred to as HOPs. Only the locations of the HOPs will be shown.
- Use the Map to fast travel to a location.
Chapter 1: Island
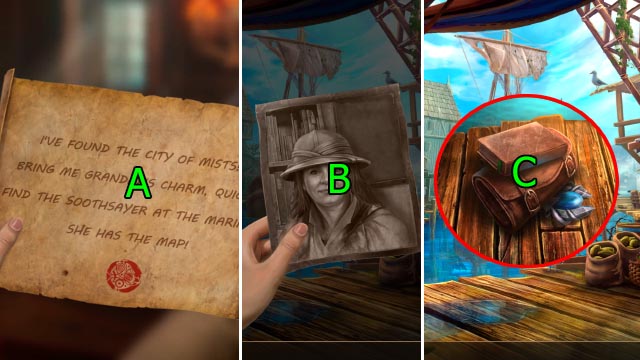
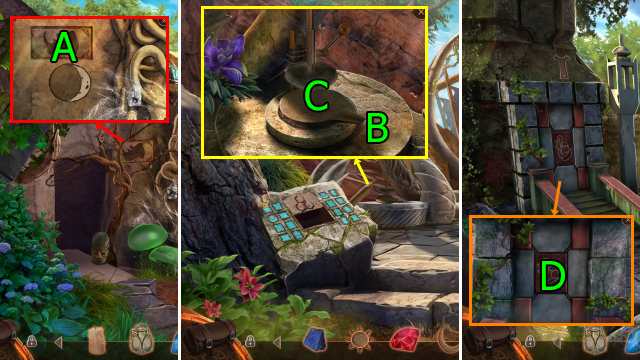
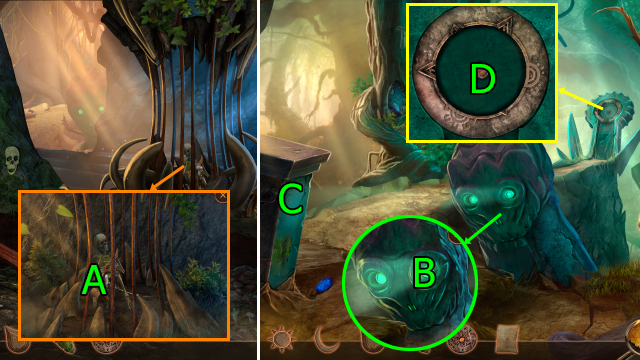
- Press (A).
- Press (B); get PHOTO OF MOM.
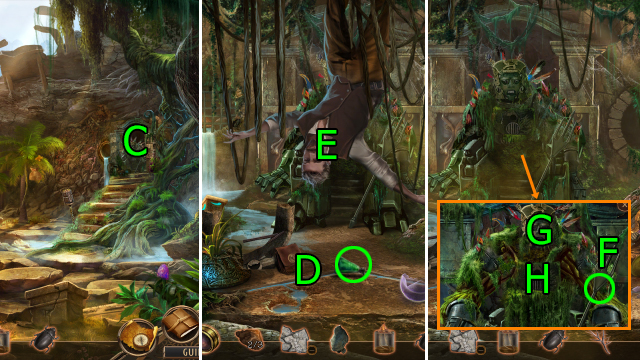
- Press (Cx6); get Journal, Toolbelt, Great-granddad's Charm, and Needle-nose Pliers.
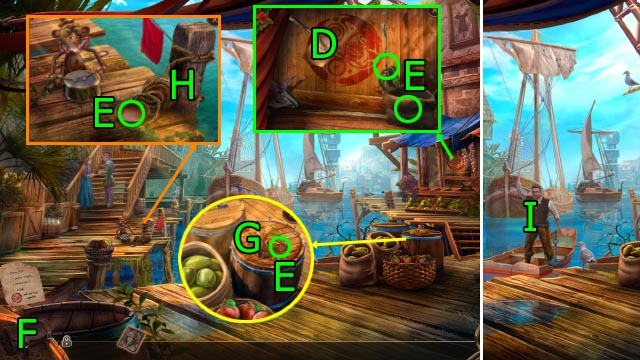
- Press (Dx2); get Knife.
- Get BROKEN BELL, EMPTY BOWL, SACK, and WOOD SHAVINGS (E).
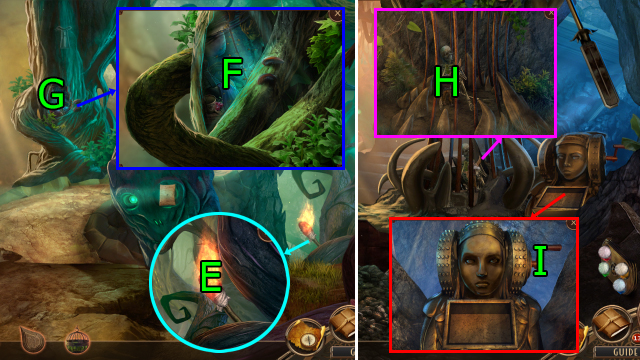
- Press (F); use Needle-nose Pliers on (G), get NAILS.
- Press, use SACK, and press (Gx4).
- Use Knife and press (H); get COCONUT.
- Use BROKEN BELL; get TOY SNAKE.
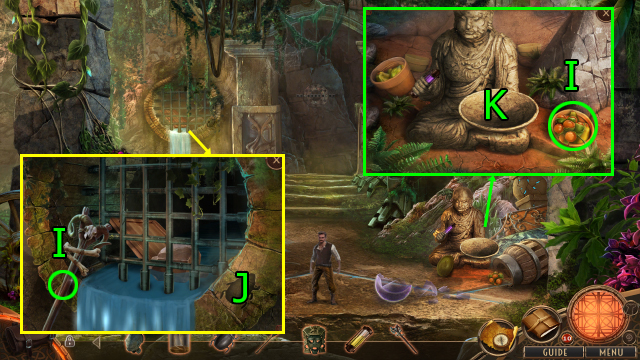
- Press (I).
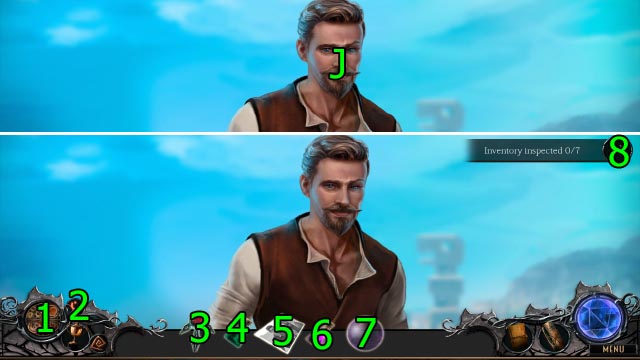
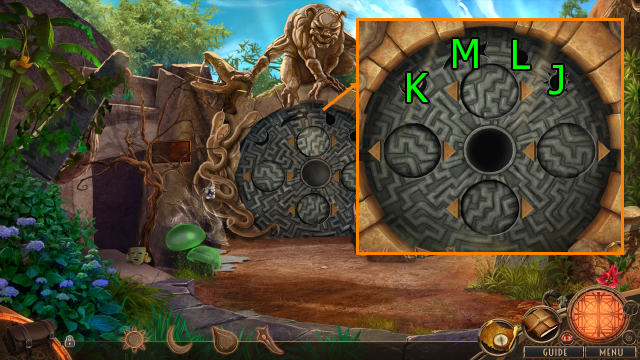
- Press (Jx5).
- Press (1-2-3x2-4x2-5x2-6x2-7x2-8).
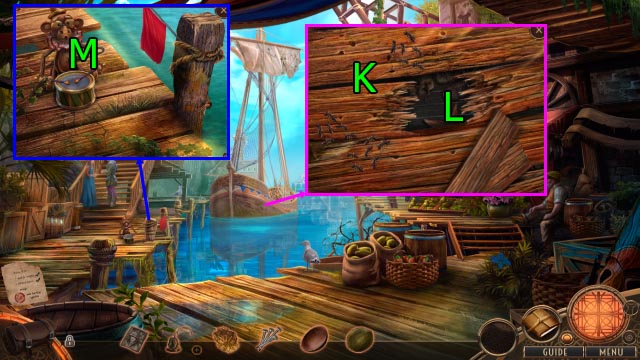
- Use EMPTY BOWL and WOOD SHAVINGS on (K); get TERMITES and WINDING KEY.
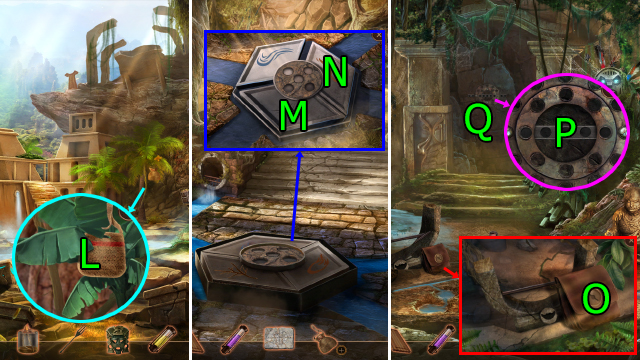
- Use NAILS and COCONUT on (L).
- Use WINDING KEY on (M).
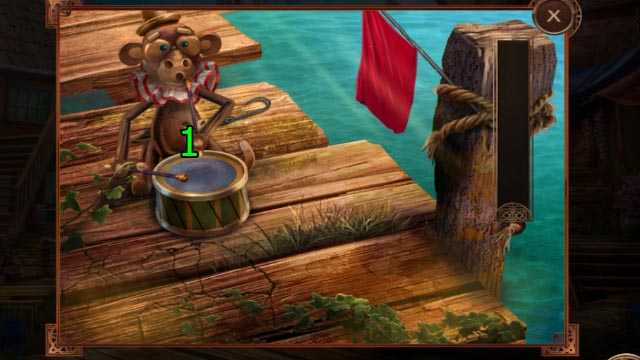
- Solution (@1): Press (A) repeatedly until the meter fills up.
- Get MONKEY ARM.
- Use MONKEY ARM; get TINY DRUMSTICK.
- TINY DRUMSTICK on BROKEN BELL; get BELL.
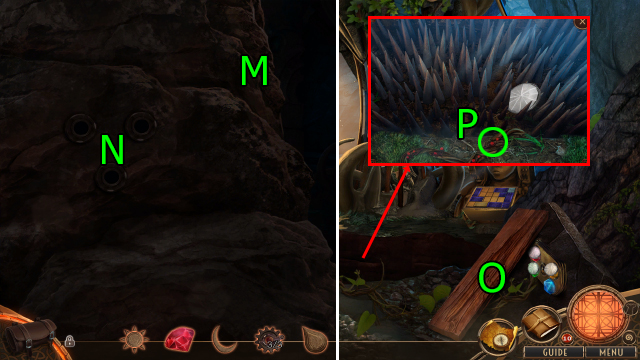
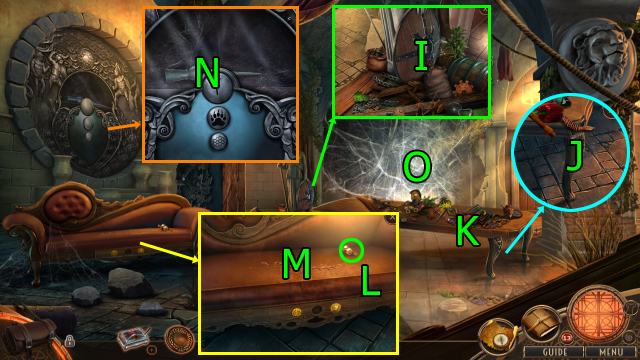
- Use BELL on (N).
- Use PHOTO OF MOM on (N).
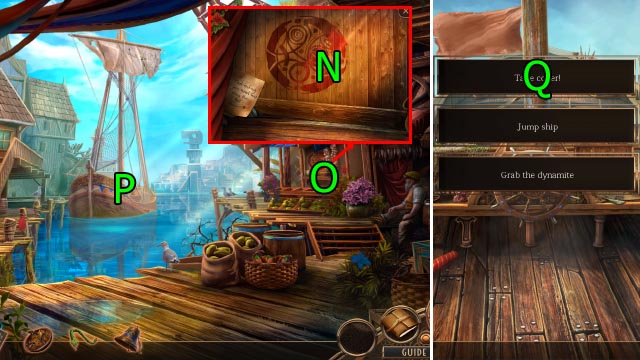
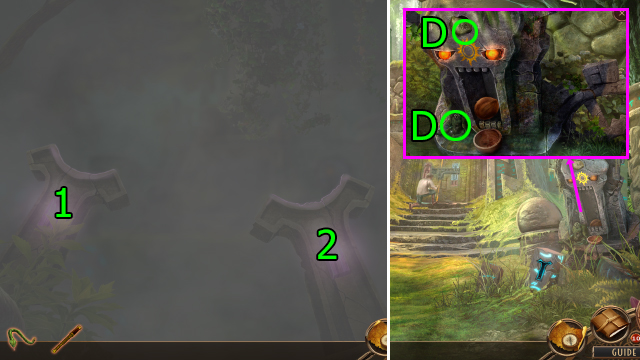
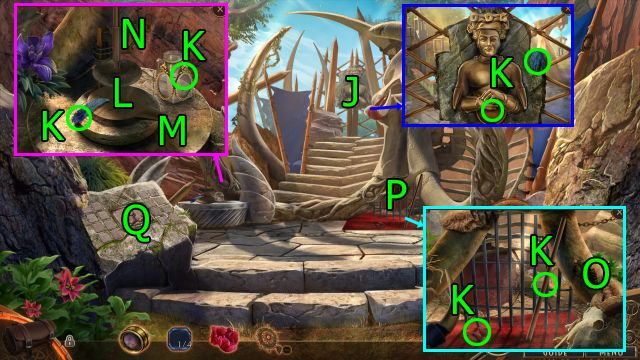
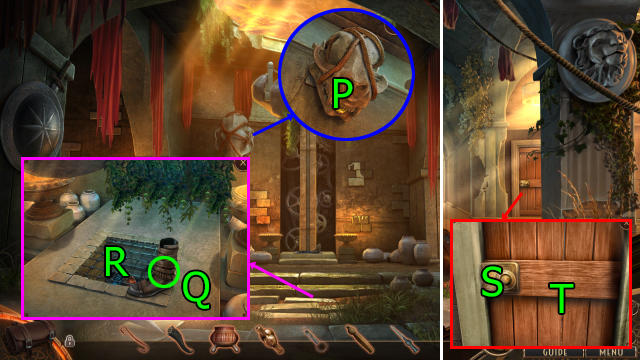
- Solve HOP (O).
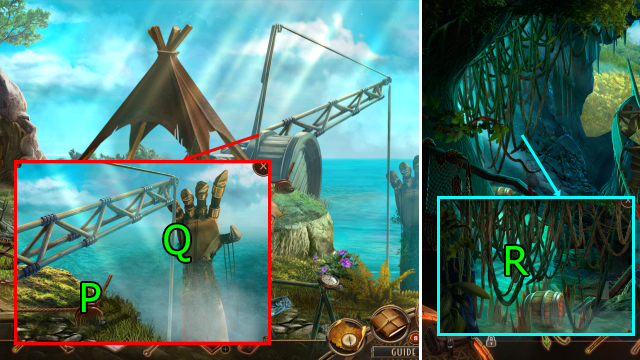
- Go (P).
- Press (Q).
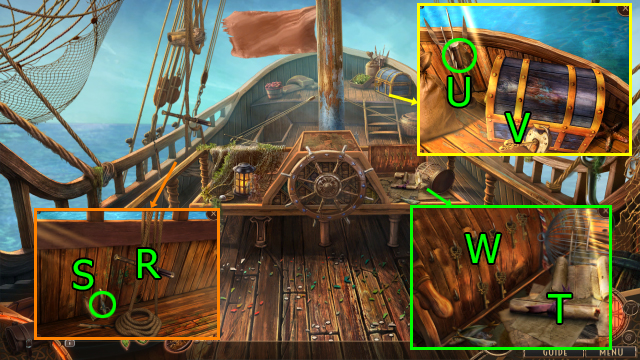
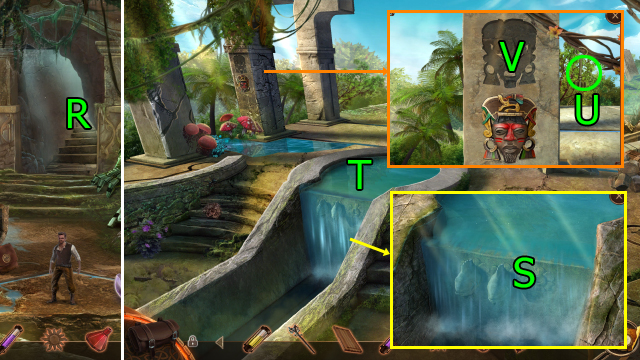
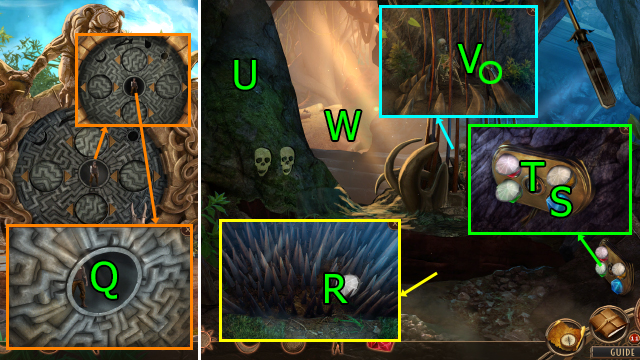
- Use Knife on (R); get SPYGLASS.
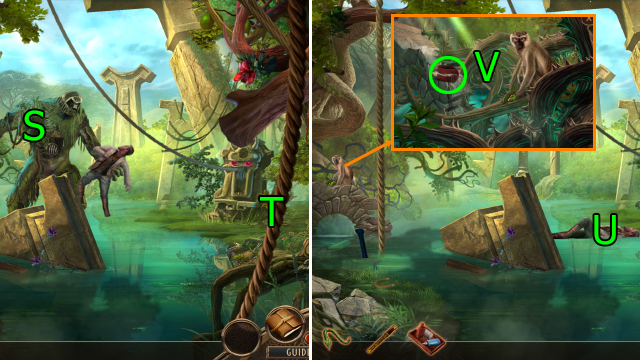
- Get BROKEN MUSKET (S).
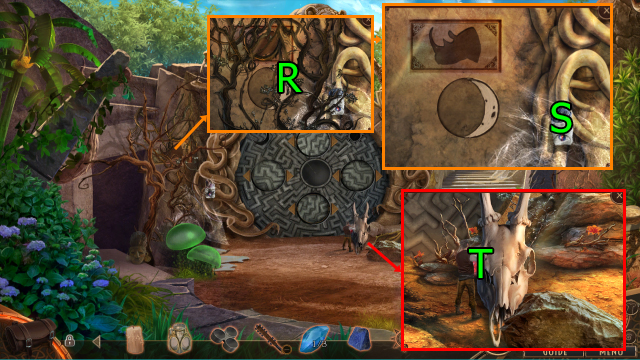
- Press (R).
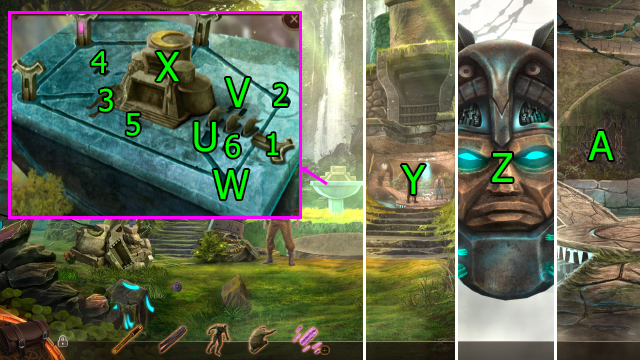
- Press (Tx10); get BLANK PAPER.
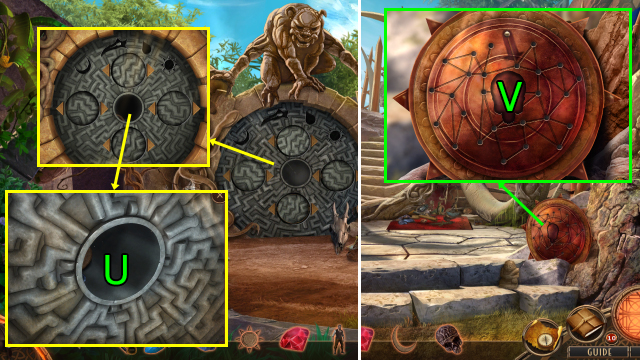
- Get UNLIT TORCH (U).
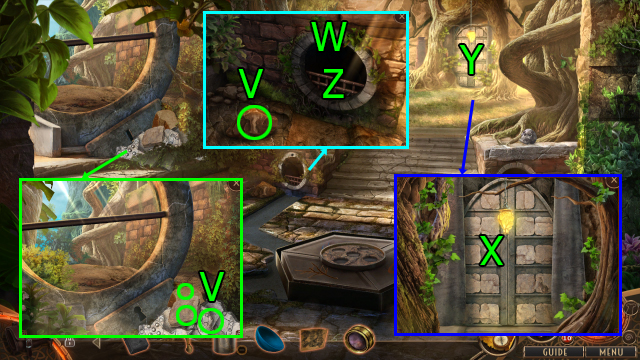
- Press (V); get BROKEN KEY.
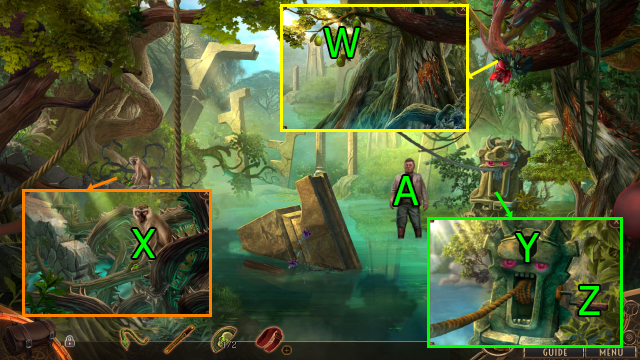
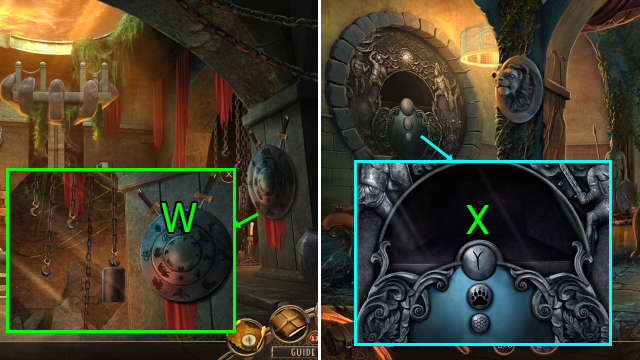
- Use BROKEN KEY on (W).
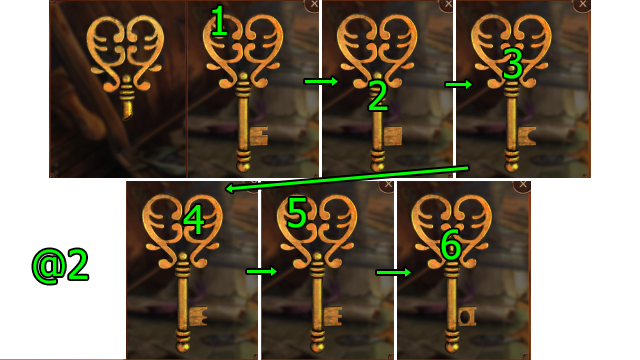
- Solution (@2): Press (1-2-3-4-5-6).
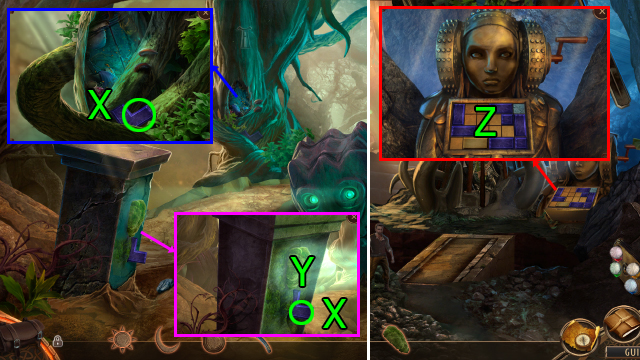
- Get CHEST KEY.
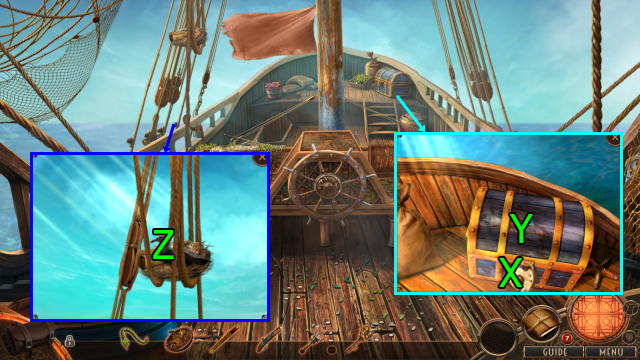
- Use Needle-Nose Pliers and CHEST KEY on (X); press (Yx5), get GUNPOWDER POUCH.
- BLANK PAPER, GUNPOWDER POUCH, and BROKEN MUSKET on UNLIT TORCH; get LIT TORCH.
- Use LIT TORCH and press (Z).
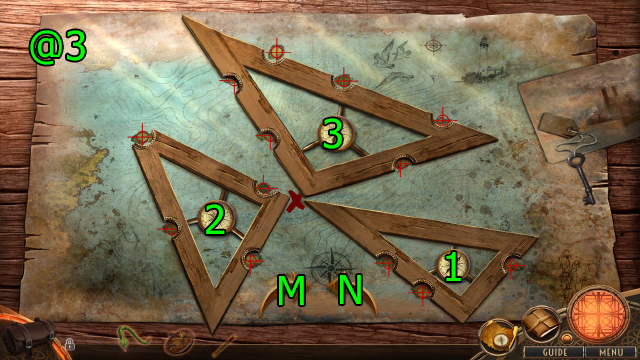
- Solution (@3): Press (M) and (N) to rotate and place (1)-(2)-(3).
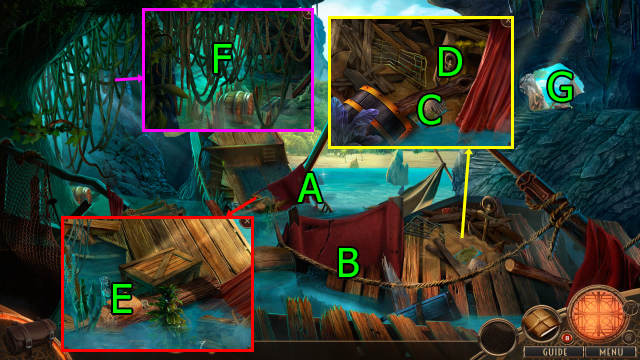
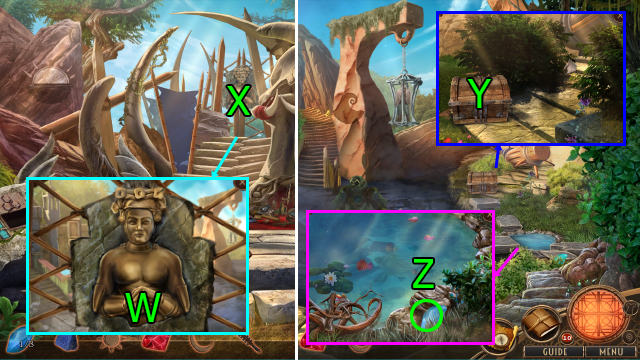
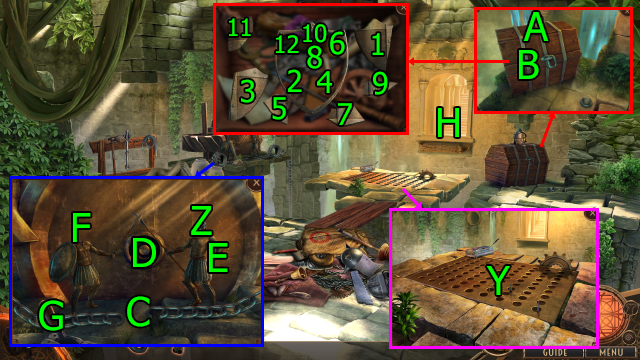
- Press (A).
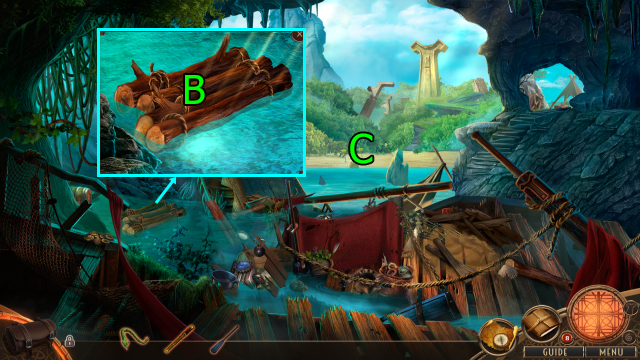
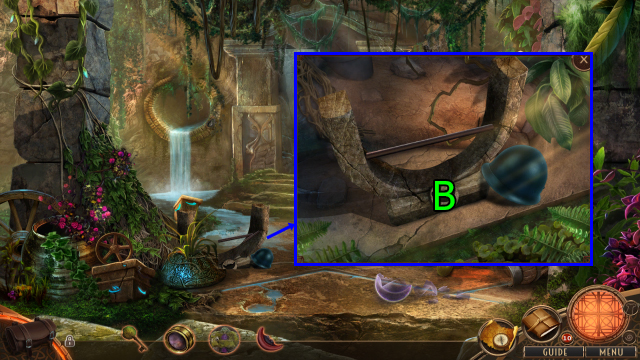
- Solve HOP (B); get BUOY HOOK WITH ROPE.
- Press (Cx4); get Map.
- Press (Dx4); get ANCHOR.
- Press (Ex2); get MERMAID STATUETTE.
- Use Knife on (F).
- Go (G).

- Press and use MERMAID STATUETTE on (H).
- Press (H).
- Press (Ix2); get SHOVEL and LEATHER BAG.
- Use LEATHER BAG; get BANDAGE.
- Use BUOY HOOK WITH ROPE on (J).
- Use TERMITES and SHOVEL on (K).
- Get LEVER (L).
- Press (Mx4).
- Use Great-granddad's Charm and press (N); get INCOMPLETE MEDICAL SUPPLIES.
- Press (O); press (1-2-3-4-5-6-7).
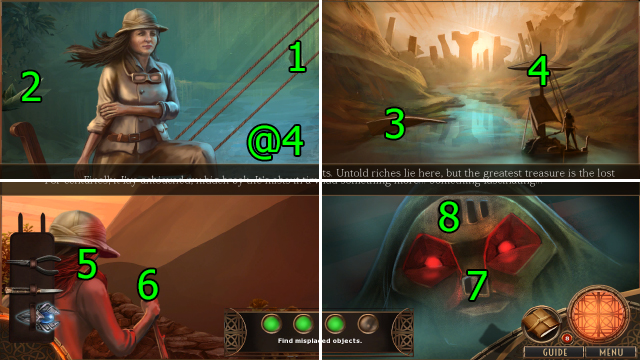
- Solution (@4): Drag (1-2)-(3-4)-(5-6)-(7-8).
- Get SMELLING SALTS.
- Press (P); use ANCHOR on (Q).
- Press, use LEVER, and press (Px3); press (Q).
- Solve HOP; get MACHETE.
- BANDAGE and SMELLING SALTS on INCOMPLETE MEDICAL SUPPLIES; get MEDICAL SUPPLIES.
- Go The Eye of Mist.
- Use MACHETE and go (R).
- Use Great-granddad's Charm and press (S).
- Use Knife on (T).
- Use MEDICAL SUPPLIES on (U); get SKULL EMBLEM (1/2).
- Get BELT (V).
- SPYGLASS and Knife on BELT; get HUNTING KNIFE.
- Use HUNTING KNIFE on (W); get FRUIT.
- Use FRUIT on (X); get SKULL EMBLEM (2/2).
- Use SKULL EMBLEM (2/2) on (Yx2) and press (Z); get TANGLED NET.
- Use TANGLED NET on (A).

- Solution (@5): Press (3-8-6)-(3-2-5)-(7-3-1).
- Get OAR.
- Go The Eye of Mist.
- Use OAR on (B).
- Press (C).
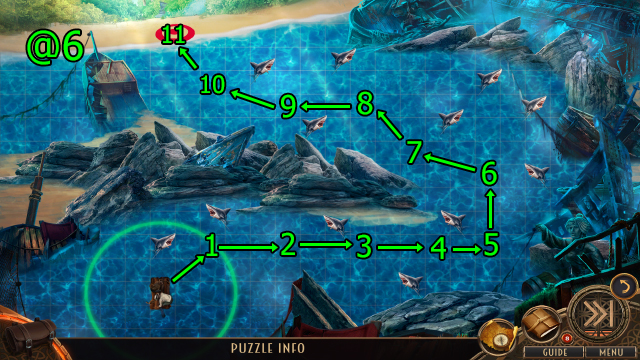
- Solution (@6): Press (1-2-3-4-5-6-7-8-9-10-11).
Chapter 2: City
- Press (1-2).
- Get CARVED STONE and BROKEN STATUETTE (D).
- Use BROKEN STATUETTE.
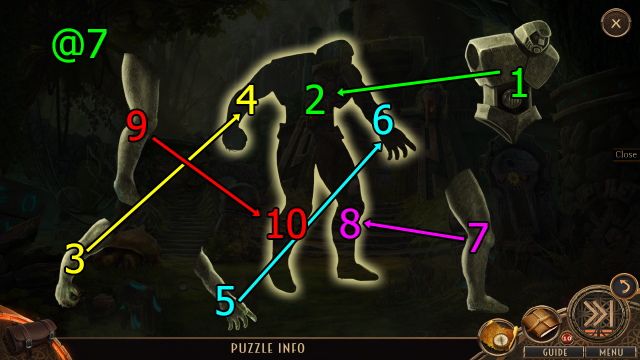
- Solution (@7): Drag (1-2)-(3-4)-(5-6)-(7-8)-(9-10).
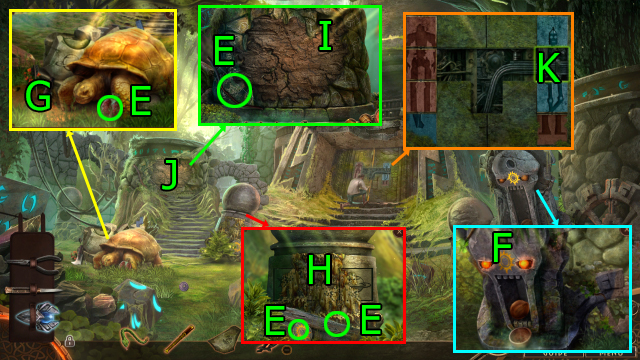
- Get EXOTIC FRUIT, SUNSTONE, JUNGLE BARK BOARDS, and BOW (E).
- Use SUNSTONE and press (F); get COCONUT WATER.
- Use COCONUT WATER on (G); get EMPTY BOWL, STONE SPEARHEAD, and ARROW.
- Use EMPTY BOWL and STONE SPEARHEAD on (H); get BOWL WITH STICKY SAP.
- BOWL WITH STICKY SAP on BROKEN STATUETTE; get PROTECTOR STATUETTE.
- Use STONE SPEARHEAD and CARVED STONE on (I).
- Solve HOP (J); get DECORATED TILE.
- Use DECORATED TILE on (K).
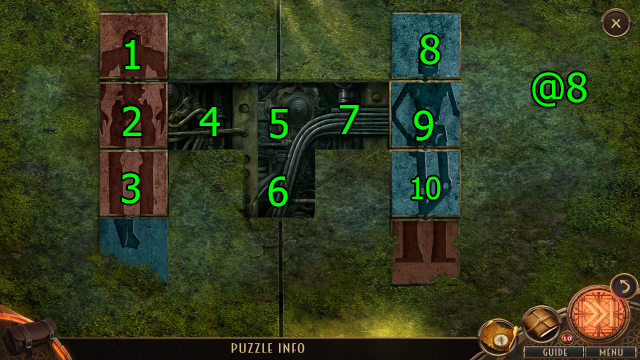
- Solution (@8): Press (9-6-10-4-6-10-4-6-2-9-3-7-6-3-1-6-7-1-9-2-8-4-6-8-10-6-4-10-2-9-1-7-6-1-7-6-9-2-10-4-6-10-4-6-2-9-1-7-6-1-7-2).
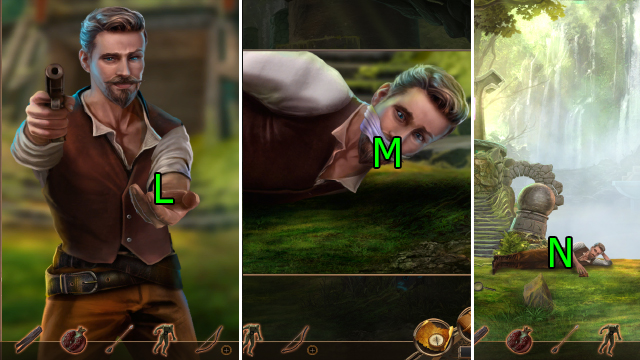
- Use TOY SNAKE on (L).
- Press (M).
- Press (M).
- Press (N).
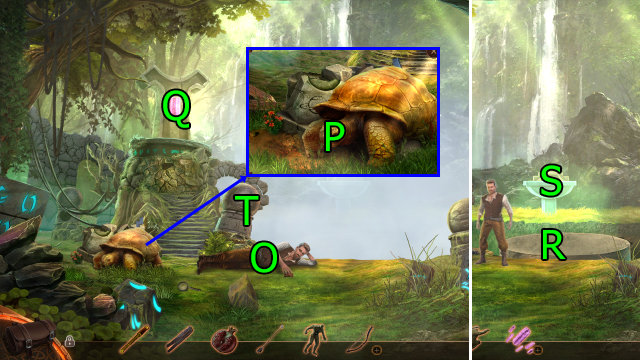
- Use EXOTIC FRUIT on (O); get BABY TORTOISE.
- Use BABY TORTOISE on (P); get TINY FIGURINE.
- ARROW on BOW; get BOW AND ARROW.
- Use BOW AND ARROW on (Q); get SHATTERED CRYSTALS.
- Use SHATTERED CRYSTALS; get CRYSTAL SHARDS (4/4).
- Use JUNGLE BARK BOARDS on (R).
- Go (S).
- Go (T).
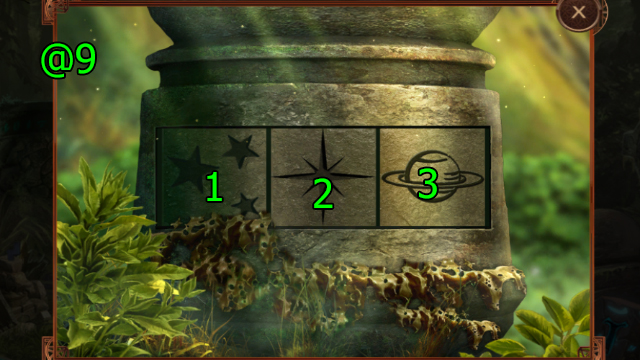
- Solution (@9): Press (1x3)-(2).
- Get TINY PILLAR.
- Use TINY FIGURINE on (U), use PROTECTOR STATUETTE on (V), use TINY PILLAR on (W); drag (1-2)-(3-4)-(5-6).
- Use CRYSTAL SHARDS (4/4) and press (X).
- Go (Y).
- Use Great-granddad's Charm and press (Z).
- Go (A).
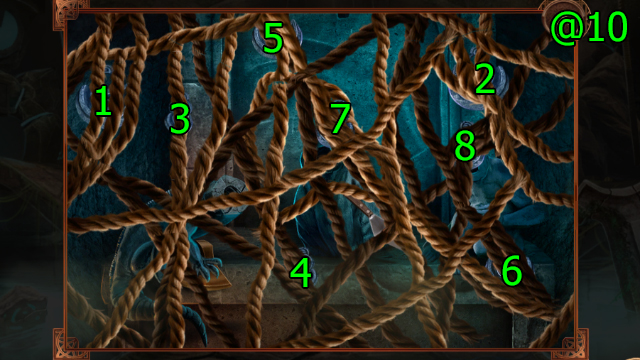
- Solution (@10): Press (1-2-3-4-5-6-7-8).
- Get INCOMPLETE CHEST EMBLEM.
- Use INCOMPLETE CHEST EMBLEM.
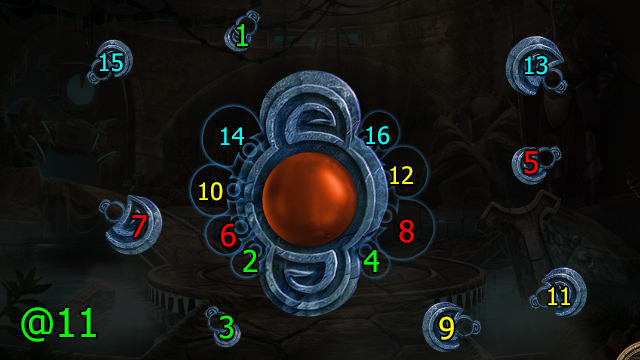
- Solution (@11): Drag (1-2)-(3-4)-(5-6)-(7-8)-(9-10)-(11-12)-(13-14)-(15-16).
- Get CHEST EMBLEM.
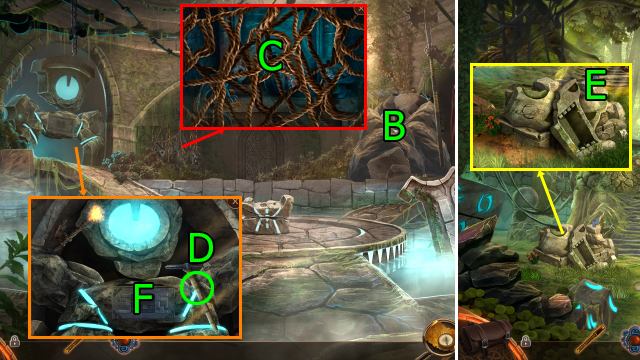
- Go (B).
- Use Knife on (C); get HEAVY ROPE and TROWEL.
- Get MINING PICK (D).
- Go The City of Mists.
- Use MINING PICK on (E); get METAL TILE.
- Go Fog Fortress.
- Use METAL TILE on (F).
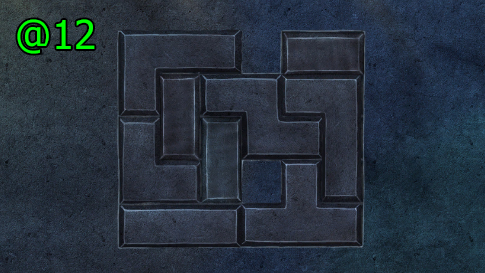
- Solution (@12).

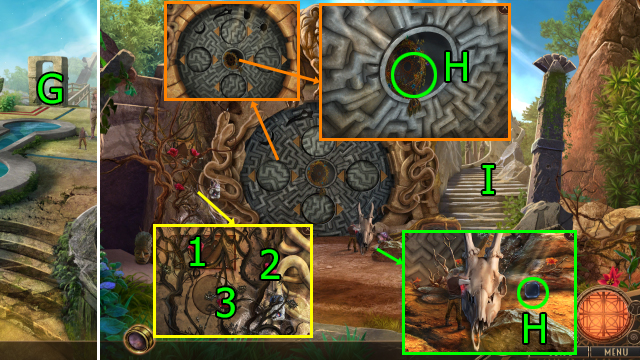
- Go (G).
- Press (H).
- Use SPYGLASS on (H).
- Get IGUANA, PAPER, MONKEY HEAD, and CORAL KEY (I).
- Use TROWEL on (J); get MALLET.
- Use MALLET; get TOTEM PIECE.
- Knife on MALLET; get BLUE POWER STONE and HAMMER.
- Use IGUANA and CHEST EMBLEM on (K).
- Solve HOP (L); get JAGUAR HEAD.
- Use TOTEM PIECE on (M).
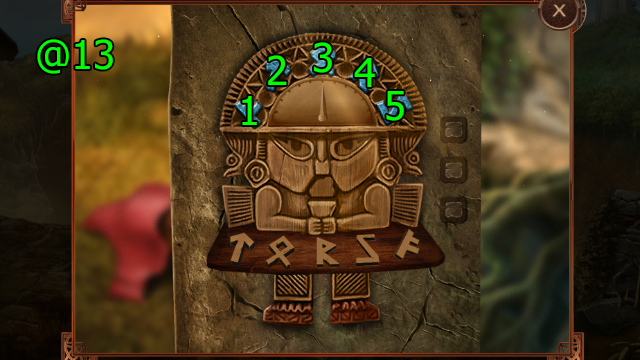
- Solution (@13): Press (2-5-1)-(4-1-3-2)-(1-5-2-4-3).
- Get IGUANA HEAD.
- Go Fog Fortress.
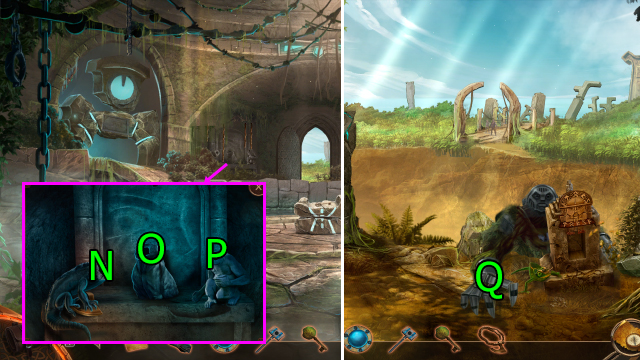
- Use IGUANA HEAD on (N), use JAGUAR HEAD on (O), use MONKEY HEAD on (P); get CURVED AXE BLADE.
- CURVED AXE BLADE on HEAVY ROPE; get GRAPPLING HOOK.
- Go The Great Chasm.
- Use GRAPPLING HOOK and Great-granddad's Charm on (Q).
- Get LIGHTER, CEREMONIAL BOWL, CHARRED BRANCH, RUSTY HANDLE, and UNLIT CANDLE (R).
- Use PAPER and CHARRED BRANCH on (S); get DOOR SYMBOLS.
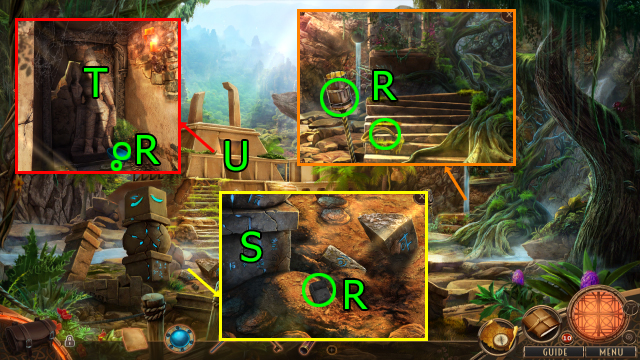
- Use BROKEN SPYGLASS; get SPYGLASS LENS.
- Use HAMMER on (T).
- Go (U).
- Get HEAVY STONE (1/3), CLAY STONE, BROKEN TABLET, and HEAVY STONE (2/3) (V).
- Use RUSTY HANDLE on (W).
- Press (X); get STONE FISH HEAD.
- Use CLAY STONE on (X).
- Solve HOP (Y); get CANDLE OIL.
- CANDLE OIL and LIGHTER on UNLIT CANDLE; get LIT OIL CANDLE.
- Use LIT OIL CANDLE on (Z); get BRANCH and BEETLE EMBLEM.
- Use BROKEN TABLET.
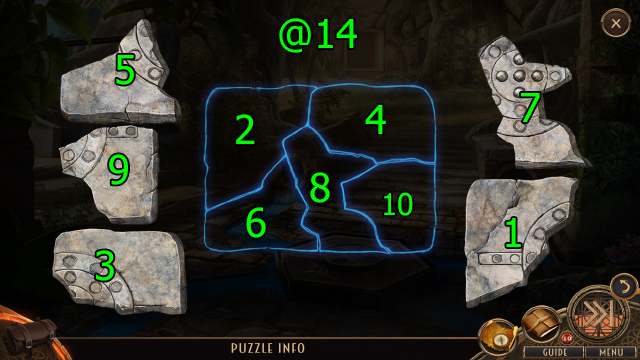
- Solution (@14): Drag (1-2)-(3-4)-(5-6)-(7-8)-(9-10).
- Go Canyon of Echoes.
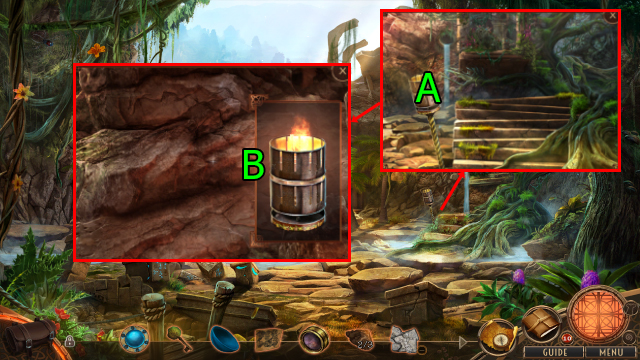
- Use LIT OIL CANDLE on (A).
- Use DOOR SYMBOLS on (B).
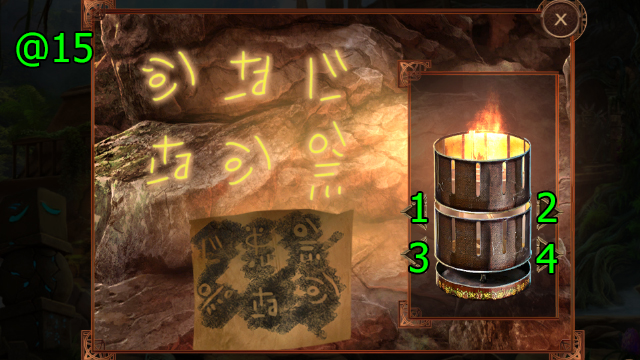
- Solution (@15): Press (1x2-4).
- Go (C).
- Get SHRINKING POTION (D).
- Use SHRINKING POTION on (E).
- Get TRIDENT (F).
- Press (G); get TERRIFYING MASK.
- Press (Hx3); get YELLOW LIQUID VIAL.
- Use BLUE POWER STONE and Great-granddad's Charm on (H).
- Get VOODOO STAFF and STICKY FRUIT (I).
- Use BEETLE EMBLEM on (J); get HEAVY STONE (3/3) and CARVING BOARD.
- Use HEAVY STONE (3/3) on (K); get PURPLE LIQUID VIAL.
- Knife and CEREMONIAL BOWL on STICKY FRUIT; get BOWL WITH STICKY GOO.
- BOWL WITH STICKY GOO on BROKEN TABLET; get DOOR CLUE.
- Go Canyon of Echoes.
- Use TRIDENT on (L); get SATCHEL.
- Knife on SATCHEL; get DRIED HERBS and COMPASS NEEDLE.
- Go Forsaken Temple.
- Use BRANCH on (M), use DRIED HERBS and LIT OIL CANDLE on (N); get CIRCULAR PLATE.
- Go Mine Entrance.
- Use COMPASS NEEDLE on (O); get SUN EMBLEM, WAR PAINT, and IMPROVISED PAINTBRUSH.
- Use DOOR CLUE and CIRCULAR PLATE on (P).
- Go (Q).
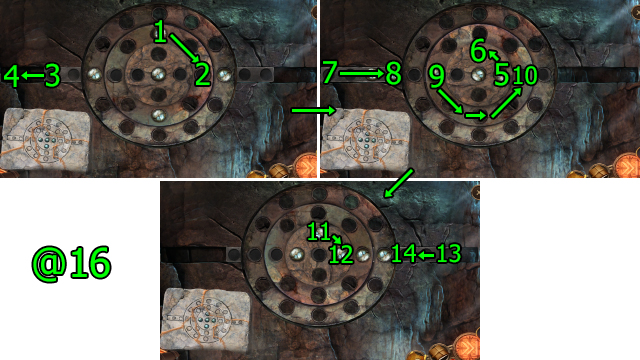
- Solution (@16): Drag (1-2)-(3-4)-(5-6)-(7-8)-(9-10)-(11-12)-(13-14).
- Go (R).
- Use CARVING BOARD and STONE FISH HEAD on (S).
- Solve HOP (T); get GREEN LIQUID VIAL.
- Get BONE KEY (U).
- Use TERRIFYING MASK, WAR PAINT, and IMPROVISED PAINTBRUSH on (V).
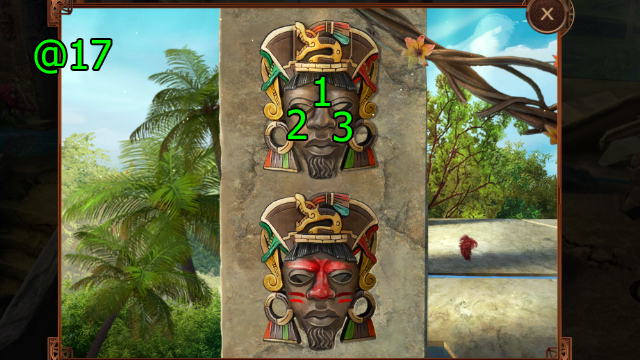
- Solution (@17): Press (1-2x2-3x2).
- Get CRESCENT EMBLEM.

- Use BONE KEY and press (W); get CODED IMAGE PLATE.
- Use VOODOO STAFF on (X).
- Use SUN EMBLEM on (Y), use CRESCENT EMBLEM on (Z).
- Press and use GREEN LIQUID VIAL, YELLOW LIQUID VIAL, and PURPLE LIQUID VIAL on (A).
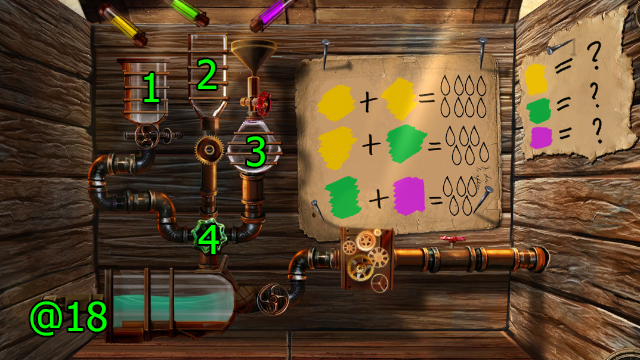
- Solution (@18): Press (1x4-2x2-3x3-4).
- Get ANIMAL HORN KEY.
- Go Mine Entrance.
- Use ANIMAL HORN KEY and CODED IMAGE PLATE on (B).
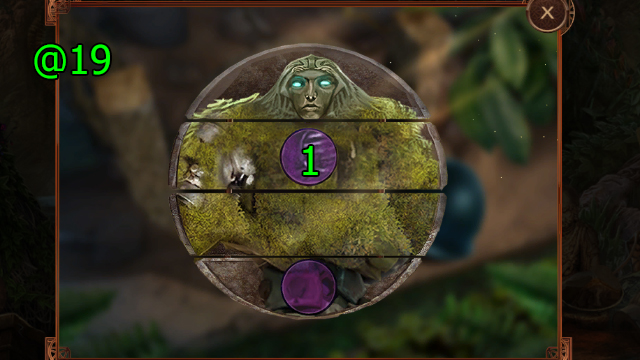
- Solution (@19): Press (1) when it turns green.
- Get SEMI-COMPLETE IMAGE PLATE.
- Go Forsaken Temple.
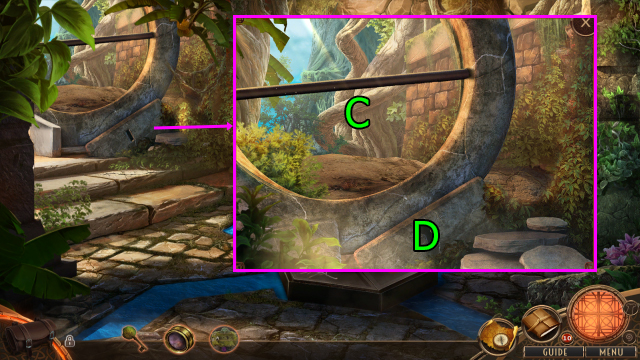
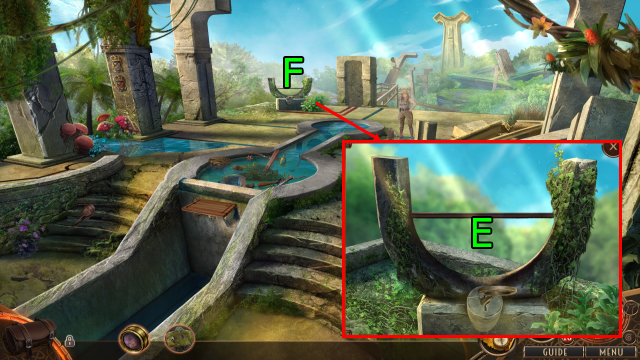
- Use SEMI-COMPLETE IMAGE PLATE on (C), use CORAL KEY on (D).
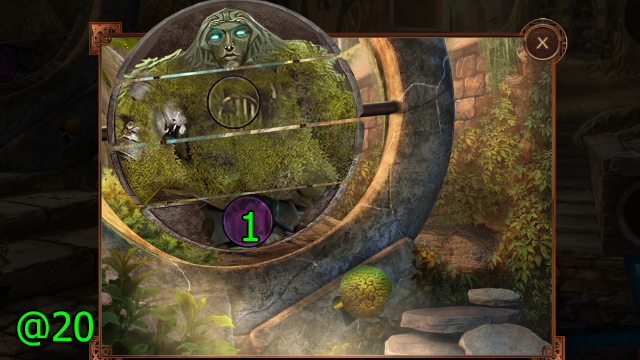
- Solution (@20): Press (1) when it turns gray.
- Get COMPLETED IMAGE PLATE.
- Go Crossing's End.
- Use COMPLETED IMAGE PLATE and press (E).
- Go (F).
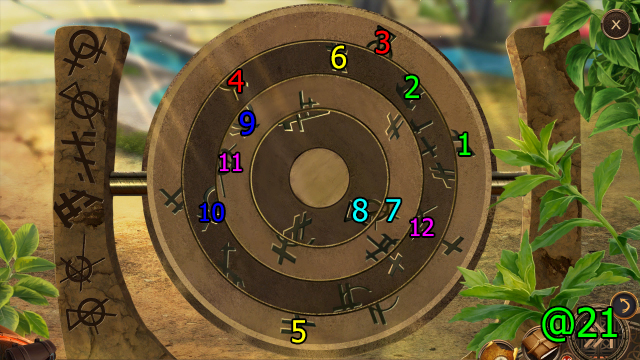
- Solution (@21): Drag (1-2), press (2), drag (3-4), press (4), drag (5-6), press (6), drag (7-8), press (8), drag (9-10), press (10), drag (11-12), press (12).
Chapter 3: Vault
- Go (G).
- Get OBSIDIAN SHARD (1/4) and TRIBAL GARLAND (H).
- Press (1-2-3); get FIREFLOWERS.
- Go (I).
- Go (J).
- Get COPPER BOWL, LEATHER GLOVE, DATES, WOODEN ROD, JAR WITH A MELTED CANDLE, and FEATHER (K).
- WOODEN ROD on TRIBAL GARLAND; get FISHNET.
- Use FIREFLOWERS and DATES on (L), use COPPER BOWL on (M), press (N); get VEGETABLE OIL.
- Use JAR WITH A MELTED CANDLE; get MELTED CANDLE and EMPTY JAR.
- Use VEGETABLE OIL and press (O); get PAINT CUPS.
- Solve HOP (P); get BROKEN OBSIDIAN SWORD.
- Go (Q).

- Solution (@22): Press (1-12)-(2-9)-(3-5)-(4-15)-(6-13)-(7-10)-(8-16)-(11-14)-(17-18-19).
- Get PILLAR ACTIVATION STONE (1/3), BLUE GEM, and SUN KEY.
- Go Mist Center Gate.
- Use LEATHER GLOVE on (R).
- Use Needle-Nose Pliers on (S); get OBSIDIAN SHARD (2/4).
- Use Knife on (T); get COLLINS WITH RUBY.
- FEATHER on COLLINS WITH RUBY; get NOT-SO-HUGE RUBY and MINIATURE COLLINS.
- Use MINIATURE COLLINS on (U); get OBSIDIAN SHARD (3/4), MOON KEY, and BLOOD SEAL.
- Go Skeletal Sentry.
- Use BLOOD SEAL on (V).
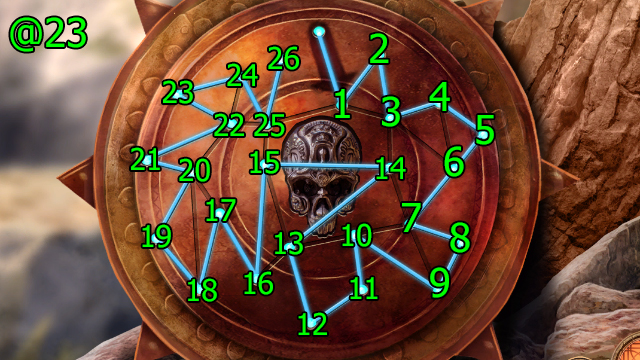
- Solution (@23): Press (1-2-3-4-5-6-7-8-9-10-11-12-13)-(14-15-16-17-18-19-20-21-22-23-24-25-26).
- Get OBSIDIAN SHARD (4/4).
- OBSIDIAN SHARD (4/4) on BROKEN OBSIDIAN SWORD; get OBSIDIAN SWORD.
- Use OBSIDIAN SWORD on (W).
- Go (X).
- Press (Y); get RHINO HEAD EMBLEM and RED GEM.
- Get PILLAR ACTIVATION STONE (2/3) (Z).
- Go Mist Center Gate.
- Use RHINO HEAD EMBLEM on (A); get YELLOW GEM and OLD GEAR (1/3).
- Go Skeletal Sentry.
- Use PAINT CUPS on (B), use BLUE GEM, RED GEM, and YELLOW GEM on (C); get COLORED DUST.
- Go Doom Valley.
- Use COLORED DUST on (D).
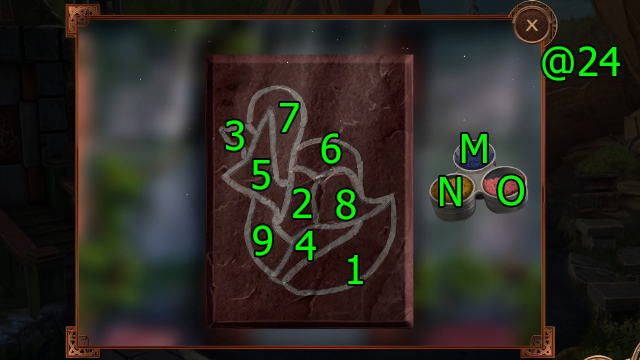
- Solution (@24): Press (M-1-2-3)-(N-4-5-6)-(O-7-8-9).
- Get BROKEN ACTIVATION STONE and OLD GEAR (2/3).
- MELTED CANDLE and SPYGLASS LENS on BROKEN ACTIVATION STONE; get ACTIVATION STONE.
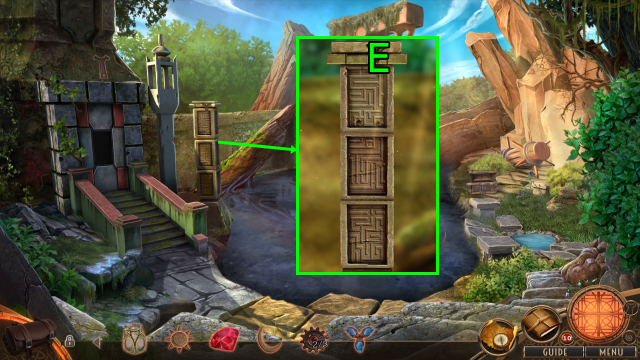
- Use ACTIVATION STONE on (E).
- Solution (@25): Press (1L)-(2Rx2)-(3L)-(4).
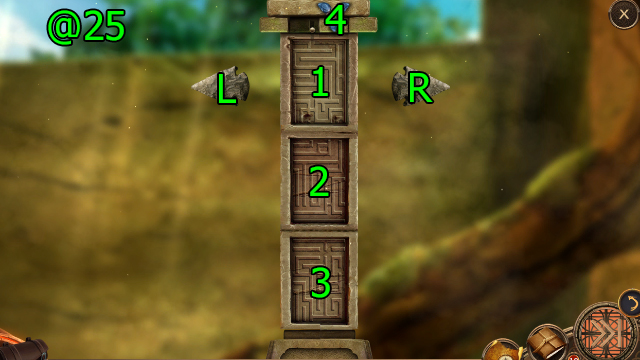
- Solve HOP (F); get YELLOW POWER STONE.
- Get OLD GEAR (3/3) (G).
- Use YELLOW POWER STONE on (H).
- Use Great-granddad's Charm on (I).
- Press (J); get WATER KEY.
- Press (J); get BREAD CRUMBS.
- Use BREAD CRUMBS, EMPTY JAR, and FISHNET on (K); get GLOWING FISH.
- Go Mist Center Gate.
- Go (L).
- Use GLOWING FISH on (M).
- Use OLD GEAR (3/3) on (N).
- Press (O).
- Press (P); get LONG VINE.
- Go Mist Center Gate.
- Use NOT-SO-HUGE RUBY and LONG VINE on (Q); get COLLINS-ON-A-VINE and NOT-SO-HUGE RUBY.
- Go Cavern of Traps.
- Use COLLINS-ON-A-VINE and NOT-SO-HUGE RUBY on (R); get ANCIENT LENS.
- Use ANCIENT LENS on (S) and press (T).
- Solve HOP (U).
- Get BONE SCRAPER (V).
- Go (W).
- Get OBSIDIAN PLATE (1/2) and OBSIDIAN PLATE (2/2) (X).
- Use BONE SCRAPER on (Y); get MOSS.
- Go Cavern of Traps.
- Use OBSIDIAN PLATE (2/2) on (Z).
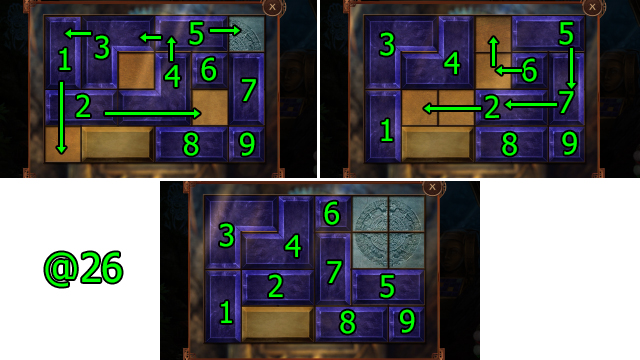
- Solution (@26): Drag (5)-(4)-(2)-(1)-(3)-(4), (2)-(6)-(7)-(5).
- Get MARBLE DISC.
- Get TINY FUNGUS SKETCH (A).
- Go Cairn Stones.
- Use TINY FUNGUS SKETCH on (B) and press (C).
- Use MARBLE DISC on (D).
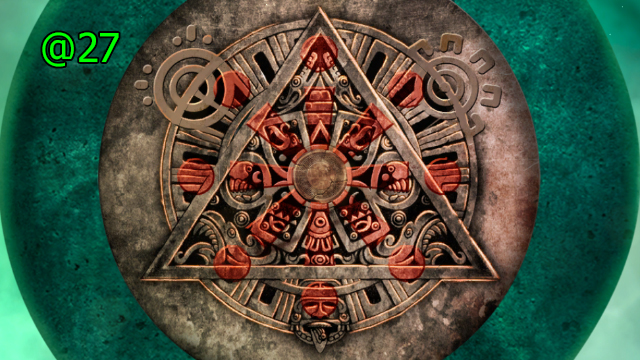
- Solution (@27).
- Get SMALL CAGE.
- MOSS on SMALL CAGE; get CAGE.
- Use CAGE on (E); get SMOKE BOMB.
- Use SMOKE BOMB on (F).
- Solve HOP (G); get FUNGUS OF STRENGTH.
- Go Cavern of Traps.
- Use FUNGUS OF STRENGTH on (H); get MAGIC FUNGUS.
- Use MAGIC FUNGUS.
- Press (I); get BONE KEY.
- Go Mist Center Gate.
- Use SUN KEY on (J), use MOON KEY on (K), use WATER KEY on (L), use BONE KEY on (M).
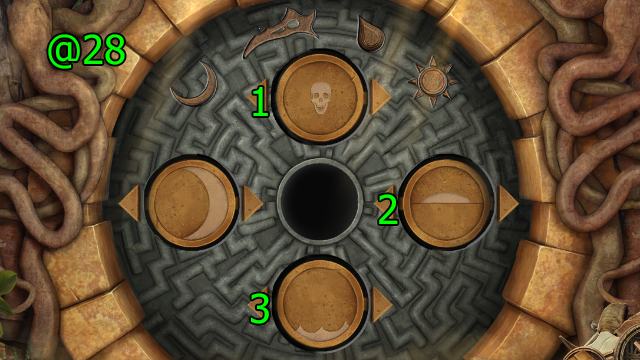
- Solution (@28): Press (1x2)-(2)-(3).

- Go (N).
- Press (O).
- Get STONE (P).
- Use STONE on (Q).
- Solve HOP (R); get AXE.
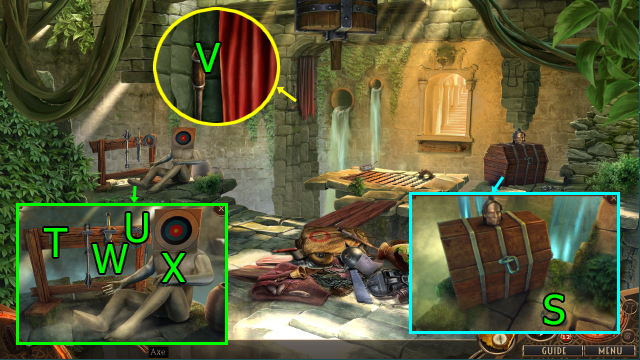
- Use AXE on (S); get CHAIN LINK.
- Use AXE on (T); get WHIP (U).
- Use WHIP on (V).
- Use WHIP on (U); get SWORD (W).
- Press and use SWORD on (X); get TRAINING DUMMY.
- Press and use TRAINING DUMMY on (Y); get JEWELED CASE and METAL SPROCKET.
- Use JEWELED CASE; get BENT AWL.
- Use BENT AWL on (Z); get MINIATURE VISOR.
- Use MINIATURE VISOR on (A); get GLADIATOR FIGURINE HEAD.
- Press (B), solve HOP; HOP solution: Press (1-2)-(3-4)-(5-6)-(7-8)-(9-10)-(11-12).
- Get SMALL SHIELD.
- Use CHAIN LINK on (C), use METAL SPROCKET on (D), use SMALL SHIELD on (E), use GLADIATOR FIGURINE HEAD on (F), press (G).
- Go (H).
- Press and use Knife on (I); get LEATHER BELT.
- Press (J); get TABLE LEG.
- Solve HOP (K); get POTTERY WITH NUMERALS.
- Get LOCK HANDLE (L).
- Use Knife on (M); get SPRING.
- MEDALLION on JEWELED CASE; get DECORATED HANDLE.
- Press (N); get GLADIATOR LANCE.
- Use GLADIATOR LANCE on (O); get STICKY GLADIATOR LANCE.
- Go (O).
- Use STICKY GLADIATOR LANCE on (P); get BULL TOKEN.
- Get WAR BOOT (Q).
- TABLE LEG on WAR BOOT; get BOOT BLADE.
- Press, use STICKY GLADIATOR LANCE, and PRESS (Rx2); get KETTLEBELL (1/3).
- Go Gladiator Lounge.
- Use BOOT BLADE and Knife on (S); get BROKEN LOCK.
- Press and use POTTERY WITH NUMERALS on (T).
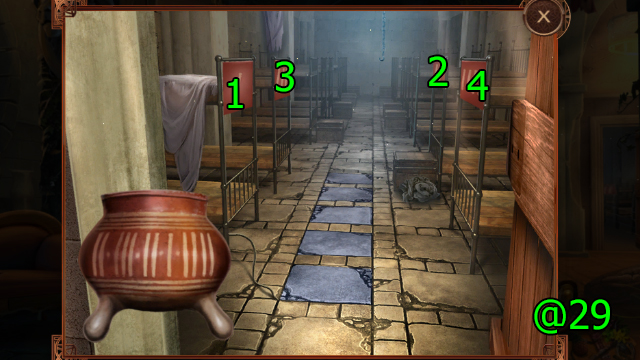
- Solution (@29): Press (2-3-2-1-4).
- Get KETTLEBELL (2/3).
- SPRING and LEATHER BELT on BROKEN LOCK; get FIXED LOCK.
- Go Elevator Entrance.
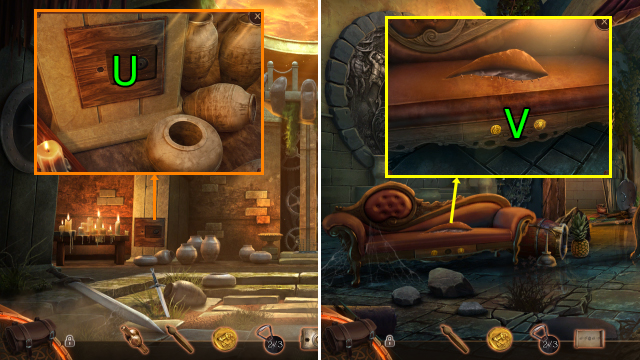
- Use FIXED LOCK and LOCK HANDLE and press (Ux2); get BEAST SCROLL.
- Go Gladiator Lounge.
- Use BULL TOKEN and BEAST SCROLL on (V).
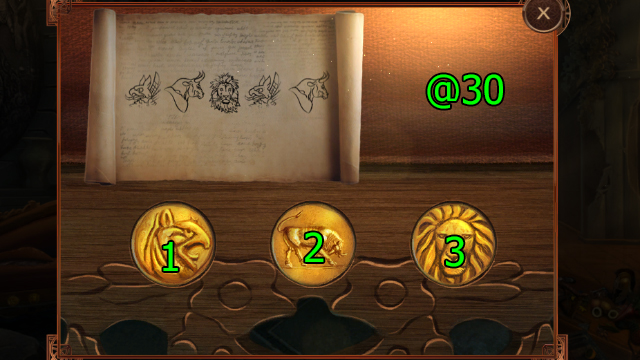
- Solution (@30): Press (1-2-3-1-2).
- Get ACID.
- Go Elevator Entrance.
- Use ACID on (W); get ORNATE SHIELD.
- Go Gladiator Lounge.
- Use ORNATE SHIELD on (X).
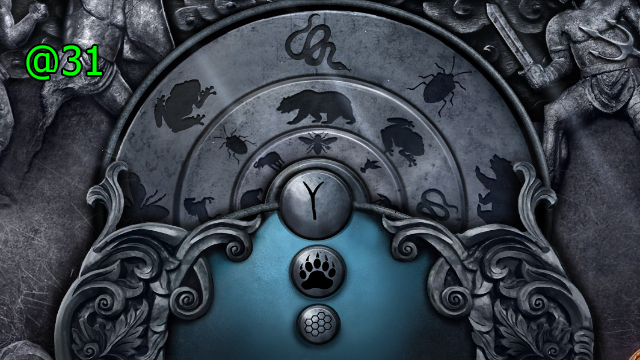
- Solution (@31).
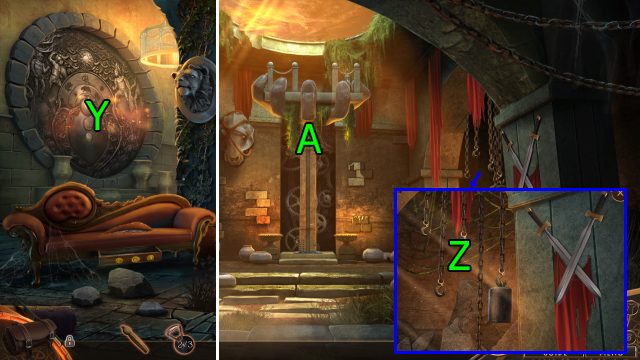
- Solve HOP (Y); get KETTLEBELL (3/3).
- Go Elevator Entrance.
- Use KETTLEBELL (3/3) on (Z).
- Go (A).

- Get ANIMAL PELT, BROKEN CRANK, and POT WITH OIL (B).
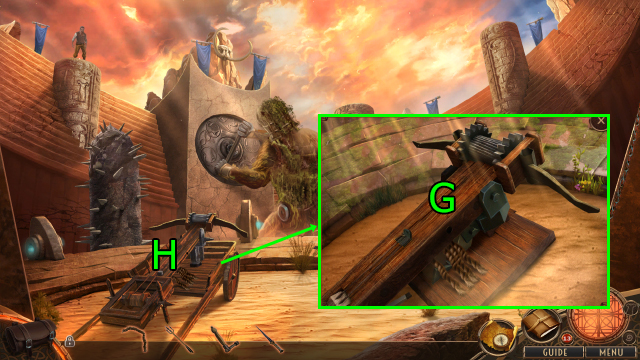
- Use Knife on (C); get TORN ROPE and BALLISTA TRIDENT.
- Press, use ANIMAL PELT, use BALLISTA TRIDENT, and press (D); solve HOP, get BALLISTA STRINGS.
- DECORATED HANDLE on BROKEN CRANK; get REPAIRED CRANK.
- Press and use POT WITH OIL on (E); get SHURIKEN.
- Use SHURIKEN on (F).
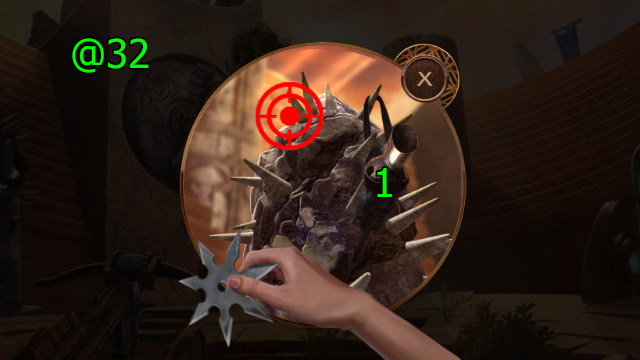
- Solution (@32): Press (1) when the cursor is over (1).
- Get GRASPING GAUNTLET.
- Use GRASPING GAUNTLET.
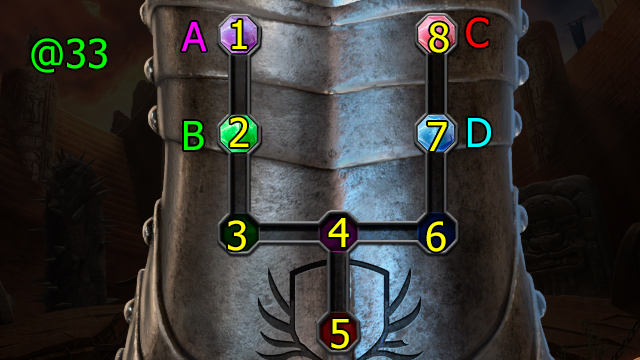
- Solution (@33): Drag (B-5)-(A-6)-(B-1)-(A-2)-(D-3)-(C-5)-(D-6)-(A-4)-(B-3).
- Get JEWELED DAGGER.
- JEWELED DAGGER and TORN ROPE on BROKEN TRIDENT; get IMPROVISED BALLISTA BOLT.
- Use IMPROVISED BALLISTA BOLT, BALLISTA STRINGS, and REPAIRED CRANK on (G).
- Go (H).

- Solution (@34): Drag (1-1)-(2-3), press (4), drag (5-6), press (7), drag (8-9)-(10-11), press (12).
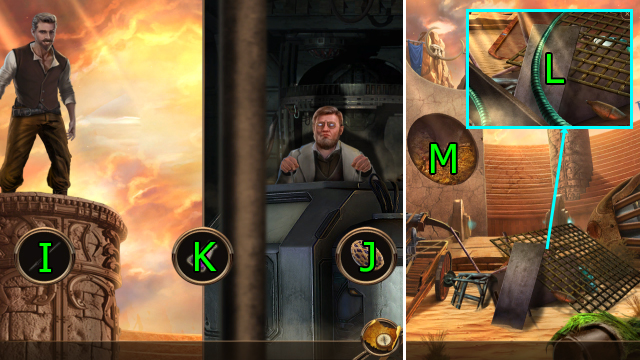
- Press (I)-(J)-(K).
- Press (Lx4).
- Go (M).
- Congratulations! You've completed Wanderlust: The City of Mists!
Created at: 2019-04-07