

Walkthrough Menu
General Tips
- This is the official guide for Whispered Secrets: Everburning Candle.
- This guide will not mention when you have to zoom into a location; screenshots will show each zoom scene.
- The screenshots will show where to play a Hidden-Object Puzzle (HOP) and what inventory item will be received.
- Some inventory items require further actions.
- This guide will give step-by-step solutions for all puzzles which are not random. Read the instructions in the game for each puzzle.
- This guide will show all options when required to make a choice.
Chapter 1: Angelina
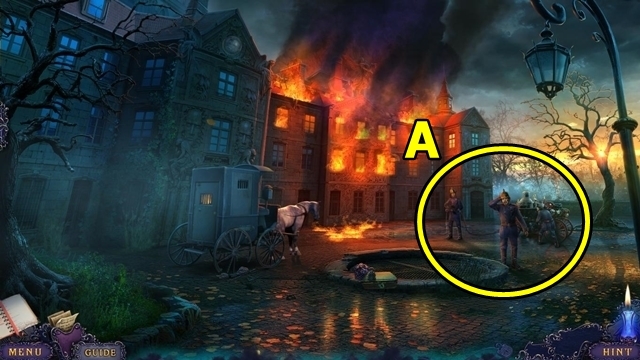
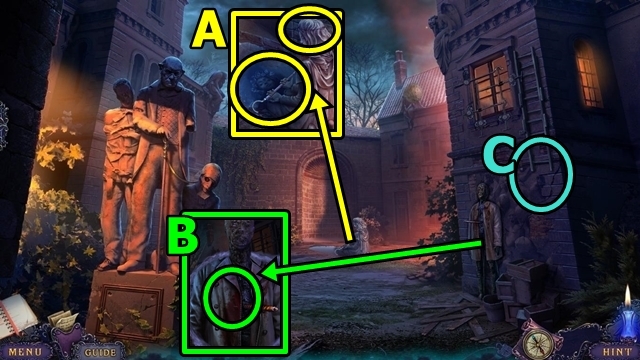
- Talk to the fireman (A).
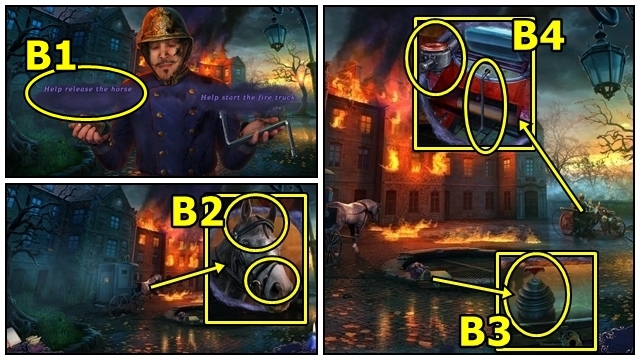
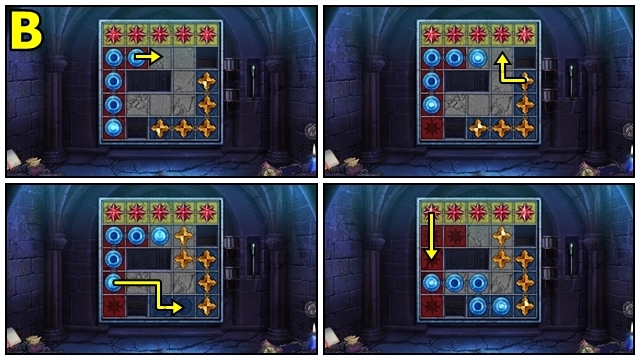
- If you select 'Help release the horse' (B1); receive the BLINDERS.
- Add the BLINDERS (B2); take the bridle.
- Take the PUMP (B3).
- Place the PUMP (B4); turn the crank twice.
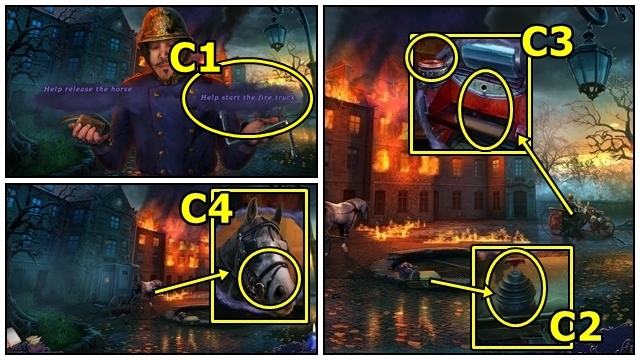
- If you select 'Help start the fire truck' (C1); receive the FIRE-TRUCK CRANK.
- Take the PUMP (C2).
- Insert the FIRE-TRUCK CRANK (C3) and PUMP; turn the crank twice.
- Take the bridle (C4).
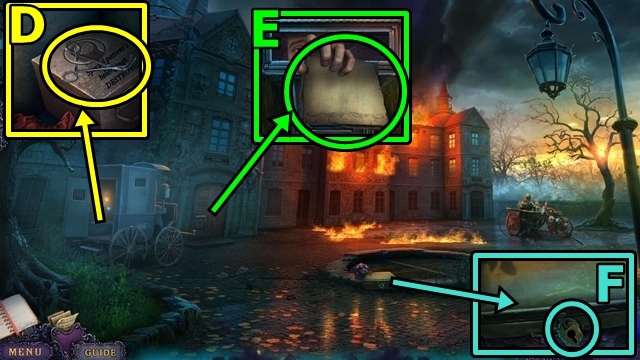
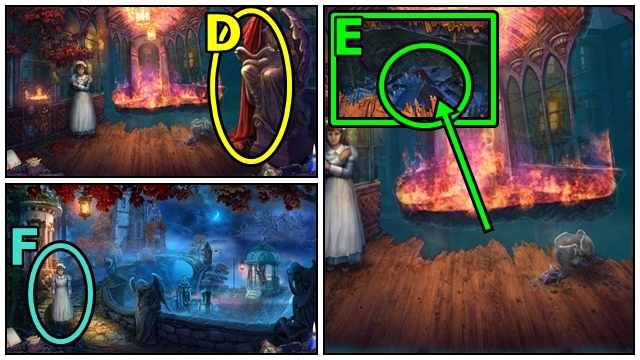
- Take the FORCEPS (D).
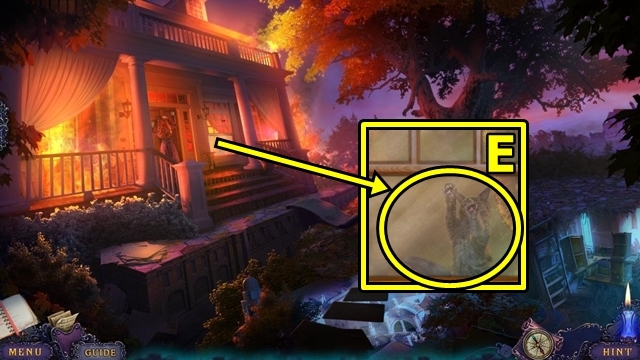
- Take the FOLDED NOTE (E).
- Unfold the FOLDED NOTE (inventory); take the KEY WITH CHARM.
- Remove the SUITCASE KEY and RABBIT'S FOOT from the KEY WITH CHARM (inventory).
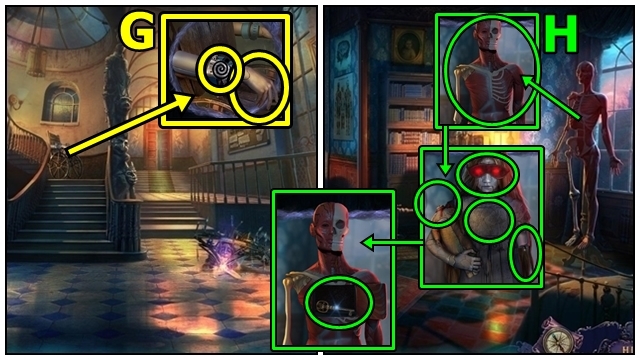
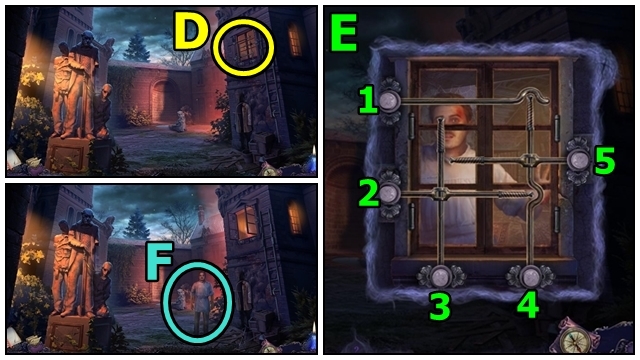
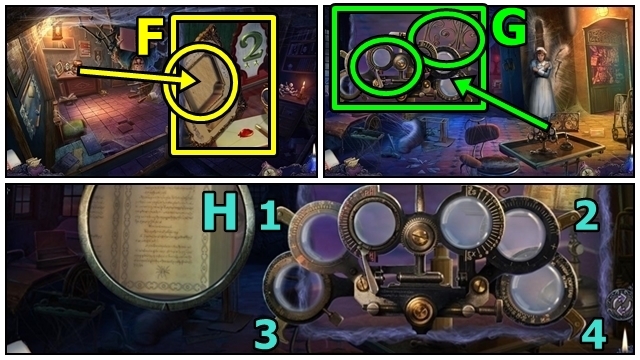
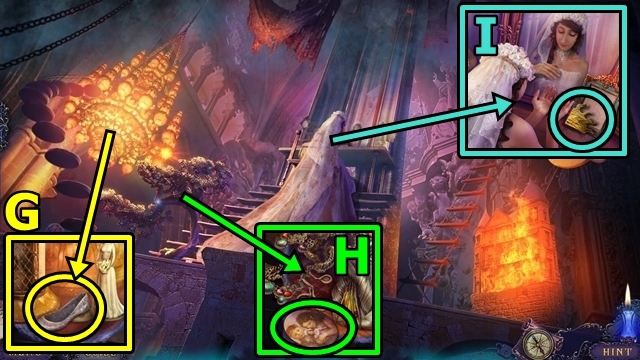
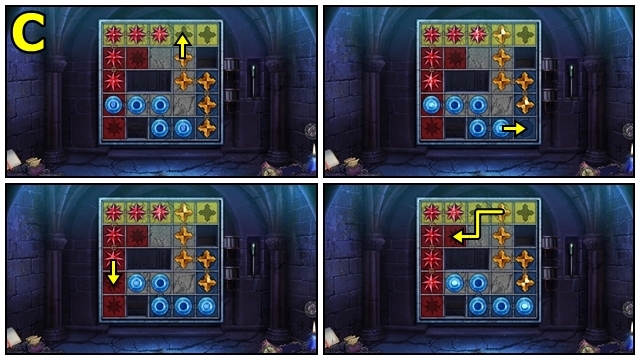
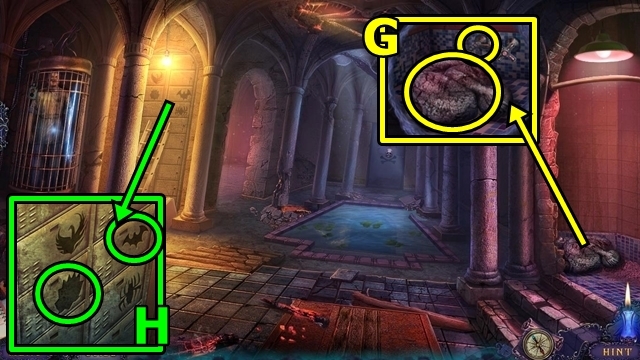
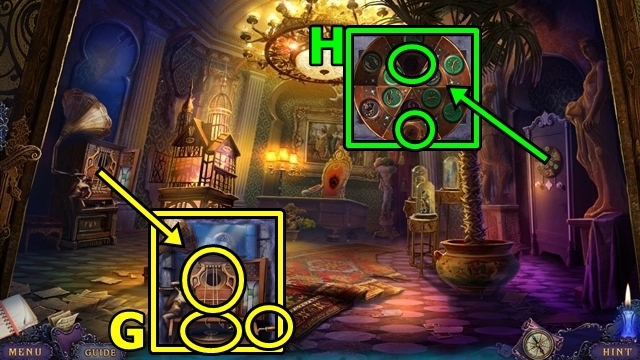
- Insert the SUITCASE KEY (F); take the map and ADMINISTRATIVE BOOK. Move the papers. Use the FORCEPS; take the MEDICAL-STAFF BADGE.
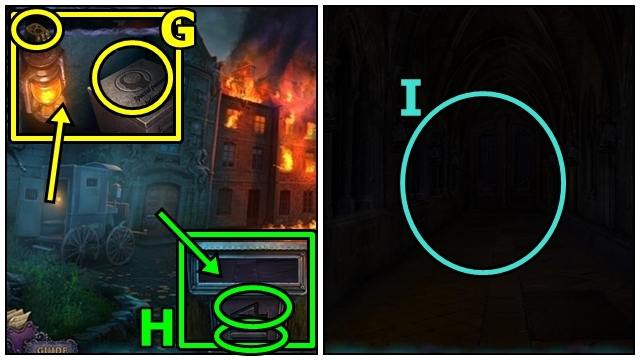
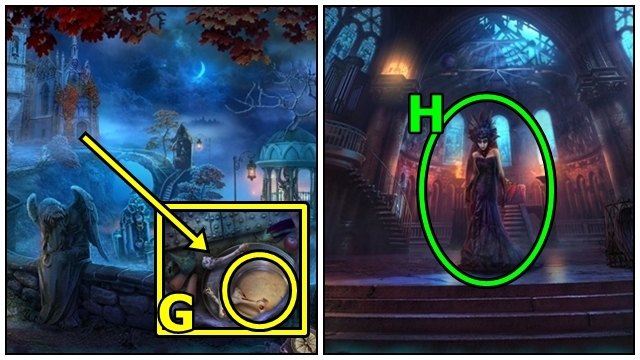
- Insert the RABBIT'S FOOT (G); receive the LANTERN. Insert the MEDICAL-STAFF BADGE; read the file; take the BROKEN CADUCEUS; read the note; take the NUMBER FOUR.
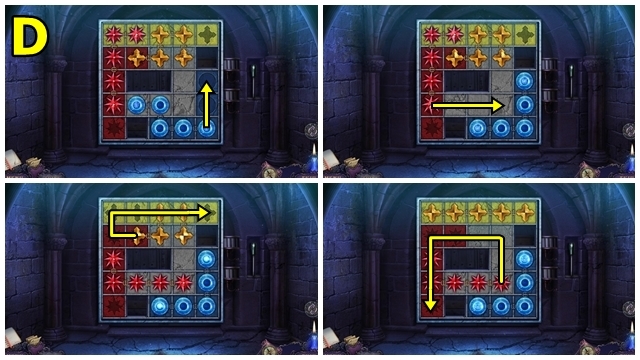
- Take the NUMBER TWO from the ADMINISTRATIVE BOOK (inventory). Open the book, turn the pages; take the PLAQUE PART.
- Insert the NUMBER TWO and NUMBER FOUR (H). Enter the Reception Hallway.
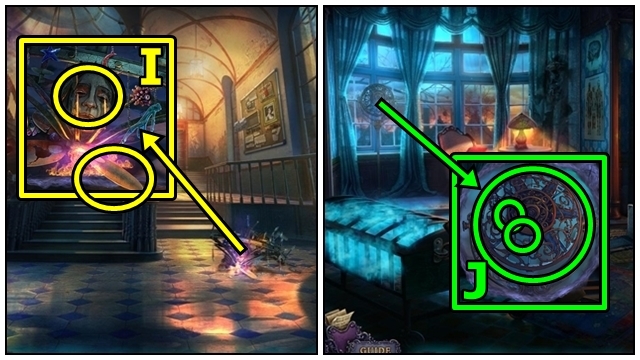
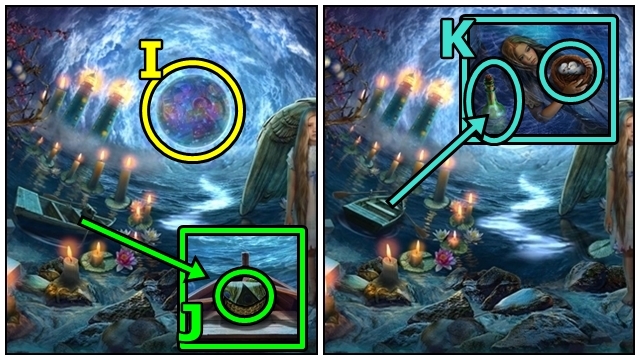
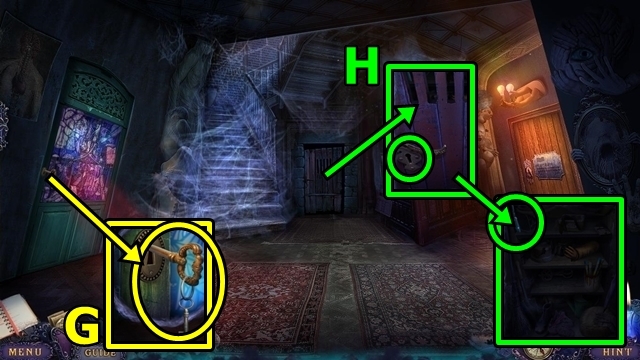
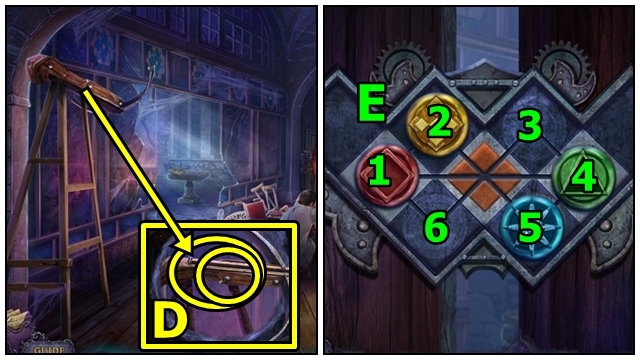
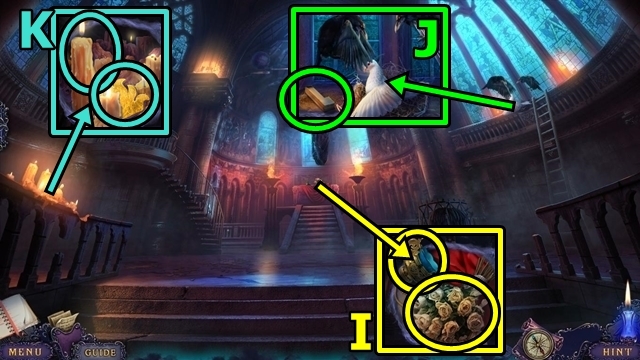
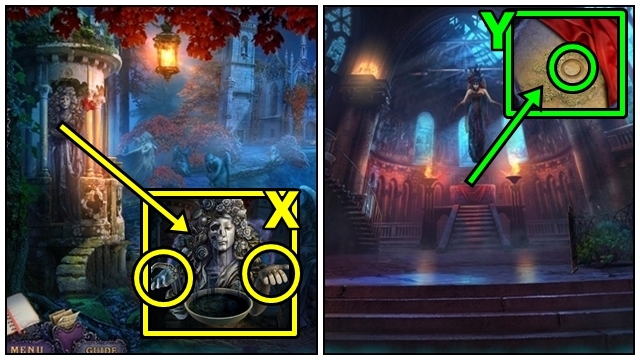
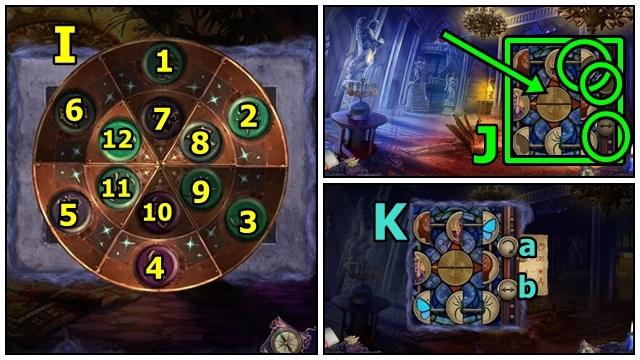
- Use the LANTERN (I); play the mini-game.
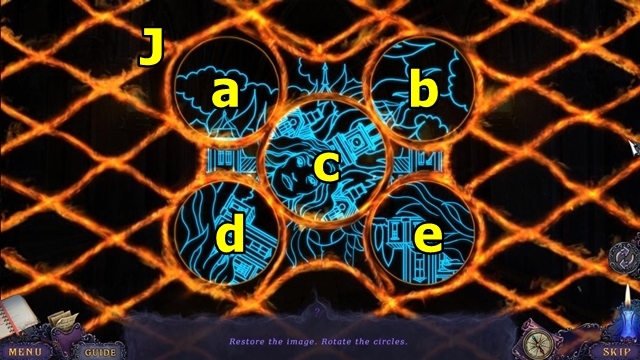
- Solution: cx5-a-bx2-dx3-ex4 (J).
- Move forward.
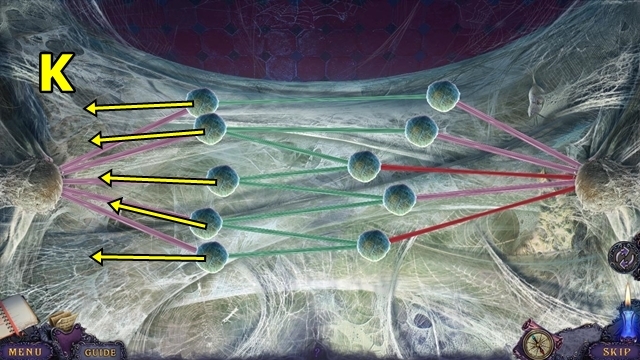
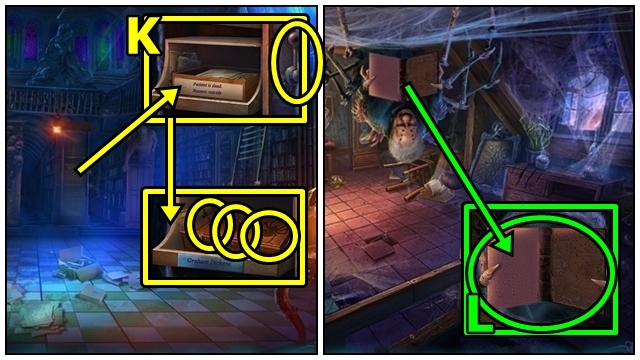
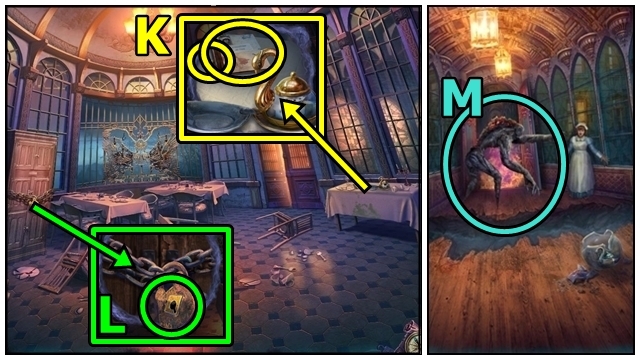
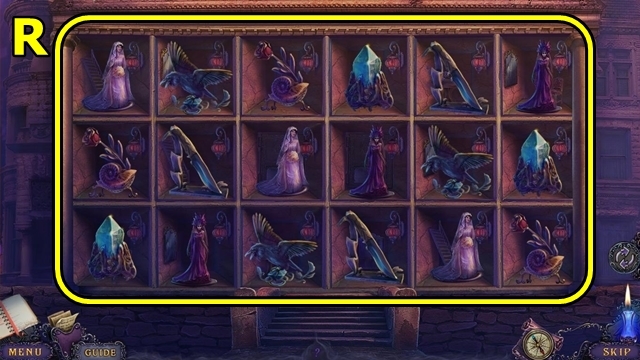
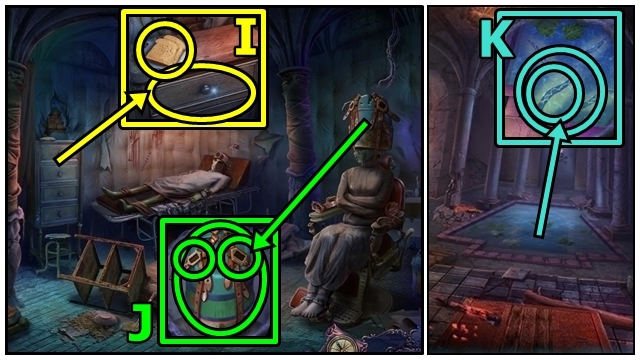
- Play the HOP (K); receive the STAINED-GLASS MASK.
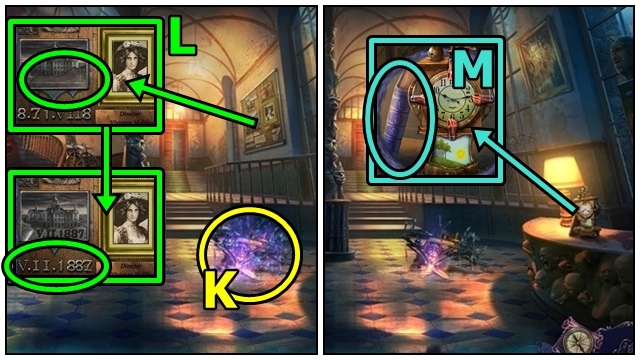
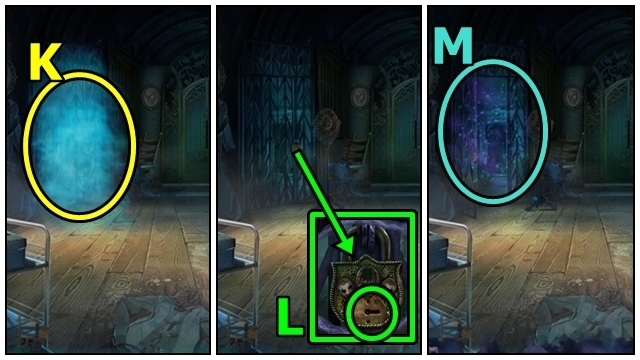
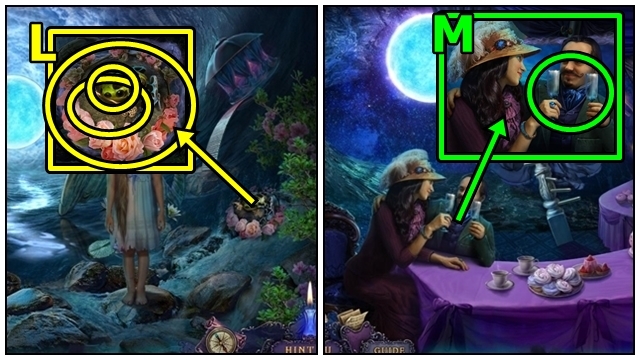
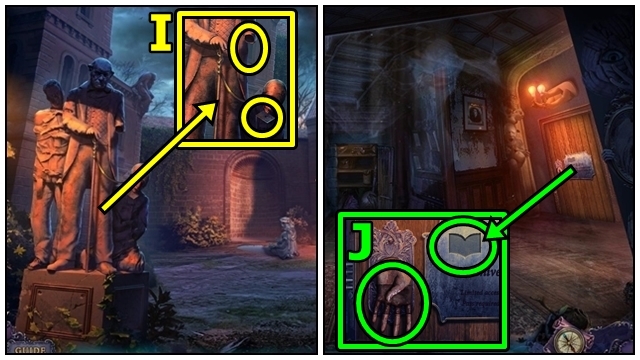
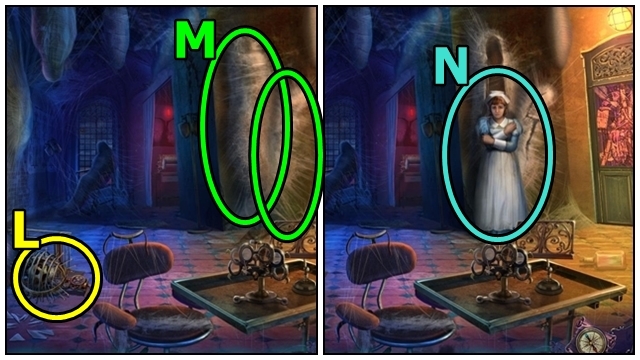
- Insert the PLAQUE PART (L); reset the dates. Read the note; take the DIARY KEY.
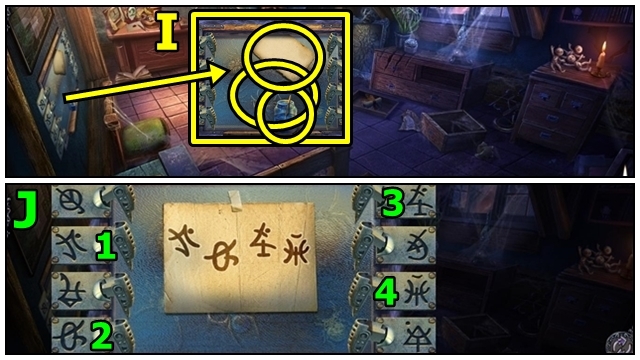
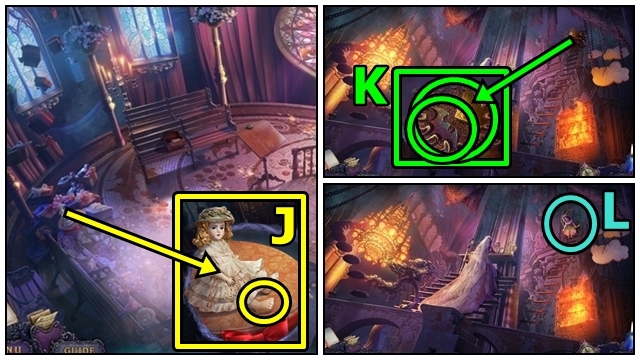
- Open the book (M); tear the page; take the LOCKED DIARY.
- Move forward.
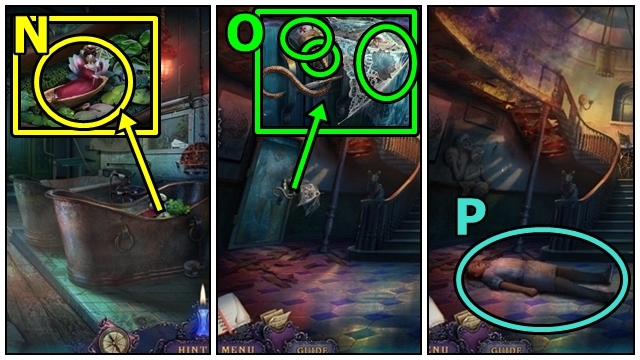
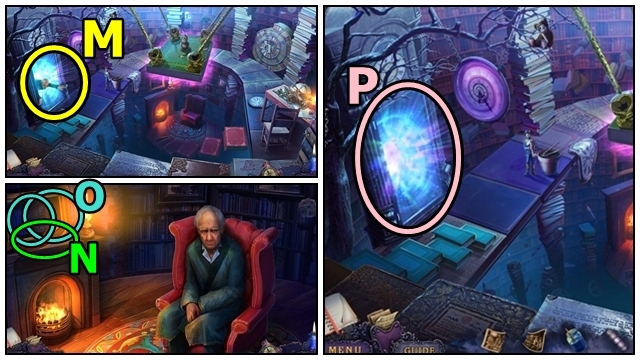
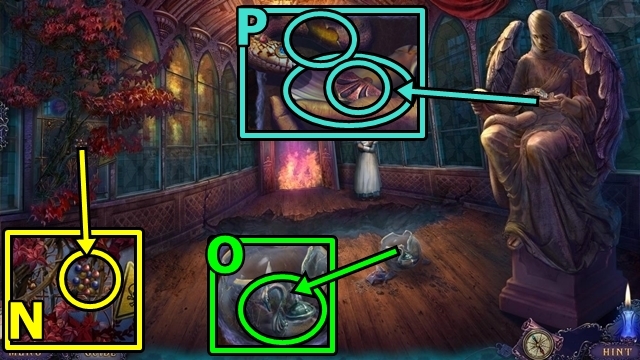
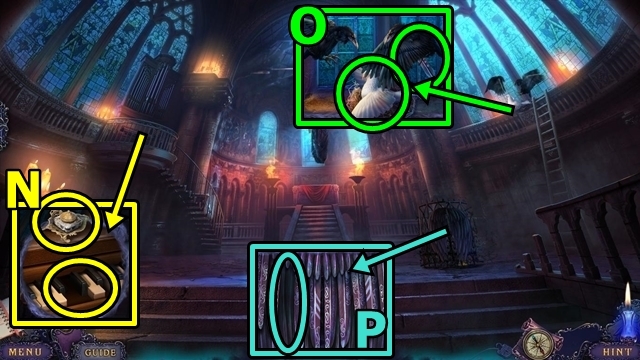
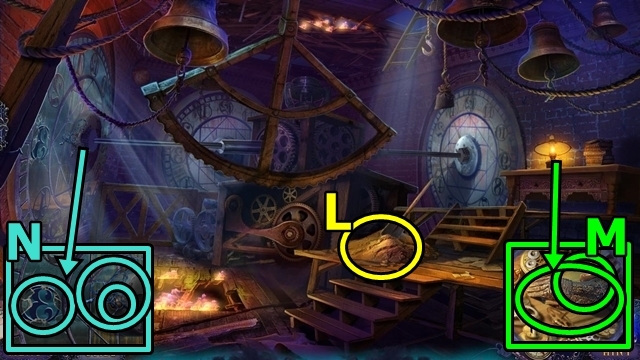
- Move the doll (N); take the LILY.
- Move down.
- Put the BROKEN CADUCEUS together (inventory); take the SNAKE'S HEAD.
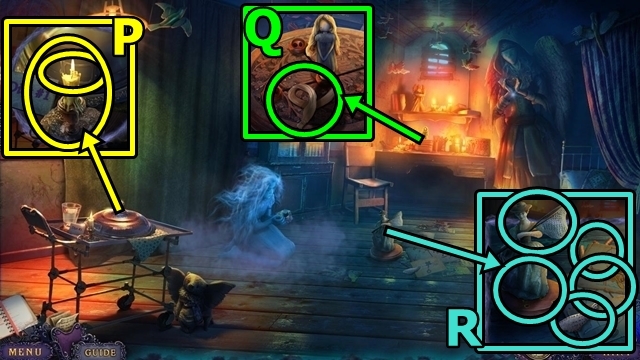
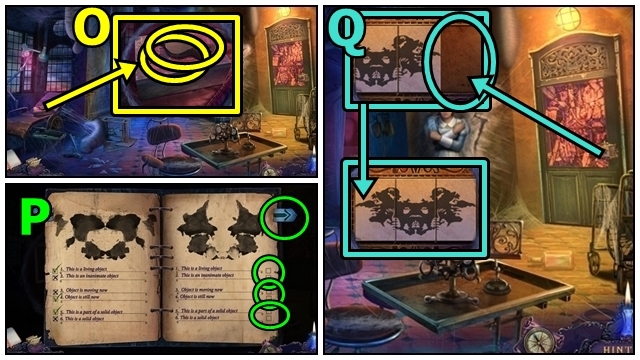
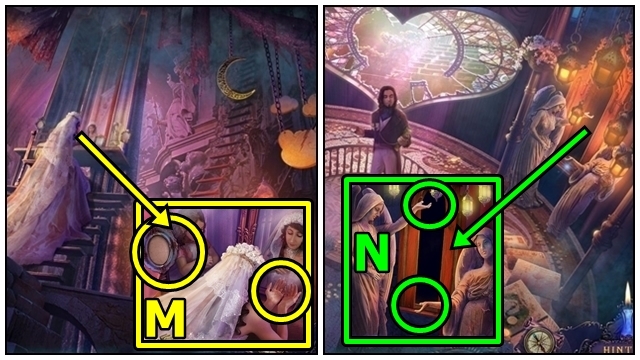
- Take the DOLL'S HEAD (O). Add the SNAKE'S HEAD and the LILY. Take the BROKEN UMBRELLA.
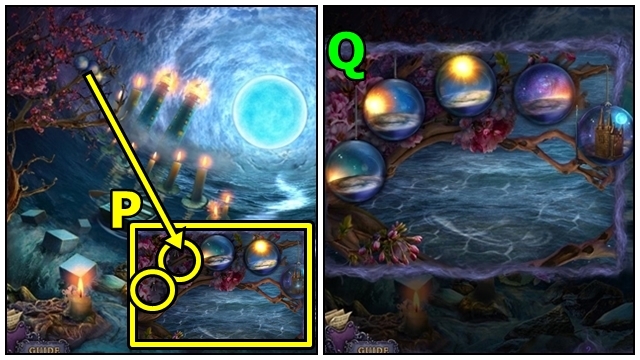
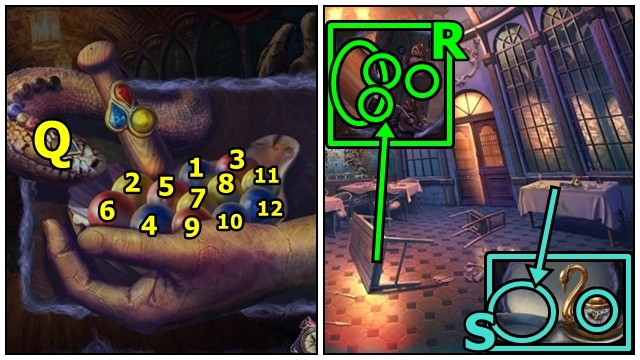
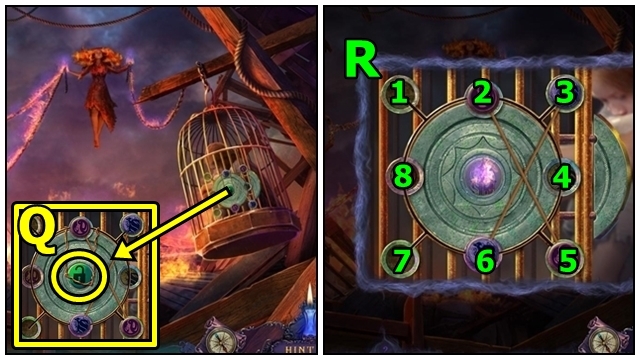
- Play the mini-game (P).
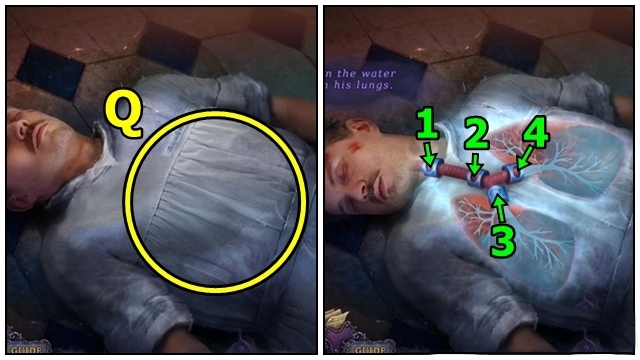
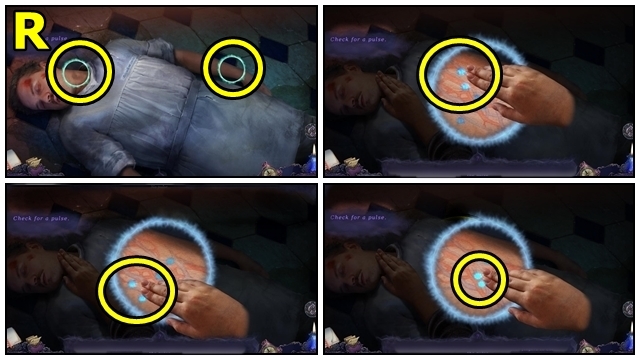
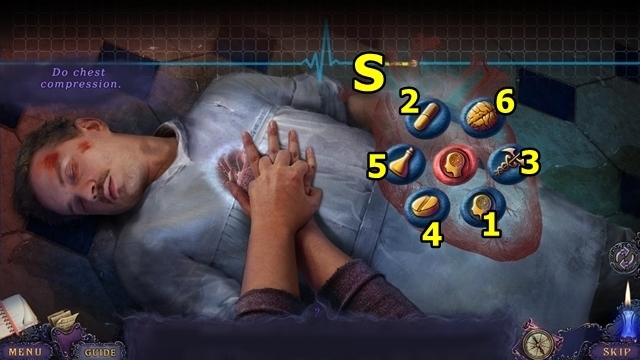
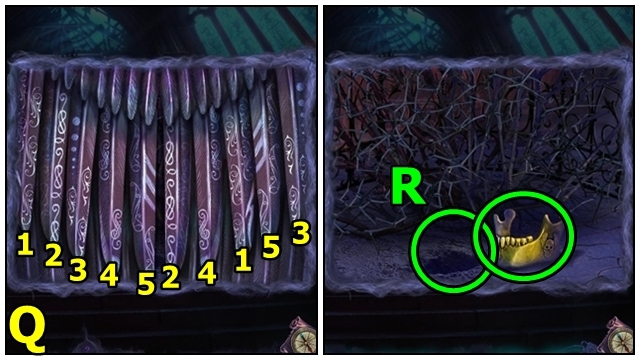
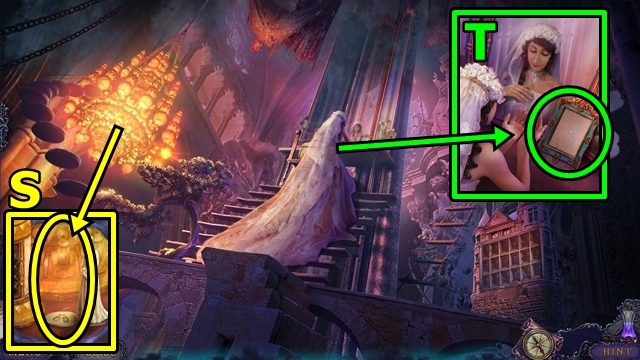
- Solution: Press the chest (Q); then open valves: 1-3. Check for a pulse (either choice yields the same result) (R). Find the pairs (S).
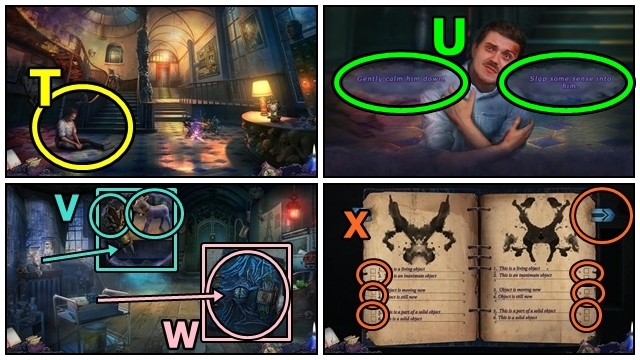
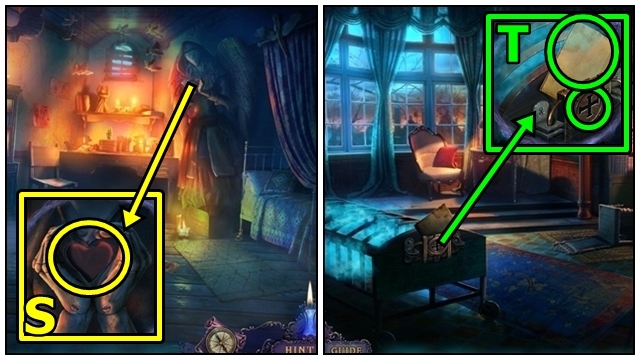
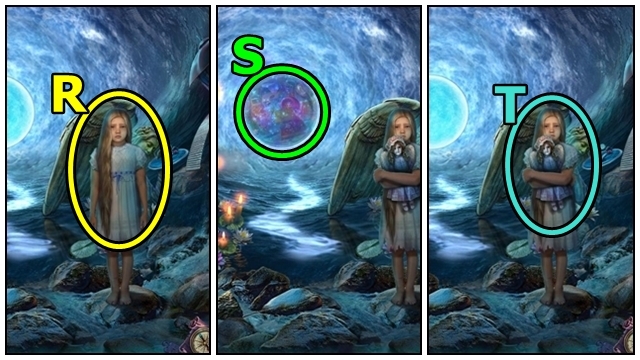
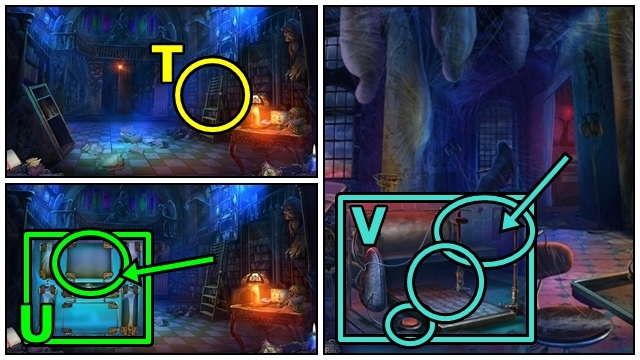
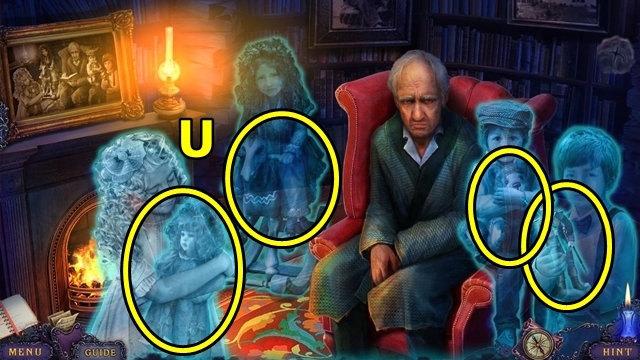
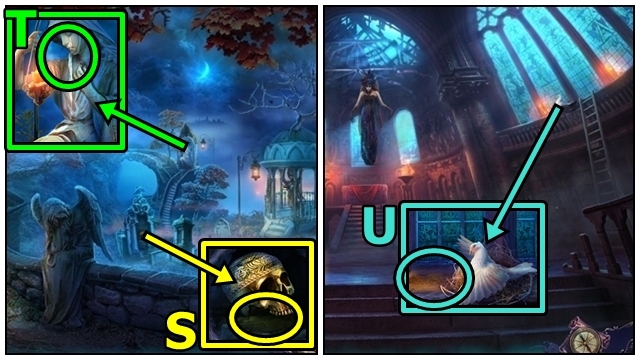
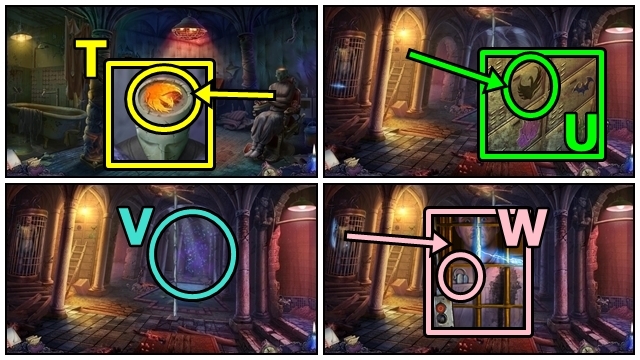
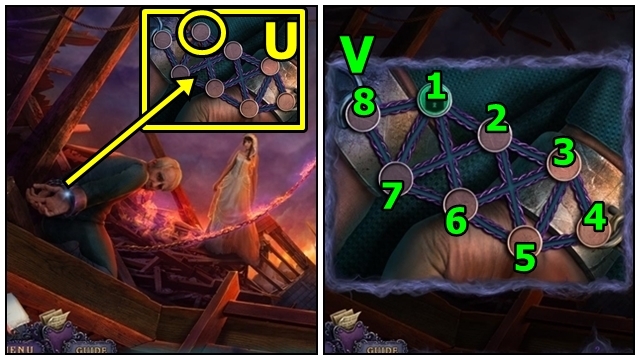
- Talk to Barney (T).
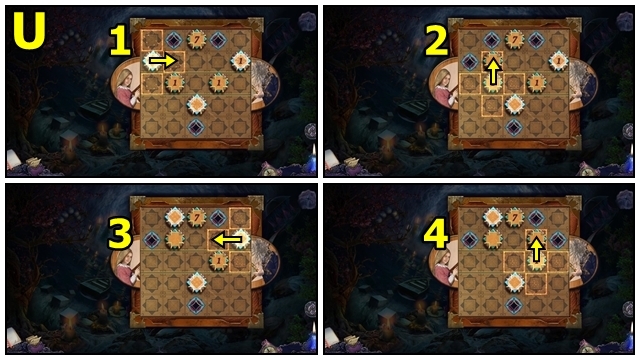
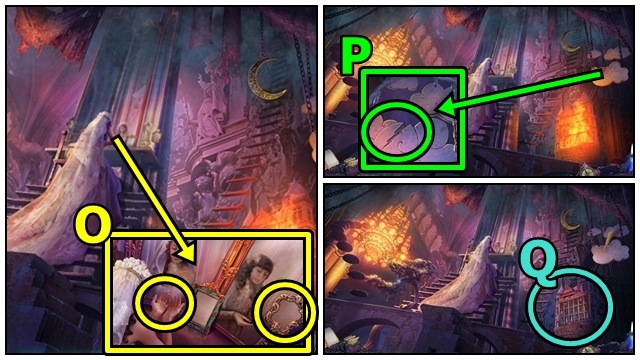
- Select either choice (U); talk to Barney, receive the GINSENG ROOT.
- Move forward.
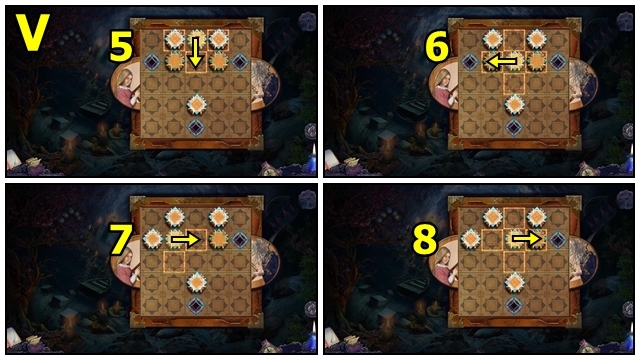
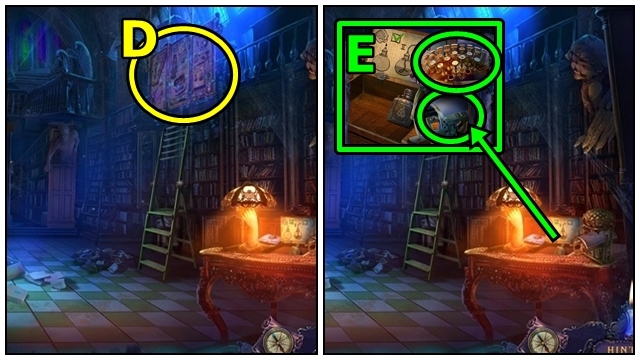
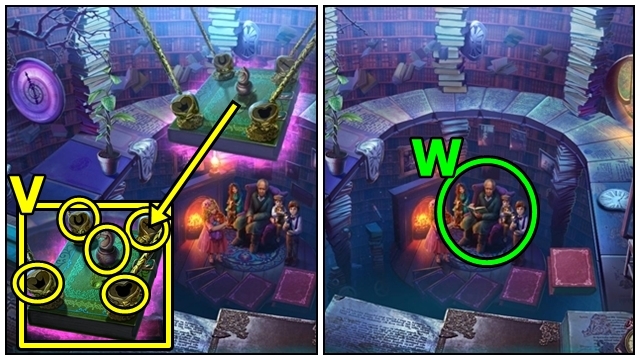
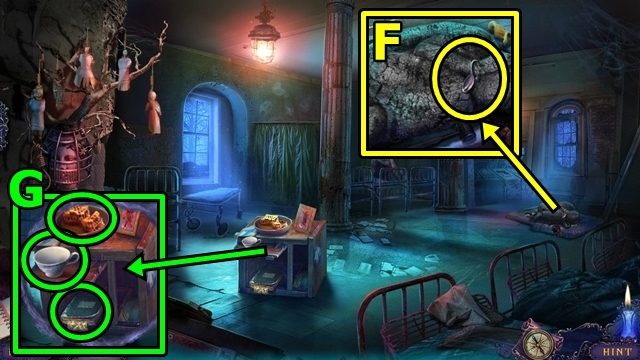
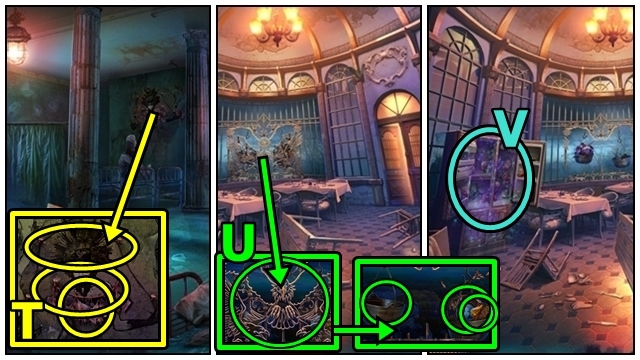
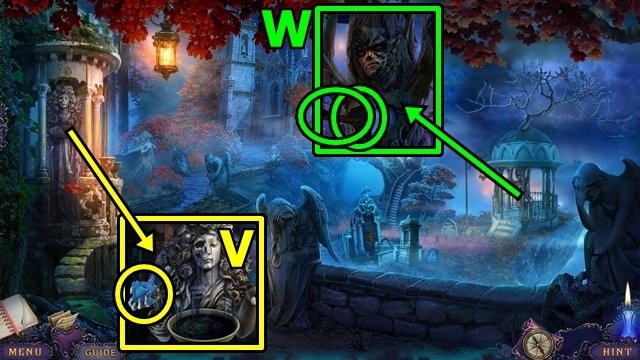
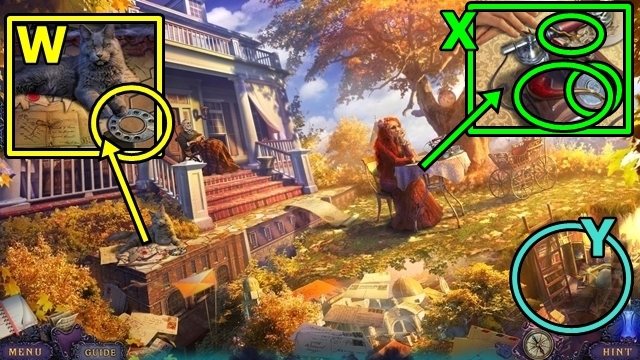
- Take the PORCELAIN LAMB (V). Insert the GINSENG ROOT. Read the note; take the PILL BOTTLE.
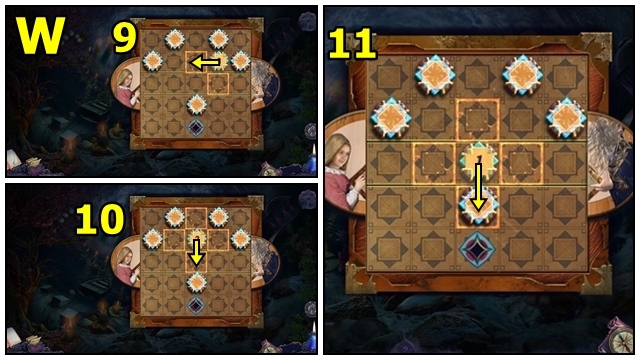
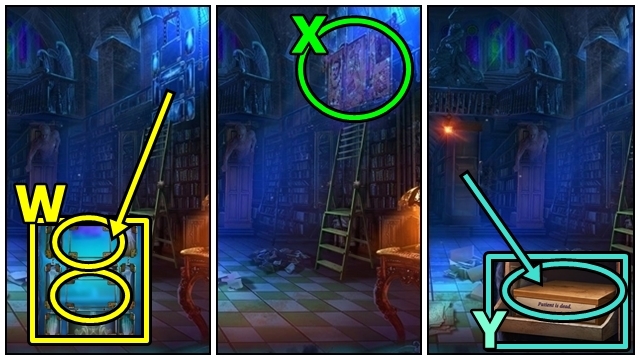
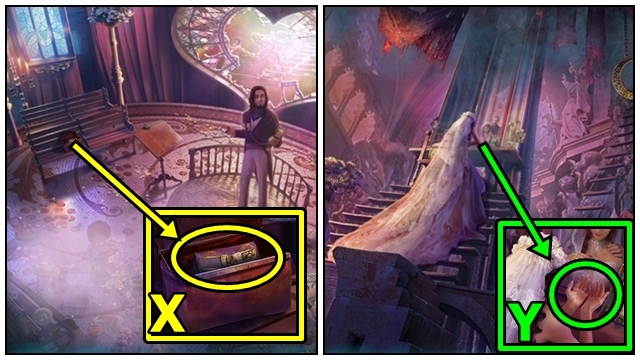
- Open the book (W); turn the pages. Take the test (X); turn the page to complete the test. Close the book; take the NIGHT SKY.
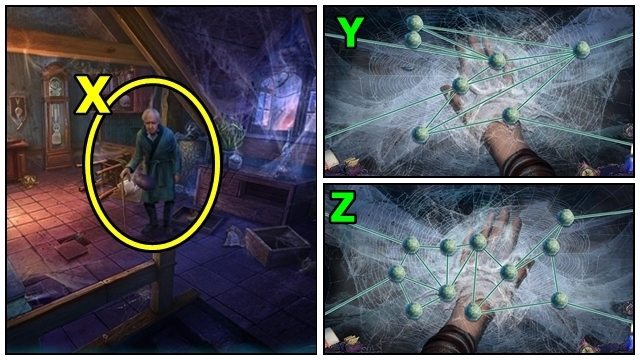
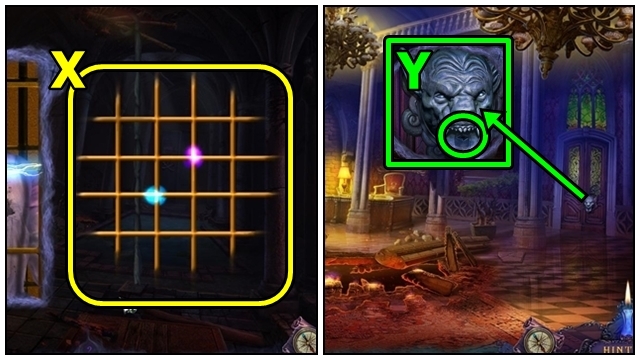
- Move down.
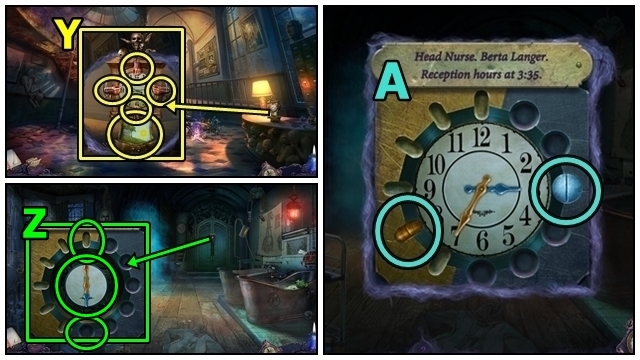
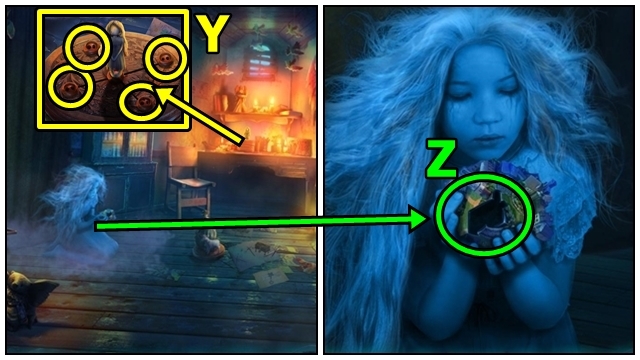
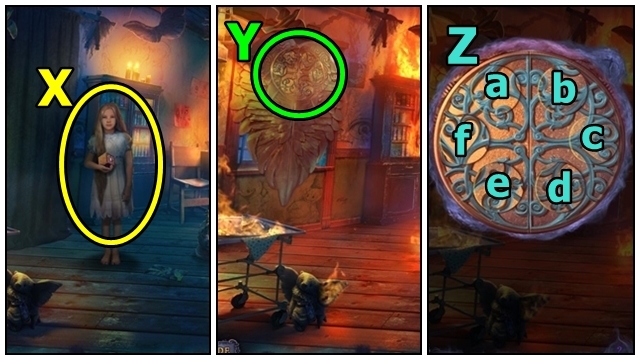
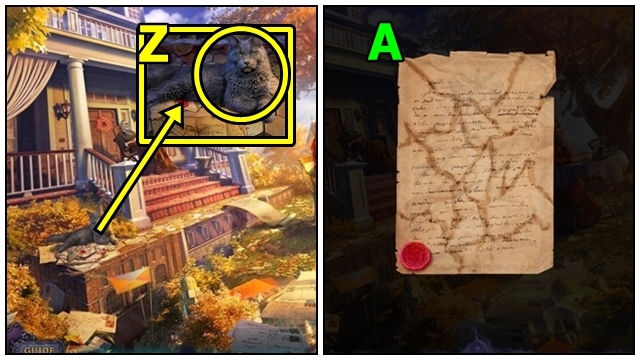
- Move the hands (Y); add the NIGHT SKY. Take the CLOCKFACE.
- Move forward.
- Remove the cork from the PILL BOTTLE (inventory); take the SILVER PILL.
- Insert the DIARY KEY into the LOCKED DIARY (inventory): open the book; take the GOLDEN PILL; tear a page.
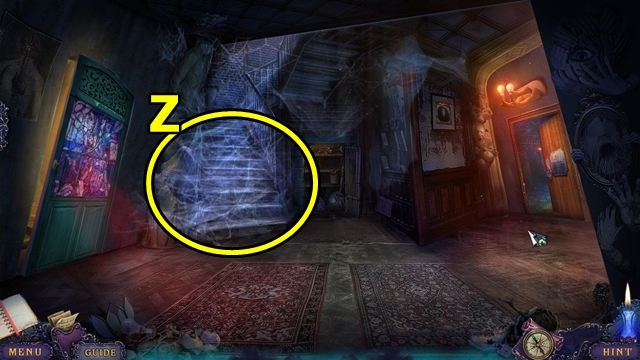
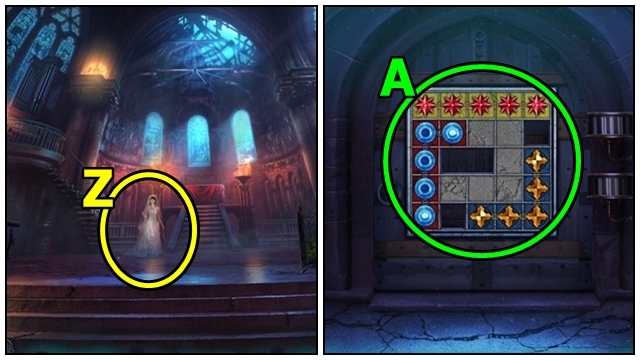
- Insert the CLOCKFACE (Z), SILVER PILL and GOLDEN PILL; play the mini-game.
- Solution: (A).
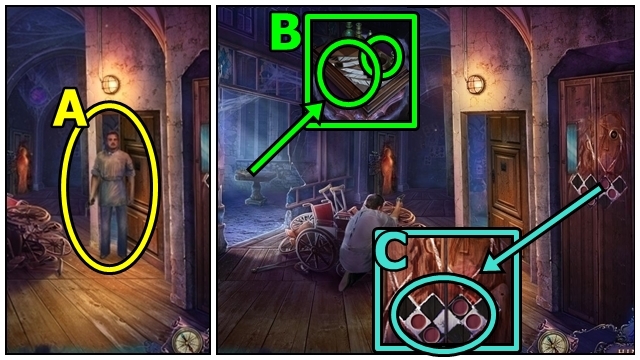
- Move forward.
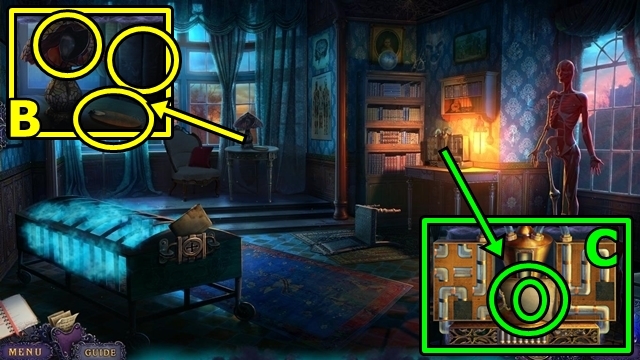
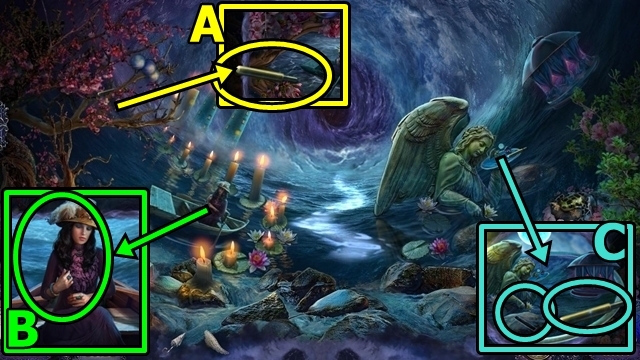
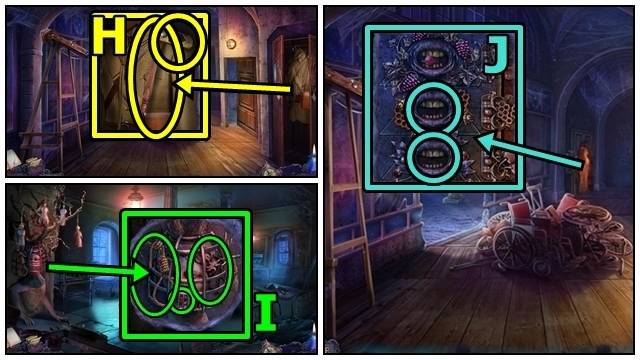
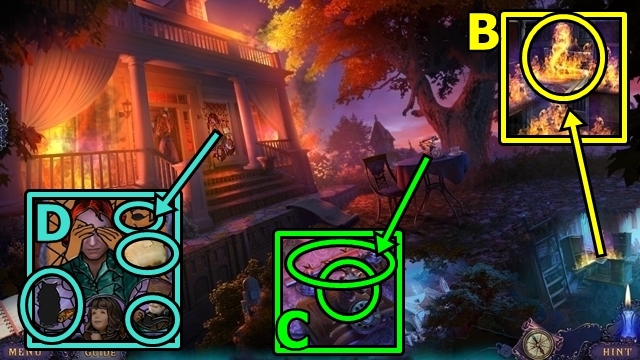
- Take the FAN BLADE (B). Insert the STAINED-GLASS MASK; take the VALVE.
- Read the note (C); add the VALVE. Play the mini-game.
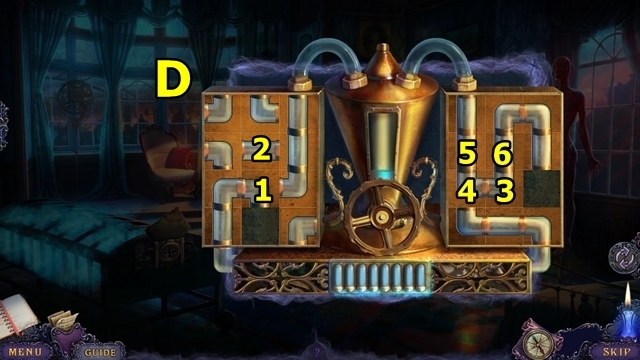
- Solution: (D).
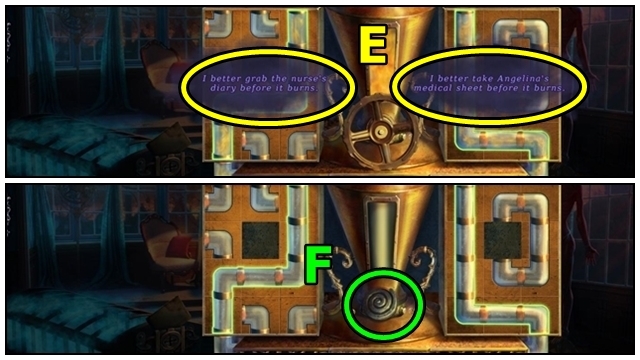
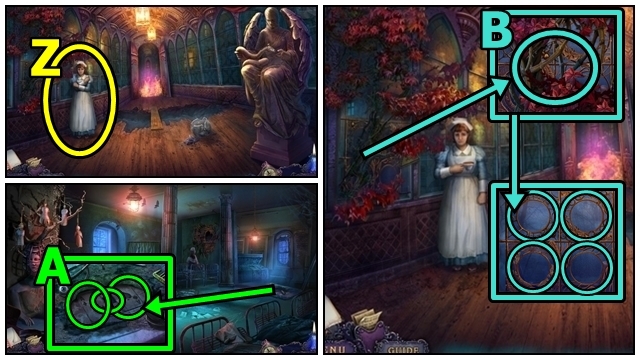
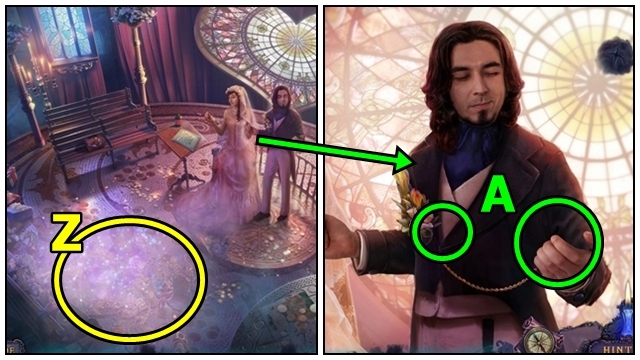
- Select 'I better grab the nurse's diary before it burns' (E); receive the NURSE'S DIARY; or select 'I better take Angelina's medical sheet before it burns'; receive ANGELINA'S MEDICAL SHEET.
- Take the SPIRAL SYMBOL (F).
- Open either the NURSE'S DIARY (inventory) or ANGELINA'S MEDICAL SHEET; turn the pages; move the photos; take the DINNER LABEL.
- Return to the Reception Hallway.
- Insert the SPIRAL SYMBOL(G); take the MANNEQUIN'S ARM.
- Return to the Head Nurse's Office.
- Examine the skeleton (H). Take the SLEEPING MASK. Attach the DOLL'S HEAD and MANNEQUIN'S ARM; take the BROKEN HEART. Take the RESIDENTIAL-WING KEY.
- Return to the Reception Hallway.
- Add the SLEEPING MASK (I); take the FAN BLADE.
- Return to the Head Nurse's Office.
- Remove the cover (J); add the FAN BLADES. Take the FAN.
- Move down.
- Place the FAN (K).
- Insert the RESIDENTIAL-WING KEY (L).
- Examine the doorway (M).
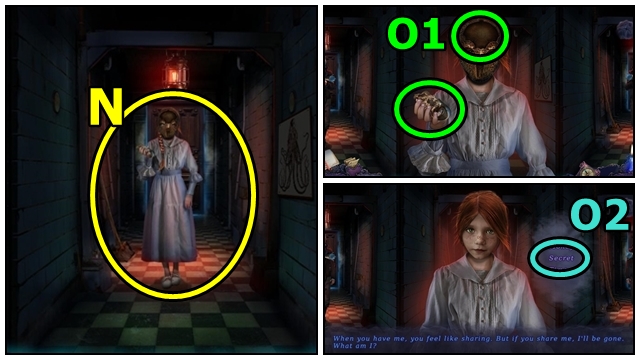
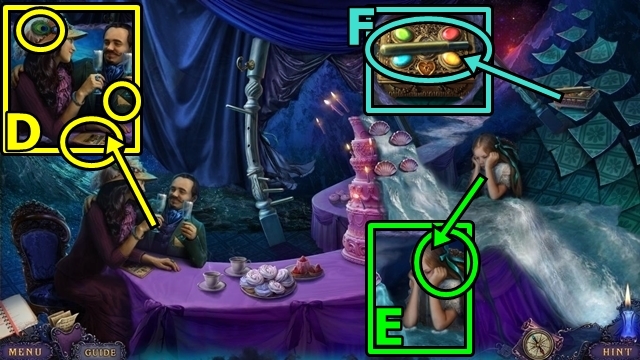
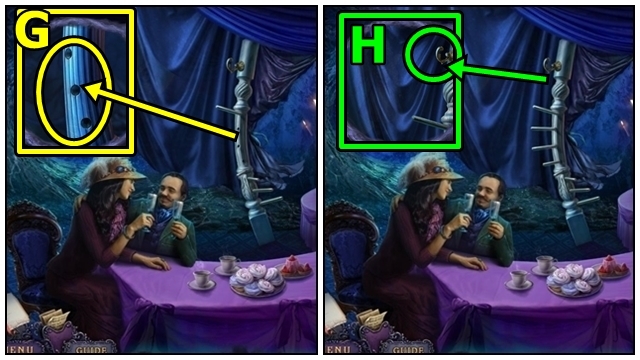
- Select any child (N). Take the MASK PART (O1). Insert a MASK PART; then answer a riddle (O2). Answers are 'stamp', 'secret', 'fire', 'darkness' and 'coffin'. Play the HOP.
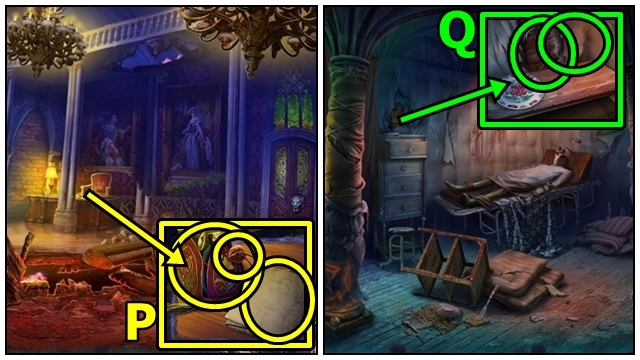
- Take the WAX CANDLE (P). Insert the DINNER LABEL; take the PIECE OF CHEESE.
- Take the LOCK OF HAIR (Q).
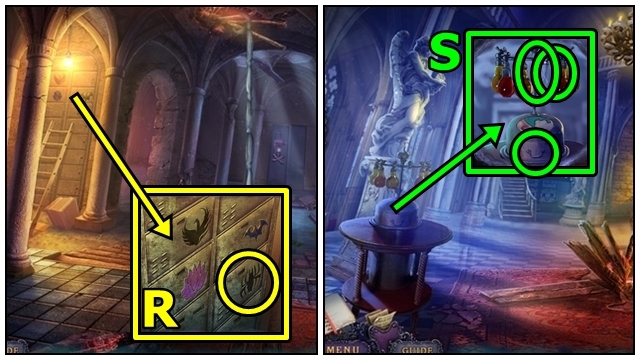
- Take the TORN WING (R). Place the PORCELAIN LAMB; take the NET. Move the papers; use the LOCK OF HAIR; take the HOMEMADE KEY.
- Insert the BROKEN HEART (S); use the WAX CANDLE; take the RED-HAIRED DOLL.
- Return to the Head Nurse's Office.
- Read the note (T). Insert the HOMEMADE KEY. Take the DAPPER DOLL and MAZE BUTTON.
- Move down.
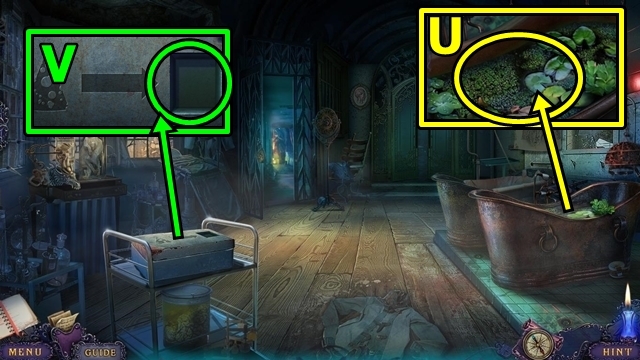
- Use the NET (U); pull the plug; take the DOLL WITH UMBRELLA.
- Insert the CHEESE (V).
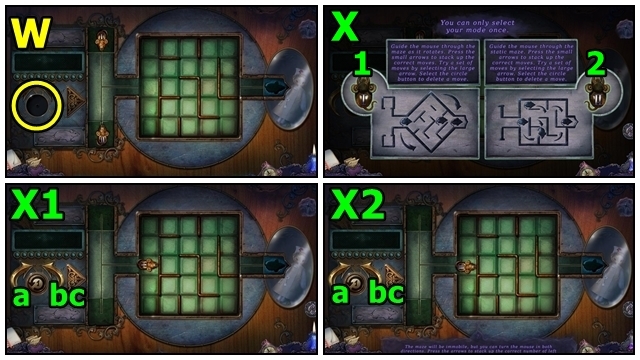
- Add the MAZE BUTTON (W); play the mini-game.
- Solution: Choose a mode (X). Choice 1: a-b-b-a-a-b-b-a-c (X1). Choice 2: b-a-a-b-b-a-a-b-c (X2). Take the BERTA DOLL.
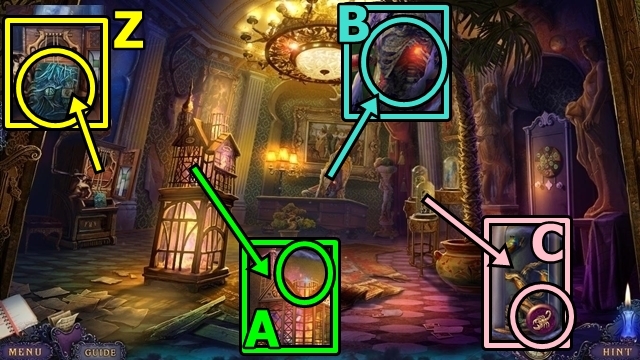
- Return to Angelina's Room.
- Place the RED-HAIRED DOLL (Y), DOLL WITH UMBRELLA, BERTA DOLL and DAPPER DOLL; take the CUBE PART.
- Insert the CUBE PART (Z); play the HOP.
- Take the WOODEN PEGS (1/3) (A).
- Place the BROKEN UMBRELLA (B). Take the TOY BRIDGE.
- Take the WOODEN PEGS (2/3) (C). Place the TOY BRIDGE.
- Go right.
- Take the PEACOCK FEATHER (D) and NEWS CLIPPING. Read the note.
- Take the RIBBON (E).
- Take the WOODEN PEGS (3/3) (F).
- Insert the WOODEN PEGS (G).
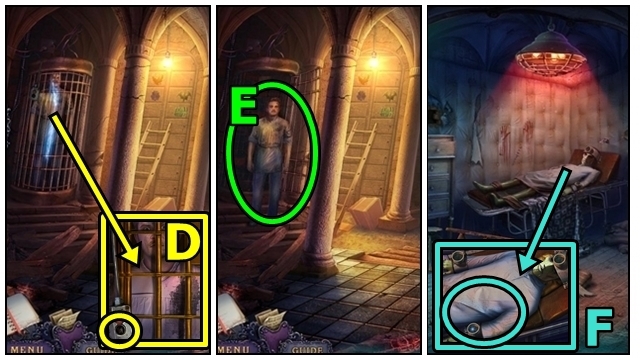
- Use the RIBBON (H); take the TATTERED DOLL.
- Move down.
- Play the HOP (I); receive the BIRDLING.
- Add the PEACOCK FEATHER (J). Read the notes.
- Examine the boat (K). Take the MESSAGE IN A BOTTLE; add the BIRDLING; take the SUNRISE ORNAMENT.
- Unfold the NEWS CLIPPING (inventory); take the SMALL CROWN.
- Take the WREATH (L). Place the SMALL CROWN; take the GOLDEN KEY.
- Move right.
- Remove the cork from the MESSAGE IN A BOTTLE (inventory); read the message; take the BOTTLE WITH WATER.
- Pour the BOTTLE WITH WATER (M); take the DOLL'S EYE.

- Insert the GOLDEN KEY (N); read the note; take the PEARL NECKLACE.
- Take the PEARLS from the PEARL NECKLACE (inventory).
- Add the PEARLS (O); take the SUNSET ORNAMENT.
- Move down.
- Add the SUNRISE ORNAMENT (P) and SUNSET ORNAMENT; play the mini-game.
- Solution: (Q). Take the CASTLE.
- Open the CASTLE (inventory); take the THREADED NEEDLE.
- Take the METAL STAR from the TATTERED DOLL (inventory). Add the DOLL'S EYE and TORN WING; use the THREADED NEEDLE. Take ANGELINA'S DOLL.
- Offer ANGELINA'S DOLL (R).
- Play the HOP (S); receive the PUZZLE CUBE.
- Offer the PUZZLE CUBE (T); play the mini-game.
- Solution: (U-W). Examine the photo.
- Talk to Angelina (X). Take the GARNET SPIDER.
- Play the mini-game (Y).
- Solution: bx3-dx3-ex2-fx3 (Z).
- Go to the Inner Yard.
Chapter 2: Graham
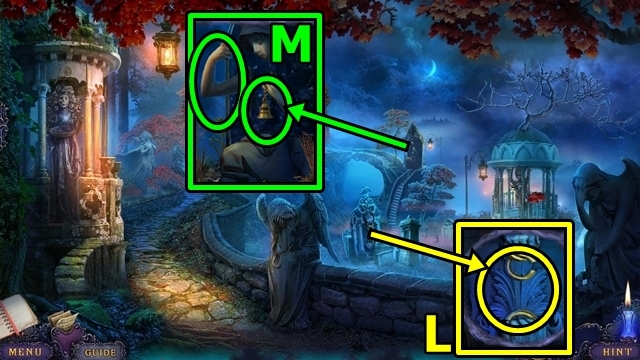
- Place the WREATH (A); take the HOOK.
- Open the coat (B); read the newspaper; take the ARCHIVIST'S SEAL.
- Use the HOOK (C).
- Play the mini-game (D).
- Solution: 3-2-4-5-1 (E).
- Talk to Barney (F); receive the BOOK TOKEN.
- Enter the Old Wing.
- Take the STORAGE KEY (G).
- Use the STORAGE KEY (H); turn on the light; play the HOP; receive the STATUE'S HAND.
- Move down.
- Attach the STATUE'S HAND (I); take the ARCHIVIST'S PASS.
- Enter the Old Wing.
- Insert the BOOK TOKEN (J) and the ARCHIVIST'S PASS.
- Enter the Archive.
- Play the mini-game.
- Solution: (K).
- Take the CRANIOMETER (L).
- Open the cocoons (M).
- Talk to the nurse (N). Play the HOP. Take the NURSE'S NOTES.
- Open the NURSE'S NOTES (inventory). Take the PHOTO HALF; turn the pages; move the photos; take the RORSCHACH EMBLEM.
- Take the BELLOWS (O). Add the RORSCHACH EMBLEM; take the book.
- Do the test (P); turn the page and continue the test; close the book. Take the RORSCHACH TILE.
- Insert the RORSCHACH TILE (Q); rearrange the picture. Go through the door.
- Enter the Archive.
- Take the HANDLE (R). Insert the ARCHIVIST'S SEAL; take the UNFINISHED EXPLOSIVE and ROYAL SEAL.
- Insert the METAL STAR (S); then the ROYAL SEAL. Take GRAHAM'S MEDICAL SHEET.
- Lift the ladder (T).
- Take the X-RAY FILM (U).
- Return to the Diagnostic Room.
- Take the NEEDLE from the CRANIOMETER (inventory); remove the handle; add the HANDLE. Turn the handle, take the SKULL.
- Add the SKULL (V) and X-RAY FILM. Press the button; take the SKULL X-RAY.
- Return to the Archive.
- Open GRAHAM'S MEDICAL SHEET (inventory); read the notes; take the CHEST X-RAY.
- Insert the SKULL X-RAY (W) and CHEST X-RAY.
- Play the HOP (X); receive the PHOTO HALF.
- Open the box (Y); take the TORN CORD.
- Move down.
- Add the TORN CORD to the UNFINISHED BOMB (inventory); light the lighter; light the fuse; take the LIT EXPLOSIVE.
- Use the LIT EXPLOSIVE (Z).
- Go upstairs.

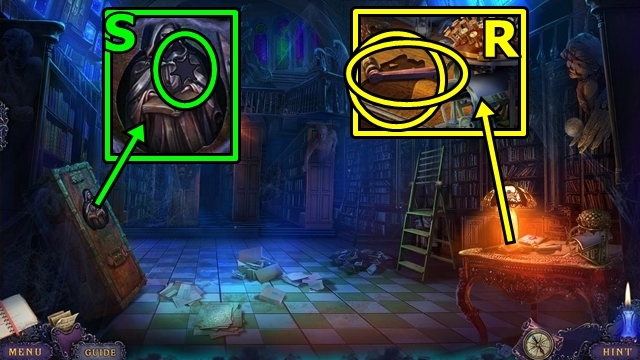
- Take the JADE SPIDER (A). Use the BELLOWS; take the BRONZE FEATHER.
- Read the note (B); take the BOOK SPINE. Insert the BRONZE FEATHER; take the LENS.
- Use the NEEDLE (C); take the TYPEWRITER BUTTONS.
- Return to the Archive.
- Play the HOP (D); take the BLANK AWARD.
- Insert the TYPEWRITER BUTTONS (E) and BLANK AWARD; take GRAHAM'S LITERARY AWARD.
- Return to Attic: Spider's Lair.
- Add GRAHAM'S LITERARY AWARD (F); take the TINY BOOK.
- Return to the Diagnostic Room.
- Add the LENS (G) and TINY BOOK; play the mini-game.
- Solution: 1, 4 (H). Read the book; take the SPIDER CODE.
- Return to the Attic: Spider's Lair.
- Read the note (I); take the BLUE PAINT. Add the SPIDER CODE; play the mini-game.
- Solution: (J). Take the LAZULI SPIDER.
- Return to the Archive.
- Pull the lever (K). Add the GARNET SPIDER, JADE SPIDER and LAZULI SPIDER; take the COVERLESS BOOK.
- Return to the Attic: Spider's Lair.
- Add the COVERLESS BOOK (L).
- Examine the mirror (M).
- Take the WOODEN RUNNER PARTS (N). Add the PHOTO HALVES (O).
- Play the HOP (P); receive the MOUSE.

- Add the BOOK SPINE (Q). Take the FRAGRANT FLOWERS; read the scroll. Add the WOODEN RUNNER PARTS; take the ROCKING HORSE.
- Add the MOUSE (R); take the PLAIN DOLL.
- Take the TOY RIFLE from the PLAIN DOLL (inventory); read the note; use the BLUE PAINT; take the DOLL PRINCESS.
- Play the HOP (S); receive the MAGIC BEANS.
- Take the UNFLEDGED ARROWS (T). Add the MAGIC BEANS; read the note; take the TEDDY BEAR. Read the scroll. Add the TOY RIFLE; take the TOY SOLDIER.
- Add the DOLL PRINCESS (U); take ELLIE'S KEY. Add the ROCKING HORSE; take ARYA'S KEY. Add the TEDDY BEAR; take JIMMY'S KEY. Add the TOY SOLDIER; take CLAUDE'S KEY.
- Take the CHESS PIECE (V). Add ELLIE'S KEY, ARYA'S KEY, JIMMY'S KEY and CLAUDE'S KEY.
- Talk to Graham (W).
- Talk to Graham (X); receive the BLACK CLOTH.
- Play the mini-game.
- Solution: (Y-Z).
Chapter 3: Gwen
- Talk to Barney (A).
- Take the FEATHERS (B). Place the CHESS PIECE; take the CHESS TOKENS.
- Insert the CHESS TOKENS (C); take the LEATHER STRAP.
- Add the FEATHERS to the UNFLEDGED ARROWS (inventory); take the CROSSBOW ARROWS.
- Add the LEATHER STRAP (D), then CROSSBOW ARROWS. Receive the REVOLVER.
- Play the mini-game.
- Solution: 4-3, 1-4, 2-1, 5-2, 3-6, 4-3, 1-4, 4-5, 3-4, 6-1 (E). Open the door.
- Enter the General Room.
- Take the BENT SPOON (F). Play the HOP; receive the SEDATIVES.
- Straighten the BENT SPOON (inventory); take the SPOON.
- Use the SPOON (G); receive the SPOONFUL OF HONEY. Take the CUP. Read the book; tear the page. Take the MILITARY BADGE.
- Move down.
- Insert the MILITARY BADGE (H); take the REPAIR KIT.
- Enter the General Room.
- Open the REPAIR KIT (inventory); take the FILE.
- Take the SMALL NOOSE (I); use the FILE; take the CHERRY.
- Move down.
- Insert the SPOONFUL OF HONEY (J) and CHERRY. Enter the Dining Room.
- Take GWEN'S MEDICAL SHEET (K) and REFRIGERATOR KEY.
- Insert the REFRIGERATOR KEY (L); play the HOP; receive the PESTLE.
- Enter the Glass Corridor.
- Use the REVOLVER (M).
- Take the COLORFUL BERRIES (N).
- Use the SMALL NOOSE (O); receive the SWAN PEPPERBOX.
- Take the IRON PETAL (P). Add the PESTLE and COLORFUL BERRIES. Play the mini-game.
- Solution: Level 1: blue-yellow-red; Level 2: blue-red-red-yellow; Level 3: yellow-red-blue-yellow-blue. The screenshot shows one possible solution (Q). Take the BLACK JUICE.
- Move down.
- Insert the IRON PETAL (R); move the holders; take the BOARD.
- Add the SWAN PEPPERBOX (S); take the DIE.
- Return to the General Room.
- Move the bats (T). Add the BLACK CLOTH and BLACK JUICE. Remove the panel; take the BLACK WINGS.
- Return to the Dining Room.
- Add the BLACK WINGS (U). Place the FRAGRANT FLOWERS; take the STICKY NECTAR and ANGELINA'S PORTRAIT.
- Play the HOP (V); receive the FROZEN HEART.
- Enter the Glass Corridor.

- Place the BOARD (W).
- Talk to Clarissa (X). Receive the HEALING HERBS.
- Move down.
- Take the GOLD LINKS (Y). Set the CUP. Add the HEALING HERBS and SEDATIVES; take the SEDATIVE TEA and ACE OF DIAMONDS. Place the FROZEN HEART; take the HEART and GRAHAM'S PORTRAIT.
- Enter the Glass Corridor.
- Offer the SEDATIVE TEA (Z). Receive the WALLET.
- Return to the General Room.
- Open the WALLET (inventory); read the note; take the ACE OF SPADES.
- Insert the ACE OF DIAMONDS (A), DIE and ACE OF SPADES. Open the book; do the test; take the CLEAVER and FIONA'S PORTRAIT.
- Return to the Glass Corridor.
- Open GWEN'S MEDICAL SHEET (inventory); read the notes; move the photos; take GWEN'S PORTRAIT.
- Use the CLEAVER (B). Insert GRAHAM'S PORTRAIT, ANGELINA'S PORTRAIT, GWEN'S PORTRAIT and FIONA'S PORTRAIT.

- Play the mini-game.
- Solution: (C).
- Take the VELVET CURTAIN (D).
- Place the VELVET CURTAIN (E). Go down to Autumn Park.
- Talk to Clarissa (F).
- Place the HEART (G).
- Enter the Abandoned Chapel.
- Talk to Gwen (H).
- Move the flowers (I); take the CANDLE HOLDER.
- Take the ORGAN KEYS (1/3) (J).
- Take the GOLDEN SUNRAYS (1/3) (K). Add the CANDLE HOLDER; receive the BURNING CANDLE.
- Move down.
- Insert the GOLD LINKS (L); take the ORGAN KEYS (2/3).
- Take the BROKEN BELL (M). Add the BURNING CANDLE. Take the ORGAN KEYS (3/3); remove the noose; take the SPROUT.
- Enter the Abandoned Chapel.
- Take the INKWELL (N); insert the ORGAN KEYS; take the HAMMER.
- Add the HAMMER to the BROKEN BELL (inventory); take the BELL WITH HAMMER.
- Use the BELL WITH HAMMER (O); take the METAL FEATHER.
- Insert the METAL FEATHER (P); play the mini-game.
- Solution: (Q).
- Take the GOLDEN JAW (R). Place the SPROUT; take the BLACK ROSE.
- Move down.
- Insert the GOLDEN JAW (S); take the GOLDEN BOWL.
- Use the GOLDEN BOWL (T); receive the FRESH WATER.
- Enter the Abandoned Chapel.
- Offer the FRESH WATER (U); take the HEART STENCIL.
- Move down.
- Take the BLUE SHARDS (V).
- Add the HEART STENCIL to the BLUE SHARDS (inventory); insert the shards; add the STICKY NECTAR. Take the HEART HALF.
- Remove the stick (W); add the HEART HALF; take the WHITE FLOWER.
- Add the BLACK ROSE (X) and WHITE FLOWER; take the WEDDING RING.
- Enter the Abandoned Chapel.
- Insert the WEDDING RING (Y).
- Play the HOP (Z); receive the POCKET WATCH.
- Examine the couple. Place the POCKET WATCH (A); take the ENVELOPE.
- Move down.
- Open the ENVELOPE (inventory); take the EVIDENCE: ASYLUM LETTER and WOLF EMBLEM.
- Place the WOLF EMBLEM (B); open the bag; take the EVIDENCE: NEWS CLIPPING.
- Examine the couple. Offer the EVIDENCE: ASYLUM LETTER (C) and EVIDENCE: NEWS CLIPPING.
- Take the CREST PART (D) and RED LANTERN.
- Examine the corsage (E); place the CREST PART; take the PEN.
- Add the PEN (F) and INKWELL.
- Move forward.
- Take the GLASS SLIPPER (G).
- Take the CHILDHOOD PHOTO (H).
- Take the GOLDEN SUNRAYS (2/3) (I).
- Move down twice.
- Add the GLASS SLIPPER (J). Move the hat; take the FANCY GLOVES and GOLDEN SUNRAYS (3/3).
- Move forward.
- Take the METAL BAT (K). Add the GOLDEN SUNRAYS.
- Take GWEN'S DOLL (L).
- Insert the CHILDHOOD PHOTO (M); offer GWEN'S DOLL. Take the YELLOW LANTERN.
- Move down twice.
- Place the YELLOW LANTERN (N) and RED LANTERN; take the TEENAGE PHOTO.
- Move forward.
- Insert the TEENAGE PHOTO (O); offer the FANCY GLOVES; take the VENEER LIGHTNING.
- Move down.
- Insert the VENEER LIGHTNING (P).
- Play the mini-game (Q).
- Solution: (R). Take the CAGE TOWER and PORCELAIN SOLDIER.
- Place the PORCELAIN SOLDIER (S); take the ADULT PHOTO.
- Insert the ADULT PHOTO (T).
- Move down twice.

- Play the HOP (U); receive the GEMSTONES.
- Move forward.
- Insert the GEMSTONES (V); take the FIERY BUCKLE and ENGAGEMENT RING.
- Place the ENGAGEMENT RING (W). Take the LOCK PART.
- Move down twice.
- Grab the bag (X); insert the LOCK PART. Take the EVIDENCE: FAKE LETTERS.
- Move forward.
- Offer the EVIDENCE: FAKE LETTERS (Y). Examine the letters.
- Talk to Gwen (Z).
- Examine the panel (A). Play the mini-game.
- Solution: (B-D).
Chapter 4: Fiona
- Move forward; enter the Isolation Ward: Fiona's Room.
- Take the RUBBER HOSE (E).
- Move down.
- Move the curtain (F).
- Move the ashes (G). Attach the RUBBER HOSE; take the METAL LILY.
- Insert the METAL LILY (H); open the drawer; take the FIERY BUCKLE; close the drawer. Insert the METAL BAT; open the drawer; take the IRON BONE; close the drawer.
- Enter the Isolation Ward: Fiona's Room.
- Take the STALE BREAD (I). Open the drawer; take the NUTCRACKER.
- Insert the FIERY BUCKLES (J); take the HELMET.
- Move down.
- Offer the STALE BREAD (K); use the HELMET; receive the GLOWING EEL.
- Enter the Isolation Ward: Fiona's Room.

- Take the EMPTY SACK (L); add the GLOWING EEL; take the IRON BONE.
- Move down.
- Add the IRON BONES (M).
- Play the HOP (N); receive the KNOTTED SHEET.
- Use the KNOTTED SHEET (O). Go up to the Grand Hall.
- Use the NUTCRACKER (P); read the note; take the STAINED-GLASS CLUE and NAIL FILE. Open the file; read the note; take the HEAVY PAPERWEIGHT.
- Return to the Isolation Ward: Fiona's Room.
- Move the cloth (Q); insert the NAIL FILE; use the HEAVY PAPERWEIGHT. Take the METAL SPIDER.
- Move down.
- Insert the METAL SPIDER (R); open the drawer. Open the book; do the test; close the book. Take the SMELLING SALTS. Close the drawer.
- Move up.
- Take the STRINGS (S). Add the SMELLING SALTS; take the TONGS.
- Return to the Isolation Ward: Fiona's Room.
- Use the TONGS (T); take the METAL PHOENIX.
- Move down.
- Insert the METAL PHOENIX (U); open the drawer. Read the note. Take FIONA'S FAMILY PHOTO and ROUND FIRESTONES (1/3).
- Play the HOP (V); receive the BACK SCRATCHER.
- Talk to Barney (W); use the BACK SCRATCHER; play the mini-game.
- Solution: Click the blue circle when the two blue pulses are on it, repeat for the purple pulses (X). Receive the IRON TONGUE.
- Move up.
- Insert the IRON TONGUE (Y). Enter the Director's Office.
- Open the book (Z); take the test; take the TRAP BUTTON.
- Insert the CAGE TOWER (A); take the STUFFED BIRD.
- Move the ashes (B); take the ROUND FIRESTONES (2/3).
- Take the SCORPIO SIGN (C). Add the STUFFED BIRD; take the STAINED-GLASS BUTTERFLY.
- Return to the Basement.
- Insert the TRAP BUTTON (D).
- Talk to Barney (E). Receive the ROUND FIRESTONES (3/3).
- Enter the Isolation Ward: Fiona's Room.
- Insert the ROUND FIRESTONES (F); take the MYSTERIOUS PARCEL.
- Enter the Director's Office.
- Unfold the MYSTERIOUS PARCEL (inventory); take the RECORD.
- Add the STRINGS (G) and RECORD; turn the crank. Play the HOP (). Read the note; take the ARIES SIGN.
- Insert the SCORPIO SIGN (H) and ARIES SIGN; play the mini-game.
- Solution: 9, 4-5, 4-2, 7-12, 9-12 (I). Take FIONA'S MEDICAL SHEET and STAINED-GLASS BUTTON.
- Move down.
- Add the STAINED-GLASS BUTTERFLY (J), STAINED-GLASS CLUE and STAINED-GLASS BUTTON; play the mini-game.
- Solution: ax4-b-ax3-b-ax6-b-ax4-b-ax2-b-ax7-b-ax6-b-ax6-b (K).
- Enter the Clock Tower.
- Use the EMPTY SACK (L); receive the SACK OF SAND.
- Take the METAL GAUNTLET (M) and WINDING KEY.
- Take the NET (N). Add the WINDING KEY; turn it twice; move the 3; take the CLOCK HAND.

- Insert the CLOCK HAND (O).
- Add the SACK OF SAND (P).
- Go up to the Tower Roof.
- Take the IRON BUTTON (Q); play the mini-game.
- Solution: 5-4-2-1-4-8-6-2-3-4-8-6-1-8 (R).

- Use the METAL GAUNTLET (S); play the mini-game.
- Solution: This puzzle is random (T).
- Add the IRON BUTTON (U); play the mini-game.
- Solution: 8-7-1-6-7-2-3-6-5-3-4-5-2-1 (V).
- Take the PHONE DIAL (W).
- Take the FATHER'S PIPE (X). Add the PHONE DIAL. Take the CANDY WRAPPER.
- Play the HOP (Y); receive the GLASS KITTY. Take the MEMORIES.
- Open FIONA'S MEDICAL SHEET (inventory); read the notes; move the photos; take the RAZOR.
- Use the RAZOR on the MEMORIES (inventory); look through all the photos; take the RIBBON.
- Add the RIBBON to the CANDY WRAPPER (inventory); take the RIBBON WITH WRAPPER.
- Use the RIBBON WITH WRAPPER (Z); take the TORN LETTER.
- Examine the TORN LETTER (inventory); play the mini-game.
- Solution: (A). Read the note.
- Throw the NET (B); read the article; take the RUBY.
- Lift the receiver (C); take the BRONZE DEER HEAD.
- Read the note (D); add the GLASS KITTY, FATHER'S PIPE and RUBY.
- Use the BRONZE DEER HEAD (E).
- Congratulations, you've completed Whispered Secrets: Everlasting Candle.
Created at: 2016-04-29