

Walkthrough Menu
- General Tips
- Chapter 1: Ship Graveyard
- Chapter 2: To the Shore
- Chapter 3: The Outskirts of Town
- Chapter 4: The Backyard
- Chapter 5: The Memorial
- Chapter 6: The Way to the Temple
General Tips
- This is the official guide for Whispered Secrets: Song of Sorrow.
- This guide will not mention each time you have to zoom into a location; the screenshots will show each zoom scene.
- Hidden-object puzzles are referred to as HOPs. This guide will not show HOP solutions. It will identify the location of the HOP and the inventory item acquired.
- This guide will show solutions for non-random puzzles. Please read the in-game instructions for each puzzle.
- In this game, you will sometimes have to select the new scene to trigger dialog, cut-scenes, or tasks prior to interacting with the scene.
Chapter 1: Ship Graveyard
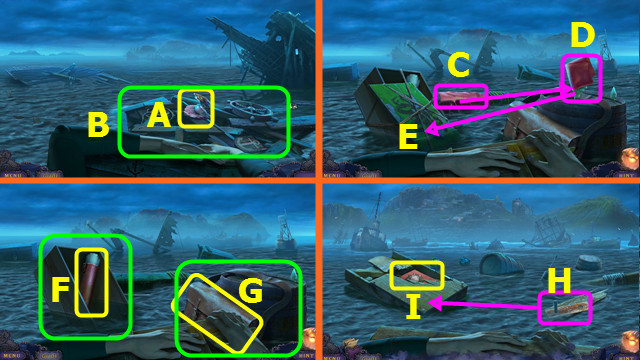
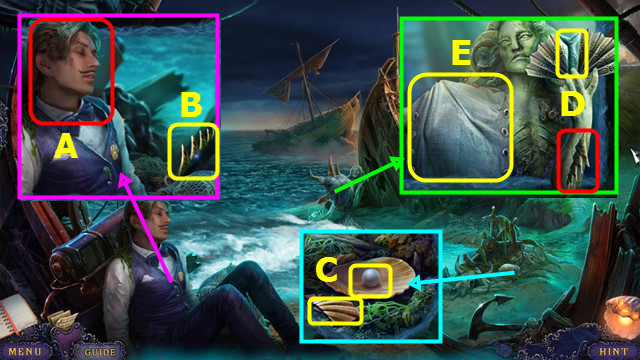
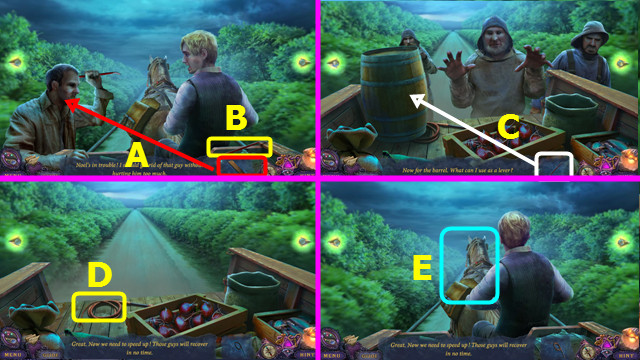
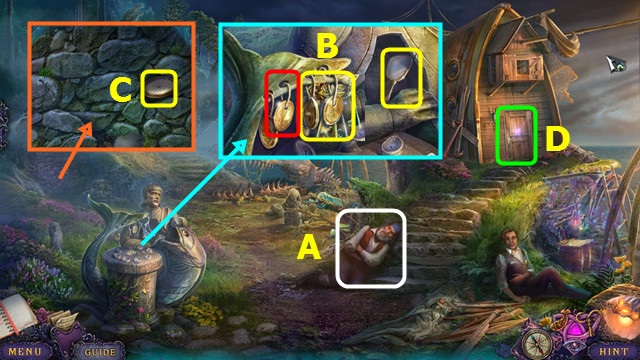
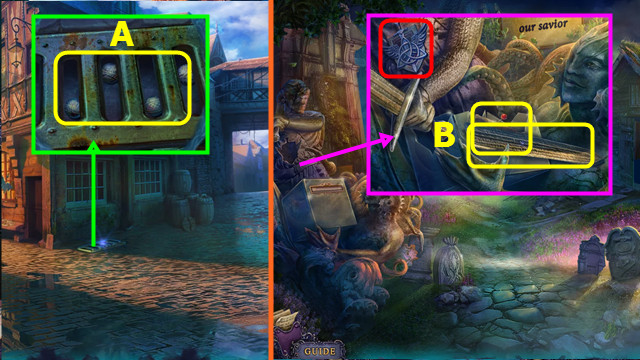
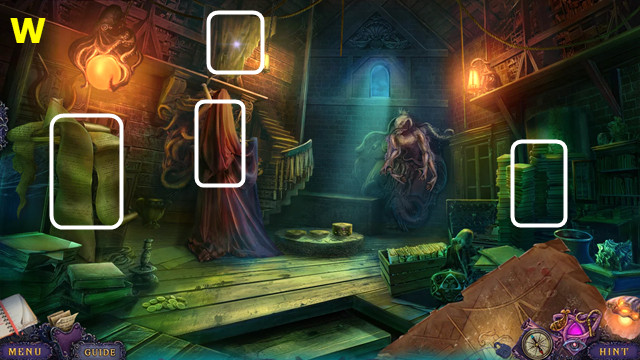
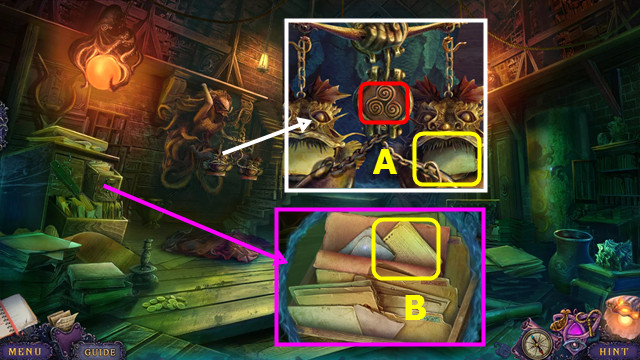
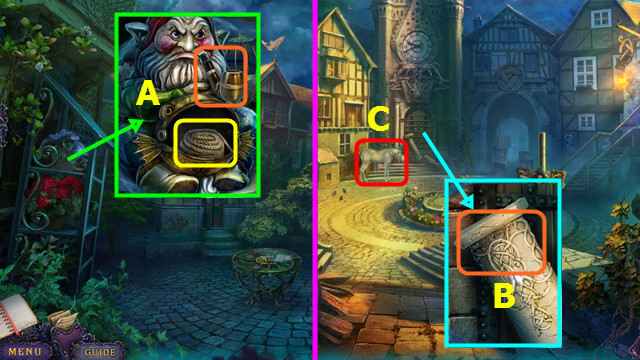
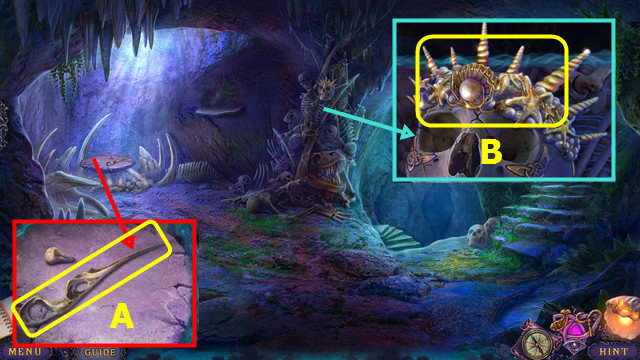
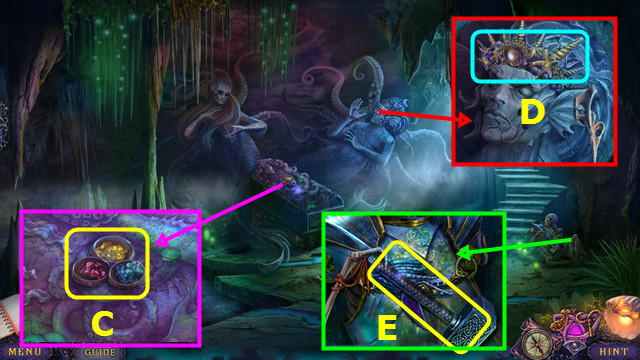
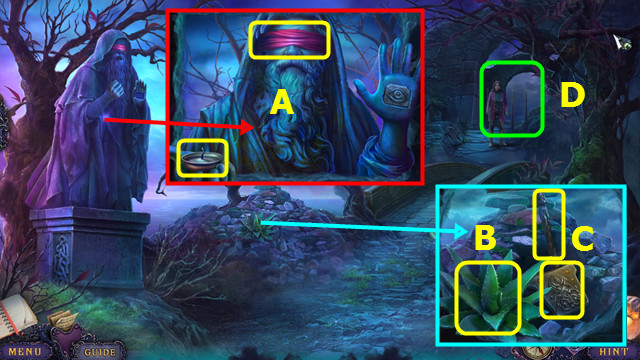
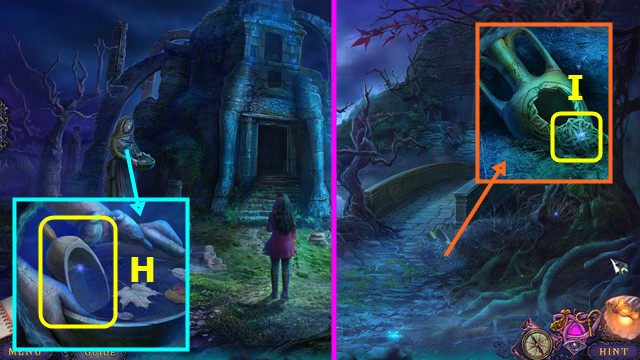
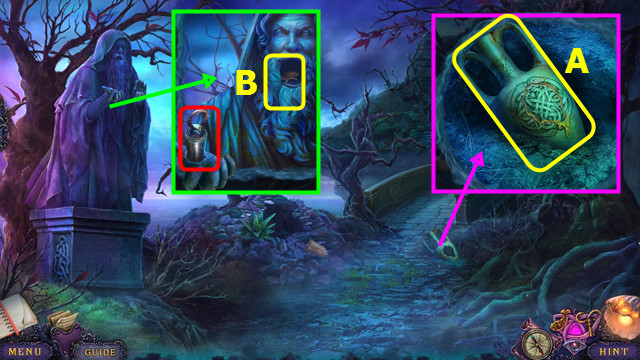
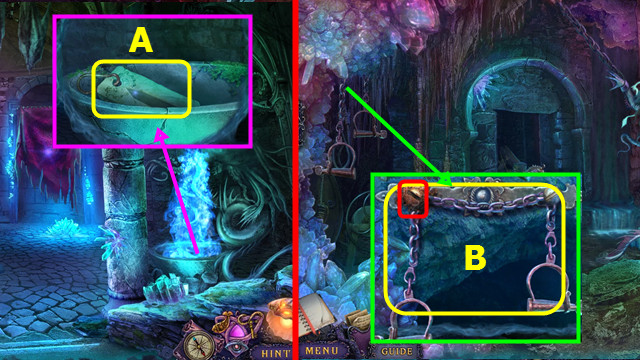
- Remove the net and take the HINT (A).
- Move the debris (B).
- Go forward.
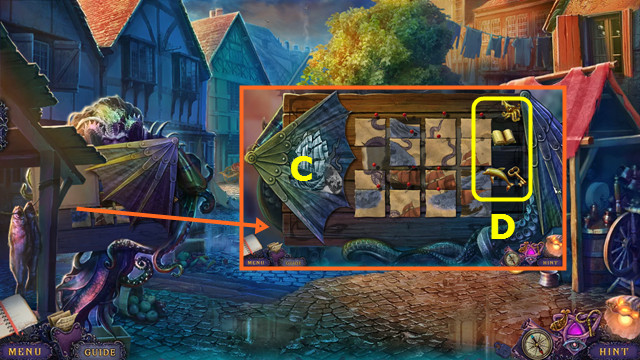
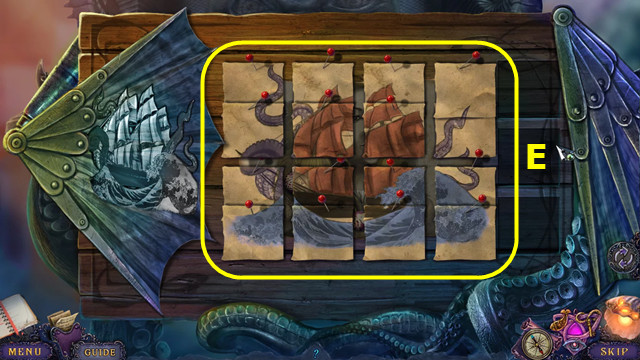
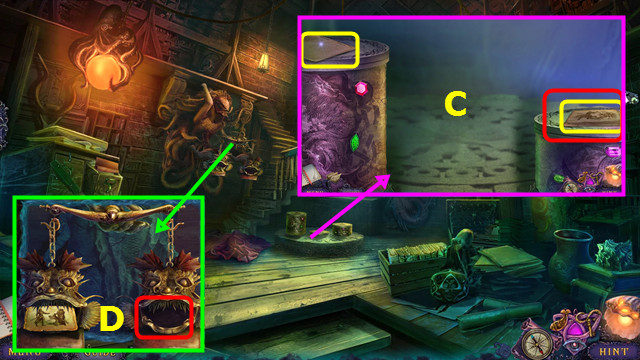
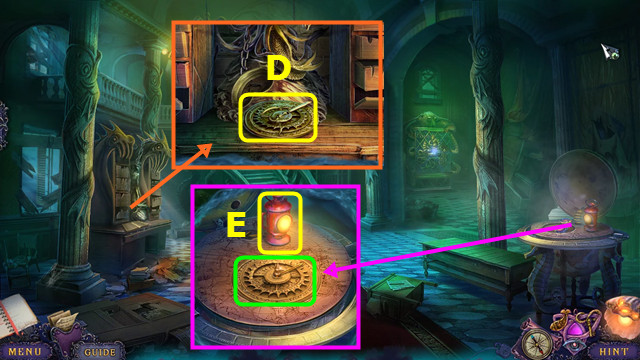
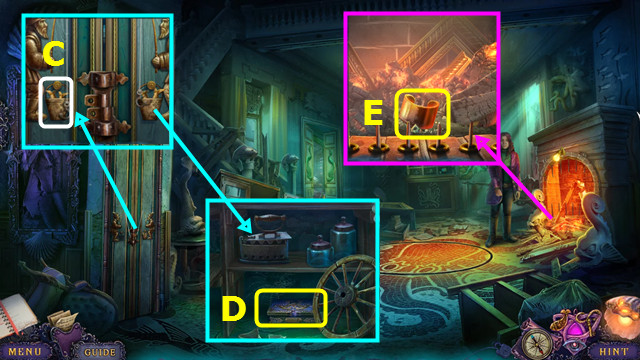
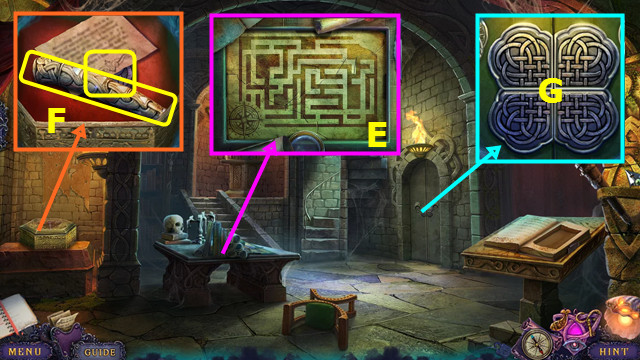
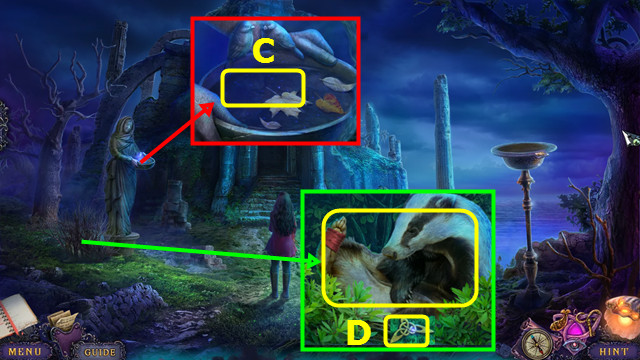
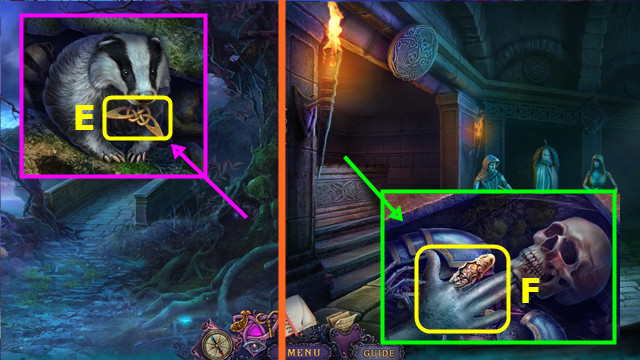
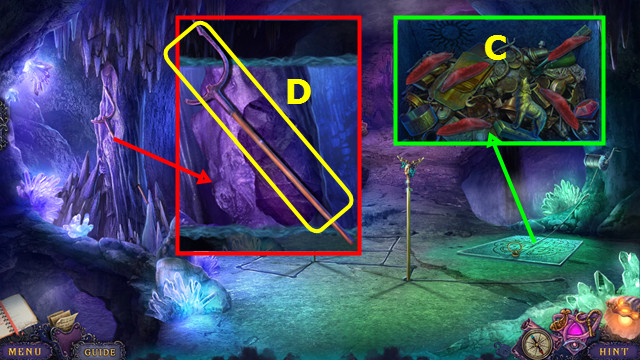
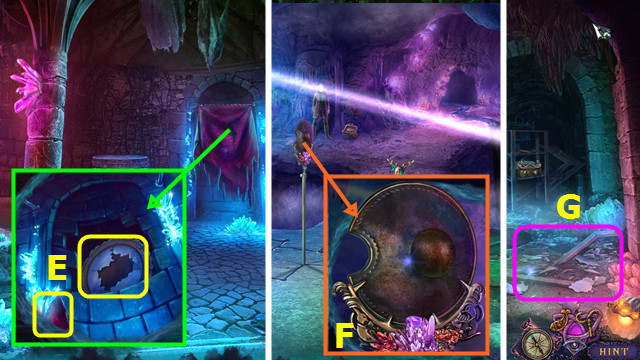
- Use C on D; use D on E.
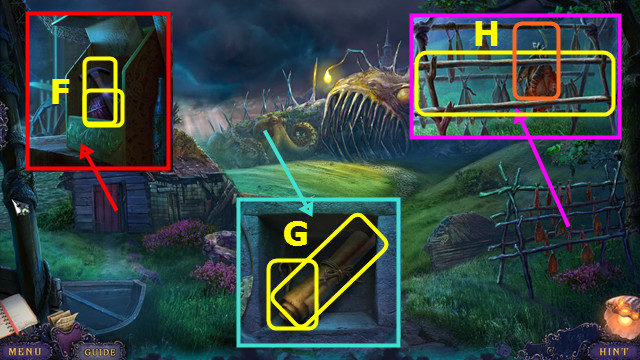
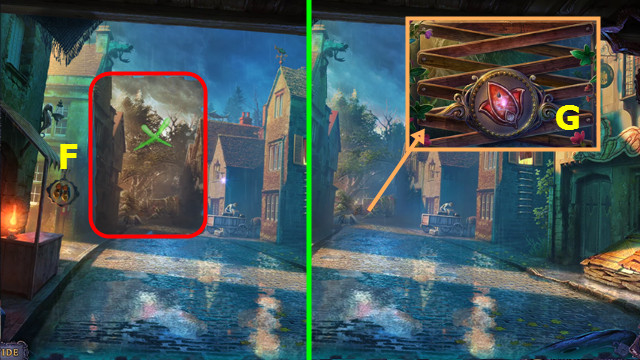
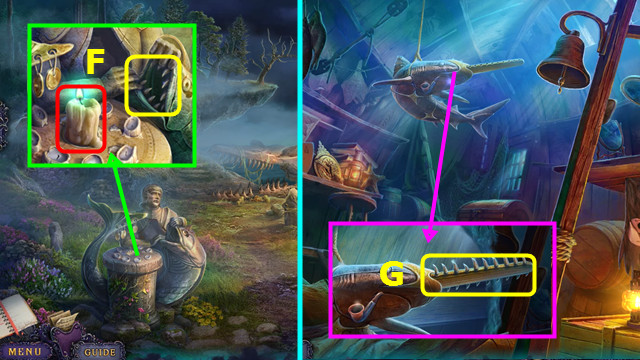
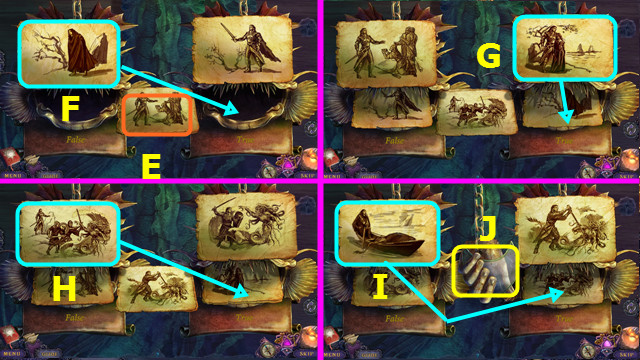
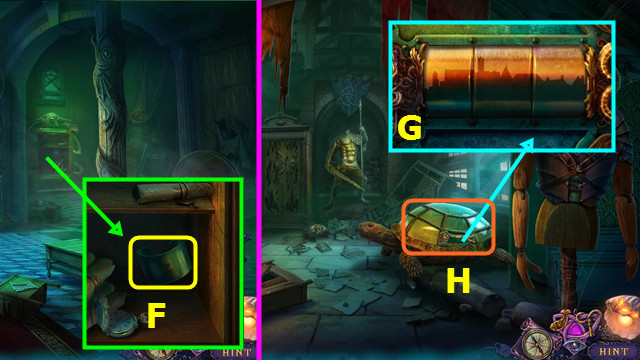
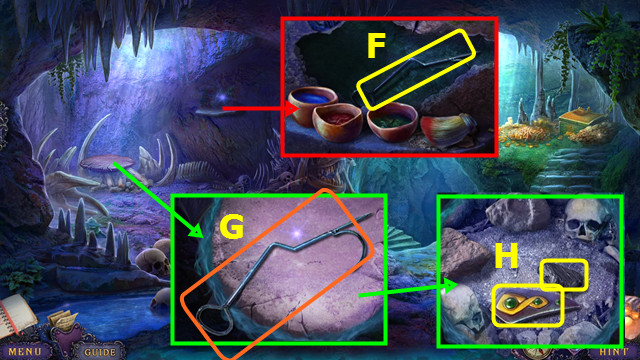
- Remove the lid; take the TASKS (F).
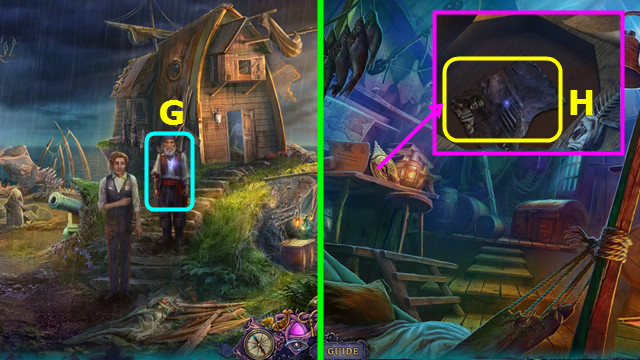
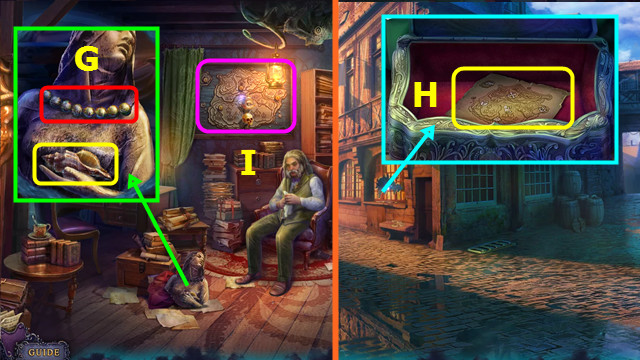
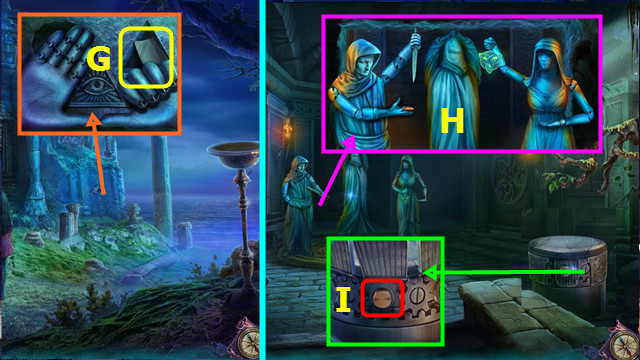
- Take the INVENTORY bag (G).
- Move the debris (green).
- Go forward.
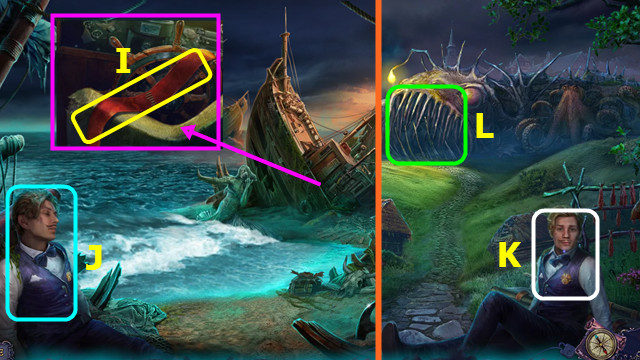
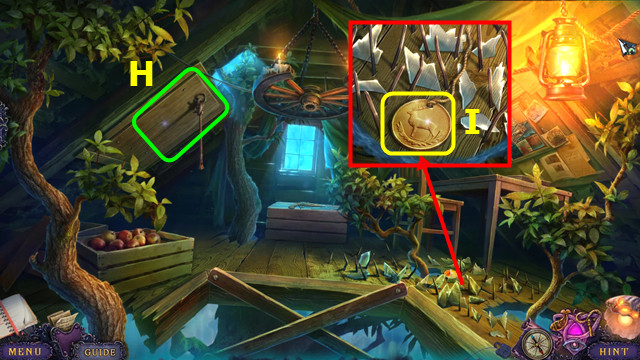
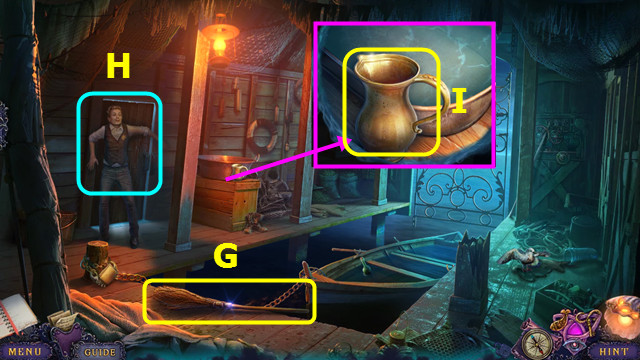
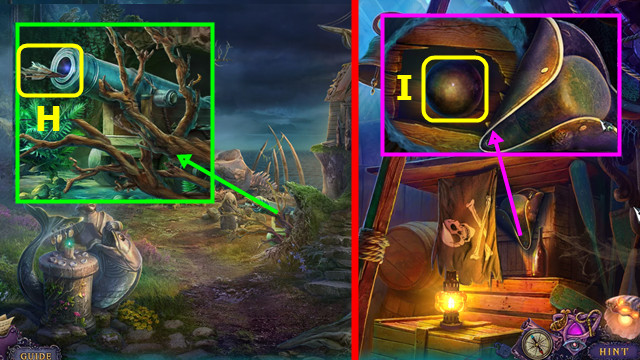
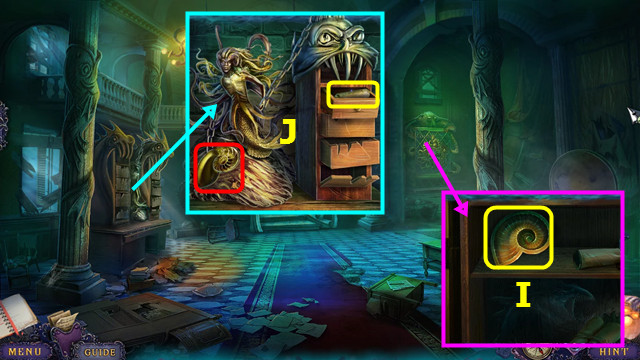
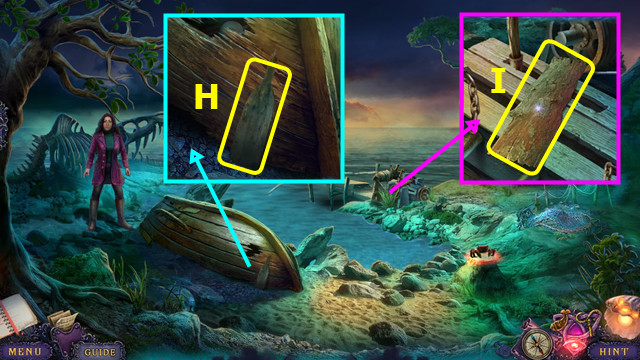
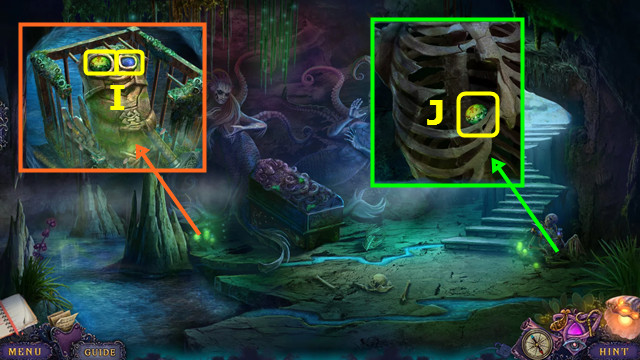
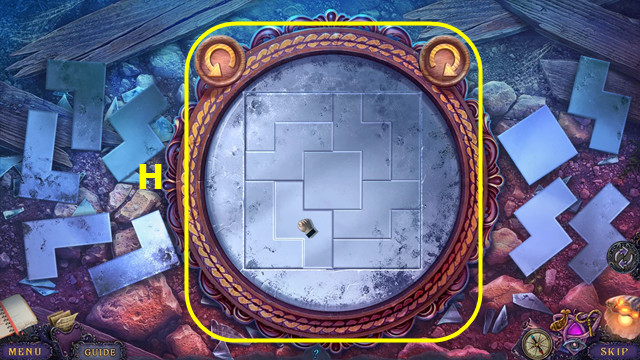
- Use (H) on (I); untie and take the JOURNAL.
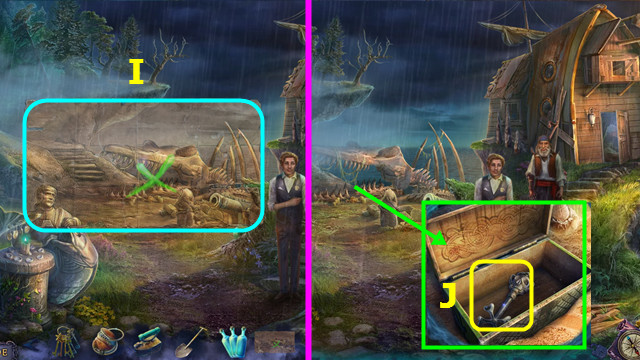
- Go forward.
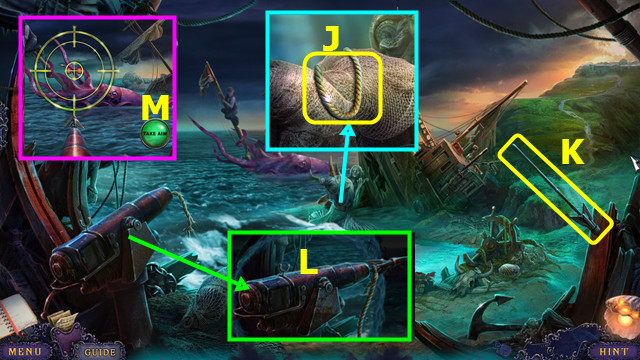
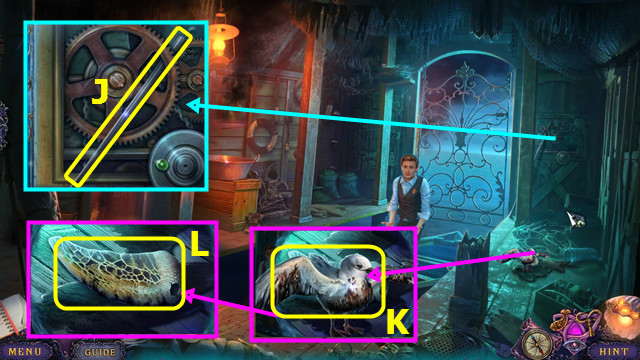
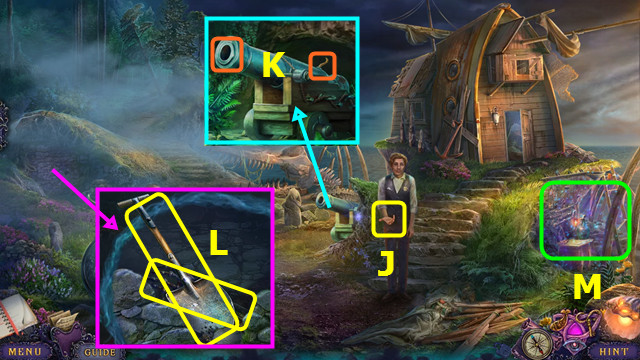
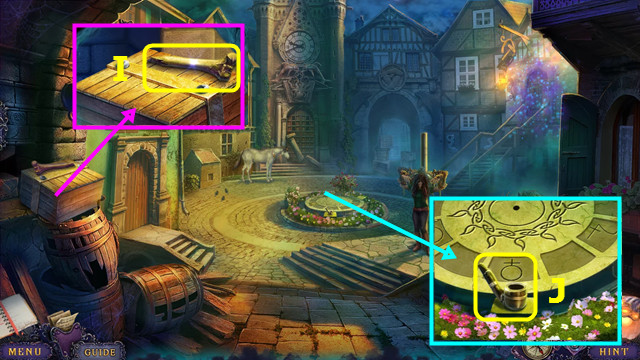
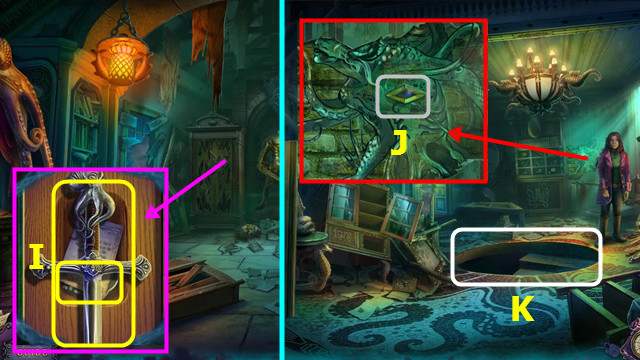
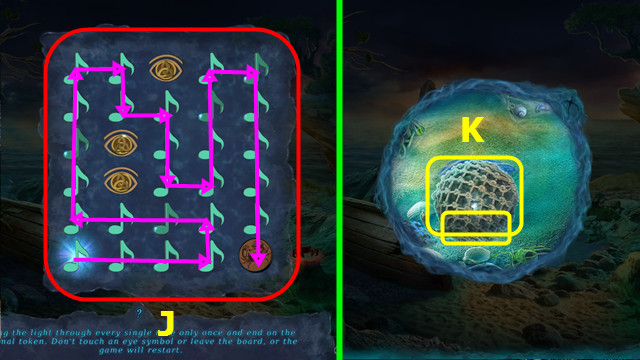
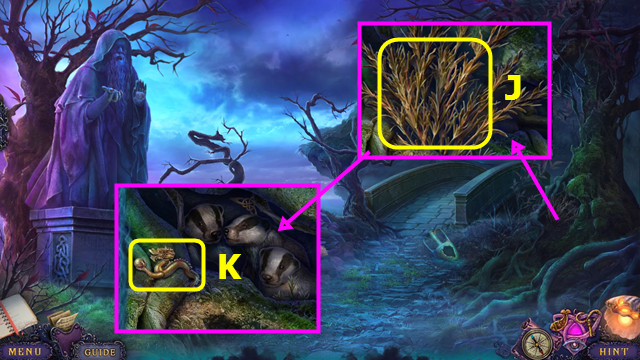
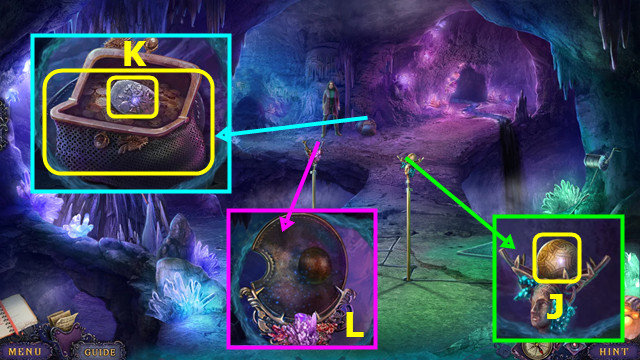
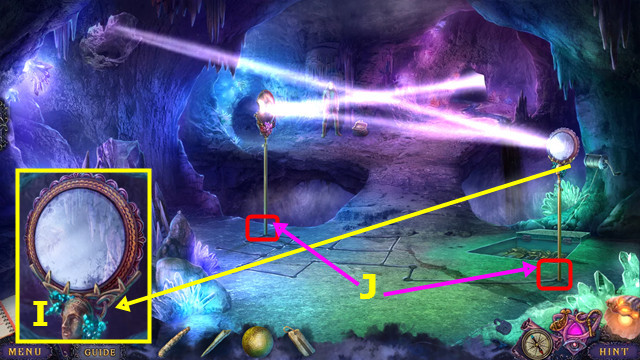
- Take the ROPE (J).
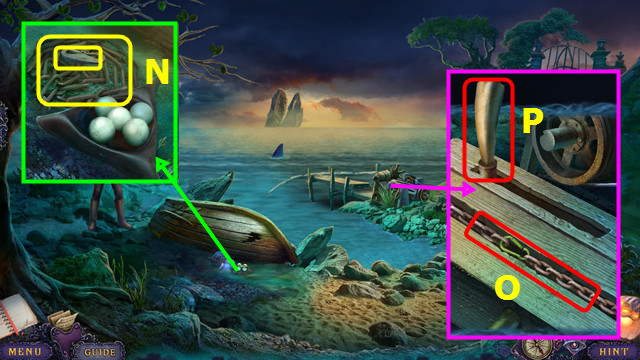
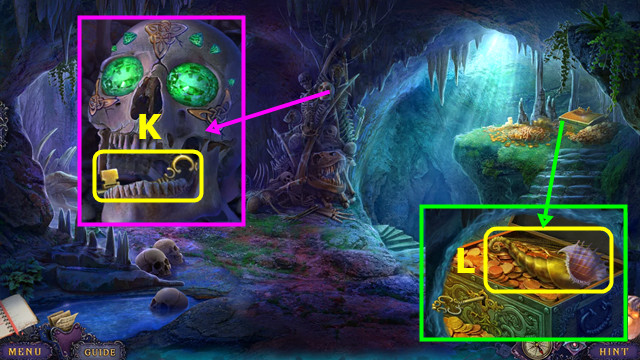
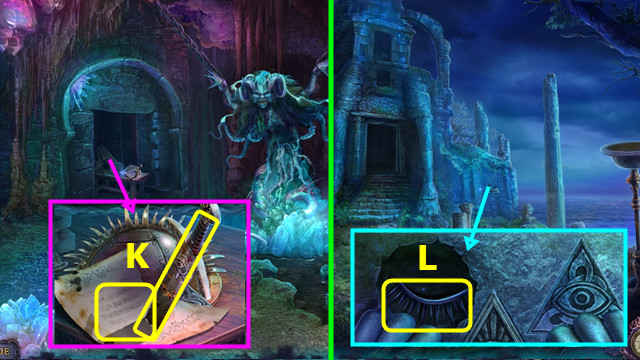
- Take the HARPOON (K).
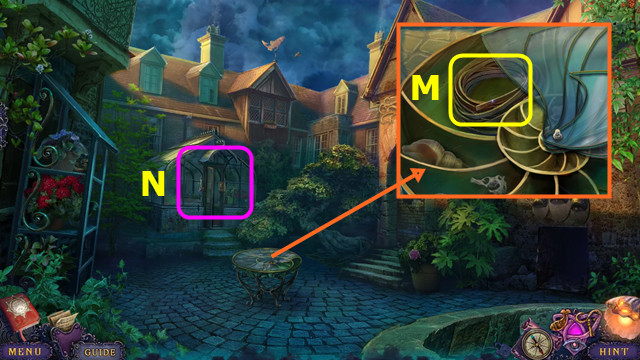
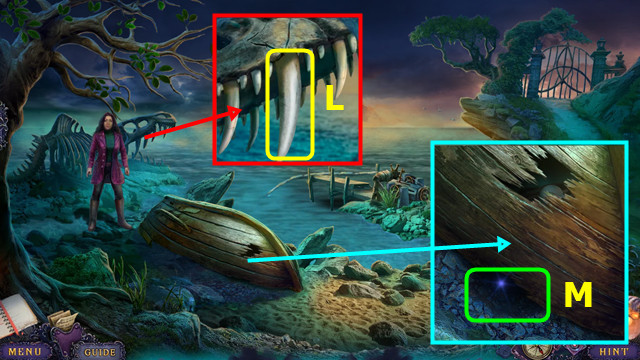
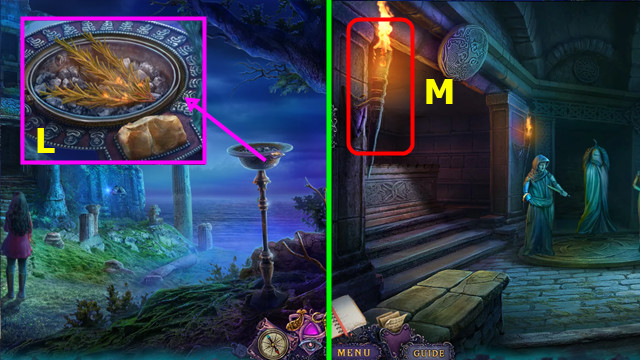
- Place the HARPOON and ROPE (L).
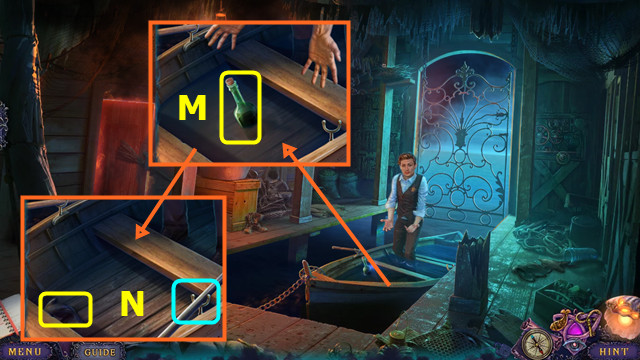
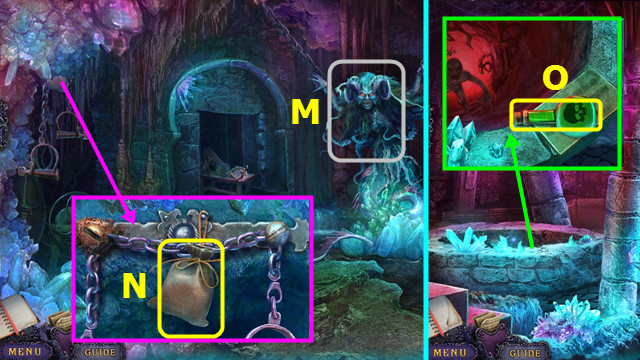
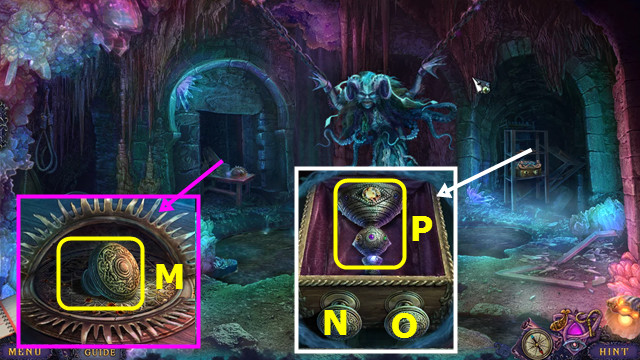
- Select (M) 3x when the red dots are in the center.
- Select (M) to fire.
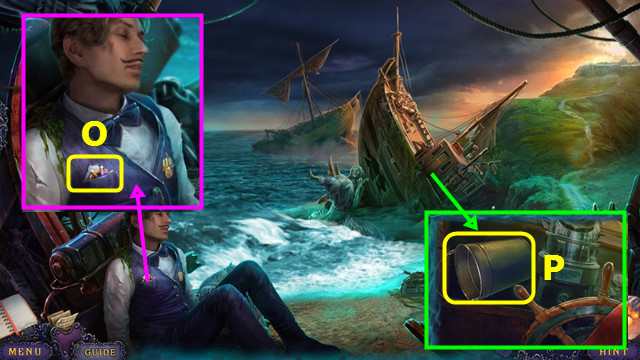
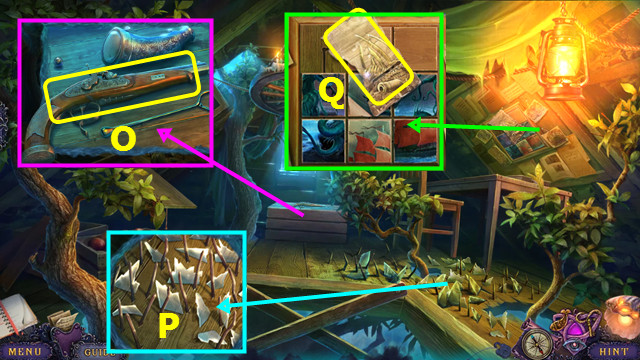
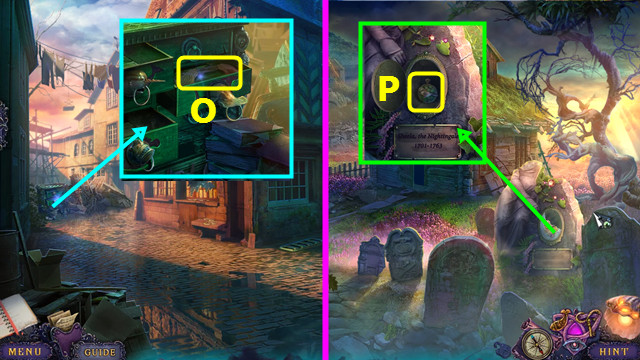
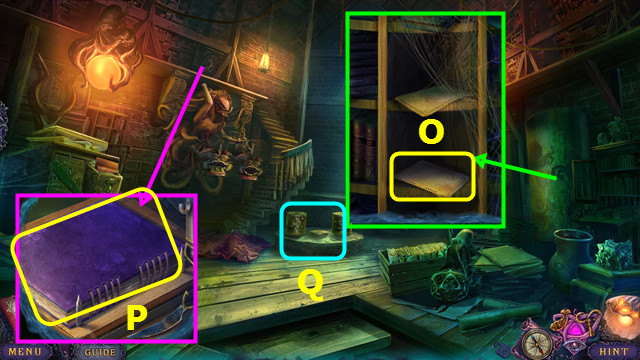
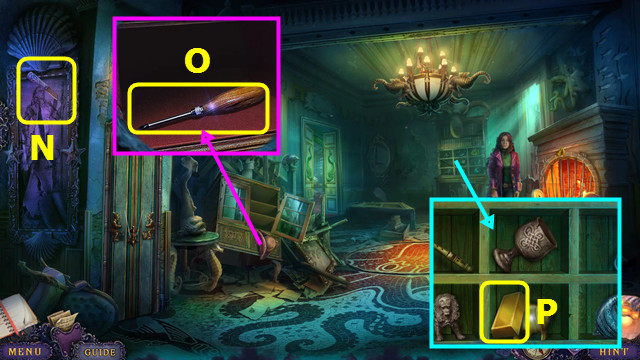
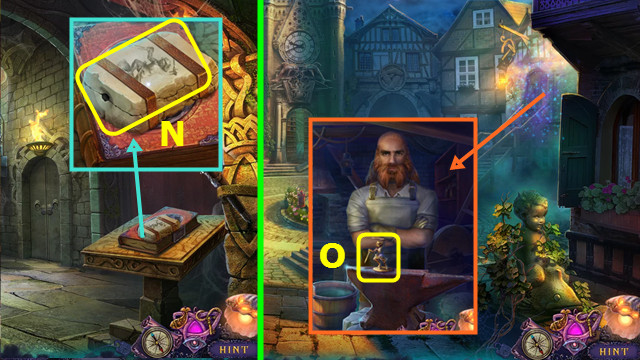
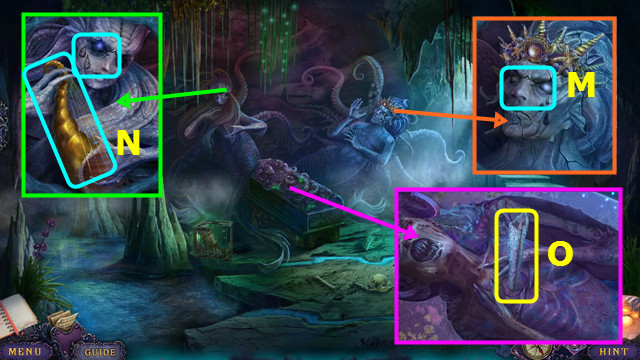
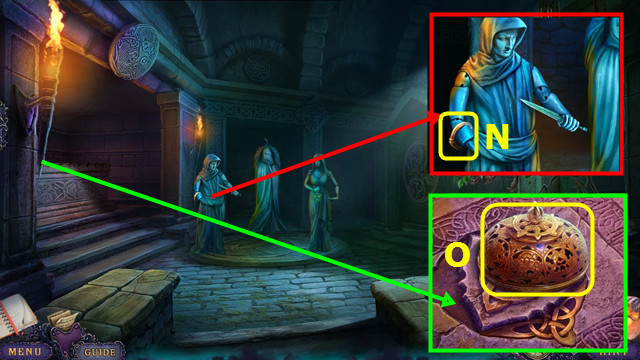
- Take the HELM EMBLEM (O).
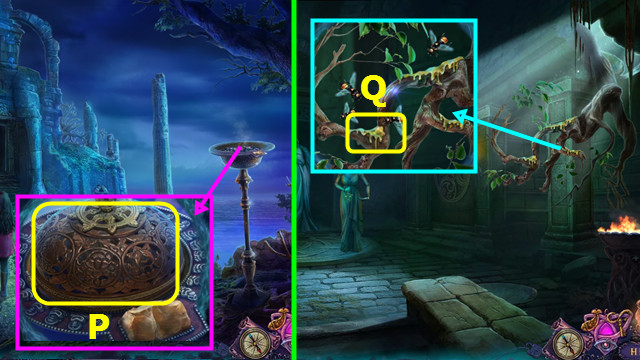
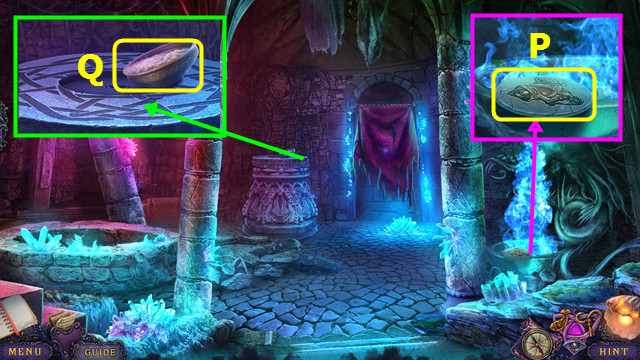
- Place the HELM EMBLEM; take the BUCKET (P).
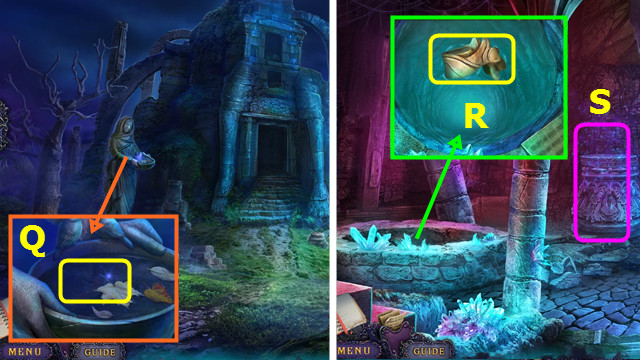
- Walk right.
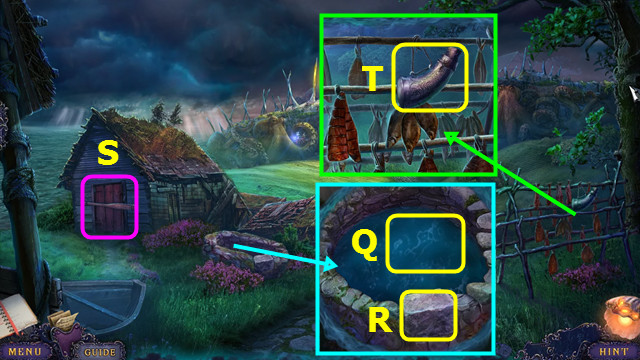
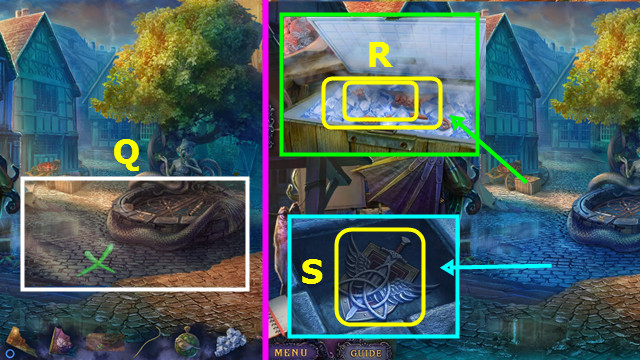
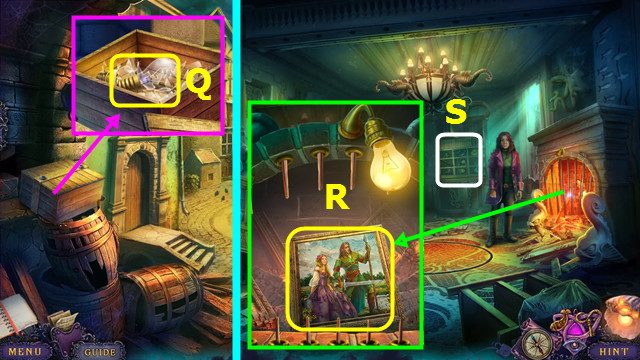
- Use the BUCKET to take the BUCKET OF WATER (Q).
- Take the STONE (R).
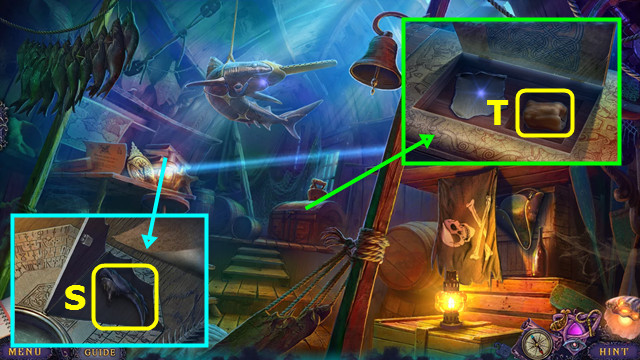
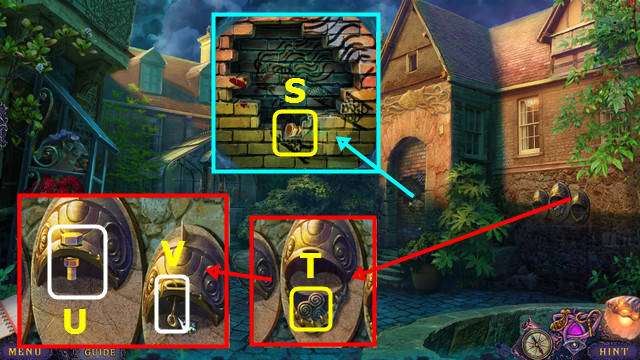
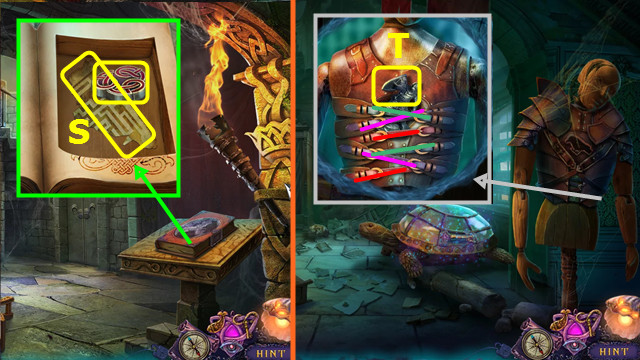
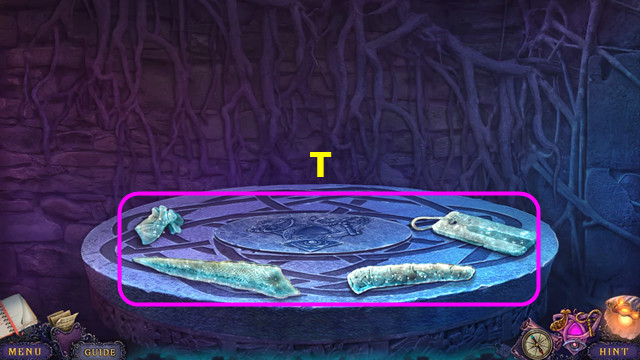
- Remove the oar; play the HOP to earn the SEALED PENDANT (S).
- Take the GUNPOWDER FLASK (T).
- Walk down.
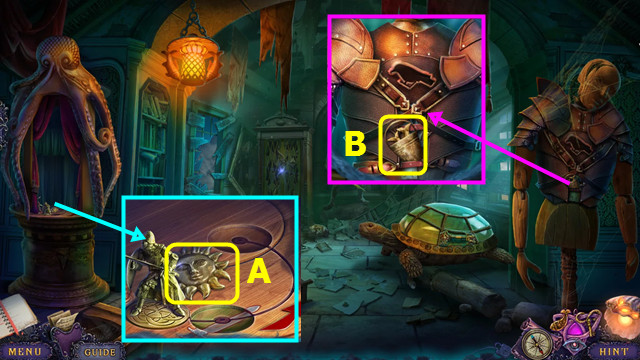
- Use the BUCKET OF WATER (A).
- Move the net; take the BONE FIN (B).
- Use the STONE; take the PEARL and SHARP SHELL (C).
- Place the BONE FIN; take the FISH TAIL (D).
- Use the SHARP SHELL; take the SAIL (E).
- Walk right.
- Remove the debris and place the PEARL. Read the note; take the HAMMER and NEEDLE AND THREAD (F).
- Place the FISH TAIL: take the MAP and MEAT HOOK (G).
- Use the MEAT HOOK; take the POLES (H).
- Walk down.
- Use the NEEDLE AND THREAD; take the LEATHER BELT (I).
- Combine the POLES, SAIL, and LEATHER BELT to make the STRETCHER.
- Use the STRETCHER (J).
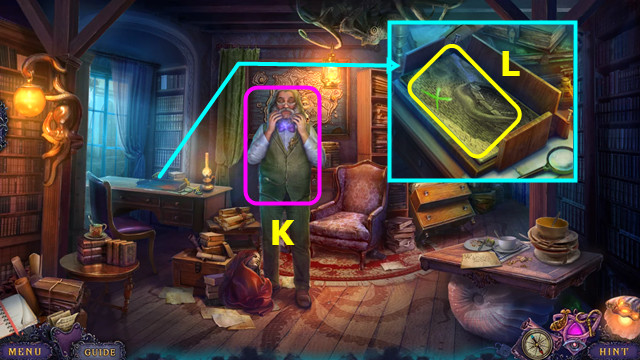
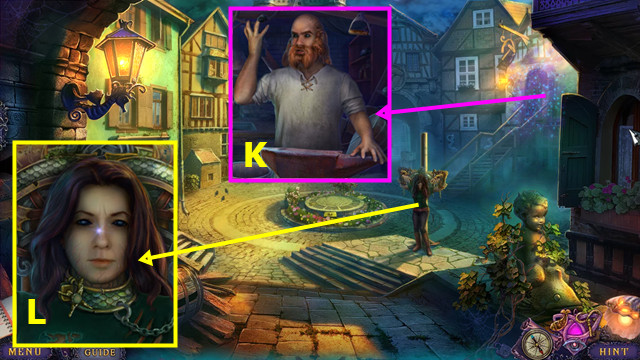
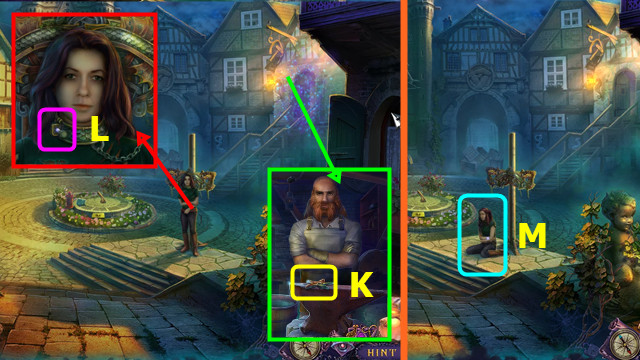
- Talk to Noel (K).
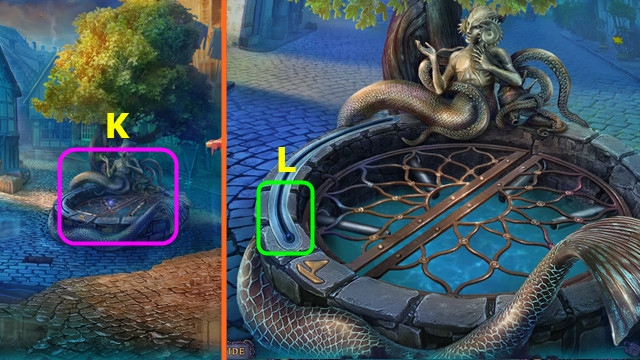
- Select (L).
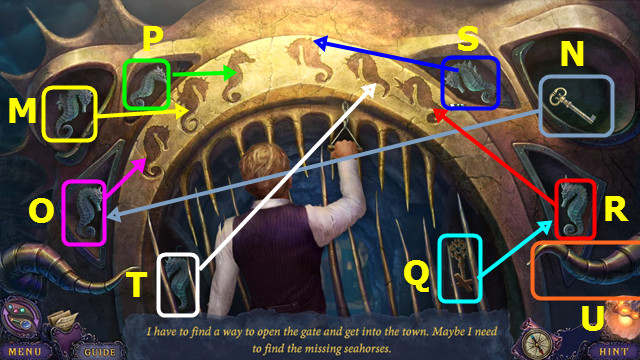
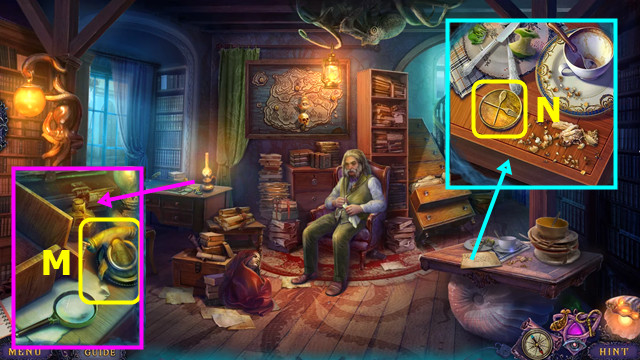
- Open the eye; move the seahorse (M).
- Open the eye; use the key (N).
- Place the seahorse (O).
- Place the seahorse (P).
- Use the key (Q).
- Place the seahorse (R).
- Place the seahorse (S).
- Place the seahorse (T).
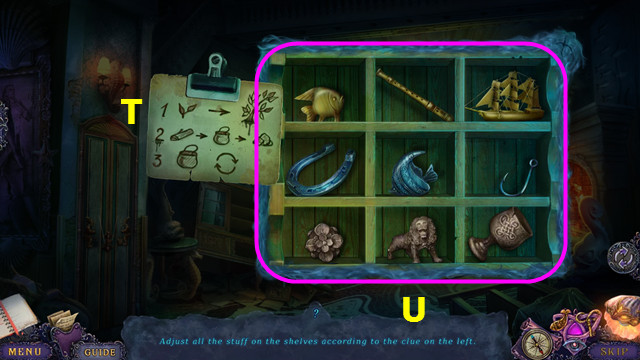
- Select (U).
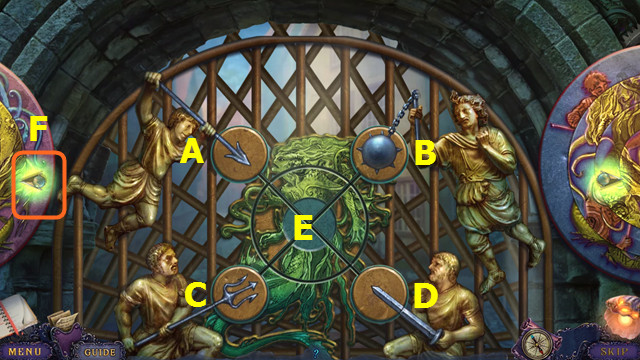
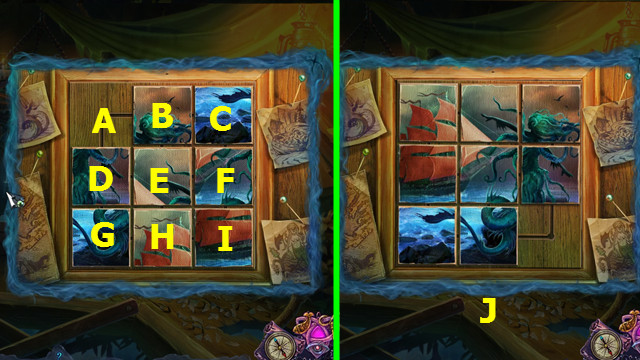
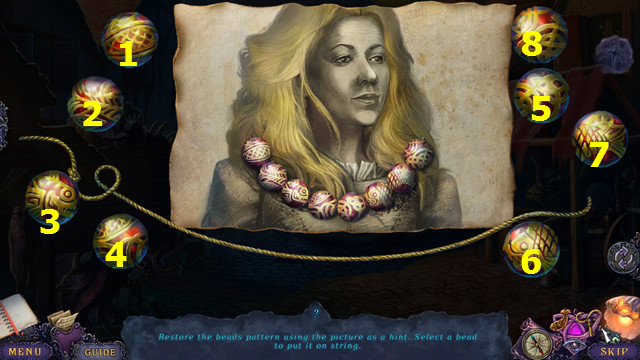
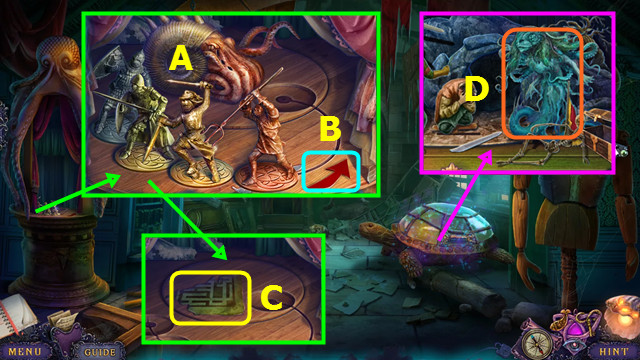
- Select C-D-B-E-A-C-E.
- Turn left (F).
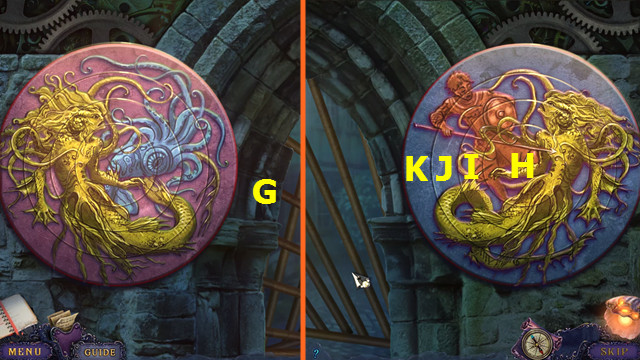
- Restore the image (G).
- Go right 2x.
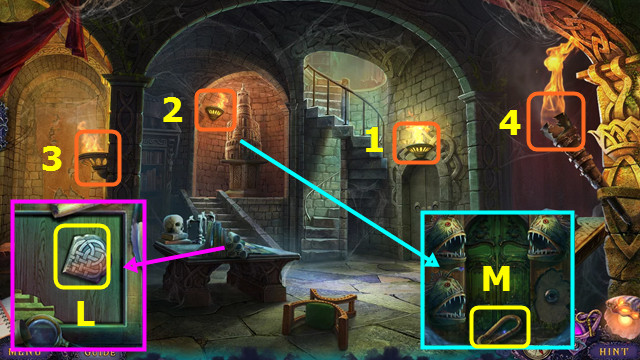
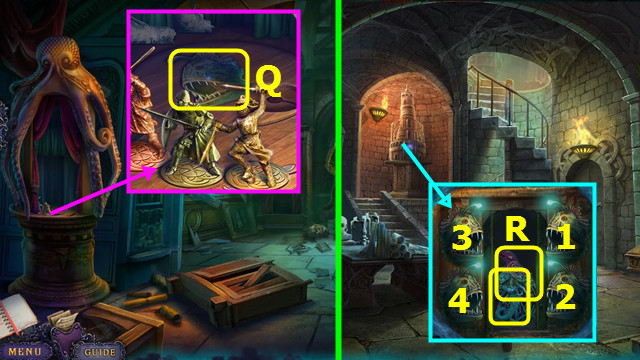
- Select Hx3-I-Jx3-K.
- Walk forward.
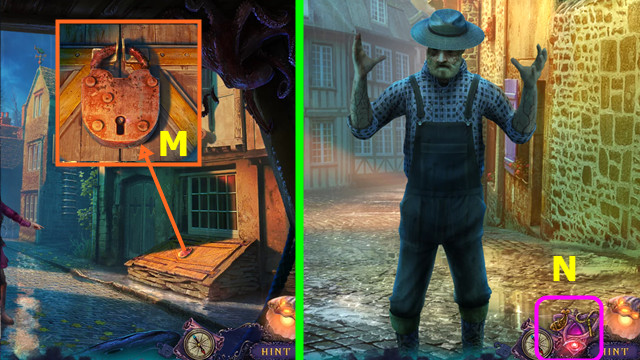
- Use the HAMMER and remove the lock (M).
- You earn LEANDRA'S POUCH.
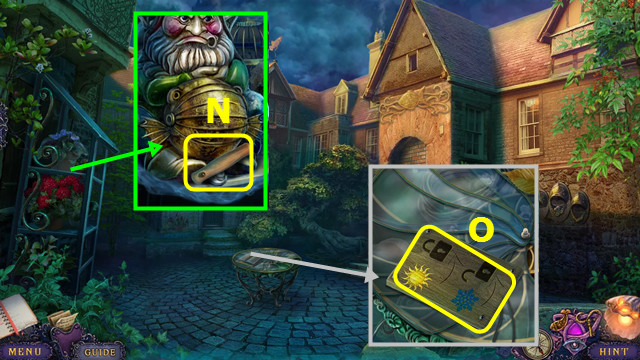
- Open LEANDRA'S POUCH; take the HIDEOUT CLUE, 1st FLOWER KEY PART, and AMULET.
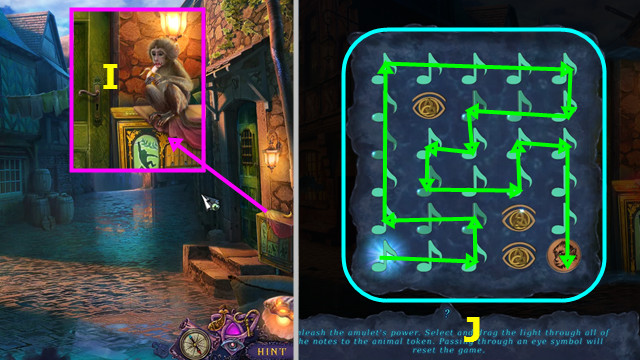
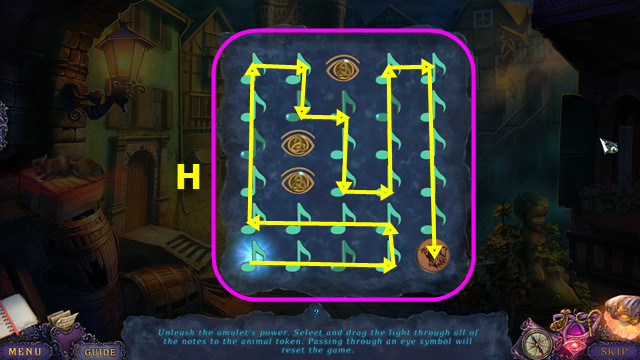
- Select and touch the AMULET (N).
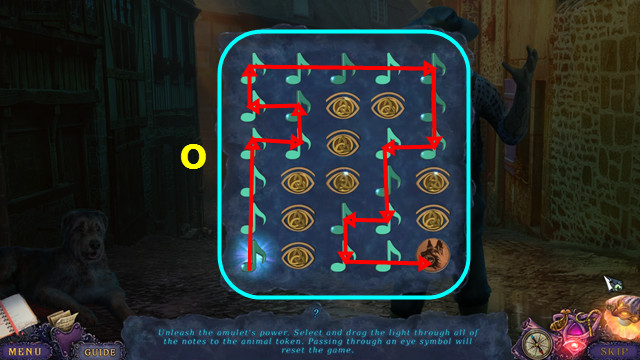
- Drag a path as shown (O).
- Touching a symbol will reset the mini-game.
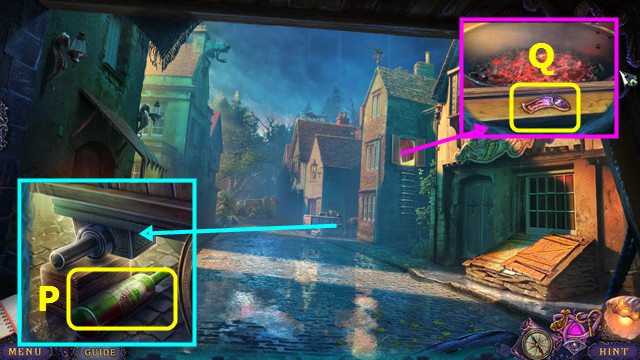
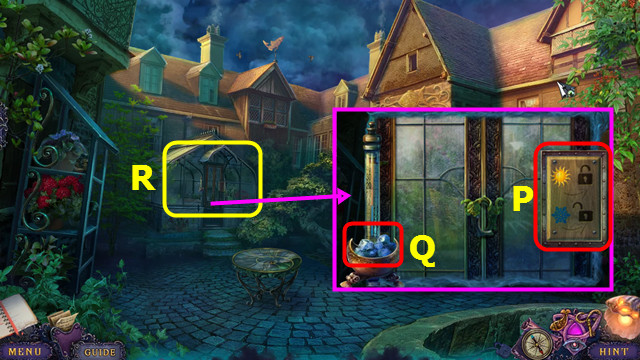
- Take the WINE (P).
- Take the 2nd FLOWER KEY PART (Q).
- Go right.
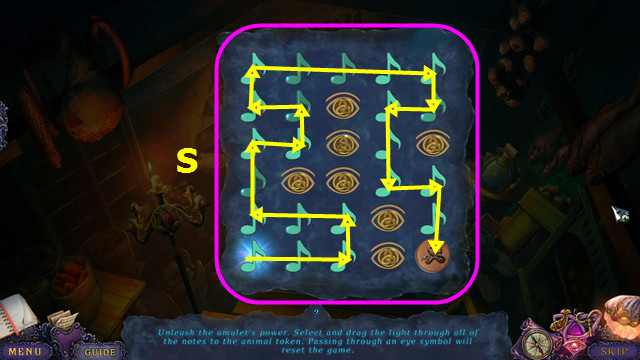
- Select and touch the AMULET.
- Drag along the shown path (S).
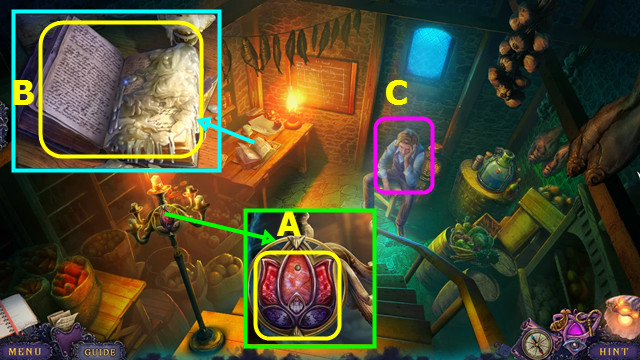
- Place the 2 FLOWER KEY PARTS; earn the FLOWER KEY (A).
- Read and turn the pages; take the WAXED BOOK (B).
- Talk to Noel; earn the 1st WHEEL PIECE (C).
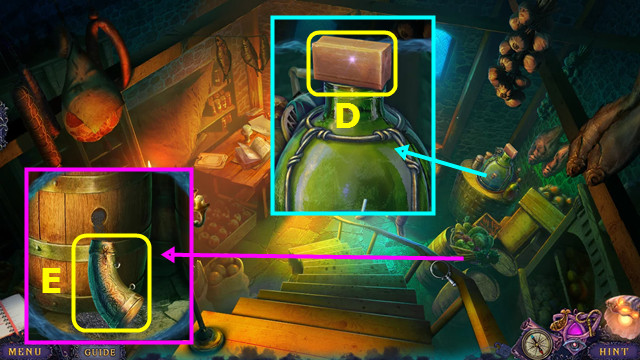
- Take the SOAP BAR (D).
- Remove the cork and use the GUNPOWDER FLASK to take the FULL GUNPOWDER FLASK (E).
- Walk down.
- Place the HIDEOUT CLUE (F).
- Place the FLOWER KEY (G).
- Go forward.
- Pull; select and play the HOP to earn the FLASK WITH WATER (H).
- Take the COIN ON A ROPE (I).
- Return to the Cellar.
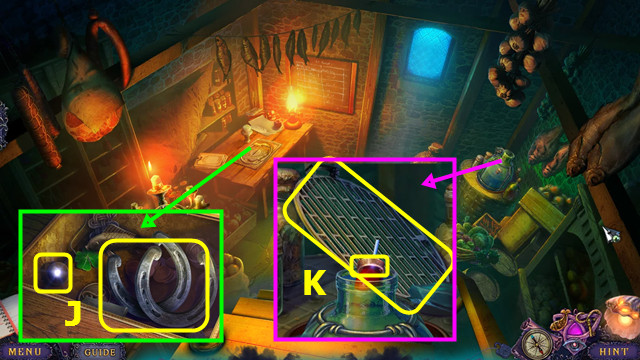
- Use the COIN ON A ROPE; take the HORSESHOES and LEAD BALL (J).
- Use the FLASK WITH WATER and WINE. Take the ENGRAVED RING; move the cloth and take the IRON GRATING (K).
- Combine the SEALED PENDANT and ENGRAVED RING; take the 1st PAINTING PART.
- Walk down.
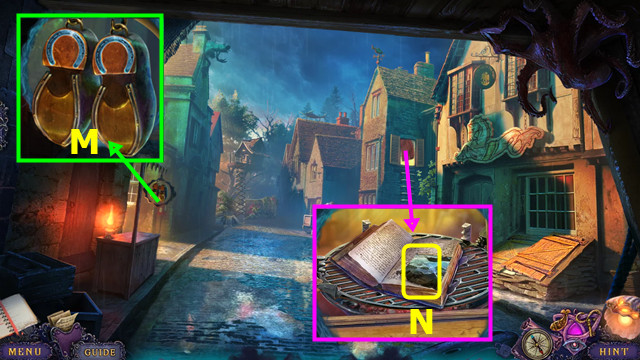
- Place the HORSESHOES; take the IRON SHOES (M).
- Place the IRON GRATING and WAXED BOOK; read the note and take the 2nd PAINTING PART (N).
- Go forward.
- Place the FULL GUNPOWDER FLASK and LEAD BALL; select the pistol 2x to earn the LOADED PISTOL (O).
- Use the IRON SHOES (P).
- Take the 1st TORN CLUE and place the 2 PAINTING PARTS (Q).
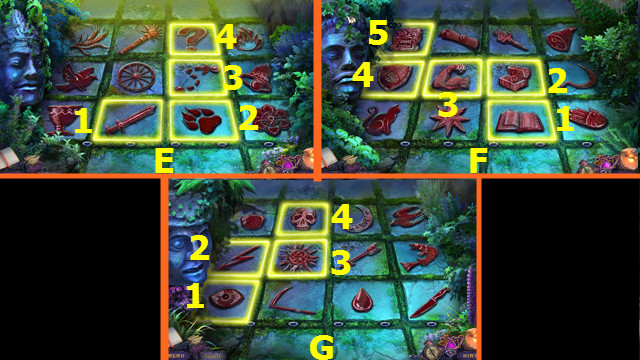
- Select: B-C-F-I-H-E-B-C-F-I-H-G-D-E-H-G-D-A
- B-C-F-I-H-E-D-A-B-C-F-E-D-A-B-C-F-I.
- Final solution (J).
- Read the journal.
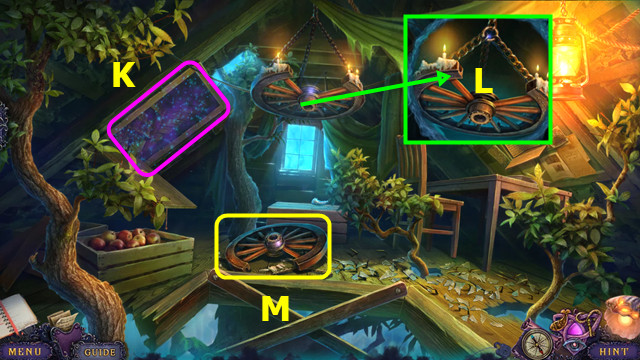
- Pull; select and play the HOP to earn the FISH PEG (K).
- Use the LOADED PISTOL (L).
- Take the BROKEN WHEEL (M).
- Combine the WHEEL PIECE and BROKEN WHEEL to make the CART WHEEL.
- Walk down.
Chapter 2: To the Shore
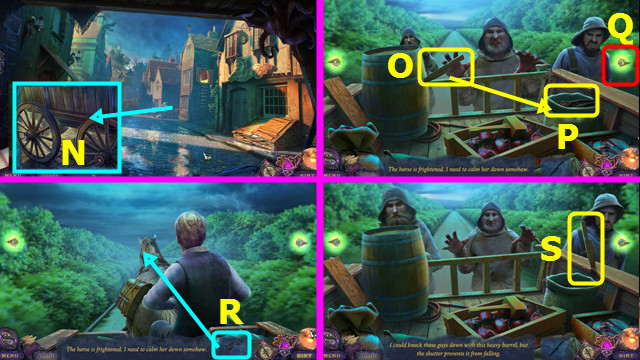
- Place the CART WHEEL and FISH PEG (N).
- Take the KNIFE (O).
- Use the KNIFE; take the BLINDERS (P).
- Turn right (Q).
- Use the BLINDERS (R).
- Turn right.
- Take the KNIFE (S).
- Turn right.
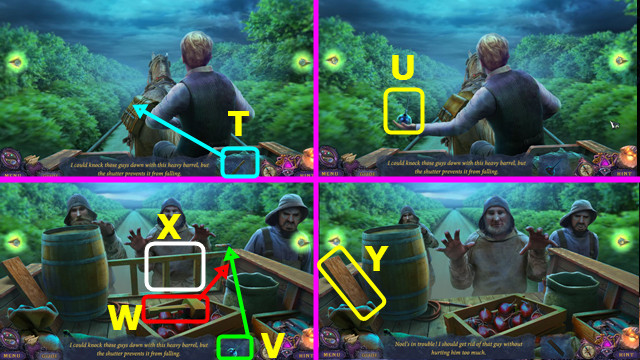
- Use the KNIFE (T).
- Take the OIL (U). Turn right.
- Use the OIL (V). Take the HAMMER (W) and use it.
- Select (X).
- Turn right. Take the BOARD (Y).
- Turn right.
- Use the BOARD (A).
- Take the CROWBAR (B).
- Turn right. Use the CROWBAR (C).
- Take the WHIP (D). Turn right.
- Use the WHIP (E).
- Take the BROOM (G).
- Use the BROOM (H).
- Take the PITCHER (I).
- Take the IRON POLE (J).
- Take the SEAGULL COVERED IN OIL (K).
- Use the IRON POLE to make the HANDMADE PADDLE (L).
- Take the DARK WATER and use the PITCHER (M).
- Take the DOLPHIN HANDLE and place the HANDMADE PADDLE (N).
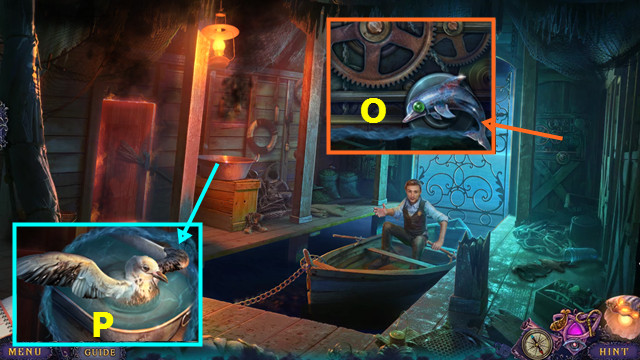
- Place and select the DOLPHIN HANDLE (O).
- Place the SEAGULL COVERED IN OIL and use the SOAP BAR (P).
- Select and touch the AMULET.
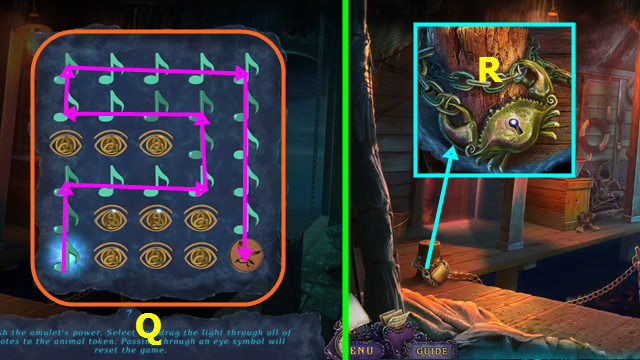
- Create the marked path (Q).
- You earn the BOAT KEY.
- Read the note and use the BOAT KEY (R).
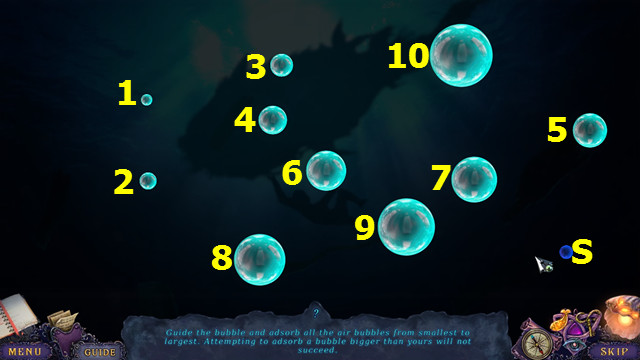
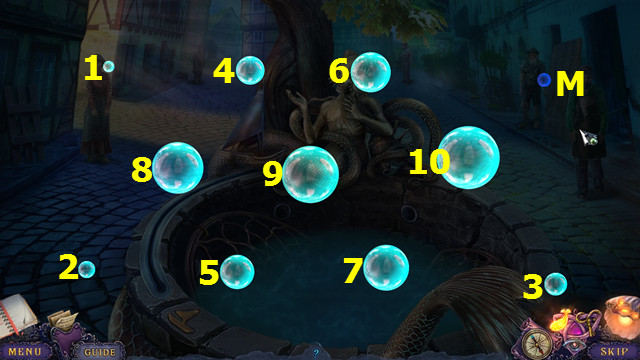
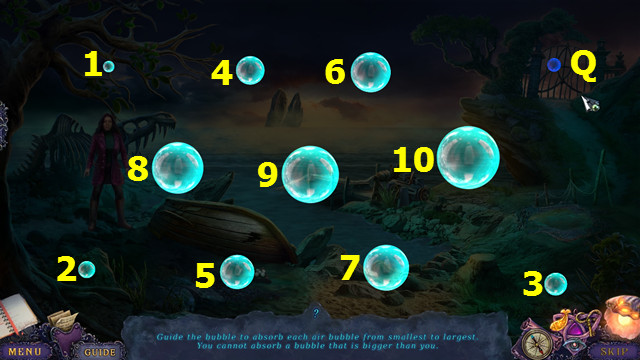
- Select and touch the AMULET.
- Drag the bubble (S) through the others (1-10).
- Talk to O'Callahan; earn the LIGHTER (A).
- Take the KEYS; place the COIN ON A ROPE and take the SMALL MIRROR (B).
- Take the BROKEN COMPASS (C).
- Open the door and enter the Fisherman's Hut (D).

- Take the ANGLERFISH HEAD and place the SMALL MIRROR (E).
- Select the mirrors 1-5.
- Read the note and take the LEVIATHAN EMBLEM (S).
- Take the IRON and place the LEVIATHAN EMBLEM; read the note and take the RITUAL CANDLE (T).
- Walk down.
- Place the RITUAL CANDLE; take the SHARP TEETH (F).
- Enter the Fisherman's Hut.
- Place the SHARP TEETH; take the SAW FISH (G).
- Walk down.
- Use the SAW FISH; take the ARROW SHAFTS (H).
- Enter the Fisherman's Hut.
- Place and select the ARROW SHAFTS, move the hat, and take the SMALL CANNONBALL (I).
- Walk down.
- Take the BUNCH OF STUFF (J).
- Place the SMALL CANNONBALL and use the LIGHTER (K).
- Take the TINY SPADE and ARTIFICIAL LIMB (L).
- Select (M).
- Place the BUNCH OF STUFF and use the ARTIFICIAL LIMB on O'Callahan (A).
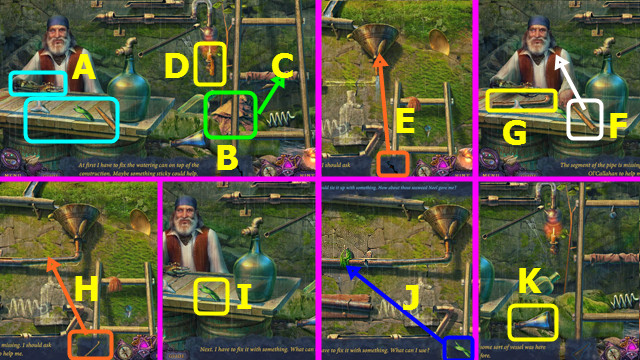
- Use B on C. Take the WAX and go up the ladder (D).
- Place the WAX and go down (E).
- Take the POLE (F) and give to O'Callahan. Take the PIPE and go up (G).
- Place the PIPE and go down (H). Take the SEAWEED and go up (I).
- Use the SEAWEED and go down (J). Take the FLASK and go up (K).
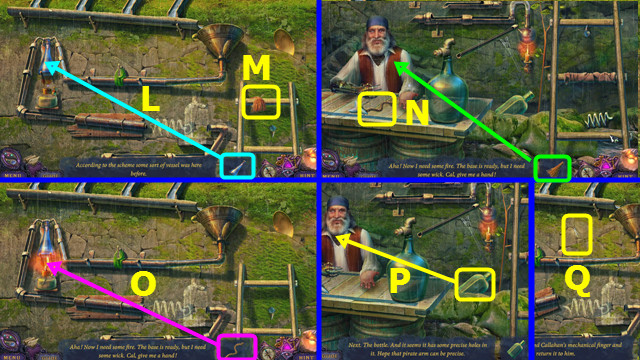
- Place the FLASK (L). Take the STRINGS and go down (M).
- Give the STRINGS to O'Callahan; take the WICK (N).
- Go up and place the WICK (O). Go down.
- Take the BOTTLE (P) and give to O'Callahan. Take the FINGER (Q) and go down.
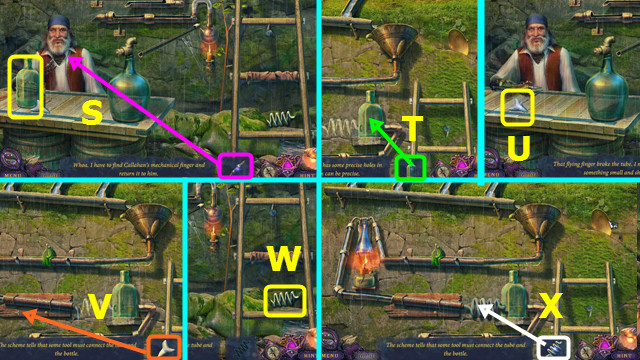
- Give the FINGER to O'Callahan; take the BOTTLE (S).
- Go up and place the BOTTLE (T). Go down and take the SHARK TOOTH (U).
- Go up and use the SHARK TOOTH (V). Go down and take the SPIRAL TUBE (W).
- Go up and place the SPIRAL TUBE (X).
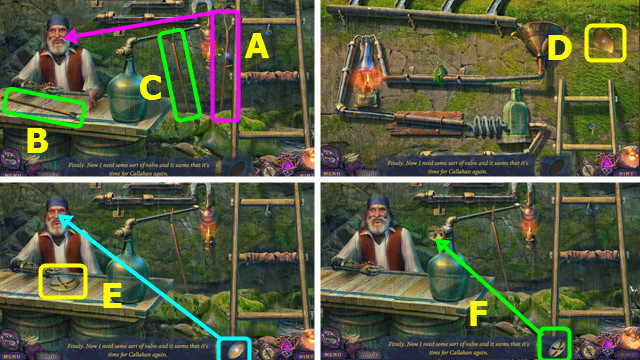
- Go down; take the BRANCH and give to O'Callahan (A).
- Take the PROP STICK (B). Place the PROP STICK (C).
- Go up and take the PLATE (D).
- Go down; give the PLATE to O'Callahan and take the VALVE (E).
- Place the VALVE (F). You earn FRESH WATER.
- Talk to O'CALLAHAN; earn the 2nd TORN CLUE and COMPASS NEEDLE (G).
- Enter the Fisherman's Hut.
- Place the BROKEN COMPASS and COMPASS NEEDLE; take the 3rd TORN CLUE (H).
- Combine the 3 TORN CLUES to make the SHORE CLUE.
- Walk down.
- Place the SHORE CLUE (I).
- Use the TINY SPADE and open the chest; read the note and take the CHEST KEY (J).
- Enter the Fisherman's Hut.

- Use the CHEST KEY (K).
- Play the HOP; earn the SIREN STATUETTE.
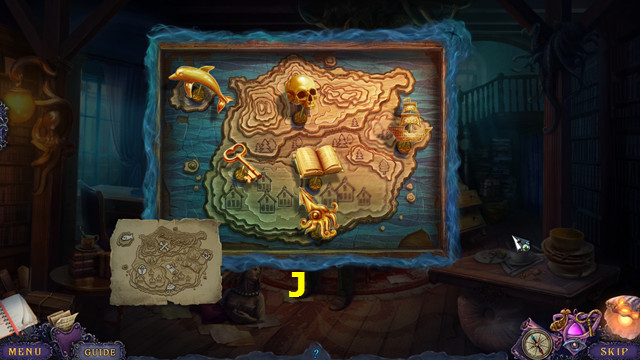
- Take the FOREST MAP (M).
- Walk down.

- Use the FOREST MAP to receive the MARKED FOREST MAP (N).
- Use the MARKED FOREST MAP (O).
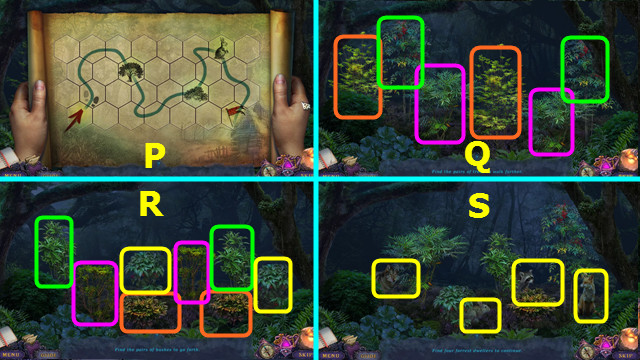
- Restore the path (P).
- Select the color-coded pairs (Q).
- Select the color-coded pairs (R).
- Select the animals (S).
Chapter 3: The Outskirts of Town
- Take the PLIERS (T).
- Use the PLIERS (U).
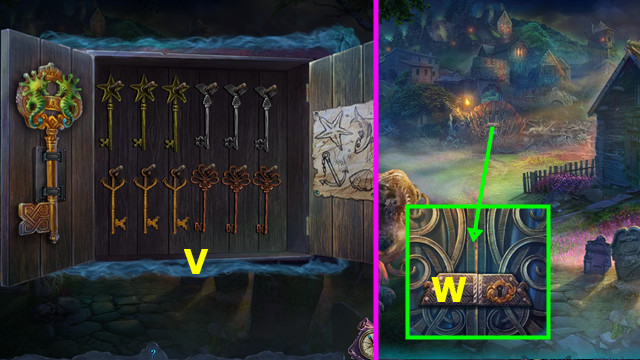
- Place the KEYS; arrange the keys as shown to earn the TOWN KEY (V).
- Use the TOWN KEY (W).
- Go forward.
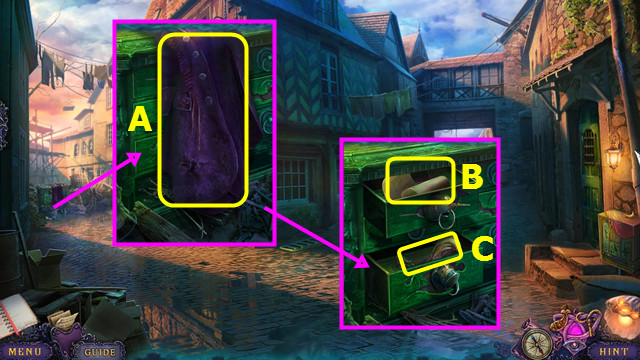
- Take the LEANDRA'S COAT (A).
- Open the drawer and take the CIPHERED LETTER (B).
- Place and select the ANGLERFISH HEAD; take the IRON TAIL (C).
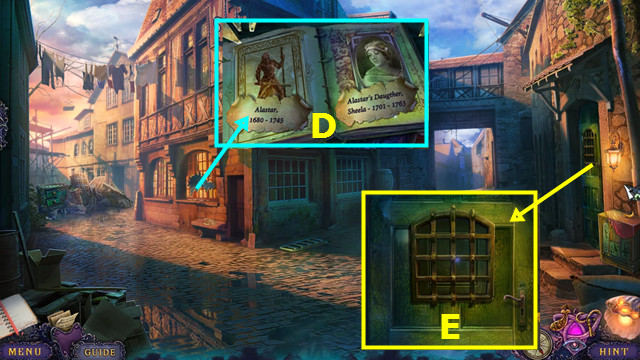
- Remove the plaque, read the book to earn the 1st CLUE PART (D).
- Knock on the door (E).
- Go forward.

- Take the CRACKED PORTRAIT (F).
- Place and select the IRON TAIL; take the MONKEY (G).
- Place the IRON to make the HOT IRON (H).
- Walk down.
- Place the MONKEY (I).
- Select and touch the AMULET.
- Trace the path (J).
- Walk right.
- Use the FRESH WATER; talk to O'Leary to earn the WEBBED FAN (K).
- Place the CIPHERED LETTER and HOT IRON; take the MARKET CLUE (L).
- Take the HAMMERHEAD KNOB (M).
- Read the note and take the FOOD TOKEN (N).
- Walk down.
- Place and select the HAMMERHEAD KNOB; take the THREAD (O).
- Walk down.
- Place the CRACKED PORTRAIT; take SHEELA'S MEDALLION (P).
- Go forward 2x.
- Place the MARKET CLUE (Q).
- Read the note and use the FOOD TOKEN; take the ICE and OCTOPUS TENTACLE (R).
- Remove the tile; read the note and take the BRAVERY MEDAL (S).
- Walk down.
- Use the OCTOPUS TENTACLE to take the GLASS BEADS (A).
- Walk down.
- Place the BRAVERY MEDAL; take the SWORD SHARD and PINNED PICTURE PART (B).
- Walk forward 2x.
- Read the note and place the WEBBED FAN (C).
- Take the GOLDEN PINS (D).
- Place the PINNED PICTURE PART on the boards.
- Restore the image (E).
- Take the NIGHTINGALE'S PORTRAIT.
- Combine the GLASS BEADS, THREAD, and NIGHTINGALE'S PORTRAIT.
- Select 1-8.
- Take the NECKLACE.
- Walk down and right.
- Move the cloth and place the NECKLACE; take the SHELL EMBLEM (G).
- Walk down.
- Place SHEELA'S MEDALLION and the SHELL EMBLEM; open the case, read the note, and take the ISLAND MAP (H).
- Walk right.
- Select (I).
- Place the GOLDEN PINS and ISLAND MAP on the board.
- Move the pieces to the shown positions (J).
- Take the SEALED SCROLL and SHIP.
- O'Leary takes the SEALED SCROLL and gives you the 2nd CLUE PART and the STONE PRISM.
- Combine the 2 CLUE PARTS to make the ARCHIVE CLUE.
- Walk right.
- Select (K).
- Place the SHIP (L).
- Select and touch the AMULET.
- Drag the bubble (M) through the others (1-10).
Chapter 4: The Backyard
- Take the TOOL HANDLE (N).
- Combine the TOOL HANDLE and SWORD SHARD to make the HANDMADE CHISEL.
- Read the note and take the THERMAL CLUE (O).
- Place the THERMAL CLUE (P) and ICE (Q).
- Play the HOP; earn the GOLD FISHHOOK (R).
- Use the HANDMADE CHISEL: take the BOLT WITH SCREW (S).
- Take the SWIRL EMBLEM (T).
- Use the BOLT WITH SCREW (U) and the GOLD FISHHOOK (V).
- Walk right.
- Use the ARCHIVE CLUE on the scene.
- Select the 4 areas (W).
- Place the SWIRL EMBLEM; read the note and take the FOLDER DIVIDER (A).
- Place the FOLDER DIVIDER; read the note and take the 1/3 LEGEND PAGES (B).
- Take the 2/3 LEGEND PAGES; take the ENGRAVED TABLETS and place the STONE PRISM (C).
- Place the ENGRAVED TABLETS (D).
- Select the tablets to begin (E).
- Move the tablets to the ‘true' fish (F-I).
- Take the GLASS PETAL (J).
- Walk down.
- Place the GLASS PETAL; take the LEATHER CORD (M).
- Play the HOP; earn the KELPIE (N).
- Walk right.
- Place the SIREN STATUETTE and KELPIE: read the note and take the 3/3 LEGEND PAGES (O).
- Place the 3 LEGEND PAGES and LEATHER CORD; select the cord and take the HERO'S LEGEND (P).
- Select (Q).
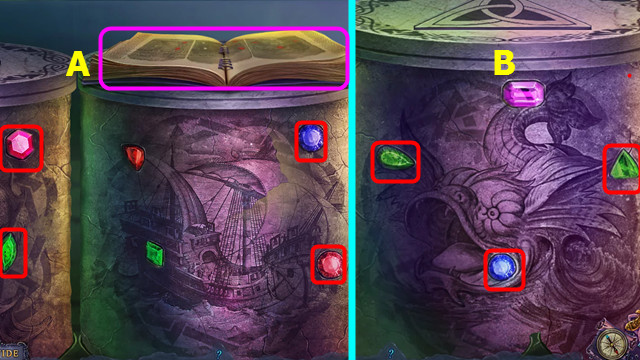
- Place and read the HERO'S LEGEND (A).
- Select the gems (red); pan right for the right column (B).
- Pan left 2x.
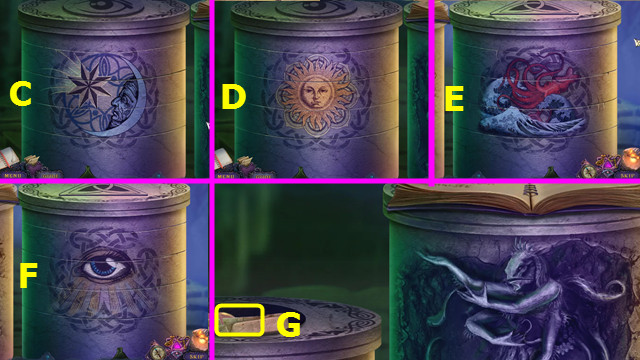
- Restore the image (C).
- Change to the 2nd image (D).
- Pan right 2x.
- Restore the image (E).
- Change to the 2nd image (F).
- Read the note and take the 1/2 CROW EMBLEM (G).
- Go forward.
- Select and touch the AMULET.
- Trace the path (H).
- Take the BROKEN BONE (I).
- Take the PIPE (J).
- Use the FRESH WATER (K).
- Talk to Leandra; use FRESH WATER (L).
- Walk down 2x.
- Place the PIPE; take the ROPE (A).
- Go right and forward.
- Place the ROPE (B).
- Select (C).
- Go forward.
- Read the book; take the STAR COMPASS (D).
- Take the FISH EYES; place the STAR COMPASS and take the LANTERN (E).
- Walk down.

- Place the FISH EYES; take the TEMPLE MODEL (F).
- Go forward.
- Place the TEMPLE MODEL: take the SUNDIAL PART (G).
- Walk down.
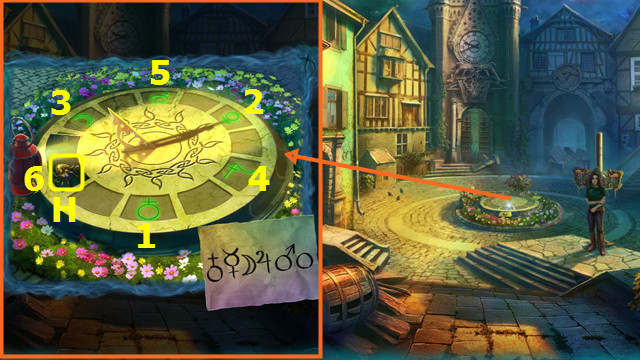
- Place the SUNDIAL PART and LANTERN on the sundial.
- Select 1-6; take the SIREN STATUE (H).
- Go forward.
- Place the SIREN STATUE; read the book and take the GOLDEN SEASHELL (I).
- Place the GOLDEN SEASHELL; take the STARFISH BLUEPRINTS (J).
- Walk down.
- Give the STARFISH BLUEPRINTS; play the HOP. Take the STARFISH and talk to the Smithy (K).
- Use the STARFISH (L).
- Give LEANDRA'S COAT (M).
- Walk left.
- Take the LETTER OPENER (N).
- Take the HAT and use the BROKEN BONE; take the SCREWDRIVER (O).
- Take the GOLD BAR (P).
- Walk down.
- Use the SCREWDRIVER; remove the lid and take the LIGHTBULB (Q).
- Walk left.
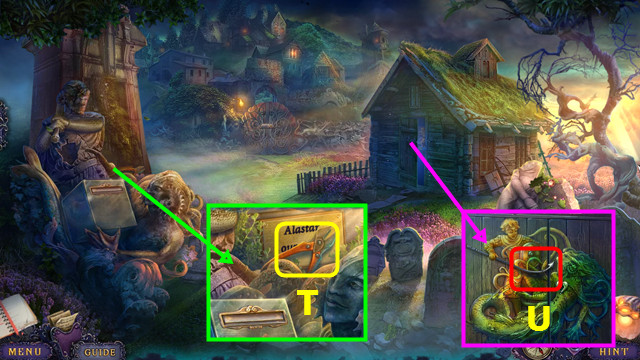
- Place the LIGHTBULB; move the debris and take the ALASTAR PAINTING (R).
- Use the LETTER OPENER on the ALASTAR PAINTING; take the BOOKCASE HINT.
- Select (S).
- Place the BOOKCASE HINT (T).
- Arrange the items as shown (U).
- Walk left.
Chapter 5: The Memorial
- Take the DECORATIVE SUN (A).
- Take the FISH BUCKET EMBLEM (B).
- Walk down.
- Place the FISH BUCKET EMBLEM and open the doors (C).
- Play the HOP; earn the POKER.
- Take the JEWELRY BOX (D).
- Use the POKER to take the 1st TOWN BRACELET (E).
- Walk down and forward.
- Move the items and place the DECORATIVE SUN; take the 2nd TOWN BRACELET (F).
- Walk down and go left 2x.
- Place the 2 TOWN BRACELETS; restore the image (G).
- Play the HOP; earn the ARROW (H).
- Place the ARROW; take the LEGENDARY SWORD, read the note, and take the 1/3 ENGRAVED STONE (I).
- Walk down.
- Use the LEGENDARY SWORD (J).
- Enter the floor (K).
- Select 1-4.
- Take the 2/3 ENGRAVED STONE (L).
- Take the CARABINER (M).
- Take the BLACKSMITH MOLD (N).
- Go up and walk down.
- Give the GOLD BAR and BLACKSMITH MOLD; play the HOP and take the GOLD WARRIOR (O).
- Walk left 2x.
- Place the GOLD WARRIOR; take the ANGLERFISH HEAD (Q).
- Walk down and enter the floor.
- Place the ANGLERFISH HEAD; select 1-4.
- Take the 2/2 CROW EMBLEM and the CARDBOARD SIREN (R).
- Place the 2 CROW EMBLEMS and open the book; read the note and take the KNOTTED EMBLEM and 1st MAP PART (S).
- Combine the JEWELRY BOX and KNOTTED EMBLEM and read the note; take the BIRD EMBLEM and WINGS.
- Go up and left.
- Place the BIRD EMBLEM; select pairs of straps (color-coded) and take the TIN WARRIOR (T).
- Place the TIN WARRIOR on the device.
- Arrange the figures as shown (A).
- Press 4x (B).
- Take the 2nd MAP PART (C).
- Place the CARDBOARD SIREN (D); play the HOP to earn the CELTIC KNOT.
- Go to the Hidden Room.
- Place the 2 MAP PARTS; take the TUNNEL MAP (E).
- Place the WINGS and CELTIC KNOT; take the BONE WEAPON, read the note, and take the 3/3 ENGRAVED STONE (F).
- Place the 3 ENGRAVED STONES and TUNNEL MAP (G).
- Take the BROKEN SHOVEL (H).
- Take the FIRM PLANK (I).
- Select and touch the AMULET.
- Drag along the indicated path (J).
- Take the NET WEIGHT and BRUSH; use the BROKEN SHOVEL (K).
- Use the NET WEIGHT to take the MONSTER TOOTH (L).
- Use the FIRM PLANK (M).
- Use the HAT: take the FLINT and RUSTY CHAIN (N).
- Remove the broken lever (P); use the RUSTY CHAIN and CARABINER (O).
- Place and select the MONSTER TOOTH (P).
- Select and touch the AMULET.
- Drag the bubble (Q) through the others (1-10).
- Play the HOP.
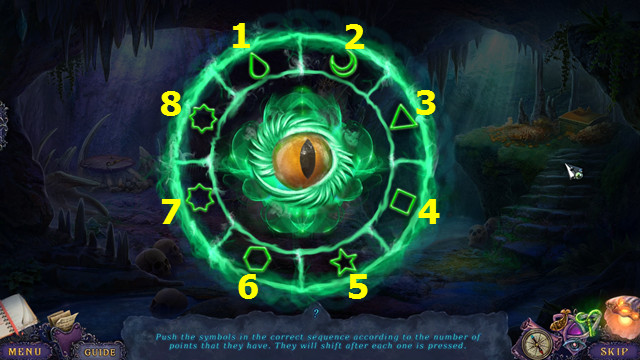
- Select and touch the AMULET.
- Select the symbols 1-8.
- The symbols move as you play; they may be in different locations.
- Take the 1st BONE SCISSORS HALF (A).
- Take the GOLD TIARA (B).
- Go forward.
- Take the COLORED PAINTS (C).
- Place the GOLD TIARA; earn the 2nd BONE SCISSORS HALF (D).
- Combine the 2 BONE SCISSORS HALVES to make the BONE SCISSORS.
- Use the BONE SCISSORS; take the WARHAMMER (E).
- Go forward.
- Place the BRUSH and COLORED PAINTS; touch the paints. Take the BENT GAFF (F).
- Use the BENT GAFF and WAR HAMMER to make the STRAIGHT GAFF (G).
- Take the COAL and ARMOR PLATE (H).
- Go forward.
- Use the STRAIGHT GAFF and WAR HAMMER: take the MARBLE EYE and 1st PRECIOUS EYE (I).
- Place the ARMOR PLATE and remove all the armor; take the 2nd PRECIOUS EYE (J).
- Go forward.
- Place the 2 PRECIOUS EYES; take the CHEST KEY (K).
- Use the CHEST KEY; take the GOLD LYRE (L).
- Go forward.
- Use the COAL (M).
- Use the COAL and place the GOLD LYRE (N).
- Take the BONE BLADE (O).
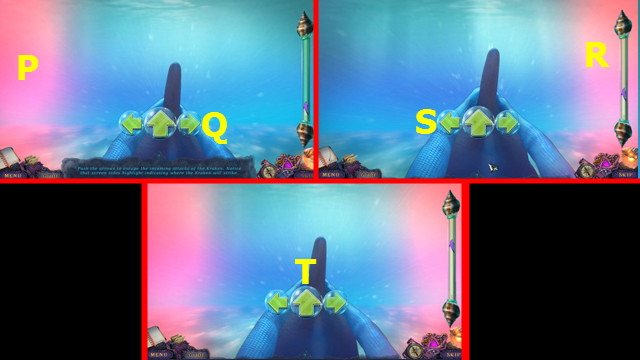
- Avoid the tentacles.
- When the red haze appears on the left (P), select the right arrow (Q).
- When the red haze appears on the right (R), select the right arrow (S).
- When the red haze appears on both sides, select the center arrow (T).
Chapter 6: The Way to the Temple
- Place the MARBLE EYE; take the RED CLOTH and CANDLE (A).
- Use the RED CLOTH to make the IMPROVISED BANDAGE (B).
- Move the rocks; take the COLUMN PLATE and STAFF (C).
- Select (D).
- Select 1-4 (E).
- Go forward.
- Select 1-5 (F).
- Go forward.
- Select 1-4 (G).
- Go forward.
- Take the WOODEN SCOOP (H).
- Walk down.
- Use the WOODEN SCOOP; take the VESSEL PART (I).
- Use the WOODEN SCOOP to take the DRY ROSEMARY (J).
- Take the SMALL DRAGON (K).
- Go forward.
- Use the DRY ROSEMARY and FLINT; use the CANDLE to make the LIT CANDLE (L).
- Go forward.
- Use the LIT CANDLE (M).
- Take the IRON RING (N).
- Take the SMOKER LID (O).
- Walk down.
- Place the SMOKER LID; take the INCENSE SMOKER (P).
- Go forward.
- Use the INCENSE SMOKER and VESSEL PART to make the STICKY PART (Q).
- Walk down 2x.
- Place the STICKY PART; take the RESTORED VESSEL (A).
- Use the IRON RING; take the BRASS SHAPE (B).
- Go forward.
- Use the RESTORED VESSEL to take the FULL VESSEL (C).
- Use the FULL VESSEL and IMPROVISED BANDAGE; take the MAMA BADGER and 1st GOLD ORNAMENT (D).
- Walk down.
- Place MAMA BADGER; take the 2nd GOLD ORNAMENT (E).
- Go forward 2x.
- Place the 2 GOLD ORNAMENTS and use the STAFF; place the BRASS SHAPE and take the ELDER HAND and STONE TRIANGLE (F).
- Walk down.
- Place the STONE TRIANGLE; take the STATUE CLUE (G).
- Walk forward.
- Place the ELDER HAND and STATUE CLUE; arrange the statues as shown (H).
- Place the COLUMN PLATE and push the button (I).
- Walk right.
- Take the GOLDEN PUPIL (J).
- Place and select the SMALL DRAGON; take the FLAT COIN. Move the purse and take the DULL SHIELD (K).
- Place the DULL SHIELD; earn the SHARP CRYSTAL (L).
- Go forward.
- Talk to the Siren (M).
- Take the SALT (N).
- Walk down and left.
- Take the ACID and read the plaque (O).
- Take the ALTAR PART (P).
- Take the TALC POWDER and place the ALTAR PART (Q).
- Play the HOP; take the SALAMANDER EGG.
- Place the SALAMANDER EGG; take the BONE GRINDSTONE (A).
- Walk down and forward.
- Use the ACID and use the FLAT COIN 2x to earn the SHACKLES (B).
- Walk down.
- Use the SHACKLES and the SALT; play the HOP to earn the CHISELING TOOLS (C).
- Use the TALC POWDER and CHISELING TOOLS; take the TRIDENT (D).
- Walk left.
- Use the TRIDENT; take the MIRROR FRAME and TAPESTRY PIECE (E).
- Walk down.
- Use the TAPESTRY PIECE (F).
- Walk forward.
- Select (G).
- Place the MIRROR FRAME and use the SHARP CRYSTAL on the pieces.
- Restore and take the CELTIC MIRROR (H).
- Please note that the markings on the pieces are important.
- Walk down.
- Place the CELTIC MIRROR (I).
- Move the two poles as shown (J).
- Go forward.
- Take the ALASTAR'S DAGGER, read the note, and take the TRIANGULAR STONE (K).
- Walk down 3x.
- Place the TRIANGULAR STONE; take the IRON LASHES (L).
- Return to the Siren's Prison.
- Place the IRON LASHES and GOLDEN PUPIL; take the SUN HANDLE (M).
- Place the SUN HANDLE and select N-O-O-N.
- Take the HOLY GOBLET (P).
- Walk down 3x.
- Use the HOLY GOBLET to take the FULL GOBLET (Q).
- Return to the Ritual Room.
- Use the FULL GOBLET and ALASTAR'S DAGGER; take the BONE RING (R).
- Select (S).
- Place the BONE WEAPON, BONE BLADE, BONE GRINDSTONE, and BONE RING on the platform (T).
- Play the HOP.
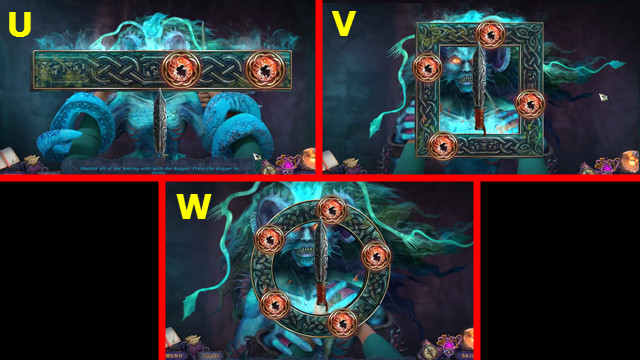
- Select the blade to hit the orbs as they move (U-W).
- Congratulations! You have completed Whispered Secrets: Song of Sorrow!
Created at: 2016-12-21