

Walkthrough Menu
- General Tips
- Chapter 1: The Backyard
- Chapter 2: Charleston Hall
- Chapter 3: Between Worlds
- Chapter 4: Wise Tarte
- Chapter 5: Lower Town
- Chapter 6: Upper Town
General Tips
- This is the official guide for Witches' Legacy: Awakening Darkness.
- This guide will not mention each time you have to zoom into a location; the screenshots will show each zoom scene.
- Hidden-object puzzles are referred to as HOPs. This guide will not show HOP solutions. It will identify the location of the HOP and the inventory item acquired.
- This guide will show solutions for non-random puzzles. Please read the in-game instructions for each puzzle.
- In this game, you will sometimes have to select the new scene to trigger dialog, cut-scenes, or tasks prior to interacting with the scene.
Chapter 1: The Backyard
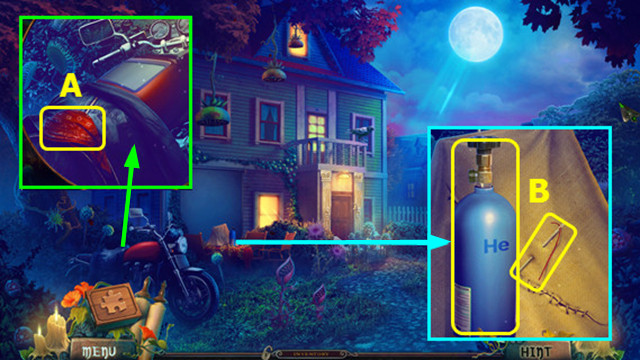
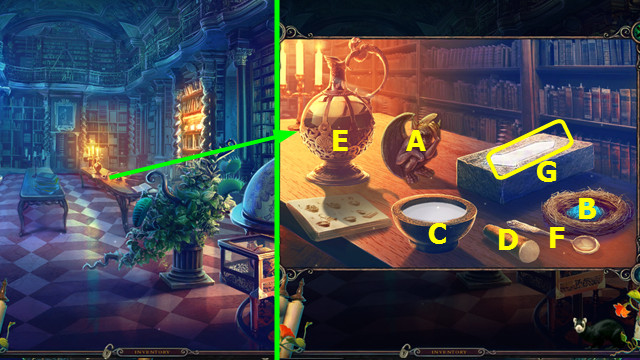
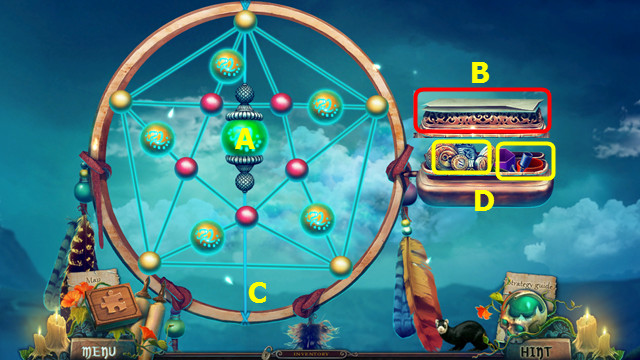
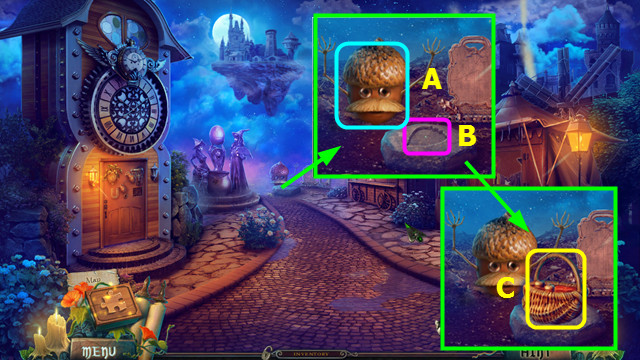
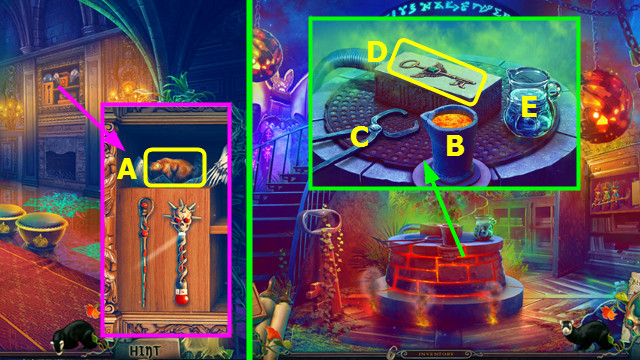
- Move the jacket; select and take the BANDANA (A).
- Take the HELIUM and read the plant journal; take the NEEDLE AND THREAD (B).
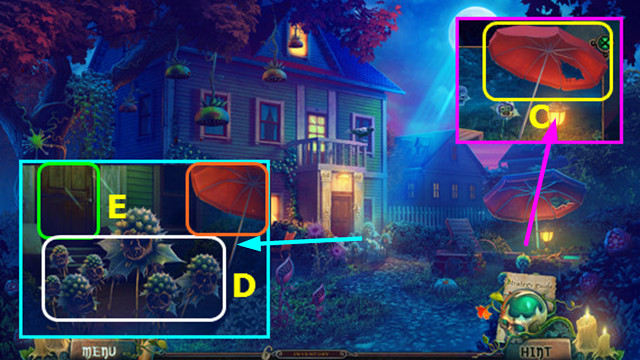
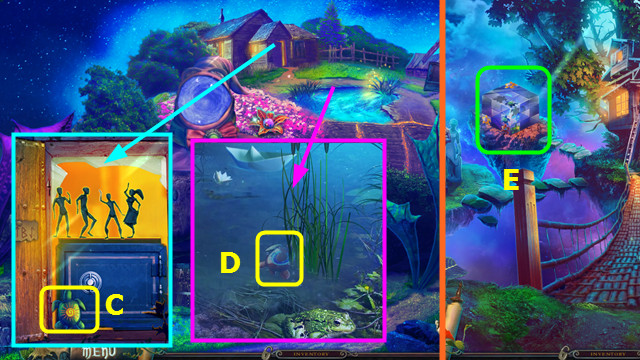
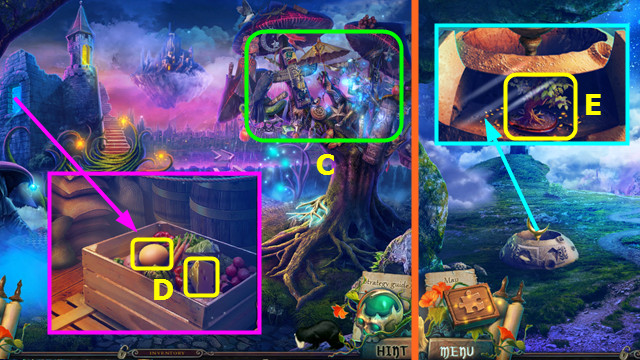
- Take the TORN UMBRELLA (C).
- Combine the TORN UMBRELLA, BANDANA, and NEEDLE AND THREAD to make the UMBRELLA (inventory).
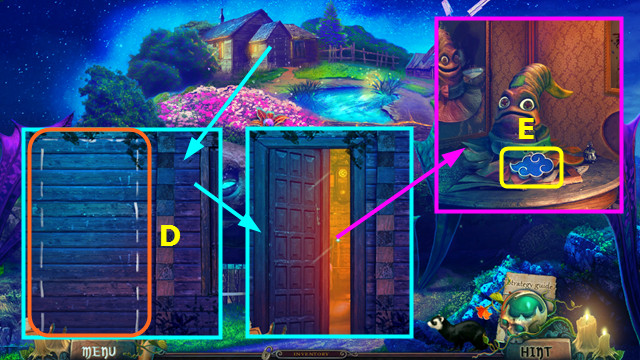
- Place the UMBRELLA and select the plants (D).
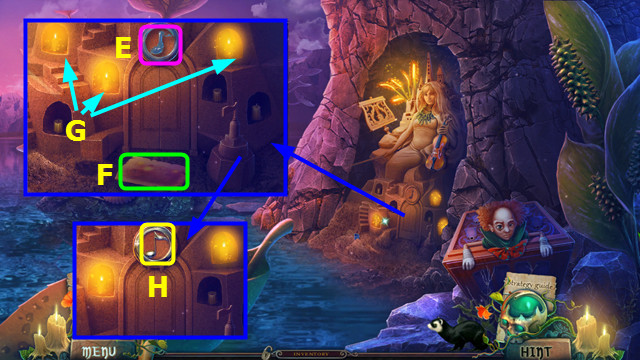
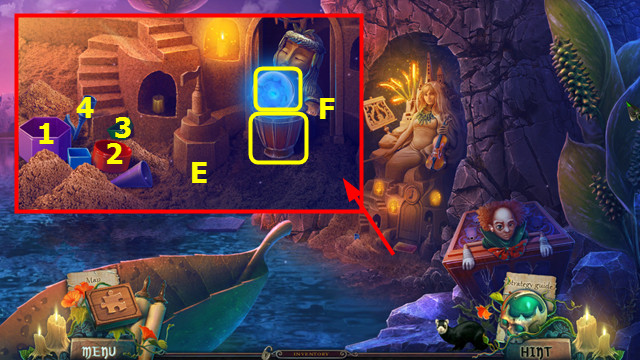
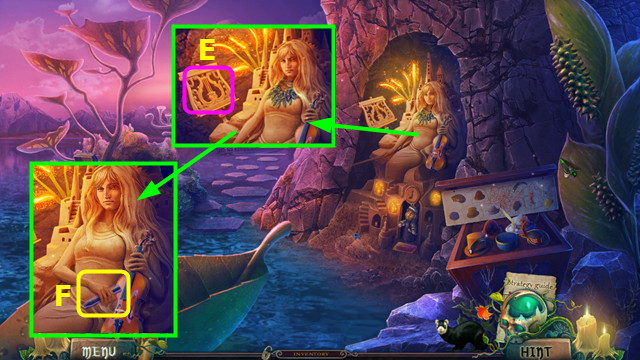
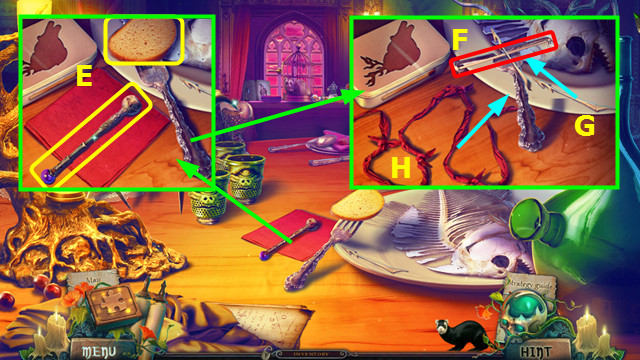
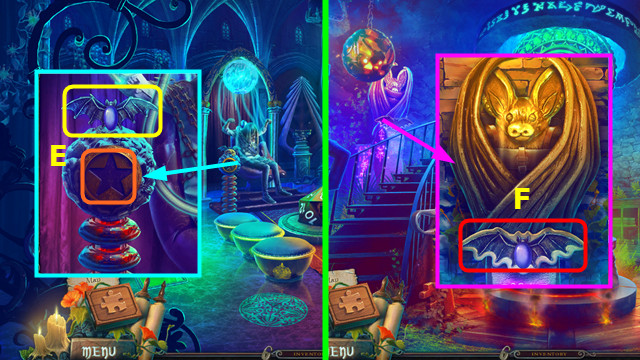
- Walk forward (E).
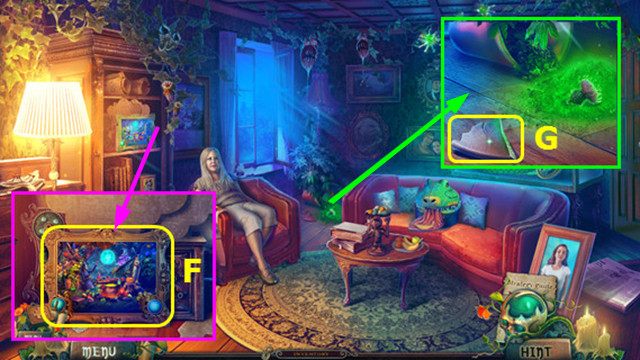
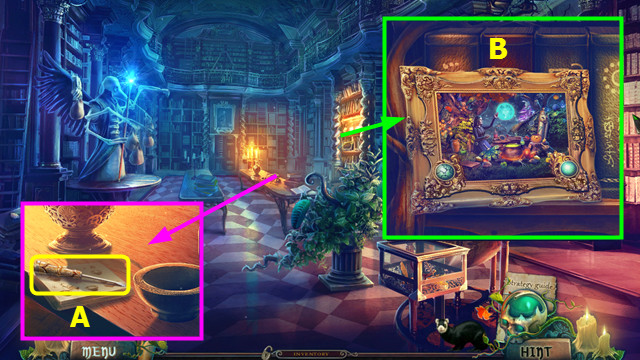
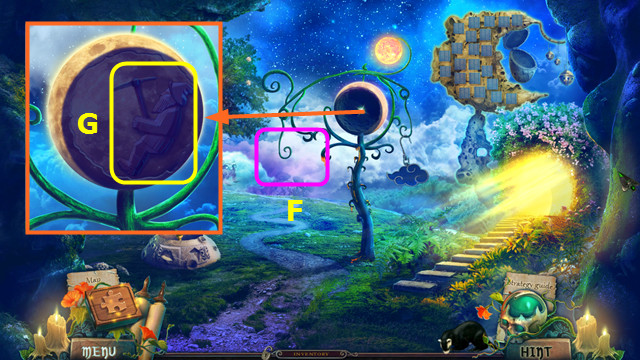
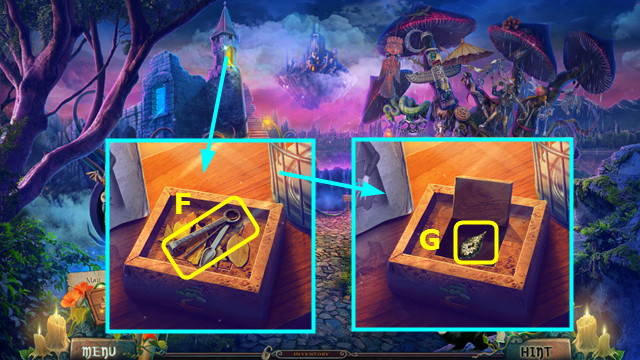
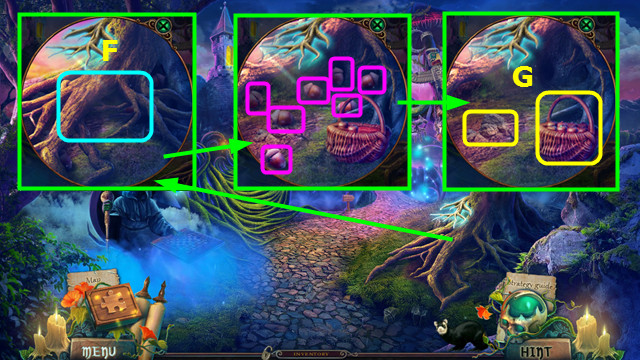
- Take the MAGIC PAINTING (F).
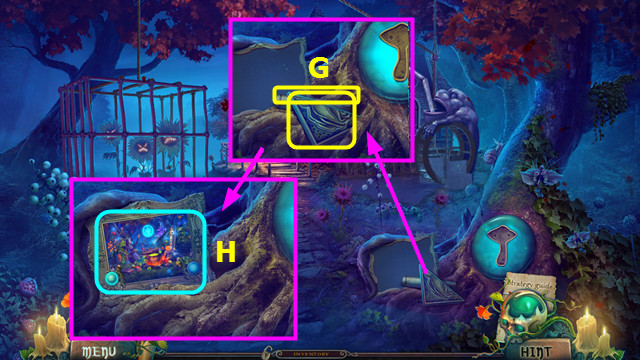
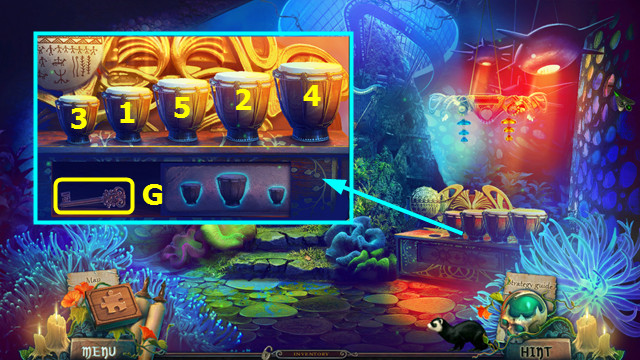
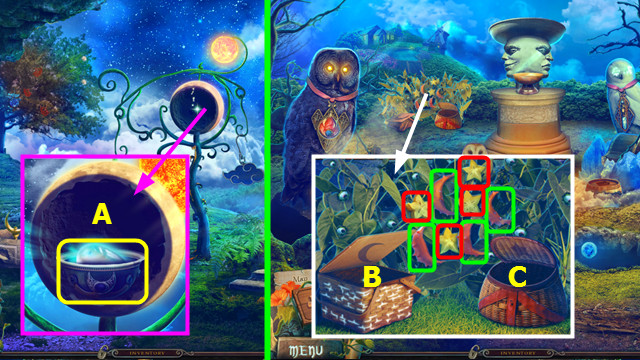
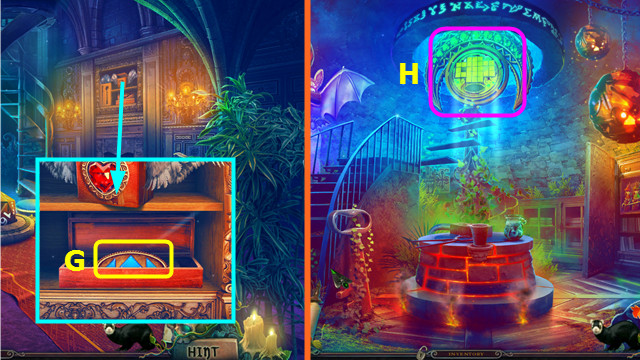
- Take the SHARP SHARD (G).
- Walk down.

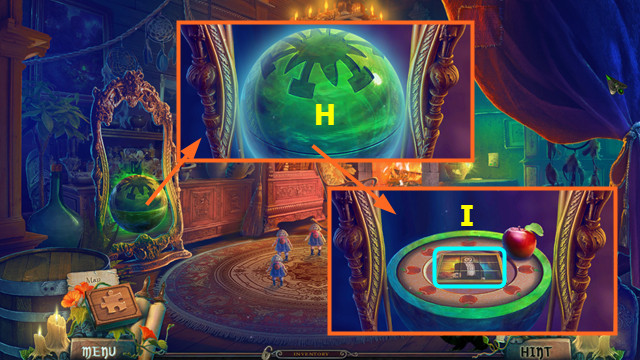
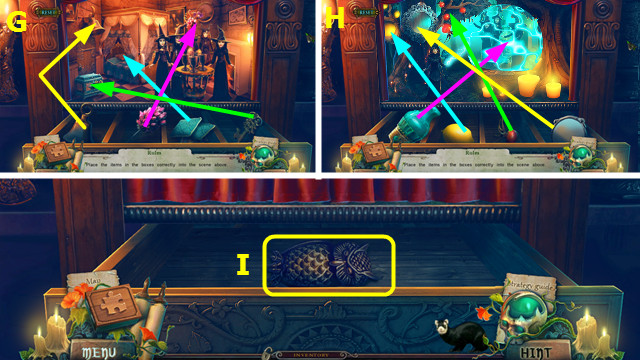
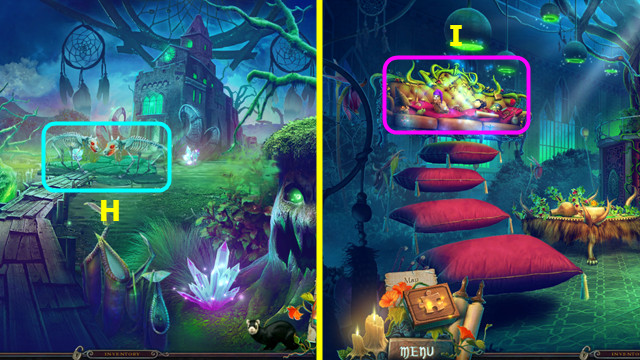
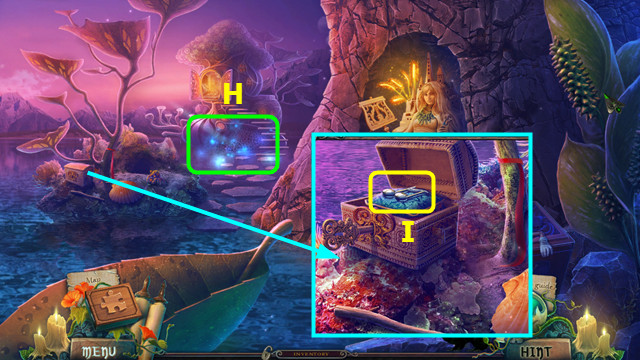
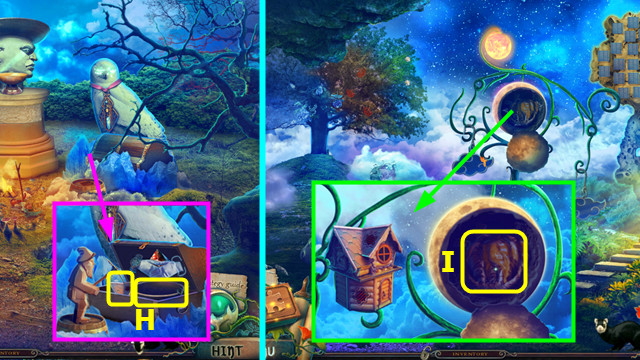
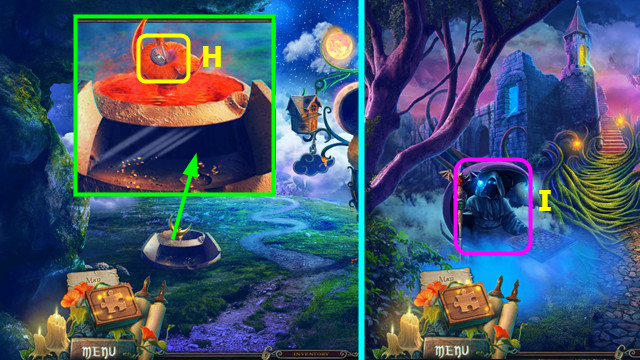
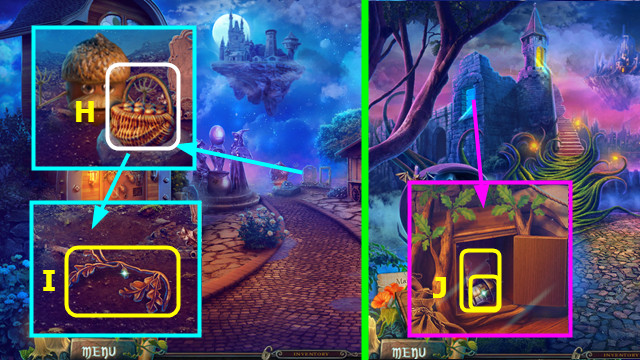
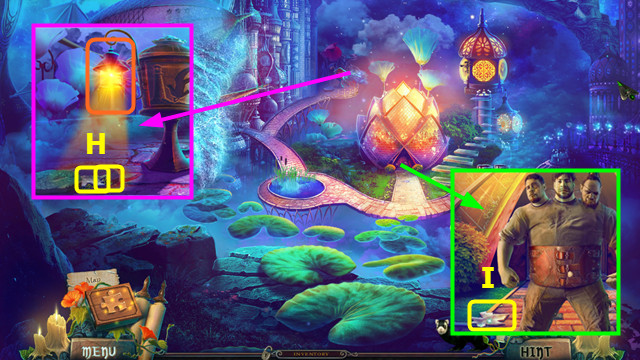
- Use the SHARP SHARD (H).
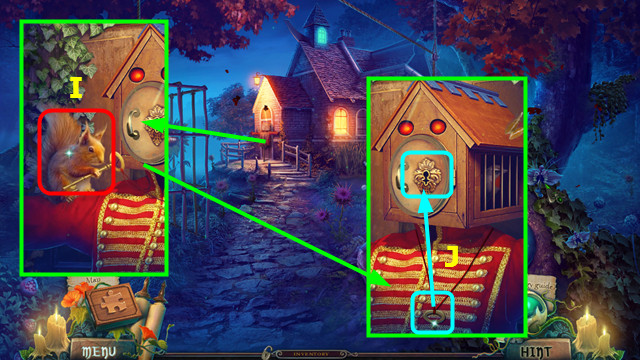
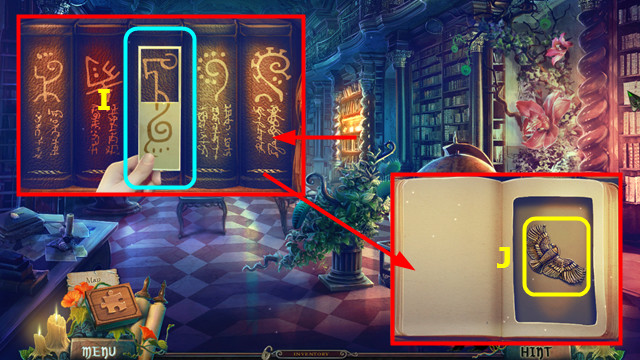
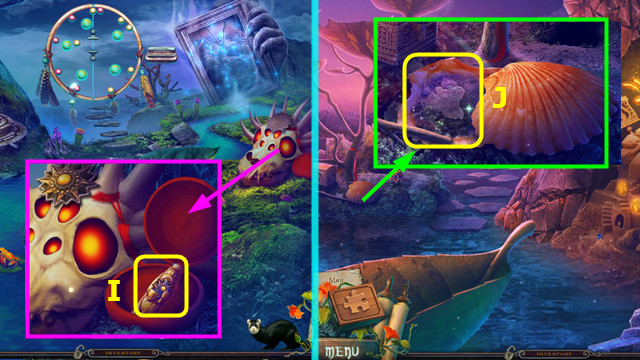
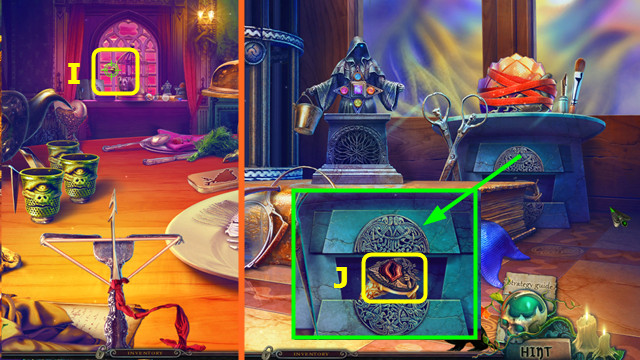
- Select the 5 projector pieces (green); take the COGWHEEL (I).
- Go forward.
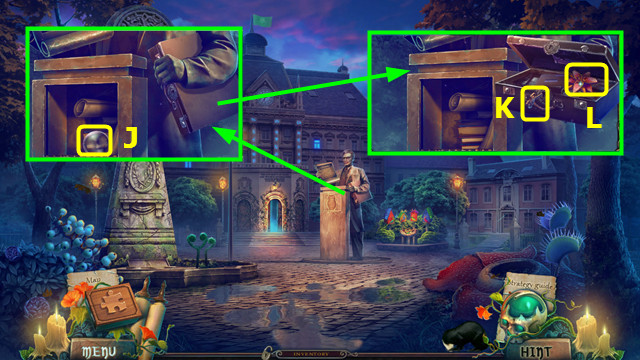
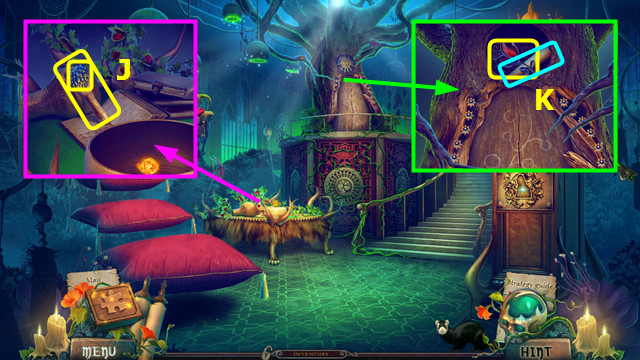
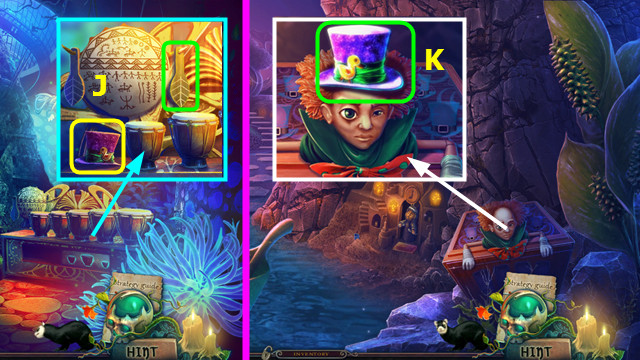
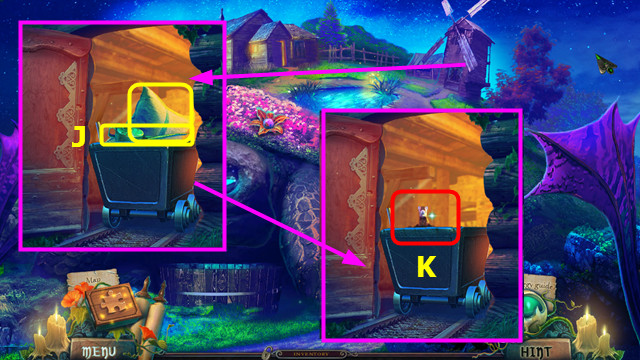
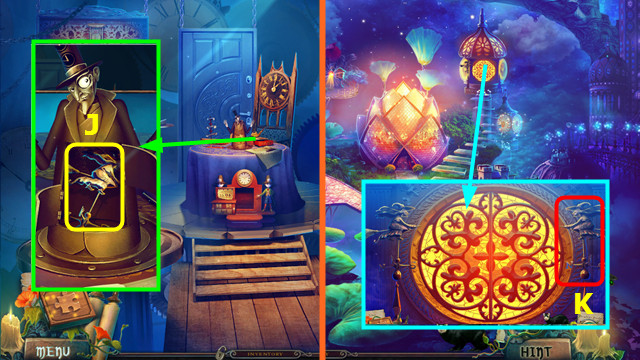
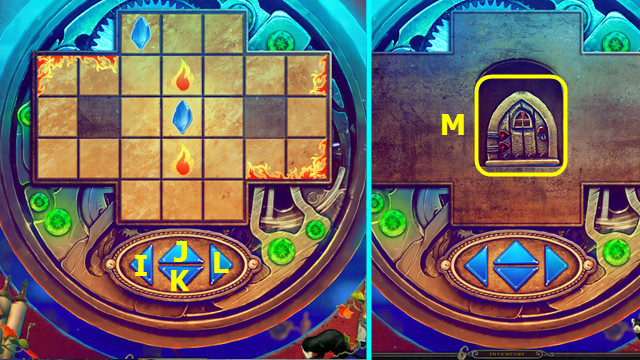
- Select (J).
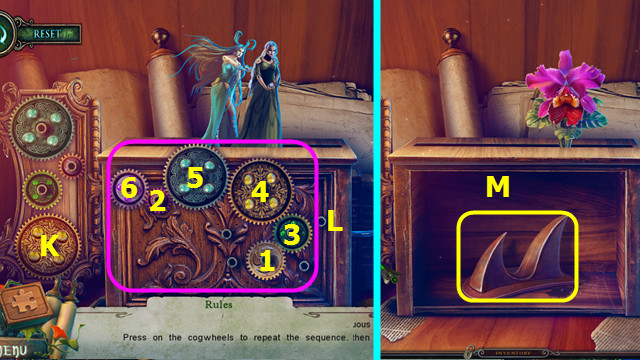
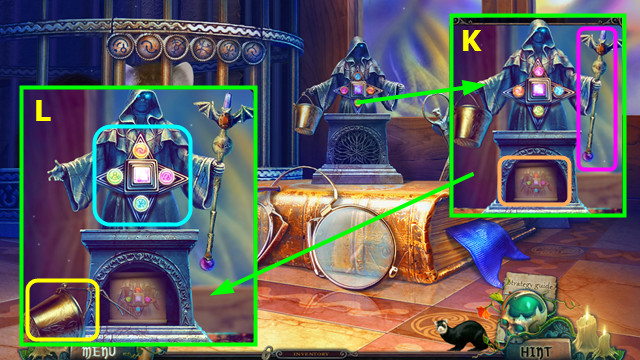
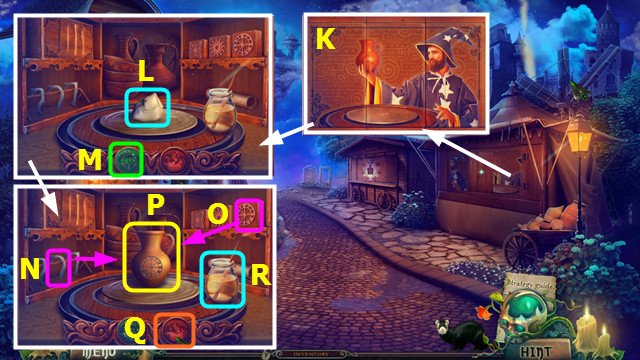
- Place the COGWHEEL (K).
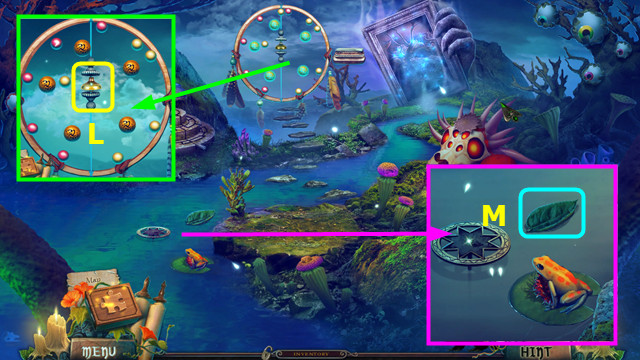
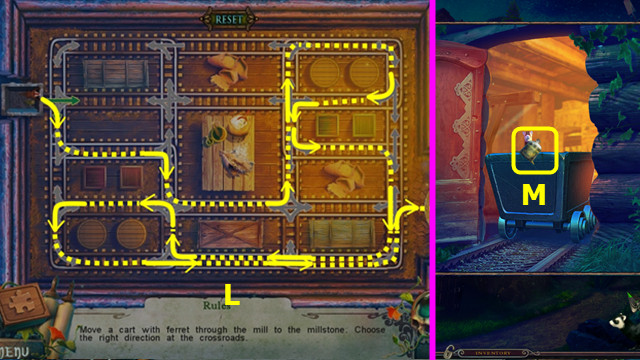
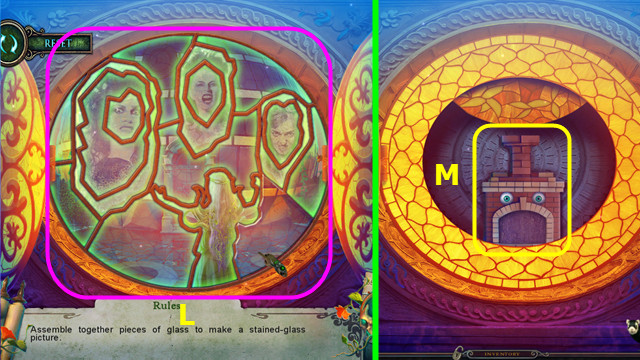
- Place the cogwheels as shown (L).
- Press the cogwheels 1-6.
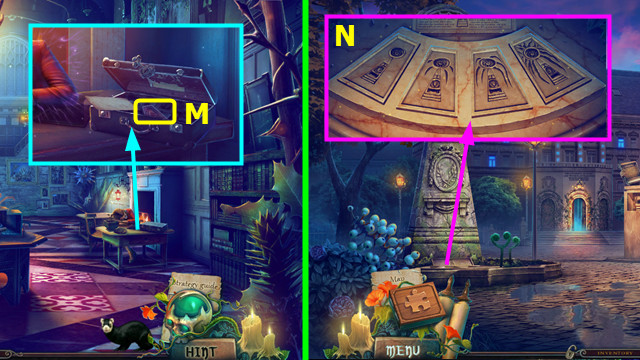
- Take the METAL SPIKES (M).
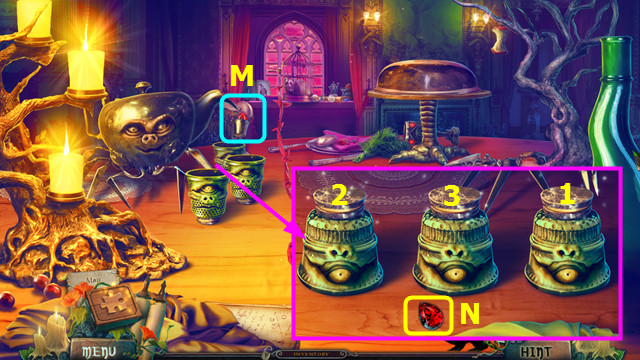
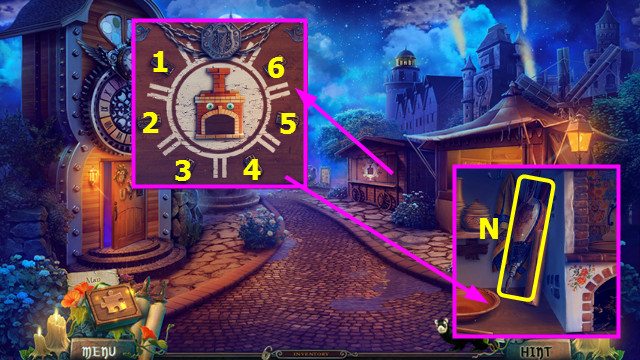
- Walk down.
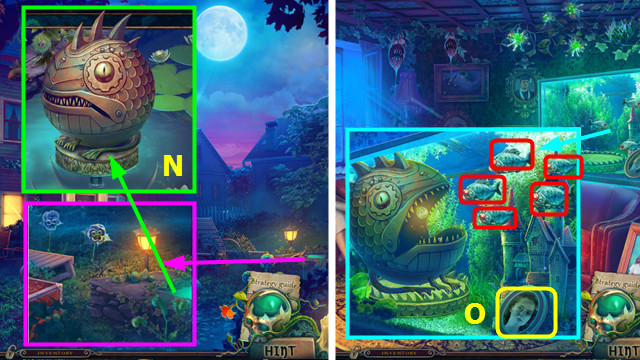
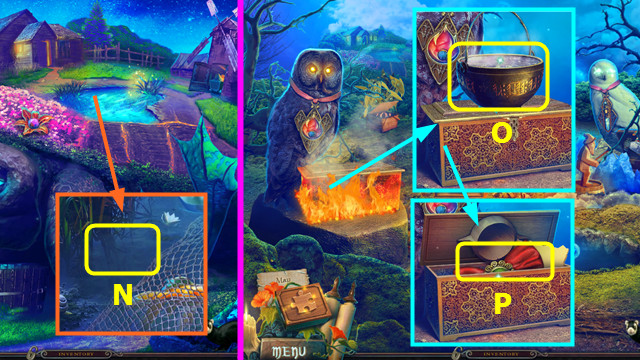
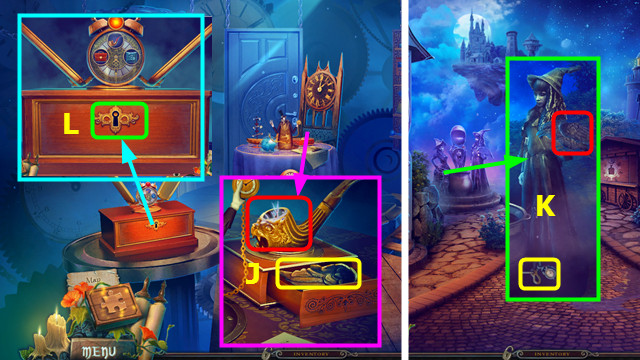
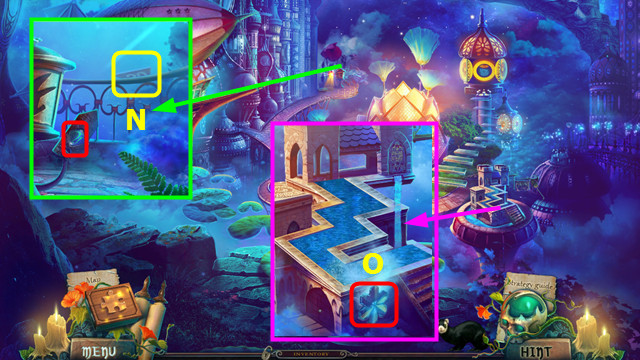
- Place the METAL SPIKES; take the FISH STATUE (N).
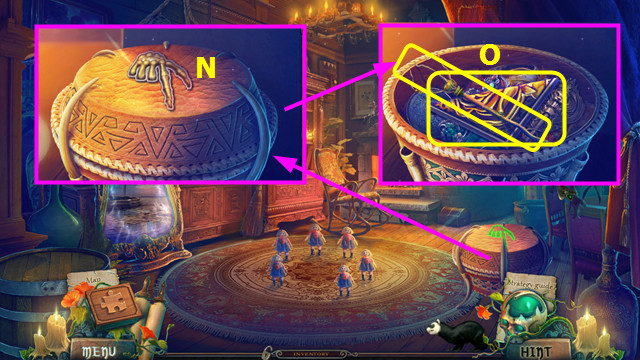
- Go forward.
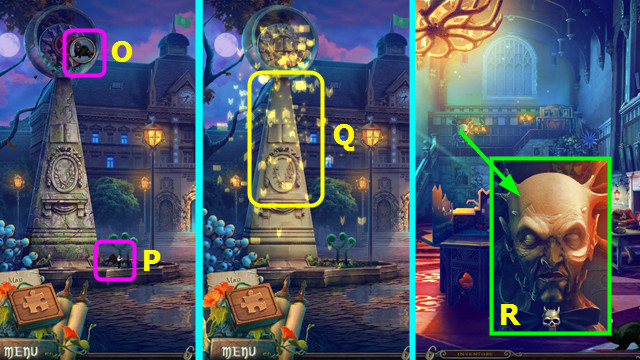
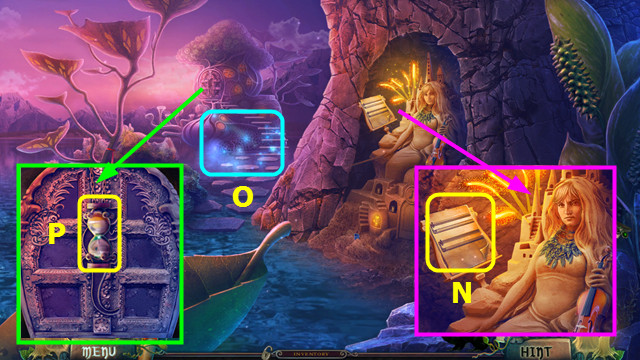
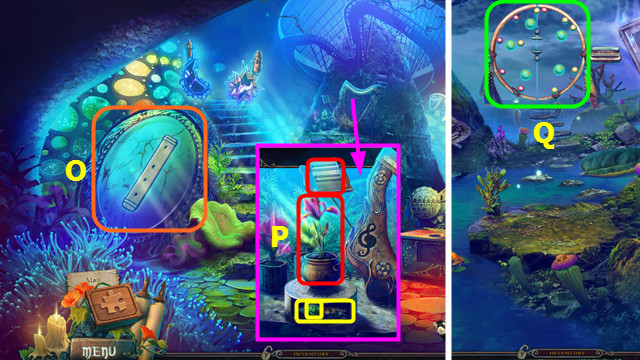
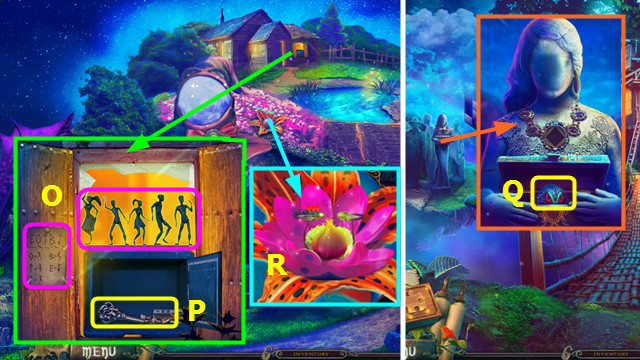
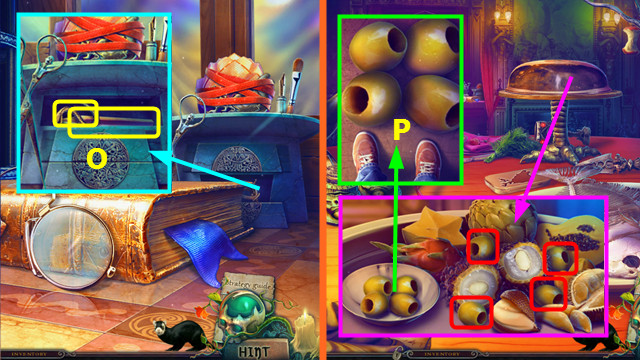
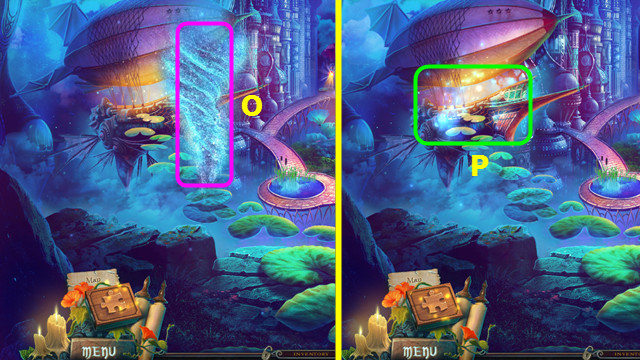
- Place the FISH STATUE, select each fish (red), and take the PORTRAIT OF NIKKI (O).
- Walk down.
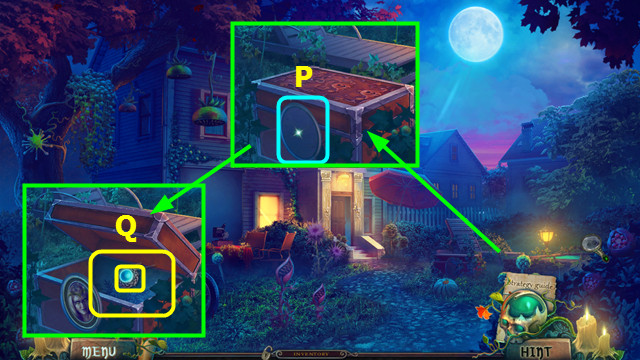
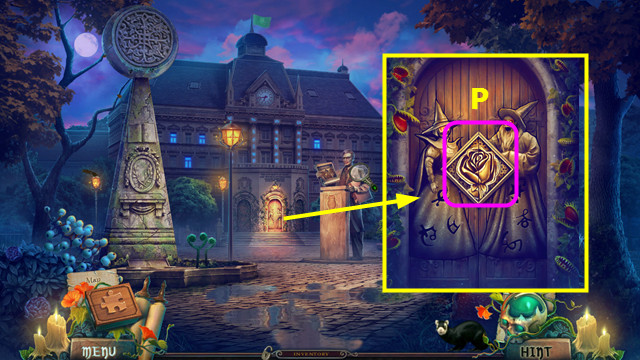
- Place the PORTRAIT OF NIKKI (P).
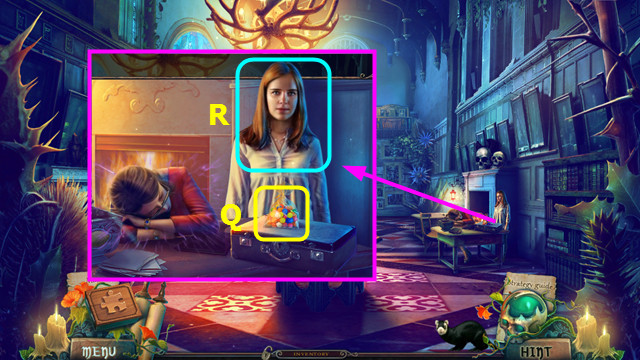
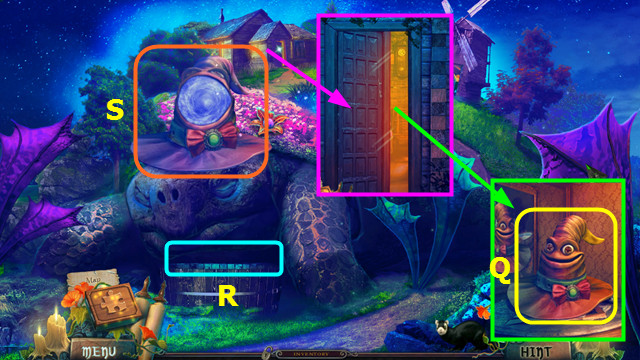
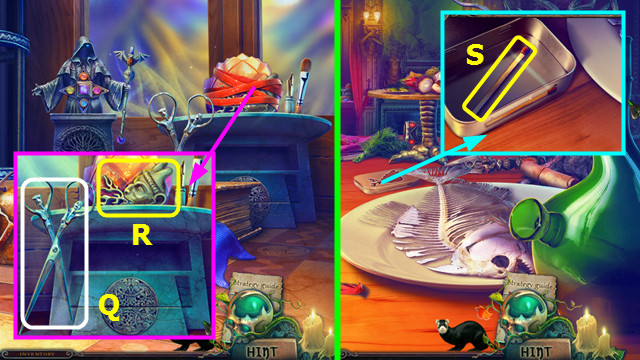
- Take the LIGHT AMULET and PILLOW (Q).
- Walk forward.

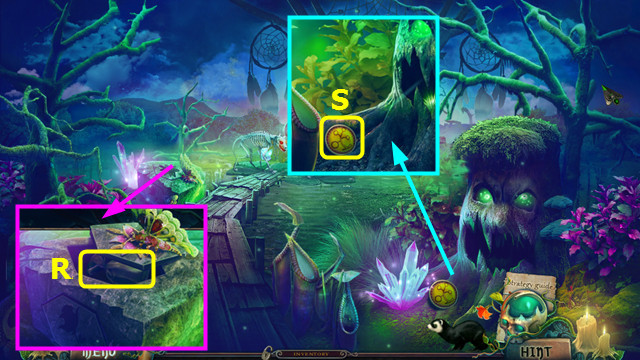
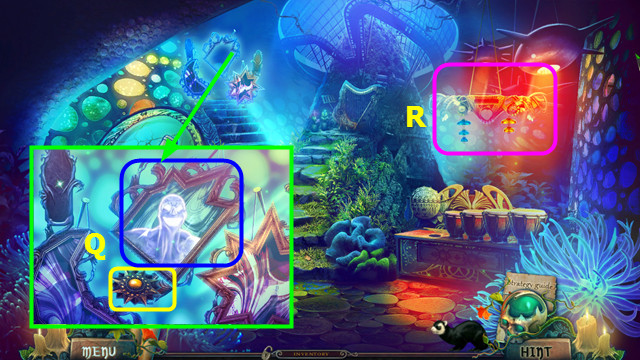
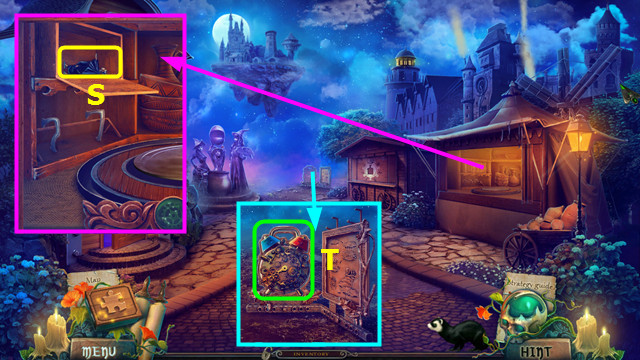
- Select, and then use the PILLOW (R); use the feather (S) on (R).
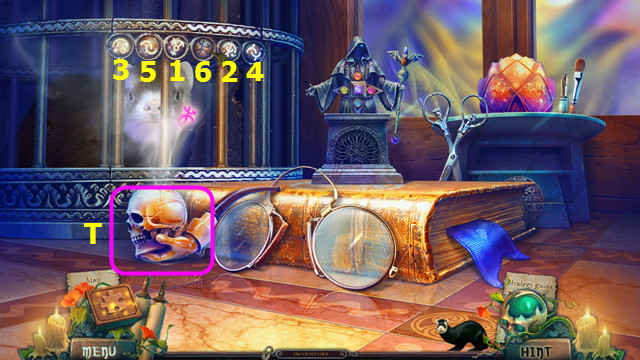
- Take the MAGNET; move the cloth and take the FILM REEL (T).
- Walk down.
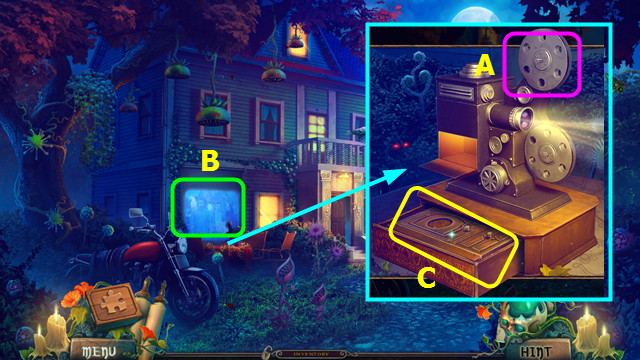
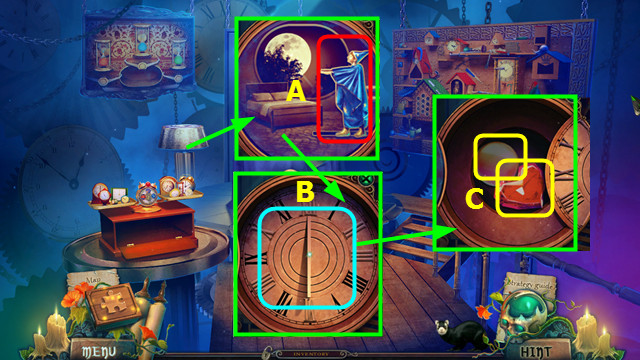
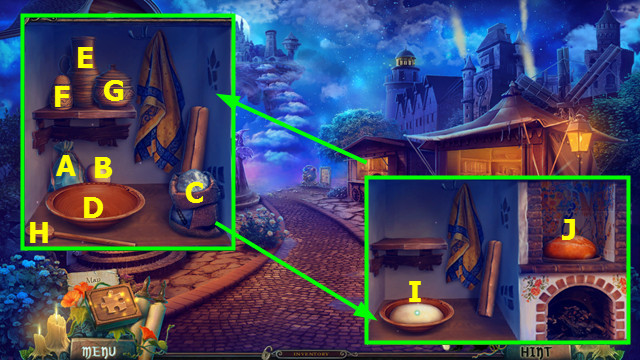
- Place the FILM REEL (A).
- Play the HOP (B).
- Take the ALCHEMY KIT (C).
- Open the right side of the ALCHEMY KIT; read the note and take the BOTTLE (inventory).
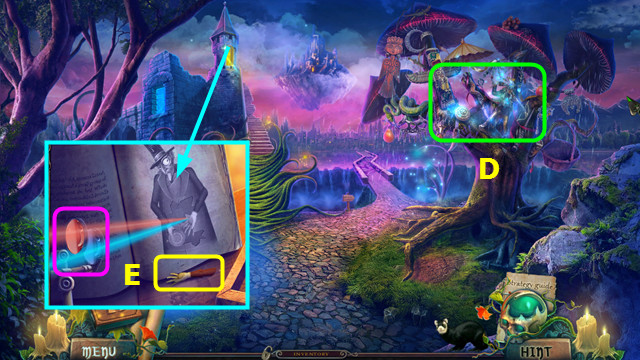
- Walk forward.
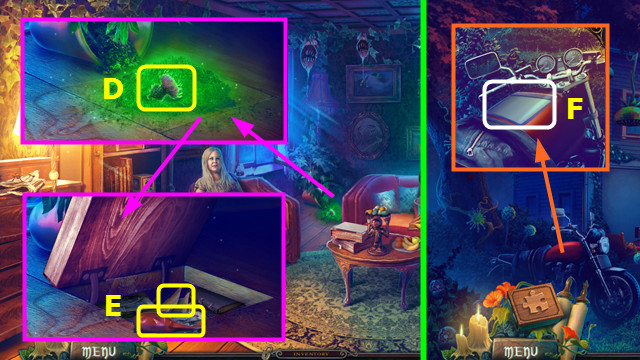
- Use the BOTTLE to take the BOTTLED THISTLE (D).
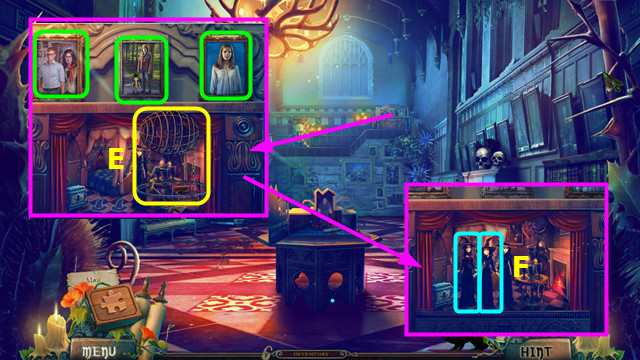
- Open the floorboard; take the BALLOON, move the items, and take the the MAP AND PHOTO (E).
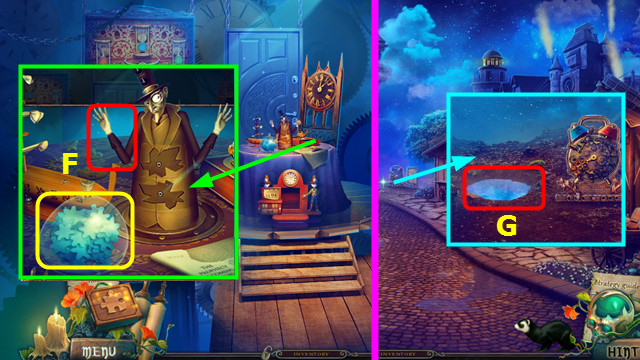
- Walk down.
- Place the MAP AND PHOTO (F).
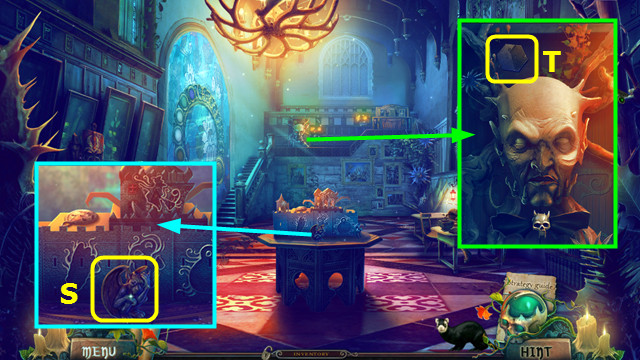
- Take the 1st EMBLEM PART and MAP (G).
- Place and select the MAGIC PAINTING (H).
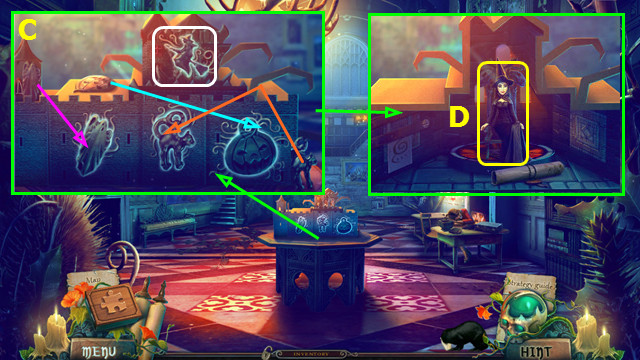
- Play the HOP; earn the NUT KERNEL.
- Give the NUT KERNEL (I).
- Use the key on the lock (J).
- Walk forward.
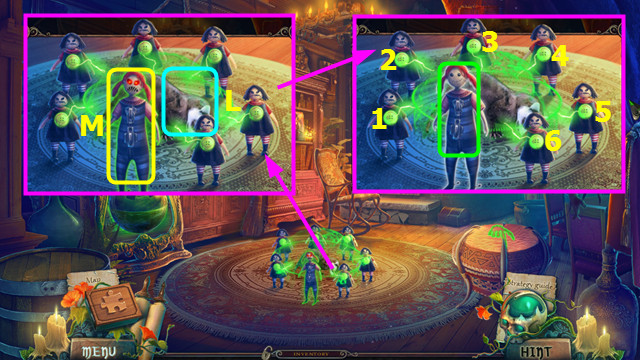
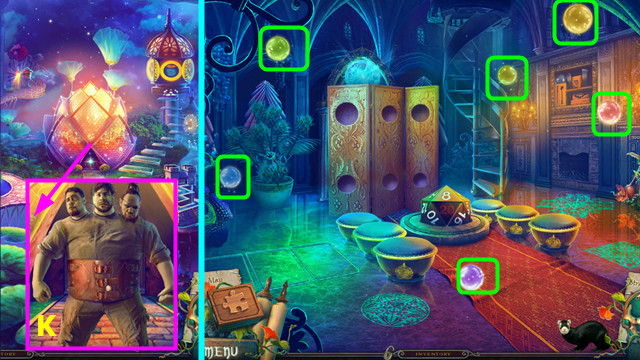
- Talk to Bertha (L).
- Use the MAGNET to take the EVIL DOLL (M).
- Open the EVIL DOLL and remove the thistle; add the LIGHT AMULET to make the GOOD DOLL (inventory).
- Place the GOOD DOLL; select 1-6.
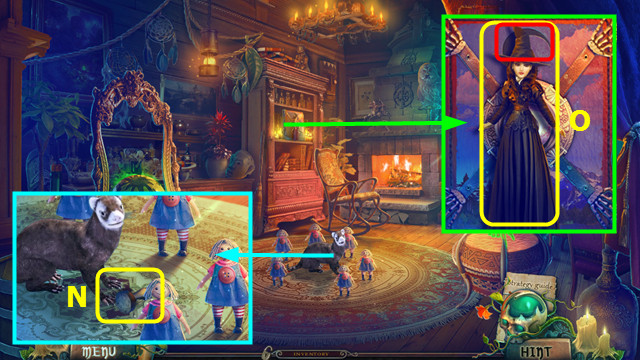
- Take the ALCHEMY SEAL (N).
- Use the ALCHEMY SEAL to open the left side of the ALCHEMY KIT; add the BOTTLED THISTLE and use bottles 1-3 on the thistle and take the JEWELED MOON (inventory).
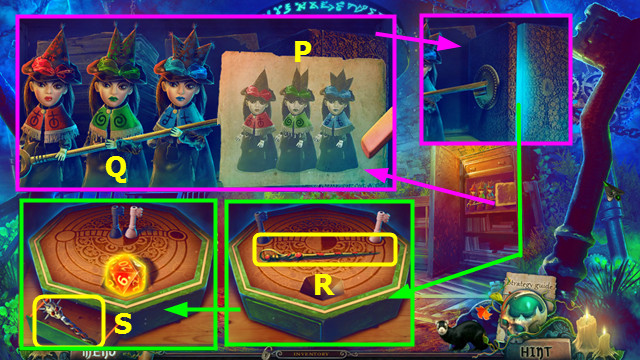
- Take the 1st WITCH DOLL and place the JEWELED MOON (O).
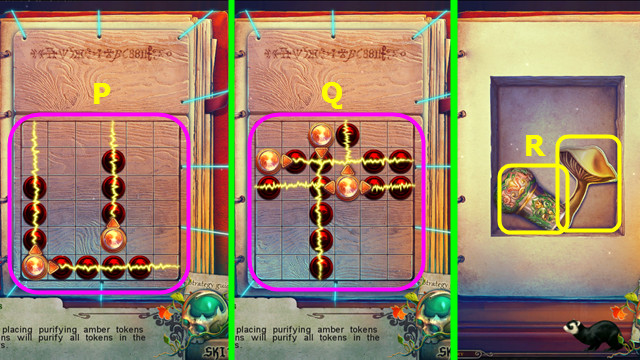
- Place the amber tokens as shown (P-Q).
- Take the 1/2 MAGIC STAFF and AMBER MUSHROOM (R).
- Walk down.
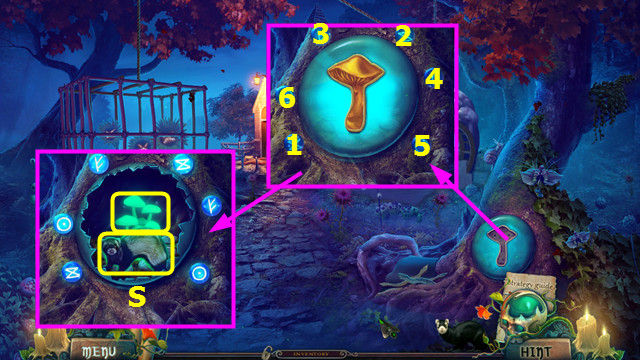
- Place the AMBER MUSHROOM; select 1-6.
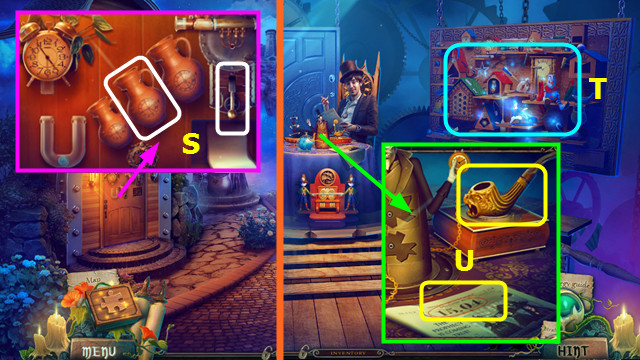
- Take the FERRET EMBLEM and GLOWING MUSHROOMS (S).
- Walk forward.
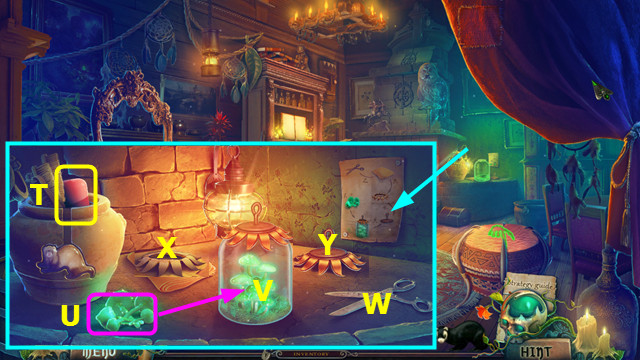
- Place the FERRET EMBLEM; move the brushes and take the SOAP (T).
- Place and select the GLOWING MUSHROOMS so some return to your inventory (U). Move the glowing mushrooms to the jar (V).
- Use the scissors (W) on the cloth (X).
- Move the cut cloth to the lid (Y).
- Place the lid on the jar; take the SUNFLOWER LANTERN (V).
- Walk down.
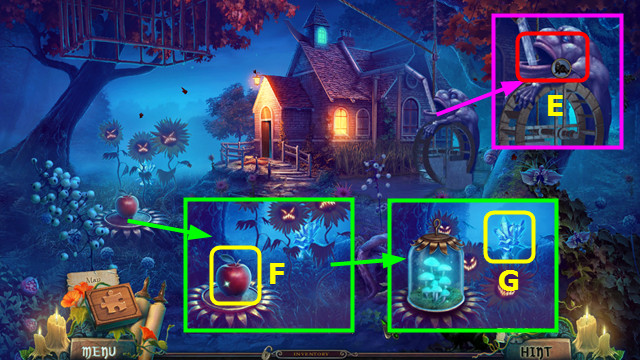
- Use the FERRET and SOAP (E).
- Take the MAGIC APPLE and place the SUNFLOWER LANTERN (F).
- Take the CRYSTAL CLUSTER (G).
- Walk forward.
- Place the CRYSTAL CLUSTER (H).
- Place the MAGIC APPLE; select (I).
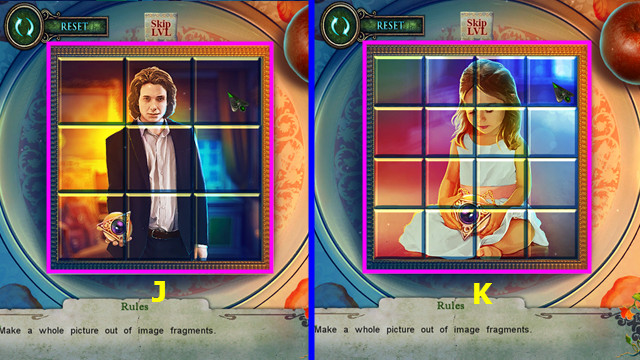
- Restore the pictures (J-K).
- Go forward.

- Play the HOP; earn the SKELETON HAND (L).
- Take the MORTARBOARD (M).
- Walk down.
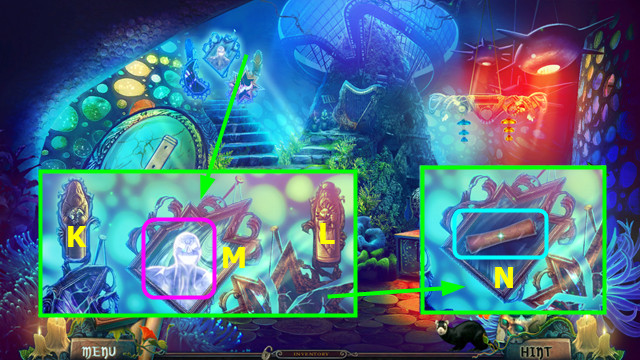
- Place the SKELETON HAND; select it 5x (N).
- Take the mirror and move the cloth; take the 2/2 MAGIC STAFF and 2nd EMBLEM PART (O).
- Go forward.
- Place the 2 EMBLEM PARTS (P).
- Play the HOP.
- Walk forward.
Chapter 2: Charleston Hall
- Take the BUBBLE GUM (Q).
- Give the 2 MAGIC STAFF pieces (R).
- Take the PLASTER GARGOYLE (S).
- Take the BRONZE TILE (T).
- Walk down.

- Place the BRONZE TILE; rotate the tiles as shown (A).
- Take the GOLD LIZARD and WITCH EMBLEM (B).
- Go forward.
- Place the WITCH EMBLEM and restore the other 3 emblems (C).
- Read the scroll and take the 2nd WITCH DOLL (D).
- Look at each picture (green).
- Take the AIRSHIP FRAME (E).
- Combine the AIRSHIP FRAME, BALLOON, and HELIUM to make the AIRSHIP (inventory).
- Place the 2 WITCH DOLLS (F).
- Restore the items (G-H).
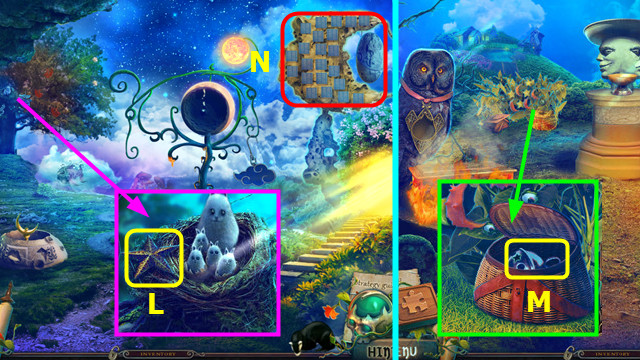
- Take the OWL (I).
- Walk down.
- Place the OWL; move the items and take the lens (J).
- Take the BRIEFCASE KEY (K).
- Move the items and take the JEWELED LILY (L).
- Walk forward.
- Use the BRIEFCASE KEY; read the note and take the MARBLE PLATE (M).
- Walk down.
- Place the MARBLE PLATE; swap as shown (N).
- Use the FERRET (O); use the AIRSHIP (P).
- Use the MORTARBOARD to take the KNOWLEDGE ENERGY (Q).
- Go forward.
- Use the KNOWLEDGE ENERGY (R).
- Go forward.
- Take the SCREWDRIVER (A).
- Place the MAGIC PAINTING (B); play the HOP and earn the ACID POTION.
- Walk down.
- Use the ACID POTION and SCREWDRIVER (C).
- Take the PAPER WINDOW and METAL ROD (D).
- Go forward.
- Place the METAL ROD (E); select 1-6.
- Select (F).
- Set the corners to follow the path (green).
- Select (G).
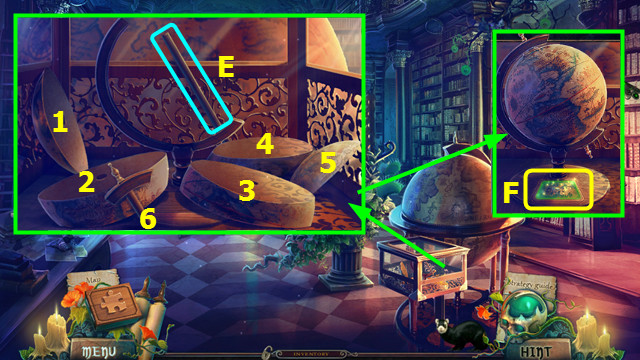
- Take the MARSH MAP (H).
- Use the PAPER WINDOW and select in shown position (I).
- Open the book; take the EAGLE EMBLEM (J).
- Walk down 2x.
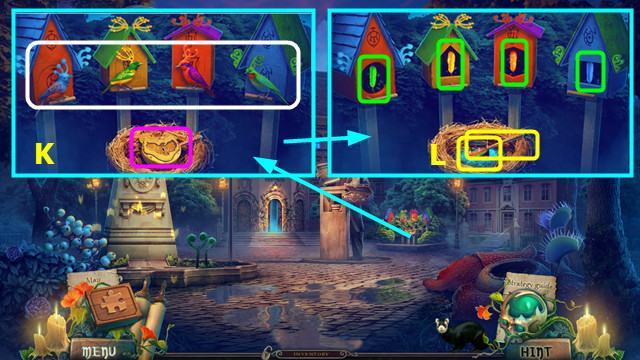
- Place the EAGLE EMBLEM; swap the birds as shown (K).
- Select each feather (green); take the MAGIC BRUSH and MAGIC DUST (L).
- Go forward.
- Place the MAGIC BRUSH (M).
- Look at the scroll (N).
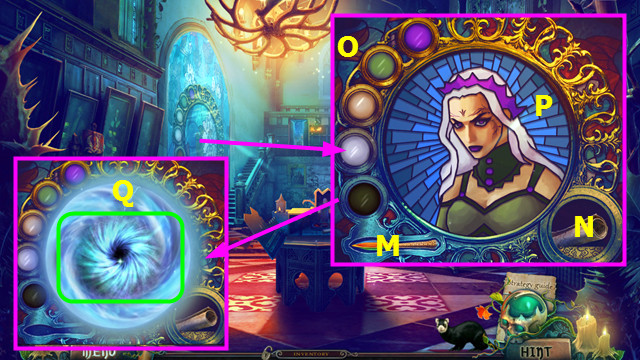
- Use the brush on the paints (O) and color the portrait to match the scroll (P).
- Use the MARSH MAP (Q).
- Place the JEWELED LILY; take the SACK (R).
- Take the EARTH RUNE (S).
- Walk down and forward.
- Place the SACK; select 1-6.
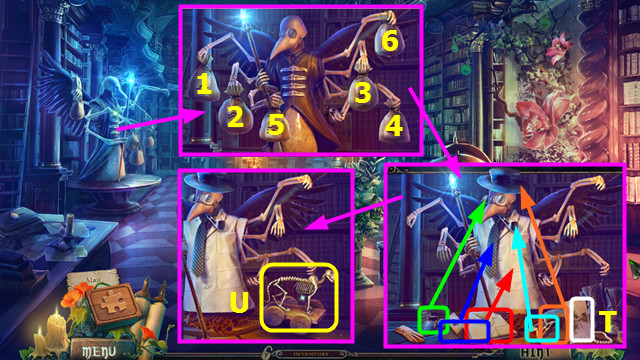
- Read the instructions (T).
- Place the items on the figure (color-coded).
- Take the SKELETAL CAT (U).
- Place the PLASTER GARGOYLE (A) and MAGIC DUST (B).
- Place (A) in the bowl (C); use the pestle (D) on (C).
- Pour (B) into (C).
- Pour (E) into (C).
- Use the spoon (F) on (C).
- Pour (C) into the mold (G).
- Take the MAGIC CHALK (G).
- Walk down and left.
- Use the SKELETAL CAT (H).
- Go forward.
- Play the HOP; earn the SCALE PAN (I).
- Combine the SCALE PAN and GLOWING MUSHROOMS to make the GLOWING HELMET (inventory).
- Take the MIRACLE BERRY and BRANCH (J).
- Place the EARTH RUNE; take the JEWELED ROSE and read the instructions (K).
- Walk down.
- Place the JEWELED ROSE; take CASSANDRA'S AMULET (L).
- Use the FERRET, BRANCH, and GLOWING HELMET (M); take the LIQUID FIRE and BRIAR BERRY (N).
- Go forward.

- Place CASSANDRA'S AMULET (O).
- Restore the picture (P).
- Take the MAGIC DOME (Q).
- Walk down 2x.

- Place the MAGIC DOME; remove the dome and take the LEMON (R).
- Walk left and forward.
- Use the LIQUID FIRE; take the FIREBALL (S).
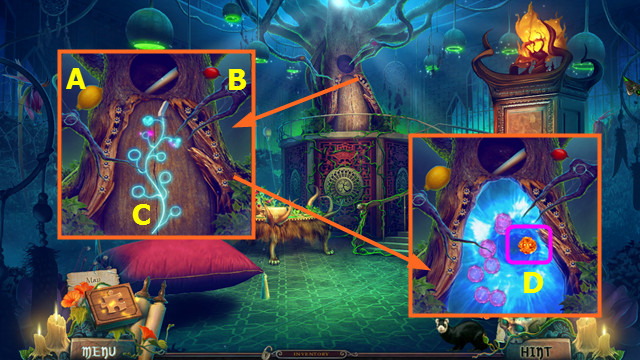
- Place the LEMON (A) and BRIAR BERRY (B).
- Use the MAGIC CHALK (C).
- Place and select the FIREBALL (D).
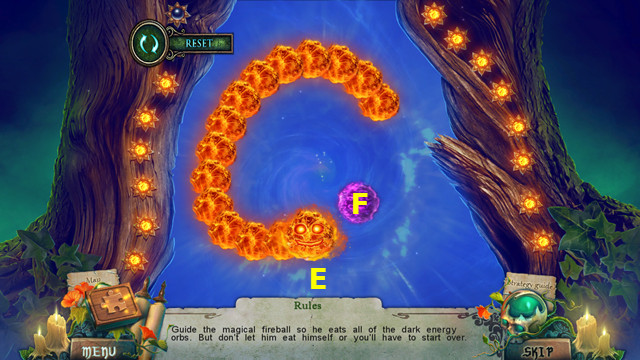
- Drag the fireball (E) to eat all the dark energy orbs (F).
- Tip: drag the fireball in a circle so he does not eat his tail.
- Walk forward.
Chapter 3: Between Worlds
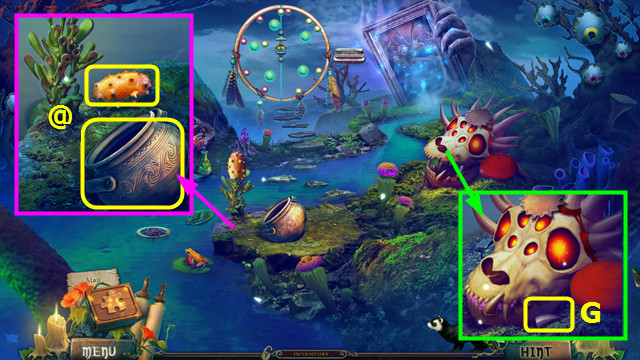
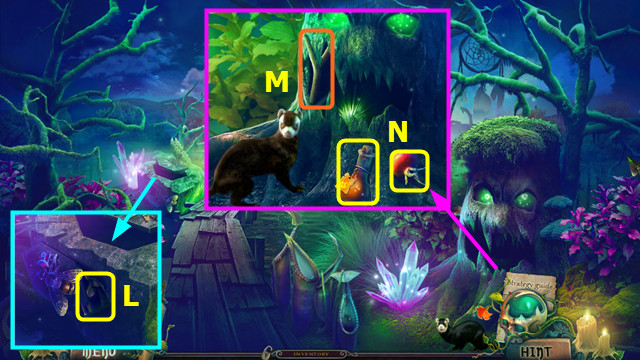
- Use the BUBBLEGUM; take the STEEL FANG (G).
- Use the STEEL FANG; take the MIRACLE FRUIT and CROCK (@).

- Take the MOON IDOL and read the instructions (H).
- Place the MIRACLE FRUIT and MIRACLE BERRY (I).
- Pull the lever (J); take the GROWTH JUICE (K).
- Take the AIR BELL (L).
- Use the GROWTH JUICE (M).
- Go forward.
- Take the MUSIC SHEET (N).
- Play the HOP; earn the STAINED GLASS (O).
- Take the SYMBOL OF TIME and place the GOLD LIZARD (P); play the HOP.
- Walk forward.
- Place and select the STAINED GLASS; take the SUN SIGN (Q).
- Select (R).

- Place the AIR BELL.
- Move AB-CB-AC-BC-BC-AB-CB-CB-CA-CA-BA-BA-CB-AB-AB-AC-AC-BC-BC-BA-CA-CA-CB-AB-AB-CA-BC-BC-BA-CA-CA-BC-AB-AB-AC-BA-BC.
- Take the BAMBOO TUBE and GHOST NOTE (D).
- Walk down.
- Place the GHOST NOTE (E).
- Read the instructions (F).
- Set the candles as shown (G).
- Take the GLASS NOTE 1 (H).
- Walk down.
- Place the SUN SIGN; take the SOLAR IDOL (I).
- Go forward.
- Open the shell; take the MAGIC SOIL (J).
- Go forward.
- Place the MOON IDOL (K) and SOLAR IDOL (L).
- Select (M).
- Read the note and earn the HOBNAIL (N).
- Combine the BAMBOO TUBE and HOBNAIL to make the FLUTE (inventory).
- Use the FLUTE; play the HOP and earn the SOUL-FILLED BUD (O).
- Combine the CROCK, SOUL-FILLED BUD, and MAGIC SOIL to make the SOUL-FILLED FLOWER (inventory).
- Place the MUSIC SHEET and SOUL-FILLED FLOWER; take the BEAD and ICY AMULET (P).
- Walk down 2x.
- Select (Q).
- Place the BEAD (A).
- Read the instructions (B).
- Place the beads as shown (C).
- Take the MOUSE and FORMS (D).
- Go forward.
- Place the FORMS; select the form and place on the stack (E) in numerical order (1-4).
- Take the LIGHT SPHERE and TAMBOUR (F).
- Walk forward.
- Place the TAMBOUR; select 1-5.
- Take the SIM KEY (G).
- Walk down.
- Play the HOP; earn the DRUM PIECE (H).
- Use the SIM KEY; take the GLASS NOTE 2 (I).
- Go forward.
- Use the DRUM PIECE; take the HAT (J).
- Walk down.
- Place the HAT (K).
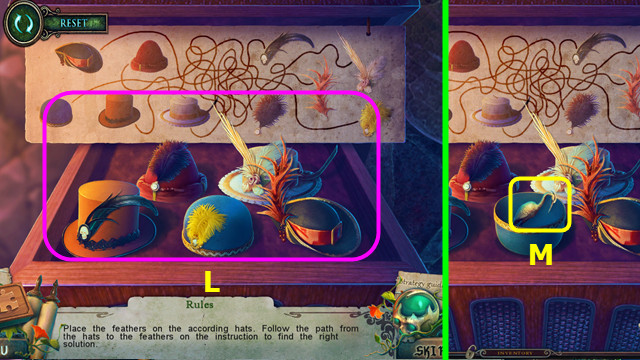
- Swap the feathers as shown (L).
- Take the HERON (M).
- Walk down.
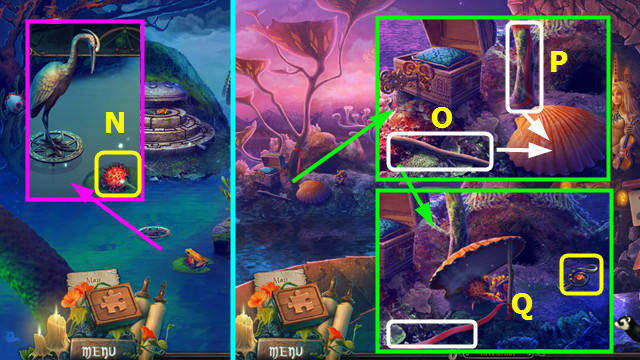
- Place the HERON; take the DRAGON FRUIT (N).
- Go forward.
- Use the branch (O) and ribbon (P) on the shell; add the DRAGON FRUIT.
- Pull the ribbon and take the GLASS TREBLE CLEF (Q).
- Go forward.
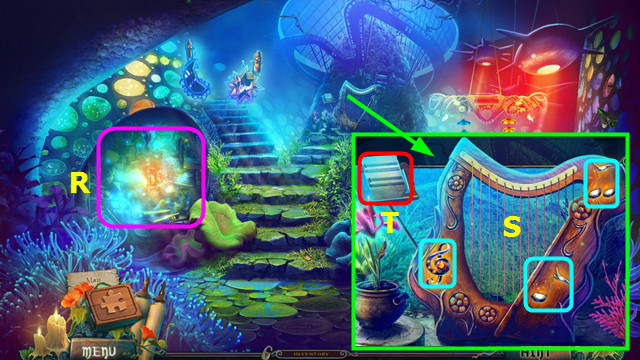
- Play the HOP; earn the BIG BELL (R).
- Place the GLASS NOTE 1, GLASS NOTE 2, and GLASS TREBLE CLEF (S).
- Select (T).
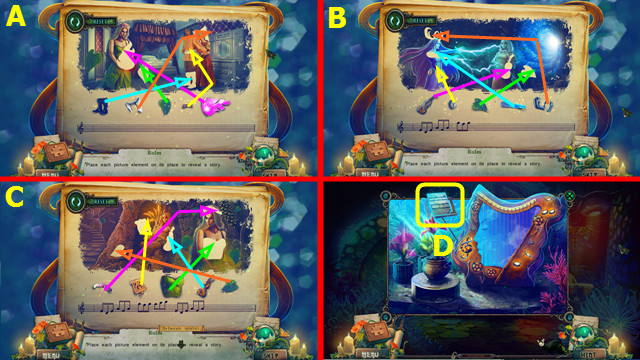
- Restore the picture elements (A-C).
- Take the MELODY OF THE SOUL (D).
- Walk down.
- Place the MELODY OF THE SOUL (E).
- Take the MAGICAL CHARCOAL (F).
- Walk right.

- Place the SYMBOL OF TIME; take the LOLLIPOP (G).
- Take the TEA BUSH (H).
- Walk right.

- Take the TURTLE SYMBOL (I).
- Take the SLEEPING GRASS (J).
- Place the LIGHT SPHERE and use the FERRET and LOLLIPOP; take the FUZZY (K).
- Walk down.
- Place the FUZZY; take the WICKER STAR (L).
- Walk right.
- Place the WICKER STAR; take the SMALL BELL (M).
- Walk down.
- Select (N).
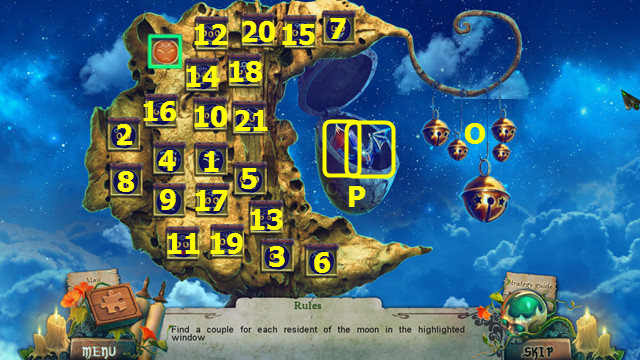
- Place the BIG BELL and SMALL BELL (O).
- Select 1-21.
- Take the STAFF EMBLEM and FIRE AMULET (P).
- Walk right.
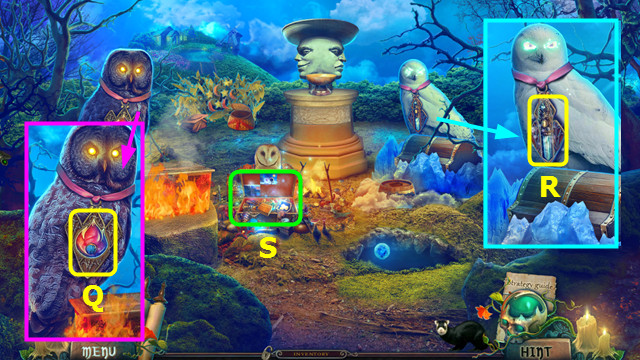
- Place the FIRE AMULET (Q).
- Place the ICY AMULET (R).
- Play the HOP; earn the LUNAR BOWL (S).
- Walk down.
- Place the LUNAR BOWL; take the MOONBEAM (A).
- Walk right.
- Use the MOONBEAM (B).
- Move the 4 moon fruit (green) to the moon basket (B).
- Move the 4 star fruit (red) to the star basket (C).
- Walk forward.
Chapter 4: Wise Tarte
- Use the MAGICAL CHARCOAL (D).
- Take the CLOUD PIN (E).
- Walk down 2x.
- Place the CLOUD PIN (F).
- Take the GNOME FIGURE and open the moon (G).
- Walk right.
- Place the GNOME FIGURE; take the BEE HOUSE and EMPTY POT (H).
- Walk down.
- Place the BEE HOUSE; take the HONEYCOMB and MILL FIGURE (I).
- Walk right and forward.
- Place the MILL FIGURE; take the FLOUR and EMPTY OILER (J).
- Use the FERRET and SLEEPING GRASS (K).
- Move the cart on the indicated path (L).
- Take the SLEEPING POWDER (M).
- Use the EMPTY POT to take the POT WITH WATER (N).
- Walk down.
- Place the POT WITH WATER; take the POT WITH BOILING WATER (O).
- Take the BOWTIE (P).
- Go forward.
- Place the BOWTIE; take the HAT OF SUBCONSCIOUS (Q).
- Place the TEA BUSH, HONEYCOMB, POT WITH BOILING WATER, and SLEEPING POWDER (R).
- Use the HAT OF SUBCONSCIOUS and GROWTH JUICE (S).
- Go forward.

- Play the HOP; earn the BELL (A).
- Place the TURTLE SYMBOL; take the ELASTIC and SICKLE (B).
- Walk down.
- Place the BELL; take the GREEN TURTLE (C).
- Use the SICKLE; take the RED TURTLE (D).
- Go forward.
- Select (E).
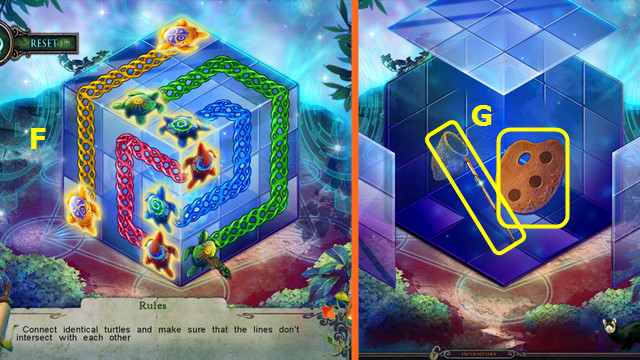
- Place the GREEN TURTLE and RED TURTLE.
- Connect the colored turtles (F).
- Take the NET and MAGIC PALETTE (G).
- Walk down.
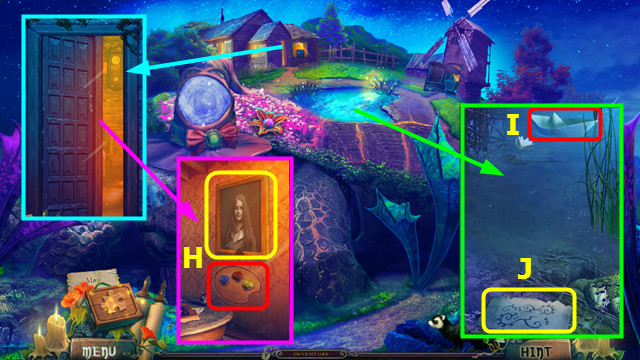
- Place the MAGIC PALETTE; take the PORTRAIT OF LISA (H).
- Use the NET (I); unfold the boat and take the PAGE (J).
- Go forward.
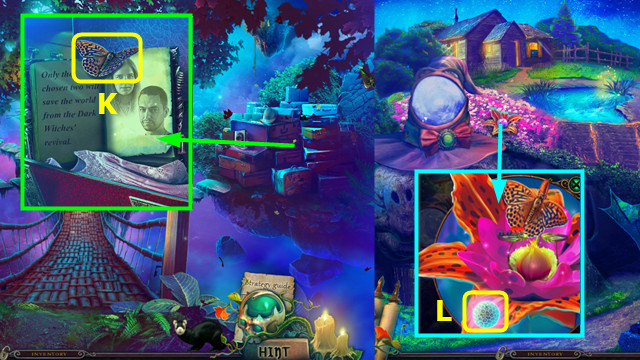
- Place the PAGE; take the BUTTERFLY (K).
- Walk down.
- Place the BUTTERFLY; take the SHINING BALL (L).
- Walk down.

- Play the HOP; earn the DANCING WOMAN (M).
- Place the SHINING BALL; take the CIPHER (N).
- Go forward.
- Place the CIPHER and DANCING WOMAN; arrange the figures as shown (O).
- Take the PRECIOUS KEY (P).
- Go forward.
- Use the PRECIOUS KEY; take the POLLINATOR (Q).
- Walk down.
- Select (R).
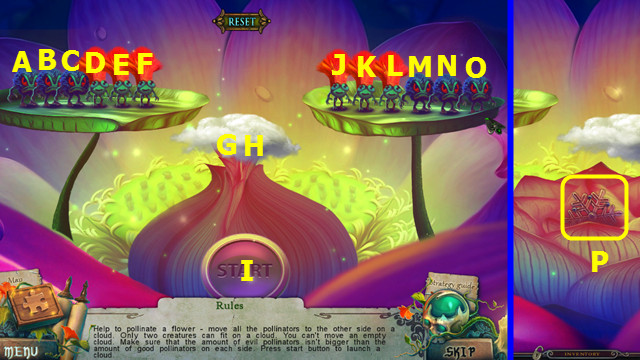
- Place the POLLINATOR.
- Select A-B-I-H-I-C-I-H-I-G-D-E-I-H-O-I-H-F-I-G-H-N-I-B-I-H-I-C-I-G-H.
- Take the SNOWFLAKE (P).
- Go forward.

- Place the SNOWFLAKE; take the ICE BRACELET (Q).
- Walk down 2x.
- Place the ICE BRACELET; take the SOUL STONE (R).
- Go forward 2x.
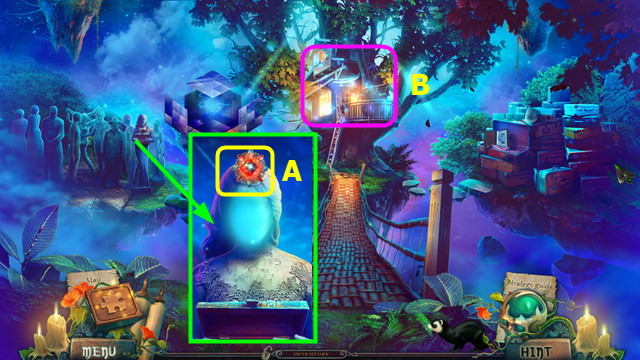
- Place the SOUL STONE; take LISA'S SOUL (A).
- Combine the PORTRAIT OF LISA and LISA'S SOUL to make LISA (inventory).
- Play the HOP; earn the BUTTERFLY VEIL (B).
- Walk down 2x.
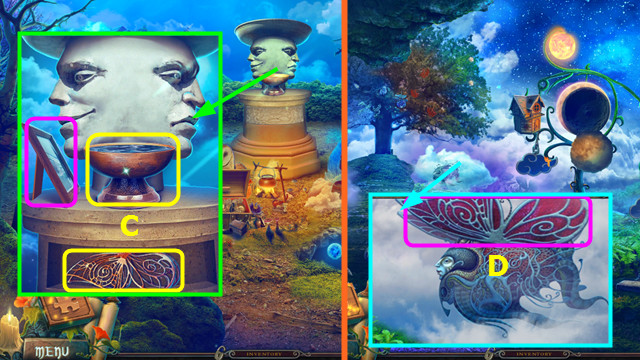
- Place LISA; take the TEARS OF THE TWO-FACED and FRAME OF WINGS (C).
- Combine the FRAME OF WINGS and BUTTERFLY VEIL to make the WINGS (inventory).
- Walk down.
- Place the WINGS (D).
- Go forward.
- Take the ROD and SLICE OF BREAD (E).
- Combine the ROD and STAFF EMBLEM to make the STAFF (inventory).
- Select the fork 2x and add the ELASTIC (F); move the arrow (G) to the fork.
- Select the napkin 6x (H).
- Take the crossbow.
- Aim and click (I).
- Go forward.
- Take the ELOQUENCE MEDALLION (J).
- Place the STAFF and read the instructions (K).
- Swap the gems as shown; take the STRAINER (L).
- Go down.
- Place the STRAINER, select the pot, and select the strainer again (M).
- Select the correct cup 1-3; take the RUBY (N).
- Go forward.
- Place the RUBY; take the GOLDEN SNAKE and PENCIL (O).
- Walk down.
- Use the PENCIL to remove the dome. Remove the items and select the 4 olives (red).
- Select the olives 5x and use the EMPTY OILER to find the OIL (P).
- Go forward.
- Use the OIL (Q); take the FIRE-BREATHING DEMON (R).
- Walk down.
- Place the FIRE-BREATHING DEMON; take the MATCH (S).
- Walk forward.
- Use the MATCH (T).
- Select 1-6.
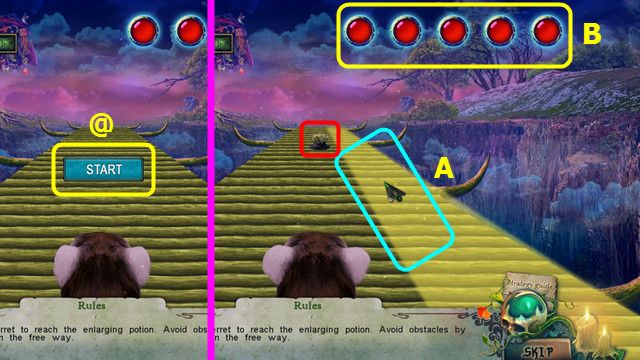
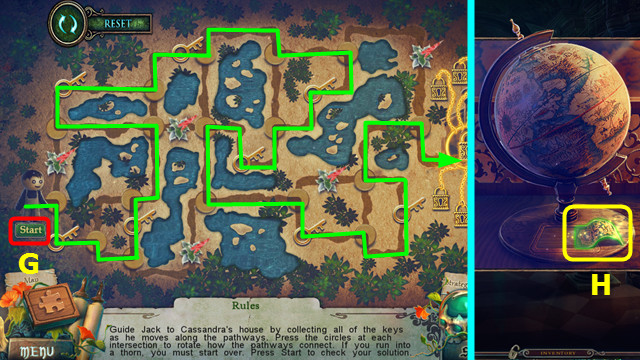
- Select Start (@).
- Change lanes to avoid obstacles (A).
- A route solution is: left, center, left, center, left, center, right, right, left, right, right, center, left, center, left, center, left.
- If you hit 5 obstacles, the run will re-start (B).
- Play the HOP; earn the MOONSTONE (C).
- Use the SLICE OF BREAD and open the crate; take the EGG, move the items and take the CHEESE (D).
- Walk down.
- Place the MOUSE and CHEESE; take the BONSAI (E).
- Go forward.
- Place the BONSAI; take the TAMPER (F).
- Move the leaves 2x and place the MOONSTONE; take the MOON SEED (G).
- Walk down.
- Place the MOON SEED; take the FATE FIGURE (H).
- Walk forward.
- Select (I).
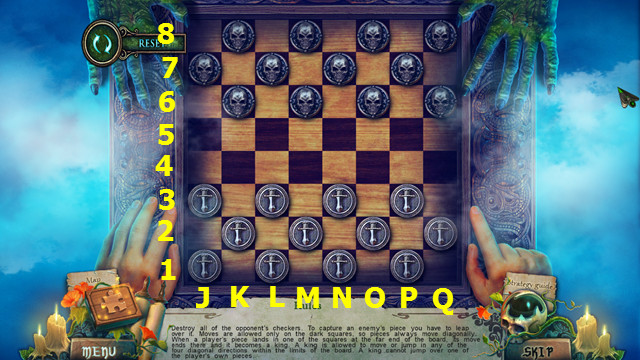
- Place the FATE FIGURE.
- Play checkers; L3-K4, P3-Q4, K4-J5, Q4-O6-N3-O4, O2-Q4, Q4-O6, K2-L3, L3-K4, M2-L3, Q2-P3, P3-Q4, L3-M4, K4-L5, J3-K4, Q4-O6, O6-P7, P7-O8, L1-N3-L5-J7, J5-L7, O8-L5, J7-K8, K8-O4, O4-M2-Q6, Q6-M2.
- There are many solutions; your solution may differ.
- Go forward.
Chapter 5: Lower Town
- Select (A).
- Place the ELOQUENCE MEDALLION (B).
- Take the BASKET (C).

- Drag the scene to see the Clockmaker (D).
- Take the REED and read the note (E).
- Walk down.
- Use the REED (F).
- Place the BASKET and collect the 7 acorns (pink).
- Take the ACORNS and CLAY (G).
- Go forward.
- Place the ACORNS (H).
- Take the GOLDEN BOUGH (I).
- Walk down.
- Place the GOLDEN BOUGH; take the MAGIC LANTERN and POTTERY PLATE (J).
- Walk forward.
- Place the POTTERY PLATE; restore the picture (K).
- Place the CLAY (L); select (M).
- Place the handle (N) and stamp (O) on the pitcher (P).
- Press (Q).
- Use the glaze (R) on (P); take the PITCHER.
- Place the PITCHER; lift the lever (S).
- Walk left.
- Play the HOP; earn the BRACELET (T).
- Take the DATE and PIPE (U).
- Walk down.
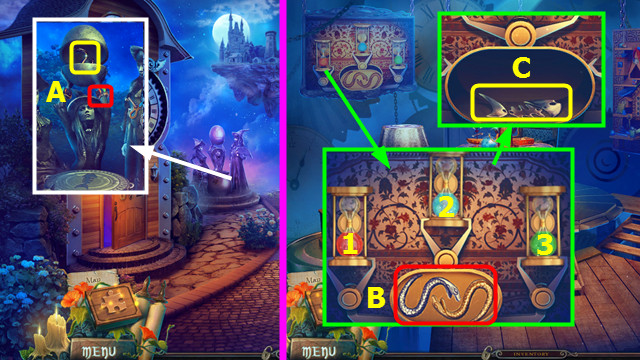
- Place the BRACELET; take the SILVER SNAKE (A).
- Walk left.
- Place the GOLD SNAKE and SILVER SNAKE (B); select 1-3.
- Read the note and take the SKELETAL FISH (C).
- Walk down.
- Place the SKELETAL FISH; select the 5 fish (D).
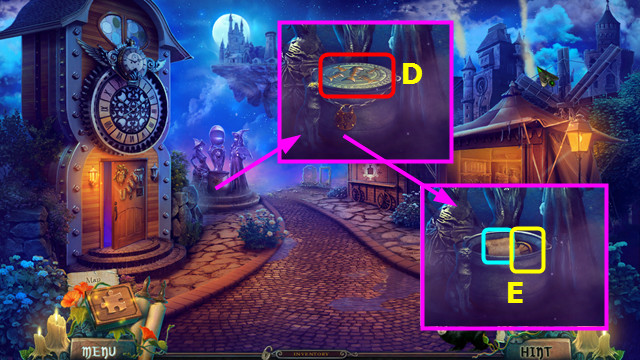
- Read the note and take the DIAL (E).
- Walk left.
- Place the DIAL (F), remove the paper, and place the DATE (G).
- Take the DIAMOND SAW (H).
- Walk down 2x.
- Use the DIAMOND SAW; take the ROOT OF TRUTH (I).
- Combine the PIPE, ROOT OF TRUTH, and TAMPER to make the PIPE OF TRUTH (inventory).
- Go forward and left.
- Place the PIPE OF TRUTH; take the STONE WING (J).
- Walk down.
- Place the STONE WING; take the WINDER (K).
- Walk left.
- Use the WINDER (L).
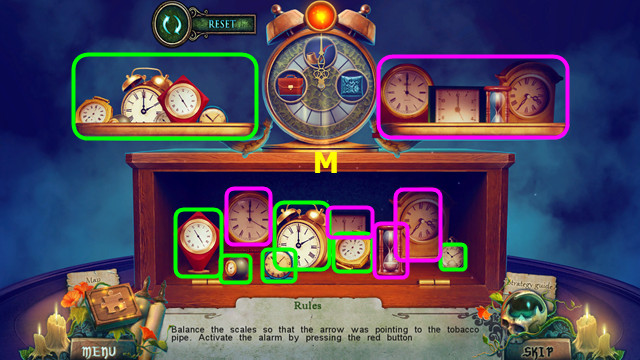
- Move the clocks as shown (M).
- Other solutions are possible.
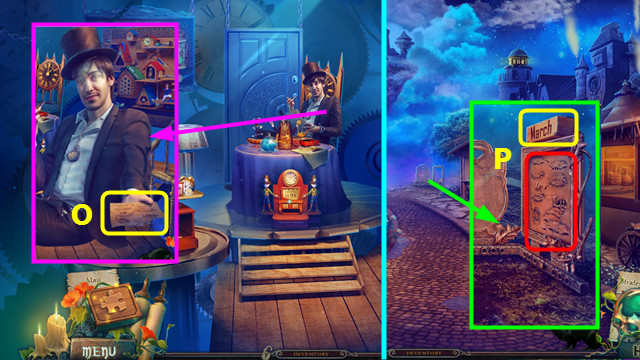
- Talk to the Clockmaker; take the WEATHER SCROLL (O).
- Walk down.
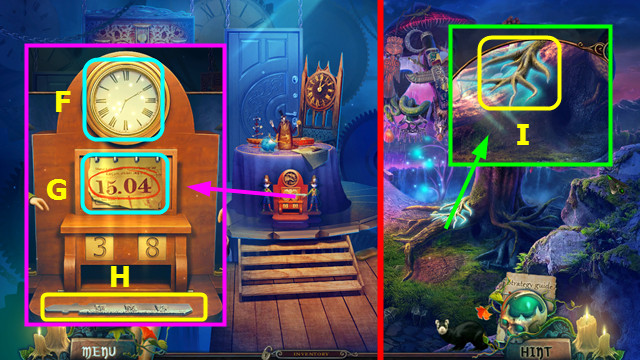
- Place the WEATHER SCROLL; take the BAR WITH MONTHS (P).
- Walk left.
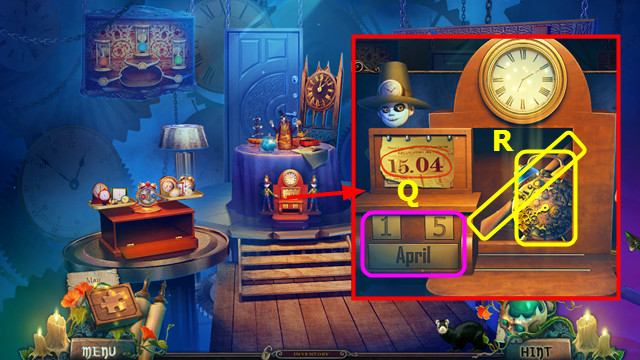
- Place the BAR WITH MONTHS; change the month and date as shown (Q).
- Take the REWINDING MECHANISM and POTTERY TOOL (R).
- Walk down.
- Place the POTTERY TOOL; remove the items and take the SLEEPWALKER (S).
- Place the REWINDING MECHANISM (T).
- Walk left.
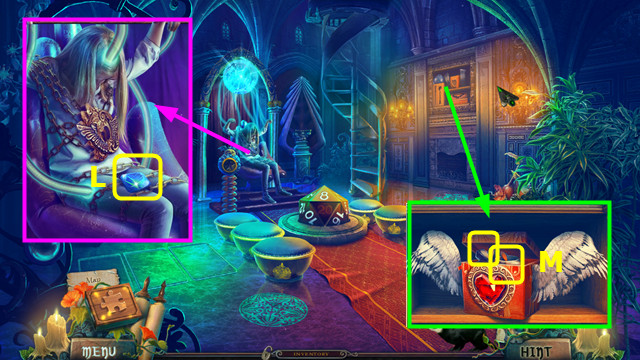
- Place the SLEEPWALKER (A).
- Select and play the HOP (B).
- Take the RUBY HEART and RED GLASS (C).
- Walk down 2x.
- Play the HOP; earn the RAIN CLOUD (D).
- Place the RED GLASS; take the PUPPET'S HAND (E).
- Go forward and left.
- Place the PUPPET'S HAND; take the DUST CLOUDS (F).
- Walk down.
- Use the RAIN CLOUD and DUST CLOUDS (G).
- Go forward.
Chapter 6: Upper Town
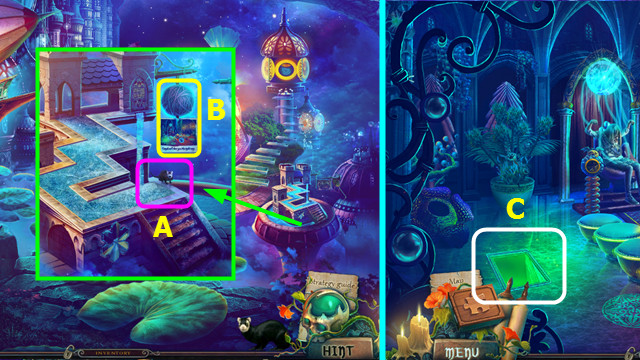
- Place the MAGIC LANTERN; take the CRYSTAL PLATE 1 and the CELTIC KNOT (H).
- Take the CRYSTAL PLATE 2 (I).
- Walk down and left.
- Place the CRYSTAL PLATE 1 and CRYSTAL PLATE 2; take the VANE (J).
- Walk down and forward.
- Place the VANE (K).
- Restore the stained glass (L).
- Take the MAGICAL FURNACE (M).
- Walk down.
- Place the MAGICAL FURNACE; select 1-6.
- Take the BELLOWS (N).
- Go forward.
- Use the BELLOWS (O).
- Play the HOP; earn the REDUCING POWDER (P).
- Walk down.
- Place the REDUCING POWDER (A), EGG (B), and FLOUR (C).
- Use (C), and then (B) in the bowl (D).
- Use E-F-G in (D).
- Use the spoon (H) on (D).
- Use (A) on (D).
- Select the dough (I).
- Select (J); take the REDUCING ROLL.
- Go forward.
- Use the REDUCING ROLL (K).
- Go forward.
- Select the 6 orbs (green).
- Take the AIR RUNE (L).
- Place the RUBY HEART; take the FROSTY STONE and RESIN (M).
- Walk down.
- Place the AIR RUNE; take the NUMBERED PLATE (N).
- Place the FROSTY STONE (O).
- Go forward.
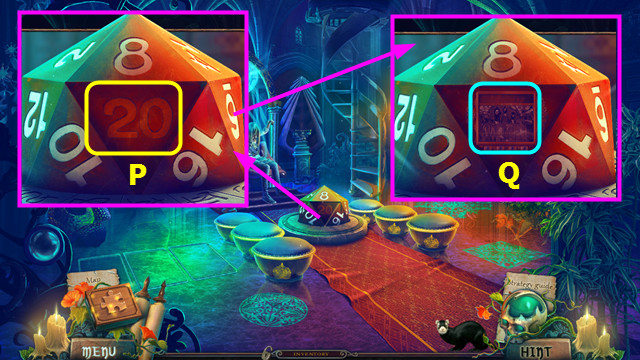
- Place the NUMBERED PLATE (P).
- Select (Q).
- Drop the tiles in columns: 4-6-5-5-2-4-5-6-1-4-3-3-6-1-2-4-2-5-1-3-3-2-6-1.
- Take the DIE and SEAGULL (R).
- Walk down.

- Place the SEAGULL; take the MAST (S).
- Walk down and left.
- Play the HOP; earn the the DOLL SHOES (T).
- Place the MAST; select the symbols 1-5.
- Take the STEEL WOLF and BOARD (U).
- Combine the BOARD, RESIN, and DOLL SHOES to make the SNOWBOARD (inventory).
- Walk down and forward.
- Use the FERRET and SNOWBOARD (A).
- Read the note and take the GUIDING TANGLE (B).
- Go forward.
- Use the GUIDING TANGLE; enter the floor (C).

- Place the CELTIC KNOT; use the keys on the locks (color-coded).
- Take the CHRYSOTILE STAR and read the note (D).
- Walk down.
- Place the CHRYSOTILE STAR; take the BAT (E).
- Enter the floor.
- Place the BAT; play the HOP for the CURSED NECKLACE (F).
- Walk down.
- Place the CURSED NECKLACE; take the KEY MECHANISM (G).
- Enter the floor.
- Select (H).
- Place the KEY MECHANISM.
- Select L-J-I-J-I.
- Take the MAGICAL DOOR (M).
- Walk down 2x.

- Play the HOP; earn the BRONZE HARE (N).
- Place the MAGICAL DOOR; read the scroll, move the pencils, and take the ERASER (O).
- Go forward and enter the floor.
- Use the ERASER; close the note (P).
- Swap the hats and shawls as shown (Q).
- Take the WAND (R).
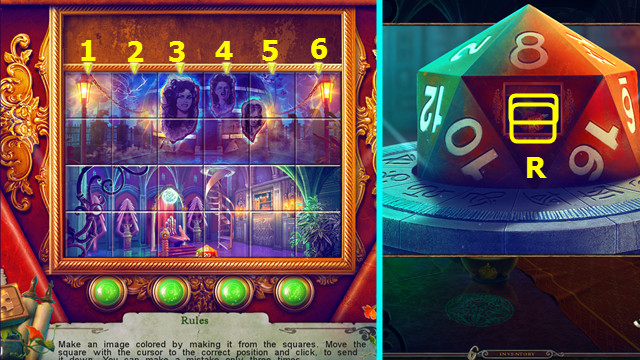
- Place and select the DIE 3x; take the WITCH'S WAND (S).
- Walk down.
- Place the WAND and WITCH'S WAND; take the GOLDEN BEAR (A).
- Enter the floor.
- Place the STEEL WOLF, GOLDEN BEAR, and BRONZE HARE (B).
- Use the tongs (C) on the crucible (B), and then the mold (D).
- Use the water (E) on the mold (D); take the ALLOY KEY.
- Walk down.
- Use the ALLOY KEY (G).
- Go up the stairs.
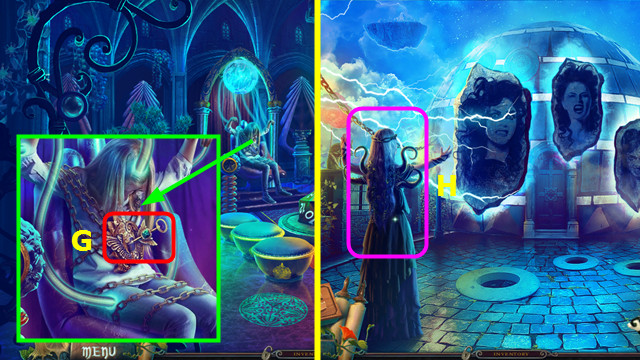
- Use the TEARS OF THE TWO-FACED (H).
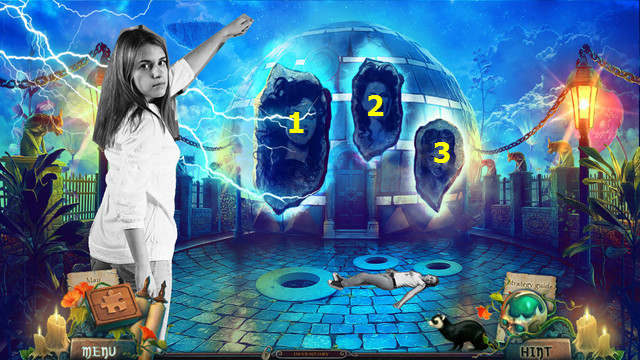
- Select 1-3.
- Congratulations! You have completed Witches' Legacy: Awakening Darkness!
Created at: 2016-01-22