

Walkthrough Menu
- General Tips
- Chapter 1: The Showroom
- Chapter 2: The Bewitched Wood
- Chapter 3: The Locks
- Chapter 4: Prison
- Chapter 5: Castle Courtyard
- Chapter 6: Near the Well
- Chapter 7: Morgana's Hideaway
- Chapter 8: Star Valley
General Tips
- This is the official guide for Witches Legacy: The Dark Throne.
- This guide will not mention each time you have to zoom into a location; the screenshots will show each zoom scene.
- Hidden-object puzzles are referred to as HOPs. This guide will not show HOP solutions. It will identify the location of the HOP and the inventory item acquired.
- This guide will show solutions for non-random puzzles. Please read the in-game instructions for each puzzle.
Chapter 1: The Showroom
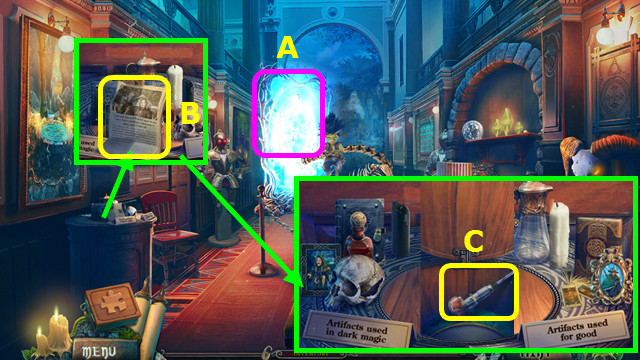
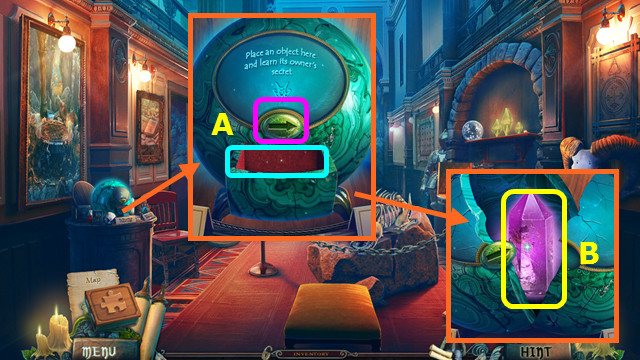
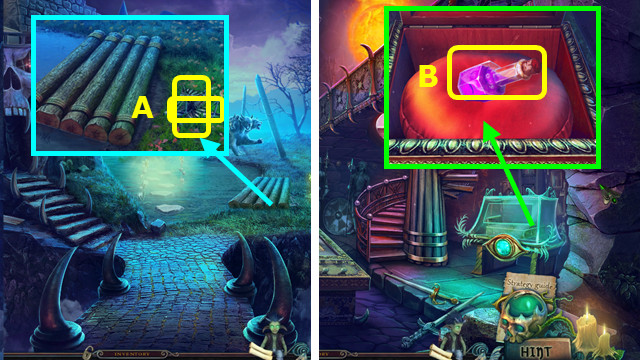
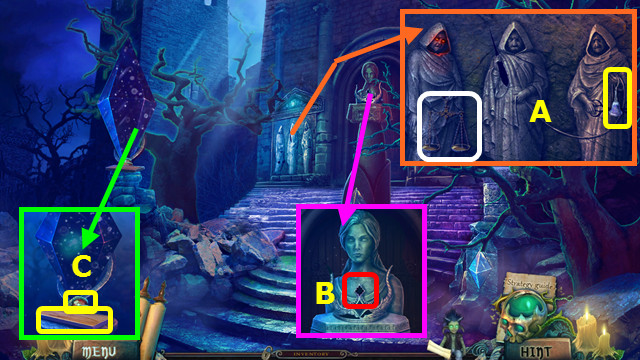
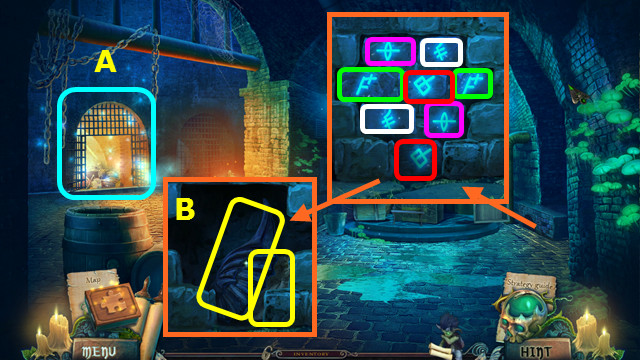
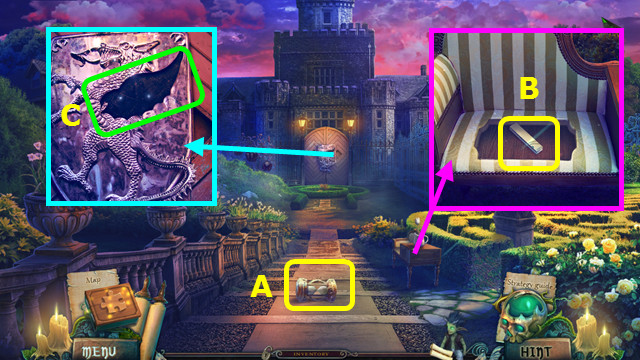
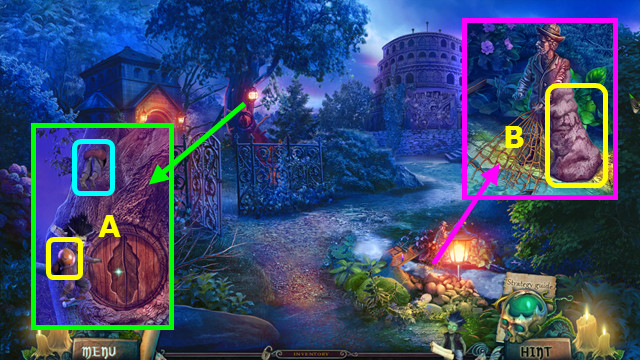
- Touch the mirror (A).
- Take the NEWSPAPER (B).
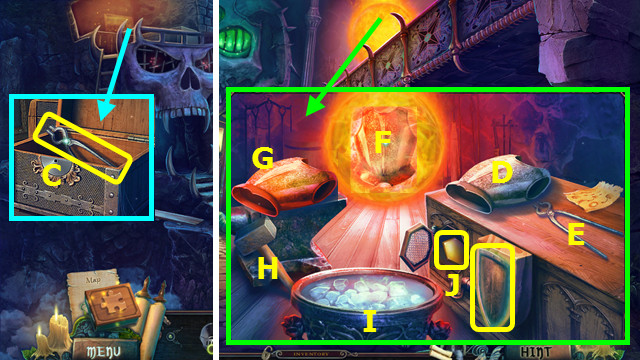
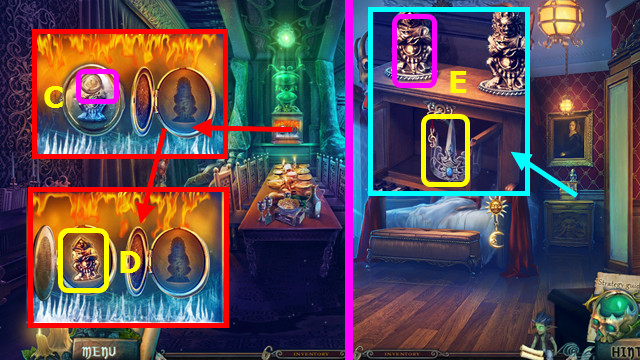
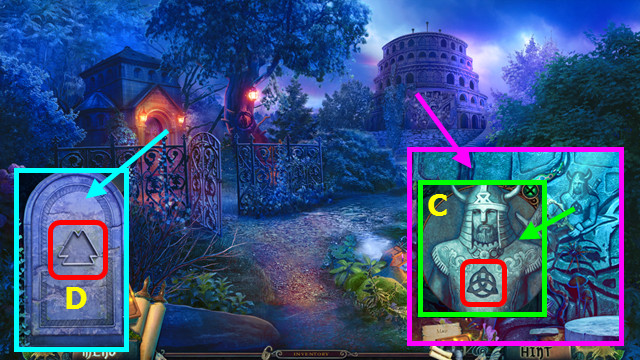
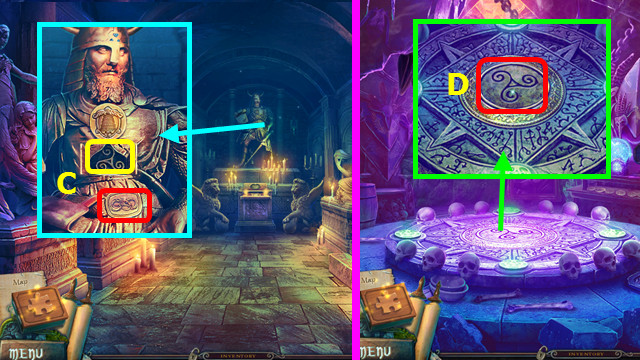
- Move the items as shown; take the ANCIENT KNIFE (C).
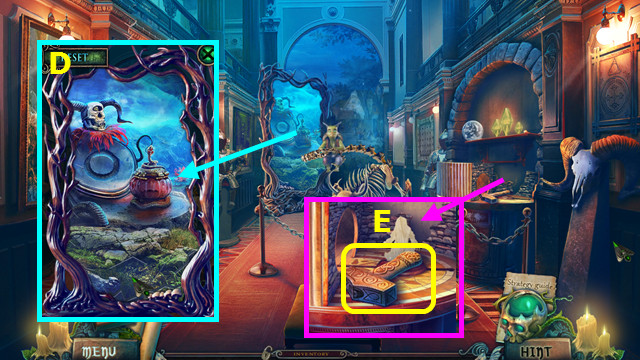
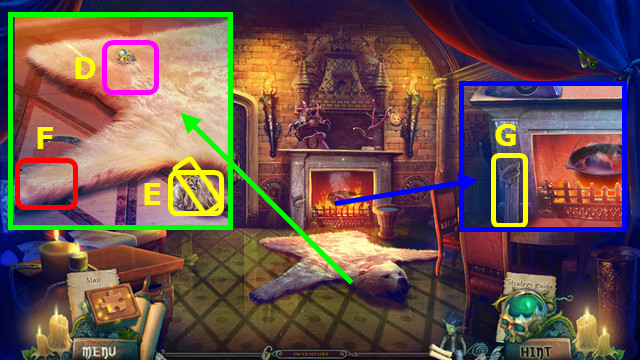
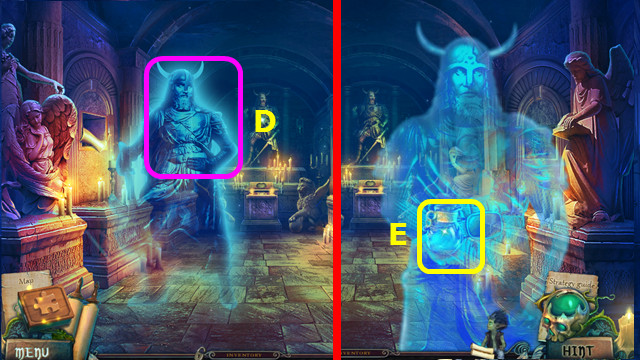
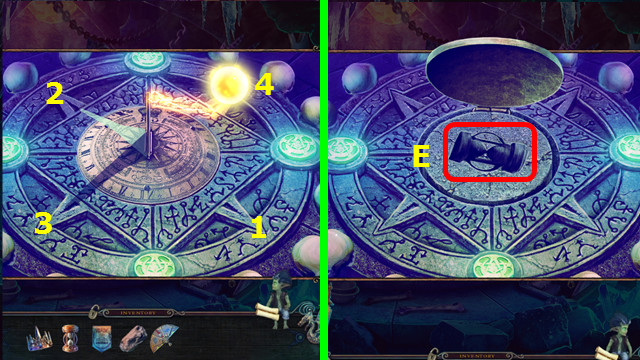
- Touch, and then restore the mirror (D).
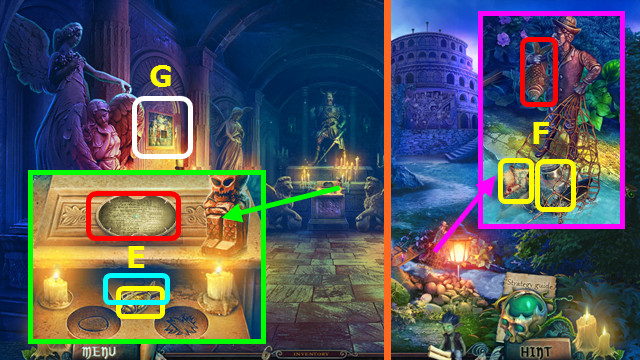
- Take the RITUAL HAMMER (E).
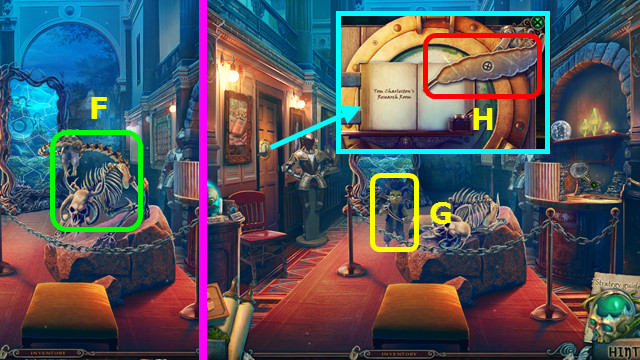
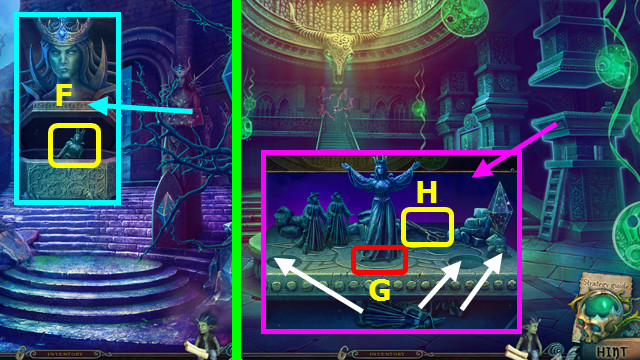
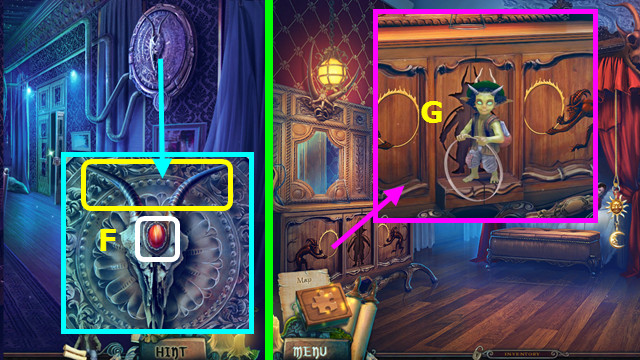
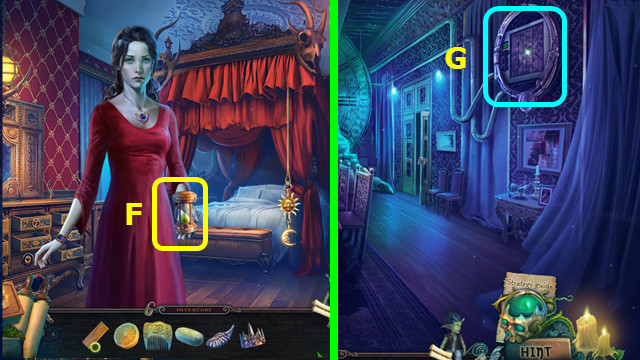
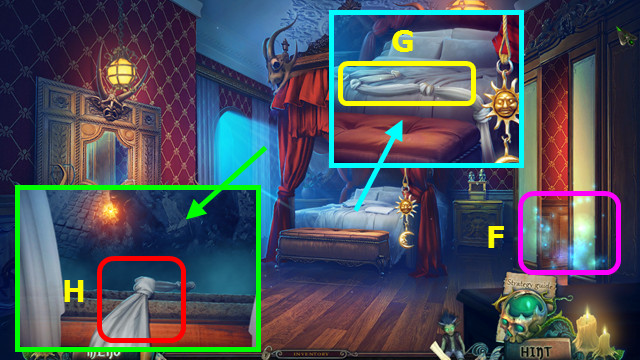
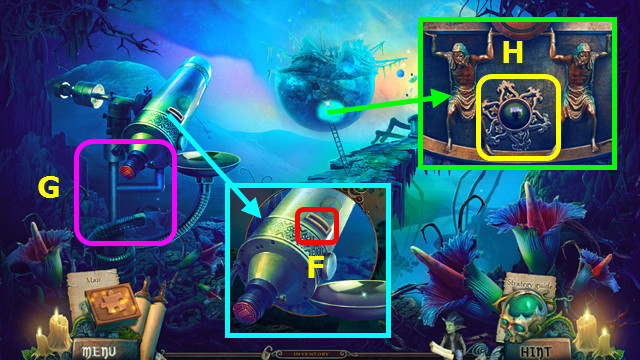
- Use the RITUAL HAMMER (F).
- Take the TUSK and IMP (G).
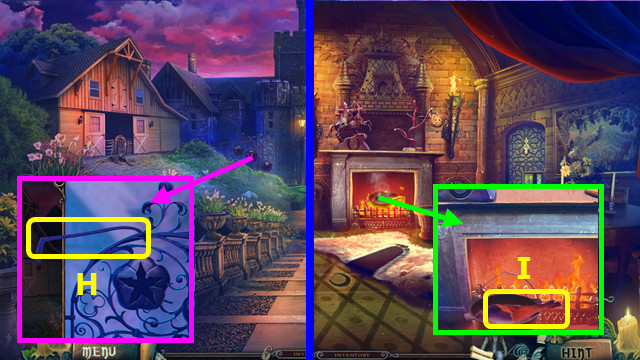
- Combine the TUSK and ANCIENT KNIFE to make the BONE PEN (inventory).
- Place the BONE PEN (H).
- Walk left.
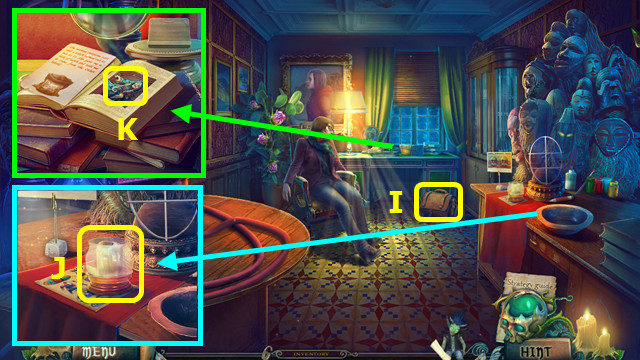
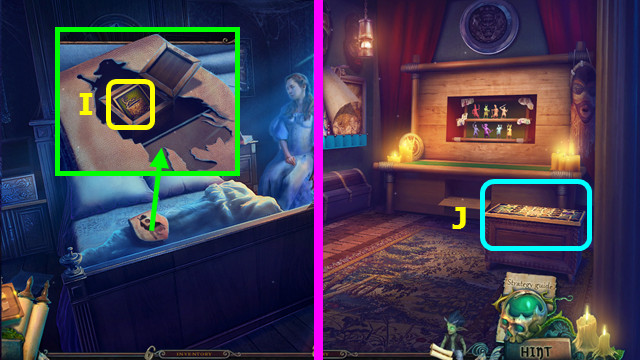
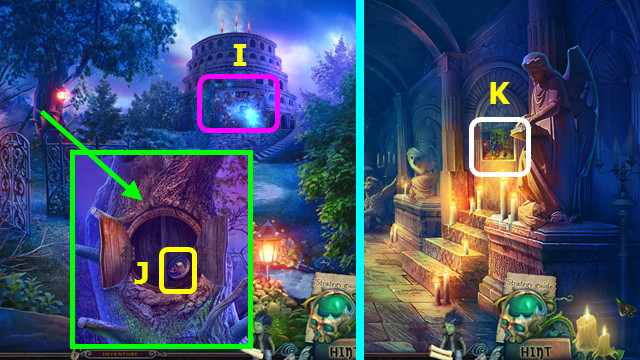
- Take CARRIE'S BAG (I).
- Open CARRIE'S BAG, place the photos into the frame, and take the SUNGLASSES (inventory).
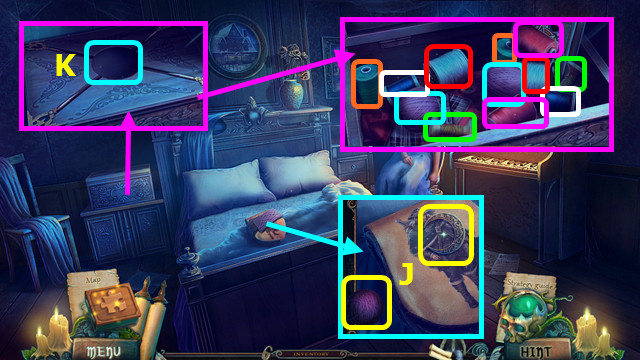
- Take the CANDLE (J).
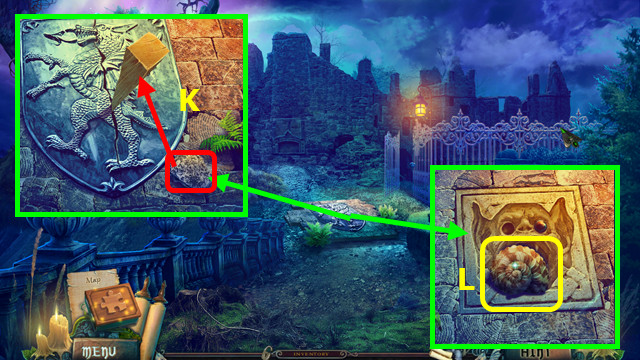
- Open Tom's Diary; read the note and take the WITCH FIGURINE (K).
- Walk down.
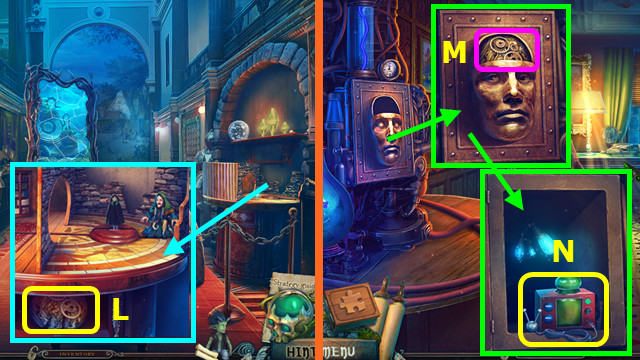
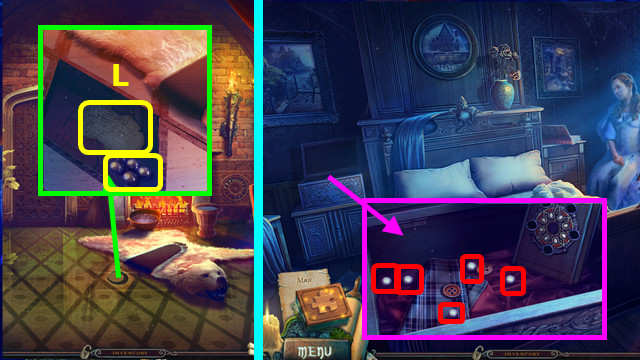
- Place the WITCH FIGURINE; take the MECHANICAL BRAIN (L).
- Walk left.
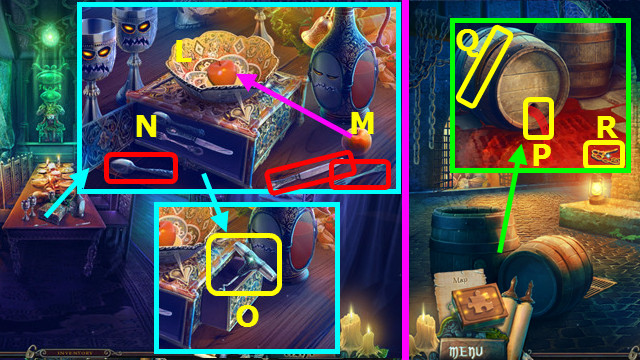
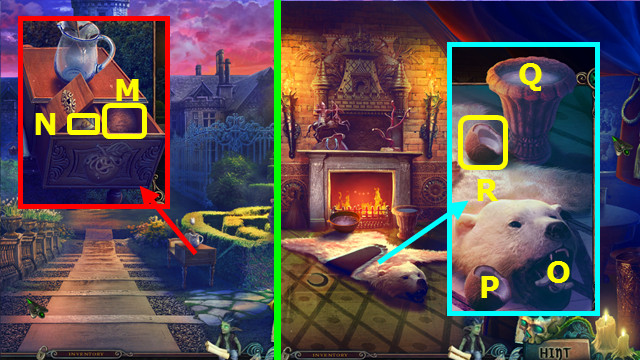
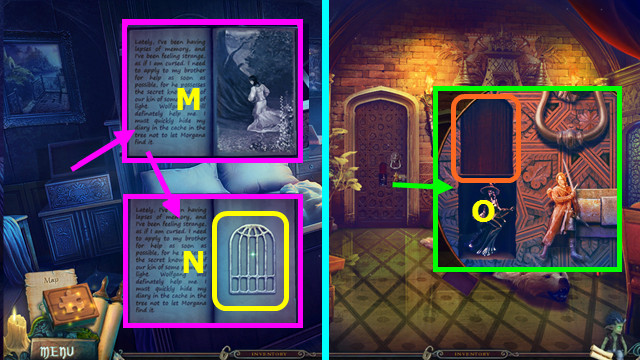
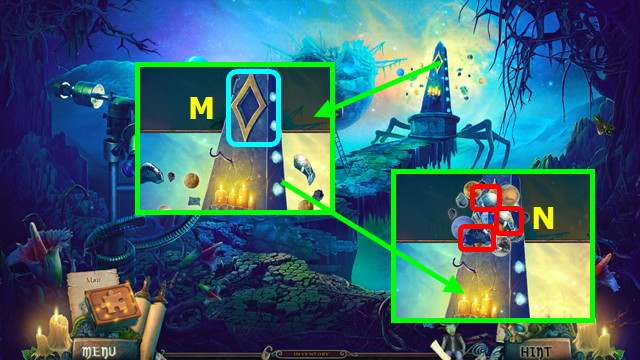
- Place the MECHANICAL BRAIN (M).
- Take the LIGHTNING CATCHER (N).
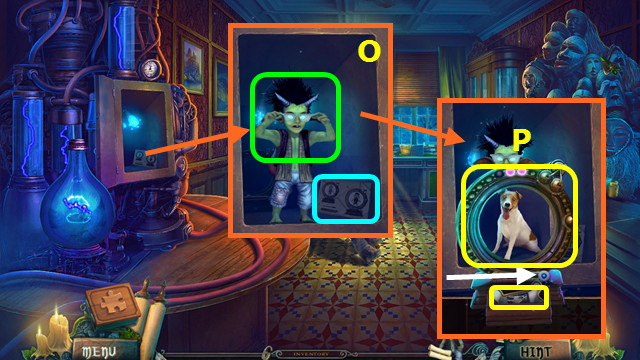
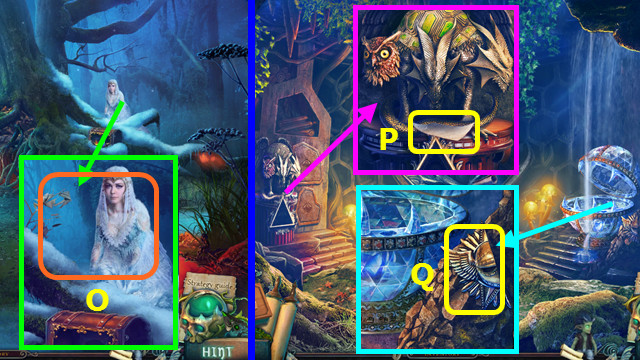
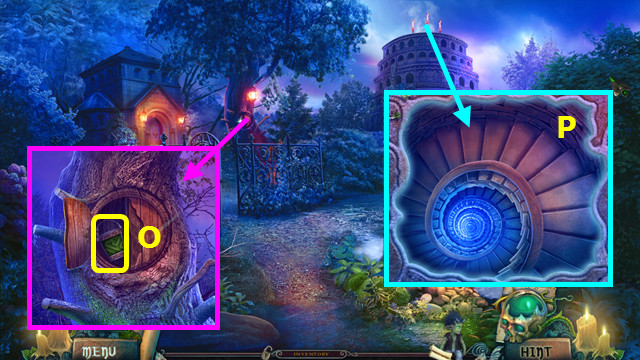
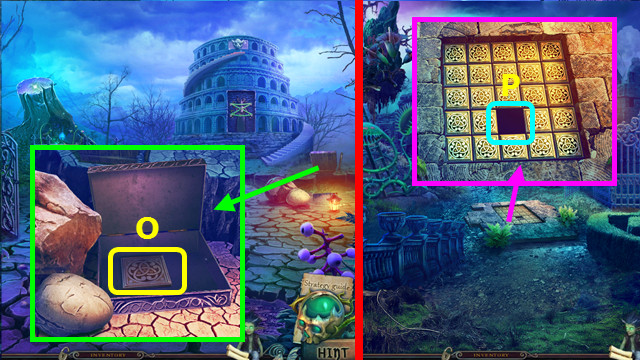
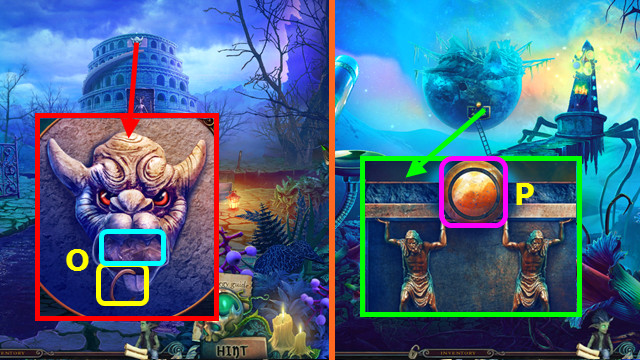
- Read the note; use the IMP and SUNGLASSES (O).
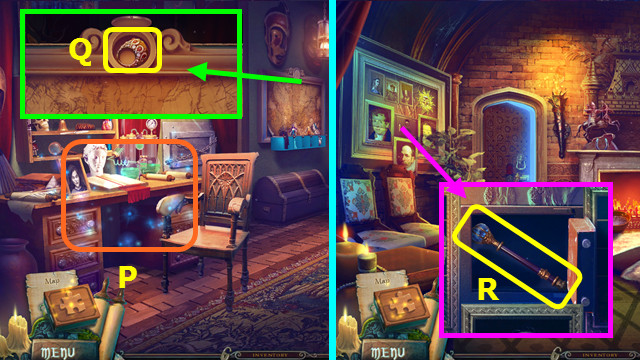
- Slide the button; take the PHOTO OF PUPPY and GLASS OF TRUTH (P).
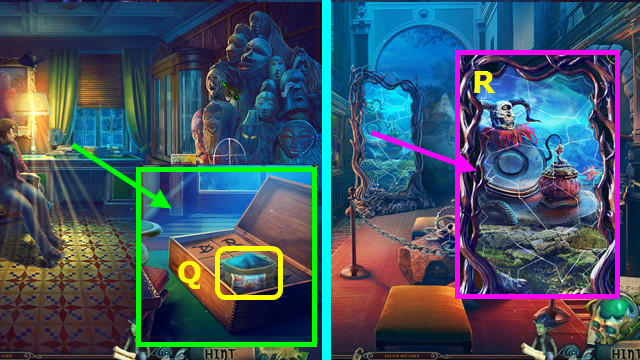
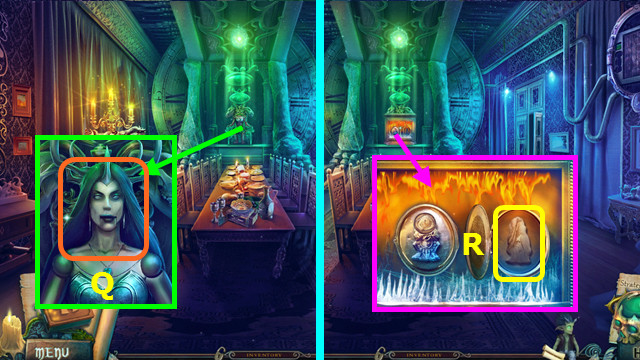
- Place the PHOTO OF PUPPY; take the OTHER WORLD SOIL (Q).
- Walk down.
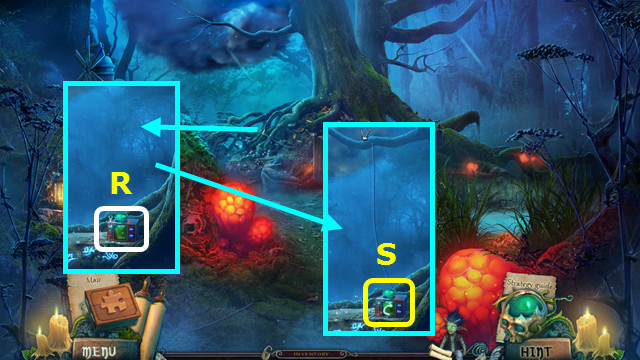
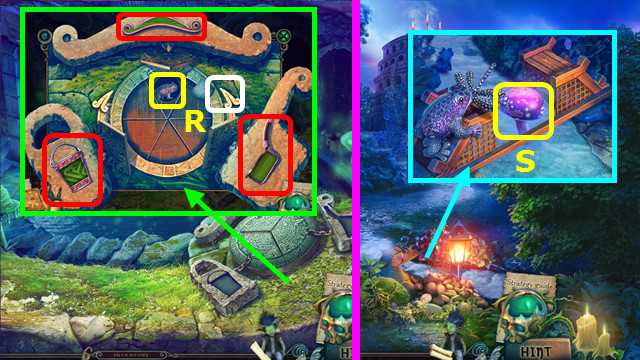
- Use the OTHER WORLD SOIL (R).
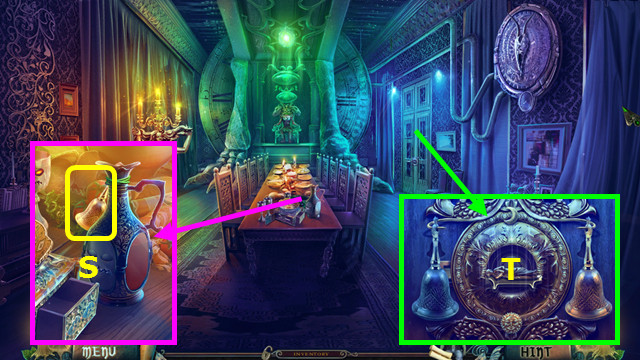
- Walk forward.
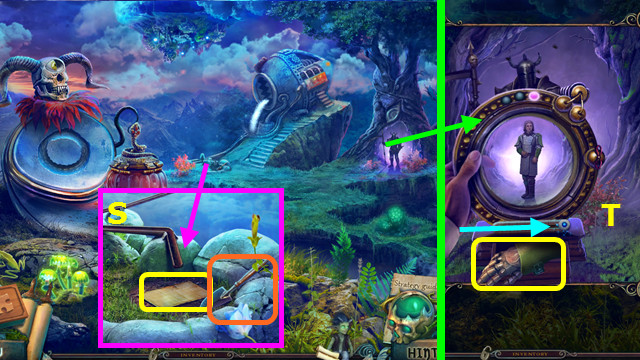
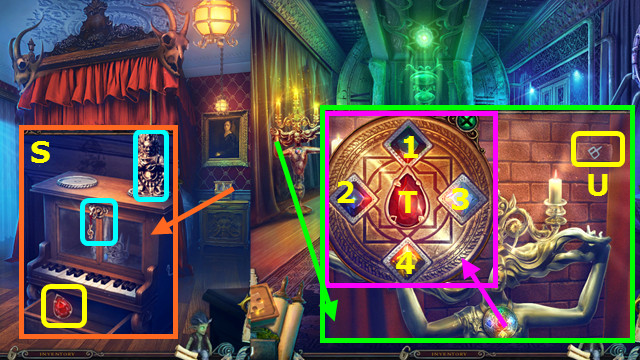
- Take the MAP and select the shovel (S).
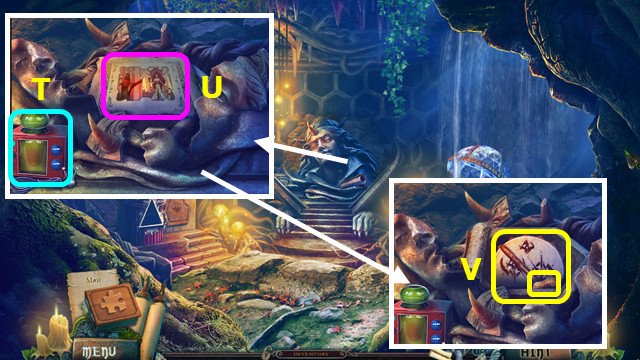
- Use the GLASS OF TRUTH; slide the button right and take the GATEKEEPER'S GLOVE (T).
- Walk down.
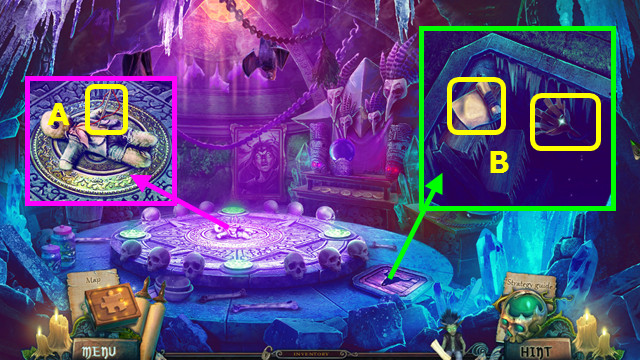
- Place the GATEKEEPER'S GLOVE; press the button 5x (A).
- Take the CRYSTAL ENERGY (B).
- Walk forward.
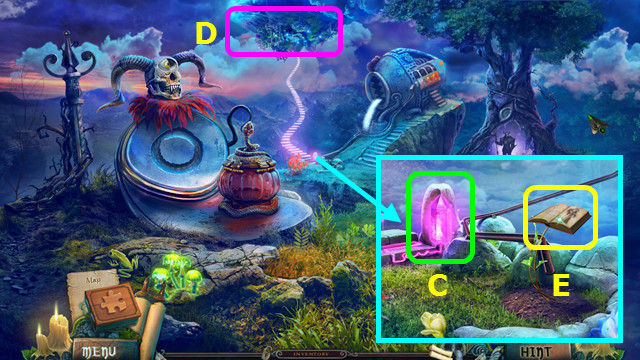
- Place the CRYSTAL ENERGY (C).
- Play the HOP; earn the SEEDS (D).
- Place the SEEDS; take the SACRED BOOK (E).
- Walk down and left.
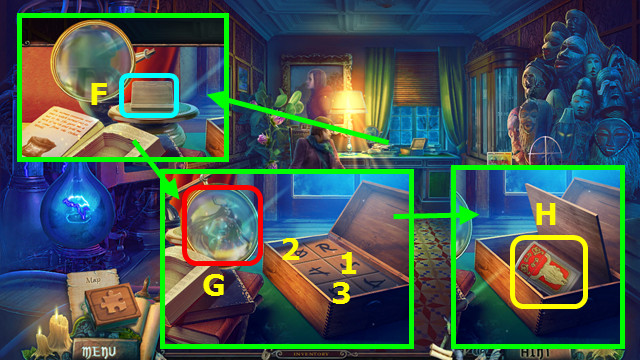
- Place the SACRED BOOK (F).
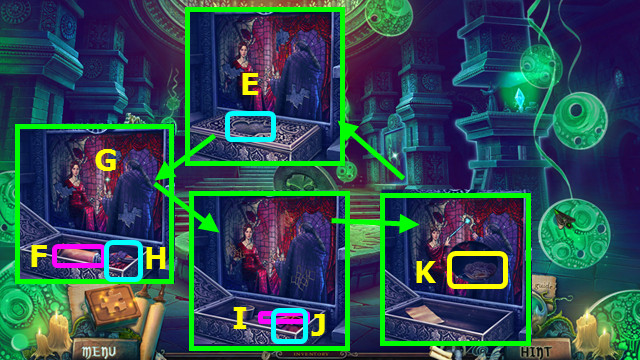
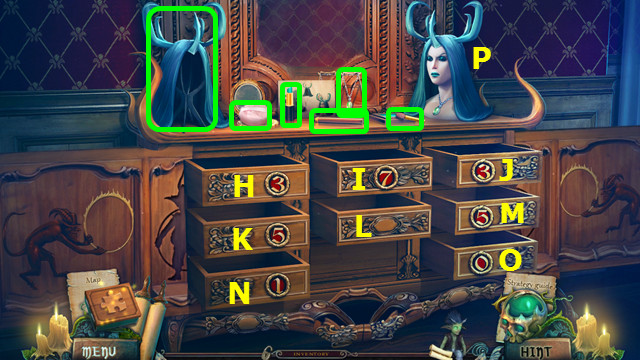
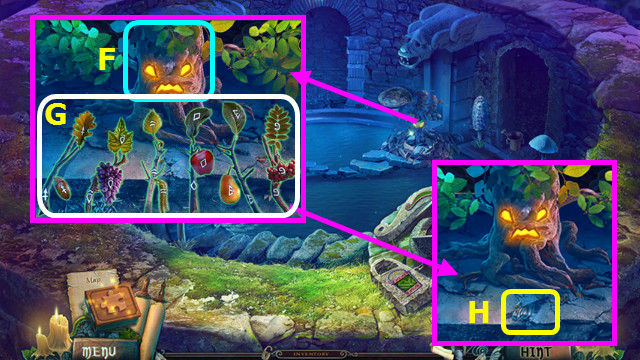
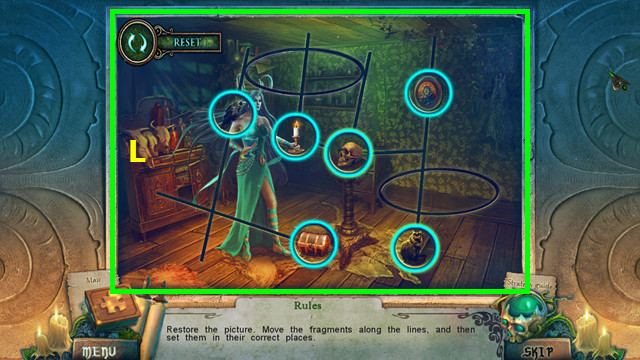
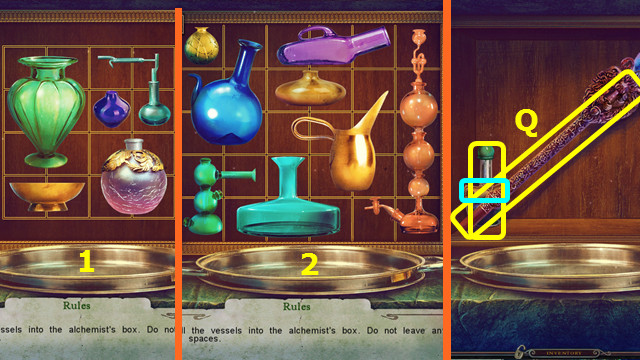
- Play the HOP (G).
- Press 1-3.
- Take the LIGHTER (H).
- Combine the CANDLE and LIGHTER to make the MOLTEN WAX (inventory).
- Walk down and forward.
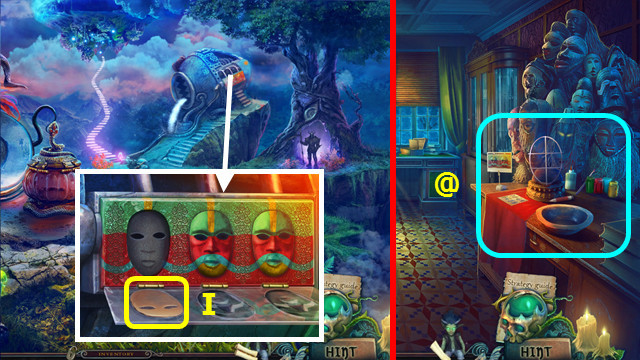
- Open the panel; use the MOLTEN WAX and take the MASK CASTING (I).
- Walk down and left.
- Select (@).
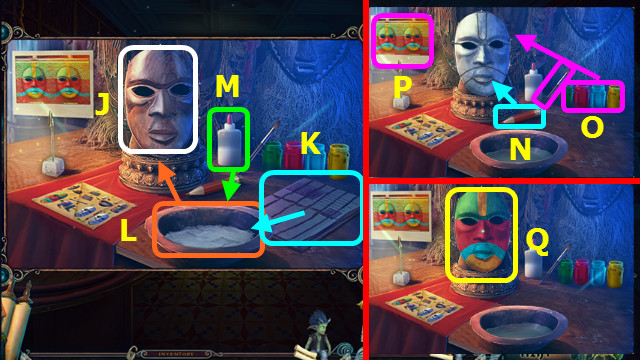
- Place the MASK CASTING (J) and NEWSPAPER (K).
- Select (K) 4x; move to (L).
- Use (M) on (L).
- Move (L) to (J) 2x.
- Use (N) on the mask casting.
- Select the paintbrush (O) and use the paints to finish the mask as shown (P).
- Take the RITUAL MASK (Q).
- Walk down and forward.
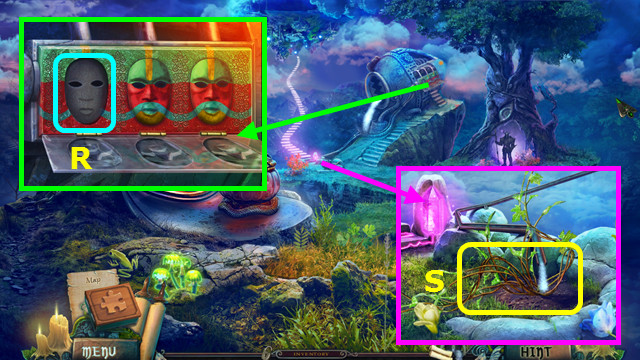
- Place the RITUAL MASK (R).
- Take the VINES (S).
- Use the IMP and VINES (T).
- Pull the vine (U).
- Take the CASTLE EMBLEM (V).
- Walk right.
Chapter 2: The Bewitched Wood
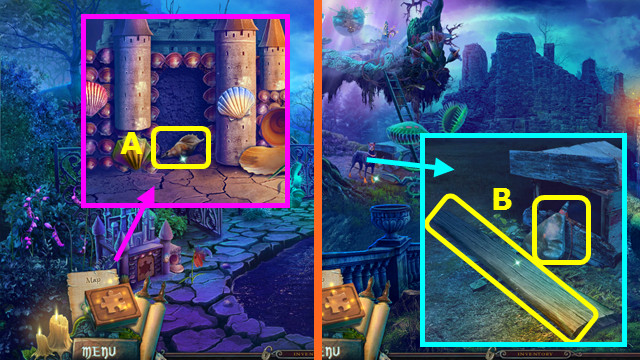
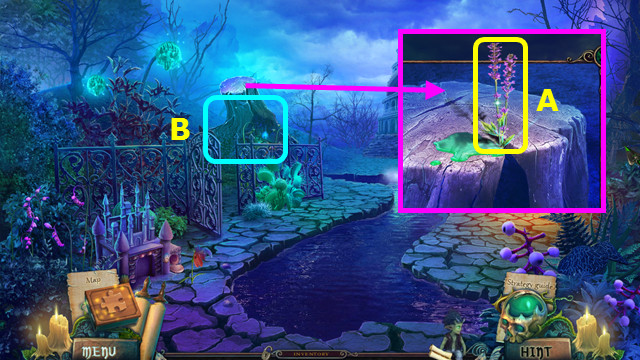
- Take the RED FEATHER (A).
- Take the TWINE (B).
- Walk left.
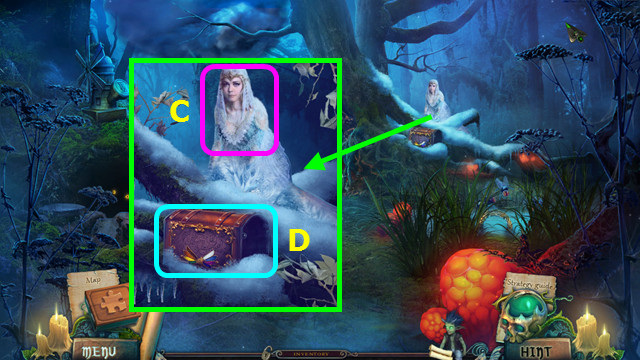
- Talk to Vesta (C).
- Select the chest (D).
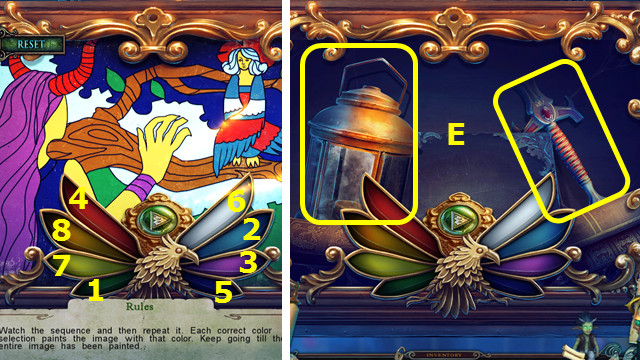
- Place the RED FEATHER and push the arrow button.
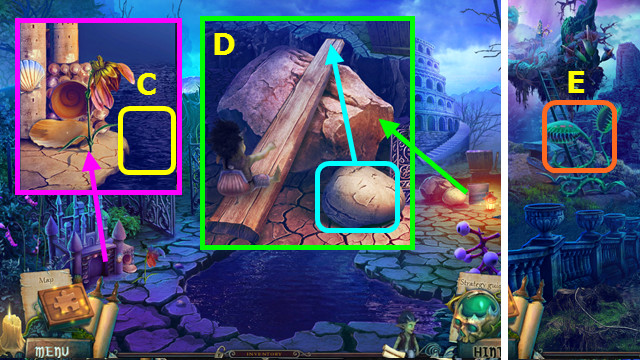
- Select 1-8.
- Take the LANTERN and SWORD HILT (E).
- Walk down.

- Place the LANTERN, use the stick on the fire, and then the lantern; take the LIT LANTERN (F).
- Walk left.
- Use the LIT LANTERN; take the BROKEN BIRD and BRUSHWOOD (G).
- Restore the BROKEN BIRD to make the MECHANICAL BIRD (inventory).
- Walk down.
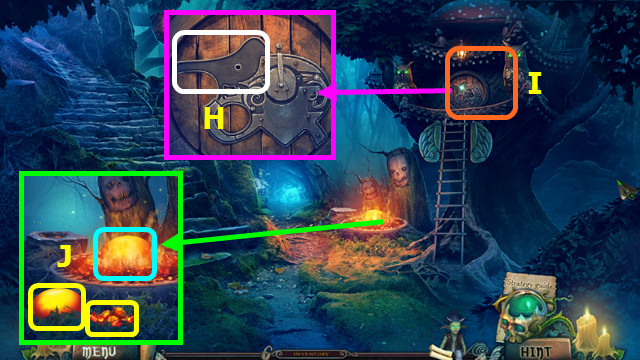
- Place the MECHANICAL BIRD (H).
- Play the HOP; earn the POT HOOK (I).
- Use the POT HOOK; take the FIRE SALAMANDER EGG and EMBERS (J).
- Walk left.
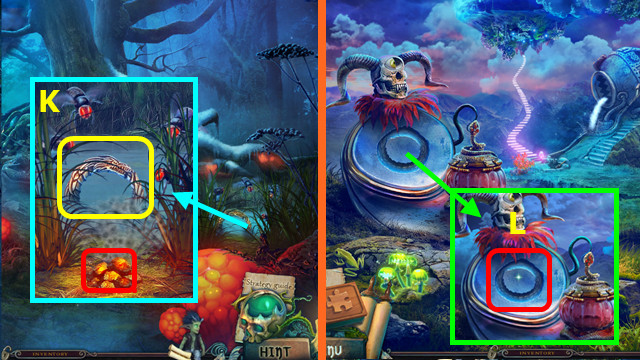
- Use the EMBERS; take the OUROBOROS (K).
- Walk down 2x.
- Place the OUROBOROS (L).

- Change the symbols as shown; place the FIRE SALAMANDER EGG (M).
- Take the FIRE SALAMANDER SHELL and FIRE SALAMANDER (N).
- Walk right and left.
- Use the FIRE SALAMANDER (O).
- Walk forward.
- Take the TISSUE PAPER (P).
- Arrange the BRUSHWOOD; add the TISSUE PAPER and TWINE to make the KITE (inventory).
- Take the 1st FALLEN WARRIOR EMBLEM FRAGMENT (Q).
- Walk down.
- Place the LIGHTNING CATCHER (R).
- Use the IMP and KITE; take the LIGHTNING (S).
- Walk forward.
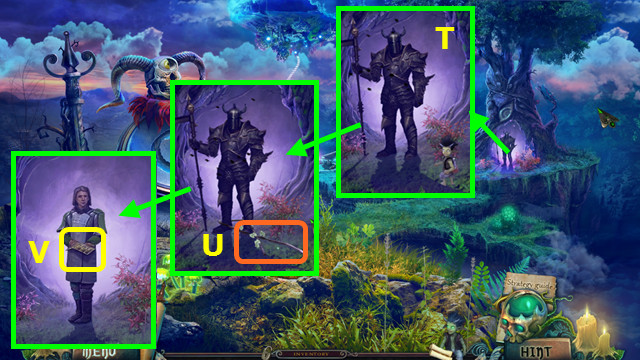
- Place the LIGHTNING (T).
- Play the HOP (U).
- Take the PEANUT and TAMBOURINE (V).
- Walk down 2x.
- Use the TAMBOURINE (A).
- Play the HOP; earn the ALL-SEEING EYE (B).
- Walk left and forward.
- Place the ALL-SEEING EYE (C).
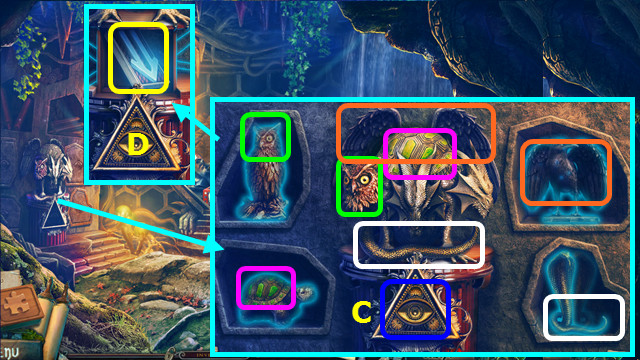
- Restore the 4 animals (color-coded).
- Take the WIND RUNE (D).
- Walk down.
- Place the WIND RUNE; take the EYE PIECE and read the note (E).
- Walk down 2x.
- Play the HOP; earn the AIR PLANT (F).
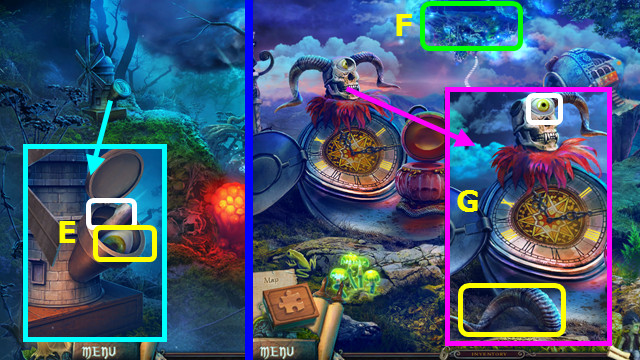
- Place the EYE PIECE; take the HORN (G).
- Walk right.
- Place the HORN; take the PICKAX (H).
- Walk left and forward.
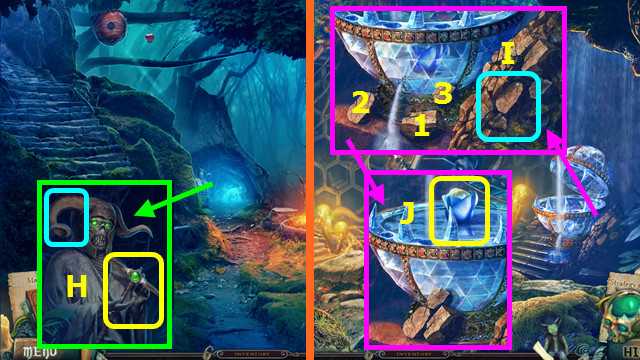
- Use the PICKAX (I); select 1-3.
- Take the WATER LILY BUD (J).
- Walk down.
- Place the PEANUT, FIRE SALAMANDER SHELL, WATER LILY BUD, and AIR PLANT (K).
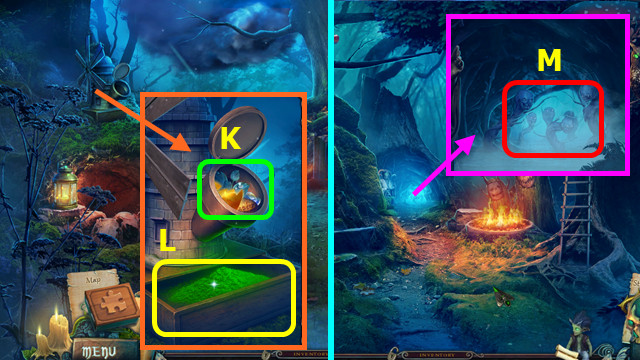
- Take the MAGIC POWDER (L).
- Walk down.
- Use the MAGIC POWDER (M).
- Walk forward.
Chapter 3: The Locks
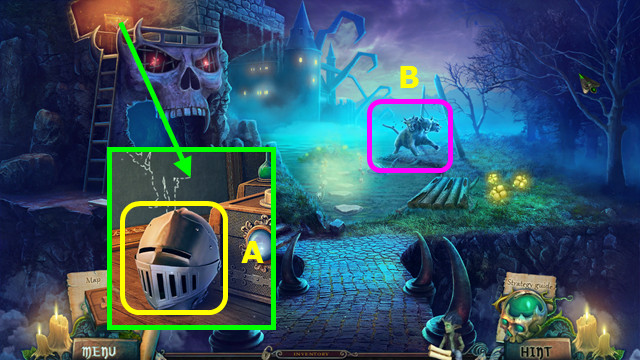
- Take the HELMET (A).
- Select (B).
- Use the GLASS OF TRUTH, slide the button, and take the MONSTER EMBLEM (C).
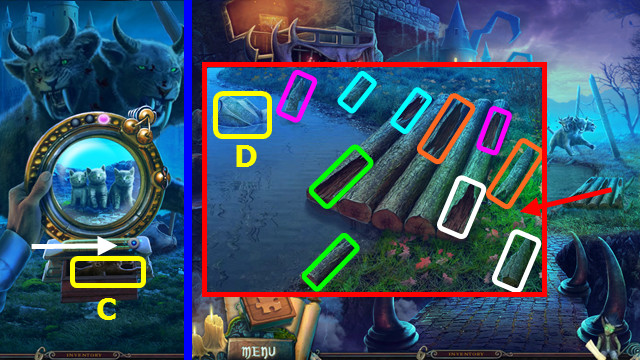
- Walk down.
- Restore the logs (color-coded).
- Take the CHEST ARMOR (D).
- Walk left.
- Take the MOON and SAPPHIRE; place the CASTLE EMBLEM and MONSTER EMBLEM (F).
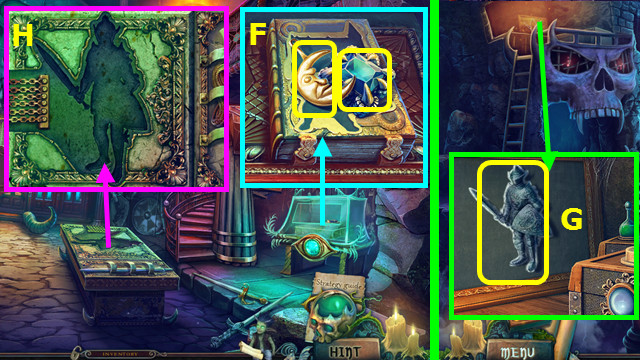
- Play the HOP; earn the IMAGE OF KNIGHT and MAGIC CHALK.
- Walk down.
- Use the MAGIC CHALK; take the KNIGHT FIGURINE (G).
- Walk left.
- Place the KNIGHT FIGURINE (H).
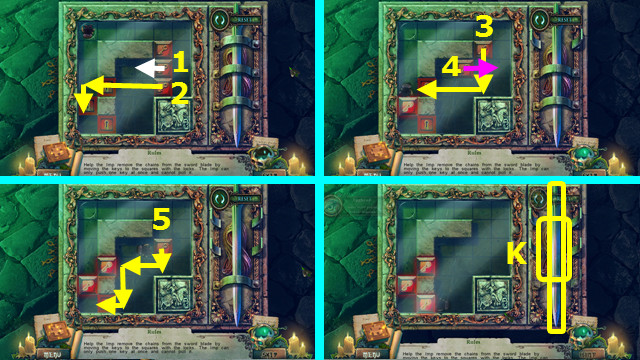
- Move the keys along the paths (1-5).
- Take the SWORD BLADE and ROPE (K).
- Walk down.
- Use the ROPE; take the SCALES and 2nd FALLEN WARRIOR EMBLEM FRAGMENT (A).
- Walk left.
- Place the 2 FALLEN WARRIOR EMBLEM FRAGMENTS; take the ELIXIR (B).
- Walk down.
- Place the ELIXIR; take the TONGS (C).
- Walk left.
- Place the CHEST ARMOR (D) and TONGS (E).
- Move D to F; use E on F and G.
- Use H on G 3x.
- Use E on G and I.
- Take the HONEYCOMB and SHIELD (J).
- Walk down 2x.
- Play the HOP; earn the STRENGTH POTION (K).
- Combine the SWORD BLADE, SWORD HILT, and STRENGTH POTION to make the MAGIC SWORD (inventory).
- Place the HONEYCOMB; move the spores and take the CLOTH (L).
- Open the HELMET; add the CLOTH and EMBERS to make the RESPIRATOR MASK (inventory).
- Walk forward.

- Use the IMP and RESPIRATOR MASK; take the KNIGHT'S COAT OF ARMS (M).
- Walk left.
- Place the KNIGHT'S COAT OF ARMS (N).
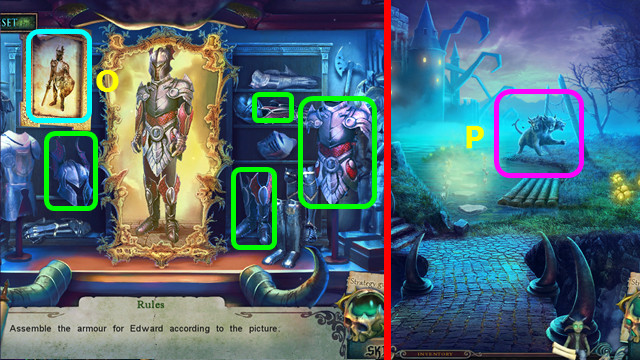
- Place the IMAGE OF KNIGHT (O).
- Select the armor (green).
- Walk down.
- Select (P).

- Use the SHIELD and MAGIC SWORD.
- Select 1-15.
- Walk forward.
- Place the SCALES and take the SILVER BELL (A).
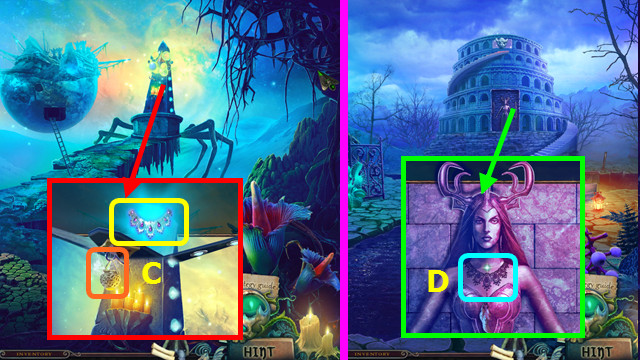
- Place the SAPPHIRE; play the HOP (B).
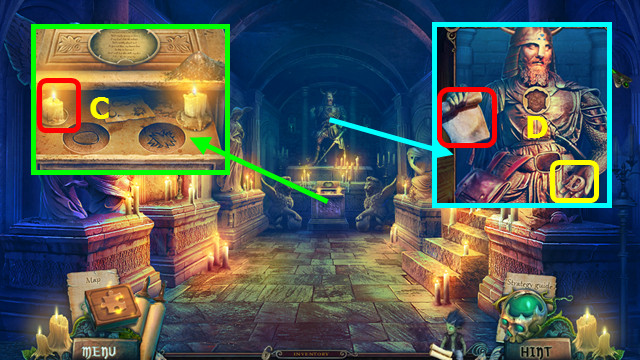
- Take the TABLET and SERPENT HEART (C).
- Walk forward.

- Select the painting 3x; take the BLACK TABLET and KEY OF LIFE (D).
- Take MOIRA'S SPINDLE (E).
- Walk down.
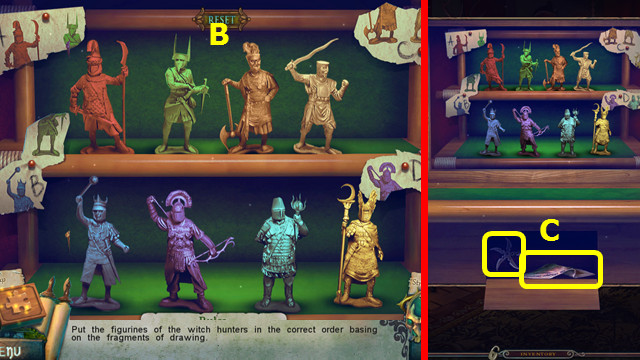
- Place the BLACK TABLET; take the MARBLE WITCH (F).
- Walk forward.
- Place the MARBLE WITCH; move the 3 figures to the tableau (G).
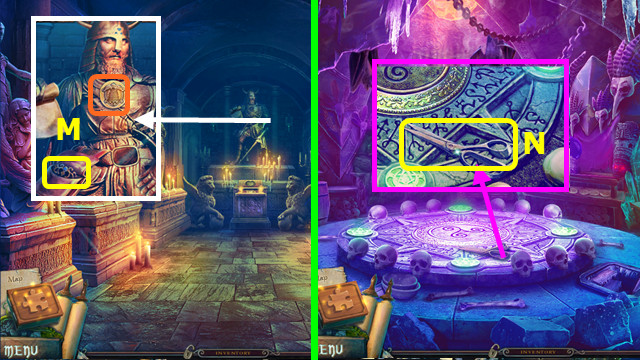
- Take MOIRA'S SCISSORS (H).
- Walk down.
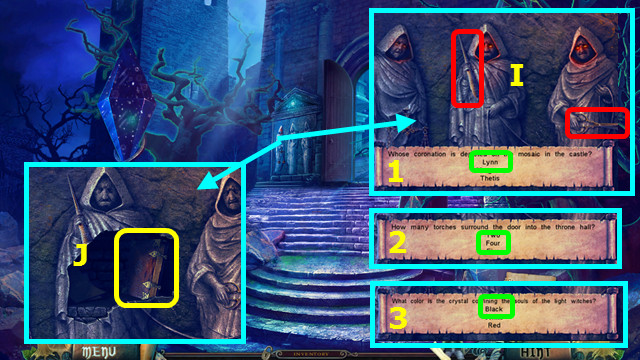
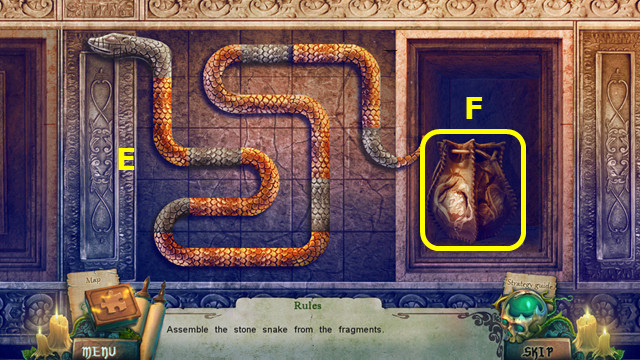
- Place MOIRA'S SPINDLE and MOIRA'S SCISSORS (I).
- Answer the questions (1-3).
- Take the BOOK OF LIFE (J).
- Combine the BOOK OF LIFE and KEY OF LIFE; restore the picture and take the DRAGON CLAW (inventory).
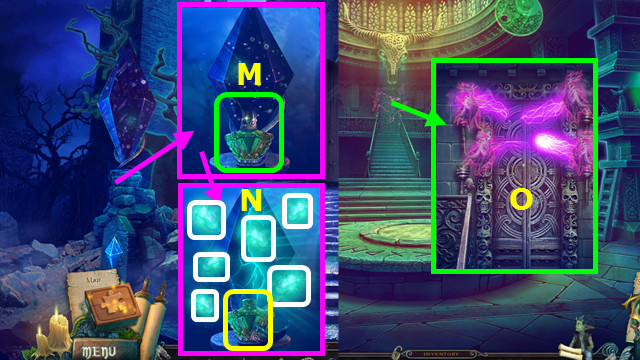
- Place and select the DRAGON CLAW (M).
- Select the 6 souls; take the BRIGHT SOULS (N).
- Walk forward.
- Use the BRIGHT SOULS (O).
- Walk forward.
Chapter 4: Prison
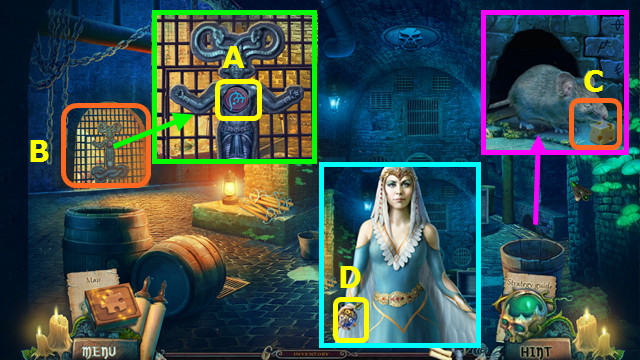
- Take the RUNE CHIP; place the SERPENT HEART (A).
- Play the HOP; earn the MONEY POUCH (B).
- Open the MONEY POUCH; move items and take the CHEESE and EMPTY FLASK (inventory).
- Select the hole; place the CHEESE (C).
- Take the DIAMOND NUT (D).
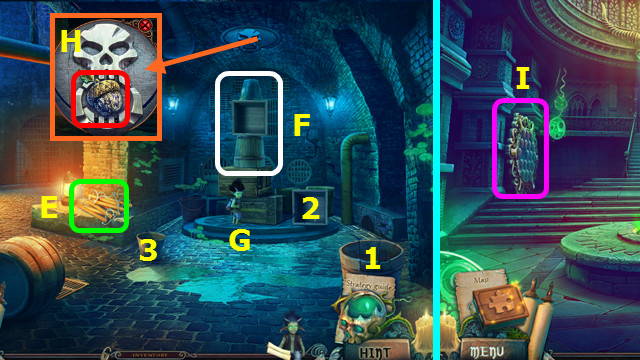
- Play the HOP; earn the ROPE LADDER (E).
- Place the 3 items (1-3) on the stack (F).
- Give the IMP the ROPE LADDER (G).
- Place the DIAMOND NUT (H).
- Go up the ladder.
- Select (I).
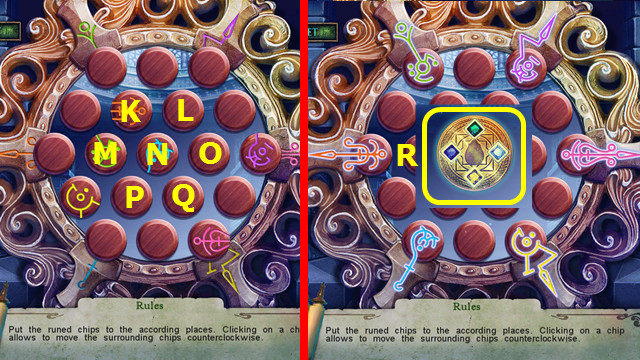
- Place the RUNE CHIP.
- Solution: Kx4-O-L-Mx3-N-Px4-Q-O-Qx5.
- Take the HARPY'S AMULET (R).
- Walk forward.
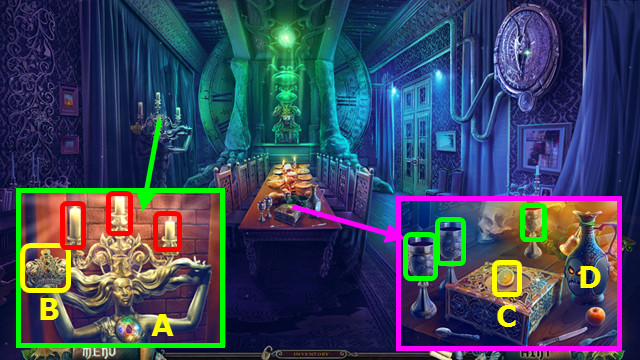
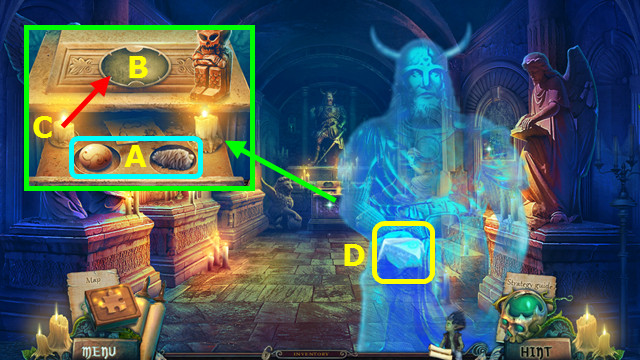
- Select the 3 candles (red); place the HARPY'S AMULET (A).
- Take the CROWN (B).
- Take the LEMON (C).
- Pour the 3 goblets (green) into the pitcher (D).
- Walk down.
- Place the CROWN (E).
- Use the glue (F) on the mosaic (G).
- Place the pieces (H) on the mosaic.
- Select the palette knife (I); use the cloth (J) on the mosaic.
- Read the note; take the MAGIC BOWL (K).
- Walk forward.
- Place the MAGIC BOWL (L); move (M) to (L).
- Restore the silverware (red) to the case (N).
- Take the CORKSCREW (O).
- Return to the Prison.
- Use the CORKSCREW; use the EMPTY FLASK to take the FLASK OF WINE (P).
- Take the BARREL HOOP (Q) and CLOCKWORK KEY (R).
- Go up and forward.
- Use the FLASK OF WINE; take the GOLDEN BELL (S).
- Place the SILVER BELL and GOLDEN BELL (T).
- Walk right.
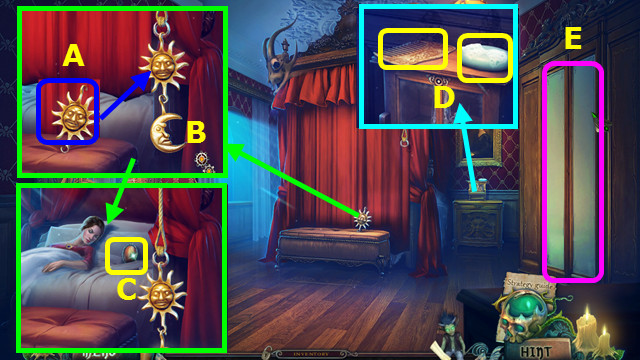
- Hang the sun (A) and add the MOON (B).
- Take the GOLD AGATE (C).
- Take the COMB and SOAP (D).
- Open the closet; play the hop to earn the HAT (E).
- Walk down.
- Place the GOLD AGATE; take the HORNS (F).
- Combine the HAT and HORNS to make the HAT WITH HORNS (inventory).
- Walk right.
- Give the BARREL HOOP and HAT WITH HORNS to the imp (G).
- Select O-N-L-J-L-H-L-K-L-M-L-I.
- Use the 6 items (green) on the bust (P) to make MORGANA'S HEAD.
- Walk down.
- Place MORGANA'S HEAD (Q).
- Close the door; take the DEMON (R).
- Walk right.
- Place the CLOCKWORK KEY and DEMON; take the RUBY TEARDROP (S).
- Walk down.
- Place the RUBY TEARDROP (T); touch 1-4.
- Take the RUNE STONE (U).
- Go to the Prison.
- Play the HOP; earn the BANSHEE SIGNET (A).
- Place the RUNE STONE; select pairs (color-coded).
- Take the DRAGON WING and CLAY (B).
- Go up and forward.
- Use the BANSHEE SIGNET (C).
- Place the CLAY; take the BANSHEE (D).
- Walk right.
- Place the BANSHEE; take the WITCHES CROWN (E).
- Take the RULER OF TIME (F).
- Walk down.
- Select (G).
- Place the RULER OF TIME (H).
- Solution, part 1 (I).
- Solution, part 2 (J).
Chapter 5: Castle Courtyard
- Take the RULER OF TIME (A).
- Take the PIANO KEY (B).
- Remove the sign; place the DRAGON WING (C).
- Walk forward.
- Use the COMB (D).
- Take the PIN and BEAR FUR (E).
- Move the paw (F).
- Take the SAW (G).
- Walk down.
- Use the SAW; take the FIRE IRON (H).
- Walk forward.
- Use the FIRE IRON; take the HAM (I).
- Walk down.

- Use the HAM (J).
- Play the HOP; earn the HORSESHOE (K).
- Walk forward.
- Place the HORSESHOE; take the WOODEN APPLE (L).
- Walk down.
- Place the WOODEN APPLE; take the CRACKED COCONUT (M).
- Use the PIN; take the TORN CARD (N).
- Walk forward.
- Place the COCONUT (O).
- Use (P) on (Q); take the COCONUT WATER (R).
- Walk down.
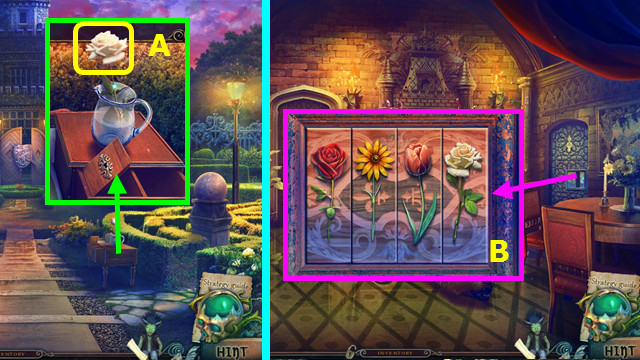
- Use the COCONUT WATER; take the ROSE (A).
- Combine the TABLET and TORN CARD; add the ROSE to make the FLOWER PANEL (inventory).
- Walk forward.
- Place the FLOWER PANEL; swap the flowers as shown (B).
- Walk right.
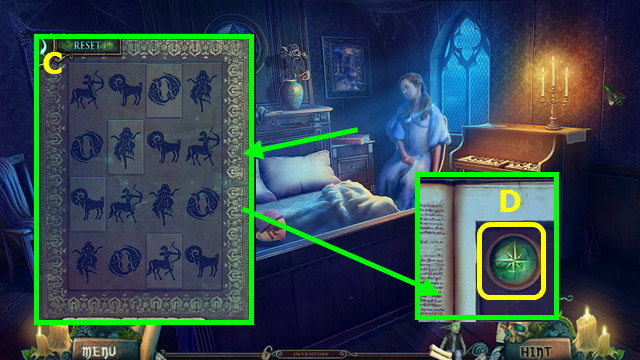
- Change the 4 tiles (C).
- Take the WIND ROSE (D).
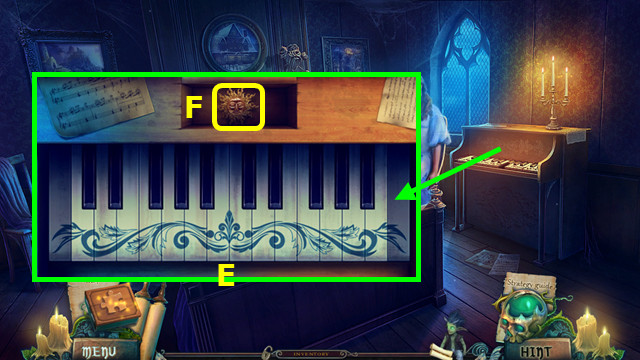
- Place the PIANO KEY; restore the keyboard (E).
- Take the SUN (F).
- Walk down.
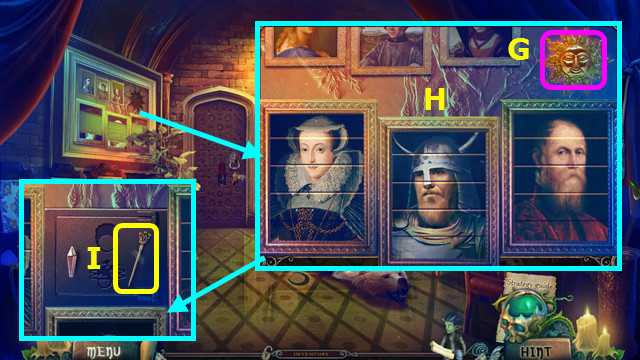
- Place the SUN (G).
- Restore the 3 portraits (H).
- Take the PIN (I).
- Walk right.
- Use the PIN; take the BALL OF YARN and HALF-MOON (J).
- Place the BALL OF YARN (K).
- Select pairs (color-coded).
- Walk down.
- Place the HALF-MOON; take the CALL SPELL and BEADS (L).
- Walk right.
- Place the BEADS; select each bead (red).
- Restore and select the picture (M).
- Take the SILVER CAGE (N).
- Walk down.
- Place the SILVER CAGE (O).
- Walk forward.
- Play the HOP; earn the DRAGON MEDALLION (P).
- Place the WIND ROSE; take the DRAGON RING (Q).
- Walk down.
- Place the DRAGON MEDALLION and DRAGON RING; take the MAGIC WAND (R).
- Walk forward.
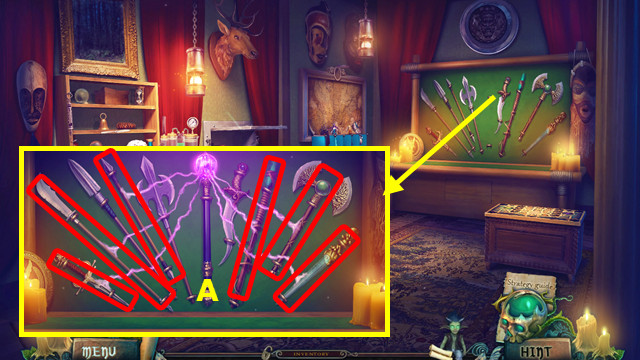
- Place the MAGIC WAND (A).
- Select the 6 weapons (red).
- Solution (B).
- Take the PENNANT and NINJA STAR (C).
- Walk down and right.

- Use the NINJA STAR; take the WOLFGANG APPLIQUE (D).
- Walk down and forward.
- Select (E).
- Place the WOLFGANG APPLIQUE (F).
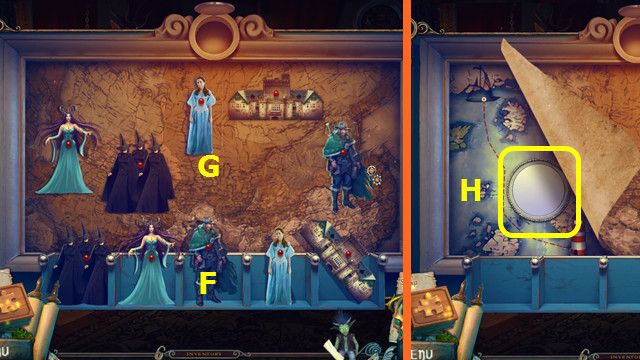
- Place the cutouts on the map (G).
- Take the MIRROR (H).
- Return to Elizabeth's Room.
- Place the MIRROR; take the FIGURE (I).
- Walk down and forward.
- Select (J).
- Place the FIGURE.
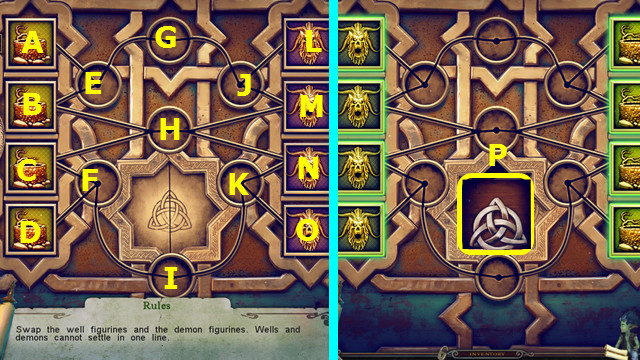
- Select N-I-M-G-C-M-I-N-D-C-N-I-C-H-I-D-O-F-H-O-B-K-M-N-G-J-A-H-J-A-L-E-H-L-N-M-K-N-E-B-F-C.
- Read the note; take the IRISH TRINITY KNOT (P).
- Walk down. After the cut-scene, walk right.
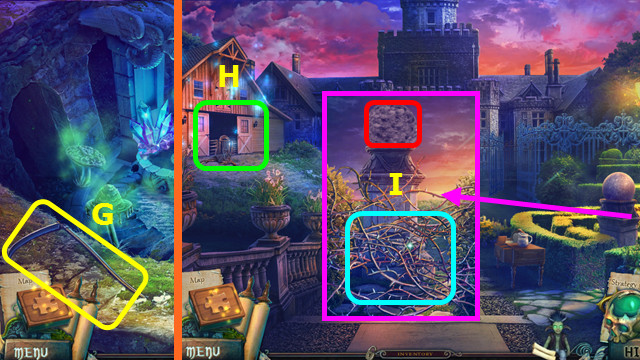
Chapter 6: Near the Well
- Use the IMP and SOAP; take the EGG (A).
- Take the CLAY (B).
- Place the IRISH TRINITY KNOT (C); play the HOP to earn the FALLEN WARRIOR EMBLEM.
- Place the FALLEN WARRIOR EMBLEM (D); play the HOP.
- Walk left.
- Place the CALL SPELL; read the instructions and take the BRONZE FISH (E).
- Walk down.
- Place the BRONZE FISH; take the INKWELL and TAPESTRY PIECE (F).
- Walk left.
- Select (G).
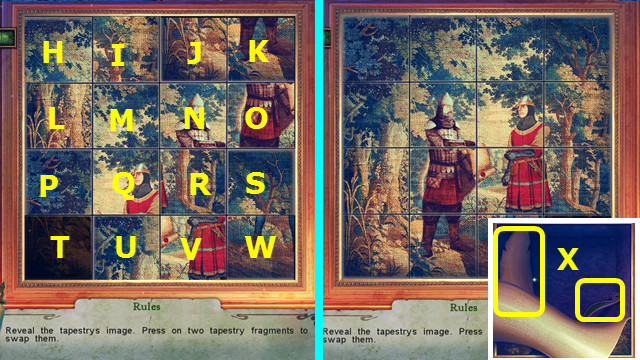
- Place the TAPESTRY PIECE.
- Select U-Q-M-L-P-T-U-V-R-S-O-N-R-S-O-K-J-I-M-Q-R-S-O.
- K-J-I-M-Q-R-S-O-K-J-N-O-K-J-I-H-L-P-T-U-V-W-S-O-N-M-Q.
- P-T-U-V-R-Q-U-V-W-S-O-N-R-Q-P-L-M-N-O-S-R-N-M-L-P-T-U.
- V-W-S-R-Q-P-T-U-V-W-S-R-Q-P-T-U-Q-P-T-U-V-W-S-R-V-W-S.
- R-V-U-Q-R-S-W-V-R-Q-P-T-U-V-W-S-R-Q-U-T-P-Q-R-V-U-T-P.
- Q-U-T-P-Q-U-V-R-Q-P-T-U-Q-R-S-W.
- Take the PARCHMENT and YOKE TALISMAN (X).
- Combine the INKWELL, LEMON, and PARCHMENT to make the INVISIBLE SPELL (inventory).
- Place the EGG and BEAR FUR (A).
- Place the INVISIBLE SPELL (B).
- Use the candle on the spell (C).
- Take the GHOST STOLE (D).
- Walk down.

- Use the GHOST STOLE (E).
- Select the 5 symbols (green).
- Go down the stairs (F).
- Take the SCYTHE (G).
- Walk down 2x.
- Play the HOP; earn the SCOOP TALISMAN (H).
- Use the SCYTHE; touch the sphere (I).
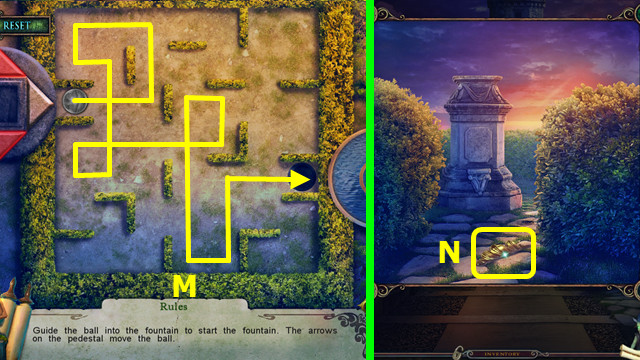
- Solution (M).
- Take the GOLD LEAF (N).
- Walk right.
- Place the GOLD LEAF; take the BUCKET TALISMAN (O).
- Go down the stairs (P).
- Place the YOKE TALISMAN, BUCKET TALISMAN, and SCOOP TALISMAN (red).
- Press the button 3x; take the note and CRYSTAL FROG (R).
- Walk down.
- Place the CRYSTAL FROG; take the HEALING MUSHROOM (S).
- Return to the Inside the Well.

- Place the HEALING MUSHROOM (A).
- Select the 6 mushrooms (white).

- Talk to the Keeper (B).
- Take the DRAGON SIGNET (C).
- Walk down and left.
- Use the DRAGON SIGNET (D).
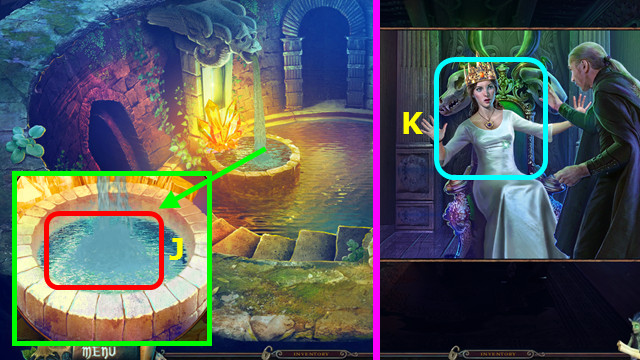
- Take the LIFE-GIVING WATER (E).
- Return to Inside the Well.
- Use the LIFE-GIVING WATER (F).
- Swap the leaves and fruit as shown (G).
- Take the SILVER LEAF (H).
- Walk down.
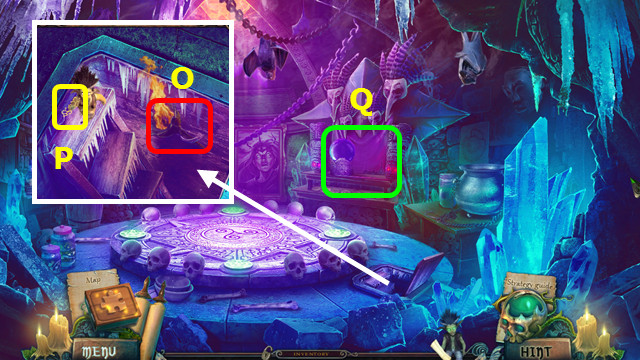
- Play the HOP; earn the SKULL (I).
- Place the SILVER LEAF; take the SKULL DISK (J).
- Walk left.
- Select (K).
- Place the SKULL DISK; move the chips as shown (L).
- Walk right.
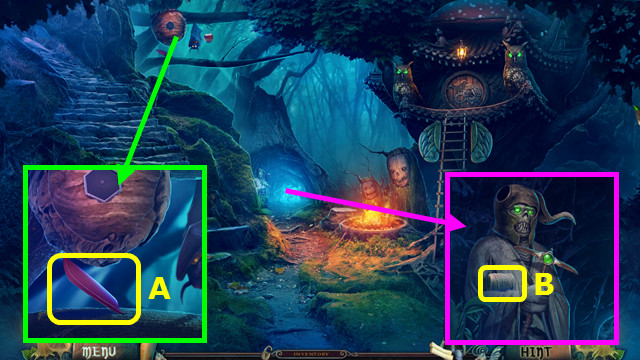
Chapter 7: Morgana's Hideaway
- Take the NEEDLE (A).
- Place the SKULL; take the GRANITE ROLL and TORCH (B).
- Walk down.
- Use the TORCH; take the LIGHTED TORCH (C).
- Place the GRANITE ROLL; take the LETTER D (D).
- Walk down 2x.
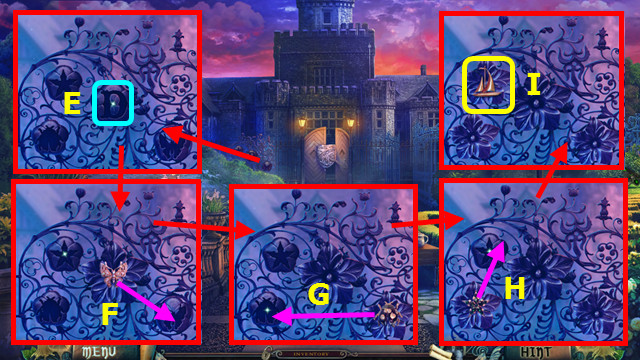
- Place the LETTER D (E).
- Move the butterfly (F).
- Move the bug (G).
- Move the star (H).
- Take the SHIP (I).
- Walk forward 2x.

- Play the HOP; earn the MITTEN (J).
- Place the SHIP; take the SOFA CUSHION (K).
- Walk down 2x.
- Place the SOFA CUSHION; take the GUARDIAN MEDALLION (L).
- Walk right and left.
- Place the GUARDIAN MEDALLION; take the 1st PIECE OF RIM (M).
- Walk right.
- Take the SCISSORS (N).
- Combine the MITTEN, SCISSORS, and NEEDLE to make the SMALL COAT (inventory).
- Place the LIGHTED TORCH (O).
- Give the IMP the SMALL COAT; take the 2nd PIECE OF RIM (P).
- Select (Q).
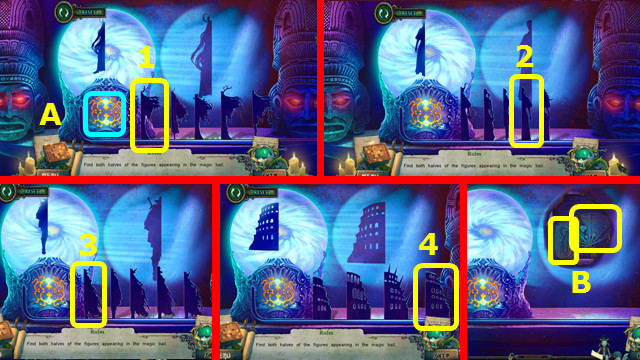
- Place the 2 PIECES OF RIM (A).
- Select 1-4; the position of your silhouettes may differ.
- Take the GOLD BUCKLE and MAGIC FAN (B).
- Walk down.
- Place the GOLD BUCKLE; take the TRISKELION (C).
- Walk right.
- Place the TRISKELION (D).
- Move the orb 1-4.
- Place the RULER OF TIME (E).
- Walk right.
- Play the HOP; earn the WITCH'S COIN (F).
- Select the 2 sheets; take the BEDSHEET ROPE (G).
- Use the BEDSHEET ROPE; go forward (H).

- Place the PENNANT (I); play the HOP.
- Walk right.
- Take the WEDGE (J).
- Walk down.
- Place the WEDGE and use the rock (K).
- Take the SHELL (L).
- Walk right.

- Restore the 3 shells (red); place the SHELL and take the PEARL (M).
- Walk down.
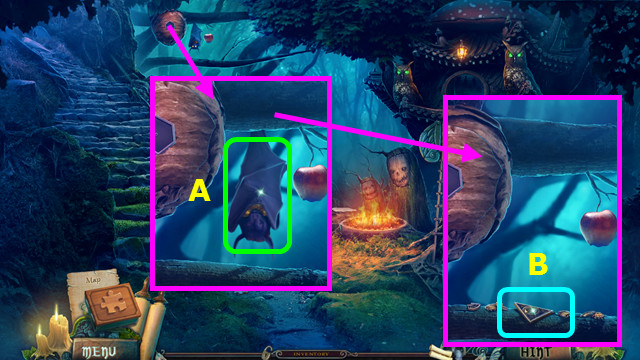
- Place the PEARL; take the BAT (N).
- Walk right.
- Remove the mud 2x, place the BAT, and take the CELTIC TILE (O).
- Walk down.
- Place the CELTIC TILE (P).
- Press 1-7.
- Read the note; take the TURTLE (Q).
- Walk right.
- Place the TURTLE; take the MAGIC WHISTLE (A).
- Walk down.
- Use the MAGIC WHISTLE; take the WINESKIN and BOARD (B).
- Walk right.
- Use the WINESKIN to take the BLACK WATER (C).
- Use the IMP and BOARD; drop the rock on the board (D).
- Walk down.
- Use the BLACK WATER (E).
- Walk left.
Chapter 8: Star Valley
- Use the WITCH'S COIN (F).
- Play the HOP; earn the HYDRA CONSTELLATION (G).
- Use the MAGIC FAN; take the STAR (H).
- Walk down and right.

- Place the HYDRA CONSTELLATION (I) and STAR (J).
- Move the 4 stars to the locks (green).
- Restore the snakes (K).
- Take the MAGNETIC CRYSTAL (L).
- Walk down and left.
- Place the MAGNETIC CRYSTAL (M).
- Select 3 pieces; take the STONE MOUTH (N).
- Walk down and right.
- Place the STONE MOUTH; place the CLAY and take the TITAN'S RING (O).
- Walk down and left.
- Place the TITAN'S RING (P).
- Place the items 1-2.
- Take the BRAVERY STAFF, read the note, and take the DRYAD POTION (Q).
- Walk down and right.
- Use the DRYAD POTION; take the LAVENDER (A).
- Play the HOP; earn the OIL BURNER (B).
- Combine the OIL BURNER and LAVENDER to make the AROMATIC OILS (inventory).
- Walk down and left.
- Place the AROMATIC OILS; take MORGANA'S NECKLACE (C).
- Walk down and right.
- Place MORGANA'S NECKLACE (D).
- Solution (E).
- Take the MAGIC POUCH (F).
- Walk down and left.

- Place the MAGIC POUCH (G).
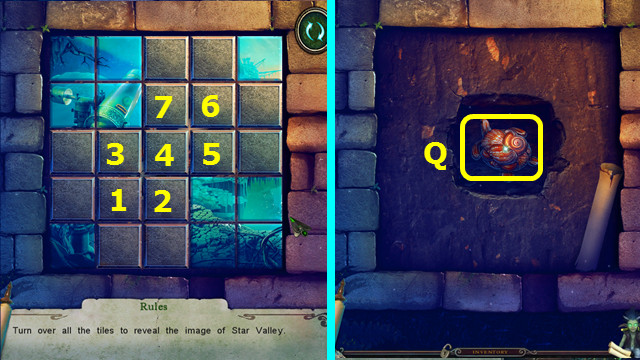
- Play the HOP; earn the STARDUST (H).
- Walk down and right.
- Use the STARDUST (I).
- Go forward.
- Use the WITCH'S CROWN (J).
- Play the HOP.
- Use the BRAVERY STAFF (K).
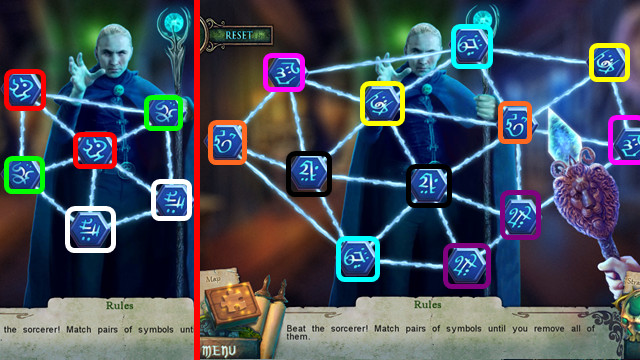
- Select pairs (color-coded). Rune placement may vary.
- Congratulations! You have completed Witches Legacy: The Dark Throne!
Created at: 2015-07-31