Walkthrough Menu
- General Tips & Information
- Investigation One
- Investigation Two
- Investigation Three
- Investigation Four
- Investigation Five
- Investigation Six
- Investigation Seven
- Investigation Eight
- Epilogue
General Tips & Information
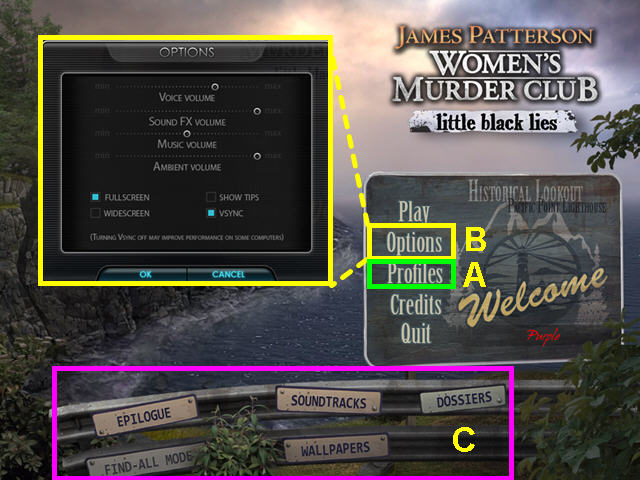
- Select profiles on the main screen to add or delete player profiles (A).
- You may play this game in full screen or windowed mode by changing the settings in the options menu (B).
- You may adjust the volume of voice, music, ambient noise and FX sounds in the options menu.
- You may turn on/off game tips in the options menu.
- You may play in fullscreen or windowed mode.
- This game supports widescreens.
- Select play to start your game.
- The options menu is accessible from both the main screen and the in-game menu.
- Once you complete the game you will have access to wallpapers, soundtracks, and a find all mode (C).
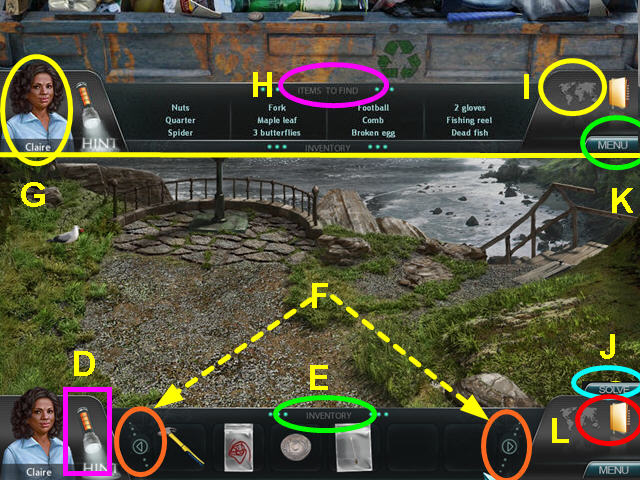
- Hints are unlimited, but you must wait for the flashlight to refill.
- The flashlight is in the lower left corner (D).
- You inventory in in the lower bar and will hide when not in use. (E).
- There are scroll buttons to move your inventory left or right (F).
- The character you are playing is displayed in the lower left. (G).
- When playing a hidden object scene, your inventory will recede (H).
- After a certain point in the game, you will have access to the map (I).
- Click on the map icon in the lower right corner, then select your destination.
- When playing a mini-game the 'Solve' button will appear, just above the map icon (J).
- There is no waiting to solve a mini-game.
- Below the map icon is the menu button (K).
- Use the menu button to access options or to return to the main menu.
- Above the menu button is the journal (L).
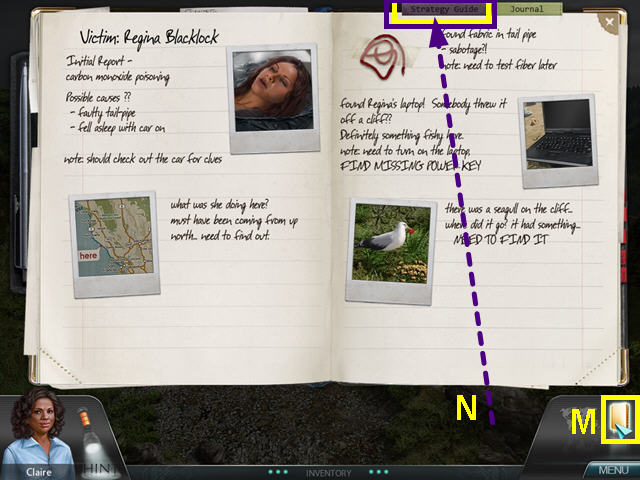
- The book in the lower right corner is your case journal (M).
- When you find clues to the case, they are added here.
- Select the tab at the top for an in-game strategy guide (N).
Investigation One
- You are now playing as Claire Washburn the medical examiner.
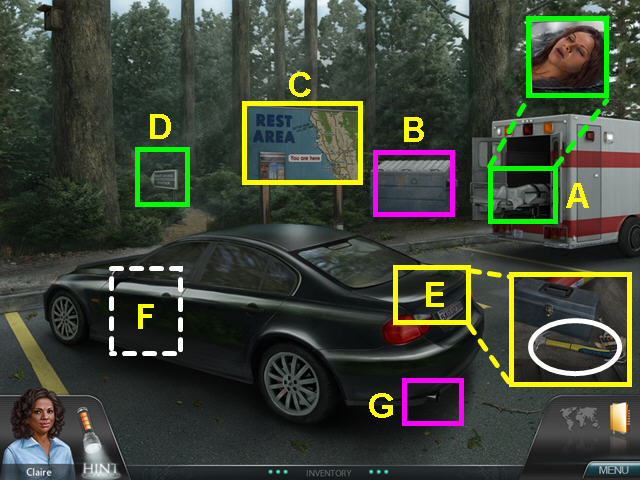
- After the officer speaks with you, click on the gurney in the ambulance to identify the body (A).
- The officer will speak with you again, then the ambulance will leave.
- Try to open the dumpster, but you need something to prop the lid open (B).
- Look at the rest area billboard and click on the map (C).
- Note the path to the scenic overlook (D).
- Look in the trunk of the car and take the HAMMER (E).
- Note the door of the car (F).
- Look at the tailpipe of the car (G).
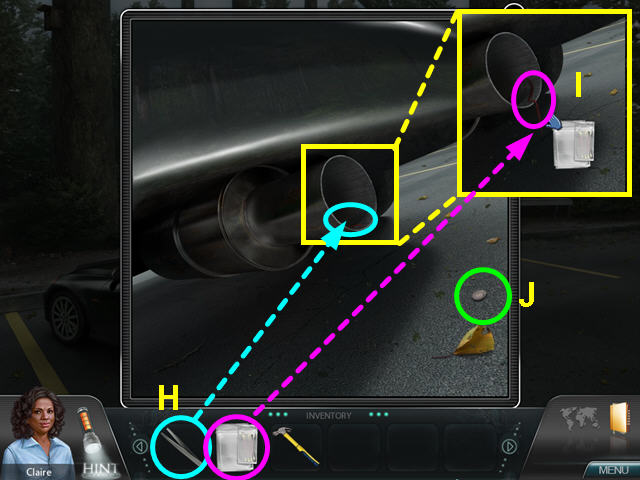
- Use the TWEEZERS to reach the items in the tailpipe (H).
- Use the TEST KIT to collect the red fiber (I).
- Take the QUARTER from the ground (J).
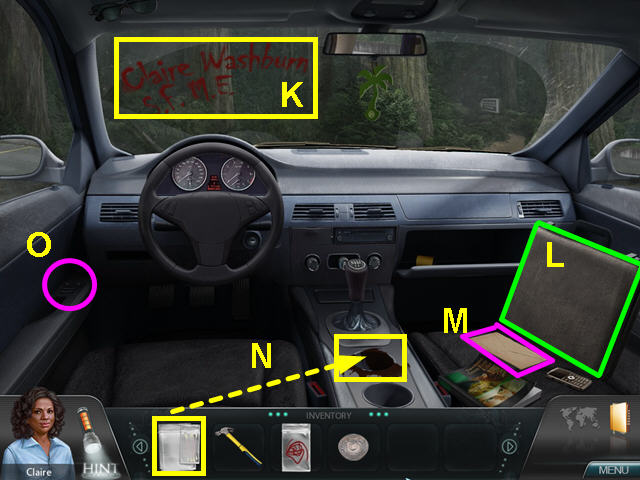
- Click on the driver's door of the car to look inside.
- Look at the lipstick note on the windshield (K).
- Look at the briefcase to notice that Regina's laptop is missing (L).
- Look at the picture and note you had recently sent Regina (M).
- Look at the window controls to notice that they are not working (N).
- Use the TEST KIT from your inventory to take a sample of the coffee (O).
- Exit the car and take the path to the scenic overlook.
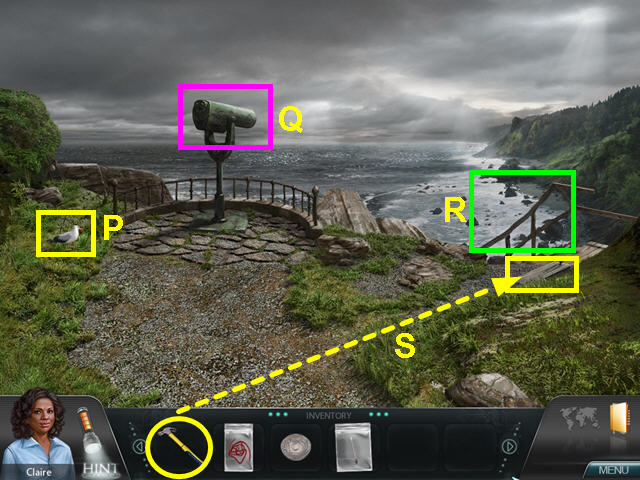
- Look at the seagull with something red in his mouth (P).
- Note the telescope (Q).
- Note the stairs down to the shoreline (R).
- Use the HAMMER to remove the nail and take the BOARD (S).
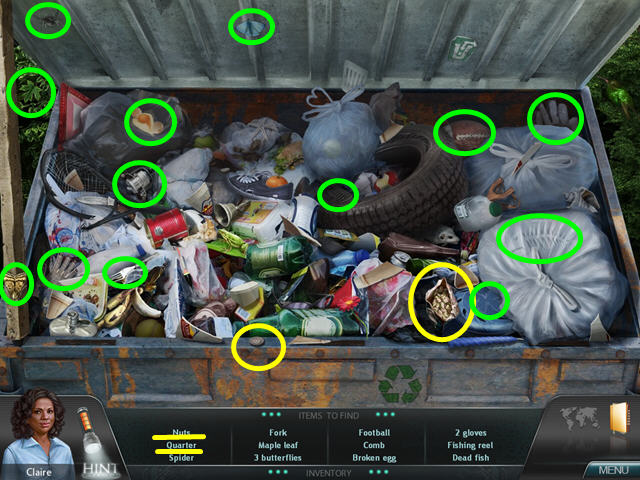
- Return to the crime scene and use the BOARD on the dumpster to prop open the lid.
- Look inside the dumpster for a hidden object scene.
- Locate all the items on the list.
- The NUTS and QUARTER will go into your inventory.
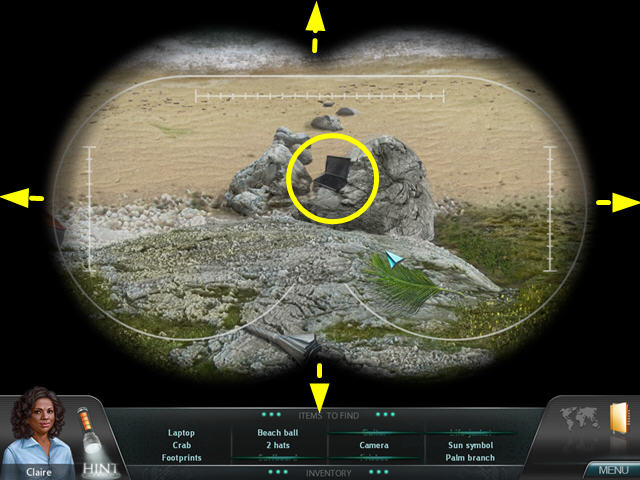
- Take the path to the scenic over look and use a QUARTER on the telescope.
- Look at the telescope for a hidden object area.
- Use your mouse to move the viewer around the shoreline.
- You can move in all directions.
- Locate all the items on the list.
- You will spot Regina's laptop during the search.
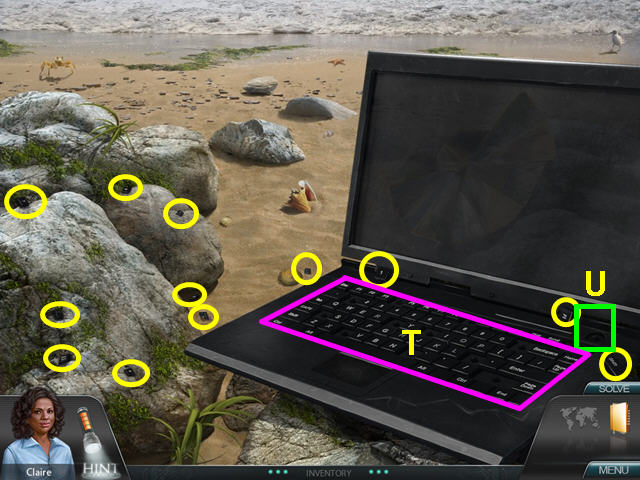
- Take the stairs down to the shoreline.
- Locate all the keyboard keys to the laptop and place them into the keyboard (T).
- Keys in the wrong position will be highlighted in red.
- You are able to locate all the keys except for the red power button (U).
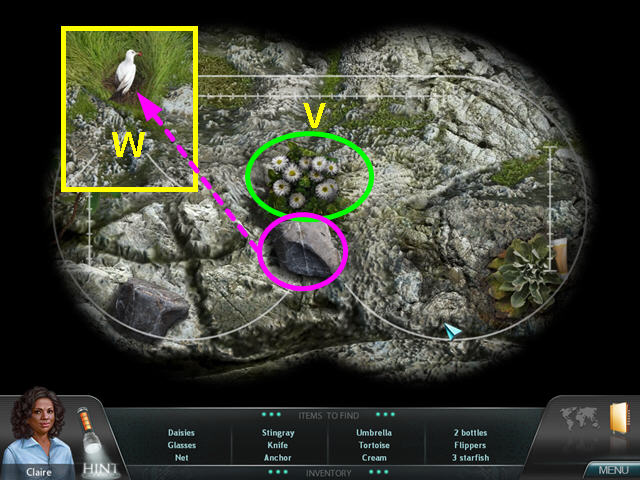
- Return to the scenic overlook to find the seagull is gone.
- Use a QUARTER on the telescope again.
- Locate all the items on the list.
- When you find the daisies (V), the rock will roll and disturb the seagull (W).
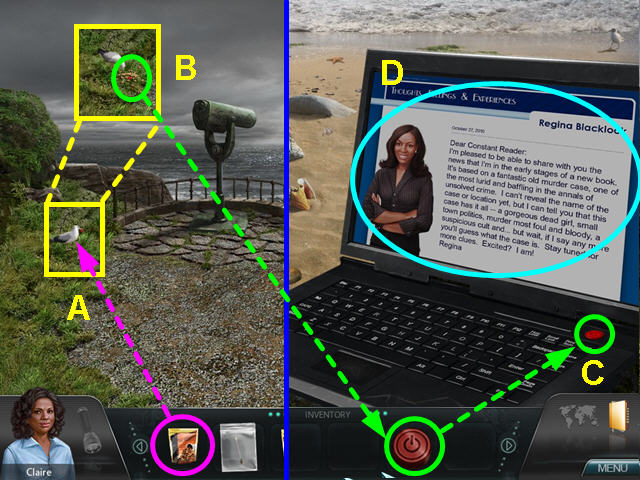
- Once you exit the telescope, you find the seagull has returned.
- Give the NUTS to the seagull (A).
- Take the RED POWER BUTTON (B).
- Go down the stairs to the shoreline.
- Place the RED POWER BUTTON on the laptop and turn it on (C).
- Look at Regina's research for her new book (D).
- Take the laptop and leave for the lab.
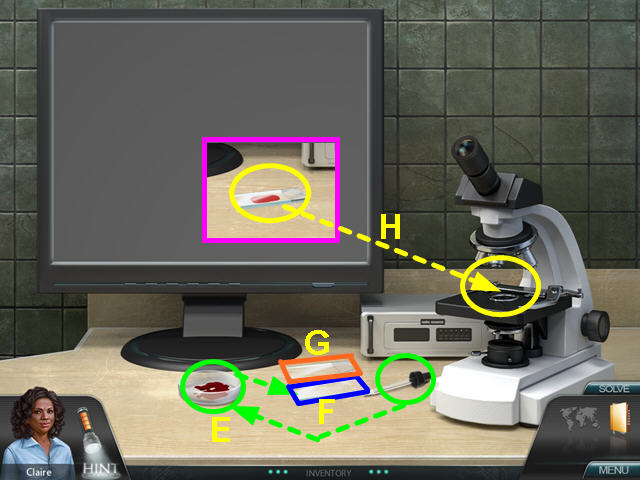
- Take the dropper and use it on the blood sample (E).
- Use the dropper on the closest slide (F).
- Place the second slide on top of the first (G).
- Place the prepped sample on the microscope and look in the lens (H).
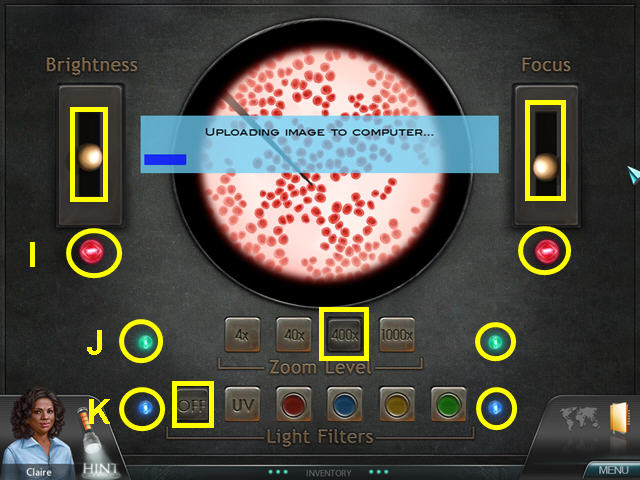
- Move the sliders on the brightness and focus until the light for each goes on (I).
- Push the button for 400x – the green lights will go on (J).
- Turn the light filters off- the blue lights will go on (K).
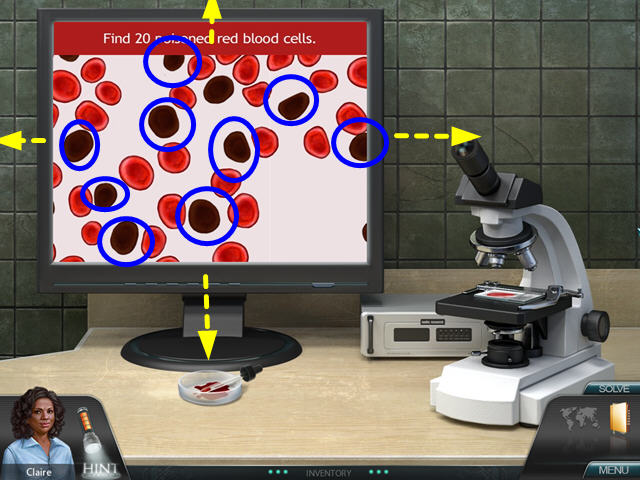
- Click on the 20 poisoned blood cells – they are of a darker color.
- Left-click and drag to the slide to find all the cells.
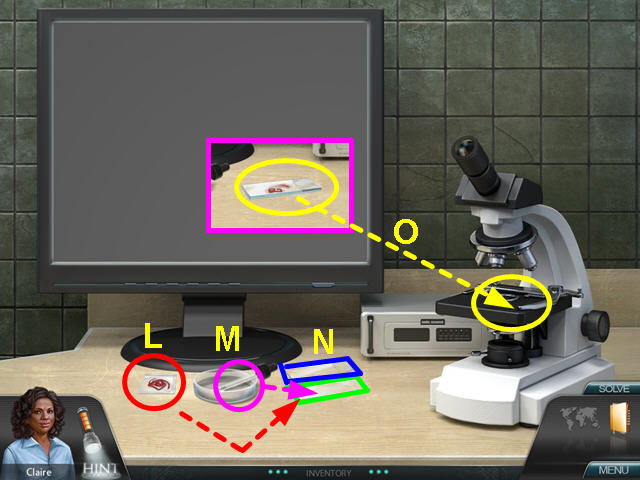
- Place the red fiber on the closest slide (L).
- Use the dropper to get and place a drop of water on the sample (M).
- Place the second slide onto the first (N).
- Place the prepped slide into the microscope and look into the lens (O).
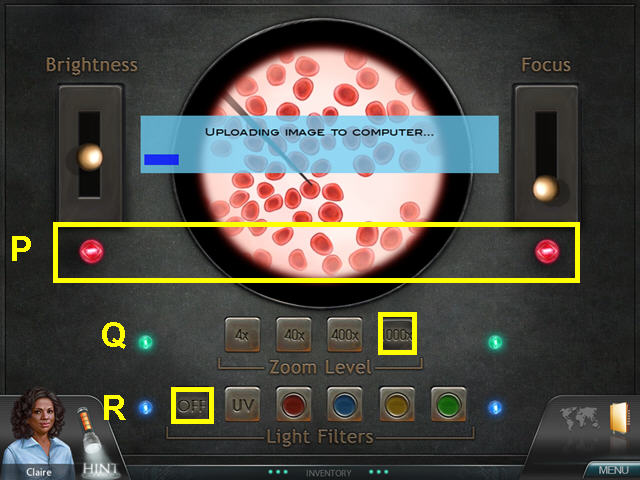
- Move the sliders on the brightness and focus until the light for each goes on (P).
- Push the button for 1000x – the green lights will go on (Q).
- Turn the light filters off- the blue lights will go on (R).
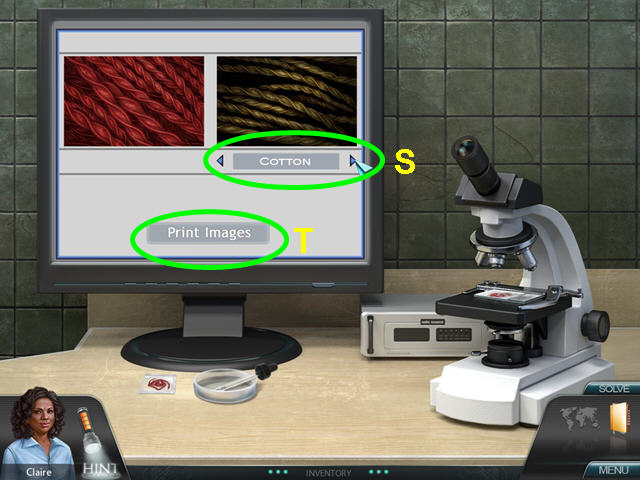
- Page through the database to determine a match for the sample, which is cotton (S).
- Click on the 'Print Images' button (T).
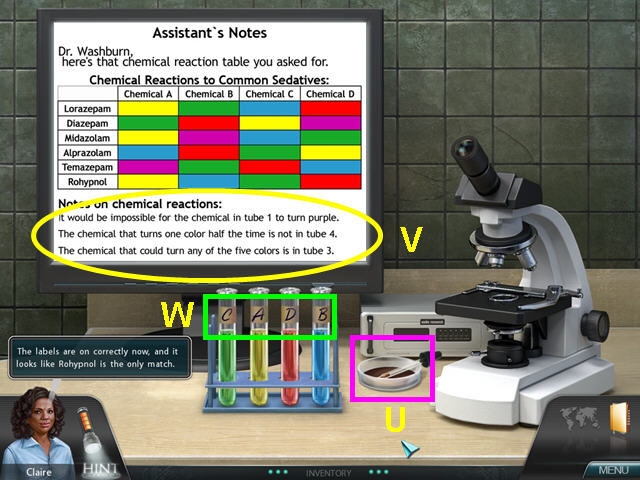
- Use the dropper to drop a coffee sample into each test tube (U).
- Based on your assistant's notes (V), place the labels onto the test tubes.
- From left to right, the solution is: C-A-D-B (W).
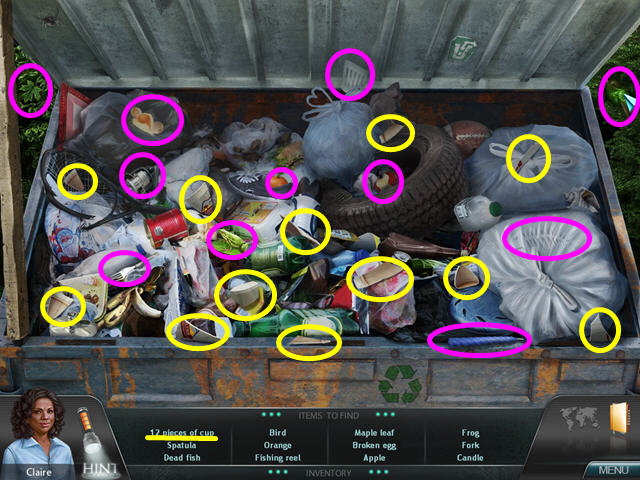
- Back at the crime scene look in the dumpster for another hidden object scene.
- Locate all the items on the list.
- The 12 COFFEE CUP PIECES will go into your inventory.
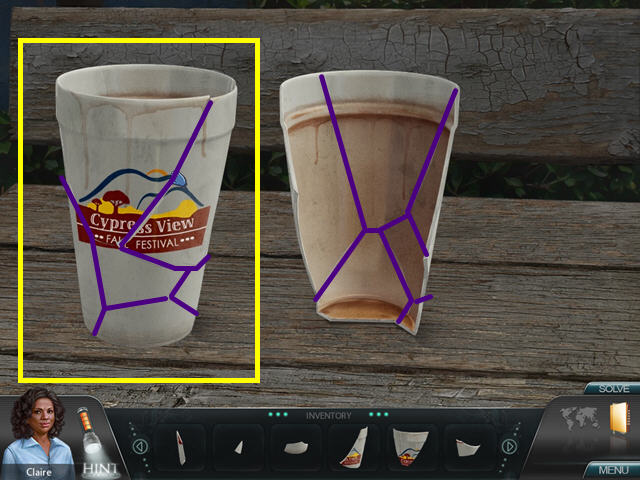
- Piece together the broken coffee cup.
- Begin with the back portion and build from the bottom up.
- Regina got the coffee from the Cypress View Fall Festival.
Investigation Two
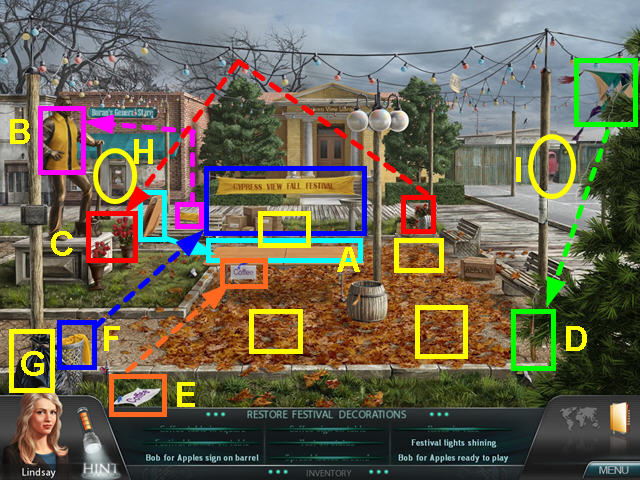
- Claire calls on her friend Detective Lindsay Boxer to help investigate.
- Use the items found in the square to recreate the festival setting.
- Take the folding table by the upper left bench and place it in the center of the square- look for the 4 holes in the ground from the table legs (A).
- Take the yellow vest from the upper left park bench and place it on the statue (B).
- Take the two bunches of roses just to the right of the birdbath and place them in the urns in front of the statue (C).
- Find the kite in the upper right corner and follow the string down to the stick (D).
- Take the STICK when it falls to the ground.
- Take the coffee sign from the lower left grass and place is on the left side of the table by the blue piece of tape (E).
- Take the yellow banner from the garbage can and use it on the table (F).
- Take the garbage bag and use it to spread leaves in the 4 corners of the square (G).
- Note the entrance to the general store (H).
- Walk to the mechanic's shop (I).
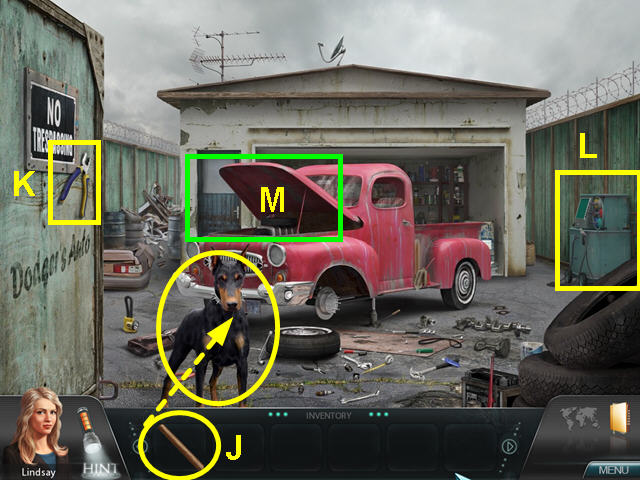
- Give the STICK to the dog (J).
- Take the PLIERS hanging on the door (K).
- Note the paint mixer against the right fence (L).
- Look under the hood of the truck for a hidden object scene (M).
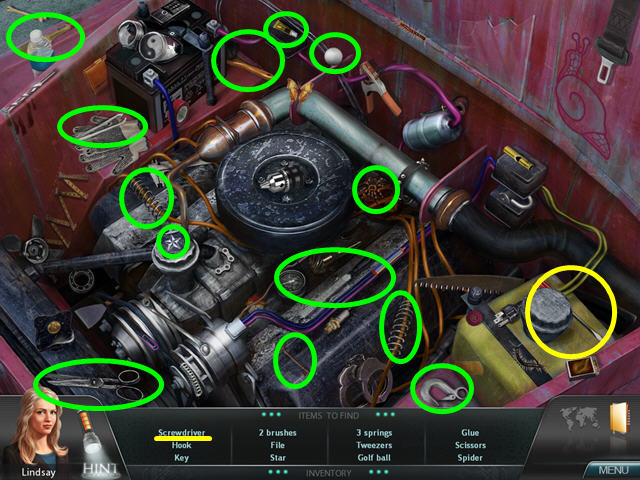
- Locate all the items on the list.
- The SCREWDRIVER will go into your inventory.
- After speaking with the mechanic, look at the paint mixer for a mini-game.
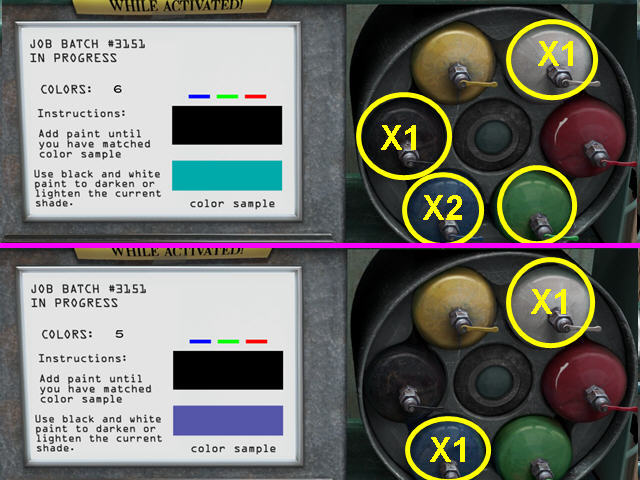
- The object of this mini-game is to release paint on the right to match the sample on the left.
- There are 6 samples to match.
- The number tells you how many sample remain.
- Click on the paint cans the number of times indicated.
- These are the solutions for teal and lavender.
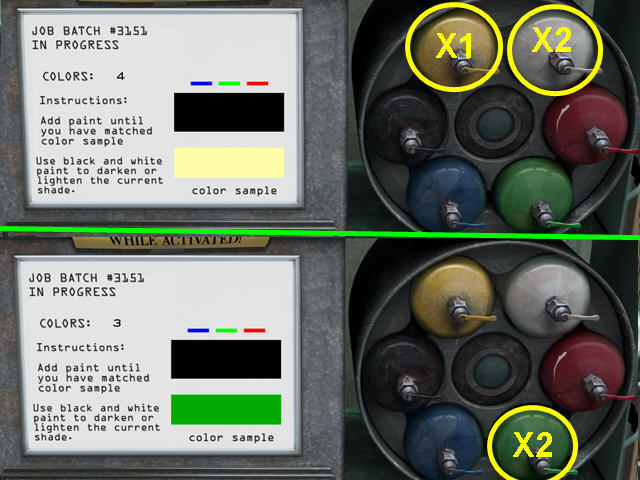
- These are the solutions for light yellow and green.
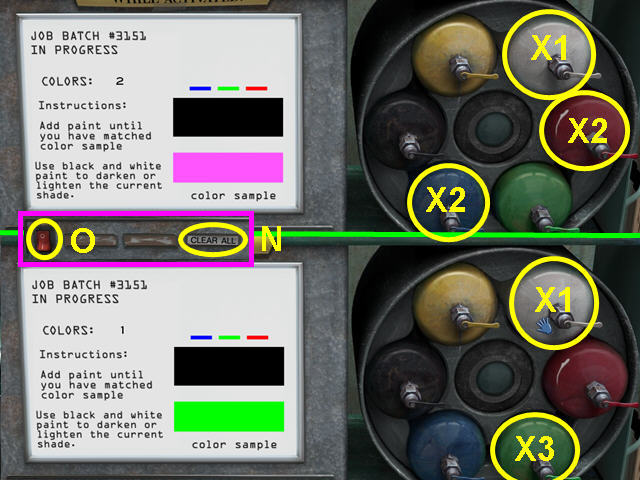
- These are the solutions for pink and bright green.
- Should you make a mistake, press the 'Clear All' button (N).
- When you are complete, press the red power button (O).
- Exit the paint mixer.
- Push the paint mixer away from the fence.
- Look at the patch on the fence.
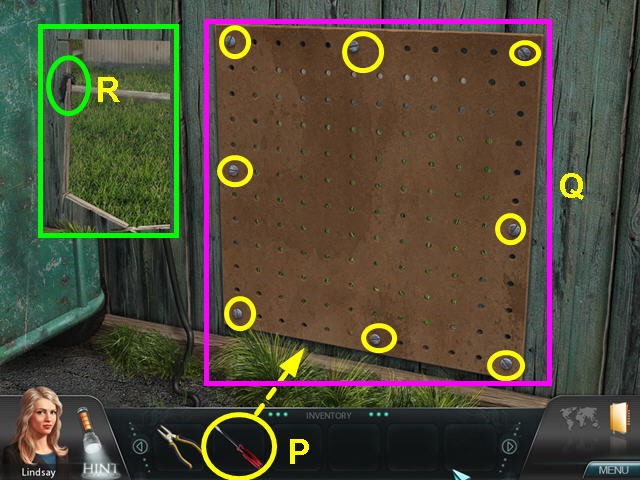
- Use the SCREWDRIVER to remove the 8 screws (P).
- Left-click on the screw, then move in a circular, counterclockwise direction.
- Once all the screws are removed, click on the piece of pegboard to remove it (Q).
- Take the FIBER SAMPLE from the left side of the hole (R).
- Exit the hole and the mechanic shop.
- Return to the square and enter the general store.
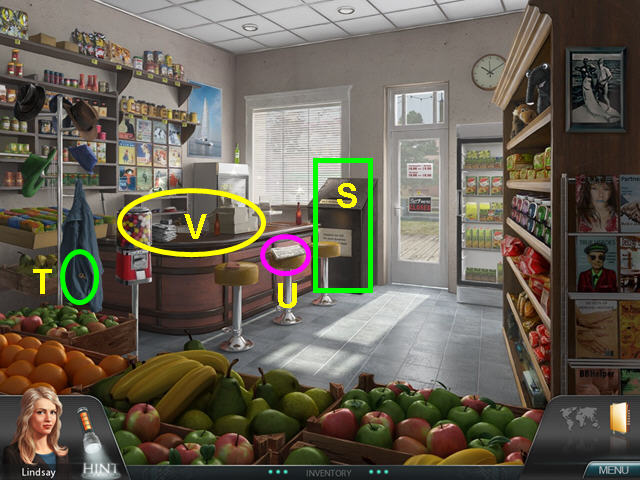
- Note the donation bin (S).
- Click on the jacket, then take the KEY (T).
- Look at the newspaper on the stool (U)/
- Select the counter for a hidden object scene (V).
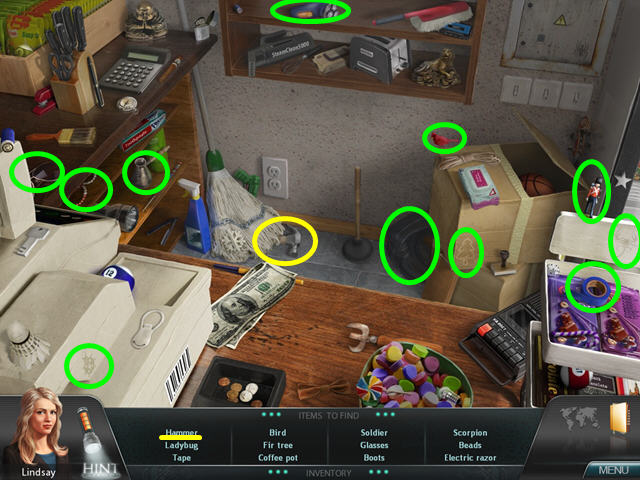
- Locate all the objects on the list.
- The HAMMER will go automatically into your inventory.
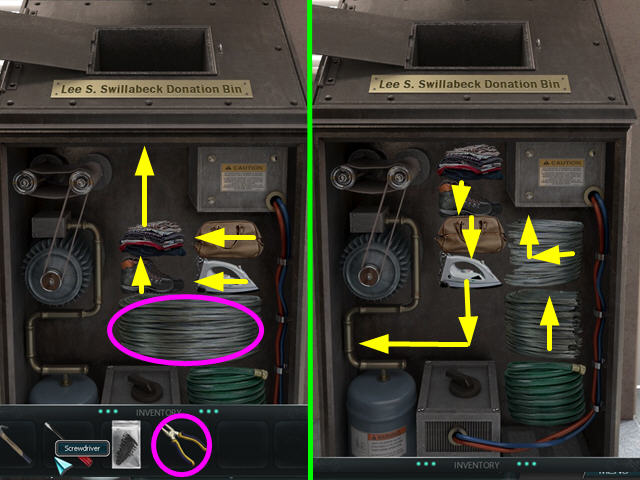
- Look at the close-up of the donation bin.
- Use the KEY on the lock for a mini-game.
- Move the items around inside the bin so the you can take the hose.
- Move the clothes and the boots up.
- Move the iron and the bag to the left.
- Use the PLIERS to cut the roll of wire.
- Move the right half of wire up and move the left half to the right and up.
- Move the iron down and to the left, then move the bag and the boot down.
- Push the right wire to the left and up, then move the left wire up.
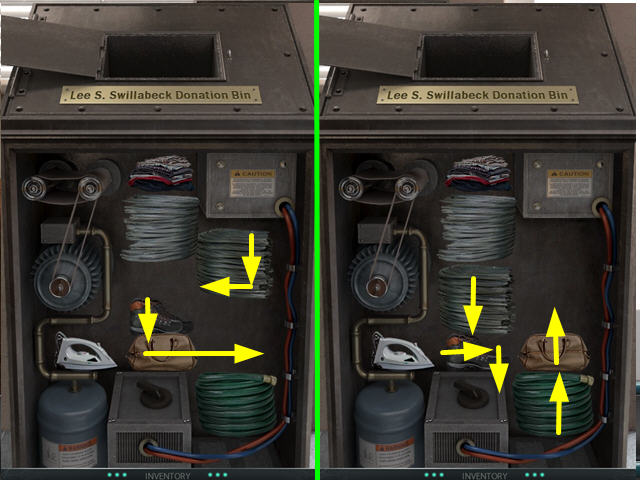
- Move the bag to the right and push the boot down.
- Move the left wire down and to the left.
- Move the bag and the hose up.
- Push the boot to the right and down.
- Move the left wire down.
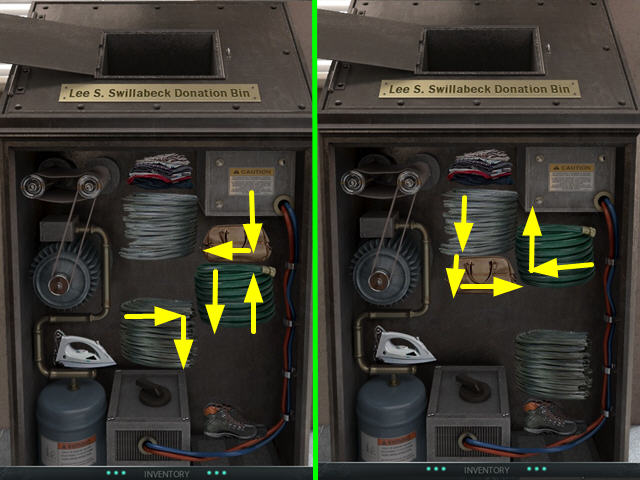
- Move the hose down and push the bag down and to the left.
- Push the hose up, then move the left wire to the right and down.
- Move the bag down and to the right.
- Push the right wire down, the move the hose to the left and up.
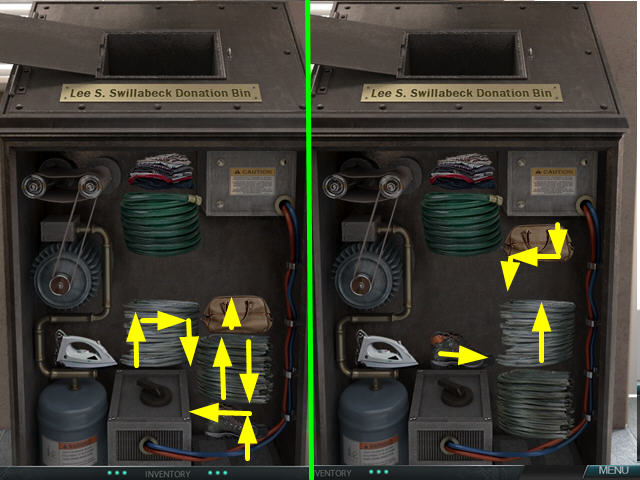
- Move the bag up, then push the right wire up.
- Push the left wire up, then move the boot up and to the left.
- Move the left wire down and the right wire should move to the right and down.
- Move the bag down and to the left.
- Push the right wire up and move the boot to the right.
- Move the bag down.
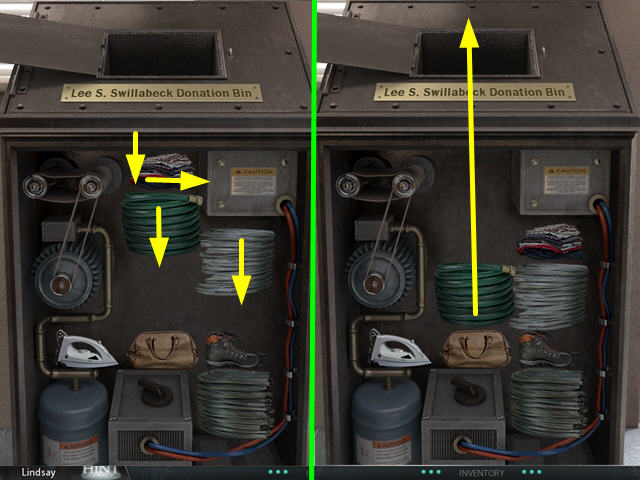
- Move the hose and the right wire down.
- Push the clothes down and to the right.
- Move the hose up and out of the bin.
- The HOSE will go automatically into your inventory.
- Exit the general store.
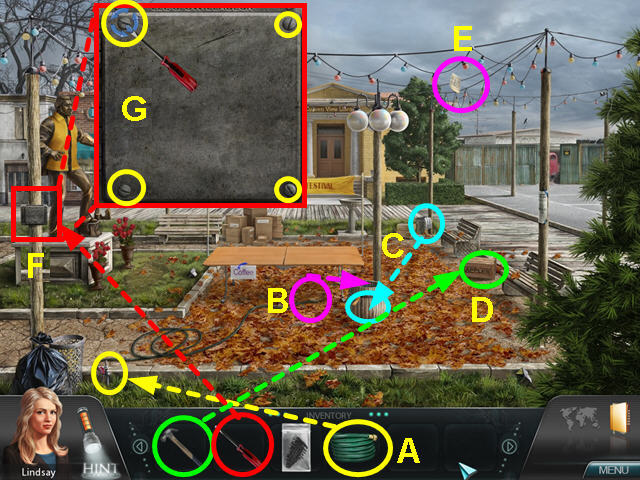
- Use the HOSE on the spigot (A).
- Pick up the end of the hose and use in on the barrel opening (B).
- Take the sign from the upper right garbage can and use it on the front of the barrel (C).
- Use the HAMMER to open the apple crate (D).
- Take APPLES from the crate- they will go automatically into your inventory.
- Use the APPLES on the barrel.
- Look at the close-up of the barrel and remove 3 apples.
- Take the paper that falls to the ground from the overhead wires (E).
- Look at the close-up of the circuit box (F).
- Use the SCREWDRIVER to remove the 8 screws (G).
- Left-click on the screw, then move in a circular, counterclockwise direction.
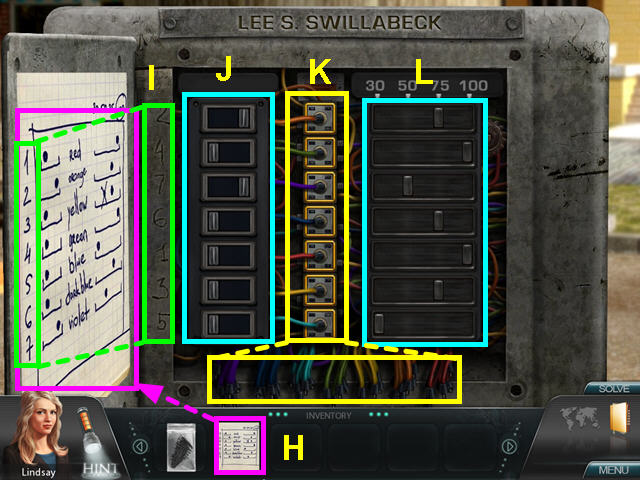
- Place the DIAGRAM on the door so it is easier to look at (H).
- Use the numbers scratched in the metal to determine which settings to use (I).
- Move the switches to the left or right (J).
- Take the correct colored wire from the bottom and use it on the connector (K).
- Moe the slide to the correct voltage (L).
- The connectors will light if correct.
- The town council secretary will come and speak with you.
Investigation Three
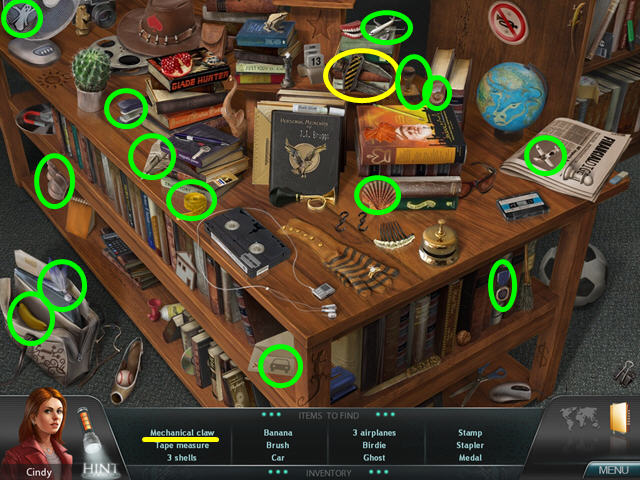
- Lindsay calls on reported Cindy to do some more digging in Cypress View.
- Enter the Library, which is the yellow building in the center of the scene.
- Select the sparkling, short book case in the lower for a hidden object scene.
- Locate all the objects on the list.
- The MECHANICAL CLAW will go automatically into your inventory.
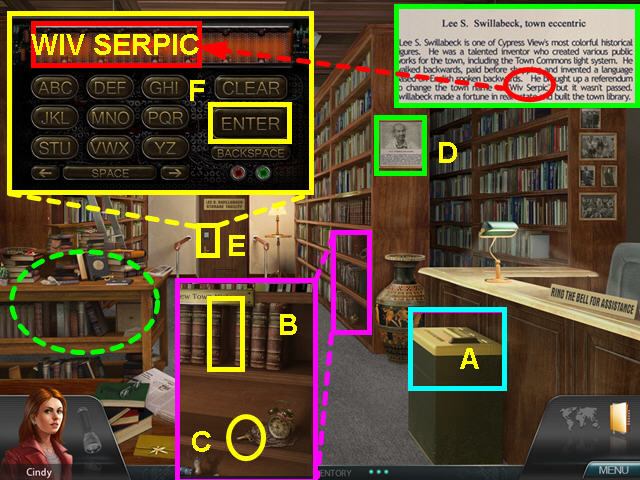
- Look at the floor safe to see you need an access card (A).
- Look at the center book case to see a book is missing from the town's history (B).
- Take the WINDING KEY (C).
- The librarian will speak with you and you learn that the missing book is in storage and not available to the public.
- Read the plaque on the town inventor and see that he wanted to change the town's name to Wiv Serpic (D).
- Look at the lock on the rear door (E).
- Enter the code 'WIV SERPIC', then press enter (F).
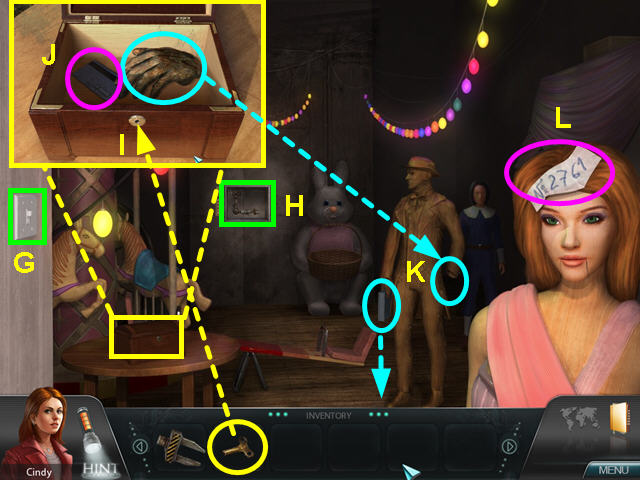
- Turn on the light switch (G).
- Look at the area illuminated by the light to learn you need some parts (H).
- Look at the small chest and use the WINDING KEY to open it (I).
- Take the WOODEN HAND and the KEY CARD (J).
- Use the WOODEN HAND on the wooden man and he will drop the locked clipboard (K).
- Note the number taped to the mannequin’s head (L).
- Exit the storage room and look at the floor safe.
- Use the KEY CARD to unlock the safe.
- Inside you find an envelope of photos.
- You need to find a way to steam open the envelope.
- Exit the library.
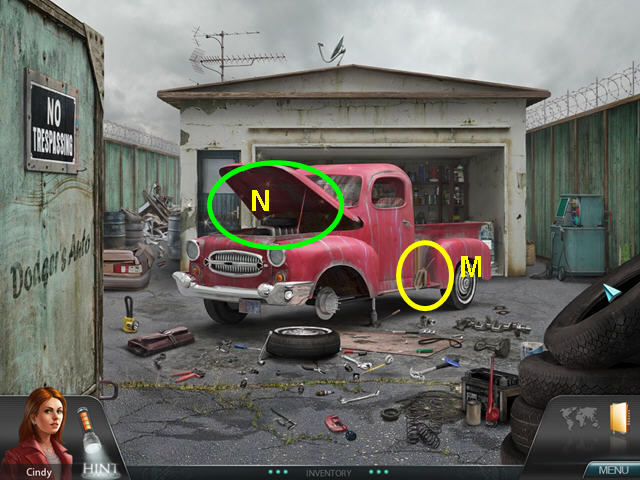
- Select the right fence to visit the mechanic's shop.
- Look at the running board and move the brown cloth (M).
- Take the OIL CAN.
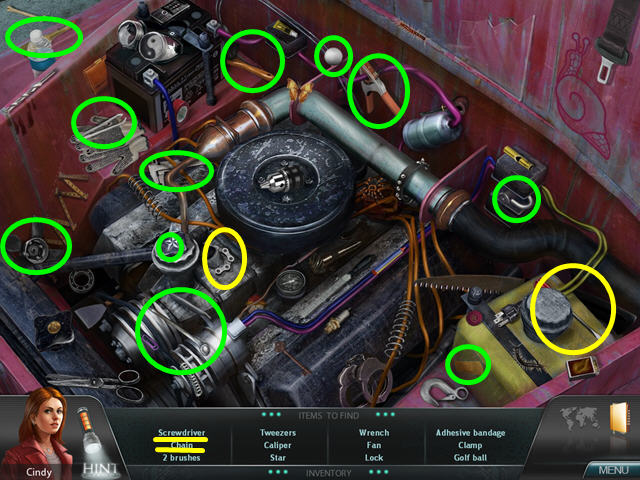
- Look under the hood of the truck for a hidden object scene (N).
- Locate all the items on the list.
- The SCREWDRIVER and the CHAIN will go automatically into your inventory.
- Return to the town square and enter the general store on the left.
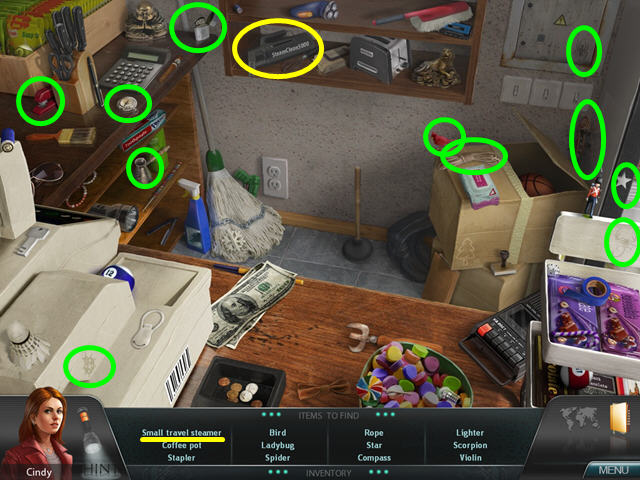
- Select the sparkling counter for a hidden object scene.
- Locate all the items on the list.
- The STEAMER will go automatically into your inventory.
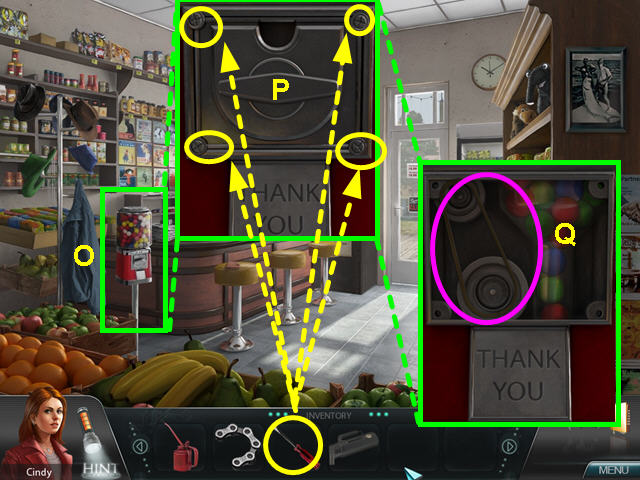
- Look at the close-up of the gumball machine (O).
- Use the SCREWDRIVER to remove the 4 screws (P).
- Left-click on the screw, then move in a circular, counterclockwise direction.
- Take the RUBBER BAND (Q).
- Exit the general store.
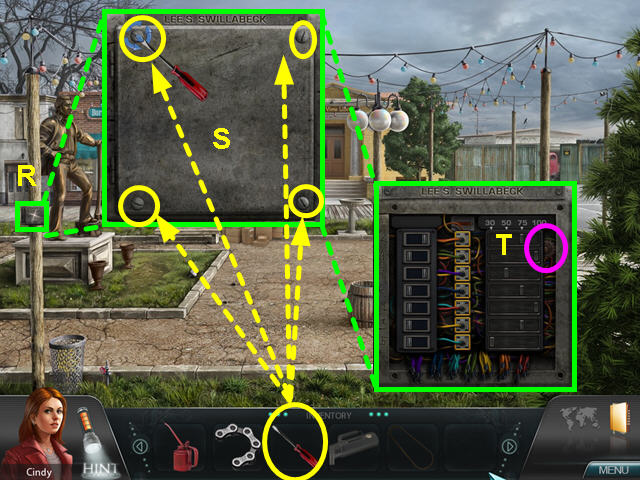
- Look at the close-up of the circuit box (R).
- Use the SCREWDRIVER to remove the 4 screws (S).
- Left-click on the screw, then move in a circular, counterclockwise direction.
- Take the GEAR (T).
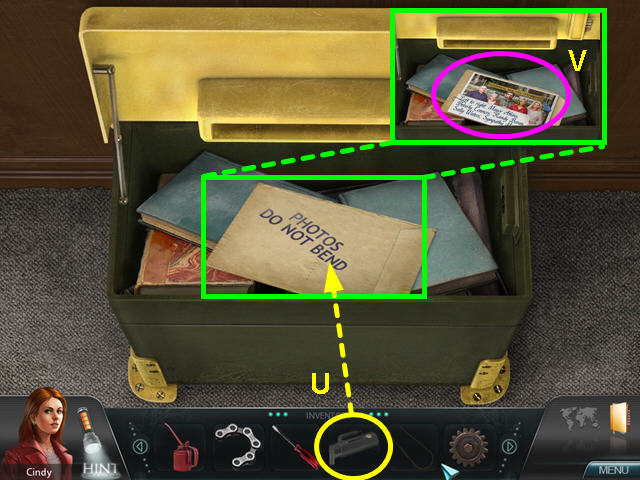
- Enter the library and look at the floor safe.
- Use the STEAMER on the photo envelope (U).
- Click on the open end of the envelope to remove the photo.
- Take the photo (V).
- Enter the storage room.
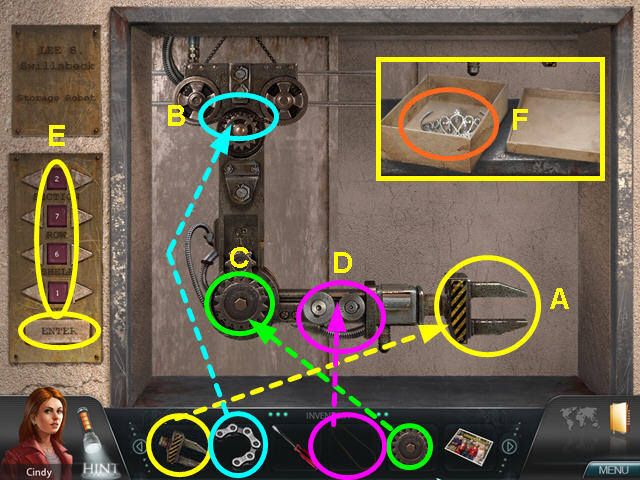
- Look at the close-up of the storage robot arm on the back wall.
- Place the MECHANICAL CLAW on the right end of the arm (A).
- Place the CHAIN at the top of the arm (B).
- The GEAR should be placed at the elbow of the mechanical arm (C).
- Place the RUBBER BAND between the gear and the claw (D).
- Enter the code from the mannequin’s head (2761), then press enter (E).
- Click on the box in the claw, then take the TIARA (F).
- Exit the storage robot.
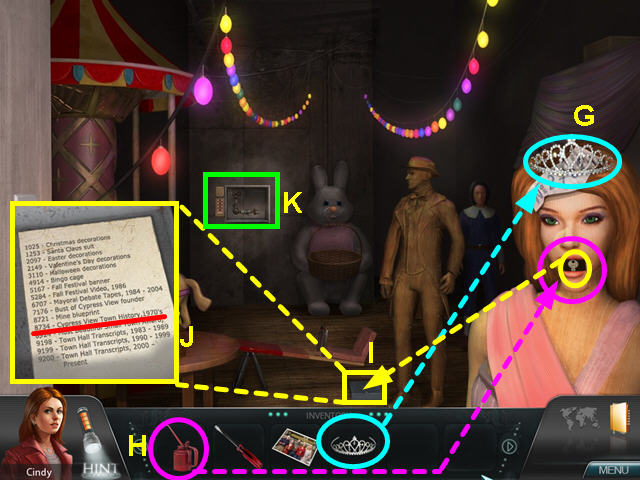
- Place the TIARA on the mannequin’s head (G).
- Use the OIL CAN on the man mouth (H).
- Take the KEY from the mannequin’s mouth.
- Look at the close-up of the clipboard and use the KEY to unlock it (I).
- Read the list inside and find the code (8734) for the missing 1970's history book (J).
- Look at the close-up of the storage robot arm on the back wall (K).
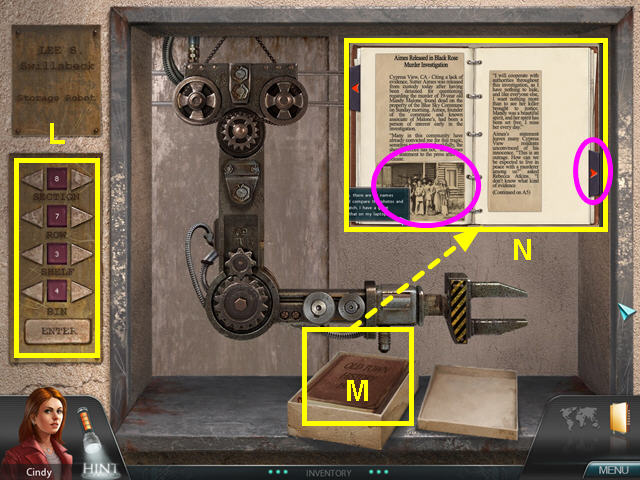
- Key in the code 8734 and press enter (L).
- Click on the box in the robot claw, then click on the book (M).
- Turn the pages of the book until you reach the photograph (N).
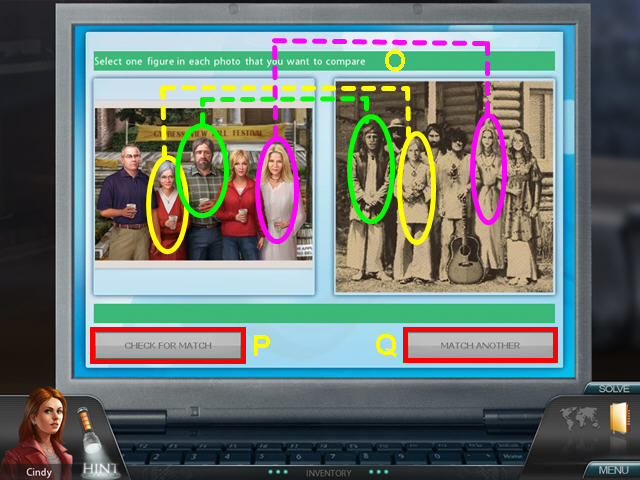
- Once Cindy's laptop appears, click on the Photo Compare icon.
- Select a person in the right and left photos to compare (O).
- Press the 'Check For Match' button to see the are the same person (P).
- Press the 'Match Another' to compare another set (Q).
- Once you have 3 matches, the investigation will end.
Investigation Four
- You are now playing as Lindsay and are in Cypress View to follow up on Cindy's leads.
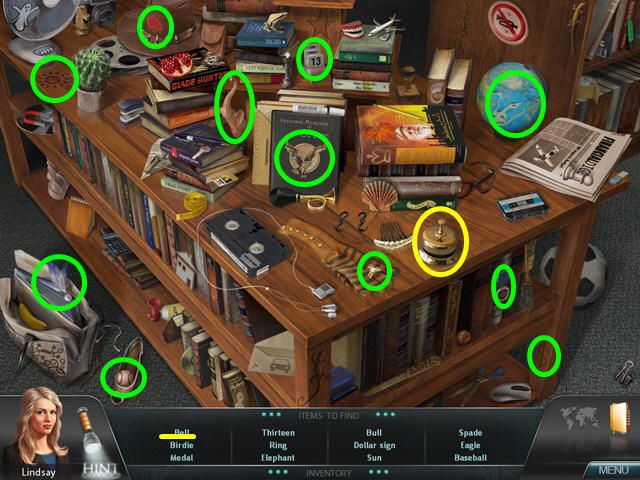
- Enter the library and select the sparkling low book case on the left for a hidden object scene.
- Locate all the items on the list.
- The BELL will go automatically into your inventory.
- Place the bell on the library desk and the Beverly Connors, the librarian will appear.
- Speak to her thoroughly, using the dialog topics in the inventory bar and she will give you a map.
- The map icon next to the journal is now active- you can click on a location to travel there.
- Exit the library.
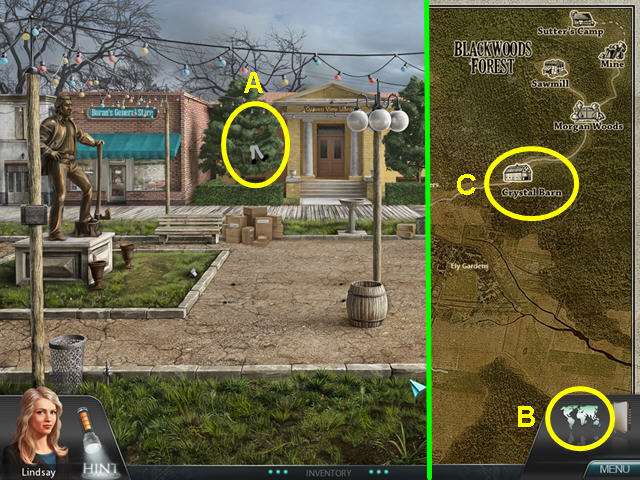
- Click on the figure in the tree to learn it is Randy Boren (A).
- Randy cannot come down until he removes the branch, but someone has stolen the chainsaw.
- Select the map icon in the lower right (B).
- Click on the Crystal barn to travel (C).
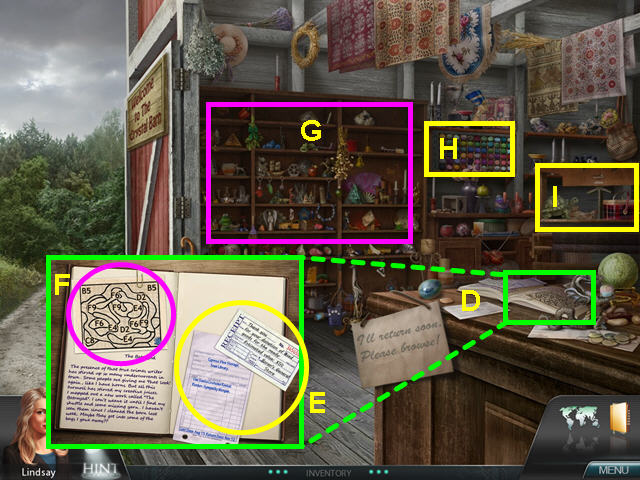
- Look at the close-up of the desk (D).
- Read the receipts for the Santa suit rental and the donation (E).
- Take the PATTERN (F).
- Note the shelving (G).
- Note the yarn display (H).
- Look at the close-up of the loom (I).
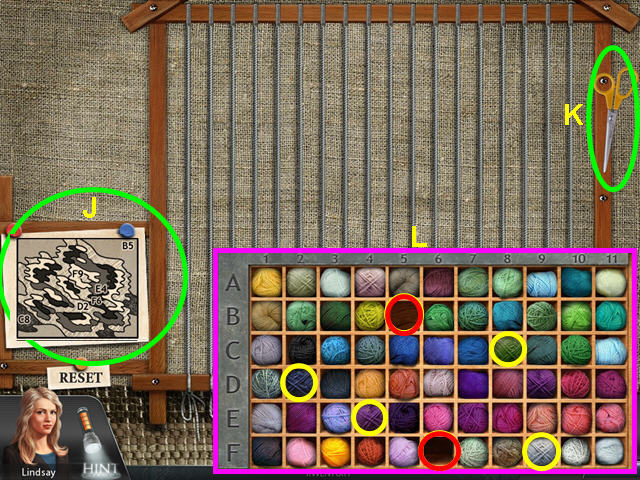
- Place the PATTERN into the holder on the left of the loom (J).
- Make note of the 6 yarn color codes needed for this pattern- B5, C8, D2, E4, F6, and F9.
- Take the SCISSORS (K).
- Look at the yarn display and take the 4 yarn colors that are available, leaving B5 and F6 as still needed (L).
- Look at the wall shelves for a hidden object scene.
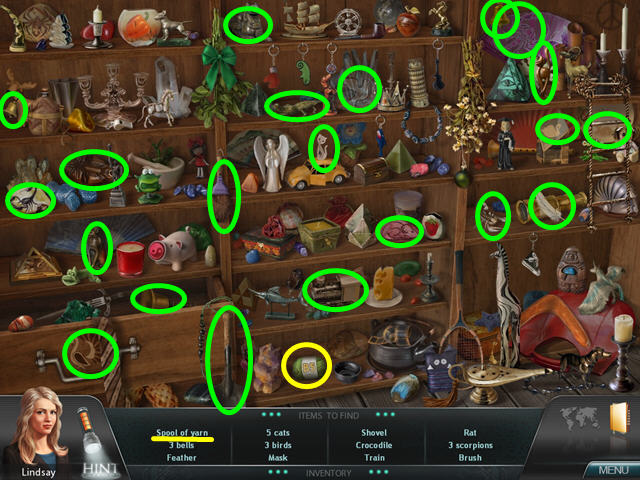
- Locate all the items on the list.
- The B5 YARN will go automatically into your inventory.
- Look at the maps and return to Cypress View.
- Click on Rand in the tree and he will give you the KEY to the store.
- Use the KEY on the front door and enter the general store.
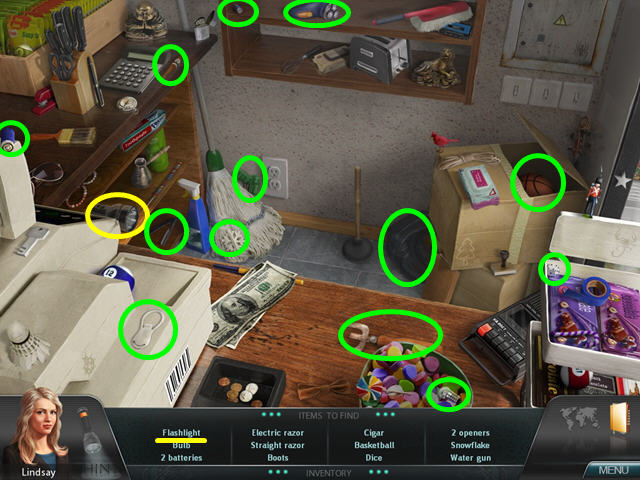
- Select the sparkling counter for a hidden object scene.
- Locate all the items on the list.
- The FLASHLIGHT will go automatically into your inventory.
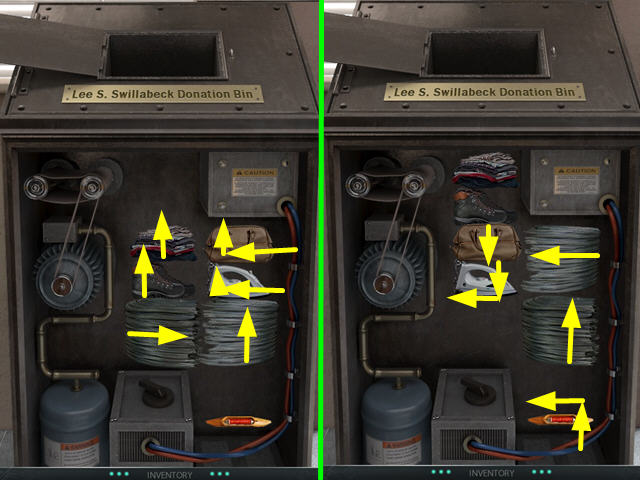
- Look at the donation bin for a mini-game.
- Move the clothes and boots up.
- Move the bag and iron left and up.
- Push the right wire up and the left wire to the right.
- Move the iron down and to the left.
- Move the bag down.
- Push the right wire to the left and the left wire up.
- Move the shuttle up and to the left.
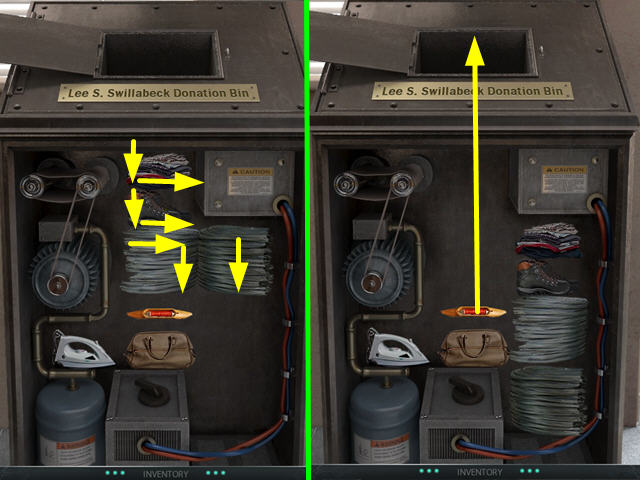
- Move the left wire down and the right wire will go to the right and down.
- Move the boots and clothes down and to the right.
- Push the SHUTTLE up and out of the bin.
- Click on the map icon, then click to return to the Crystal Barn.
- Follow the dirt road on the left to Morgan Woods.
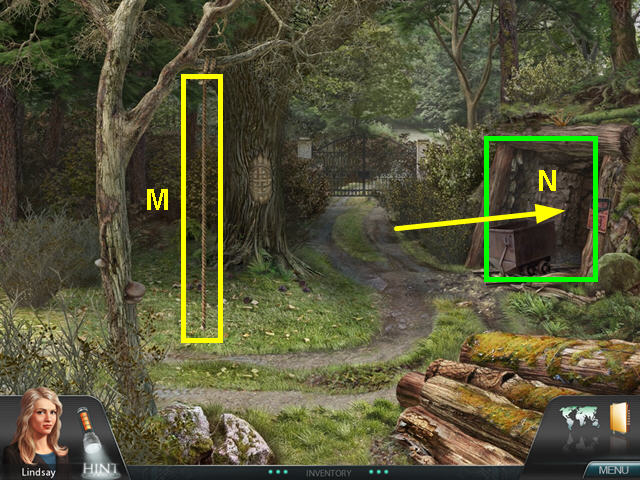
- Take the ROPE hanging from the tree (M).
- Enter the mine (N).
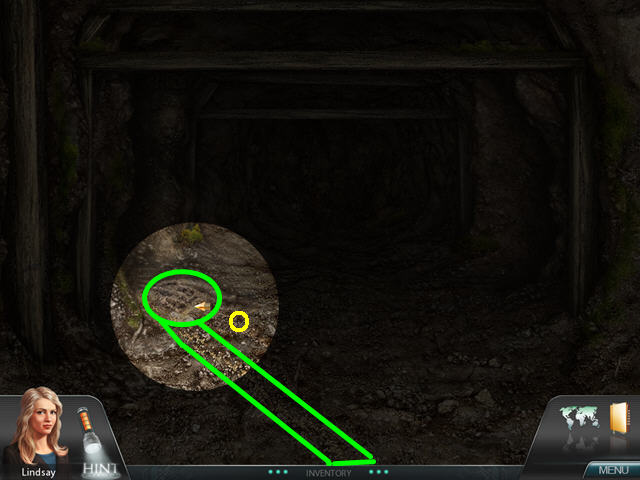
- Take the FLASHLIGHT and use it on the darkness.
- Walk forward and look for footprints and a trail of sawdust (O).
- Continue left and forward.
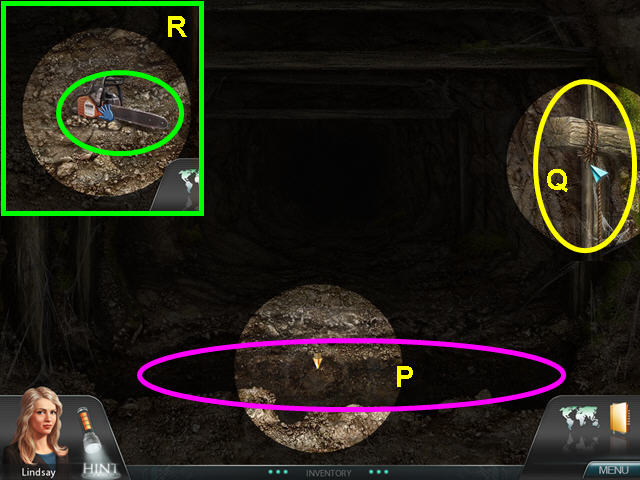
- There is a deep crevasse that you cannot jump (P).
- Use the ROPE on the wood beam on the right (Q).
- Walk forward, right, and right.
- Take the ELECTRIC SAW (R).
- Use the map to return to town.
- Give the ELECTRIC SAW to Randy in the tree and he will talk to you.
- Sympathy will also appear and talk to you.
- Enter the library.
- Go to the storage room door and key in Wiv Serpic then press enter.
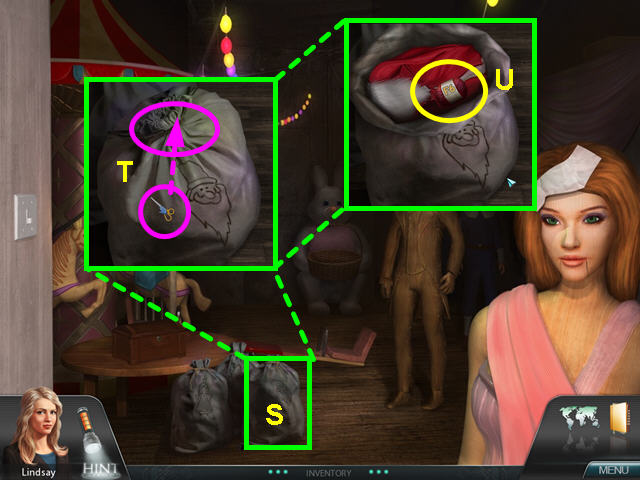
- Look at the close-up of the bag with the Santa (S).
- Use the SCISSORS to cut the drawstring (T).
- Take the F6 YARN from the bag (U).
- Use the map to return to the Crystal Barn and look at the close-up of the loom.
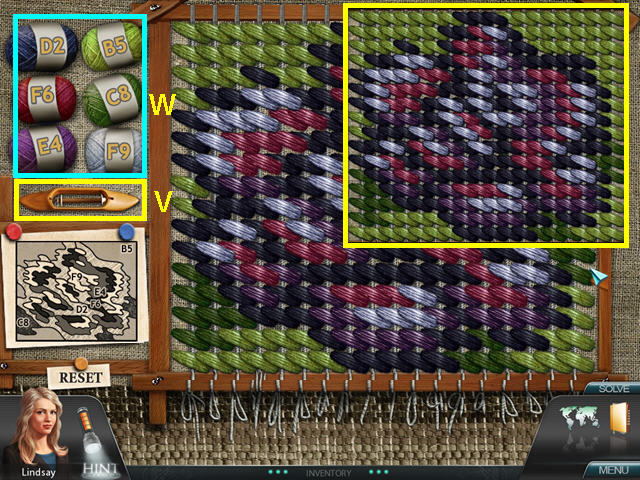
- Place the 6 YARN skeins and the SHUTTLE on the left side of the loom above the pattern.
- Take the shuttle (V) and click it on one of the yarn skeins (W).
- Look at the pattern and find the location where that color goes and click.
- Should you make a mistake, you can reset and start over, or choose another color and correct the mistake.
- Once you complete the pattern, Sympathy will appear and you can talk to her in depth.
Investigation Five
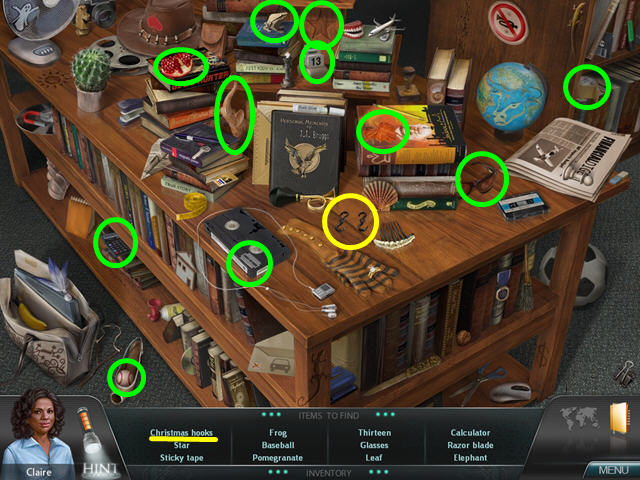
- Lindsay has called Claire in for her forensic expertise in finding the crime scene at the camp.
- Enter the library and select the sparkling low bookcase for a hidden object area.
- Locate all the items on the list.
- The CHRISTMAS HOOKS will go automatically into your inventory.
- Ring the bell on the desk to talk with the librarian.
- Look at the lock on the storage room door and key in Wiv Serpic, then press enter.
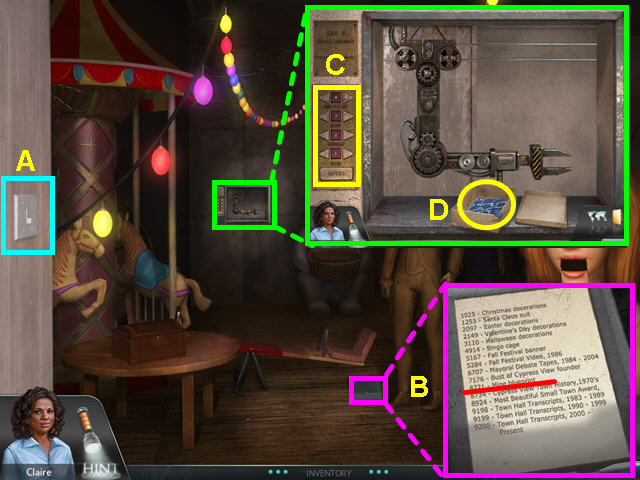
- Turn on the light switch for the robot arm (A).
- Look at the clipboard to find the mine blueprints are stored at 8721 (B).
- Look at the robot arm and key in 8721, then press enter (C).
- Click on the box then take the BLUEPRINTS (D).
- Use the map to travel to the Crystal Barn.
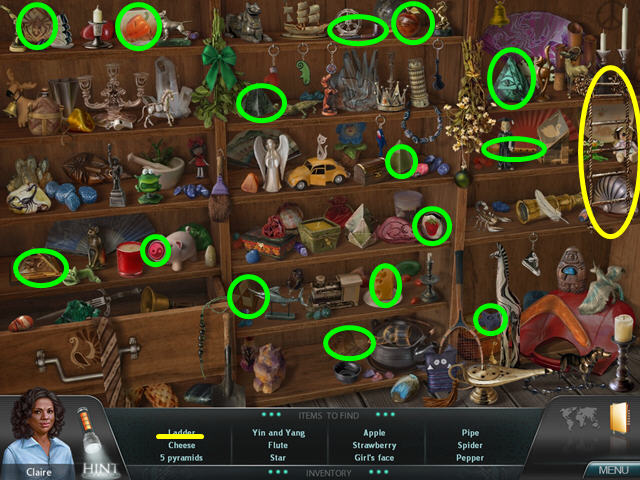
- Select the sparkling shelves for a hidden object scene.
- Locate all the items on the list.
- The LADDER will go automatically into your inventory.
- Look at the desk and note that Sutter's birthday is 12-4-48.
- Walk forward to Morgan Woods, then enter the mine.
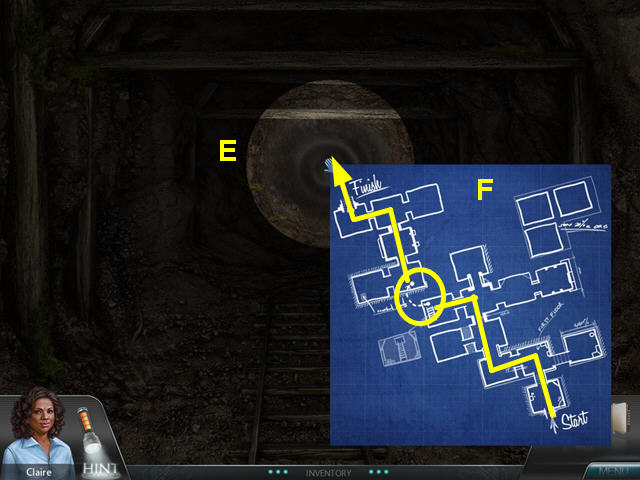
- Use the FLASHLIGHT, then use the BLUEPRINTS (E).
- Examine the BLUEPRINTS to find that the path for the first part is: forward, left, forward, forward, and left (F).
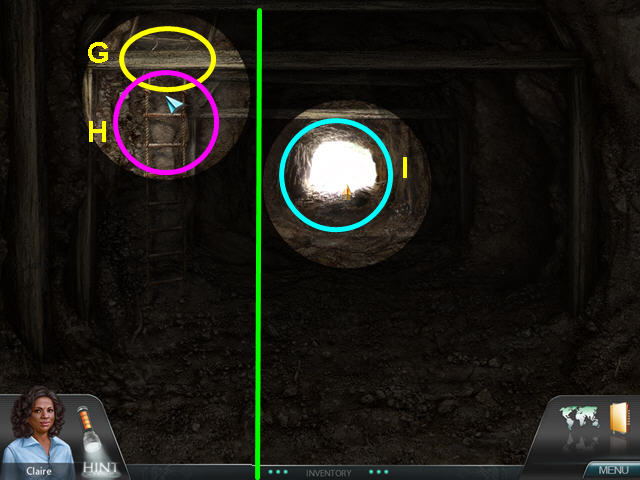
- Look at the opening in the ceiling and hang the HOOKS from the edge (G).
- Use the LADDER on the hooks (H).
- Climb up the ladder, the walk forward, forward, and left.
- Walk forward out of the mine (I).
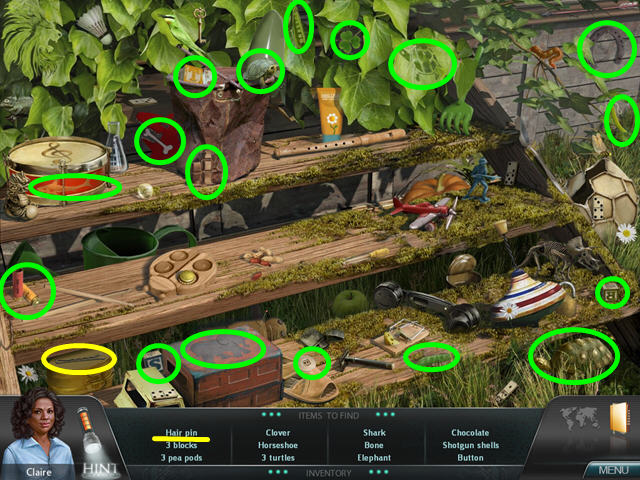
- Click on the sparkling steps of the left cabin for a hidden object scene.
- Locate all the objects on the list.
- The HAIRPIN will go automatically into your inventory.
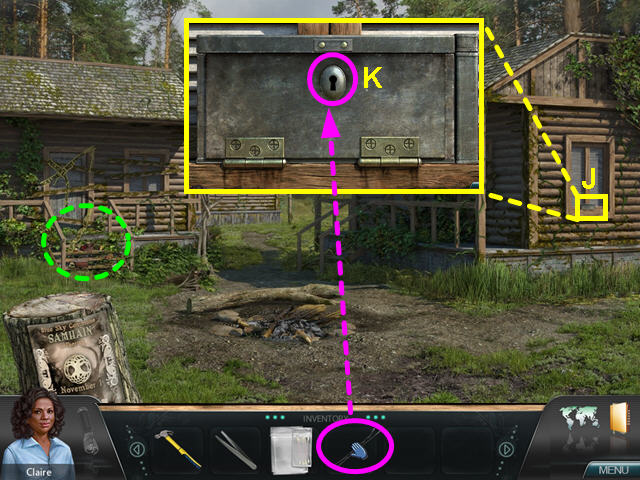
- Look at the base of the window on the right cabin (J).
- Use the HAIRPIN on the lock to trigger a mini-game (K).
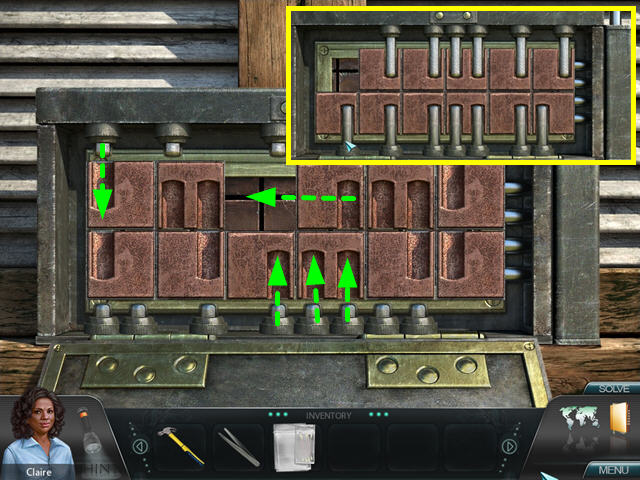
- The object of this mini-game is to slide the pieces so that you can extend all the rods.
- Click on a square to move it.
- When you have all the squares in place, click on each of the rods to extend them.

- Check out our video solution!
- Here is a video solution for one of the variations on the mini-game.
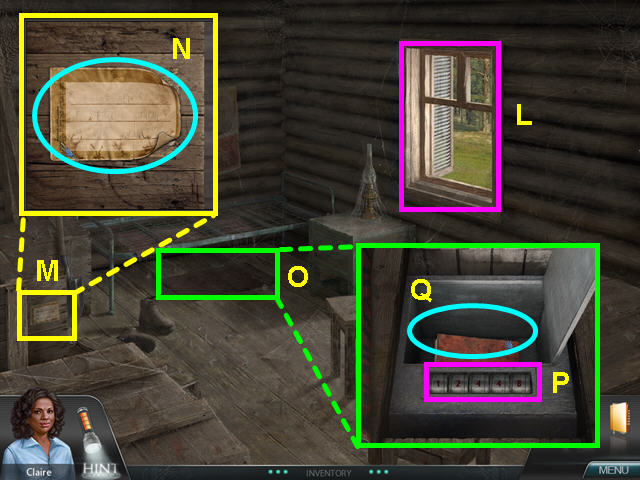
- Exit the lock and enter the window.
- Click on the shutter to let in some light (L).
- Look at the faded label (M).
- Use the TWEEZERS on the four corners of the label (N).
- Use the TEST KIT to collect the label.
- Move the rug and use the HAMMER to remove the plank (O).
- Key in Sutter's birthday of 12-4-48 and open the safe (P).
- Read the journal about a sacrifice with the body buried under a tree (Q).
- Exit the camp to Morgan woods.
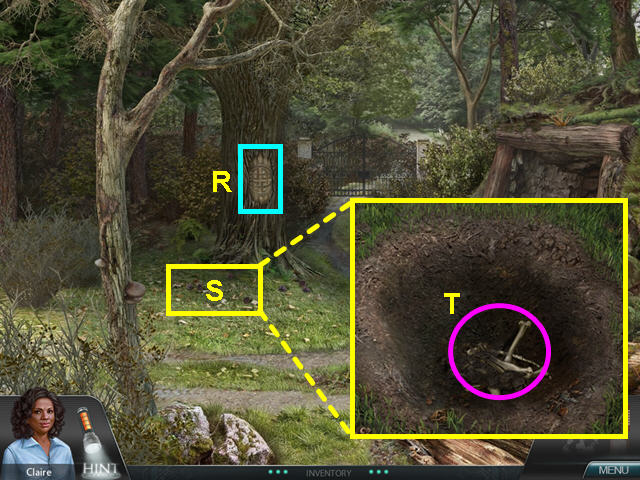
- Note the symbol on the tree (R).
- Look at the ground and use the shovel to dig (S).
- Take the BONES from the hole (T).
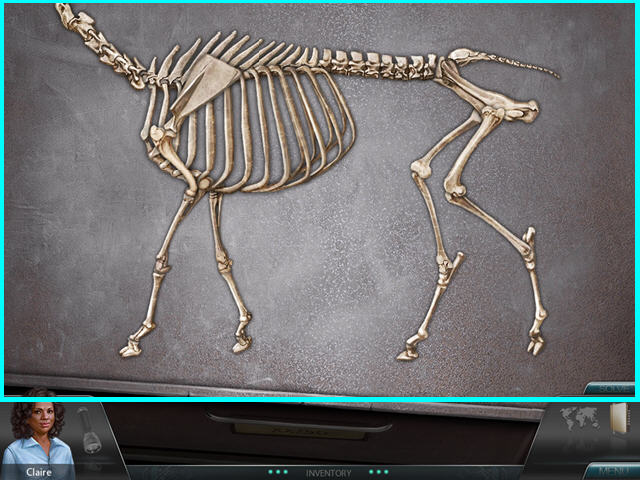
- Back at the lab, assemble the bones.
- Left-click to take or place a bone.
- Adjoining bones will stay together.
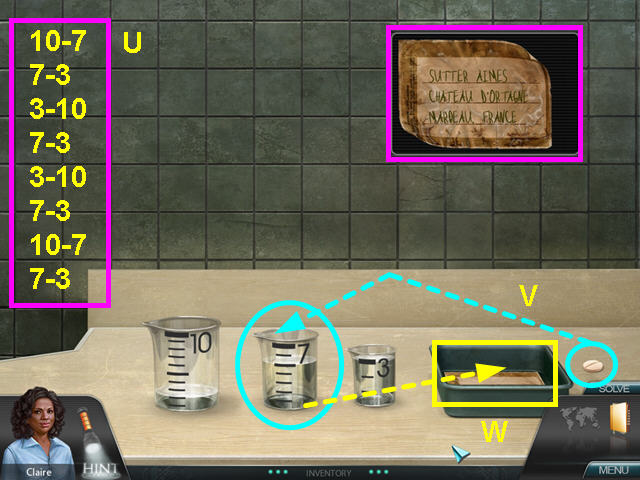
- Pour the liquid between the 3 containers until you have 5 cups in one container.
- Pour: 10-7, 7-3, 3-10, 7-3, 3-10, 7-3, 10-7, and 7-3 (U).
- Place the tablet into the 7 cup container which now has exactly 5 cups of liquid (V).
- Pour the mixture over the label to reveal Sutter's destination (W).
- You are once again playing Lindsay.
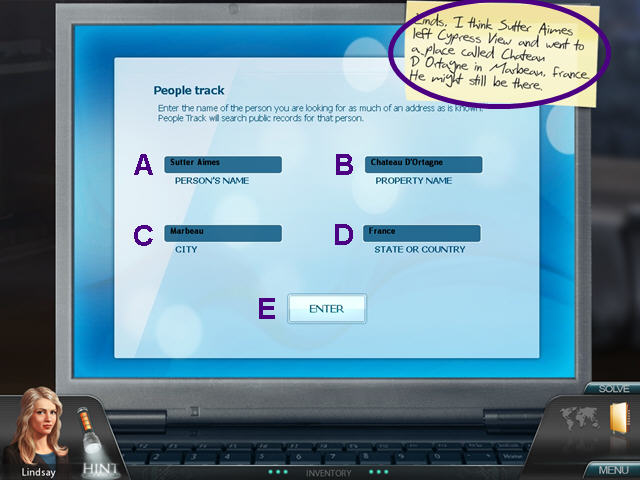
- Type in Sutter's information from the label.
- The person's name is Sutter Aimes (A).
- The location name is Chateau D'Ortagne (B).
- Type Marbeau for the city (C).
- The state or country is France (D).
- Click on enter (E).
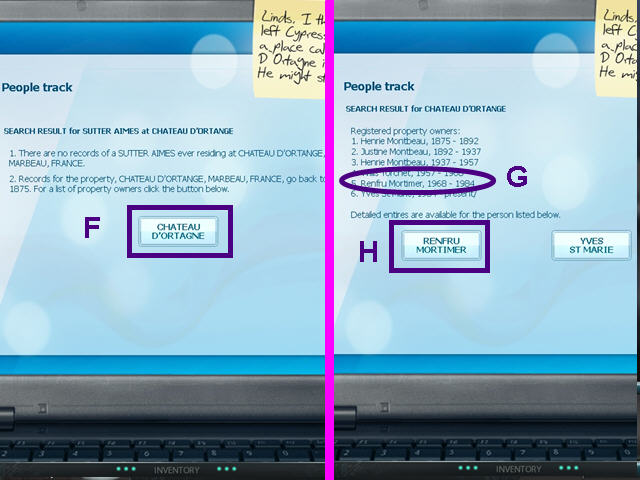
- The search results have no records of Sutter Aimes at that address, so press the button to search for previous owners (F).
- There was only one owner during the 1970's (G).
- Select Renfru Mortimer (H).
- Click OK when you finish reading about Mr. Mortimer.
- Talk to Mr. Mortimer completely.
Investigation Six
- You are once again playing as Lindsay, back in Cypress View to check on the spreadsheet lead.
- Enter the general store and talk to Randy about Regina's purchases.
- Per Randy, she bought a shovel and a map.
- Exit the store and walk to the library.
- Ring the bell on the desk and talk to the librarian.
- She will give you directions to the lighthouse.
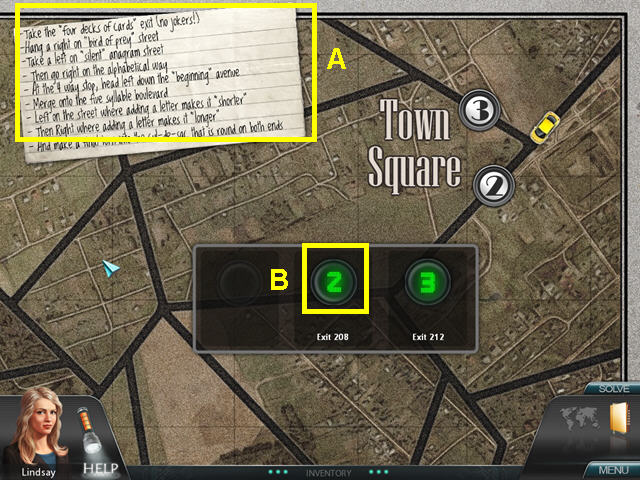
- The directions the librarian gave are a bit unusual (A).
- The first intersection calls for the four decks of cards exit.
- Multiply 4 x 52 to get 208.
- Click on #2, Exit 208 (B).
- The bird of prey street is #3 Eagle Drive.
- The 'silent' anagram street is #1 Listen Street.
- The alphabetic way means #3 Accent Way as all the letters in Accent are in order.
- The beginning avenue is #2 Alpha Avenue.
- The 5-syllable boulevard is #2 Serendipity Boulevard.
- Adding a letter to #2 Sorter Street will make it shorter.
- Adding a letter to #2 Loner Way will make it longer.
- The final turn is the road that is round on both ends- #2 Oslo Street.
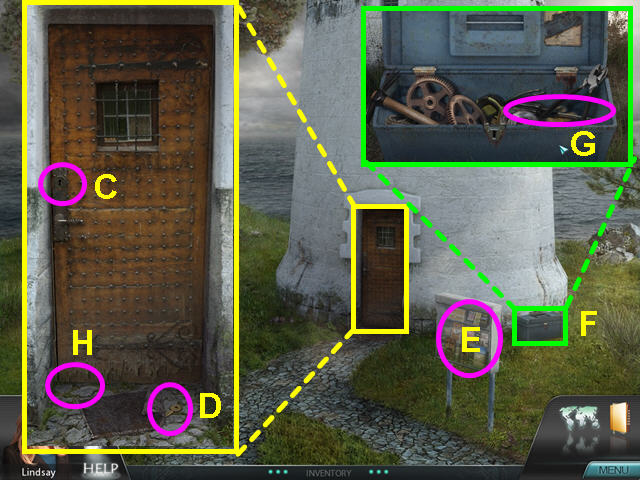
- Look at the lighthouse door to find it is locked.
- Look in the keyhole to see that the key may be in the keyhole (C).
- Look under the mat and take the TOOLBOX KEY (D).
- Take a FLYER from the stand (E).
- Look at the close-up of the toolbox and use the TOOLBOX KEY to open the lock (F).
- Take the SCREWDRIVER (G).
- Return to the door.
- Place the FLYER under the door (H).
- Use the SCREWDRIVER on the keyhole to push out the key.
- Pull the flyer from under the door and take the LIGHTHOUSE KEY.
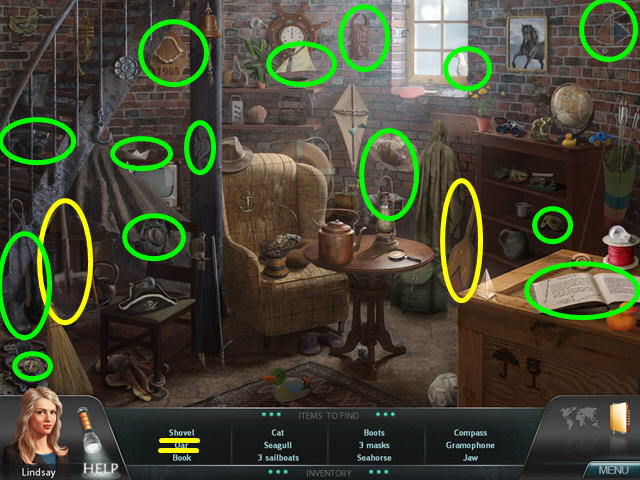
- Use the LIGHTHOUSE KEY to open the door.
- Select the door for a hidden object scene.
- Locate all the items.
- The OAR and SHOVEL will go automatically into your inventory.
- The book has notes about some rocks.
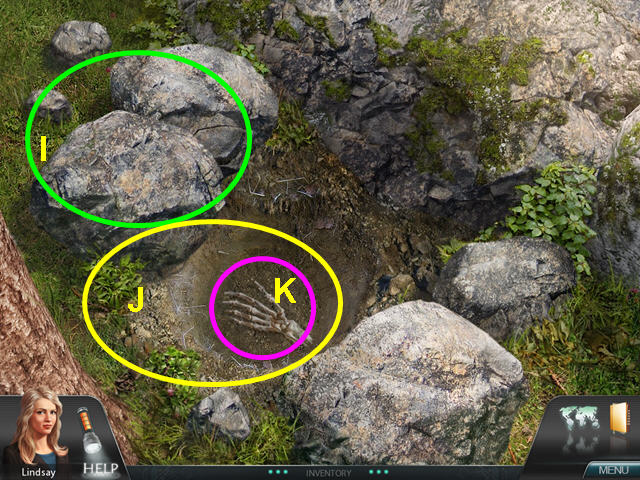
- Look at the close-up of the rocks to the left of the fireplace.
- Use the OARS to break apart the rocks (I).
- Use the SHOVEL on the ground (J).
- Look at the skeletal hand (K).
- Exit the rocks.
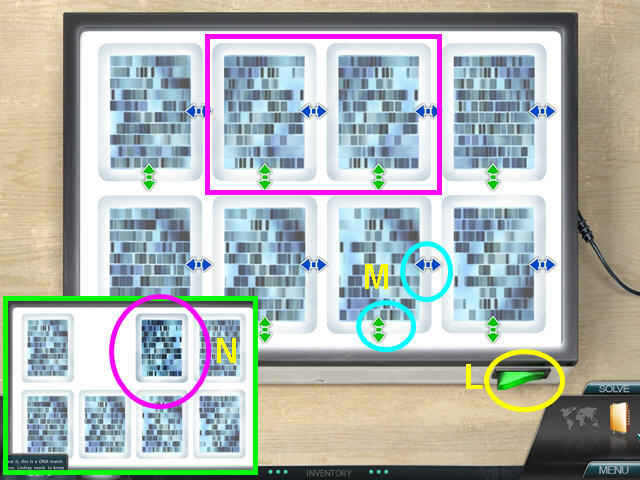
- You are now back at the lab, playing as Claire.
- Flip the switch on the light table (L).
- The object of this game is to find the pair of matching DNA samples.
- Use the blue and green arrow to flip and rotate the samples (M).
- Drop the the matching slide on top of the other (N).
Investigation Seven
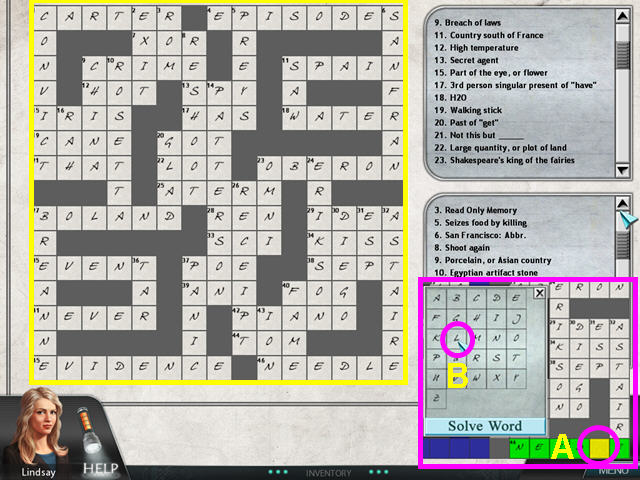
- You are back in Cypress View as Lindsay.
- Try to talk to librarian sitting in the town square.
- You must help with her crossword puzzle first.
- Click on a blank square in the crossword and a letter grid will appear (A).
- The clue for that word will highlight in the list.
- Select the letter you want and the space will fill (B).
- After speaking to the librarian, select the map icon.
- Click on Hillcrest apartments on the lower half of the map.
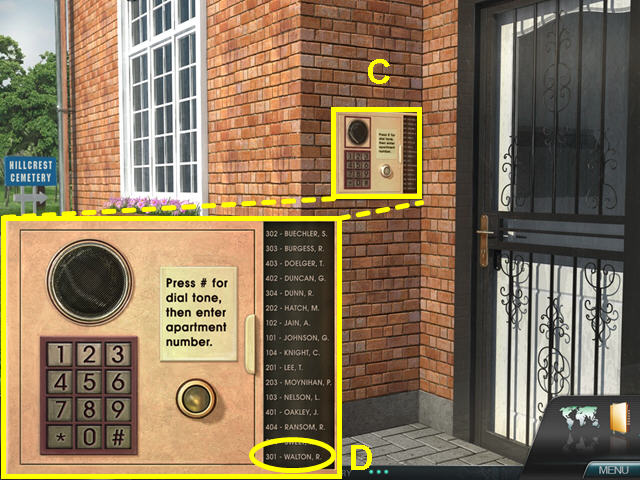
- Look at the close-up of the call box (C).
- Enter #301 to reach Mr. Walton (D).
- The system seems to be out of order, so open the panel.
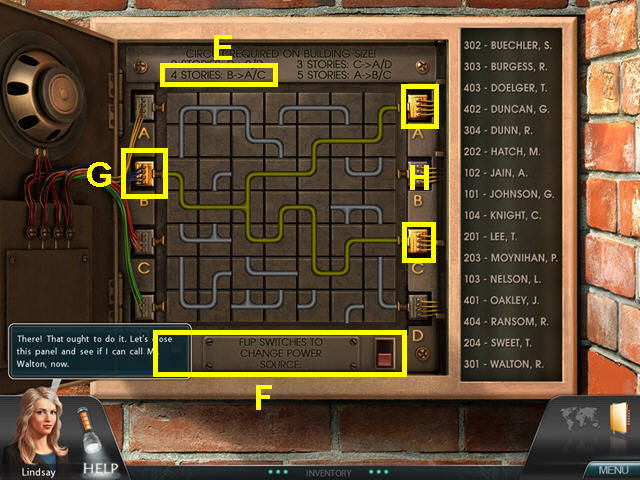
- Looking at the list of tenants tells us that there are 4 floors in the building.
- Per the requirements, the power must go from B to A and C (E).
- Use the 2 red switches at the bottom (F) to light up B on the left (G).
- Click on the squares to rotate them and complete the circuit from B to A and C (H).
- Click on the door to the panel to close it.
- Dial #301 and speak to Mr. Walton.
- Click on the door to enter the apartment.
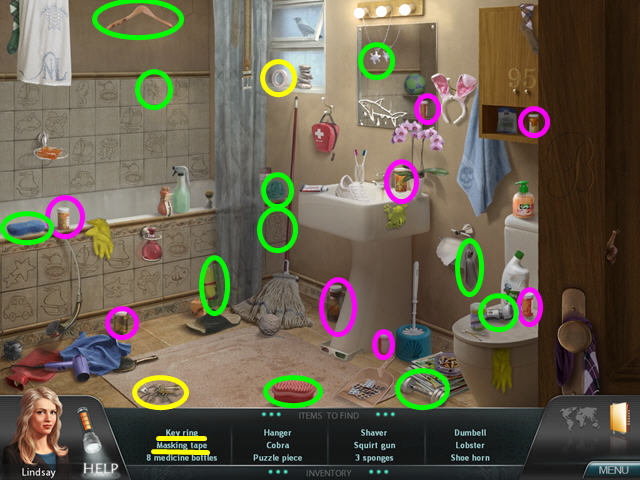
- The retired sheriff need his medications before he can talk.
- Click on the sparkling bathroom door for a hidden object scene.
- Locate all the items on the list.
- The KEY RING and MASKING TAPE will go automatically into your inventory.
- The sheriff gives you the names of his suspects, but they are buried in the cemetery next door.
- Exit the apartment and take the path on the left to Hillcrest Cemetery.
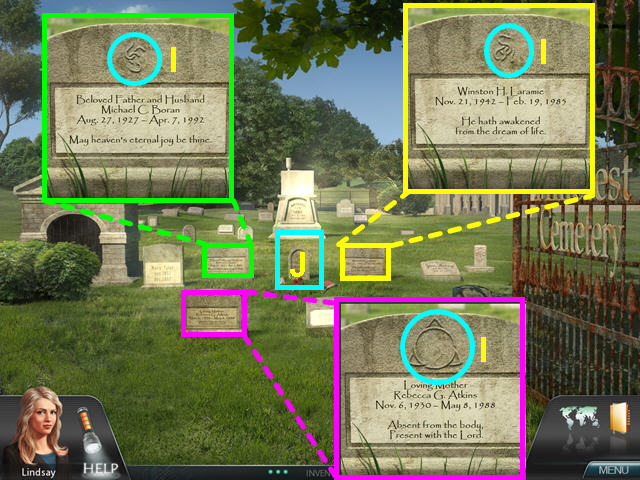
- Look at the close-ups of the three headstones and notice that each has a partial symbol at the top (I).
- Click on the sparkling headstone for a hidden object scene (J).
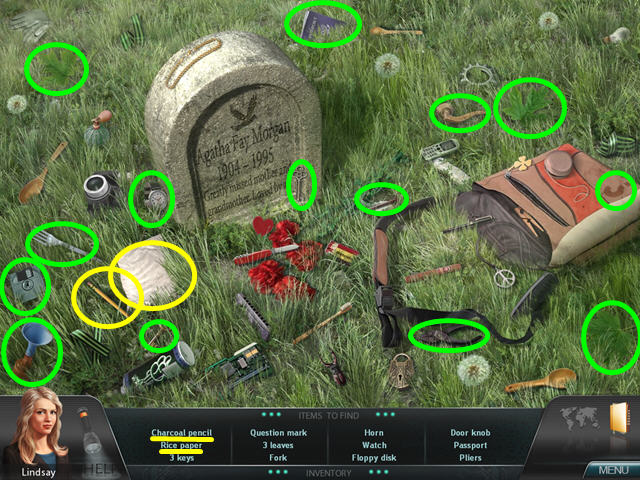
- Collect all the items on the list.
- The RICE PAPER and CHARCOAL PENCIL will go automatically into you inventory.
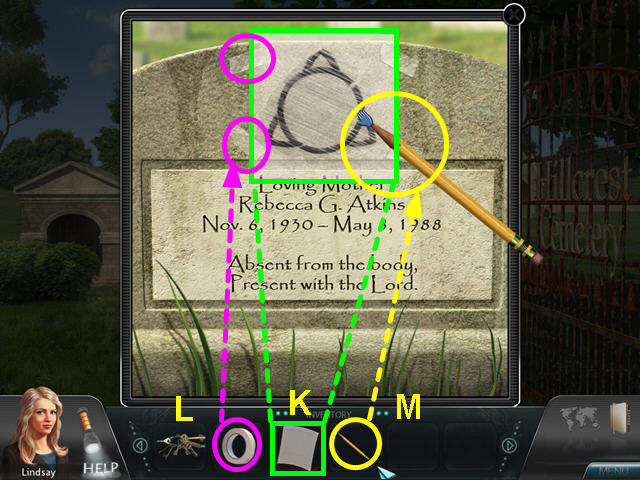
- Look at the close-up of one of the tombstones.
- Place the RICE PAPER over the marking (K).
- Use the MASKING TAPE to secure the paper (L).
- Left-click, hold and drag the CHARCOAL PENCIL over the symbol to make a rubbing (M).
- Repeat this process with the other 2 tombstones.
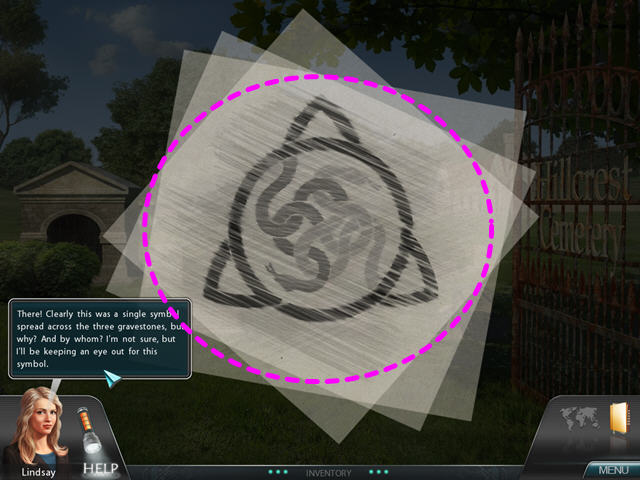
- Rotate the three pieces of paper to form the symbol.
- Each piece will lock in place when correct.
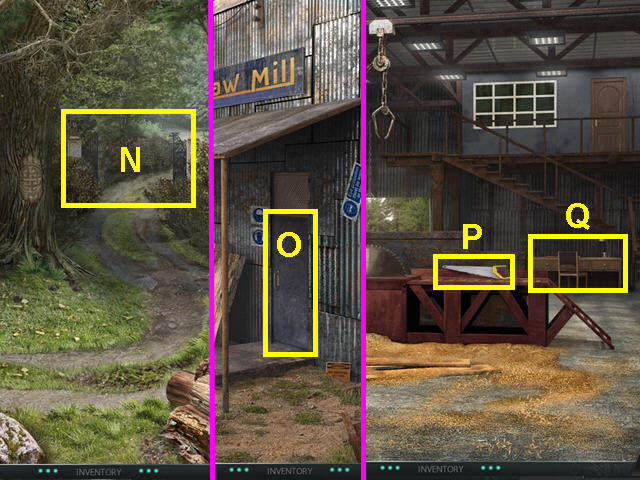
- Click on the map icon and go to Morgan Woods.
- Use the KEY RING to unlock the gate (N).
- Go through the gate to the mill.
- Enter the mill door (O).
- Talk to Adam Atkins and learn he needs a fuse before he can talk.
- Take the HAND SAW (P).
- Note the desk in the back (Q).
- Exit the mill.
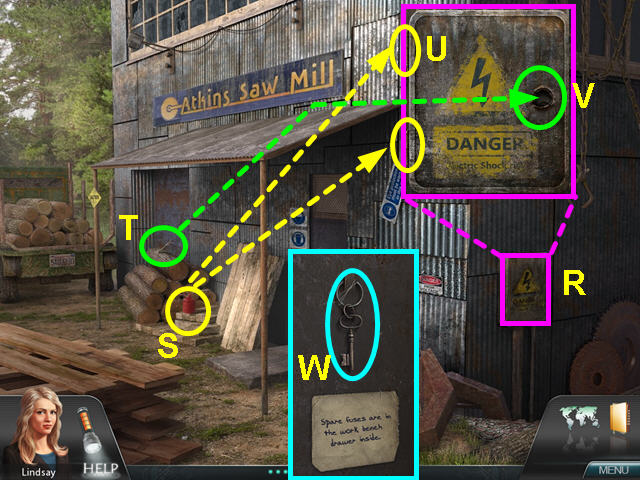
- Look at the close-up of the fuse-box to find it missing a handle and rusted shut (R).
- Take the OIL CAN (S).
- Use the HANDSAW on the top log to get a STICK (T).
- Go back to the close-up of the fuse box.
- Use the OIL CAN on each hinge (U).
- Use the STICK on the hole and open the fuse box (V).
- Take the KEY from inside the door (W).
- Enter the mill and look at the desk.
- Use the KEY to unlock the right drawer of the desk, then take the 2 fuses.
- Exit the mill.
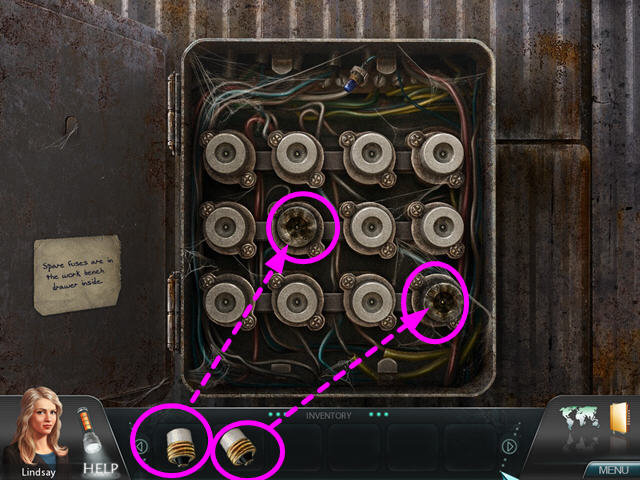
- Look at the close-up of the fuse-box.
- Replace the two burnt out fuses.
- Return to the mill and speak to Adam Atkins thoroughly.
- Use the map to return to town.
- Enter the general store.
- Select the sparkling counter for a hidden object scene.
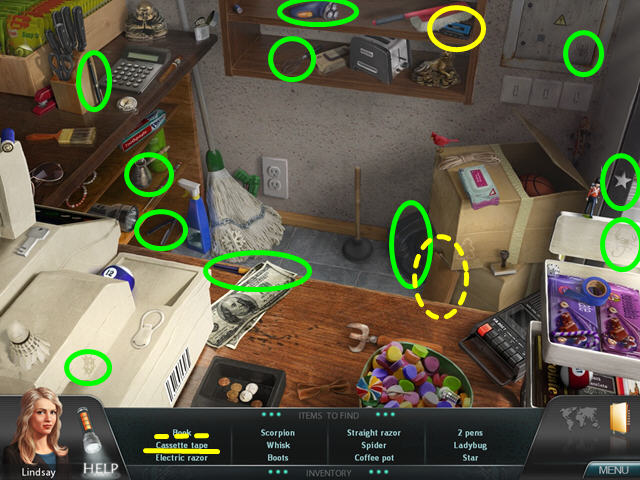
- Locate all the items on the list.
- Among the items is a book with the same symbol from the tombstones.
- The CASSETTE TAPE will go automatically into your inventory.
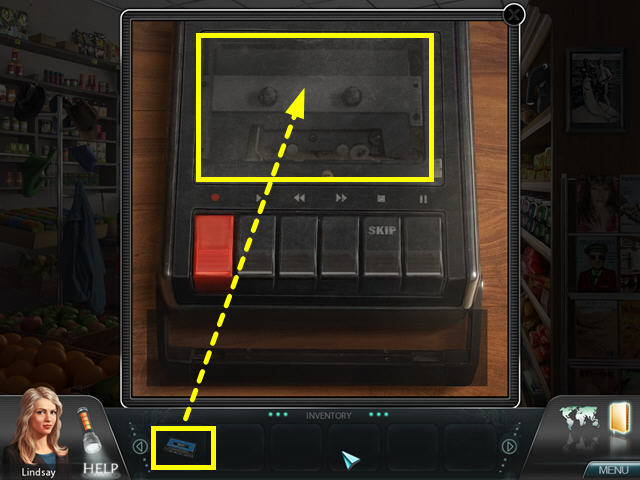
- Look at the counter to find a cassette player.
- Place the CASSETTE TAPE into the player.
- The tape will play automatically.
- Talk to Randy Boren completely and he will confess to the murder of Sutter Aimes.
Investigation Eight
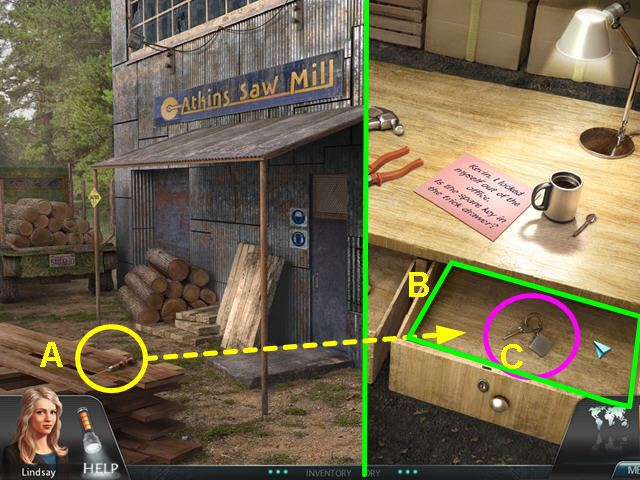
- Use the map to travel to Morgan woods.
- Walk through the gate to the front of the mill.
- Take the AWL from the pile of wood on the left (A).
- Enter the mill and look at the desk.
- Open the right drawer and use the AWL to remove the false bottom (B).
- Take the OFFICE KEY from the drawer (C).
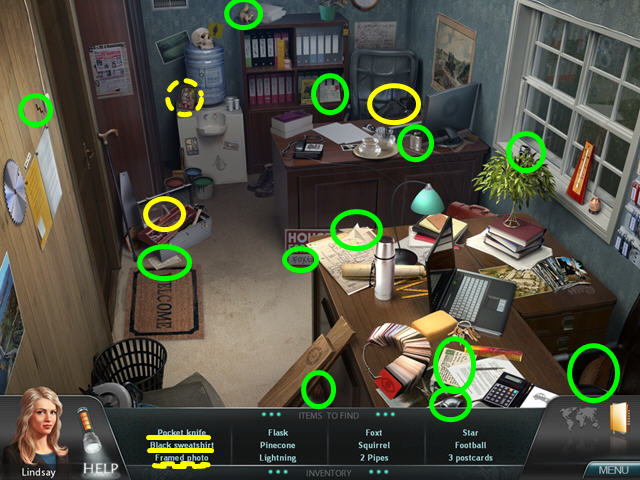
- Use the OFFICE key to unlock the door on the second level.
- Select the sparkling door for a hidden object scene.
- Locate all the items on the list.
- You find a photograph of Atkins and Mandy.
- The POCKET KNIFE and BLACK SWEATSHIRT will go automatically into your inventory.
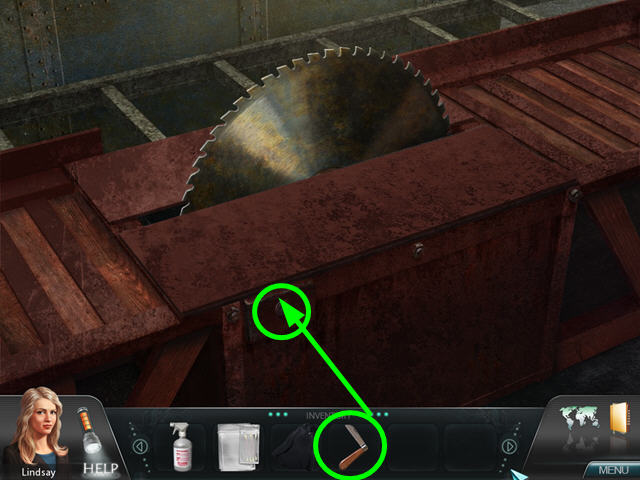
- Look at the large circular saw.
- Use the POCKET KNIFE on the keyhole to trigger a mini-game.
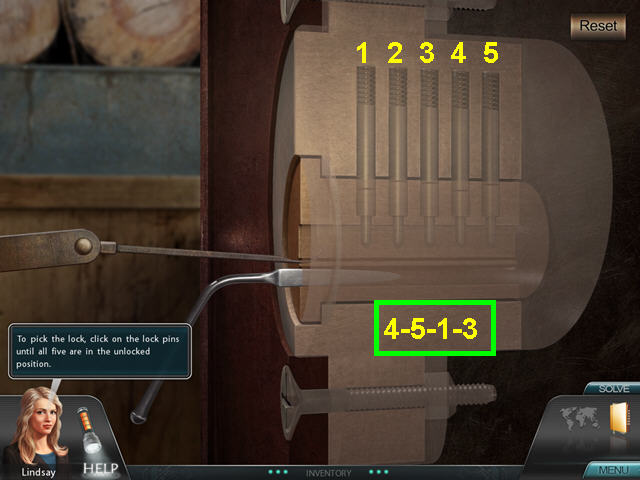
- The object is to push all the tumblers.
- Clicking on a tumbler effects another.
- Numbering the tumblers 1-5, click on 4-5-1-3.
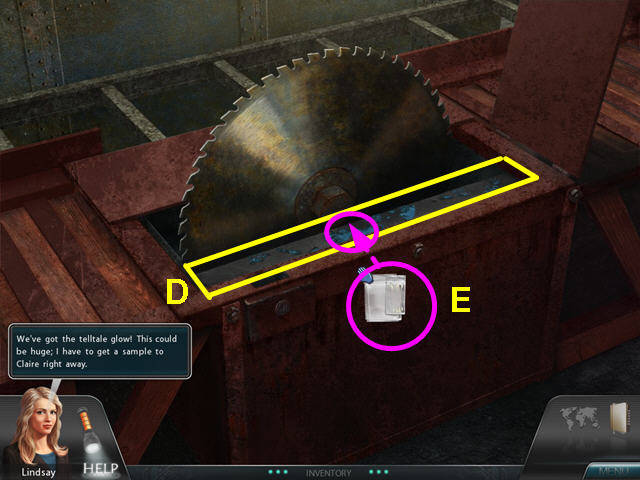
- Use the LUMINOL on the area in front of the blade (D).
- Spray until the bottle disappears.
- Use the TEST KIT on the glowing areas to collect a sample (E).
- You are now Claire back at the lab.
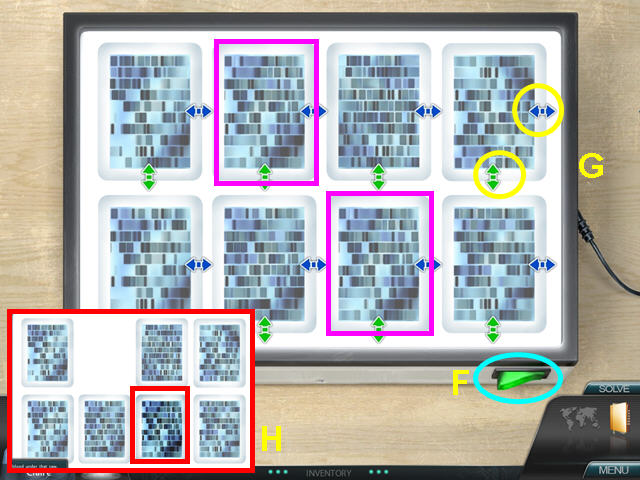
- Look at the light table and flip the green switch (F).
- The object of this game is to find the pair of matching DNA samples.
- Use the blue and green arrows to flip and rotate the samples (G).
- Drop the the matching slide on top of the other (H).
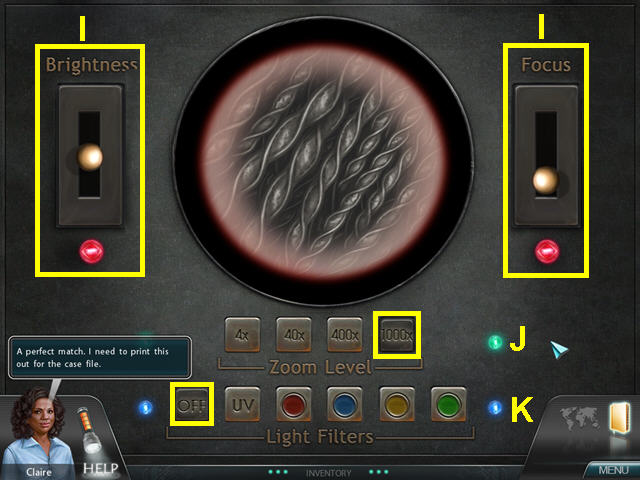
- Look at the microscope.
- Move the sliders on the brightness and focus until the light for each goes on (I).
- Push the button for 1000x – the green lights will go on (J).
- Turn the light filters off- the blue lights will go on (K).
- After Claire and Lindsay speak, you are playing as Lindsay.
- The DNA RESULTS and FIBER ANALYSIS are in your inventory.
- Enter the Mill and confront Atkins and he confesses to the accidental death of Mandy and the murder of Regina.
- Congratulations! You have completed James Patterson Women's Murder Club: little black lies!
Epilogue
- After the end scene, return to the main menu and click on the epilogue button.
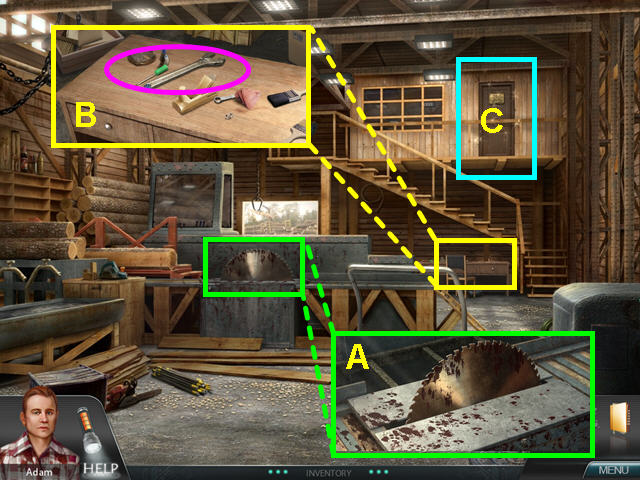
- You are now playing as Adam Atkins, 35 years ago.
- Look at the close-up of the saw to see you need bleach (A).
- Look at the close-up of the desk and take the WRENCH (B).
- Click on the sparkling door on the upper level for a hidden object scene (C).
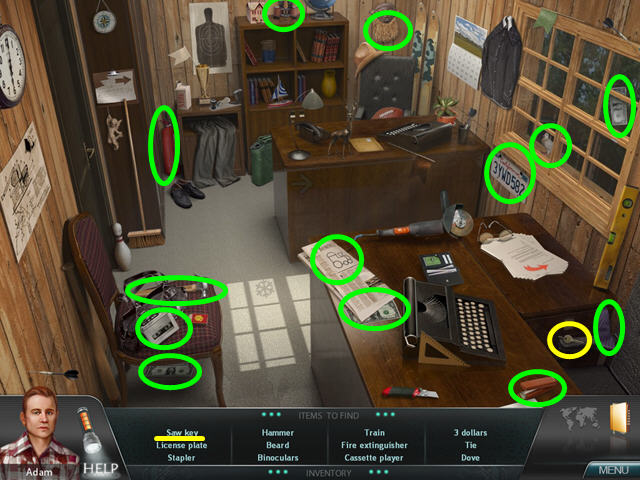
- Locate all the items on the list.
- The SAW KEY will go automatically into your inventory.
- Exit the mill.
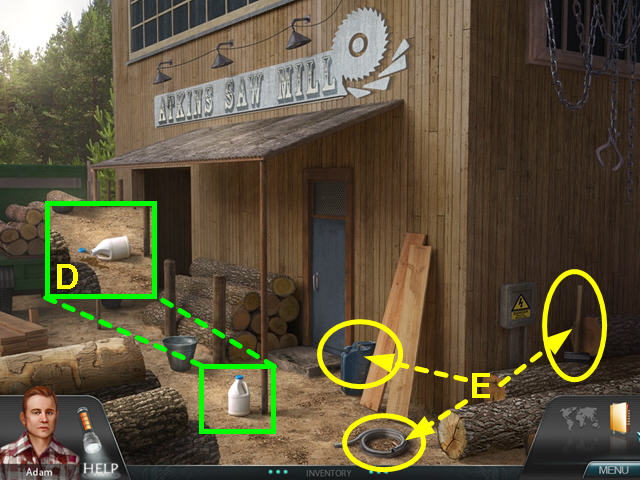
- Try to take the bleach, but you find the bottle is empty (D).
- Take the HOSE, SLEDGEHAMMER and GAS CAN (E).
- Enter the mill.
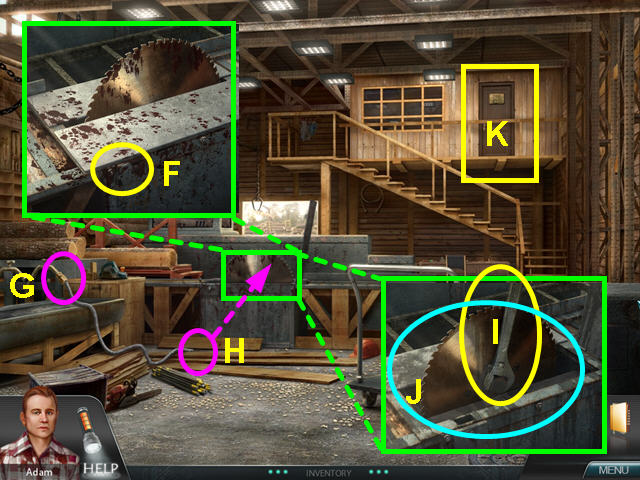
- Look at the close-up of the saw and use the SAW KEY on the keyhole to open the panel (F).
- Exit the close-up.
- Use the HOSE on the faucet (G).
- Take the end of the hose and use it on the saw (H).
- Look again at the close-up of the saw.
- Use the WRENCH on the large center bolt (I).
- Click on the wrench to move it to the right.
- Use the SLEDGEHAMMER on the wrench to finish removing the bolt.
- Take the SAW (J).
- Click on the sparkling door on the upper level for a hidden object scene (K).
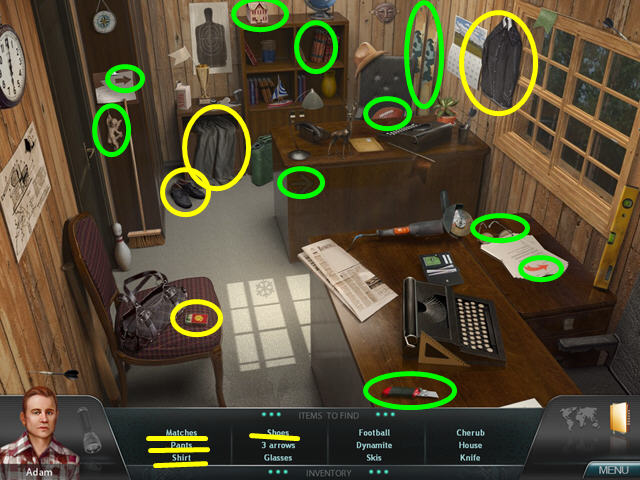
- Locate all the items on the list.
- The MATCHES, SHOES, PANTS, and SHIRT will go automatically into your inventory.
- Once you finish the scene, Adam will automatically change into the clean clothes and the bloody ones will be in your inventory.
- Exit the mill.
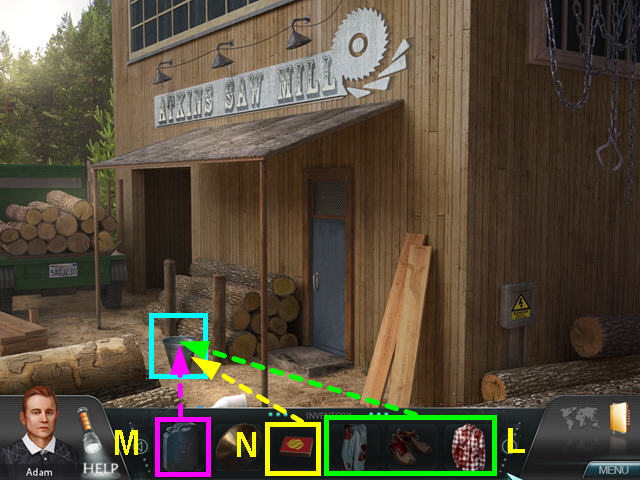
- Place the SHOES, PANTS, and SHIRT into the bucket (L).
- Use the GAS CAN on the bucket (M).
- Use the MATCHES to burn the clothes (N).
Created at: 2010-09-26

